EN
INDUCTION
INDUCTION
INDUCTION
INDUCTION
Model Number:VI24-VZ4P01MDEU
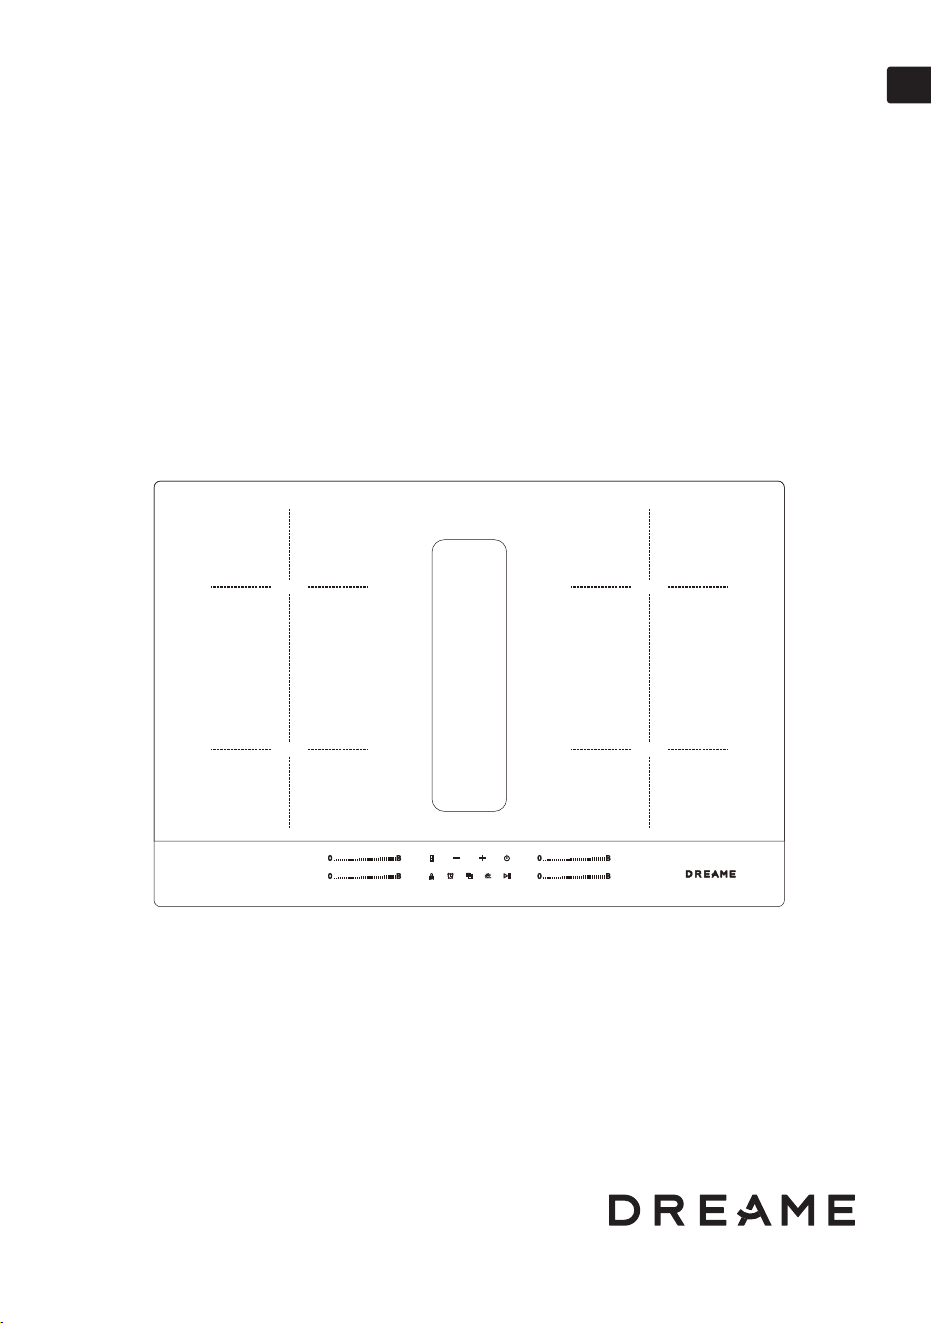
Induction Hob With Integrated
Ventilation System
User Manual
Please read this manual carefully before using the
product and keep it for future reference.


Content
1. List..................................................................................................................1
2. Safe and Notice.........................................................................................2
3. Heating Technology..................................................................................5
4. Description of Accessory Diagrams.....................................................6
5. Product Structure......................................................................................7
6. Operations..................................................................................................8
7. Protection Instructions............................................................................12
8. Clean and Maintanence.........................................................................13
9. Failure Display and Inspection for Induction Hob...........................15
10. Installation...............................................................................................19
EN
1
1. List
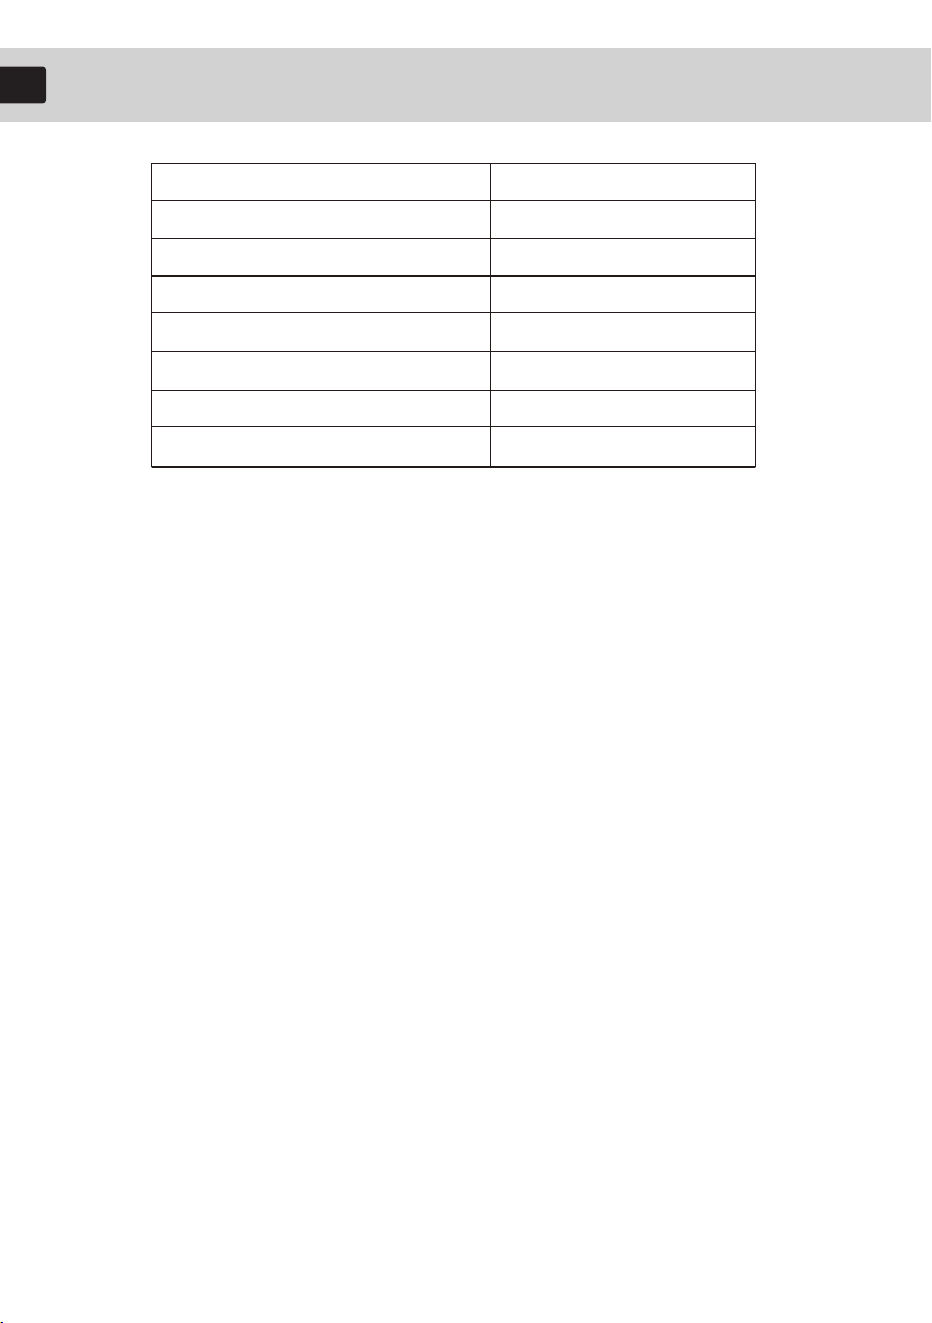
Nama
Induction Hob
Oil cup
Activated carbon filter screen
Exhaust pipe connection
Sponge strip
Steel fixing sheet
Screw
Regarding the process of using an induction cooker correctly:
Step 1: After plugging in, enter standby mode
Step 2: Choose the right cookware for induction hob
Step 3: Adjust the power level by sliding the bar
Step 4: The timer function can be used to set the time.
Step 5: The child lock function lights up and the machine cannot be
operated
except ON/OFF. Users need to press the child lock button for 3 seconds to
unlock it.
Step 6: After finish cooking, press the power button to turn off the
machine. If the surface temperature exceeds 60℃, “H” keeps flashing until
the temperature drops down to below 60℃, and the fan continues to work
within 3-5 minutes.
Step 7: Wait until the surface cools down before cleaning the machine.
Please note repeated use without cleaning it properly and timely will make
it difficult to clean if there are oil stains on it. It is suggested to clean the
surface every time it is used.
Quantity
1
1
1
1
2
4
4
EN

2. Safe and Notice
2
EN
READ ALL INFORMATION BEFORE USE.
• If the product fails, to avoid danger, please find a local repair center for
repair.
• The installation and replacement of the machine or any parts of the
appliance must be done by professionals. Manufacturers and agents are not
liable for injuries or property damage cause by improper installation,
improper use or improper maintenance.
• If the surface is cracked, switch off the appliance to avoid the possibility of
electric shock.
• Metallic objects such as knives, forks, spoons and lids should not be placed
in the hotplace since they can get hot.
• Household and indoor use only.
• When the appliance is not un use and before cleaning, unplug and
appliance from the outlet first.
• To protect against the risk of electrical shock, do not immerse the unit,
cord or plug in water or other liquid.
• The appliance is only intended for the purpose described in user manual.
Do not use it or any parts of the appliance out if the intended use to avoid
risk.
• The use of attachments which are not recommended or sold by the
appliance manufacturer may cause a risk of injury.
• The disassembled packaging materials (plastic bags, foam, plastic parts,
etc.) should be placed out of the reach of children, as they may cause harm
or danger.
• This hob comes with cooling fans with air vent underneath the worktop
itself. If there is a drawer under the worktop, do not put any paper or small
light objects in it as they could be sucked up by the fan, damaging it or
compromising its function.
WARNING:
• Do not use aluminum foil to protect parts of the hob.
• Keep the area around the hob free from combustible material (plastic, paper,
etc.) or flammable liquids which may catch fire.
• After using the hob, you should use the control button to shut down. Do not
rely on the hob to detect that there is no pot and turn it off by itself.
• Do not heat the unopened sealed or airtight container, because it may explore
if heated.
• The hob part of this product is equipped with a “child lock” button, which can
avoid improper use by children and others, and can also avoid accidentally
starting the hob during cleaning.
• Do not block the air inlet of the hood during use, and do not let water or soup
flow into the air inlet box.
• The round filter under the metal mesh of this product needs to be cleaned
regularly to maintain a good suction effect. Please make sure that the power
has been cut off before cleaning.
Always remember before carrying out any cleaning or maintenance work,
always make sure that the appliance is disconnected from the mains supply by
unplugging the power cord from socket-outlet.
• Do not flame under the range hood.
• Unattended cooking on a hob with fat or oil can be dangerous and may result
in fire.
Never try to extinguish a fire with water, but switch off the appliance and then
cover flame, e.g. with a lid or a fire blanket.
• If the supply cord is damaged, it must be replaced by the manufacturer, its
service agent in order to avoid a hazard.
• This appliance can be used by children aged from 8 years and above and
persons with reduced physical, sensory or mental capabilities or lack of
experience and knowledge if they have been given supervisor or
instruction concerning use of the appliance in a safe way and understand
the hazards of involved. Children shall not play with the appliance.
Cleaning and user maintenance shall not be made by children without
supervision.
Means for disconnection must be incorporated in the fixed wiring in
accordance with the wiring rules.
• The temperature of accessible surface may be high when the appliance
is operating.
3
2. Safe and Notice
EN
• If the product fails, to avoid danger, please find a local repair center for
repair.
• The installation and replacement of the machine or any parts of the
appliance must be done by professionals. Manufacturers and agents are not
liable for injuries or property damage cause by improper installation,
improper use or improper maintenance.
• If the surface is cracked, switch off the appliance to avoid the possibility of
electric shock.
• Metallic objects such as knives, forks, spoons and lids should not be placed
in the hotplace since they can get hot.
• Household and indoor use only.
• When the appliance is not un use and before cleaning, unplug and
appliance from the outlet first.
• To protect against the risk of electrical shock, do not immerse the unit,
cord or plug in water or other liquid.
• The appliance is only intended for the purpose described in user manual.
Do not use it or any parts of the appliance out if the intended use to avoid
risk.
• The use of attachments which are not recommended or sold by the
appliance manufacturer may cause a risk of injury.
• The disassembled packaging materials (plastic bags, foam, plastic parts,
etc.) should be placed out of the reach of children, as they may cause harm
or danger.
• This hob comes with cooling fans with air vent underneath the worktop
itself. If there is a drawer under the worktop, do not put any paper or small
light objects in it as they could be sucked up by the fan, damaging it or
compromising its function.
• Do not use aluminum foil to protect parts of the hob.
• Keep the area around the hob free from combustible material (plastic, paper,
etc.) or flammable liquids which may catch fire.
• After using the hob, you should use the control button to shut down. Do not
rely on the hob to detect that there is no pot and turn it off by itself.
• Do not heat the unopened sealed or airtight container, because it may explore
if heated.
• The hob part of this product is equipped with a “child lock” button, which can
avoid improper use by children and others, and can also avoid accidentally
starting the hob during cleaning.
• Do not block the air inlet of the hood during use, and do not let water or soup
flow into the air inlet box.
• The round filter under the metal mesh of this product needs to be cleaned
regularly to maintain a good suction effect. Please make sure that the power
has been cut off before cleaning.
Always remember before carrying out any cleaning or maintenance work,
always make sure that the appliance is disconnected from the mains supply by
unplugging the power cord from socket-outlet.
• Do not flame under the range hood.
• Unattended cooking on a hob with fat or oil can be dangerous and may result
in fire.
Never try to extinguish a fire with water, but switch off the appliance and then
cover flame, e.g. with a lid or a fire blanket.
• If the supply cord is damaged, it must be replaced by the manufacturer, its
service agent in order to avoid a hazard.
WARNING: To prevent
WARNING:
CAUTION:
WARNING: To prevent
WARNING:
CAUTION:
2.3 Gas Connection
Assembly of gas supply and leakage
check
of used gas is different than the values
Points that must be checked during
flexible hose assembly:
• The appliance and its accessible parts become hot during use.
• Care should be taken to avoid touching heating elements.
• Children less than 8 years old shall be kept away unless continuously
supervised.
• A steam cleaner is not to be used.
• The appliance is not intended to be operated by means of external timer
or separated remote-control system.
• Danger of fire: Do not store items on the cooking surfaces.
Caution, hot surface
WARNING:

2. Safe and Notice
4
EN
Dot not dispose of electrical appliances as unsorted municipal waste, use
separated collection facilities.
EN - ۲
WARNING Serious injury or death risk
RISK OF ELECTRIC SHOCK Dangerous voltage risk
SYMBOL ISO 7010 W021
CAUTION
IMPORTANT / NOTE
EN - ۲
RISK OF ELECTRIC SHOCK Dangerous voltage risk
SYMBOL ISO 7010 W021
CAUTION
IMPORTANT / NOTE
EN - ٤
WARNING:
WARNING:
EN - ٤
WARNING:
WARNING:
WARNING:
WARNING:
EN - ٤
WARNING:
WARNING:
WARNING:
WARNING:
EN - ۱۰
1.4 During Cleaning and Maintenance
Disposal of your old machine
EN - ۱۲
B
C
C
D
E
Assembly of gas supply and leakage
of used gas is different than the values
Points that must be checked during
flexible hose assembly:
WARNING:
Contact your local government for information regarding the collection systems
available.
If electrical appliances are disposed of in landfills or dumps, hazardous
substance can leak into the groundwater and get into the food chain, damaging
your health and well-being.
3. Heating Technology
5
EN
Thank you for choosing our company’s induction hob combination series
products. Please read this manual carefully before use and keep it properly for
future reference.
Our company’s hob combination series products have two heating methods:
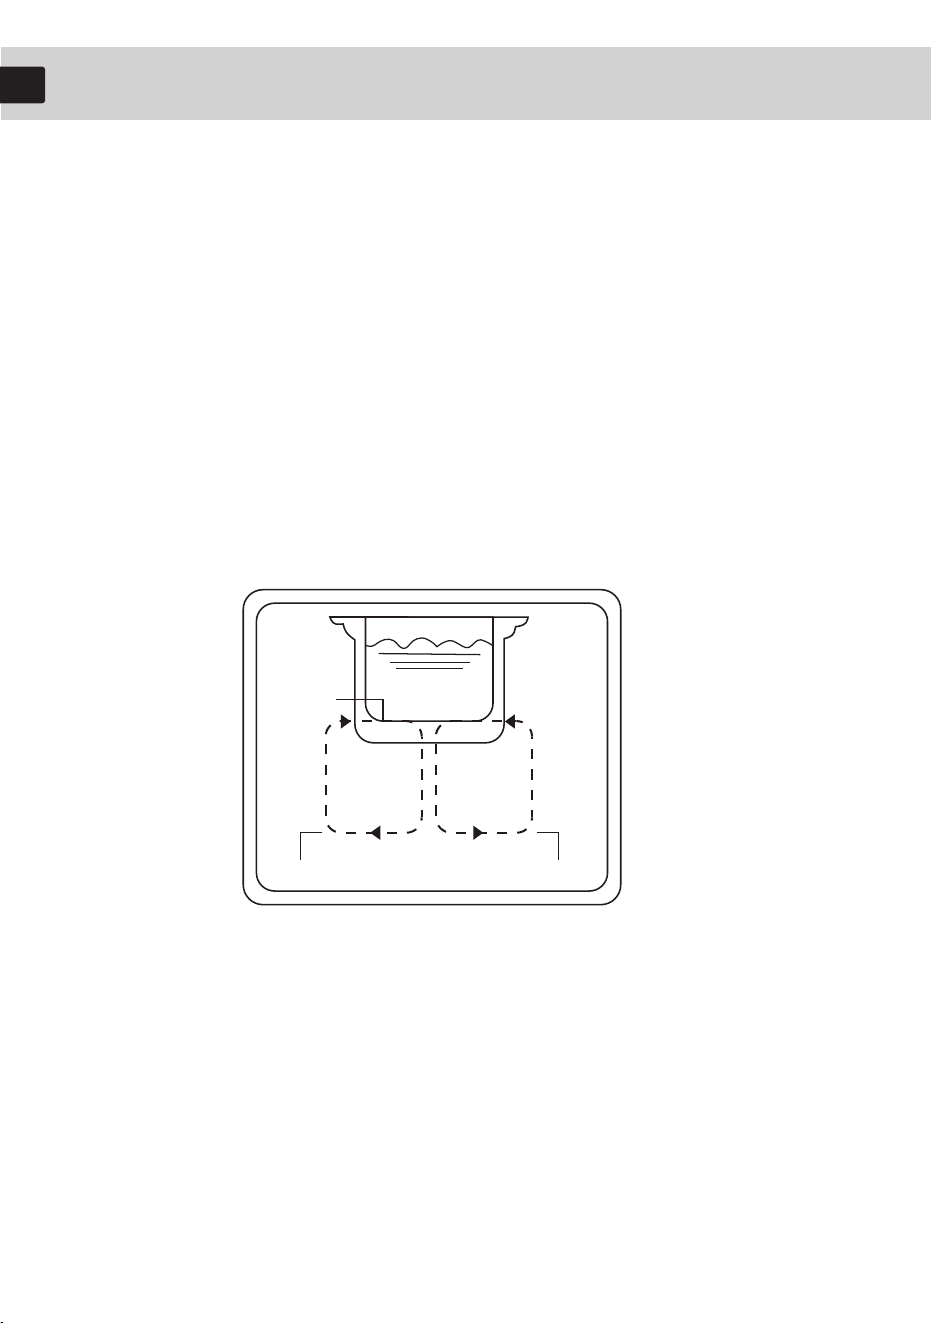
a. Adopting advanced electromagnetic heating technology: its working principle
is based on the principle of magnetic field induced eddy current heating, using
current to generate a magnetic field through a coil. When the magnetic force in
the magnetic field passes through the bottom of the iron containing pot,
countless small eddy currents will be generated, causing the pot itself to heat
up at high speed, and then heat the food inside the pot. Its characteristics
include fast heating, high thermal efficiency, no open flame, no smoke, no
harmful gases, no thermal radiation to the surrounding environment, and good
safety.
vortex
glass
magnetic lines The coil generates magnetic field lines
Electromagnetic heating
Introduction
4. Description of a accessory diagrams
6
Model Name
VI24-VZ4P01MDEU
Voltage
220-240V~50/60Hz
Power
7200W
Product Size
770*520*208mm
Cut-out Size
750*500mm
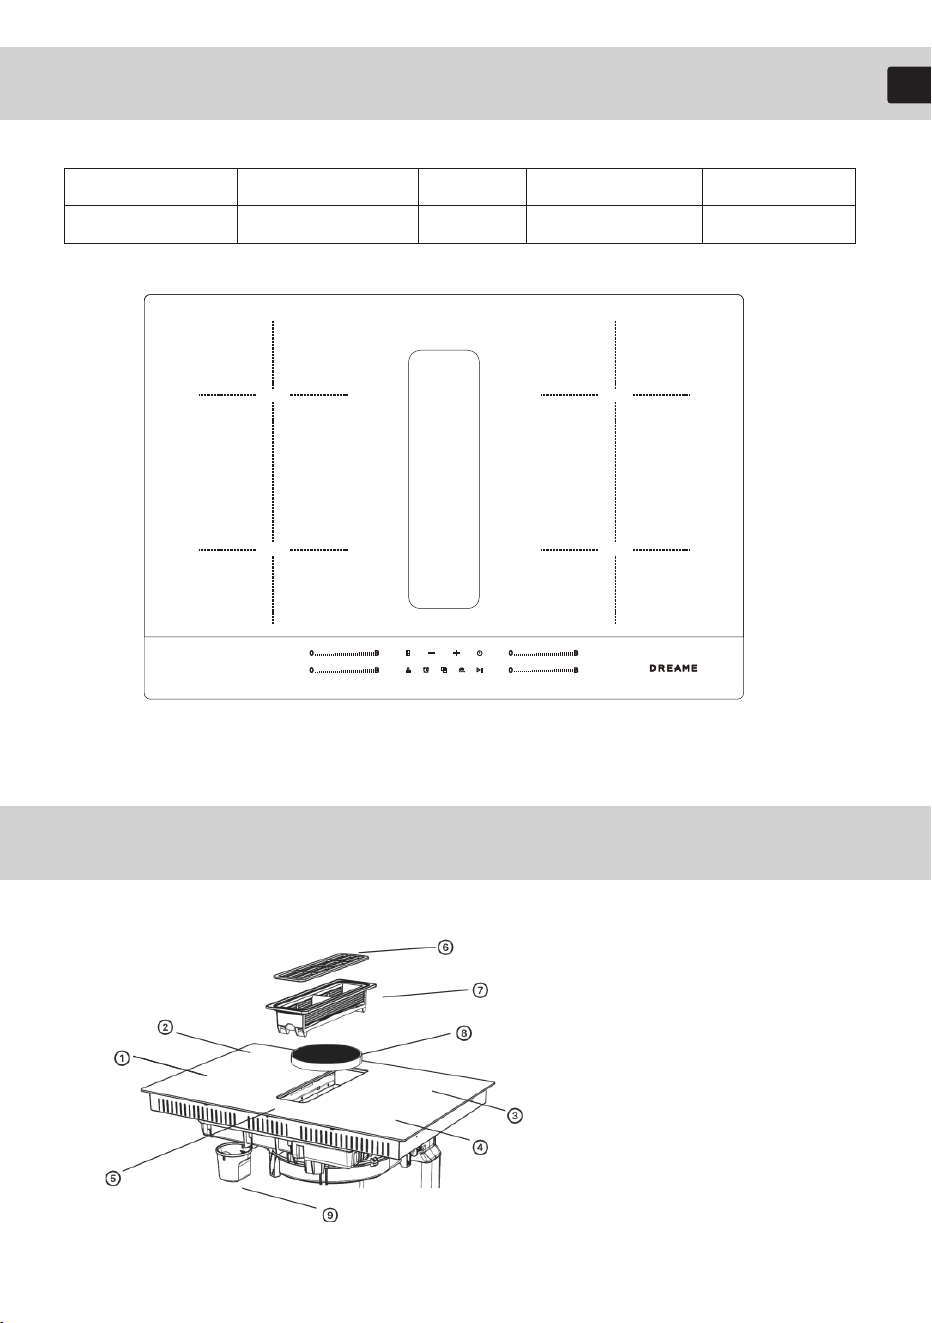
1-4 Cooking zone
5 Control Panel
6 Metal grid
7 Air inlet box
8 Filter element
9 Oil cup
VI24-VZ4P01MDEU
INDUCTION
INDUCTION
INDUCTION
INDUCTION
5. Product Structure
EN
6. Operation
6.1 Control Panel Design
6.3.1 ON/OFF
1) Touch “ON/OFF”, and you will hear a “beep” sound. The machine is in standby
mode. If there is no operations within 30s, the machine turns off automatically.
2) Under standby mode, the indicator display “--”.
6.3.2 Power adjustment
Slide the power bar “ ” of the desired cooking zone
to adjust the power.
Power level ranges from P1~B. Please note under the boost function, the
machine runs at the maximum power for 5 minutes. After 5 minutes, its power
drops to level 9 automatically.
6.2 Explanation of Functions
6.3 Operation Instructions
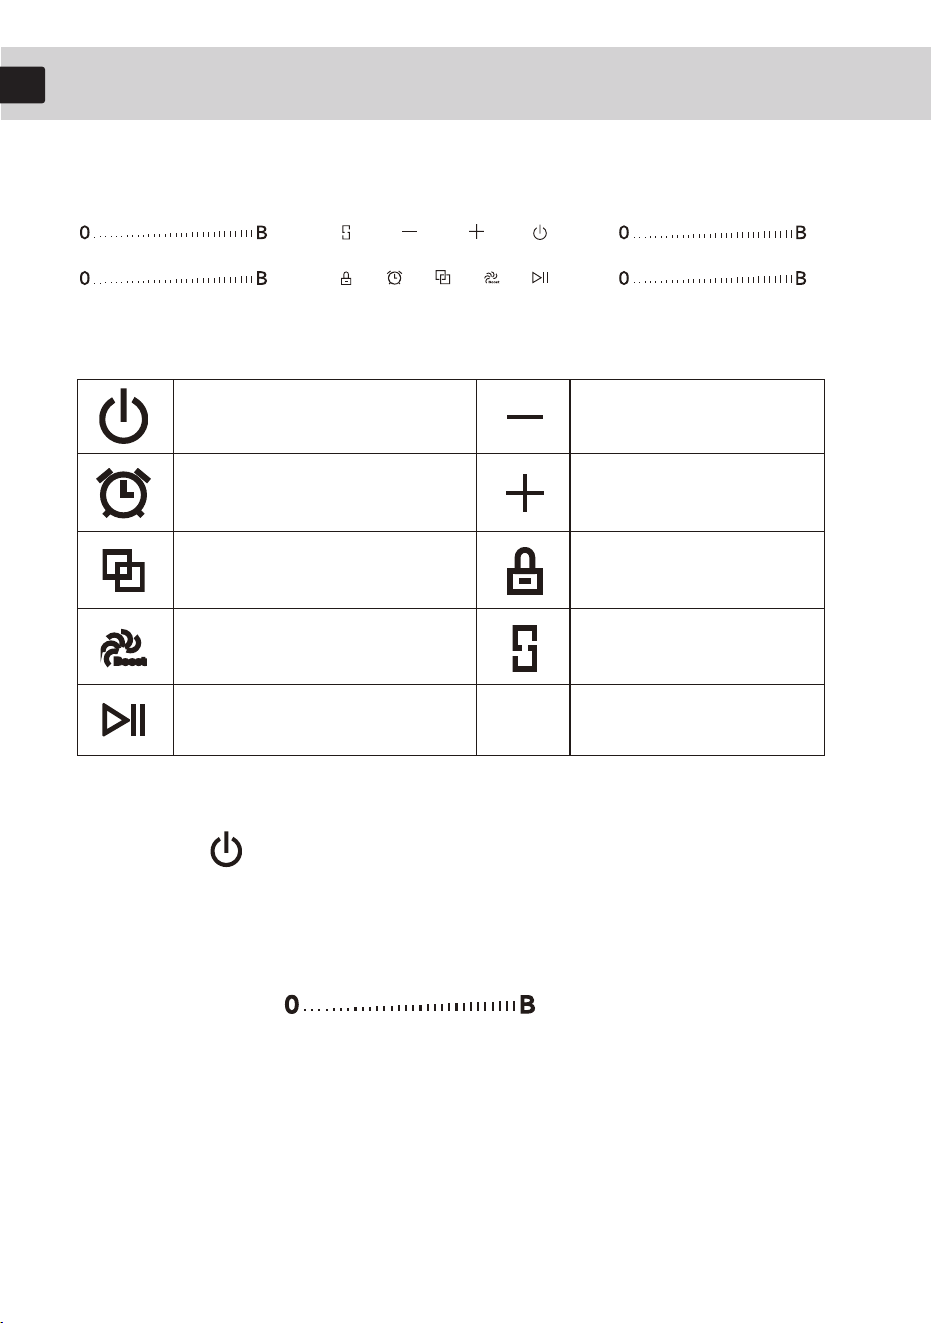
ON/OFF
Timer
power adjustment of the hood
Power boost of the hood
Pause of the hob
Reduce power/timer
Increase power/timer
Child lock
Flexi zone
7
EN
6. Operation
8
EN
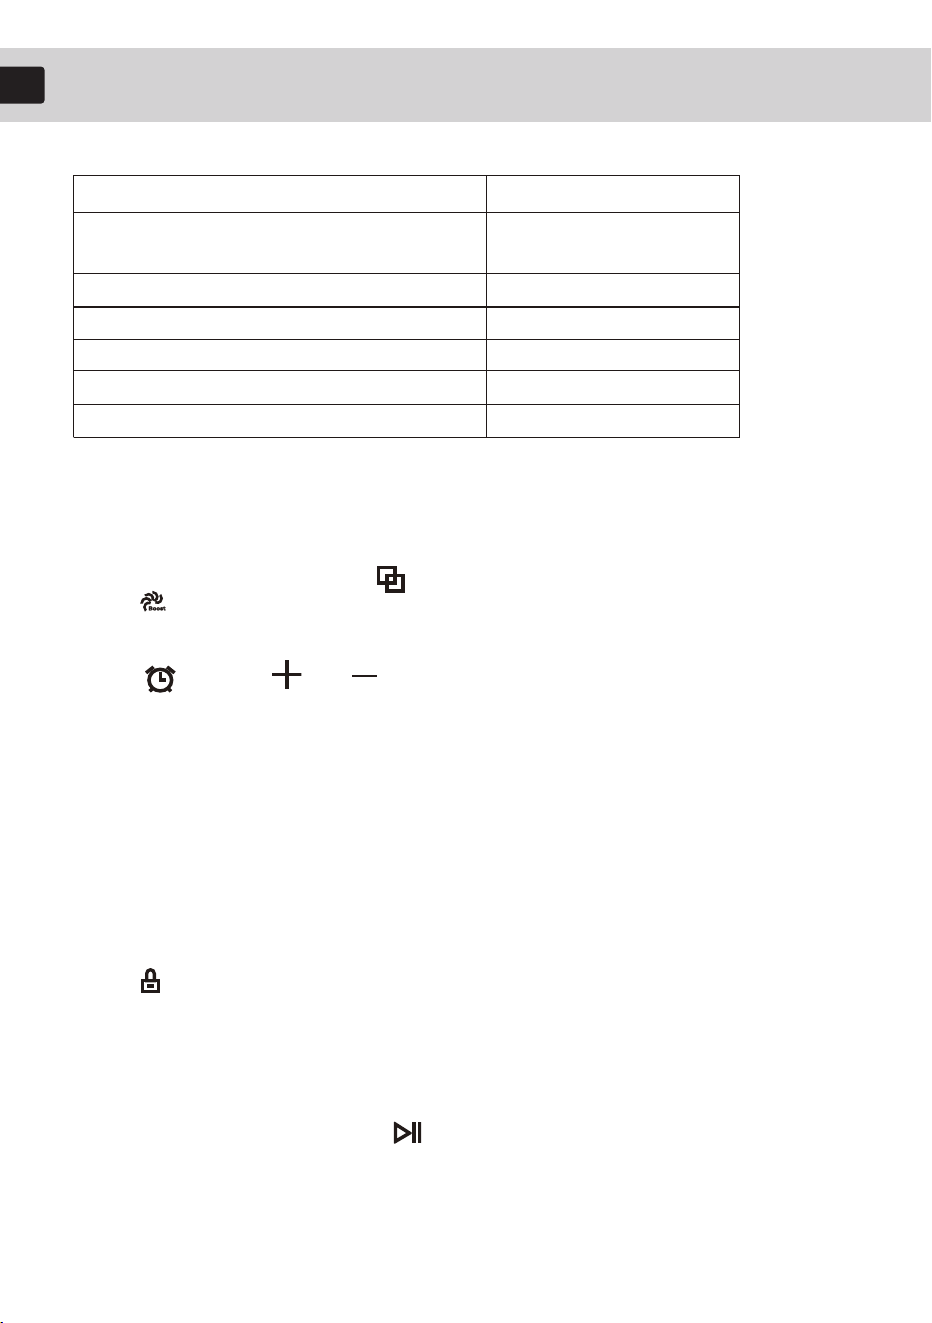
Network safety restriction for the booster function
Almost cooking zones are booster-capable.
However, the cooktop is divided into two groups for power distribution
reasons. For groups A and B the following applies:
Operating both zones of a group with the booster activated, is not
possible (see illustration).
If the booster is activated for both zones, they are automatically set to
power level 9.
6.3.3 Automatic power adjustment of the hood
Every time the machine is turned on, the linkage function of the hood is
automatically activated. When you touch “ ”, the power of the hood will be
automatically adjusted according to the hob power. Total power level of the
hood is level 5. Below is the detail of hood power and the hob power.
Group A Group B
Group A Group B
Group A Group B Group A Group B
with
booster
with
booster
with
booster
with
booster
with
booster
with
booster
with
booster
Group A Group B
with
booster
with
booster
6. Operation
9
EN
When the induction hob is in P0 position, the hood motor stops with a delay of
30 seconds.
6.3.4 Boost function of the hood
Touch power adjustment label “ ” to change from automatic mode to boost
mode “ ”. The power of the hood can reach to the maximum at once.
6.3.5 Timer
Touch “ ”. Touch “ ”or “ ” to increase or decrease time by 1 minute.
Timer ranges from 0~99 minutes. When the time is up, the machine returns to
standby mode and stops heating. Default timer is 30 minutes.
Always choose the desired cooking zone first before using timer!
If more than one heating zone is set with timer, the timer indicator will show
the shortest time, e.g. zone 1 is set with timer 1 minute, zone 2 with 5 minutes,
timer display “01".
6.3.6 Child lock
Touch“ ”, the machine enters into a lock mode. All buttons are lock except
“ON/OFF”.
This function is designed to prevent accidental use. Touch the lock button
again for 3 seconds to cancel lock mode.
6.3.7 Pause of the hob
During cooking, users can touch “ ” to stop cooking temporary. At this time,
the digital tube will keep flashing. If no further operation is performed within 5
minutes, the machine will turn off automatically.
[ATTENTION]
Hood Power Level
F1
(turns off automatically after 30s)
Hob Power
P0
F1
F2
F3
F4
F5
P1-P2
P3-P4
P5-P6
P7-P8
P9-Boost
6.3.8 Flexi Zone
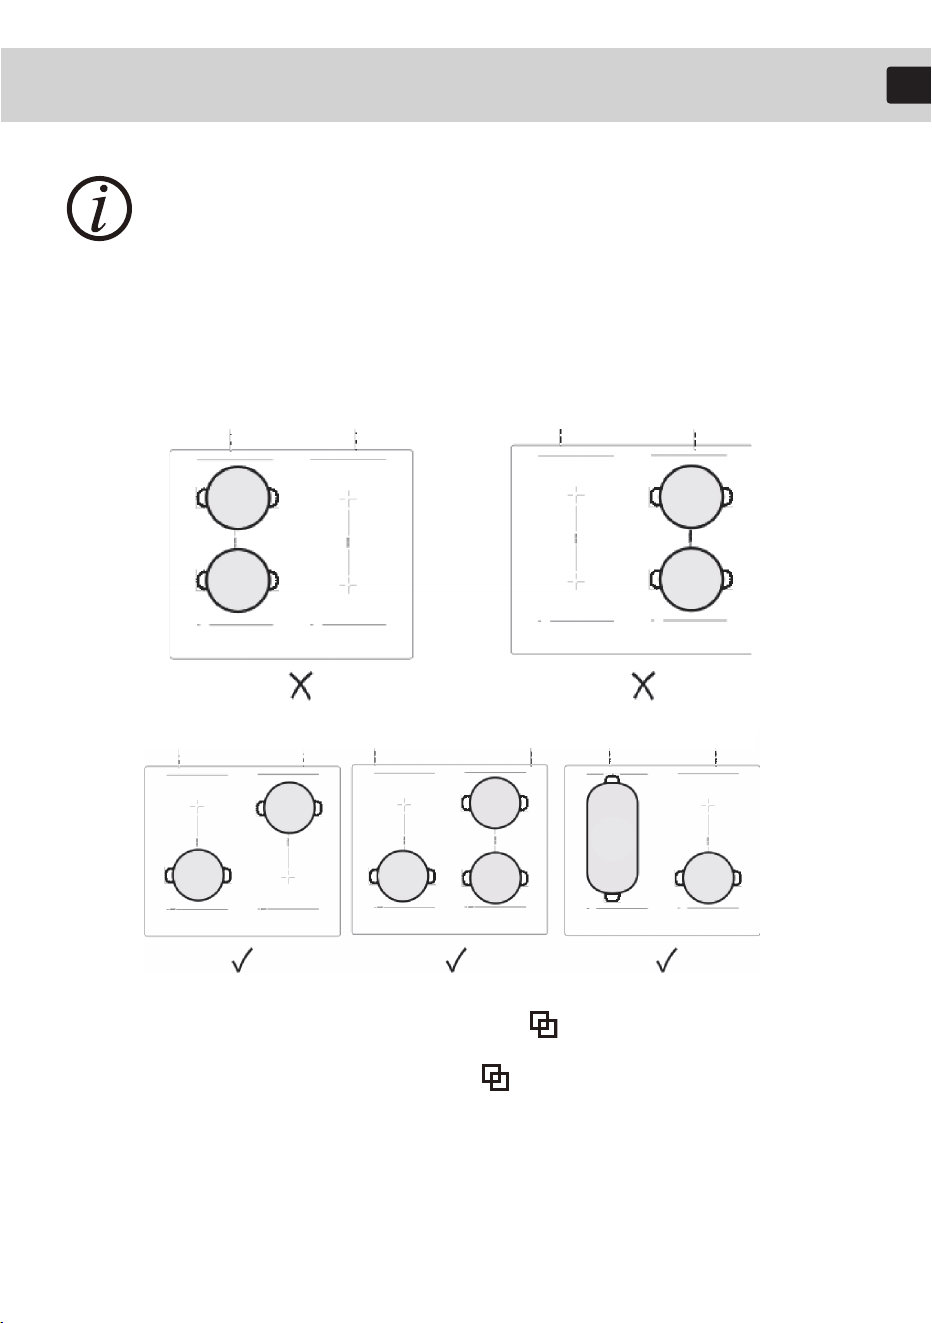
Choose the desired cooking zone first, and touch “ ”. At this time, the zone
on one side will work together at the same time. Default power level of flexi
zone is “P5" . Power level can be adjusted by sliding the bar.
Touch the “ ” again to cancel flexi cooking function.
6. Operation
10
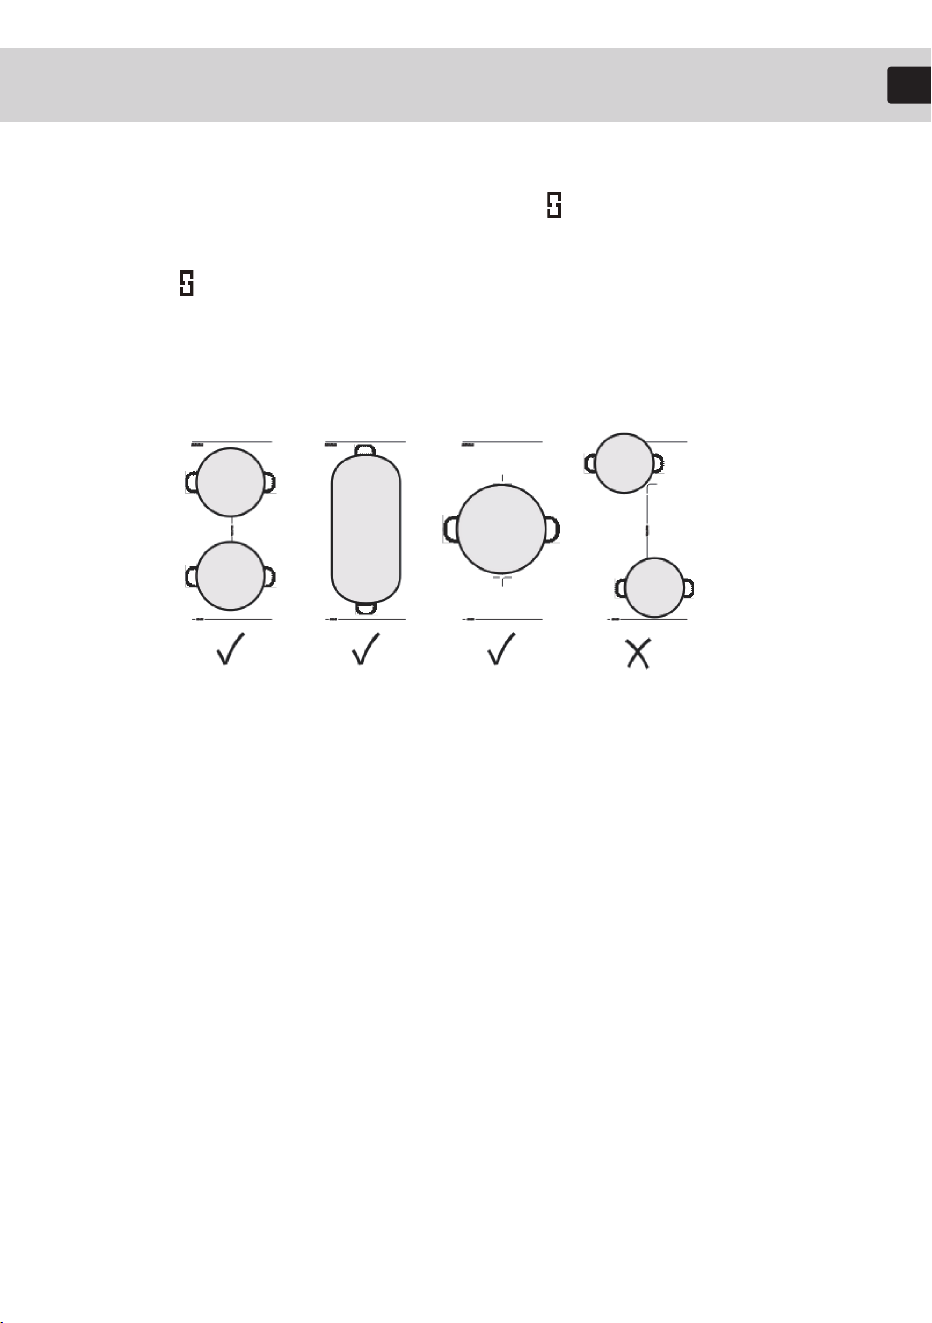
• Important note: In flex-zone operation, the cookware must be placed in
the middle of the zone, so that both cooking zones are evenly covered.
Examples of good and bad placement of cookware:
6.3.8 Flexi Zone
Choose the desired cooking zone first, and touch “ ”. At this time, the zone
on one side will work together at the same time. Default power level of flexi
zone is “P5" . Power level can be adjusted by sliding the bar.
Touch the “ ” again to cancel flexi cooking function.
≥ 200mm
EN
7. Protection Instructions
11
7.1 Over-temperature Protection
A temperature sensor equipped can monitor the temperature inside the induction
hob. If inside temperature is over high, the machine will drop power or stop
heating so as to protect inner components.
7.2 Residual Heat Warning
When the hob has been operated for some time, there will be residual heat on the
surface. The machine will display “H” to warn users not to touch the surface before
the machine cools down.
7.3 Cooking Guidelines
Take care when frying as the oil and fat heat up very quickly. At extremely high
temperature oil and fat will ignite spontaneously and this presents a serious fire
risk.
7.4 Heat Settings
The settings below are guidelines only. The exact setting will depend on several
factors, including your cookware and the amount you are cooking. Experiment with
induction hob to find the settings that best suit you.
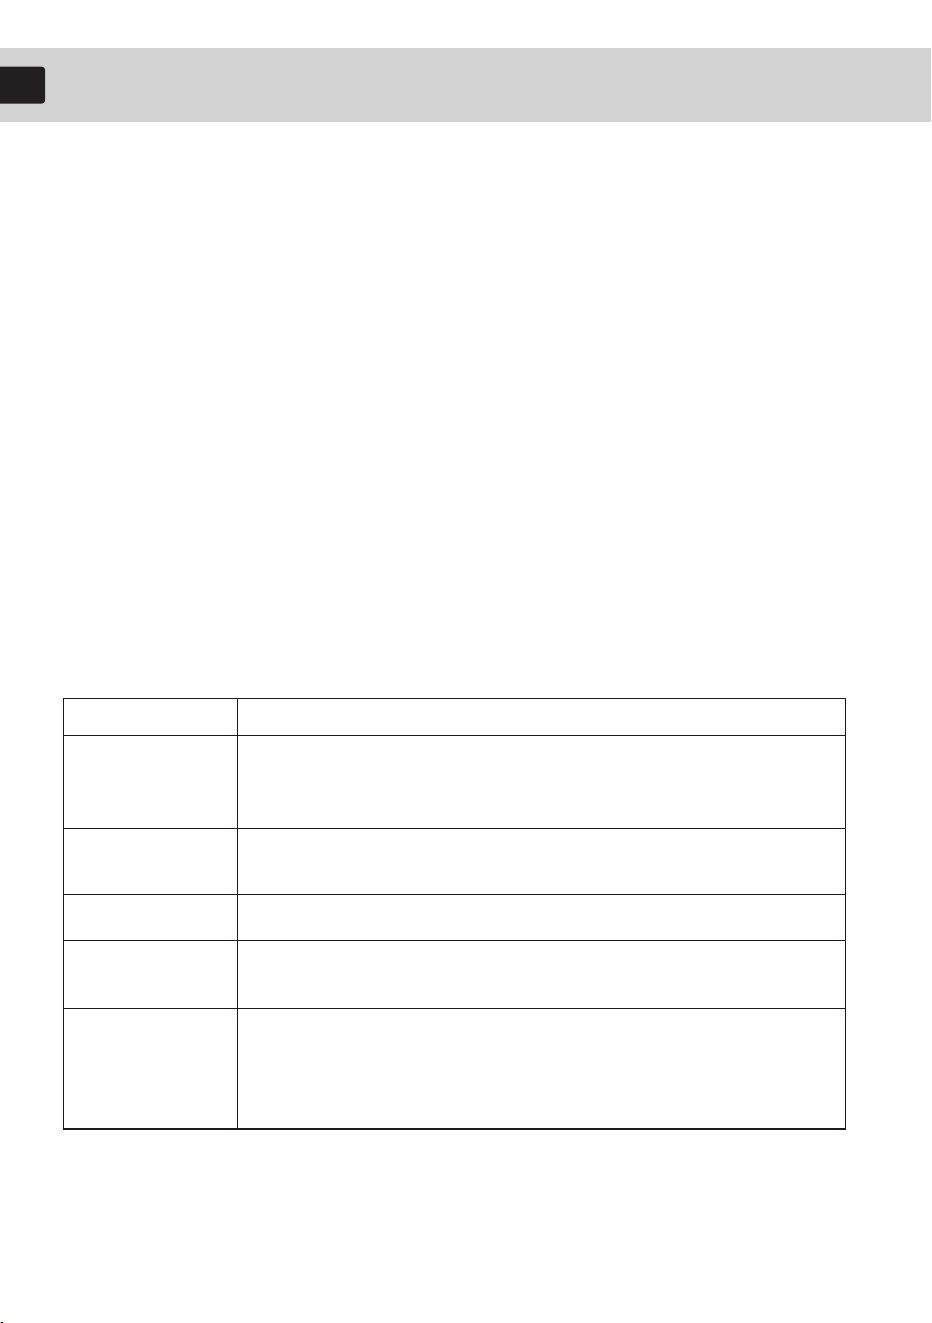
Heat Setting
1-2
3-4
5-6
7-8
9-b
Suitability
• delicate warming of small amount of food
• melting chocolate, butter, etc
• gentle simmering
• reheating
• rapid simmering
• pancakes
• sauteing
• cooking pasta
• stir-frying
• searing
• boiling soup
• boiling water
EN
8. Clean and Maintenance
12
Type of soiling
Everyday
soiling of the
glass surface
(fingerprints,
marks, stains
left by food or
non-sugary
spill-overs.)
How to proceed
• Switch off the hob.
• Apply a cooktop cleaner
while the glass is still
warm (but no hot!).
• Clean the glass with a
soft cloth.
• Rinse thoroughly and
remove all cleaning
residues.
• Dry the cooking surface
with a clean textile for
paper towel.
Important!
• Make sure that the hob is not
hot
• Scrubbing sponges, some
nylon sponges and
harsh/abrasive cleaning agents
scratch in the glass.
• Check the manufacturer’s
specifications for suitability for
glass surfaces.
• Always remove cleaning
residues completely. The
cooking surface may
otherwise be damaged.
Spillovers,
melts and hot
sugary spills on
the glass
surface
Remove these immediately
with a spatula, scraper or
razor blade scraper suitable
for glass ceramic cooktops.
• Switch off the hob.
• Hold the scraper at a
30° angle to the hob
and scrape the soiling
onto a cool part of the
hob.
• Remove the soiled area
with a dishcloth or
paper towel.
• Clean, rinse and dry the
glass as described
under “Everyday
soiling”.
• Be careful not to burn yourself
on heated cooking zones.
• Note that the blades of the
scrapers are extremely sharp
and can cause injury. Keep
them out of the reach of
children.
• Remove this type of soiling as
soon as possible to prevent it
from sticking to and damaging
the glass.
EN
8. Clean and Maintenance
13
Type of soiling
How to proceed Important!
Spillovers on
the touch
controls
• Switch off the hob.
• Absorb liquids with a
soft cloth.
• Wipe the touch control
area with a clean, damp
cloth or soft sponge.
• Dry the area completely
with a textile or paper
towel.
• If the control panel is soiled,
the hob may switch off.
• The touch panel may not
function as long as there is
liquid on it. Make sure that
you have wiped the area
completely dry before you
switch the hob back on.
EN
9. Failure Display and Inspection for Induction Hob
14
EN
Problem
The cooktop
cannot be
turned on.
The touch
controls are
unresponsive.
The touch
controls are
difficult to
operate.
Some keys do
not work./ The
display does
not work
normally.
The power
indicator is
working, but
the heating
process does
not start.
Possible cause
No power
The control is
locked/the key lock has
been activated.
There is a slight film of
water on the controls
You are using the tip of
your finger when
touching the controls.
PCB board error
What to do
Make sure the hob is properly
connected to the power supply and that
it is intact.
Check whether there is a power outage
in your home or area.
If you’ve checked everything and the
problem persists, contact a qualified
technician.
Contact a certified electrician.
Unlock the control panel.
See safety chapter.
Make sure the touch control area is dry.
the ball of your finger when touching
the controls.
Ensure that the ventilation paths are not
blocked and that the ambient
temperature is not too high.
Contact a certified electrician
PCB board / display
error
Overheating of the hob
The cooling fan is not
working.
Technical error
Disconnect the hob from the power
supply and reconnect it after a short
time.
If the problem persists, contact a
certified electrician.
9. Failure Display and Inspection for Induction Hob
15
EN
The cookware
is not heated
and the “U”
icon is
displayed.
Operation
stops suddenly
and the “U”
icon is
displayed.
Use induction-suitable cookware in a
size suitable for the desired cooking
zone and position it correctly. See the
cookware chapter.
Contact a certified electrician.
The cookware is not
suitable for induction or
is not detected.
The automatic detection
function has failed.
Problem
The glass is
being
scratched.
Some pans or
pots make
crackling or
clicking noises.
A slight
humming noise
can be heard
when operating
at high power.
Fan noise
Possible cause
Rough-edged cookware
is used.
Unsuitable, abrasive
scourer or cleaning
products are being
used.
This may be caused by
the construction of
your cookware (layers
of different metals
vibrating differently).
This can be caused by
induction technology.
A cooling fan
integrated in the hob
prevents the
electronics from
overheating. If
necessary, it continues
to run even after the
hob is switched off.
What to do
Use cookware with flat and smooth
bottom.
See the cleaning chapter.
This is harmless and normal.
This is normal, but the noise should
quiet down or disappear completely by
reducing the power level.
This is normal and necessary for
error-free operation.
Do not disconnect the appliance from
the power supply while the fan is
running.
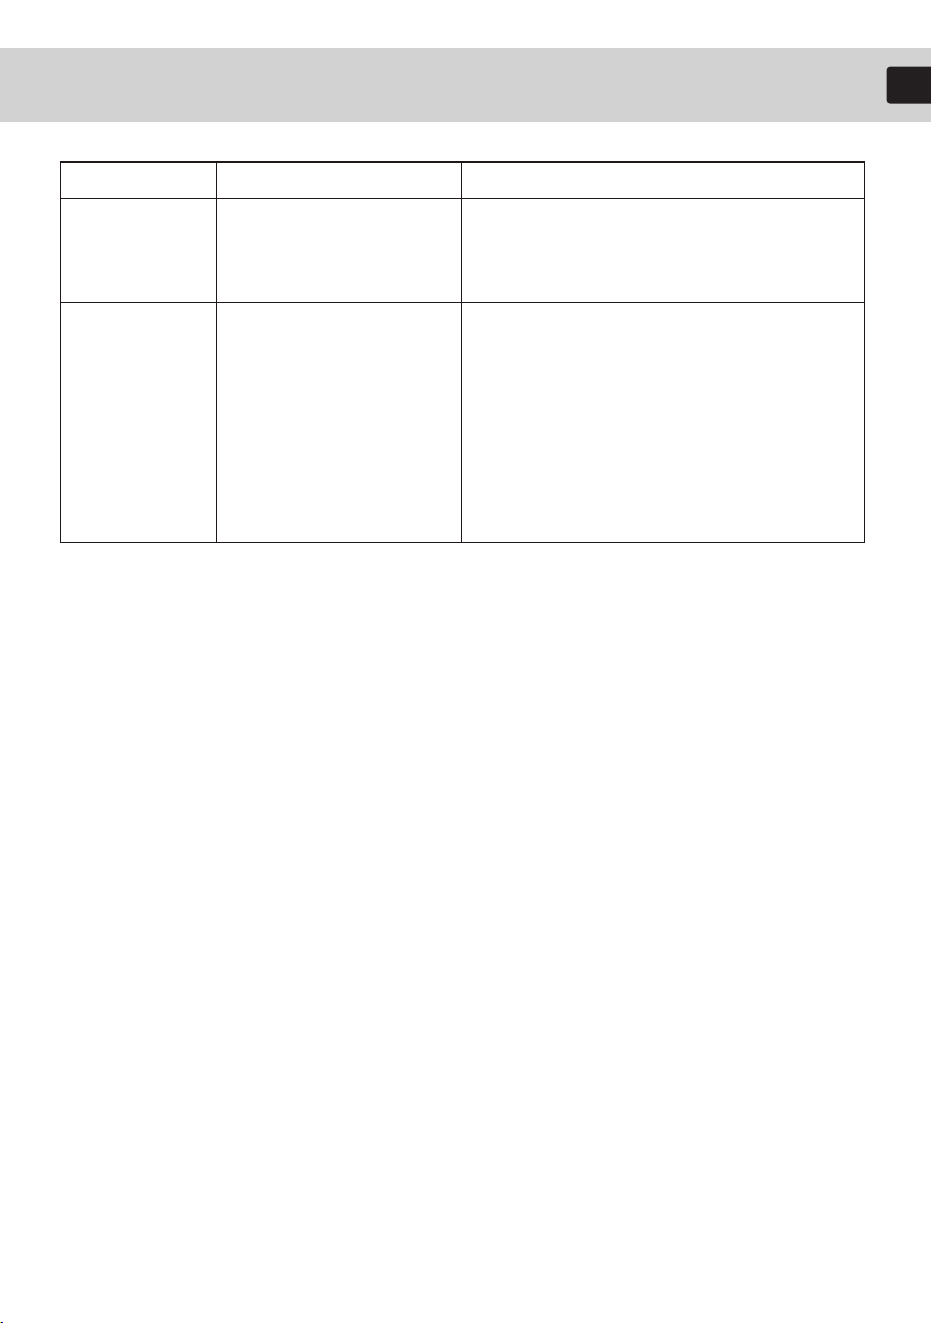
9. Failure Display and Inspection for Induction Hob
16
EN
Problem Possible cause What to do
Abnormal fan
noise
The hob or
cooking one
switches off
suddenly, a
signal tone is
heard and an
error code is
displayed.
The cooling fan is
damaged.
Technical error / code
meaning see follow
table
Contact a certified electrician.
Note down the error code, disconnect
the hob from the power supply and
contact a certified electrician.
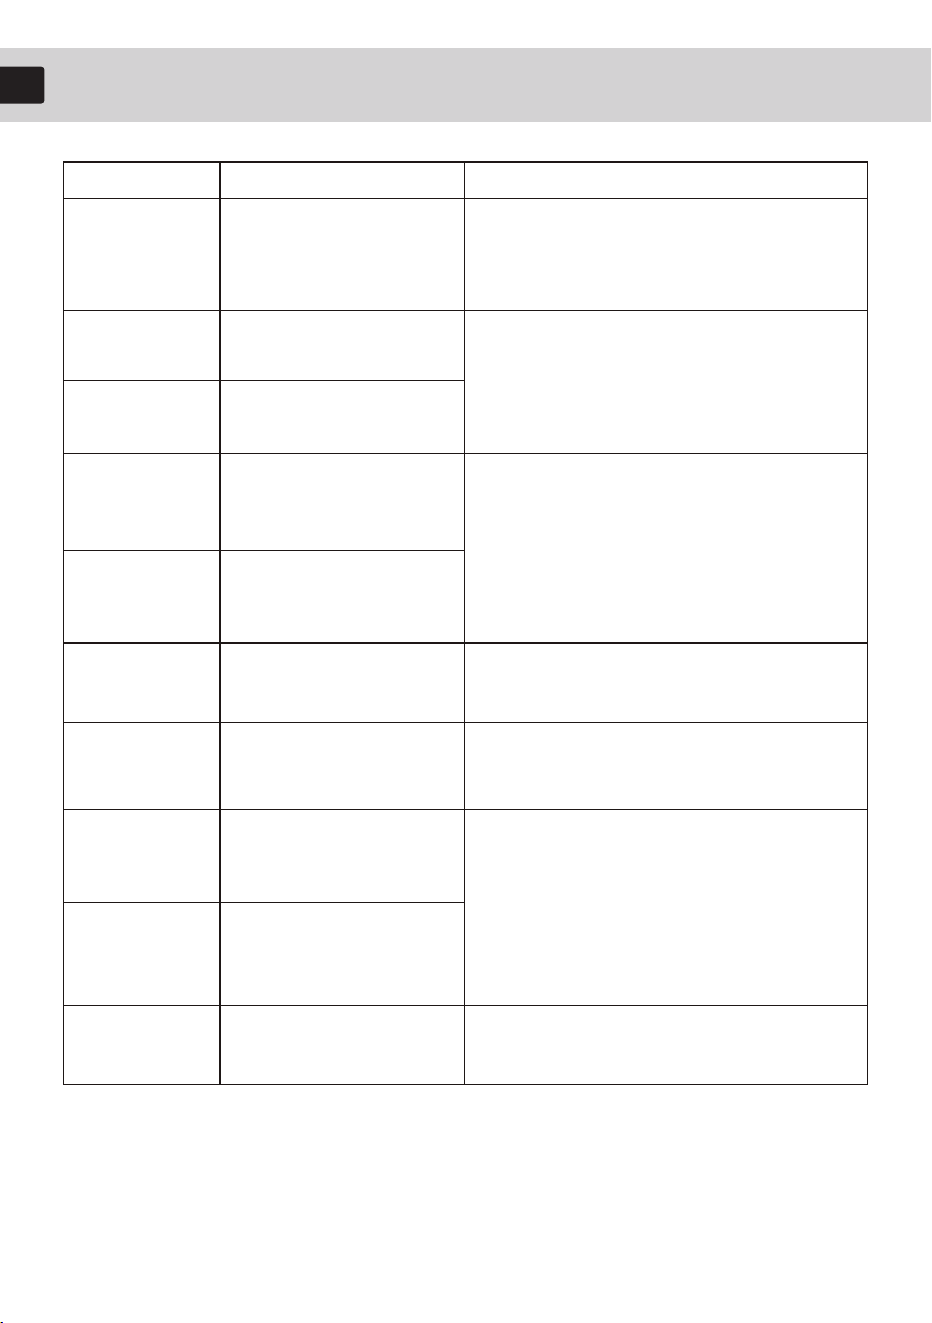
9. Failure Display and Inspection for Induction Hob
17
EN
Error code
U
E1
E2
E3
E5
E6
E7
Meaning
No suitable cookware
was identified
Voltage too high, 285V
(±10V)
Voltage too low, 85V
(±10V)
Error message of the
cooktop sensor / short
circuit
E4
Error message of the
IGBT sensor / short
circuit
Overheating of the hob
IGBT overheating
Malfunction of the
cooktop sensor
What to do
Place suitable cookware in the middle of
the corresponding cooking zone (see
chapter on cookware)
Check the power supply
If it is normal, turn the hob back
on.
Contact the customer service or a
certified electrician.
Wait until the hob has cooled down and
then switch it on again.
Wait until the hob has cooled down and
then switch it on again.
Et
Overflow protection
Remove spilled liquids and switch the
hob back on.
Contact the customer service or a
certified.
Er
Communication failure
between display and
mainboard
10. Installation
18
EN
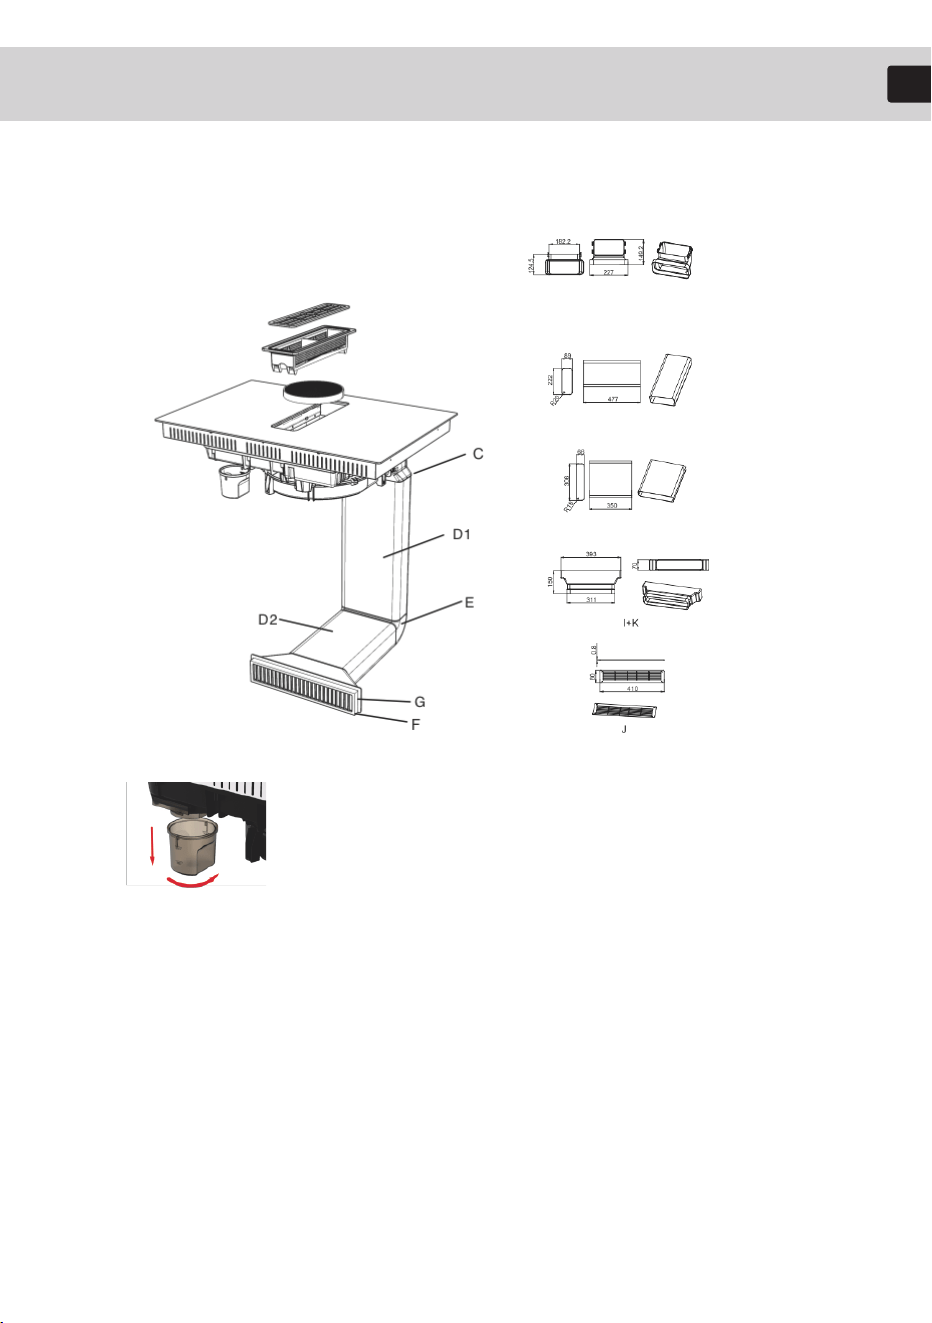
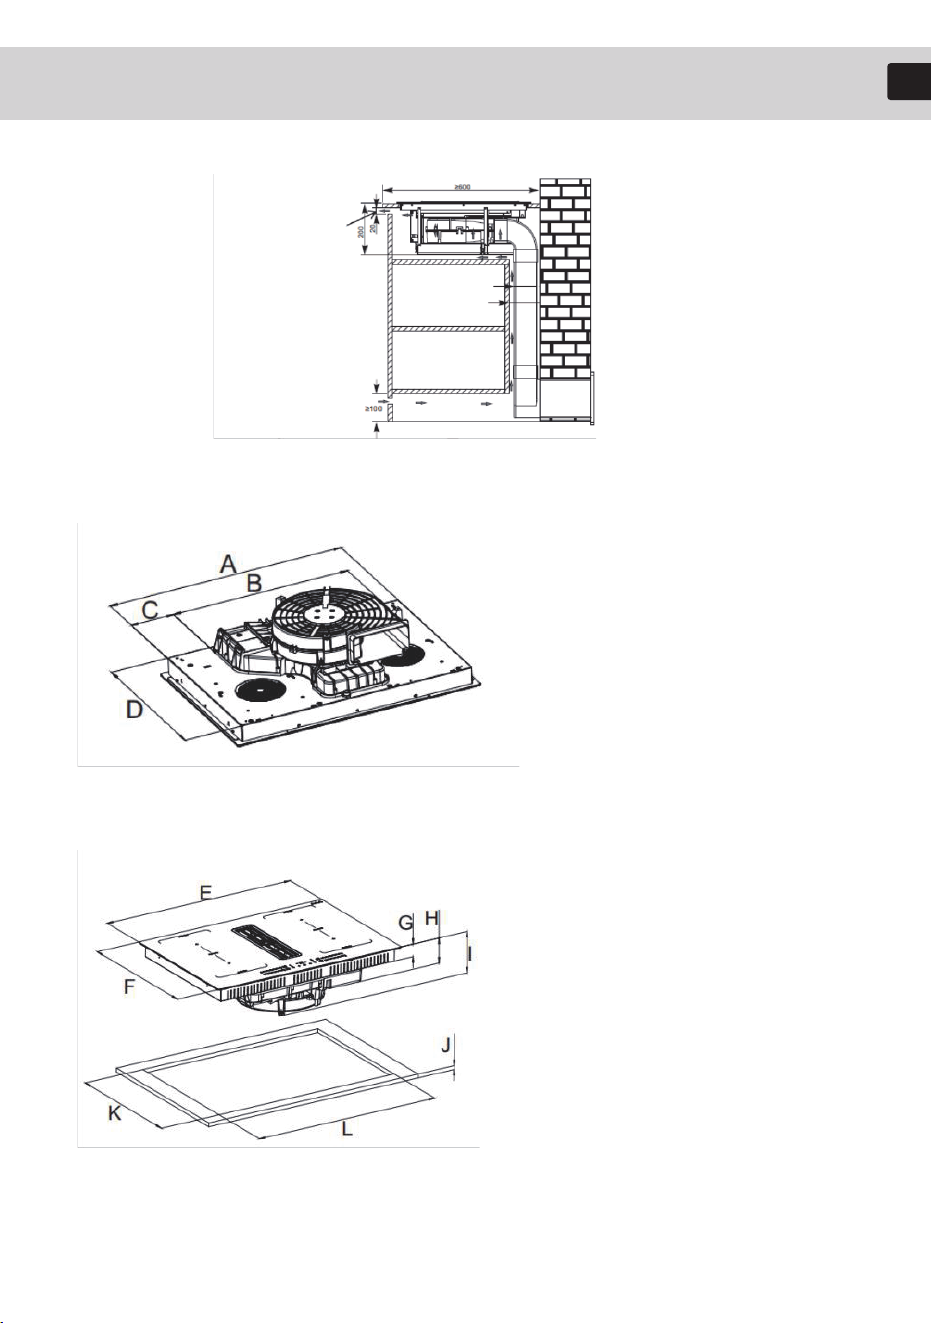
Note: C interface is provided by the factory, other pipes can be prepared by the
factory or purchased by the buyer himself.
Installation tips
The hob can be installed on a top with a flat surface and thickness of between
30 and 40mm. The cupboard underneath the top should leave enough sufficient
area to accommodate inlet plenum, blower cavity, inlet pipe, outlet pipe and so
on, and this area should make sure good ventilation and heat dissipation is
provided. Refer to pic below.
C (Factory
provided)
Oil cup
10. Installation
19
EN
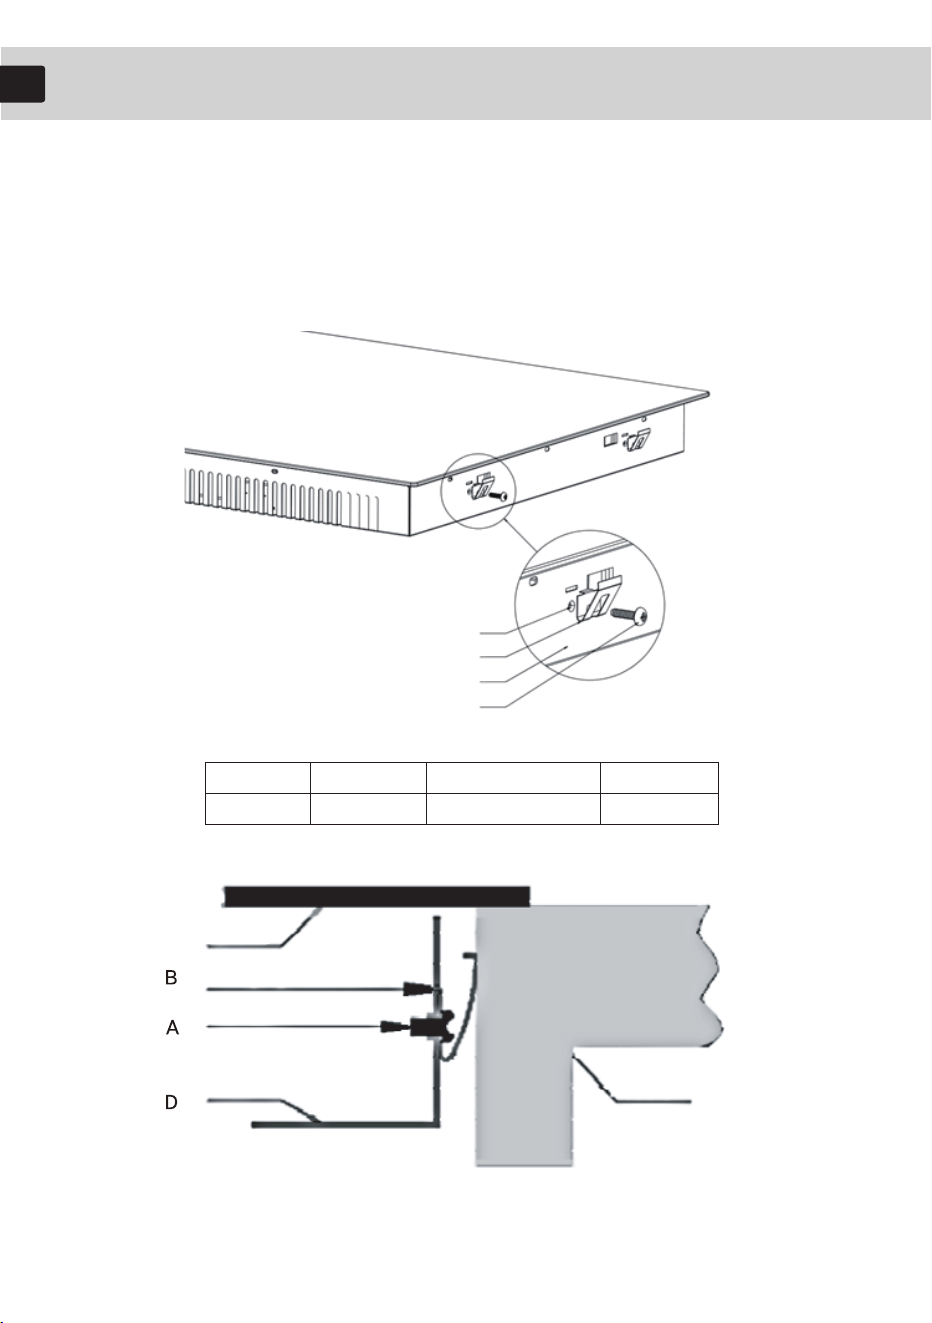
Before Locating the Fixing Brackets
The unit should be placed on a stable, smooth surface (use the packaging).Do not
apply force onto the controls protruding from the cooktop.Fix the cooktop on the
work surface by screw four brackets on the bottom of cooktop(see picture) after
installation.
A
screw
B
bracket
C
screw hole
D
base
Glass
Retaining bracket
Screw
Bottom case
Worktop/kithen
cabinet
ST 3,5*8
A
D
B
C
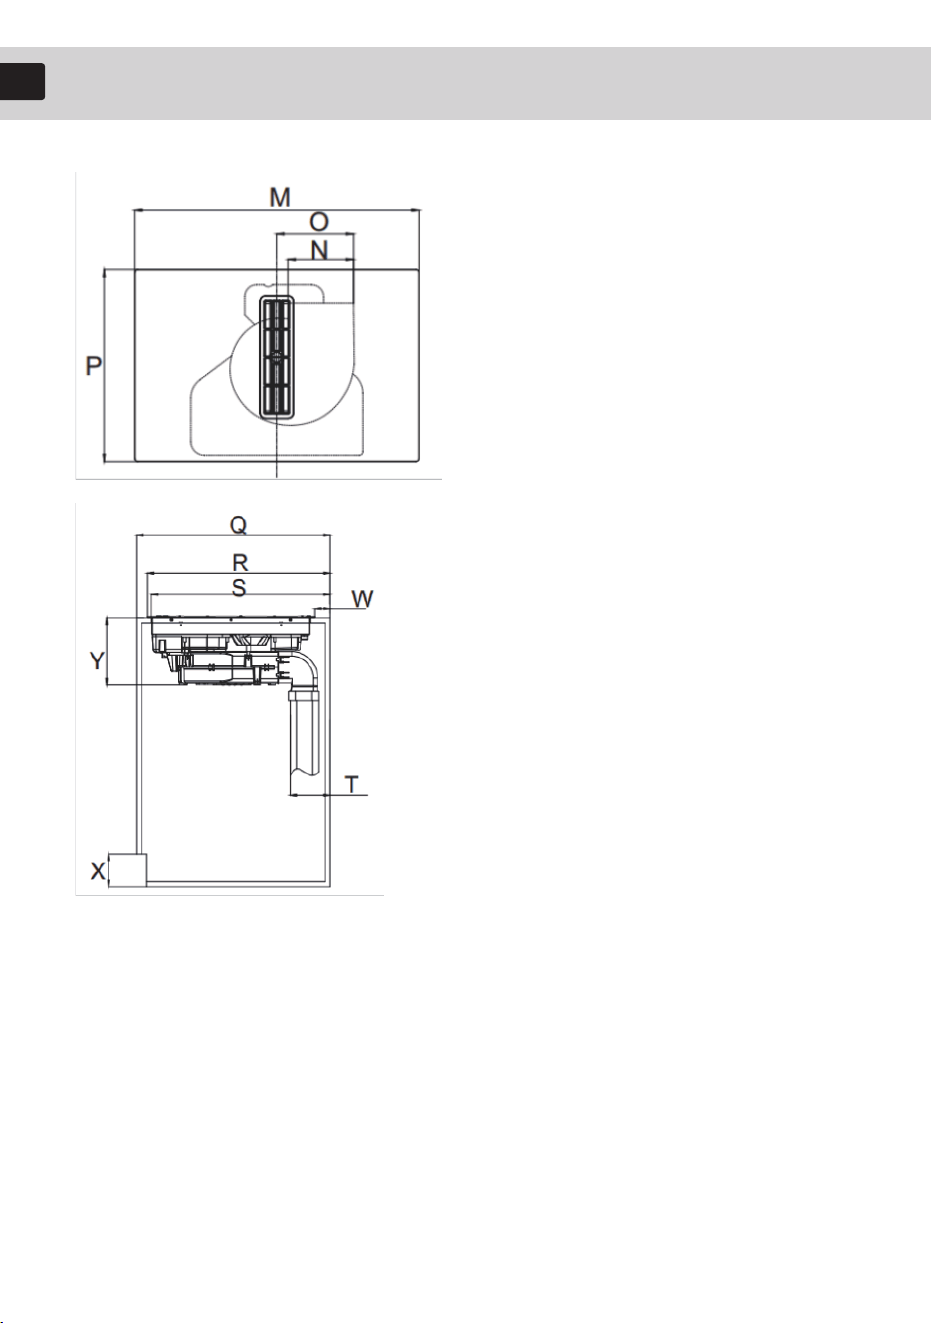
10. Installation
20
EN
Dimension:
Width: A 730mm
B 455mm
C 132mm
Depth: D 490mm
Dimension:
Width: E 770mm
Depth: F 520mm
Height: G 56mm
H 110mm
I 206mm
Cut-out:
Width: K 750mm
J 500mm
L ≥10mm
cut off the bar
in front of the
work surface
10. Installation
21
EN
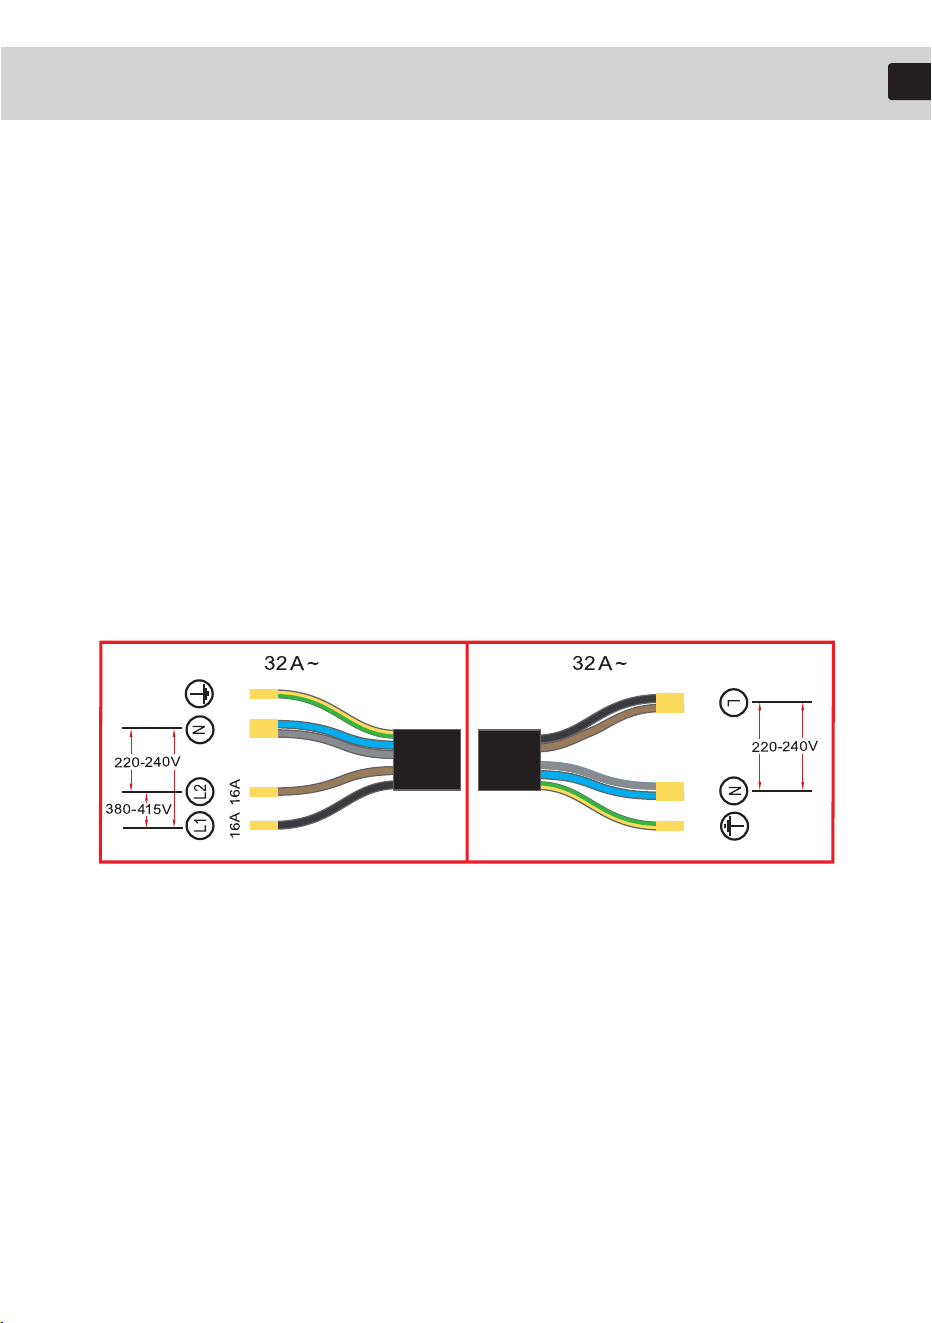
Note:
“X” means changing the built-in size according to the actual size of your cabinet.
There shall be adequate ventilation of the room when the rang hood is used.
There is a fire risk if cleaning is not carried out in accordance with the
instructions.
CAUTIONS: Accessible parts may become hot when used with cooking
appliances. The air must not be discharged into a flue that is used for exhausting
fumes from appliance.
Dimension:
Width: M 770mm
N 177mm
O 207.5mm
Depth: P 520mm
Dimension:
Depth: Q 600+Xmm
F 560+Xmm
G 550+Xmm
T 105mm
W 45+Xmm
Height: X 100mm
Y 205mm
The minimum distance between the supporting surface for the cookware on the
hob and the lowest part of the range hood. When this device is located above an
oven or other appliance, this distance shall be at least 65 cm.
The distance of 65 cm can be reduced for non-combustible parts of range hood, or
parts operating at safety extra low voltage, provided these parts do not give access
to lives parts if deformed. Regulations concerning the discharge of air have to be
fulfilled.
CAUTION: This appliance is not intended to be used with gas hobs.
10. Installation
22
EN
Installation Tips
• Connecting the hob to the mains
• Make sure that the data on the rating plate (V) matches your supply voltage.
• The connection to the power supply must be carried out by a qualified
electrician in accordance with the relevant standard or with a single-pole circuit
breaker, as described below:
Note:
“X” means changing the built-in size according to the actual size of your cabinet.
There shall be adequate ventilation of the room when the rang hood is used.
There is a fire risk if cleaning is not carried out in accordance with the
instructions.
CAUTIONS: Accessible parts may become hot when used with cooking
appliances. The air must not be discharged into a flue that is used for exhausting
fumes from appliance.
The minimum distance between the supporting surface for the cookware on the
hob and the lowest part of the range hood. When this device is located above an
oven or other appliance, this distance shall be at least 65 cm.
The distance of 65 cm can be reduced for non-combustible parts of range hood, or
parts operating at safety extra low voltage, provided these parts do not give access
to lives parts if deformed. Regulations concerning the discharge of air have to be
fulfilled.
CAUTION: This appliance is not intended to be used with gas hobs.

10. Installation
23
EN
• The electrical connection must be made properly and in accordance with the
applicable safety regulations.
• To connect the hob to the main power supply, do not use adapters, reducers, or
branching devices as they can cause overheating and fire.
• The cable must not be kinked or pinched.
• The power supply cable must not touch any hot parts and must be positioned
so that its temperature will not exceed 75℃ at any point.
• The cable must be checked regularly.
• If the cable is damaged or needs to be replaced, this must be done by a
qualified electrician with the correct tools.
After installation, the connection cable and the underside of the hob
must no longer be accessible.


EN
Manufacturer: Zhiyue Youchuang Technology (Suzhou) Co., Ltd.
Address: Room 552, Unit 5010, No.282 Dongping Street, Suzhou Industrial Park, Suzhou
Area, China (Jiangsu) Pilot Free Trade Zone
Official Website: global.dreametech.com
VersionNo.: 250912A1
Scan the QR Code
To view the Digital User Manual