1
Owner's Manual
Please read this manual thoroughly
before operating the DOGTRA SMART FENCE.
Click on the QR to
Start Training
Flags sold separately
2 3
IMPORTANT SAFETY AND PRODUCT
INFORMATION
IMPORTANT SAFETY AND PRODUCT INFORMATION WARNING
Please read all safety and product information below before using your Dogtra
product. Failure to follow these safety instructions may result in injury to you,
your dog and others, or it may result in damage to your Dogtra product or other
property.
PRODUCT SAFETY
SMART FENCE Placement
Place the control station of your SMART FENCE on an exterior structure (e.g. house
wall) that is approximately at the center of the virtual boundary that you wish to
create. The control station should be placed as high as possible and at least 6 ft
above the ground. Do not use SMART FENCE indoors.
Virtual Boundary
The SMART FENCE is a virtual training device and not a physical fence and cannot
replace such fences. Take extra precautions and do not place the virtual boundary
of your SMART FENCE immediately beside a road, highway, or other hazard. For
example, allow at least 10-15 feet of space between the virtual boundary and any
road or highway, in case your dog crosses the boundary.
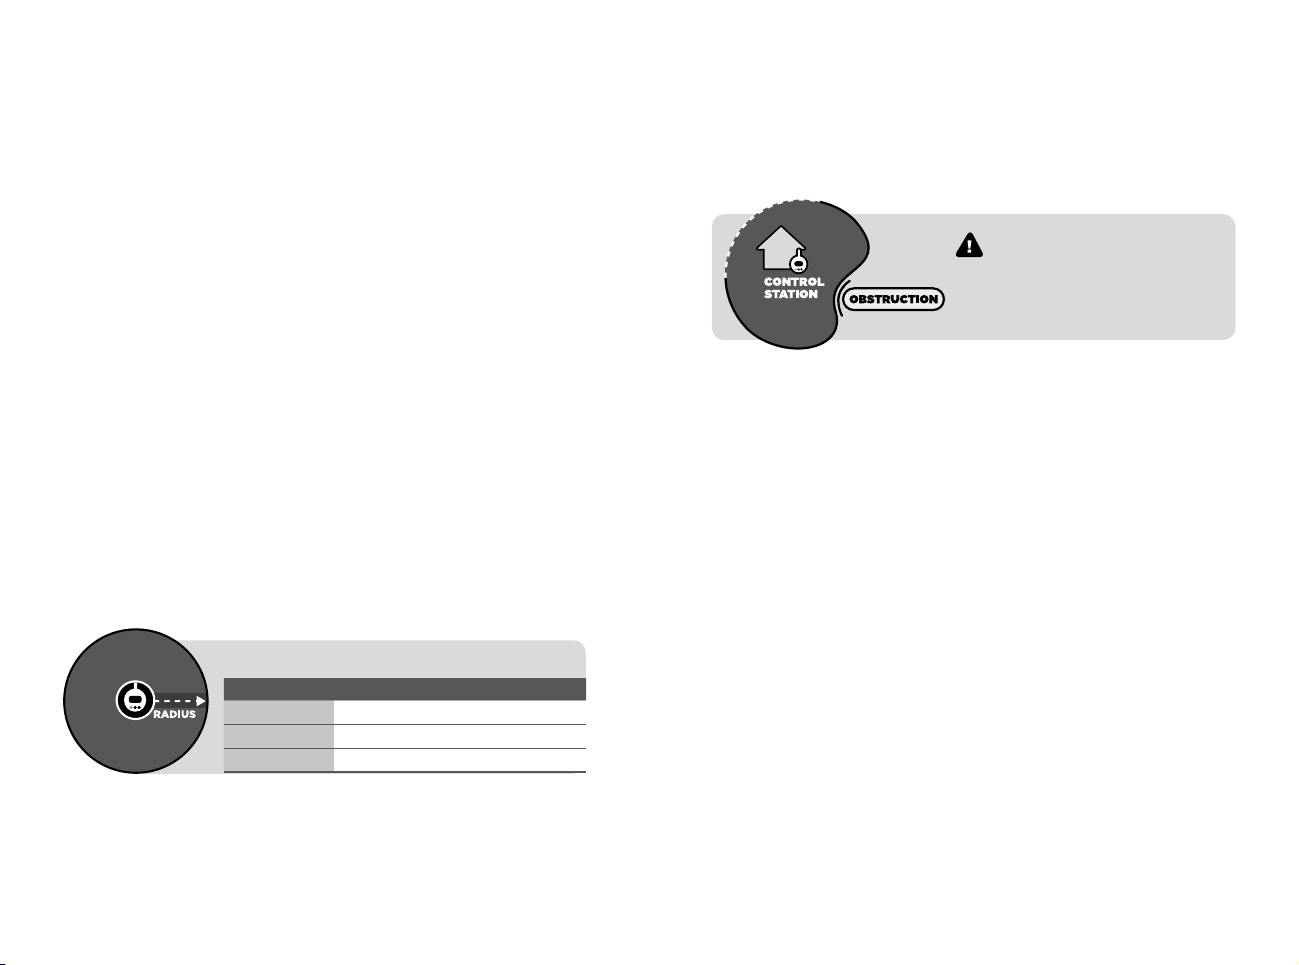
SMART FENCE Without Obstructions
SMART FENCE creates a virtual boundary centered around the control station of
the product. Without obstructions (see below), the outline of the virtual boundary
is circular. The distance from the control station to the boundary edge may be 30
to 105 feet depending on your selected boundary setting and any obstructions.
Prepare and verify your SMART FENCE boundary before using the product (see
below).
SMART FENCE With Obstructions
Obstructions may affect the virtual boundary of your SMART FENCE. Areas
with buildings, structures, vehicles, appliances, larger metallic objects, or other
obstructions may change or block the outline of the virtual boundary. For example,
if the control station is placed at the front of a house, the virtual boundary may not
extend to the back or sides of the house. Prepare and verify your SMART FENCE
boundary before using the product (see below).
The radio-frequency virtual boundary
shape & size may change with nearby
obstructions
Measurement XS S M L XL
Yard Radius
10 15 25 30 35
Feet Radius
30 45 75 90 105
Acre
1/10 1/4 1/2 2/3 3/4
VIRTUAL FENCE COVERAGE RANGE
SMART FENCE Preparation and Verification
Before using SMART FENCE with your dog or after changing SMART FENCE
settings, do the following: (i) check that the collar power is on and that your battery
is sufficiently charged, (ii) check that the control station power is on, (iii) confirm
the connections between SMART FENCE collar and control station, and (if used)
between the app and control station, (iv) walk the perimeter of your activated
SMART FENCE boundary to verify that the virtual boundary is active in the area
that you have selected, and (v) train your dog how to respond to collar stimulations
if your dog attempts to cross or crosses the SMART FENCE boundary.
IMPORTANT – Train Your Dog How To Respond to SMART FENCE
Supervise your dog while using SMART FENCE. Dogtra products may be used with
a variety of training methods that provide clear and consistent messages to your
dog. Before using SMART FENCE, train your dog how to respond to the SMART
FENCE boundary if it receives stimulation from the collar. Train your dog to not
cross the virtual boundary, or if it does cross, train your dog to return and not pass
beyond the virtual boundary line. Visual tools such as flags may be helpful when
training your dog. For training tips, go to dogtra.com/pages/manuals.
Collar Fit and Use
Take care: properly fit the collar on to your dog, reposition the collar’s contact
points every few hours, and do not use the collar for more than 8 hours at a time.
Routinely check the collar’s contact point areas on your dog to confirm proper fit
and skin condition. Failure to do so may result in skin irritation or sores on your dog.
See collar fitting instructions in the manual.
Aggressive Dogs
Do not use SMART FENCE with aggressive dogs as such dogs may react adversely,
cross the virtual boundary, and/or cause injury to people or other dogs or animals.
Seek the assistance of a dog training specialist or veterinarian when dealing with
aggressive dogs.

4 5
Children
Dogtra products are not toys. Adult supervision and close attention are necessary
when Dogtra products are used by or near children.
PRODUCT INFORMATION
Handling and Repair
Dogtra products can be damaged or malfunction if dropped, especially on
hard surfaces, or otherwise improperly handled. Do not use a damaged or
malfunctioning product as it may cause injury or property damage. If your
product is damaged or malfunctions, contact Dogtra to obtain service before
using the product.
Electrical Product
Your Dogtra product contains electrical components and batteries. The power plug
and cord are not waterproof and should be protected from rain or other moisture
using an outdoor outlet cover. Do not use or keep your product near heat or
flammable sources. Such use or storage may damage your product and/or cause
fire, explosion, injury, or property damage.
Medical Device Interference
Dogtra products contain electrical and magnetic components that emit low level
electromagnetic waves and radio frequencies. These electromagnetic waves or
radio frequencies may interfere with pacemakers, defibrillators, or other medical
devices. Consult your physician or medical device maker before using your medical
device around a Dogtra product. If you think that your Dogtra product is interfering
with your pacemaker, defibrillator, or other medical device, stop using the Dogtra
product.
Inadvertent Activation
The digital microprocessor offers thousands of unique codes to eliminate frequency
mix-up with other Dogtra e-collars. The Correction button will automatically shut
down after being held down for 12 seconds or more as a safety feature.
Unauthorized Use
Your Dogtra product should be used only in a humane manner to train and educate
your dog. Dogtra products are not intended for use in any other manner nor are
they intended for use with other animals or with humans.
Battery
Your Dogtra product contains batteries. Take care when removing and installing
batteries as your fingers may get caught. Dispose of batteries as provided by your
local regulations. Do not disassemble, crush, heat, or otherwise alter the battery as
it may cause fire, injury or property damage.
CONTENTS
MAIN FEATURES
................................................................
AT A GLANCE
....................................................................
DOGTRA SMART FENCE APP - FREE
..........................
FLAG TRAINING REQUIRED
..........................................
OVERVIEW
..........................................................................
COLLAR FITTING
..............................................................
HOW IT WORKS
.................................................................
CHECKLIST BEFORE YOU START
FOR HOUSE INSTALLATION
....................................
OUTDOOR INSTALLATION
.......................................
UNDERSTANDING YOUR TRAINING SYSTEM
POWER ON/OFF
.........................................................
LED INDICATOR TYPES, LCD BACKLIGHT
............
HOW TO CHARGE
.......................................................
STATION WALL-MOUNT HOLSTER
INSTALLATION
.............................................................
HOW TO PAIR SMART FENCE COLLAR(S)
.........
CONNECTION STATUS OF THE SMART FENCE
COLLAR ON THE CONTROL STATION
..................
DISPLAY INFORMATION
...........................................
CONTROL STATION FUNCTION
.............................
CONTAINMENT STATUS ALARM
.............................
7
8
9
9
10
12
14
15
18
20
22
23
24
25
26
27
28
31
1.
2.
1.
2.
3.
4.
5.
6.
7.
8.
9.

6 7
SMART FENCE APP
PAIRING THE CONTROL STATION TO A PHONE
..
KEY FEATURES OF THE SMART FENCE APP
.......
GENERAL TRAINING TIPS
................................................
MAINTENANCE
...................................................................
TROUBLESHOOTING GUIDE
............................................
FCC/ISED WARNING STATEMENT
.................................
DOGTRA PRODUCT WARRANTY
...................................
1.
2.
34
35
40
42
43
45
46
MAIN FEATURES
• Up to 3/4-acre coverage in a circular boundary shape with a
Radius ranging from a minimum of 30 feet up to a maximum
of 105 feet.
• 2-way radio frequency wireless communication technology to
make auto containment corrections and receive exit-alarms.
• IPX9K waterproof rating on both CONTROL STATION and the
collar for safe outdoor usage.
• Complimentary DOGTRA SMART FENCE app for editing
settings, corrections, and notifications WITHOUT a
subscription. Bluetooth connection with CONTROL STATION
required.
* App not required to operate.
• DOGTRA SMART FENCE is the only wireless e-fence in the
market that includes a boundary escape alarm without
subscription.
* As of 2025
• LCD screen to display the status and settings on the
CONTROL STATION.
• Expandable 2-Dog system
• 24-level Stimulation
• Three correction modes, Static, Tone, and/or Vibration, to
choose from for containment purposes.
• E-collar command function via CONTROL STATION or SMART
FENCE app.
* Not ideal for advanced behavior correction training, but for emergency use
• 2-Hour rapid charge battery
• USB-C Type charging
• Portable CONTROL STATION
• Wall-mount holster for outdoor installation
8 9
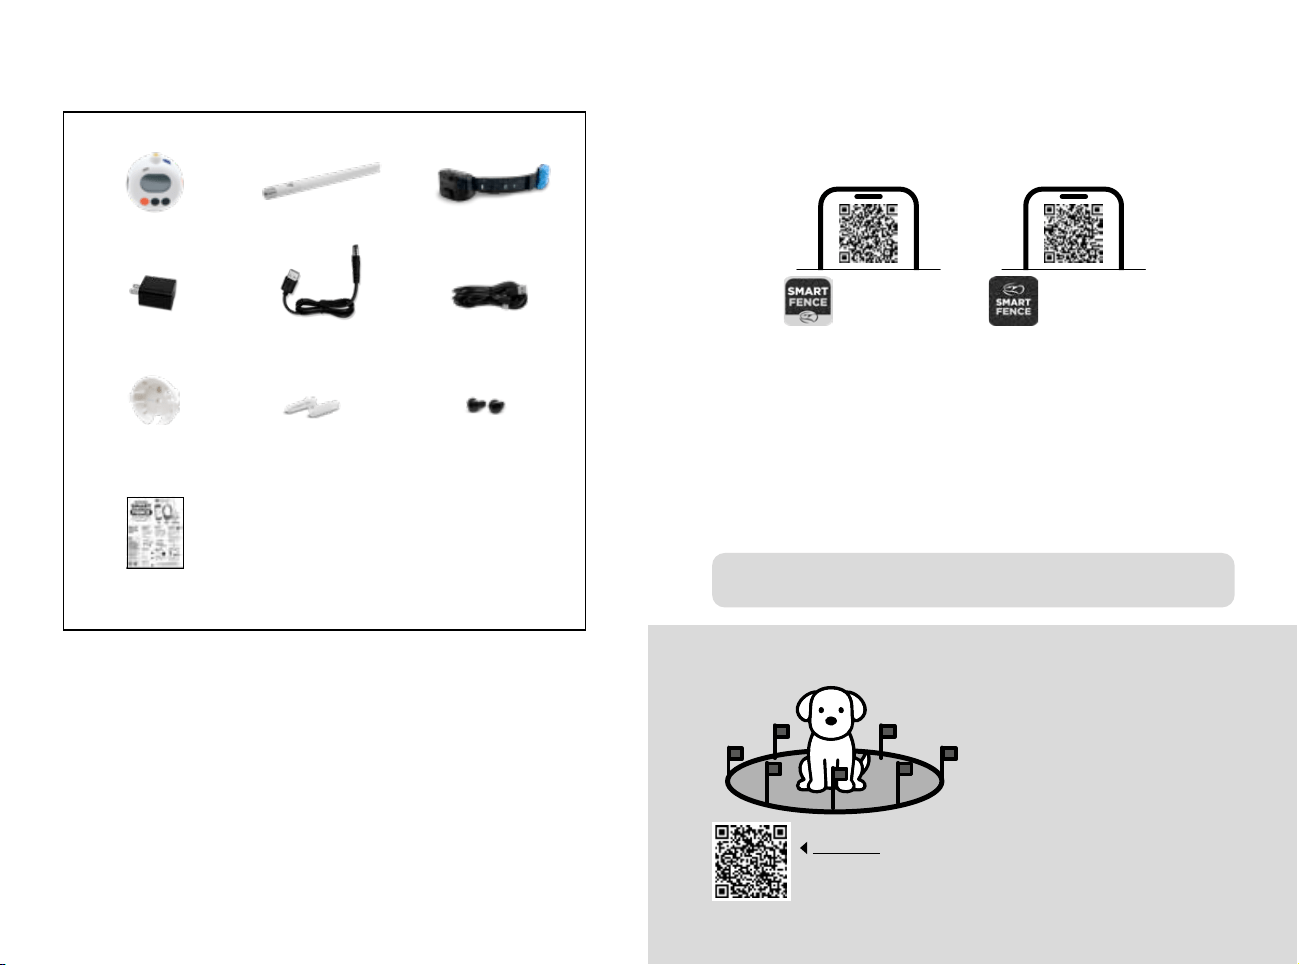
AT A GLANCE
Antenna Collar
Wall-Mount
Holster
CONTROL STATION
USB-5.5
Charging Cable
controller & collar
Battery charger
USB-C
extension cable
Quick Manual
Optional Accessories
Auto Charger
The input of the automatic charger for the SMART FENCE is
12V ~ 24V and the output is 5V 2500mA.
European Charger
Dogtra's European chargers are designed for use with 220V
AC electrical outlets.
To purchase accessories, visit www.dogtra.com or call
customer service at (888) 811-9111.
Plastic
Anchors (Qty.2)
Controller Mounting
screws (Qty.2)
DOGTRA SMART FENCE APP - FREE
The app is currently compatible with:
1. Bluetooth 5.0 and above. Check the version with the
phone manufacturer.
2. iOS: 14 and above, iPhone 8 and above
3. Android: 7.0 and above
Please make sure to create virtual fence(s) before you start putting the
SMART FENCE collar on your dog - Fence data will sync automatically with
paired collar(s).
SMART FENCE app is not required to operate.
Search for "DOGTRA SMART FENCE" in your app store or
scan the QR code below to download the DOGTRA SMART
FENCE APP on your phone - No Fee Required.
Important:
Make sure the collar is powered on before leaving your dog outside!
Scan the QR code
and download it
from the app store
Scan the QR code
and download it
from the play store
FLAG TRAINING REQUIRED
* Flags sold separately
SCAN HERE to view the
online Flag training guide.
You can also find the
guide on your app.
For effective containment
of your dog with The Dogtra
SMART FENCE Product, we
strongly recommend reviewing
the "Flag Training Guide" to
practice with your dog(s). This
online content is also available
on the SMART FENCE app.
10 11
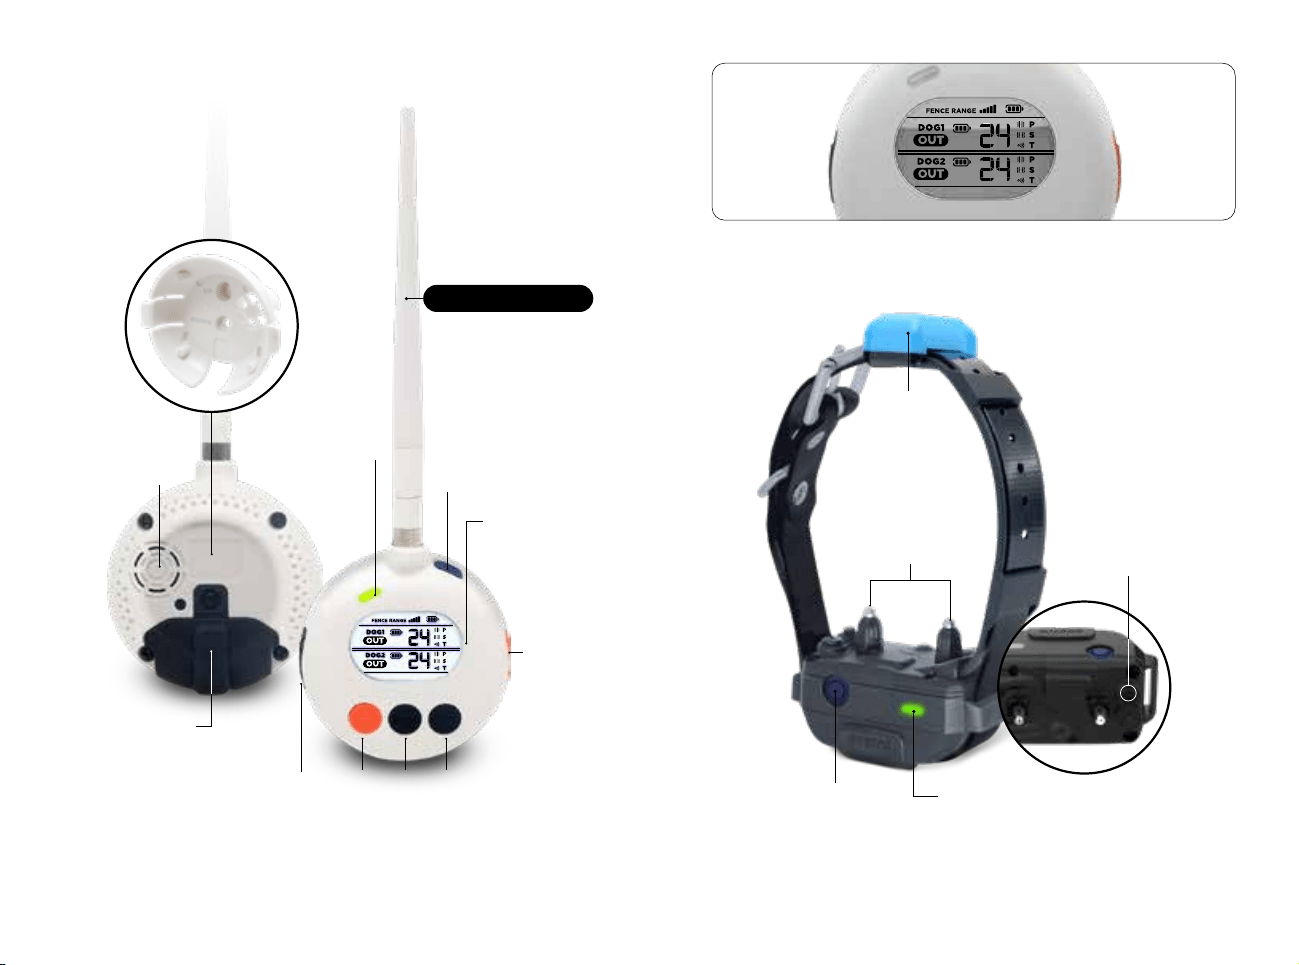
OVERVIEW
DOGTRA SMART FENCE
CONTROL STATION
2.4GHZ ANTENNA
Indicator
LED
Tone
Speaker
Station
Wall-Mount Holster
Power On/Off
LCD Display
Manual
Correction
Button for
Dog 2
Setting
Button
Alarm
Mute
Manual Correction
Button for Dog 1
USB-C Battery
Charging Plug
with Rubber Cap
Select
Button
DOGTRA SMART FENCE
Collar
Power
On/Off
Indicator LED
Contact Point(s)
DOGTRA SMART FENCE
CONTROL STATION LCD screen
Radio
frequency
Antenna
5mm-port
Battery Charging
Plug with
Rubber Cap
12 13
COLLAR FITTING
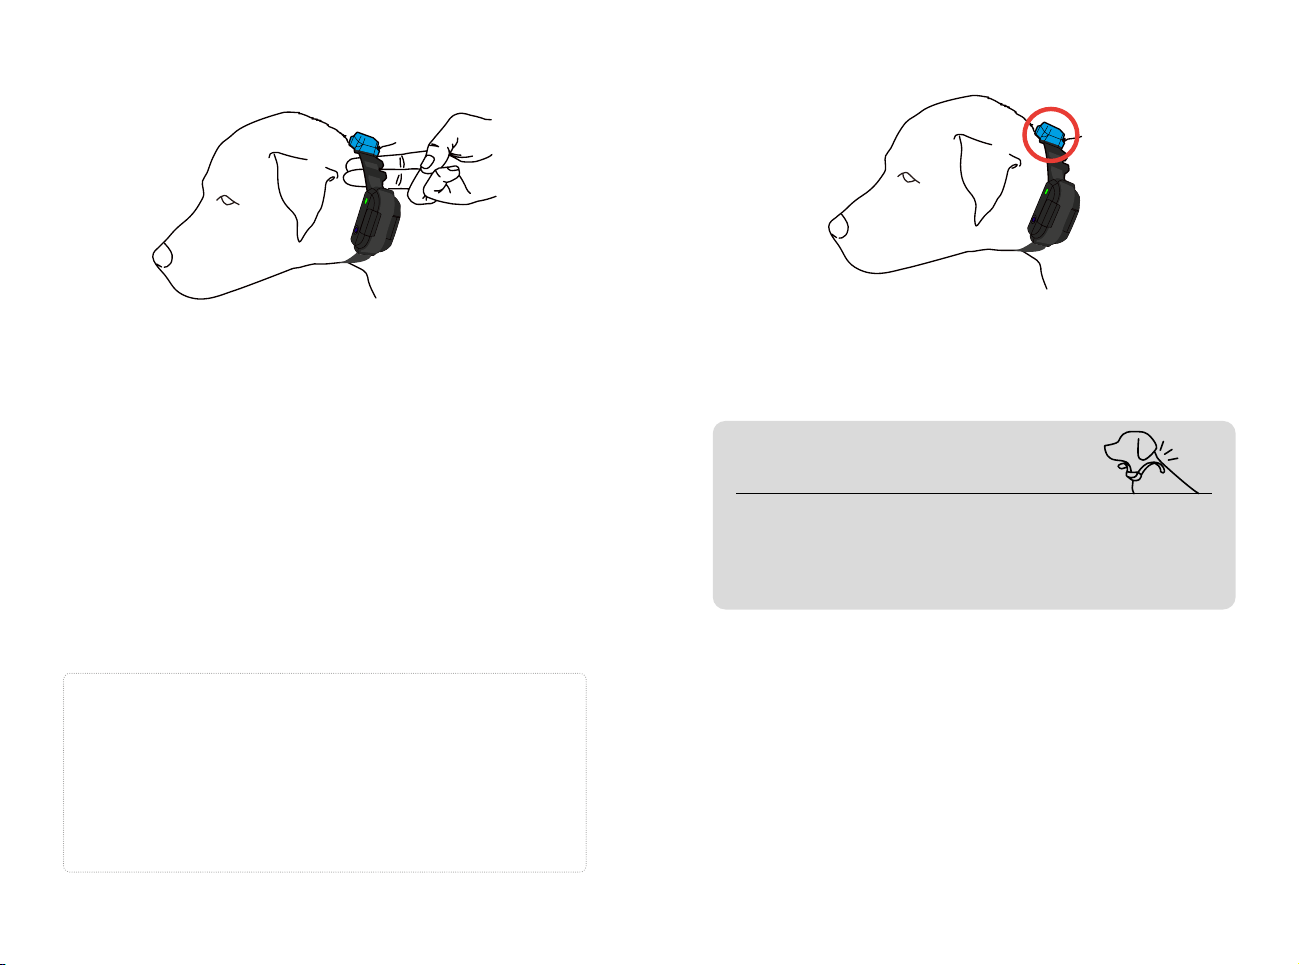
PROPER FIT
Position the receiver on either side of the dog’s windpipe,
ensuring the contact points press firmly against the skin.
You should be able to fit two fingers underneath the collar
strap. Make sure the radio frequency antenna is placed
around the back of the dog’s neck to face the sky.
IMPROPER FIT
A loose fit can allow the receiver to move around on the
dog’s neck and cause irritation. If the receiver is too loose,
the contact will be inconsistent and cause inconsistent
correction. Do not position the radio frequency antenna at
the front of the dog’s neck, as this may cause the signal to
face the ground and reduce accuracy
Attention!
Leaving the receiver in the same position on the dog’s neck
for extended periods may cause skin irritation. If the dog is to
wear the receiver for long periods, occasionally reposition
the receiver every few hours so that the contact points are
moved to a different location on the dog’s neck. Remove the
receiver after 8 hours of usage. Make sure you check for skin
irritation each time you use the unit.
When placing the collar on your dog, make sure the blue
radio frequency antenna is facing upward toward the sky.
This will ensure the collar receives the strongest signal for
accurate tracking.
PUTTING ON THE COLLAR
MAKE SURE TO REMOVE THE COLLAR
BEFORE ENTERING INDOOR SPACES.
Walls and roofs can block the signal, which may cause
unintended corrections.
We recommend not using a dog door to prevent dogs from
entering indoors while wearing the collar.
14 15
HOW IT WORKS
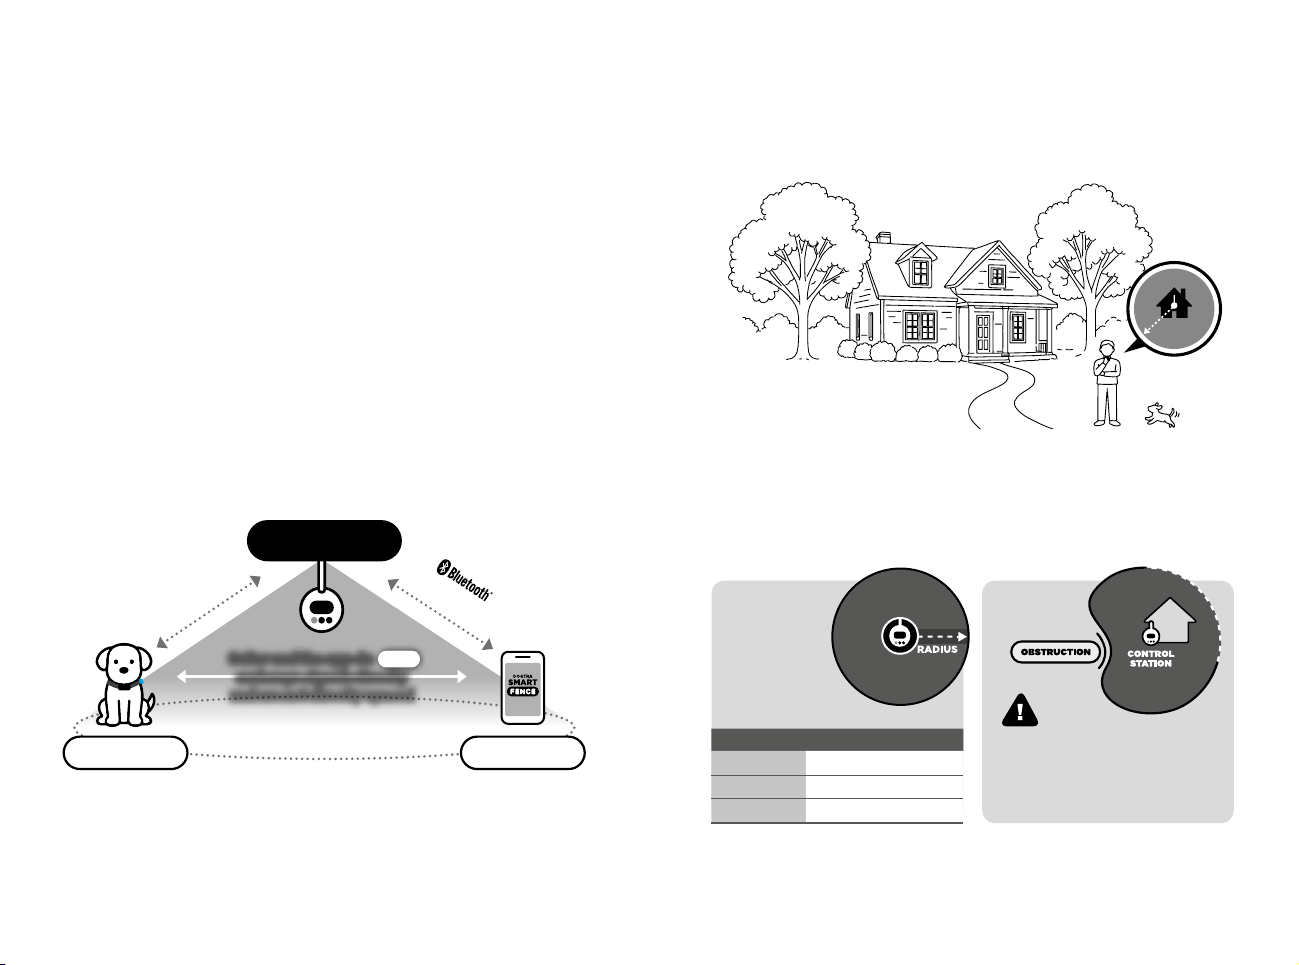
• CONTROL STATION is the main hub that's connected to the
collar to feed the information to the app. Range is centered
around the CONTROL STATION, not the app. App is not
connected directly with the collar.
CONTROL STATION
FENCE CENTER POINT
SMART FENCE
COLLAR
SMART FENCE
APP
Collar and the app do NOT Collar and the app do NOT
exchange signals directly exchange signals directly
and are not directly syncedand are not directly synced
NOT
within 33ft.(10m)
Selected fence range
The Dogtra SMART FENCE uses radio frequency to send signals
from the CONTROL STATION to the receiver collar, detecting
how far the receiver collar is and automatically applying the
selected correction type(s) when your dog approaches or crosses
the boundary.
Connect the CONTROL STATION to the free app via Bluetooth (33
ft range). Use the app to adjust 5 boundary sizes, 24 correction
levels, receive alerts, manage notifications, and mute alarms.
SYSTEM FLOW
** SMART FENCE receiver collar may be used without the app.
1. FOR HOUSE INSTALLATION
CHECKLIST BEFORE YOU START
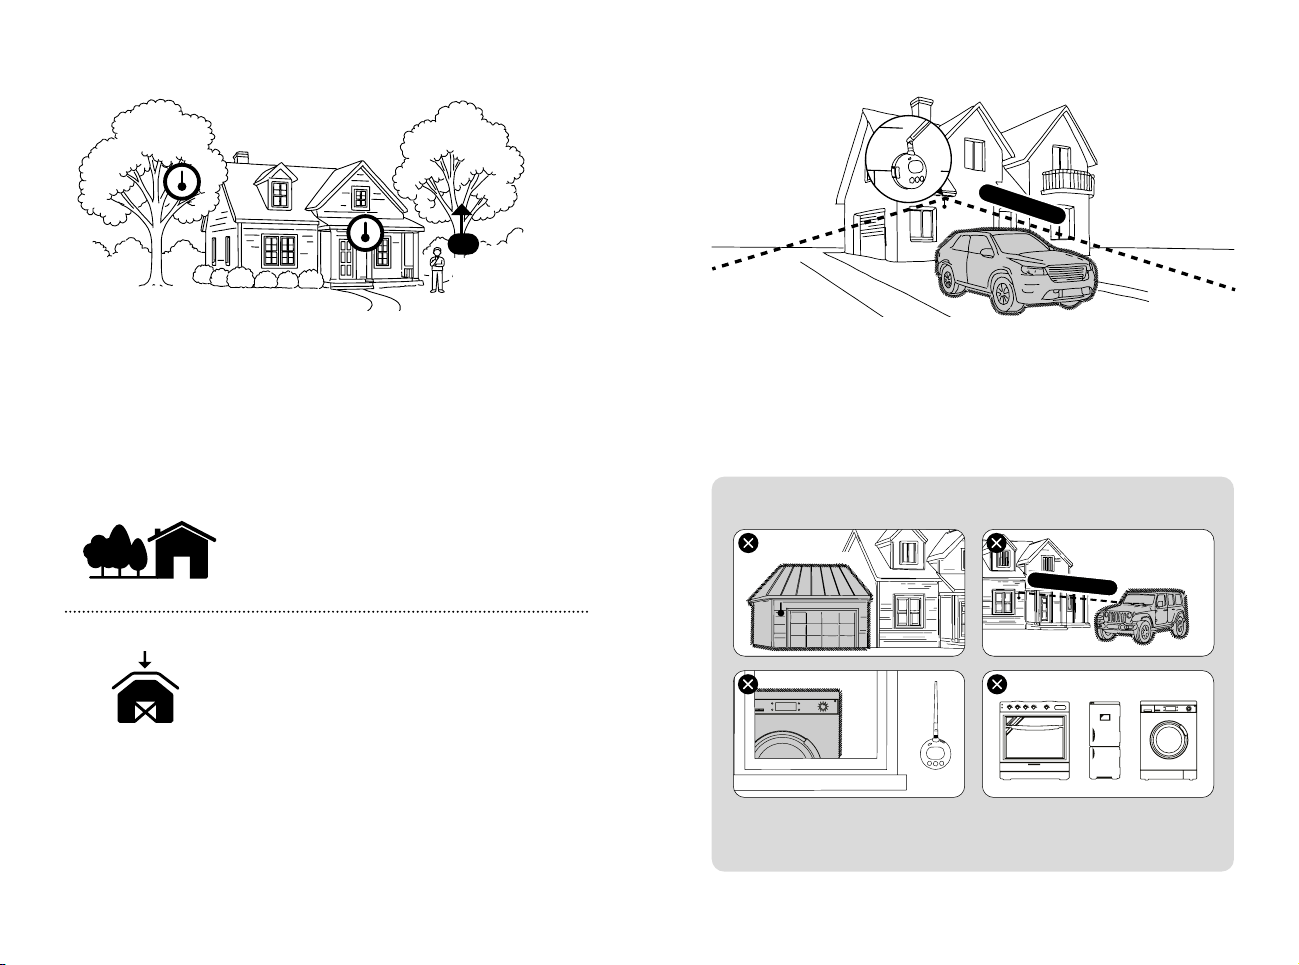
UNDERSTAND YOUR LANDSCAPE & COVERAGE SIZE
Determine the size of the boundary needed to cover your
lot, and identify an ideal center point within that boundary. If
there is one side of the yard where your dog is more likely to
stay, we recommend placing the CONTROL STATION on that
side.
• At the boundary: Collar delivers the selected correction.
You can choose the mix of correction types. (See page 34)
• When crosses the boundary: Correction continues for up to
12 seconds, then stops.
• Safe Zone: No correction is applied when your dog returns.
WHEN YOUR DOG APPROACHES THE BOUNDARY
Measurement XS S M L XL
Yard Radius
10 15 25 30 35
Feet Radius
30 45 75 90 105
Acre
1/10 1/4 1/2 2/3 3/4
The radio-frequency
virtual boundary shape &
size may change with
nearby obstructions
VIRTUAL FENCE
COVERAGE RANGE
16 17
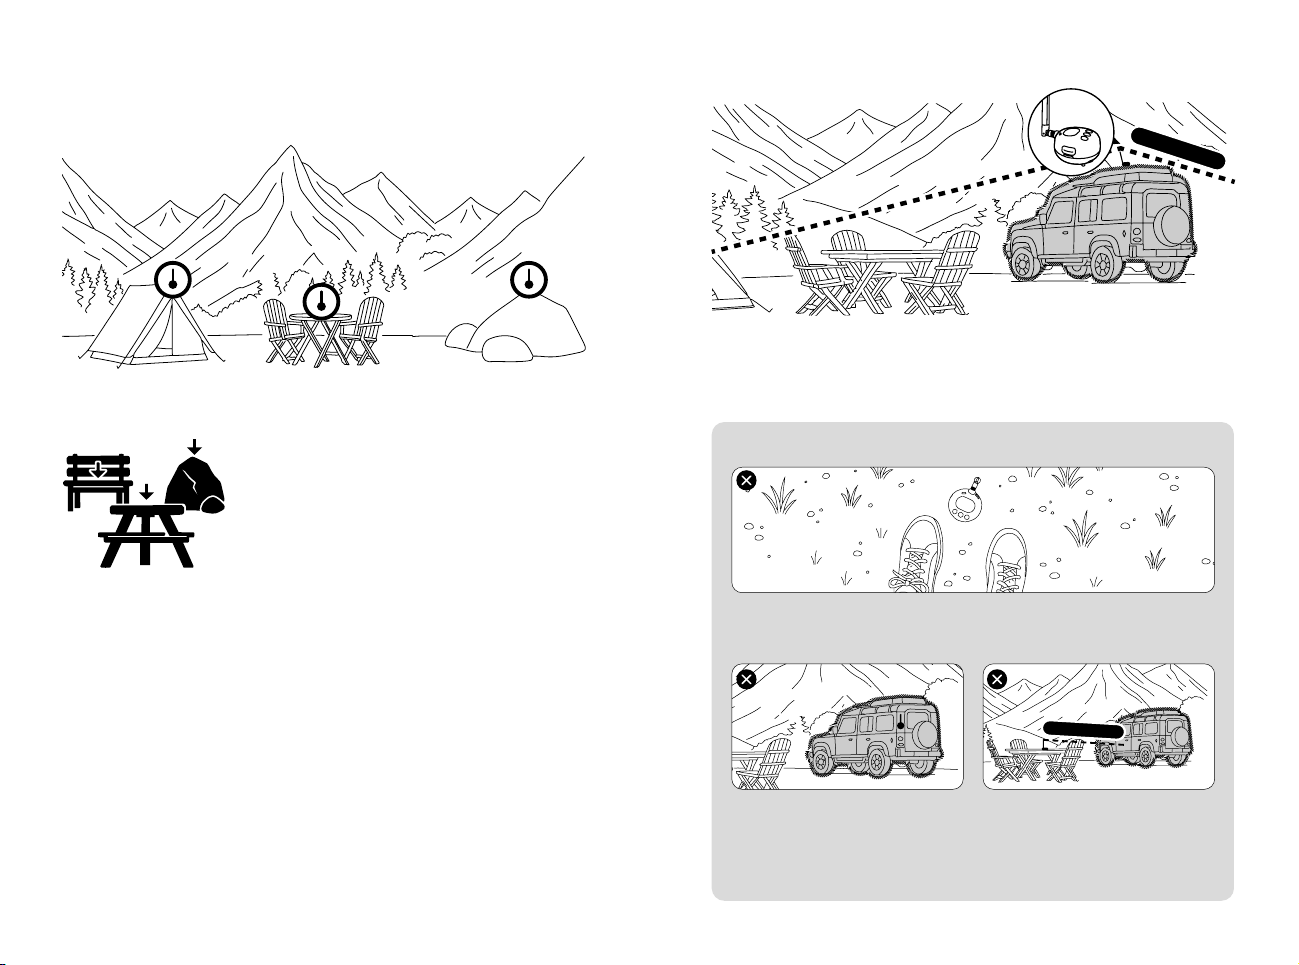
Use the provided wall mount and charging cable to install
the CONTROL STATION as high as possible in order for the
fence signal to emit over any objects.
INSTALLATION LOCATION
* Operating Temperature: -10
°
C+45
°
C(14
°
-113
°
F)
• CONTROL STATION Location Guide:
Install CONTROL STATION as high as
possible on the outer wall of your house
or non-metallic outdoor objects around
the location you would like to place.
If there are large metal objects (garage
door, storage, car, etc) within the
boundary area, find a location that is
higher than the object – Or, a spot on
top of them.
* Compatible with aftermarket USB-C extension cables. We recommend
adding waterproof protection to the extension section to prevent damage.
Recommended
installation at least 6ft.
6ft.
• CONTROL STATION Installation Height Suggestion:
CAUTION
Install the CONTROL STATION higher than any other
obstructions within the range. If there are no major metal
objects, we still recommend installing the CONTROL
STATION 6’ or higher to ensure fence signal can safely cover
the area.
Do not attach near metal buildings. Metal structures or objects
within the fence area may weaken the signal.
Fence Signal
Metal structure
Fence Signal
18 19
UNDERSTAND YOUR LANDSCAPE & COVERAGE SIZE
2. OUTDOOR INSTALLATION
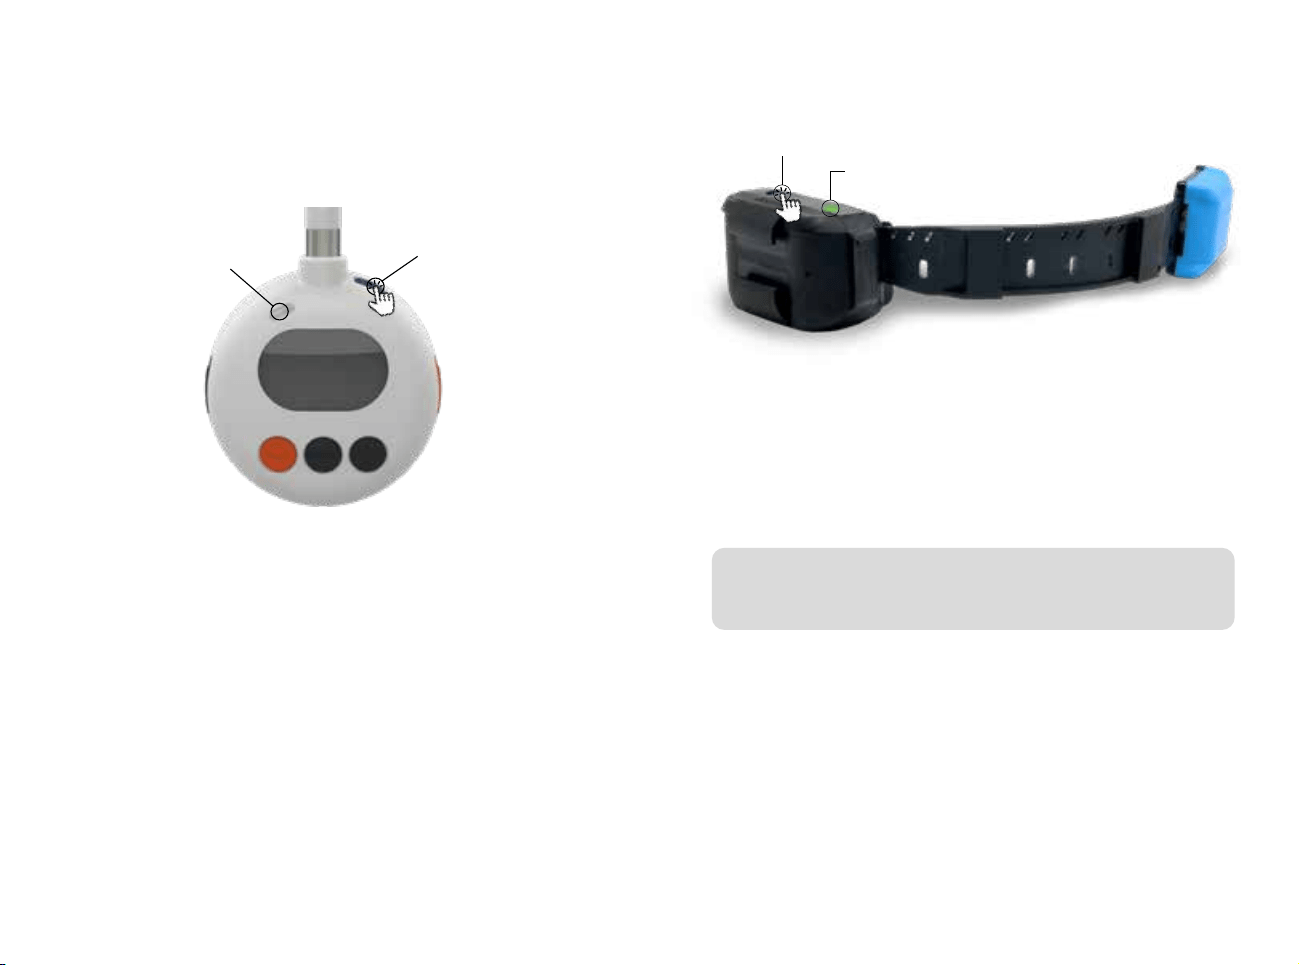
The CONTROL STATION can be installed
and used outdoors such as at parks or
at campgrounds. If you can't install the
CONTROL STATION 6 ft or higher, place
the CONTROL STATION on a chair, table,
stone, etc. that are not metal objects.
Placement of the CONTROL STATION
under 6 ft may reduce the range.
* Make sure your dog is trained to stay within boundaries.
* Operating Temperature: -10
°
C+45
°
C(14
°
-113
°
F)
• CONTROL STATION Installation Suggestion:
If a car or other metal object is nearby, place the CONTROL
STATION on top of it to allow the radio frequency signal to
transmit more effectively
Fence Signal
Don't put the CONTROL STATION on the ground as it may
significantly reduce the range.
CAUTION
Do not mount the CONTROL STATION at the same height
as metal objects, such as a car, as this may interfere with the
signal. If metal objects are within the fence range, you may
want to place the CONTROL STATION on top of them.
Fence Signal
20 21
UNDERSTANDING
YOUR TRAINING SYSTEM
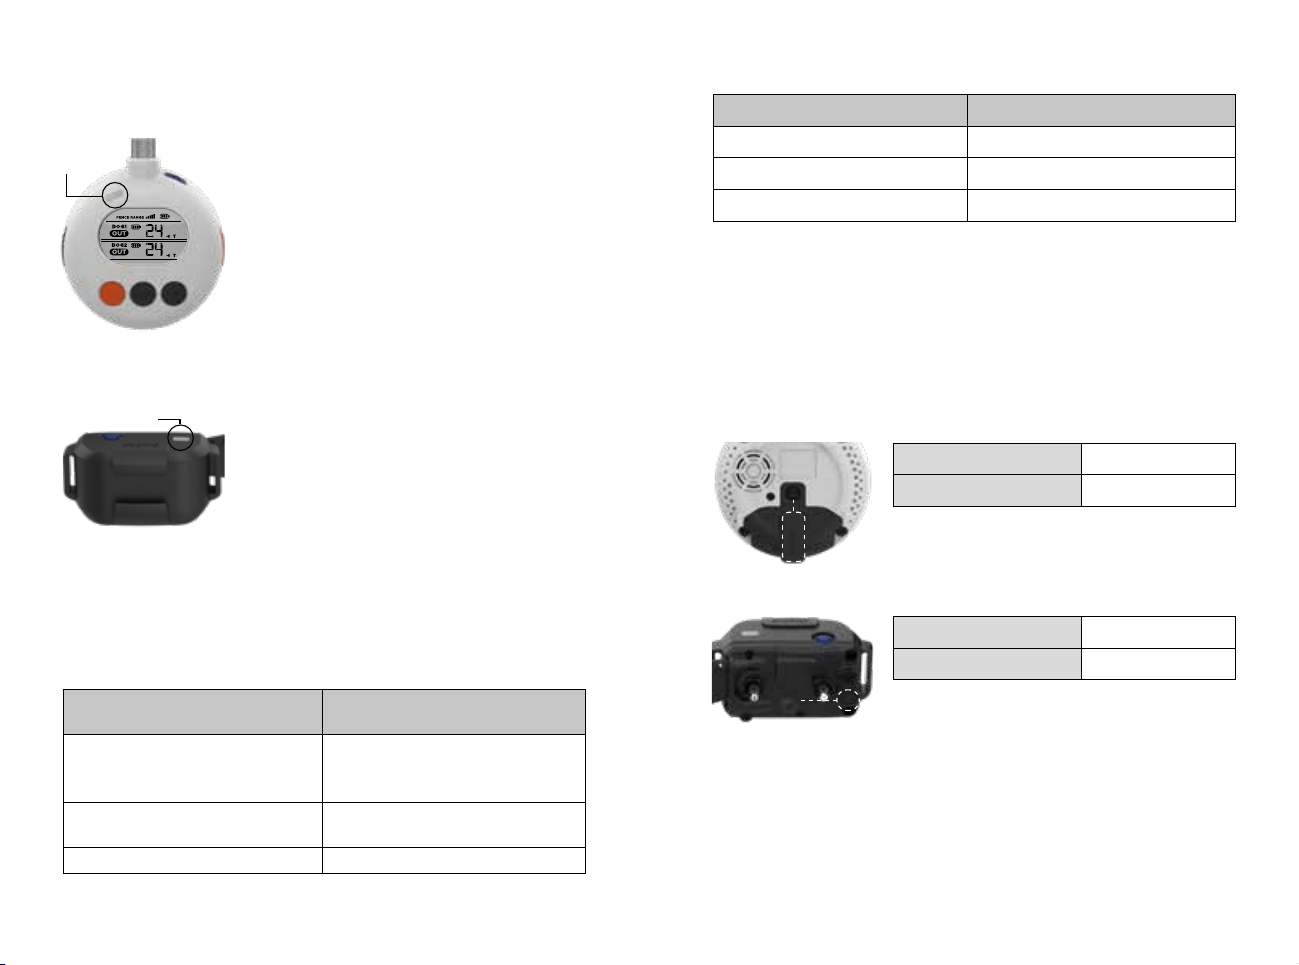
• Power ON
Press the blue button next to the antenna for more than 0.5
seconds until the green LED and LCD screen turn on.
• Power OFF
Press the blue button next to the antenna on the top of the
product for more than 0.5 seconds until the red LED and
the LCD screen turn off.
1. POWER ON/OFF
CONTROL STATION
Power On/Off button
Indicator LED
* Press for more than
0.5 seconds
Note:
When turning the CONTROL STATION or Collar on or off, the unit
emits distinct power-on and power-off sounds
• Power ON
Press the blue button for more than 0.5 seconds until the
green LED lights up.
• Power OFF
Press the blue button for more than 0.5 seconds until the
red LED lights up and turns off.
Collar
Power
On/Off button
LED indicator light
22 23
• LED Indicator
The LED indicator light will blink when
the CONTROL STATION is turned on
and ready to use.
• LCD screen
The screen displays the virtual fence
range, the containment status of the
collar(s), and the correction settings.
The backlight turns on when a button
is pressed and dims after 4 seconds.
• The LED indicator light will blink when
the SMART FENCE collar is turned on
and ready to use.
• When the SMART FENCE collar’s
connection to the CONTROL STATION
is unstable or disconnected, the LED
indicator light will turn magenta to
alert you and will stop displaying the
battery life colors.
2. LED INDICATOR TYPES, LCD BACKLIGHT
LED indicator LED indicator
lightlight
CONTROL STATION
Collar
Indicator LED color according to collar(s) status
* SMART FENCE Collar Battery Status by LED Color:
Situation
SMART FENCE Collar
LED Indicator Types
CONTROL STATION &
Receiver Collar Connected
Green /Amber / Red,
based CONTROL STATION
battery life status
CONTROL STATION &
Receiver Collar Disconnected
Magenta*
Pairing Mode Blue
LED indicator LED indicator
lightlight
Indicator LED color according to battery life
INDICATOR LED COLOR BATTERY LIFE
Green
Charging complete
Amber Medium charge
Red Needs charging
3. HOW TO CHARGE
SMART FENCE uses a lithium polymer battery. Recharge it
if the LED indicator light is red. If the battery bar shows only
one bar on the CONTROL STATION LCD or app, the system
does not respond to manual correction commands.
CONTROL STATION
Needs charging Red light
Charging complete Green light
* Can also be operated while connected to USB
C-Type
*Receptacle*Receptacle
Collar
Needs charging Red light
Charging complete Green light
* Power OFF when charging jack is connected
*Receptacle*Receptacle
24 25
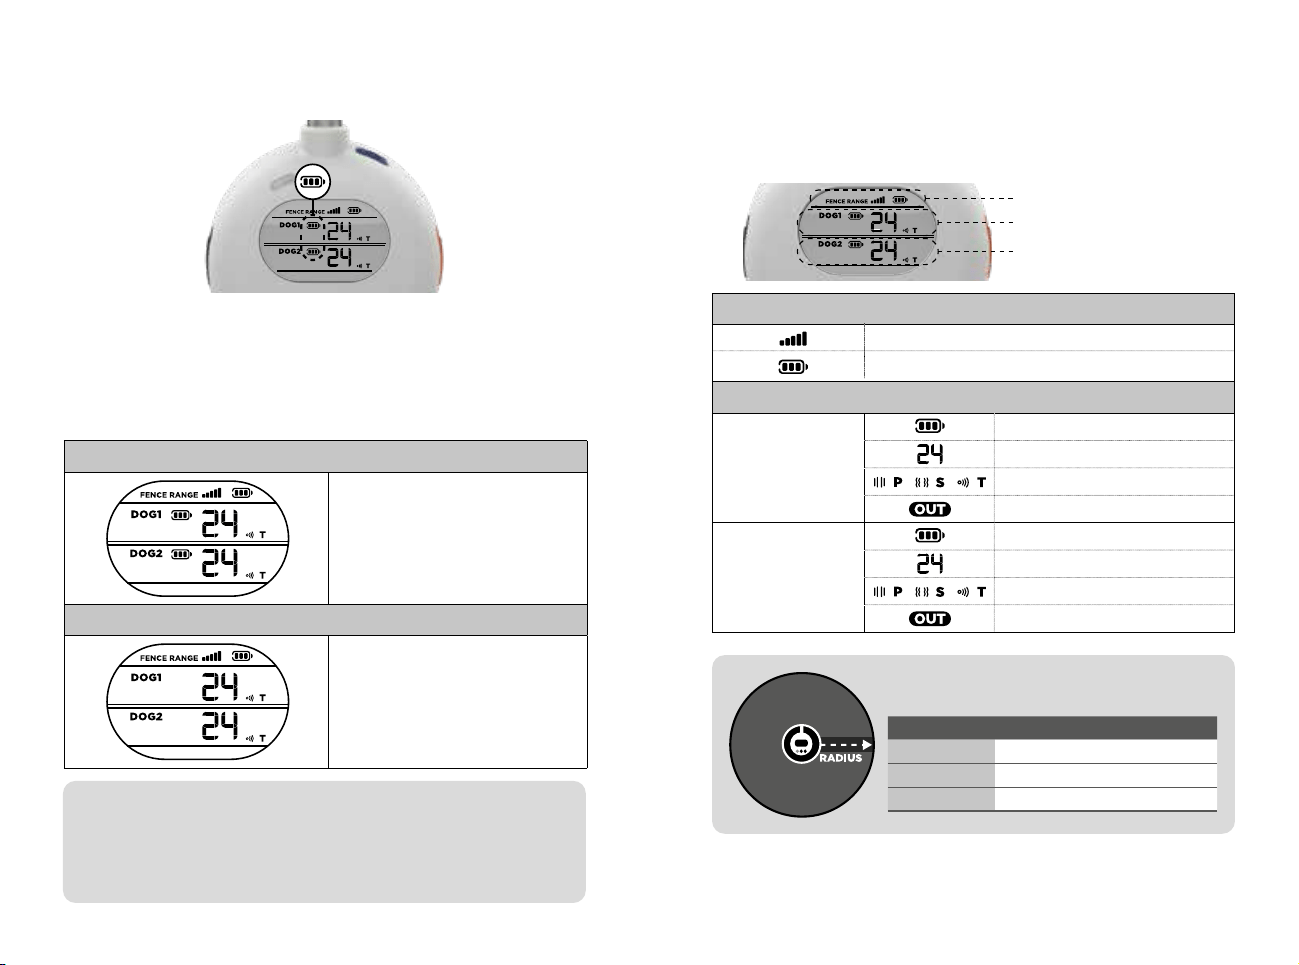
5. HOW TO PAIR SMART FENCE COLLAR(S)
STEP 1
STEP 2
STEP 3
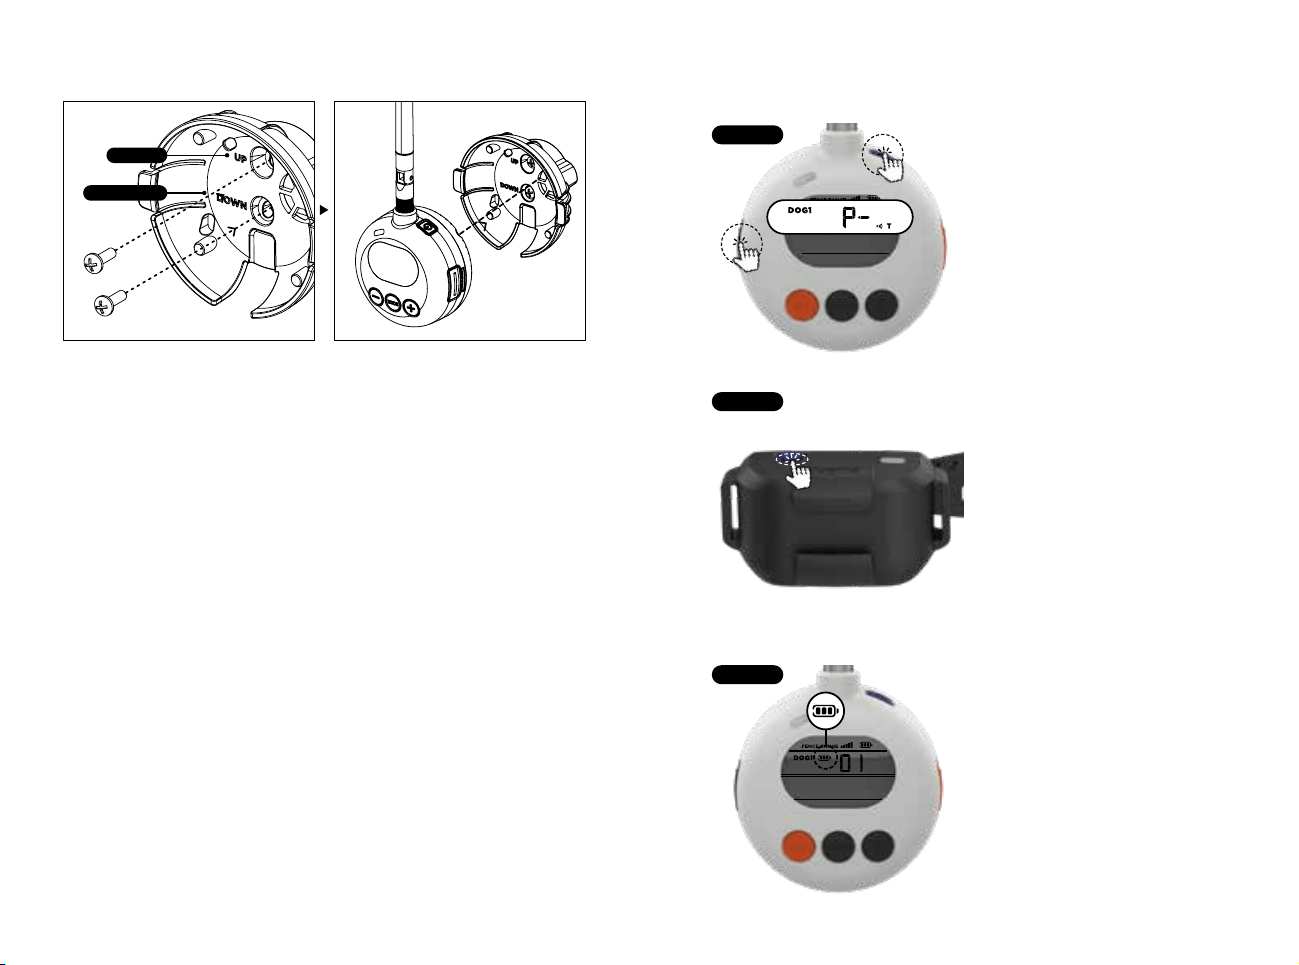
4. STATION WALL-MOUNT HOLSTER INSTALLATION
BOTTOM
TOP
1. Select an ideal installation location.
(Choose an ideal installation location based on the guide
from the previous pages.)
2. Ensure the holster’s top side is facing up. Fasten the screw
through the mounting hole.
3. Press the CONTROL STATION firmly into the holster to
secure it.
4. An aftermarket USB-C extension cable can be used if the
included cable is too short.
• Ensure the CONTROL
STATION is turned off.
• Press and hold both the
blue power button and the
black square button on the
side simultaneously until
the LED indicator begins
blinking. The LCD display
will show “P-”, indicating it
is in pairing mode
• Ensure the SMART FENCE
collar is turned off.
• Press and hold the blue
power button for 5 seconds
until the LED changes from
green to blue.
• Release the button when
the blue LED starts blinking
rapidly to begin pairing with
the CONTROL STATION.
• Once pairing is successful,
the collar’s battery
status will appear on the
CONTROL STATION’s LCD
screen.
• If the battery status does
not appear, pairing may
have timed out or failed.
Please repeat the process.
26 27
6. CONNECTION STATUS OF THE SMART FENCE COLLAR
ON THE CONTROL STATION
• When the CONTROL STATION and SMART FENCE collar are
connected successfully, the collar's battery information is
displayed on the LCD screen.
• The SMART FENCE collar's connection status is displayed
as below:
Note:
When the LED indicator on the SMART FENCE collar flashes blue,
check the device connection status. If the connection is unstable,
restart both the CONTROL STATION and the receiver collar by
switching them off and on again.
Stable connection
Collar Battery Information
Display
Collar(s) Unstable or disconnected
The battery status
DOES NOT show.
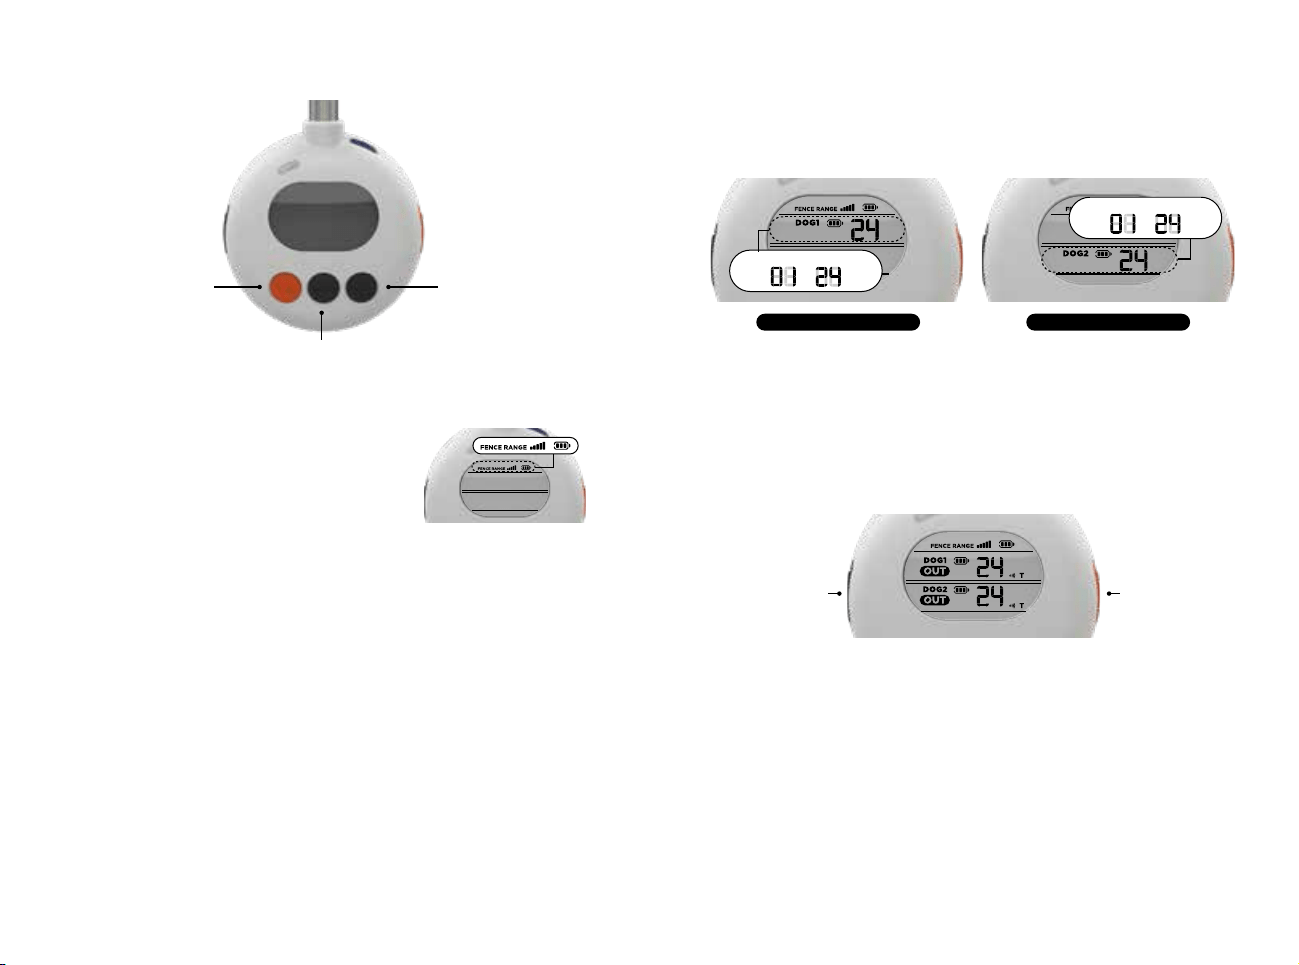
7. DISPLAY INFORMATION
When powered on, the LCD screen displays the settings and
status of the paired collar(s). The second collar’s information
will appear only when it is paired.
A) CONTROL STATION
B) SMART FENCE Dog 1
C) SMART FENCE Dog 2
A) CONTROL STATION
SMART FENCE Collars
B)
SMART FENCE
Dog 1
C)
SMART FENCE
Dog 2
Fence Range (XS/S/M/L/XL) *
Battery Status (Low/Mid/Full)
Battery Status (Low/Mid/Full)
Correction Levels (1 to 24)
Correction Mode
Containment Status
Battery Status (Low/Mid/Full)
Correction Levels (1 to 24)
Correction Mode
Containment Status
VIRTUAL FENCE COVERAGE RANGE
Measurement XS S M L XL
Yard Radius
10 15 25 30 35
Feet Radius
30 45 75 90 105
Acre
1/10 1/4 1/2 2/3 3/4
*
28 29
8. CONTROL STATION FUNCTION
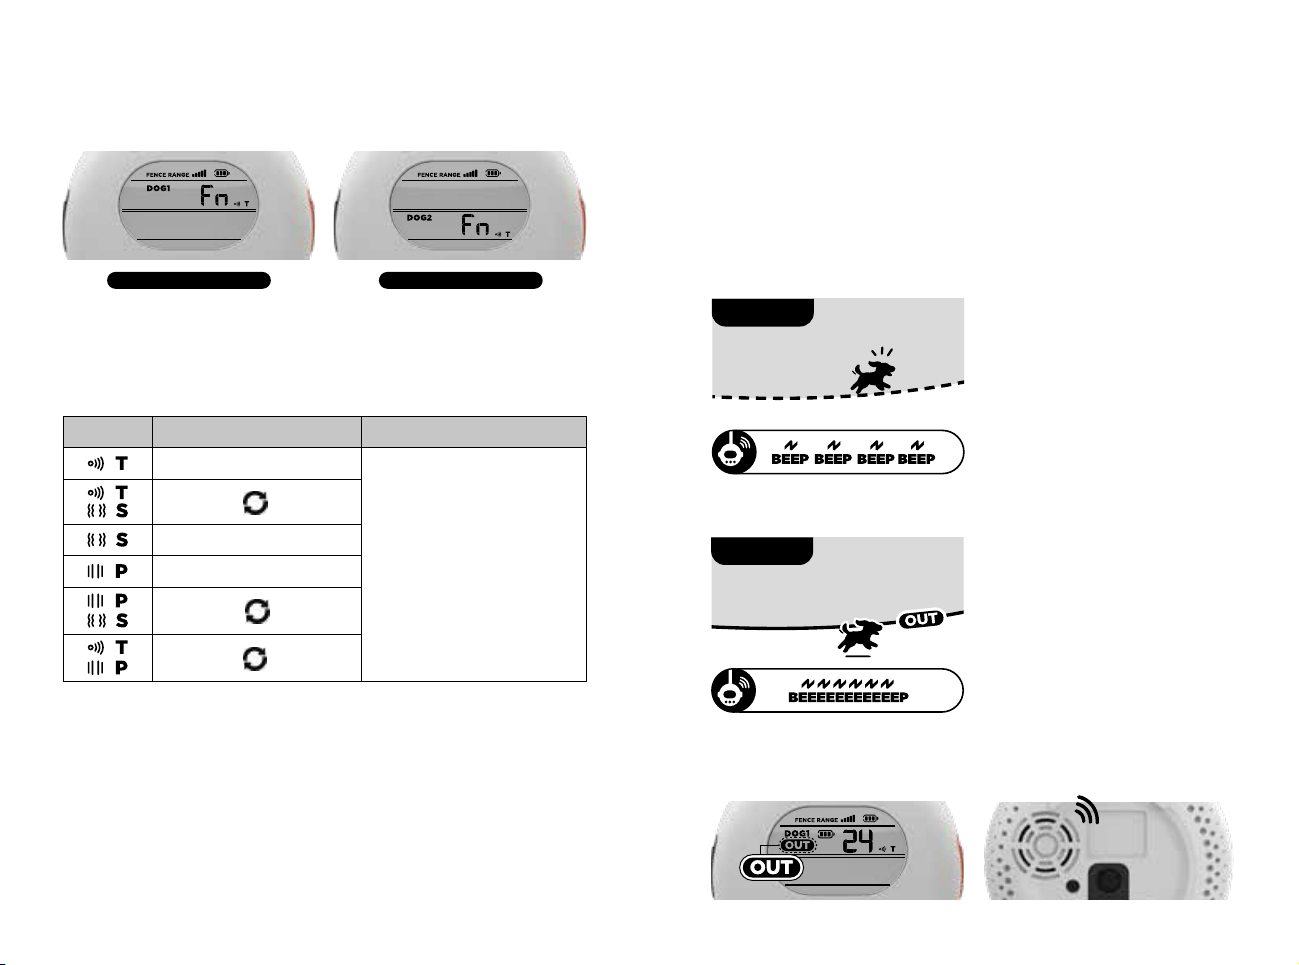
Selecting Virtual Fence Range
‘+’ button
Increase/Next
Settings Button
‘-’ button
Decrease/Previous
• Press the Settings Button until the
LCD displays the CONTROL STATION
information only as shown in the
picture on the right.
• Select the desired Fence Range by pressing the "-" and "+"
buttons on the left and right of the Settings Button while
looking at the Level-up icon displayed on the LCD.
• After selecting the Fence Range, the LCD will automatically
return to the main screen, saving your settings.
Selecting Correction Level
• Press the Settings Button twice until the LCD matches the
display shown in the pictures below. Select the desired
correction level (1–24) by pressing the “−” or “+” buttons.
• After selecting the static level, if you wait without pressing
any buttons, the LCD screen will return to the main screen
and your desired static levels will be saved.
• To set the correction type, press the Settings Button again.
DOG 1 COLLAR DOG 2 COLLAR
~
SELECT THE STATIC LEVEL
~
SELECT THE STATIC LEVEL
E-collar (Manual Stimulation)
There are square buttons on both sides of this product:
• Left black button: Dog 1 recall
• Right orange button: Dog 2 recall
How the buttons work
• Press the manual stimulation button to apply the currently
selected correction mode.
• The button can operate continuously for a maximum of 12
seconds.
• The LED indicator will light up while the button is pressed.
Manual
Stimulation
for Dog 2
Manual
Stimulation
for Dog 1
30 31
• The stimulation icons displayed may differ from the picture,
as they reflect previously saved settings.
• Select the desired stimulation mode by pressing the “−” and
“+” buttons. There are six stimulation modes available.
• Press the Settings Button until the LCD displays as
shown in the picture below.
LCD ICON MODE OUTPUT TIME
Tone only
Up to 12 seconds
For safety reasons, the
stimulation automatically
turns off after 12 seconds
even if the dog remains at
the boundary.
Tone Static
Static only
Pager only
Pager Static
Tone Pager
• After selecting the stimulation method, if you wait without
pressing any buttons, the LCD screen will return to the main
screen and your desired stimulation methods will be saved.
• For the dog’s safety and well-being, no further correction is
applied once the dog is outside the set boundary or when
it returns to the safe zone inside the boundary.
Selecting Correction Type
DOG 2 COLLARDOG 1 COLLAR
9. CONTAINMENT STATUS ALARM
When a dog wearing the SMART FENCE collar goes out of
bounds, an audible warning will sound from the Control
Station. The CONTROL STATION will continue sounding the
warning until the dog returns within the boundary.
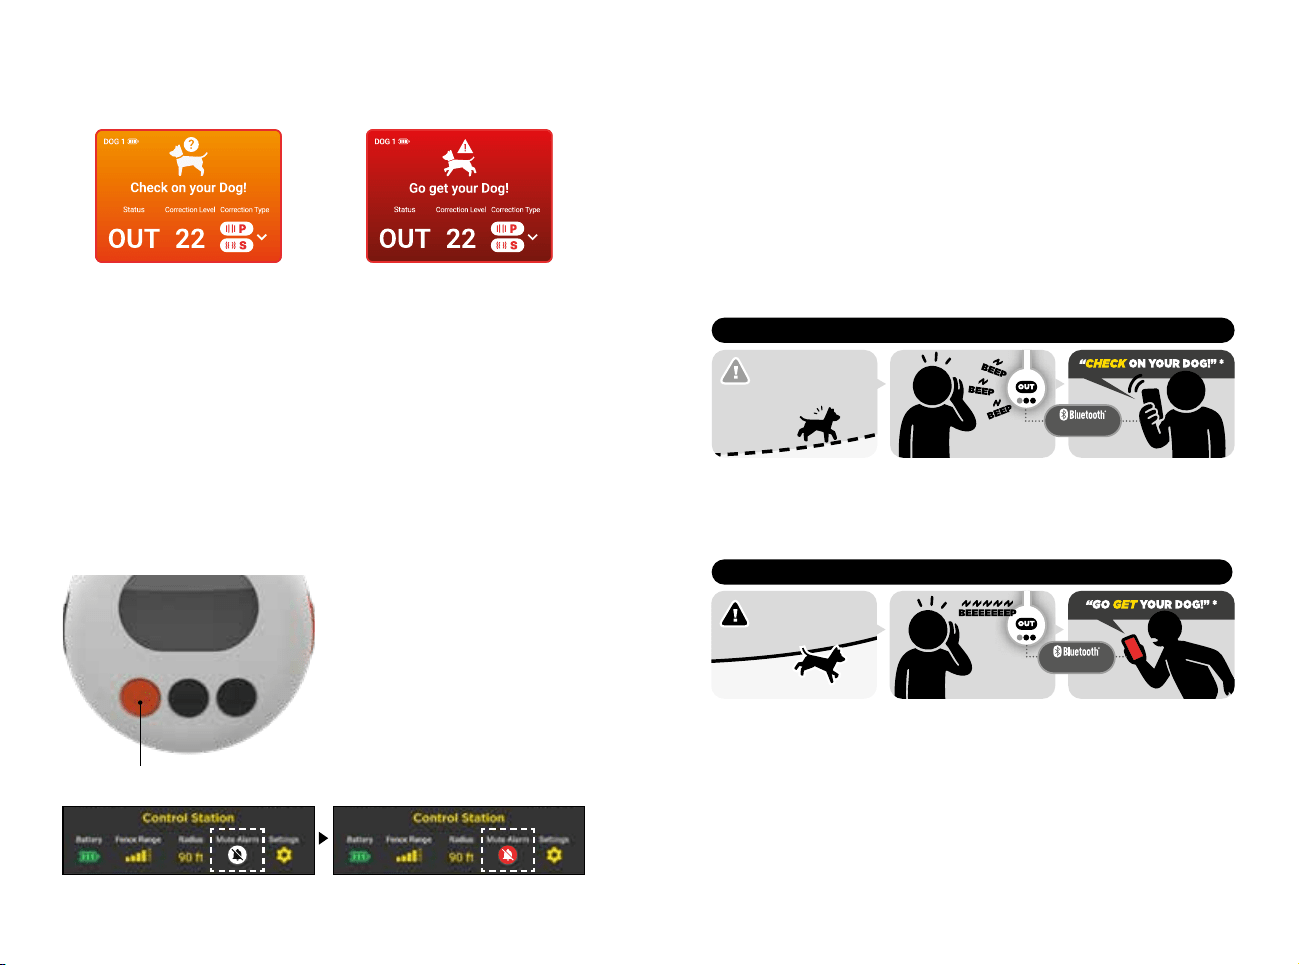
There is a two-tier alert system:
CONTROL STATION Audible Alarm
- Another when the dog "crosses" the boundary.
A continuous beeping alarm
sounds if the dog crosses the
boundary.
Note: Alarm will not stop until manually
muted by the user, even if the dog
returned to the safe zone, ensuring you
are alerted that the dog was or is out of
the set boundary range.
The LCD screen on the CONTROL STATION displays an “OUT”
icon for both situations in the corresponding collar’s section.
TIER 2
* Up to 12 seconds
- One when the dog is "at" the boundary
A beeping alarm sounds
when the dog is near
or approaching the set
boundary range.
TIER 1
* Up to 12 seconds
32 33
SMART FENCE app Notification Alarm
• The Dogtra SMART FENCE app notifies you of the
containment status in two tiers, similar to the audible alarm:
one alert when the dog is at the boundary, and another
when the dog crosses it. While the app is active and
connected to the CONTROL STATION via Bluetooth, it can
either send a push notification when you are using another
app, or display an in-app alert as shown below when you
are in the SMART FENCE app.
Near Boundary (orange display)
“Check on your dog!”: to see if your dog is staying within the
boundary.
Crosses Boundary (red display)
“Go get your dog!”: indicating your dog has gone past the
boundary.
WHEN DOG PASSES BEYOND THE BOUNDARY
* Bluetooth connection required for app notification
OUTOUT
WHEN DOG IS AT THE VIRTUAL FENCE BOUNDARY
The Collar info displays the exit warning in two statuses.
Depending on each status, Collar Info is displayed on the
SMART FENCE screen as shown above, and the set stimulus
icon blinks for up to 12 seconds to indicate the occurrence
of a stimulus. At this time, the CONTROL STATION sounds a
departure warning sound alarm.
Near Boundary
(orange display)
The collar is close to the
virtual fence boundary
Crosses Boundary
(red display)
The collar passes beyond the
selected virtual fence radius range
SMART FENCE App Notification Alarm
Turning Off The CONTROL STATION Alarm
• On the CONTROL STATION:
Press the orange ‘Mute'
button on the Controller to
turn off the alert sound.
• On SMART FENCE app:
Press the ‘Mute' button on
top of the App screen to
turn off the notification
sound.
Alarm Mute
Tap the white ‘Mute’ button to silence the alarm
33ft range
33ft range
34 35
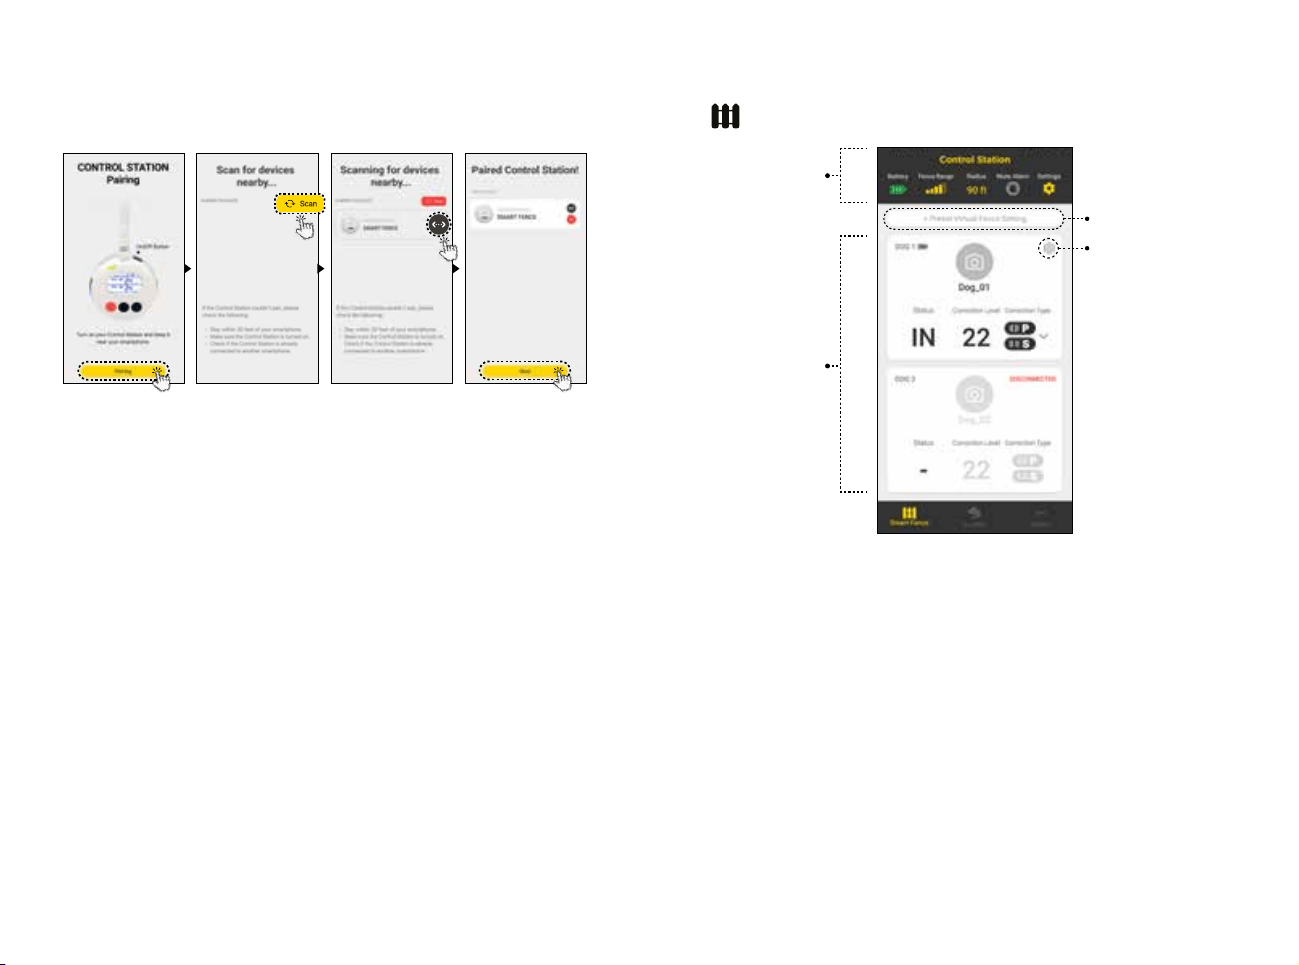
1. Turn on your CONTROL STATION and keep it near your
smartphone and press the Pairing button.
2. Press the Scan button to pair the CONTROL STATION.
3. Tap the black icon to pair the CONTROL STATION, then
press Next to launch the SMART FENCE app.
4. Press Next to start the SMART FENCE APP
SMART FENCE APP
1. Pairing the CONTROL STATION to a Phone
* To pair with the CONTROL STATION again, go to 'Menu' page to find the
'CONTROL STATION Pairing' button.
* SMART FENCE Collar cannot be paired by the app. Connect the collar by the
CONTROL STATION (page 25).
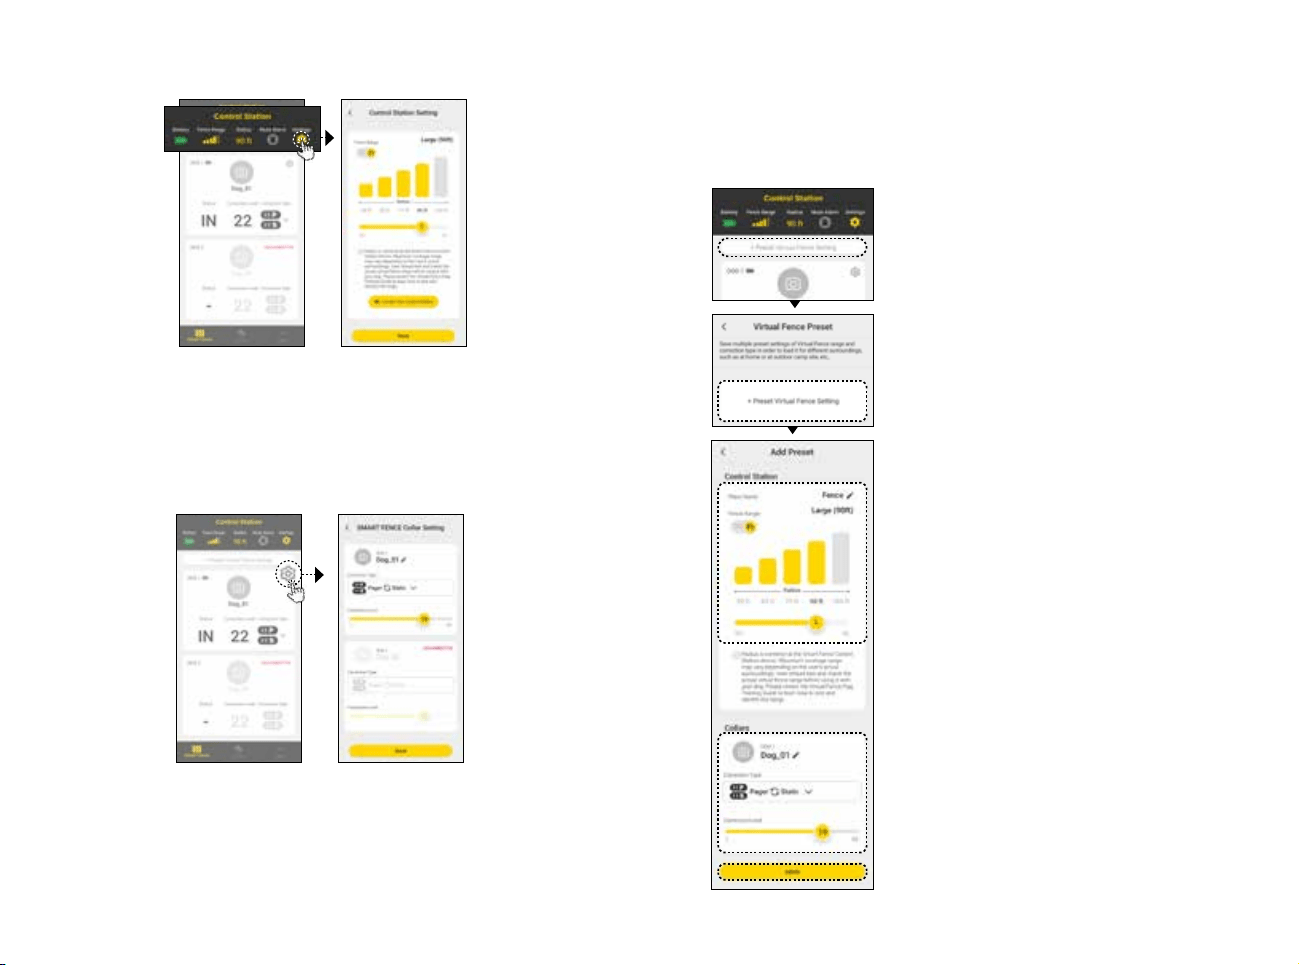
Fence Info
Displays the current battery and settings of the CONTROL
STATION. You can change settings by tapping the rightmost
icon.
Preset
If you frequently use the device in certain locations, you can
save presets to quickly and easily switch settings.
Collar Info
Displays the current status of the paired collar with the
CONTROL STATION and the configured correction type and
level. You can change the profile, stimulation method, and
intensity of each color by pressing the settings button in the
upper right corner.
2. KEY FEATURES OF THE SMART FENCE APP
SMART FENCE
Fence Info
Collar Info
Preset
Collar Setting
(Profile, Correction)
36 37
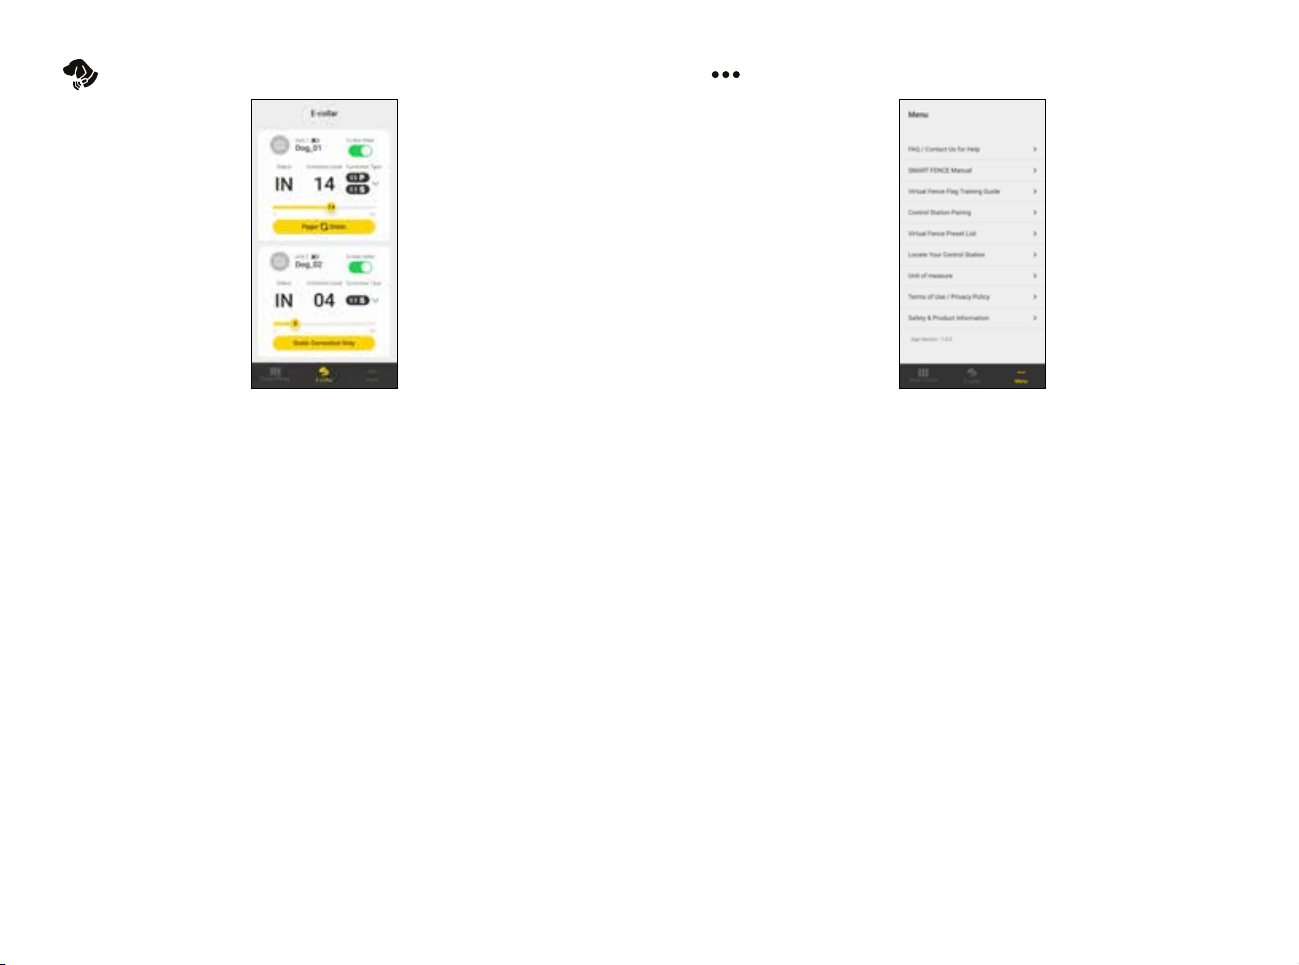
1. Tap the icon at the top right of the screen to enter the
virtual fence settings.
2. Move the slider to set the virtual fence range, and click Save.
Setting Virtual Fence range
1. Tap the icon at the top right of the screen to enter the
Collar settings.
2. Select the correction type and move the slider to set the
correction level, and click Save. You can edit the collar
profile and name here as well.
Setting Receiver Collar Correction Settings
1. Enter the preset settings screen at the
top of the main screen or through the
(More - Virtual Fence Preset List).
3. Set Virtual Fence Range and
Correction Type/Level of each Collar.
(More - Virtual Fence Preset List).
4. Enter the Place and Dog Name and
save.
5. Return to the preset list and select
the preset settings you wish to apply
by pressing the load button below.
* If you want to make changes on Collar settings
after 'Preset' was saved, you will have to either
deselect the preset, or re-save the previous
preset.
2. Press the ‘+ Preset Virtual Fence
Setting’.
Preset
If you frequently take your dog to certain locations
(campgrounds, parks, etc.), you can set presets to easily
change fence/collar settings.
38 39
E-COLLAR
The correction setting on the E-collar will also apply when
the dog breaches the fence boundary.
If you select a correction type that includes Static, adjusting
the level with the slider and pressing the Correction button
will immediately activate the correction on the collar. If you
continue to press the Correction button, the correction will
last up to 12 seconds.
If you do not want to use the E-collar button, switch the
"E-Collar Enabled" setting to off.
MENU
• Quick Start Guide
Describes the basic contents of the SMART FENCE App and
how to use the devices.
• SMART FENCE Manual
Links to the user manual for the Collar and the App.
• Virtual Fence Flag Training Guide
Guides you to train your dog to recognize the Virtual fence.
• CONTROL STATION Pairing
Pair your smartphone with SMART FENCE app with the
Control Station.
• Virtual Fence Preset List
Edits multiple preset settings of the Virtual Fence range and
correction type (s)
• Locate Your CONTROL STATION
Locate your CONTROL STATION through the beeping alarm
sound if you cannot find the device.
• Terms of Use / Privacy Policy
Check Terms of Use and Privacy Policy before use.

40 41
1. It’s important to understand that all radio frequency-based
collars may experience a small amount of signal drift. This
means the boundary line can naturally shift about 4 feet in either
direction. Over time, your dog will learn the approximate location
of the virtual fence, and the tone will serve as a warning when
they get too close to the boundary.
2. Keep in mind that radio frequency collars can be affected by
obstructions between the collar and the satellites. If you bought
your collar during the winter, it is important to check the line in
the spring once trees are fully leafed out to ensure the signal is
reliable along the entire virtual fence boundary.
3. Fitting the collar properly is crucial! The collar needs to be snug
enough that each contact point makes solid contact with your
dog’s neck. If it is too loose or if there is too much hair in the way
the collar will not work reliably. Dogs with thicker fur may require
contact point extensions or you may need to trim their fur to
ensure good contact.
4. Finding the right level for your dog is an important part of the
process. When you introduce the stimulation/correction, your
goal is to have it just high enough that your dog notices it. As you
walk your dog towards the virtual fence, watch your dog closely
for a sign of a reaction. Some dogs will move their ears back or
slightly cock their head or tense neck muscles when they first
feel the stimulation/correction. If they do not react, check the fit
of the collar before increasing the level. If you are sure that the
collar is fitted properly increase the stimulation/correction one
level at a time until you see a reaction.
5. Don’t make a big deal out of putting the collar on or taking
it off. You don’t want your dog to associate the collar with the
fence. We want the dog to consider the boundary to be absolute,
and associate the noise of the collar with the boundary, but not
the collar itself.
6. Never pull or push the dog into the virtual fence area, we want
them to wander into it on their own.
GENERAL TRAINING TIPS
7. Remember that a virtual fence is not a substitute for
behavioral training. If your dog is reactive/aggressive towards
other dogs or people it is essential to specifically train on
that issue rather than simply using a virtual fence. A reactive/
aggressive dog is likely to run through a virtual fence after
another dog regardless of the stimulation/correction level that
the collar is set to.
8. Working with distractions is highly dog dependent. If your dog
is excited by other dogs, it will take much more work to ensure
they respect the stimulation/correction when another dog
passes by your yard. If your dog is extremely ball or prey driven
motivated it may take more repetitions/practice until you can
throw a ball through the virtual fence and have them not chase.
It is key to understand your dog and train according to their
personality.
9. If you remove flags to mow the lawn, make sure to place them in
the same location.
10. Should you need to take the dog out of the virtual fence, we
recommend removing the collar. Then, either place the dog in
your vehicle to drive past the virtual fence, or pick the dog up to
physically carry over the virtual fence. By doing this, it will make
it easier for your dog to understand the virtual fence is not to be
crossed.
• DISCLAIMER: If you must train them how to walk through the
fence safely, use the following steps:
• Always put your dog on a leash before exiting.
• Make a big deal of putting on the leash, but do not make a big
deal about taking off their fence collar. Teach them a word
such as “Safe” that you use each time you take them out.
• Choose one spot (driveway, specific gate etc.) where your dog
will always exit - with a leash on the dog.
• Your dog may be nervous to walk past the line at first, and may
need a lot of praise and excitement from you.

42 43
MAINTENANCE
Basic Maintenance
Make sure the rubber charging cap is securely in place when the
system is in use. After each training session, carefully inspect the
unit for any missing parts or damage to the casing. Damaged or
broken casing may aect the waterproof guarantee on the unit.
After confirming that there is no damage to the casing, rinse the
receiver and clean out any dirt or debris.
Storage Maintenance
The unit should be fully charged before storing for extended
periods. While in storage, the unit should be given a full charge
once a month and before the first use.Store the units at room
temperature. Do not keep the units exposed to extreme climates.
Troubleshooting
If the unit is malfunctioning, please refer to the “Troubleshooting
Guide” before sending it to Dogtra for service. If you have any
questions or concerns, you may email them to info@dogtra.com, or
call customer service at (888) 811-9111.
1. My dog is not reacting to the system.
- Make sure the receiver and transmitter are on.
- Make sure the collar strap is tight enough so both contact points
are touching the dog’s skin.
- The contact points may be too short for your dog’s thick or long
coat. You might need to trim down the hair on the dog’s neck, so
both contact points are touching the skin.
- The intensity level may be too low for your dog. Keep increasing
the stimulation until the dog responds usually by neck movement,
head shaking, looking over his shoulder, etc. (response may be
very subtle so pay attention.)
2. The LED indicator light comes on, but I do not feel any
stimulation.
– The battery may be low, so check the LED light for battery life.
3. The transmitter has no range or stimulation is less when the dog
is farther away.
- The antenna(s) may be damaged. To order parts, please contact
customer service at (888) 811-9111 or go to
www.dogtra.com.
- The range indicated on the unit’s box is for flat terrain. Heavy
brush, trees, hills, or moisture will affect the range of your unit. For
best range, hold the transmitter vertically above your head, and/or
try moving to higher ground.
- Any electrical conductors will affect the range, such as cars, chain-
link dog runs, metal structures, and radio towers. For best results,
operate away from these objects.
4. My units are not holding a charge.
- The batteries might not be charged properly, or the charger,
splitter, and the charging port may not be functioning properly.
You can send in your charging units to have us inspect them.
– The charging pin may be damaged. Inside the charging port, there
is a metal pin that should be standing straight up and stiff. If the
pin is wobbling, broken, or missing, you will need to send the unit
in to the Repair Department. The charging port must be clean
TROUBLESHOOTING GUIDE

44 45
prior to charging; clean the dirt out with a cotton swab and some
rubbing alcohol. If the dog is in saltwater, be sure to rinse the
receiver and charging port with clean water.
– If the above does not resolve your issues, contact Dogtra customer
service at info@dogtra.com or (888) 811-9111.
5. My dog has skin irritation.
- This may be due to an improper fit or from wearing the unit too
long. If your dog exhibits signs of skin irritation, consult with a
veterinarian. Once the dog’s skin returns to a normal condition,
continue to use the receiver and check your dog’s neck each time
you use the unit.
PART 15.19
This device complies with part 15 of the FCC Rules. Operation is subject to the
following two conditions:
(1) This device may not cause harmful interference, and
(2) this device must accept any interference received, including interference
that may cause undesired operation
PART 15.21
Any changes or modifications (including the antennas) to this device that are
not expressly approved by the manufacturer may void the user’s authority to
operate the equipment under FCC rules.
PART 15.105
Note: This equipment has been tested and found to comply with the limits
for a Class B digital device, pursuant to part 15 of the FCC Rules. These limits
are designed to provide reasonable protection against harmful interference
in a residential installation. This equipment generates, uses and can radiate
radio frequency energy and, if not installed and used in accordance with
the instructions, may cause harmful interference to radio communications.
However, there is no guarantee that interference will not occur in a particular
installation. If this equipment does cause harmful interference to radio or
television reception, which can be determined by turning the equipment off
and on, the user is encouraged to try to correct the interference by one or
more of the following measures:
- Reorient or relocate the receiving antenna.
- Increase the separation between the equipment and receiver.
- Connect the equipment into an outlet on a circuit different from that to
which the receiver is connected.
- Consult the dealer or an experienced radio/TV technician for help.
This device contains licence-exempt transmitter(s)/receiver(s) that comply
with Innovation, Science and Economic Development Canada’s licence-exempt
RSS(s). Operation is subject to the following two conditions:
(1) This device may not cause interference.
(2) This device must accept any interference, including interference
that may cause undesired operation of the device.
FCC and IC RF Radiation Exposure Statement: This equipment complies
with FCC and IC RF Radiation exposure limits set forth for an uncontrolled
environment.
This device and its antenna must not be co-located or operating in conjunction
with any other antenna or transmitter.
FCC/ISED WARNING STATEMENT

46 47
LIMITED WARRANTY
For Dogtra Products Purchased from Dogtra Authorized Dealers
One-Year Warranty
Except as otherwise provided below, Dogtra warrants to the original retail
purchaser (“You”) that its Dogtra products shall be free of defects in materials
and workmanship for a period of one (1) year from the date of purchase
(“Warranty”). The Warranty covers the cost of repair (parts and labor) or
replacement (if repair is not feasible) of a defective Dogtra product during said
one-year period. For such repaired or replaced products, the remaining portion
of the original warranty period, or ninety (90) days, whichever is longer,
shall apply. Dogtra, at its sole discretion, shall determine whether to repair or
replace a product covered by the Warranty.
Warranty Conditions
The Warranty is not transferrable and applies to your Dogtra product only if:
(1) You are the original retail purchaser of the product,
(2) You bought the product from a Dogtra authorized dealer, and
(3) You present a receipt or other proof of purchase showing a valid purchase
date, the name and address of the authorized dealer, and the purchased
product identified by model and/or serial number.
Warranty Exclusions
The Warranty does not cover damage, loss, or deterioration to your Dogtra
product caused: by misuse, neglect, abuse, or other improper handling of the
product; by failure to follow use or care instructions; by use of the product for
other than its intended purpose; by accident or natural forces such as fire or
flooding; or by normal wear and tear such as scratches to the product surface.
The Warranty also does not cover Dogtra products that: are purchased from
non-authorized dealers; are purchased outside of the United States or Canada;
have been damaged during shipment (even if Dogtra paid or arranged for
shipping); have been modified or tampered with in any manner; are opened or
repaired by anyone other than Dogtra; or have serial numbers that have been
altered or defaced.
Sole Warranty
This Warranty is the only warranty offered by Dogtra for its Dogtra products.
Other than said Warranty, Dogtra makes no other representations or warranties
whatsoever regarding its products, whether oral or in any product manual,
on any packaging, on any website, or in any other written material. No dealer
of Dogtra products, nor any employee or agent of Dogtra, is authorized to
make any additions, changes, or extensions to the Warranty. Dogtra, at its sole
discretion and at any time, reserves the right to modify the Warranty.
DOGTRA PRODUCT WARRANTY
DISCLAIMER OF OTHER WARRANTIES
THE FOREGOING WARRANTY IS PROVIDED IN LIEU OF ALL OTHER
WARRANTIES, WHETHER EXPRESS OR IMPLIED. DOGTRA DISCLAIMS ANY
IMPLIED WARRANTIES INCLUDING, BUT NOT LIMITED TO, THE IMPLIED
WARRANTIES OF MERCHANTABILITY AND FITNESS FOR A PARTICULAR
PURPOSE.
Limitation of Remedies
Dogtra’s liability is limited to the cost of repair or replacement of the Dogtra
product under Warranty. Any claim or action to enforce the Warranty must
be commenced within thirty (30) days of the Warranty’s expiration for
your product. Dogtra will not be liable for any indirect, incidental, special,
consequential, or similar damages based on breach of warranty, breach of
contract, negligence, strict tort, or any other legal theory related to Dogtra
and its products. Damages that Dogtra will not be responsible for include, but
are not limited to: loss of income or profits; loss of revenue or savings; loss of
use of the product or associated products; cost of any substitute products or
services; inconvenience, downtime, or any other time; loss of goodwill; claims
of third parties including customers; and damage to property.
Legal Rights May Vary By State or Jurisdiction
The Warranty gives You specific legal rights, and You may also have other
rights which vary by state or jurisdiction. Some states or jurisdictions do not
allow certain limitations of implied warranties or of incidental or consequential
damages or other remedies, so certain of the foregoing limitations may not
apply to You.
If any portion of the Warranty is held by a court to be invalid or unenforceable,
the remaining portions of the Warranty shall remain in full force and effect and
shall in no way be affected or invalidated, and the invalid or unenforceable
portion shall be modified so as to most nearly achieve the intent of the
Warranty.
Product Registration
Dogtra recommends that customers register their products as soon as possible
after purchase. Product registration will facilitate any future warranty service.
You may also receive useful information and updates about your existing and
future Dogtra products. To register your product, visit www.dogtra.com/
product-registration. If your product is not registered with Dogtra, You will be
required to provide a receipt or other proof of purchase (as provided above) to
qualify for warranty service.

48
How to Obtain Warranty Service
Should your Dogtra product require warranty service, please contact Customer
Service by phone or email for a warranty evaluation (see below for contact
information). Upon approval of your warranty work, Dogtra will repair or
replace (at Dogtra’s election) your product without charge for labor or parts.
You are responsible for shipping, including cost, of your product to Dogtra for
warranty service. Dogtra will handle shipping, including cost, of the repaired or
replaced product back to customers in the USA. Dogtra will not be responsible
for shipping, including cost and/or applicable taxes or fees, for products sent
to Canada. Such costs, taxes, or fees will be borne by the customer.
To register your product, visit www.dogtra.com/product-registration.
Dogtra Customer Service
12322 Monarch Street, Garden Grove, CA 92841
(888) 811-9111 | repair@dogtra.com
Mon – Fri, 8:00 AM to 4:30 PM (PST)
Copyright © 2025 Dogtra Company All rights reserved.