
1
200iQ
Owner's Manual
Please read this manual thoroughly
before operating the 200iQ training e-collar.

2 3
IMPORTANT SAFETY AND PRODUCT INFORMATION
WARNING
Read all safety and product information below before using
Dogtra products. Failure to follow these safety instructions
could result in injury to you, your dog, and/or damage to
Dogtra products or other property.
PRODUCT SAFETY
Training Methods
Dogtra products can be used with a variety of training
methods. However, each dog may respond differently to
training methods and Dogtra products. Observe your dog
closely when determining the correct training method to use
with Dogtra products.
Aggressive Dogs
Do not use Dogtra products on aggressive dogs. Such dogs
may react adversely and cause injury to people or other dogs.
When dealing with an aggressive dog, seek the help of a dog
training professional or veterinarian.
Children and the disabled
Dogtra products are not toys. Adult supervision and extreme
caution are required when Dogtra products are used by or
near children.
PRODUCT DAMAGE
Electrical Product
Dogtra products include electrical components and
batteries. Do not use or store the product near heat or
flammable substances. Such use or storage may damage the
product or cause fire, explosion, personal injury, or property
damage.
Medical Device Interference
Dogtra products contain electrical and magnetic components
that emit low levels of electromagnetic radiation and radio
frequencies. These electromagnetic waves or radio frequencies
may interfere with pacemakers, defibrillators, or other medical
devices. Consult your physician or medical device manufacturer
before using any medical device with Dogtra products. If you
think Dogtra products may interfere with your pacemaker,
defibrillator, or other medical device, stop using Dogtra
products.
Inadvertent Activation
The digital microprocessor offers thousands of unique codes
to eliminate frequency match-up with other Dogtra e-collars.
The Constant button will automatically shut down after
being held down for 12 seconds or more as a safety feature.
Charging
Only charge Dogtra products with Dogtra Branded batteries
and device chargers. Do not charge the product by any
other means or at temperatures below 0°C (32°F) or above
45°C (113°F).
Unauthorized use
Dogtra products should only be used in a humane manner to
train and educate dogs.
Dogtra products are not intended for use in any other way
and are not intended for use on other animals or humans.
Battery removal and disposal
Dogtra products include batteries. Be careful when
removing or installing the battery as your fingers may be
caught. Dispose of batteries according to local regulations.
Do not disassemble, crush, heat or modify the battery. Fire,
injury or property damage may result.
4 5
Optional Accessories
Belt Clip
A belt clip is available for the handheld transmitter.
Auto Charger
The auto charger for the 200iQ has an input of 12-volts to
24-volts and has an output of 5-volts 1000mA.
European Charger
Dogtra’s European chargers are designed for use with a
220 volt AC electrical outlet.
To purchase accessories, please visit www.dogtra.com or
call customer service at (888) 811-9111.
AT A GLANCE
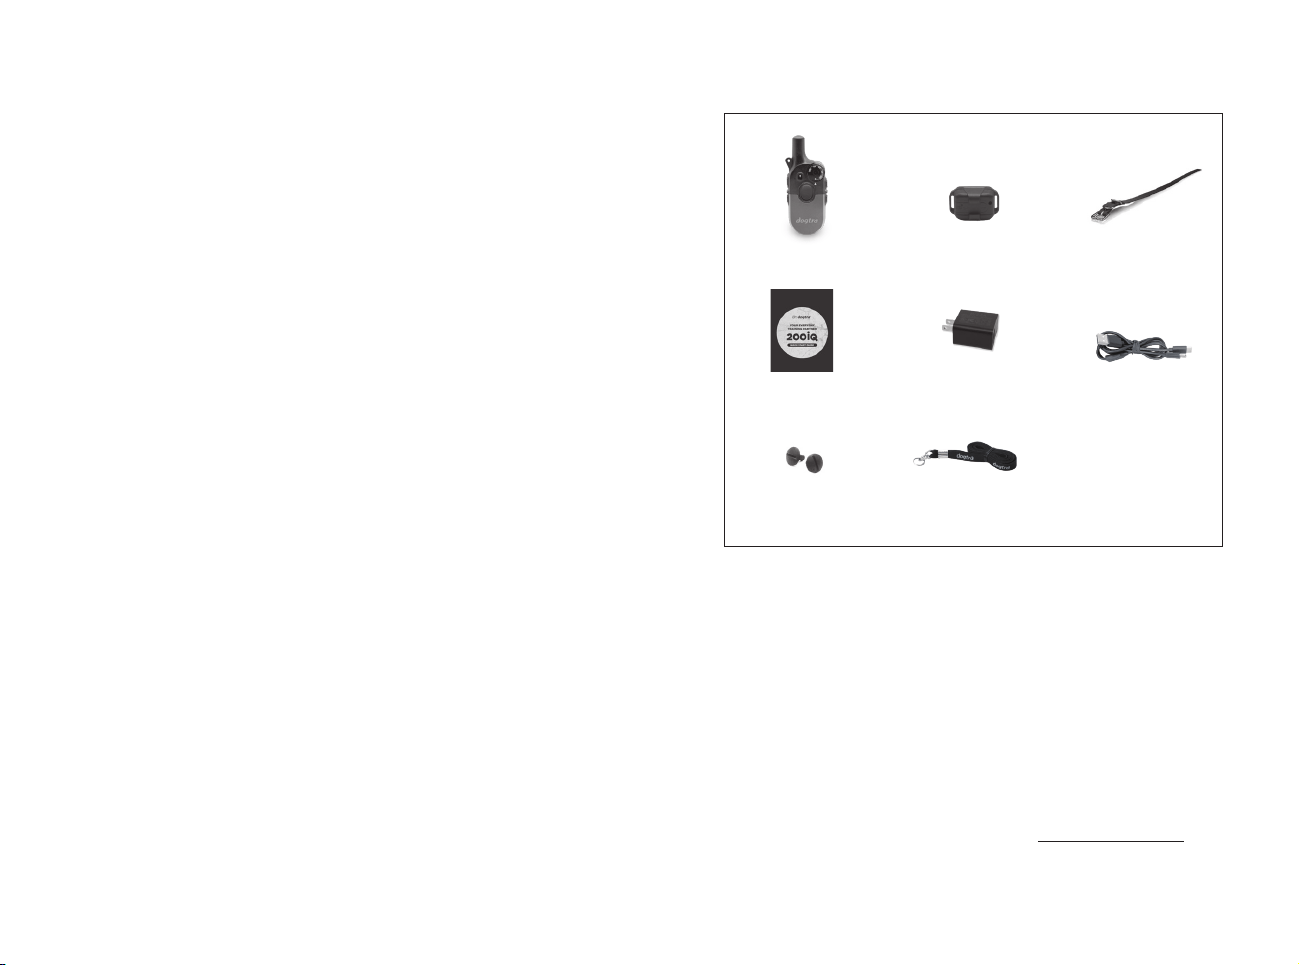
Quick Manual
Transmitter
Battery Charger Splitter Cable
CONTENTS
AT A GLANCE
..................................................................
MAIN FEATURES
............................................................
OVERVIEW
.....................................................................
UNDERSTANDING YOUR TRAINING SYSTEM
1. TURNING THE 200iQ ON/OFF
...........................
2. TRANSMITTER BUTTON FUNCTION
................
3. EXPANDABLE 2-DOG SYSTEM
...........................
4. HOW TO ADD AN ADDITIONAL RECEIVER
DEVICE
......................................................................
5. SWITCH IT UP! SWAPPABLE CASE COVERS
..
6. HOW TO INSERT THE STRAP
..............................
7. RECEIVER FITTING
.................................................
8. FINDING THE RIGHT STIMULATION
..................
9. NON-STIMULATION CONTACTS
........................
10. MAXIMIZING THE DISTANCE
..............................
11. LED INDICATOR
.....................................................
12. BATTERY CHARGE
................................................
13. ATTACHING THE BELT CLIP
................................
14. USING THE TEST LIGHT
......................................
GENERAL TRAINING TIPS
.........................................
MAINTENANCE
............................................................
TROUBLESHOOTING GUIDE
....................................
FCC WARNING STATEMENT
.....................................
DOGTRA PRODUCT WARRANTY
...........................
5
6
7
9
9
11
11
12
13
14
15
16
17
18
19
21
22
24
26
27
29
30
Receiver
Collar Strap
Non-Stimulation
Contacts
Lanyard
6 7
• 1/2 mile range
• IPX9K waterproof certified transmitter and receiver
• Medium output receiver
• 100 stimulation levels/front-facing Rheostat Dial
• Two stimulation types: Nick & Constant stimulation
• Audible Tone
• LED Locate Light
• XPP (Extreme Performance Pager) Vibration
• Enhanced contact points
• Standard 5/8” Male Contact Points
• Ultra-compact receiver
• For dogs as small as 10 lbs
• 2-hour rapid charge lithium polymer batteries
• USB C-TYPE Charging
• Expandable to a 2-dog system
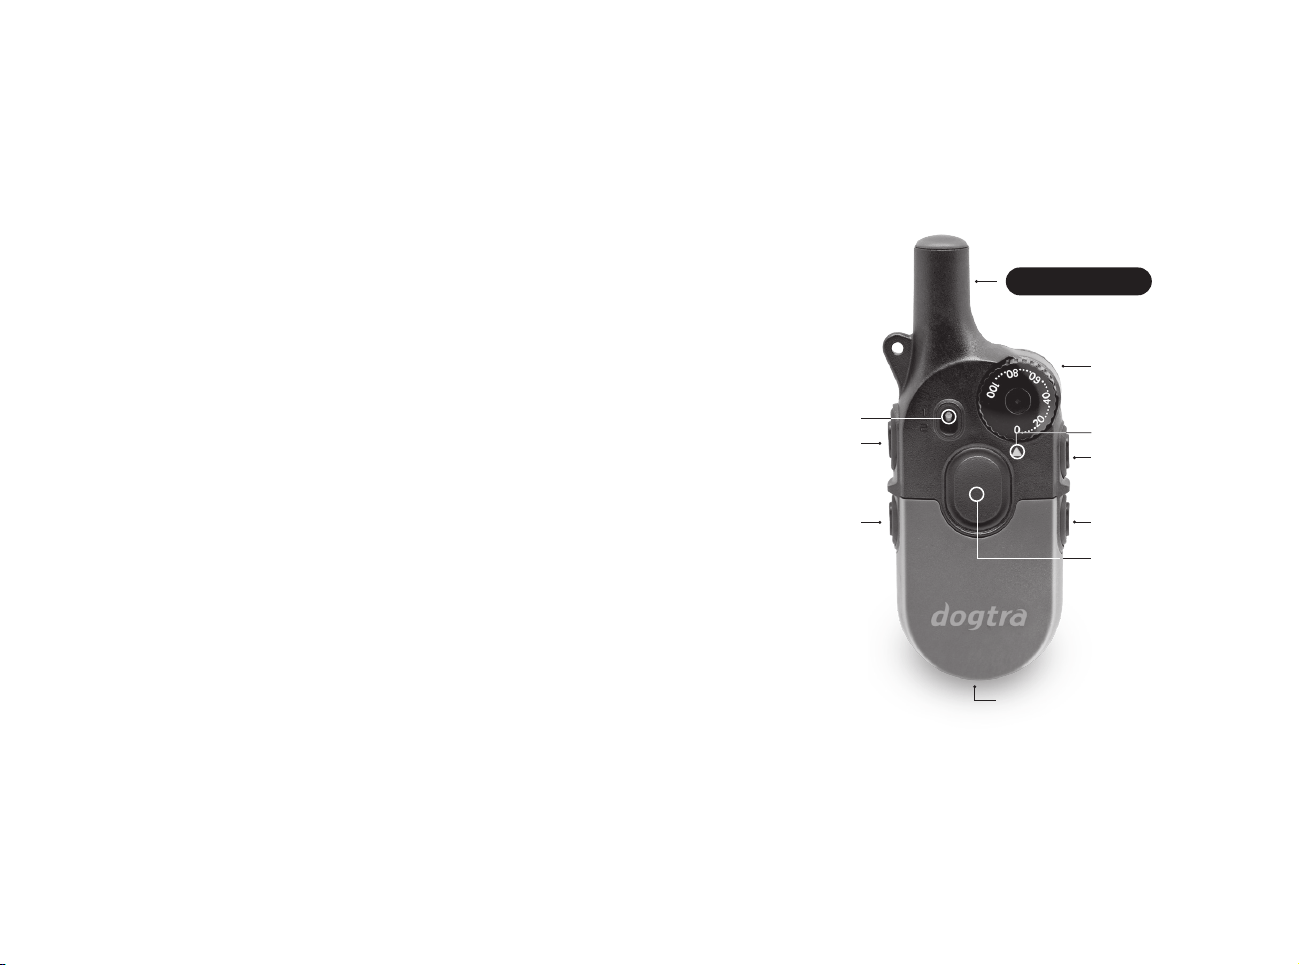
OVERVIEWMAIN FEATURES
200iQ
Transmitter
Tone
Light
100 Level
Rheostat Dial
1/2 Mile Range
Nick
Receiver
Selector Toggle
(Up to 2-Dogs)
Constant
USB-C
Charging
Vibration
LED Level
Indicator Light
8 9
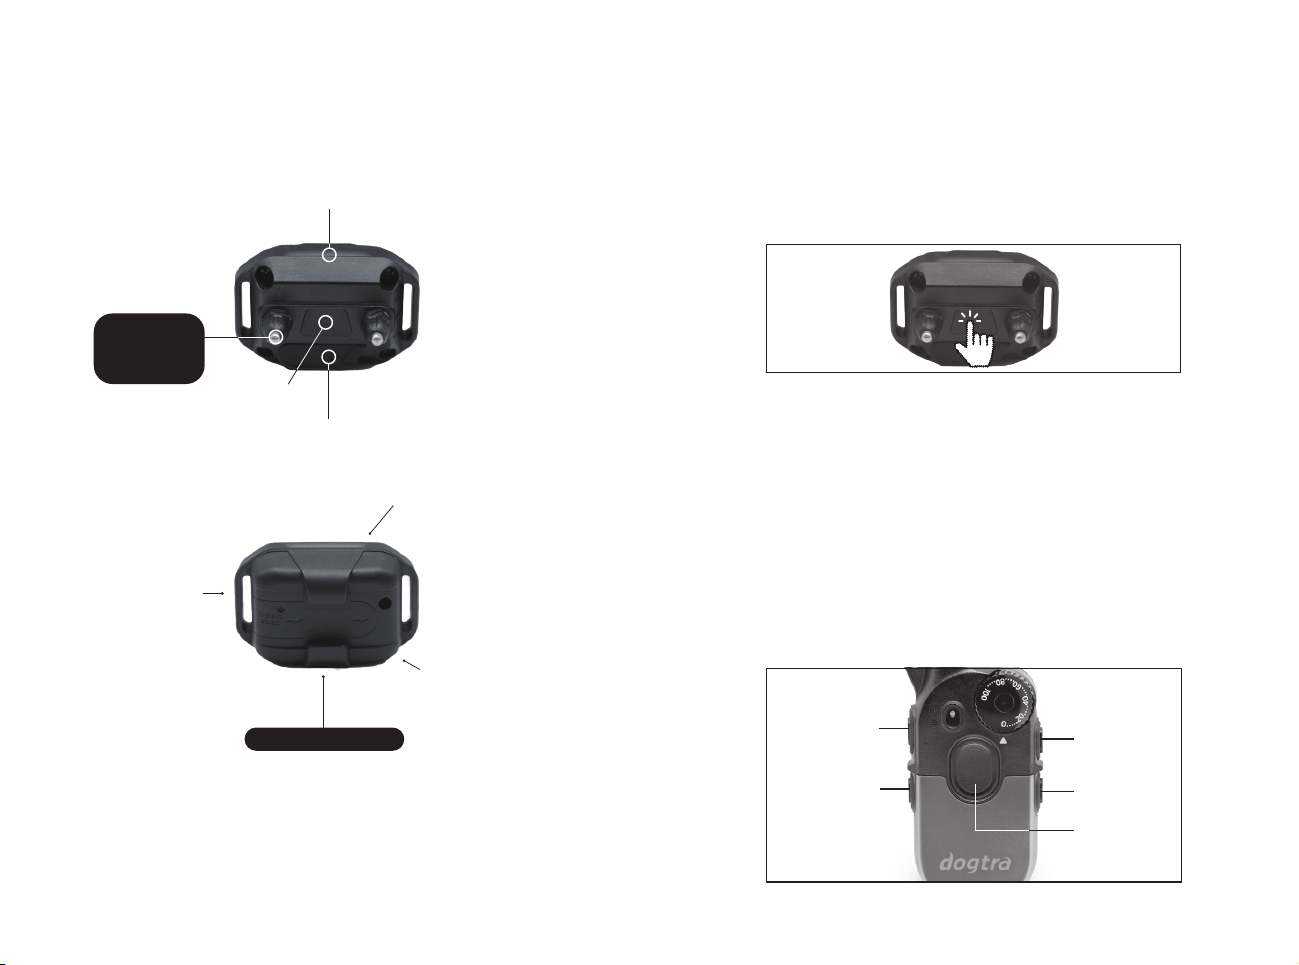
200iQ
Receiver
UNDERSTANDING YOUR
TRAINING SYSTEM
1. TURNING THE 200iQ ON/OFF
The transmitter does not have an on/off button and it will
only activate when paired receiver is turned on.
The receiver’s collar power button is located between
the contact points. Press and hold the power button for 2
seconds to turn it on or off. The LED indicator will display
a solid green light accompanied by a tone when the unit
powers on, and a red light with a tone when it powers off.
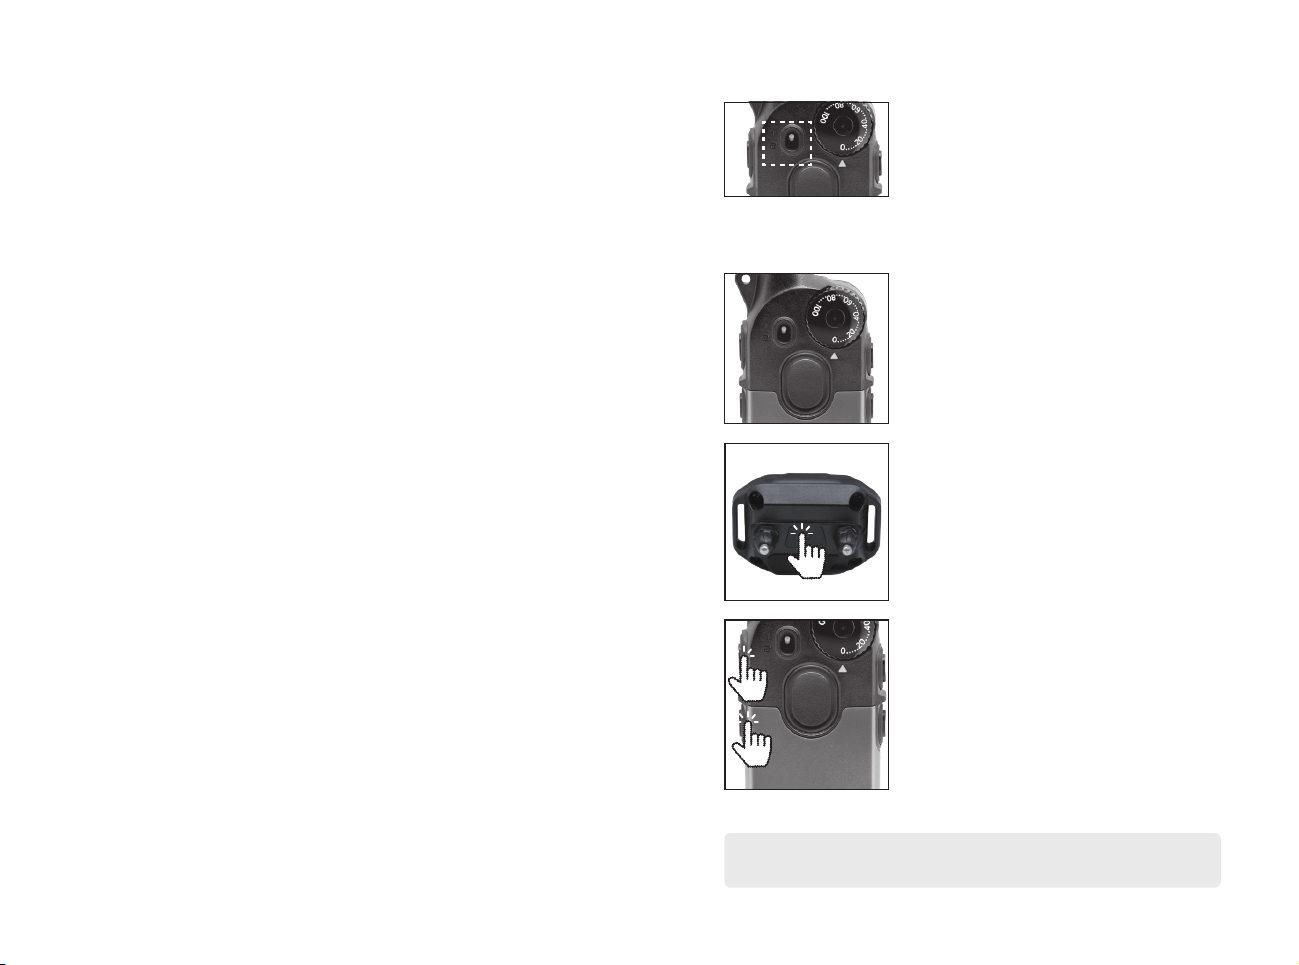
The 200iQ multi dog unit has five buttons (one on the face
of the transmitter and two on the left side and two on the
Right side).
2. TRANSMITTER BUTTON FUNCTION
XPP (Extreme
Performance Pager)
Vibration
Tone
IPX9K
Certified
Waterproof
Removable
Contact
Points
USB-C
Charging
On/Off
1000 Lux
LED Light
Medium Output
3) Constant
5) Vibration
2) Tone
4) Light
1) Nick
10 11
1) Nick
When the Nick button is pressed, the receiver emits a single
rapid pulse of static stimulation.
2) Tone
The tone button emits a beeping sound when
held, lasting up to 12 seconds maximum.
3) Constant
Constant button emits a continuous stream of stimulation
when held, lasting up to 12 seconds maximum.
4) Light
There are two light modes:
- Continuous Beacon Mode:
By tapping the Locate Light button once. Will emit
ongoing continuous blinking, every 4 seconds.
To disable the continuous blinking, tap the Locate Light
button again.
- Manual Light Mode:
To manually enable the beacon light, press and
hold the Locate Light button which emits for up
to 12 seconds maximum.
5) Vibration
The pager button emits non-stimulating vibration
when held, lasting up to 12 seconds maximum.
3. EXPANDABLE 2-DOG SYSTEM
If you purchase an additional receiver,
you can use the front toggle switch to
select the dog you want to stimulate.
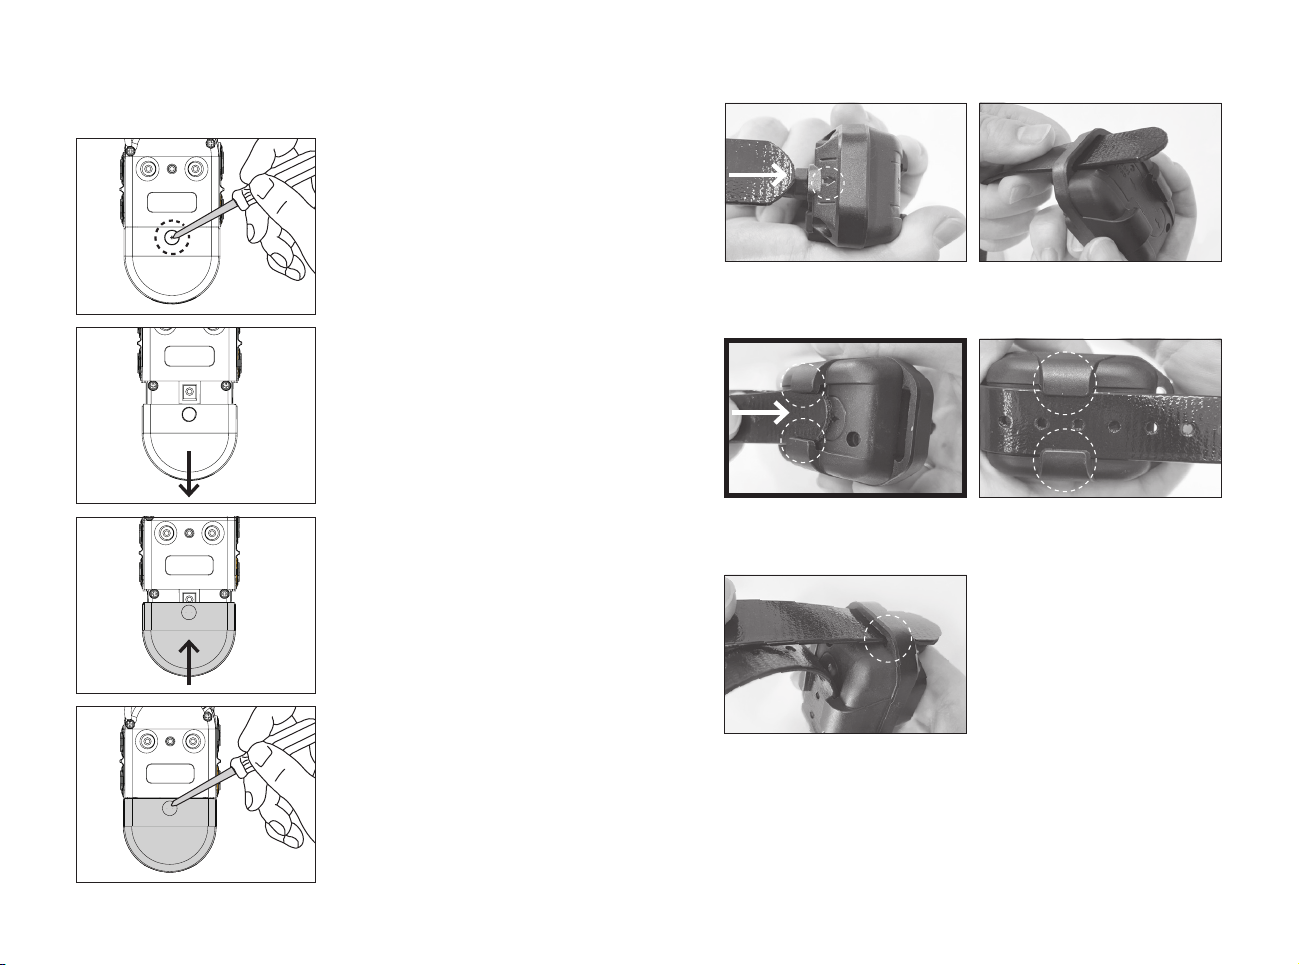
4. HOW TO ADD AN ADDITIONAL RECEIVER DEVICE
Repeat the pairing process if the pager vibration test is unsuccessful,
or if the pairing between the devices has timed out or failed.
1. Set the dial to 0 and place the
toggle switch in either position “1”
or position “2”. Note: If a collar is
already paired, select an unused
position to avoid overriding the
existing one.
3. While the green LED on the
receiver is rapidly blinking,
simultaneously press both side
buttons on the transmitter (Nick
and Constant). Once coding is
complete, the LED indicator on the
receiver will blink every 4 seconds.
2. To begin pairing, the receiver must
be turned o. Initiate the pairing
mode by pressing and holding the
power button for 5 seconds until
the LED starts blinking and then
release.
12 13
6. HOW TO INSERT THE STRAP
3. Attach the receiver to the strap by threading the strap
through the opposite hole.
2. Make sure to connect the middle groove of the
receiver.
* Through the * Through the
middle groovemiddle groove
1. Insert the strap by looking at the direction of the arrow
on the receiver.
Additional Case Covers are sold separately.
5. SWITCH IT UP! SWAPPABLE CASE COVERS
3. Fit the new cover tightly
onto the device.
4. Use a phillips #1
screwdriver, and use the
screw that you previously
removed to tighten the
case onto the body.
1. Use the phillips #1
screwdriver to loosen the
screw. You will need this
screw to tighten the case
later. Do not loose it
2. Remove the Case Cover
by pulling it down.
14 15
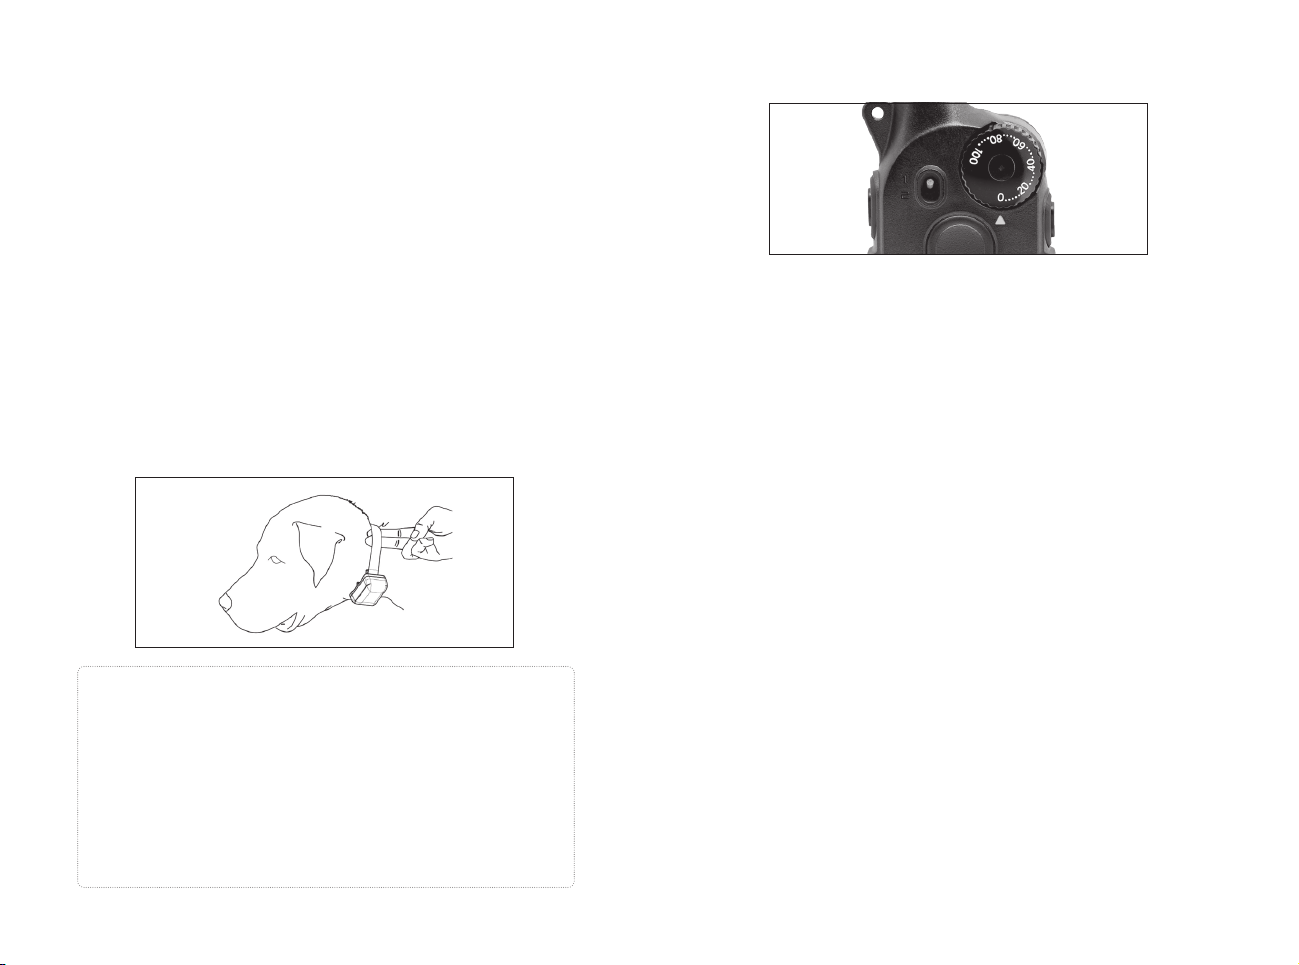
Proper Fit
The receiver should be fitted so that the medical grade
stainless steel contact points press firmly against
the dog’s skin. You should be able to fit two fingers
underneath the collar strap. The best location is on either
side of the dog’s windpipe.
Improper Fit
A loose fit can allow the receiver to move around on the
dog’s neck. When this happens, the contact points may
rub against the skin and cause irritation. If the receiver is
too loose, the contact will not be consistent and cause the
corrections to be inconsistent. Dogtra uses medical grade
stainless steel contact points and anti-microbial plastic to
protect the dog’s skin.
Attention!
Leaving the receiver in the same location on the dog’s neck
for an extended period of time can cause skin irritation due
to the sensitivity from the contact points. If the dog is to
wear the receiver for long periods, occasionally reposition
the receiver every few hours so that the contact points are
moved to a different location on the dog’s neck and remove
the receiver after 8 hours of usage. Make sure you check for
skin irritation each time you use the unit.
7. RECEIVER FITTING
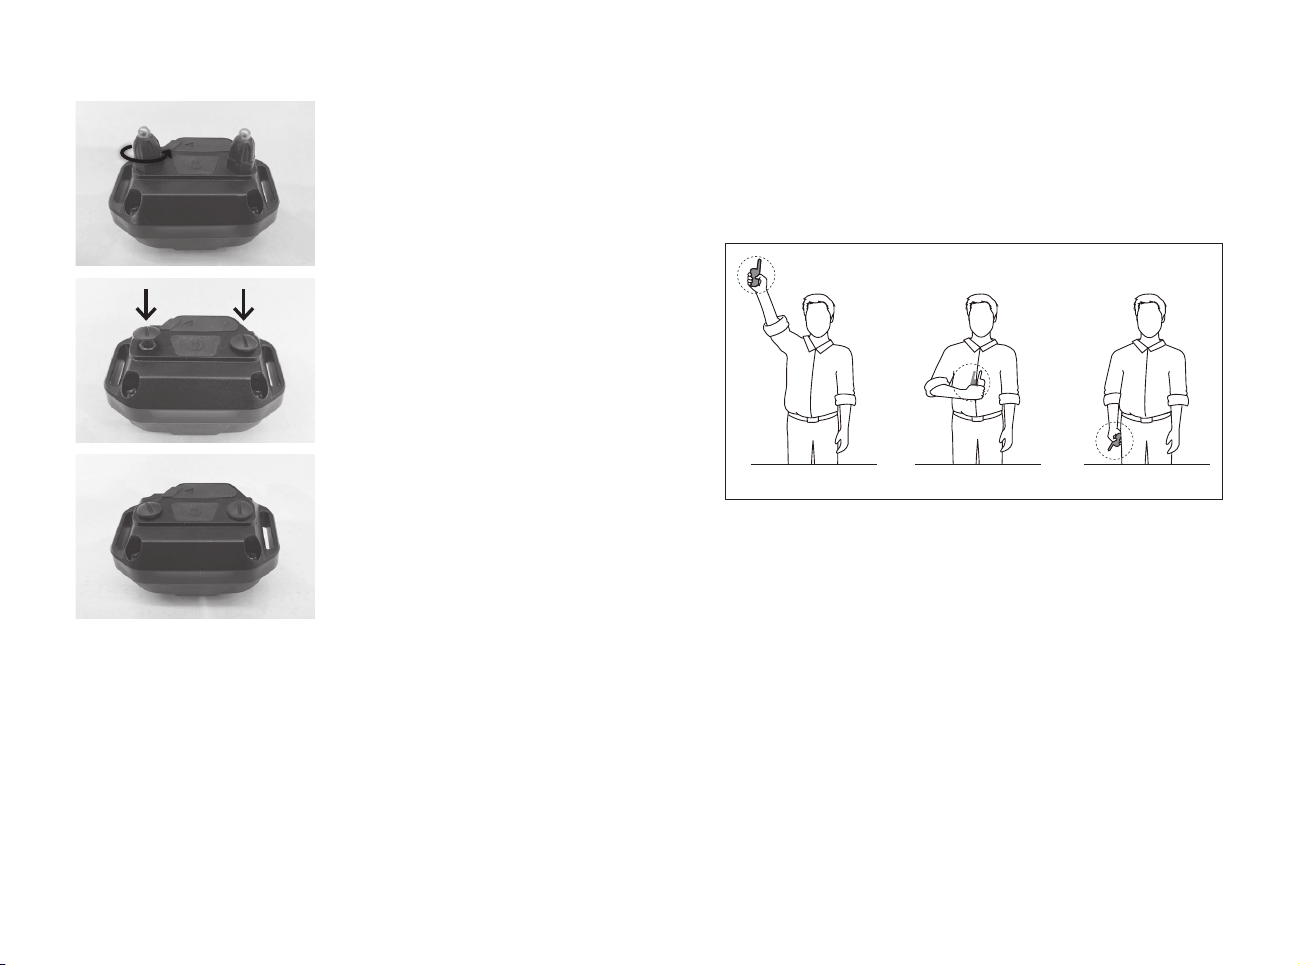
8. FINDING THE RIGHT STIMULATION
The 200iQ has a Rheostat Dial on the front of the
transmitter (0 is the lowest level and 100 is the highest
level). Remember that you will need to adjust the
level setting (up or down) depending on your dog’s
temperament and sensitivity. Always start at the lowest
level and work your way up. The appropriate level can
be found when the dog responds to the stimulation
with a mild reaction. Also, as the dog’s attitude changes,
especially during times of increased excitement or
distraction, you may need to adjust the stimulation level.
NOTE : The stimulation intensity can be adjusted even
when the stimulation is in use.
16 17
9. NON-STIMULATION CONTACTS
1. Please loosen the contact
points and remove them.
2. Place non-stimulation
contacts in each place
3. Press non-stimulation
contacts to secure the
non-stimulation contacts
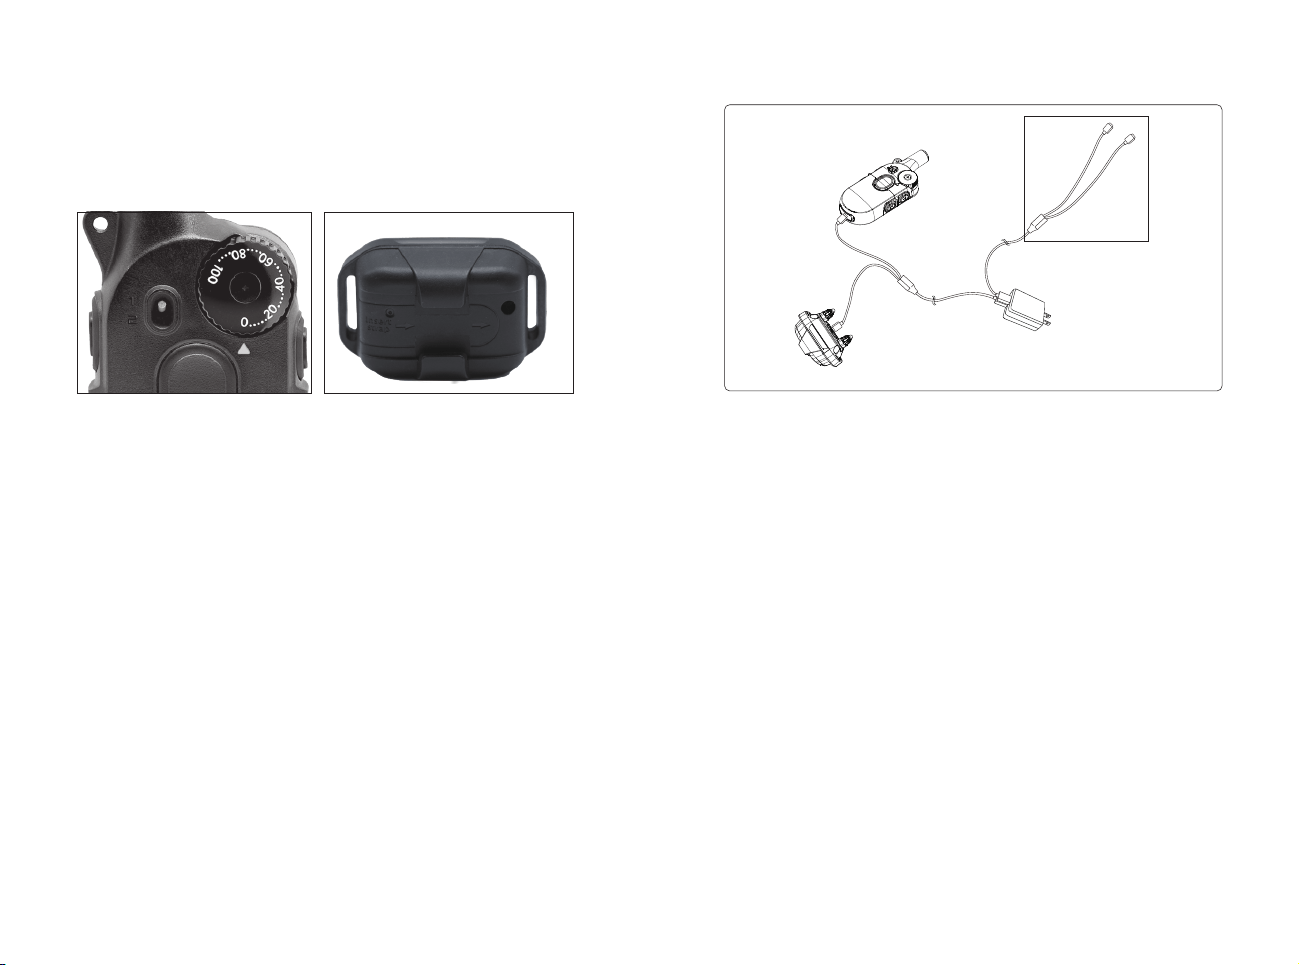
The 200iQ has a 1/2-mile range. Depending on the way
you use your transmitter, the transmitter range may vary.
To get the greatest range, hold the transmitter away from
your body and avoid touching the antenna. Keep your unit
properly charged for maximum signal strength.
10. MAXIMIZING THE DISTANCE
Typical range
Maximum range
Minimum range
18 19
11. LED INDICATOR
The LED indicator flashes every 4 seconds when the
receiver is on and ready for use. The LED indicator will
blink on both the transmitter and the receiver when the
transmitter buttons are pressed.
The LED indicator color indicates the battery life level.
Green = Full charge
Amber = Medium charge
Red = Needs charge
If the unit is used while the LED indicator is red, it may
shut down automatically.
Receiver Indicator Light
When the Constant button on the transmitter is pressed,
the receiver indicator light will glow steadily (either green,
amber, or red based on the remaining battery life), as
long as you hold the button down, for up to 12 seconds.
When the Nick button is pressed, the light comes on for a
fraction of a second.
Dogtra 200iQ uses a lithium polymer battery. If the light
is red, the device does not turn on, or the system does not
stay on when you press the button, recharge the device.
NOTE 1: Use only Dogtra approved batteries, chargers
and accessories with the Dogtra e-collar. This will prevent
any damage that may occur if you try to use a different
charger.
Note 2: The device will be partially charged when leaving
the Dogtra facility. When you receive the system, be sure
to give it an initial charge of 2 hours before using it for the
first time in an area away from flammable materials.
Note 3: When the charger is not in use, unplug it from the
power source. If the device will be stored unused for more
than 3 months, fully charge the battery.
12. BATTERY CHARGE
Two- Dog Unit Only
20 21
Follow the steps below to charge your system:
1. Open the rubber plugs on the battery charging
receptacles and plug in the charging cable.
2. Plug the charger into a 120-volt wall outlet. (Use a 220-
volt European charger for Europe) If charging in the
vehicle, use a USB AtoC or USB CtoC cable to charge,
depending on the type of port available. All indicator
lights should glow red when properly connected, and
the unit will automatically shut off during the charging
process. Once the unit is fully charged and unplugged
from the charging cable, you will need to turn the unit
on again before use.
3. The lithium polymer battery is fully charged within
2 hours. The lights will stay red during the charging
process and turn green once the unit is fully charged.
4. After charging, cover the battery charging receptacles
with the rubber plugs.
Recharging is required in the following cases:
•The LED on the transmitter or receiver is red.
•The LED on the transmitter or receiver does not light.
• A low-battery sound occurs when the transmitter or
receiver is powered off.
Charger Info
Manufacturer: E-SUN
Manufacturing country: CHINA
Model name: MKC-0502500VT
INPUT: 100-240V~50/60Hz 0.4A
OUTPUT: 5V 2500mA
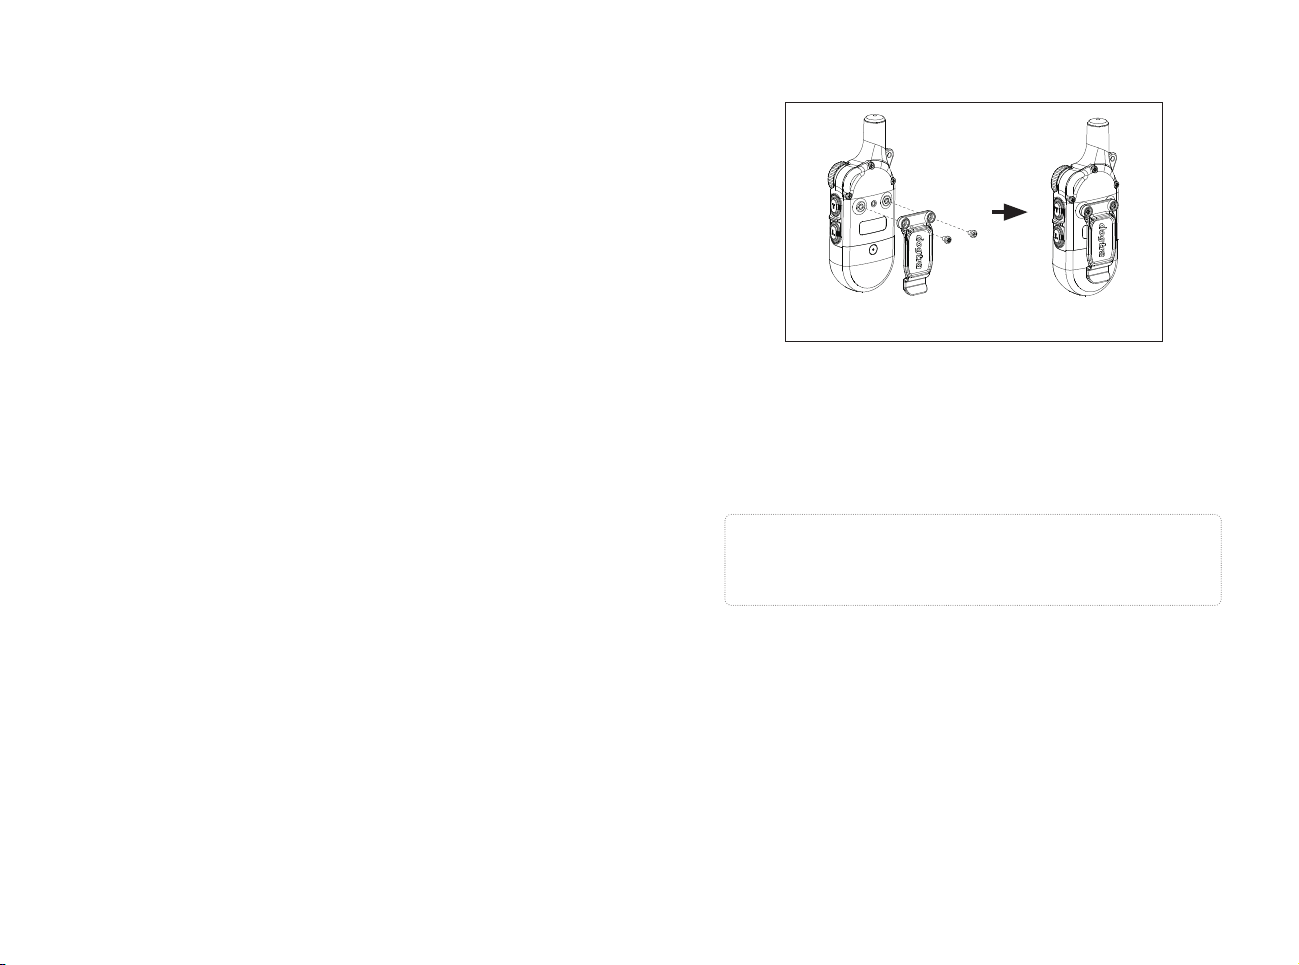
13. ATTACHING THE BELT CLIP
To attach a belt clip, follow the instructions below.
1. Align the belt clip with the groove on the back of the
transmitter.
2. Use a screwdriver to firmly tighten the screws of the
belt clip.
Caution
Firmly tighten both screws of the belt clip. Be careful
not to overtighten.
* Belt clip must be purchased separately.
22 23
14. USING THE TEST LIGHT
1. Turn on the receiver by pressing and holding the on/
o button in the center of the contact terminal. The
receiver’s light will briefly turn on and then blink once
every 4 seconds to indicate that the receiver is ready
to use (if the light is red, the receiver needs to be
charged).
2. Turn on the transmitter by pressing and holding the
on/o button on the right side of the transmitter. The
LED blinks every 4 seconds and the remaining
battery life is displayed on the LCD screen. (If the
battery icon on the LCD transmitter screen shows only
1 bar, it needs to be charged.)
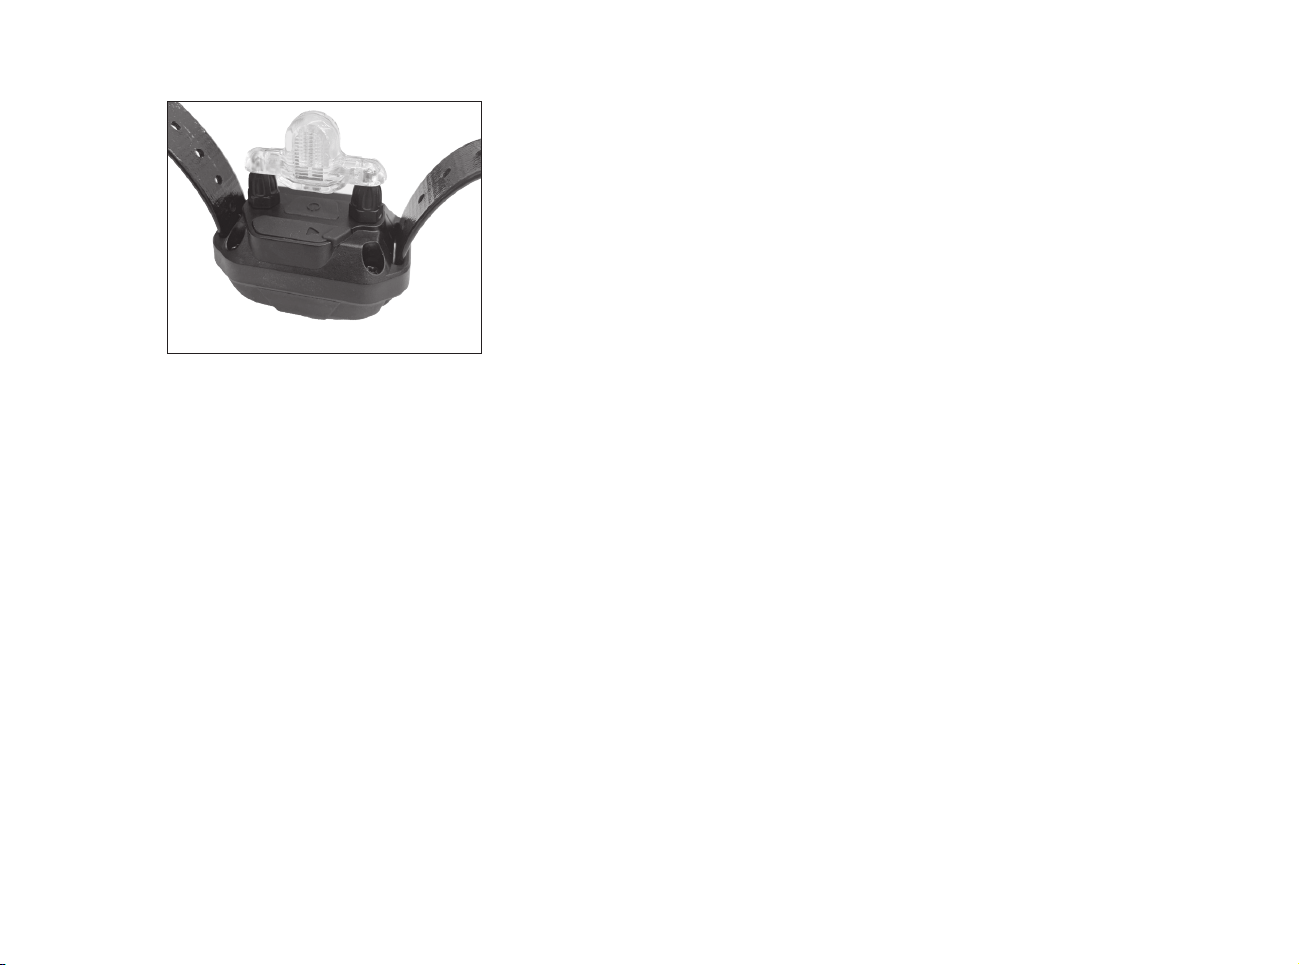
3. Place the test light onto the contact points as shown.
(Test Light is sold separately, available on dogtra.com)
4. Press the Nick button on the transmitter and observe
the test light. It should only be on for a moment. (The
higher the intensity, the brighter the test light.)
5. Observe the test light while pressing the Constant
button on the transmitter. The button should light up
as long as you hold it down. However, as a safety fea-
ture, if you press the Constant button for more than 12
seconds, the receiver will automatically stop
stimulation.
6. Turn the rheostat dial on the transmitter clockwise and
then counterclockwise. The test light shines brighter at
higher stimulation levels and dimmer at lower
stimulation levels.
Note: The test light may not be visible if the stimulation
level is set below level ten.
* Test Light must be purchased separately.

24 25
GENERAL TRAINING TIPS
Your dog must know some basic obedience commands
before beginning training with the 200iQ. A dog learns
by first being shown a command, followed by lots of
repetition over an extended period. As the dog becomes
proficient at these commands, the trainer can introduce
distractions and different locations to strengthen them.
Obedience Training on the Leash
Your dog must fully understand the obedience commands
(sit, stay, here, heel, and kennel) before using the e-collar
for reinforcement of these commands. A leash attached
to a standard collar is used to "teach" the dog the basic
obedience commands (sit, stay, here, heel, and kennel). A
tug on the leash/collar is used to reinforce the command.
When the dog complies with the command, use positive
reinforcement/praise. Once the dog understands these
commands, the e-collar can be used to reinforce them.
Beginning E-Collar Training
When you feel your dog understands the obedience
commands on the leash we can now start with the e-collar
training. With the dog on the leash and wearing the
e-collar, continue with your obedience drills. Apply light
stimulation (Nick or Constant) when a command is given;
the stimulation can be removed as the dog complies.
Through repetition, the dog learns to perform the
command.
The final step is the avoidance phase in which the
dog learns that he can avoid the stimulation altogether
by performing your commands. When these training
procedures are complete, the e-collar is used as a reminder
when the dog does not comply with your commands at
home or in the field. Keep your initial training sessions
short and positive as dogs have a short attention span.
How Much Stimulation to Use
Always start with low levels of stimulation and work
your way up depending on the disposition of your dog
and the given situation. By using the correct amount of
stimulation to get your point across, you will have a more
controllable environment and a dog that is under less
stress. Animals (and humans) perform better in a less
stressful environment.
For more training information, please visit our website at
www.dogtra.com.

26 27
MAINTENANCE
Basic Maintenance
Make sure the rubber charging cap is securely in place
when the system is in use. After each training session,
carefully inspect the unit for any missing parts or
damage to the casing. Damaged or broken casing may
aect the waterproof guarantee on the unit. After
confirming that there is no damage to the casing, rinse
the receiver and clean out any dirt or debris.
Storage Maintenance
The unit should be fully charged before storing for
extended periods. While in storage, the unit should be
given a full charge once a month and before the first use.
Store the units in room temperature. Do not keep the
units exposed to extreme climates.
Troubleshooting
If the unit is malfunctioning, please refer to the
“Troubleshooting Guide” before sending it to Dogtra for
service. If you have any questions or concerns, you may
email them to info@dogtra.com, or call customer service
at (888) 811-9111.
TROUBLESHOOTING GUIDE
1. My dog is not reacting to the system.
- Make sure the receiver and transmitter are on.
- Make sure the collar strap is tight enough so both
contact points are touching the dog’s skin.
- The contact points may be too short for your dog’s thick
or long coat. You might need to trim down the hair on
the dog’s neck, so both contact points are touching the
skin.
- The stimulation level may be too low for your dog.
Keep increasing the stimulation until the dog responds
usually by neck movement, head shaking, looking over
his shoulder, etc. (response may be very subtle so pay
attention.)
2. The LED indicator light comes on, but I do not feel any
stimulation.
– The battery may be low, so check the LED light for
battery life.
3. The transmitter has no range or stimulation is less
when the dog is farther away.
- The antenna(s) may be damaged. To order parts, please
contact customer service at (888) 811-9111 or go to
www.dogtra.com.
- The range indicated on the unit’s box is for flat terrain.
Heavy brush, trees, hills, or moisture will affect the
range of your unit. For best range, hold the transmitter
vertically above your head, and/or try moving to higher
ground.
- Any electrical conductors will affect the range, such as
cars, chain-link dog runs, metal structures, and radio
towers. For best results, operate away from these
objects.

28 29
PART 15.19
This device complies with part 15 of the FCC Rules. Operation is subject to
the following two conditions:
(1) This device may not cause harmful interference, and
(2) this device must accept any interference received, including
interference that may cause undesired operation.
PART 15.21
Any changes or modifications (including the antennas) to this device
that are not expressly approved by the manufacturer may void the user’s
authority to operate the equipment under FCC rules.
PART 15.105
Note: This equipment complies with the limits for a Class B digital
device, pursuant to part 15 of the FCC Rules. These limits are designed
to provide reasonable protection against harmful interference in a
residential installation. This equipment generates, uses and can radiate
radio frequency energy and, if not installed and used in accordance with
the instructions, may cause harmful interference to radio communications.
However, there is no guarantee that interference will not occur in a
particular installation. If this equipment does cause harmful interference
to radio or television reception, which can be determined by turning
the equipment off and on, the user is encouraged to try to correct the
interference by one or more of the following measures:
- Reorient or relocate the receiving antenna.
- Increase the separation between the equipment and receiver.
- Connect the equipment into an outlet on a circuit different from that to
which the receiver is connected.
- Consult the dealer or an experienced radio/TV technician for help.
This device contains licence-exempt transmitter(s)/receiver(s) that comply
with Innovation, Science and Economic Development Canada’s licence-
exempt RSS(s). Operation is subject to the following two conditions:
(1) This device may not cause interference.
(2) This device must accept any interference, including interference
that may cause undesired operation of the device.
FCC and IC RF Radiation Exposure Statement: This equipment complies
with FCC and IC RF Radiation exposure limits set forth for an uncontrolled
environment.
This device and its antenna must not be co-located or operating in
conjunction with any other antenna or transmitter.
FCC WARNING STATEMENT
4. My units are not holding a charge.
- The batteries might not be charged properly, or the
charger, splitter, and the charging port may not be
functioning properly. You can send in your charging
units to have us inspect them.
– The charging pin may be damaged. Inside the charging
port, there is a metal pin that should be standing
straight up and stiff. If the pin is wobbling, broken, or
missing, you will need to send the unit in to the Repair
Department. The charging port must be clean prior
to charging; clean the dirt out with a cotton swab and
some rubbing alcohol. If the dog is in saltwater, be sure
to rinse the receiver and charging port with clean water.
– If the above does not resolve your issues, contact
Dogtra customer service at info@dogtra.com or
(888) 811-9111.
5. My dog has skin irritation.
- This may be due to an improper fit or from wearing the
unit too long. If your dog exhibits signs of skin irritation,
consult with a veterinarian. Once the dog’s skin returns
to a normal condition, continue to use the receiver and
check your dog’s neck each time you use the unit.

30 31
LIMITED WARRANTY
For Dogtra Products Purchased from Dogtra Authorized Dealers
One-Year Warranty
Except as otherwise provided below, Dogtra warrants to the original
retail purchaser (“You”) that its Dogtra products shall be free of defects
in materials and workmanship for a period of one (1) year from the date
of purchase (“Warranty”). The Warranty covers the cost of repair (parts
and labor) or replacement (if repair is not feasible) of a defective Dogtra
product during said one-year period. For such repaired or replaced
products, the remaining portion of the original warranty period, or ninety
(90) days, whichever is longer, shall apply. Dogtra, at its sole discretion,
shall determine whether to repair or replace a product covered by the
Warranty.
Warranty Conditions
The Warranty is not transferrable and applies to your Dogtra product only
if:
(1) You are the original retail purchaser of the product,
(2) You bought the product from a Dogtra authorized dealer, and
(3) You present a receipt or other proof of purchase showing a valid
purchase date, the name and address of the authorized dealer, and the
purchased product identified by model and/or serial number.
Warranty Exclusions
The Warranty does not cover damage, loss, or deterioration to your Dogtra
product caused: by misuse, neglect, abuse, or other improper handling
of the product; by failure to follow use or care instructions; by use of the
product for other than its intended purpose; by accident or natural forces
such as fire or flooding; or by normal wear and tear such as scratches to
the product surface.
The Warranty also does not cover Dogtra products that: are purchased
from non-authorized dealers; are purchased outside of the United States
or Canada; have been damaged during shipment (even if Dogtra paid
or arranged for shipping); have been modified or tampered with in any
manner; are opened or repaired by anyone other than Dogtra; or have
serial numbers that have been altered or defaced.
DOGTRA PRODUCT WARRANTY
Sole Warranty
This Warranty is the only warranty offered by Dogtra for its Dogtra
products. Other than said Warranty, Dogtra makes no other representations
or warranties whatsoever regarding its products, whether oral or in any
product manual, on any packaging, on any website, or in any other written
material. No dealer of Dogtra products, nor any employee or agent of
Dogtra, is authorized to make any additions, changes, or extensions to the
Warranty. Dogtra, at its sole discretion and at any time, reserves the right
to modify the Warranty.
DISCLAIMER OF OTHER WARRANTIES
THE FOREGOING WARRANTY IS PROVIDED IN LIEU OF ALL OTHER
WARRANTIES, WHETHER EXPRESS OR IMPLIED. DOGTRA DISCLAIMS
ANY IMPLIED WARRANTIES INCLUDING, BUT NOT LIMITED TO, THE
IMPLIED WARRANTIES OF MERCHANTABILITY AND FITNESS FOR A
PARTICULAR PURPOSE.
Limitation of Remedies
Dogtra’s liability is limited to the cost of repair or replacement of the
Dogtra product under Warranty. Any claim or action to enforce the
Warranty must be commenced within thirty (30) days of the Warranty’s
expiration for your product. Dogtra will not be liable for any indirect,
incidental, special, consequential, or similar damages based on breach
of warranty, breach of contract, negligence, strict tort, or any other legal
theory related to Dogtra and its products. Damages that Dogtra will not be
responsible for include, but are not limited to: loss of income or profits; loss
of revenue or savings; loss of use of the product or associated products;
cost of any substitute products or services; inconvenience, downtime,
or any other time; loss of goodwill; claims of third parties including
customers; and damage to property.
Legal Rights May Vary By State or Jurisdiction
The Warranty gives You specific legal rights, and You may also have other
rights which vary by state or jurisdiction. Some states or jurisdictions
do not allow certain limitations of implied warranties or of incidental or
consequential damages or other remedies, so certain of the foregoing
limitations may not apply to You.
If any portion of the Warranty is held by a court to be invalid or
unenforceable, the remaining portions of the Warranty shall remain in full
force and effect and shall in no way be affected or invalidated, and the
invalid or unenforceable portion shall be modified so as to most nearly
achieve the intent of the Warranty.

32
Product Registration
Dogtra recommends that customers register their products as soon as
possible after purchase. Product registration will facilitate any future
warranty service. You may also receive useful information and updates
about your existing and future Dogtra products. To register your product,
visit www.dogtra.com/product-registration. If your product is not
registered with Dogtra, You will be required to provide a receipt or other
proof purchase (as provided above) to qualify for warranty service.
How to Obtain Warranty Service
Should your Dogtra product require warranty service, please contact
Customer Service by phone or email for a warranty evaluation (see below
for contact information). Upon approval of your warranty work, Dogtra
will repair or replace (at Dogtra’s election) your product without charge
for labor or parts. You are responsible for shipping, including cost, of
your product to Dogtra for warranty service. Dogtra will handle shipping,
including cost, of the repaired or replaced product back to customers in
the USA. Dogtra will not be responsible for shipping, including cost and/or
applicable taxes or fees, for products sent to Canada. Such costs, taxes, or
fees will be borne by the customer.
To register your product, visit
www.dogtra.com/product-registration.
Dogtra Customer Service
12322 Monarch Street, Garden Grove, CA 92841
(888) 811-9111
repair@dogtra.com
Mon – Fri, 8:00 AM to 4:30 PM (PST)
© 2025 Dogtra. All rights reserved.