This product is NOT a permanent structure.
The fabric canopy top should never be left on during periods
of heavy or extended rain, snow/sleet or any other inclement
weather occurrence where high winds or wind
gusts can occur.
If left on, damage to the gazebo and surroundings can occur.
CAUTION
If you have questions or concerns, do not return to the store.
Please call the toll-free number 833-807-3550 for assistance.
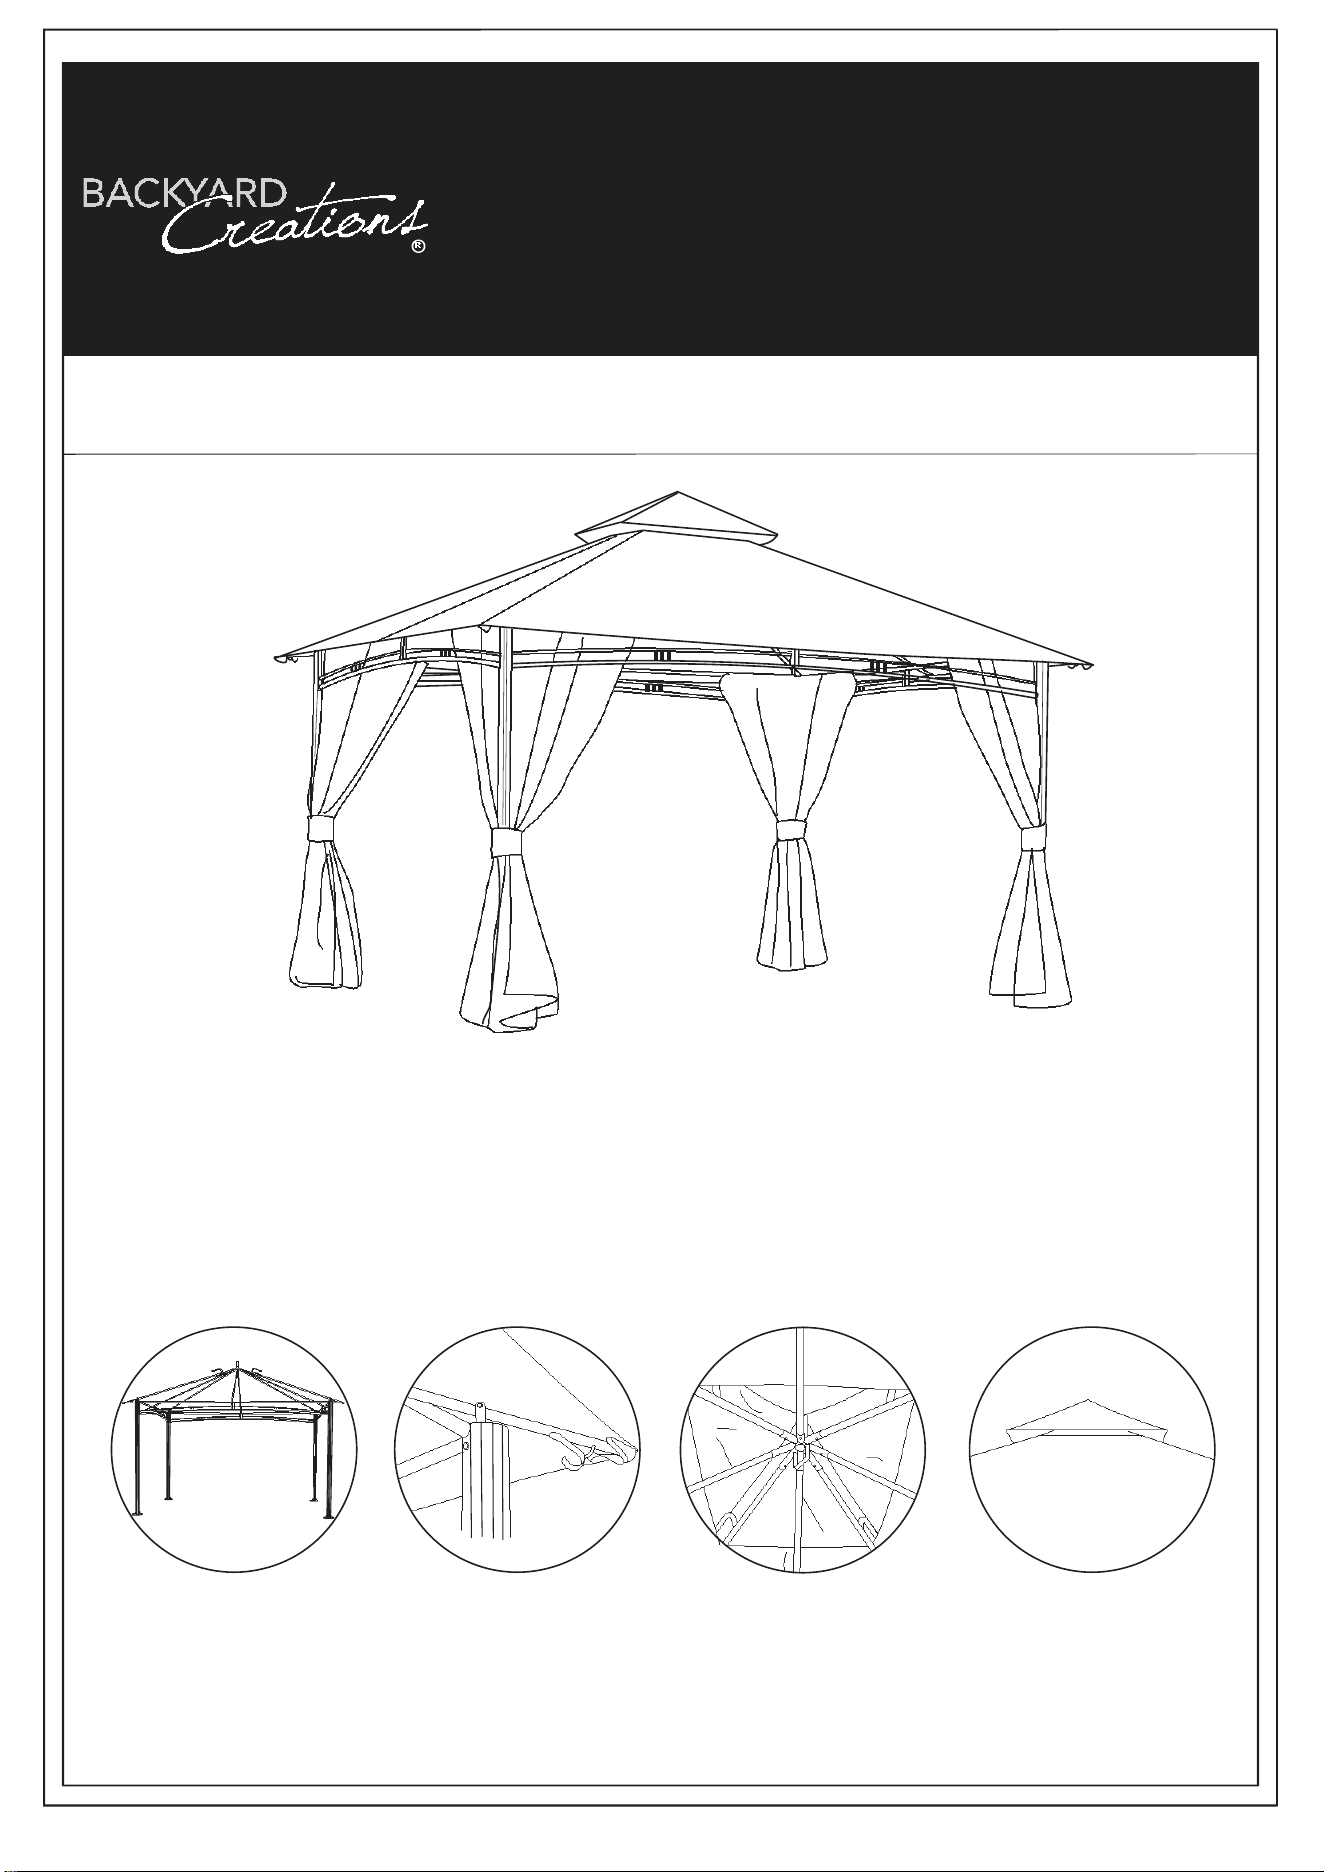
Durable Construction with
Fluted steel Post
Hanging Hooks for Flowers & Plants
Inside Center Hanging Ring
Double Roof for Better Ventilation
ASSEMBLY INSTRUCTIONS
13ft x 10ft Roof Style Gazebo
Durable Construction with
Fluted Steel Post
Inside Center Hanging Hook
Hanging Hooks for Flowers
& Plants
Double Roof for Better
Ventilation
SKU# 272-1175
ITEM# 184DGZ1-PU-25
MFG# LGCD0809A
Rev 9-25-2024
Long side 13ft
Short side 10ft
.
.....
Table of Contents
Table of Contents ........................................................2
Safety Information ........
....... ........... ...............................
2
Care
Instructions
.......................................................
2
Parts
List.......................................................................3
Assembly
.................................................................4~11
Safety Information
W
A
R
N
I
N
G
:
Keep all flame and heat sources away from this tent fabric. This tent is made from fabric that meets CPAI-84 specification
for
flame resistance. It is not fireproof. The fabric will burn if left in continuous contact with any flame source. The application of any foreign
substance to the tent fabric may render the flame-resistance properties ineffective.
W
A
R
N
I
N
G
: T
h
i
s
G
aze
b
o
i
s
NOT
a
p
e
r
m
a
n
e
n
t
s
t
r
u
c
t
u
r
e a
nd
i
s
d
e
s
i
gn
e
d
f
o
r
s
un
s
h
a
d
e
a
nd
p
r
i
v
a
c
y
a
nd
m
u
s
t
b
e
u
s
e
d
und
e
r
n
o
r
m
a
l
w
ea
t
h
e
r
c
o
nd
iti
o
n
s
.
W
e
r
e
c
o
mm
e
nd
r
e
m
o
v
a
l
o
f t
h
e
f
a
b
r
i
c
c
a
n
o
p
y
i
n
w
i
nd
y
c
o
nd
iti
o
n
s
a
s
g
aze
b
o
s
c
a
t
c
h
w
i
nd
s
i
m
il
a
r
t
o
u
m
b
r
e
ll
a
s
.
Y
o
u
m
u
s
t
h
o
w
e
v
e
r
c
o
m
p
l
e
t
e
l
y
d
i
s
a
ss
e
m
b
l
e
t
h
e
un
it
p
r
i
o
r
t
o
a
n
y
s
e
v
e
r
e
w
ea
t
h
e
r
c
o
nd
iti
o
n
s
s
u
c
h
a
s
t
hund
e
r
s
t
o
r
m
,
snow/sleet,
hu
rr
i
c
a
n
e
,
a
nd
/
o
r
h
ea
vy
w
i
nd
a
nd
r
a
i
n.
F
a
il
u
r
e
t
o
r
e
m
o
v
e
t
h
e
f
a
b
r
i
c
c
a
n
o
p
y
o
r
d
i
s
a
ss
e
m
b
l
e
t
h
e
un
it
w
ill
c
a
u
s
e
t
h
e
g
aze
b
o
t
o
h
a
v
e
s
t
r
u
c
t
u
r
e
d
a
m
a
g
e
o
r
e
v
e
n
s
t
r
u
c
t
u
r
a
l
c
o
ll
a
p
s
e
.
CAU
T
I
O
N
: Al
w
a
ys
i
n
s
t
a
ll
o
n
l
e
v
e
l
g
r
o
und
u
tili
z
i
ng
ti
e
d
o
w
n
c
o
r
d
s
a
nd
g
r
o
und
s
t
a
k
e
s
.
D
o
n
o
t
p
e
r
m
a
n
e
n
tl
y
a
n
c
h
o
r
un
it t
o
w
oo
d
d
e
c
k
o
r
c
o
n
c
r
e
t
e
s
u
r
f
a
c
e
.
CAU
T
I
O
N
: G
azebo
f
a
b
r
i
c
s
a
r
e
w
a
t
e
r
r
e
s
i
s
t
a
n
t
bu
t
n
o
t
w
a
t
e
r
p
r
oo
f
a
nd
m
a
y
l
ea
k
du
r
i
ng
p
r
e
c
i
p
it
a
ti
o
n.
F
a
b
r
i
c
s
w
ill f
a
d
e
f
r
o
m
over exposure to
d
i
r
e
c
t
s
un
li
gh
t
.
CAU
T
I
O
N
: K
ee
p
a
ll
c
h
il
d
r
e
n
a
nd
p
e
t
s
a
w
a
y
f
r
o
m
a
ss
e
m
b
l
y
a
r
ea
.
Be
g
i
n
a
ss
e
m
b
l
y
n
o
t l
e
ss
t
h
a
n
6
f
ee
t f
r
o
m
a
n
y
o
b
s
t
r
u
c
ti
o
n
s
u
c
h
a
s
f
e
n
c
e
,
g
a
r
a
g
e
,
h
o
u
s
e
,
o
v
e
r
h
a
ng
i
ng
b
r
a
n
c
h
e
s
,
c
l
o
t
h
e
s
line
o
r
e
l
e
c
t
r
i
c
a
l
w
i
r
e
s
.
S
o
m
e
p
a
r
t
s
m
a
y
c
o
n
t
a
i
n
s
h
a
r
p
e
dg
e
s
. W
ea
r
p
r
o
t
e
c
ti
v
e
g
l
o
v
e
s
if
n
e
c
e
ss
a
r
y
.
At l
ea
s
t t
w
o
o
r
m
o
r
e
p
eo
p
l
e
a
r
e
r
e
c
o
mm
e
nd
e
d
f
o
r
s
a
f
e
a
ss
e
m
b
l
y
.
Assembly Manual and Video
For your convenience, we have created this detailed printed assembly manual, and we have
also added a new assembly video on our product page on the Menard’s website. Simply go to
WWW.MENARDS.COM
®
and search for Menards SKU 272-1175 (this is the NEW 13’x10’ Roof
Style Gazebo – Color Black Frame w/ Gray Canopy.) Then scroll down to “ADDITIONAL
RESOURCES” on the right side of the page and click on Assembly Instructions. The video will
provide a step-by-step assembly overview.
Care Instructions
Before using, wipe frame with a clean, dry cloth. Do not use bleach or solvents. Treat/apply a
one-step automotive type wax to the frame for maximum protection against UV light and salty
damp air. To wash the fabric canopy, completely remove fabric canopy from gazebo frame, and
use a solution of mild soap and water to hand wash, rinse thoroughly, air dry completely. Never
use washing machine or dryer. Please properly tighten all hardware at time of assembly and
then be sure to perform periodic inspections during usage to check for loose hardware and for
cracked/damaged welds.
Page 2
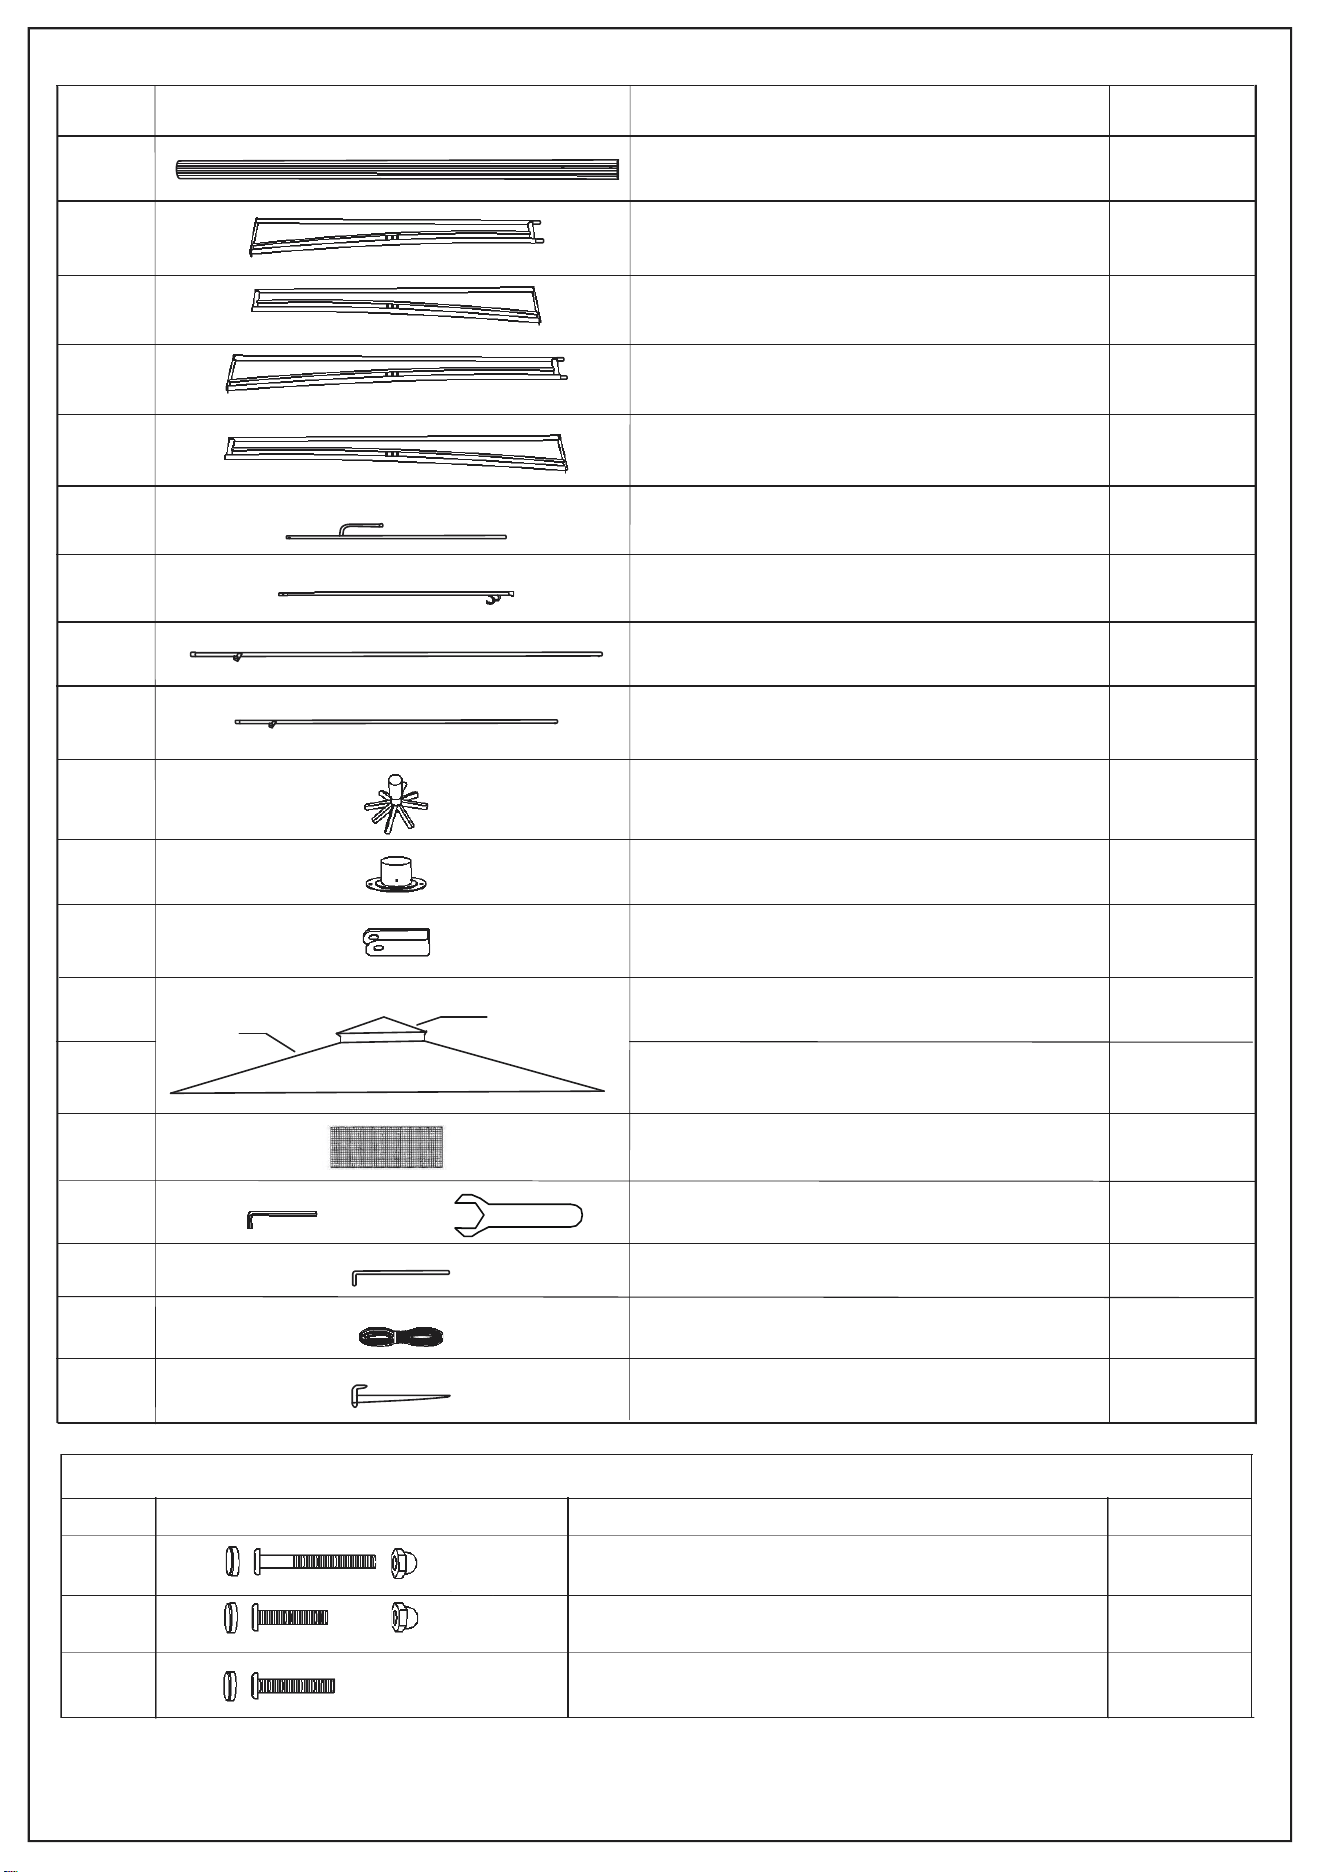
PART ILLUSTRATION DESCRIPTION QUANTITY
N/ N1 N N1
PARTS LIST
Corner Post
4PCS
Short Beam
2PCS
Short Beam
2PCS
Long Beam
Long Beam
Short Corner Roof Tube
Long Corner Roof Tube
Middle Roof Tube
Middle Roof Tube
Roof Hub
Post Base
Bracket
Vent Cover
Main Canopy
Mosquito Netting
Wrench
Post Anchor
Tie Down Guy-Rope
Tie Down Guy-Rope Anchor
2PCS
2PCS
2PCS
2PCS
4PCS
4PCS
1PC
4PCS
4PCS
1PC
1PC
4PCS
1SET
8PCS
4PCS
4PCS
A
B
C
D
E
F1
F2
G
H
I
J
K
L1
L2
M
O
P
Q
Note: For your convenience, we have included a few extra hardware pieces to help ensure trouble free assembly,
so please don’t be concerned if you have a few pieces leftover. Save these for future use if needed.
PART NO
#1
#2
#3
PARTS
PARTS NAME
QTY
Bolt and Nut
Bolt and Nut
Bolt
M6mmX35mm
M6mmX16mm
4PCS
4PCS
32PCS
L1
L2
Page 3
HARDWARE AND ACCESSORIES
M6mmX60mm
STEP 1: CORNER POST AND PEDESTAL ASSEMBLY
For this and all subsequent steps, refer to the image below the page for how the assemblies
should look like when done.
1) Attach Bracket K to the top of Corner Post A with Bolt #3. DO NOT FULLY TIGHTEN (PART K, #3
BOLT) UNTIL AFTER THE ROOF ASSEMBLY STEP IS COMPLETED ON PAGE 7.
2) Attach Post Base J to the bottom of Corner Post A with Bolts #3.
3) Repeat the above procedures for the other three corner posts.
NOTE: DO NOT OVERTIGHTEN ANY NUTS OR BOLTS…TIGHTEN UNTIL SNUG. TO AVOID
STRIPPING AND BINDING OF THE HARDWARE, WE DO NOT RECOMMEND THE USE OF POWER
TOOLS TO TIGHTEN ANY HARDWARE. PLEASE USE THE HAND TOOLS PROVIDED.
COMPLETED ASSEMBLY FOR STEP 1
K
K
K
K
A
A
A
A
#3
①
②
③
N
Page 4
WARNING: TO AVOID DAMAGE OR INJURY, DO NOT LEAVE
POSTS STANDING UPRIGHT UNATTENDED. LAY DOWN ON A
SOFT SURFACE TO AVOID SCRATCHING UNTIL READY TO
START THE NEXT STEP.
M6mmX16mm
4PCS
4PCS
4PCS
12PCS
A
J
K
#3
N N1
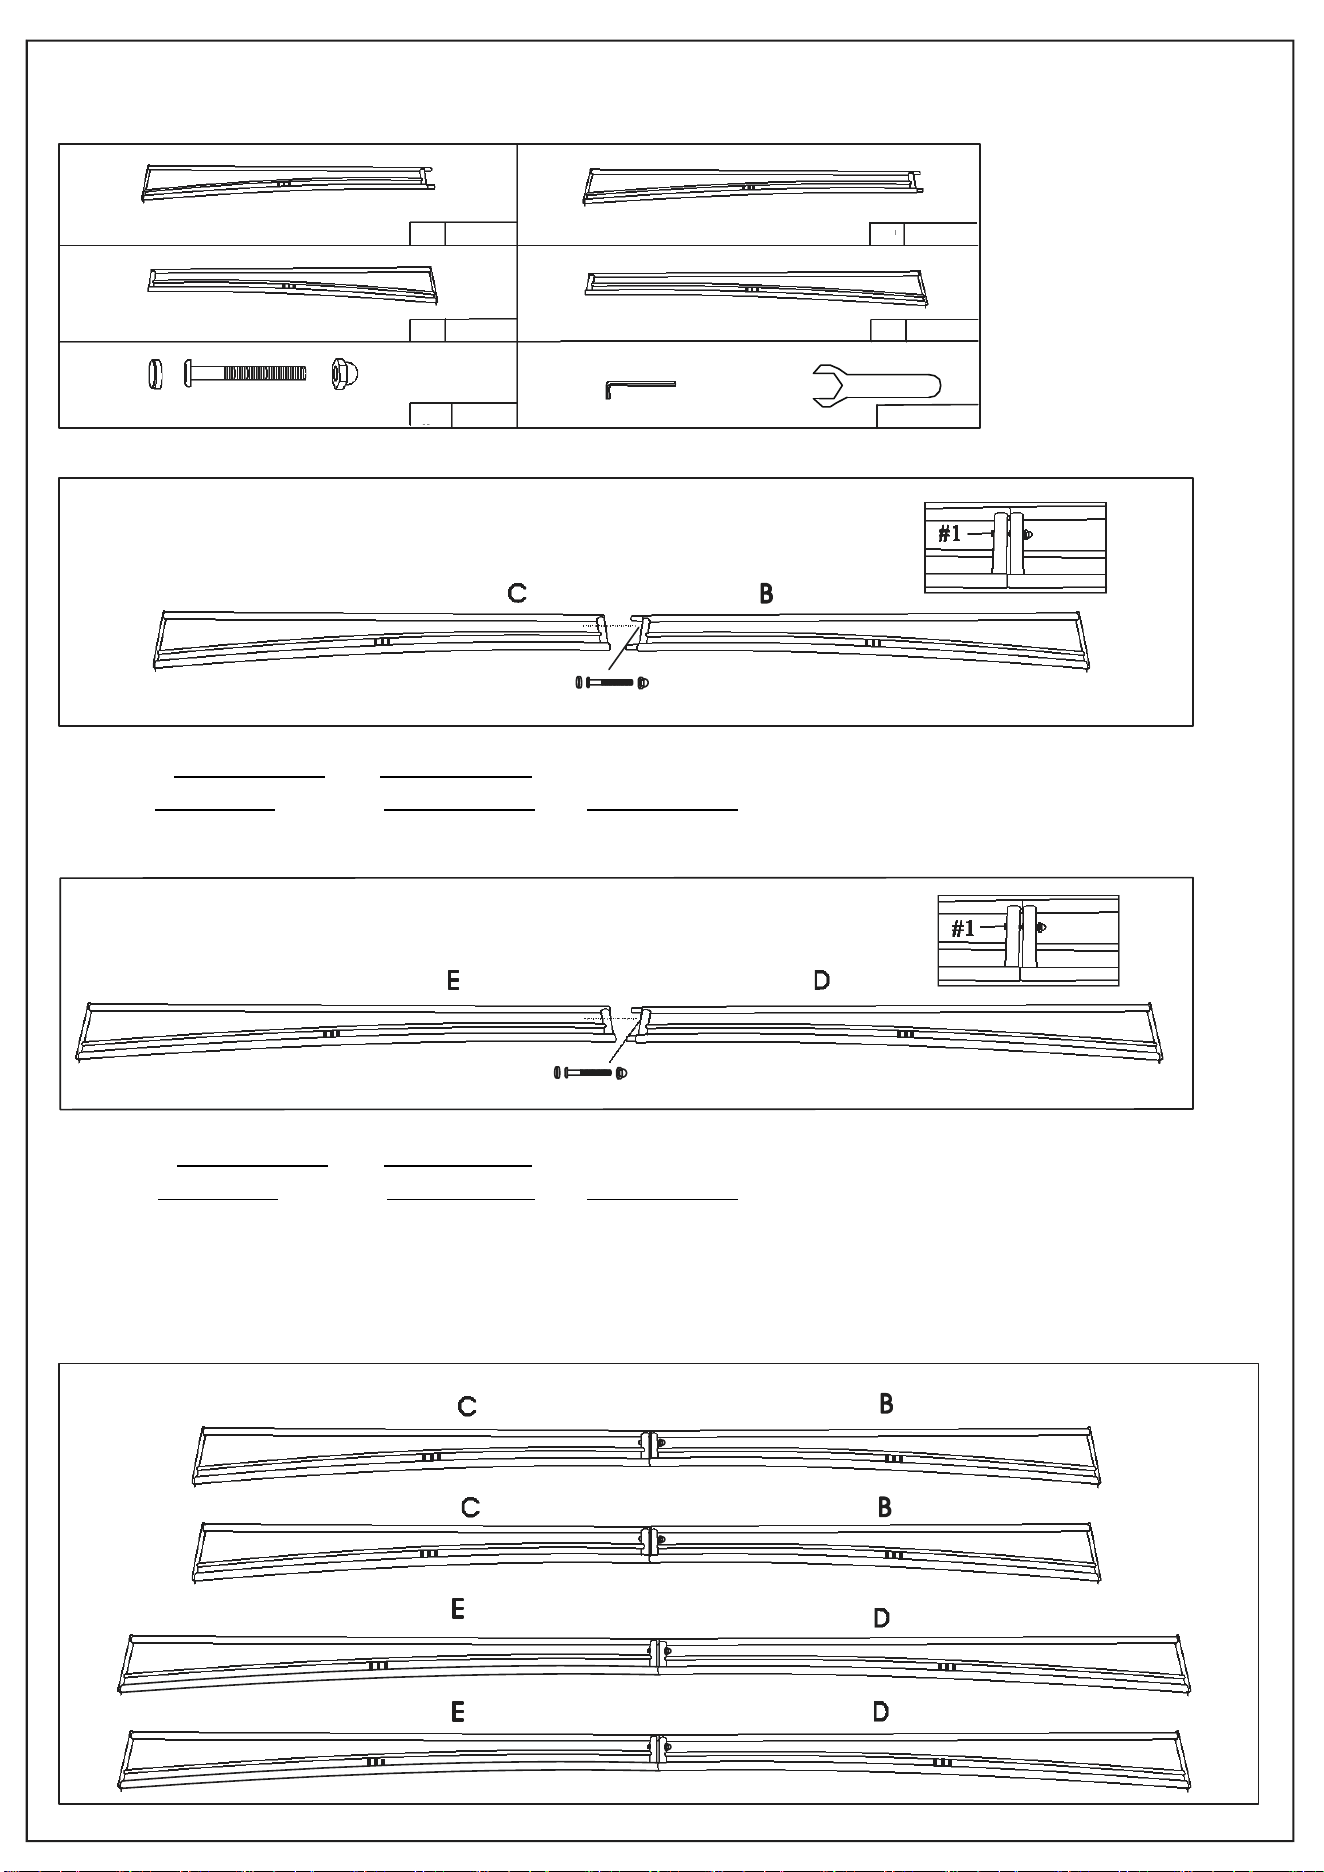
STEP 2: BEAM ASSEMBLY
1) Insert Short Beam B into Short Beam C.
2) Use Bolt/Nut#1 to secure Short Beam C and Short Beam B to form a complete short beam.
3) Repeat above procedures 1) and 2) to assemble the other short beam.
4) Insert Long Beam D into Long Beam E.
5) Use Bolt/Nut#1 to secure Long Beam E and Long Beam D to form a complete long beam.
6) Repeat the procedures 4) and 5) to assemble the other long beam.
COMPLETED ASSEMBLY FOR STEP 2
N+N1
Page 5
#1
#1
M6mmX60mm
2PCS
2PCS
2PCS
2PCS
4PCS
B
C
D
E
#1
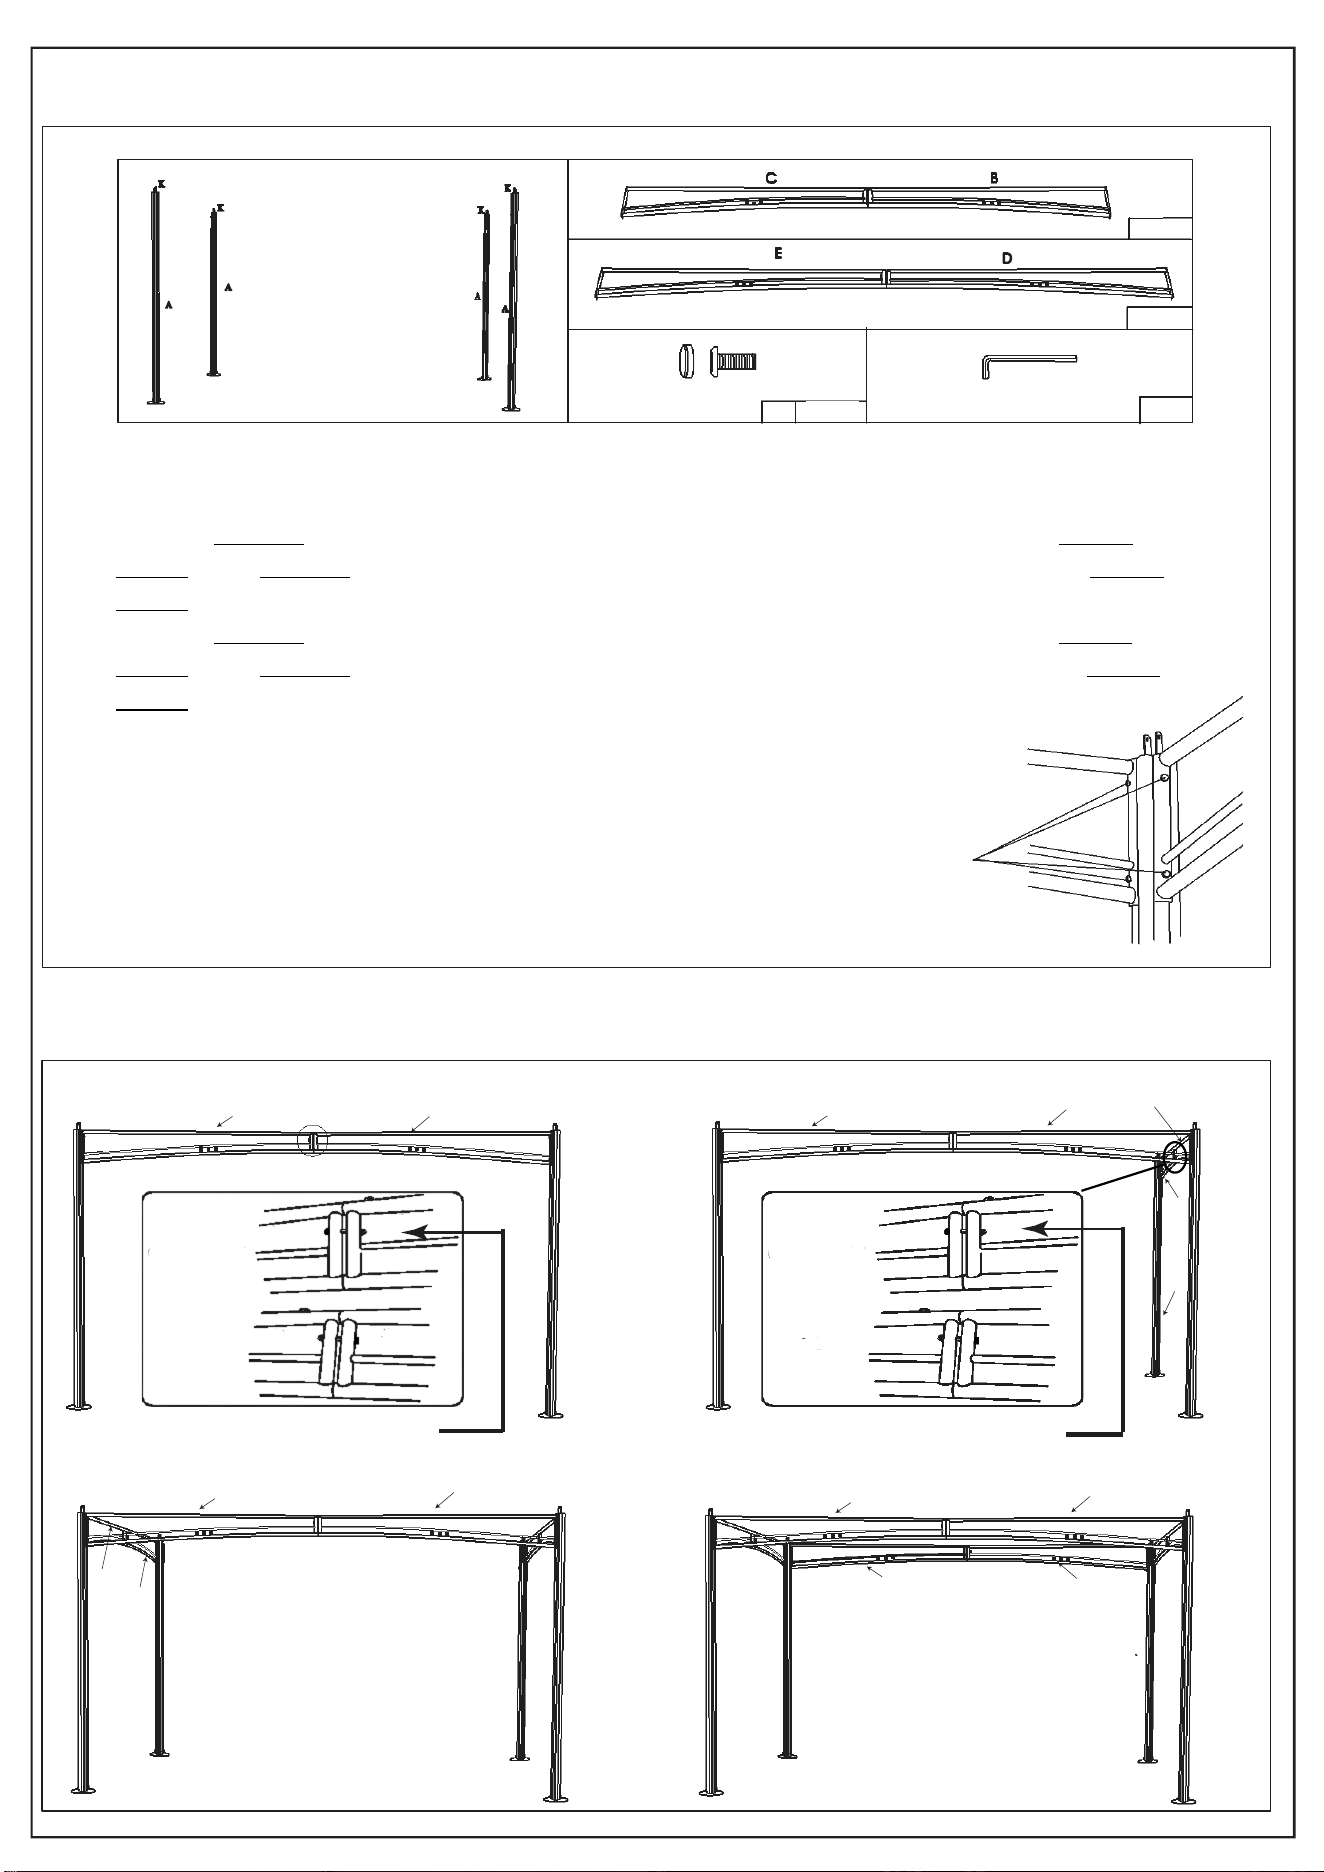
Assemble the Main Frame Step by Step
E D E D
C
A A
%
&
A
'
'
STEP 3: MAIN UPPER FRAME ASSEMBLY
1) Please have a free standing ladder ready for ease of assembly.
2) Use 2 Bolts #3 to attach the B side of the assembled Short Beams to the outside right Corner
Post A and 2 Bolts #3 to attach the C side of the assembled Short Beams to the outside left Corner
Post A. (SEE ILLUSTRATION BELOW)
3) Use 2 Bolts #3 to attach the D side of the assembled Long Beams to the outside right Corner
Post A and 2 Bolts #3 to attach the E side of the assembled Long Beams to the outside left Corner
Post A. (SEE ILLUSTRATION BELOW)
4) Repeat the above procedures until the frame is up.
**IMPORTANT
Please insure that all Side Beams follow
Illustration below. Failure to do so may
cause damage to canopy once placed on frame.
#3
M6mmX16mm
#3
N
Page 6
This side faces outside.
E
E
D
D
Fig 3.3
Fig 3.4
D
E
This side faces outside.
B
C
CORRECT
WORNG
CORRECT
WORNG
C
B
C
B
E
D
D
E
A
Fig 3.2
B
2PCS
2PCS
16PCS
Fig 3.1
F1 F2
F1
F2
3)Hold the Roof Hub I in the air, letting receivers (H) face the long side of the gazebo while
receivers (G) face the short side.
4)
Place Long Corner Roof Tubes F2 into the Bracket K located on the top of each Corner Post.
Secure with Bolts and Nuts #2.
F2
K
F1
F1
H
G
G
Short side of the frame
H
F1 F1
F2
(Upward View)
Long side
STEP 4: ROOF ASSEMBLY
1) Connect Short Corner Roof Tube F1 and Long Corner Roof Tube F2 to from one complete
corner roof tube. Repeat this to form four complete corner roof tubes.
2) Please have a freestanding ladder ready at the center of the canopy gazebo.
Snap in four complete corner roof tubes to the receivers (F1) of the Roof Hub I.
COMPLETED ASSEMBLY FOR STEP 4
Page 7
4PCS
4PCS
4PCS
1PC
F1
F2
#2
I
M6mmX35mm
F2
F2
F2
F1
F1
F1
F1
I
H
Click
H
(Upward View)
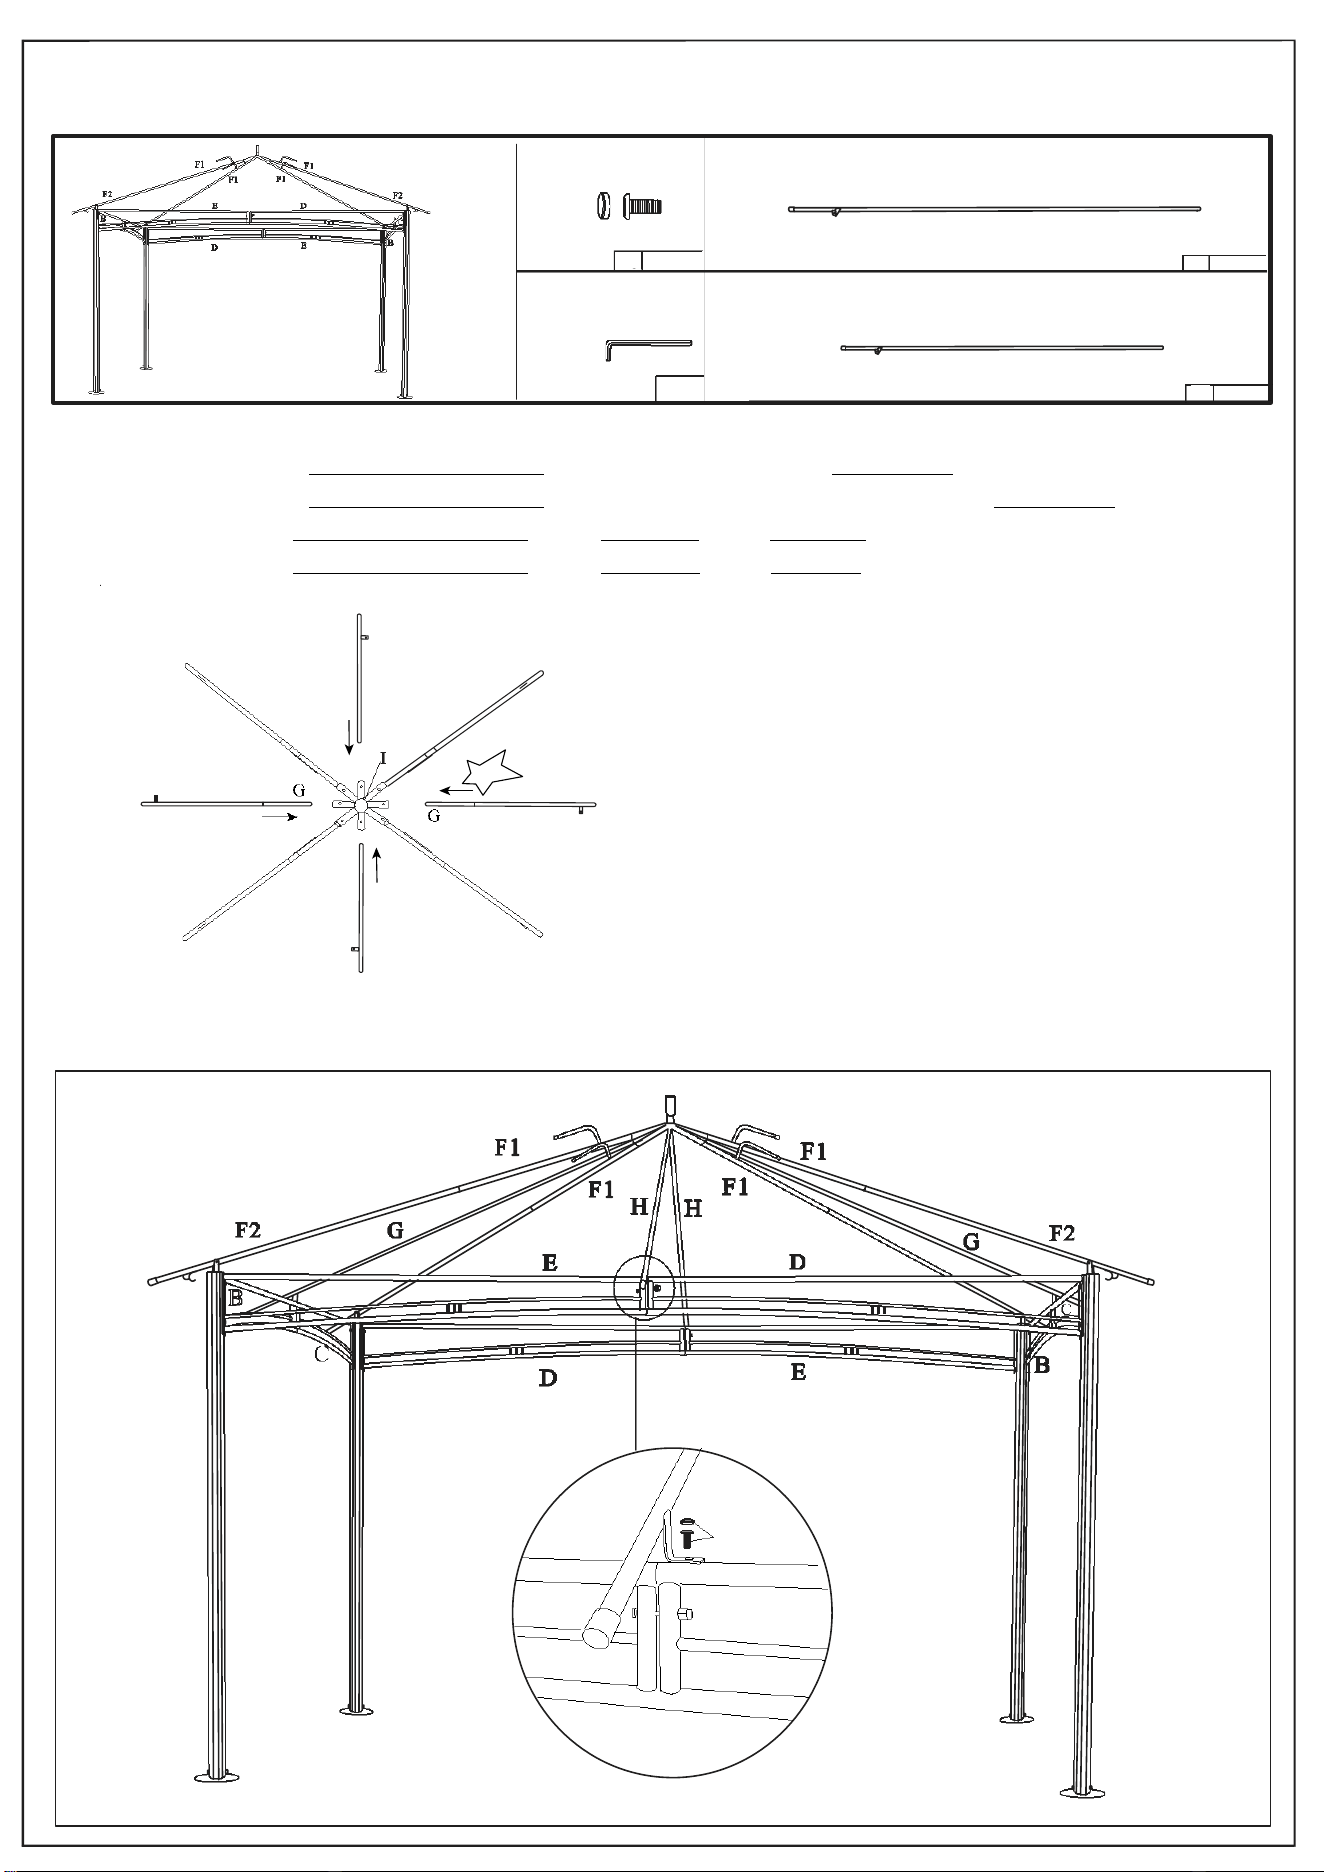
STEP 5: ROOF ASSEMBLY
1) Snap in two Middle Roof Tubes G to the receivers (G) of the Roof Hub I.
2) Snap in two Middle Roof Tubes H to the remaining two receivers (H) of the Roof Hub I.
3) Secure the Middle Roof Tubes G to the Beams B using Bolts #3.
4) Secure the Middle Roof Tubes H to the Beams D using Bolts #3.
COMPLETED ASSEMBLY FOR STEP 5
M6X16mm
Page 8
N
4PCS
2PCS
2PCS
G
H
#3
#3
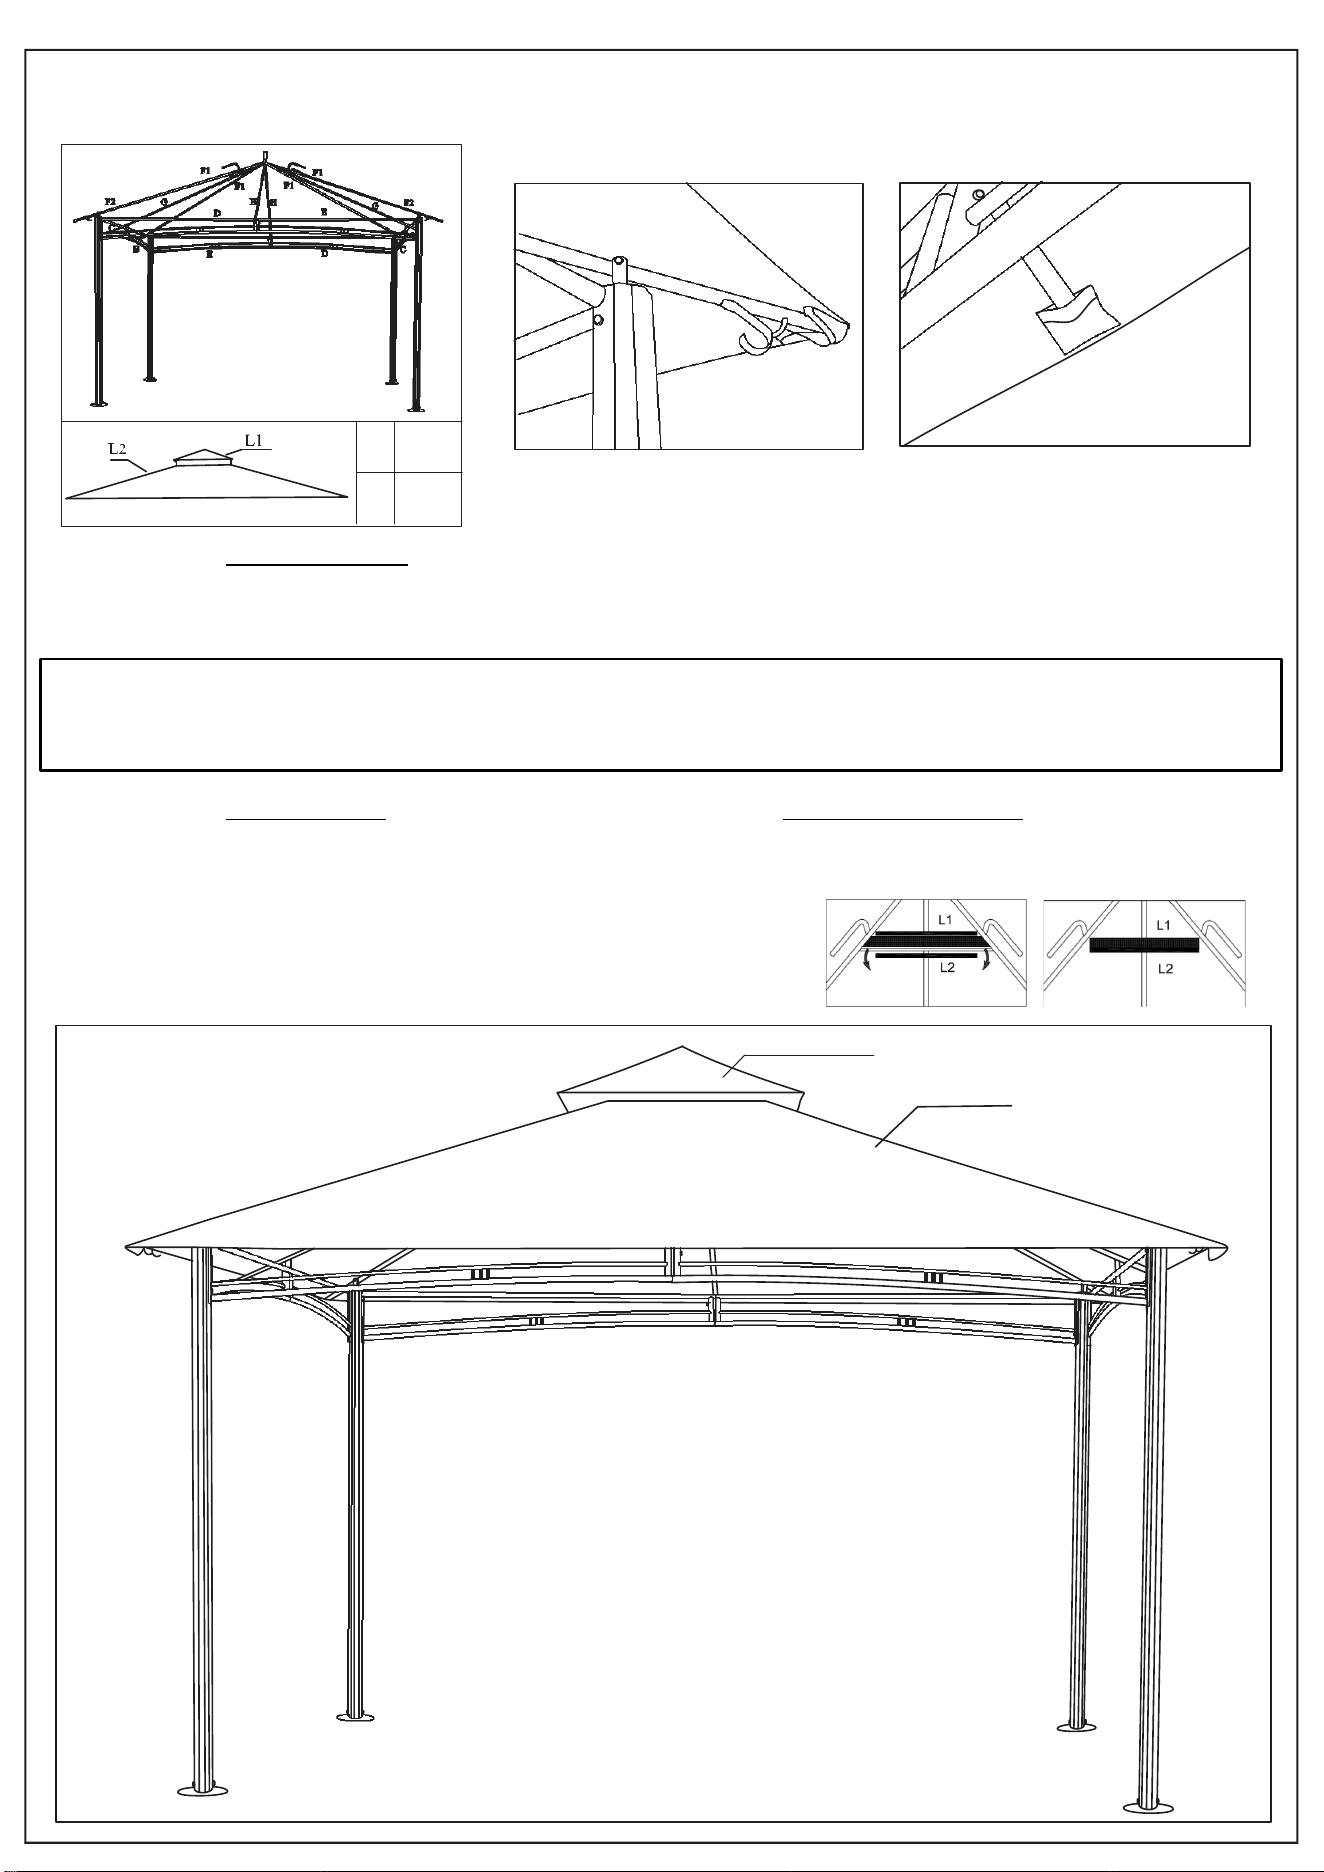
Fig. 6.1
Fig. 6.2
IMPORTANT:
The corner roof tubes should be placed into the corner pockets prior to placing the middle roof
tubes into the middle pockets. This will help to place the canopy onto the roof with ease.
STEP 6: TOP CANOPY ASSEMBLY
1. Gently place Main Canopy L2 over roof frame. Pull the canopy down to each corner
until all Corner Roof Tubes fit well into the corner pockets on Canopy. (Fig. 6.1)
Use the pockets in the middle of each side to cover each middle roof tube. (Fig. 6.2)
2. Gently place Vent Cover L1 (from under the Main Canopy) over Corner Roof Tubes F1.
Pull the Vent Cover down to each corner until all Roof Tubes fit well into the corner pockets
on Vent Covers.
3. Velcro Vent Cover to Main Canopy from underneath.
COMPLETED ASSEMBLY FOR STEP 6
L1
L2
L2
L1
1PC
1PC
Page 9
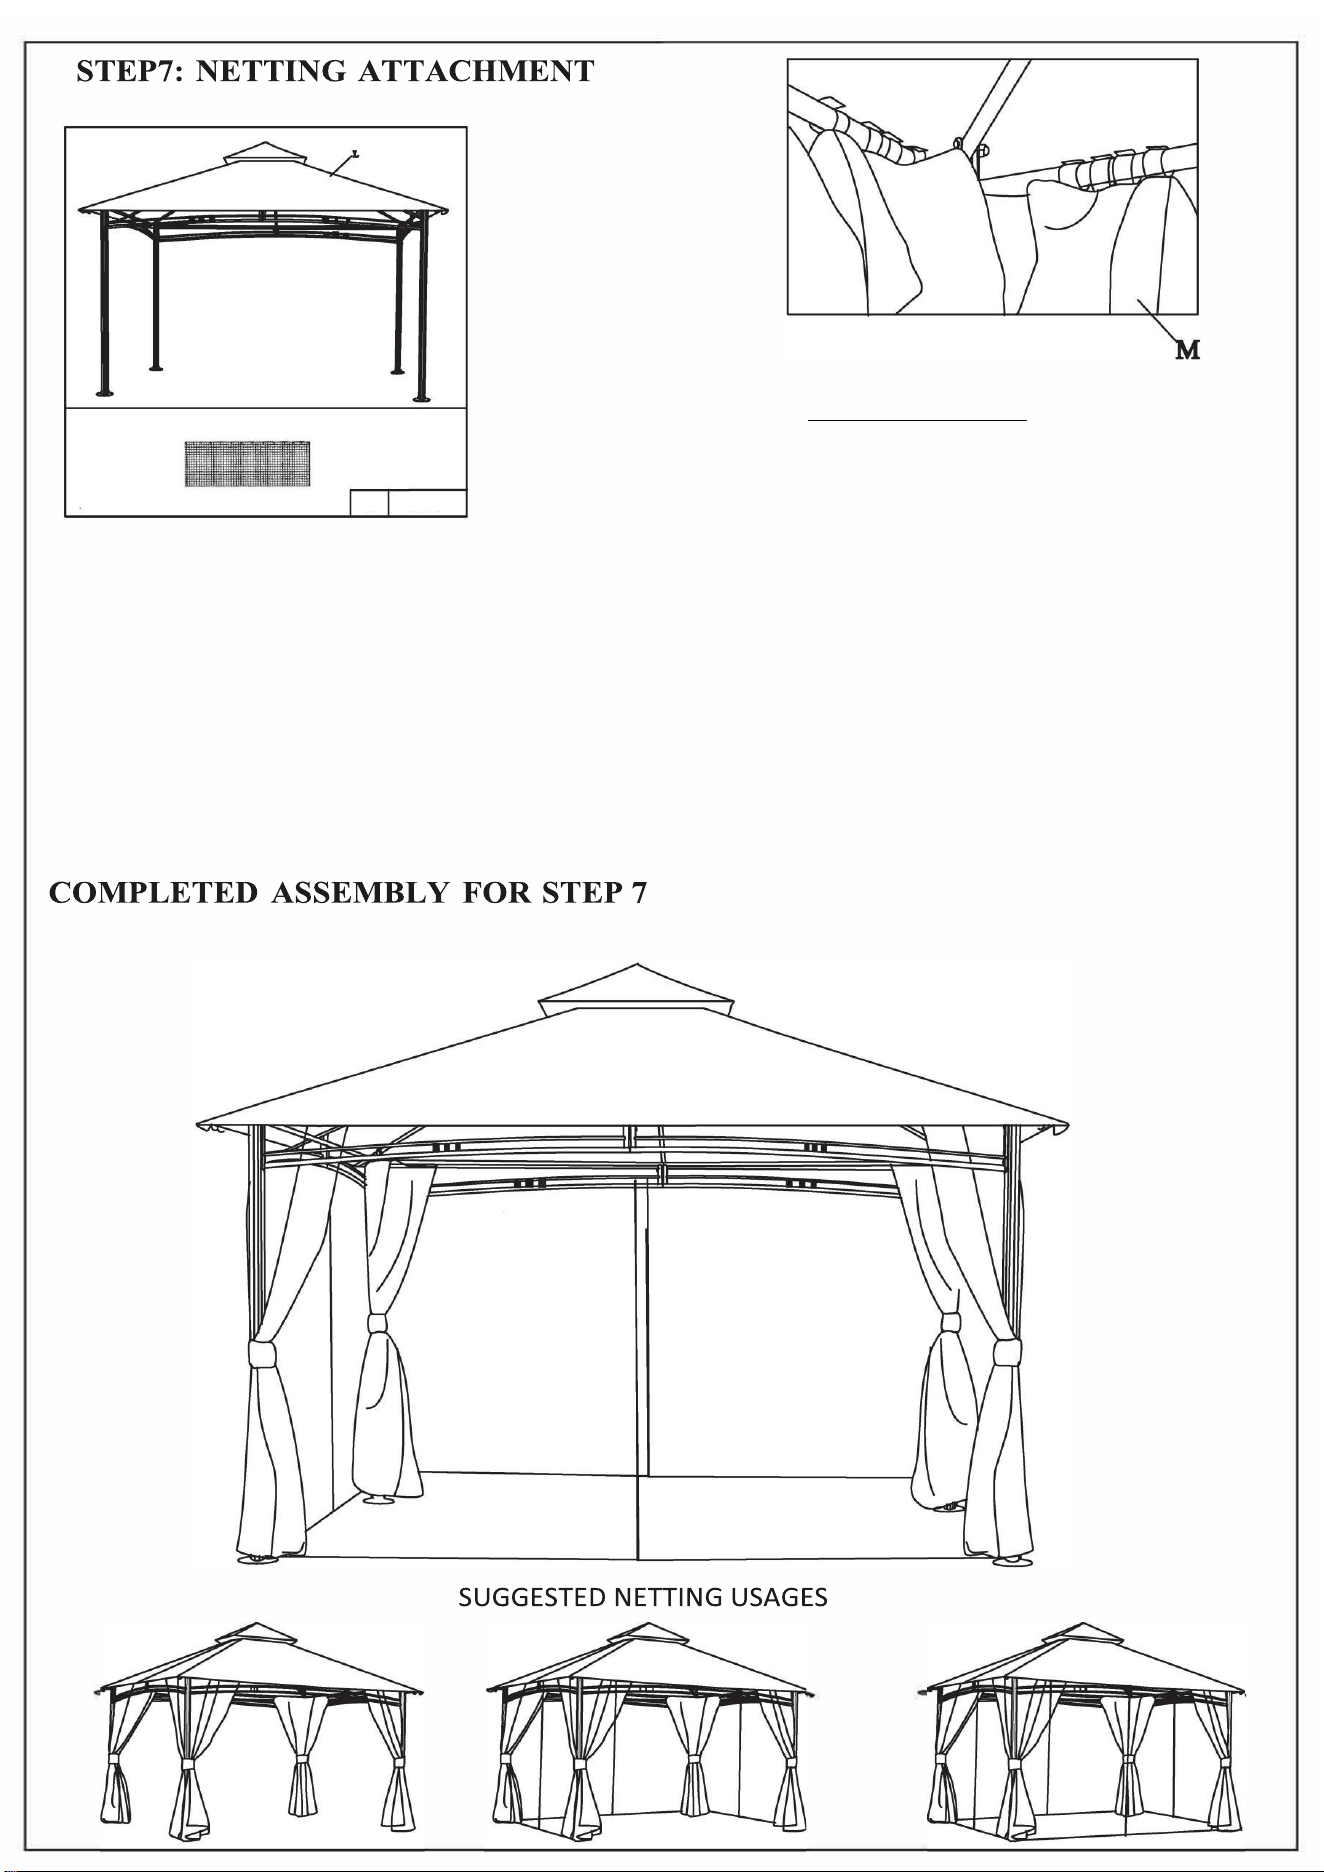
l) From the Tie Backs on the Mosquito Netting M, find the long side
and short side of each panel. Attach the mosquito netting up from
the inside of the garden house with hook and loop straps according
to the long side and short side of frame.
2) Slide the mosquito netting open and close and test the zippers to make sure they match and run smoothly.
3) Please locate tiebacks sewn at the outer corner of the netting and always wrap around the corner posts.
4) The mosquito netting can also be held back to the posts. Unzip and slide the netting to the corner. Use
the fabric tiebacks sewn to the inside of the netting corner to wrap the netting all around the corner post.
Page 10
M
4PCS
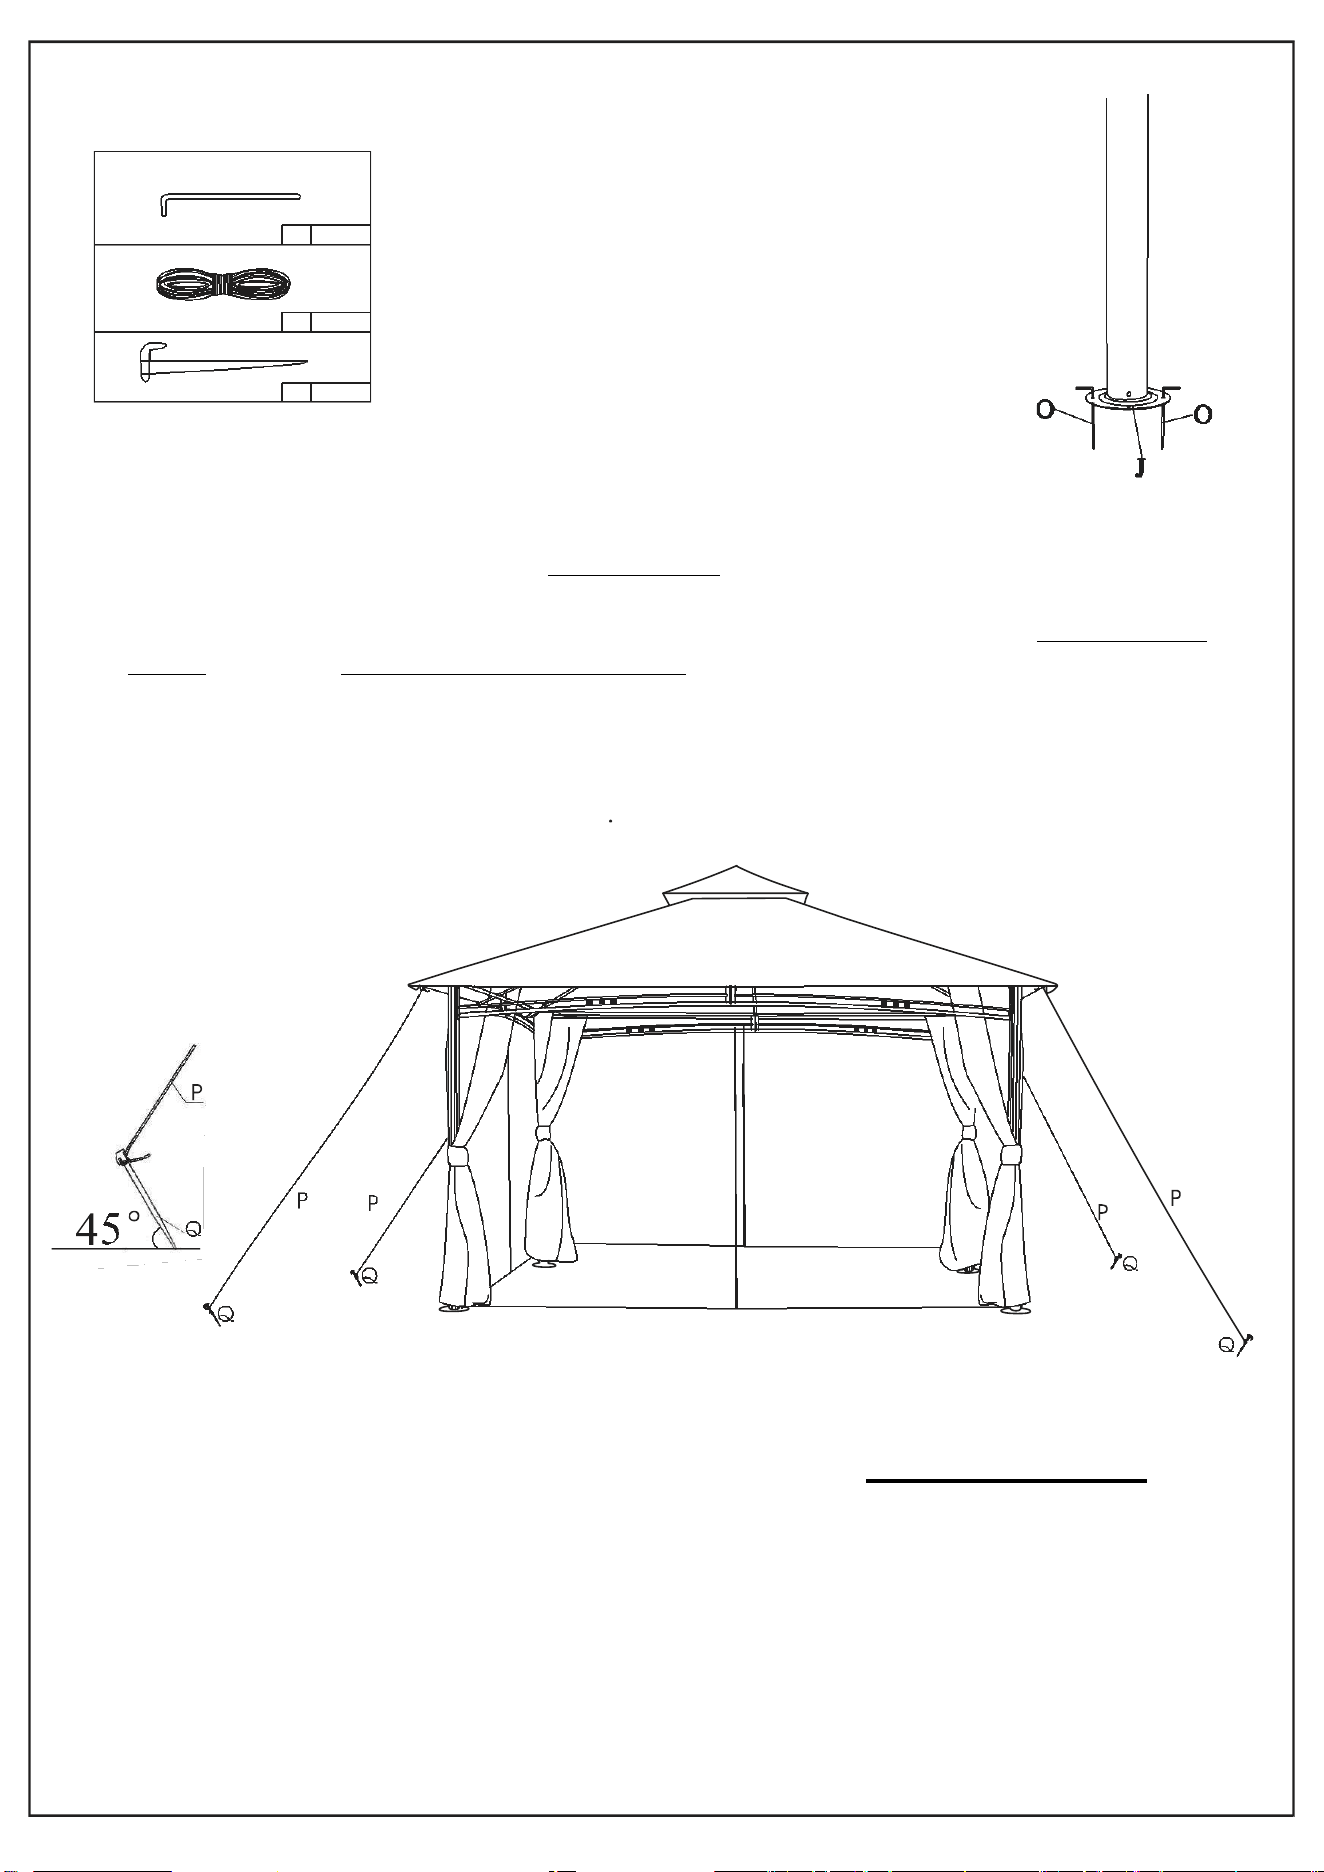
STEP 8: ANCHORING AND ACCESSORIES
1) Carefully adjust the position of the canopy gazebo and make sure four posts are standing completely
upright on level ground. Hammer two Post Anchors O through the holes on each post base into the
ground.
2) Measure out from post to the longest possible distance (to best use the length of the Tie Down Guy-
Rope P) and secure Tie Down Guy- Rope Anchor Q to ground at 45 degree angle.
3) Repeat the above processes at each corner until the canopy gazebo is firmly anchored.
4) Reminder, your canopy gazebo is a shade and privacy structure and is not meant to be permanent.
Please read warning page again for all safety precautions.
Congratulations! You are done with assembly.
Now call your friends and invite them over to celebrate your new canopy gazebo and enjoy.
Customer Service:
Call between 8:30am to 4:30pm C.S.T.
(Monday to Friday)
Linya Outdoor Living, LLC
P.O. Box 423
Ripon WI 54971
TEL: (833) 807-3550
Customer-Service@Linyaoutdoor.com
ITEM#: 184DGZ1-PU-25
MFG#: LGCD0809A
Page 11
O
P
Q
8PCS
4PCS
4PCS