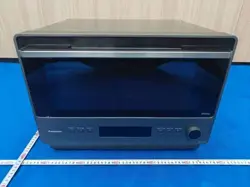
Operating Instructions
...
Commercial High Speed Oven/Microwave Oven
(Original instructions)
Manuel d’utilisation
...
Four commercial à micro-ondes/convection haute vitesse
(Traduction des instructions d’origine)
Instrucciones de Funcionamiento
...
Horno de Alta Velocidad/Horno de Microondas Comercial
(Traducción de las instrucciones originales)
Model No.
NE-SCV3N
H05063K20AP
Thank you for purchasing this Panasonic product.
Please read these instructions completely before operating this oven and keep for future reference.
Before using this product, please pay extra attention to “IMPORTANT SAFETY INSTRUCTIONS”
(pages 4–7).
Nous vous remercions d’avoir choisi ce produit Panasonic.
Avant d’utiliser ce four, veuillez lire attentivement le manuel d’utilisation et conservez-le pour référence ultérieure.
Avant d’utiliser ce produit, veuillez porter une attention particulière aux « INSTRUCTIONS DE
SÉCURITÉ IMPORTANTES » (pages 62–65).
Muchas gracias por haber adquirido este producto de Panasonic.
Por favor, lea atentamente estas instrucciones antes de operar este horno y guárdelas para futuras consultas.
Antes de usar este producto, preste especial atención a las “INSTRUCCIONES IMPORTANTES
DE SEGURIDAD” (páginas 120–123).
(For USA Only) / (Pour les États-Unis uniquement) / (Solo para EE. UU.)
For microwave oven safety reference, please visit the FDAʼs web page at:
Pour la référence de sécurité du four micro-ondes, veuillez visiter la page Web de la FDA à l’adresse suivante :
Para consultar sobre la seguridad del horno de microondas, visite la página web de la FDA en:
https://www.fda.gov/radiation-emittingproducts/resourcesforyouradiationemittingproducts/ucm252762.htm
Scan the QR code to see it online. / Scannez le code QR pour les lire en ligne / Escanee el código QR para verlo en línea.
Operating Instructions
Manuel d’utilisation
Instrucciones de Funcionamiento
Setting Support Tool
Réglage de l’outil de support
Herramienta de ayuda a la configuración
https://fs.panasonic.com/download/
English Français Español
NOTFINAL
2
3
English
Contents
Page
IMPORTANT SAFETY INSTRUCTIONS ......................................4
INSTALLATION..........................................................8
Parts of your Oven .....................................................12
Accessories ...........................................................14
Care of your Oven ......................................................15
Connecting a USB Memory Stick..........................................18
Connecting to your Personal Computer ....................................19
Types of Container to Use ...............................................20
Cooking Modes ........................................................21
Cooking Chart .........................................................22
Preheating ............................................................24
Starting Preheating ....................................................24
Setting the Required temp. / Lowest cooking temp. ...........................25
Cooling ...............................................................26
Cooling the Oven Interior................................................26
Cooking ..............................................................27
Cooking with a Saved Cooking Menu ......................................27
Cook more ...........................................................28
Creating a Cooking Menu and Registering in Memory ........................29
Cooking Menu Set-up Screen ............................................29
Convection Cooking....................................................30
Grill (Broil) Cooking ....................................................31
Convection-and-Grill (Broil) Cooking .......................................32
Microwave Cooking ....................................................33
Convection-and-Microwave Cooking .......................................34
Grill (Broil)-and-Microwave Cooking .......................................35
Cooking in Steps ......................................................36
Editing a Cooking Menu .................................................38
Deleting a Cooking Menu ...............................................38
Editing a Cooking Menu.................................................39
Using the Assist Cooking Settings Feature ..................................40
Backup and Restore with the USB Memory Stick ............................42
Backup to the USB Memory Stick .........................................42
Performing a Restore from the USB Memory Stick ............................43
Various Settings .......................................................44
Tools ...............................................................44
Regular Maintenance ...................................................52
Troubleshooting .......................................................53
Common Queries ......................................................54
When to Call a Service Agent.............................................55
Copyrights ............................................................56
Specifications .........................................................57
Panasonic High Speed Oven/Microwave Oven Limited Warranty (For USA Only) ..58
Owner’s Record
Model No.
Serial No.
The serial number of this product may be found on
the side of the oven.
You should note the model number and the serial
number of this oven in the space provided and retain
this book as a permanent record of your purchase
for future reference.
Date of Purchase
Dealer’s Name
Dealer’s Address
Q For USA Only
See page 55 before calling
Toll Free
Service Information
To locate a convenient service agent call
1-877-266-6836
www.panasonic.com/cmo
Virtual Test Kitchens
PRECAUTIONS
TO AVOID POSSIBLE EXPOSURE
TO EXCESSIVE MICROWAVE ENERGY
(a) Do not attempt to operate this oven
with the door open since open-door
operation can result in harmful exposure to
microwave energy. It is important not to
defeat or tamper with the safety interlocks.
Under normal conditions, the oven will not
operate with the door open.
(b) Do not place any object between the
oven front face and the door, or allow soil
or cleaner residue to accumulate on
sealing surfaces.
(c) Do not operate the oven if it is damaged.
It is particularly important that the oven
door close properly and that there is no
damage to the :
(1) door (bent)
(2) hinges and latches (broken or
loosened)
(3) door seals and sealing surfaces.
(d) The oven should not be adjusted or
repaired by anyone except properly
qualified service personnel.
TV / RADIO / WIRELESS EQUIPMENT
INTERFERENCE
This product has been tested and found to comply with the limits for Microwave Oven, pursuant
to Part 18 of the FCC Rules. This product can radiate radio frequency energy, which could cause
interference to such products as radio, TV, baby monitor, cordless phone, Bluetooth, wireless
router, etc., which can be confirmed by turning this product off and on. If present, the user is
encouraged to try to correct by taking one or more of the following countermeasures:
(1) Increase the spacing distance between the microwave oven and other product receiving the
interference.
(2) If possible, use a properly installed receiver antenna and/or reorient the receiving antenna of
the other product receiving the interference.
(3) Plug the microwave oven into a different outlet from the other product receiving the
interference.
(4) Clean door and sealing surfaces of the oven. (See Care of your Oven)
4 5
English
Your oven is a cooking device and you should use as much care as you use with a stove or any
other cooking device.
When using this electric appliance, basic safety precautions should be followed, including the
following:
WARNING
– To reduce the risk of burns, electric shock, fire, injury to persons or exposure
to excessive microwave energy:
1. Read all instructions before using the appliance.
2. Read and follow “PRECAUTIONS TO AVOID POSSIBLE EXPOSURE TO EXCESSIVE
MICROWAVE ENERGY,” found on page 3.
3. This appliance must be grounded. Connect only to a properly grounded outlet. See
“GROUNDING INSTRUCTIONS” found on page 8.
4. Install or locate this appliance only in accordance with the provided installation instructions found
on page 8.
5. Do not cover, or block any openings on this appliance.
6. Do not store, or use this appliance outdoors. Do not use this product near water for example,
near a kitchen sink, in a wet basement, or near a swimming pool, or similar locations.
7. Use this appliance only for its intended use as described in this manual. Do not use corrosive
chemicals or vapors in this appliance. This type of oven is specifically designed to heat, or cook
food. It is not designed for industrial or laboratory use.
8. When cleaning surfaces of door and oven that come together on closing the door, use only mild,
non-abrasive soaps or detergents applied with a sponge or soft cloth.
9. As with any appliance, close supervision is necessary when the microwave oven is used by
children.
10. DO NOT operate this appliance if it has a damaged cord or plug, is not working properly, or has
been damaged or dropped.
11. Do not immerse cord or plug in water.
12. Keep cord away from heated surfaces.
13. Do not let cord hang over edge of table or counter.
14. SUITABLE FOR SERVICING ONLY WHEN DE-ENERGIZED. This appliance should be serviced
only by qualified service personnel. Contact the nearest authorized service facility for
examination, repair or adjustment.
Do NOT remove the outer panel of the oven.
IMPORTANT SAFETY INSTRUCTIONS
Your safety and the safety of others are very important.
We have provided important safety messages in this manual and on your appliance.
Always read and obey all safety messages.
This is the safety alert symbol. It is used to alert you to potential hazards that can kill
or hurt you and others.
All safety messages will follow the safety alert symbol and either the word
“DANGER”, “WARNING” or “CAUTION”. These words mean:
DANGER
You can be killed or seriously injured if you don’t immediately follow
instructions.
WARNING
You can be killed or seriously injured if you don’t follow instructions.
CAUTION
You can be exposed to a potentially hazardous situation which, if not
avoided, may result in minor or moderate injury.
All safety messages will tell you what the potential hazard is, tell you how to reduce the chance
of injury, and tell you what can happen if the instructions are not followed.
15. Some products such as whole eggs and sealed containers (for example, closed glass jars) may
explode and should not be heated in this oven.
16. To reduce the risk of fire in the oven cavity:
(a) Do not overcook food. Carefully attend appliance when paper, plastic, or other combustible
materials are placed inside the oven to facilitate cooking.
(b) Remove wire twist-ties from paper or plastic bags before placing bag in oven.
(c) If materials inside the oven ignite, keep oven door closed, turn oven off, and disconnect the
power cord, or shut off power at the fuse or circuit breaker panel.
(d) Do not use the cavity for storage purposes.
Do not leave paper products, cooking utensils, or food in the cavity when not in use.
17. Liquids, such as water, coffee, or tea are able to be overheated beyond the boiling point without
appearing to be boiling due to surface tension of the liquid. Visible bubbling or boiling when the
container is removed from the microwave oven is not always present. THIS COULD RESULT IN
VERY HOT LIQUIDS SUDDENLY BOILING OVER WHEN THE CONTAINER IS DISTURBED
OR A UTENSIL IS INSERTED INTO THE LIQUID. To reduce the risk of injury to persons:
(a) Do not overheat the liquid.
(b) Stir the liquid both before and halfway through heating it.
(c) Do not use straight-sided containers with narrow necks.
(d) After heating, allow the container to stand in the oven for a short time before removing the
container.
(e) Use extreme care when inserting a spoon or other utensil into the container.
18. Do not install the oven less than 3 feet (916 mm) above the floor. Doing so may result in danger
of burns.
Only a combination of same models are allowed when stacking.
19. The contents of feeding bottles and baby food jars must be stirred or shaken and the
temperature checked before consumption, in order to avoid burns.
20. Microwave heating of beverages can result in delayed eruptive boiling, therefore care must be
taken when handling the container.
21. Floor at adjacent to the oven may be slippery, care should be taken.
22. Do not overturn or drop this oven or accessories. Doing so may cause injury, electric shock, or
microwave leakage.
23. Do not use the oven near an automatically controlled device such as an automatic door or a fire
alarm when you are using this oven via wireless LAN repeater.
Electromagnetic waves, originating from a wireless LAN, for example, can affect an
automatically controlled device, leading to malfunction that can cause an accident.
24. Do not use the oven in a hospital or near electrical medical devices when you are using this
oven via wireless LAN repeater.
Electromagnetic waves, originating from a wireless LAN, for example, can affect an electrical
medical device, leading to malfunction that can cause an accident.
25. Persons fitted with a pacemaker should keep the pacemaker at least 15 cm away from the
wireless LAN repeater when you are using this oven via wireless LAN repeater.
Electromagnetic waves, originating from a wireless LAN, for example, may affect the
pacemaker’s operation.
26. This appliance shall not be placed or installed where the public has access.
27. HOT CONTENTS CAN CAUSE SEVERE BURNS. DO NOT ALLOW CHILDREN TO USE THE
MICROWAVE. Use caution when removing hot items.
28. Oversized foods or oversized metal utensils should not be inserted in a microwave oven as they
may create a fire or risk of electric shock.
29. Do not clean with metal scouring pads. Pieces can burn off the pad and touch electrical parts
involving a risk of electric shock.
6
7
English
CAUTION
1. In order to maintain the high quality of the magnetron tubes and other components, you are
requested not to turn the oven on without food inside.
2. Do not dry clothes in the oven since there is a possibility of the clothes burning if left in the oven
for too long of a time.
3. The oven is intended for heating food and beverages. Drying of food or clothing and heating of
warming pads, slippers, sponges, damp cloth and similar may lead to risk of injury, ignition or
fire.
4. Do NOT use newspapers or paper bags for cooking.
5. Do NOT hit or strike the control panel. Damage to controls may occur.
6. Accesible parts may become hot during use.
7. Take caution when removing the hot accessories after cooking. It may cause burn. Use oven gloves.
8. Do not store flammable materials next to, on top of, or in the oven. It could be a fire hazard.
9. Do not attempt to deep fat fry in your oven.
10. The oven should not be cleaned with a water jet.
11. The oven should not be cleaned with a steam cleaner.
12. Electromagnetic fields can present a possible danger. It is recommended that people using a
heart pacemaker avoid proximity to these fields.
13. When the oven is not in use, it is recommended that items are removed.
If left inside and the switch is accidentally activated, there is potential for damage to occur.
14. Do not heat with oil from the leftover food or the food left in the accessories in the oven cavity.
Doing so may generate sparks and cause fire or smoking.
15. It is recommended to use personal protection equipment in case of spreading hot food stuff.
16. Exterior oven surfaces, including air vents on the cabinet and the oven door will get hot during use.
Take care when opening or closing door and when inserting or removing food and accessories.
There are heaters situated in the top and back of the oven.
After use, the roof, walls and floor will be very hot.
17. Take caution when rapidly cooling the hot accessories after cooking. It may cause burn with
steam or airborne droplets. It may also cause injury by the accessories breaking.
18. It is essential reheated food is served “piping hot”. Always check before serving and if in doubt
return food to oven for further heating.
All temperatures provided are for guidance only. Local legislation of food temperature requirements
should be applied, to ensure a safe temperature has been reached before serving any food.
19. The standing time is essential for foods cooked or reheated by CONVECTION-AND-
MICROWAVE, or GRILL (BROIL)-AND-MICROWAVE. During the standing time, heat will
continue to conduct to the center to cook the food completely.
The denser the food, the longer the standing time. Reheated foods also require a standing time.
20. When the oven has finished operating, the fan motor will continue to rotate in order to cool the
electric components. This is normal, and food can still be removed from the oven during this
cooling period. Do not remove the plug or turn off the breaker.
21. Disconnect the power cord from the wall outlet before installation and be sure the oven cavity is
empty. It may cause electric shock or injury.
USING YOUR OVEN
1.
This oven is intended for commercial use and is not intended for continuous mass production of food.
2. Do not store any objects inside the oven in case it is accidentally turned on. In case of electronic
failure, the oven can be turned o at wall outlet.
WHEN THE HEATER IS TURNED ON FOR THE FIRST TIME
You may detect smoke or a harsh odor. This is normal and is caused by the burning off of the oil
that is used to protect the oven cavity.
You may prefer to perform a blank baking as described below if you find this unpleasant;
1. Place the supplied cooking plate into the oven. (p.14)
2. Preheat the oven at 525°F (280°C) for 20 minutes. (p.24)
OAfter heating up the oven empty, when you want to end the preheating, press the Stop/Reset pad.
OAlways ventilate when performing a blank baking.
OThere is no food sanitation issues even if you use the oven without performing a blank baking first.
SAVE THESE INSTRUCTIONS
For proper use of your oven read remaining safety cautions and operating instructions.
Certification
cULus, NSF / ANSI 4, FCC Part 18, ICES-001, and UL710B/NFPA96 [EPA202 (UL/KNLZ listed for
ventless operation.)] UL710B (KNLZ) listed for ventless operation.
IF BOTTOM PLATE BREAKS or CRACKS, or THERE IS SPARKING IN THE CAVITY WHILE
HEATING FOOD, DO NOT CONTINUE TO USE OVEN AND CONTACT AUTHORIZED SERVICE
AGENCY IMMEDIATELY!! 1-877-266-6836 (For USA Only)
SUITABLE FOR SERVICING ONLY WHEN DE-ENERGIZED.
During service and/or replacement of parts, the oven should be disconnected from the power
supply. Once the plug is removed, it should remain visible to the service operator to avoid
inadvertent reconnection.
Panasonic Corporation makes no warranties of any kind, either express or implied, including but
not limited to warranties of merchantability, fitness for a particular purpose, of title, or of non-
infringement of third party rights. Use of the product by a user is at the user’s risk. All cooking
settings are for guidance only and should be altered depending on the initial state, temperature,
moisture and type of food. Depending on the characteristics of the food, cooking times and power
levels may need to be adjusted. Prior to service of food ensure it has reached a safe temperature.
IMPORTANT SAFETY INSTRUCTIONS
8
9
English
EXAMINE YOUR OVEN
Unpack the oven, remove all packing material, and examine the oven for any damage such as
dents, broken door latches or cracks in the door. Notify the service agent immediately if the unit is
damaged. DO NOT install it if the unit is damaged.
GROUNDING
When an outlet is not grounded, it is the personal responsibility and obligation of the customer to
have it replaced with a properly grounded outlet.
VOLTAGE AND POWER WARNING
The voltage used must be the same as specified on the oven. Using another voltage than that
which is specified is dangerous and may result in a fire or other type of accident causing damage.
Do not plug your oven in via an extension cable as this can be dangerous. The back of the oven
heats up during use. Do not allow the cord to be in contact with the back of the oven or cabinet
surface.
PLACEMENT OF THE OVEN
Locate the oven on a smooth, flat, and stable surface.
There should be no gap between the table surface and the bottom of the oven. Do not place the
oven in a hot or damp area, e.g. near a stove, sink, or directly above heat lamps on a serving line.
Free airflow around the oven is important. There is a possibility of a small amount of interference
with weak broadcast signals if the oven is too close to a radio or TV.
GROUNDING INSTRUCTIONS
This appliance must be grounded. In the event of an electrical short circuit, grounding reduces the
risk of electric shock by providing an escape wire for the electric current. This appliance is equipped
with a cord having as a grounding wire with a grounding plug. The plug must be plugged into an
outlet that is properly installed and grounded.
WARNING – Improper use of the grounding can result in a risk of electric shock.
Consult a qualified electrician or serviceman if the grounding instructions are not completely
understood, or if doubt exists as to whether the appliance is properly grounded.
If it is necessary to use an extension cord, use only a 3-wire extension cord that has a 3-blade
grounding plug, and a 3-slot receptacle that will accept the plug on the appliance. The marked rating
of the extension cord shall be equal to or greater than the electrical rating of the appliance.
WIRING REQUIREMENTS
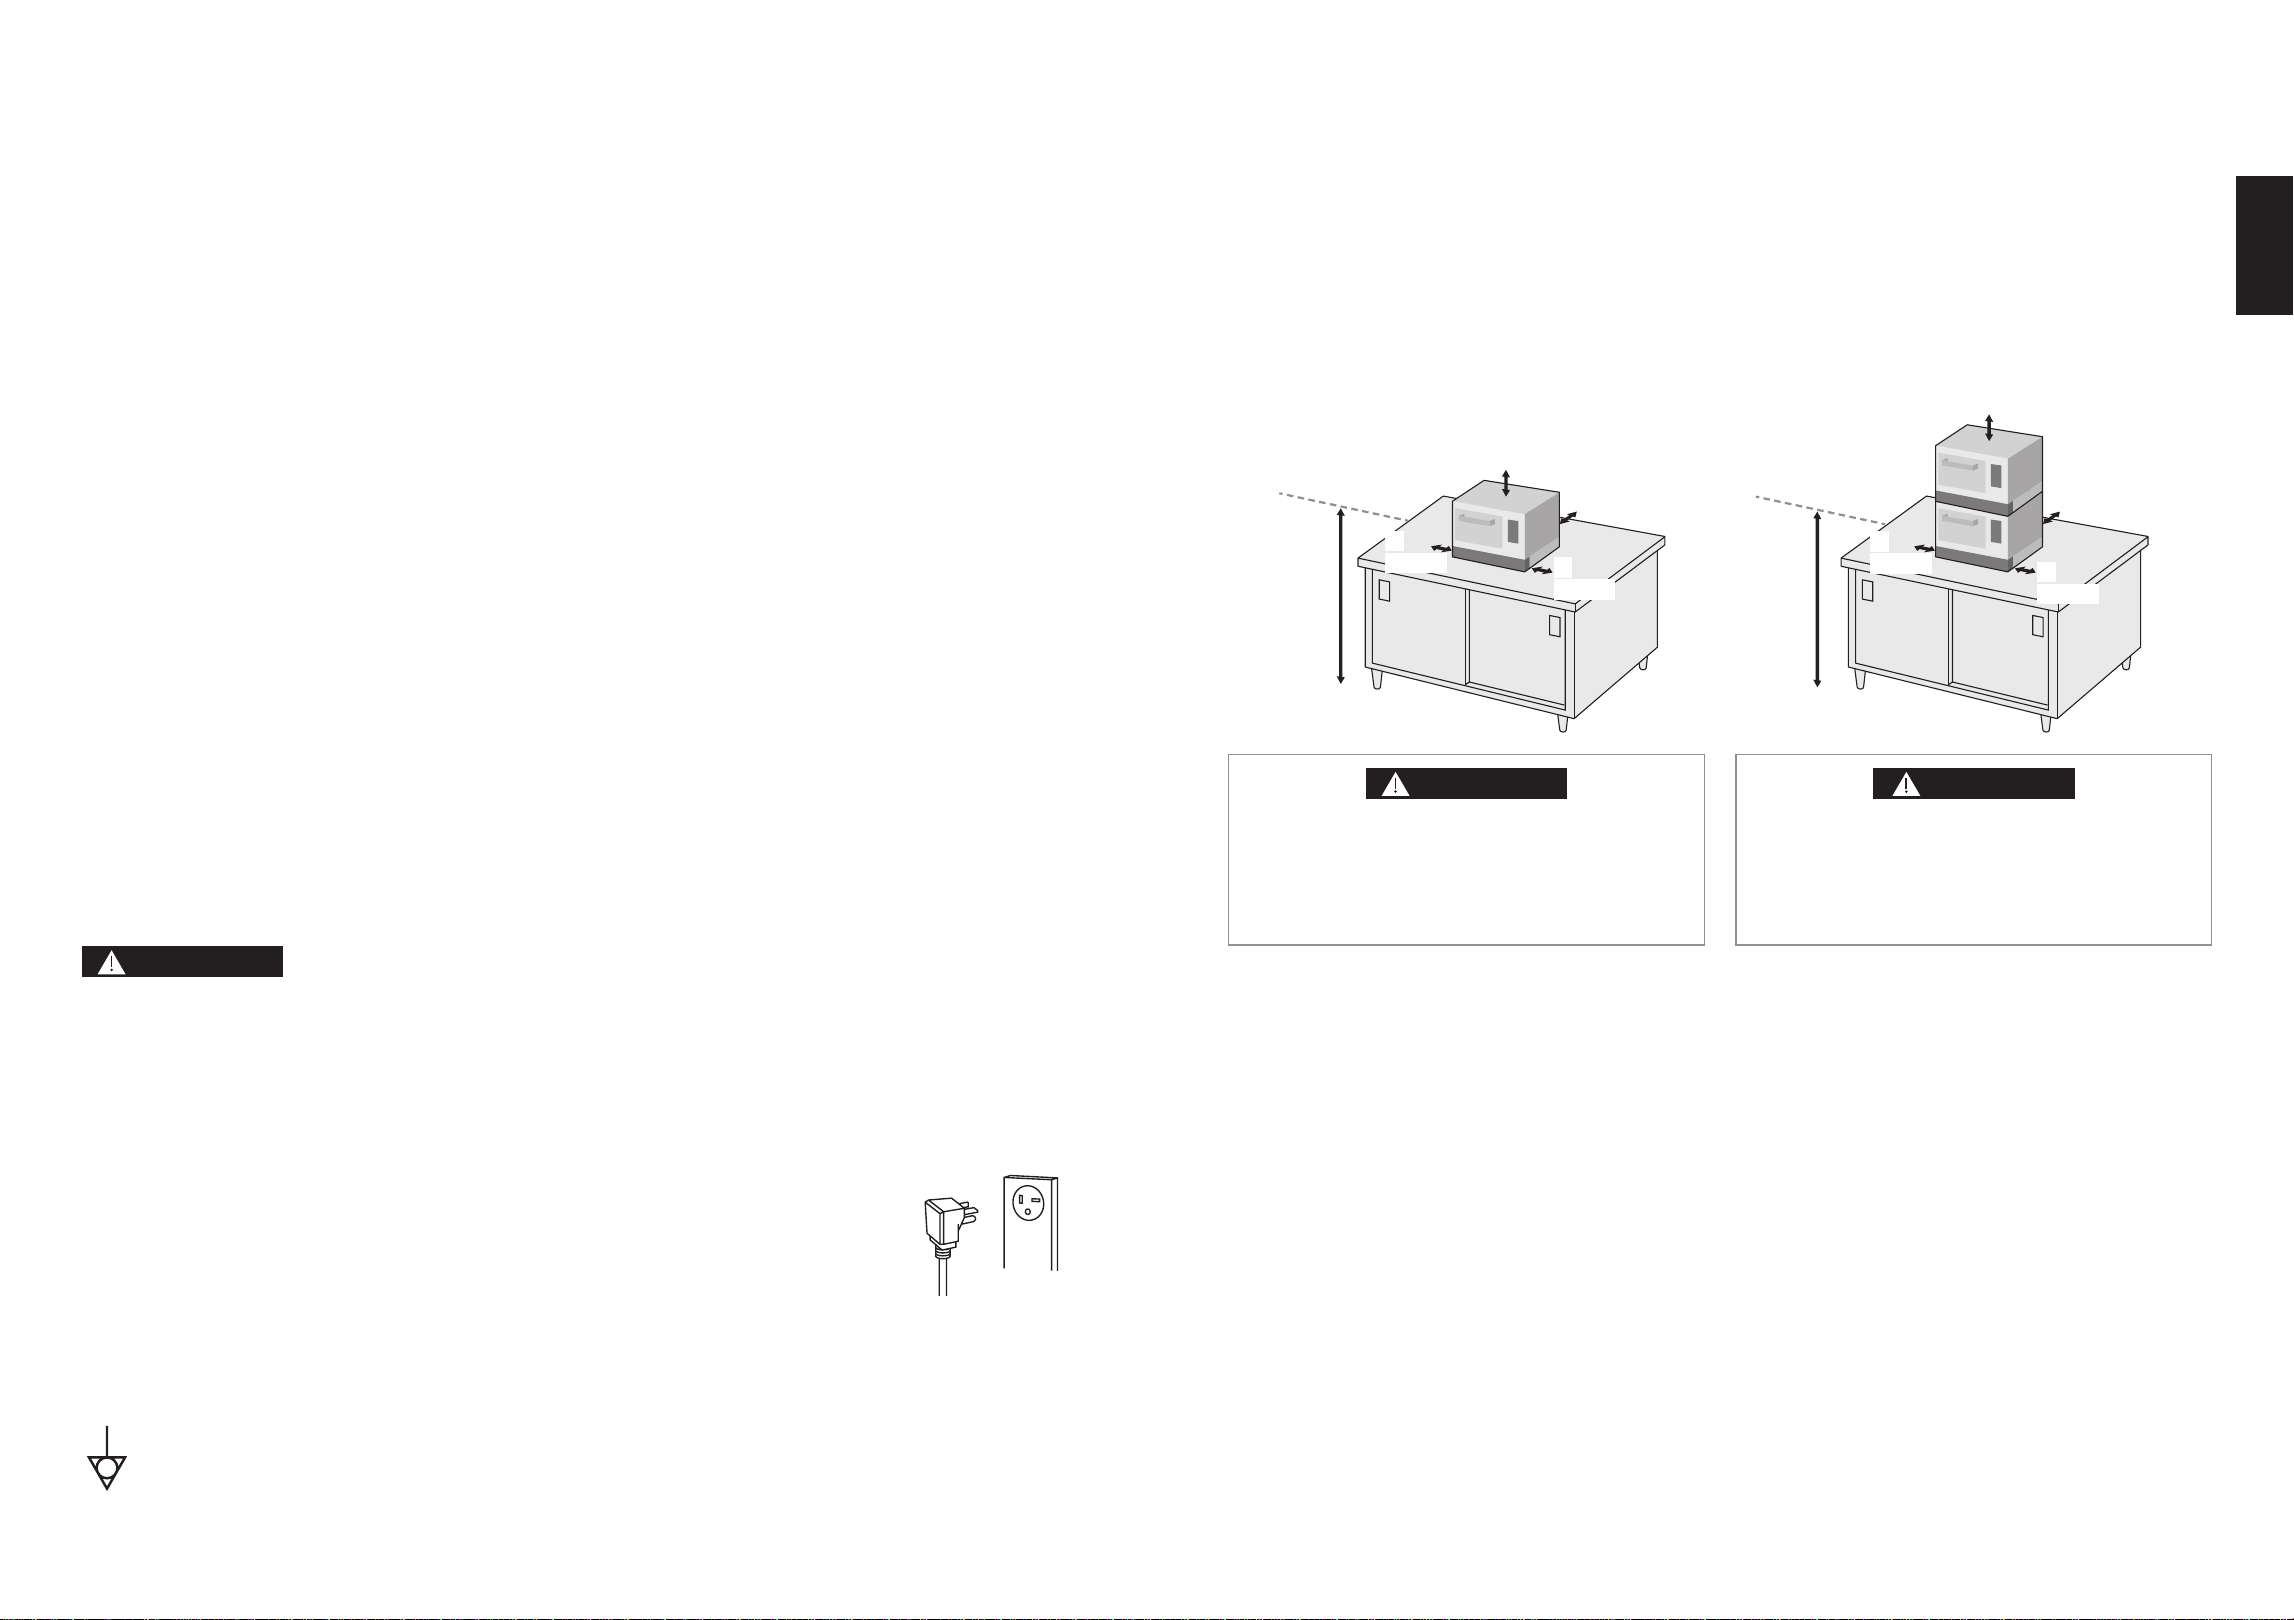
No other appliance should share the circuit with the oven. If it does,
the branch circuit fuse may overload and either cause the oven to
produce lower power output or blow the fuse.
1. This oven must be on a separate, 60 Hz GROUNDED CIRCUIT
– minimum 20 amps.
NEMA #6-20P
208 V/240 V
Grounded Outlet
NEMA #6-20R
2. The ovens are built to operate on 2 different voltages (240 V or
208 V).
An external equipotential bonding conductor is provided at the back side of the oven and it is
marked by this symbol.
PLEASE READ THE FOLLOWING CAUTIONS BEFORE USING THIS OVEN
Failure to follow these instructions and properly maintain this unit may lead to premature failure of
the microwave and may void the warranty.
O The oven is free standing type and shall not be placed in a cabinet. Do not place the oven in a hot
or damp place; e.g. near a gas or electric range. Do not operate the oven when the room
temperature is higher than 104°F (40°C) and/or the humidity is more than 85 %.
O Only a combination of same models are allowed when stacking. (p.10) Not doing so may result
in danger of burns. Oven must be placed for easy access to control panel and door, as well as to
disconnect power or shut off power by fuse or circuit breaker.
8˝ (20 cm)
1.2˝ (3 cm)
4˝
(10 cm)
4˝
(10 cm)
More than
3 feet
(916 mm)*
*For Canada only
8˝ (20 cm)
1.2˝ (3 cm)
More than
3 feet
(916 mm)*
4˝
(10 cm)
4˝
(10 cm)
*For Canada only
WARNING
Do not install the oven less than 3 feet
(916 mm) above the floor. Doing so may
result in danger of burns. Only a
combination of same models are allowed
when stacking.
CAUTION
Disconnect the power cord from the wall
outlet before installation and be sure the
oven cavity is empty.
It may cause electric shock or injury.
O Do not slam door shut or pull down on the door as this may damage the door latch mechanism
and/or hinges and render the microwave inoperative.
O Before use, the user should check that utensils are suitable for use in the oven. See page 20.
O Do not use metalware, ceramics trimmed with gold or silver, or any container with a metal content
when cooking with the microwave.
O If the oven is being placed near other products, ensure that there is the space shown above and
a divider must exist between the oven and other products.
The height of the divider must be greater than or equal to 24˝ (61 cm), or for stacking, greater
than or equal to 40˝ (102 cm).
Ventilation
The NE-SCV3N Oven has been certified by Underwriters Laboratories (UL) for ventless operation in
accordance with UL710B (KNLZ) and NFPA 96.
The test was conducted according to the EPA method 202 test.
Installation, use, and maintenance are to be in accordance with the Standard for Ventilation Control
and Fire Protection of Commercial Cooking Operations, NFPA 96.
Do not cook food items such as fatty raw meats or foods containing low quality animal fats without
proper ventilation. Consult NFPA 96 and local codes to ensure compliance with ventilation
requirements. Failure to comply may void warranty and cause damages or injuries not covered by
the manufacturer.
To ensure continued compliance with all health, building, and fire codes, you are required to
maintain clean and sanitary conditions around your oven at all times.
INSTALLATION
10
11
English
Instruction for
Stacking
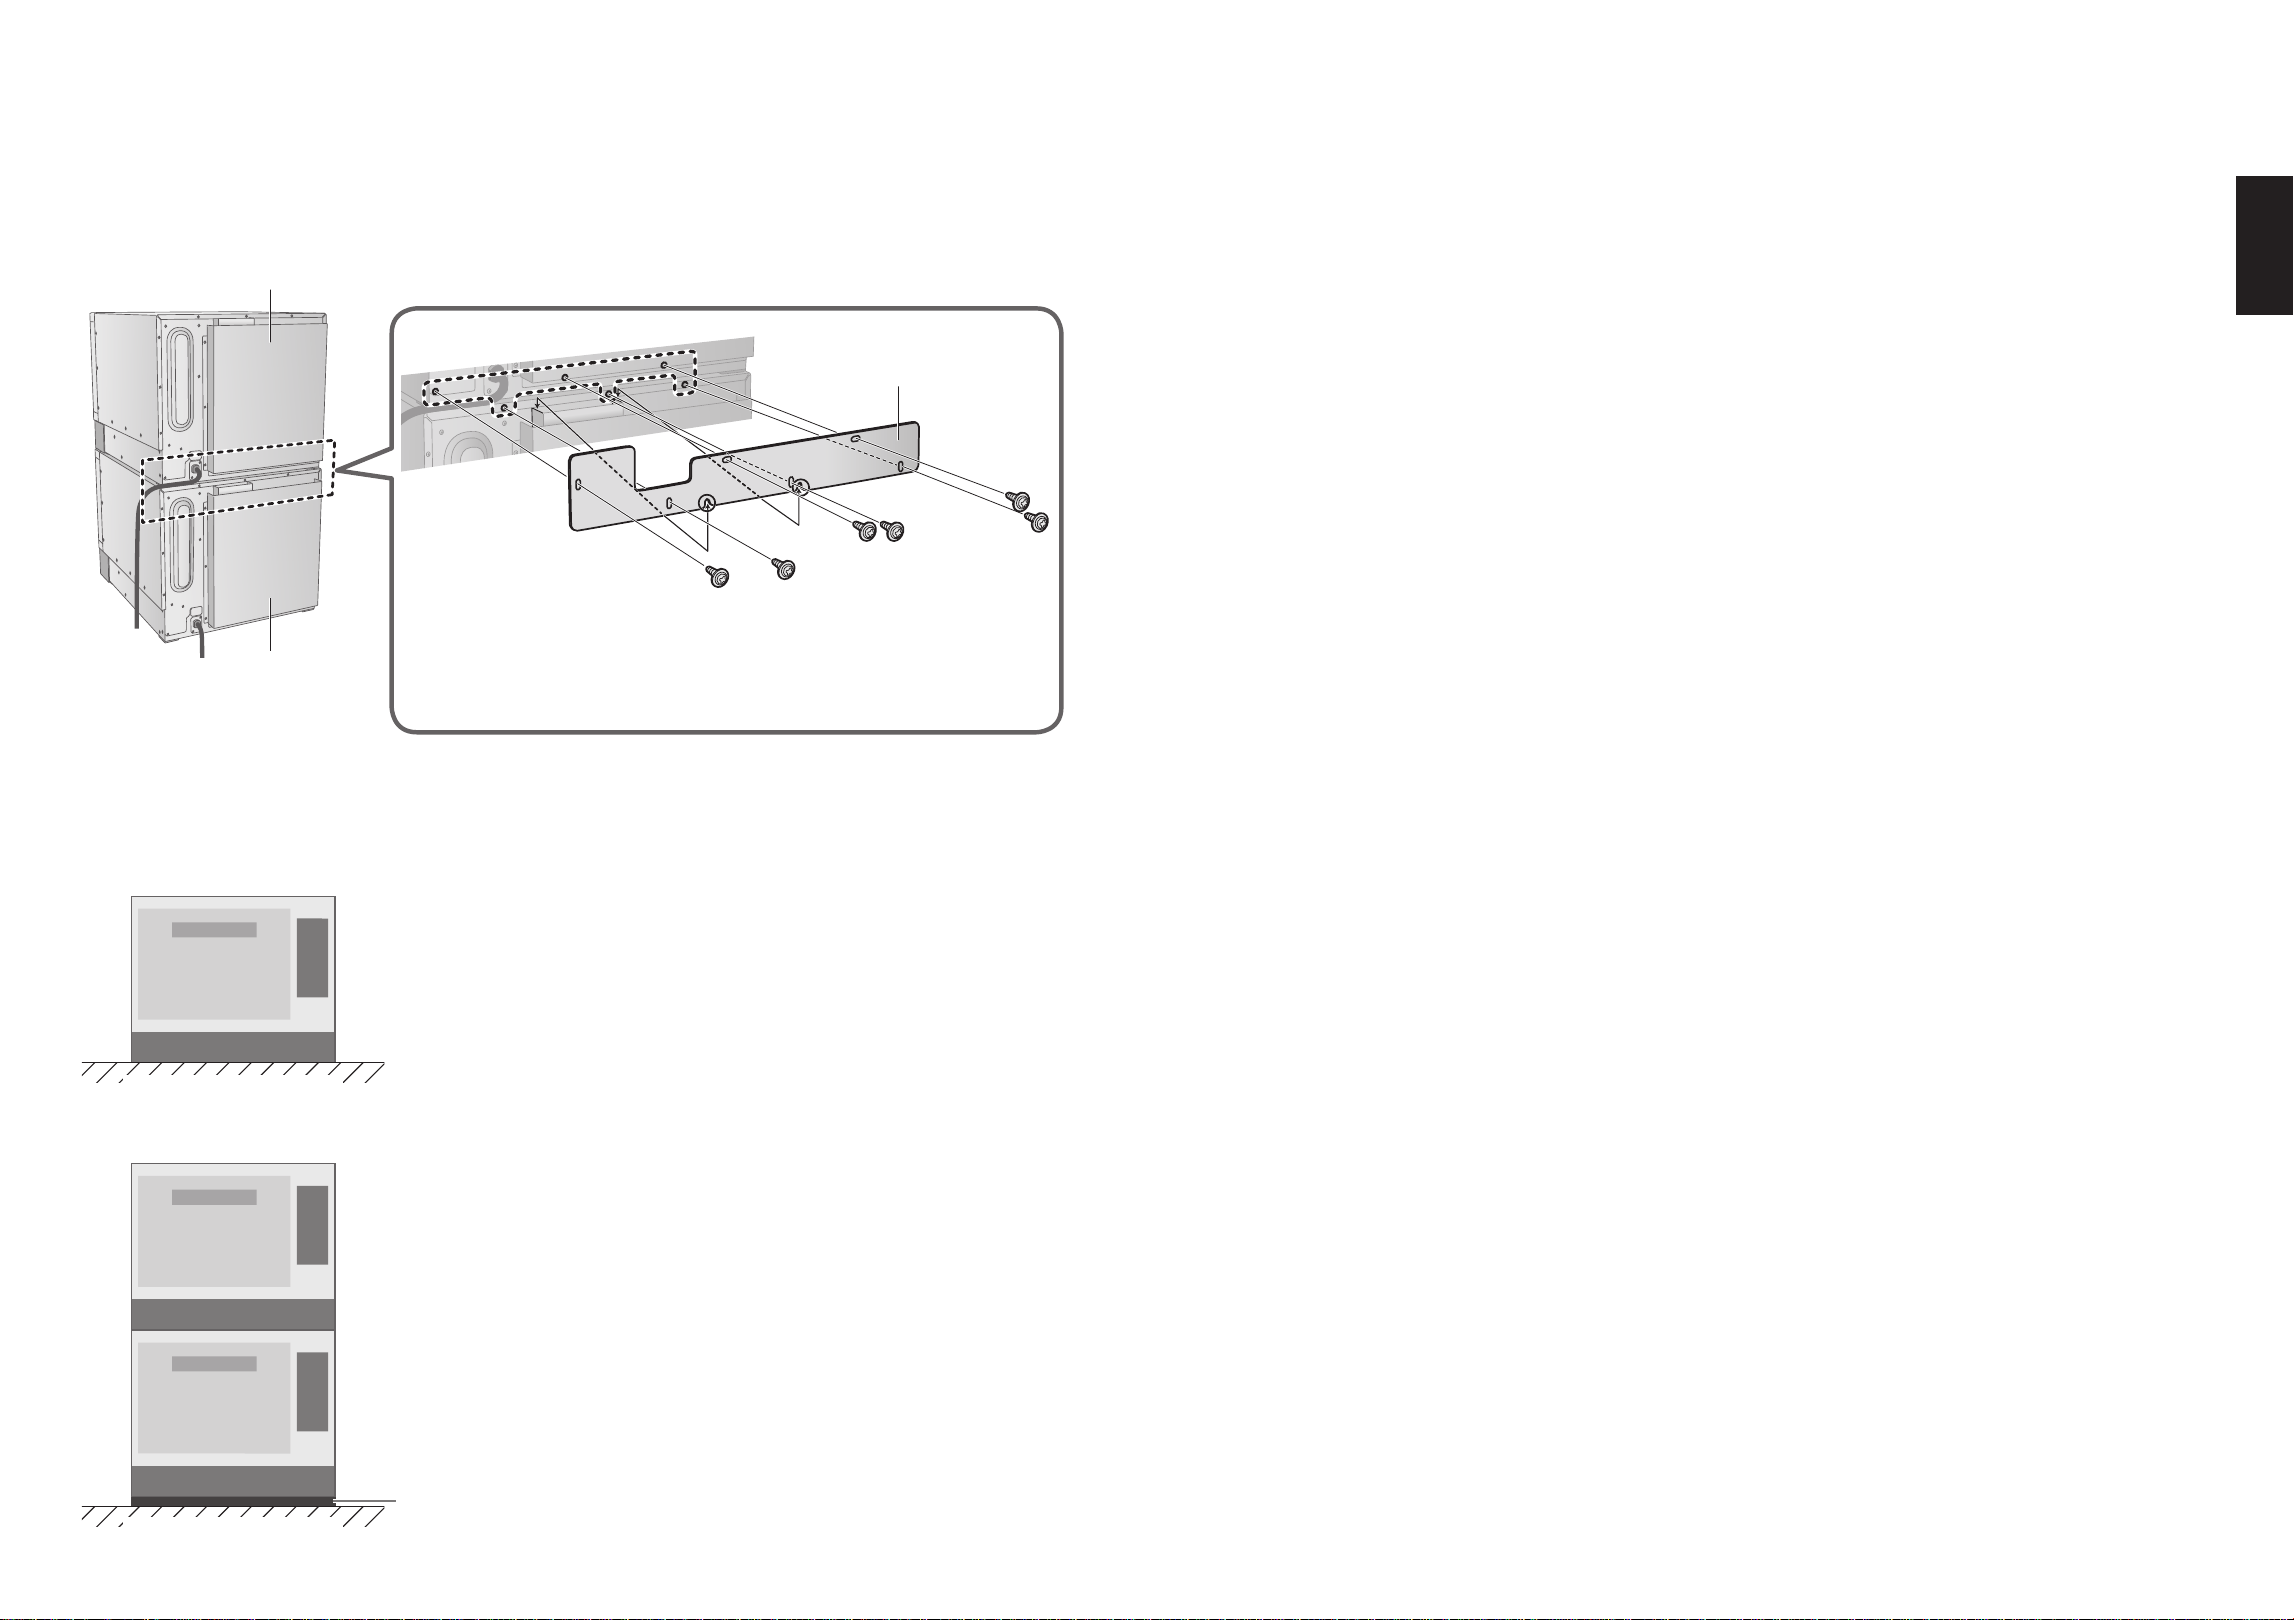
Oven can be stacked up to two ovens by fixing with the Panasonic joint plate. The joint plate is an optional
item. Contact the dealer or a service agent. (p.3)
Request the installation to an electric constructor. (The construction cost is not included in the price of the oven.)
Attach the optional joint
plate (Foot Bracket).
① Remove the marked 6 screws (3 each for the upper and lower
ovens).
② Match the holes of the ovens and the joint plate (Foot Bracket), and
tighten the all screws to fix them.
Upper oven
Lower oven
Make sure the power cord of
the upper oven will not block the
exhaust vent of the lower one.
Installation on the kitchen counter
For single installation
Kitchen counter surface
You can put the oven on the kitchen counter.
To clean underneath the oven, please see
page 17.
For stacking
Silicone Sealant
Kitchen counter surface
When oven is stacked, its base must be sealed in
accordance with NSF Standards as per the
following instructions.
1. Oven shoud be located on a level counter top
surface. Complete the electrical connections.
2. Thoroughly clean and sanitize the oven
bottom perimeter and the counter top area
around the oven perimeter.
3. Remove the Air Filter from the front of the
oven before applying high temp. silicone.
4. Lay generous bead of high temp. silicone seal
around the entire perimeter of the base of
each oven unit.
5. Smooth the silicone seal into the crevice with
nger or tool to provide a cover seal.
INSTALLATION Memo
12
13
English
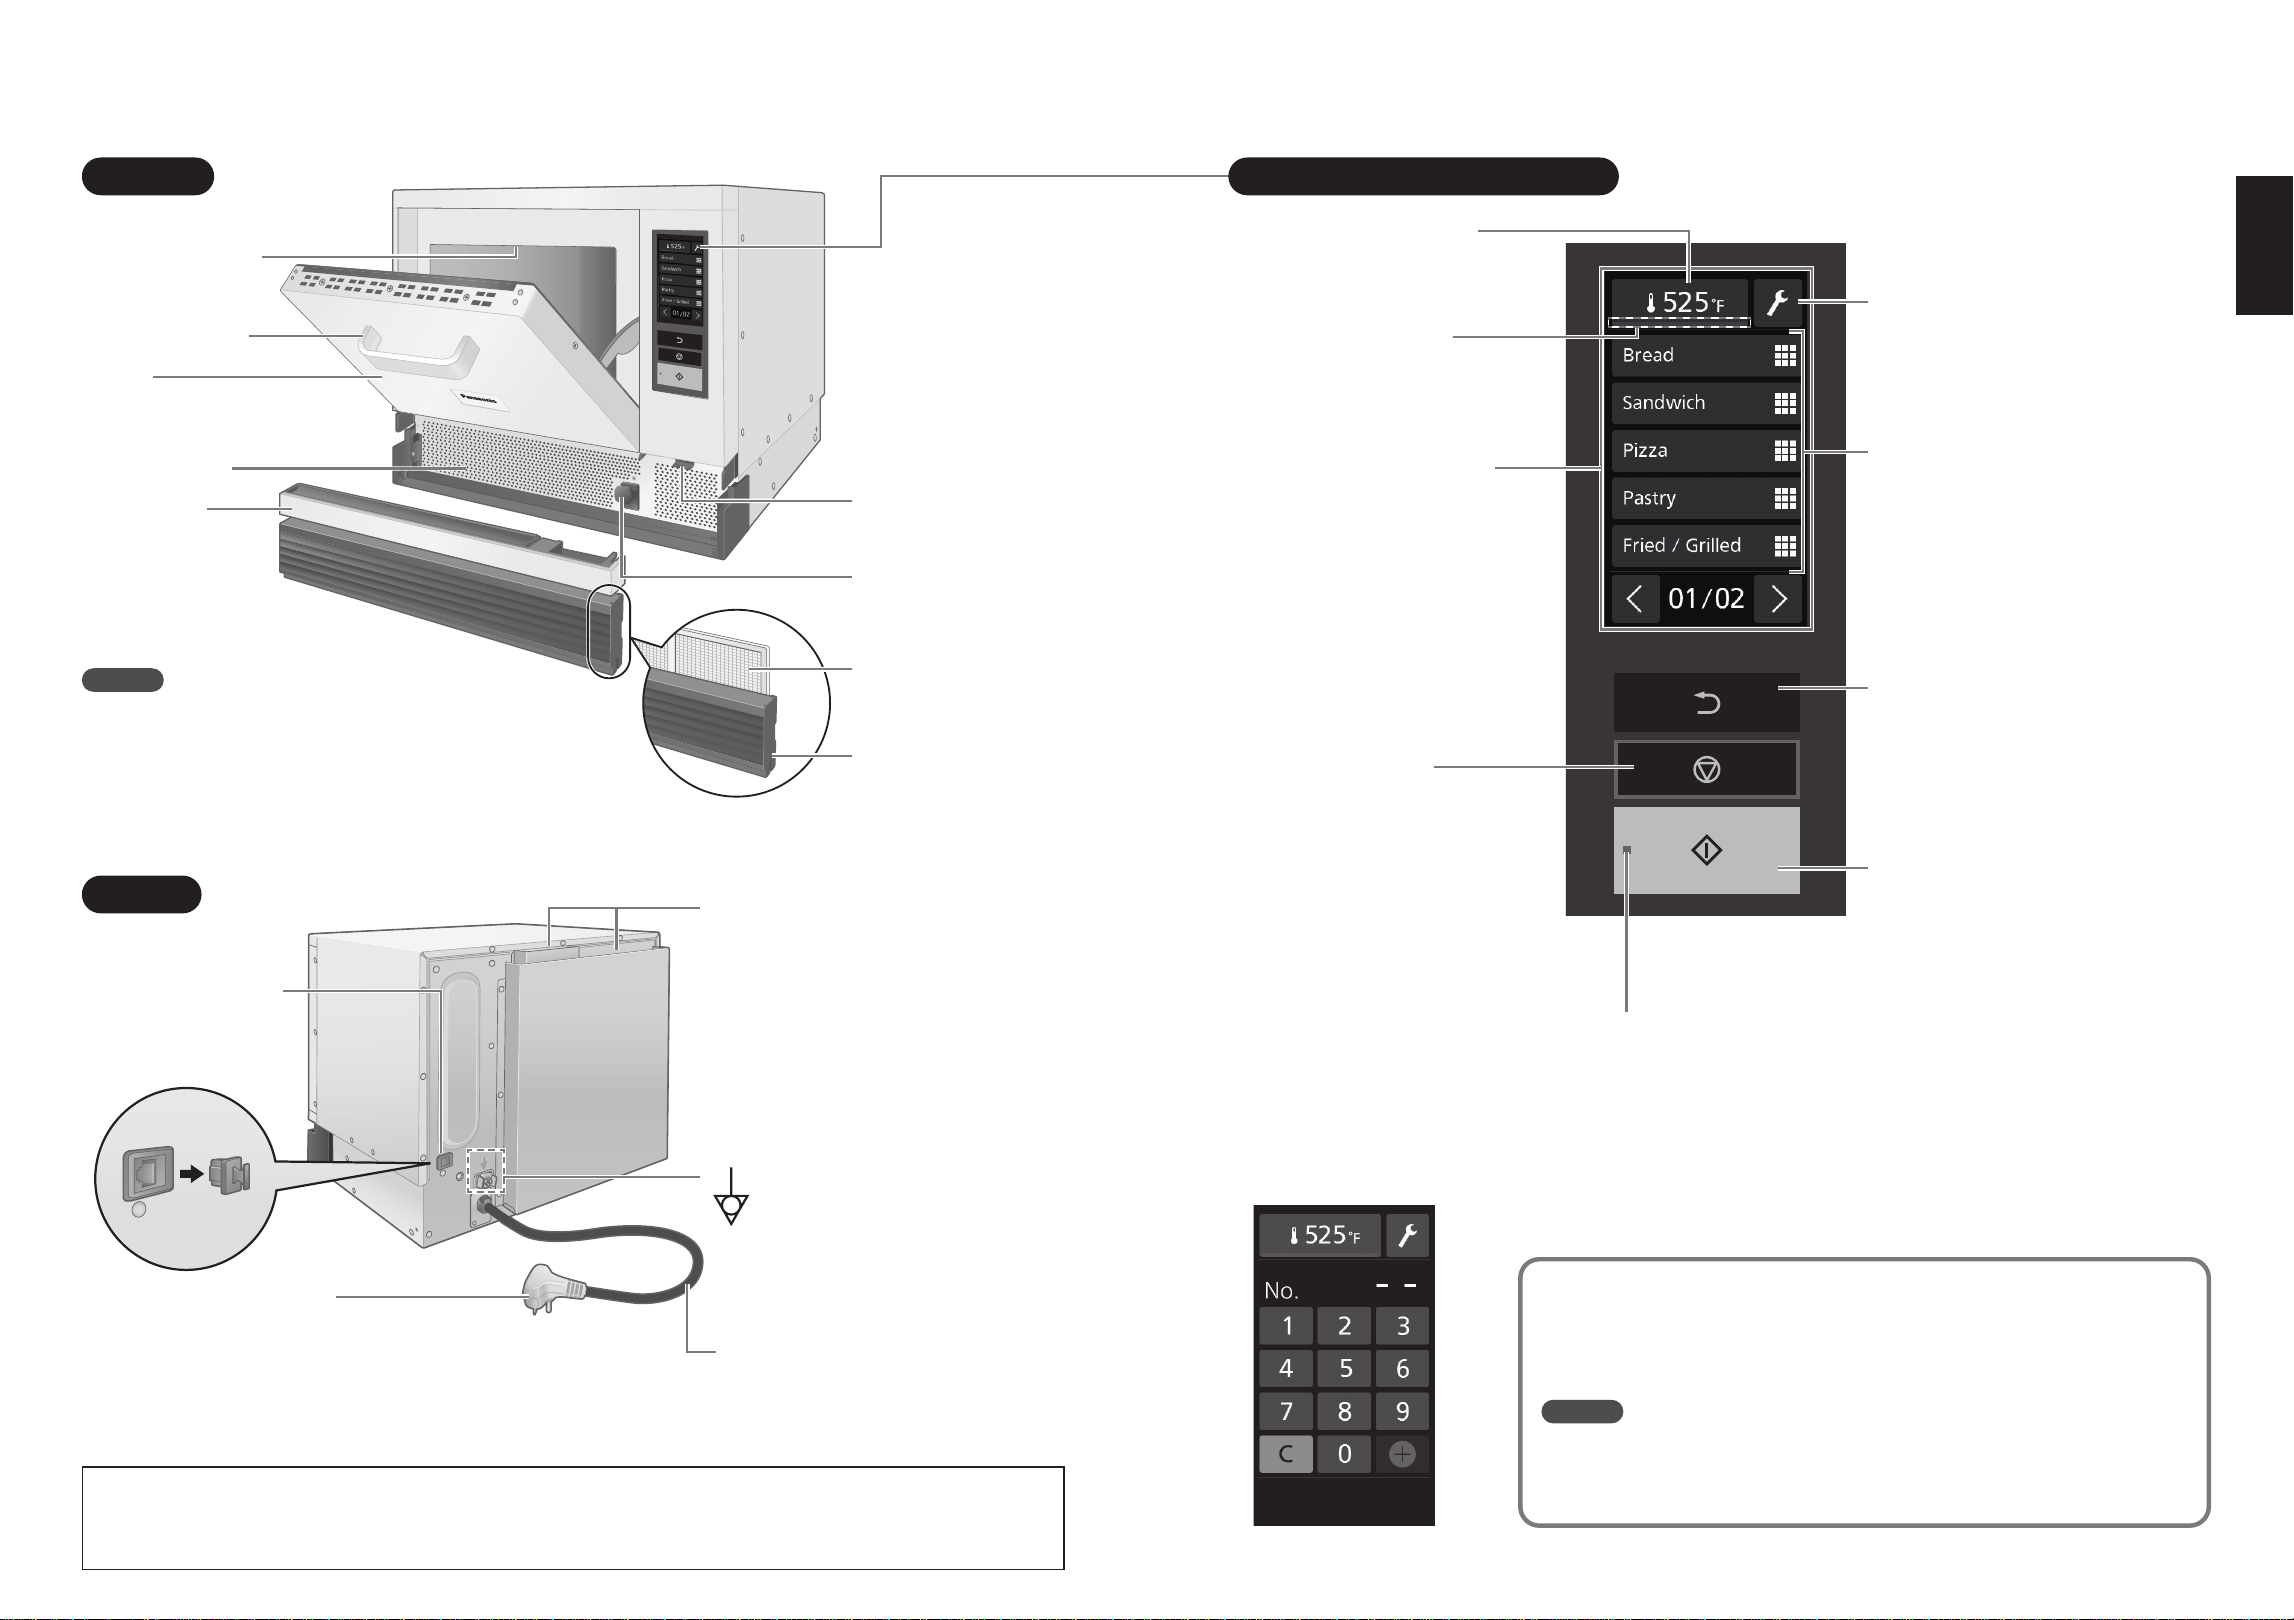
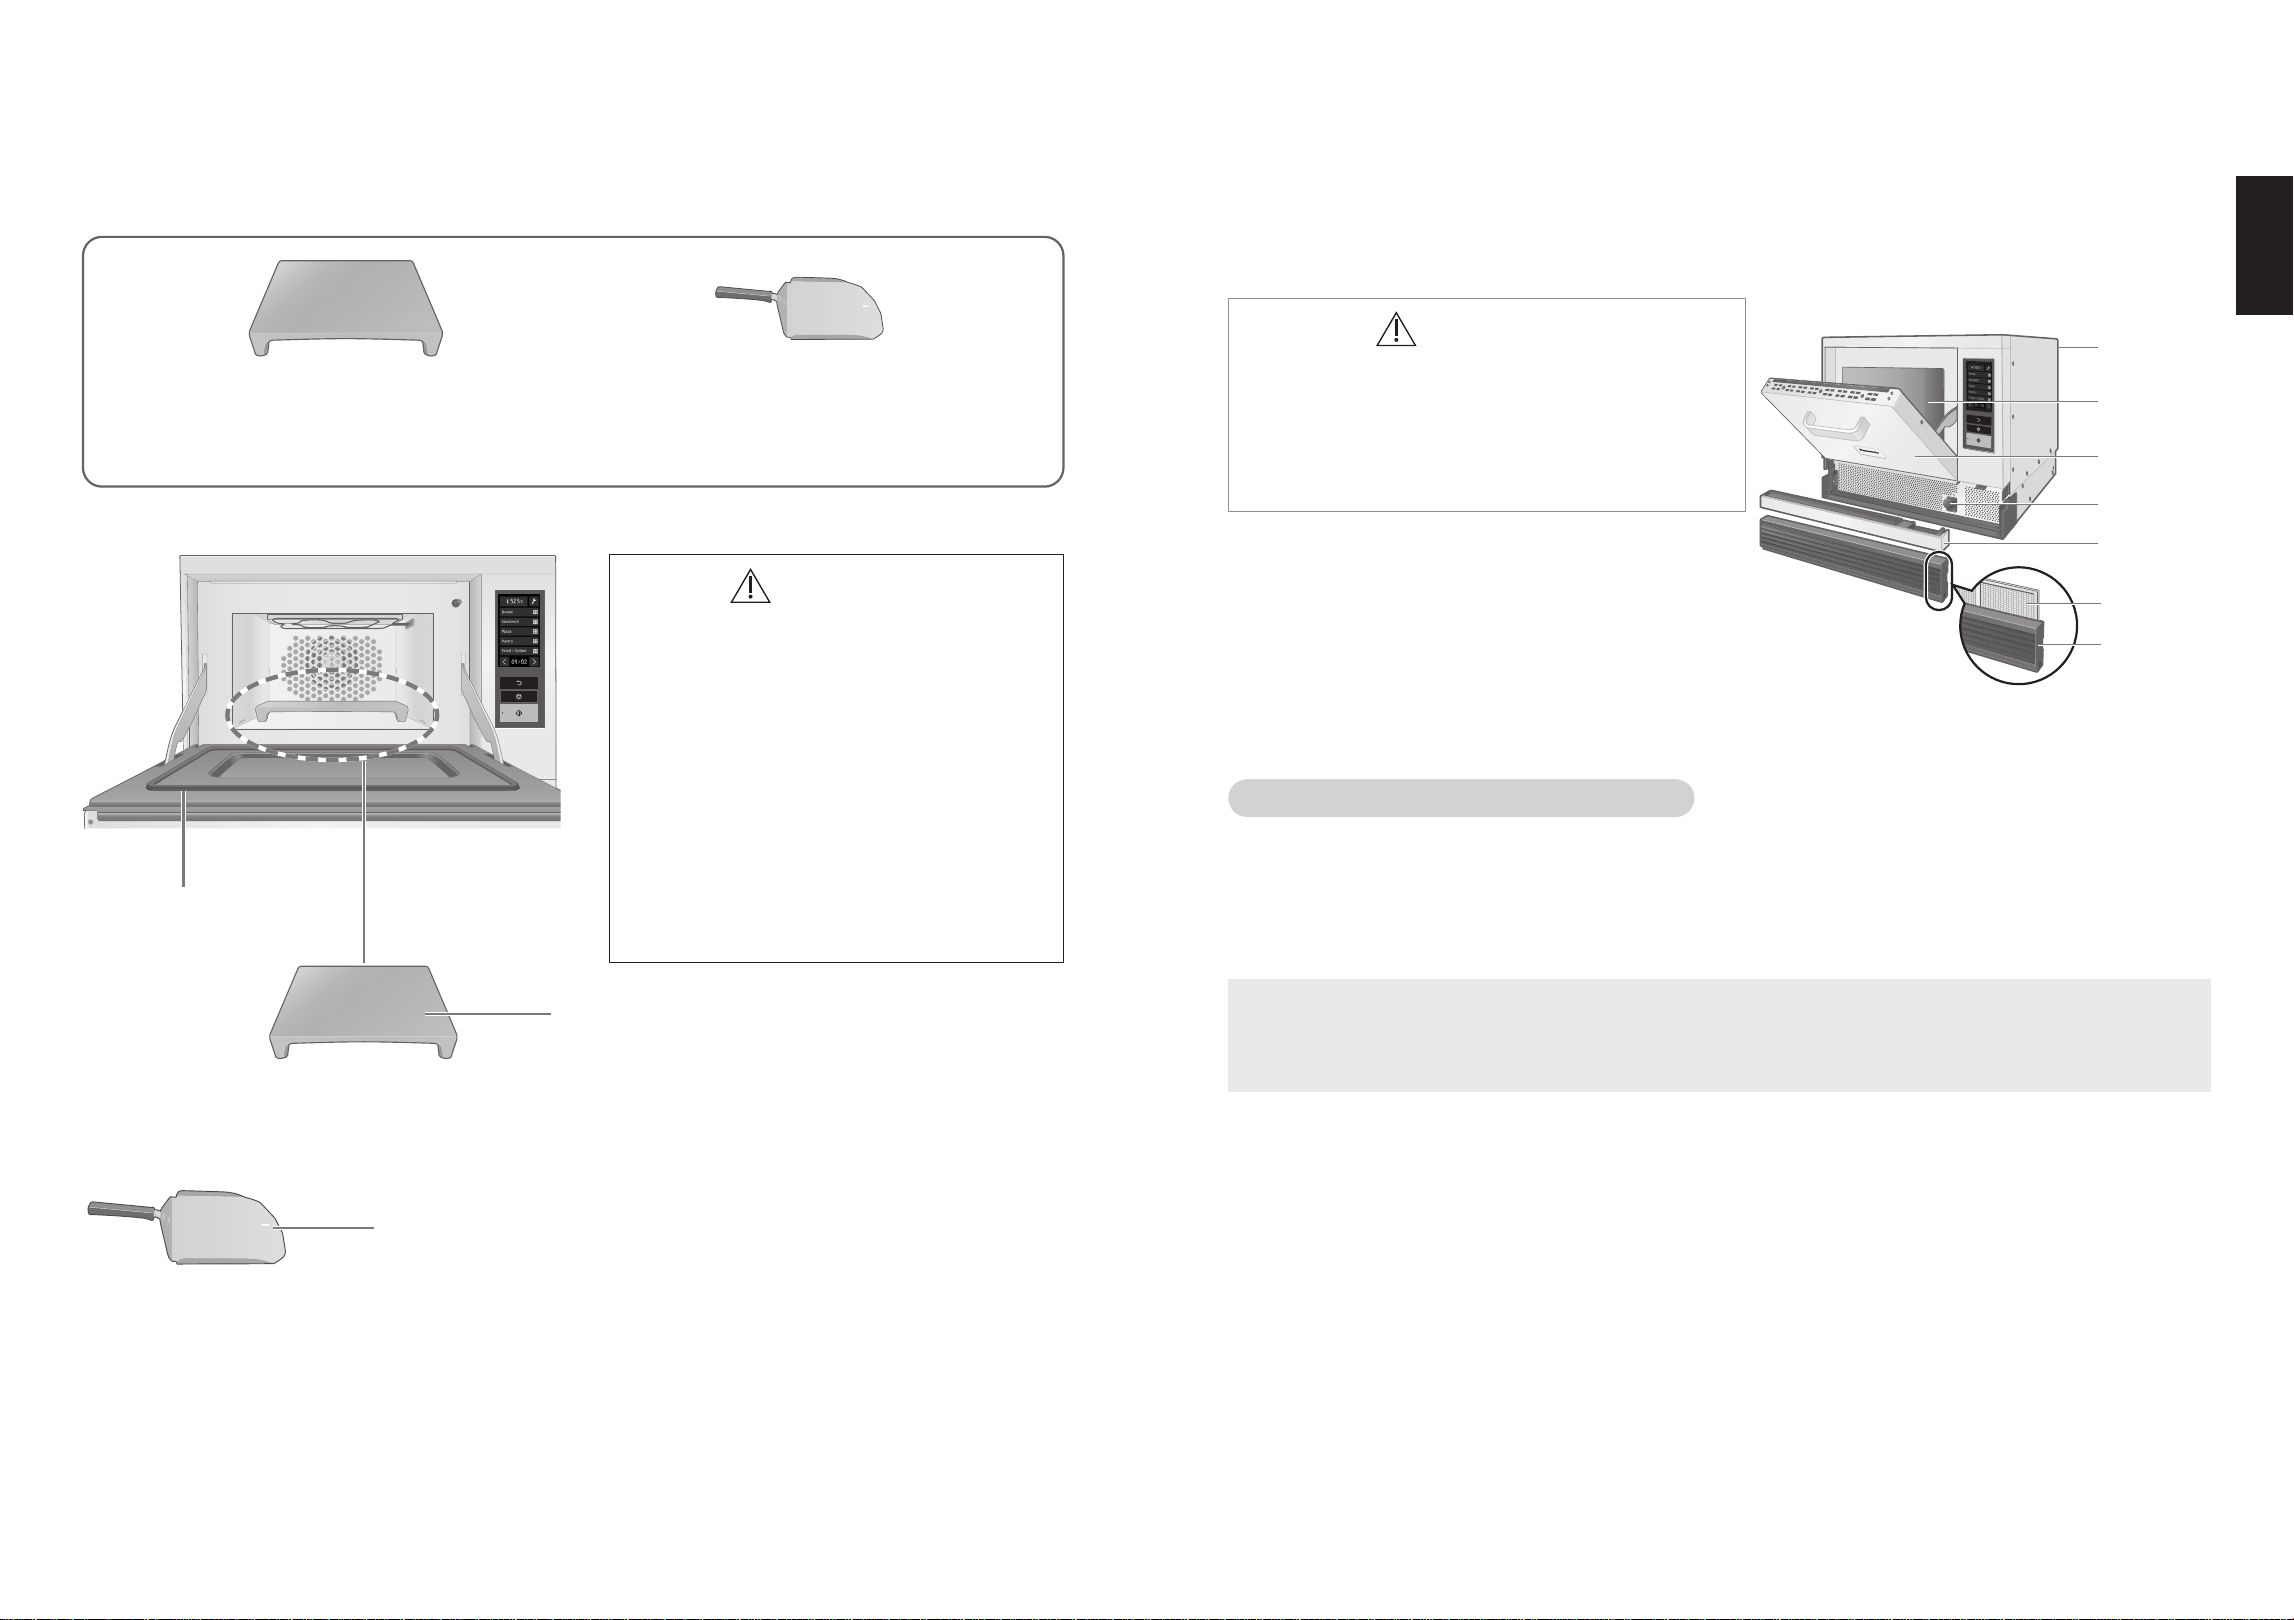
Exhaust Vent
Catalytic converter
The oil smoke that circulates inside
the oven cavity is decomposed and
purified by going through the catalytic
converter.
O The catalyst reaction will lower
when the cooking temperature is
low [approximately 475°F (250°C)
or lower].
Power Supply Cord
O Illustrations may differ to the actual items. Caution labels are affixed to the actual oven.
O How to remove the front
cover, drip tray, air filter
and oil tray. (p.17)
Front
Back
Notes
Always install the air filter, drip tray and front cover
before using the oven.
Continuous use of the oven without these parts will
result in malfunction.
Parts of your Oven
GROUNDING
IMPORTANT: FOR PERSONAL SAFETY, THIS OVEN MUST BE PROPERLY GROUNED.
When an outlet is not grounded, it is personal responsibility and obligation of the customer to have it replaced
with a properly grounded outlet.
Door Handle
Upper Heater
Intake Vent
Drip Tray
Collects food
residues and water.
Door
Opening this while cooking will
stop the operation.
LAN Cable Port
When using the LAN
cable port, remove
the cover.
An external equipotential
bonding conductor is provided
at the back side of the oven and
it is marked by this symbol.
Power Supply Plug
Front Cover
Oil Tray (p.16)
Collects oil from inside
the oven.
Air Filter
It is set inside the front
cover.
USB Memory
Port (p.18)
O The bottom surface
of the oven interior
is made from
ceramic to allow
electromagnetic
waves to pass
through.
Q The home screen during
“Menu number select”
“Home setting” (p.49)
Q Display Off Function
The home screen of the display turns blank if it is not used for 5 minutes.
While the display off function is in effect, if the door is opened, the screen
is displayed.
Notes
When the cooking is finished, the fans are operated to ventilate the oven
interior and cool the mechanical parts.
Therefore, do not remove the power plug or trip the circuit breaker.
Lamp
O When the power plug is inserted,
the lamp flashes, but this is not a
malfunction.
Stop/Reset Pad
O Press once to temporarily stop
the cooking process.
To resume cooking, press the
Start pad.
O Press twice to clear your
instructions (returns to the home
screen) or cancel cooking.
Preheating State
Indication Bar (p.24)
O Displays the progress of
the preheating.
Preheating Setting
O “Preheat temp.” (p.25) and
“Cooling” (p.26) are available.
Touch Screen (display)
O Tap on the screen directly to use
the controls.
O Displays the menu list, cooking
temperature and cooking time,
the beep sound, etc.
O Do not touch the screen with a
sharp object. Doing so will cause
damage.
Back Pad
O Returns to the previous control
screen so that settings can be
changed.
O Unavailable after cooking has
started
Tools (pp.44–51)
Start Pad
O After setting preheating or cooling,
press this pad.
O If you press this button when the
lamp is flashing, the preheating or
cooking starts.
Menu List
O You can switch between the picture
list screen and the menu number
select screen. (p.49)
Control Panel (home screen)
14
15
English
O To purchase accessories, please contact the dealer or a service agent. (p.3)
Take care when handling the cooking plate as it is breakable. If it is damaged, stop using it and contact the
dealer or a service agent.
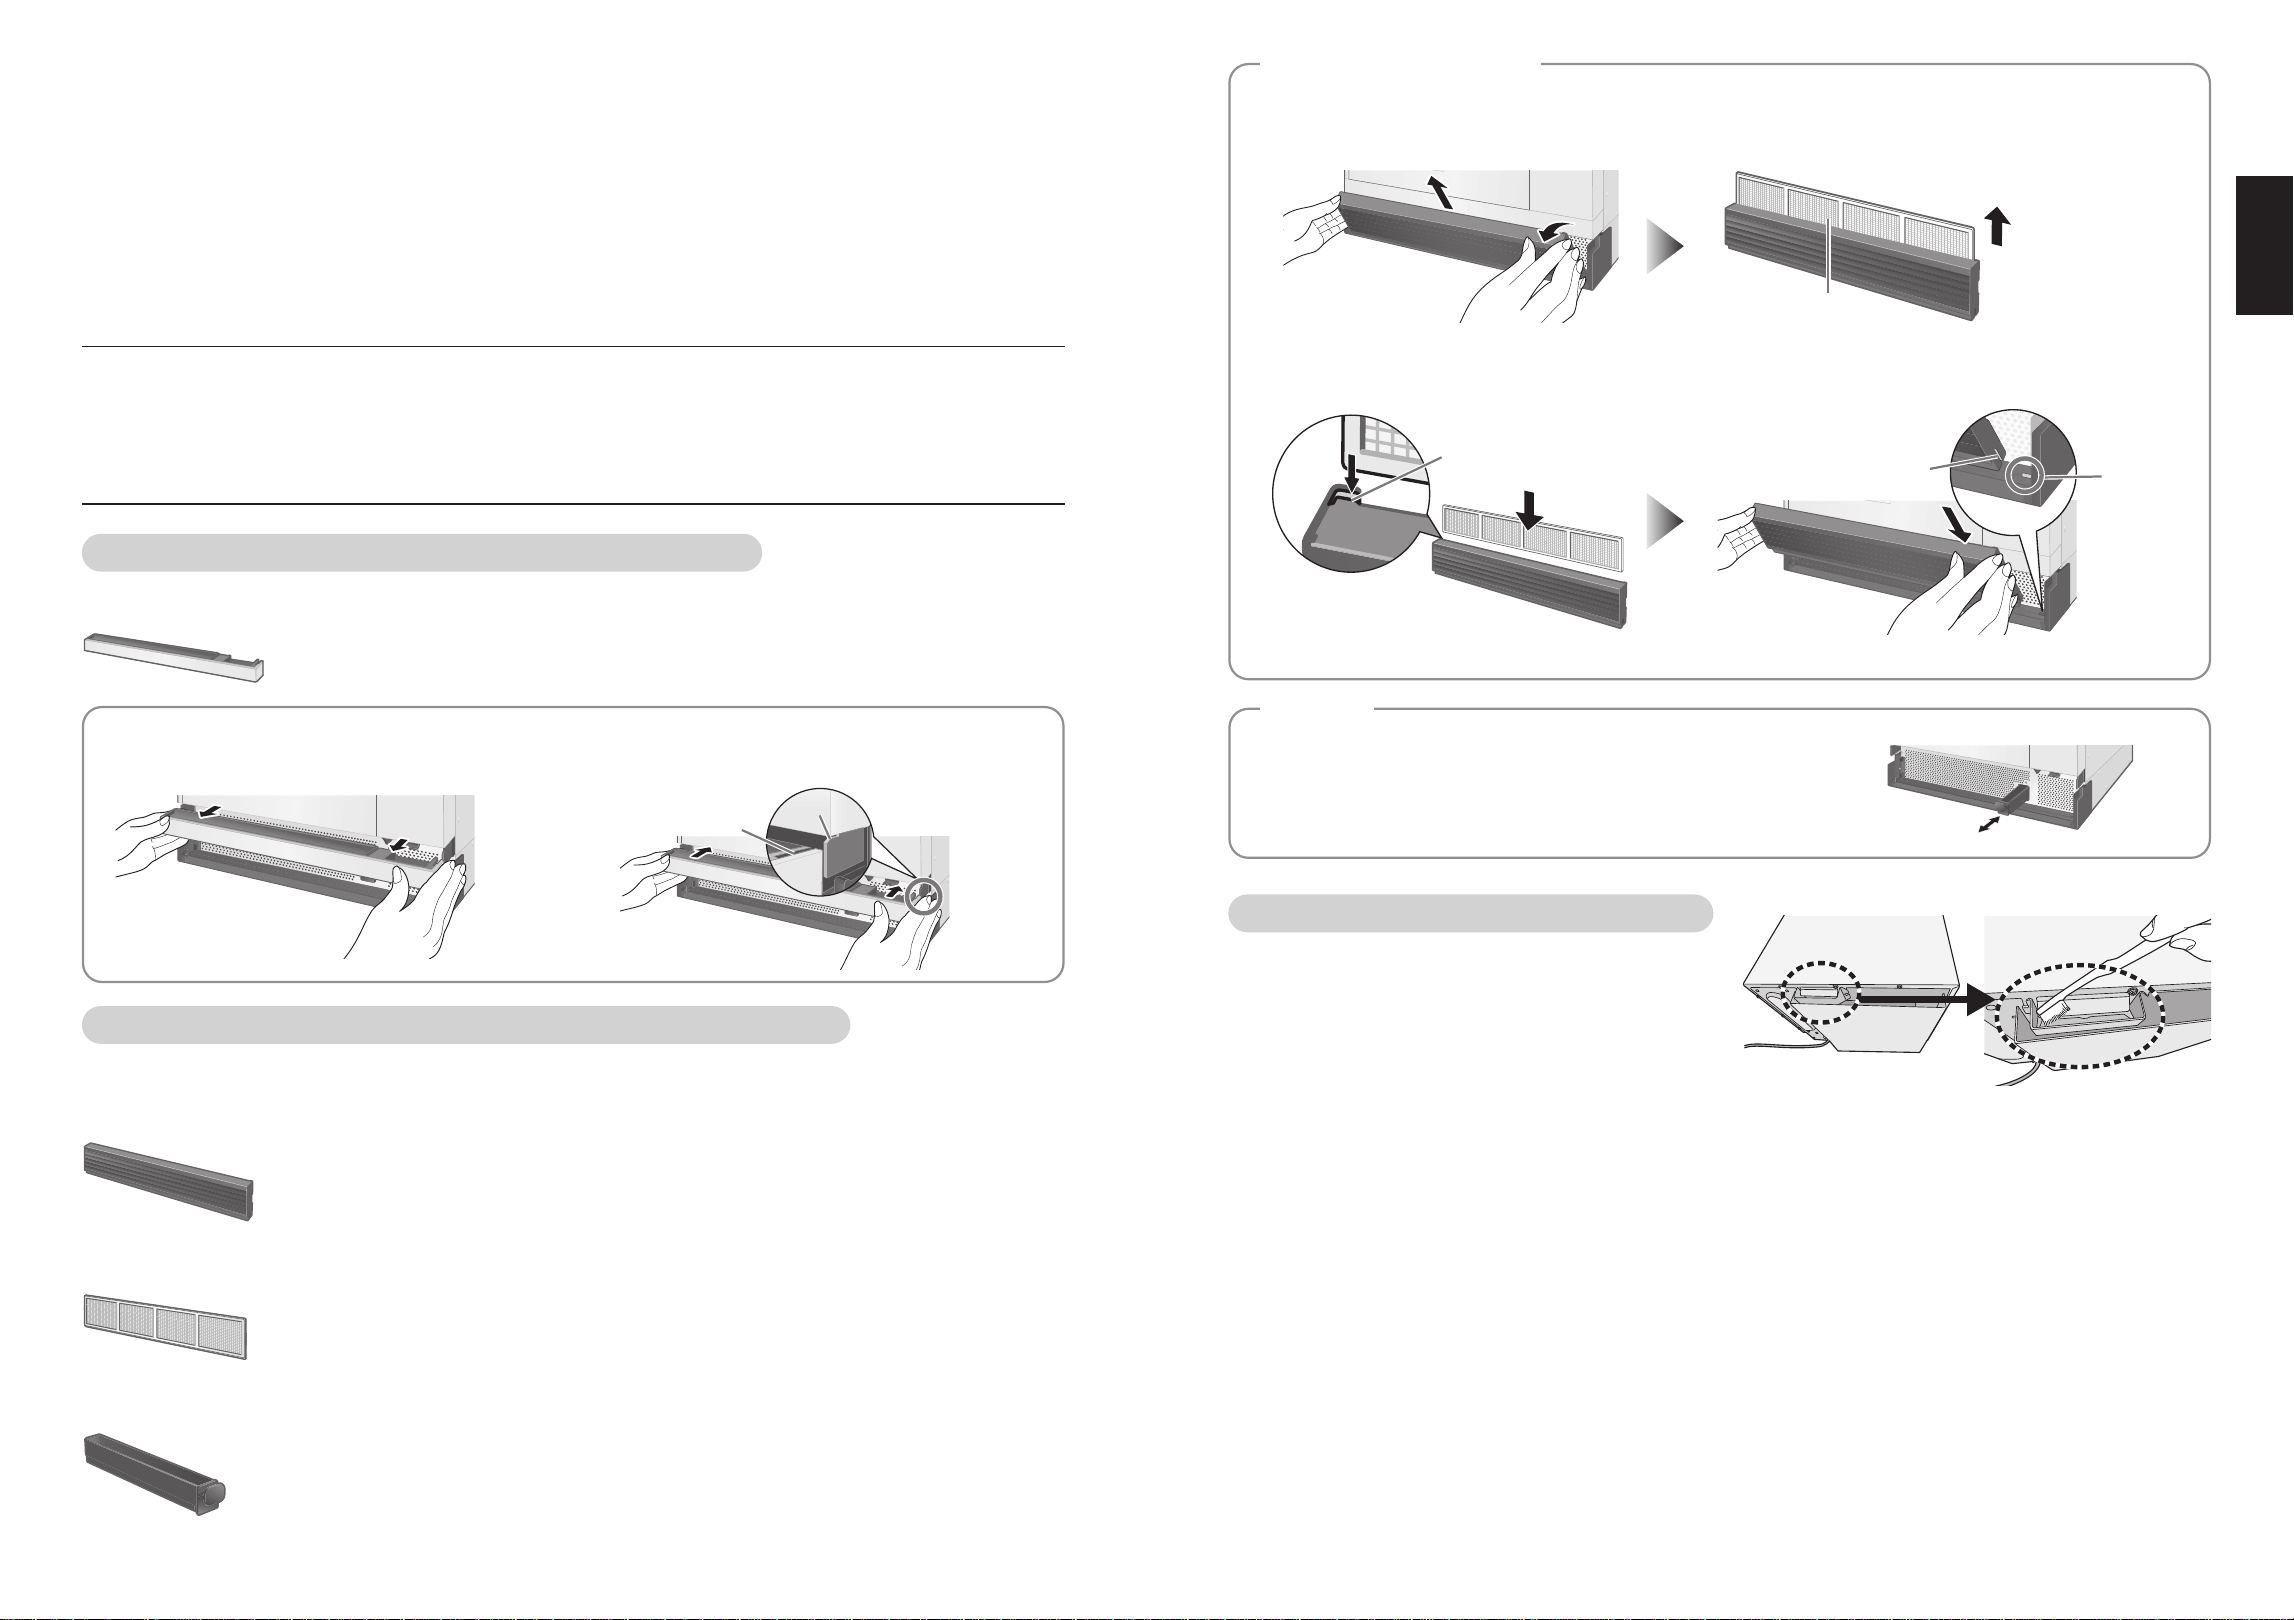
Cooking Plate
Paddle
When using this product, make sure you place the cooking plate on the bottom surface of the oven
interior.
Accessories
It is essential that you follow these points to get the maximum use from your oven. Microwaves attract
moisture and grease: therefore a dirty oven does not cook EFFICIENTLY.
Failure to maintain the oven in a clean condition could lead to deterioration of the surface that could
adversely affect the life of the appliance and possibly result in a hazardous situation.
O This oven requires regular maintenance. (p.52)
WARNING
OPull out the power plug before
maintenance.
If not, this may result in electric shock.
OWait for the oven cavity to cool down first
before cleaning.
If not, this may result in burns and injuries.
QBefore Cleaning
O Do not clean this oven with a water jet or steam cleaner.
O Do not pour detergent and leftover food into the gap
and punching holes. This will result in a malfunction.
O If the oven becomes damaged in any way, contact the
dealer or a service agent before continuing use.
O Do not use thinner, benzine, cleanser, or bleach. There
is a danger of damage or deformation.
Oil Tray
Air Filter
Drip Tray
Front Cover
Oven Cavity
Door
Exhaust
Vent
Clean these parts Every Day.
QOven Cavity • Door Inner Side • Door Seal
Wipe with a damp cloth
Thoroughly wipe away water, oil and leftover food stains frequently to prolong the use of the oven.
Failure to remove burnt food remains and dust may cause rust.
If the stains are bad, wipe away with a cloth soaked in a neutral kitchen detergent.
O If left in a stained condition, the stain becomes difficult to remove, so that the food scraps burn, and the
smell of the food persists.
O Take good care in particular of the area where the main unit and door contact and the surroundings.
O Do not scrape the parts other than the metal part inside the door (door seal area etc.) with a hard scrubber,
which may cause damage of the door seal and malfunction of the oven. Be sure to use only a soft scrubber.
O Do not splash detergent directly onto the top and rear surfaces of oven cavity. This will result in a
malfunction.
QOuter Areas
Wipe with a damp cloth
Wipe away oil and food stains immediately.
O Do not use thinner, benzene, abrasive cleanser, bleaching agent, alkaline residential or household synthetic
detergent.
If the stains are bad, wipe away with a cloth soaked in a neutral kitchen detergent.
Take care not to allow the kitchen detergent to enter the exhaust vent and gaps.
O Outer side of the door • handle area
After wiping with a wet cloth, wipe the areas with soft, dry cloth.
Care of your Oven
Paddle
Use when removing foods.
Do not maintain contact with acidic or alkaline foods for
a long time.
Cooking Plate
CAUTION
The oven shall not be operated by
microwave without food in the oven.
Doing so may cause the oven to become
abnormally hot due to sparks and the red-
hot inner bottom surface. This may cause a
risk of burns.
O Also, do not operate the oven only with
containers, and the provided
accessories.
O Take care not to burn yourself when
removing any accessories from the oven
after cooking. Use oven gloves.
O Illustrations may differ to the actual items.
Please note, there is a
seam in the door – this is
intentional.
16
17
English
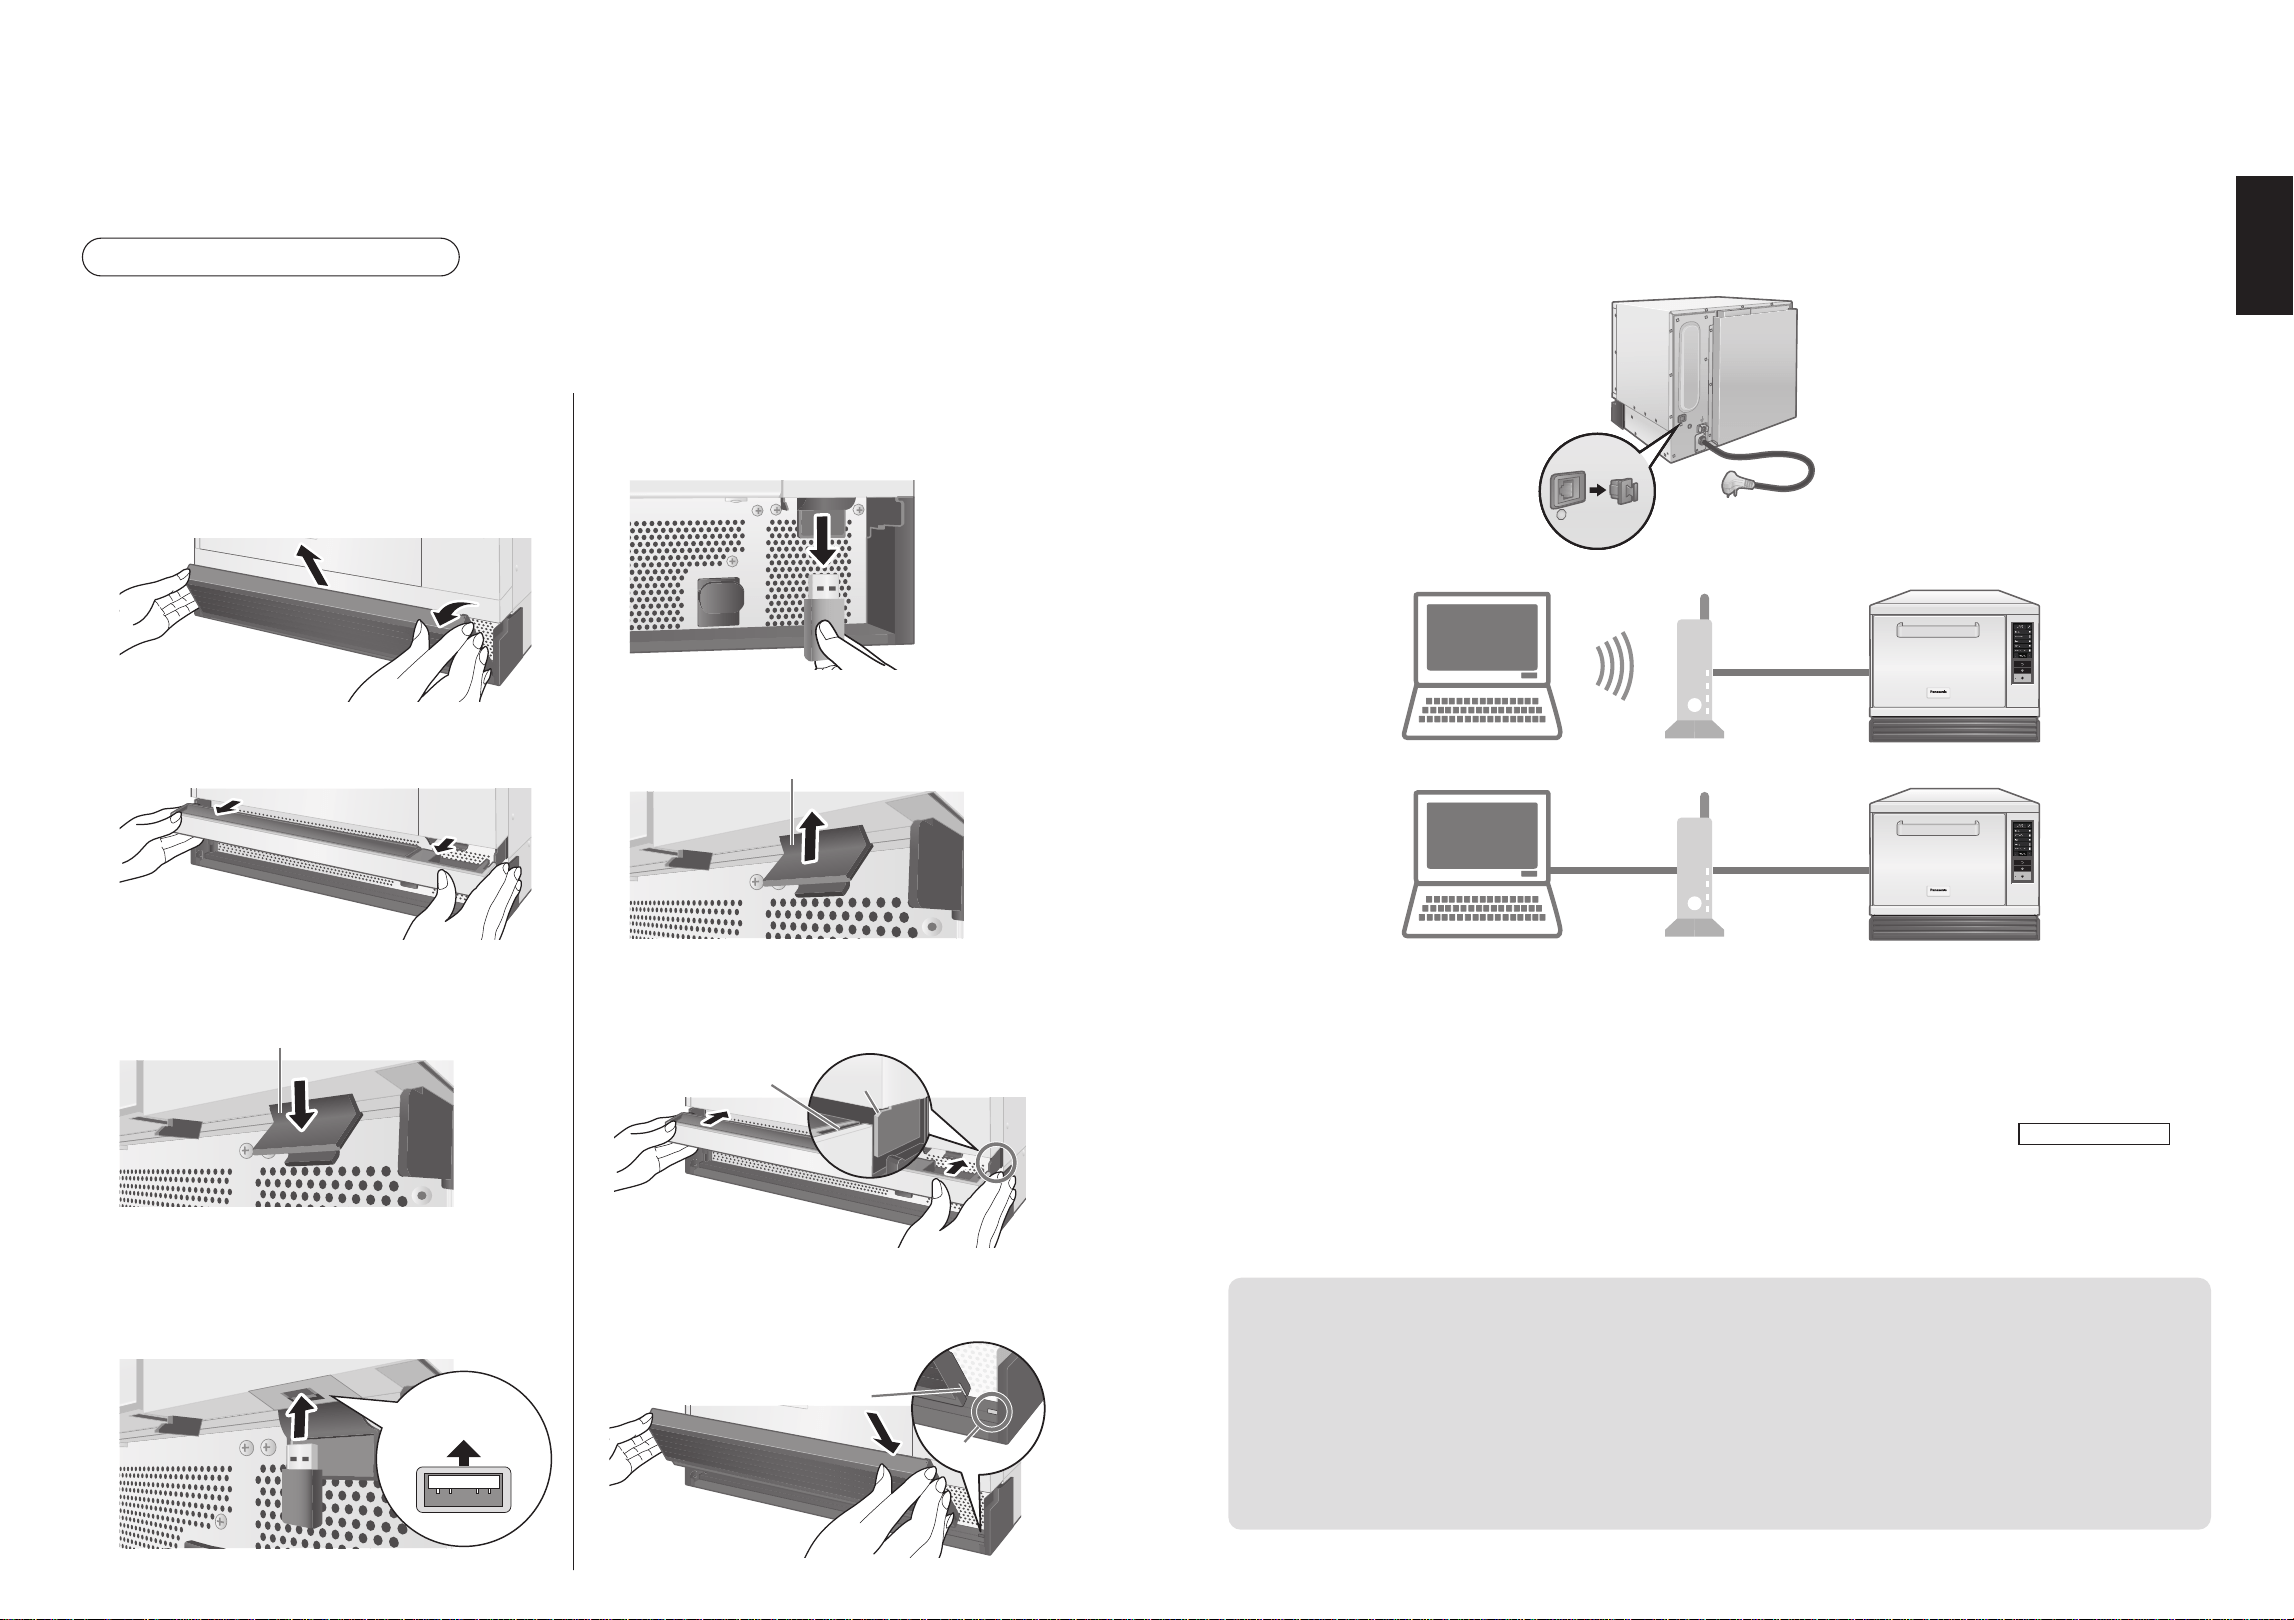
O Removing
After pulling the front cover down toward you, lift it diagonally upward to remove it.
Remove the air filter by pulling it out of the front cover.
Air Filter
O Attaching
Insert the air filter into the groove of the front cover, and after firmly inserting it all the way in, install it so
that the groove of the front cover is inserted into part ⒶⒶ of the main unit.
Groove
ⒶⒶ
GrooveGroove
Q If the air filter is not set, the front cover will not close.
Front Cover/Air Filter
O Removing
Remove the front cover first, and take out the oil tray.
O Attaching
Follow the reverse procedure to install the oil tray.
Oil Tray
Clean this part once a month.
QExhaust Vent
Clean the rear exhaust vent with
a toothbrush and a towel
QKitchen counter surface
For single Installation
•Wait until it cools down. Please see p.26 if the oven is hot.
O Remove the Air Filter from the Oven.
O Remove all the accessories from the oven cavity.
When removing all the accessories or when cooling it down by Cool Down Operation. (p.26)
Please be careful because it may still be hot.
O You can move the Oven.
Move the Oven to other location and wipe it on the kitchen counter.
Please be careful when moving the oven because it may be very heavy.
We recommend it to be moved by two people.
For stacking
Please contact the dealer or an authorized service center according to the situation of the kitchen.
Please seal it with Silicone Sealant after service as described in p.10.
Care of your Oven
QCooking Plate • Paddle
Wash with a sponge scrubbing brush with (neutral) detergent for use in the
kitchen applied to it.
If you are concerned about stains, clean the equipment every time you use it.
O Do not wash the equipment in a dishwasher.
O If you are concerned about bad oil stains or the like
Use alkaline detergent. When using alkaline detergent, use after thoroughly reading the detergent’s usage
cautions. After performing the maintenance, make sure you wipe the equipment with a damp cloth so no
detergent remains.
However, you cannot use this on the inside of the door as the resin parts will deteriorate. If by chance the
detergent should get on the resin parts, wipe them with a damp cloth immediately.
Disassemble and clean this part Every Day.
QDrip Tray
Wipe with a damp cloth
O Removing
Pull the drip tray toward you to remove it.
O Attaching
Install the drip tray so that its groove slots into part
ⒷⒷ
of the main unit.
GrooveGroove
ⒷⒷ
Disassemble and clean these parts Once a Week.
O Do not wash the equipment in a dishwasher.
QFront Cover
Wipe with a damp cloth
Wipe away oil and food stains immediately.
If the stains are bad, wipe away with a cloth soaked in a neutral kitchen
detergent.
QAir Filter
Dry after washing with water
Clean it after every use if the stains are bad.
The filter may lose its effect if the stains are left behind.
The temperature of the internal parts may also rise, resulting in a malfunction.
QOil Tray
Wipe away oil stains with a soft cloth or paper towel
If the stains are bad, clean the area with a soft scrubber dipped in a neutral
kitchen detergent and dry.
18
19
English
Connecting a USB Memory Stick
O Use a Type-A USB memory stick compliant with USB 2.0 or later and formatted with FAT32.
O No USB memory stick is included as an accessory. Use a commercially available USB memory stick.
O We do not guarantee the behaviour of all commercially available USB memory sticks.
How to Insert and Remove
O The USB memory port is below the operation area.
O Do not leave the USB memory stick inserted as it is not then possible to install the front cover or the drip tray.
O
While data are being read from or written to the USB memory stick, do not insert or remove it. Doing so may
destroy the data.
Q How to Insert Q How to Remove
①
After pulling the front cover down
toward you, lift it diagonally upward
to remove it
①
Remove the USB memory stick
②
Pull the drip tray toward you to
remove it
②
Close the USB memory port cover
USB Memory Port Cover
③
Pull down the USB memory port
cover to open it
USB Memory Port Cover
③
Attach the drip tray
Install the drip tray so that its groove slots
into part Ⓑ of the main unit.
ⒷⒷ
Groove
④
Insert the USB memory stick
Be careful about the orientation of the USB
memory stick and insert it.
Main unit
side
④
Attach the front cover
Install the front cover so that its groove slots
into part Ⓐ of the main unit.
ⒶⒶ
Groove
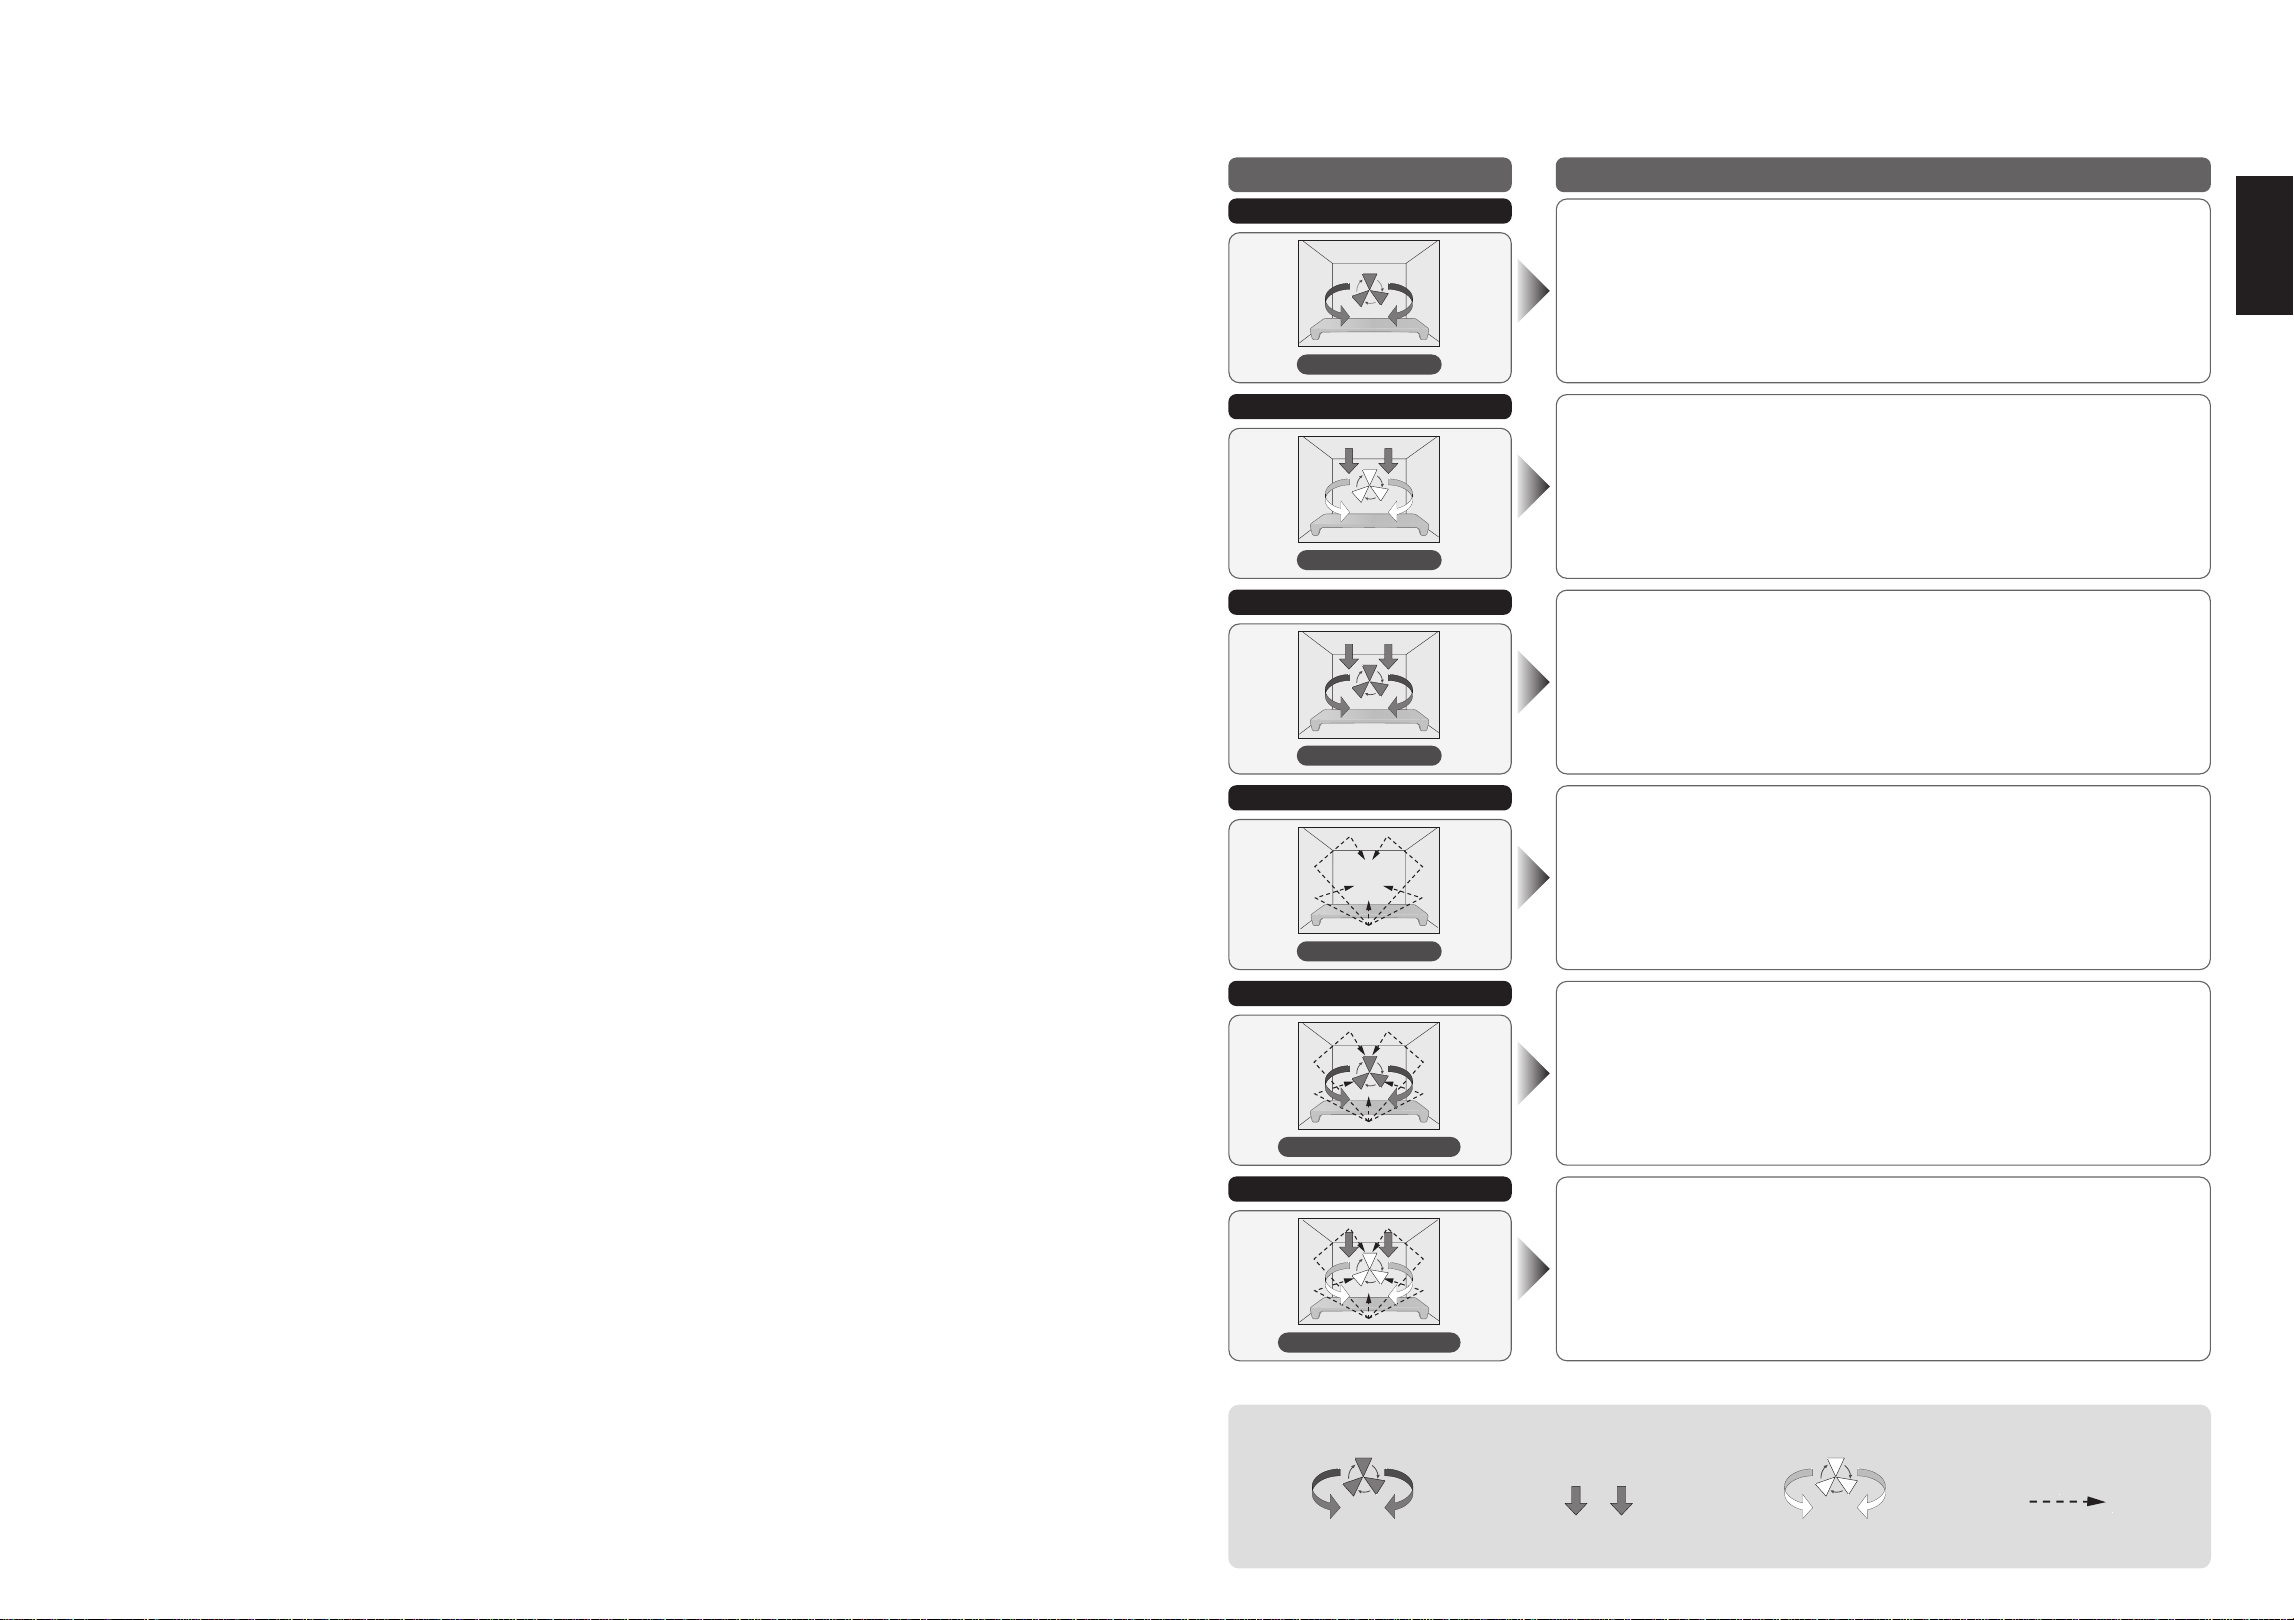
Connecting to your Personal Computer
Connecting to your personal computer enables you to read into the main unit the menu list and the
device settings created with the setting support tool, or send the device’s menu list to the setting
support tool.
When sending or reading in data, connect the device and router with a LAN cable.
LAN CableLAN Cable
LAN Cable
Wi-Fi
LAN Cable Port
Q When Connecting to a Network
O Depending on the surrounding environment, use a heatproof cable for the LAN cable.
In addition, be careful to lay it so that it does not come into contact with the hot parts of the main unit.
O To guarantee normal operation, use Microsoft Windows 11 or later as the OS for the personal computer. (as
of December 2025)
O The network connection settings vary depending on the environment used.
O When configuring the IP address and DNS settings for the network connection, refer to
Network settings
(p.51).
O If a communication error occurs or a stable connection cannot be achieved, re-configure the settings
according to prompts such as the messages displayed by the setting support tool.
O Microsoft Windows is a registered trademark of the US Microsoft Corporation in the US and other countries.
Setting support tool
The setting support tool is an application that enables creation and editing of menus, menu lists, and
device settings on your personal computer.
O For details, consult the setting support tool operating instructions.
The tool can be installed from the following website.
O
The contents, screens, etc., of the setting support tool may be altered without notice due to a tool
upgrade, for example. The contents of the URL and QR codes may be changed or deleted without notice.
https://fs.panasonic.com/download/setting_support_tool_en.html
20
21
English
Types of Container to Use
CONVECTION-AND-MICROWAVE/
GRILL (BROIL)-AND-MICROWAVE/MICROWAVE
As these programs use microwaves and heat [CONVECTION or GRILL (BROIL)], you must choose the
container carefully.
DO USE: Ceramics, Heat Resistant glass eg. Pyrex
®
DO NOT USE:
Plastics, Cling film, Metal, Metal skewers, Aluminum foils, Silicon, Lacquerware, Glass without
heat resistance, Paper, Wood, Wicker
CONVECTION/GRILL (BROIL)/CONVECTION-AND-GRILL
(BROIL)
DO USE: Ceramics, Heat Resistant glass eg. Pyrex
®
, Metal, Metal skewers, Aluminum foil
DO NOT USE:
Plastics, Cling film, Silicon, Lacquerware, Glass without heat resistance, Paper, Wood,Wicker
O Silicon containers specified for use with the grill (broil) can be used with convection.
Please use the container at or below the heatproof temperature stated on it.
O Please observe the heatproof temperature described in the package when using heat-resistant cooking
sheet or parchment paper, etc.
Cooking Modes
Cooking Modes How it works
Convection
Heater
A convection heater (circulation fan heater) circulates heat throughout
the oven cavity and cooks food fully while controlling the set
temperature. (p.30)
Grill (Broil)
Heater
A grill (broil) heater provides heat and a circulation fan operates to
distribute the heat throughout the oven cavity.
Every surface of the food is well-cooked. (p.31)
Convection-and-Grill (Broil)
Heater
Both convection heater (circulation fan heater) and grill (broil) heater
circulate heat in the oven cavity while controlling the temperature.
Cooks the food throughout while browning on the surface. (p.32)
Microwave
Microwave
O You can set microwave-only cooking at Step 2 or Step 3 only of
Cooking in Steps.
Applies microwaves to the food causing the molecules in the food to
strongly collide and give rise to heating by friction.
As a result, the food is heated about the same on the surface and
inside. (p.33)
Convection-and-Microwave
Heater+Microwave
Combined cooking with convection heater (circulation fan heater) and
microwave.
A convection heater circulates heat throughout the oven cavity with
controlling the set temperature while the microwave heats the food fully.
The cooking time is reduced. (p.34)
Grill (Broil)-and-Microwave
Heater+Microwave
Combined cooking with grill (broil) heater and microwave.
A grill (broil) heater adds heat while a microwave heats the food, and
additionally a circulation fan operates to give the entire surface a crisp
finish.
The cooking time is reduced. (p.35)
O Illustrations are images. The accessories to be used differ depending on the cooking mode.
About the arrows in the illustration
Convection Heater Grill (Broil) Heater Fan only Microwave
22
23
English
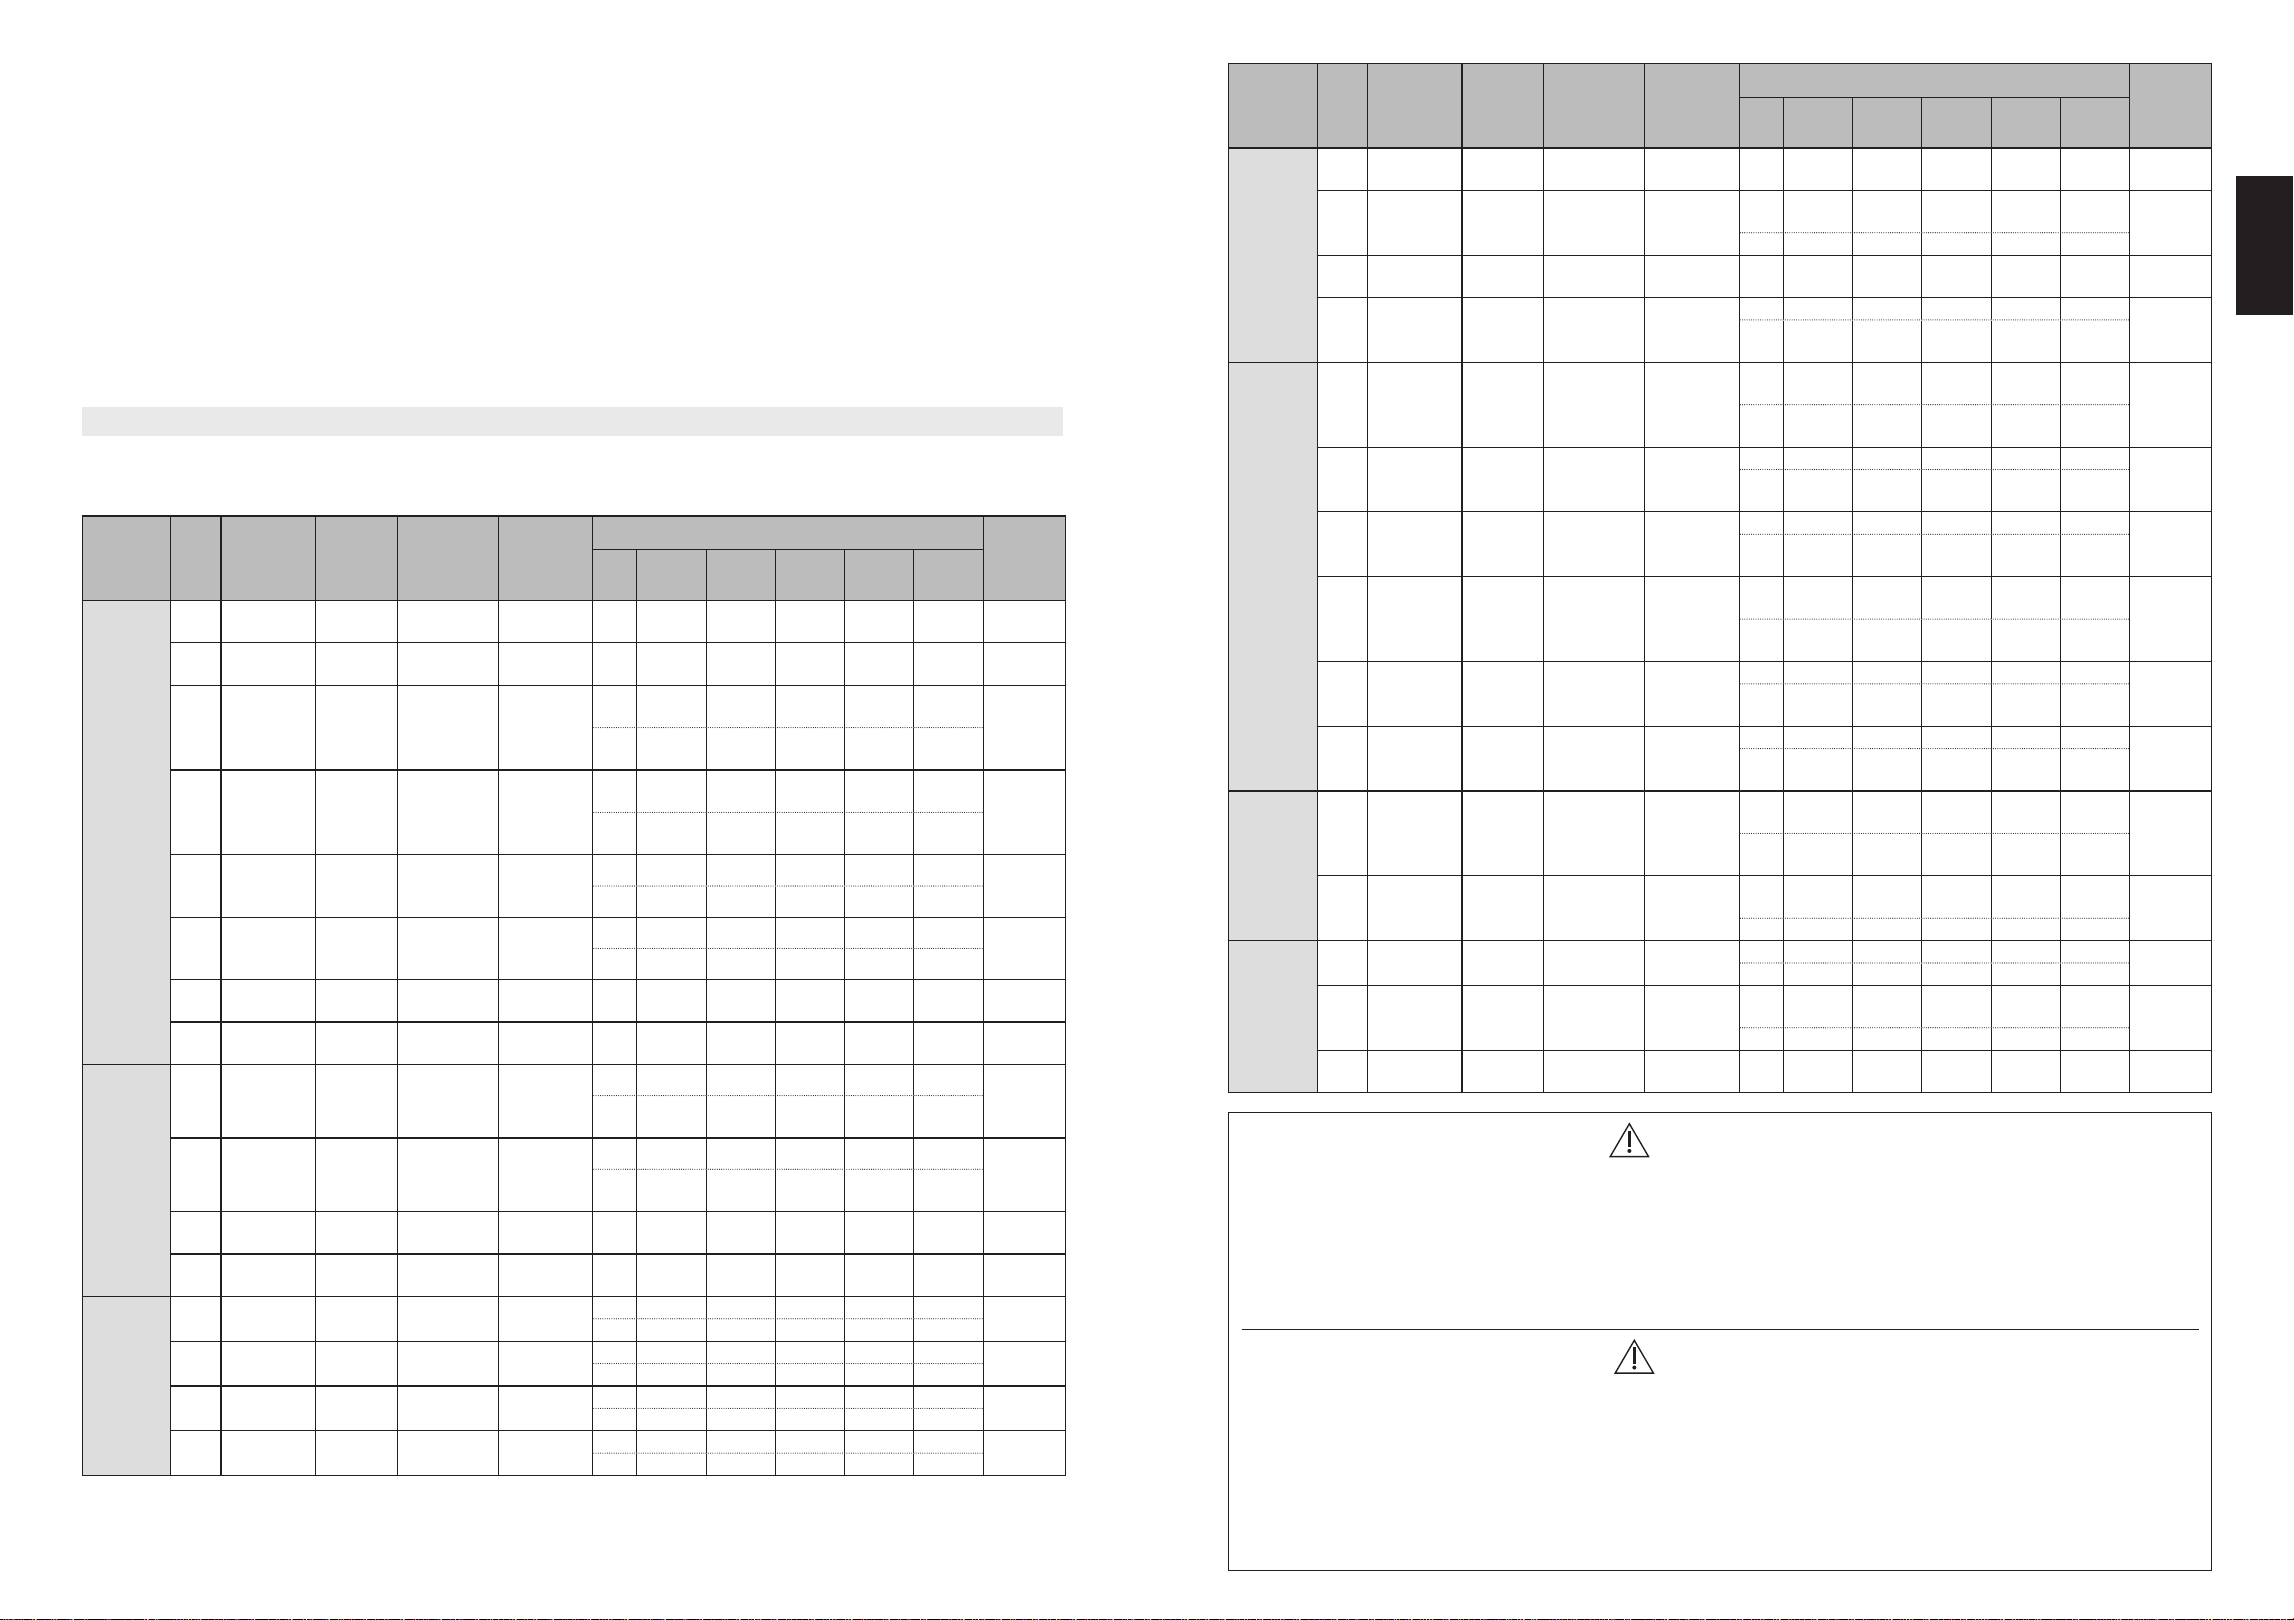
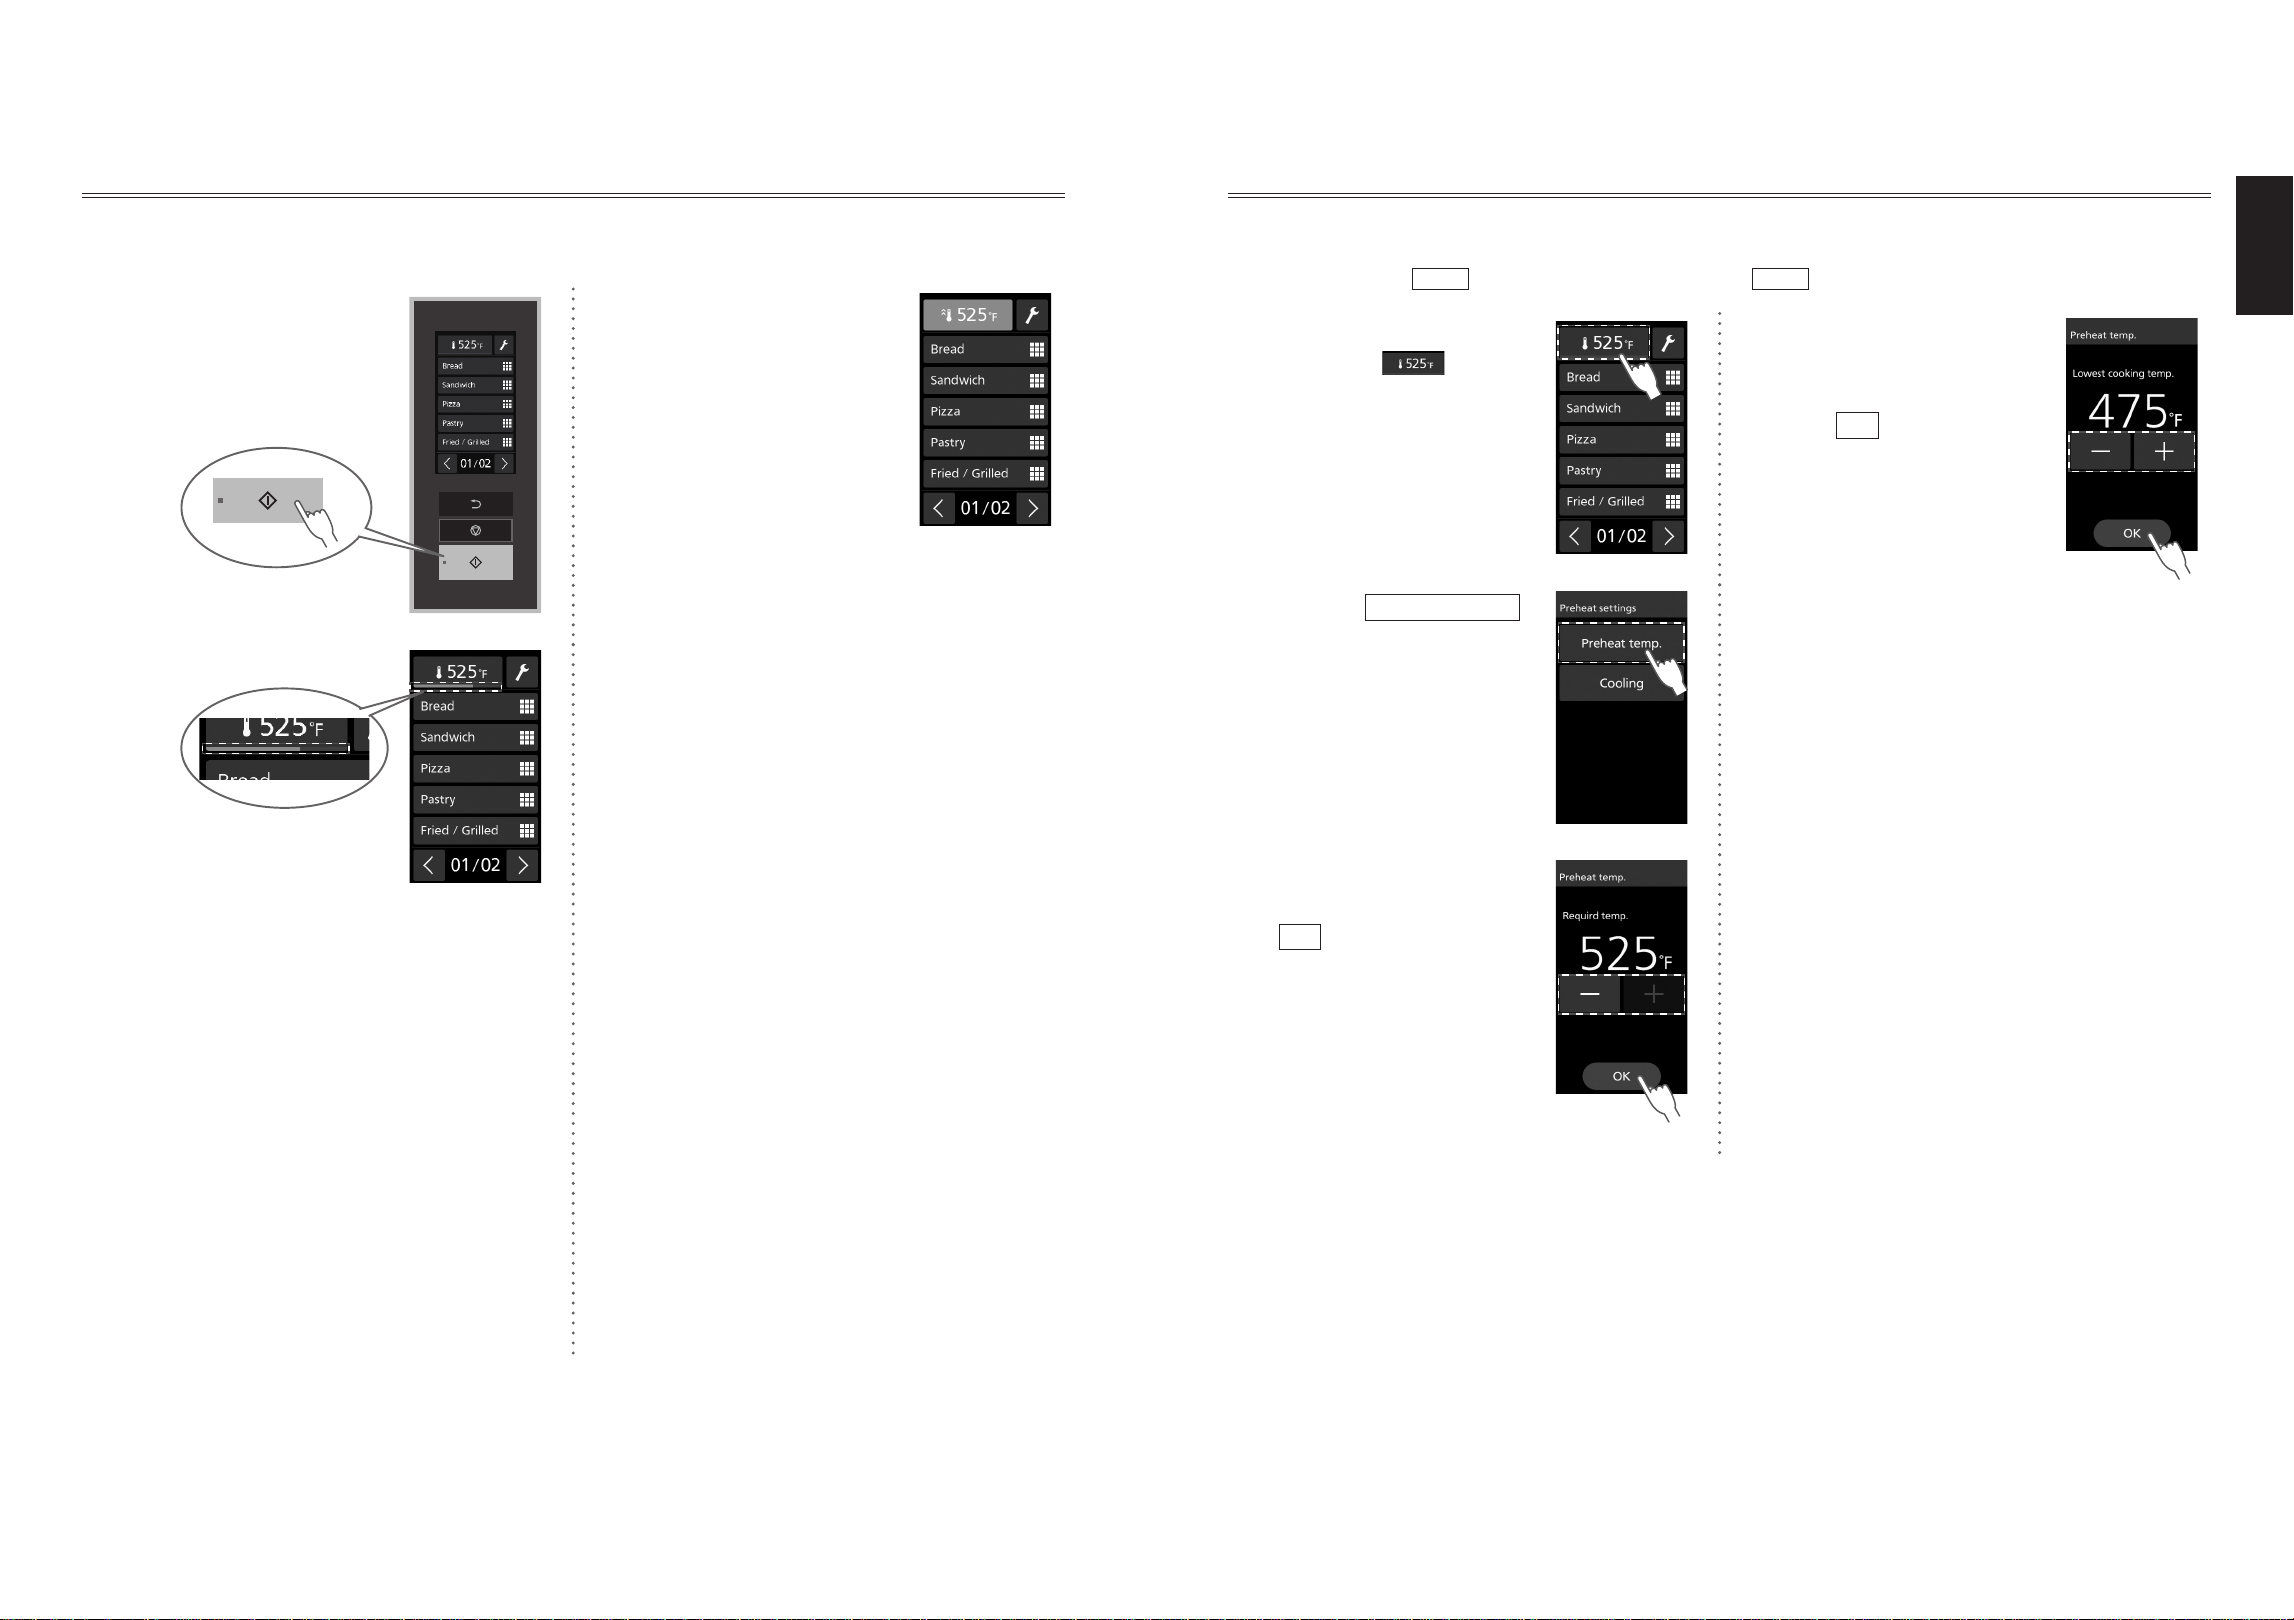
Cooking Chart
Cooking time is just a guide. Adjust depending on the kind of food and the start temperature.
O This oven is designed for reheating already cooked foods.
O Panasonic Corporation makes no warranties of any kind, either express or implied, including but not limited
to warranties of merchantability, fitness for a particular purpose, of title, or of non-infringement of third party
rights. Use of the product by a user is at the user’s risk. All cooking settings are for guidance only and should
be altered depending on the initial state, temperature, moisture and type of food. Depending on the
characteristics of the food, cooking times and power levels may need to be adjusted. Prior to service of food
ensure it has reached a safe temperature. Oil from the food may cause failure.
O Insert the cooking plate included as an accessory in the oven interior from when preheating is performed.
O If the fan speed is high, foods on the surface may be scattered. In this case, please lower the fan speed.
ORefer to “Accessories” (p.14) for details on how to use the accessories before cooking.
QReheat
Category
No. Menu
Start
Temp.
Quantity
(Weight)
Preheat
Temp.
Program
Total
Time
Step Conv
Grill
(Broil)
Fan MW Time
Bread
000 Toast 1pc
Room
temp.
1 slice
(1.6 oz/45 g)
525°F
(280°C)
1 OFF HIGH 100% OFF 30 sec 30 sec
001 Toast 2pc
Room
temp.
2 slices
(3.2 oz/90 g)
525°F
(280°C)
1 OFF HIGH 100% OFF 35 sec 35 sec
002
Croissant
1pc
Room
temp.
1 piece
(1.4 oz/40 g)
525°F
(280°C)
1
525°F
(280°C)
OFF 80% 900 W 15 sec
20 sec
2
525°F
(280°C)
LOW 90% OFF 5 sec
003
Croissant
2pc
Room
temp.
2 pieces
(2.8 oz/80 g)
525°F
(280°C)
1
525°F
(280°C)
OFF 80% 900 W 26 sec
30 sec
2
525°F
(280°C)
LOW 90% OFF 4 sec
004 Bagel 1pc
Room
temp.
1 piece
(2.8 oz/80 g)
525°F
(280°C)
1 OFF HIGH 100% 300 W 30 sec
35 sec
2 OFF HIGH 100% OFF 5 sec
005 Bagel 2pc
Room
temp.
2 pieces
(5.6 oz/160 g)
525°F
(280°C)
1 OFF HIGH 80% 300 W 35 sec
45 sec
2 OFF HIGH 80% OFF 10 sec
006 Waffle
Room
temp.
1 piece
(2.5 oz/70 g)
525°F
(280°C)
1 OFF LOW 50% 1050 W 25 sec 25 sec
007
Pain au
choco
Room
temp.
1 piece
(2.8 oz/80 g)
525°F
(280°C)
1
350°F
(180°C)
OFF 30% 1200 W 25 sec 25 sec
Sandwich
008
Ham &
cheese
Chilled
1 piece
(4.2 oz/120 g)
525°F
(280°C)
1 OFF LOW 100% 1200 W 30 sec
35 sec
2
525°F
(280°C)
HIGH 100% OFF 5 sec
009
Chicken
SUB
Chilled
1 piece
(5.6 oz/160 g)
525°F
(280°C)
1 OFF LOW 100% 1200 W 35 sec
40 sec
2
525°F
(280°C)
HIGH 100% OFF 5 sec
010 Toastie Chilled
1 piece
(6 oz /170 g)
525°F
(280°C)
1 OFF LOW 90% 1200 W 35 sec 35 sec
011 Wrap Chilled
1 piece
(4.6 oz/130 g)
525°F
(280°C)
1 OFF LOW 80% 1200 W 35 sec 35 sec
Pizza
012 Pizza CHL Chilled
1 piece
(7.1 oz/200 g)
525°F
(280°C)
1 OFF LOW 80% 1200 W 40 sec
1 min
2 OFF HIGH 80% OFF 20 sec
013 Pizza FRZ Frozen
1 piece
(7.1 oz/200 g)
525°F
(280°C)
1 OFF LOW 50% 1200 W 1 min
1 min
20 sec
2 OFF HIGH 50% 500 W 20 sec
014
Pepperoni
CHL
Chilled
1 piece
(7.1 oz/200 g)
525°F
(280°C)
1 OFF LOW 50% 900 W 45 sec
1 min
25 sec
2 OFF HIGH 60% OFF 40 sec
015
Pepperoni
FRZ
Frozen
1 piece
(7.1 oz/200 g)
525°F
(280°C)
1 OFF LOW 50% 1200 W 1 min
1 min
45 sec
2 OFF HIGH 30% 600 W 45 sec
Category
No. Menu
Start
Temp.
Quantity
(Weight)
Preheat
Temp.
Program
Total
Time
Step Conv
Grill
(Broil)
Fan MW Time
Pastry
016 Scone Chilled
1 piece
(2.8 oz/80 g)
525°F
(280°C)
1 OFF HIGH 90% 900 W 20 sec 20 sec
017 Muffin Chilled
1 piece
(2.1 oz/60 g)
525°F
(280°C)
1
525°F
(280°C)
OFF 30% 1200 W 15 sec
20 sec
2 OFF HIGH 100% OFF 5 sec
018 Brownie Chilled
1 piece
(2.5 oz/70 g)
525°F
(280°C)
1
350°F
(180°C)
OFF 30% 1200 W 20 sec 20 sec
019 Apple pie Chilled
1 piece
(2.8 oz/80 g)
525°F
(280°C)
1 OFF LOW 50% 750 W 35 sec
40 sec
2
525°F
(280°C)
LOW 70% OFF 5 sec
Fried/
Broiled
020
Broiled
chicken
Frozen
1 piece
(4.2 oz/120 g)
525°F
(280°C)
1 OFF LOW 50% 1200 W
1 min
40 sec
2 min
20 sec
2
525°F
(280°C)
HIGH 60% OFF 40 sec
021
Fried
chicken
Frozen
1 piece
(3.9 oz/110 g)
525°F
(280°C)
1 OFF LOW 50% 1200 W 1 min
1 min
40 sec
2
525°F
(280°C)
OFF 30% 600 W 40 sec
022
Fried fish
stick
Frozen
1 piece
(2.1 oz/60 g)
525°F
(280°C)
1 OFF LOW 100% 1200 W 30 sec
1 min
10 sec
2
525°F
(280°C)
HIGH 50% OFF 40 sec
023
French
fries
Frozen
7.1 oz/200 g
525°F
(280°C)
1
525°F
(280°C)
OFF 100% 900 W
1 min
30 sec
1 min
45 sec
2
525°F
(280°C)
OFF 100% OFF 15 sec
024
Onion
rings
Frozen
5.3 oz/150 g
525°F
(280°C)
1 OFF LOW 100% 1200 W 40 sec
1 min
30 sec
2
525°F
(280°C)
HIGH 30% OFF 50 sec
025
Hash
brown
Frozen
1 piece
(2.1 oz/60 g)
525°F
(280°C)
1 OFF LOW 100% 1200 W 40 sec
1 min
10 sec
2
525°F
(280°C)
HIGH 70% OFF 30 sec
Pasta
bake
026
Pasta
bake CHL
Chilled
1 piece
(7.8 oz/220 g)
525°F
(280°C)
1
475°F
(250°C)
OFF 90% 900 W
1 min
20 sec
2 min
2
475°F
(250°C)
OFF 90% 600 W 40 sec
027
Pasta
bake FRZ
Frozen
1 piece
(7.8 oz/220 g)
525°F
(280°C)
1
525°F
(280°C)
OFF 30% 1200 W 2 min
2 min
40 sec
2 OFF HIGH 80% 600 W 40 sec
Others
028 Quiche Chilled
1 piece
(3.9 oz/110 g)
525°F
(280°C)
1 OFF LOW 90% 1050 W 30 sec
35 sec
2 OFF LOW 90% OFF 5 sec
029 Meat pie Chilled
1 piece
(5.3 oz/150 g)
525°F
(280°C)
1
475°F
(250°C)
OFF 50% 1200 W 1 min
1 min
5 sec
2 OFF HIGH 100% OFF 5 sec
030 Hot dog Chilled
1 piece
(2.8 oz/80 g)
525°F
(280°C)
1
350°F
(180°C)
OFF 50% 1050 W 25 sec 25 sec
WARNING
Do not over-heat food.
If the heating time is too long for the amount of food, there is a danger of fire or smoke.
O When heating, always start with minimum cooking time and heat while keeping an eye on
the progress.
O In particular, take care when heating small amounts, oily or fatty foods or liquids, or sweet
potatoes and other root vegetables.
CAUTION
When removing food from the oven, take care that a cooking sheet or similar does not
make contact with the upper heater.
There is a danger of fire or smoke.
When using a cooking sheet or similar:
O Observe the heatproof temperature stated on the package.
O Use a sheet size that matches the quantity of the food.
O Take care that the sheet does not touch the upper surface of the oven interior.
24
25
English
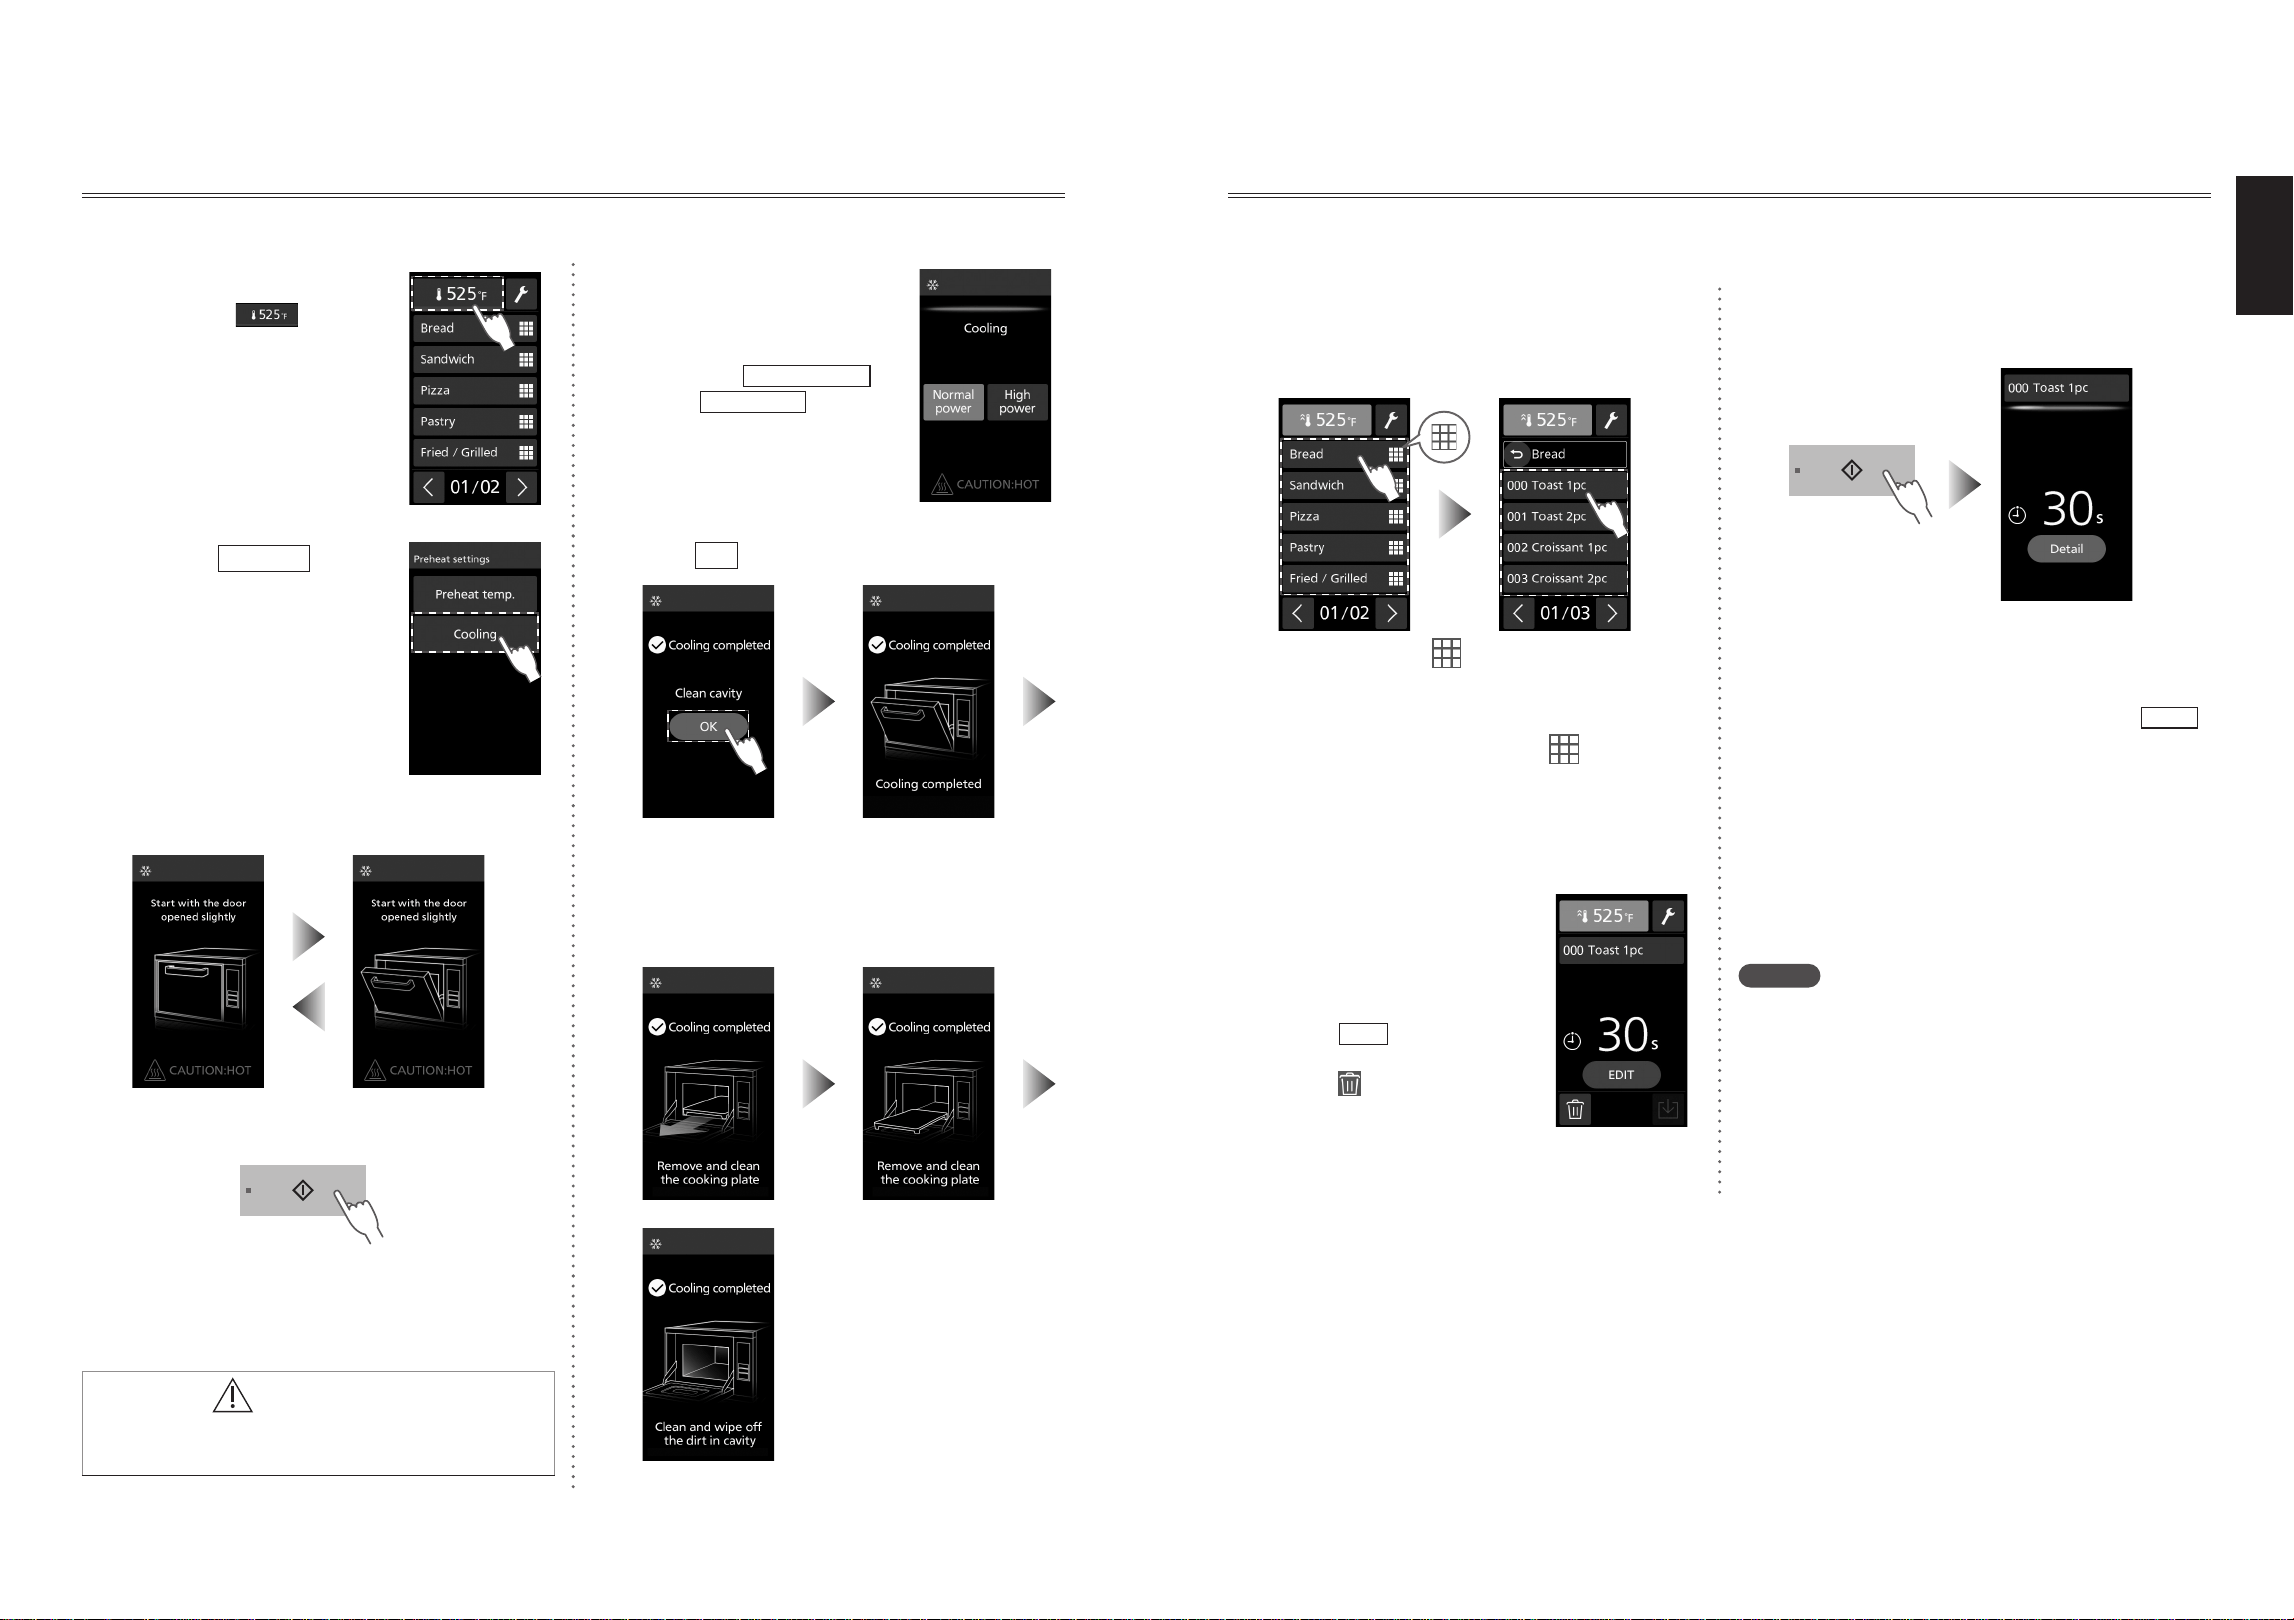
Preheating
Starting Preheating
To start cooking, make sure you perform preheating. Before cooking, you can also perform preheating
only.
1
Press the Start pad
2
Start preheating
O During preheating, the
preheating state indication
bar displays the progress of
the preheating. (When the
preheating state indication
bar reaches the right edge
and the preheating
temperature display lights
up, the preheating is
complete.)
O If the door is opened or
closed during preheating,
the preheating stops.
O After closing the door, the
preheating re-starts
automatically after
approximately 10 seconds.
If it does not re-start, press
the Start pad.
3
Preheating has been
completed
O
Approximate preheating
time; 525°F (280°C): 7 min.
O The default setting is that the beep sounds after
preheating is complete.
O If the door is left open after the preheating is
complete, you will be notified by a beep sounding.
O You can turn off the beep.
“To select ON or OFF for the preheated beep”
(p.48)
“To select ON or OFF for the door alarm” (p.48)
O After the preheating is complete, if the oven interior
temperature falls below the lowest cooking
temperature, the preheating automatically re-starts,
and the oven interior temperature is maintained at
the set preheating temperature. If no operation is
performed for 4 hours after the preheating is
complete, the preheating is not re-started, and the
screen enters the display off state.
O If the door is left open for 1 minute or longer after
the preheating is complete, the preheating will not
re-start even if the door is closed. Press the Start
pad.
Q To cancel preheating
Press the Stop/Reset pad once.
Setting the Required temp. / Lowest cooking temp.*
The temperature of the preheating performed before cooking and the temperature at which the cooking
can start are set.
[ex.: Required temp.
525°F
(280°C), Lowest cooking temp.
475°F
(250°C)]
1
Tap the preheating
setting ( )
2
Select
Preheat temp.
3
Set the required
temperature, and tap
OK
O From 350°F (180°C) to
525°F (280°C)
[Default setting: 525°F
(280°C)]
4
Set the lowest
cooking
temperature*, and
tap
OK
O From 350°F (180°C) to
525°F (280°C)
[Default setting: 475°F
(250°C)]
O After the setting information
has been displayed for
3 seconds, the panel
returns to the home screen.
* Cooking can be started before the preheating is
complete by setting the lowest cooking temperature
below the required temperature.
If the lowest cooking temperature is set to a low
temperature, it may affect the results of the cooking.
26
27
English
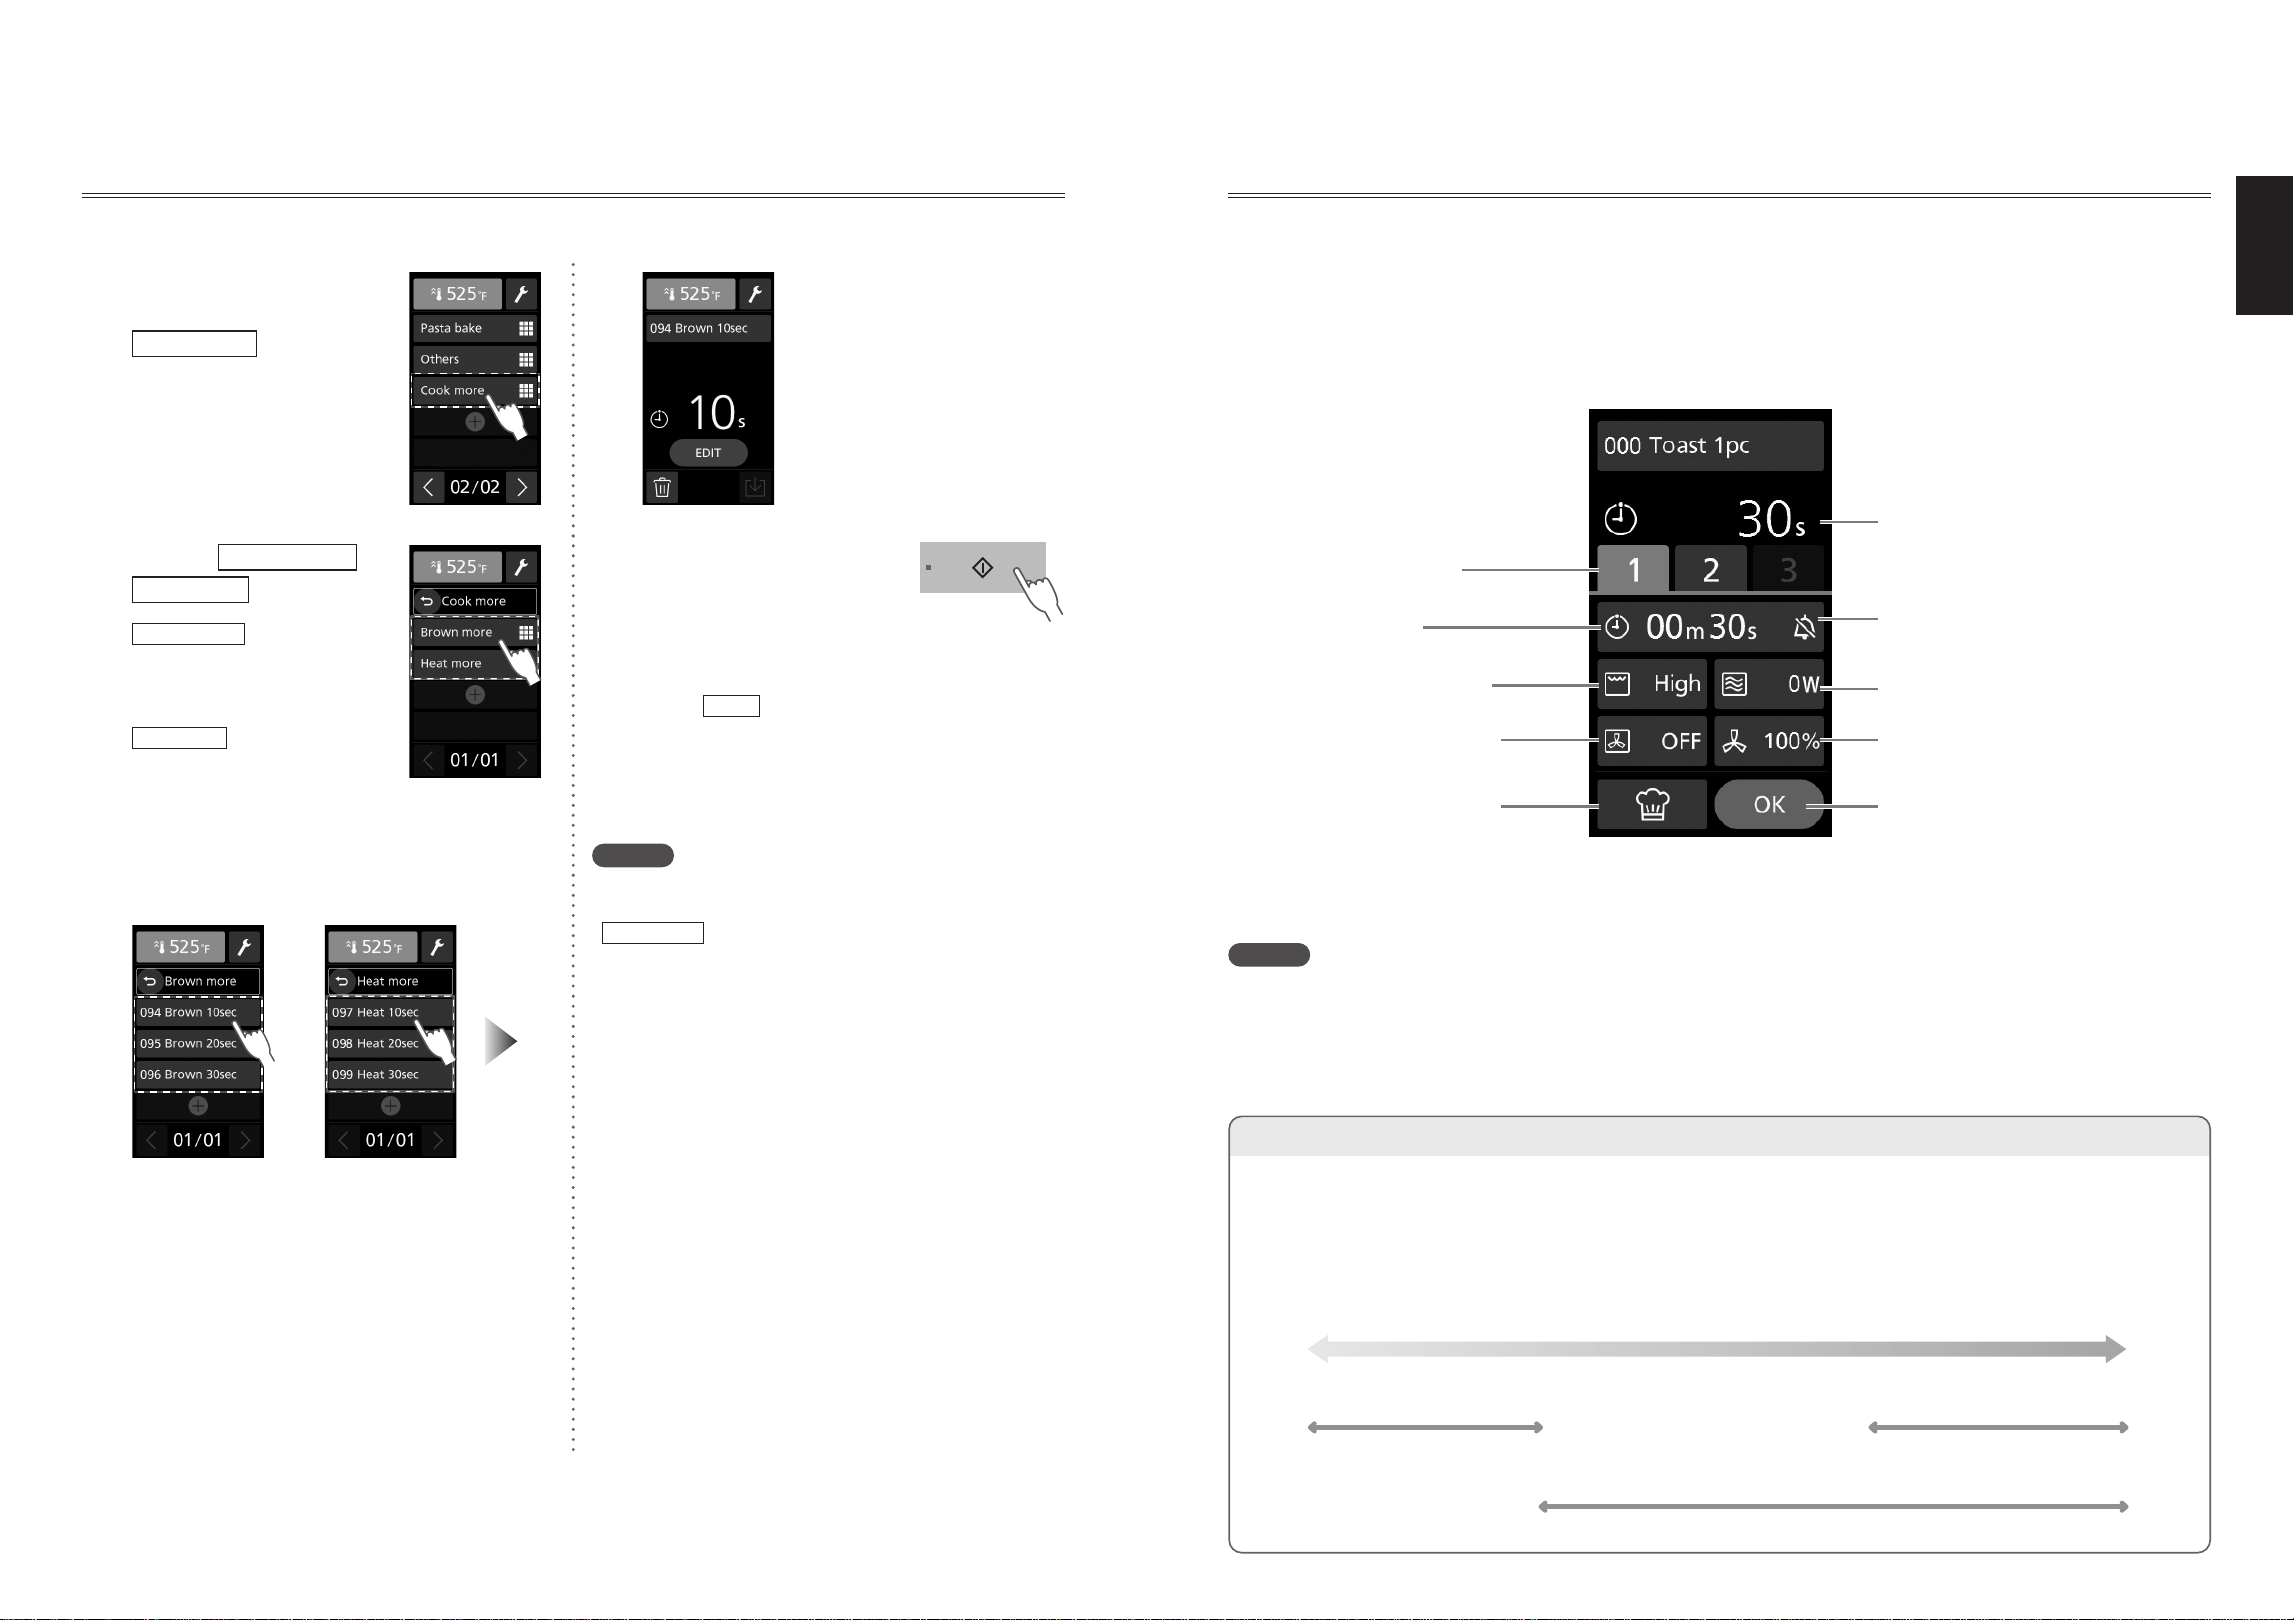
Cooling
Cooling the Oven Interior
After cooking, you can cool down the oven interior if you are carrying out maintenance, etc.
1
Tap the preheating
setting ( )
2
Select
Cooling
3
Open the door a little, and start
O Open the door slightly to lock it in place.
(Keep your face away.)
CAUTION
Take care of hot air when opening the
door.
4
Starting cooling
O While cooling, the cooling
mode can be switched
between
Normal power
and
High power
.
5
Tap
OK
O This screen is only
displayed when the “Call
for cavity cleaning” is “ON”.
(p.50)
(Default setting: ON)
O Press the Stop/Reset pad
to return to the home
screen.
O The cooling time depends
on the temperature inside
the oven.
(up to 45 minutes)
Cooking with a Saved Cooking Menu
Select a cooking menu from the menu list, and start cooking.
Perform preheating before starting cooking. (p.24)
1
After the preheating is
complete, select a cooking
menu from the menu list
O The items with displayed on the right
are categories.
Select the category to display the menus
within the category.
If you select an item with no displayed
on the right, the process advances to
2
.
O If “Menu number select” is set in “Home
setting”, input a number.
(Default setting: Picture list)
2
Check the menu’s
cooking settings
O You can check and edit the
menu’s cooking settings
with
EDIT
. (p.39)
O You can delete the menu
with . (p.38)
Put the food into the oven
and close the door
3
Press the Start pad
(Cooking will start.)
O After starting
cooking, the current
step’s cooking
settings can be
checked with
Detail
.
“Cooking Menu Set-
up Screen” (p.29)
O After the cooking is complete, a beep sounds.
The beep stops when you open the door.
Notes
The cooking menu can be newly created or edited.
In addition, it is possible to exchange data with the
oven using the USB memory stick and your
personal computer.
•Connecting to your personal computer (p.19)
•Creating a cooking menu (pp.29–37)
•Editing a cooking menu (pp.38–40)
•Using a USB memory stick (p.42)
Cooking
28
29
English
Cook more
After cooking, you can brown the food or raise the food’s internal temperature.
1
After the cooking is
finished, select
Cook more
2
Select
Brown more
or
Heat more
Brown more
:
heat with the grill (broil)
set to high and the fan
speed at 100%.
Heat more
:
heat with the convection
at 525°F (280°C), the
microwave at 600 W, and
the fan speed at 30%.
3
Select the heating time menu
Q “Brown more”
menu
Q “Heat more”
menu
O If “Menu number select” is set in
“Home setting”, input a number.
094: Brown 10sec
095: Brown 20sec
096: Brown 30sec
097: Heat 10sec
098: Heat 20sec
099: Heat 30sec
Put the food into the oven
and close the door
4
Press the Start pad
(Cooking will start.)
O After starting cooking, the
current step’s cooking
settings can be checked
with
Detail
.
“Cooking Menu Set-up
Screen” (p.29)
Notes
•When editing with the setting support tool, if the
menu numbers from 094 to 099 are deleted,
Cook more
is deleted from the menus displayed.
Cooking
Cooking Menu Set-up Screen
You can set or edit the cooking menu contents in the cooking menu set-up screen.
O This feature cannot be used when memory lock is ON. Please cancel memory lock. (p.46)
Q To display the cooking menu set-up screen
When newly creating a cooking menu; perform step
1
of “Convection Cooking” (p.30)
When editing a cooking menu; perform steps
1
to
2
of “Editing a Cooking Menu” (p.39)
Displays the total cooking time.
Microwave (pp.33–35)
Step number (pp.36–37)
Each step’s set time
Grill (Broil) (p.31, p.32, p.35)
Convection (p.30, p.32, p.34)
Assist cooking settings (p.40)
O This can only be used when
editing a menu already registered
in memory.
Fan speed
(p.30, p.31, p.36, p.37)
Confirm the setting contents.
You can set a beep / no beep for
when each step ends. (p.36)
Notes
•While setting or editing the cooking menu, when adjusting the temperature, fan speed, and time, if you keep
the button pressed down it will fast-forward.
•In the main unit’s screen operation, you cannot set or edit the cooking menu name, the category name, the
menu arrangement, or the background image.
To set or edit, use the setting support tool.
Fan Speed
O The fan circulates the heat of the heater throughout the entire oven to brown food and give a crisp finish
to the surface.
O The fan speed can be set from 30% to 100% when cooking on modes other than microwave. Adjust it
depending on the food.
Q Fan speed guide
30% 50% 60% 70% 90%80% 100%40%
Dries the food quickly and
makes the surface crispy
Gives the surface a crispy finish
Bake gently
Creating a Cooking Menu and Registering in Memory
30
31
English
Creating a Cooking Menu and Registering in Memory
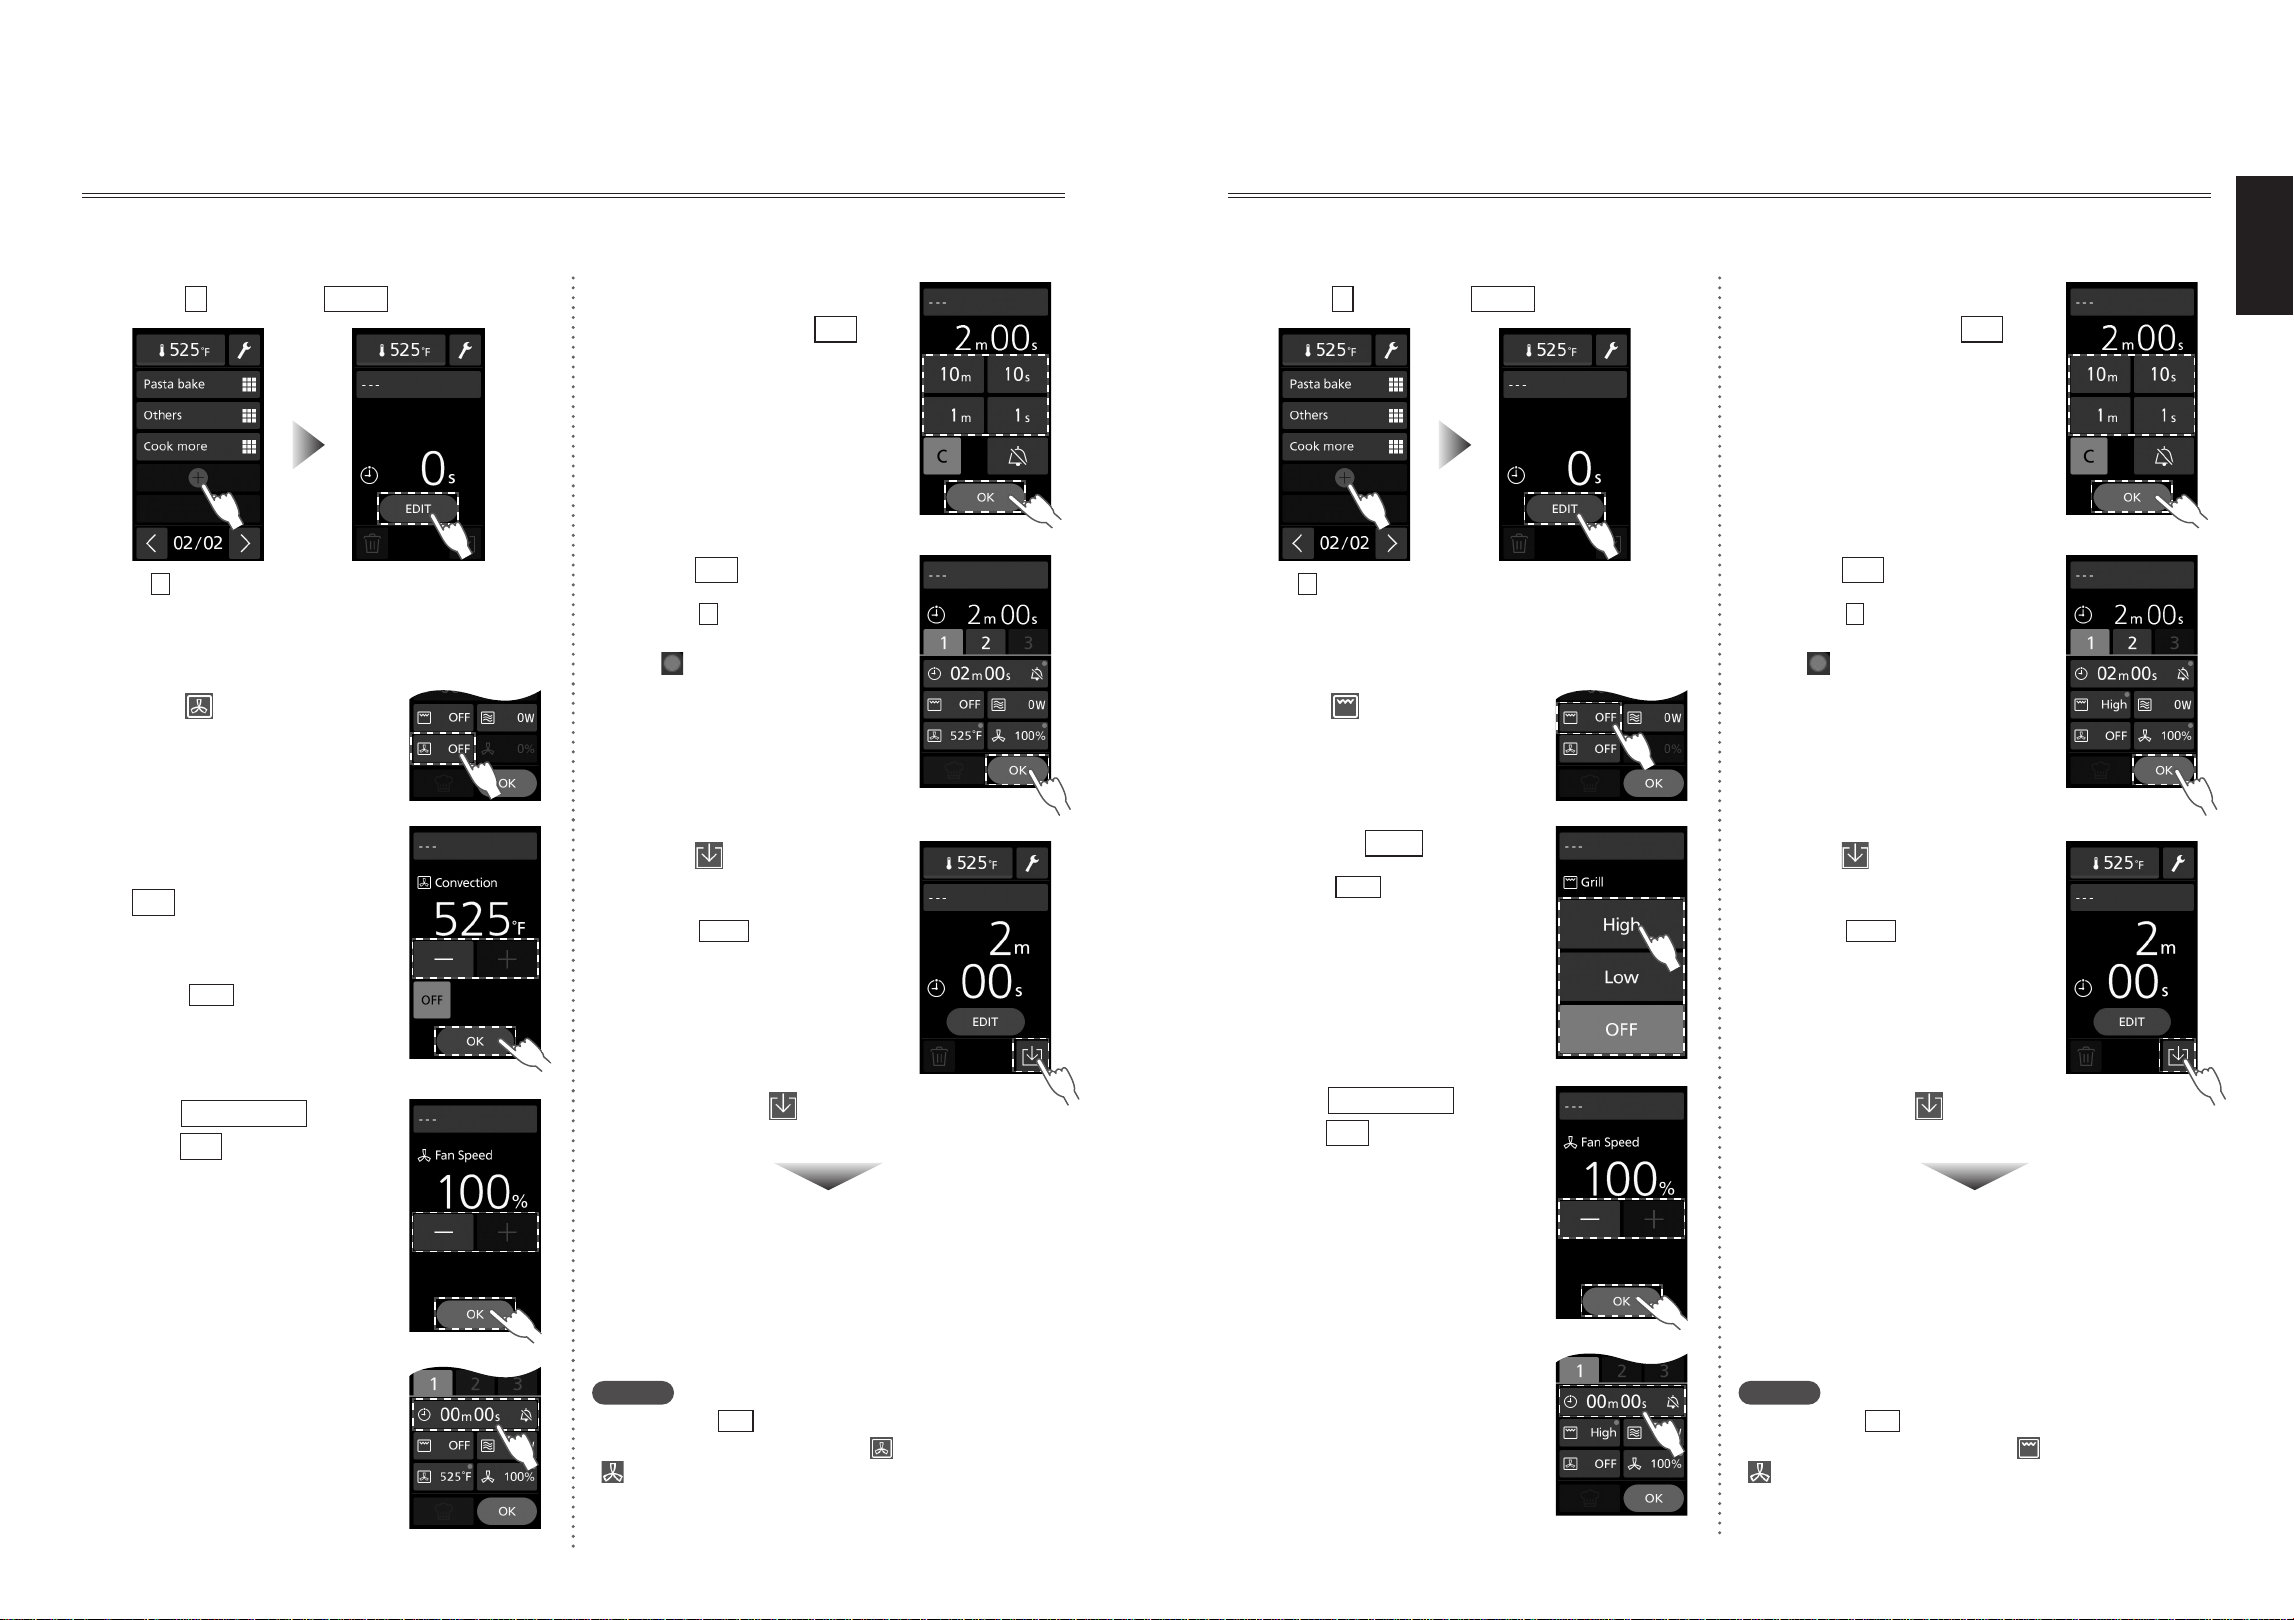
Convection Cooking
O This feature cannot be used when memory lock is ON. Please cancel memory lock. (p.46)
[ex.: One-step cooking, Convection 525°F (280°C), Fan Speed 100%, 2 min]
1
Tap
+
, and tap
EDIT
O
+
is displayed at the end
of the menu list, or in the
place where the cooking
menu was deleted.
2
Tap (convection)
3
Set the oven
temperature, and tap
OK
O From 350°F (180°C) to
525°F (280°C)
O Tap
OFF
to cancel the
already selected cooking
process.
4
Set
Fan Speed
, and
tap
OK
O From 30% to 100%
O “Fan Speed” (p.29)
5
Tap the time setting
6
Set the cooking
time, and tap
OK
O Maximum set time
30 minutes for each step
7
Tap
OK
O Tap
2
when setting Step 2.
“Cooking in Steps” (p.37)
O is displayed at the upper
right of the function button
that has been set.
8
Tap
(memory registration)
O Tap
EDIT
to display the
cooking menu set-up
screen.
O Press the Start pad to start
cooking.
You can also register the
cooking menu in memory
by pressing after the
cooking.
Memory registration complete
O Press the Stop/Reset pad to return to the home
screen.
O The cooking menu is automatically named as the
maximum number in the menu list and stored in
memory.
Notes
•Until you tap
OK
in step
7
, you can change the
respective settings by tapping (convection) and
(fan speed).
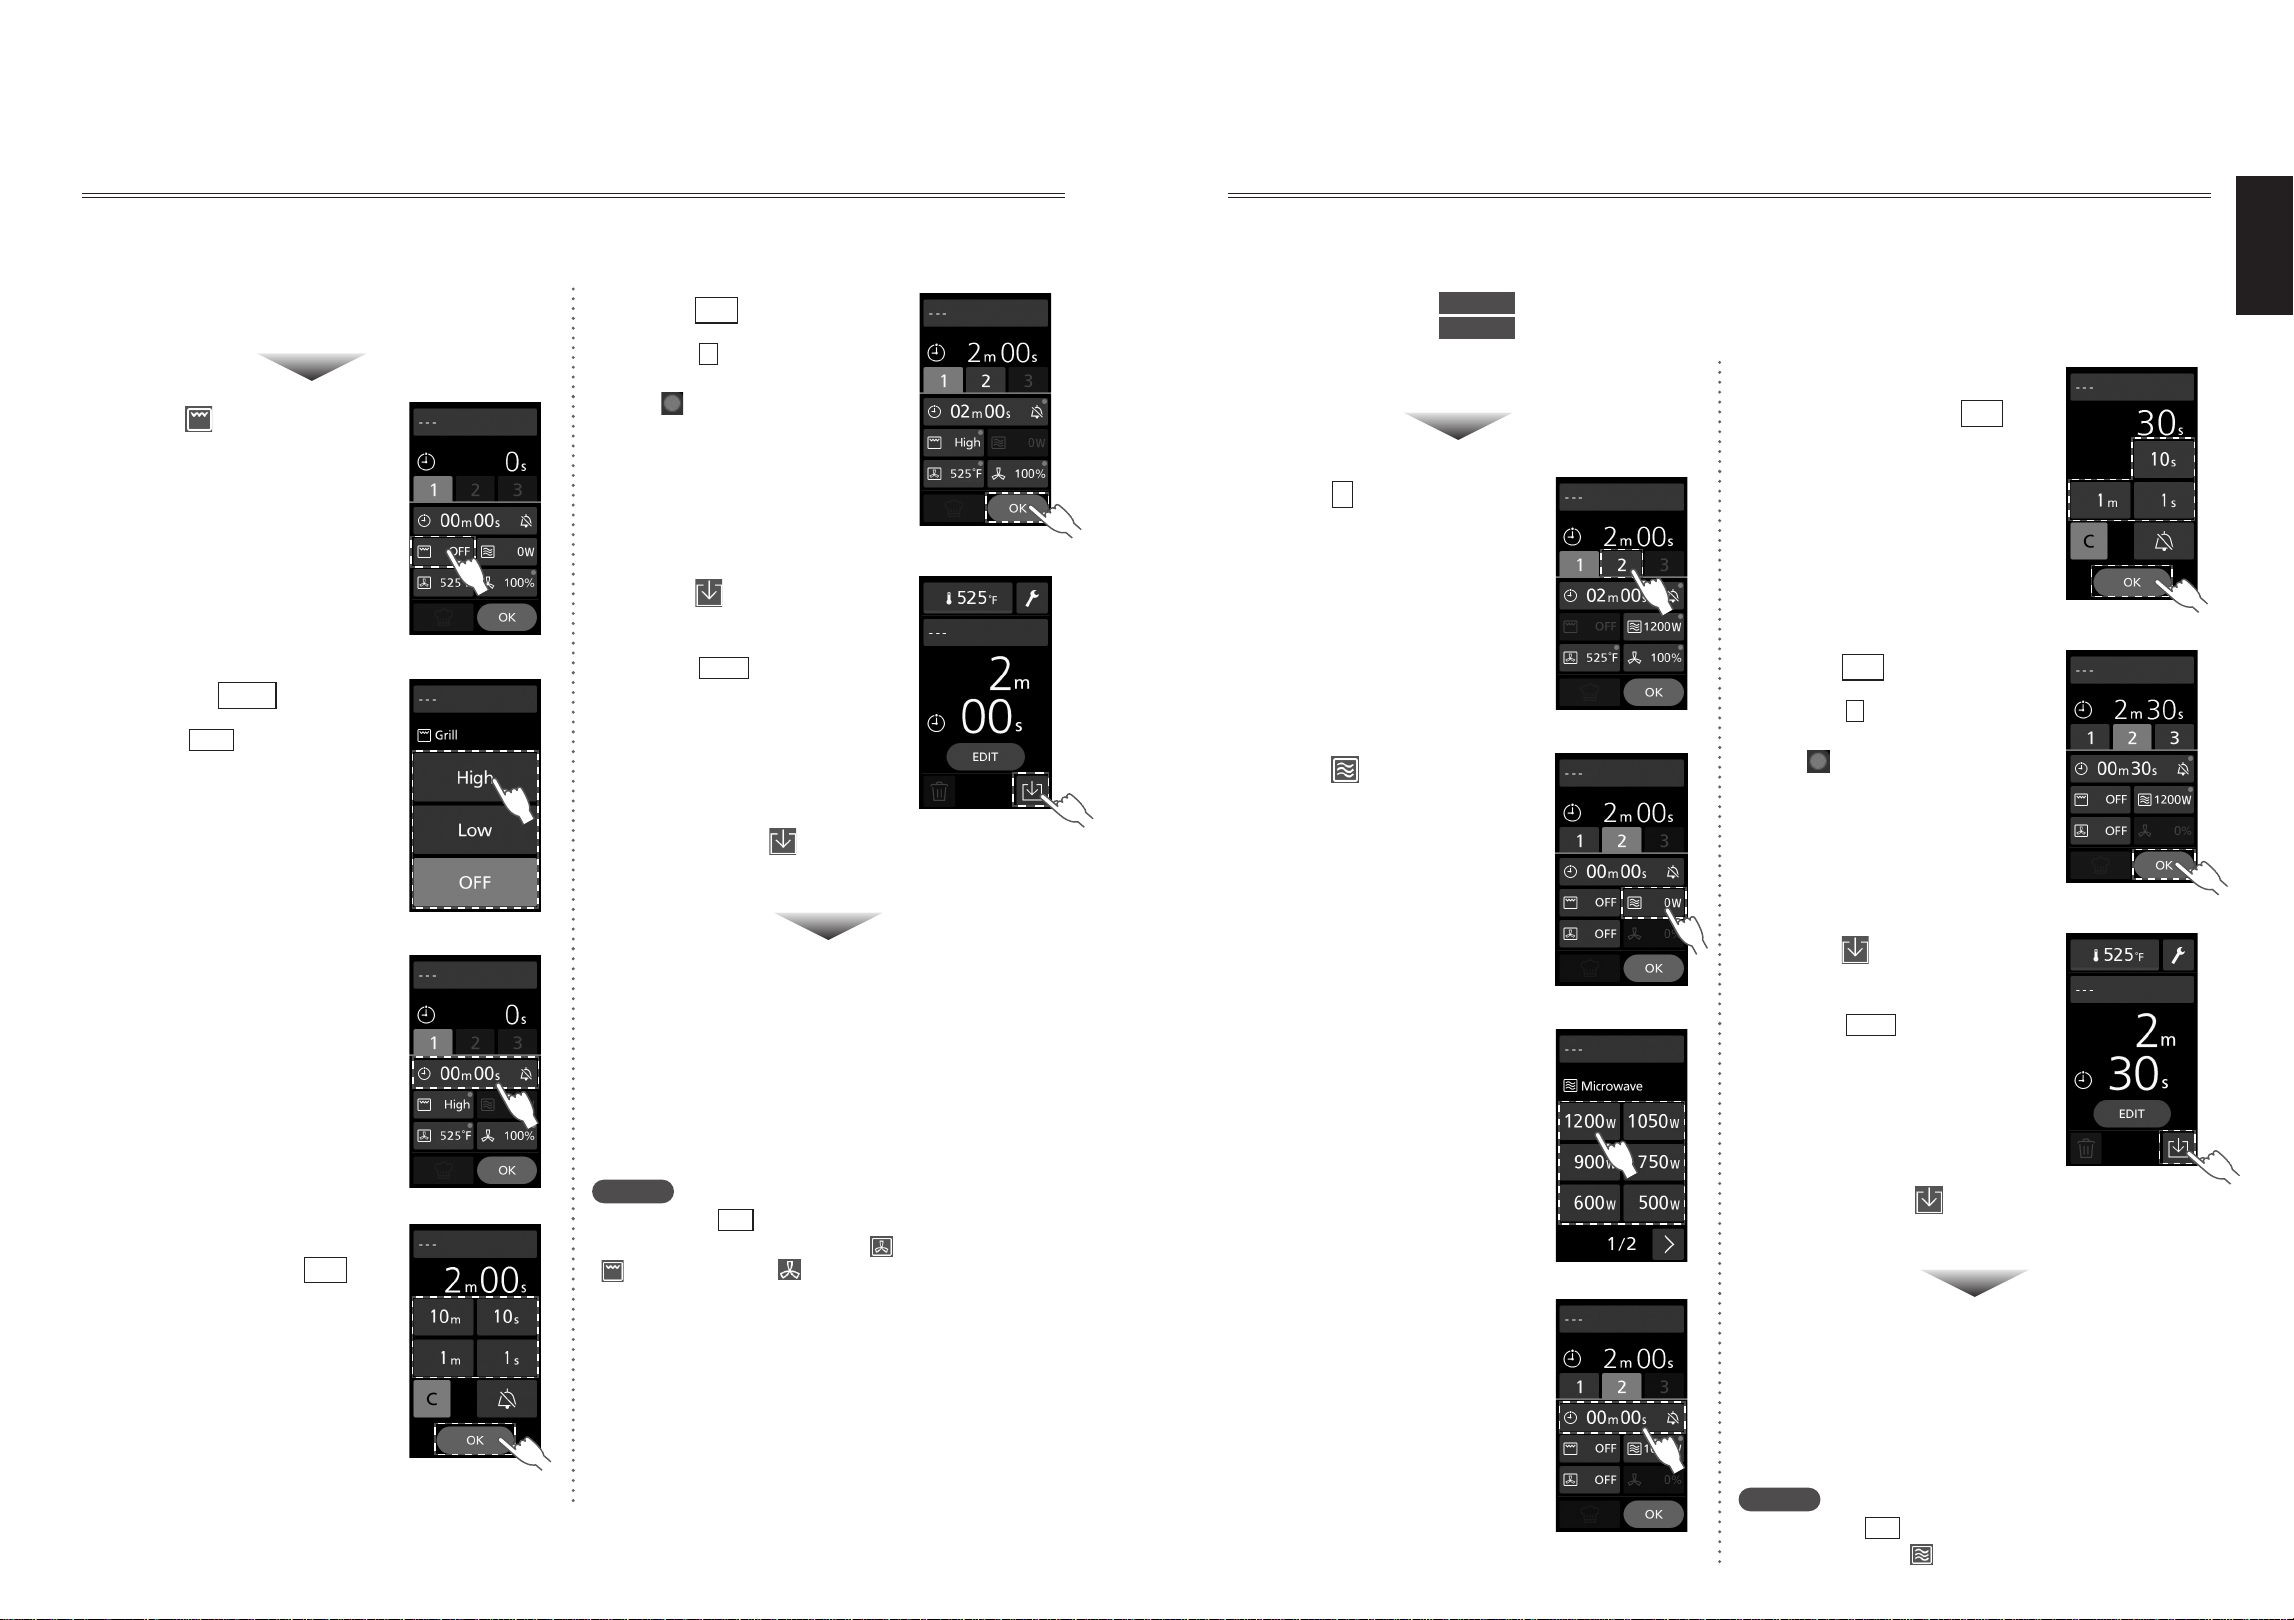
Grill (Broil) Cooking
O This feature cannot be used when memory lock is ON. Please cancel memory lock. (p.46)
(ex.: One-step cooking, Grill (Broil) High, Fan Speed 100%, 2 min)
1
Tap
+
, and tap
EDIT
O
+
is displayed at the end
of the menu list, or in the
place where the cooking
menu was deleted.
2
Tap [grill (broil)]
3
Select
High
O Tap
OFF
to cancel the
already selected cooking
process.
4
Set
Fan Speed
, and
tap
OK
O From 30% to 100%
O “Fan Speed” (p.29)
5
Tap the time setting
6
Set the cooking
time, and tap
OK
O Maximum set time
30 minutes for each step
7
Tap
OK
O Tap
2
when setting Step 2.
“Cooking in Steps” (p.37)
O is displayed at the upper
right of the function button
that has been set.
8
Tap
(memory registration)
O Tap
EDIT
to display the
cooking menu set-up
screen.
O Press the Start pad to start
cooking.
You can also register the
cooking menu in memory
by pressing after the
cooking.
Memory registration complete
O Press the Stop/Reset pad to return to the home
screen.
O The cooking menu is automatically named as the
maximum number in the menu list and stored in
memory.
Notes
•Until you tap
OK
in step
7
, you can change the
respective settings by tapping [grill (broil)] and
(fan speed).
32
33
English
Creating a Cooking Menu and Registering in Memory
Convection-and-Grill (Broil) Cooking
O This feature cannot be used when memory lock is ON. Please cancel memory lock. (p.46)
[ex.: One-step cooking, Convection 525°F (280°C), Fan Speed 100%, Grill (Broil) High, 2 min]
Perform steps
1
to
4
of
“Convection Cooking” (p.30)
5
Tap [grill (broil)]
6
Select
High
O Tap
OFF
to cancel the
already selected cooking
process.
7
Tap the time setting
8
Set the cooking
time, and tap
OK
O Maximum set time
30 minutes for each step
9
Tap
OK
O Tap
2
when setting Step 2.
“Cooking in Steps” (p.37)
O is displayed at the upper
right of the function button
that has been set.
Tap
(memory registration)
O Tap
EDIT
to display the
cooking menu set-up
screen.
O Press the Start pad to start
cooking.
You can also register the
cooking menu in memory
by pressing after the
cooking.
Memory registration complete
O Press the Stop/Reset pad to return to the home
screen.
O The cooking menu is automatically named as the
maximum number in the menu list and stored in
memory.
Notes
•Until you tap
OK
in step
9
, you can change the
respective settings by tapping (convection),
[grill (broil)], and (fan speed).
10
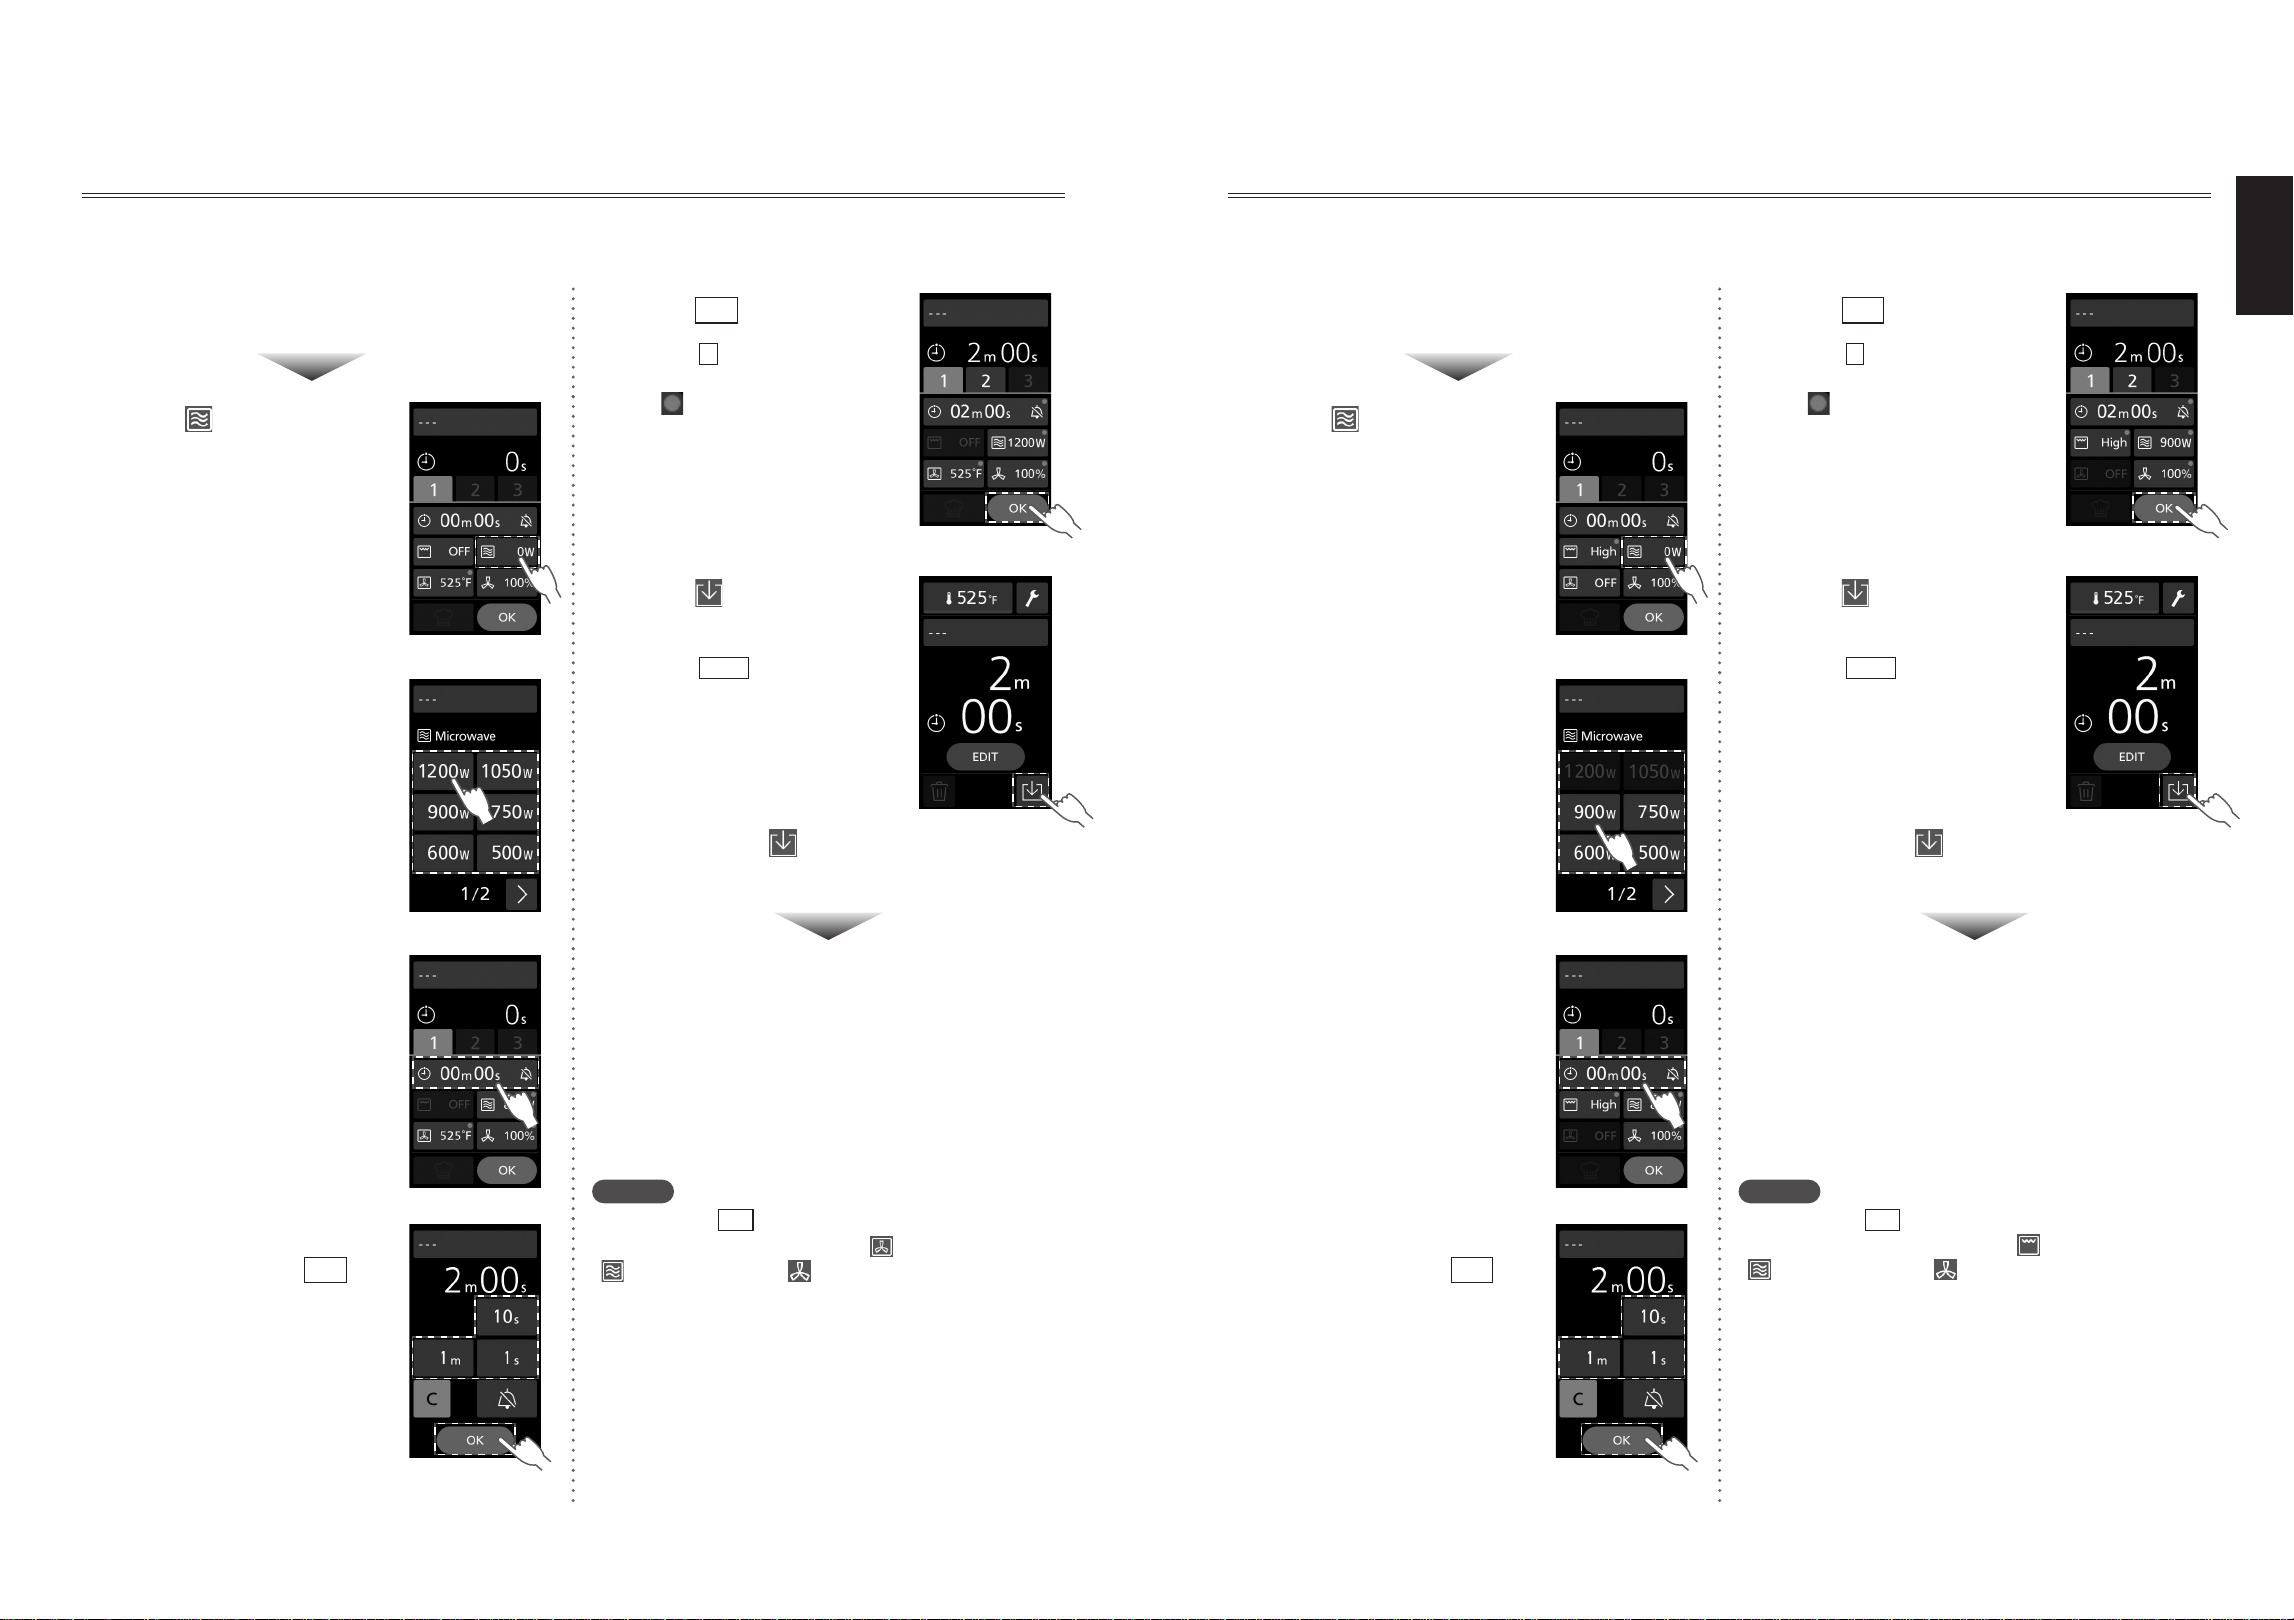
Microwave Cooking
O This feature cannot be used when memory lock is ON. Please cancel memory lock. (p.46)
It is not possible to set one-step cooking with the microwave only. (The second step and third step settings can
be set for microwave only.)
(ex.: Two-step cooking,
Step 1
[Convection 525°F (280°C), Fan Speed 100%, Microwave 1200 W, 2 min] →
Step 2
[Microwave 1200 W, 30 sec]
Set Step 1 (p.36)
1
Tap
2
2
Tap (microwave)
3
Select the
microwave power
O During step 2
From 0 W to 1200 W
O During step 3
From 0 W to 600 W
4
Tap the time setting
5
Set the cooking
time, and tap
OK
O During step 2
Maximum set time of 5
minutes
O During step 3
Maximum set time of 10
minutes
6
Tap
OK
O Tap
3
when setting Step 3.
“Cooking in Steps” (p.37)
O is displayed at the upper
right of the function button
that has been set.
7
Tap
(memory registration)
O Tap
EDIT
to display the
cooking menu set-up
screen.
O Press the Start pad to start
cooking.
You can also register the
cooking menu in memory
by pressing after the
cooking.
Memory registration complete
O Press the Stop/Reset pad to return to the home
screen.
O The cooking menu is automatically named as the
maximum number in the menu list and stored in
memory.
Notes
•Until you tap
OK
in step
6
, you can change the
setting by tapping (microwave).
34 35
English
Convection-and-Microwave Cooking
O This feature cannot be used when memory lock is ON. Please cancel memory lock. (p.46)
[ex.: One-step cooking, Convection 525°F (280°C), Fan Speed 100%, Microwave 1200 W, 2 min]
Perform steps
1
to
4
of
“Convection Cooking” (p.30)
5
Tap (microwave)
6
Select the
microwave power
O From 0 W to 1200 W
7
Tap the time setting
8
Set the cooking
time, and tap
OK
O During steps 1, 2
Maximum set time of
5 minutes
O During step 3
Maximum set time of
10 minutes
9
Tap
OK
O Tap
2
when setting Step 2.
“Cooking in Steps” (p.37)
O is displayed at the upper
right of the function button
that has been set.
Tap
(memory registration)
O Tap
EDIT
to display the
cooking menu set-up
screen.
O Press the Start pad to start
cooking.
You can also register the
cooking menu in memory
by pressing
after the
cooking.
Memory registration complete
O Press the Stop/Reset pad to return to the home
screen.
O The cooking menu is automatically named as the
maximum number in the menu list and stored in
memory.
Notes
•Until you tap
OK
in step
9
, you can change the
respective settings by tapping
(convection),
(microwave), and (fan speed).
10
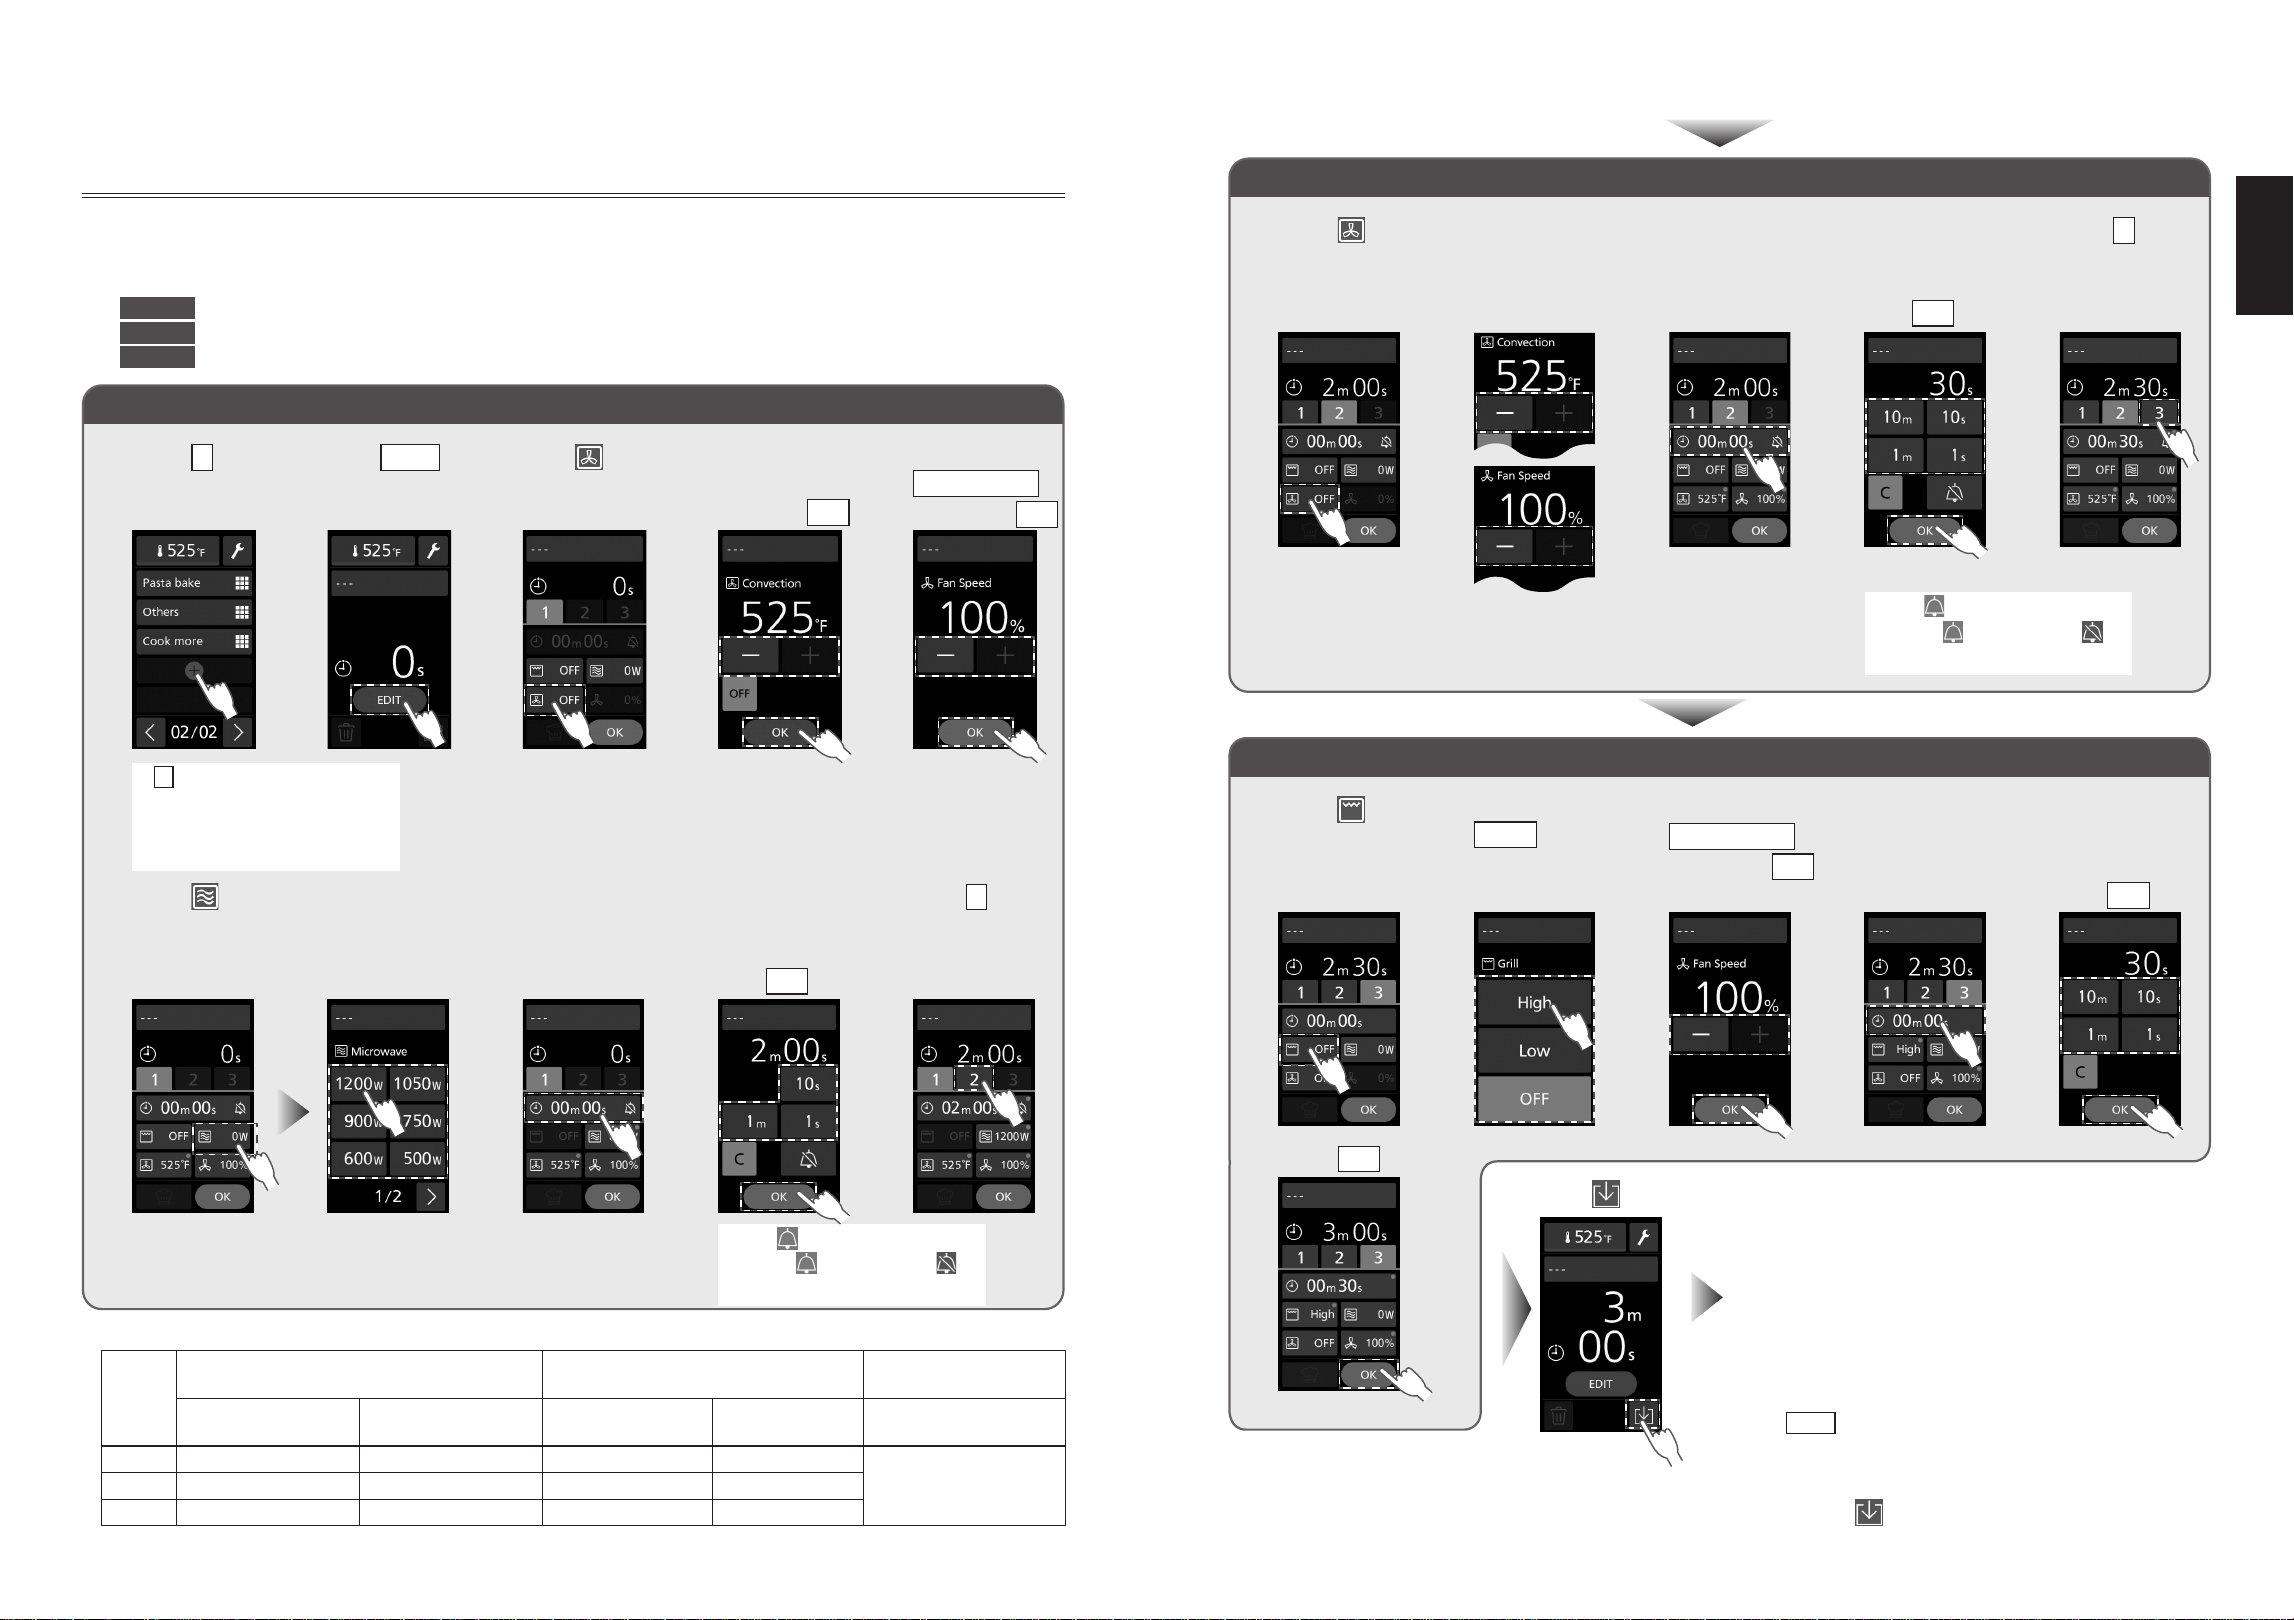
Creating a Cooking Menu and Registering in Memory
Grill (Broil)-and-Microwave Cooking
O This feature cannot be used when memory lock is ON. Please cancel memory lock. (p.46)
(ex.: One-step cooking, Grill (Broil) High, Fan Speed 100%, Microwave 900 W, 2 min)
Perform steps
1
to
4
of
“Grill (Broil) Cooking” (p.31)
5
Tap (microwave)
6
Select the
microwave power
O When the grilll (broil) is set
to high
From 0 W to 900 W
O When the grilll (broil) is set
to low
From 0 W to 1200 W
7
Tap the time setting
8
Set the cooking
time, and tap
OK
O During steps 1, 2
Maximum set time of
5 minutes
O During step 3
Maximum set time of
10 minutes
9
Tap
OK
O Tap
2
when setting Step 2.
“Cooking in Steps” (p.37)
O is displayed at the upper
right of the function button
that has been set.
Tap
(memory registration)
O Tap
EDIT
to display the
cooking menu set-up
screen.
O Press the Start pad to start
cooking.
You can also register the
cooking menu in memory
by pressing
after the
cooking.
Memory registration complete
O Press the Stop/Reset pad to return to the home
screen.
O The cooking menu is automatically named as the
maximum number in the menu list and stored in
memory.
Notes
•Until you tap
OK
in step
9
, you can change the
respective settings by tapping
[grilll (broil)],
(microwave), and (fan speed).
10
36 37
English
Cooking in Steps
Use Convection, Grill (Broil) and Microwave functions to suit your recipe.
The microwave power, temperature, cooking time or other can be set for up to three continuous steps.
O This feature cannot be used when memory lock is ON. Please cancel memory lock. (p.46)
ex.:
Step 1
[Convection 525°F (280°C), Fan Speed 100%, Microwave 1200 W, 2 min] →
Step 2
[Convection 525°F (280°C), Fan Speed 100%, 30 sec] →
Step 3
[Grill (Broil) High, Fan Speed 100%, 30 sec]
Step 1
1
Tap
+
2
Tap
EDIT
3
Tap
(convection)
4
Set the oven
temperature,
and tap
OK
5
Set
Fan Speed
,
and tap
OK
O
+
is displayed at the end
of the menu list, or in the
place where the cooking
menu was deleted.
6
Tap (microwave) to select
the output
7
Tap the
time
setting
8
Set the
cooking
time, and
tap
OK
9
Tap
2
O Tap , and you can set a
beep (
) or no beep ( )
for when each step ends.
Q Each step’s maximum microwave output and maximum set time
Microwave
Convection-and-Microwave/
Grill (Broil)-and-Microwave
Convection/Grill (Broil)/
Convection-and-Grill (Broil)
Maximum
microwave power
Maximum
cooking time
Maximum
microwave power
Maximum
cooking time
Maximum
cooking time
Step 1
Setting unavailable Setting unavailable
1200 W* 5 min.
30 min.Step 2 1200 W 5 min. 1200 W* 5 min.
Step 3 600 W 10 min. 600 W 10 min.
* A maximum of 900 W when the grill (broil) is set to High
Creating a Cooking Menu and Registering in Memory
Step 2
1
Tap
(convection)
2
Set the
temperature
and fan
speed
3
Tap the
time
setting
4
Set the
cooking
time, and
tap
OK
5
Tap
3
O Tap , and you can set a
beep (
) or no beep ( )
for when each step ends.
Step 3
1
Tap [grill
(broil)]
2
Select
High
3
Set
Fan Speed
,
and tap
OK
4
Tap the
time
setting
5
Set the
cooking
time, and
tap
OK
6
Tap
OK
Tap (memory registration)
Memory registration complete
O Press the Stop/Reset pad to return to the home
screen.
O The cooking menu is automatically named as the
maximum number in the menu list and stored in
memory.
O Displays the total time for all the steps.
O Tap
EDIT
to display the cooking menu set-up
screen.
O Press the Start pad to start cooking.
You can also register the cooking menu in memory
by pressing
after the cooking.
38
39
English
Editing a Cooking Menu
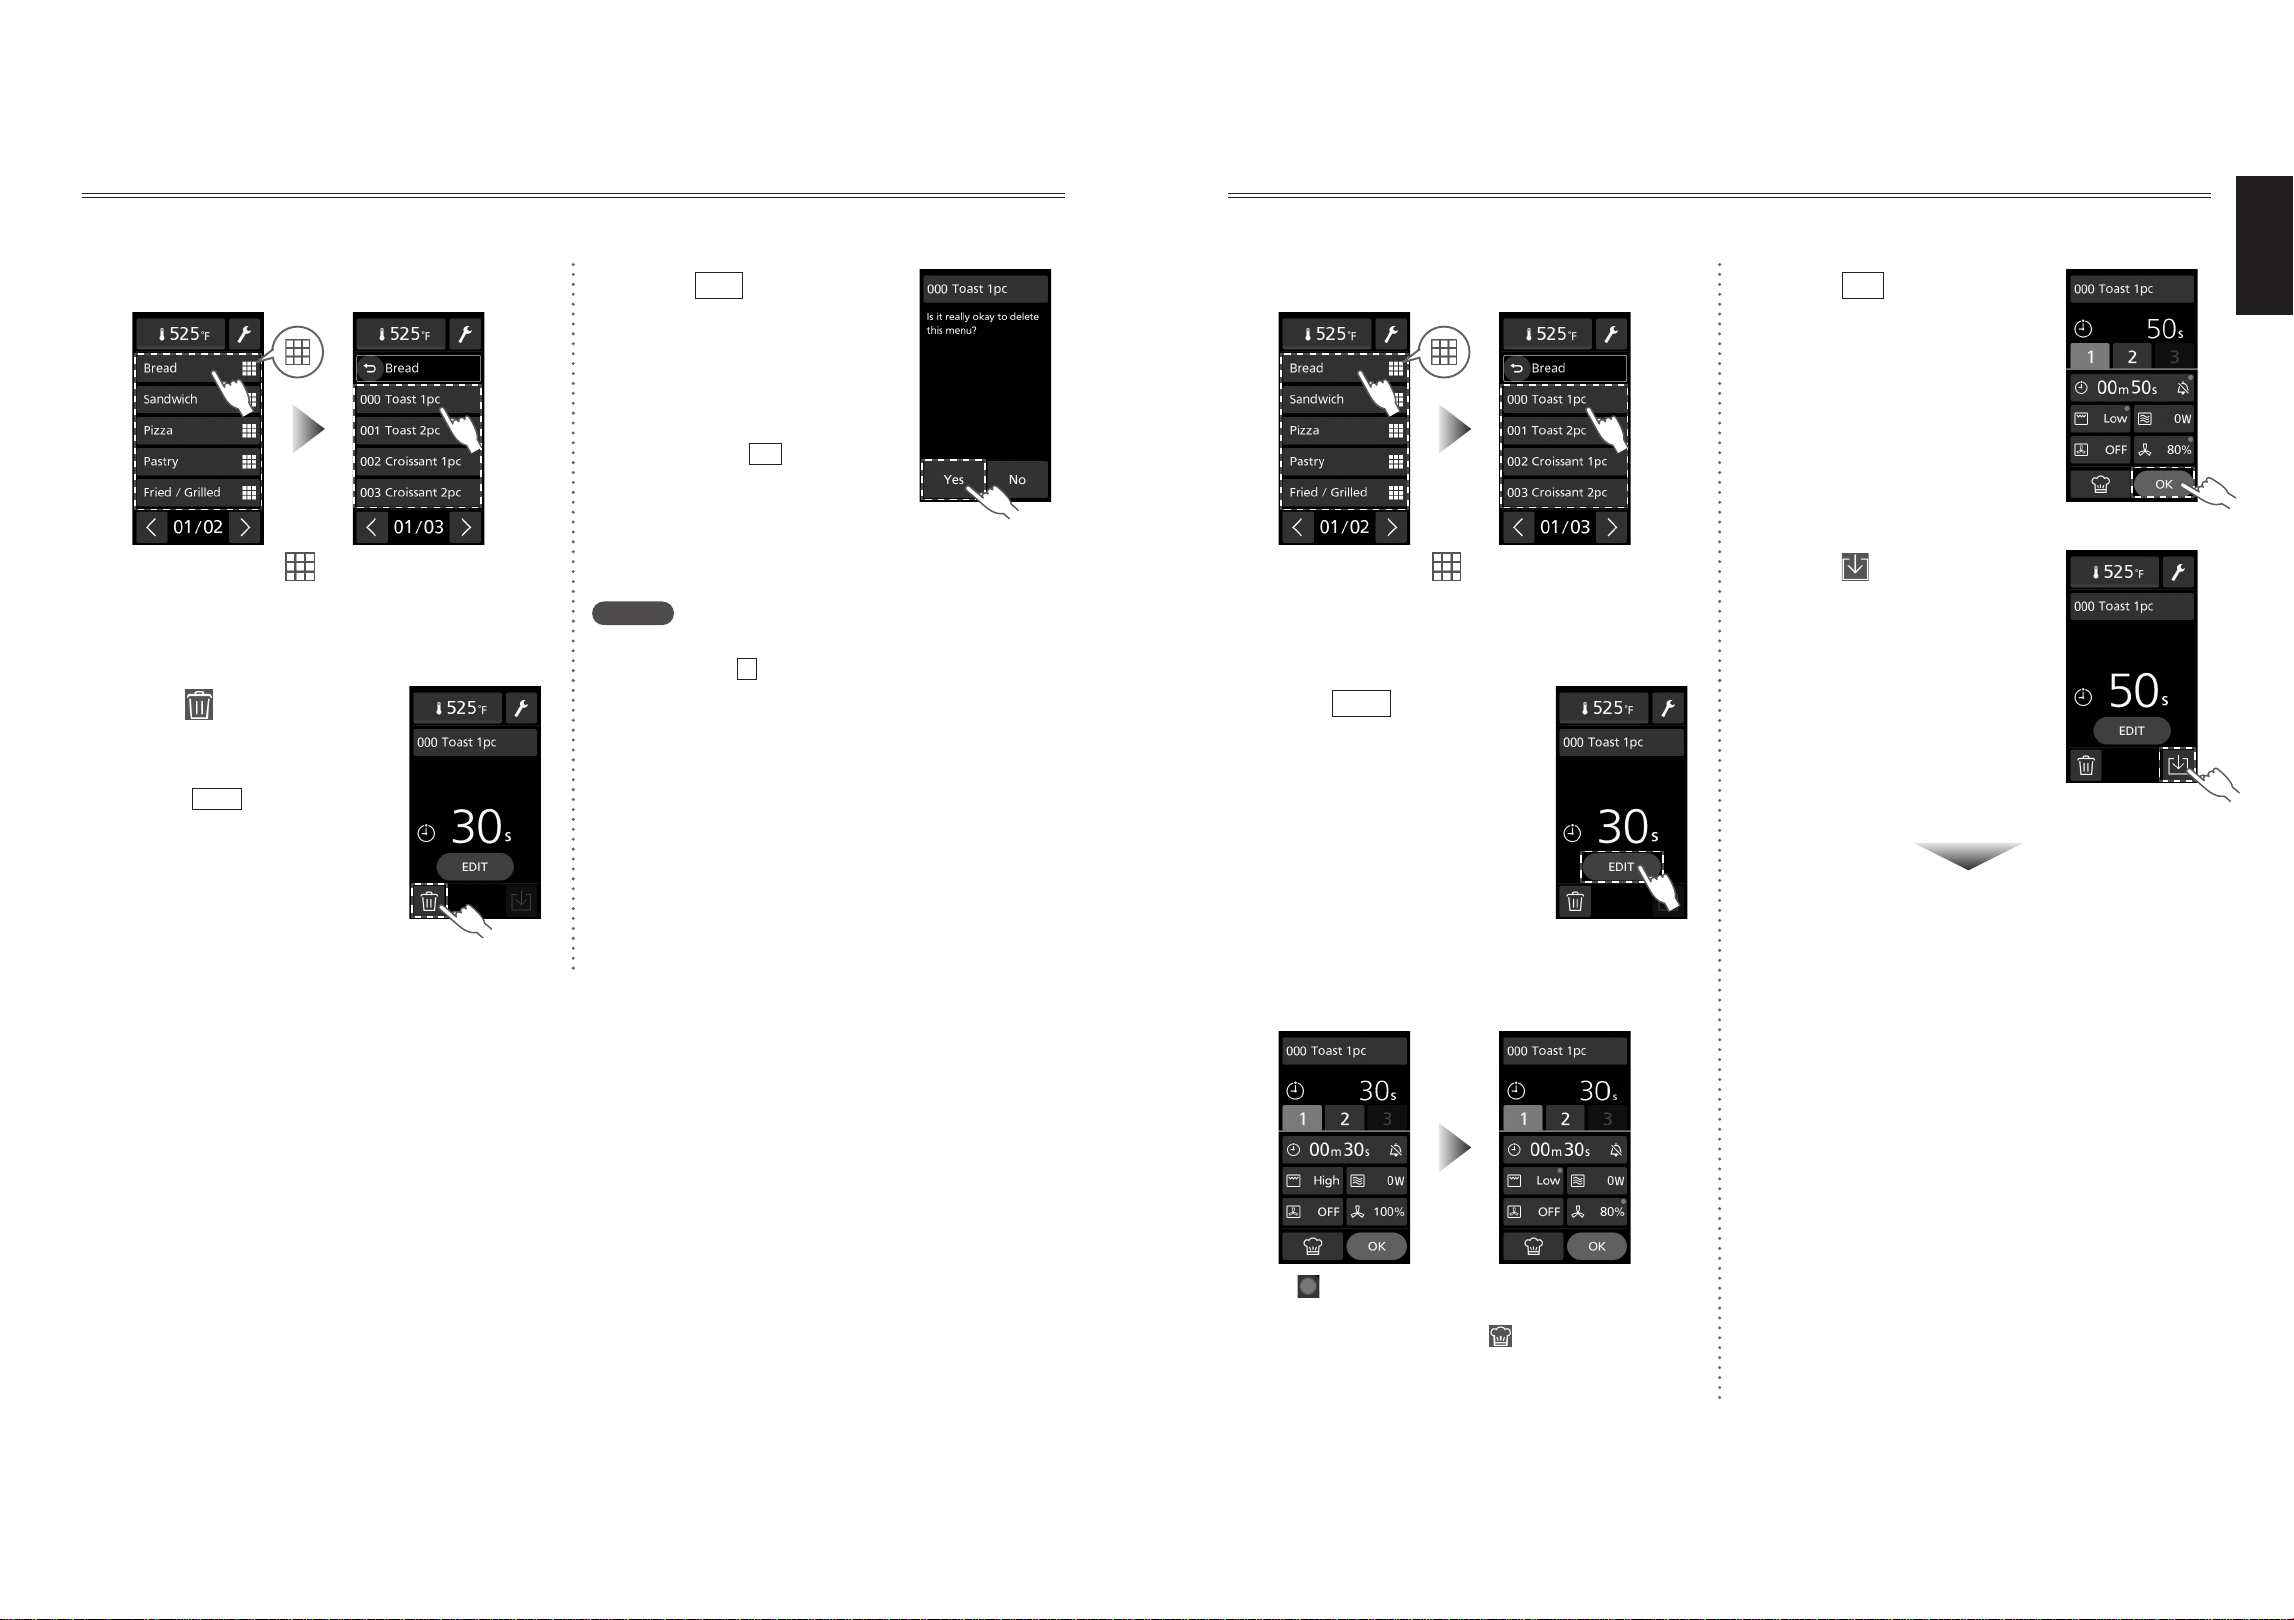
Deleting a Cooking Menu
O This feature cannot be used when memory lock is ON. Please cancel memory lock. (p.46)
1
Select the menu to be deleted
O The items with displayed on the right
are categories. (p.27)
O If “Menu number select” is set in “Home
setting”, input a number.
2
Tap
O You can check and edit the
menu’s cooking settings
with
EDIT
.
3
Tap
Yes
O After the deletion
confirmation screen has
been displayed for
3 seconds, the panel
returns to the home screen.
O If you tap
No
, the UI
returns to the step
2
screen.
Notes
•The menu number remains even after deleting the
cooking menu.
+
is displayed at the deleted menu
number.
Editing a Cooking Menu
O This feature cannot be used when memory lock is ON. Please cancel memory lock. (p.46)
1
Select the menu to be edited
O The items with displayed on the right
are categories. (p.27)
O If “Menu number select” is set in “Home
setting”, input a number.
2
Tap
EDIT
3
Select the item you want to edit
and change it
O is displayed at the upper right of the
button for the item that has been changed.
O To edit the menu, tap , and you can use
the assist cooking settings feature.
4
Tap
OK
5
Tap
(memory registration)
Memory registration complete
O Press the Stop/Reset pad to return to the home
screen.
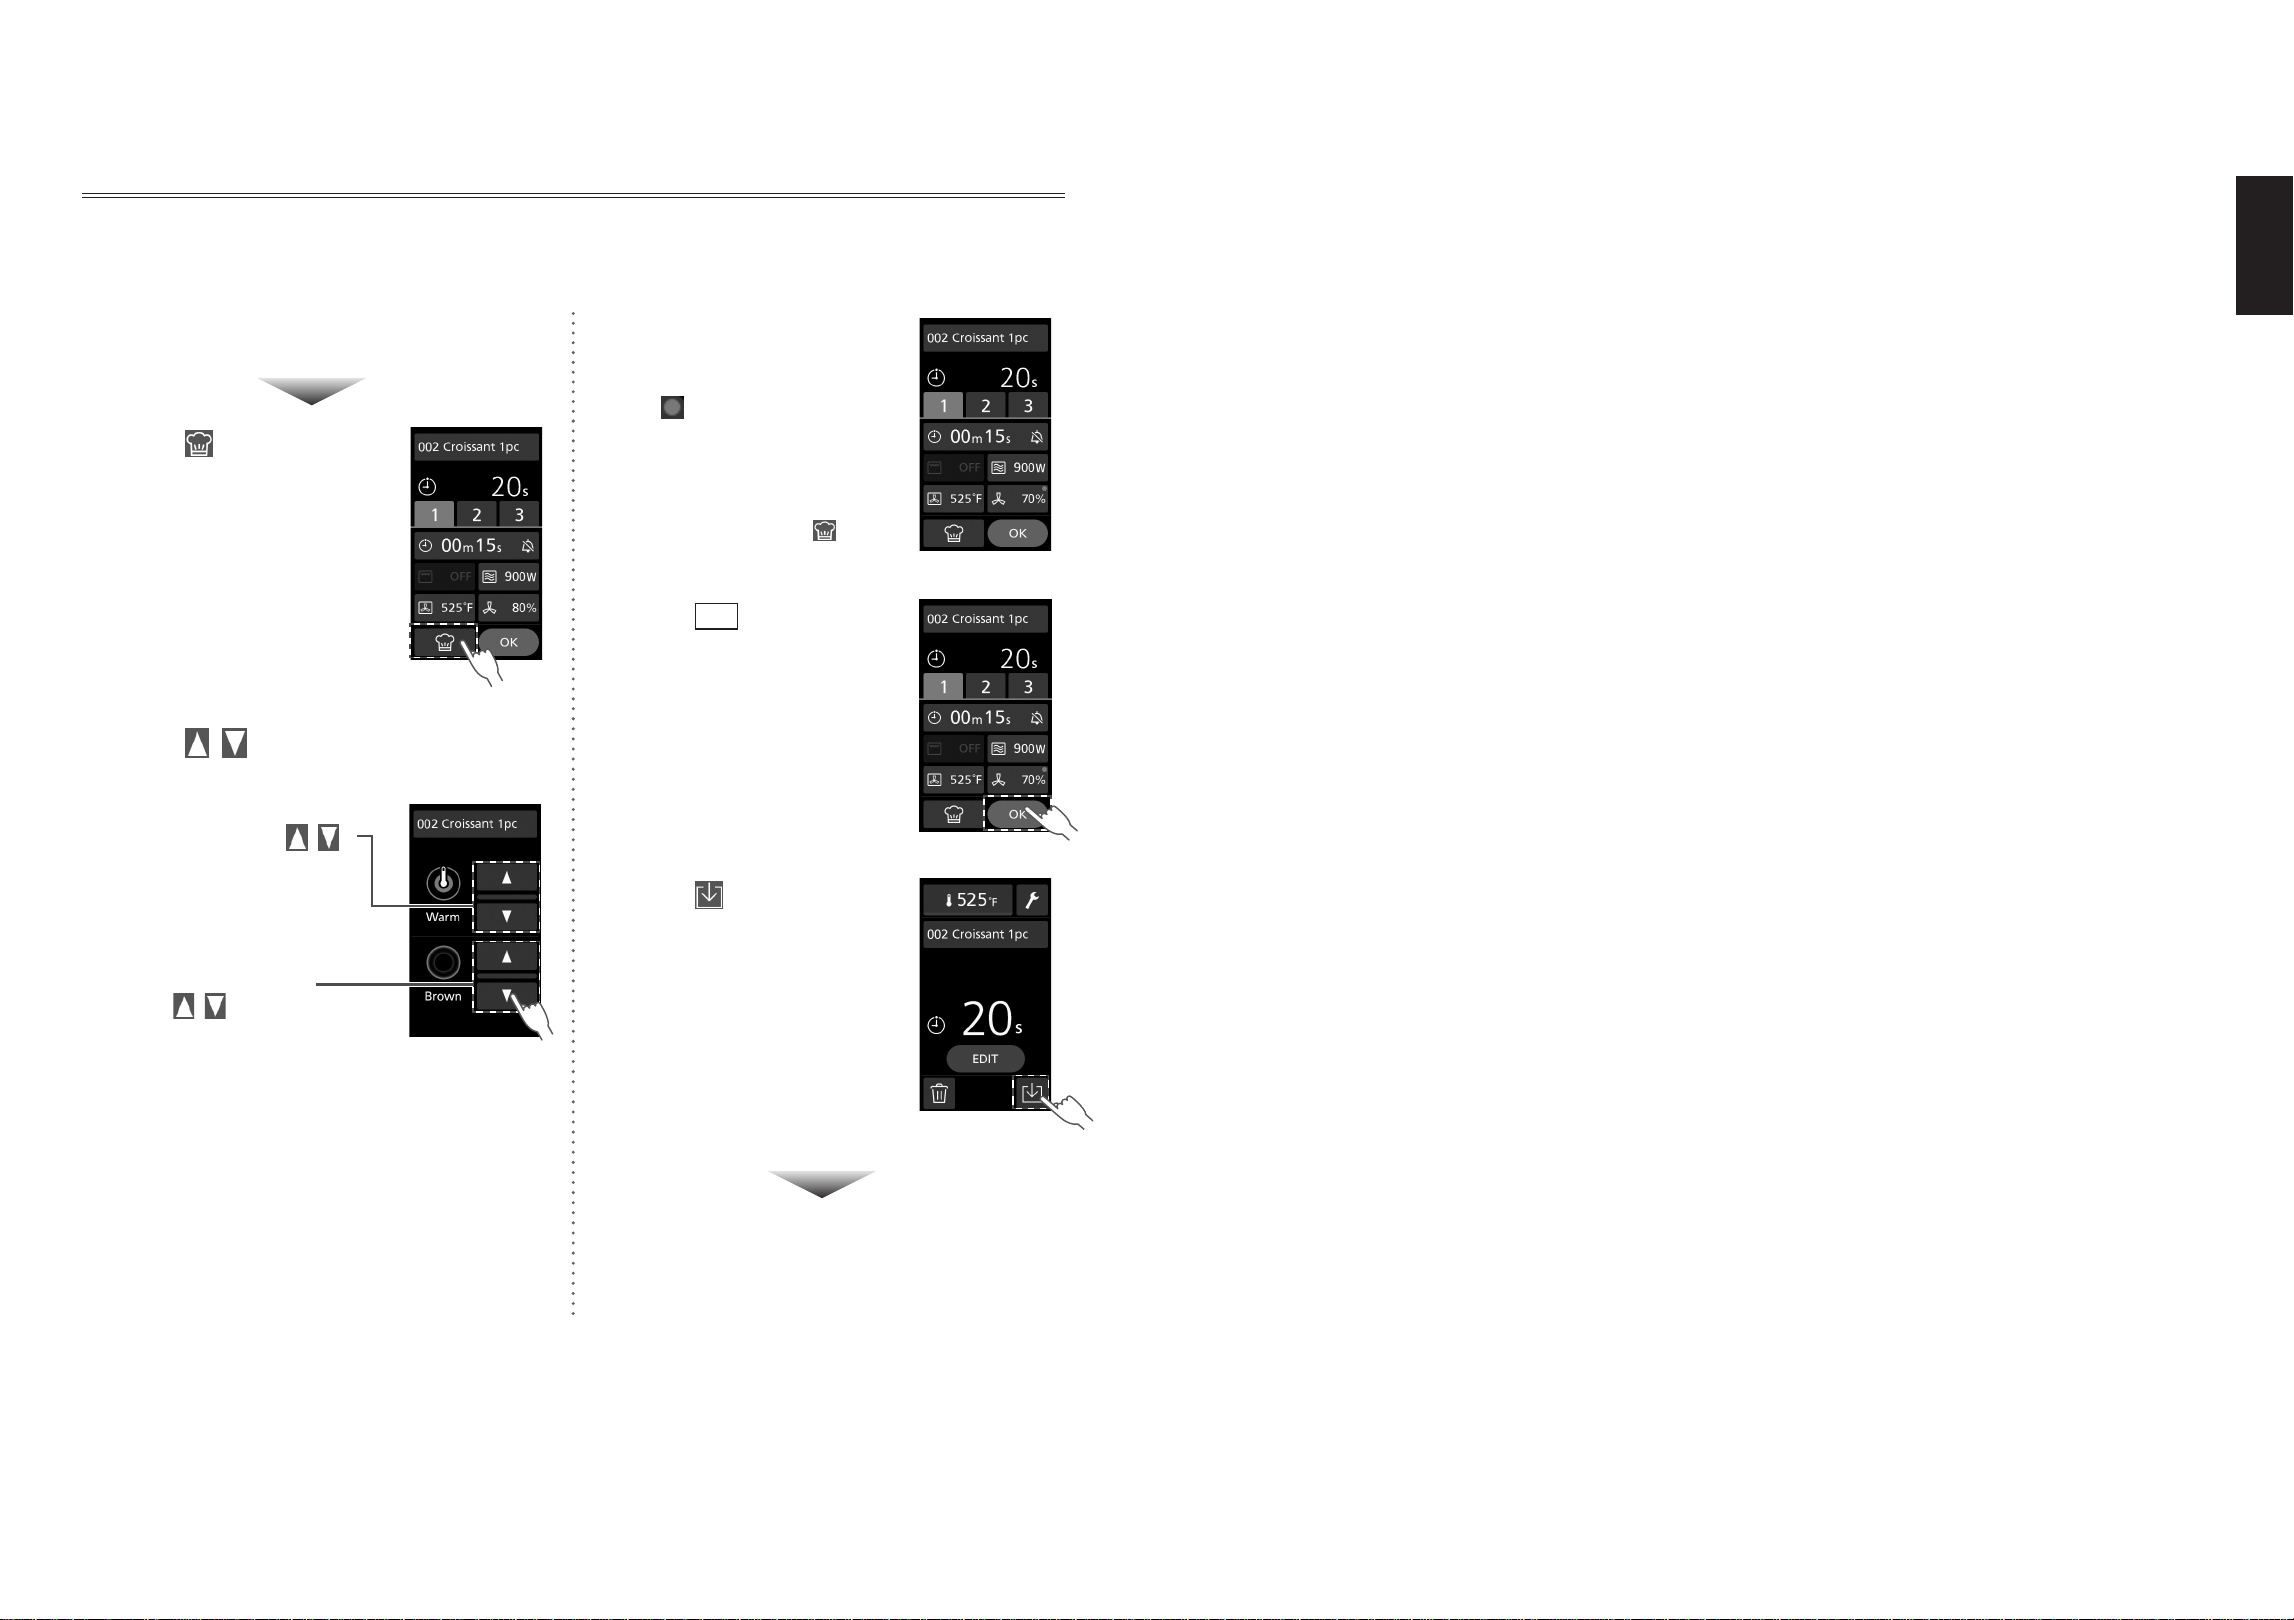
40
41
English
Using the Assist Cooking Settings Feature
When editing the menu contents, you can use the assist cooking settings feature.
In the assist cooking settings feature, check the state of the food cooked, and when next cooking, you
can adjust the program to your preferred state of the food temperature and the way of browning.
Perform steps
1
to
2
of
“Editing a Cooking Menu” (p.39)
3
Tap
4
Tap / to adjust the food
temperature and browning
Adjust the food
temperature with /
O Adjust the food
temperature based on
the microwave output
changes.
Adjust the browning
with /
O Adjust the browning
based on the fan speed
and the grill (broil) output
changes.
O When a message is displayed, check the
contents, and perform the required
corrections.
O In a menu that does not use the microwave,
the food temperature cannot be set.
5
Check the altered
program
O is displayed at the upper
right of the button for the
item that has been
changed.
O If you want to make further
adjustments, tap again,
and make the adjustments.
6
Tap
OK
7
Tap
(memory registration)
Memory registration complete
O Press the Stop/Reset pad to return to the home
screen.
Editing a Cooking Menu Memo
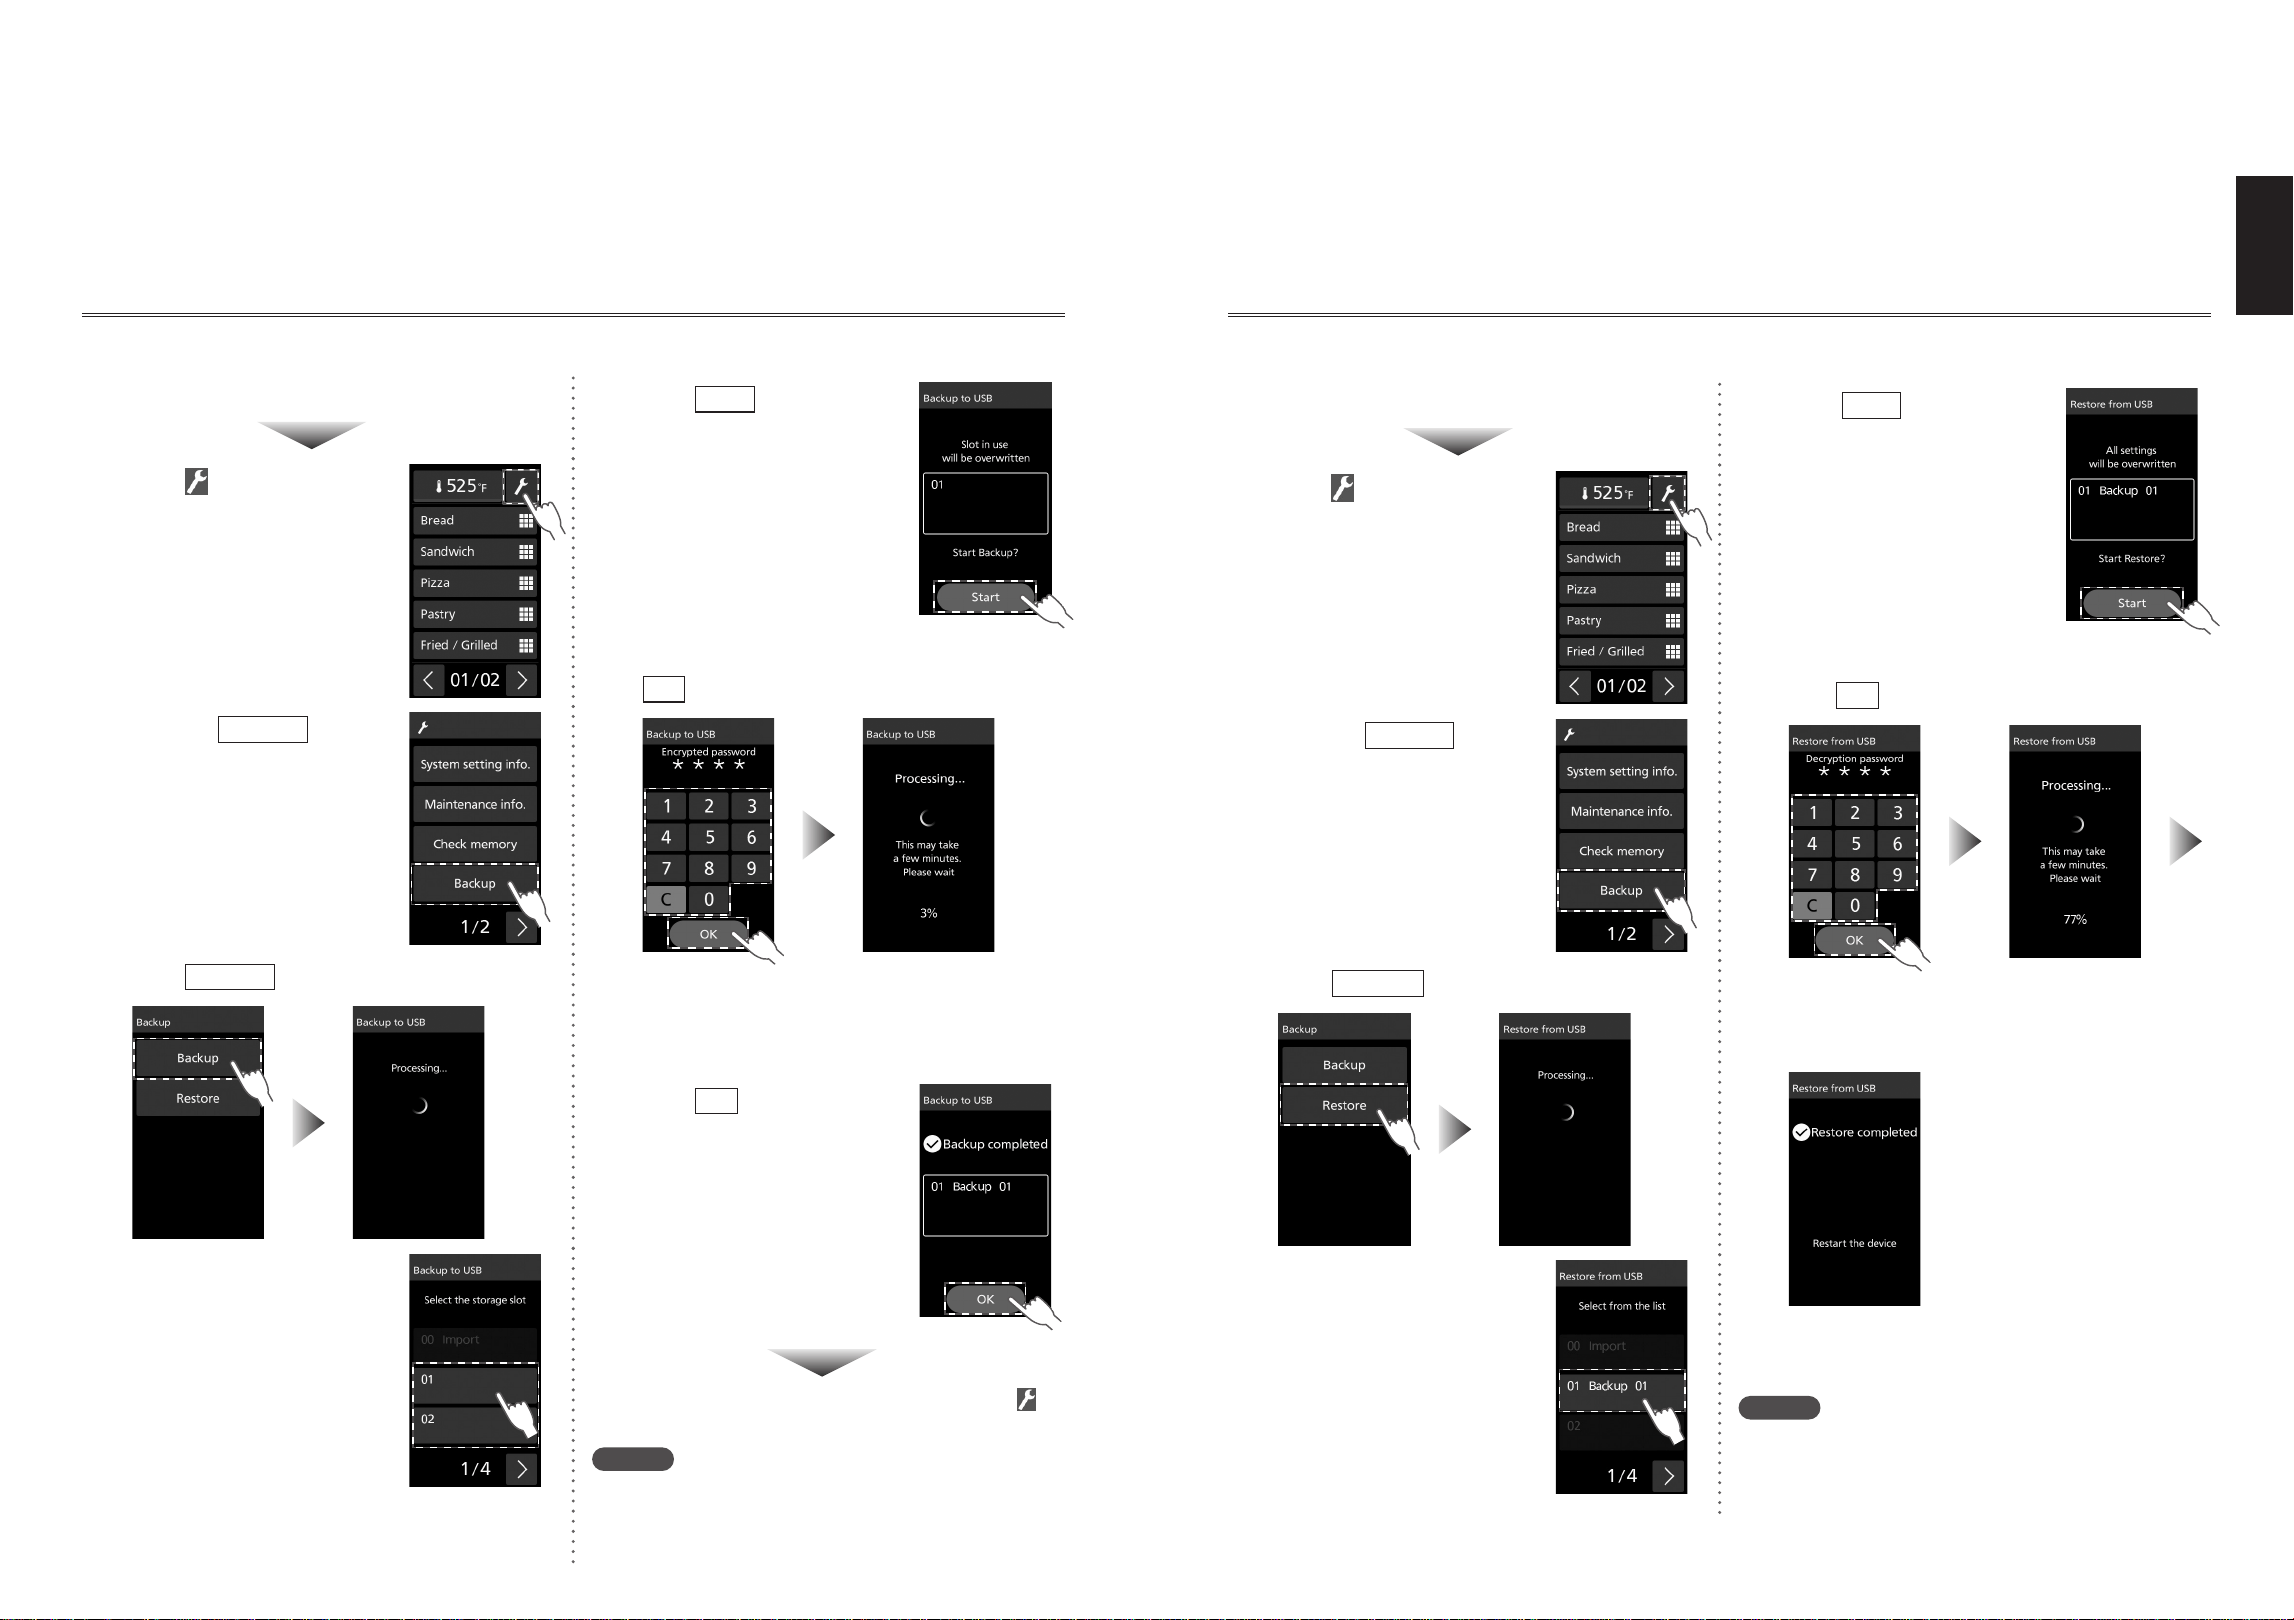
42
43
English
Backup to the USB Memory Stick
O This feature cannot be used when memory lock is ON. Please cancel memory lock. (p.46)
Insert the USB memory stick (p.18)
1
Tap (tools)
2
Select
Backup
3
Tap
Backup
4
Select the slot to be
saved
O There are 10 slots from
“00” to “09”.
O The backup cannot be
performed in the “00
Import” slot. The “00
Import” slot is used when
restoring the data created
in the setting support tool.
5
Tap
Start
O If there is a menu list in a
slot that has been backed
up, it is overwritten.
6
Set a 4-digit password, and tap
OK
O The set password is required when
restoring the backed up menu list to the
main unit.
O Do not forget the password.
7
Tap
OK
O The UI returns to the screen displayed before
was tapped.
Notes
•“Backup 01” to “Backup 09” is displayed in the
backed up slot depending on the slot number.
Backup and Restore with the USB Memory Stick
It is possible to backup the menu list to the USB memory stick, edit on your personal computer with
the setting support tool, and restore the menu list and device settings created with the setting support
tool from the USB memory stick to the main unit.
O Restoring refers to reverting to previously backed up data or importing data.
Performing a Restore from the USB Memory Stick
O This feature cannot be used when memory lock is ON. Please cancel memory lock. (p.46)
Insert the USB memory stick (p.18)
1
Tap (tools)
2
Select
Backup
3
Tap
Restore
4
Select the data to be
restored
O In the slots with data, “00
Import”, “Backup 01” to
“Backup 09” are displayed.
O When restoring data that
were created with the
setting support tool, select
“00 Import”.
5
Tap
Start
O If the restore is performed,
the menu list and device
settings registered in the
main unit are overwritten.
6
Input the 4-digit password, and
tap
OK
O Input the password set when the backup
was performed or set with the setting
support tool.
O When the restore is complete, the main unit
reboots.
Notes
•For details of the setting support tool, consult the
setting support tool operating instructions.
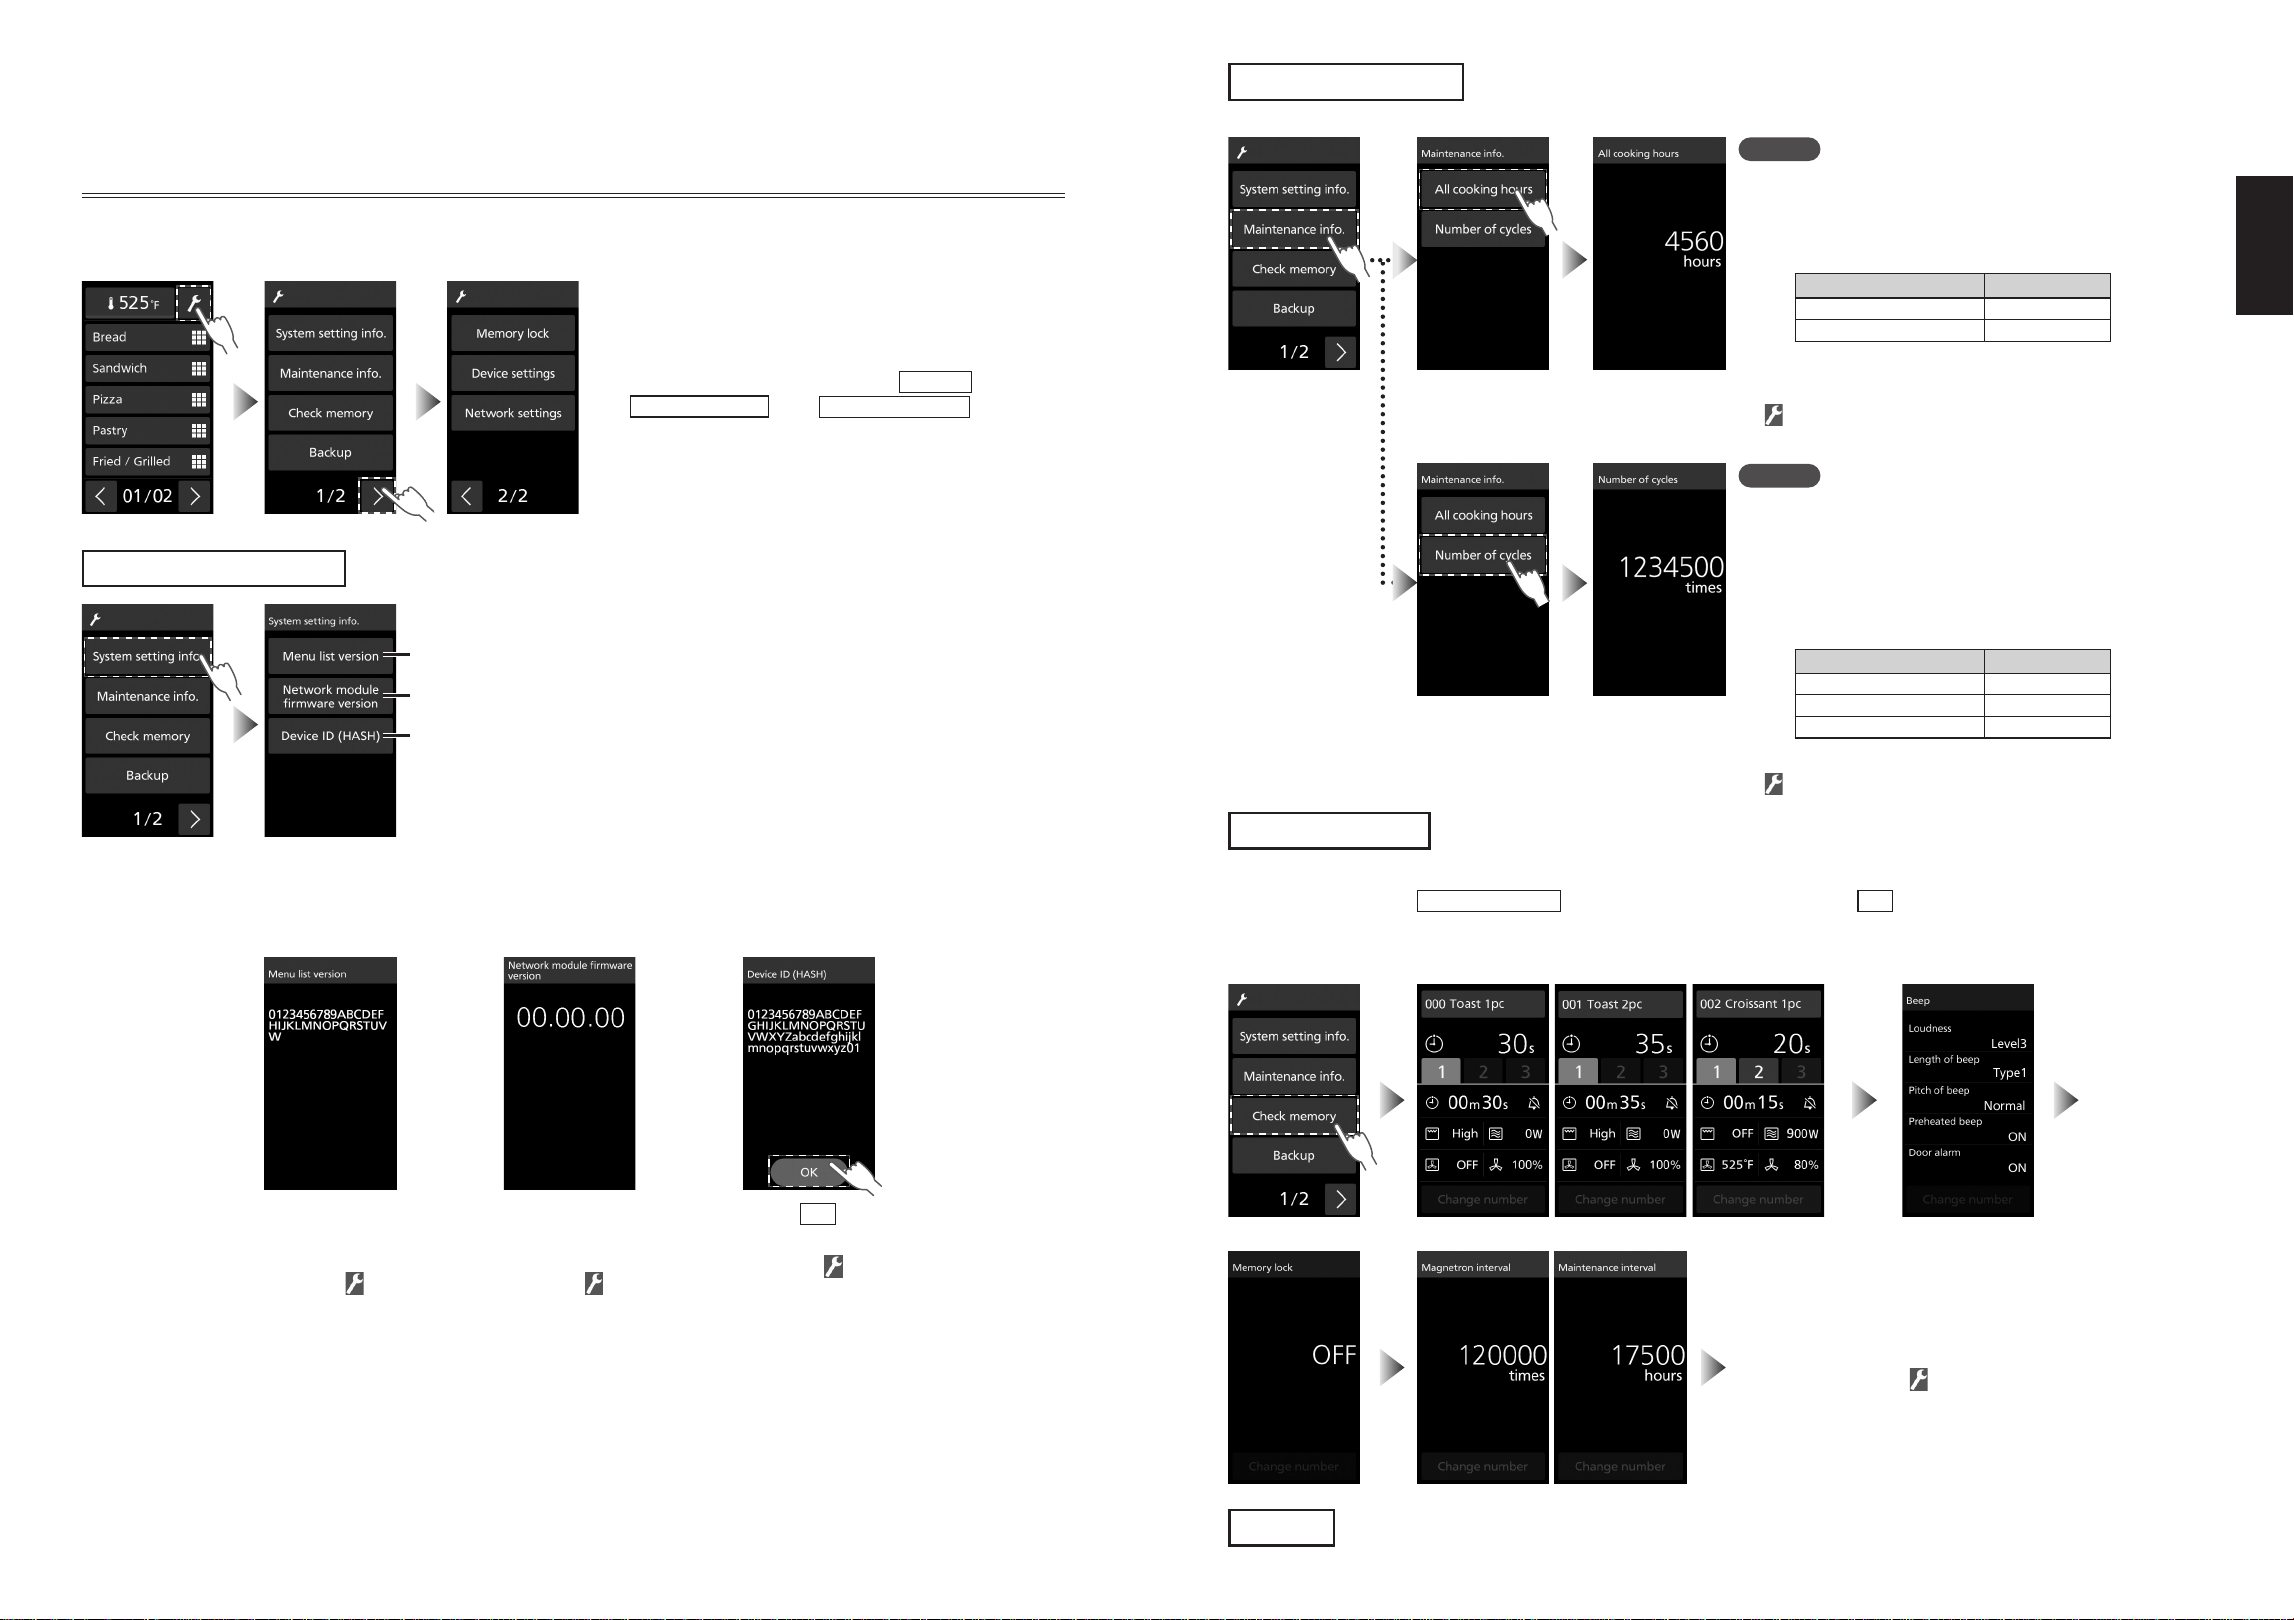
44
45
English
Various Settings
You can change and confirm various settings such as screen and beep settings, and network-related
settings.
O While the memory lock is ON,
Backup
,
Device settings
, and
Network settings
cannot be
selected. (p.46)
System setting info.
①
②
③
Tap ① to confirm the
menu list version.
Tap ② to confirm the
network module
firmware version.
Tap ③ to confirm the
device ID (HASH).
O After 3 seconds, the
UI returns to the
screen displayed
before was tapped.
O The menu list version
can also be confirmed
from the setting
support tool.
O After 3 seconds, the
UI returns to the
screen displayed
before was tapped.
O Tap
OK
to return to
the screen displayed
before was tapped.
Tools
Maintenance info.
Q To review the all cooking hours (including preheating)
Notes
The highest figure of the counter is 999999 hours.
It returns to “0” the next time it is used.
O A total of all cooking hours is rounded down to the
nearest hour.
ex.)
All cooking hours Display
59 min 0
1 hr 59 min 1
O After 3 seconds, the UI returns to the screen
displayed before was tapped.
Q To review the number of cycles (including preheating)
Notes
• The highest figure of the counter is 3999999 times.
It returns to “0” the next time it is used.
• If you start cooking again after a pause in the
middle, it also counts as a new cycle.
O The last two figures of the total number of cycles
are rounded down.
ex.)
Number of cycles Display
99 times 0
101 times 100
1100 times 1100
O After 3 seconds, the UI returns to the screen
displayed before was tapped.
Check memory
The information registered in memory and the beep settings, memory lock settings,
and maintenance guidelines are displayed every 3 seconds.
O In order to call up a particular menu number to confirm, press the Stop/Reset pad while the display is
changing, then tap
Change number
, enter the menu number and tap
OK
.
Press the Start pad to display the memory contents in order starting with the memory contents for the
number called up.
Cooking menu contents
Beep settings
Memory lock
Maintenance guidelines
O The UI returns to the screen
displayed before was tapped.
Backup
(pp.42–43)
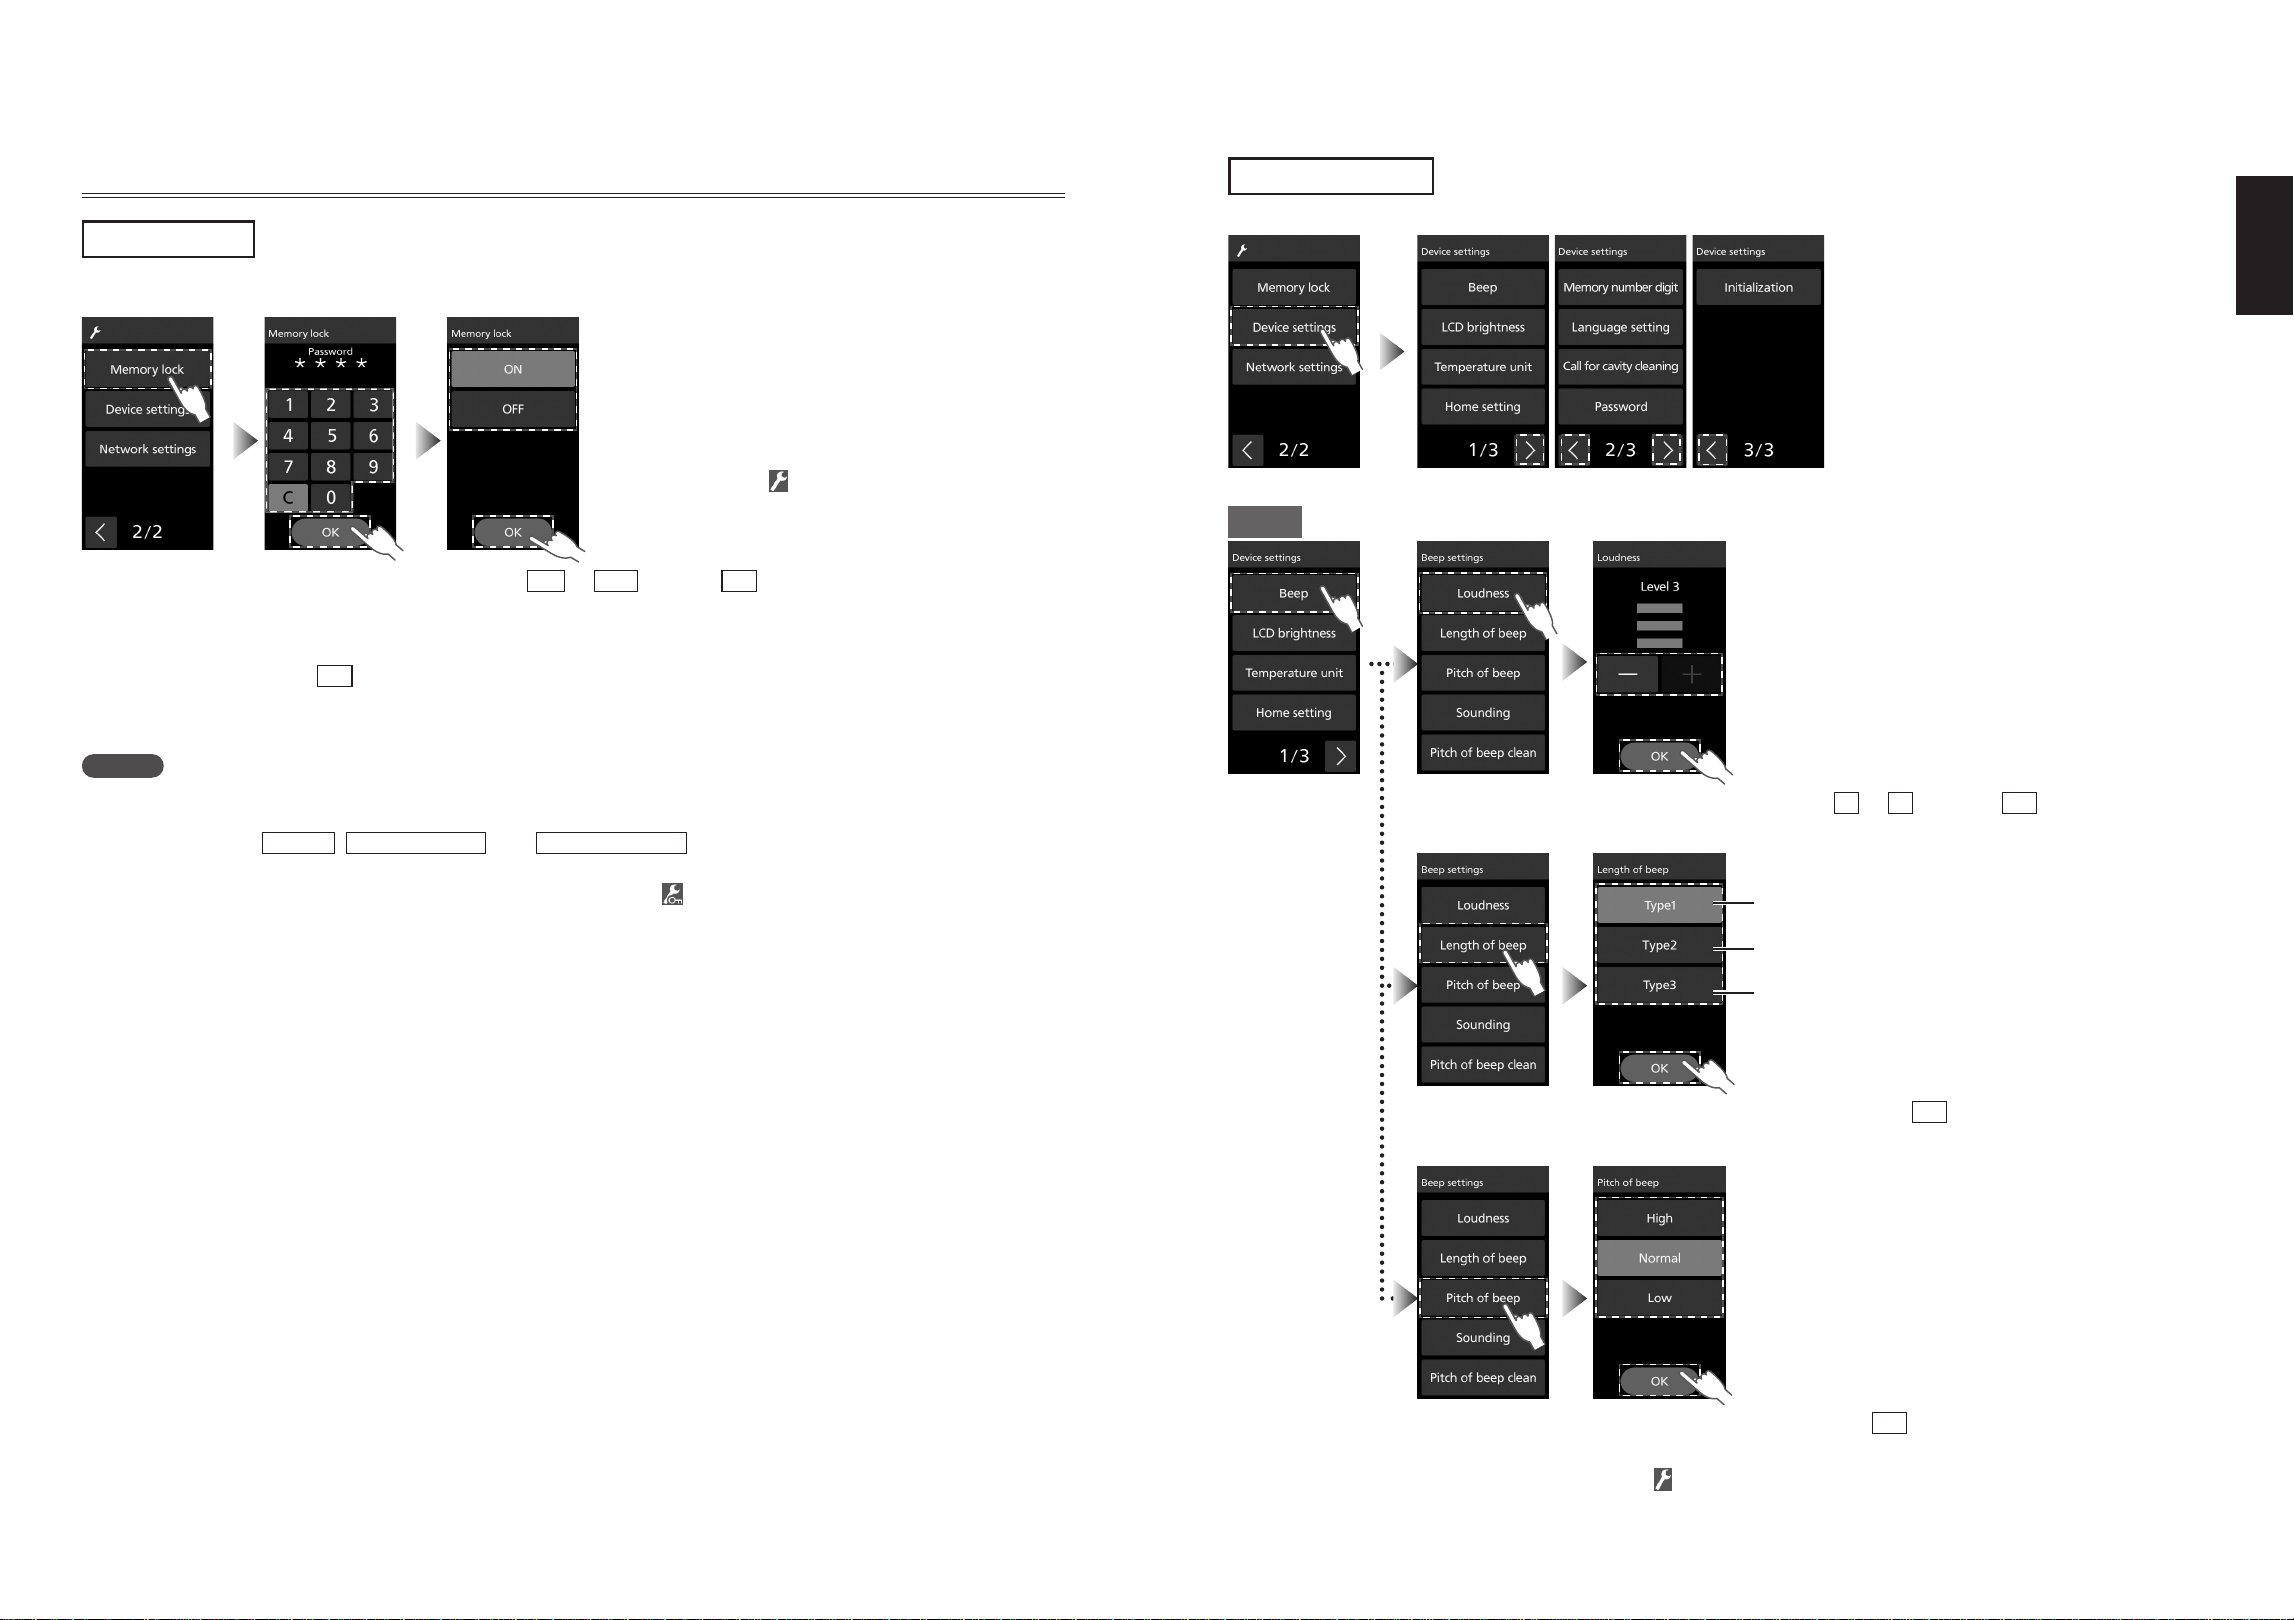
46
47
English
Various Settings
Tools
Memory lock
O To configure the memory lock settings, it is necessary to set the password beforehand. (p.50)
(Default setting: OFF)
O After the setting information has been displayed
for 3 seconds, the panel returns to the screen
displayed before was tapped.
O Input the
password set
in “Password”
(p.50), and
tap
OK
.
O Select
ON
or
OFF
, and tap
OK
.
Notes
Q When the memory lock is ON
O If the cooking menu is selected, the cooking starts even if the Start pad is not pressed.
O The service tool’s
Backup
,
Device settings
, and
Network settings
cannot be selected.
In addition, the menu cannot be confirmed, edited, deleted, and so on, either.
O While the memory lock is ON, the service tool icon displayed is .
Q When the memory lock is OFF
O Press the Start pad to start cooking.
You can choose memory lock ON or OFF.
Device settings
The device’s various settings can be changed.
Beep
Q To change the loudness
(Default setting: Level 3)
O Select the loudness with
+
or
–
, and tap
OK
.
Q To change the length of beep at the end of program
Beeps in three short pulses every
15 seconds
Beeps in longer pulses continuously
Beeps in one long pulse then beeps in three
longer pulses every 30 seconds
O The beep stops when you open the door.
(Default setting: Type1)
O Select the length of beep and tap
OK
.
Q To change the tone pitch of the beep at the end of program
(Default setting: Normal)
O Select the tone pitch and tap
OK
.
O After the setting information has been displayed for 3 seconds, the panel returns to the
screen displayed before was tapped.
O
It is not displayed while the memory lock is ON. Perform the operation after unlocking
the memory lock. (p.46)
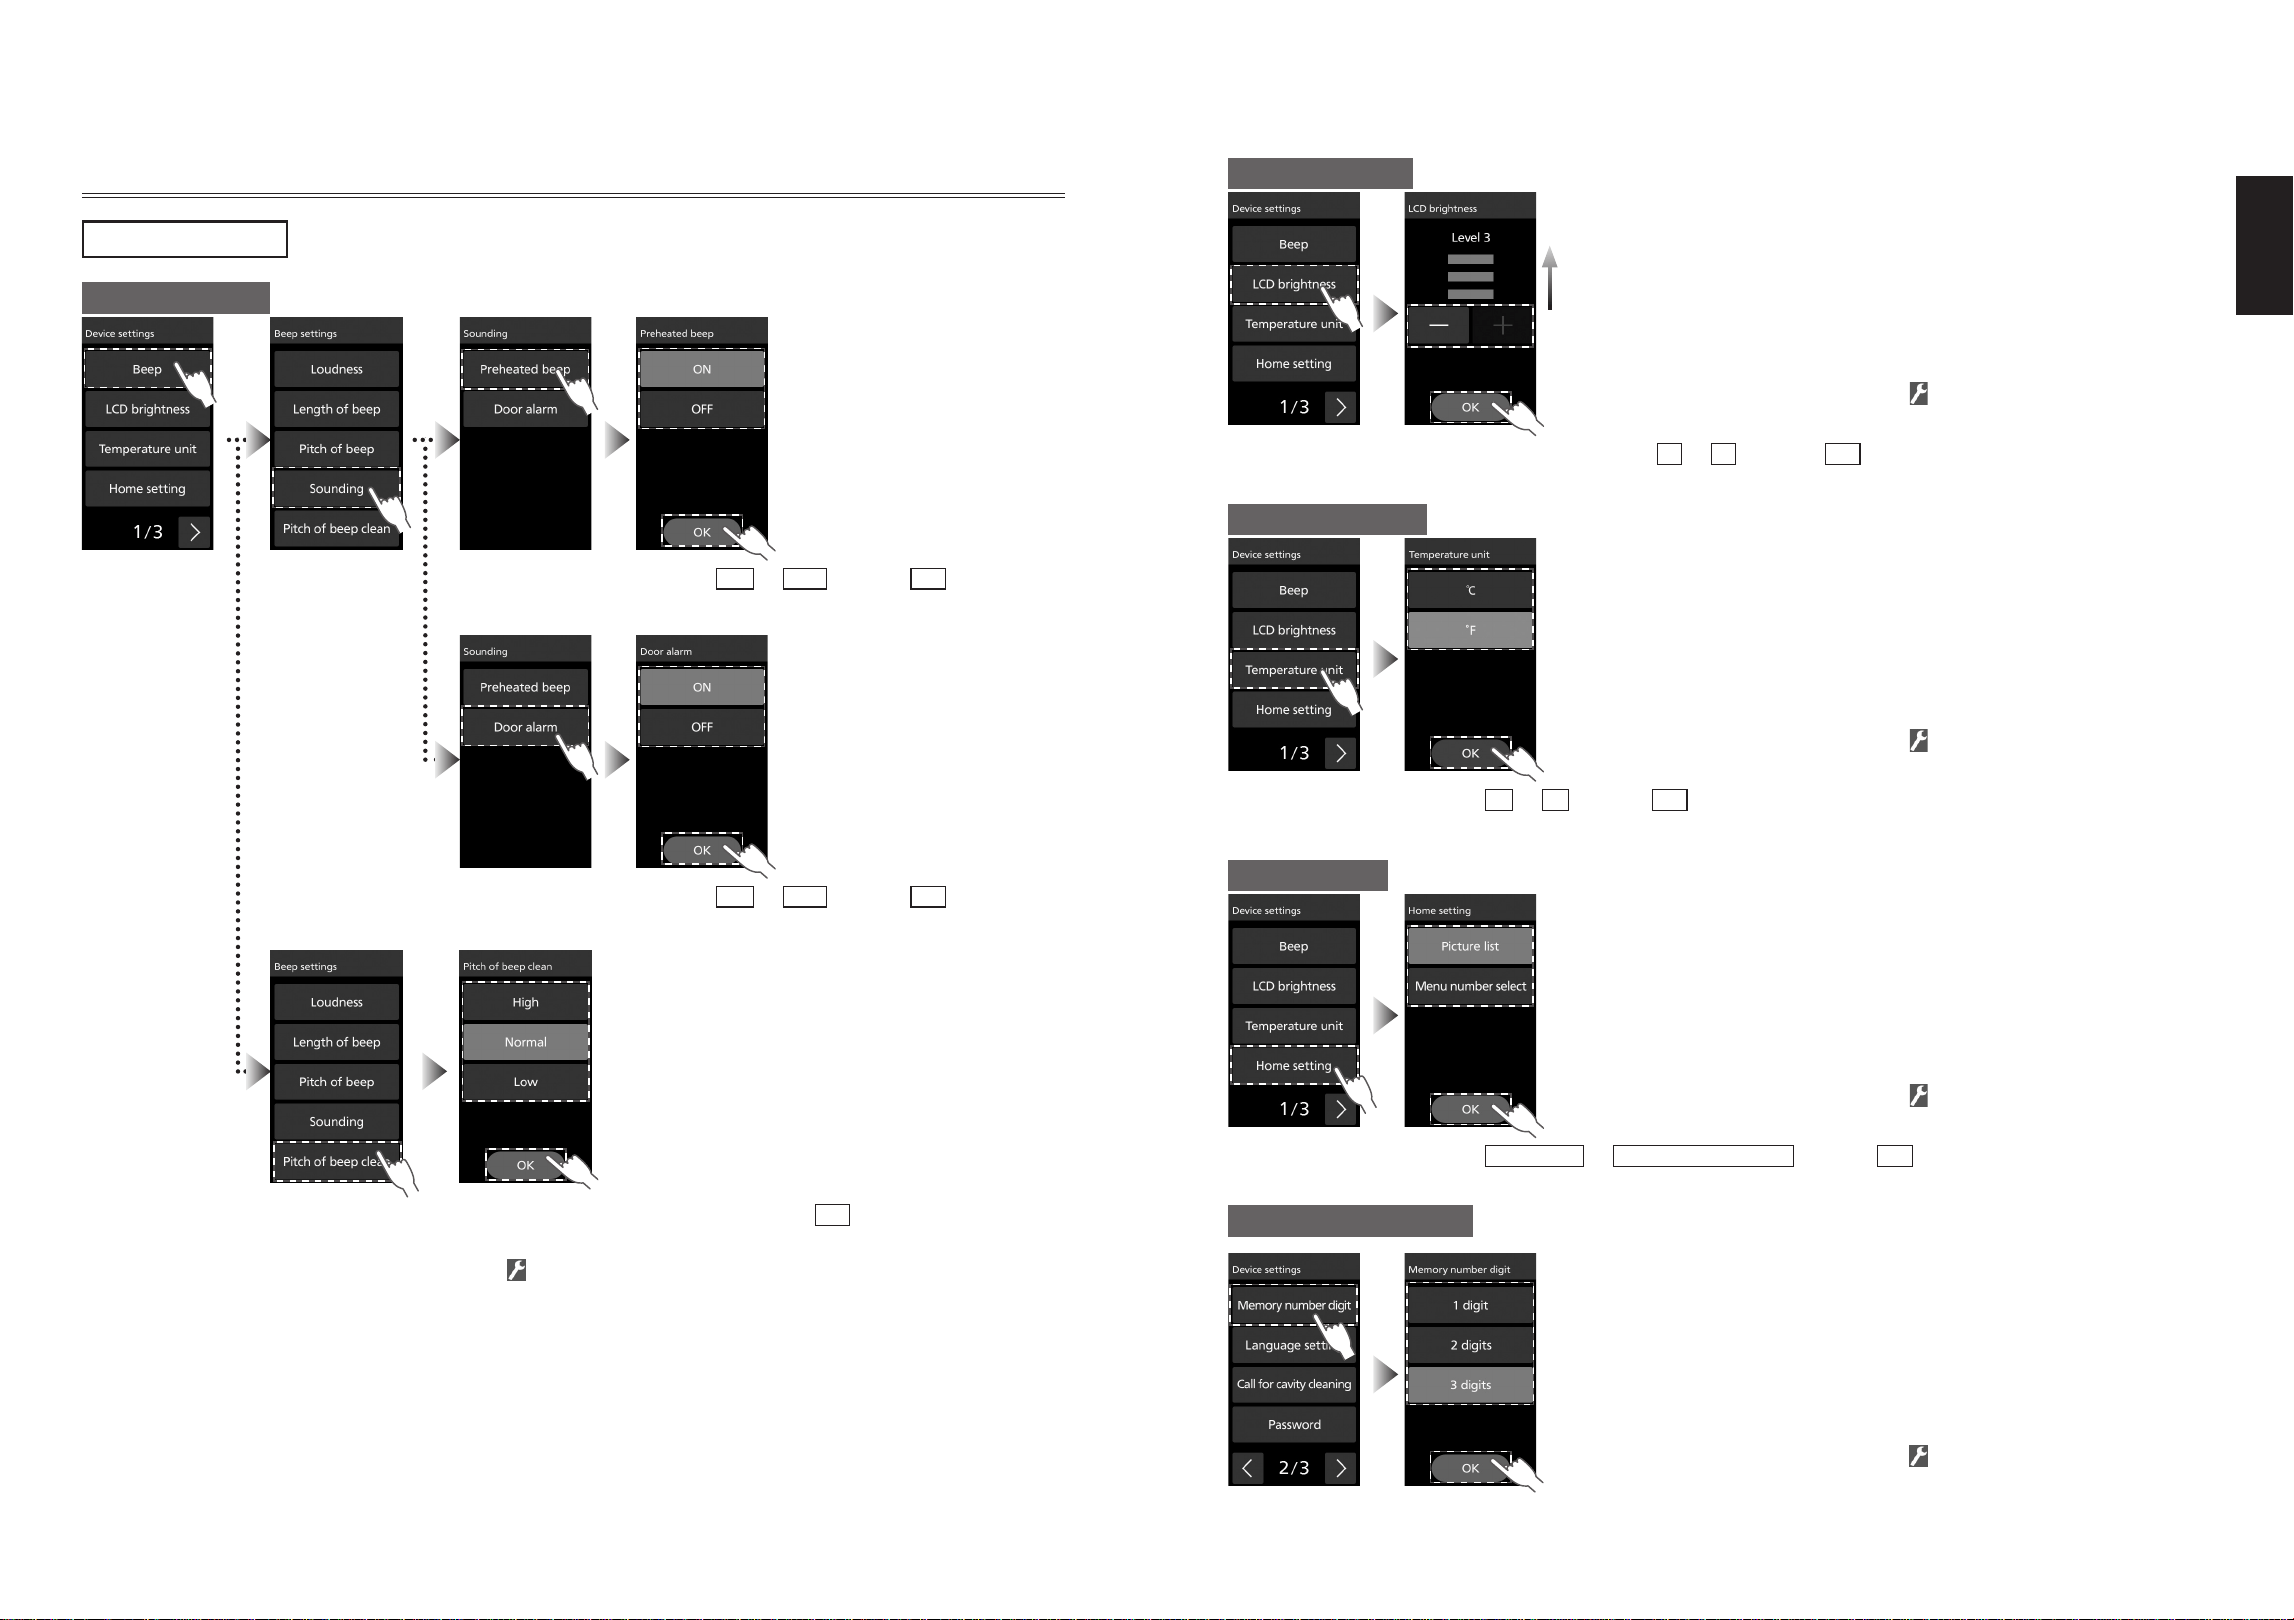
48
49
English
Device settings
Beep (continued)
Q To select ON or OFF for the preheated beep
(Default setting: ON)
O Select
ON
or
OFF
, and tap
OK
.
Q To select ON or OFF for the door alarm
(Default setting: ON)
O Select
ON
or
OFF
, and tap
OK
.
Q When you want to change the tone of the beep when informing you of cleaning
(Default setting: Normal)
O Select the pitch of the sound, and tap
OK
.
O After the setting information has been displayed for 3 seconds, the panel returns to the
screen displayed before was tapped.
O
It is not displayed while the memory lock is ON. Perform the operation after unlocking
the memory lock. (p.46)
Tools
Various Settings
LCD brightness
You can choose the brightness of the touch screen.
Bright
Dark
(Default setting: Level 3)
O After the setting information has been displayed for 3 seconds, the panel
returns to the screen displayed before was tapped.
O Select the brightness with
+
or
–
, and tap
OK
.
Temperature unit
You can select the unit of temperature displayed.
(Default setting: °F)
O After the setting information has been displayed for 3 seconds, the panel
returns to the screen displayed before was tapped.
O Select
°C
or
°F
, and tap
OK
.
Home setting
You can select from two types of home screen.
(Default setting: Picture list)
O After the setting information has been displayed for 3 seconds, the panel
returns to the screen displayed before was tapped.
O Select
Picture list
or
Menu number select
, and tap
OK
.
Memory number digit
The number of figures, which should be entered on the home screen when “Home
setting” is set to “Menu number select”, can be changed.
The number of figures for the menu number is set to double as default
setting (100 kinds: 00–99).
You can also set single-figure (10 kinds: 0–9) or triple figures (1000 kinds:
000–999).
O After the setting information has been displayed for 3 seconds, the panel
returns to the screen displayed before was tapped.
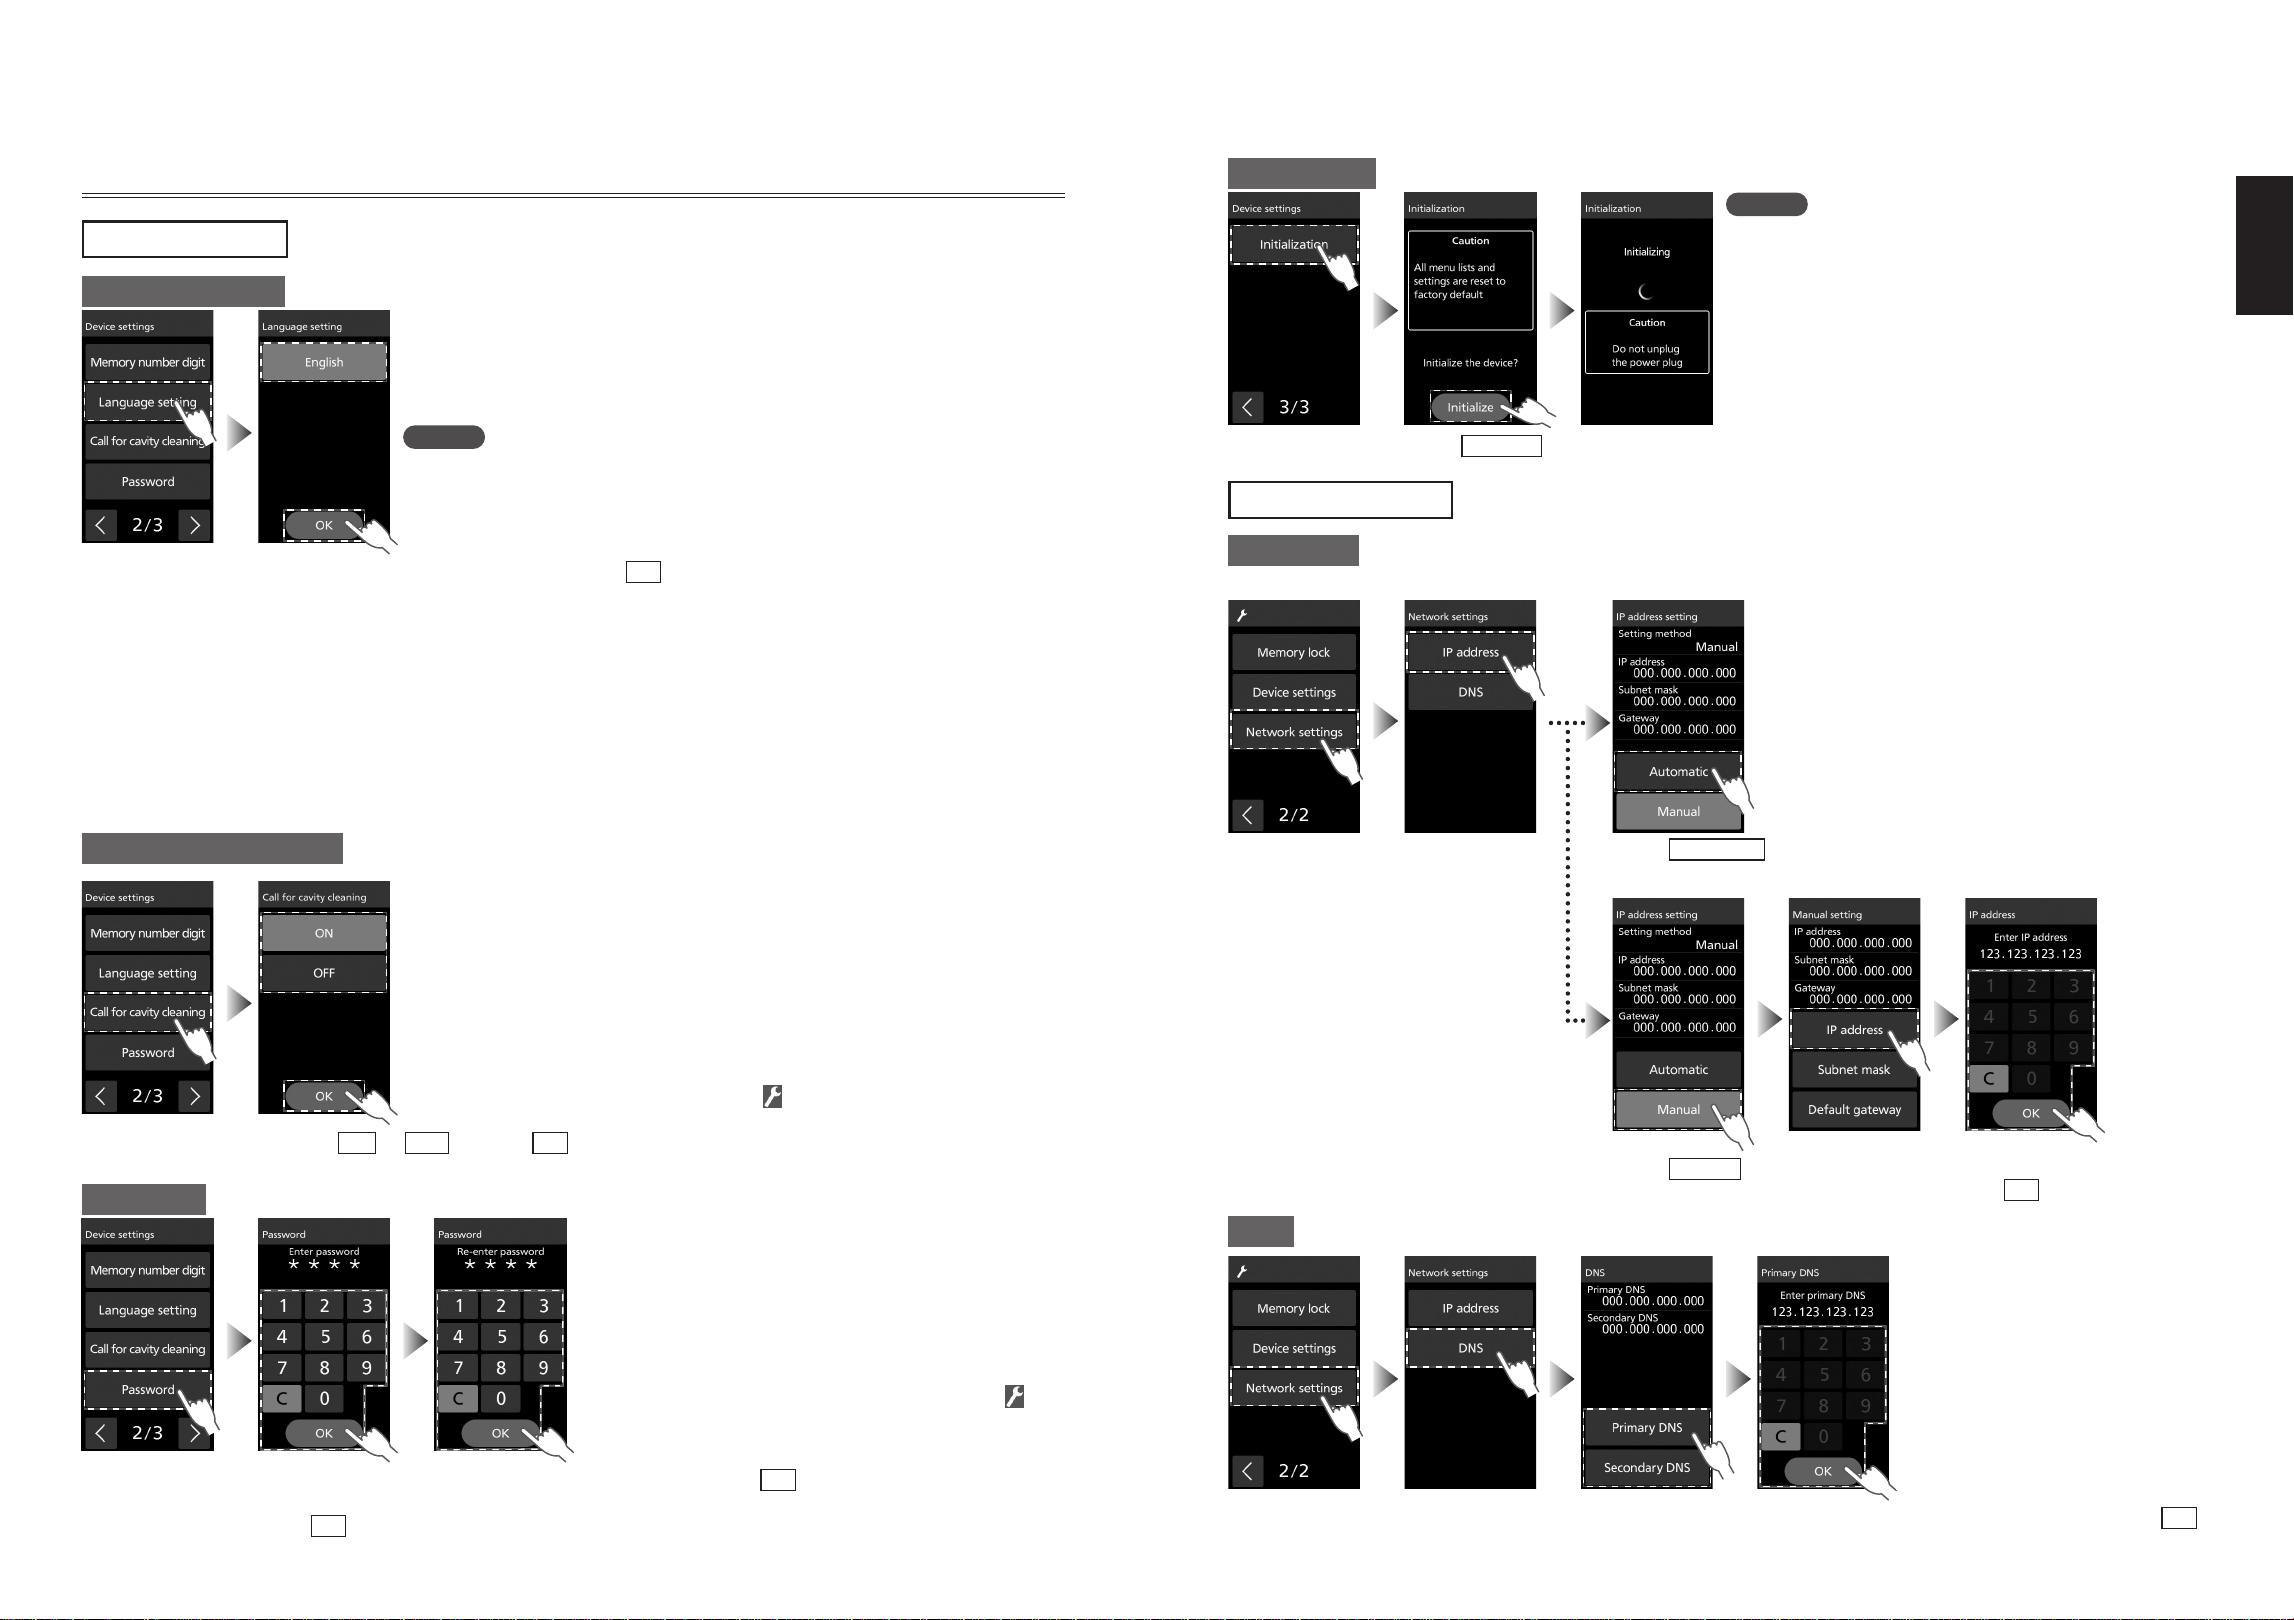
50
51
English
Device settings
Language setting
You can select the display language.
(Default setting: English)
O After the setting information has been displayed for 3 seconds, the UI
reboots.
Notes
O Up to 2 languages can be set as display languages on this device. Set
the desired display language when you import a menu list from the
setting support tool.
O Select the language to display, and tap
OK
.
Q About the device language setting
The display language’s factory setting is “English”. When setting the display language to another language, set
the device’s display language in the setting support tool, then import a menu list to this device.
For details of the setting support tool, refer to the setting support tool operating instructions.
O The setting support tool, setting support tool operating instructions, and menu list data can be downloaded
from the following website.
https://fs.panasonic.com/download/setting_support_tool_en.html
Call for cavity cleaning
You can configure the settings to display or not display a notification to perform
cleaning during start-up or after cooling.
(Default setting: ON)
O After the setting information has been displayed for 3 seconds, the panel
returns to the screen displayed before was tapped.
O Select
ON
or
OFF
, and tap
OK
.
Password
You can set or change the password for the memory lock settings.
O The UI returns to the screen displayed before was
tapped.
O Input the
password, and
tap
OK
.
O Input the password again, and tap
OK
.
O Do not forget the password.
O It is not displayed while the memory lock is ON. Perform the operation after
unlocking the memory lock. (
p.46
)
Tools
Various Settings
Initialization
Initialises the main unit’s settings.
Notes
O The changed settings all return to the factory
settings.
O The registered menu is deleted, so if required,
make sure you back up the menu list before
performing the initialisation. (p.42)
O When the initialisation is complete, the UI
automatically reboots.
O Initialisation takes approximately 1 to 2 minutes.
O Tap
Initialize
to start the initialisation.
Network settings
IP address
You can set the IP address used when connecting to the network.
Q When setting automatically
O You can confirm the contents set automatically.
O Tap
Automatic
.
Q When setting manually
O Tap
Manual
.
O Select the item you want to set, input the
setting value, and tap
OK
.
DNS
You can set the DNS used when connecting to the network.
O Select the item you want to set, input the setting value, and tap
OK
.
O It is not displayed while the memory lock is ON. Perform the operation after
unlocking the memory lock. (p.46)
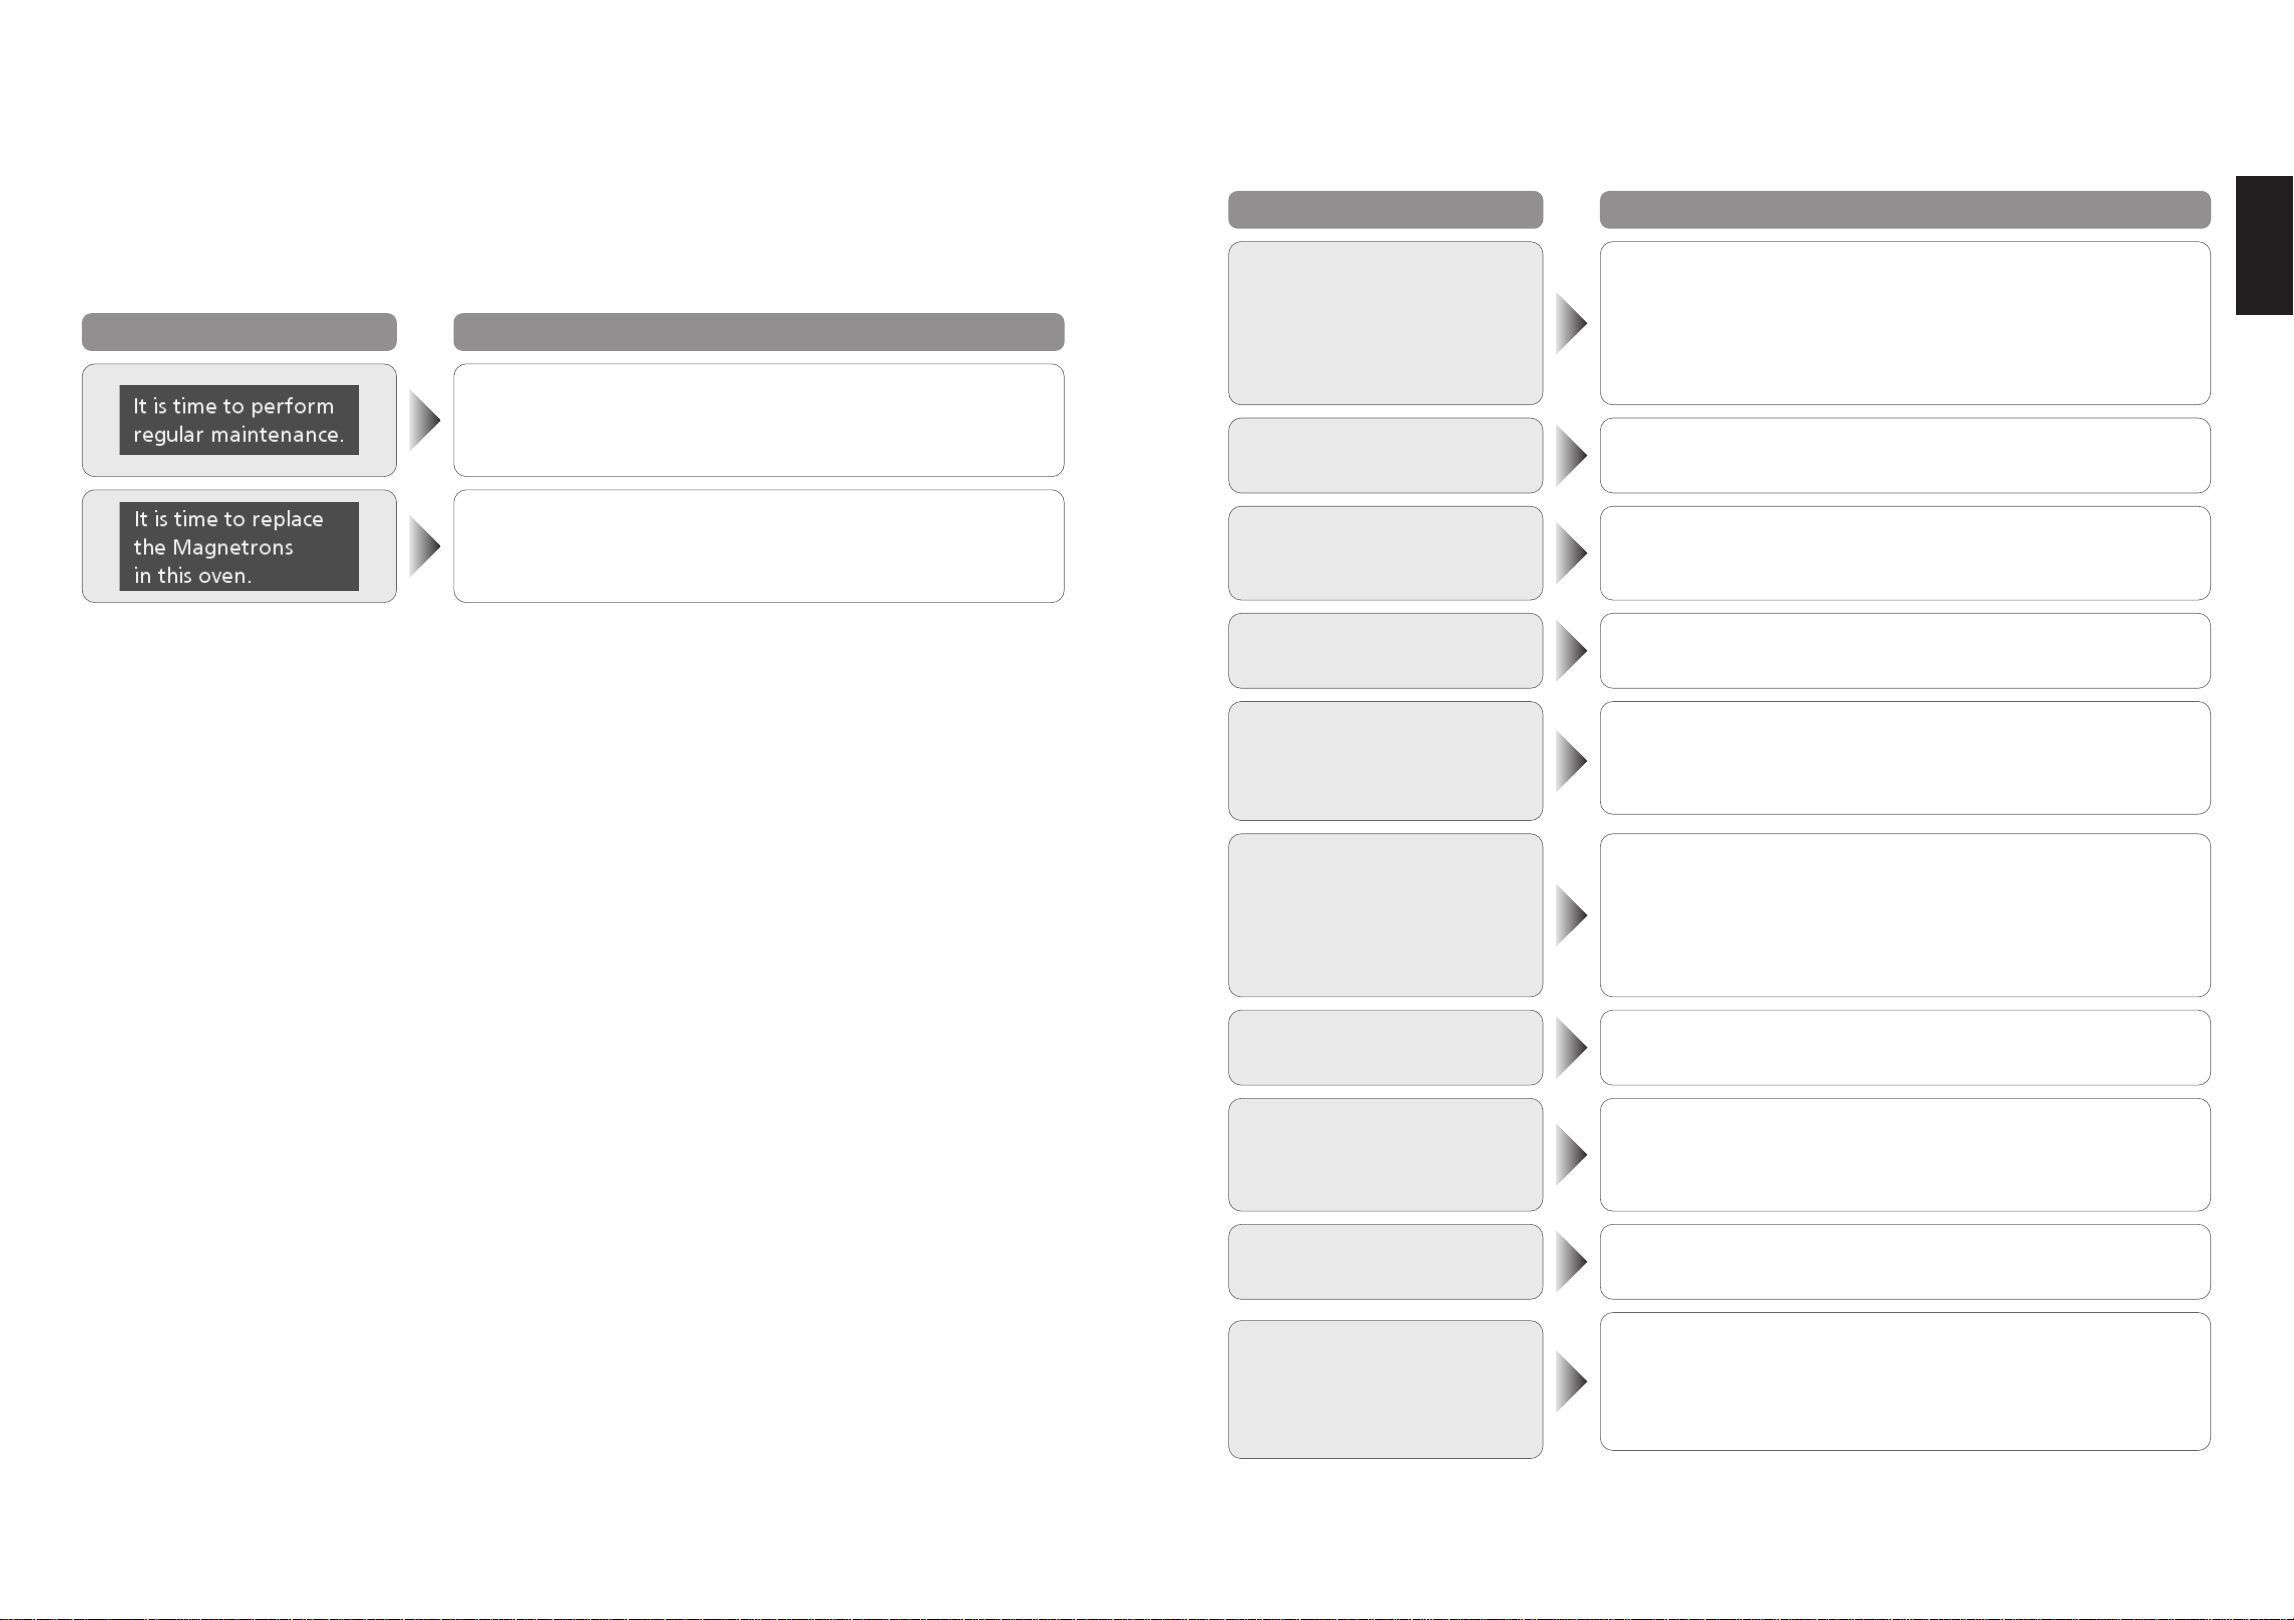
52
53
English
Regular Maintenance
When one of the following is displayed, oven maintenance is required. Continuing to use the oven may
cause failure.
Please contact the dealer or a service agent promptly. (p.3)
O Displays until maintenance is done when the power plug is removed and reinserted or when there has been
no operation for a while. In addition, the oven will beep 6 times after completing cooking regardless of the
settings.
Display Cause
O Displays when the oven has been used for 17,500 hours.
Please contact the dealer or a service agent to replace the
parts.
O Displays when the magnetron has been used 120,000 times.
Please contact the dealer or a service agent to replace the
parts.
O The above time and number of operations is not a guarantee.
Troubleshoot following the next procedure when there is a problem.
Symptom Cause
It does not operate at all
O Is there a power outage?
O Is the breaker in the power distribution board tripped, or the
power supply plug unplugged?
O Is the home screen displayed in the control panel? If the auto
display off function is in operation, perform the operation after
the home screen is displayed by opening the door.
It does not cook correctly
O Is the cook setting, accessory, or the cook time incorrect?
O Has the oven been sufficiently preheated?
When cooking in the
microwave, the food does not
warm up
O Are you using items that reflect electromagnetic waves such as
a metal container or aluminium foil? (p.20)
There is a sound O There will be a sound of cooking starting and the fan will sound.
There is smoke or harsh odor
O A smoke or harsh odor may occur due to burning of the oil for
oven cavity protection when the heater is turned on for the first
time. Always ventilate and perform a blank baking if it concerns
you. (p.7)
There are sparks during
cooking
O A metal container can only be used in the oven when not using
microwave power. (p.20)
O Is a container containing gold or silver particles used?
O Is any metal (aluminium foil, metallic skewer, etc.) touching the
wall of the oven cavity?
O Is the oven cavity rusted? A rust may cause sparks.
The buzzer does not beep
O Is the loudness of the beep set to OFF?
The buzzer will not beep when it is set to OFF. (pp.47–48)
There is an odor or smoke
O This is not a malfunction. The catalyst reaction will lower when
the cooking temperature is low [approximately 475°F (250°C) or
lower]. Also, it may exceed the processing ability when the
amount of oil smoke generated during cooking is high.
There is a sour odor
O Depending on the food, a sour odor may occur during cooking,
but this is caused by the catalyst reaction and it is not abnormal.
Foods “explode” during
heating
O Microwave power level is too high.
Reduce power level.
O Skins of foods i.e potatoes, chicken are not pierced.
Pierce skins on foods to release pressure build up during
heating. NEVER try to boil eggs in shells.
Troubleshooting
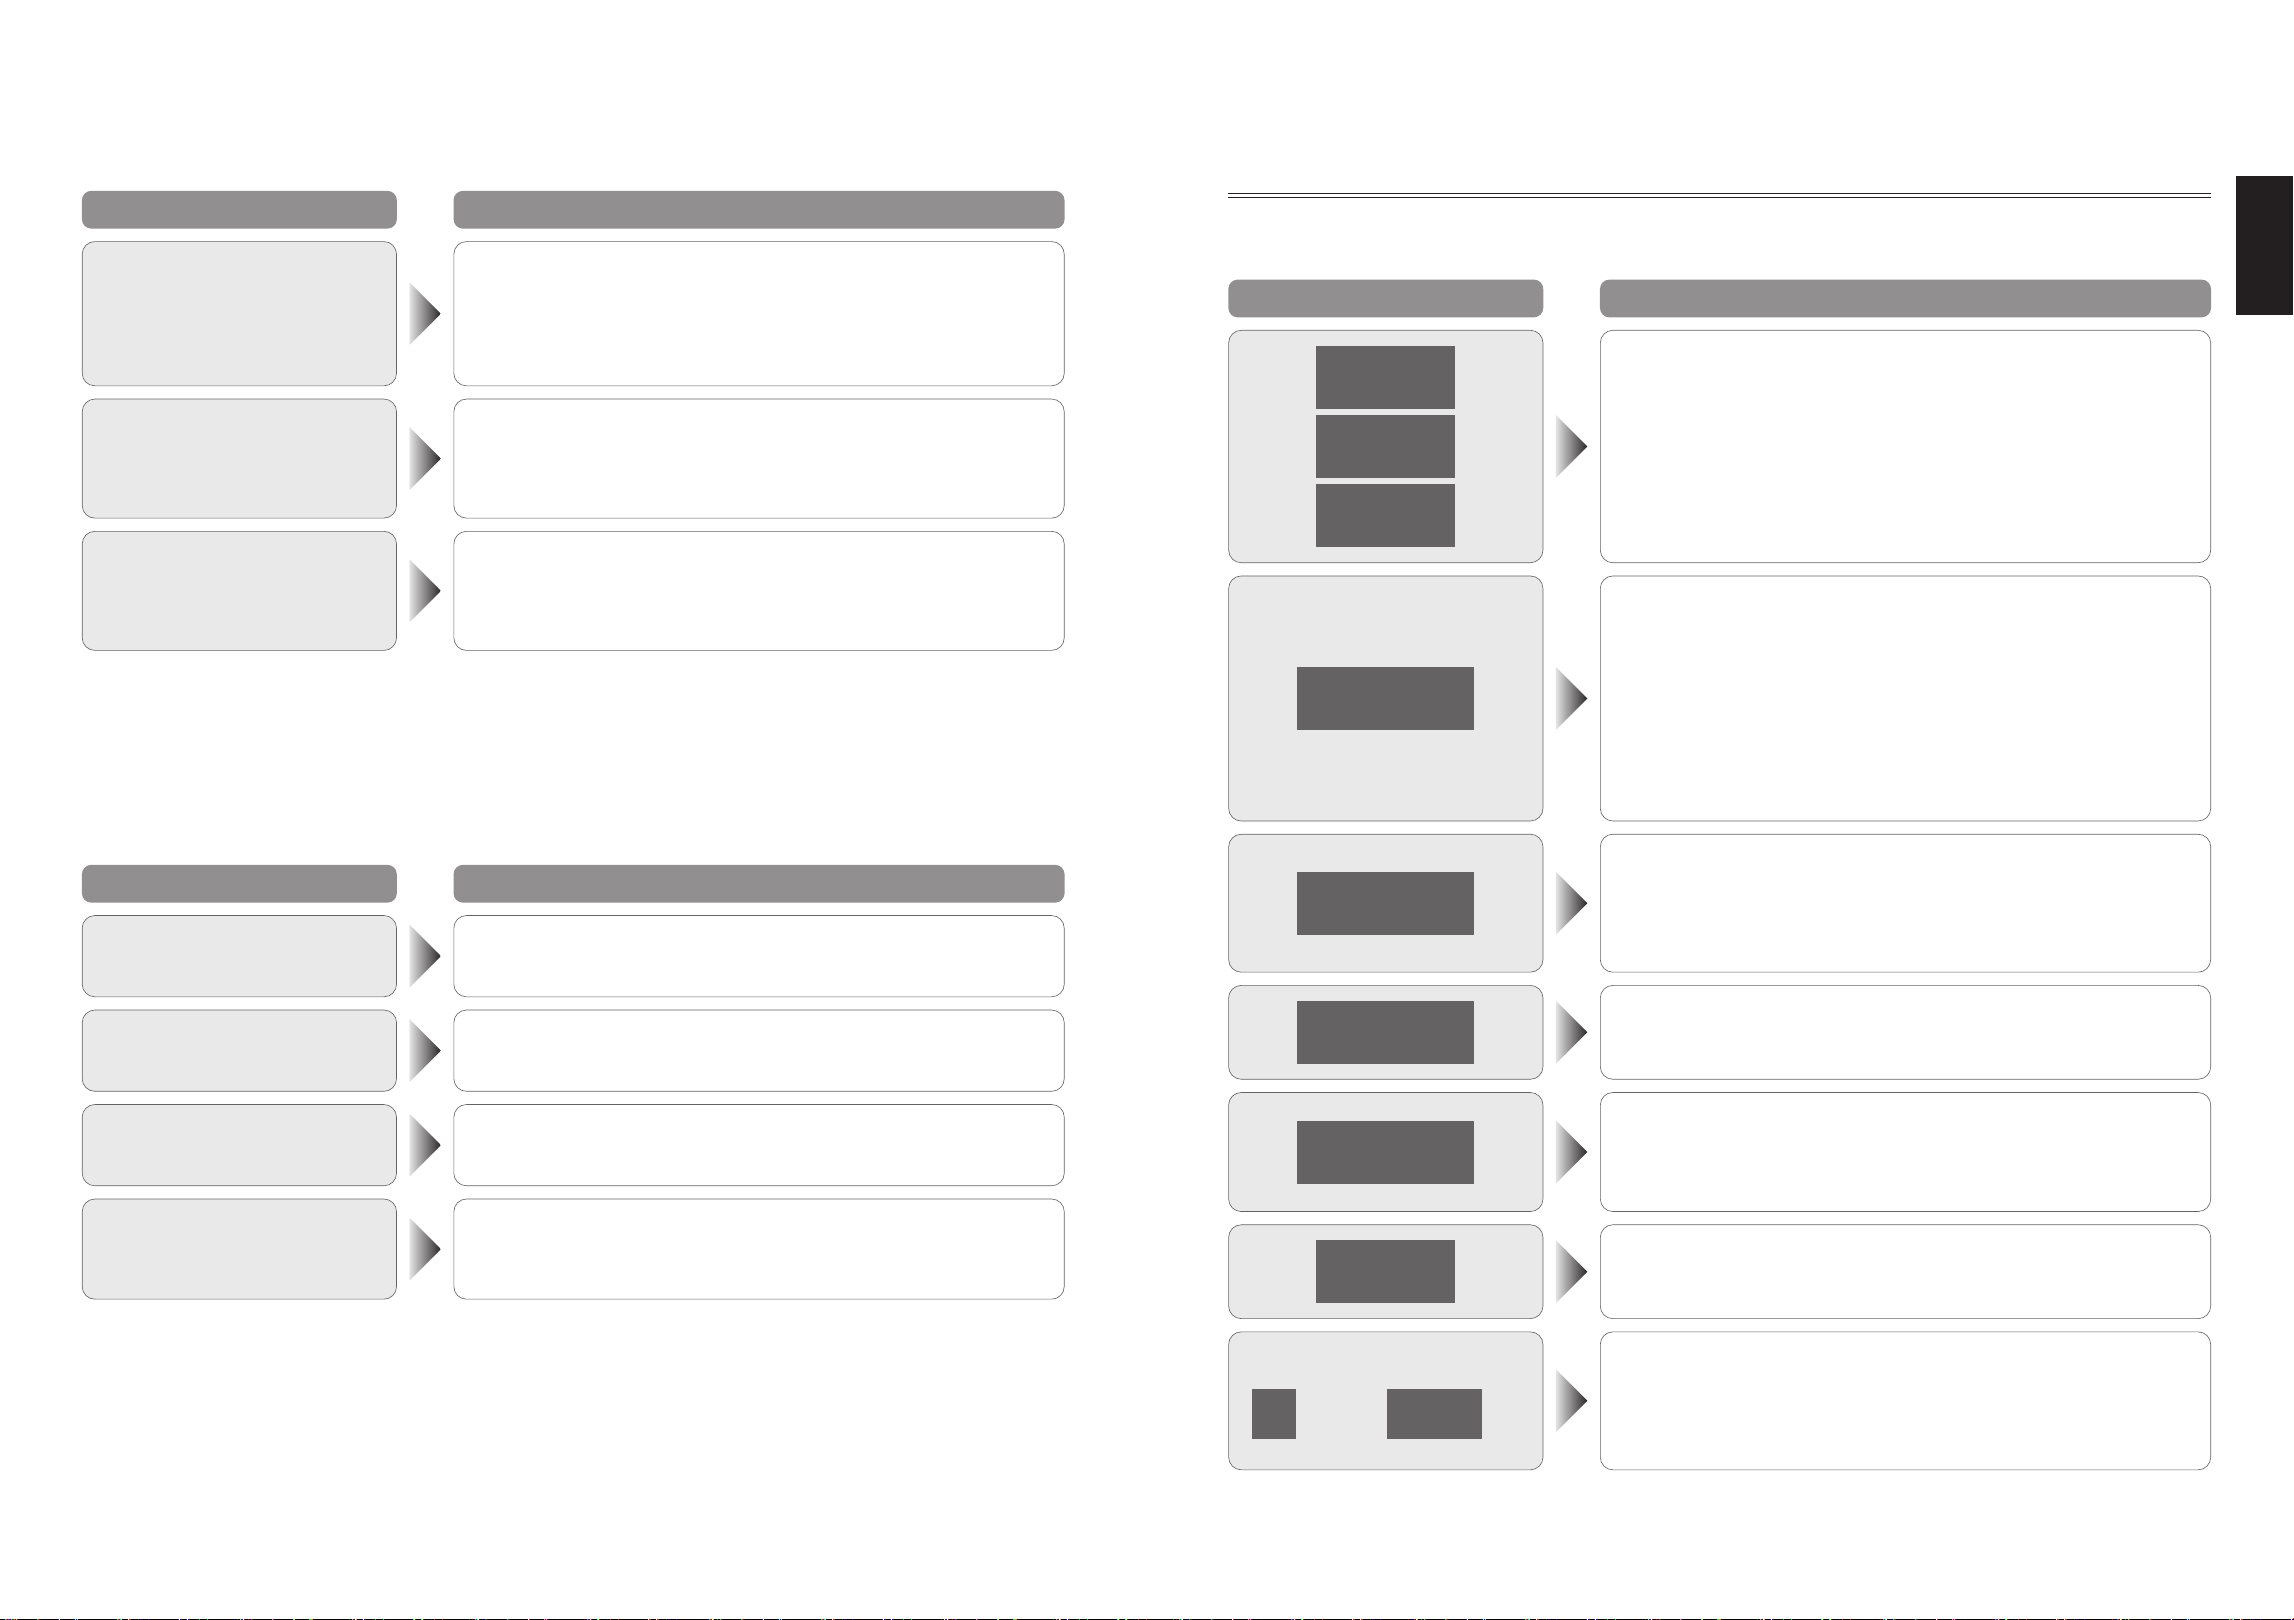
54
55
English
Symptom Cause
Smoke appears around the
door when broiling
O Fat from foods is splashing on to the grill (broil) elements and
burning.
Stop the oven and drain away all excess fat and juices. Watch
the food carefully as it broils. Ensure the cavity ceiling and all
accessories are cleaned regularly.
The cooking result of a
certain memory cooking is
different from that of the
previous time
O Did the preheat temperature or cooking mode that were set into
memory change? (p.25)
There are drops of water in
the oven interior and on the
door.
O As it is a tightly sealed design, water drops may appear in the
oven interior or on the door due to microwave cooking, etc.
Wipe up the water with a dish cloth or similar after the oven
interior has cooled down.
Common Queries
Question Answer
Where can I obtain additional
oven accessories?
O Contact the manufacturer or the dealer from whom you
purchased the oven.
Can the oven be stacked?
O Only the same oven can be stacked. Be sure to fix with optional
parts. For details, refer to “Instruction for Stacking”. (p.10)
Can I dry tea towels and
clothes in the oven?
O No. Never put these, or similar items in your Panasonic Oven.
How often should the oven be
serviced?
O When the message referring p.55 is displayed, oven
maintenance is required. Please contact the dealer or a service
agent. (p.3) Continuing to use the oven may cause failure.
Troubleshooting
If a “U” or “F” Appears In The Display
Start all over again after checking the contents when the following display appears. Display disappears
when Stop/Reset pad is pressed.
Display Cause
U40
U41
U43
Displayed when the temperature of the electrical components
is high.
O Are you heating the oven without any food in it?
O Are you heating a small amount of food or an amount outside
that specified?
Increase the amount of food and heat it.
U140
Displayed while exchanging data with the USB memory stick,
when the USB memory stick has not been inserted, or the
main unit has not recognized the USB memory stick.
O Insert the USB memory stick.
• Are you using an unsupported file system (e.g. NTFS)?
Use a USB memory stick formatted with FAT32.
• Are you connecting to the main unit via a relay/conversion
adapter such as a USB hub?
Insert the USB memory stick directly in the USB port.
U141
Displayed when the data have not been written to the USB
memory stick.
O Check the USB memory stick.
• Is the USB memory stick configured as read-only or password-
locked?
U142
Displayed when the data have not been written to the USB
memory stick due to insufficient storage space.
O Use a USB memory stick with free storage space.
U143
Displayed when the data have not been read from the USB
memory stick.
O Check the USB memory stick.
• Is the USB memory stick password-locked?
U88
The touch screen is touched for a while.
O Has the screen been touched for 25 seconds or more?
O Is there any dirt stuck on the screen?
F
code e.g.
F30
etc.
If the “F” code does not disappear even after pressing the Stop/
Reset pad, pull out the plug and then plug it in again after
5 seconds.
The oven is faulty if the “F” code still appears.
Contact the dealer or a service agent. (p.3)
O We do not guarantee the behaviour of all commercially available USB memory sticks.
When to Call a Service Agent
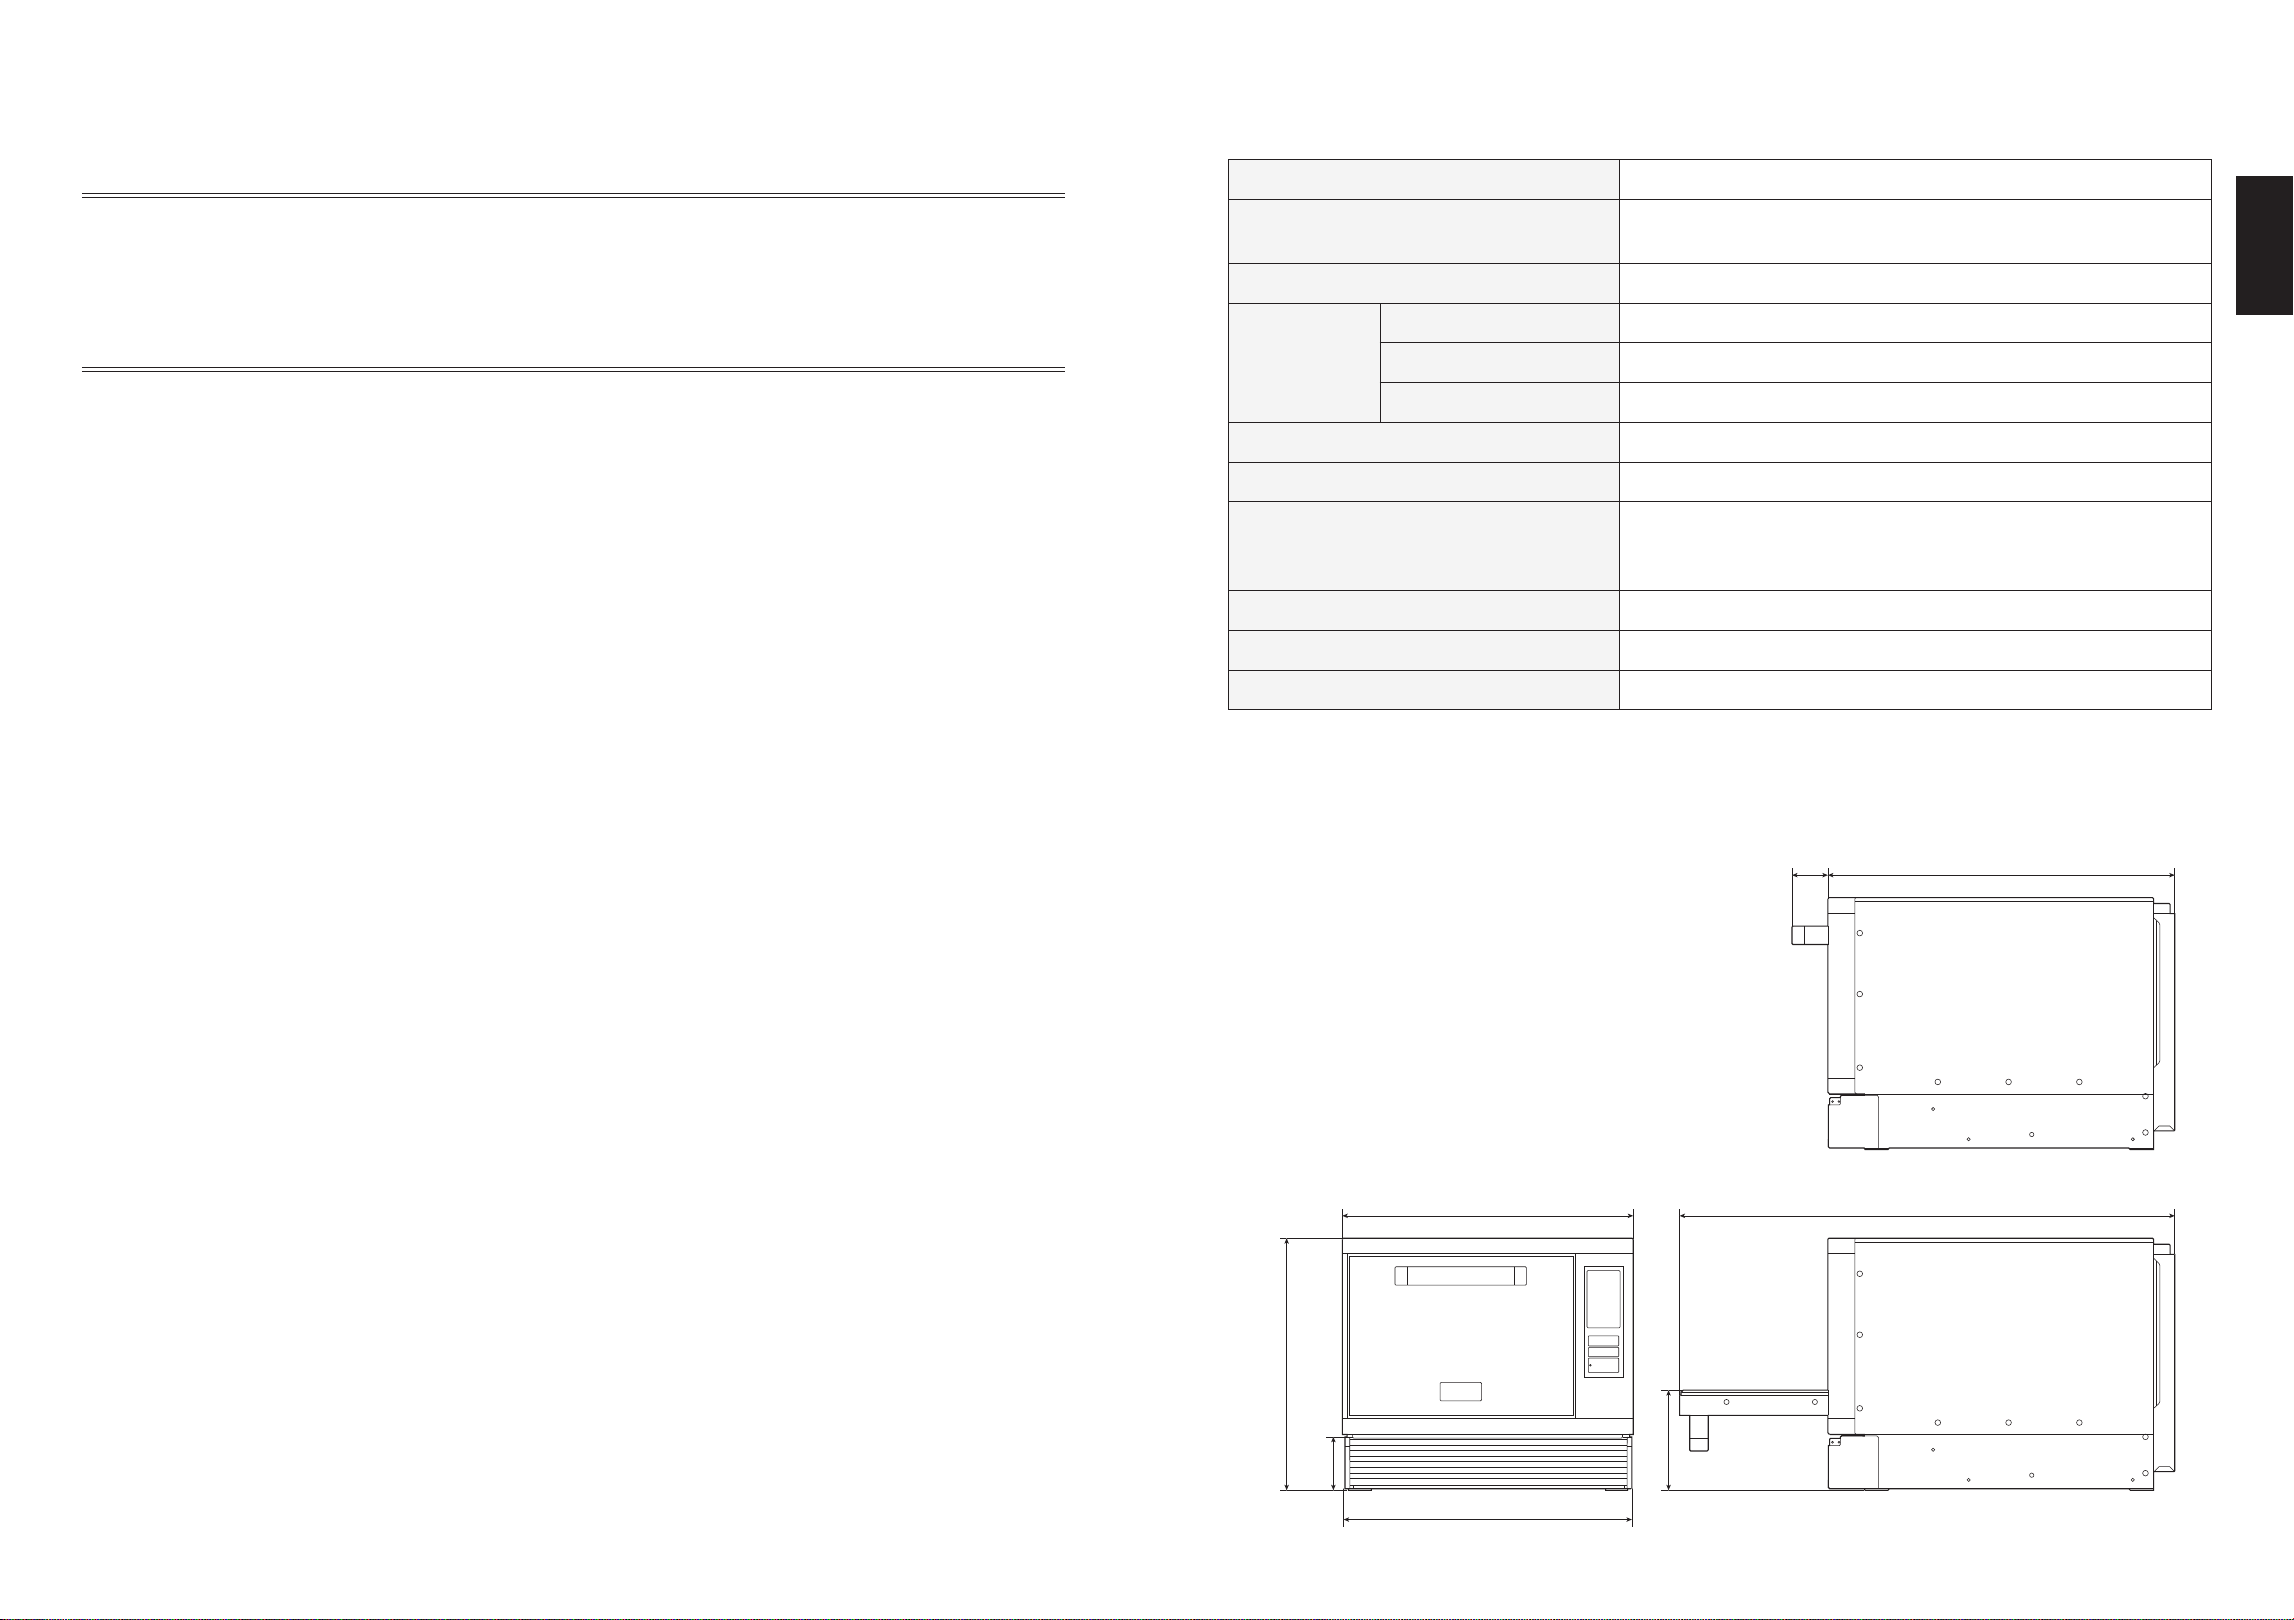
56
57
English
If There Is Damage To The Oven
Contact a service agent immediately if you find damage to the supply cord, control panel, cavity, accessories,
or the door. It is best not to use the oven again until you have ascertained from the service agent that it is safe
to do so. Remember to give the service agent as much information as possible. (p.3)
If The Oven Is Not Working
If you find the oven is not working, follow these points before contacting a service agent. Check:
1. The oven door is closed.
2. The required function(s) have been set correctly and the Start pad pressed. (pp.24–51)
3. The memory lock has not been activated or deactivated against your requirements.
4. The oven is connected to a 20 amp outlet and the supply is operational. Try another power point, there
maybe a problem with the outlet or even a total power failure.
5. The oven is not connected to the electrical supply by means of an adaptor or extension cable.
6. The air vents are not blocked. If they are, unblock them, leave the oven for 15 minutes and then try again.
7. The “Troubleshooting” and “Common Queries” section on pp.53–54.
If the oven is still not operational, contact your service agent with all your details. (p.3)
Copyrights
Q Software
This product contains the following software.
(1) Software developed by Panasonic Corporation (below, “Panasonic”) or for Panasonic.
(2) Third party software licensed by Panasonic.
(3) Open source software licensed under the terms.
In the case of software classified under (3) above, these are distributed under the expectation that they will be
useful on their own, but we provide absolutely no warranty including no implied warranties concerning “product
fitness” or “suitability for a particular purpose”.
For the latest information, consult the Panasonic website.
When to Call a Service Agent
Specifications
Power Source 208/240 V AC, 60 Hz, Single phase
Required Power
3750 W 19 A (208 V)
17 A (240 V)
Outlet 20 A (NEMA #6-20R)
Output
Microwave 1200 W (IEC 60705)
Convection 1265 W
Grill (Broil) 1915 W
Frequency 2450 MHz
Convection Temperature Range 350–525 °F (180–280 °C)
Preheating Temperature Range
475 °F (250 °C) / 525 °F (280 °C) (Default)
Can be changed between 350–525 °F (180–280 °C) in 25 °F
increments
Net Weight Approx. 86.0 lbs. (39 kg) (including accessories)
Outer Dimensions (W×D×H) 18-
11
⁄16˝×22-
1
⁄4˝×16-
7
⁄32˝ (474 mm×565 mm×412 mm)
Cavity Dimensions (W×D×H) 10-
5
⁄8˝×13˝×4-
5
⁄16˝ (270 mm×330 mm×110 mm)
Specifications subject to change without notice.
Sound pressure level is less than 70 dB (A weighted).
18-
11
⁄16˝ (474 mm) 31-
3
⁄4˝ (807 mm)
22-
1
⁄4˝ (565 mm)
2-
1
⁄4˝ (57 mm)
18-
15
⁄32˝ (469 mm)
16-
7
⁄32˝ (412 mm)
6-
15
⁄32˝ (164 mm)
3-
5
⁄16˝
(84 mm)
58 59
English
Panasonic High Speed Oven/Microwave Oven
Limited Warranty (For USA Only)
Limited Warranty Coverage (For USA Only)
If your product does not work properly because of a defect in materials or
workmanship, Panasonic Corporation of North America (referred to as “the
warrantor”) will, for the length of the period indicated on the chart below,
which starts with the date of original purchase (“warranty period”), at its
option either (a) repair your product with new or refurbished parts, (b) replace
it with a new or a refurbished equivalent value product, or (c) refund your
purchase price. The decision to repair, replace or refund will be made by the
warrantor.
Product or
Part Name
Labor Parts
NE-SCV3N
1 Yr. 1 Yr.
* Please refer to the owner’s manual on how to use the cycle count feature.
During the “Labor” warranty period there will be no charge for labor. During
the “Parts” warranty period, there will be no charge for parts.
This warranty only applies to products purchased and serviced in the United
States. This warranty is extended only to the original purchaser of a new
product which was not sold “as is”.
Service:
On-site service in the continental U.S.A. can be obtained during the
warranty period from a Panasonic authorized service center.
In the United States call 1-877-266-6836 or please visit
https://www.panasonic.com/cmo .
IF REPAIR IS NEEDED DURING THE WARRANTY PERIOD, THE
PURCHASER WILL BE REQUIRED TO FURNISH A SALES
RECEIPT/PROOF OF PURCHASE INDICATING DATE OF PURCHASE,
AMOUNT PAID AND PLACE OF PURCHASE. CUSTOMER WILL BE
CHARGED FOR THE REPAIR OF ANY UNIT RECEIVED WITHOUT SUCH
PROOF OF PURCHASE.
Limited Warranty Limits and Exclusions
This warranty ONLY COVERS failures due to defects in materials or
workmanship, and DOES NOT COVER glass, plastic parts, temperature
probes (if included) and normal wear and tear or cosmetic damage. The
warranty ALSO DOES NOT COVER damages which occurred in shipment,
or failures which are caused by products not supplied by the warrantor, or
failures which result from accidents, misuse, abuse, neglect, bug infestation,
mishandling, misapplication, alteration, faulty installation, set-up
adjustments, maladjustment of consumer controls, improper maintenance,
power line surge, lightning damage, modification, rental use of the product,
service by anyone other than an authorized servicer, or damage that is
attributable to acts of God.
THERE ARE NO EXPRESS WARRANTIES EXCEPT AS LISTED UNDER
“LIMITED WARRANTY COVERAGE”.
THE WARRANTOR IS NOT LIABLE FOR INCIDENTAL OR
CONSEQUENTIAL DAMAGES RESULTING FROM THE USE OF THIS
PRODUCT, OR ARISING OUT OF ANY BREACH OF THIS WARRANTY.
(As examples, this excludes damages for lost time, travel to and from the
servicer, loss of or damage to media or images, data or other memory or
recorded content. The items listed are not exclusive, but for illustration only.)
ALL EXPRESS AND IMPLIED WARRANTIES, INCLUDING THE
WARRANTY OF MERCHANTABILITY, ARE LIMITED TO THE PERIOD
OF THE LIMITED WARRANTY.
Some states do not allow the exclusion or limitation of incidental or
consequential damages, or limitations on how long an implied warranty lasts,
so the exclusions may not apply to you.
This warranty gives you specific legal rights and you may also have other
rights which vary from state to state. If a problem with this product develops
during or after the warranty period, you may contact your dealer or Service
Center. If the problem is not handled to your satisfaction, then write to:
Panasonic Corporation of North America
Consumer Affairs Department
2 Riverfront Plaza
Newark NJ 07102-5490
PARTS AND SERVICE, WHICH ARE NOT COVERED BY THIS LIMITED
WARRANTY, ARE YOUR RESPONSIBILITY.
Statute of Limitations
No suit shall be brought on an alleged breach of The Warrantor warranty
more than one (1) year following expiration of the relevant
warranty period.
Customer Services Directory (United States Only)
For operational and technical assistance, or to locate your
nearest Dealer or Service Center, you may contact us directly
at:
1-877-CMO-OVEN (1-877-266-6836)
Monday-Friday 9am-5pm EST
Or by visiting our Web Site at:
https://www.panasonic.com/cmo
Parts/Accessory Purchases (United States Only)
Purchase Parts, Accessories and Owner’s Manual online for all
Panasonic Products by visiting our Web Site at:
https://shop.panasonic.com/support
You may also contact us directly at:
1-800-332-5368 (Phone) 1-800-237-9080 (Fax Only)
(Monday-Friday 9am-5pm EST)
As of December 2025
Panasonic Commercial
High Speed Oven/Microwave Oven
Limited Warranty
Panasonic Canada Inc. warrants this product to be free of defects in material and workmanship
and agrees to remedy such defects. This warranty covers 1 Year Parts and Labour. This
warranty coverage is from the original date of purchase. Parts may be replaced under this
warranty with new or comparable remanufactured parts. This warranty does not cover light
bulbs, glass, plastic parts, exterior or interior damage.
This warranty does not apply outside of the boundaries of Canada or to any product which has
been improperly installed, subjected to usage for which the product was not designed, misuse
or abuse, shipping damage, or which has been altered or repaired in any way that eects the
reliability or detracts from the performance.
Panasonic Canada Inc. shall not in any case be liable for special, incidental or consequential
damages arising from breach of warranty, breach of contract, negligence, or any other legal
theory. Such damages include, but are not limited to, loss of prots or revenue, loss of use of
the Product or any associated equipment, cost of capital, cost of any substitute equipment,
facilities or services, downtime costs, or claims of customers of the Purchaser for such
damages.
WARRANTY SERVICE
“IN WARRANTY” On-site service can be obtained by contacting any Panasonic authorized
commercial microwave oven service centre. To locate an authorized service centre please refer
to your dealer. A purchase receipt or other proof of date of original purchase will be required
before warranty service is performed.
FOR YOUR PROTECTION
Complete the Warranty Registration Card and mail immediately.
STATUTORY WARRANTIES
The provisions of this additional written warranty are in addition to and not a modication of or
subtraction from the statutory warranties and other rights and remedies contained in any
applicable legislation.
CUSTOMER’S RECORD
Model No.: Serial No.: Date of Purchase:
Dealer’s Name:
Address:
City Province Postal Code

Panasonic Corporation of North America
Two Riverfront Plaza,
Newark, NJ 07102-5490
For Parts and Service:
1-877-266-6836
For Sales, Test Kitchen and Technical Support:
1-877-266-6836 (1-877-CMO-OVEN)
https://www.panasonic.com/cmo
Panasonic Canada Inc.
5770 Ambler Drive
Mississauga, Ontario
L4W 2T3
https://www.panasonic.com
Panasonic de México, S.A. de C.V.
Av. Félix Cuevas 6, Piso 3
Col. Tlacoquemecatl del Valle, Benito Juárez C.P. 03200,
Ciudad de México, México
Tel: +52 (55) 50 00 12 00
Correo:
© Panasonic Corporation 2026
H05063K20AP
A1225-0
Printed in Vietnam