The illustrations in this manual are for reference only.
Please refer to the actual product for accuracy.
Electric Screwdriver
User Manual
MSD008


3
EN
1 Safety Information �������������������������������������������������������������������������������� P04
2 Screwdriver Overview ������������������������������������������������������������������������ P08
3 Storage Case & Accessories ��������������������������������������������������������������� P09
4 Before You Begin ��������������������������������������������������������������������������������� P10
5 Operation����������������������������������������������������������������������������������������������� P11
6 Troubleshooting ����������������������������������������������������������������������������������� P13
7 Specifications ��������������������������������������������������������������������������������������� P13
8 After-Sales Service Card ��������������������������������������������������������������������� P15
Table of Contents
Original Instructions

4
EN
1.1 General Safety Warnings for Power Tools
WARNING:
Read all safety warnings and all instructions. Failure to follow
the warnings and instructions may result in electric shock, fire, and/or
serious injury.
Save all warnings and instructions for future reference.
The term "power tool" in the warnings refers to your battery-operated
(cordless) power tool.
Work Area Safety
• Keep the work area clean and well-lit. Cluttered or dark areas invite accidents.
• Do not operate power tools in explosive atmospheres, such as in the presence of
flammable liquids, gases, or dust. Power tools create sparks, which may ignite dust
or fumes.
• Keep children and bystanders away while operating a power tool. Distractions can
cause you to lose control.
Electrical Safety
• Power tool plugs must match the outlet. Never modify the plug in any way. Do not
use any adapter plugs with earthed (grounded) power tools. Unmodified plugs and
matching outlets will reduce the risk of electric shock.
• Avoid body contact with earthed or grounded surfaces, such as pipes, radiators,
ranges, and refrigerators. There is an increased risk of electric shock if your body
is earthed or grounded.
• Do not expose power tools to rain or wet conditions. Water entering a power tool
will increase the risk of electric shock.
• Do not abuse the cord. Never use the cord for carrying, pulling, or unplugging
the power tool. Keep the cord away from heat, oil, sharp edges, or moving parts.
Damaged or entangled cords increase the risk of electric shock.
• When operating a power tool outdoors, use an extension cord suitable for outdoor
use. Using a cord suitable for outdoor use reduces the risk of electric shock.
• If operating a power tool in a damp location is unavoidable, use a residual current
device (RCD) protected supply. Use of an RCD reduces the risk of electric shock.
Note:
The term residual current device (RCD) may be replaced by the term ground
fault circuit interrupter (GFCI) or earth leakage circuit breaker (ELCB).
Personal Safety
• Stay alert, watch what you are doing, and use common sense when operating a
power tool. Do not use a power tool while you are tired or under the influence of
1 Safety Information

5
EN
drugs, alcohol, or medication. A moment of inattention while operating power tools
may result in serious personal injury.
• Use personal protective equipment. Always wear eye protection. Protective
equipment such as dust masks, non-skid safety shoes, hard hats, or hearing
protection used for appropriate conditions will reduce personal injuries.
• Prevent unintentional starting. Ensure the switch is in the off-position before
connecting to a power source and/or battery pack, picking up or carrying the tool.
• Carrying power tools with your finger on the switch or energizing power tools with
the switch on invites accidents.
• Remove any adjusting key or wrench before turning the power tool on. A wrench or a
key left attached to a rotating part of the power tool may result in personal injury.
• Do not overreach. Keep proper footing and balance at all times. This enables better
control of the power tool in unexpected situations.
• Dress properly. Do not wear loose clothing or jewellery. Keep your hair, clothing,
and gloves away from moving parts. Loose clothes, jewellery, or long hair can be
caught in moving parts.
• If devices are provided for the connection of dust extraction and collection
facilities, ensure these are connected and properly used. The use of dust collection
can reduce dust-related hazards.
Power Tool Use and Care
• Do not force the power tool. Use the correct power tool for your application. The
correct power tool will do the job better and safer at the rate for which it was designed.
• Do not use the power tool if the switch does not turn it on and off. Any power tool
that cannot be controlled with the switch is dangerous and must be repaired.
• Disconnect the plug from the power source and/or the battery pack from the power
tool before making any adjustments, changing accessories, or storing power tools. Such
preventive safety measures reduce the risk of starting the power tool accidentally.
• Store idle power tools out of the reach of children and do not allow people
unfamiliar with the power tool or these instructions to operate the power tool.
Power tools are dangerous in the hands of untrained users.
• Maintain power tools. Check for misalignment or binding of moving parts, breakage
of parts, and any other condition that may affect the power tools operation. If
damaged, have the power tool repaired before use. Many accidents are caused by
poorly maintained power tools.
• Keep cutting tools sharp and clean. Properly maintained cutting tools with sharp
cutting edges are less likely to bind and are easier to control.
• Use the power tool, accessories, tool bits, etc., in accordance with these
instructions, taking into account the working conditions and the work to be
performed. Use of the power tool for operations different from those intended
could result in a hazardous situation.

6
EN
Battery Tool Use and Care
• Recharge only with the charger specified by the manufacturer. A charger that
is suitable for one type of battery pack may create a risk of fire when used with
another battery pack.
• Use power tools only with specifically designated battery packs. Use of any other
battery packs may create a risk of injury and fire.
• When the battery pack is not in use, keep it away from other metal objects, like
paper clips, coins, keys, nails, screws or other small metal objects that can make a
connection from one terminal to another. Shorting the battery terminals together
may cause burns or a fire.
• Under abusive conditions, liquid may leak from the battery; avoid contact. If
contact occurs, rinse immediately with water. If the liquid gets into the eyes, seek
medical attention immediately. Liquid leaked from the battery may cause irritation
or burns.
• Do not use damaged or modified battery packs or tools. A damaged or modified
battery pack may behave unpredictably and cause fire, explosion, or injury.
• Do not expose the battery pack to fire or high temperatures. Exposure to fire or
temperatures above 130°C may cause the battery pack to explode.
Service
• Have your power tool serviced by a qualified repair person using only identical
replacement parts. This will ensure the safety of the power tool.
• Never attempt to service a damaged battery pack. The battery pack should only be
serviced by the manufacturer or an authorized service provider.
1.2 Specific Safety Instructions
Cordless Screwdriver
• Hold the power tool by insulated gripping surfaces when performing an operation
where the fastener may contact hidden wiring or its own cord. Fasteners
contacting a "live" wire may make exposed metal parts of the power tool "live" and
could give the operator an electric shock.
• Keep screwdriver bits and drill bits sharp and in good condition. This will reduce
the load on the machine and ensure a longer life of the machine.
• Use only screwdriver bits and drill bits recommended by the manufacturer.
• This electric screwdriver is specially designed to work with compatible bits
and is intended solely for screwdriving tasks. Do not modify the product or use
non-original accessories for cutting, grinding, drilling, or any other unintended
purposes, as this may result in equipment damage or personal injury. The
manufacturer assumes no responsibility for any consequences resulting from
improper use, modification, or failure to follow the instructions in this manual.
7
EN
Re-chargeable Batteries
• Batteries may leak or explode if not handled correctly. Always observe the
following precautions when handling batteries.
• Do not use this battery in this product for any other purpose.
• Do not attempt to dismantle the product.
• Do not immerse in or expose the product to water.
• Batteries are prone to leakage when discharged. To avoid damage to the product,
recharge the battery when no charge remains.
• Store the product in a cool place when not in use.
• After prolonged use, the battery in this product may become hot. Switch the
machine off and allow the battery to cool down.
• Do not use the product if you notice any discoloration or distortion of the casing.
• Do not dispose of the product through incineration or in the domestic waste
system. Take the product to an approved recycling or disposal facility.
• Avoid charging your tool in freezing conditions. Charging may be ineffective in
freezing conditions.
Chargers
• Use only a 5V power adapter and the supplied Type-C charging cable to charge
the battery.
• Never attempt to charge non-rechargeable batteries.
• Have defective cords replaced immediately.
• Do not expose the charger to water.
• Do not open the charger.
• Do not probe the charger.
• The charger is intended for indoor use only.
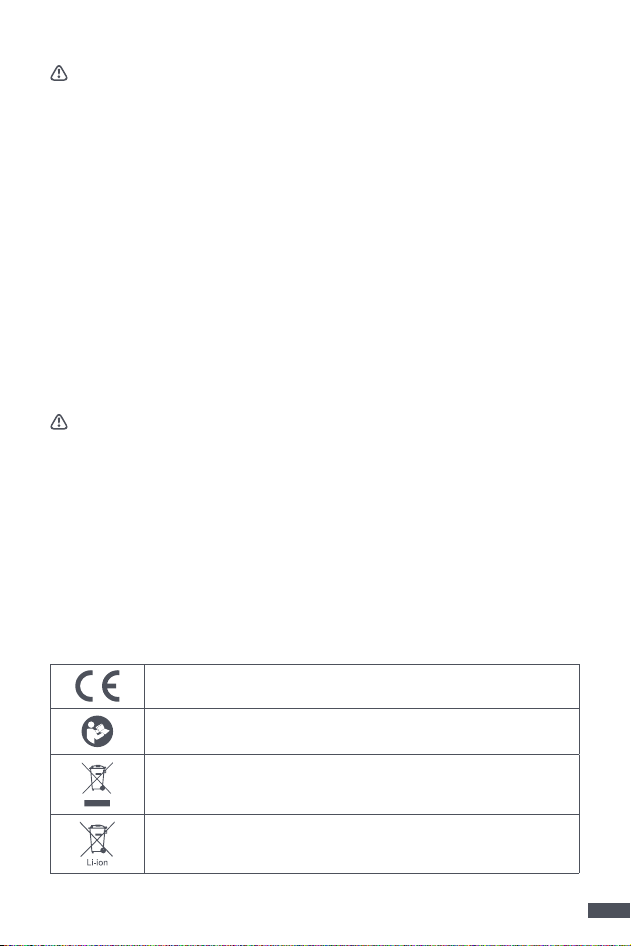
1.3 Explanation of Symbols
This product conforms to relevant safety standards�
To reduce the risk of injury, the user must read the instruction manual�
Do not dispose of old appliances with domestic rubbish�
Separate collection symbol - Battery with heavy metal element “Li-ion”�
8
EN
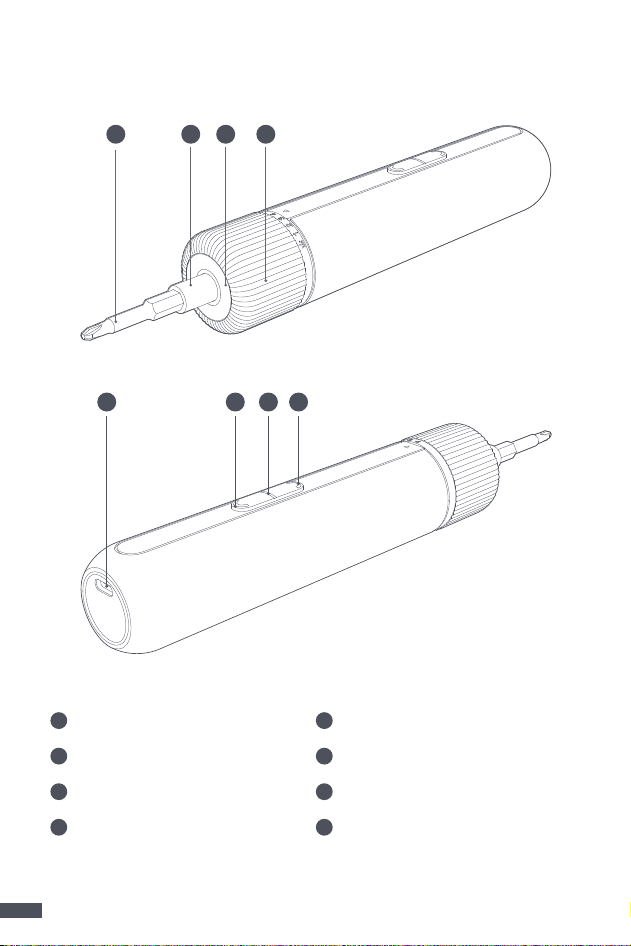
2 Screwdriver Overview
1
Bit
2
Chuck
3
LED light
4
Torque adjustment knob
5
Forward button
6
Reverse button
7
Charging indicator light
8
Type-C charging port
1 2 4
6
3
578
9
EN
3 Storage Case & Accessories
3.1 Open & Close the Storage Case
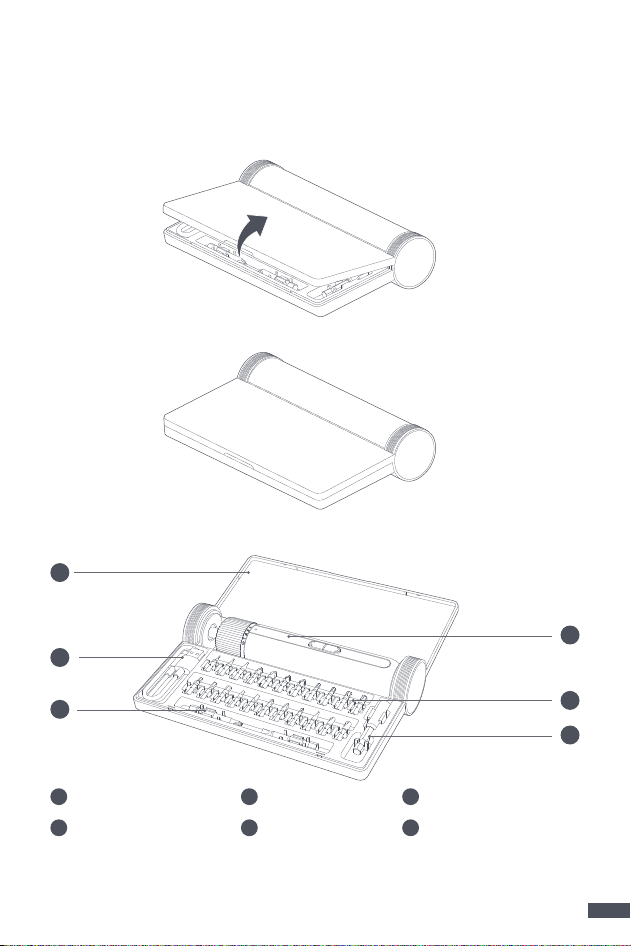
1. Rotate the top cover in the direction of the arrow to open the case.
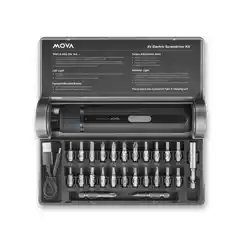
2.2 Product and Accessories
2. After use, place the tool and accessories back into the case and close the lid.
Note: Screwdriver bits are consumable parts and subject to wear during regular use.
Replace as needed depending on usage.
1
3
2
4
5
6
1
Top cover
2
Type-C charging cable
3
50 mm bits ×2
4
Screwdriver
5
25 mm bits ×22
6
60 mm extension rod ×1
10
EN
Indicator Light Description
Flashing Red
Battery level is below 10% while operating. The light
turns white when you release the button, and turns off
after 10 seconds.
Flashing White Charging in progress.
Solid White
Fully charged. The light turns off automatically after 10
minutes.
4 Before You Begin
4.2 Charging
The product features a universal Type-C charging port at the bottom. We recommend
using the included Type-C cable and a 5V power adapter for charging.
Note: The power adapter is not included. Please prepare your own.
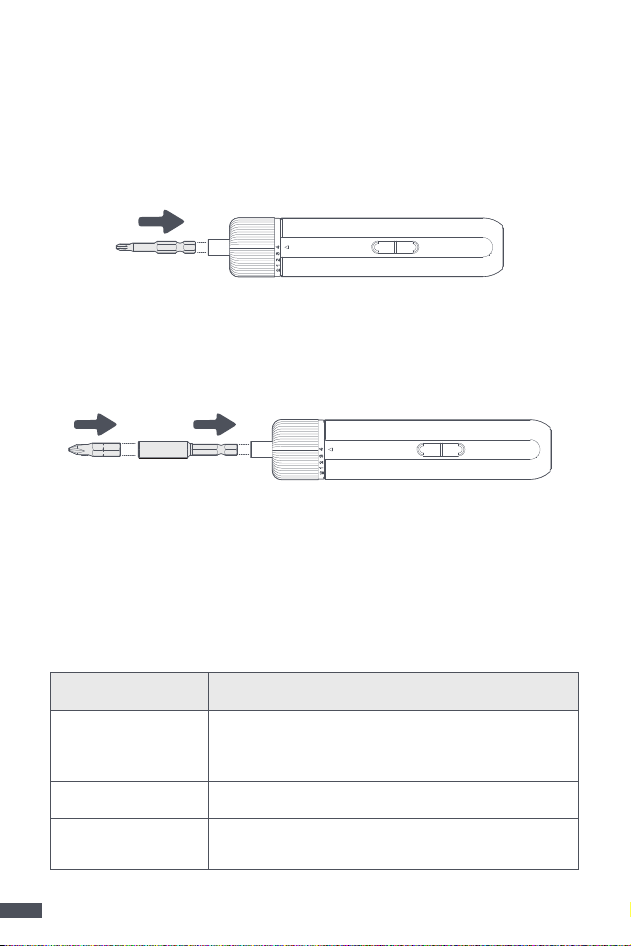
4.1 Install the Screwdriver Bit
Direct Installation Method
Insert the required screwdriver bit straight into the chuck and push firmly until the bit
is fully seated.
Extended Reach Method
1. Insert an extension rod into the chuck.
2. Insert the required screwdriver bit into the extension rod and ensure it is securely
seated.
Note:
Using tweezers or pliers to grip a short bit is easier than bare-handed handling.
Charging Indicator Status
11
EN
5 Operation
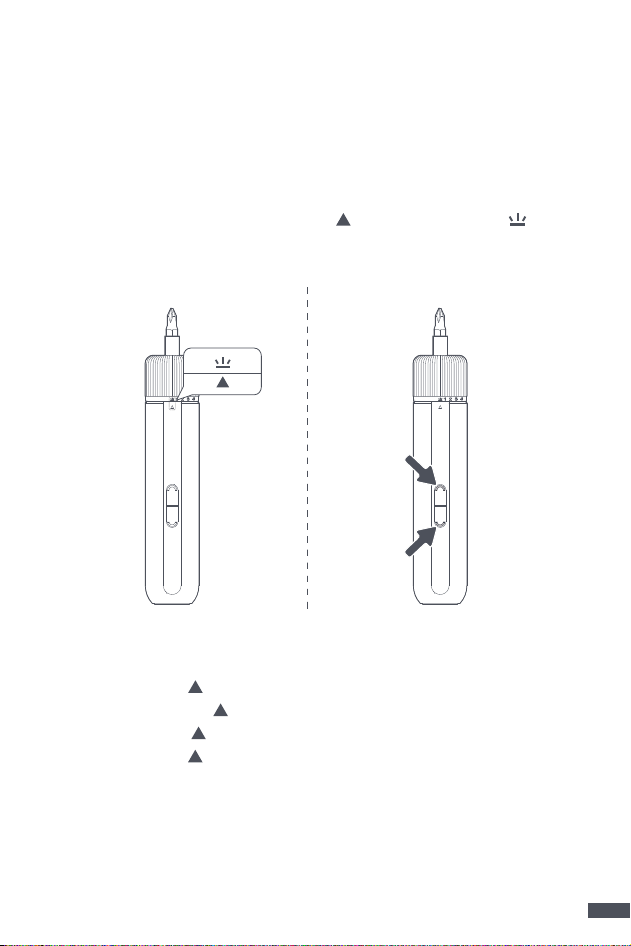
5.1 (Optional) Switch on LED Light
Note: If the light doesn’t turn on, press either rotation button (forward/reverse) to
wake the device.
1. Rotate the torque adjustment knob until the
aligns with the light icon . The
LED will turn on automatically.
2. Press the forward and reverse buttons simultaneously to turn off the light.
Caution: Always disconnect the charging cable before using the screwdriver. Do not
operate while charging to avoid safety risks or equipment damage.
5.2 Adjust Torque
Rotate the torque adjustment knob to set the torque gear.
• Low Torque: Align with torque gear 1.
• Medium Torque: Align
with torque gear 2.
• High Torque: Align
with torque gear 3.
• Max Torque: Align
with torque gear 4.
Note:
Torque selection depends on screw size and material hardness.
• Use lower torque settings for small screws or soft materials.
• Use higher torque settings for large screws or hard materials.
Caution:
If unsure, start with the lowest torque and increase gradually to avoid damaging
the screw.
Turn on Light Turn off Light
12
EN
5.3 Tighten/Loosen Screws
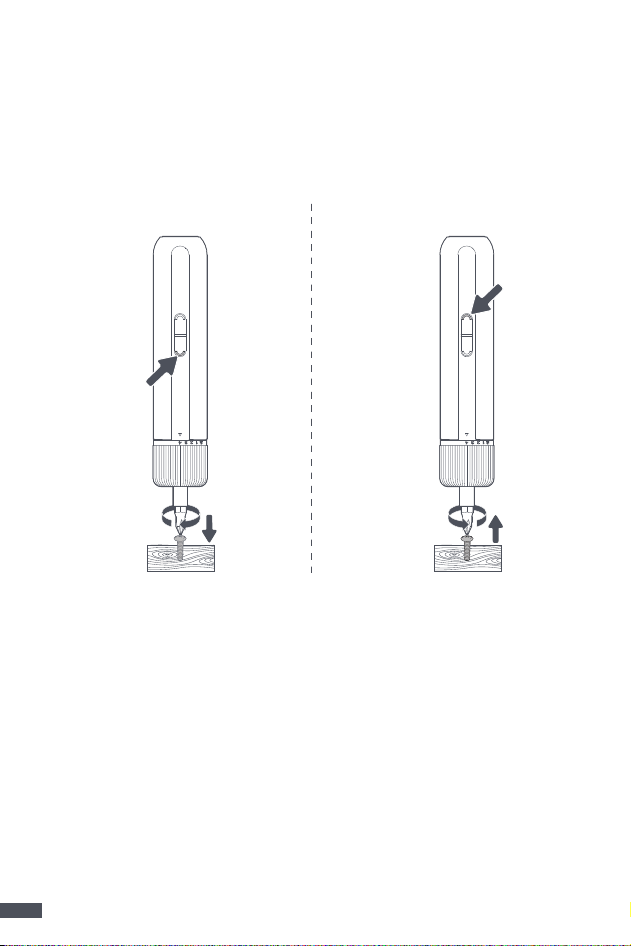
Press the Forward/Reverse button to tighten or loosen screws:
• Clockwise (Tighten):
Press the Forward button (See Figure 1).
• Counterclockwise (Loosen):
Press the Reverse button (See Figure 2).
Release the button to stop the screwdriver immediately.
5.4 Sleep Mode
Sleep mode helps conserve battery and prevents accidental activation when the tool
is not in use.
• Press both the Forward and Reverse buttons simultaneously to enter sleep mode.
• The screwdriver will automatically enter sleep mode 5 minutes after use if no
button is pressed.
Figure 1 Figure 2
13
EN
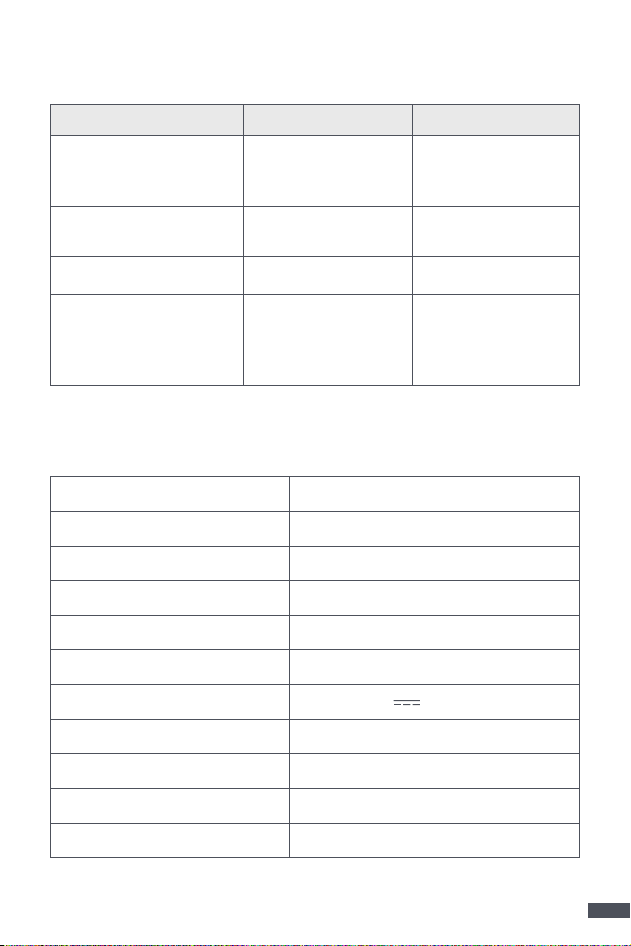
Issue Cause Solution
Red light flashes when
pressing the Forward/
Reverse button
Low battery Recharge
No response when pressing
the Forward/Reverse button
Battery fully drained Recharge
Bit cannot be installed Incompatible bit size Use the correct bit size
The battery does not
charge
USB cable not
connected properly or
the wrong cable used
Use the included
Type-C cable and a 5V
adapter. Check if the
indicator lights up.
6 Troubleshooting
7 Specifications
Model MSD008
Max Hard Torque in Electric Mode 8 N·m
Max Soft Torque in Electric Mode 5 N·m
Max Torque in Manual Mode 12 N·m
Dimension 219 mm × 136 mm × 49 mm
Product Weight Approx. 715 g
Rated Voltage 4 V
10 A (max.)
Operating Temperature -10℃ ~ 50℃
Storage Temperature -20℃ ~ 60℃
No-load Speed 260 r/min
Charging Time 3~5 hours
7.1 Screwdriver Parameters
* Based on testing under internal lab conditions.

14
EN
Length Type Size Type Size
25 mm
Slotted
SL2
Phillips
PH1
SL4 PH2
SL5
Pozidriv
PZ1
Square
S0
PZ2 S1
Tor x TR
T10
Hex
H2.5
T15 H3
T20 H4
T25
Y-Type
Y1
Spanner
C1
Y2 C2
Triangle 2.3 U-Type 6
50 mm
Phillips PH2 Slotted SL4
7.2 Bit Specifications

15
EN
8 After-Sales Service Card
Warranty
1. The product is warranted for 2 years from the date of purchase. Please refer to your
local laws and regulations for the specific warranty period applicable in your area.
2. We provide free repair services for manufacturing defects that occur under normal
use.
3. The warranty does not cover any of the following:
• Product failures or damages caused by the consumer due to improper use
(not following the 'Safety Information' and 'Cautions' in the product manual),
maintenance, or storage (including operational errors, liquid ingress, incorrect
plugging/unplugging, scratches, handling, bumps, inputting inappropriate
voltage, inhaling white ash, sand, dust, special adhesive chemicals, metal, and
other micro-particles, etc.);
• The whole machine and accessories have exceeded the free warranty period;
• Normal wear and tear, and consumable parts (such as scratches on the shell);
• Damage caused by disassembly by oneself or by non-MOVA authorized service
centers;
• No valid proof and valid invoice or invoice copy;
• The model and product attributes on the proof do not match the model
attributes of the repaired product or have been altered;
• Damage caused by natural disasters, accidents, or other irresistible forces.
4. For more warranty information, please refer to the official MOVA website:
https://global.mova-tech.com/
CONTACT US
https://www.mova.tech/pages/contact-us

Manufacturer: Woting Technology (Suzhou) Co., Ltd.
Address: Floor 9, Building B, No. 7 Qianzhu Road, Taihu Lake Street,
Wuzhong District, Suzhou, Jiangsu Province, P.R.China