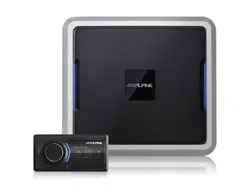

RB5000DU
User Manual

2
THANK YOU!
Thank you for your purchase of Advanced Wireless Communications’ RB5000DU Two-Way Base
Station. This Base Station is a business grade device. Treat it with care, and you will enjoy years of
reliable operation.

3
Product Safety and RF Exposure for Portable Two-Way Radios Compliance with
RF Energy Exposure Standards
NOTICE: This radio is intended for use in occupational/controlled applications where users have been
made aware of the potential for exposure and can exercise control over their exposure. This radio device
is NOT authorized for general population, consumer or similar use.
BEFORE USING THIS RADIO, READ THE TRAINING MATERIAL BELOW WHICH
CONTAINS IMPORTANT OPERATING INSTRUCTIONS FOR SAFE USAGE AND RF ENERGY
AWARENESS AND CONTROL INFORMATION FOR COMPLIANCE WITH RF ENERGY
EXPOSURE LIMITS IN APPLICABLE NATIONAL AND INTERNATIONAL STANDARDS.
This device contains licence-exempt transmitter(s)/receiver(s) that comply
with Innovation, Science and Economic Development Canada’s licence-
exempt RSS(s). Operation is subject to the following two conditions:
(1) This device may not cause interference.
(2) This device must accept any interference, including interference that
may cause undesired operation of the device.

L’émetteur/récepteur exempt de licence contenu dans le présent appareil est conforme aux CNR
d’Innovation, Sciences et Développement économique Canada applicables aux appareils radio
exempts de licence. L’exploitation est autorisée aux deux conditions suivantes :
(1) L' appareil ne doit pas produire de brouillage;
(2) L' appareil doit accepter tout brouillage radioélectrique subi, même si le brouillage est susceptible
d' en compromettre le fonctionnement.
This equipment complies with ISED exposure limits set forth for an uncontrolled environment. This
equipment shall be installed and operated with minimum distance 31.9cm between the radiator &
body.
Énoncé d’exposition aux radiofréquences pour ISED
Cet équipement est conforme aux limites d'exposition ISED définies pour un environnement non
contrôlé. Cet équipement doit être installé et utilisé avec une distance minimale de 31.9 cm entre le
radiateur et la carrosserie.
4
Warning:Users must operate this product in compliance with the requirements of CanadianRSS-119
and use the frequencies legally. Do not illegally alter the product's operatingfrequency. This product
has been frequency-limited in accordance with RSS-119, and userscannot operate it outside of this
range

5
FCC Statement
NOTE: This equipment has been tested and found to comply with the limits for a Class B digital
device, pursuant to part 15 of the FCC Rules. These limits are
designed to provide reasonable protection against harmful interference in a
residential installation. This equipment generates, uses and can radiate radio
frequency energy and, if not installed and used in accordance with the instructions, may cause
harmful interference to radio communications. However, there is no guarantee that interference will
not occur in a particular installation. If this equipment does cause harmful interference to radio or
television reception, which can be determined by turning the equipment off and on, the user is
encouraged to try to correct the interference by one or more of the following measures:
- Reorient or relocate the receiving antenna.
- Increase the separation between the equipment and receiver.
-Connect the equipment into an outlet on a circuit different from that to which the receiver is
connected.
-Consult the dealer or an experienced radio/TV technician for help
Changes or modifications not expressly approved by the party responsible for compliance could void
the user's authority to operate the equipment.

6
This device complies with Part 15 of the FCC Rules. Operation is subject to the following two
conditions:
(1) this device may not cause harmful interference, and (2) this device must accept any
interference received, including interference that may cause undesired operation.
This device complies with part 15 of the FCC Rules. Operation is subject to the condition that
this device does not cause harmful interference.
WARNING: MODIFICATION OF THIS DEVICE TO RECEIVE CELLULAR
RADIOTELEPHONE SERVICE SIGNALS IS PROHIBITED UNDER FCC RULES AND
FEDERAL LAW.
FCC RF Exposure Statement:
This equipment complies with FCC radiation exposure limits set forth for an uncontrolled
environment. This equipment shall be installed and operated with minimum distance 24.2cm
between the radiator & body.

User Safety Information
• Only qualified technicians are allowed to maintain this product.
• To avoid electromagnetic interference, turn o your radio in places where posted notices instruct you
to do so. Hospitals or health care facilities may be using equipment that is sensitive to external RF
energy. When traveling on aircraft, turn o your radio when the airline crew instructs you to do so.
• When in vehicles equipped with an air bag, do not place a portable radio in the airbag deployment
area.
• Turn o your radio prior to entering any area with a potentially explosive atmosphere. Do not remove,
install, or charge batteries in such areas.
• To avoid possible interference with blasting operations, turn o your radio when you are near
electrical blasting caps.
• Do not expose the radio to direct sunlight for long periods of time. Do not place the radio in direct
contact with any heating source.
7

Thank You ............................................................................................................................................. Page 2
CONTENTS
Declaration ................................................................................................................................. Page 3
Contents .............................................................................................................................................. Page 8
Getting Acquainted ............................................................................................................................ Page 10
Base Station View ....................................................................................................................... Page 10
LCD Display Symbols ................................................................................................................ Page 12
Safety and Care Instructions ............................................................................................................. Page 14
Safety Precautions ...................................................................................................................... Page 14
Caring For This Product ............................................................................................................. Page 14
Caution ........................................................................................................................................ Page 15
Getting Started ................................................................................................................................... Page 16
Turn the Unit ON/OFF ............................................................................................................. Page 16
Adjusting the Volume ................................................................................................................. Page 16
Selecting a Channel .................................................................................................................... Page 16
Transmitting and Receiving ................................................................................................................ Page 17
Talk to Another Radio ................................................................................................................. Page 17
Keypad Lock ................................................................................................................................. Page 18
8

VOX Operation .......................................................................................................................... Page 19
Monitoring a Channel ................................................................................................................ Page 20
Scanning ...................................................................................................................................... Page 21
Wireless Cloning ................................................................................................................................. Page 24
Local Programming Mode .................................................................................................................. Page 25
Local Programming Menu .......................................................................................................... Page 25
Entering Programming Mode .................................................................................................... Page 26
Selecting the Main Menu ........................................................................................................... Page 27
Selecting a Channel .................................................................................................................... Page 28
Programming the Frequency ..................................................................................................... Page 28
Programming the Key Function ................................................................................................ Page 30
Advanced Features ............................................................................................................................. Page 35
Limited Menu Feature ........................................................................................................................ Page 36
Frequencies List .................................................................................................................................. Page 37
Troubleshooting .................................................................................................................................. Page 40
9
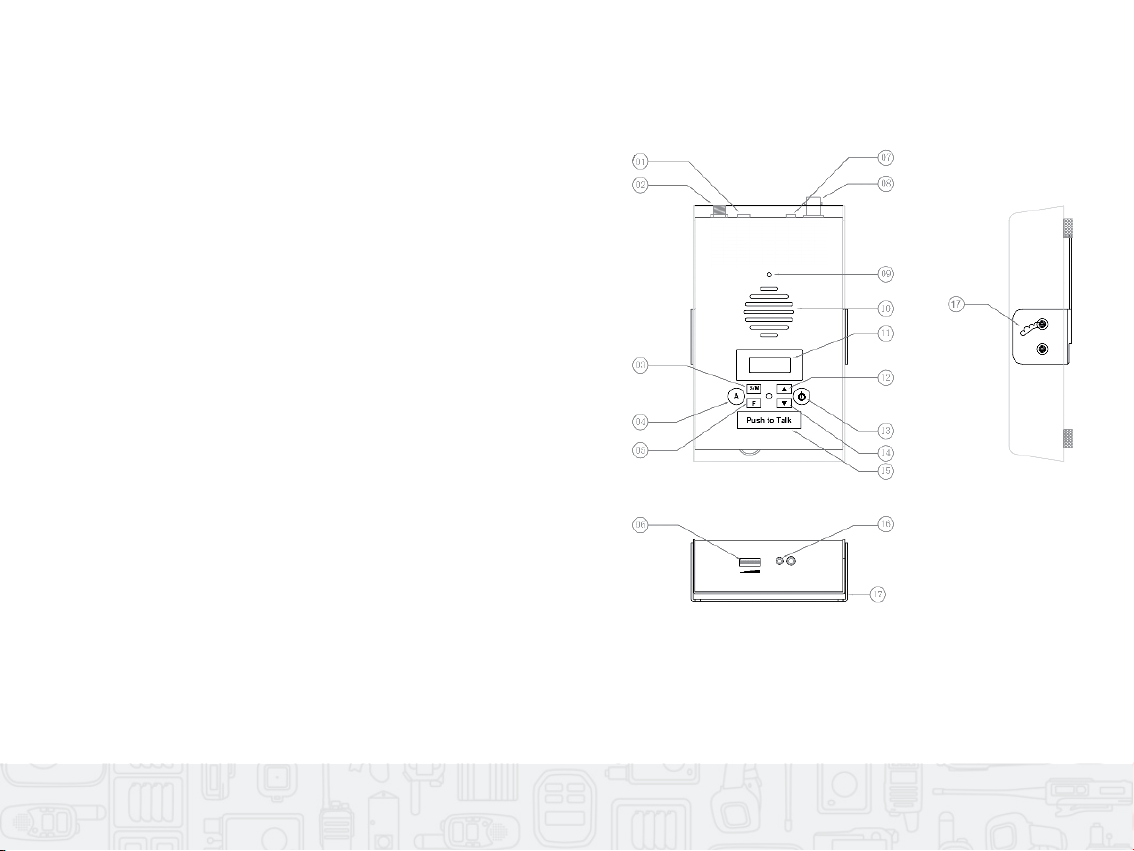
GETTING AQUAINTED
1. External PTT Jack
2. DC Input
3. S/M Programmable Function Key. (Default:
Menu @ Long Press, Scan @ Short Press
4. A, Programmable Function Key (Default:
Channel View @ Short press, Monitor @
Long press)
5. F, Programmable Function Key (Default:
Key Lock @ Long press, None @ Short press,
Exit current status key in local programming
mode)
6. Volume Adjustment Knob
7. External Speaker Jack
8. Antenna Connector
9. LED Indicator (Tx & Busy)
Base Station View
ACQUAINTED
M Programmable Function Key.
(Default: Menu @ Long Press, Scan
A, Programmable Function Key
(Default: Key Lock @ Long press,
None @ Short press, Exit current
10
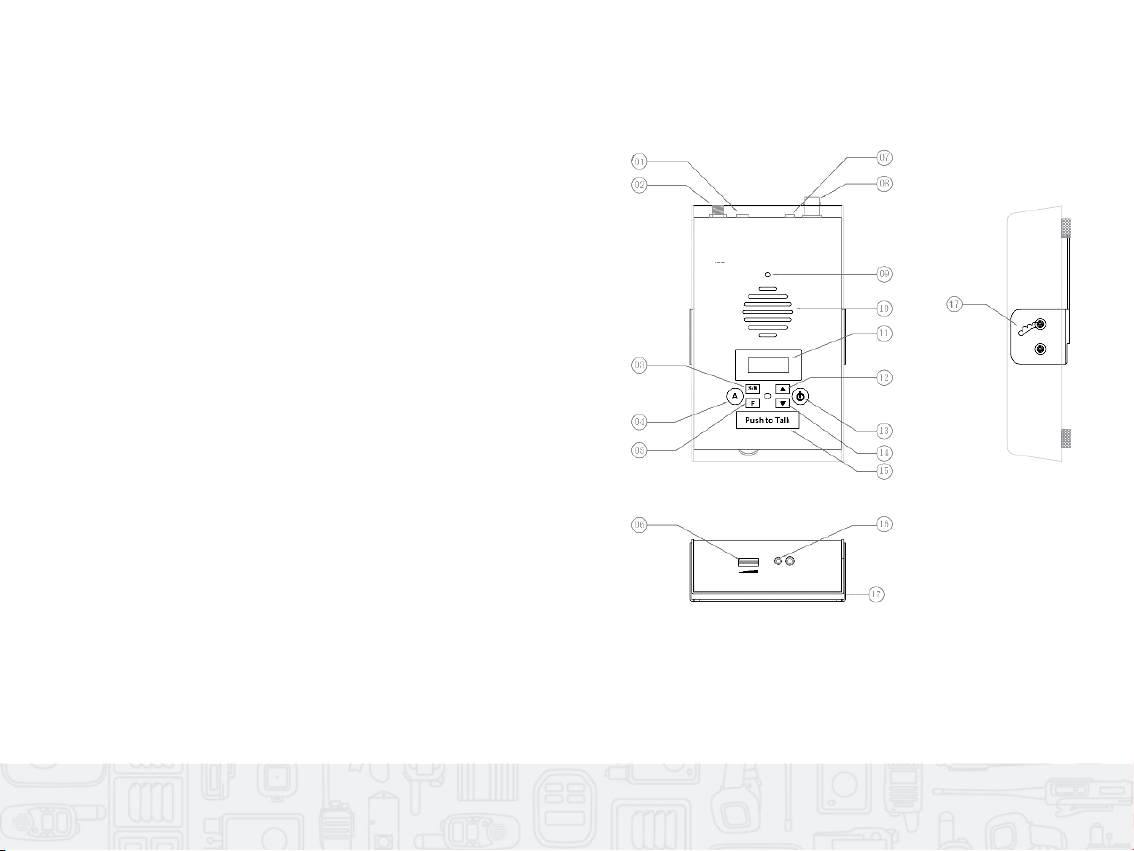
10. Speaker
11. LCD Display
12. ▲ Channel Up Key
(Select item key in local programming mode)
13. Power Switch
14. ▼ Channel Down Key
(Select item key in local programming mode)
15. PTT Key
16. Headset Jack/Programming Cable Jack
17. Bracket with Adjustable Angle
NOTE: The A, S/M, and F keys can be programmed
for a variety of functions. See “Local Programming
Mode” menu list later in this manual. Please contact
your dealer for further details on these functions.
11
ACQUAINTED
M Programmable Function Key.
(Default: Menu @ Long Press, Scan
A, Programmable Function Key
(Default: Key Lock @ Long press,
None @ Short press, Exit current
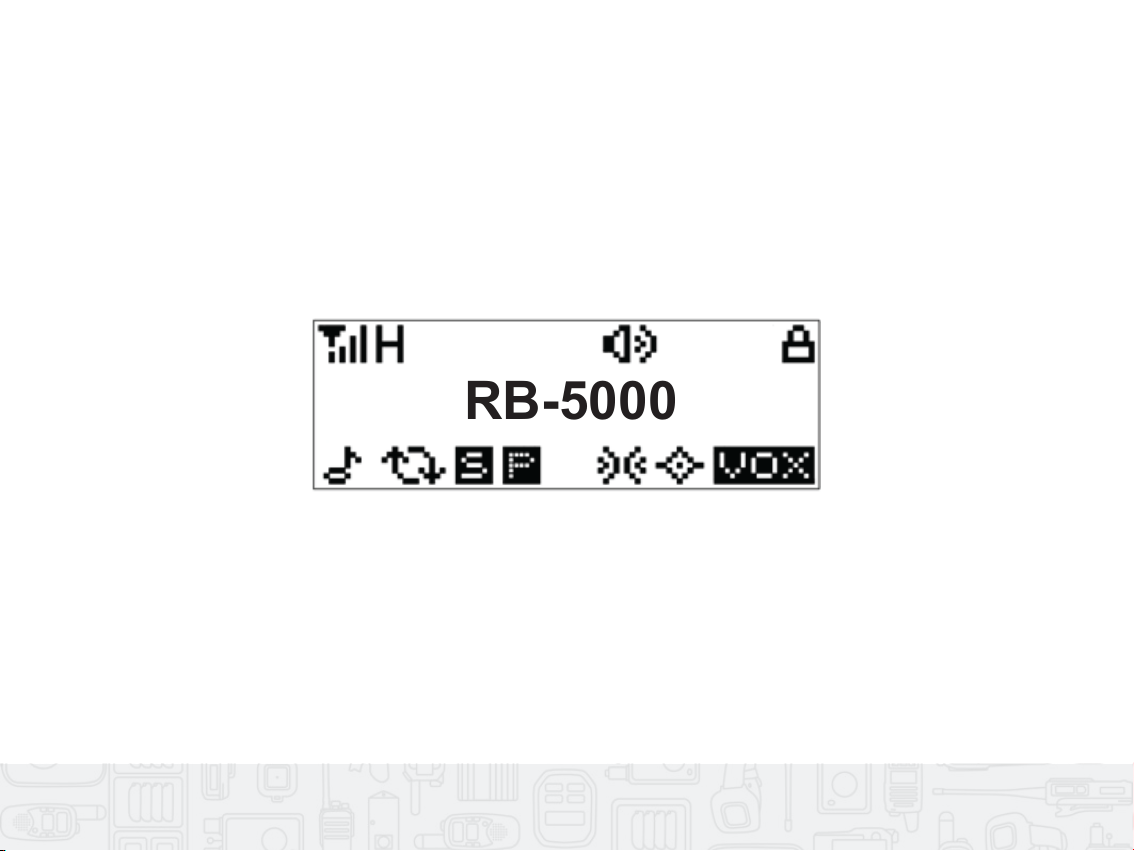
LCD Displays and Symbols
RB-5000
12
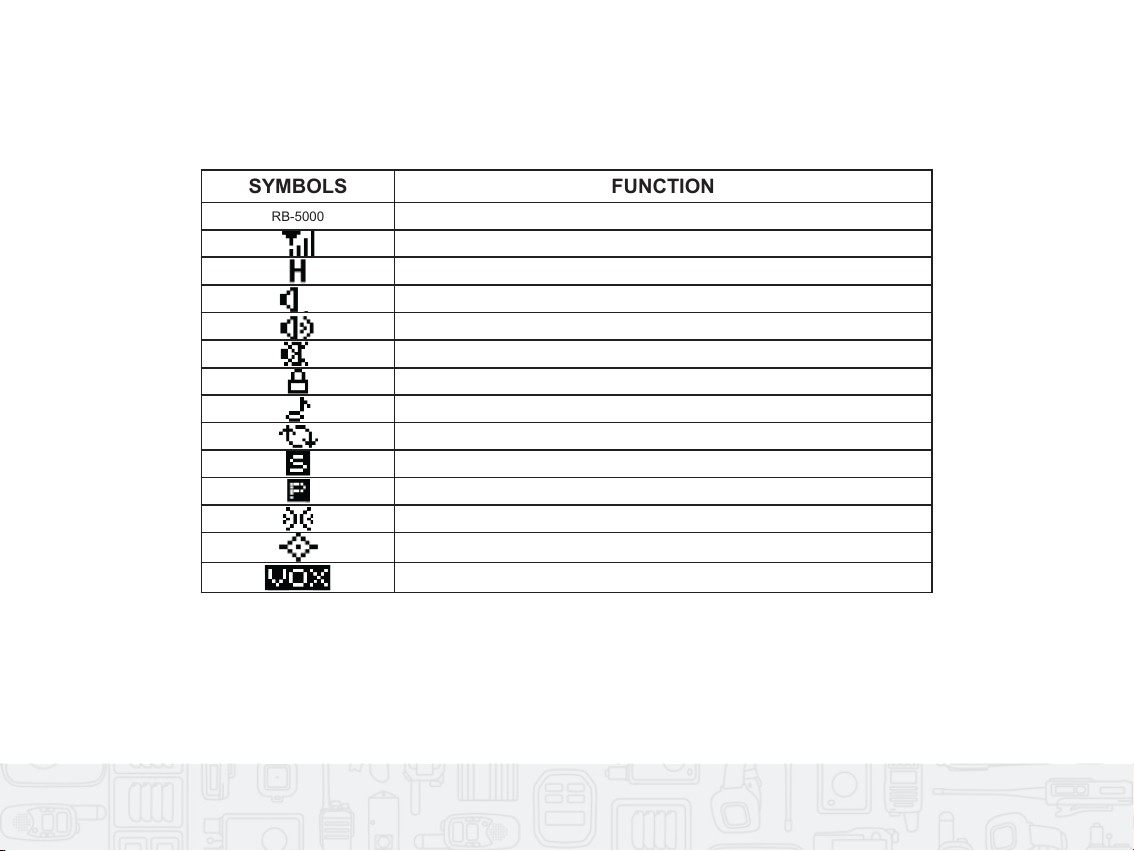
SYMBOLS FUNCTION
RB-5000
Power on text, it can be channel number/Channel alias/Channel frequency
Received Signal Strength Indicator
High Power: the current channel is high power (H,L)
Monitor indicator
Speaker opened
Speaker function disabled
Keypad Lock
DTMF Signaling Enable
Scan
The current channel is in scan list
The current channel is priority channel
Compander enabled
Scrambler enabled
VOX Enable
13
Power on text, it can be channel number/channel alias/channel frequency
Received signal strength indicator
High power: the current channel is high power (H,L)
Monitor indicator
Speaker opened
Speaker function disabled
Keypad lock
DTMF signaling enable
Scan
The current channel is in scan list
The current channel is priority channel
Compander enabled
Scrambler enabled
VOX enable

SAFETY AND CARE INSTRUCTIONS
• Please observe the following safety precautions when setting up and using this product.
• LCD panel - The LCD panel is made of glass, and may break if the unit is dropped or impacted.
• Heat sources - Keep the product away from heat sources such as radiators, stoves, heaters, and other
heat-generating products.
• Water and moisture - Do not use the product in or near water or in high moisture areas such as a
bathroom or outdoors when rain is present.
Safety Precautions
• To ensure you receive the maximum benefit from using this product, please observe the following
guidelines.
• Cleaning - Use a damp cloth. Do not use liquid cleaning agents, benzene, thinner, or aerosols.
• Repair - Do not attempt to repair the product or modify the circuitry by yourself. Only replacement
parts that are recommended by Advanced Wireless Communications (AWC) should be used. You
can contact AWC at 1-800-475-5852.
• Do not scratch hard objects against the LCD display as this may cause damage.
Caring For This Product
14

• Only replace power adapter with the same or equivalent type recommended by the manufacturer.
• Do not dispose this product as unsorted municipal waste. Collection of such waste separately for
special treatment is necessary.
• To reduce the risk of electric shock, do not expose equipment to rain or moisture.
Caution
15

GETTING STARTED
• Press key to turn the radio on, and press again to turn the radio o. When you turn the radio on,
the radio will chirp and if enabled, speak the channel number. The display briefly shows the power on
message and radio firmware version number.
Turn the Unit ON / OFF
• Rotate clockwise the volume adjustment knob to decrease the volume, and counterclockwise to
increase the volume.
Adjusting the Volume
To select between channels (maximum 16):
• Press to increase channel number.
• Press to decrease channel number.
Select a Channel
TURN THE UNIT ON
Press to increase channel numbe
Press to decrease channel number
16

TRANSMITTING AND RECEIVING
For best transmission, speak about 12 inches away from the radio and leave a short pause before speaking
once you have pressed the PTT button.
The transmitting and receiving radios must be on the same channel using the same CTCSS code or DCS
code in order for you to communicate with another party.
Talk to Another Radio
1. Press and hold “A” (this button is set to the “Monitor” function) to check for channel activity.
Do not transmit if someone is speaking on the channel.
2. Press and hold PTT button and speak into the microphone to transmit.
3. Release the PTT button once you have finished speaking to allow other radios to respond. The radio
will automatically hear received transmissions.
NOTE: The transmit LED located above the speaker is red when transmitting and is green when receiving.
17

Signal Strength and Channel Busy Indicators:
When there is activity on a frequency, the radio LCD displays and the green LED lights stead.
When there is activity on the same frequency and code as your radio (your radio is receiving), the radio
displays and a signal strength from 1 (weakest) to 4 (strongest). This can help determine when a radio
is moving out of range.
NOTE: Obstacles that block the signal path may aect the strength of the incoming signal.
Keypad Lock
To avoid accidentally changing the channel and the unit’s preferred settings, you can lock the keypad.
To Lock or Unlock the Keypad:
Press and hold the F button for 2 seconds. appears on the LCD when the keypad is locked.
NOTE:
1. The “F” button long press is programmed for key lock (default).
2. While key lock is “on” you can still use the PTT button.
button for 2.0 seconds. A
18
VOX Operation
The Voice Activated Transmission (VOX) function allows your voice to activate transmission automatically
when the transceiver is used with an optional hands-free microphone/headset. If the unit is set to VOX
sensitivity 1, 2, ... 6, it will automatically detect and transmit your voice through to the selected channel.
NOTE: The VOX level and transmission delay time should be set according to your voice loudness and
personal preference.
To Set Up a VOX Headset:
1. Turn the radio o.
2. Plug the headset into the accessory jack.
3. Turn the radio back on again. The radio displays .
4. Lower the radio volume BEFORE placing the headset in or near your ear.
5. To transmit, speak into the accessory microphone. To receive, stop talking.
NOTE: This product is compatible with Motorola headsets. Please ask your local Account Manager for
further information. Pressing the PTT button disables VOX.
19

Monitoring a Channel
Monitoring allows you to check for activity on a channel. The AWR-RB5000 has three monitor modes.
You can choose a mode according to your preference, in local programmable mode (if enabled).
• Squelch O (Default): In this mode, the speaker is unmuted in any condition so as to receive any
sound on the current channel. When audio signal is received on the channel, audio will be heard.
Otherwise, background noise will be heard. Operation: Press and hold the “Monitor” (Default A) key
to enter this mode, and release the key to exit.
• Monitor Toggle: In this mode, the receiving party can receive incoming calls from the transmitting
party regardless of CTCSS/CDCSS condition. If the channel frequency is not the same, the receiving
party will not receive any incoming calls. Operation: Press the “Monitor” key to enter this mode, and
press it again to exit.
• Monitor Momentary: Refer to “Monitor” toggle. Operation: Hold down the programmed monitor
key continuously to enter this mode, and release the key to exit.
20
Scanning
You can scan up to 16 channels and frequencies. When the radio detects activity, it stops scanning
and locks in on the active channel. If programmed for talk-back, you can talk and listen to the person
transmitting without changing channels.
NOTE: The icon will appear on the display when the current channel is added to the scan list.
The icon will appear on the display when the current channel is a priority channel.
To Set Up a VOX Headset:
1. To start scanning, press the key programmed as “Scan” (S/M default). The scan icon
displays and the radio begins to scan the channels. When the radio detects activity, it stops on
that channel and displays and the channel number.
2. To talk to the person transmitting without switching channels, press the PTT button before scan
resumes. If no transmission occurs, scanning resumes.
Note: These timers can be changed by the programming software.
3. To stop scanning, press the “Scan” key. If you press PTT while the radio is scanning, the radio
transmits on the channel you were on before you activated scan.
21
Skipping and Removing Channels While Scanning:
Scan has two temporary features to make it easier to use.
• Scan Advance - If the radio stops scanning on a channel you do not want to listen to, press to
resume scanning for the next active channel.
• Nuisance Delete - If the radio stops scanning on a channel you do not want to listen to, press to
resume scanning for the next active channel.
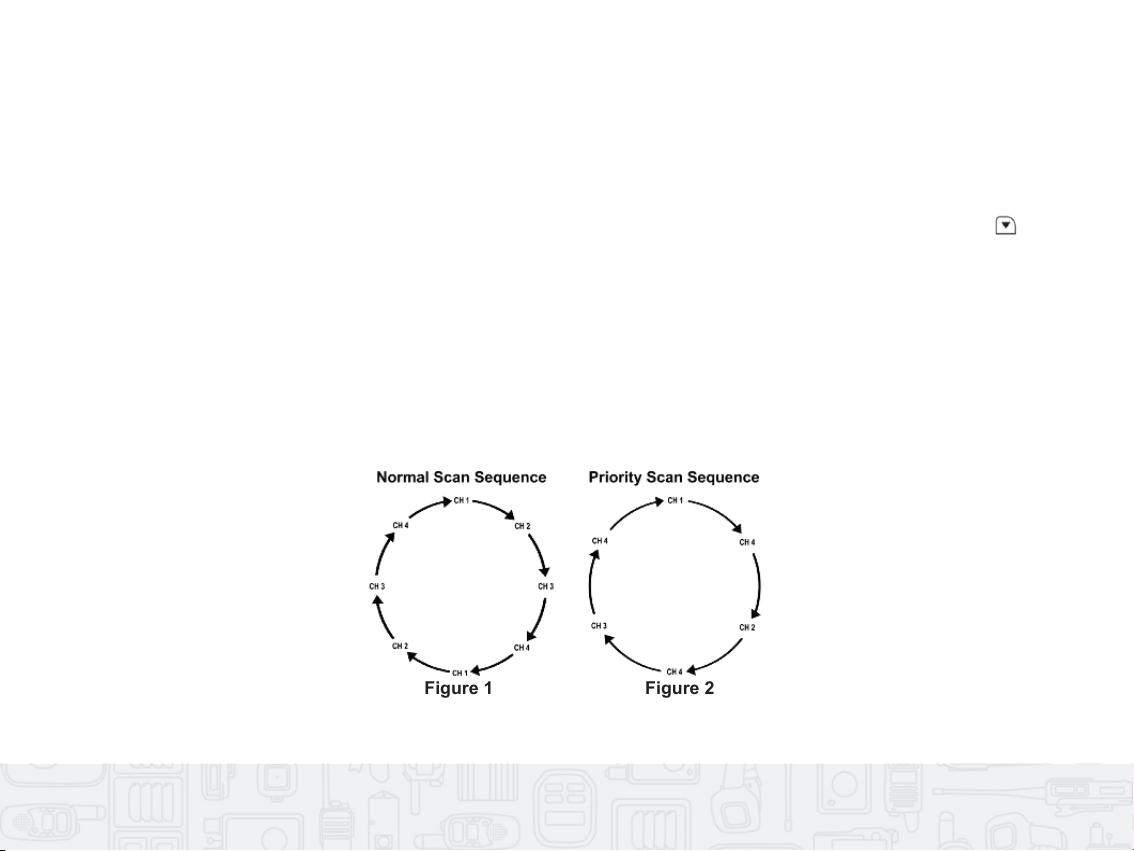
Without Priority Channel:
Providing that there is a scan list with 4 channels and all channels are non-prioritized, the normal scan
operation would proceed in the following sequence, as shown in Figure 1.
Figure 1 Figure 2
22
If the radio stops scanning on a channel you do not want to listen to, press to resume

With Priority Channel:
If you prioritize Channel 4 as priority, the scan operation would proceed in the following sequence, as
shown in Figure 2.
This function enables users to scan the most frequently used channel so that messages will not be missed.
The priority channel is programmed by the dealer via programming software or by the radio’s keypad if full
radio programming is activated.
Power-on Scan:
If Power-on Scan is enabled by your dealer, the radio will automatically enter scan mode when it is turned
on. The radio is always in scan mode. Scan cannot be turned o.
NOTE: If the radios receiving on a non-priority channel, the priority channel is still scanned. The radio will
switch to the priority channel once any activity is detected.
23

WIRELESS CLONING
The AWR-RB5000 is capable of Wireless Cloning.
NOTE: It is VERY important to know the Source radio. If a Target radio’s PTT is pressed, it will overwrite
the intended Source unit.
1. When cloning a radio(s), they should be in the same area as the Source radio (radio containing the
desired configuration).
2. To put the AWR-RB5000 in clone mode, press and hold the S/M key and PTT key while turning
the radio on. “CLONE” will be displayed on the LCD.
3. To start the cloning process, press the PTT button of the Source radio.
4. The Source radio LED will light steady red. The Target radio will toggle from red to green. There
can be any number of Target radios.
5. When complete, the Source radio will display “CLONE”, the Target radio will display “OK”. If
“ERROR” is displayed on the Target radio, perform the clone process again.
6. When finished, turn the Source radio and all Target radios o, then on to use.
24
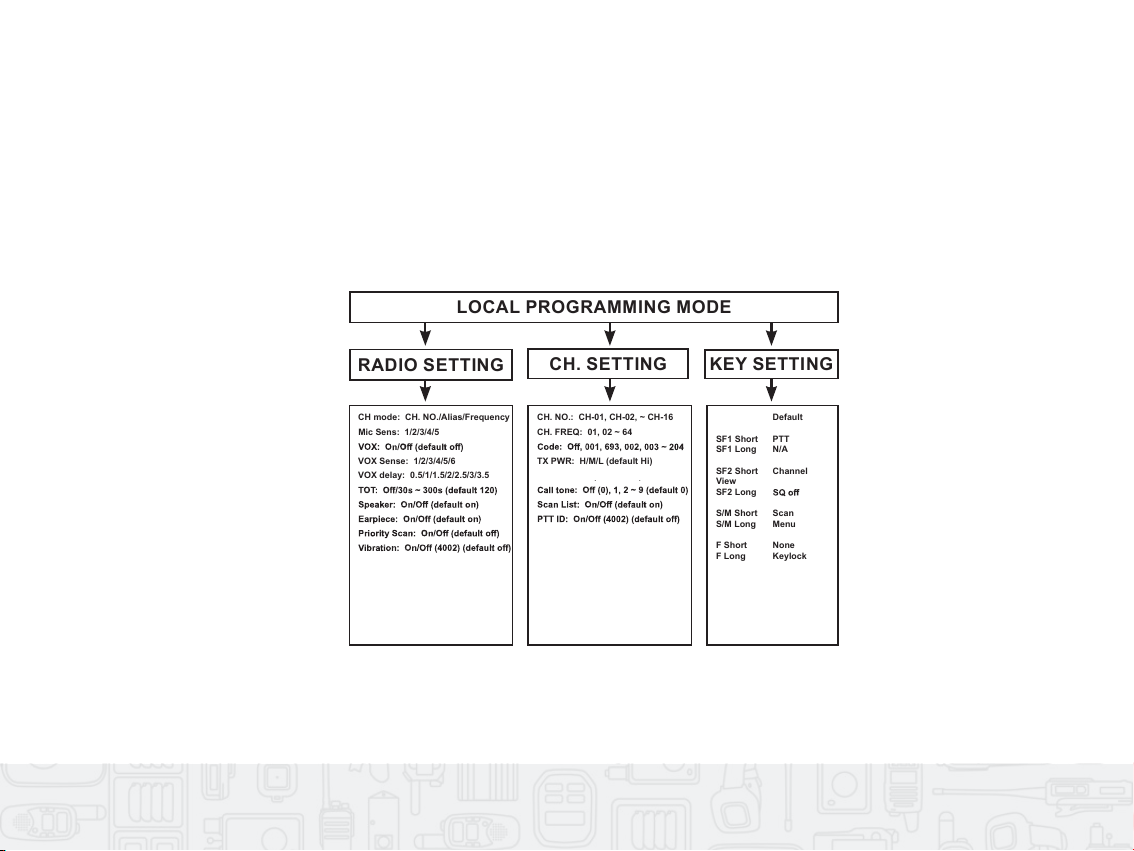
Local Programming Mode
Local programming mode allows you to configure your radio by manual operation.
NOTE: Local programming mode can be disabled by the PC programming software.
Local Programming Menu
LOCAL PROGRAMMING MODE
RADIO SETTING
KEY SETTING
CH. SETTING
CH mode: CH. NO./Alias/Frequency
Mic Sens: 1/2/3/4/5
VOX Sense: 1/2/3/4/5/6
VOX delay: 0.5/1/1.5/2/2.5/3/3.5
CH. NO.: CH-01, CH-02, ~ CH-16
CH. FREQ: 01, 02 ~ 64
TX PWR: H/M/L (default Hi)
SF1 Short
SF1 Long
SF2 Short
View
SF2 Long
S/M Short
S/M Long
F Short
F Long
Default
PTT
N/A
Channel
Scan
Menu
None
Keylock
TX PWR: H/L (default Hi)
BAT saver: On/O (default on)
Key tone: On/O (default on)
Roger Tone: On/O (default o)
PTT Tone: On/O (default o)
Backlight: On/O (default on)
Voice: O/English/Chinese
Compander: On/O (default on)
Scrambler: On/O (default o)
25
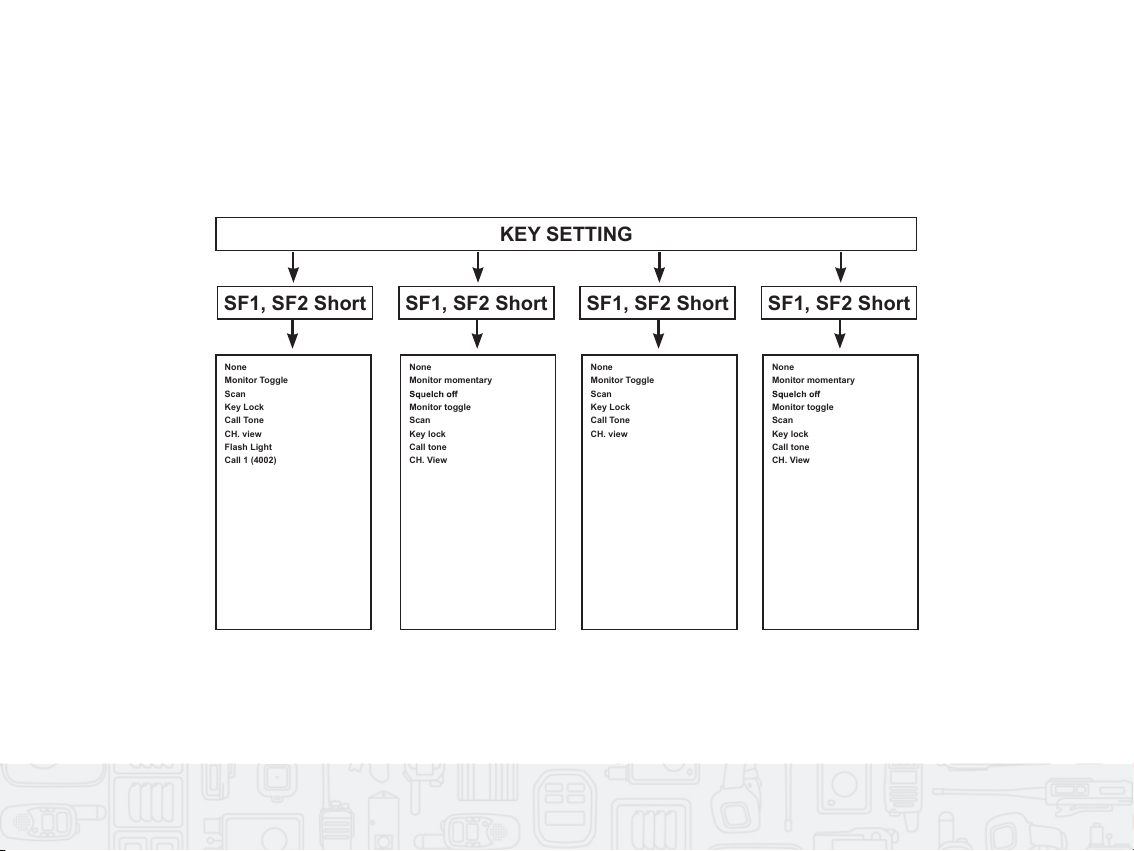
Key Setting Menu
KEY SETTING
SF1, SF2 Short
None
Monitor Toggle
Scan
Key Lock
Call Tone
CH. view
Flash Light
Call 1 (4002)
Call 2 (4002)
Menu
PTT
None
Monitor momentary
Monitor toggle
Scan
Key lock
Call tone
CH. View
Flash Light
Call 1 (4002)
Call 2 (4002)
Menu
None
Monitor Toggle
Scan
Key Lock
Call Tone
CH. view
Flash Light
Call 1 (4002)
Call 2 (4002)
Menu
None
Monitor momentary
Monitor toggle
Scan
Key lock
Call tone
CH. View
Flash Light
Call 1 (4002)
Call 2 (4002)
Menu
SF1, SF2 Short SF1, SF2 Short SF1, SF2 Short
Menu
PTT
Menu
Menu
Menu
26

Entering Programming Mode
Press and hold PTT and F key while turning the radio on. The radio beeps and displays RADIO SETTING.
The radio enters radio setting programming mode.
NOTE: If you press and hold the PTT button for 3 seconds when the radio is in local programming mode,
you will exit from the programming mode.
Key Operation Definition:
When you enter the local programming mode, the key function is as below:
• ▲ Select the main menu/function.
• ▼ Select the main menu/function.
• S/M Enter sub-menu or confirm the selected value/function.
• “F” Exit the sub-menu status and return to front of the menu.
27
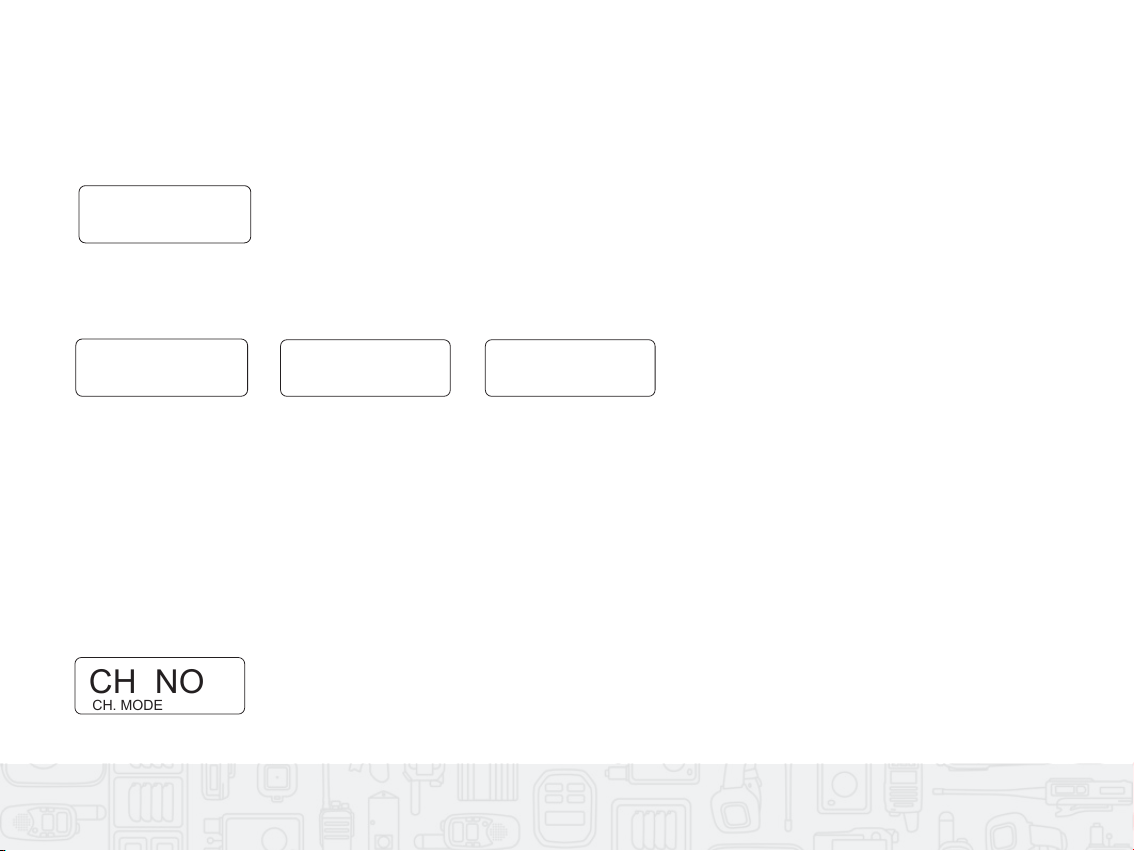
Selecting Radio Setting/ Channel Setting/ Key Setting Main Menu
1. When the radio is in “radio setting” programming mode, “RADIO SETTING” will appear on the
bottom of the screen.
▲ Select the main menu/function.
▼ Select the main menu/function.
When the radio is in "radio setting" programming mode, the "RADIO SETTING" will
RADIO SETTING
2. Press ▲ or ▼ to select the main menu that you want to program.
Press ▲ or ▼ to select the main menu that you want to program
to enter the main menu setting status
When the radio is in RADIO SETTI status, press ▲ or ▼ until displays on the
bottom of the screen. In the meantime the current display mode will appear in the middle of the
screen.
RADIO SETTING
CH. SETTING KEY SETTING
3. Press S/M to enter the main menu setting status.
Programming Channel Display Mode (Ch. Mode)
1. When the radio is in “RADIO SETTING” status, press ▲ or ▼ until “CH. MODE” displays on
the bottom of the screen. In the meantime the current display mode will appear in the middle of
the screen.
Press ▲ or ▼ to select the main menu that you want to program
to enter the main menu setting status
When the radio is in RADIO SETTI status, press ▲ or ▼ until displays on the
bottom of the screen. In the meantime the current display mode will appear in the middle of the
screen.
CH. MODE
CH NO
28
RADIO SETTING
RADIO SETTING CH. SETTING KEY SETTING
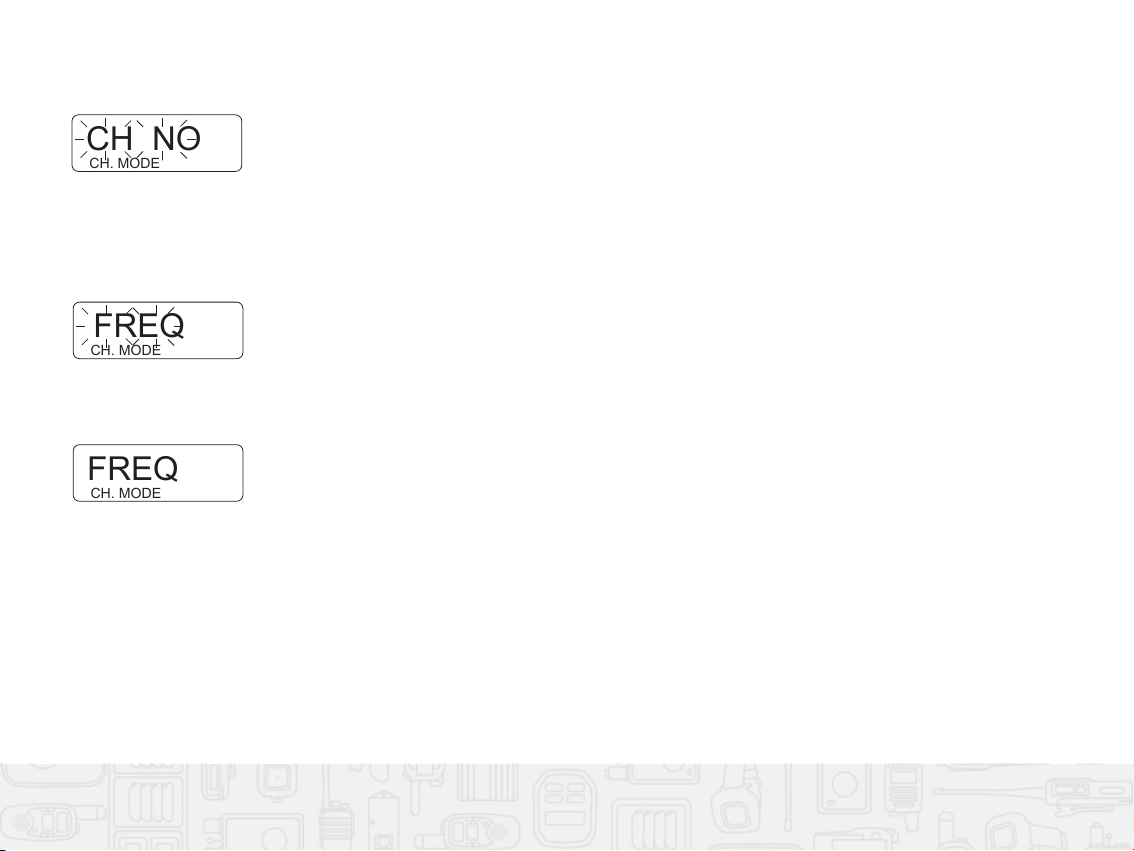
2. Press S/M and the current display mode will flash.
Press ▲ or ▼ to select the main menu that you want to program
to enter the main menu setting status
When the radio is in RADIO SETTI status, press ▲ or ▼ until displays on the
bottom of the screen. In the meantime the current display mode will appear in the middle of the
screen.
CH. MODE
CH NO
3. Press ▲ or ▼ to select the channel display mode you want to set.
NOTE: There are three modes that can be selected: Channel number (CH NO), Alias, Frequency.
Press ▲ or ▼ to select the channel display mode you want to set.
: there are three modes that can be selected: Channel number (CH NO), Alias,
Frequency.
to ender CH MODE.
Press ▲ or ▼ to set another function, or Press F to exit CH MODE status, or Press and hold
to exit Local programming mode.
o set MIC Sensitivity, VOX delay, O , Speake , Priority Scan, Key tone, PT tone,
Roge , Backlight, Channel Voice, the process is similar with channel display mode.
When the radio is in CH SETTIN status, Press ▲ or ▼ until the “CH NO” appears in the
CH. MODE
FREQ
4. Press S/M to enter CH MODE.
Press ▲ or ▼ to select the channel display mode you want to set.
: there are three modes that can be selected: Channel number (CH NO), Alias,
Frequency.
to ender CH MODE.
Press ▲ or ▼ to set another function, or Press F to exit CH MODE status, or Press and hold
to exit Local programming mode.
o set MIC Sensitivity, VOX delay, O , Speake , Priority Scan, Key tone, PT tone,
Roge , Backlight, Channel Voice, the process is similar with channel display mode.
When the radio is in CH SETTIN status, Press ▲ or ▼ until the “CH NO” appears in the
CH. MODE
FREQ
5. Press ▲ or ▼ to set another function, or press F to exit CH MODE status, or press and hold PTT
to exit local programming mode.
NOTE: To set MIC Sensitivity, VOX Delay, TOT, Speaker, Priority Scan, Key Tone, PTT Tone, Roger,
Backlight, Channel Voice, the process is similar with channel display mode.
29
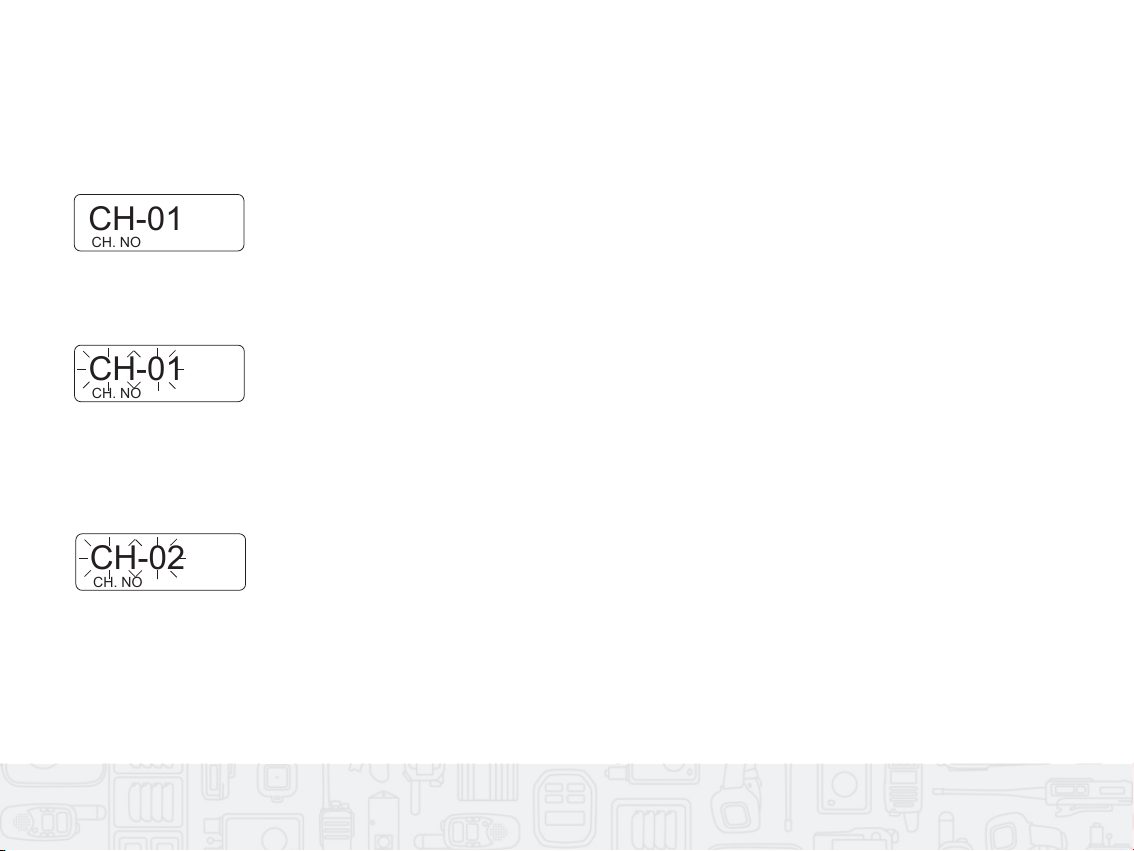
Programming Channel Parameters
1. When the radio is in CH. SETTING status, press ▲ or ▼ until the “CH NO.” appears in the bottom
of the screen. (This is the first setting item after you enter channel programming mode).
Press ▲ or ▼ to select the channel display mode you want to set.
: there are three modes that can be selected: Channel number (CH NO), Alias,
Frequency.
to ender CH MODE.
Press ▲ or ▼ to set another function, or Press F to exit CH MODE status, or Press and hold
to exit Local programming mode.
o set MIC Sensitivity, VOX delay, O , Speake , Priority Scan, Key tone, PT tone,
Roge , Backlight, Channel Voice, the process is similar with channel display mode.
When the radio is in CH SETTIN status, Press ▲ or ▼ until the “CH NO” appears in the
CH. NO
CH-01
2. Press S/M and the “CH-01” will flash.
Press ▲ or ▼ to select a channel numbe
there are 16 channels that can be selected.
Press ▲ or ▼ to set another function, or Press to exit channel setting menu, or Press and
hold PTT to exit Local programming mode.
CH. NO
CH-01
3. Press ▲ or ▼ to select a channel number.
Press ▲ or ▼ to select a channel numbe
there are 16 channels that can be selected.
Press ▲ or ▼ to set another function, or Press to exit channel setting menu, or Press and
hold PTT to exit Local programming mode.
CH. NO
CH-02
NOTE: There are 16 channels that can be selected.
30
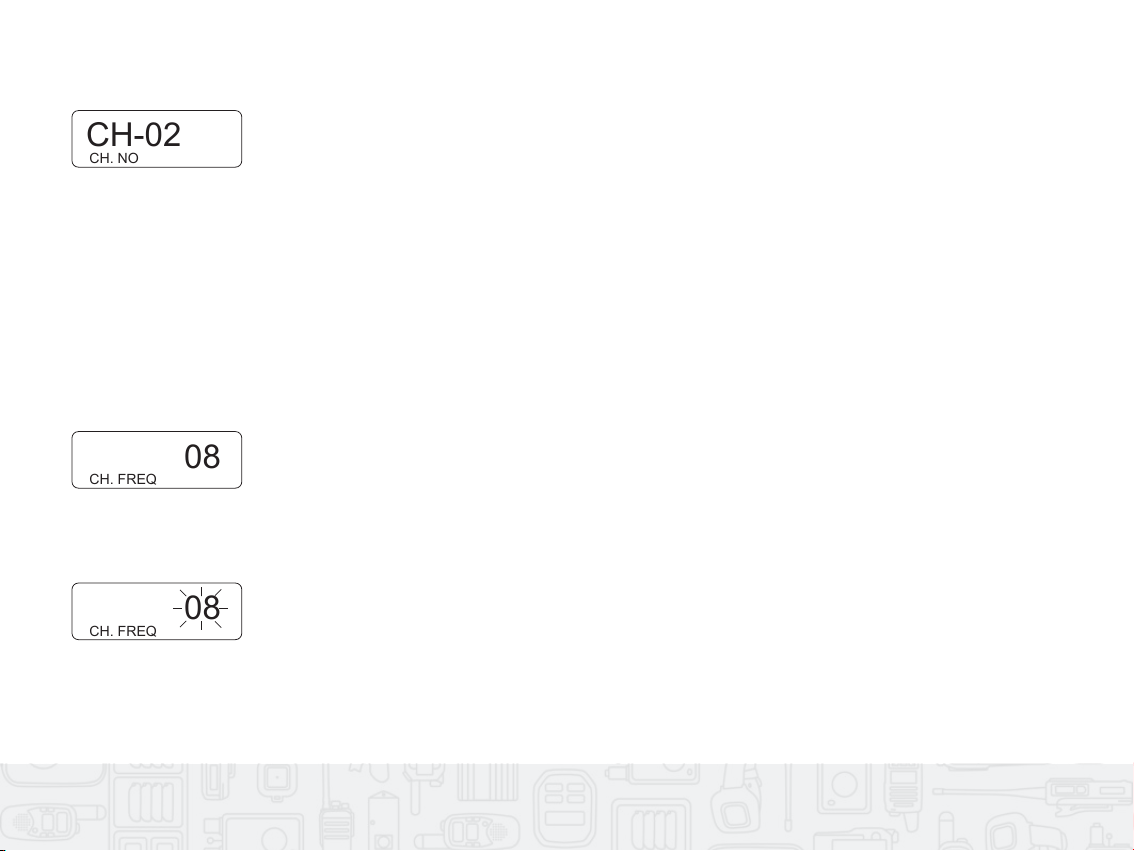
4. Press S/M to confirm the selecting channel.
Press ▲ or ▼ to select a channel numbe
there are 16 channels that can be selected.
Press ▲ or ▼ to set another function, or Press to exit channel setting menu, or Press and
hold PTT to exit Local programming mode.
CH. NO
CH-02
5. Press ▲ or ▼ to set another function, or press F to exit channel setting menu, or press and hold PTT
to exit local programming mode.
Programming the Channel Frequency
1. When the radio is in channel setting status, press ▲ or ▼ until the “CH. FREQ” appears on the
bottom of the screen.
When the radio is in channel setting status, press ▲ or ▼ until the
S/M
Press ▲ or ▼to select the frequenc
See page 36-37 for information on frequencies for communicating with other business
There are 64 available frequencies.
CH. FREQ
08
2. Press S/M and the “08” will flash.
When the radio is in channel setting status, press ▲ or ▼ until the
Press ▲ or ▼to select the frequenc
See page 36-37 for information on frequencies for communicating with other business
There are 64 available frequencies.
CH. FREQ
08
31
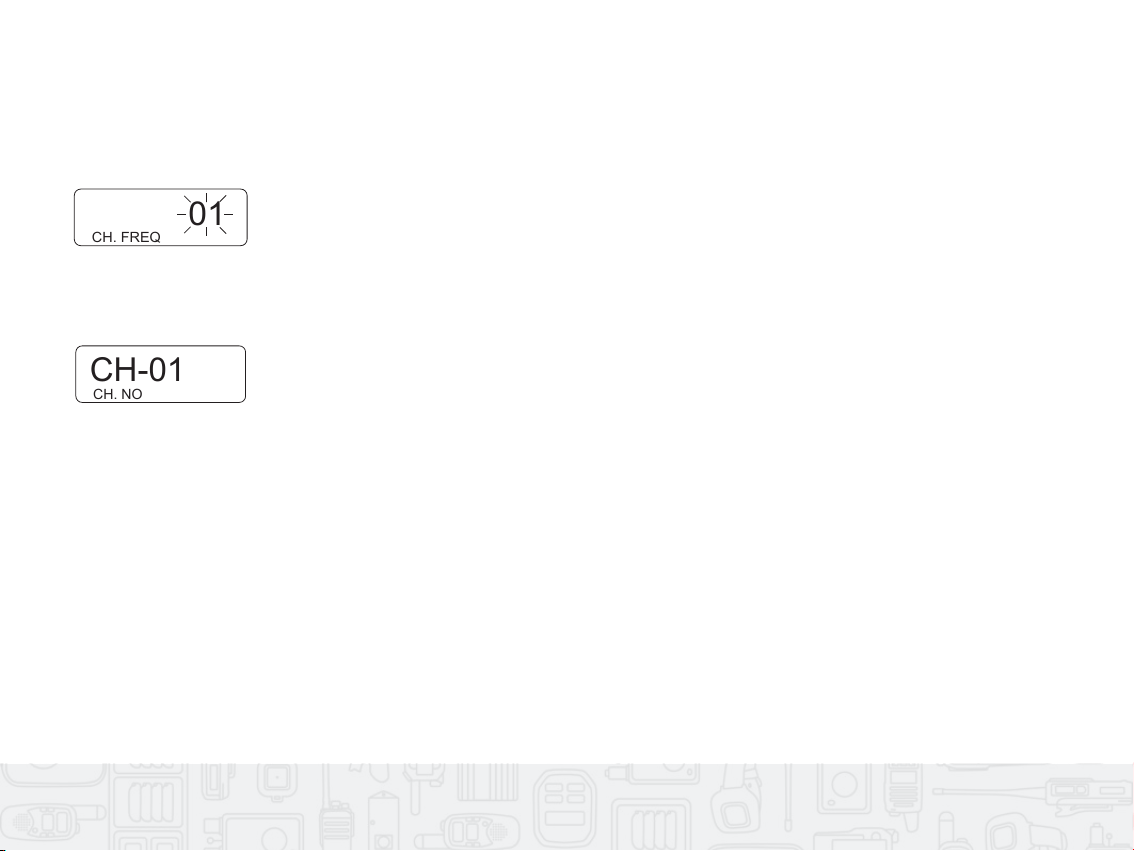
3. Press ▲ or ▼to select the frequency.
When the radio is in channel setting status, press ▲ or ▼ until the
Press ▲ or ▼to select the frequenc
See page 36-37 for information on frequencies for communicating with other business
There are 64 available frequencies.
CH. FREQ
01
NOTE: See page 36-37 for information on frequencies for communicating with other business radios.
There are 64 available frequencies.
4. Press S/M to confirm the selected frequency.
. Press ▲ or ▼ to set another function, or Press to exit channel setting status, or Press and
hold PTT to exit Local programming mode.
For Code, TX PWR (transmit power), BCL, Call Tone, Scan List, Compande ,
Scrambler setting, the process is similar with programming frequenc .
for the Code list see page 36-44.
When the radio is in key setting programming status, press ▲ or ▼until the SF1 short appears
on the bottom of the screen.
when SF1 function is set to none, will appear on the screen.
Press S/M to set SF1 key short press function. The
CH. NO
CH-01
5. Press ▲ or ▼ to set another function, or press F to exit channel setting status, or press and
hold PTT to exit local programming mode.
NOTE: For codes, TX PWR (transmit power), BCL, Call Tone, Scan List, Compander, and Scrambler
Settings, the process is similar with programming frequency. For the code list see pages 36-44.
32
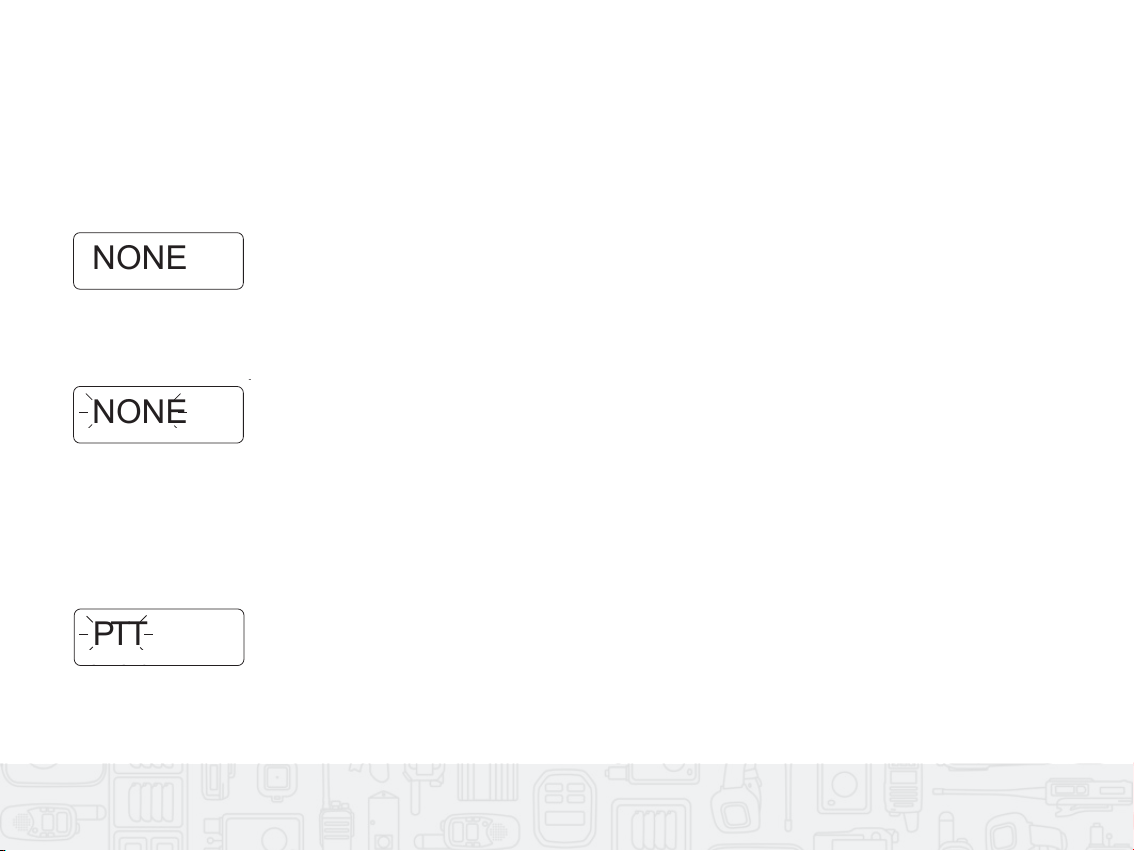
Programming SF1 (Push to Talk) Key Short Press Function
1. When the radio is in key setting programming status, press ▲or ▼until the SF1 short appears on the
bottom of the screen.
Press ▲ or ▼ to set another function, or Press to exit channel setting status, or Press and
hold PTT to exit Local programming mode.
For Code, TX PWR (transmit power), BCL, Call Tone, Scan List, Compande ,
Scrambler setting, the process is similar with programming frequenc .
for the Code list see page 36-44.
When the radio is in key setting programming status, press ▲ or ▼until the SF1 short appears
on the bottom of the screen.
when SF1 function is set to none, will appear on the screen.
Press S/M to set SF1 key short press function. The
SF1 SHORT
NONE
NOTE: When SF1 function is set to none, “NONE” will appear on the screen.
2. Press S/M to set SF1 key short press function. The “NONE” flashes.
Press ▲ or ▼ to set another function, or Press to exit channel setting status, or Press and
hold PTT to exit Local programming mode.
For Code, TX PWR (transmit power), BCL, Call Tone, Scan List, Compande ,
Scrambler setting, the process is similar with programming frequenc .
for the Code list see page 36-44.
When the radio is in key setting programming status, press ▲ or ▼until the SF1 short appears
on the bottom of the screen.
when SF1 function is set to none, will appear on the screen.
. Press S/M to set SF1 key short press function. The
SF1 SHORT
NONE
3. Press ▲or ▼to select the key function.
NOTE: When you set SF1 short press as a PTT function, the SF1 long press will not be set to another
function.
Press ▲ or ▼ to select the key function.
When you set SF1 short press a PTT function, then SF1 long press will not be set to
another function.
Press ▲ or ▼ to set another function or Press to exit status, or Press and
hold PTT to exit Local programming mode.
FOR SF1 long, short, long, short, long, short and long key setting,
the process is similar to SF1 short.
SF1 SHORT
PTT
33
SF1 SHORT
SF1 SHORT
SF1 SHORT
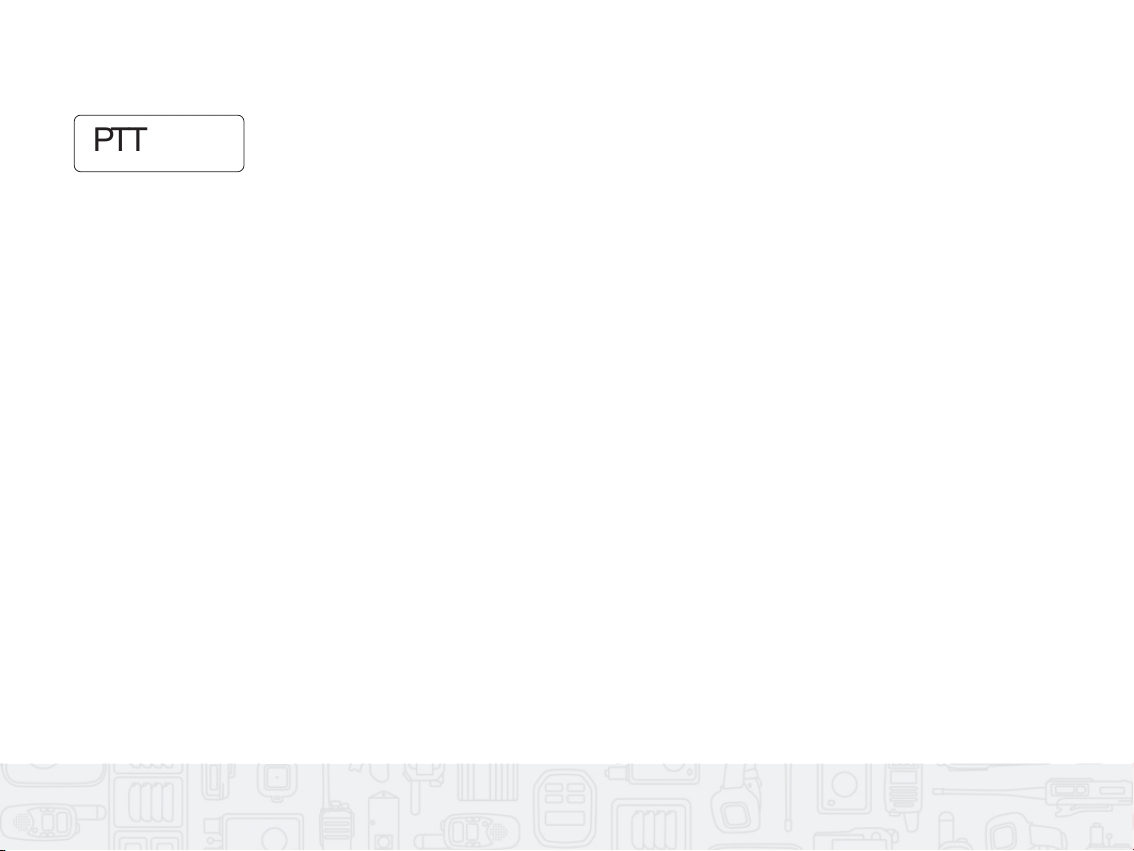
4. Press S/M to confirm the key function.
Press ▲ or ▼ to select the key function.
When you set SF1 short press a PTT function, then SF1 long press will not be set to
another function.
Press ▲ or ▼ to set another function or Press to exit status, or Press and
hold PTT to exit Local programming mode.
FOR SF1 long, short, long, short, long, short and long key setting,
the process is similar to SF1 short.
SF1 SHORT
PTT
5. Press ▲or ▼to set another function or press “F” to exit ‘KEY SETTING’ status, or press and hold PTT
to exit local programming mode.
NOTE: For SF1 long, A short, A long, S/M short, S/M long, F short, and F long key settings, the process
is similar to SF1 short.
34
SF1 SHORT

ADVANCED FEATURES
When the BCL feature is enabled, you are prevented from transmitting on a channel that is already in
use by fellow radio users. Press the PTT on a channel that is already in use by fellow radio users, the radio
will sound an alert tone and return to the receive mode.
Busy Channel Lockout (BCL)
The Time-Out-Timer (TOT) is used to prevent someone from using the same channel for a long time and
to prevent the radio from damage due to continuous transmission. If the transmission exceeds the preset
time, transmission will be inhibited, and a beep tone will sound. To stop the beep tone, release the PTT
key. Press the PTT key again to resume transmitting.
Time-Out-Timer (TOT)
If enabled, transmit audio will not be heard clearly unless the receiving radio also has scramble enabled.
Scrambler
Companding is a feature that allows improved voice quality in weak signal areas. It compresses your voice
at transmission and expands it when receiving while simultaneously reducing static noise. However, to
enjoy this benefit, all transmitting and receiving radios must have this feature activated.
Compander
35

LIMITED MENU FEATURE
The AWR-RB5000 has a limited menu feature. If enabled, this feature allows the user to access
commonly altered settings.
Default S/M Long Press
These settings include:
• Battery Save - On/O
• PTT Tone - On/O
• TX Power - H/M/L
• Scan List - On/O
• Power on Scan Channel Selection (if enabled by programming software)
NOTE: Scan list On/O determines if the selected channel will be part of the scan list.
36
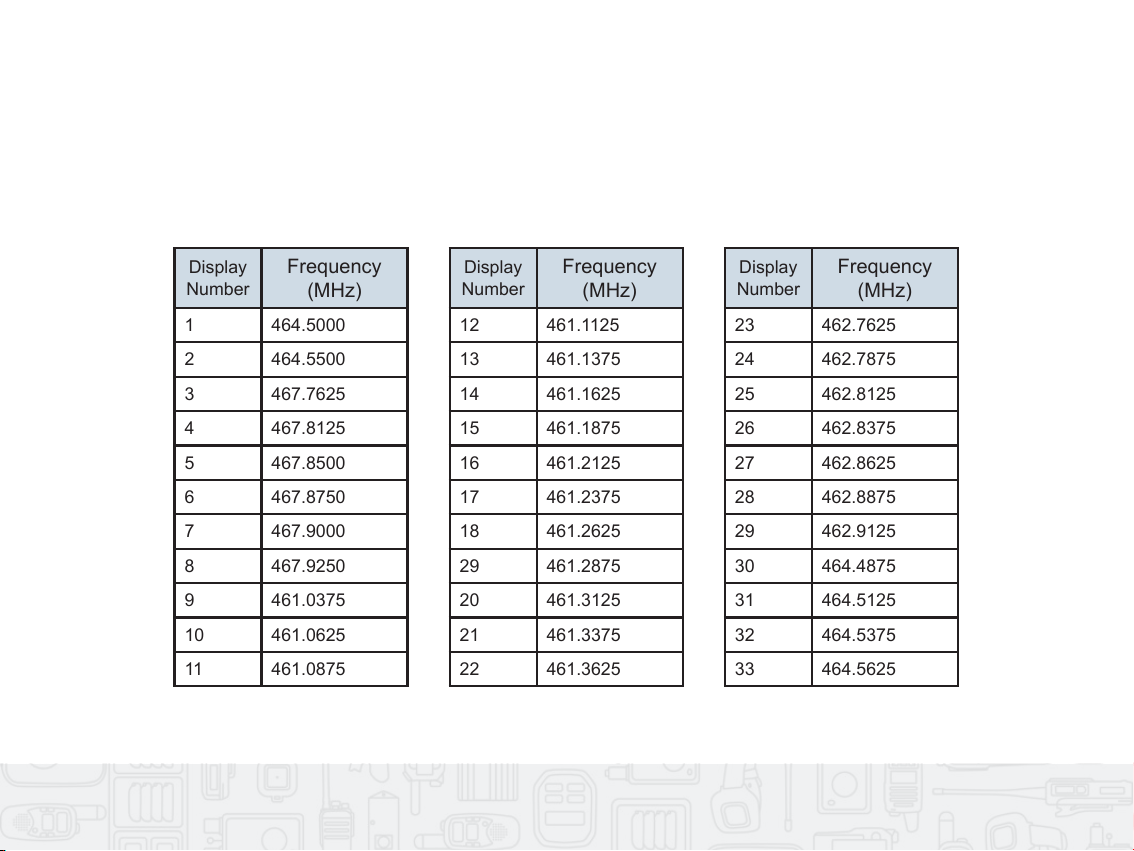
FREQUENCIES LISTS
UHF Frequency List
FREQUENCY LIST
Display
Number
Frequency
(MHz)
1 464.5000
2 464.5500
3 467.7625
4 467.8125
5 467.8500
6 467.8750
7 467.9000
8 467.9250
9 461.0375
10 461.0625
11 461.0875
Display
Number
Frequency
(MHz)
23 462.7625
24 462.7875
25 462.8125
26 462.8375
27 462.8625
28 462.8875
29 462.9125
30 464.4875
31 464.5125
32 464.5375
33 464.5625
Display
Number
Frequency
(MHz)
12 461.1125
13 461.1375
14 461.1625
15 461.1875
16 461.2125
17 461.2375
18 461.2625
29 461.2875
20 461.3125
21 461.3375
22 461.3625
37
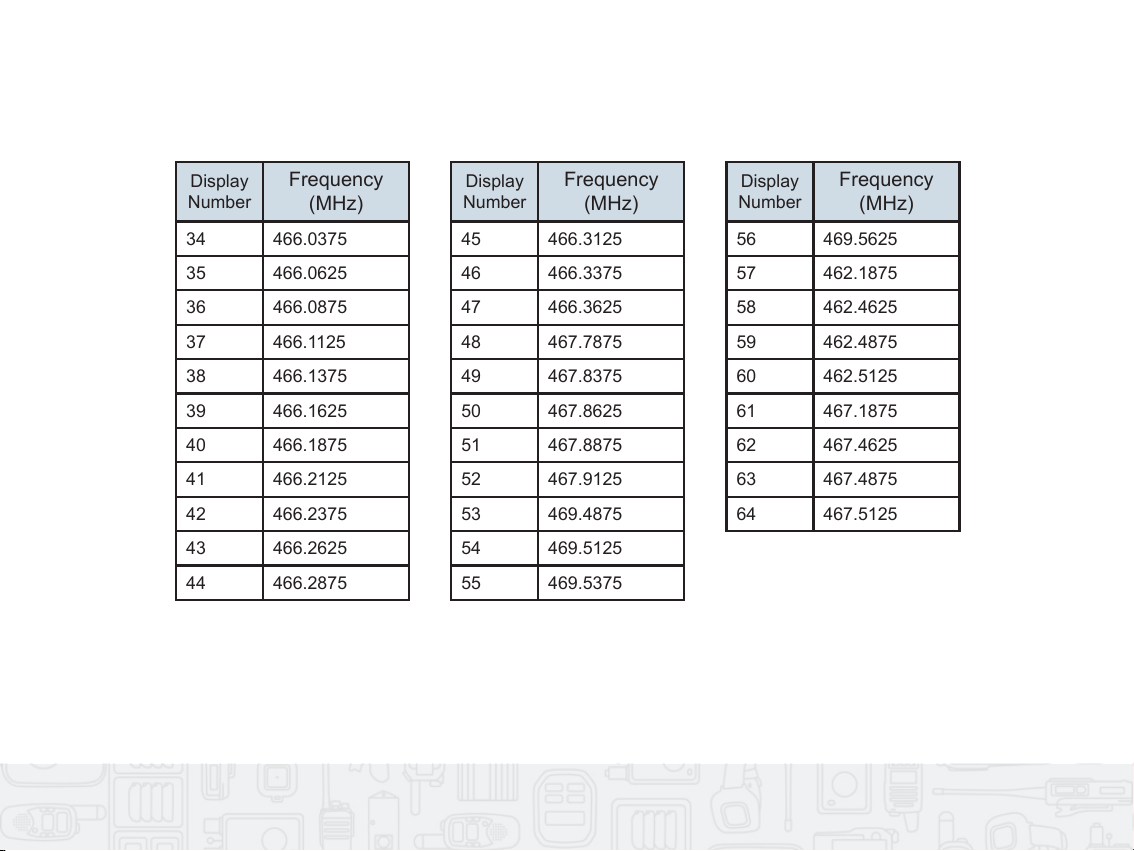
Display
Number
Frequency
(MHz)
34 466.0375
35 466.0625
36 466.0875
37 466.1125
38 466.1375
39 466.1625
40 466.1875
41 466.2125
42 466.2375
43 466.2625
44 466.2875
Display
Number
Frequency
(MHz)
56 469.5625
57 462.1875
58 462.4625
59 462.4875
60 462.5125
61 467.1875
62 467.4625
63 467.4875
64 467.5125
Display
Number
Frequency
(MHz)
45 466.3125
46 466.3375
47 466.3625
48 467.7875
49 467.8375
50 467.8625
51 467.8875
52 467.9125
53 469.4875
54 469.5125
55 469.5375
38
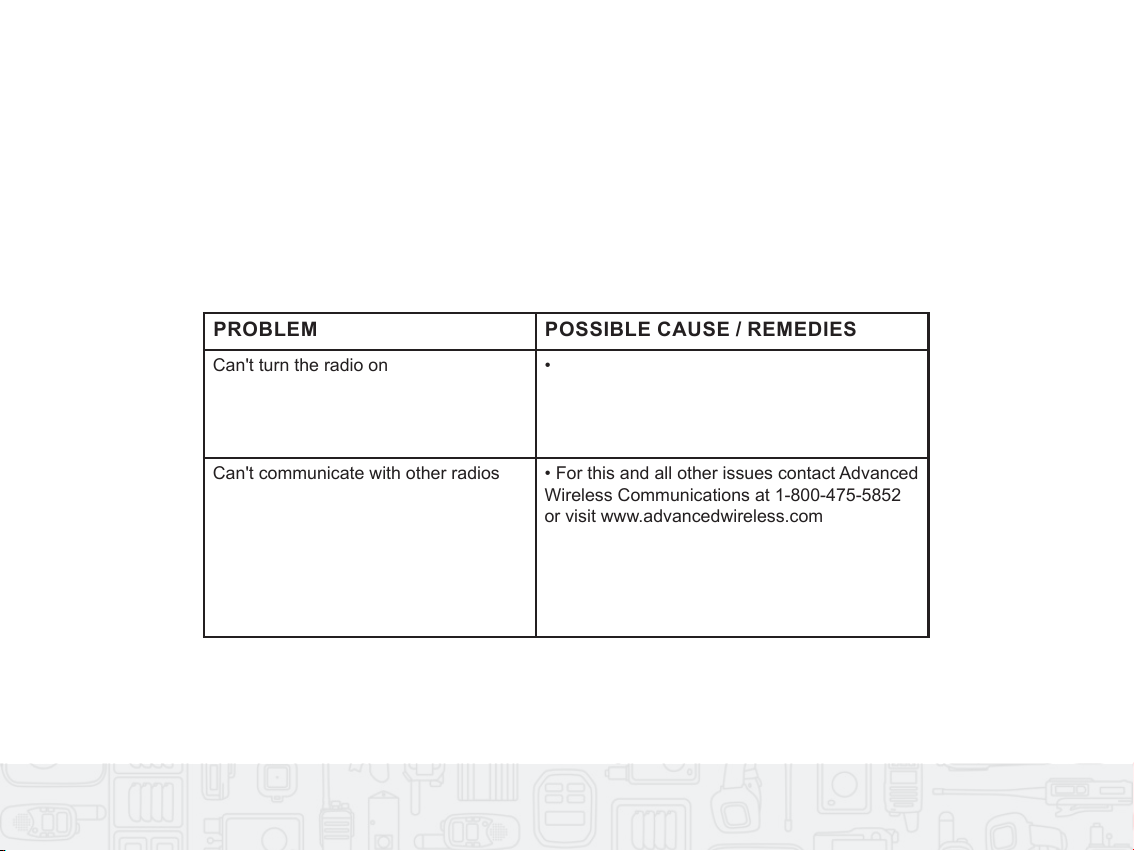
See below for some common problems and their remedies. DO NOT attempt any repairs yourself. This
will invalidate your warranty.
Troubleshooting
PROBLEM POSSIBLE CAUSE / REMEDIES
Can't turn the radio on • Check the Power Adapter is correctly installed
Can't communicate with other radios • For this and all other issues contact Advanced
Wireless Communications at 1-800-475-5852
or visit www.advancedwireless.com for more
information.
39
Check the power adapter is correctly installed
for more
information.