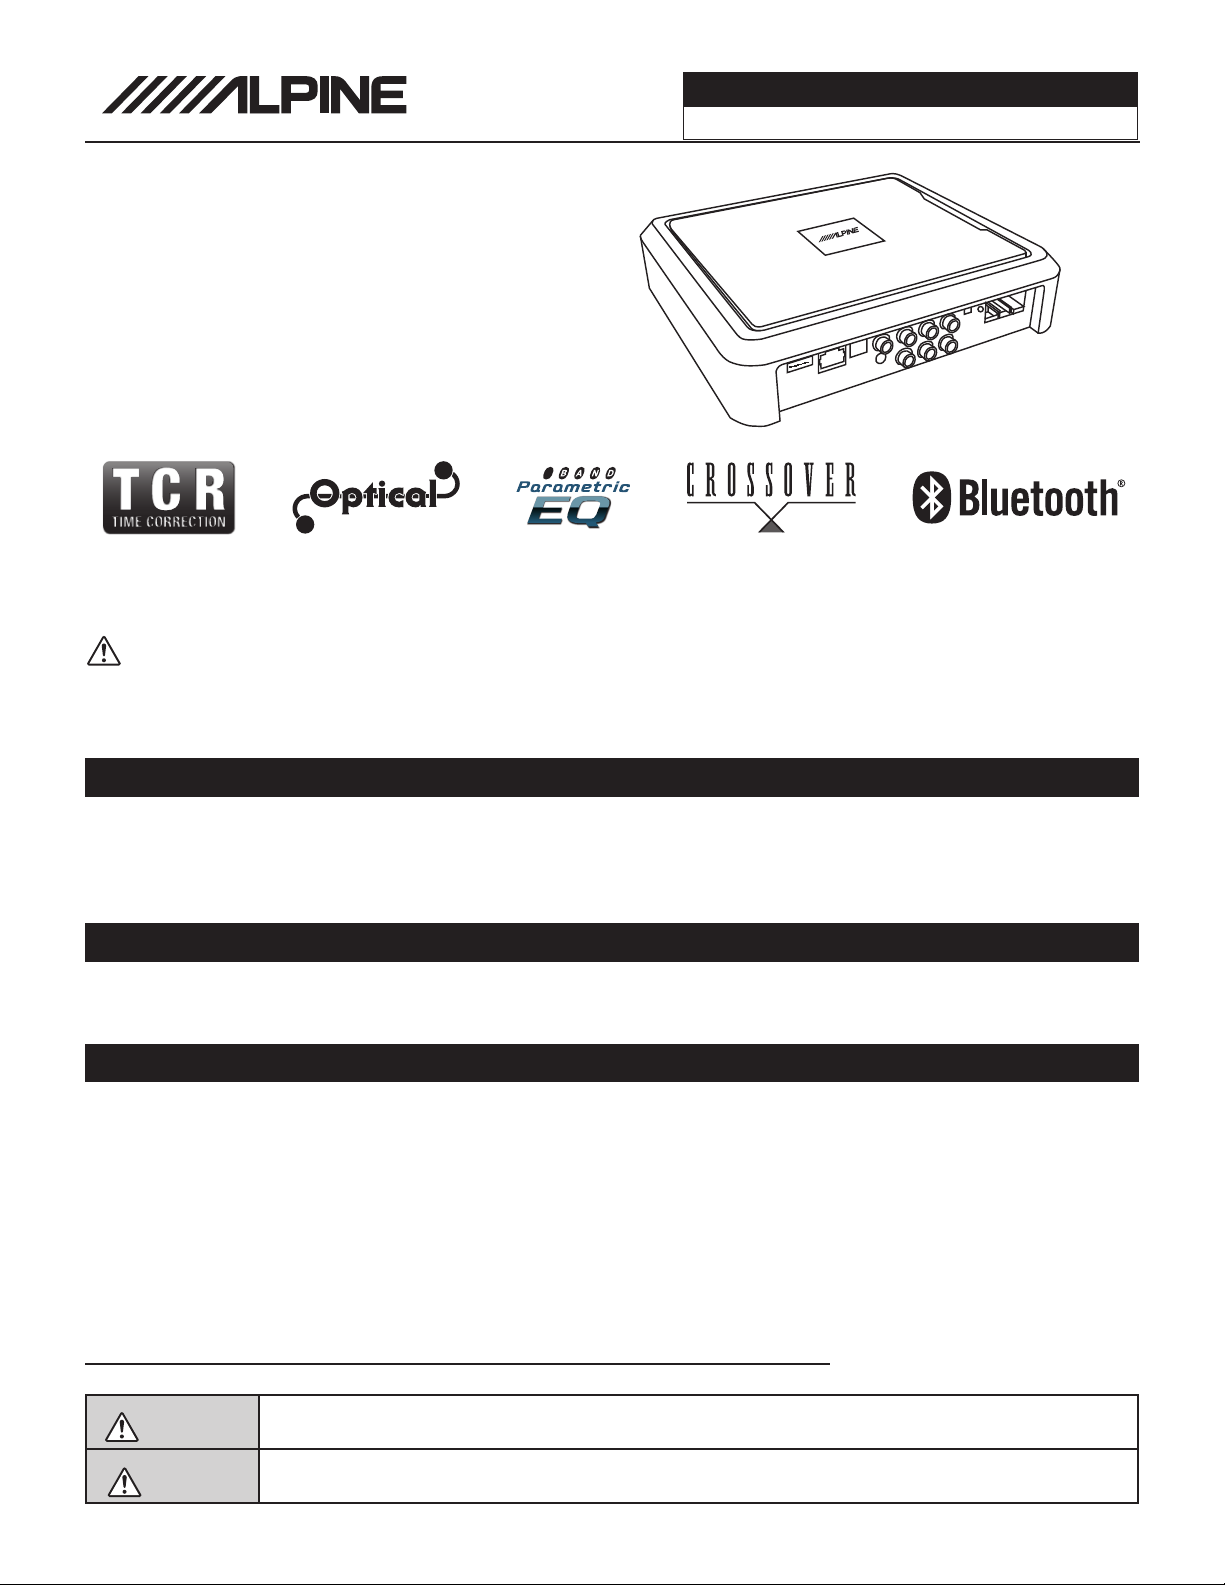
Sound Processor
PXE-0850X 20201201v1
z 1/28
PXE-0850X
Advanced Digital Wireless
Sound Processor
Installation Manual
Note
zDesign and specifications are subject to change without notice for improvement.
To Ensure Safe Use, Always Follow These Precautions
zThe installation of this product requires specialized skills and experience. We recommend that you have the
product installed by an Alpine authorized dealer.
zBefore you use this product, be sure to carefully read this installation manual and the separate user's manual
so that you can use the product correctly. Alpine Electronics bears no responsibility for problems that arise as
a result of failure to follow the instructions in the manuals.
zThis manual includes a number of symbols that are intended to help you use the product safely, to prevent
harm to you and others, and to protect against damage to property. These symbols and their meanings are
listed below. Make sure you fully understand these symbols before you begin reading the main text.
Explanations of Injury and Damage That May Result from Incorrect Use
Warning
Ignoring the content marked by this indication and using the product incorrectly is
expected to lead to death or serious injury.
Caution
Ignoring the content marked by this indication and using the product incorrectly is only
expected to lead to injury or property damage.
* The specified vehicles have been tested and have met compatibility specs at the time of testing. Compatibility is
not guaranteed if the manufacturer has made production changes to the listed vehicles above.
Warning: Before you begin wiring, remove the ground wire from the negative
terminal of the battery. Failing to do so can lead to electric shock, injury or damage
to equipment.
Introduction
zCongratulations on purchasing the PXE-0850X. This installation manual is designed to take you through the
installation of PXE-0850X. Please familiarize yourself with the owners manual and if you still have additional
questions please call 1-800-TECH-101.
31

Sound Processor
PXE-0850X 20201201v1
z 2/28
Sound Processor
PXE-0850S z 2/27
WARNING
Types Of Precautions................................................3
Tools Required
Tools Possibly Required...........................................4
Accessory List
List of Accessories...................................................4
Download the App
Downloading the App...............................................5
Pairing the Device
Pairing the Device....................................................5
Component Locations
Component Locations...............................................6
Wire Harness Pinouts
Wire Harness Pinouts...............................................7
Installation Examples
6-Channel In/6-Channel Out (With Aftermarket
Head Unit)...............................................................................8
Mixer Setup- 4-Channel In/6-Channel Out
(With OEM Head Unit).............................................................9
4-Channel In/6-Channel Out (With OEM Head
Unit)......................................................................................10
Mixer Setup- 4-Channel In/6-Channel Out
(With OEM Head Unit)...........................................................11
5-Channel In/10-Channel Out Using High
Level Out (With OEM Head Unit)...........................................12
Mixer Setup- 5-Channel In/10-Channel Out
Using High Level Out (With OEM Head Unit)........................13
4-Channel In/6-Channel Out Using High
Level Out (With OEM Head Unit)...........................................14
Mixer Setup- 4-Channel In/6-Channel Out Using
High Level Out (With OEM Head Unit)...................................15
5-Channel In/10-Channel Out Using
High Level Out (With OEM Head Unit)...................................16
Mixer Setup- 5-Channel In/10-Channel Out
Using High Level Out (With OEM Head ................................17
Mobile Phone App Instructions
Home Screen.........................................................18
EQ ........................................................................19
Mixer.......................................................................20
Delay.......................................................................21
Output.....................................................................22
PC App Overview
PC App Overview....................................................23
PC App Overview Continued...................................24
Controller Interface
Controller Interface.................................................25
Specifications
Specifications.........................................................26
Specifications Continued........................................27
Troubleshooting
Troubleshooting......................................................27
Table Of Contents

Sound Processor
PXE-0850X 20201201v1
z 3/28
Forbidden
Indicates actions that are
forbidden (must not be
performed)
Forbidden
Indicates that disassembly is
forbidden.
Mandatory
Indicates actions that are
mandatory (must be performed)
Marks content that should receive
your full attention.
Warning
Do not disassemble or modify the product.
Doing so could lead to an accident, fire, or
electric shock.
Forbidden
Store screws and other small objects where
children cannot reach them. If one of thse
small objects is swallowed, consult with a
doctor immediately.
When replacing fuses be sure to
use the fuses with the specified current
rating. Failing to do so could lead to
an accident or fire.
Forbidden
Only connect the product to a 12 VDC negative
ground car. Failing to do so could lead to an
accident or fire.
Mandatory
Before you begin wiring, remove the ground
wire from the negative terminal of the battery.
Failing to do so could lead to electric shock or
injury.
Do not cut the insulation on a cord and take
power from another device. Doing so could
lead to fire or electric shock.
Forbidden
Do not install the product in a location where
it willl obstruct the driver’s forward view;
interfere with the operation of the steering
wheel, gear shift, or the like; or pose a threat
to passengers. Doing so could lead to an ac-
cident or injury.
Forbidden
When making a hole in the vehicle body, be
careful to avoid damaging pipes, the fuel tank,
electrical wiring, and the like. This kind of
damage could lead to an accident or fire.
When installing and grounding the product, do
not use any of the bolts or nuts of the steering
wheel, brakes, fuel tank, or the like. Doing so
could make the brakes stop working or could
lead to fire.
Forbidden
Do not install athe product near the passen-
ger-side airbag. Doing so could interfere with
the operation of the airbag and lead to an
accident or injury.
Forbidden
Bundle cords so that they don’t interfere with
driving. Wrapping cords around the steer-
ing wheel, gearshift, brake pedal, or the like
could lead to an accident or damage equip-
ment.
Caution
Connect the product properly according to the
instructions. Failing to do so could lead to fire
or an accident.
Forbidden
Do not sandwich cords between the seat
railing or allow them to touch protrusions. Re-
sulting breaks or shorts could lead to electric
shock or fire.
Do not block vents or heat sinks. Doing so
could lead to fire or damage equipment.
Use the accessories according to the instruc-
tions, and attach them securely. Failing to
do so could lead to an accident or damage
equipment.
Forbidden
Do not install the product where it may be ex-
posed to water or in a place with high levels
of humidity or dust. Doing so could lead to fire
or damage equipment.
Forbidden
The installation and wiring of this product re-
quires specialized skills and experience. Have
the product installed by an Alpine authorized
dealer.
Types of Precautions
Mandatory
Sound Processor
PXE-0850X 20201201v1
z 4/28
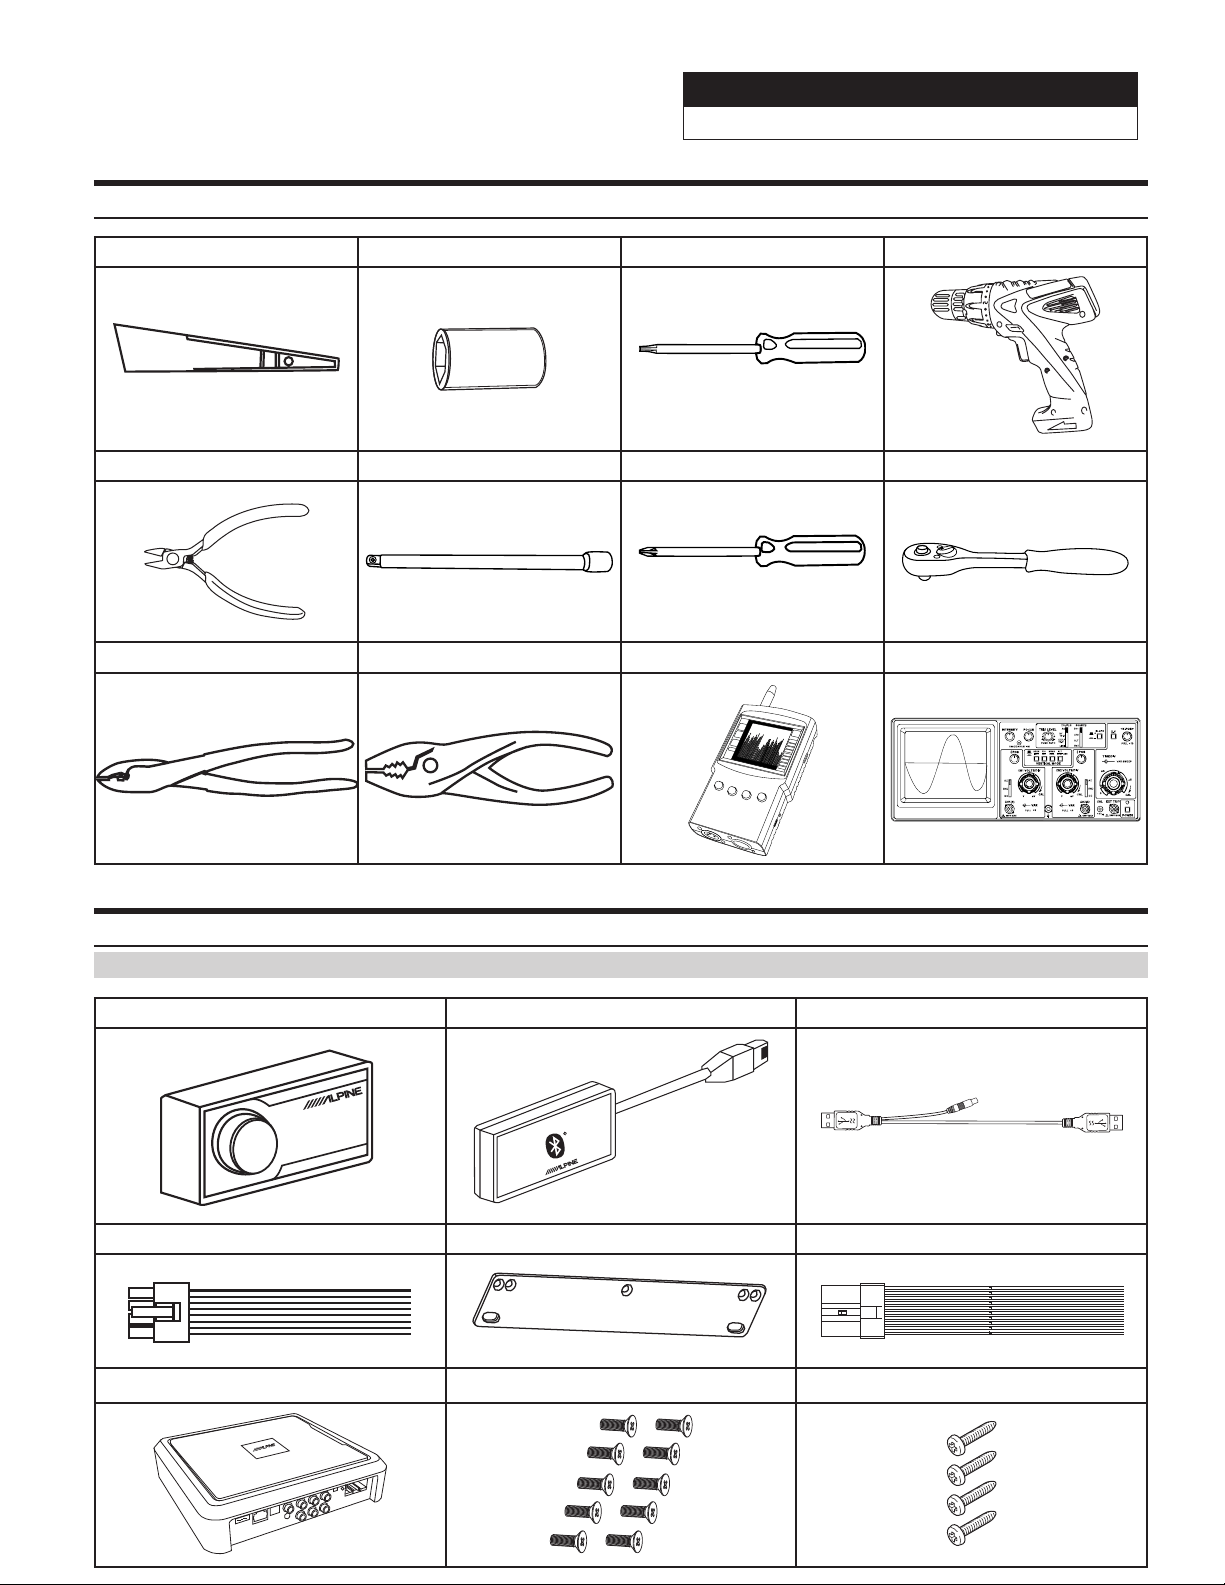
Tools Possibly Required (This Will Vary Depending On The Vehicle)
Panel Removing Tool Sockets Torx Screwdriver Power Drill
Wire Cutters Extension Phillips Screwdriver Ratchet
Crimpers Pliers RTA Oscilloscope
Accessory List
Installation Kit Parts
Wired Controller Bluetooth Adapter USB 3.0 Cable
REMOTE COMMANDER PXE-0850S
Extern
al Bluetooth
Speaker Harness x 2 Stand Mount x 4 High Level Input Connector
Processor Screws x 10 Screws x 4

Sound Processor
PXE-0850X 20201201v1
z 5/28
Download The App
Pairing The Device
1 For Android users the PXE-0850X app is available on the Google Play store. The name of the app is PXE-
DSPAPP.
2 For iphone users the PXE-0850X app is available through iTunes. The name of the app is PXE-DSP-APP.
3 The PC App is located on the Alpine web site in the Knowlege Center. Go to www.alpine-usa.com. Click on
Support, then Knowledge Center, and type PXE-0850X in the search bar. Download the zip file, unzip, and
double click on the app.
1 Open the settings menu of the smart device.
2 Go to the Bluetooth settings and make sure it is turned on.
3 Scan for devices.
4 The tablet or phone will find DSP-HD-AXXXXX. Click to connect to it.
Note: The light on the Bluetooth adapter will flash until a device has been paired. Once a device is paired it will
remain steady.
Sound Processor
PXE-0850X 20201201v1
z 6/28
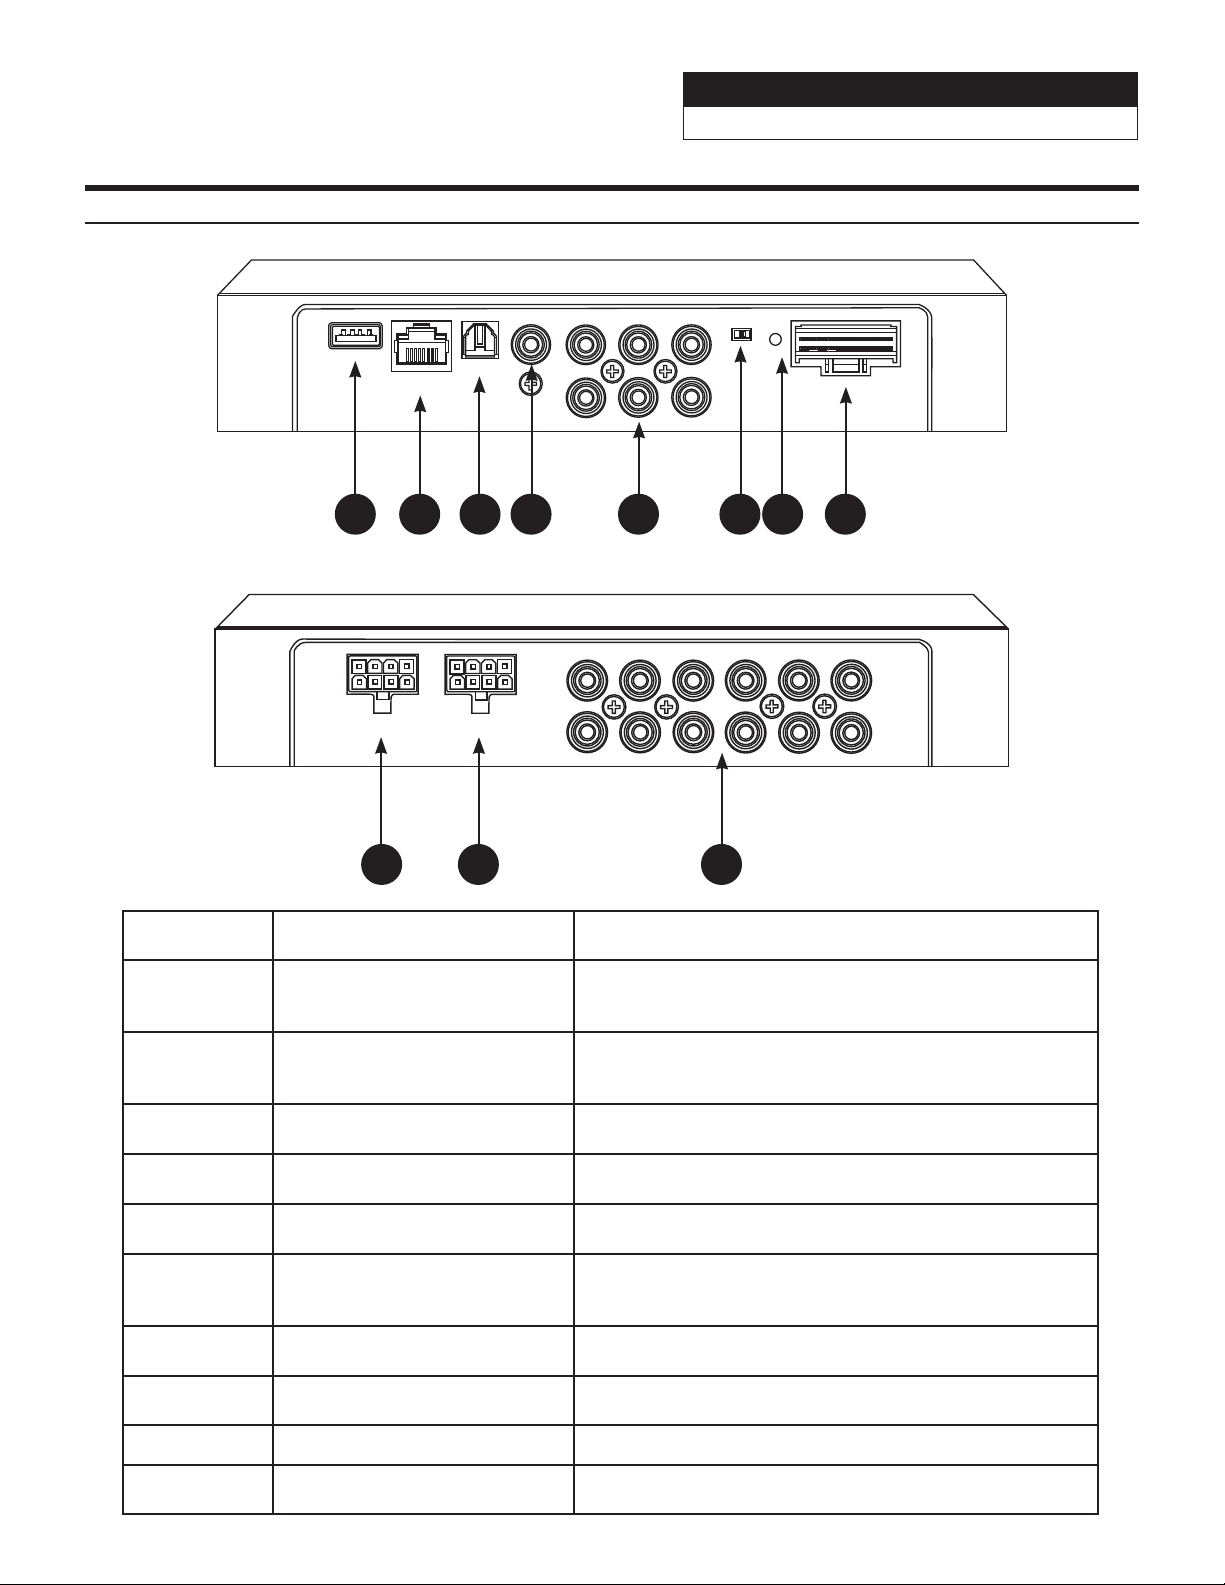
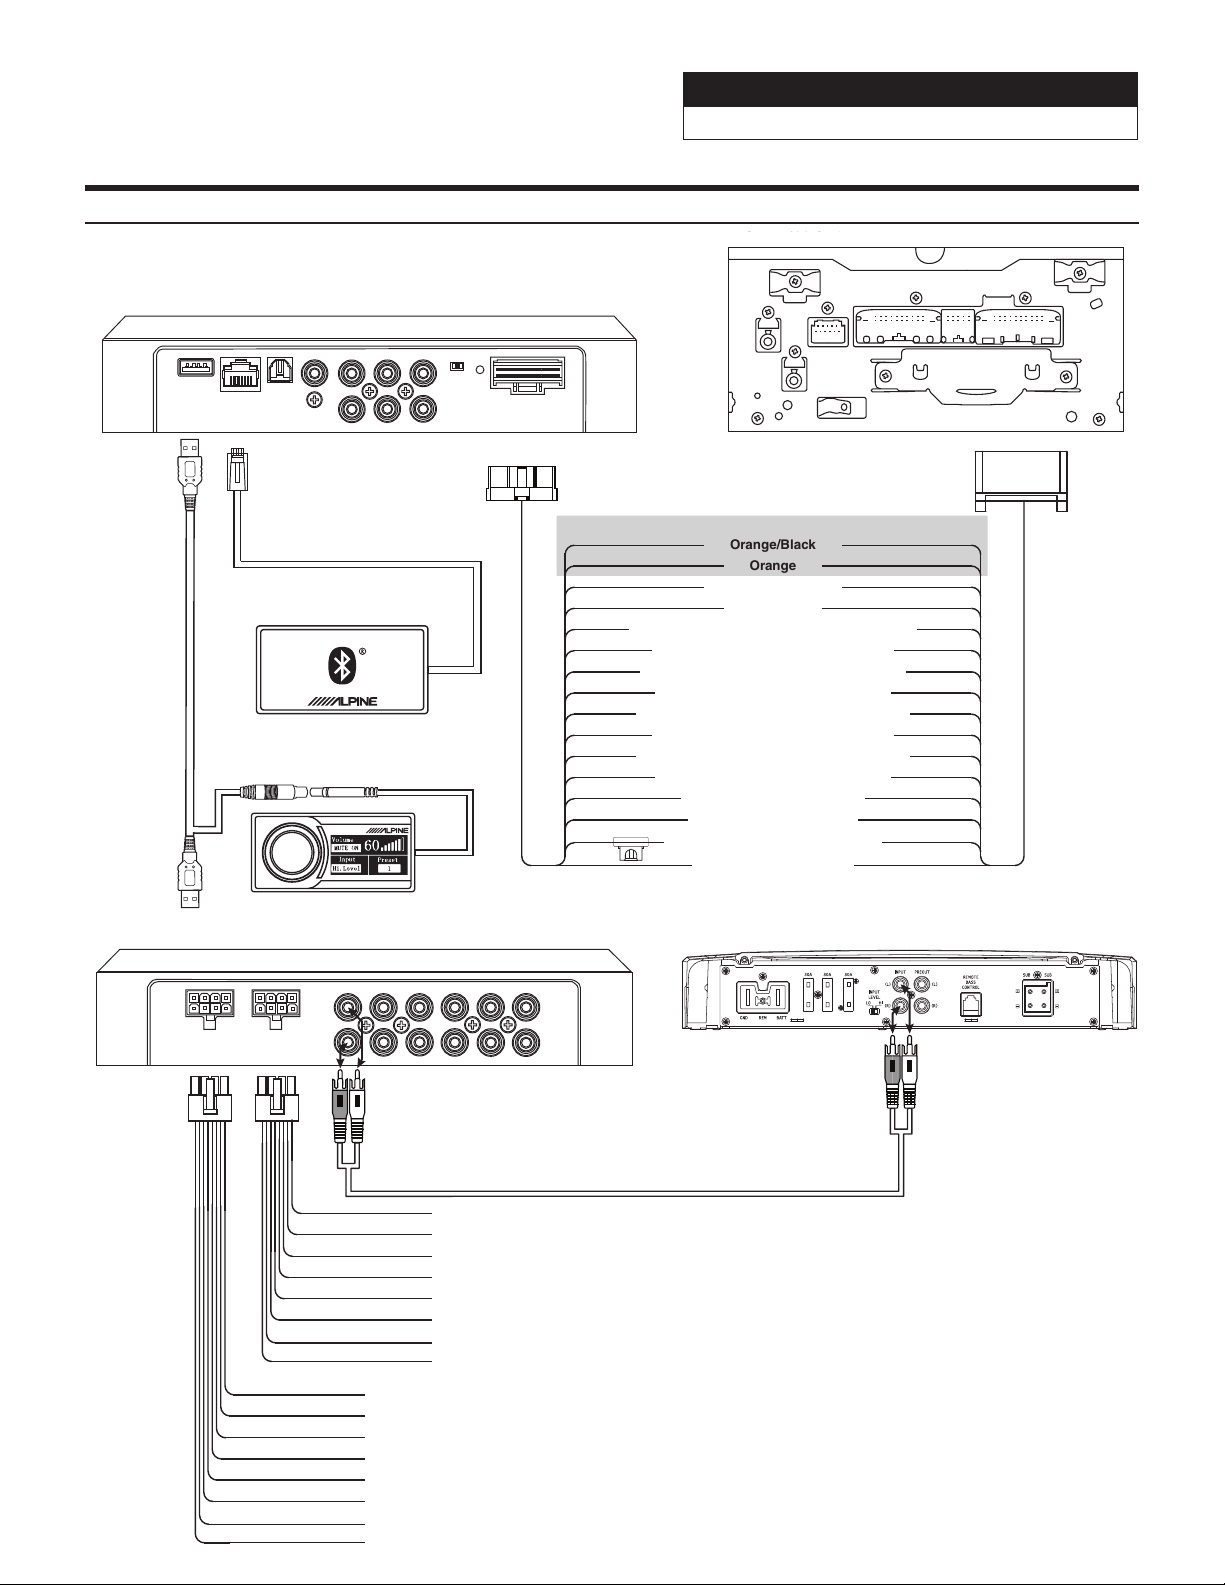
POWER
ACC
HOST
IN3
IN1
IN6 IN4 IN2
Coaxial
Optical
External
Bluetooth
USB
IN5
CH11
CH9 CH7 CH5 CH3 CH1
CH12 CH10 CH8 CH6 CH4 CH2
SPK OUTPUTSPK OUTPUT
Component Name Component Definition
1 USB Input
The USB 3.0 cable is used to connect to a Windows PC to
tune with software. The cable also has the connection for
the wired controller.
2 External Bluetooth Input
The Bluetooth interface is used for streaming lossless
music and for tuning with the phone app. After a phone is
paired the indicator light turns on.
3 Optical Input Optical Output.
4 Coaxial Input Optical Coaxial Input.
5 RCA Inputs 6-channels of low level inputs.
6 Remote Input Switch
If ACC is selected then ACC will power on the processor. If
Host is selected the processor will run on by signal sensing
with the high level input.
7 Power Indicator Light Power Indicator Light.
8 High Level Input Harness Used to input speaker level signals up to 10W or 30V.
9 & 10 High Level Output Each channel is rated at 18W RMS.
11 RCA Outputs 6 RCA low level outputs to go to aftermarket amplifiers.
1 2 3 4 5 6 7 8
9 10 11
Component Locations
Sound Processor
PXE-0850X 20201201v1
z 7/28
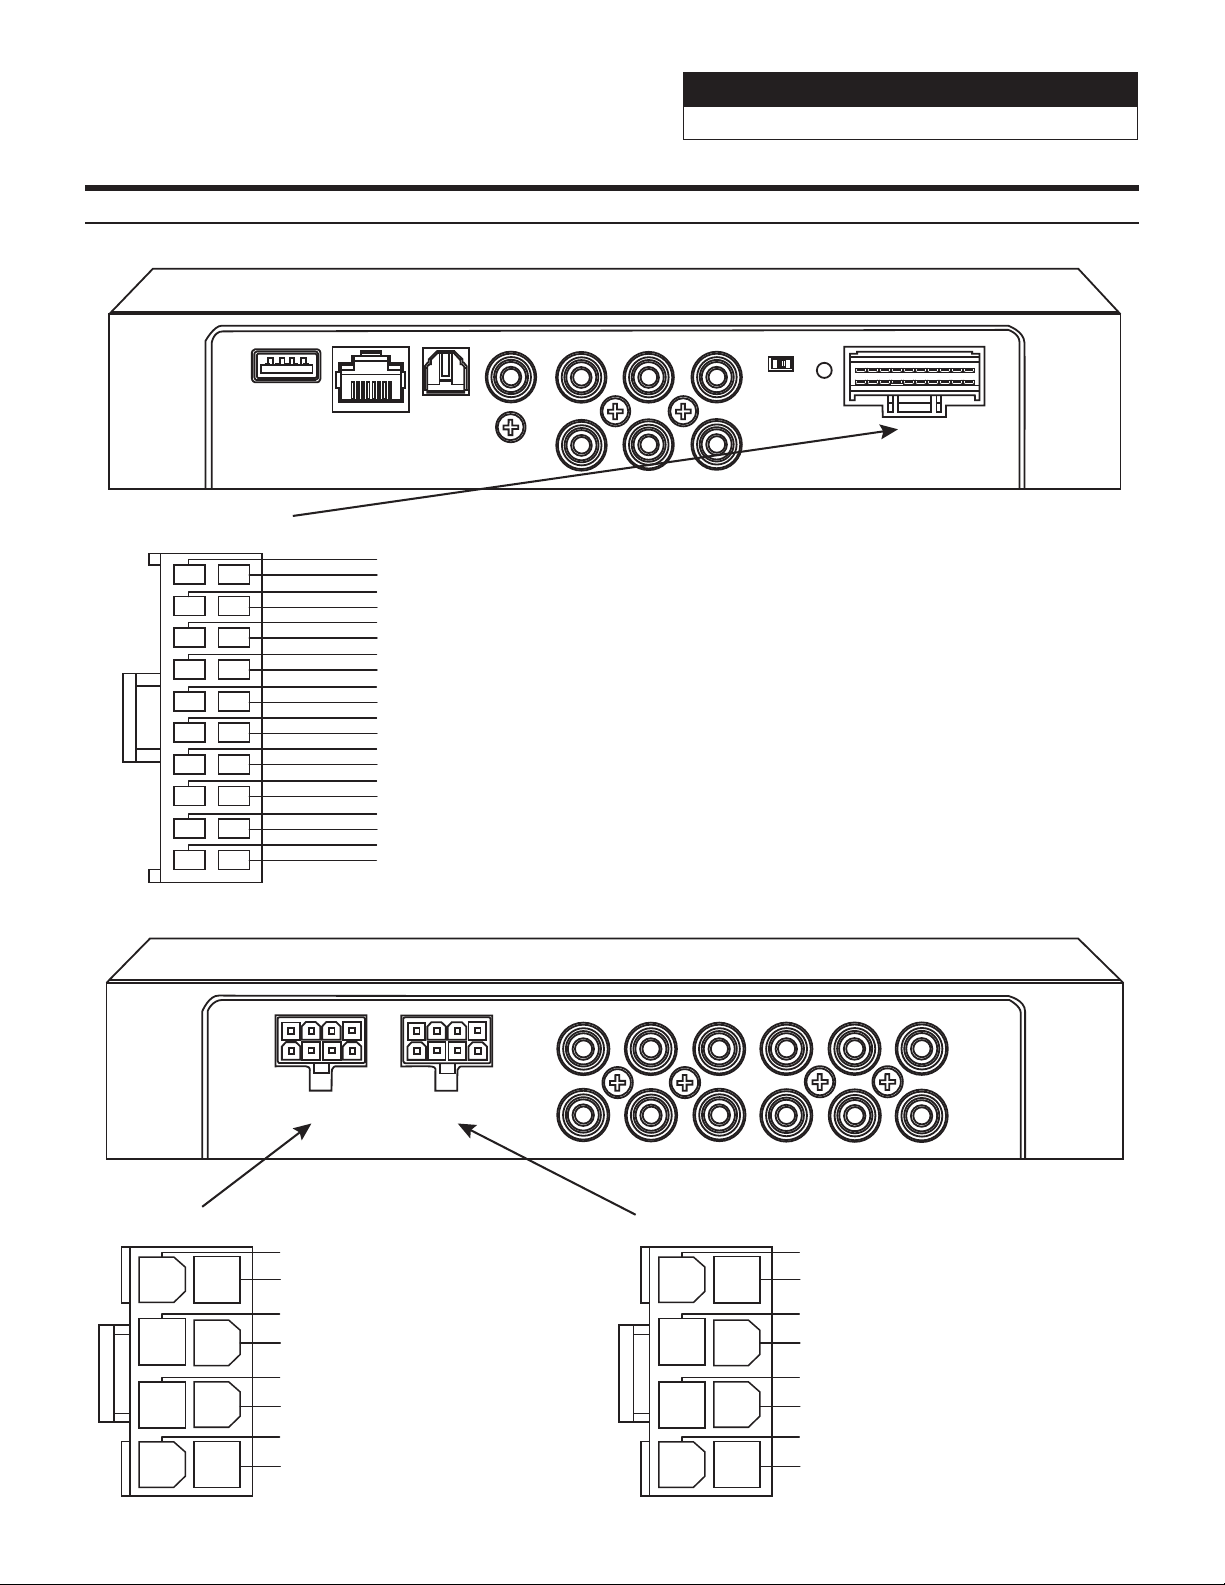
Wire Harness Pinouts
3
1
12
13
11
Main Harness
Yellow 16AWG....................................
Black 16AWG......................................
SPK Output
1
2
3
4
5
6
7
8
Yellow 16AWG.....................................
Black 16AWG......................................
Yellow 16AWG.....................................
Black 16AWG......................................
Blue/White 22AWG.............................
Red 22AWG.........................................
White/Black 22AWG...........................
White 22AWG......................................
Grey/Black 22AWG.............................
Grey 22AWG........................................
Green/Black 22AWG...........................
Green 22AWG.....................................
Violet/Black 22AWG...........................
Violet 22AWG......................................
Pink/Black 22AWG..............................
Pink 22AWG........................................
Orange/Black 22AWG.........................
Orange 22AWG...................................
Purple/Black 22AWG (High Level Output Channel 8 -)
Purple 22AWG (High Level Output Channel 8 +)
2
6
4
15
16
14
5
9
7
18
19
17
8
10
20
Green/Black 22AWG (High Level Output Channel 7 -)
Green 22AWG (High Level Output Channel 7 +)
Grey/Black 22AWG (High Level Output Channel 6 -)
Grey 22AWG (High Level Output Channel 6 +)
White/Black 22AWG (High Level Output Channel 5 -)
White 22AWG (High Level Output Channel 5 +)
CH1
CH2
CH3
CH4
CH5
CH6
CH7
CH8
CH9
CH10
CH11
CH12
SPK OUTPUTSPK OUTPUT
POWER
ACCHOST
IN1
IN2
IN3
IN4
IN5
IN6
COAXIAL
OPTICAL
EXTERNAL
BLUETOOTH
USB
SPK Output
1
2
3
4
5
6
7
8
Purple/Black 22AWG (High Level Output Channel 4 -)
Purple 22AWG (High Level Output Channel 4 +)
Green/Black 22AWG (High Level Output Channel 3 -)
Green 22AWG (High Level Output Channel 3 +)
Grey/Black 22AWG (High Level Output Channel 2 -)
Grey 22AWG (High Level Output Channel 2 +)
White/Black 22AWG (High Level Output Channel 1 -)
White 22AWG (High Level Output Channel 1 +)
(+12V Constant)
(Ground)
(+12V Constant)
(Ground)
(+12V Constant)
(Ground)
(Remote Output To External Amplifier)
(+12V Switched)
(High-Level Input Channel 1 -)
(High-Level Input Channel 1 +)
(High-Level Input Channel 2 -)
(High-Level Input Channel 2 +)
(High-Level Input Channel 3 -)
(High-Level Input Channel 3 +)
(High-Level Input Channel 4 -)
(High-Level Input Channel 4 +)
(High-Level Input Channel 5 -)
(High-Level Input Channel 5 +)
(High-Level Input Channel 6 -)
(High-Level Input Channel 6 +)
Sound Processor
PXE-0850X 20201201v1
z 8/28
Front RCA (Channels 1 & 2)
PXE-0850X
External Bluetooth
Module
PXE-0850X
Main Harness
CAN I/F
GPS
USB
EXT. KEY W.REMOTE
POWER
SXM/DAB
PRE OUT
DISP. OUT
HDMI IN HDMI OUT
ANTENNA
Rear RCA (Channels 3 & 4)
Sub RCA (Channels 5 & 6)
Red - +12V Ignition
Yellow - +12V Constant x 3
Black - Ground x 3
Aftermarket Head Unit
White
4-Channel Amp
Sub Amp
White/Black
Gray
Gray/Black
Green
GreenBlack
Violet
Violet/Black
Pink
Pink/Black
Orange
Orange/Black
**Not Used**
Blue/White - Remote
External Bluetooth
Not Used Not Used
Controller
POWER
ACCHOST
IN1
IN2
IN3
IN4
IN5
IN6
COAXIAL
OPTICAL
EXTERNAL
BLUETOOTH
USB
CH1
CH2
CH3
CH4
CH5
CH6
CH7
CH8
CH9
CH10
CH11
CH12
SPK OUTPUTSPK OUTPUT
REMOTE COMMANDER PXE-0850S
If
the
USB
is
plugged
in
backwards
the
controller
will
not
work
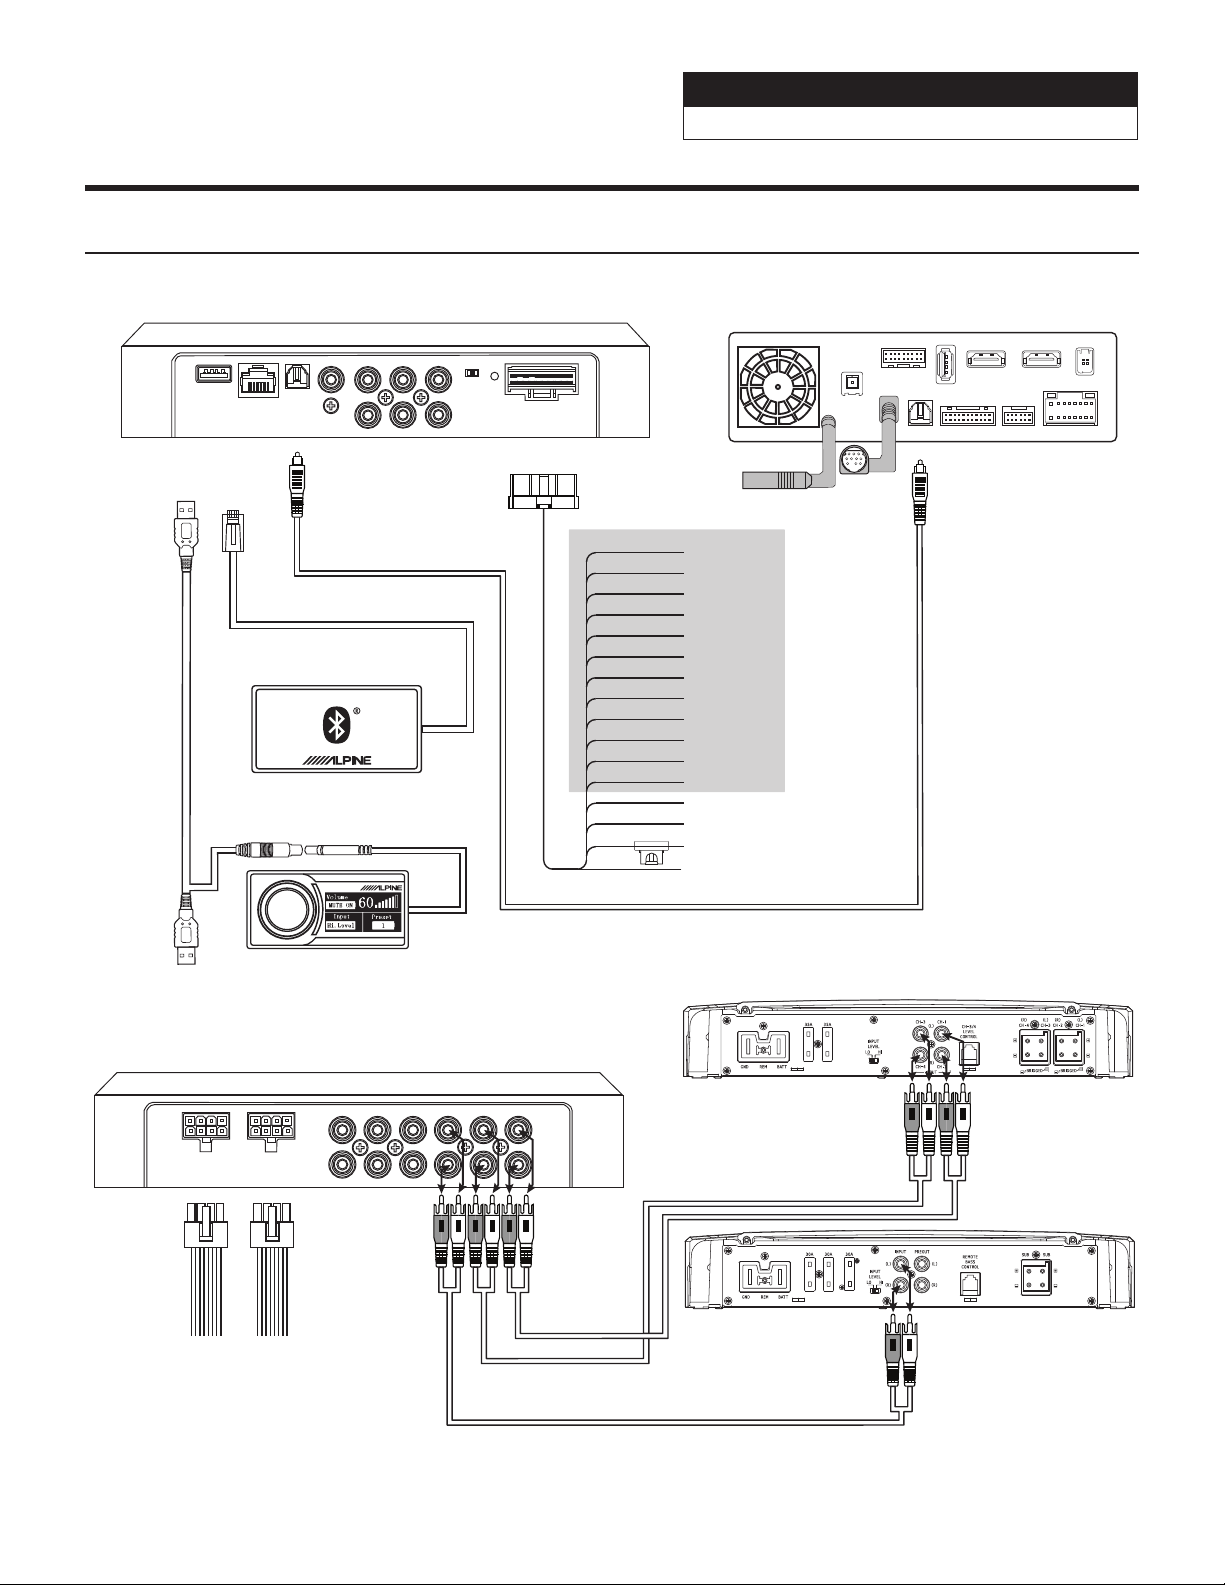
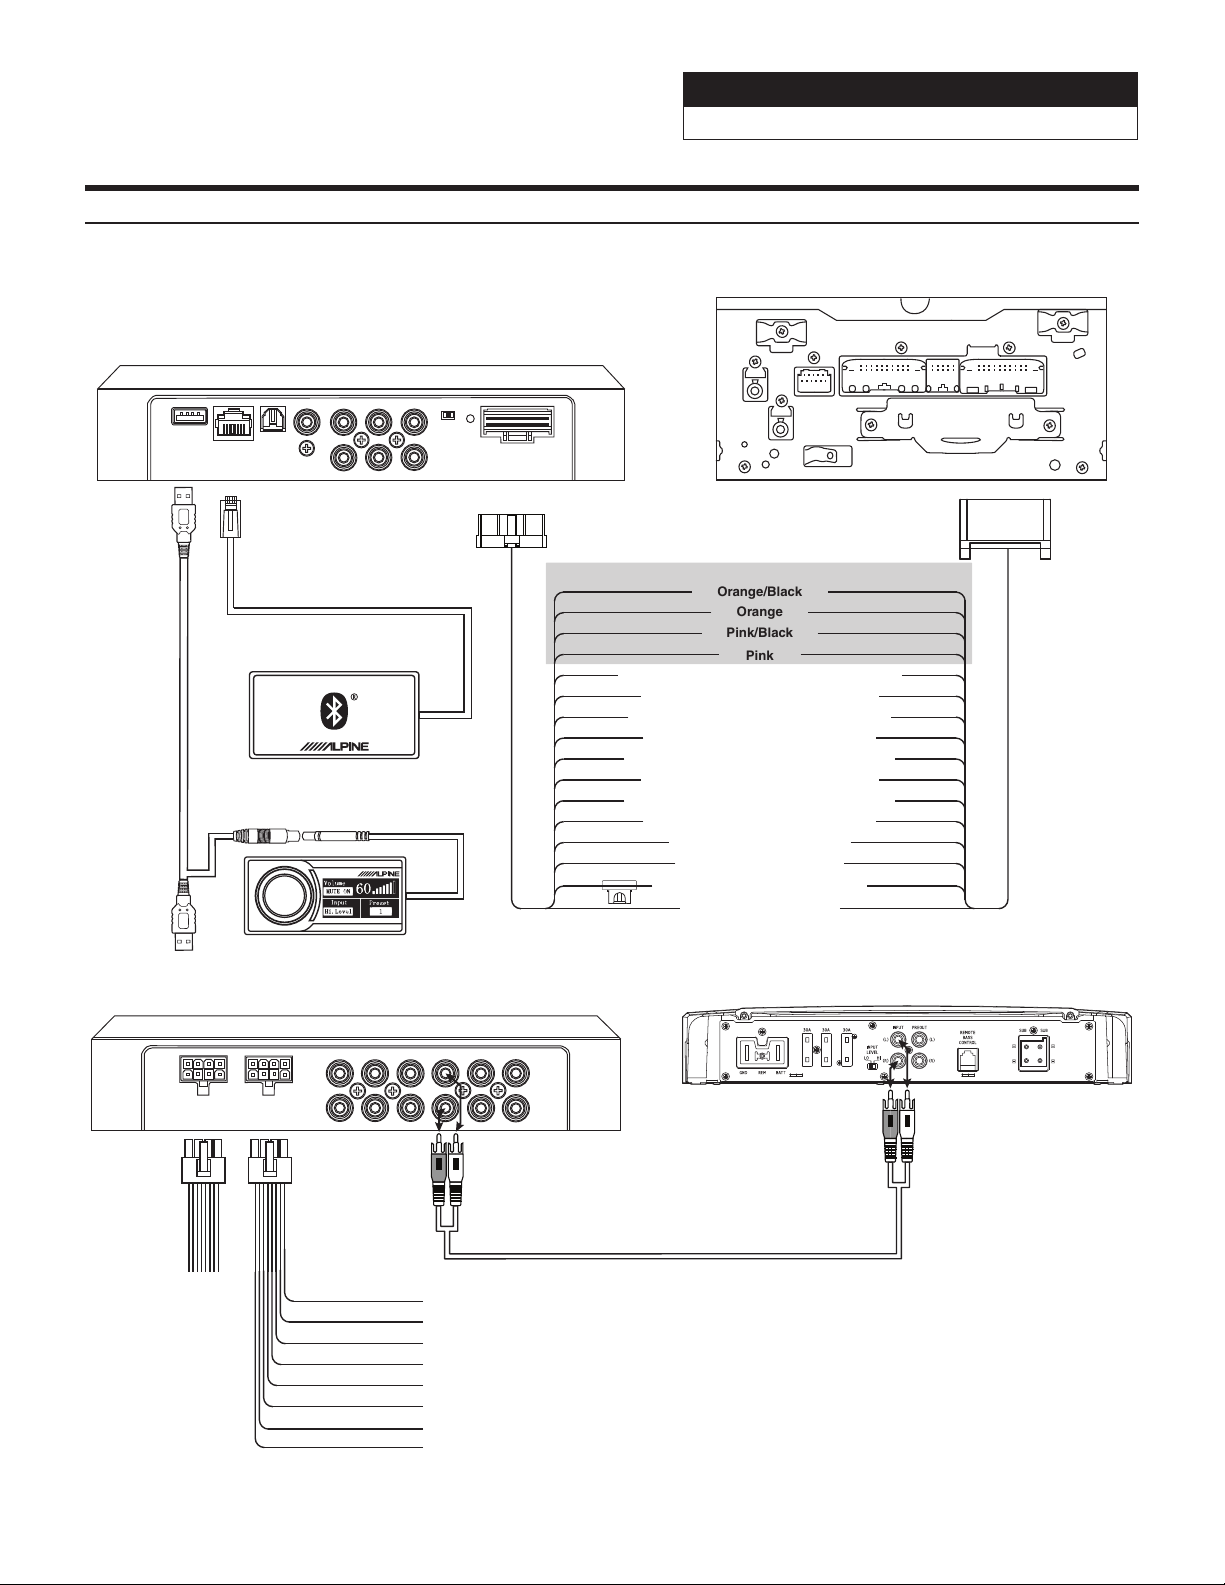
Installation Example- 6-Channel In/6-Channel Out (With Aftermarket Head Unit)
Sound Processor
PXE-0850X 20201201v1
z 9/28
Channel 4 Channel 5 Channel 6
Channel 1 Channel 2 Channel 3
Mixer Setup- 6-Channel In/6-Channel Out (With Aftermarket Head Unit)
Before
After

Sound Processor
PXE-0850X 20201201v1
z 10/28
PXE-0850X
PXE-0850X
Main Harness
Red - +12V Ignition
Yellow - +12V Constant x 3
Black - Ground x 3
OEM Head Unit
White to Front Left Speaker +
4-Channel Amp
Sub Amp
White/Black to Front Left Speaker -
Gray to Front Right Speaker +
Gray/Black to Front Right Speaker -
Green to Rear Left Speaker +
Green/Black to Rear Left Speaker -
Violet to Rear Right Speaker +
Violet/Black to Rear Right Speaker -
Pink
Pink/Black
Orange
Orange/Black
Blue/White - Remote
Not Used Not Used
**Not Used**
Note: These are all full-range outputs
from the OEM head unit.
POWER
ACCHOST
IN1
IN2
IN3
IN4
IN5
IN6
COAXIAL
OPTICAL
EXTERNAL
BLUETOOTH
USB
CH1
CH2
CH3
CH4
CH5
CH6
CH7
CH8
CH9
CH10
CH11
CH12
SPK OUTPUTSPK OUTPUT
External Bluetooth
Module
Main Harness
External Bluetooth
Controller
REMOTE COMMANDER PXE-0850X
If
the
USB
is
plugged
in
backwards
the
controller
will
not
work
Installation Example- 4-Channel In/6-Channel Out (With OEM Head Unit)

Sound Processor
PXE-0850X 20201201v1
z 11/28
MIxer Setup- 4-Channel In/6-Channel Out (With OEM Head Unit)
Channel 4 Channel 5 Channel 6
Channel 1 Channel 2 Channel 3
Before
After
Sound Processor
PXE-0850X 20201201v1
z 12/28
Installation Example- Digital In/6-Channel Out Using Aftermarket Amplifiers (With Aftermarket
Head Unit)
PXE-0850X
PXE-0850X
Main Harness
CAN I/F
GPS
USB
EXT. KEY W.REMOTE
POWER
SXM/DAB
DISP. OUT
HDMI IN HDMI OUT
ANTENNA
Optical Cable (Not Included)
Red - +12V Ignition
Yellow - +12V Constant x 3
Black - Ground x 3
Aftermarket Head Unit
White
4-Channel Amp
Sub Amp
White/Black
Gray
Gray/Black
Green
GreenBlack
Violet
Violet/Black
Pink
Pink/Black
Orange
Orange/Black
**Not Used**
Blue/White - Remote
Not Used Not Used
OPTICAL
POWER
ACCHOST
IN1
IN2
IN3
IN4
IN5
IN6
COAXIAL
OPTICAL
EXTERNAL
BLUETOOTH
USB
CH1
CH2
CH3
CH4
CH5
CH6
CH7
CH8
CH9
CH10
CH11
CH12
SPK OUTPUTSPK OUTPUT
External Bluetooth
Module
Controller
External Bluetooth
REMOTE COMMANDER PXE-0850X
Optical Cable
If
the
USB
is
plugged
in
backwards
the
controller
will
not
work
Sound Processor
PXE-0850X 20201201v1
z 13/28
Mixer Setup- Digital In/6-Channel Out Using Aftermarket Amplifiers (With Aftermarket Head Unit)
Channel 4 Channel 5 Channel 6
Channel 1 Channel 2 Channel 3
Before
After
Sound Processor
PXE-0850X 20201201v1
z 14/28
Installation Example- 4-Channel In/6-Channel Out Using High Level Out (With OEM Head Unit)
PXE-0850X
PXE-0850X
Main Harness
OEM Head Unit
Sub Amp
Not Used
White to Front Left Speaker +
White/Black to Front Left Speaker -
Gray to Right Front Speaker +
Gray/Black to Right Front Speaker -
Green to Rear Left Speaker +
Green/Black to Rear Left Speaker -
Violet to Rear Right Speaker +
Violet/Black to Rear Right Speaker -
Red - +12V Ignition
Yellow - +12V Constant x 3
Black - Ground x 3
White to Front Left Speaker +
White/Black to Front Left Speaker -
Gray to Front Right Speaker +
Gray/Black to Front Right Speaker -
Green to Rear Left Speaker +
Green/Black to Rear Left Speaker -
Violet to Rear Right Speaker +
Violet/Black to Rear Right Speaker -
Pink
Pink/Black
Orange
Orange/Black
Blue/White - Remote
**Not Used**
Note: These are all full-range outputs
from the OEM head unit.
POWER
ACCHOST
IN1
IN2
IN3
IN4
IN5
IN6
COAXIAL
OPTICAL
EXTERNAL
BLUETOOTH
USB
CH1
CH2
CH3
CH4
CH5
CH6
CH7
CH8
CH9
CH10
CH11
CH12
SPK OUTPUTSPK OUTPUT
External Bluetooth
Module
Main Harness
External Bluetooth
Controller
REMOTE COMMANDER PXE-0850X
If
the
USB
is
plugged
in
backwards
the
controller
will
not
work
Sound Processor
PXE-0850X 20201201v1
z 15/28
Mixer Setup- 4-Channel In/6-Channel Out Using High Level Out (With OEM Head Unit)
Channel 4 Channel 5 Channel 6
Channel 1 Channel 2 Channel 3
Before
After
Sound Processor
PXE-0850X 20201201v1
z 16/28
Installation Example- 5-Channel In/10-Channel Out Using High Level Out (With OEM Head Unit)
PXE-0850X
External Bluetooth
Module
PXE-0850X
Main Harness
OEM Head Unit
External Bluetooth
White to Front Left Tweeter +
White/Black to Front Left Tweeter -
Gray to Front Right Tweeter +
Gray/Black to Front Right Tweeter -
Green to Front Left Midrange +
Green/Black to Front Left Midrange -
Violet to Front Right Midrange +
Violet/Black to Front Right Midrange -
Red - +12V Ignition
Yellow - +12V Constant x 3
Black - Ground x 3
White to Front Left Tweeter +
White/Black to Front Left Tweeter -
Gray to Front Right Tweeter +
Gray/Black to Front Right Tweeter -
Green to Rear Left Mid-Range +
Green/Black to Rear Left Mid-Range -
Violet to Rear Right Mid-Range +
Violet/Black to Rear Right Mid-Range -
Pink to Sub +
Pink/Black to Sub -
Orange
Orange/Black
Blue/White - Remote
**Not Used**
Note: These are all crossed over outputs
from the OEM head unit.
POWER
ACCHOST
IN1
IN2
IN3
IN4
IN5
IN6
COAXIAL
OPTICAL
EXTERNAL
BLUETOOTH
USB
CH1
CH2
CH3
CH4
CH5
CH6
CH7
CH8
CH9
CH10
CH11
CH12
SPK OUTPUTSPK OUTPUT
White to Front Left Woofer +
White/Black to Front Left Woofer -
Gray to Front Right Woofer+
Gray/Black to Front Right Woofer -
Green to Rear Left Speaker +
Green/Black to Rear Left Speaker -
Violet to Rear Right Speaker +
Violet/Black to Rear Right Speaker -
Sub Amp
Controller
REMOTE COMMANDER PXE-0850X
If
the
USB
is
plugged
in
backwards
the
controller
will
not
work
Sound Processor
PXE-0850X 20201201v1
z 17/28
Mixer Setup- 5-Channel In/10-Channel Out Using High Level Out (With OEM Head Unit)
Channel 1
Channel 2 Channel 3
Channel 4
Channel 5 Channel 6
Channel 8 Channel 9 Channel 10Channel 7
Before
After
Sound Processor
PXE-0850X 20201201v1
z 18/28
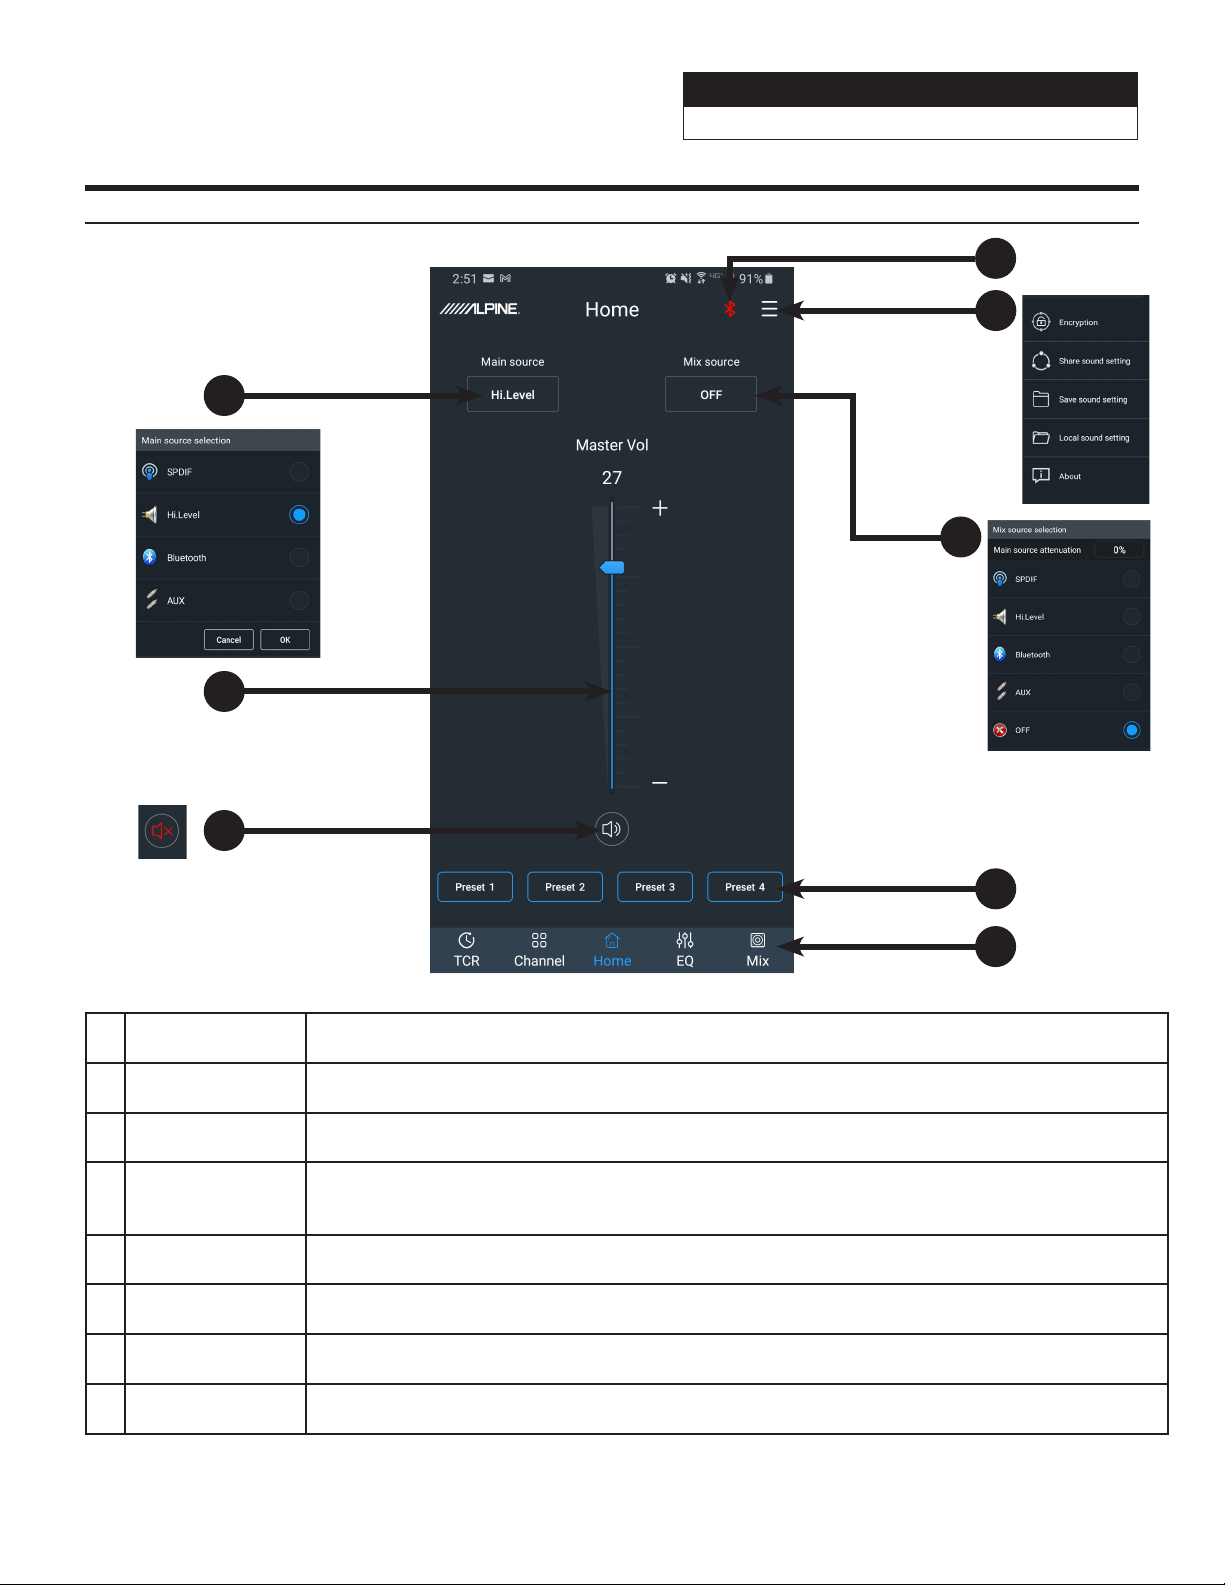
Mobile Phone App Instructions- Home Screen
1 Mute Button Mutes the audio.
2 Master Volume Adjusts the system volume up and down.
3 Main Source Select input source (Hi-level, Aux, Bluetooth, and S/PDIF).
4
Connections
Indicator
If the Bluetooth icon is red then there is no phone paired. If the icon is green that indicates a phone
is currently paired. If a phone has been previously paired then just start the app and the icon will turn
green. Pressing on the icon will allow selection of streaming audio and data operation.
5 Files Tab User is able to Save, Share, and Load presets; along with viewing the software version.
6 Mix Source Mixes the audio in from a 2nd source (external GPS, radar detector, DVD player, etc).
7 Preset Buttons
Store and recall up to 6 preset sound settings. Only 4 presets can display on the screen at a time.
Slide from left to right to select the different presets.
8 Tuning Interface Switches between the app tuning screens.
1
2
3
4
5
6
7
8
Sound Processor
PXE-0850X 20201201v1
z 19/28
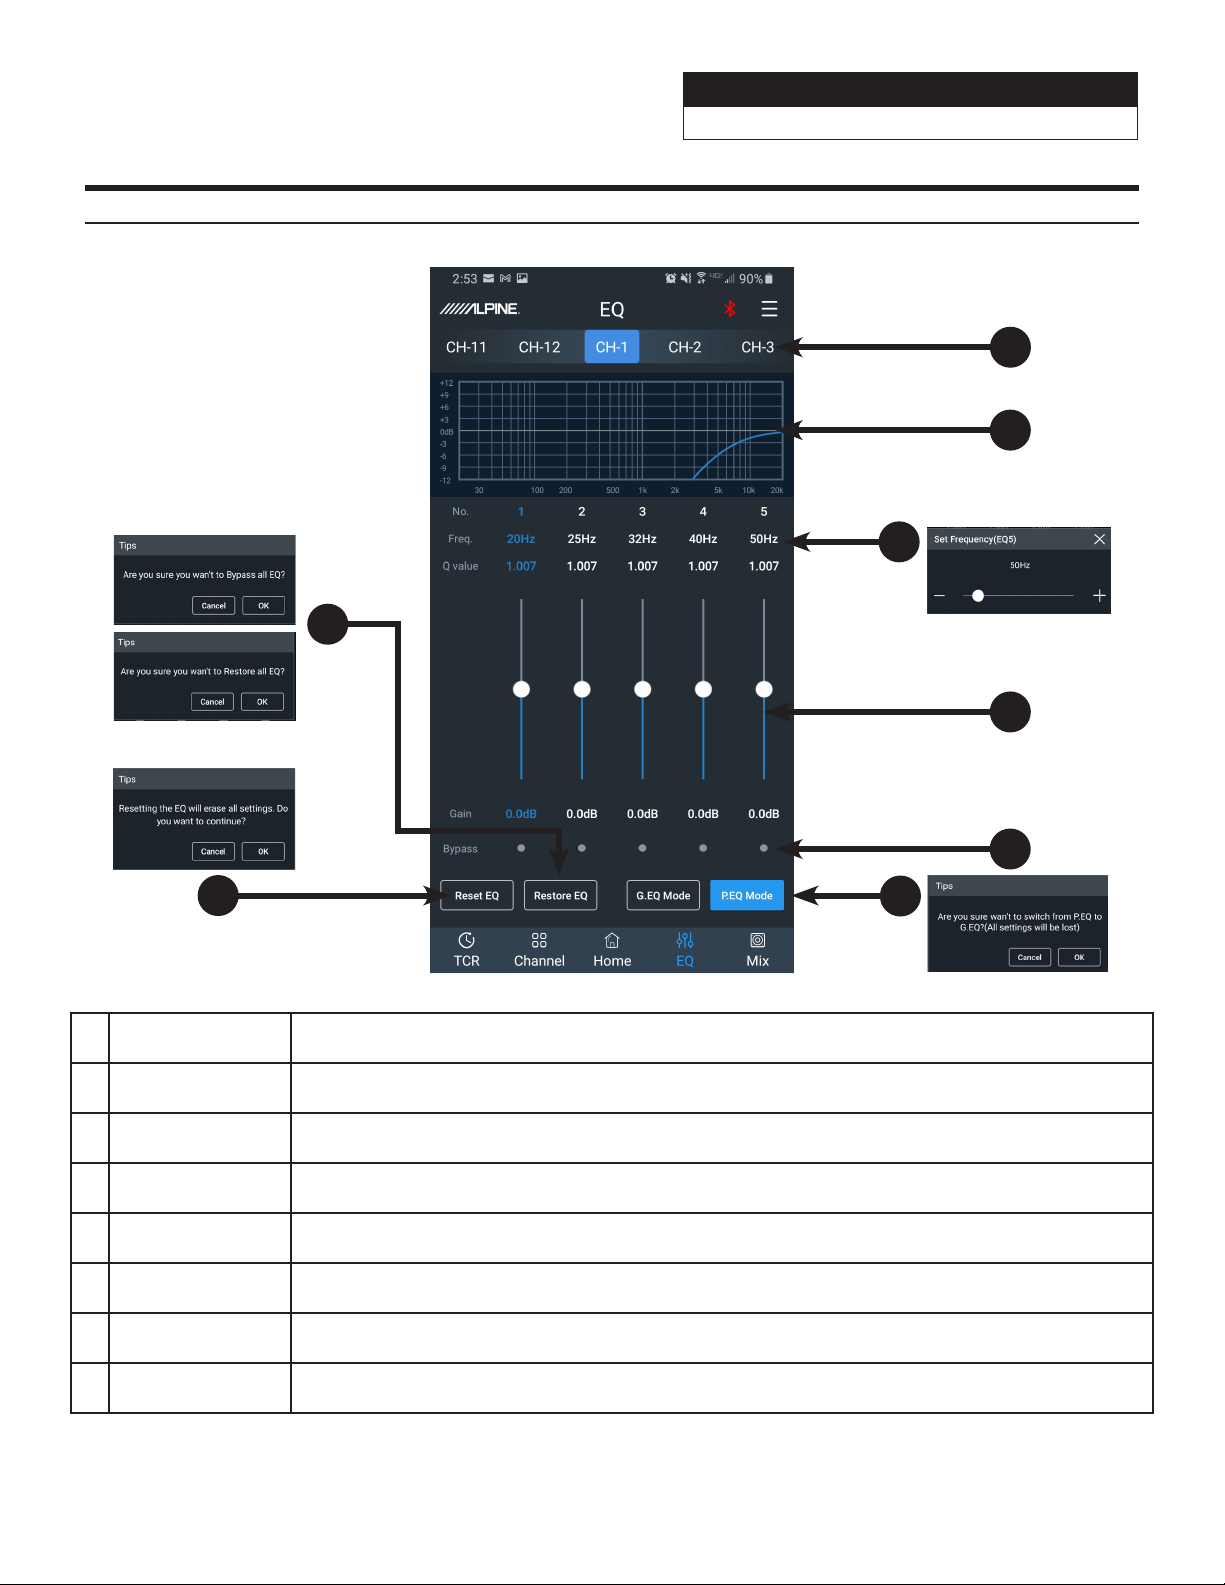
Mobile Phone App Instructions- EQ
1 Output Channel The 12 output channels can be selected by sliding left or right.
2 EQ Curve Displays the current curve of the EQ adjustments.
3
Frequency, Q
Value, Gain
Adjust the Frequency, Q-Value, and Level. Note: Q and Frequency can only be adjusted when using
the Parametric EQ. Only Level can be adjusted in Graphic EQ mode.
4 Gain Slide up or down to increase or decrease the gain between -12dB and +12dB.
5 Band On/Off Press to bypass the EQ band. Press again to put the setting back to where it was.
6 P. EQ/G. EQ Mode
Selects either the Parametric EQ mode or the Graphic EQ mode. Switching the mode will result in a
loss of all settings.
7 Reset EQ Reset the EQ settings.
8
Restore/Bypass
EQ
Press to temporarily bypass the EQ settings. Press again to restore the settings.
1
4
5
2
3
6
7
8
Sound Processor
PXE-0850X 20201201v1
z 20/28
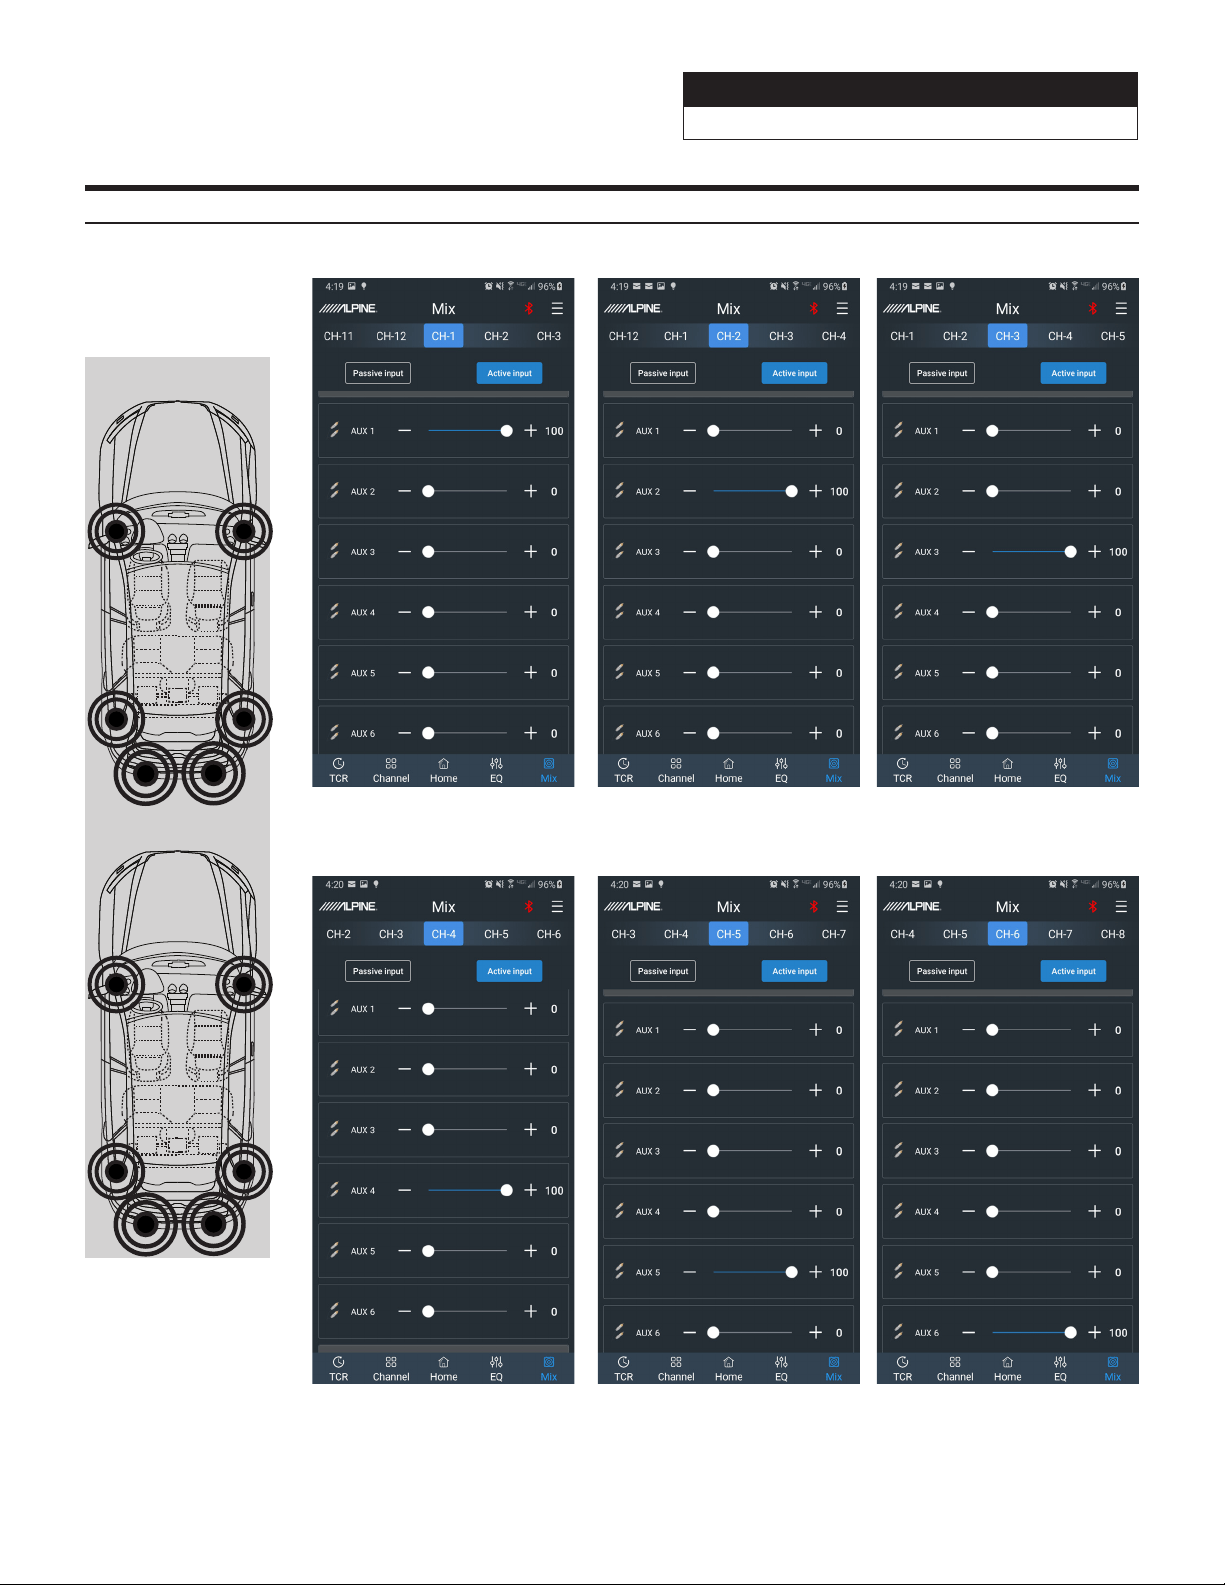
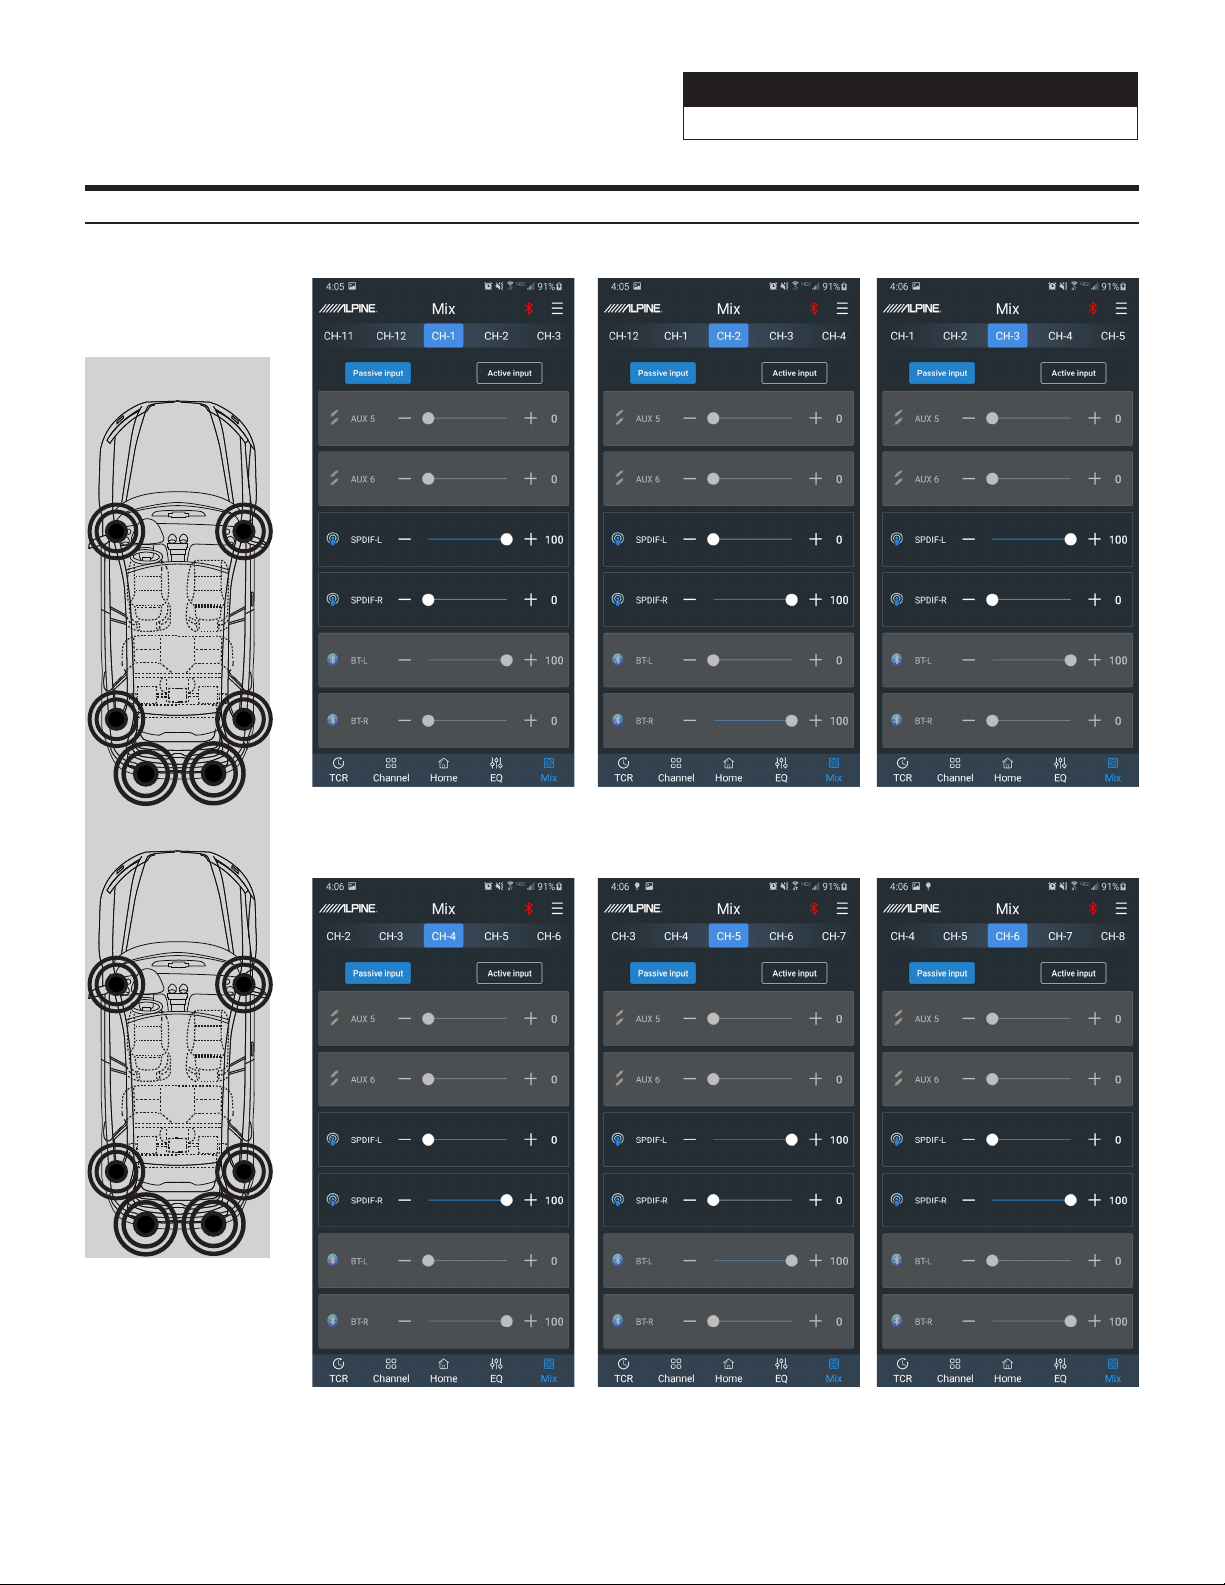
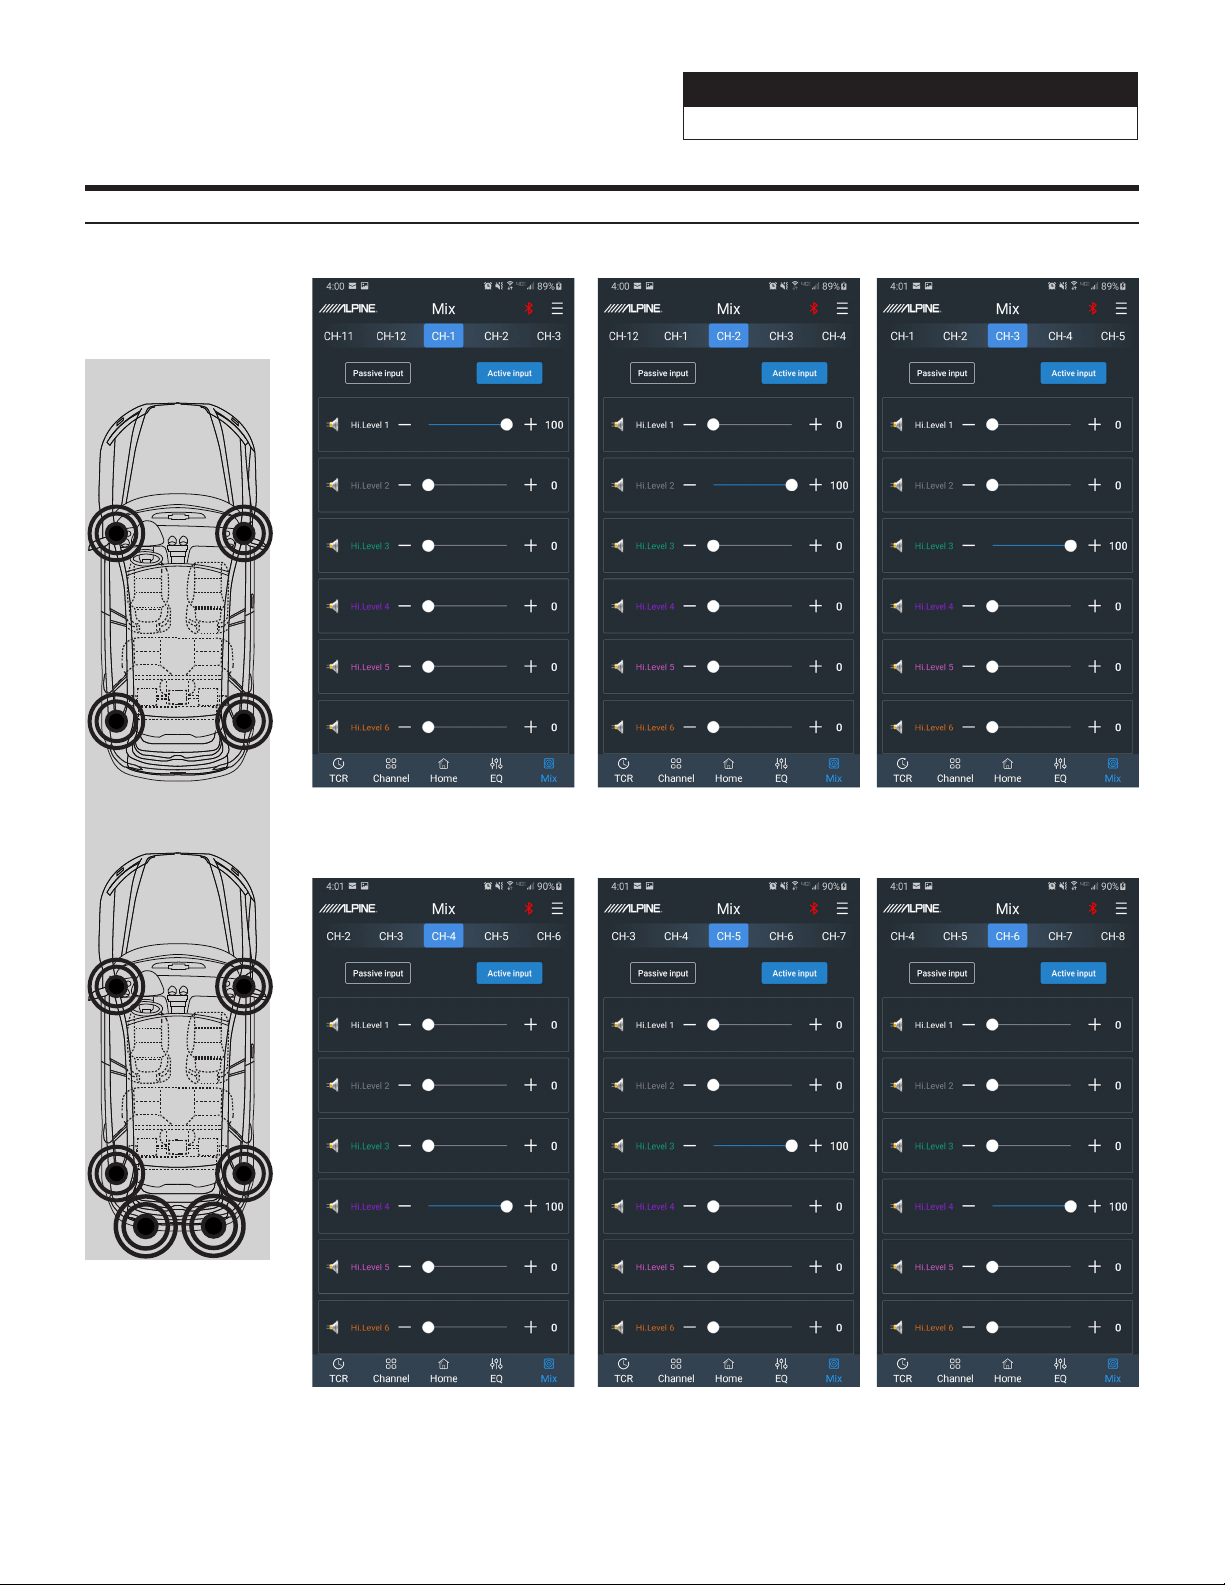
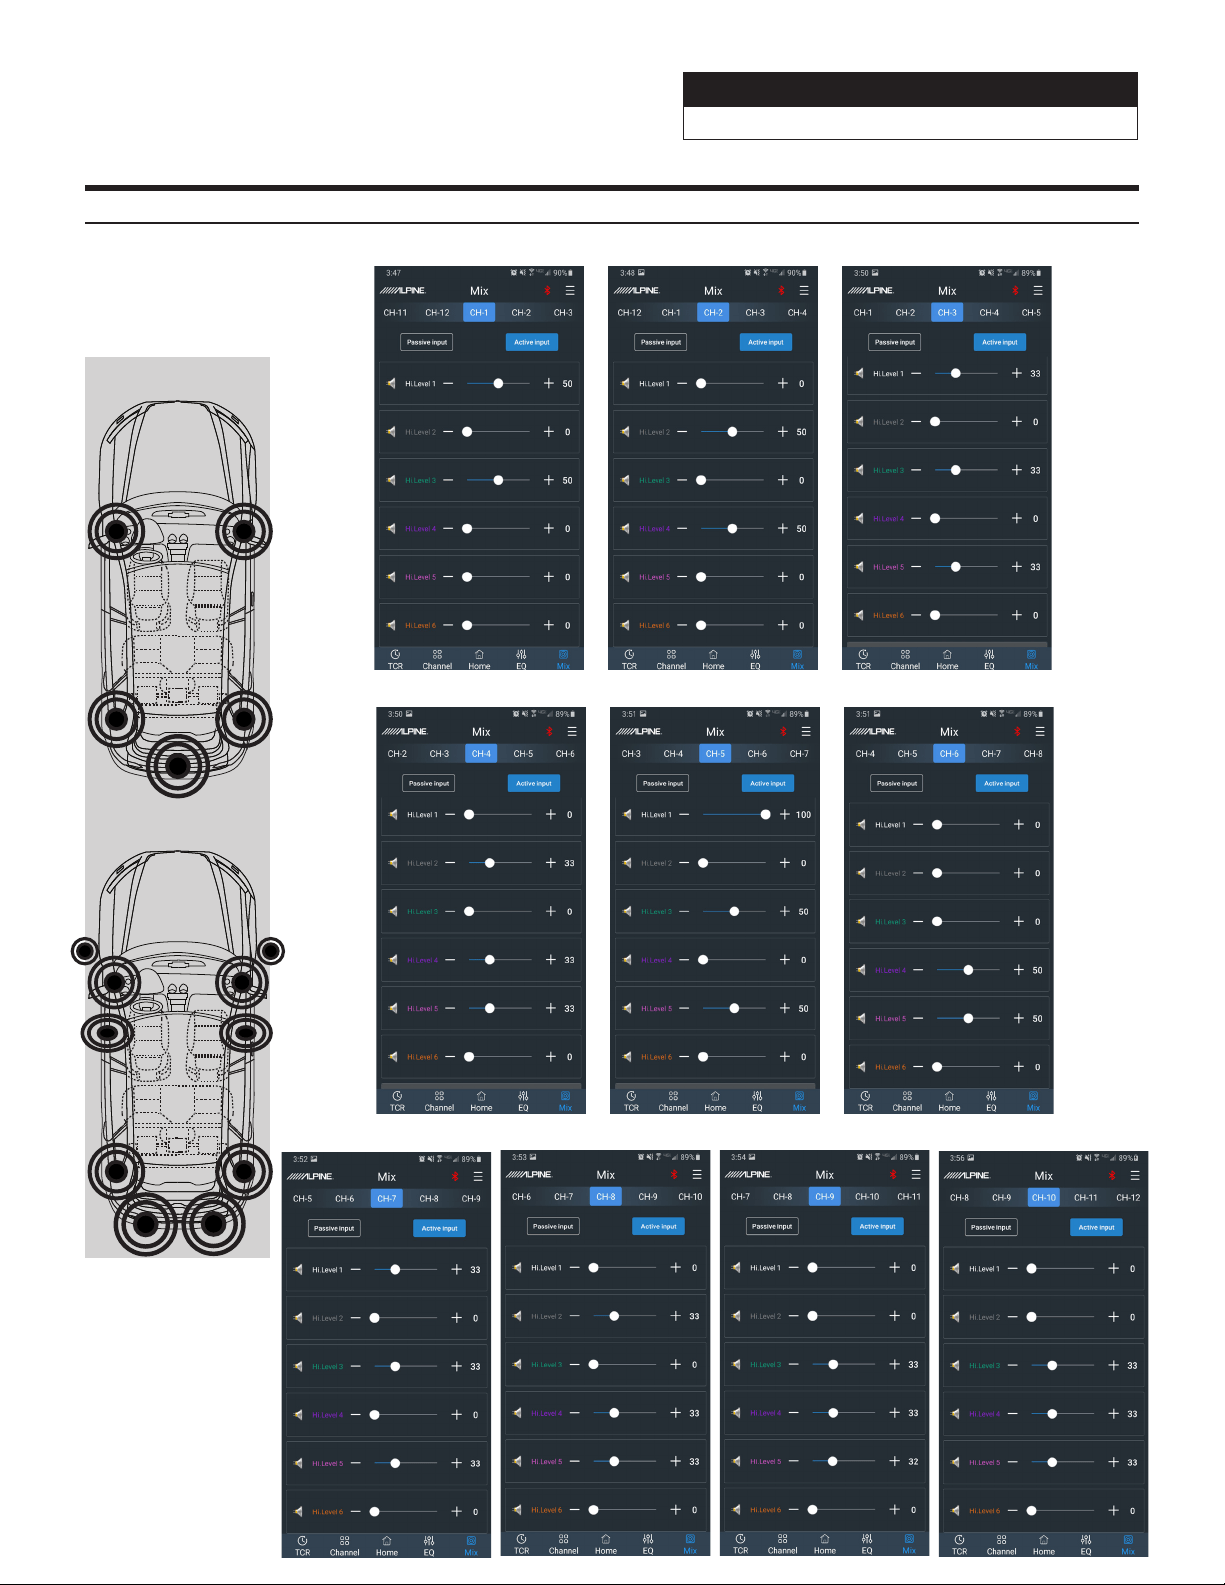
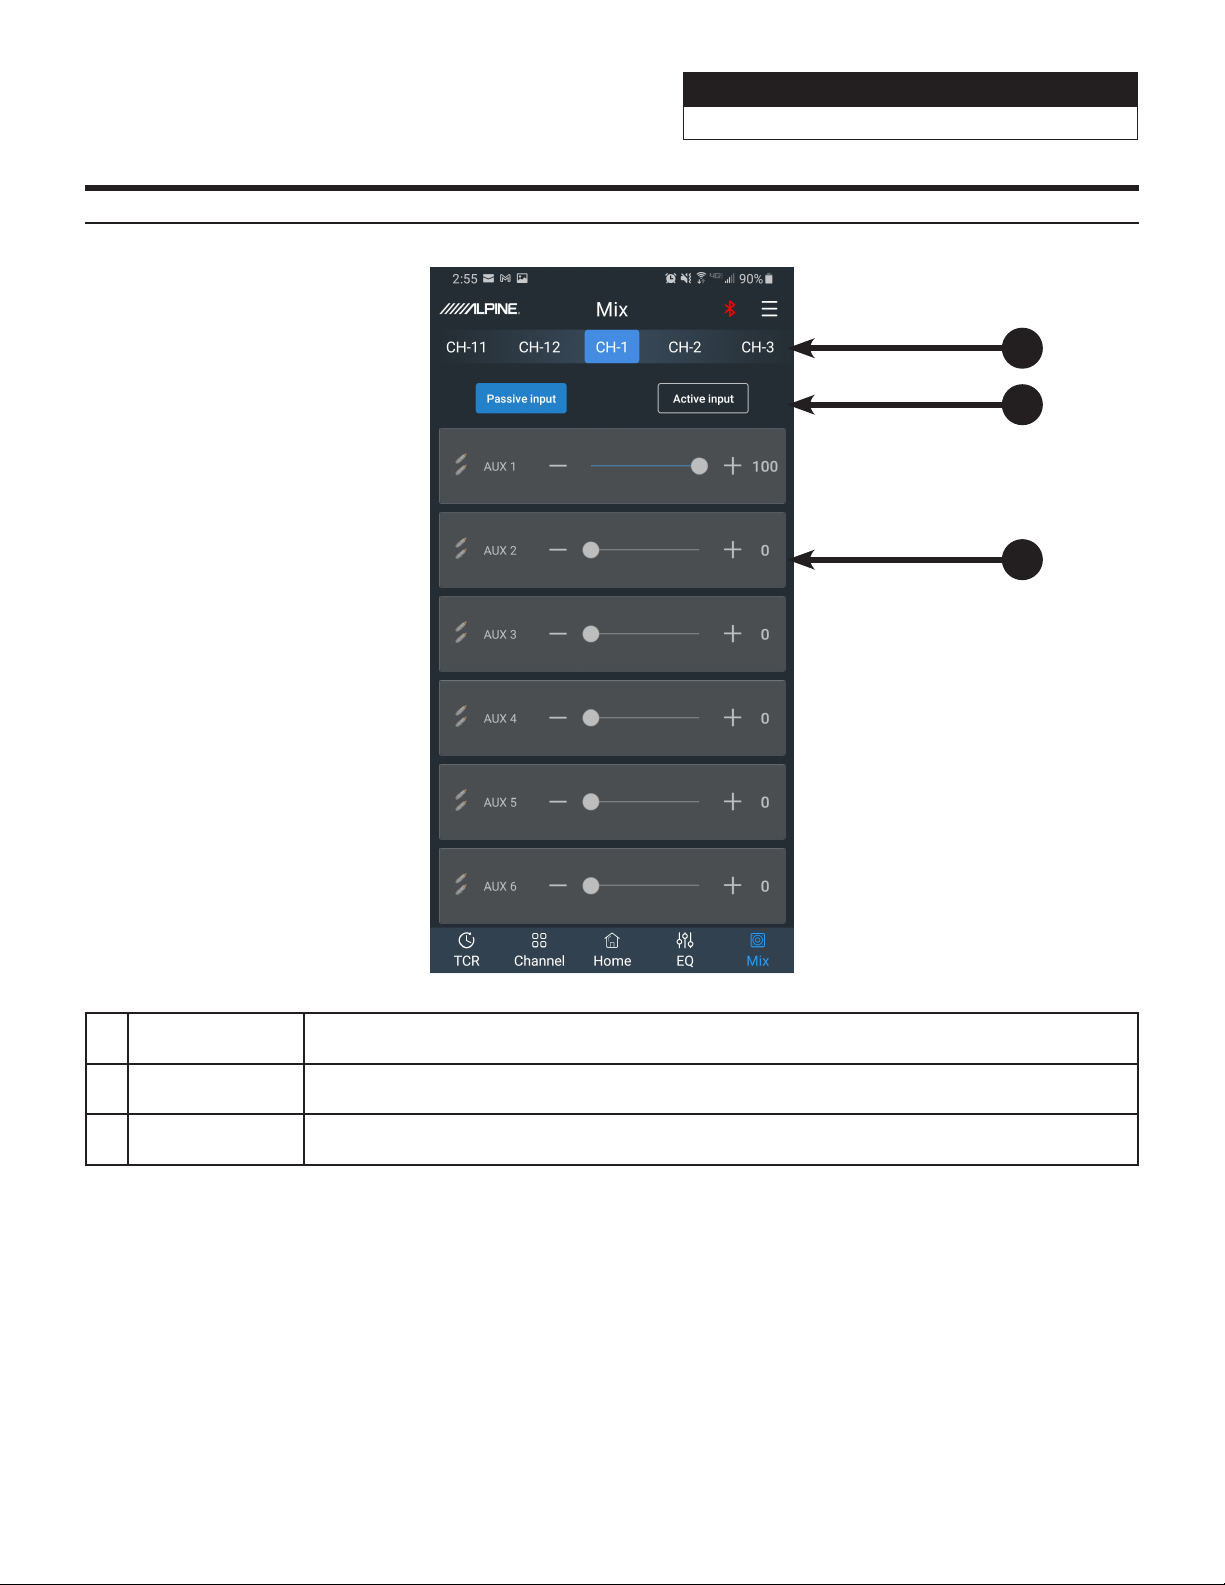
Mobile Phone App Instructions- Mixer
1 Mixer Channel
The 12 channels for mixing can be selected by sliding left or right. Matrix mixing allows routing
any of the 6 Passive or Active inputs to any of the 12 Low Level or 8 High Level (25W) outputs.
2
Active/Passive
Input
Not used. Leave in the default setting of Passive. Warning: If this gets changed you will lose the
mixer settings for that channel.
3 Input Level
Adjust the slider left to right to move from 0 to 100% of the signal to mix in from that specifc
channel.
Note: It is highly recommended that the total for one channel equal 100 to prevent clipping.
2
1
3
Sound Processor
PXE-0850X 20201201v1
z 21/28
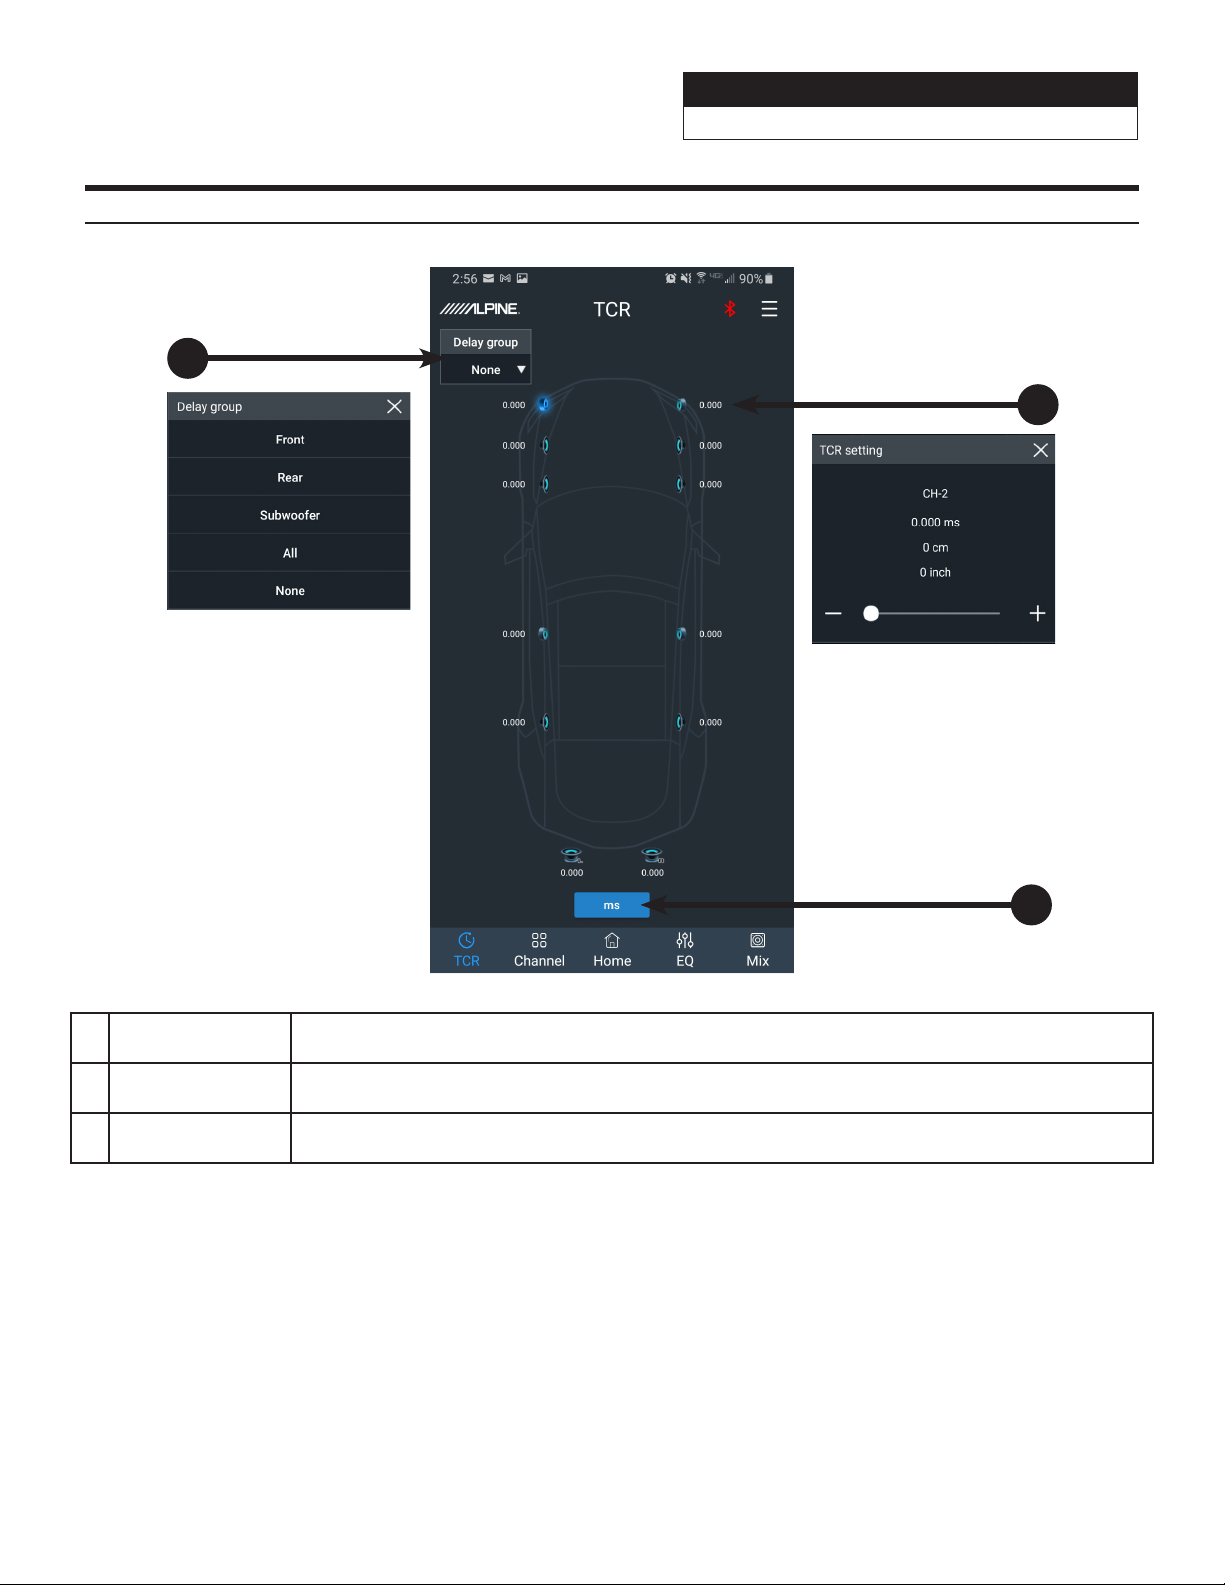
1 Delay Group Allows the user to delay multiple linked channels at the same time.
2 Speaker Select
Tap the speaker icon of each channel to select the channel to delay. A slider will pop up to enter the
value of the delay.
3 Delay Units Select between Milliseconds, Centimeters, and Inches as the increment to adjust the delay.
Mobile Phone App Instructions- TCR
1
2
3
Sound Processor
PXE-0850X 20201201v1
z 22/28
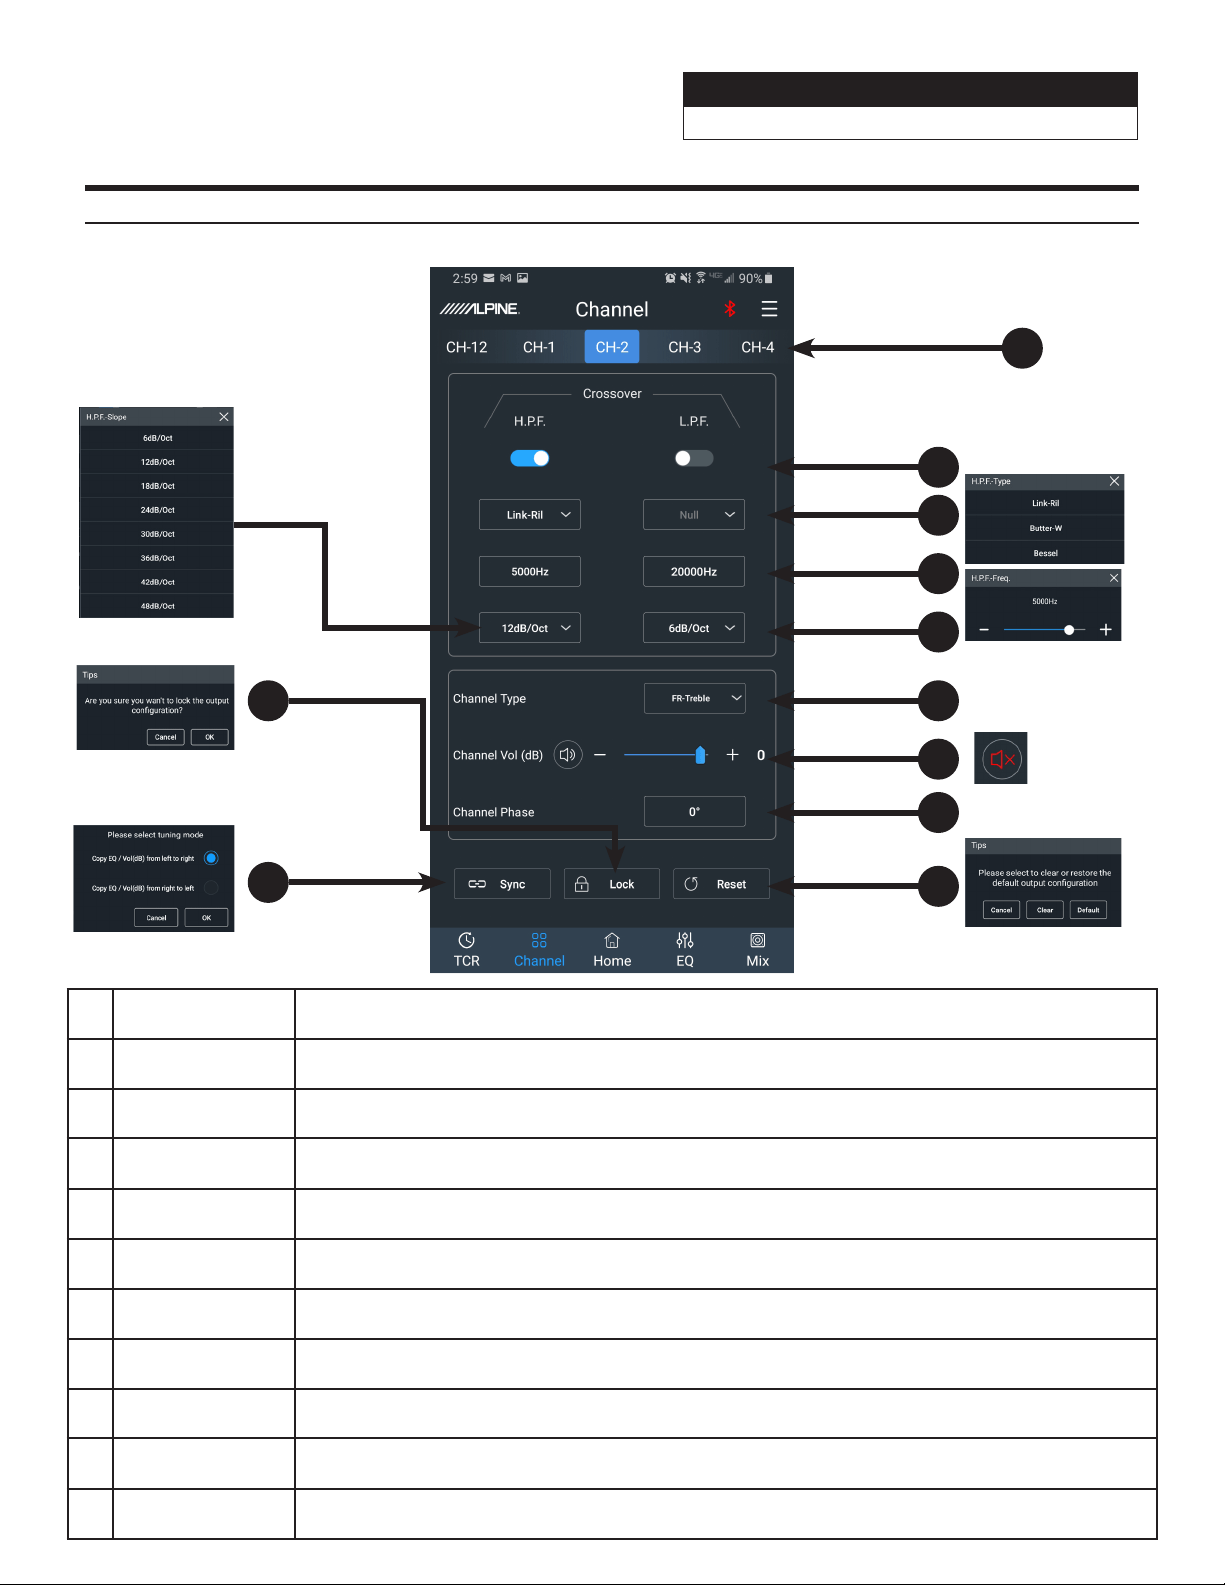
1 Channel Selection The 12 output channels can be selected by swiping left or right.
2 Crossover Press to select to turn the H.P.F or the L.P.F on or off.
3 Filter Type Select between 3 filter types: Linkwitz-Riley, Bessel, and Butterworth.
4
Crossover
Frequency
Select the crossover frequency (between 20Hz & 20kHz).
5 Slope Range Select the crossover slope (12dB, 18dB, 24dB, 30dB, 36dB, 42dB, or 48dB).
6 Channel Type
Select the type of speaker being used. This will bring up a popup menu that will list every speaker
type.
7 Channel Output Adjust Channel Output levels between 0-60. Press the speaker icon to mute.
8 Channel Phase Sets the phase from 0 to 180.
9 Reset Select “Clear” to clear out all the settings. Select “Default” to restore to factory default values.
10 Sync
Press to select to combine the data for the left and right channels. Select method to copy from left
to right or from the right to left.
11 Lock Sets the phase from 0 to 180.
Mobile Phone App Instructions- Channel
2
1
3
4
5
6
7
8
9
10
11
Sound Processor
PXE-0850X 20201201v1
z 23/28
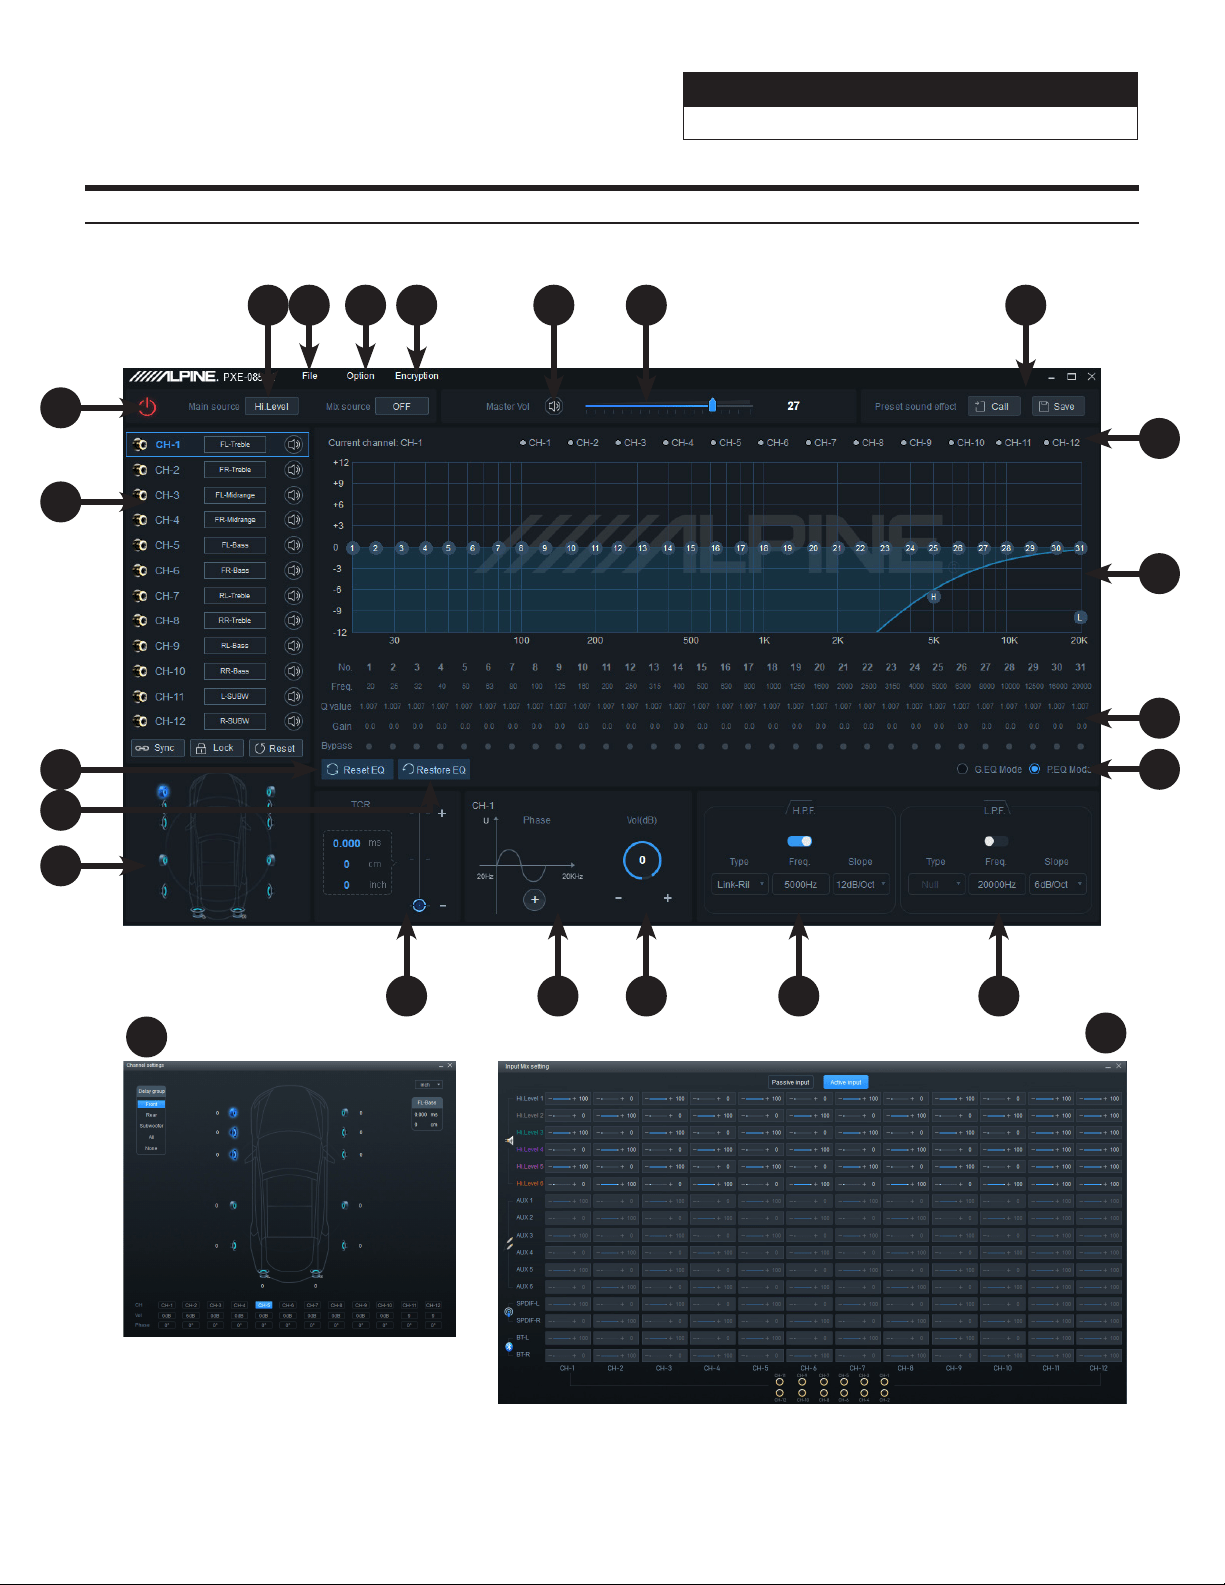
PC App Overview
21
20
12
17
15 1316
1 3 6 7
9
19
8
14
2 4 5
10
11
18
17
3

Sound Processor
PXE-0850X 20201201v1
z 24/28
PC App Overview Continued
1 Main Source Select input source (Hi-level, Aux, Bluetooth, and S/PDIF).
2 File Tab Load or Save presets stored on your PC.
3 Option Tab
Input Mix Setting- opens the Mixer popup screen.
The 12 channels for mixing can be selected by sliding left or right. Matrix mixing allows routing any
of the 6 Passive or Active inputs to any of the 12 Low Level or 8 High Level (25W) outputs.
Firmware Update- opens the explorer for a firmware update file.
Restore Factory Settings- resets everything to factory defaults.
Language- allows the user to change the language to Chinese.
About- shows device info
4 Encrytpion Tab Create a 6 digit password to encrypt the settings.
5 Mute Mutes the audio.
6 Volume Slider Adjusts the system volume up and down.
7
Preset Sound
Effect
Store and recall up to 6 preset sound settings.
8 Channel Selector Select the desired channels to overlay in the EQ Curve Window.
9 EQ Curve Window
Displays the current curve of the EQ adjustments. The numbers can be used to move the bands of
the EQ up and down. H and L can be used to drag the crossover settings.
10 EQ Settings
Frequency, Q Value, and Gain for each of the 31 bands can be adjusted. Each channel can be
bypassed as well.
11 P. EQ/G. EQ Mode
Select either the Parametric EQ mode or the Graphic EQ mode. Switching the mode will result in a
loss of all settings.
12 Low Pass Filter
Switch the Low Pass Filter on or off to cut high frequencies.
Select between 3 filter types: Linkwitz-Riley, Bessel, and Butterworth.
Select the crossover frequency (between 20Hz & 20kHz).
Select the crossover slope (12dB, 18dB, 24dB, 30dB, 36dB, 42dB, or 48dB).
13
High Pass Filter
Switch the High Pass Filter on or off to cut low frequencies.
Select between 3 filter types: Linkwitz-Riley, Bessel, and Butterworth.
Select the crossover frequency (between 20Hz & 20kHz).
Select the crossover slope (12dB, 18dB, 24dB, 30dB, 36dB, 42dB, or 48dB).
14 Channel Output Adjust Channel Output levels between -60-0.
15 Channel Phase Sets the phase from 0 to 180.
16 TCR Enter the value of the channel delay. The slider will display ms, cm, and inches.
17 Channel Settings
Clicking on one of the speaker icons will open the Channel Settings popup. Channel Output,
Channel Phase, TCR, and Delay Group can all be adjusted.
18
Restore/Bypass
EQ
Press to temporarily bypass the EQ settings. Press again to restore the settings.
19 Reset EQ Reset the EQ settings.
20 Output Channels
The 12 Output Channels can be selected and configured. Clicking on the channel will display it in the
EQ Curve window. Each channel can be assigned a location. Clicking on the speaker icon will Mute
channels invidually.
21 Connect Tab
Plug in the PC via USB and press the Connect Tab to allow the software to communicate with the
PXE-0850X.
Sound Processor
PXE-0850X 20201201v1
z 25/28
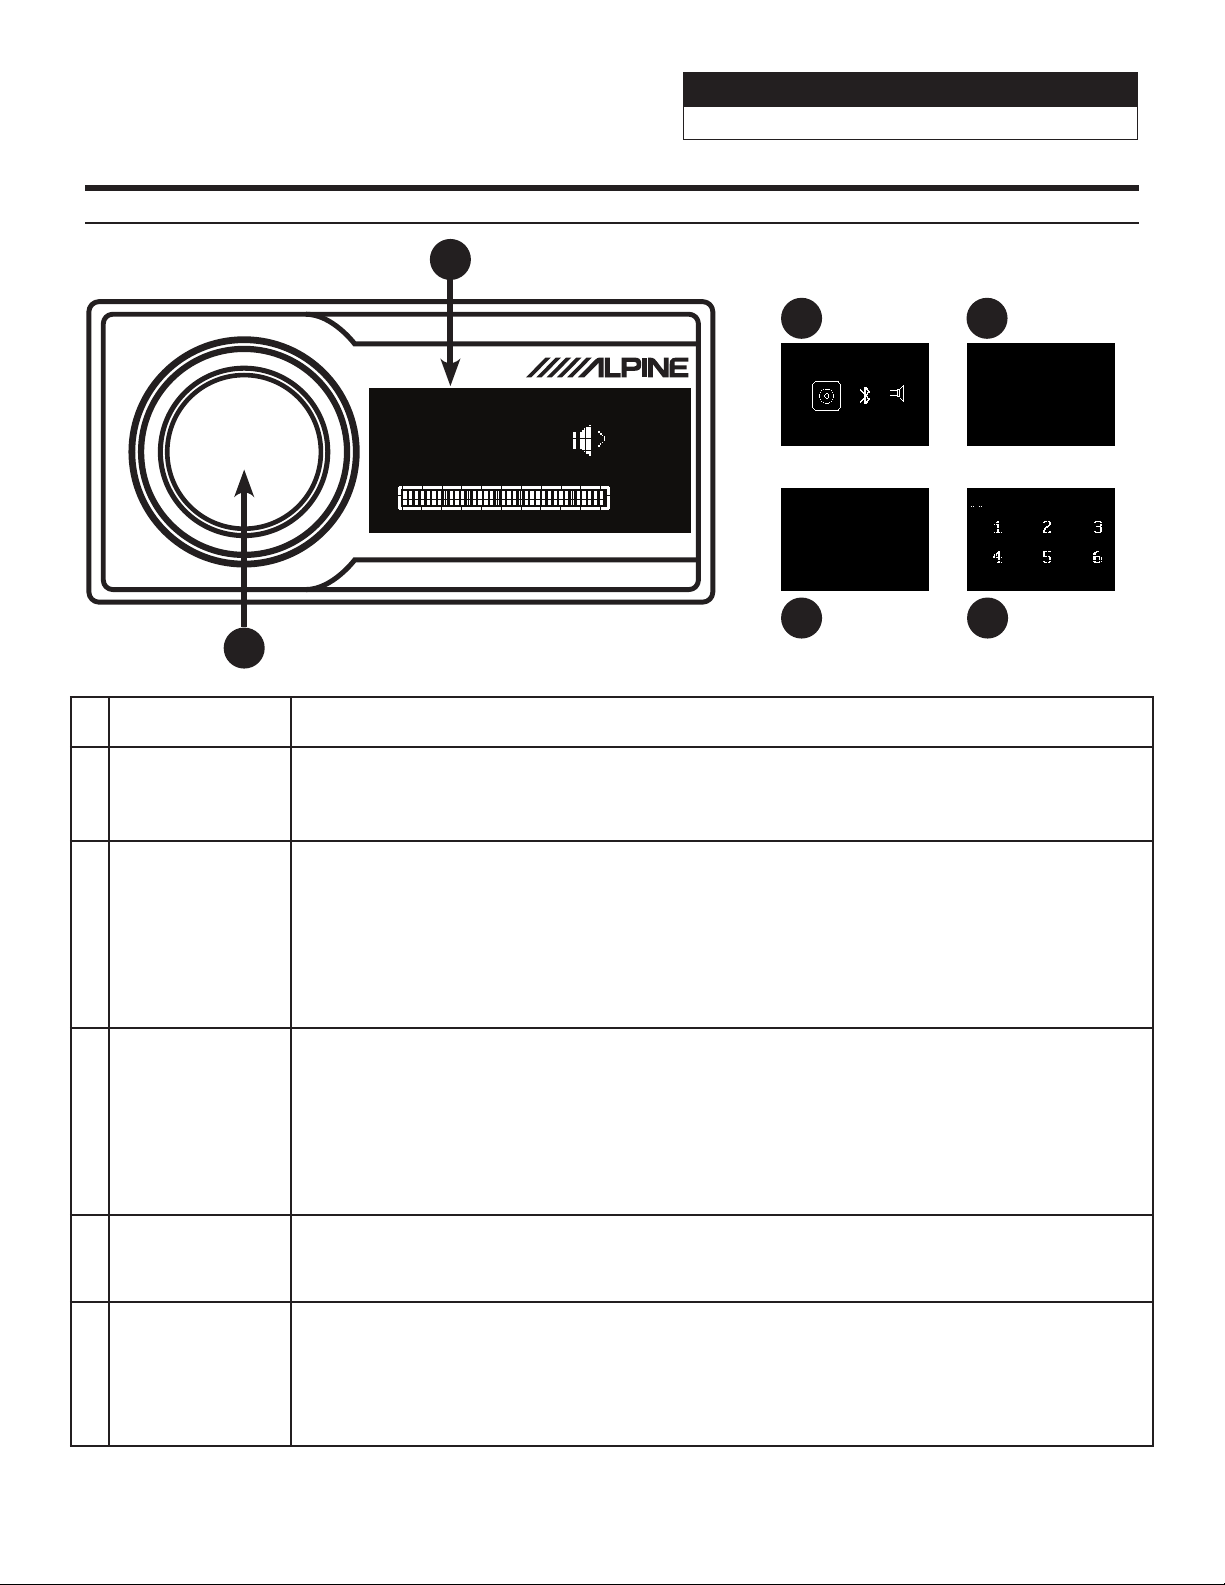
Controller Interface
1 Rotary Encoder
Rotate clockwise or counter-clockwise to scroll through selections. Press and hold for 3 seconds to
bring up the other menus. A short press forwards to the next menu screen.
2 Volume
The default screen is Volume. Adjust the master Volume by turning the Rotary Encoder clockwise
or counter-clockwise. Clockwise will increase the Volume and counter-clockwise will decrease the
Volume. The interface will display the Volume numericaly 0-35 and it will also display it incrementally
with the bars. Press the Rotary Encoder to Mute.
3 Main Source
1. Press and hold the Rotary Encoder for 3 seconds to bring up the source screen.
2. Rotate the Rotary Encoder right or left to scroll between Coaxial (digital), BT (Bluetooth), Hi.L
(high-level), Aux (low-level). When Bluetooth and either the Hi or Aux are connected at the same
time, the Bluetooth will default as the main source.
3. The selected Main Source is displayed by a box around the icon. There is no reason to press the
Rotary Encoder to select the source. The menu will automatically time out if nothing is pressed for 5
seconds and go back to the default Volume screen.
4 Mix Source
1. The second short press of the Rotary Encoder will select the Mix Source menu.
2. Rotate the Rotary Encoder right or left to scroll between Coaxial (digital), BT (Bluetooth), Hi.L
(high-level), Aux (low-level), and Mix Source Closed. When Mix Source Closed is selected the Mix
Source is set to off.
3. The selected Mix Source is displayed by a box around the icon. There is no reason to press the
Rotary Encoder to select the source. The menu will automatically time out if nothing is pressed for 5
seconds and go back to the default Volume screen.
5 Sub W
1. The third short press of the Rotary Encoder will select the Sub W menu.
2. Turn the rotary encoder left or right to adjust the subwoofer level between 0-15. If there is no sub
output defined in the Channel settings it will show the error message No Sub Channel!.
6 Preset
1. The fourth short press of the Rotary Encoder will select the Preset menu.
2. Turn the Rotary Encoder left or right to scroll through Presets 1-6.
3. The selected Preset is displayed by highlighting the number. Short press the rotary encoder and
the Preset will load. The menu will automatically time out if nothing is pressed for 5 seconds and go
back to the default Volume screen.
Note: If a laptop is connected or the phone app is launched and connected the Controller will be inoperable. It will display the
Alpine logo and can’t be used.
REMOTE COMMANDER PXE-0850X
VOLUME
35
1
3 4
5
2
Main Source
Coaxial BT Hi. l
Mix Source
Mix Source CLosed!
Preset 0
Sub w
No Sub Channel!
6
Sound Processor
PXE-0850X 20201201v1
z 26/28
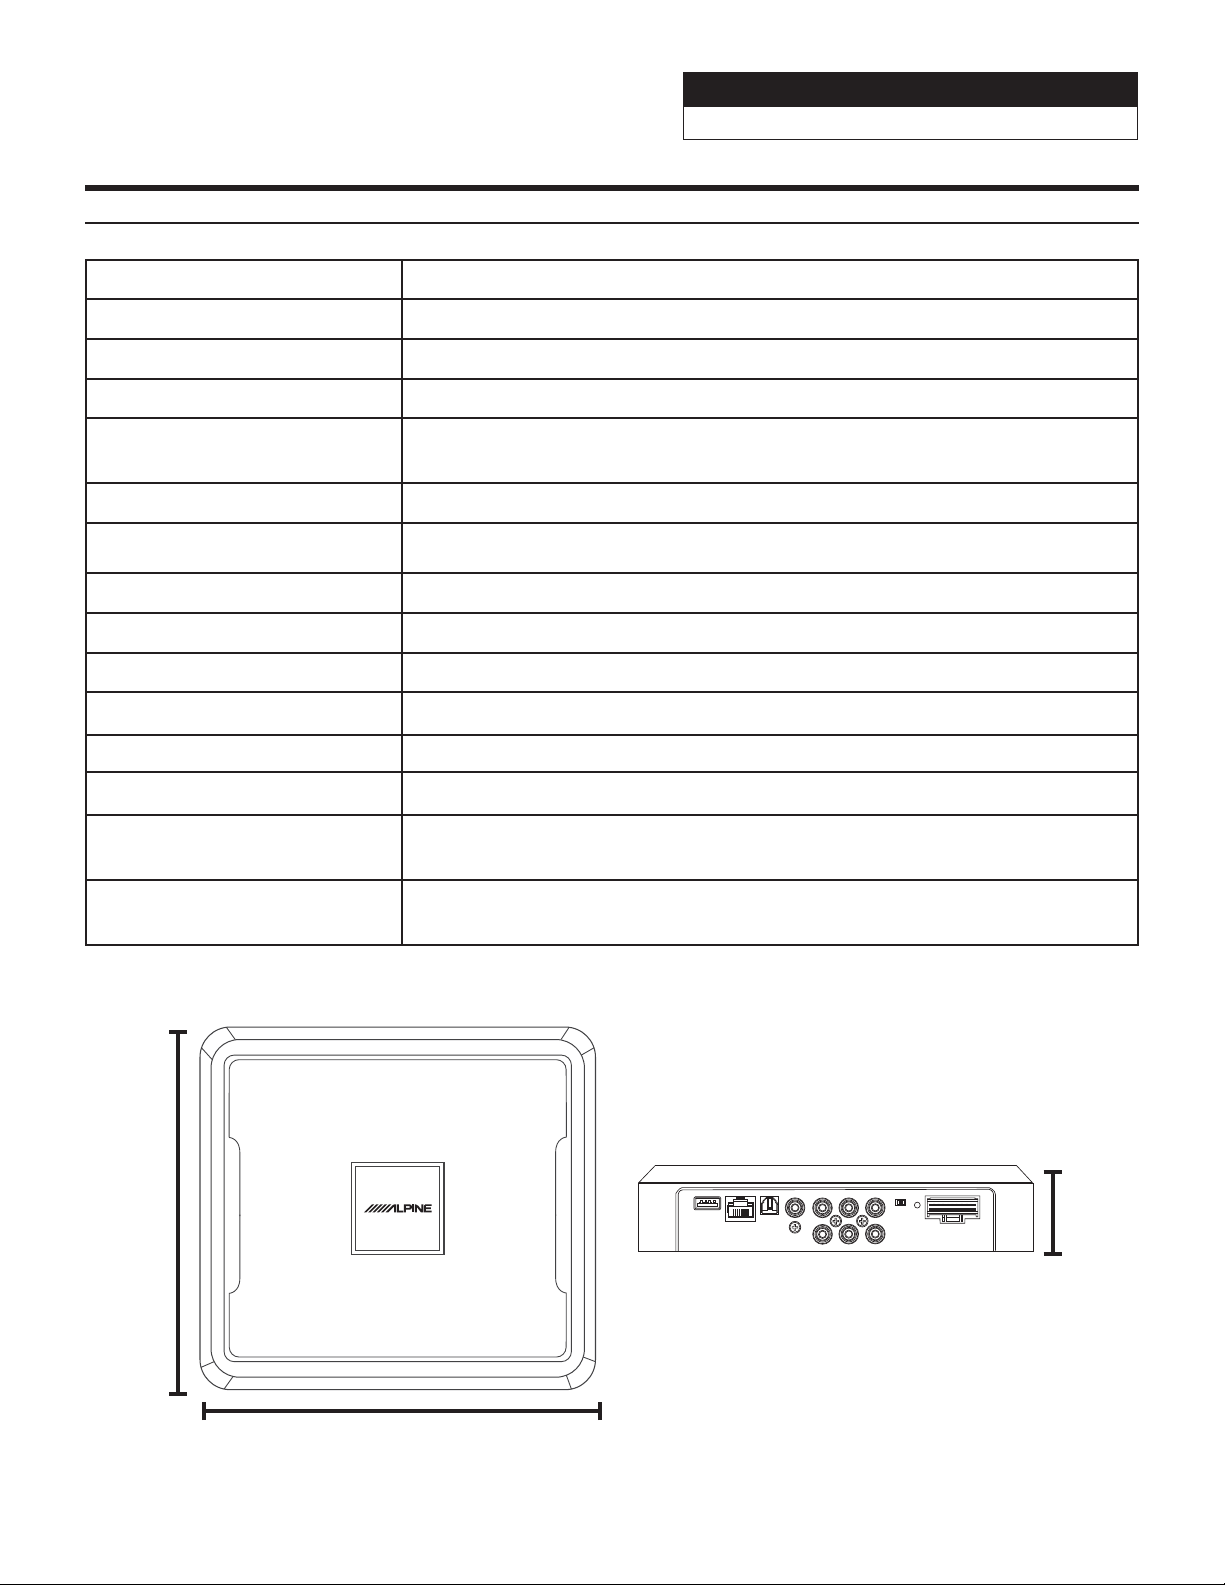
Specifications
Dynamic Range ≥110dB
Signal-To-Noise-Ratio ≥100dB
Total Harmonic Distortion ≤0.05%
Frequency Response 20Hz-20kHz
Input Impedance
Low-level input: 20KΩ
High-level input: 330Ω
Low-Level Output Impedance 51Ω
Scope Of Signal Input And Output RCA Input: 7.5Vpp; High Level: 24Vpp; RCA Output: 7.5Vpp
Ambient Temperature -20 - 60°C
Storage Temperature -40 - 85°C
Power Source 9V - 15V DC
Active REM Input Options of high-level activation (H1+/H1-) and ACC activation for selection
Active REM Output +12V activation; Voltage output (0.1A)
Stand-by Power Consumption ≤0.1W
Gross Weight
1.7kg
3 pounds 12 ounces
Dimensions
210mm (length) x 190mm (width) x 45mm (heigth)
8-17/64” (length) x 7-31/64” (width) x 1-49/64”
POWER
ACC
HOST
IN3
IN1
IN6 IN4 IN2
Coaxial
Optical
External
Bluetooth
USB
IN5
45mm
1-49/64”
190mm
7-31/64”
210mm
8-17/64”
Sound Processor
PXE-0850X 20201201v1
z 27/28
Troubleshooting Guide
Symptom Possible Cause Remedy
1
Controller only displays
Alpine logo and doesn’t allow
controls.
The USB cable is not plugged in the
right direction, a laptop is plugged
in, or the phone app is connected.
The USB cable needs to be plugged into
the PXE-0850X with the side that has the
connection for the controller going away
from the PXE-0850X.
A PC can’t be plugged into the PXE-0850X
and have use of the controller at the same
time. Disconnect the device.
The phone app can’t be connected via
Bleutooth to the PXE-0850X and have use of
the controller at the same time. Disconnect
the app.
2
Not getting full range sound.
OEM head unit has crossed over
outputs.
Outputs should be tested with an
oscilloscope and RTA to see what
frequencies they are outputting.
If the outputs are crossed over they will need
to be mixed with others to get a full range
signal. Test the output of the PXE-0850X
to see what channels need to be mixed in
more.
3
Top light on PXE-0850X is
flashing.
Device is connected and the app is
being used.
When the app is connected the lights on the
unit will flash. Once the app is disconnected
they will go back to steady.
4
Light stays on after vehicle is
shut off.
The PXE-0850X stays on for 2
minutes after the system shuts off.
This is normal operation.
5 Bluetooth module is flashing. No devices are paired to the unit.
If a device is paired to the PXE-0850X the
Bluetooth extension light will stop flashing
and the light will go steady.
Specifications
Type of Input Signals 6-channel high-level, 6-channel Aux, S/PDIF, Coaxial, Bluetooth
Output Type 12-Channel RCA output, 8-Channel high-level
Output Signal Gain Range of gain: mute, -59.9dB - 0dB
Native Sample Rate 32k - 96k
Output Signal EQ
1. Range of frequency: 20Hz - 20KHz, resolution 1Hz
2. Q-Factor: 0.404 - 28.85, resolution 0.01
3. Gain: -12.0dB - +12.0dB, resolution 0.1dB
Output Crossover
1. Types of filters: Butterworth, Linkwitz-Riley, and Bessel
2. Filter crossover points: 20Hz - 20KHz, resolution 1Hz
3. Filter slope (Slope) setting: 12dB/Oct - 48db/Oct
Output Phase Position And Delay
Phase: 0°/180°
Delay: 0.000-20 milliseconds, 0.00-692cm, 0.00-273inches
Number Of Preset Sound Settings 6
Sound Processor
PXE-0850X 20201201v1
z 28/28
Limited Warranty
ALPINE ELECTRONICS OF AMERICA, INC. (“Alpine”), is dedicated to quality craftsmanship and are pleased to oer this Warranty. We suggest that you read it thoroughly. Should you have any questions, please contact
your Dealer or contact Alpine at one of the telephone numbers listed below.
PRODUCTS COVERED:
This Limited Warranty (“Limited Warranty”) covers Alpine Car Audio Products and Related Accesso-
ries (“the Product”). Products purchased in Canada are only covered in Canada. Products purchased
in the U.S.A. are only covered in the U.S.A.
LENGTH OF WARRANTY:
This Warranty is in eect for one year (1) from the date of the original retail purchase of the
Product.
WHO IS COVERED:
This Warranty only covers the original purchaser of the Product, who must reside in the United
States, Puerto Rico, or Canada.
WHAT IS COVERED:
This Warranty covers defects in materials or workmanship (parts and labor), under normal use, in
the product.
WHAT IS NOT COVERED:
This Limited Warranty does not cover the following:
① Damage occuring during shipment of the Product to Alpine for repair (claims must be
presented to the carrier).
② Damage caused by normal wear and tear, accident or abuse, including burned voice coils
caused by over-driving the speaker (amplier level is turned up and driven into distortion
or clipping). Speaker mechanical failure (e.g. punctures, tears, or rips). Cracked or damaged
LCD panels. Dropped or damaged hard drives.
③ Damage caused by negligence, misuse, improper operation, or failure to follow instructions
contained in the Owner’s manual.
④ Damage caused by act of God, including without limitation, earthquake, re, ood, storms, or
other acts of nature.
Any cost or expense related to the removal or reinstallation of the product.
⑤ Service performed by an unauthorized person, company, or assosiation.
⑥ Any product which has the serial number defaced, altered, or removed.
⑦ Any product which has been adjusted, altered, or modied with Alpine’s consent.
⑧ Any product not distributed by Alpine within the United States, Puerto Rico or Canada.
⑨ Any product not purchased from an Authorized Alpine dealer.
HOW TO OBTAIN WARRANTY SERVICE:
① You are responsible for delivery of the Product to an Authorized Alpine Service Center or Alpine
for repair and for payment of any initial shipping charges. Alpine will, at its option, repair or
replace the product with a new or reconditioned product without charge. If the repairs are
covered by this Limited Warranty, and if the product was shipped to an Authorized Alpine
Service Center or Alpine, Alpine will pay the return shipping charges. The repaired or replaced
Product will continue to be covered under the original Limited Warranty period.
② You should provide a detailed description of the problem(s) for which service is required.
③ You must supply proof of your purchase of the product.
④ You must package the product securely to avoid damage during shipment. To prevent lost
packages it is recommended to use a carrier that provides a tracking service.
HOW WE LIMIT IMPLIED WARRANTIES:
ANY IMPLIED WARRANTIES INCLUDING FITNESS FOR A PARTICULAR PURPOSE AND
MERCHANTABILITY ARE LIMITED IN DURATION TO THE PERIOD OF THE EXPRESS WARRANTY SET
FORTH ABOVE AND NO PERSON OR THIRD PARTY IS AUTHORIZED TO ADD, MODIFY, OR EXTEND THE
TERMS OF THIS LIMITED WARRANTY AND/OR ASSUME FOR ALPINE ANY OTHER LIABILITY IN
CONNECTION WITH THE SALE OF THE PRODUCT.
HOW WE EXCLUDE CERTAIN DAMAGES:
TO THE MAXIMUM EXTENT PERMITTED BY APPLICABLE LAW, ALPINE AND ITS PARENT COMPANY
AFFILIATES AND SUBSIDIARIES EXPRESSLY DISCLAIM LIABILITY TO YOU UNDER ANY THEORY OF
LIABILITY FOR ALL INCIDENTAL, INDIRECT DAMAGES, SPECIAL PUNITIVE, AND CONSEQUENTIAL
DAMAGES WHICH MAY BE INCURRED BY YOU IN RELATION TO THE PRODUCT. THE TERM INCIDENTAL
DAMAGES INCLUDES, BUT IS NOT LIMITED TO , COSTS AND EXPENSES OF TRANSPORTING THE PROD-
UCT TO THE ALPINE SERVICE CENTER, LOSS OF THE ORIGINAL PURCHASER’S TIME, LOSS OF THE USE
OF THE PRODUCT, BUS FARES, CAR RENTALS OR OTHER COSTS RELATING TO THE CARE AND CUSTODY
OF THE PRODUCT. THE TERM CONSEQUENTIAL DAMAGES INCLUDES, BUT IS NOT LIMITED TO THE COST
OF REPAIRING OR REPLACING OTHER PROPERTY WHICH IS DAMAGED WHEN THIS PRODUCT DOES
NOT WORK PROPERLY. TO THE EXTENT PERMITTED BY APPLICABLE LAW, THIS LIMITED WARRANTY
AND THE REMEDIES PROVIDED HEREUNDER ARE EXCLUSIVE AND IN LIEU OF ALL OTHERS. TO THE
MAXIMUM EXTENT PERMITTED BY APPLICABLE LAW, THE TOTAL LIABILITY OF ALPINE, ITS PARENT
COMPANY, AFFILIATES, AND SUBSIDIARIES IN CONNECTION WITH THIS LIMITED WARRANTY AND/OR
THE PRODUCT SHALL NOT EXCEED THE AMOUNT YOU ACTUALLY PAID FOR THE PRODUCT.
HOW STATE/PROVINCIAL LAW RELATES TO THE WARRANTY:
This Warranty gives you specic legal rights, and you may also have other rights which vary from
state to state and province to province. In addition, some states/provinces do not allow limitations
on how long an implied warranty lasts, and some do not allow the exclusion or limitation of
incidental or consequential damages. Accordingly, limitations as to these matters contained herein
may not apply to you.
In any of the terms this Limited Warranty are held to be null, void, illegal or unenforceable for any
reason, the remaining terms of this Limited Warranty will remain in full force and eect.
IN CANADA ONLY:
For warranty service in the Canadian market contact:
Phone: (905) 513-7733 Fax: (905) 513-7740
Email: info@gentec-intl.com
Or visit our website at http://www.alpine-canada.com
HOW TO CONTACT CUSTOMER SERVICE:
Should the product require service, please call the following number for your nearest Authorized
Alpine Service Center:
CUSTOMER SERVICE: 1-800-421-2284, ext. 860304
TECH SUPPORT: 1-800-TECH-101 (1-800-832-4101)
Or visit our website at http://www.alpine-usa.com
This Limited Warranty is provided by ALPINE ELECTRONICS OF AMERICA, INC., whose principal oce is at 1500 Atlantic Blvd. Auburn Hills, MI 48326, U.S.A.
Do not send products to this address.
Call the toll-free number or viist the website to locate a service center.