
Oro Technology Co., LTD
Tire Pressure Monitoring System
MODEL : W410-A

ORO TPMS User Manual
To ensure correct operations and services please read these instructions
before installing and operating the TPMS
FCC Notices
This device complies with Part 15 of the FCC Rules. Operation is subject to the
following two conditions: (1) this device may not cause harmful interference, and
(2) this device must accept any interference received, including interference that
may cause undesired operation. This equipment has been tested and found to comply
with the limits for a Class B digital device, pursuant to Part 15 of the FCC Rules.
These limits are designed to provide reasonable protection against harmful
interference in a residential installation. This equipment generates, uses and can
radiate radio frequency energy and, if not installed and used in accordance with
the instructions, may cause harmful interference to radio communications. However,
there is no guarantee that interference will not occur in a particular installation.
If this equipment does cause harmful interference to radio or television reception,
which can be determined by turning the equipment off and on, the user is encouraged
to try to correct the interference by one or more of the following measures:
--Reorient or relocate the receiving antenna.
--Increase the separation between the equipment and receiver.
--Connect the equipment into an outlet on a circuit different from that to which
the receiver is connected.

-- Consult the dealer or an experienced radio/TV technician for help.
CAUTION:
Any changes or modifications not expressly approved by the grantee of this device
could void the user's authority to operate the equipment.
RF exposure warning:
The equipment complies with FCC RF exposure limits set forth for an uncontrolled
environment.
The equipment must not be co-located or operating in conjunction with any other
antenna or transmitter. This equipment should be installed and operated with a
minimum distance of 20cm between the radiator &your body.

W410 Tire Pressure Monitoring System
ORO-W410 Tire Pressure Monitoring Systems (TPMS), can monitor and provide tire pressure,
tire temperature, and car battery information in real time. This real time information can extend
tire life, reduce fuel consumption, help monitor battery status, and provide a more safe driving
condition.
ORO-W410 Tire Pressure Monitoring System includes 4 tire sensors, and1 receiver display.
The TPMS monitors the pressure/temperature by snap-in installation into the wheel, and
transmits the tire information wirelessly to the receiver. The TPMS display will trigger an alarm
when any abnormalities happen to the tire in order to prevent any possible accidents that may
happen to the driver/vehicle.
W410 TPMS Specification
1.Transmitter Specification
Battery Life
Up to 5~ 7 years in normal use
Power Supply
3V Lithium battery
Operating Humidity
Max 95%
Storage Temperature
-40 ℃ to 125 ℃
Operation Temperature
-40 ℃ to 115 ℃
RF Strength
0.0463 mW
Operating Frequency
433.92 MHz
Pressure Monitoring Range
0 ~ 116 psi (or 0~800 kPa or 0~8 bar)
Pressure Reading Accuracy
±1 psi (or ±7 kPa ; ± 0.1 bar)
Temperature Monitoring Range
-30 ℃ to 115 ℃
Temperature Reading Accuracy
±3 ℃
Module Weight
22.7g ± 1g
2. Receiver Module Specification
Power Supply
DC 9V ~ 16V
Operating Humidity
Max 95%
Operation Current
<200mA at DC 12V
Storage Temperature
-30℃ to 85 ℃
Operation Temperature
-25℃ to 85 ℃
Pressure Display Range
0 ~ 116 psi (or 0~800 kPa or 0~8 bar)
Temperature Display Range
-30 ℃ to 115 ℃
W410 Systems Operation
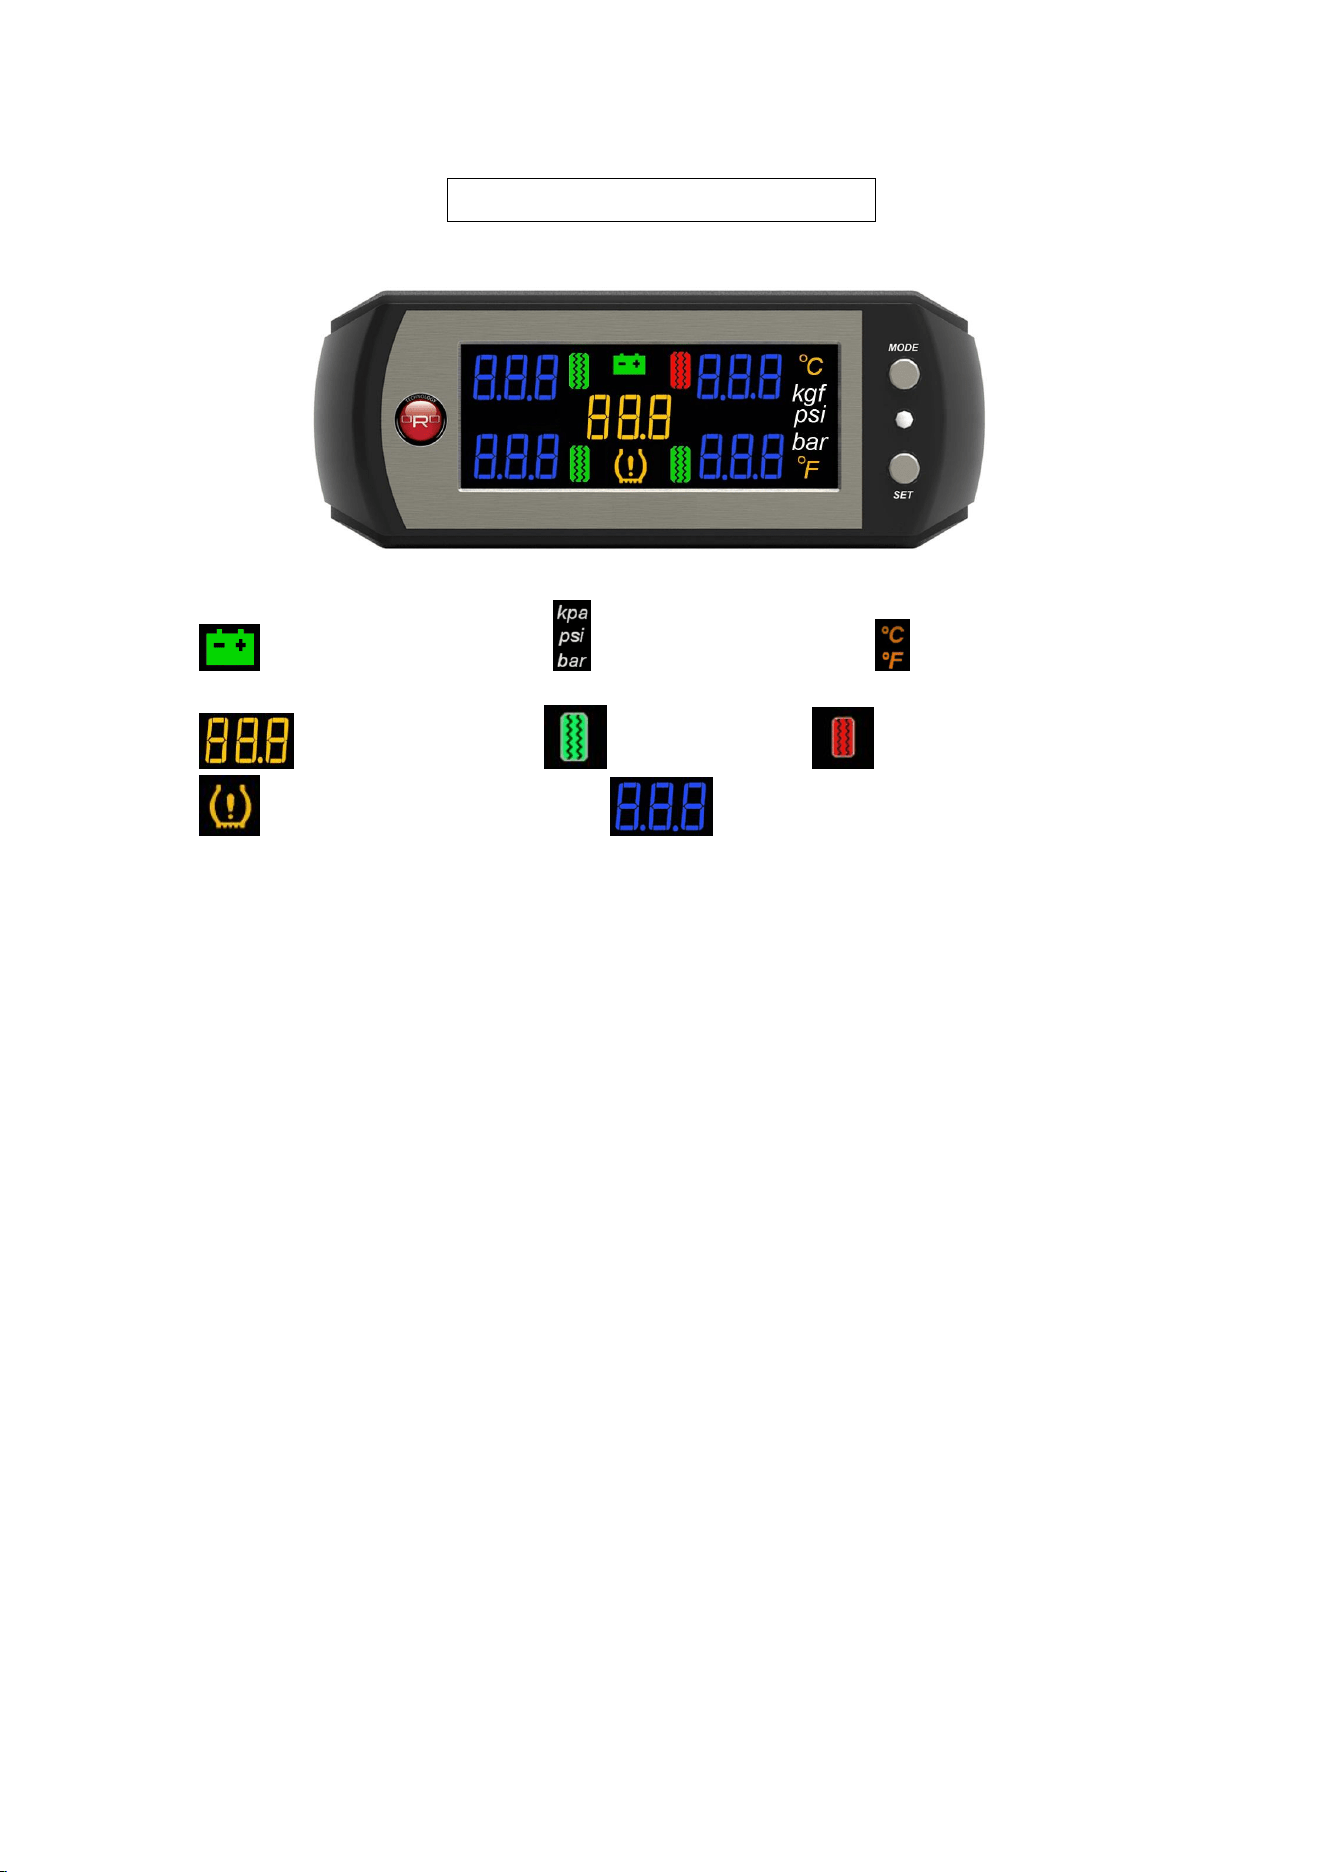
1. Display Signals Description
:Battery Signal :Pressure Unit : Temperature Unit
:Battery Voltage Value : Normal Tire :Abnormal Tire Pressure
:Abnormal Tire Condition Signal : Tire Pressure/Temperature Display Unit
NOTE
There is an ambient light sensor on the top right side of display that is able to adjust the
brightness automatically of the LED Display. The display will be brighter in the day and darker
in the night to ensure that the user will be able to read the LED Display clearly and not be
affected by external lighting.
2. Operation to Change Display Mode
W410 has 3 different modes. They are Tire Pressure Display Mode, Temperature Display
Mode, and Pressure-Temperature Alternate Mode. The display will show the tire pressure
mode once it is turned on. To enter the temperature mode press the MODE button once and
to display pressure-temperature press it another time. The system will continuously monitor
the tire pressure, tire temperature, battery voltage, no matter what kind of information is being
displayed and will notify the driver whenever anything abnormal happens. If the user does not
change from the factory default, the system will show the tire pressure display. The 3 modes of
display are as follows:
a. Pressure Display Mode: Display of 4 tires pressure and battery voltage unit only.
b. Temperature Display Mode: Display of 4 tires temperature and battery voltage unit only.
c. Pressure-Temperature Alternate Display Mode: Rotating display of tire pressure and
temperature with a constant display of battery voltage.
3. How to Change the Unit of Tire Pressure and Temperature
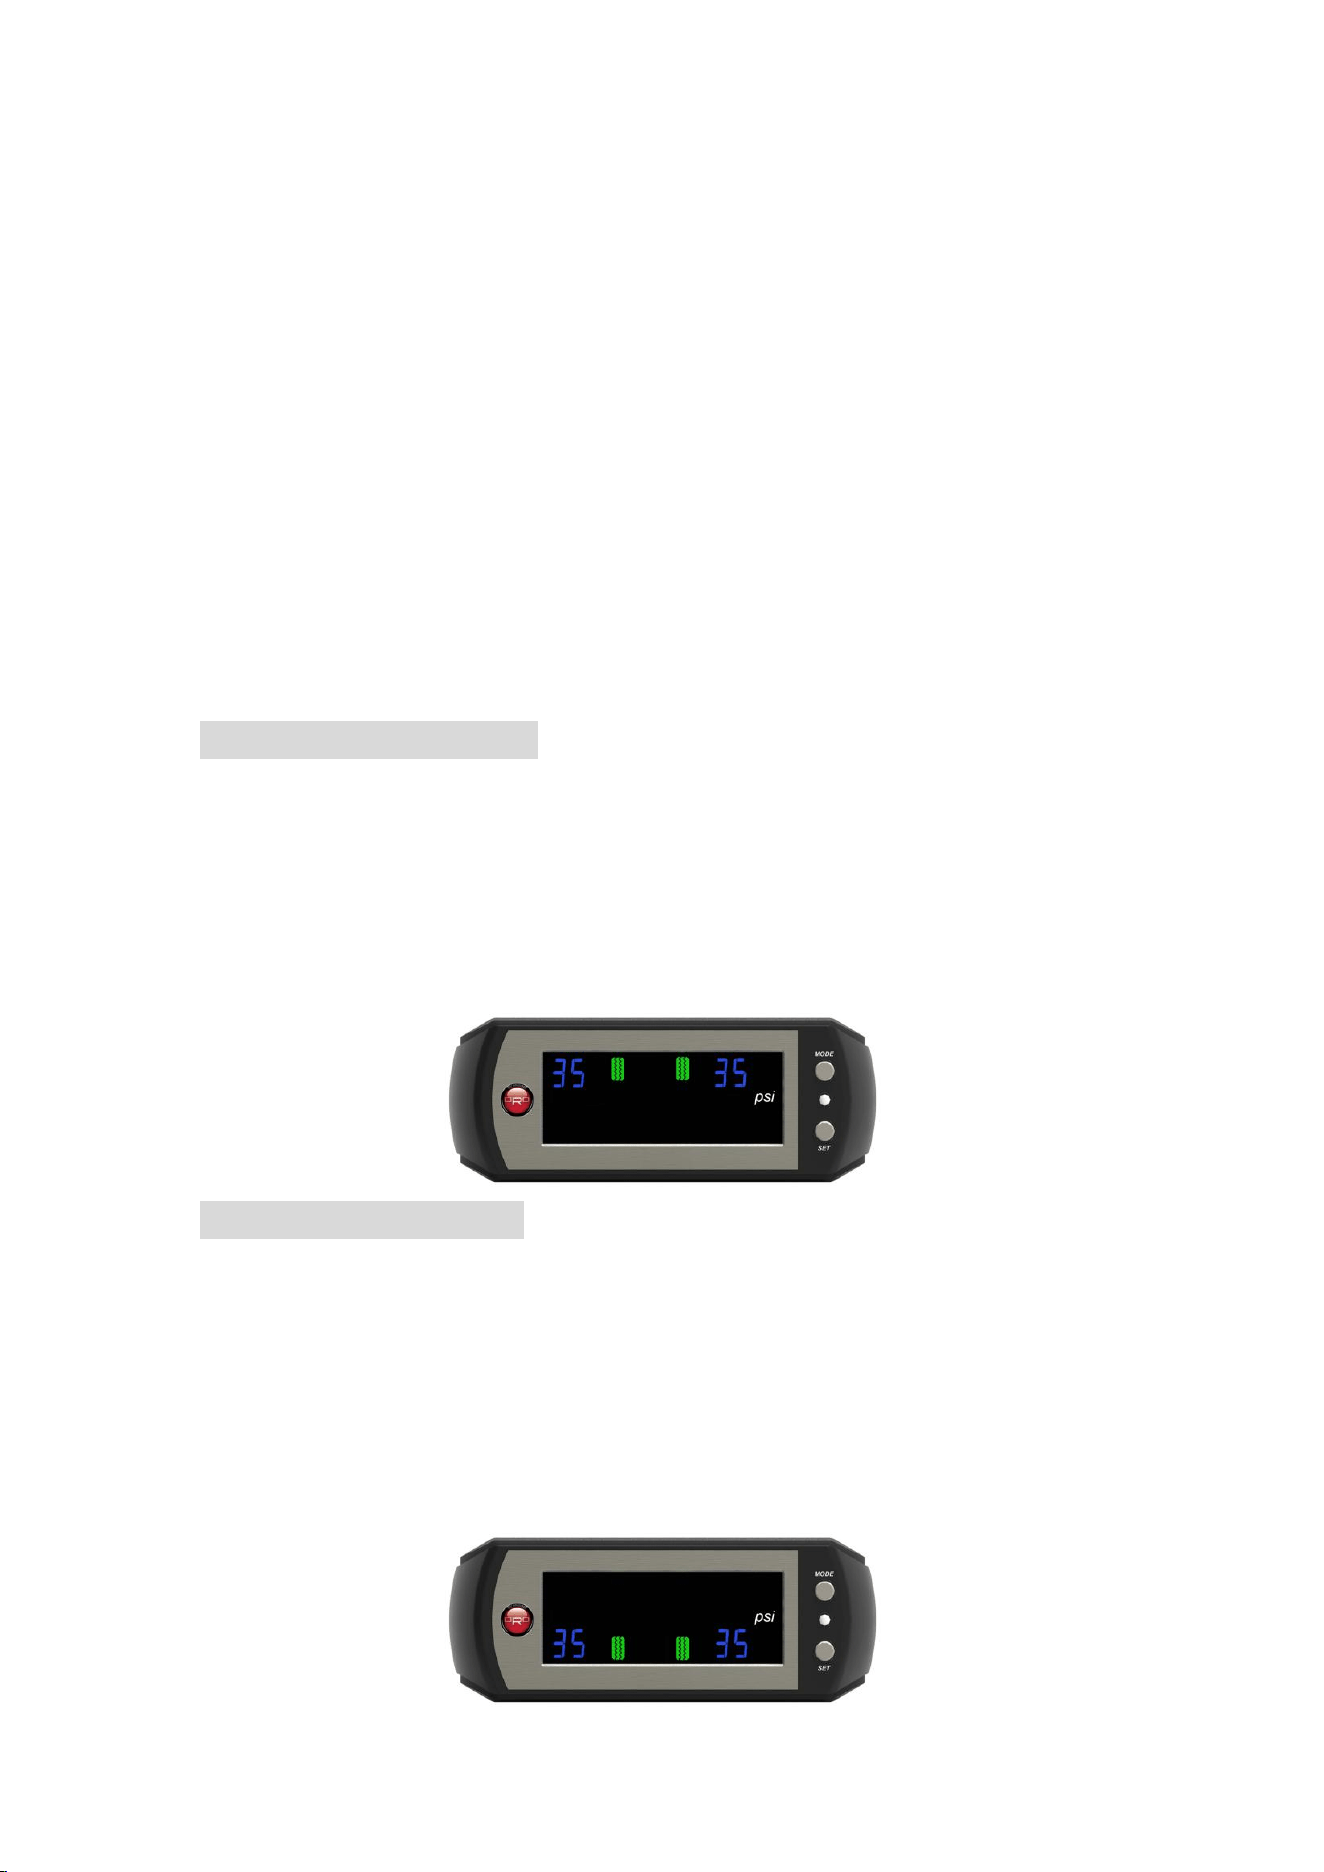
W410 displays 3 kinds of pressure units, bar, kPa and psi. For temperature, Celsius or
Fahrenheit can be displayed. To change the factory default for pressure or temperature, press
the MODE button for 3 sec.
4. How to Modify Factory Default
W410 has 4 factory default modes for users to choose from. Press the SET button
continuously for 3 sec. to enter the set up mode from Front Tire-Standard tire pressure set up,
Rear Tire-Standard tire pressure set up, Tire Temperature-Over Temperature Warning, and
Operation Mode. For other parameter settings, please refer below for the relevant process:
NOTE: The user should change the suitable pressure unit for own vehicle before entering into
the setup mode.
Set up Front Tire Pressure Value: Range 24psi~80psi (1.7bar~5.5bar), the default set
value is 35psi (2.4bar)
a. Press the SET button for 3 seconds to enter the Front Tire-Standard Tire Pressure Setting
Mode. The unit increases by 1 psi with each press of the button. When it has reached
80psi (5.5bar), pressing the button again will return the system unit to 24 psi (1.7bar).
b. The system will enter to Rear Tire Pressure Value Mode automatically by quickly
pressing the SET button.
Set up Rear Tire Pressure Value: Range: 24psi~80psi (1.7bar~5.5bar), the default set value
is 35psi (2.4bar)
a. Press the SET button for 3 seconds to enter the Rear Tire-Standard Tire Pressure
Setting Mode. The unit increases by 1 psi with each press of the button. When it has
reached 80psi (5.5bar), pressing the button again will return the system unit to 24 psi
(1.7bar).
b. The system will enter to High Temperature Alarm Value Mode automatically by
quickly pressing the SET button.
Set up Tire High Temperature Value︰Range: 60℃~90℃ (140℉到 194℉), the default set
value is 80℃ (176℉)。
a. Press the SET button for 3 seconds to enter the Standard Tire Temperature Setting Mode.
The unit increases by 1℃ (1℉) with each press of the button. When it has reached 90℃
(194℉), pressing the button again will return the system unit to 60℃ (140℉).
b. The system will enter to display set Turn ON Mode automatically by quickly pressing
the SET button.
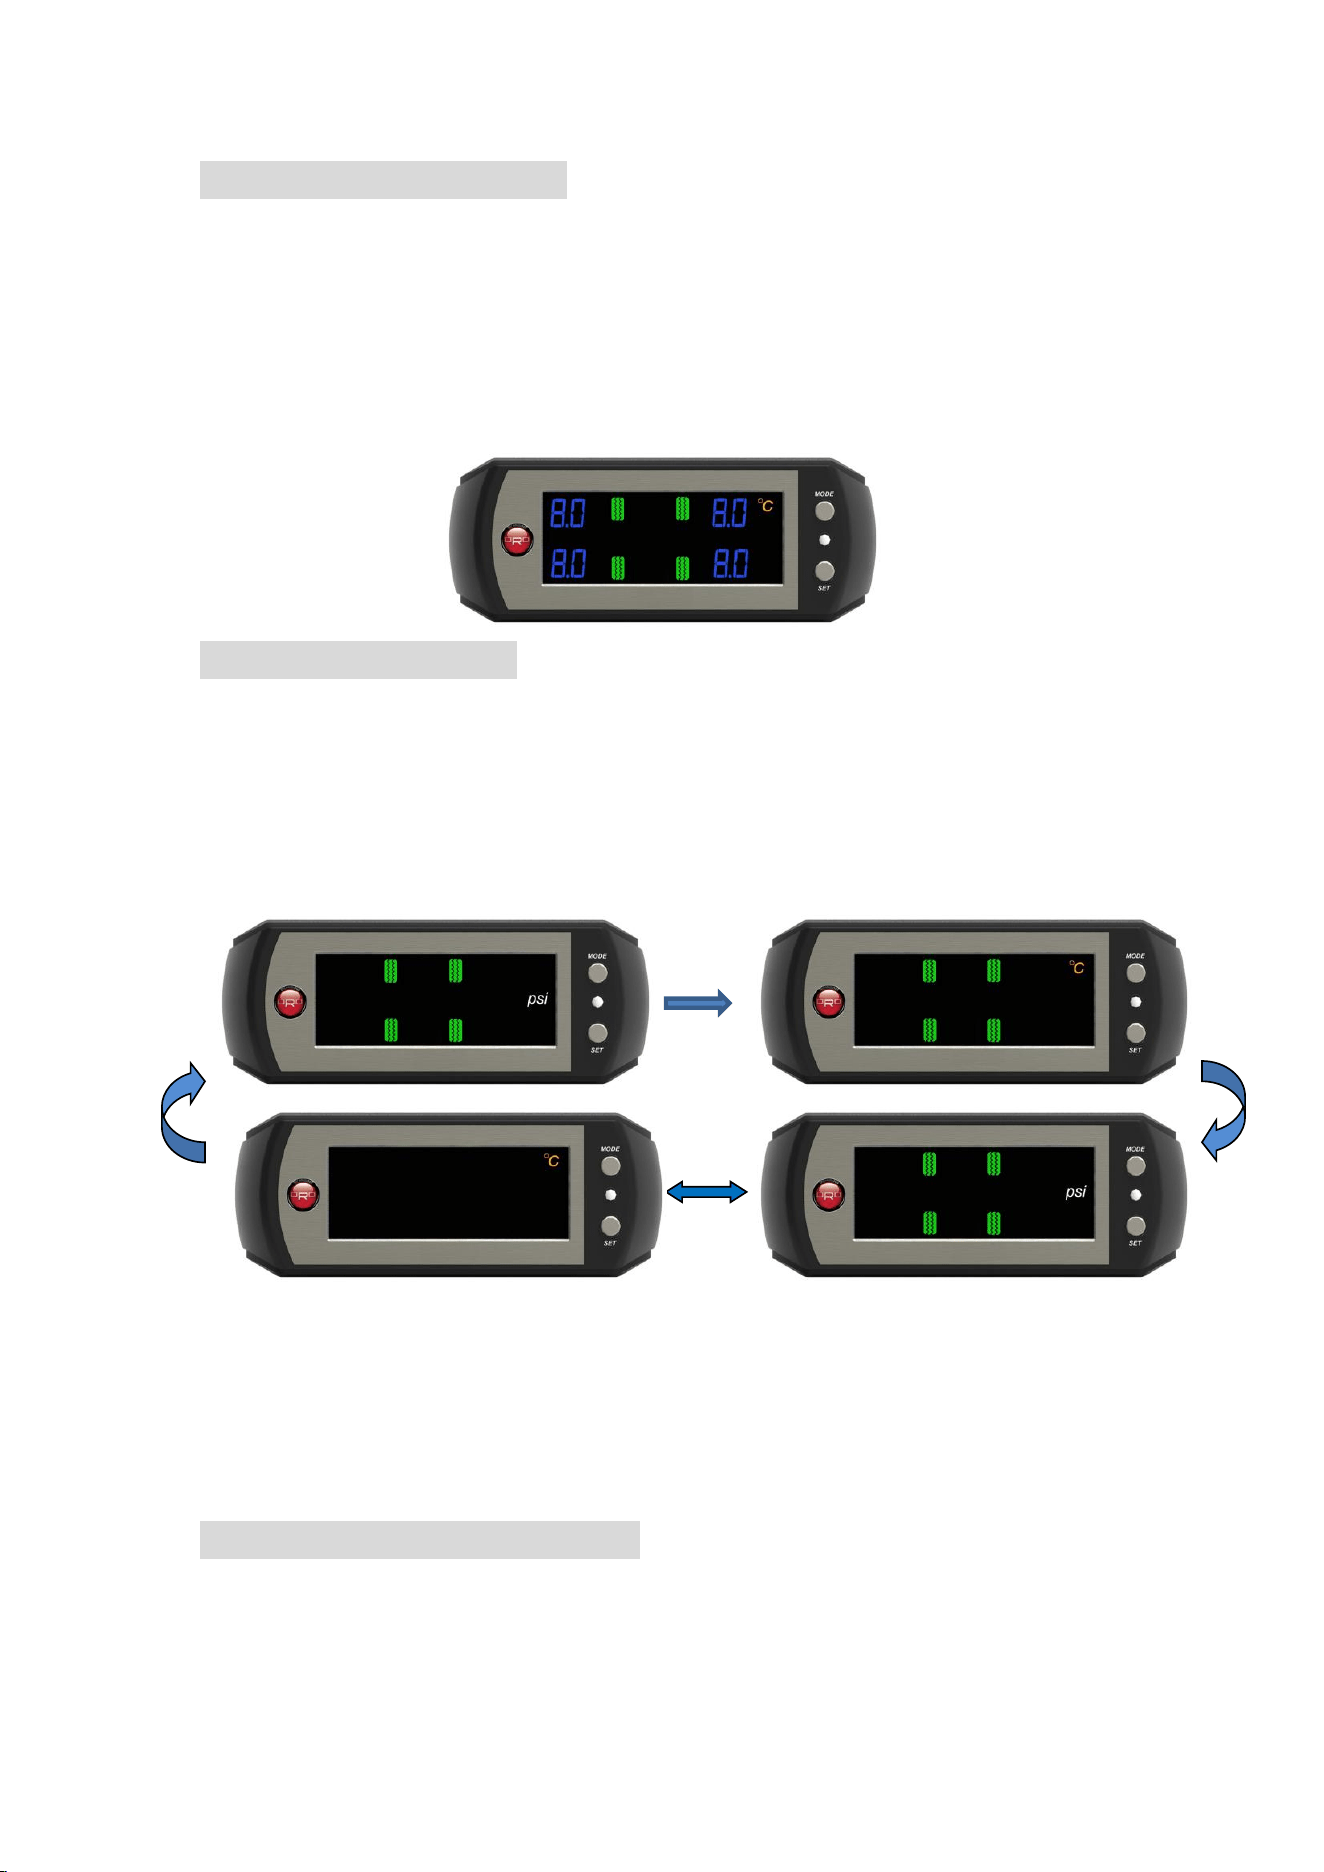
Set up Device TURN ON Mode︰Displaying Pressure, Temperature and
Pressure/Temperature rotate displaying, 3 modes for option, the default set is Pressure
displaying.
a. Quickly Pressing the Mode button will allow selection of the TURN ON Mode.
b. 3 modes are shown below. The pressure value can be psi, kPa, bar. The Temperature
value can be ℃, ℉ which can be changed by following the above instructions.
Pressure mode display Temperature mode display
Rotate Displaying Pressure & Temperature
c. After quickly Pressing the SET button to TURN ON the device successfully, the
system will enter AUTO Display TURN OFF Timing Set Mode automatically.
AUTO Display TURN OFF Timing Set Mode︰There are 4 modes to select: Normal ON, 1
minute display, 3 minutes display and 5 minutes display.
a. Quickly Press MODE button to select the AUTO TURN OFF Timing Mode. The AUTO
TURN OFF timing starts counting after receiving the 4 tires info. The system keeps
monitoring tire pressure, tire temperature and battery, any upon any abnormality,
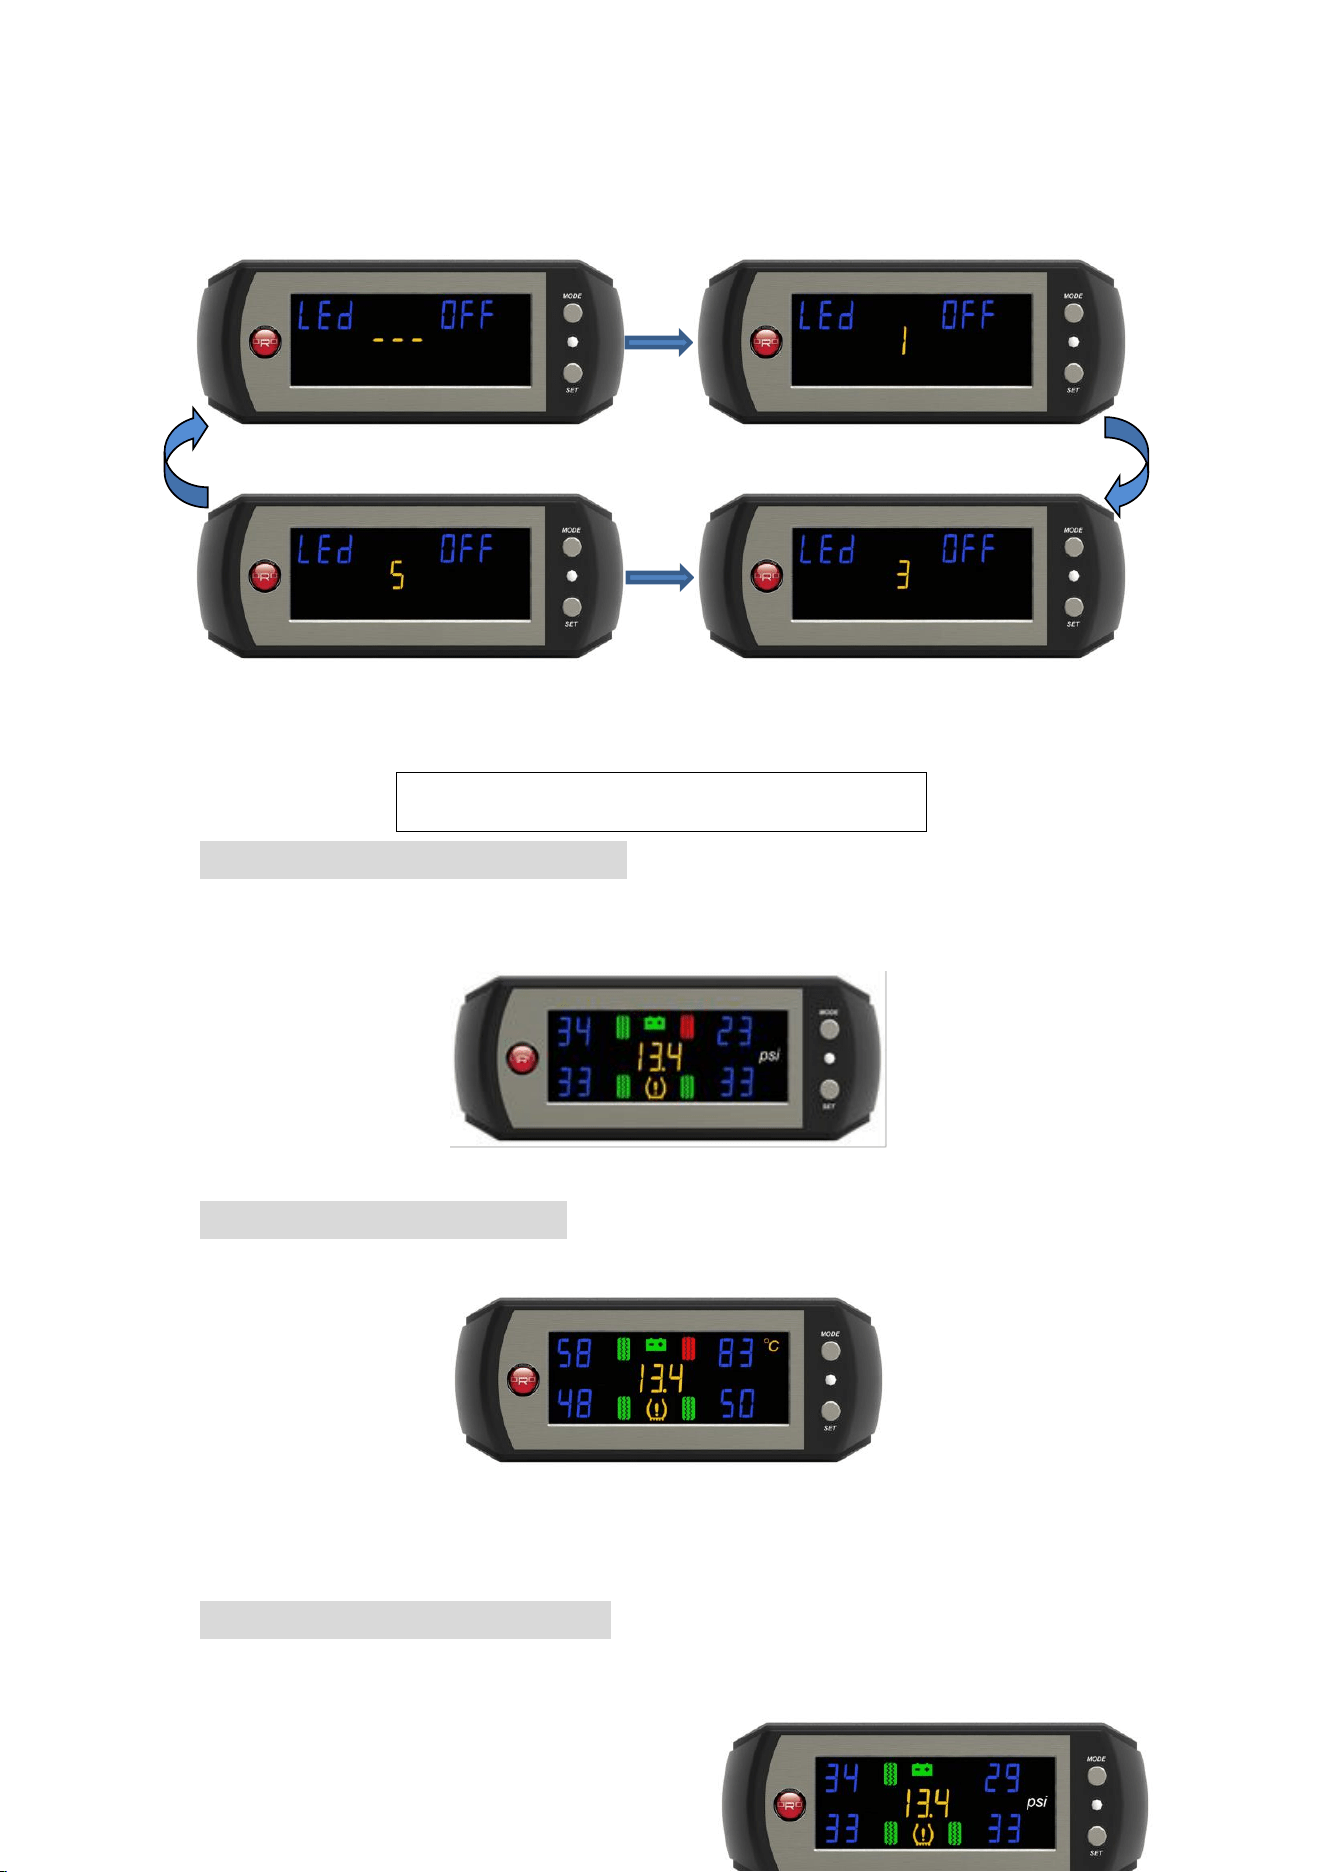
will alarm and display instantly.
b. The 4 mode display are as bellows︰
Display Normal ON 1 Minute Display
5 Minutes Display 3 Minutes Display
W410 Alarm Mode Description
Tire Pressure over Low/High Alarm Mode︰When tire pressure is over low or high than
25% of set value.
Warning Method:The abnormal tire will flash RED with Beep sound as warning.
Tire Temperature High Alarm Mode︰When the tire temperature is higher than set value.
Warning Method:The abnormal tire will flash RED with Beep sound as warning.
Rapid Pressure Air Leaking Alarm Mode︰When the tire has a rapid pressure air leaking
situation. (Vary more than 3psi or 20kPa in 30sec.)
Warning Method:The abnormal tire will flash RED with Beep sound as warning.
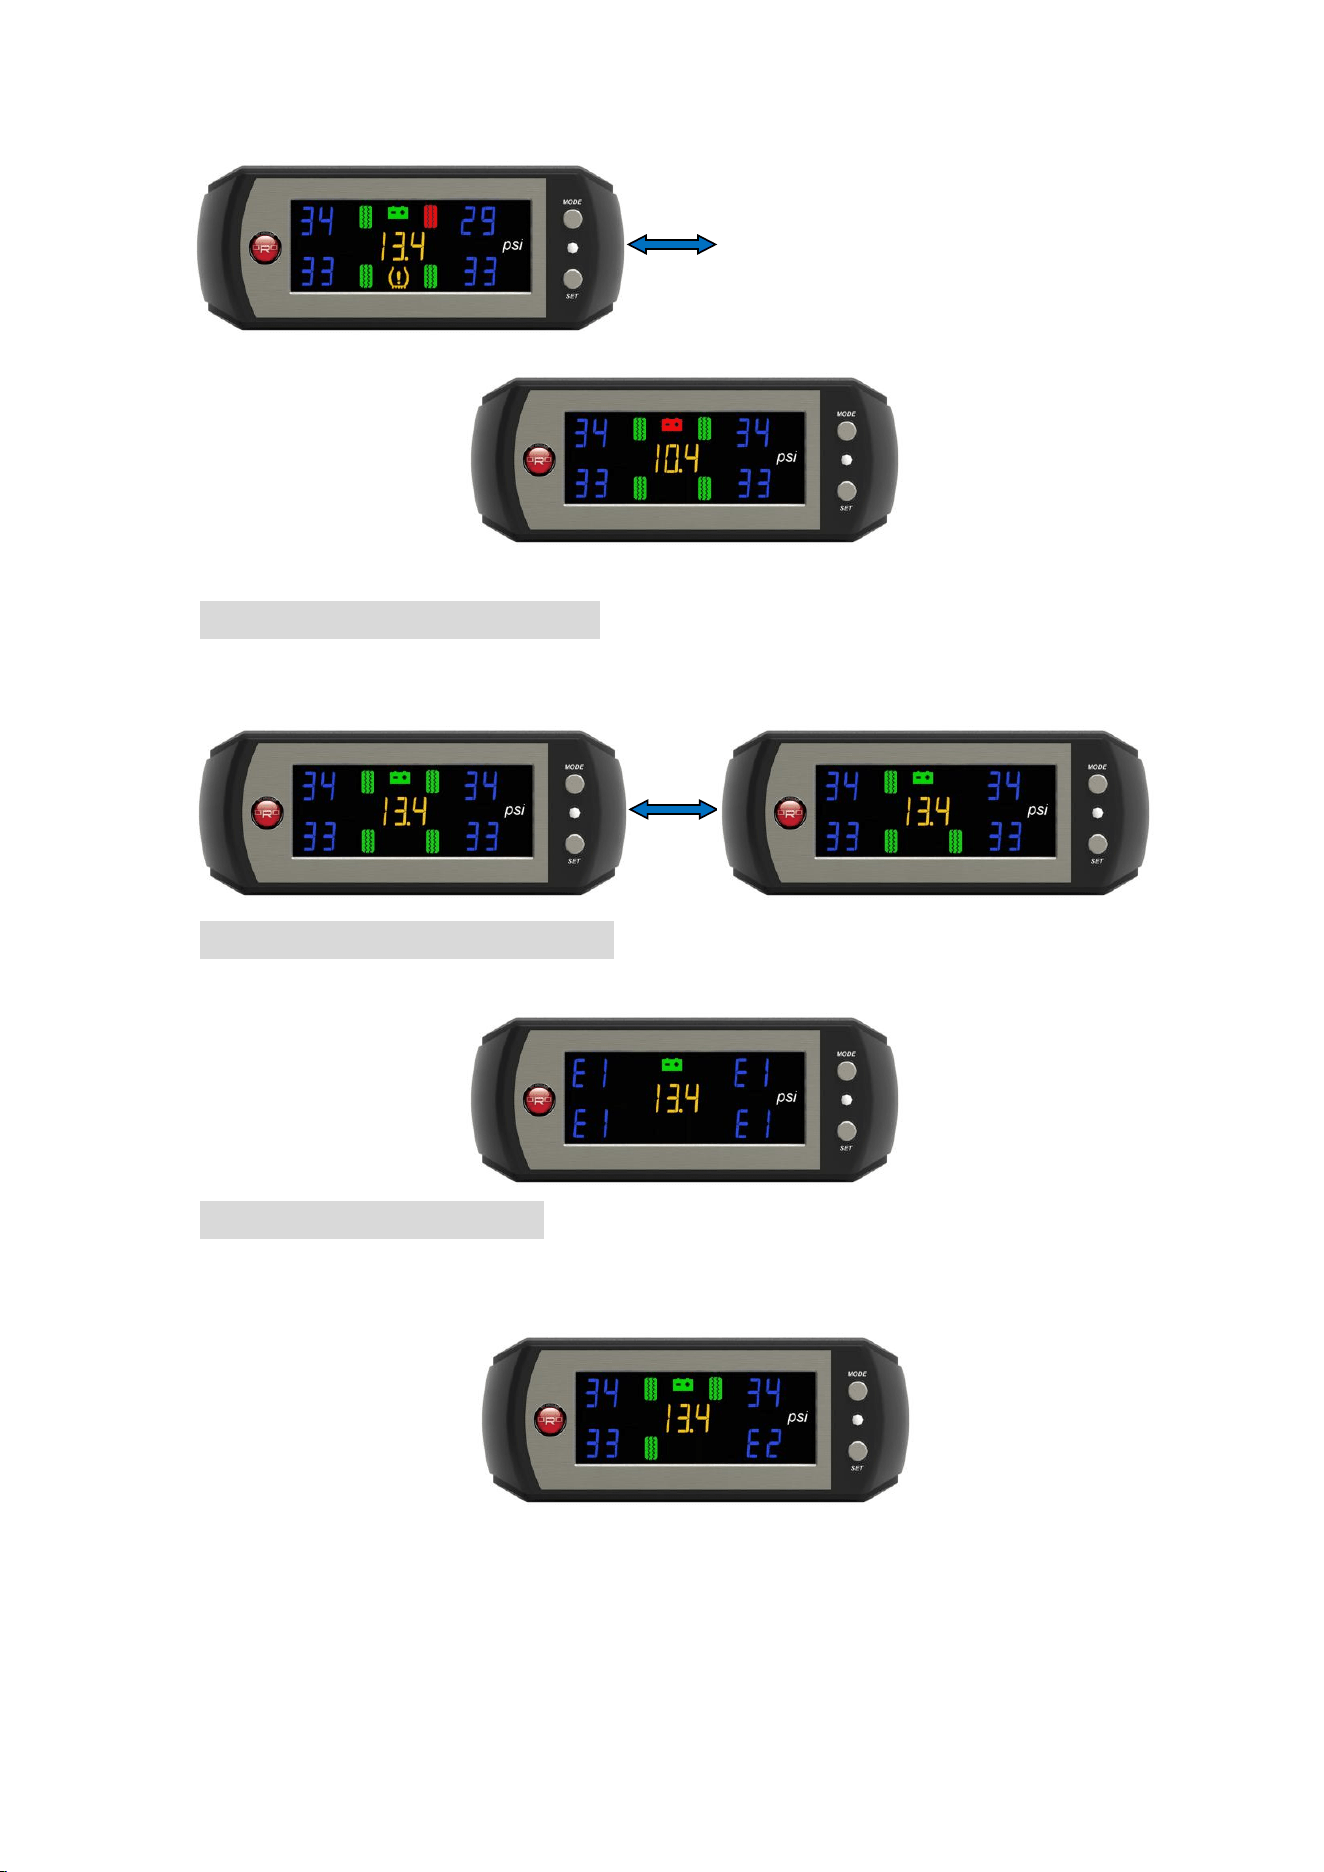
Battery Low Voltage Alarm Mode︰When battery voltage is lower than 11.5V.
(Regardless the vehicle engine is operating or not.
Warning Method:Battery light will show in RED.
TPMS Sensor Low Battery Alarm Mode︰When the tire sensor has a low battery status.
(Suggest to replace the tire sensor with new ORO sensor)
Warning Mode:The tire light will flashing.
Receiver Display Abnormal Alarm Mode︰When receiver display has a default failure.
Warning Mode:Show E1 and Greed Light does not work.
No Signal Detecting Alarm Mode︰When receiver module is not able to receive signal
from tire sensor over 10 minutes.
Warning Mode:Show E2 on the display without Green Light.
NOTE:1. When the alarm beep sound happens, pressing the MODE key continuously for
3 second will turn off the audible alarm.
2. When there is an abnormal status in the receiver module and the unit is not
able to receive signals from tire sensor, please contact customer service.
W410 Set for Tire Changing and Rotation
Upon completion of changing or rotation of tires, the user should also reset the position of the
tires on the display unit. W410 has provided 7 modes where users can reset quickly and keep
the tire position as it in on the display unit.
The user should ascertain that the display is plugged in, when carrying out the Tire
Changing/Rotating Mode. If the power is interrupted, please repeat the reset process in order
to proceed successfully. The user should confirm whether the display is able to monitor all the
tire information correctly, if not, please carry out the reset process.
Set up Process for Enter the Tire Changing and Rotation
Depress the SET button and MODE button simultaneously for 3 seconds. The system will
enter set up mode 1. Pressing once each time will allow the user to move from mode 1 to
mode 6 and back to normal display.
Description for Each Set up Process
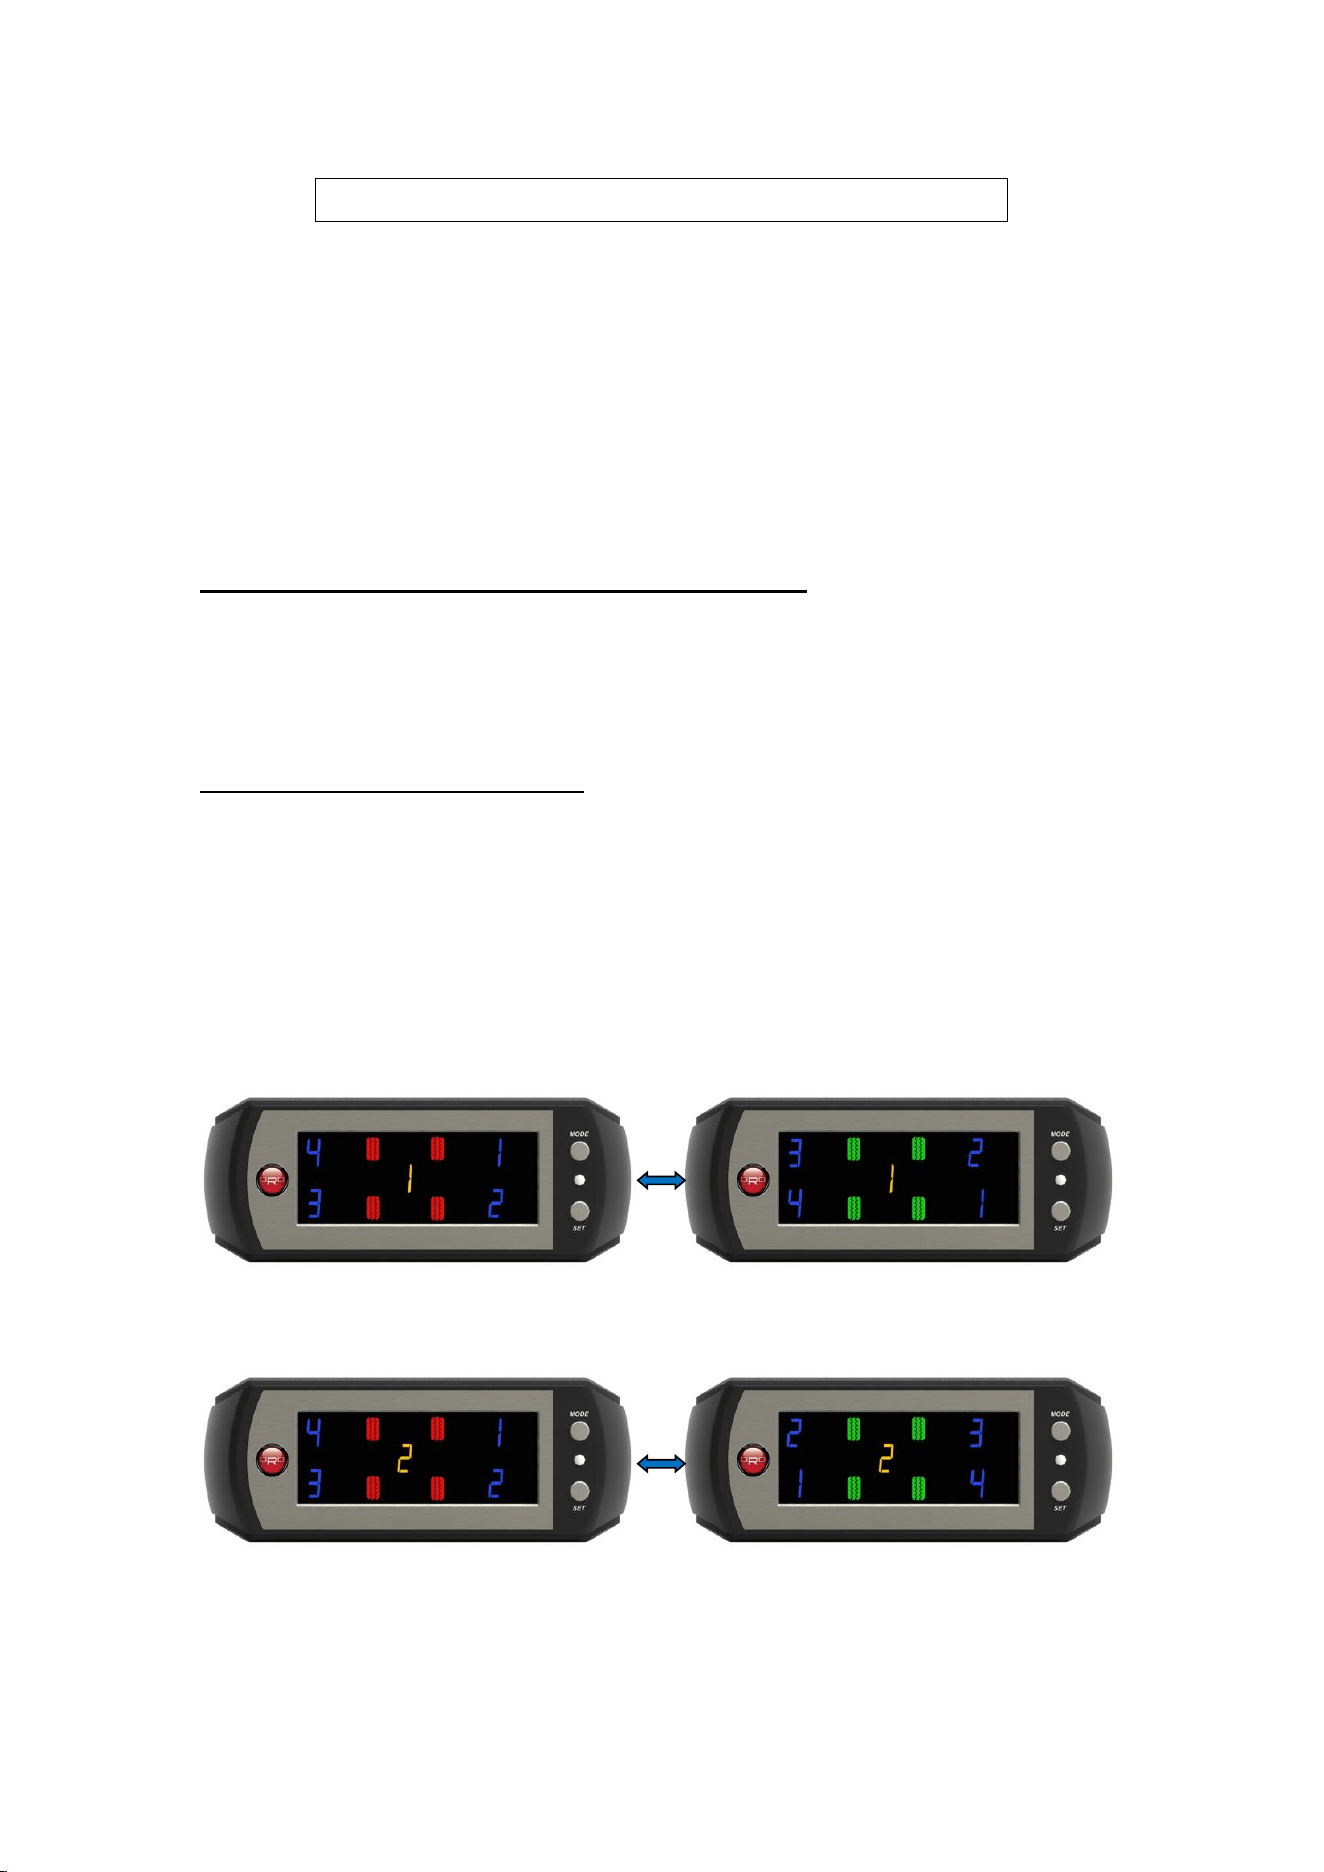
When the display shows a yellow “1”, this means the display is now in mode 1 and the 4 red
lights means the tire position are not set as shown in Fig. 1. The 4 green lights indicates the
tire position that the user wants to set up as shown in Fig. 2. Press the SET button
continuously for 3 sec. until sounds beep indicating set up complete for mode 1. (Front and
Rear Tires Exchange) then the system will return to the normal operating display.
Mode 1: Front and Rear Tire Parallel Exchange
Mode 2: Tire Diagonal Exchanged
Mode 3:Front Tire Diagonal Exchange, Rear Tire Parallel Exchange to Front
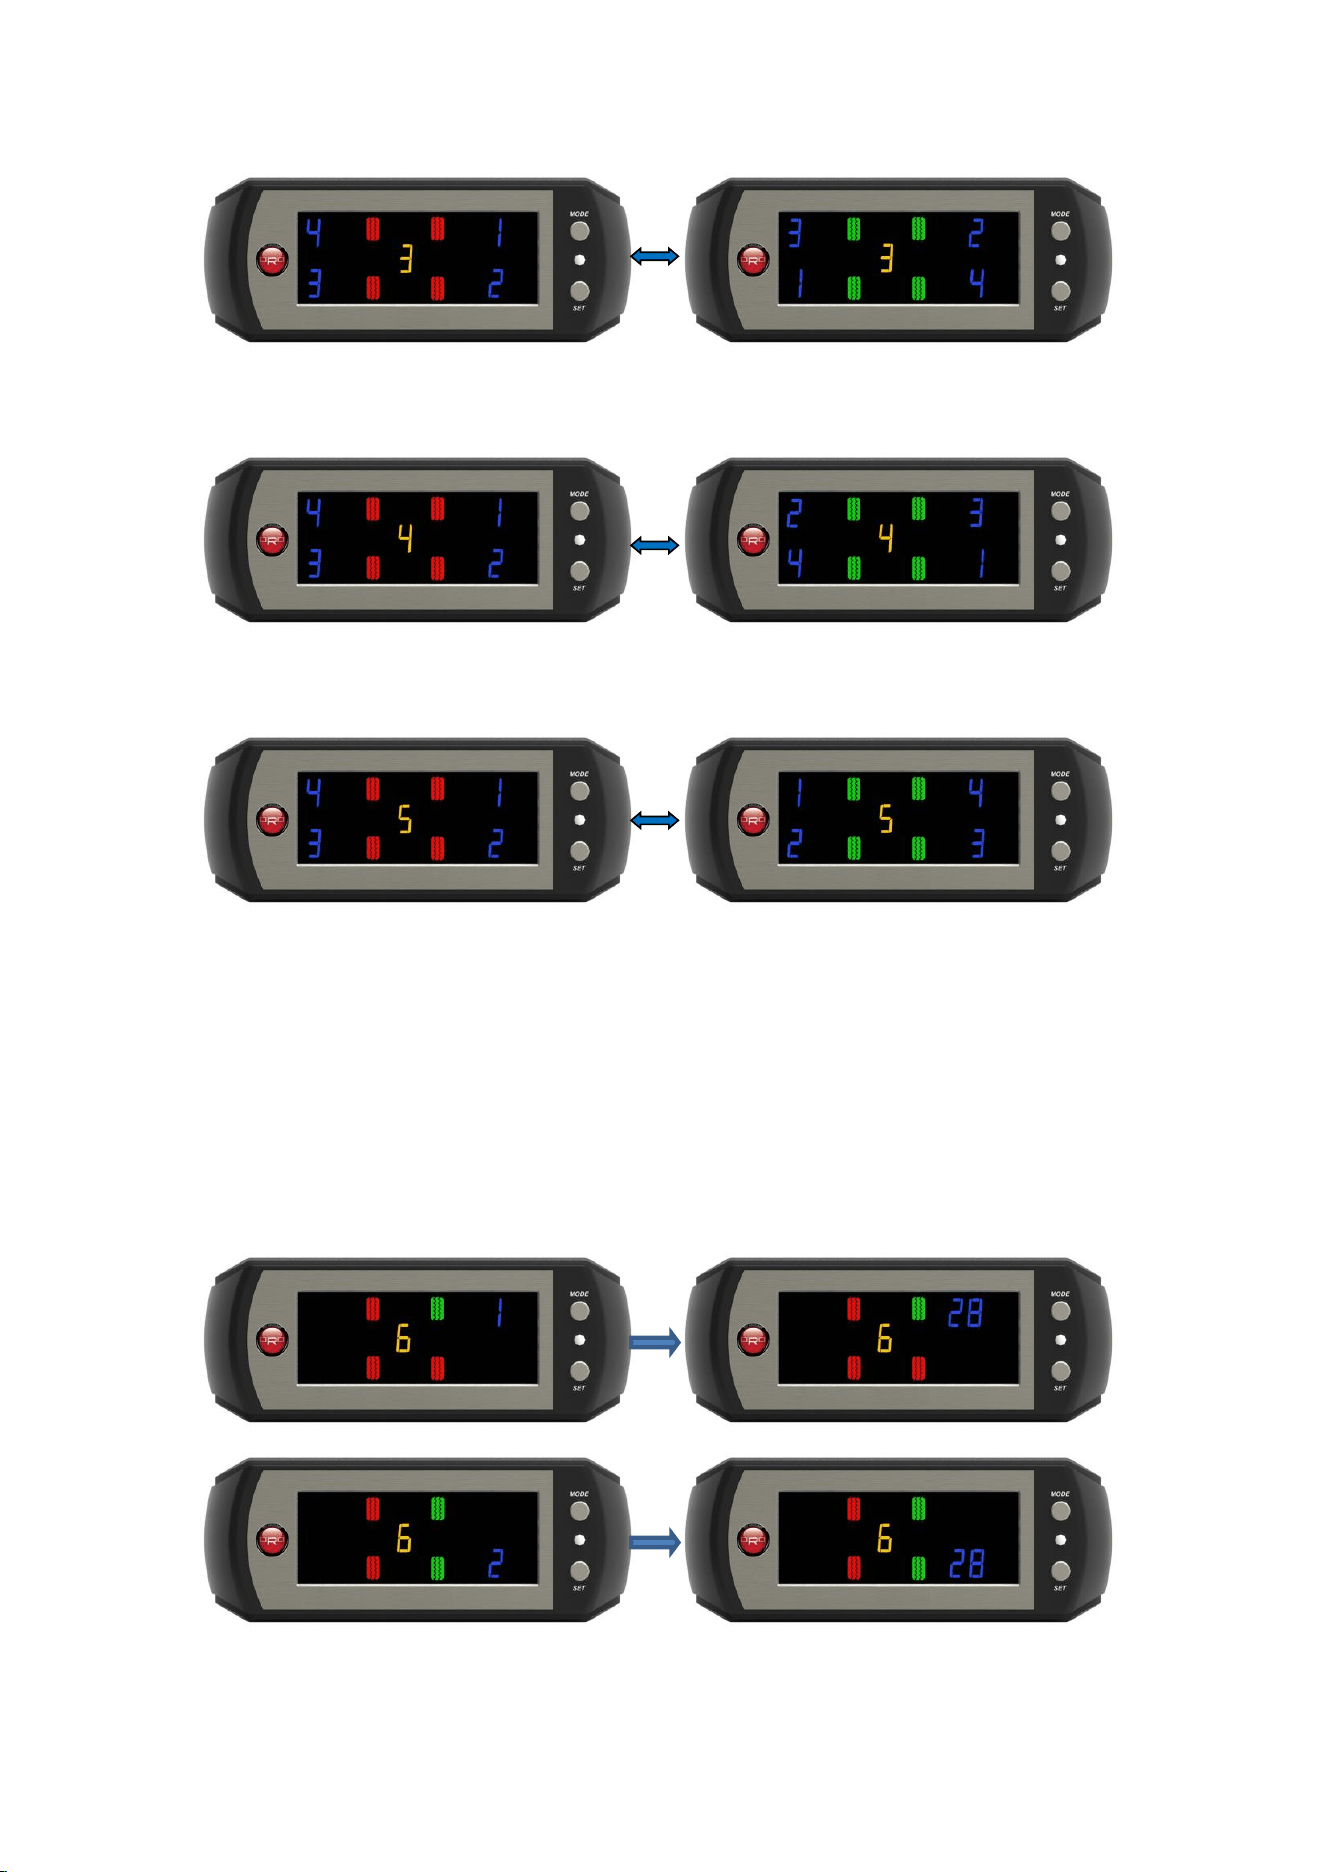
Mode 4: Rear Tire Diagonal Exchange, Front Tire Parallel Exchange to Rear
Mode 5: Right Side and Left Side Tire Parallel Exchange
Mode 6: Random Repositioning
The user should install the tire to their desired position before entering mode 6. When the
display shows a yellow “6”, this means that it is now in mode 6.
Reset starting from Right Front Tire -> Right Rear Tire -> Left Rear Tire -> Left Front Tire
automatically in order to complete the set up mode 6. The user should deflate the tire pressure
rapidly over 0.3bar/30kPa or 4 psi within 15 sec. until there is a beep sound, which means the
user has completed the set up
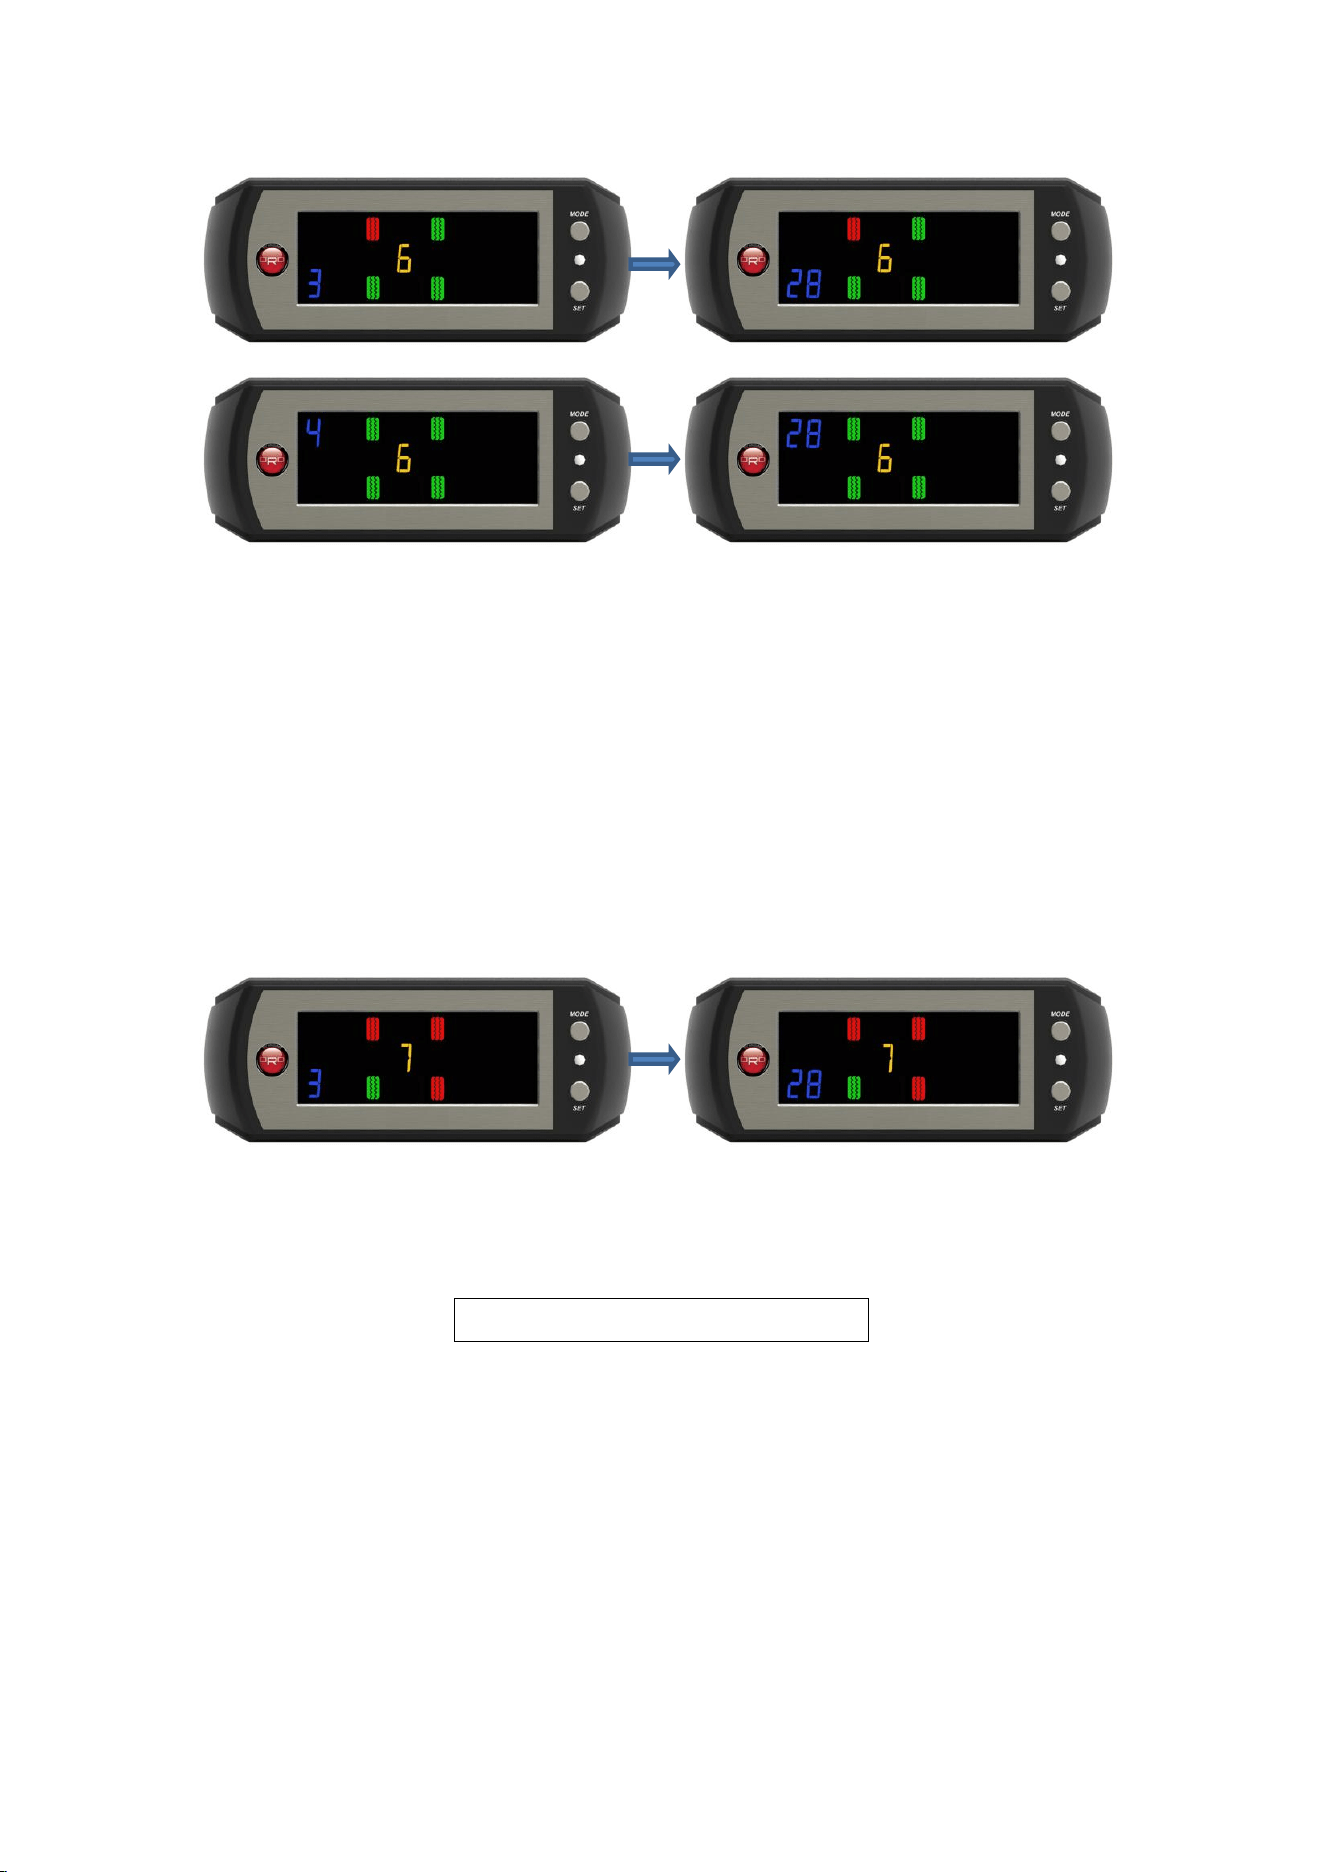
a. Depress the SET key to skip LF relearn or after completing the rapid deflation of Left
Front tire for relearn process. The system will return to the normal operation system
automatically.
Mode 7: Single Sensor Replaced
The user should confirm whether the all sensors are manufactured by ORO before carrying out
any changes or replacement. The system will not work with non ORO Technology sensors.
The monitor will display No.7 in yellow which means the system is in mode 7.
Choose a sensor to be replaced starting from Right Front Tire -> Right Rear Tire -> Left Rear
Tire -> Left Front Tire to complete the set up mode 7 and return to the normal operating mode.
Product Warranty Policy
We warrant our products for 12 months from the date of original purchase to be free from
defects in materials and workmanship. If, during this period, the product fails under normal
usage, because of a manufacturing defect, we will replace or repair the item. To obtain repair
or replacement under the terms of this warranty, please return the product to the place of
purchase. Proof of purchase and date of purchase are required to validate the warranty claim.
In the event where proof of purchase is unable to be determined, the warranty will be just 6
months.
The following situations void the warranty even when within warranty time period.
1. Broken or damage on appearance of the product.

2. The barcode label is not clear or torn.
3. The user did not follow the user manual instructions on installation, incorrect installation, or
improper storage, which made the system fail or be damaged.
4. The system has been installed by non-authorized distributor or technician from ORO.
5. When the user is not using the original manufacturer’s accessories (eg: Power code) thus
causing the system to fail.
6. Any natural catastrophe, improper installation, improper usage, or any re-modelling process
without authorization.
7. Consumables such as batteries which should be replaced on time.
Caution
The range of warranty are not including the “Aluminum Valves” and “Screws”, the user should
change the “Aluminum Valves” and “Screws” when changing the tire sensor.
Attention
Any user self repairing or modifying the system included the device are NOT protected under
the warranty policy.
Any other question which related to the warranty policy, please feel free to contact with your
nearest authorized distributor or contact directly with ORO by emailing:
sales@oro-technology.com
For ORO TPMS latest and updated news, please go to: www.oro-technology.com
ORO Technology thanks you for your using ORO TPMS and wishes you “Safe Driving.”
Appendix
bar
Tire pressure unit, 1 bar = 0.1N / mm
2
psi
Tire pressure unit, 1 psi = 0.0689 bar.
kPa
Tire pressure unit, 1 kPa = 0.01 bar
℃
Temperature unit, Centigrade = (Fahrenheit-32) x 5/9
℉
Fahrenheit