
2026 VAPON
VAPON Technology Co. Ltd
TyrelQ S3
www.vapontech.com
(925) 344-6360
VAPON Technology Co. Ltd

1
TyrelQ S3 TPMS Service Tool User Manual_English_V1.01
Trademarks
VAPON is a trademark of VAPON Technology Co., Ltd.
All other marks are trademarks or registered trademarks of their respective
holders.
Copyright Information
© 2026 VAPON Technology Co., Ltd.
All rights reserved.
Disclaimer
The information, specifications and illustrations in this manual are based on the
latest information available at the time of printing.
VAPON reserves the right to make changes at anytime without notice.
Visit our website:
www.vapontech.com
For Technical Assistance, send us an email at:
support@vapontech.com

2
TyrelQ S3 TPMS Service Tool User Manual_English_V1.01
One-Year Limited Warranty
Subject to the conditions of this limited warranty, VAPON Technology Co., Ltd
(“VAPON”) warrants to its customers that this product is free of defects in
materials and workmanship at the time of its original purchase for a subsequent
period of one (1) year.
If the product fails to operate under normal use during the warranty period due
to defects in materials or workmanship, VAPON will, at its sole option, either
repair or replace the product in accordance with the terms and conditions herein.
Terms and Conditions
1 If VAPON repairs or replaces the product, the repaired or replaced product
shall be warranted for the remaining time of the original warranty period. No
charge will be made to the customer for replacement parts or labor charges
incurred by VAPON in repairing or replacing the defective parts.
2 The customer shall have no coverage or benefits under this limited warranty if
any of the following conditions are applicable:
a) The product has been subjected to abnormal use, abnormal conditions,
improper storage, exposure to moisture or dampness, unauthorized
modifications, unauthorized repair, misuse, neglect, abuse, accident, alteration,
improper installation, or other acts which are not the fault of VAPON, including
damage caused by shipping.
b) The product has been damaged by external causes such as collision with an
object, or from fire, flooding, sand, dirt, windstorm, lightning, earthquake or
damage from exposure to weather conditions, Act of God, or battery leakage,
theft, blown fuse, improper use of any electrical source, or the product was
used in combination or connection with other products, attachments, supplies or
consumables not manufactured or distributed by VAPON.
3 The customer shall bear the cost of shipping the product to VAPON. VAPON
shall bear the cost of shipping the product back to the customer after the
completion of service under this limited warranty.
4 VAPON does not warrant uninterrupted or error-free operation of the product.
If a problem develops during the limited warranty period, the consumer shall
take the following step-by-step procedure:
a) The customer shall return the product to the place of purchase for repair or
replacement, or contact your local VAPON distributor or visit our website
www.vapontech.com for further information.
b) The customer shall include a return address, daytime phone number and/or
fax number, a complete description of the problem and original invoice
specifying date of purchase and serial number.
c) The customer will be billed for any parts or labor charges not covered by this
limited warranty.

3
TyrelQ S3 TPMS Service Tool User Manual_English_V1.01
d) VAPON will repair the product under the limited warranty within 30 days after
receipt of the product. If VAPON cannot perform repairs covered under this
limited warranty within 30 days, or after a reasonable number of attempts to
repair the same defect, VAPON, at its option, will provide a replacement
product or refund the purchase price of the product less a reasonable amount
for usage.
e) If the product is returned during the limited warranty period, but the problem
with the product is not covered under the terms and conditions of this limited
warranty, the customer will be notified and given an estimate of the charges the
customer must pay to have the product repaired, with all shipping charges billed
to the customer. If the estimate is refused, the product will be returned freight
collect. If the product is returned after the expiration of the limited warranty
period, VAPON
’
s normal service policies shall apply and the customer will be
responsible for all shipping charges.
5.Any implied warranty of merchantability, or fitness for a particular purpose or
use, shall be limited to the duration of the foregoing limited written
warranty.Otherwise,the foregoing limited warranty is the consumer’s sole and
exclusive remedy and is in lieu of all other warranties, express or implied.Vapon
shall not be liable for special, incidental, punitive or consequential damages,
including but not limited to loss of anticipated benefits or profits, loss of savings
or revenue,loss of data, punitive damages,loss of use of the product or any
associated equipment, cost of capital, cost of any substitute equipment or
facilities, downtime,the claims of any third parties,including customers, and
injury to property,resulting from the purchase or use of the product or arising
from breach of the warranty,breach of contract,negligence,strict tort,or any other
legal or equitable theory, even if Vapon knew of the likelihood of such
damages.Vapon shall not be liable for delay in rendering service under the
limited warranty,or loss of use during the period that the product is being
repaired.
6 Some states do not allow limitation of how long an implied warranty lasts, so
the one-year warranty limitation may not apply to you (the Consumer). Some
states do not allow the exclusion or limitation of incidental or consequential
damages, so certain of the above limitations or exclusions may not apply to you
(the Consumer). This limited warranty gives the Consumer specific legal rights
and the Consumer may also have other rights which vary from state to state.

4
TyrelQ S3 TPMS Service Tool User Manual_English_V1.01
Safety Information
For your own safety and the safety of others, and to prevent damage to the
equipment and vehicles, read this manual thoroughly before operating your
tool. The safety messages presented below and throughout this user
’
s
manual are reminders to the operator to exercise extreme care when using
this device. Always refer to and follow safety messages and test
procedures provided by the vehicle manufacturer. Read, understand and
follow all safety messages and instructions in this manual.
Safety Message Conventions Used
We provide safety messages to help prevent personal injury and
equipment damage. Below are the signal words we used to indicate the
hazard level in a condition.
Indicates an imminently hazardous situation which, if not avoided, will
result in death or serious injury to the operator or to bystanders.
Indicates a potentially hazardous situation which, if not avoided, could
result in death or serious injury to the operator or to bystanders.
Indicates a potentially hazardous situation which, if not avoided, may result
in moderate or minor injury to the operator or to bystanders.
Important Safety Instructions
Always use your tool as described in the user
’
s manual, and follow all
safety messages.
●
Do not route the test cable in a manner that would interfere with driving
controls.
● Do not exceed voltage limits between inputs specified in this user’s
manual.
● Always wear ANSI approved goggles to protect your eyes from propelled
objects as well as hot or caustic liquids.
● Fuel, oil vapors, hot steam, hot toxic exhaust gases, acid, refrigerant and
other debris produced by a malfunctioning engine can cause serious
injury or death. Do not use the tool in areas where explosive vapor may
collect, such as in below-ground pits, confined areas, or areas that are

5
TyrelQ S3 TPMS Service Tool User Manual_English_V1.01
less than 18 inches (45 cm) above the floor.
●
Do not smoke, strike a match, or cause a spark near the vehicle while
testing and keep all sparks, heated items and open flames away from
the battery and fuel / fuel vapors as they are highly flammable.
● Keep a dry chemical fire extinguisher suitable for gasoline, chemical and
electrical fires in the work area.
● Always be aware of rotating parts that move at high speed when an
engine is running and keep a safe distance from these parts as well as
other potentially moving objects to avoid serious injury.
● Do not touch engine components that get very hot when an engine is
running to avoid severe burns.
●
Block drive wheels before testing with engine running. Put the
transmission in park (for automatic transmission) or neutral (for manual
transmission). And never leave a running engine unattended.
●
Do not wear jewelry or loose-fitting clothing when working on an engine.
●
Do not connect or disconnect the equipment while the ignition is on or
the engine is running.

6
TyrelQ S3 TPMS Service Tool User Manual_English_V1.01
Table of Contents
One-Year Limited Warranty
..................................................................................................................... 2
Safety Information .................................................................................................................................... 4
Safety Message Conventions Used ...................................................................................................... 4
Important Safety Instructions
................................................................................................................4
Table of Contents ......................................................................................................................................6
1 Using This Manual ................................................................................................................................. 8
1.1 Bold Text ........................................................................................................................................... 8
1.2 Symbols and Icons ...........................................................................................................................8
1.2.1
Solid Spot .............................................................................................................................................................................. 8
1.2.2
Arrow Icon ..............................................................................................................................................................................8
1.2.3
Note and Important Message .................................................................................................................................................8
2 Introduction............................................................................................................................................9
About TyrelQ S3 ..................................................................................................................................... 9
2.1 Descriptions .............................................................................................................................................................................9
2.2 Accessories ...............................................................................................................................................................................9
2.3 TechnicalSpecifications ......................................................................................................................................................... 10
3 Getting Started.....................................................................................................................................10
3.1 Power on/off the TPMS Service Tool ............................................................................................ 10
3.2 Charging the TPMS Service Tool .................................................................................................. 10
3.2.1
Charging via Wall Plug .........................................................................................................................................................10
3.2.2
Charging via Personal Computer with USB Cable ............................................................................................................... 11
3.3 Application Overview ..................................................................................................................... 11
3.4 Tool Symbols and Icons .................................................................................................................11
4 OBD II ................................................................................................................................................... 12
5 TPMS Operations.................................................................................................................................12
5.1 TPMS Sensor Activate................................................................................................................... 13
5.2 TPMS Diagnose .............................................................................................................................. 15
5.2.1 Read Sensor ID ...................................................................................................................................................................15
5.2.2 Read Version Information ....................................................................................................................................................16
5.2.3 Read Codes ........................................................................................................................................................................ 17
5.2.4 Erase Codes ........................................................................................................................................................................17

7
TyrelQ S3 TPMS Service Tool User Manual_English_V1.01
5.2.5 Live Data ............................................................................................................................................................................. 18
5.2.6 OBD Learning ......................................................................................................................................................................19
5.2.7 Service Function ..................................................................................................................................................................20
5.3 TPMS Sensor Programming.......................................................................................................... 21
5.3.1 Manual Create .....................................................................................................................................................................21
5.3.2 Clone By Activation ............................................................................................................................................................. 22
5.3.3 Automatic Create (1-16 sensors) ........................................................................................................................................ 23
5.3.4 Clone By OBD ..................................................................................................................................................................... 25
5.4 Study Help ...................................................................................................................................... 26
6 RKE & RF Monitor ................................................................................................................................ 27
7 Latest Test............................................................................................................................................ 28
8 Settings ................................................................................................................................................ 28
8.1 Sales region change....................................................................................................................... 29
8.2 Language ........................................................................................................................................ 29
8.3 Pressure Unit ..................................................................................................................................30
8.4 Temperature Unit ........................................................................................................................... 30
8.5 Unit .................................................................................................................................................. 31
8.6 Beep Set ..........................................................................................................................................31
8.7 Automatic Power-off...................................................................................................................... 31
8.8 Uninstall .......................................................................................................................................... 32
8.9 Display Test .................................................................................................................................... 32
8.10 Keypad Test .................................................................................................................................. 32
8.11 WIFI................................................................................................................................................33
8.12 Bluetooth ...................................................................................................................................... 33
8.13 About .............................................................................................................................................33
9 Update...................................................................................................................................................33

8
TyrelQ S3 TPMS Service Tool User Manual_English_V1.01
1 Using This Manual
We provide tool usage instructions in this manual. Below are the conventions we used in the
manual.
1.1 Bold Text
Bold text is used to highlight selectable items such as buttons and menu options.
Example:
Press the ENTER button to select.
1.2 Symbols and Icons
1.2.1
Solid Spot
Operation tips and lists that apply to specific tool are introduced by a solid spot ●.
Example:
When System Setup is selected, a menu that lists all available options displays. Menu options
include:
●
Languages
●
Unit
●
Beep
●
Keypad Test
●
LCD Test
1.2.2
Arrow Icon
An arrow icon indicates a procedure.
Example
To change menu language:
1. Scroll with the arrow keys to highlight Language on the menu.
2.Press the Yes button to select.
1.2.3
Note and Important Message
Note
A NOTE provides helpful information such as additional explanations, tips, and comments.
Example:
NOTE
Test results do not necessarily indicate a faulty component or system.
Important
IMPORTANT indicates a situation which, if not avoided, may result in damage to the test
equipment or vehicle.
Example:
IMPORTANT
Do not soak keypad as water might find its way into the TPMS Service Tool.
9
TyrelQ S3 TPMS Service Tool User Manual_English_V1.01
2 Introduction
About TyrelQ S3
TyrelQ S3 is a professional TPMS diagnostic and maintenance tool which is capable of activating
and decoding universal TPMS Sensors, programming TPMS sensors and diagnosing the original
car tire pressure monitoring system. It can provide a complete solution for the TPMS service
segment of the automotive aftermarket.
2.1 Descriptions
This section illustrates external features, ports and connectors of the tool.
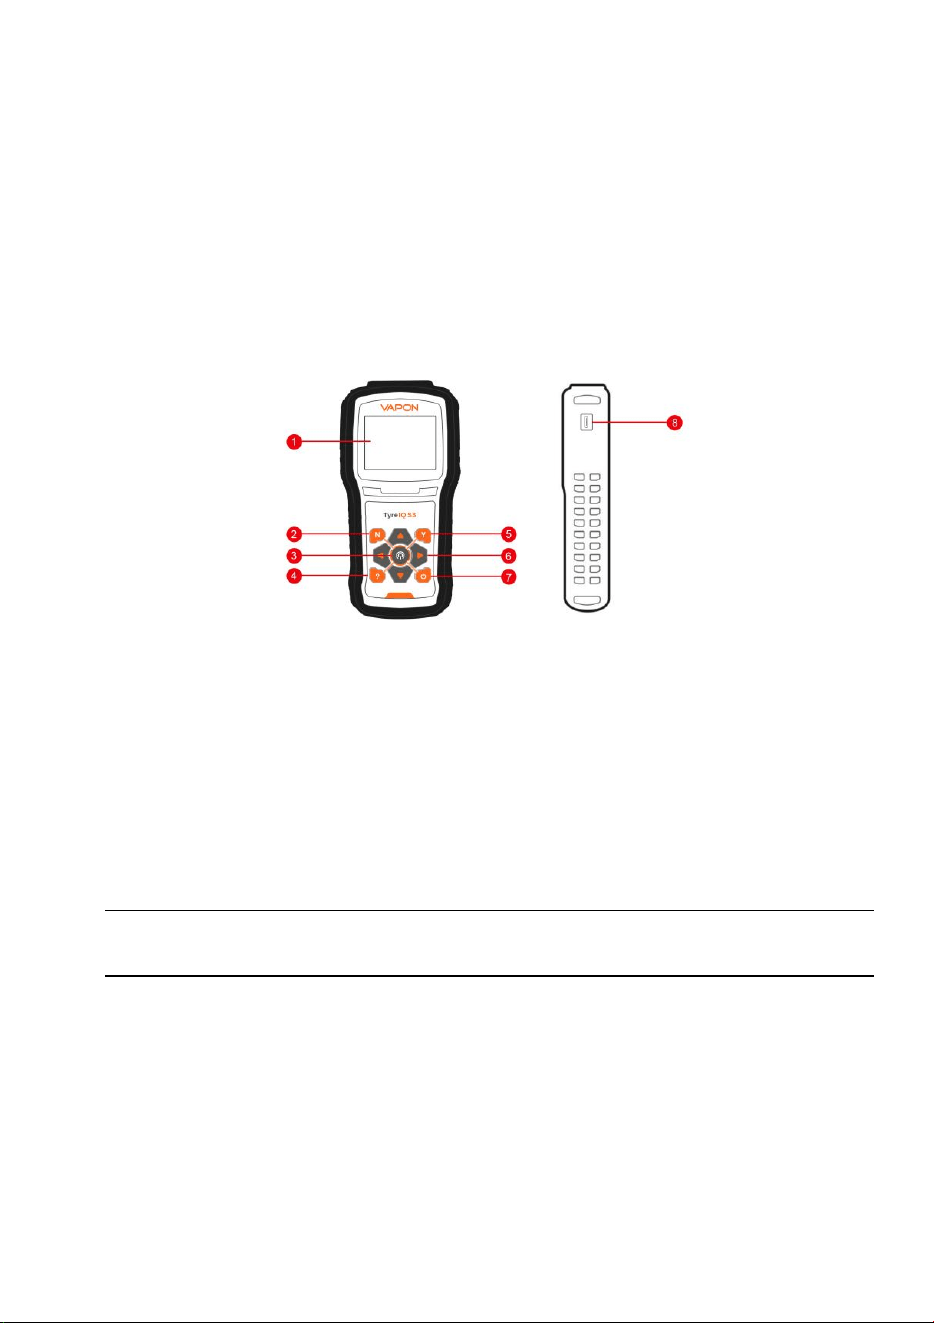
Figure 2-1 Front View
1 LCD Display - Shows menus, test results and operation tips.
2 No Key - Cancels a selection (or action) from a menu or generally returns to previous screen.
3 Trigger Key - Executes sensor trigger function.
4 HELP Key - Displays help information.
5 Yes Key - Confirms a selection (or action) from a menu.
6 Direction Keys
- select an option or scroll through a screen of data or text.
7 Power Switch - Turns on/off the TPMS Service Tool and press and hold for 5 seconds
for emergency reboots.
8 USB Port - Provides a USB connection between the TPMS Service Tool and PC / laptop.
IMPORTANT
Do not use solvents such as alcohol to clean keypad or display. Use a mild nonabrasive detergent
and a soft cotton cloth.
2.2 Accessories
This section lists the accessories that go with the TPMS Service Tool. If you find any of the
following items missing from your package, contact your local dealer for assistance.
1 USB Cable - provides connection between the TPMS Service Tool and a computer to
upgrade the tool and charges the built-in battery.
2 Buletooth VCI - connecting with the vehicle to test OBDII function and TPMS system.
3 Battery Charger - charges built-in battery via wall plug.
4 Warranty Card - A warranty card is required if you need any repair or replacement from us.

10
TyrelQ S3 TPMS Service Tool User Manual_English_V1.01
5 Quick Start Guide - provides brief operation instructions for the usage of the scanner.
6 User Manual - comprehensively introduces the scanner including function, performance,
method of use, etc.
2.3 Technical Specifications
Display: Backlight, 240*320 TFT color display
Working Temperature: 0 to 55 ℃ (32 to 140℉)
Storage Temperature: -20 to 70℃ (-4 to 158℉)
Power Supply: 3.7V/3000mAH Li-polymer battery, 3.3V USB power
Dimensions (L*W*H): 200*100*38mm
Gross Weight: 1.3kg
Radio reception: 315 MHz and 433MHz
Radio emission: 125MHz,315 MHz and 433MHz
LF module of TyrelQ S3 module: The module is generated by MCU 125khz PWM as a
starting signal, excited by LC oscillation circuit, and radiated 125khz electromagnetic signal,
which is used for TPMS sensor to wake up from low power mode.
3 Getting Started
This section describes how to provide power to the TPMS Service Tool. It provides a brief
introduction of applications loaded on the TPMS Service Tool, an introduction of symbol and
icons displayed on the screen and how to power on/off and charge the tool.
3.1 Power on/off the TPMS Service Tool
The TyrelQ S3 is powered on/off by pressing the power switch.
To power on/off the tool
1. Press the power switch to power on the tool, and the unit will display the Main Menu.
2. Hold the power switch for one 1 seconds and the release to power down the TyrelQ S3. The
tool powers down automatically after a period of inactivity. Please refer to 8.6 Auto Power-off
Interval for details.
3.2 Charging the TPMS Service Tool
The TyrelQ S3 is shipped with fully charged battery, but due to self-drain it may require charging,
it is recommended to charge the tool over 3 hours before first use.
The unit charges on any of the following sources
●
12-volt wall plug
● USB connection to personal computer
IMPORTANT
Use the battery charger or USB cable included in the TyrelQ S3 tool kit ONLY. The use of
un-approved power supplies may damage the tool and will void the tool warranty.
3.2.1
Charging via Wall Plug
To charge via wall plug
1. Find the power port at left side of the tool.
11
TyrelQ S3 TPMS Service Tool User Manual_English_V1.01
2. Connect the tool to power source with the battery charger provided.
3.2.2
Charging via Personal Computer with USB Cable
The TPMS Service Tool can also be charged through the USB port.
To charge via USB cable
1.Insert the small end of the USB cable to the USB port at the right side of the TPMS Service
Tool and the large end to a computer.
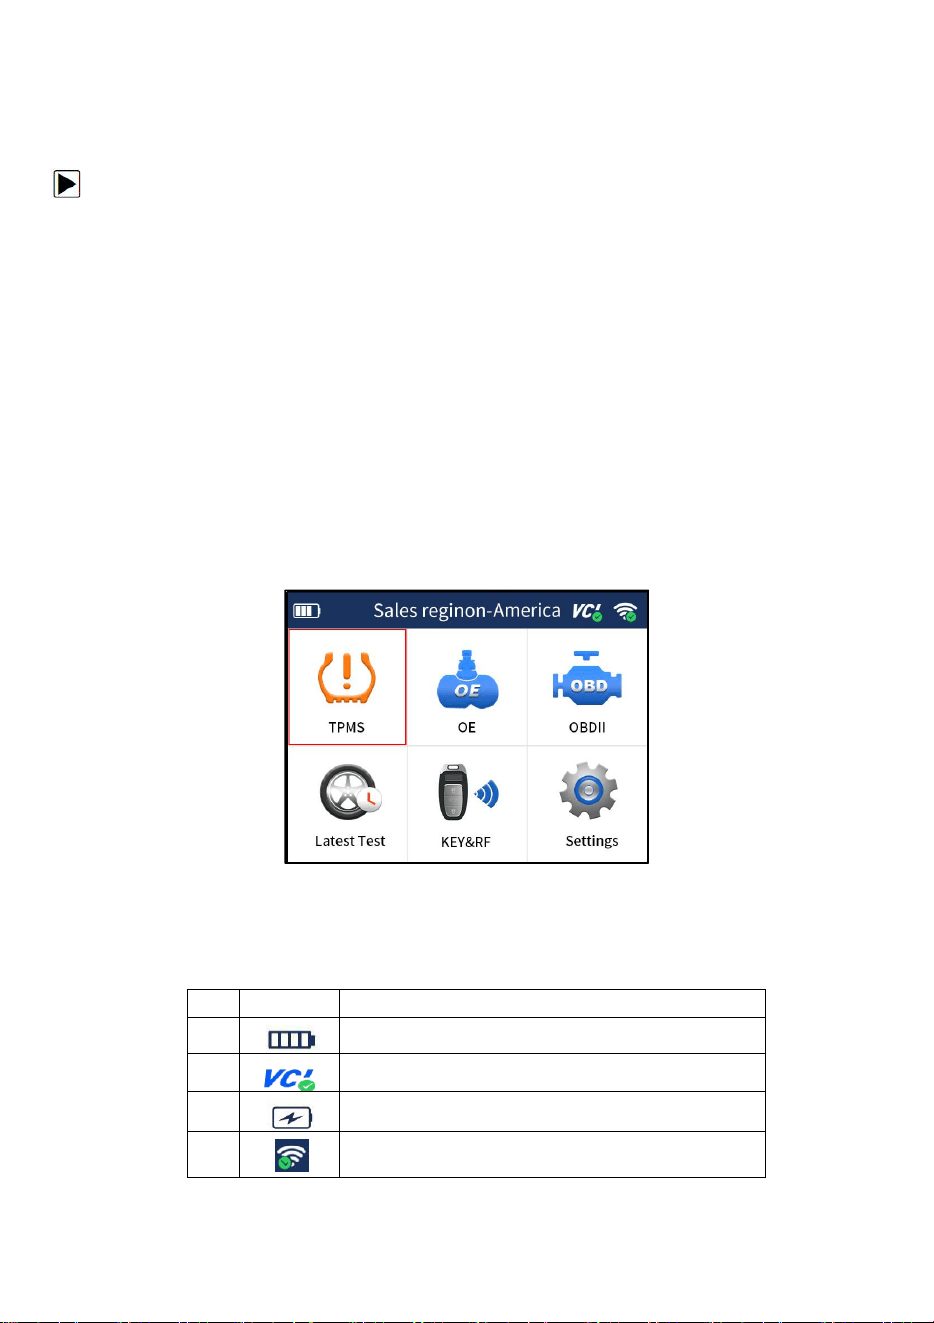
3.3 Application Overview
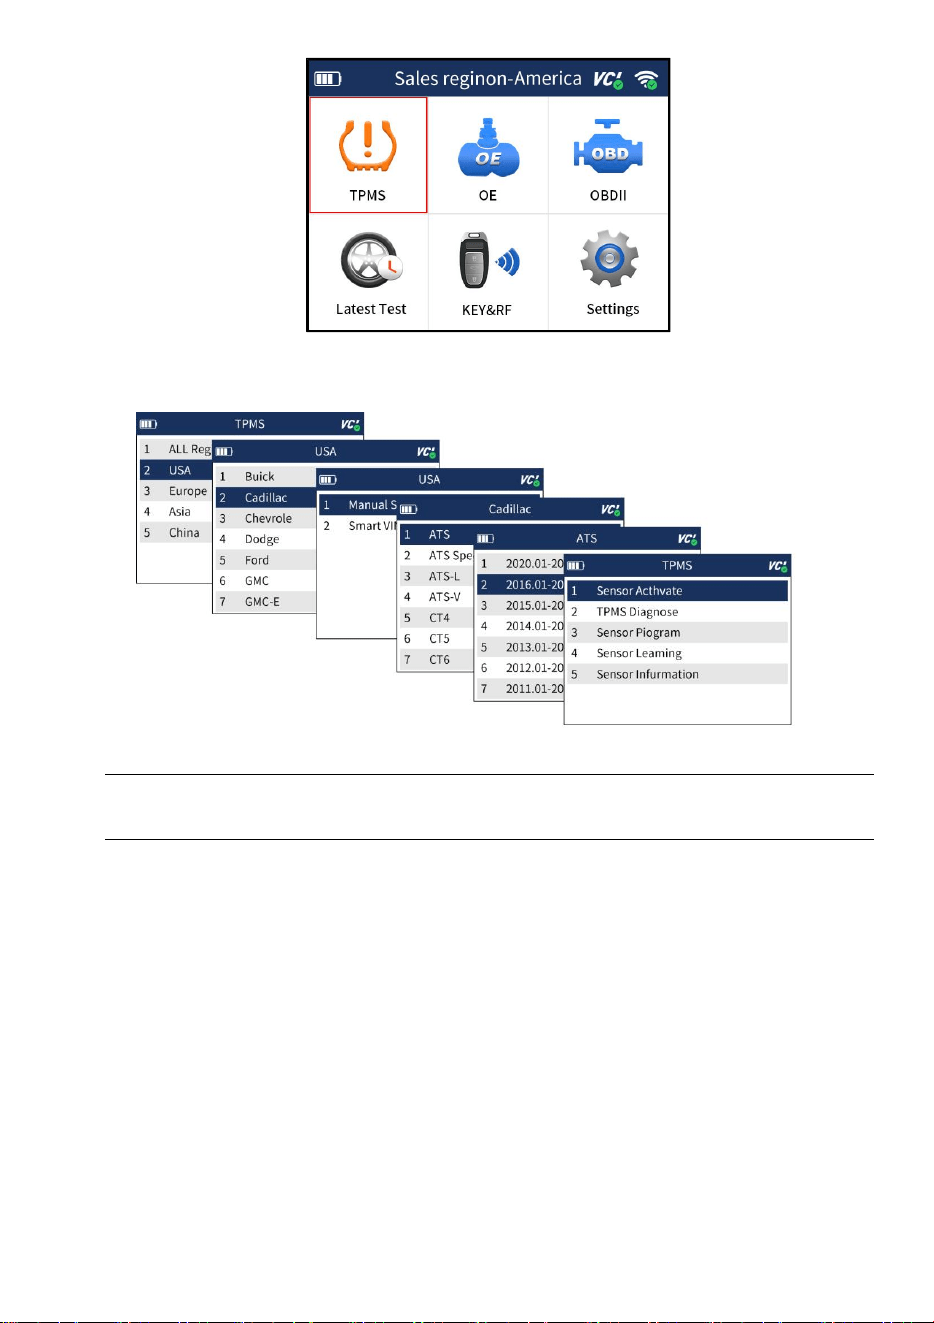
When the TPMS Service Tool boots up, the Main Menu displays. This screen shows all applications
loaded on the unit.
The following applications are preloaded into the TPMS Service Tool
●
TPMS – leads to screens for TPM sensor activation, programming, TPMS Diagnose and
sensor learning process.
●
OE - enters vehicle selection by selecting "sensor brand" and part number (OE number) at one
time.
●
OBDII – leads to OBDII screens for all 9 generic OBD system tests.
●
Latest Test – leads to screens for access the last tested sensor data.
● KEY&RF – leads to screens for checking RF Remote Keyless Entry (key FOB).
● Settings – leads to screens for adjusting default settings to meet your own preference.
● Data Manager – leads to screens for access to data records.
● Update – leads to screen for updating the scanner.
Figure 3-1 Sample Home Screen
3.4 Tool Symbols and Icons
This section provides a brief introduction of symbols and icons of tool display.
No.
Indicator
Description
1
Indicates internal battery volume.
2
Indicates the VCI is connecting.
3
Indicates battery charging.
4
Wifi connected successfully.
Table 3-1

12
TyrelQ S3 TPMS Service Tool User Manual_English_V1.01
4 OBD II
OBD II menu lets you access all OBD service modes. According to ISO 9141-2, ISO 14230-4, and
SAE J1850 standards, the OBD application is divided into several sub programs, called ‘Service
$xx’. Below is a list of OBD diagnostic services:
● Service $01 - request current powertrain diagnostic data
● Service $02 - request powertrain freeze frame data
●
Service $03 - request emission-related diagnostic trouble codes
● Service $04 - clear/reset emission-related diagnostic information
● Service $05 - request oxygen sensor monitoring test results
●
Service $06 - request on-board monitoring test results for specific monitored systems
● Service $07 - request emission-related diagnostic trouble codes detected during current
or last completed driving cycle
● Service $08 - request control of on-board system, test or component
●
Service $09 - request Vehicle Information
● Service $0A - permanent diagnostic trouble codes(DTCs)(cleared DTCs)
When OBD II application is selected from Home screen, the scanner starts to detect the
communication protocol automatically. Once the connection has established, a menu that lists all of
the tests available on the identified vehicle displays. Menu options typically include:
●
System Status
● Read Codes
●
Freeze Frame Data
●
Clear Codes
● Live Data
●
I/M Readiness
● O2 Sensor Test
●
On-board Monitor Test
● Component Test
● Vehicle Information
●
Modules Present
● Code Lookup
NOTE
Not all function options listed above are applicable to all vehicles. Available options may vary by the
year, model, and make of the test vehicle. A “Not supported the mode!” message displays if the
option is not applicable to the vehicle under test.
5 TPMS Operations
This section illustrates how to use the TPMS Service Tool including how to activate & decode TPM
sensor data, how to do TPMS diagnosis and how to program OEM sensors etc.
To test the TPMS:
1. Choose Settings--Area from the Main Menu and select the area you work.
2. Highlight TPMS from the Main Menu and press the YES key to start.
13
TyrelQ S3 TPMS Service Tool User Manual_English_V1.01
Figure 5-1 Sample Application Menu
3.On each screen that appears, select the correct option and then press the YES key. Do this
until the complete vehicle information is entered.
Figure 5-2 Sample Vehicle Selection Menu
NOTE
The selected vehicle is remembered by the tool when a test is started. It is very convenient for
workshops to trigger TPM sensors of the same vehicle.
5.1 TPMS Sensor Activate
It enters all wheel mode which provides a vehicle icon on the screen to give user prompts for
each wheel. In this mode, each TPM has wheel locations of LF (Left Front), RF (Right Front),
RR (Right Rear), LR (Left Rear) and spare (if the car has a spare tire).
1. In all wheel mode, the solid spot flashes at the wheel to be tested. Depending on the sensor
type, place the tool to the correct position to insure sensor activation and decode. Below is a
chart illustrating how to correctly place the tool.
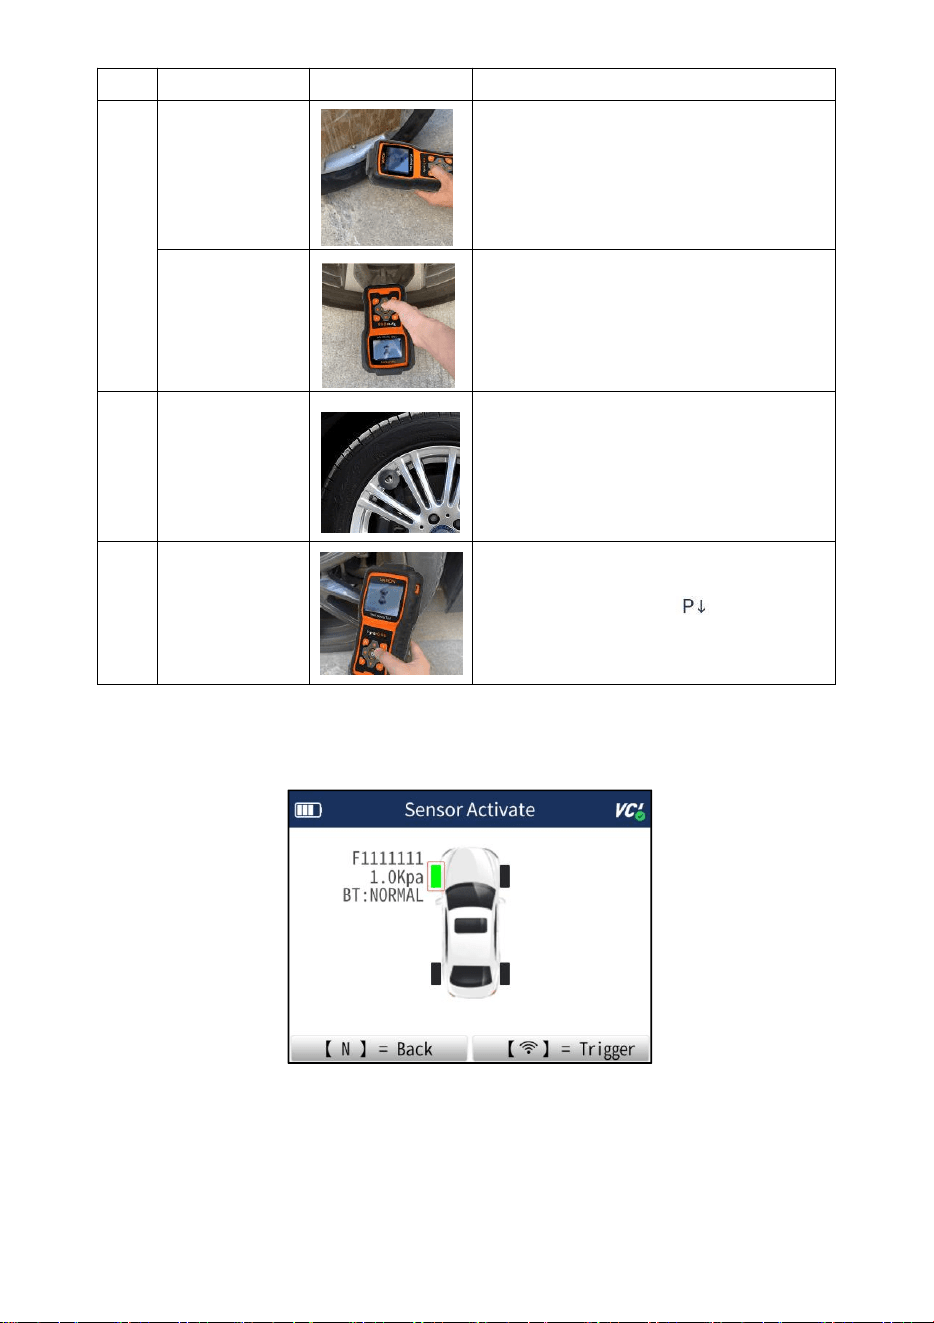
14
TyrelQ S3 TPMS Service Tool Manual_English_V1.01
No.
Sensor Type
Illustration
Description
1
LF Activated
Sensors
The tool should be placed alongside the
valve stem.
Ford branded
LF Activated
Sensors
The tool should be held 180°away from the
valve stem.
2
Magnet
Activated
Sensors
If the TPM requires a magnet, place the
magnet over the stem and then place the
tool alongside the stem
3
Delta P
activated
sensors
If the sensor requires tire deflation (of the
order of 10PSI), the icon will appear
on screen. Please deflate the tire and place
the tool alongside the stem
Table 5-1
2. Press Activate to test the TPM. If test passes, TPM data is briefly displayed for 3 seconds
and then the solid spot on the vehicle icon moves around to prompt that the next wheel
should be tested. Or manually move around vehicle using UP/DOWN arrow keys.
Figure 5-3 Sample All Wheel Test Data Screen
3. TPM data is stored and can be accessed by selecting a wheel location and press the YES
key.
4. Depending on test results, one of the following possible scenarios may display.
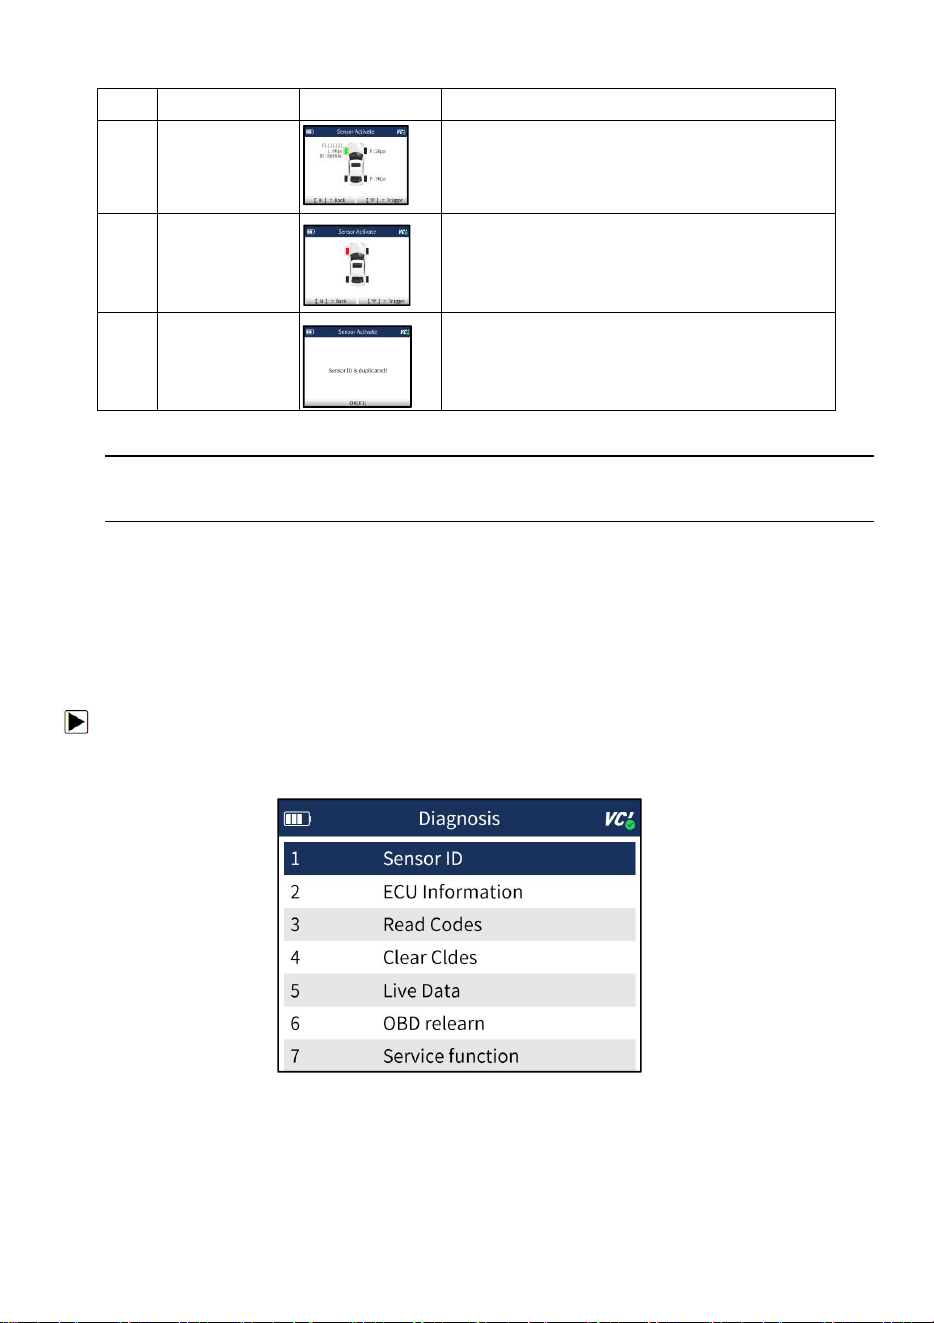
15
TyrelQ S3 TPMS Service Tool Manual_English_V1.01
Table 5-2
NOTE
Operator can press the NO key to abort the sensor activation and return to previous menu at any
time.
5.2 TPMS Diagnose
The TPMS Diagnose function lets users retrieve/clear TPMS DTCs, read live data and perform
special functions, helping technicians to quickly find out faulty TPMS and turn off MILs.
5.2.1 Read Sensor ID
To Read Sensor ID
1. Select TPMS--Diagnose from the available Menu.
2. Choose Read ID after the tool communicate with the car successfully.
Figure 5-4 Sample Sensor ID Menu
3. The sensor ID information will be displayed. Press Y button to save the sensor ID or N
button to exit.
No.
Sensor Type
Illustration
Description
1
Successful
Sensor Read
TPMS sensor was successfully activated and
decoded. The TyrelQ S3 emits a series of
tones and displays pressure at wheel
location.
2
Failed Sensor
Read
The search period expires without reading a
TPM. The TyrelQ S3 emits a single audible
beep and displays “No sensor detected.”
Repeat the test process to verify.
3
Duplicate ID
A sensor with a duplicate ID has been read.
The TyrelQ S3 emits three audible beep and
displays “Sensor ID duplicate.” Clear data and
re-read sensors.
16
TyrelQ S3 TPMS Service Tool Manual_English_V1.01
Figure 5-5 Sample Sensor ID Screen
5.2.2 Read Version Information
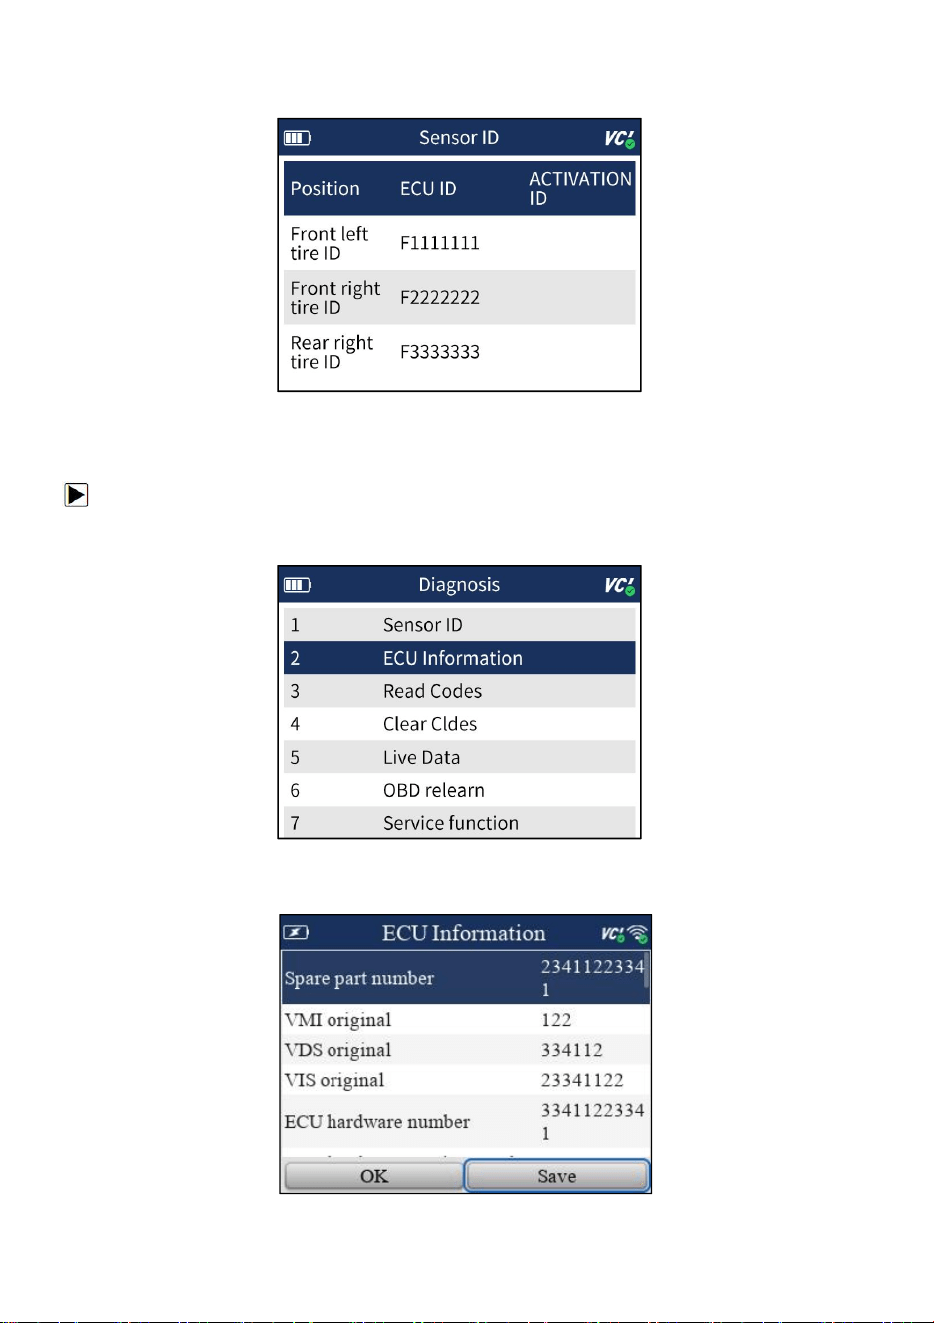
To Read Version Information
1. Select TPMS--Diagnose from the available Menu.
2. Choose Read Version Information after the tool communicate with car successfully.
Figure 5-6 Sample ECU Information Menu
3.The version information will be displayed. Press Y button to save the version information or Y or
N button to exit.
17
TyrelQ S3 TPMS Service Tool Manual_English_V1.01
Figure 5-7 Sample ECU Information Screen
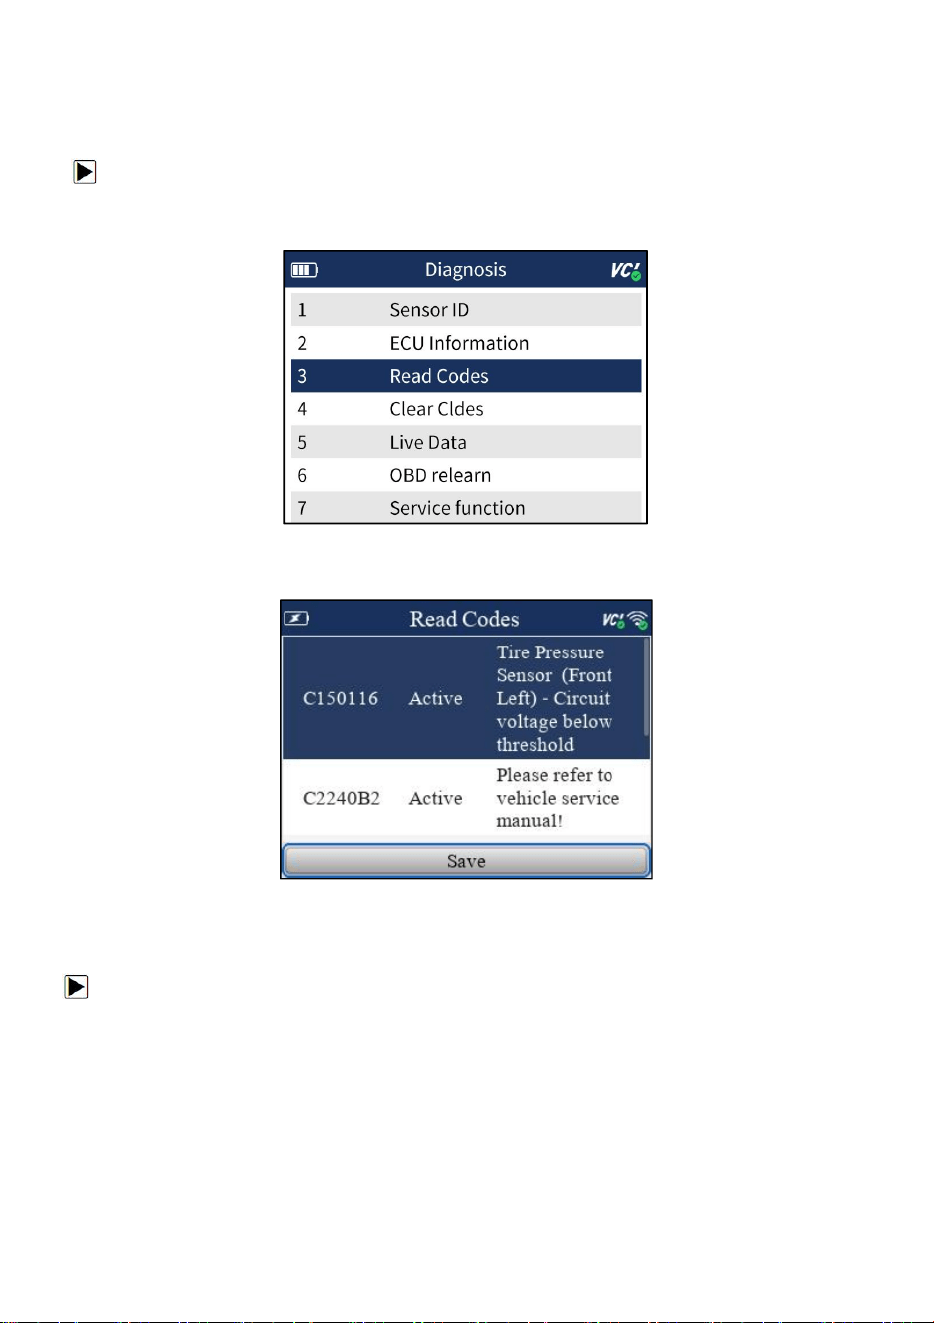
5.2.3 Read Codes
To Read Codes
1. Select TPMS--Diagnose from the available Menu.
2. Choose Read Codes after the tool communicate with the car successfully.
Figure 5-8 Sample Read Codes Menu
3.The fault codes will be displayed if have. Press Y button to save the fault codes or N button to
exit.
Figure 5-9 Sample Read Codes Screen
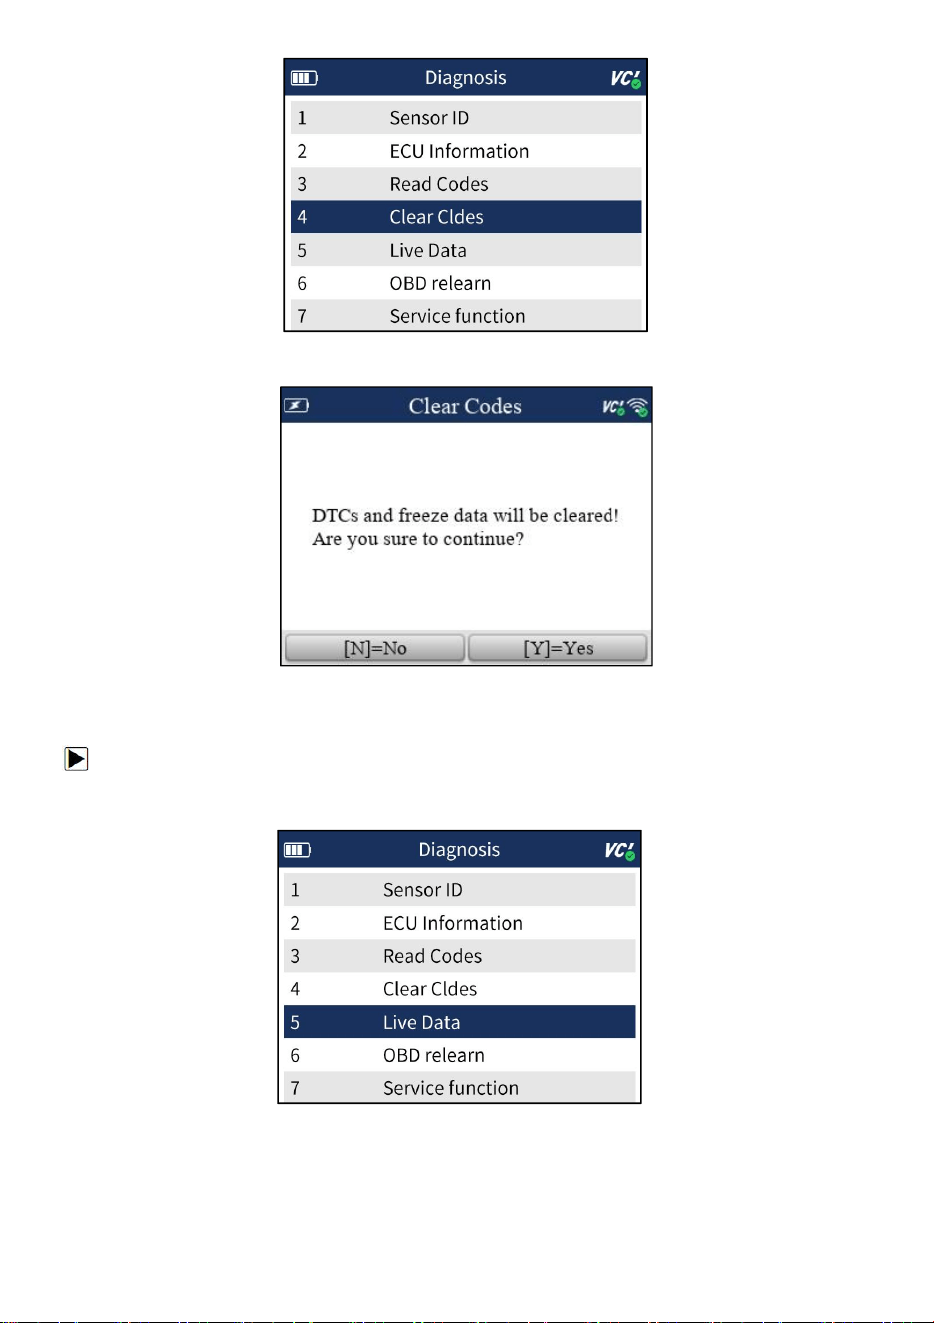
5.2.4 Erase Codes
To Erase Codes
1. Select TPMS--Diagnose from the available Menu.
2. Choose Erase Codes after the tool communicate with the car successfully.
18
TyrelQ S3 TPMS Service Tool Manual_English_V1.01
Figure 5-10 Sample Clear Codes Menu
3.There will be a notice displayed. Press Y button to continue the operation or N button to exit.
Figure 5-11 Sample Clear Codes Screen
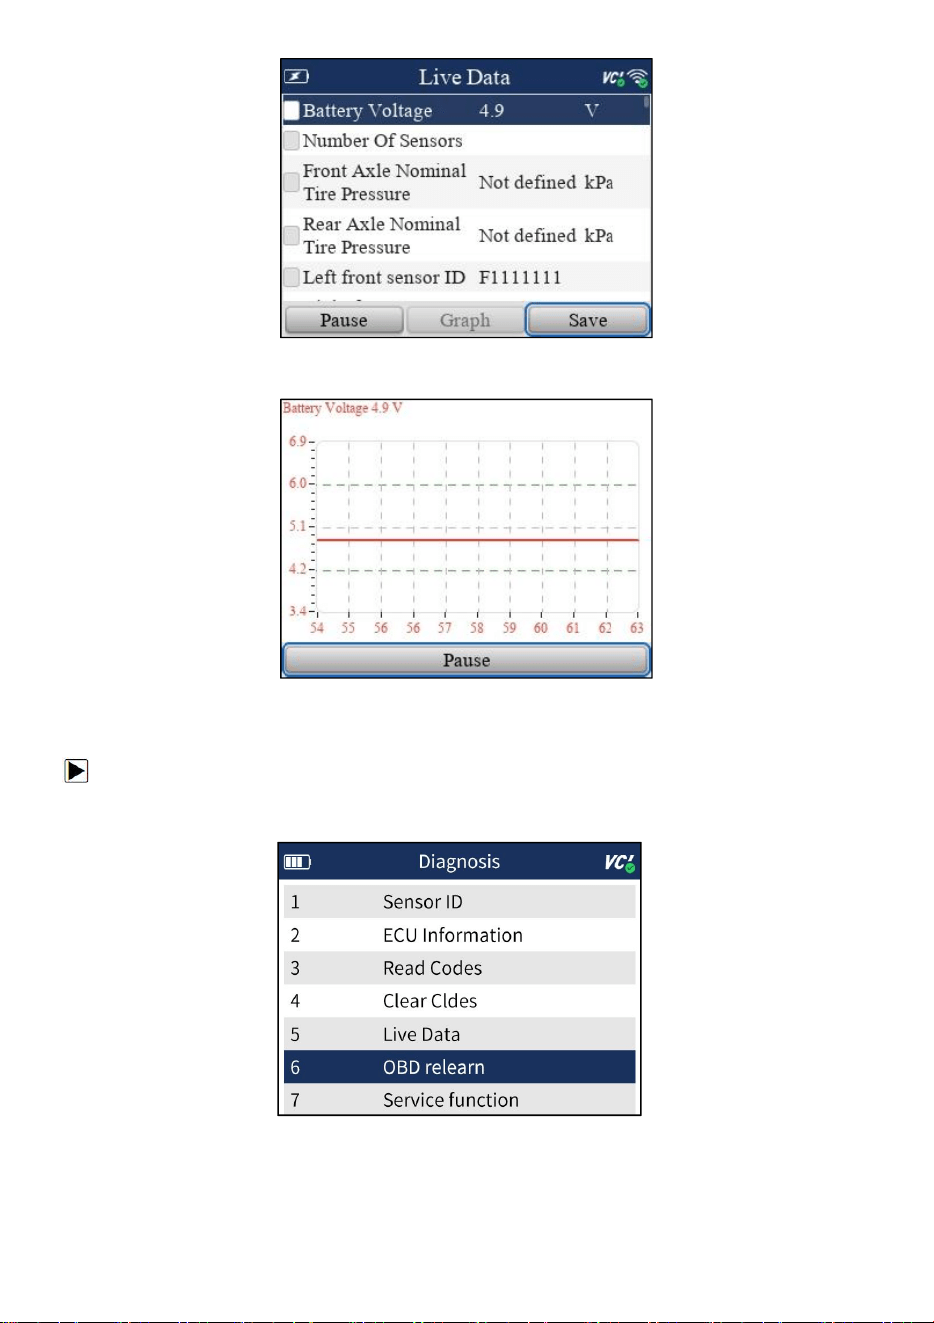
5.2.5 Live Data
To check Live Data
1. Select TPMS--Diagnose from the available menu.
2. Choose Live Data after the tool communicate with the car successfully.
Figure 5-12 Sample Live Data Menu
3.The live data will be displayed. Press Y button to Pause, Y button to enter graph screen, Y
button to Save or N button to exit.
19
TyrelQ S3 TPMS Service Tool Manual_English_V1.01
Figure 5-13 Sample Live Data Screen
Figure 5-14 Sample Single Graph Screen
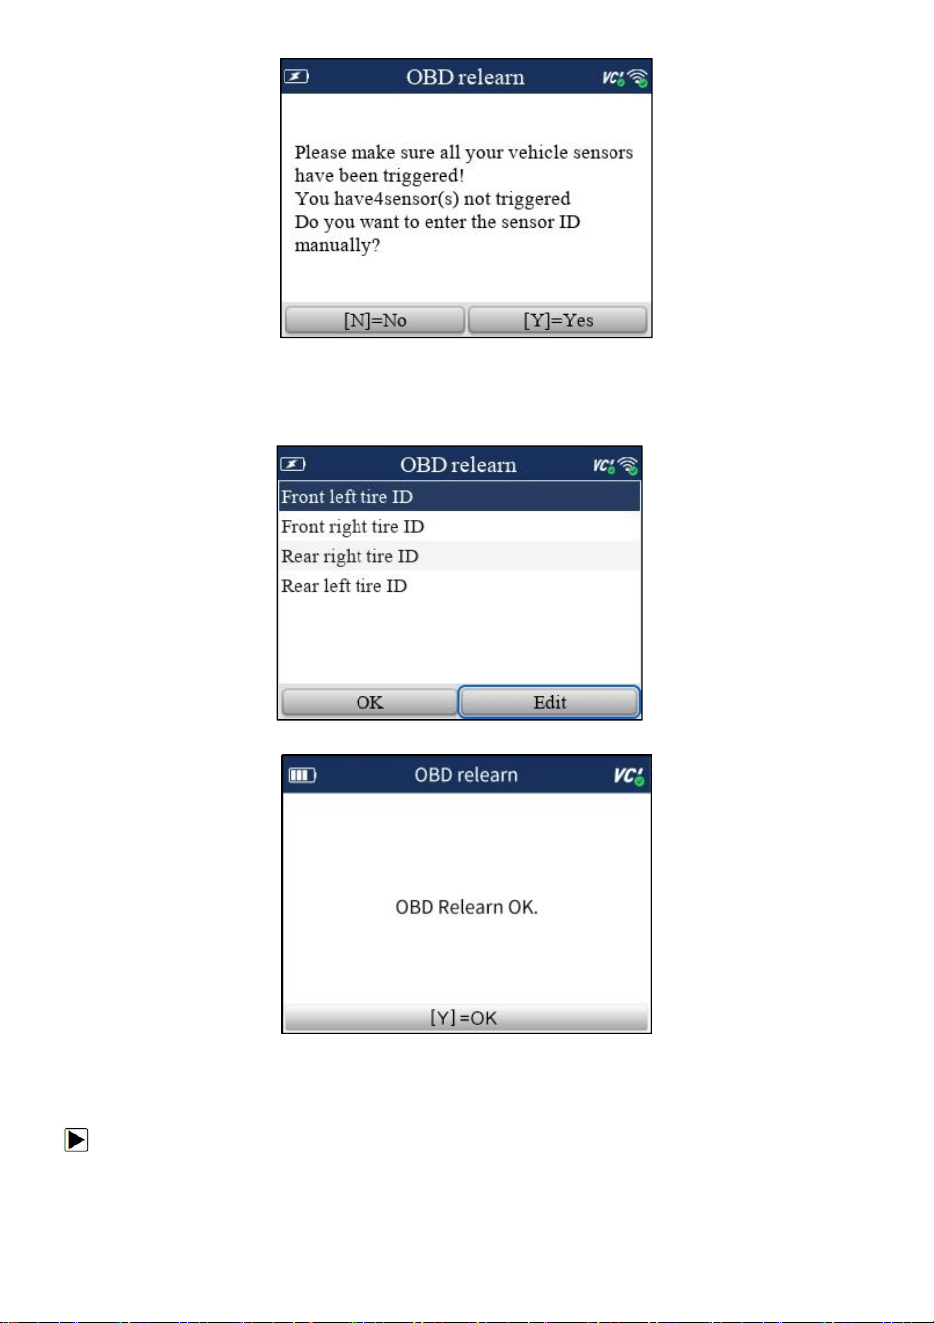
5.2.6 OBD Learning
To enter OBD Learning
1.Select TPMS--Diagnose from the available Menu.
2.Choose OBD Learning after the tool communicate with the car successfully.
Figure 5-15 Sample OBD Relearn Menu
3. The screen will show as Figure 4 if all sensors are activated. If not, you need to input sensor ID
manually and press Y button to continue the operation.
20
TyrelQ S3 TPMS Service Tool Manual_English_V1.01
Figure 5-16 Sample OBD Relearn Screen
4.If learning successfully, please re-activate the sensors and sensor pressure
information will be displayed on the cluster. If failed, the cluster will not display the
sensor pressure information and the TPMS MILs will turn on.
Figure 5-17 Sample OBD Relearn Screen
Figure 5-18 Sample OBD Relearn Screen
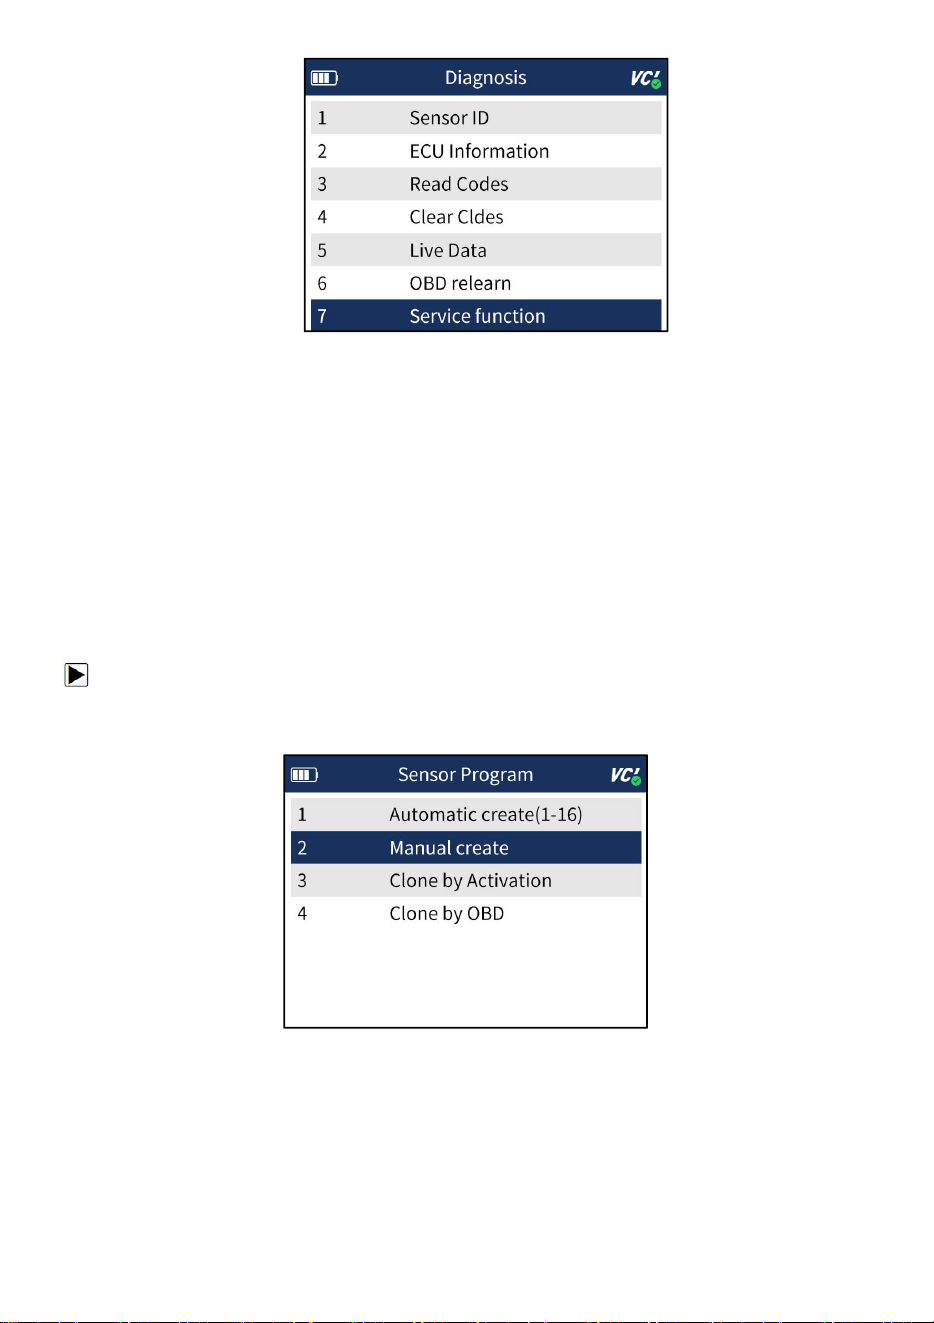
5.2.7 Service Function
To enter Service Function
1.Select TPMS--Diagnose from the available Menu.
2.Choose Service Function after the tool communicate with the car successfully.
21
TyrelQ S3 TPMS Service Tool Manual_English_V1.01
Figure 5-19 Sample Service Function Screen
3.Choose the available function and follow the instructions on the tool to continue the
operation.
5.3 TPMS Sensor Programming
The TPMS Programming function lets users to program the sensor data to the VAPON sensors
and replace faulty sensor. There are following four options available when doing programming.
● Manual Create
● Copy By Activation
● Automatic Create
●
Copy By OBD
5.3.1 Manual Create
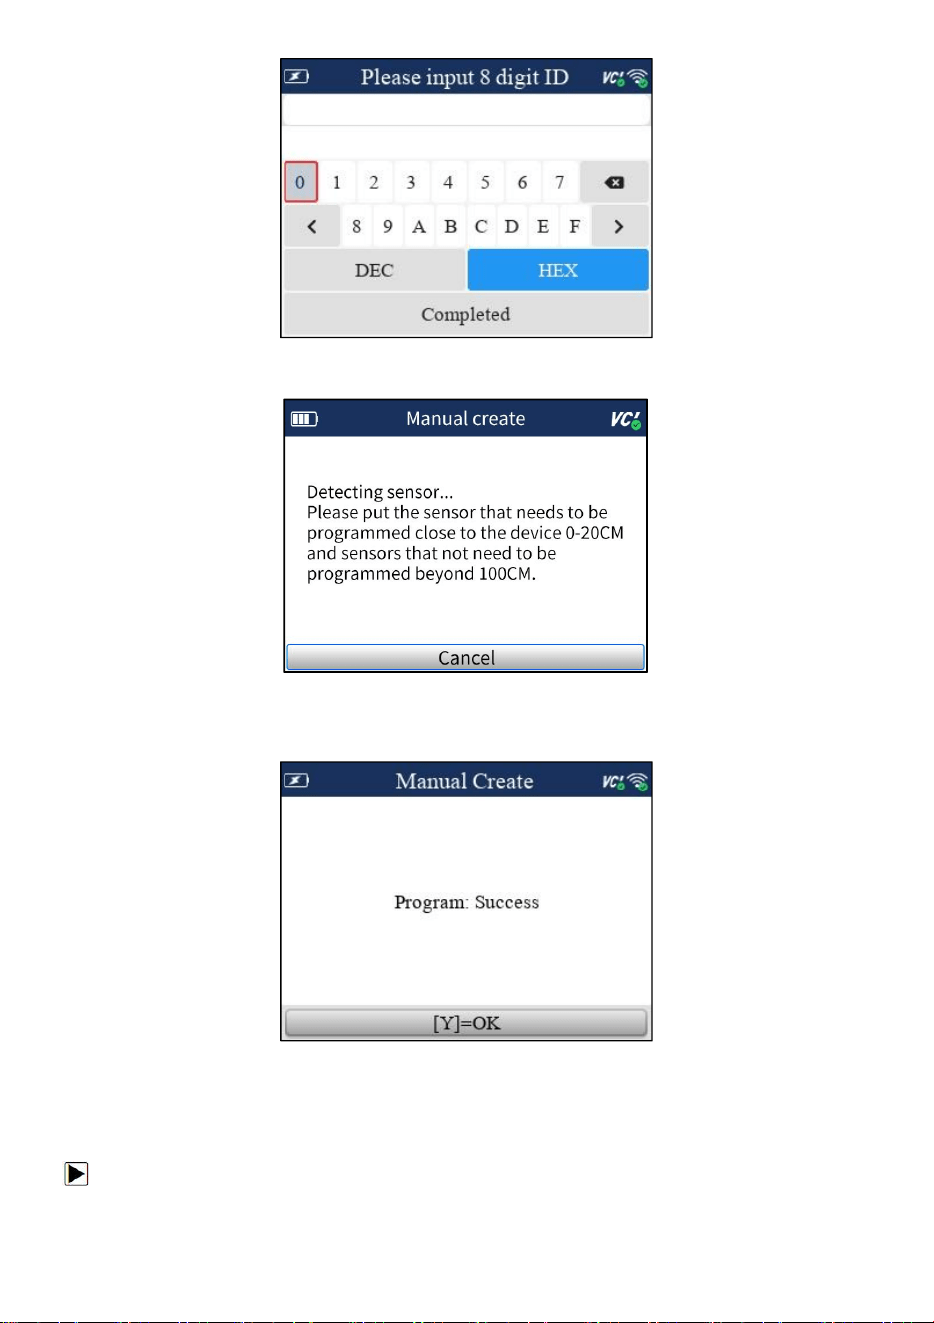
The Manual Create function lets users to input the sensor ID manually.
To create sensor ID manually:
1. Highlight TPMS from the Main Menu and select the vehicle model as need.
2. Select Programming--Manual Create from the available menu.
Figure 5-20 Sample Programming Menu
3. Input the sensor ID in the dialog box and press Y to continue.
22
TyrelQ S3 TPMS Service Tool Manual_English_V1.01
Figure 5-21 Sample Manual Create Screen
4. Place a new VAPON sensor near the TPMS tool (around 0-20 cm).
Figure 5-22 Sample Manual Create Screen
5. Press Y to start the programming when the tool detect the sensor.
6. Press Y to exit after the programming successfully.
Figure 5-23 Sample Programming Screen
5.3.2 Clone By Activation
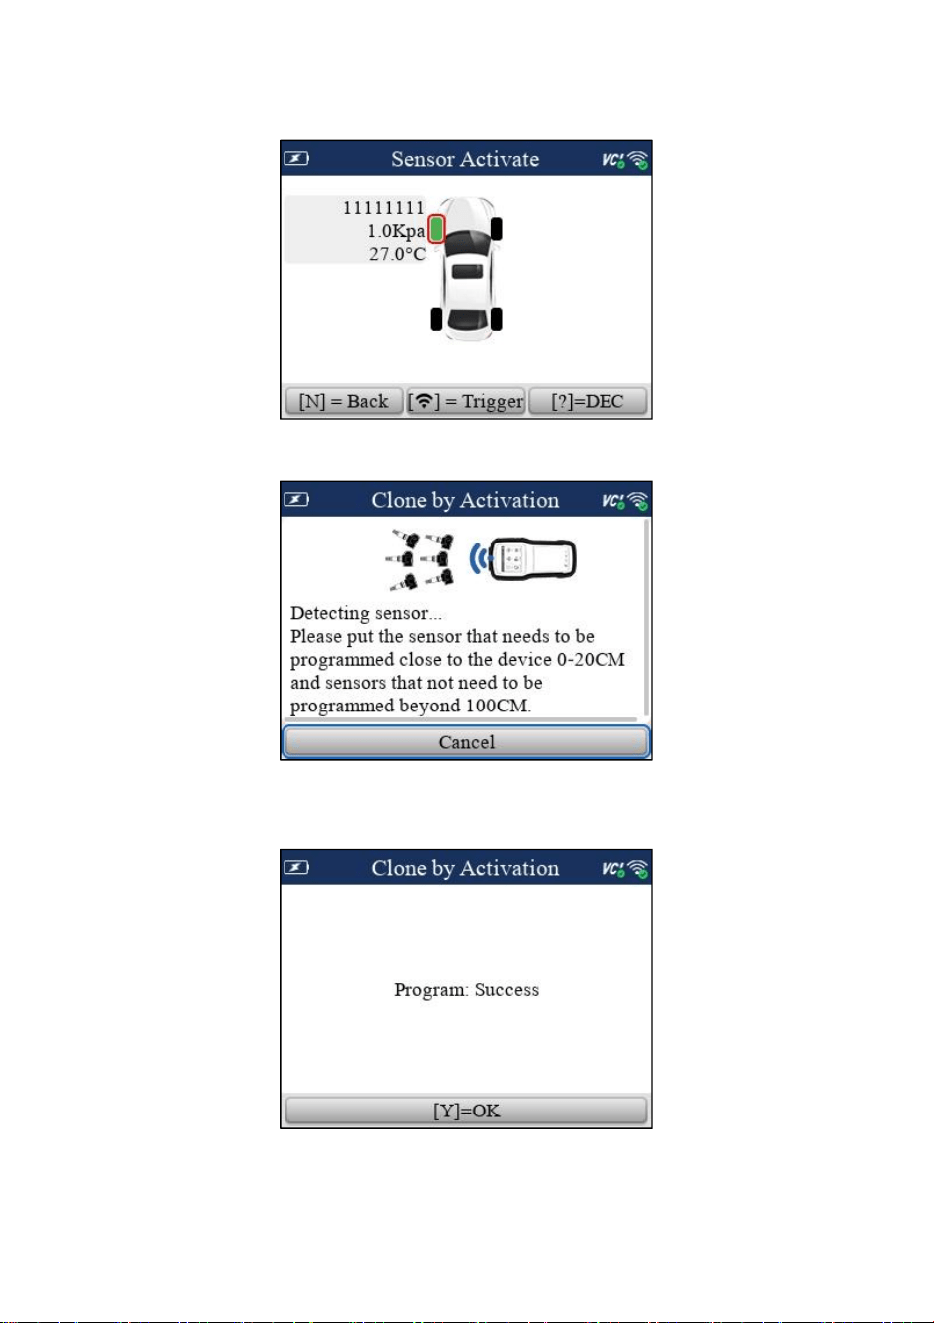
The Clone By Activation function lets users automatically write in the retrieved original sensor data
to the VAPON Sensor which is used after the original sensor is triggered.
To Clone by activation:
1. Highlight TPMS from the Main Menu and select the vehicle model as need.
23
TyrelQ S3 TPMS Service Tool Manual_English_V1.01
2. Select Programming--Clone by Activation from the available menu.
3. Place the tool near the original sensor to be copied and press Activate to continue.
4. After trigger successfully, press Y to continue.
Figure 5-24 Sample Activation Screen
5. Place a new VAPON sensor near the TPMS tool (around 0-20 cm).
Figure 5-25 Sample Activation Screen
6. Press Y to start the programming when the tool detect the sensor.
7. Press Y to exit after the programming successfully.
Figure 5-26 Sample Activation Screen
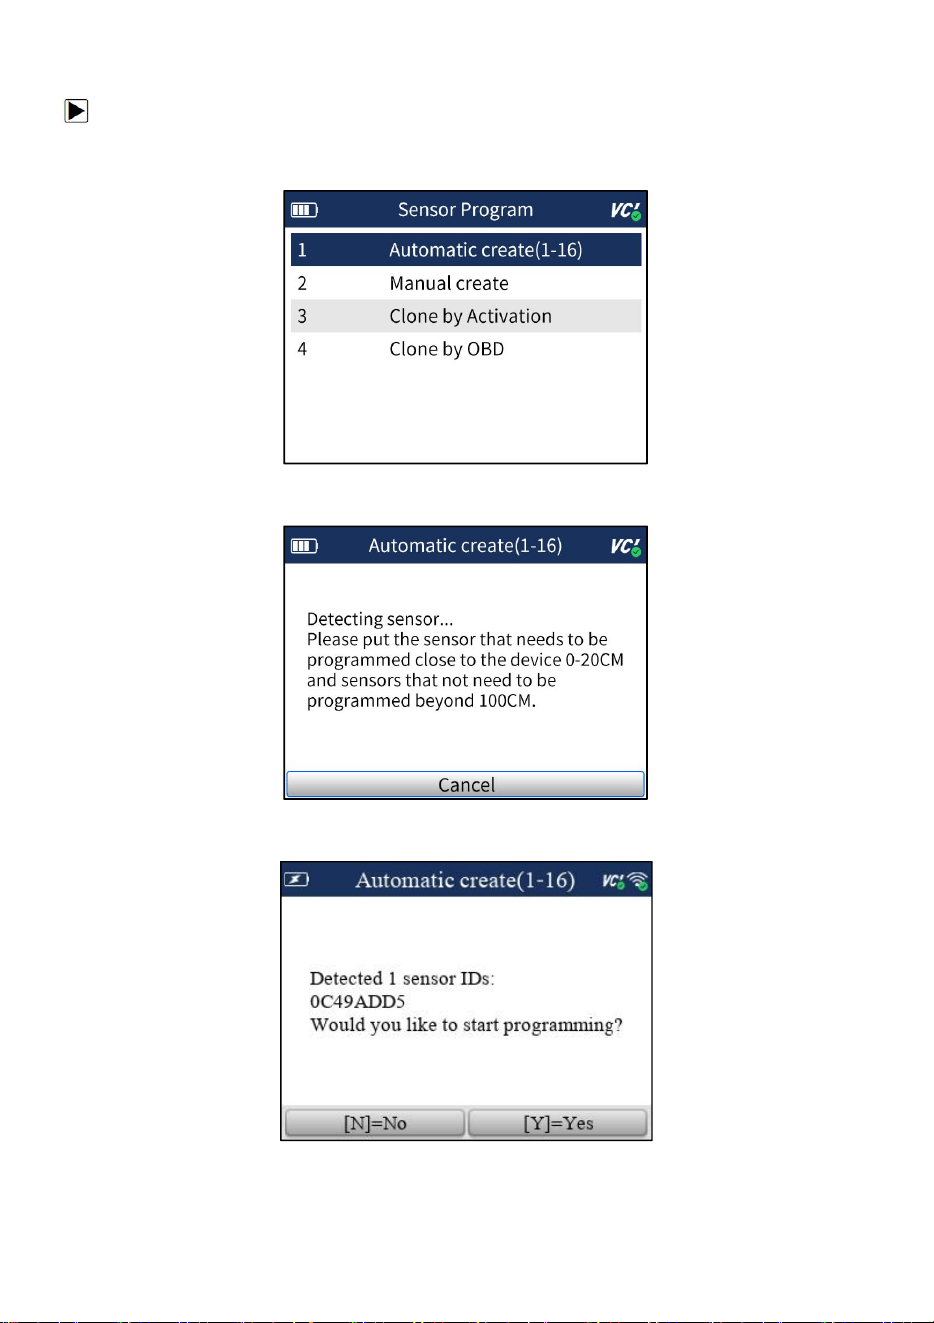
5.3.3 Automatic Create (1-16 sensors)
24
TyrelQ S3 TPMS Service Tool Manual_English_V1.01
The Automatic Create function is to program VAPON sensors by applying random IDs created
according to the test vehicle when it is unable to obtain the original sensor ID.
To create sensor ID automatically:
1. Highlight TPMS from the Main Menu and select the vehicle model as need.
2. Select Programming--Automatic Create from the available menu.
Figure 5-27 Sample Automatic Create Menu
3. Place new VAPON sensors(1-16) near the TPMS tool (around 0-20 cm).
Figure 5-28 Sample Automatic Create Screen
4. Press Y to start the programming when the tool detect the sensor.
Figure 5-29 Sample Sensor Detection Screen
8. Press Y to exit after the programming successfully.
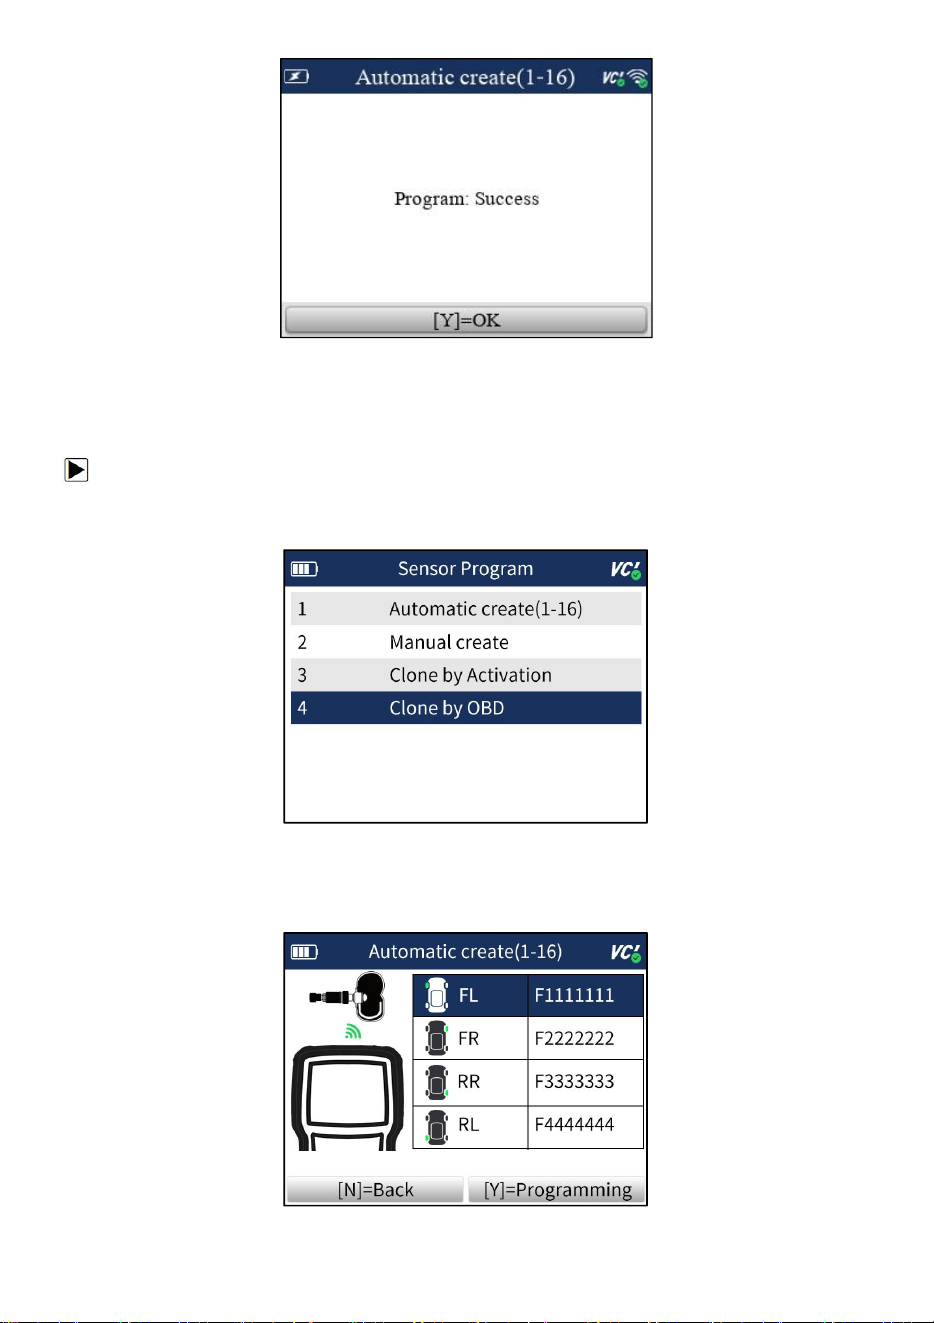
25
TyrelQ S3 TPMS Service Tool Manual_English_V1.01
Figure 5-30 Sample Programming Success Screen
5.3.4 Clone By OBD
This function lets users to write in the saved sensor information to VAPON sensors after
performing Read IDs from Vehicle in Learning function.
To create sensor ID manually:
1.Highlight TPMS from the Main Menu and select the vehicle model as need.
2.Select Programming--Clone by OBD from the available menu.
Figure 5-31 Sample Clone by OBD Menu
3. Connect the TPMS tool with the vehicle via OBDII cable and turn the ignition on.
4. Select the sensor ID to be copied after reading ID information successfully and press Y to
continue.
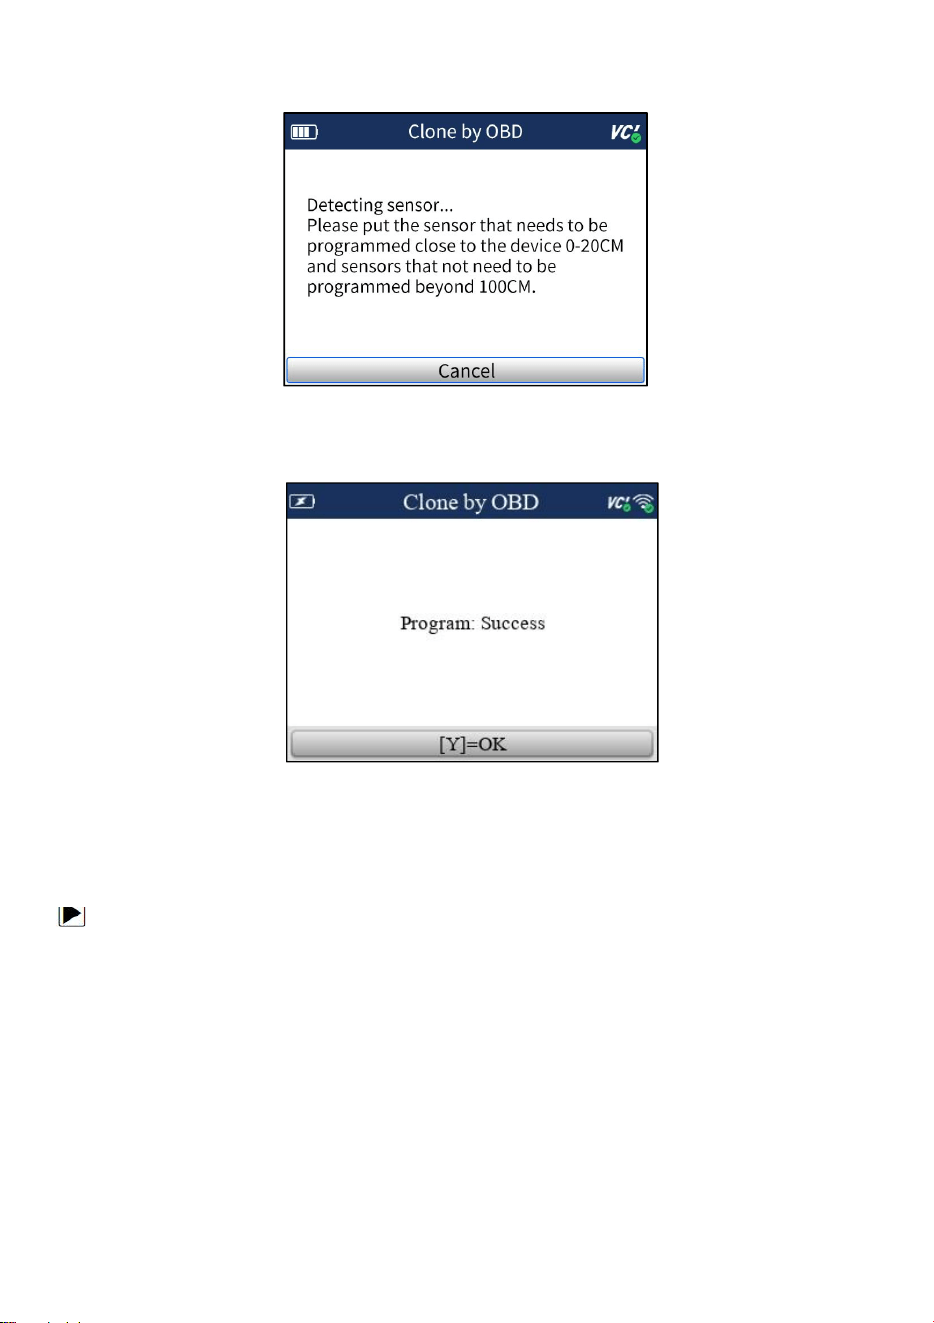
26
TyrelQ S3 TPMS Service Tool Manual_English_V1.01
Figure 5-32 Sample ID Copy Screen
5. Place a new VAPON sensor near the TPMS tool (around 0-20 cm).
Figure 5-33 Sample Programming Screen
6. Press Y to start the programming when the tool detect the sensor.
7. Press Y to exit after the programming successfully.
Figure 5-34 Sample Programming Success Screen
5.4 Study Help
This part introduces the relevant information of the sensor, such as manufacturer, sensor frequency,
OE number, learning type, learning method and learning steps etc.
To check Sensor Learning Process:
1. Scroll with the UP/DOWN arrow keys to highlight TPMS from the Main Menu and
press the YES key to start.
2. On each screen that appears, select the correct option and then press the YES key. Do this
until the complete vehicle information is entered.
3. Scroll with the UP/DOWN arrow keys to highlight Sensor Learning Process and press the
YES key to confirm.
4. The detailed process information will be displayed.
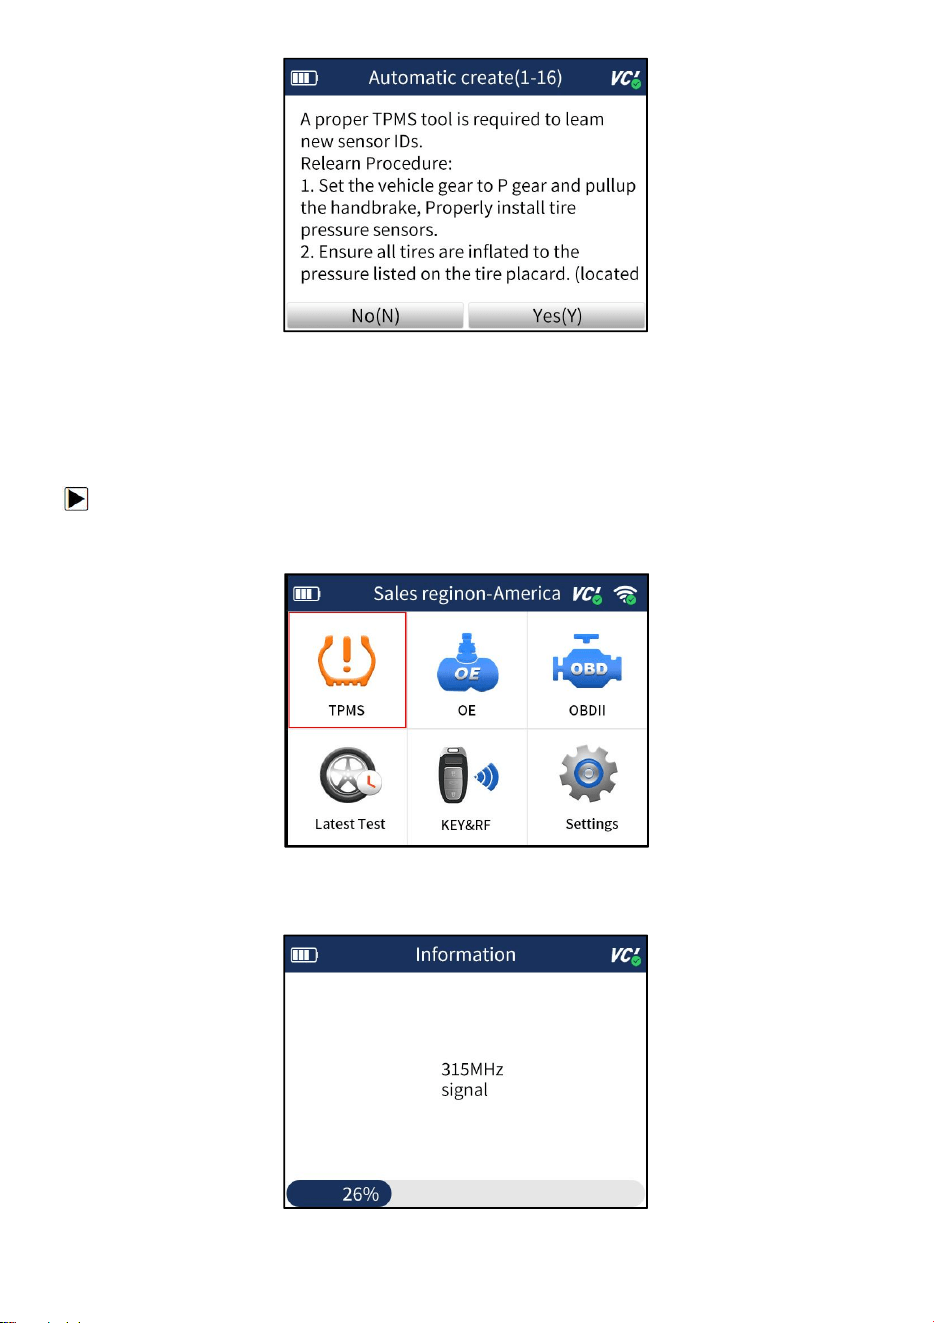
27
TyrelQ S3 TPMS Service Tool Manual_English_V1.01
Figure 5-35 Sample Sensor Learning Process Screen
6 RKE & RF Monitor
This section illustrates how to check RF Remote Keyless Entry (key FOB) with the trigger tool.
The TyrelQ S3 tests 315MHz and 433MHz key fobs only, and checks only for a signal present.
To test the check RF Remote Keyless Entry:
1. Scroll with the UP/DOWN arrow keys to highlight RKE & RF Monitor from the Main Menu and
press the YES key to start.
Figure 6-1 Sample Application Menu
2. Hold the Key Fob close to the tool, and press the function buttons on the FOB. If the button
works and the FOB is sending a signal, the tool will beep and the following screen displays.
28
TyrelQ S3 TPMS Service Tool Manual_English_V1.01
Figure 6-2 Sample RKE& RF Monitor Screen
3. Press the NO key to exit.
7 Latest Test
Latest Test leads to screens for historic test records and can save 25 records at most.
To test the TPM sensors:
1. Scroll with the UP/DOWN arrow keys to highlight Latest Test from the Main Menu and press
the YES key to start.
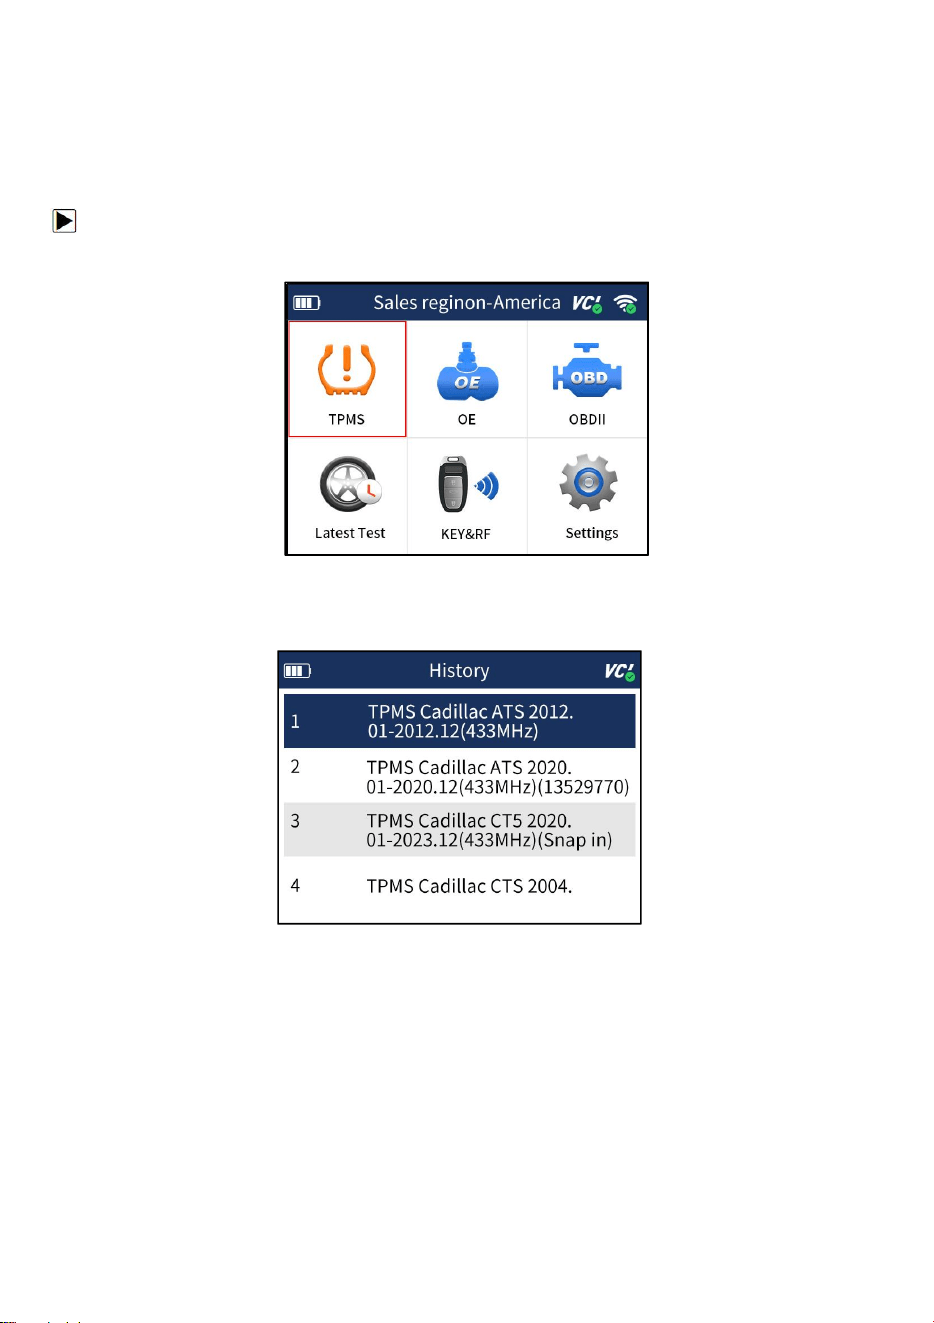
Figure 7-1 Sample Latest Test Screen
2. Scroll with the UP/DOWN arrow keys to choose one test record from the history diagnostic
records and press the YES key to start.
Figure 7-2 Sample Vehicle Record Screen
3. Choose the function you need to start the operation.
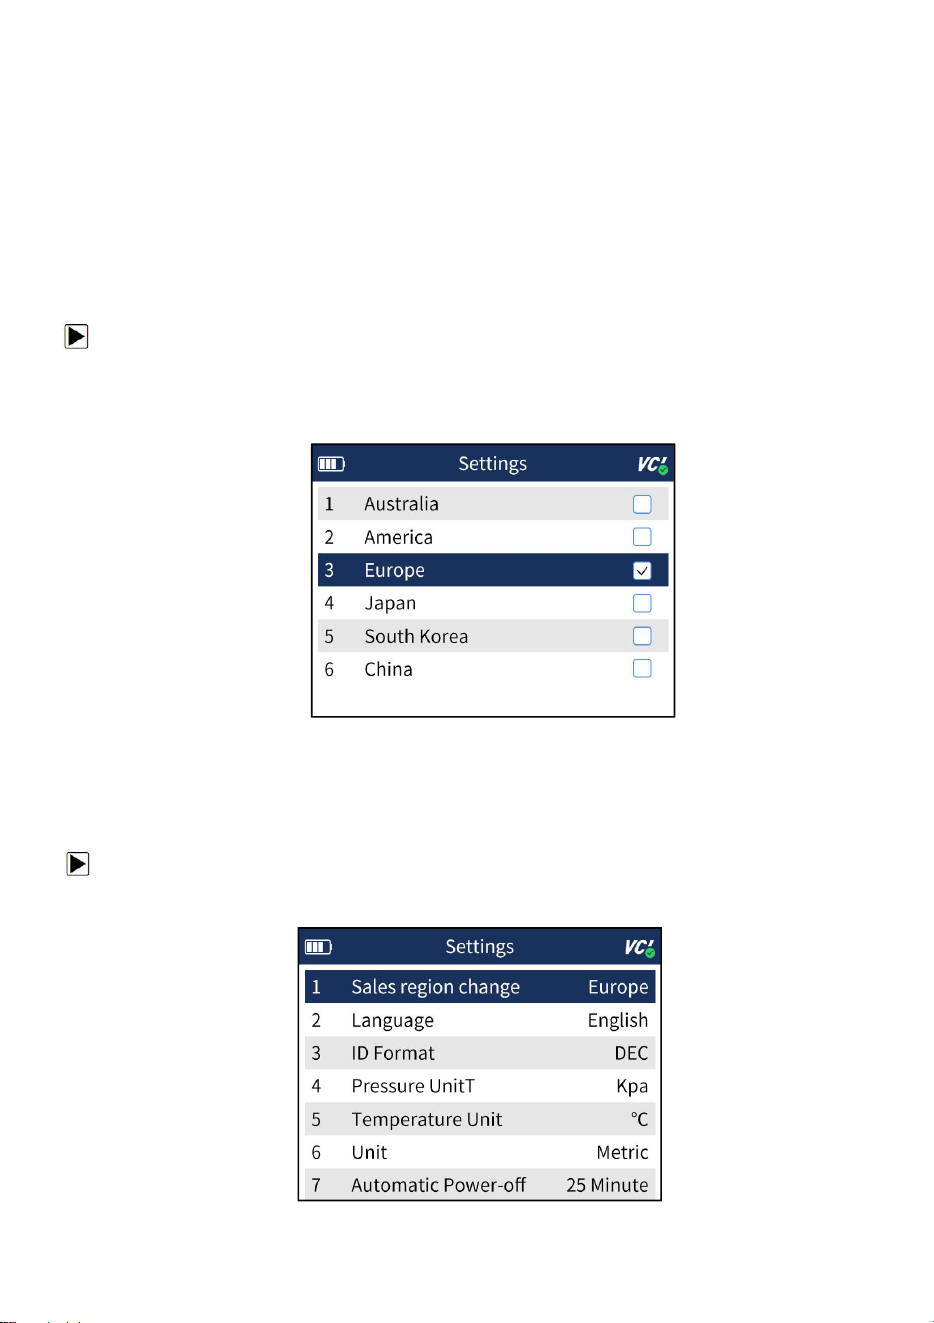
8 Settings
This section illustrates how to program the TPMS Service Tool to meet your specific needs.
When Setup application is selected, a menu with available service options displays. Menu options
typically include
● Sales region change
● Language
● Pressure Unit
● Temperature Unit
29
TyrelQ S3 TPMS Service Tool Manual_English_V1.01
●
Unit
●
Beep Set
●
Automatic Power-off
●
Uninstall
●
Display Test
●
Keypad Test
●
WIFI
●
Bluetooth
●
About
8.1 Sales region change
Selecting Sales region change opens a screen that allows you to select the area you work in.
To configure sales region
1. Scroll with the UP/DOWN arrow keys to highlight Region from Settings menu and press
the YES key.
2. Highlight the region you work in before starting the test. And the tool will load the new database
for the selected area.
Figure 8-1 Sample Sales Region Selection Screen
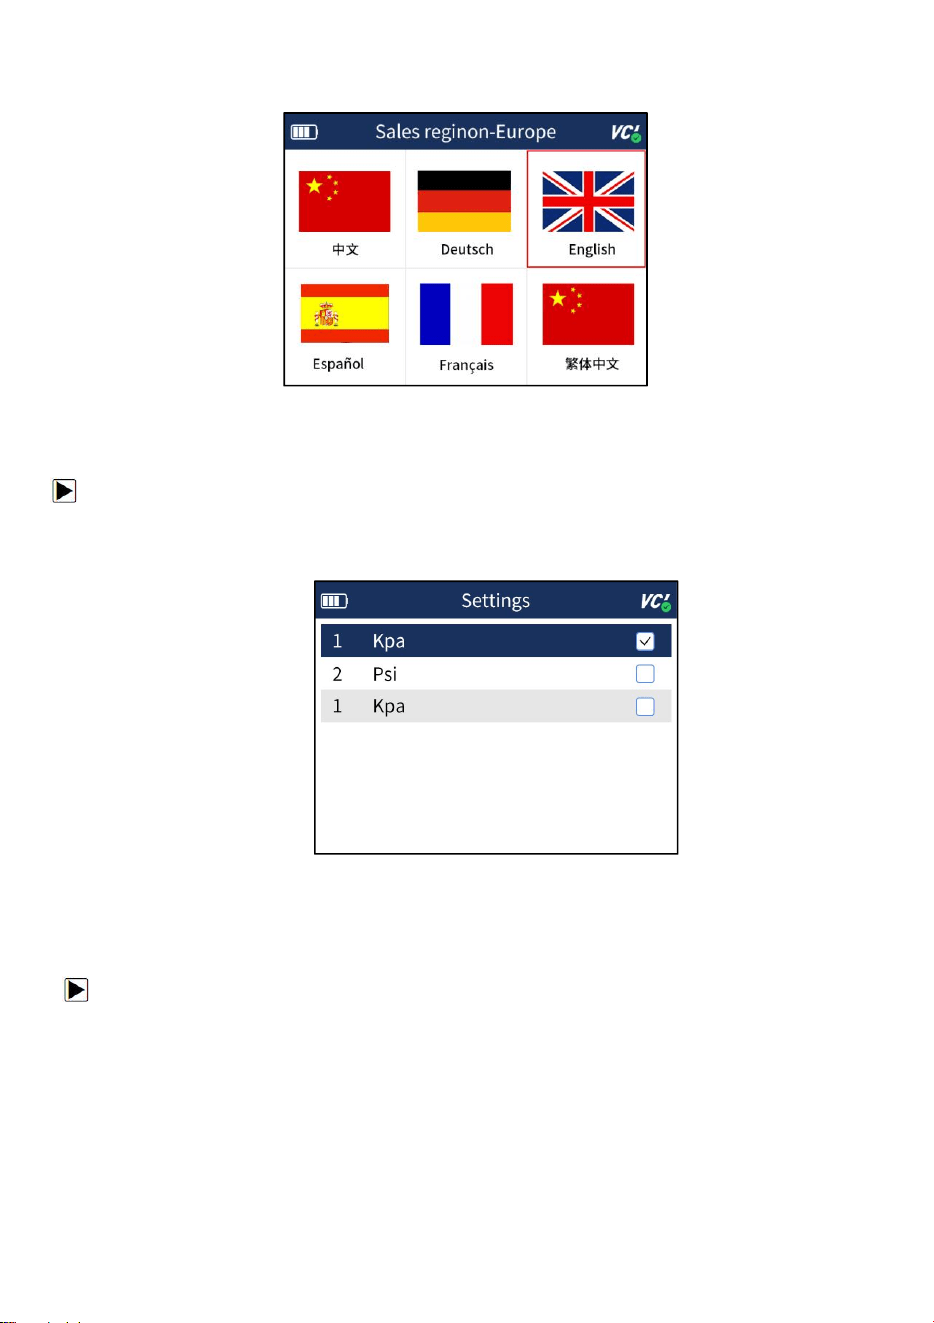
8.2 Language
Selecting Language opens a screen that allows you to choose system language. The TPMS
Service Tool is set to display English menus by default.
To configure system language
1. Scroll with the UP/DOWN arrow keys to highlight Language from Setup menu and press the
YES key.
30
TyrelQ S3 TPMS Service Tool Manual_English_V1.01
Figure 8-2 Sample Language Setup Screen
2. Press the UP/DOWN arrow key select a language and press the YES key to confirm and return.
Figure 8-3 Sample Language Selection Screen
8.3 Pressure Unit
Selecting Pressure Unit opens a screen that allows you to set the pressure unit in kPa, PSI or bar.
To configure pressure unit
1. Scroll with the UP/DOWN arrow keys to highlight Pressure Unit from Setup menu and press
the YES key.
2. Press the UP/DOWN arrow key select an item and press the YES key to save and return.
Figure 8-4 Sample Pressure Unit Selection Screen
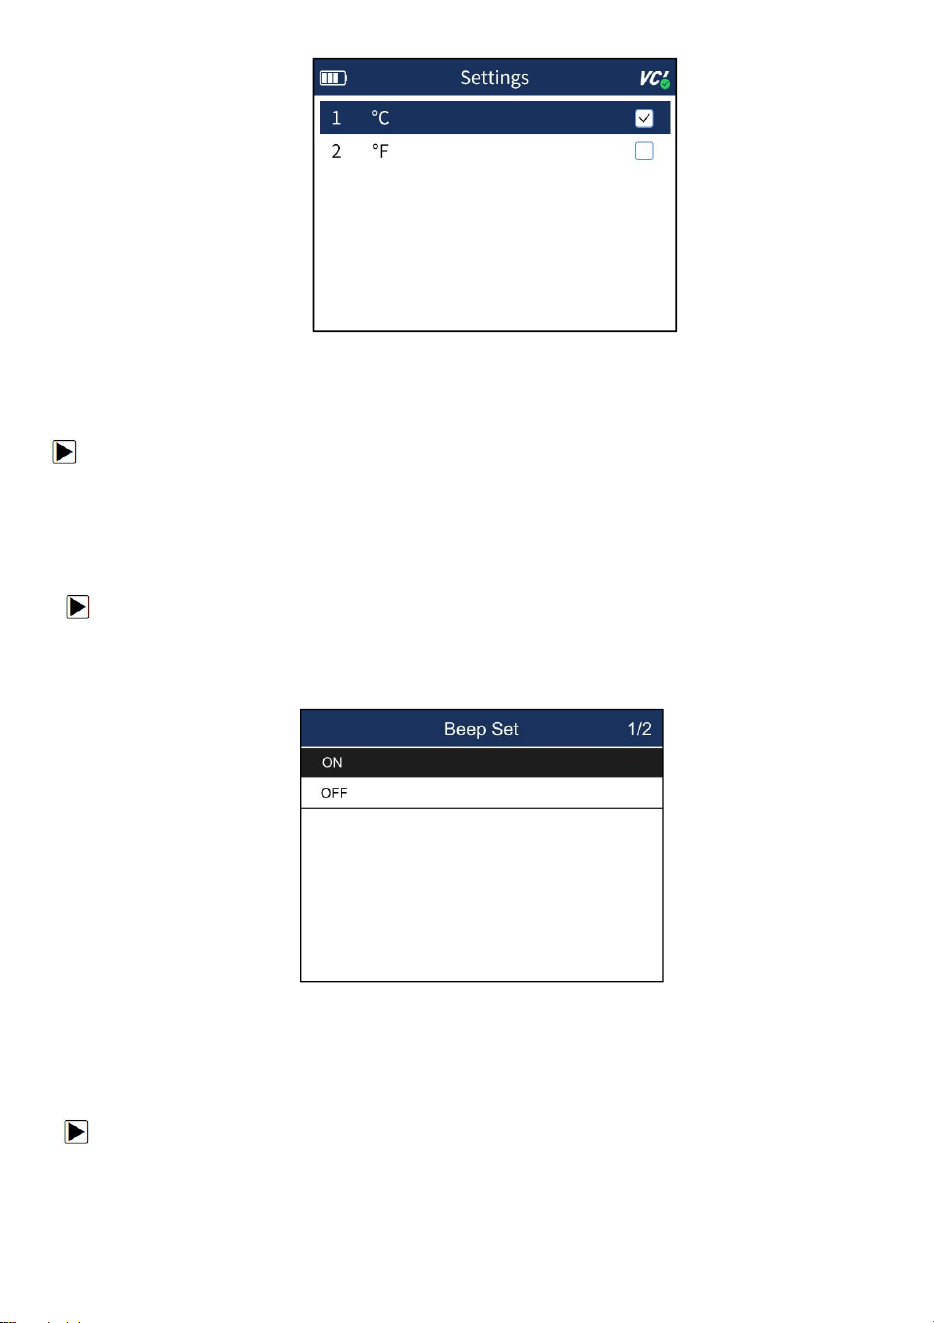
8.4 Temperature Unit
Selecting Temperature Unit opens a screen that allows you to set the temperature unit Celsius or
Fahrenheit degrees.
To configure temperature unit
1. Scroll with the UP/DOWN arrow keys to highlight Temperature Unit from Setup menu and
press the YES key.
2. Press the UP/DOWN arrow key select an item and press the YES key to save and return.
31
TyrelQ S3 TPMS Service Tool Manual_English_V1.01
Figure 8-5 Sample Temperature Unit Selection Screen
8.5 Unit
Selecting Unit opens a dialog box that allows you to choose between Imperial customary or metric
units of measure.
To change the unit setup:
1. Press Settings from home screen of the TyrelQ S3 diagnostic application.
2. Press Unit and available unit system display.
3. Select a unit system.
8.6 Beep Set
Selecting Beep Set opens a dialog box that allows you to turn on/off the beeper.
To turn on/off the beeper
1. Scroll with the UP/DOWN arrow keys to highlight Beep Set from Settings menu and press the
YES key.
2. Press the UP/DOWN arrow key select an item and press the YES key to save and return.
Figure 8-6 Sample Beeper On/Off Selection Screen
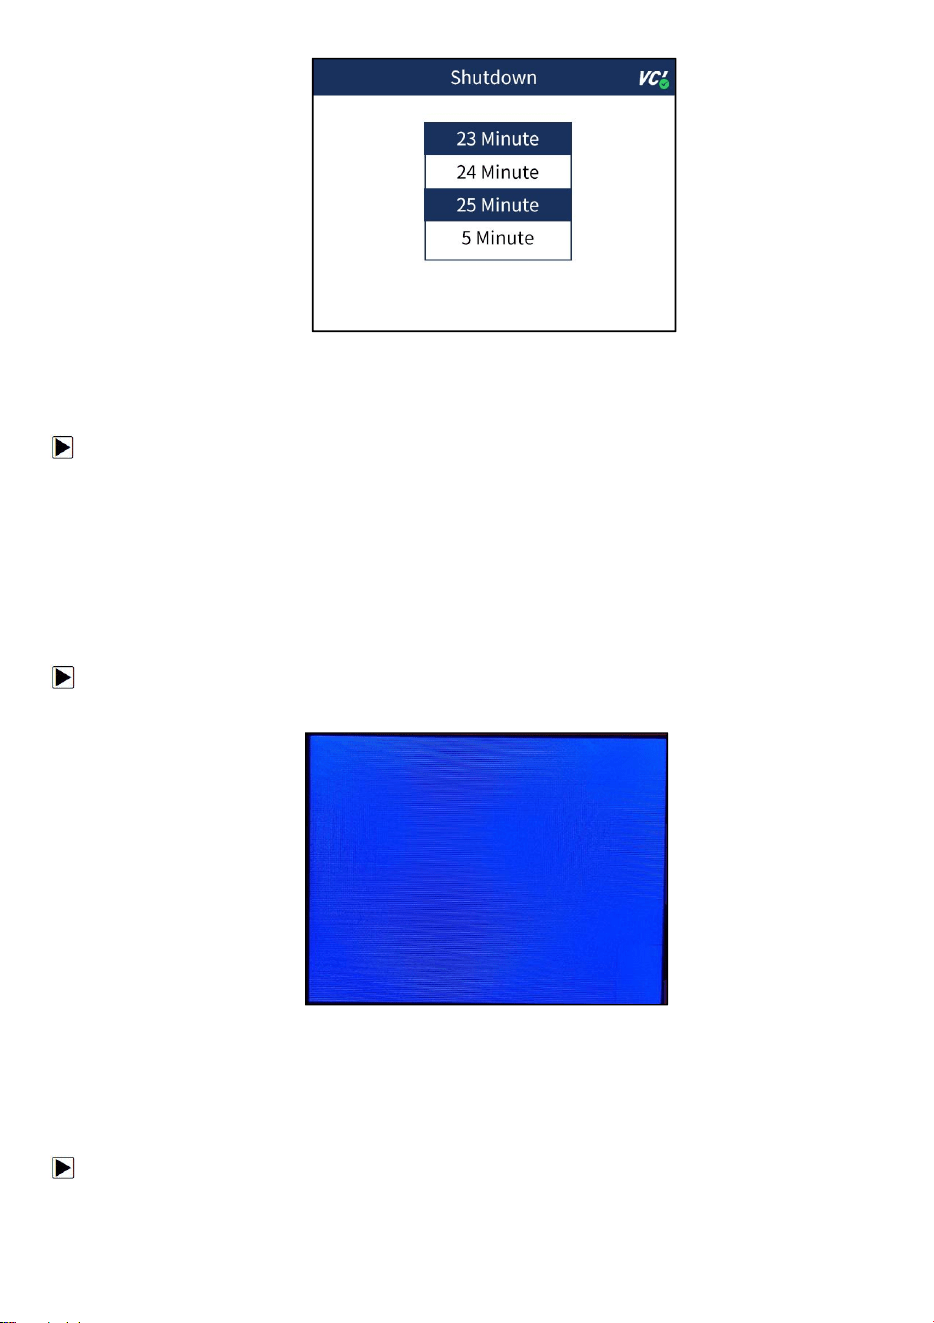
8.7 Automatic Power-off
Selecting Auto Power-off opens a dialog box that allows you to set automatic power-off interval of
the trigger tool to save battery life. Auto power off is not operational when charging. The
maximum interval is 20 minutes and the minimal is 1 minute.
To change auto power off interval:
1. Use the UP/DOWN arrow key to select Auto Power-Off from Settings screen and press the YES
key to confirm.
2. Use the UP/DOWN key to increase or decrease time, and press the YES key to save and return.
32
TyrelQ S3 TPMS Service Tool Manual_English_V1.01
Figure 8-7 Sample Auto Power-off Interval Screen
8.8 Uninstall
This option allows you to uninstall the vehicle software installed in the scanner.
To uninstall a vehicle software:
1.
Tap Settings application on home screen of TyrelQ S3.
2. Tap the Uninstall Vehicle Software option on the option list.
3. Choose the vehicle software you want to delete or choose Select All.
4.
Press Back to quit or and press OK to uninstall.
8.9 Display Test
Selecting
Display Test
option opens a screen that allows you to check the functionality of the
display.
To test the display:
1. Scroll with the arrow keys to highlight
Display Test
from Settings menu and press the
ENTER
key to start test. Check if there are any missing spots in the LCD screen.
Figure 8-8 Sample LCD Test Screen
2. To quit the test, press the Back key.
8.10 Keypad Test
Selecting
Keypad Test
option opens a screen that allows you to check the functionality of the
keypad.
To test the keypad:
1. Scroll with the arrow keys to highlight
Keypad Test
from Settings menu and press
ENTER
key.
33
TyrelQ S3 TPMS Service Tool Manual_English_V1.01
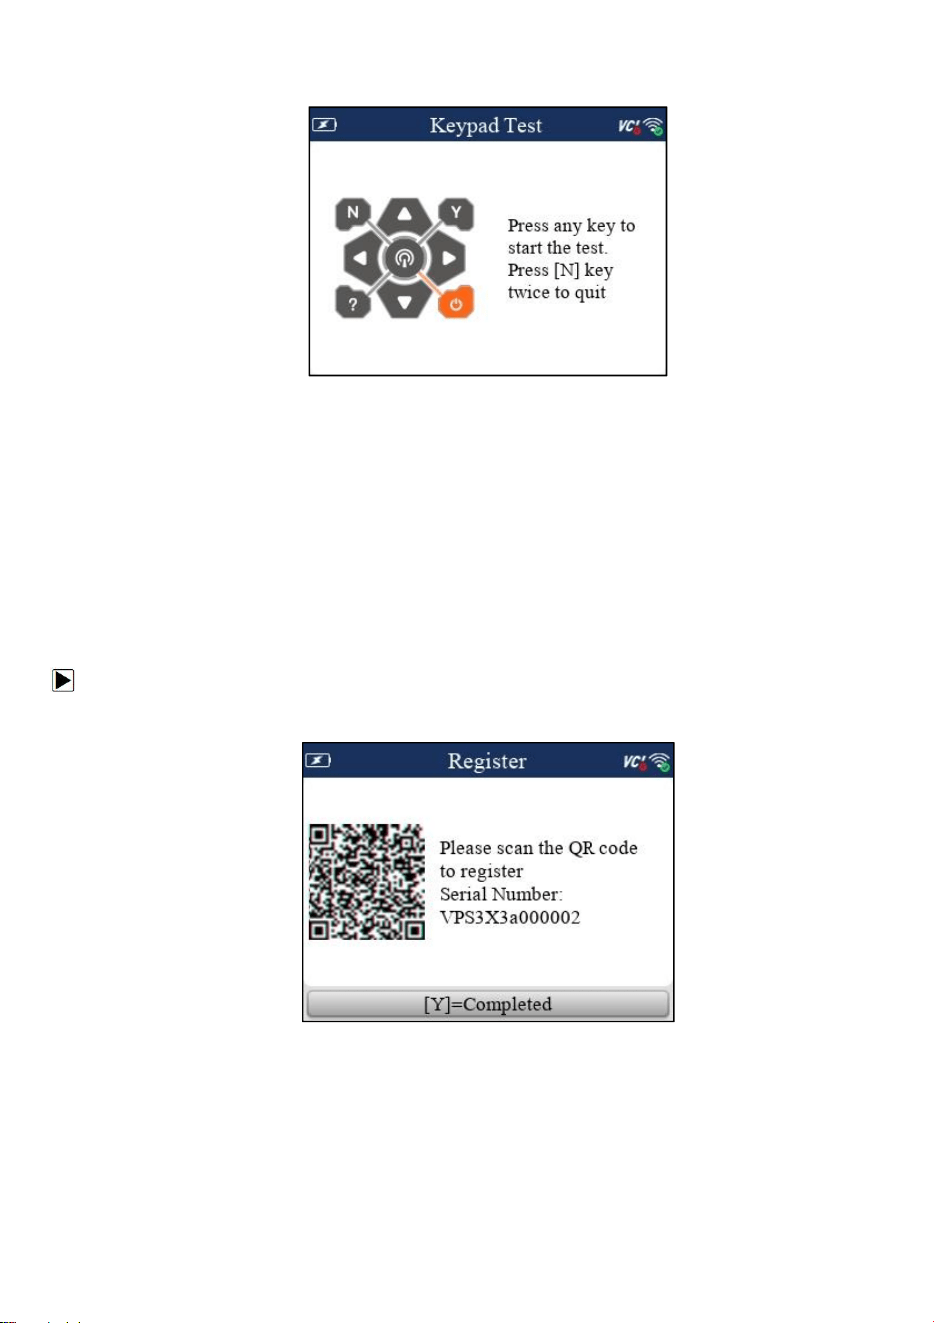
2. Press any key to start test. The virtue key corresponding with the key you pressed will be
highlighted on the screen if it works correctly.
Figure 8-9 Sample Keypad Test Screen
3. To quit the test, press
N
key twice.
8.11 WIFI
Selecting
WIFI
option opens a screen that shows all available wifi for your scan tool. Please note only
2.4G wifi can be supported.
8.12 Bluetooth
Selecting Bluetooth option opens a screen that shows all available bluetooth for your scan tool.
8.13 About
Selecting About option opens a screen that shows information about your scan tool, such as serial
number, which may be required for product registration.
To view information of your scan tool:
1. Scroll with the arrow keys to highlight
About
from Settings menu and press the
ENTER
key.
2. A screen with detailed information of the scanner displays.
Figure 8-10 Sample Tool Information Screen
3. Press the
Back
key to exit.
9 Update
The scanner can be updated to keep you stay current with the latest development of diagnosis.
This section illustrates how to register and update your scan tool.
34
TyrelQ S3 TPMS Service Tool Manual_English_V1.01
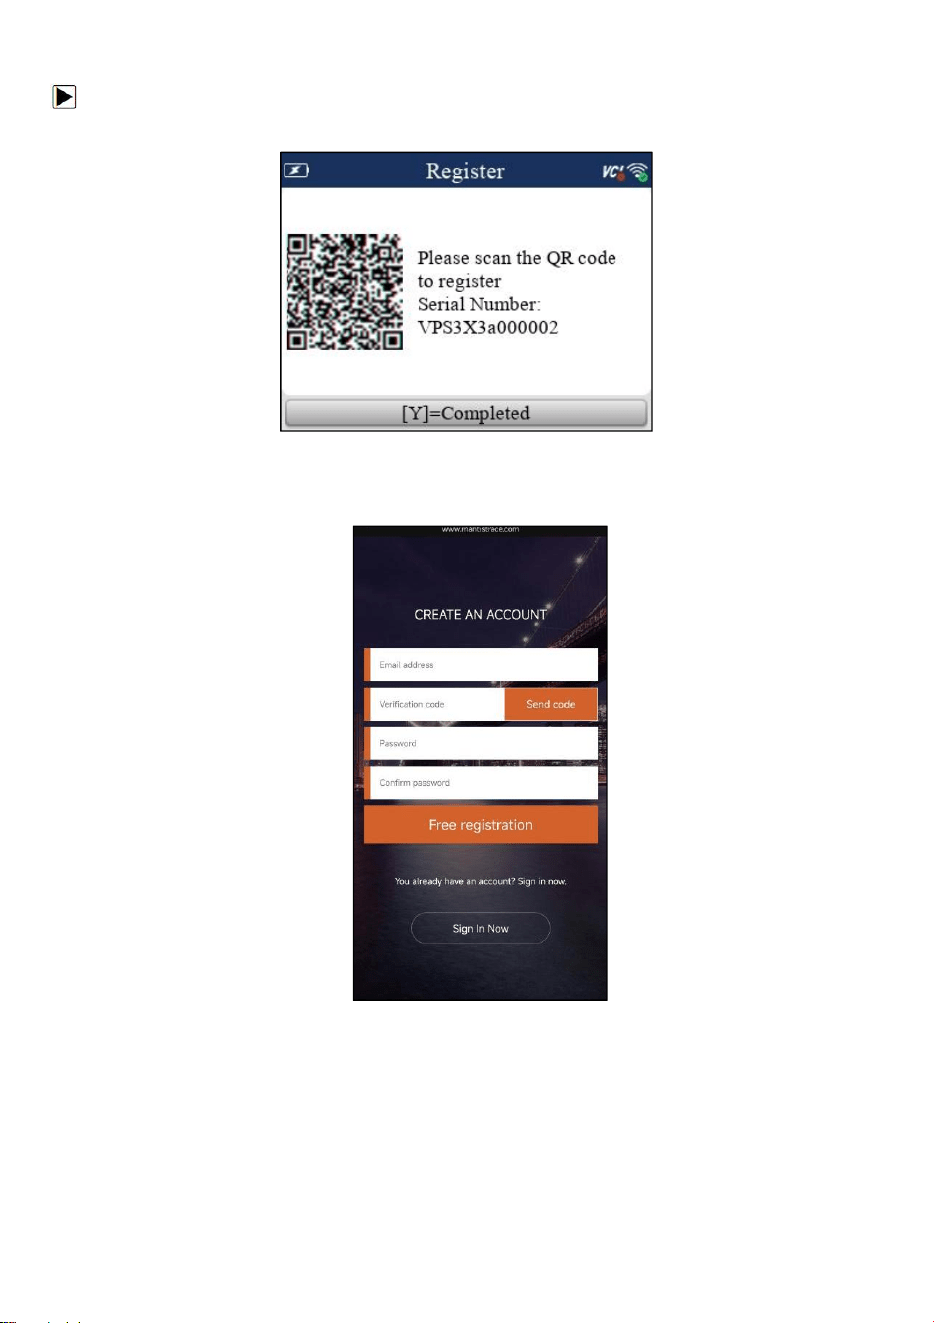
You are also allowed to register and create a VAPON ID by scanning QR code.
To register by scanning QR code:
1. Enter
Update
and connect WIFI, then scan the QR code to register.
Figure 9-1 Sample Registration Screen
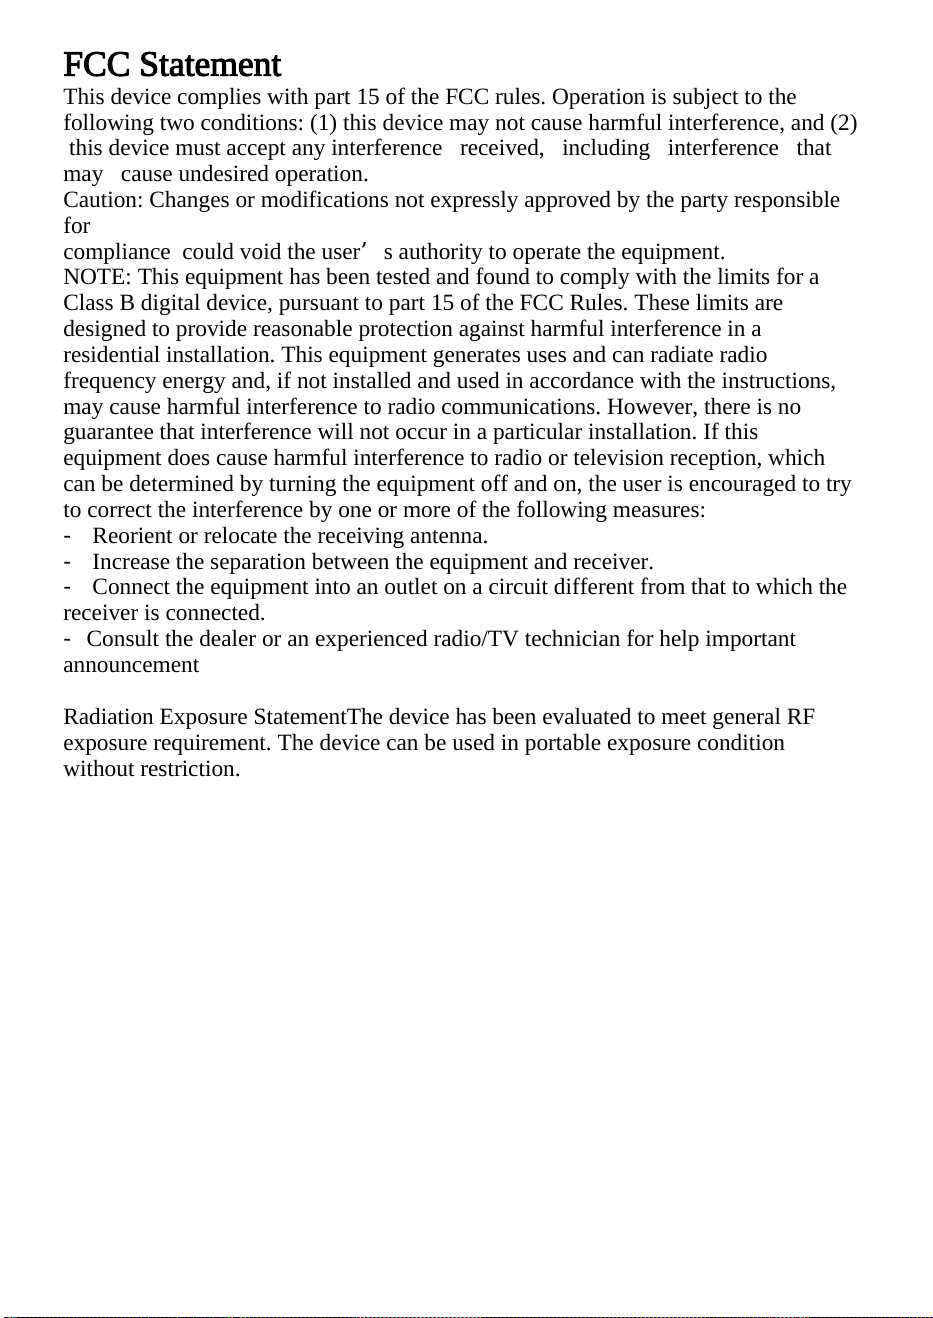
2. Scan the QR code and enter Rigister webpage. Enter your own email address and click “Send
code” to find the verification code in your mailbox . Create a unique password, confirm
password and then click “Free registration” to complete.
Figure 9-2 Sample Register Screen
FCC Statement
This device complies with part 15 of the FCC rules. Operation is subject to the
following two conditions: (1) this device may not cause harmful interference, and (2)
this device must accept any interference received, including interference that
may cause undesired operation.
Caution: Changes or modifications not expressly approved by the party responsible
for
compliance could void the user’s authority to operate the equipment.
NOTE: This equipment has been tested and found to comply with the limits for a
Class B digital device, pursuant to part 15 of the FCC Rules. These limits are
designed to provide reasonable protection against harmful interference in a
residential installation. This equipment generates uses and can radiate radio
frequency energy and, if not installed and used in accordance with the instructions,
may cause harmful interference to radio communications. However, there is no
guarantee that interference will not occur in a particular installation. If this
equipment does cause harmful interference to radio or television reception, which
can be determined by turning the equipment off and on, the user is encouraged to try
to correct the interference by one or more of the following measures:
‐ Reorient or relocate the receiving antenna.
‐ Increase the separation between the equipment and receiver.
‐ Connect the equipment into an outlet on a circuit different from that to which the
receiver is connected.
‐Consult the dealer or an experienced radio/TV technician for help important
announcement
Radiation Exposure StatementThe device has been evaluated to meet general RF
exposure requirement. The device can be used in portable exposure condition
without restriction.