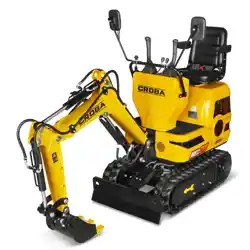

Operator’s Manual
READ AND UNDERSTAND THE ENTIRE MANUAL BEFORE OPERATING MACHINE


TABLE OF CONTENTS
INTRODUCTION
SAFETY WARNING SIGNS
FRONT, REAR, LEFT, AND RIGHT
2
2
3
SAFETY
5
CONTROLS
23
4
SIGNAL WORDS
OPERATIONS
30
TRANSPORTATION 34
MAINTENANCE 35
TROUBLESHOOTING
40
PARAMETERS 42
ACCESSORIES
45
EXPLODED VIEW & PARTS LIST 46
30
BEFORE START OF OPERATIONS
30
START AND STOP OF ENGINE
31
OPERATIONS OF MACHINE
34
LOADING AND UNLOADING
35
OVERVIEW
36
SERVICE DATA
37
LIST OF WEARING PARTS
38
CRITICAL SAFETY PARTS
40
NO BATTERY POWER
41
RESTART AFTER REFUELING
41
FLASHING OF WARNING LAMPS
42
BASIC PARAMETERS
43
OVERALL DIMENSIONS OF MACHINE
44
OPERATING RANGE
45
PRECAUTIONS FOR OPERATIONS
45
PERIODICAL REPLACEMENT OF
HYDRAULIC OIL
37
PERIODICAL REPLACEMENT OF
HYDRAULIC OIL
3
FOREWORD
SERIAL NUMBER
3
4
DESIGNATED OPERATIONS
RUN-IN PERIOD
4
PRODUCT FEATURES
4
4
NOTES ABOUT READING OF THIS MANUAL
PRECAUTIONS DURING PREPARATIONS
7
GENERAL PRECAUTIONS
5
8
SAFETY MEASURES AT START
9
OPERATION PRECAUTIONS
13
PRECAUTIONS FOR PARKING
14
PRECAUTIONS DURING TRANSPORT
15
PRECAUTIONS FOR MAINTENANCE
20
SAFETY SIGNS
21
SIGN ON PRECAUTIONS
23
COMPONENT NAME
24
FUSE CASE, FUEL FILLING PORT, SEAT
24
SEAT
25
ELECTRICAL CONTROL PANEL
26
SWITCHES
26
JOYSTICKS AND PEDALS
28
ACCESSORY
1
TABLE OF CONTENTS

EXPLANATION OF THE SYMBOLS ON THE PRODUCT
Symbols are used in this manual to draw your attention to potential hazards. The safety symbols and the accompanying
explanations must be fully understood. The warnings themselves will not rectify a hazard and cannot replace proper
accident prevention measures.
2
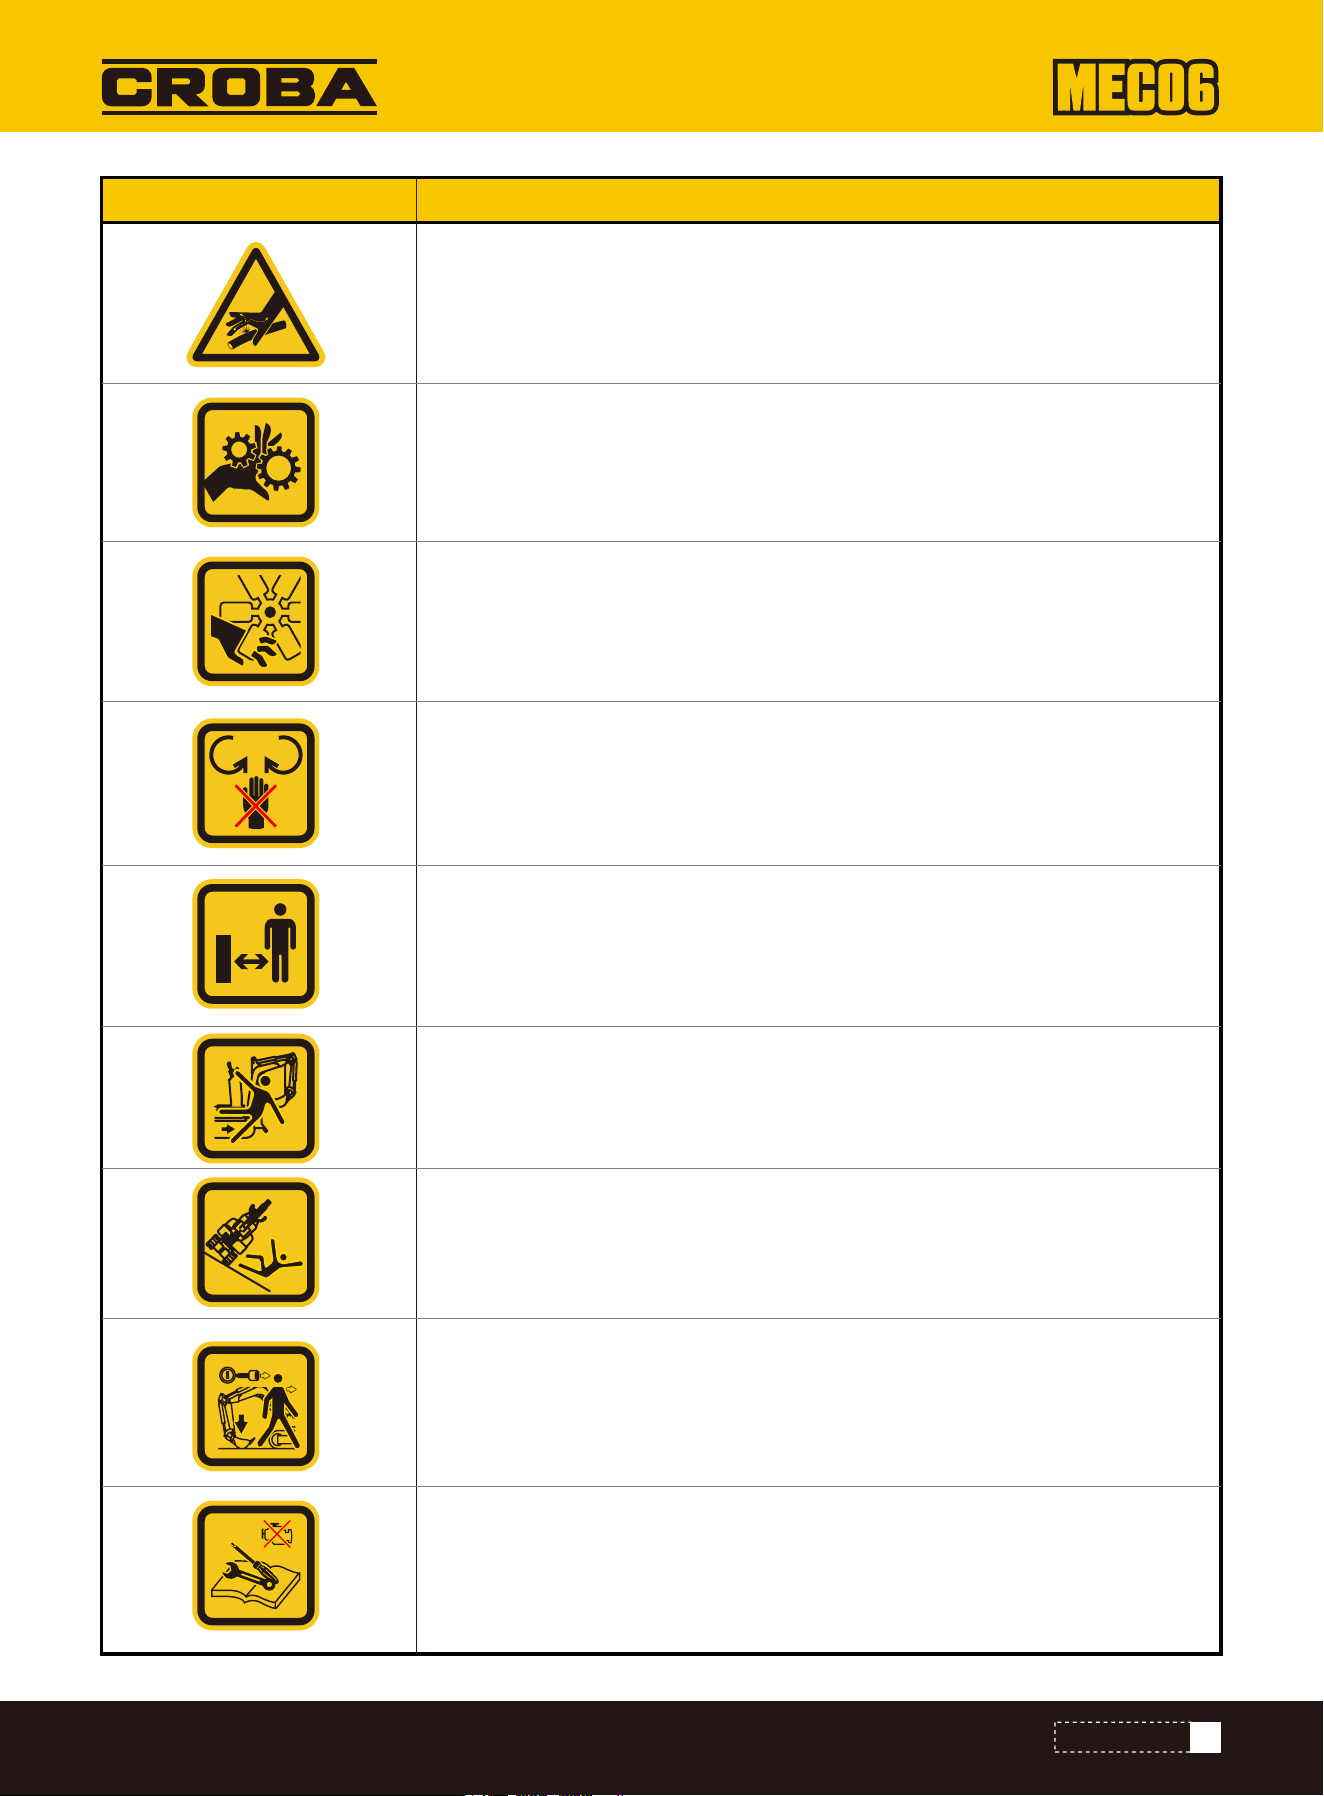
SAFETY WARNING SIGNS
Before commissioning, read and observe the operating manual and safety instruc-
tions!
Wear hearing protection. Exposure to noise can cause hearing loss.
Wear a safety helmet.
Wear safety goggles. Sparks created during work or fragments, chippings and dust
ejected by the device can case sight loss.
Smoking prohibited. No sparks or flames.
Do not start the engine by short-circuiting the starter connections.
Do not touch any parts that are still hot from operation. They can cause severe
burns.
Stay out of the area to avoid serious personal injury or death.
Be careful, objects can be thrown away during use.
Watch your hands.
Label Meaning
3
INTRODUCTION
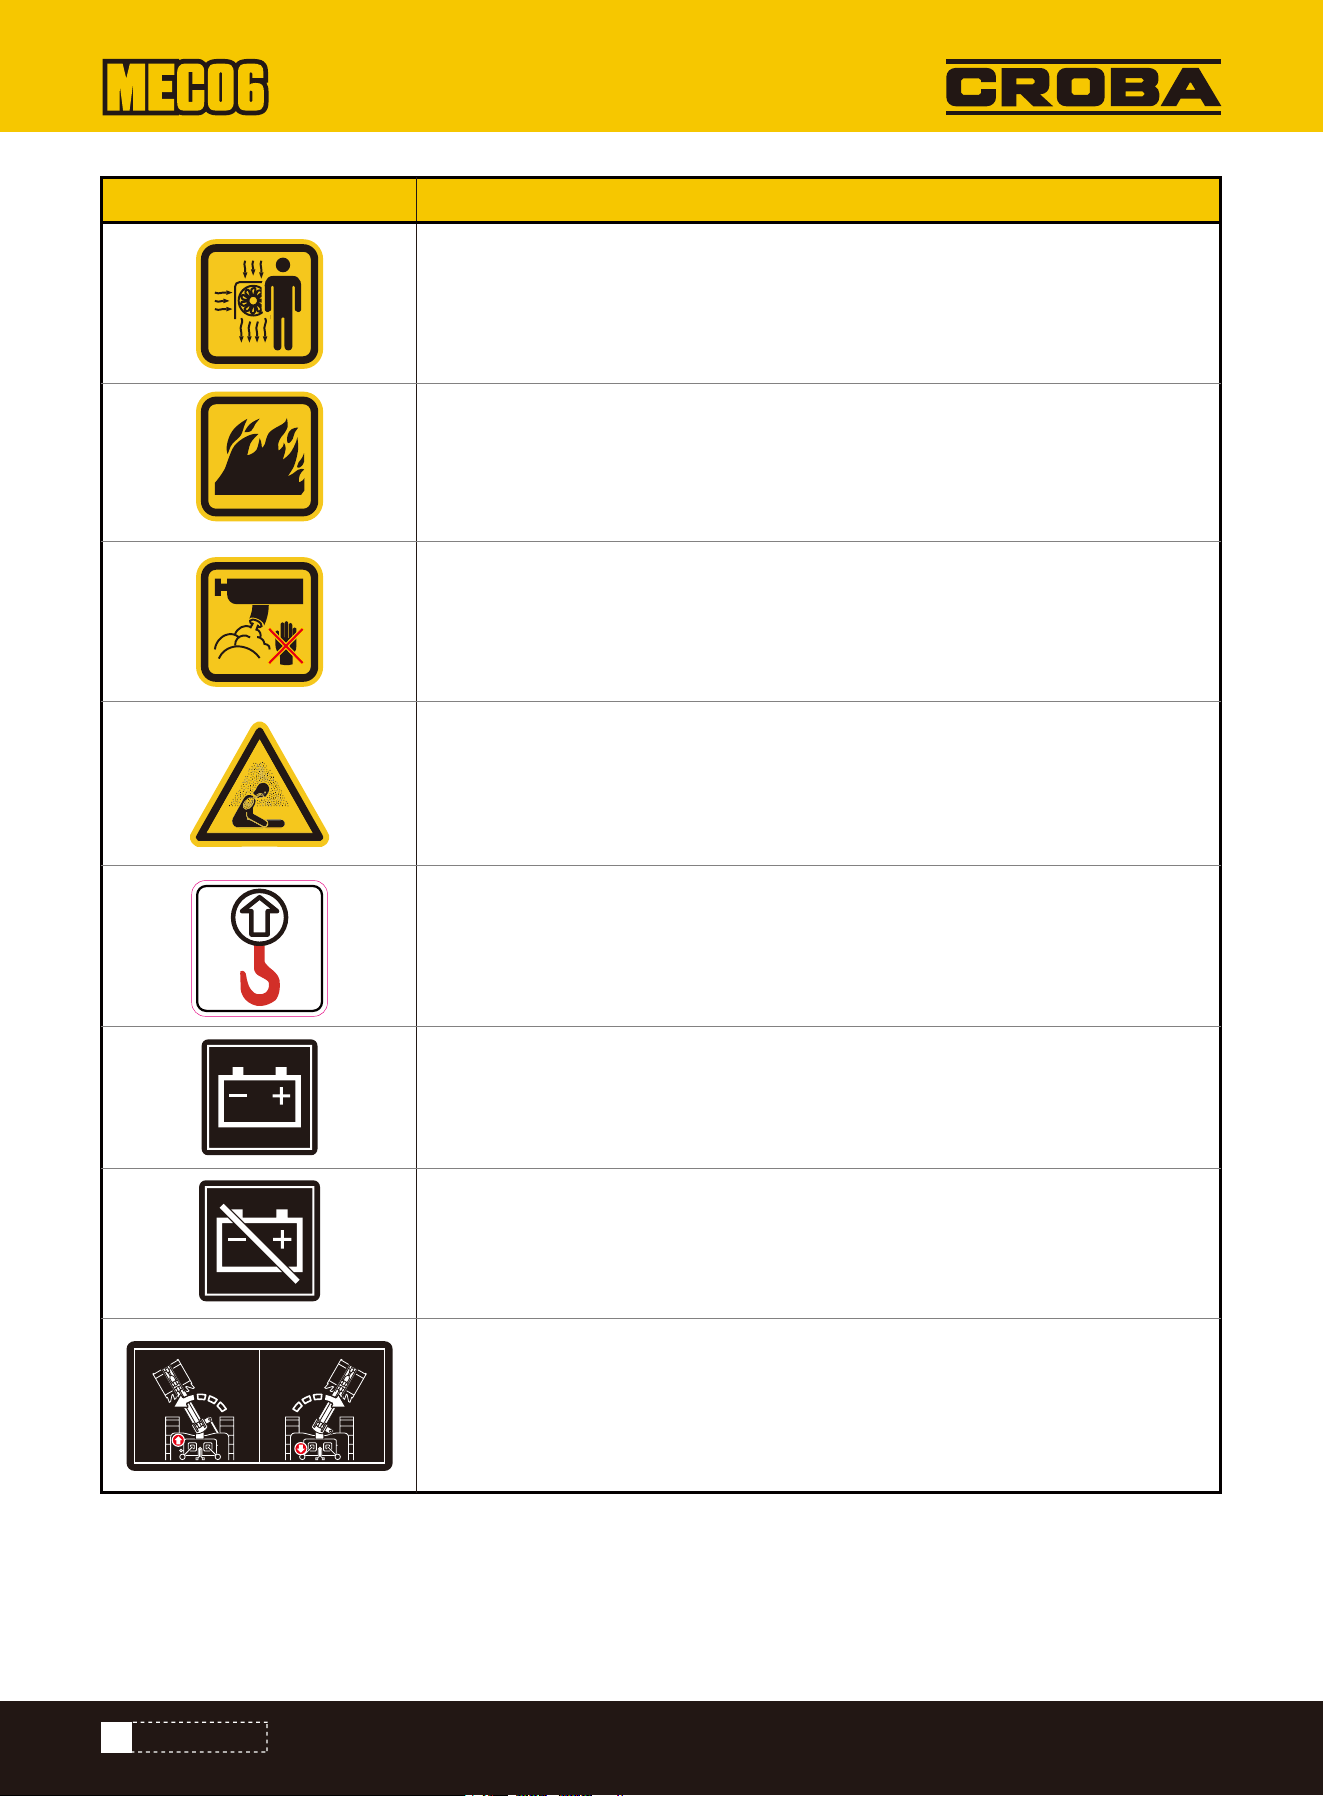
Do not use your bare hands to check for possible leaks.
Keep away from moving parts.
Keep away from the fan.
Keep hands away from moving parts. Moving parts can crush and cut.
Keep bystanders away.
Pay attention to safety when working in front of the machine.
Tipping hazard!
Switch off the engine, disconnect the spark plug cable and secure that all moving
parts are stationary before cleaning, repairing or inspecting the excavator.
Move the bucket close to the ground and remove the key when switching off the
excavator.
Label Meaning
4
INTRODUCTION
Pay attention to the heat of the fan.
Petrol and its vapours are extremely flammable and explosive.
Do not touch any hot parts such as the exhaust etc.
The exhaust gases are dangerous because they contain carbon monoxide.
Staying in the area can result in unconsciousness and death.
3-point lifting device
“Charge battery” warning light
Disconnector earthing cable (negative switch)
Press the pedal at the front to swivel the boom to the left. Press the pedal at the
rear to swivel the boom to the right.
Label Meaning

INTRODUCTION
We hope your new product brings you much enjoyment and success.
In accordance with the applicable product liability laws, the manufacturer of this product assumes no liability for damage
to the product or caused by the product arising from:
• Improper handling
• Non-compliance with the operating manual
• Repairs carried out by third parties, unauthorised specialists
• Installing and replacing non-original spare parts
• Improper use
• Failures of the electrical system due to failure to observe the national electrical requirements and regulations
Read the whole text of the operating manual before assembly and commissioning.
This operating manual should help you to familiarise yourself with your product and to use it for its intended purpose.
The operating manual includes important instructions for the safe, proper and economic operation of the product, for
avoiding danger, for minimising repair costs and downtimes and for increasing the reliability and extending the service
life of the product.
In addition to the safety instructions in this operating manual, you must also observe the regulations applicable to the
operation of the product in your country.
Keep the operating manual package with the power tool at all times and store it in a plastic cover to protect it from dirt
and moisture. They must be read and carefully observed by all operating personnel before starting the work.
The product may only be used by personnel who have been trained to use it and who have been instructed with respect
to the associated hazards.
The required minimum age must be observed.
In addition to the safety instructions in this operating manual and the separate regulations of your country, the generally
recognised technical rules relating to the operation of such products must also be observed.
We accept no liability for accidents or damage that occur due to a failure to observe this manual and the safety instruc-
tions.
Dear Customer,
Note:
Note:
5
SAFETY
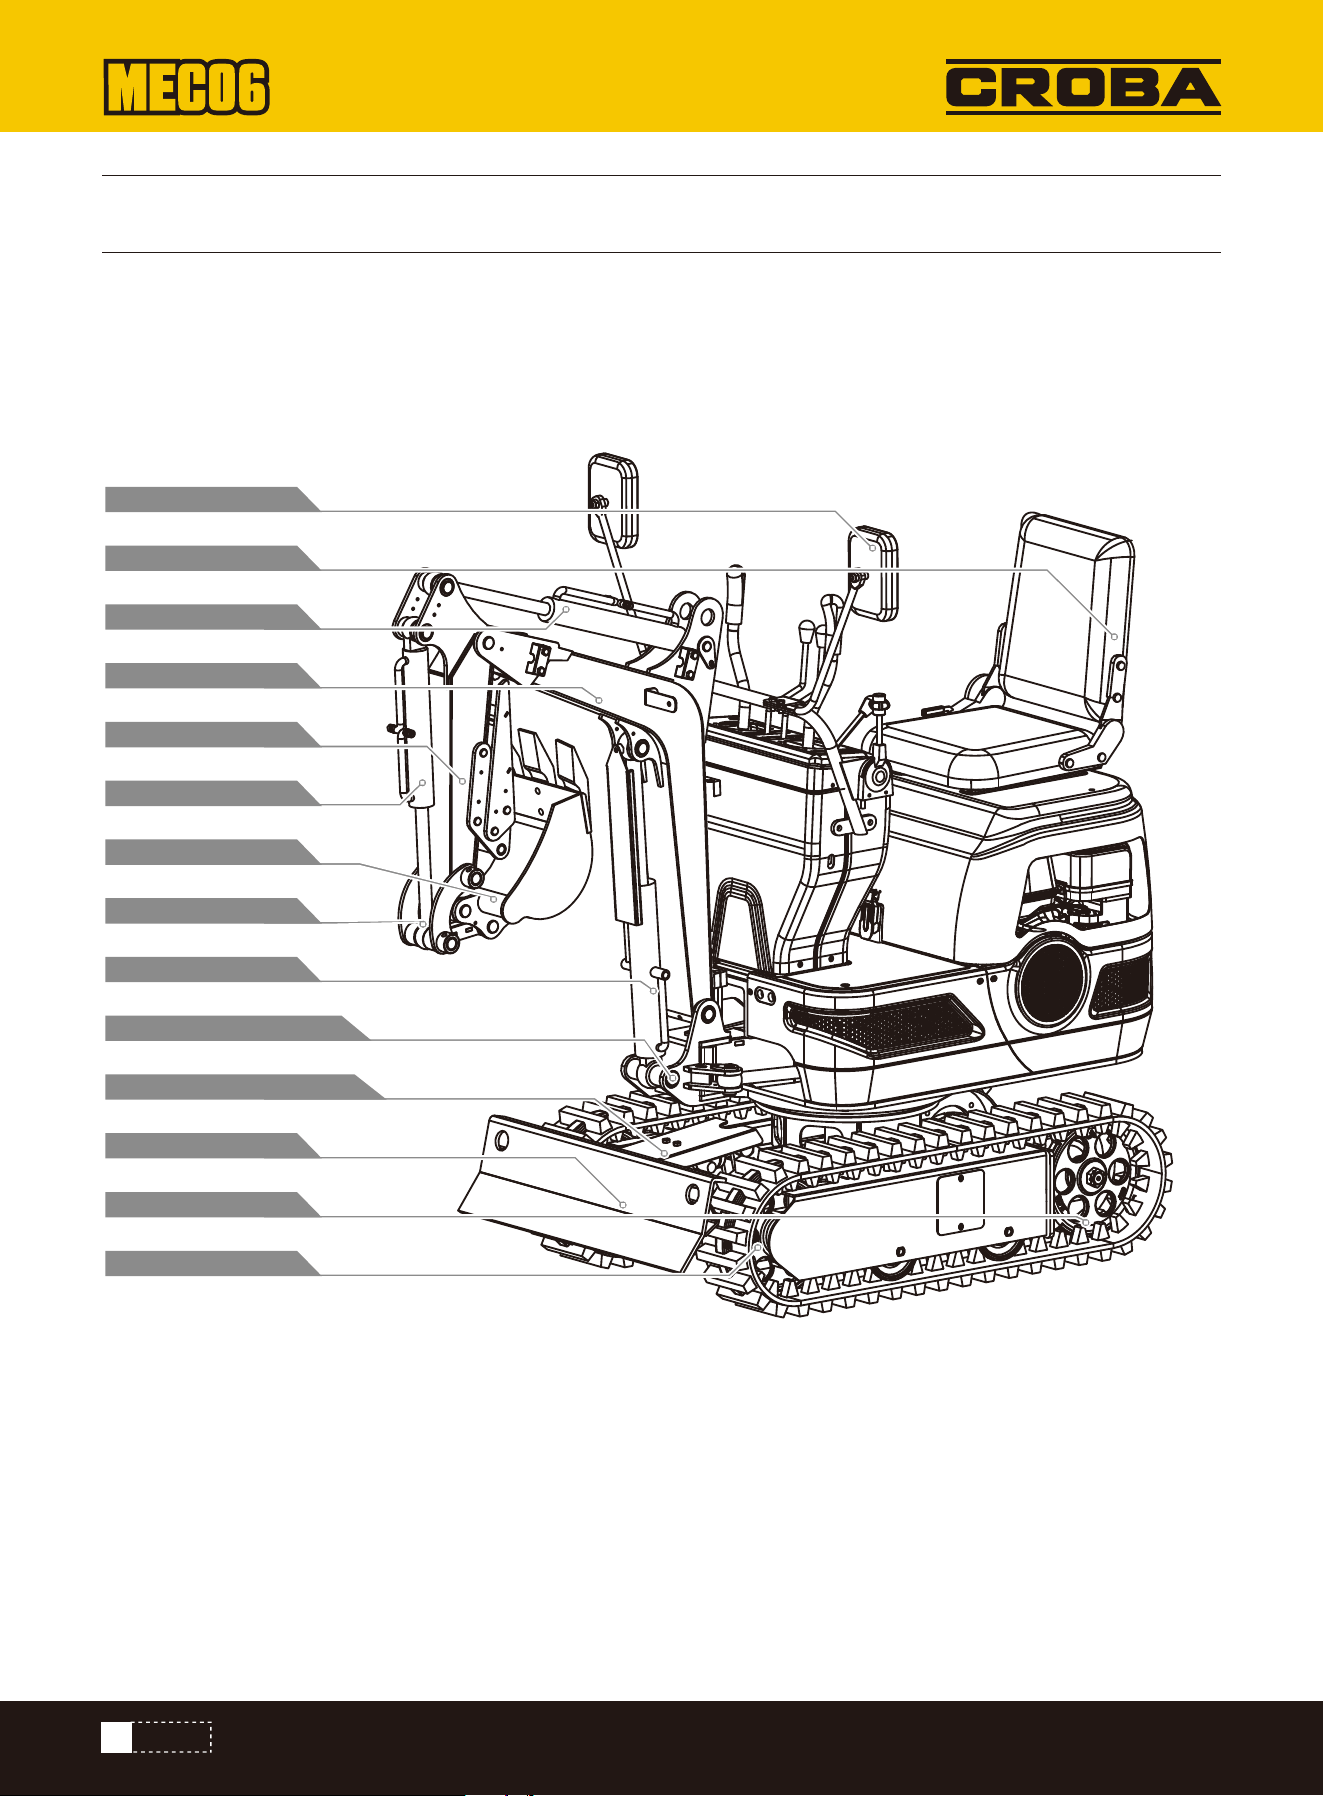
PRODUCT DESCRIPTION
6
SAFETY
1.
2.
3.
4.
5.
6.
7.
8.
9.
10.
11.
12.
13.
14.
Rear-view mirror
Operator seat
Arm cylinder
Boom
Arm
Bucket cylinder
Bucket
Bucket joint
Boom cylinder
Swivelling bracket
Levelling blade cylinder
Dozer blade
Drive pinion
Front idle roller
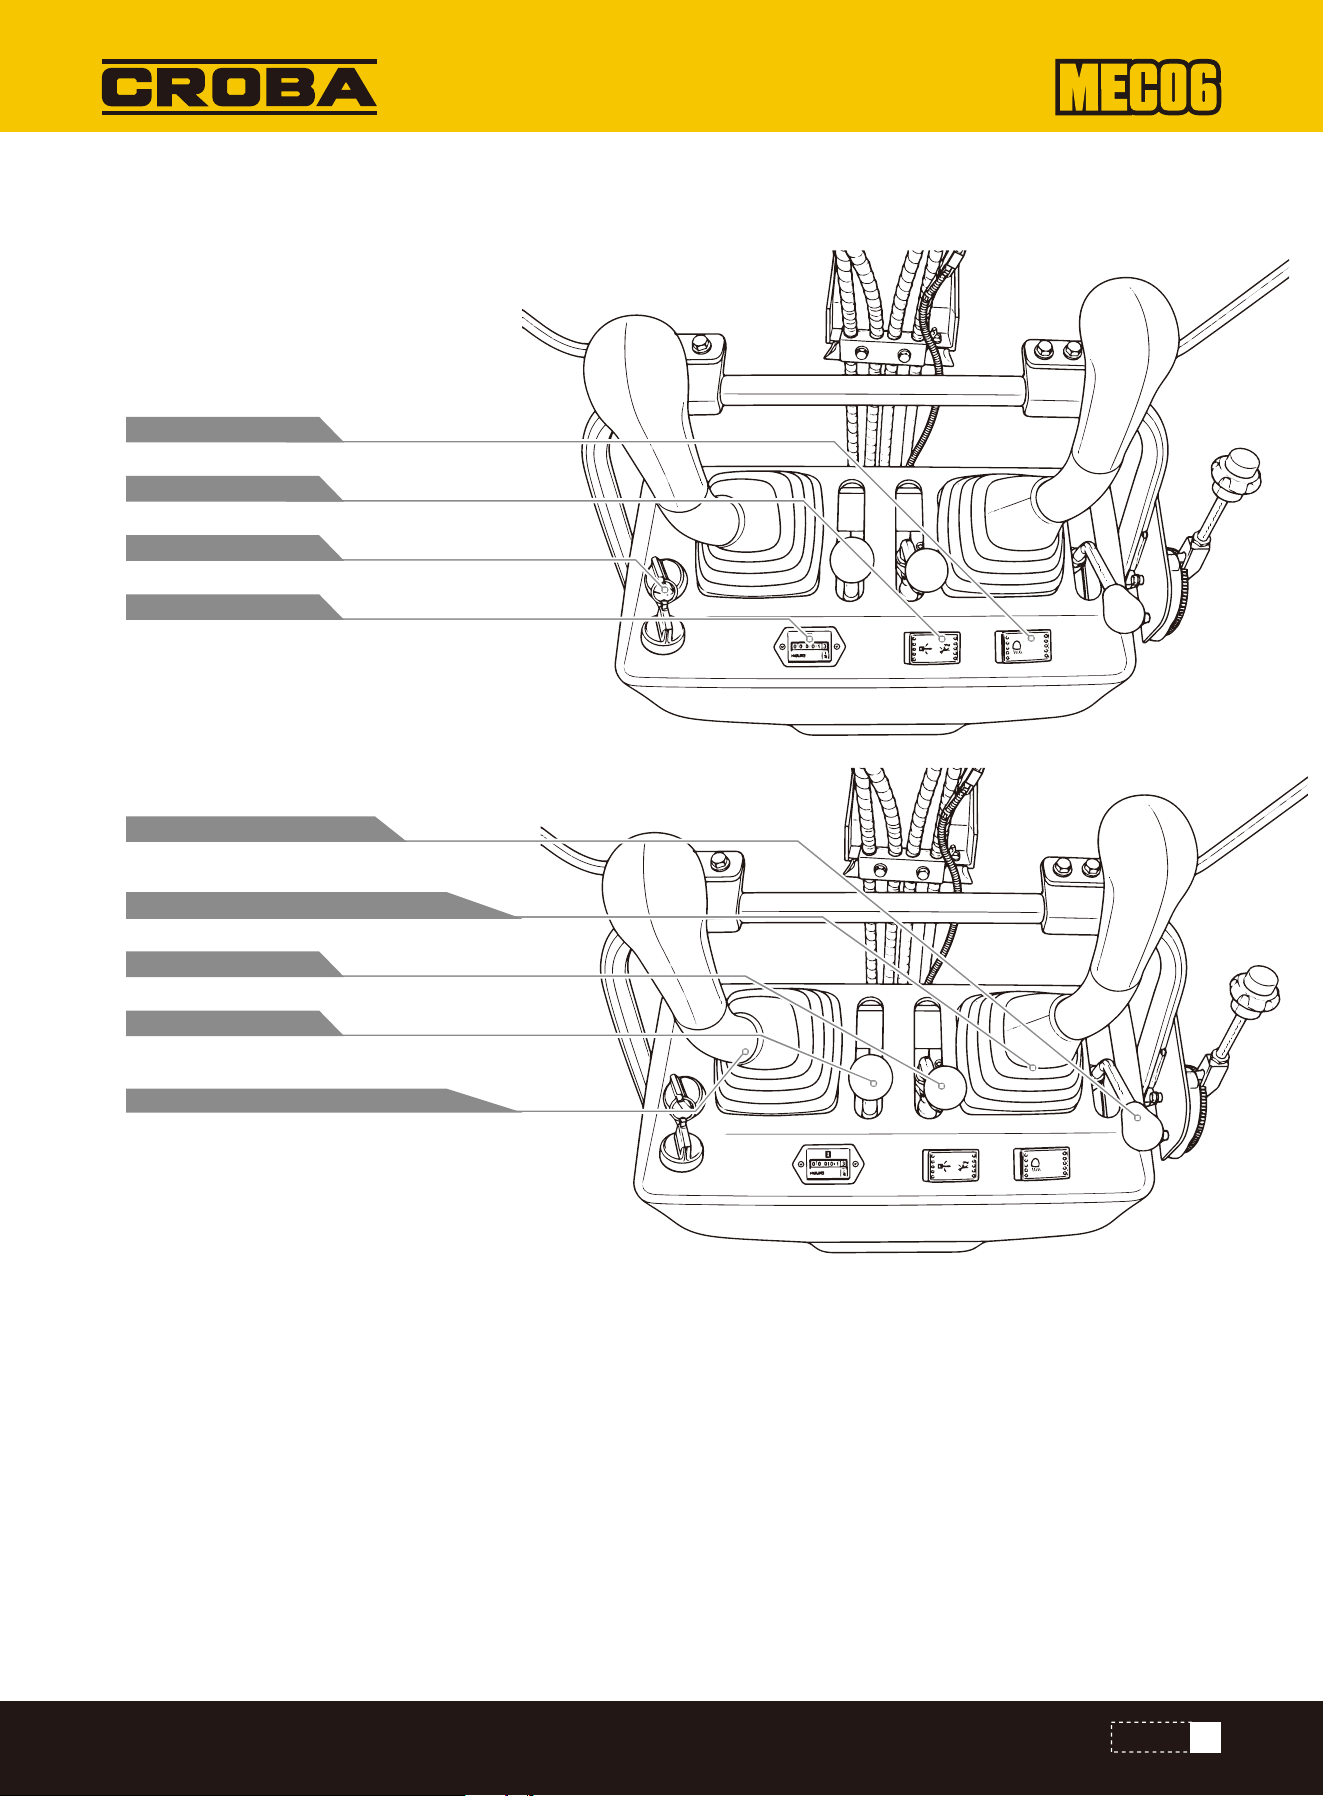
7
SAFETY
16.
17.
18.
19.
Work light switch
Horn switch
Ignition switch
Hour counter
20.
21.
22.
23.
24.
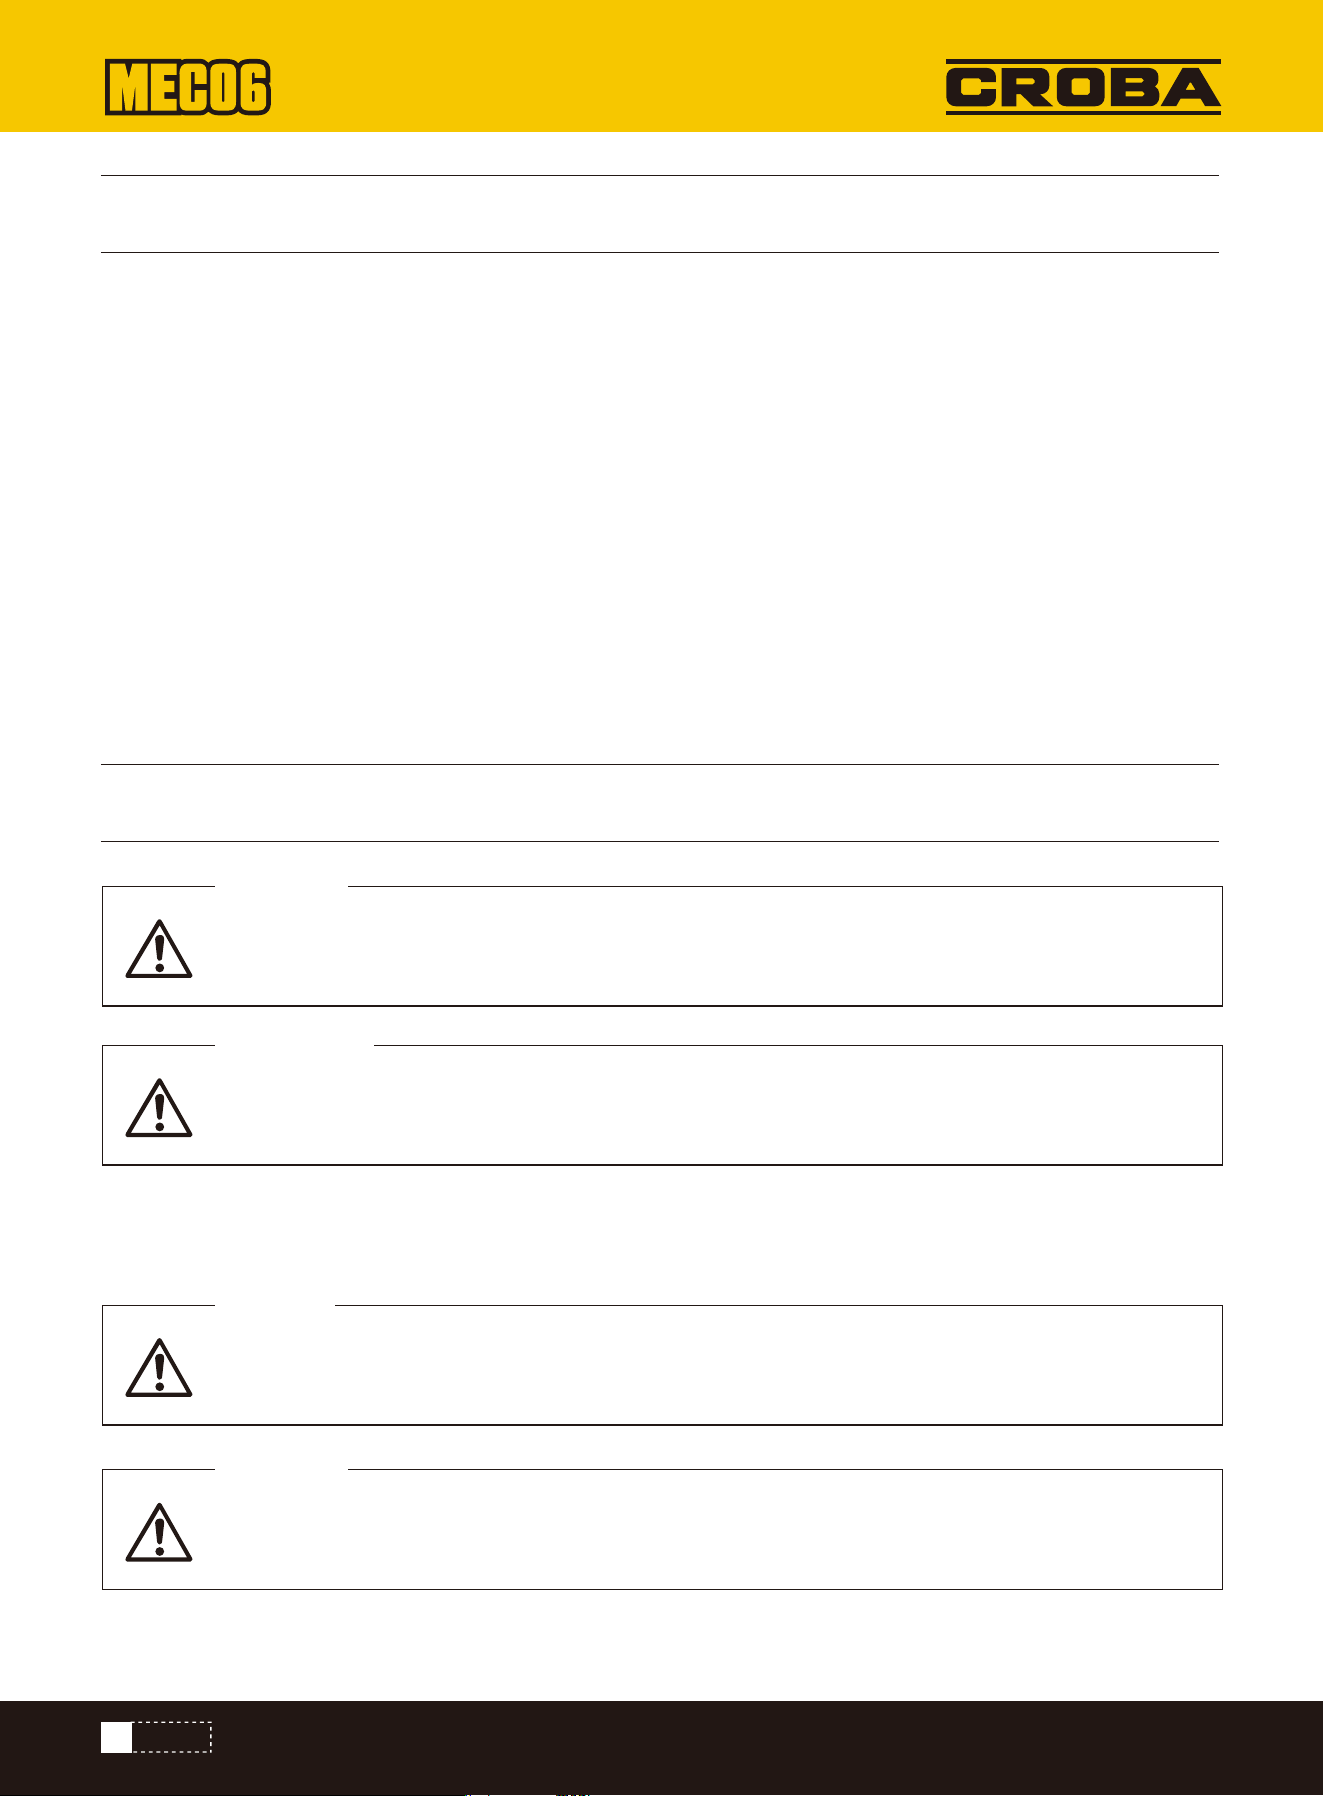
Operating lever for dozer blade
Operating lever for attachments (right)
Drive lever (right)
Drive lever (left)
Operating lever for attachments (left)
PROPER USE
GENERAL SAFETY INSTRUCTIONS
Read all safety information, instructions, illustrations and technical data for this product.
Failure to follow all instructions listed below may result in electric shock, fire and/or serious injury.
WARNING
A failure to observe these instructions poses a danger of death or the risk of serious injuries.
WARNING
A failure to observe these instructions poses an extreme danger of death or the risk of life-threat-
ening injuries.
DANGER
When using equipment, several safety warnings must be observed to prevent injuries and damage.
ATTENTION
The mini excavator is suitable for carrying out earthworks and leveling the ground after completion of construction work
within the specified technical limits.
The product may only be used in the intended manner. Any use beyond this is improper. The user/operator, not the manu-
facturer, is responsible for damages or injuries of any type resulting from this.
An element of the intended use is also the observance of the safety instructions, as well as the assembly instructions
and operating information in the operating manual.
Persons who operate and maintain the product must be familiar with the manual and must be informed about potential
dangers.
The liability of the manufacturer and resulting damages are excluded in the event of modifications of the product.
The product may only be operated with original parts and original accessories from the manufacturer.
The safety, operating and maintenance specifications of the manufacturer, as well as the dimensions specified in the
technical data, must be observed.
Please note that our products were not designed with the intention of use for commercial or industrial purposes. We
assume no guarantee if the product is used in commercial or industrial applications, or for equivalent work.
The manufacturer is not liable for damage caused by improper use or incorrect operation.
For this reason, please carefully read this operating manual / safety instructions. If you hand the device over to another
person, please hand over this operating manual / safety instructions as well. We accept no liability for accidents or
damage that occur due to a failure to observe this manual and the safety instruc�tions.
8
SAFETY

WORKING RANGE
A failure to observe these instructions poses a risk of damage to the engine or other property.
• Familiarize yourself with your machine.
• Read the operating manual carefully and make sure you understand its contents, as well as all labels attached to the
machine.
• Familiarize yourself with the area of application, as well as limitations of the machine, and particular sources of
danger.
• Make sure that you know all the controls and their function exactly.
• Make sure you know how to stop the machine and controls.
• Do not attempt to use the machine without knowing the exact method of operation and the maintenance requirements
of the engine and how to avoid accidents resulting in personal injury and/or property damage.
• Keep other people, particularly children, away from your work area.
• Never start or operate the machine in an enclosed space. The exhaust gases are dangerous because they contain the
odorless and deadly gas carbon monoxide. Operate the machine only in a well-ventilated outdoor area.
• Never operate the machine without good visibility or lighting conditions.
PERSONAL SAFETY
• Do not use the machine if you have taken drugs, alcohol or medication that affects your ability to operate the machine
correctly.
• Wear suitable clothing. Wear long trousers, boots and gloves.
• Do not wear loose clothing, shorts or jewelry of any kind. Tie back long hair so that it is at shoulder height at most.
Keep hair, clothing and gloves away from moving parts. Loose-fitting clothing, jewelry or long hair may become caught
in the moving parts. Check your machine before starting.
• Leave protective screens in place and in working order.
• Make sure that all nuts, bolts, etc. are securely tightened.
• Never use the machine if it is in need of repair or in poor mechanical condition. Replace damaged, missing or defective
parts before use.
• Check the machine for fuel leaks.
• Keep it in good functional order. Do not use the machine if the engine cannot be switched on and off at the correspond-
ing switch.
• A petrol-driven machine that cannot be controlled via the engine switch is dangerous and must be replaced.
• Before starting the machine, get into the habit of checking that screwdrivers and spanners are away from the area
around the machine. A screwdriver or spanner that is still in a rotating device part may result in personal injury.
• Be attentive, watch your actions and use common sense when working with the machine.
• Do not overextend yourself. Do not operate the machine barefoot or with sandals or similar light footwear. Wear safety
shoes that protect your feet and improve your grip on slippery surfaces.
• Ensure safe footing and balance at all times. This will allow you to better control the machine in unexpected situations.
• Prevent unintentional start-up. Make sure that the engine switch is switched off before transporting the machine or
carrying out maintenance work on the machine. Transport or maintenance work on the machine can lead to accidents
if the switch is on.
Note:
A failure to observe these instructions poses a minor to moderate danger of injury.
CAUTION
9
SAFETY

USE AND CARE OF THE MACHINE
SAFE HANDLING OF PETROL
• Petrol is very flammable and its gases can explode if they ignite.
• Take safety measures when handling petrol to reduce the risk of serious injury.
• Use a suitable petrol can when filling or draining the tank.
• Carry out this work in clean, well-ventilated outdoor areas.
• Do not smoke. Do not allow sparks, naked flames or other sources of fire to get near when filling up with petrol or work-
ing with the machine.
• Never fill the tank indoors. Keep earthed, electrically conductive objects, such as tools, away from exposed electrical
parts and wires to avoid sparking or arcing. This could ignite petrol gases.
• Always switch off the engine and let it cool down before refilling the fuel tank. Never remove the fuel filler cap or fill
fuel into the tank while the engine is running or while the engine is hot.
• Do not use the machine if you know there is a leak in the fuel system. Slowly loosen the fuel filler cap to release any
pressure in the tank. Never overfill the tank (petrol should never be above the marked maximum fill level). Close the
fuel tank securely again with the fuel filler cap and wipe up any spilled petrol.
• Do not use the machine if the fuel filler cap is not screwed tightly shut. Avoid ignition sources near spilled petrol. If
petrol has been spilled, do not attempt to start the machine. Move the machine away from the area of the spillage and
prevent the formation of ignition sources until the petrol gases have dissipated.
• Store petrol only in containers specially manufactured for this purpose.
• Store petrol in a cool, well-ventilated area away from sparks and naked flames or other sources of ignition. Never store
petrol or the machine with a filled tank in a building where petrol gases could reach sparks, naked flames or other
ignition sources such as water heaters, ovens, clothes dryers or similar.
• Allow the engine to cool before storing the machine in an enclosed area.
• Never pick up or carry the machine while the engine is running.
• Do not handle the machine violently.
• Use the right machine for your area of application. The right machine will do the job it was designed for better and more
safely.
• Do not change the speed governor setting of the engine or over-rev it. The speed control system controls the maximum
speed of the engine with maximum safety.
• Do not hold your hands or feet near rotating parts.
• Avoid contact with hot petrol, oil, exhaust gases and hot surfaces. Do not touch the engine or exhaust silencer. These
parts become particularly hot during use. They are still hot a short time after the machine is switched off.
• Allow the engine to cool down before carrying out maintenance or adjustment work.
• If the machine starts to make unusual noises or vibrations, switch the engine off immediately, disconnect the spark
plug cable and determine the cause. Unusual noises or vibrations are usually a safety sign of faults.
• Only use assembly and accessory parts approved by the manufacturer. Failure to do so may result in injury.
• Service the machine. Check for misalignment or jamming of moving parts, damaged parts and other conditions that
could impair function of the machine. Have the machine repaired before any further use if you find any damage. Many
accidents are the result of poorly maintained equipment.
• Keep the engine and silencer free of grass, leaves, excess grease or soot encrustation to reduce the risk of fire.
• Never pour or splash water or any other liquid onto the machine.
• Keep the handles dry, clean and free of small parts.
• Clean the machine after every use.
• Follow the applicable waste disposal guidelines for petrol, oil etc. to protect the environment.
10
SAFETY

SERVICE
RESIDUAL RISKS
• Keep the switched-off machine out of the reach of children and do not allow persons who are not familiar with the
machine or these instructions to use the machine. The machine is dangerous in the hands of untrained operators.
• Before cleaning, repairing, inspecting or adjusting, switch off the engine and ensure that all moving parts have come to
a standstill.
• Always ensure that the throttle lever is in the "off" position. Disconnect the spark plug cable and keep it away from the
spark plug to prevent accidental start-up.
• Have your machine serviced by qualified personnel. Use only original spare parts. This ensures that the machine remains
safe.
Save all warnings and instructions for future reference.
The product has been built according to state-of-the-art and the recognized technical safety rules. However, individual
residual risks can arise during operation.
• Health hazard due to electrical power, with the use of improper electrical connection cables.
• Furthermore, despite all precautions having been met, some non-obvious residual risks may still remain.
• Residual risks can be minimized if the "Safety Instructions" and the "Intended Use" together with the operating manual
as a whole are observed.
• Avoid accidental starting of the product: the operating button may not be pressed when inserting the plug in a socket.
Use the tool attachment that is recommended in this operating manual. This is how to ensure that your product
provides optimum performance.
• Keep your hands away from the working area when the product is in operation.
11
SAFETY

PARAMETERS
Subject to technical changes!
Noise and vibration
Noise can have serious effects on your health. If the machine noise exceeds 85 dB, please wear
suitable hearing protection.
WARNING
MEC06
Model
Operating Weight:
Bucket Capacity:
Bucket Width:
Digging Force(Arm):
Digging Force(Bucket):
Engine:
Starting:
Travel Speed:
Traction Force:
Swing Speed:
Gradeability:
Ground Contact Pressure:
Boom Swing:
Track Shoe type:
Track Shoe width:
Pump Capacity:
Hydraulic reservoir:
Width for machine
1,345 lb
0.39 ft³
11.4 in
944 lbf
1,978 lbf
300cc,Gas
Key-type starter Switch and Shutdown
0 – 1.24 mph
742 lbf
9.5 rpm
15°
3.84 psi
Left 65° / Right65°
Rubber Crawler
5.9 in
4.76 gpm
2.64 gal
28.1 in
Noise data
Sound power level L
WA
Sound pressure level L
pA
Uncertainty K
wa/pA
93.0 dB
82.5 dB
2.0 dB
12
SAFETY
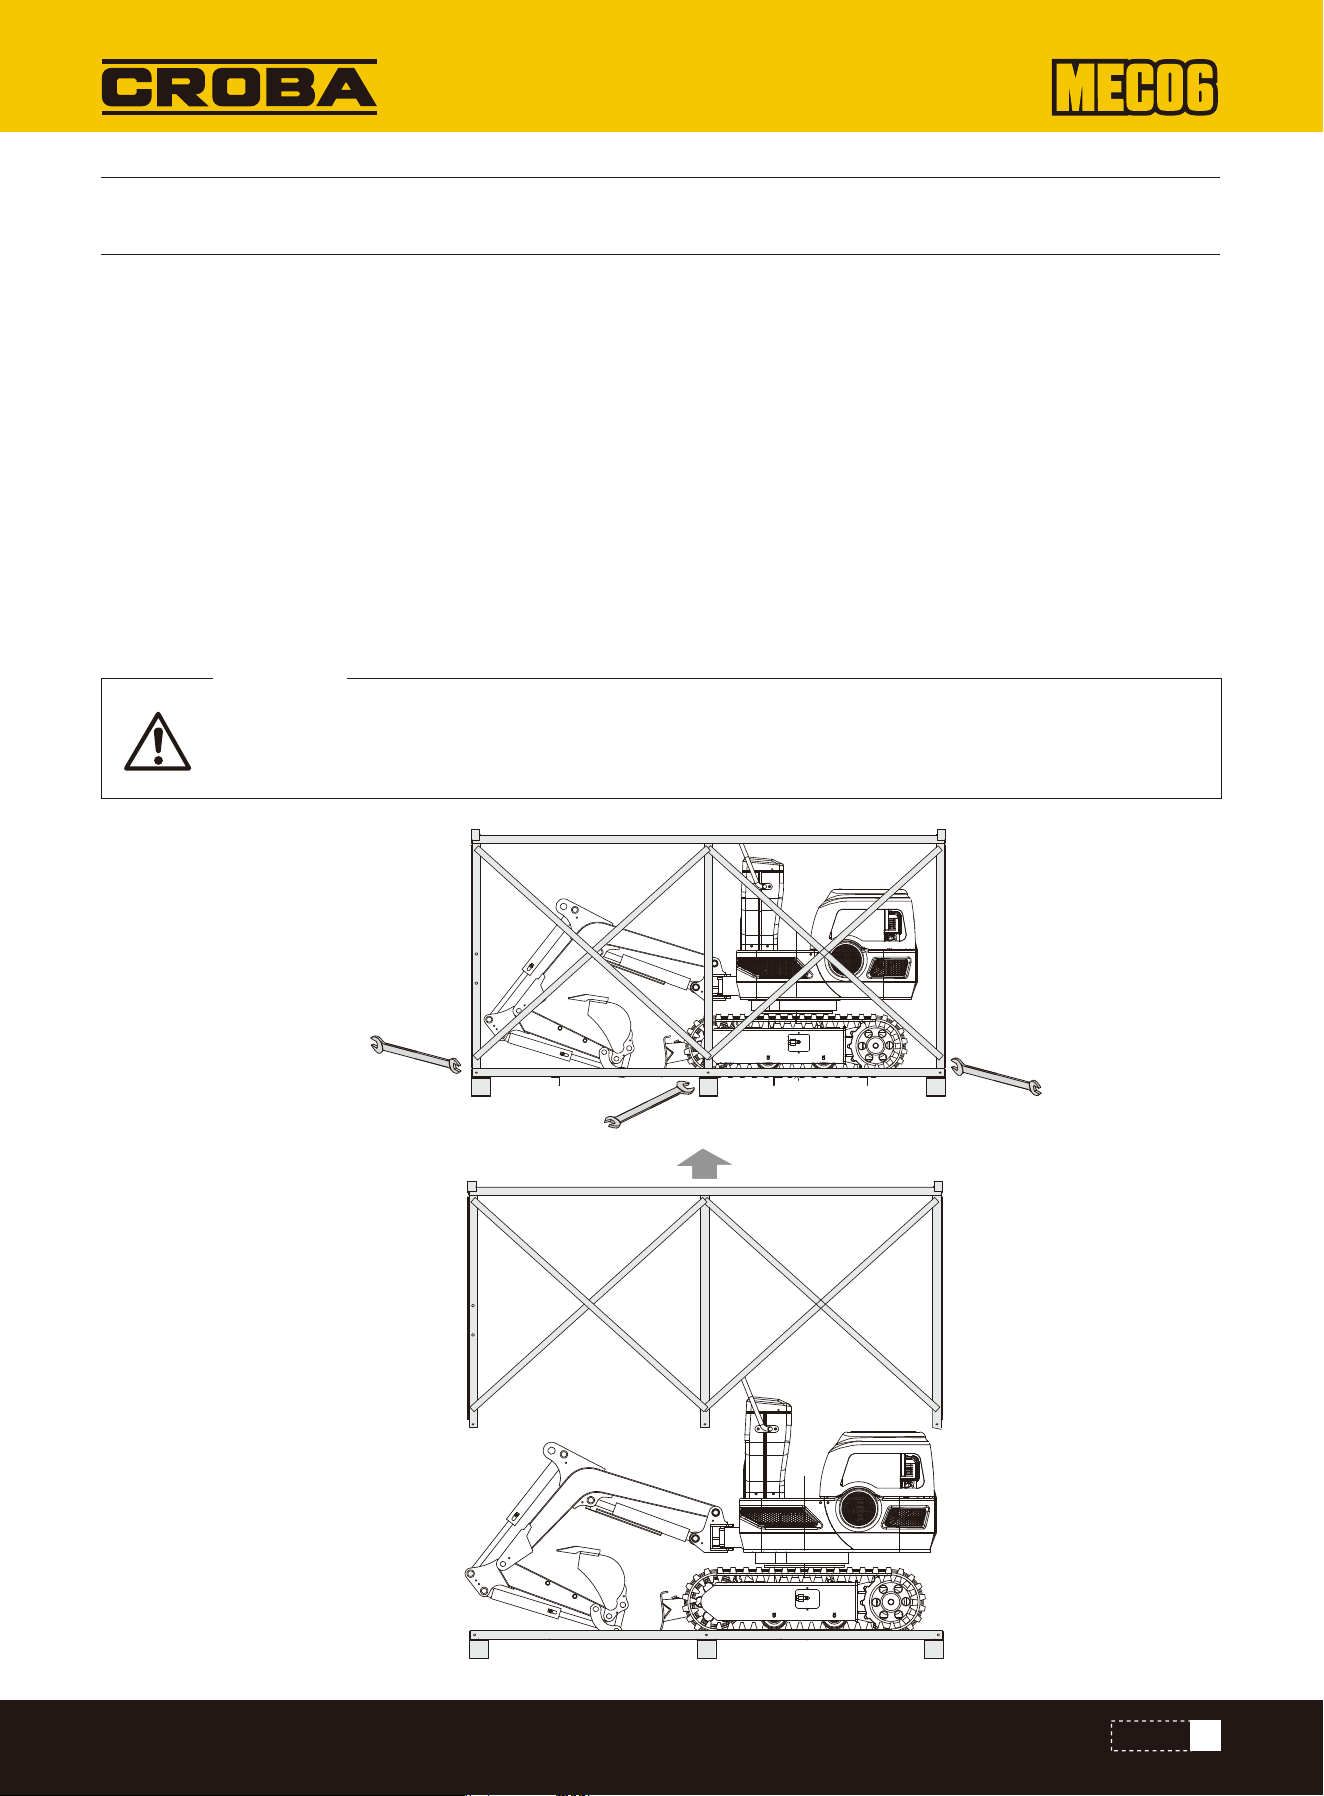
UNPACKING
Open the packaging and carefully remove the product.
Remove the packaging material, as well as the packaging and transport safety devices (if present).
Remove the M8 fastening screws from the iron frame and remove the iron frame. Lift the machine down.
Check whether the scope of delivery is complete.
Check the product and accessory parts for transport damage. In the event of complaints the carrier must be informed
immediately. Later claims will not be recognized.
If possible, keep the packaging until the expiry of the warranty period.
Familiarize yourself with the product by means of the operating manual before using for the first time.
With accessories as well as wearing parts and replacement parts use only original parts. Spare parts can be obtained
from your specialist dealer.
When ordering please provide our article number as well as type and year of manufacture for the product.
13
SAFETY
The product and the packaging material are not children's toys! Do not let children play with plastic
bags, films or small parts! There is a danger of choking or suffocating!
WARNING
M8x60 M8x60
M8x60 M8x60
M8x65
M8x65
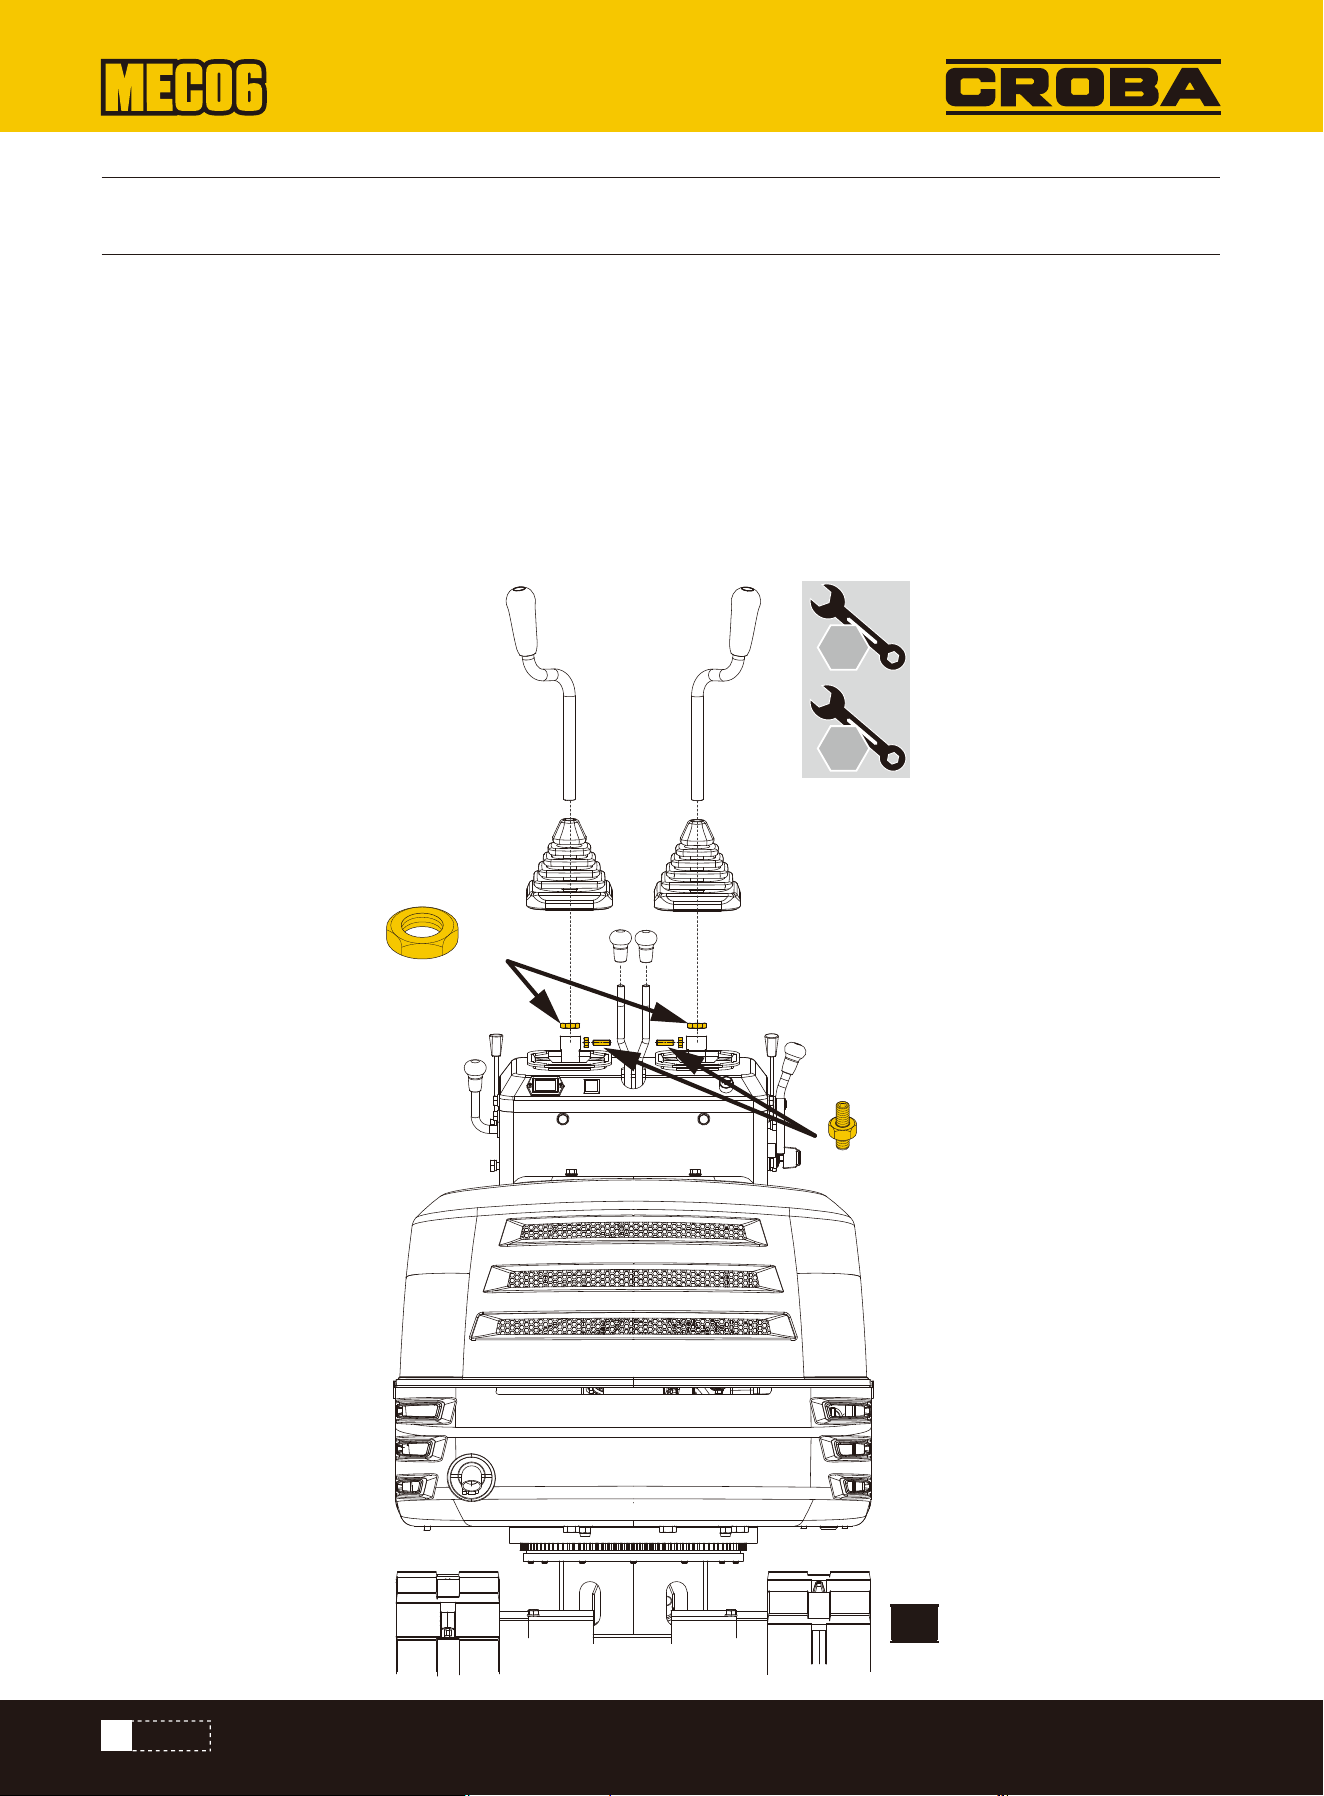
ASSEMBLY
If you follow the assembly instructions below, you will have the machine assembled in just a few minutes.
1. Remove the flat nut M12 from the operating lever and loosen the set screw M6x16 and the nut on the side of the
fastening opening.
2. Slide the operating lever through the rubber sleeve and the M12 flat nut into the mounting opening on the switch box.
3. Turn it to a suitable angle for operation and fasten the M16 flat nut to secure it.
4. Fasten the M6x16 set screw and the nut from the side. Repeat these steps to fit the other lever.
5. Screw the knobs to the operating levers.
FITTING THE OPERATING LEVERS
14
SAFETY
M6x16
(x4)
M12
(x2)
A
16
mm
13
mm
18
mm
19
mm
19
mm
4
mm
16
mm
10
mm
4
mm
16
mm
13
mm
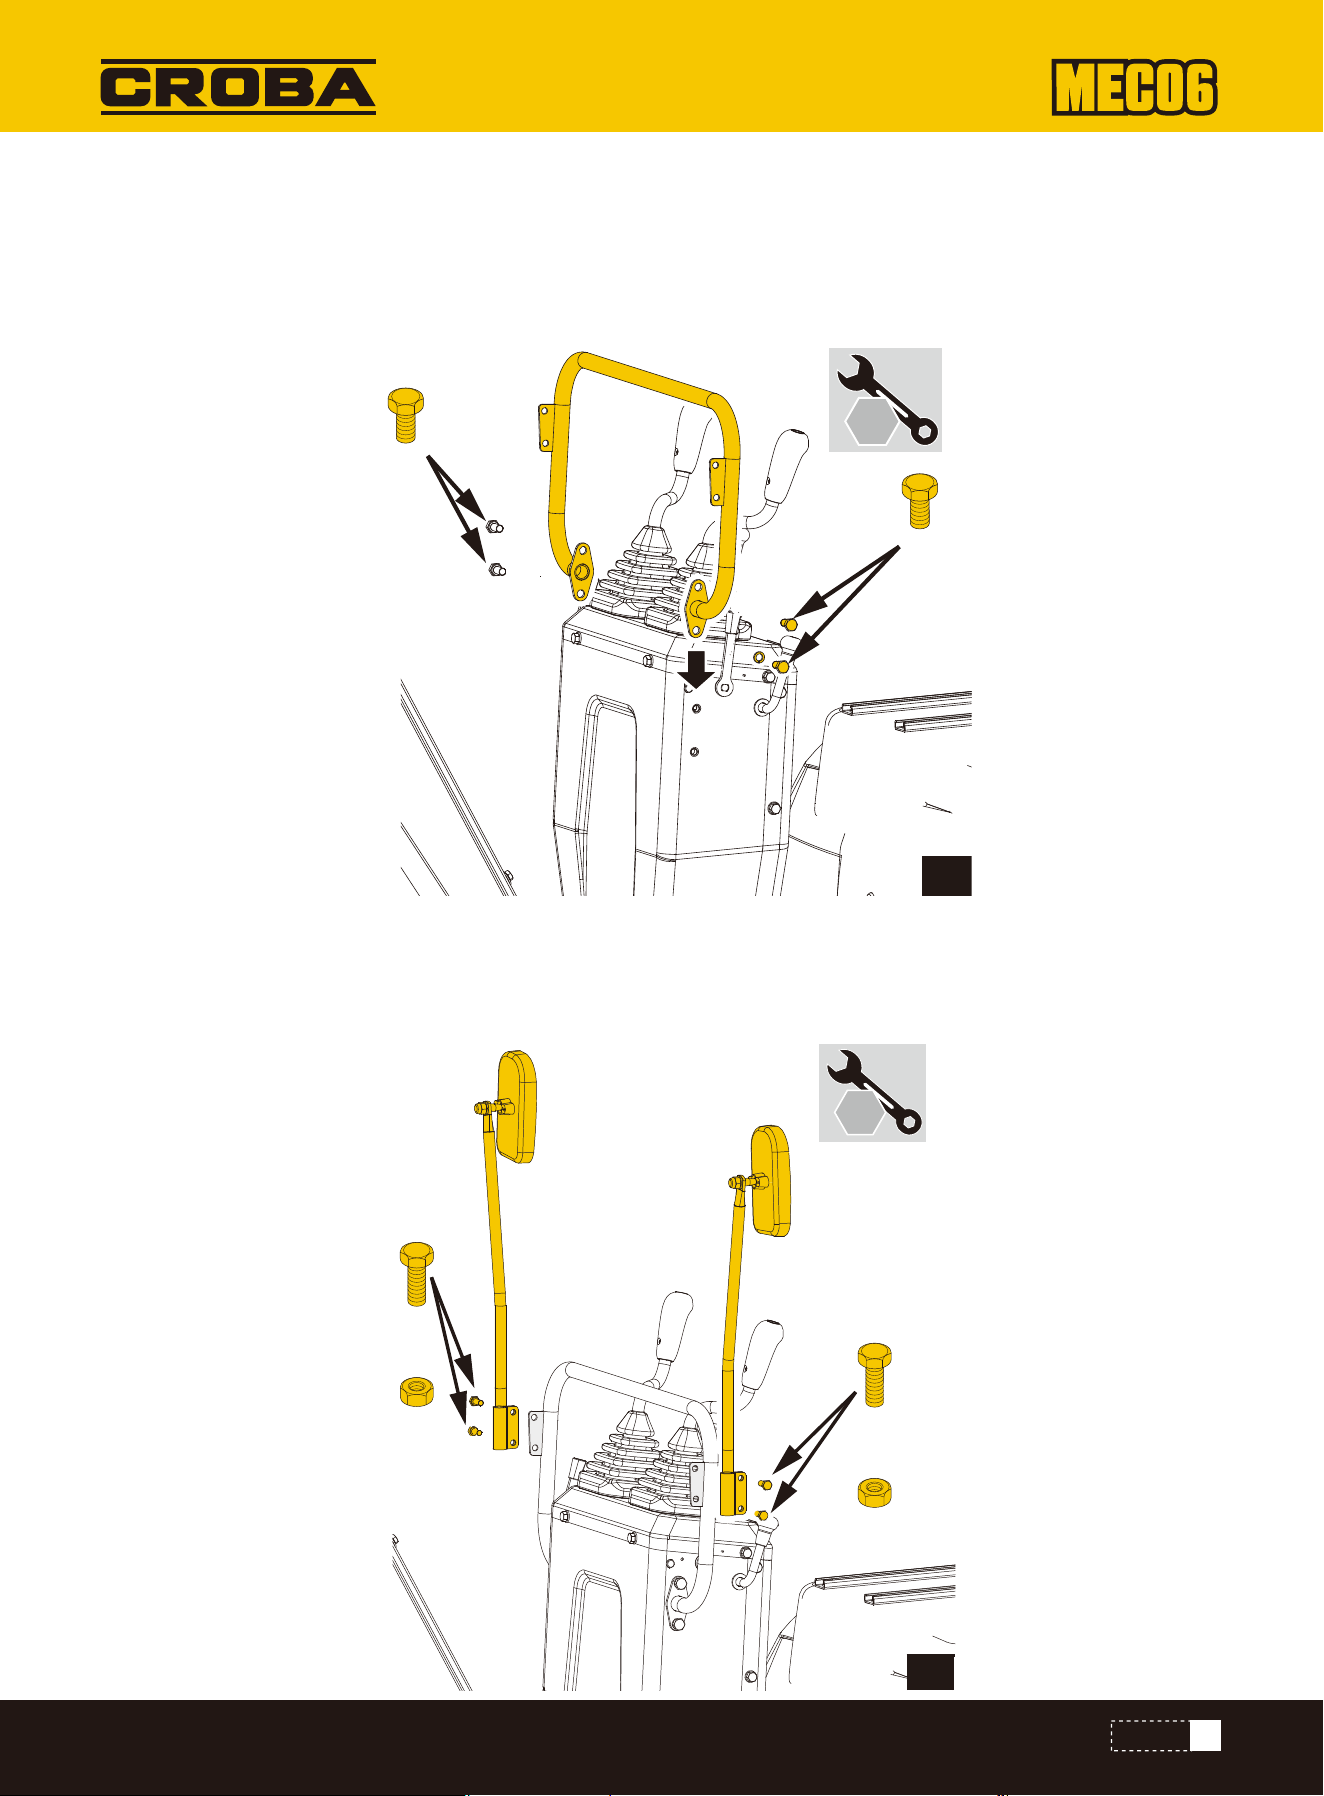
1. Unscrew the M10x20 screws, washers and spring washers from the switch box.
2. Attach the handlebar to the sides of the switch box.
3. Align the openings and secure the connection with the screws and washers.
STRUCTURE OF THE HANDLEBARS
1. Remove the M10x20 screws and nuts from the mirror connections.
2. Attach the connector to the brackets on the handle bar using the screws and nuts. Ensure that the mirrors are facing
backwards
FITTING THE REAR-VIEW MIRRORS
15
SAFETY
M10x20
B
14
mm
13
mm
4
mm
M10x20
M10x20
C
14
mm
4
mm
X 2
M10x20
Always remove the battery before carrying out adjustments on the product.
WARNING
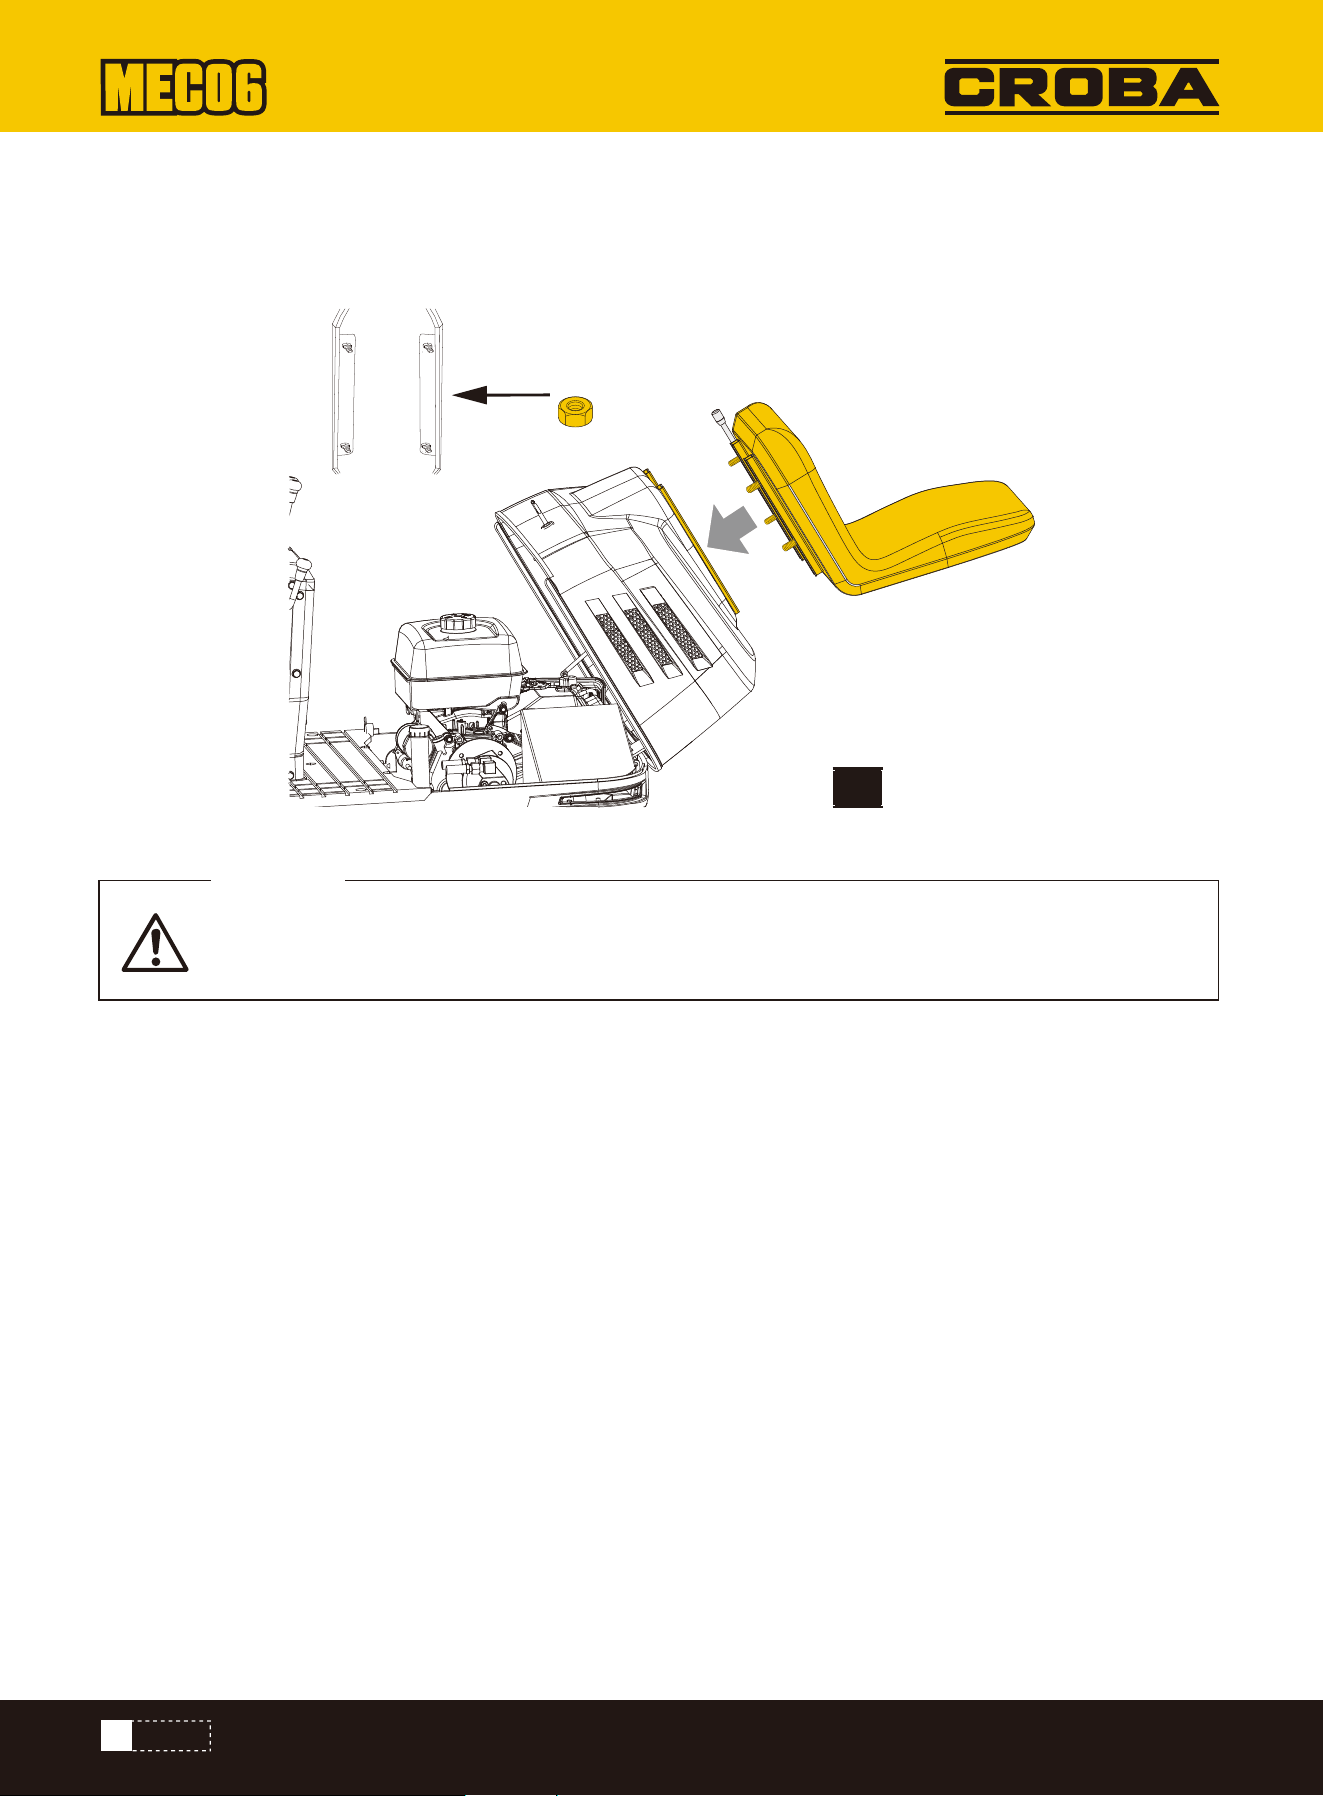
1. Open the bonnet and align the four bolts on the hole.
2. Tighten the bolt with M8 nut
FITTING THE OPERATOR SEAT
16
SAFETY
D
M8 (x4)
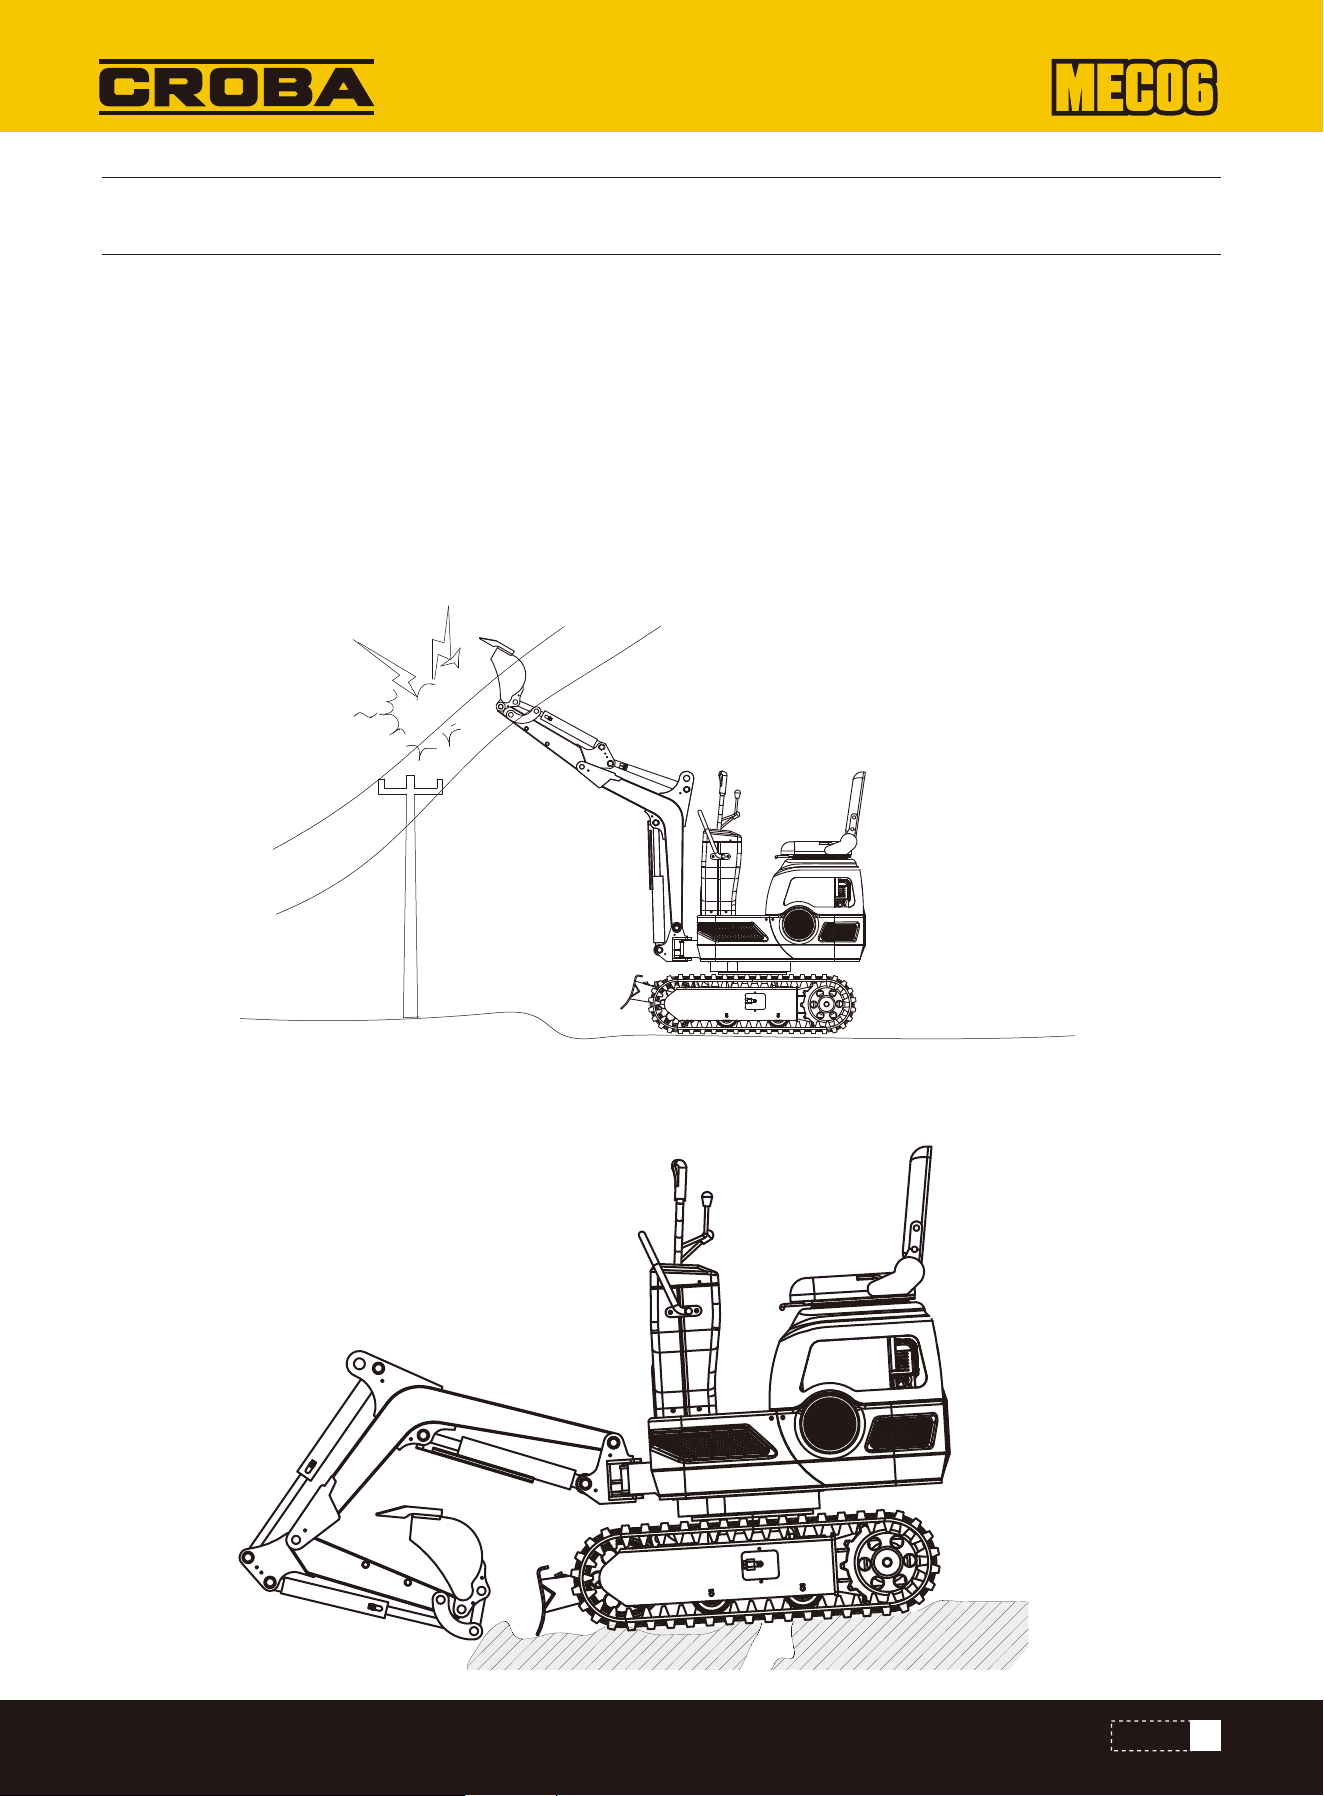
BEFORE COMMISSIONING
1. Familiarize yourself with the excavator and be aware of its limitations. Read this operator's manual carefully before
starting the excavator.
2. Observe the danger, warning and caution notices on the machine.
3. The crawler width is 710 mm. Work in the right lane.
4. Do not operate the excavator under the influence of alcohol, medication or other substances. Tiredness is also danger-
ous.
5. Check the surroundings carefully before using the excavator or installing attachments.
•The excavator must not be used in a contaminated environment.
•Neither the excavator as a whole nor its internal components may be used in potentially explosive atmospheres.
•Pay attention to the distance overhead for electrical cables.
•Check for underground pipes and cables.
•Check for hidden holes, obstacles, soft ground and overhangs.
17
SAFETY

DAILY CHECKS
CONTROLS
Only carry out maintenance work on the excavator on level ground with the engine switched off and
the safety devices in the "Locked" position.
CAUTION
•Walk around the excavator and check for visible damage and wear.
•Check the fuel level.
•Check the oil level.
•Check the hydraulic oil level.
•Check the air filter for blockages.
•Check the hour counter.
•Check the lighting system.
•Check the condition of the hazard, warning and caution labels. (See "DANGER, WARNING AND CAUTION LABELS” in "SAFE
OPERATION”.)
•Do not allow persons to remain within the working area of the excavator.
6. Do not allow other persons to use this machine until they have been thoroughly familiarized with the operation and
work instructions. Ensure that you have read and understood the operator's manual.
7. Do not wear loose, torn or oversized clothing when working with the excavator. Clothing can get caught in rotating
parts or controls and lead to accidents or injuries. Wear appropriate safety clothing as required and in accordance with
legal regulations, e.g. safety helmet, safety shoes, ear protection, work gloves, etc.
8. Do not allow passengers to climb onto parts of the excavator seat during operation.
9. Check the mechanical parts for proper adjustment and possible wear. Replace worn or damaged parts immediately.
Check nuts and bolts regularly for tightness. (Details can be found under "Care and maintenance".)
10. Keep your excavator clean. Heavy soiling, grease, dust and grass can catch fire and cause accidents or injuries.
11. Only use approved attachments.
12. Before starting the excavator, ensure that it has been filled with 10 petrol, lubricated, oiled and other maintenance
work has been carried out.
13. Do not modify the excavator as this can lead to unforeseen safety problems.
To avoid damage, it is important to check the condition of the excavator before starting up.
18
SAFETY
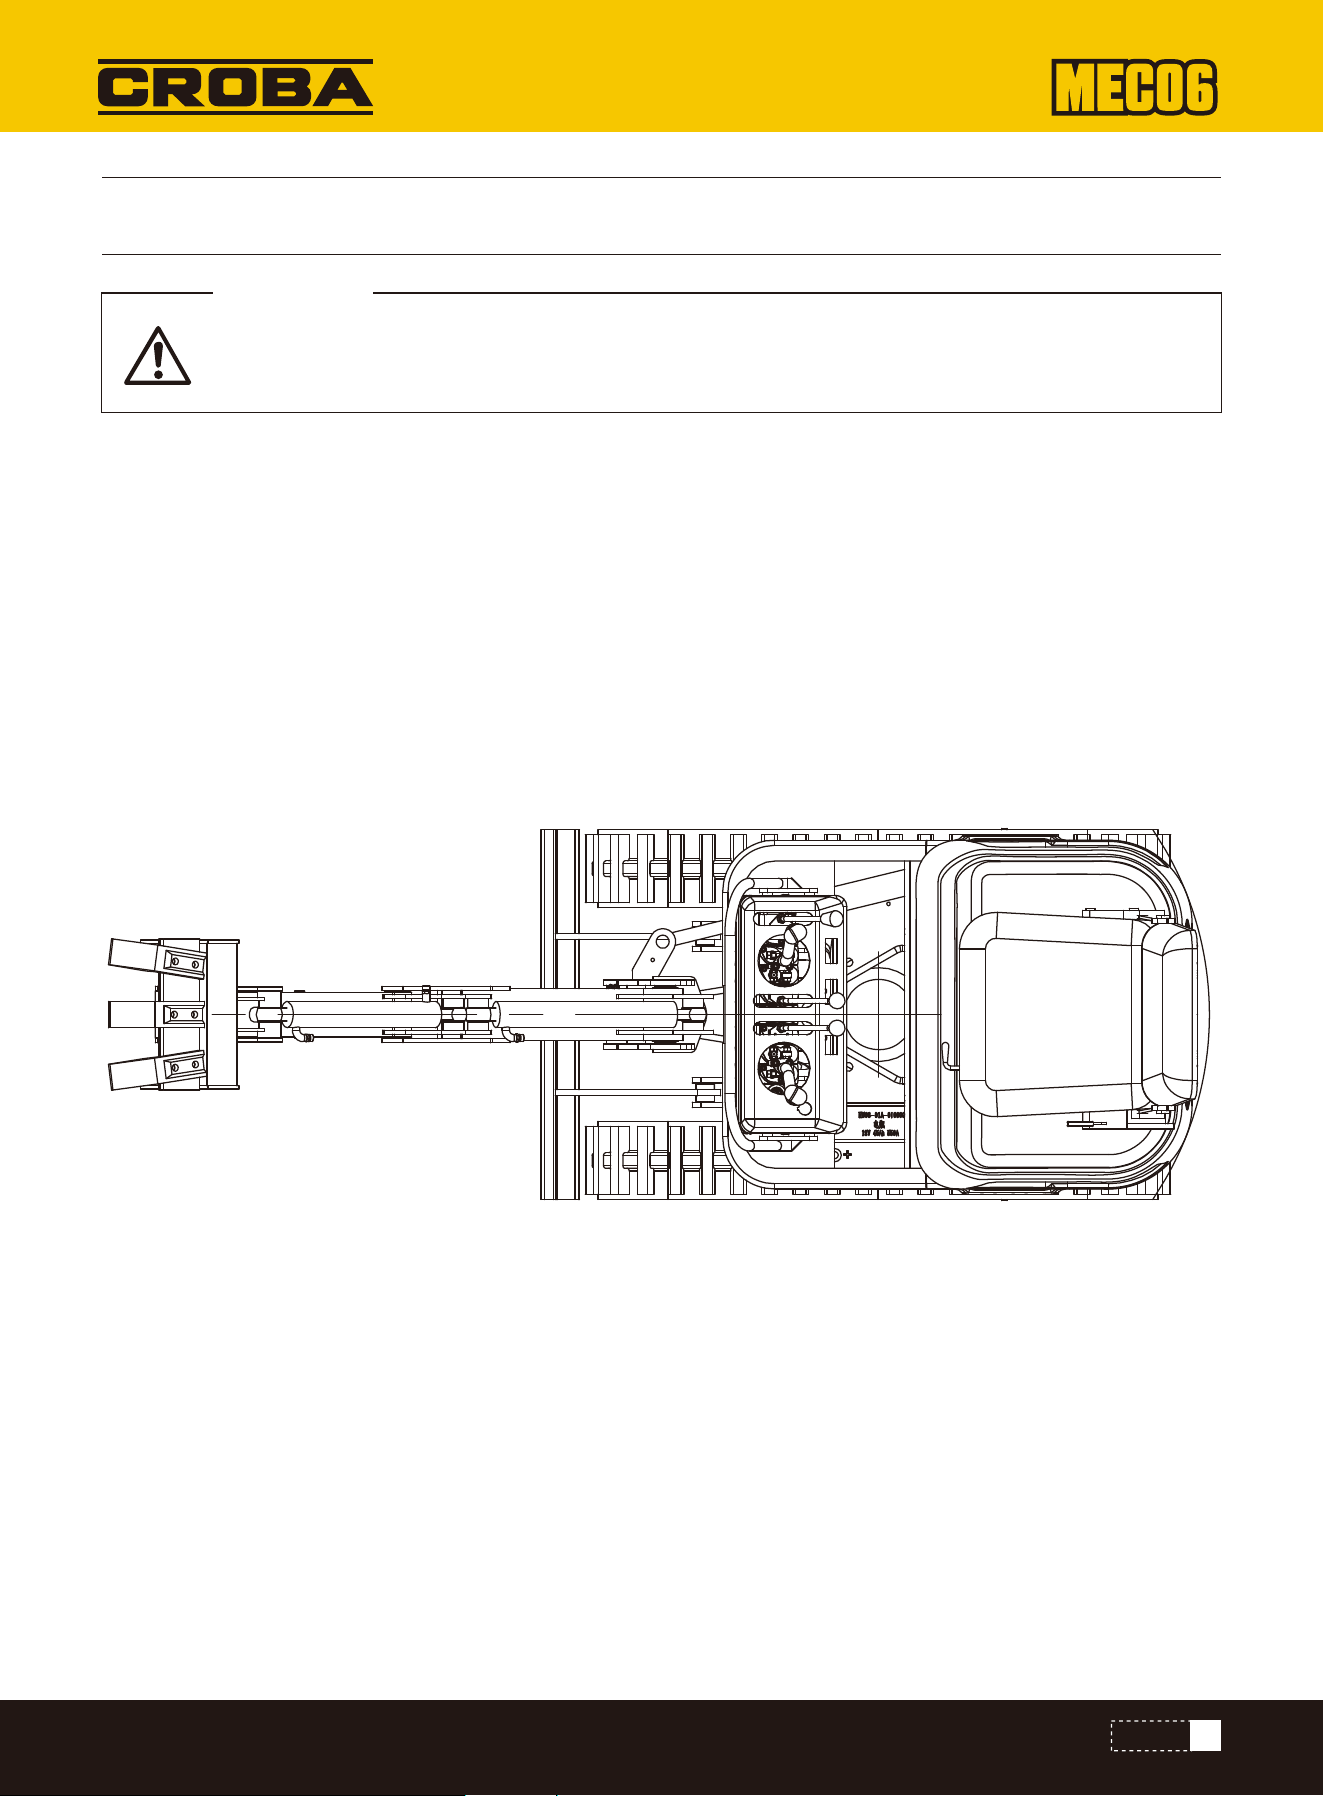
COMMISSIONING
Always make sure the product is fully assembled before commissioning!
ATTENTION
1. Get on and off the machine in a safe manner. Always look in the direction of the machine. Always use the handrails and
existing steps and keep your balance. Do not hold on to the control levers and switches. Do not jump from the stationary
or moving machine.
2. Only start and control the excavator from the operator's seat. The driver must not lean out of their seat when the
engine is running.
3. Before starting the machine, make sure that all operating levers are in the neutral position.
4. Do not start the engine by bridging the connections of the starter motor. Do not attempt to bypass the ignition lock,
otherwise the engine could start suddenly and the excavator could start moving.
5. Ensure that the bulldozer blade is at the front. (The bulldozer blade must be raised.) If the swivel frame has been rotat-
ed by 180°, i.e. the bulldozer blade is at the rear from the operator's point of view, the direction of travel is opposite to
the direction of travel of the levers. (If the drive lever is moved forwards, the excavator moves backwards as seen by the
operator.)
6. Do not run the engine in closed or poorly ventilated spaces. Carbon monoxide is colorless, odorless and deadly.
7. Leave all safety elements and cladding in place. Replace damaged or missing safety devices.
8. Precautionary measures against overturning. Keep away from steep slopes and embankments to ensure safe opera-
tion. Do not swivel the bucket downwards. Lower the bulldozer blade when digging. Keep the bucket as low as possible
when travelling uphill. Turn carefully on slopes. Do not keep the excavator close to the edges of trenches and embank-
ments, as the earth could give way due to the weight of the excavator.
9. Always pay attention to where the excavator is moving. Keep an eye out for obstacles.
10. Keep sufficient distance from ditches and bank edges. Protection of children! If the operator does not pay attention
to the presence of children, tragic accidents can occur. Children are generally attracted to machines and their activities.
19
SAFETY
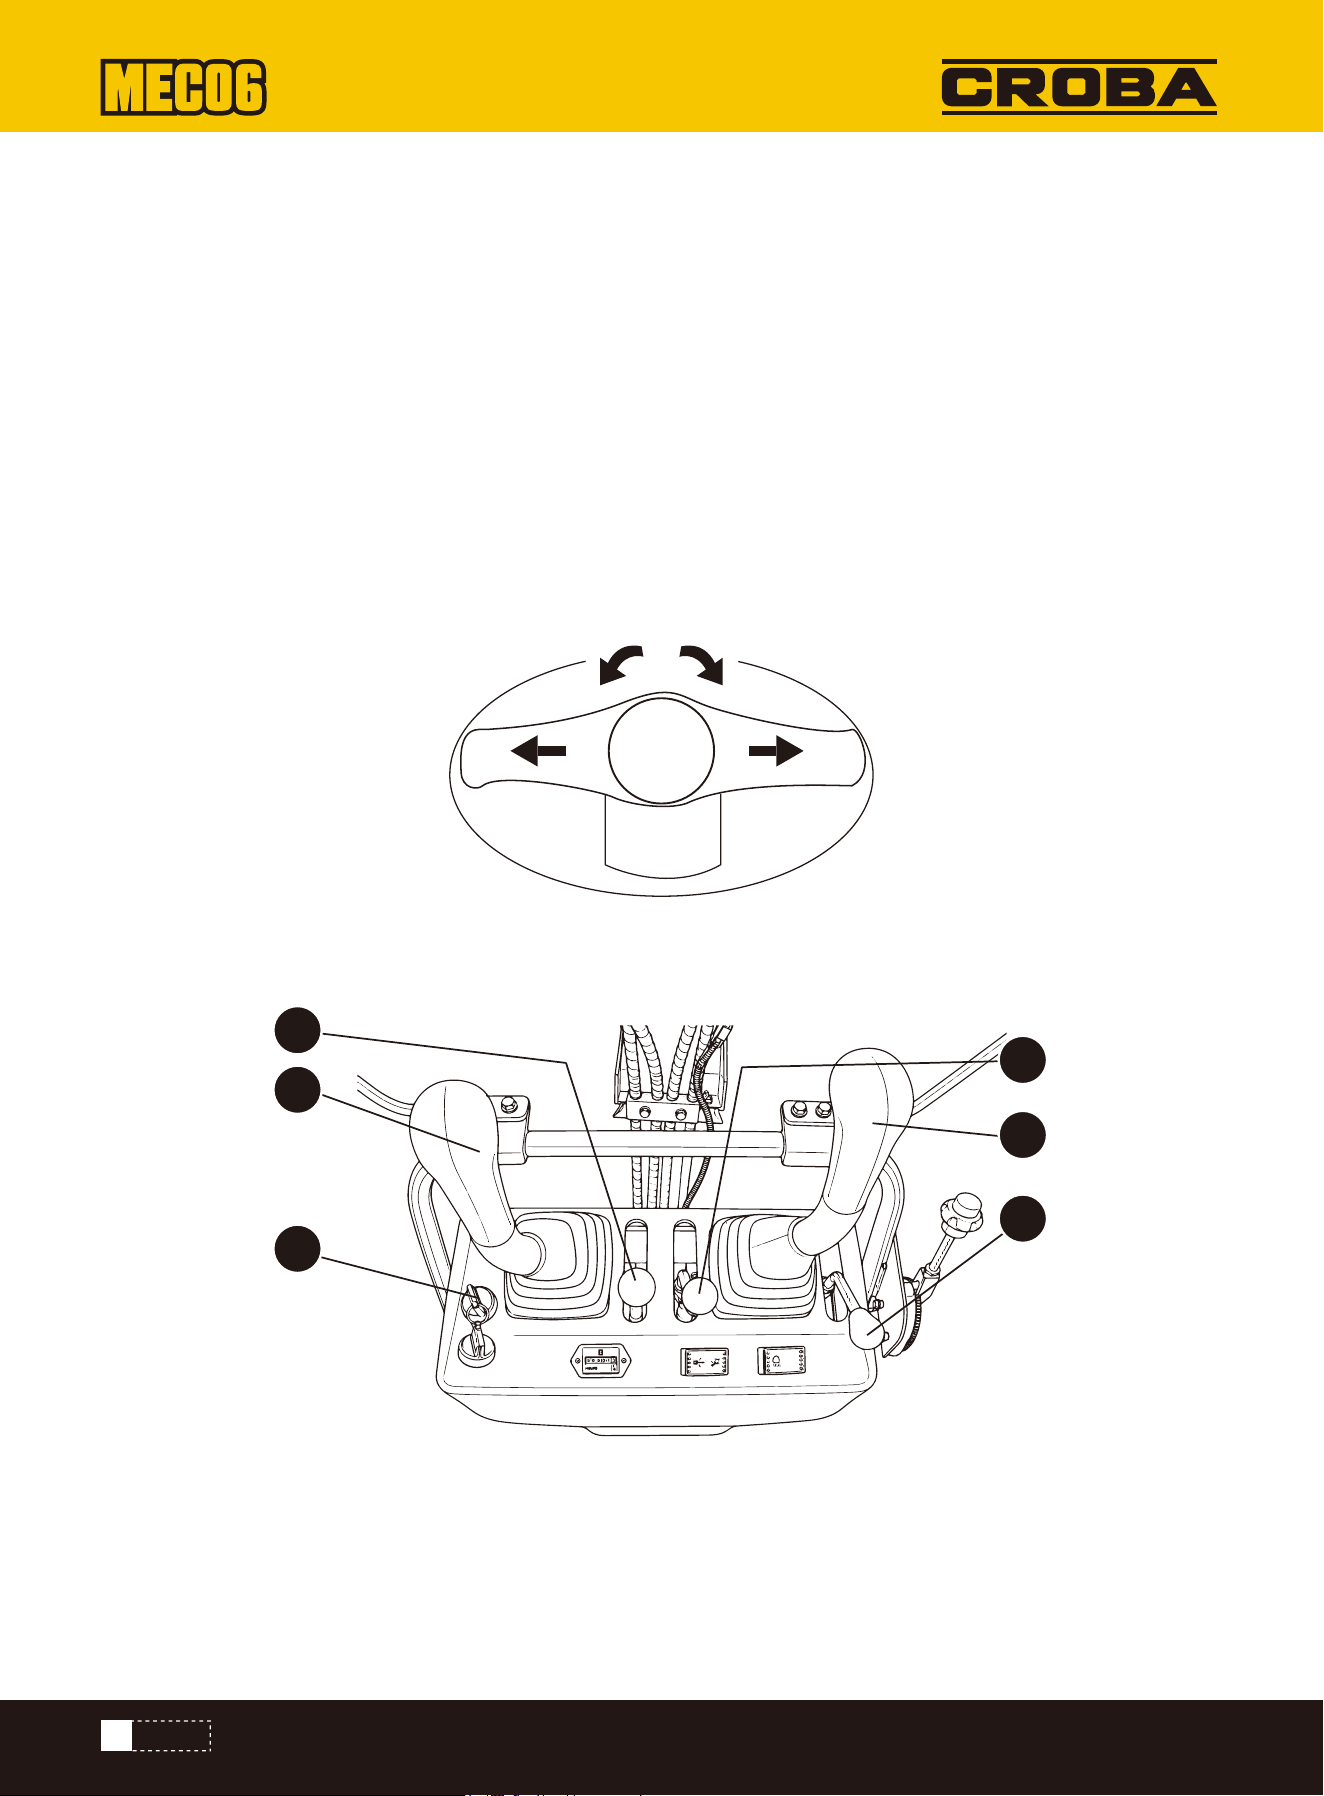
STARTING THE ENGINE
Start the engine as follows:
1.Establish power supply with Switch.
(1) Drive lever (left)
(2) Drive lever (right)
(3) Attachment operating lever (left)
(4) Attachment operating lever (right)
(5) Ignition switch
(6) Operating lever for bulldozer blade
2. Before starting the engine, make sure that all control levers are in the neutral position.
11. Never assume that children will stay where you last saw them.
12. Keep children away from the work area and leave them under the supervision of a responsible adult.
13. Pay attention and switch off your machine if children enter the work area.
14. Never transport children on your machine. There is no safe place for them there. They could fall down and be run over
or interfere with the controls of your machine.
15. Do not allow children to operate the machine, even under adult supervision.
16. Never allow children to play on the machine or its attachments.
17. Take extra care when reversing, look behind and down and make sure the area is clear before you start moving.
18. If possible, park the machine on firm, flat and level ground. Lower the attachments to the ground, remove the key from
the ignition lock and wedge
20
SAFETY
1
2
4
6
3
5
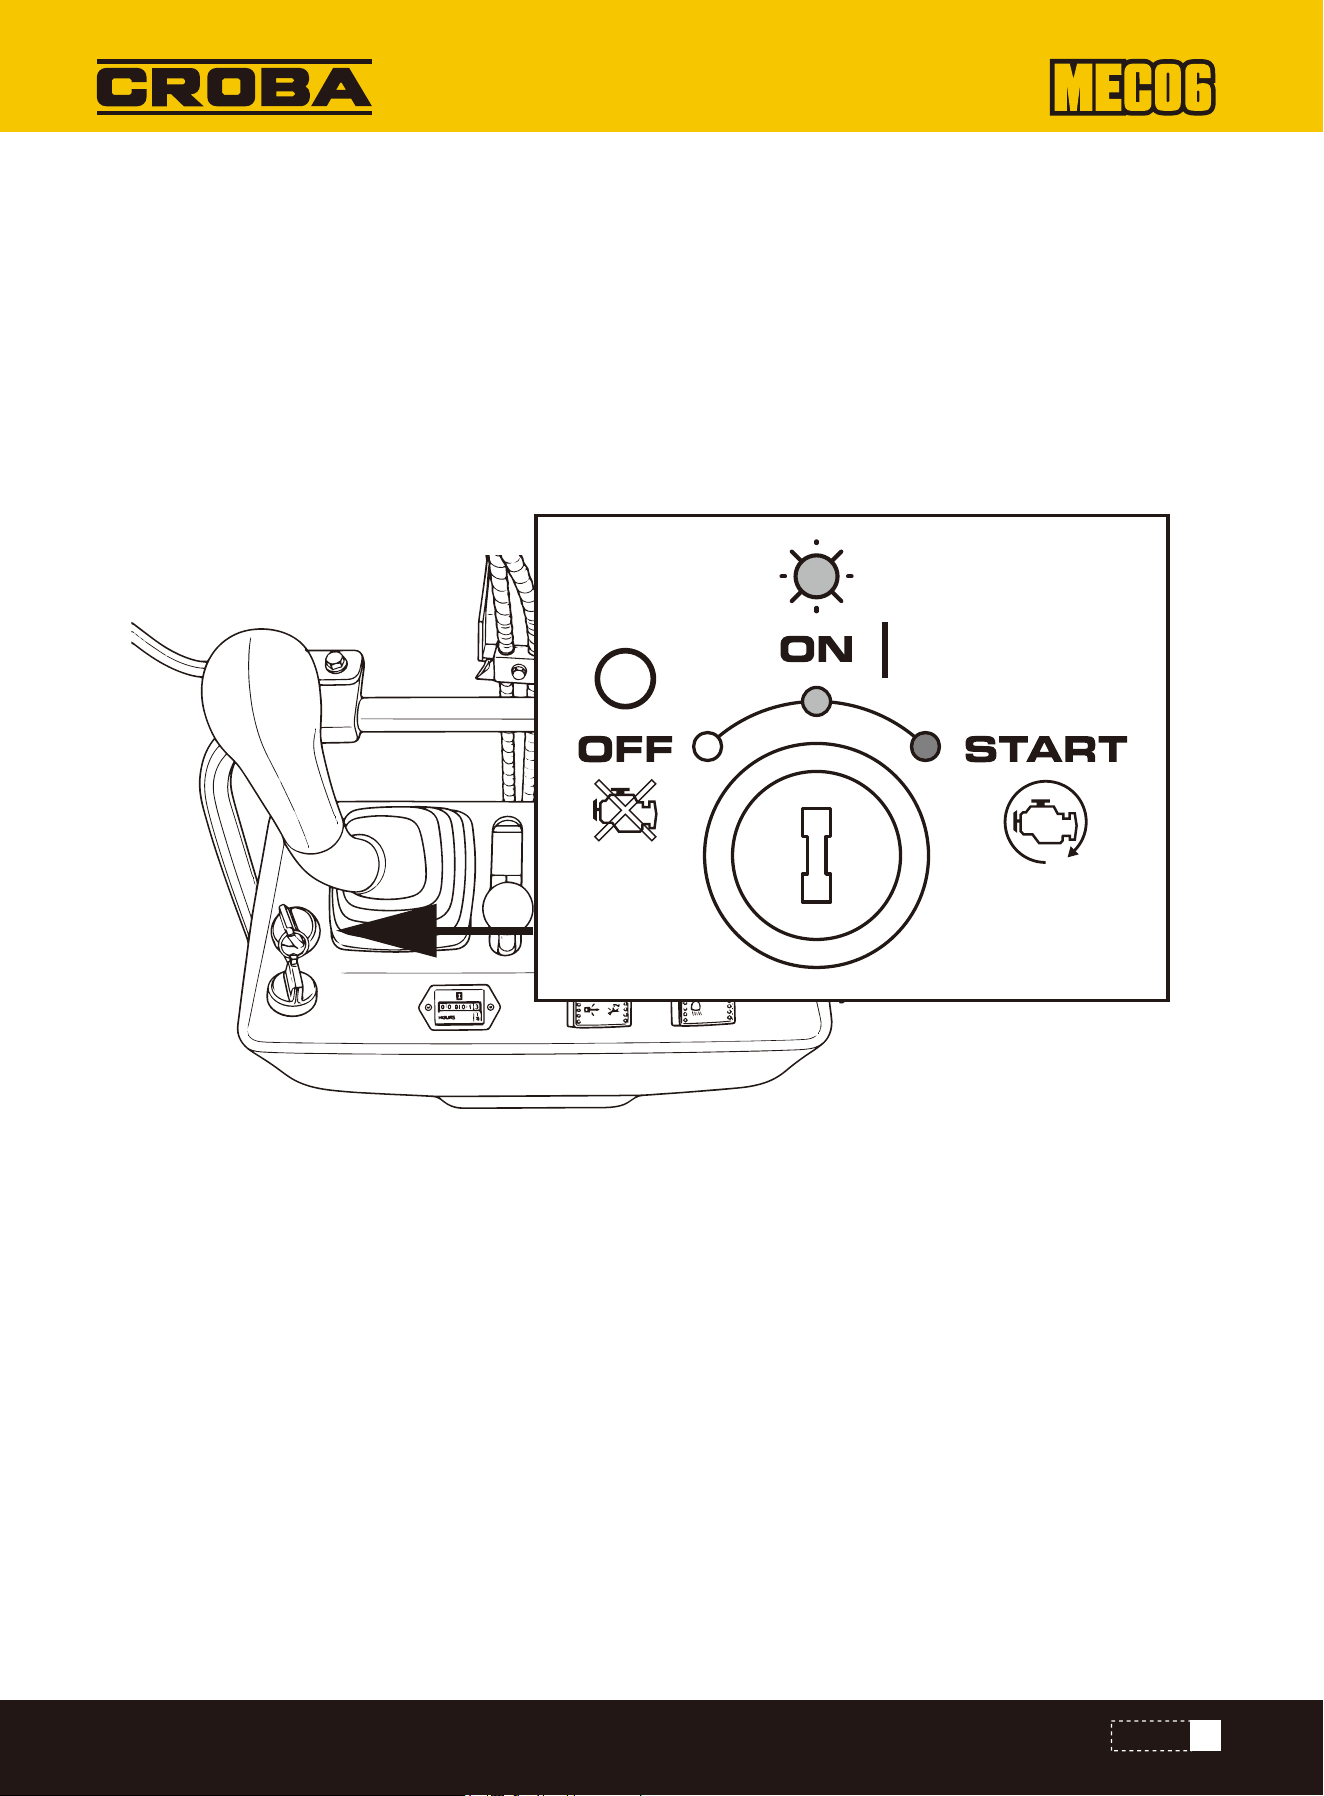
3.Press the lock button and the set the throttle lever to "half throttle"(=middle position between "fast" and "slow").
4.Pull the choke lever (the choke is closed.)
5.Insert the ignition key into the ignition lock and turn it to the "ON" position until the engine starts
6.Loosen the choke lever
7. Pull out 1/2 of the throttle handle before starting. Pull the air regulator handle back down and set the start key to "ON"
for five seconds to start. When the petrol engine starts, the left-hand air regulator handle resets. (Note that the petrol
engine can be started when the vehicle is warm without pulling the air regulator handle).
8. Let go when the engine has started. The key automatically returns to the "ON" position.
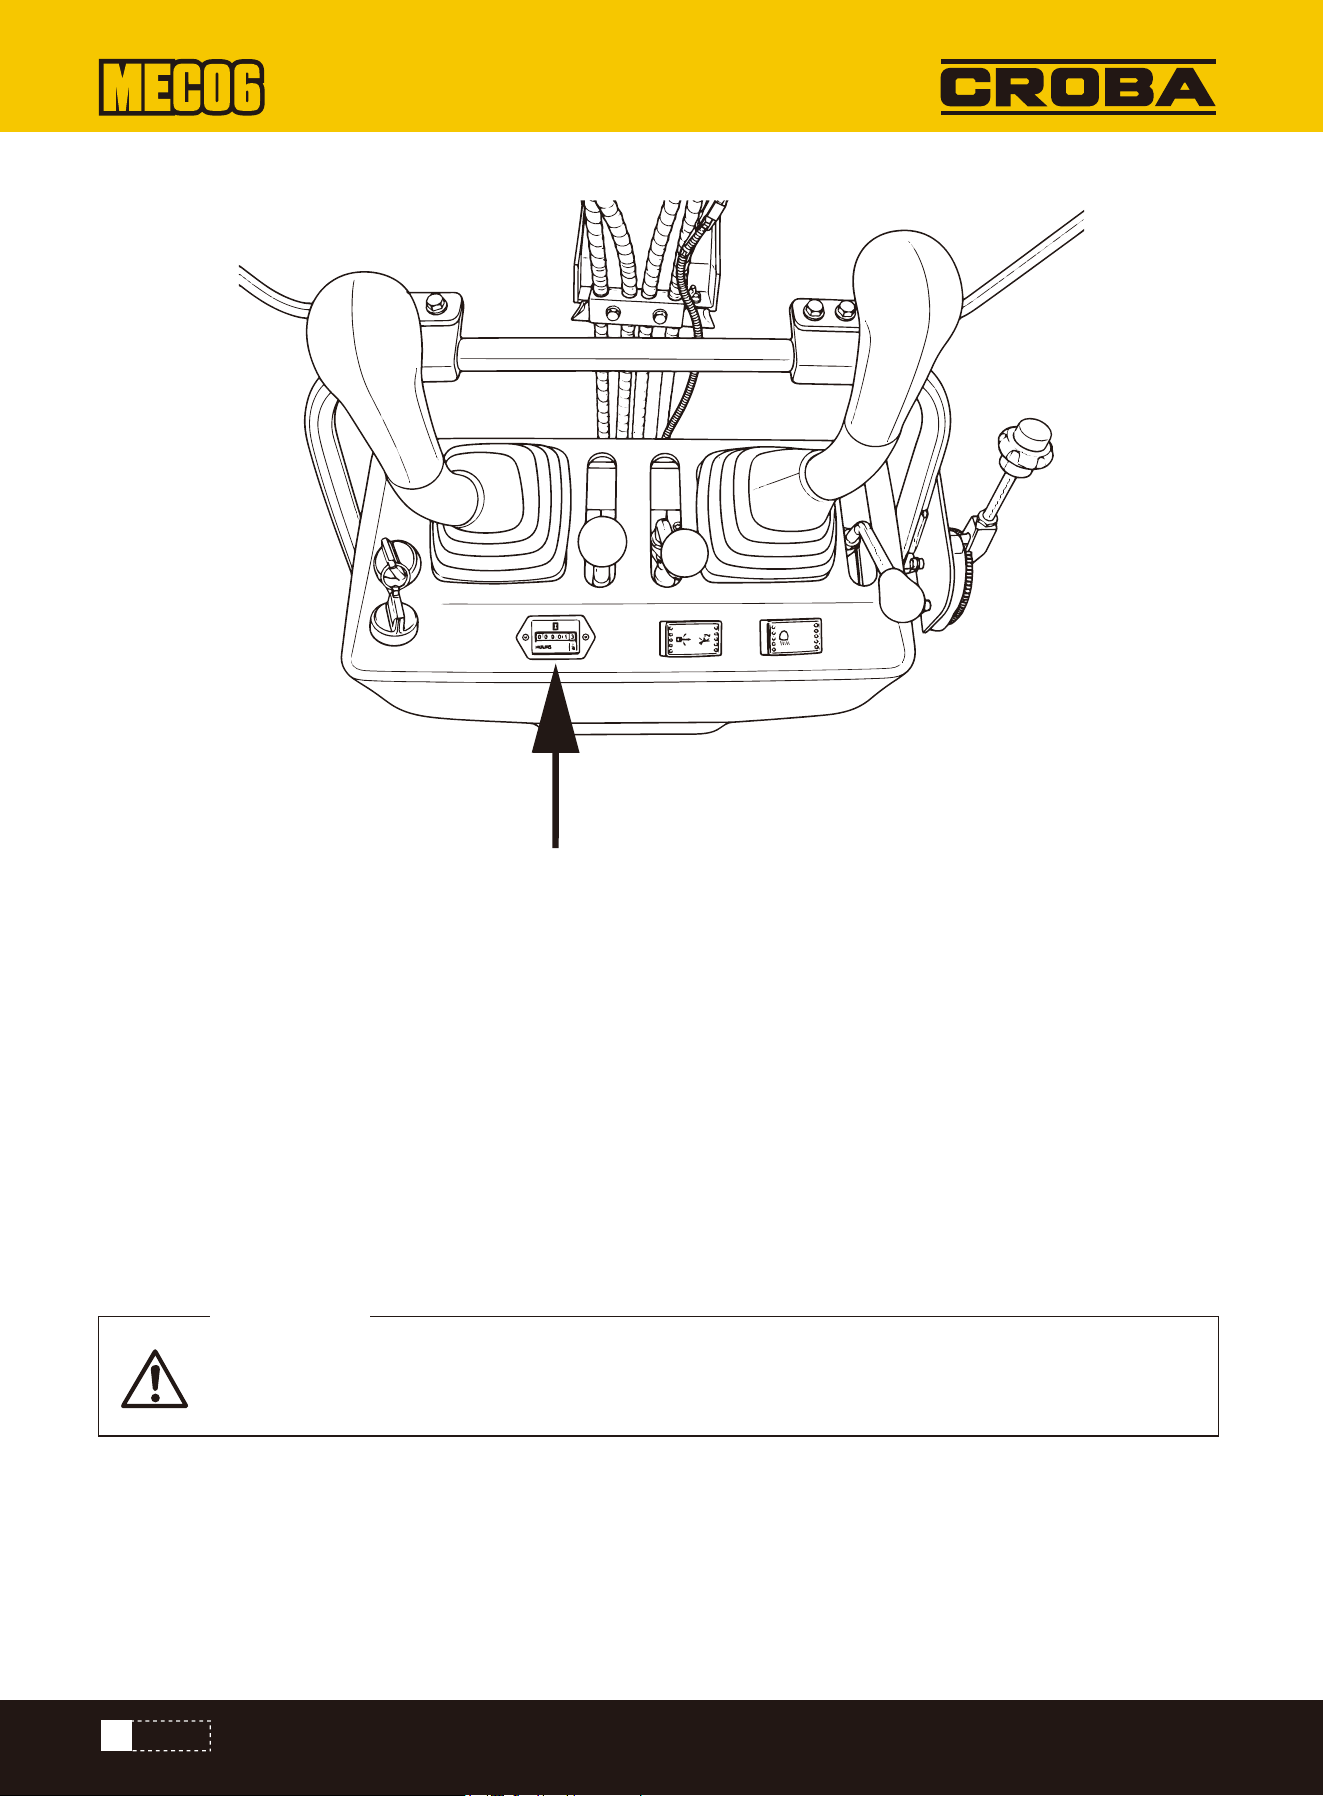
The hour counter shows the total operating hours of the excavator.
NOTE:
If the battery is empty, the machine can be started by pulling the pull starter.
HOUR COUNTER
The counter counts up by 1 for each hour of operation. The electrical counter continues when the engine stops and the
key is still in the "ON" position.
READING THE COUNTER
21
SAFETY
CHECKPOINTS AFTER STARTING THE ENGINE
In these cases, the excavator must be checked and maintained in accordance with the dealer's
instructions.
ATTENTION
Check the following points after starting the engine, but before starting work:
1. Move the throttle lever to the "LOW" position and allow the engine to idle for approx. 5 minutes. This warms up the
engine oil and allows it to penetrate all parts of the engine.
Note: This operation in idle mode is usually called "warming up".
2. After the engine has warmed up, check as follows:
• The color of the exhaust gases is normal and no abnormal noises or vibrations can be heard.
• No liquid escapes from the pipes or hoses.
Stop the engine immediately if any of the following circumstances occur:
• The speed of the engine suddenly increases or decreases.
• Sudden abnormal noises.
• The exhaust fumes are black.
22
SAFETY
STARTING THE ENGINE WHEN COLD
SWITCHING OFF THE ENGINE
Ensure that the safety lever is locked during warm-up.
ATTENTION
1. Pull the throttle lever out by 1/3.
2. Pull the air regulator handle back down and the start key to "ON" for five seconds to start. When the petrol engine
starts, the left-hand air regulator handle resets. (Note that the petrol engine can be started when the vehicle is warm
without pulling the air regulator handle).
3. Release the key when the engine has started. It automatically returns to the "ON” position.
Allow the engine to idle for about 5 minutes to cool down.
1. Move the throttle lever to the idle position.
2. Carefully lower the attachments to the ground using the levers.
3. To stop the engine, turn the key to the "OFF" position and remove the key.
Note: After starting the engine, allow it to warm up for about 10 minutes without load. If the temperature of the
hydraulic fluid is too low, the function will be impaired. Do not use the excavator under full load until the engine
has warmed up sufficiently.
Do not leave the bucket or bulldozer blade raised, as someone could accidentally touch the levers
and cause serious accidents. Lower all attachments to the ground, otherwise accidents may occur.
WARNING
23
CONTROLS

CHECKING THE CONTROLS DURING OPERATION
RUNNING IN THE NEW EXCAVATOR
OPERATION
Switch off the engine immediately in the following cases:
Pay attention to the following points after starting the engine, but before starting work:
• The speed of the engine suddenly increases or decreases.
• Sudden abnormal noise development.
• The exhaust gases suddenly become very dark.
Observe the following controls during operation to ensure normal function.
The service life of the new excavator is influenced by operation and maintenance. Your new excavator was carefully
inspected and tested before it left the factory. Nevertheless, all moving components must be run in during the first 50
hours. Do not work at full speed and load during this time. It is extremely important to run in the excavator correctly in
order to achieve its full performance and service life. The following points should always be observed during the running-in
phase. Do not work at full speed or full load for the first 50 working hours.
• Allow the engine to warm up sufficiently in the cold.
• Do not increase the engine speed more than necessary.
OIL CHANGE DURING THE RUNNING-IN PHASE
STARTING UP
Adjusting the operator's seat
Lubricating oil plays a particularly important role during the running-in phase of the excavator.
The various moving parts have not yet been run in, so that many fine metal particles develop which can cause damage or
shorten the service life of many components. Pay attention to the intervals between oil changes and carry them out
sooner rather than later. See "Care and maintenance" for more details on lhgn.
After adjusting the seat, make sure that the seat adjustment is engaged.
1. Move forwards and backwards: Move the seat forwards and backwards while holding the adjustment lever.
2. Move the locking lever to the "unlock” position.
3. Move the locking lever to the "unlock” position and lift the lower side of the bucket 20 cm to 40 cm off the ground.
Push the right-hand handle bar forwards if the engine stops suddenly so that the bucket falls down
and there are no malfunctions that could lead to accidents due to the bucket falling down.
WARNING
24
CONTROLS
The excavator may only be used by persons who are familiar with its operation. Do not allow anyone
other than the operator to work with the excavator.
CAUTION
Before adjusting the operator 's seat, make sure that nobody puts their hands on the bonnet behind
the seat.
CAUTION
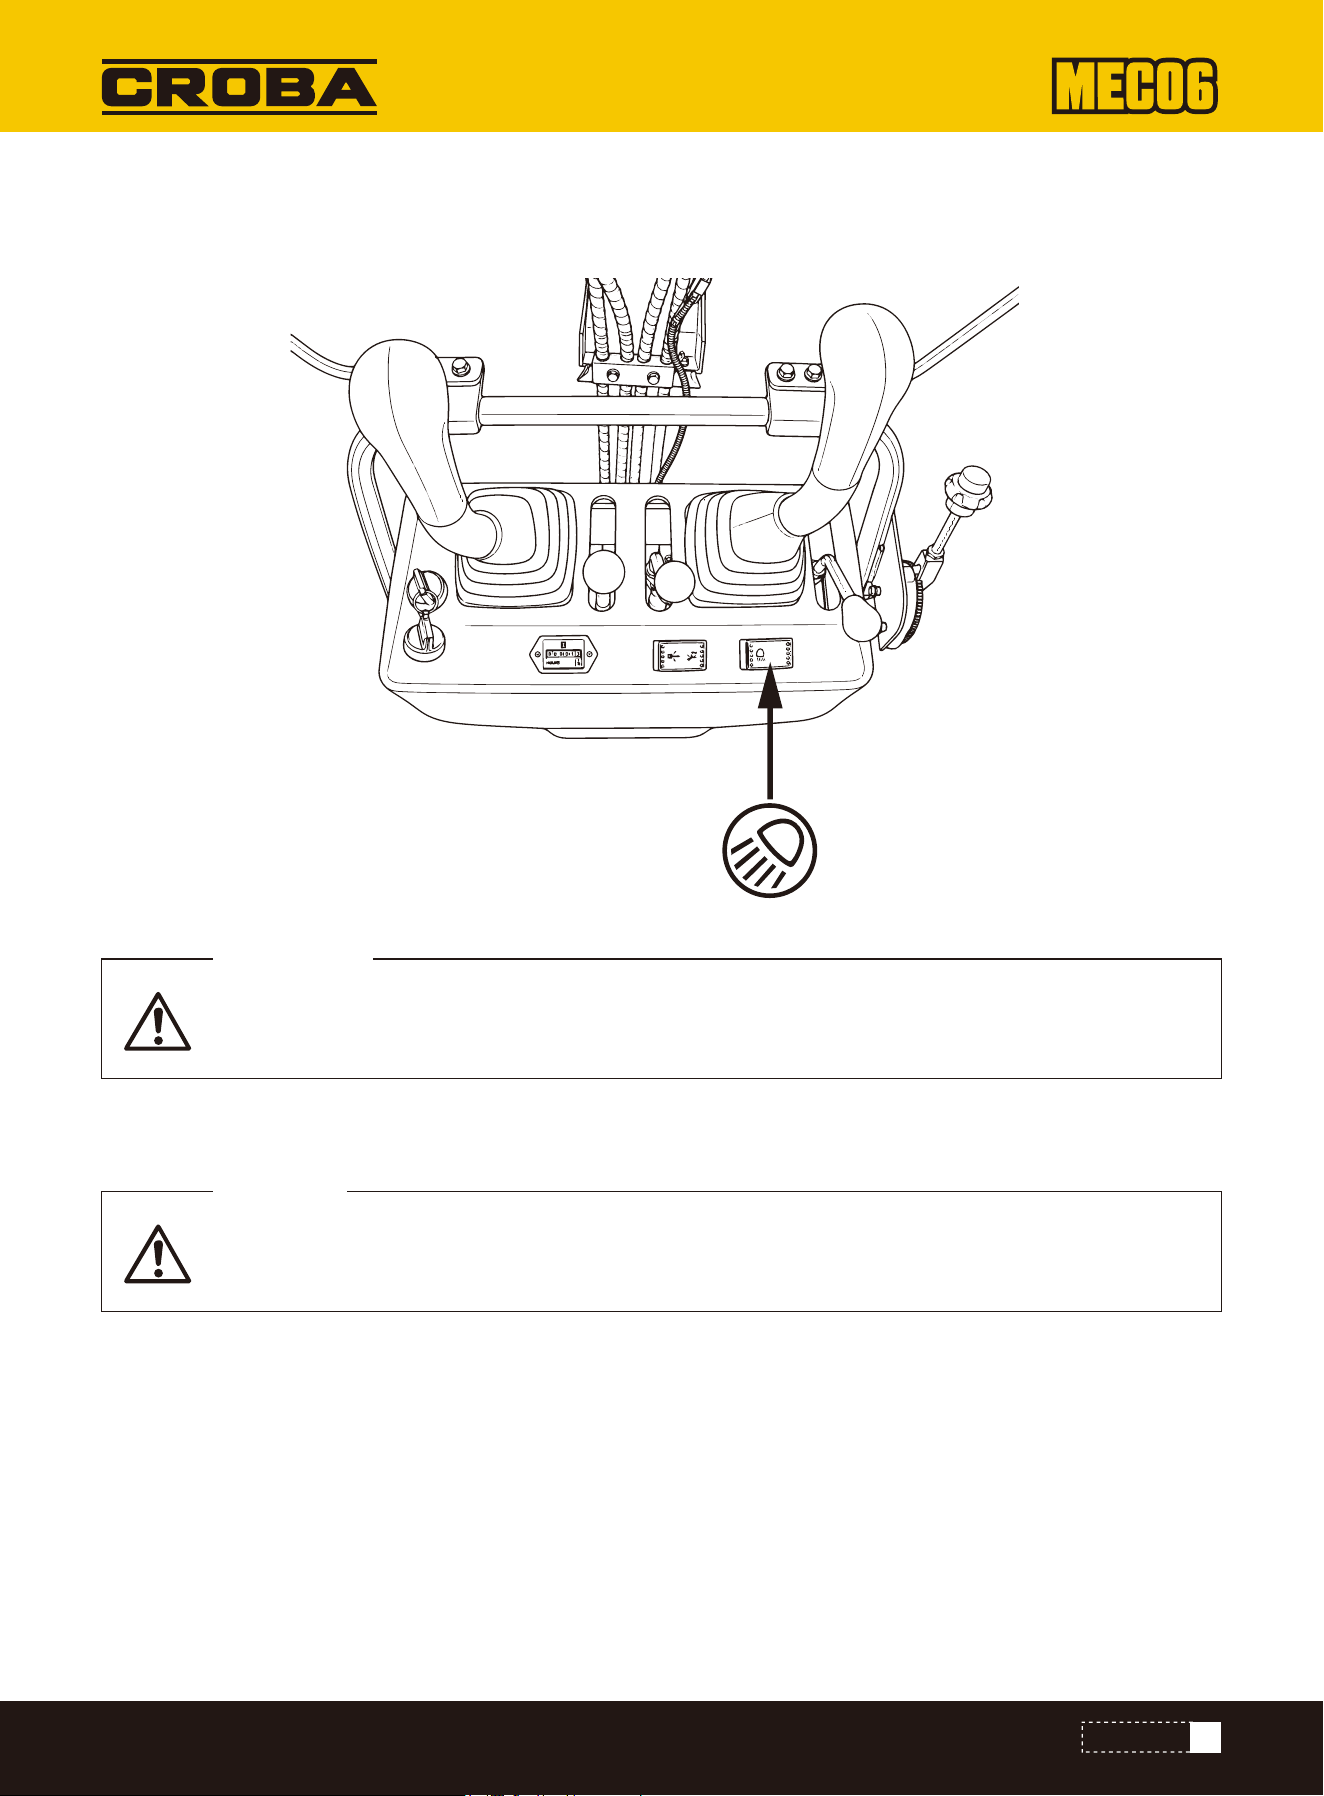
Visibility is limited in the dark, so work lighting alone is not enough. Prepare additional lighting and
observe the safety regulations and special regulations for working at night.
CAUTION
Work light switch
When the key is in the "ON" position, the lights are switched on by tapping the switch.
Night mode
When the key is in the "ON" position, the lights are switched on by tapping the switch.
25
CONTROLS
The brightness in the vicinity of the machine must be above 500 lux.
ATTENTION
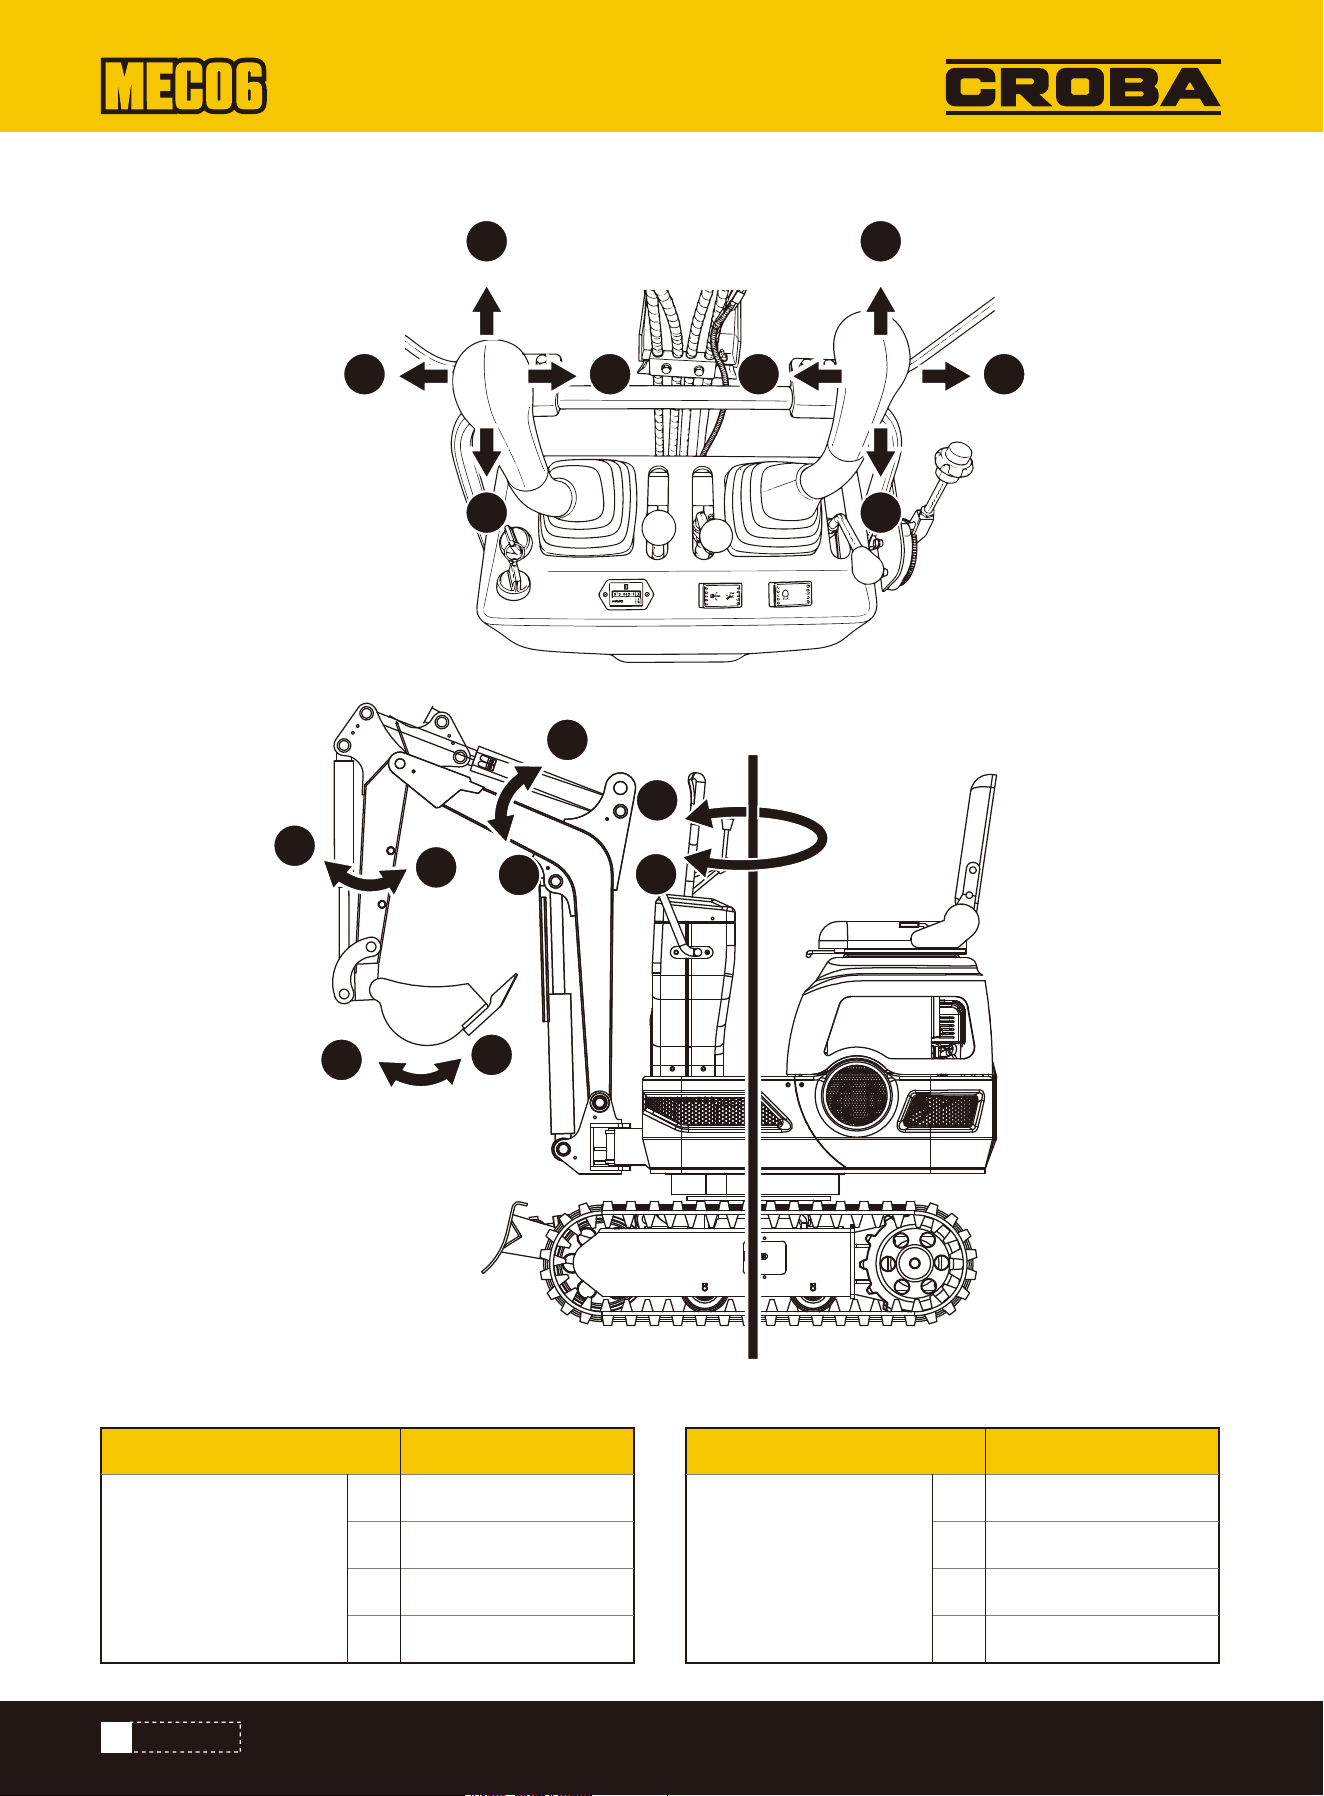
Position of the lever
Front left attachment
operating lever
Front right attachment
operating lever
A
B
C
D
Extend arm
Retract arm
Swivel left
Swivel right
Movement Position of the lever
1
2
3
4
Lower the boom
Raise the boom
Dig bucket
Empty bucket
Movement
Drive lever
26
CONTROLS
A
B
C D
1
2
3 4
2
1
4
3
A
B
C
D
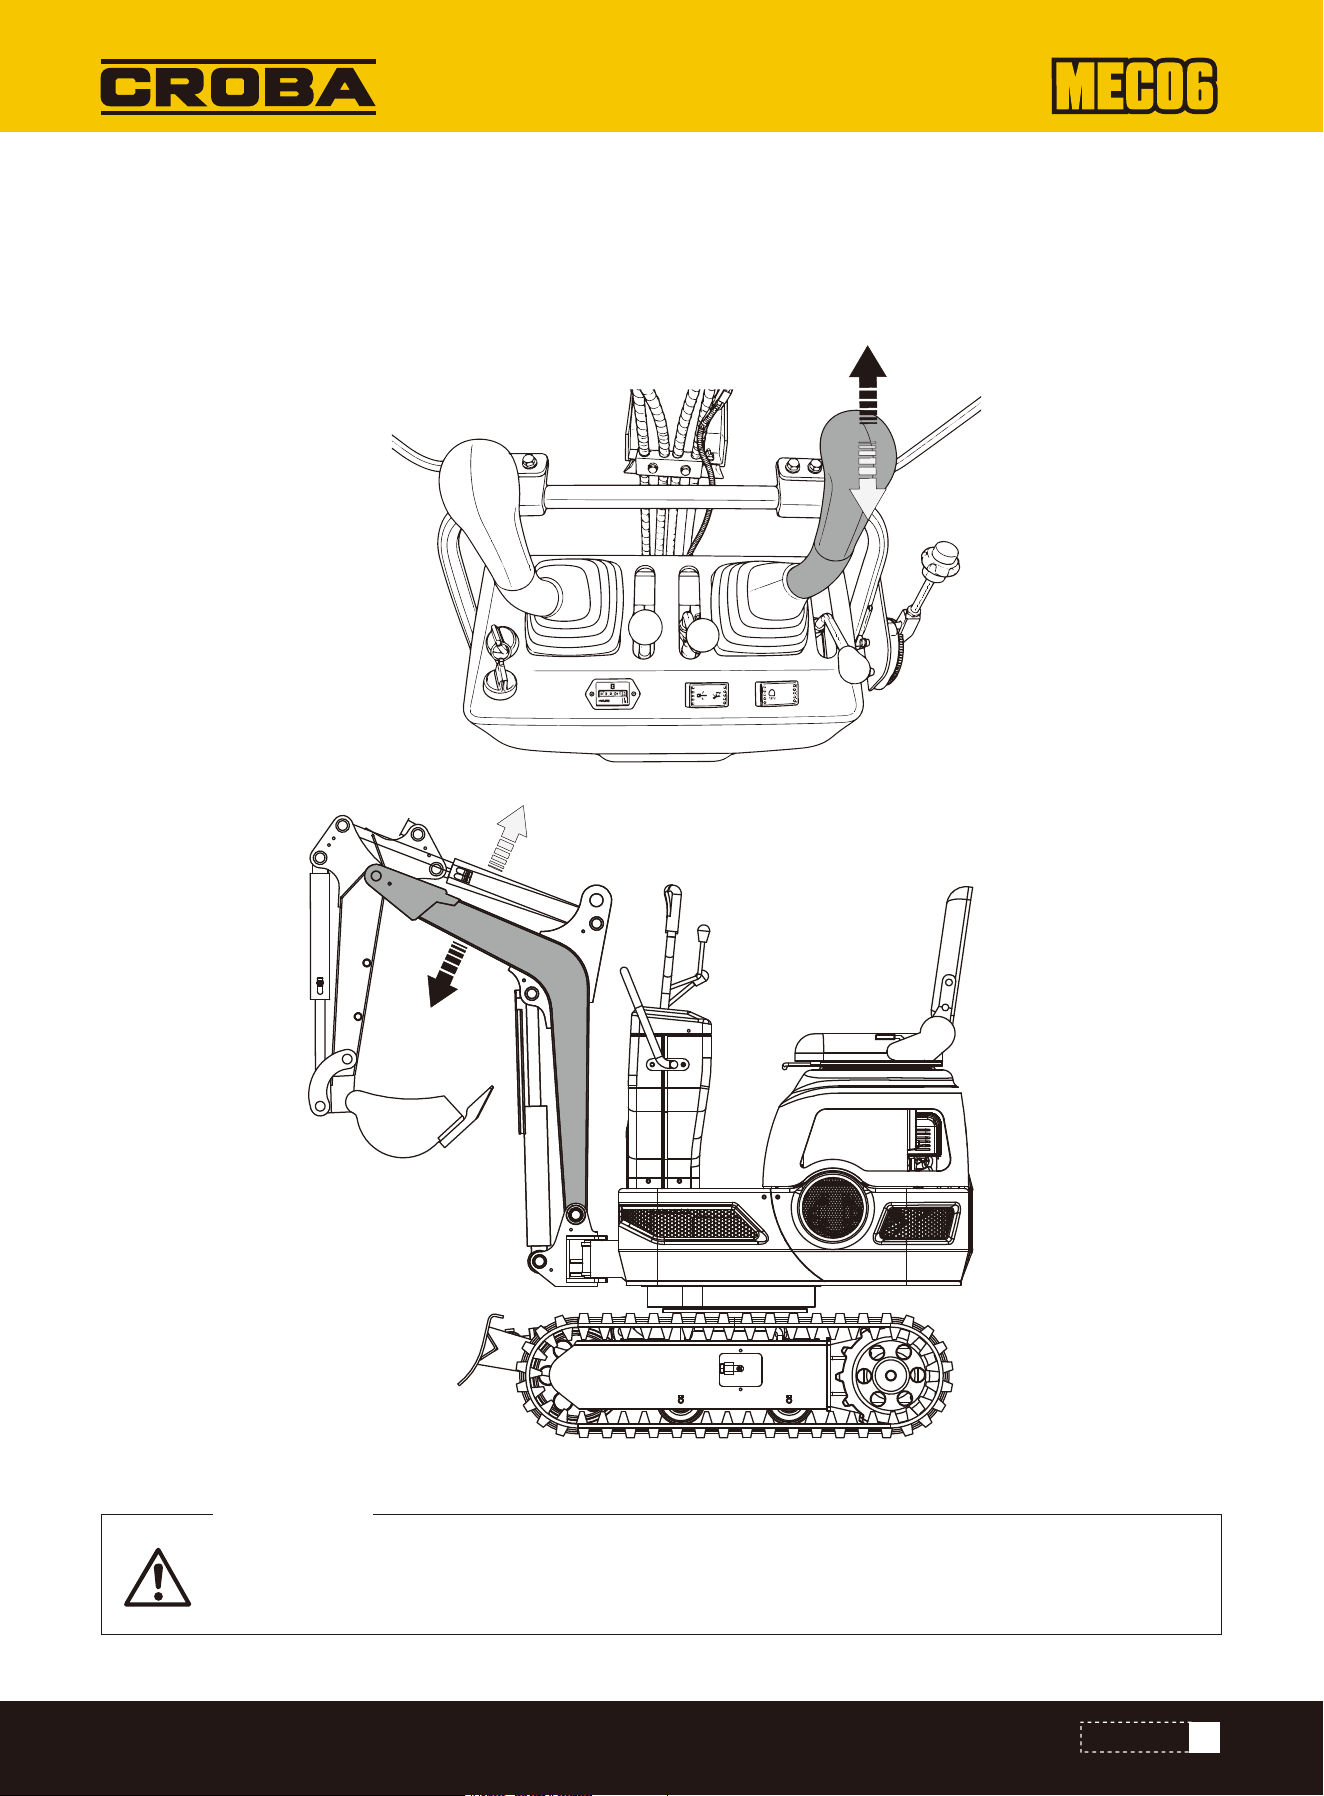
OPERATING THE BOOM
To raise the boom, pull the operating lever of the boom backwards. The boom is equipped with a damping cylinder that
prevents the excavated material from falling out of the bucket. If the hydraulic oil temperature is low (e.g. immediately
after starting the engine), the damper function only starts with a slight delay (approx. 3 to 5 seconds). This is due to the
viscosity of the hydraulic oil and is not a sign of a malfunction.
27
CONTROLS
When lowering the boom, make sure that it does not hit the dozer blade and that the excavator teeth
do not touch it.
ATTENTION
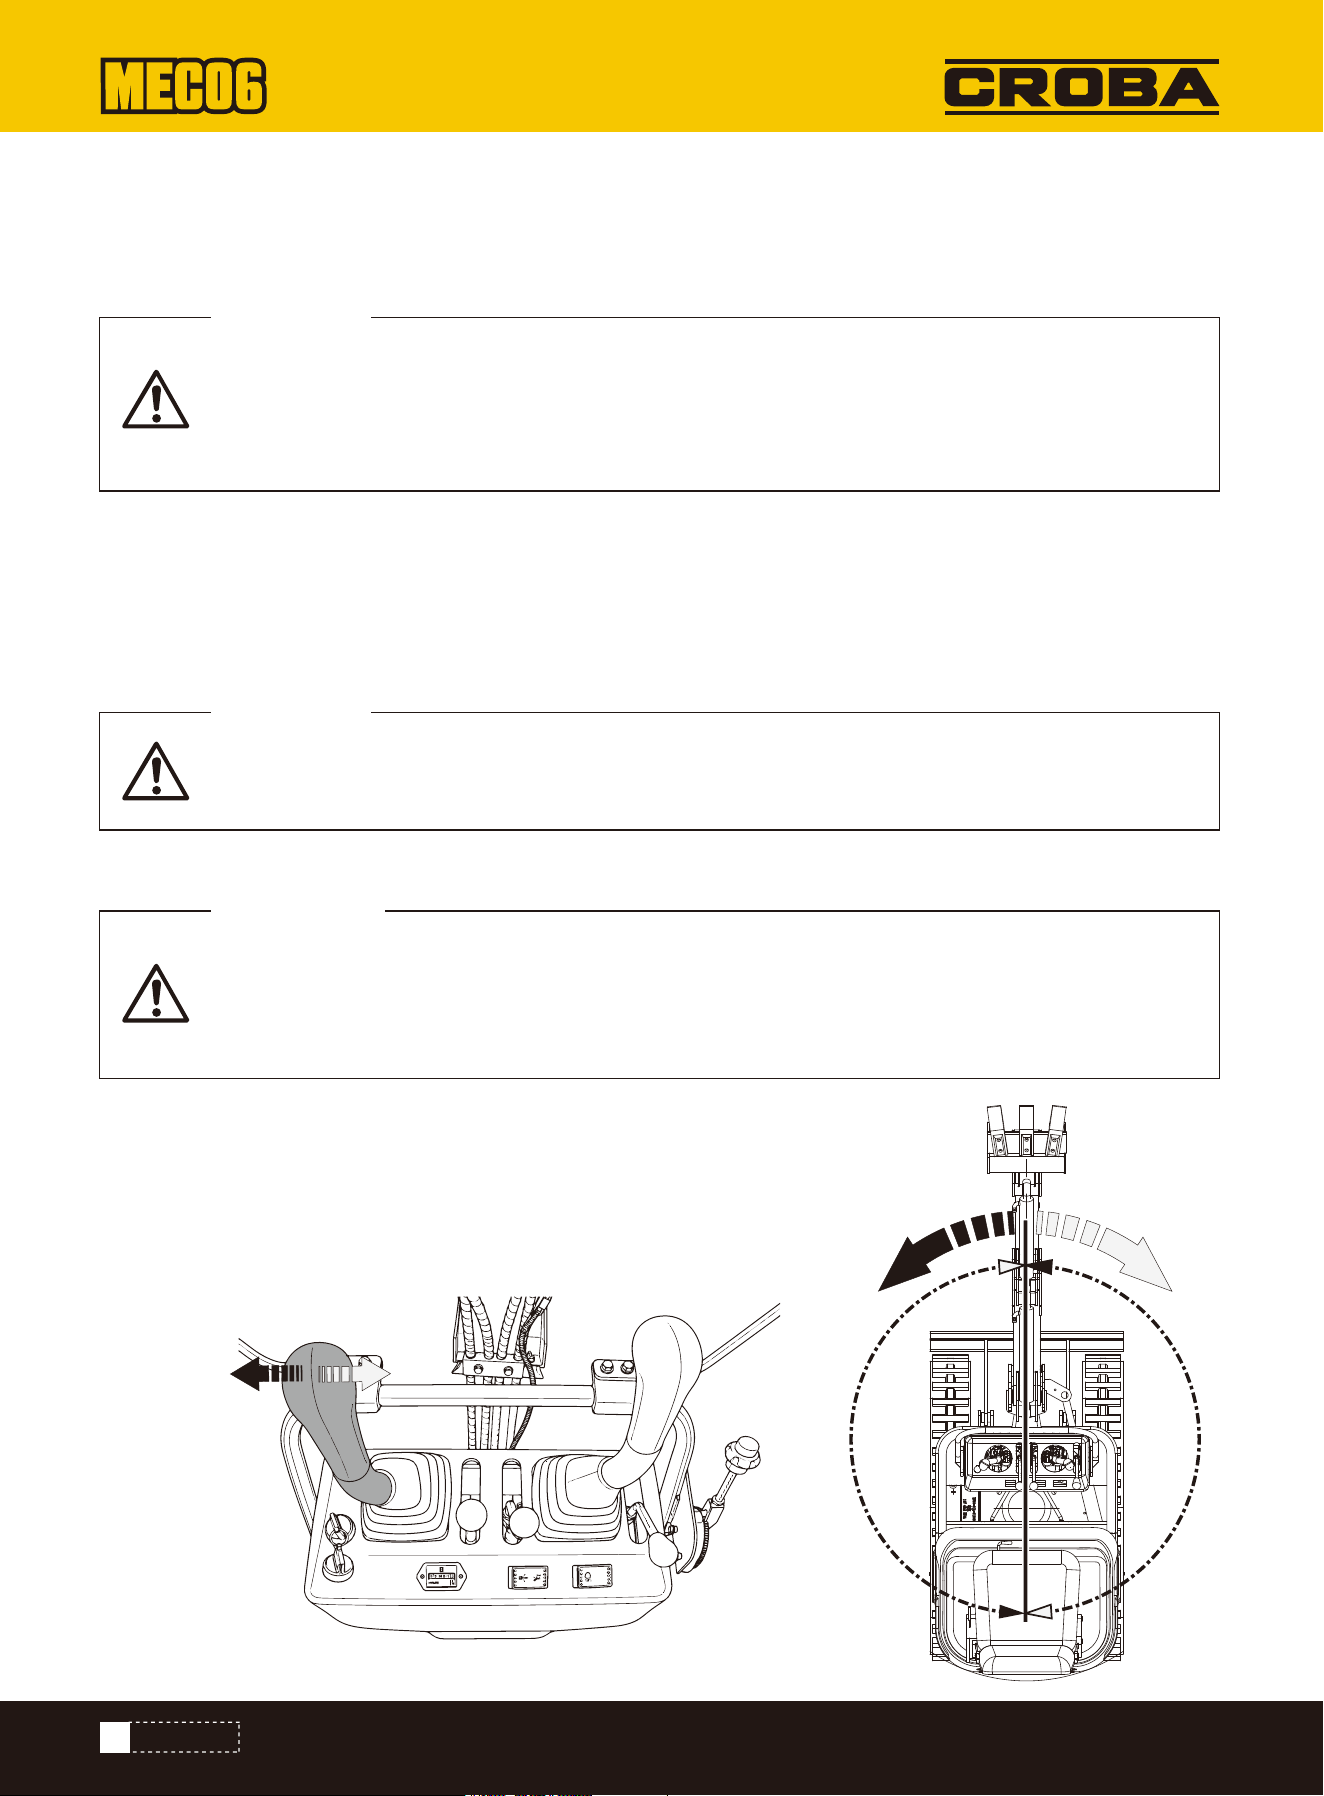
OPERATING THE ARM
Pull the left operating lever for the attachment backwards and the arm is retracted. Push the operating lever forwards to
extend the arm.
OPERATING THE BUCKET
To dig with the bucket, move the operating lever for the right attachment from the "Neutral" position to the left. Move the
operating lever to the right and the bucket is pushed outwards and the contents are poured out.
1. Tilt the operating lever to the left and the upper superstructure will rotate to the left.
2. Tilt the operating lever to the right and the upper superstructure will rotate to the right.
Keep the work area clear!
SWIVELLING OPERATION
28
CONTROLS
When moving the arm, the movement may pause for a brief moment if the arm is in a vertical posi-
tion. This is because the maximum load on the arm and bucket is reached in this position and the
hydraulic pressure in the cylinder is not high enough. This is a characteristic of the hydraulic
system and not a sign of a malfunction.
ATTENTION
Hen working in groups, always let the others know in advance what you intend to do.
ATTENTION
Never move the left attachment operating lever abruptly from right to left (or vice versa). Accord-
ing to the law of inertia, this causes a shock load on the swivel motor gearbox and the part-turn
motor. In addition, the service life of the excavator is shortened. Remove the swiveling locking pin
before carrying out swiveling operations.
IMPORTANT!
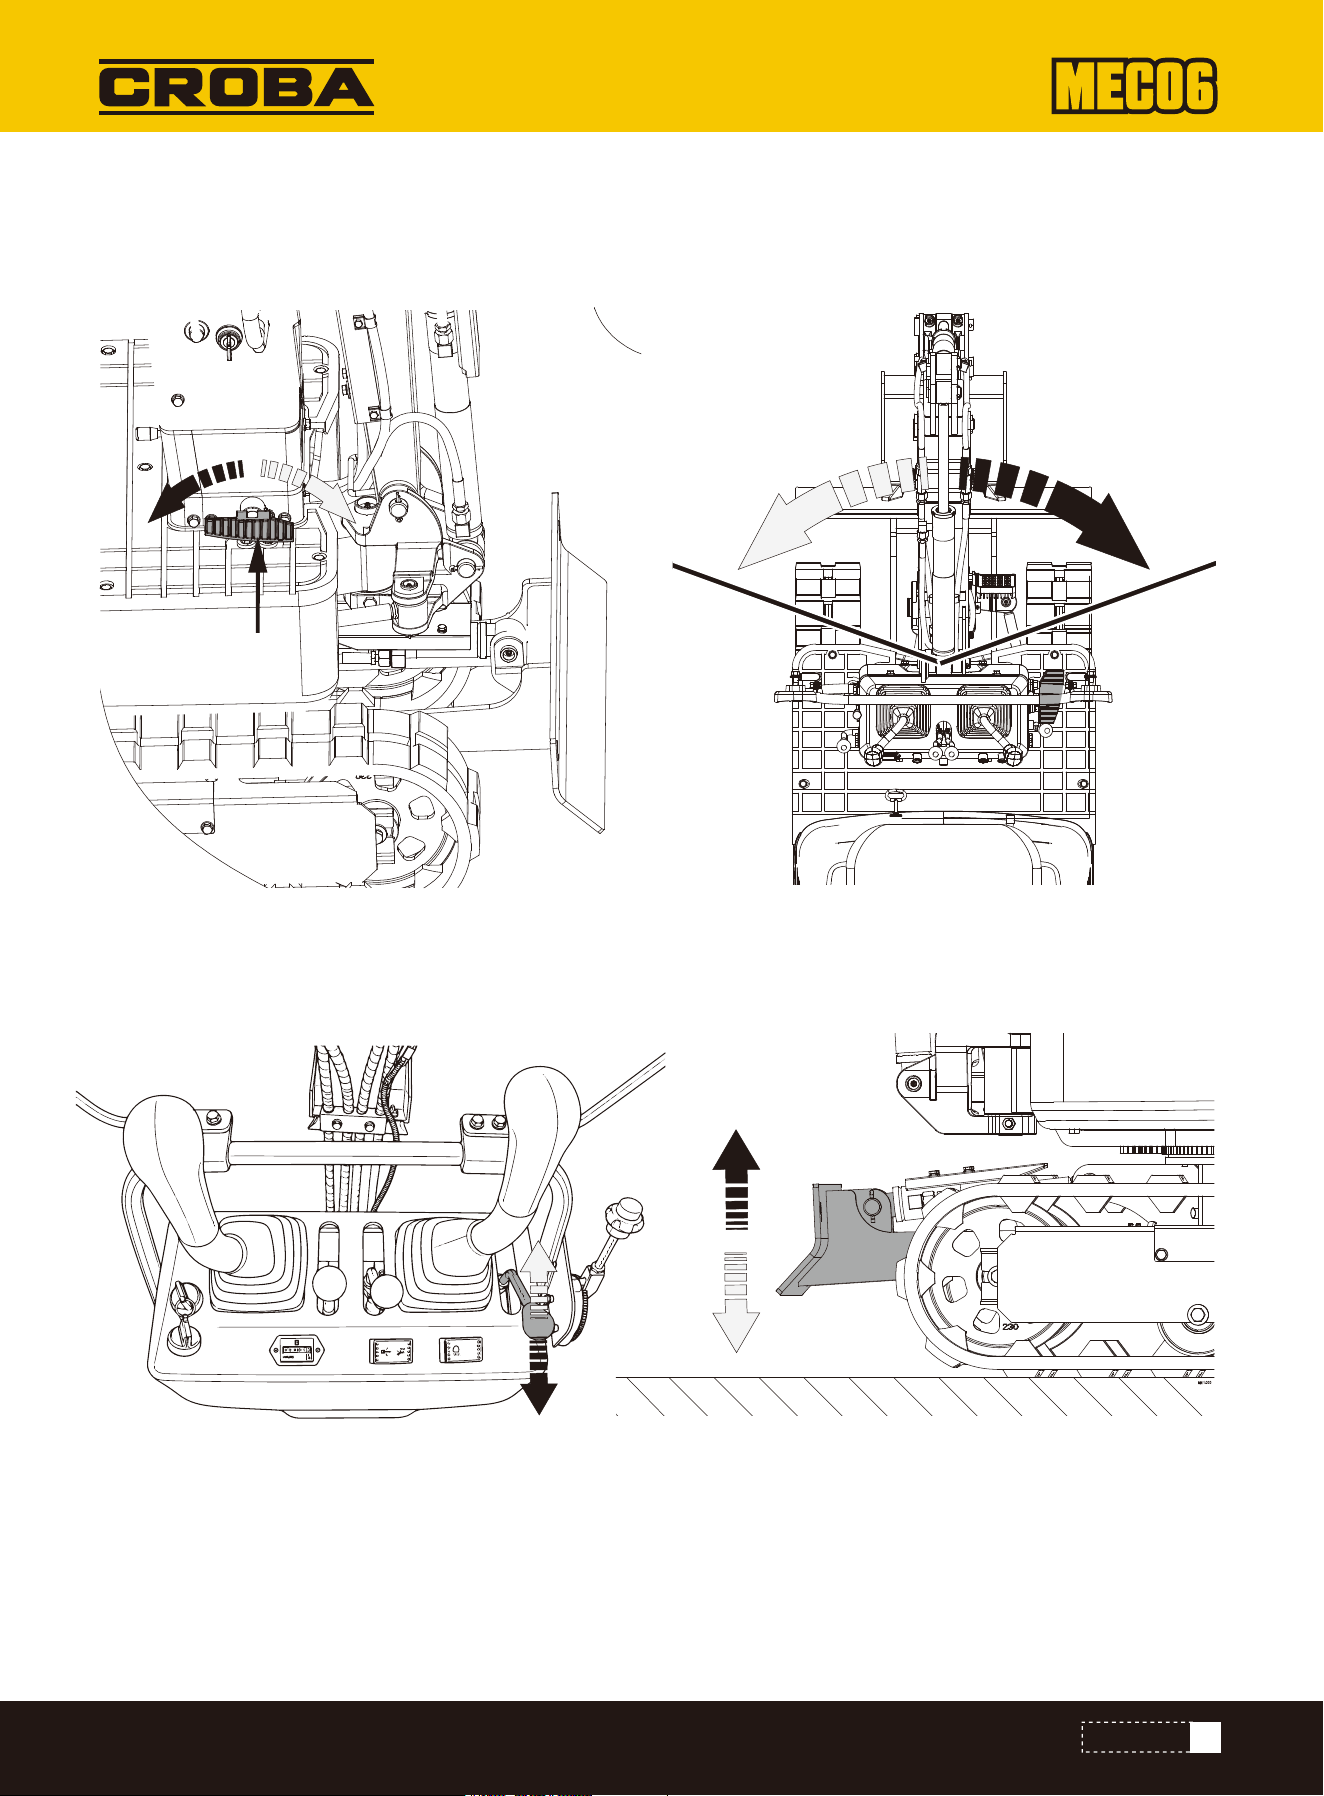
SWIVELLING THE OUTRIGGER
1. Press the pedal at the front to swivel the boom to the left.
2. Press the pedal at the rear to swivel the boom to the right.
OPERATING THE LEVELLING BLADE
1. To raise the leveling blade, pull the operating lever for the dozer blade to the rear. Push the operating lever forwards to
lower the dozer blade.
2. Operate both drive levers with your left hand and the control lever for the dozer blade with your right hand during earth-
works.
29
CONTROLS
65° 65°
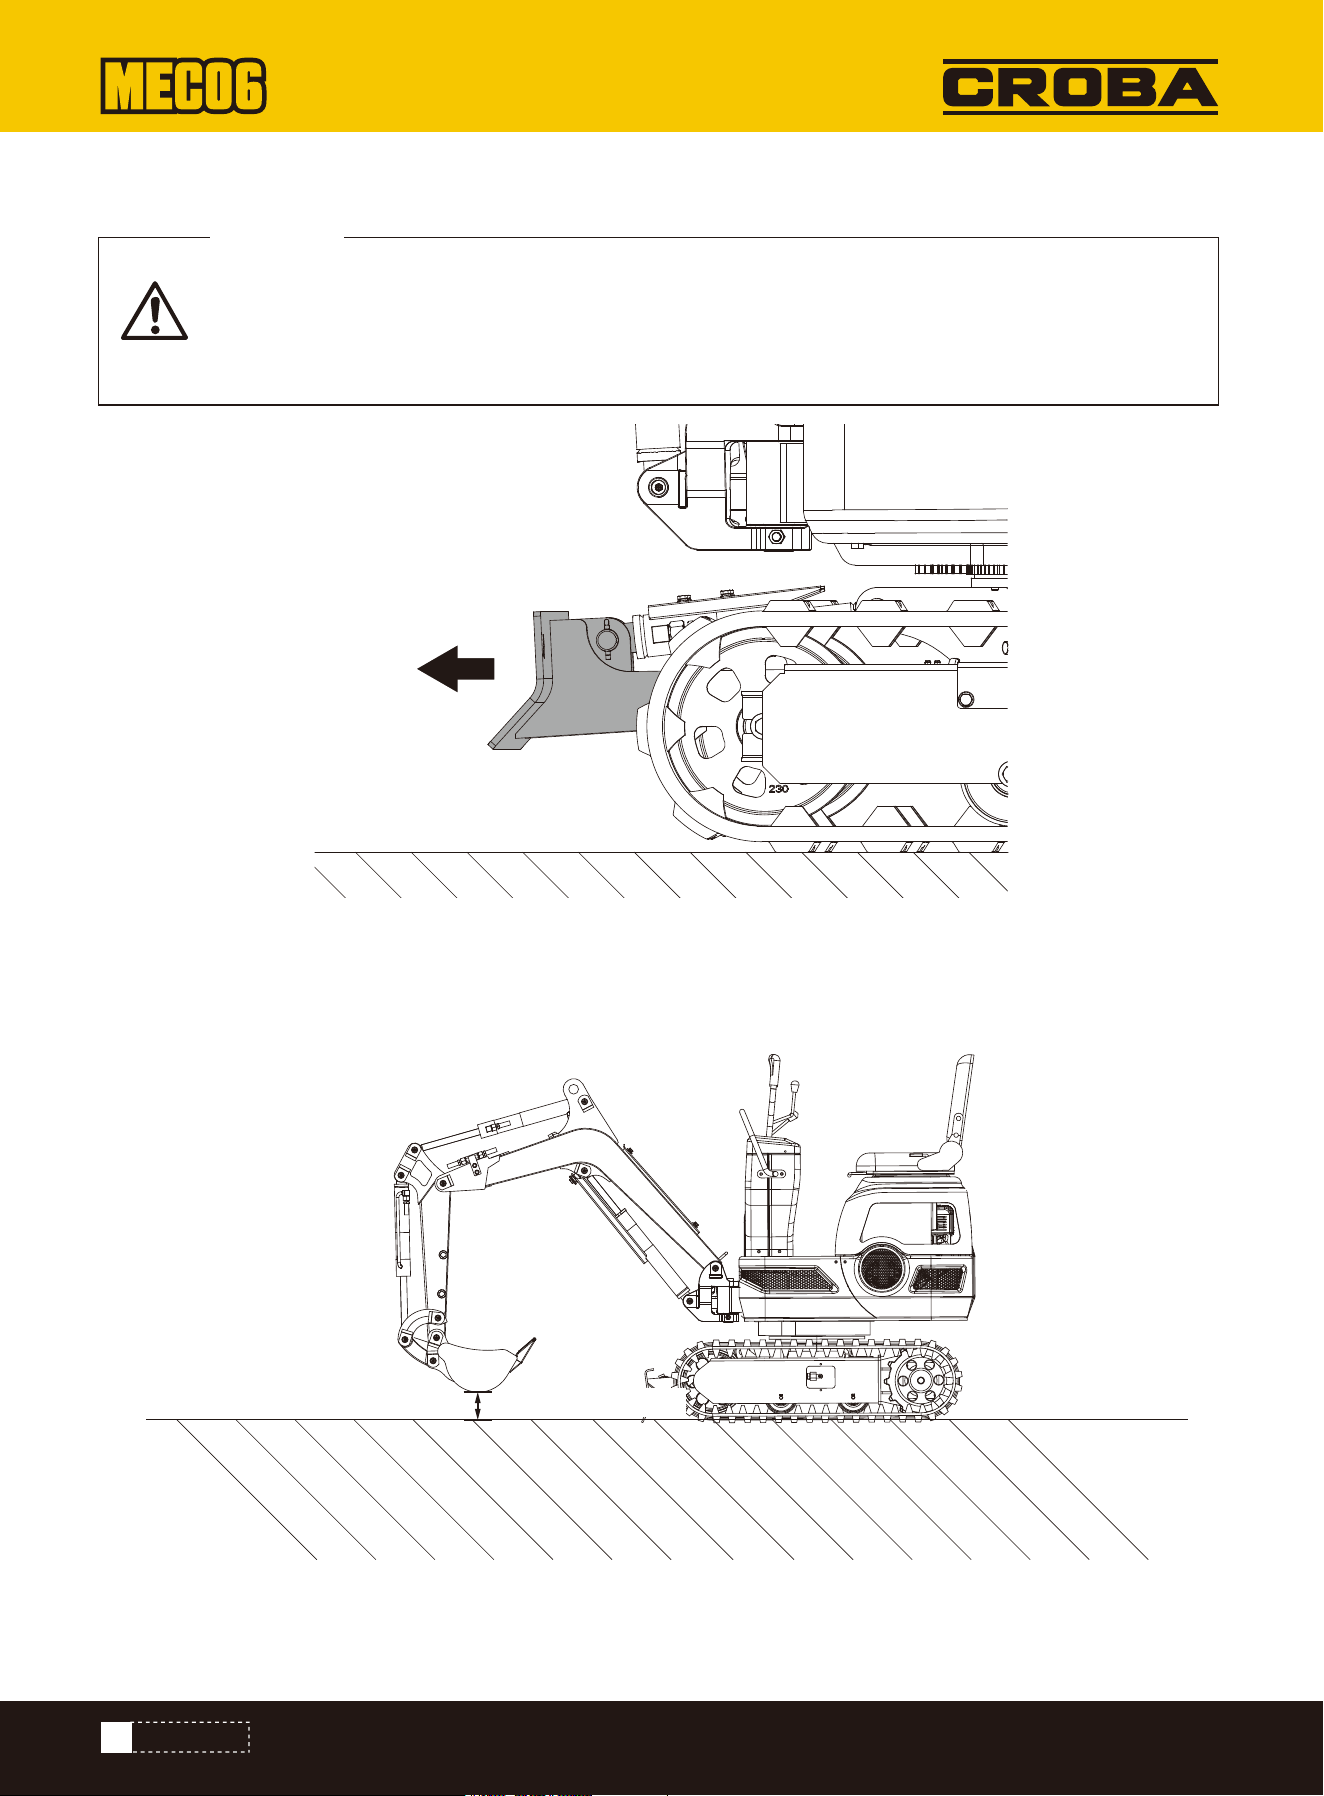
OPERATIONS
Before starting the engine, make sure that there are no other persons in the vicinity of the excava-
tor. Check the direction of the crawlers before working with the excavator. (Idle roller and dozer
blade pointing to the front of the excavator.) Avoid driving across a slope or working sideways on
it.
WARNING
DRIVING
1. Set the engine speed from idling to medium speed.
2. Raise the dozer blade and hold the bucket 8 to 16 in from the ground.
30
8-16 in
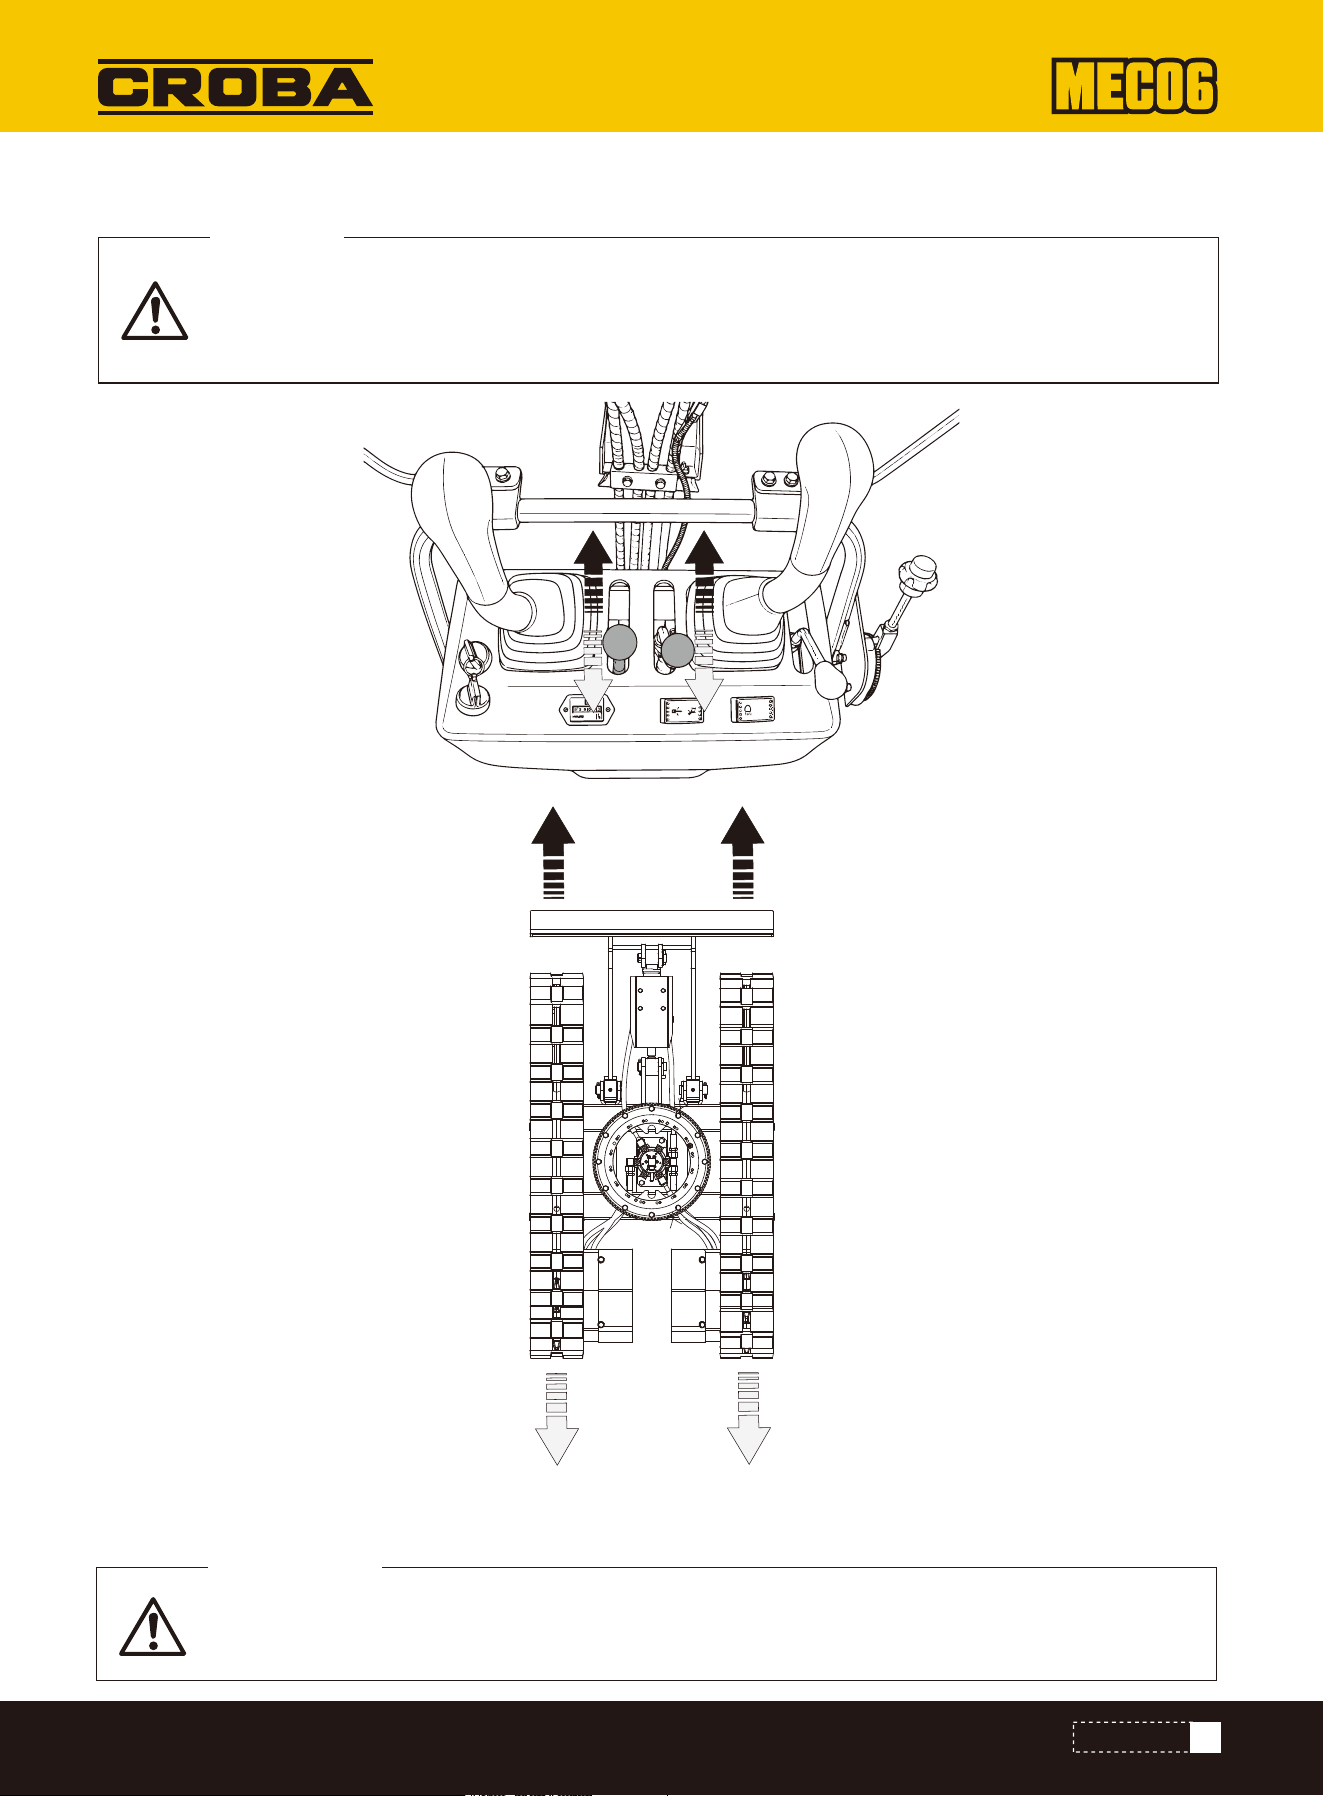
If the swiveling frame has been rotated by 180°, i.e. it is at the rear from the operator's point of
view, the direction of travel is opposite to the direction of travel of the levers. (If the drive lever
wards as seen by the operator.)
WARNING
Drive lever (right, left)
If the drive lever is pushed forwards, the excavator moves forwards and vice versa. The front of the excavator is the side
with the dozer blade.
31
OPERATIONS
If the crawlers become clogged with sand or stones when working on soft ground, lift a crawler
using the boom, arm and bucket and allow the crawler to turn to shake off sand and stones.
IMPORTANT!
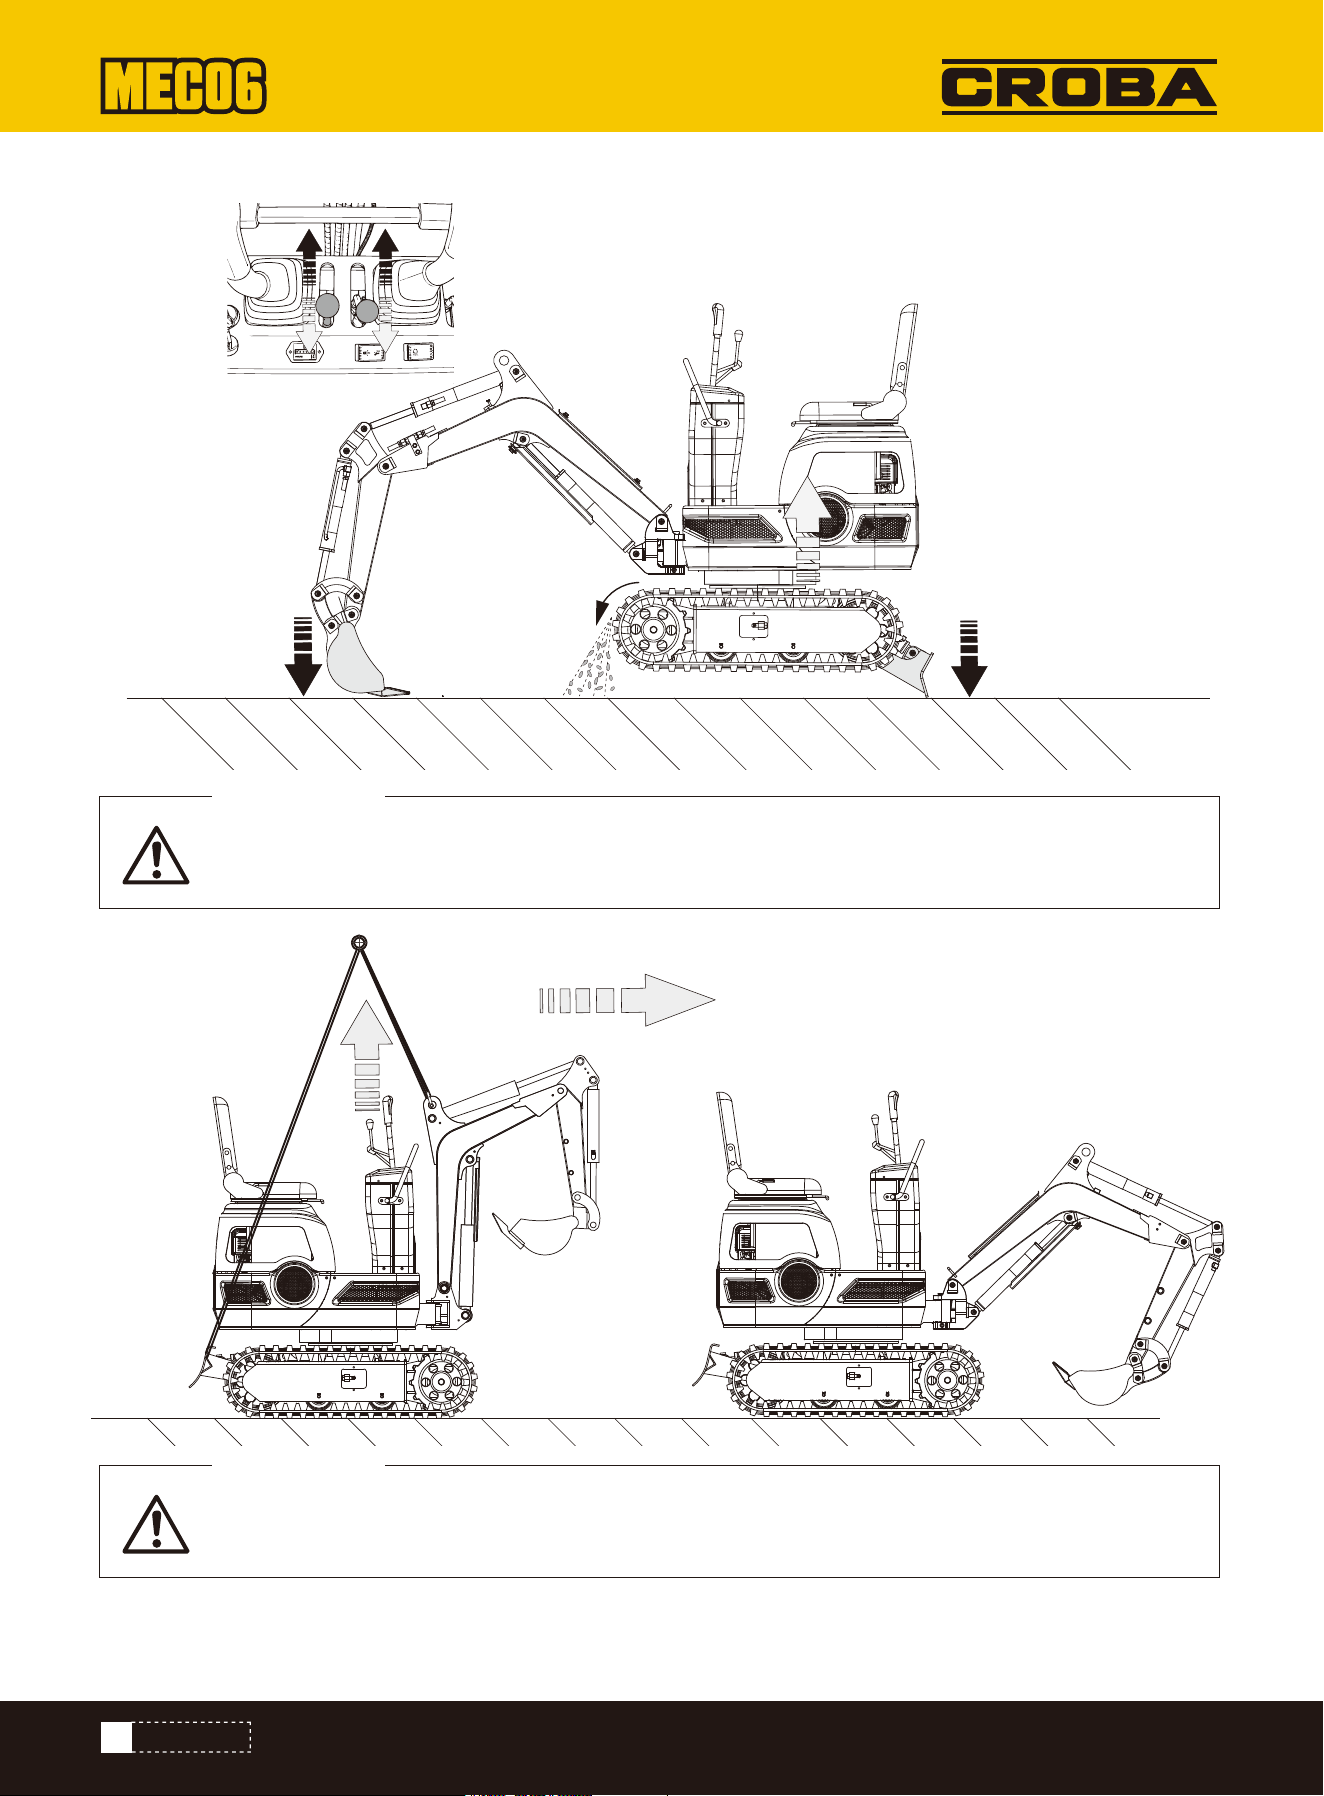
32
OPERATIONS
If the excavator gets stuck in the mud while travelling on muddy ground and cannot move, it should
be lifted to a safe area using the sling as shown in the illustration below.
IMPORTANT!
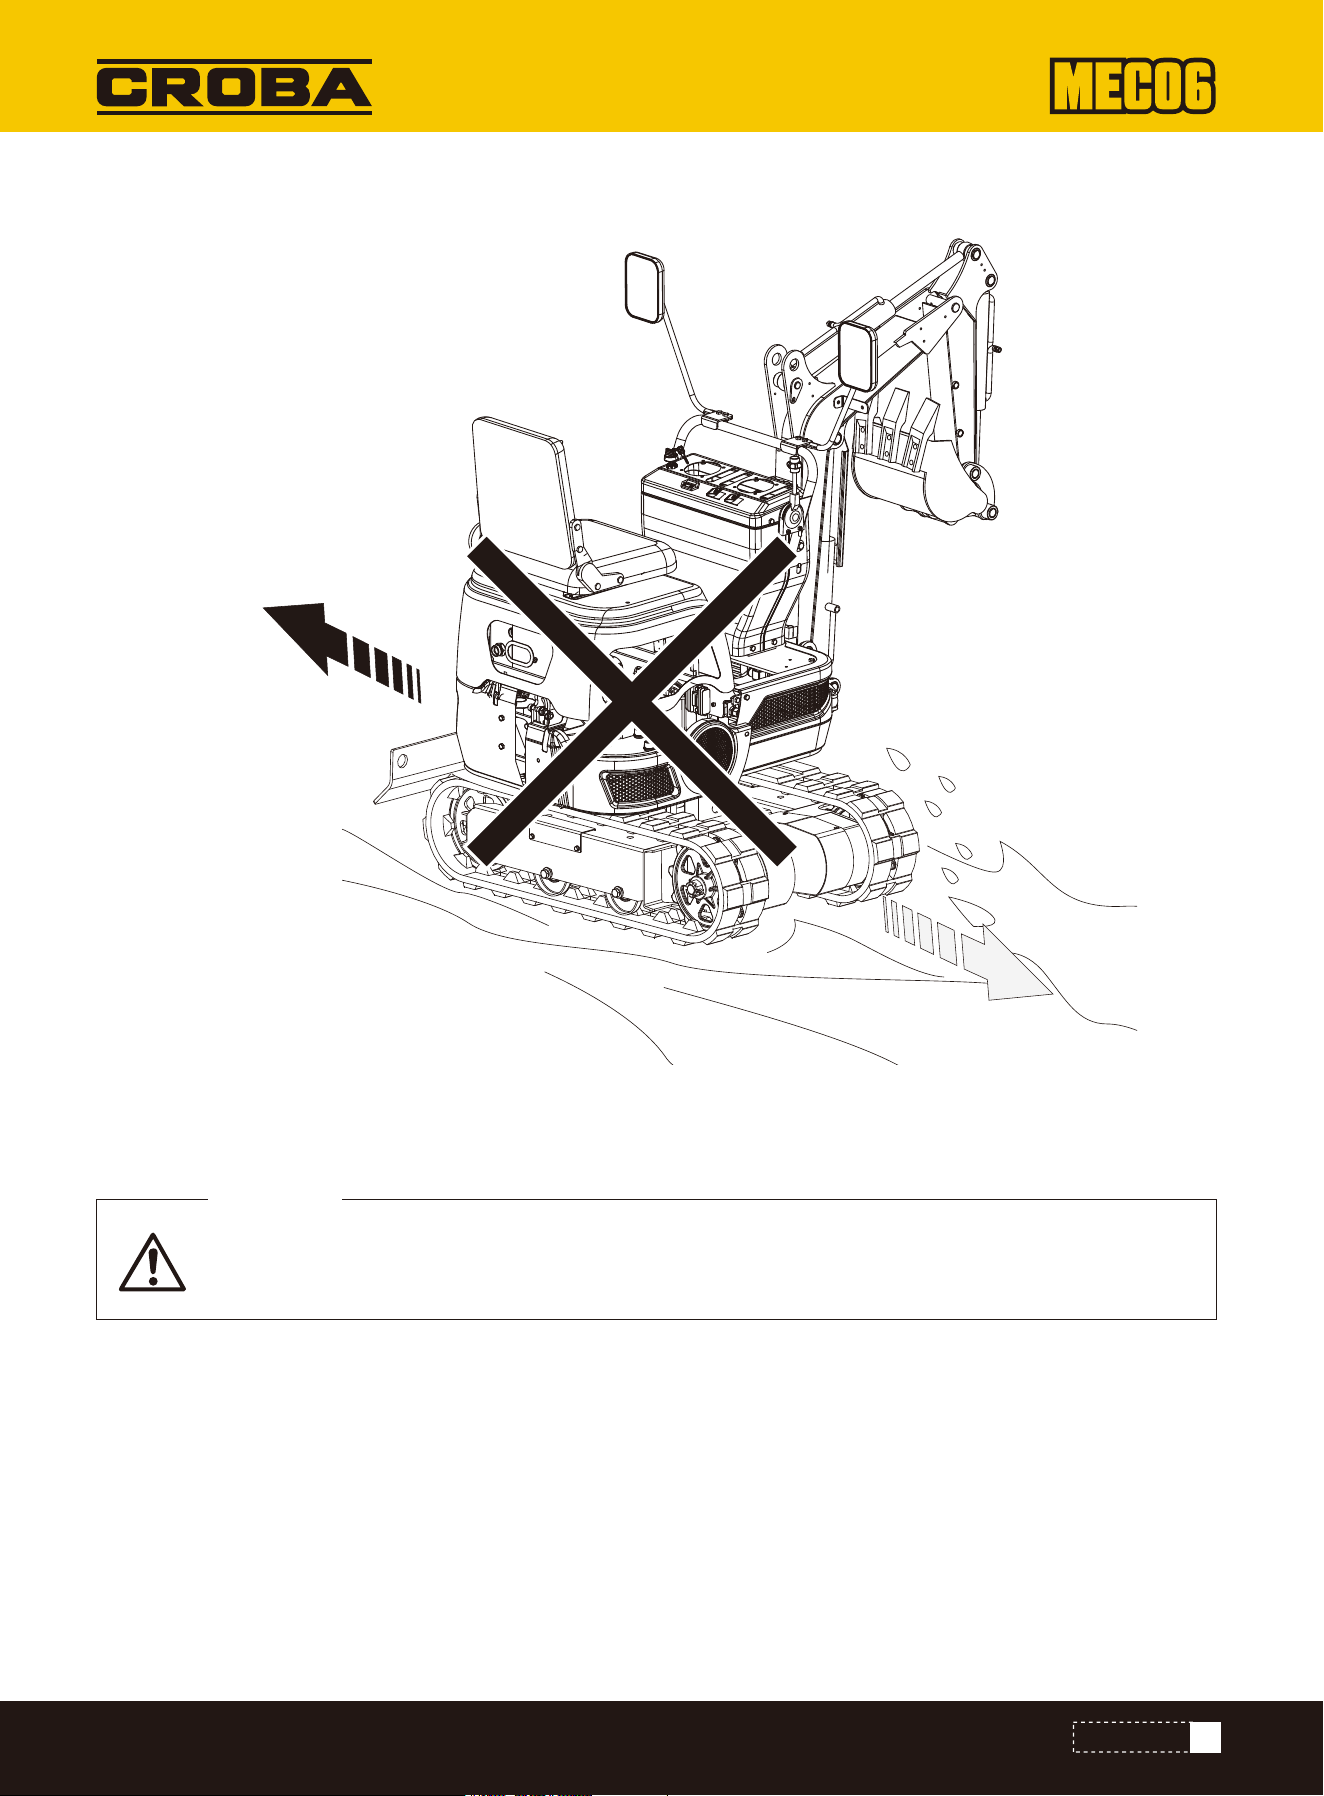
The excavator must not be driven on muddy roads if the swiveling platform is perpendicular to the
crawlers. Otherwise the crawlers can get stuck in the mud.
IMPORTANT!
CHANGE OF DIRECTION
TURNING ON THE SPOT
Do not change direction on steep slopes. The excavator could topple over. Watch out for people in
the work area before changing direction.
CAUTION
If the dozer blade is facing backwards, the direction of rotation is reversed. (For example, press the left (right) lever
forwards and the crawler on the right (left) from the operator's point of view moves backwards towards the operator.)
Note:
The illustrated movement shows the turning movement with the dozer blade pointing for wards.
33
OPERATIONS
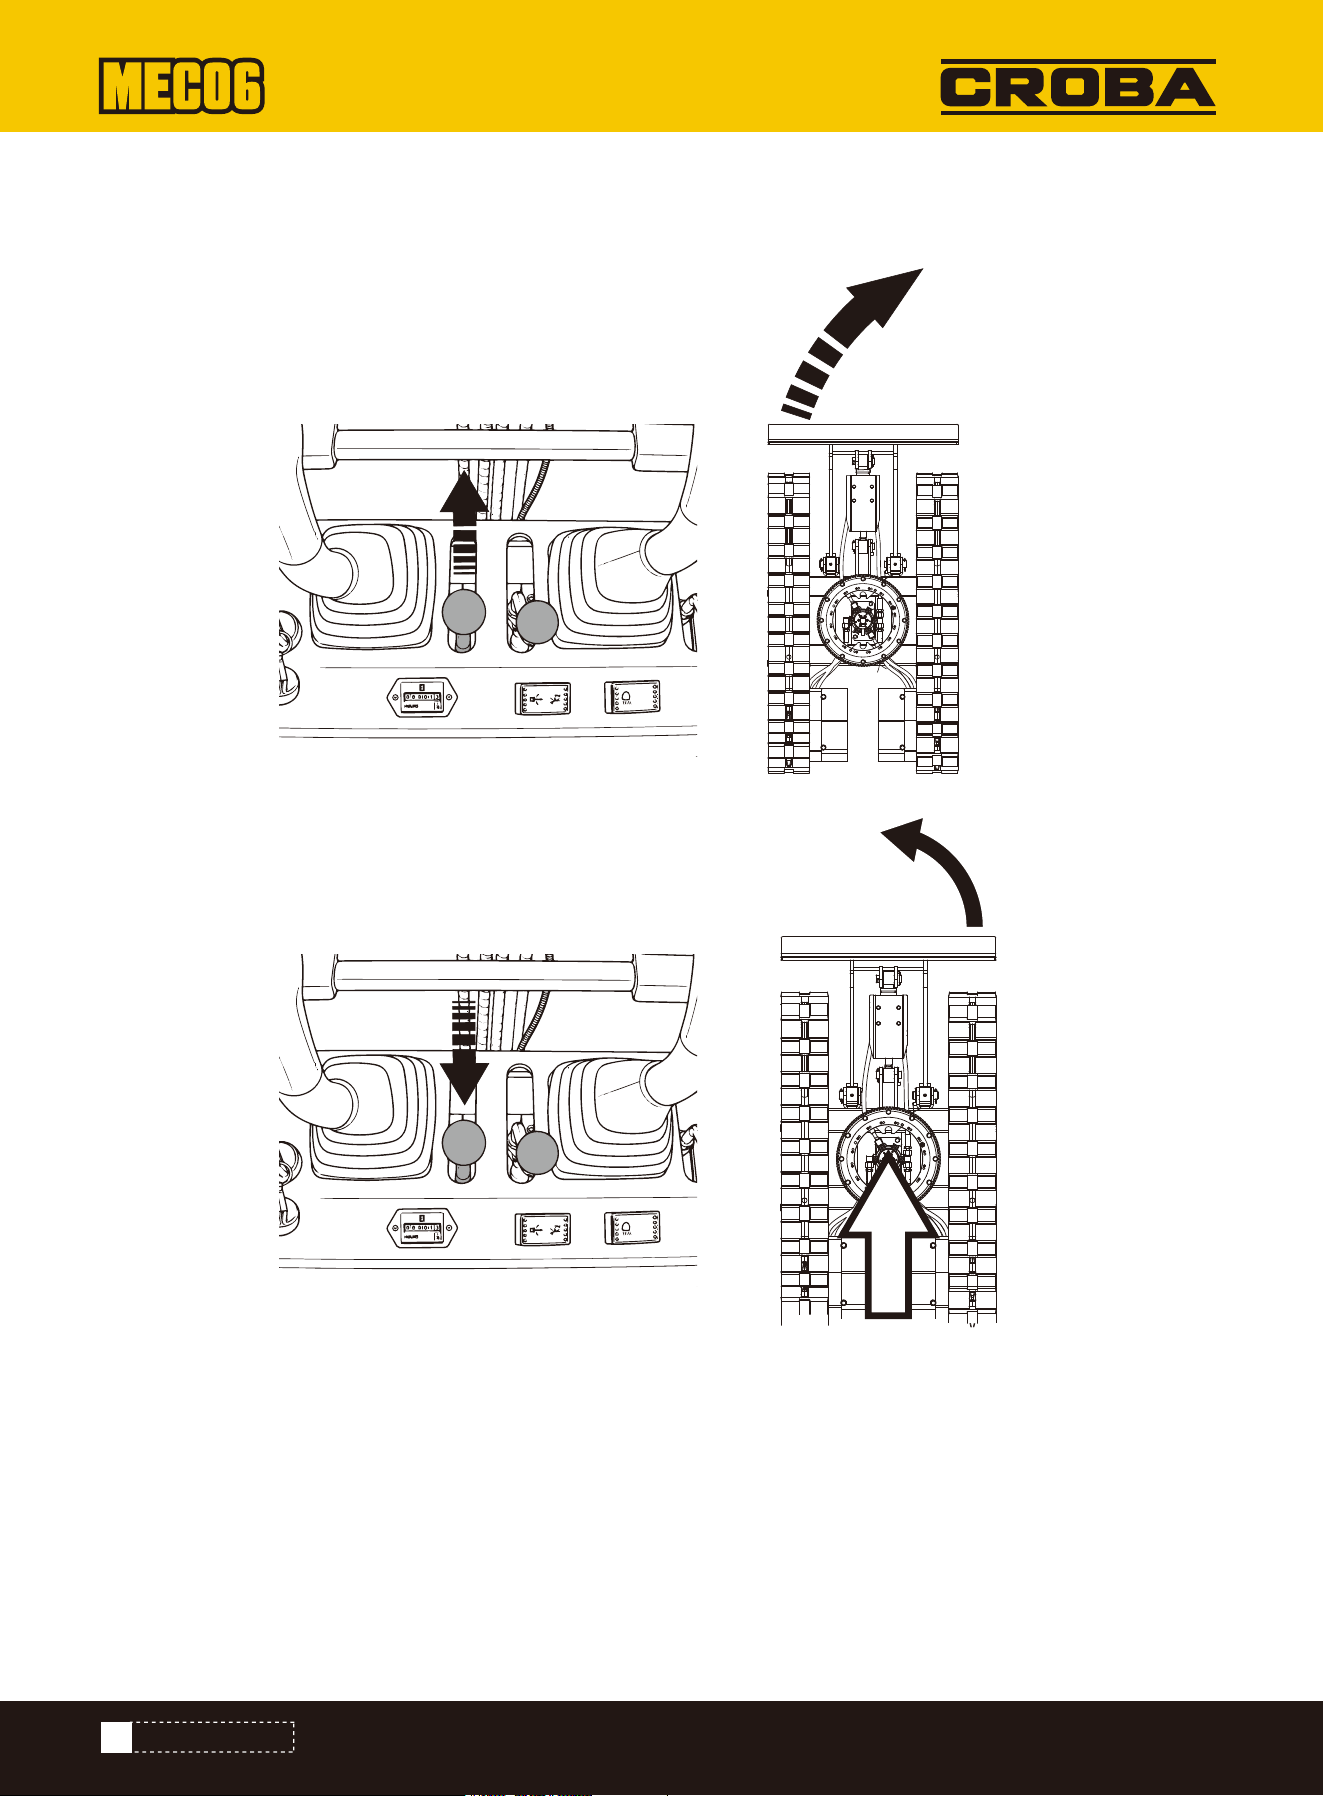
CHANGING DIRECTION WHILE STATIONARY
2. Pull the left drive lever backwards and the excavator will turn to the left.
1. Push the left drive lever forwards and the excavator turns to the right.
34
TRANSPORTATION
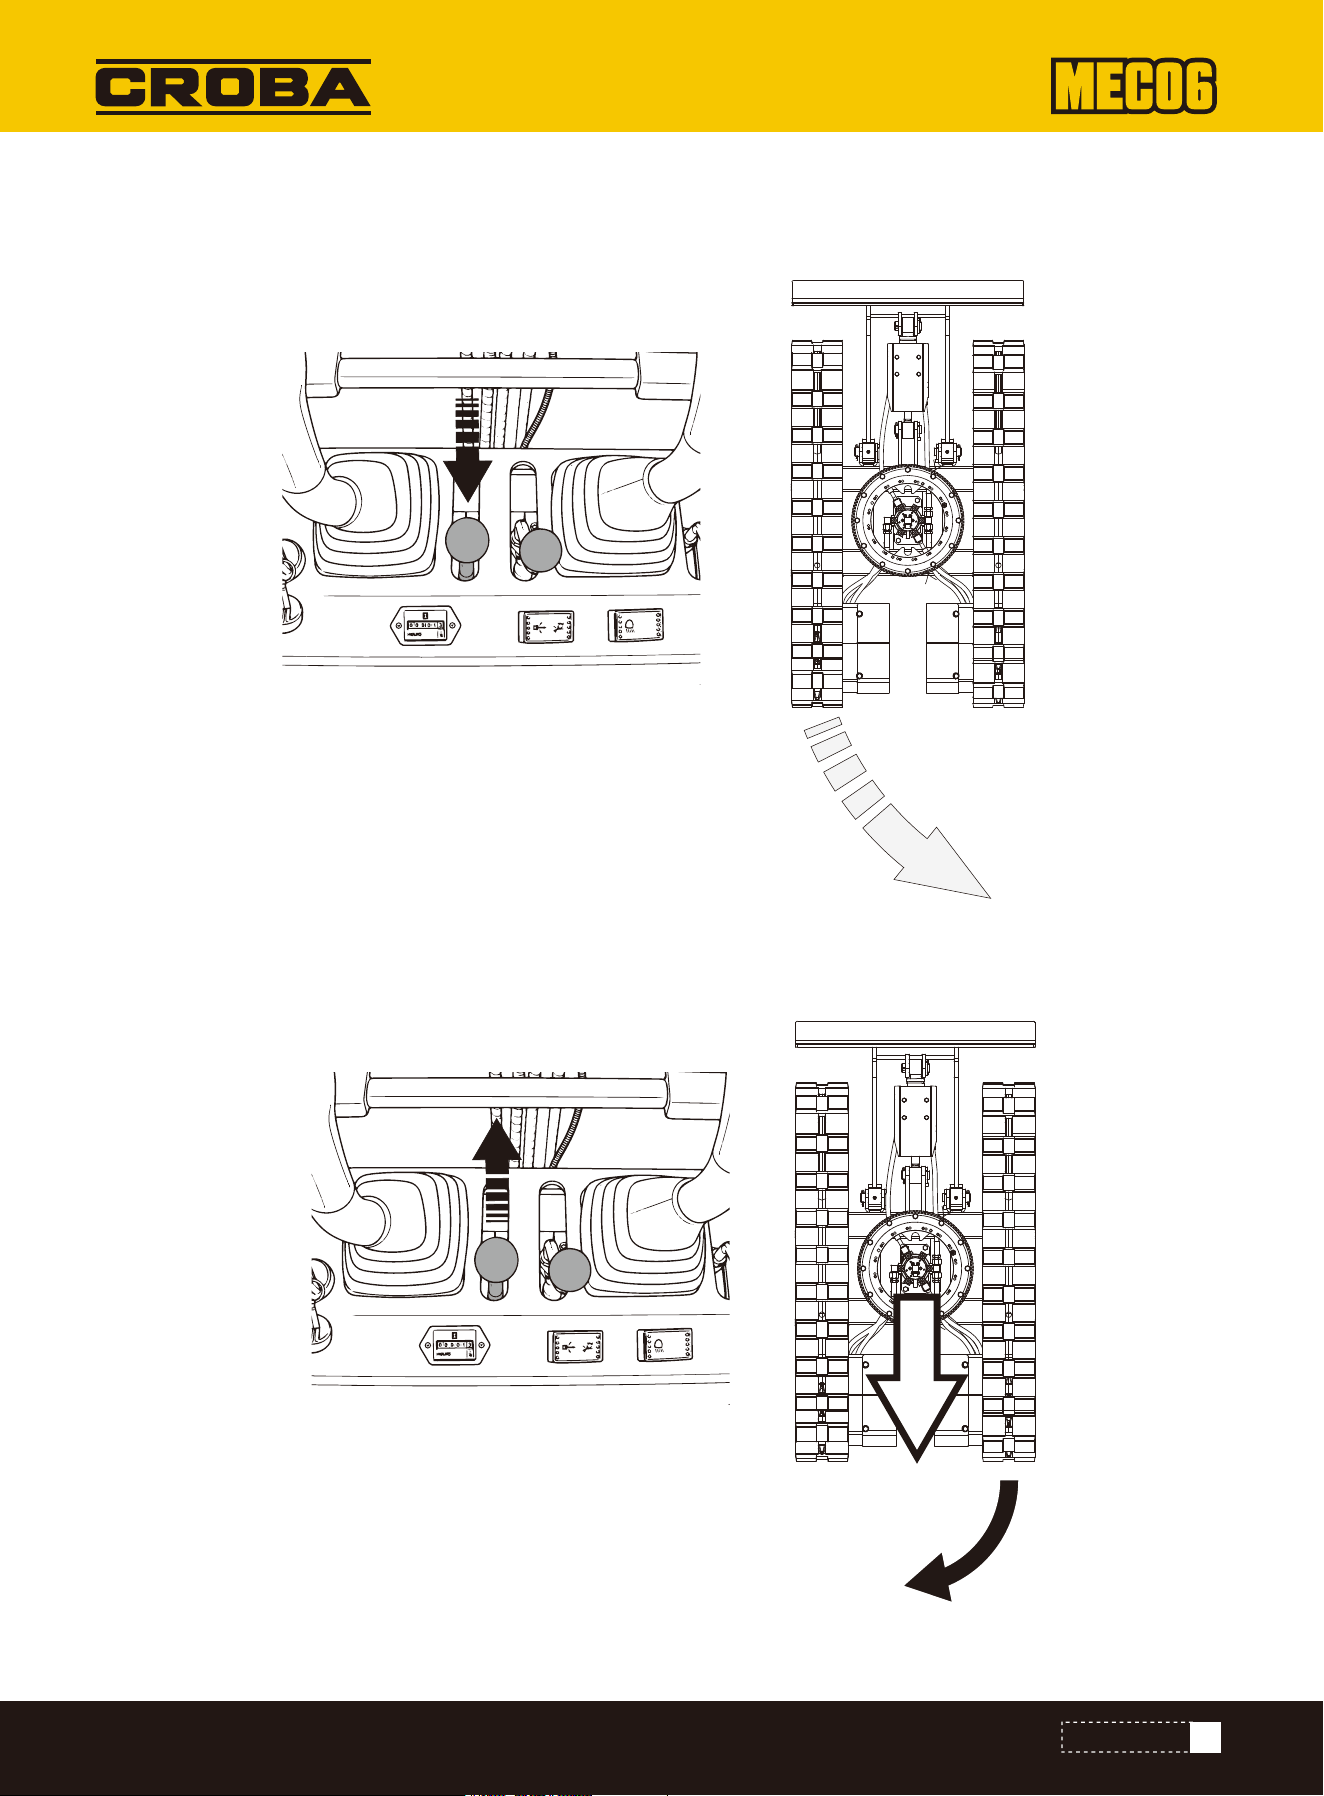
CHANGING DIRECTION WHILE DRIVING
1. When driving forwards, set the left drive lever to the neutral position and the excavator will turn to the left.
2. When reversing, set the left drive lever to the neutral position and the excavator will turn to the right.
35
MAINTENANCE
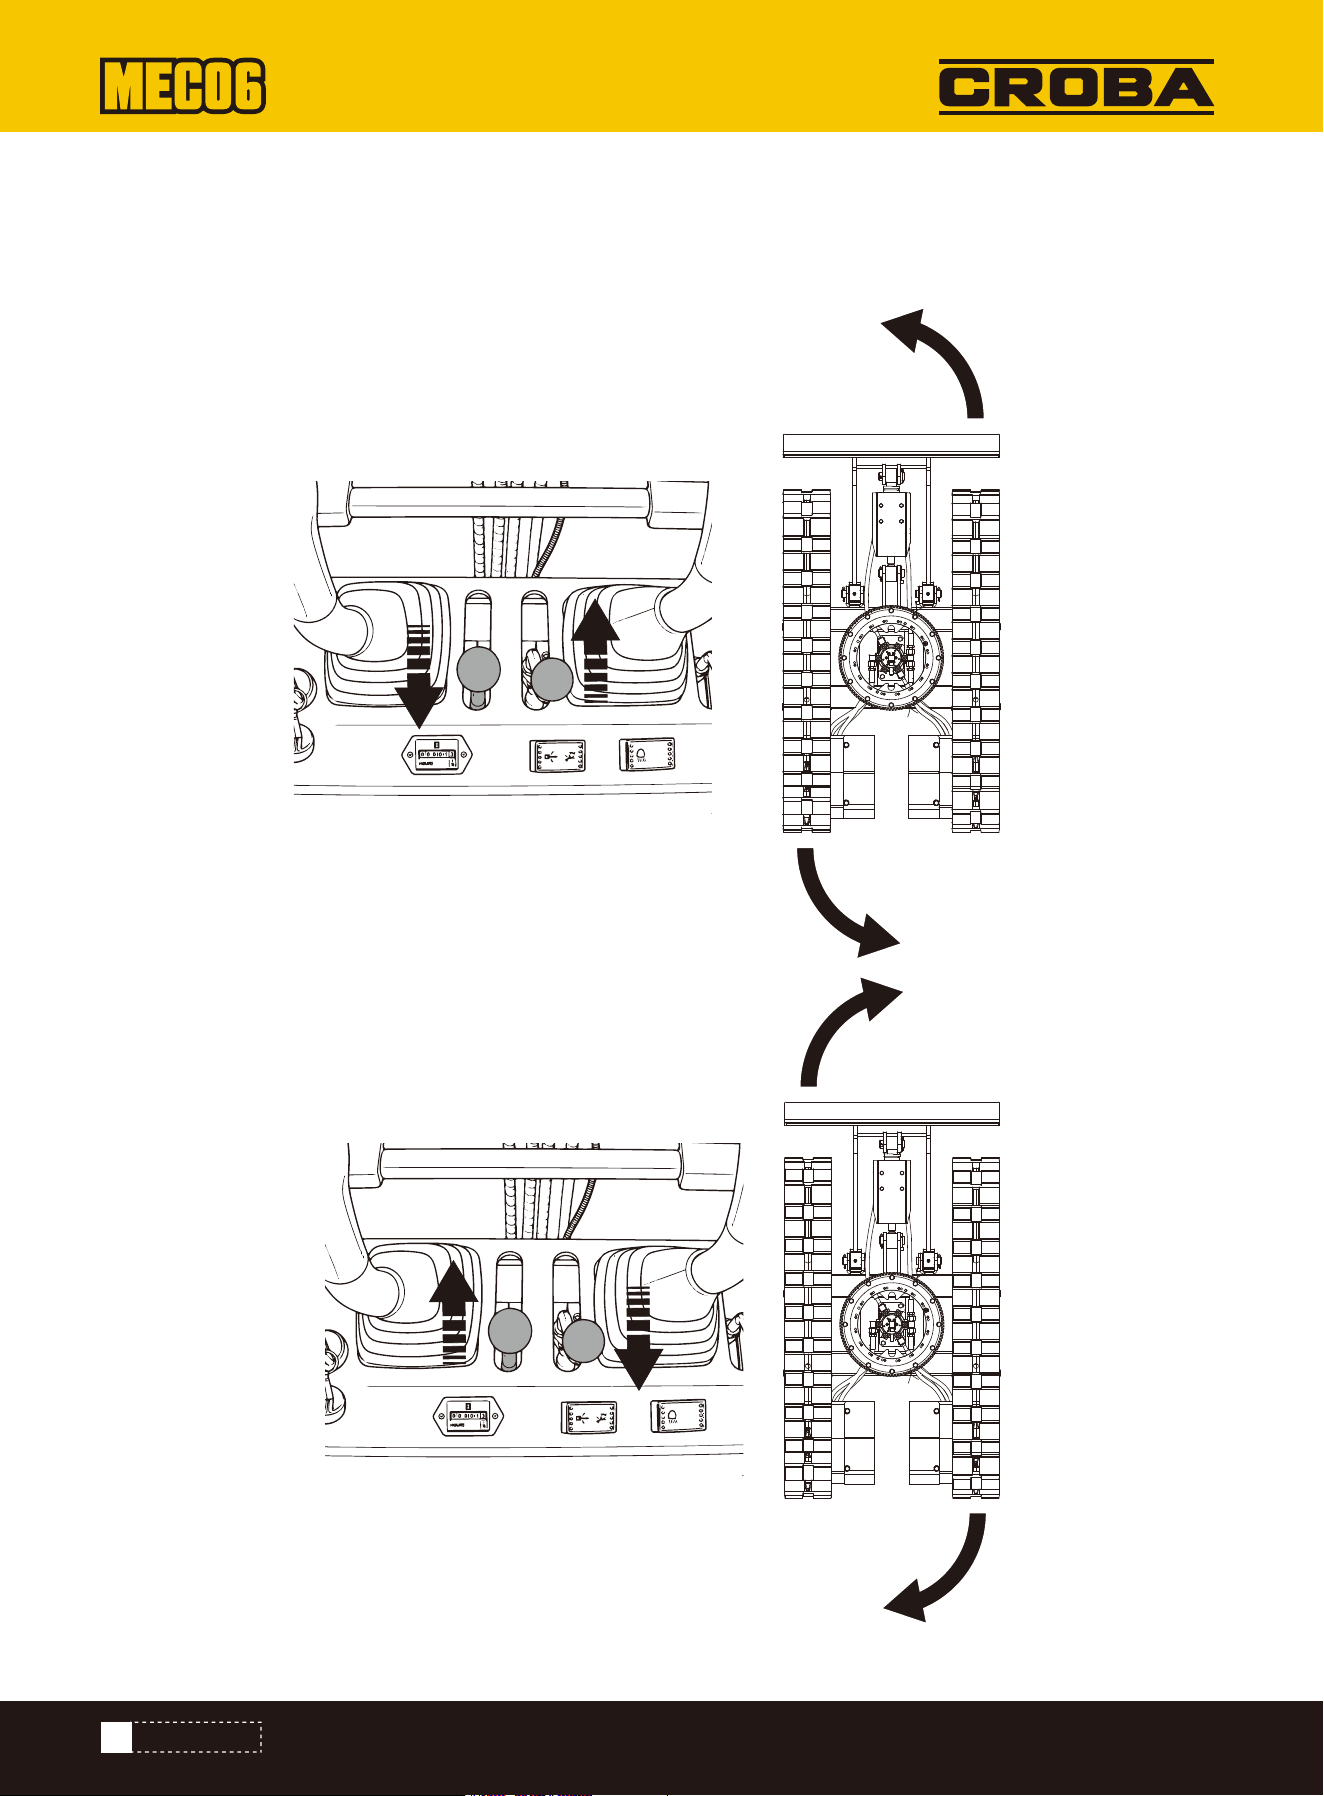
TURNING ON THE SPOT
If both drive levers are activated in opposite directions, both crawlers rotate at the same speed in opposite directions.
The axis of rotation is the center of the excavator.
36
MAINTENANCE
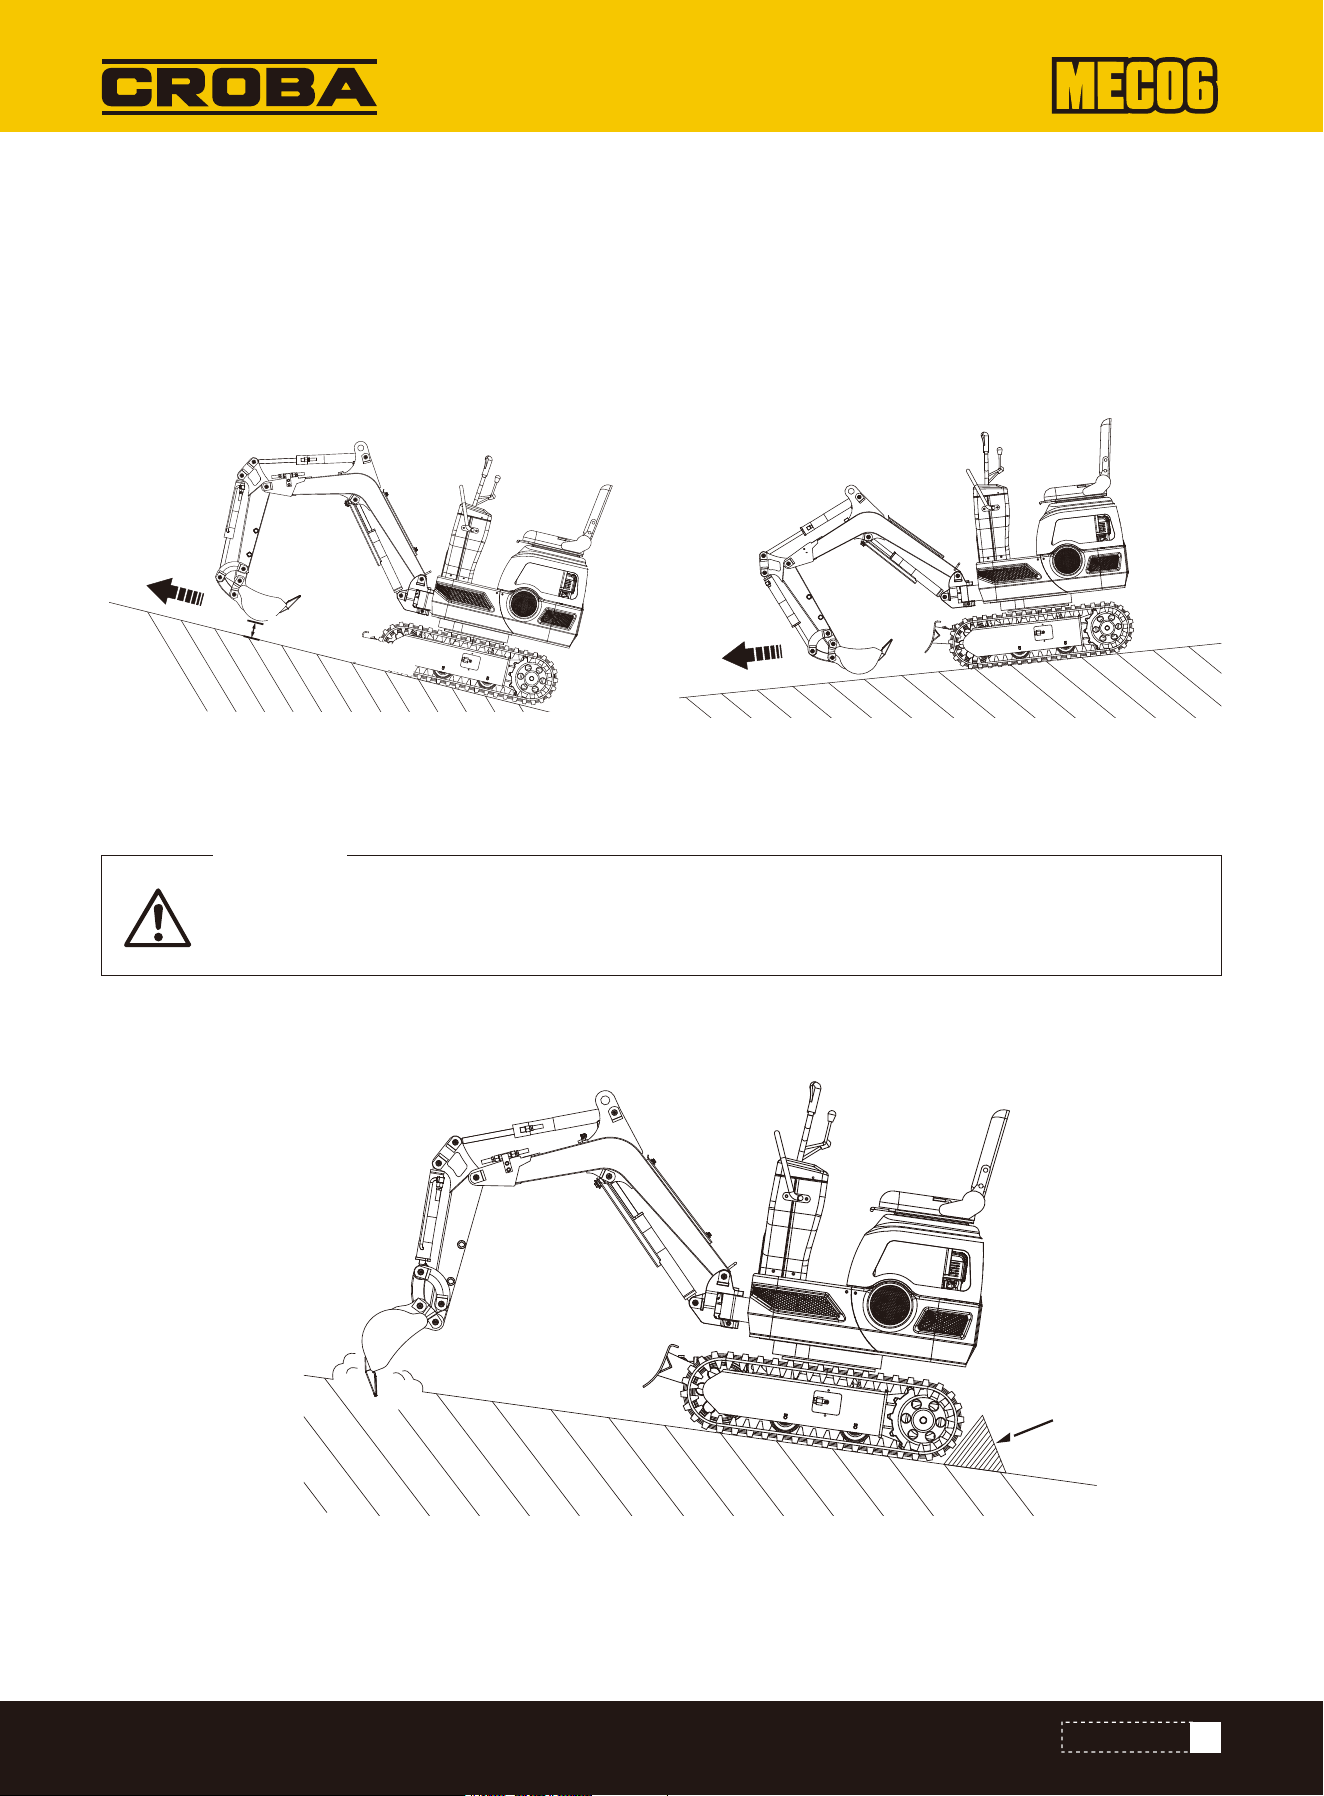
If the excavator is parked on a slope or left unattended, place the bucket on the ground and all
operating levers in the neutral position. Block the crawlers with wedges.
WARNING
DRIVING UPHILL AND DOWNHILL
PARKING ON SLOPES
When driving uphill, keep the lower edge of the bucket approx. 8 in to 16 in above the ground. Even if the excavator does
not slip easily because of the crawlers, it is safer to let the bucket glide over the ground when travelling downhill. Always
select a low speed when travelling uphill and downhill.
37
MAINTENANCE
[DRIVING UPHILL] [DRIVING DOWNHILL]
8-16 in

Clean the machine after work and lubricate all moving parts. Check the oil level.
CAUTION
Do not attempt to shake off soil adhering to the bucket as explained below. This can damage the machine.
Adhering soil can be shaken off when the bucket is emptied by moving the bucket to the maximum stroke of the cylinder.
If this is not enough, extend the arm as far as possible and move the bucket backwards and forwards.
Do not shoot at the dozer blade with the boom cylinder! Ensure that the boom cylinder does not hit the dozer blade when
carrying out deep excavation work. If necessary, swivel the upper carriage so that the dozer blade is at the rear of the
machine.
Be careful when retracting the bucket! Avoid hitting the dozer blade when retracting the bucket (for driving or transport).
Avoid collisions! When moving the excavator, take care that the dozer blade does not collide with obstacles such as rocks
etc.
Such collisions can significantly shorten the service life of the leveling blade and the cylinder.
Support the machine correctly! Lower the dozer blade completely to the base when stabilizing the machine with the level-
ing blade.
If water or mud reaches over the top of the crawlers, the swivel bearing, the gearbox of the swivel motor and the sprocket
can come into contact with mud, water and other foreign bodies.
The excavator must be thoroughly washed with high pressure after each use.
• Thoroughly clean the area around the swivel bearing, the swivel motor gearbox and the gear rim to remove foreign
objects.
• Carefully refer to the operator's manual for the correct lubrication procedures for the swivel bearing, swivel motor
gearbox and gear rim.
• Reattach the protective cover if it has been removed beforehand.
Preparation for operation in cold weather
1. Replace the engine and hydraulic oil with grades with viscosities suitable for cold weather.
2. If the battery is not sufficiently charged, battery performance will drop in cold weather and the battery may freeze.
Make sure that the battery is at least 75% charged after use so that the battery fluid does not freeze. To simplify the next
start, we recommend storing the battery in closed or heated rooms.
38
MAINTENANCE
Do not attempt to break concrete or rock by swiveling the buckets sideways. Also avoid moving
piles of earth by swiveling the bucket sideways. Avoid the following activities at all costs:
• Lifting by utilizing the machine's gravity.
• Compacting gravel or soil by dropping the bucket.
• Lifting with the aid of the machine's driving energy.
IMPORTANT!
IMPORTANT NOTES ON OPERATING THE EXCAVATOR
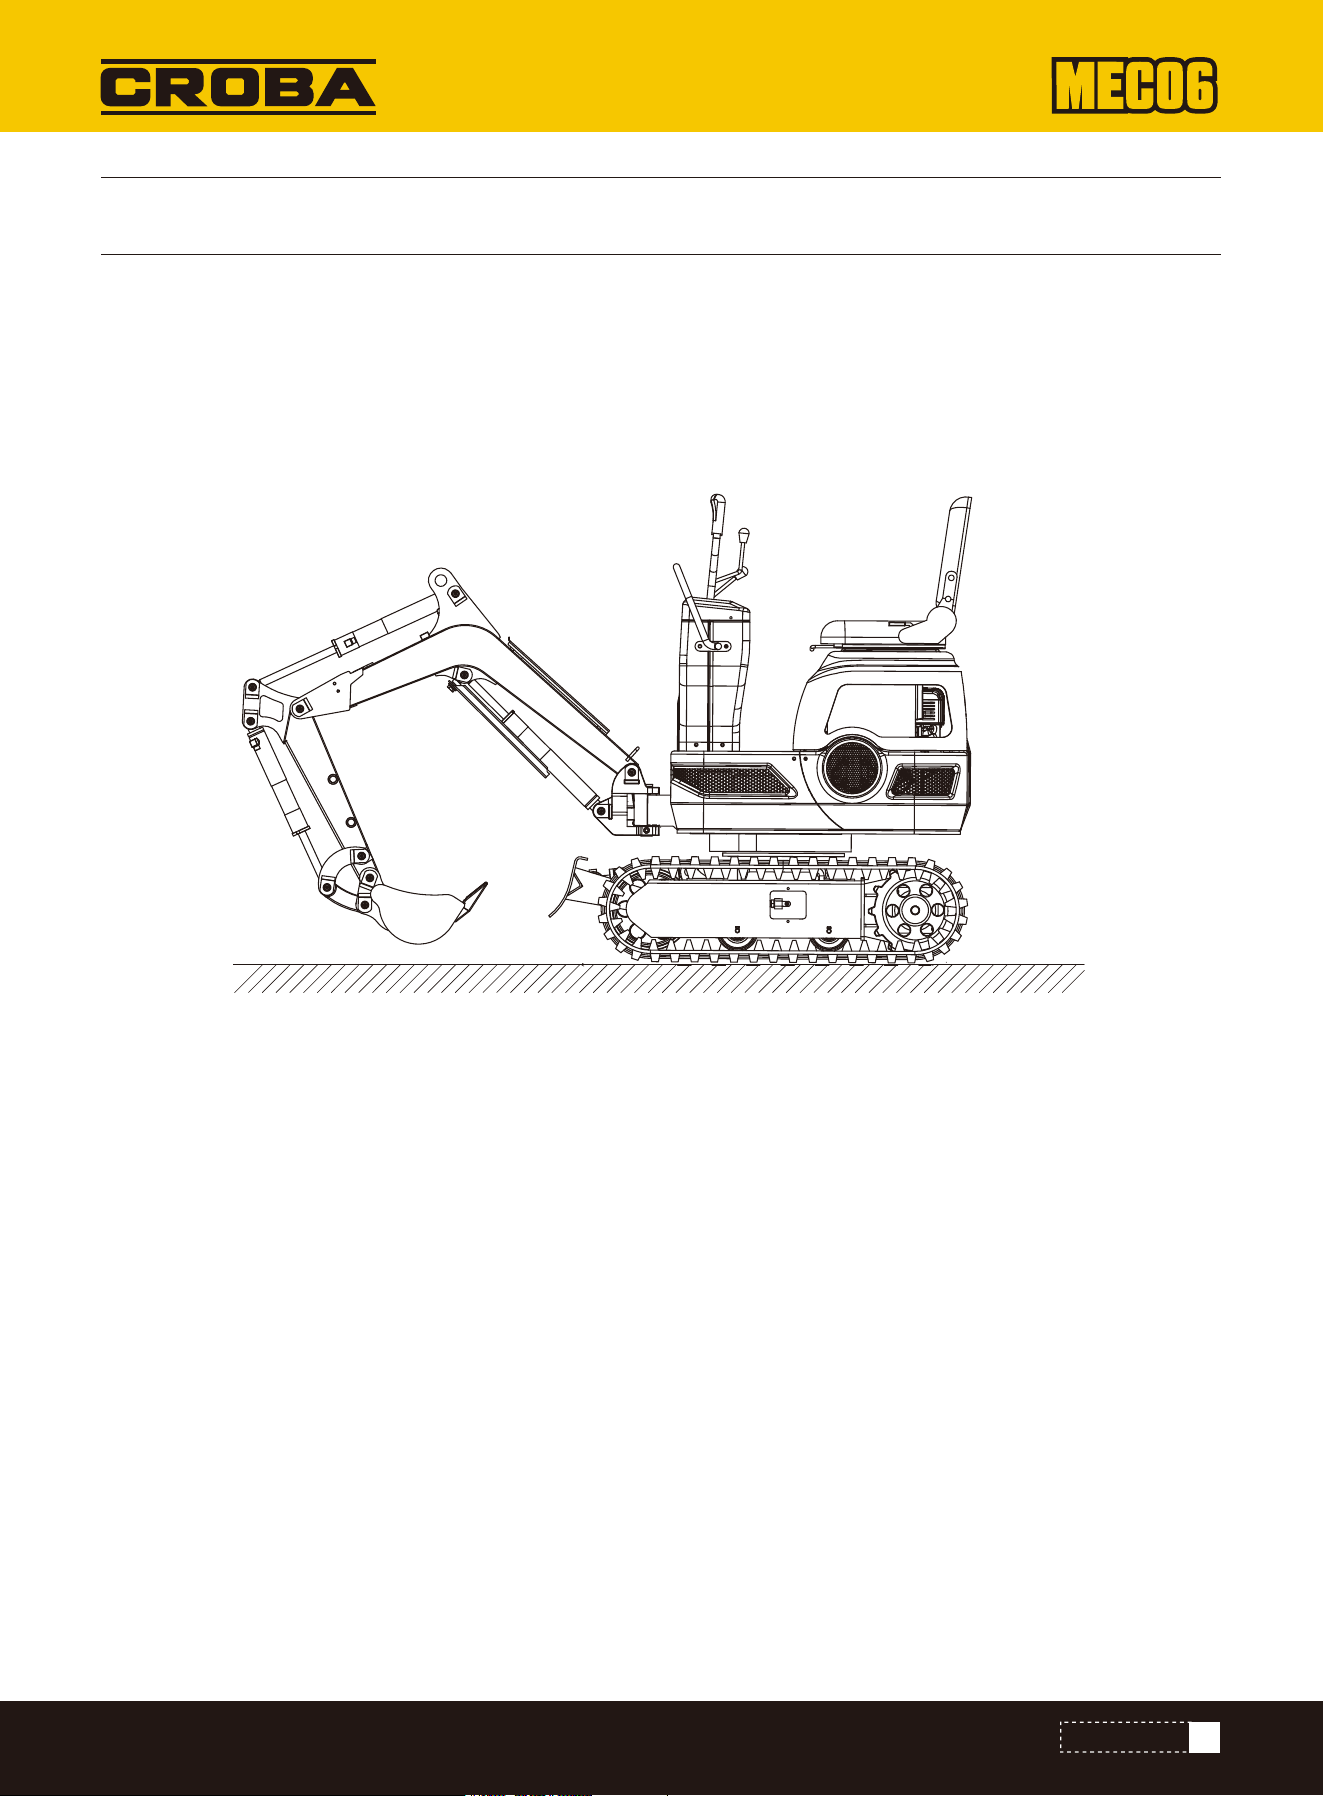
•Place the excavator on hard, level ground.
•Lower the attachments and the dozer blade onto the base.
•Switch off the engine.
•Secure all operating levers.
•Remove the key.
Clean the excavator thoroughly after work and wipe it dry. Otherwise, mud and soil can freeze on the crawlers when the
temperature drops below 0°C. Then the excavator cannot be put into operation. Store the excavator in a dry place or on
wooden planks or mats if this is not possible. If the excavator is stored on damp or muddy ground, the crawlers may freeze
overnight. Then the excavator cannot be put into operation. In addition, the piston rods of the hydraulic cylinders must be
rubbed dry. Otherwise, serious damage may occur if dirty water penetrates the seals.
39
MAINTENANCE
AFTER COMMISSIONING
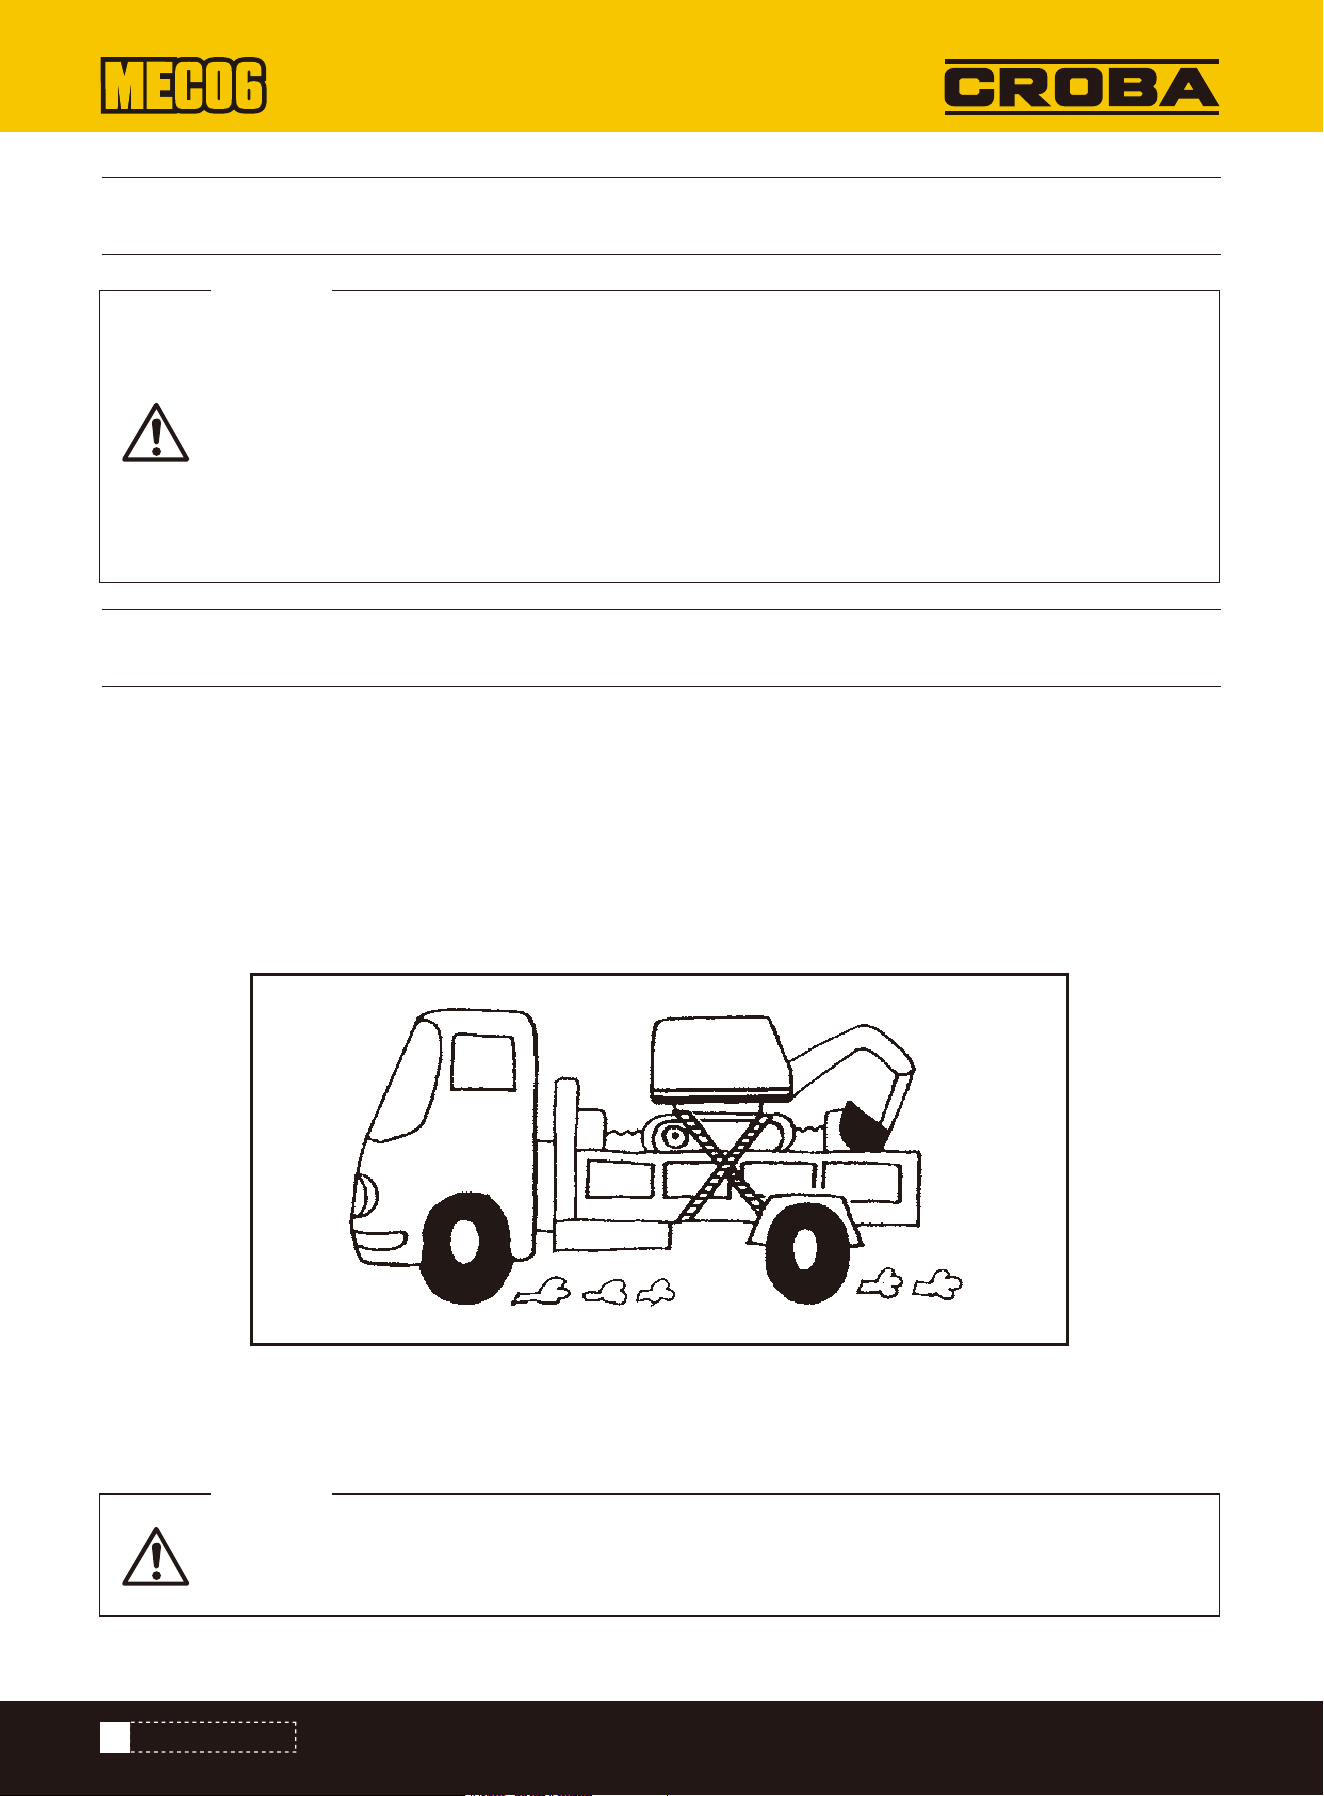
TRANSPORTING THE EXCAVATOR ON A LORRY
1. Observe all regulations regarding the transport of excavators on public roads.
2. Use sufficiently long and stable ramps when loading onto a lorry. (For details, see "TRANSPORTING THE EXCAVATOR ON
A LORRY".) The machine can also be lifted onto the lorry. (For details, see “IF TING THE EXCAVATOR”.)
3. Do not change the direction of travel and prevent yourself from overturning. Therefore, do not attempt to swivel the
attachment across the loading ramps.
4. Swivel the upper carriage to the rear of the lorry Lower the attachment onto the loading surface, release the pressure
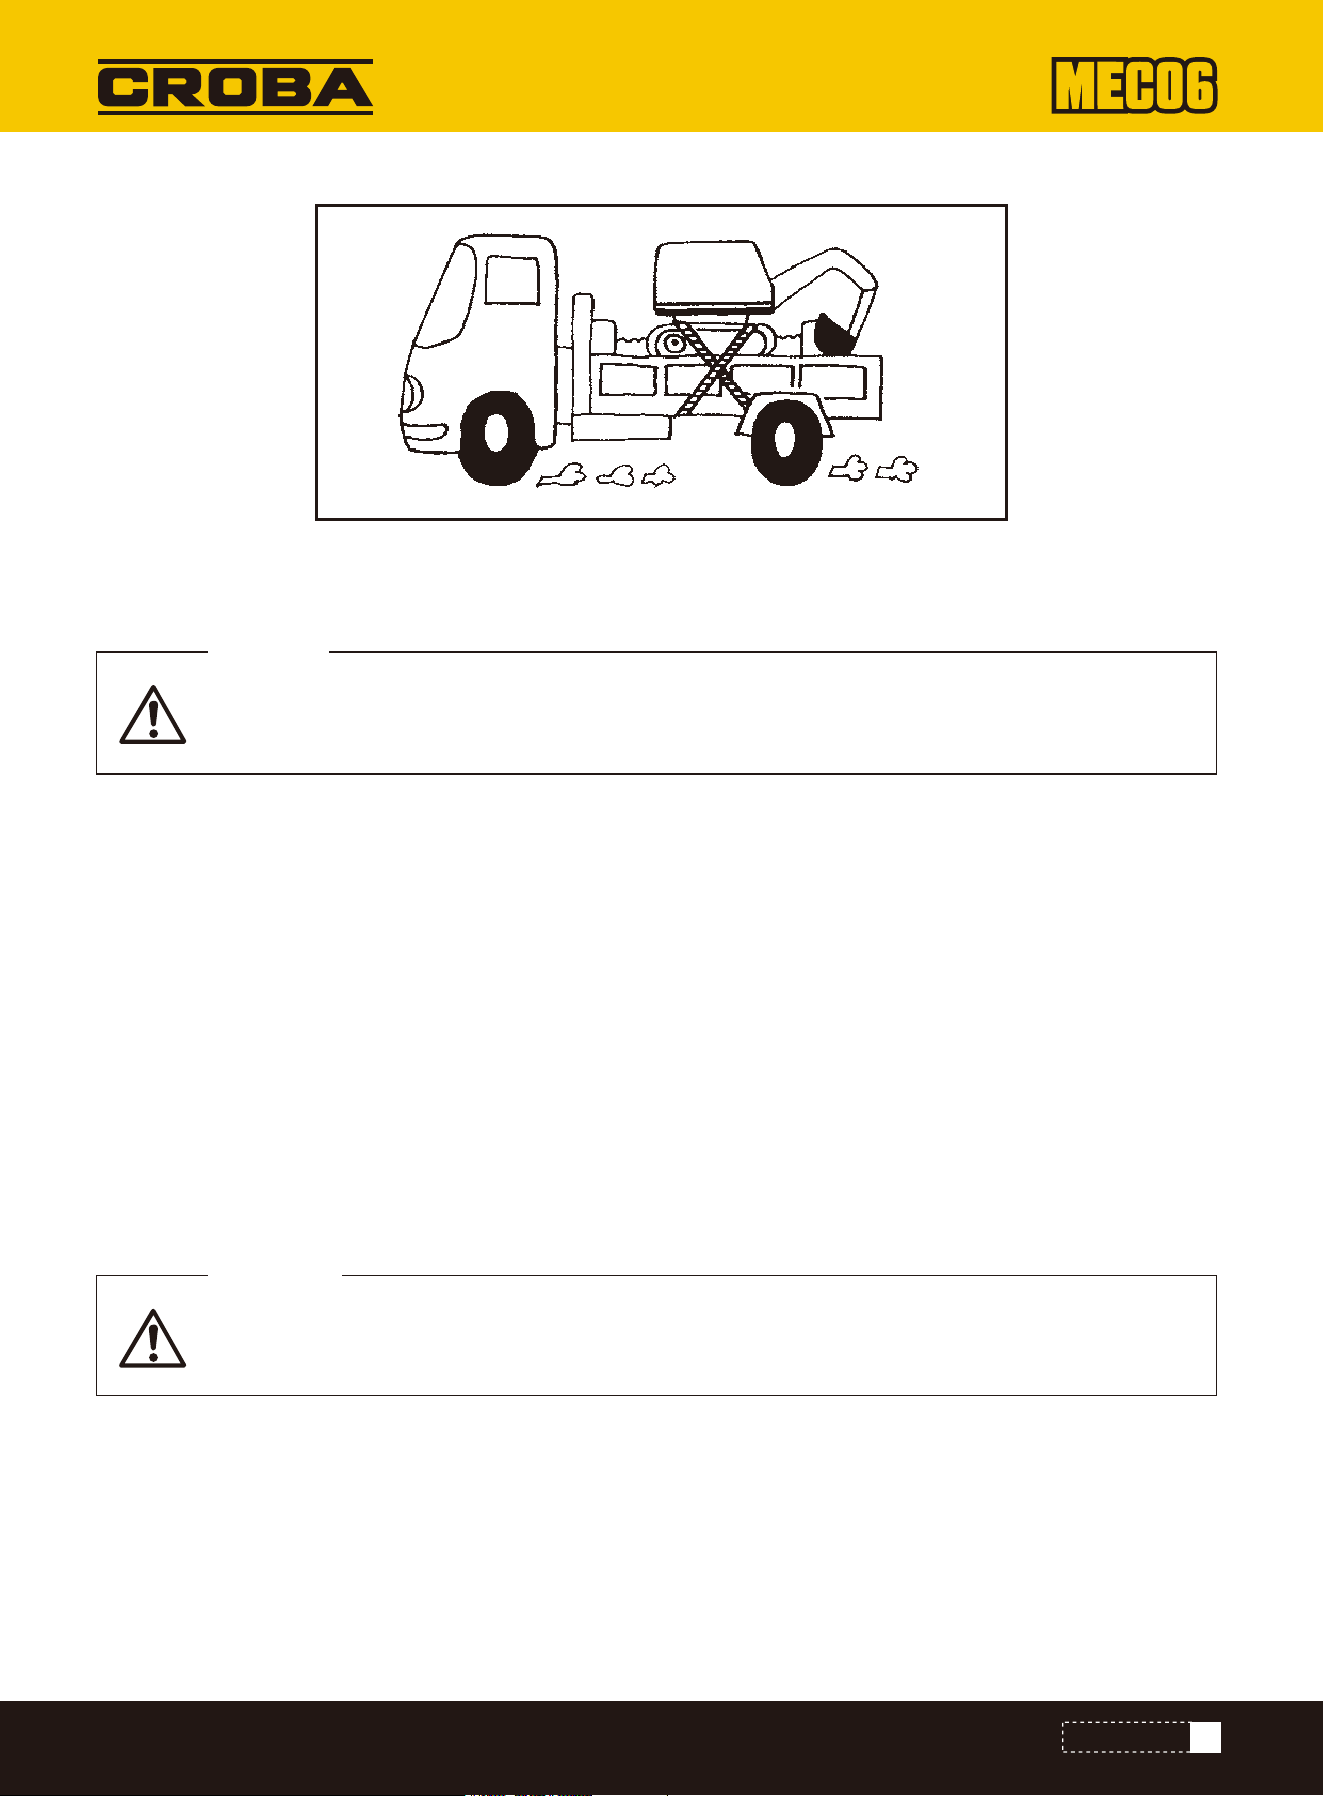
from the hydraulic system and secure the boom with the lever. Block the crawlers with blocks and tie down the excavator.
After loading the excavator, lash the chassis of the excavator to the lorry with a strong steel cable.
5. Do not brake abruptly when the excavator is loaded. Fatal accidents could occur.
40
TROUBLESHOOTING
CLEANING
TRANSPORT
Pull out the battery before carrying out any cleaning work.
• Keep protective devices, air vents and the motor housing as free of dust and dirt as possible. Rub
the product clean with a clean cloth or blow it off with compressed air at low pressure.
• We recommend that you clean the product directly after every use.
• Clean the product at regular intervals using a damp cloth and a little soft soap. Do not use any
cleaning products or solvents; they could attack the plastic parts of the product. Make sure that
no water can penetrate the interior of the product. Water penetration increases the risk of an
electric shock.
DANGER
Do not change direction when the excavator is on the ramp. If a change of direction is required,
drive off the ramp completely and change direction.
DANGER
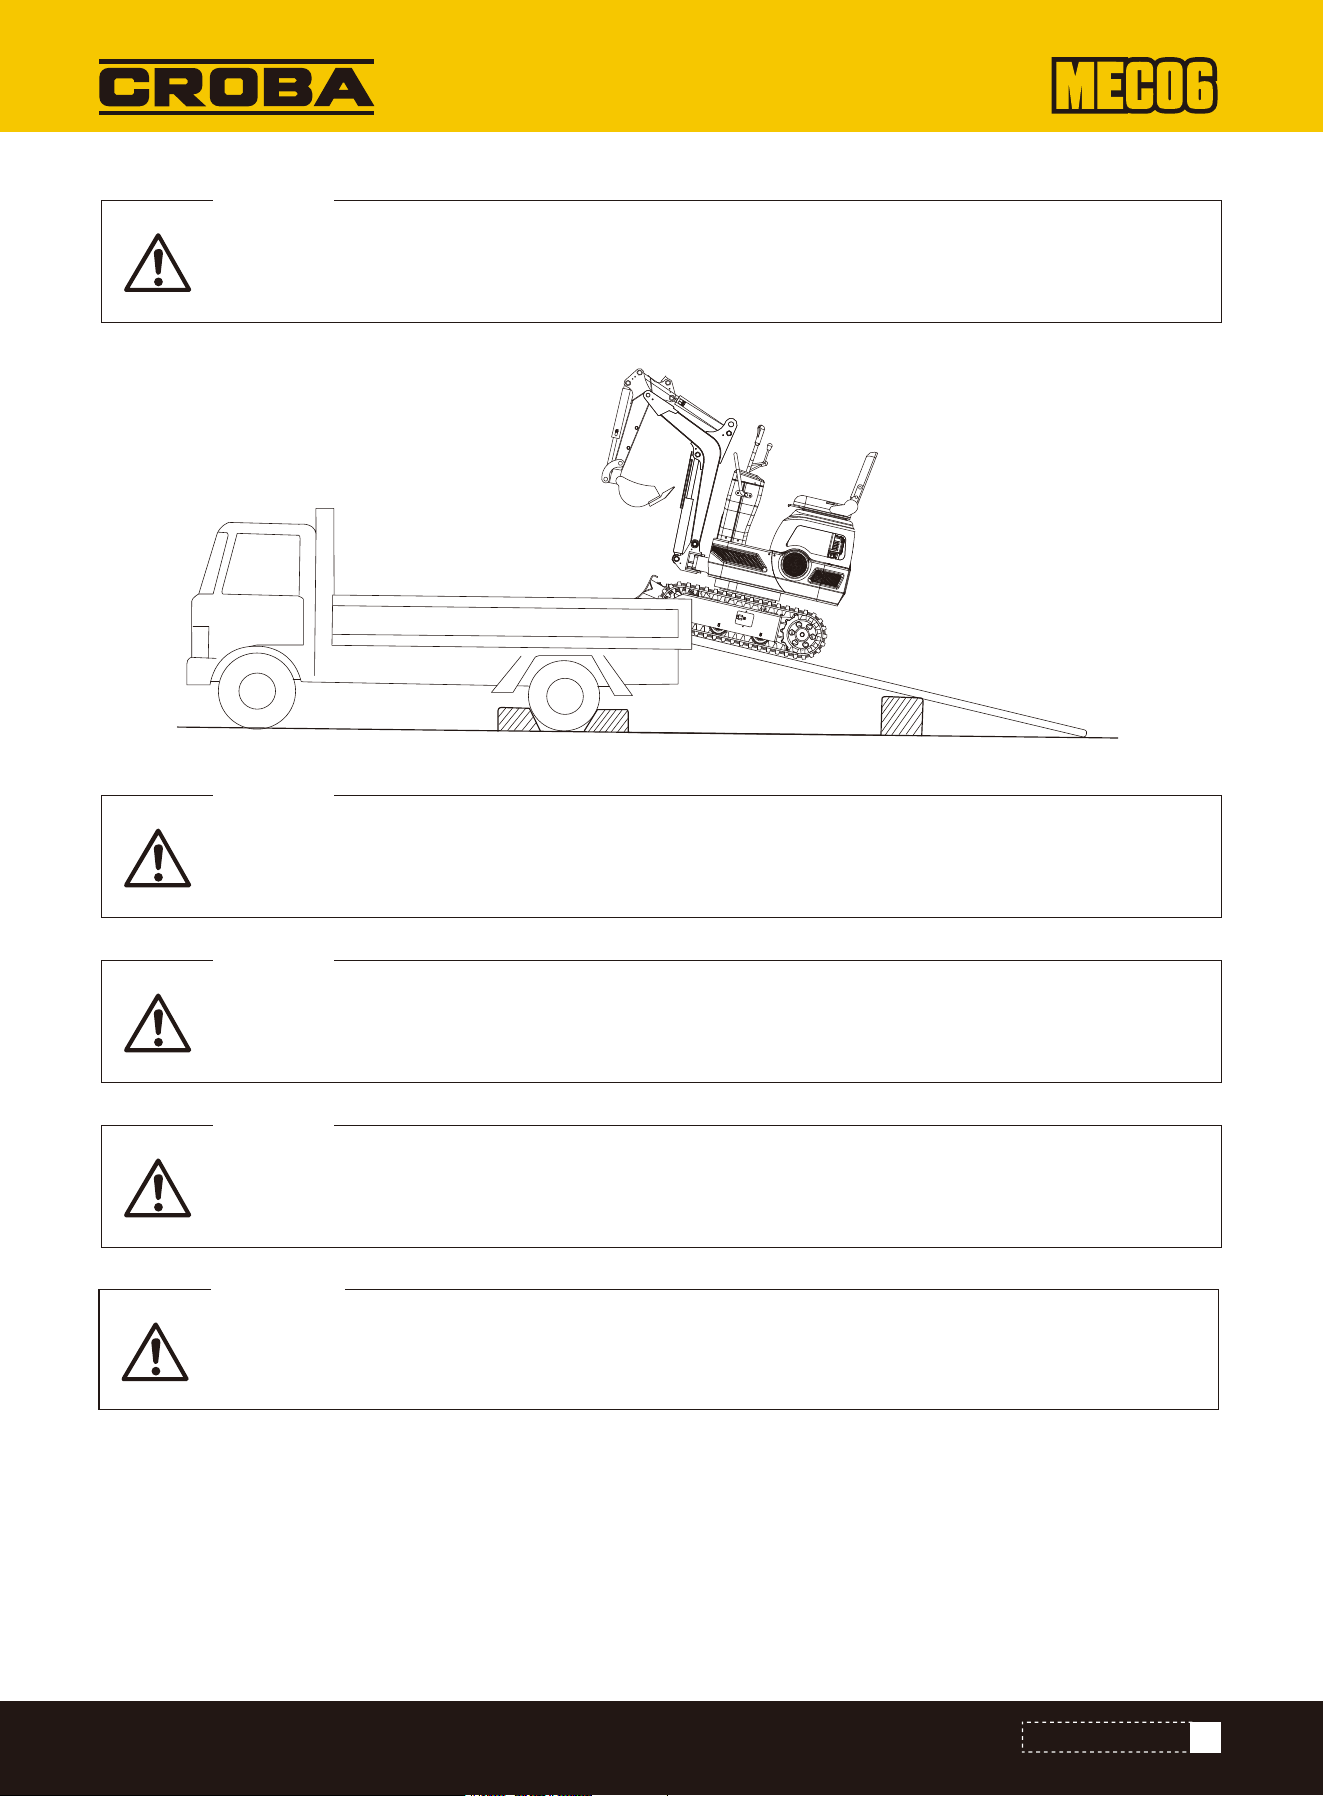
Lower the bucket and dozer blade onto the loading surface of the lorry after the machine has been
loaded onto the lorry. Secure the swivel frame with the swiveling locking pin.
WARNING
Prepare a platform for loading or unloading the excavator. Proceed as follows when using ramps:
1. Activate the lorry's parking brakes and block the drive wheels from both sides.
41
TROUBLESHOOTING
If driving forwards or backwards onto the lorry or if you swivel the upper carriage, make sure that
neither the cab nor the side walls of the lorry are damaged.
DANGER
When the excavator reaches the point between the ramps and the loading surface of the lorry, stop
and drive very slowly until the excavator is in a horizontal position.
DANGER
Only move the excavator onto the lorry with the arm fully retracted. Otherwise, the cab of the lorry
could be damaged if the upper carriage is swiveled around.
DANGER
Do not lift the machine with the boom to load or unload the excavator onto the lorry. This could lead
to hazardous situations.
DANGER
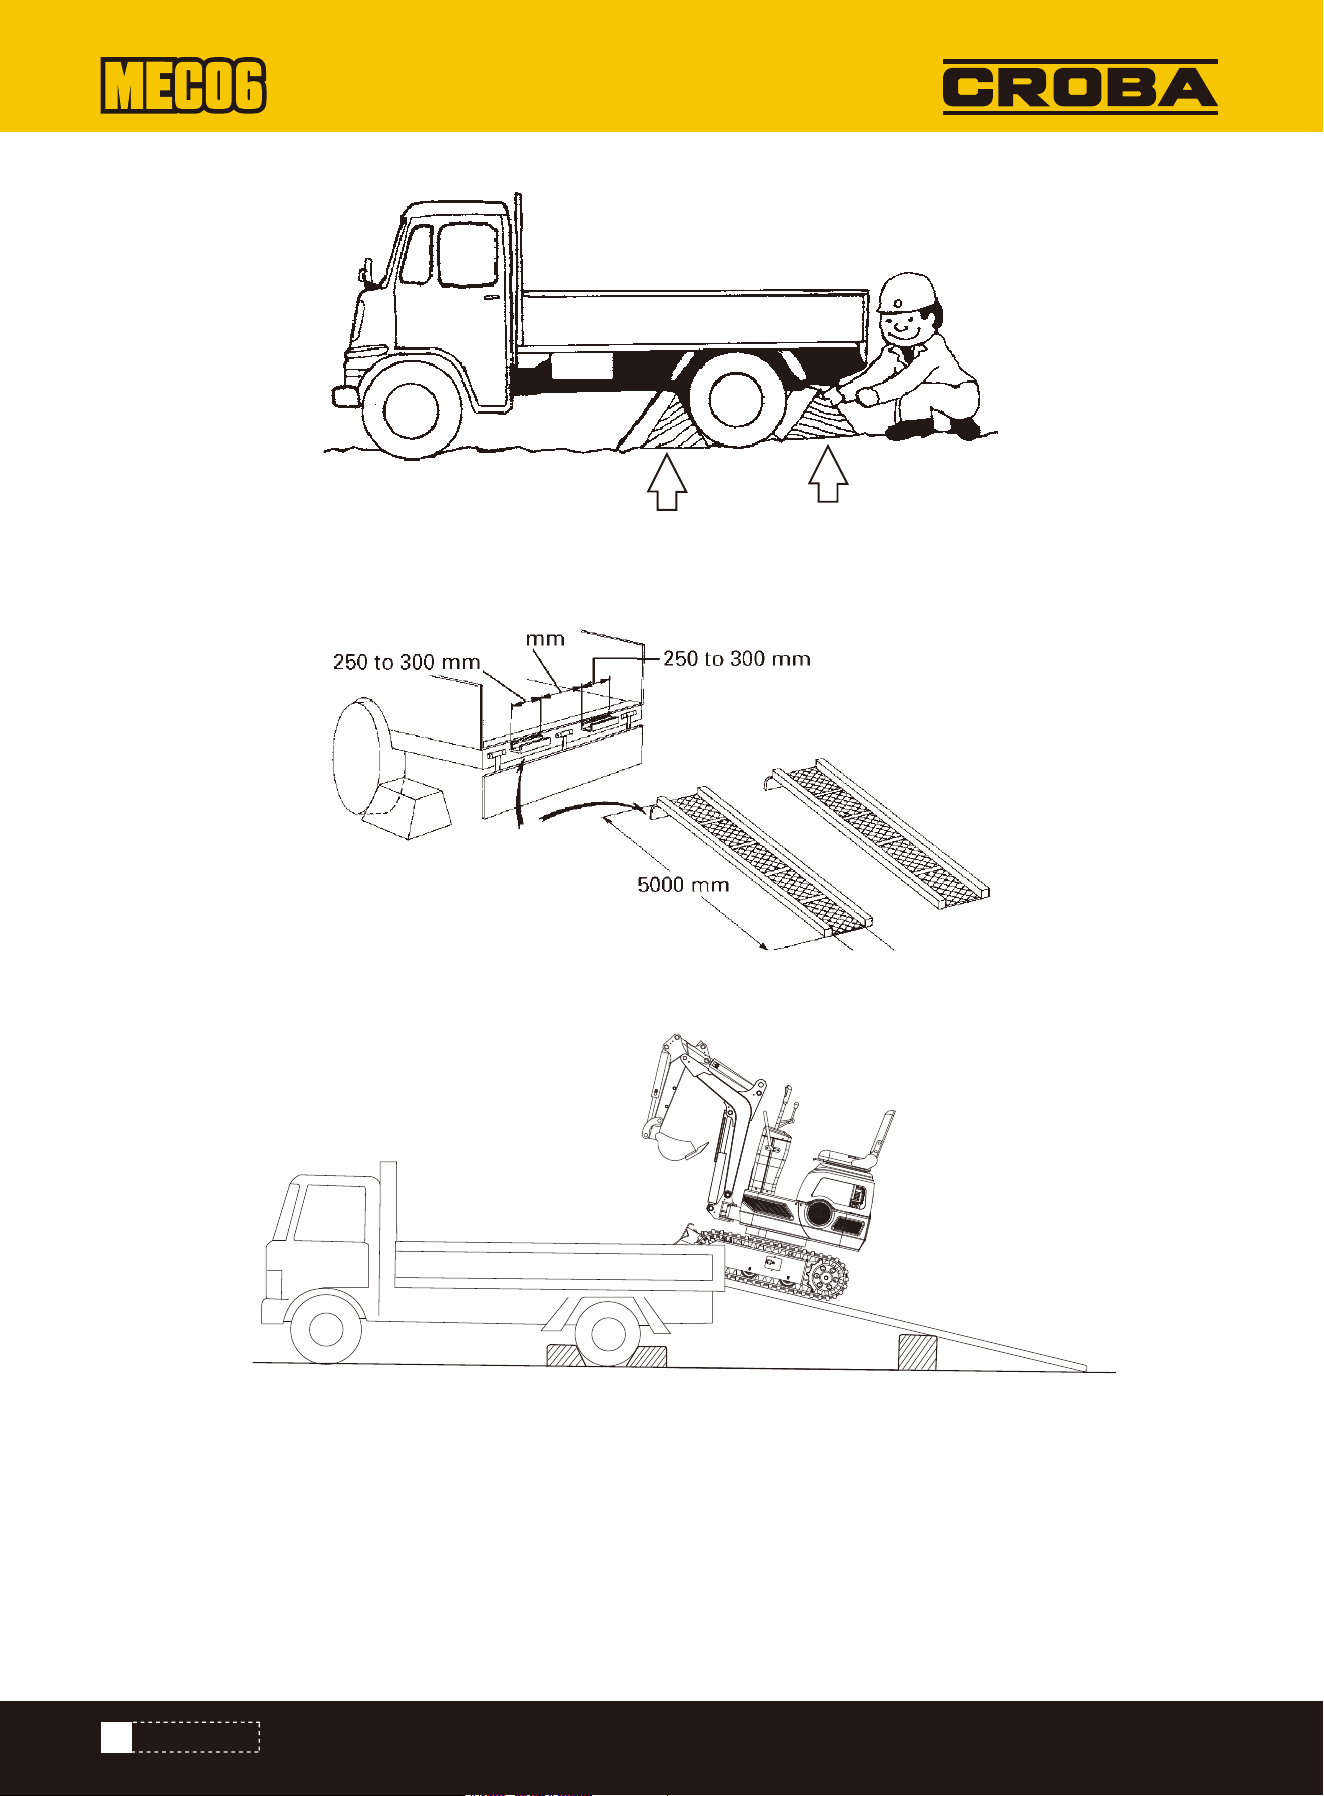
2. Use mounting plates to secure the ramp properly. Attach the ramps directly to the loading surface of the lorry.
3. Use blocks or struts under the ramps and on the loading surface for additional safety.
4. Align the ramps and crawlers completely and then drive the excavator slowly up the ramps with the dozer blade facing
forwards. Swivel the upper carriage towards the rear of the truck when the crawlers are completely on the loading surface
of the lorry.
5. Block the crawlers and lash down the excavator.
42
PARAMETERS
300
LIFTING THE EXCAVATOR
Only lift the excavator at the 3 points shown.
WARNING
Basics for lifting with chains/belts:
1. The crane is lifted and operated in accordance with the guidelines described.
2. As the tools mentioned in this manual are for reference only, the standards regarding strength, control and other
details are based on the respective applicable guidelines.
Safety aspects when lifting with chains/belts:
1. Do not lift any loads if this exceeds the maximum load capacity of the crane.
2. Select the correct rigging for the weight, size and shape of the load.
3. First determine the center of gravity of the load, position the hook directly above the load and lift the load so that the
center of gravity of the load is as low as possible.
4. Steel cables must be fastened in the center of the hook.
5. The load must be lifted vertically from the ground.
6. Do not enter the work area under suspended loads and do not move the load over other people. The load must be moved
in an area where the balance can be easily equalized.
General guidelines for lifting:
Lifting position (see figure below)
1. Pull the boom fully backwards.
2. Fully retract the arm.
3. Fully retract the bucket.
4. Swivel the boom to the center position.
5. Swivel the upper carriage 180° to ensure that the dozer blade is at the rear as seen by the operator. 6. Insert the
swiveling locking pin.
6. Before unloading, remove the locking pin and then lift the dozer blade and bucket off the loading surface.
43
PARAMETERS
The correct instructions for safe handling can be found here. Read these carefully before moving
the machine. Ensure that the operating personnel read the operator's manual carefully.
DANGER
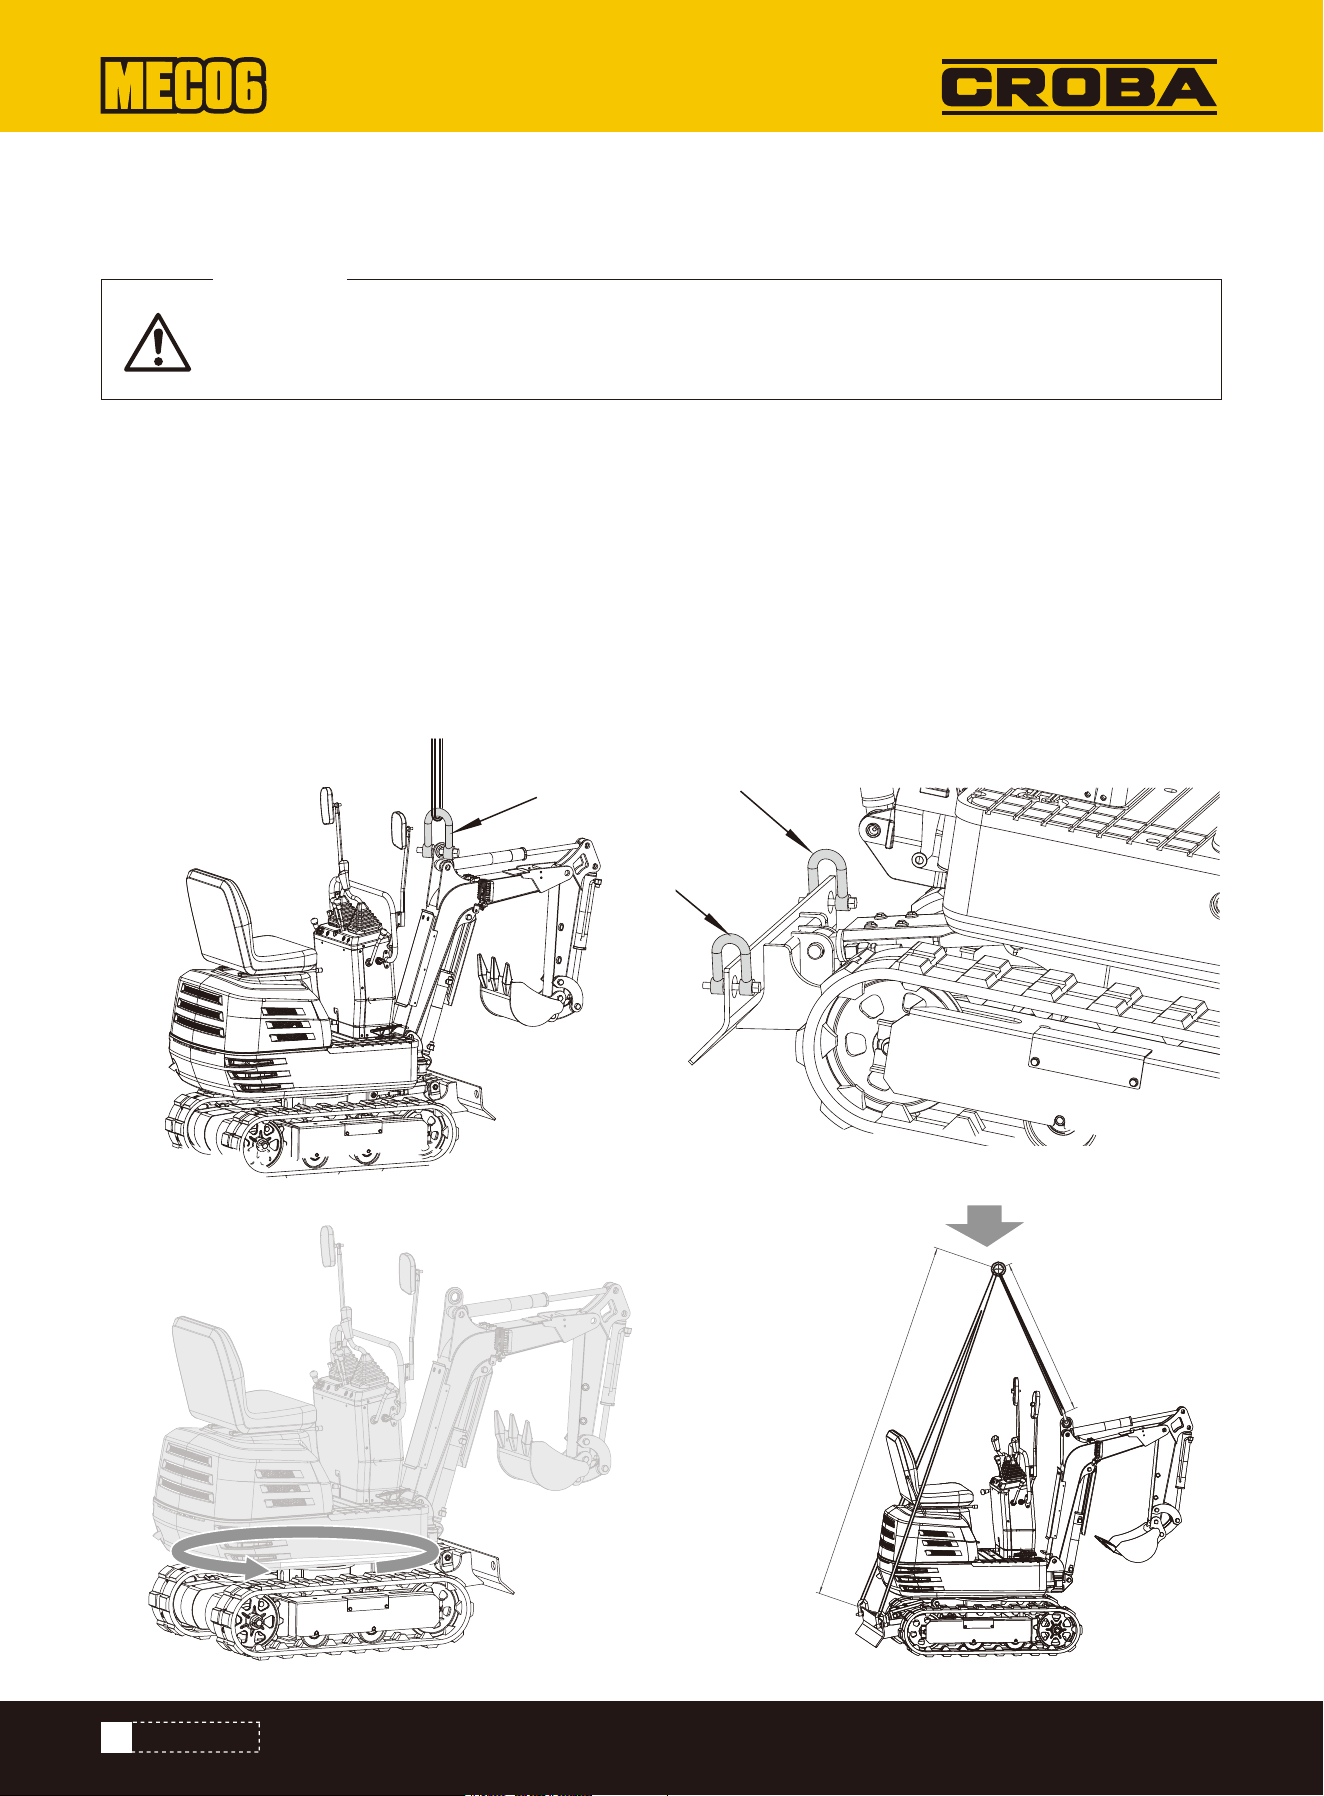
Fastening the chains/straps.
1. Always hook the excavator in at three points (on the boom and to the right and left of the dozer blade).
2. When attaching the straps, use a shackle at each stroke opening.
3. Use padding materials where the belts touch the machine.
Tackle
Use components of sufficient strength.
Lifting
1. Lift slowly and safely.
2. Do not climb onto the excavator when lifting it.
3. Lift the excavator horizontally. (Change the connections as required).
The dozer blade must be raised.
WARNING
44
PARAMETERS
2160mm
1000mm
180°
Observe the following sequences if the excavator is to be stored for an extended period:
1. The entire excavator should be thoroughly cleaned and stored indoors. If the excavator has to be stored outdoors, lay
out wooden planks on a level surface, place the excavator on them and cover it completely.
2. Change the oil and lubricate the excavator.
3. Lubricate the visible sections of the piston rods particularly well.
4. Remove the battery and store it indoors.
Follow the procedures below if the machine is to be put into operation after a long period of storage.
1. Wipe the grease off the hydraulic cylinder rods.
2. Switch on the engine and activate the attachments and the drive mechanism without load to allow the hydraulic oil to
circulate. (If the machine is stored for longer than one month, carry out steps (1) and (2) every month.)
Do not clean the excavator with the engine running.
CAUTION
To avoid the risk of exhaust poisoning, do not run the engine in a closed building without good
ventilation.
CAUTION
Remove the key from the ignition lock during storage to prevent unauthorized persons from oper-
ating the excavator and injuring themselves.
CAUTION
45
ACCESSORIES
Wash the excavator with the engine switched off. If you wash the excavator while the engine is
running, water can enter the air filter through the inlet and cause engine problems. Wash the exca-
vator carefully to avoid splashing water over the air filter.
IMPORTANT!
STORAGE

Place the machine on a level, firm surface before starting maintenance work. Lower the attachments to the ground, stop
the engine and release the cylinder pressure by operating the levers. When dismantling hydraulic parts, ensure that the
hydraulic oil has cooled down sufficiently to prevent burns. Start the maintenance work carefully, i.e. loosen the screws
slowly so that no oil splashes out.
1. Allow the excavator to cool down sufficiently before working on the engine, the exhaust system, the heat protection
system and the hydraulics.
2. Always switch off the engine when filling it with petrol. Avoid spilling and overfilling with petrol.
3. Smoking is prohibited when refueling and handling the battery! Keep sparks and fire away from the fuel tank and
battery. Flammable gases escape from the battery.
4. If the battery is empty, the machine can be started by pulling the cable.
5. Avoid short-circuiting the battery. Always remove the earth cable first and connect the positive cable first.
6. Have a first aid kit and a fire extinguisher ready at all times.
7. Leaking hydraulic fluid has sufficient pressure to penetrate the skin and cause serious injury. Leaks from tiny holes can
be completely invisible. Never check for possible leaks with your bare hands. Always use a piece of wood or cardboard.
We recommend the use of a face mask or eye protection. If injuries occur due to leaking hydraulic fluid, contact a doctor
immediately. This liquid can cause gangrene or severe allergic reactions.
8. Do not throw the battery away to prevent battery fluid containing heavy metals from leaking out.
9. Observe all laws and regulations regarding the disposal of used oil, coolants, solvents, hydraulic fluids, battery acid
and batteries.
10. To prevent fires, do not heat up the hydraulic components (tanks, pipes, hoses, cylinders) until they have been rinsed
and washed.
11. Use a face mask or eye protection to protect the eyes and respiratory tract from dust and other foreign bodies.
12. Do not crawl under the excavator if it is only supported by the boom and arm or the dozer blade. The excavator can
tip over or sink due to loss of pressure in the hydraulics. Always use safety struts or other suitable supports.
13. Do not use any parts that are lined with asbestos. Do not use these types of parts even if they can be installed.
46
EXPLODED VIEW&PARTS LIST
MAINTENANCE

14. Fire protection. The excavator and some attachments contain components that are very hot under normal working
conditions. The main source of high temperatures is the engine and the exhaust system. The electrical system can be a
source of sparks and flashover if damaged or improperly maintained. The following fire safety guidelines will help you to
keep your devices running efficiently and minimize the risk of fire.
15. Blow off any accumulations of foreign matter near the hot engine exhaust components such as the petrol engine
cylinder head and exhaust manifold as well as the exhaust pipe and silencer more frequently if you are working in difficult
conditions.
16. Remove all flammable debris such as leaves, straw, pine needles, twigs, bark, small wood chips and other flammable
materials from inside the machine's protrusions and lower structures and areas near the engine.
17. Inspect all petrol and hydraulic lines for wear or poor condition. Replace them immediately if they start to leak.
18. Check the electrical cables and connections regularly for damage. Repair any loose or frayed cables before commis-
sioning the machine. Clean all electrical connections and tighten them if necessary.
19. Check the exhaust system daily for signs of leaks. Check for broken pipes and silencers as well as loose or missing
screws, nuts and clamps. If leaks or broken parts of the exhaust system are found, the repairs must be carried out before
commissioning.
20. Always keep a multi-purpose fire extinguisher on or near the machine. Familiarise yourself with the operation of the
fire extinguisher.
47
EXPLODED VIEW&PARTS LIST
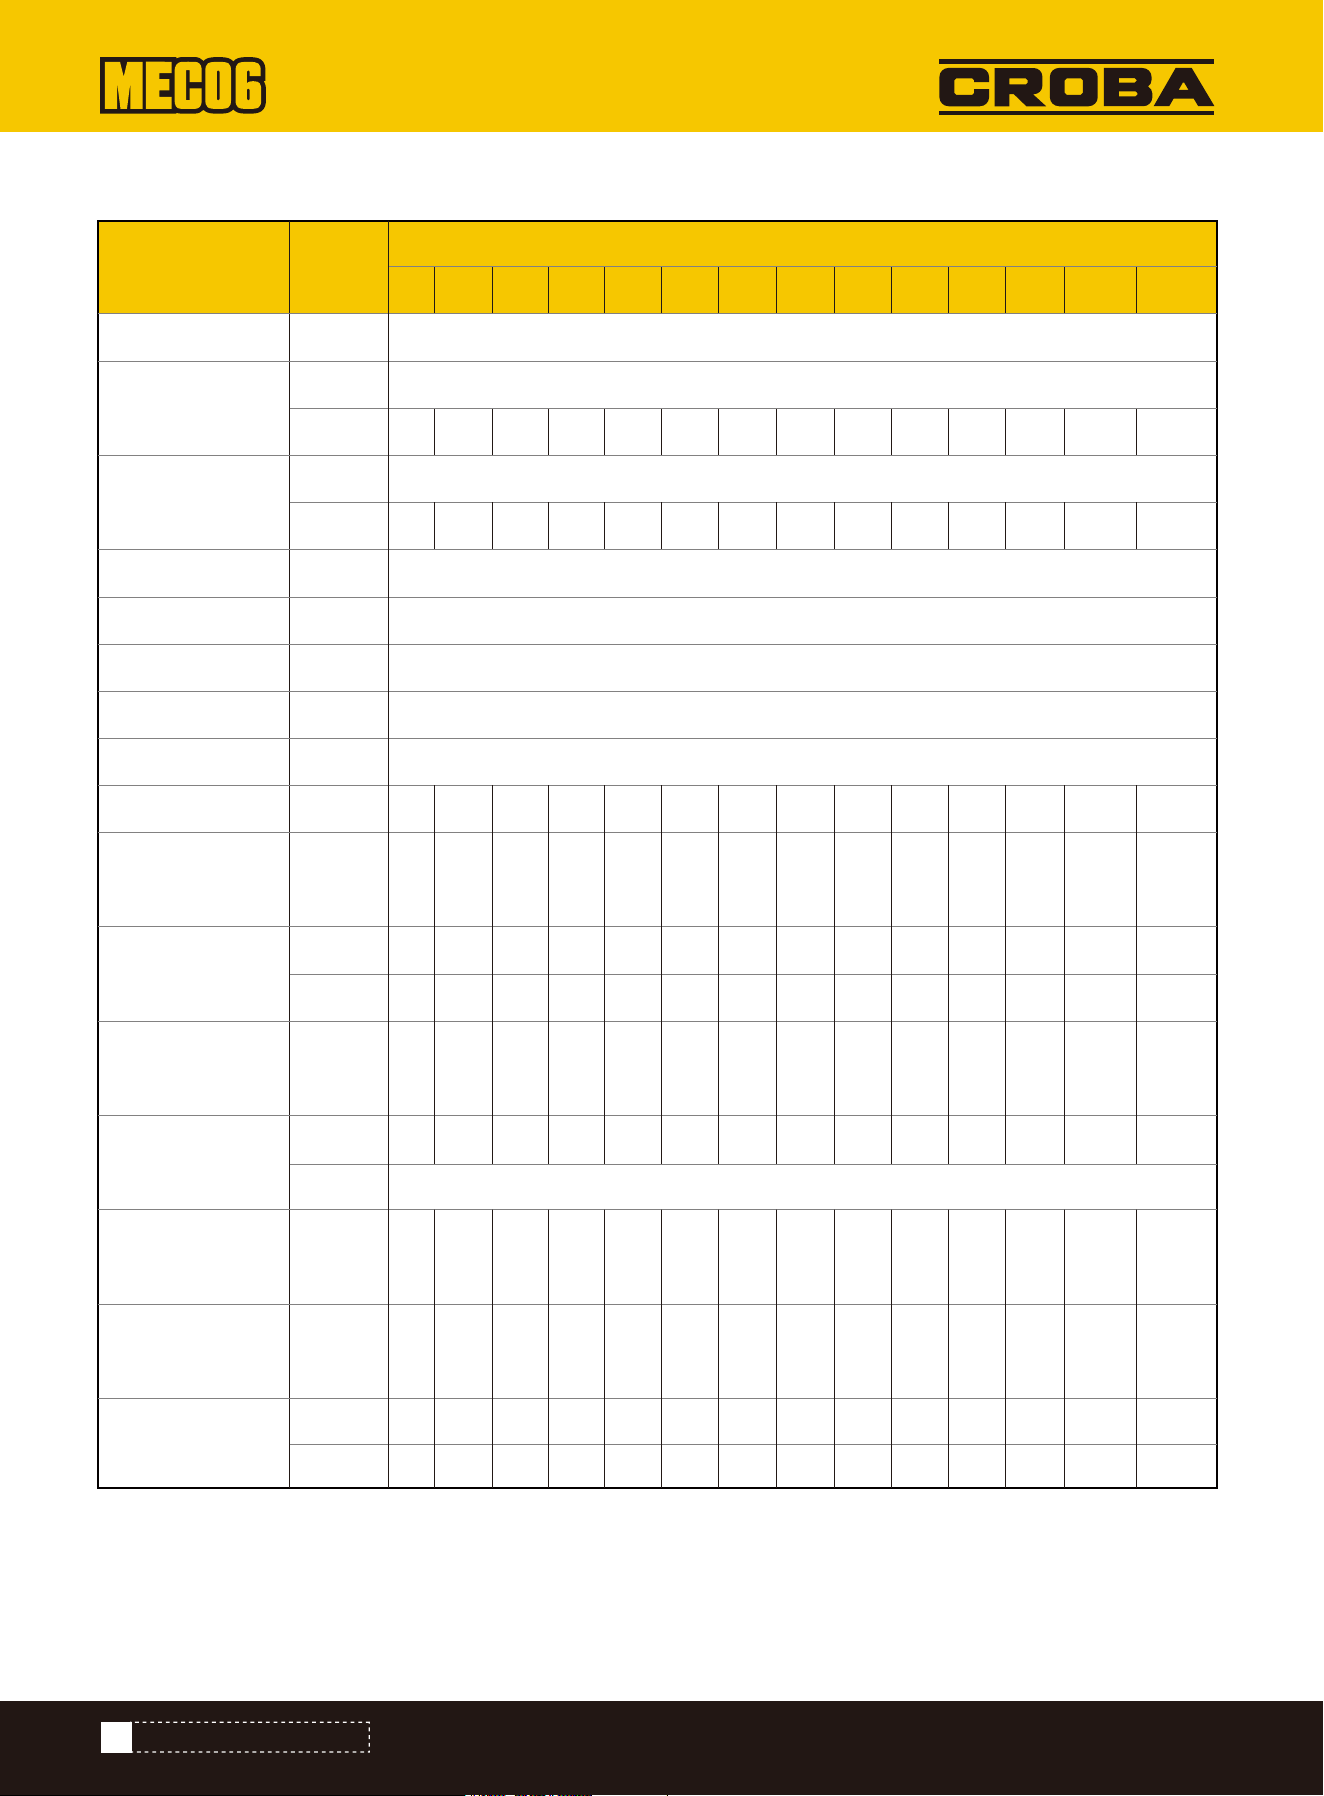
** Clean the air filter element more often if the machine is operated in dusty conditions.
Components Measure
50 100 150 200 250 300 350 400 450 500 550 600 1000 2000
x x x x x x x x x x x x x x
x x x x x x x x x x x x x x
x x x x x x x x x x x x x x
x x x x x x x x x x x x x x
x x x
x x x x x x x x
x x
x x
x x x x x
x x x x x
x x x x x x x x x x x x x x
x x
Operating hours
Fuel
Engine oil
Hydraulic oil
Lubrication points
Fan wheel
Electric cabling
Air cylinder, fan wheel
Machine
Battery
Lubrication of the
swivel bearing
teeth
Air filter
element **
Swivel bearing
lubrication
Fuel line and
hoses
Hydraulic return
filter
Hydraulic suction
filter
Spark plug
Daily
Daily
Daily
Daily
Daily
Daily
Daily
Every 2 years
Daily
Check
Check
Change
Check
Change
Check
Check
Check
Clean
Clean
Check
Check
Cleaning
Change
Check
Check
Change
Change
Change
Check
Change
Maintenance intervals
48
EXPLODED VIEW&PARTS LIST
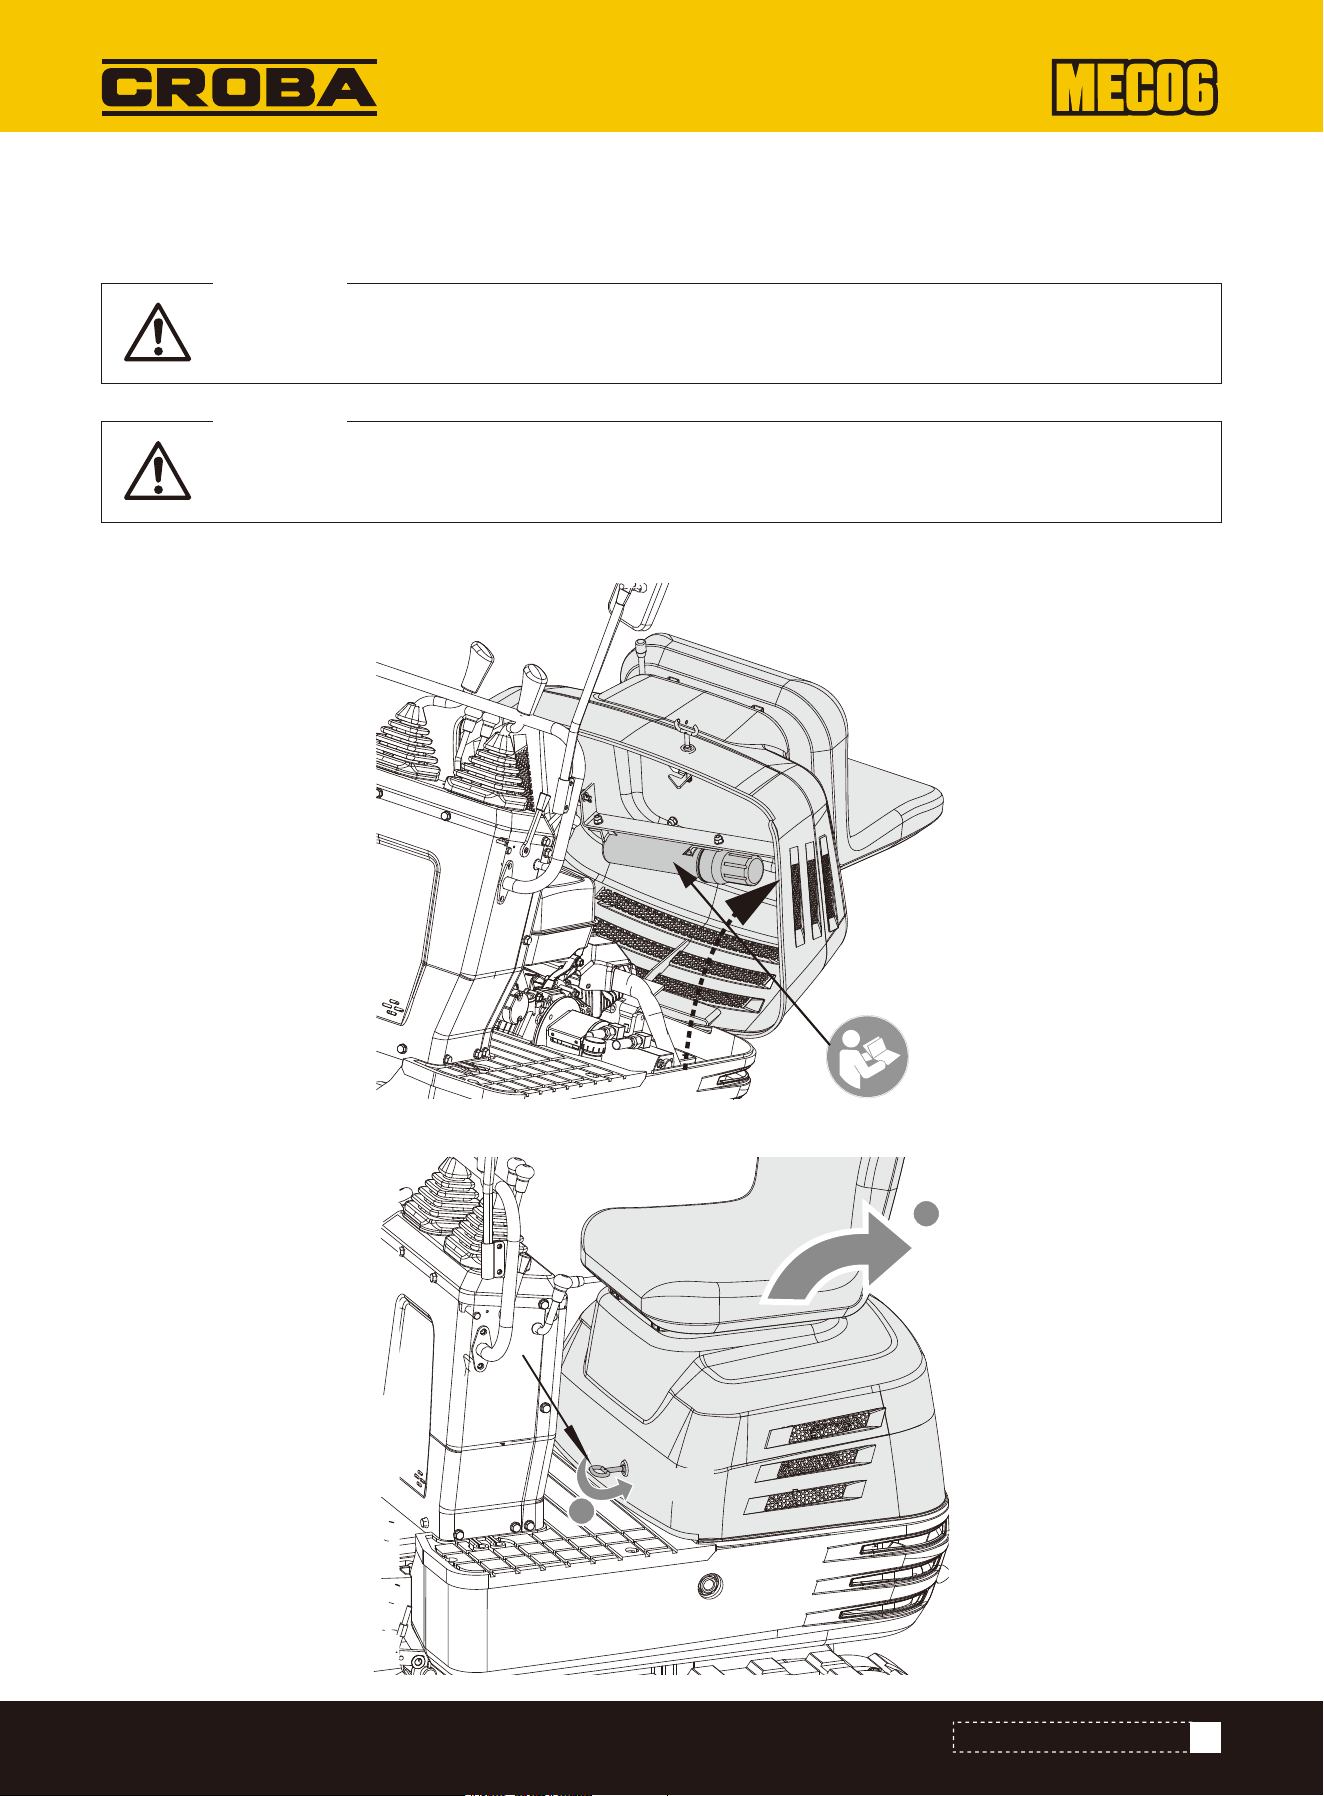
OPENING AND CLOSING OF COMPONENTS
Turn the key in the direction of the arrow as shown in the figure below to open the bonnet.
Keep the tools and the operator's manual in the manual storage area.
Opening/closing the bonnet
49
EXPLODED VIEW&PARTS LIST
Do not open the bonnet until you have switched off the engine.
CAUTION
Do not touch the silencer or the exhaust pipe, as this can cause serious burns.
CAUTION
1
2
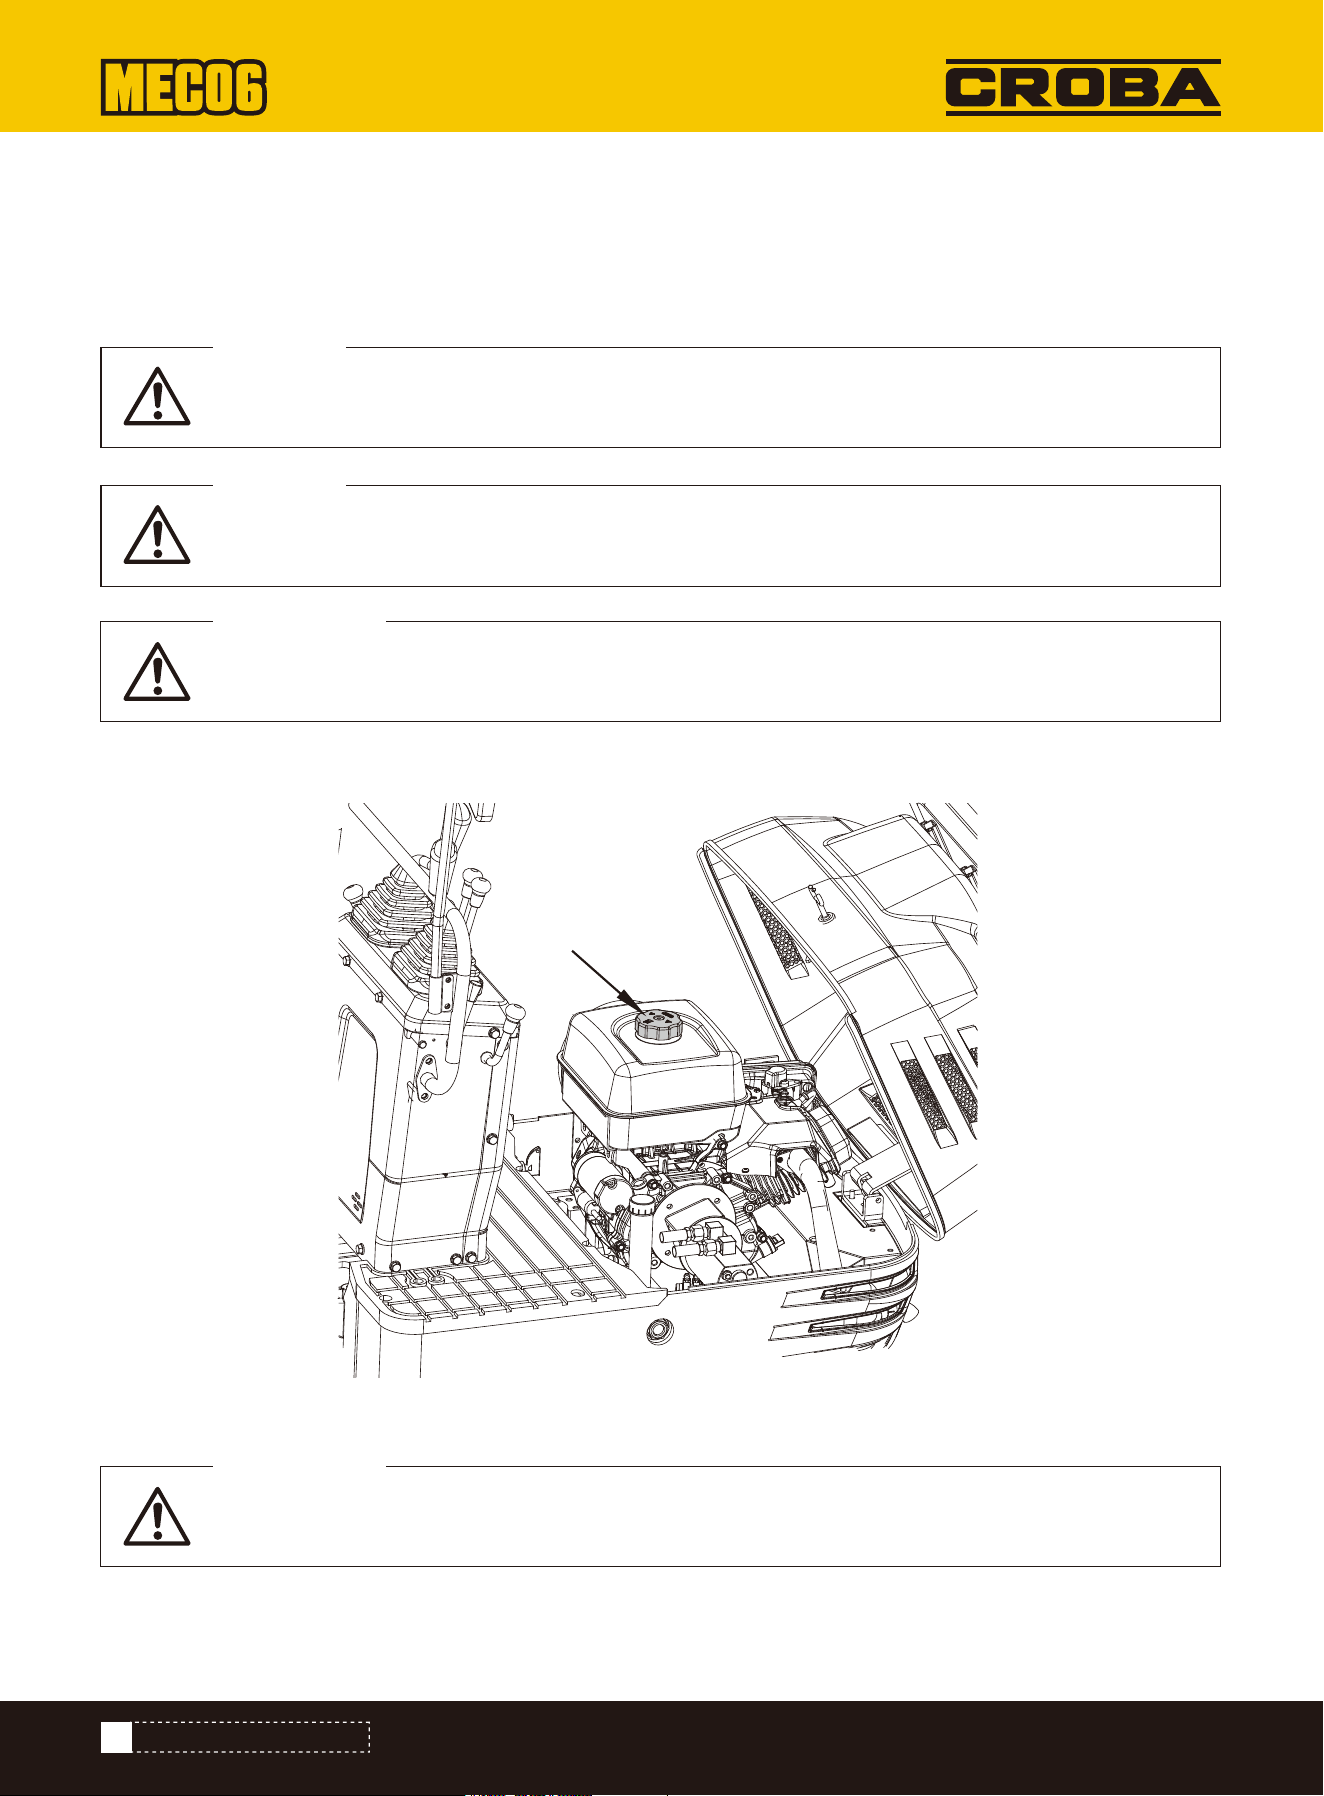
DAILY CHECKS
For your own safety and to ensure a long service life of the machine, careful inspections should be carried out before each
use.
1. Check the fill level in the fuel tank.
2. Open the fuel filler cap and top up with petrol. To do so, use a commercially available funnel.
Tank Capacity: 1.6 gal
Checking the petrol level
50
EXPLODED VIEW&PARTS LIST
Use unleaded petrol with an octane rating of 86 or higher.
IMPORTANT!
Always top up with petrol after a working day.
IMPORTANT!
Switch off the engine before filling with petrol.
CAUTION
Do not smoke when filling with petrol.
CAUTION
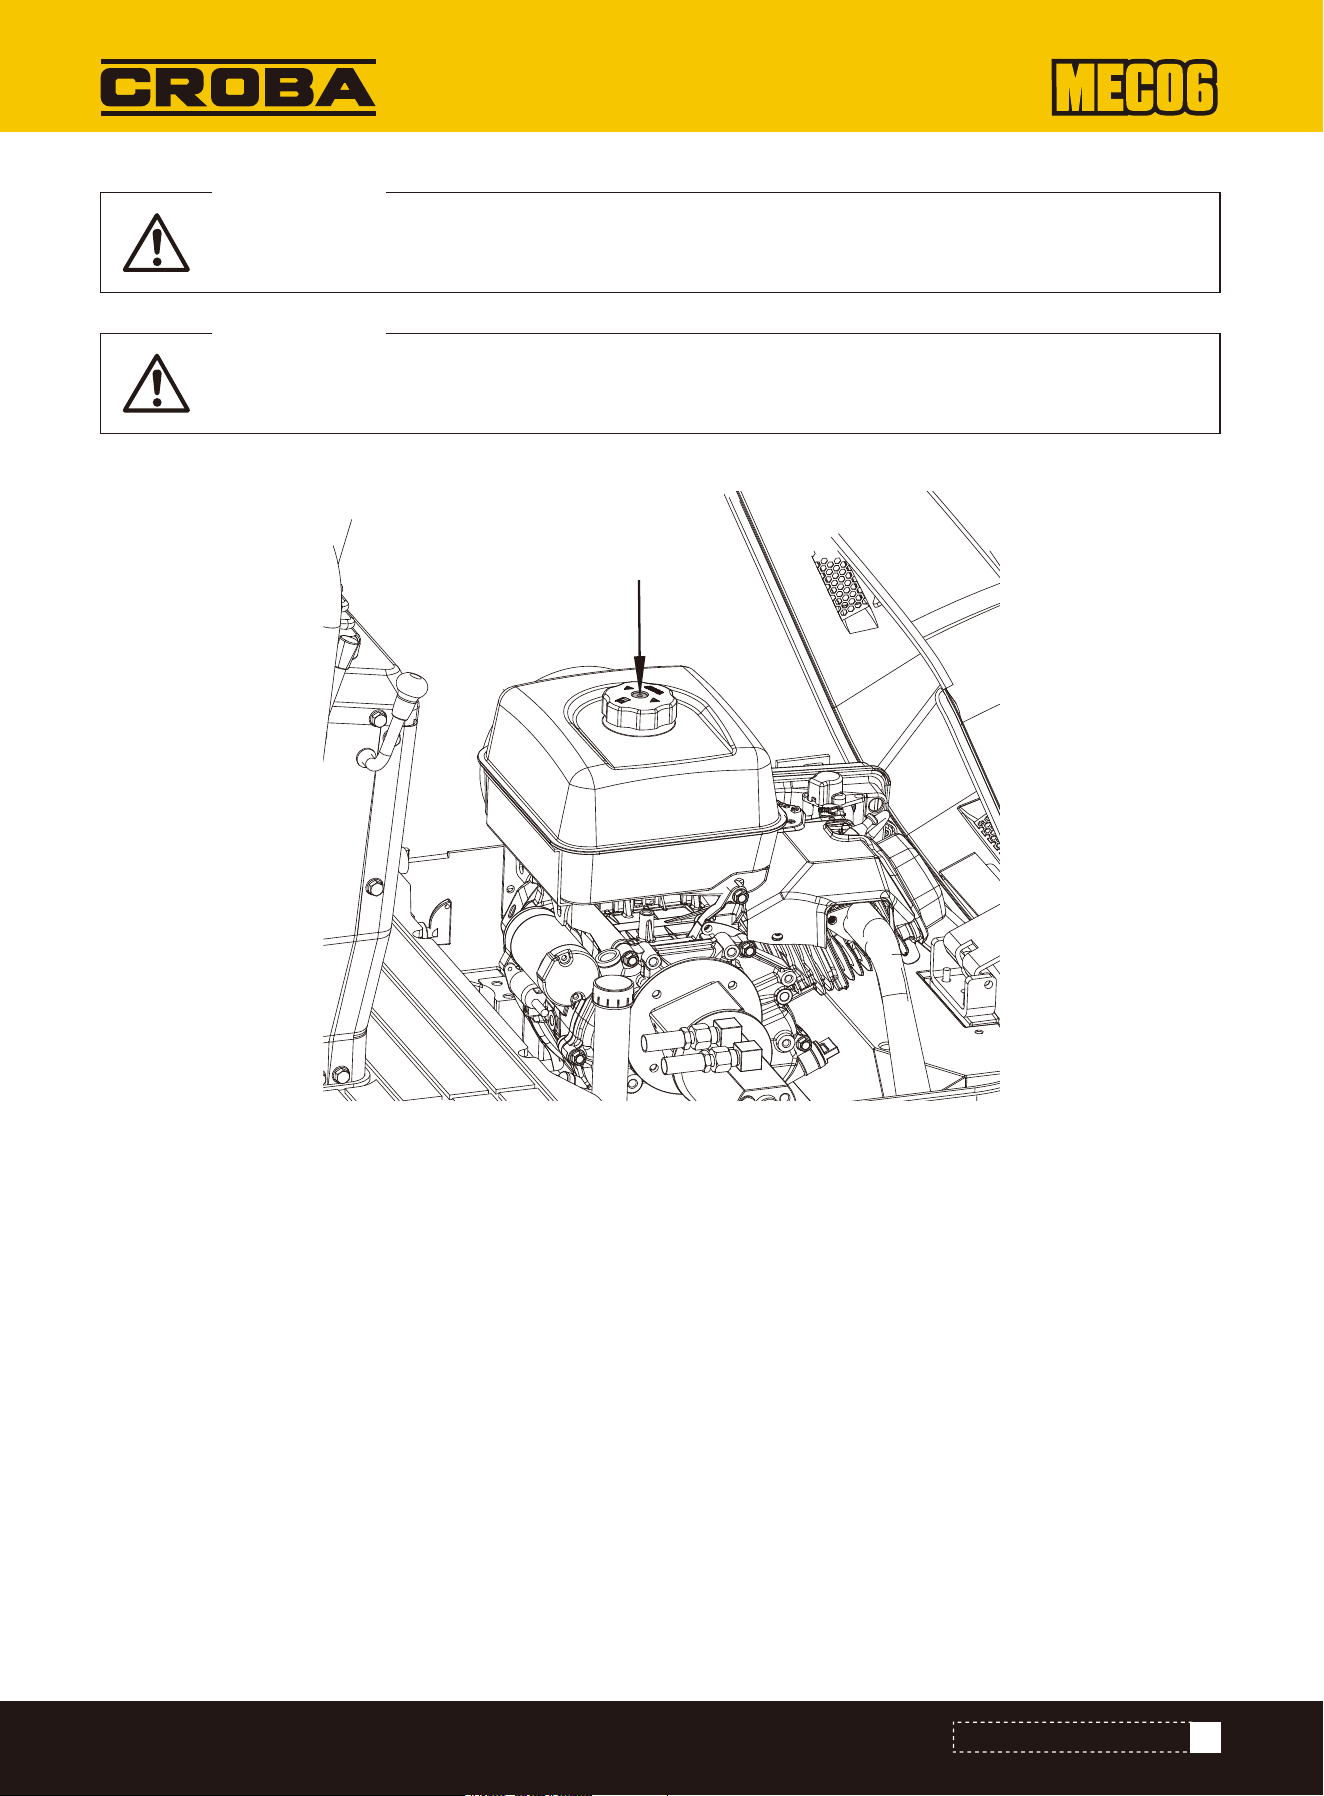
If the vent is clogged with sludge, negative pressure is created in the fuel tank.
51
EXPLODED VIEW&PARTS LIST
See "FLUSHING THE FUEL SYSTEM” in "OTHER SETTINGS AND EXCHANGES".
IMPORTANT!
The fuel filler cap has a vent. Make sure that you clean the ventilation when you top up with petrol.
IMPORTANT!
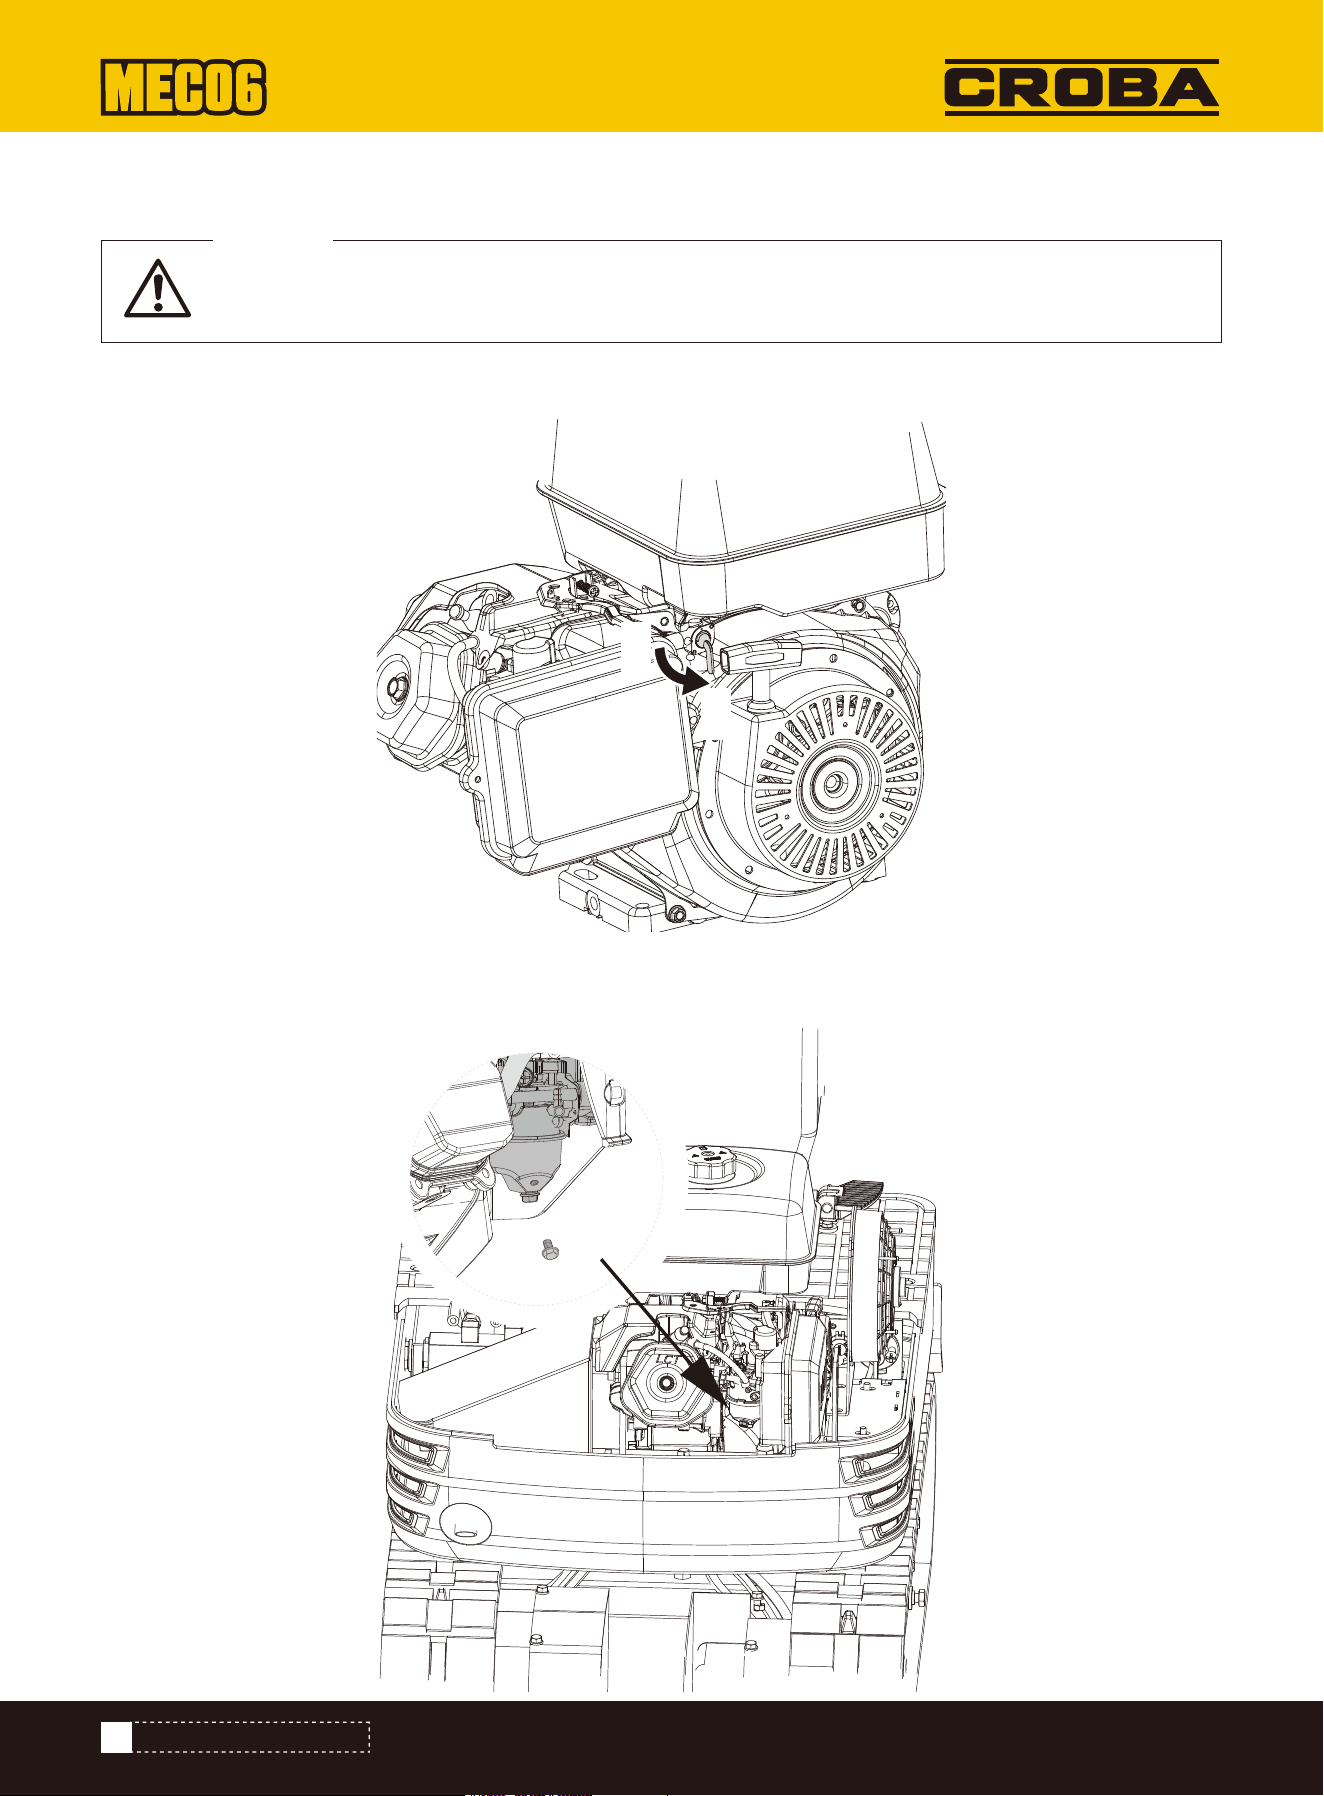
If the petrol engine is not used for a longer period of time, the engine may have starting problems. Proceed as follows:
1. Shut the petrol valve.
2. Unscrew the screw at the carburetor vent outlet to drain the water or gas from the petrol.
3. Tighten the screw on the carburetor vent outlet.
4. Shut the petrol valve.
5. Start the engine.
Draining water or air from the fuel tank
52
EXPLODED VIEW&PARTS LIST
Always keep away from flames when draining water or air from the fuel tank.
DANGER
1
0
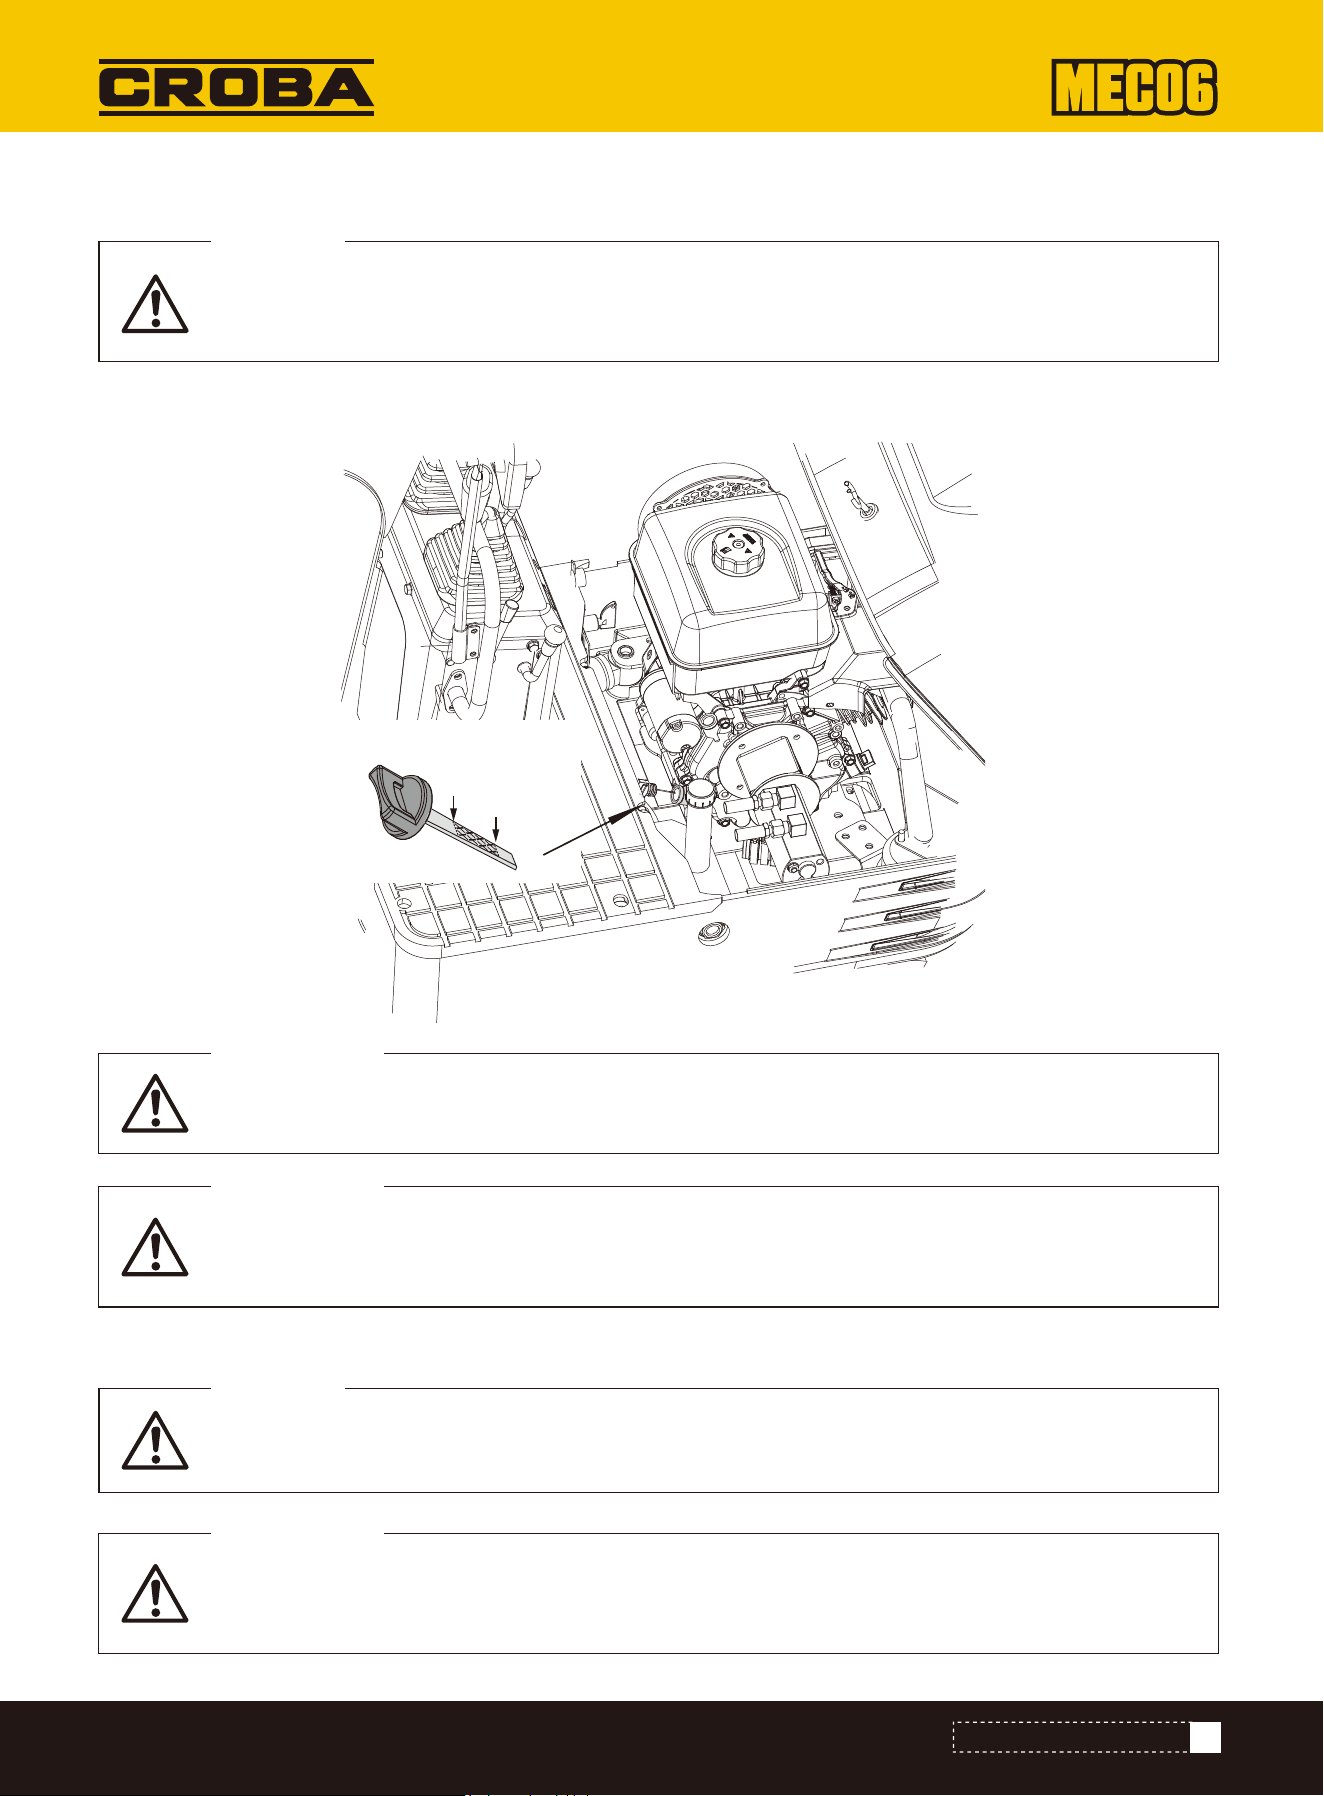
Switch off the engine before checking the oil level.
CAUTION
First lower all attachments to the ground and then switch off the engine.
CAUTION
Insert the dipstick fully into the opening provided, remove it and check the oil level. Top up with oil if necessary. The
machine must be on level ground when checking the oil level.
Checking the engine oil level
Checking the hydraulic oil level
53
EXPLODED VIEW&PARTS LIST
Use engine oil with the correct viscosity (according to the outside temperature).
IMPORTANT!
Wipe away sand and dust in the area of the oil filler opening before topping up the oil. Make sure
that you use the same type of hydraulic fluid.
IMPORTANT!
Wait five minutes after stopping the engine and then check the oil level. (The excavator must be on
level ground.)
IMPORTANT!
Max. Min.
H
L
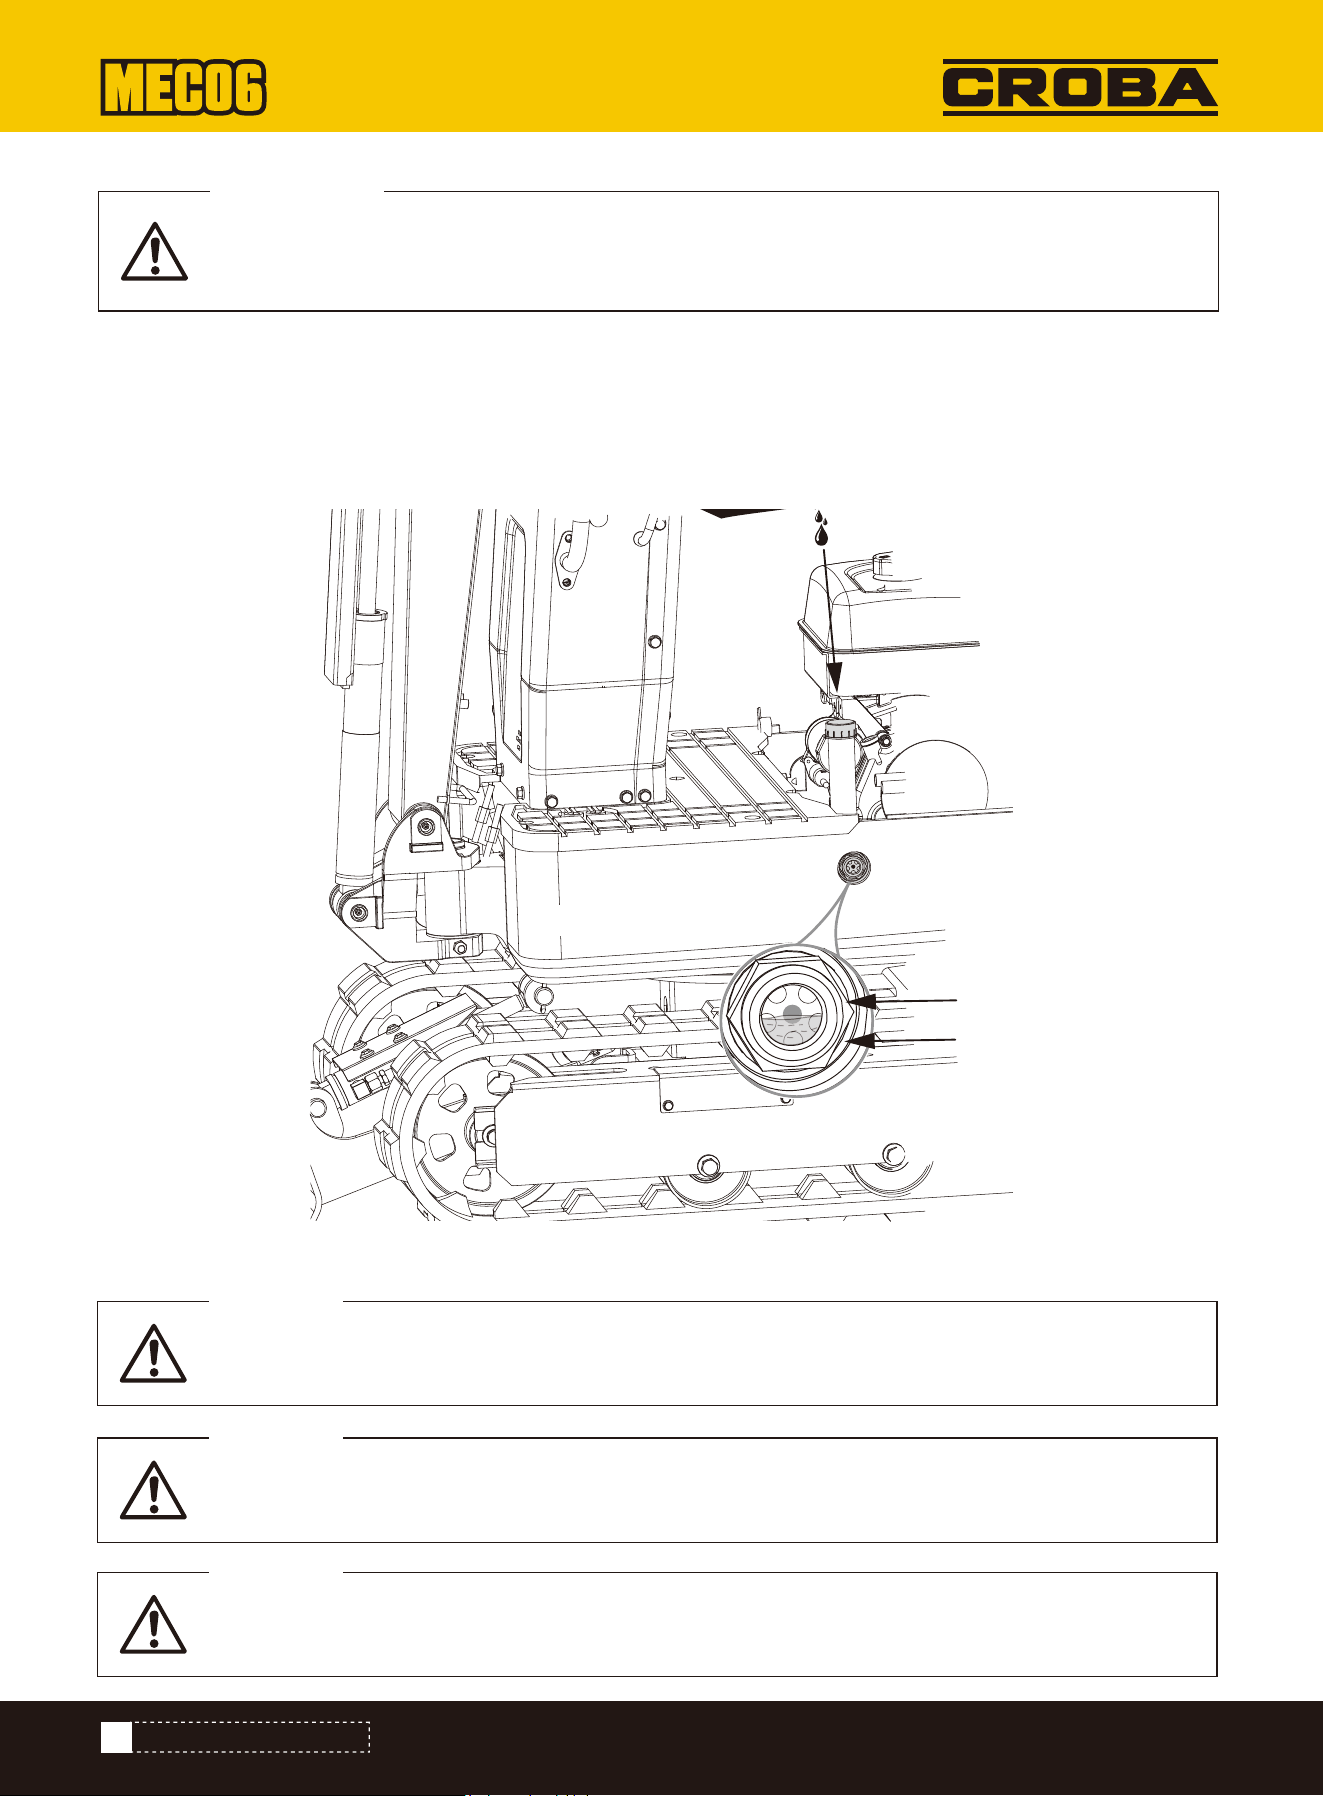
First lower all attachments to the ground and then switch off the engine.
CAUTION
When lubricating, make sure that you do not stop at the excavator teeth.
CAUTION
Lubricate the following points generously when excavating in water. Lubricate again after complet-
ing the work.
CAUTION
1. Move the excavator on level ground. Extend all cylinder rods to their center position and place the bucket on the ground.
2. Check whether the oil level is at the center mark at a normal temperature of 10 °C to 30 °C.
3. There is sufficient oil if the oil level is between the markings.
4. If the oil level is too low, add enough oil through the filler opening before starting the engine. This step is important to
protect the hydraulic system.
Lubrication points
54
EXPLODED VIEW&PARTS LIST
The excavator was filled with hydraulic fluid before delivery. See "RECOMMENDED OIL TYPES”.
(Different brands must not be mixed!)
IMPORTANT!
Max. Min.
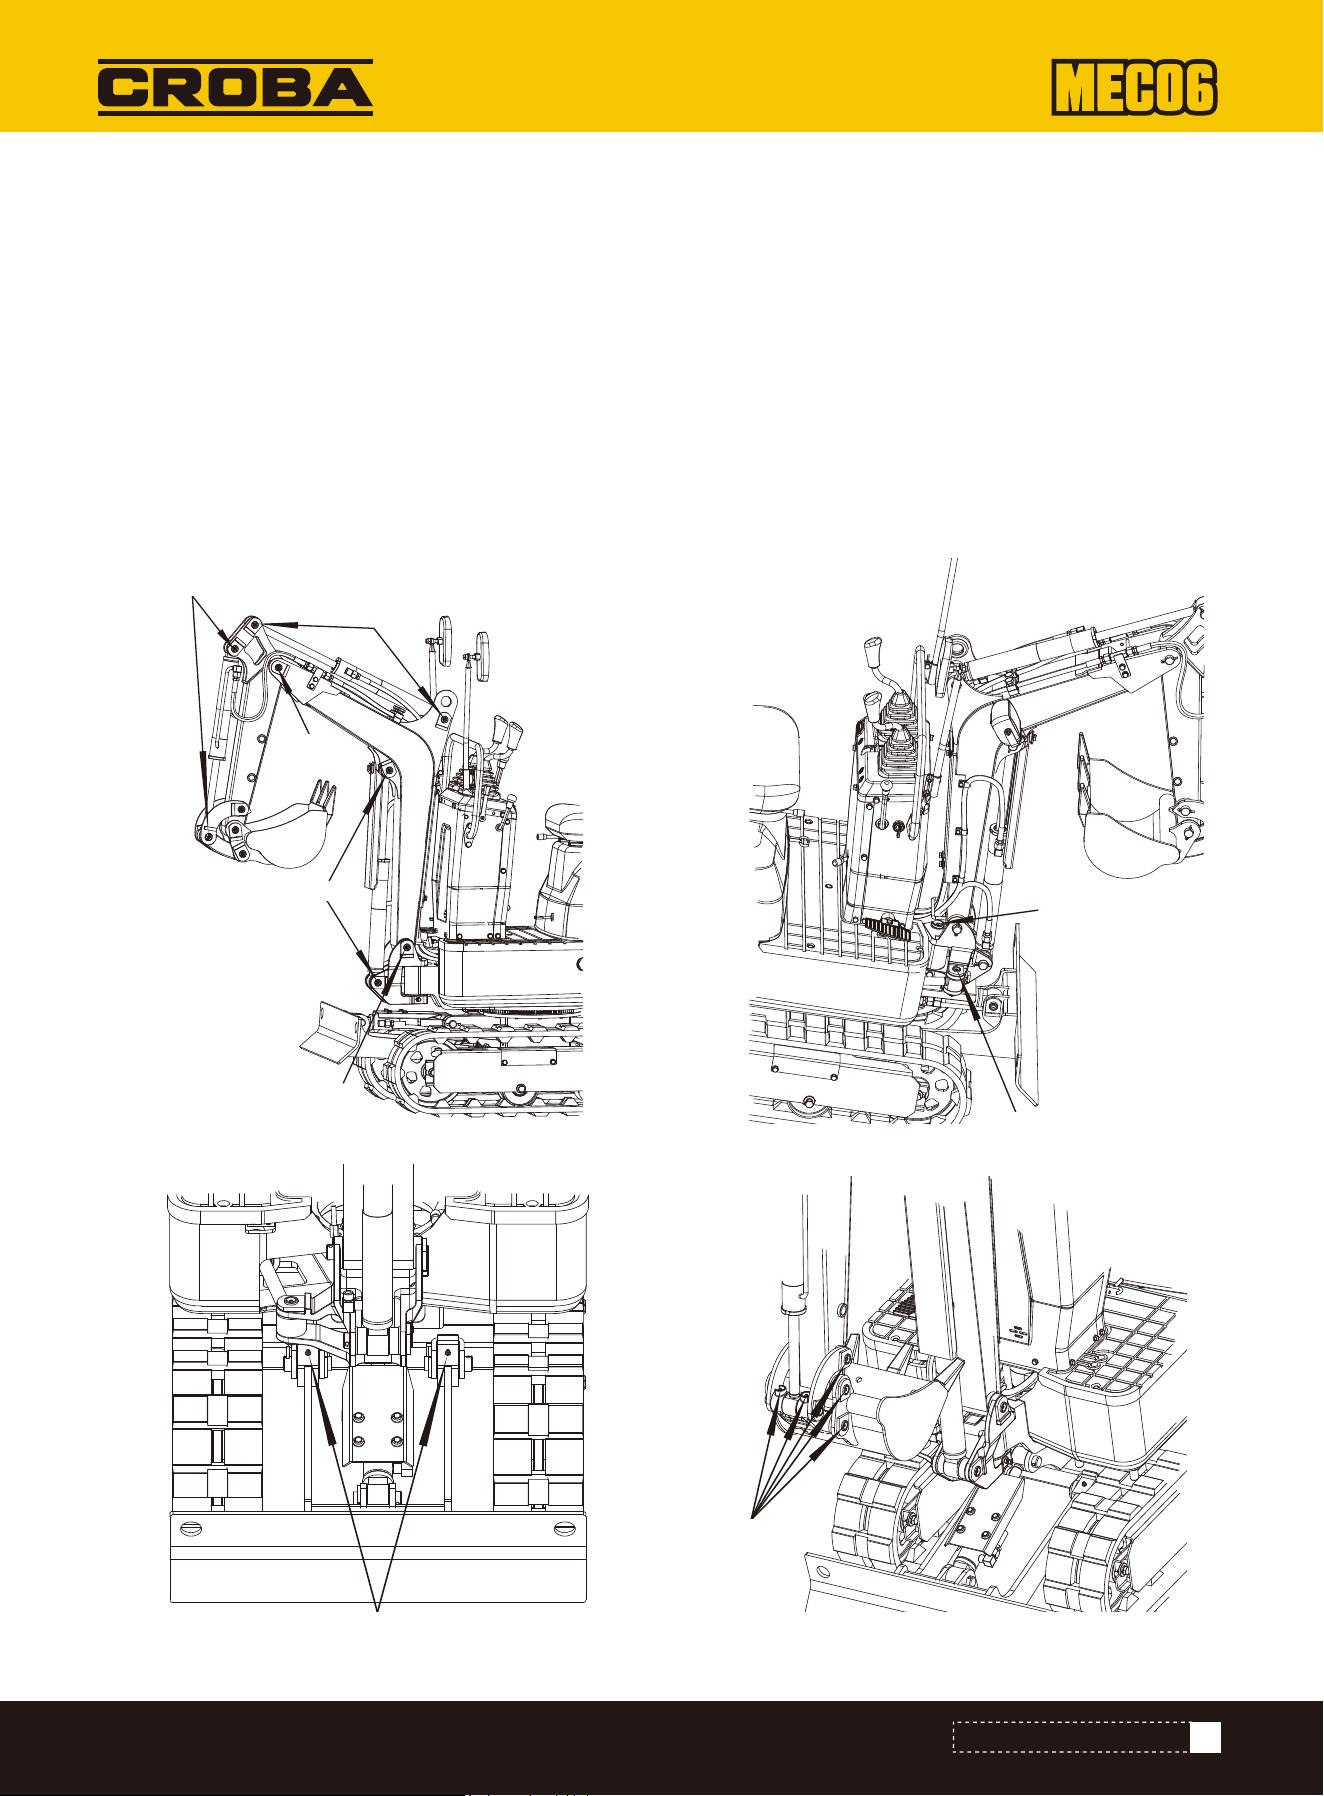
1. Lower boom joint
2. Lower arm joint
3. Hub of the cantilever cylinder
4. Hub of the arm cylinder
5. Bucket cylinder pin
6. Boom swiveling pivot point
7. Wing cylinder hub
8. Dozer blade hinge pin
9. Bucket hinge pin
1 position
1 position
2 positions
2 positions
2 positions
1 position
2 positions
2 positions
5 positions
Grease the grease nipples marked by the arrows in the figure below:
55
EXPLODED VIEW&PARTS LIST
1
(x1)
2
(x1)
4
(x2)
3
(x2)
5
(x2)
6
(x1)
7
(x2)
8
(x2)
9
(x5)
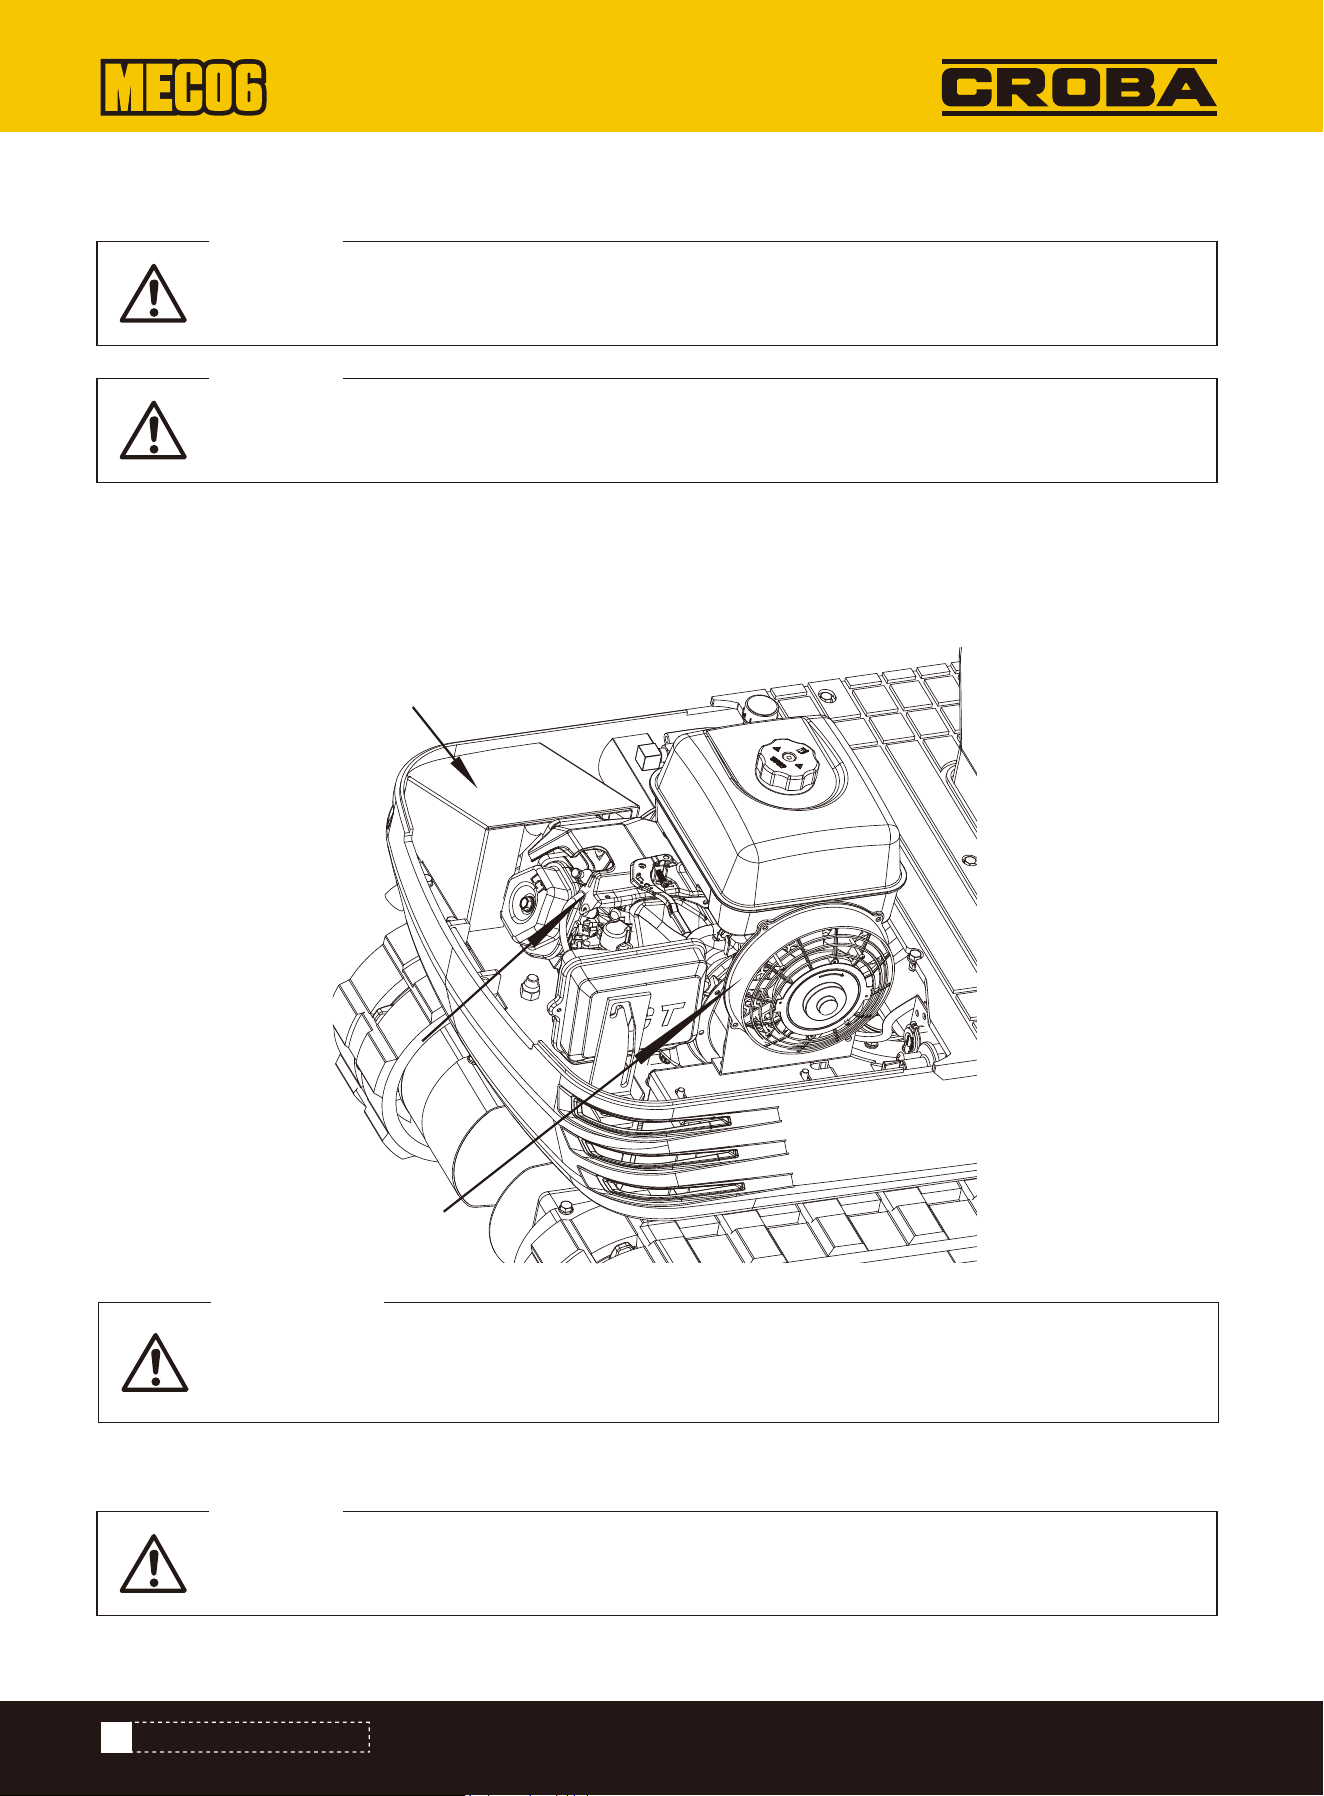
Always stop the engine before checking the cooling fan.
CAUTION
Wear eye protection when cleaning with compressed air.
CAUTION
Always stop the engine before cleaning the cabling, lines and engine.
CAUTION
1. Check the cooling fan for normal operation more frequently in warm weather. Check for dust on the cooling fan of the
petrol engine cylinder head. Please clean large accumulations of dust with compressed air.
2. Check whether the exhaust silencer and the cladding are oxidized. Check whether the insulation layer of the exhaust
silencer cladding is complete.
Checking the cooling fan
Cleaning the engine and electrical cables
56
EXPLODED VIEW&PARTS LIST
The cooling fan must be clean so that the engine does not overheat and free ventilation of the
system is possible.
IMPORTANT!
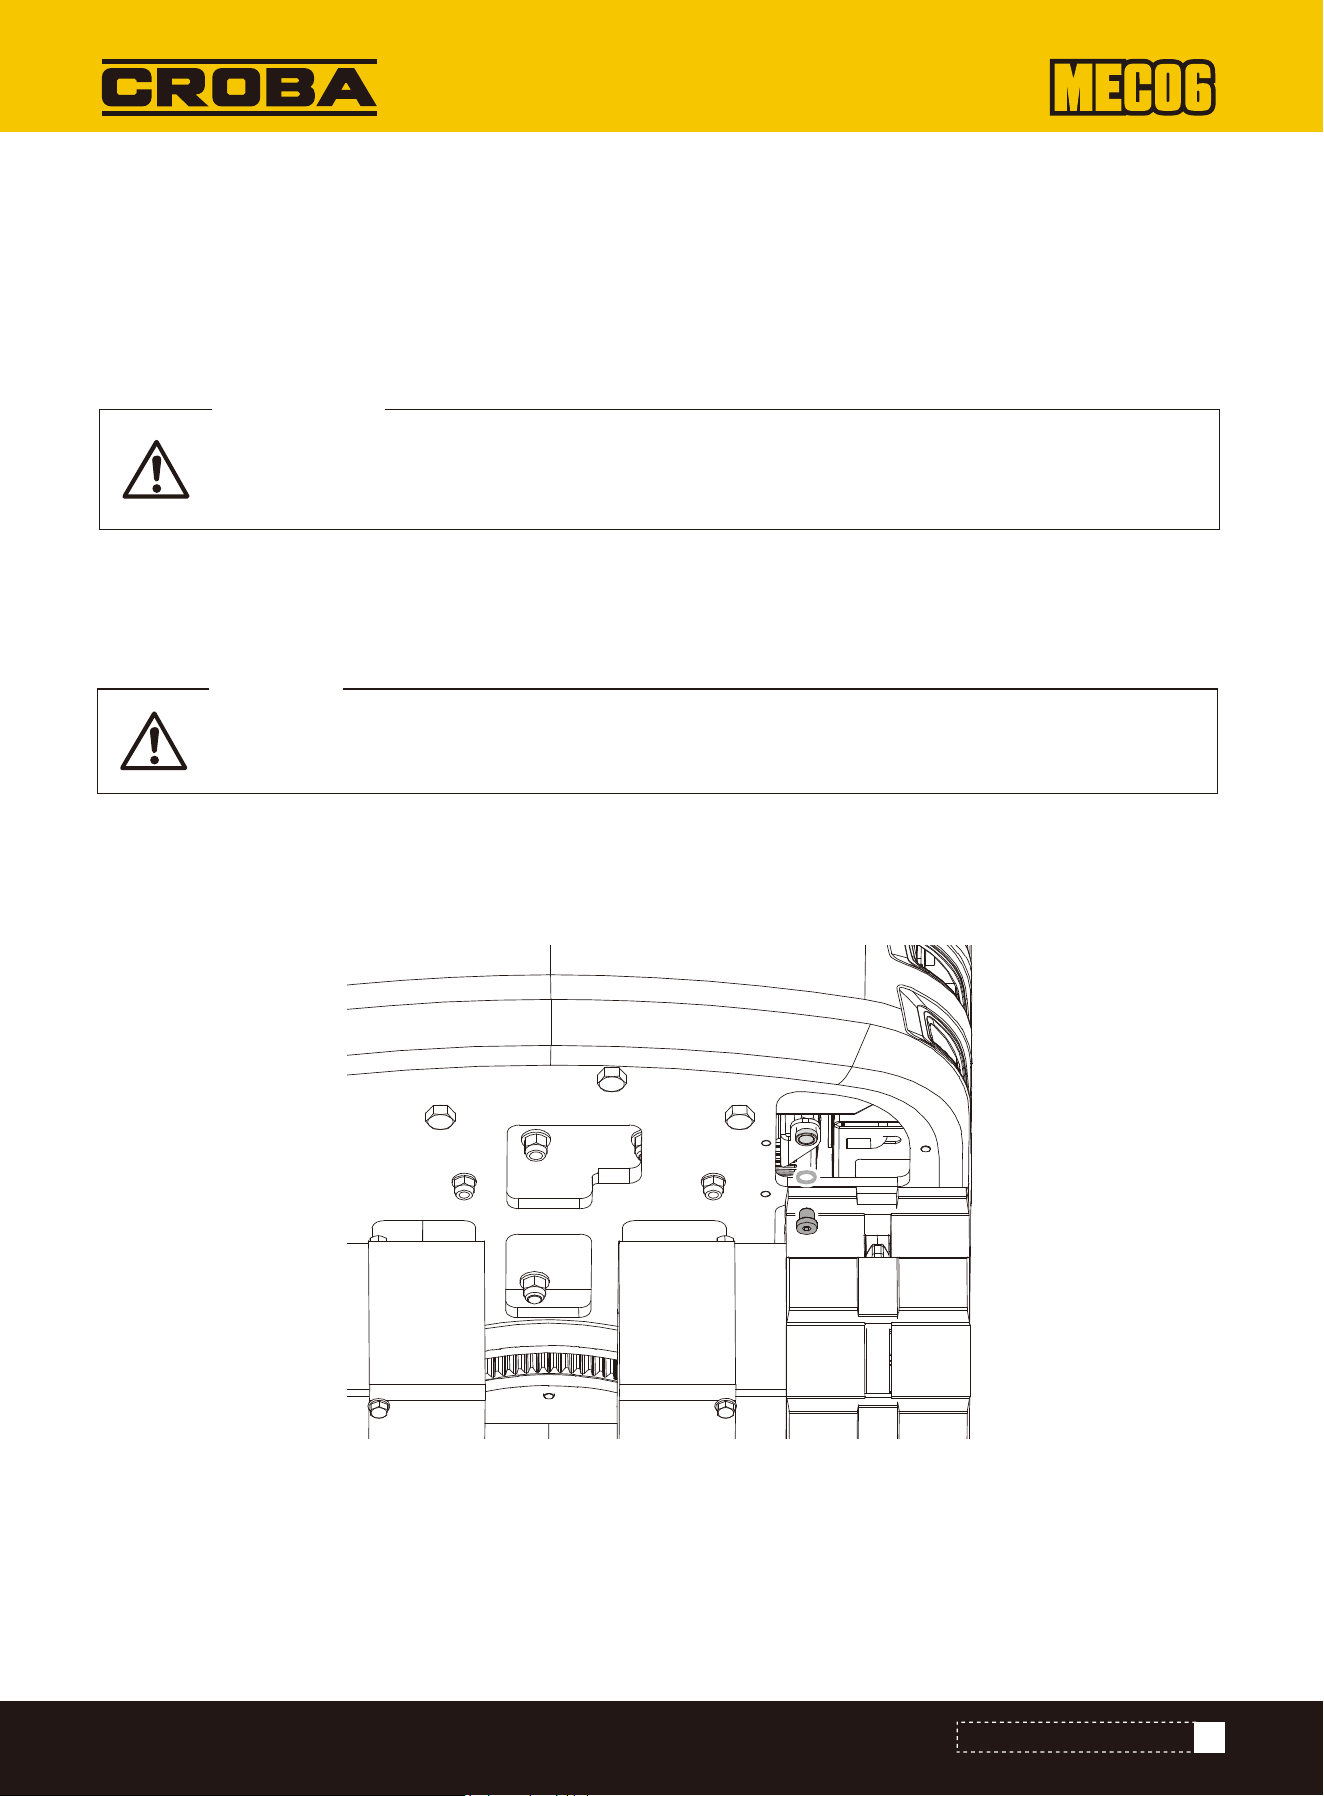
First switch off the engine and wait until the oil has cooled down.
CAUTION
Before starting the engine, check whether flammable substances have accumulated on the battery, the cables and lines,
the exhaust silencer or the engine. Remove these thoroughly.
1. Remove the drain plug from the underside of the engine and drain the oil completely. Important! Place a suitable
container under the engine to collect the used oil. Dispose of used engine oil in accordance with local legislation. We
recommend taking it to your local recycling center or petrol station in a sealed container for recycling.
2. Retighten the drain plug.
3. Fill with new oil to the required level.
Check the electrical circuit for loose connections, short circuits or loosened connections.
Testing the electrical circuit
Check the electrical circuit for loose connections, short circuits or loosened connections.
Every 50 operating hours:
Washing the whole machine
Change the engine oil
Regular checks and maintenance work
57
EXPLODED VIEW&PARTS LIST
Do not wash the excavator with the engine running. Water could penetrate the air filter and damage
the engine. Make sure that the air filter remains dry.
IMPORTANT!
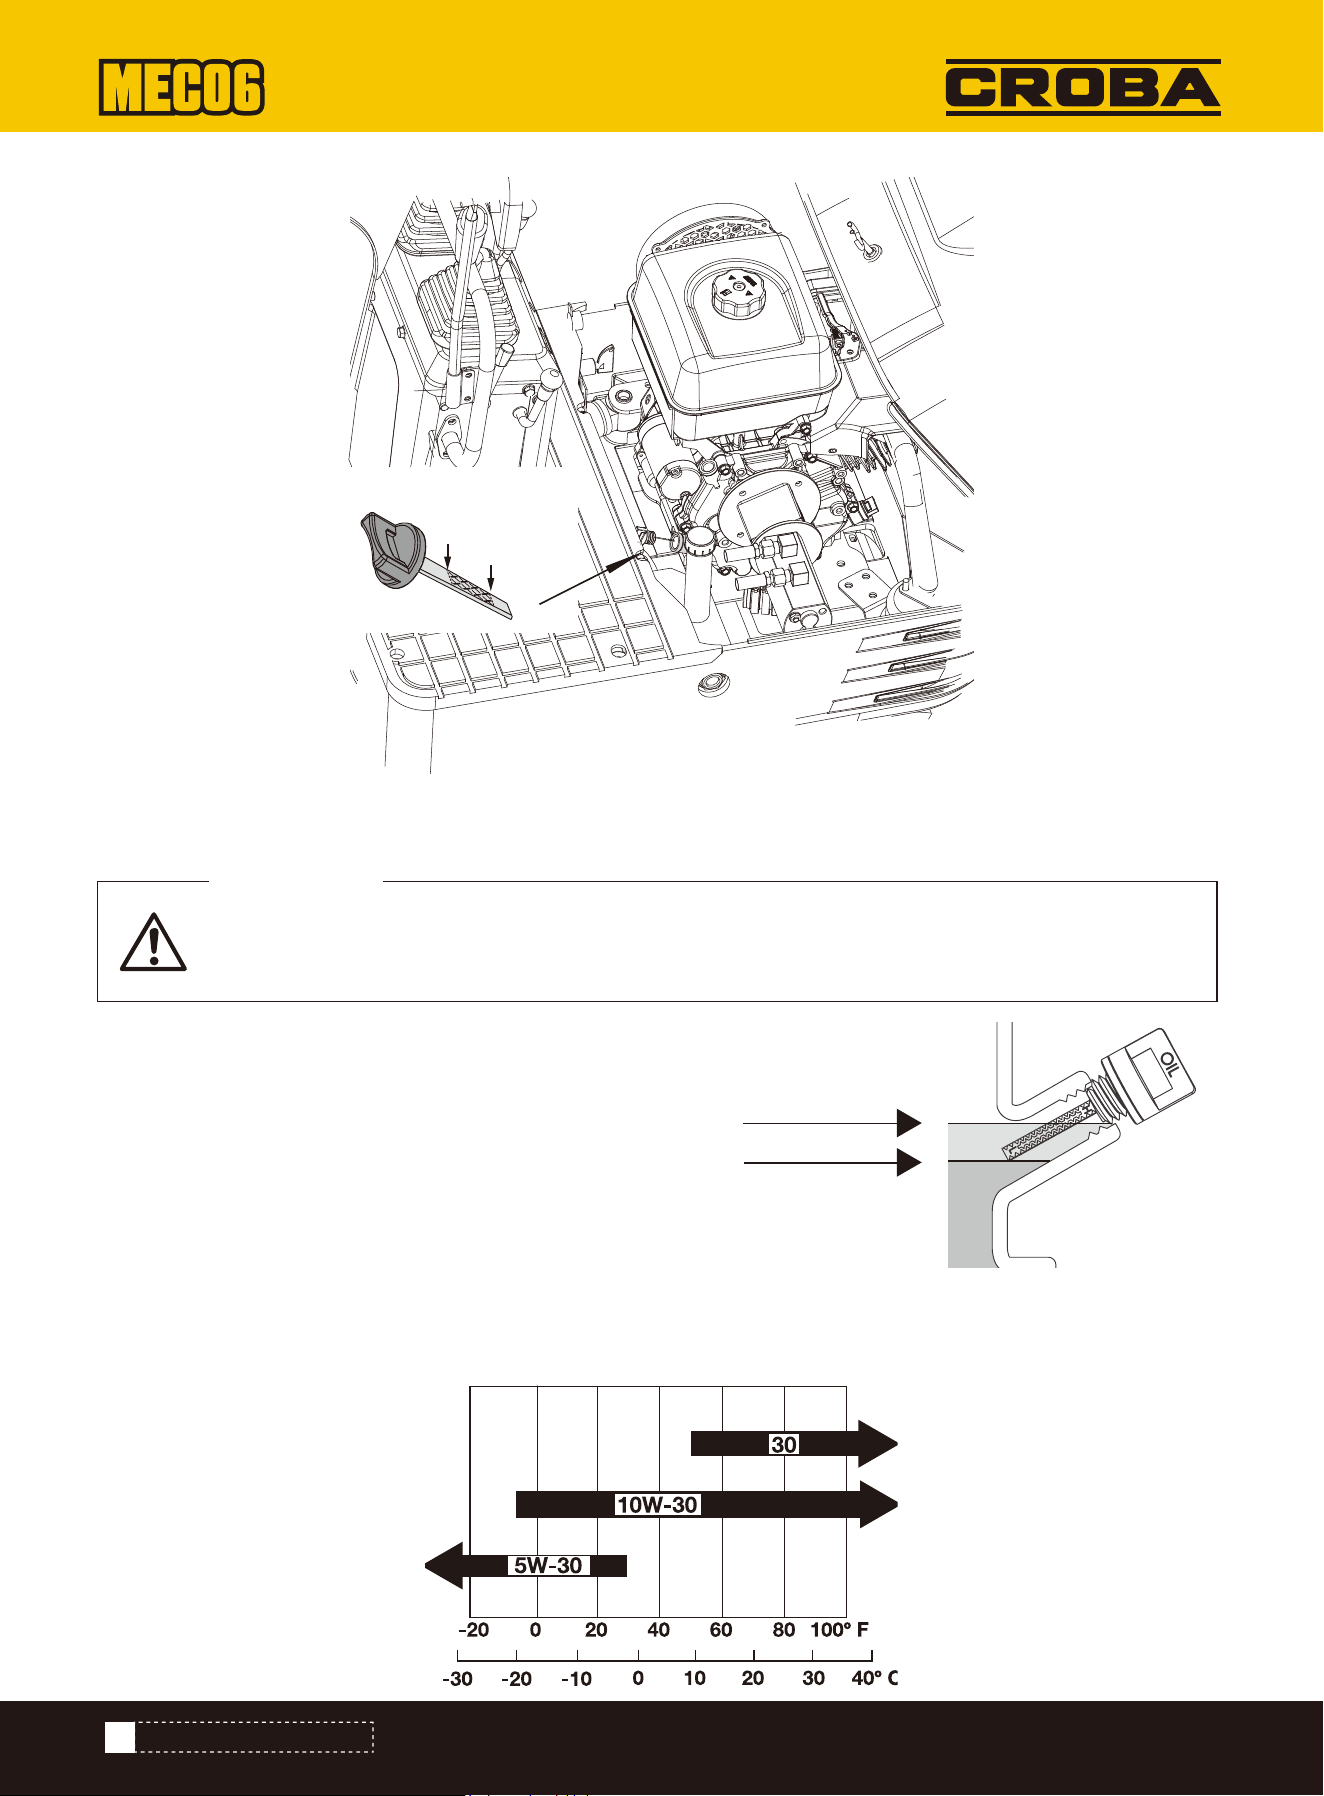
4. Allow the engine to turn at idle speed for 5 minutes. Check the oil level. To do this, insert the dipstick fully into the
opening provided and pull it out again. If the oil level is between the two markings, no oil needs to be topped up.
Engine Oil Capacity: 1.2 qt
Note: The total oil quantity should be 4 more ounces (approx. 0.1
litres) above the above quantities due to the mounting angle and
proper draining.
The engine oil influences performance and service life. Use a
4-stroke automotive detergent oil. SAE 10W-30 is recommended
for general use.
Other viscosities shown in the diagram can be used if the average temperature in your area permits. The SAE oil viscosity
and the utilization classification can be found on the API label on the oil container. Use API SERVICE category SJ or higher
engine oil.
Engine oil recommendations
58
EXPLODED VIEW&PARTS LIST
The engine oil must be changed once a year regardless of the operating hours.
IMPORTANT!
Max. Min.
H
L
max.
min.
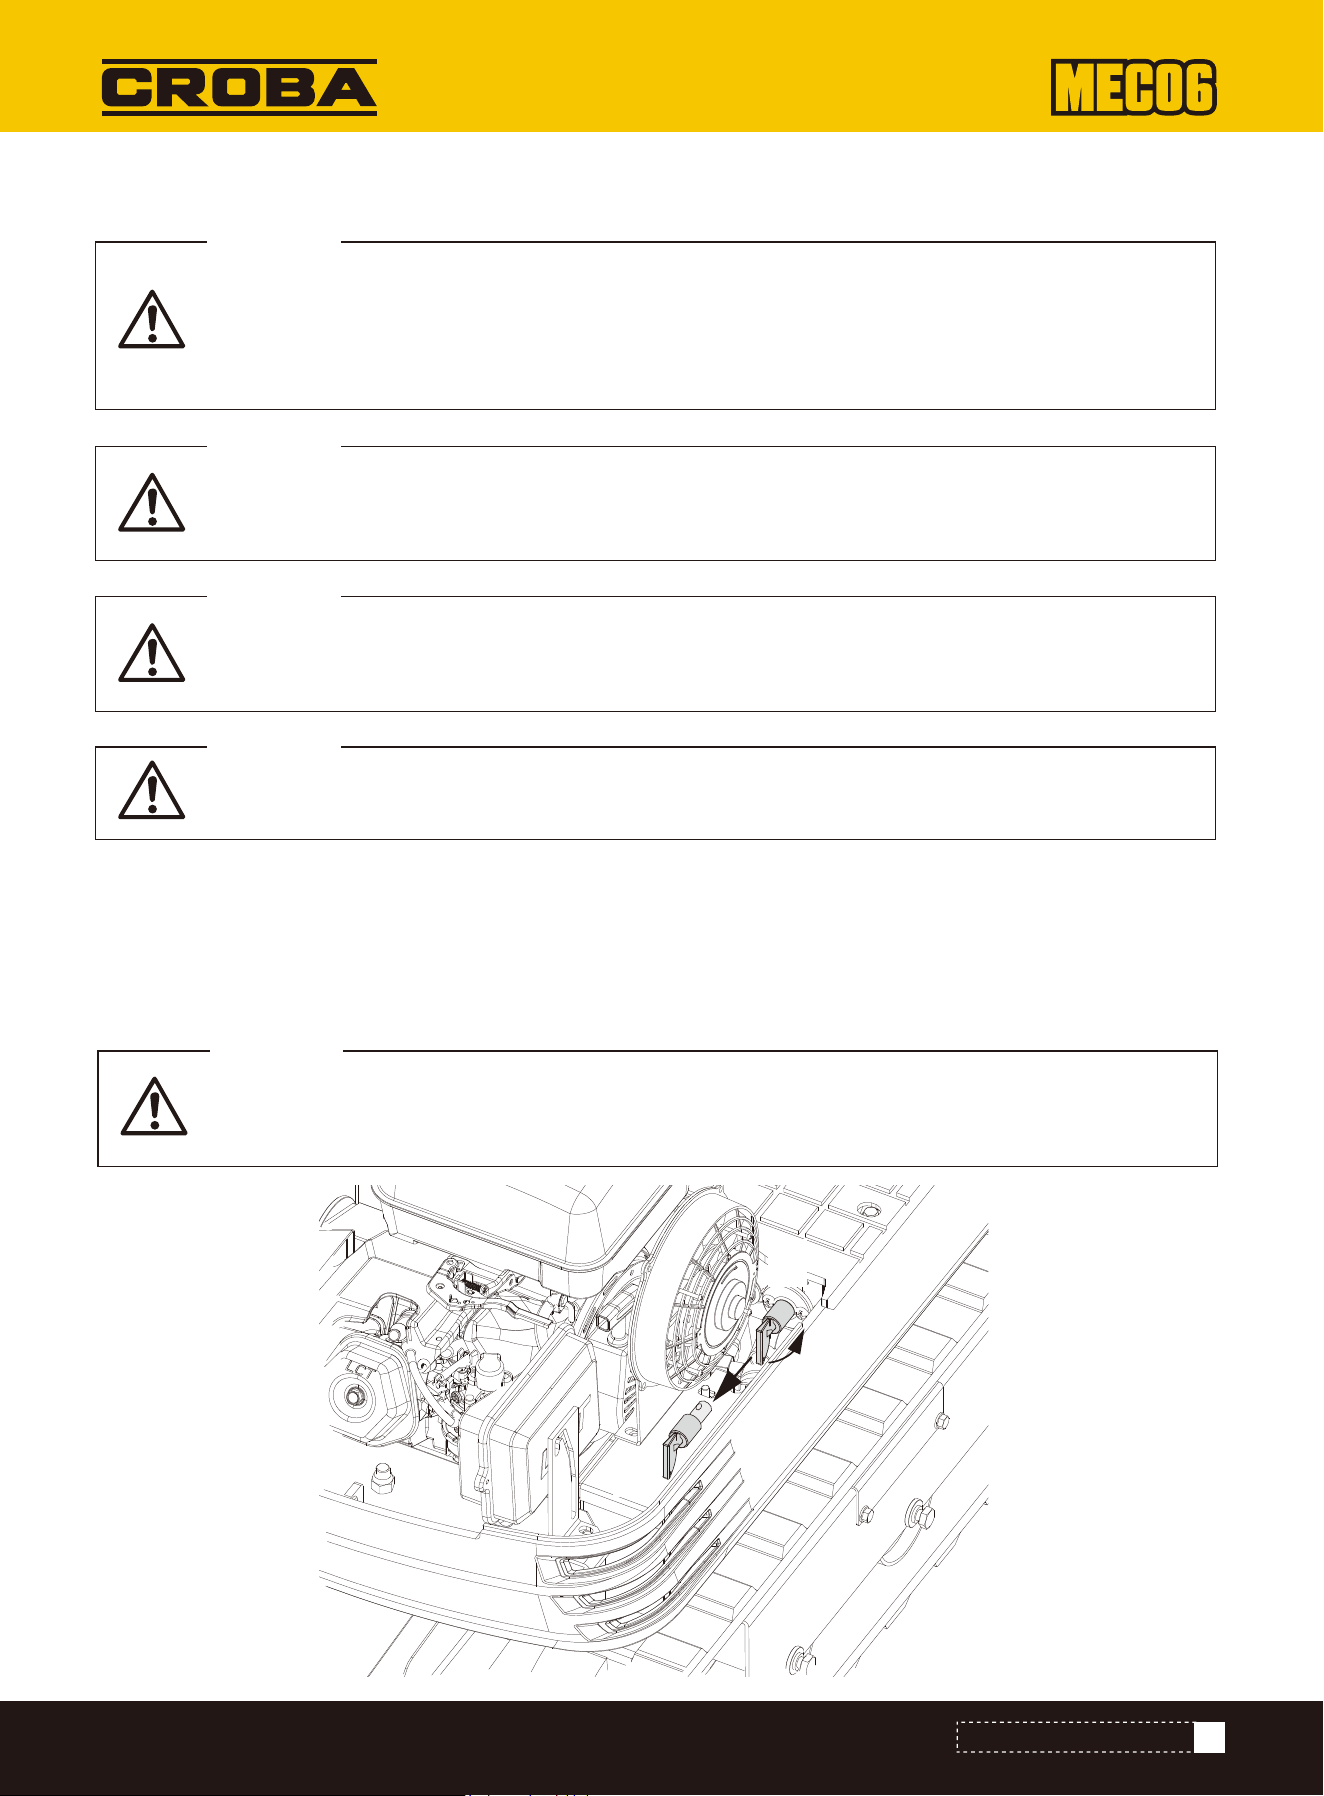
BATTERY MAINTENANCE
Batteries contain sulfuric acid, which can cause severe burns. Avoid contact with skin, eyes or
clothing. First aid - External: Rinse with plenty of water. Internal: Drink large quantities of water or
milk. Call a doctor immediately. Eyes: Rinse with plenty of water for 15 minutes and seek medical
attention immediately. Keep batteries out of the reach of children.
CAUTION
Before inspecting or removing the battery, switch off the engine and set the ignition switch to the
"OFF” position.
CAUTION
When removing the battery, always remove the negative earth cable first. When installing a battery,
always connect the earthing cable last. This prevents a possible explosion due to sparking.
CAUTION
Always wear eye protection when working with the battery.
CAUTION
1. Check whether the battery appears deformed.
2. Replace the battery if it is deformed.
3. Remove any dust from the battery cover (ventilation opening).
4. Check whether the battery connections are loose. Tighten them if they are loose. Make sure that you tighten the
positive screw and ensure that the tool used does not touch the cladding.
59
EXPLODED VIEW&PARTS LIST
1
0
Before tightening the positive screw, make sure that you switch off the switch of the negative
earthing cable first.
WARNING
When the battery has been activated, hydrogen and oxygen gases in the battery are extremely
explosive. Keep open sparks and flames away from the battery at all times, especially when
charging the battery.
CAUTION
When disconnecting the cable from the battery, start with the negative connection. When connect-
ing the cable to the battery, start with the positive connection.
CAUTION
Do not check the charge status of the battery by placing a metal object over the connections.
CAUTION
1. To charge the battery slowly, connect the positive terminal of the battery to the positive charging connection and the
negative terminal to the negative connection. Then charge as usual.
2. Fast charging should only be carried out in emergencies. The battery is then partially charged at high speed and in a
short time. If you are using a fast-charging battery, the battery must be recharged as quickly as possible. If this is not
done, it can shorten the service life of the battery.
3. Use a battery with the same specifications when replacing an old battery with a new one.
1. Fill grease through the grease nipples (on the right side).
2. Lubricate at every 90° degree position (1.58 wheel) of the swivel frame.
3. Fill with approx. 50 g grease (approx. 20 strokes with the grease gun). Spread the grease over the teeth.
Battery charged
Lubricating the teeth of the swivel bearing
60
EXPLODED VIEW&PARTS LIST
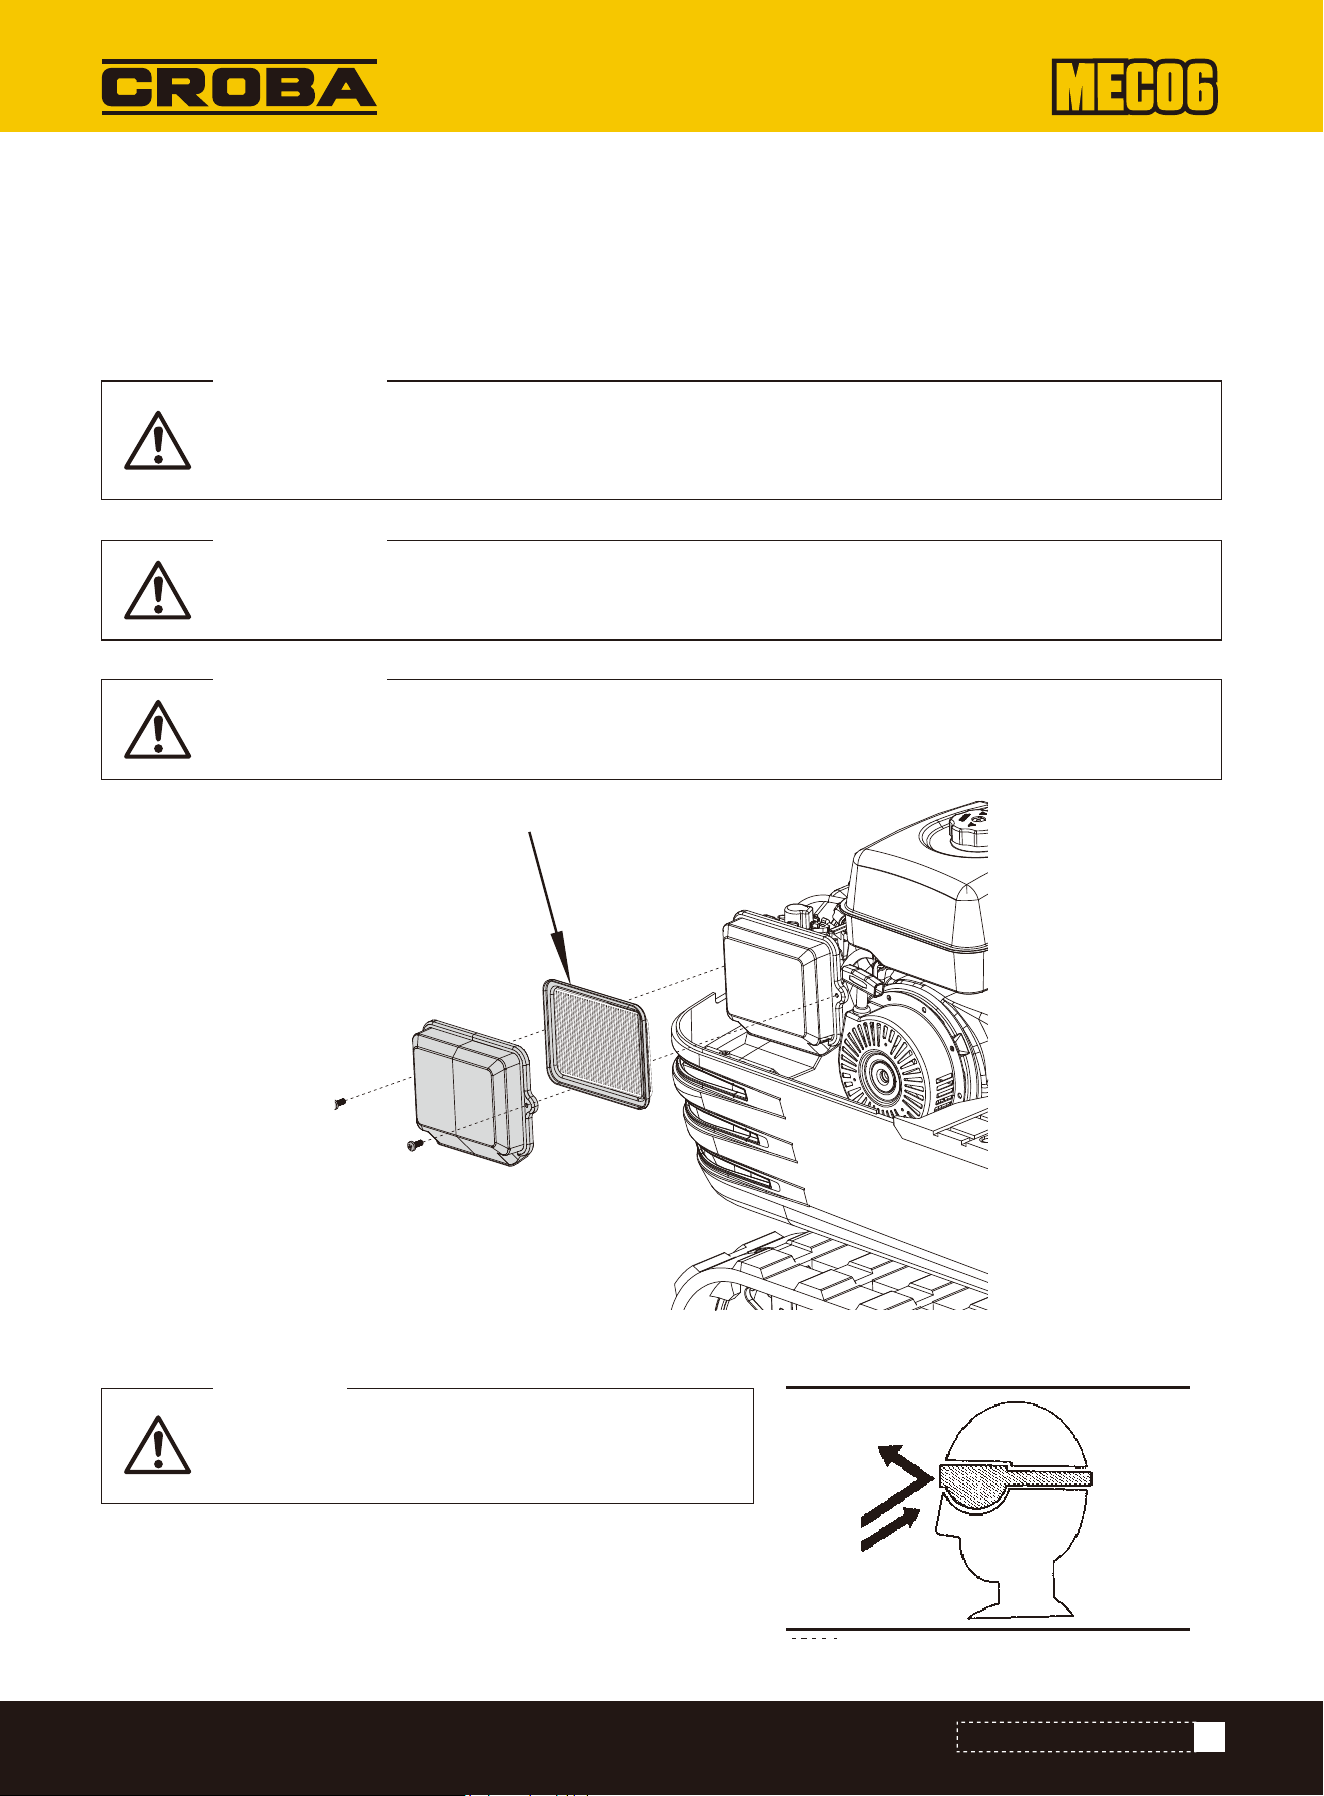
If the machine is used in extremely dusty areas, the air filter element must be inspected and
cleaned more frequently than the specified maintenance intervals.
IMPORTANT!
The air filter has a dry element, keep it free of oil.
IMPORTANT!
Do not run the engine without the air filter.
IMPORTANT!
Wear eye protection!
CAUTION
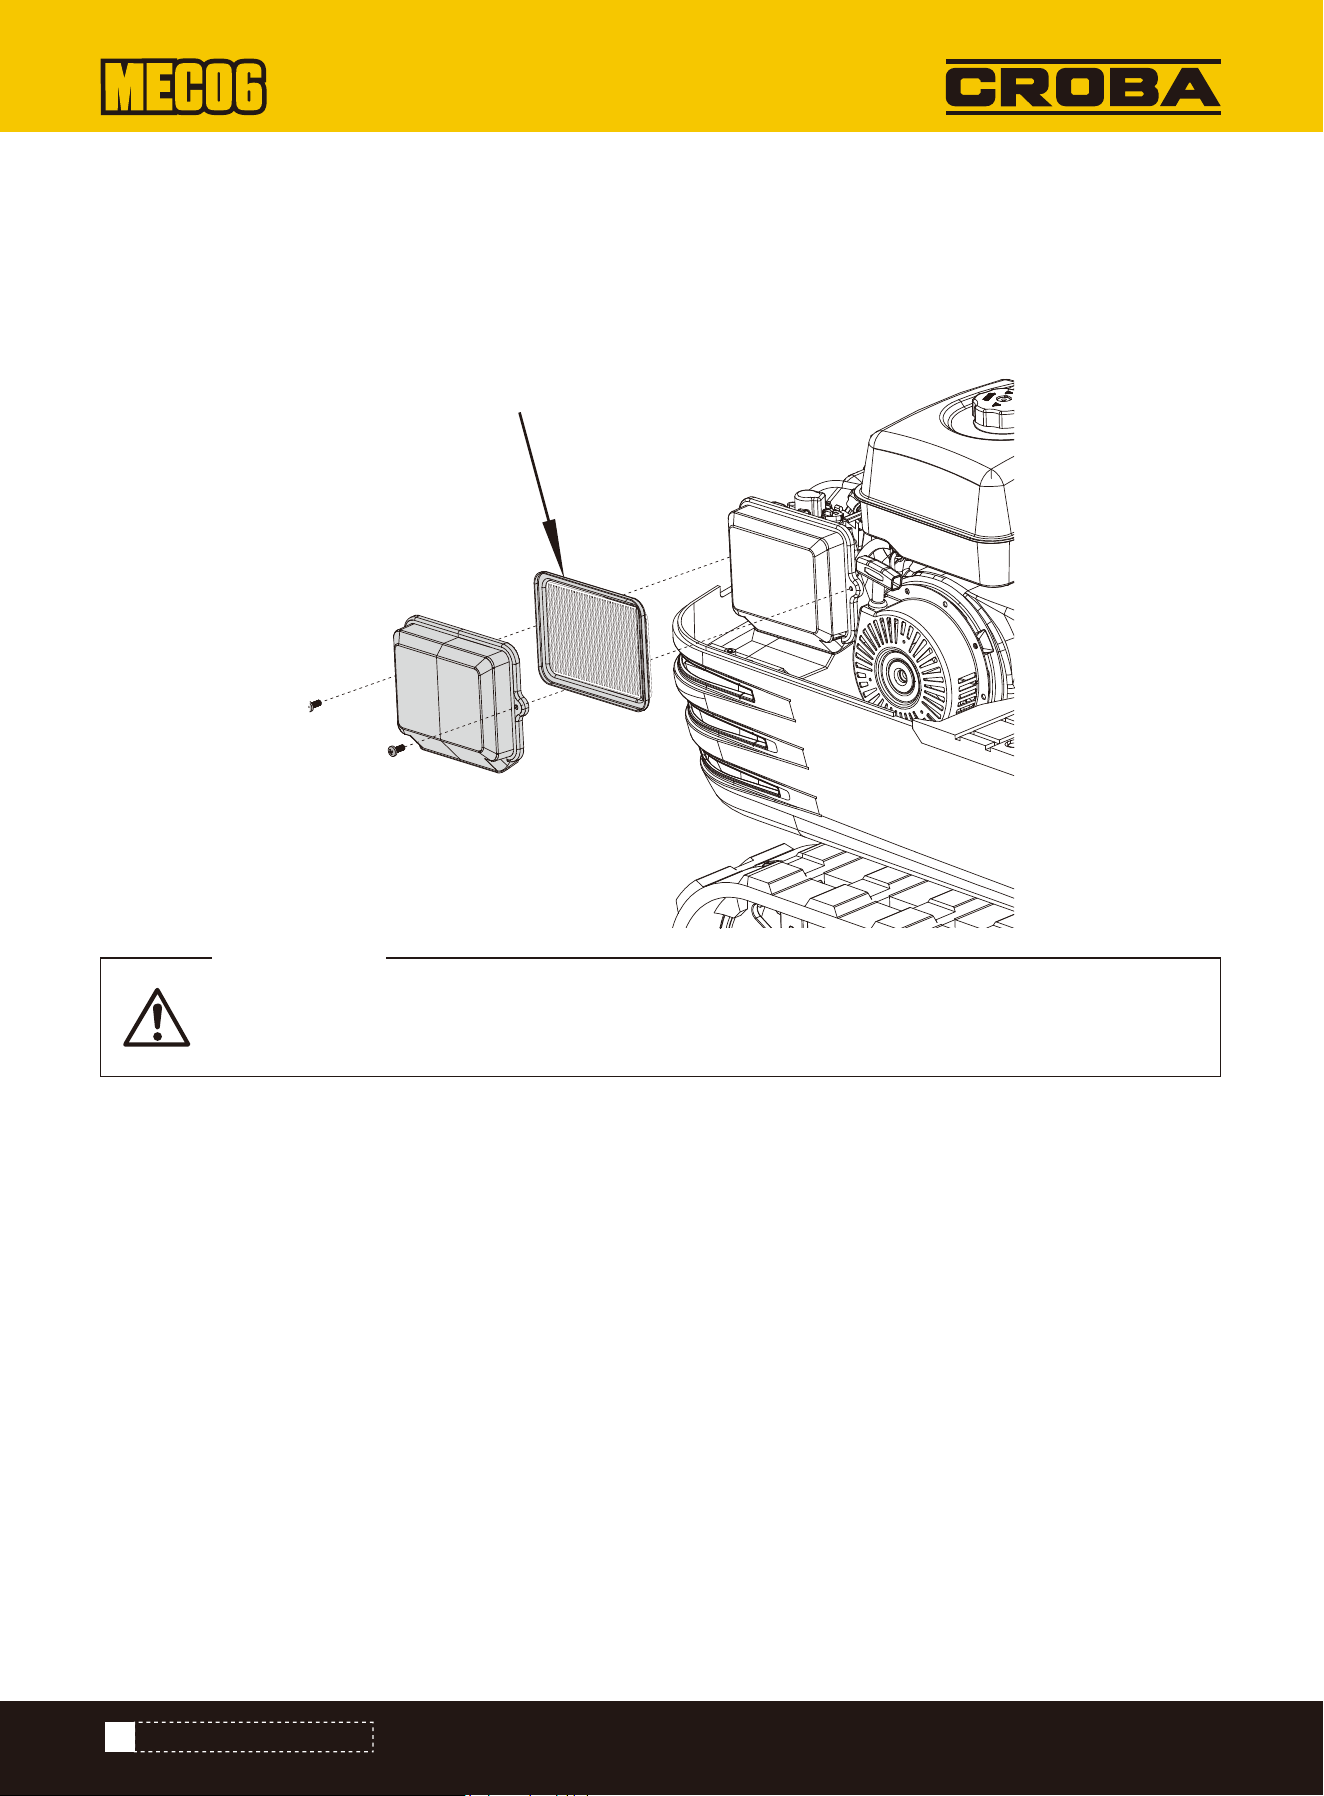
1. Open the bonnet and remove the dust cover.
2. Remove the outer element, clean the element and the inside of the housing and reassemble
3. When reassembling, ensure that the dust cover is fitted with the UP mark (arrow) pointing upwards. Do not remove the
inner element.
Inspection and cleaning of the air filter element
Maintenance of the air filter
61
EXPLODED VIEW&PARTS LIST
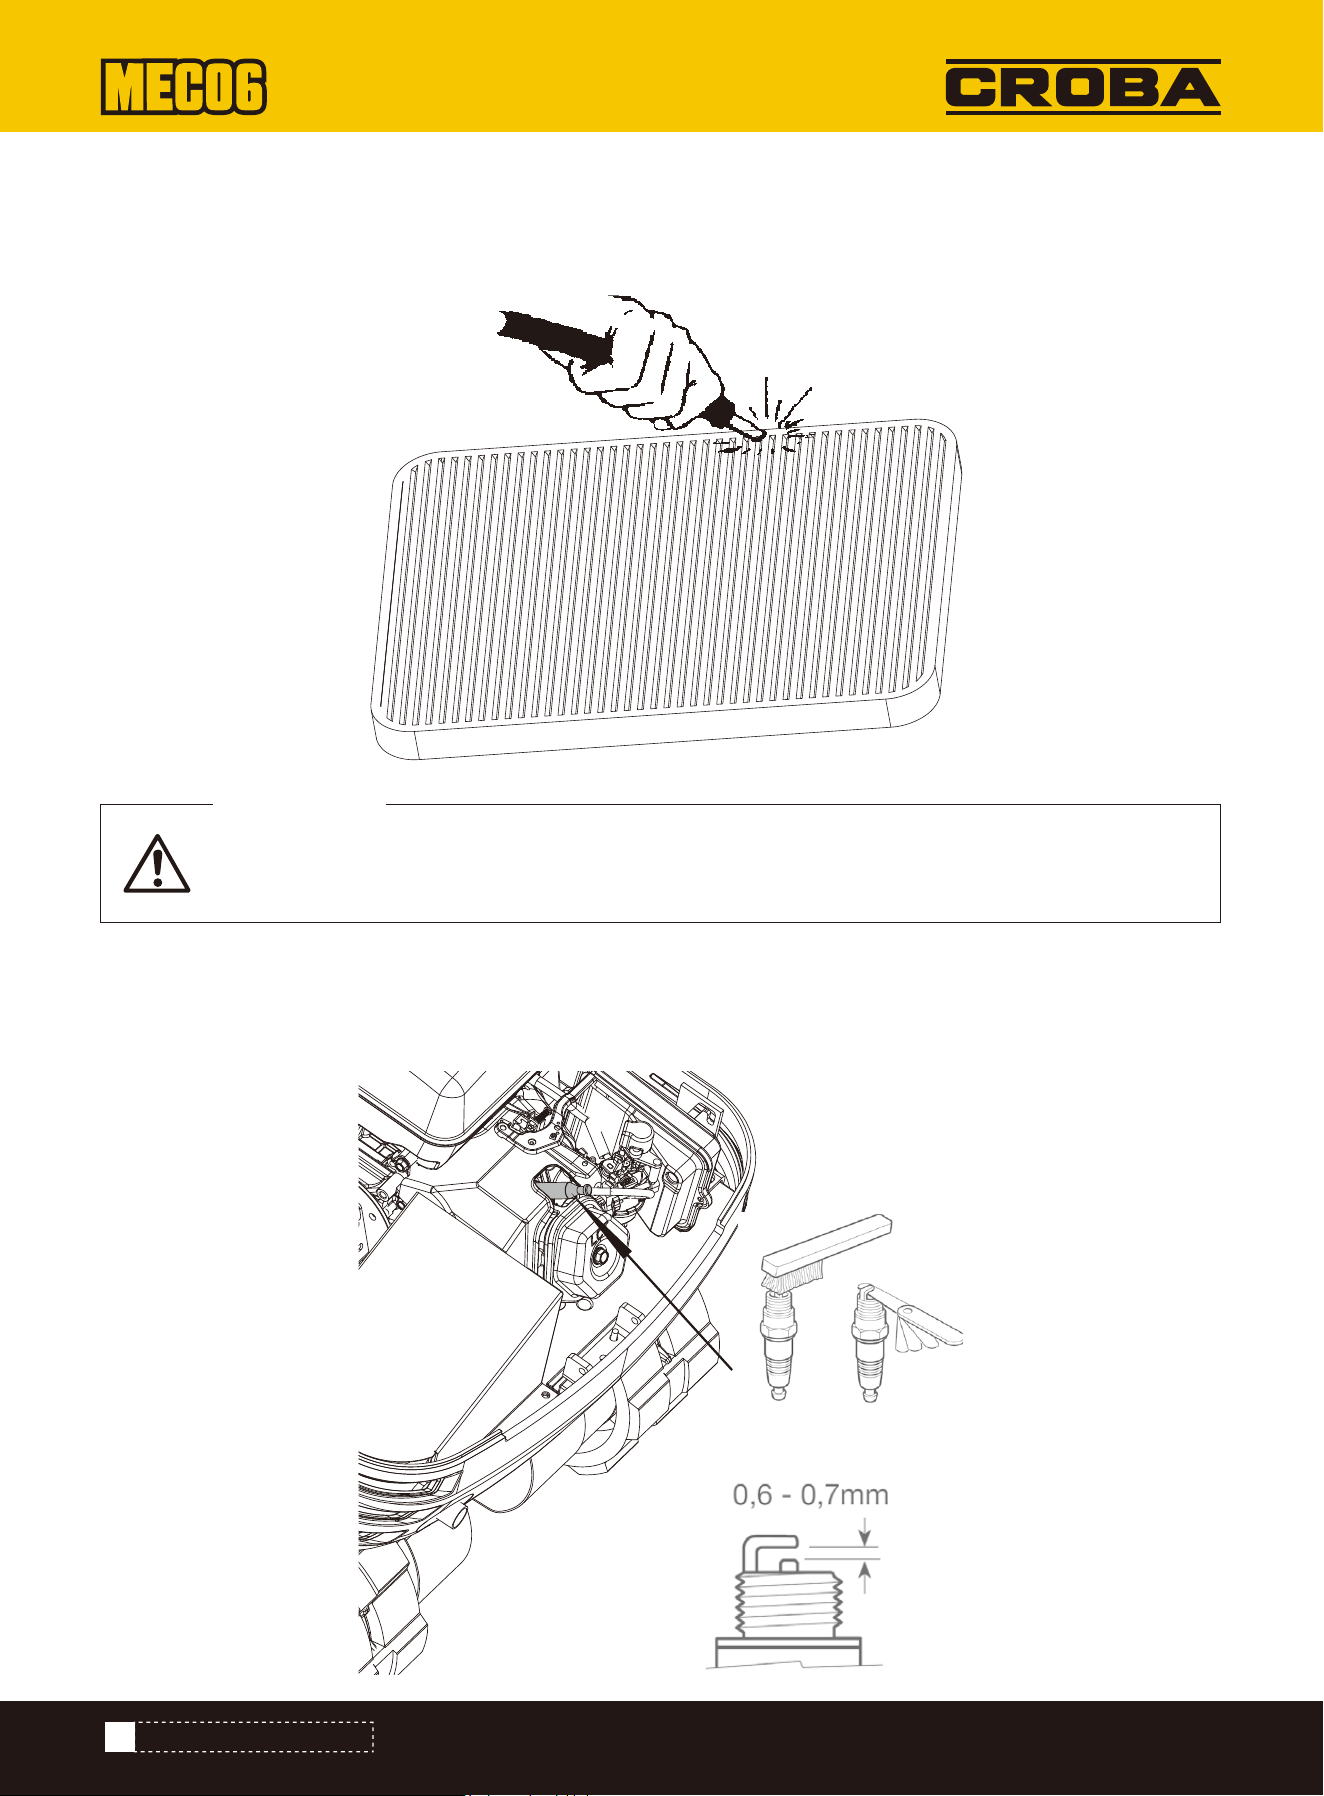
CHECKING THE SPARK PLUG
If the air intake is still not sufficient or the color of the exhaust gases is abnormal even after clean-
ing, the air filter element must be replaced.
IMPORTANT!
The pressure of the compressed air must be below 205 kPa (2.1 kg/cm) and the cartridge must be blown clean from the
inside to the outside until the dust deposits have been completely removed.
Use the special spark plug spanner to remove the spark plug and check whether there are any carbon deposits on the
spark plug needle. In this case, remove the carbon deposits. Replace the spark plug if it is defective.
Cleaning with compressed air
62
EXPLODED VIEW&PARTS LIST
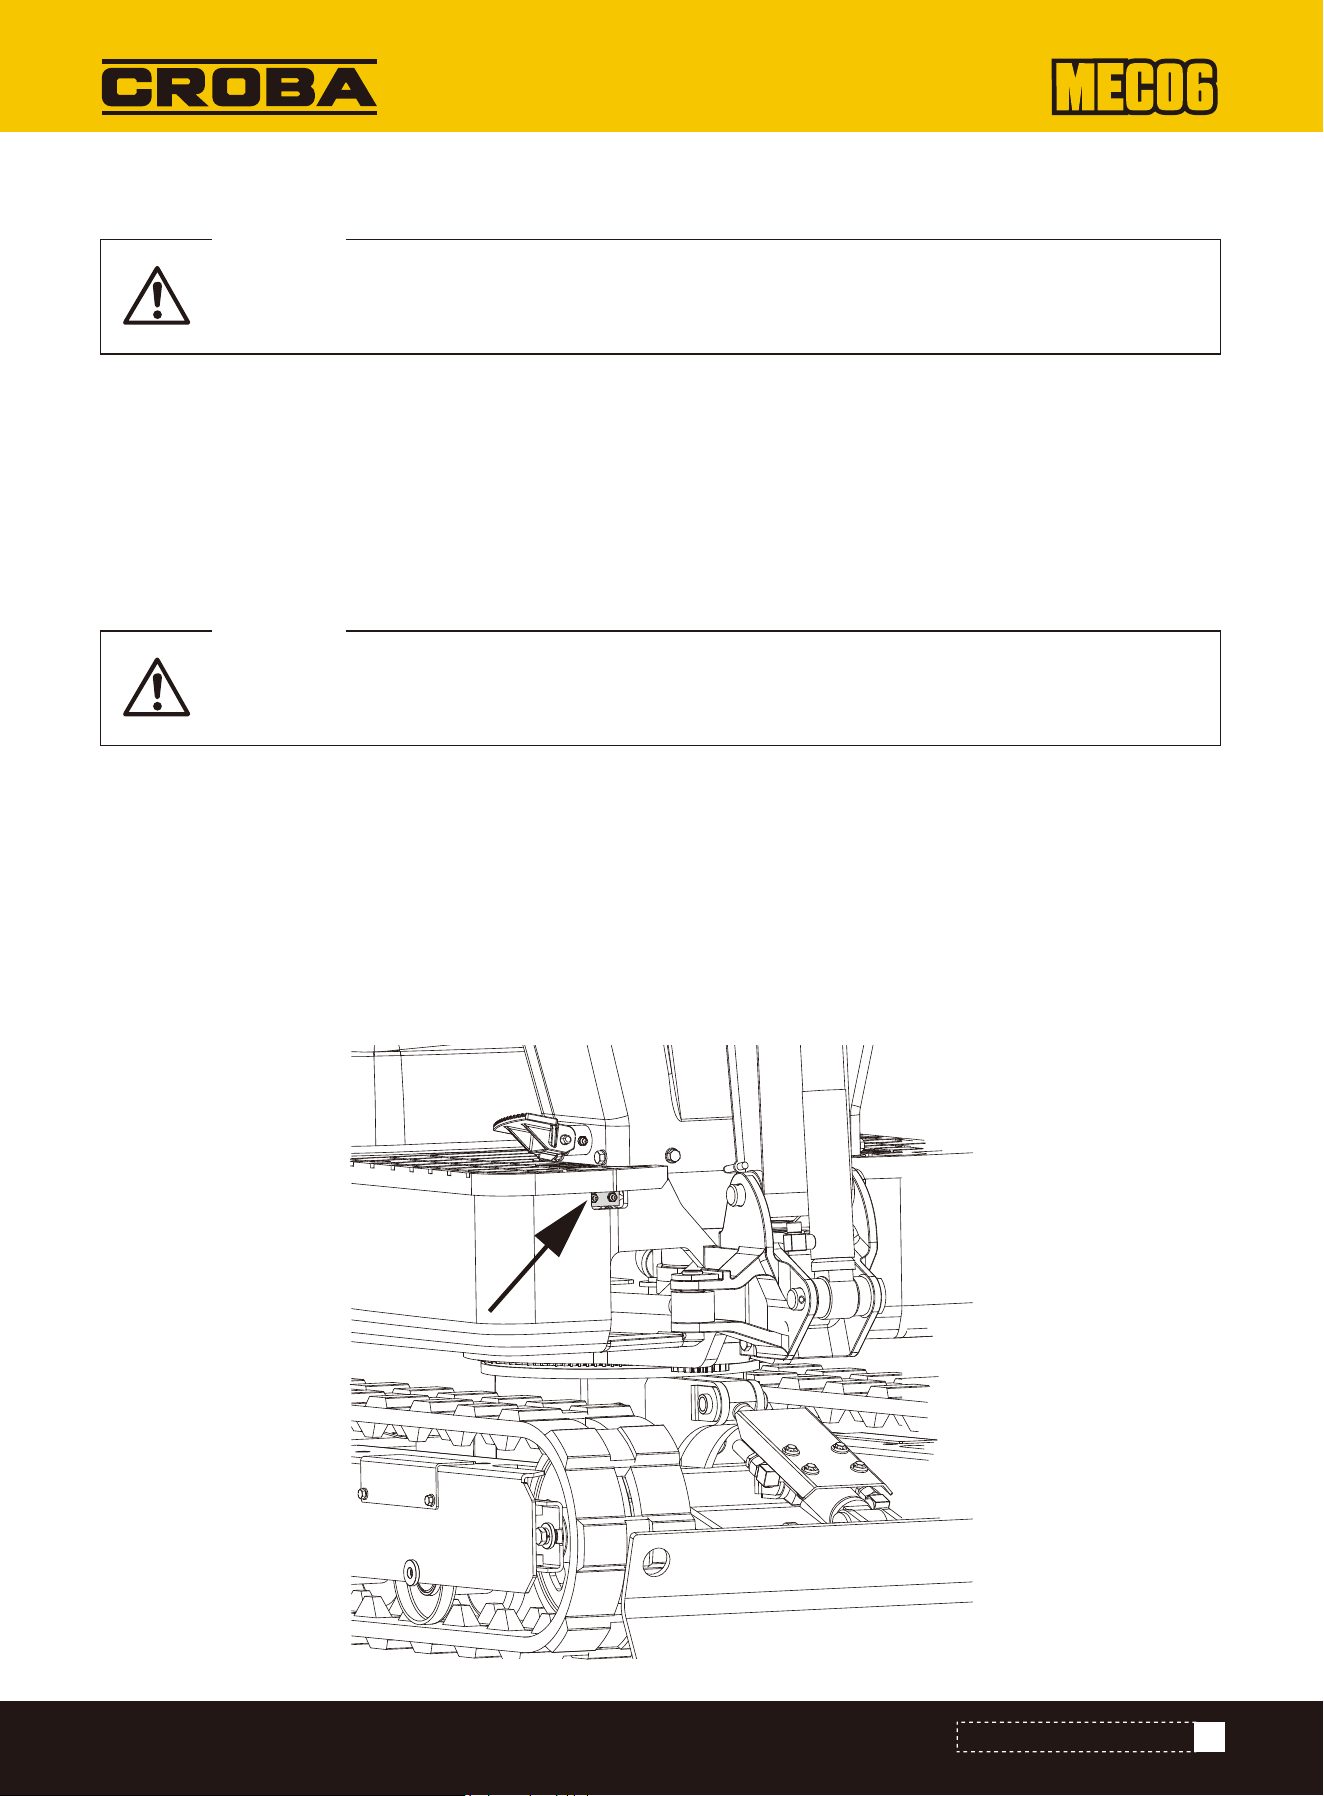
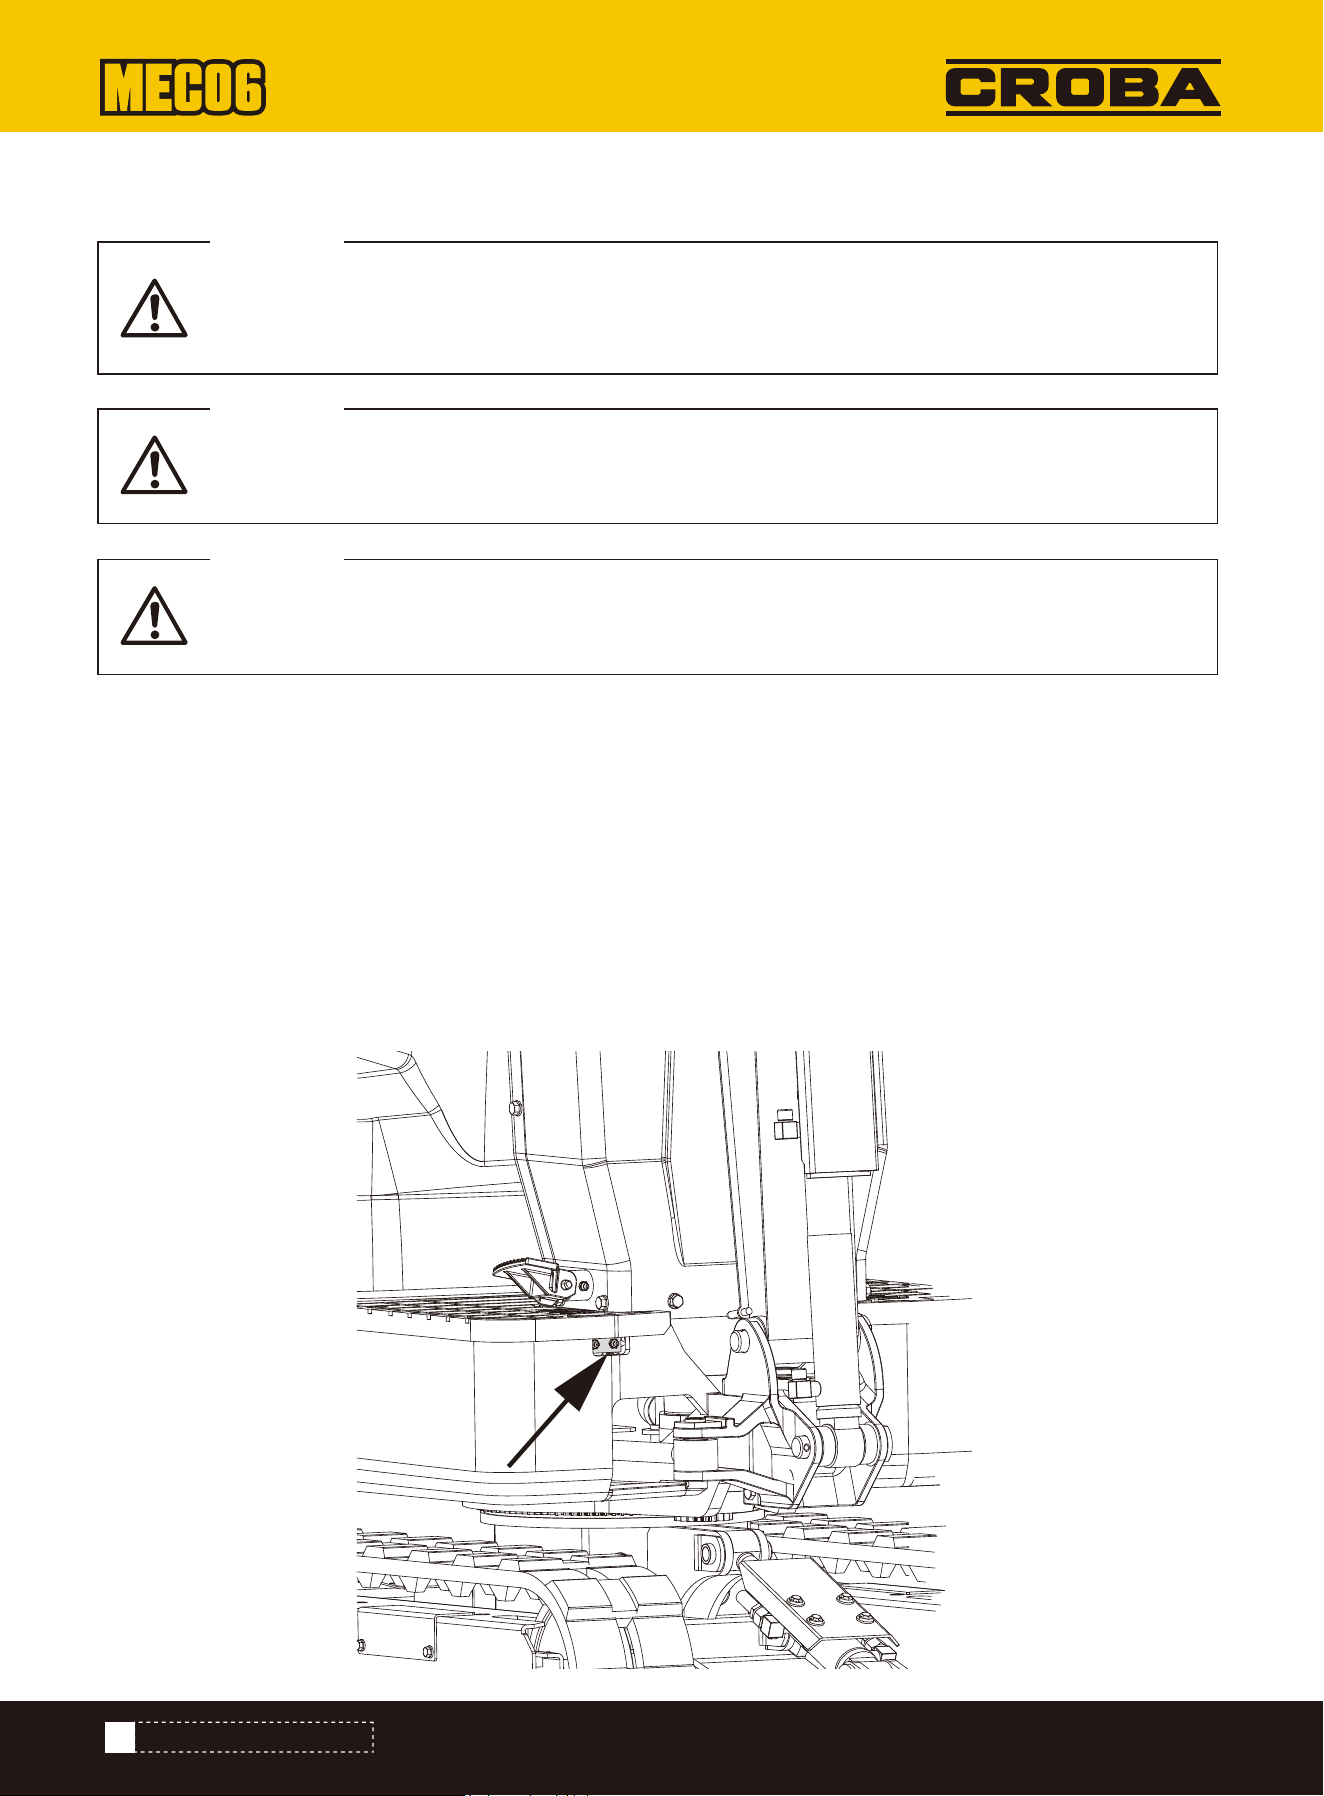
LUBRICATING THE SWIVEL BEARING
Using the wrong spark plug can damage the engine.
CAUTION
A loose spark plug can overheat and damage the engine. Overtightening the spark plug can damage
the thread in the cylinder head.
CAUTION
1. Remove the spark plug connector and use compressed air to remove deposits from the spark plug area.
2. Remove the spark plug with a 13/16-inch spark plug spanner.
3. Examine the spark plug. Replace them if the electrodes are worn or the insulation is torn or chipped. The spark plug gap
should be set to 0.027-0.030 inch.
4. Install the spark plug carefully to avoid wedging the threads. Screw the spark plug in by hand until it stops turning.
5. Tighten the spark plug with a 13/16-inch spark plug spanner. Tighten the spark plug with a 1/4 turn when the spark
plug is seated.
6. Refit the spark plug connector. Ensure that it engages securely.
Every 100 operating hours:
Carry out the complete 50 operating hours maintenance at the same time.
1. Lubricate through the corresponding grease nipples.
2. Lubricate at every 90° position (1.58 wheel) of the swivel frame.
3. Apply 5 strokes with the grease gun in each point.
Maintenance of the spark plug
63
EXPLODED VIEW&PARTS LIST
Shorten the replacement intervals if you work in areas with a lot of dust or sand.
IMPORTANT!
REPLACING THE AIR FILTER ELEMENT
CHECKING THE PETROL LINE
Open the bonnet and remove the dust cover. Remove the outer and inner elements and replace them with new elements.
When reassembling, make sure that you fit the dust cover with the UP mark (arrow) pointing upwards.
1. Check that all lines and hose clamps are secure and undamaged.
2. If the lines and hose clamps are worn or damaged, they must be repaired or replaced immediately.
Every 1000 operating hours:
Carry out the complete 50, 100, 200 and 500 operating hour maintenance at the same time.
Changing the hydraulic oil (including replacing the suction filter and the return filter in the hydraulic tank)
Every 200 operating hours:
Carry out the complete 50 and 100 operating hour maintenance at the same time.
64
EXPLODED VIEW&PARTS LIST
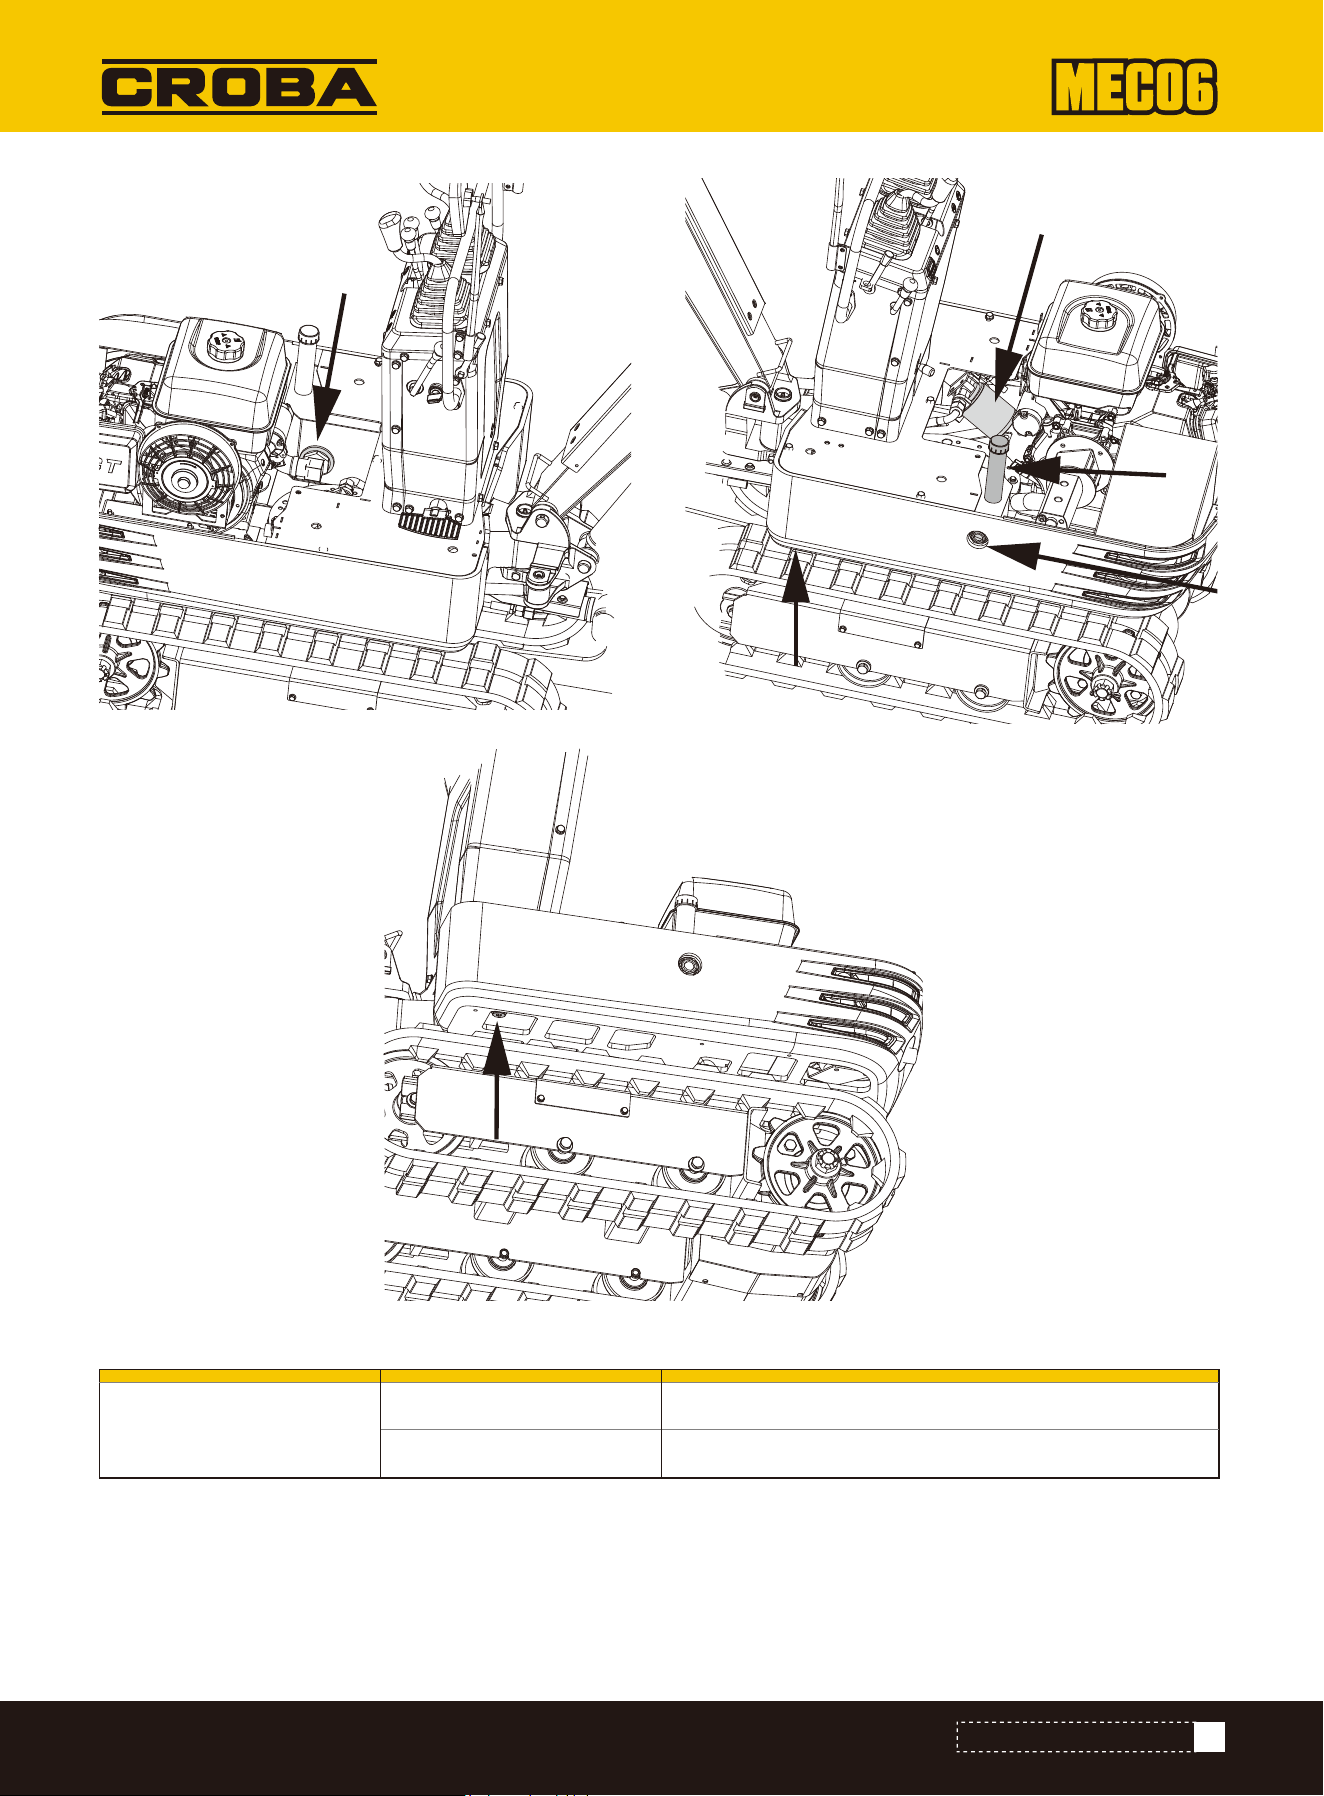
Check the level of the hydraulic oil in the inspection window. Add oil when the level is lower than 1/3.
65
EXPLODED VIEW&PARTS LIST
Hydraulic oil quantities
Hydraulic oil tank approximately 10.8 litres
Total oil quantity approximately 14.0 litres

If the crawlers are too tight, this increases wear.
IMPORTANT!
Do not crawl under the excavator.
CAUTION
1. Changing and topping up hydraulic oil (1) Only use the oil types recommended in the operator's manual to change or top
up the oil.
2. Do not mix different brands of oil when topping up.
3. Change the return filter and oil.
4. The filter must be changed more frequently due to contamination caused by frequent removal and attachment of the
pipes.
5. Use the correct filter for replacement.
6. Oil change after operating hours.
Electrical cabling and fuses
Check the connections regularly for correct connections. Loose cable connections or damaged cables can lead to
malfunctions in the electrical system. This could lead to short circuits, leakage currents and other costly problems.
Check the cabling and replace damaged components immediately. Contact your dealer if the fuse blows immediately after
replacement. Only use the specified fuses.
Replacing the spark plug
Replace after one year or after 500 operating hours. Maintenance every two years.
Replacing the petrol line
Replace the cables and terminals. (See "Checking the petrol line" under Maintenance every 200 hours.)
Other settings and replacements
Adjusting the crawlers
Proceed as follows to loosen the crawlers:
1. Remove the side cover plate and loosen the M20 nut on the inside using a 30 mm spanner.
2. Adjust the M20x120 hexagonal screw and turn it clockwise to tighten the crawler. The crawler loosens when you turn
it clockwise.
3. Tighten the M20 nut with a spanner after adjustment.
Note
: When tightening, the torque must be between 98 and 108 Nm.
4. Attach the side cover plate.
Hydraulic oil check
Annual maintenance:
66
EXPLODED VIEW&PARTS LIST
Normal excavation work
Return filter Suction filter
Every 1000 hours 1000 hours
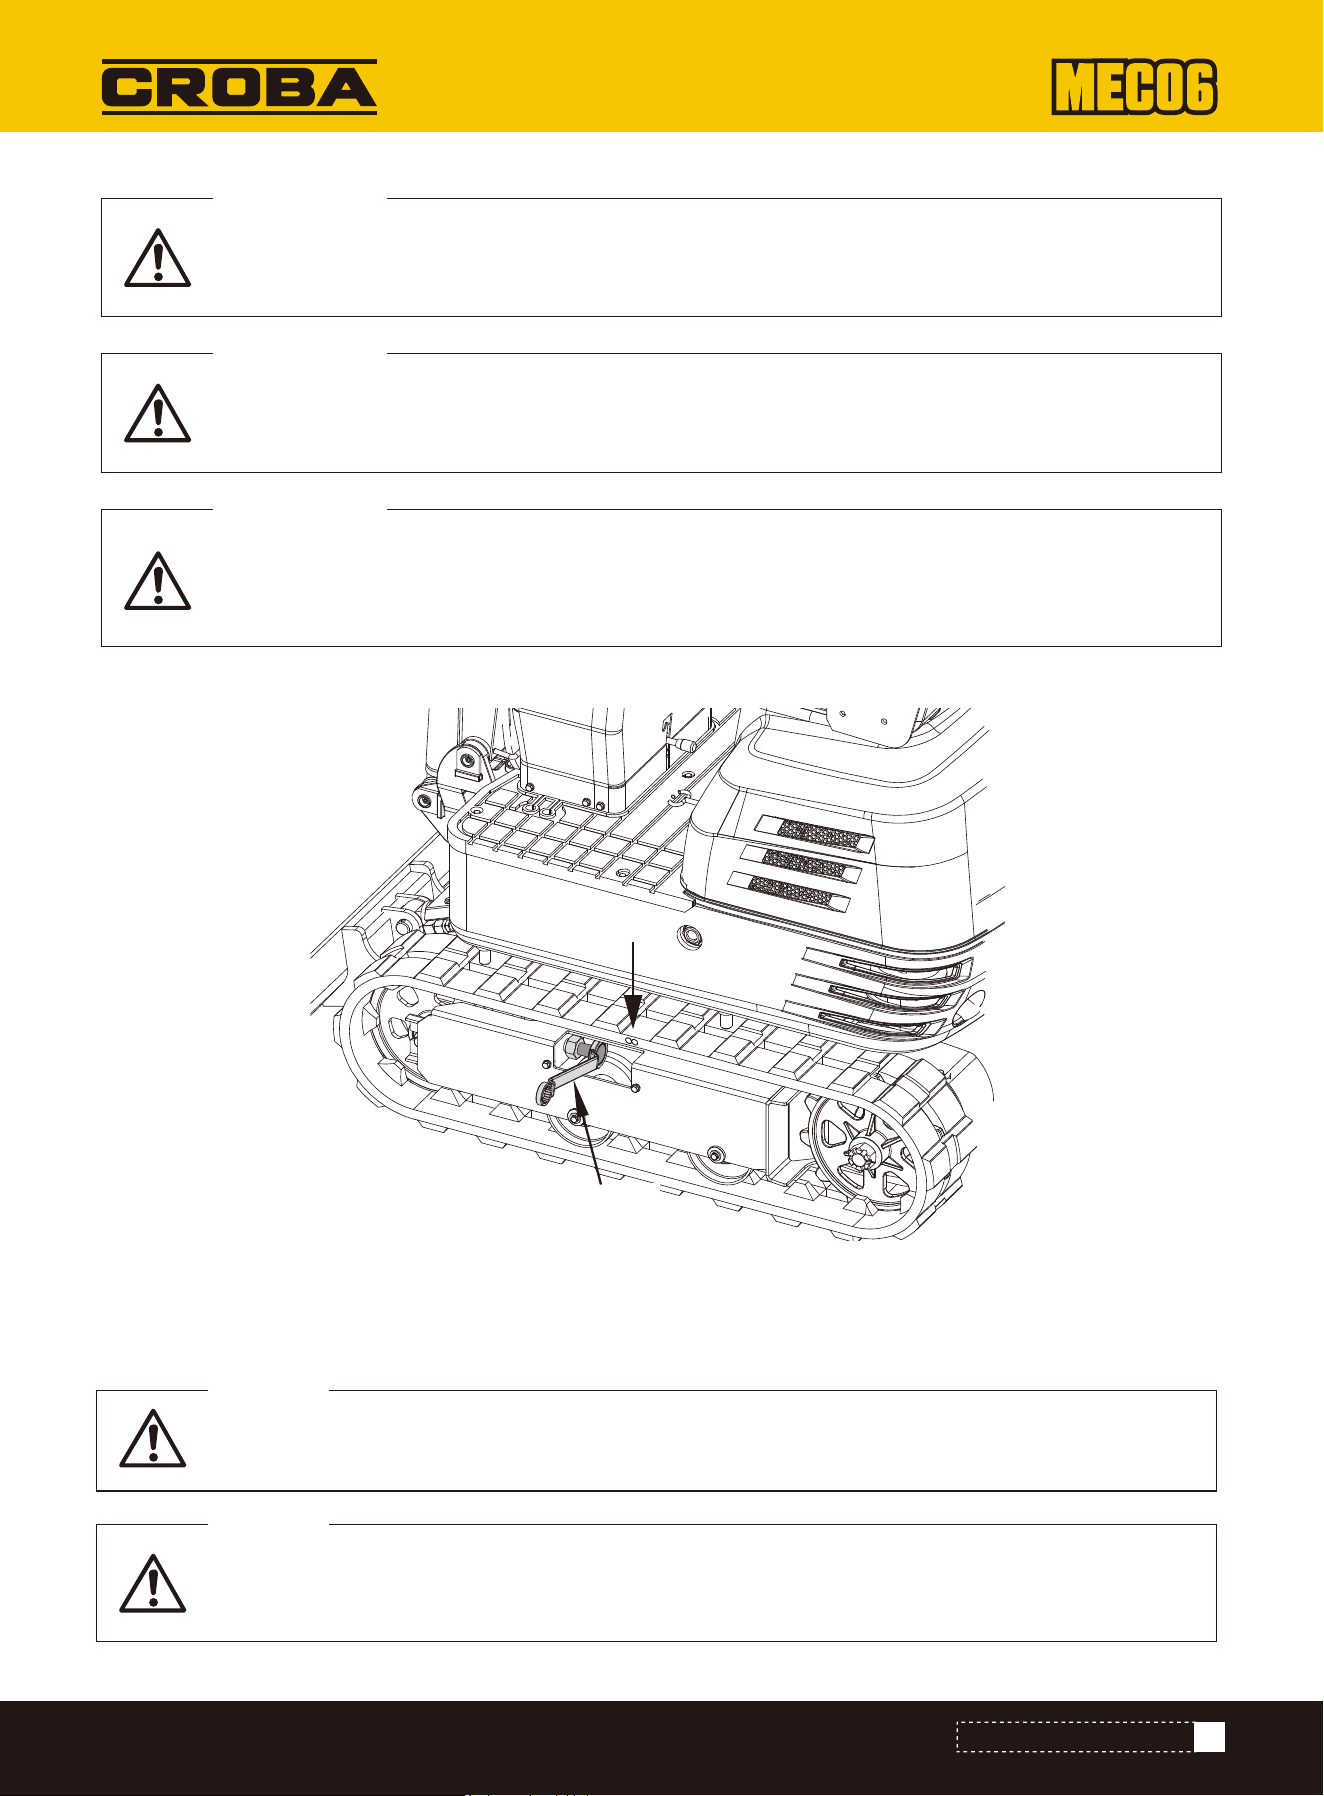
If the crawlers are too loose, the crawler shoes can collide with the sprocket and wear is increased.
The crawlers can shift and detach.
IMPORTANT!
Clean the crawlers after each use.
IMPORTANT!
If the tension of the crawlers is increased by adhering sludge, lift the crawlers using the boom, arm
and bucket, allow the engine to turn at idle speed and carefully remove the sludge from the crawl-
ers, especially the openings of the connecting plate.
IMPORTANT!
Do not work under the machine under these conditions.
DANGER
For safety reasons, do not rely on hydraulic stabilizers, as they can leak, drop suddenly or be
lowered unintentionally.
DANGER
SW 30
1. Tension the crawlers when they are raised until the distance (clearance between the crawler roller and the inner
surface of the crawlers) is 10 to 15 mm (see figure). In this case, the connecting piece of the crawlers is positioned at
the top center between the idle roller and the pinion.
Tension the crawlers as specified:
67
EXPLODED VIEW&PARTS LIST
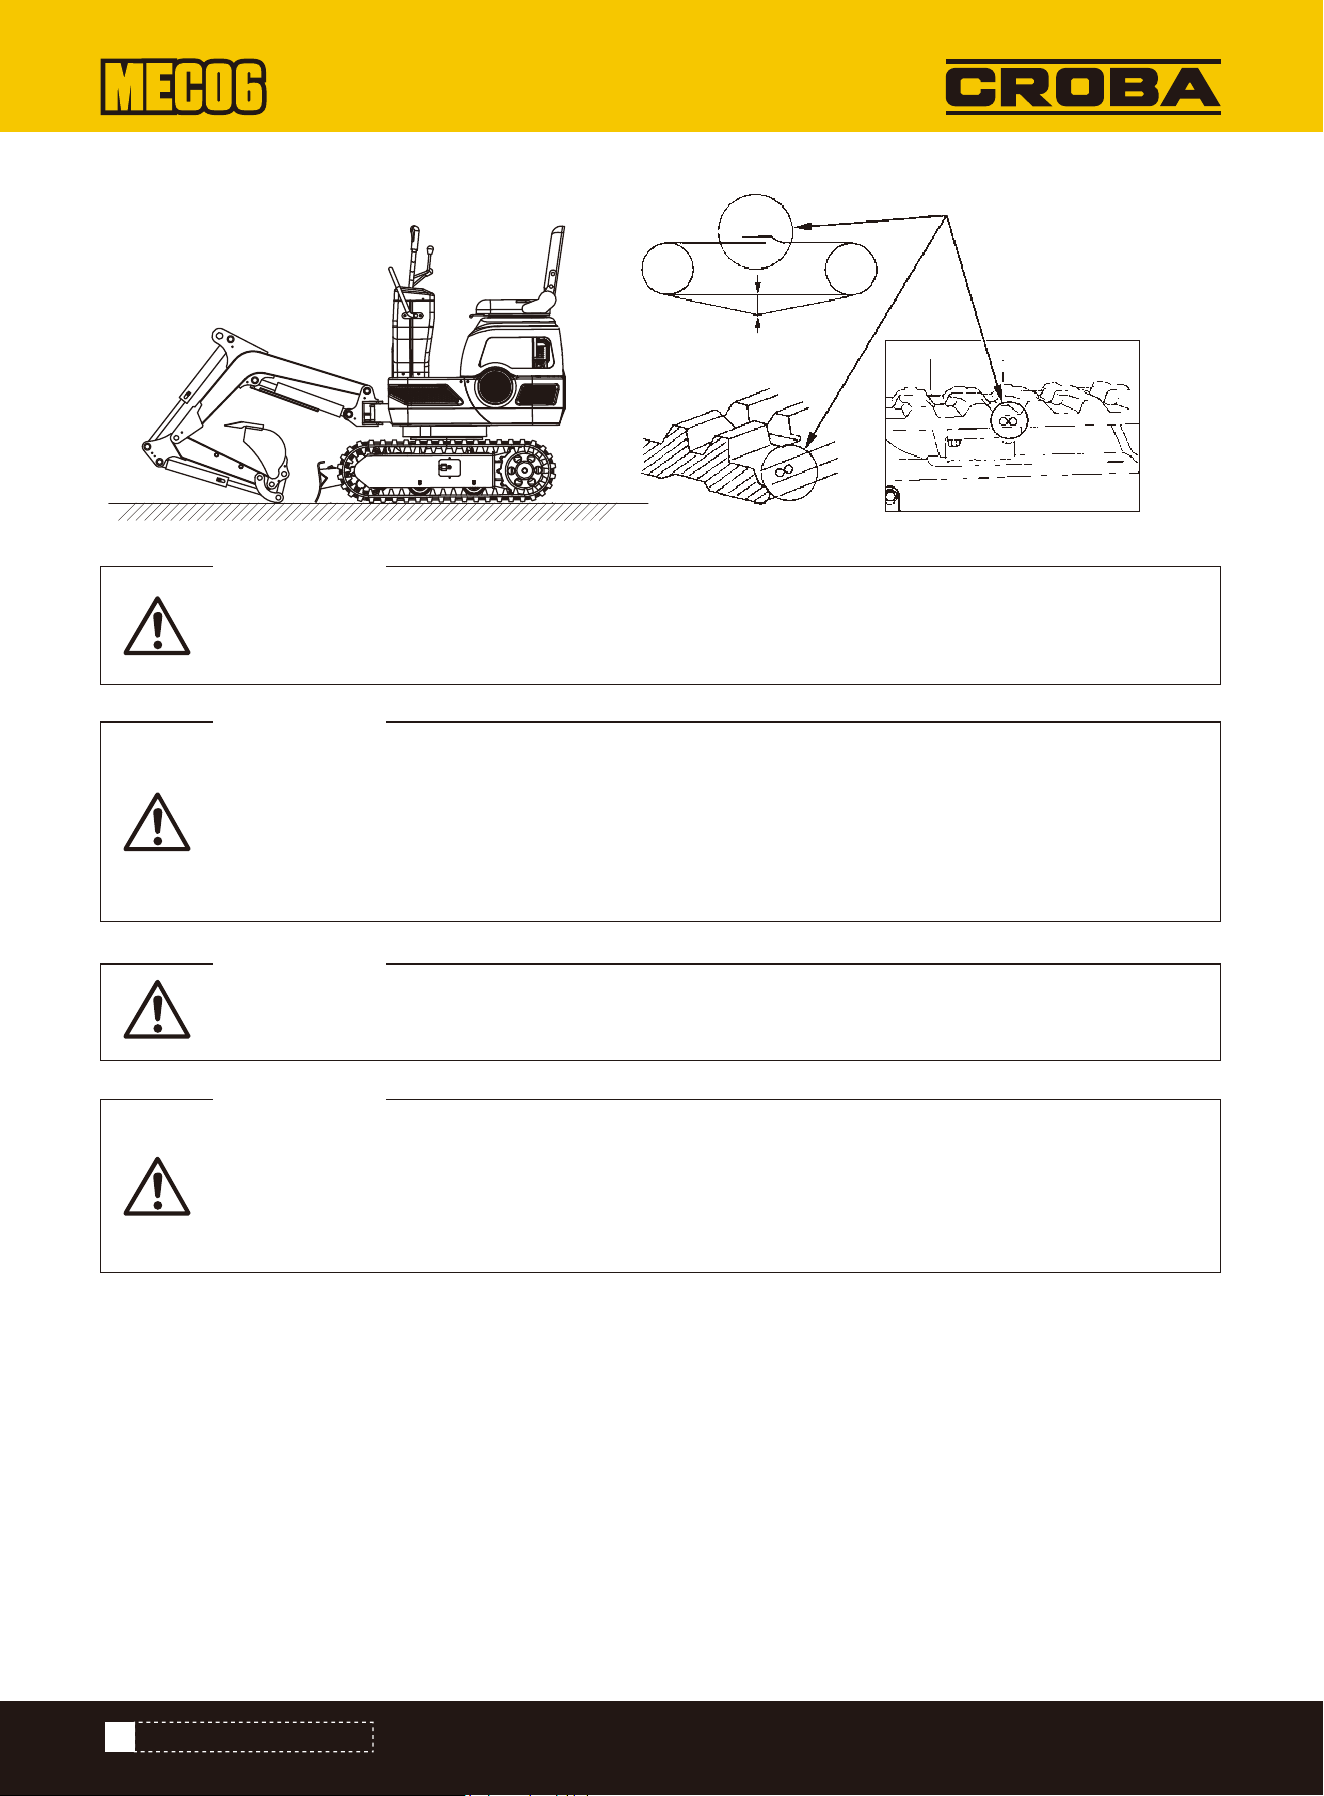
Ensure that no foreign objects such as stones get caught in the crawlers. Remove such foreign
objects before adjusting the crawler tension.
IMPORTANT!
Crawler connecting piece
The ends of the rubber crawlers are joined together with a connecting piece. When setting the
crawlers, the connecting piece must be positioned at the top center between the idle roller and the
pinion. If the connecting piece is positioned incorrectly, the crawler will be tensioned too loosely
and further readjustment will be necessary.
IMPORTANT!
After adjusting, turn the crawler once or twice to check the tension.
IMPORTANT!
In addition, the following points must be observed when adjusting the crawlers.
(1) If a crawl er sags more than 0.98 inches (25 mm), it must be readjusted.
(2) Check the tension of the crawlers 30 hours after first use and readjust if necessary. Check and
then adjust every 50 operating hours.
IMPORTANT!
10 bis 15 mm
Special instructions for the use of rubber crawlers
1. Change direction as slowly as possible. Avoid turning on the spot to prevent wear and the ingress of dirt.
2. Move the machine a short distance straight backwards if too much dirt and sand is blocking the crawlers. The soil and
sand will then fall out and you can change direction.
3. Avoid using the rubber crawlers on riverbeds, stony surfaces, reinforced concrete and iron plates. The rubber can be
damaged and wear increased.
68
EXPLODED VIEW&PARTS LIST
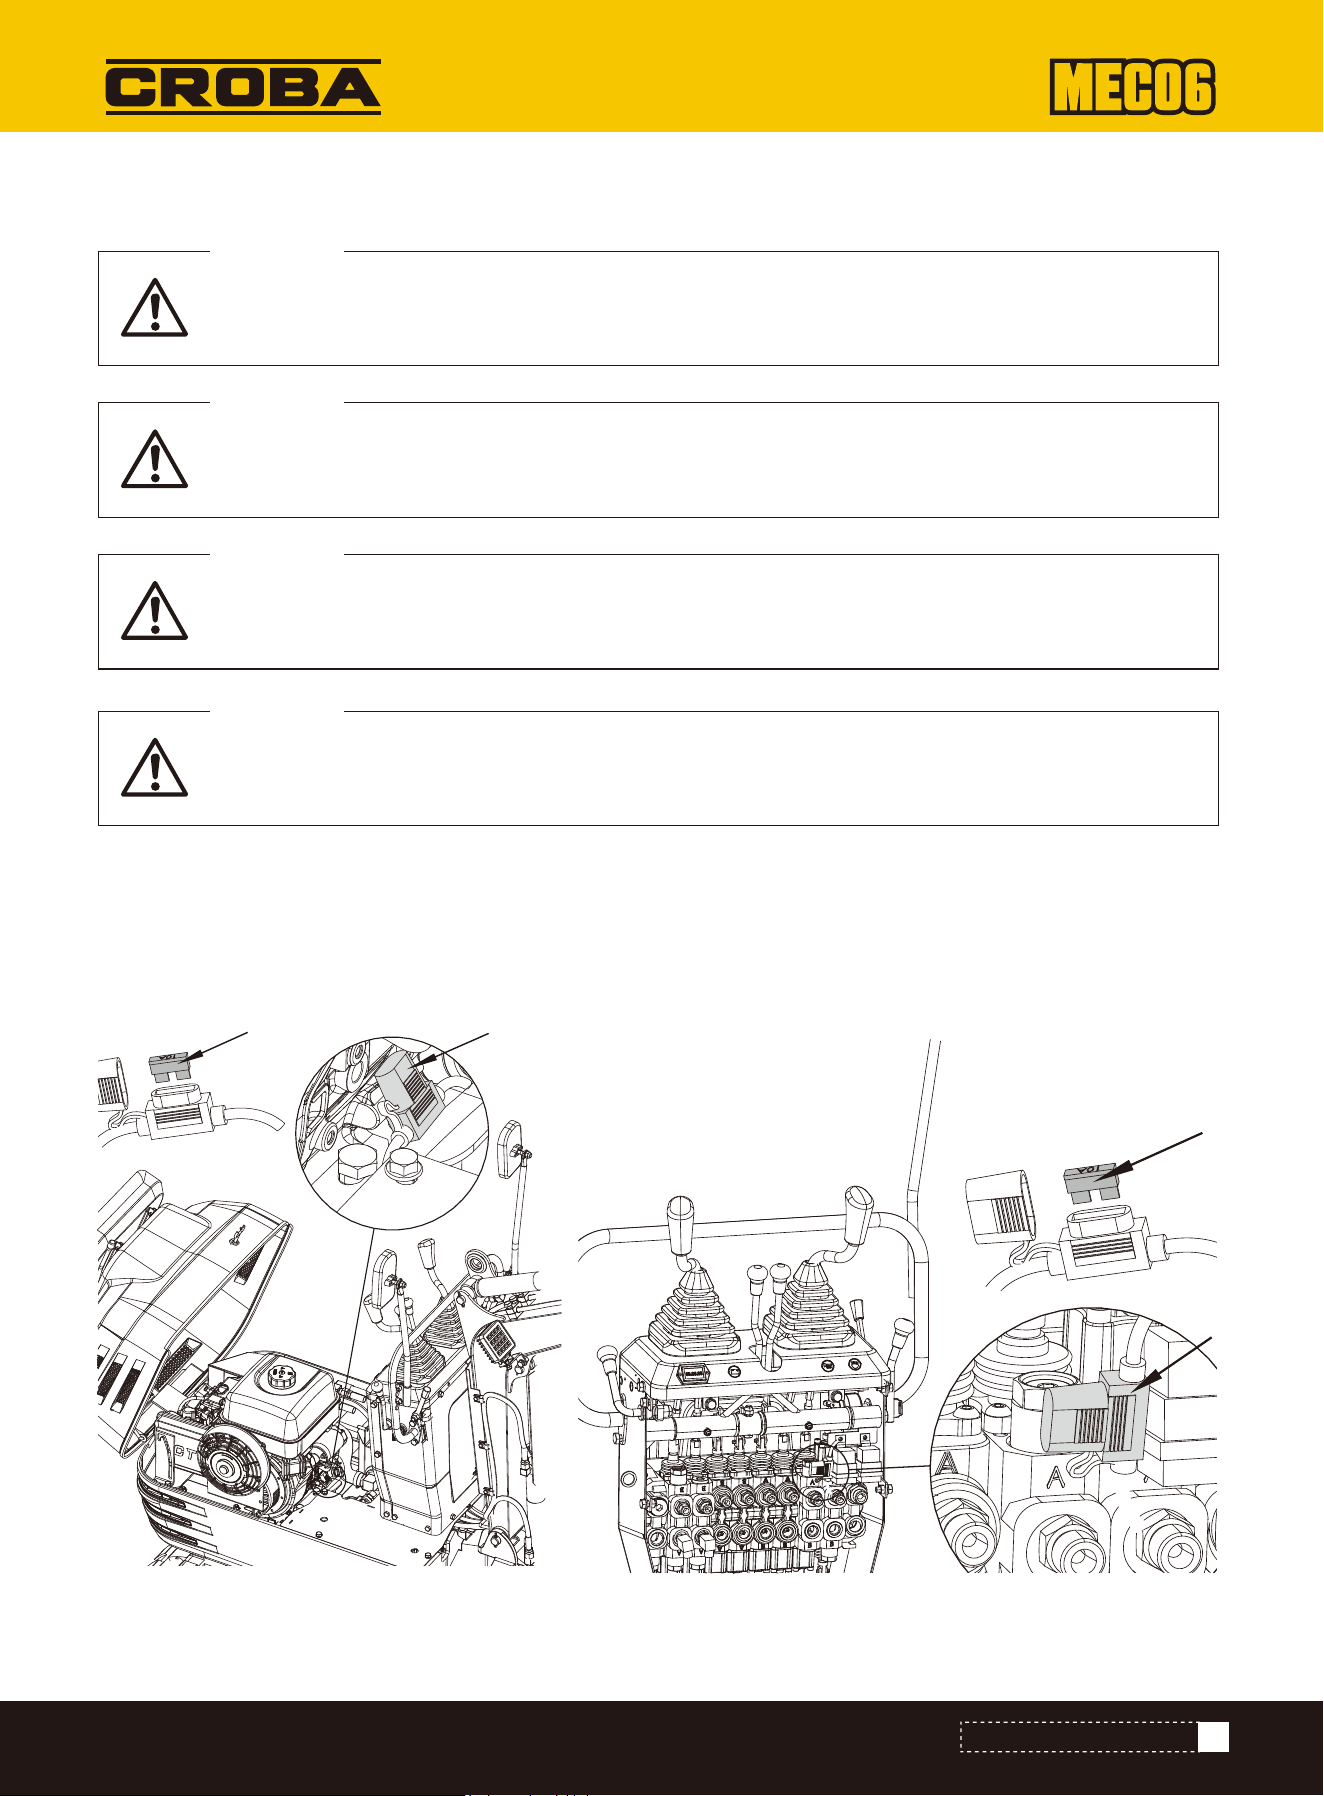
Replacing the bucket
Replacing fuses
A slow-blow fuse is provided to protect the electrical circuits. Check the electrical circuits for problems and replace the
old one with a new, compatible slow-blow fuse if it has blown.
1. Remove the cover from the fuse box.
2. Replace the blown fuse with a new fuse of the same rating.
69
EXPLODED VIEW&PARTS LIST
If the coupling pins are removed or installed, chips may fall off. Always use gloves, safety goggles
and a helmet.
CAUTION
Always work in pairs if the device needs to be changed while the engine is running. One person sits
in the operator's seat and the other works on the machine.
CAUTION
Do not use your fingers to center the openings. These could be injured or severed by sudden,
uncontrolled movements.
CAUTION
Read the manual for the attachment part in order to carry out an operation correctly and safely
when installing other attachments.
CAUTION

Performance of the fuse and circuits
Regular replacement f important components
Also check the petrol and hydraulic lines during the following regular inspections.
To ensure safe operation, we strongly advise you to inspect and maintain the machine at regular intervals. For additional
safety, ask your dealer to replace the following important components.
These parts are subject to material deterioration or wear out over time. During regular inspections, it is difficult to assess
how badly they are damaged. They must therefore be replaced with new parts, even if the wear and tear is not visible after
a certain period of use.
If a component is worn out before the end of its service life, it must be repaired or replaced in the same way as other parts.
If a hose clamp is deformed or torn, it must be repaired.
Check the following points for hydraulic lines that are not replaced regularly. Tighten or replace them if you notice any
abnormalities.
When replacing the hydraulic lines, also replace their O-rings and seals. Contact your dealer to replace important parts.
70
EXPLODED VIEW&PARTS LIST
1
2
No. Power Switching circuit
10 A
10 A
Working relay fuse
Fuse, work light, horn, hour meter
Daily checks
Monthly
Inspection interval Control points
Leaking oil at the connections and points of petrol and hydraulic lines.
Leaking oil at the connections and points of petrol and hydraulic lines. Damage to
petrol and hydraulic lines (cracks, chafing).
Annually Leaking oil at the connections and points of petrol and hydraulic lines. Impairment,
deformation, deterioration, twisting and other damage (cracks, chafing) to petrol
and hydraulic lines.
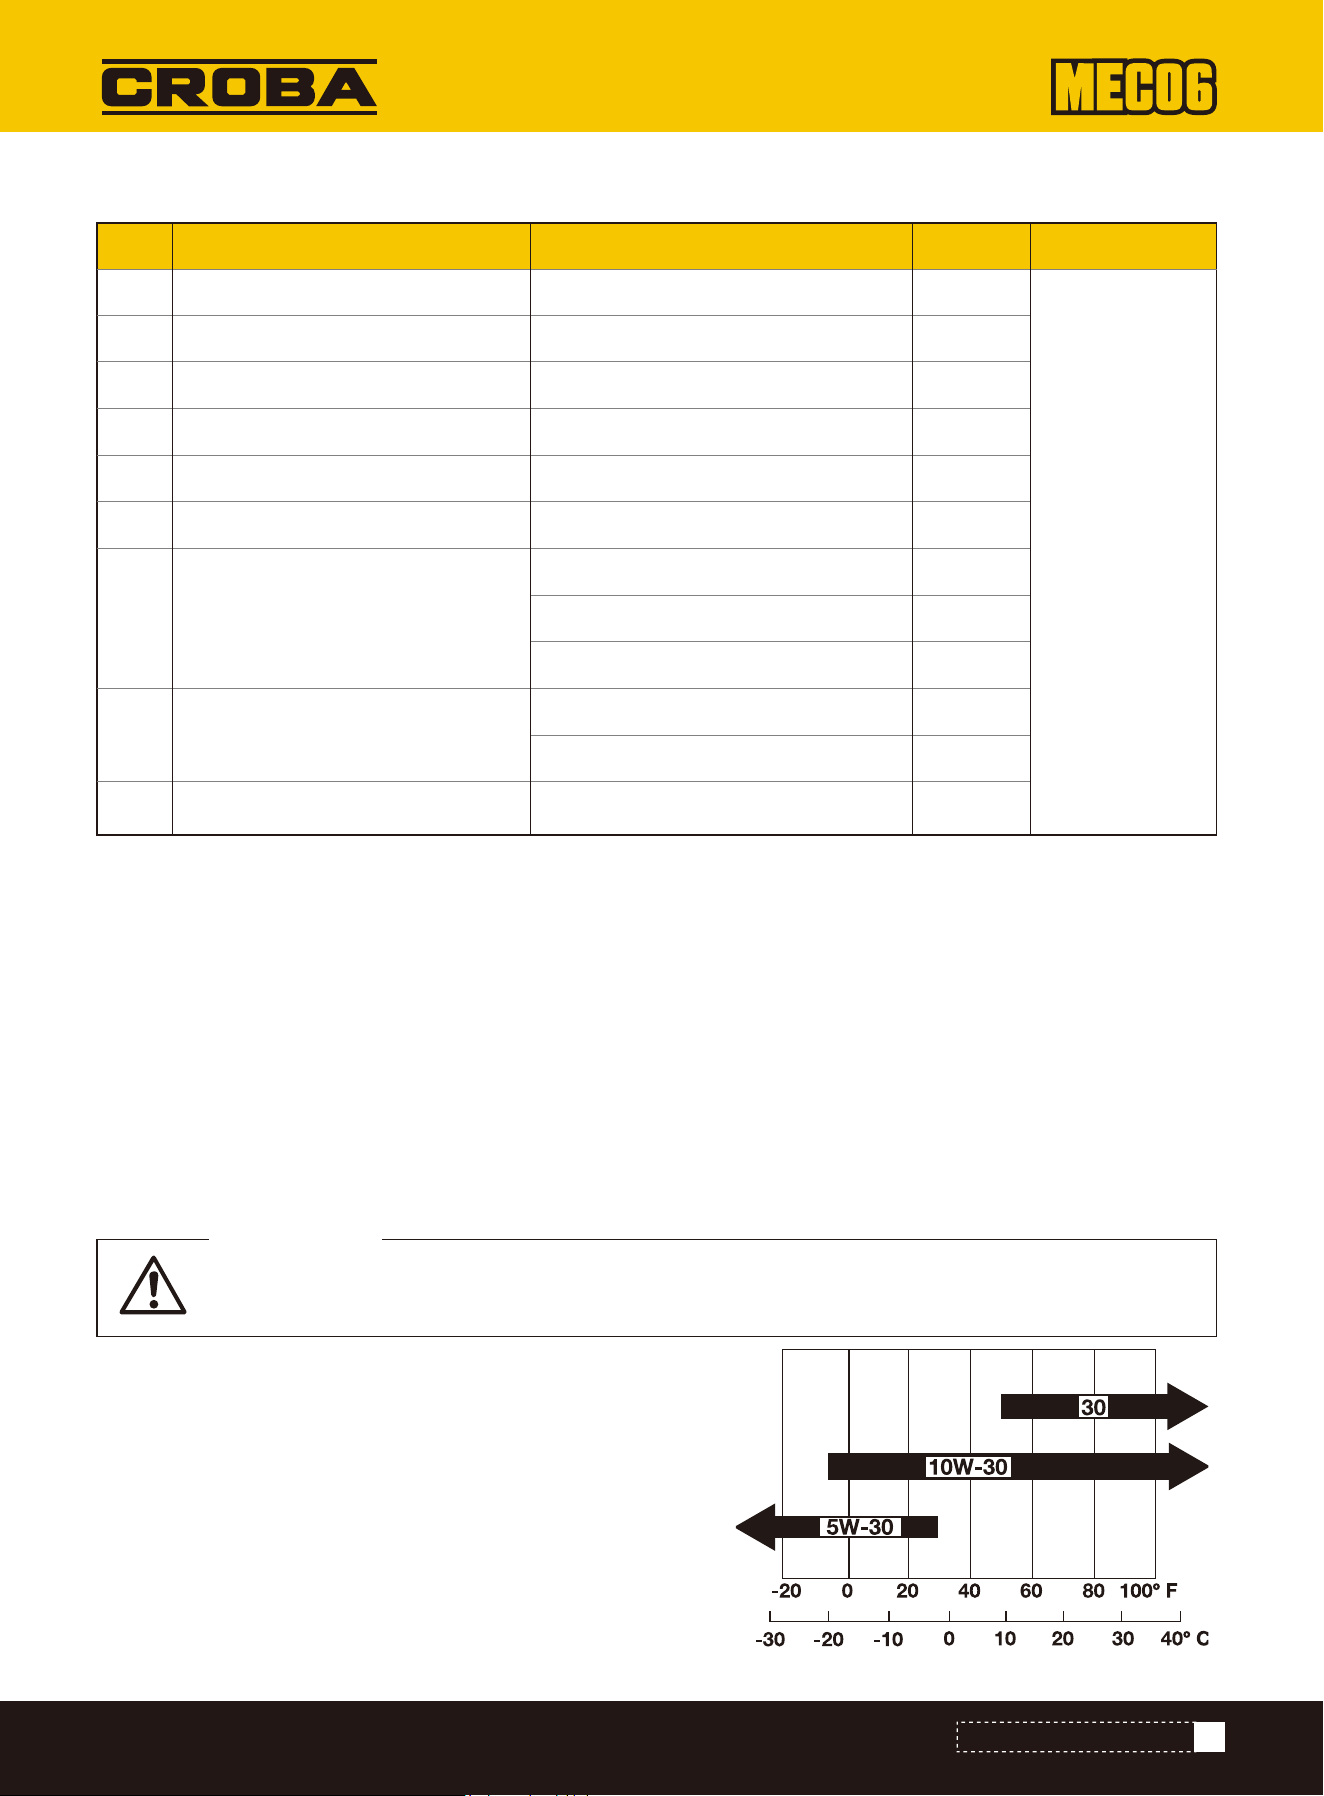
RECOMMENDED OIL TYPES
List of important components
Fuel recommendations
Engine oil recommendations
A hydraulic oil of ISO 32 quality was used before delivery.
IMPORTANT!
Only use a hydraulic line approved by the dealer to avoid serious damage to the hydraulic system.
Use unleaded petrol with an octane rating of 86 or higher. These engines work best with unleaded petrol. NEVER use stale
or contaminated petrol or an oil/petrol mixture. Prevent dirt or water from getting into the fuel tank. Only use suitable and
properly labelled petrol cans. Maximum recommended ethanol content: 10% This is not compatible with E15.
The engine oil influences performance and service life. Use 4-stroke automotive oil. SAE 10W-30 is recommended for
general use. Other viscosities shown in the diagram can be used if the average temperature in your area permits.
10W AW32
ASLE H-150
ISO 32
Recommended hydraulic oils
Recommended hydraulic oil type:
71
EXPLODED VIEW&PARTS LIST
1
2
3
4
5
6
7
8
9
1
2
2
2
2
2
4
4
2
1
1
2
No. Components Place of use
Hydraulic line (intake)
Hydraulic line (supply)
Hydraulic line (boom cylinder)
Hydraulic line (arm cylinder)
Hydraulic line (bucket cylinder)
Hydraulic line (swiveling cylinder)
Hydraulic conduit (leveling blade
cylinder & crawler cylinder)
Hydraulic line
Hydraulic line (swivel motor)
Main pump
Main pump control valve
Control valve boom cylinder
Control valve arm cylinder
Control valve bucket cylinder
Control valve swiveling cylinder
Control valve swivel joint
Leveling blade cylinder swivel joint
Swivel joint tank cylinder
Control valve connection
Connection return line
Control valve swivel motor
Quantity Period
Every 2 years
on 4000 hours

Recommended lubricating oil
The SAE oil viscosity and the utilisation classification can be found on the API label on the oil container Use API SERVICE
category SJ or higher engine oil.
After repairs or maintenance, make sure that all safety-related parts are installed and are in perfect condition. All parts
which may cause injury must be kept where they are inaccessible to children or others.
Connections and repairs
Service information
Ordering spare parts
Connections and repair work on the electrical equipment may only be carried out by electricians.Please provide the follow-
ing information in the event of any queries:
• Type of current for the motor
• Machine data - type plate
• Motor data - type plate
With this product, it is necessary to note that the following parts are subject to natural or usage-related wear, or that the
following parts are required as consumables.
Wearing parts*: V-belt, engine oil, spark plug, air filter, rubber tracks
* may not be included in the scope of delivery!
Please provide the following information when ordering spare parts:
• Model designation
• Item number
72
EXPLODED VIEW&PARTS LIST
Lubrication
Usage Shell Mobil Exxon
Shell Alvania EP2 Mobilux ΕΡ2
Beacon Q2
REPAIR & ORDERING SPARE PARTS
Such work should be performed by a customer service center or an authorised specialist. The same
applies to accessory parts.
ATTENTION

Notes for packaging
Information on the disposal of used batteries
Fuels and oils
The following table shows fault symptoms and describes remedial measures in the event of your product failing to work
properly. If you cannot localize and rectify the problem with this, please contact your service workshop.
The packaging materials are recyclable. Please dispose of packaging in an environmentally
friendly manner.
You can find out how to dispose of the disused device from your local authority or city administration.
• For safe removal of used batteries from the electrical device and for information on their type or chemical system,
please refer to the additional information in the operating or assembly instructions.
• Owners or users of batteries are legally obliged to return them after use. The return is limited to household quantities.
• Old batteries may contain pollutants or heavy metals that can harm the environment or human health. Recycling old
batteries and using the resources they contain helps to protect these two important issues. The plastic and metal
parts used can be separated by type and thus recycled.
• The symbol of the crossed-out dustbin means that used batteries must not be disposed of with household waste.
• If the signs Hg, Cd or Pb are also located below the dustbin symbol, this stands for the following:
• Before disposing of the device, the fuel tank and the engine oil tank must be emptied!
• Fuel and engine oil do not belong in household waste or drains, but must be collected or disposed of separately!
• Empty oil and fuel tanks must be disposed of in an environmentally friendly manner.
• Used batteries can be returned free of charge to the following places:
- Hg: Battery contains more than 0.0005% mercury
- Cd: Battery contains more than 0.002% cadmium
- Pb: Battery contains more than 0.004% lead
- Public disposal or collection points (e.g. municipal works yards)
- Battery retail outlets
- Take-back points of the common take-back system for old device batteries
- Take-back point of the manufacturer (if not a member of the common take-back system)
73
EXPLODED VIEW&PARTS LIST
TROUBLESHOOTING
DISPOSAL AND RECYCLING
Used batteries do not belong in household waste, but should be collected and disposed of sepa-
rately!

Engine
Hydraulic
system
Drive system
Fault Possible cause Remedy
Starting difficulties The petrol valve is shut.
Air or water in the fuel
system.
The viscosity of the oil is
too high, so that the engine
turns too slowly in winter.
The battery is almost flat.
The starter motor does not
work.
The spark plug does not
ignite.
Low oil level.
Low fuel level.
Low fuel level.
Bad petrol. Use high quality petrol.
Drain the engine oil to the specified oil
quantity.
Open the cold starter valve.
Too much engine oil.
Too little hydraulic oil.
Blockage by stones. Remove the foreign objects.
Set the appropriate settings.
Leaks in lines and/or
connections.
The swiveling locking pin is
in the locking position.
The crawlers are too loose
or too tight.
Add oil.
Replace the line or connection.
Remove the swiveling locking pin from the
locking position.
The cold starter lever shuts
the cold starter valve in the
carburetor.
Air filter blocked.
Insufficient engine
power.
The engine stops
suddenly.
Abnormal color of
the exhaust gases.
The performance of
the boom, arm,
bucket, drive,
swiveling function
and dozer blade is
too poor.
The swivel motor
does not work.
Deviation from the
direction of travel.
Ensure that the petrol valve is in the "Open”
position.
See the instructions in the section
"Removing water or air from the fuel tank" to
remove air and water.
Start with the cable pull to recharge the
battery.
Replace the spark plug.
Add engine oil.
Check the fuel level and top up if necessary.
Clean the air filter element.
Check the fuel level and top up if necessary.
Flush the fuel system.
Use winter hydraulic oil.
74
EXPLODED VIEW&PARTS LIST
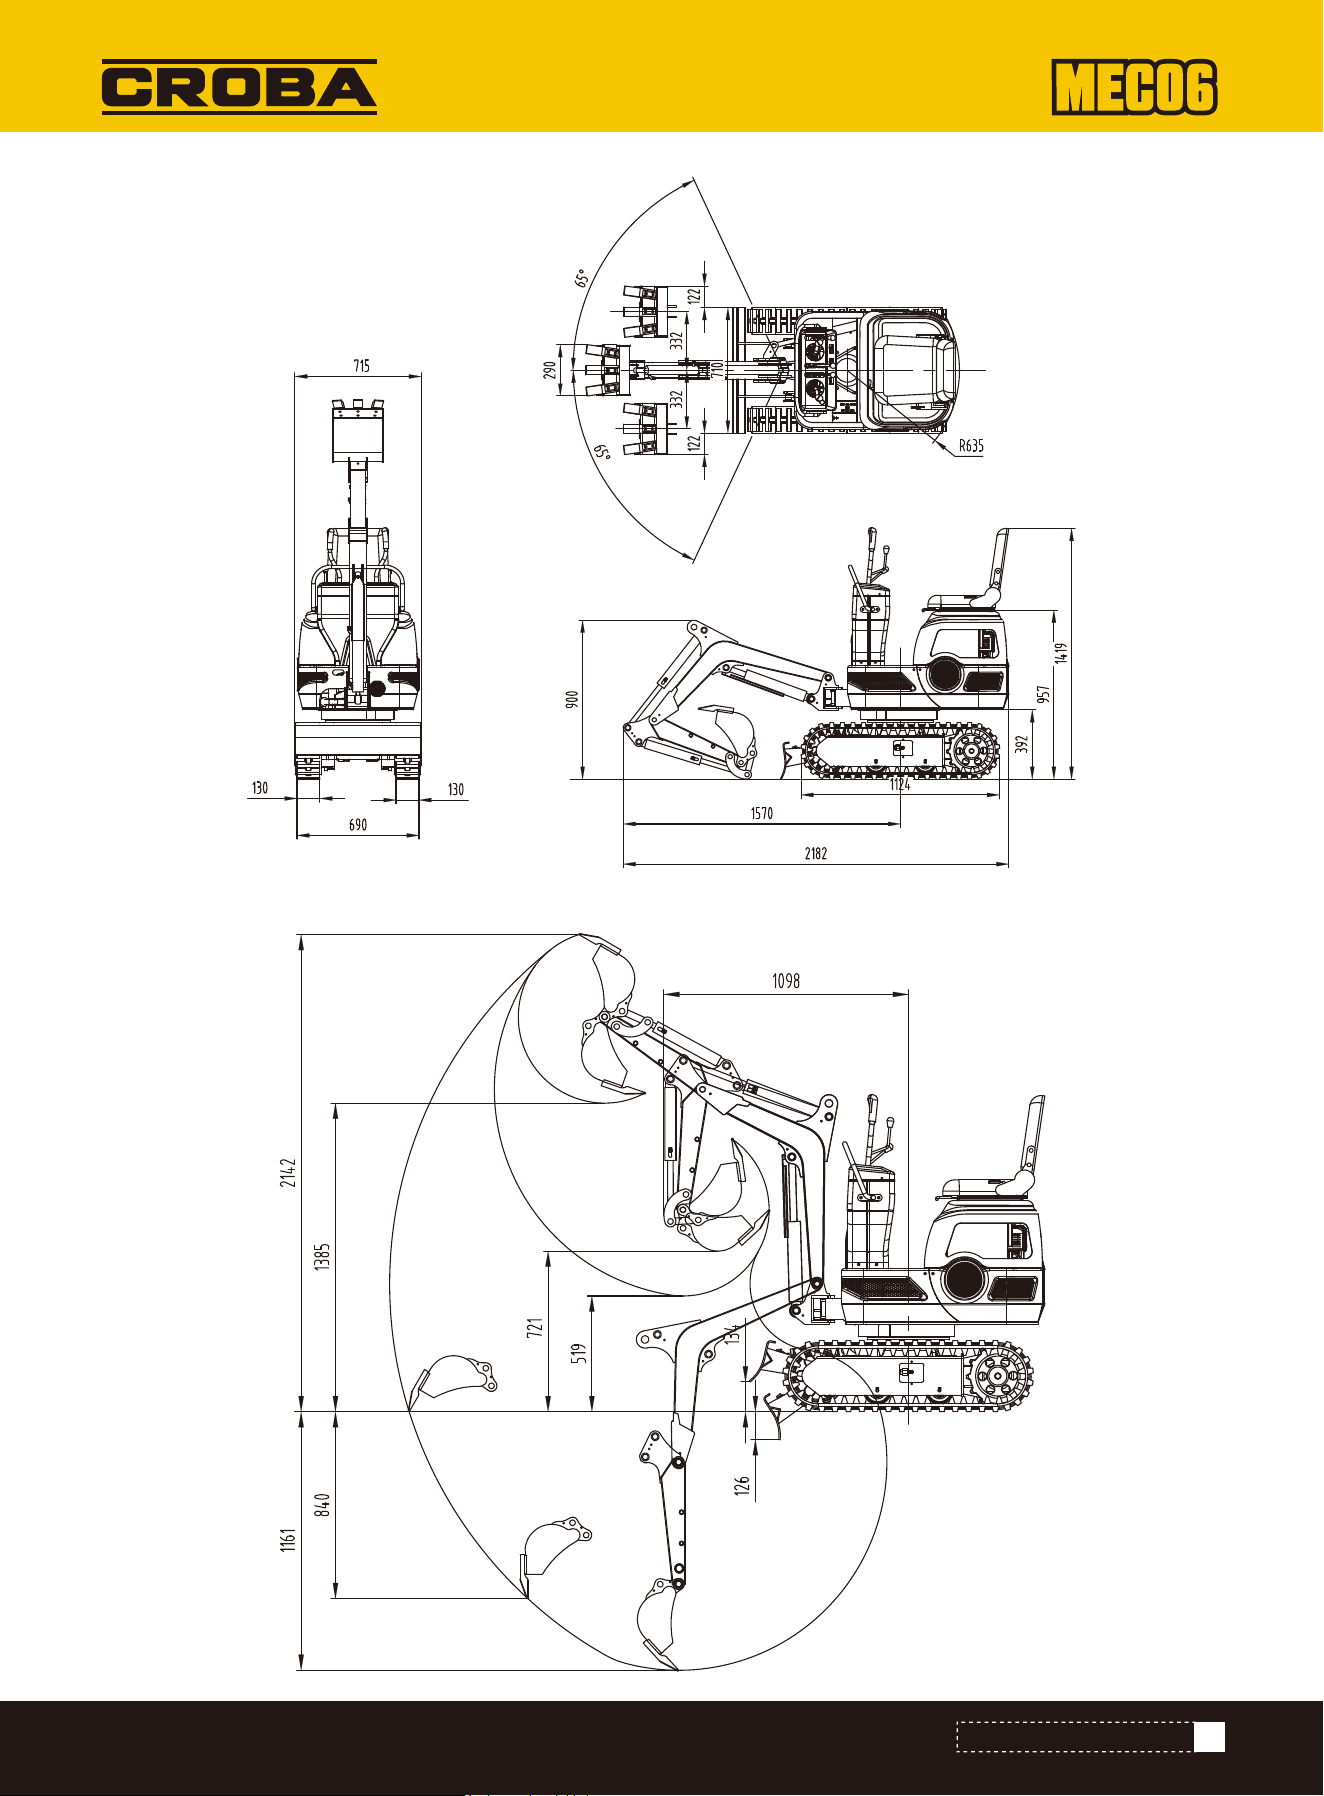
75
EXPLODED VIEW&PARTS LIST
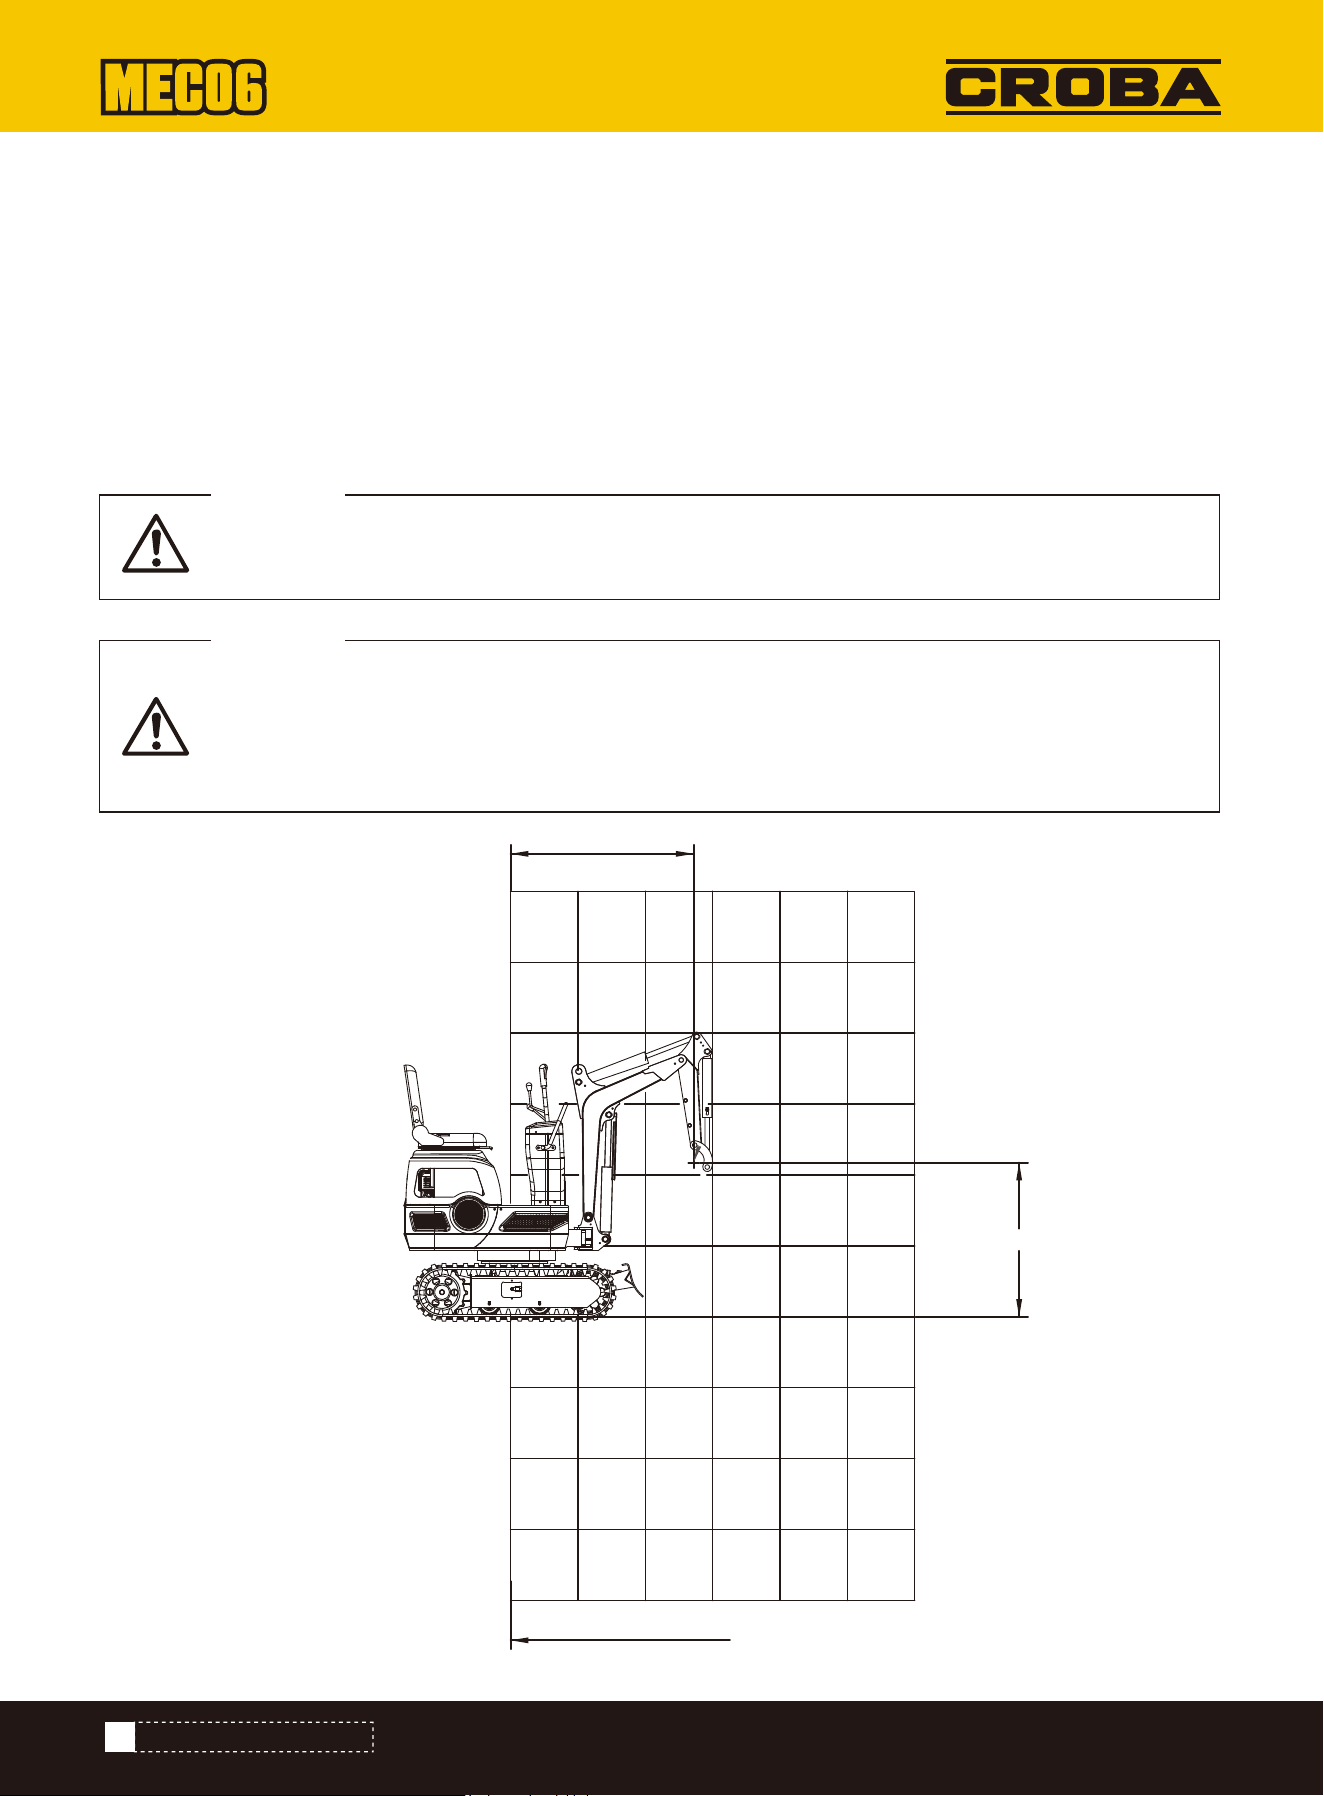
It is not permitted to lift loads greater than those listed in the lifting capacity tables.
WARNING
The values specified in the tables only apply on a level, hard surface. When lifting on soft ground,
the machine can tip over because the load is only concentrated on one part of the machine. The
table values are calculated at the end of the arm without the bucket. To find the permitted loads for
machines with a bucket, the weight of the bucket must be taken off the values in the table.
WARNING
CHECKING THE PETROL LINE
1. The lifting capacity is based on ISO 10567 and does not exceed 75% of the static tipping load of the machine or 87%
of the hydraulic lifting capacity of the machine.
2. The strokes are as follows:
The load point corresponds to the front bolt part of the arm.
The machine positions are (i) over front (top plate), (ii) over front (bottom plate), and (iii) over side.
The working cylinder is the boom cylinder.
3. The excavator bucket, hook, loop and other lifting accessories are considered in the loads.
76
EXPLODED VIEW&PARTS LIST

(i) OVER FRONT (TOP PLATE)
Height (mm) Load radius (mm)
0
2400
2000
1600
1200
800
400
0
-400
-800
-1200
380 760
3.8 (390)
2.0 (200)
1.9 (190)
1.9 (190)
1.9 (190)
1.4 (140)
1.3 (130)
1.3 (130)
1.3 (130)
1.2 (120)
1.2 (120)
1.2 (120)
0.9 (90)
0.9 (90)
1140 1520 1900 2280
(i) OVER FRONT (BOTTOM PLATE)
Height (mm) Load radius (mm)
0
2400
2000
1600
1200
800
400
0
-400
-800
-1200
380 760
4.8 (490)
2.4 (240)
3.1 (320)
3.2 (330)
2.8 (290)
1.4 (140)
1.5 (150)
1.5 (150)
1.8 (180)
2.1 (210)
2.2 (220)
1.9 (190)
1.6 (160)
1.6 (160)
1140 1520 1900 2280
77
EXPLODED VIEW&PARTS LIST

(ii) OVER FRONT
Height (mm) Load radius (mm)
0
2400
2000
1600
1200
800
400
0
-400
-800
-1200
380 760
2.7 (280)
1.6 (160)
1.5 (150)
1.4 (140)
1.4 (140)
1.4 (140)
1.1 (110)
1.1 (110)
1.0 (100)
1.0 (100)
0.9 (90)
0.9 (90)
0.7 (70)
0.7 (70)
1140 1520 1900 2280
78
EXPLODED VIEW&PARTS LIST