
Section 1/2
2
TABLE OF CONTENTS
INTRODUCTION
Introduction 2
Specifications 3
Recycling And Disposal 3
Symbols 3
Safety 9
Safe Operstion 10
Dealer Service 16
Unpacking The Container 17
Contents Supplied 18
Assembly 19
Description of Machine Parts 20
Instrument Panel And Control Elements 21
Before Start 22
Handling The Safety Devices 22
Daily Checks 22
Operation of The Engine 23
Starting The Engine 23
Stopping The Engine 25
Excavator Operation 26
Control Observations During Operation 26
Running-in of The New Excavator 26
Starting 27
Operation of The Boom 28
Operation of The Arm 29
Operation of The Bucket 29
Swivel (Unit Swing) Operation 29
Boom Swing Operation 30
Boom Swing Pedal 31
Operation of Dozer 31
Driving 32
Turns 33
Up And Downhill Travelling 35
Parking on a Slope 35
Important Information on Excavator Operation 36
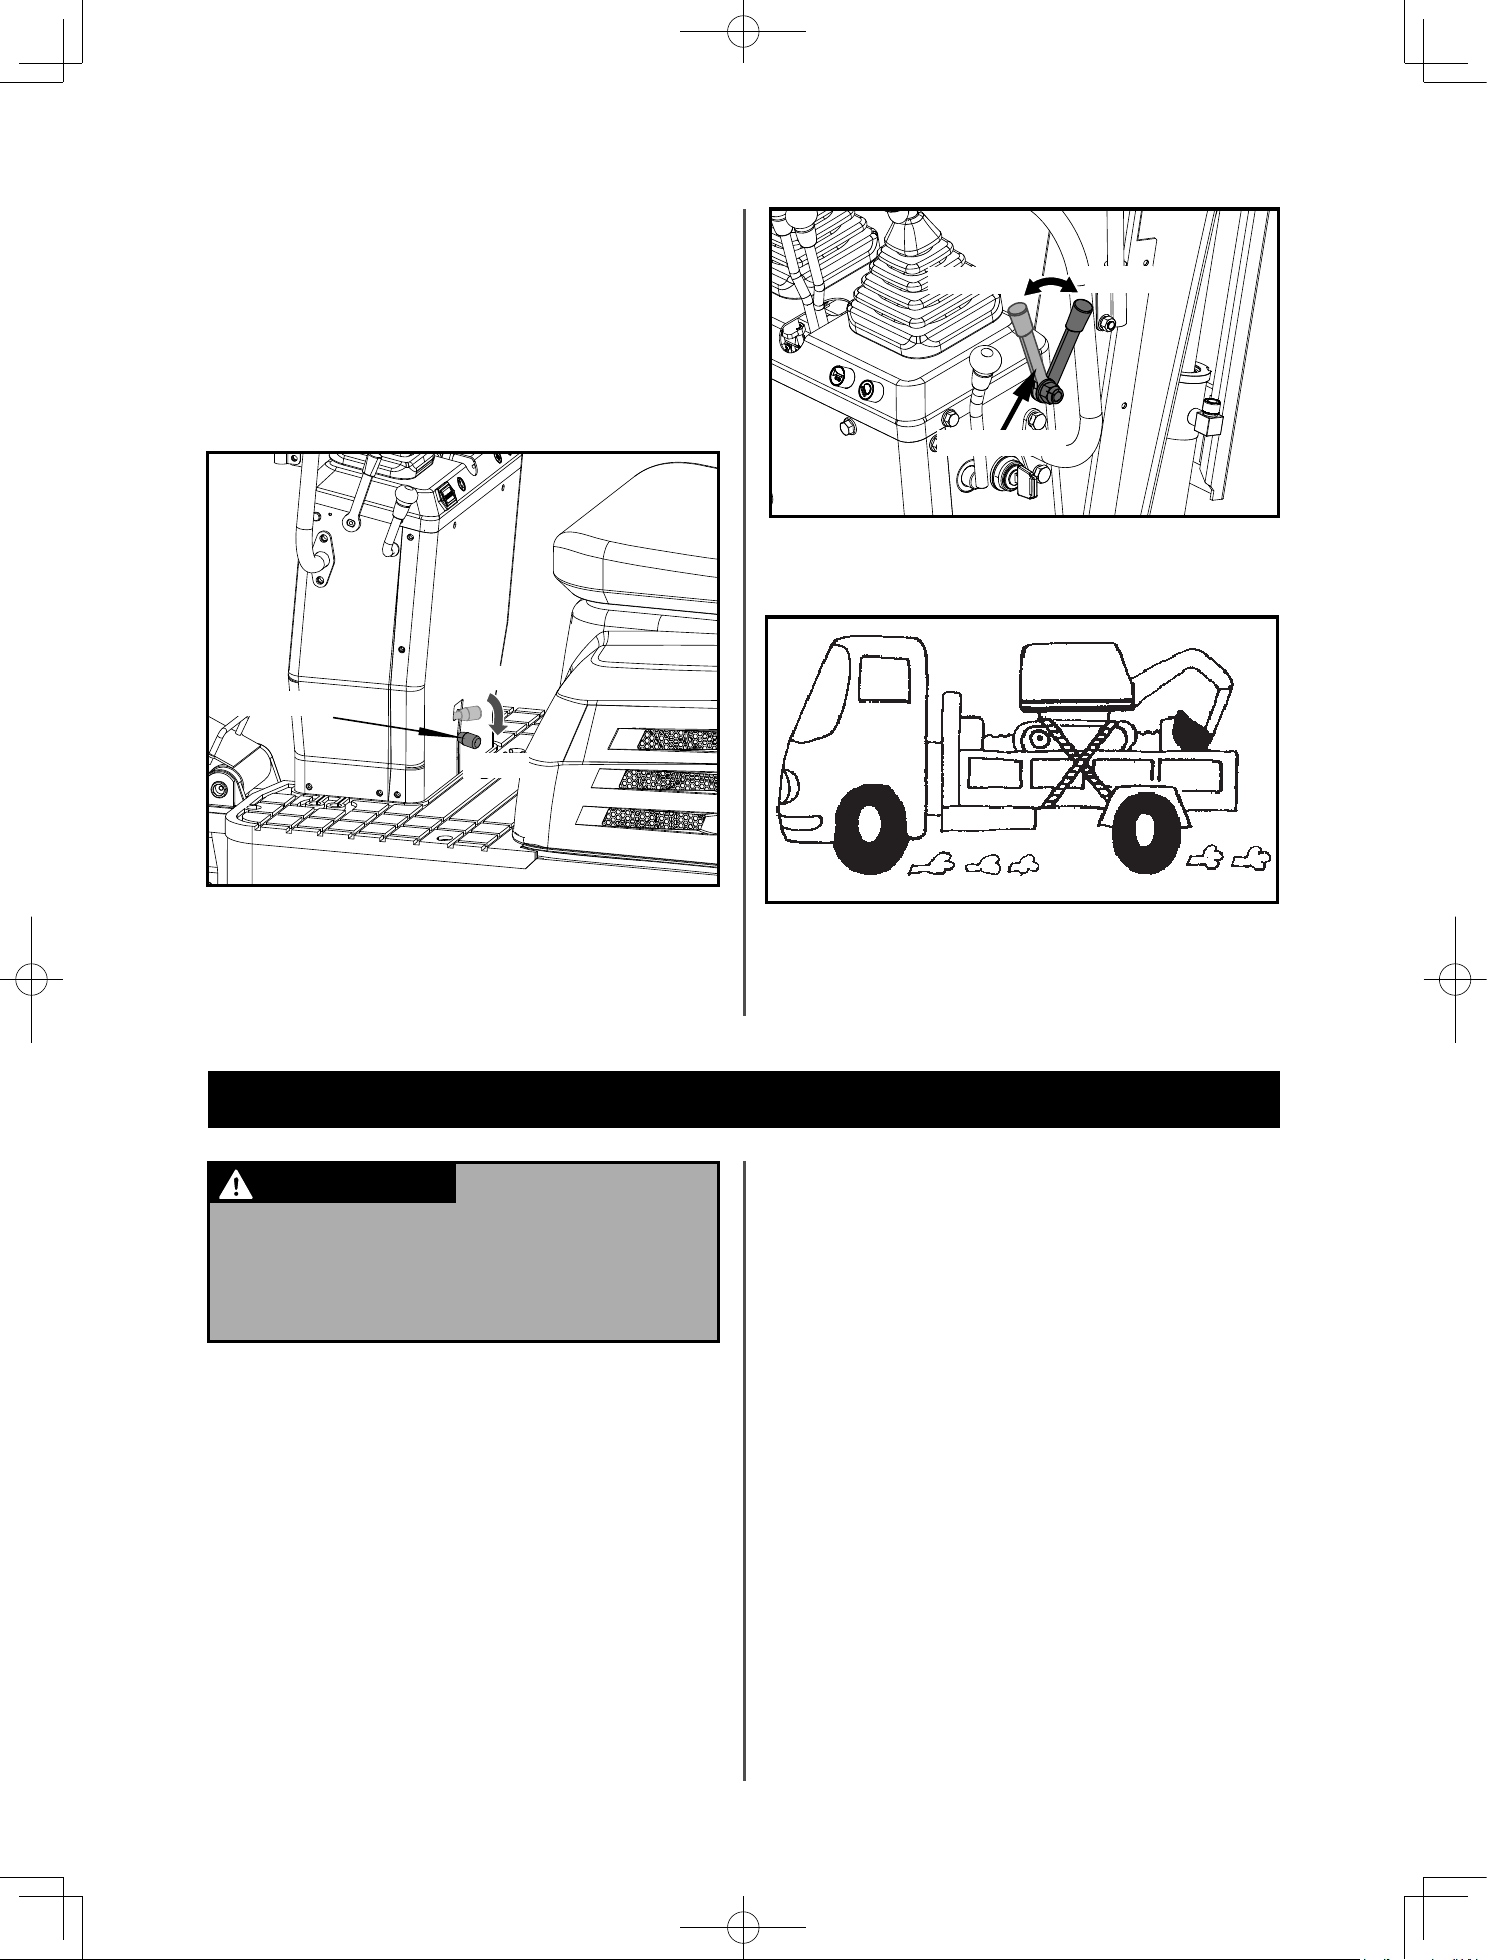
Transporting the Excavator on a Truck 37
Lifting of the Excavator 38
Maintenance 40
Maintenance Intervals 40
Opening and Closing of Parts 41
Daily Checks 41
Regular Checks and Maintenance Work 45
Every 50 Service Hours 45
Every 100 Service Hours 50
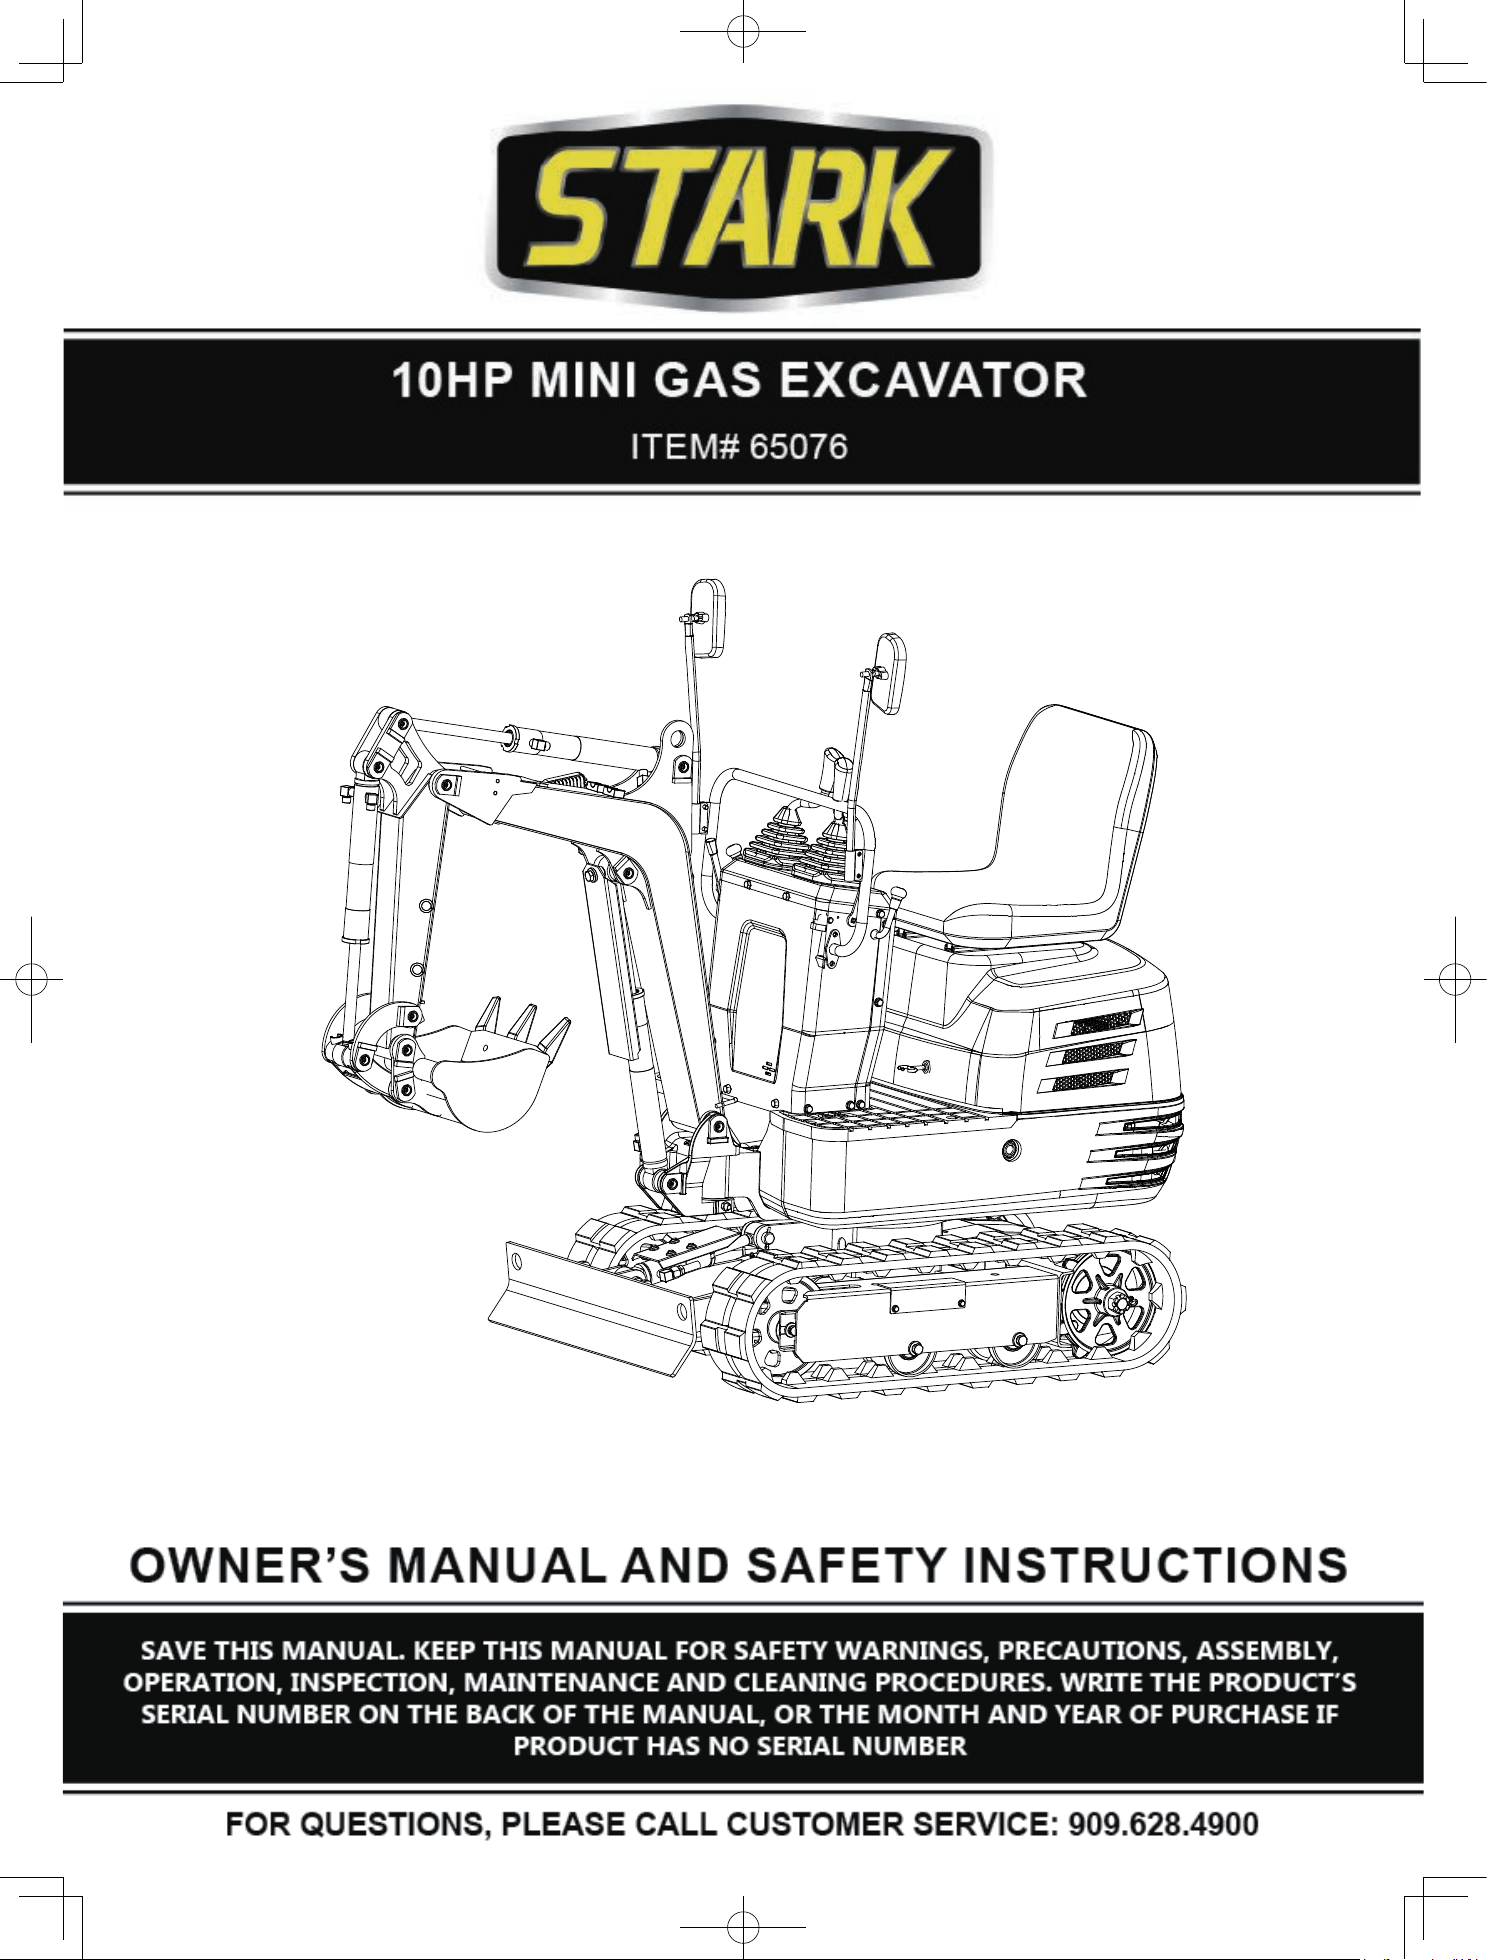
You are now the proud owner of a excavator.
This excavator is a product of quality engineering
and manufacturing. It is made of quickly fine
materials and under rigid quality control systems.
It will give you long, satisfactory service. To obtain
the best use of your excavator, please read this
manual carefully. It will help you become familiar
with the operation of the excavator and contains
many helpful hints about excavator maintenance.
It is policy to utilize as quick as possible every
advance in our research. The immediate use of
new techniques in the manufacture of products
may cause some small parts of this manual to
be outdated. Distributors and dealers will have
the most up-to-date information. Please do not
hesitate to consult with them.
Every 200 Service Hours 50
Every 1000 Service Hours 51
Annual Servicing 52
Biennial Servicing 52
Other Adjustments and Replacements 53
Adjustment of Crawlers 53
Changing the Bucket 54
Fuses 55
Troubleshooting 56
Operation in Cold Weather Conditions 57
Preparation for Operation in Cold Weather 57
Procedure after Work Carried Out 57
Long Storage 58
Periodic Replacement Of Important
Component Parts
59
Recommended Oils 60
Main Dimensions 61
Lifting Capacity 62
Wiring Diagram 64
Hydraulic System Diagram 65
Parts List 67
Parts Diagram 68
Parts List 68
Attachments (Sold Separately) 76
Carefully read
through this entire operator’s manual
before using this unit. Take special care to
heed the cautions and warnings.
IMPORTANT
WARNING
CAUTION
NOTE

3
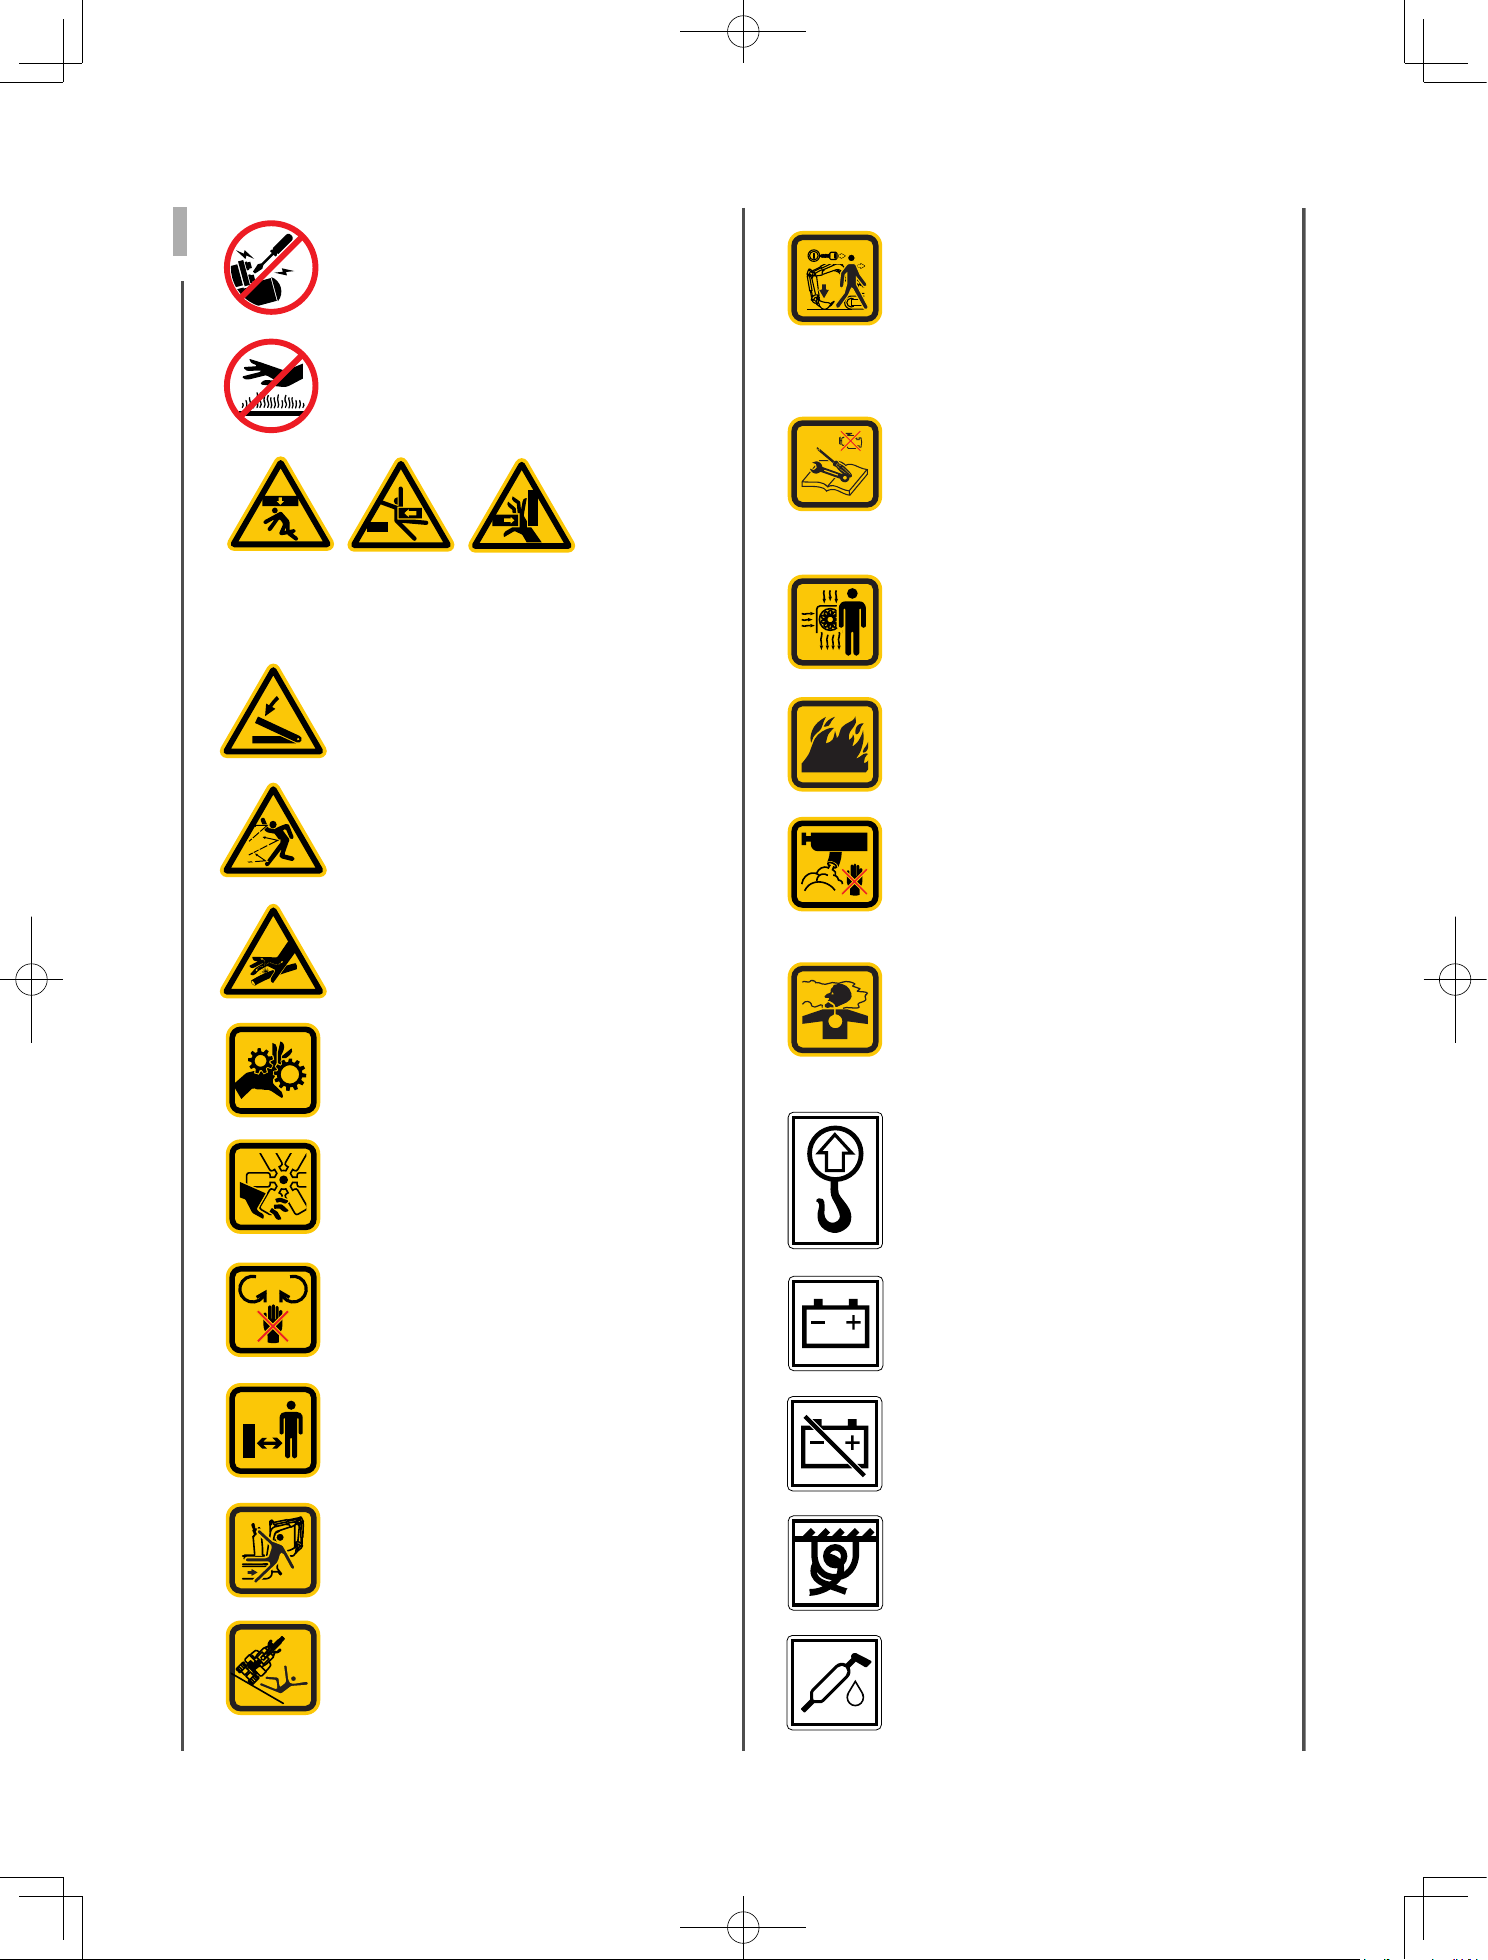
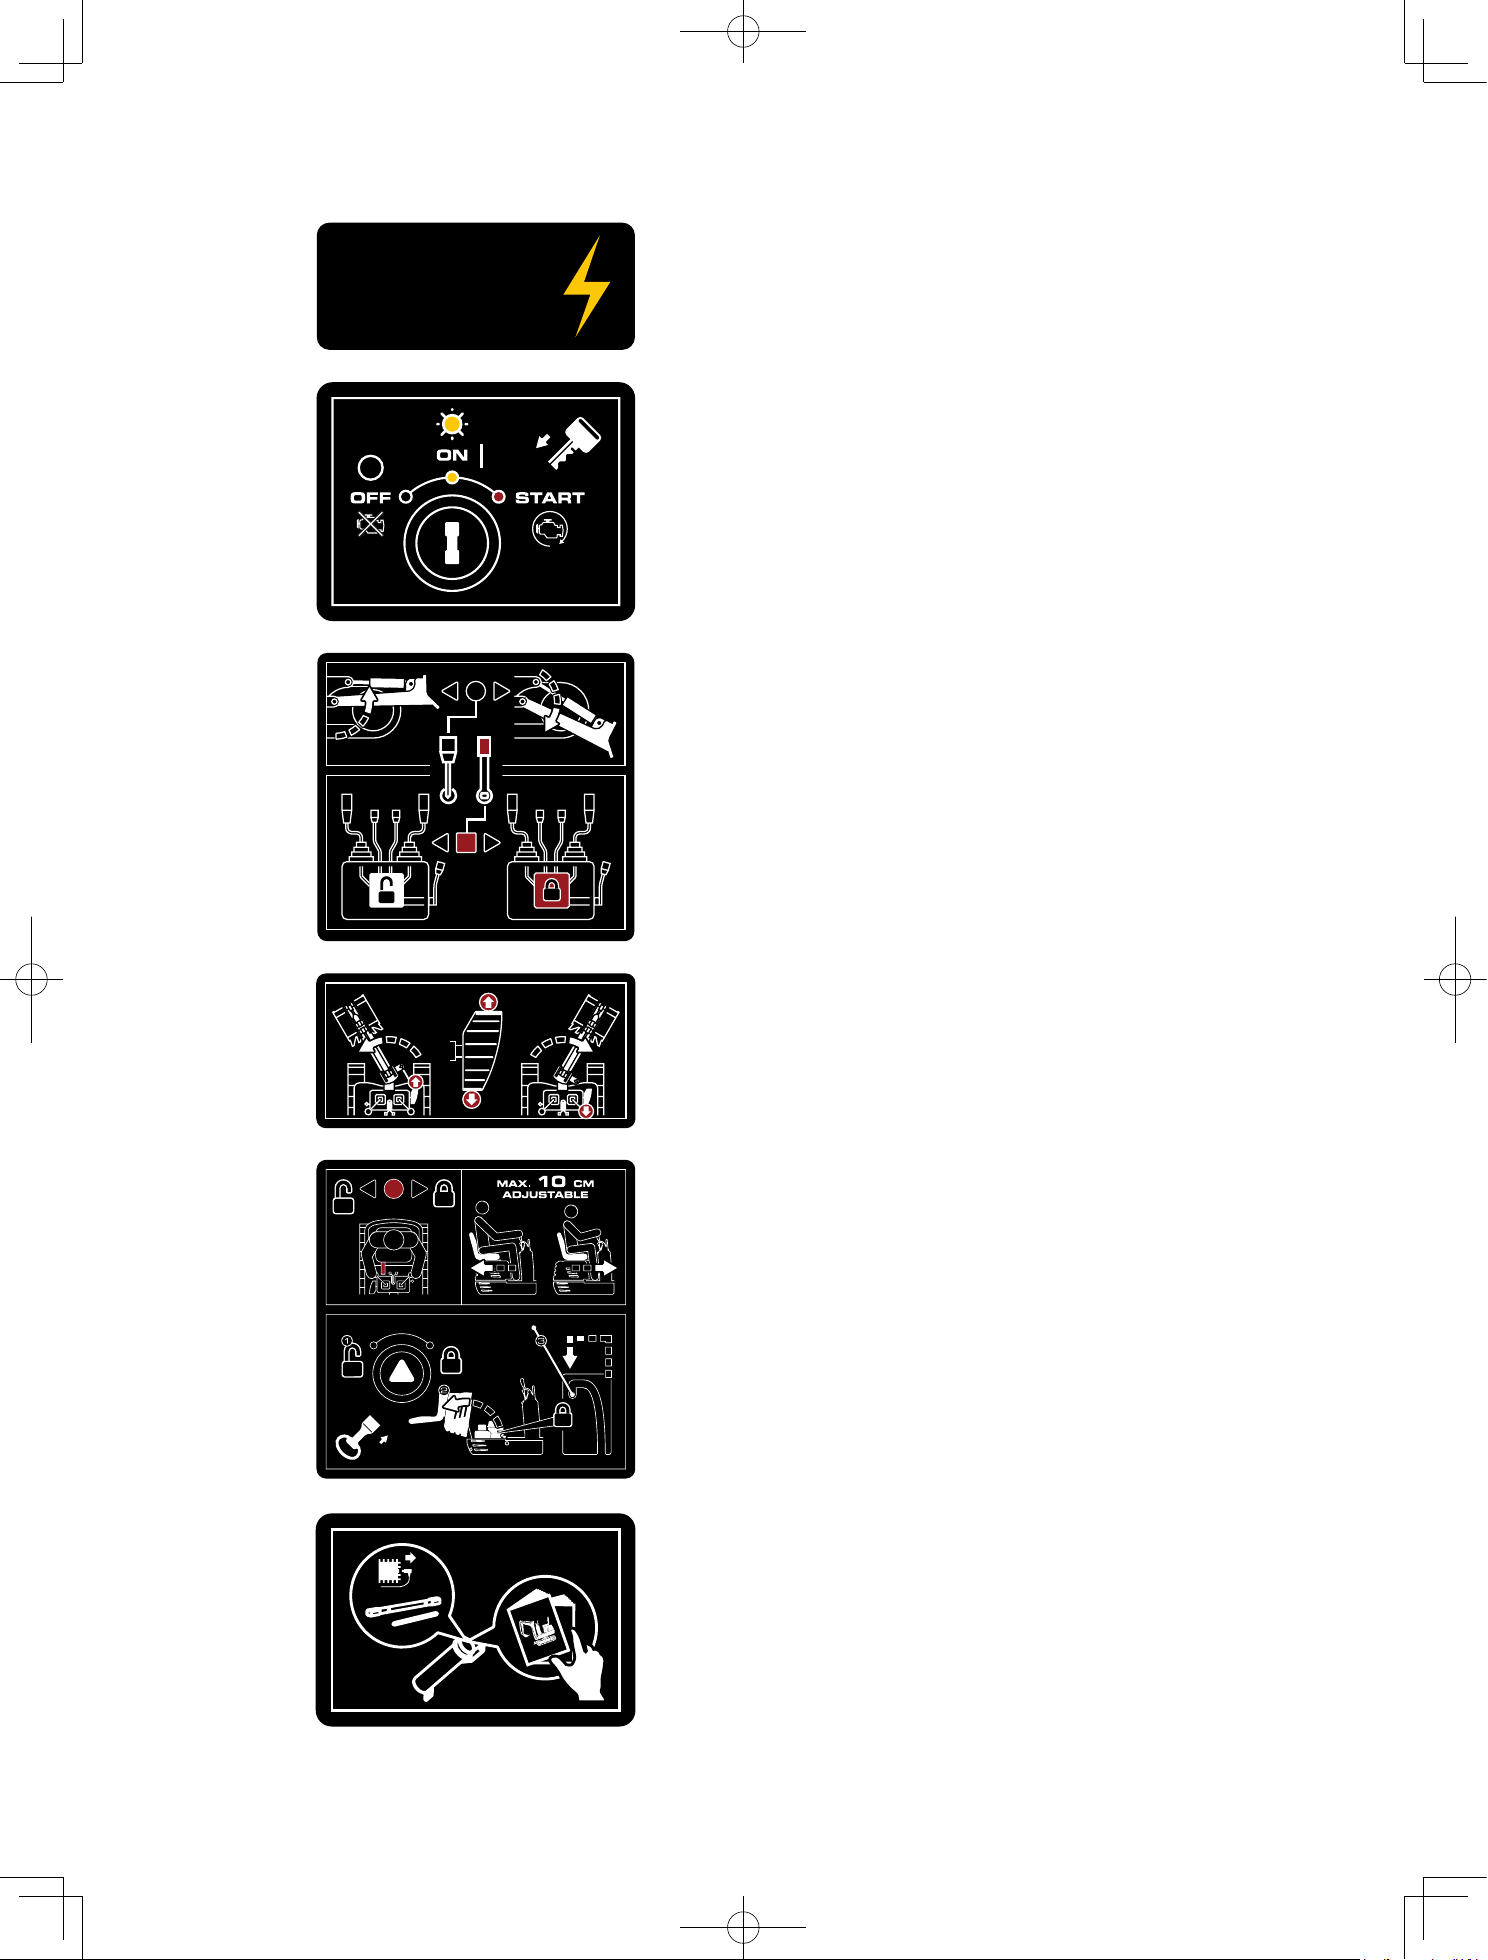
SYMBOLS
The instruments and operation elements
have been marked with a series of symbols
in order to simplify the operation of your
excavator. These symbols represent important
information about the production or
instructions on its use.
Recognize Safety Information
This is the safety alert symbol.
When you see this symbol on
your machine or in this manual,
be alert for the potential of
personal injury. Follow the
precautions and safe operating
practices highlighted by
this symbol. A signal word
— DANGER, WARNING, or
CAUTION — is used with the
safety alert symbol. DANGER
identifies the most serious
hazards. DANGER and WARNING
signs are located near specific
hazards. General precautions are
on CAUTION labels.
Read these instructions carefully.
Wear eye protection.
Wear hearing protection.
Wear safety helmet
Keep your hands away!
No smoking, sparks, or flames
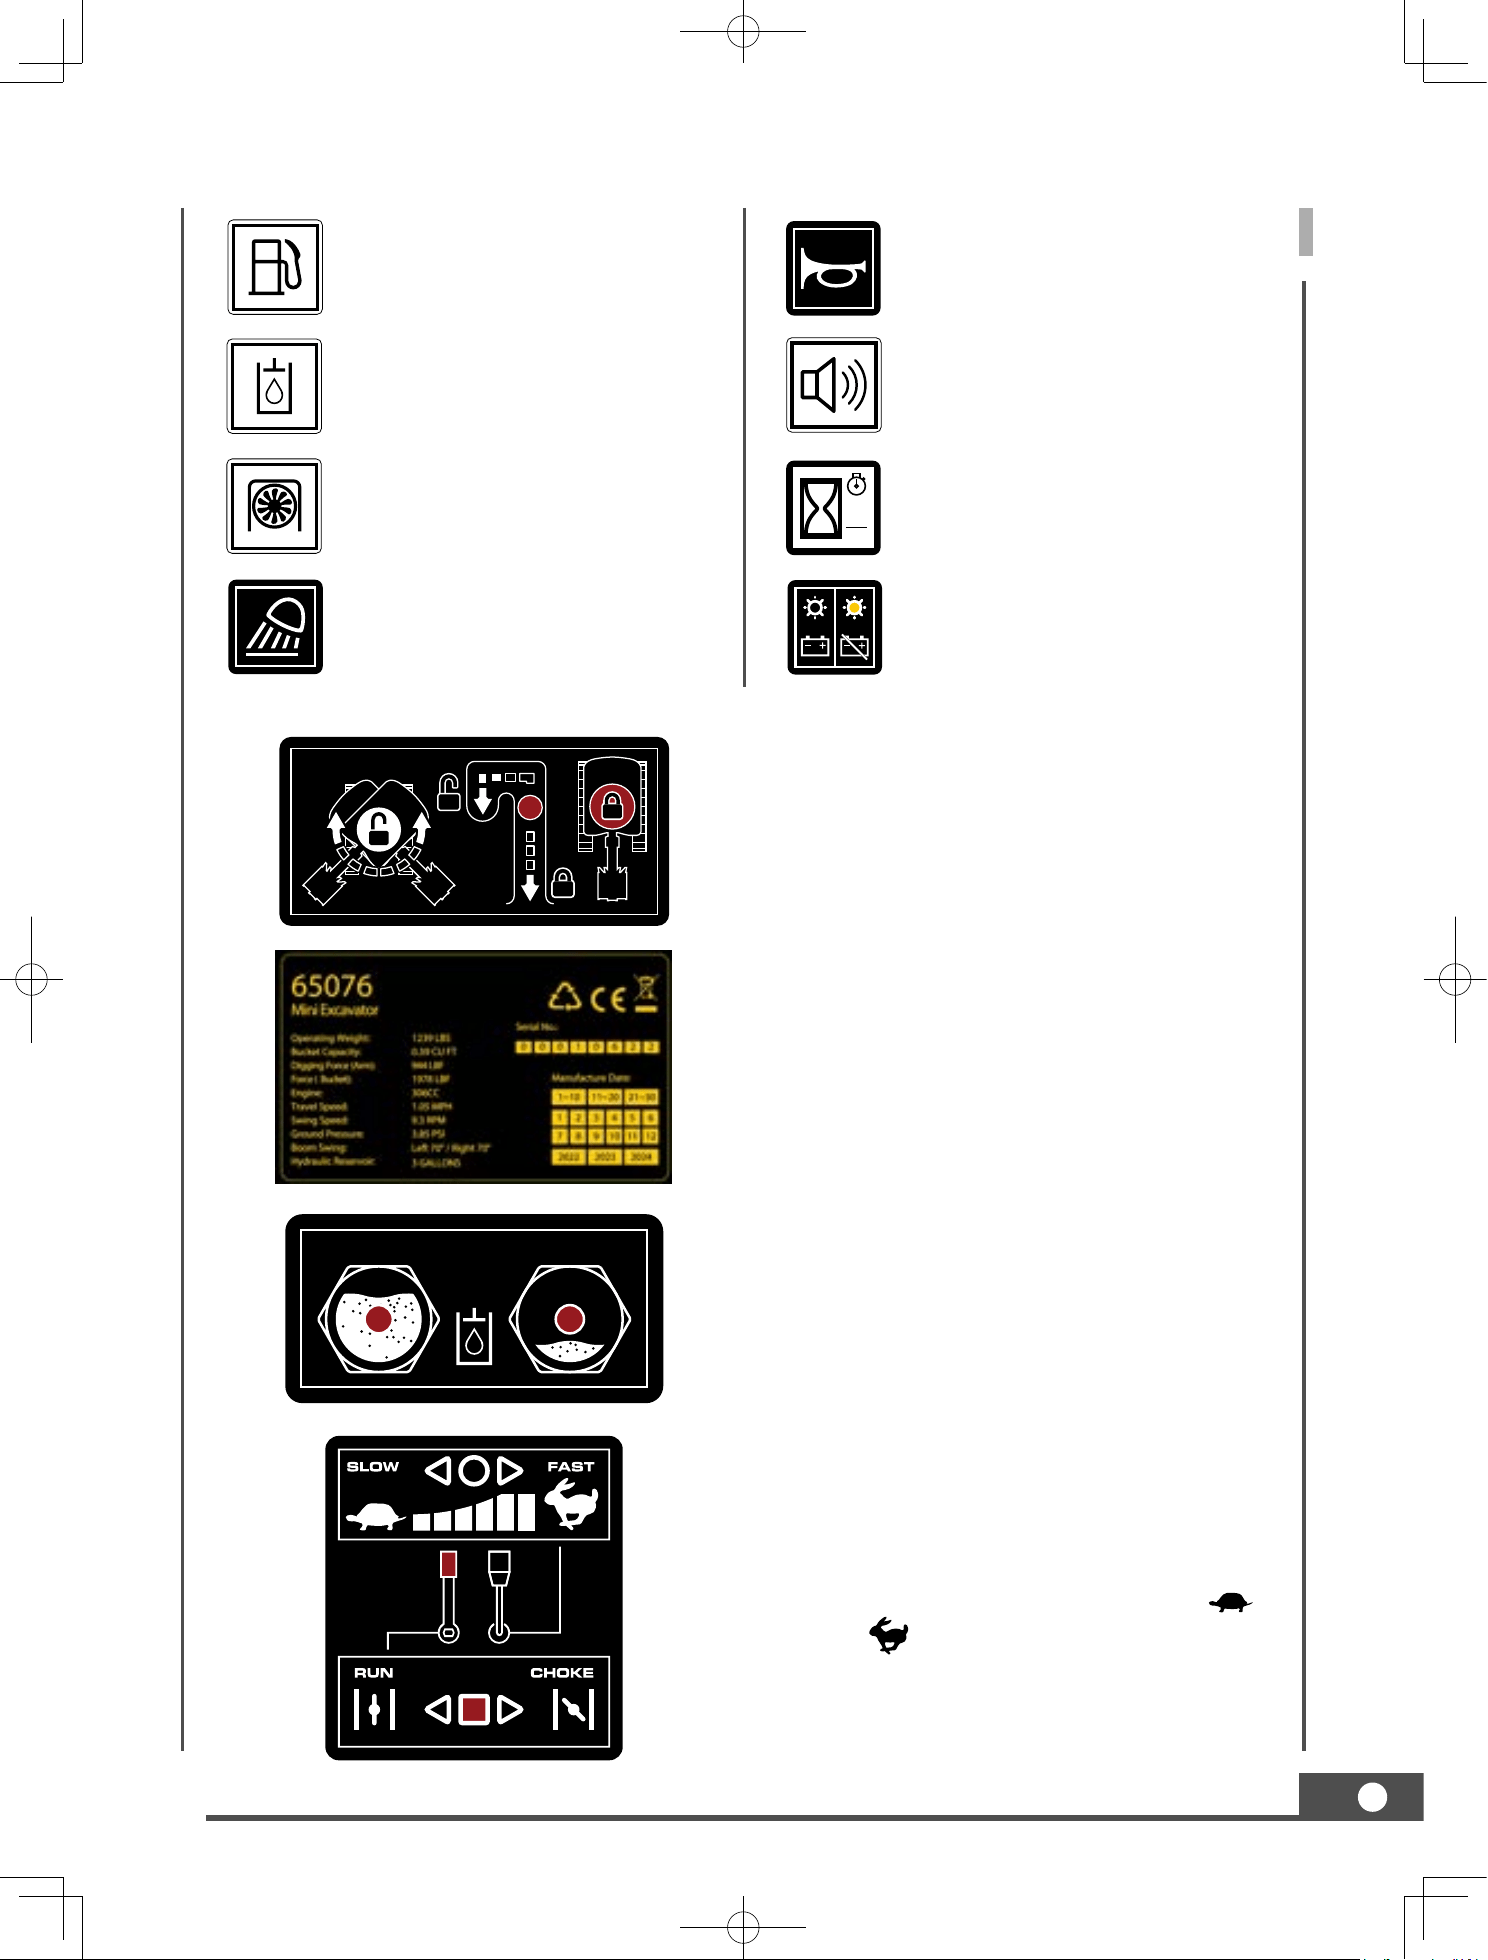
Specifications
Item No.
65076
Operating Weight
1239 LBS
Standard
bucket
Volume
0.39 CU FT
Width
11.41 IN
Digging Force (Arm)
944 LBF
Digging Force (Bucket)
1978 LBF
Engine
306 cc, Gas
Starting
Key-type Starter Switch
and Shutdown
Swing speed
9.3 rpm
Travel speed
1.05 MPH
Gradeability
15°
Ground Contact Pressure
3.84 PSI
Boom
Swing
Left
70° (L)
Right
70° (R)
Track Shoe type
Rubber Crawler
Pump Capacity
9x2 L/min
Hydraulic reservoir
3.17 GAL
Hydraulic Pressure
2538 PSI
Parking Brake
Hydraulic Lock Type
Sound pressure level at
the operator’s station
(LpA)
82.5dB, K=4dB
Vibration
value
Arm
2.17 m/s
2
, K=0.5
Whole body
7.65 m/s
2
, K=0.5
RECYCLING AND DISPOSAL
This marking indicates that this
product should not be disposed with
other household wastes. To prevent
possible harm to the environment
or human health from uncontrolled
waste disposal, recycle it responsibly
to promote the sustainable reuse of
material resources. To return your
used device, please use the return
and collection systems or check with
your local authority or local stores
for advice of environmental safe
recycling.
4
When leaving the excavator,
please put the bucket close to
the ground and remove the
key.
Shut off the engine, disconnect
spark plug wire, and make
certain all moving parts have
stopped before cleaning,
repairing, or inspecting the
unit.
Beware of fan heating
Gasoline and its vapors are
extremely flammable and
explosive.
Do not touch hot parts such
as exhaust etc.
The exhaust fumes are
dangerous, containing carbon
monoxide. Staying in the
environment can lead to
unconsciousness and death.
2#
10
1
3-Point Lifting
2#
10
1
Alarm lamp “Battery charge”
2#
10
1
Ground wire disconnect switch
(Negative switch)
2#
10
1
Tie down the excavator
2#
10
1
Grease
Do not start engine by shorting
across starter terminals
Do not touch parts that are hot
from operation. Serious burns
may result.
Keep out of this area to avoid serious
personal injury or death.
Be careful with your hands.
Be aware, objects may be
thrown while in use.
Do not use the bare hand for
checking on possible leakages.
Keep away from rotating parts.
Keep away from fan
Keep hands away from moving
parts. Moving parts can crush
or cut.
Keep bystanders away.
Pay attention to safety
when working in front of the
machine
Tipping hazard!
5
2#
10
1
Gas
2#
10
1
Hydraulic Oil
2#
10
1
Cooling Fans
2#
10
1
Lamp
2#
10
1
Horn Button
2#
10
1
Horn Position
2#
10
1
Hours
2#
10
1
Power Indicator
Instruct user to lock or unlock the swing
frame with the swing lock pin.
Mini Excavator
29575
TIYA Hydraulics Co., Ltd.
Fuqian Street North, Gaoze,
Wulian, 262300 Shandong,
P.R. China
Serial No.:
0 0 0 1 0 6 2 2
Manufacture Date:
11~201~10
2022 2023 2024
1 2 3 4 5 6
7 8 9 10 11 12
21~30
562 kg
0.011 m³
4.2 kN
8.8 kN
306cc/6.3kW/3600rpm
306cc/6.8kW/3600rpm
1.7 km/h
9.3 rpm
26.5 kPa
Left 70° / Right 70°
12 L
Operating Weight:
Bucket Capacity:
Digging Force (Arm):
Digging Force (Bucket):
Engine:
Travel Speed:
Swing Speed:
Ground Pressure:
Boom Swing:
Hydraulic Reservoir:
Machine parameter label
FULL EMPTY
HYDRAULIC
OIL
Always check the hydraulic oil lever before
using the machin
e
THROTTLE CONTROL The throttle control
regulates the speed of the engine. The
throttle control moves between Slow .
and Fast . positions
6
POWER
OUTLET
12V~ 15A
Power Outlet 12V,15
A
ENGINE ON/OFF/START SWITCH The
engine switch has three positions. OFF -
engine will not start or run. ON - engine will
run. Start - engine will ignite
5 joystick locked
Pull back the black control lever to raise the
dozer. Pushing the lever forward to lower the
dozer
.
Step on the front of the pedal to swing the
boom to left. Step on the rear of the pedal to
swing the boom to the right
.
Hold the lever towards to right side to unlock
the seat, then do adjustment.
Manual Tube
7
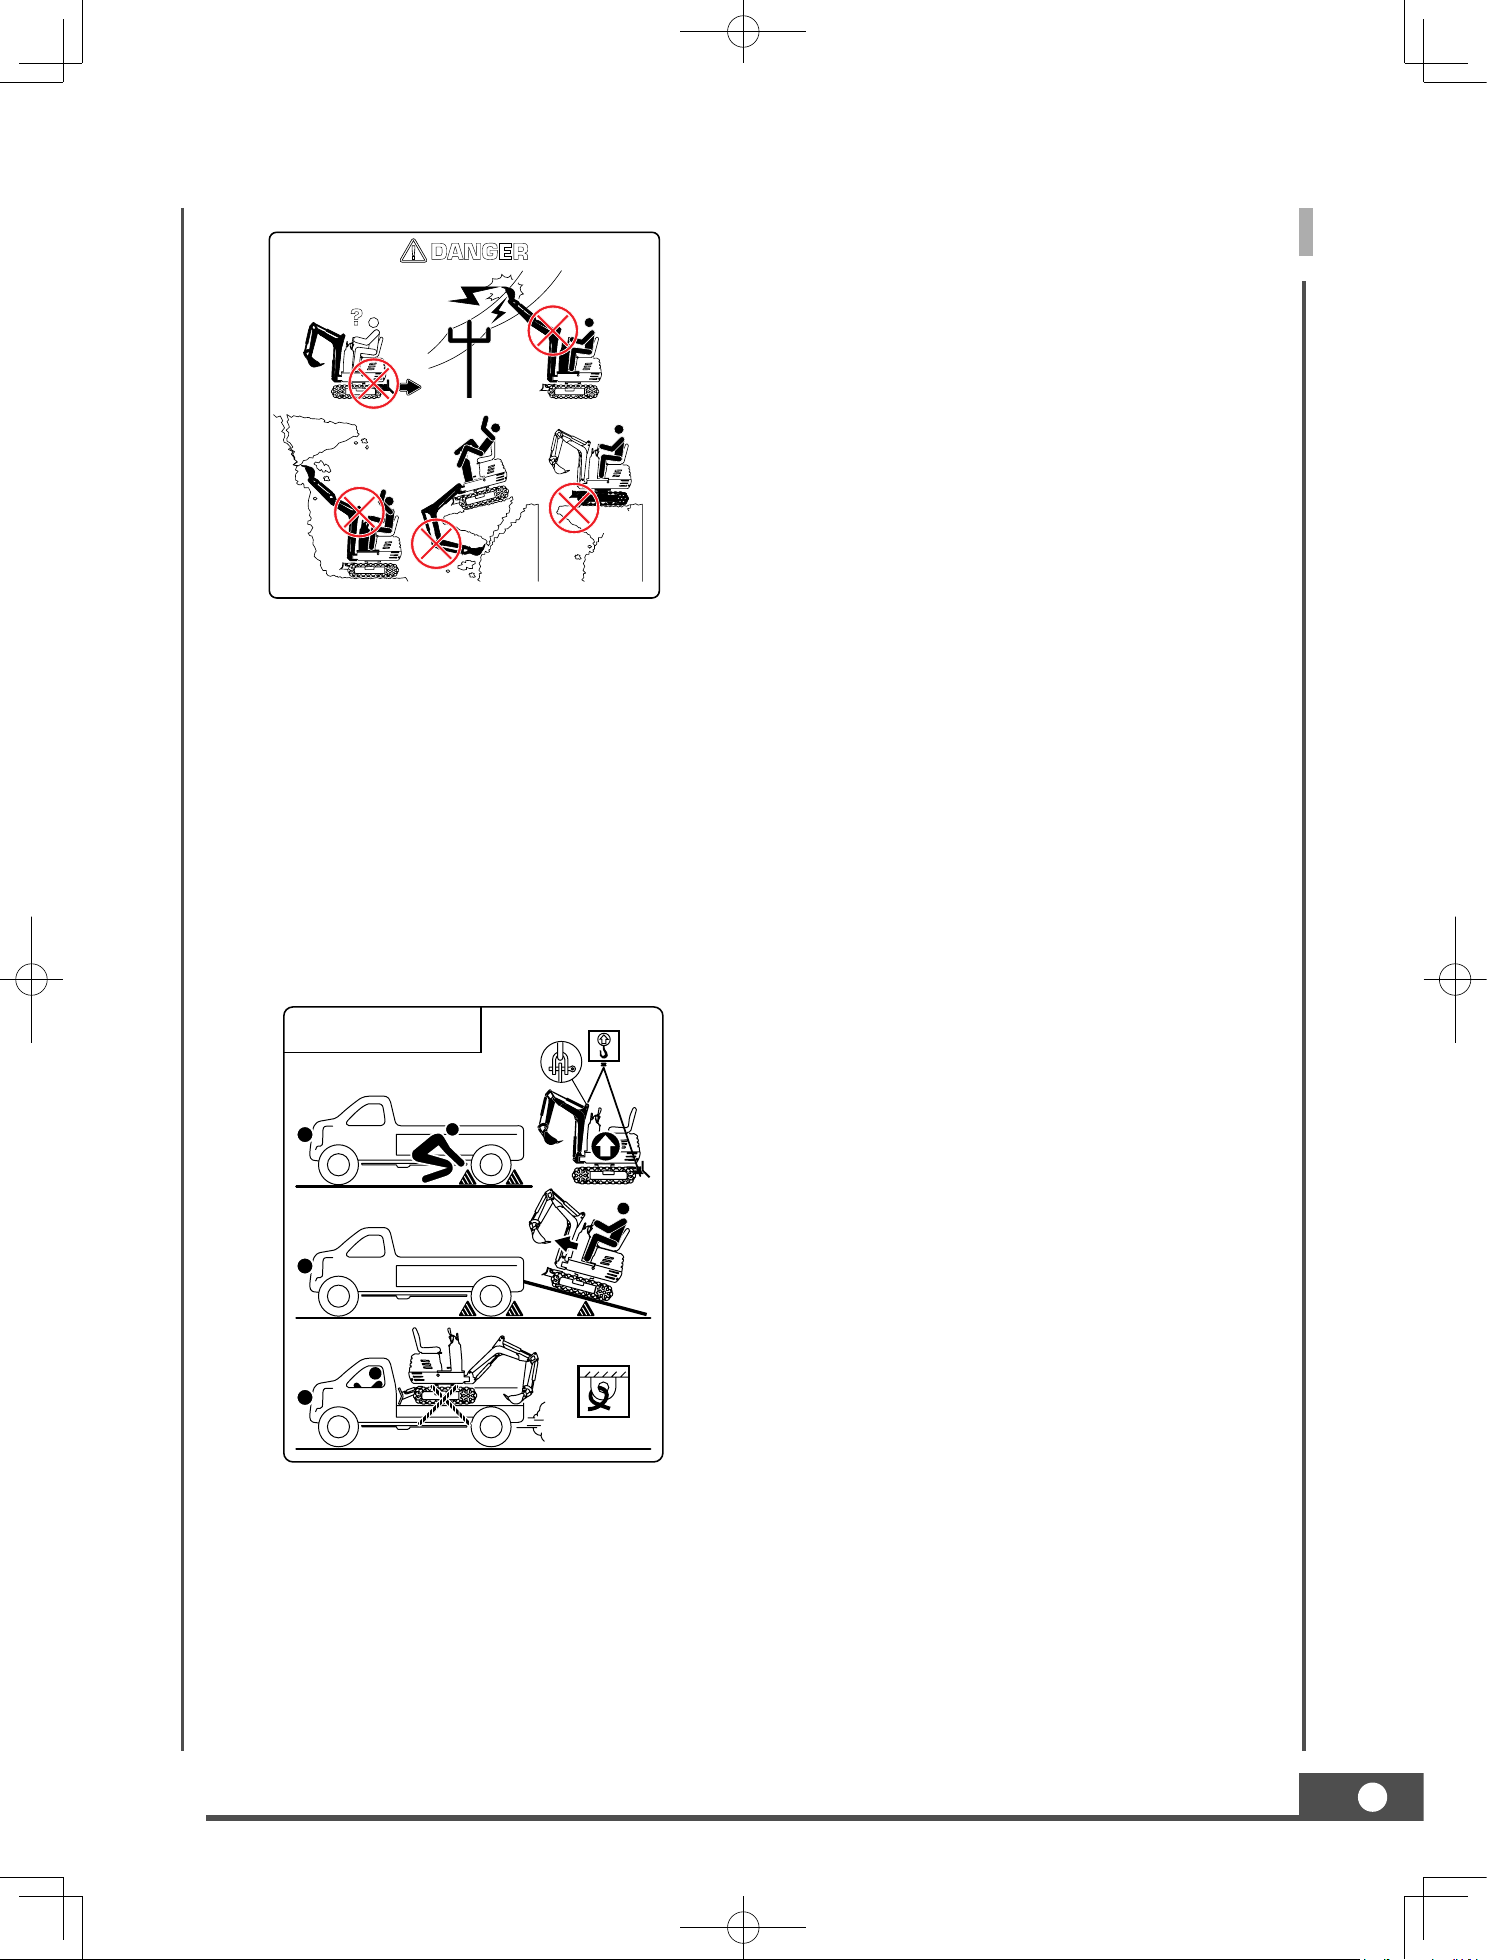
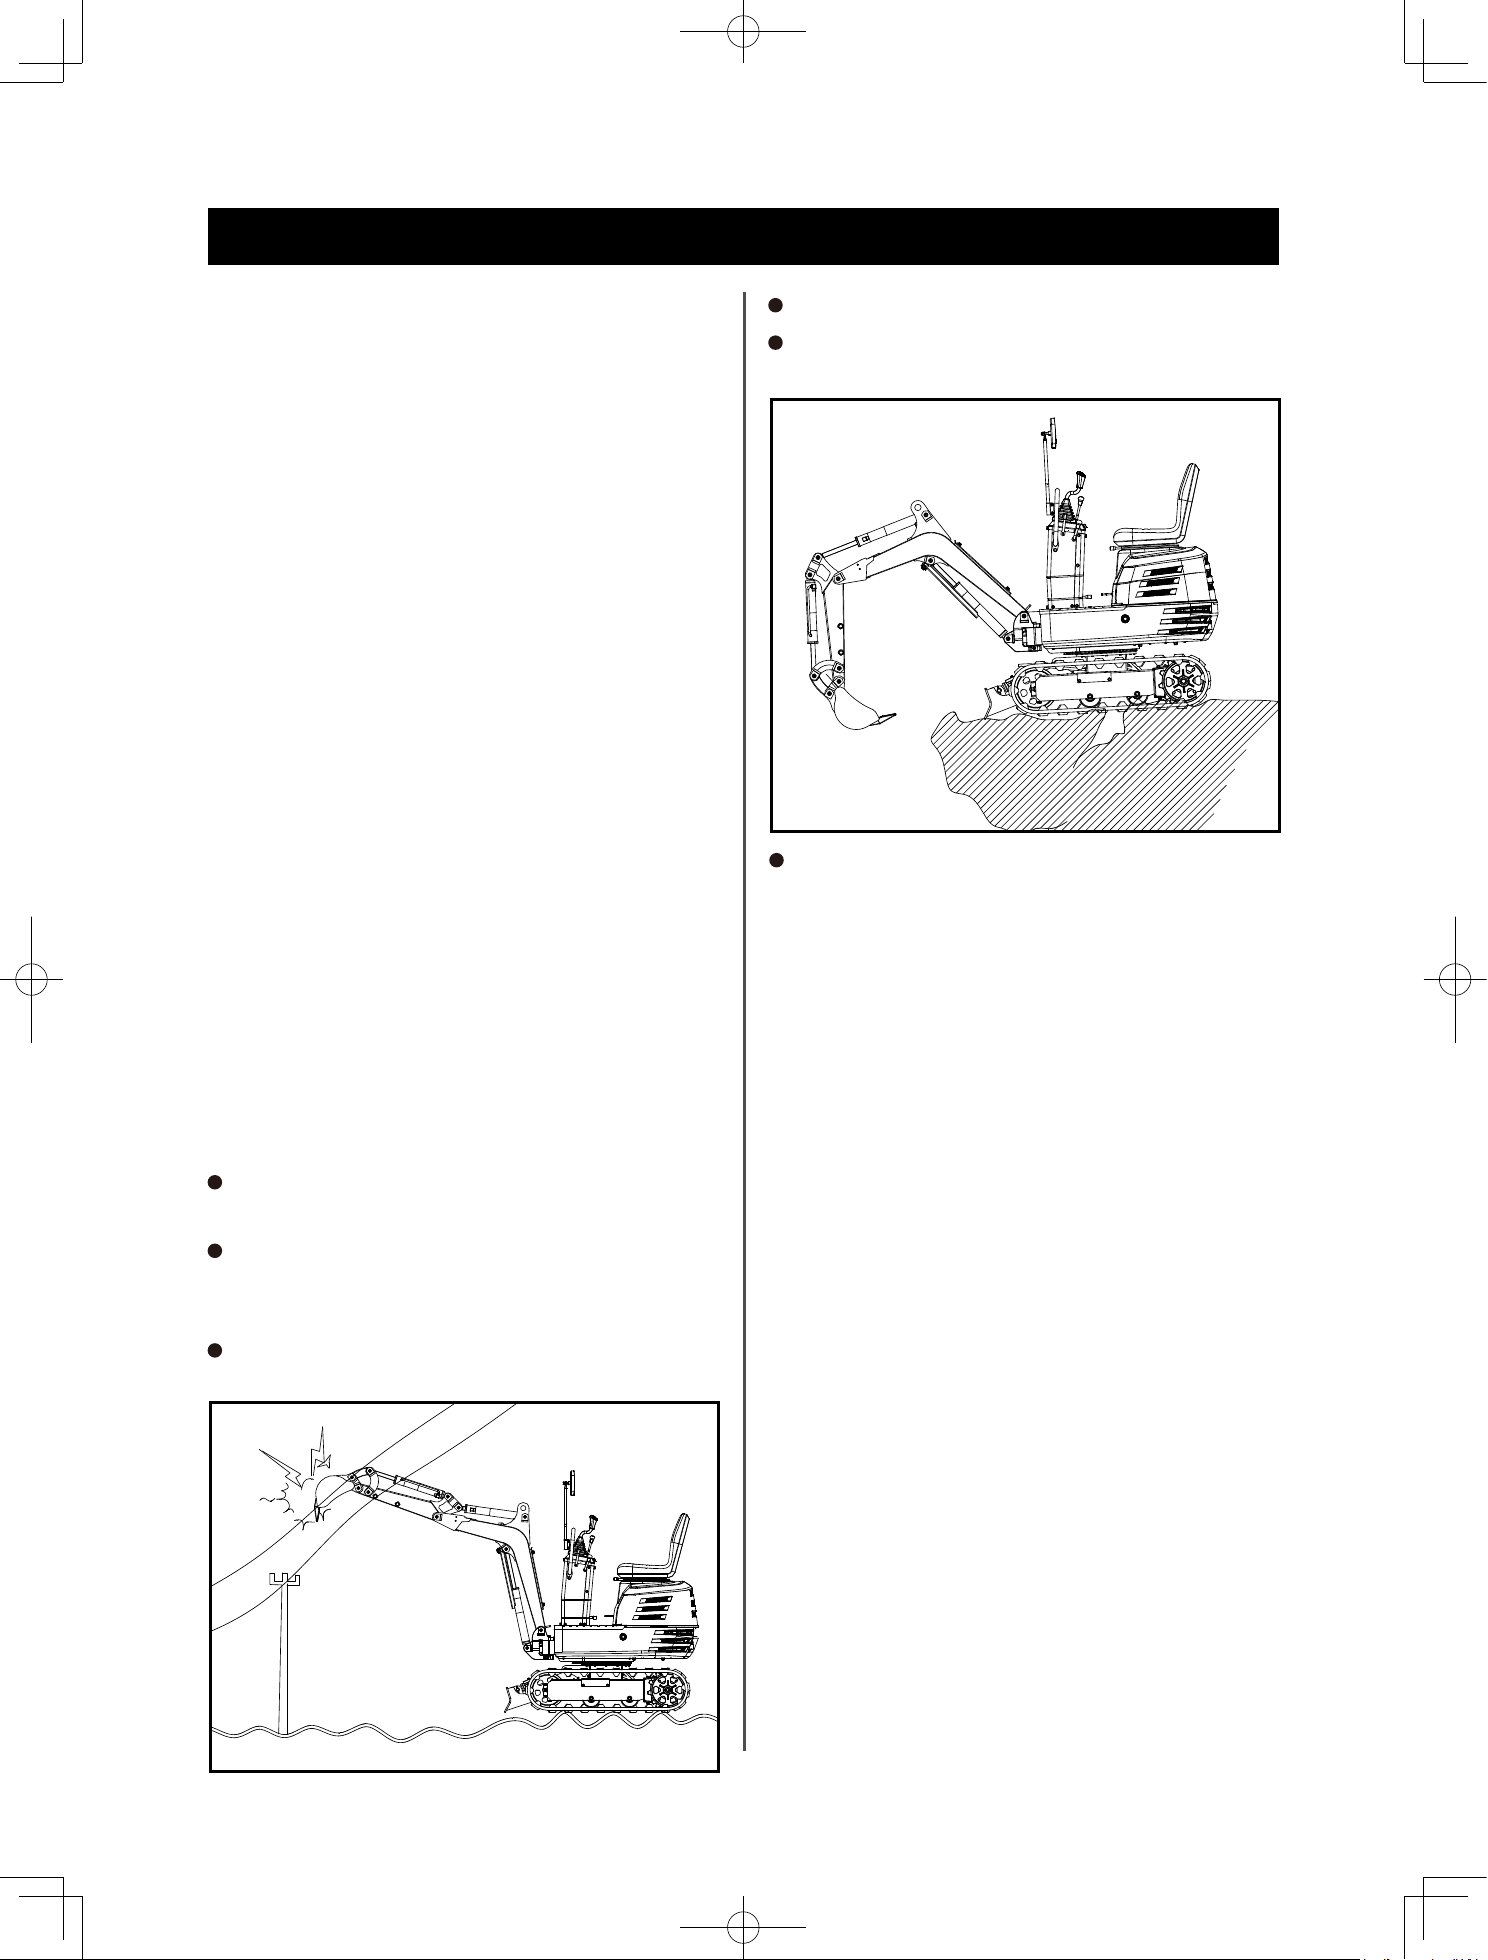
DANGER
?
Avoid Work Site Hazards Avoid contact with
gas lines, buried cables and water lines. Call
utility line location services to identify all
underground utilities before you dig. Prepare
work site properly. Avoid operating near
structures or objects that could fall onto the
machine. Clear away debris that could move
unexpectedly if run over. Avoid boom or arm
contact with overhead obstacles or overhead
electrical lines. Never move any part of
machine or load closer than 3 m (10 ft) plus
twice the line insulator length to overhead
wires.
Keep bystanders clear at all times. Keep bystanders away from raised booms, attachments,
and unsupported loads. Avoid swinging or raising booms, attachments, or loads over or near
personnel. Use barricades or a signal person to keep vehicles and pedestrians away. Use a
signal person if moving machine in congested areas or where visibility is restricted. Always
keep signal person in view. Coordinate hand signals before starting machine. Operate only
on solid footing with strength sufficient to support machine. When working close to an
excavation, position travel motors away from the hole. Reduce machine speed when operating
tool on or near ground when obstacles may be hidden (e.g., during snow removal or clearing
mud, dirt, etc.).
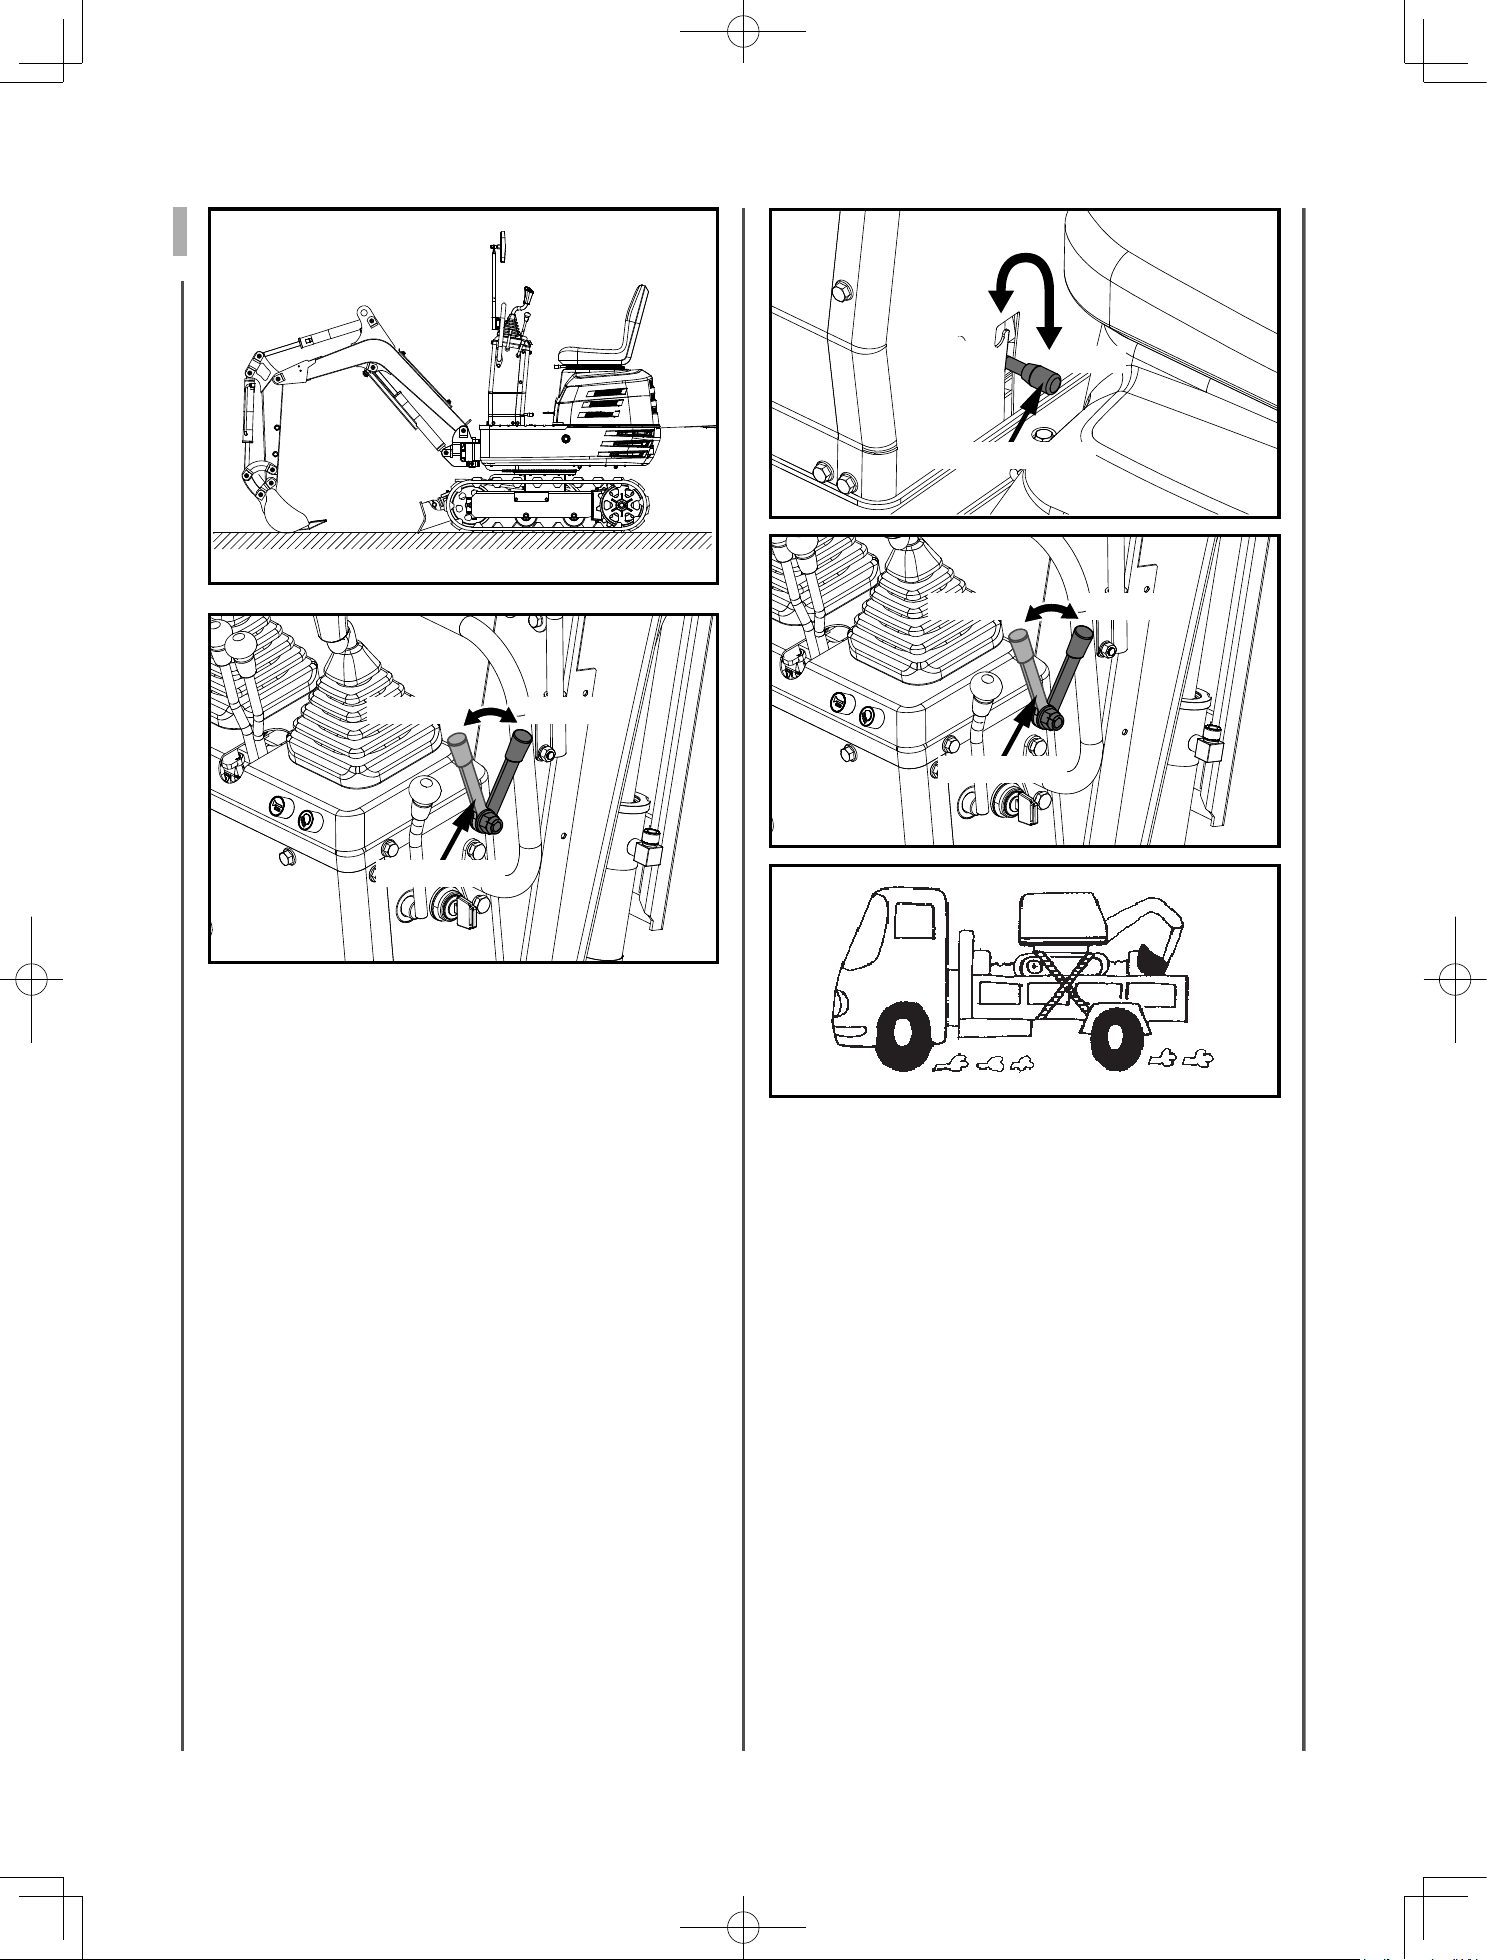
3-point Lifting
Man-made Slope
1
2
3
TRANSPORT
Using 3-point Lifting way or ramp to load or
unload the excavator.
Warning: Apply the parking brakes of the
truck, and block the drive wheels from both
sides.
Warning: use blocks or struts under the
ramps and the truck bed.
Warning: Block the crawlers and tie down the
excavator.
Warning: To avoid personal injury or death:
After loading the machine on the truck,
swivel the upper body around to the back
of the truck and lock the swing frame with
the swing lock pin. Lower the bucket and
dozer onto the truck bed and then lock the
boom with the lever before getting off. It
is prohibited to operate the machine when
operator stands on the ground.
8
E
J
D
G
H
F
I
A
C
B
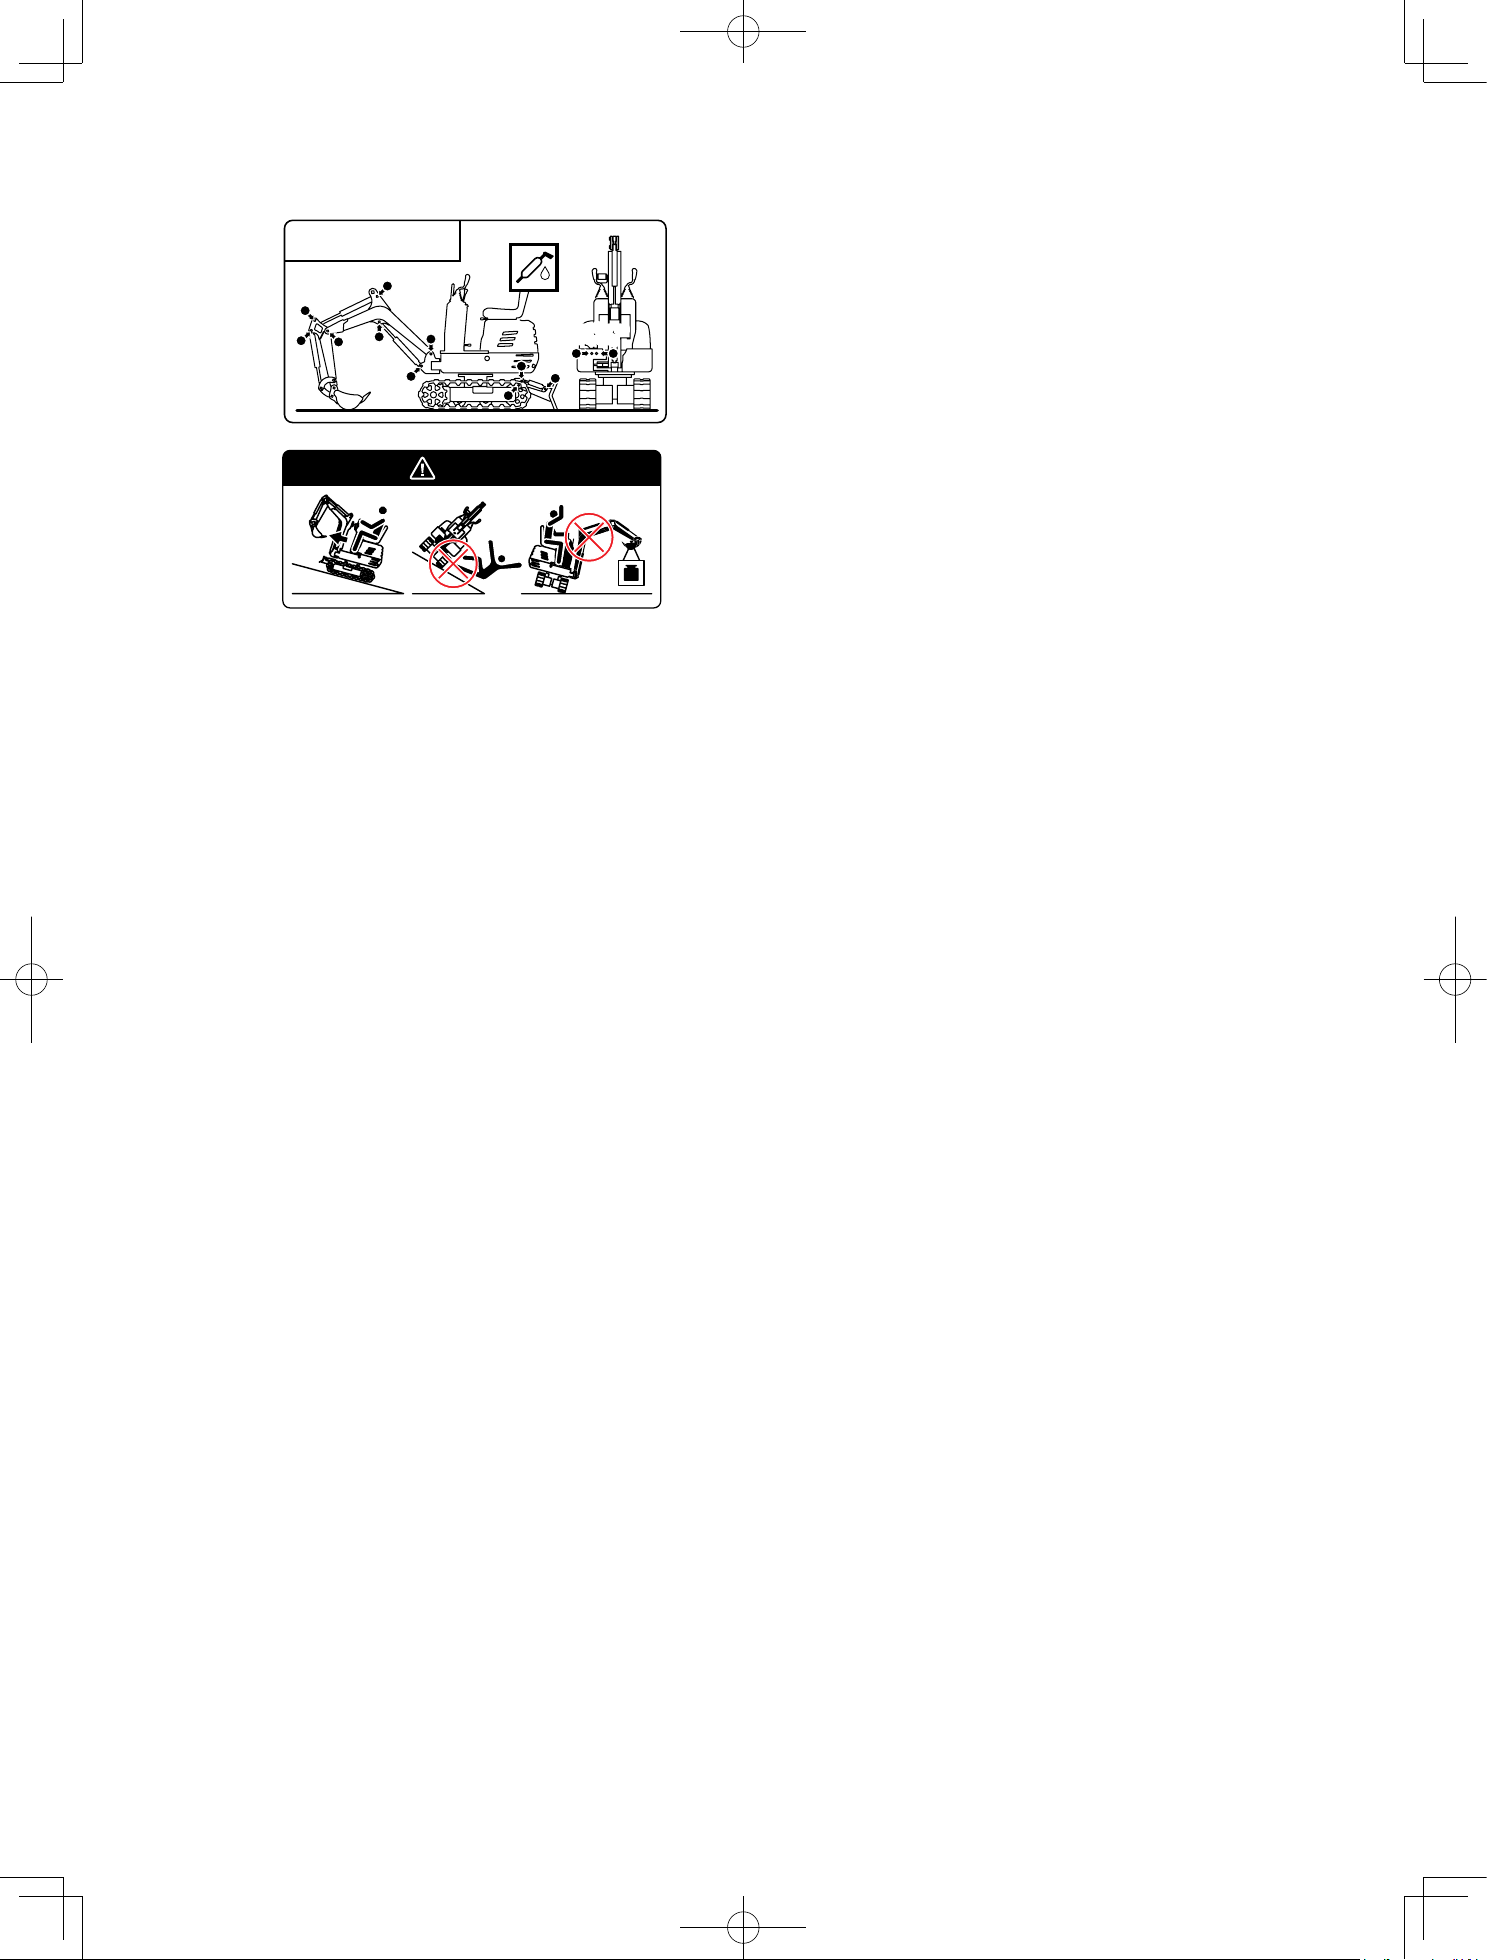
GREASE
K L
Platform
Swing
Periodly grease the excavator
Avoid Machine Tip Over
- Do not jump if the machine tips. You will be
unlikely to jump clear and the machine may
crush you.
- Load and unload from trucks or trailers carefully. Be sure truck is wide enough and on a firm level
surface. Use loading ramps and attach them properly to truck bed. Avoid trucks with steel beds
because tracks slip more easily on steel.
- Be careful on slopes. Use extra care on soft, rocky or frozen ground. Machine may slip sideways in
these conditions. When traveling up or down slopes, keep the bucket on uphill side and just above
ground level.
- Be careful with heavy loads. Using oversize buckets or lifting heavy objects reduces machine
stability. Extending a heavy load or swinging it over side of undercarriage may cause machine to
tip.
- Ensure solid footing. Use extra care when operating near banks or excavations that may cave-in
and cause machine to tip or fall.
MAX.15°
DANGER
9
NN
N N
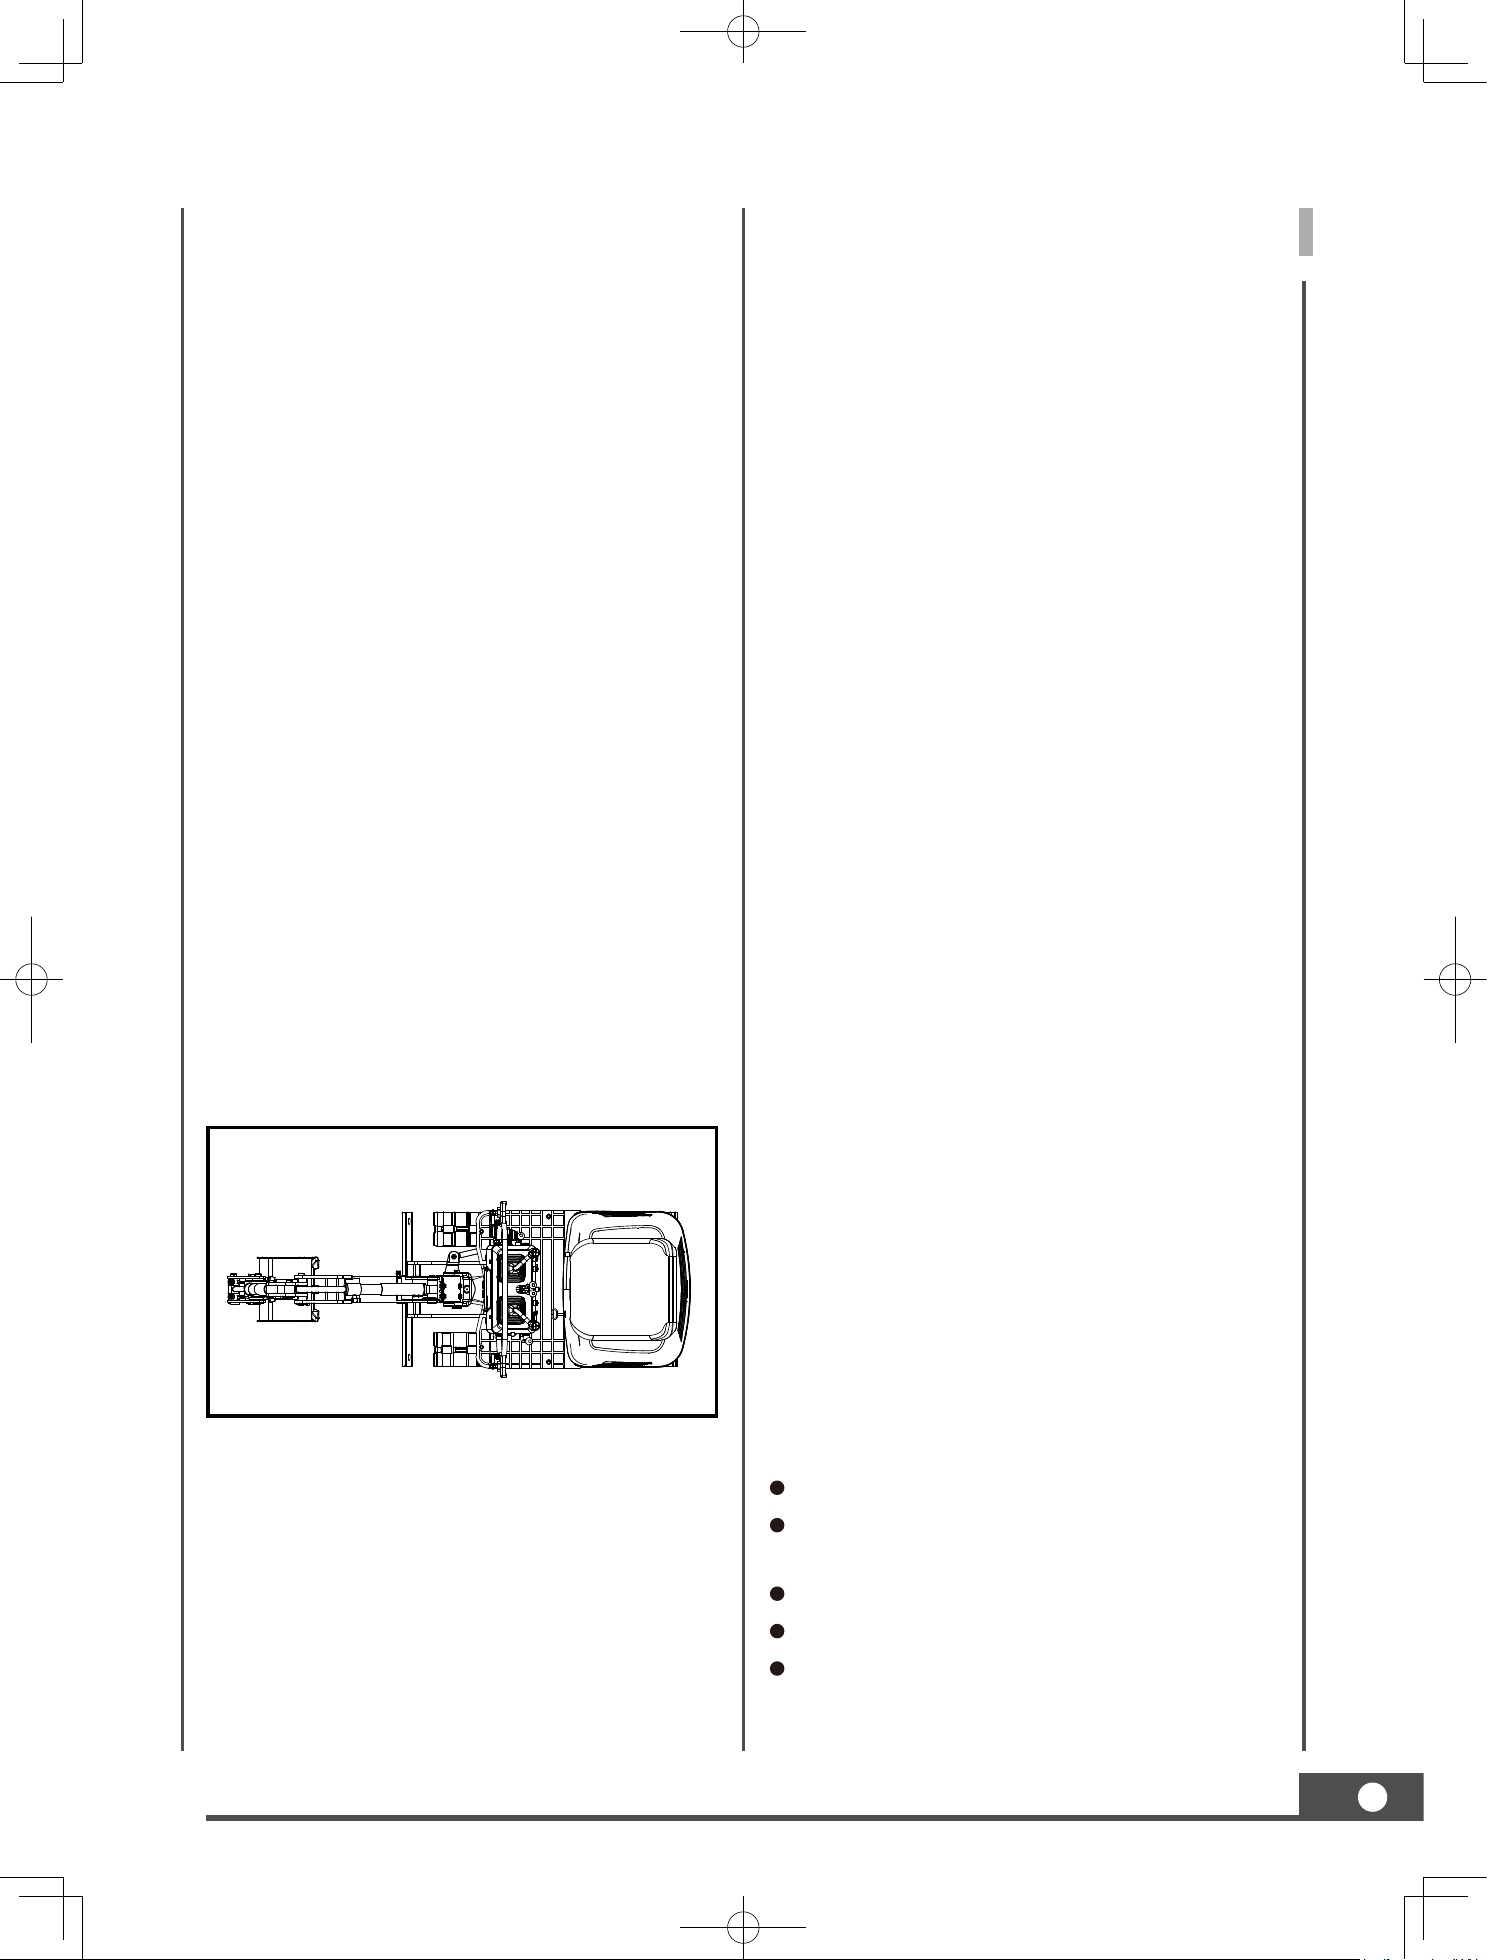
1. Pushing the both drive levers forward, moves the excavator forward, and vice-versa. The front of the
excavator is the direction where the dozer is present. Only operate one side drive lever to change
the direction when the excavator is stationary or travelling; Operate the left and right drive lever in
opposite directions to achieve left and right spin turn.
2. Operation of the Arm and Unit Swing.
3. Operation of the Boom and Bucket.
2 3
1
This symbol, the industry's "Safety Alert
Symbol", is used throughout this manual and
on labels on the machine itself to warn of
the possibility of personal injury. Read these
instructions carefully. It is essential that you
read the instructions and safety regulations
before you attempt to assemble or use this
unit.
SAFETY
Indicates a potentially
hazardous situation which, if not avoided, could
result in death or serious injury.
Indicates an imminently
hazardous situation which, if not avoided, will
result in death or serious injury.
Indicates a potentially
hazardous situation which, if not avoided, may
result in minor or moderate injury.
Indicates that equipment
or property damage could result if instructions
are not followed.
Gives helpful information.
IMPORTANT
WARNING
CAUTION
NOTE
DANGER
IMPORTANT
WARNING
CAUTION
NOTE
IMPORTANT
WARNING
CAUTION
NOTE
IMPORTANT
WARNING
CAUTION
NOTE
10
SAFE OPERATION
The best insurance against accidents is to
abide by the safety regulations.
Read and understand this section carefully,
before operating the excavator.
Every user, however experienced, should
carefully read and understand this section
and those of the attachments and accessories
before taking the excavator into operation.
The owner is obliged to inform the operators
of these instructions in detail.
Keep this manual in the toolbox.
1. BEFORE OPERATION
1. Make yourself acquainted with the excavator
and be aware of its limits. Read this operator's
manual carefully before starting the excavator.
2. Obey the danger, warning and caution labels
on the machine.
3. Track width 690mm. Operate in the correct
track.
4. Do not use the excavator under the influence
of alcohol, medication or other substances.
Fatigue is also dangerous.
5. Check the surroundings carefully before using
the excavator or when attachments are being
attached.
The excavator is not intended to be used in
a contaminated environment.
Neither the excavator as a whole nor its
internal components are intended for use in
potential explosive atmospheres.
Pay attention to the overhead clearance with
electric wires.
Check for pipes and buried cables.
Check for hidden holes, hindrances, soft
ground and overhangs.
During excavator use do not allow any
persons within the working range.
6. Do not allow other persons to use the
machine before having informed him on the
exact operation and work instructions, and be
assured that the operator's manual has been
read and understood.
7. Do not wear baggy, torn or too large clothing
when working with the excavator. Clothing
can get caught in rotating parts or control
elements which can cause accidents or
injuries. Wear adequate safety clothing, e.g.
safety helmet, safety shoes, eye protection, ear
protection, working gloves, etc., as necessary
and as prescribed by laws or statutes.
8. Do not allow passengers to get on any part of
the excavator seat during operation.
9. Check mechanical parts for correct
adjustments and wear. Exchange worn or
damaged parts immediately. Check nuts and
bolts regularly for tight fitment. (for details
see "Care and Maintenance").
10. Keep your excavator clean. Heavy soiling,
grease, dust and grass can inflame and cause
accidents or injuries.
11. Use only authorized attachments.
12. Before starting the excavator, be absolutely
sure that the excavator has been filled with
11
Front Rear
fuel, lubricated, greased and undergone other
maintenance work.
13. Do not modify the excavator, otherwise it
could lead to unforeseen safety problems.
2. STARTING OF THE EXCAVATOR
1. Get into and out of the machine safely. Always
face the machine. Always use handrails
and available steps and keep yourself well
balanced. Do not hold any of the control
Ievers and switches. Do not jump on or off the
machine, whether stationary or in motion.
2. Start and control the excavator only from the
operator's seat. The driver should not lean out
of his seat when the engine is running.
3. Before starting the engine, make sure that all
control levers are in their neutral positions.
4. Do not start the engine by jumping the starter
connections. Do not try to circumvent using
the starter switch, otherwise the engine could
start suddenly and the excavator could move.
5. Make sure that the dozer is on the front side.
(The dozer must be raised.) If the swing frame
has been turned 180 , i.e. the dozer is, seen
from the operator, "behind", then the travel
direction is opposite to the drive direction
of the levers (when activating the drive
lever forwards, the excavator, seen from the
operator, will move backwards).
6. Do not run the engine in closed or badly
ventilated rooms. Carbon monoxide is
colourless, odourless and deadly.
7. Keep all safety equipment and covers in place.
Replace damaged or missing safety devices.
8. Precautions against tipping over. In order to
secure safe operation, keep away from steep
slopes and embankments. Do not swing the
bucket downwards. Lower the dozer during
digging. Keep the bucket as low as possible
while driving upwards. Turn slowly on slopes.
Do not keep the excavator near the edges of
trenches and banks, as the earth can give way
due to the weight of the excavator.
9. Watch out at all times where the excavator
is being moved to. Keep an eye out for
hindrances.
10. Keep enough distance from trench and bank
edges.
Safety for children
Tragedy can occur if the operator is not alert
to the presence of children. Children generally
are attached to machines and the work they
do.
11. Never assume that children will remain where
you last saw them.
12. Keep children out of the work area and under
the watchful eye of another responsible adult.
13. Be alert and shut your machine down if
children enter the work area.
14. Never carry children on your machine. There
is no safe place for them to ride. They may
fall off and be run over or interfere with your
control of the machine.
15. Never allow children to operate the machine
even under adult supervision.
16. Never allow children to play on the machine
or on the implement.
17. Use extra caution when backing up, look
behind and down-make sure area is clear
before moving.
18. When parking your machine if at all possible
park on a firm, flat and level surface. Lower
the implements to the ground, remove the
key from the ignition and chock the crawlers.
3. AFTER OPERATION
Before leaving the machine,
Bring the excavator to hard even ground.
Lower the attachments and the dozer blade
on the ground.
Stop the engine.
Lock all control levers.
Remove the key.
12
Lock lever
Lock
Unlock
Swing lock pin
Lock
Unlock
4. SAFE LOADING AND TRANSPORT OF THE
EXCAVATOR
1. Observe all regulations concerning the
transport of excavators on public roads.
2. Use adequately long and robust ramps
when loading on a truck. (for details see
"TRANSPORTING THE EXCAVATOR ON A
TRUCK"); You can also lift the machine onto
the truck. (for details see "LIFTING OF THE
EXCAVATOR").
3. Do not change the running direction and to
avoid a tipping over, do not try to swing the
attachment crosswise to the loading ramps.
4. After loading of the excavator on a truck,
swivel the upper body around to the back of
the truck and engage the swing lock pin.
Lower the attachment on the loading plane,
release the pressure from the hydraulic
system and lock the boom with the lever.
Block the crawlers with blocks and wire down
the excavator. After loading the excavator
on a truck, tie down the undercarriage of the
excavator with a strong steel wire on the truck.
5. Do not brake abruptly with the excavator
loaded. Fatal accidents could happen.
5.
MAINTENANCE
Before doing maintenance work on the excavator,
place the machine on even solid ground, Iower
the attachments on the ground, stop the engine
and release the cylinder pressure by actuating
the levers. When dismantling hydraulic parts,
make sure that the hydraulic oil has cooled down
sufficiently to avoid burns.
Start maintenance work carefully, e.g. loosen
screws slowly so that oil will not squirt out.
1. Before doing work on the engine, the exhaust
system, the heat protection shield and the
hydraulics, let the excavator cool down
sufficiently.
2. Turn off the engine at all times when filling
with fuel. Avoid spilling and over-filling of
fuel.
Lock lever
Lock
Unlock
13
3. Smoking is prohibited while fuelling and
handling the battery! Keep sparks and
fire away from the fuel tank and battery.
Flammable gases escape from the battery.
4. When the battery is dead, it can be started by
pull the recoil starter.
5. To avoid short-circuiting the battery, always
remove the earth cable first and attach the
plus cable first.
6. Keep a first-aid box and a fire extinguisher at
hand at all times.
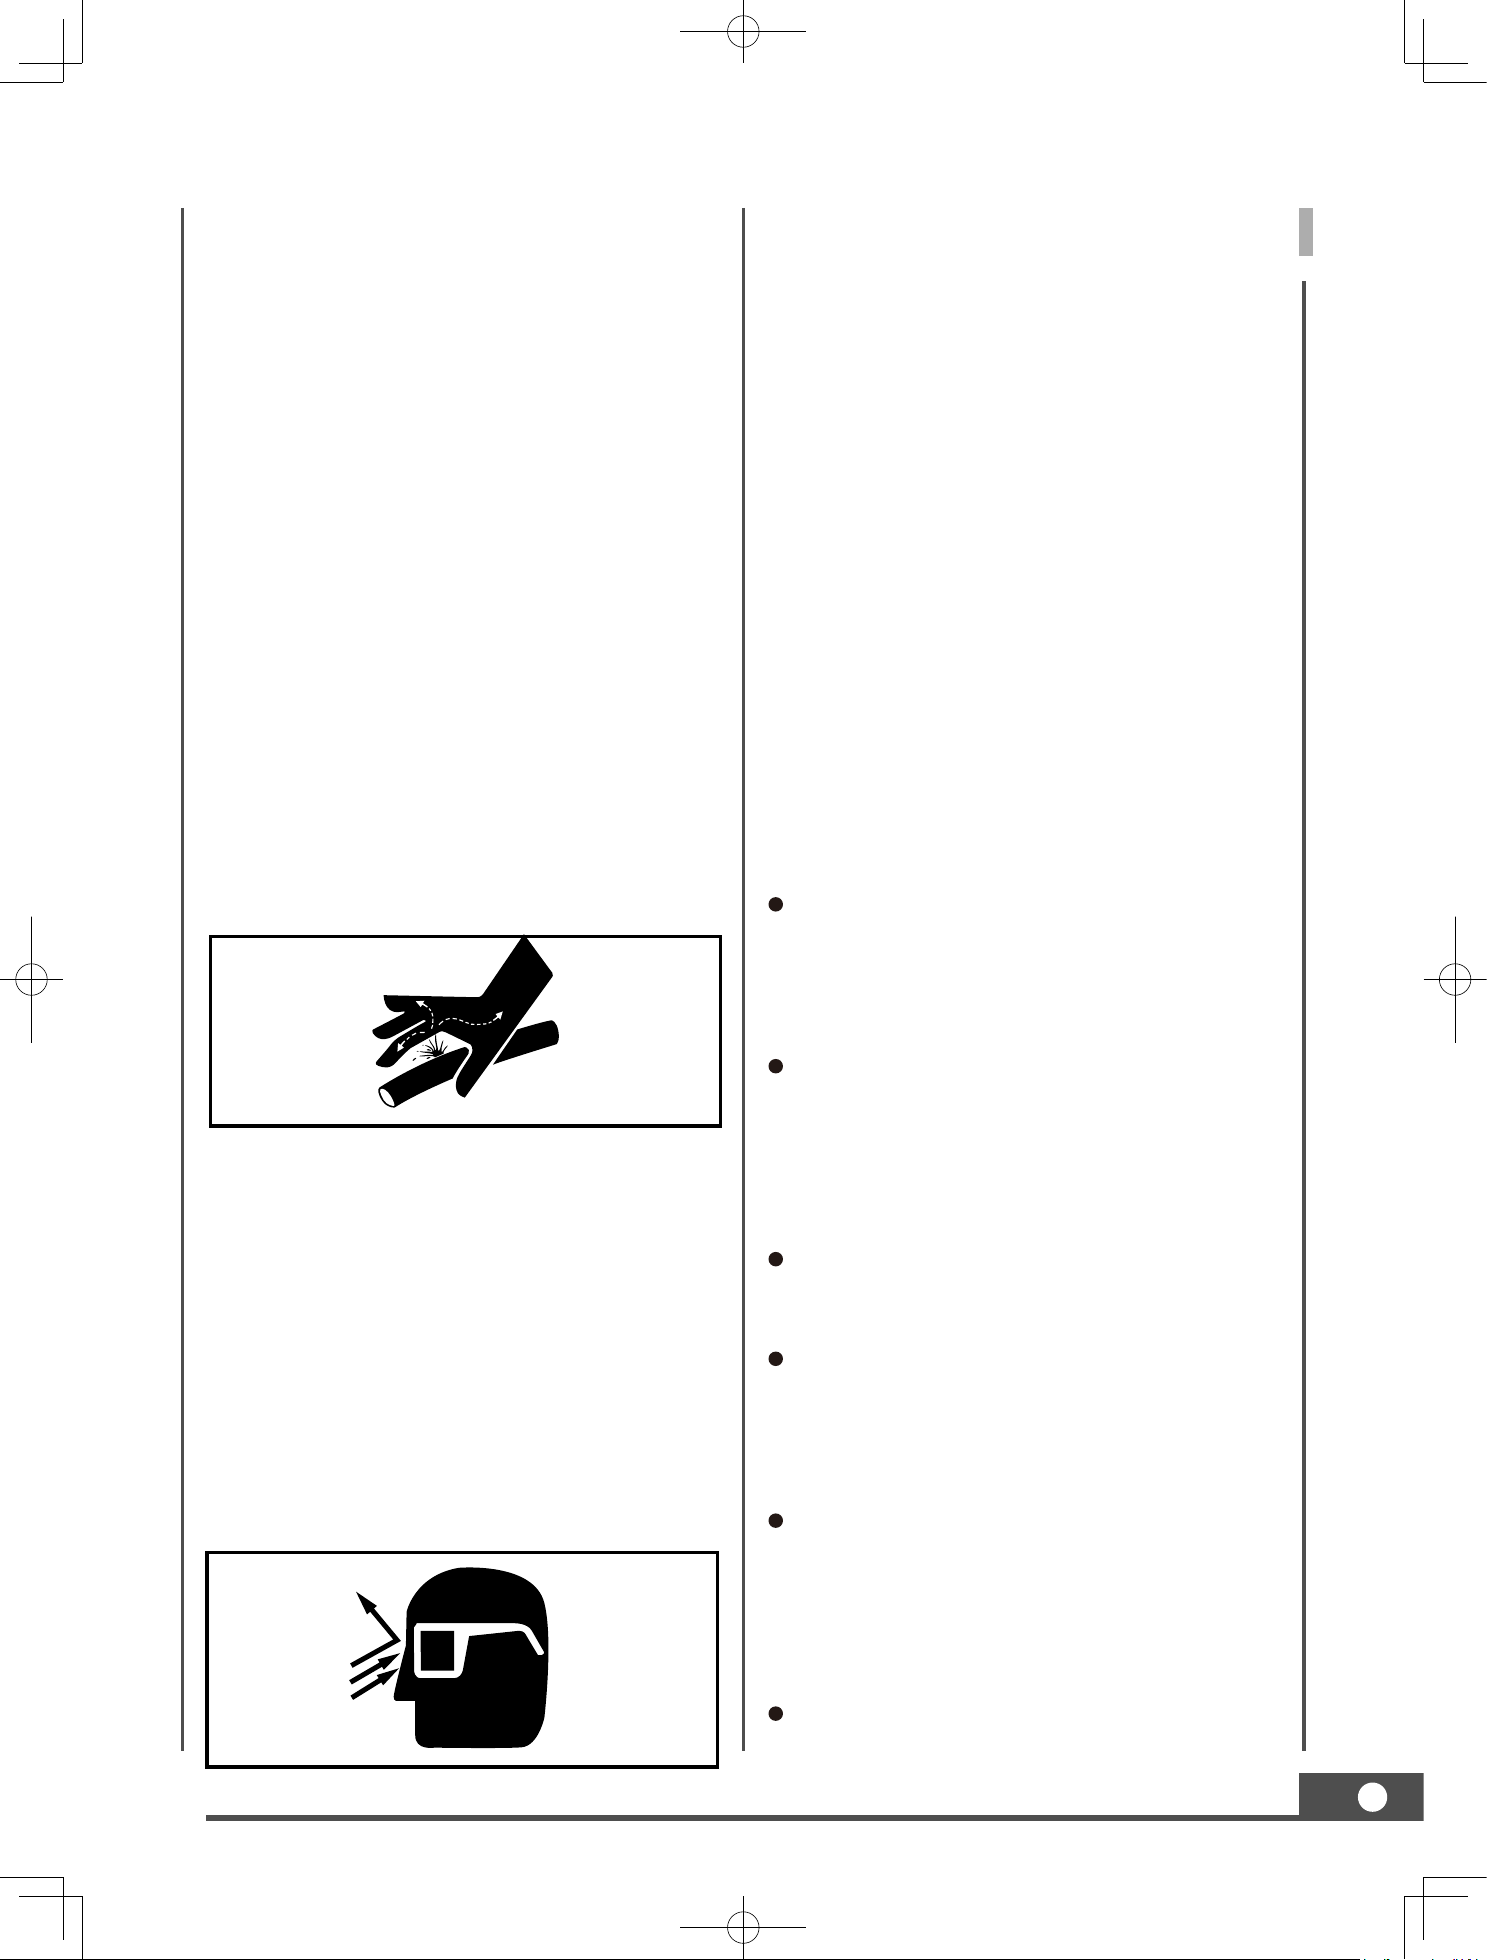
7. Leaking hydraulic fluid has enough pressure to
penetrate the skin and cause serious injuries.
Leakages from pin holes can be totally invisible.
Do not use the bare hand for checking on
possible leakages. Always use a piece of wood
or cardboard. It is strongly recommended you
use a face mask or eye protection.
Should injuries occur with leaking hydraulic
fluid, contact a doctor immediately. This
fluid can cause gangrene or serious allergic
reactions.
8. To avoid leakage of battery acid which
contains heavy metals, do not throw the
battery away.
9. Observe all laws and regulations concerning
the disposal of used oil, coolants, solvents,
hydraulic fluids, battery acids and batteries.
10. To avoid fire, do not heat the hydraulic
components (tanks, pipes, hoses, cylinders)
before they have been drained and washed.
11. Use a face mask or eye protection to protect
the eyes and respiratory system against
dust and other foreign particles.
12. Do not crawl under the excavator if the
excavator is only supported by the boom
and arm or the dozer. The excavator can
tip over or lower itself due to hydraulic
pressure loss. Always use safety struts or
other appropriate supports.
13. Use no parts which are lined with asbestos.
Do not use these kind of parts even if they
can be installed.
14. Fire prevention
Excavator and some attachments have
components that are at high temperatures
under normal operating conditions. The
primary source of high temperatures is the
engine and exhaust system. The electrical
system, if damaged or incorrectly maintained,
can be a source of arcing or sparks.
The following fire prevention guidelines
will help to keep your equipment up and
running efficiently and keep the risk of fire
to a minimum.
Blow off all accumulated debris near hot
engine exhaust components such as cylinder
head of gasoline engine and exhaust manifold
as well as exhaust pipes and muffler more
frequently when working in severe conditions.
Clean out all accumulated flammable
debris such as leaves, straw, pine needles,
branches, bark, small wood chips and any
other combustible materials from inside the
machine belly pans or lower unit structures as
well as from area in proximity to the engine.
Inspect all fuel lines and hydraulic hoses
for wear or for deterioration. Replace them
immediately if they begin to leak.
Examine electrical wiring and connectors
frequently for damage. Repair any wires
that are loose or frayed before operating the
machine. Clean all electrical connections and
tighten all electrical connections as necessary.
Inspect the exhaust system daily for any
signs of leakage. Check for broken pipes
and muffler and also for loose or missing
bolts, nuts and clamps. If any exhaust leaks
or fractured parts are found, repairs must
be completed prior to operation.
Always keep a multipurpose fire extinguisher
on or near the machine. Be familiar with the
operation of the fire extinguisher.

14
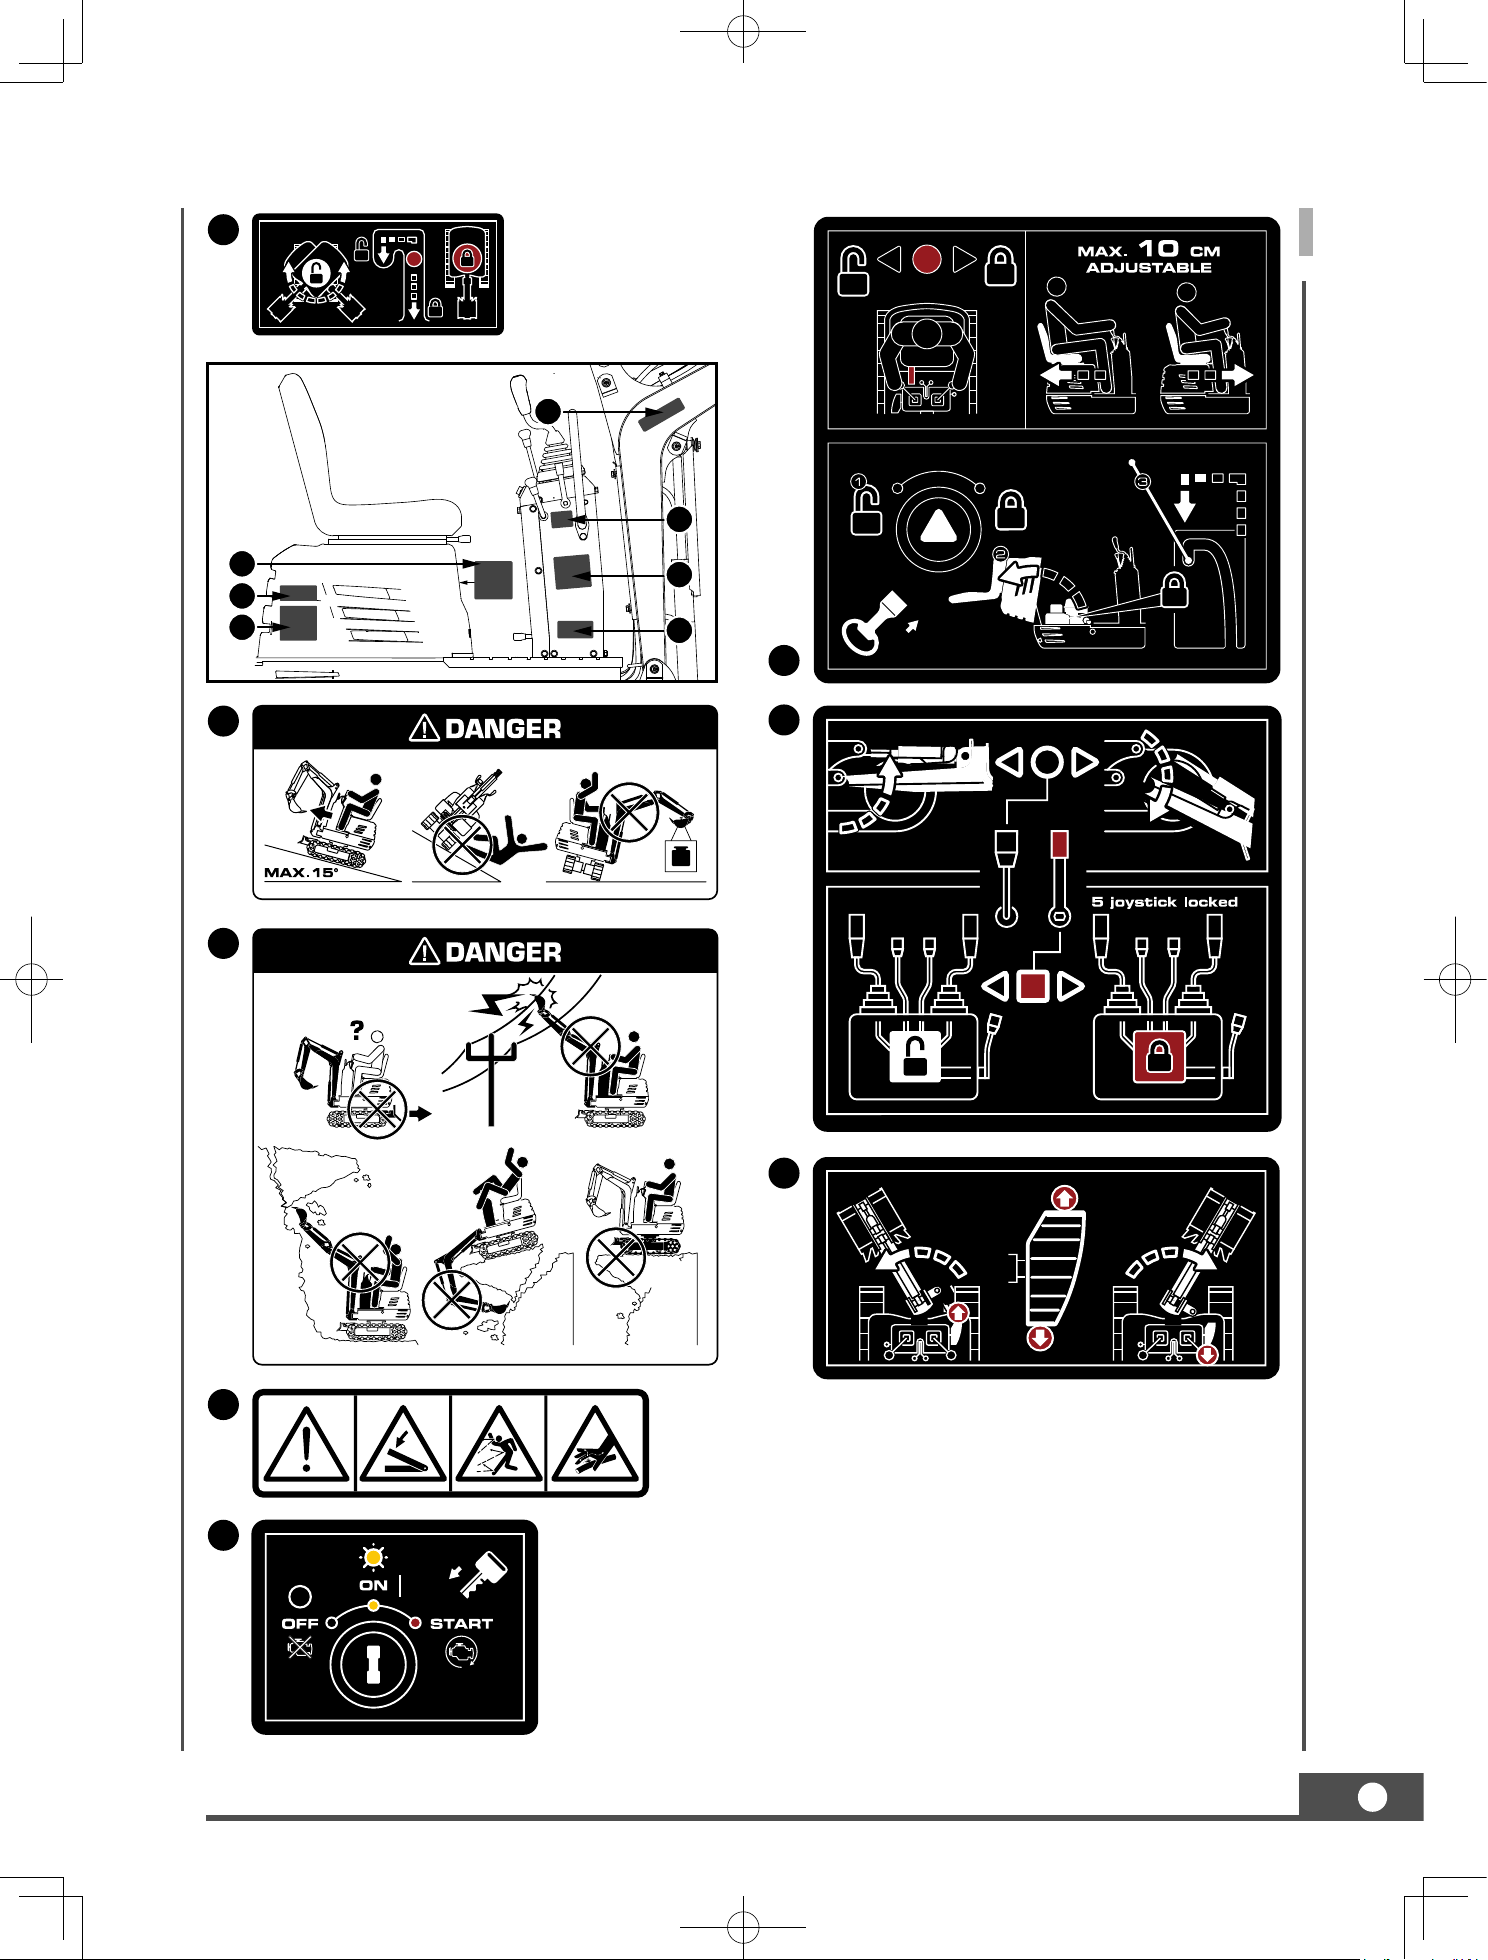
6. DANGER, WARNING AND CAUTION LABELS
1
3
2
7
8
9
4
5
10
11
6
12
13
14
15
16
17
18
10
1
1
3
2
7
8
9
4
5
10
11
6
12
13
14
15
16
17
18
10
1
1
3
2
7
8
9
4
5
10
11
6
12
13
14
15
16
17
18
10
1
1
4
5
6 7 8
9
10
NN
N N
2
3
FULL EMPTY
HYDRAULIC
OIL
15
1
3
2
7
8
9
4
5
10
11
6
12
13
14
15
16
17
18
10
1
15
16
17
18
11
12
13
14

16
7. CARE OF DANGER, WARNING AND
CAUTION LABELS
(1) Keep danger, warning and caution labels,
clean and free from obstructing material.
(2) Clean danger, warning and caution labels
with soap and water, dry with a soft cloth.
(3) Replace damaged or missing danger, warning
and caution labels with new labels from your
dealer.
DEALER SERVICE
Your dealer is always ready to help so that your
excavator offers the best performance. After
having carefully read this manual, you will realize
that much of the routine maintenance can be
done by yourself. Your dealer is responsible for
servicing and the delivery of spare parts. When
ordering spare parts from your dealer, always
mention the serial number of the excavator and
the engine.
Note these numbers right away in the supplied
lines.
Excavator Serial No.
Excavator Model No.
Engine serial No.
10
1
Excavator Serial No.
Excavator Model No.
Engine serial No.
10
1
(4) If a component with danger, warning and
caution label(s) affixed is replaced with new
part, make sure new label(s) is (are) attached
in the same location(s) as the replaced
component.
(5) Mount new danger, warning and caution
labels by applying on a clean dry surface and
pressing any bubbles to outside edge.
Excavator Model No.
Excavator Serial No.
Engine Serial No.
17
GB
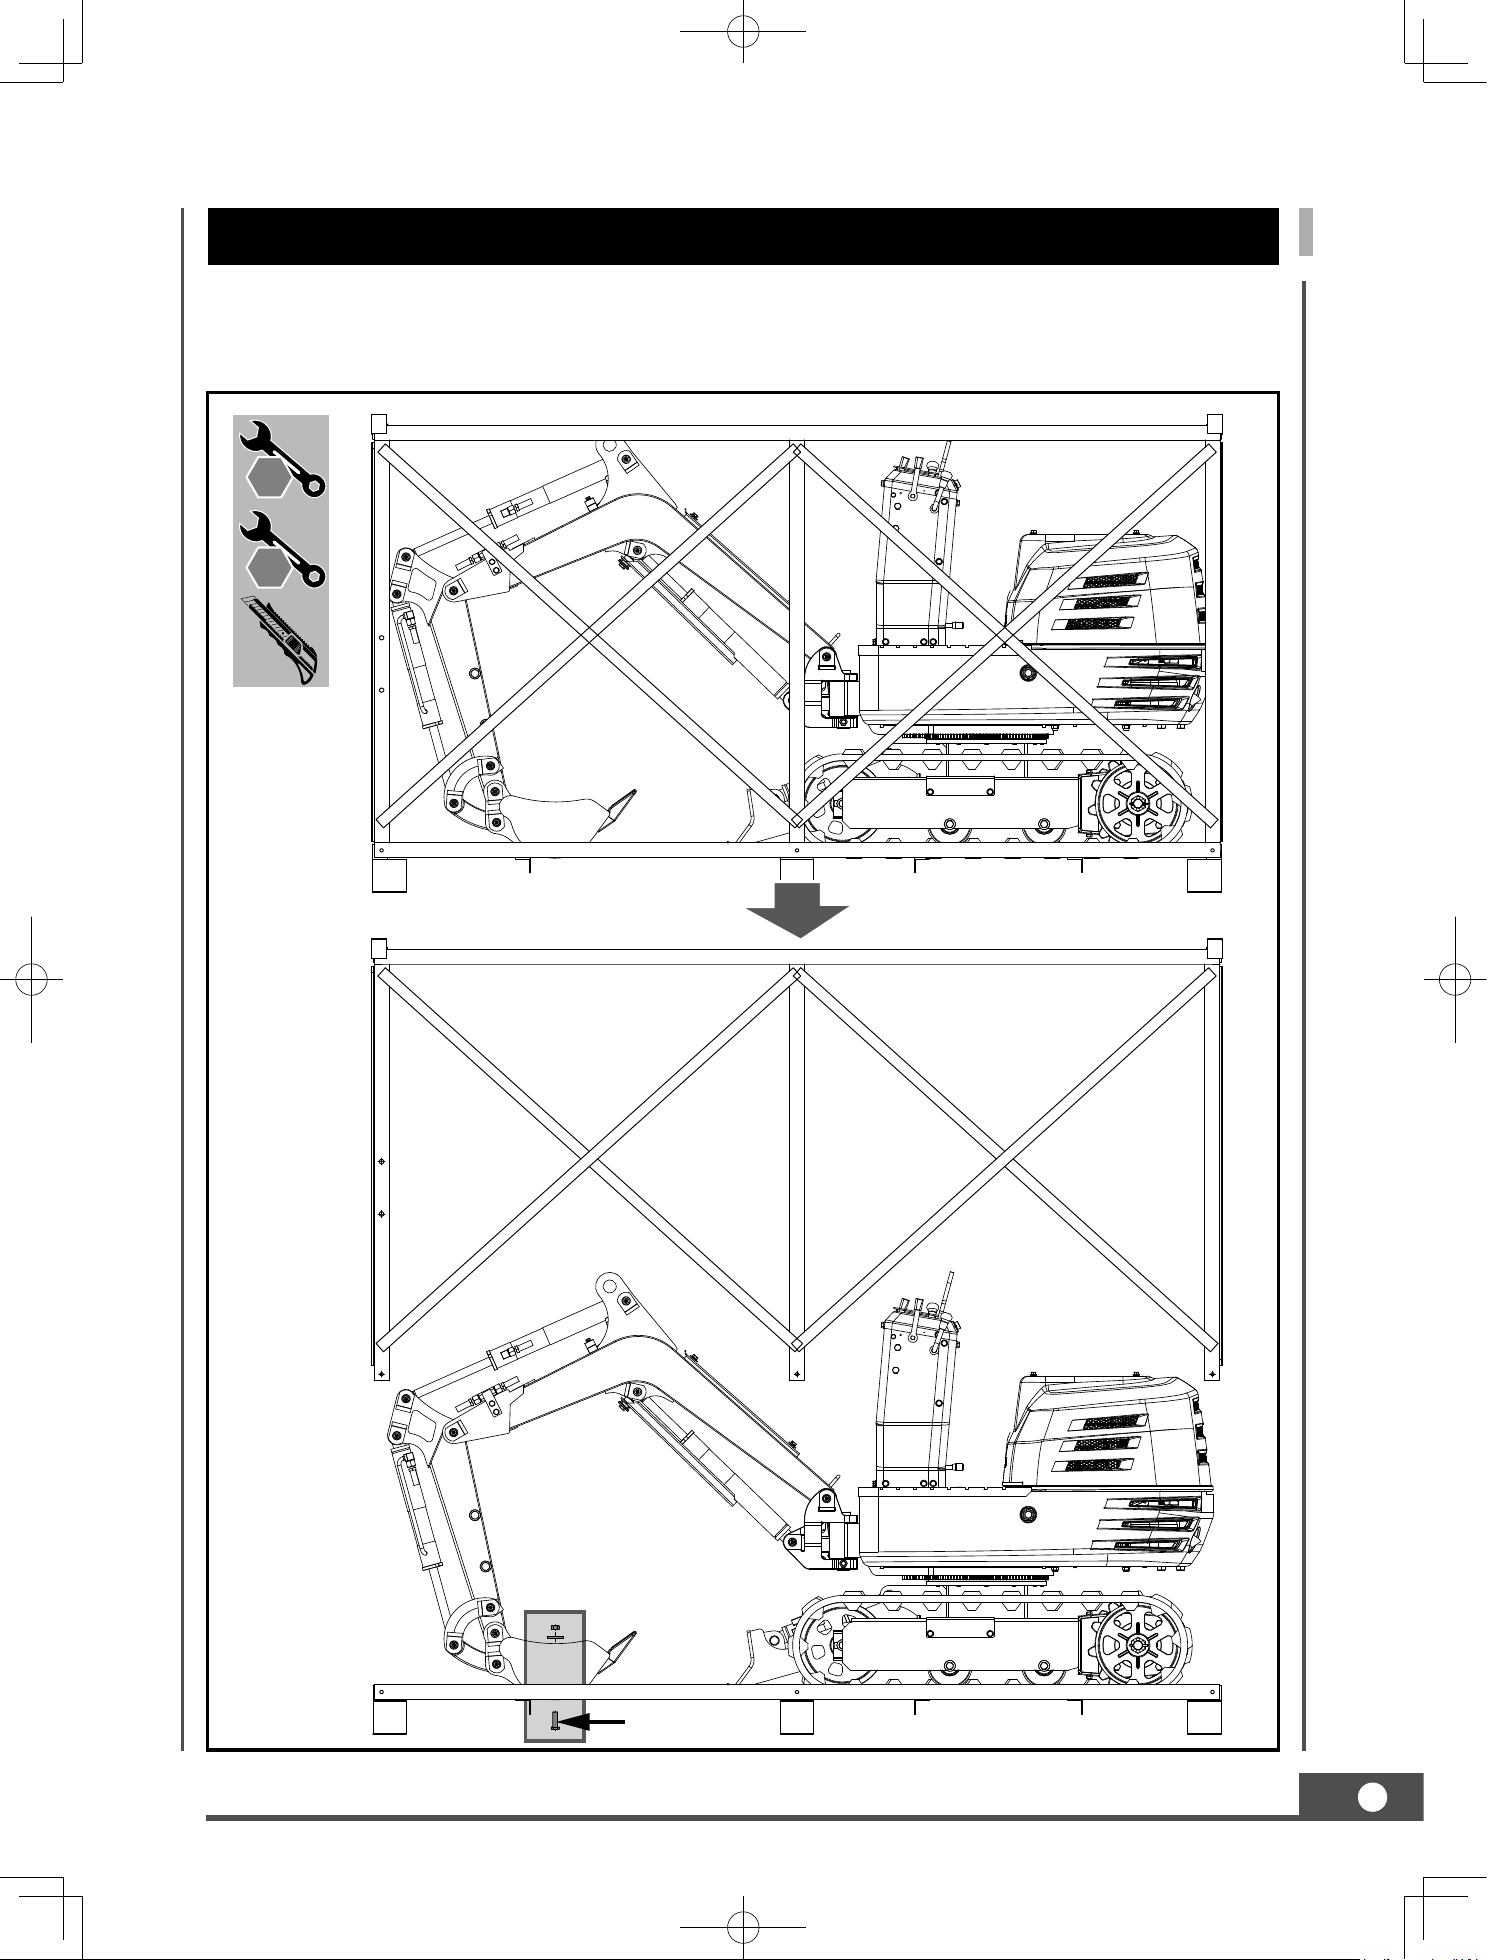
UNPACKING THE CONTAINER
Remove the M8 fixing bolts that fix the iron frame and take off the iron frame. Loosen the M12
fixing bolt to release the bucket and remove the straps securing the machine. Lift the machine
down.
Bolt M12 (x1)
16
mm
13
mm
18
mm
19
mm
24
mm
4
mm
X 2
16
mm
13
mm
18
mm
19
mm
24
mm
4
mm
X 2
18
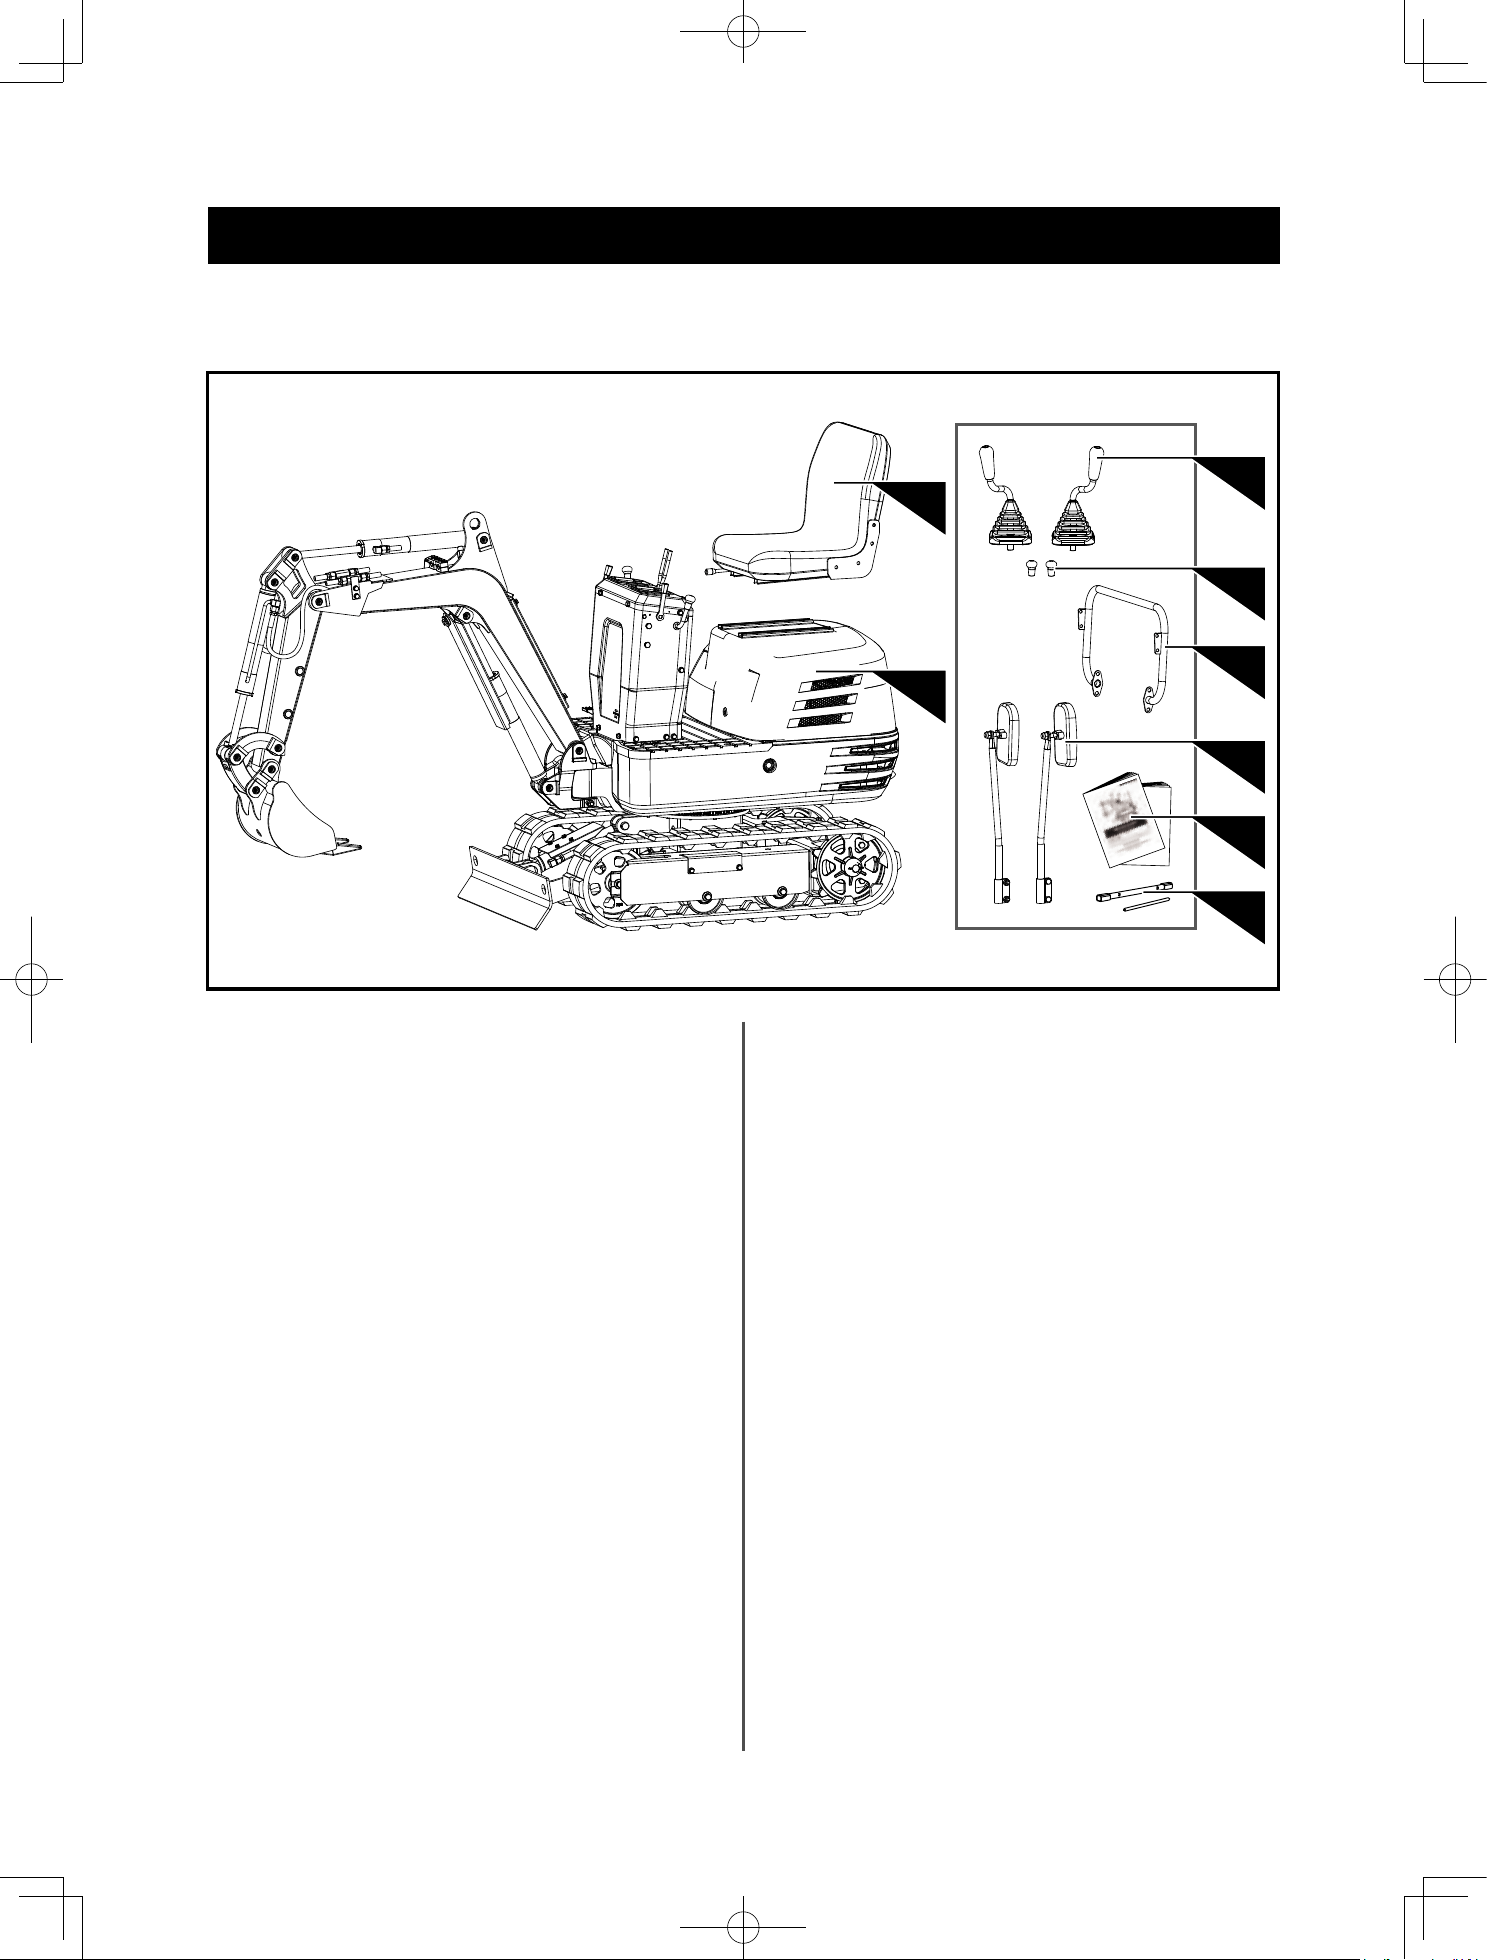
CONTENTS SUPPLIED
The mini excavator comes partially assembled and is shipped in carefully packed package. After
all the parts have been removed from the package, you should have:
1. Main Body
2. Operator's Seat
3. Control Levers for Front Attachments
4. Drive Lever Knobs
5. Handlebar
6. Rearview Mirror
7. Operator’s Manual & Engine Manual
8. Tools for Spark Plug Assembly
7
8
6
3
5
2
4
1
19
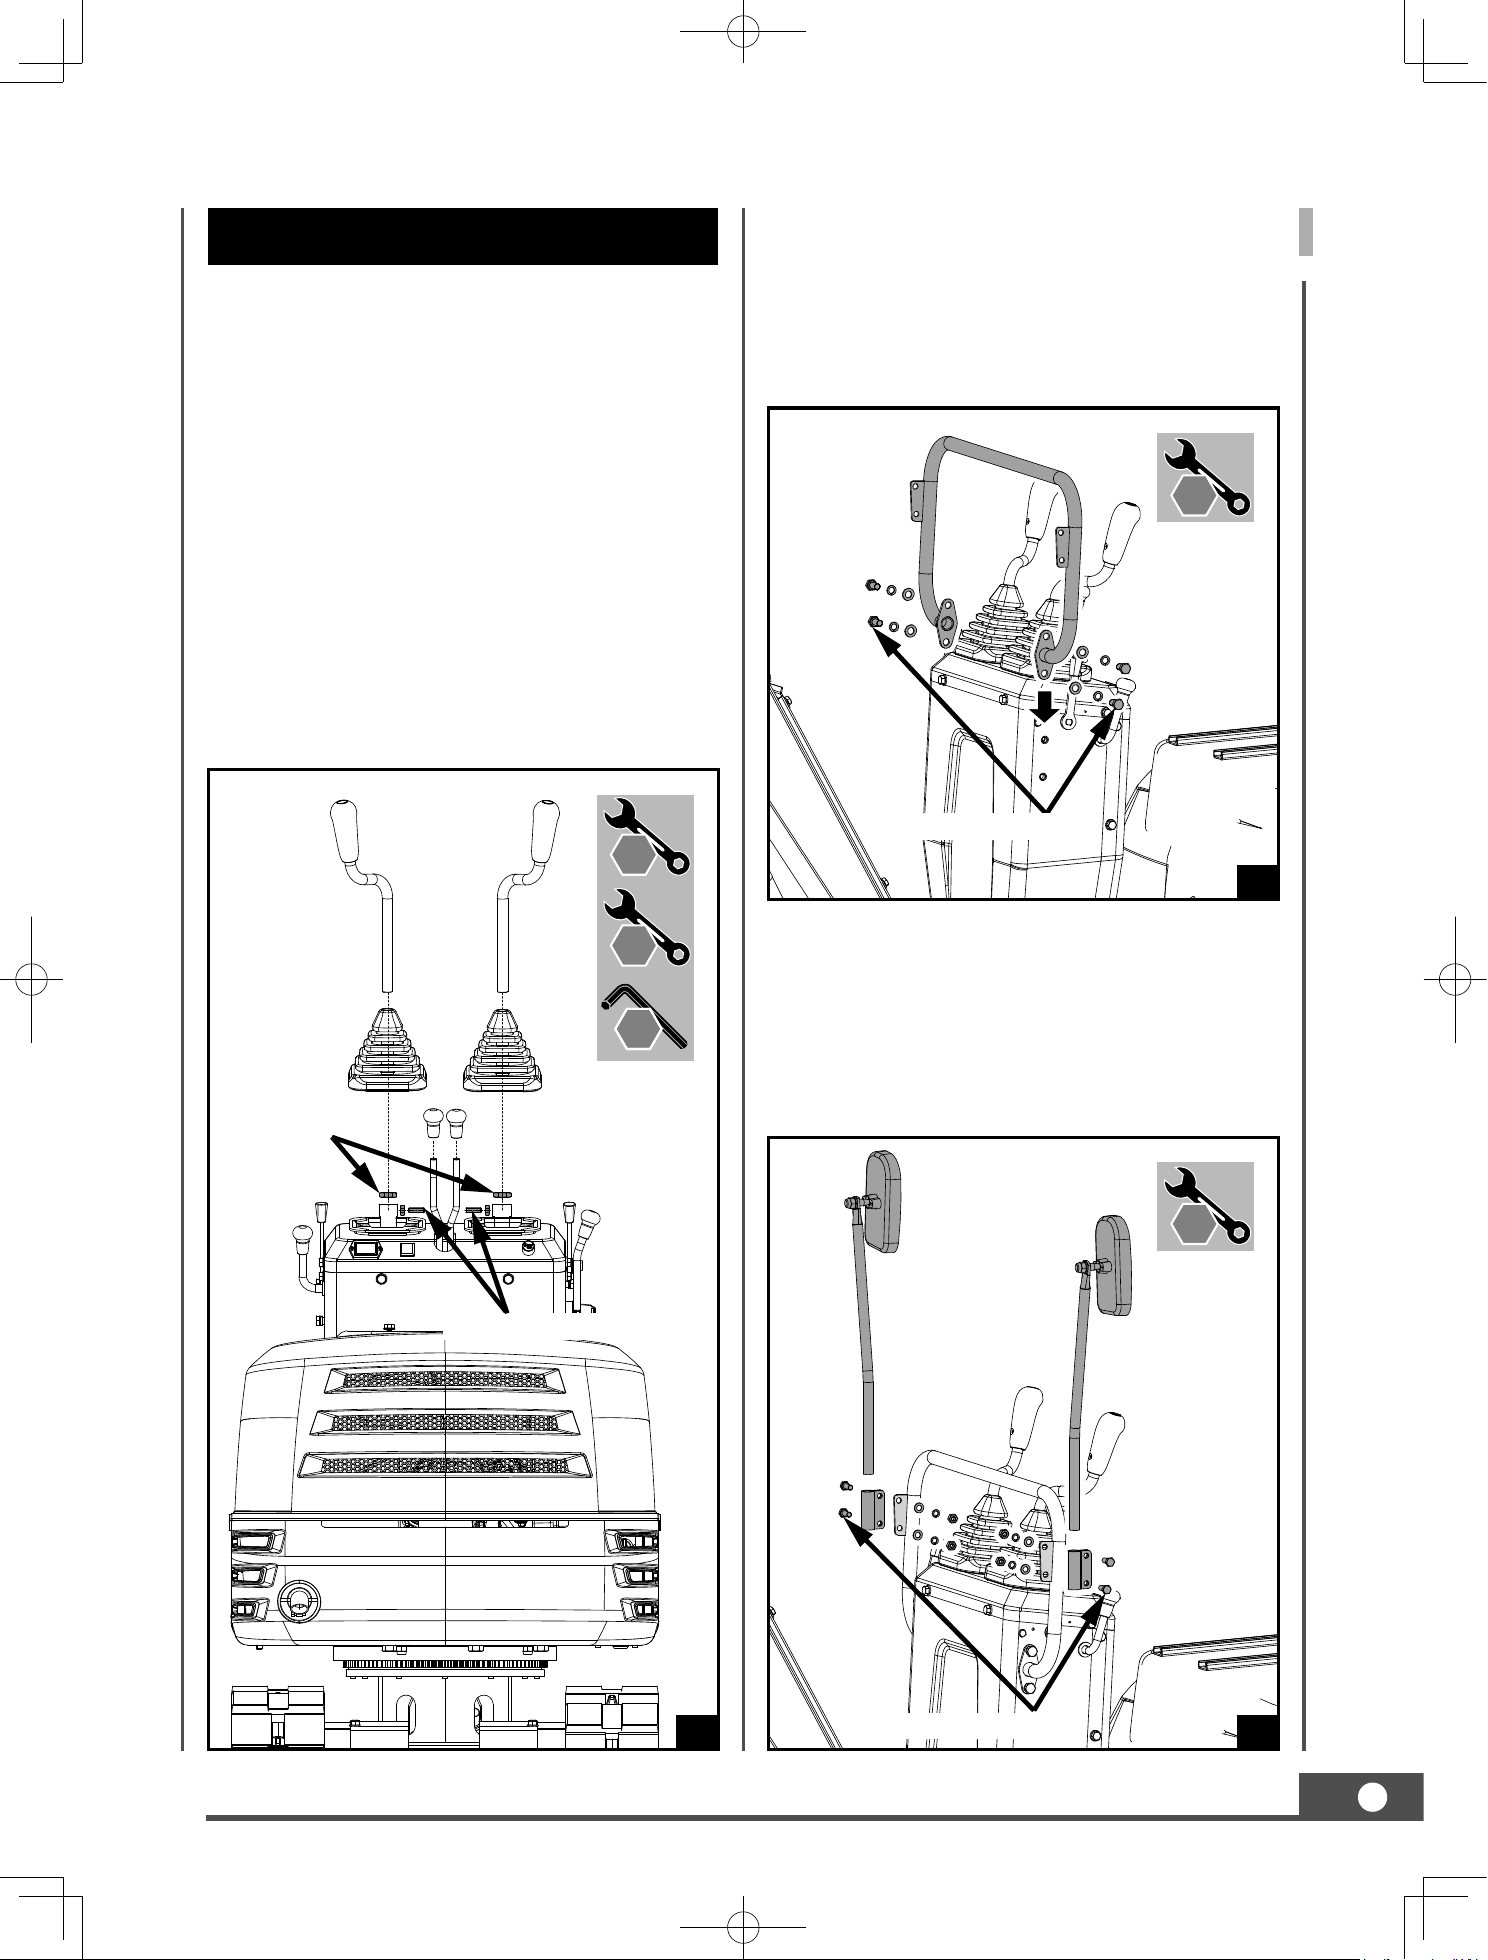
Following the assembly directions below, you
will assemble the machine in a few minutes.
Control Levers Assembly
Rearview Mirror Assembly
Handlebar Assembly
ASSEMBLY
1.Take off the thin nut M16 from the control lever
and loosen the set screw M8x25 and the nut on
the side of the fixing hole.
Slide the control lever through the rubber sleeve
and the thin nut M16 into the fixing hole on the
control cabinet. Rotate it to an angle suitable for
operation and lock the thin nut M16 to secure it.
Tighten the set screw M8x25 and nut from the
side. Repeat the same steps to mount the other
lever.
2. Screw the knobs to the drive levers.
Screw out the M10x20 bolts, flat washers and
spring washers from the control cabinet. Attach
the handlebar to the sides of the control cabinet.
Align the holes and secure the connection with
the bolts and washers.
Screw out the M8x30 bolts, washers and nuts
from the mirror connectors. Fasten the connector
to the brackets on the handlebar with the bolts,
washers and nuts, making sure the mirrors face
backwards as shown in the Fig. C.
Bolt M10x20 (x4)
Bolt M8x30 (x4)
Set screw M8x25 (x2)
Thin nut M16 (x2)
A C
B
16
mm
13
mm
18
mm
19
mm
24
mm
4
mm
16
mm
13
mm
18
mm
19
mm
24
mm
4
mm
16
mm
13
mm
18
mm
19
mm
24
mm
4
mm
16
mm
13
mm
18
mm
19
mm
24
mm
4
mm
16
mm
13
mm
18
mm
19
mm
24
mm
4
mm
X 2
20
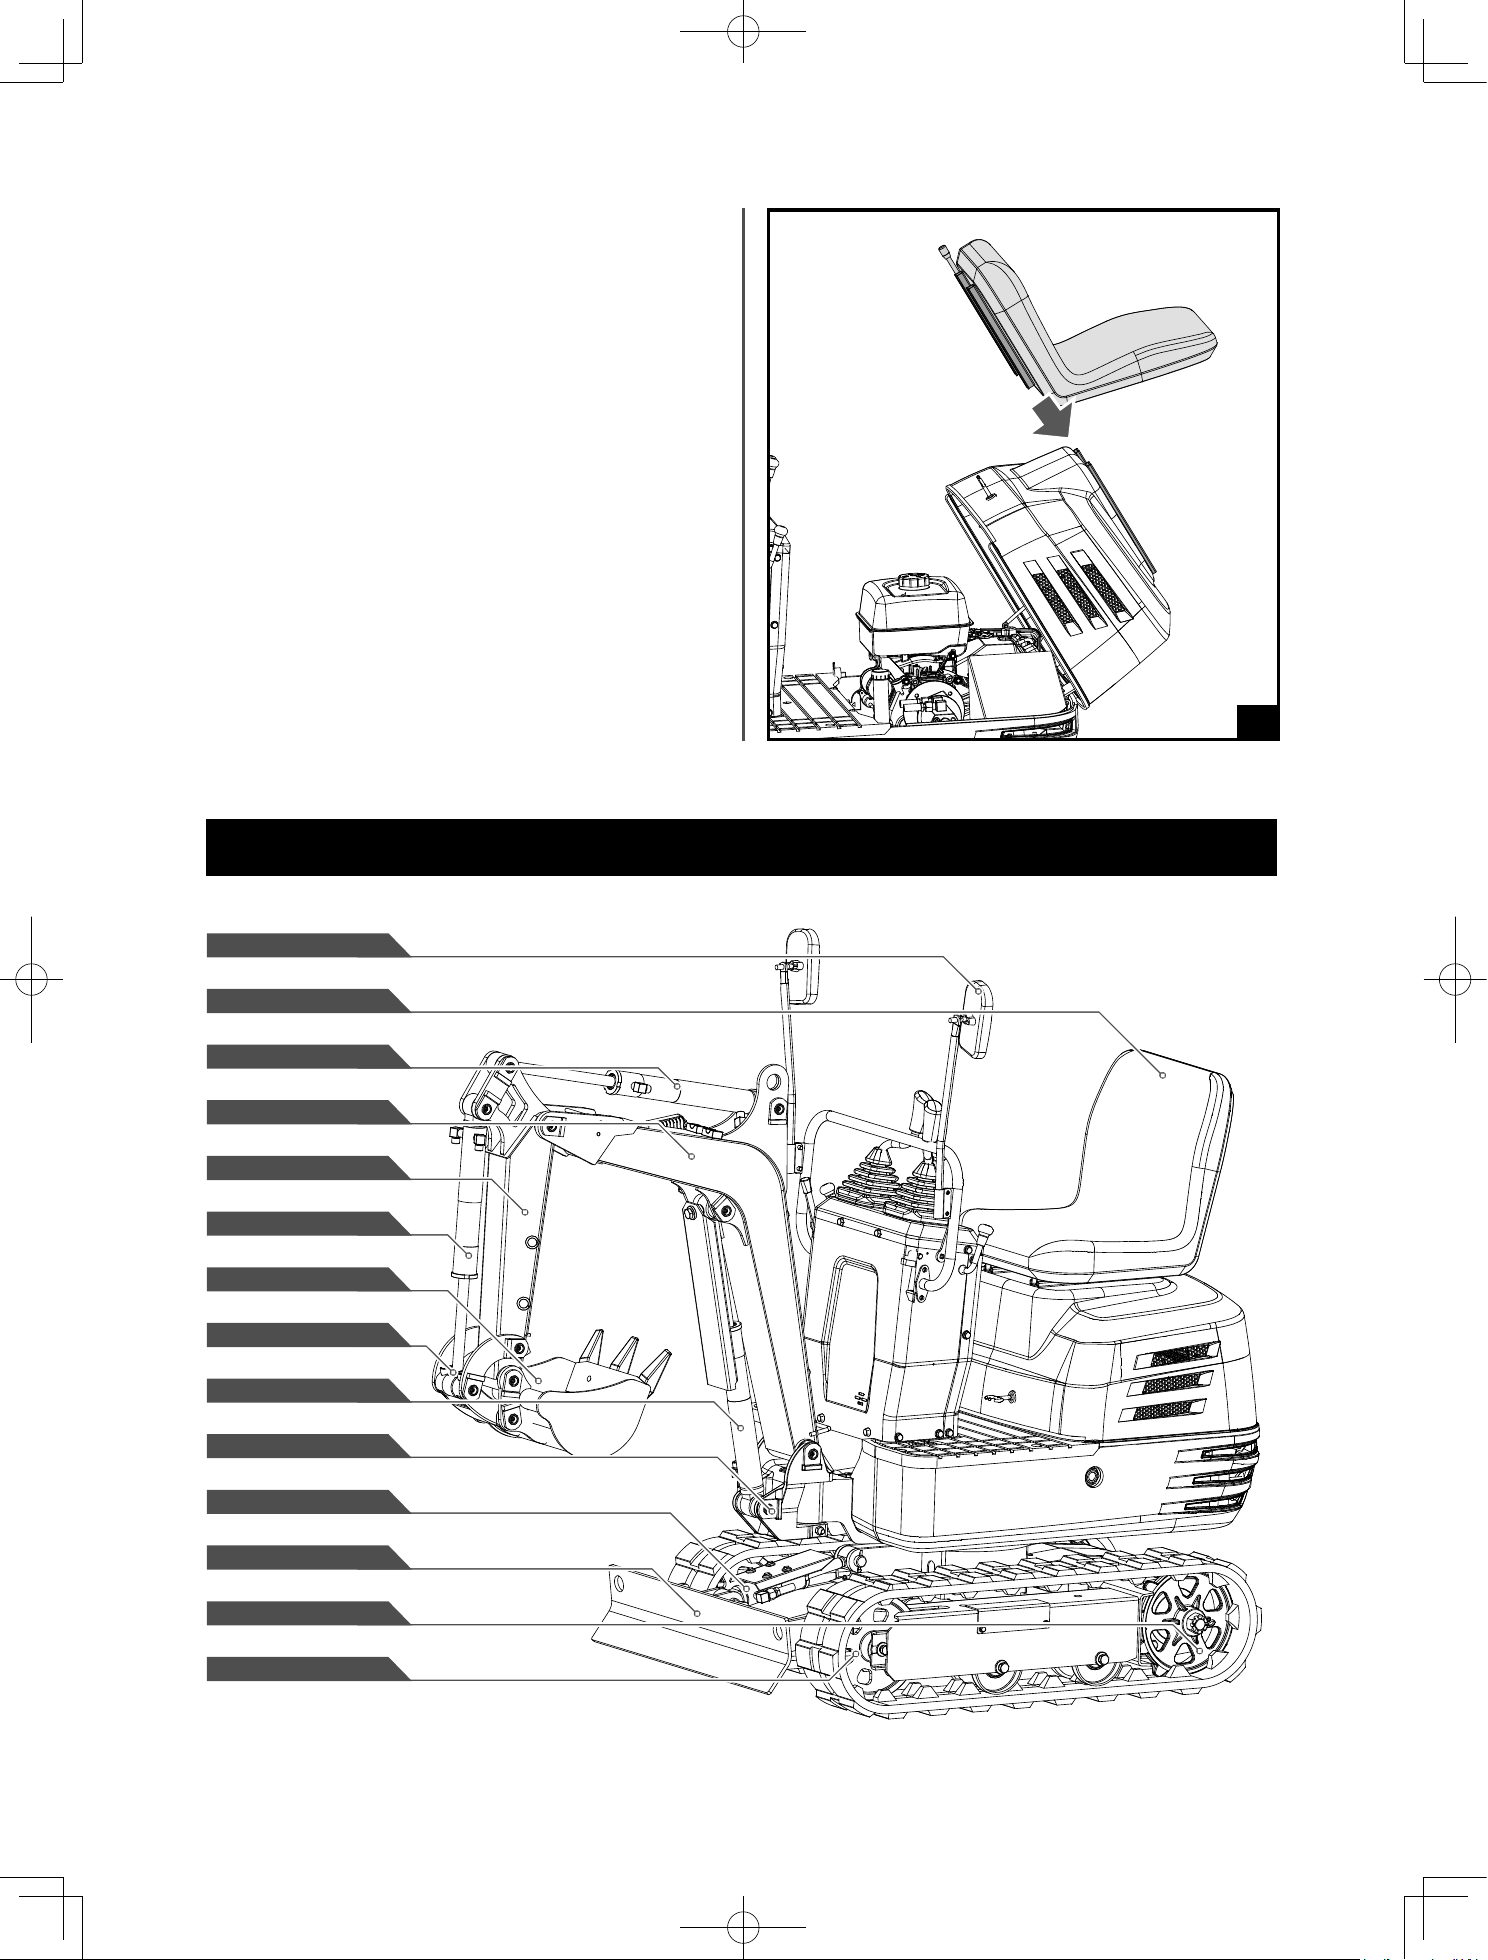
DESCRIPTION OF MACHINE PARTS
Rearview mirror
Operator's seat
Arm cylinder
Boom
Arm
Bucket cylinder
Bucket
Bucket link
Boom cylinder
Swing bracket
Dozer cylinder
Dozer
Drive sprocket
Front idler
Operator's Seat Assembly
Open the engine hood and install the seat from
front to rear.
Adjust it to a suitable position by sliding it back
and forth.
D
21
GB
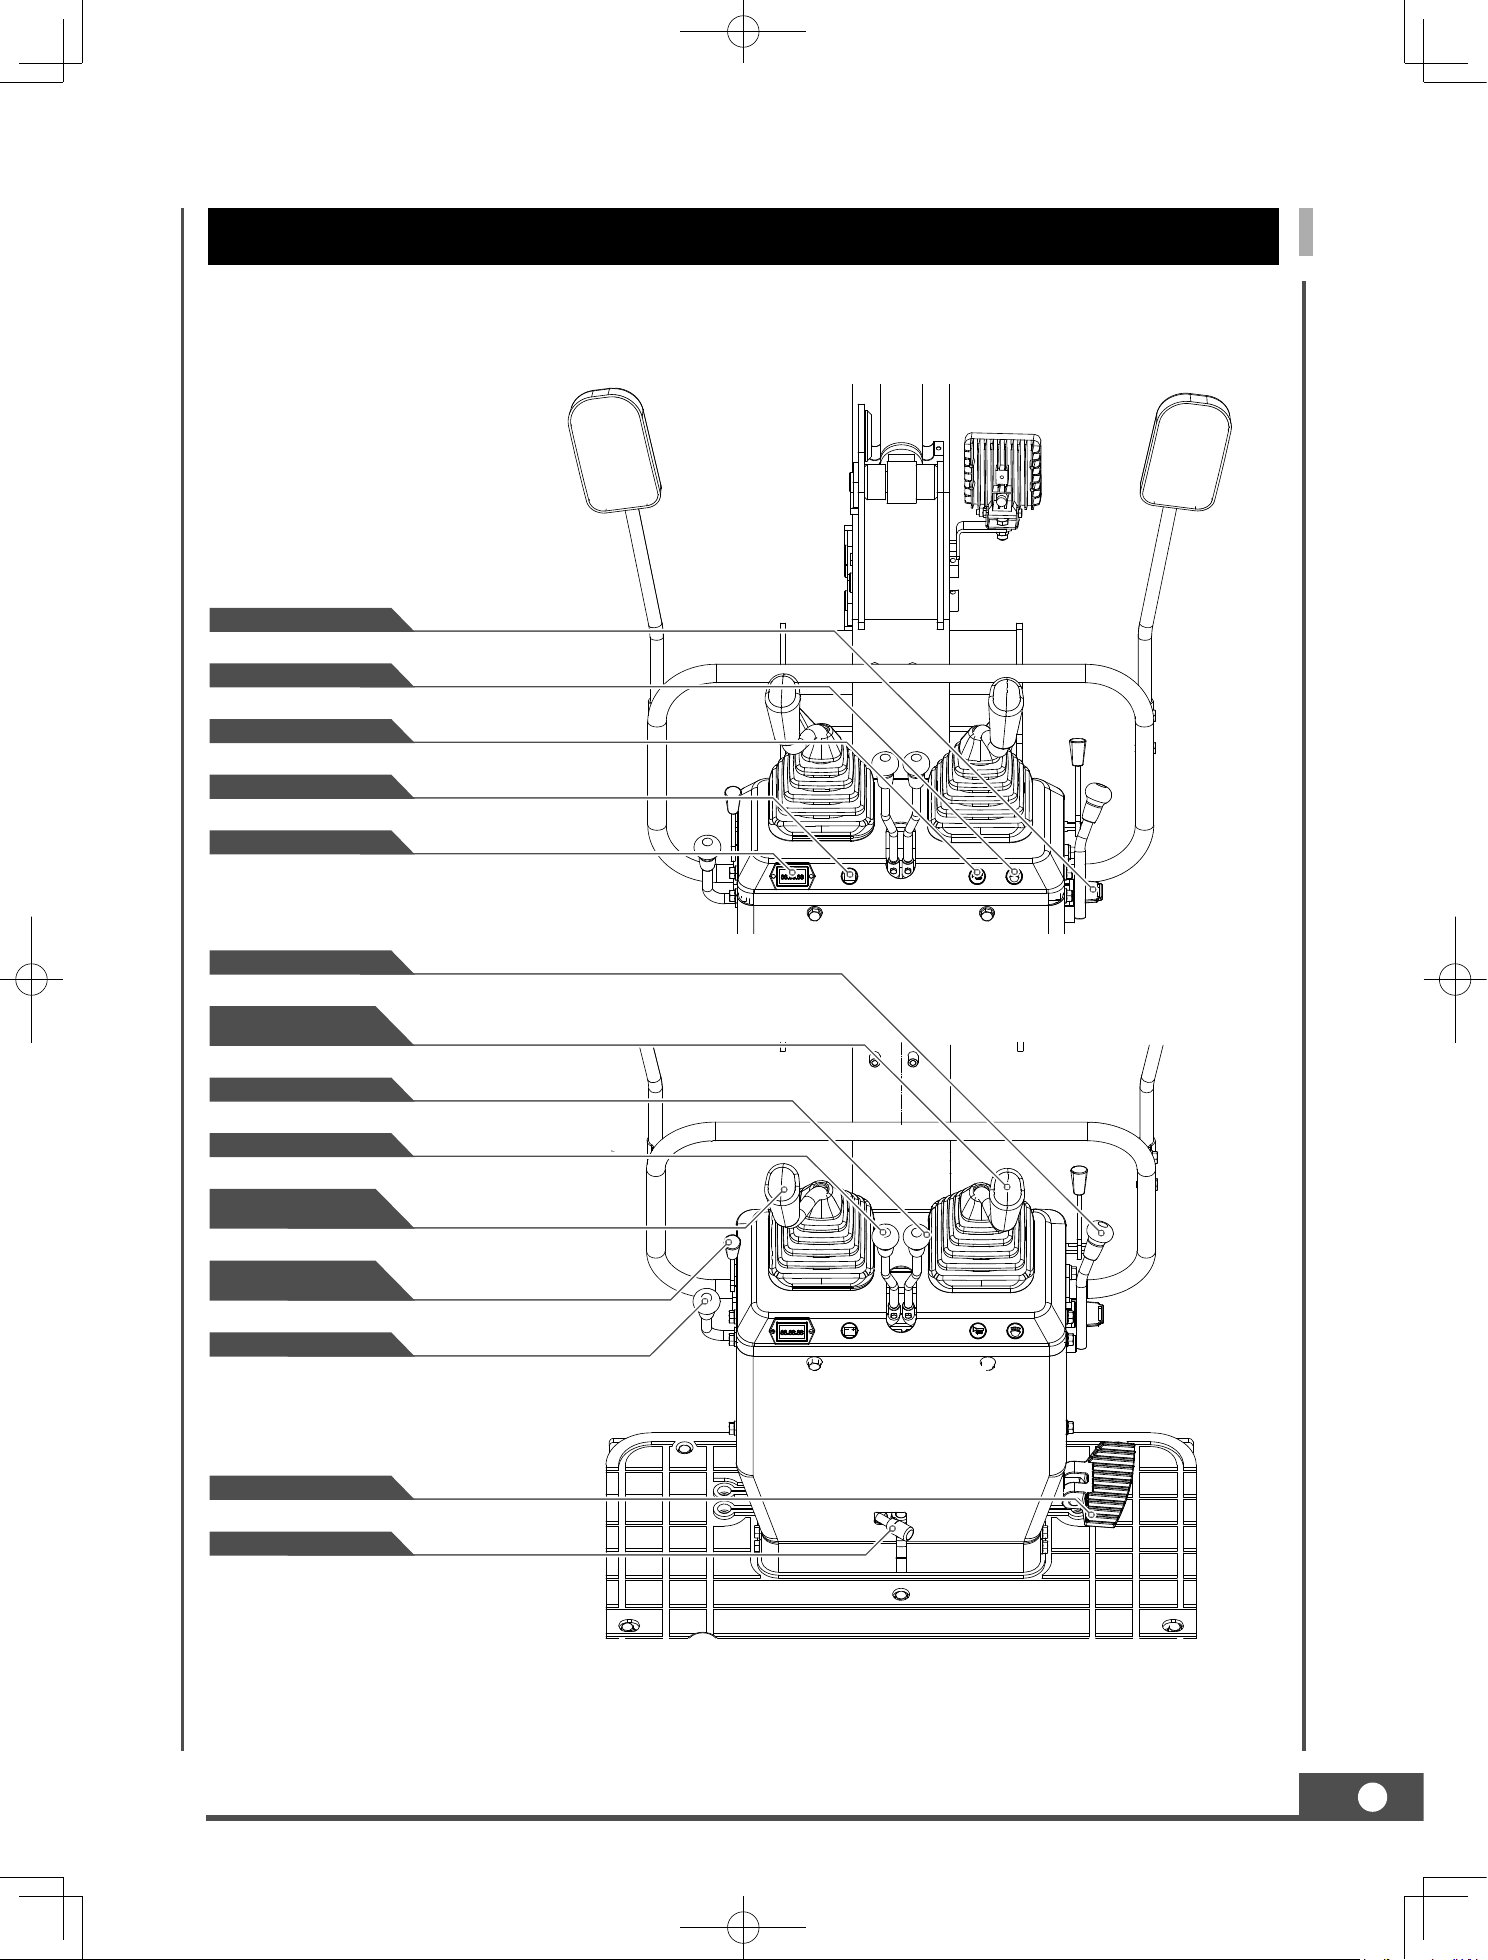
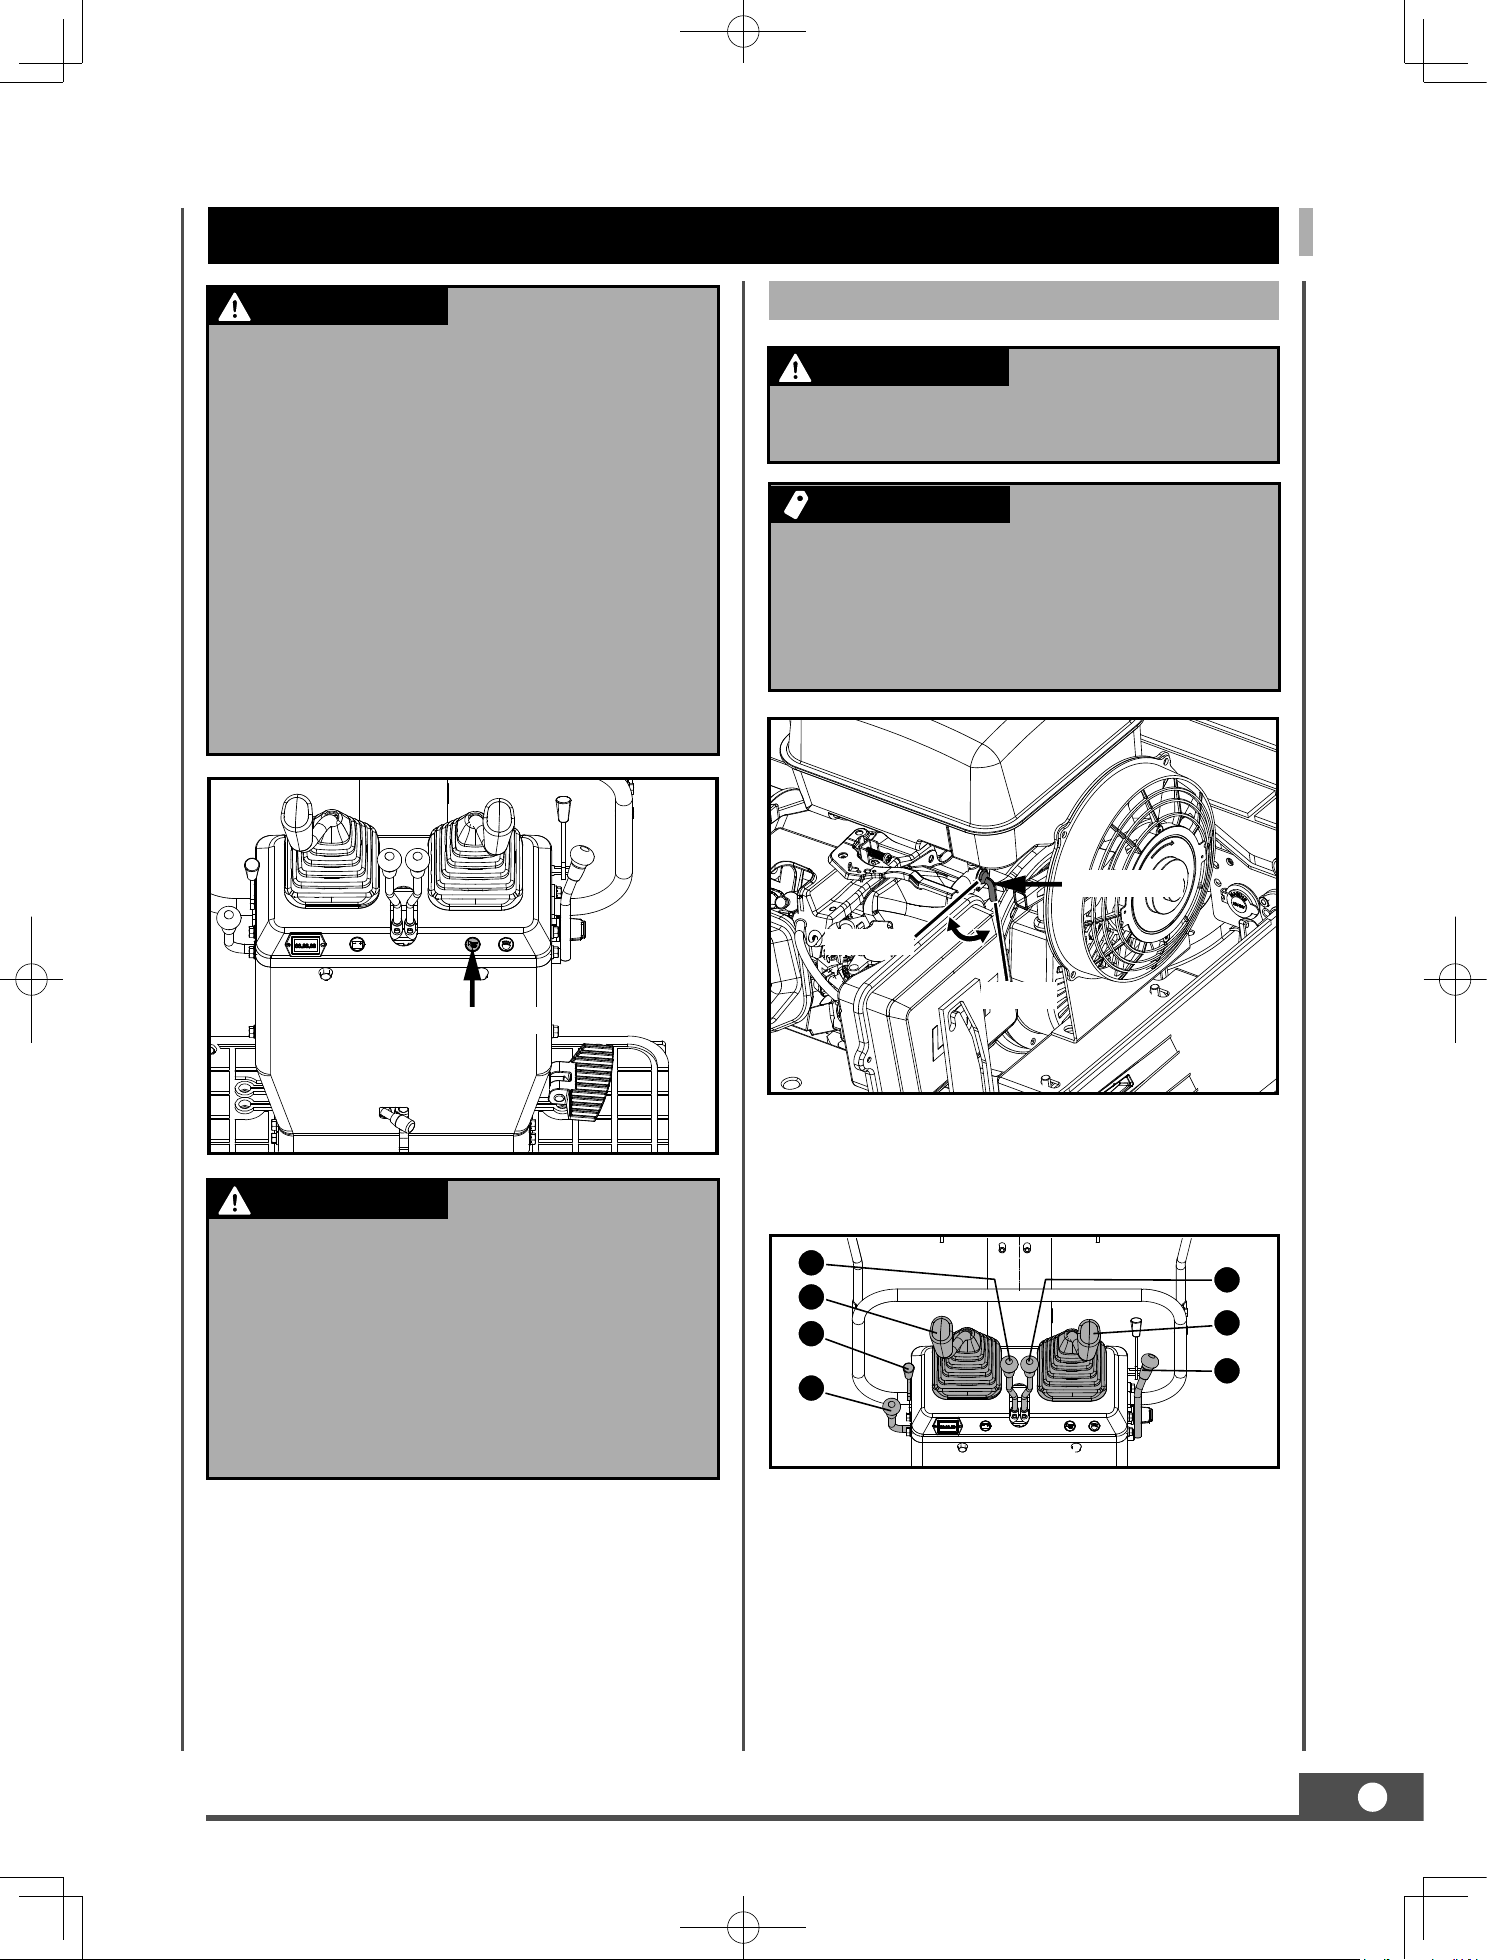
INSTRUMENT PANEL AND CONTROL ELEMENTS
Working light switch
Starter switch
Control lever for dozer
Control lever for front
attachments (right)
Right Drive Lever
Left Drive Lever
Boom swing pedal
Horn switch
Power indicator
Hour meter
Throttle lever
Lock lever
Control lever for front
attachments (left)
Choke control
lever of gasoline engine
22
BEFORE START
HANDLING THE SAFETY
DEVICES
DAILY CHECKS
Control lever lock
Swing lock pin
This pin is used to lock the swing frame. Set the
lock pin to the "Lock" position and the swing
frame gets locked to the track frame.
Checks
Walk around the excavator and check for visual
damage and wear.
Check fuel level.
Check engine oil level.
Check hydraulic fluid level.
Check air filter for clogging.
Check hour meter.
Check the light system.
Check the condition of the danger, warning and
caution labels. (See "DANGER, WARNING AND
CAUTION LABELS" in "SAFE OPERATION" .)
The attachment control lever lock is located on
the right side alike.
In order to avoid damage, it is important to check
the condition of the excavator before starting.
Lock lever
Lock
Unlock
Swing lock pin
Lock
Unlock
When the excavator
is not used or left unattended, be sure to
place the bucket on the ground and lock
the control levers. The front attachment
may fall : it's dangerous. Also remove the
key.
Do maintenance work
on the excavator only on even ground with
the engine off and the safety devices in the
"Lock" position.
Before locking the
lock pin, be sure to place the swing frame
and the track frame parallel with each
other.
IMPORTANT
WARNING
CAUTION
NOTE
IMPORTANT
WARNING
CAUTION
NOTE
IMPORTANT
WARNING
CAUTION
NOTE
23
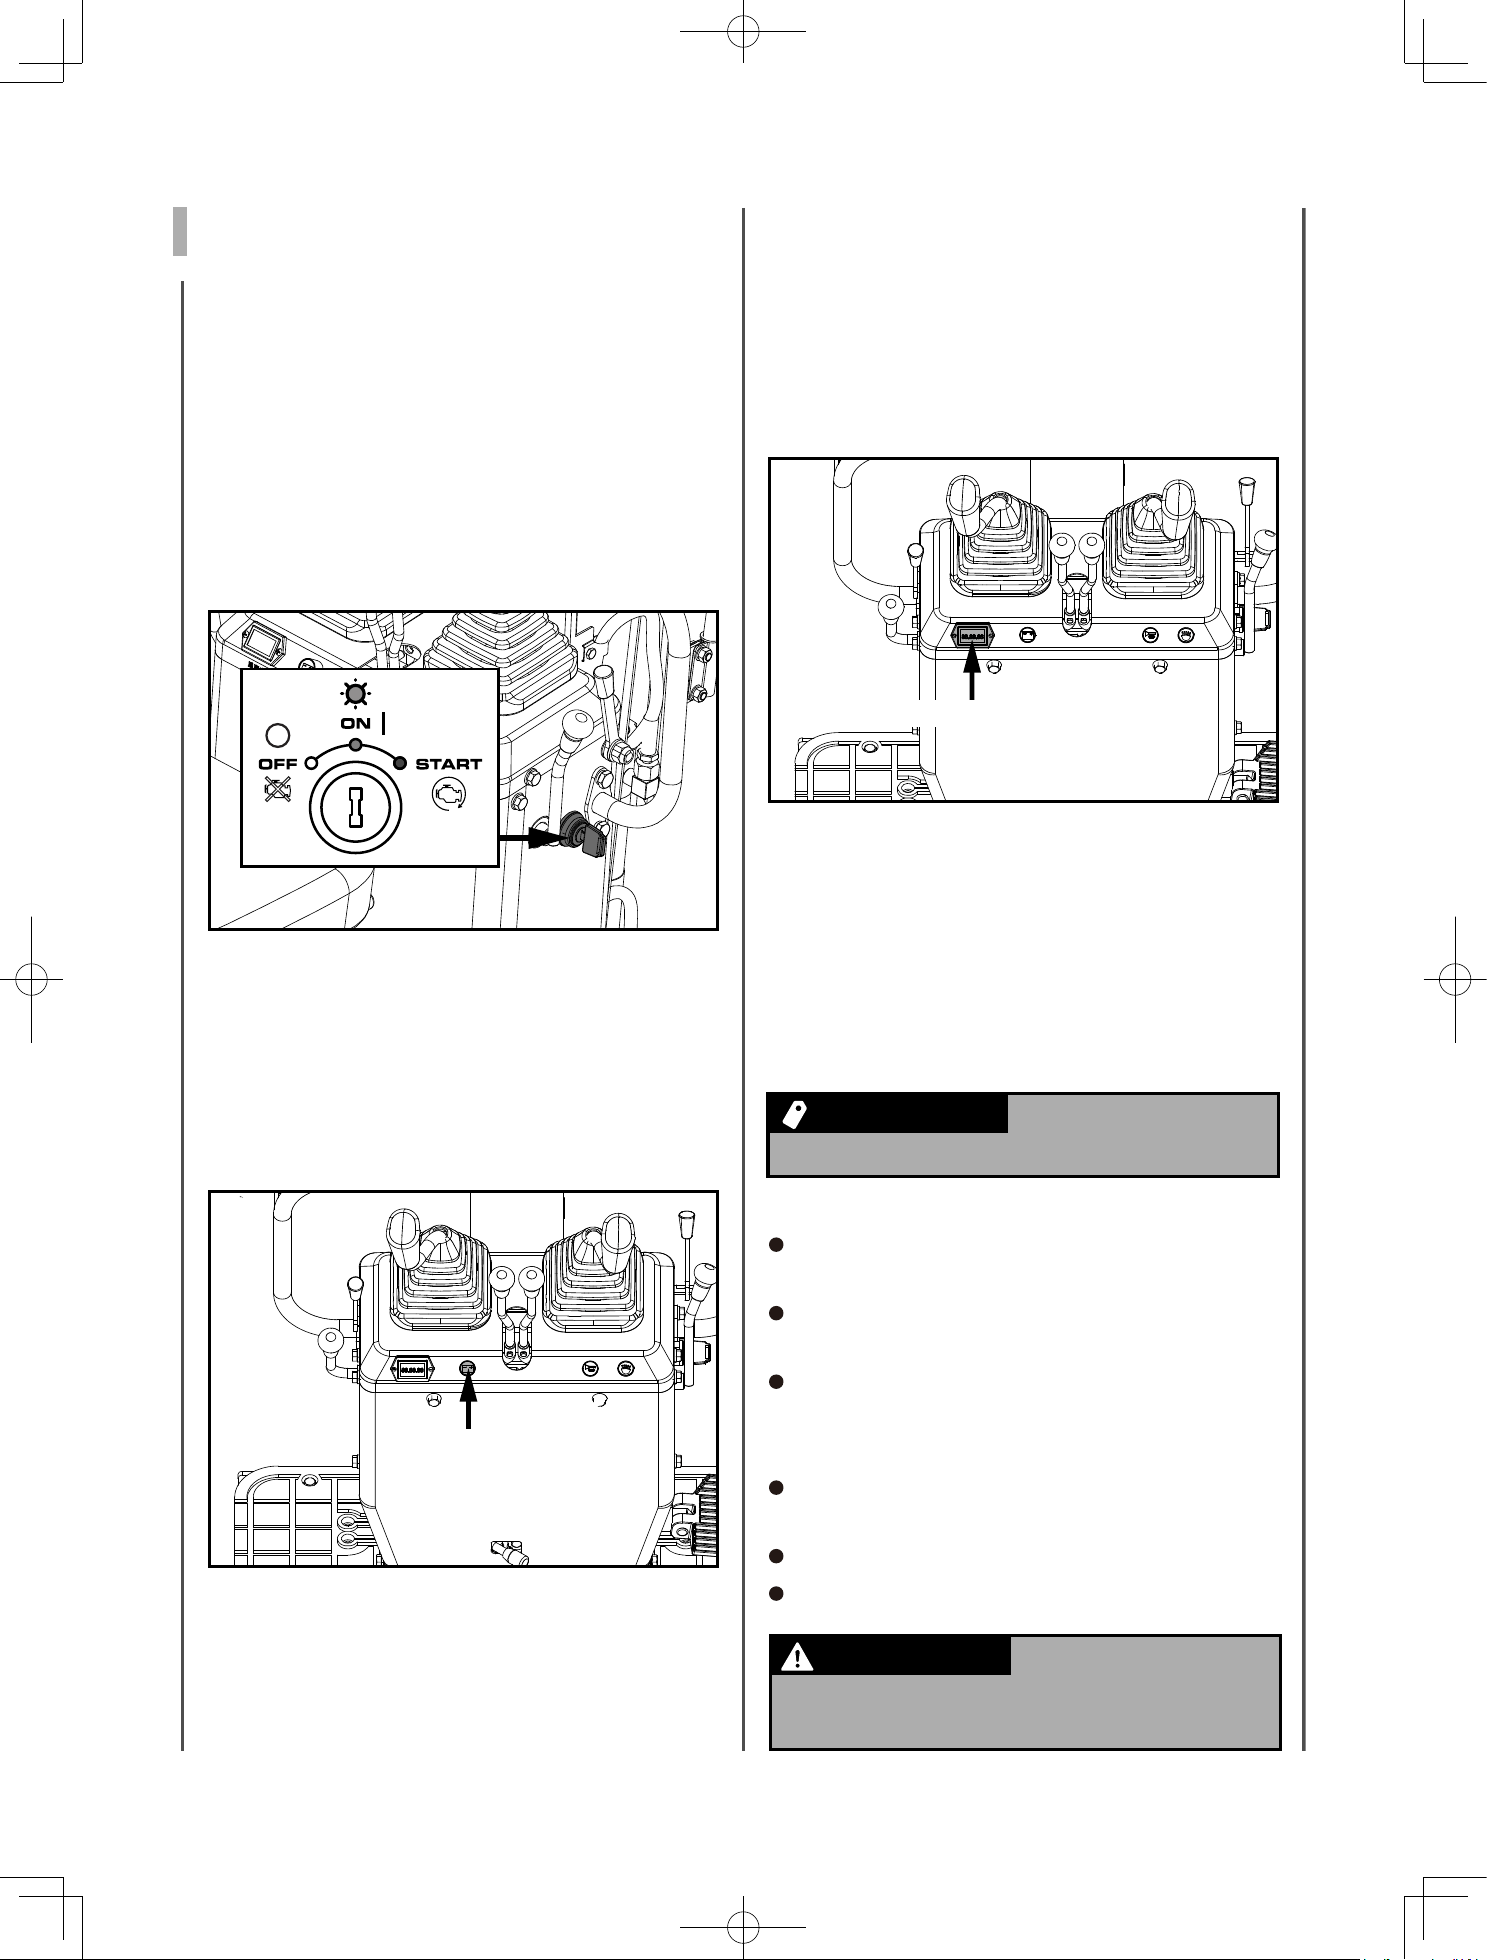
OPERATION OF THE ENGINE
STARTING THE ENGINE
Start the engine in the following manner:
1. Before starting the engine, make sure that all
control levers are in the neutral positions.
(1) Left drive lever
(2) Right drive lever
(3) Attachment control lever (left)
(4) Attachment control lever (right)
(5) Throttle lever
(6) Control lever for dozer
(7) Choke control lever of gasoline engine
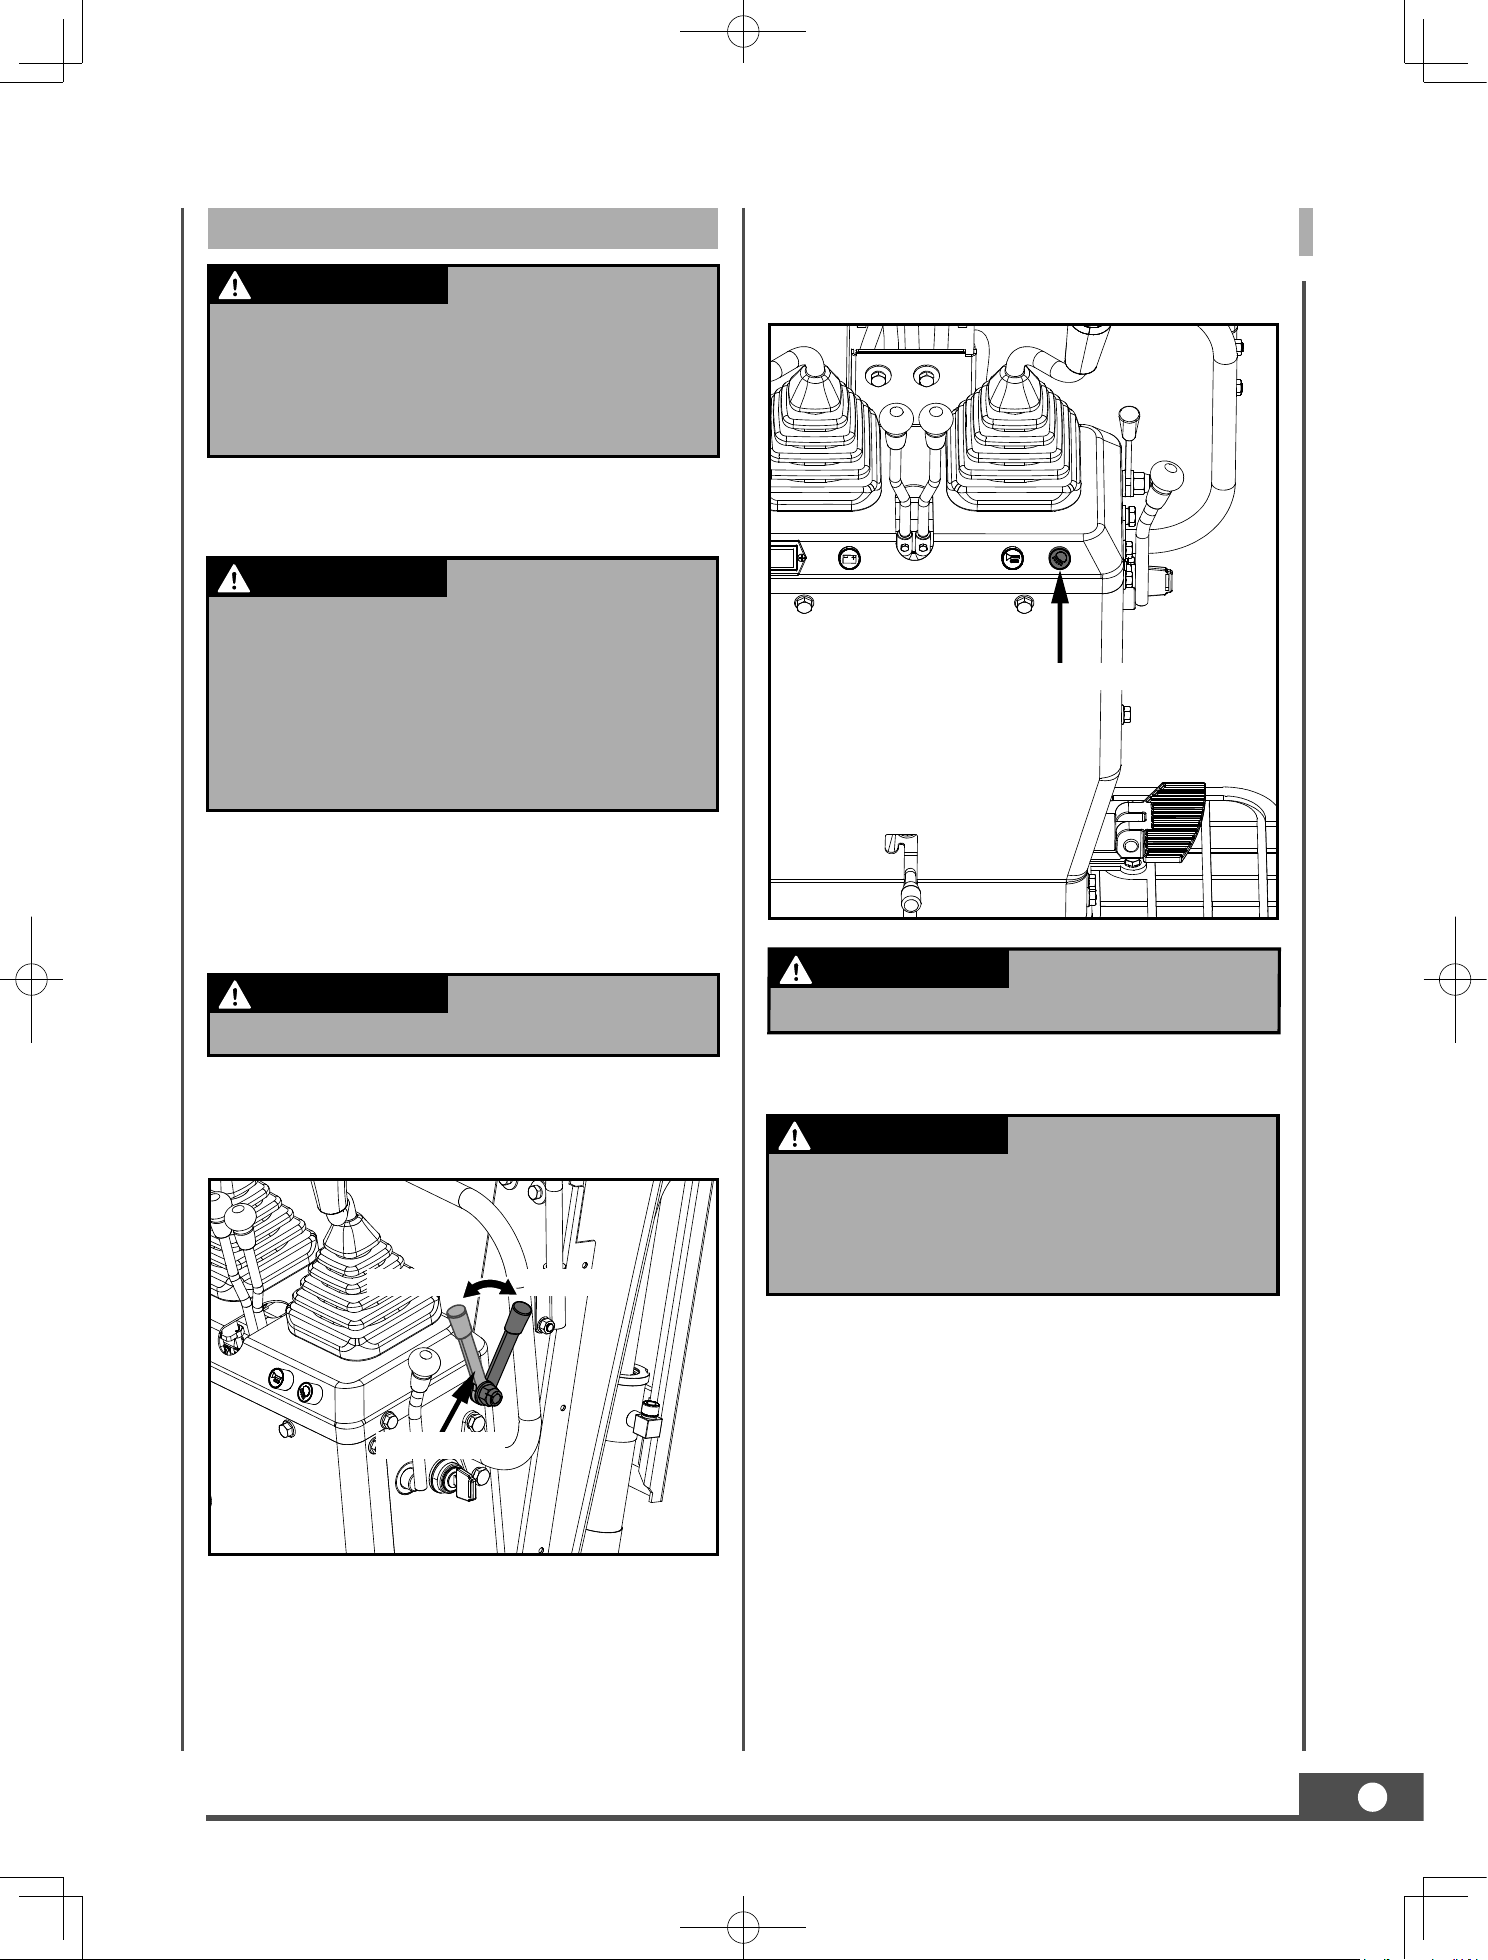
Horn switch
Fuel cock
Open
Closed
1
2
4
6
3
7
5
Read "SAFE
OPERATION" at the beginning of this
operator's manual.
Obey the danger, warning and caution
labels on the excavator.
Exhaust gases are poisonous. Do not let
the engine run in closed quarters without
sufficient and adequate ventilation.
Always start the engine from the operator's
seat. Do not start the engine while standing
next to the excavator. Before starting the
engine, sound the horn to get the attention
of persons standing nearby.
The operator should
always conduct the routine checks (see
"MAINTENANCE").
Do not use start help
spray or similar fluids.
In order not to overload the battery and
starter, avoid start-ups of more than 10
sec.
When the engine does not start in 10 sec.,
please set the interval to 20 sec. or more,
and restart.
IMPORTANT
WARNING
CAUTION
NOTE
IMPORTANT
WARNING
CAUTION
NOTE
IMPORTANT
WARNING
CAUTION
NOTE
The engine fuel cock was
set at “Open” position before leaving factory. No
need to move the fuel cock lever when starting
the engine. Only when the engine failed to be
started, open the engine hood, check and make
sure that the fuel cock is in the“Open” position.
IMPORTANT
WARNING
CAUTION
NOTE
24
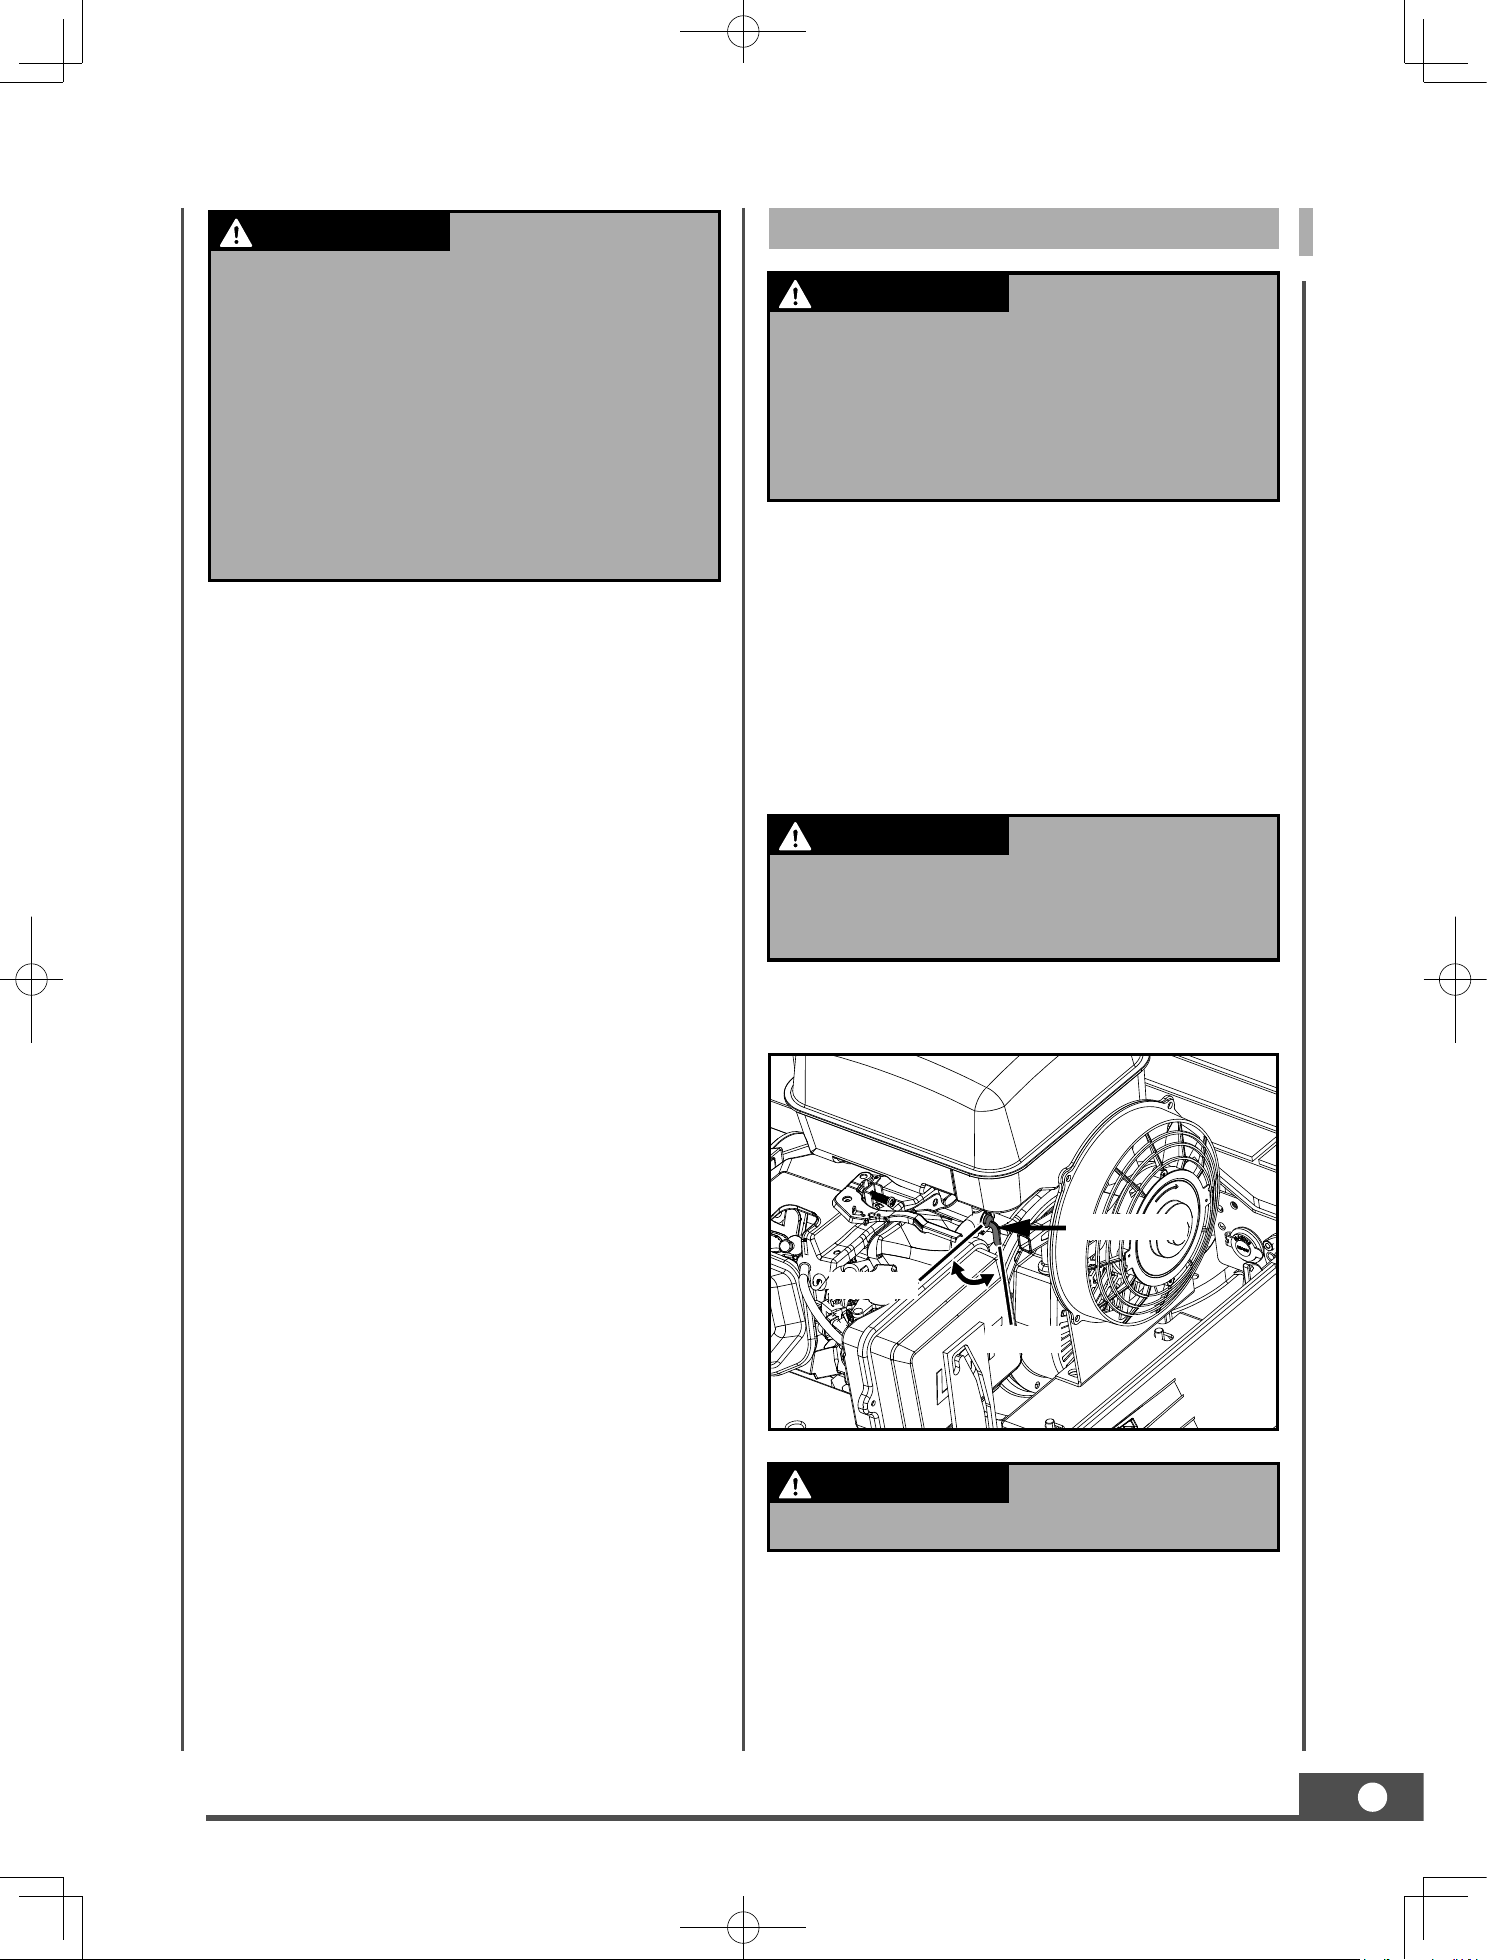
Power indicator
Hour meter
5. If the choke lever has been moved to the
CLOSE position to start the engine, gradually
move it to the RUN position as the engine
warms up.
6. Check if power indicator have gone out. If
the power indicator does not go out, stop the
engine and check for the cause.
2. To start a cold engine, move the choke control
lever to the CHOKE position. To restart a warm
engine, leave the choke lever in the RUN position.
3. Move the throttle lever away from the SLOW
position, about 1/3 of the way toward the
FAST position.
4. Active the Key Ignition Switch by turning
it fully clockwise toward “START”. Release
the key as soon as the engine starts, it
will automatically return to the Run “ON”
position. Do not active the key continuously
for more than 5 to 10 seconds at a time.
When the power indicator light is off, first check
whether the fuse is blown. After the fuse is
replaced, the fuse is normal, indicating that the
battery is dead and needs to be charged; If the
fuse is still blown after replacement, it is necessary
to find professional maintenance personnel to
repair the circuit.
Hour meter
The hour meter shows the total operating hours
of the excavator.
Meter reading
The meter counts up 1 for one operating hour.
The electric meter is still counting if the engine
stops but the key is in the "ON" position.
Checkpoints after Starting the Engine
After starting the engine, but before starting
operation, check following points:
1. Put the throttle lever in the "LOW" position
and let the engine idle for approx. 5 minutes.
This allows the engine lubricant to warm up
and penetrate every part of the engine.
2. Once the engine has warmed up, check:
the alarm lamp "Battery charge" goes out
when accelerating the engine.
the colour of the exhaust gas is normal and no
abnormal noises or vibrations are heard or felt.
no fluid is leaking from pipes or hoses.
Should any following conditions arise, stop the
engine immediately.
The engine revolution increases or decreases
suddenly.
Sudden abnormal noises.
Exhaust gas is black.
This idling is usually
called "Warm-up".
IMPORTANT
WARNING
CAUTION
NOTE
In these cases, the
excavator must be checked and serviced
according to the directions of the dealer.
IMPORTANT
WARNING
CAUTION
NOTE
25
Stop fuel cock
Let the engine idle for approx. 5 minutes to let it
cool down.
1. Put the throttle lever in idle position.
2. Lower the work attachments carefully on the
ground by activating the levers.
3. To stop the engine, turn the key to the "OFF"
position and remove the key.
Open the engine hood and push the stop lever
back and hold until the engine stops.
STOPPING THE ENGINE
Fuel cock
Open
Closed
Do not keep the
bucket or dozer in the lifted position, as a
person could accidentally touch the levers
and cause serious accidents.
Lower all work attachments on to the
ground, otherwise accidents could occur.
In the case of an
emergency, or should the engine in idle
position and key in the off position, still
run, do like as below.
If the engine does not
stop with the key, contact your dealer.
IMPORTANT
WARNING
CAUTION
NOTE
IMPORTANT
WARNING
CAUTION
NOTE
IMPORTANT
WARNING
CAUTION
NOTE
Let the engine warm
up after start-up.
Let the engine warm up after start-
up for approx. 10 minutes under no
load conditions. If the hydraulic fluid
temperature is too low, the operation will
be affected.
Do not operate the excavator under full
load before the engine is warmed up
enough.
IMPORTANT
WARNING
CAUTION
NOTE
26
EXCAVATOR OPERATION
CONTROL OBSERVATIONS
DURING OPERATION
RUNNING-IN OF THE NEW
EXCAVATOR
Stop the Engine immediately if:
After starting the engine, but before starting
operation, check following points:
Sudden increase or decrease in engine
revolution occurs.
Sudden abnormal noises occur.
Exhaust gases turn suddenly very dark.
Make following control observations during
operation to be sure that everything functions
normally.
The operation and care of the new excavator
influences its life span. Your new excavator
has been carefully checked and tested before
leaving the factory. In spite of this, all movable
components must run-in during the first 50 work
hours. Do not work with full revolution and full
loads during this period. It is most important
to run-in your excavator properly in order to
achieve its full performance and longevity. During
the running-in, the following points should be
adhered to in all cases.
Do not Work with Full Revolutions or Full Loads
during the First 50 Working Hours.
Let the engine warm up sufficiently in the cold
season.
Do not let the engine rev-up more than
necessary.
Oil Change in the Run-in Stage.
The lubrication oil plays a specially important role
during the run-in phase of the excavator. The
numerous movable parts are not yet run-in, so
that many fine metal particles can develop and
cause damage or shorten the lifetime of many
components. Pay attention to the oilchange
intervals and execute them sooner rather than
later as necessary. See the subject "Care and
Maintenance" for more details on the oil-change
intervals.
When the engine
stops suddenly, push forward the right
handrail to let the bucket fall down, so
as not to cause misoperation, resulting in
injury due to the bucket fall.
IMPORTANT
WARNING
CAUTION
NOTE
27
STARTING
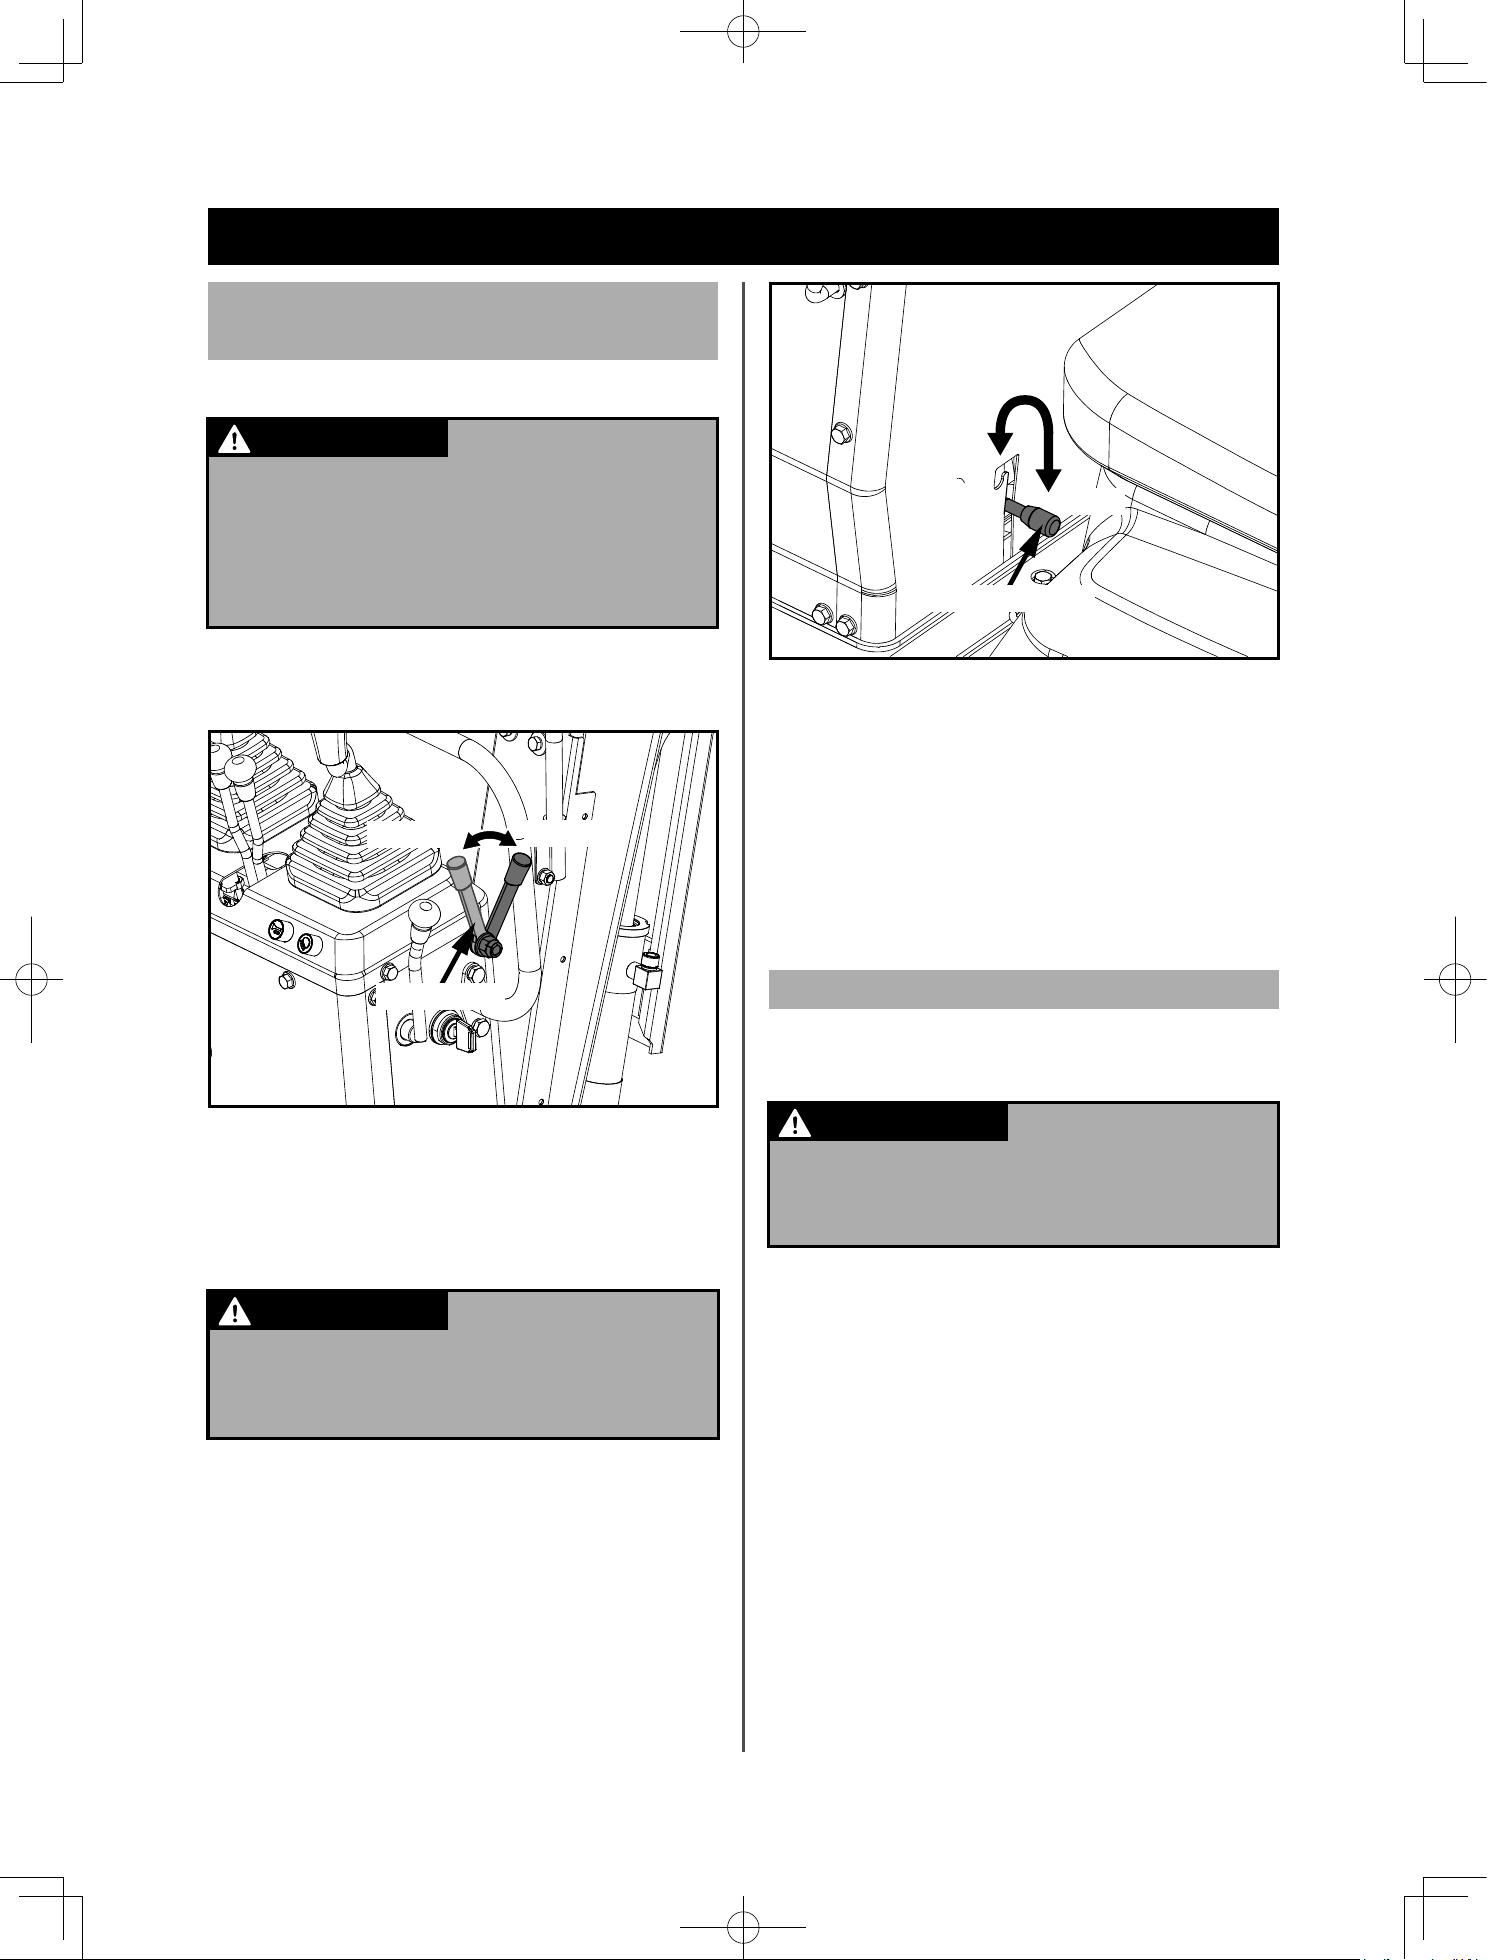
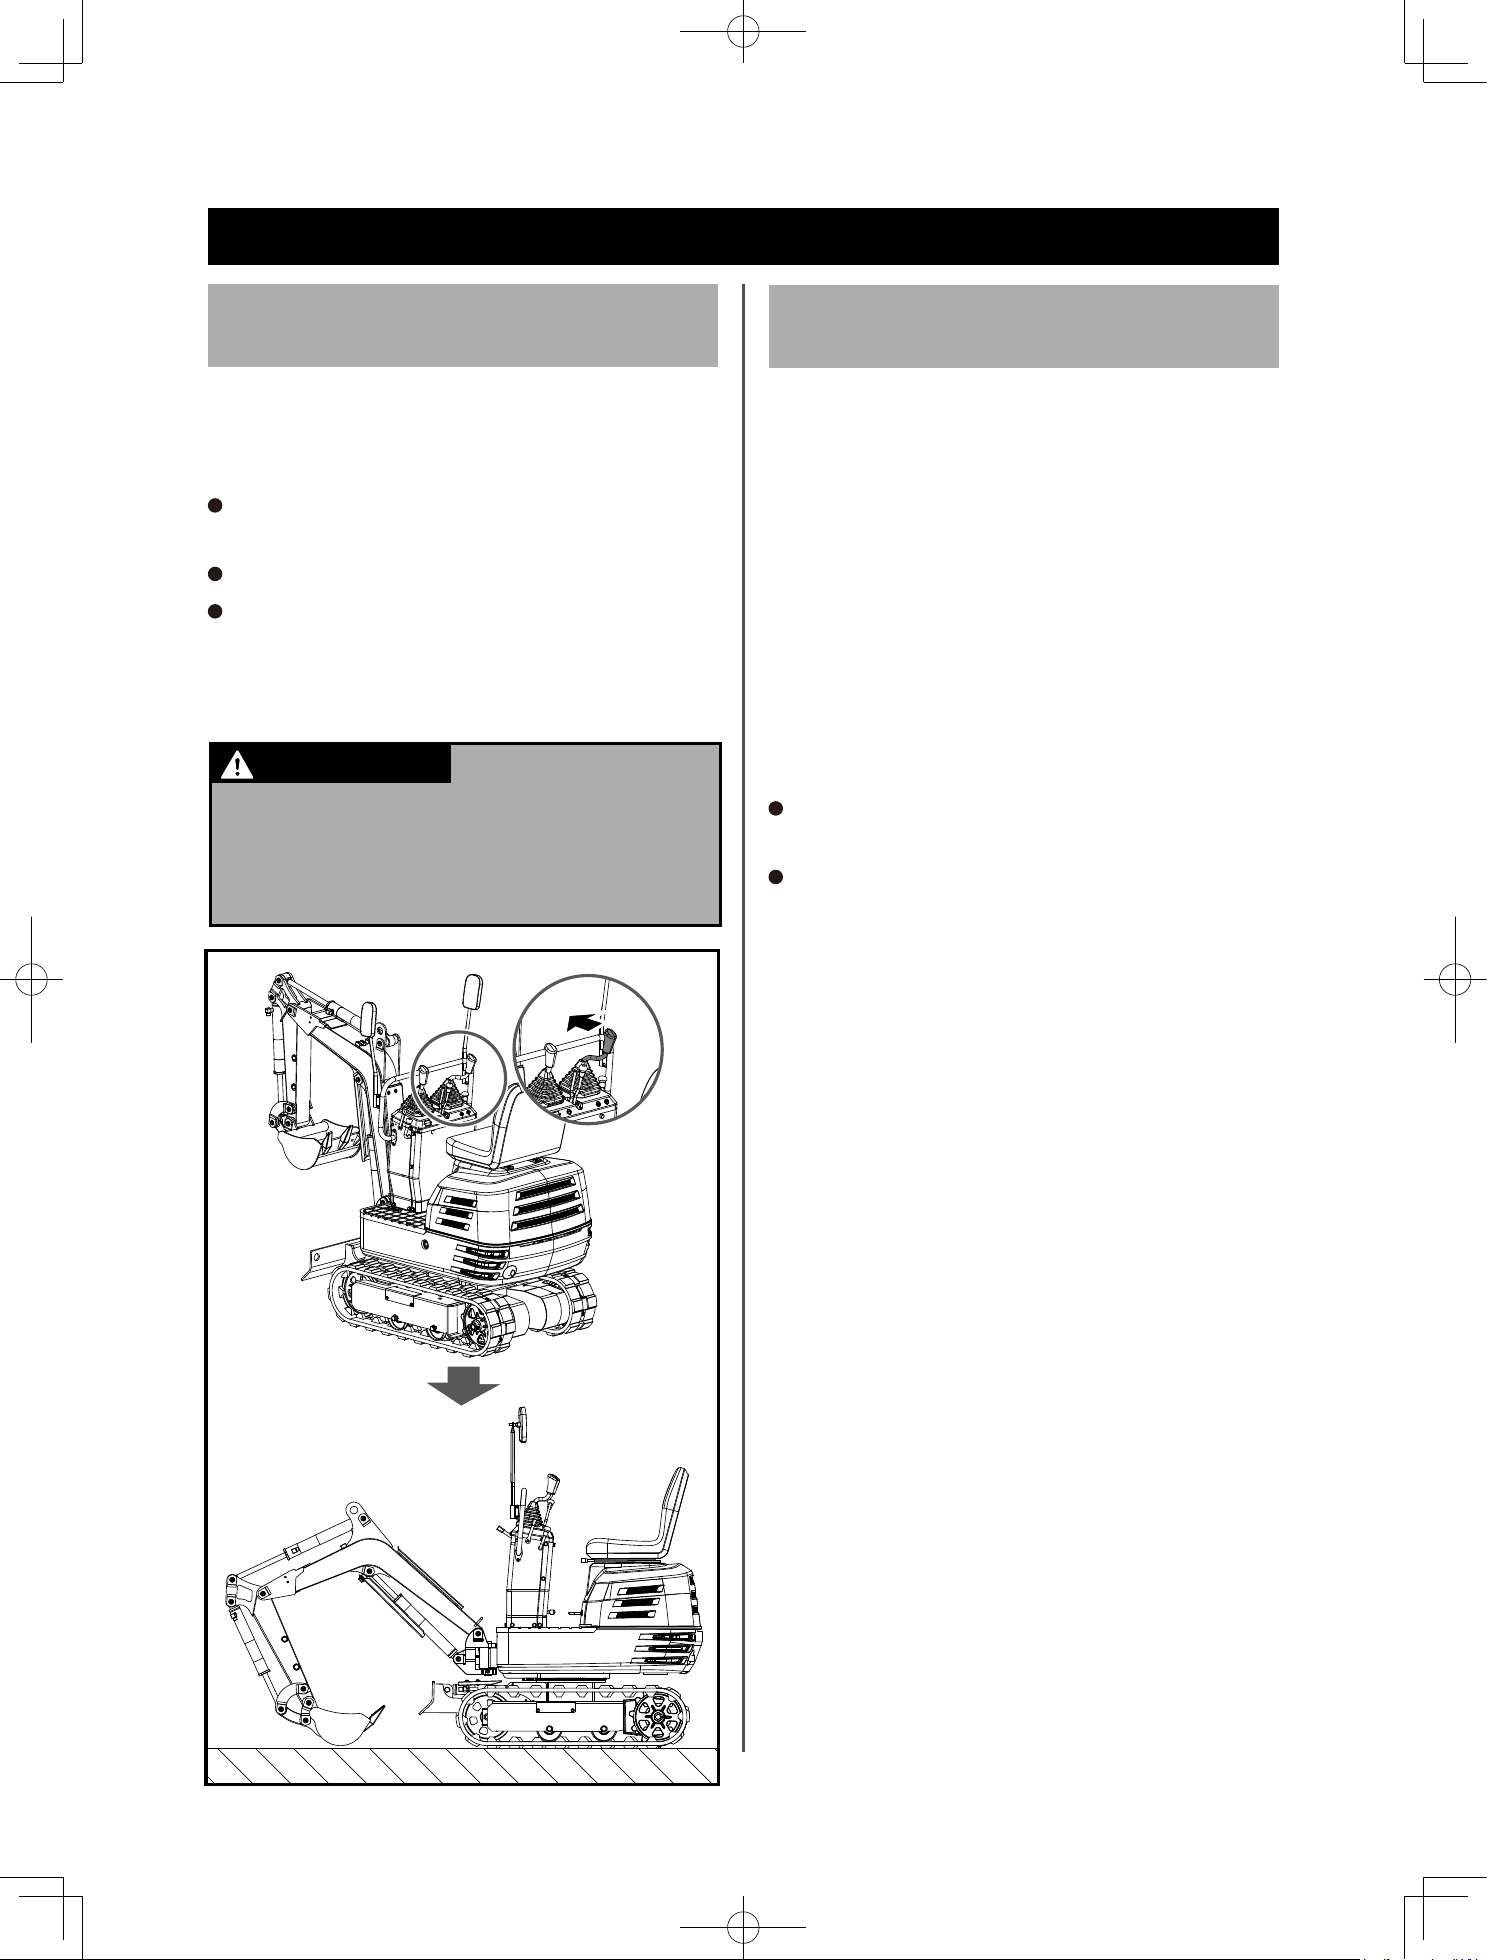
Adjusting the Operator's Seat
1. Adjusting the Operator's Seat
To and fro : While holding up the to-and-fro
adjustment lever, reposition the seat to and
fro.
2. Bring the lock lever into the "Unlock" position.
Please bring the lock lever into the "Unlock"
position, and raise the lower side of the bucket
from the ground by 20 to 40 cm.
Lock lever
Lock
Unlock
No persons, other
than those familiar with the excavator, are
allowed to use the excavator.
Do not allow any person other than the
operator to ride on the excavator.
Before adjusting the
operator's seat, make sure that no one puts
hands on the engine bonnet behind the
seat.
After having adjusted the seat, make sure
that the seat adjuster has clicked into
position.
Check safety aspects
all around the excavator.
IMPORTANT
WARNING
CAUTION
NOTE
IMPORTANT
WARNING
CAUTION
NOTE
IMPORTANT
WARNING
CAUTION
NOTE
Working Light Switch
If the key is in the "ON" position, the lights will be
switched on by tipping the switch.
Night operation
Working Light Switch
Visibility is reduced
in darkness, so that the working light alone
is not enough. Prepare additional lighting,
observe safety rules as well as special
regulations for night work.
IMPORTANT
WARNING
CAUTION
NOTE
The ambient lighting
of the machine must be above 500Lux.
IMPORTANT
WARNING
CAUTION
NOTE
28
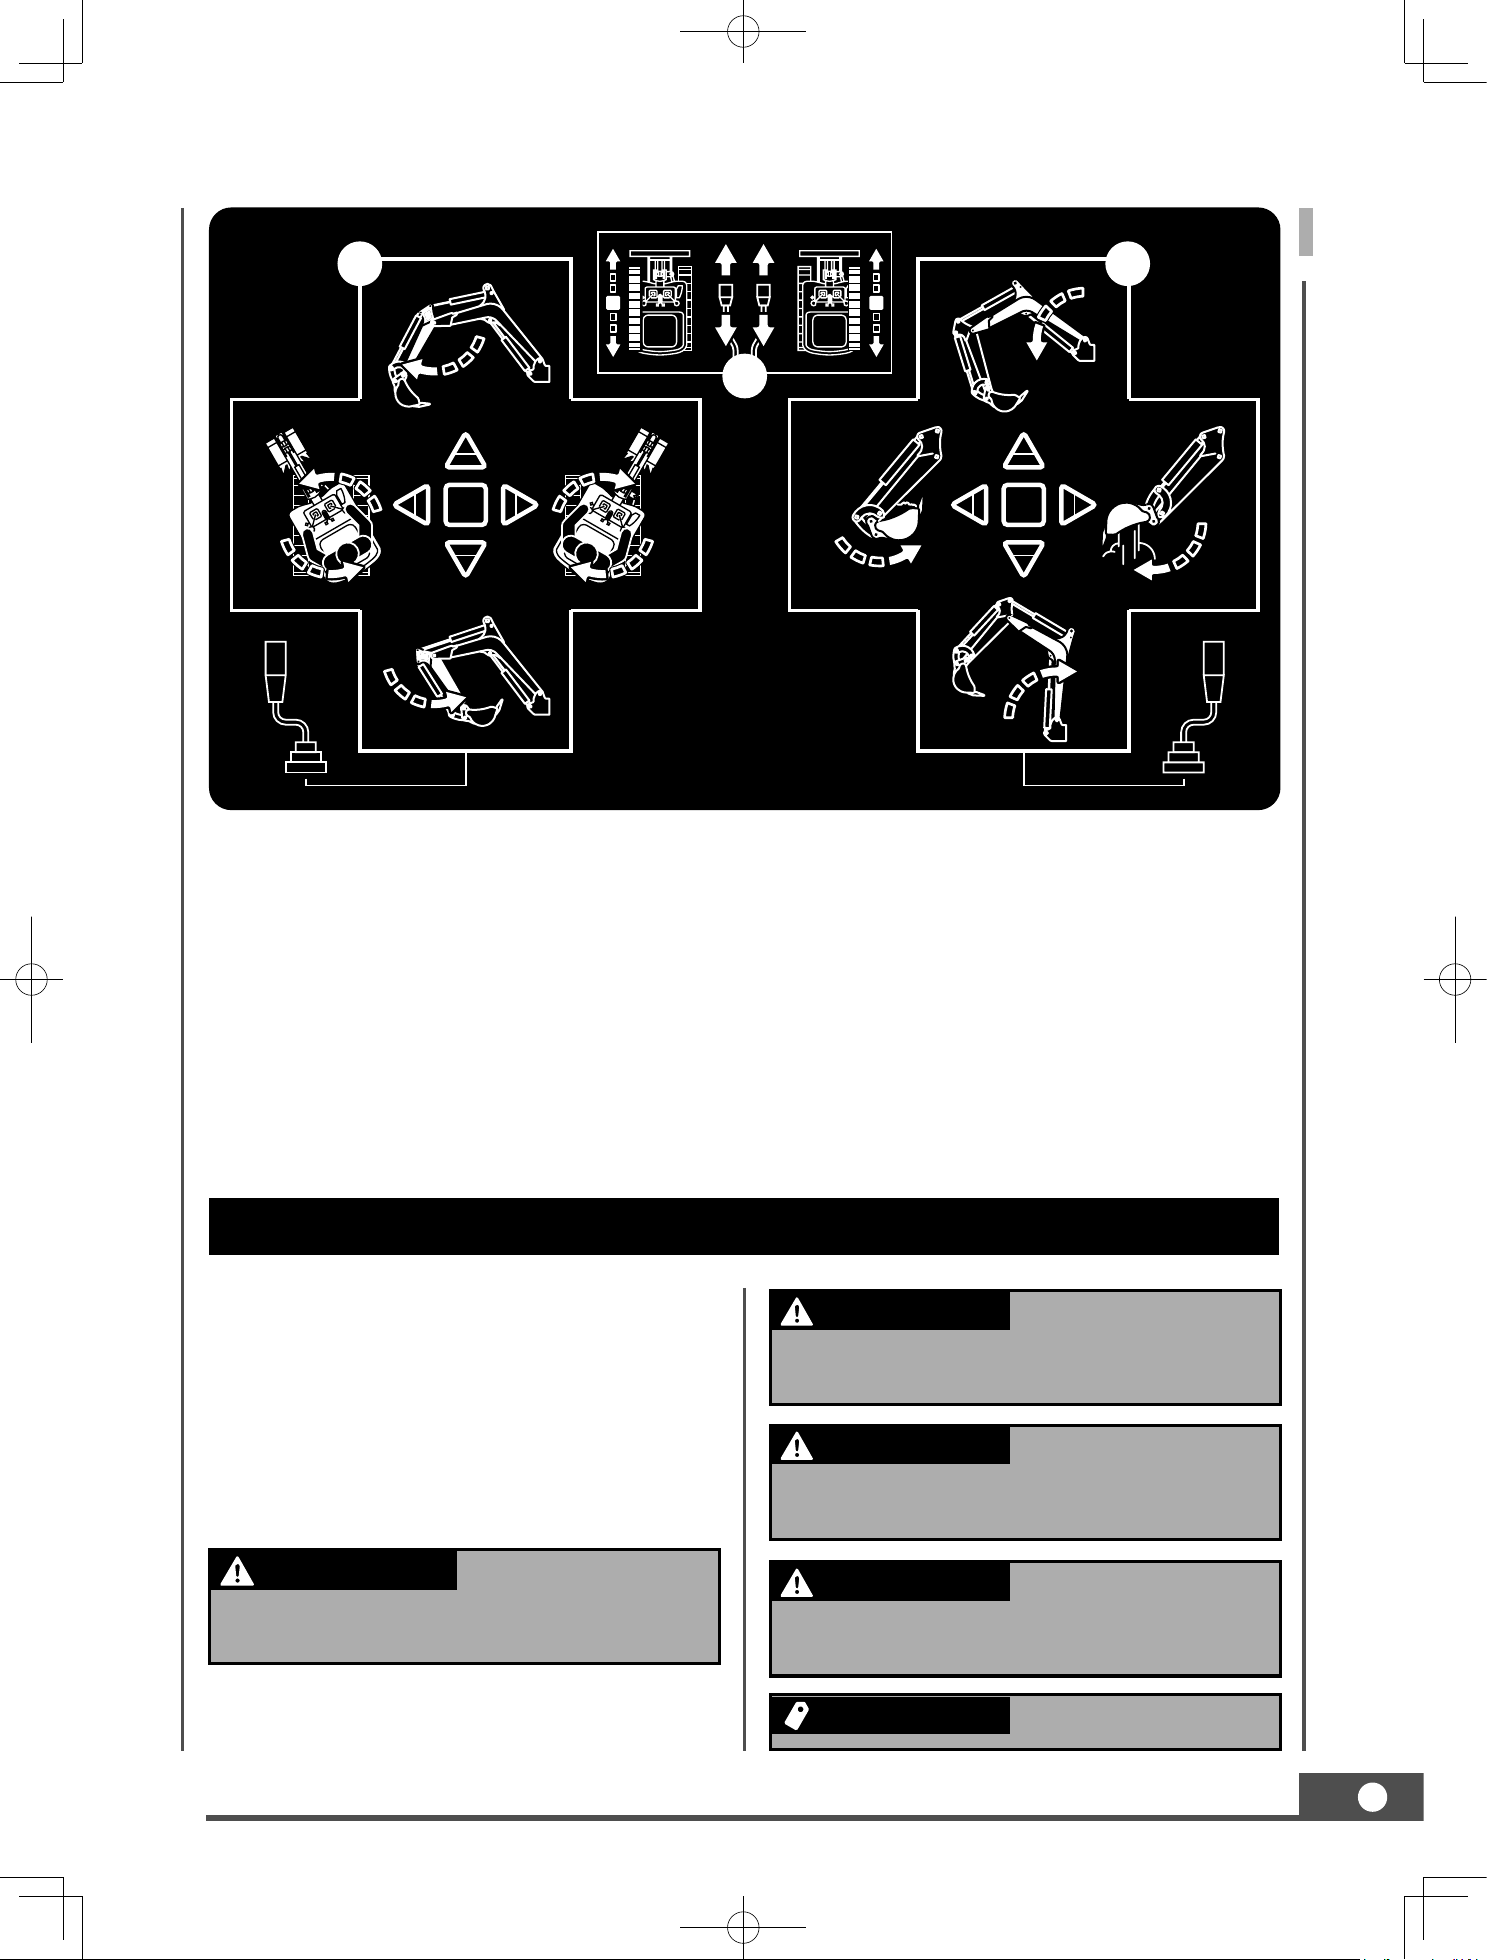
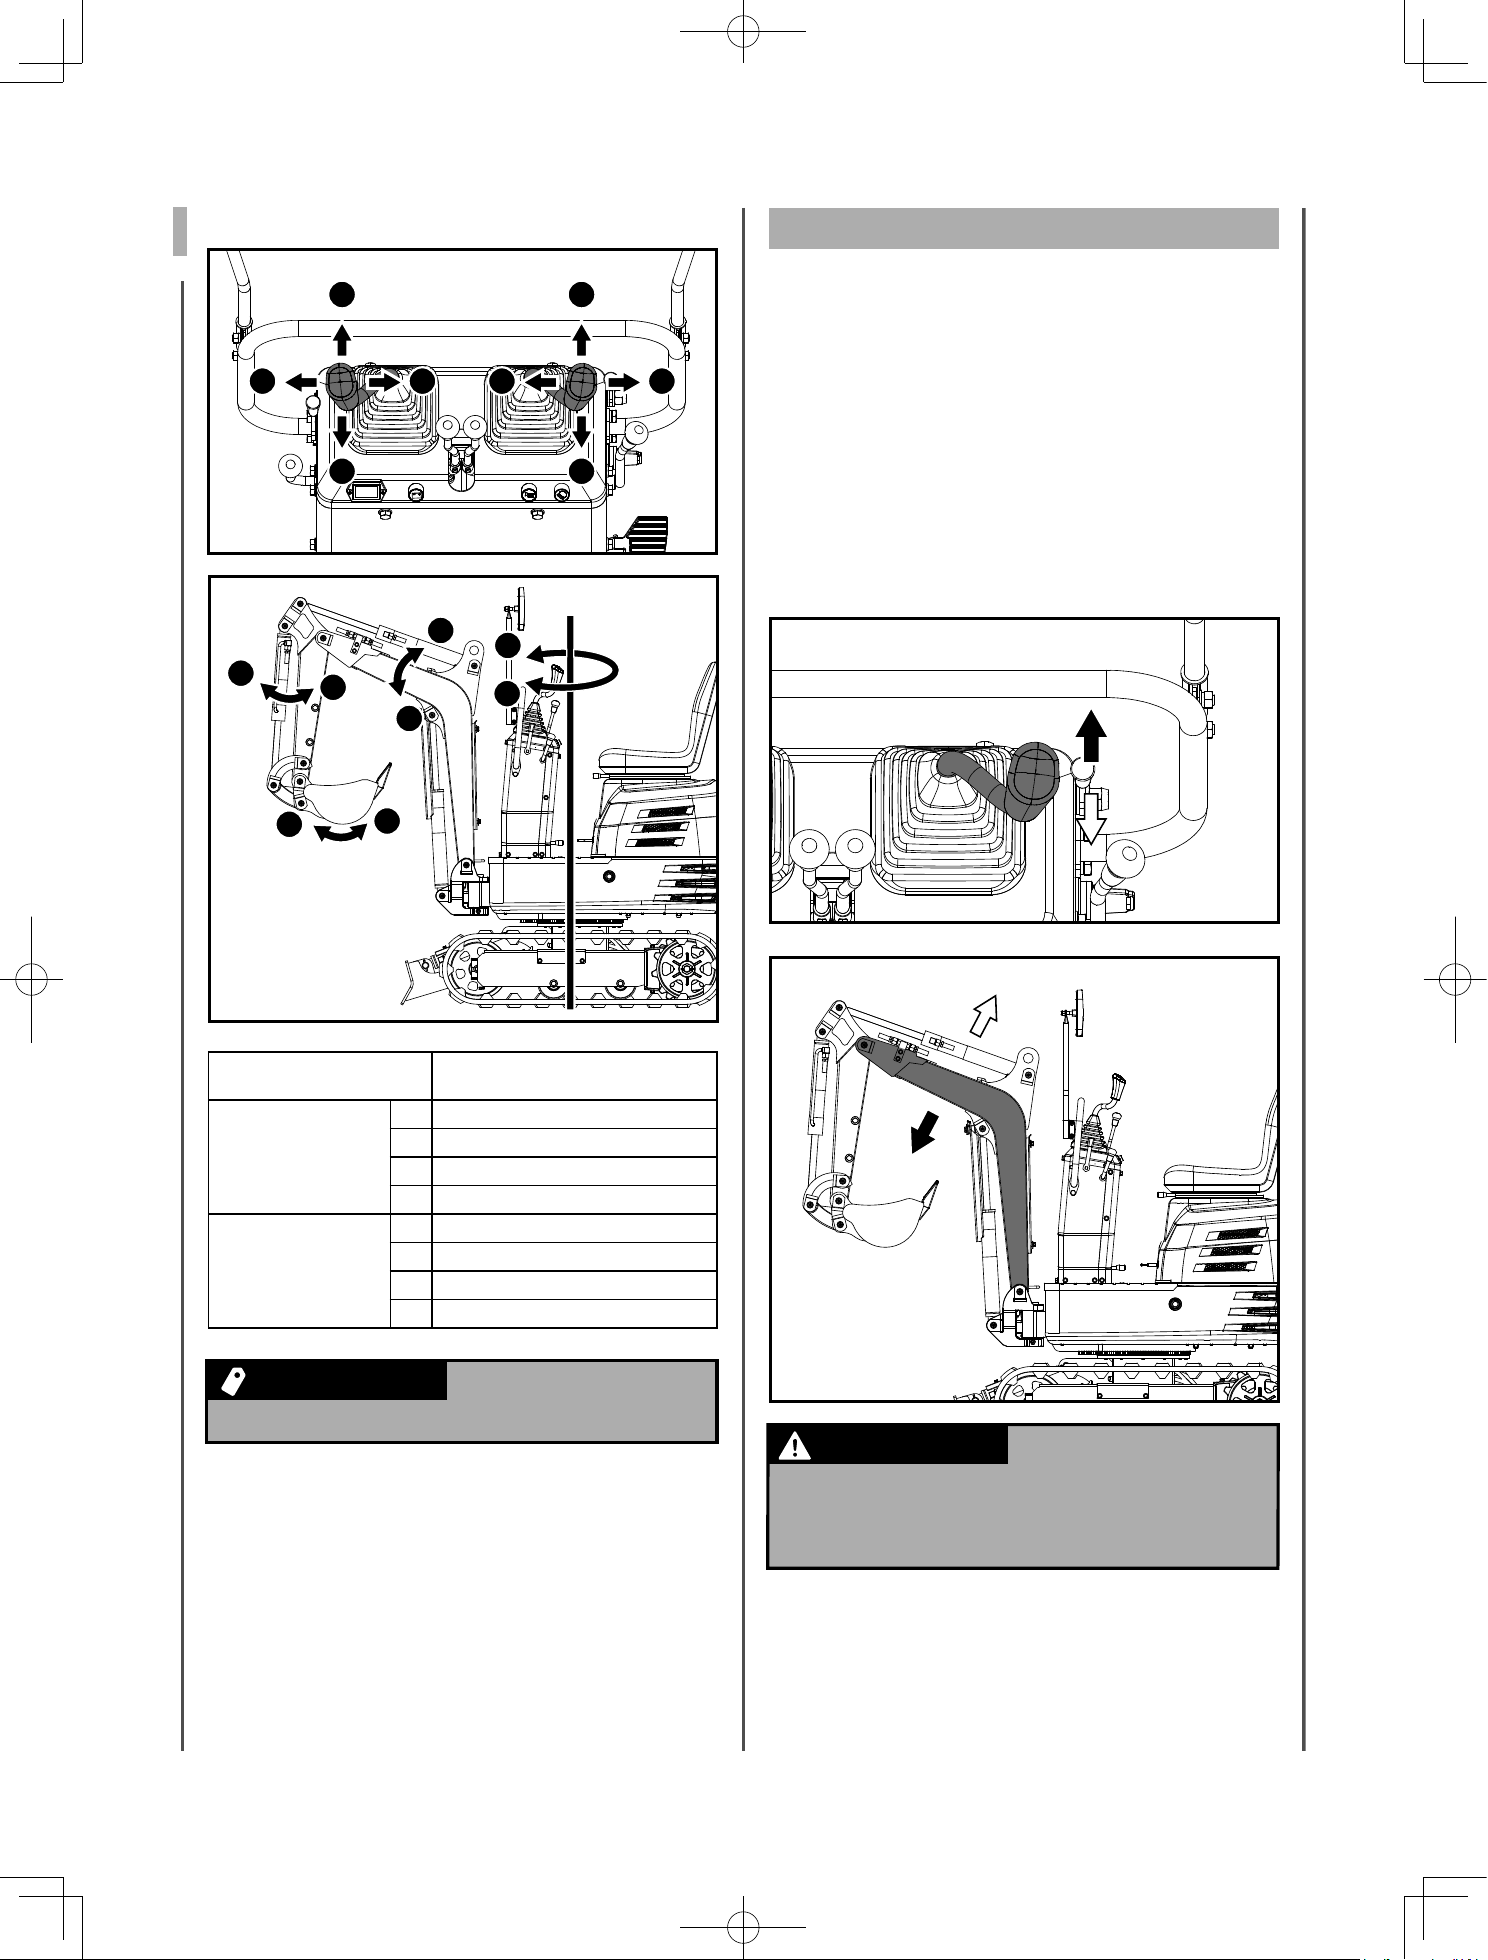
Drive lever
A
B
C D
1
2
3 4
2
1
4
3
A
B
C
D
Lever position Movement
Left Front
Attachment
Control Lever
A Arm out
B Arm in
C Swivel to left
D Swivel to right
Right Front
Attachment
Control Lever
1 Boom lower
2 Boom raise
3 Bucket dig
4 Bucket dump
See "SWIVEL
MOVEMENT AND SWING MOVEMENT".
IMPORTANT
WARNING
CAUTION
NOTE
OPERATION OF THE BOOM
To raise the boom, pull the attachment control
lever back.
The boom is equipped with a cushion cylinder
which prevents excavated material in the bucket
from fall-in out. By low hydraulic oil temperature,
(e.g. right after starting the engine) the cushioning
function will only be effected after a certain delay
(approx. 3 to 5 seconds). This condition results
from the viscosity of the hydraulic oil and is no
sign of a malfunction.
When lowering the
boom, make sure that it does not hit the
dozer and that the bucket teeth do not
touch the dozer.
IMPORTANT
WARNING
CAUTION
NOTE
29
OPERATION OF THE ARM
Pull back the left attachment control lever and
the arm will be pulled in. To move the arm out,
push the control lever towards the front.
When pulling in the
arm, the movement may stop for a short
moment when the arm is in its vertical
position. This is caused by the fact that at
this position the maximum load for the arm
and bucket is reached, and the hydraulic
pressure in the cylinder is not high enough.
This is a characteristic of the hydraulic
system and is not a sign of a malfunction.
IMPORTANT
WARNING
CAUTION
NOTE
OPERATION OF BUCKET
SWIVEL (UNIT SWING)
OPERATION
To dig with the bucket, move the right attachment
control lever from the neutral position towards
the left. Moving the control lever towards the
right pushes the bucket outwards and dumps its
contents.
When working in
groups, always let the others know what
you are going to do before you do it.
Keep away from the working area.
IMPORTANT
WARNING
CAUTION
NOTE
30
1. Tilt the control lever to the left and the upper
structure will turn to the left.
2. Tilt the control lever to the right and the upper
structure will turn to the right.
Do not operate the
left attachment control lever abruptly
from the right to the left (or vice versa).
Because of the law of inertia, this causes
an impact load on the swing gear and the
swing motor. Additionally, the lifetime of
the excavator will be shortened.
Unlock the swing lock pin before carrying
out swivel operations.
IMPORTANT
WARNING
CAUTION
NOTE
BOOM SWING OPERATION
1. Step on the front of the pedal to swing the
boom to the left.
2. Step on the rear of the pedal to swing the
boom to the right.
A
B
Pedal
FRONT
70° 70°
31
BOOM SWING PEDAL
Fix
Always keep your
toes within the edge of foot step; otherwise
there is a possibility that your toes will be
caught between swing frame and boom or
boom cylinder.
IMPORTANT
WARNING
CAUTION
NOTE
When boom swing
operation is not in use, fold the boom
swing pedal forward to fix the pedal from
unexpected moves.
IMPORTANT
WARNING
CAUTION
NOTE
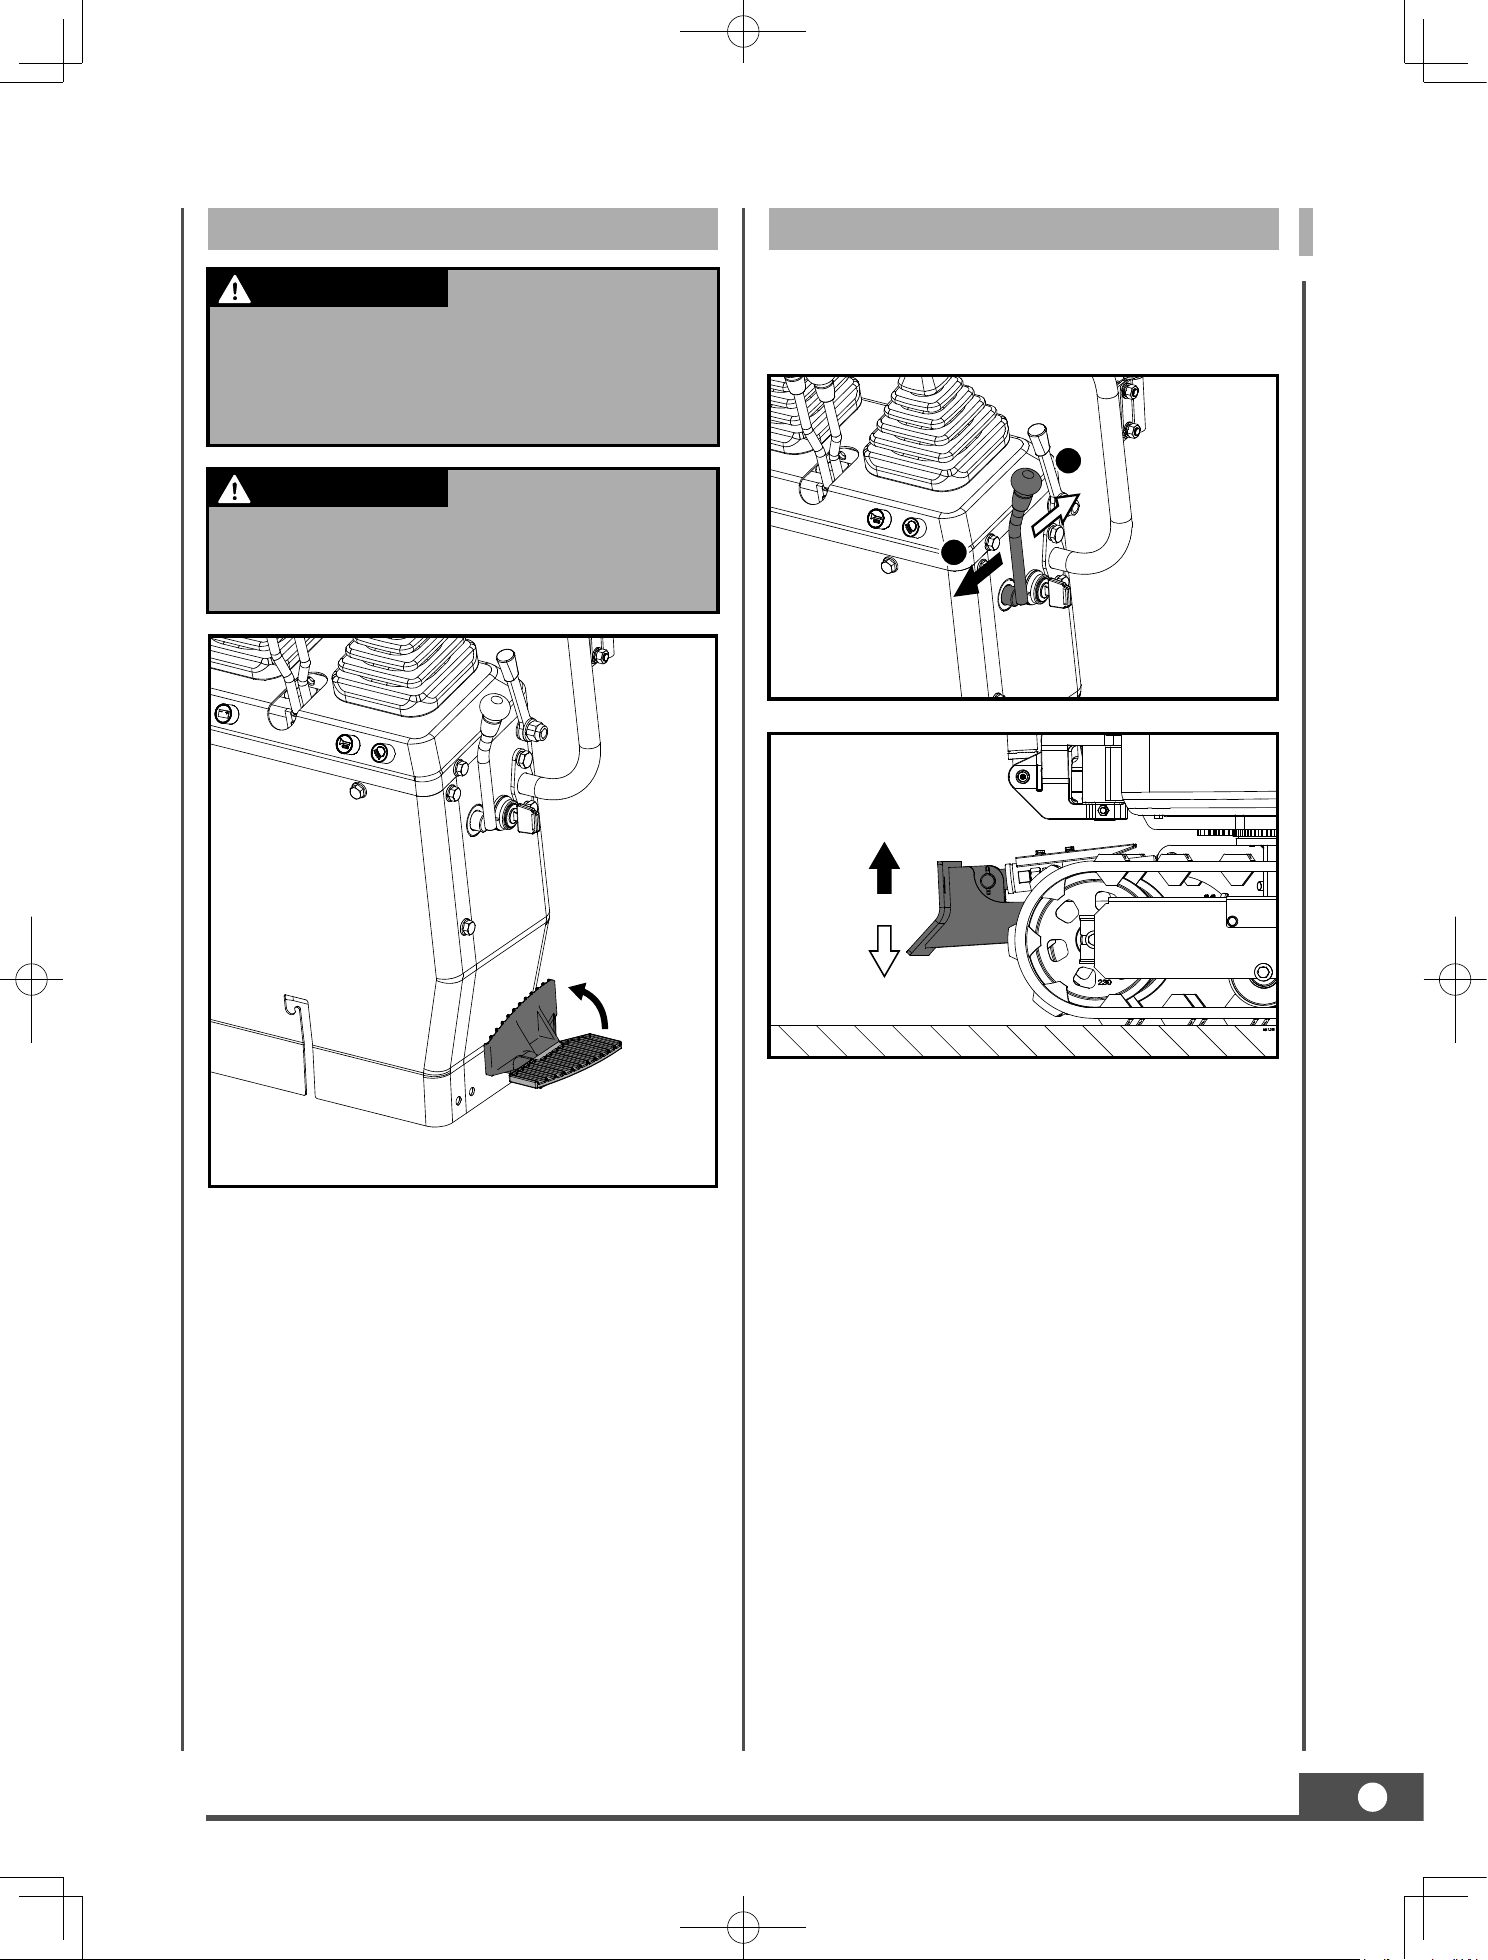
OPERATION OF DOZER
1. To lift the dozer, pull control lever for dozer
backward. Push the control lever forward to
lower the dozer.
2. While undertaking earth moving work, control
both drive levers with the left hand and the
control lever for dozer with the right hand.
A
B
Raise
Lower

32
DRIVING
Front
Before starting the
engine, make sure that no further persons
are in the excavator surroundings.
Before operating the excavator, check the
crawler direction. (Idler and dozer to the
front of the excavator).
Avoid travelling across a slope or working
sideways on a slope.
IMPORTANT
WARNING
CAUTION
NOTE
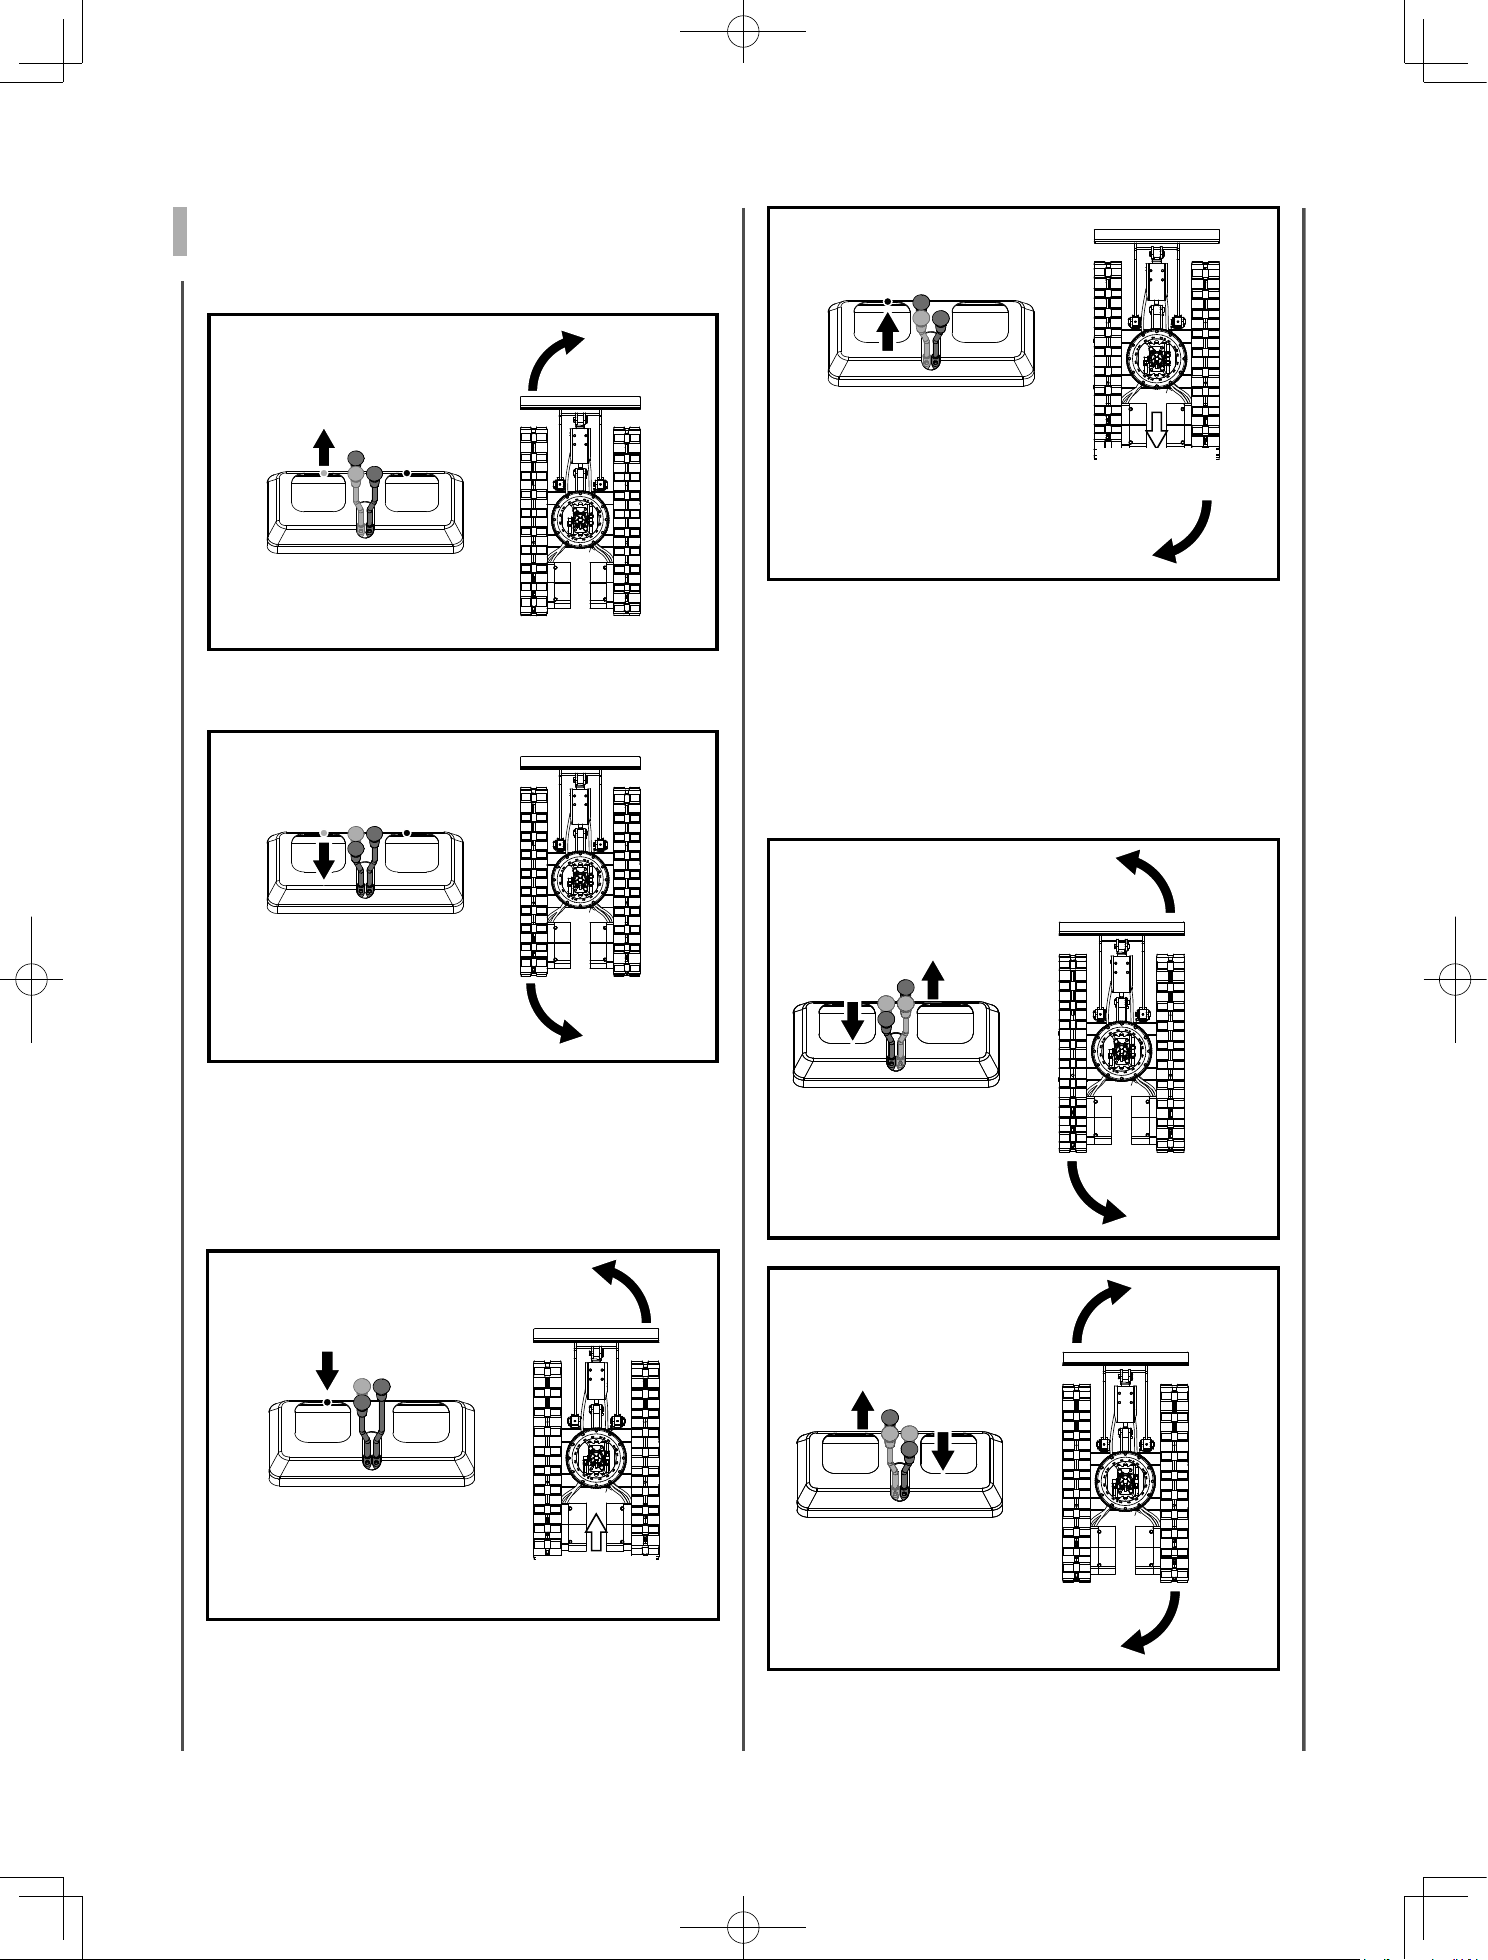
Drive Levers (Right, Left)
Pushing both drive control levers forward
simultaneously, moves the excavator forward.
Similarly, pulling both drive control levers
backward simultaneously, moves the excavator
backward. The front of the excavator is the
direction where the dozer is present.
Forward
Backward
Forward
Backward
Left drive lever Right drive lever
If the swing frame
has been turned 180 , i.e. the dozer is, seen
by the operator, "behind", then the travel
direction is opposite to the drive direction
of the levers (when activating the drive
lever forwards, the excavator, seen by the
operator, will move backwards).
IMPORTANT
WARNING
CAUTION
NOTE
Forward
Backward
Forward
Backward
Forward
Backward
1. Adjust the engine speed from idling to an
intermediate speed.
2. Raise the dozer and hold the bucket about
20 to 40 cm off the ground.
20-40cm
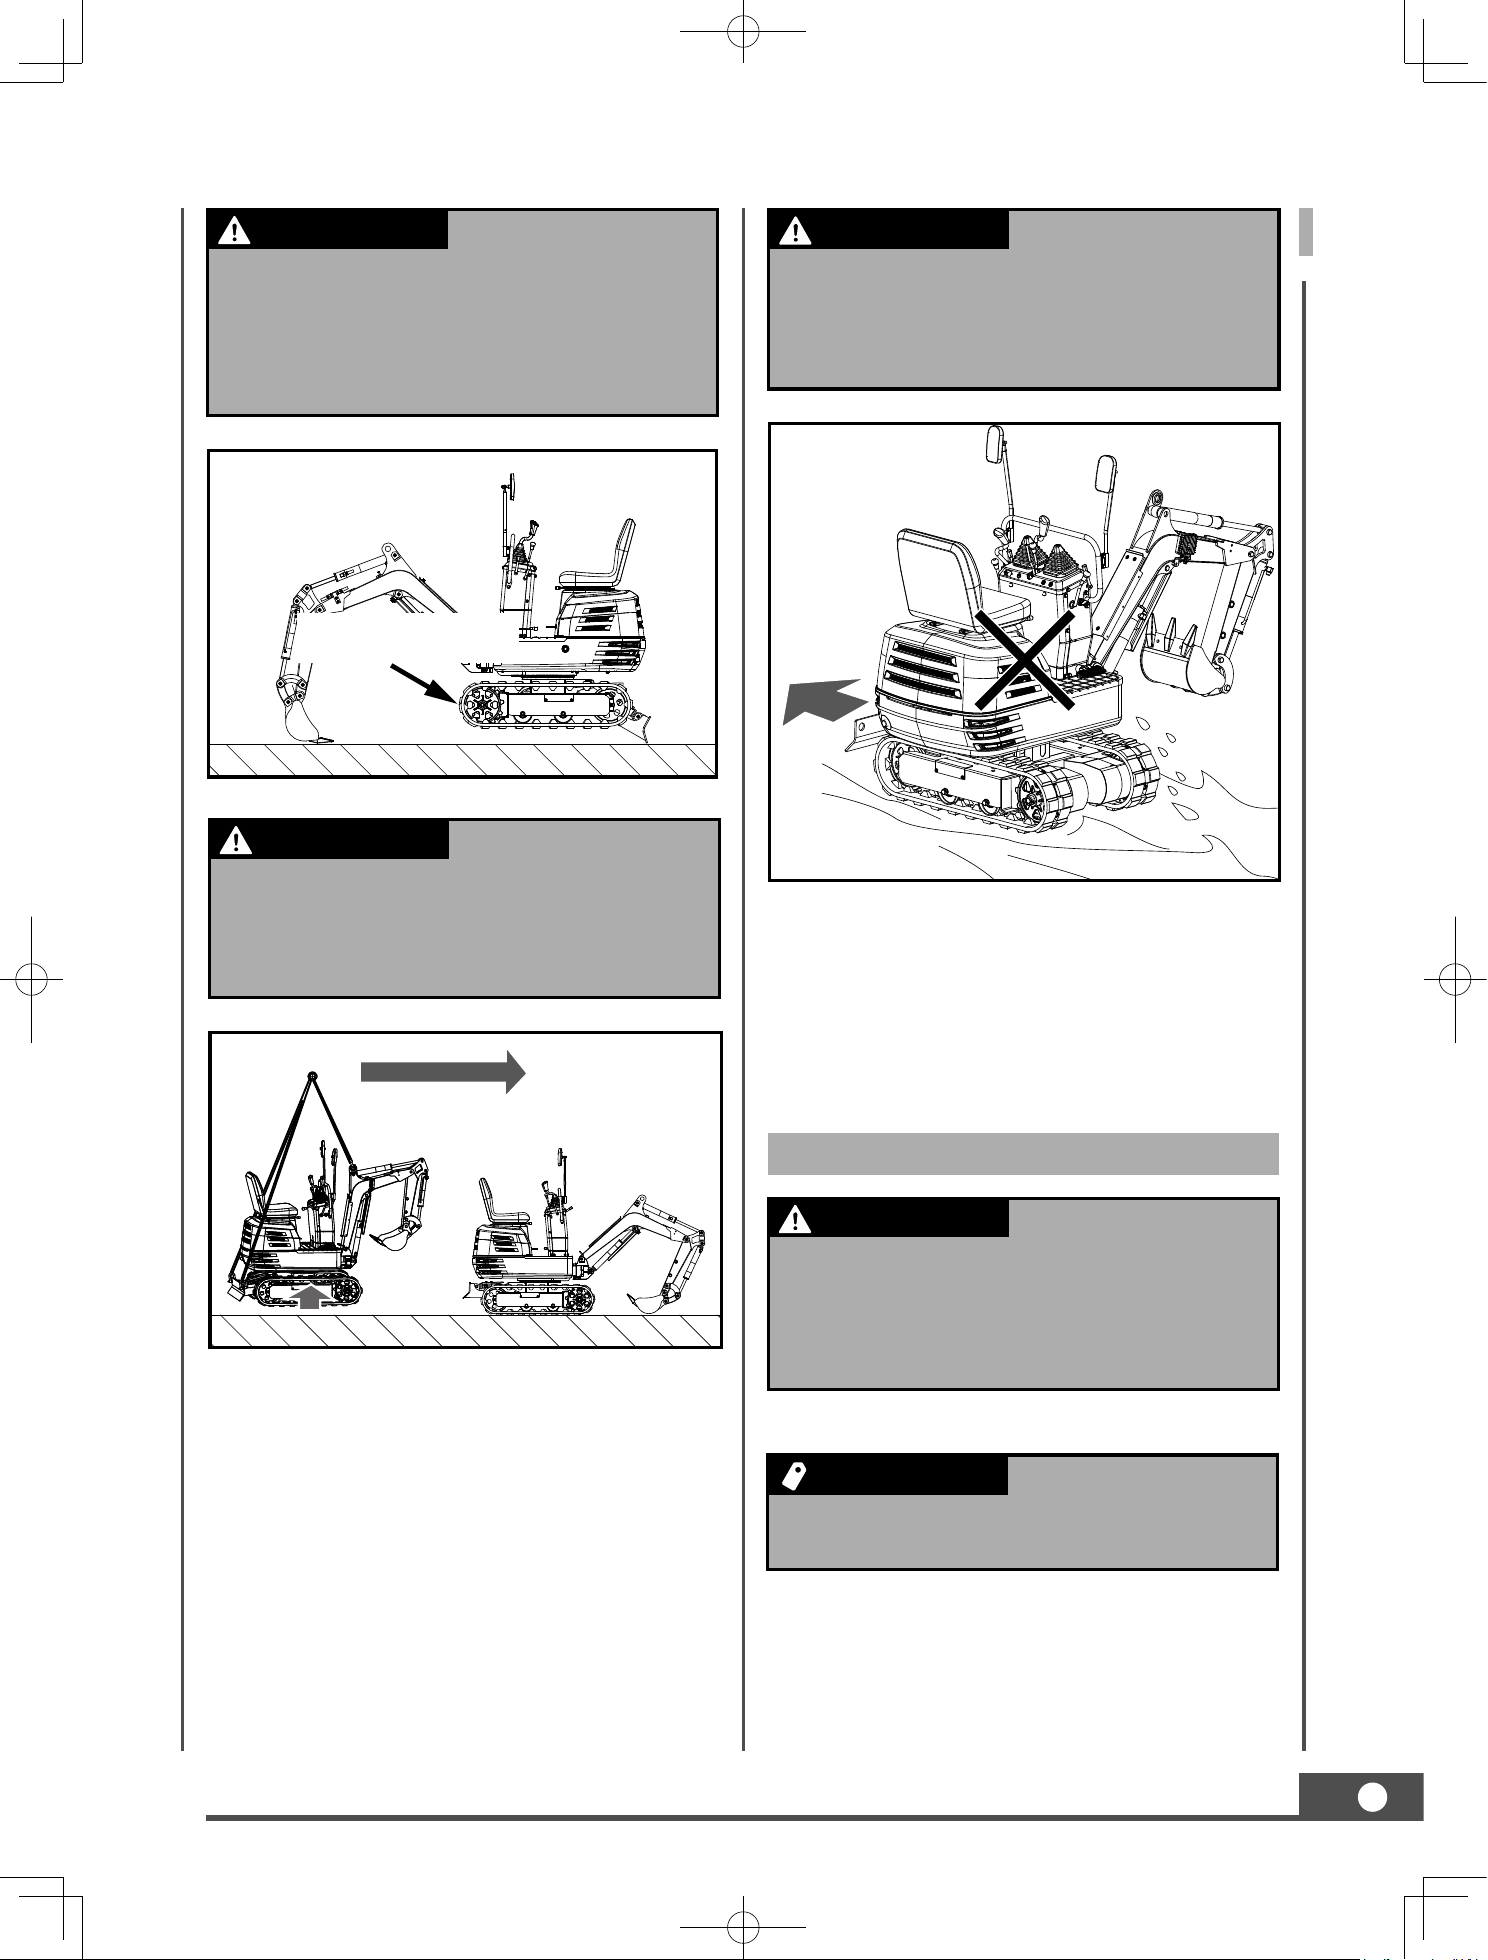
33
Rotate to shake off
sand and gravel
If the crawler is
clogged with sand or gravel while working
on soft ground, lift up one crawler with the
help of the boom, arm and bucket and let
the crawler rotate to shake off the sand
and gravel.
IMPORTANT
WARNING
CAUTION
NOTE
When driving in the
muddy ground, if the excavator is stuck
in the mud and cannot move, it should be
lifted to a safety zone with the hoisting
belt as shown in the drawing below.
The excavator cannot
travel on the muddy road with the slewing
platform perpendicular to the tracks, so as
to prevent the tracks from being involved
in the mud.
IMPORTANT
WARNING
CAUTION
NOTE
IMPORTANT
WARNING
CAUTION
NOTE
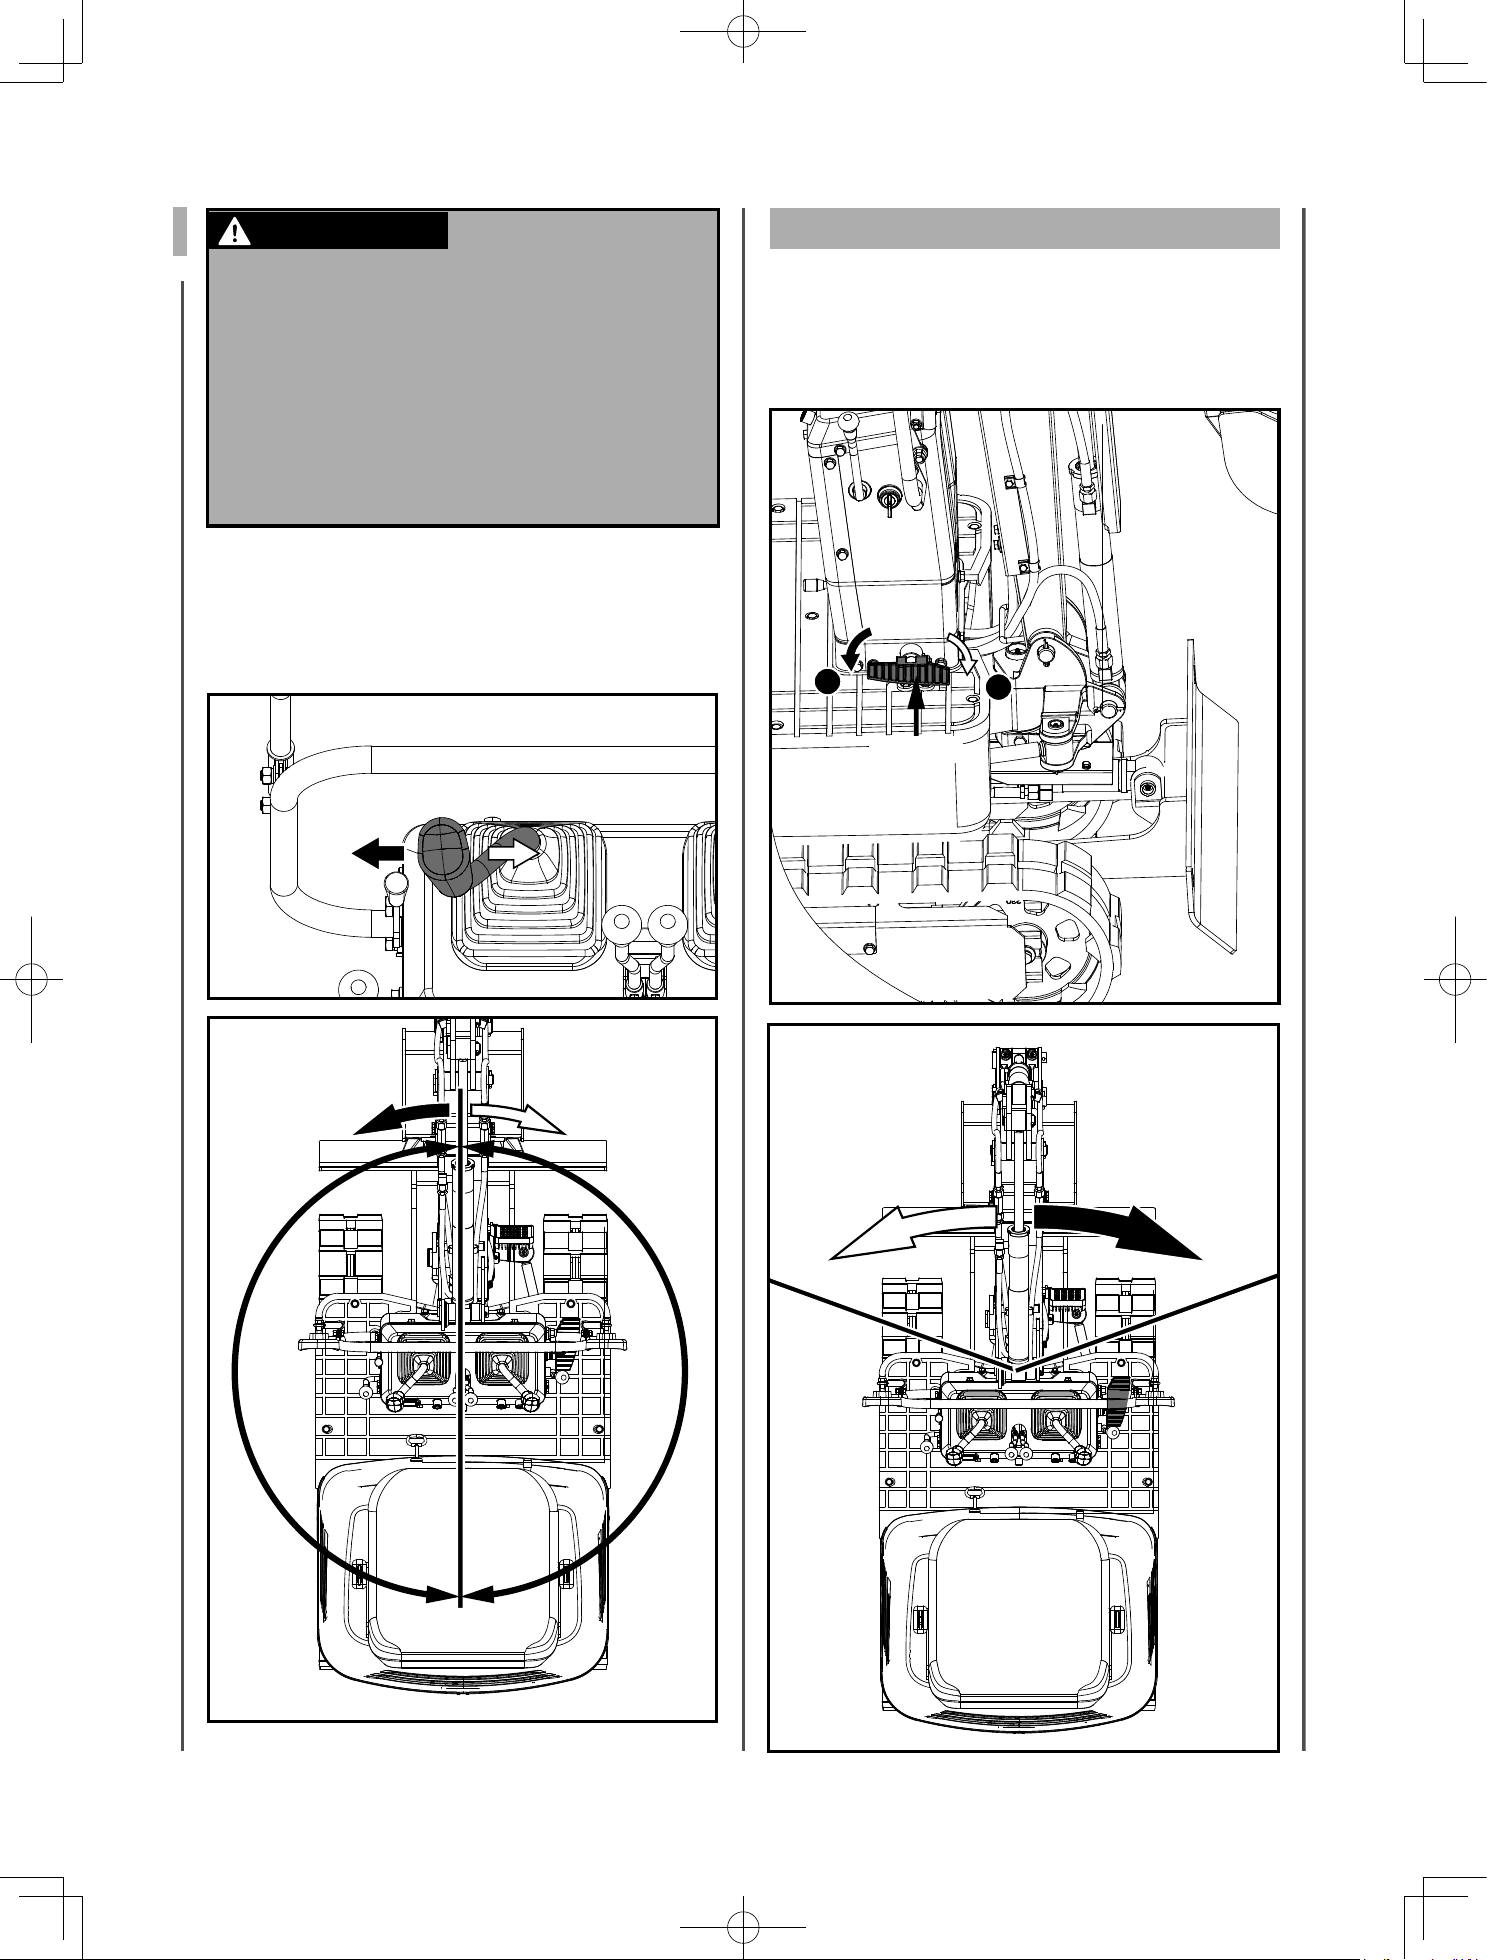
Pivot Turn
When the dozer is facing the back, the turning
direction is reversed.
(For example, push the left (right) drive lever
forward; right (left) crawler, seen by the operator,
will move backward from the operator.)
TURNS
Do not change
direction on steep slopes, or the excavator
could tip over.
Before changing direction, beware of
persons in the working area.
IMPORTANT
WARNING
CAUTION
NOTE
Movement as
illustrated shows turning motion with the
dozer positioned facing the front.
IMPORTANT
WARNING
CAUTION
NOTE
34
GB
Pivot Turn
When both drive levers are activated in the
opposite directions, both crawlers will rotate with
the same speed but in opposite directions, the
excavator will rotate in place. Centre of rotation
is the centre of the excavator.
Travelling
forward
Travelling
backward
Neutral position
Neutral position
Travelling
forward
Travelling
backward
Neutral position
Neutral position
Change of Direction while Stationary
1. Push the left drive lever forward; the excavator
will turn to the right.
2. Pull the left drive lever backward, back of the
excavator will turn to the right.
Change of Direction while Travelling
1. While travelling forward, pull back the left
drive lever into the neutral position, and keep
pushing the right lever in the forward position,
the excavator will turn to the left.
2. While travelling backward, push back the left
drive lever into the neutral position, and keep
pulling the right lever in the backward position,
back of the excavator will turn to the right.
Travelling
forward
Travelling
backward
Neutral position
Neutral position
Travelling
forward
Travelling
backward
Neutral position
Neutral position
Left spin turn
Left spin turn
Right spin turn
Right spin turn
Left spin turn
Left spin turn
Right spin turn
Right spin turn
35
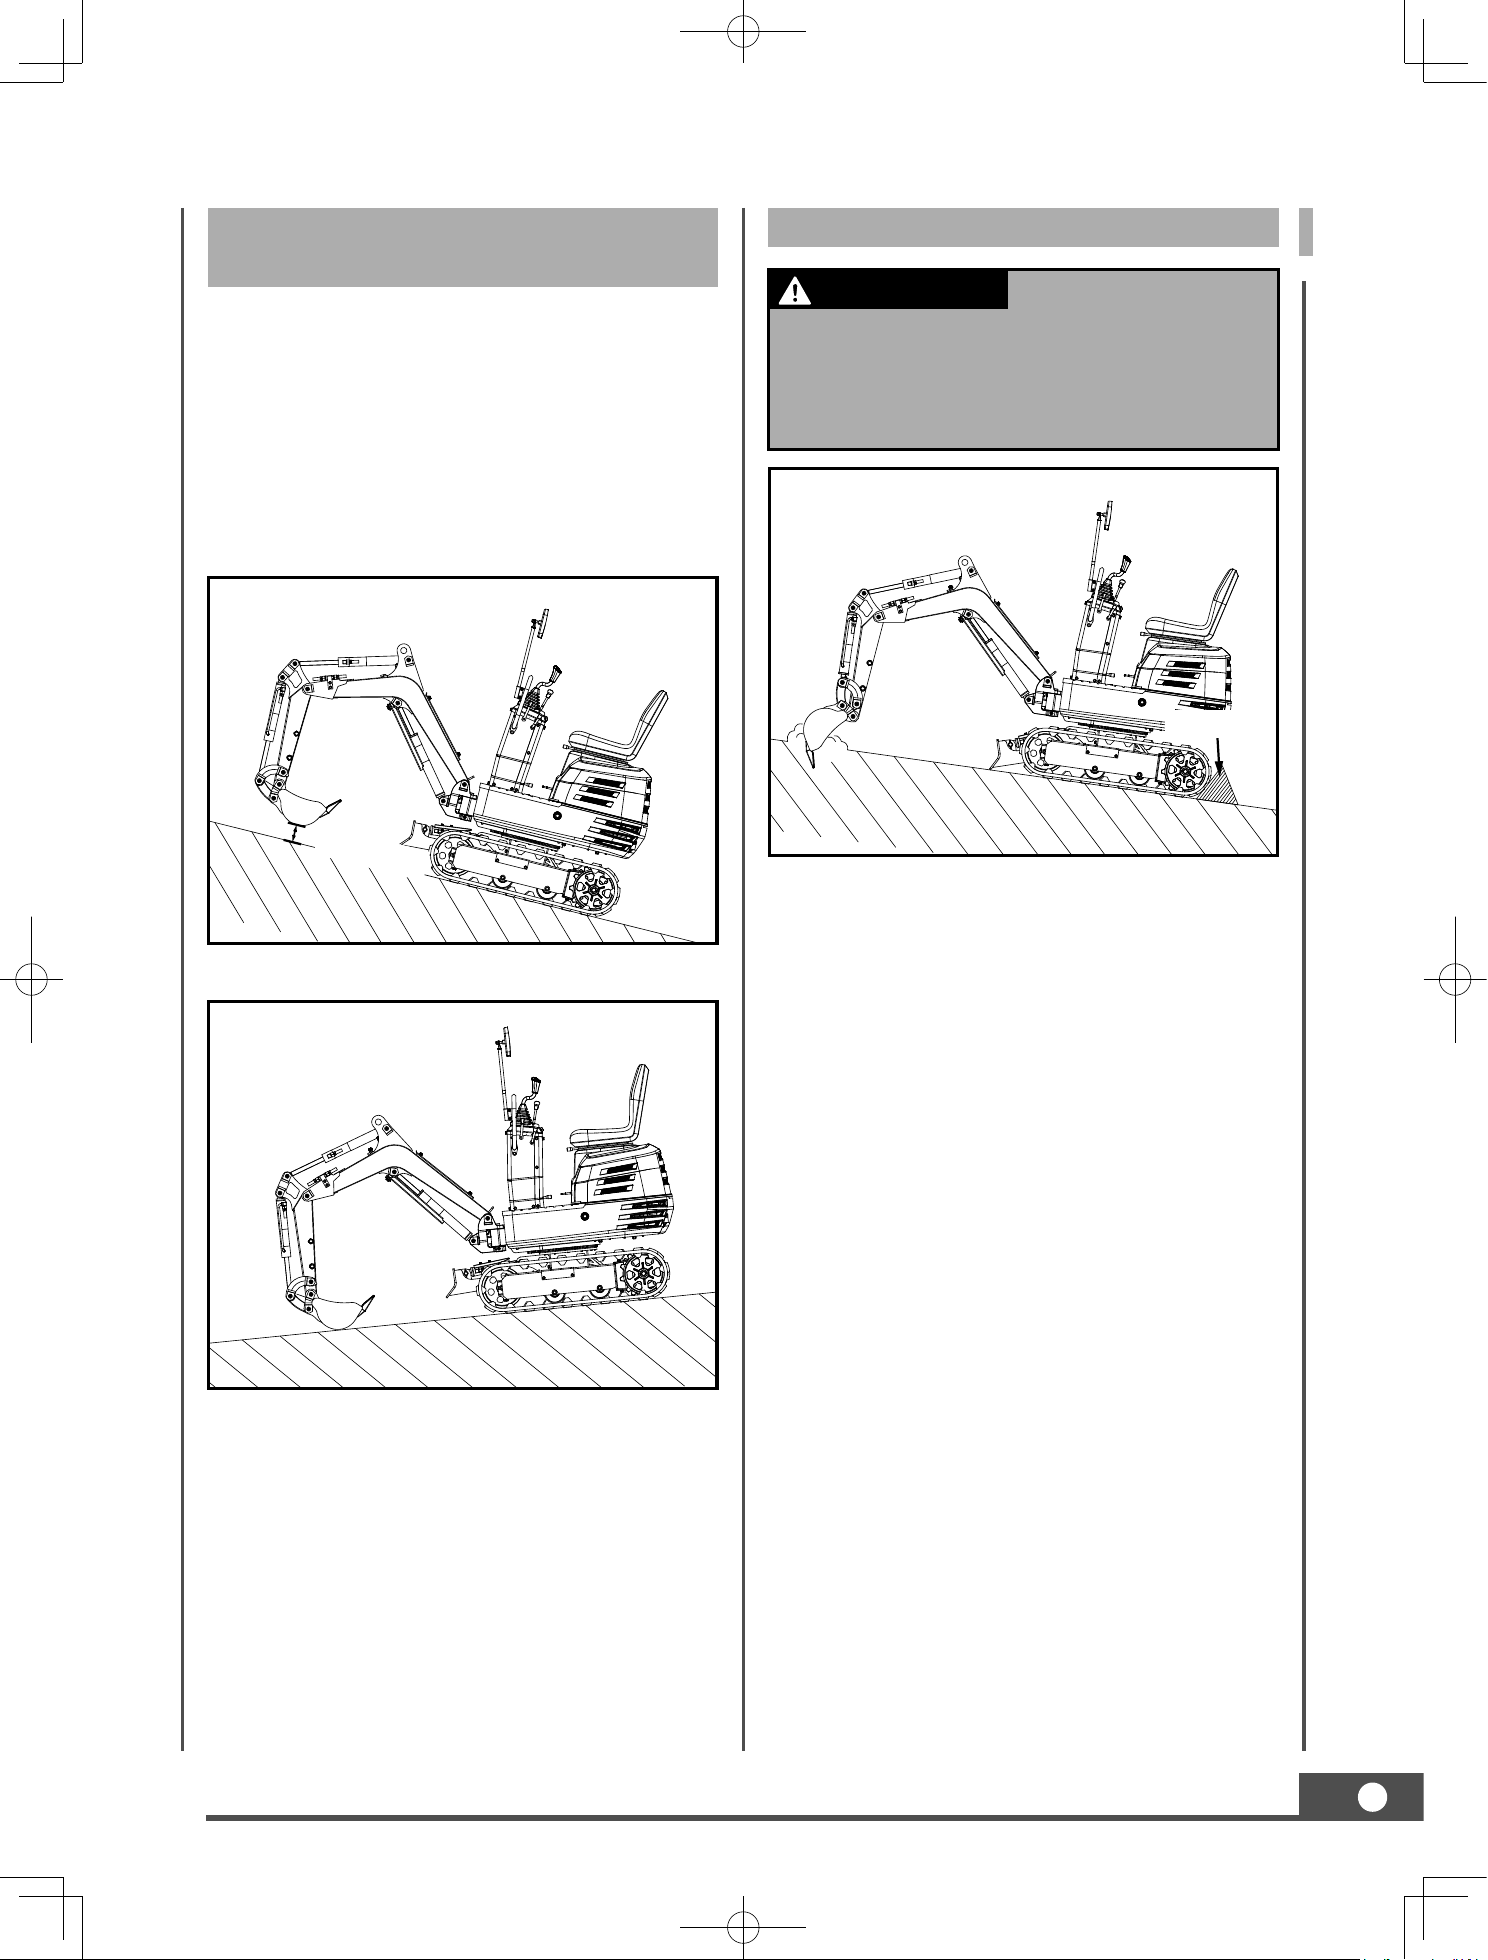
UP AND DOWNHILL
TRAVELLING
PARKING ON A SLOPE
While travelling uphill, keep the lower edge
of the bucket approx. 20 to 40cm above the
ground. Although the excavator will not slip
easily because of the crawlers, it is safer to let
the bucket slide over the ground while travelling
downhill. Always choose slow speed for uphill
and downhill travelling.
[UPHILL TRAVELLING]
[DOWNHILL TRAVELLING]
20-40cm
Chock
When the excavator
is parked or left unattended on a slope, be
sure to put the bucket on the ground and
place all control levers in neutral position,
then brace the crawlers with chocks.
IMPORTANT
WARNING
CAUTION
NOTE
36
IMPORTANT INFORMATION
ON EXCAVATOR OPERATION
After work, clean the
machine and lubricate all movable parts.
Check oil level.
MPORTANT: Do not
try to crush concrete or boulders using side
swings with the bucket. Also avoid using
side sweeps of the bucket to move earth
piles.
Under all circumstances avoid the following
operations:
Excavation using the gravitational
impact of the machine.
Compacting of gravel or soil using the
dropping action of the bucket.
Excavation using the travelling power
of the machine.
Do not try to drop or shake of soil adhering
to the bucket in the manner shown in the
explanation below. This can cause damage
to the machine.
Adhering soil can be shaken off when the
bucket is being emptied by moving the
bucket out to the maximum stroke of the
cylinder. Should this not suffice, swing out
the arm as far as possible and operate the
bucket back and forth.
Do not hit the dozer with the boom
cylinder! Make sure that the boom cylinder
does not hit the dozer when carrying out
deep excavation. If necessary swivel the
upper structure so that the dozer is at the
back of the machine.
Pay attention when pulling in the bucket!
When pulling in the bucket (for driving or
transportation) avoid hitting the dozer.
Avoid collisions!
When moving the excavator, pay attention
so that the dozer does not collide with
obstructions such as boulders etc..
Such collisions substantially shorten the life
IMPORTANT
WARNING
CAUTION
NOTE
IMPORTANT
WARNING
CAUTION
NOTE
span of the dozer and the cylinder.
Support the machine correctly!
When stabilizing the machine with the
dozer, Iower the whole dozer fully on to
the ground.
If the water or mud level reaches higher
than the top of the tracks, the swivel
bearing, swivel motor gear and ring gear
may be exposed to mud, water and other
foreign objects.
The excavator must be properly pressure
washed after each use.
Thoroughly clean the area around the
swivel bearing, swivel motor gear and
ring gear to remove foreign objects.
Refer to operator's manual for proper
swivel bearing, swivel motor gear and
ring gear lubrication procedures.
Reinstall any protective covering if
removed earlier.

37
TRANSPORTING THE EXCAVATOR ON A TRUCK
Transporting on a Truck
Prepare a platform to load or unload the
excavator. Take following steps when using
ramps.
1. Apply the parking brakes of the truck, and
block the drive wheels from both sides.
2. Use fixing plates to secure the ramp properly.
Connect the ramps directly with the truck bed.
No directional changes
should be made when the excavator is on
the ramp. Should a change of direction be
necessary, drive off the ramp completely and
make the turn.
When the excavator
reaches the point between the ramps and
the truck bed, halt and then move very
slowly until the excavator reaches the
horizontal position.
When driving forwards
or backwards onto the truck, or when
swinging the upper body, make sure that
neither the cabin or the gates of the truck
will be damaged.
Move the excavator
onto the truck only with the arm completely
pulled in. Otherwise the truck cabin could
be damaged when swinging the upper body
around.
Do not jack up the
machine using its boom to load or unload
the excavator from the truck. Dangerous
situation could arise.
DANGER
DANGER
DANGER
DANGER
DANGER
3. For additional safety, use blocks or struts
under the ramps and the truck bed.
After loading the
machine on the truck, lower the bucket and
dozer onto the truck bed. Lock the swing
frame with the swing lock pin.
IMPORTANT
WARNING
CAUTION
NOTE
38
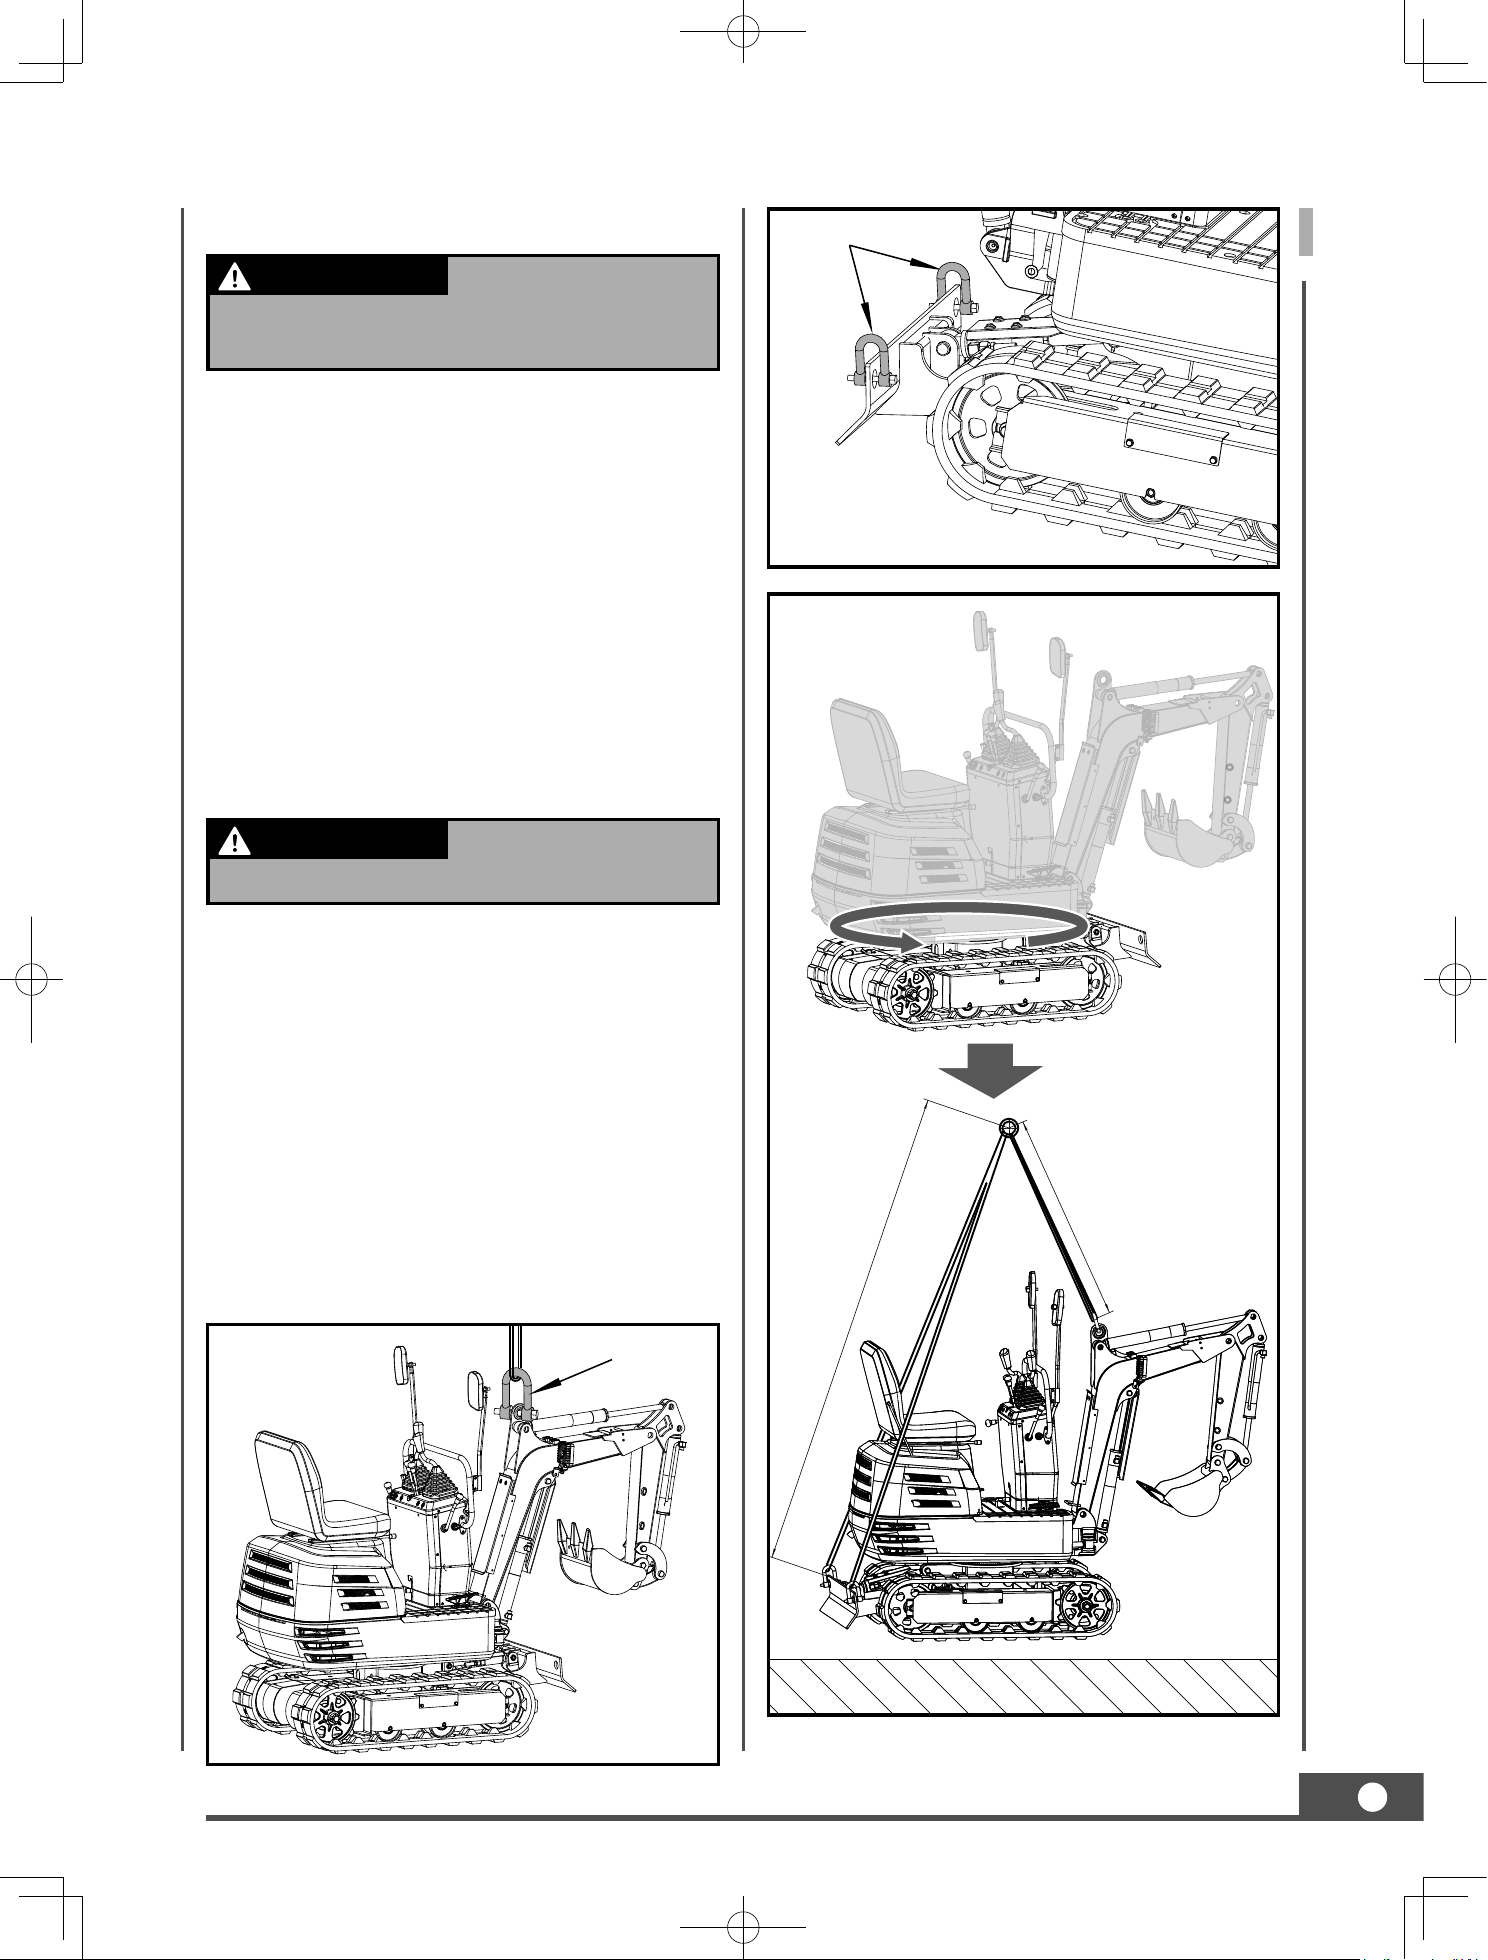
LIFTING OF THE EXCAVATOR
Safety Aspects when Lifting with Chains / Straps
Basics when Lifting with Chains / Straps
4. Completely align the ramps and the crawlers
and then drive the excavator slowly up the
ramps with the dozer in the front. After
ensuring that the crawlers are completely
on the truck bed, swivel the upper body
around to the back of the truck.
5. Lock the swing frame with the swing lock pin.
7. Block the crawlers and tie down the
excavator.
6. Lower the bucket and dozer onto the truck
bed and then lock the boom with the lever
before getting off.
8. Before unloading, remove the swing lock pin
and then raise the dozer and bucket from
the truck bed.
1. Do not lift loads that exceed the maximum
load capacity of the crane.
2. Choose correct tackle suitable to the weight,
size and form of the load.
3. First assess the centre of gravity of the load,
position the hook directly over the load and
lift the load so that the centre of gravity of
the load lies as low as possible.
4. The steel wires must be fixed in the middle
of the hook.
5. The load must be lifted vertically from the
ground.
6. Do not enter the working area under
suspended loads and do not move the
load over other persons. The load must be
moved in an area where the equilibrium can
be balanced out easily.
1. The lifting and crane operation is to be
undertaken according to the guidelines
described.
2. As the accessories for lifting mentioned in
this instruction are only given as reference,
the standards concerning strength, control
and other details are based on the respective
applicable guidelines.
Lock
Unlock
Swing lock pin
The correct instructions
for safe handling are described here. Read
these carefully before moving the machine.
Make sure that the operating personnel read
the operator's manual carefully.
DANGER
Lock lever
Lock
Unlock
39
General guidelines for lifting
1. Lifting position. (see below illustration)
(1) Pull in the boom completely towards rear.
(2) Pull in the arm completely.
(3) Pull in the bucket completely.
(4) Swing the boom in the central position.
(5) Swing the upper body 180° to make sure
the dozer is seen from the operator behind.
(6) Insert the swing lock pin.
2. Attaching the chains / straps.
(1) Always hook the excavator at three points.
(one on the boom and right and left of the
dozer blade)
(2) Always use a shackle on each lifting hole
when attaching the straps.
(3) Use cushioning material at all places where
the straps contact the machine.
3. Tackle
Choose components with enough strength.
4. Lifting
(1) Lift slowly and safely
(2) Do not enter the excavator area when lifting.
(3) Lift the excavator horizontally. (Modify
connections according to needs)
Shackle
Shackle
Do not lift the
excavator other than at the 3 points as
illustrated.
The dozer must be
raised.
IMPORTANT
WARNING
CAUTION
NOTE
IMPORTANT
WARNING
CAUTION
NOTE
2160mm
1000mm
180°