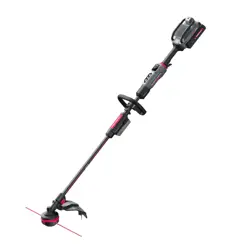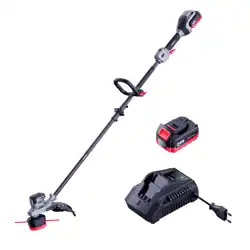
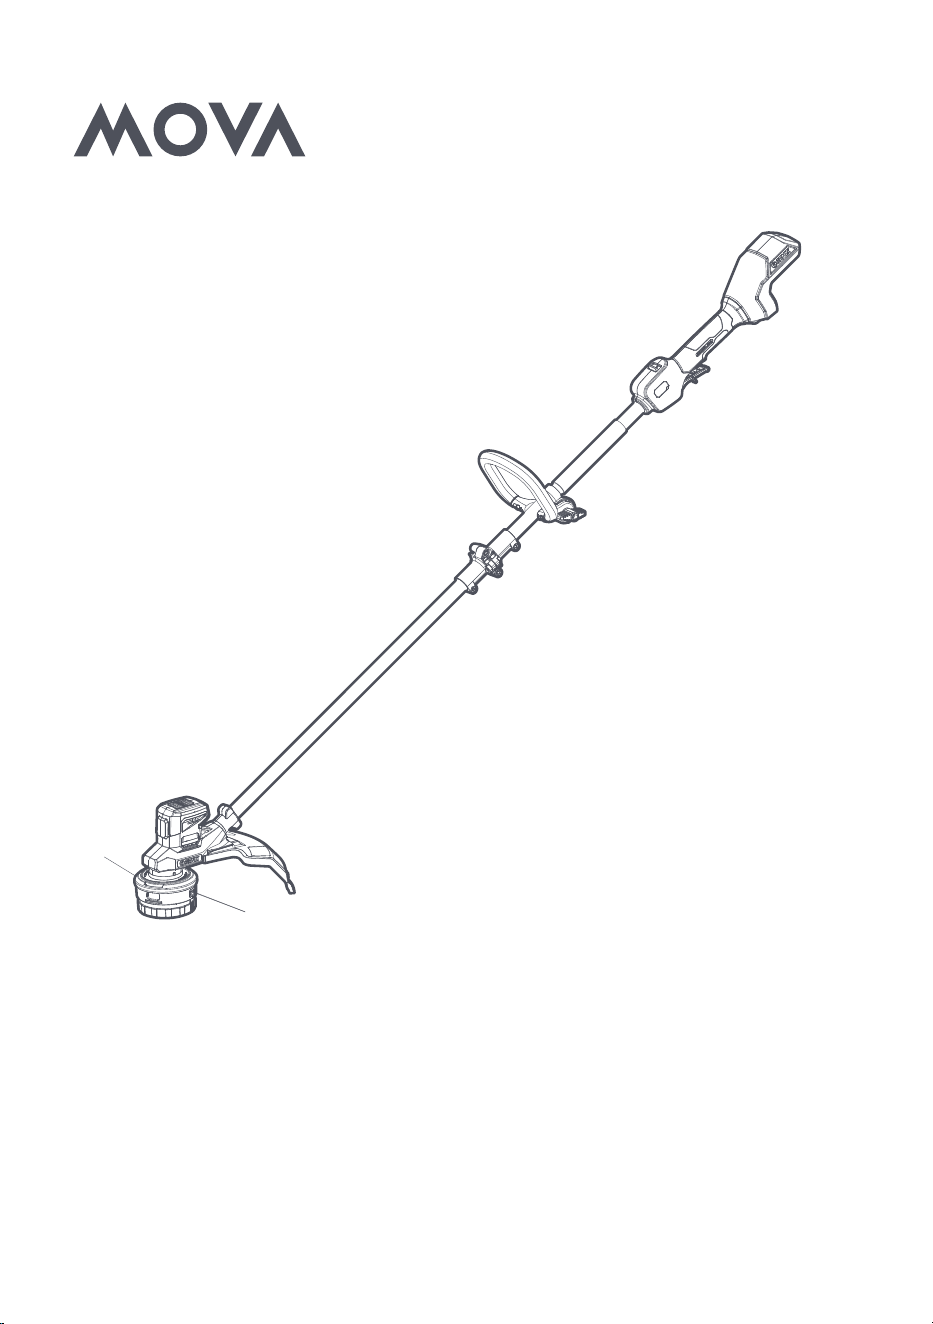
Model: GT215/GT215X
20V 38cm
Brushless Grass Trimmer
User Manual
CAUTION: Before using this tool, please read this manual completely, and follow all
operating safety measures.
EN
2
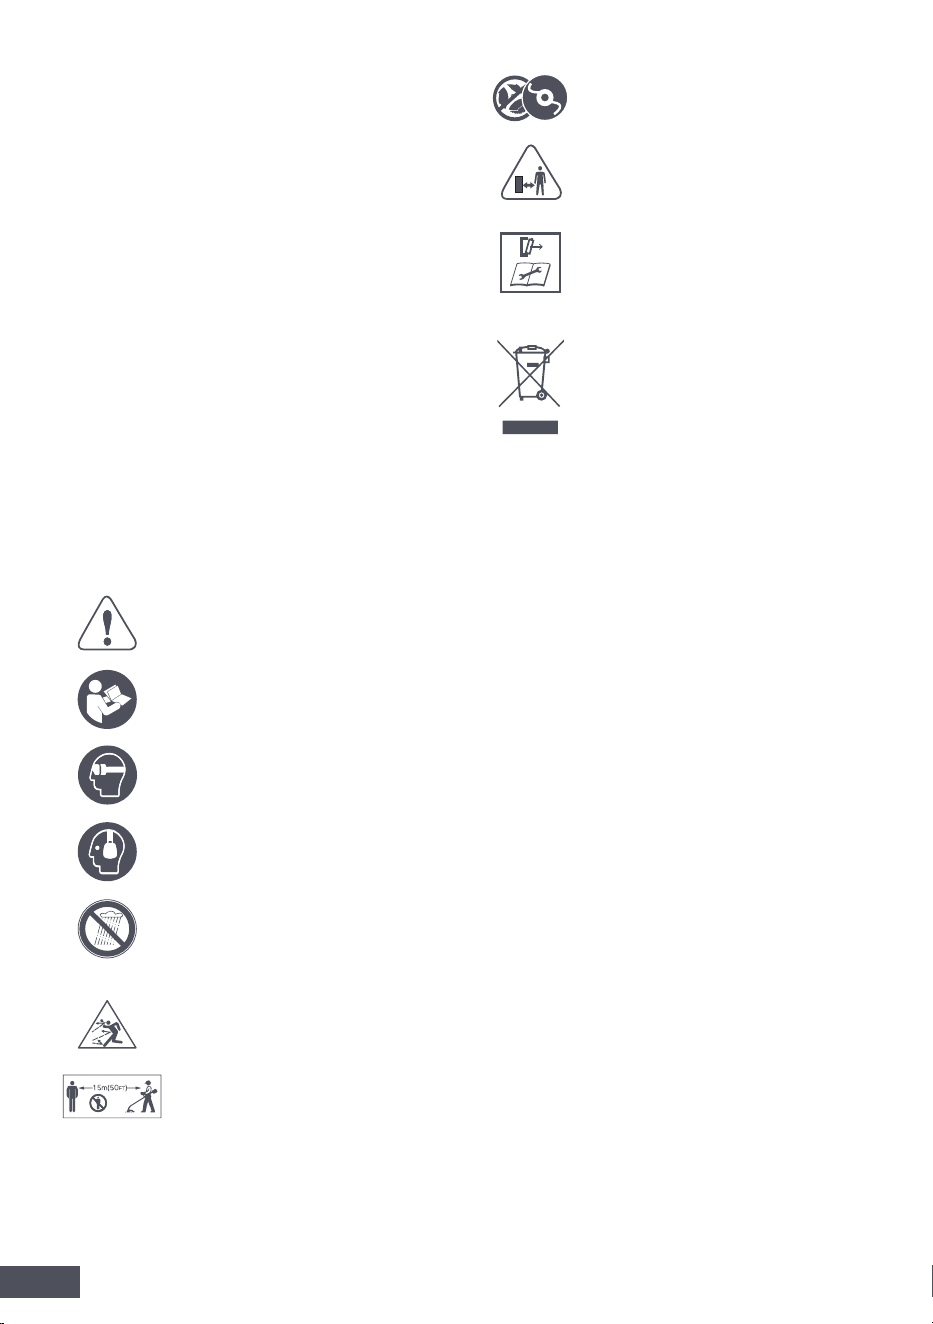
The following table depicts and describes
safety and international symbols and
pictographs that may appear on this product.
Read, understand, and follow all instructions
on the machine and in the instruction manual
for complete safety, assembly, operating,
maintenance, and repair information before
attempting to assemble and operate.
Caution / Warning.
To reduce the risk of injury, user
must read instruction manual.
Wear eye protection.
Wear hearing protection.
Do not use in rain or wet
conditions.
WARNING - Beware of thrown
objects.
WARNING - The distance between
the machine and bystanders shall
be at least 15m.
Do not use metal blades.
Keep bystanders a safe distance
away from the work area.
WARNING – Disconnect battery
before maintenance.
Waste electrical products should
not be disposed of with household
waste. Please recycle where
facilities exist. Check with your
Local Authority or local store for
recycling advice.
Original Instructions
SAFETY &
INTERNATIONAL
SYMBOLS
SAFETY & INTERNATIONAL SYMBOLS ............2
SAFETY INSTRUCTIONS ....................................3
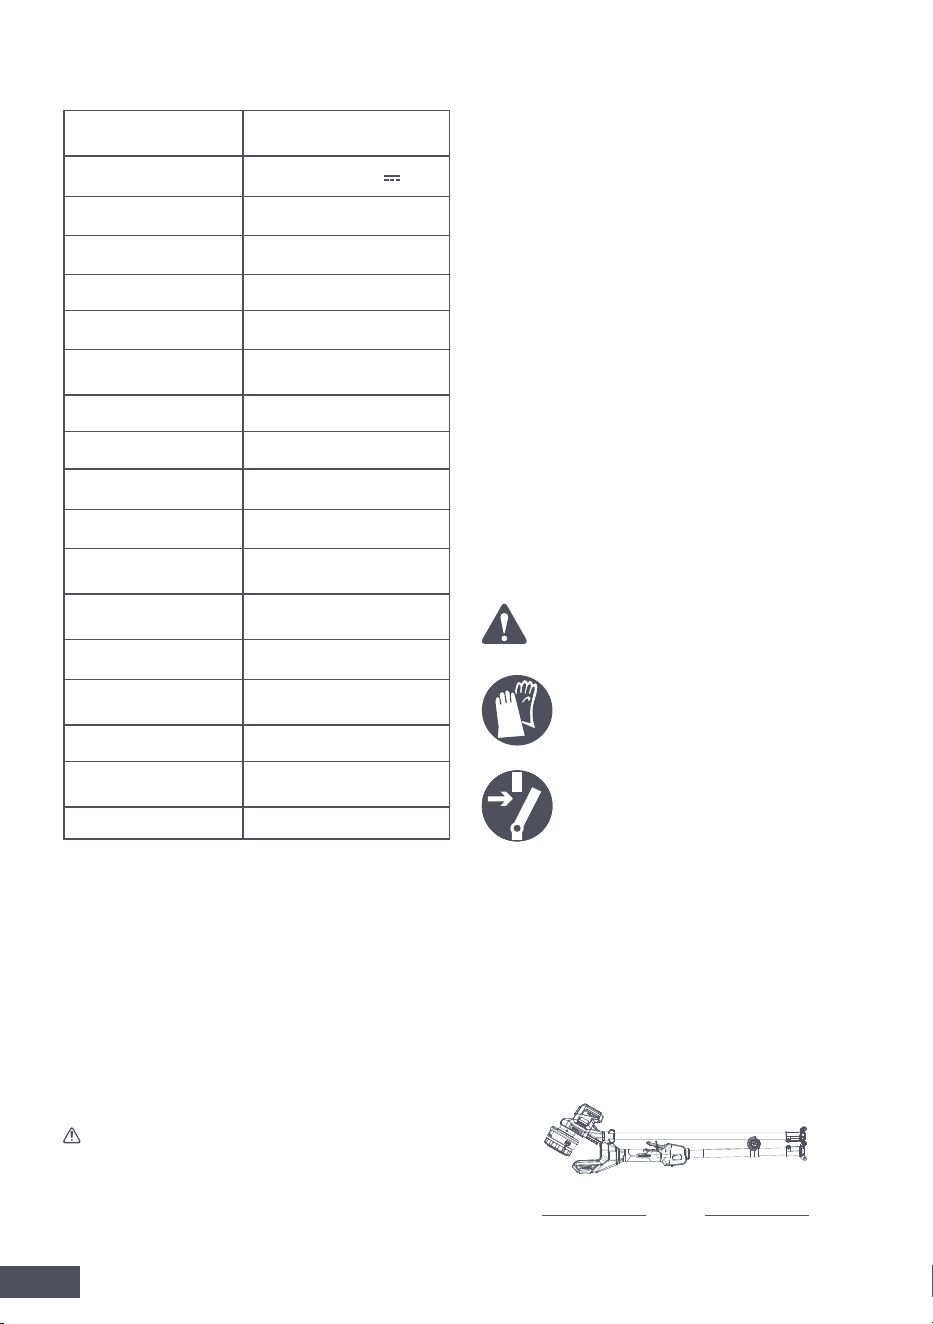
KNOW YOUR UNIT ............................................. 7
SPECIFICATIONS ................................................ 8
ASSEMBLY ..........................................................8
OPERATION ...................................................... 10
MAINTENANCE ................................................. 11
TROUBLESHOOTING ....................................... 14
WARRANTY POLICY......................................... 15

EN
3
Read all safety warnings, instructions,
illustrations and specifications provided
with this power equipment.
Failure to follow
all instructions listed below may result in
electric shock, fire and/or serious injury.
Save all warnings and instructions for
future reference.
The term “power equipment” in the warnings
refers to your mains-operated (corded) power
equipment or battery-operated (cordless)
power equipment.
1. Work Area Safety
a.
Keep work area clean and well lit.
Cluttered or dark areas invite accidents.
b.
Do not operate power equipment in
explosive atmospheres, such as in the
presence of flammable liquids, gases
or dust.
Power equipment create sparks
which may ignite the dust or fumes.
c.
Keep children and bystanders away
while operating a power equipment.
Distractions can cause you to lose control.
2. Electrical Safety
a.
Power equipment plugs must match
the outlet. Never modify the plug in any
way. Do not use any adapter plugs with
earthed (grounded) power equipment.
Unmodified plugs and matching outlets will
reduce risk of electric shock.
b.
Avoid body contact with earthed or
grounded surfaces, such as pipes,
radiators, ranges and refrigerators.
There is an increased risk of electric shock if
your body is earthed or grounded.
c.
Do not expose power equipment to rain
or wet conditions.
Water entering a power
equipment will increase the risk of electric
shock.
d.
Do not abuse the cord. Never use the
cord for carrying, pulling or unplugging
the power equipment. Keep cord away
from heat, oil, sharp edges or moving
GENERAL POWER TOOL SAFETY
WARNINGS
SAFETY INSTRUCTIONS
parts.
Damaged or entangled cords
increase the risk of electric shock.
e.
When operating a power equipment
outdoors, use an extension cord
suitable for outdoor use.
Use of a cord
suitable for outdoor use reduces the risk of
electric shock.
f.
If operating a power equipment in a
damp location is unavoidable, use a
residual current device (RCD) protected
supply.
Use of an RCD reduces the risk of
electric shock.
3. Personal Safety
a.
Stay alert, watch what you are doing
and use common sense when operating
a power equipment. Do not use a power
equipment while you are tired or under
the influence of drugs, alcohol or
medication.
A moment of inattention while
operating power equipment may result in
serious personal injury.
b.
Use personal protective equipment.
Always wear eye protection.
Protective
equipment such as a dust mask, non-skid
safety shoes, hard hat or hearing protection
used for appropriate conditions will reduce
personal injuries.
c.
Prevent unintentional starting. Ensure
the switch is in the off-position before
connecting to power source and/or
battery pack, picking up or carrying
the power equipment.
Carrying power
equipment with your finger on the switch or
energising power equipment that have the
switch on invites accidents.
d.
Remove any adjusting key or wrench
before turning the power equipment on.
A wrench or a key left attached to a rotating
part of the power equipment may result in
personal injury.
e.
Do not overreach. Keep proper footing
and balance at all times.
This enables
better control of the power equipment in
unexpected situations.
f.
Dress properly. Do not wear loose
clothing or jewellery. Keep your hair and
clothing away from moving parts.
Loose
clothes, jewellery or long hair can be caught
in moving parts.
g.
If devices are provided for the
connection of dust extraction and
collection facilities, ensure these are
connected and properly used.
Use of
dust collection can reduce dust-related
hazards.
WARNING!

EN
4
h.
Do not let familiarity gained from
frequent use of power equipment allow
you to become complacent and ignore
power equipment safety principles.
A
careless action can cause severe injury
within a fraction of a second.
4. Power Equipment Use and Care
a.
Do not force the power equipment. Use
the correct power equipment for your
application.
The correct power equipment
will do the job better and safer at the rate for
which it was designed.
b.
Do not use the power equipment if the
switch does not turn it on and off.
Any
power equipment that cannot be controlled
with the switch is dangerous and must be
repaired.
c.
Disconnect the plug from the power
source and/or remove the battery
pack, if detachable, from the power
equipment before making any
adjustments, changing accessories,
or storing power equipment.
Such
preventive safety measures reduce the
risk of starting the power equipment
accidentally.
d.
Store idle power equipment out of
the reach of children and do not allow
persons unfamiliar with the power
equipment or these instructions to
operate the power equipment.
Power
equipment are dangerous in the hands of
untrained users.
e.
Maintain power equipment and
accessories. Check for misalignment
or binding of moving parts, breakage of
parts and any other condition that may
affect the power equipment’s operation.
If damaged, have the power equipment
repaired before use.
Many accidents
are caused by poorly maintained power
equipment.
f.
Keep cutting equipment sharp and
clean.
Properly maintained cutting power
equipment with sharp cutting edges are
less likely to bind and are easier to control.
g.
Use the power equipment, accessories
and power equipment bits etc. in
accordance with these instructions,
taking into account the working
conditions and the work to be
performed.
Use of the power equipment
for operations different from those intended
could result in a hazardous situation.
h.
Keep handles and grasping surfaces
dry, clean and free from oil and grease.
Slippery handles and grasping surfaces
do not allow for safe handling and control
of the power equipment in unexpected
situations.
5. Battery Power Equipment Use and Care
a.
Recharge only with the charger
specified by the manufacturer.
A charger
that is suitable for one type of battery pack
may create a risk of fire when used with
another battery pack.
b.
Use power equipment only with
specifically designated battery packs.
Use of any other battery packs may create a
risk of injury and fire.
c.
When battery pack is not in use, keep
it away from other metal objects, like
paper clips, coins, keys, nails, screws
or other small metal objects, that can
make a connection from one terminal
to another.
Shorting the battery terminals
together may cause burns or a fire.
d.
Under abusive conditions, liquid may
be ejected from the battery; avoid
contact. If contact accidentally occurs,
flush with water. If liquid contacts
eyes, additionally seek medical help.
Liquid ejected from the battery may cause
irritation or burns.
e.
Do not use a battery pack or power
equipment that is damaged or modified.
Damaged or modified batteries may exhibit
unpredictable behaviour resulting in fire,
explosion or risk of injury.
f.
Do not expose a battery pack or
power equipment to fire or excessive
temperature.
Exposure to fire or
temperature above 130 °C may cause
explosion.
g.
Follow all charging instructions and do
not charge the battery pack or power
equipment outside the temperature
range specified in the instructions.
Charging improperly or at temperatures
outside the specified range may damage
the battery and increase the risk of fire.
6. Service
a.
Have your power equipment serviced
by a qualified repair person using
only identical replacement parts.
This
will ensure that the safety of the power
equipment is maintained.
b.
Never service damaged battery packs.

EN
5
Service of battery packs should only
be performed by the manufacturer or
authorized service providers.
a.
Do not use the machine in bad weather
conditions, especially when there is a
risk of lightning.
This decreases the risk of
being struck by lightning.
b.
Thoroughly inspect the area for wildlife
where the machine is to be used.
Wildlife
may be injured by the machine during
operation.
c.
Thoroughly inspect the area where the
machine is to be used and remove all
stones, sticks, wires, bones, and other
foreign objects.
Thrown objects can cause
personal injury.
d.
Before using the machine, always
visually inspect to see that the cutter or
blade and the cutter or blade assembly
are not damaged.
Damaged parts
increase the risk of injury.
e.
Follow instructions for changing
accessories.
Improperly tightened blade
securing nuts or bolts may either damage
the blade or result in it becoming detached.
f.
Wear eye, ear, head and hand
protection.
Adequate protective
equipment will reduce personal injury by
flying debris or accidental contact with the
cutting line or blade.
g.
While operating the machine, always
wear non-slip and protective footwear.
Do not operate the machine when
barefoot or wearing open sandals.
This
reduces the chance of injury to the feet
from contact with the moving cutters or
lines.
h.
While operating the machine, always
wear long trousers.
Exposed skin
increases the likelihood of injury from
thrown objects.
i.
Keep bystanders away while operating
the machine.
Thrown debris can result in
serious personal injury.
j.
Always use two hands when operating
the machine.
Holding the machine with
both hands will avoid loss of control.
k.
Hold the machine by insulated gripping
surfaces only, because the cutting line
or blade may contact hidden wiring.
Cutting line or blades contacting a “live”
wire may make exposed metal parts of the
machine “live” and could give the operator
an electric shock.
l.
Always keep proper footing and operate
the machine only when standing on the
ground. Slippery or unstable surfaces
may cause a loss of balance or control
of the machine.
m.
Do not operate the machine on
excessively steep slopes.
This reduces
the risk of loss of control, slipping and falling
which may result in personal injury.
n.
When working on slopes, always be sure
of your footing, always work across
the face of slopes, never up or down
and exercise extreme caution when
changing direction.
This reduces the risk
of loss of control, slipping and falling which
may result in personal injury.
o.
Keep all parts of the body away from
the cutter, line or blade when the
machine is operating. Before you start
the machine, make sure the cutter, line
or blade is not contacting anything.
A
moment of inattention while operating the
machine may result in injury to yourself or
others.
p.
Do not operate the machine above waist
height.
This helps prevent unintended
cutter or blade contact and enables better
control of the machine in unexpected
situations.
q.
When cutting brush or saplings that
are under tension, be alert for spring
back.
When the tension in the wood fibres
is released, the brush or sapling may strike
the operator and/or throw the machine out
of control.
r.
Use extreme caution when cutting
brush and saplings.
The slender material
may catch the blade and be whipped toward
you or pull you off balance.
s.
Maintain control of the machine and do
not touch cutters, lines or blades and
other hazardous moving parts while
they are still in motion.
This reduces the
risk of injury from moving parts.
t.
Carry the machine with the machine
switched off and away from your body.
Proper handling of the machine will reduce
the likelihood of accidental contact with a
moving cutter, line or blade.
u.
Only use replacement cutters, lines,
cutting heads and blades specified by
the manufacturer.
Incorrect replacement
parts may increase the risk of breakage and
injury.
GRASS TRIMMER SAFETY
WARNINGS

EN
6
v.
When clearing jammed material or
servicing the machine, make sure
the switch is off and the machine is
disabled.
Unexpected starting of the
machine while clearing jammed material
or servicing may result in serious personal
injury.
1.
Although all reasonable and necessary safety
measures have been adopted in the design,
production, and testing of this power tool to
minimize potential risks, due to the inherent
characteristics of mechanical products and
the diversity of usage scenarios, there may
still be residual risks that cannot be
completely eliminated.
2.
Familiarize yourself with this product by
reading and understanding the instruction
manual. Pay close attention to all safety
directions and follow them precisely to help
prevent risks and hazards.
a.
Always remain alert when using this
product so you can recognize and handle
risks early. Quick action can help prevent
serious injury and property damage.
b.
Switch the product off and disconnect it
from the power supply if any
malfunctions occur. Have a qualified
professional inspect and repair it as
needed before resuming operation.
The line trimmer is only intended for cutting
grass and light weeds. It should not be used
for any other purpose.
RESIDUAL RISK
INTENDED USE
EN
7
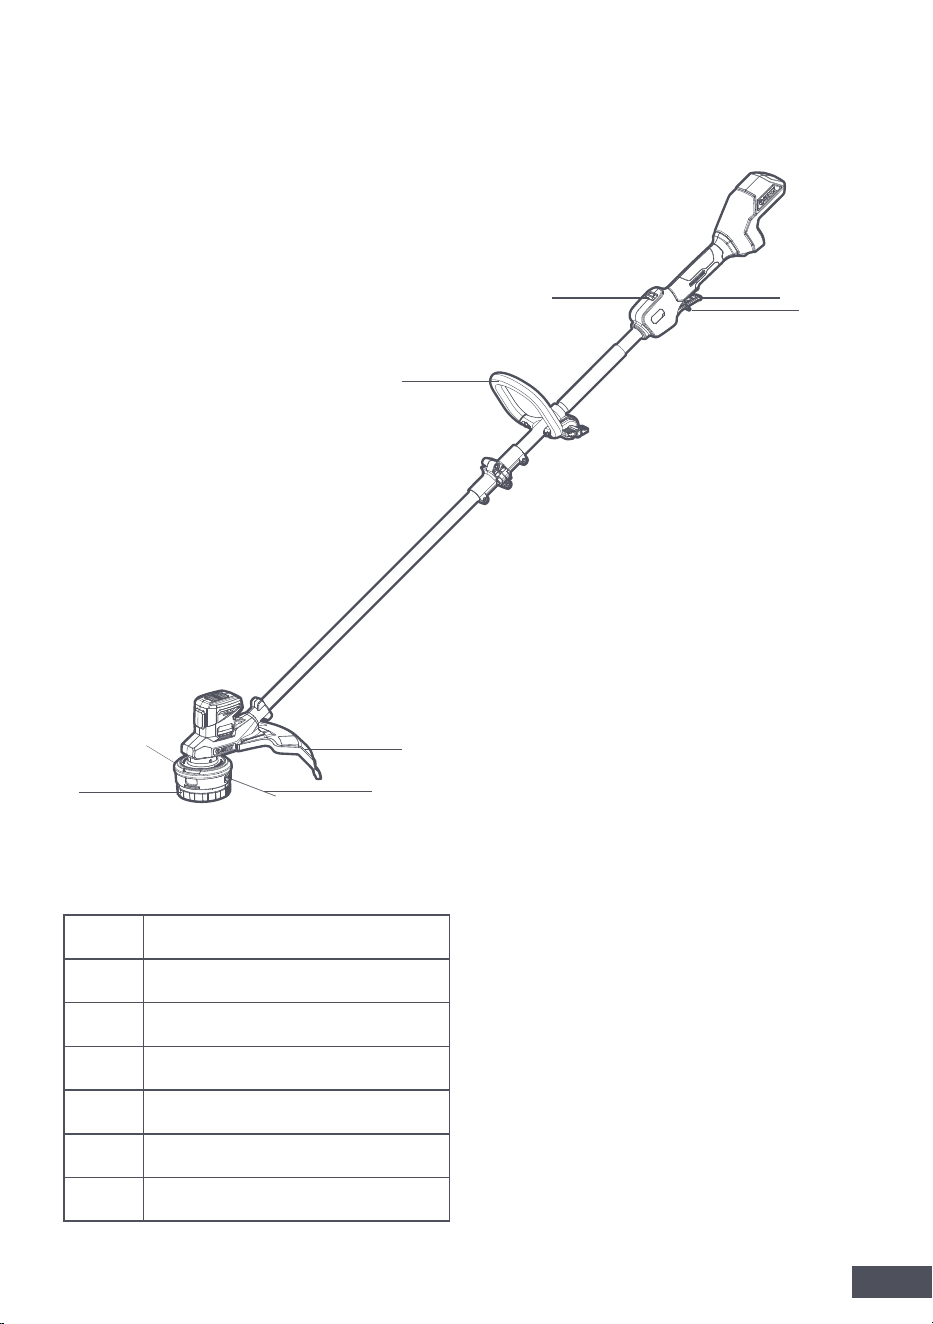
KNOW YOUR UNIT
1
2
3
4
5
67
1 Trigger
2 Safety Switch
3 Speed Adjustment Button
4 Handle
5 Guard
6 Cutting Line
7 Trimmer Head
EN
8
SPECIFICATIONS ASSEMBLY
Model GT215/GT215X*
Input Voltage 18 V (max 20 V)
Motor Type Brushless
Rated Output Power 500 W
Max speed 6500 /min
Cutting Capacity 38 cm
Cutting Line
Diameter
2.0 mm x2
Cutting Line Type Heavy Duty
Cutting Line Length 5 m
Feeding System Semi-automatic
Weight (Tool Only) 3.0 kg
Sound Power Level
L
WA
L
WA
= 94 dB(A)
Guaranteed Sound
Power Level L
WA
L
WA
= 96 dB(A)
Uncertainty K
WA
K
WA
= 2.0 dB(A)
Sound Pressure
Level L
PA
L
PA
= 86.5 dB(A)
Uncertainty K
PA
K
PA
= 3.0 dB(A)
Vibration Emission
Value a
Rear handle: 3.66 m/s
2
Front handle: 3.31 m/s
2
Uncertainty K K=1.5 m/s
2
NOTE:
The declared noise emission value(s)
and vibration total value(s) are measured in
accordance with a standard test method, and
may be used both for comparing tools and for
making a preliminary assessment of exposure.
WARNING:
The noise and vibration emissions
during actual use of the power tool may differ
from the declared value(s), depending on
how the tool is used. To protect the operator,
hearing protection and gloves should be worn
under actual working conditions.
*20V Max battery, maximum initial battery
voltage (measured without a workload) is 20V.
The nominal voltage is 18V.
1.
Unpack all parts and lay them on a flat,
stable surface:
2.
Remove all packing materials and shipping
devices, if applicable.
3.
Package Contents
•
Grass Trimmer
•
Battery Pack
•
Charger
•
Grass Trimmer Line (5 m)
•
Grass Trimmer Spool
•
Grass Trimmer Guard
•
User Manual
NOTE:
The actual accessories supplied may
vary depending on the product model,
sales region, production batch, or package
configuration.
4.
If parts are missing or damaged. Do not
use the product. Contact your local dealer.
5.
Ensure that you have all the accessories
and tools needed for assembly and
operation. This also includes suitable
personal protective equipment.
WARNING!
Wear protective gloves for this
assembly work and always lay the
product on a flat and stable
surface while assembling.
Follow the assembly instructions
step-by-step and use the pictures
provided as a visual guide to easily
assemble the product! Do not
insert the battery pack before
the power tool is completely
assembled or adjusted!
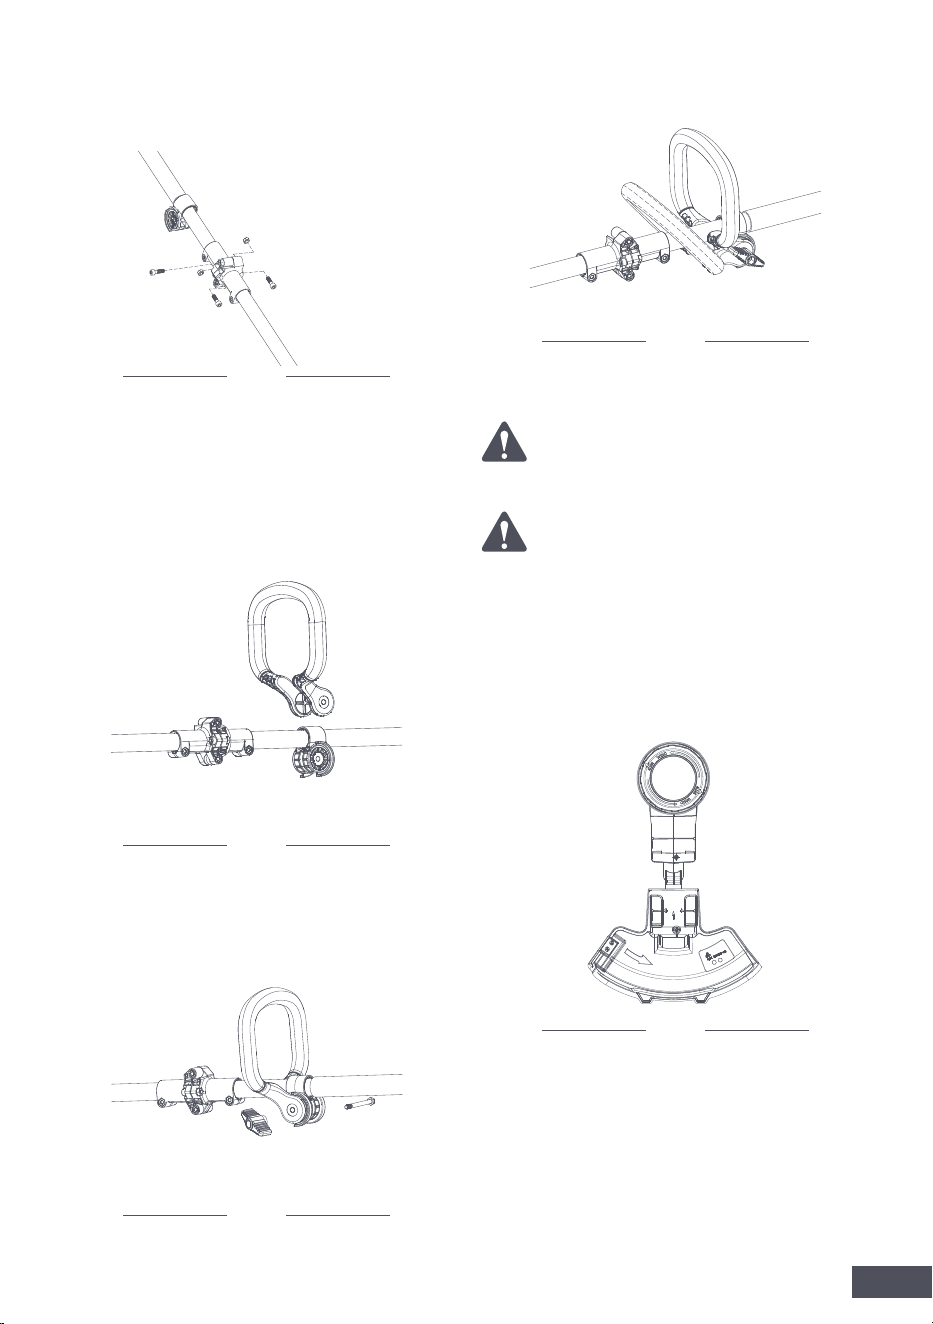
INSTALLING THE SHAFT
1.
Unfold both sections of the grass trimmer,
ensuring they are aligned correctly and the
coupler is straight.
Fig. 1
*X=0-999, A-Z may vary depending on the sales
region or package configuration, with no safety-
related changes between these models.
EN
9
WARNING!
WARNING!
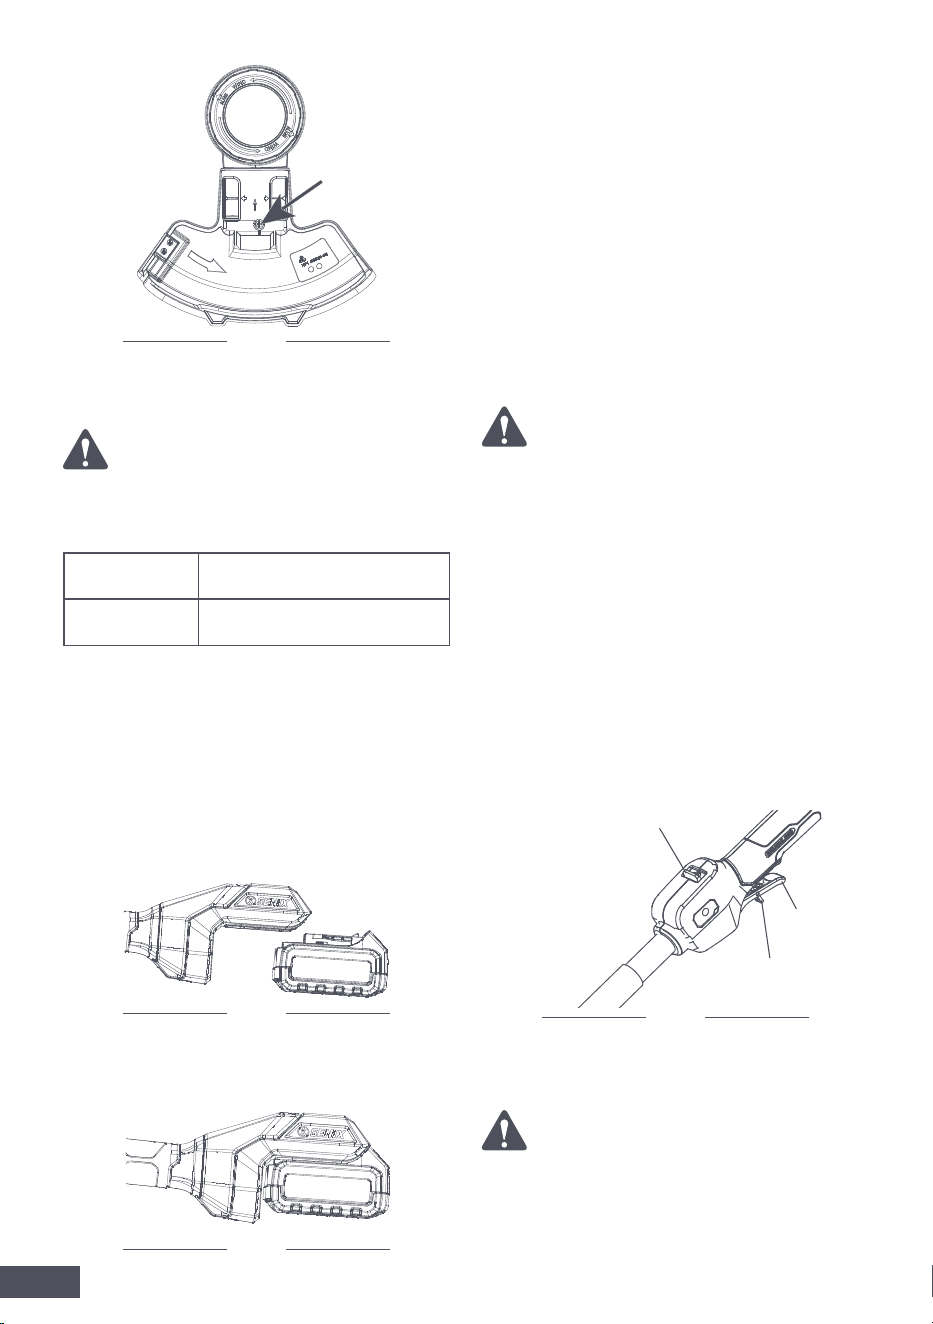
INSTALLING THE HANDLE
INSTALLING THE GUARD
1.
Clamp the handle securely to the handle
support, making sure that the slots on both
the handle and the support are properly
aligned.
2.
Insert the bolt through the hole and lightly
tighten the handle locking knob.
3.
Adjust the handle to the desired position,
then fully tighten the handle locking knob.
1.
Insert the guard onto the neck of the
trimmer head.
2.
Secure the guard by tightening the bolt.
Never operate the tool without the guard
firmly in place.
Always wear gloves when mounting or
replacing the guard. The blade on the guard is
sharp.
2.
Insert the three bolts and two nuts into the
coupler and tighten them securely.
Note:
Fit the nuts into the dedicated slots
on the coupler.
Fig. 2
Fig. 3
Fig. 4
Fig. 5
Fig. 6
EN
10
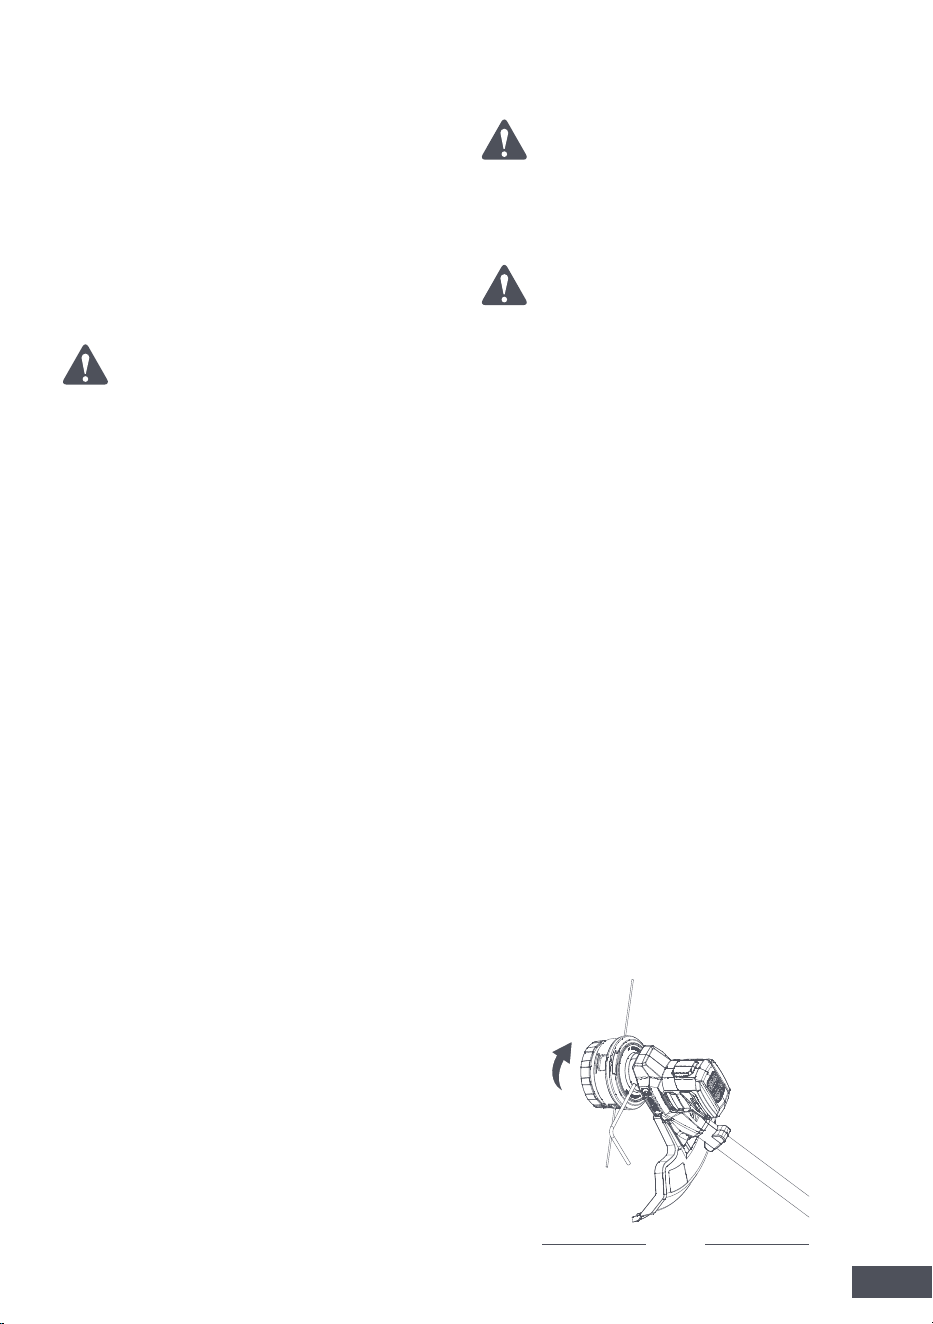
Fig. 7
Fig. 8
Fig. 9
Fig. 10
INSTALLING/REMOVING
THE BATTERY PACK
WARNING!
WARNING!
WARNING!
Use only the accessories listed below.
Using non-approved accessories may result in
poor performance or safety hazards.
Always wear the necessary protective gear to
help reduce the risk of injury while operating
this grass trimmer. Keep all parts of your body
clear of the cutting attachment and any hot
surfaces.
Before each use, inspect the trimmer for
any signs of damage or wear.
1.
To start the grass trimmer, push the
safety switch forward, then squeeze the
trigger. To adjust the speed, press the
speed-adjusting button until you reach
the desired setting.
2.
To stop the trimmer, simply release the
trigger.
1.
Check the trimmer head, guard, and
handle for cracks, warping, bending, or
NOTE:
For usage instructions of the battery
pack
and charger, please refer to the respective user
manuals.
Battery Pack GBA202/GBA204/GBA208
Charger GCH202/GCH204/GCH206D
To install:
1. Align the ribs on the battery pack with the
mounting slots in the tool.
2. Slide the battery pack in until it clicks into
place.
To remove:
Depress the battery-release button and pull
the battery pack out.
OPERATION
SWITCHING ON/OFF
USING THE TRIMMER
Speed Adjustment Button
Trigger
Safety Switch
EN
11
Fig. 11
WARNING!
WARNING!
WARNING!
•
Maintain the cutting attachment at a
parallel angle to the ground.
•
Allow the tip of the line to do the cutting
particularly along walls. Forcing the
trimmer or using more than the line
tip reduces cutting efficiency and may
overload the motor.
•
Cutting height is determined by how far
the cutting line is from the lawn’s surface.
•
For grass taller than 20 cm, trim in small
increments from the top down to avoid
premature line wear or motor drag.
•
Move the trimmer slowly in and out of the
cutting area, keeping the head at the
desired height. A forward-backward or
side-to-side motion works best. Shorter
cutting lengths generally produce the best
results.
•
Trim only when grass and weeds are dry.
•
Be aware that fences, stone or brick walls,
curbs, and wood surfaces can cause extra
line wear or breakage.
•
Avoid contact with trees and shrubs. The
trimmer line can easily damage bark,
wood moldings, siding, and fence posts.
other damage; replace any compromised
parts as needed.
2.
The line-cutting blade on the guard’s
edge can become dull over time, so it is
recommended to sharpen it periodically
with a file or replace it with a new blade.
3.
After each use, clean the trimmer using
only mild soap and a damp cloth. Keep
liquids from entering the tool, and never
submerge any part of it in water. Make
sure the motor housing air vents are free
of debris at all times.
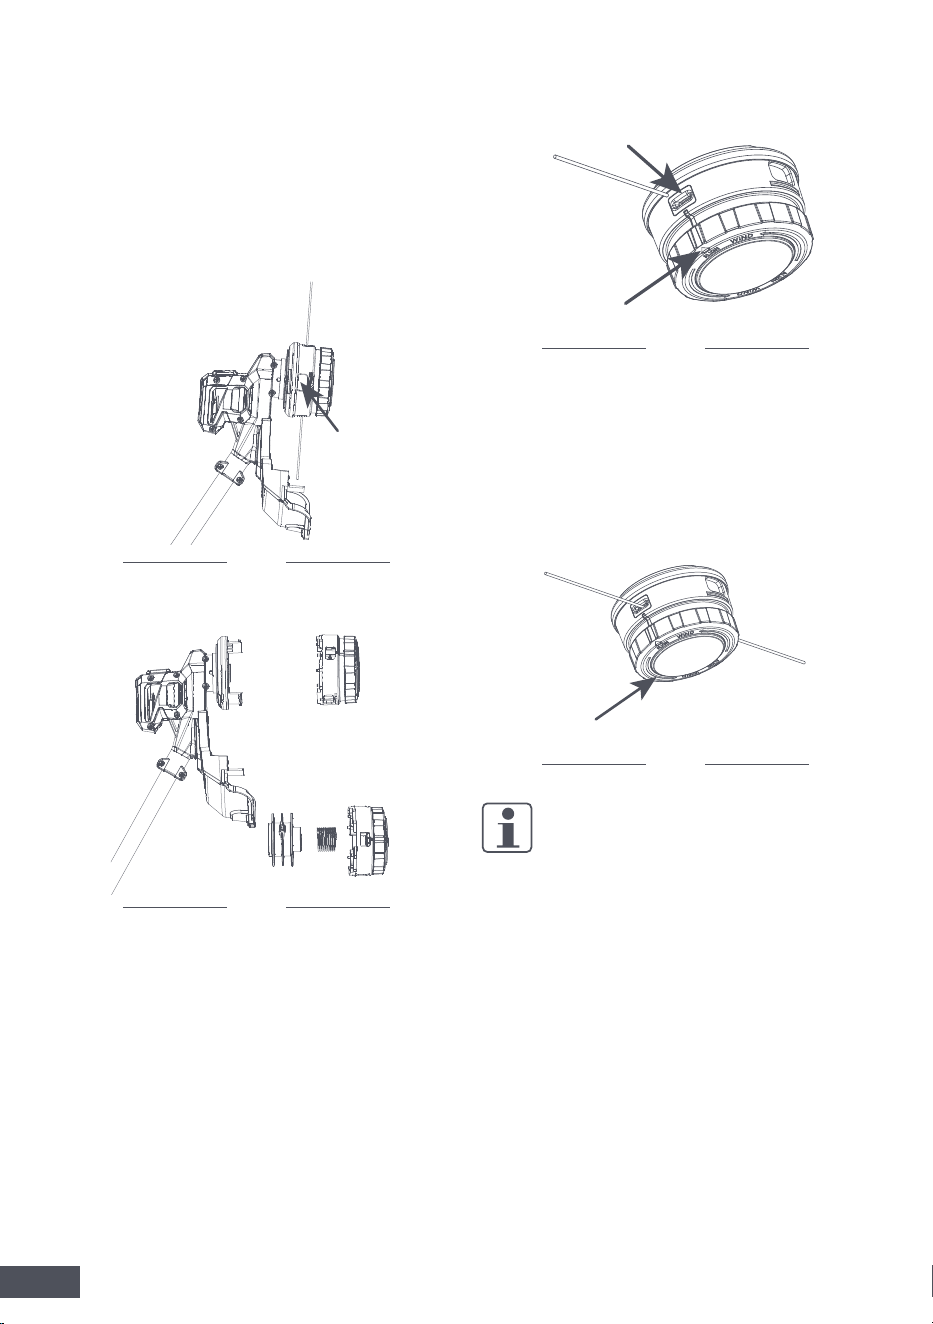
If the trimmer head becomes blocked by
foreign objects during operation, stop the
trimmer and wait until it has completely
stopped. Remove the battery. Then remove
the objects and clean the trimmer head.
Handling or cleaning moving parts can result
in serious injury.
Only perform cleaning and maintenance
according to these instructions! All further
works must be performed by an Authorized
Service Center.
TO PREVENT SERIOUS INJURY FROM
ACCIDENTAL OPERATION: Make sure the
battery pack is removed before performing
any procedure in this section.
TO PREVENT SERIOUS INJURY FROM TOOL
FAILURE: Do not use damaged equipment. If
you notice abnormal noise or vibration, have
the issue resolved before continuing use.
If you discover any of the following issues,
stop using the tool and take it to an Authorized
Service Center for repair:
•
Leaking, swollen, or cracked battery pack.
•
Loose hardware.
•
Misalignment or binding of accessories.
•
Cracked or broken parts.
•
Any other condition that may affect safe
operation
1.
Rotate the trimmer head until the outer,
visible locking hole lines up with the inner
locking hole beneath the trimmer head.
2.
Insert a hex wrench into the locking hole
until it stops.
3.
Turn the head counterclockwise to
unscrew and remove it.
MAINTENANCE
GENERAL TRIMMING TECHNIQUES
REPLACING THE TRIMMER
HEAD
EN
12
4.
Install the new trimmer head using Steps 1
and 2, then turn the head clockwise until it
is fully secured.
the opposite eyelet.
4.
Pull the line from the other side until equal
lengths of the line extend from both sides
of the trimmer head.
5.
Rotate the lower cover in the direction of
the long arrow to wind the line.
1.
Press the two release tabs and pull the
lower cover assembly of the trimmer head
straight out to remove it.
1.
Align the small arrow on the lower cover
with the eyelet.
2.
Cut a piece of line approximately 5 m
long.
3.
Insert one end of the line into the eyelet
and feed it through until it emerges from
2.
Take the spool out of the lower cover assembly.
3.
Remove the cutting line from the spool.
4.
Put spool back in place. Align the slots
with the release tabs to install the lower
cover assembly.
•
Use a small brush to gently clean the
exterior of the product. Avoid strong
detergents and household cleaners
containing aromatic oils or solvents, as
these can damage plastic parts.
•
Wipe away any remaining moisture with a
soft cloth.
•
Clean the product as described above.
•
Always carry the product by its handle.
•
Secure the product properly when
transporting.
NOTE:
Only use a cutting line that meets the
“SPECIFICATION” guidelines for replacement.
REMOVING EXCESS LINE
WINDING UP THE CUTTING
LINE
CLEANING
TRANSPORTATION
Fig. 12
Fig. 14
Fig. 15
Fig. 13

EN
13
•
Clean the product as described above.
•
Store in a dark, dry, frost-free and well
ventilated area that is inaccessible to
children.
•
Use original package for storage or cover
with a suitable cloth to protect it against
dust.
Product should not be disposed of with
household waste. Please recycle where
facilities exist. Check with your local authority
or retailer for recycling advice. Users should
clean up cut grass generated during operation
to protect environment.
NOTE:
It’s best to store the battery pack at the
temperature of 10°C - 26°C.
STORAGE
DISPOSAL
Electrical products should not be
discarded with household
products.
Used electrical products must be
collected separately and disposed
of at collection points provided for
this purpose. Talk with your local
authorities or dealer for advice on
recycling.

EN
14
TROUBLESHOOTING
Suspected malfunctions are often due to causes that can be addressed by the user. Therefore,
troubleshoot the product using this section. In most cases the problem can be solved quickly.
Problem Possible Cause Solution
Product does not
start
Battery pack is depleted Charge battery pack
Battery pack is not properly
attached
Remove the battery pack from
the product and reattach it
Battery is too hot/cold
Allow the battery pack to cool
or warm to a suitable operating
temperature
Product does not
cut
Line is too short or broken off Manually feed the cutting line
Spool is empty Refill the line spool
Cutting line can no
longer be fed
Line inside the spool is entangled
Inspect the spool and rewind the
line if necessary
Spool is empty Refill the line spool
Cutting line breaks
frequently
Line inside the spool is entangled
Remove the spool and rewind the
line properly
Trimmer used incorrectly (e.g.,
hitting hard objects)
Trim using only the tip of the line.
Avoid stones, walls, and other
hard objects. Regularly feed the
line to maintain the full cutting
diameter
Heavy vibrations
Cutting line is broken
Pull out and manually feed the
cutting line
Grass is blocking the line feed
hole
Remove any grass or debris from
the line feed hole

EN
15
WARRANTY POLICY
• During the warranty period, if the product exhibits manufacturing defects (excluding damage
caused by improper use or mishandling), you may contact the MOVA after-sales service team for
support. Upon confirmation of the defect by our technicians, you will be eligible for complimentary
repair or replacement under the warranty terms.
• The warranty is only applicable to the original purchase from an authorized MOVA retailer.
• The warranty period may vary by country/region and is subject to local laws and regulations.
Warranty period:
Personal and Household Use
• 20V, 40V Garden tools (e.g., lawn mowers, hedge trimmers):
3-year
limited warranty from the
date of purchase.
• 20V, 40V (2*20V) Battery system (e.g., chargers, battery packs):
2-year
limited warranty from
the date of purchase.
• Maintenance parts/accessories:
NOT
covered under the limited warranty.
Professional Use: For commercial, agricultural, and institutional applications: 30-day
limited
warranty from the date of purchase.
During the warranty period, the following situations are not covered
under the warranty:
1. Products used for rental purposes.
2. Products whose serial number, factory label, and other identifiers have been torn off or altered.
3. No valid purchasing document (receipt, invoice, or other) is provided to certify the date the
product was purchased.
4. Maintenance parts/accessories, including but not limited to: lawn mower blades, trimmer
blades, grass bag, mulching insert, grass trimmer head, wheels, brush cutter blade, saw chain,
belts, skid shoes, scraper bar, shear bolts, blower tube/nozzles, and other similar accessories.
5. Defects caused by normal wear and tear or normal product aging. This includes but is not
limited to scratches, dents, paint peeling, or any corrosion or discoloration caused by overheating,
abrasives, and chemical cleaners.
6. Damage caused by:
• Abuse, overloading, misuse, or unauthorized modification.
• Natural disasters, accidents, or other force majeure events.
7. Malfunctions resulting from failure to operate the product according to its instructions,
specifications, or guidelines, or due to improper maintenance, care, or storage.
8. Failures due to the use of unauthorized accessories.
9. Failures caused by repairs made by an unauthorized service center or tampering with the
product by individuals without permission from MOVA.
The warranty covers only the repair of defects specified in these terms. Any other claims
are excluded. Please note: No full unit replacement service will be provided during repairs.
MOVA reserves the right to amend these terms and retains final authority over warranty
interpretation, subject to applicable laws.
For more warranty information, please visit the official website: https://www.mova.tech/
CONTACT US
https://www.mova.tech/pages/contact-us

Manufacturer: Lawnix Technology (Nanjing) Co., Ltd.
Address: Room 501-510, 5/F, Block E (Building 2), No.10 Mozhou East Road, Jiangning
Development Zone, Jiangning District, Nanjing, Jiangsu Province, P.R.China
Made in China