·Please read this manual carefully before use.
·The company reserves the right to interpret the instructions.
·The appearance of the product is subject to the actual product.
·Please contact the invoice after reading-and keep it properly.
·In case of product technology or software upgrades, please forgive us without notice.
S7 Vacuum Cleaner
ser's anual

1
Important safety instructions
Please read all the contents of the manual carefully before using this product.
1.Pleasedonotusethevacuumcleanertosuckdetergent,kerosene,glassslag,needles,
soot,wetdust,sewage,matchesandotheritems.
2.Pleasedonotusethevacuumcleanertosucksmallparticlessuchascement,gypsum
powder,wallpowder,orlargeobjectssuchastoypaperballs,otherwiseitwillcause
thevacuumcleanertoblockorthemotortoburnout.
3.Pleasekeepthevacuumcleanerawayfromfiresourcesandotherhigh-temperature
places.
4.Whenusingthevacuumcleaner,pleasepayattentiontoinstallthefilterassemblyand
therollerbrushofthefloorbrush.
5.Pleasedonotpourorsplashwaterorotherliquidsintothemachine,soasnottocause
ashortcircuitandburnthemachine.
6.Whenusinganewbatteryorthebatteryusedforthefirsttimeafterlong-termstorage,
pleasefullychargethebattery.Whenstoringandnotusingthemachineforalong
time,pleaseensurethatitischargedanddischargedatleastonceeverythreemonths.
7.Whenyourvacuumcleanerisfullychargedandneedscleaningormaintenance,
pleaseunplugthepoweradapterintime,anddonotpullthepowercord.
8.Whencleaningthevacuumcleaner,useadryclothtowipeit,donotusegasoline,
bananawaterandothercleanersthatareeasytocrackorfadetheshell.
9.Pleasedonotuseorstorethevacuumcleanerunderunfavorableconditionssuchas
hightemperatureandlowtemperature.Itisrecommendedtouseitindoorsat
ambienttemperature(0-40℃).Pleasestoreitinacoolanddryplace.Prolonged
sunlightexposureisprohibited.
10.Donotletchildrenuseorplaywiththismachine.
11.Whenthewholemachineisfullychargedandcannotwork,youmustgotothe
designatedmaintenancepointforinspectionandmaintenance.Pleasedonot
disassembleorassemblethemachineprivately.
Beforediscardingtheappliance,thebatterymustberemovedfromtheappliance.
Whenremovingthebattery,themachinemustbedisconnectedfromthepowersource.
Discardedbatterypacksshouldberecycledanddisposedofsafely,andpleasedonot
discardthemrandomly.
Ifthecordofthepoweradapterisdamaged,inordertoavoiddanger,youmustgoto
themanufacturer'slocalmaintenancedepartmentorsimilardepartmenttoreplaceit.
2
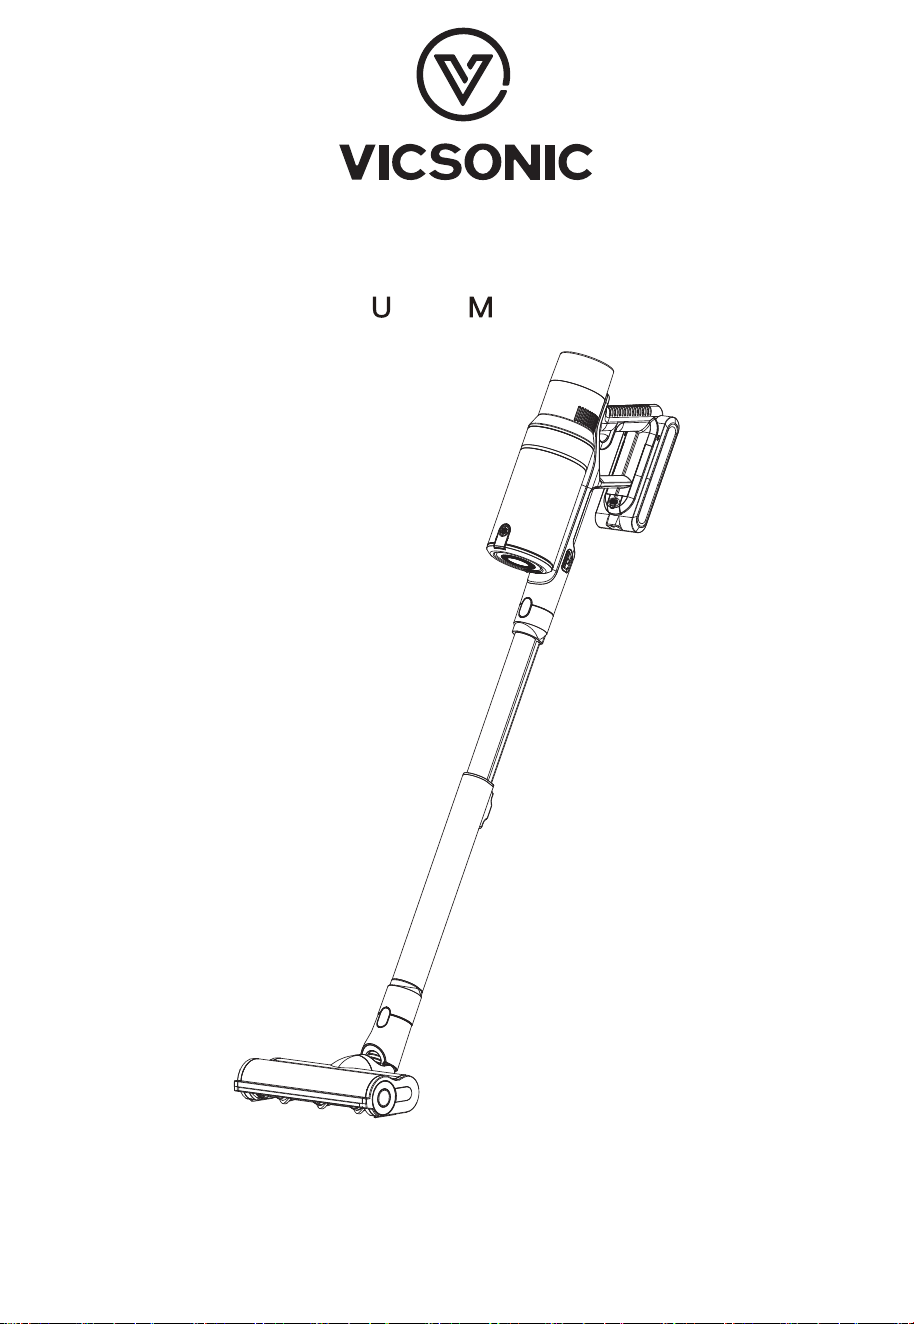
Schematic diagram of vacuum cleaner parts
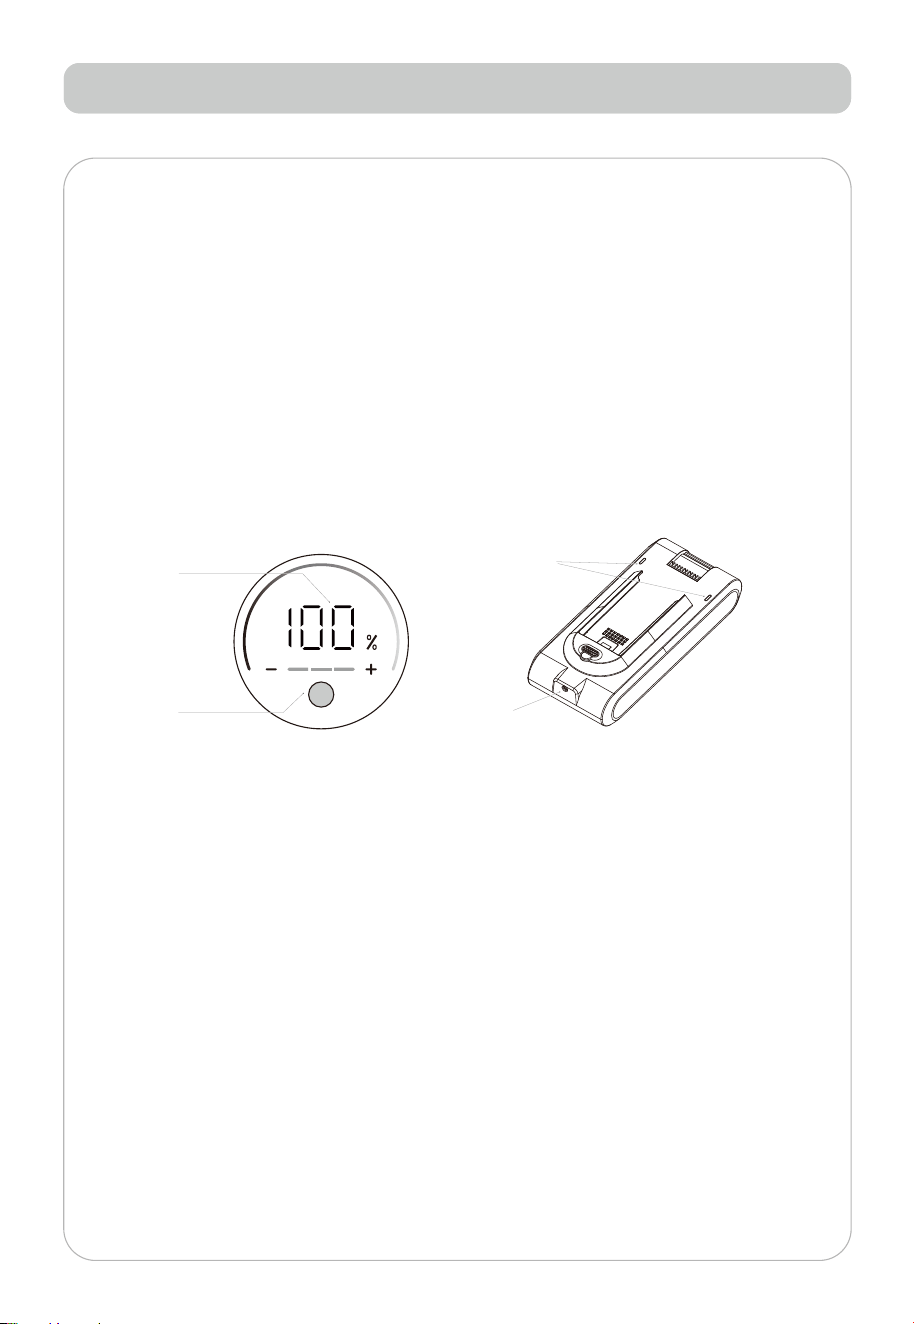
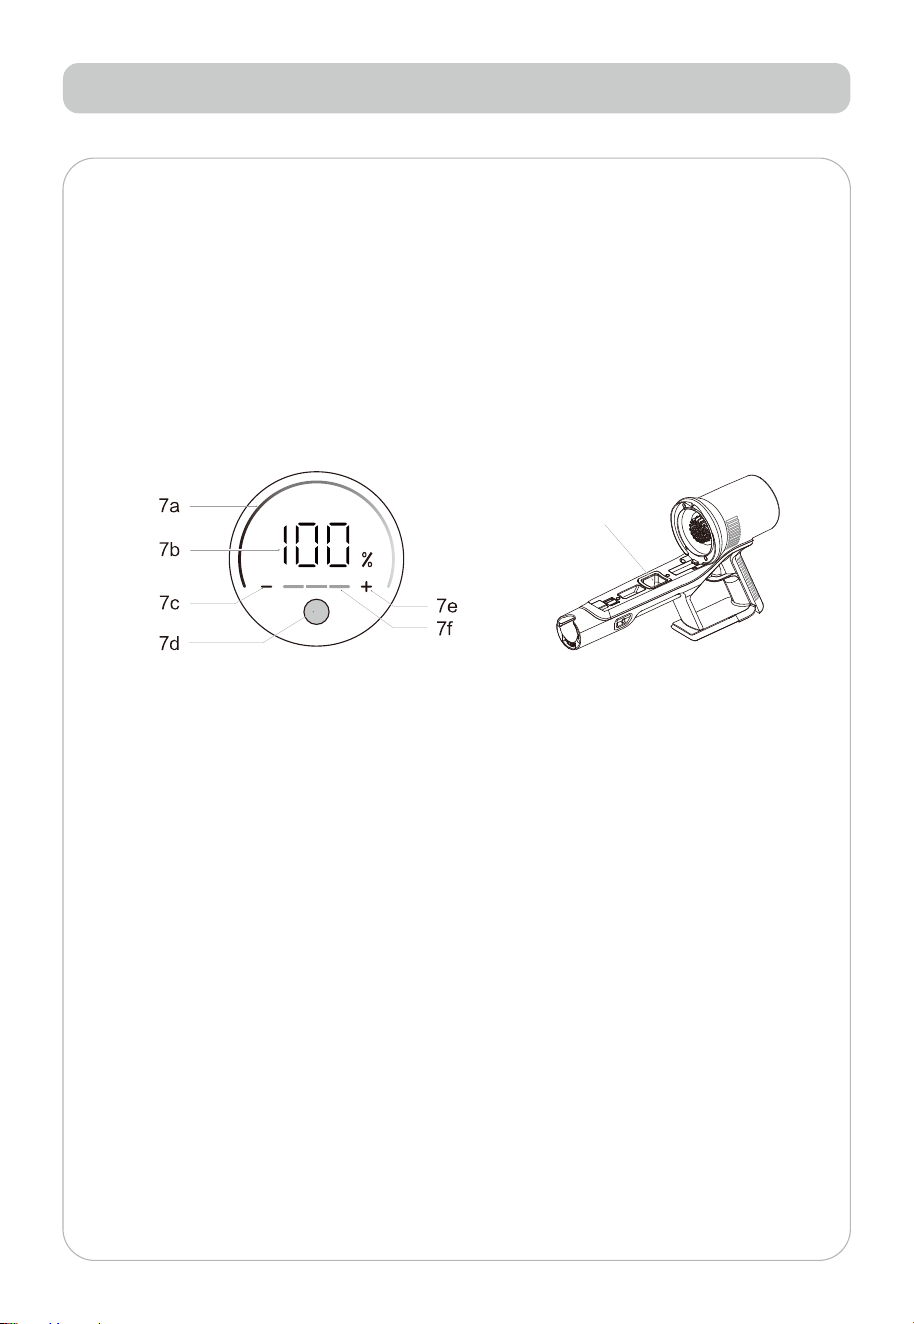
1.Dustindicator 2.Airoutlet 3.Dustcollectioncup
4.Dustcupopenbutton 5.Takeoverthetube 6.Electricfloorbrush
7.LEDdisplaymodule 7a.Powerdisplaybar 7b.Battery/alarmdisplay
7c.Manualdownshifttouchbutton 7d.Self/manualswitchbutton
7e.Manualupshifttouchbutton 7f.Manualgearpositionindication
8.Handle 9.Switchbutton 10.Batterypack
11.Batterypackreleasebutton 12.Chargingport
13.Dustcupreleasebutton
Product component description
3
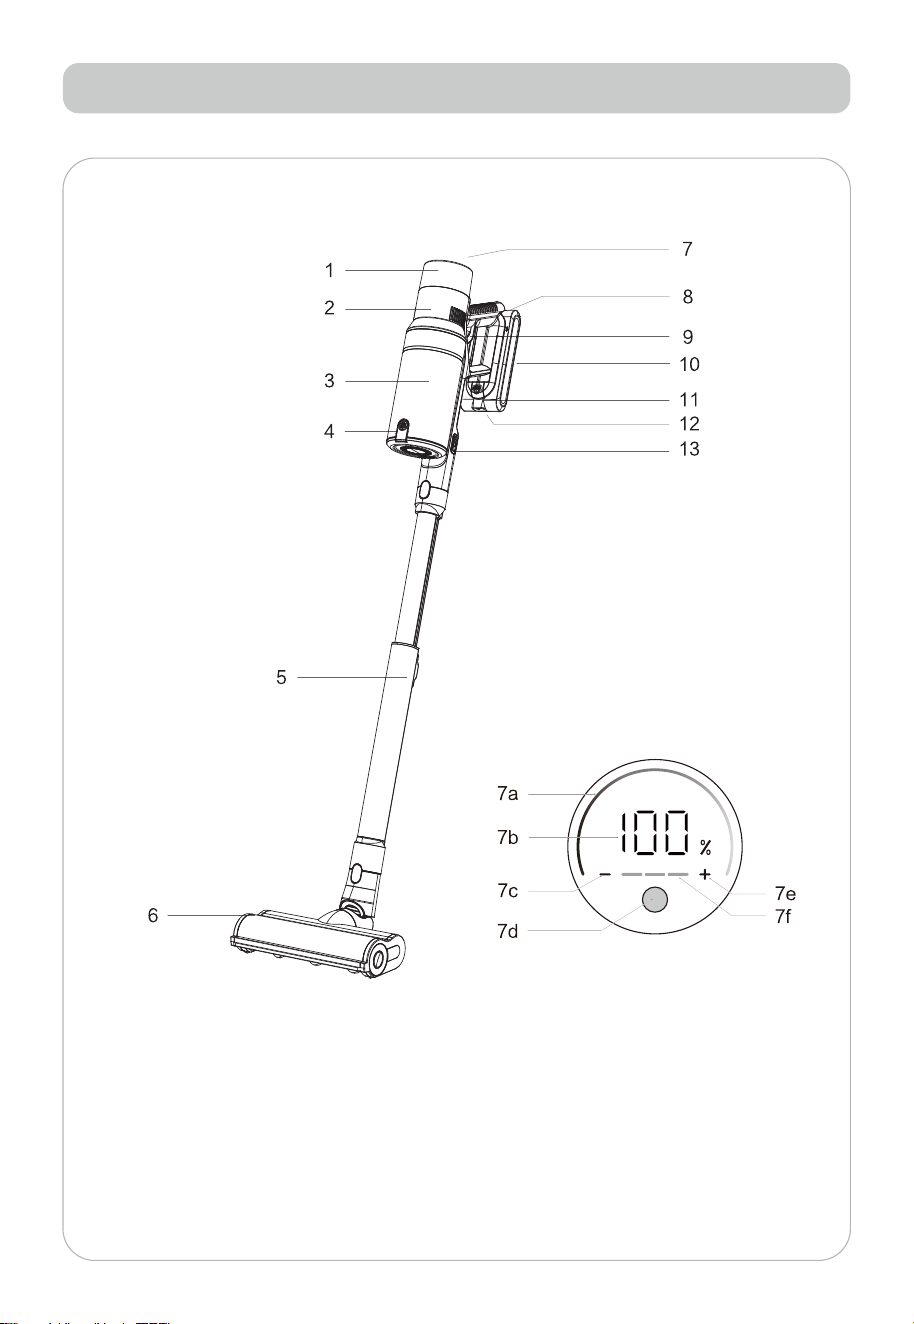
3URGXFWFRQƉJXUDWLRQDQGQDPH
Host
Folding tube
Electricfloorbrush Wall-mountedstoragerack
Sofa brush
Longflatsuction
Two-in-onebrushsuction
Adapter
Product component description
4
Instructions for use
Precautions for product assembly:
7XUQRƈWKHSRZHURIWKHYDFXXPFOHDQHUEHIRUHLQVWDOOLQJRUUHSODFLQJDFFHVVRULHV
7KLVSURGXFWFDQQRWNHHSLWVHOIXSULJKWZLWKRXWDƉ[HGOHDQ3ODFHWKHPDFKLQHDQG
DFFHVVRULHVƉUPO\
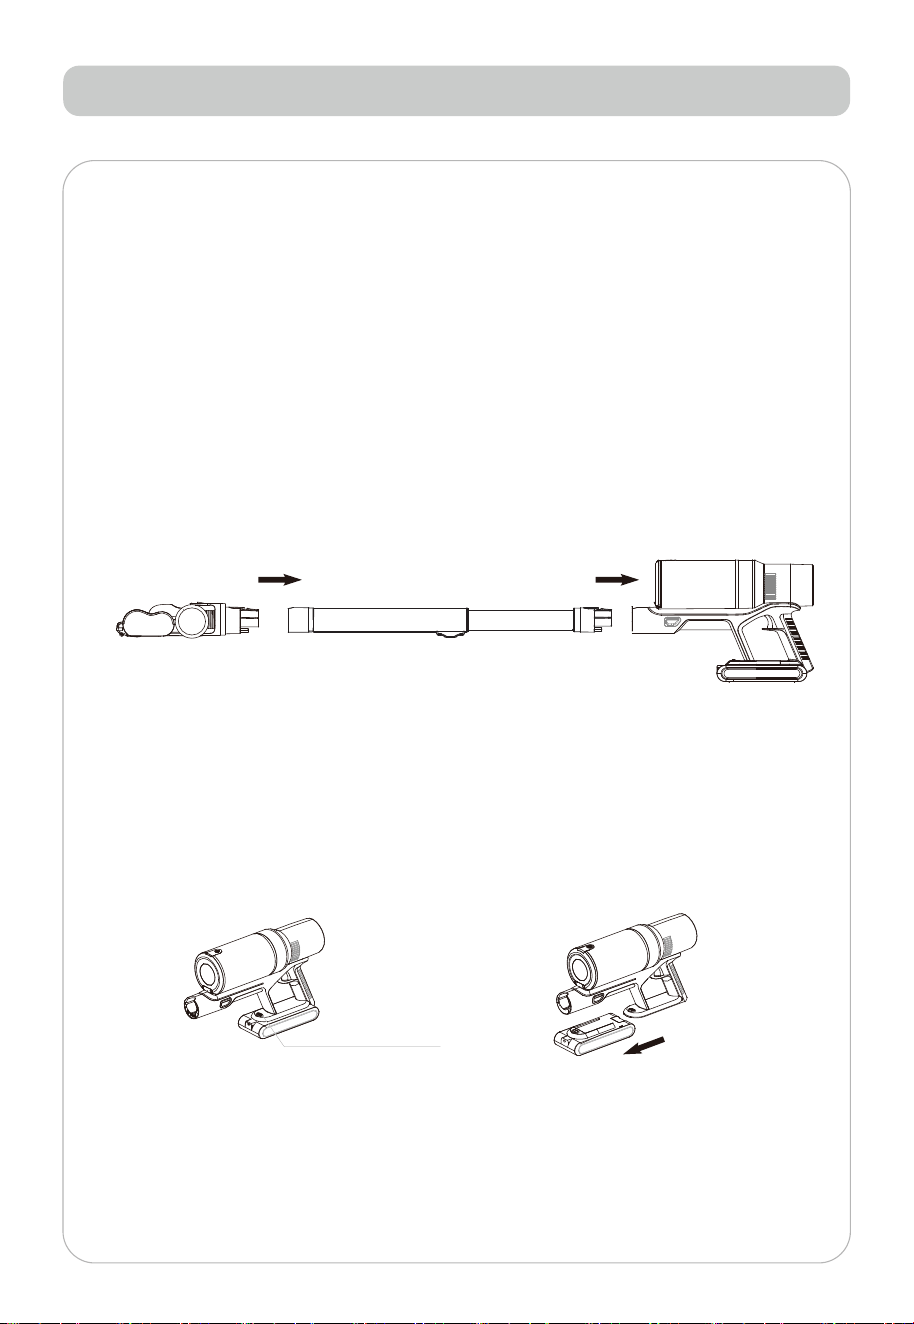
1. Installation and removal
$OLJQWKHHOHFWULFƊRRUEUXVKFRQQHFWRUZLWKWKHH[WHQVLRQWXEHDQGLQVHUWLWDQGVQDS
it tightly;
,QVHUWWKHVXFWLRQHQGRIWKHKRVWLQWRWKHFRQQHFWLQJHQGRIWKHH[WHQVLRQSLSHDQG
EXFNOHLWƉUPO\
(3). When disassembling, press the corresponding release button and pull it outwards to
UHPRYHWKHƊRRUEUXVKRUWKHKRVW
2. Battery pack installation and removal
(1). Press the battery pack release button and pull it outward to remove the battery pack;
(2). When installing, align the battery pack at the back of the host and slide it in until it is
fastened.
Battery pack release button.
5
Real-time battery display
E
Instructions for use
Charging
During the working process of the machine, when the power of the LED display module shows
LWSURPSWVWKDWWKHSRZHULVLQVXƋFLHQWDQGLWQHHGVWREHFKDUJHG
(1). Please use the charger that equipped with this machine for charging.
(2). Disconnect the power, then plug the adapter into the charging.
(3). The LED display module displays the real-time power, and the LED light on the battery pack
ƊDVKHVLQGLFDWLQJWKDWWKHFKDUJLQJLVQRUPDO
7KH/('GLVSOD\PRGXOHGLVSOD\VUHDOWLPHSRZHU7KHƊDVKLQJ/('OLJKWRQWKHEDWWHU\SDFN
indicates that the charging is normal.
(4). The LED display module shows 100%, and the LED light on the battery pack is always on and
stops blinking, it means that the charging is complete.
:KHQFKDUJLQJSUHVVDQGKROGWKLVNH\GIRUVHFRQGVWRWXUQRƈWKHFKDUJLQJDWPRVSKHUH
light.
Warning:
'RQWWXUQRQWKHYDFXXPFOHDQHUZKLOHFKDUJLQJ'RQRWUHPRYHWKHEDWWHU\SDFNZKHQ
FRQQHFWLQJWRWKHKRVWIRUFKDUJLQJ
7KHEDWWHU\FDQRQO\EHFKDUJHGDWDQDPELHQWWHPSHUDWXUHEHWZHHQs&DQGs&([FHVVLYH
heat or cold may prolong the time required for charging and even damage the battery.
3. The normal charging of this product takes 4-6 hours. It is best to perform 1-3 full charge and
GLVFKDUJHSURFHVVHVEHIRUHWKHƉUVWXVHVRWKDWWKHEDWWHU\DFWLYLW\FDQEHIXOO\DFWLYDWHG
4. If the product is not used for a long time, it is recommended to fully charge and discharge the
machine once every 3 months or so, so as to avoid passivation of the battery electrodes due to
ORQJSHULRGVRIQRQXVH
Battery pack indicator LED lights
Charging port
6
Instructions for use
Instructions
1. The battery pack indicator light is always on when the vacuum cleaner is operating
normally. When the battery power is low, the indicator light on the battery pack will
FRQWLQXHWRƊDVKXQWLOLWDXWRPDWLFDOO\VKXWVGRZQ3OHDVHFKDUJHLQWLPH
7KHHOHFWULFƊRRUEUXVKZLOOURWDWHDWDKLJKVSHHGZKHQDVVLVWLQJLQYDFXXPLQJ$WWKLV
WLPHSOHDVHGRQRWVWD\RQWKHVDPHSODFHRQWKHƊRRUIRUWRRORQJRWKHUZLVHLWPD\
GDPDJHWKHƊRRUVXUIDFH
7KHHOHFWULFƊRRUEUXVKHQGLVHTXLSSHGZLWKRYHUFXUUHQWSURWHFWLRQIXQFWLRQ:KHQWKH
HOHFWULFƊRRUEUXVKLVHQWDQJOHGRUEORFNHGWKHSUHVHWSURWHFWLRQSURJUDPZLOOFXWRƈWKH
SRZHU,QWKLVFDVHWKHHOHFWULFƊRRUEUXVKZLOOVWRSDQGWKH/('VFUHHQZLOOGLVSOD\(,Q
WKLVFDVHSOHDVHWXUQRƈWKHSRZHURIWKHPDFKLQHLPPHGLDWHO\UHPRYHWKHEDWWHU\SDFN
FKHFNDQGFOHDQWKHHOHFWULFƊRRUEUXVK$IWHUUHPRYLQJWKHEORFNDJHSOHDVHUHORDGWKH
battery pack and start the machine to use it again.
4. The machine is equipped with an infrared dust sensor. In the automatic gear, the power of
the machine can be adjusted in real time according to the detection result of the amount of
GXVW+RZHYHUORQJWHUPXVHPD\FDXVHGXVWWRDFFXPXODWHDQGDƈHFWWKHQRUPDO
RSHUDWLRQRIWKHGXVWVHQVRU,IWKH/('VFUHHQGLVSOD\V(SOHDVHWXUQRƈWKHSRZHULQ
time, remove the battery pack and dust cup, and clean the dust sensor. After reinstalling
the battery pack and dust cup, start the machine and you can use it again.
$VVKRZQLQWKHƉJXUHEHORZDYDULHW\RIFRPELQDWLRQPRGHVFDQEHUHDOL]HGE\PDWFKLQJ
the host and accessories. After the machine is assembled, press the switch button to start
the machine and start working, and press it again to shut down the machine.
7KHGHIDXOWVHWWLQJLVDXWRPDWLFPRGHZKHQVWDUWLQJXSDVVKRZQLQWKHƉJXUHEHORZ3UHVV
the 7d button in the power-on state to switch to manual gear. After switching, it defaults to
low manual gear. Tap 7e "+" to adjust upshift, conversely tap 7c "-" to adjust downshift.
Press the 7d button again to switch to automatic mode.
IR sensor
Notice:
7
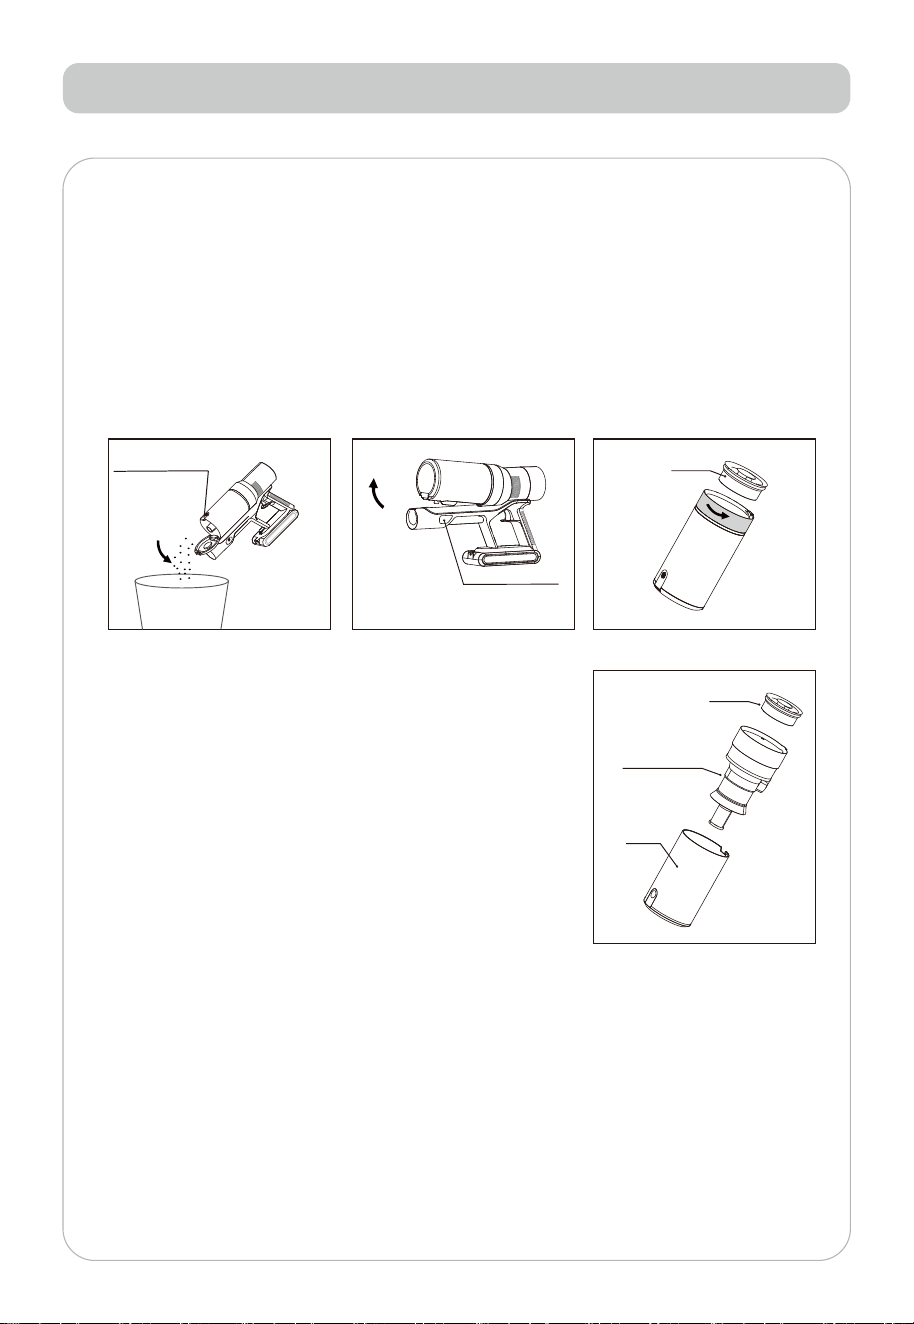
Cleaning the dust cup:
&OHDQLQJRIƉOWHUFRPSRQHQWV
Dust Cup Open Button
Dust cup release button
HEPA
HEPA
Dust cup
7XUQRƈWKHSRZHUDQGUHPRYHWKHDFFHVVRULHV
2. As shown in Figure 4, align the bottom of the dust collection cup of the main unit with the
trash can, and press the open button on the dust collection cup to collect the dust. The
bottom cover of the cup opens automatically, gently shake to empty the dust in the dust
collection cup, close the bottom cover and lock it tightly.
Note: When the dust in the dust collecting cup reaches the marked maximum
position, please clean the dust collecting cup in time.
1. As shown in Figure 5, press the dust cup release button and
remove the dust cup assembly.
$VVKRZQLQ)LJXUHUHPRYHWKHhepaDQGURWDWHWKHƉOWHU
assembly counterclockwise.
$VVKRZQLQ)LJXUHWDNHWKHƉOWHURXWRIWKHGXVWFXS
&OHDQWKHhepaƉOWHUDQGGXVWFXSZLWKDVRIWEUXVKDQG
reinstall them in the reverse order. Incorrect installation will
UHVXOWLQUHGXFHGVXFWLRQ
5. In order to maintain the best cleaning performance, it is
recommended to clean it every 4-6 times (depending on
actual usage).
Removal of foreign body blockage
When the air duct of the machine is entangled and blocked by foreign matter, the protection
SURJUDPZLOOFXWRƈWKHSRZHUVXSSO\RIWKHHOHFWULFƊRRUEUXVKDQGWKHHOHFWULFƊRRUEUXVKZLOO
VWRSURWDWLQJ$WWKLVWLPHSOHDVHWXUQRƈWKHPDFKLQHVZLWFKLPPHGLDWHO\FKHFNDQGFOHDQWKH
HOHFWULFƊRRUEUXVKRUH[WHQVLRQSLSHUHPRYHWKHEORFNDJHDQGFRROGRZQIRUDSHULRGRIWLPH
before using it again.
5HPRYDORIIRUHLJQREMHFWVWKDWDUHEORFNHGE\WKHH[WHQVLRQWXEH
5HPRYHWKHH[WHQVLRQWXEHFKHFNDQGXQEORFNLWDQGWKHQUHLQVWDOOLW
5HPRYDORIIRUHLJQREMHFWVEORFNHGE\WKHHOHFWULFƊRRUEUXVK
Refer to "Cleaning of Electric Floor Brush".
Picture 4 Picture 5 Picture 6
Picture 7
:DUQLQJ,WLVIRUELGGHQWRXVHWKLVPDFKLQHZLWKRXWLQVWDOOLQJDVHSDUDWLRQƉOWHU
+RQH\FRPEƉOWHU
Cleaning and maintenance
8
&OHDQLQJRIHOHFWULFƊRRUEUXVK
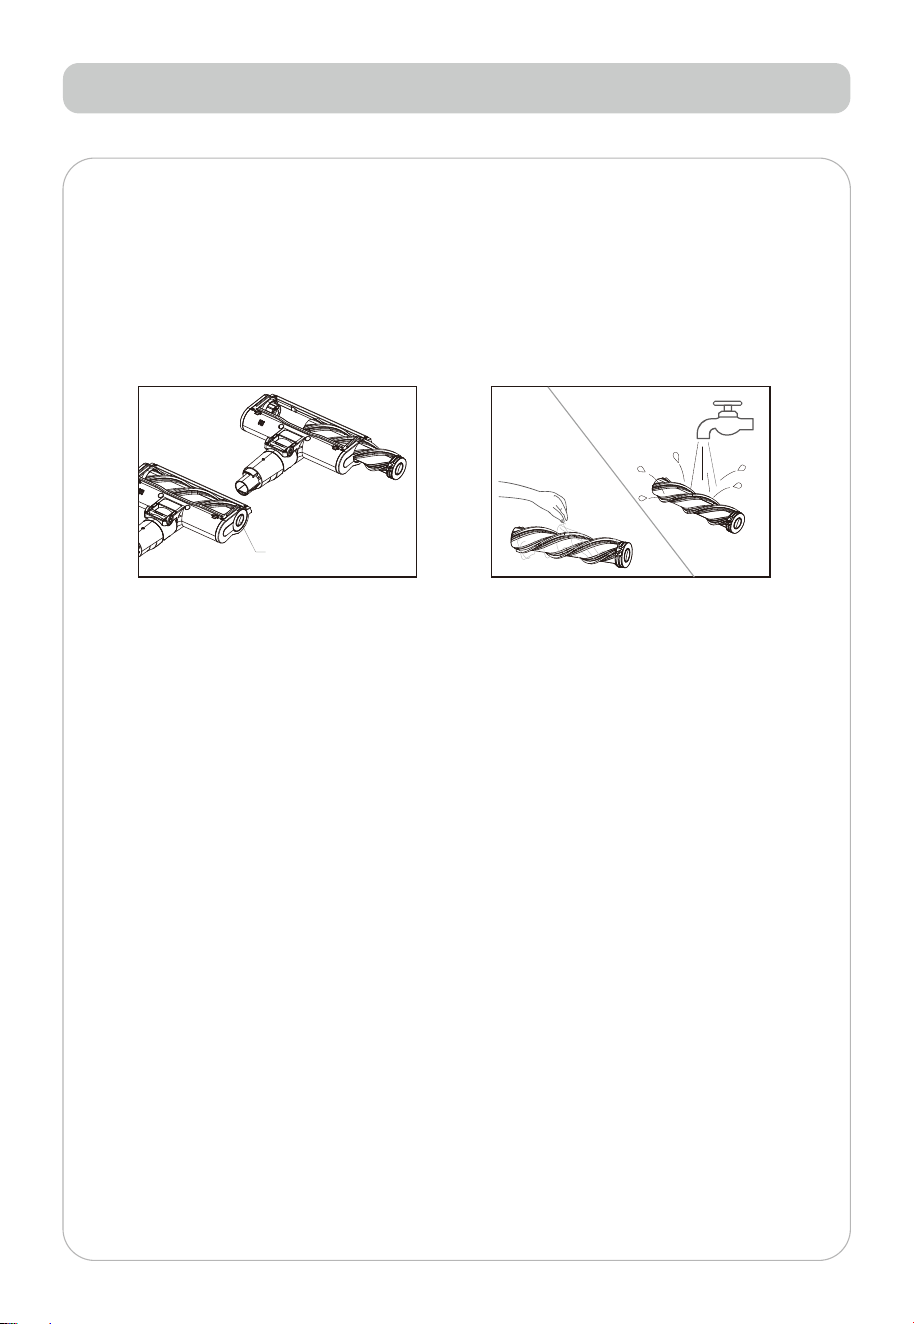
$VVKRZQLQ)LJXUHSUHVVWKHURXQGORFNRQWKHVLGHRIWKHHOHFWULFƊRRUEUXVKWRSXOORXW
WKHUROOHUEUXVK&DXWLRQVRPHGXVWZLOOIDOORƈZKHQ\RXWDNHLWRXW
7HDURƈWKHWDQJOHGKDLUDQLPDOKDLURUGHEULVRQWKHUROOHUEUXVKWRUHPRYHWKHGXVW
3. It can be rinsed with clean water if necessary, and it must be completely dried before
reinstalling it for use.
Picture 8 Picture 9
操作說明
Cleaning and maintenance
Lock

9
Common malfunctions
Important hint
,I\RXƉQGWKDWWKHYDFXXPFOHDQHULVZRUNLQJDEQRUPDOO\SOHDVHWXUQRƈWKHYDFXXPFOHDQHUDQG
FXWRƈWKHSRZHU
Malfunction Causes Solutions
The vacuum cleaner won't start
Low battery
Please refer to the "Battery
Charging" section of the
manual for proper charging
Please refer to the
LQVWUXFWLRQPDQXDO5HPRYDO
of foreign body blockage"
The dust cup is full
Please empty the trash in
the dust cup
7KHH[WHQVLRQWXEHRU
ƊRRUEUXVKLVEORFNHGE\
foreign matter
Dust cup or
VHSDUDWLRQƉOWHULVQRW
installed correctly
Please reinstall the
dust cup or separation
ƉOWHUFRUUHFWO\
Dust cup or
VHSDUDWLRQƉOWHULVQRW
installed correctly
The roller brush is
entangled or stuck, and
the protection device is
triggered
Please refer to the instruction
PDQXDO5HPRYDORIIRUHLJQ
body blockage"
Please reinstall the
dust cup or separation
ƉOWHUFRUUHFWO\
Please empty the
trash in the dust cup
Please reinstall the dust cup
RUVHSDUDWLRQƉOWHUFRUUHFWO\
Low battery
Please refer to the "Battery
Charging" section of the
manual for proper charging
The battery is aging
Purchase and use the
manufacturer’s battery pack
Notice:
This vacuum cleaner must use the original battery pack.
If you need to replace the battery, please contact the after-sales service point for replacement.
Do not use the battery pack for purposes other than this vacuum cleaner.
The vacuum cleaner has
no or low suction power
There is obvious dust
leakage from the vacuum
cleaner
LED display shows E3
The usable time of this
vacuum cleaner is shortened
10
Fault Code
&
&
&
&
&
&
&
&
Blinking times of
battery pack indicator
Failures
Common malfunctions
Fault code table
1
2
3
4
5
6
7
9
The air duct has been blocked
Battery pack no-load protection
has been triggered
Adapter voltage is too high/cur-
rent is too high
The battery pack is too low and
has been triggered
Battery pack over-temperature
protection has been triggered
Ground brush stall protection has
been triggered
Short circuit (overcurrent)
protection has been triggered
Dust induction infrared probe
needs to be cleaned in time

11
S7
The main technical parameters
Model
Adaptor
Input voltage
Adaptor
2XWSXWcYROWDJHc
Charging time
Voltage
Power
Battery
capacity
7HFKQLFDOVSHFLƉFDWLRQV
≈
Control version
Motor
Switch
Battery
Indicator light
Charging port
480W
Suction
Usage Time
Number of
Filter Cones
Dust Cup
Capacity
28-30kPa
60-65 Min
10
1.2L (Including Filter Element)
Noise
Filter Level
Motor Speed
Cleaning Mode
≤65 dB
Level 6
130000
Four
7*2500mAh
Electrical schematic diagram
7*24 hours
Professional customer service online
Email: vicsonic@163.com
Ocial website: www.vicsonic.net
~
4.32kg
3.29kg
