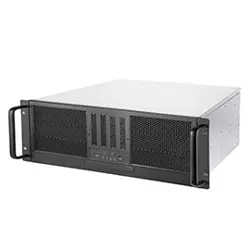
www.silverstonetek.com
User manual
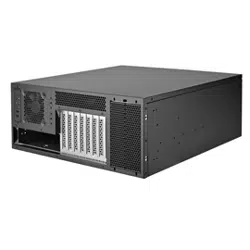
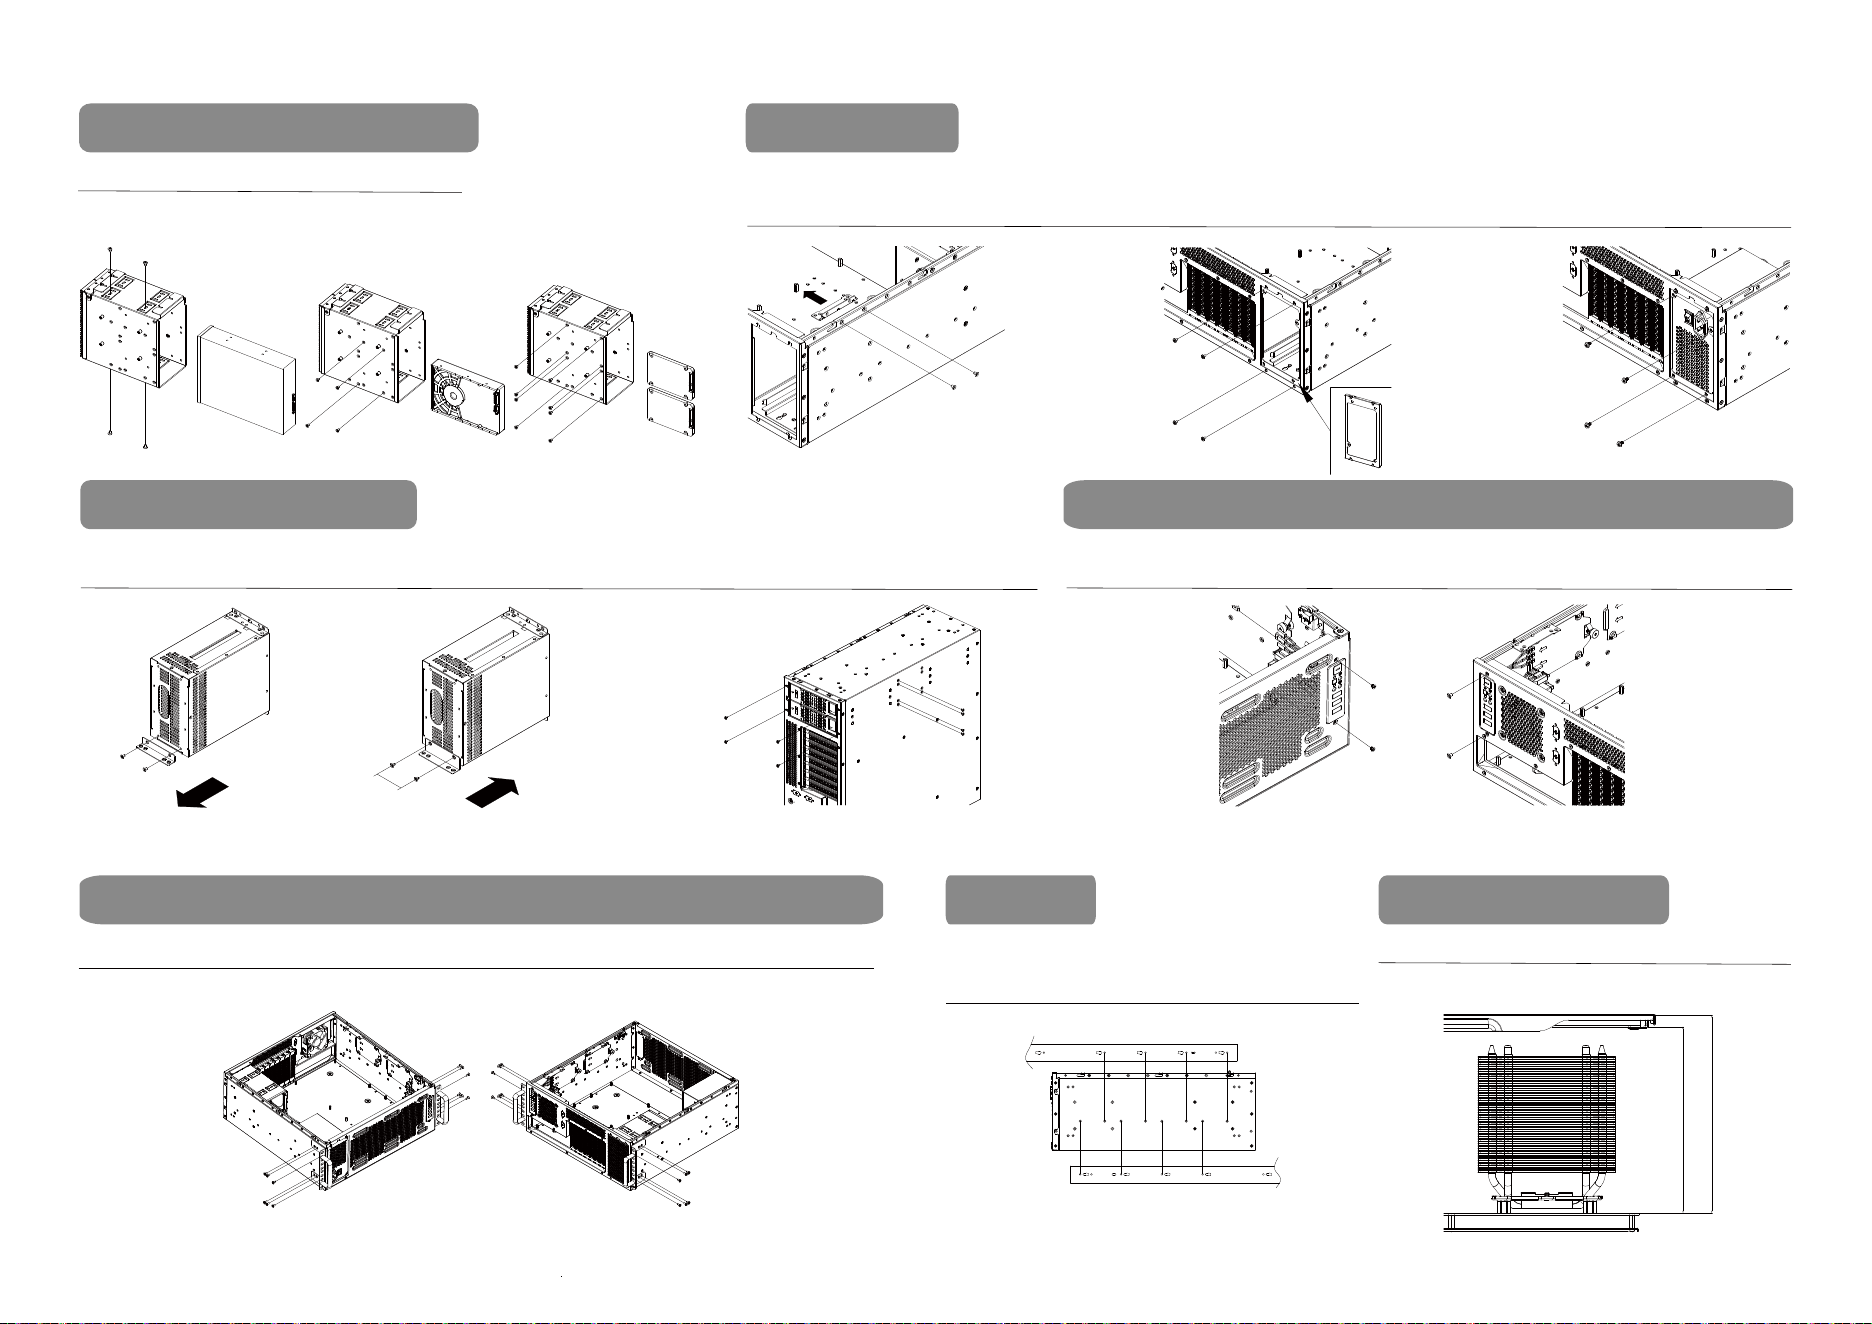
Removal of multi-functional retainer
Unfasten and remove the top 4 screws securing the
retainer
Expansion card retainer and graphics card compatibility
Graphics card height limitation with retainer clips: 124mm
Graphics card height limitation without retainer clips: 147mm
Graphics card height limitation with expansion card retainer removed: 158mm
Unfasten and remove the 8 screws securing the
retainer from both sides of the chassis
Adjusting the position of the retainer
Unfasten the captive thumbscrews, and reposition
the clips based on the graphics cards placement
Adjusting the retainer clip position
Unfasten the captive thumbscrew(s), and adjust the angle
of the clip to best secure the graphics card in place
Adjusting the retainer clip angle
Expansion card retainer usage instructions
Position 1 Position 2 Position 3
Retainer clips usage instructions
Graphics card height limitation
Motherboard
standoff
Accessories Content
Motherboard
screws
2.5” SSD screws
(M3-4)
Drive cage
2.5” SSD screws
(M3-5)
2.5” SSD trays
3.5” HDD Screws
(#6-32)
PSU mounting
screws
HandlebarsPSU mounting
bracket
Handlebar bracket
Handlebar screws Conductive foam
Cable ties
Velcro straps User manual
RM46-502I
1
Position 1
Position 2
Position 3
Position 4
Position 5
Position 6
1
2
Retainer clips facing forward
Retainer clips facing rearwards
Retainer clips facing forward
Retainer clips facing rearwards
Retainer clips facing forward
Retainer clips facing rearwards
124mm
147mm
158mm
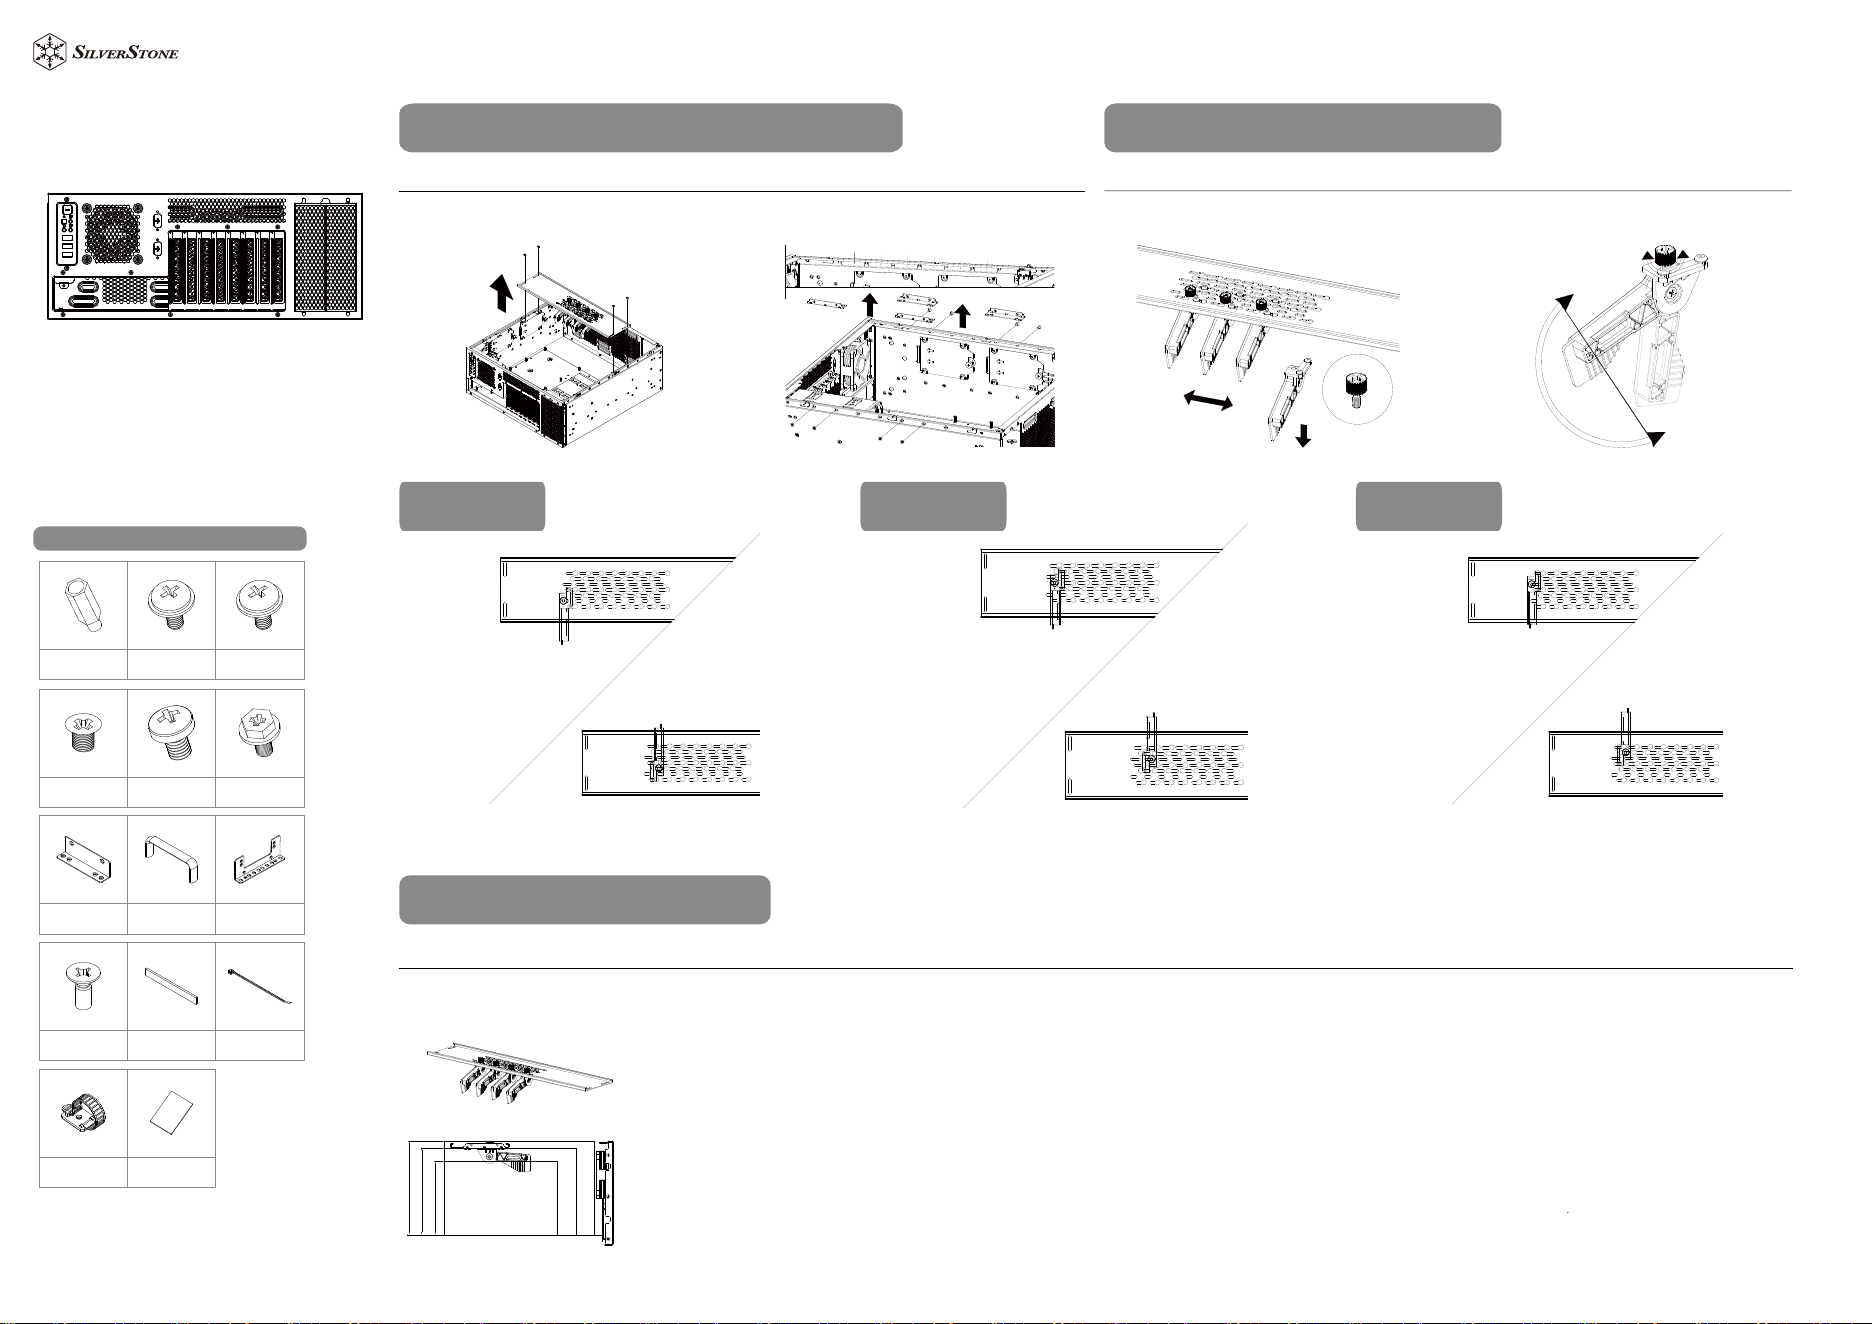
Unfasten and remove the PSU mounting bracket screws Remove the PSU mounting bracket from the rear chassis panel
Removal of PSU mounting bracket
Remove the expansion card retainer
Preparation
Remove the top panel
PSU mount and 5.25” drive cage interchangeability instructions
Remove the bottom PSU mounting bracket screws located at
outer side of the bottom chassis
Remove the bottom PSU mounting bracket located at the bottom
of the chassis
2
Unfasten and remove the 4 screws on the side securing the drive cage
Adjust the 5.25” drive cage position to the rear, and the PSU
mounting bracket to the front
Secure the corresponding screws
5.25” drive cage removal
Installation of components in the 5.25” drive cagePSU mount and 5.25” drive cage interchangeability instructions
Installing conductive foam to fill the gaps on the drive cage Installing 2 x 5.25” ODD drives
50mm
OR
Rear mounting position
Front mounting position
OR
Rear mounting position Front mounting position
Rear mounting position
Front mounting position
PSU mounting bracket is pre-installed at the rear side, if the positions
is to be interchanged, ensure the PSU mounting bracket is also moved
to the front PSU mounting position for installation
First remove the beams that supports the
expansion card retainer
5.25" ODD x 1 or 3.5” HDD x 1 or 2.5” SSD x 2
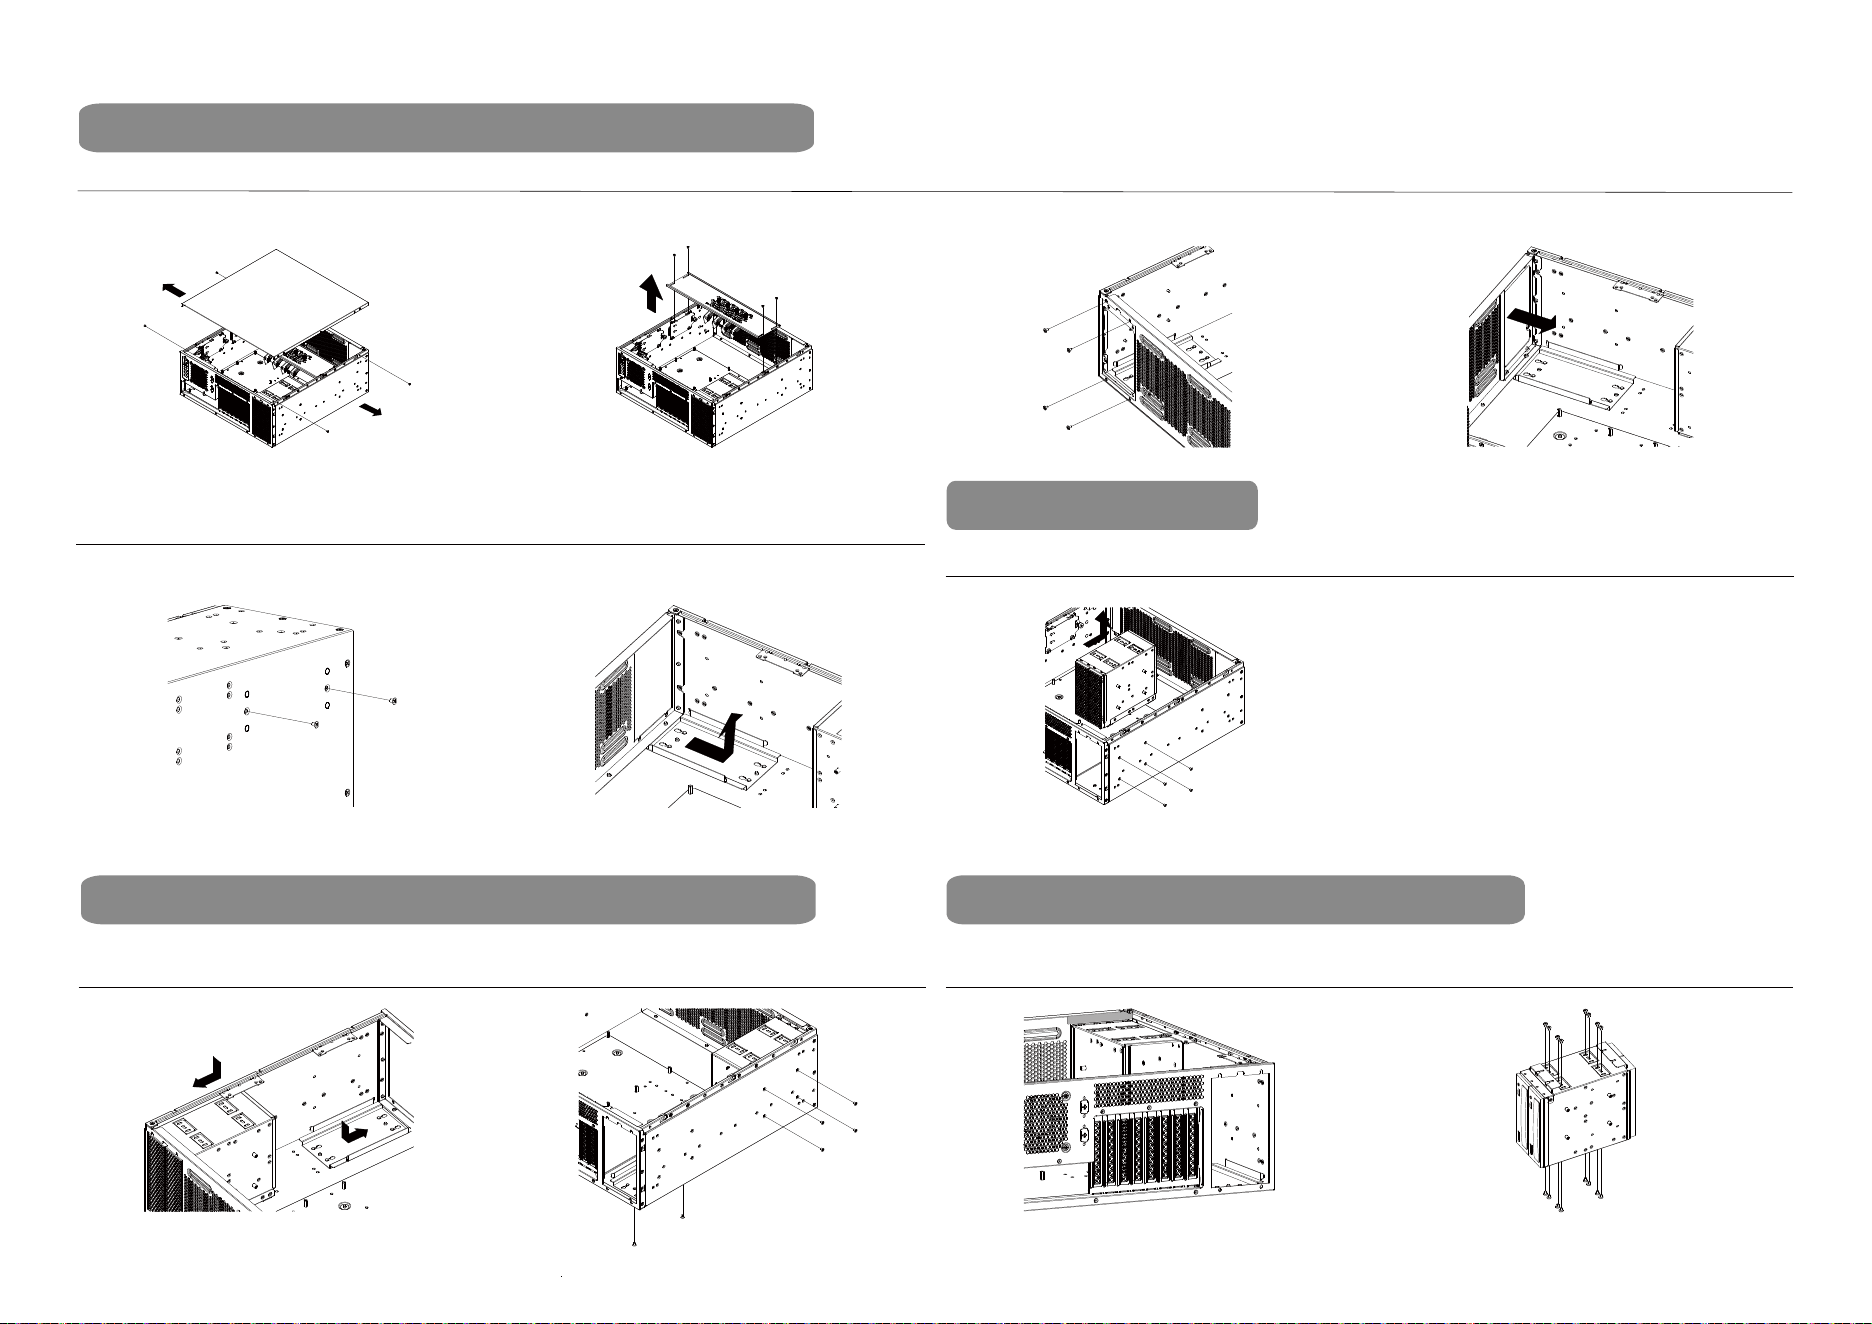
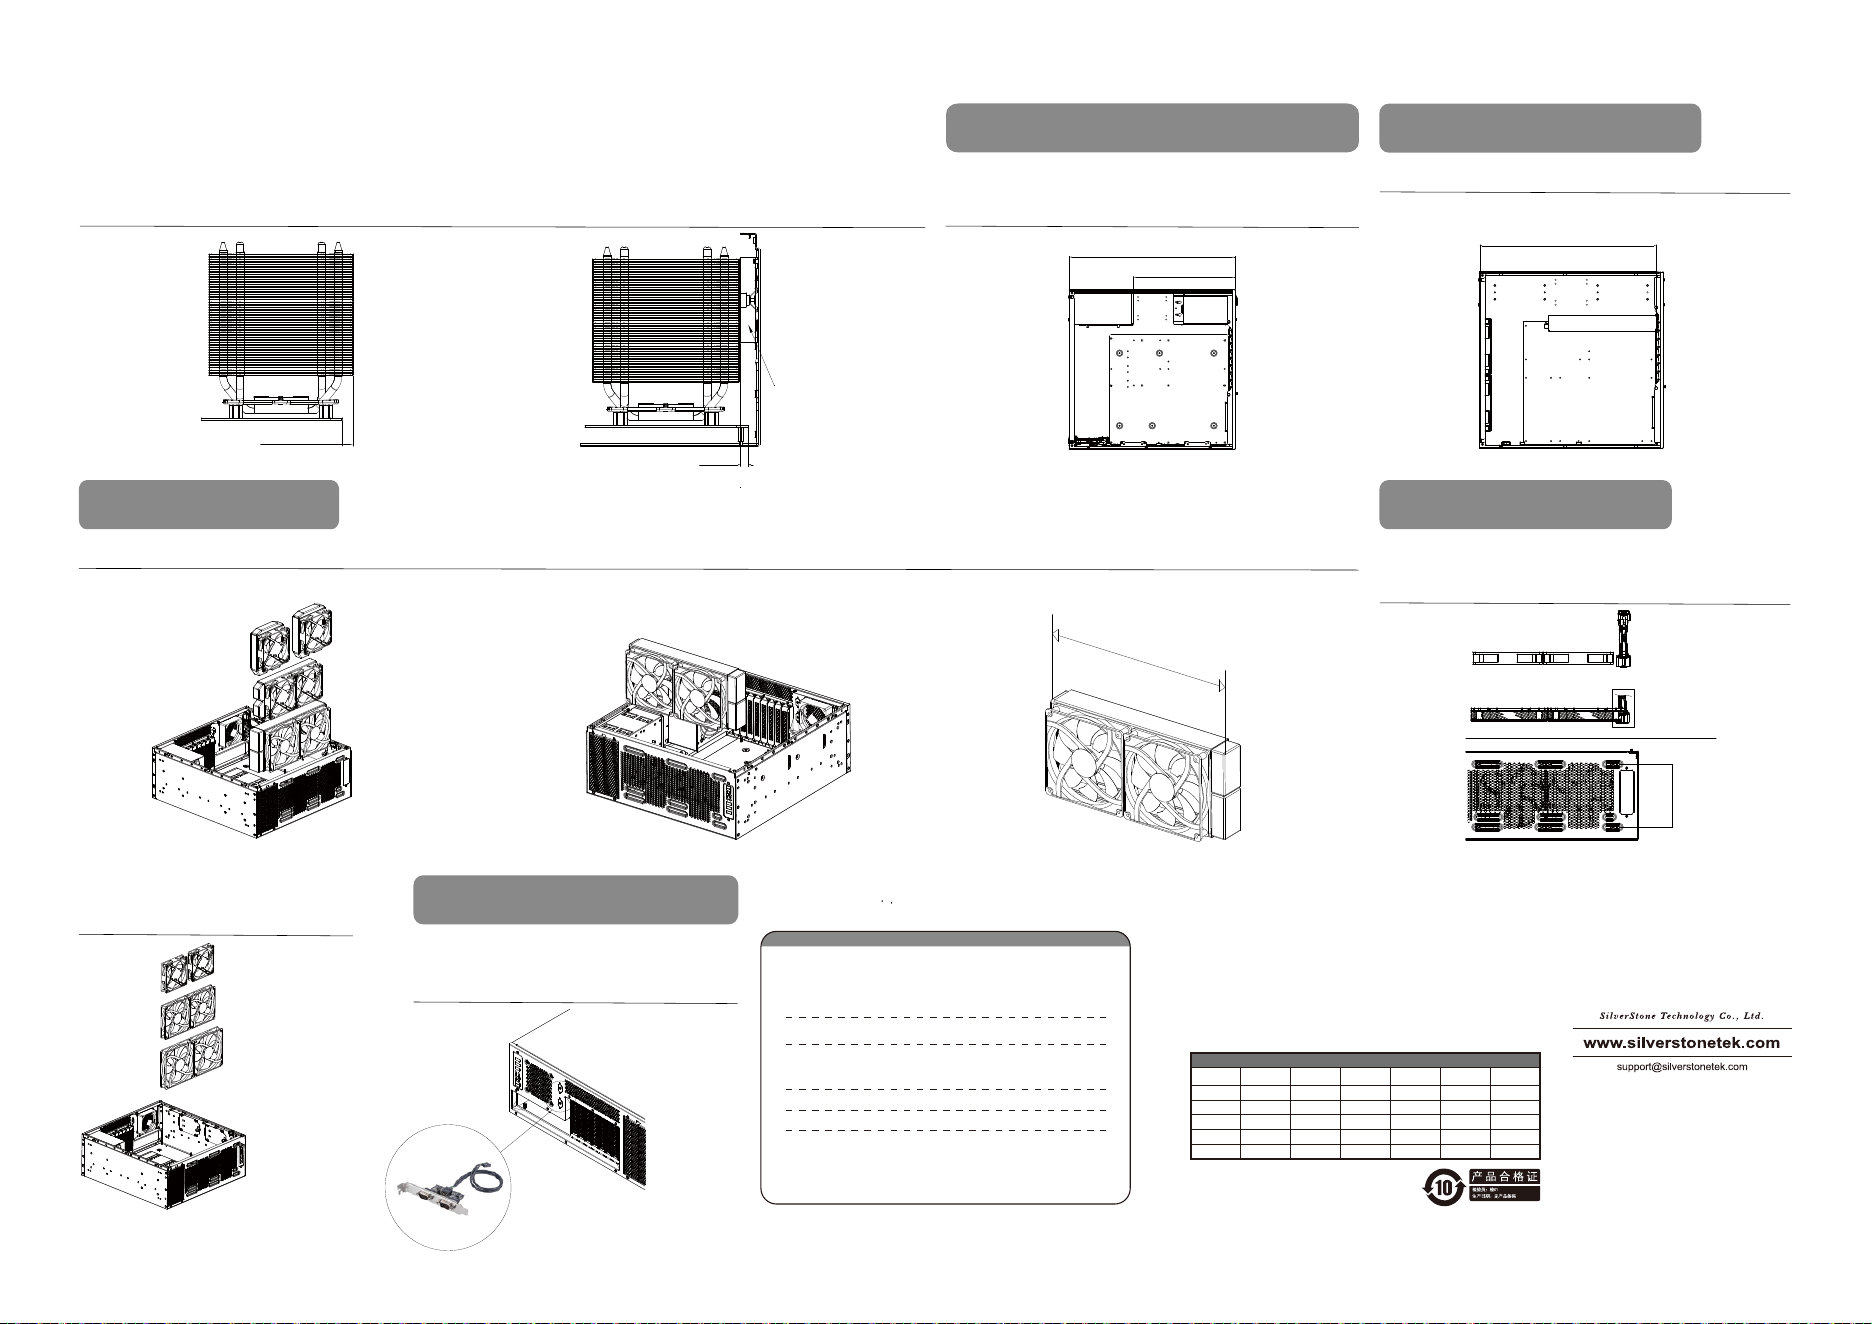
Storage drive installation options PSU Installation
Install and secure the PSU to the chassis Rear mounting position / Front mounting positionRemove the PSU mounting bracket Attach and secure the additional PSU mounting bracket included
in the accessories package to the chassis
Secure PSU with screws
Mini Redundant Installation I/O panel can also be interchanged between front and rear side
3
Rear mounting position / Front mounting position Due to its interchangeable nature, when mounting the RMS05-22
rail slides, ensure that the inner rails are screwed and secured into
the designated mounting holes
Rail slides
5.25”ODD *1
2.5" SSD *2
or
3.5" HDD *1
or
Handlebars can also be interchanged between the front and rear side
Component restrictions
CPU cooler height limitations
Maximum height with expansion card retainer: 138mm
Maximum height without expansion card retainer: 148mm
138mm
Maximum 148mm
Maximum: 7mm
5mm
2.5"SSD
or
2.5"bracket
5.25"Device
Power
Supply
455mm
254mm
Graphics card
Maximum 438mm
120mm radiator x2
240mm radiator x1
280mm radiator x1
Max. 333mm
140mm mounting holes
160mm x 2
140mm x 2
would interfere
with I/O panel
120mm x2
140mm x2
160mm x2
*(I/O panel can not be
simultaneously installed)
PSU and 5.25” device restrictions
I/O panel installed at the rear
Graphics card and fan/radiator total thickness cannot exceed 438mm
The radiator compatibility allows three combinations between
280mm, 240mm or 120mm
When installing a 280mm radiator, please install the fan(s)
between the rear chassis panel and the radiator to avoid
interference with the I/O panel
Maximum length limitation for radiator
Graphics card restrictions
Radiator restrictions Cooling fans limitations
If the I/O panel is located at the rear, the maximum number of fans is 2x140mm
If the I/O panel is located at the front, allows installation of 160mm fans with
140mm mounting holes
Can purchase optional SilverStone ECD01
(Internal USB 2.0 to dual RS232 port adapter)
to be installed in the RS232 reserved ports
Warranty terms & conditions
Warranty Information
This product has a limited 1 year warranty in North America and Australia.
For information on warranty periods in other regions, please contact your reseller or SilverStone authorized distributor.
本产品自购买之日起,于中国地区(不包含澳门,香港特别行政区)享有一年有限责任保固(部分产品为二年,三年或五年)。
详细保固年限请参照官方网站 https://silverstonetek.com.cn/ 公布之产品型号为依据。
1. Product component defects or damages resulted from defective production is covered under warranty.
Defects or damages with the following conditions will be fixed or replaced under SilverStone
Technology’s jurisdiction.t
a) Usage in accordance with instructions provided in this manual, with no misuse, overuse, or other
inappropriate actions.
b) Damage not caused by natural disaster (thunder, fire, earthquake, flood, salt, wind, insect, animals, etc…)
c) Product is not disassembled, modified, or fixed. Components not disassembled or replaced.
d) Warranty mark/stickers are not removed or broken.
Loss or damages resulted from conditions other than ones listed above are not covered under warranty.
2. Under warranty, SilverStone Technology’s maximum liability is limited to the current market value for
the product (depreciated value, excluding shipping, handling, and other fees). SilverStone Technolog
y
is not responsible for other damages or loss associated with the use of product.
3. Under warranty, SilverStone Technology is obligated to repair or replace its defective products. Under
no circumstances will SilverStone Technology be liable for damages in connection with the sale,
purchase, or use including but not limited to loss of data, loss of business, loss of profits, loss of use
of the product or incidental or consequential damage whether or not foreseeable and whether or not
based on breach of warranty, contract or negligence, even if SilverStone Technology has been advised
of the possibility of such damages.
4. Warranty covers only the original purchaser through authorized SilverStone distributors and resellers
and is not transferable to a second hand purchaser.
5. You must provide sales receipt or invoice with clear indication of purchase date to determine warrant
y
eligibility.
6. If a problem develops during the warranty period, please contact your retailer/reseller/SilverStone
authorized distributors or SilverStone http://www.silverstonetek.com.
Please note that: (i) You must provide proof of original purchase of the product by a dated itemized
receipt; (ii) You shall bear the cost of shipping
(or otherwise transporting) the product to SilverStone authorized distributors. SilverStone authorized
distributors will bear the cost of shipping (or otherwise transporting) the product back to you after
completing the warranty service; (iii) Before you send the product, you must be issued a Return
Merchandise Authorization (“RMA”) number from SilverStone. Updated warranty information will be
posted on SilverStone’s official website.
Please visit http://www.silverstonetek.com for the latest updates.
Additional info & contacts
For North America (usasupport@silverstonetek.com)
SilverStone Technology in North America may repair or replace defective product with refurbished product that is not new but has been
functionally tested.
Replacement product will be warranted for remainder of the warranty period or thirty days, whichever is longer. All products should be sent
back to the place of purchase if it is
within 30 days of purchase, after 30 days, customers need to initiate RMA procedure with SilverStone Technology in USA by first downloading
the “USA RMA form for end-users”
form from the below link and follow its instructions. http://silverstonetek.com/contactus.php
For Australia only (support@silverstonetek.com)
Our goods come with guarantees that cannot be excluded under the Australian Consumer Law.
You are entitled to a replacemen
t or refund for a major failure and for compensation for any other reasonably foreseeable loss or damage.
You are also entitled to have the goods repaired or replaced if the goods fail to be of acceptable quality and the failure does not amount to a
major failure.
Please refer to above “Warranty terms & conditions” for further warranty details.
SilverStone Technology Co., Ltd. 12F No. 168 Jiankang Rd., Zhonghe Dist., New Taipei City 235 Taiwan R.O.C. + 886-2-8228-1238 (standard
international call charges apply)
For Europe (support.eu@silverstonetek.de)
For China (support@silverstonetek.com.cn)
For all other regions (support@silverstonetek.com)
有毒有害物质/元素及其化学含量表
部件名称
风扇
机壳
(金属)
汞
(Hg)
镉
(Cd)
六价铬
(Cr(VI))
多溴联苯
(PBB)
多溴二苯醚
(PBDE)
○ ○ ○ ○ ○
铅
(Pb)
○
○ ○ ○ ○ ○○
线材
○ ○ ○ ○ ○○
螺丝
○ ○ ○ ○ ○
○
包材
○ ○ ○ ○ ○
○
○:表示该有毒有害物质在该部件所有均质材料中的含量均在GB/T 26572 规定的限量
要求以下。
本表格依据SJ/T 11364的规定编制
×:表示该有毒有害物质至少在该部件的某一均质材料中的含量超出GB/T 26572 规定的
限量要求。
G11251190
4
Installation of RS232 ports
CPU cooler is allowed to protrude 7mm over the edge of the
motherboard
When 2.5” SSD mounting bracket is installed on the side, the
distance between the CPU cooler and the edge of the
motherboard must be greater than 5mm
The measurements from the front to the rear is 455mm
Considering the cable management requirements, it is recommended
that the length of the PSU and 5.25” device should not exceed 430mm