
1
Serial Number
DF25336
Purchase Date
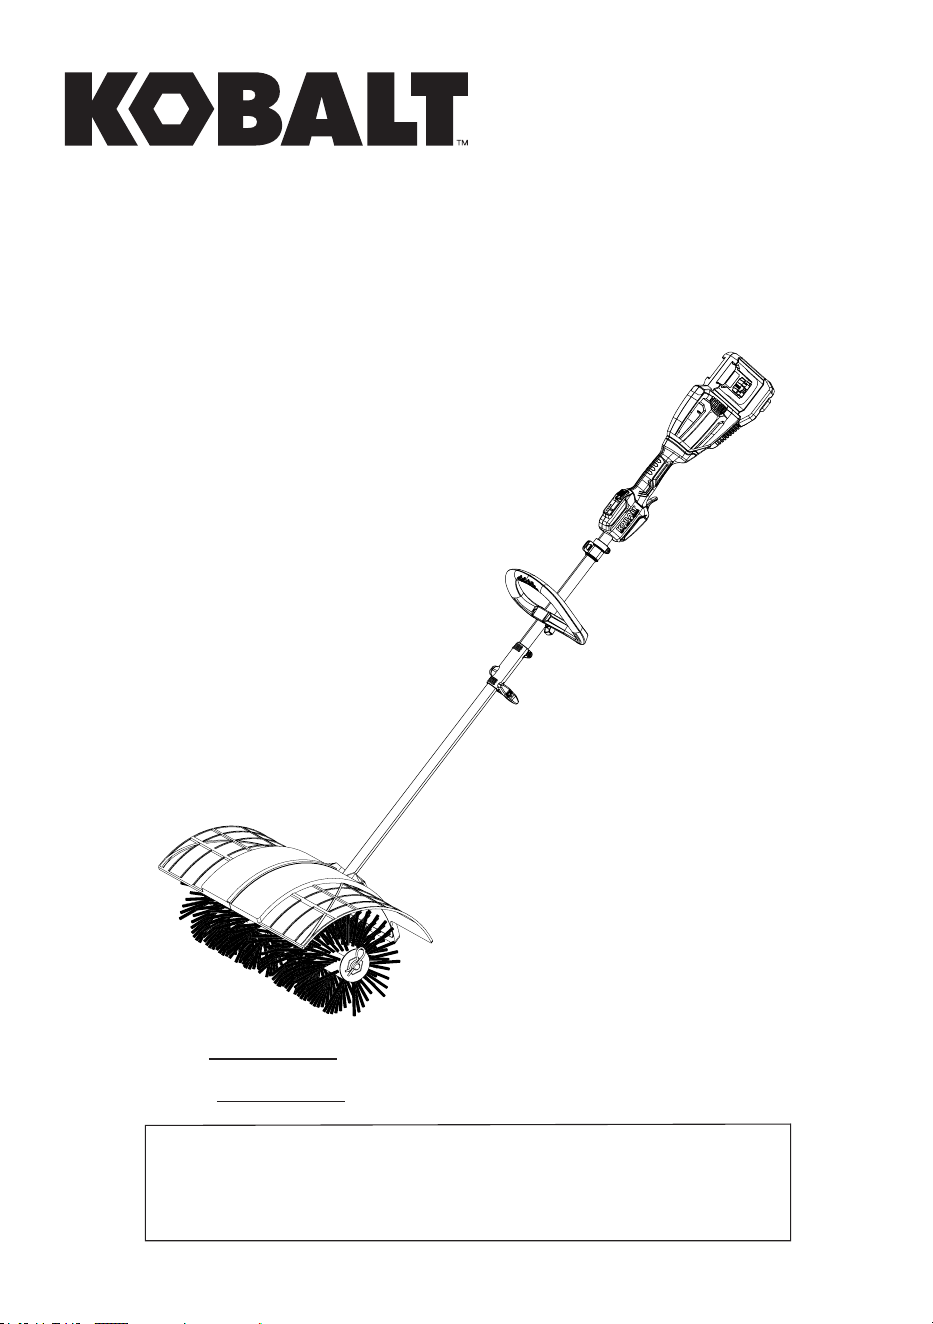
ITEM #6037903
MODEL #KABK 3265-06
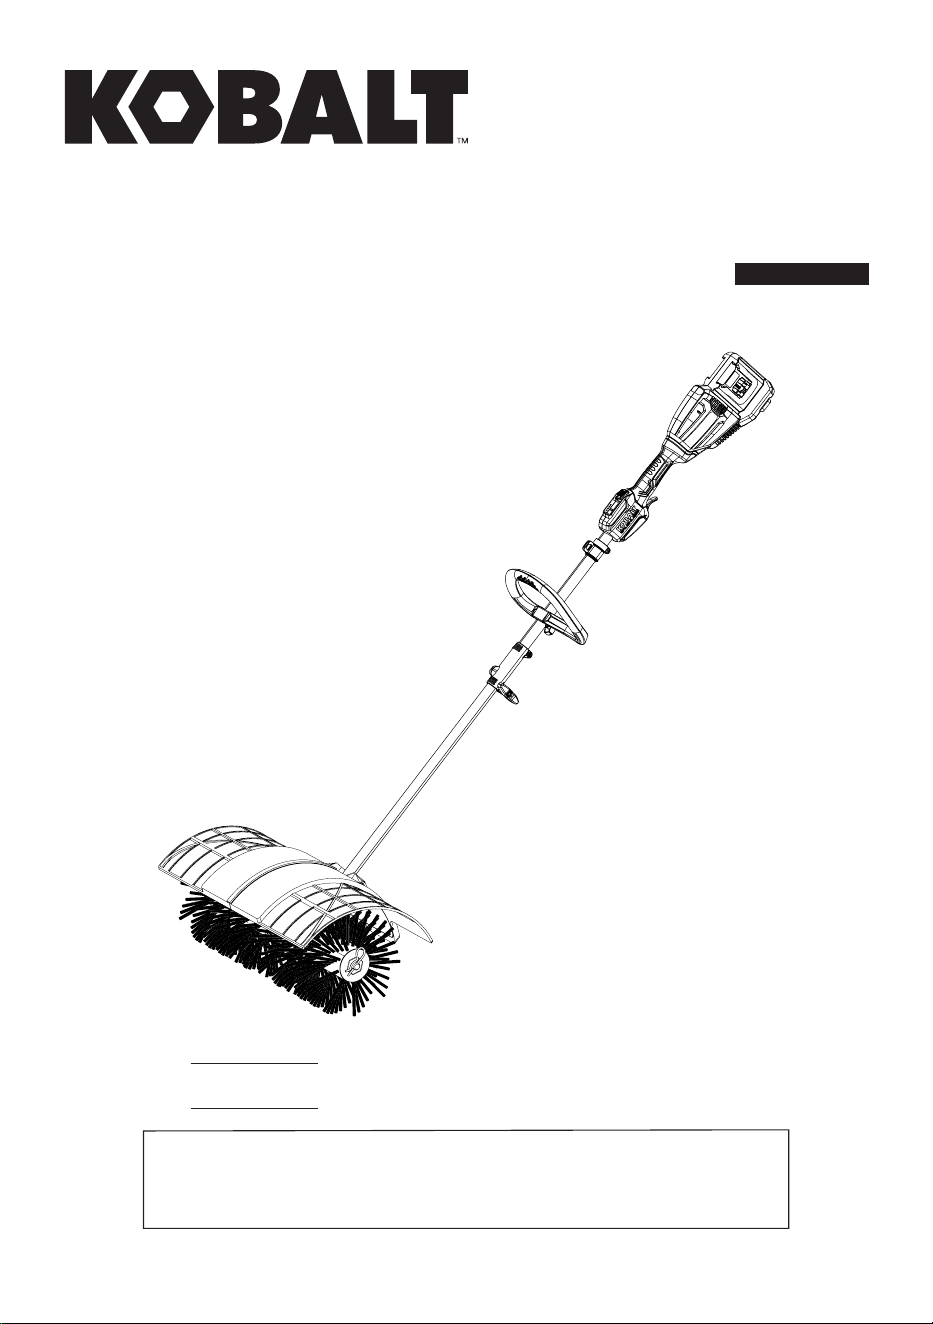
BRISTLE BRUSH
ATTACHMENT KIT
Español p. 20
Thank you for purchasing this KOBALT product.
Questions, problems or missing parts?
Before returning, contact us on:
888-356-2258, 8 a.m. - 8 p.m., EST, Monday - Sunday or [email protected].
KOBALT and logo design are trademarks or
registered trademarks of LF, LLC. All rights reserved.

2
TABLE OF CONTENTS
PRODUCT SPECIFICATIONS
Product Specications............................................................................................................................
Package Contents..................................................................................................................................
Hardware Contents.................................................................................................................................
Symbols..................................................................................................................................................
Safety Information...................................................................................................................................
Preparation.............................................................................................................................................
Assembly Instructions.............................................................................................................................
Operating Instructions.............................................................................................................................
Care and Maintenance............................................................................................................................
Troubleshooting......................................................................................................................................
Warranty.................................................................................................................................................
Replacement Parts List..........................................................................................................................
2
3
4
5
7
10
10
14
16
17
18
19
SPECIFICATIONS
Voltage 48 V DC
No-load speed 170/190 RPM ± 10%
3
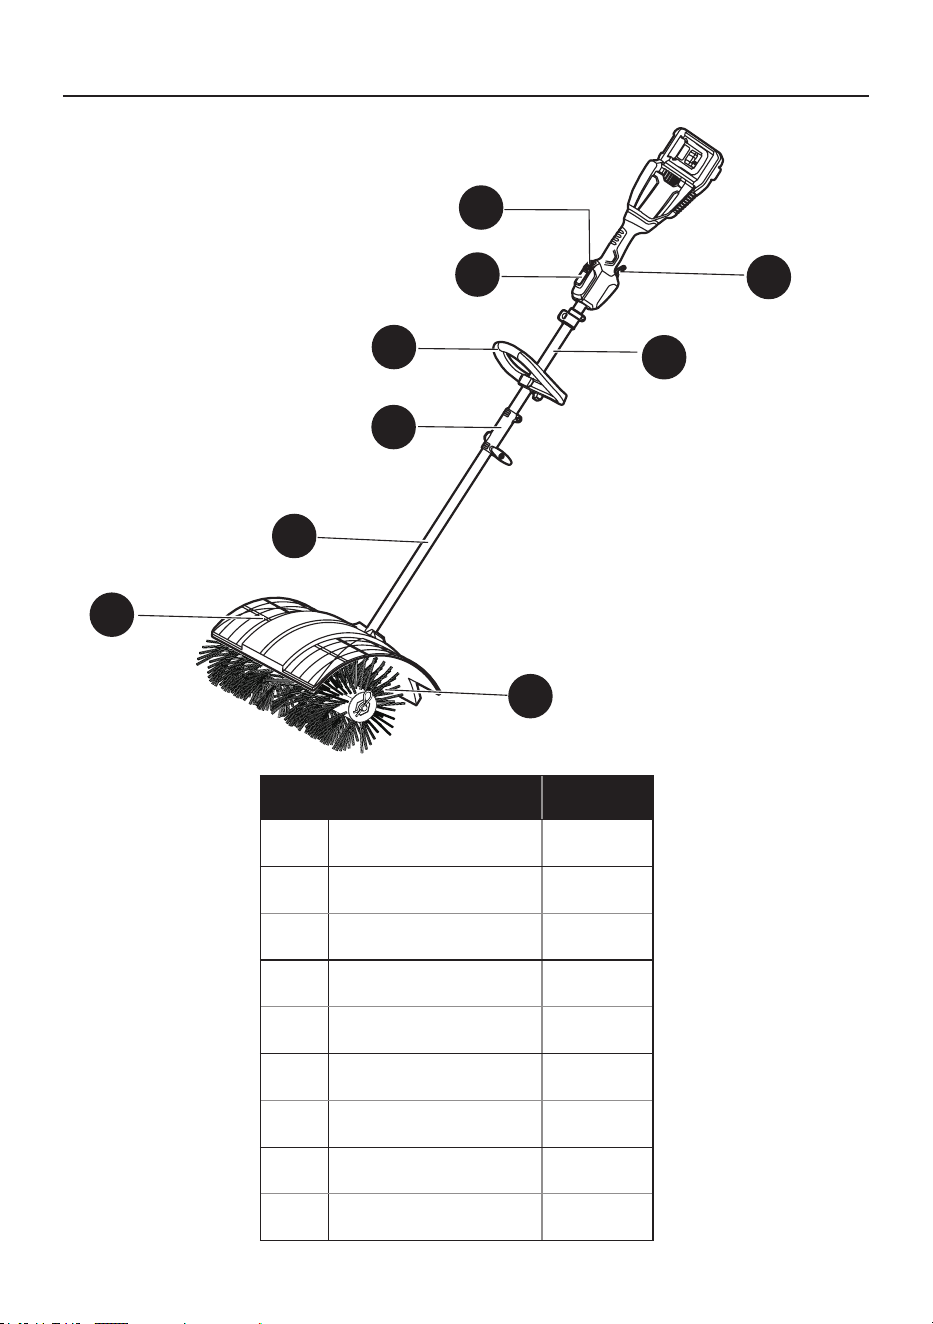
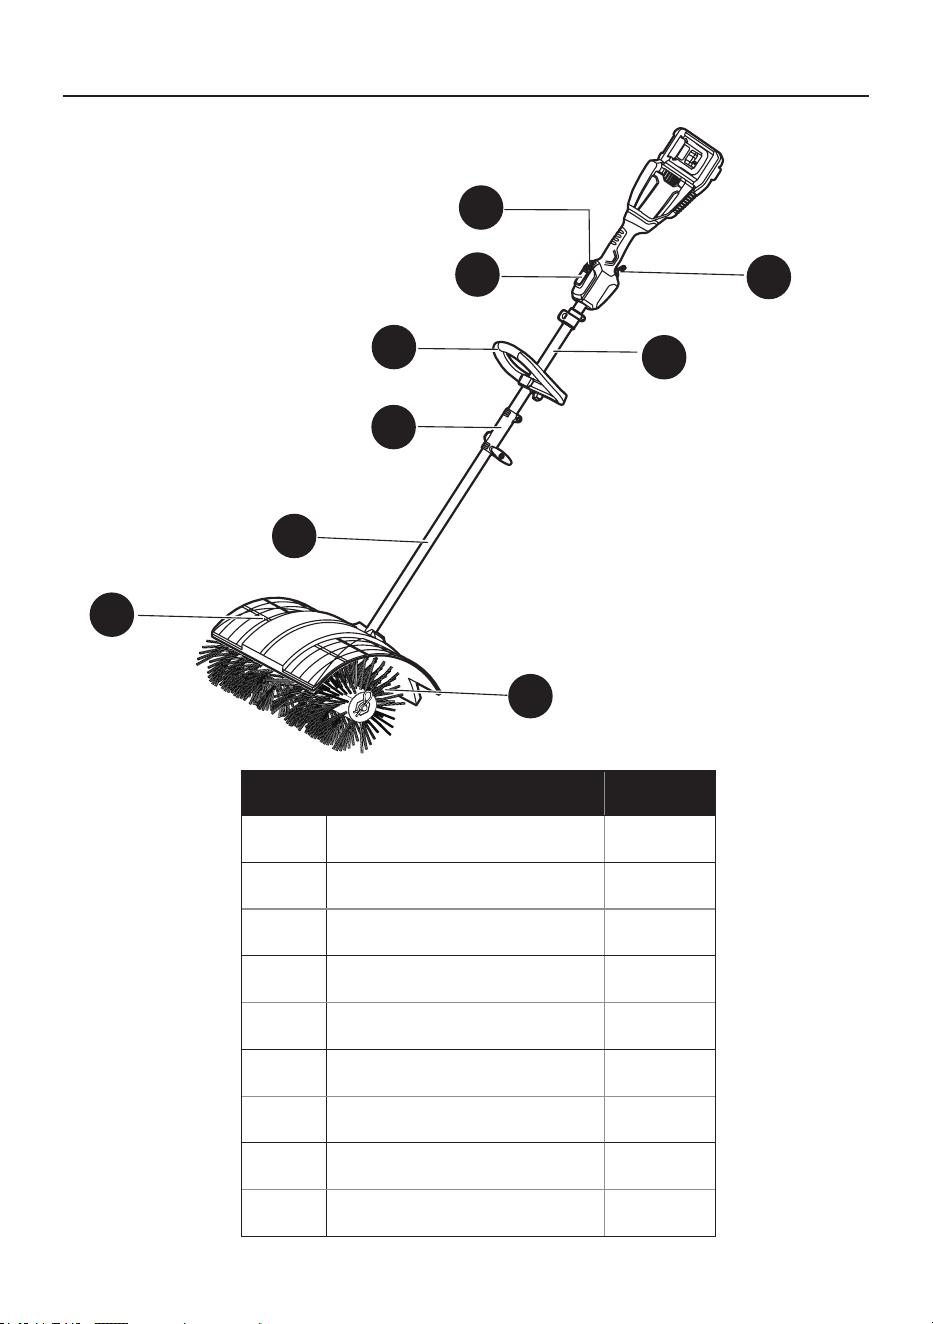
PACKAGE CONTENTS
PART DESCRIPTION QUANTITY
A Power button 1
B Power indicator LED 1
C Front / Auxiliary handle 1
D Coupler 1
E Lower tube 1
F Trigger 1
G Upper tube 1
H Brush roller 1
I Guard 1
I
G
H
E
D
C
B
H
F
A
4
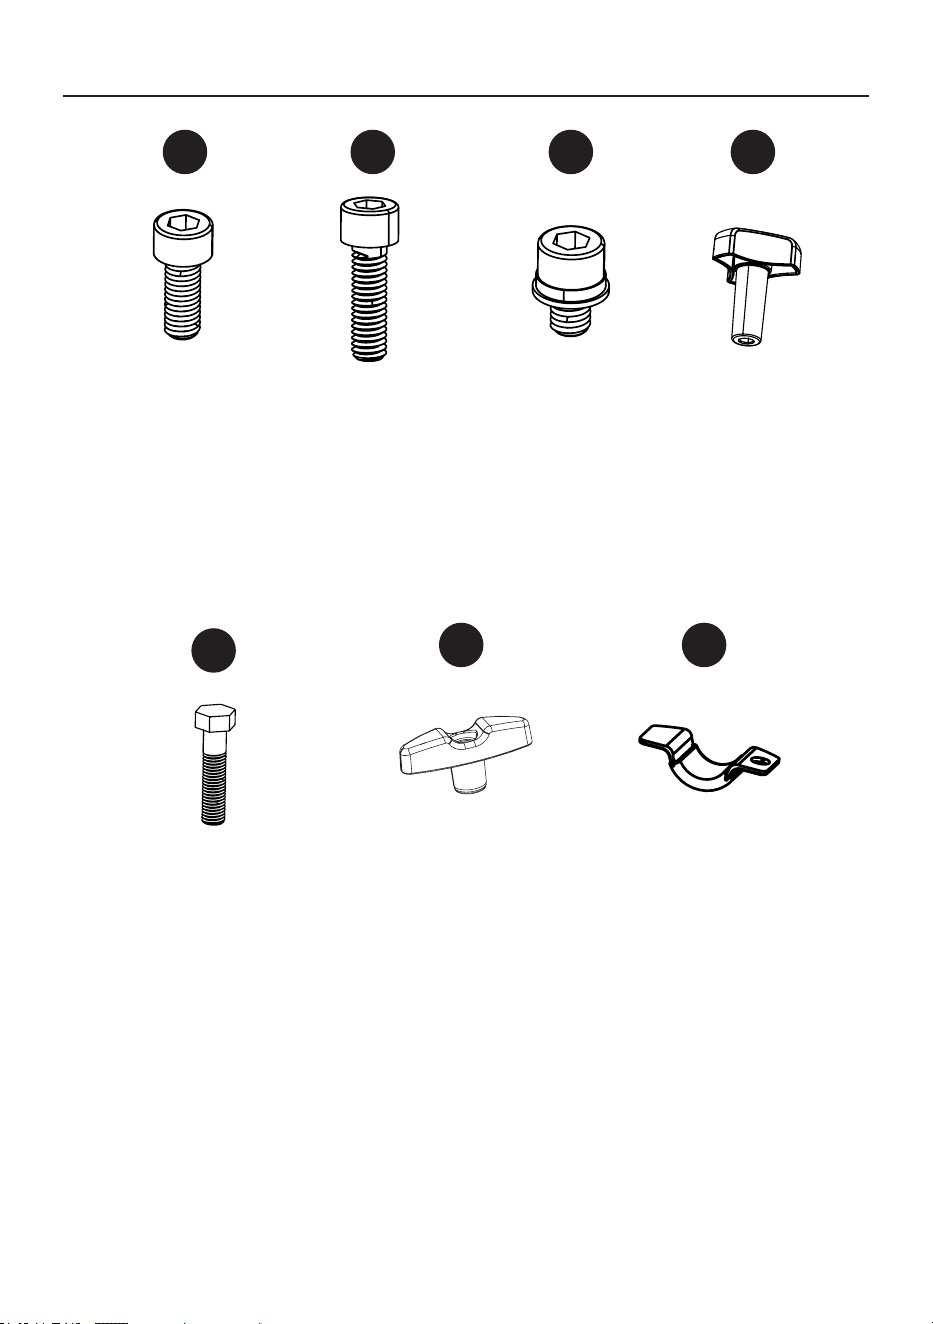
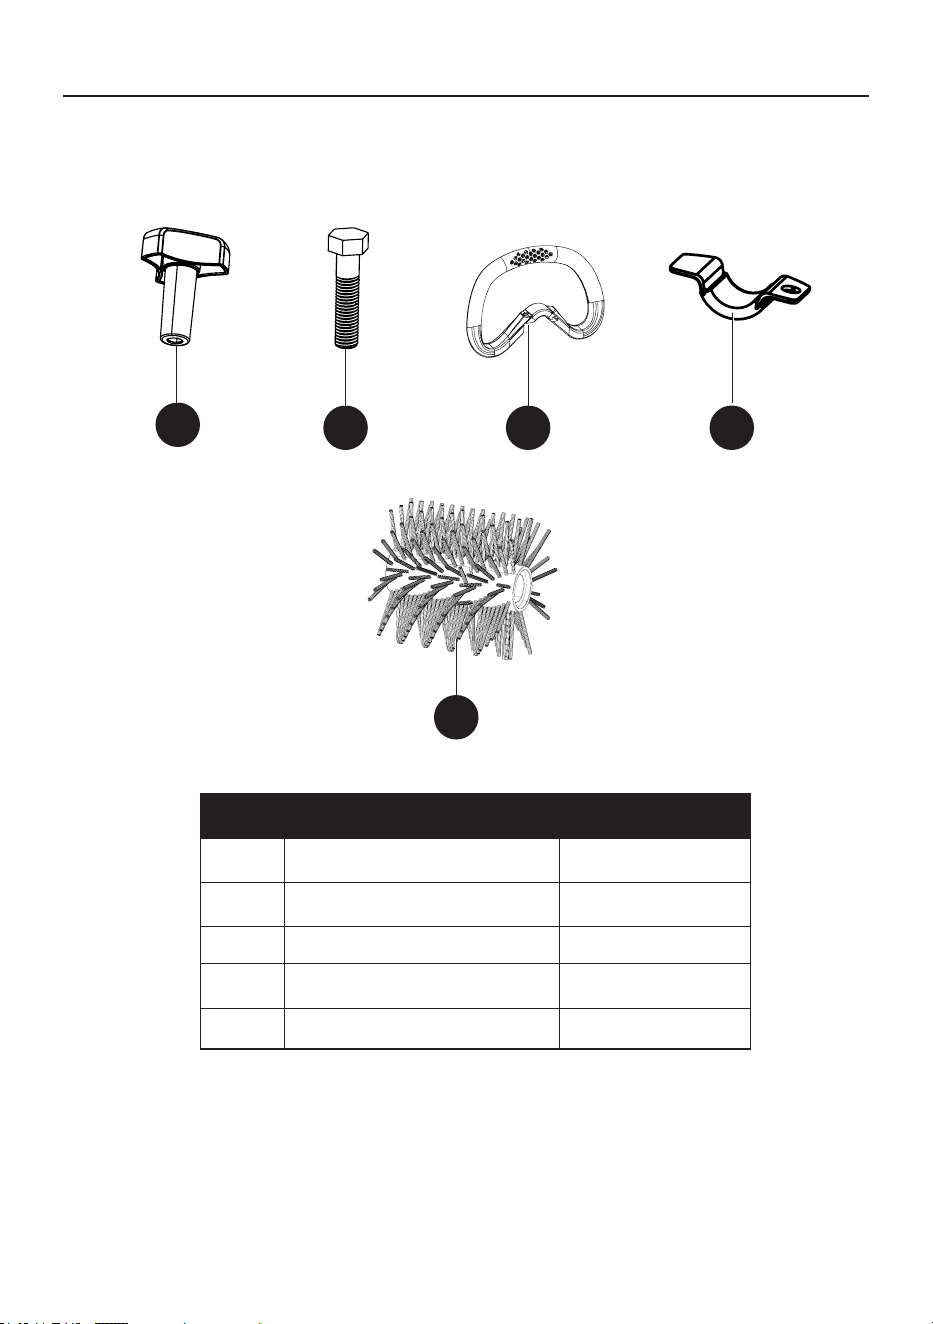
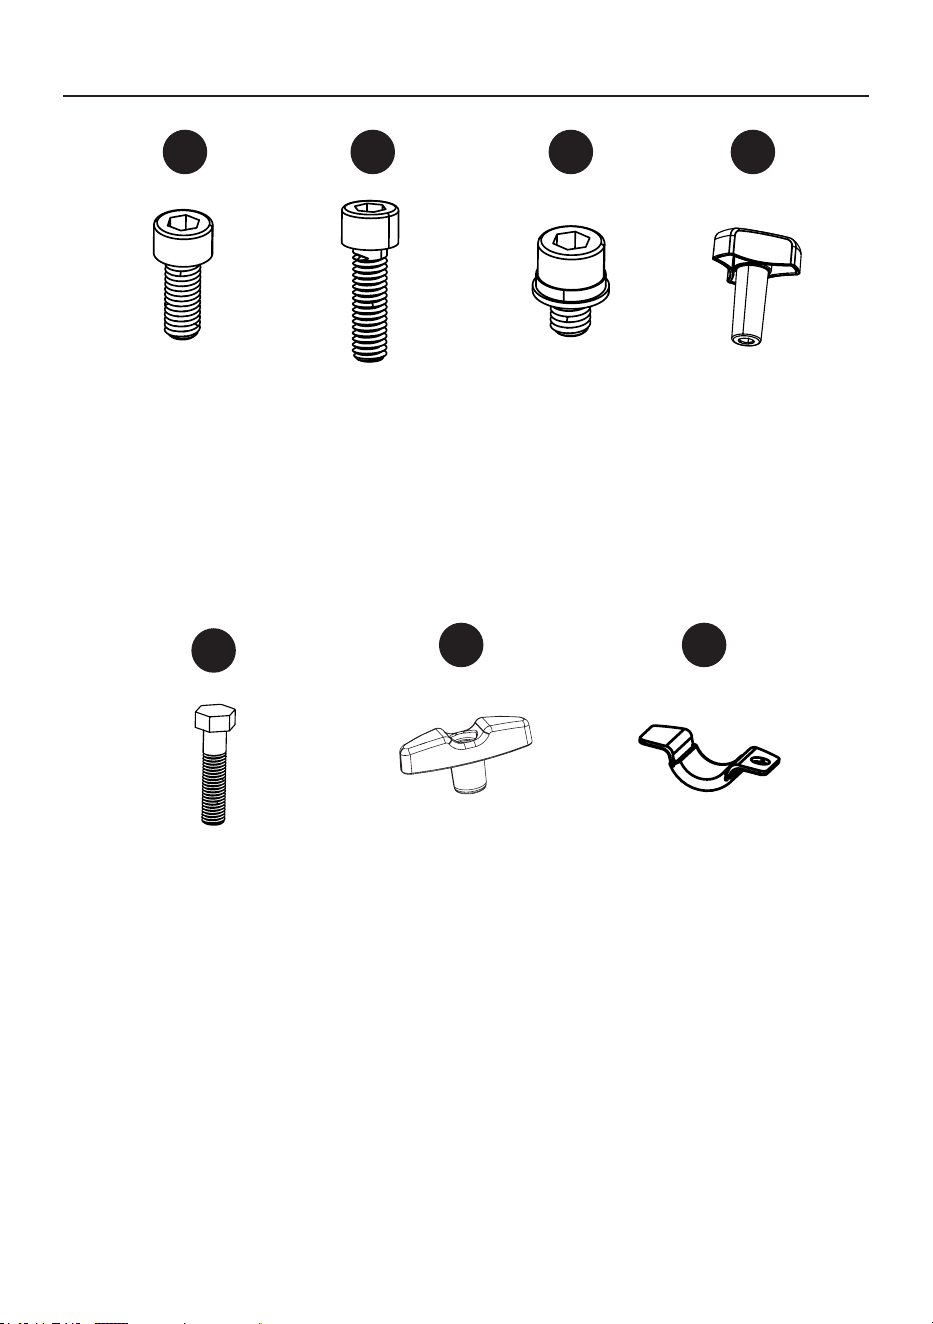
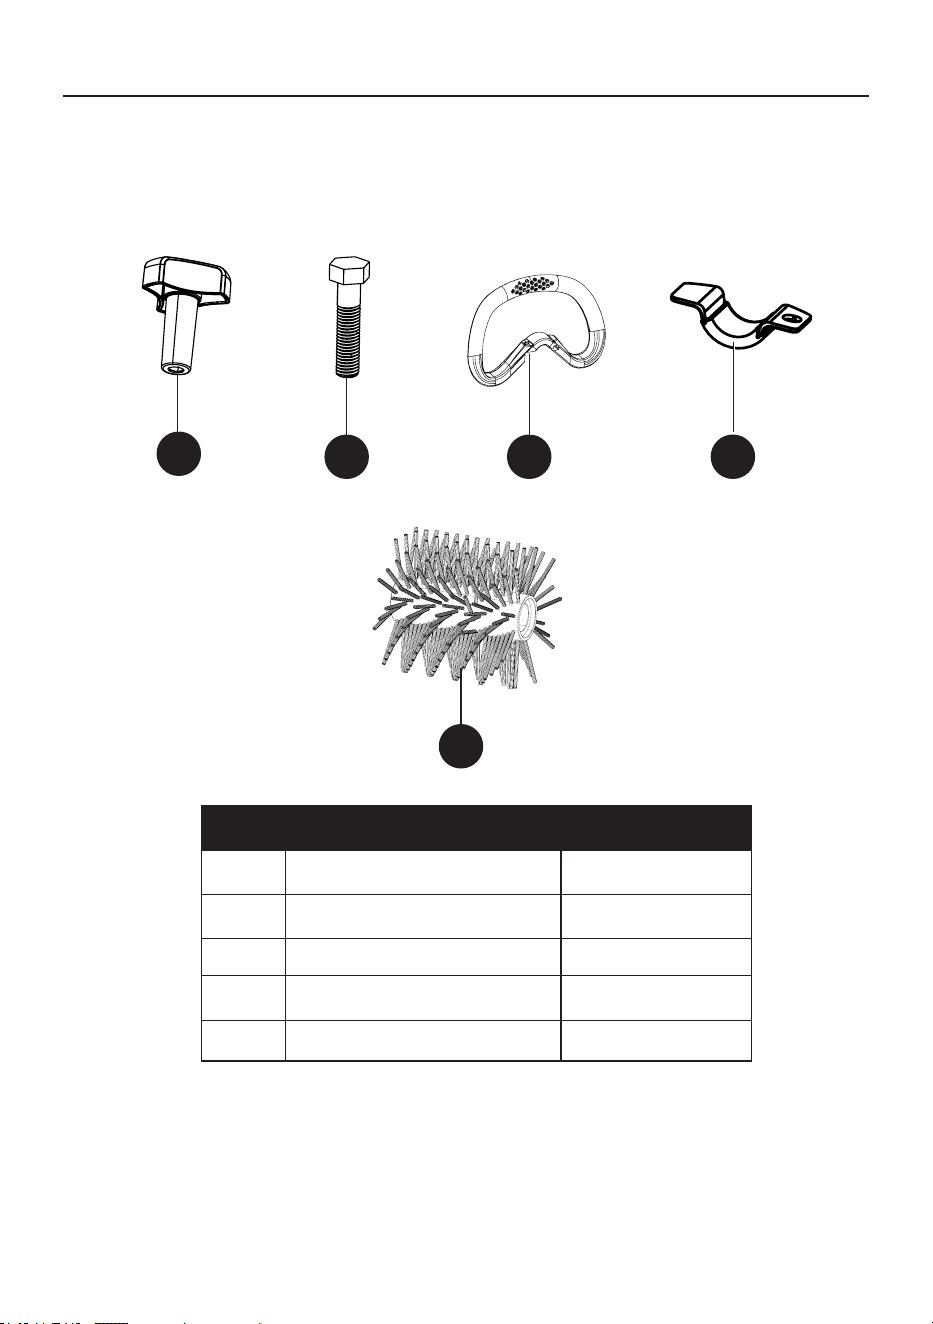
HARDWARE CONTENTS (Not to scale)
Screw
Qty. 2
Fastening
Knob
Qty. 1
Lower Bracket
Qty. 1
Knob
Qty. 1
Bolt
Qty. 1
AA
FF
BB
GG
EE
Screw
Qty. 2
Screw
Qty. 1
CC DD
5
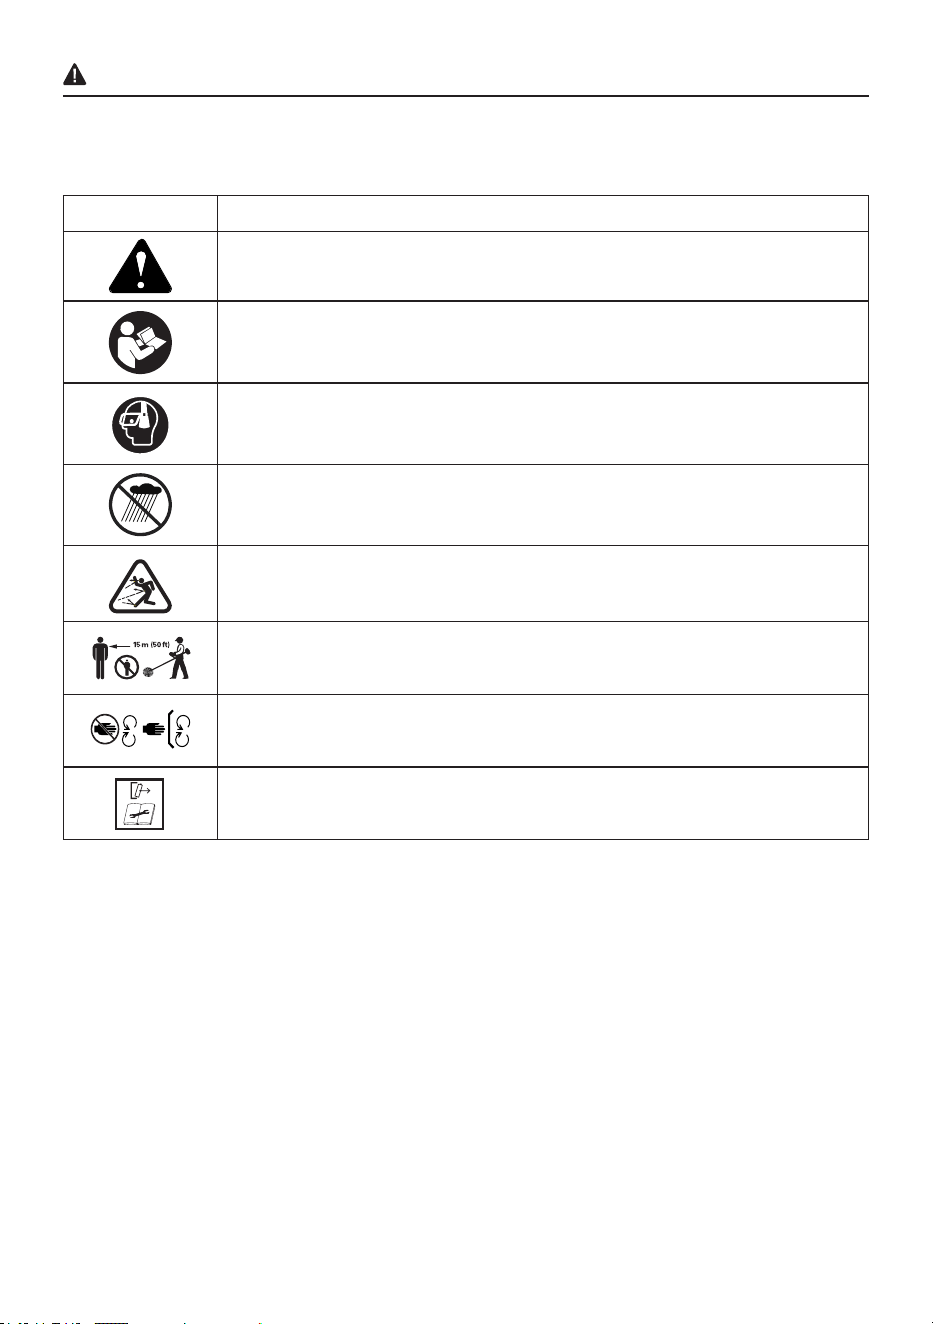
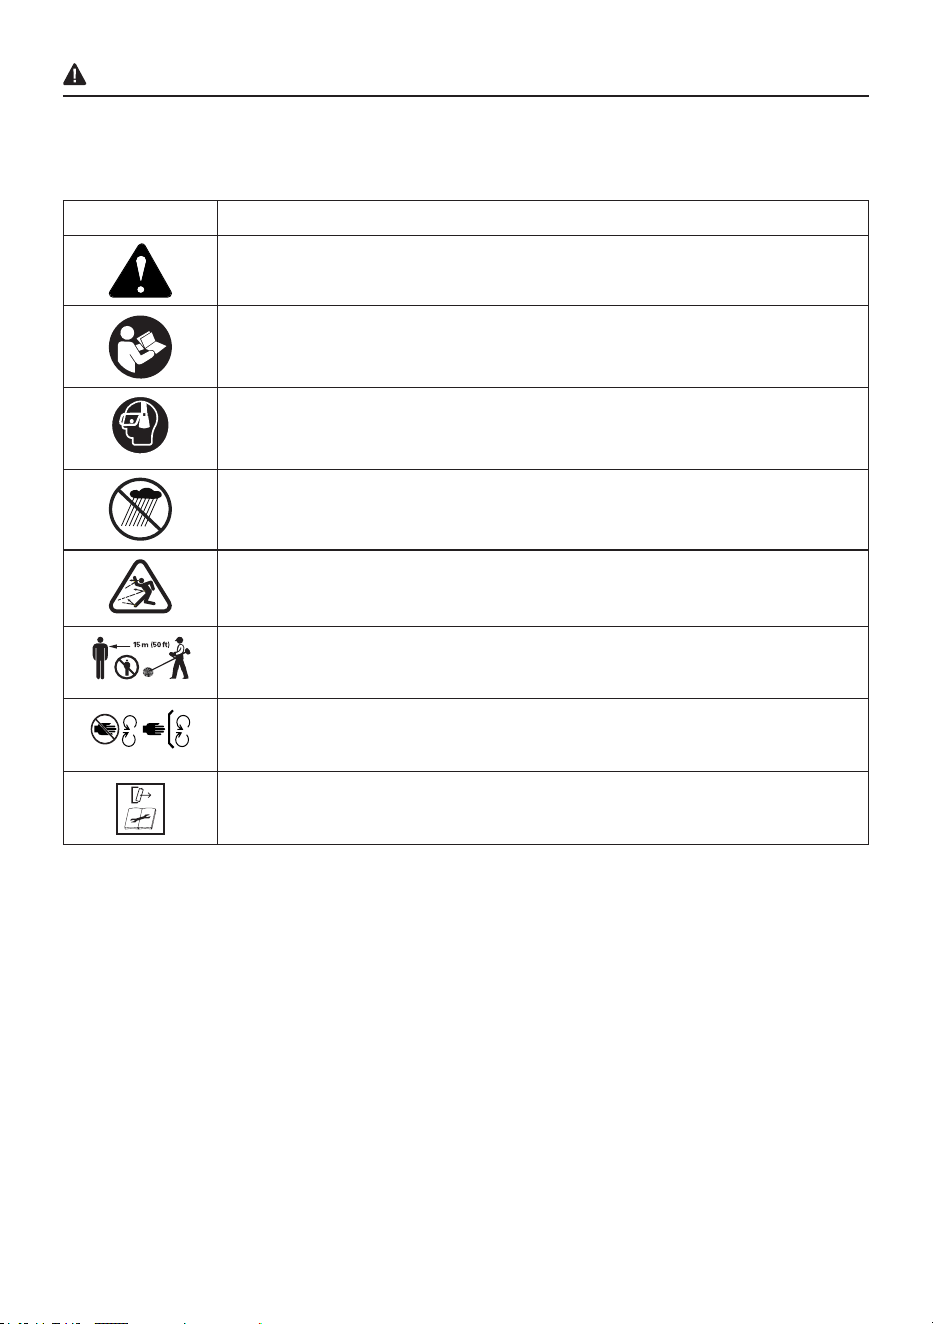
SYMBOLS
Some of the following symbols may be used on this product. Please study them and learn their
meaning. Proper interpretation of these symbols will allow you to operate the product better and safer.
SYMBOLS EXPLANATION
Indicates a potential personal injury hazard.
To reduce the risk of injury, user must read instruction manual.
Wear eye and ear protection.
Do not expose to rain.
Beware of thrown objects.
The distance between the machine and bystanders shall be at least 15 m (50 ft).
Keep hands away from the rotating brush.
Disconnect battery before maintenance.

6
SYMBOLS
The following signal words and meanings are intended to explain the levels of risk associated with this
product.
SYMBOL SIGNAL MEANING
DANGER
Indicates an imminently hazardous situation, which, if not avoided,
will result in death or serious injury.
WARNING
Indicates a potentially hazardous situation, which, if not avoided,
could result in death or serious injury.
CAUTION
Indicates a potentially hazardous situation, which, if not avoided,
may result in minor or moderate injury.
CAUTION
(Without Safety Alert Symbol) Indicates a situation that may result in
property damage.
WARNING
• To avoid serious personal injury, do not attempt to use this product until you have read this owner’s
manual thoroughly and understand it completely. If you do not understand the warnings and
instructions in this owner’s manual, do not use this product. Call 888-356-2258 for assistance.
•
The operation of any product can result in foreign objects being thrown into your eyes,
which can result in severe eye damage. Before operating a product, always wear safety
goggles, safety glasses with side shields, or a full-face shield when needed. A Wide Vision
Safety Mask is recommended for use over eyeglasses or standard safety glasses with side
shields. Always use eye protection that is marked to comply with ANSI Z87.1.

7
SAFETY INFORMATION
WARNING
1) Work area safety
a) Keep work area clean and well lit. Cluttered or dark areas invite accidents.
b) Do not operate products in explosive atmospheres, such as in the presence of ammable
liquids, gases or dust. Products create sparks which may ignite the dust or fumes.
c) Keep children and bystanders away while operating a product. Distractions can cause you to lose
control.
2) Electrical safety
a) Product plugs must match the outlet. Never modify the plug in any way. Do not use any
adapter plugs with earthed (grounded) products. Unmodied plugs and matching outlets will reduce
risk of electric shock.
b) Avoid body contact with earthed or grounded surfaces, such as pipes, radiators, ranges and
refrigerators. There is an increased risk of electric shock if your body is earthed or grounded.
c) Do not expose products to rain or wet conditions. Water entering a product will increase the risk of
electric shock.
d) Do not abuse the cord. Never use the cord for carrying, pulling or unplugging the product.
Keep cord away from heat, oil, sharp edges or moving parts. Damaged or entangled cords increase
the risk of electric shock.
e) When operating a product outdoors, use an extension cord suitable for outdoor use. Use of a
cord suitable for outdoor use reduces the risk of electric shock.
f) If operating a product in a damp location is unavoidable, use a RESIDUAL CURRENT DEVICE
(RCD) protected supply. Use of an RCD reduces the risk of electric shock.
NOTE: The term “RESIDUAL CURRENT DEVICE (RCD)” may be replaced by the term “ground fault
circuit interrupter (GFCI)”or “earth leakage circuit breaker (ELCB)”.
3) Personal safety
a) Stay alert, watch what you are doing and use common sense when operating a product. Do
not use a product while you are tired or under the inuence of drugs, alcohol or medication. A
moment of inattention while operating products may result in serious personal injury.
b) Use personal protective equipment. Always wear eye protection. Protective equipment such as
a dust mask, non-skid safety shoes, hard hat or hearing protection used for appropriate conditions will
reduce personal injuries.
c) Prevent unintentional starting. Ensure the switch is in the o-position before connecting to
power source and/or BATTERY pack, picking up or carrying the tool. Carrying products with your
nger on the switch or energizing products that have the switch on invites accidents.
d) Remove any adjusting key or wrench before turning the product on. A wrench or a key left
attached to a rotating part of the product may result in personal injury.
e) Do not overreach. Keep proper footing and balance at all times. This enables better control of the
product in unexpected situations.
f) Dress properly. Do not wear loose clothing or jewelry. Keep your hair and clothing away from
moving parts. Loose clothes, jewellery or long hair can be caught in moving parts.
Read all safety warnings, instructions, illustrations and specications provided with this power
tool. Failure to follow all instructions listed below may result in electric shock, re and/or serious injury.
Save all warnings and instructions for future reference.
The term “product” in the warnings refers to your mains-operated (corded) product or BATTERY
operated (cordless) product.

8
SAFETY INFORMATION
g) If devices are provided for the connection of dust extraction and collection facilities, ensure
these are connected and properly used. Use of dust collection can reduce dust-related hazards.
h) Do not let familiarity gained from frequent use of tools allow you to become complacent and
ignore tool safety principles. A careless action can cause severe injury within a fraction of a second.
4) BATTERY tool use and care
a) Recharge only with the charger specied by the manufacturer. A charger that is suitable for one
type of BATTERY pack may create a risk of re when used with another BATTERY pack.
b) Use products only with specically designated BATTERY packs. Use of any other BATTERY
packs may create a risk of injury and re.
c) When BATTERY pack is not in use, keep it away from other metal objects, like paper clips,
coins, keys, nails, screws or other small metal objects, that can make a connection from one
terminal to another. Shorting the BATTERY terminals together may cause burns or a re.
d) Under abusive conditions, liquid may be ejected from the BATTERY; avoid contact. If contact
accidentally occurs, ush with water. If liquid contacts eyes, additionally seek medical help.
Liquid ejected from the BATTERY may cause irritation or burns.
e) Do not use a BATTERY pack or tool that is damaged or modied. Damaged or modied batteries
may exhibit unpredictable behavior resulting in re, EXPLOSION or risk of injury.
f) Do not expose a BATTERY pack or tool to re or excessive temperature. Exposure to re or
temperature above 130 °C (265 °F) may cause explosion.
g) Follow all charging instructions and do not charge the BATTERY pack or tool outside the
temperature range specied in the instructions. Charging improperly or at temperatures outside the
specied range may damage the BATTERY and increase the risk of re.
5) Service
a) Have your product serviced by a qualied repair person using only identical replacement
parts. This will ensure that the safety of the product is maintained.
b) Never service damaged BATTERY packs. Service of BATTERY packs should only be performed by
the manufacturer or authorized service providers.
WARNING
Use only Kobalt approved replacement batteries. Other batteries may cause injury or damage to the
mower. Use only with the battery packs and chargers listed below:
BATTERY PACK:
KB 224-03, KB 224-06, KB 324-06, KB 424-03, KB 424A-06, KXB 424-03, KB 424-
06, KB 524-03, KB 524-06, KB 624-03, KB 624-06, KXB 824-03, KB 824-06
CHARGER:
KRC 2445-03, KCH 2401-03, KDPC 124-03, KRC 2490-03, KCH 2411-03, KRC 2404-03,
KCH 324-06, KCH 624-06, KCH 1024-06, KCH 1424-06
For best performance results, use with (2) 4.0 Ah Batteries or higher.

9
SAFETY INFORMATION
SAVE THESE INSTRUCTIONS
WARNING (PROPOSITION 65)
Some dust created by power sanding, sawing, grinding, drilling, and other construction activities
contains chemicals known to cause cancer, birth defects or other reproductive harm. Some
examples of these chemicals are:
• Lead from lead-based paints.
• Crystalline silica from bricks and cement and other masonry products, and
• Arsenic and chromium from chemically treated lumber.
Your risk of exposure to these chemicals varies depending on how often you do this type of work.
To reduce your exposure to these chemicals, work in a well-ventilated area, and work with approved
safety equipment, such as dust masks that are specially designed to lter out microscopic particles.
SERVICE
Servicing requires extreme care and knowledge and should be performed only by a qualied service
technician. For service, it is suggested you return the product to your nearest AUTHORIZED SERVICE
DEPARTMENT for repair. When servicing, use only identical replacement parts.
10
PREPARATION
Before beginning assembly of product, make sure all parts are present. Compare parts with package
contents list and hardware contents list. If any part is missing or damaged, do not attempt to assemble
the product.
Estimated Assembly Time: 5 - 10 minutes
ASSEMBLY INSTRUCTIONS
WARNING
To avoid injury and to reduce the risk of electrical shock or re:
• Replace the battery or charger immediately if the battery case or charger cord is damaged.
• Always make sure the string trimmer switch is OFF before inserting or removing the battery.
• Always make sure the battery is removed and the switch is turned OFF before inspecting, adjusting,
or maintaining any other part of the string trimmer.
• Read, understand, and follow the Battery Charger instructions.
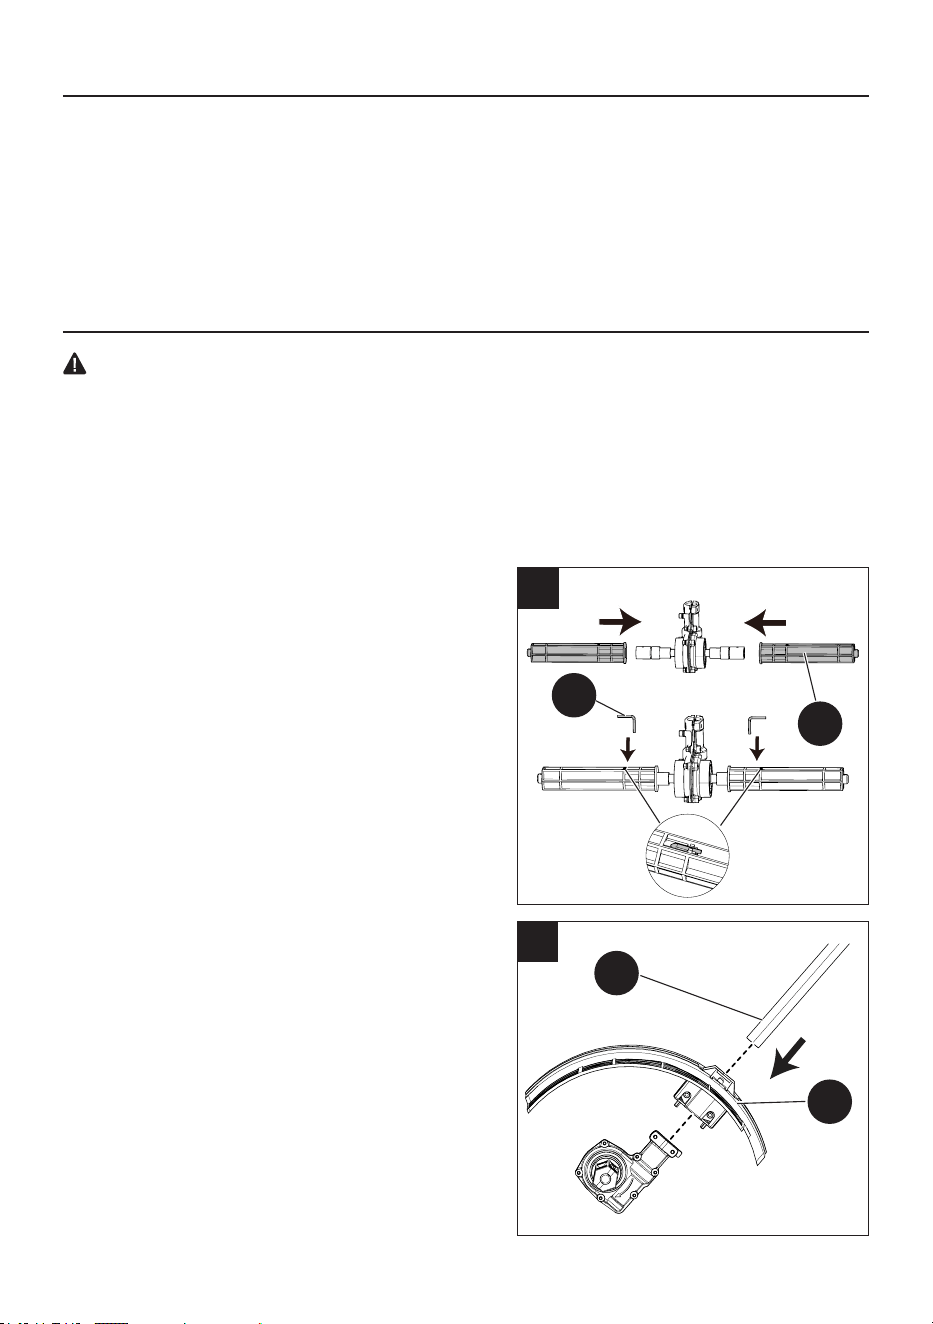
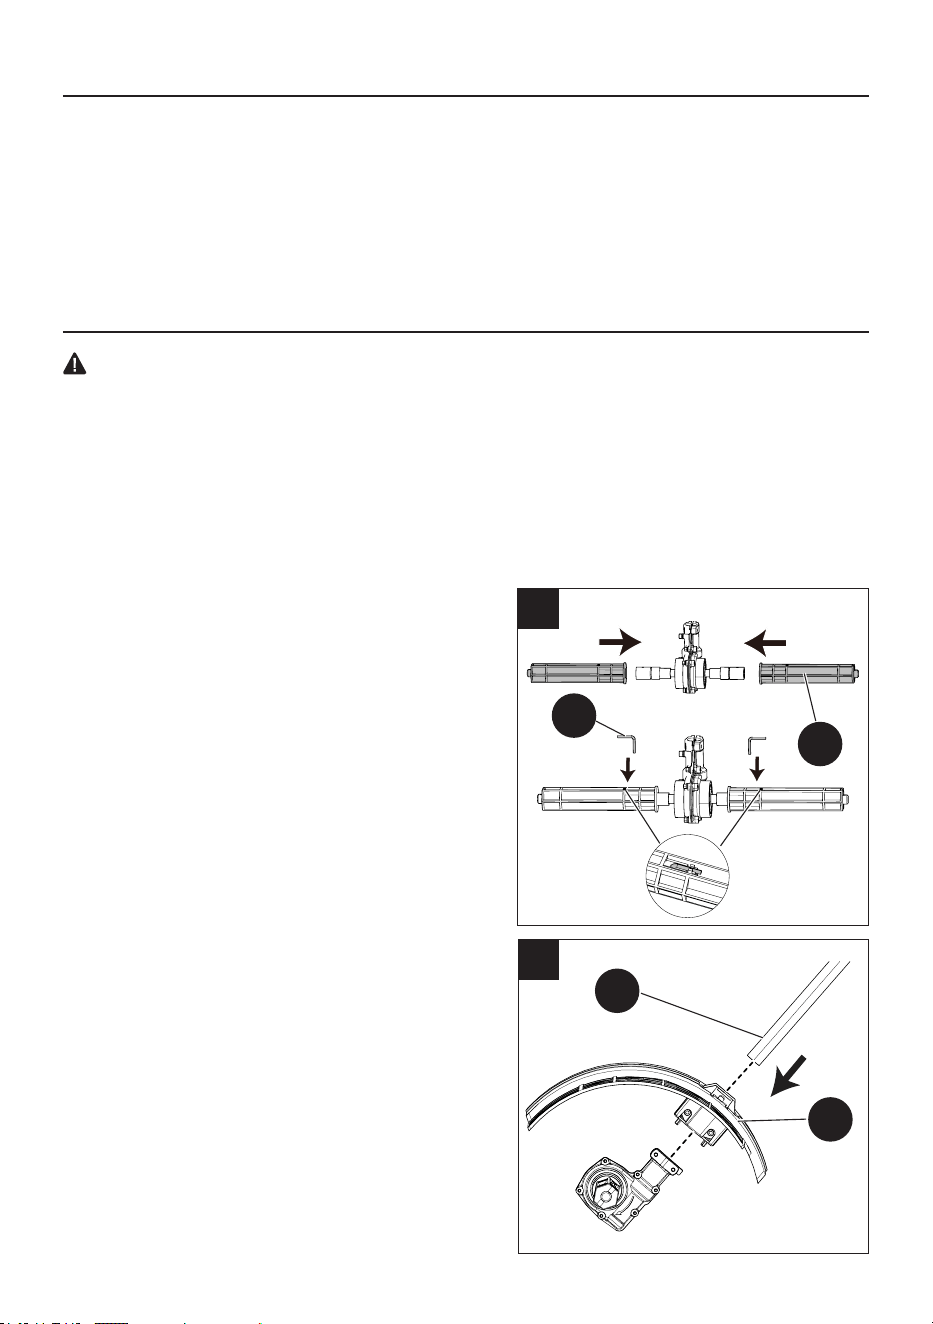
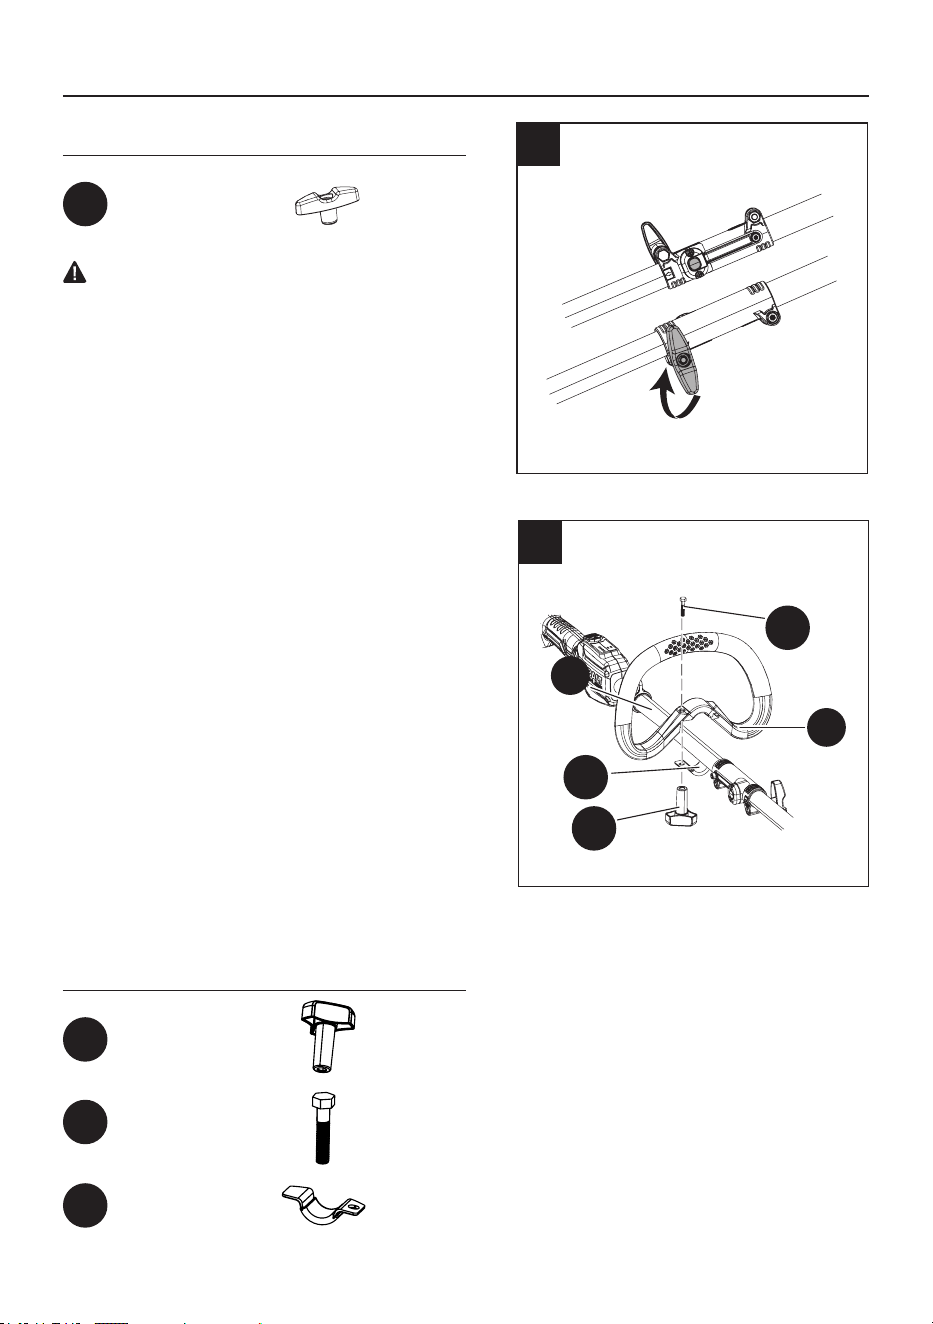
1. Installing the guard
1a
CAUTION
Install the protective guard before the bristle brush
is connected to the power head. It should not be
removed or disassembled.
• Install the connecting sleeves (M) and lock pin
(N).
• Pass the lower tube (E) through the hole in the
guard (I) and insert it into the hole of the brush
assembly.
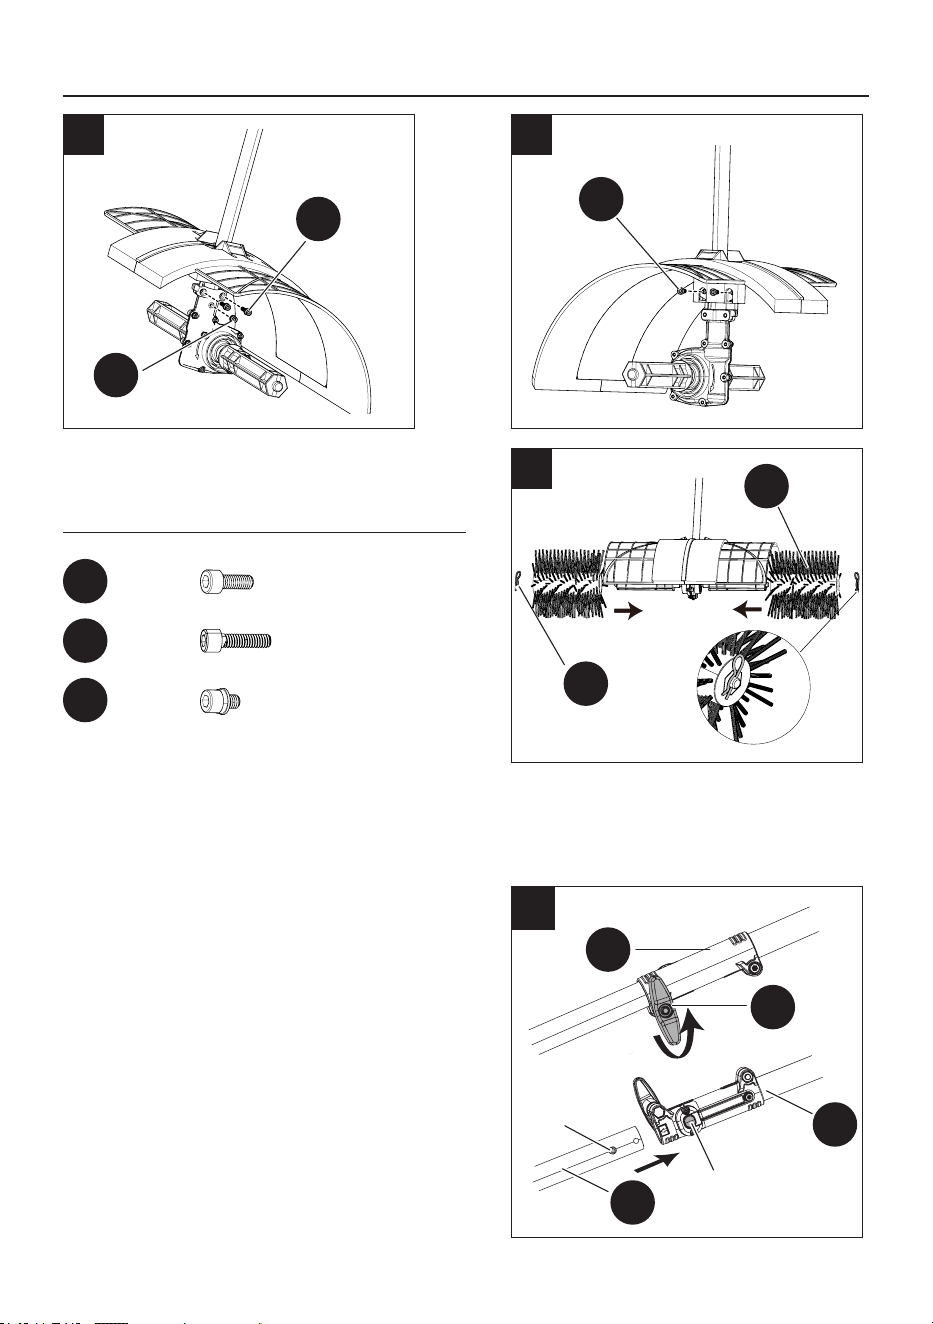
• Tighten the screw (CC) to x the tube.
• Tighten the 2 screws (BB).
• Adjust the guard to your desired position and
tighten the 2 screws (AA) to secure the guard.
• Install the brush rollers (L) and hitch pins (K).
I
E
I
1b
M
N
11
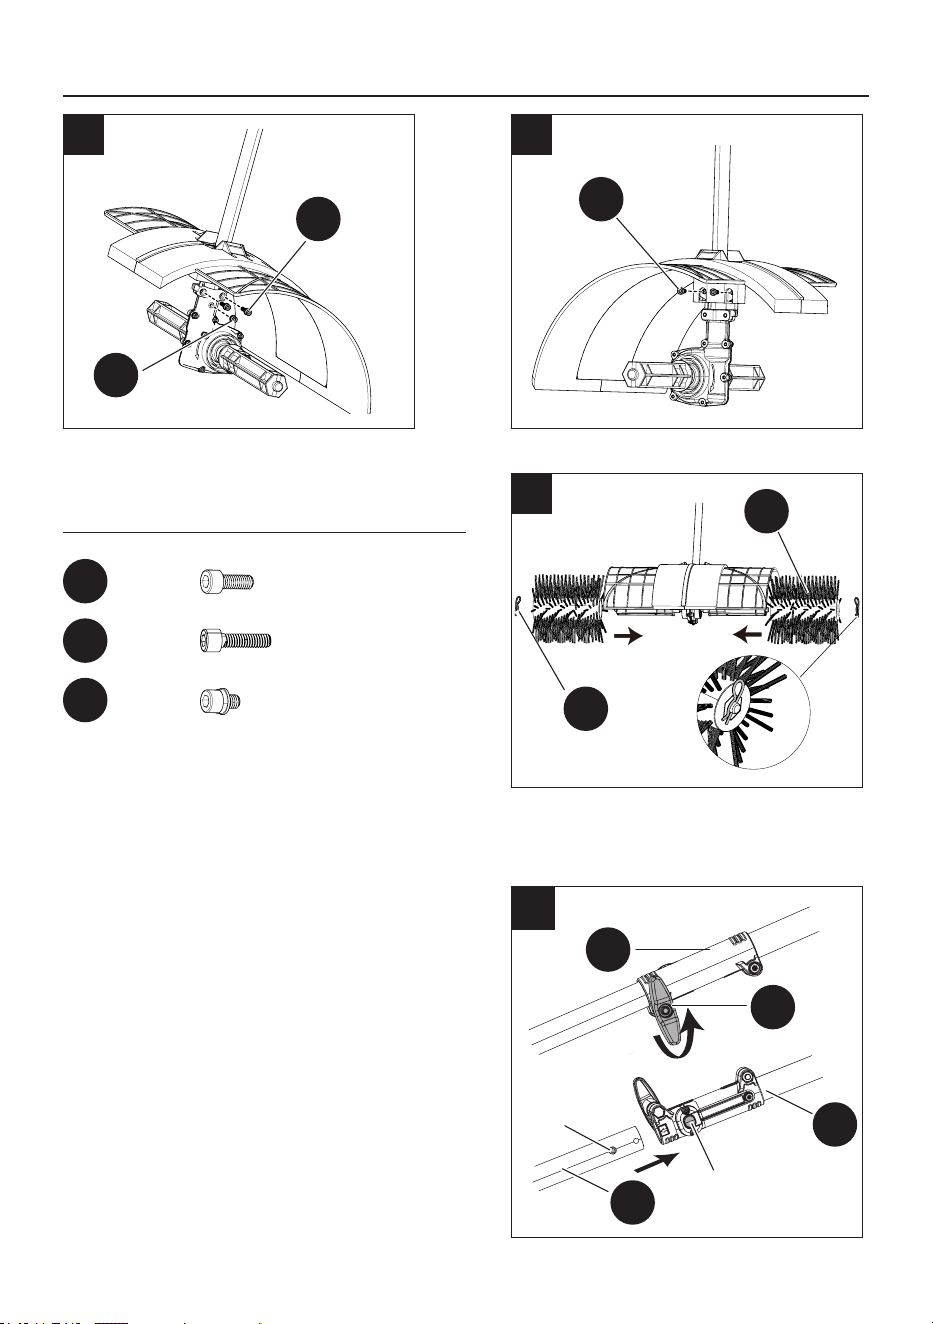
Hardware Used
Screw
x 2
AA
ASSEMBLY INSTRUCTIONS
2a
2. Connecting upper / lower trimmer tubes
• Loosen the knob (FF) on the coupler (D).
• Push in the release button on the lower tube (E).
• Align the attachment pin with the release button
on the upper tube (G) and slide the two tubes
together.
• Rotate the lower tube (E) until the attachment
pin locks into the positioning hole.
• Tighten the knob (FF).
D
E
Attachment pin
Release button
G
x 2
x 1
AA
FF
BB
CC
Screw
Screw
1e
1d
BB
CC
1c
E
L
K
12
Hardware Used
Knob x 1
FF
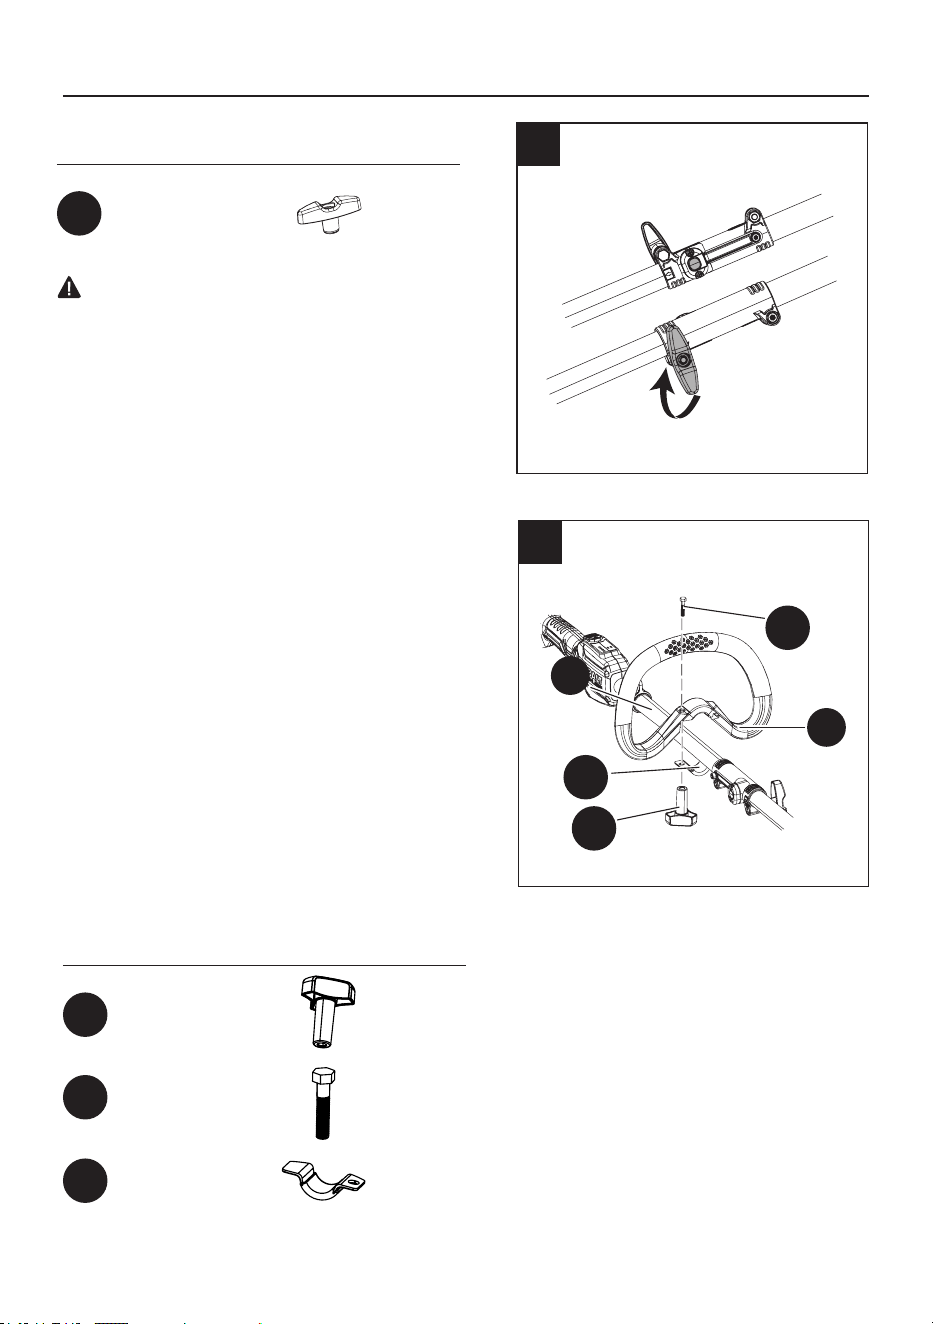
2b
ASSEMBLY INSTRUCTIONS
3
3. Installing the front / auxiliary handle
• Position the front/auxiliary handle (C) onto the
upper portion of the trimmer section by sliding
over the upper tube (G).
• Once the front/auxiliary handle (C) is in the
desired position, align the hole on the handle
with the hole on the bracket (GG), then slide
the bolt (EE) through the top of the handle and
secure with the fastening knob (DD).
• Tighten until there is no movement in the
handle.
• The front handle can be adjusted to a suitable
position.
Note: Do not overtighten the fastening knob. It
could cause the xed block to break.
Hardware Used
Fastening Knob x 1
DD
WARNING
To avoid injury, adjust the auxiliary handle for
optimum control and balance. Do not overreach
when operating grass trimmer. Keep proper
balance at all times for better control of the tool in
unexpected situations.
Bolt x 1
EE
Lower bracket x 1
GG
BB
C
G
DD
GG
EE
13
ASSEMBLY INSTRUCTIONS
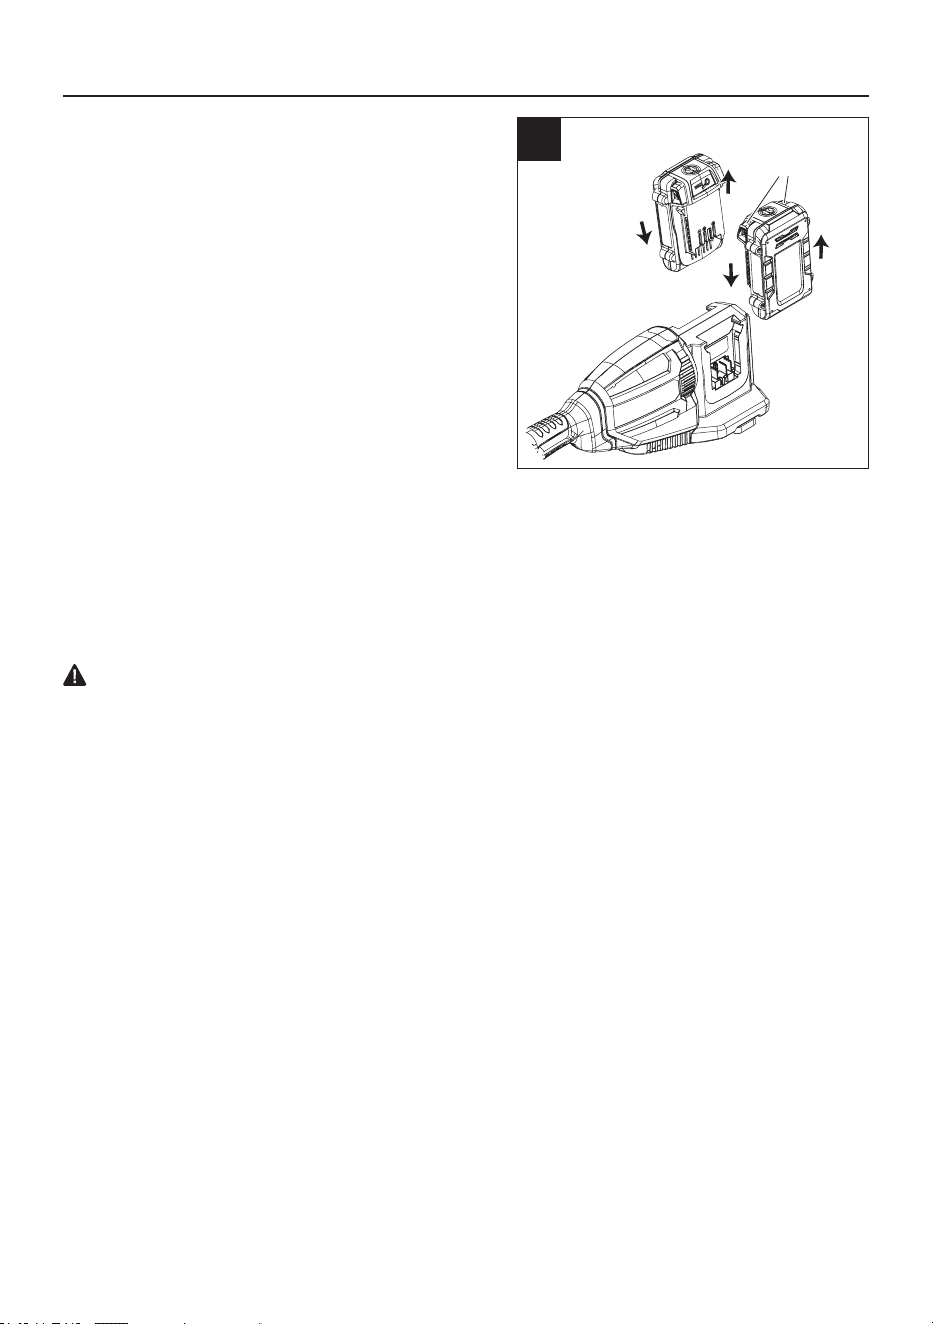
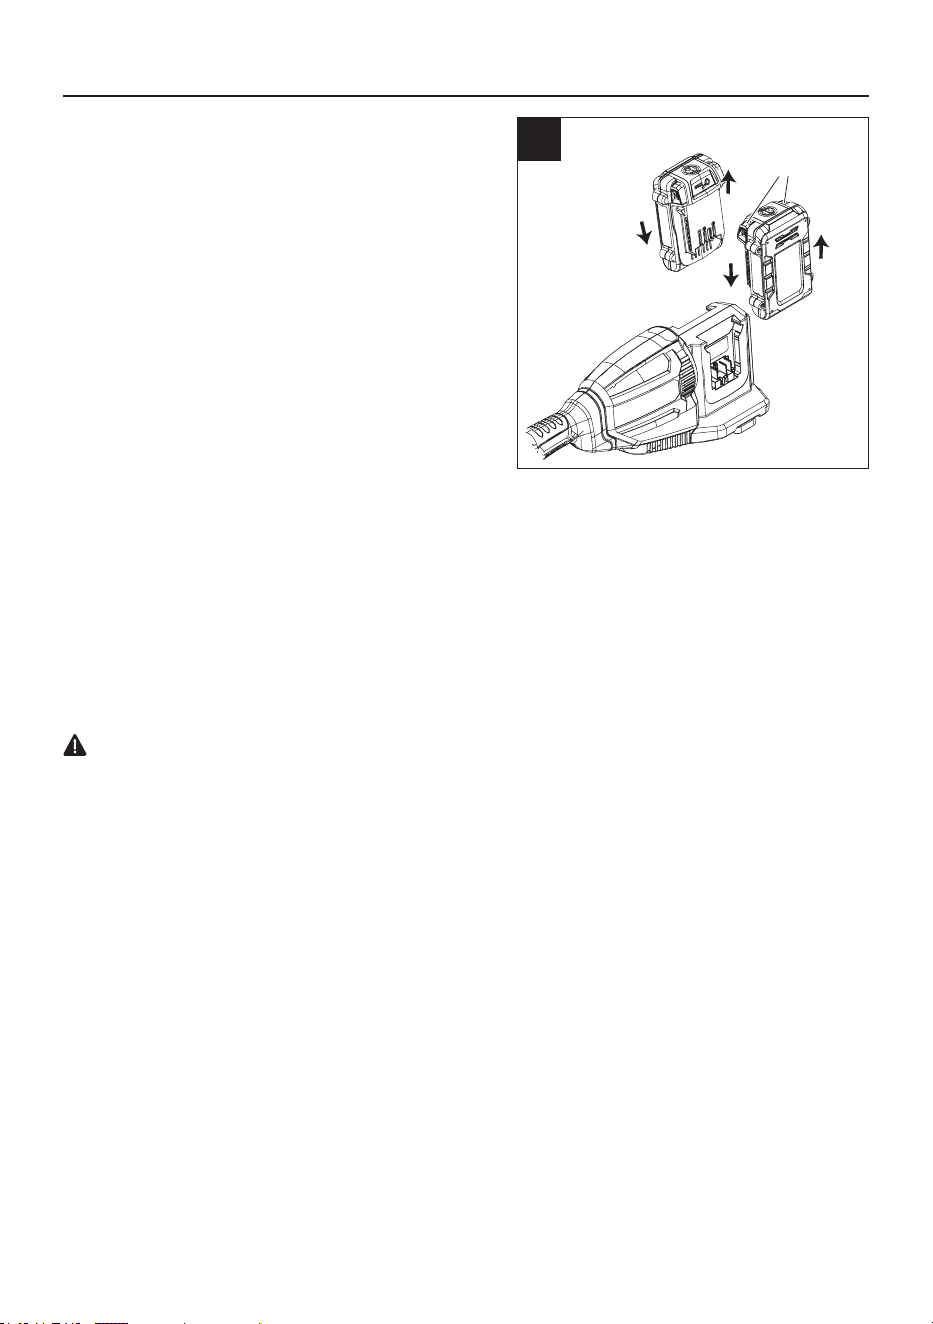
4
4. Installing / removing the battery
IMPORTANT
The batteries are not charged when they are
purchased. Before using the trimmer for the rst
time, plug the batteries into the battery charger and
charge.
To install the battery
• Make sure that the batteries are fully charged.
• Push the batteries into the battery slots. The
batteries lock into position when you hear a click.
• Make sure that both batteries are installed
securely.
To remove the battery
• Release the trigger.
• Push the battery release buttons and pull out the batteries to fully stop its operation.
Note: The batteries t into the battery slots snugly in order to prevent accidental dislodging.
WARNING
Follow these instructions in order to avoid injury and to reduce the risk of electric shock or re:
• Replace the battery immediately if the battery case is damaged.
• Verify that the switch is in the OFF position before inserting or removing the battery.
• Verify that the battery is removed and the switch is in the OFF position before inspecting, adjusting, or
performing maintenance on any part of the string trimmer.
Battery release
button
14
OPERATING INSTRUCTIONS
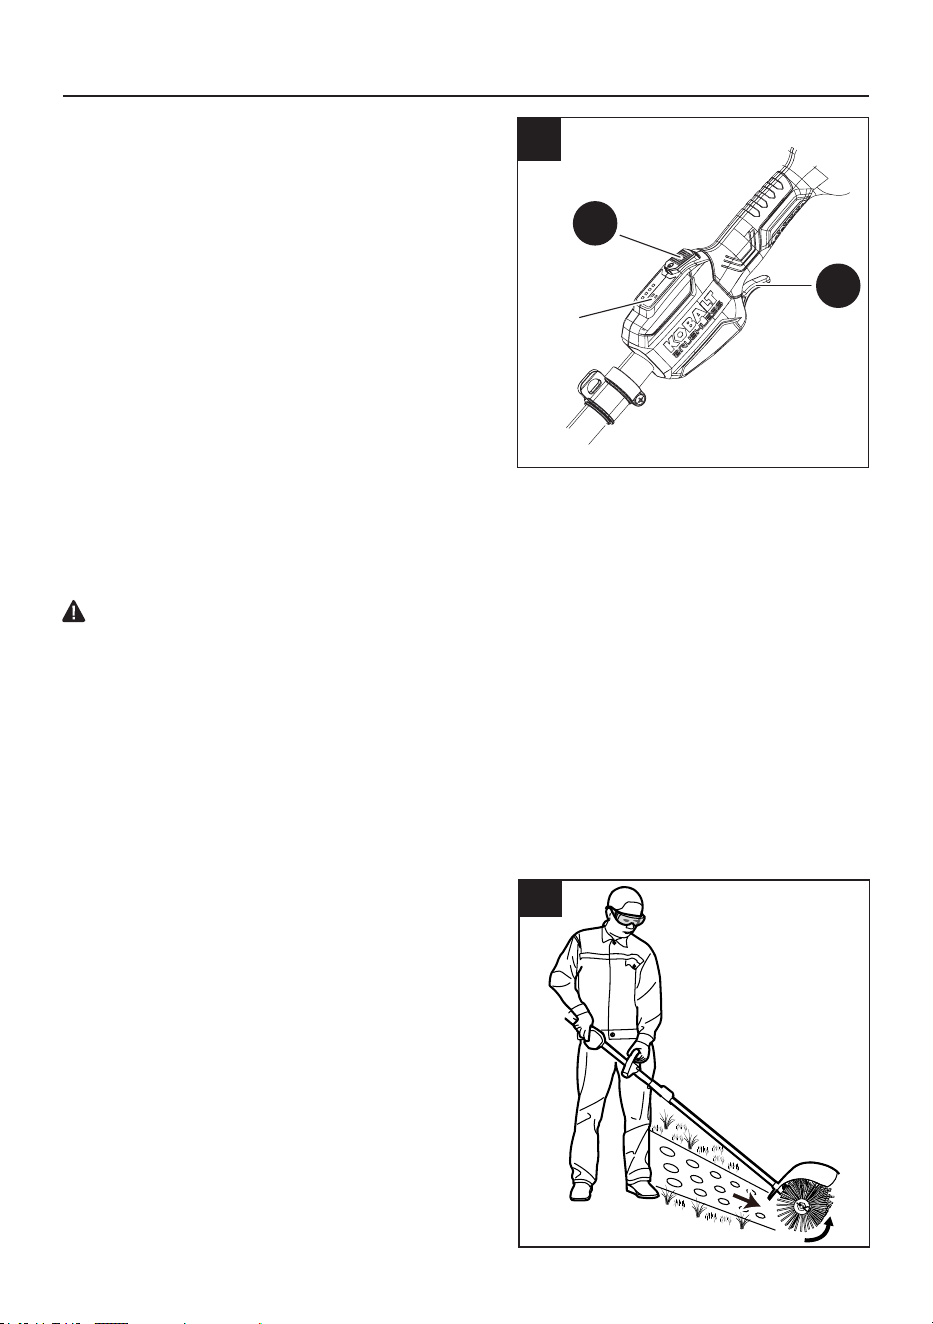
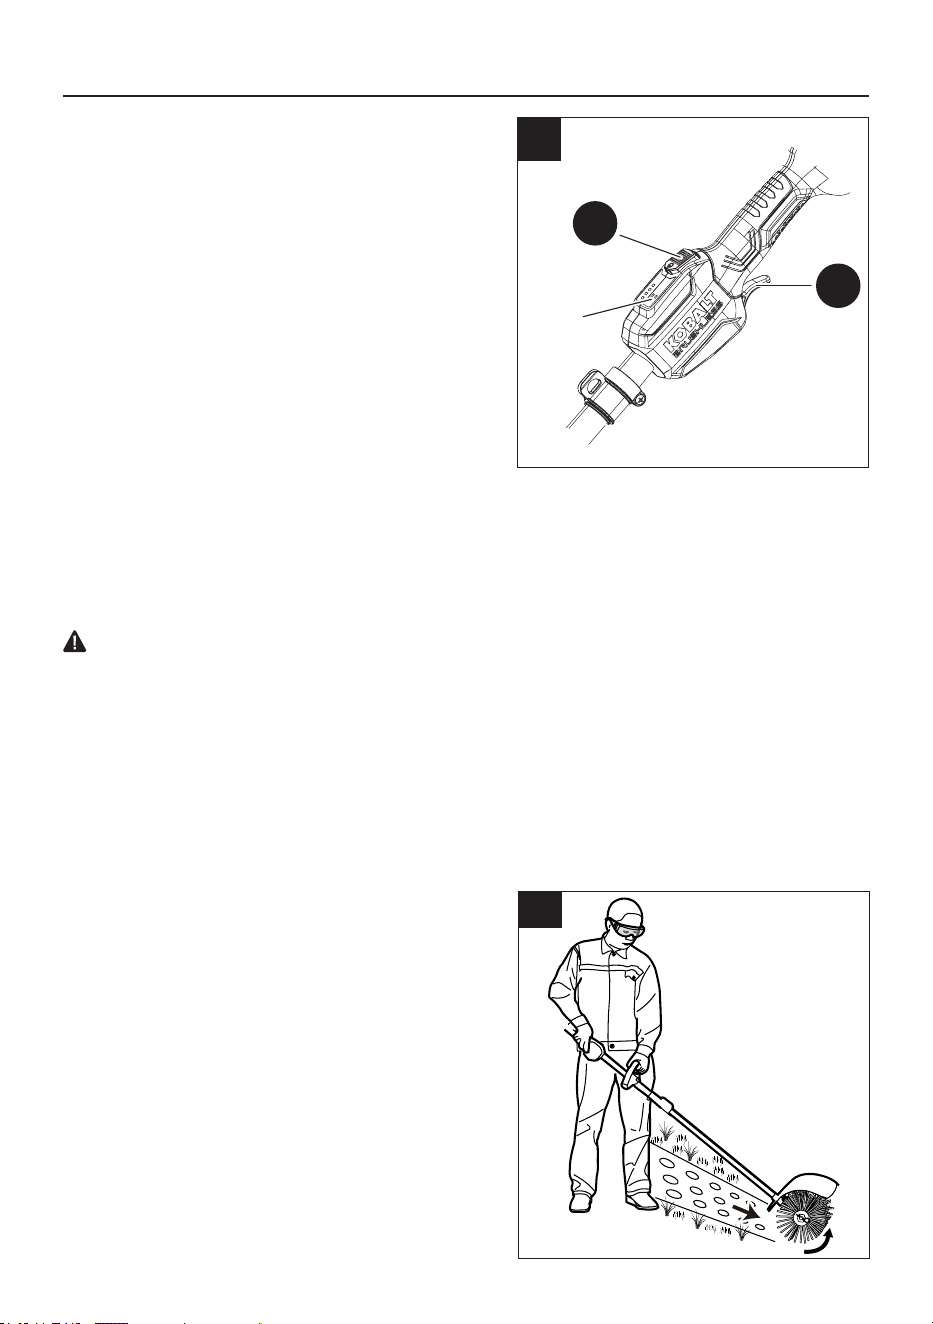
1
1. Starting / stopping the product
IMPORTANT
This tool requires (2) Kobalt 24V batteries to operate.
• Push the power button (A), then pull the trigger (J)
to start. Push the power button to adjust the speed.
If two bars are illuminated, it indicates high-speed
mode; if a single bar is on, it represents low-speed
operation.
• Release the trigger (J) to stop.
CAUTION
Always allow 5 seconds or more for the product to
completely stop after releasing the trigger. Do not
invert the product or place your hands under the
protective guard until the product has come to a
complete stop.
A
Speed
indicator
LED
K
2
• Work with the bristle brush forward. Hold the
bristle brush with one hand on the rear handle
and the other hand on the front-assist handle.
Keep a rm grip with both hands while operating
the bristle brush.
• Hold and guide the bristle brush at a shallow
angle. If the bristle brush is held at too steep
an angle, it tends to push back towards the
operator.
• Maintain your grip and balance on both feet.
2. Operation tips
WARNING
• Do not allow familiarity with this product to make you careless. Remember that a careless fraction of a
second is sucient to inict serious injury.
• Always wear eye protection that is marked to comply with ANSI Z87.1. Failure to do so could result in
objects being thrown into your eyes and other possible serious injuries.
• Do not use any attachments or accessories not recommended by the manufacturer of this product.
The use of attachments or accessories not recommended can result in serious personal injury.
• Dress properly to reduce the risk of injury when operating this tool. Do not wear loose clothing or
jewelry. Wear eye protection. Wear heavy, long pants, boots and gloves. Do not wear short pants or
sandals or go barefoot.
• If the surface to be cleaned is dry, spray it with water to reduce the amount of dust created.
J

15
OPERATING INSTRUCTIONS
• Thrown materials may seriously injure the operator or bystander. To reduce the risk of personal
injury, it is essential to take the following precautions:
• Always hold the tool with both hands when operating. Use a rm grip on both handles.
• Move the bristle brush to the work area before starting and start the bristle brush at a lower
speed.
• To reduce the risk of injury from loss of control, hold and guide the bristle brush at a shallow
angle. If the bristle brush is held at too steep an angle, it tends to push back towards the operator.
• Before each use, check for damaged/worn parts. Check the brush roller, guard, front-assist handle,
and drive axle and replace any parts that are cracked, warped, bent, or damaged in any way.
• Clean the bristle brush after each use. See the Maintenance section for cleaning instructions.
• To reduce the risk of injury, never work without the guard.
• Ensure the brush roller has come to a complete stop and the battery is removed o before cleaning
or servicing the bristle brush. Failure to comply could result in possible serious personal injury.
APPLICATIONS
You may use this product for the purpose listed below:
• Cleaning areas and paths, including uneven and jointed surfaces.
• Cleaning the pavement/concrete/asphalt driveways, walkways, and yards.

16
CARE AND MAINTENANCE
1. General maintenance
Avoid using solvents when cleaning plastic parts. Most plastics are susceptible to damage from
various types of commercial solvents and may be damaged by their use. Use a clean cloth to remove
dirt, dust, oil, grease, etc.
WARNING
• When servicing, use only identical replacement parts. Use of any other parts may create a hazard
or cause product damage. To ensure safety and reliability, all repairs should be performed by a
qualied service technician.
• To prevent serious personal injury, remove the battery packs from the power head and wait for
the brush roller to stop before servicing, cleaning, changing add-on attachments or when the
product is not in use.
• Do not at any time let brake uids, gasoline, petroleum-based products, penetrating oils, etc.,
come in contact with plastic parts. Chemicals can damage, weaken, or destroy plastic, which may
result in serious personal injury.
• When cleaning the bristle brush attachment, DO NOT immerse it in water or other liquids. Do
not clean your machine with a pressure washer. The solid jet of water may damage parts of the
machine.
2. Brush roller maintenance
• Clean the brush roller frequently.
• If any of the brush roller needs replacing due to damage, replace both brush rollers for best
performance.
WARNING
All bristle brush service, other than the items listed in these maintenance instructions, should be
performed by authorized service personnel.
3. Cleaning the unit
• Remove the batteries.
• Clear the pieces of roots, clogged soils, or plants from the brush rollers, guard, or the gear box.
For thorough cleaning, remove the brush rollers and guard to wash them thoroughly.
• Keep the air vents free of obstructions.
WARNING
• Before performing maintenance, remove batteries from the tool.
• A damaged brush roller may break into pieces after long-time use, which may cause dangerous
projectiles. Thrown objects can cause serious injury. Inspect it regularly and do not operate the
bristle brush with worn or damaged parts.
4. Storing the unit
• Remove the battery packs from the tool.
• Clean the tool thoroughly and inspect the brush rollers.
• Remove the bristle brush attachment from the power head and cover the attachment shaft with
end cap to avoid dirt getting into the coupling.
• Store the tool in a dry, well-ventilated area, locked-up or up high, out of the reach of children. Do
not store the unit on or adjacent to fertilizers, gasoline, or other chemicals.

17
TROUBLESHOOTING
PROBLEM POSSIBLE CAUSE CORRECTIVE ACTION
Motor fails to start
when switch trigger is
depressed.
Batteries are not secure. To secure the batteries, make
sure the latches on the battery
compartment snap into place.
Batteries are not charged. Charge the batteries according
to the instructions included with
your model.
Possible wiring or electrical
contact problem.
Call KOBALT (888-356-2258) for
technical service.
Bristle brush is
obviously damaged.
Abnormal damage during
transportation or use.
Replace it or contact KOBALT
customer service department.
If you still have questions or an unresolved issue after going through this troubleshooting guide, or just
want to speak to a KOBALT product expert, please call our KOBALT customer service department at
888-356-2258.

18
WARRANTY
5-YEAR LIMITED WARRANTY
This Kobalt 24 V×2 String Trimmer Attachment Bristle is warranted to the original purchaser from the
original purchase date for ve (5) years subject to the warranty coverage described herein.
This Kobalt 24 V×2 String Trimmer Attachment Bristle is warranted for the original user to be free from
defects in material and workmanship.
If you believe that the Kobalt 24 V×2 String Trimmer Attachment Bristle is defective at any time during
the specied warranty period, simply return the String Trimmer Attachment Bristle along with proof of
purchase to the place of purchase for a free replacement or refund, or call 888-3KOBALT (888-356-
2258) for warranty service.
This warranty is void if: defects in materials or workmanship or damages result from repairs or
alterations which have been made or attempted by others or the unauthorized use of nonconforming
parts; the damage is due to normal wear, damage is due to abuse (including overloading of the tool
beyond capacity), improper maintenance, neglect or accident; or the damage is due to the use of the
tool after partial failure or use with improper accessories or unauthorized repair or alteration.
This warranty gives you specic legal rights, and you may also have other rights that vary from state to
state.
Replacement parts are not covered under warranty.
19
REPLACEMENT PARTS LIST
For replacement parts, call our customer service department at 888-356-2258, 8 a.m. - 8 p.m., EST,
Monday - Sunday. You may also contact us at [email protected].
Printed in Vietnam/China
DD
EE GG
PART DESCRIPTION PART #
DD Fastening knob R0214516-00
EE Bolt R0207110-00
C Front / Auxiliary handle R0207109-00
GG
Lower bracket R0202491-00
H
Replacement Brush R0214525-00
C
H
20
Número de serie
Fecha de compra
ARTÍCULO #6037903
MODELO #KABK 3265-06
KIT DE
ACCESORIOS PARA
CEPILLO DE CERDAS
KOBALT y el diseño del logotipo son marcas
comerciales o marcas registradas de LF, LLC. Todos
los derechos reservados.
Gracias por comprar este producto KOBALT.
¿Preguntas, problemas o piezas faltantes?
Antes de devolver, póngase en contacto con nosotros en:
888-356-2258, de lunes a domingo, de 8 a.m. a 8 p.m., hora estándar del Este, o
escriba a [email protected].

21
ÍNDICE
ESPECIFICACIONES DEL PRODUCTO
21
22
23
24
26
29
29
33
35
36
37
38
ESPECIFICACIONES
Voltaje 48 V CC
Velocidad sin carga 170/190 RPM ± 10%
Especicaciones del producto..................................................................................................................
Contenido del paquete............................................................................................................................
Aditamentos...........................................................................................................................................
Símbolos................................................................................................................................................
Información de seguridad.........................................................................................................................
Preparación............................................................................................................................................
Instrucciones para el ensamblaje..............................................................................................................
Instrucciones de uso..............................................................................................................................
Cuidado y mantenimiento .....................................................................................................................
Detección de problemas........................................................................................................................
Garantía................................................................................................................................................
Lista de piezas de repuesto...................................................................................................................
22
CONTENIDO DEL PAQUETE
PIEZA DESCRIPCIÓN CANTIDAD
A Botón de encendido 1
B LED indicador de alimentación 1
C Mango frontal y auxiliar 1
D Acoplador 1
E Tubo inferior 1
F Gatillo 1
G Tubo superior 1
H Cepillo giratorio 1
I Protector 1
I
G
H
E
D
C
B
H
F
A
23
ADITAMENTOS (no se muestran a escala)
Tornillo
Cantidad. 2
Perilla de
sujeción
Cantidad. 1
Abrazadera
inferior
Cantidad. 1
Perilla
Cantidad. 1
Perno
Cantidad. 1
AA
FF
BB
GG
EE
Tornillo
Cantidad. 2
Tornillo
Cantidad. 1
CC DD
24
SÍMBOLOS
Algunos de los siguientes símbolos pueden aplicarse al uso de este producto. Obsérvelos y aprenda
su signicado. La interpretación correcta de estos símbolos le permitirá utilizar el producto de manera
ecaz y segura.
SÍMBOLOS
DESIGNACIÓN
Indica que existe el riesgo de que se produzcan lesiones personales.
Para reducir el riesgo de lesiones, el usuario debe leer el manual de
instrucciones.
Use protección para los ojos y los oídos.
No lo exponga a la lluvia.
Cuidado con los objetos arrojados.
La distancia entre la máquina y los transeúntes debe ser de al menos 15.24 m (50
pies).
Mantenga las manos alejadas del cepillo en rotación.
Desconecte la batería antes de realizar el mantenimiento.

25
SÍMBOLOS
Las siguientes palabras de señalización y sus signicados tienen el objeto de explicar los niveles de
riesgo relacionados con este producto.
SÍMBOLO SEÑAL SIGNIFICADO
PELIGRO
Indica una situación de peligro inminente que, si no es prevenida,
causará la muerte o lesiones severas.
ADVERTENCIA
Indica una situación de peligro potencial que, si no es prevenida,
podría causar la muerte o lesiones severas.
PRECAUCIÓN
Indica una situación de peligro potencial que, si no es prevenida,
puede causar lesiones menores o moderadas.
PRECAUCIÓN
(Sin el símbolo de alerta de seguridad) Indica una situación que
puede causar daños materiales.
ADVERTENCIA
• Para evitar lesiones corporales serias, no intente utilizar este producto sin haber leído y comprendido
totalmente el manual del operador. Si no comprende los avisos de advertencia y las instrucciones del
manual del operador, no utilice este producto. Llame al 888-356-2258 para obtener ayuda.
•
Cualquier producto en funcionamiento puede lanzar objetos hacia los ojos, lo cual puede
causar serios daños a los mismos. Antes de iniciar la operación de herramientas de
corriente, siempre utilice gafas de seguridad, gafas de seguridad con protección lateral,
y en la medida en que sea necesario, un protector para toda la cara. Se recomienda una
máscara de seguridad de visión amplia sobre los lentes o las gafas de seguridad estándar
con protección lateral. Siempre póngase protección ocular con la marca de cumplimiento de
la norma ANSI Z87.1.

26
INFORMACIÓN DE SEGURIDAD
ADVERTENCIA
1) Seguridad en el área de trabajo
a) Mantenga el área de trabajo limpia y bien iluminada. Las áreas desordenadas u oscuras
aumentan las posibilidades de accidentes.
b) No utilice productos en atmósferas en las que exista riesgo de explosión, como por ejemplo
en presencia de líquidos, gases o polvo inamables. Los productos producen chispas que podrían
encender el polvo o el humo.
c) Mantenga a los niños y espectadores alejados durante la operación de un producto. Las
distracciones pueden provocar que pierda el control.
2) Seguridad eléctrica
a) Los enchufes del producto deben encajar en el tomacorriente. Nunca modique el enchufe
de ningún modo. No utilice ningún enchufe adaptador con productos con puesta a tierra. Los
enchufes sin modicaciones y que encajan en los tomacorrientes reducen el riesgo de descarga
eléctrica.
b) Evite el contacto del cuerpo con supercies conectadas a tierra, como tuberías, radiadores,
estufas o refrigeradores. Si su cuerpo tiene conexión a tierra, existe un riesgo mayor de sufrir una
descarga eléctrica.
c) No exponga los productos a la lluvia ni a condiciones de humedad. Si ingresa agua en un
producto, aumentará el riesgo de descarga eléctrica.
d) No maltrate el cable. Nunca use el cable para transportar, jalar o desenchufar el producto.
Mantenga el cable alejado del calor, el aceite, los bordes losos o las piezas en movimiento. Los
cables dañados o enredados aumentan el riesgo de descarga eléctrica.
e) Si opera un producto en exteriores, use una extensión eléctrica apropiada para su uso en
exteriores. El uso de un cable adecuado para uso en exteriores reduce el riesgo de sufrir una descarga
eléctrica.
f) Si es inevitable utilizar un producto en un lugar húmedo, use un suministro protegido con
un DISPOSITIVO DE CORRIENTE RESIDUAL (RCD, por sus siglas en inglés). El uso de un RCD
disminuye el riesgo de descargas eléctricas.
NOTA: el término “DISPOSITIVO DE CORRIENTE RESIDUAL (RCD)” puede reemplazarse por el
término “interruptor de circuito de falla de puesta a tierra (GFCI, por sus siglas en inglés)” o “interruptor
de circuito de puesta a tierra (ELCB, por sus siglas en inglés)”.
3) Seguridad personal
a) Manténgase alerta, preste atención a lo que hace y utilice el sentido común cuando utilice
un producto. No utilice un producto si está cansado o bajo los efectos de drogas, alcohol o
medicamentos. Un momento de desatención mientras opera productos puede provocar lesiones
personales graves.
b) Use un equipo de protección personal. Use siempre lentes de protección. Los equipos de
protección, como las mascarillas antipolvo, los zapatos de seguridad antideslizantes, los cascos o los
auriculares de seguridad, que se usan en las condiciones adecuadas disminuyen el riesgo de sufrir
lesiones.
Lea todas las advertencias de seguridad, instrucciones, imágenes y especicaciones que
se incluyen con esta herramienta eléctrica. No seguir todas las instrucciones que se detallan a
continuación podría provocar descargas eléctricas, incendios o lesiones graves.
Guarde todas las advertencias e instrucciones para referencia futura.
El término “producto” que aparece en las advertencias se reere al producto que se conecta a la línea
principal (con cable) o al producto que funciona con BATERÍA (inalámbrico).

27
INFORMACIÓN DE SEGURIDAD
c) Evite un arranque accidental. Antes de conectar la herramienta a la fuente de alimentación o al
paquete de BATERÍAS o antes de levantarla o transportarla, asegúrese de que el interruptor esté
en la posición de apagado. Transportar productos con el dedo en el interruptor o enchufarlos con el
interruptor encendido aumenta las posibilidades de accidentes.
d) Retire todas las llaves de ajuste o llaves inglesas antes de encender el producto. Si se deja una
llave conectada a una pieza giratoria del producto, se podrían producir lesiones personales.
e) No se extienda demasiado. Mantenga una postura y un equilibrio adecuados en todo
momento. Esto permite un mejor control del producto en situaciones inesperadas.
f) Use ropa adecuada. No use ropa holgada ni joyas. Mantenga el cabello y la ropa alejados de
las piezas en movimiento. La ropa holgada, las joyas o el cabello largo pueden quedar atrapados en
las piezas en movimiento.
g) Si se proporcionan dispositivos para la conexión de instalaciones de extracción y recolección
de polvo, asegúrese de que se conecten y se usen de manera adecuada. La recolección de polvo
puede disminuir los peligros relacionados con este.
h) No permita que la familiaridad del uso frecuente de las herramientas lo haga no tener en
cuenta los principios de seguridad en el manejo de las herramientas. Un descuido puede ocasionar
una lesión grave en cuestión de segundos.
4) Uso y cuidado de herramientas con BATERÍA
a) Recargue únicamente con el cargador especicado por el fabricante. Un cargador adecuado
para un tipo de paquete de BATERÍAS puede generar un riesgo de incendio cuando se usa con otro
paquete de BATERÍAS.
b) Use productos solo con paquetes de BATERÍAS designados especícamente. El uso de
cualquier otro paquete de BATERÍAS puede crear un riesgo de lesión e incendio.
c) Cuando el paquete de BATERÍAS no está en uso, aléjelo de objetos metálicos, como
sujetapapeles, monedas, llaves, clavos, tornillos u otros objetos metálicos pequeños que
pudieran crear una conexión entre los terminales. Si se conectan las terminales de la BATERÍA, es
posible que se produzcan quemaduras o un incendio.
d) En condiciones de mal uso, es posible que salga líquido de la BATERÍA; evite el contacto. Si
entra en contacto por accidente, enjuague la zona comprometida con agua. Si el líquido entra en
contacto con los ojos, solicite atención médica. El líquido que sale de la BATERÍA puede provocar
irritación o quemaduras.
e) No use un paquete de BATERÍAS ni una herramienta si están dañados o modicados. Las
baterías dañadas o modicadas pueden tener reacciones impredecibles, que podrían provocar
incendios y EXPLOSIONES o suponer un mayor riesgo de sufrir lesiones.
f) No exponga el paquete de BATERÍAS ni la herramienta al fuego o a una temperatura excesiva.
La exposición al fuego o a temperaturas por encima de los 130 °C (265 °F) puede causar una explosión.
g) Siga todas las instrucciones de carga y no cargue el paquete de BATERÍAS ni la herramienta
fuera del rango de temperatura especicado en las instrucciones. La carga inadecuada o a
temperaturas fuera del rango especicado podría dañar la BATERÍA y aumentar el riesgo de incendio.
5) Reparación
a) Permita que solo una persona capacitada repare el producto, mediante el uso solo de piezas
de repuesto idénticas. Esto garantizará que se mantenga la seguridad del producto.
b) Nunca realice mantenimiento a los paquetes de BATERÍAS. Solo el fabricante o los proveedores
de servicio autorizados pueden realizar el mantenimiento de los paquetes de BATERÍAS.

28
INFORMACIÓN DE SEGURIDAD
GUARDE ESTAS INSTRUCCIONES
ADVERTENCIA (PROPUESTA 65)
Algo del polvo provocado por las lijas, sierras, trituradoras y taladros eléctricos, y otras actividades
de construcción contiene productos químicos reconocidos como causantes de cáncer y defectos
congénitos u otros daños en el aparato reproductivo. Algunos ejemplos de estos productos químicos
son:
• plomo de pinturas con base de plomo,
• sílice cristalina de ladrillos, cemento y otros productos de mampostería,
• arsénico y cromo de madera tratada con químicos.
El riesgo que corre a la exposición de estos químicos varía dependiendo de la frecuencia con que
realiza estos tipos de trabajos. Para reducir la exposición a estos productos químicos: trabaje en
un área bien ventilada y con el equipamiento de seguridad aprobado, como por ejemplo máscaras
especialmente diseñadas para ltrar las partículas microscópicas.
MANTENIMIENTO
El mantenimiento del producto requiere extremo cuidado y conocimientos técnicos, por lo cual
solo debe ser efectuado por un técnico de servicio calicado. Para realizar el mantenimiento, le
recomendamos llevar el producto al CENTRO DE SERVICIO AUTORIZADO más cercano para su
reparación. Al realizar mantenimiento, utilice solo piezas de repuesto idénticas a las de fabricación.
ADVERTENCIA
Utilice únicamente baterías de reemplazo aprobadas por Kobalt. Otras baterías pueden causar
lesiones o daños a la podadora. Use solamente los paquetes de baterías y los cargadores que se
indican a continuación:
PAQUETE DE BATERÍAS:
KB 224-03, KB 224-06, KB 324-06, KB 424-03, KB 424A-06, KXB 424-03,
KB 424-06, KB 524-03, KB 524-06, KB 624-03, KB 624-06, KXB 824-03, KB 824-06
CARGADOR:
KRC 2445-03, KCH 2401-03, KDPC 124-03, KRC 2490-03, KCH 2411-03, KRC 2404-
03, KCH 324-06, KCH 624-06, KCH 1024-06, KCH 1424-06
Para obtener mejores resultados de rendimiento, utilice con (2) baterías de 4.0 Ah o superiores.
29
PREPARACIÓN
Antes de empezar a ensamblar del producto, asegúrese de tener todas las piezas. Compare las
piezas con la lista del contenido del paquete y la lista de aditamentos. Si hay piezas faltantes o
dañadas, no intente ensamblar el producto.
Tiempo aproximado de ensamblaje: 5 - 10 minutos
INSTRUCCIONES PARA EL ENSAMBLAJE
ADVERTENCIA
Para evitar lesiones y disminuir el riesgo de descargas eléctricas o incendio:
• Reemplace inmediatamente la batería o el cargador si la funda de la batería o el cable del cargador
están dañados.
• Siempre asegúrese de que el interruptor de la orilladora esté apagado antes de insertar o retirar la
batería.
• Asegúrese siempre de retirar la batería y de que el interruptor esté apagado antes de inspeccionar,
ajustar o dar mantenimiento a cualquier pieza de la orilladora.
• Lea, comprenda y siga las instrucciones del cargador de la batería.
1. Instalación del protector
PRECAUCIÓN
Instale el protector antes de conectar el cepillo de
cerdas al cabezal de potencia. No se debe retirar ni
desmontar.
• Instale las fundas de conexión (M) y el pasador
de bloqueo (N).
• Pase el tubo inferior (E) a través del oricio
de la protección (I) e insértelo en el oricio del
ensamble del cepillo.
• Apriete el tornillo (CC) para jar el tubo.
• Apriete los 2 tornillos (BB).
• Ajuste el protector a la posición deseada y
apriete los 2 tornillos (AA) para asegurar el
protector.
• Instale los cepillos giratorios (L) y los pasadores
de enganche (K).
I
E
I
1b
1a
M
N
30
Aditamentos utilizados
Tornillo
x 2
AA
INSTRUCCIONES PARA EL ENSAMBLAJE
2a
2. Conexión de los tubos superior e inferior de
la orilladora
• Aoje la perilla (FF) en el acoplador (D).
• Presione el botón de liberación en el tubo
inferior (E).
• Alinee el pasador de jación con el botón de
liberación en el tubo superior (G) y deslice los
dos tubos juntos.
• Gire el tubo inferior (E) hasta que el
pasador de jación se trabe en el oricio de
posicionamiento.
• Apriete la perilla (FF).
D
E
Pasador de jación
Botón de liberación
G
x 2
x 1
AA
FF
BB
CC
Tornillo
Tornillo
1d
BB
CC
1c
1e
E
L
K
31
Aditamentos utilizados
Perilla
x 1
FF
2b
INSTRUCCIONES PARA EL ENSAMBLAJE
3
3. Instalación del mango frontal y auxiliar
• Coloque el mango delantero/auxiliar (C) en la
porción superior de la sección de la orilladora al
deslizarla sobre el tubo superior (G).
• Una vez que el mango delantero/auxiliar (C)
esté en la posición deseada, alinee el oricio en
el mango con el oricio en la abrazadera inferior
(GG), luego deslice el perno (EE) a través de
la parte superior del mango y asegúrelo con la
perilla de sujeción (DD).
• Apriete hasta que no haya movimiento en el
mango.
• El mango frontal se puede ajustar a una
posición adecuada.
Nota: no apriete demasiado la perilla de
sujeción, podría hacer que el bloque jo se
rompa.
Aditamentos utilizados
Perilla de sujeción x 1
DD
ADVERTENCIA
Para evitar lesiones, ajuste el mango auxiliar para
obtener un equilibrio y un control óptimos. No
se incline demasiado cuando opere la orilladora
Mantenga el equilibrio todo el tiempo para controlar
mejor la herramienta en situaciones inesperadas.
Perno x 1
EE
Abrazadera inferior
x 1
GG
BB
C
G
DD
GG
EE
32
INSTRUCCIONES PARA EL ENSAMBLAJE
4
4. Instalación y remoción de la batería
IMPORTANTE
Las baterías no vienen cargadas cuando se compran.
Antes de usar la orilladora por primera vez, inserte las
baterías en el cargador de baterías y cárguelas.
Para instalar la batería
• Asegúrese de que las baterías estén completamente
cargadas.
• Empuje las baterías en las ranuras de las baterías.
Las baterías se bloquean en su posición cuando
escucha un clic.
• Asegúrese de que ambas baterías están instaladas
de forma segura.
Para retirar la batería
• Suelte el gatillo.
• Presione los botones de liberación de las baterías y extraiga las baterías para detener completamente
su funcionamiento.
Nota: las baterías encajan en las ranuras para las baterías con rmeza, de modo que se evite el
desprendimiento accidental.
ADVERTENCIA
Siga estas instrucciones para evitar lesiones y reducir el riesgo de descarga eléctrica o incendio:
• Reemplace la batería inmediatamente si la funda de la batería está dañada.
• Verique que el interruptor esté en la posición de apagado antes de insertar o retirar la batería.
• Verique que haya retirado la batería y que el interruptor esté en la posición de apagado antes de
inspeccionar, ajustar o realizar mantenimiento en cualquier pieza de la orilladora.
Botón de liberación de
la batería
33
INSTRUCCIONES DE USO
1
1. Arranque y detención del producto
IMPORTANTE
Esta herramienta requiere (2) baterías Kobalt de 24 V
para funcionar.
• Presione el botón de encendido (A), luego apriete
el gatillo (J) para comenzar. Presione el botón de
encendido para ajustar la velocidad. Si dos barras
están iluminadas, indica el modo de alta velocidad;
si una sola barra está encendida, representa el
funcionamiento a baja velocidad.
• Suelte el gatillo (J) para detener la operación.
PRECAUCIÓN
Después de soltar el gatillo, siempre espere 5
segundos o más hasta que el producto se detenga
completamente. No invierta el producto ni coloque las
manos debajo del protector hasta que el producto se
haya detenido por completo.
A
K
2
• Si la supercie a limpiar está seca, rocíela con
agua para reducir la cantidad de polvo que se
genera.
• Trabaje con el cepillo de cerdas hacia adelante.
Sostenga el cepillo de cerdas con rmeza,
coloque una mano en el mango posterior y
la otra mano en el mango frontal. Agarre el
cepillo de cerdas rmemente con ambas manos
mientras lo utiliza.
• Sostenga y guíe el cepillo de cerdas en un
ángulo poco profundo. Si el cepillo de cerdas se
sostiene en un ángulo demasiado pronunciado,
tiende a empujar hacia el operador.
• Sosténgala y mantenga el equilibrio con ambos
pies.
2. Consejos de funcionamiento
ADVERTENCIA
• No permita que la familiaridad con este producto lo vuelva descuidado. Recuerde que un descuido de
una fracción de segundo es suciente para provocar lesiones graves.
• Siempre use lentes de protección que cumplan con la norma ANSI Z87.1. De lo contrario, los objetos
que salgan despedidos pueden ingresar a los ojos y causar otras lesiones graves.
• No use ningún complemento o accesorio que el fabricante de este producto no recomiende. El uso
de acoplamientos o accesorios no recomendados puede producir lesiones personales graves.
• Use ropa adecuada para reducir el riesgo de lesiones cuando opere esta herramienta. Do not wear
loose clothing or jewelry. Wear eye protection. Use pantalones largos y pesados, botas y guantes.
No use pantalones cortos ni sandalias, ni tenga los pies descalzos.
J
Indicador de
velocidad
LED

34
INSTRUCCIONES DE USO
• Los materiales que salen despedidos pueden provocar daños graves al operador o a las personas
que se encuentren cerca. Para reducir el riesgo de sufrir lesiones personales, es fundamental que
tome las siguientes precauciones:
• Siempre sostenga la herramienta con ambas manos cuando la utilice. Sujete los mangos con
rmeza.
• Mueva el cepillo de cerdas al área de trabajo antes de comenzar y enciéndalo a una velocidad
más baja.
• Para reducir el riesgo de lesiones por pérdida de control, sostenga y guíe el cepillo de cerdas
en un ángulo poco profundo. Si el cepillo de cerdas se mantiene en un ángulo demasiado
pronunciado, tiende a empujar hacia atrás hacia el operador.
• Revise si hay piezas dañadas o desgastadas antes de cada uso. Verique el cepillo giratorio, el
protector, el mango de ayuda frontal y el eje motor. Reemplace cualquier pieza que esté agrietada,
deformada, doblada o dañada de alguna manera.
• Limpie el cepillo de cerdas después de cada uso. Para obtener instrucciones sobre la limpieza del
producto, consulte la sección Mantenimiento.
• Para reducir el riesgo de que se produzcan lesiones, nunca trabaje sin el protector.
• Antes de limpiar o reparar el cepillo de cerdas, asegúrese de que el cepillo giratorio se haya
detenido por completo y se haya retirado la batería. No cumplir con esto podría provocar lesiones
personales graves.
APLICACIONES
Puede usar este producto para los nes que se indican a continuación:
• Limpieza de áreas y caminos, incluidas supercies irregulares y con juntas.
• Limpieza de entradas de garaje, caminos y patios de pavimento/concreto/asfalto.

35
CUIDADO Y MANTENIMIENTO
1. Mantenimiento general
Evite utilizar solventes para limpiar las piezas de plástico. La mayoría de los plásticos tienden a
dañarse si se usan distintos tipos de solventes comerciales. Utilice un paño limpio para eliminar la
suciedad, el polvo, el aceite, la grasa, etc.
ADVERTENCIA
• Al realizar mantenimiento, utilice solo piezas de repuesto idénticas. El uso de cualquier otra
pieza puede ser peligroso o causar daños en el producto. Para garantizar la seguridad y
conabilidad, toda reparación debe realizarse por un técnico de reparación calicado.
• Para evitar que se produzcan lesiones personales graves, retire los paquetes de baterías
del cabezal de potencia y aguarde a que el cepillo giratorio se detenga antes de realizar el
mantenimiento, limpiar, cambiar los accesorios adicionales o cuando no utilice el producto.
• Nunca deje que el líquido de frenos, la gasolina, los productos a base de petróleo, los aceites
penetrantes, entre otros entren en contacto con las piezas de plástico. Los productos químicos
pueden dañar, debilitar o destruir el plástico, lo que puede resultar en lesiones graves.
• Al limpiar el accesorio del cepillo de cerdas, NO lo sumerja en agua ni en otros líquidos. No
limpie la máquina con un equipo de lavado con agua a presión. El chorro sólido de agua puede
dañar las piezas de la máquina.
2. Mantenimiento del cepillo giratorio
• Limpie el cepillo giratorio con frecuencia.
• Si alguno de los cepillos giratorios necesita reemplazarse debido a algún daño, reemplace
ambos cepillos giratorios para obtener un mejor rendimiento.
ADVERTENCIA
Solo el personal de mantenimiento autorizado debe llevar a cabo el mantenimiento que requiera
el cepillo de cerdas, salvo que se trate de los artículos que guran en estas instrucciones de
mantenimiento.
3. Limpieza de la unidad
• Retire las baterías.
• Limpie los pedazos de raíces, la tierra o las plantas atascadas en los cepillos giratorios, el
protector o la caja de velocidades. Para realizar una limpieza profunda, retire los cepillos
giratorios y el protector para lavarlos por completo.
• Mantenga los oricios de ventilación libres de obstrucciones.
ADVERTENCIA
• Antes de realizar mantenimiento, retire las baterías de la herramienta.
• Un cepillo giratorio dañado puede romperse en pedazos después de un uso prolongado, lo que
puede provocar proyectiles peligrosos. Los objetos que lance la cultivadora pueden ocasionar
lesiones graves. Inspeccione periódicamente y no opere el cepillo de cerdas con piezas
desgastadas o dañadas.
4. Almacenamiento de la unidad
• Extraiga los paquetes de baterías de la herramienta.
• Limpie bien la herramienta e inspeccione los cepillos giratorios.
• Retire el accesorio del cepillo de cerdas del cabezal de potencia y coloque la tapa del extremo
en el mango del accesorio para evitar que la suciedad ingrese al acoplador.
• Guarde la herramienta en un lugar seco y bien ventilado, alto o con seguro y fuera del alcance
de los niños. No almacene la unidad sobre o cerca de fertilizantes, gasolina u otros químicos.

36
SOLUCIÓN DE PROBLEMAS
PROBLEMA CAUSA POSIBLE ACCIÓN CORRECTIVA
El motor no arranca
cuando se presiona el
gatillo del interruptor.
Las baterías no son seguras. Para asegurar las baterías,
asegúrese de que los pestillos
del compartimiento de la batería
encajen en su lugar.
Las baterías no están cargadas. Cargue las baterías según las
instrucciones incluidas con su
modelo.
Posible problema de cableado o
de contactos eléctricos.
Llame a KOBALT (888-356-2258)
para obtener servicio técnico.
El cepillo de cerdas
está claramente
dañado.
Daños anormales durante el
transporte o el uso.
Reemplácela o comuníquese con
el Departamento de Servicio al
Cliente de KOBALT.
Si continua teniendo dudas o algún otro asunto sin resolver tras haber consultado esta guía de
resolución de problemas o simplemente desea hablar con un experto en productos Kobalt, llame al
Departamento de Servicio al Cliente de Kobalt al 888-356-2258.

37
GARANTÍA
5 AÑOS DE GARANTÍA LIMITADA
Este accesorio de cerdas para orilladora Kobalt de 24 V × 2 está garantizado para el comprador orig-
inal desde la fecha de compra original durante cinco (5) años y está sujeto a la cobertura de garantía
que se describe en el presente.
Este accesorio de cerdas para orilladora Kobalt de 24 V × 2 tiene una garantía para el usuario original
contra defectos en los materiales y la mano de obra.
Si cree que el accesorio de cerdas para orilladora Kobalt de 24 V × 2 está defectuoso en cualquier
momento durante el período de garantía especicado, simplemente devuelva el accesorio de cerdas
para orilladora junto con el comprobante de compra al lugar de compra para obtener un reemplazo
gratuito o un reembolso, o llame al 888-3KOBALT (888-356-2258) para obtener servicio de garantía.
Esta garantía es nula si: los defectos en los materiales o la mano de obra o los daños han sido
causados por reparaciones o modicaciones hechas o que se hayan intentado hacer por parte de
terceros o el uso no autorizado de piezas incompatibles; el daño es debido al desgaste normal; el
daño es debido al abuso (lo que incluye la sobrecarga de la herramienta por encima de su capaci-
dad), mantenimiento inadecuado, negligencia o accidente; o el daño es debido al uso de la herramien-
ta después de una falla parcial, el uso con accesorios inadecuados o reparaciones o alteraciones no
autorizadas.
Esta garantía le otorga derechos legales especícos, pero podría tener también otros derechos que
varían según la provincia.
Las piezas de repuesto no están cubiertas por la garantía.
38
LISTA DE PIEZAS DE REPUESTO
Para obtener piezas de repuesto, llame a nuestro Departamento de Servicio al Cliente al
888-356-2258, de lunes a domingo de 8 a.m. a 8 p.m., hora estándar del Este. También puede
ponerse en contacto con nosotros a través de [email protected].
Impreso en Vietnam / China
DD
EE GGC
H
PIEZA DESCRIPCIÓN PIEZA #
DD Perilla de sujeción R0214516-00
EE Perno R0207110-00
C Mango frontal y auxiliar R0207109-00
GG
Abrazadera inferior R0202491-00
H
Replacement Brush R0214525-00


Rev B
P0807007-01
