Sma Helmet Operating Instructions
H1
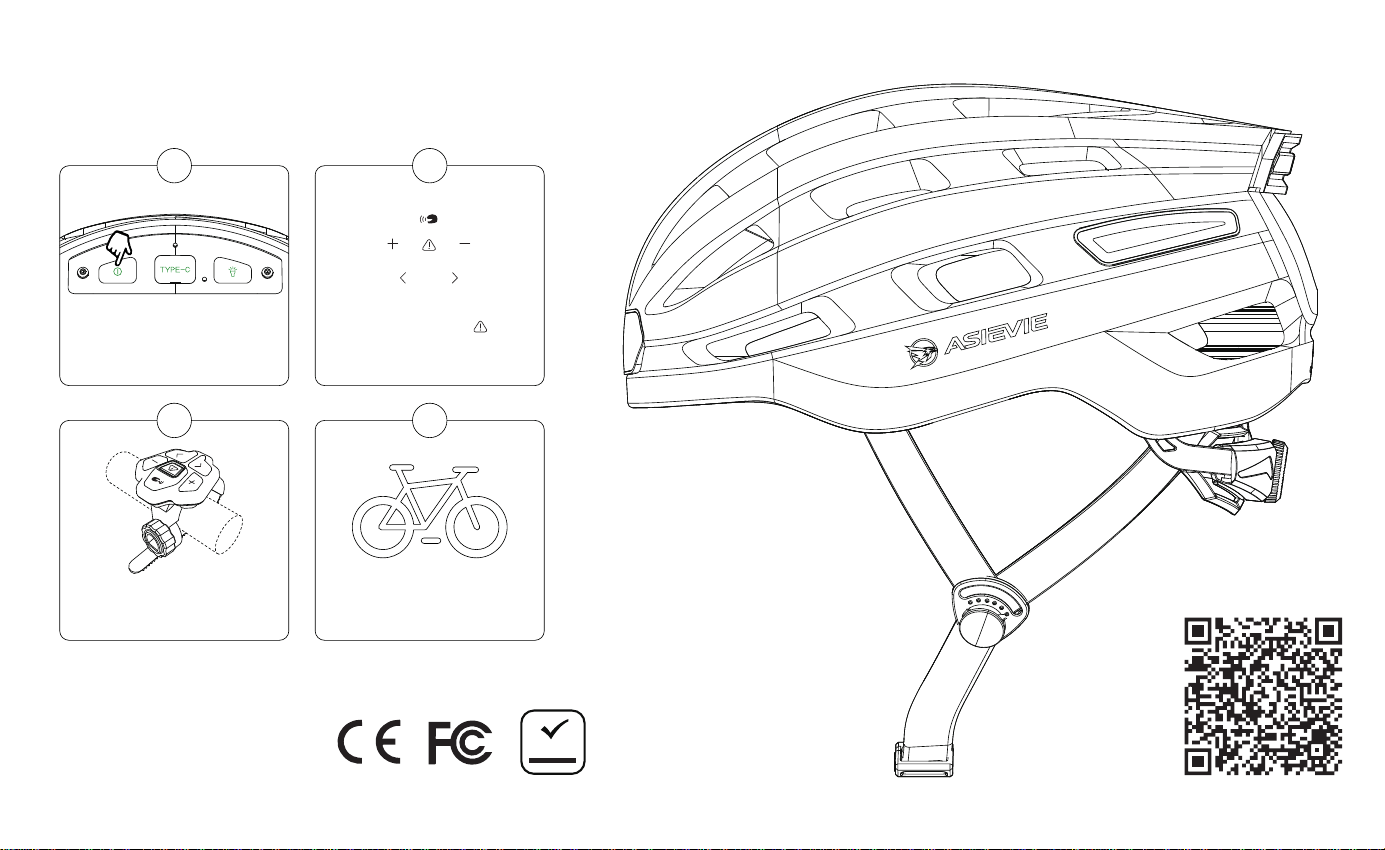
Quick Sta Guide
Operation Video
Attach the remote to
your handlebar.
3
Ride Safe!
4
2
Long press the for
3-5s to turn on the
remote controller.
“ ”
Long press the power
button to turn it on
1
Note: This product complies with
U.S. CPSC 1203 safety standard.
Please use it with condence.
ROHS

to operate the equipment.
-
-- Reorient or relocate the receiving antenna.
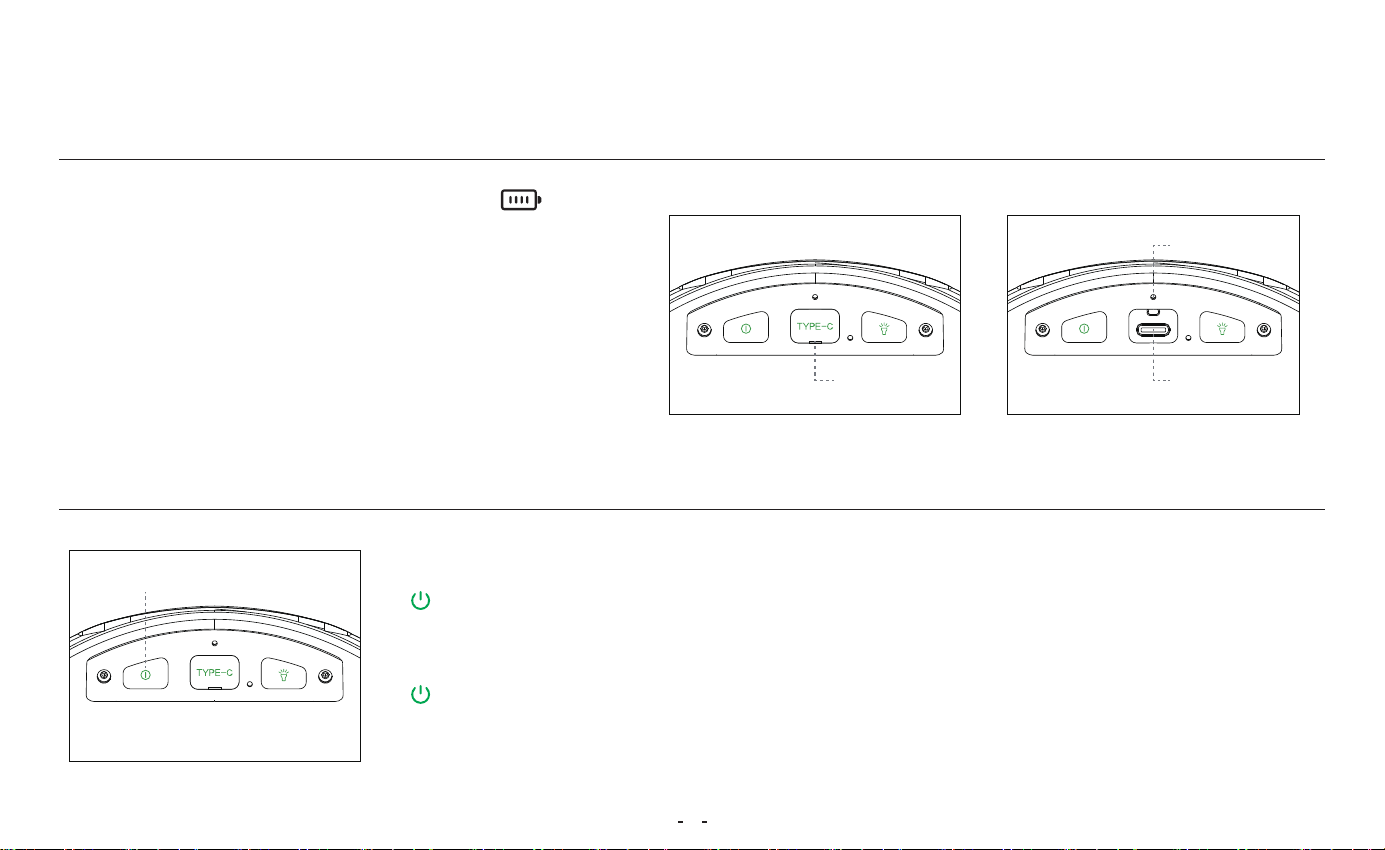
Operating Instructions
• Openthe rubber cover marked " "
• InseUSB cable
• Light Indicator:
1. Charging
2. Button Instructions
②①
Open
Power on / o
Hold for 3–5 s to power o
Voice: “Goodbye” — shut down successfully.
Hold for 3–5 s to power on
Voice: “Ready for Connection”, taillight ashes — sta up successful.
�
- Red light on→ Charging
- Red Light turns o→ Fully charged
(Charge at least 1.5 hours)
Indicator
Charging Cable
(Please charge before use)
•
•After
•Turn o
•
does .
•
•
•If
•
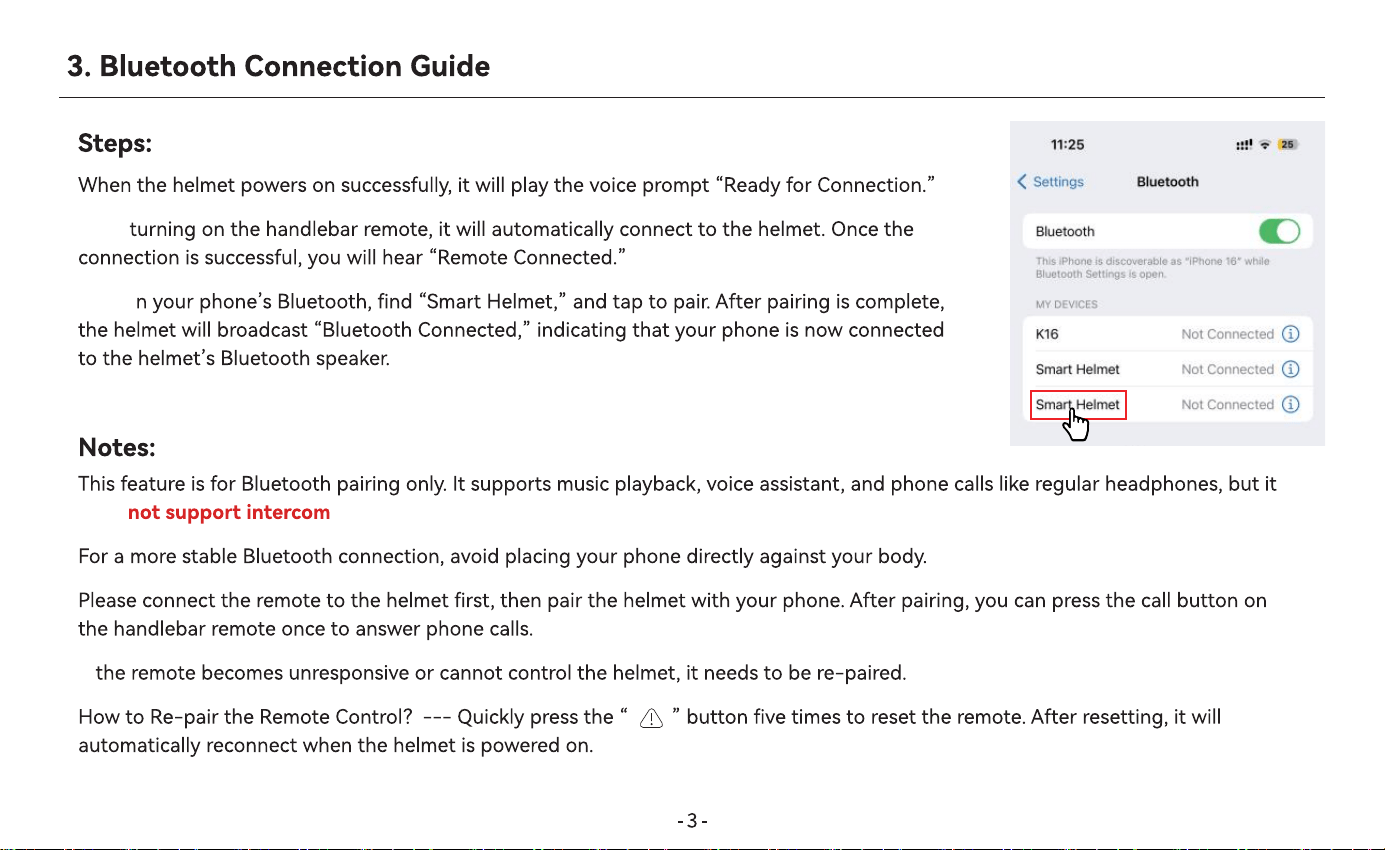
4. Lighting Key Mode (If an abnormal condition occurs, please reset the device)
5. Alarm Ale Mode
•How to adjust the headlight modes?
Press the light button “ ” on the helmet
Mode 1: “ ” Press once, Headlight steady on.
Mode 2: “ ” Press once, Fast ashing.
Mode 3: “ ” Press once, Slow ashing.
Brake sharply, tail
center light blinks.
Mode 1:
Fall, tail left and
right lights ash.
Mode 2:
Right Side
Tail Light
Left Side
Tail Light
Helmet
Headlight
Note: When turning, use the " / "
buttons on the remote to flash the left or
right lights to alert people and vehicles in
front of and behind you.
�
Helmet
Tail Light
Tail center light blinks
Tail Center Light
Left side tail light
Tail lights ash left and right
Right side tail light
Double-press the power button “ ” consecutively. A voice prompt “Voice On / O”
will be played to enable or disable voice prompts. For detailed operation instructions,
please refer to the operation video. Press the button ve times consecutively to reset.
Press and hold for more than 10 seconds to force a resta.
•How to adjust the taillight modes?
Press the light button “ ” on the helmet
Press once, all lights steady on
(Working time: 6 hours)
Press once, center light ashes rapidly
(Working time: 16 hours)
Press once, center light ashing slowly
(Working time: 28 hours)
Press once, all lights o
Mode 1:
Mode 2:
Mode 3:
Mode 4:
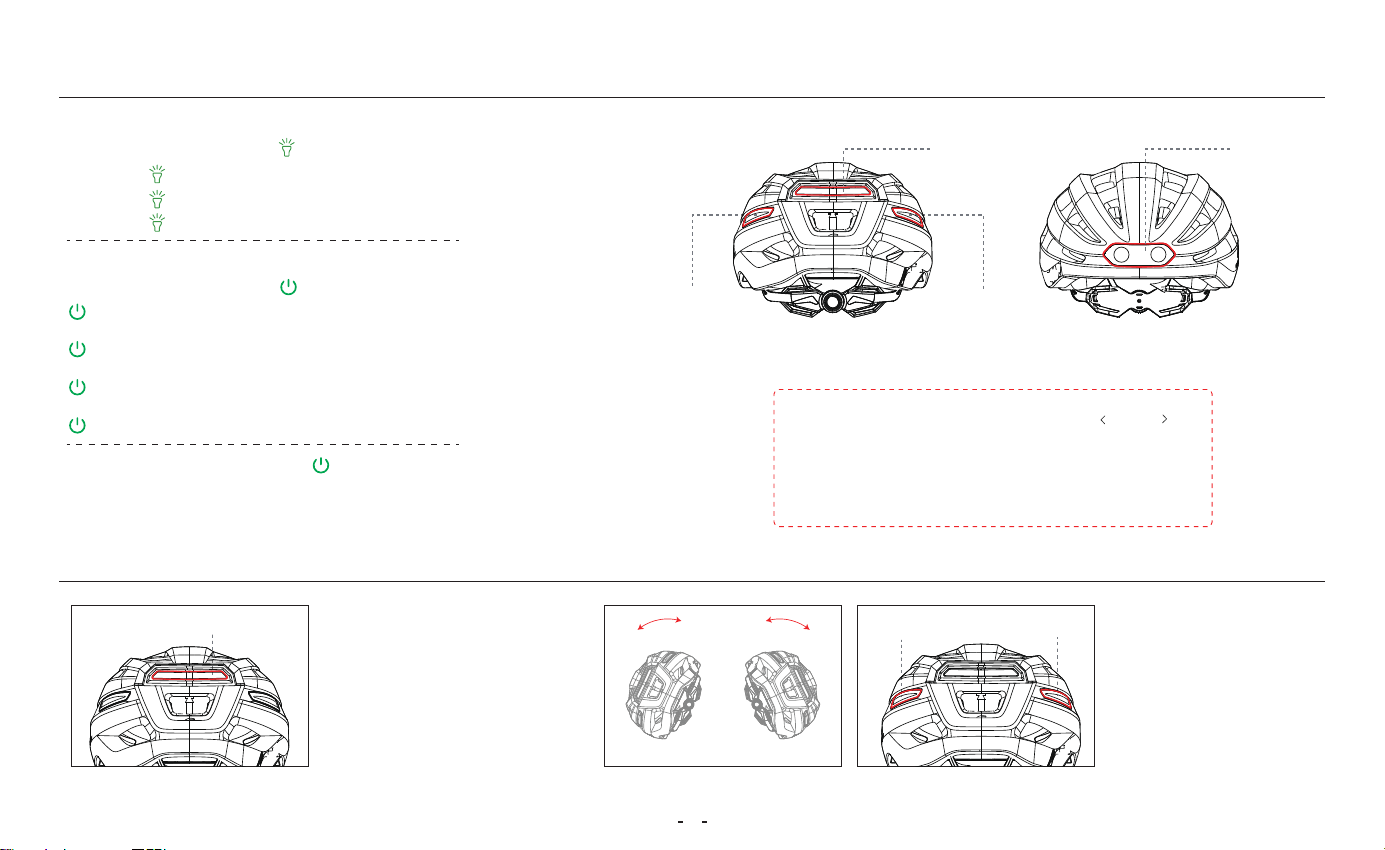
6. Remote Controller Instructions
�
Multi-function Button
1. Hold for 3s: Power on/o (Green light on = power on; blinking then o = power o)
2. Press once: Emergency asher (blinks for 15s with “didi” sound), press again to cancel
3. Press ve times consecutively: Reset and automatically connect to the helmet (within 6 meters);
voice prompt: “Remote Connected.”
Volume +
1. Press once: Increase volume
2. Hold: Next track
Volume –
1. Press once: Decrease volume
2. Hold: Previous track
Left Turn Signal
Press once: Signal left (blinks 15s with “di” sound),
press again to cancel
Right Turn Signal
Press once: Signal right (blinks 15s with “di” sound),
press again to cancel
within 6M

7. Use, Maintenance, and After-Sales Seice
(1) Proper Wearing and Use
�
•Applicable Scenarios: Regular cycling, skateboarding, unicycling, and other common spos where wearing a helmet is required.
•Non-Applicable Scenarios: This product is not suitable for extreme spos or other high-speed or high-risk activities.
•Proper Helmet Wearing:
① The helmet should be worn level, with the front edge positioned appropriately above the forehead.
② Adjust the head circumference system and chin strap to ensure a secure t without excessive pressure.
③ The helmet should not move noticeably when shaking your head.
④ Before each ride, please check the helmet shell, retention system, and electronic functions to ensure they are functioning properly.
Safety Notice: This helmet has been ceied in accordance with EN 1078�2012+A1�2012 and holds CPC ceication. It meets the essential
health and safety requirements (WGSA of Regulation (EU) 2016/425) as well as the U.S. CPSC safety standard for bicycle helmets for persons aged
5 years and older. However, no helmet can provide complete protection in all accidents. This product is designed to reduce the risk of head injuries
but cannot guarantee the prevention of all injuries.
(2) Cautions and Warnings
•This helmet contains electronic components and provides limited splash resistance. Please do not use it for prolonged riding in rainy conditions.
•After exposure to rain, water droplets may appear inside the rear warning light cover. Place the helmet in a well-ventilated area for 1–2 days, and
the moisture will dissipate naturally.
•This helmet contains a batte. Batte capacity may va with temperature. When used in low-temperature environments or below 0°C, the operat-
ing time may be reduced to vaing degrees.
•To maintain batte lifespan, if the helmet is to be stored for an extended period (over 3 months), it is recommended to fully charge the helmet
before storage and recharge it eve 3–6 months.
Impoant Safety Warning: If the helmet experiences a severe impact, fall, or trac accident during use, internal cushioning materials may be
damaged even if no visible damage is present. Protective peormance can no longer be guaranteed. Discontinue use immediately and replace the
helmet with a new one.

(3) Cleaning and Maintenance Instructions
�
•Store the helmet properly. Clean it with clean water only. Do not use alcohol, gasoline, organic solvents, or corrosive liquids such as acids or alkalis.
Avoid impacts to the helmet.
•Do not modify the structure of the helmet. Drilling holes in the shell or altering the internal foam liner is strictly prohibited, as this may impair its
shock-absorption and penetration-resistance peormance.
•Under normal use and proper maintenance, the recommended seice life of the helmet is 3–5 years.
(4) Technical Specications
•Charging Po: Type-C USB
•Electrical Rating: DC 5V / 1A
•Charging Time: 1.5 hours
•Waterproof Rating: IPX45
•Operating Time: Up to approximately 28 hours
(depending on usage of various functions)
•Storage Temperature: -10°C to 45°C
•Operating Temperature: 0°C to 45°C
(5) Electronic Function Troubleshooting
•During use, if any functional abnormality occurs, press
the power button ve times consecutively to reset the
device. Press and hold the power button for more than
10 seconds to peorm a forced resta.
•If the issue persists, please contact the seller for suppo
via the ocial order page on the purchase platform.
(6) After-Sales Seice and Warranty Information
•This product is provided with standard after-sales technical suppo seices.
•The following situations are not covered by the warranty:
① Damage caused by misuse, accidents, or drops;
② Unauthorized disassembly, modication, or non-authorized repairs;
③ Normal wear and tear or consumable pas.
•For after-sales seice, please contact the seller on the purchase platform or
an authorized brand seice channel.
(7) Environmental Protection and Disposal
This product contains electronic components and a batte. When dispos-
ing of the product, please follow local environmental regulations for proper
recycling. Do not dispose of it improperly to avoid environmental pollution.