Sparkrider
Smart Sports Cycling Glasses
User Manual
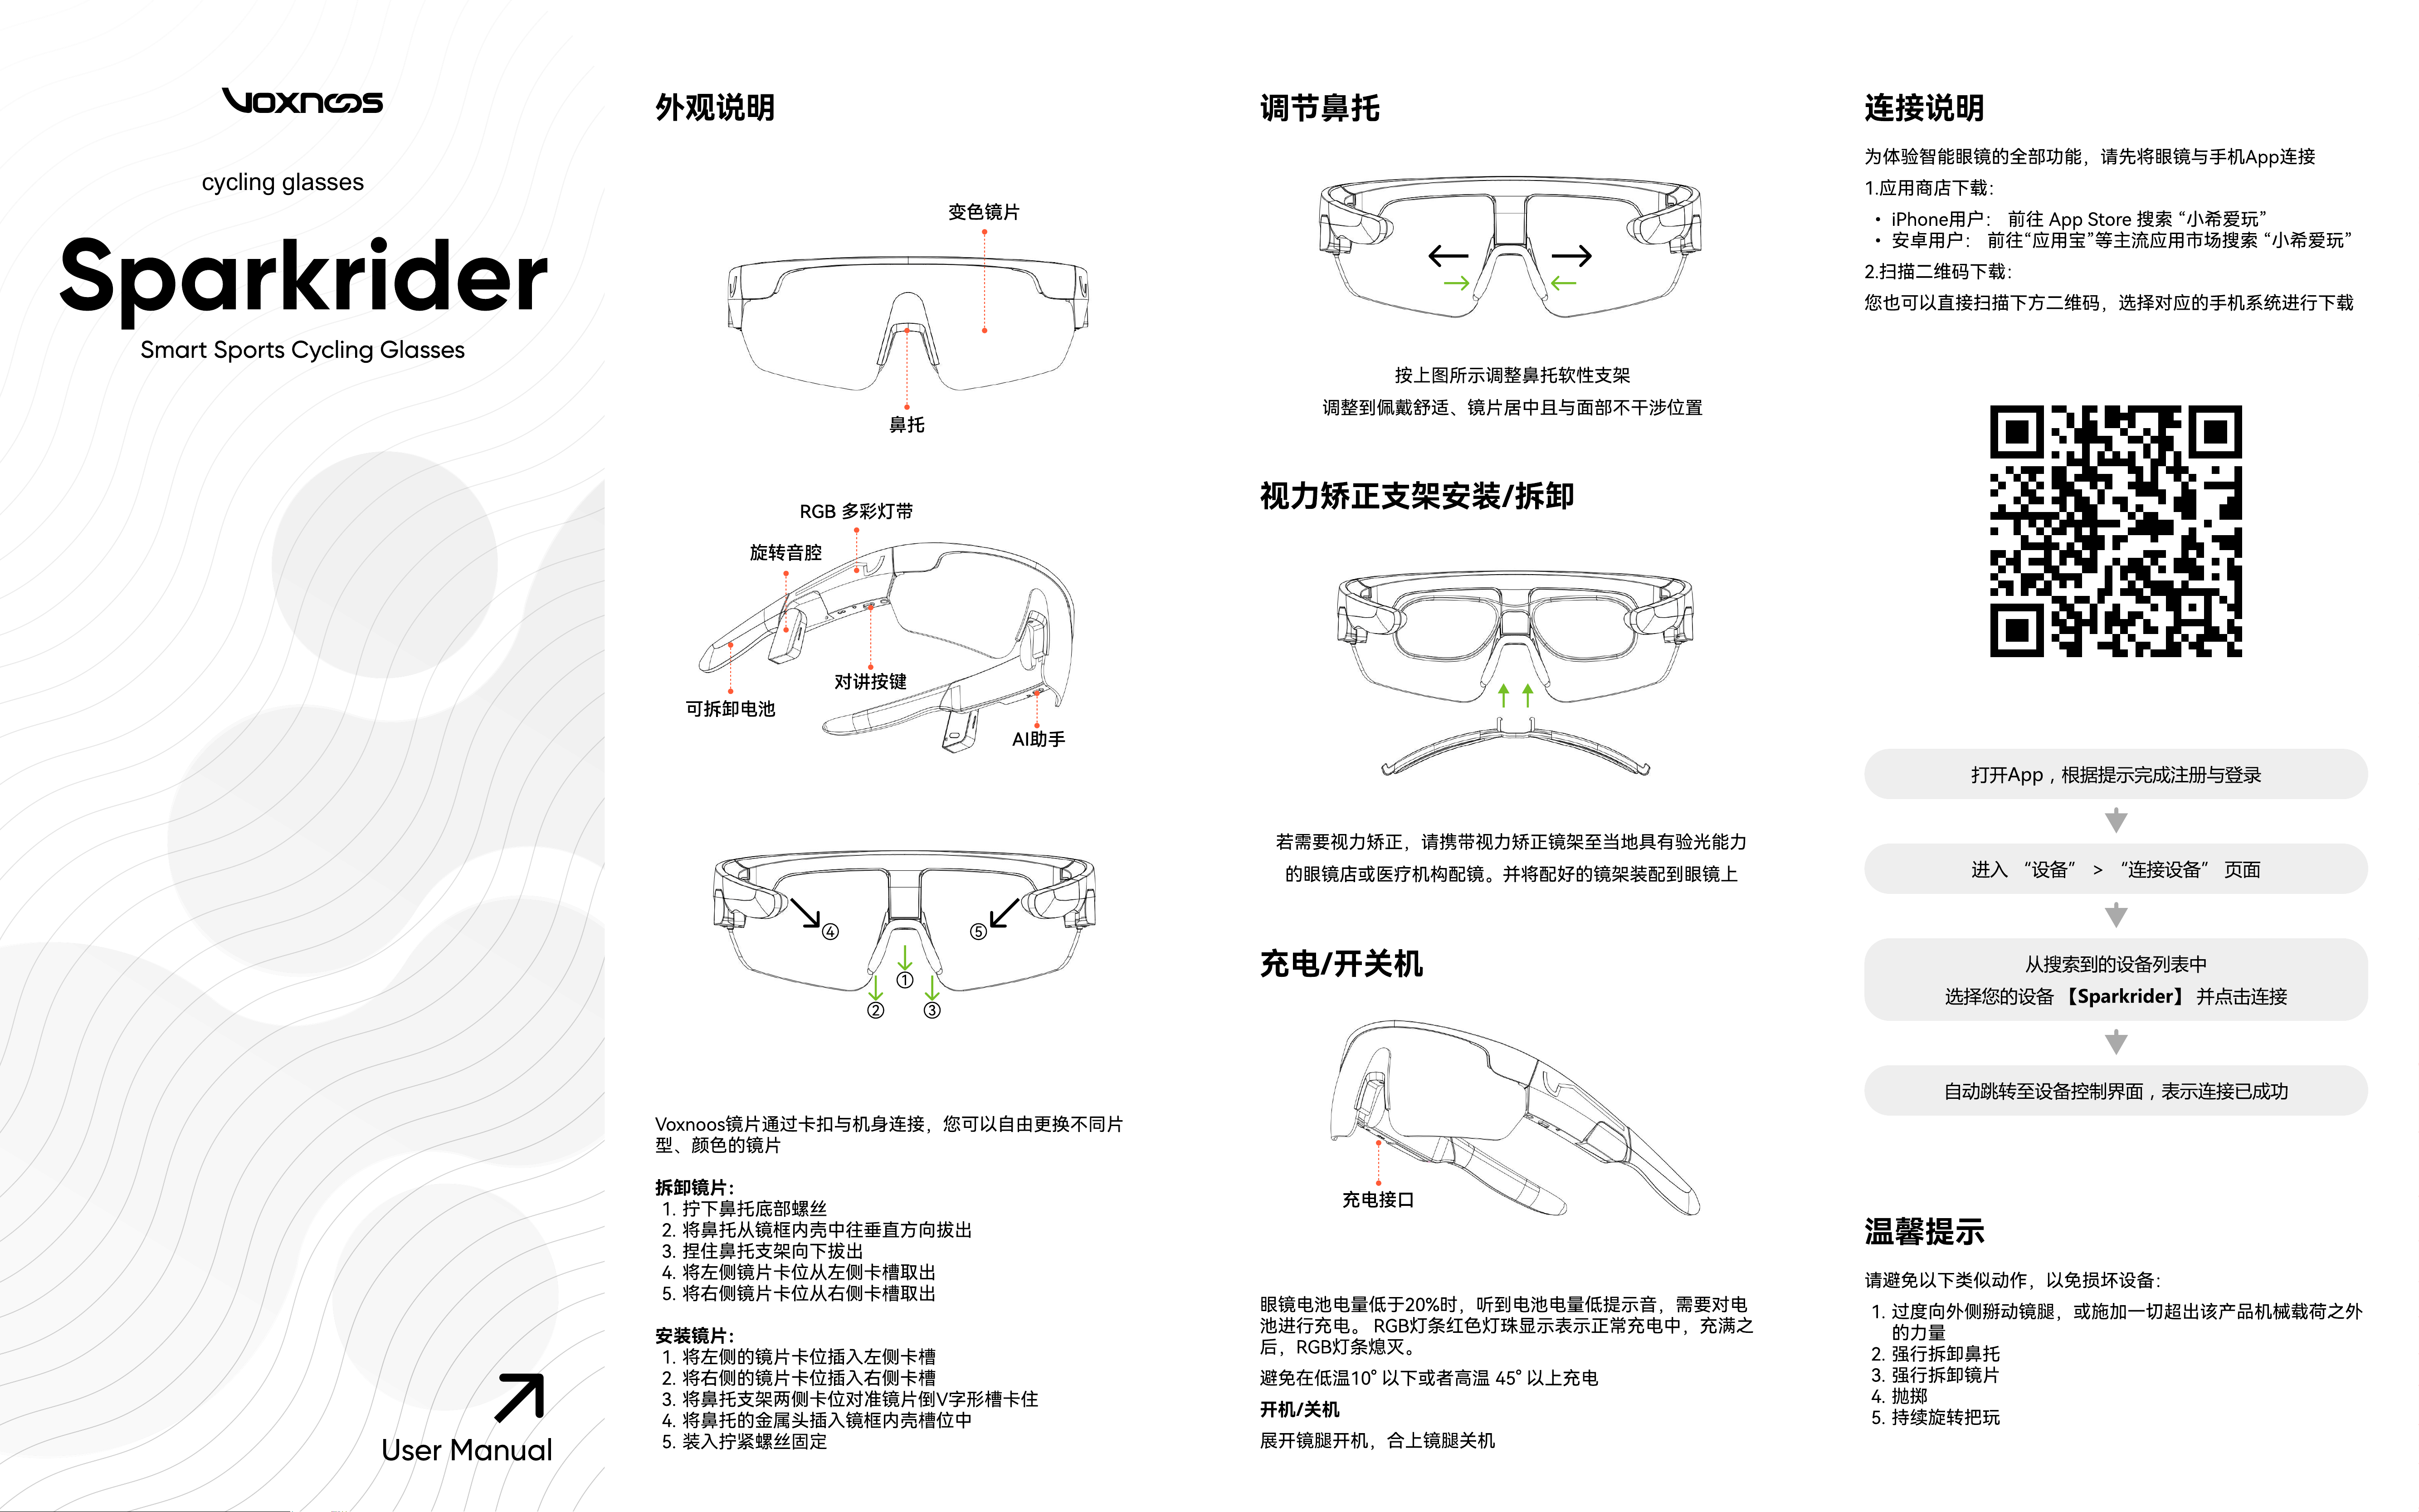
外观说明
变色镜片
鼻托
RGB 多彩灯带
旋转音腔
对讲按键
可拆卸电池
AI助手
④ ⑤
②
①
③
Voxnoos镜片通过卡扣与机身连接,您可以自由更换不同片
型、颜色的镜
拆卸镜片
拧下鼻托底部螺丝
将鼻托从镜框内壳中往垂直方向拔出
捏住鼻托支架向下拔
将左侧镜片卡位从左侧卡槽取出
将右侧镜片卡位从右侧卡槽取出
安装镜片
将左侧的镜片卡位插入左侧卡槽
将右侧的镜片卡位插入右侧卡槽
将鼻托支架两侧卡位对准镜片倒V字形槽卡住
将鼻托的金属头插入镜框内壳槽位中
装入拧紧螺丝固定
调节鼻托
按上图所示调整鼻托软性支
调整到佩戴舒适、镜片居中且与面部不干涉位置
视力矫正支架安装/拆卸
若需要视力矫正,请携带视力矫正镜架至当地具有验光能
的眼镜店或医疗机构配镜。并将配好的镜架装配到眼镜上
充电/开关机
充电接口
眼镜
电池电量低于20%时
,
听
到
电池电量低提
示
音
,需要
对电
池进行充电
。
RGB灯条红色灯珠显
示
表
示正
常充电
中,
充满之
后
,
RGB灯条熄灭
避免在低温10°
以下
或
者高温
45°
以
上
充
开机/关
展开
镜
腿开
机,
合
上镜
腿关
机
连接
说明
为体
验
智
能眼镜的
全
部
功
能,请
先
将眼镜与
手
机
App连
1.应用商
店
下载
iPhone用户:
前往
App
Store
搜索
“小希爱玩
安卓用户:
前往“应用宝”等主流应用市场搜索
“小希爱玩
2.扫描二维码下载
您也可以直接扫描下方二维码
,
选择对应
的
手
机
系统进行下载
打开App,根据提示完成注册与登录
进入 “设备” > “连接设备” 页面
从搜索到的
设备
列表
选择您的
设备
【Sparkrider】
并点击
连接
自动跳转至
设备
控制界
面,
表
示连接
已
成
功
温馨提示
请
避免以下类似动作
,
以免损坏设备
过度向外侧掰动
镜
腿
,或
施加一切超出该产品
机
械载荷之外
的力
强行拆卸
鼻
强行拆卸
镜
抛
持续旋转把玩
cycling glasses
S
p
arkrider
S
mart
S
ports Cycling Glasses
User
M
anual
FCC Warnin
Note: This device complies with Part 15 of the FCC Rules. Operation
is subject to the following two conditions: (1) this device may not
cause harmful interference, and (2) this device must accept any
interference received, including interference that may cause
undesired operation
Note: This equipment has been tested and found to comply with the
limits for a Class B digital device, pursuant to Part 15 of the FCC
Rules. These limits are designed to provide reasonable protection
against harmful interference in a residential installation. This
equipment generates, uses, and can radiate radio frequency
energy, and if not installed and used in accordance with the
instructions, may cause harmful interference to radio
communications. However, there is no guarantee that interference
will not occur in a particular installation. If this equipment does
cause harmful interference to radio or television reception, which
can be determined by turning the equipment o and on, the user is
encouraged to try to correct the interference by one or more of the
following measures
Reorient or relocate the receiving antenna
Increase the separation between the equipment and receiver
Connect the . equipment into an outlet on a circuit dierent from
that to which the receiver is connected
Consult the dealer or an experienced radio/TV technician for
help
Important: RF Exposure Information This device has been tested
and meets applicable limits for Radio Frequency (RF) exposure. The
Specic Absorption Rate (SAR) is a measure of the rate at which the
body absorbs RF energy. The SAR limit is 1.6 watts per kilogram in
countries that set the limit averaged over 1 gram of tissue. During
testing, the device is set to its highest transmission levels and
placed in positions that simulate use against the head
Important: Changes or modications not expressly approved by the
party responsible for compliance could void the user's authority to
operate the equipment.
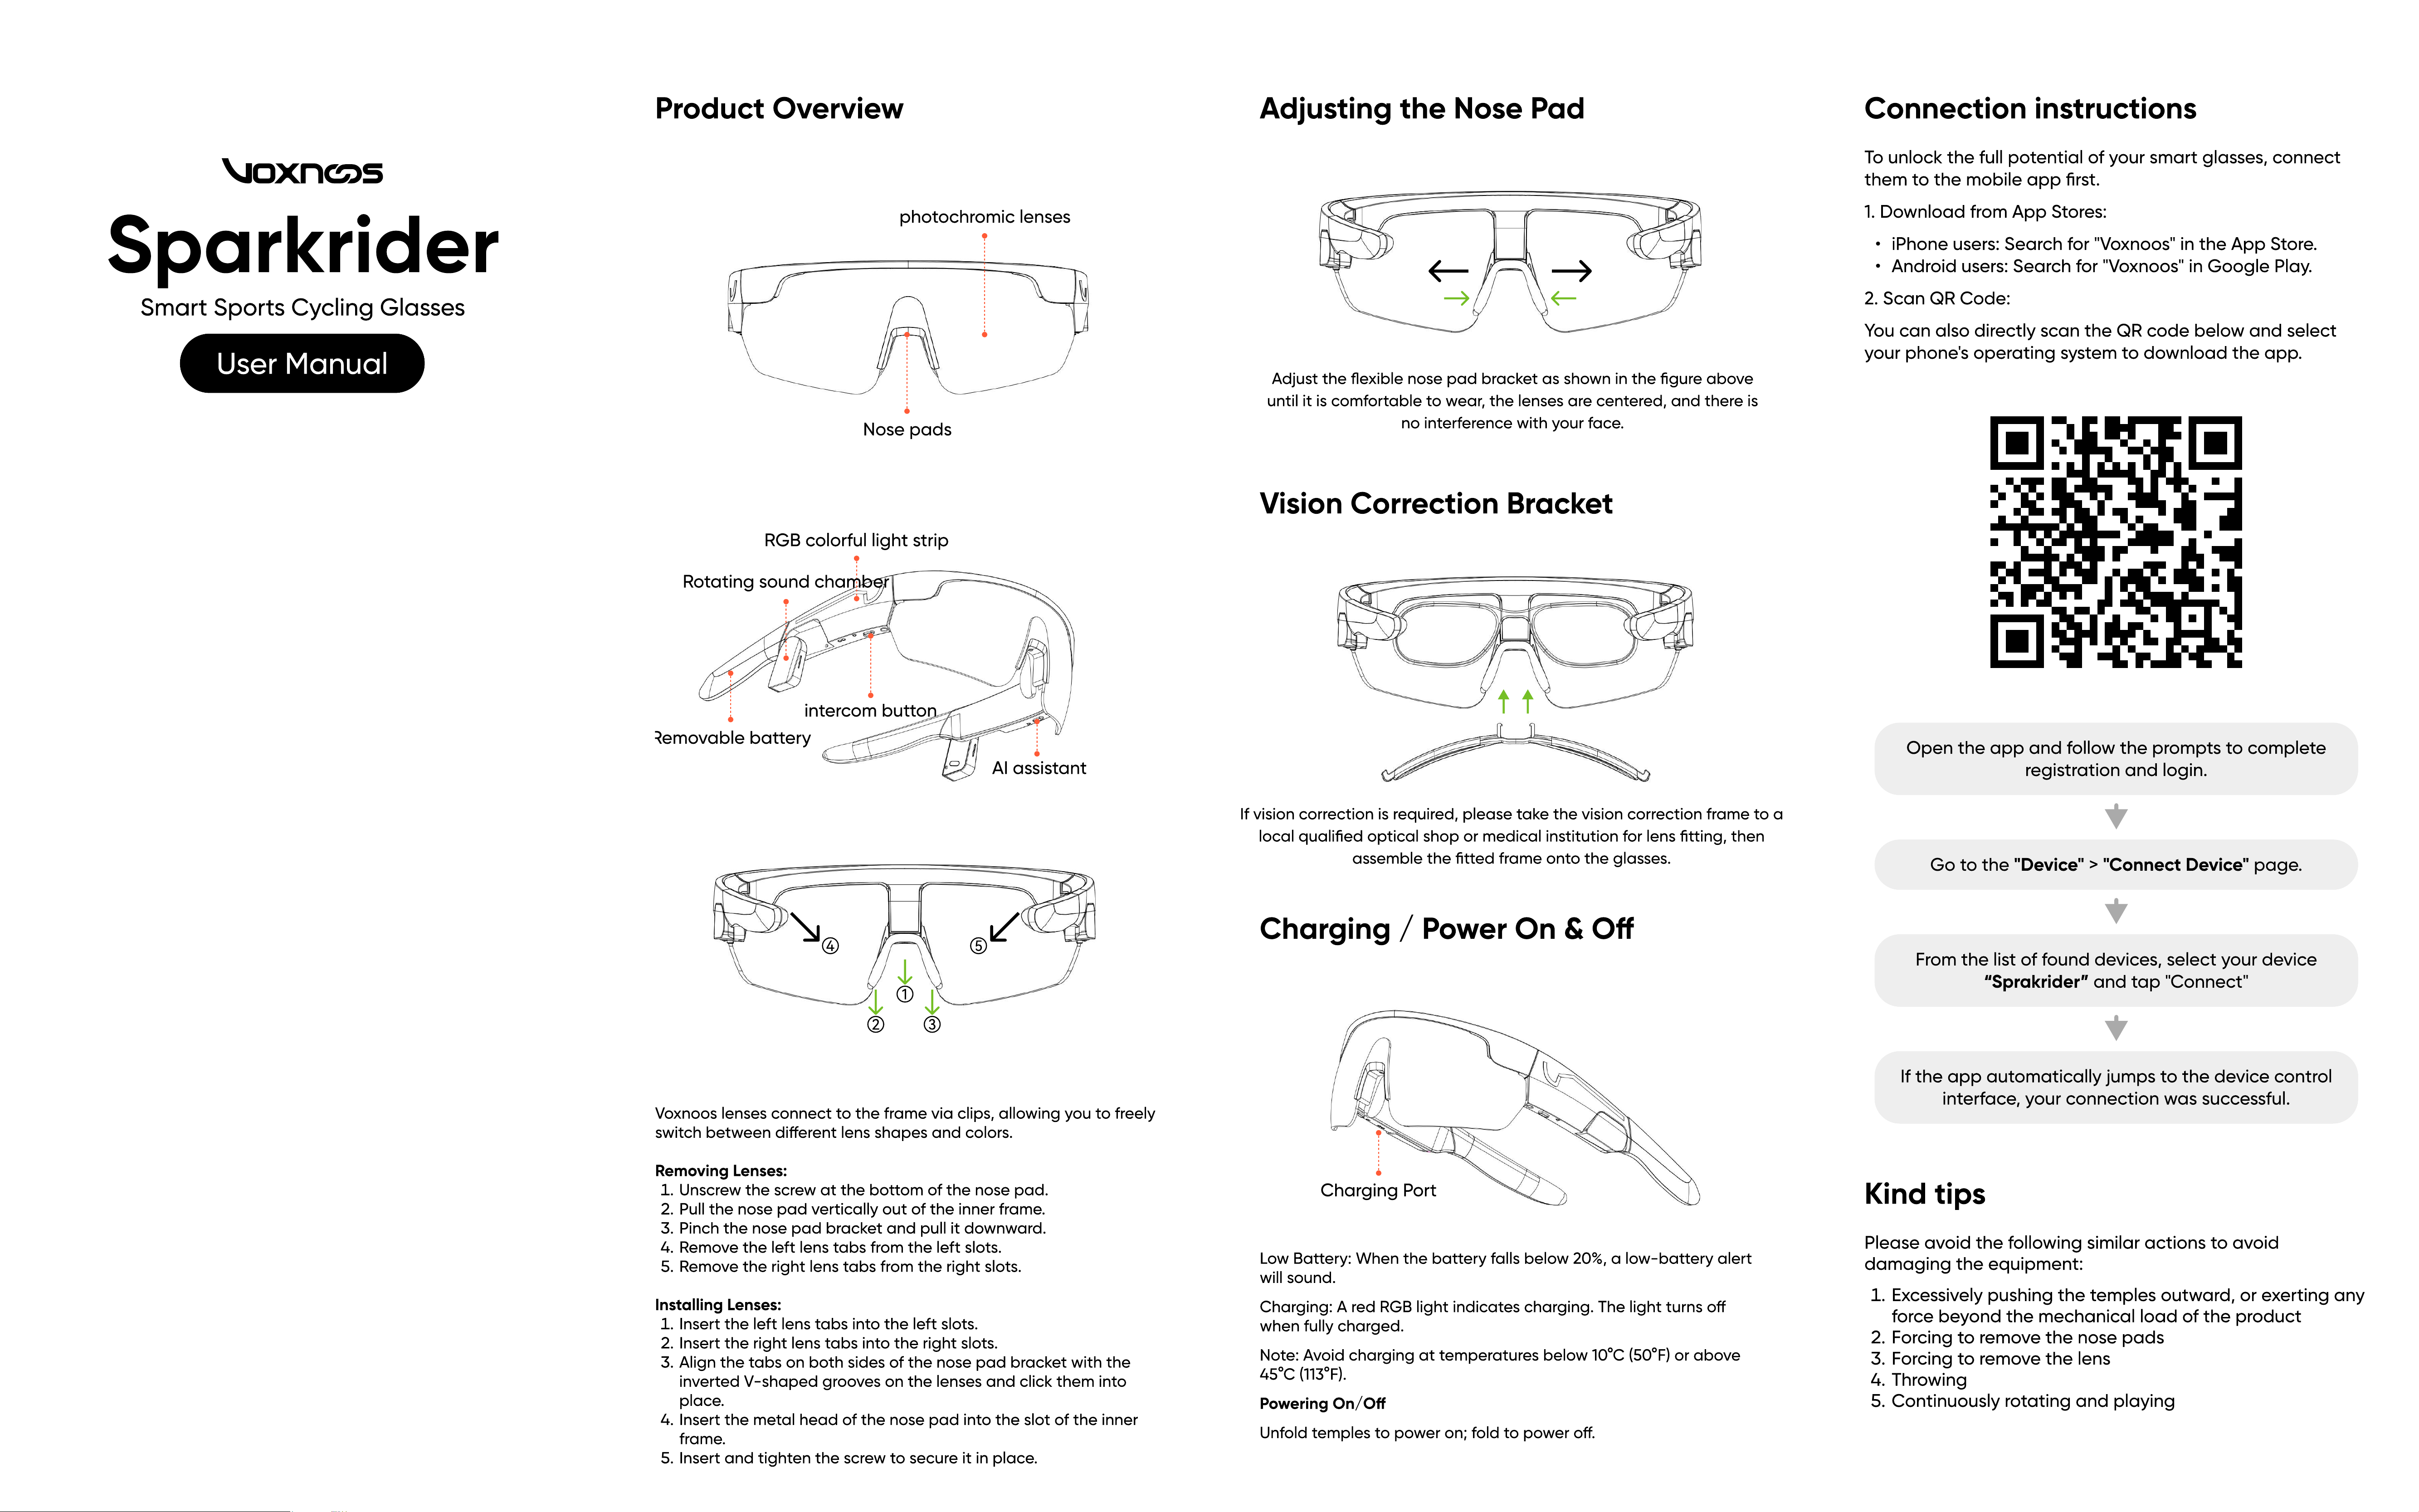
Product Overview
photochromic lenses
Nose pads
RGB colorful light strip
Rotating sound chamber
intercom button
Removable battery
AI assistant
④ ⑤
②
①
③
Voxnoos lenses connect to the frame via clips, allowing you to freely
switch between dierent lens shapes and colors
Removing Lenses
Unscrew the screw at the bottom of the nose pad
Pull the nose pad vertically out of the inner frame
Pinch the nose pad bracket and pull it downward
Remove the left lens tabs from the left slots
Remove the right lens tabs from the right slots
Installing Lenses
Insert the left lens tabs into the left slots
Insert the right lens tabs into the right slots
Align the tabs on both sides of the nose pad bracket with the
inverted V-shaped grooves on the lenses and click them into
place
Insert the metal head of the nose pad into the slot of the inner
frame
Insert and tighten the screw to secure it in place.
Adjusting the Nose Pad
Adjust the exible nose pad bracket as shown in the gure above
until it is comfortable to wear, the lenses are centered, and there is
no interference with your face.
Vision Correction Bracket
If vision correction is required, please take the vision correction frame to a
local qualied optical shop or medical institution for lens tting, then
assemble the tted frame onto the glasses.
Charging
/
Power On
&
O
Charging Port
L
ow Battery
:
W
hen the battery falls below
20%
, a low-battery alert
will sound.
Charging
:
A red RGB light indicates charging.
T
he light turns o
when fully charged.
Note
:
Avoid charging at temperatures below
10°
C
(50°F)
or above
45°
C
(113°F)
Powering On/O
Unfold temples to power on
;
fold to power o.
Connection instructions
T
o unlock the full potential of your smart glasses, connect
them to the mobile app rst
1
.
D
ownload from App
S
tores
iPhone users
:
S
earch for
"
Voxnoos
"
in the App
S
tore
Android users
:
S
earch for
"
Voxnoos
"
in Google Play
2
.
S
can
Q
R Code
Y
ou can also directly scan the
Q
R code below and select
your phone
'
s operating system to download the app.
O
pen the app and follow the prompts to complete
registration and login.
Go to the
"Device" > "Connect Device"
page.
F
rom the list of found devices, select your device
“Sprakrider”
and tap
"
Connect
"
If the app automatically jumps to the device control
interface, your connection was successful.
K
ind ti
p
s
Please avoid the following similar actions to avoid
damaging the equipment
:
E
xcessively pushing the temples outward, or exerting any
force beyond the mechanical load of the produc
F
orcing to remove the nose pad
F
orcing to remove the len
T
hrowin
Continuously rotating and playing
閃耀者
Sparkrider
戶 外 智 慧
運 動
眼 鏡
產品使用指南
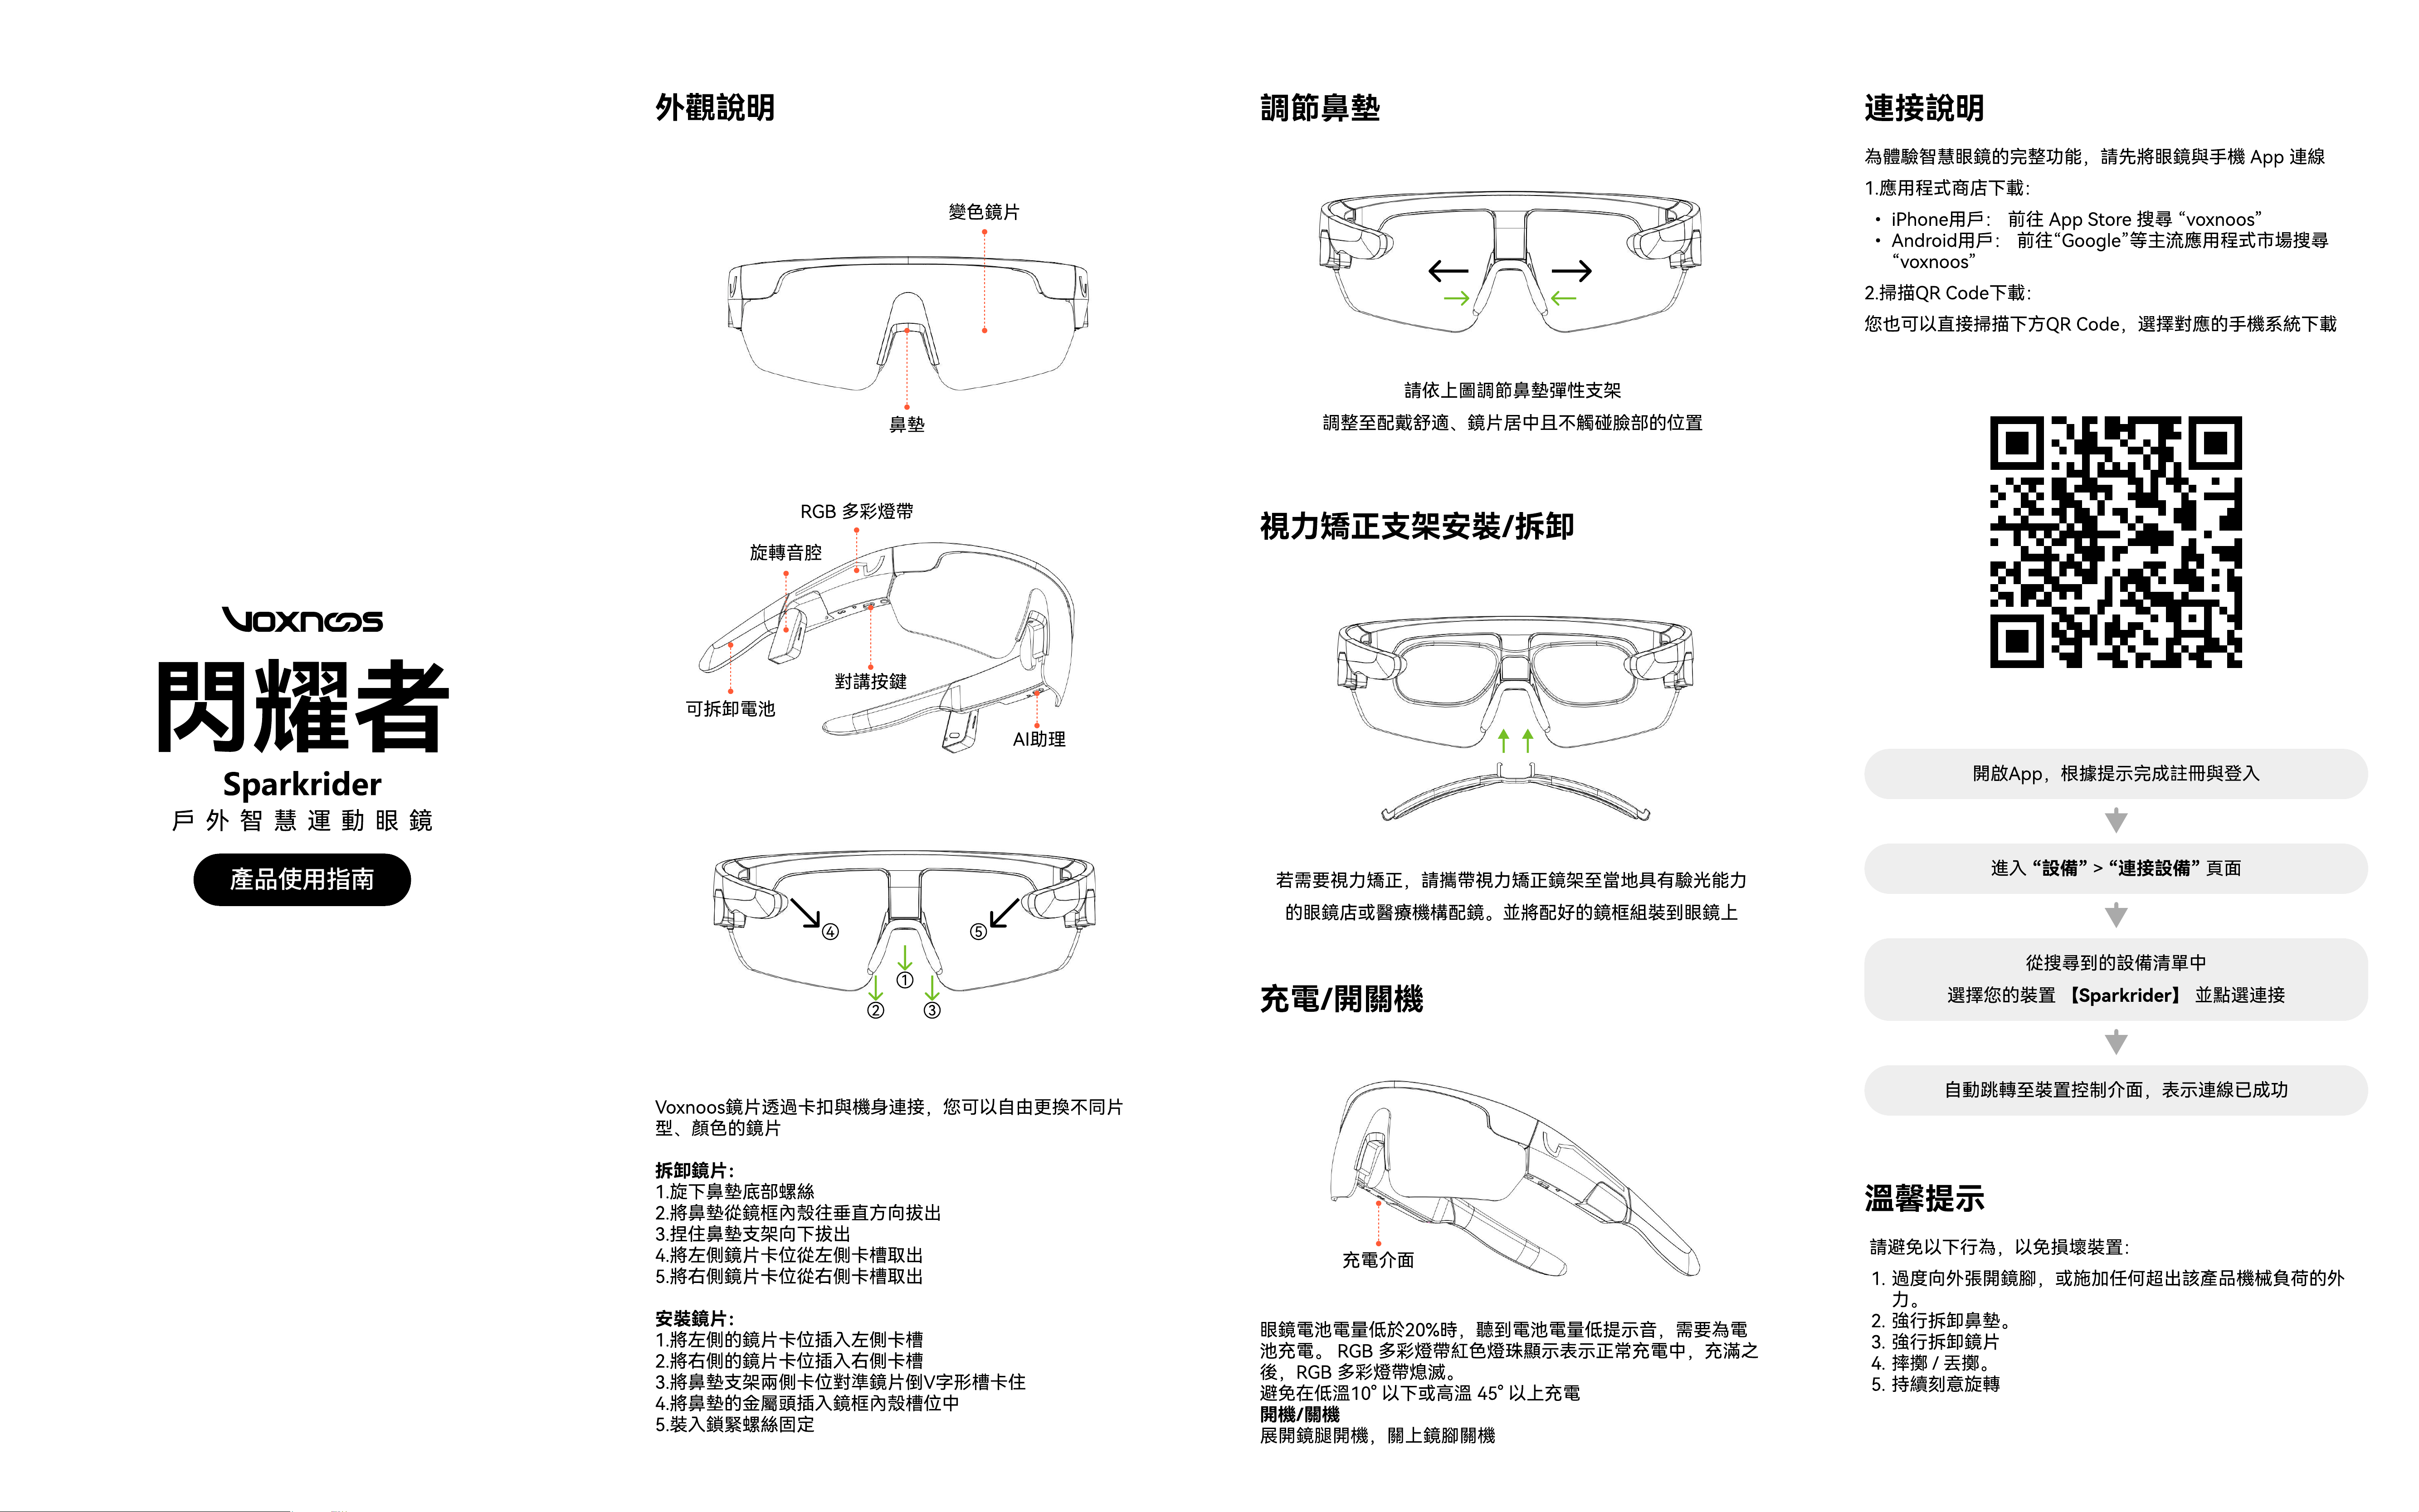
外觀說明
變色鏡片
鼻墊
RGB 多彩燈帶
旋轉音腔
對講按鍵
可拆卸電池
AI助理
④ ⑤
②
①
③
Voxnoos鏡片透過卡扣與機身連接,您可以自由更換不同片
型、顏色的鏡
拆卸鏡片
1.旋下鼻墊底部螺
2.將鼻墊從鏡框內殼往垂直方向拔
3.捏住鼻墊支架向下拔
4.將左側鏡片卡位從左側卡槽取
5.將右側鏡片卡位從右側卡槽取
安裝鏡片
1.將左側的鏡片卡位插入左側卡
2.將右側的鏡片卡位插入右側卡
3.將鼻墊支架兩側卡位對準鏡片倒V字形槽卡
4.將鼻墊的金屬頭插入鏡框內殼槽位
5.裝入鎖緊螺絲固定
調節鼻墊
請依上圖調節鼻墊彈性支
調整至配戴舒適、鏡片居中且不觸碰臉部的位置
視力矯正支架安裝/拆卸
若需要視力矯正,請攜帶視力矯正鏡架至當地具有驗光能
的眼鏡店或醫療機構配鏡。並將配好的鏡框組裝到眼鏡上
充電/開關機
充電介面
眼鏡電池電量低於20%時,聽到電池電量低提示音,需要為電
池充電。 RGB 多彩燈帶紅色燈珠顯示表示正常充電中,充滿之
後,RGB 多彩燈帶熄滅
避免在低溫10° 以下或高溫 45° 以上充
開機/關
展開鏡腿開機,關上鏡腳關機
連接
說明
為體
驗
智慧
眼鏡的
完
整
功
能,請
先
將眼鏡
與手
機 A
pp
連
1.應用程式商
店
下載
iPhone用戶:
前往
A
pp
Store
搜尋
“voxnoos
A
ndroid用戶:
前往“
G
oogle”等主流應用程式市場搜尋
“voxnoos
2.掃描Q
R
Code下載
您也
可
以直接掃描下方Q
R
Code
,
選擇
對
應
的
手
機
系統下載
開啟
A
pp
,
根據提示完成註冊與登入
進入 “設備” > “連接設備” 頁面
從搜尋到的設備清單
選擇您的裝置 【Sparkrider】 並點選連接
自動跳
轉至裝置
控制
介面,
表
示連
線已
成功
溫馨提示
請
避免以下行為
,
以免損壞
裝置
過度向外張開
鏡
腳
,或
施加任何超出該產品
機
械負荷
的
外
力
強行
拆卸鼻墊
強行
拆卸鏡
摔擲
/
丟擲
持續刻意
旋轉
スマートスポー
ツサ
イ
ク
リン
ググ
ラス
Sparkrider
取扱説明書
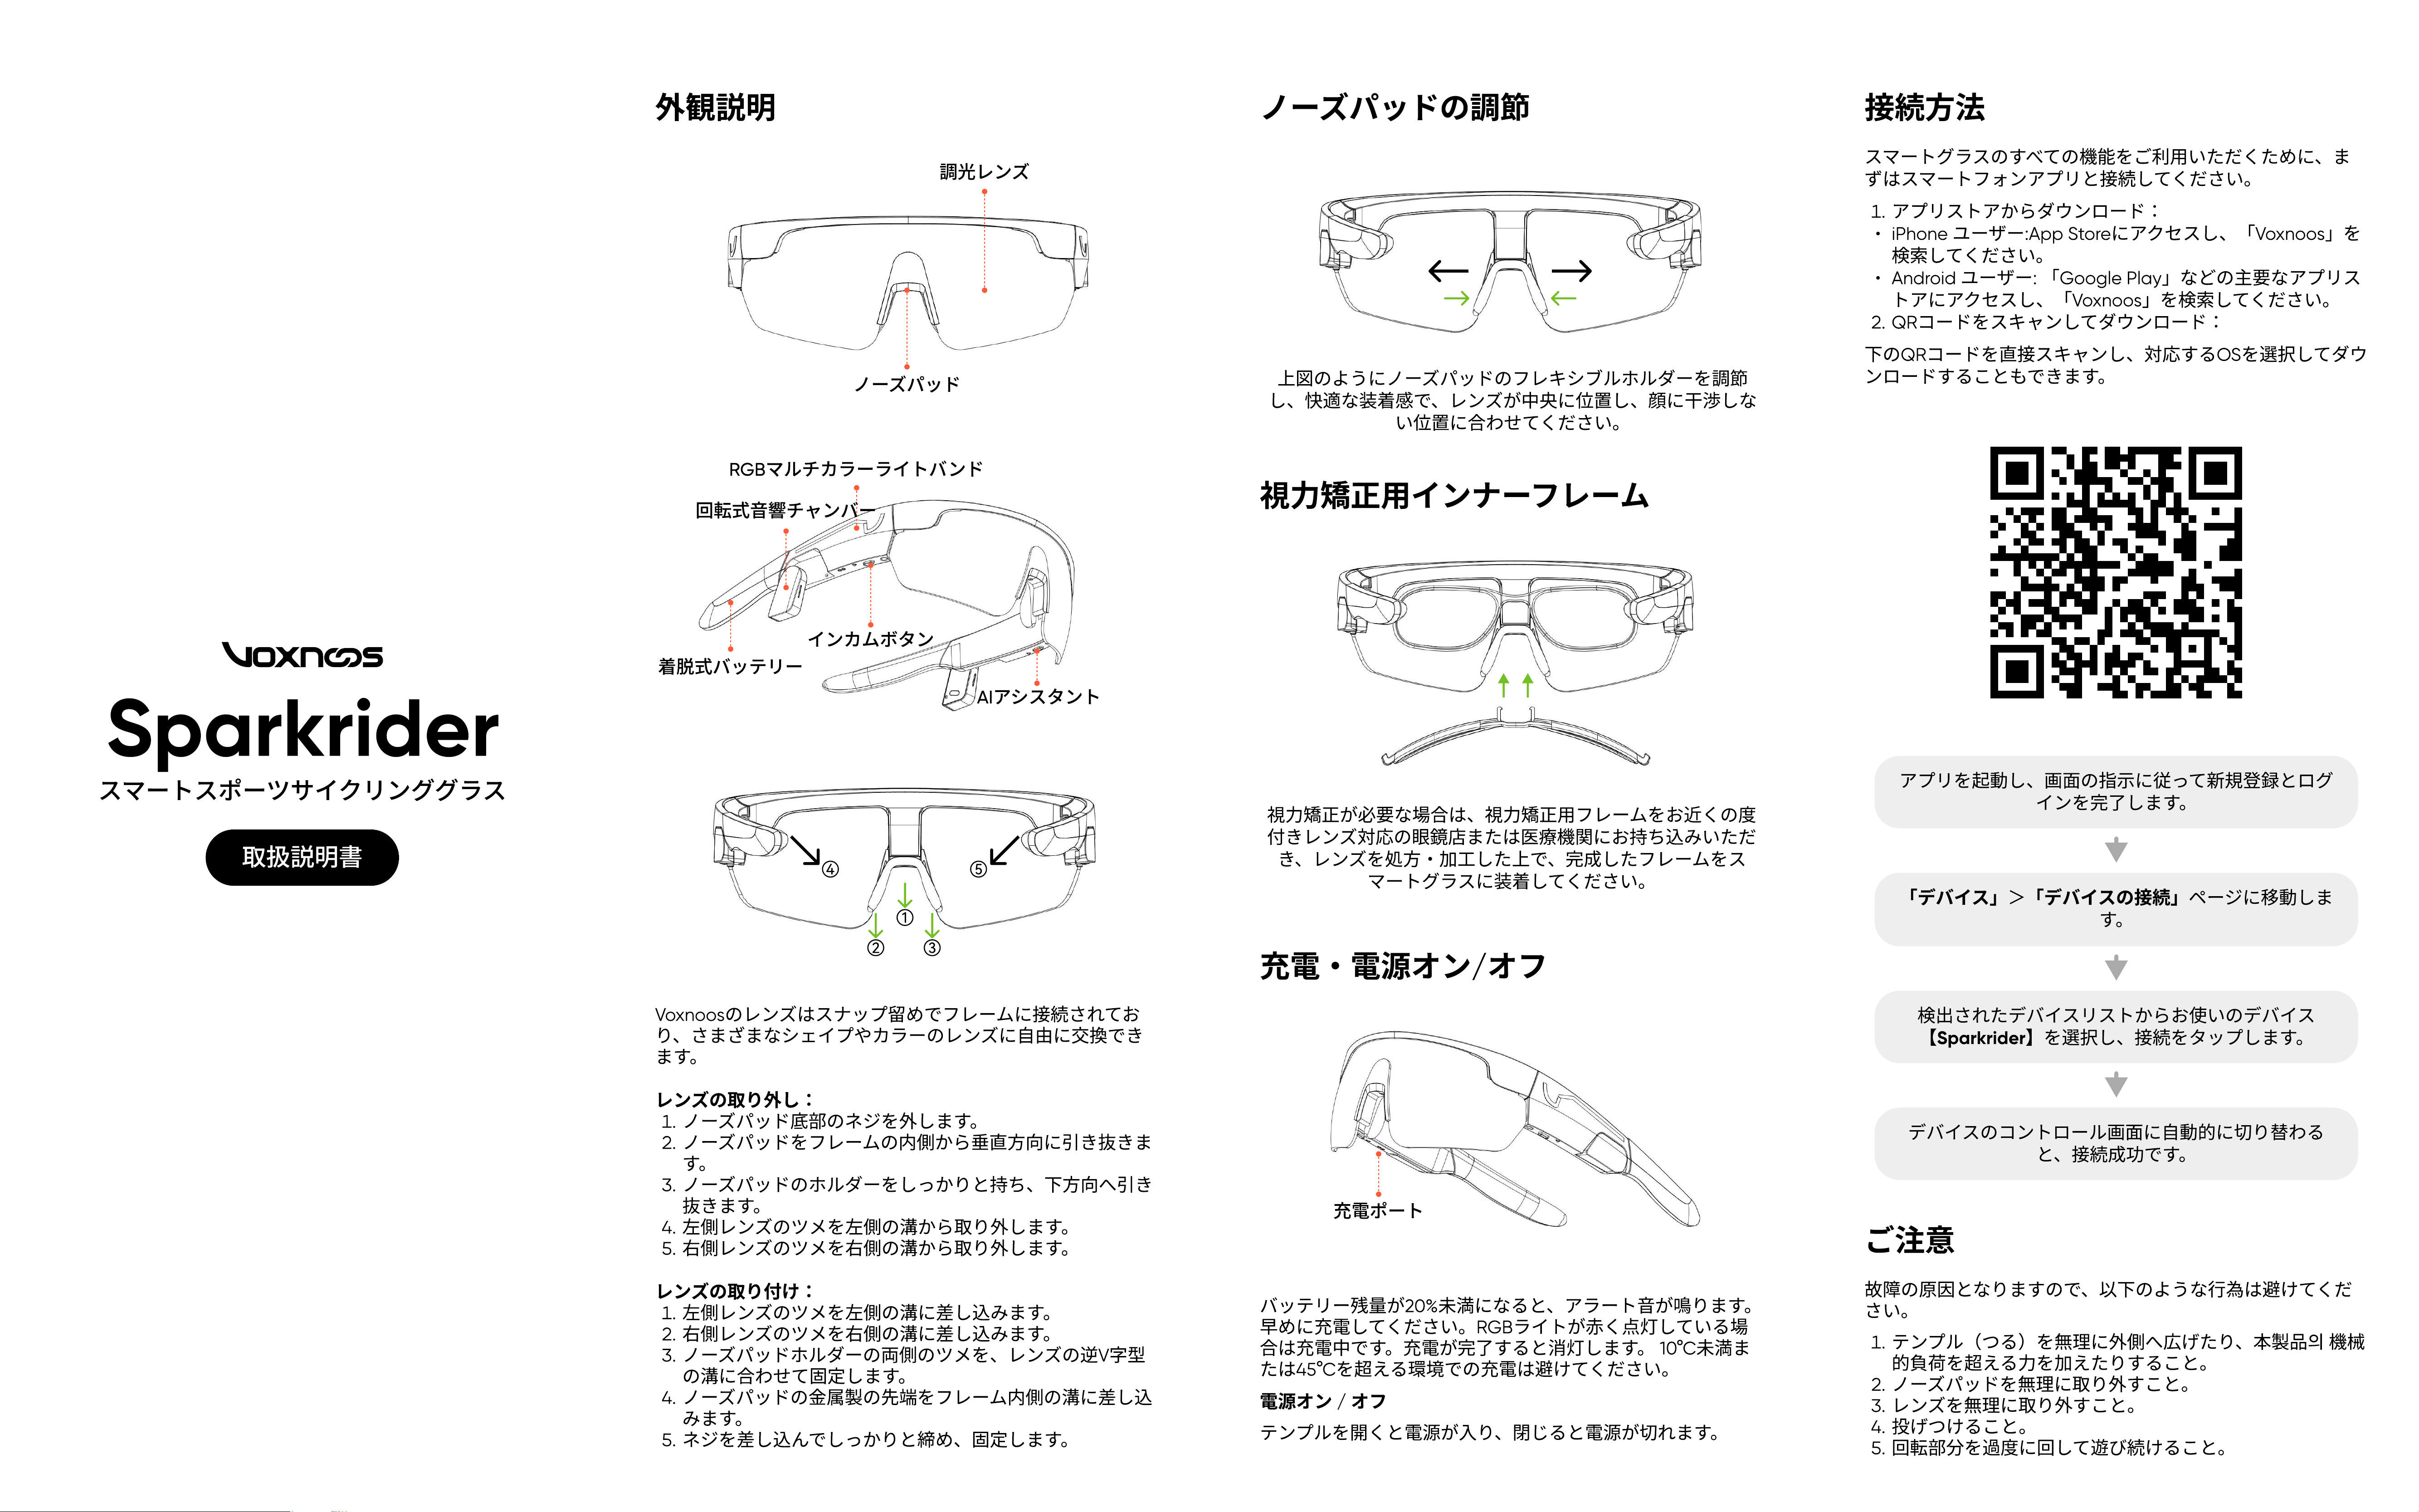
外観説明
調光レンズ
ノーズパッド
RGBマルチカラーライトバンド
回転式音響チャンバー
着脱式バッテリー
インカムボタン
AIアシスタント
④ ⑤
①
② ③
Voxnoosのレンズはスナップ留めでフレームに接続されてお
り、さまざまなシェイプやカラーのレンズに自由に交換でき
ます
レンズの取り外し
ノーズパッド底部のネジを外します。
ノーズパッドをフレームの内側から垂直方向に引き抜きま
す。
ノーズパッドのホルダーをしっかりと持ち、下方向へ引き
抜きます。
左側レンズのツメを左側の溝から取り外します。
右側レンズのツメを右側の溝から取り外します
レンズの取り付け
左側レンズのツメを左側の溝に差し込みます。
右側レンズのツメを右側の溝に差し込みます。
ノーズパッドホルダーの両側のツメを、レンズの逆V字型
の溝に合わせて固定します。
ノーズパッドの金属製の先端をフレーム内側の溝に差し込
みます。
ネジを差し込んでしっかりと締め、固定します。
ノーズパッドの調節
上図のようにノーズパッドのフレキシブルホルダーを調節
し、快適な装着感で、レンズが中央に位置し、顔に干渉しな
い位置に合わせてください。
視力矯正用インナーフレーム
視力矯正
が
必要
な
場
合は、
視力矯正用
フレームをお
近
くの
度
付
きレンズ
対応
の
眼鏡店
ま
た
は
医療機関
にお持ち込みい
た
だ
き、レンズを
処
方
・加工
し
た
上で、
完成
し
た
フレームをス
マ
ー
トグ
ラスに装着してください。
充電・電源オン/オフ
充電ポート
バ
ッ
テリ
ー
残量
が
20%未満
にな
る
と、
ア
ラー
ト音
が
鳴
ります。
早
めに
充電
してください。
RGB
ライ
ト
が
赤
く
点灯
してい
る場
合は
充電
中です。
充電
が
完了
す
る
と
消灯
します。
10°C未満
ま
た
は
45°C
を
超える環境
での
充電
は
避け
てください
電源オン / オフ
テ
ンプルを
開
くと
電源
が
入
り、
閉じる
と
電源
が
切
れます。
接続方法
ス
マ
ー
トグ
ラスのす
べ
ての
機
能
を
ご利
用
い
た
だく
た
めに、ま
ず
はス
マ
ー
ト
フ
ォ
ン
ア
プ
リ
と接続してください
ア
プ
リ
ス
トア
からダ
ウ
ン
ロ
ード
iPh
on
e
ユ
ー
ザ
ー
:App
St
o
re
に
ア
クセ
スし、
「
Voxnoos
」
を
検索
してください
A
n
dr
o
id
ユ
ー
ザ
ー
:
「
G
oo
gle
Play」
な
ど
の
主
要
な
ア
プ
リ
ス
トア
に
ア
クセ
スし、
「
Voxnoos
」
を
検索
してください
Q
R
コ
ードをスキ
ャ
ンしてダ
ウ
ン
ロ
ード
下の
Q
R
コ
ードを直接スキ
ャ
ンし、
対応
す
る
OS
を
選択
してダ
ウ
ン
ロ
ードす
る
こ
と
も
できます。
ア
プ
リ
を
起動
し、
画面
の
指示
に
従
って
新規登録
と
ロ
グ
インを
完了
します。
「デバイス」>「デバイスの接続」ペ
ージに
移動
しま
す。
検
出
され
た
デ
バ
イス
リ
ス
ト
からお
使
いの
デ
バ
イス
【Sparkrider】
を
選択
し、接続を
タ
ップします。
デ
バ
イスの
コ
ン
ト
ロ
ール
画面
に自
動的
に
切
り
替
わ
る
と、接続
成
功
です。
ご注意
故障
の
原因
となりますので、
以
下のような
行為
は
避け
てくだ
さい
テ
ンプル
(つ
る
)
を
無理
に外側へ
広げ
た
り、
本
製
品의
機
械
的負荷
を
超える力
を
加えた
りす
る
こ
と。
ノーズパッドを
無理
に取り外す
こ
と。
レンズを
無理
に取り外す
こ
と。
投げつ
ける
こ
と。
回転
部
分
を
過
度
に
回
して
遊び
続
ける
こ
と。
Sparkrider
스
마
트 스
포츠
사
이
클링
고글
사용
설명서
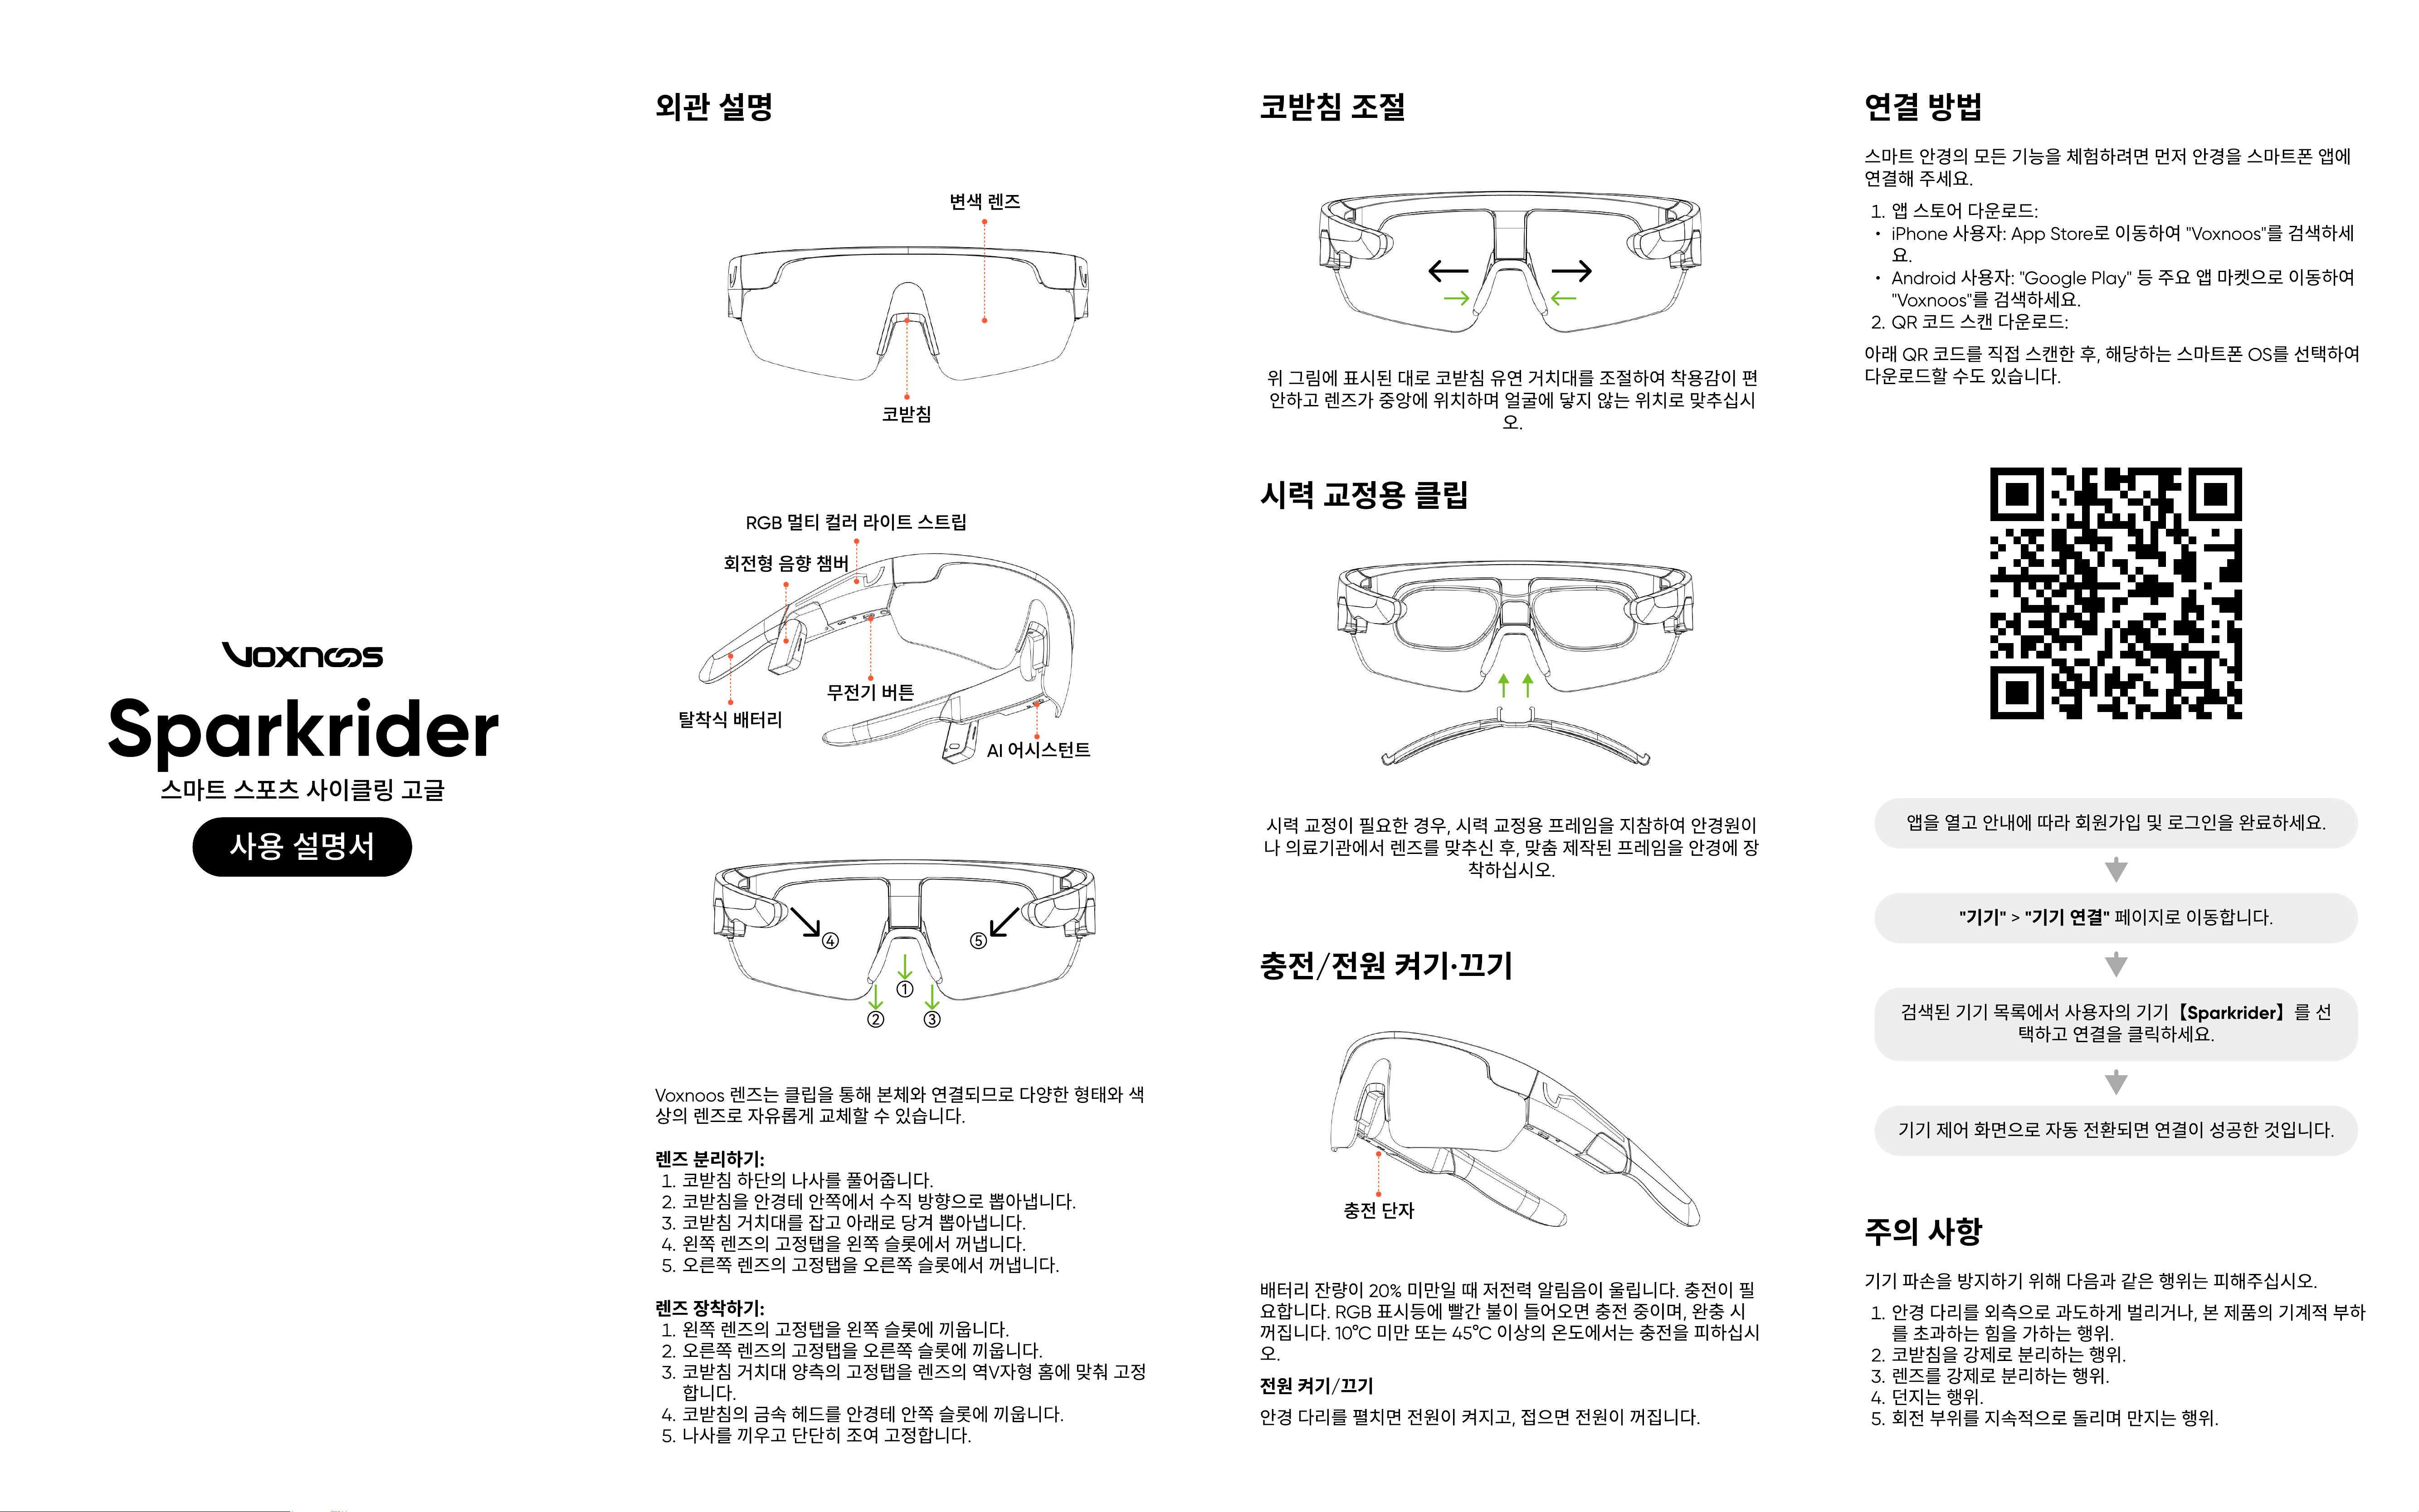
외관 설명
변색 렌즈
코받침
RGB 멀티 컬러 라이트 스트립
회전형 음향 챔버
탈착식 배터리
무전기 버튼
AI 어시스턴트
④ ⑤
②
①
③
Voxnoos 렌즈는 클립을 통해 본체와 연결되므로 다양한 형태와 색
상의 렌즈로 자유롭게 교체할 수 있습니다
렌즈 분리하기
코받침 하단의 나사를 풀어줍니다.
코받침을 안경테 안쪽에서 수직 방향으로 뽑아냅니다.
코받침 거치대를 잡고 아래로 당겨 뽑아냅니다.
왼쪽 렌즈의 고정탭을 왼쪽 슬롯에서 꺼냅니다.
오른쪽 렌즈의 고정탭을 오른쪽 슬롯에서 꺼냅니다
렌즈 장착하기
왼쪽 렌즈의 고정탭을 왼쪽 슬롯에 끼웁니다.
오른쪽 렌즈의 고정탭을 오른쪽 슬롯에 끼웁니다.
코받침 거치대 양측의 고정탭을 렌즈의 역V자형 홈에 맞춰 고정
합니다.
코받침의 금속 헤드를 안경테 안쪽 슬롯에 끼웁니다.
나사를 끼우고 단단히 조여 고정합니다.
코받침
조절
위 그림에 표시된 대로 코받침 유연 거치대를 조절하여 착용감이 편
안하고 렌즈가 중앙에 위치하며 얼굴에 닿지 않는 위치로 맞추십시
오.
시력
교정용
클립
시
력
교정
이
필요한
경우,
시
력
교정
용
프레임을
지
참
하여 안
경원
이
나
의료기관
에
서
렌즈를 맞추
신
후,
맞
춤
제작
된
프레임을
안
경
에
장
착하십시오.
충전/전원
켜기·끄기
충전 단자
배터리 잔량이 20% 미만일 때 저전력 알림음이 울립니다. 충전이 필
요합니다. RGB 표시등에 빨간 불이 들어오면 충전 중이며, 완충 시
꺼집니다. 10°C 미만 또는 45°C 이상의 온도에서는 충전을 피하십시
오
전원 켜기/끄기
안경 다리를 펼치면 전원이 켜지고, 접으면 전원이 꺼집니다.
연결
방법
스마트
안
경의
모든
기능을
체험
하
려면
먼저
안
경을
스마트폰
앱
에
연
결해
주세요
앱
스토어
다운
로
드
iPhone
사
용
자:
App
Store
로 이
동
하여
"Voxnoos"
를
검색
하
세
요
Android
사
용
자:
"Google
Play"
등
주요
앱
마켓으
로 이
동
하여
"Voxnoos"
를
검색
하
세요
QR
코
드
스캔
다운
로
드
아래
QR
코
드
를
직접
스캔한
후,
해당
하는
스마트폰
OS
를
선택
하여
다운
로
드할
수도
있습니다
.
앱을
열
고 안
내
에
따라
회
원
가
입
및
로그
인
을
완
료
하
세요
.
"기기" >
"기기 연결" 페
이지로 이
동
합
니다
.
검색
된
기기
목록
에
서
사
용
자의
기기
【Sparkrider】
를
선
택
하고 연
결을
클릭
하
세요
.
기기
제어
화
면으
로
자동
전환되
면
연
결
이
성공
한
것입
니다
.
주의
사항
기기
파손
을
방
지하
기
위
해
다
음과
같은
행
위는
피
해주
십시오
안
경
다
리
를
외측
으
로
과
도
하
게
벌리
거
나,
본
제
품
의
기
계적
부
하
를
초과
하는
힘
을
가하는
행
위
코받침
을
강
제
로
분리
하는
행
위
렌즈를
강
제
로
분리
하는
행
위
던
지는
행
위
회전
부
위를 지
속적
으
로
돌리
며
만
지는
행
위.
Sparkrider
Smarte Sport-Radbrille
Bedienungsanleitung
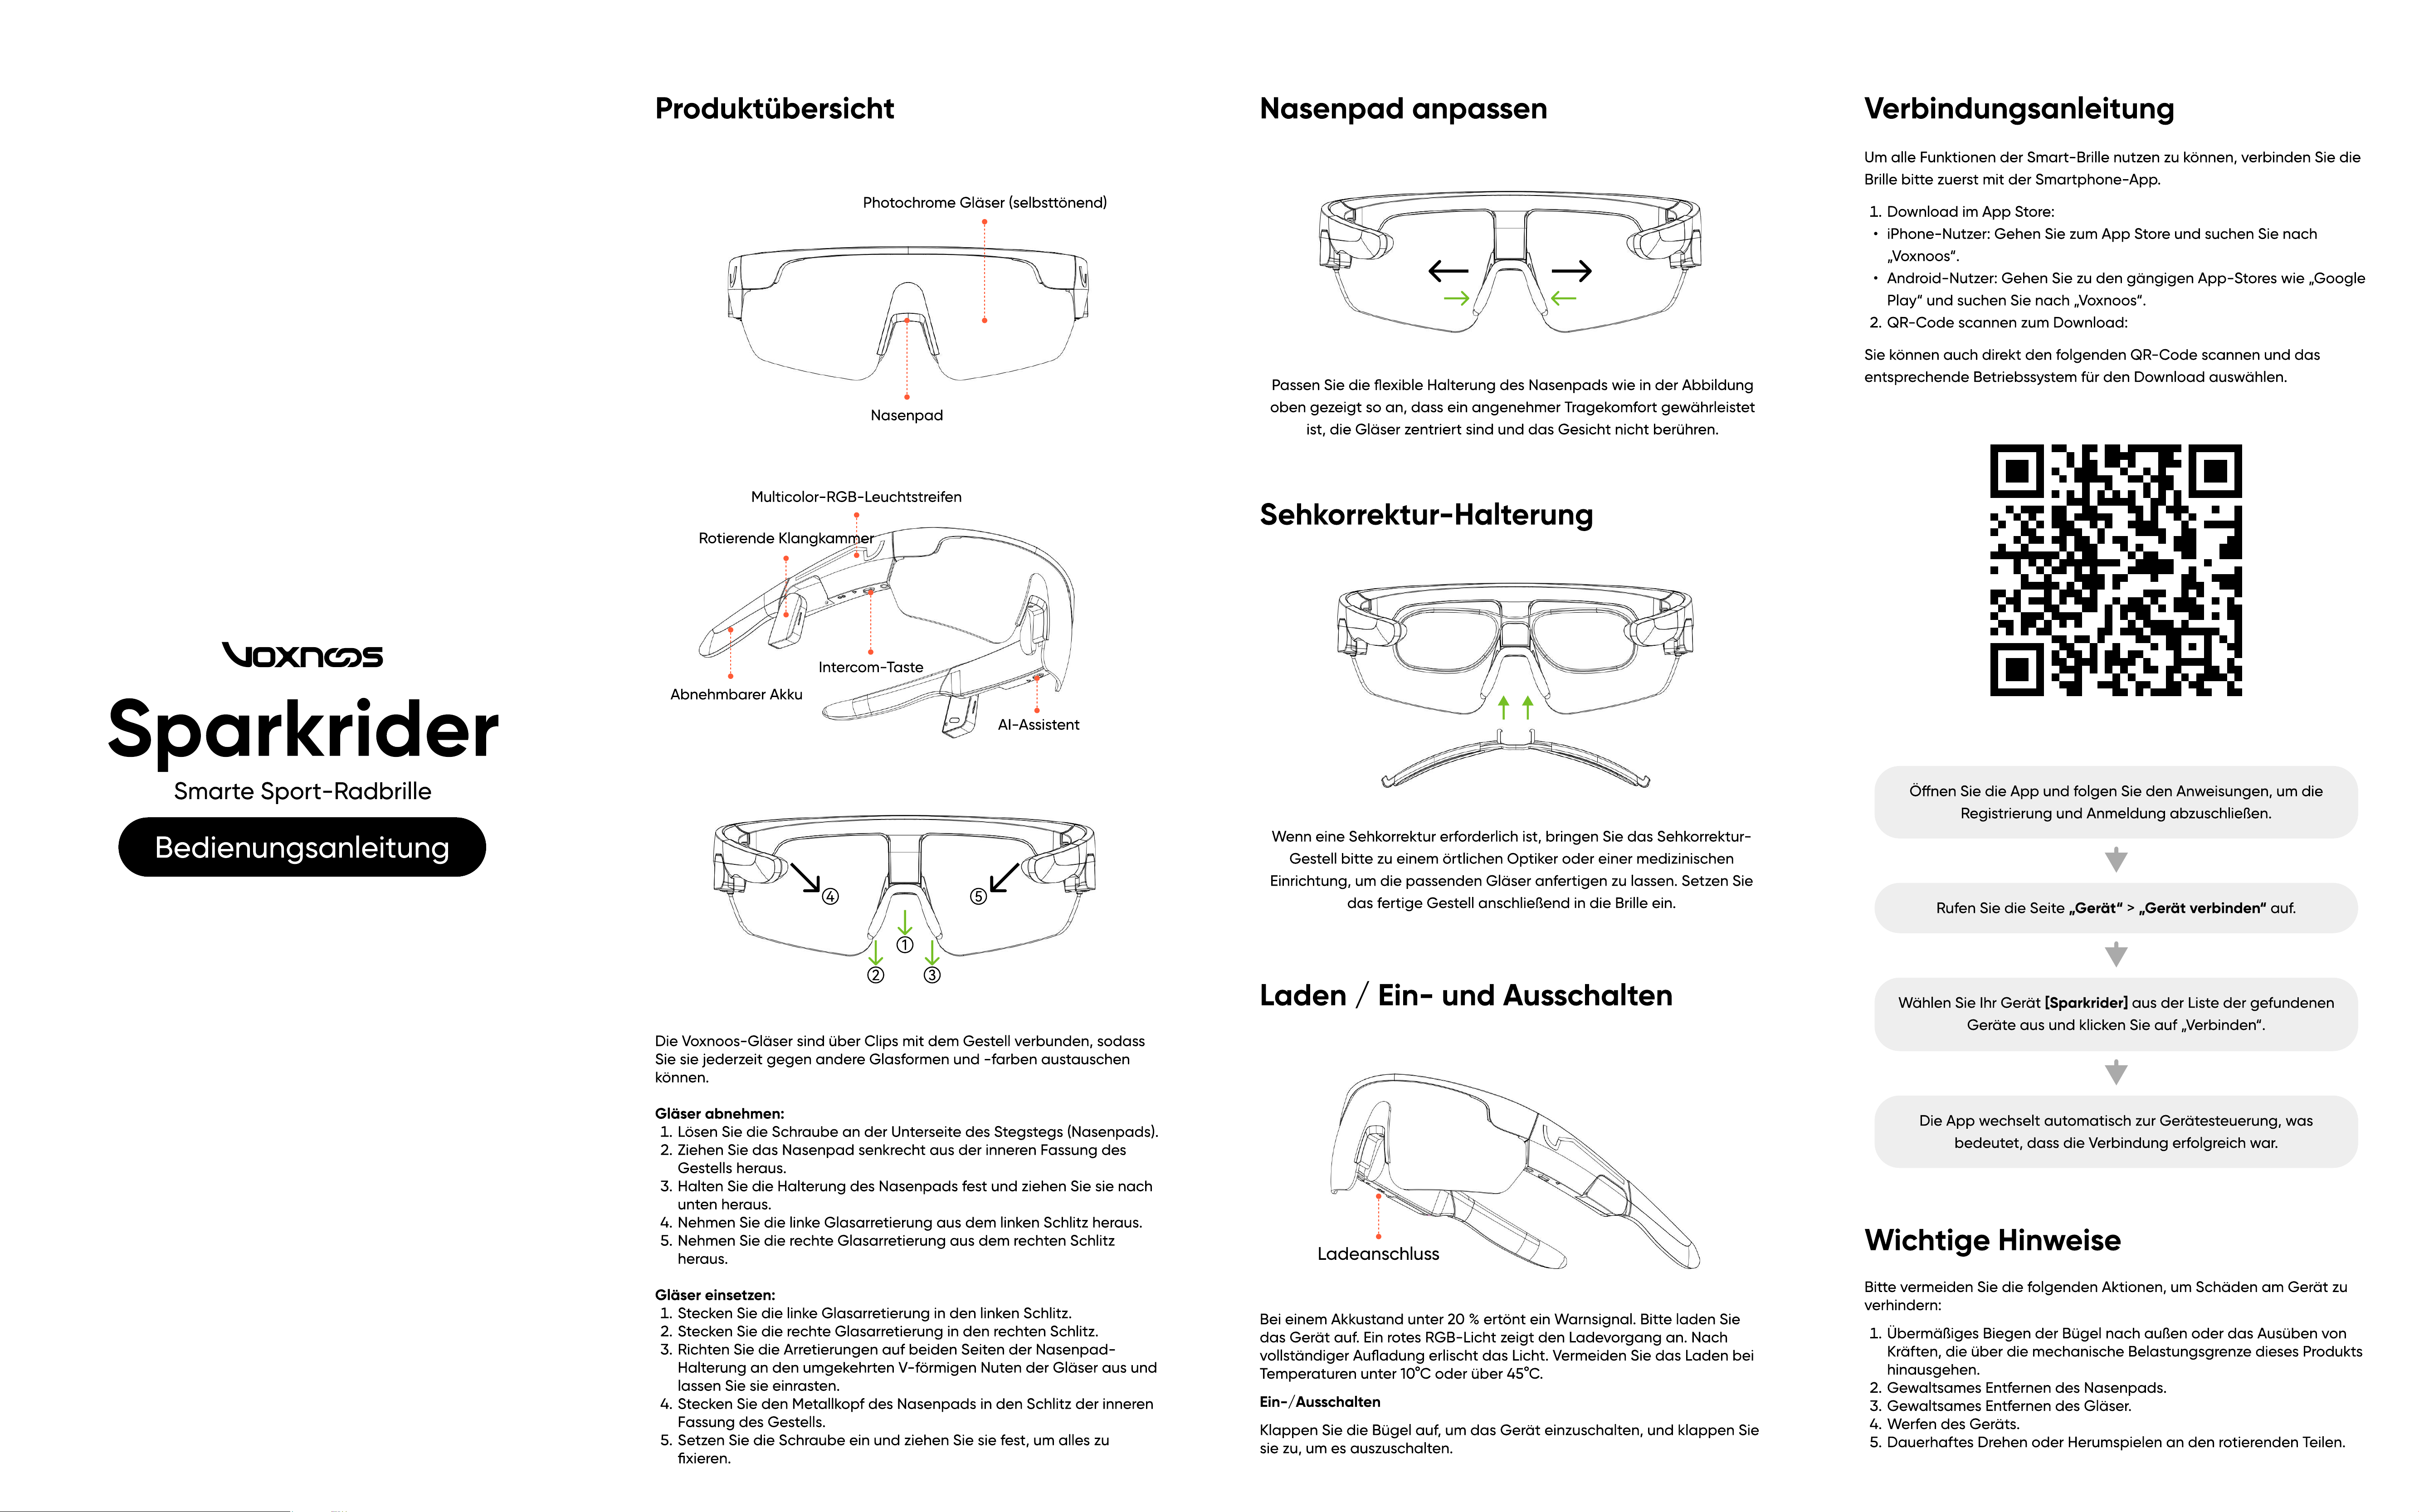
Produktübersicht
Photochrome Gläser (selbsttönend)
Nasenpad
Multicolor-RGB-Leuchtstreifen
Rotierende Klangkammer
Abnehmbarer Akku
Intercom-Taste
AI-Assistent
④ ⑤
①
② ③
Die Voxnoos-Gläser sind über Clips mit dem Gestell verbunden, sodass
Sie sie jederzeit gegen andere Glasformen und -farben austauschen
können
Gläser abnehmen
Lösen Sie die Schraube an der Unterseite des Stegstegs (Nasenpads)
Ziehen Sie das Nasenpad senkrecht aus der inneren Fassung des
Gestells heraus
Halten Sie die Halterung des Nasenpads fest und ziehen Sie sie nach
unten heraus
Nehmen Sie die linke Glasarretierung aus dem linken Schlitz heraus
Nehmen Sie die rechte Glasarretierung aus dem rechten Schlitz
heraus
Gläser einsetzen
Stecken Sie die linke Glasarretierung in den linken Schlitz
Stecken Sie die rechte Glasarretierung in den rechten Schlitz
Richten Sie die Arretierungen auf beiden Seiten der Nasenpad-
Halterung an den umgekehrten V-förmigen Nuten der Gläser aus und
lassen Sie sie einrasten
Stecken Sie den Metallkopf des Nasenpads in den Schlitz der inneren
Fassung des Gestells
Setzen Sie die Schraube ein und ziehen Sie sie fest, um alles zu
xieren.
Nasenpad anpassen
Passen Sie die exible Halterung des Nasenpads wie in der Abbildung
oben gezeigt so an, dass ein angenehmer Tragekomfort gewährleistet
ist, die Gläser zentriert sind und das Gesicht nicht berühren.
Sehkorrektur-Halterung
Wenn eine Sehkorrektur erforderlich ist, bringen Sie das Sehkorrektur-
Gestell bitte zu einem örtlichen Optiker oder einer medizinischen
Einrichtung, um die passenden Gläser anfertigen zu lassen. Setzen Sie
das fertige Gestell anschließend in die Brille ein.
L
aden
/
E
in- und
A
usschalten
Ladeanschluss
Bei einem Akkustand unter 20 % ertönt ein Warnsignal. Bitte laden Sie
das Gerät auf. Ein rotes RGB-Licht zeigt den Ladevorgang an. Nach
vollständiger Auadung erlischt das Licht. Vermeiden Sie das Laden bei
Temperaturen unter 10°C oder über 45°C
Ein-/Ausschalte
Klappen Sie die Bügel auf, um das Gerät einzuschalten, und klappen Sie
sie zu, um es auszuschalten.
V
erbindungsanleitung
U
m alle
F
unktionen der Smart-Brille nutzen zu können,
v
erbinden Sie die
Brille bitte zuerst mit der Smartphone-App
D
ownload im App Store
iPhone-Nutzer
:
Gehen Sie zum App Store und suchen Sie nach
„V
oxnoos
“
Android-Nutzer
:
Gehen Sie zu den gängigen App-Stores wie
„
Google
Pla
y“
und suchen Sie nach
„V
oxnoos
“
Q
R-
C
ode scannen zum
D
ownload
Sie können auch direkt den folgenden
Q
R-
C
ode scannen und das
entsprechende Betriebss
y
stem für den
D
ownload auswählen.
Ö
nen Sie die App und folgen Sie den Anweisungen, um die
Registrierung und Anmeldung abzuschließen.
Rufen Sie die Seite
„Gerät“ >
„Gerät verbinden“
auf.
Wählen Sie Ihr Gerät
[Spa
r
k
rider
]
aus der Liste der gefundenen
Geräte aus und klicken Sie auf
„V
erbinden
“
.
D
ie App wechselt automatisch zur Gerätesteuerung, was
bedeutet, dass die
V
erbindung erfolgreich war.
W
ichtige Hin
w
eise
Bitte
v
ermeiden Sie die folgenden Aktionen, um Schäden am Gerät zu
v
erhindern
Ü
bermäßiges Biegen der Bügel nach außen oder das Ausüben
v
on
Kräften, die über die mechanische Belastungsgrenze dieses Produkts
hinausgehen
Gewaltsames Entfernen des Nasenpads
Gewaltsames Entfernen des Gläser
Werfen des Geräts
D
auerhaftes
D
rehen oder Herumspielen an den rotierenden Teilen.