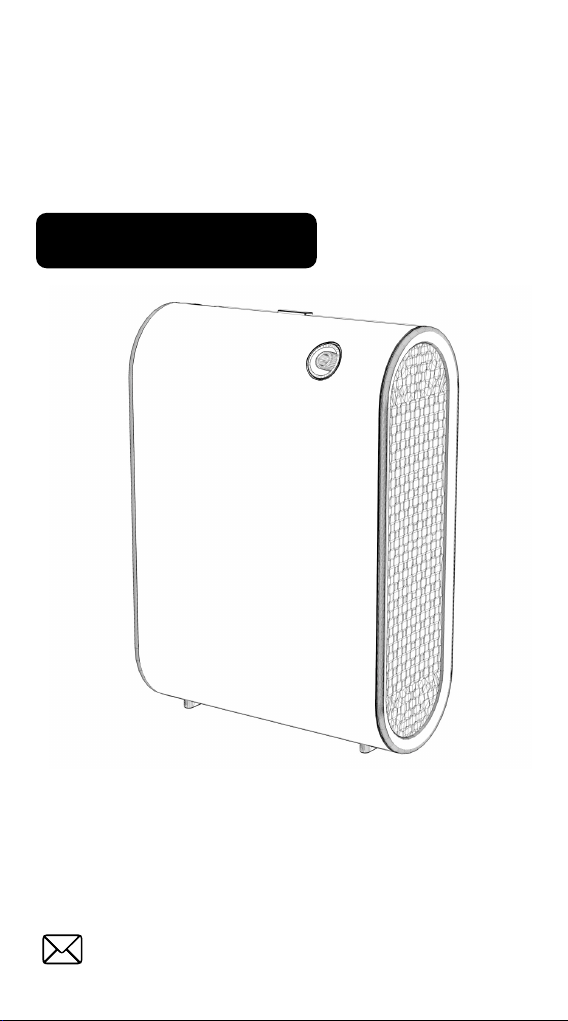
Waterless Diffuser
KOR-DF-500L
User Manual
Thank you for your purchase. We offer a one-year
warranty. In the event of any quality issues, we are
happy to provide a replacement or refund.
For assistance, please don't hesitate to contact us
via email at:

Contens
Precautions
Specifications
Installation
Control Panel
APP Operating
Maintenance
Troubleshooting
Warranty Policy
1
2
3-4
5-7
8-11
12
13-14
15

Precautions
Please read this manual carefully before using and
keep it for future reference.
All pictures shown are for illustration purposes only.
Actual products may vary due to product
enhancement.
Always keep the device in an upright position and
avoid turning it upside down or shaking it.
To prolong the lifespan of the device, it is
recommended to clean the atomizing head oil bottle
with alcohol approximately every two months.
When changing the type of essential oil, please
clean the atomizing head oil bottle with alcohol first.
Keep the device out of reach of children and pets.
Non-technical personnel are prohibited from
modifying, disassembling, or repairing the machine.
1
1
Specifications
Model : 500L
Product Size: 5.98*2.67*8.26in
Voltage: DC12V
Power: 8W
Coverage: 5000Sq.ft
Capacity: 350ml
Product weight: 1.5lb
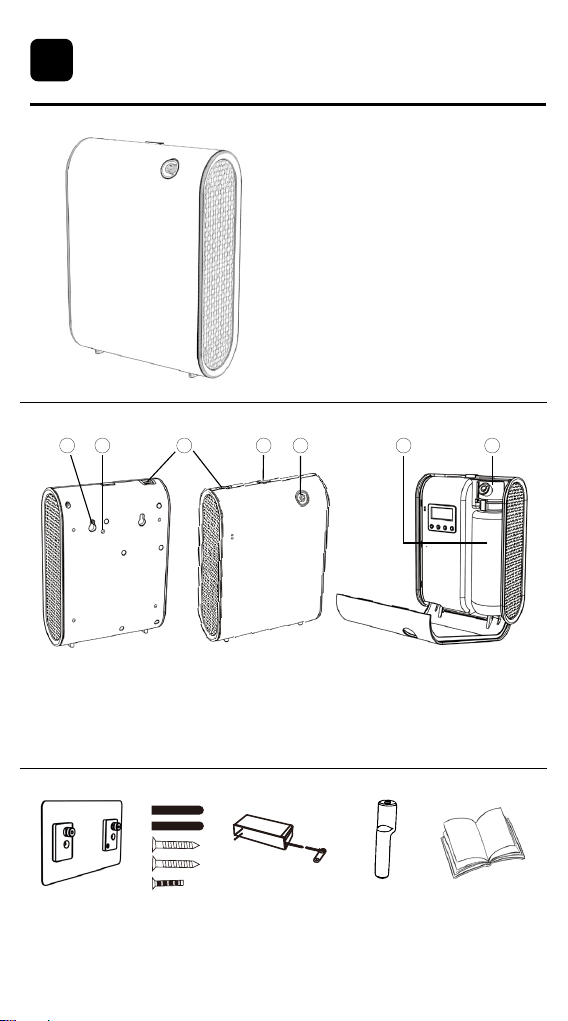
Hanging board Screw Power adapter Atomizer core User Manual
2
2
Hanging hole1.
5.
2.
6.
3. 4.
7.
Anti-theft hole Power socket Button
Atomizing port Atomizing headEssential oil bottle
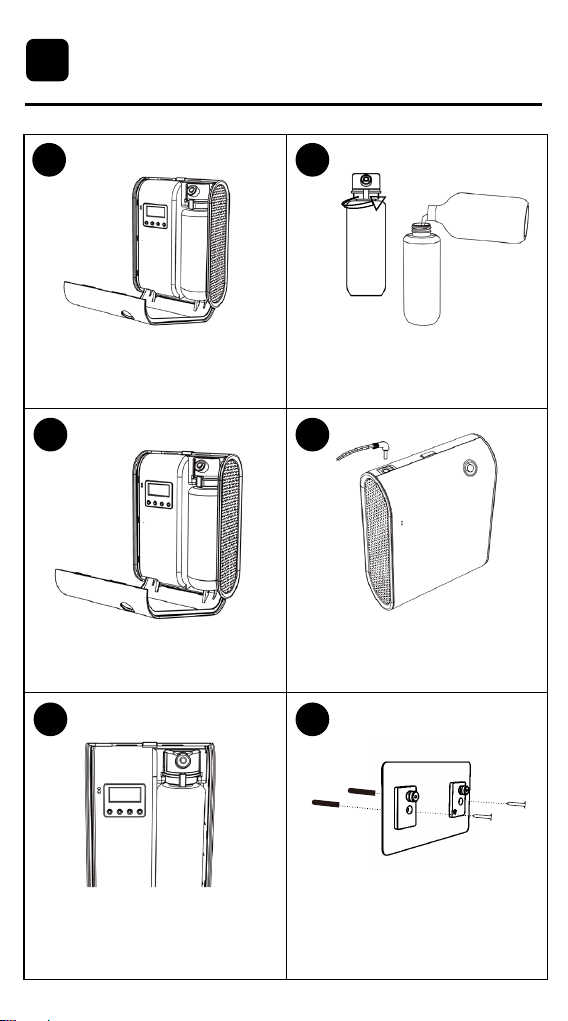
Installation
Open the device: Press the button
to lift the cover.
Close the device: Place the bottle
back and secure the cover.
Set working time: Press the button
or use the mobile app via Bluetooth
to set the time, then close the cover.
Install the hanging board:
Insert the matching screws into
the corresponding holes.
Connect to power: Plug in the
DC12V adapter.
Fill with essential oil: Remove the
bottle, take off the atomizer head,
and add essential oil.
3
3
1 2
4
65
3

Wall installation: Align the device
with the mounting holes and secure
it to the board.
Anti-theft installation: Remove the
bottle, insert the anti-theft screw
through the designated hole, and
fasten it to the mounting board.
After installation, please keep the device vertical. Tilt or flip the device
will leak oil and cause damage to the device.
4
Installation
3
7 8
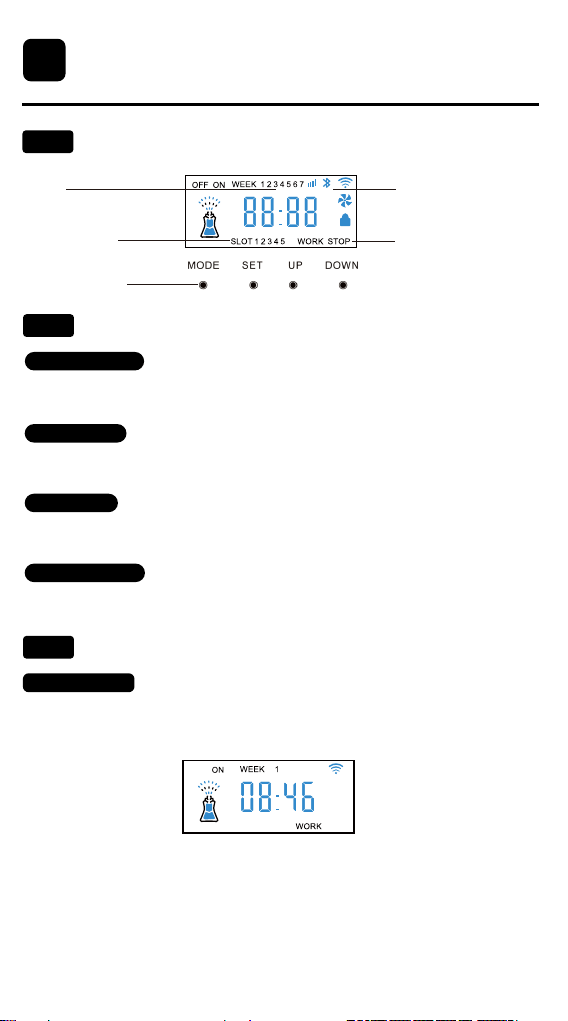
Control Panel
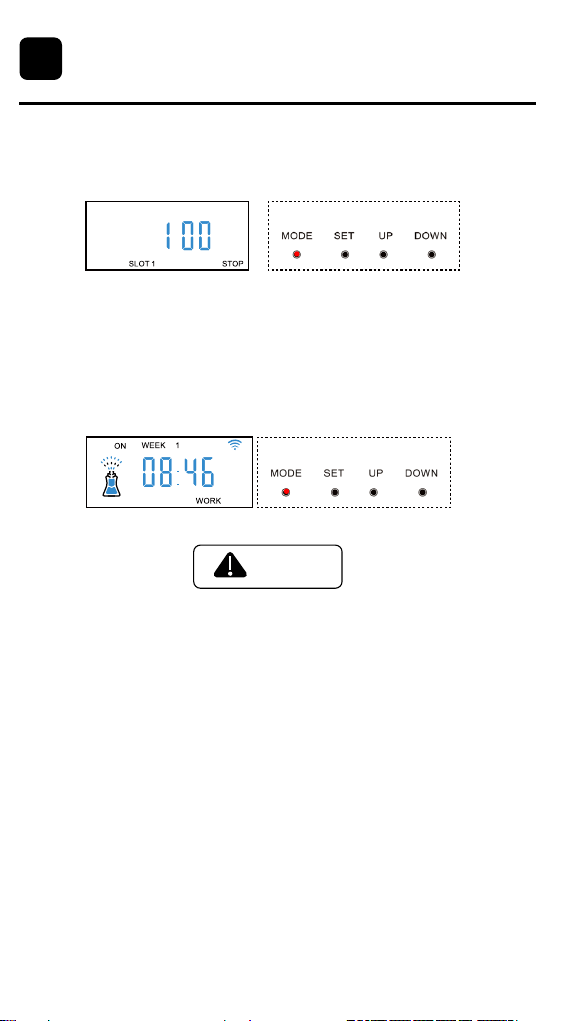
Main Menu Display:
MODE Button:
Long press: Enter network pairing mode.
Short press: Access timer settings.
SET Button:
Long press: Turn the built-in fan on/off.
Short press: Access timer settings.
UP Button:
Long press: Test the device (air pump runs for 15 seconds).
Short press: Increase numerical values.
DOWN Button:
Long press: Lock/unlock the device.
Short press: Decrease numerical values.
5
Week
Working time
period
Setting button
Function icons
Working status
4
4.1
Button Function
4.2
Button Setting:
4.3
1. Power on:
· Connect the DC12V power adapter. The indicator light will confirm the
device is working properly, and the screen will display the local time and
operating status.
Note: If no buttons are pressed for 15 seconds, the screen will turn off.
Press any button to wake the device, then press the desired button to
continue with the settings.
Control Panel
6
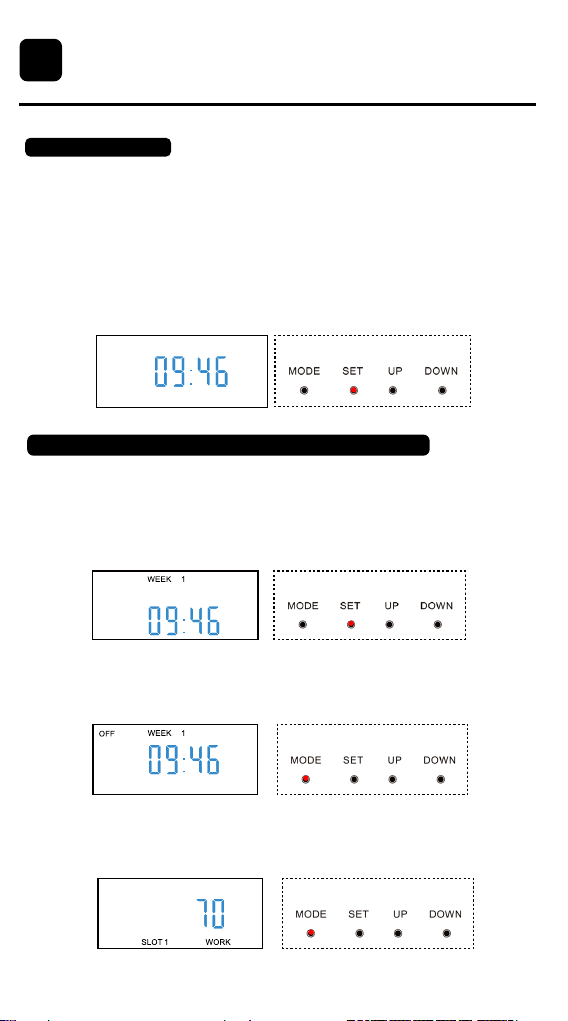
(1) Press [MODE] to display [SLOT 1 ON], indicating the start time for the
first working period.
Press [SET] to switch between hour, minute, and date settings (the
digits will flash for adjustment).
Use [UP] and [DOWN] to adjust the time and date.
3 Set the Working Period and Fragrance Frequency:
(2) Press [MODE] a second time to display [SLOT 1 OFF], indicating the
stop time for the first working period. Press [SET] to adjust the hour
and minute using [UP] or [DOWN].
(3) Press [MODE] a third time to display [SLOT 1 WORK], indicating the
atomization working time. Adjust the duration between 10s to 300s
using [UP] or [DOWN].
4
2.Set Local Time:
· On the default screen, press [SET] to enter the hour setting mode (the
hour digits will flash).
· Press [SET] again to switch to the minute setting (minute digits will flash).
· Press [SET] a third time to switch to the week setting (the week number
will flash).
· Use [UP] or [DOWN] to adjust each value.
· The local time is successfully set after adjusting all values.
7
(5)Once the first working period is set, press [MODE] five times con-
secutively or wait 10 seconds for the device to automatically return to the
main menu.
(6)To set a second working period, press [MODE] a fifth time to display
[SLOT 2 ON]. Press [SET] to enter the adjustment mode, following the
same process as SLOT 1.Up to 5 working periods can be configured
based on your needs.
1. When setting the working period, the stop time cannot be earlier than
the start time.
2. If the working period crosses midnight (00:00), it must be divided into two
separate periods. For example, if the working time is from 21:00 to 9:00,
you should set:
· SLOT 1: 21:00 - 23:59
· SLOT 2: 00:01 - 9:00
NOTE
(4) Press [MODE] a fourth time to display [SLOT 1 STOP], indicating the
atomization pause time. Adjust the pause interval between 10 to 300
seconds using [UP] or [DOWN].
Control Panel
4
APP Operating
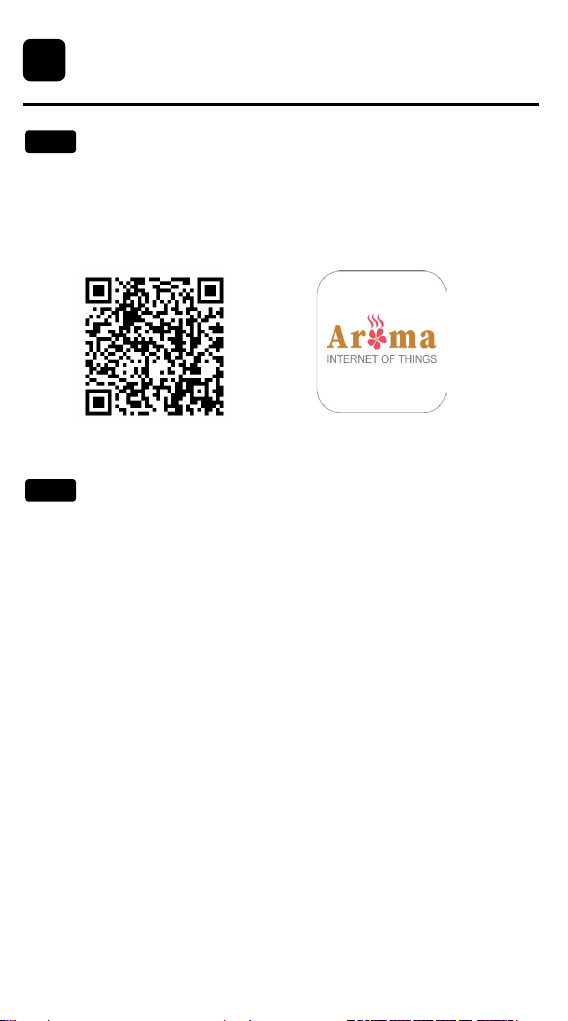
APP Download and Pairing:
1. Scan the QR code to download the Aroma IOT app.
2. Open the Aroma IOT app and log into your account.
APP download
Note: First-time users must register for an account.
3. Select the appropriate network pairing mode.
Bluetooth-WiFi Network Pairing Method:
1. Bluetooth Pairing:
· Ensure your phone's Bluetooth and location services are turned on, and
the network signal is stable.
·
Tap the "+" icon or Bluetooth icon to access the Bluetooth connection page.
· Find and select the device by checking the serial number (located under
the QR code), then tap Pair to enter the device operation page.
2. WiFi Pairing:
·
After successful Bluetooth pairing, tap WiFi Connection to start WiFi pairing.
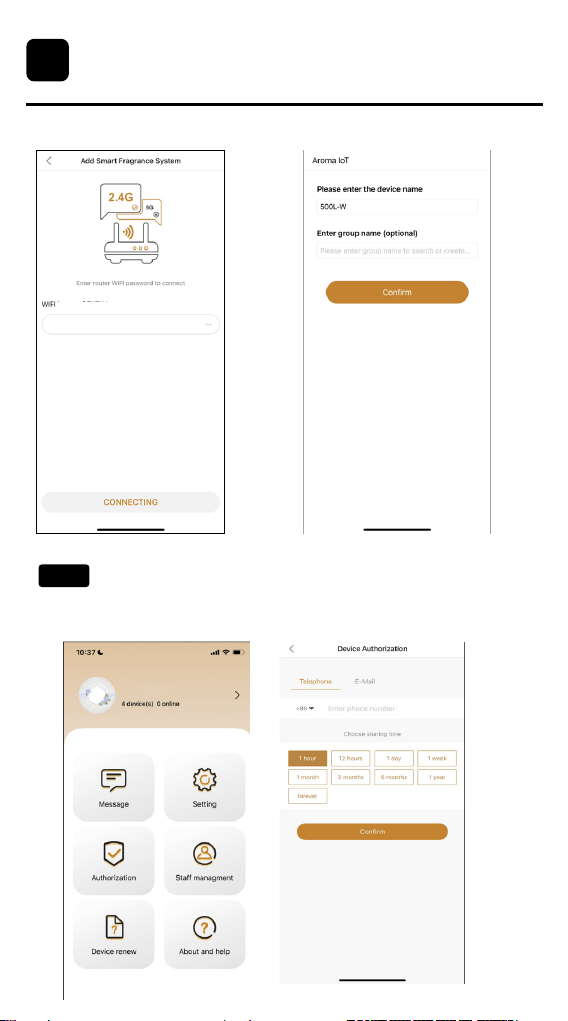
· Enter the password for the WiFi network your phone is connected to, and
tap Pair.
· Set a device name and tap Confirm to complete the network configuration.
3. Alternative WiFi Connection:
· Press and hold the [MODE] button for 3 seconds to enter AP-CONFIG
mode (the device screen will display -AP-).
· Press and hold the [MODE] button again for 3 seconds to switch to EZC2
mode (the device screen will display -C2-).
· In the app, select the corresponding mode and enter your current WiFi
password to pair the device.
· A third long press will exit pairing mode.
Note: The device supports 2.4G networks only; 5G networks are not
supported.
APP icon
8
5
5.1
5.2
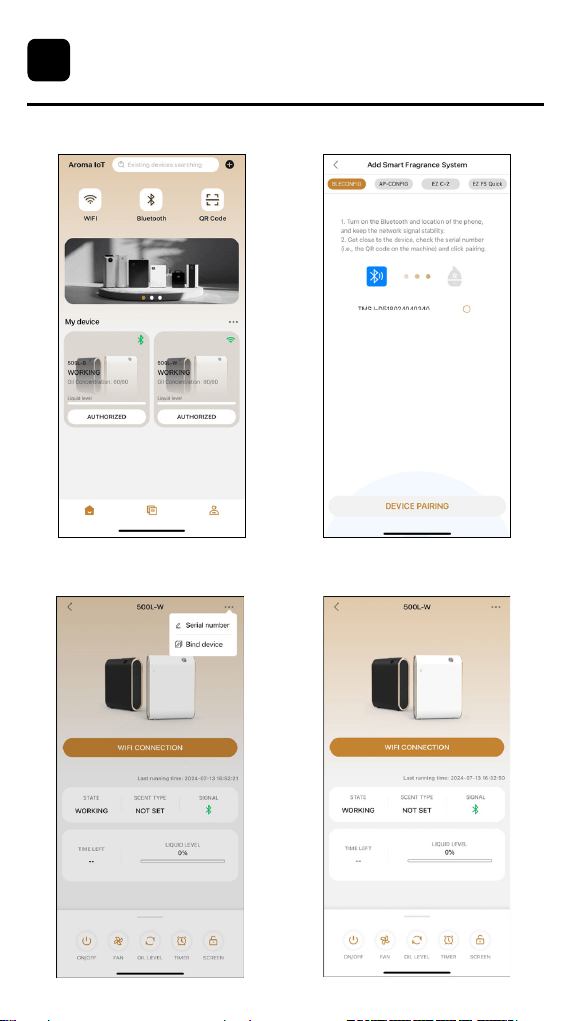
2.Connect via Bluetooth
4.Connect to WiFi3.Bind the Device
1.Enter Network Pairing Mode
9
APP Operating
5
10
1.Click on Staff Management.
2.Select Add Employee Authorization to grant access.
5.Enter WiFi Password 6.Set Device Name
Authorization Setting Methods:
APP Operating
5
5.3
11
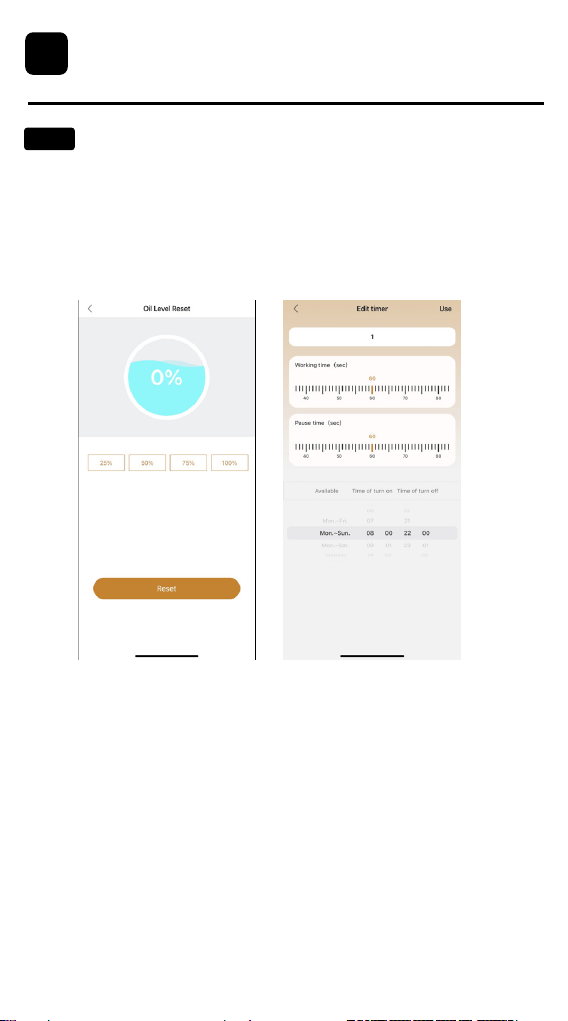
2. Timer Page:
Go to the Timer page to set or adjust the device's working
schedule and atomization timings.
Device Setup Method:
1. Oil Level Page:
Navigate to the Oil Level page to check and monitor the
current oil level in the device.
APP Operating
5
5.5

Maintenance
How to Clean the Product's Surface:
1. Turn off and disconnect the power.
2. Wipe the surface of the product with a soft cloth.
Note: Avoid wiping the power connections.
3. Do not use abrasive materials like steel wool, scrapers, or other hard
objects to clean the product.
1. Remove the atomizing head and unscrew the oil bottle.
2. Fill the oil bottle with a small amount of alcohol, reinstall it, and run the
device 1-2 times.
3. Remove the atomizing head and oil bottle, then allow them to air dry.
Note: if the diffusion effect is not good after cleaning, you can replace the
spare atomizing head (the spare atomizing head is stored behind the
essential oil bottle).
How to Change Essential Oil:
1. Remove the atomizing head and unscrew the oil bottle.
2. Fill the oil bottle with a small amount of alcohol, reinstall it, and run the
device 5 to 10 times to prevent cross-odor.
3. Remove the atomizing head and oil bottle, then allow them to air dry.
12
6
6.1
6.2
How to Clean Atomizing Head:
6.3
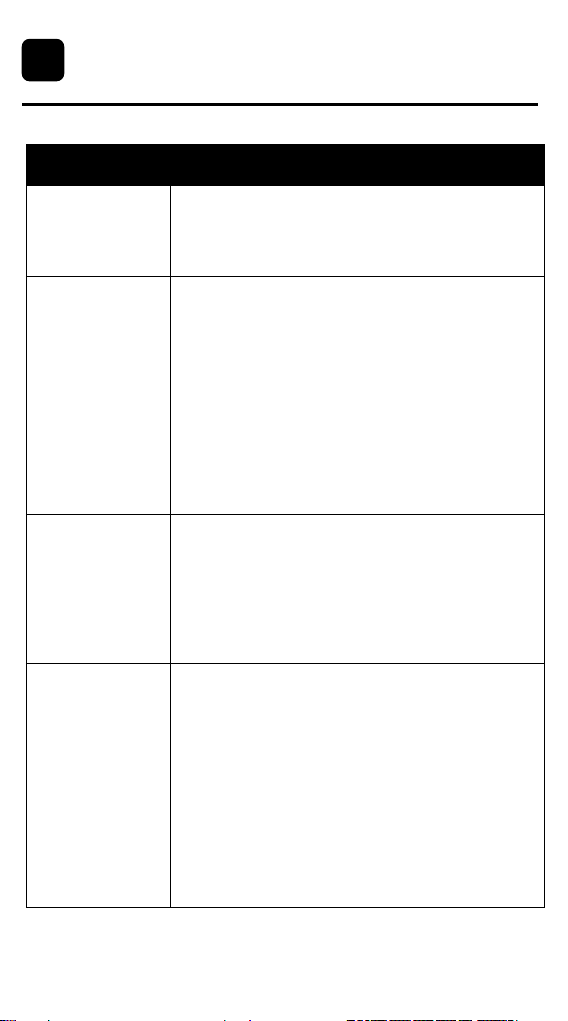
Troubleshooting
Problem Possible Solution
Not Turning On
No Diffusion
Small Diffusion
Oil leakage
1. Ensure the power cord is securely plugged in.
2.
Check that the power outlet is functioning properly
.
1. Verify if the device is in the "OFF" state.
2. Check if the air outlet seal O-ring is damaged.
3. Inspect whether the air pump is functioning and
if the atomizing head is blocked.
4. Check if the air pipe connected to the air pump is
sealed or damaged.
1. Ensuring the oil bottle is tightly sealed and
positioned upright.
2. Inspecting the atomizer head for any damage.
3. Checking the gasket for signs of damage and
replacing if necessary.
4. Verifying that the essential oil bottle and atomizer
head are aligned and securely fastened.
1. Check if the air outlet sealing ring is damaged.
2. Inspect whether the atomizer head is blocked.
3. Ensure the atomizer head is securely tightened.
13
7

Problem Possible Solution
WiFi Connection
Failure
1. Verify WiFi Credentials: Ensure accurate input
of the WiFi username and password to avoid
spelling errors or misplaced characters.
2. Check WiFi Signal Strength: Strong WiFi signal
is crucial for connection stability; consider relo-
cating the device closer to the WiFi router if the
signal is weak.
3. Ensure Compatibility with 2.4GHz Band: Confirm
that your WiFi router supports the 2.4GHz
frequency band, as the device is only compatible
with 2.4GHz networks.
4. Review Router Model: Check your router's label
to determine if it operates on the 2.4GHz band.
5. Adjust Router Settings: Some routers may have
specific requirements like IP addresses or MAC
addresses for connection. Ensure the device is
authorized to access the network by reviewing
the router settings.
14
Troubleshooting
7

WARRANTY SERVICE
Our company provides a one-year warranty
starting from the date of purchase.
The following conditions are not covered by the warranty:
- Damage that occurs after the warranty period has expired.
- Damage caused by natural disasters or other force majeure events.
- Any damage caused by use that does not follow the requirements outlined
in the User Manual.
- Failure or damage caused by the forced use of the product.
- The user disassembles or repairs the product without authorization.
In order to receive warranty service, please follow these steps:
Thank you for choosing our product, and we hope you enjoy using it.
If you have any questions or concerns, please don't hesitate to contact us.
- Provide the warranty card and the order number.
- Describe the problems you are experiencing in detail and provide pictures
or videos if possible.
- Send an email to
Non-Warranty Policy
Warranty Requirements
Model Number
Order Number
Warranty Period
Purchase date
Customer
Within 1 year from the date of purchase.
Name:
Email:
Phone Number:
Address:
15
8
8.1
8.2