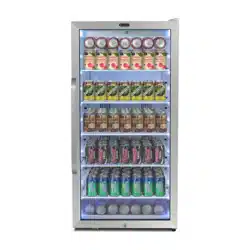
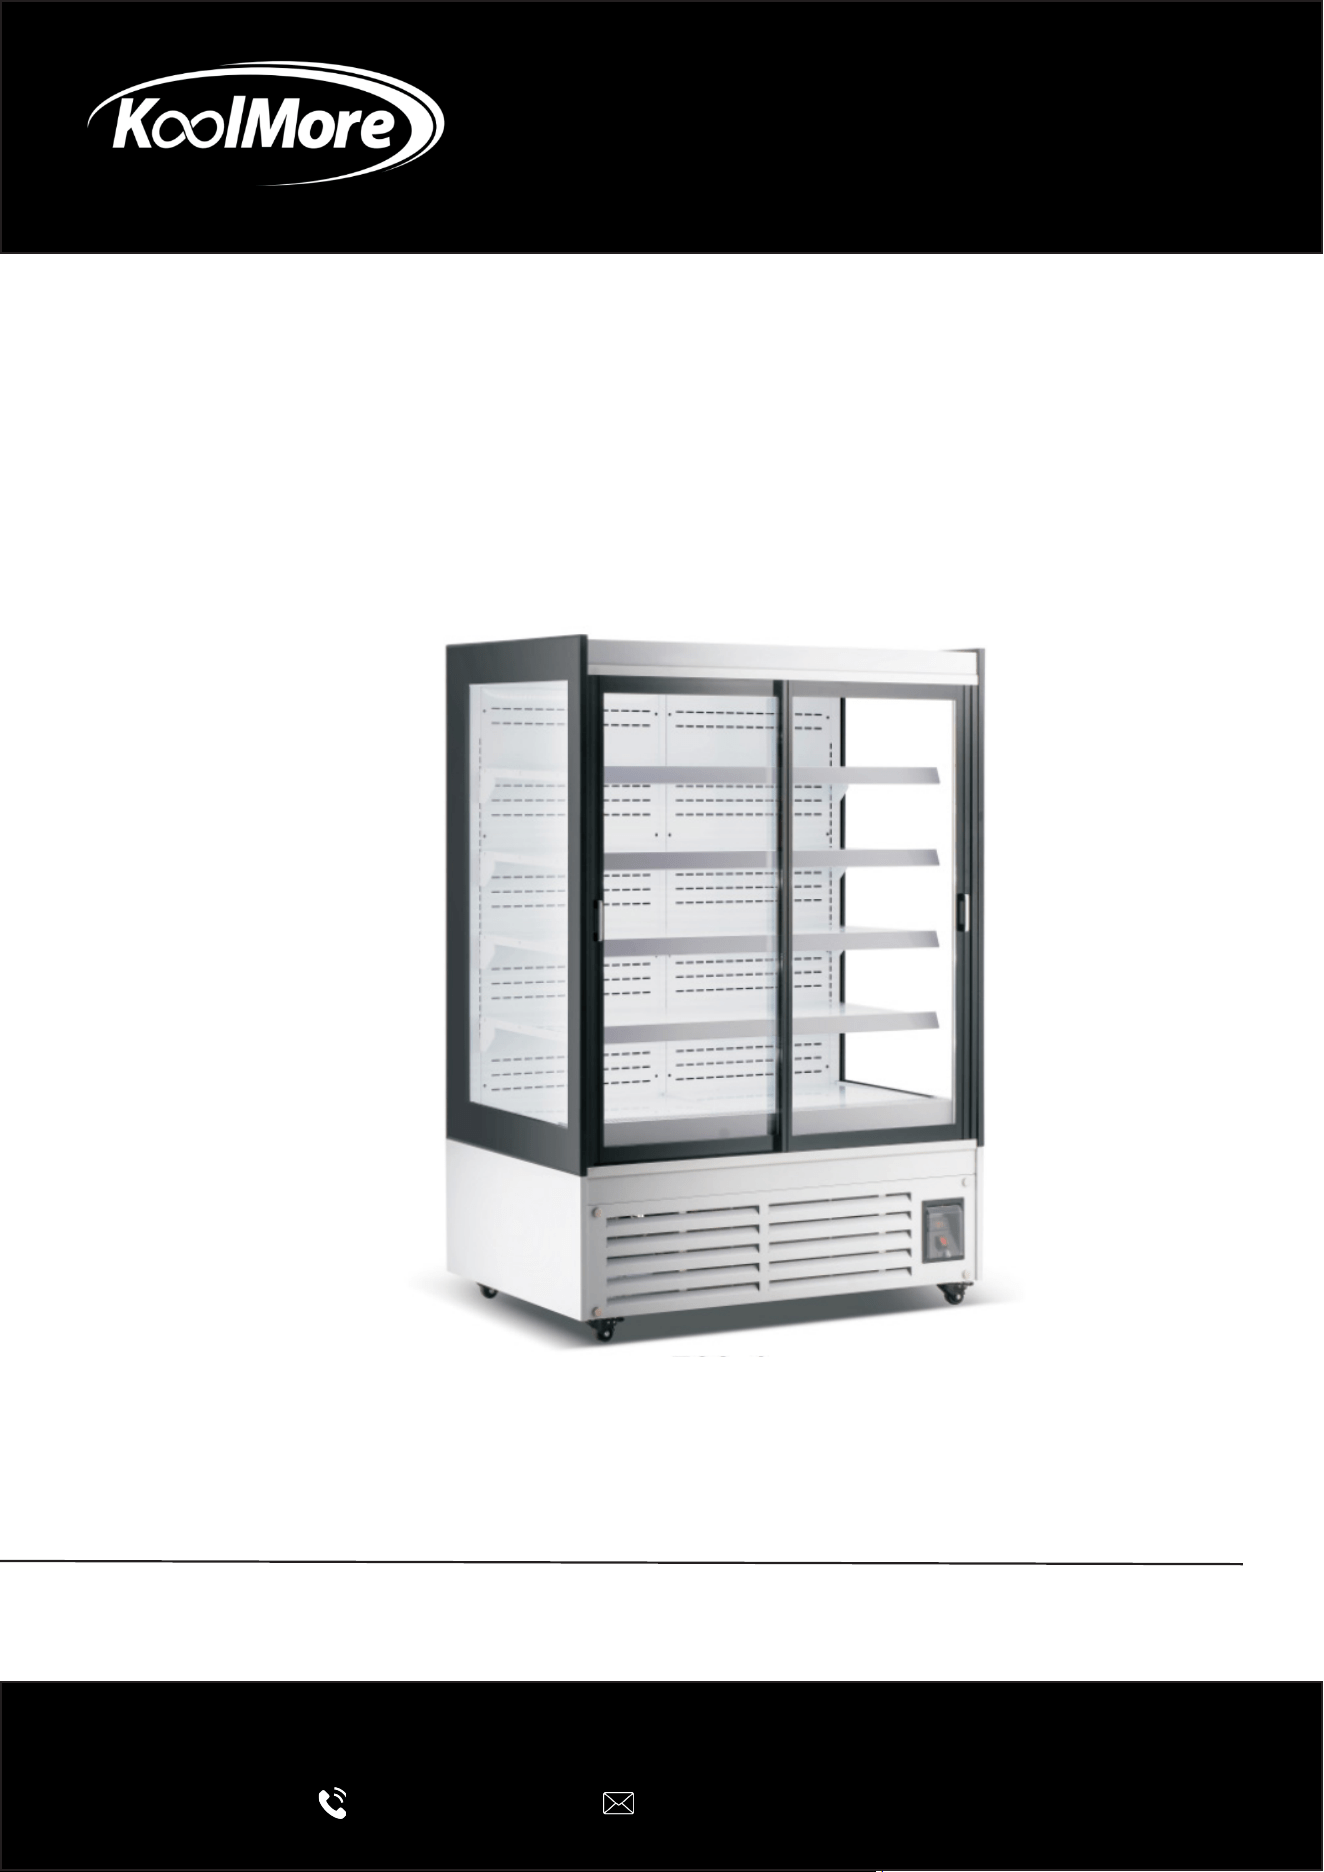
OPEN AIR MERCHANDISER
24 Cu. Ft. Commercial Open Air Beverage
Merchandiser With Sliding Glass Doors
User Manual
Please read this manual carefully before installation and operation to en-
sure safe and proper use of the appliance.
For any service related issues, please contact us:
718-576-6342
suppor[email protected]
Model: KM-CDA-SL24C

Stay informed with the latest information for your
KoolMore appliance.
Scan the QR code below to access the most recent User Manual
on our website, which is constantly being updated and improved.
If you need any assistance or have questions, our customer support
team is here to help.
Phone: 718-576-6342 Email: suppor[email protected]
Please write down the model number and serial number below for future reference. Both numbers are located on the
rating label on the back of your unit or inside of the unit and are needed to obtain warranty service. You may also
want to staple your receipt to this manual as it is your proof of purchase and may also be needed for service
under warranty.
Model Number:
Serial Number:
Date of Purchase:
To better serve you, please do the following before contacting customer service:
If you received a damaged product, immediately contact the retailer or dealer that sold you the product.
Read and follow this User Manual carefully to help you install, use, and maintain your unit.
Refer to the Troubleshooting section of this manual as it will help you diagnose and solve many common issues.

3
Contents
Safety ............................................................................................ 4
Product Overview .......................................................................... 6
Installation .................................................................................... 7
Operation ....................................................................................... 9
Maintenance .................................................................................. 12
Troubleshooting ............................................................................. 14
Circuit Diagram .............................................................................. 15
Technical Parameters .................................................................. 16
Warranty ........................................................................................ 17

4
Safety
IMPORTANT SAFETY INSTRUCTIONS
Read and follow all instructions before installing, operating, or maintaining this open-air merchan-
diser. Failure to do so may result in re, electric shock, injury, property damage, or voided warranty.
General Warnings
• This appliance is for commercial indoor use only. Do not install or operate outdoors, in direct
sunlight, near heat sources (e.g., ovens, fryers, heating vents), or in areas with excessive mois-
ture, dust, or air disturbances.
• Do not use in residential settings or near open ames, ammable materials, or explosive va-
pors.
• Keep the appliance away from children and ensure it is not used as a toy or play structure.
• This appliance is not intended for use by persons (including children) with reduced physical,
sensory, or mental capabilities, or a lack of experience and knowledge, unless supervised or
instructed on safe use and hazards.
• Children must not play with, climb on, or operate the appliance.
• Cleaning and user maintenance must not be performed by unsupervised children.
• Never leave the appliance unattended during operation. Supervise children at all times near the
unit.
Electrical Safety
WARNING – Risk of Electric Shock
• Plug into a grounded 110-120V, 60Hz outlet rated for the unit’s amperage (check nameplate).
Use a dedicated circuit with a minimum 15A (or as specied) to avoid overload.
• If the power cord or plug is damaged, discontinue use immediately and have it replaced by
qualied service personnel only (do not use extension cords).
• Unplug before cleaning, maintenance, moving, or servicing.
• Do not use if cord is frayed, pinched, or exposed to water.
• If local or National Electrical Code (NEC) requires GFCI protection, use a GFCI breaker or recep-
tacle.
• Do not modify electrical components or wiring—tampering voids ETL certication and may
cause re or shock.
Installation and Placement
CAUTION
• Install on a level, stable surface to prevent tipping. Adjust leveling legs/feet as needed.
• Maintain required clearances: at least 4-6 inches from walls/back for ventilation (check model
specs); avoid blocking air intake/exhaust or air curtain.
• Do not place near doors, HVAC vents, fans, or high-trac areas that disrupt airow—poor air-
ow can affect performance and safety.
• Do not overload shelves beyond rated capacity (check specs).
5
• Ensure proper ambient conditions: Operate the unit in an environment below 90°F with 55%
relative humidity.
Operation and Use
• Do not use mechanical devices to accelerate defrosting unless recommended by the manufac-
turer.
• Do not use abrasive cleaners, pressure washers, or immerse in water—risk of electric shock or
damage.
• Do not store ammable materials inside or near the unit.
Disposal
WARNING
Do not dispose of this appliance as unsorted municipal waste. Contact your local waste author-
ity for proper recycling or disposal instructions (e.g., separate collection for electrical/electronic
equipment). Improper disposal may release hazardous substances into the environment.
ADDITIONAL WARNING:
Caution: Risk of re. Flammable refrigerant used.
Do not puncture refrigerant tubing. Keep ventilation openings clear. Servicing must be performed
by qualied personnel only.
Meaning of crossed out wheeled dustbin:
Do not dispose of electrical appliances as unsorted municipal waste; use separate collection facil-
ities.
Contact your local government for information regarding the collection systems available.
If electrical appliances are disposed of in landlls or dumps, hazardous substances can leak into
the groundwater and enter the food chain, damaging your health and well-being.
6
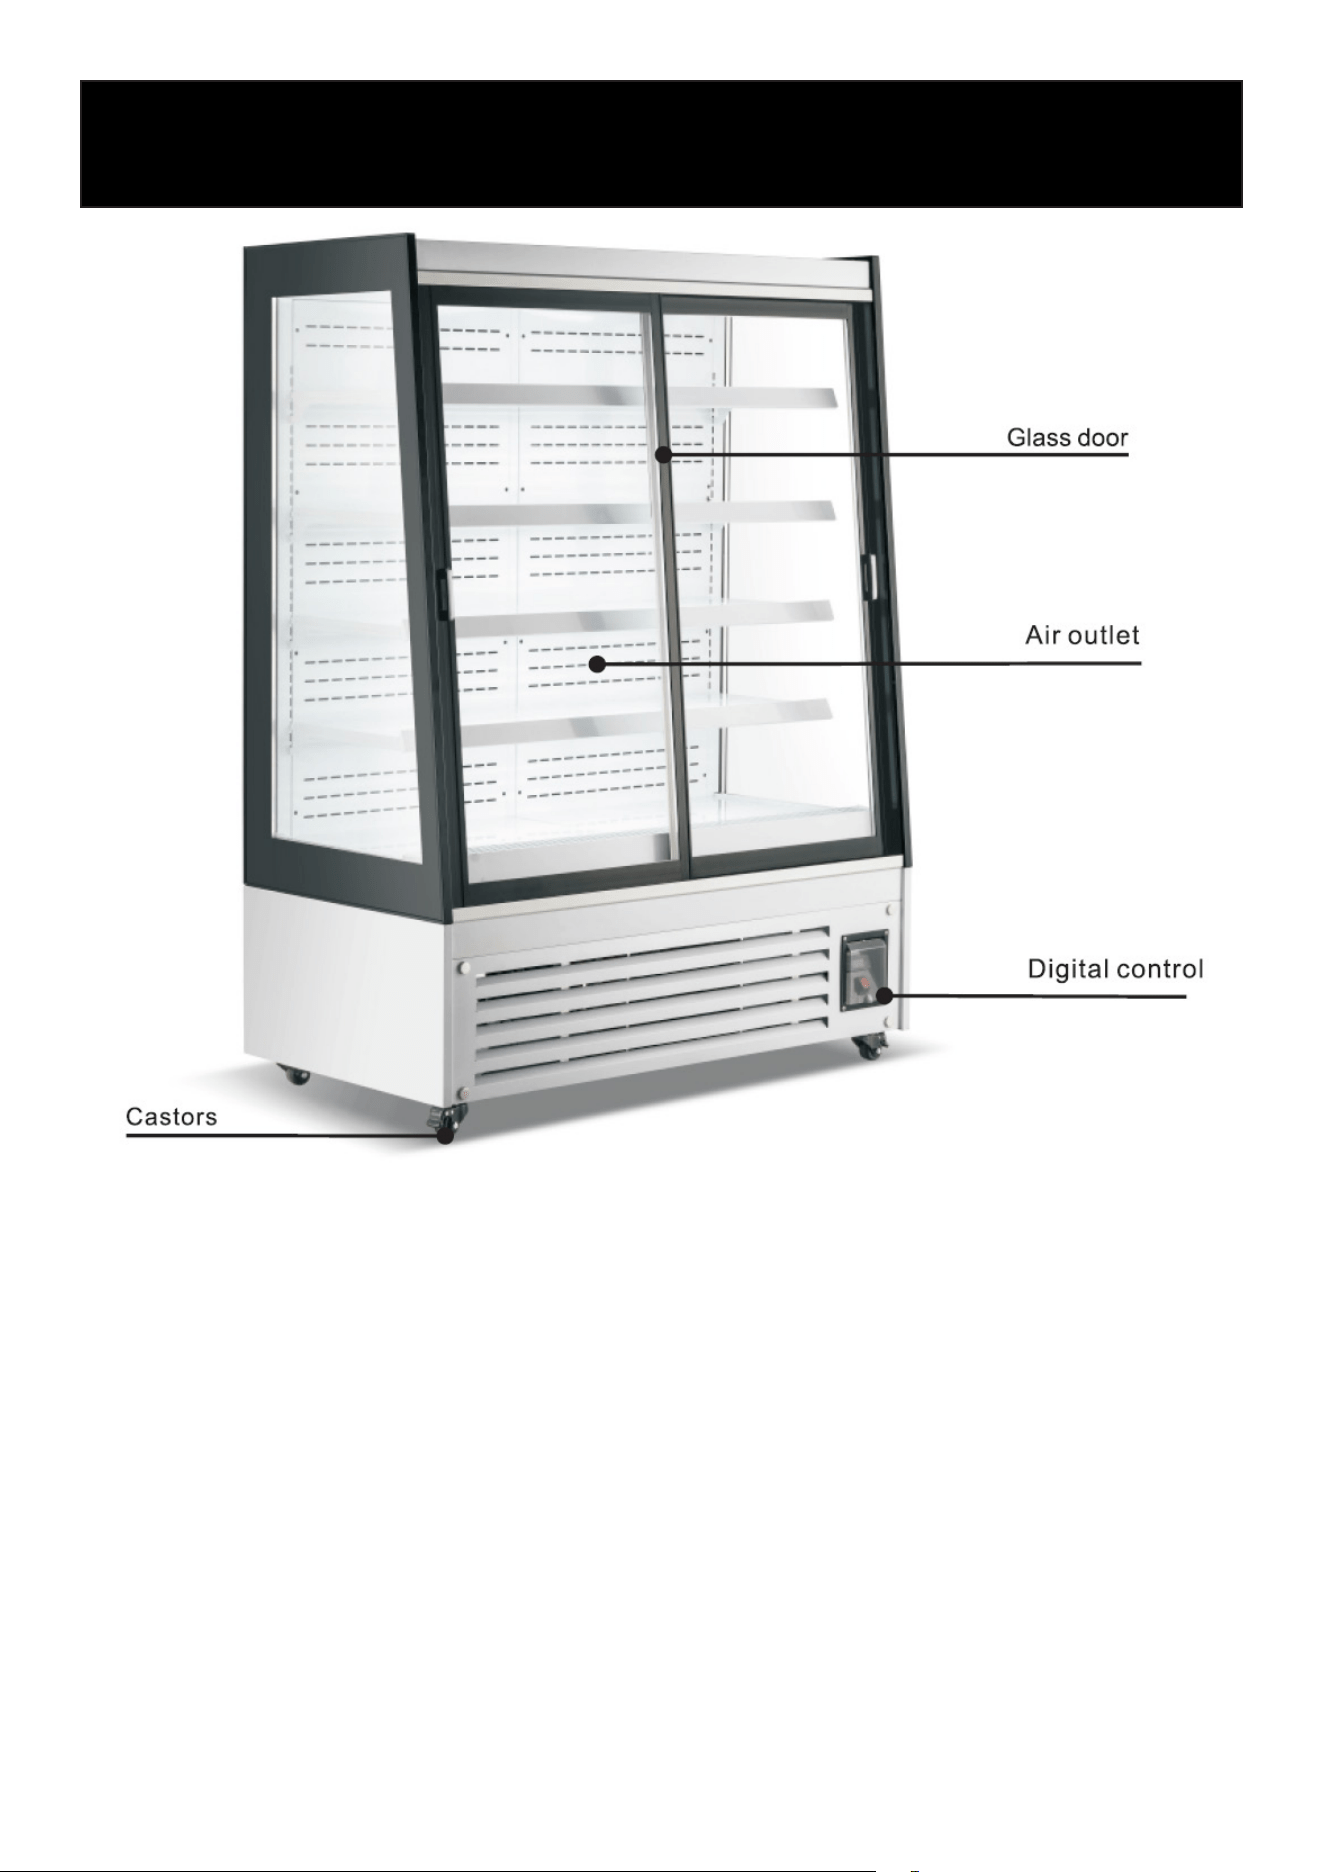
Product Overview

7
Installation
Handling & Placement
Handle With Care
Transport and move the open-air merchandiser carefully. Do not tilt the unit more than 45° during
handling.
Stable Surface
Place the refrigerator on a at, solid, and level surface to prevent vibration, noise, or instability.
Dry Location
Install the unit in a dry indoor area. Do not place the refrigerator in damp or wet environments.
Adequate Clearance
Maintain at least 4 inches of space on both sides and at the back of the unit to ensure proper air
circulation.
Insucient clearance may reduce refrigeration performance.
Proper Ventilation
Locate the refrigerator in a well-ventilated area. Good airow is essential for ecient operation.
Keep Away From Heat Sources
Do not install the refrigerator in direct sunlight or near ovens, heaters, or other heat sources, as
this may reduce cooling eciency.
Do Not Place Heavy Objects on Top
Do not place heavy loads or objects on top of the refrigerator.
Do Not Modify the Unit
Do not drill holes into the refrigerator or attach external xtures that are not approved by the manu-
facturer.
Before First Start-Up
After transportation or relocation, allow the refrigerator to stand upright for at least 2 hours before
connecting it to power.
Electrical Requirements
Dedicated Power Supply
Connect the refrigerator to a dedicated 110V, single-phase AC outlet with a properly grounded
three-prong receptacle, in accordance with local electrical codes.
Proper Grounding Required
The power outlet must have a reliable ground connection.

8
Do Not Share the Outlet
Do not connect the refrigerator to a shared outlet or extension cord. Overloading the circuit may
cause overheating or re.
Protect the Power Cord
Do not bend, damage, or place heavy objects on the power cord. A damaged cord may result in
electric shock, current leakage, or re.
Do Not Spray With Water
Do not spray or ush the unit with water. Water entering electrical components may cause an elec-
tric shock or a malfunction.
Keep Away From Flammable Materials
Do not store or use ammable or explosive substances (such as gasoline, alcohol, ether, or adhe-
sives) inside or near the refrigerator.
No Flammable Sprays Nearby
Do not spray paint, coatings, or other ammable substances near the refrigerator.
After Power Interruption
After a power failure or unplugging the unit, wait at least 5 minutes before reconnecting to power.
This protects the compressor from damage.
Not Intended for Medicine Storage
This refrigerator is not designed for the storage of medicines or medical products.
9
1. Before First Use
• Plug the refrigerator into a dedicated 110–120V grounded outlet.
• Allow the unit to run until it reaches the desired temperature before loading product.
• Conrm that cold air is circulating inside the cabinet before placing food inside.
• Only load food once proper cooling performance has been achieved.
Safety Notice:
This appliance is not intended for use by children or persons with reduced physical, sensory, or
mental capabilities, or a lack of experience and knowledge, unless properly supervised. Children
must not play with the appliance.
2. Digital Temperature Controller
Controller Functions
This unit is equipped with an integrated digital controller suitable for compressors up to 1 HP.
Main functions include:
• Temperature display
• Temperature adjustment
• Automatic and manual defrost
• Interior light control
• Parameter locking
• Self-testing
• Value storage
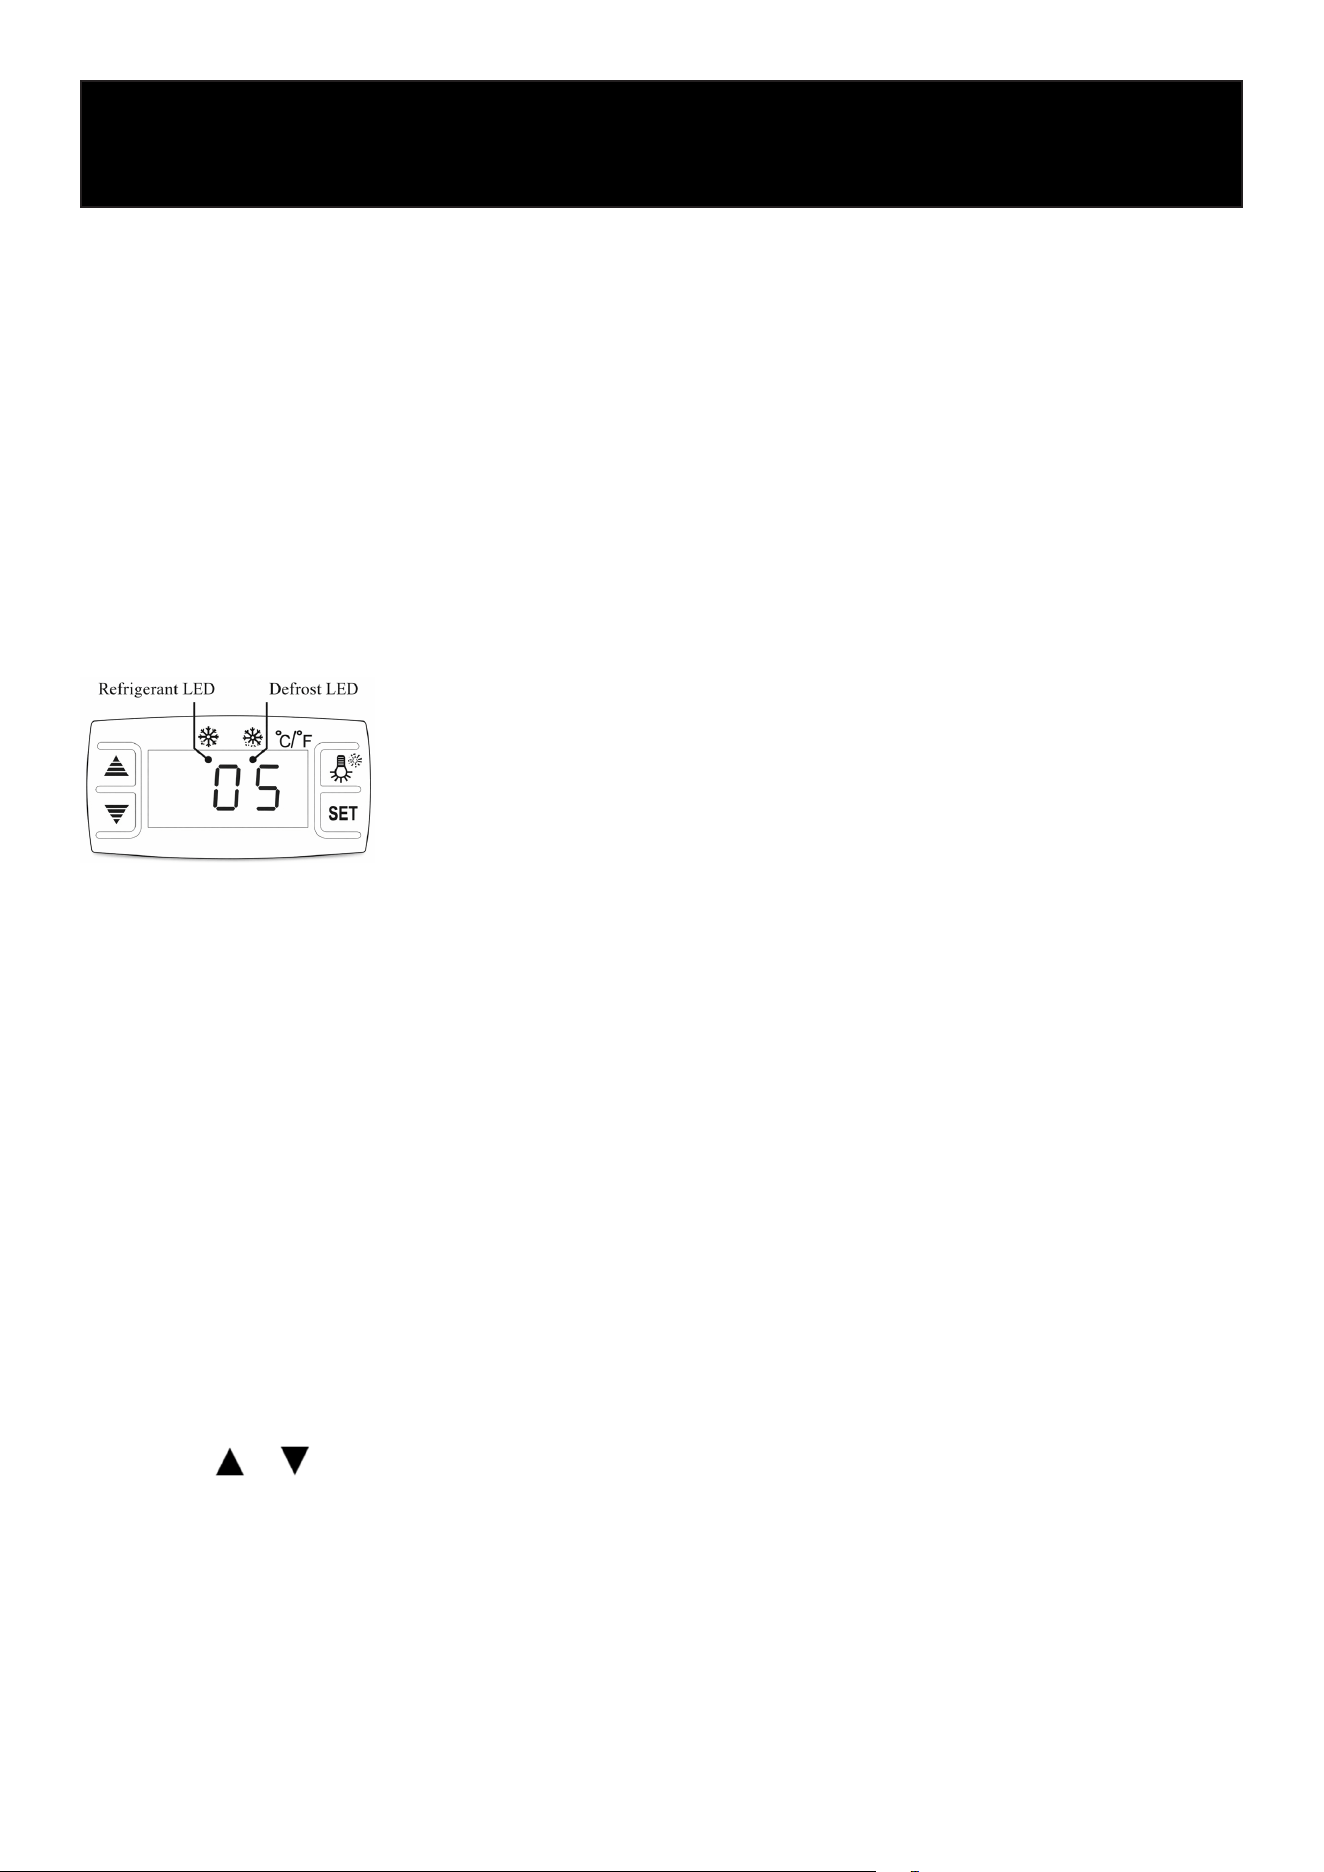
3. Digital Controller Operation
Setting the Temperature
1. Press the SET button once. The current set temperature will appear on the display.
2. Use the or buttons to adjust the temperature.
3. Press SET again to save the new setting.
4. If no buttons are pressed within 10 seconds, the display will automatically return to the cabinet
temperature.
Illumination Control
• Press the light button once to turn the interior light ON.
• Press again to turn the light OFF.
Operation

10
Manual Defrost
• Press and hold the light button for 6 seconds to initiate a manual defrost cycle.
• Press and hold again for 6 seconds to stop the defrost cycle.
Indicator Lights
• Refrigeration LED
• ON during active refrigeration.
• Flashing occurs when the cabinet temperature has stabilized.
• Defrost LED
• ON during defrost cycle.
• OFF when defrost cycle is complete.
Reset to Factory Settings
If the display shows “Disorder”:
1. Press and hold the button for 2 seconds until the buzzer sounds.
2. Immediately press and hold the button for 6 seconds until the buzzer sounds again.
3. The display will ash for approximately 3 seconds and restore factory settings.
Note: This step is for technicians performing repairs on the unit.
4. Operating Cautions
• If the power cord is damaged, it must be replaced by the manufacturer or a qualied techni-
cian.
• Do not block air intake or air outlet vents.
• Do not overload shelves or stack food tightly, as this may reduce cooling performance.
• Allow hot food to cool to room temperature before placing it inside the refrigerator.
• Avoid turning the compressor on and off rapidly.
• In the event of a power outage, keep doors closed to maintain internal temperature.
• Do not store ammable or explosive substances (such as aerosol cans with ammable propel-
lant) inside the unit
• Maximum shelf load: 40 lbs per shelf.
• During normal operation, the noise level does not exceed 70 dB(A).
• Climatic Class: 3
Recommended ambient temperature: 60°F–77°F.
• Do not store corrosive substances inside the unit.
Digital Controller Troubleshooting
For Qualied Service Technicians Only
The following information is intended for trained and authorized service personnel. Customers
should not attempt to diagnose, service, or repair internal electrical components. Doing so may
result in injury and will void the warranty.
11
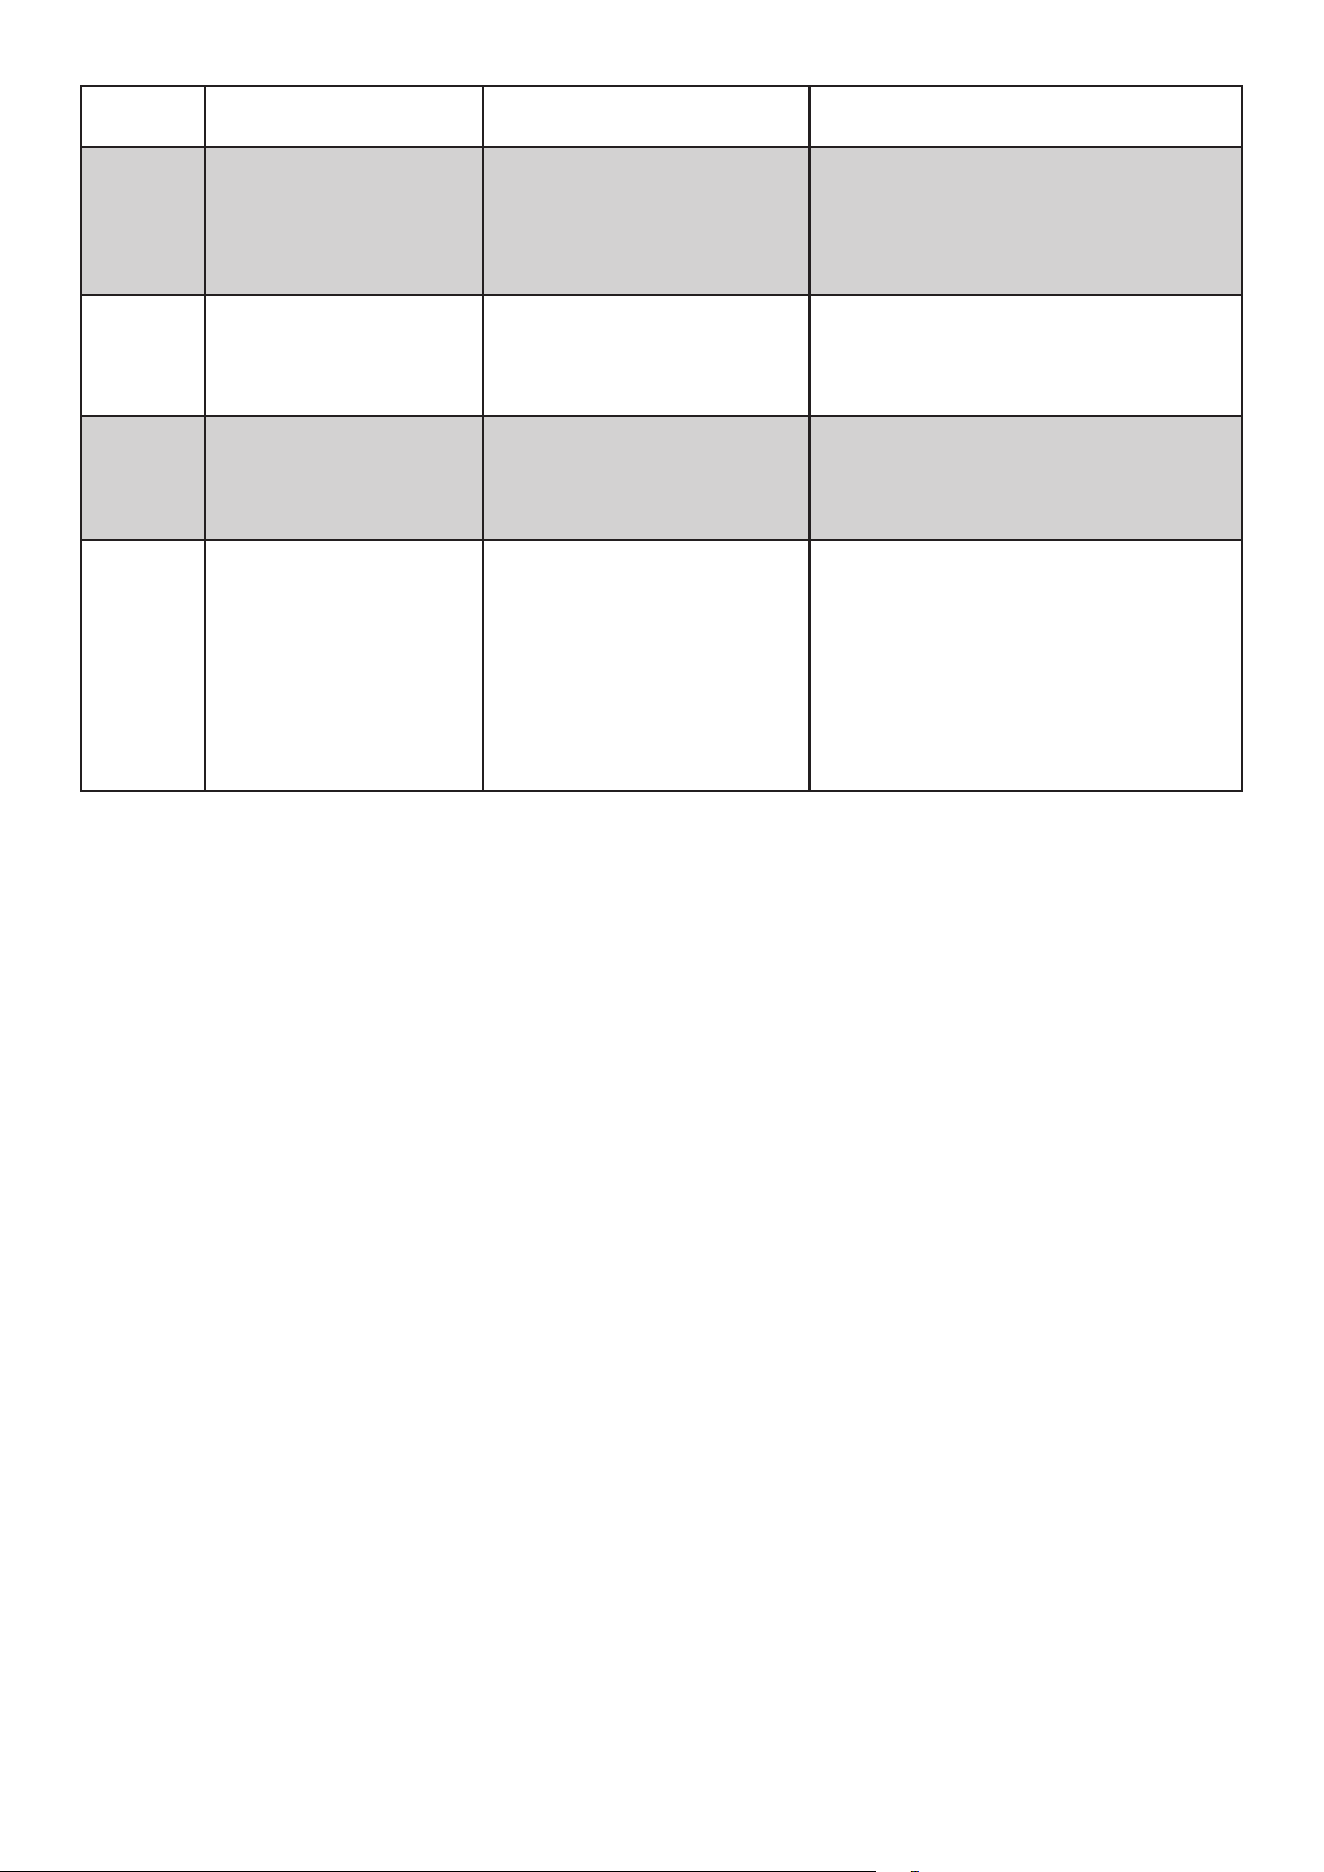
Fault
Code
Description Possible Cause Corrective Action (Technician Only)
EE1 Temperature Probe Fault
Open circuit or short circuit in
cabinet temperature probe
• Inspect probe wiring and connector at
main control board.
• Verify probe resistance value.
• Replace temperature probe if defec-
tive.
EE2 Defrost Probe Fault
Open circuit or short circuit in
defrost probe
• Inspect defrost probe wiring and
connector.
• Test probe resistance.
• Replace defrost probe if faulty.
EE3 Overheat Probe Fault
Open circuit or short circuit in
overheat protection probe
• Inspect overheat probe wiring and
connector.
• Test probe resistance.
• Replace overheat probe if necessary.
EE4
Overheat Protection Acti-
vated (Approx. 136°F)
Condenser overheating condi-
tion
• Clean condenser coil thoroughly.
• Verify condenser fan motor operation;
repair or replace if not running.
• Ensure minimum rear clearance is
maintained.
• Conrm ambient temperature is with-
in rated operating range.

12
Proper maintenance is essential to ensure safe operation, optimal performance, and long equip-
ment life.
Always disconnect the power supply before performing any cleaning or maintenance.
1. Cabinet Cleaning
• Clean the interior and exterior of the cabinet at least once per week.
• Use warm water and a mild, non-corrosive detergent.
• Wipe dry with a soft cloth after cleaning.
• Do not use abrasive cleaners, steel wool, or corrosive chemicals.
• Do not wash the unit with a water hose or high-pressure spray.
2. Condenser Cleaning
To maintain proper cooling performance, the condenser must be kept clean.
Cleaning Frequency
• Clean the condenser at least once every 1–3 months, depending on the environment.
• In dusty or high-trac areas, more frequent cleaning may be required.
• If the display shows “EE4”, clean the condenser immediately.
If the EE4 alarm continues after cleaning, contact authorized service.
Cleaning Procedure
1. Disconnect power.
2. Remove the front or bottom access panel (as applicable).
3. Use a soft brush or compressed air to remove dust and debris from the condenser ns.
4. Reinstall the panel securely before restoring power.
Do not use water directly on the condenser or electrical components.
3. Condenser De-Dusting (Air Intake Area)
• Ensure the air intake and ventilation openings remain clear of dust and obstructions.
• Remove accumulated dust from the cooling ns using a brush or compressed air.
• Keep the surrounding areas clean to reduce debris buildup.
4. Leak Inspection
• Periodically inspect all connectors and welded joints for signs of oil residue.
• Oil stains may indicate a refrigerant leak.
• If leakage is suspected, discontinue use and contact qualied service personnel immediately.
5. Operational Monitoring
• Regularly observe the unit during operation.
Maintenance

13
• If abnormal noise, odor, smoke, or vibration occurs:
• Immediately disconnect power.
• Contact qualied service personnel.
• Do not restart the unit until the issue has been resolved.
14
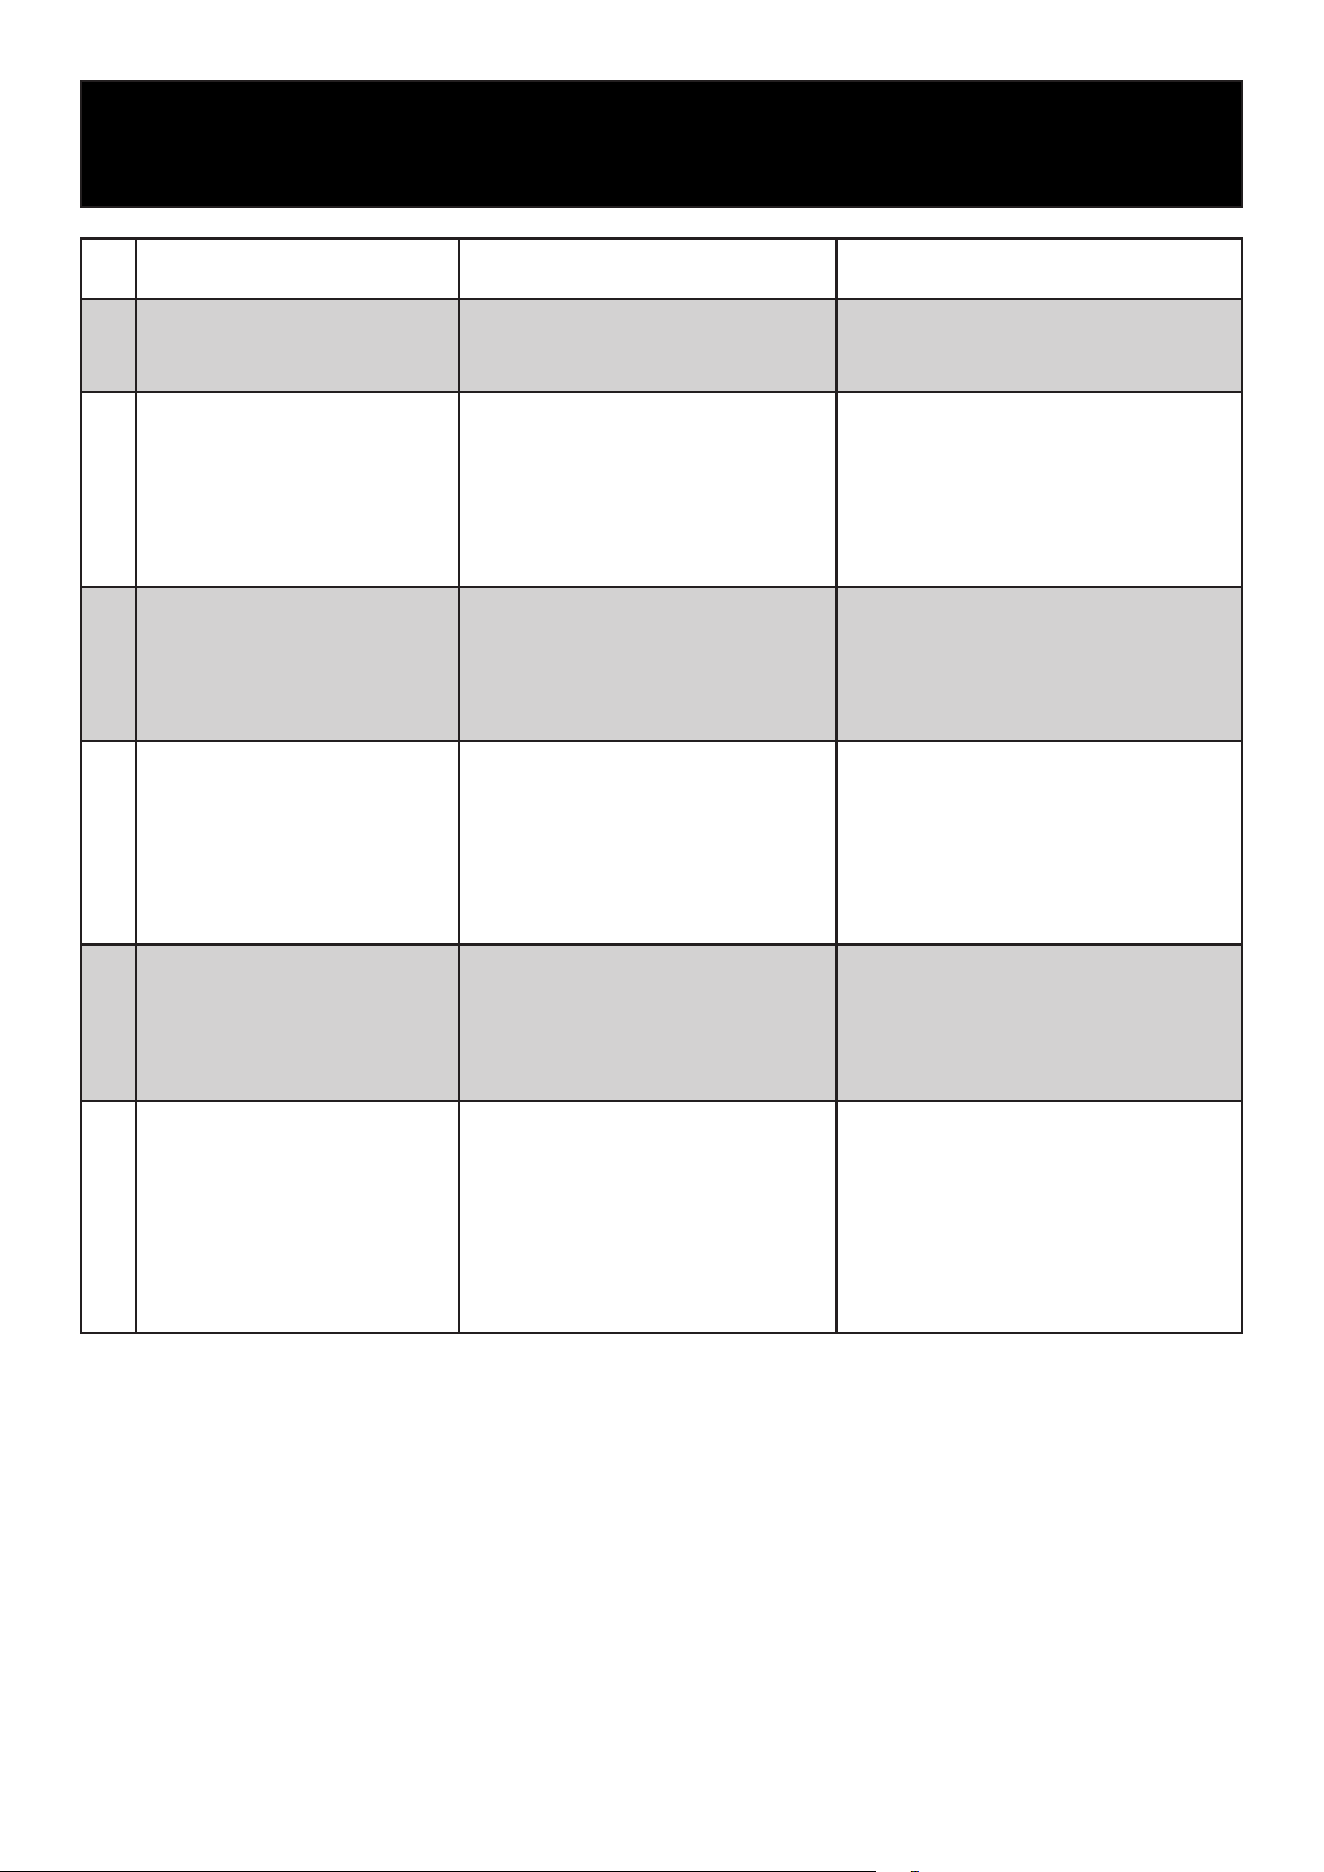
No. Problem Possible Causes Recommended Solutions
1
Unusual noise beneath the
bottom shelf
• Fan blade damaged or broken
• Disconnect power and inspect the
fan blade. Replace if damaged
2
Unit not cooling despite nor-
mal operation.
• Unit turned off
• Unit in defrost cycle
• Refrigerant leak
• Control malfunction
• Turn unit on
• Allow defrost cycle to complete
• Contact a qualied technician to
inspect for refrigerant leaks and
recharge system
• Contact authorized service person-
nel
3
Weak airow from air curtain
and elevated cabinet tempera-
ture.
• Evaporator blocked by frost
• Damaged internal fan
• Temperature set too high
• Air vents blocked by stored
items
• Increase defrost frequency
• Replace fan (technician required)
• Adjust temperature set point
• Remove obstructions and ensure
proper airow
4
Normal airow but cabinet
temperature too high.
• Insucient refrigerant.
• Temperature set too high
• Air curtain disrupted by strong
airow
• High ambient temperature or
humidity
• Contact technician to check refrig-
erant level
• Adjust temperature set point
• Remove sources of strong air
drafts
• Improve room ventilation or envi-
ronmental conditions
5
Water overow during defrost
cycle.
• Defrost heater malfunction
• Water level controller failure
• High ambient temperature or
humidity
• Replace defrost heater (technician
required)
• Replace water level controller
(technician required)
• Improve environmental conditions
6
Normal airow but periodic
cabinet temperature uctua-
tions
• Dirty condenser
• Poor ventilation
• Compressor thermal protection
activating
• Capillary tube iced over
• Temperature controller malfunc-
tion
• Clean condenser coil
• Improve ventilation clearance
• Contact technician to inspect
compressor
• Contact technician to inspect
refrigeration system
• Replace temperature controller
(technician required)
Troubleshooting
Note
The following conditions are normal and do not indicate a malfunction:
A murmuring or owing water sound may be heard while the refrigerator is operating. This is nor-
mal and occurs as refrigerant circulates through the system.
During periods of high humidity, condensation may form on the exterior surface of the refrigerator.
This is a normal condition. Simply wipe the surface with a dry cloth.
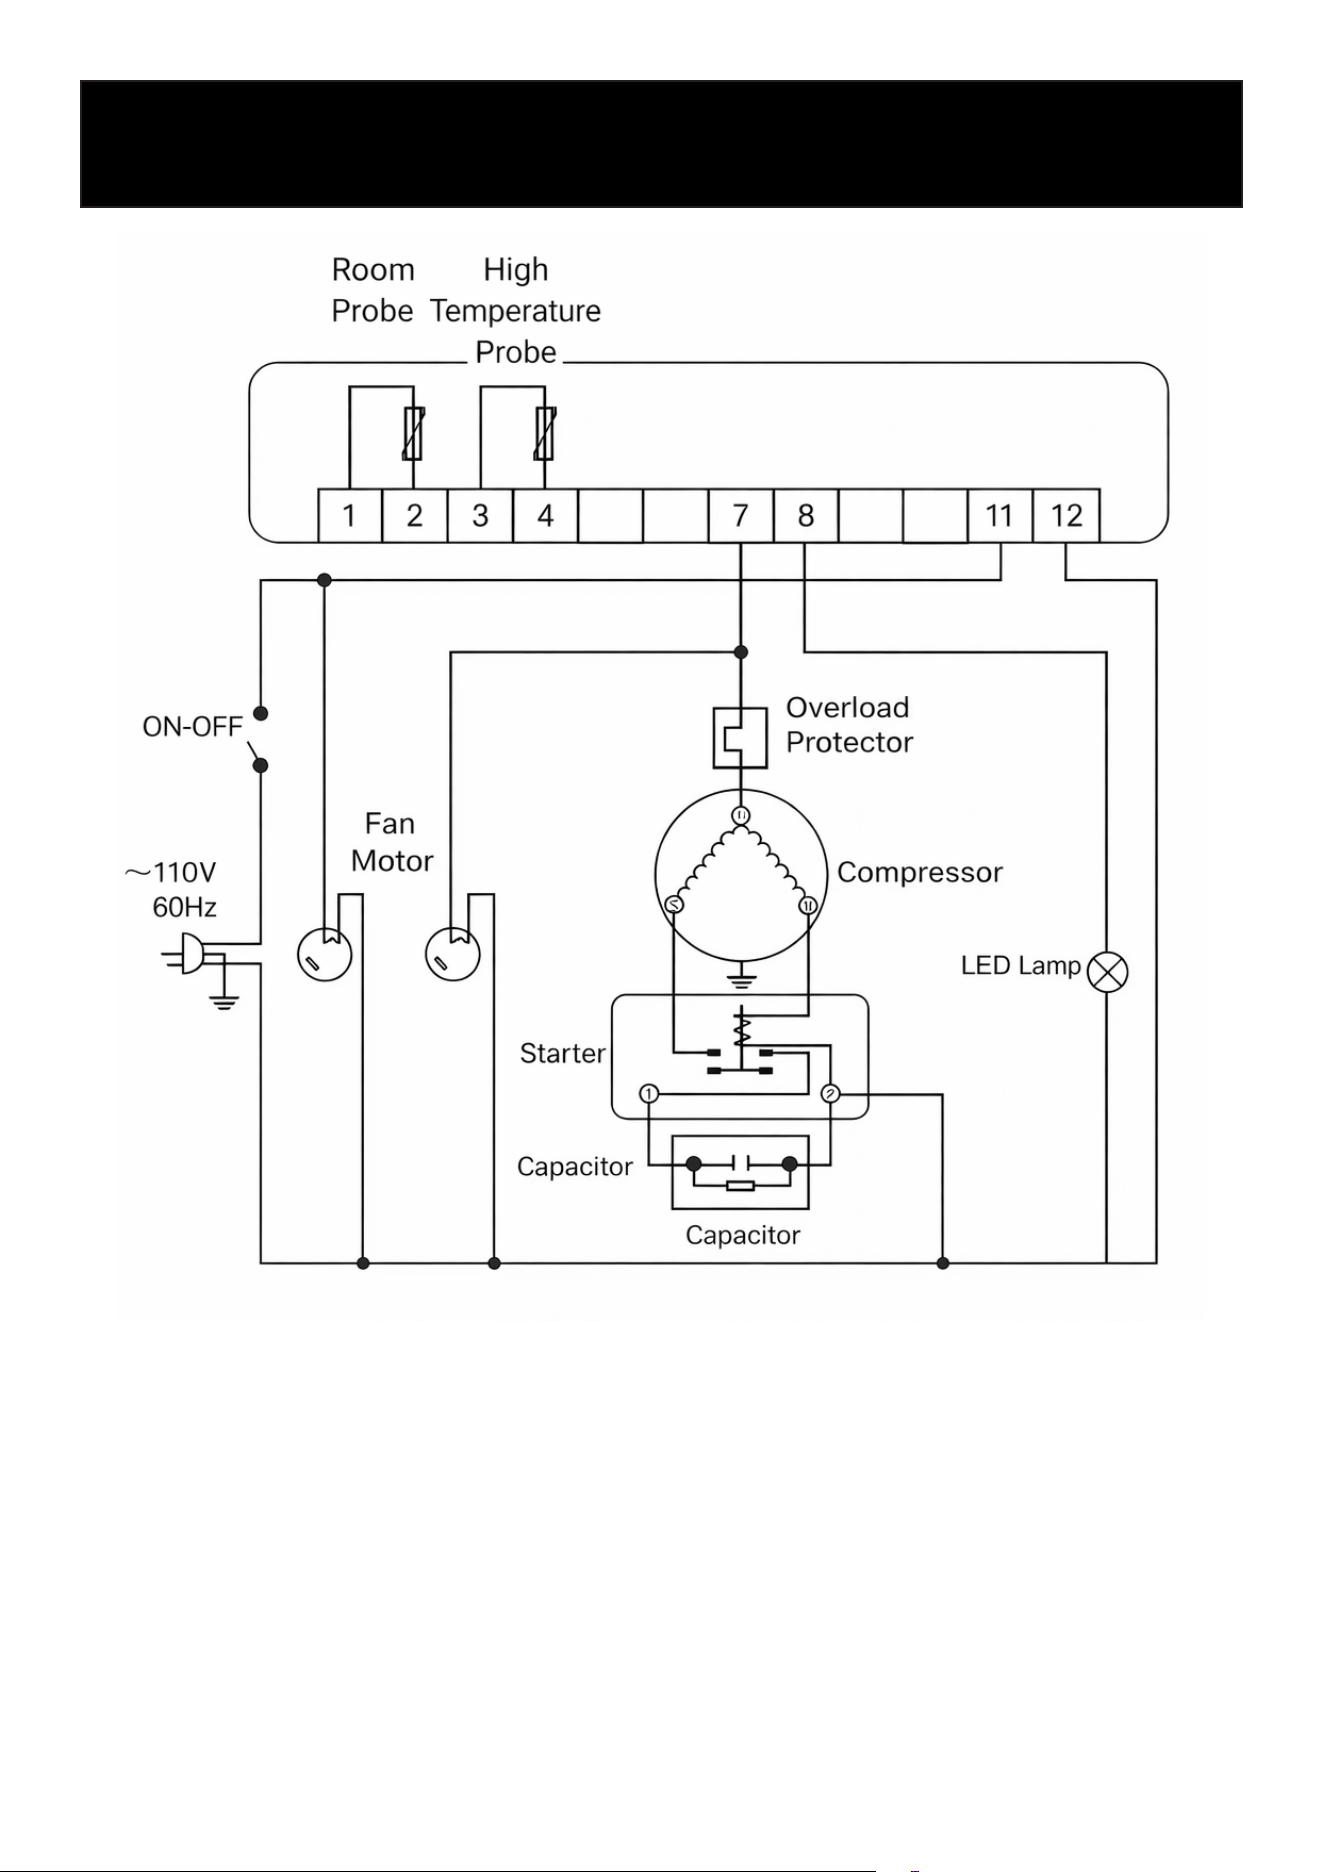
Circuit Diagram
This diagram is provided for reference purposes only. Actual wiring and components may vary
depending on model, production batch, or updates. Do not attempt repairs or modications based
on this diagram. Contact qualied service personnel or KoolMore support for any electrical issues.
15
Technical Parameters
Parameter KM-CDA-SL24C
Refrigerant and Charge (g) R290 & 200
Rated Input Power (W) 640
Refrigeration Temperature (°F) 32–53.6
Gross Capacity 24.7 cu. ft.
Net Weight (lbs) 410.1
Rated Voltage (V) 110~
Rated Frequency (Hz) 60
Overall Dimension (in.) (L × W × H) 51.57 × 27.95 × 70.67
Rated Current (A) 6.1
16

17
WARRANTY
LIMITED WARRANTY
KoolMore Supply Inc. extends a limited warranty to the original purchaser, guaranteeing that this KoolMore product is
free from manufacturing defects in material or workmanship for one year from the date of purchase.
Should you discover any such defect within the warranty period, KoolMore Supply Inc. reserves the right to repair or re-
place the product without charge, or to cover the cost of replacement parts and repair labor needed to correct defects
present at the time of purchase or resulting from regular usage, when the appliance has been installed, operated, and
maintained as per the instructions provided.
At its sole discretion, KoolMore Supply Inc. may decide to replace the product. In such an event, your replacement
appliance will carry the warranty for the remaining term of the original unit’s warranty period.
This warranty is valid exclusively to the original purchaser of the product and only applicable within the United States.
The warranty commences from the date of original consumer purchase. Proof of the original purchase date will be
required to obtain service under this warranty.
Under this limited warranty, your sole and exclusive remedy will be product repair, as outlined above. All services must
be provided by a KoolMore designated service company.
KoolMore shall not be responsible or liable for any loss, spoilage, or damage to food, beverages, pharmaceuticals,
medical supplies, or any other contents stored in the unit resulting from failure, malfunction, defects, improper instal-
lation, improper use, power interruption, or any other cause. Any such losses are expressly excluded from coverage
under this warranty.
To claim warranty or request repair service:
Email [email protected]. Please include your name, address, phone number, warranty repair request, and a copy
of your proof of purchase receipt. Alternatively, visit koolmore.com and use the Contact Us page. A KoolMore custom-
er service representative will promptly arrange service for your appliance.
We thank you for choosing KoolMore.
WARRANTY EXCLUSIONS
This limited warranty will not cover:
1. Failure of the product to perform during power failures or interruptions, or due to inadequate electrical service.
2. Damage incurred during transportation or handling.
3. Damage caused by accidents, vermin, lightning, winds, re, oods, or acts of God.
4. Damage resulting from accidents, alterations, misuse, abuse, improper installation, repair, or maintenance. This
includes using any external device that alters or converts the voltage or frequency of electricity.
5. Unauthorized product modications, repairs by unauthorized centers, or use of non-approved replacement parts.
6. Abnormal cleaning and maintenance not aligned with the user’s manual.
7. Use of incompatible accessories or components.
8. Any costs associated with repairs or replacements under these excluded circumstances shall be the responsibility
of the consumer.