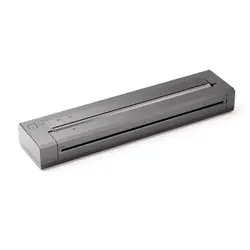

1.1 Packing List
1. Product Introduction
English
G100Pro
Quick Start Guide
2. Getting Started
2.1 Downloading the App2.1 Downloading the App
Method 1: Search for the "Phomemo"
app on App Store® or Google Play™ for
download and installation.
Method 2: Scan the QR code.
You can scan the code using your cell
phone's camera, the built-in QR code
scanning feature of your browser,
or a dedicated scanning app.
Phomemo
Phomemo
1.2 Printer Parts Instruction
Printer
×1
Quick Start Guide
×1
G
100Pr o
Qu
ick Start Guide
Type-C Cable
×1
Single-sided
Thermal Paper×1
Power Button
Charge
indicator light
Reset Hole
Top Cover
Status
indicator light
Wireless indicator light
Paper
Output Slot
Paper Entry
Slot
Type-C
Charger Port
To ensure better printing results, make sure to close the top cover tightly.
If paper jam occurs, you can open the top cover by pushing up the "△" symbols
on both sides and remove the jammed paper.
As the Safari browser on Apple devices does not support QR code scanning,
please use your device's built-in QR code scanner instead.
The company assumes full responsibility for the revision and explanation of this
manual, exercising utmost diligence to guarantee its accuracy. Nevertheless,
please note that any technical improvements to the product may not be
separately notified, and that the images of the product, accessories, software
interfaces, etc. in this manual serve solely as illustrations and references. Due to
product updates and upgrades, the actual product may vary slightly from the
images. Please refer to the physical product for accurate representations.
Special Notes
Note: This equipment has been tested and found to comply with the limits for a Class B digital
device, pursuant to part 15 of the FCC Rules. These limits are designed to provide reasonable
protection against harmful interference in a residential installation. This equipment generates,
uses and can radiate radio frequency energy and, if not installed and used in accordance with the
instructions, may cause harmful interference to radio communications. However, there is no
guarantee that interference will not occur in a particular installation. If this equipment does cause
harmful interference to radio or television reception, which can be determined by turning the
equipment off and on, the user is encouraged to try to correct the interference by one or more of
the following measures:
-Reorient or relocate the receiving antenna.
-Increase the separation between the equipment and receiver.
-Connect the equipment into an outlet on a circuit different from that to which the receiver is
connected.
-Consult the dealer or an experienced radio/TV technician for help.
Important: Change or modifications not expressly approved by the manufacturer responsible for
compliance could void the user's authority to operate the equipment.
- English:
This device contains licence-exempt transmitter(s)/receiver(s) th
at comply with Innovation,
Science and Economic Development Canada’s licence-exempt RSS(s). Operation is subject to the
following two conditions:
(1) This device may not cause interference.
(2) This device must accept any interference, including interference that may cause undesired
operation of the device.
IC RF exposure statement:
The device has been evaluated to meet general IC RF exposure requirement.
The device can be used in portable exposure condition without restriction.
- French:
L’émetteur/récepteur exempt de licence contenu dans le présent appareil est conforme aux CNR
d’Innovation, Sciences et Développement économique Canada applicables aux appareils radio
exempts de licence. L’exploitation est autorisée aux deux conditions suivantes :
1) L’appareil ne doit pas produire de brouillage;
2) L’appareil doit accepter tout brouillage radioélectrique subi, même si le brouillage est
susceptible d’en compromettre le fonctionnement
IC Déclaration d'exposition aux RF:
L'appareil a été évalué pour répondre aux exigences générales d'exposition aux RF d'IC.
L'appareil peut être utilisé dans des conditions d'exposition portable sans restriction.
Please pay attention
to electrical safety. Do not disassemble, crush or puncture the battery. This
product is not a toy.
Bitte achten Sie auf elektrische Sicherheit. Zerlegen, zerquetschen oder durchstechen Sie die
Batterie nicht. Dieses Produkt ist kein Spielzeug.
Veuillez noter la sécurité électrique. Ne pas démonter, écraser ou piquer la batterie. Ce produit
n'est pas un jouet.
Si prega di prestare attenzione alla sicurezza elettrica. Non smontare, schiacciare o perforare la
batteria. Questo prodotto non è un giocattolo.
Preste atención a la seguridad del consumo de electricidad. No retire, triture o pinche la batería.
Este producto no es un juguete.
Lütfen elektrik güvenliğine dikkat edin. Bateriyi dağıtma, yıkma veya yumruklama. Bu ürün
oyuncak değil.
Var uppmärksam på elsäkerheten. Ta inte isär, krossa eller punktera batteriet. Den här produkten
är ingen leksak.
Let op elektrische veiligheid. Demonteer, verpletter of prik de batterij niet. Dit product is geen
speelgoed.
Proszę zwrócić uwagę na bezpieczeństwo elektryczne. Nie demontuj, nie miażdż ani nie przebijaj
akumulatora. Ten produkt nie jest zabawką.
4. Information to User
4.1 FCC INFORMATION (U.S.A.)
4.2 ISED NOTICE (Canada)
WARNING
2.2 Paper Installation Guide
01
Long press the Power Button for 3 seconds until the Indicator Light
is green to power up the printer.
02 Double-click the power button to remove the printer protective paper.
Due to different models, your printer may not contain the disposable protective paper. If so,
please skip this step.
The printed content will not appear on the side that reads "non-printing side".
03
Insert the paper with the text side up into the Paper Entry Slot until the
printer automatically pulls it in and the Indicator Light is lit green, signaling
paper insertion is complete.
2.3 App Usage Guide
2.4 AirPrint User Guide
03 Wait for the printer to be searched. 04 Tap [Connect Now].
06
Select the image to be printed.
Done
Image
Connect to the printer
Connect Now
Searching
1.Long press the Power Button
until its light is lit to turn on the
printer...
01 Open the "Phomemo" app. 02 Grant permissions.
Phomemo
"Phomemo" requests Bluetooth
permission to connect to the printer.
Permission Request
Cancel OK
The software
interface is for
reference only.
Please refer to
the actual
operating page
for accurate
information.
08
Confirm the preview of the image,
and tap [Print].
07
Edit your first image, and tap [ ]
after you finish editing.
Protective paper
x2
Status indicator light
edis gnitnirp-non
Paper Entry Slot
In this
example,
printing an
image is used,
but you can
select other text
for printing
based on your
actual needs.
05
Connection successful, click on
[Print Image].
G100Pro
Print Images
01 After confirming the printer is
powered on, open your phone's
settings, enable Wi-Fi, and
connect to G100Pro.
02 Open the file you want to print.
Settings
WLAN
G100Pro
3.2 Indicator Light Instructions
3.1 Button Instructions
Button Type Operation
Long press for 3s
Double press when printer is on
Function
Power on/off
Print a self-test page
Power Button
3. Additional Instructions
Due to system version
updates, some phones may not be
supported. If you encounter issues
with usage, please contact
customer service.
Status/Indicator light
Slow flashing red light
Solid Green Light
Meaning
Functioning
Top Cover open
Printer overheated
Advised Action
/
/
/
Close Top Cover
Pause printing for 5-10 min
Solid Green Light
Slow Flashing Green Light
Red light flashing slowly
Fast flashing red light
Blue light flashing
Charge battery for 1h (or at
least 20 min for quick usage)
Charge battery for 1h
No light indication after
long pressing Power
Button for 3s
Battery depleted
Charging
Fully charged
Charge for 4h
Charge/Indicator light
Meaning
Advised Action
Low battery
Critical battery level, shutting
down soon
Critical battery level, shutting
down soon
/
/
/
/
/
Steady blue light
Flashing Green Light
Solid Green Light
Bluetooth connection completed
WiFi connection completed
Wireless/Indicator light
Meaning
Advised Action
Bluetooth receiving
data/Bluetooth printing in
progress
WiFi receiving data/WiFi printing
in progress
03 Click the [ ] in the lower-left
corner.
04 Click [Print]
05 Select your printer.
07 Printing complete. Remove the printed paper.
06 Click [Print]
Print
Printer
Layout
No printer
selected
Options
Number of portions
Paper size
Printer
G100Pro
Options
Number of portions
Paper size
Print
edis gnitnirp-non