English
D30
Quick Start Guide
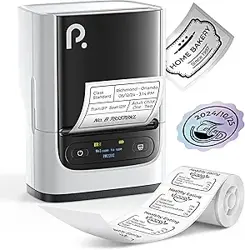
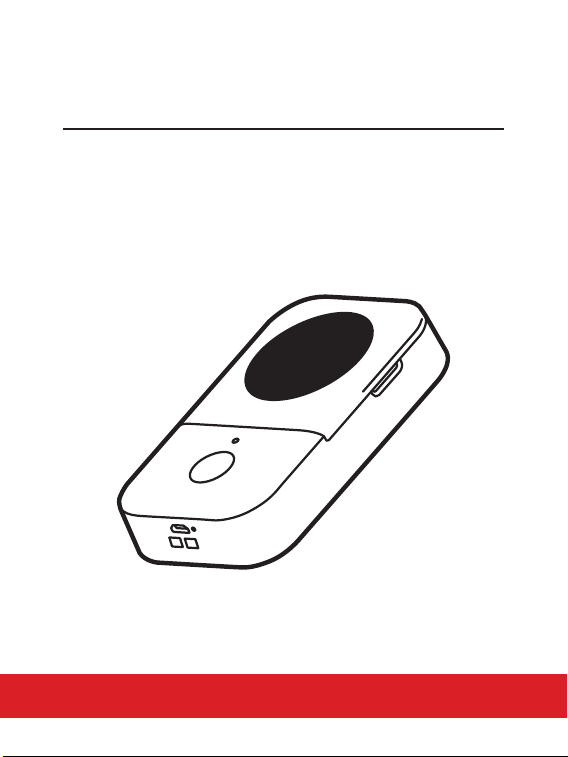
1. Product Introduction
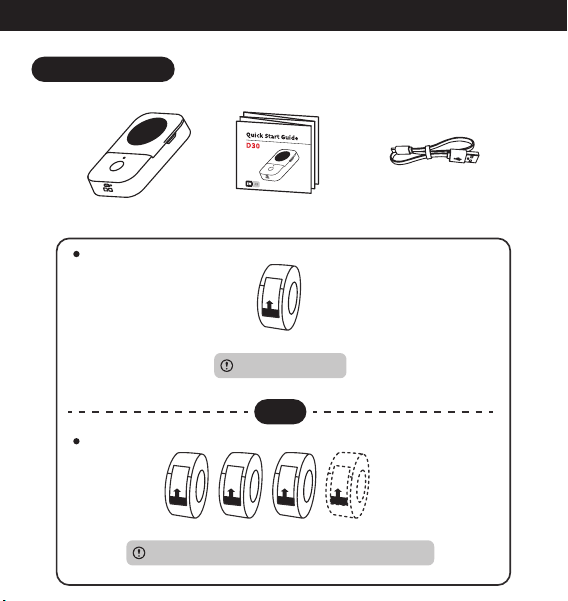
1.1 Packing List
Printer×1 Quick Start Guide×1 USB Cable×1
OR
...
Paper Roll ×n
Quantity and size tailored to your purchased package
100-Pc 12*40 mm Paper Roll ×1
Single unit
Package
Installed in printer
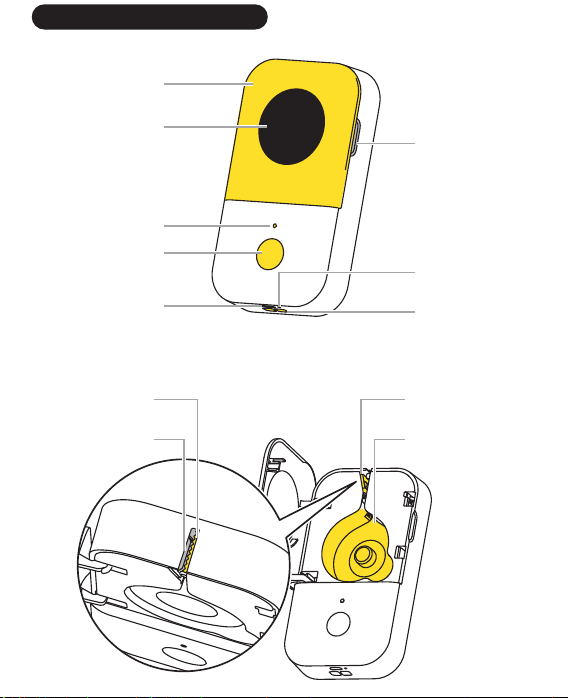
1.2 Printer Parts Instruction
Top Cover
Decorative Panel
Cover Opening
Lanyard Hole
Reset Hole
Indicator Light
Power Button
Charging Port
Print Head
Paper
Compartment
Safety Cutter
Paper Exit

2. Getting Started
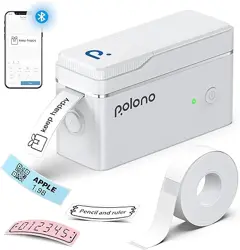
2.1 Downloading the App
Method 1: Search for the "Print
Master" app on Google Play™ or App
Store
® to download and install it.
Method 2: Scan the QR code to
download the app.
2.2 User Guide
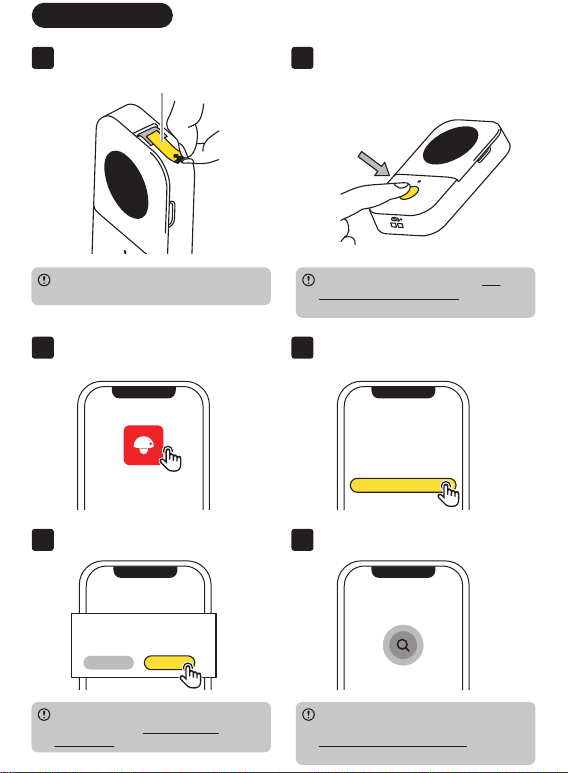
01 Remove the protective film.
Please skip this step if you are not a
first-time user of the device.
If the indicator lighting red, see 6.2.
Indicator Light Instructions in this
guide.
02 Long press the Power Button for 3
seconds until the Indicator Light is
green to power up the printer.
Protective film
3S
03 Open the "Print Master" app. 04 Click [Auto Connect].
Print Master
Welcome to Print Master
Auto Connect
For more information about app
permissions, see 5.2 Permission
Description in the electronic guide.
You can also find manual connection
options on [Home]. For more details, see
4. More Connection Methods in this
guide.
05 Grant Authorization. 06 Wait for the printer to be connected.
For a better user experience, we
require access to your printer.
"Print Master" would like to use
Bluetooth to connect to the printer
Cancel Confirm
For a better user experience, we
require access to your printer.
Searching for printer...

09 Printing is completed.
Hi
The Safety Cutter is on the same side as
the Cover Opening.
10 Pull the label towards the Safety
Cutter and tear it off.
Safety Cutter
08 Edit your first label, and tap [Print]
after you finish editing.
Hi
your nickname
PrintPlease enter your nickname
07 The printer is successfully
connected.
Connected
11 Remove the liner. 12 Attach the label to a dry, flat
surface.
Hi

03 Open the "Print Master" app.
Print Master
04 Wait for the printer to be connected.
For a better user experience, we
require access to your printer.
Searching for printer...
05 The printer is successfully
connected.
Connected
06 Go to "Home" and tap [Scan].
Scan
Print Master
D30
07 Scan the QR code on the side
sticker.
T
H
I
S
S
I
D
E
U
P
1
2
m
m
*
4
0
m
m
0
.
4
7
′
′
*
1
.
5
7
′
′
Scan in the App
for label matching
08 The label size is identified.
The illustration shows a paper roll with the new packaging. If your paper roll comes with
the previous packaging editions without a QR code, please see 4. Confirming Label Sizes in
the electronic guide for instructions on identifying the label size and creating a label.
White
12mm*40mm
01 Long press the Power Button for 3
seconds until the Indicator Light is
green to power up the printer.
3S
T
H
I
S
S
I
D
E
U
P
1
2
m
m
*
4
0
m
m
0
.
4
7
′
′
*
1
.
5
7
′
′
Scan in the App
for label matching
02 Take out the paper roll to be
installed.
If the indicator lighting red, see 6.2.
Indicator Light Instructions in this
guide.
3. Replacing the Paper Roll
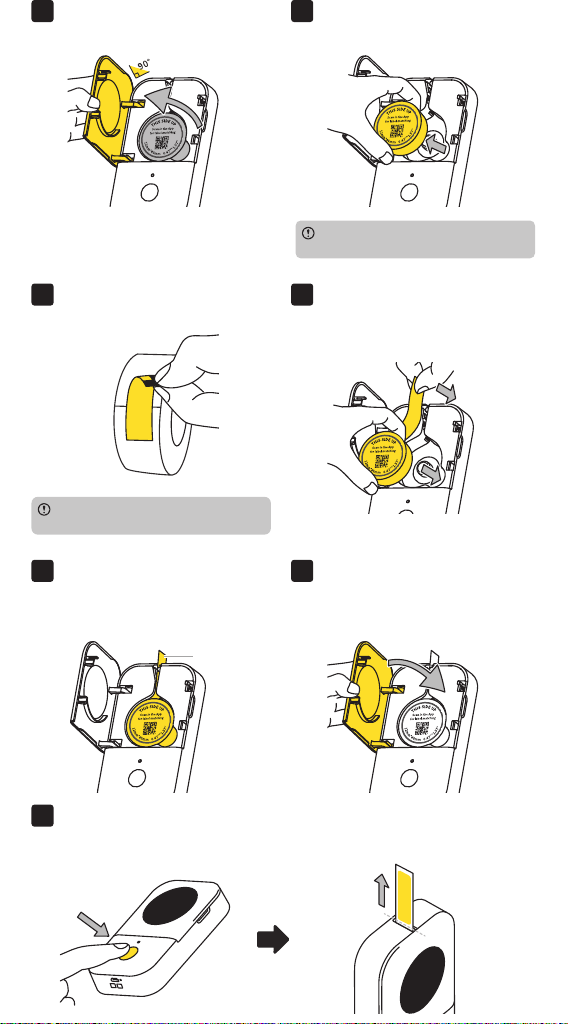
09 Open the Top Cover.
Please skip this step if you are
installing a paper roll for the first time.
10 Remove the paper roll to be
replaced.
15 Press the Power Button once when the printer is on and the Paper OUtlet will
automatically release a blank piece of label paper, indicating calibration is
complete.
Press once
13 Insert the label paper into the Paper
Outlet, and make sure the Short
Edge is slightly higher than the
Paper Outlet.
Short Edge
14 Close the Top Cover.
11 Remove the anti-loosening sticker
from the new paper roll.
12 Pull out a small amount of label
paper with the side sticker facing
up and place the paper roll in the
Paper Compartment.
Please skip this step if the paper roll to
be installed is not brand new.

01 Select your printer.
Choose your printer
D30 Series
D30 D30S D35 D20
02 Tap [ ] at the top right corner
for connection.
Print Master
D30
03 Wait for the printer to be
connected.
For a better user experience, we
require access to your printer.
Searching for printer...
04 The printer is successfully
connected.
Connected
4. More Connection Methods
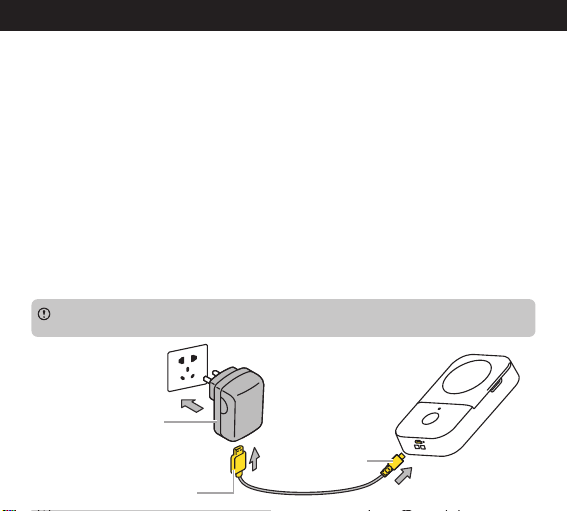
5. Charging Instructions
1. Please prepare your own power adapter (DC 5V/2A) with a Type-A port.
2. Insert the Micro Port (smaller end) of the USB cable into D30's Micro charger
port, and plug the Type-A Port (bigger end) of the USB cable into the Type-A port
of the power adapter.
3. After connecting the printer to a power outlet through the power adapter,
please check the status of the Indicator Light—a fast flashing green light indicates
that the printer is off, while a slow flashing green light indicates that the printer is
on.
4. Please charge the printer for at least 20 minutes for immediate use. Charging
will be completed in 2 to 3 hours, or when the indicator light stays solid green.
5. As the printer may heat up during charging, avoid placing it on materials such
as cotton or linen while charging.
6. Once the battery is fully charged, please unplug it promptly.
USB Type-A Port
Power Adapter with
Type-A Port (not included)
DC 5V/2A
Charging Port
•
Using the printer while charging will slow down the charging speed.
•
To preserve battery life, it is not advisable to print while charging.
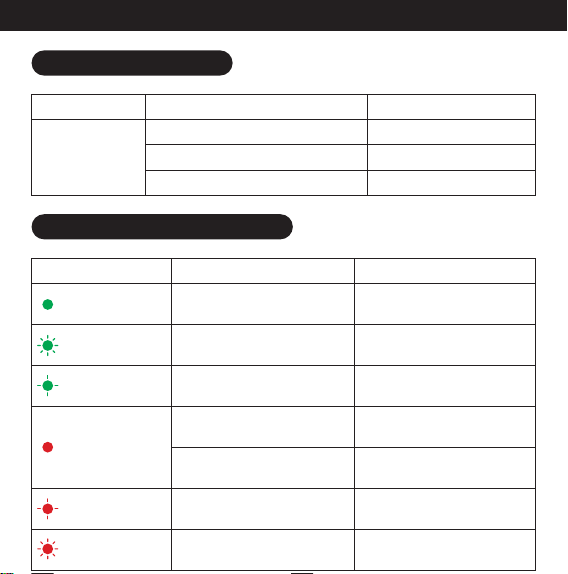
6.1 Button Instructions
6. Additional Instructions
Button Type
Power Button
Operation
Long press for 3s
Press once when printer is on
Double press when printer is on
Function
Power on/off
Calibrate label position
Print a self-test page
6.2 Indicator Light Instructions
Status
Fast Flashing
Green Light
Slow Flashing
Green Light
Solid Green Light
Meaning
Device functioning properly
and fully charged
Charging when printer is off
Charging when printer is on
Advised Action
/
/
/
Solid Red Light
Slow Flashing
Red Light
Fast Flashing
Red Light
Out of paper
Printer overheat
Low battery
Battery running low
Properly insert label paper
into Paper Outlet
Pause printing for 5 min for
printer to cool down
Charge for 1 hour (or at least
20 min if in urgent need)
Charge for 2-3 hours

The company assumes full responsibility for the revision and explanation of this
manual, with utmost care taken to ensure its accuracy. However, please note that
any technical improvements to the product may not be separately notified, and
that the images of the product, accessories, software interfaces, etc. in this
manual are for illustrative and reference purposes only. Due to product updates
and upgrades, the actual product may exhibit slight variations from the images.
Please refer to the actual product for accuracy.
Special Notes