
Table of Contents
1. Introduction .................................................................. 1
2. Installation.................................................................... 3
2.1 Part List ...............................................................3
2.2 Installation .......................................................... 3
2.2.1 Install Battery .......................................... 4
2.2.2 Wi-Fi Configure with Gateway ............... 7
2.2.3 Test the Device ...................................... 13
3. Instructions for Use .................................................... 14
3.1 Multiple Views and Size .................................14
3.2 Features .............................................................16
3.3 Custom mode ....................................................17
3.3.1 The Principle of Calculating Soil
Moisture: .........................................................17
3.3.2 Custom OFF:......................................... 18
3.3.3 Custom ON: ........................................... 18
3.4 Edit Channel Name on Mobile Application and
Website................................................................... 25
3.4.1 Edit channel name on Ecowitt APP: ......25
3.4.2 Edit Channel Name on Ecowitt.net: ...... 28
4. Application ................................................................. 30
4.1 The Installation Process Recommended for the
WH51L ................................................................... 30

4.2 The Wrong Example of Installation of the
WH51L ................................................................... 36
5. Optional Gateways/Consoles ......................................38
5.1 Table of Gateways/Consoles Which could Pair
with the WH51L ..................................................... 38
5.2 When paired with a Wi-Fi Gateway ................. 41
5.3 When paired with Console WH0291 ................ 43
5.4 When paired with a Weather Station Console
(HP2550/HP2560) .................................................. 44
5.5 When paired with a Weather Station Console
(HP3500) ................................................................ 47
5.6 When paired with a Weather Station
Console(WN1820/WN1821) .................................. 50
5.7 When paired with a weather station
console(WN1900/WN1910/WN1920/WN1980/WS3
800/WS3900) ..........................................................51
5.8 When uploaded to Ecowitt Weather Server ...... 52
6. Specification ............................................................... 53
7. Warranty Information ................................................. 54
8. Care and Maintenance ................................................ 56
9. Contact Us .................................................................. 58
9.1 After-sales Service............................................ 58
9.2 Stay in Touch .................................................... 59
1
1. Introduction
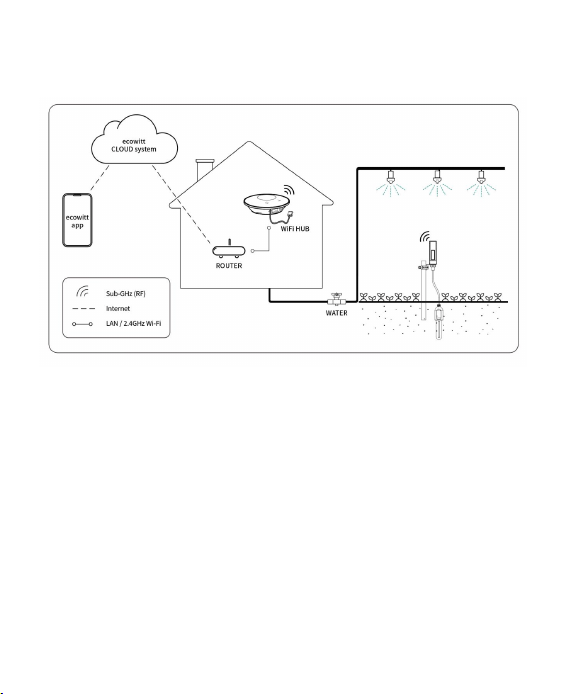
Figure 1 ECOWITT Ecosystem
Thanks for purchasing this WH51L soil moisture sensor.
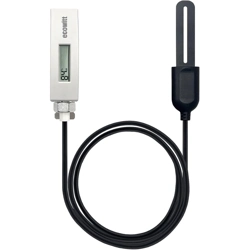
This device with 1m/3.28ft PVC sensor wire could measure
soil moisture. The data can be streamed by Ecowitt Wi-Fi
Gateway (sold separately). They can be viewed on the
Ecowitt APP after the Wi-Fi configuration is done.
Or a receiver console(sold separately) can be used to display
the received sensor value.
2
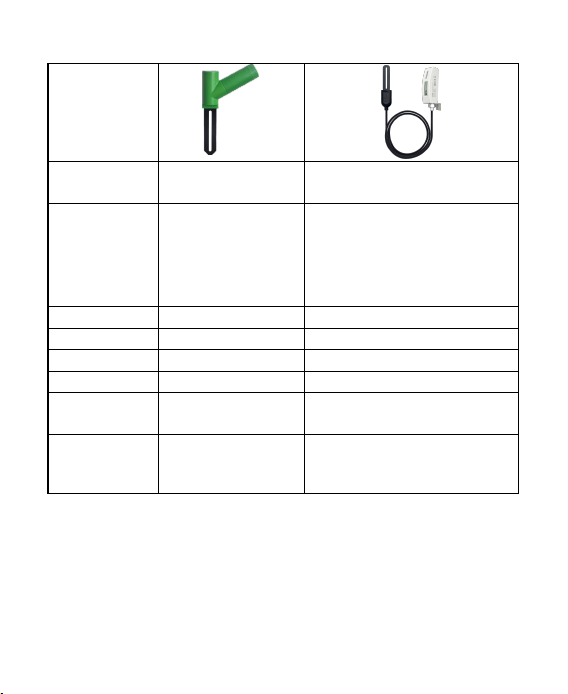
Picture
Model
Number
WH51
WH51L
Moisture
Range
0~100%
Ecowitt APP, display
consoles, and website can
display 0~100%; while
the sensor's LCD can
display 0~99%
Accuracy
±5%
±5%
Resolution
1%
1%
Display
×
LCD Display
Wire
×
1m/3.28ft PVC
Waterproof
Level
IP66(Device’s
body and sensor)
Device’s Body: IP66;
Sensor Probe: IP68
Quantity of
Channels
8
8
To ensure the best product performance, I'd like you to
please read this manual and keep it for future reference.

3
2. Installation
2.1 Part List
1 x Soil Moisture Sensor
1 x Screw ST D5.8*M3*15 Stainless Steel PA for
Mounting
1 x Stainless Steel Loop 19~29 8mm for Mounting
1 x Fix Bracket 35.1*21*20mm Stainless Steel for
WH51L
1 x User Manual
2.2 Installation
When you receive the WH51L soil moisture sensor,
please follow the below process to finish installing battery,
pairing it with the Wi-Fi gateway/console, and testing
whether the device can normally work or not.
4
2.2.1 Install Battery
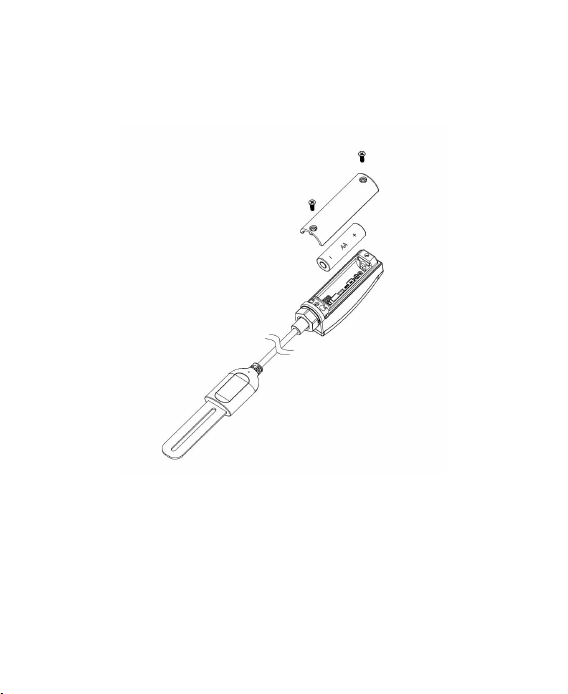
Figure 2
1. Unscrew the screws of the battery compartment.
2. Insert one AA battery and tighten the screw of the
battery compartment, like the Figure 2.
5
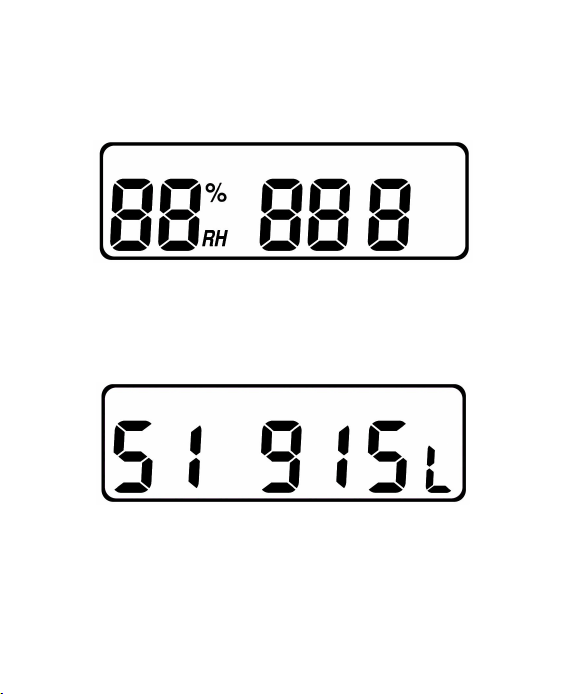
3. After inserting the battery, the LCD screen will display
all the sections 2 seconds, like the Figure 3.
Figure 3
Then the screen would display the model number, RF
frequency, and 'L' 2 seconds like Figure 4.
Figure 4
6
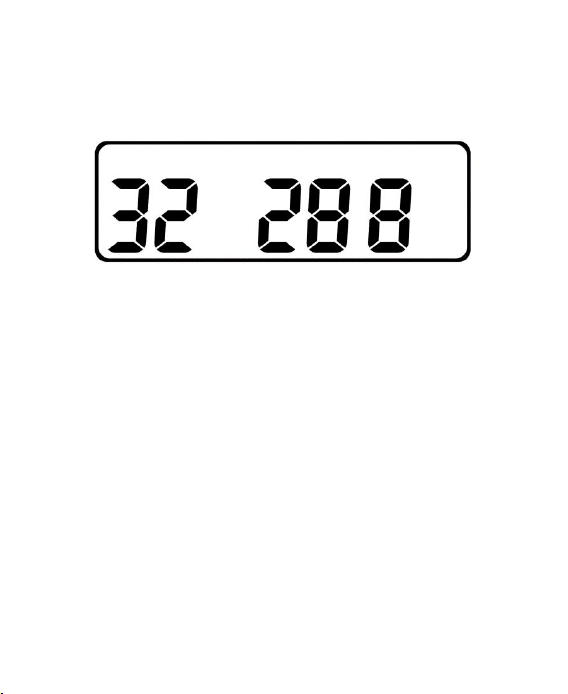
Finally the screen would display the 100%AD and 0%AD
data 3 seconds, like Figure 5.
Figure 5
4. Before install the sensor into its permanent location, we
would suggest test the sensor in air, and see if moisture
reading is 0. And then put the sensor into a cup of water,
the sensor should have its reading increased to 90% or
above. Once sensor detected a significant data change,
sensor will transmit every 10s. Once sensor has been
confirmed working correctly, then you can go to next
step.

7
5. Insert the sensor totally into the soil of your desired
location. Please do not use excessive force to push the
sensor into the soil to avoid any damage.
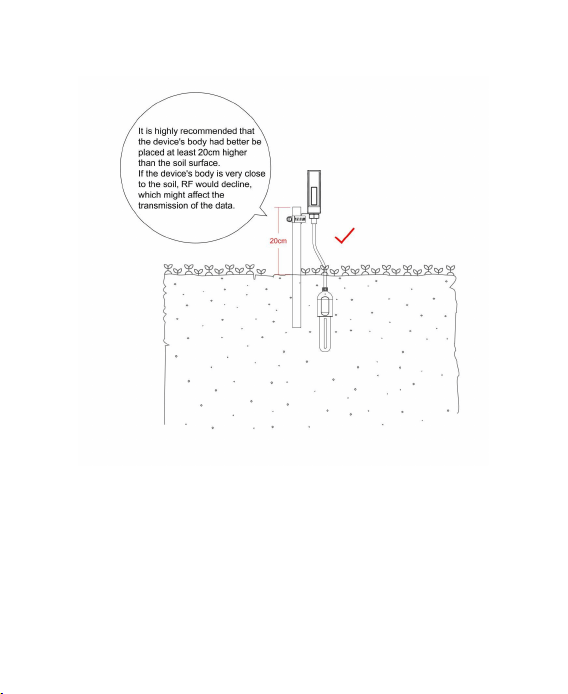
Note: It is highly recommended that the device's body
had better be placed at least 20cm higher than the soil
surface. If the device's body is very close to the soil, RF
would decline, which might affect the transmission of the
data.
2.2.2 Wi-Fi Configure with Gateway
To view the soil moisture data on your mobile application
and receive email alerts on our weather server, you need
to pair this device with our Ecowitt Wi-Fi Gateway or
display consoles, such as GW1100/GW1200/GW2000/
HP2550/HP3500/HP2560 Weather Station
(sold separately).

8
(1) Pair with Gateway
If Wi-Fi gateway has been in operation, and you have
never had any WH51L soil moisture sensor setup before,
just power up the sensor and Wi-Fi gateway will pick soil
moisture data automatically.
Note: The gateway can support up to 8 soil moisture
sensors. Each new sensor will be recognized as a new
channel according to the Power-on sequence. You may
attach a label of the channel on each sensor for distinction.
The channel name can be edited both on the Ecowitt app
and ecowitt.net (will not sync).
If you want to use a new WH51L sensor to replace the old
one (already configured on certain channel), please try the
following:
9
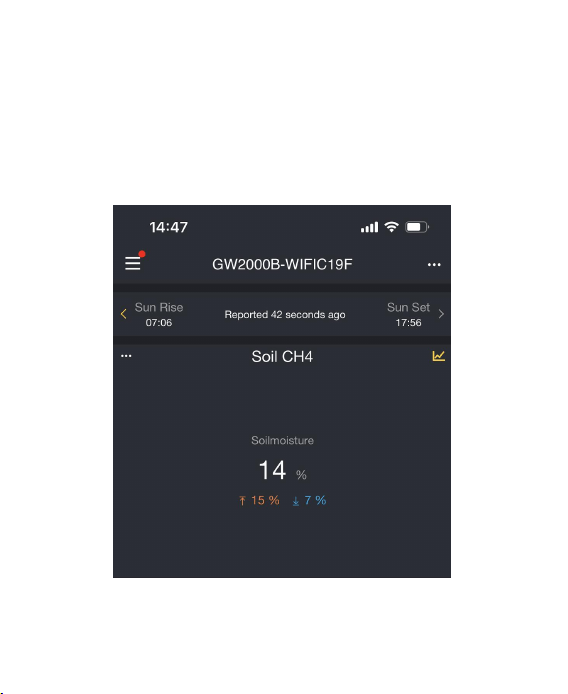
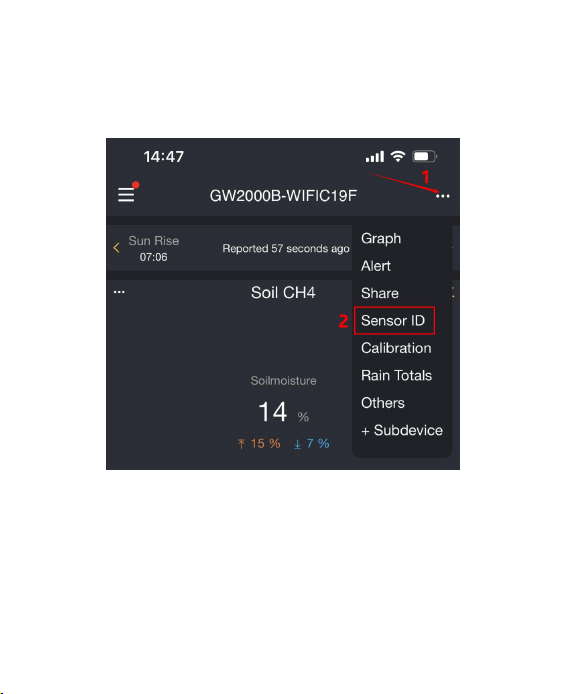
1. Open the Ecowitt app, Click 'My Device' and click
your gateway, and find your old sensor ID, for example
your WH51L’s sensor ID is on Soil CH 4, like the
Figure 6.
Figure 6
10
2. Click the upright '...' and choose 'Sensor ID', like the
Figure 7.
Figure 7
11
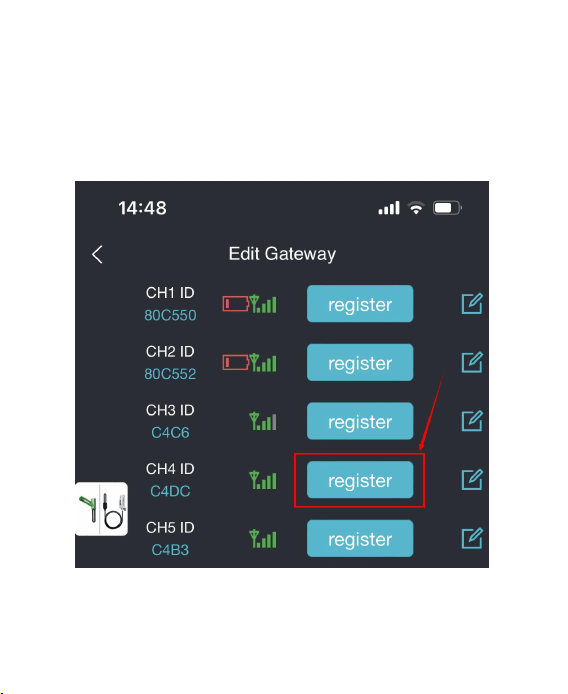
3. Power off the old sensor and power on the new sensor.
4. Click Re-register on the Sensor ID page, like the
Figure 8.
Figure 8
12
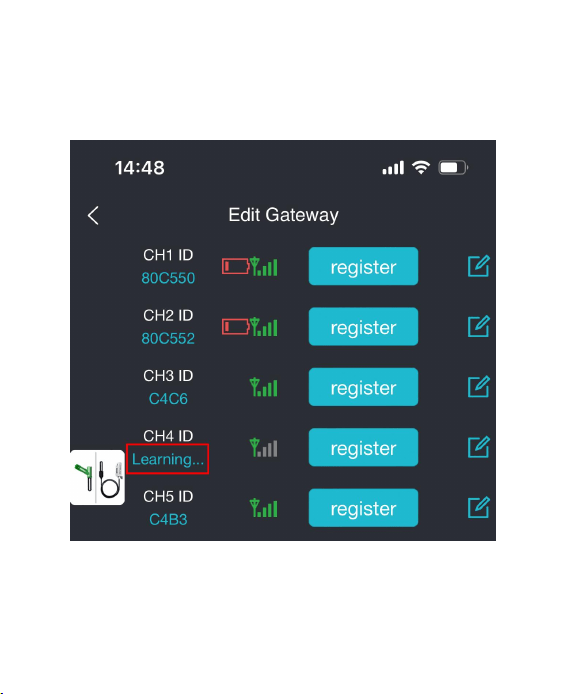
5. Then the new sensor will be learned and the old sensor
will be erased, like the Figure 9.
Figure 9

13
(2). Wi-Fi Connection for the Gateway
For this part, please refer to the manual of the Wi-Fi
gateway.
Any question, please contact the customer service.
2.2.3 Test the Device
After installing the battery and finishing the Wi-Fi
configuration with the gateway, please totally insert the
WH51L sensor probe into the water for about 1 minute.
Then you observe the readout on LCD display of
WH51L.
If the readouts of WH51L significantly change, this
WH51L could normally work. Otherwise, it might be
faulty and please feel free to contact our technical support
team.
14
3. Instructions for Use
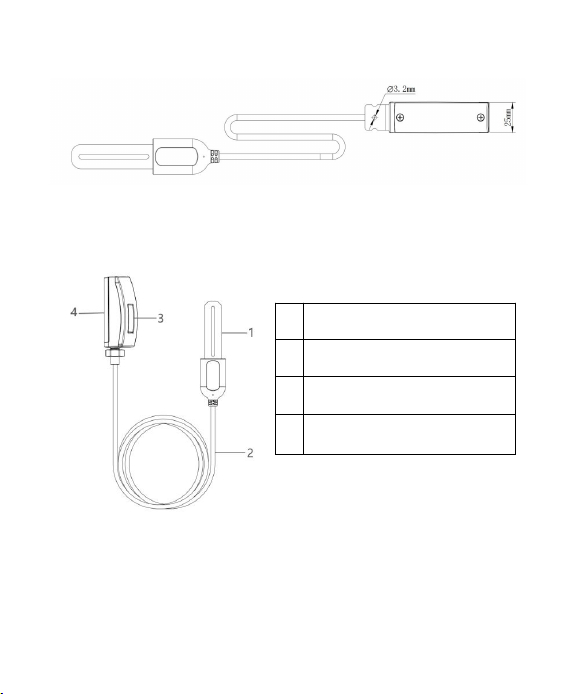
3.1 Multiple Views and Size
Figure 10: Main View
Figure 11: Right view
15
Figure 12: Back View
Figure 13: Overview
1
Soil Moisture Sensor Probe
2
1m/3.28ft PVC Wire
3
LCD Display
4
Battery Compartment

16
3.2 Features
Soil Moisture Sensor
Measures soil moisture content every 70 seconds in
standard cycle and transmits the data via RF.
When the current measurement is significant difference
from the next time data, RF will enter into quick-transmit
state and WH51L will transmit the data every 10 seconds.
Custom Mode: with 0%AD and 100%AD custom mode
to manually calibrate the low/high moisture value so that
you can get more accurate results for different soil types.
Long wireless range, up to 300 feet (100 meters) in
open areas.
The 1m/3.28ft PVC cable sensor enables the
measurement of different depths of soil moisture.

17
3.3 Custom mode
3.3.1 The Principle of Calculating Soil
Moisture:
When the WH51L sensor is inside soil with different
humidity levels, it will generate electrical signals of
different intensities. The sensor will convert the electrical
signals into AD values. The higher the humidity, the
greater the AD value. We use the following linear
function to calculate the soil humidity value:
Soil_Moisture = (Now_AD - 0%AD) * 100% / (100%
AD - 0%AD )
Note:
Now_ AD is the current AD value measured by the
sensor.

18
0% AD is the AD value when the soil is dry, and the
factory calibration defaults to the AD value in the air.
100% AD is the AD value when the soil moisture is
saturated, and the factory calibration defaults to the AD
value when the sensor is submerged in water.
3.3.2 Custom OFF:
The sensor will use factory-calibrated parameters to
calculate soil moisture.
3.3.3 Custom ON:
Due to the different measurement values of AD for
different soil types, we have introduced the Custom mode,
which can obtain more accurate soil moisture values by
setting 0% AD and 100% AD.
When you finish gateway/consoles Wi-Fi configuration

19
and log in Ecowitt APP, making sure that your phone and
the gateway/consoles connect to the same local network,
you can calibrate the soil moisture sensor by enable the
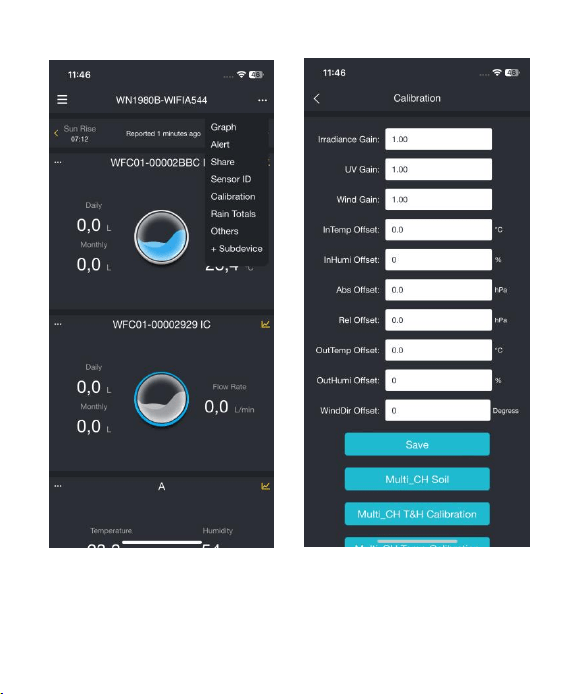
Custom mode by follow steps, like the Figure 14~ Figure
16.
Click 'My Devices'.
Select the gateway with which the sensor is paired.
Click upper right '...' .
Choose 'Multi_CH Soil' .
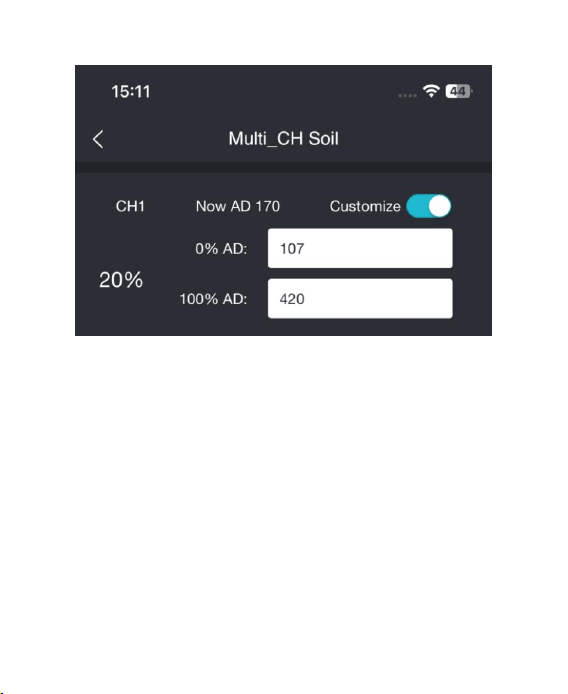
Click 'Customize' to manually calibrate the data.
20
Figure 14 Figure 15
21
Figure 16
0%AD is used to adjust for dry condition reading
inconsistency.
In dry soil, when the displayed moisture readings are too
high, the setting of 0%AD should be increased, and when
the displayed moisture readings are too low, the setting of
0%AD should be reduced.
In principle, 0%AD ≤ Now_ AD.
0%AD can also be calculated using the following
formula:
0%AD=(Now-AD - Soil-Moisture * 100%AD)/(1-
Soil-Moisture)
22
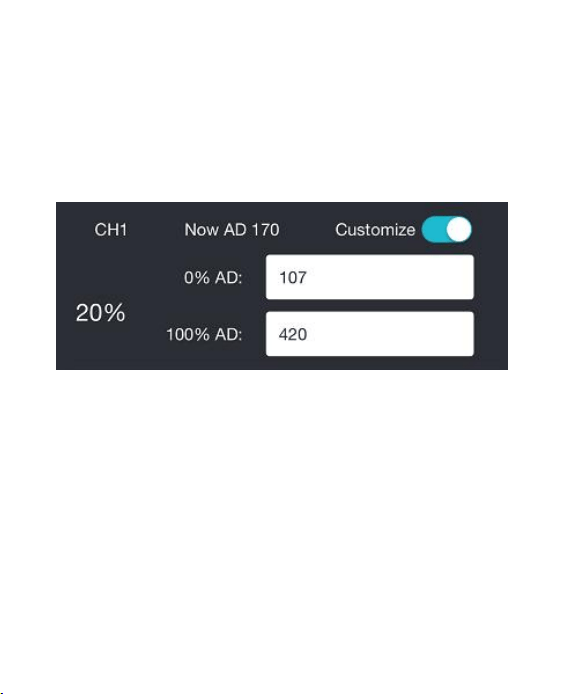
For example:
If: Now AD = 170 100%AD = 420
Target Soil Moisture Reading = 20%
Then:
0%AD = (170 - 20% * 420) / (1 - 20%) = 107
Result: 0%AD = 107(take the Integer part)
Figure 17
100% AD is used to adjust for wet condition reading
inconsistency.
In humid soil, when the displayed moisture readings are
too high, the setting of 100%AD should be increased, and
when the displayed moisture readings are too low, the
setting of 100%AD should be reduced.
In principle, 100%AD ≥ Now_ AD.
100%AD can also be calculated using the following
formula:
23
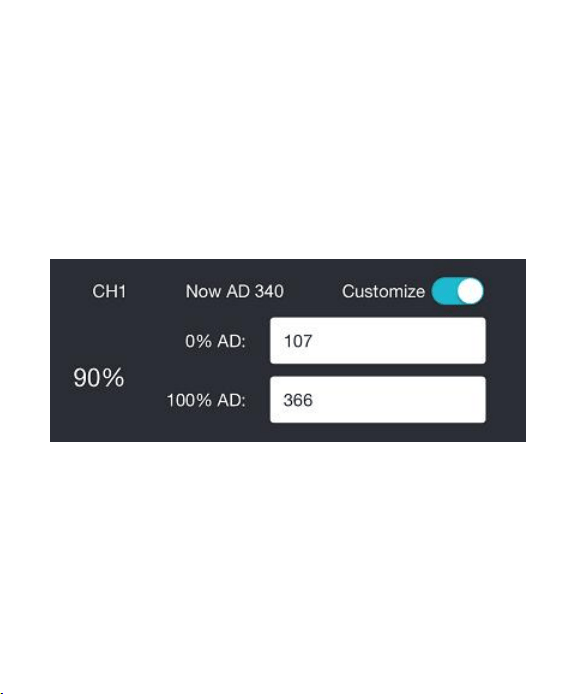
100%AD=(Now_ AD - 0%AD)/Soil_ Moisture +
0%AD
For example:
If: Now_AD = 340 0%AD = 107
Target Soil Moisture Reading = 90%
Then:
100%AD = (340– 107) / 90% + 107 = 366
Result: 100%AD = 366(take the Integer part)
Figure 18
After finishing 0%AD and 100%AD value settings, touch
the screen once to update the data. When you get your
expected moisture reading, click Save to save the setting.

24
Note:
The soil moisture sensor should be inserted into the
soil for accurate results.
Record the 0%AD and 100%AD values for future use
(when the WIFI network changes).
Generally, the sensor must be calibrated to suit your
soil type.
Calibration is only saved on the gateway side, so if
you have two different consoles handling this data,
you will need to enable custom mode and have the
same calibration for 0% and 100% to make
consoles showing the same soil moisture.
After finishing calibration, the Ecowitt APP,
ecowitt.net and the display consoles will display the
calibrated readouts, while the WH51L's LCD screen
still display the readouts before calibration.

25
3.4 Edit Channel Name on Mobile
Application and Website
3.4.1 Edit channel name on Ecowitt APP:
Log in Ecowitt APP, click 'My Devices', and then
choose the gateway/console.
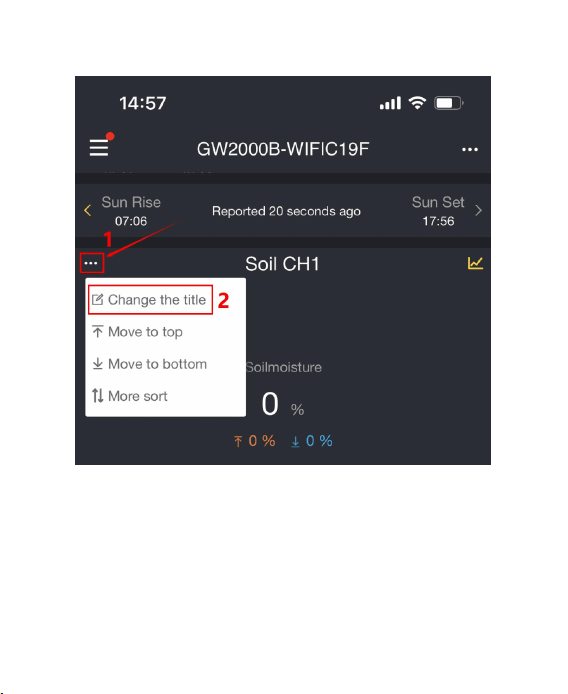
Slide down the page and find the WH51L sensor
channel.
Click '...' of the top left corner of the sensor channel
and choose the 'Change the title' like the Figure 19.
26
Figure 19
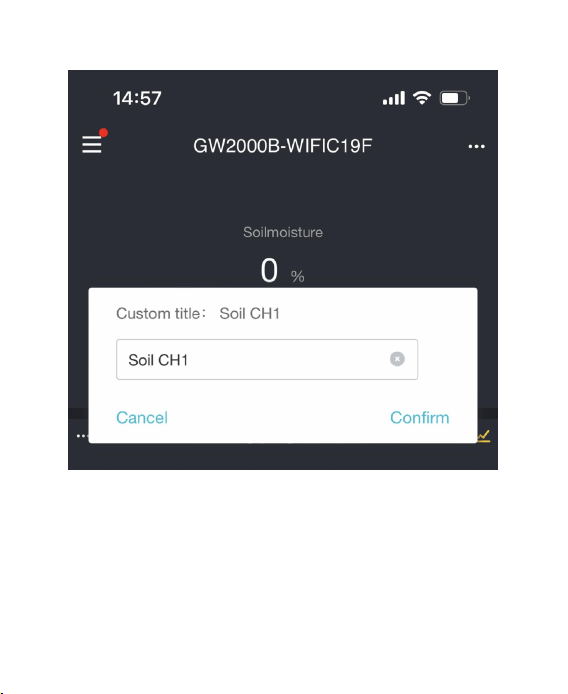
Edit the channel name on the pop-up and finally click
Confirm, like the Figure 20.
27
Figure 20
28
3.4.2 Edit Channel Name on Ecowitt.net:
Log in ecowitt.net.
Find the gateway/console which pairs with the
WH51L sensor.
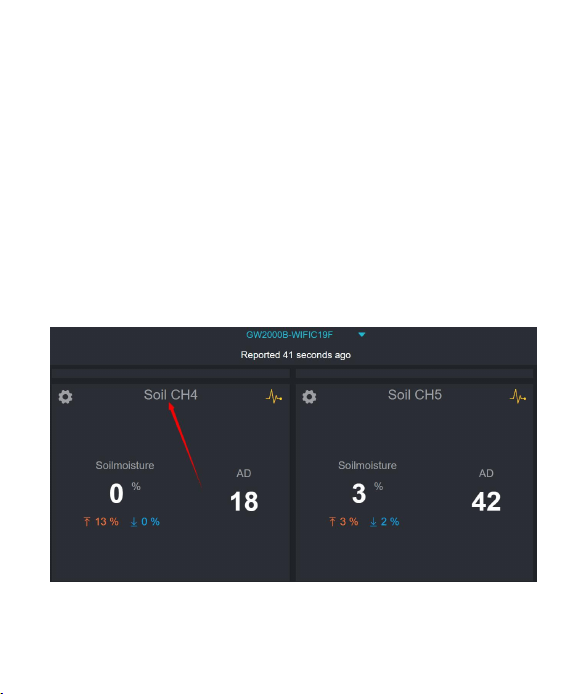
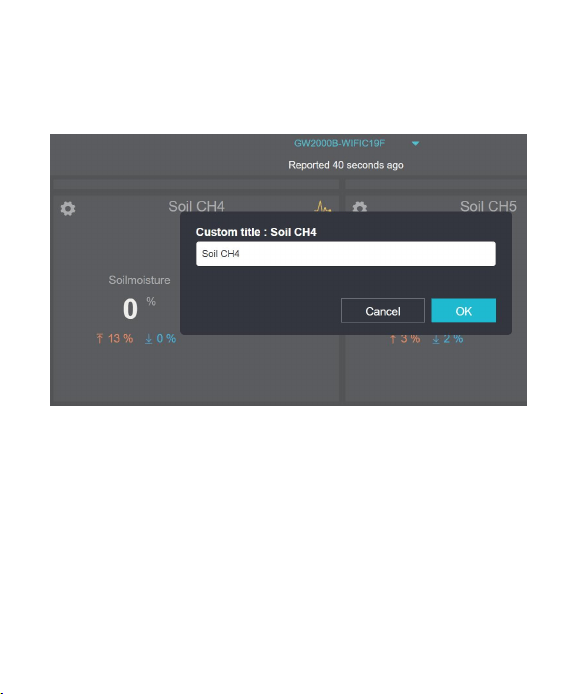
Find your sensor’s channel and directly click the
channel title, for example, click the 'Soil CH4' like
the Figure 21.
Figure 21
29
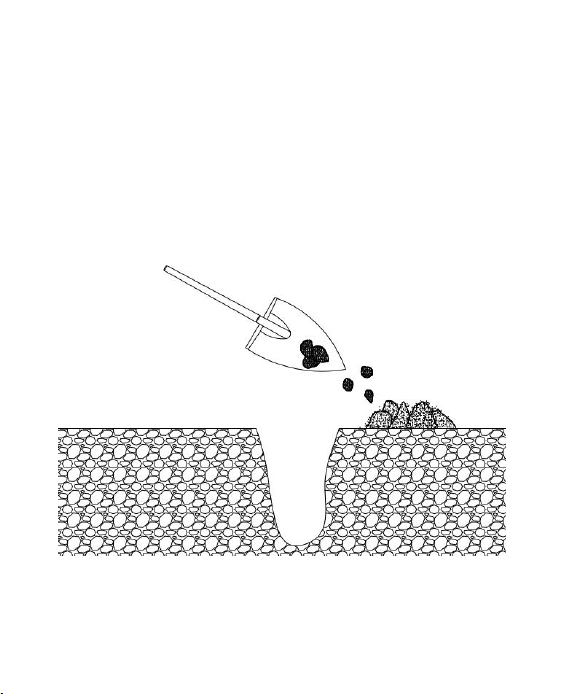
Edit the channel name on the pop-up and click 'OK'
like the Figure 22.
Figure 22
30
4. Application
4.1 The Installation Process Recommended
for the WH51L
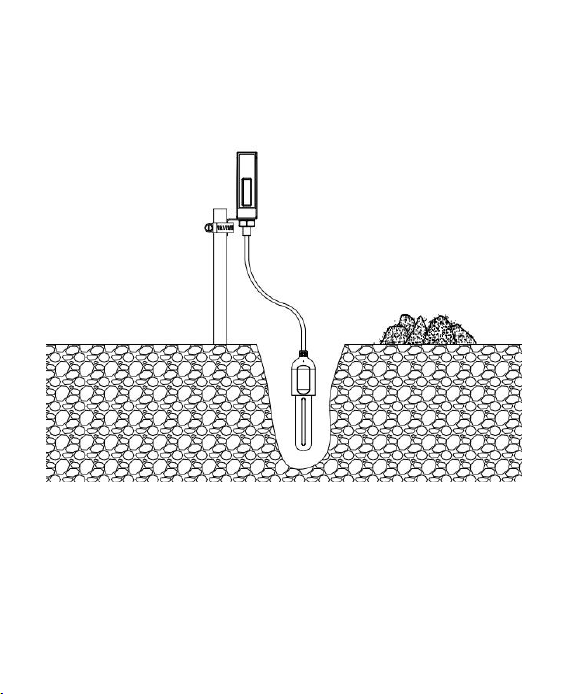
1. Excavate the soil until the depth meets your needs.
Figure 23
31
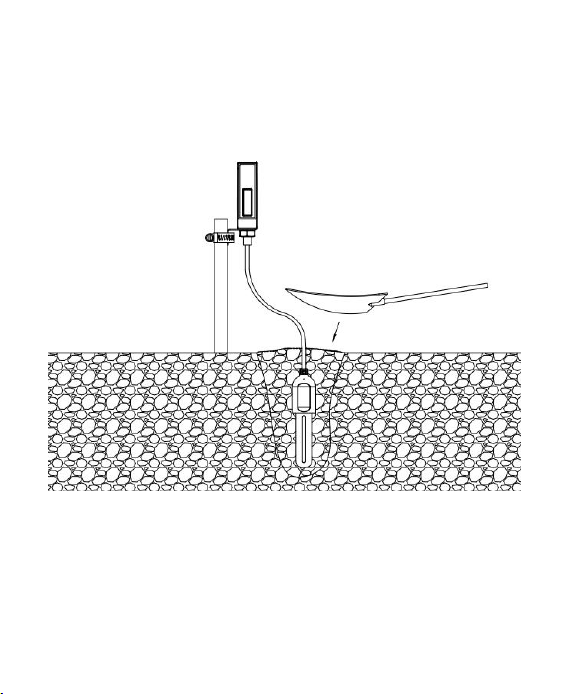
2. Bury the sensor probe of WH51L totally into the hole
you dug.
Figure 24
32
3. Backfill the soil and compact the soil to make sure the
sensor probe is inside the soil.
Figure 25
33
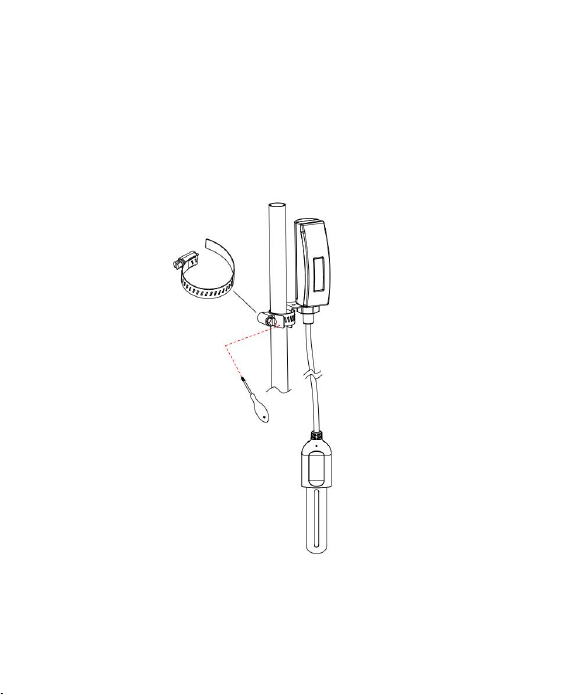
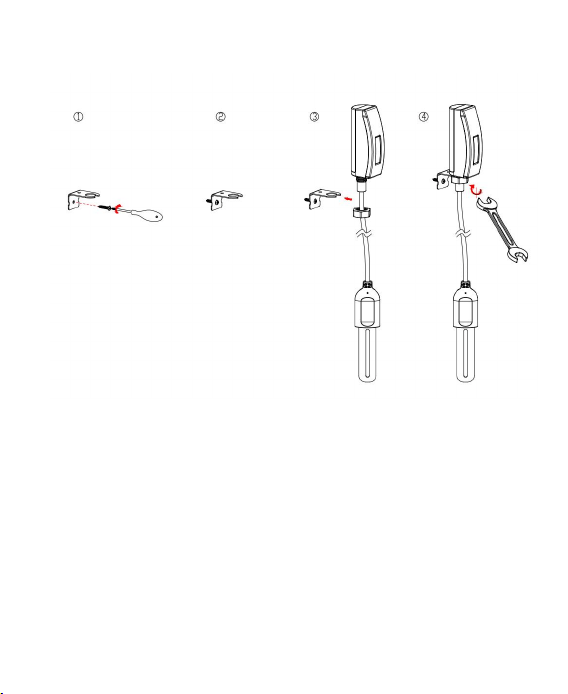
4. Fix the sensor by using the fix bracket and hose clamp,
like Figure 26, or using the fix bracket and stainless steel
screw, like Figure 27.
Figure 26
34
Figure 27
35
Figure 28: The Correct Installation of the WH51L
36
4.2 The Wrong Example of Installation of
the WH51L
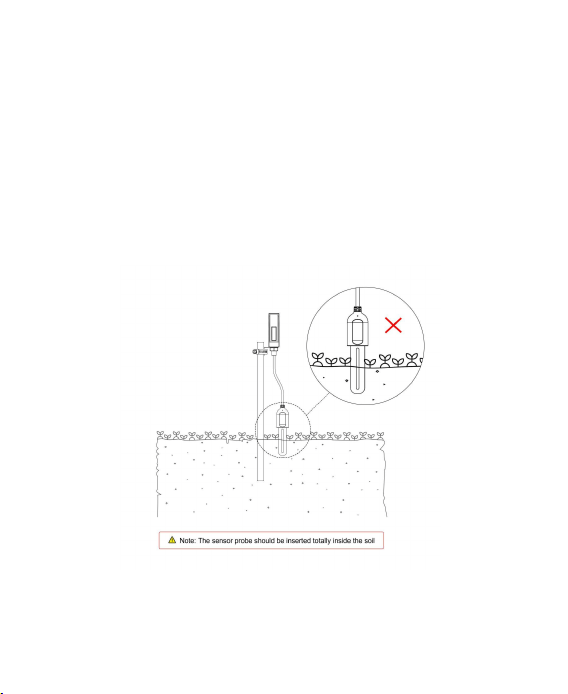
✘ The sensor probe does not totally insert inside the
soil, like the Figure 29.
✘ The device’s body is very close to the soil surface
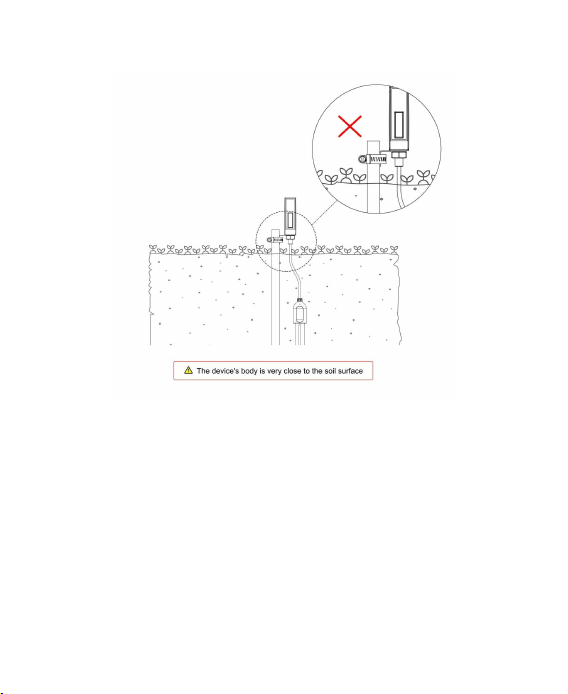
and the distance is less than 20cm, like the Figure
30.
Figure 29: The sensor probe should be inserted totally
inside the soil
37
Figure 30 The device’s body is very close to the soil
surface
38
5. Optional Gateways/Consoles
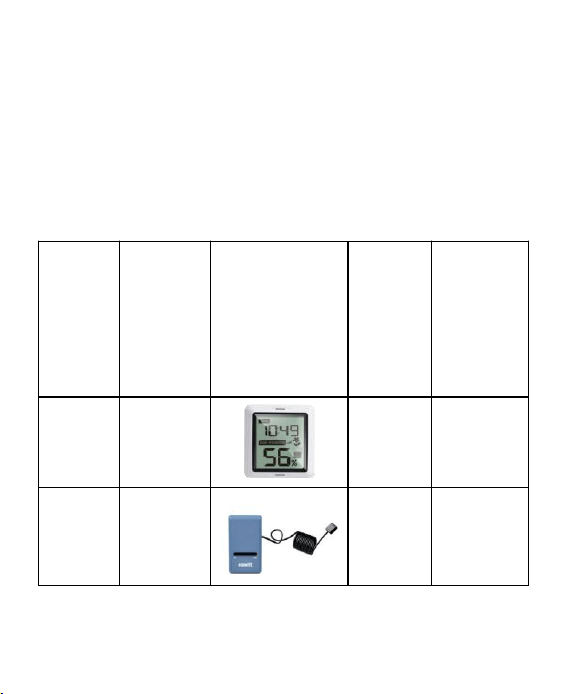
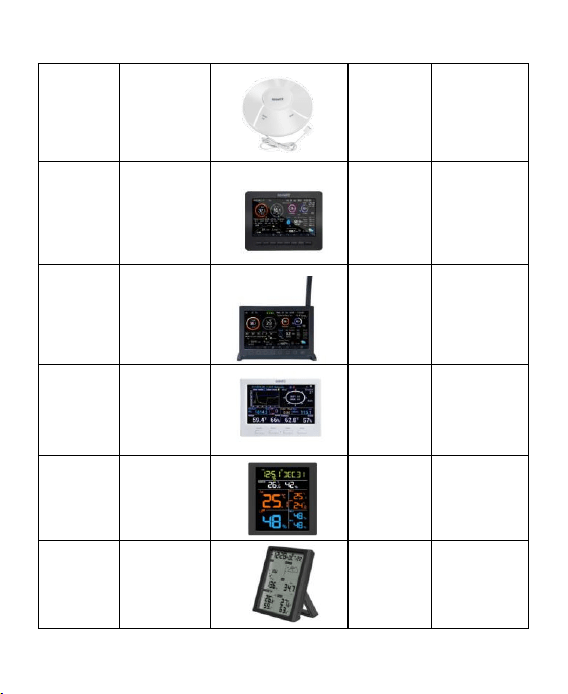
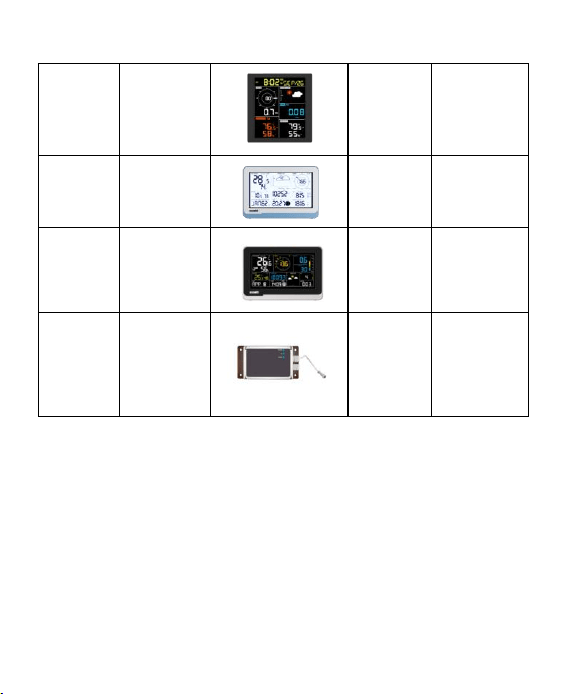
5.1 Table of Gateways/Consoles Which could
Pair with the WH51L
Gateway
/Console
Model
Name
Quantity
of
Channels
of WH51L
Picture
Whether
the data
could
Upload
to
Internet
Whether
the data
Could
Display on
the
Gateway/
Console
WH0291
1
×
√
GW1100
8
√
×
39
GW2000
8
√
×
HP2550
8
√
√
HP2560
8
√
√
HP3500
8
√
√
WN1820
/WN182
1
8
√
√
WN1900
/WN191
0
8
√
×
40
Note: Consoles have a maximum of 8 channels left for
the soil moisture sensors, which means the WH51 and
WH51L share the same 8 channels.
WN1920
/WN198
0
8
√
×
WS3800
8
√
×
WS3900/
WS3910
8
√
×
WS6006
(V
1.1.32)
1
√
×
41
5.2 When paired with a Wi-Fi Gateway
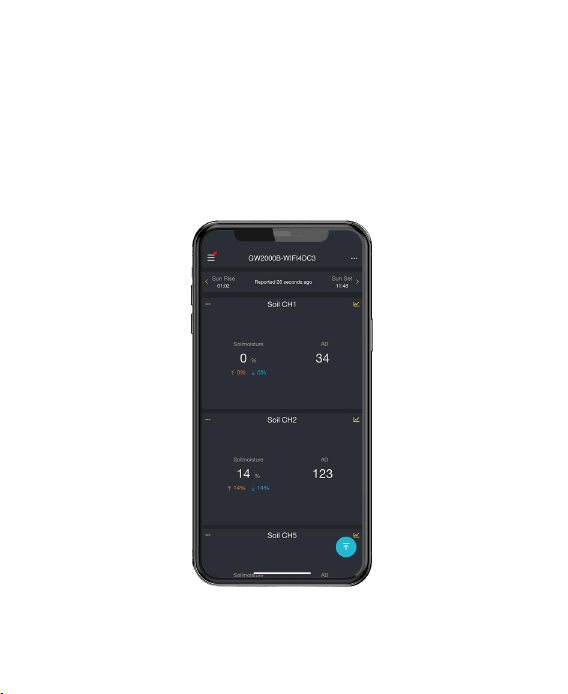
Monitor live sensor data on the Live Data page of the
Ecowitt app (requires the gateway and your phone is
using the same Wi-Fi network), like the Figure 31.
Figure 31: Data on Ecowitt APP
42
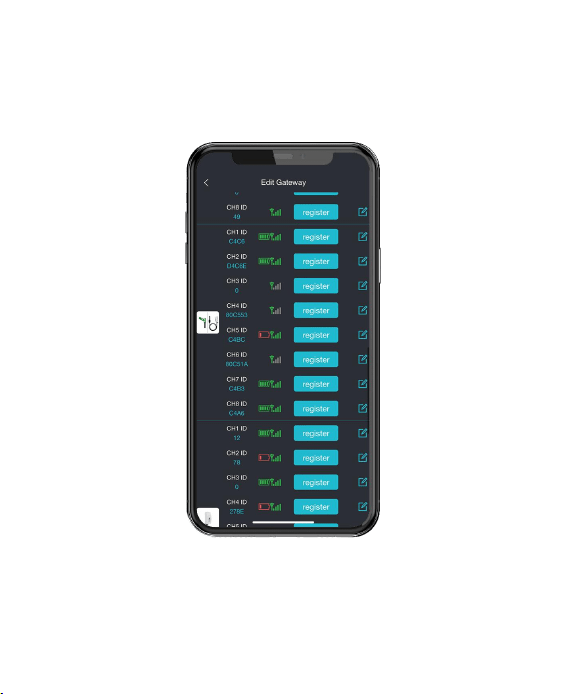
Up to 8 channels supported. Channel names can be
edited on the app, like the Figure 32.
Figure 32: Edit Gateway on Ecowitt APP
43
5.3 When paired with Console WH0291
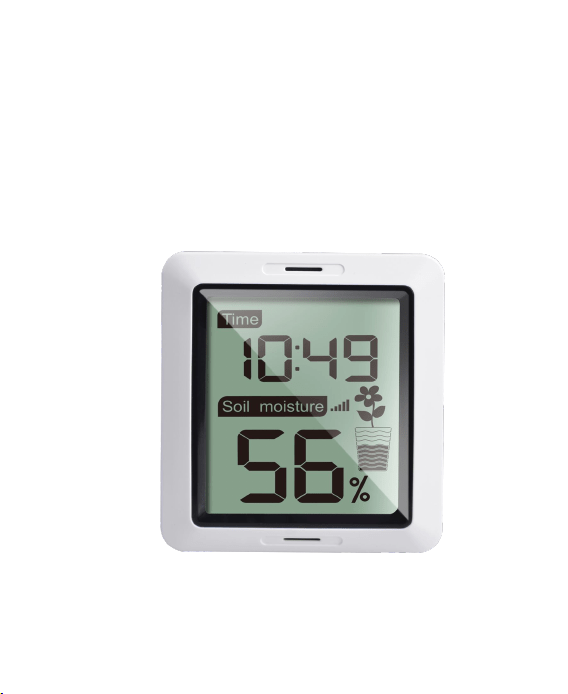
View soil moisture data in real-time on the Display,
like the Figure 33. But WH0291 display console could
not upload WH51L data to Internet.
Figure 33: Data on WH0291 Display Console
44
WH51L could also pair with WH0291 display console.
But one display console could only pair with one WH51L
or WH51.
5.4 When paired with a Weather Station
Console (HP2550/HP2560)
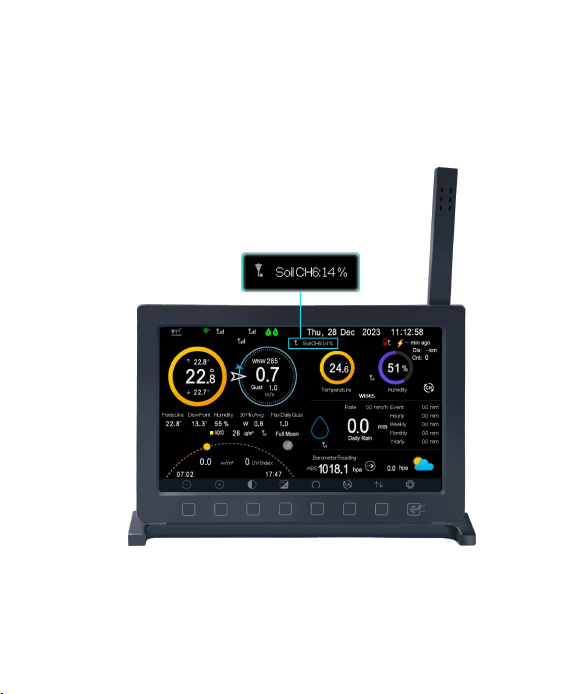
View soil moisture data in real-time on the Display,
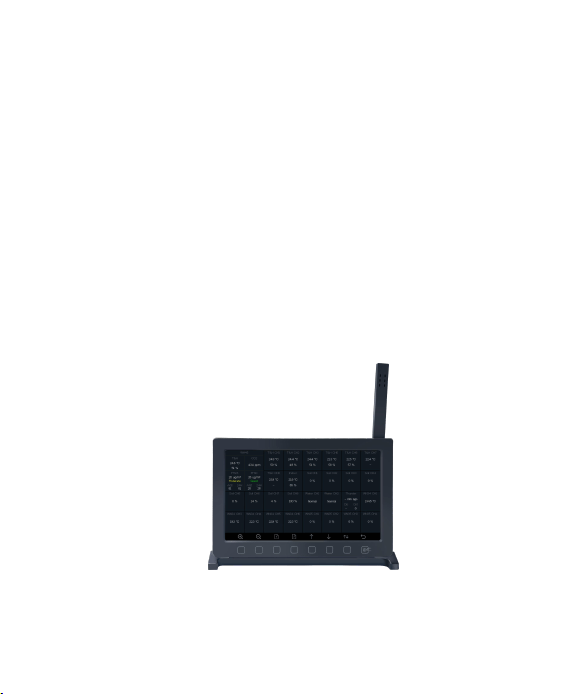
like the Figure 34.
Figure 34: Real-time data on HP2560
45
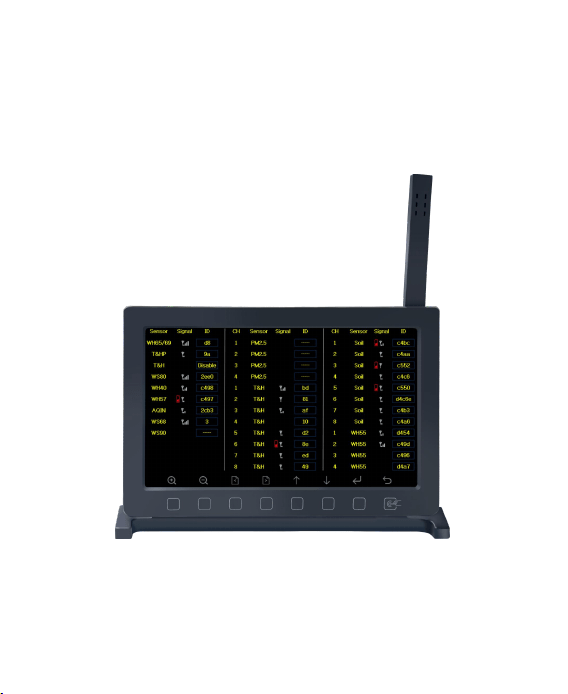
Soil moisture data will be looped playback on the
main dashboard of HP2550/HP2560, like the Figure 35.
Figure 35: Data on Main Dashboard of HP2560
46
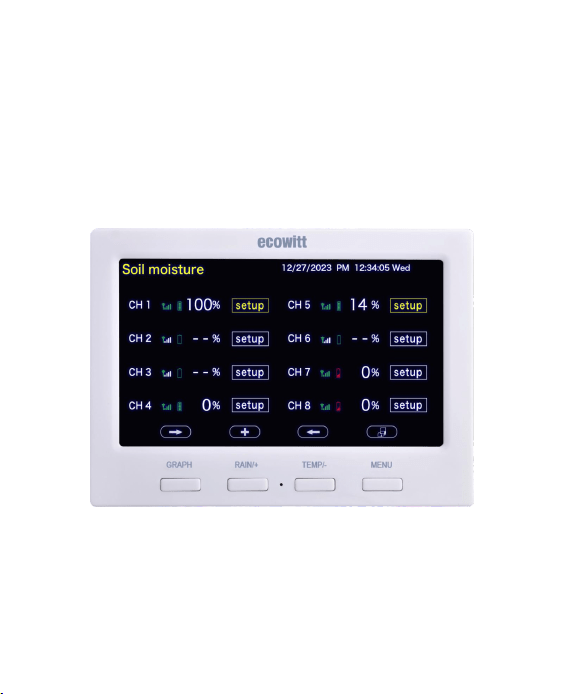
Up to 8 channels supported. Channel names can be
edited on the Display.
Register new sensor ID on Figure 36.
Figure 36: Register WH51L on HP2560 Display
Console
47
5.5 When paired with a Weather Station
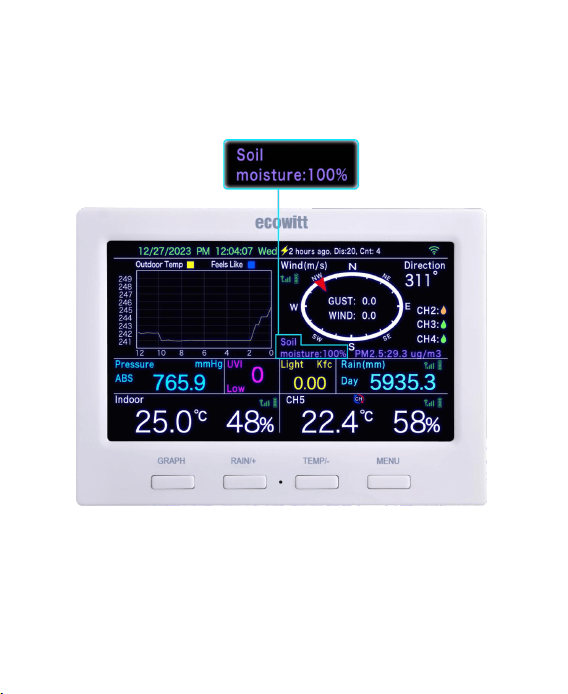
Console (HP3500)
View soil moisture data in real-time on the Display,
like the Figure 37.
Figure 37: Real-time data on HP3500
48
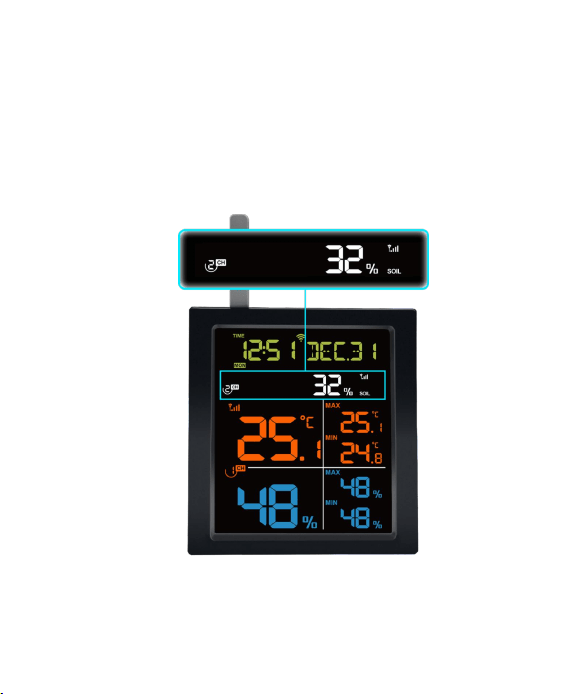
Soil moisture data will be looped playback on the
main dashboard of HP3500, like the Figure 38.
Figure 38: Data on Main Dashboard of HP3500
49
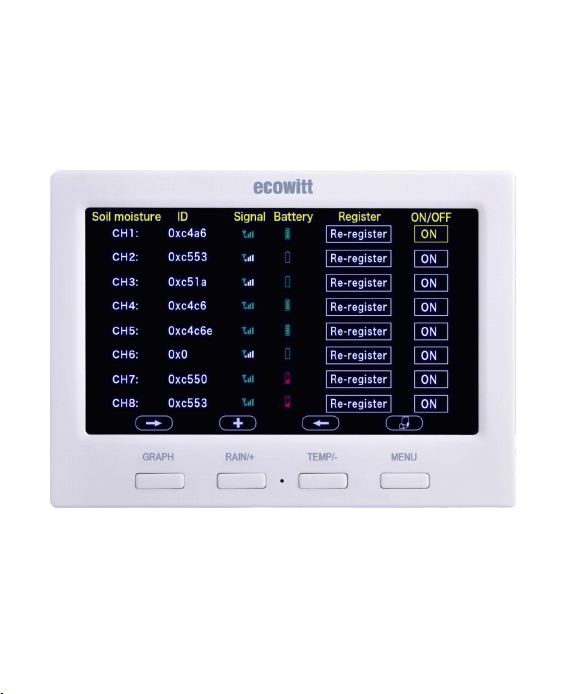
Up to 8 channels supported. Channel names can Not
be edited on the Display.
Register new sensor ID on Figure 39.
Figure 39: Register WH51L on HP3500 Display
Console
50
5.6 When paired with a Weather Station
Console(WN1820/WN1821)
View soil moisture data in real-time on the Display,
like the Figure 40.
Figure 40

51
Up to 8 channels supported.
The channel's names could only be edited on the
Ecowitt APP or website (ecowitt.net). For example, when
you edit the channels’ names on Ecowitt app, please refer
the Figure 18~ Figure 19; when you edit the channels’
names on ecowitt.net, please refer the Figure 21~ Figure
22.
5.7 When paired with a weather station
console(WN1900/WN1910/WN1920/WN198
0/WS3800/WS3900)
Could NOT view the real-time data on the display.
Only Support pair with WH51L and upload the data
to the Internet.
The channel's names could only be edited on the
Ecowitt APP or website (ecowitt.net). For example, when

52
you edit the channels’ names on Ecowitt app, please refer
the Figure 19~ Figure 20; when you edit the channels’
names on ecowitt.net, please refer the Figure 21~ Figure
22.
5.8 When uploaded to Ecowitt Weather
Server
View current soil moisture data & history records &
graph on the website
Set and receive email alerts from the server
Channel names can be edited on the website
Remote monitoring with smart phone, laptop, or
computer by visiting the website
Note: The WH51L will be recognized as the same
sensor type by the software. If you purchased both, they
will share the eight channels together and the total
quantity of the two sensors could not exceed eight.

53
6. Specification
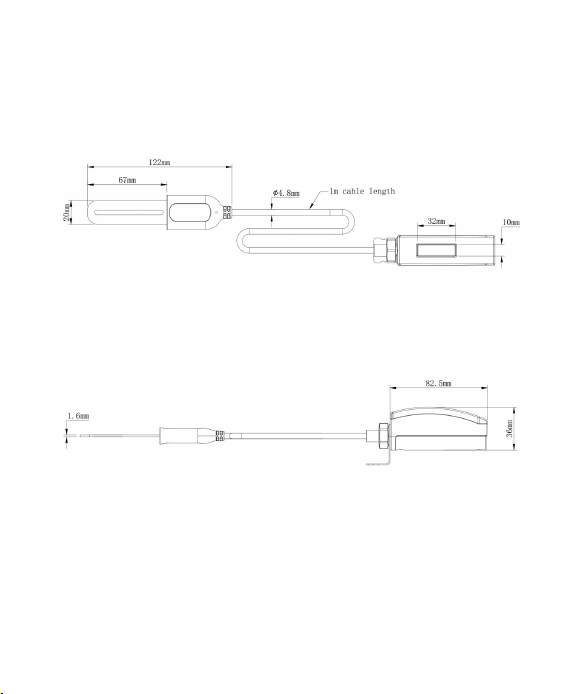
Dimensions of Housing
102.5×49×24(mm)
Dimensions of Sensor
Probe
122×29×14(mm)
Length of Sensor Wire
100(mm)
Weight
122(g)
Material of Housing
ABS+PC
Material of Sensor Wire
PVC
Material of Probe Casing
PVC
Material of Probe
FR-4(Glass Fiber Reinforced Epoxy)
Measurement Principle
Frequency Domain Reflectometry
Moisture Range
0~100%(Ecowitt APP/display
consoles/website);
0~99%(WH51L’s LCD screen)
Accuracy
±5%
Resolution
1%
Working Temperature
Range
-10°C to 50°C(14℉ to 122℉)
Frequency
915/868/433MHz depending on location
(North American:915MHz; Europe:868MHz;
Other areas:433MHz)
Sensor reporting interval
70 seconds
Transmission distance in
open field
100m(300 feet)
Device Housing Waterproof
Level
IP66
Sensor Probe Waterproof
Level
IP68
54
Power consumption
Soil moisture sensor
1xAA Alkaline batteries (not included)
Battery life
Minimum 12 months
7. Warranty Information
We disclaim any responsibility for any technical error or
printing error or the consequences thereof.
All trademarks and patents are recognized.
We provide a 1-year limited warranty on this product
against manufacturing defects or defects in materials and
workmanship.
This limited warranty begins on the original date of
purchase, is valid only on products purchased, and only to
the original purchaser of this product. To receive warranty
service, the purchaser must contact us for problem
determination and service procedures.

55
This limited warranty covers only actual defects within
the product itself and does not cover the cost of
installation or removal from a fixed installation, normal
set-up or adjustments, or claims based on
misrepresentation by the seller, or performance variations
resulting from installation-related circumstances.
Manufacture: Shenzhen Fine Offset Electronics Co., Ltd.
Address: 4/F, Block C, JiuJiu Industrial City, Shajing Tow
n, Baoan District, Shenzhen City, China

56
8. Care and Maintenance
When batteries of different brand or type are used
together, or new and old batteries are used together, some
batteries may be over-discharged due to a difference of
voltage or capacity. This can result in venting, leakage,
and rupture and may cause personal injury.
• Do not mix Alkaline, Lithium, standard, or rechargeable
batteries.
• Always purchase the correct size and grade of battery
most suitable for the intended use.
• Always replace the whole set of batteries at one time,
taking care not to mix old and new ones, or batteries of
different types.

57
• Clean the battery contacts and also those of the device
prior to battery installation.
• Ensure the batteries are installed correctly with regard to
polarity (+ and -).
• Remove batteries from product during periods of
non-use. Battery leakage can cause corrosion and damage
to this product.
• Remove used batteries promptly.
• For recycling and disposal of batteries, and to protect
the environment, please check the internet or your local
phone directory for local recycling centers and/or follow
local government regulations

58
9. Contact Us
9.1 After-sales Service
Order Issues:
If you encounter any missing or incorrect shipments of
Ecowitt products purchased, please reach out to the
respective platform's customer service from the store
where you bought the product for assistance.
Usage Inquiries:
Our product is continuously changing and improving,
particularly online services and associated applications.
To download the latest manual, and additional help, and
for any issues related to product usage feel free to contact
are committed to providing assistance and resolving any
concerns you may have.

59
9.2 Stay in Touch
Ask questions, watch setup videos, and provide feedback
on our social media outlets. Follow Ecowitt on Discord,
YouTube, Facebook and Twitter.
Copyright © 2024 ecowitt All Rights Reserved. DC011124