1
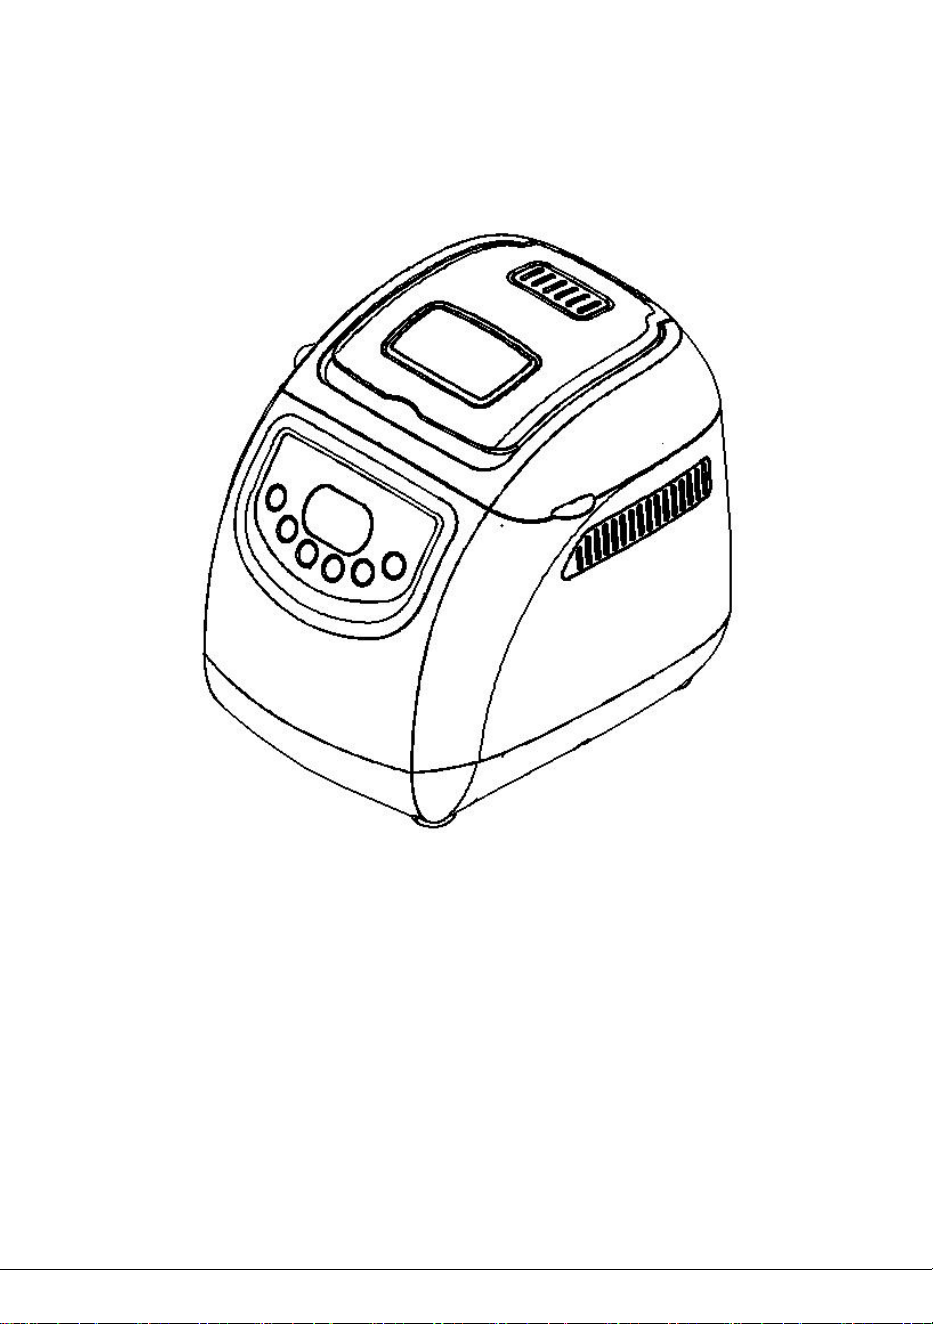
BREAD MAKER
INSTRUCTION MANUAL
Model NO.:BM8021

2
IMPORTANT SAFEGUARDS
Before using the electrical appliance, the following basic
precautions should always be followed:
1. Read all and save these instructions.
2. Before using check that the voltage of wall outlet corresponds to
the one shown on the rating plate.
3. This appliance is not intended for used by persons (including
children) with reduced physical, sensory or mental capabilities,
or lack of experience and knowledge, unless they have been
given supervision or instruction concerning use of the
appliances by a person responsible for their safety.
4. Close supervision is necessary when any appliance is used by
or near children. Children should be supervised to ensure that
they do not play with the appliance.
5. Do not touch hot surfaces. Use handles or knobs. Always use
oven mitts to handle hot bread pan or hot bread.
6. Do not put hand inside oven chamber after bread pan is
removed. Heating unit will still be hot.
7. To protect against electric shock do not immerse cord, plugs, or
bread maker in water or other liquid.
8. Unplug from outlet when not in use and cleaning. Allow to cool
before putting or taking off parts, or before cleaning the
appliance.

3
9. Do not operate any appliance with a damaged cord or plug or
after the appliance malfunctions, or is dropped or damaged in
any manner. Return the appliance to manufacturer or the
nearest authorized service agent for examination, repair or
electrical /mechanical adjustment.
10. The use of accessory attachments not recommended by the
appliance manufacturer may cause injuries.
11. Do not use outdoors and household use only.
12. Do not let cord hang over edge of table or counter or touch hot
surface.
13. Do not place on or near a hot gas or electric burner, or in a
heated oven.
14. Extreme caution must be used when moving an appliance
containing hot oil or other hot liquids.
15. Never switch on the appliance without properly placed bread
pan filled ingredients.
16. Never beat the bread pan on the top or edge to remove the pan,
this may damage the bread pan.
17. To disconnect, turn all controls off(START/STOP);then remove
plug from wall outlet.
18. Do not place eyes or face in close proximity with tempered
glass viewing window ,in the event that the safety glass breaks.
19. This appliance has been incorporated with a grounded plug.
4
Please ensure the wall outlet in your house is well earthed.
20. Do not touch any moving or spinning parts of the machine when
baking.
21. Do not operate the appliance for other than intended use.
22. Clean oven interior carefully. Do not scratch or damage heating
element tube.
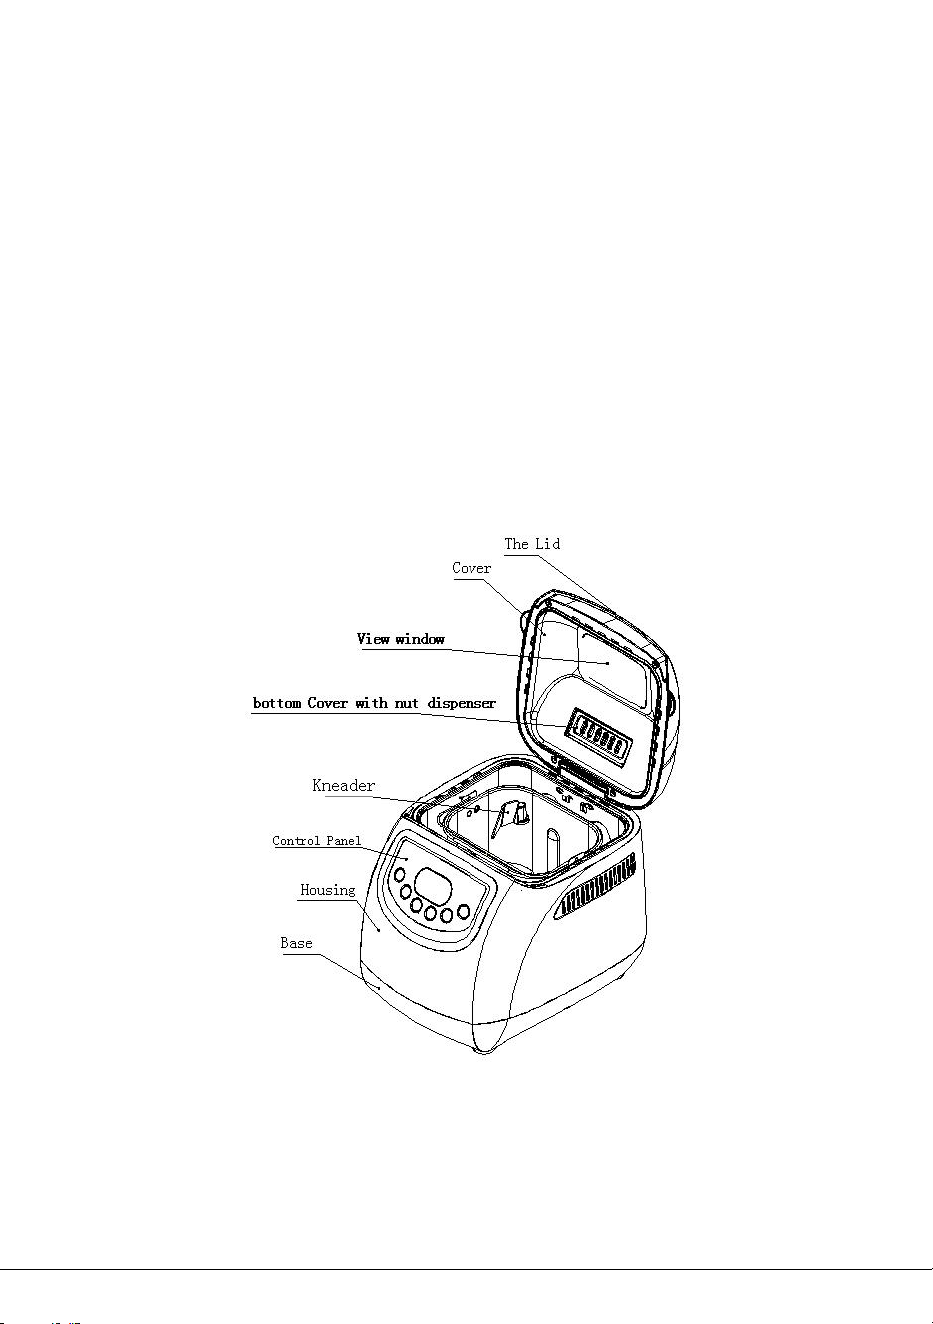
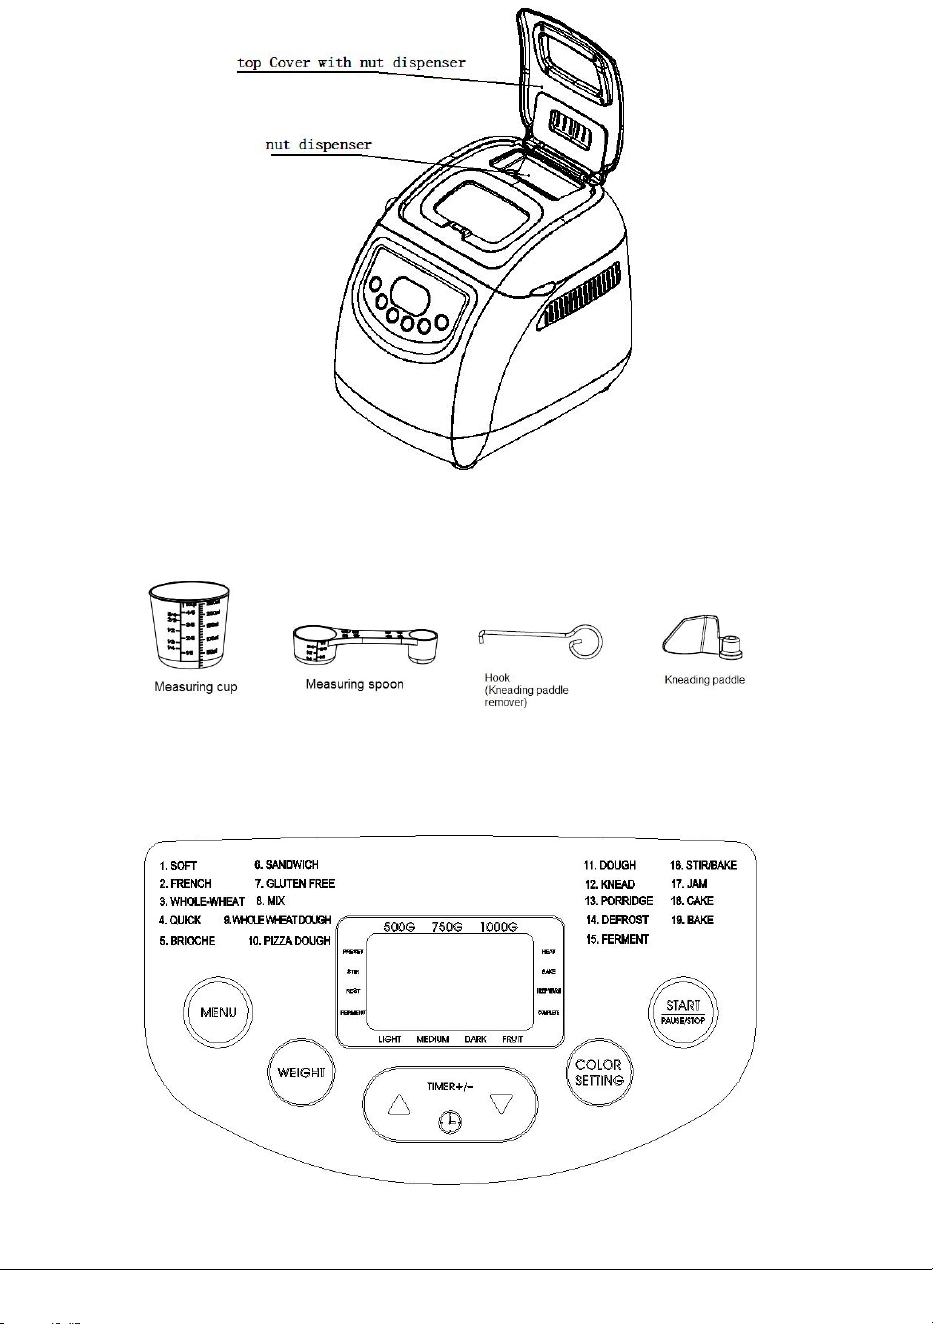
PARTS AND FEATURES
5
FUNCTION INTRODUCTION
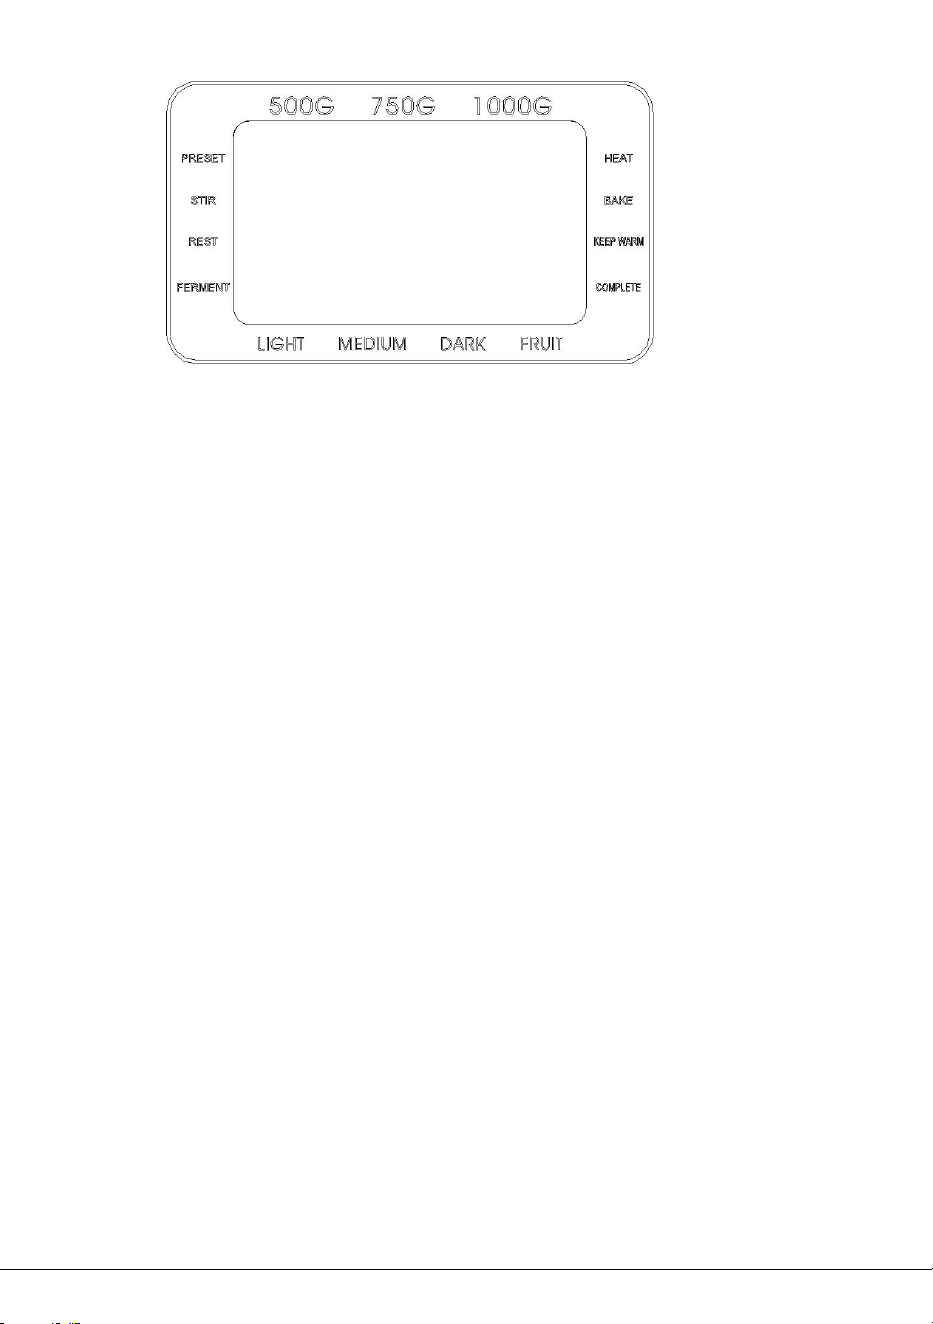
CONTROL PANEL
6
AFTER POWER ON
Plug the bread maker into power supply, a beep will be heard and
“3:00” will be displayed. But the colon between the “3” and “00”
don’t flash constantly. And “1” is the default program. The arrows
point to “750g” and “MEDIUM” as they are default settings.
START/STOP BUTTON
Press the START/STOP button once to start a program. The
indicator will light up, and the colon in the time display begin to flash
and the program will start. Any other button is inactivated except the
START/STOP button after a program has begun.
Press the START/STOP button for 0.5 seconds and shift to pause
state ,if no operation in 3 minutes, the program will continue
processing unit the setting program completed.
Press the START/STOP button for 3 seconds to cancel a program,
then a beep will be heard, it means that the program has been

7
switched off. This feature will help to prevent any unintentional
disruption to the operation of program.
To remove bread, press the START/STOP button to end the baking
cycle.
PREPROGRAMMED MENU
Press MENU button to select your desired programs. Each time it is
pressed (accompanied by a short beep) the program will vary. Press
the button discontinuously, the corresponding program number will
be cycled to show on the LCD display.
CRUST COLOR
Press COLOR button to select your desired setting: Light, Medium,
or Dark crust.
WEIGHT
Press the Weight button to choose your desired gross weight (500g,
750g, 1000g).
DELAY TIMER(“ or ”)
Use the DELAY TIMER feature to start the bread maker at a later
time. Press” or ”buttons to increase the cycle time shown on
the LCD display. Add up to 15 hours including the delay time and

8
bread making program.
NOTES:
Set the Delay Time after selecting PROGRAM MENU, WEIGHT,
and CRUST COLOR.
Do not use the timer function with recipes that include dairy or
other ingredients, such as eggs, milk, cream, or cheese.
You must decide how long it will be before your bread is ready
by pressing the “ or ”. Please note the delay time should
include the baking time of program. After baking program is
complete he bread machine will shift to the Keep Warm setting
for 1 hour. Before start making bread, press the program menu
and crust color are select first, the n pressing “ or ”to
increase or decrease the delay time at the increment of 10
minutes. The maximum delay is 15 hours.
POWER INTERRUPTION
In the event of a power outage, the process of making bread will
continue automatically within 10 minutes, even without press
START/STOP button .If the interruption time is longer than 15
minutes, the unit will not continue running and the LCD display will
revert back to the default setting. If the dough has started rising,
discard the ingredients in the bread pan and start over. If the dough
has not entered the rising phase when the power cord is remove
from wall outlet. You can press the START/STOP button to continue

9
the program from the beginning.
WARNING DISPLAY
”HHH”-This warning means that the temperature inside of the
bread pan is too high. Press START/STOP button(see below
figure1)to stop the program, unplug the power cord, open the top
lid, and let the machine cool down completely for 10-20minutes
before restarting.
”EE0”-This warning means that the temperature sensor is
disconnected. Press START/STOP button(see below figure2) to
stop the program, unplug the power cord. Please check the
sensor by the nearest authorized service agent for examination,
repair or electrical /mechanical adjustment.
Figure 1 Figure 2
KEEP WARM
After baking program is complete, the bread machine will beep 10
times and shift to Keep Warm setting for 1 hour. It will be displayed
“0:00 ”.
To cancel the Keep Warm process, press the START/STOP button
for 3 seconds.
TIP: Removing bread immediately after baking program is complete

10
will prevent crust from becoming darker.
Using the fruit & nut dispenser
If you wish to add nuts or seeds to your loaf, and keep the best
flavor, better not put them into flour at the first preparation. Or they
would be too stir to lose flavor and texture.
Automatic adding add-ins function will help you without waiting by
the side of bread maker. Tip in the nuts or seeds at dispenser in the
lid. Close the lid then start the programme, after approximately 30
minutes (the exact time is programme dependent), the nut
dispenser will operate 3 times to push the bottom cover open, to
ensure all the contents have dispensed.
BEFORE THE FIRST USE
Wash and dry bread pan and kneading paddle.
Note: Do not use metal utensils in bread pan since they may
damage the non-stick surface.
CAUTION! Falling Object Hazard. Bread maker can wobble and
walk during kneading cycle. Always position it in the center of
counter away from the edge.
1.Check for any missing or damaged parts..
2.Clean all the parts according to “CLEANING AND
MAINTENANCE”.
11
3.Set the bread maker on bake mode and
bake empty for about 10 minutes. Then
let it cool down and clean all the detached
parts again. The appliance may emit a
little smoke and/or odor when you turn it
on for the fist time. This is normal and will
subside after the first or second use.
Make sure the appliance has sufficient ventilation.
4.Dry all parts thoroughly and assemble them, the appliance is
ready for use.
Detailed Instructions
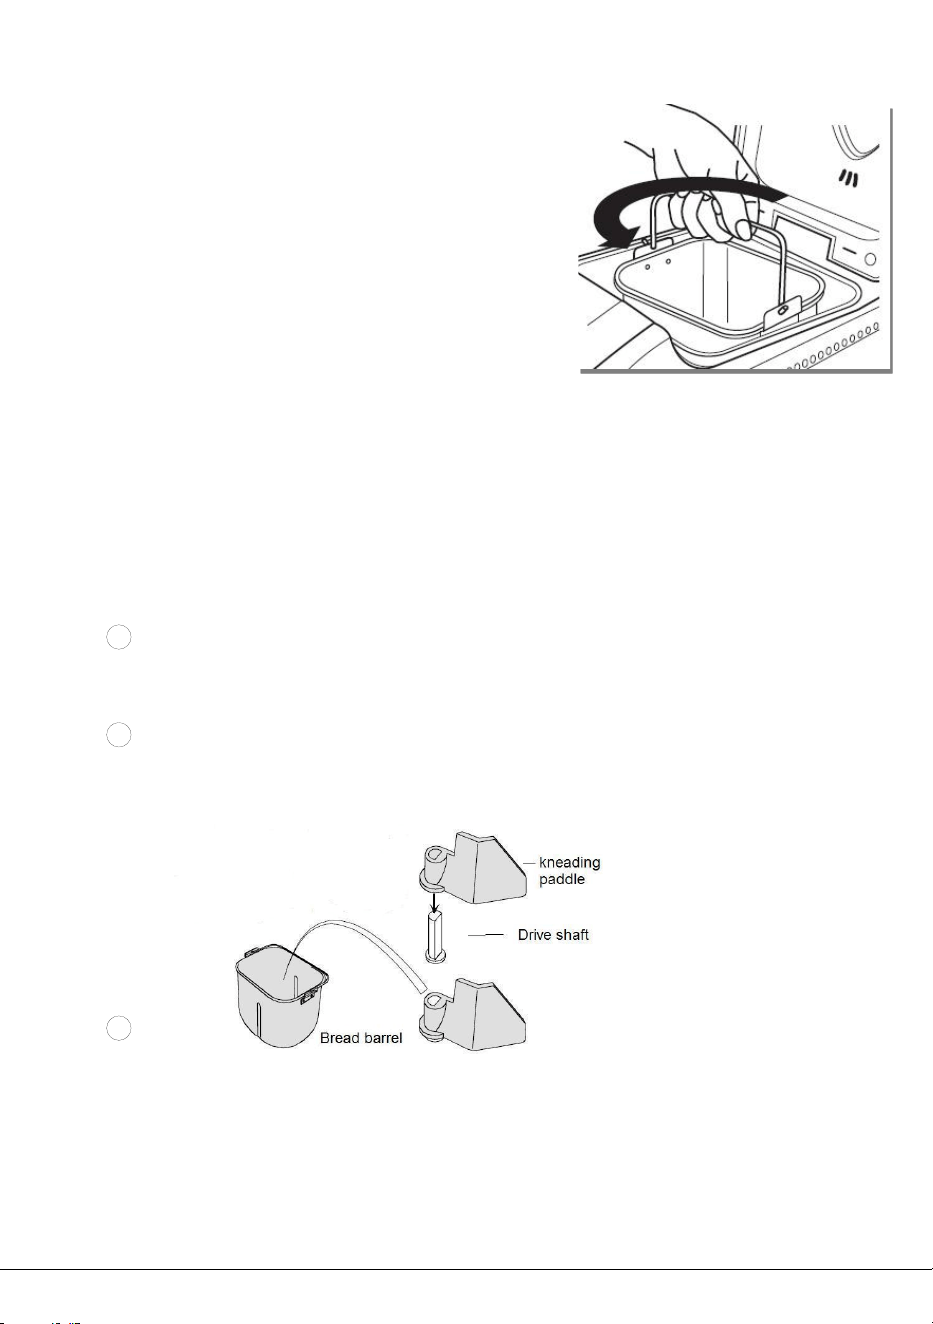
1 Using the bread pan handle, turn the bread pan
counter-clockwise and then pull it out of the appliance.
2 Push the kneading paddle onto the drive shaft inside the bread
pan.
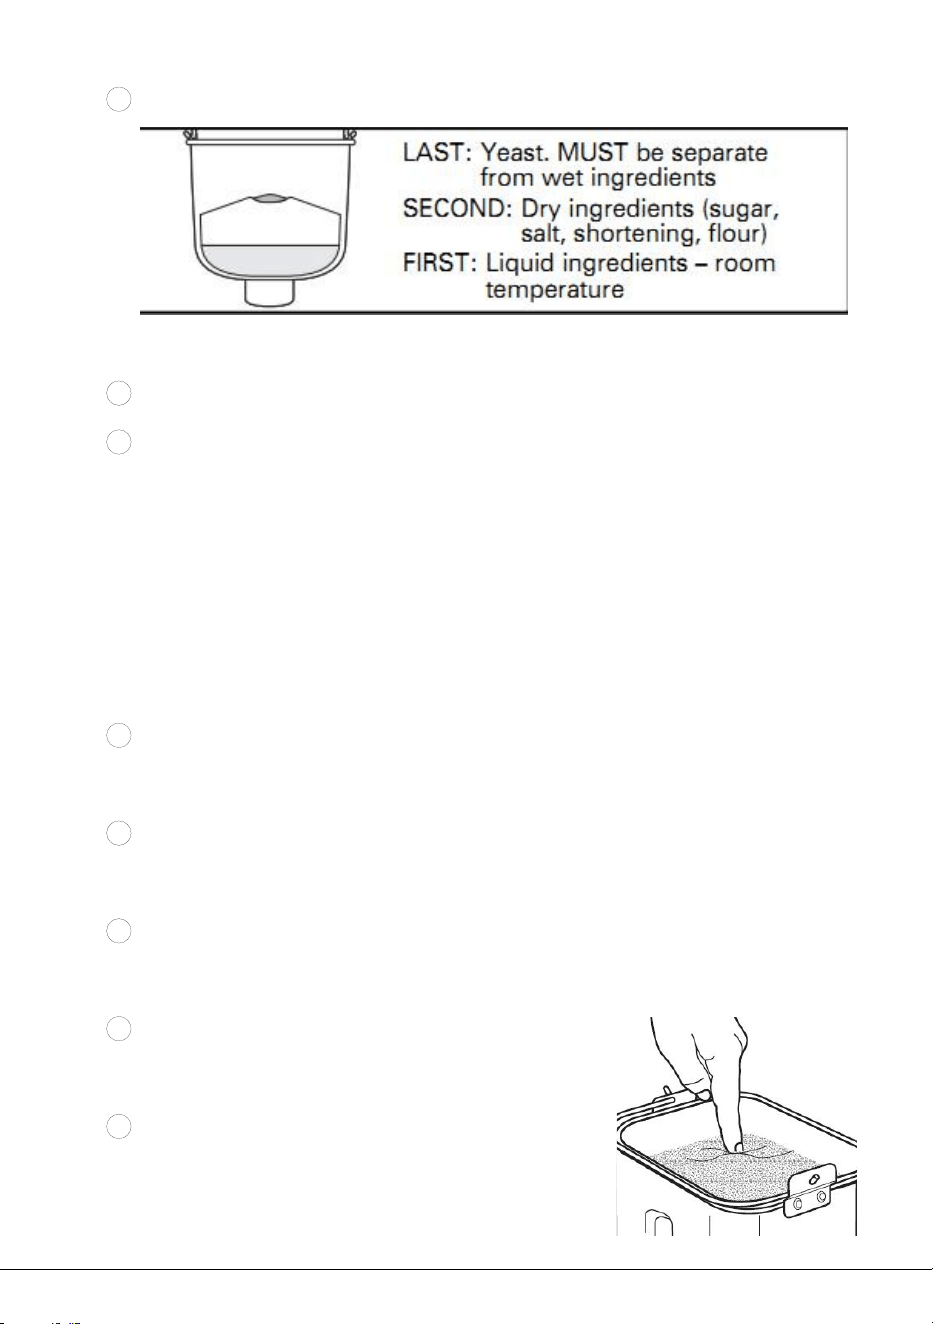
3 Add the ingredients to the bread pan in order listed in the recipe.
First, add the liquids, sugar, and salt; then the flour; and last the
yeast.
12
4
Carefully measure and add ingredients to the bread pan in the
EXACT order given in the recipe.
5
6 NOTE: Make a small indentation on the top of flour with finger,
add yeast into the indentation Make sure that yeast does not
come into contact with salt or liquids.
TIP: Premeasured all ingredients, including add-ins(nuts,
raisins),prior to beginning.
7 Place the bread pan into the break make and make sure it is
firmly locked in place by turning it clockwise. Close the lid.
8
NOTE :Bread pan must lock into place for proper mixing and
kneading.
9
Plug in the appliance beep will be heard and the LCD display
will default to Program 1.
10 Press PROPGRAM MENU button until
your desired program is displayed.
11
Press the WEIGHT button to move the
arrow to 500g,750g,1000g.(WEIGHT is

13
not an option in program
8-19.)
12 Press the CRUST button to move the arrow to desired setting:
Light, Medium, Dark crust.(Crust is not adjustable in program
8-19.)
13 If desired, set the DELAY TIMER button. Press
+
and – buttons
to increase the cycle time shown on the LCD display.(Delay
function is not available in program 13)
NOTE: Do not use the feature when using dairy, eggs, etc. This
step may be skipped if you want the bread maker to start working
immediately.
14. If want to add the add-ins(fruits ,nuts, raisins), just add them
into the dispenser tray on the cover. Dispenser will open
automatically at the right timing, add-ins will be put into dough
without manpower.
14 Press the START/STOP button once to start program. Bread
maker will beep once and “3:00” will be displayed. But the colon
between the “3” and “00” don’t flash constantly and the indicator
will light up. The kneading paddle will begin to mix your
ingredients. If Delay Timer was activated, kneading paddle will
not mix ingredients until program is set to begin.

14
15
Once the process is complete, ten beeps will be heard and shift
to the Keep Warm setting for 1 hour. You can press
START/STOP button for 3 seconds to stop the process and
Keep Warm setting will end. Unplug the power cord and then
open lid using oven mitts.
17 Let the bread pan cool down slightly before moving the bread.
Use oven mitts ,carefully turn the bread pan counterclockwise to
unlock and lift up on the handle to remove from the machine.
Caution: the Bread pan and bread may be very hot! Always handle
with care.
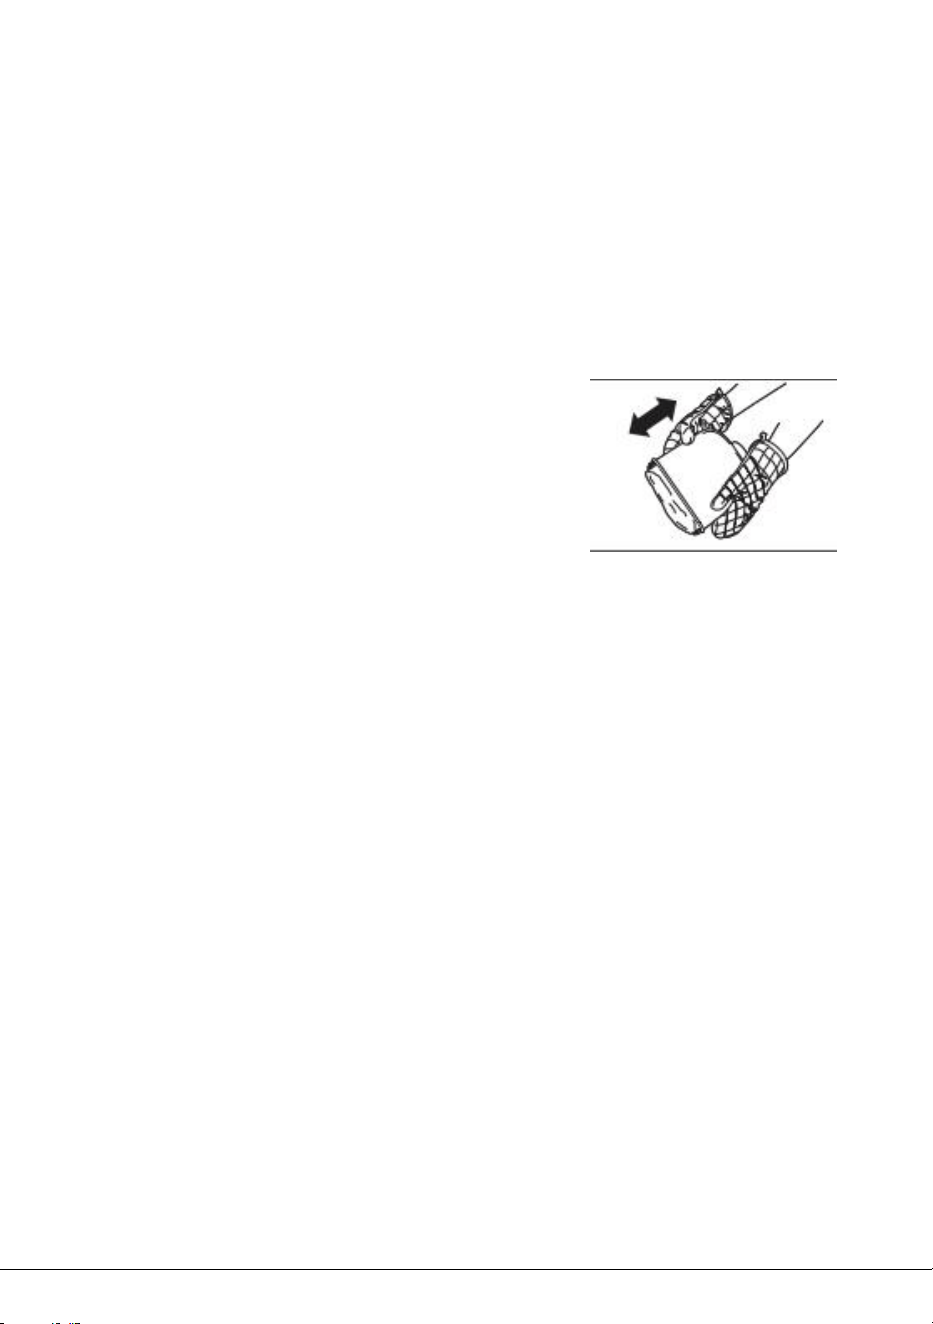
18 Using oven mitts, turn the bread pan upside down(with the
bread pan handle folded down) onto a wire cooling rack or clean
cooking surface and gently shake until bread falls out. Use a
non-stick spatula to gently loosen the sides of the bread from the
bread pan.
19
Let the bread cool for about 20 minutes before slicing. It is
recommended slicing bread with electric cutter or dentate cutter,
had better not with fruit knife or kitchen knife, otherwise the bread
may be subject to deformation.
20 If kneading paddle remains in the bread, gently pry it out using a
spatula or small utensil. The bread is hot, never use the hand to
remove the kneading paddle. When do not use or when operation is
complete, unplug the power cord.
15
Note: Store remaining bread in a sealed plastic bag for up to three
days at room temperature. To store for a long time, place sealed
plastic bag in refrigerator for up to 10 days.
REMOVING BREAD
Bread pan and baking chamber will be hot and oven mitts should be
used. Remove the bread pan by lifting the handle and turning it
counterclockwise to unlock and pull bread
pan straight up from the base of the
chamber.
Carefully shake the bread upside down
until the bread falls out of the bread pan. Allow to cool on a wire rack
for 10 minutes before slicing and slice with bread knife.
TIP: If kneading paddle comes out in the loaf, remove it with a
spatula or small utensil.
INGREDIENTS INTRODUCTION
1. Bread Flour
Bread flour is the most important ingredients of making bread and is
recommended in most yeast-bread recipes. It has a high gluten
content and (so it can be also called high-gluten flour which contains
high protein), and keep the size of the bread from collapsing after
rising. Flour varies by region. The gluten content is higher than the
all-purpose flour, so it can be used for making bread with large in
size and higher inner fiber.

16
2. All-Purpose Flour
Flour that contains no baking powder, suitable for “quick “breads or
bread made with the Quick settings. Bread flour is better suited for
yeast breads.
3. Whole-Wheat Flour
Whole-wheat flour is ground from the entire wheat kernel. Bread
made with all or part whole-wheat flour will higher fiber and
nutritional content. Whole-Wheat flour is heavier and, as a result,
loaves may be smaller in size and have a heavier texture.
It contains wheat skin and gluten. Many recipes usually combine
with Whole -Wheat flour or Bread Flour to achieve the best result.
4. Black Wheat Flour
Black Wheat Flour, also named as “Rye Flour”, it is a kind of high
fiber flour, and it is similar with whole-wheat flour. To obtain the large
size after rising, it must be used in combination with high proportion
of bread flour.
5. Self-rising flour
Flour that contains baking powder, use especially for making cakes.
Do not use self-rising flour in combination with yeast.
6. Corn flour and oatmeal flour
Corn flour and oatmeal flour are ground from corn and oatmeal
separately. They are the additive ingredients of making rough bread,
which are used for enhancing the flavor and texture.

17
7. Sugar
Sugar is “food” for yeast and also increases the sweet taste and
color of bread. It is a very important element of making the bread
rise. White sugar is normally used; however, brown sugar, powdered
sugar, or cotton sugar may also be called for in some recipes.
8. Yeast
Yeast is a living organism and should be kept in the refrigerator to
remain fresh. It needs carbohydrates found in sugar and flour as
nourishment. Yeast used in bread maker recipes will be sold under
several different names: Bread machine yeast (preferred) active-dry
yeast, and instant yeast.
After yeasting process, the yeast will produce carbon dioxide. The
carbon dioxide will expand bread and make the inner fiber soften.
1 tbsp dry yeast =3 tsp dry yeast
1 tbsp dry yeast =15ml yeast
1 tsp dry yeast =5ml
Before using, check the expiration date and storage time of yeast.
Return to refrigerator immediately after each use, the fungus will be
killed at high temperature usually the failure of bread rising is
caused by the bad yeast.
TIP: To check whether your yeast is fresh and active:
(1) Pour 1 cup (237ml) warm water (45-50
0
C) into a measuring
cup.

18
(2) Add 1 teaspoon (5ml) white sugar into the cup and stir, then 1
tablespoon (15ml) yeast over the water.
(3) Place the measuring cup in a warm place for about 10min. Do
not stir the water.
(4) Fresh, active yeast will begin to bubble or”grow”. If it does not,
the yeast is dead or inactive.
9. Salt
Salt is necessary to improve bread flavor and crust color. It is also
used to restrain yeast activity. Never use too much salt in a recipe.
But bread would be larger if without salt.
10. Egg
Eggs can improve bread texture, make the bread more nourish and
larger in size,. The egg must be whisked in with the other liquid
ingredients.
11. Grease, Butter and Vegetable Oil
Grease can make bread soften and delay storage life. Butter should
be melted or chopped to small pieces before adding to liquid.
12. Baking Powder
Baking powder is used for rising the Ultra Fast bread and cake. As it
does not need rise time, and it can produce the air, the air will form
bubble to soften the texture of bread utilizing chemical principle.
13. Baking Soda
It is similar with baking powder. It can also used in combination with

19
baking powder.
14. Water and Other Liquids (always add first)
Water is essential ingredient for making bread. Generally speaking,
water should be in room temperature between 20℃ and 25℃.
Some recipes may call for milk, or other liquids purpose of
enhancing bread flavor. Never use dairy with the Delay Timer
option.
USE EXACT MEASUREMENT
TIPS: One of the most important steps of making good bread is the
proper measurement of ingredients. Measure each ingredient
carefully and add to your bread pan in the order given in the recipe.
It is strongly suggested that use measuring cup or measuring spoon
to obtain accurate amount, otherwise the bread will be largely
influenced.
Adding Sequence
Always add ingredients in the order given in the recipe.
FIRST: Liquid ingredients
SECOND: Dry ingredients
LAST: Yeast
The yeast should only be placed on the dry flour and never come in
contact with the liquid or salt.
When you use the Delay Timer function for a long time, never add
perishable ingredients such as eggs or milk.

20
After the flour is complete kneading for first time, a beep will heard
and put fruit ingredients into the mixture. If the fruit ingredients are
added too early, the flavor will be diminished after long time stir.
Liquid Ingredients
Water, fresh milk or other liquids should be measured with
measuring cups with clear markings and a spout. Set the cup on the
counter and lower yourself to check the liquid level. When
measuring cooking oil or other ingredients, clean the measuring
cup thoroughly without other ingredients.
Dry measurements
Measure dry ingredients by gently spooning flour, etc., into the
measuring cup and then, once filled, leveling off with a knife. Never
use the measuring cup to scoop your dry ingredients directly from a
container as this could add up to one tablespoon of extra ingredients.
Do not tap the bottom of the measuring cup or pack down.
HINT: Before measuring, stir the flour to aerate it. When measuring
small amounts of dry ingredients, such as salt or sugar, use a
measuring spoon, making sure it is leveled off.

21
CLEANING AND MAINTENANCE
Disconnect the power before cleaning. Do not immerse cord, plug,
or housing in any liquid.Allow bread maker to cool down completely
before cleaning.
1.To clean the kneading paddle: If the kneading paddle is difficult to
remove from the bread, add water to the bottom of the bread pan
and allow to soak for up to 1 hour. Wipe the paddle carefully with a
cotton damp cloth. Both the bread pan and kneading paddle are
dish-washing safe components.
2.To clean bread pan: Remove the bread pan by turning it in
counterclockwise, then lift up the handle. Wipe inside and outside of
pan with damp cloth, do not use any sharp or abrasive agents, in
order to protect the non-stick coating. The bread pan must be dried
completely before installation.
Note: The bread pan and kneading paddle are dishwasher-safe.
The outside of the bread pan and base may discolor. This is normal.
3.To clean the housing and top lid: After use, allow unit to cool. Use
a damp cloth to wipe lid, housing ,baking chamber, and interior of
viewing window. Do not use any abrasive cleaners for cleaning,
since this will degrade the high polish of the surface. Never immerse
the housing into water for cleaning.
Note: It is suggested not disassembling the lid for cleaning.
4. Before the bread maker is packed for storage, ensure that it has

22
completely cooled down, is clean and dry, and the lid is closed.
USE ENVIRONMENT
The machine may work well in a wide range of temperature, but
there will be any difference in loaf size between a very warm room
and cold room. We suggest that the room temperature should be
within the range of 15
℃
to 34
℃
.
TROUBLESHOOTING
NO.
PROBLEM
PROBLEM CAUSE
SOLUTION
1
Odor or burning
smell
*Flour or other
ingredients have spilled
into the baking
chamber.
*Stop the bread maker
and allow to cool
completely.Wipe
excess flour etc., from
the baking chamber
with a paper towel.
2
Ingredients not
blending can hear
motor burning
*Bread pan or kneading
paddle may not be
installed properly.
*Too many ingredients.
*Make sure kneading
paddle is set all the way
on shaft.
*Measure ingredients
accurately.

23
3
"HHH" displays
when
START/STOP
button is pressed.
*Internal temperature
of bread maker is too
high.
*Allow unit to cool down
in between programs.
Unplug unit, open lid,
and remove bread pan.
Allow to cool 15-30
minutes before
beginning new
programs.
NO.
PROBLEM
PROBLEM CAUSE
SOLUTION
4
Window is cloudy
or covered with
condensation.
*May occur during
mixing or rising
programs.
*Condensation usually
disappears during
baking programs.
Clean window well in
between uses.
5
Kneading paddle
comes out with
the bread.
*Thicker crust with dark
crust setting.
*It is not uncommon for
the kneading paddle to
come out with the
bread loaf. Once the
loaf cools, remove the
paddle with a spatula.
6
Dough is not
blending
thoroughly; flour
and other
ingredients are
built up on sides of
pan; bread loaf is
*Bread pan or kneading
paddle may not be
installed properly.
*Too many ingredients.
*Gluten-free dough is
typically very wet. It
may need additional
*Make sure bread pan
is securely set in unit
and kneading paddle is
firmly on shaft.
*Make sure ingredients
are measured
accurately and added

24
coated with flour
help by scraping sides
with a rubber spatula.
in the proper order.
*Excess flour can be
removed from loaf once
baked and cooled. Add
water, one tablespoon
at a time, until dough
has formed into a ball.
NO.
PROBLEM
PROBLEM CAUSE
SOLUTION
7
Bread raised too
high or pushed lid
up.
*Ingredients not
measured properly(too
much yeast, flour).
*Kneading paddle not
in bread pan.
*Forgot to add salt.
*Measure all
ingredients accurately
and make sure sugar
and salt have been
added.
*Try decreasing yeast
by 1/4 teaspoon(1.2ml).
*Check installation of
kneading paddle.
8
Bread does not
rise; loaf short.
*Incurred measurement
of ingredients or
inactive yeast. *Lifting
lid during programs.
*Measure all
ingredients accurately
*Check expiration date
of yeast and flour.
*Liquids should be
room temperature.
9
Bread has a crater
in the top of the
loaf once baked.
*Dough has risen too
fast.
*Too much yeast or
water. *Incorrect
program chosen for the
recipe.
*Do not open lid during
baking.
*Select a darker crust
option.
10
Crust color is too
light
*Opening the lid during
baking.
*Do not open lid during
baking.
*Select a darker crust
25
option.
NO.
PROBLEM
PROBLEM CAUSE
SOLUTION
11
Crust color is too
dark
*Too much sugar in the
recipe.
*Decrease sugar
amount slightly.*Select a
lighter crust option
12
Bread loaf is
lopsided.
*Too much yeast or
water.
*Kneading paddle
pushed dough to one
side before rising and
baking.
*Measure all ingredients
accurately.
*Decrease yeast or
water slightly.
*Some loaves may not
be evenly shaped,
particularly with
whole-grain flour.
13
Loaves made are
different shapes.
*Varies by the type of
bread.
*Whole-grain or
multigrain is denser and
may be shorter than a
basic white bread.
14
Bottom is hollow
or holey inside.
*Dough too wet, too
much yeast, no salt.
*Water too hot.
*Measure all ingredients
accurately *Decrease
yeast or water slightly.
Check salt
measurement.
*Use room temperature
water.
NO.
PROBLEM
PROBLEM CAUSE
SOLUTION
15
Under baked or
sticky, dough
bread.
*Too much liquid;
incorrect program
chosen.
*Decrease liquid and
measure ingredients
carefully.
*Check program hosen
for recipe.
26
16
Bread mashes
down when
slicing.
*Bread is too hot.
*Allow to cool on wire
rack for 15-30 minutes
before slicing.
17
Bread has a
heavy, thick
texture.
*Too much flour, old
flour.
*Not enough water.
*Try increasing water or
decreasing flour.
*Whole-grain breads will
have a heavier texture.
18
Base of bread pan
has darkened or is
spotted.
*After washing in
dishwasher.
*This is normal and will
not affect the bread pan.
ENVIRONMENT FRIENDLY DISPOSAL
You can help protect the environment!
Please remember to respect the local regulations: hand in the
non-working electrical equipments to an appropriate waste disposal
center.
Recipe
Menus
Ingredient
Volume
Volume
Volume
Remark
1
bread weight
1000g
750g
500g
27
Basic
Bread
sequen
ce
time
3:05
3:00
2:55
[1]
water
320ml
260ml
180ml
[2]
salt
2 spoons
1.5 spoons
1 spoon
put on the
corner
[3]
sugar
3 scoops
2.5 scoops
2 scoops
put on the
corner
[4]
oil
4 scoops
3 scoops
2.5 scoops
[5]
high gluten
flour
3.5cups/
500g
2.75cups/
400g
2.25cups/
300g
[6]
instant yeast
1.2
spoons
1 spoons
0.8
spoon
put on the dry
flour, don't
touch with any
liquid
2
Quick
Bread
bread weight
1000g
750g
500g
time
2:05
2:00
1:55
[1]
water
320ml
260ml
180ml
water
temperature
40-50'C
[2]
salt
2 spoons
1.5 spoons
1spoon
put on the
corner
[3]
sugar
3 scoops
2.5 scoops
2 scoops
put on the
corner
28
[4]
oil
4 scoops
3 scoops
2.5 scoops
[5]
high gluten
flou
r
3.5cups/
500g
2.75cups/
400g
2.25cups/
300g
[6]
instant yeast
3.5 spoons
3 spoons
2.5 spoons
put on the dry
flour,don't
touch with any
liquid.
3
Sweet
bread
bread weight
1000g
750g
500g
time
3:50
3:45
3:40
[1]
water
300ml
240ml
160ml
[2]
salt
1spoon
0.5 spoon
0.5 spoon
put on the
corner
[3]
sugar
0.4 cup
0.3 cup
0.2 cup
put on the
corner
[4]
oil
2 scoops
1.5 scoops
1 scoop
[5]
4 scoops
3 scoops
2.5 scoops
[6]
high gluten flour
3.5cups/
500g
2.75cups/
400g
2.25cups/
300g
[7]
instant yeast
1.5 spoons
1.25 spoons
1spoon
put on the dry
flour,don't
touch with any
liquid.
4
bread weight
1000g
750g
500g
29
French
Bread
time
4:05
4:00
3:55
[1]
water
320ml
260ml
180ml
[2]
salt
3 spoons
2.5 spoons
2 spoons
put on the
corner
[3]
sugar
2 scoops
1.5 scoops
1.25
scoops
put on the
corner
[4]
oil
2 scoops
1.5 scoops
1.25
scoops
[5]
high gluten flour
3.5cups/
500g
2.75cups/
400g
2.25cups/
300g
[6]
instant yeast
1.5 spoons
1.25 spoons
1spoon
put on the dry
flour,
don't touch
with any liquid
5
Whole-
wheat
bread
bread weight
1000g
750g
500g
time
4:05
4:00
3:55
[1]
water
320ml
260ml
180ml
[2]
salt
1.5 spoons
1spoon
0.5 spoon
put on the
corner
[3]
sugar
3.5 scoops
3 scoops
2.5 scoops
put on the
corner
[4]
oil
3 scoops
2.5 scoops
2 scoops
30
[5]
high gluten
flour
1.75cups/
250g
1.5cups/
210g
1.25cups/
160g
[6]
whole-wheat
flour
1.75cups/
250g
1.5cups/
210g
1cups/
140g
[7]
instant yeast
2.0 spoons
1.5 spoons
1.25 spoons
put on the dry
flour,don't
touch with any
liquid。
6
Rice
bread
bread weight
1000g
750g
500g
time
2:50
2:45
2:40
[1]
water
200ml
160ml
100ml
[2]
salt
2 spoons
1.5 spoons
1 spoon
put on the
corner
[3]
sugar
3 scoops
2.5 scoops
2 scoops
put on the
corner
[4]
oil
4 spoons
3 spoons
2.5 spoons
[5]
cooked rice
2 cups/g
1.5 cups
1 cup
use cool
downed
cooked rice
[6]
high gluten
flour
2 cups/
280g
1.5cups/
210g
1cup/
140g
[7]
instant yeast
2 spoons
1.5 spoons
1.25 spoons
put on the dry
31
flour,don't
touch with any
liquid。
7
Gluten
free
bread
bread weight
1000g
750g
500g
time
3:05
3:00
2:55
[1]
water
270ml
210ml
150ml
[2]
salt
1.5spoons
1spoon
0.5spoon
put on the
corner
[3]
sugar
3.5scoop
3scoop
2.5scoop
put on the
corner
[4]
oil
3 scoops
2.5 scoops
2 scoops
[5]
gluten free flour
2cups/
280g
1.5cups/
210g
1cup/
140g
[6]
corn powder
2cups/
280g
1.5cups/
210g
1cup/
140g
can replace of
oat flour
[7]
instant yeast
1.5 spoons
1.25 spoons
1 spoon
put on the dry
flour,don't
touch with any
liquid
8
Dessert
time
1:40
/
/
[1]
egg
2 pcs
[2]
milk
1cups
32
[3]
cooked rice
1.5 cups
[4]
sugar
0.5 cups
[5]
raisin
0.5 cups
9
Mix
time
0:15
[1]
water
330ml
[2]
salt
1spoon
put on the
corner
[3]
oil
3 scoops
[4]
high gluten
flour
4 cups/560g
10
Dough
time
1:30
1000g
1:30
750g
[1]
water
330ml
260ml
[2]
salt
1spoon
1spoon
put on the
corner
[3]
oil
3 scoops
2.5 scoops
[4]
high gluten
flour
4cups/
560g
2.75cups/
400g
[5]
instant yeast
1.5 spoons
1.5 spoons
put on the dry
flour,don't
touch with any
liquid.
33
11
Knead
time
0:45
[1]
water
appropriate
amount
[2]
salt
1spoon
[3]
oil
3scoop
[4]
high gluten
flour
appropriate
amount
12
Cake
time
2:20
dissolve sugar
in egg and
water,mix well
by electric
egg-beater to
as a bulk, then
put the other
ingredients
together into
bread barrel,
then start this
menu.
[1]
water
30ml
[2]
egg
3 pcs
[3]
sugar
0.5cups
[4]
oil
2scoop
[5]
self-rising flour
2cups/280g
[6]
instant yeast
1spoon
13
Jam
time
1:20
[1]
pulp
3 cups
stir to mushy,
can put some
water or not
[2]
starch
0.5cups
34
[3]
sugar
1cups
up to flavor
14
Yogurt
time
8:00
[1]
milk
1000ml
[2]
lactic acid
bacteria
100ml
15
Bake
[1]
adjust baking temperature by pressing crust
button :100°C(light);150°C(medium);200°C(dark)
,
default 150 °C
16
Sticky
rice
time
1:20
with bake
and stir
functions,
soak
glutinous rice
30mins
before use.
[1]
water
275ml
[2]
glutinous rice
250g
17
Rice
wine
time
36:00:00
[1]
glutinous rice
500g
soak in water
30mins
before use
[2]
water
appropriate
amount
[3]
distiller's yeast
1spoon(3g)
35
18
Defrost
time
0:30
[1]
[2]
default 30mins;adjustable from 0:10 to 2:00,10mins for each pressing
[3]
19
Stir-fry
time
0:30
[1]
peanuts
300g
[2]
default 0:30;adjustable from 0:10 to 2:00,+/-1min for each
short-pressing,+/- 10mins for each long-pressing

