EnglishSENIXTOOLS.COM
NUGGET ICE MAKER
Instruction Manual
• SAFETY
• ASSEMBLY
• OPERATION
• MAINTENANCE
• WARRANTY
CAUTION: Before using this tool, please read this manual completely,
and follow all operating safety measures.
YAT USA INC. 10506 Bryton Corporate Center Dr, #500 Huntersville, NC 28078
For customer support, please call 1-800-261-3981 or email us at [email protected]
Model: E026003
EN - 2
SENIXTOOLS.COM
SAFETY &
INTERNATIONAL
SYMBOLS
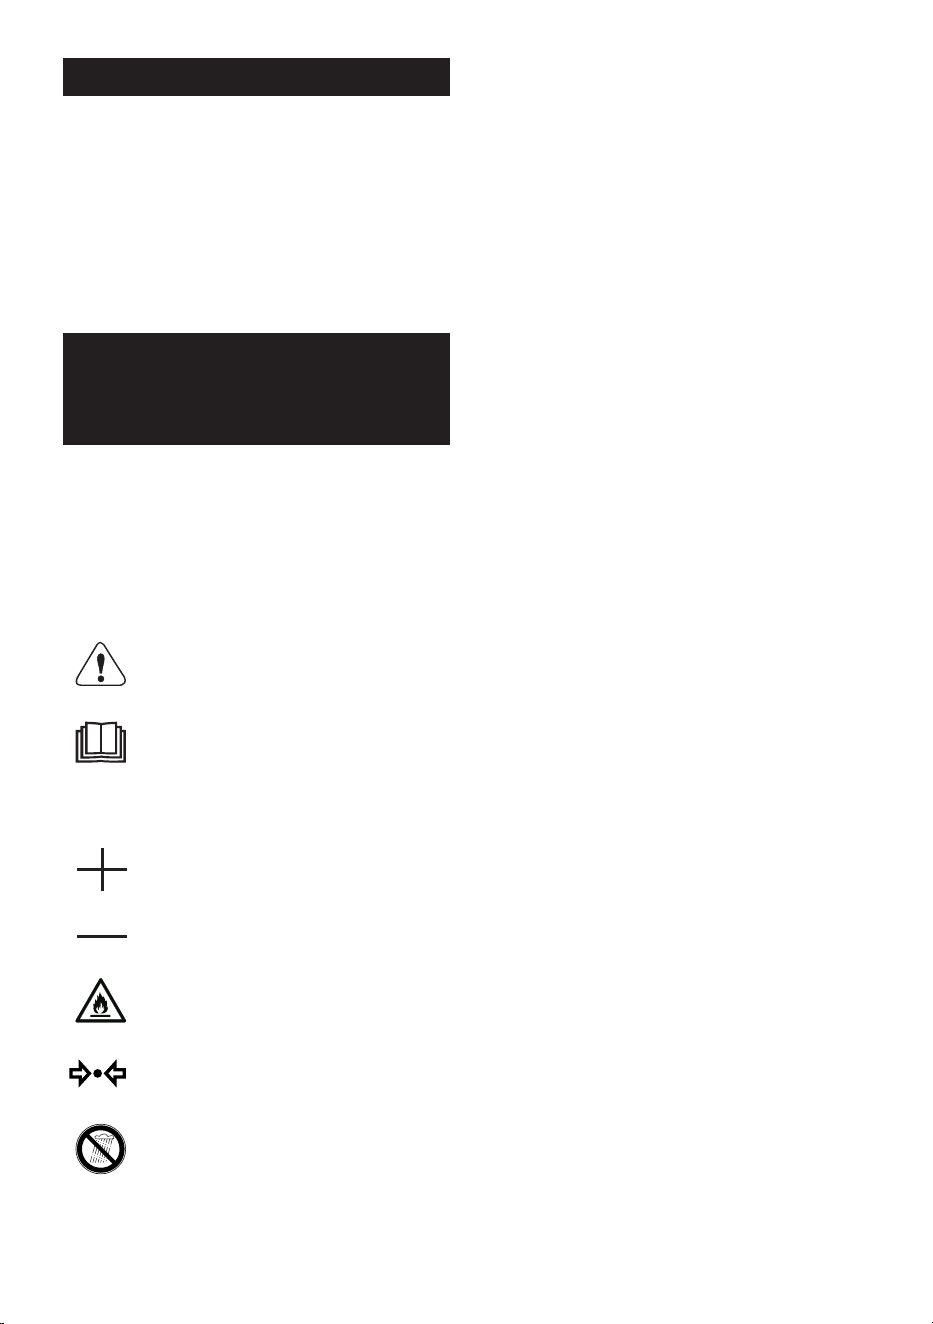
The following table depicts and describes
Safety and International symbols and
pictographs that may appear on this product.
Read, understand, and follow all instructions
on the machine and in the instruction manual
for complete safety, assembly, operating,
maintenance, and repair information before
attempting to assemble and operate.
Caution / Warning.
READ THE OPERATOR’S
MANUAL(S) – Read, understand
and follow all instructions in the
user manual(s) before attempting
to assemble and operate.
Positive terminal.
Negative terminal.
WARNING! Risk of fire/flammable
materials
Pressure
Do not use in rain or wet conditions.
TABLE OF CONTENTS
SAFETY & INTERNATIONAL SYMBOLS ..............2
SAFETY INSTRUCTIONS .........................................3
KNOW YOUR UNIT .....................................................5
SPECIFICATIONS .......................................................6
OPERATION ..................................................................6
ASSEMBLY ...................................................................6
MAINTENANCE ...........................................................8
TROUBLESHOOTING .............................................. 10
WARRANTY .................................................................11

3 - EN
SENIXTOOLS.COM
SAFETY INSTRUCTIONS
ALL OPERATORS
MUST READ THESE
INSTRUCTIONS BEFORE
USE.
WARNING!
Read all instructions when using the ice
maker. Basic safety precautions should always
be followed to reduce the risk of re, electric
shock, and personal injury.
1. Read all instructions before using.
2. Remove all packing material and carefully
check your ice maker to ensure it is
in good condition and that there is no
damage to the ice maker or power cord
and plug.
3. Before use, check the power cord for signs
of damage or aging. If the cord becomes
damaged during use, disconnect the
cord from the supply immediately. Do not
touch the cord before disconnecting the
supply. Do not use the product if the cord
is damaged or worn.
4. If the supply cord is damaged, it must be
replaced by the manufacturer, its service
agent, or a similarly qualified person to
avoid a hazard.
5. Do not modify the product in any way or
use parts and accessories that are not
recommended by the manufacturer. This
may increase the risk of serious injury to
yourself or others.
6. Close supervision is necessary when the
appliance is used near children.
7. Do not clean your appliance with
flammable fluids. The fumes can create a
fire hazard or explosion.
8. Do not tip the ice maker. If tipped, place it
upright for 2 hours before restarting.
9. Do not store explosive substances,
such as aerosol cans with flammable
propellants, in this appliance.
10. The refrigerant used in this appliance is
flammable. During servicing, keep away
from ignition sources and ensure the room
is adequately ventilated.
11. Do not store or use flammable materials
near this appliance.
12. Insulation material: Cyclopentane
(flammable). Keep away from ignition
sources. Do not burn. Disposal must be
handled by qualified personnel.
13. This appliance contains R600a
(isobutane), a flammable refrigerant.
There is a risk of fire or explosion. Dispose
of this appliance in accordance with
federal or local regulations.
14. The refrigeration system contains high-
pressure refrigerant. Do not puncture or
damage the refrigeration circuit. Servicing
must be performed by qualified personnel
only.
15. This appliance is not intended for use by
children or persons with reduced physical,
sensory, or mental capabilities without
proper supervision or instruction.
16. To avoid damaging the compressor, do
not restart the appliance frequently. Allow
a minimum of 3 minutes between power
cycles.
17. Do not use harsh chemicals or abrasive
tools to clean the appliance.
18. Use a proper electrical outlet with reliable
grounding. Ensure the plug is fully inserted
into the outlet.
19. Extension cords are not recommended.
They may overheat and create a fire
hazard.
20. If the appliance is stored in a cold
environment, wait at least 3 hours for the
appliance to warm to room temperature
before plugging it in.
21. WARNING: Fill with potable water only.
22. WARNING: Keep ventilation openings, in
the appliance enclosure or in the built-in
structure, clear of obstruction.
23. WARNING: Do not use mechanical
devices or other means to accelerate
the defrosting process, other than those
recommended by the manufacturer.
24. WARNING: Do not damage the refrigerant
circuit.
25. WARNING: Do not use electrical appliances
inside the food storage compartments of
the appliance, unless they are of the type
recommended by the manufacturer.
26. WARNING: When positioning the appliance,
ensure the supply cord is not trapped or
damaged.
27. WARNING: Do not locate multiple portable
socket-outlets or portable power supplies
at the rear of the appliance.
28. Turn off the product, remove the battery
pack or disconnect the product from the
power supply.
• Before servicing.

EN - 4
SENIXTOOLS.COM
• Before checking, cleaning, or working on
the product.
• Before changing accessories.
• Before leaving the product unattended.
29. This appliance is intended to be used
in households and similar applications
such as staff kitchen areas in shops,
offices, and other working environments;
farmhouses; bed and breakfast type
environments; and by clients in residential
hotel and motel type environments.
WARNING!
When positioning the product, ensure the
supply cord is not pinched or damaged.
• Keep the power cord away from heat, uids
and sharp edges.
• Never pull by the power cord to disconnect
the product from the power supply.
SAVE THESE
INSTRUCTIONS
INTENDED USE
The appliance is intended for making ice
cubes and dispensing cold water. Do not use it
for other purposes.
5 - EN
SENIXTOOLS.COM
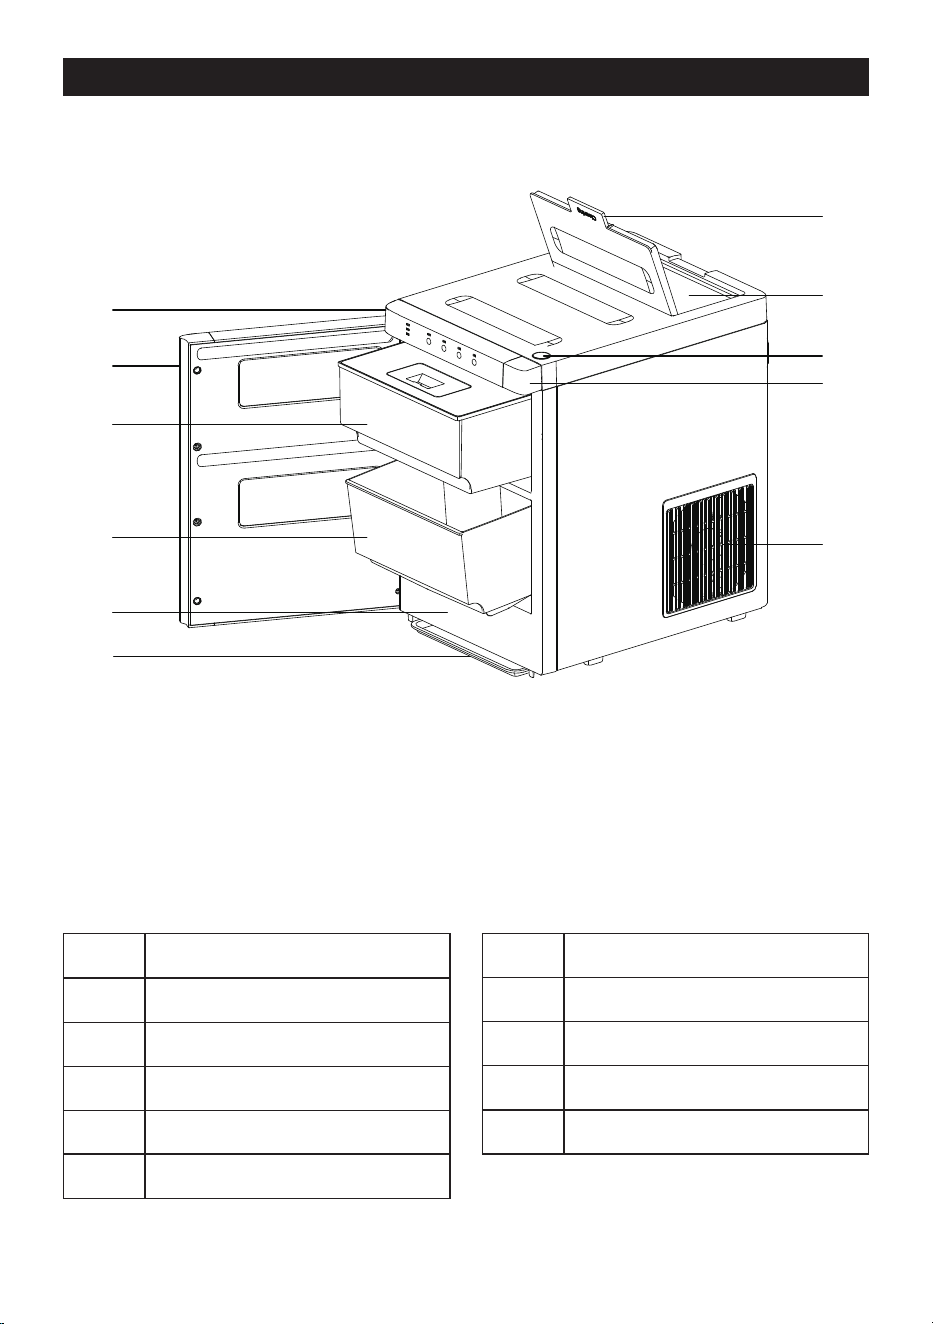
KNOW YOUR UNIT
1
2
3
4
5
6
7
8
9
10
11
APPLICATIONS
Model: E026003
As an ice maker:
Making ice cubes and dispensing cold water.
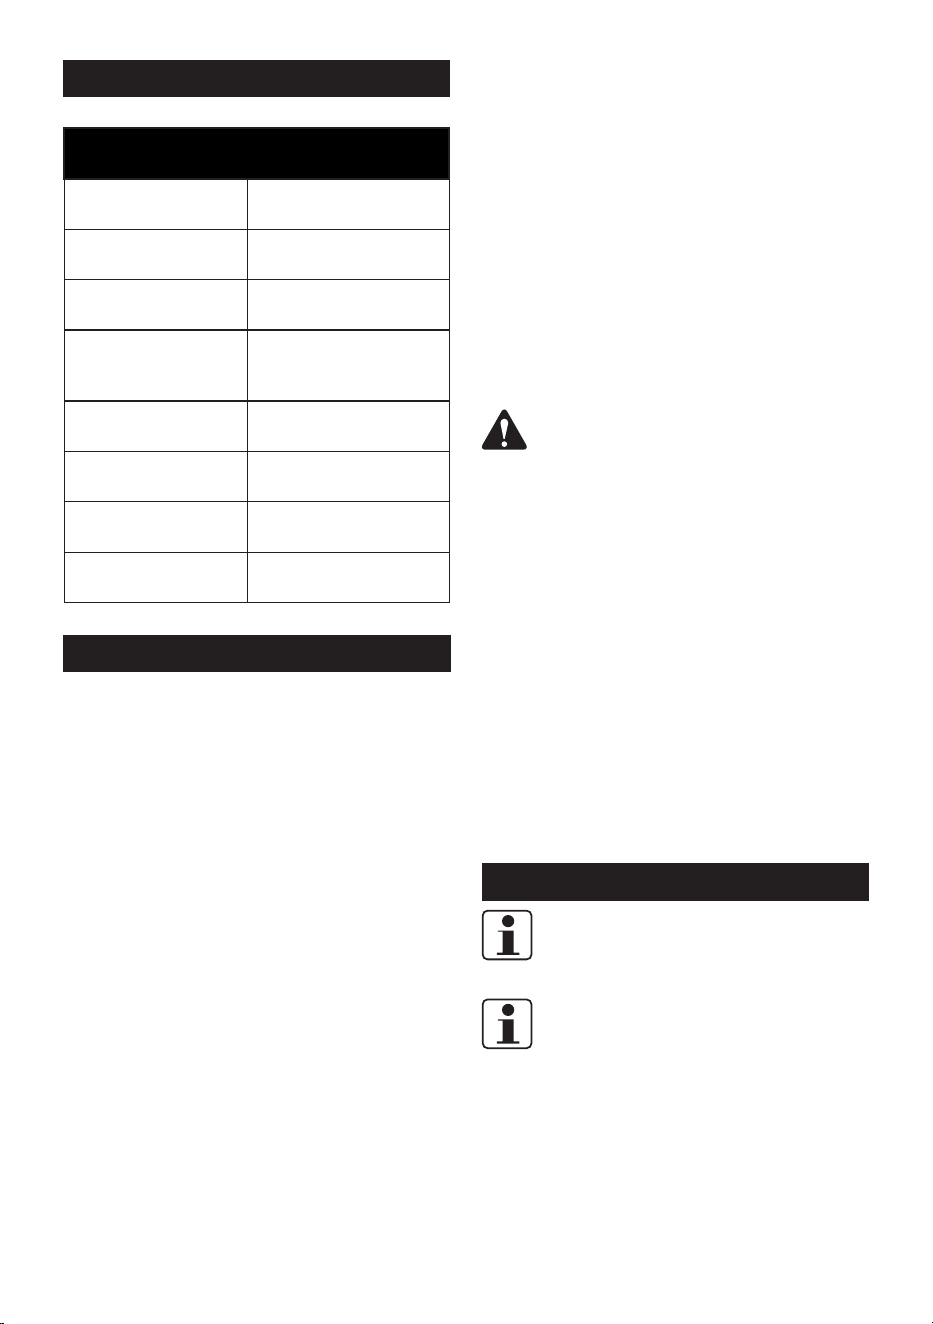
1 Balance Tank Lid
2 Balance Tank
3 Release Button
4 Ice Water Outlet
5 Air Vents
6 Control Panel
7 Side Door
8 Water Tank
9 Ice Basket
10 Ice Water Tank
11 Drip Tray
EN - 6
SENIXTOOLS.COM
SPECIFICATIONS
Model
E026003
Voltage 110-120 V ~ 60 Hz
Water Tank Capacity 67.6 oz (2.0 L)
Ice Water Tank
Capacity
33.8 oz (1.0 L)
Refrigerant /
Charge
R600a, 0.74 Oz (21g)
Ice-making Capacity 40 lb/24h (18 kg/24h)
Ice Basket Capacity 2.6 lb (1.2 kg)
Climate Class SN/N/ST/T
Weight (Unit Only) 22 lb (10.0 kg)
ASSEMBLY
BEFORE FIRST USE
1. Remove all packaging materials from
interior of the ice maker. Confirm the ice
basket and ice scoop are inside. If any part
or accessory is missing, please contact
customer service.
2. Clean the tank and ice basket with
warm soap and water. Allow parts to dry
completely.
3. The appliance must be placed on a dry and
level surface with sufficient ventilation, far
from heat sources such as ovens, heaters
and corrosive gases. Keep the right-side
vent clear (minimum 8 in / 20 cm) to avoid
overheating and ice production issues.
4. Ensure the unit is positioned near a
suitable electrical outlet.
5. Do not fill the water tank with hot water.
This may damage the ice maker. It is best
to fill the water reservoir with water of room
temperature or lower.
• Ice maker x1
• Ice scoop x1
• Drip tray x1
• Instruction manual x1
CLEANING THE ICE MAKER
Thoroughly clean the ice maker before rst
use.
1. Remove the ice basket, ice scoop and tank.
2. Wipe down the basket compartment and
tank compartment with a soft cloth and
warm water.
3. Clean the exterior with a mild detergent and
warm water.
4. Dry all surfaces with a clean, soft cloth.
5. After cleaning, ensure the drain plug is
securely in place.
6. Long-term storage: Drain and dry the
interior completely to prevent mold or
bacteria.
WARNING!
Wait 24 hours before plugging in the
appliance. This allows compressor oil that
may have moved during transport to return,
preventing damage to the compressor.
IMPORTANT POWER
NOTICES
This appliance must be grounded. The power
cord is equipped with a three-prong grounding
plug for use with a standard 110-120 V ~ 60Hz
grounded outlet. Never cut or remove the
grounding prong.
If you have any questions about grounding
or electrical connections, consult a qualified
electrician.
OPERATION
NOTE:
Ensure your ice maker is clean before use.
NOTE:
Ensure the drain plug is securely in place to
prevent leakage.
GETTING TO KNOW YOUR
CONTROL PANEL
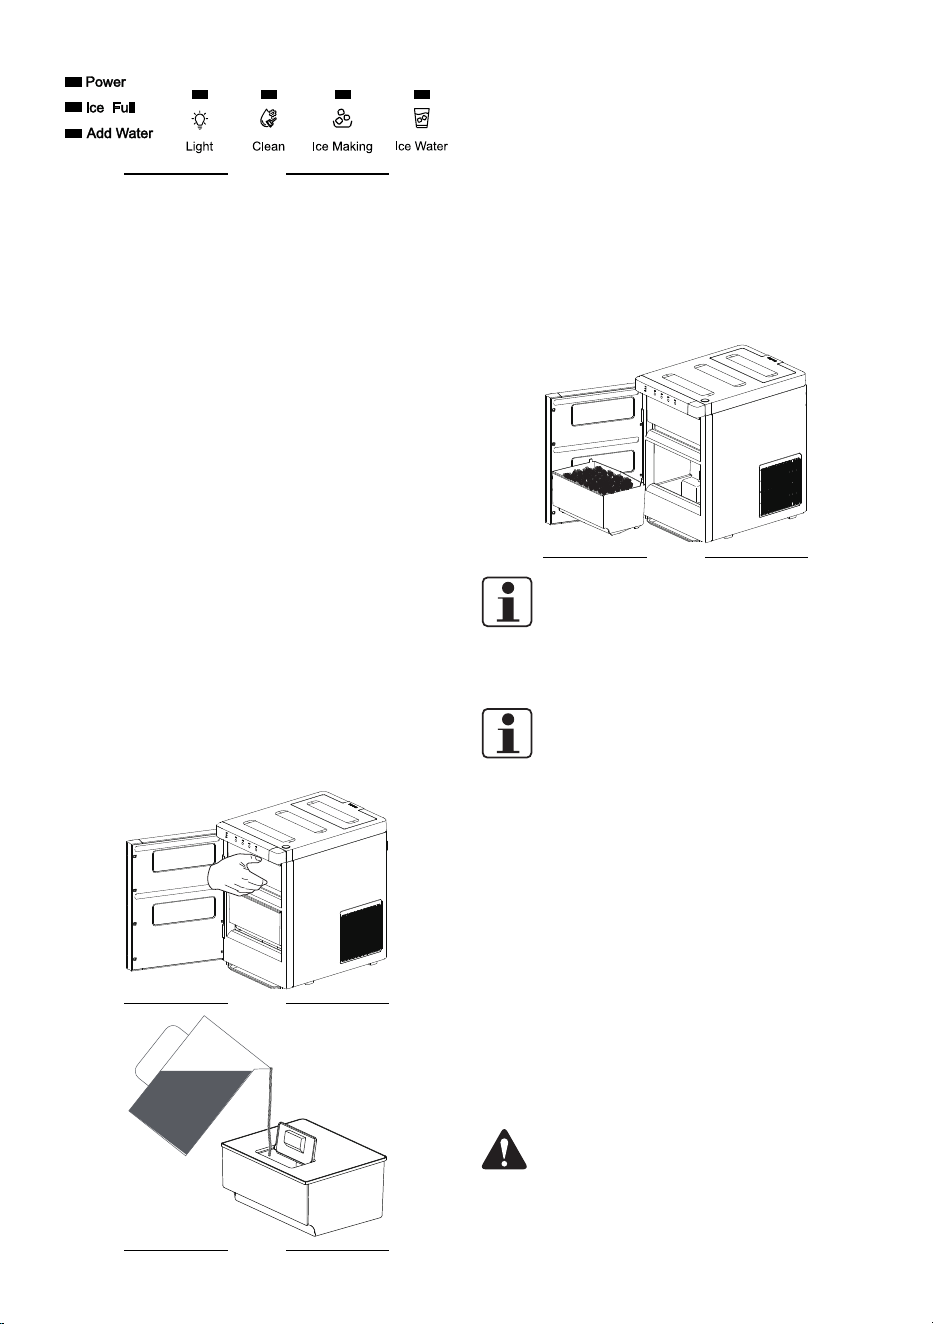
When plugged in, the display illuminates.
Operate the unit by touching the buttons on
the control panel.
7 - EN
SENIXTOOLS.COM
Fig. 1
Power Indicator
Power connected
Ice Full Indicator
Basket full
Add Water Indicator
Rell needed
Light Button
Interior light on/o
Clean Button
Self-cleaning cycle
Ice Making Button
Ice making on/o
Ice Water Button
Ice water on/o
USING YOUR ICE MAKER
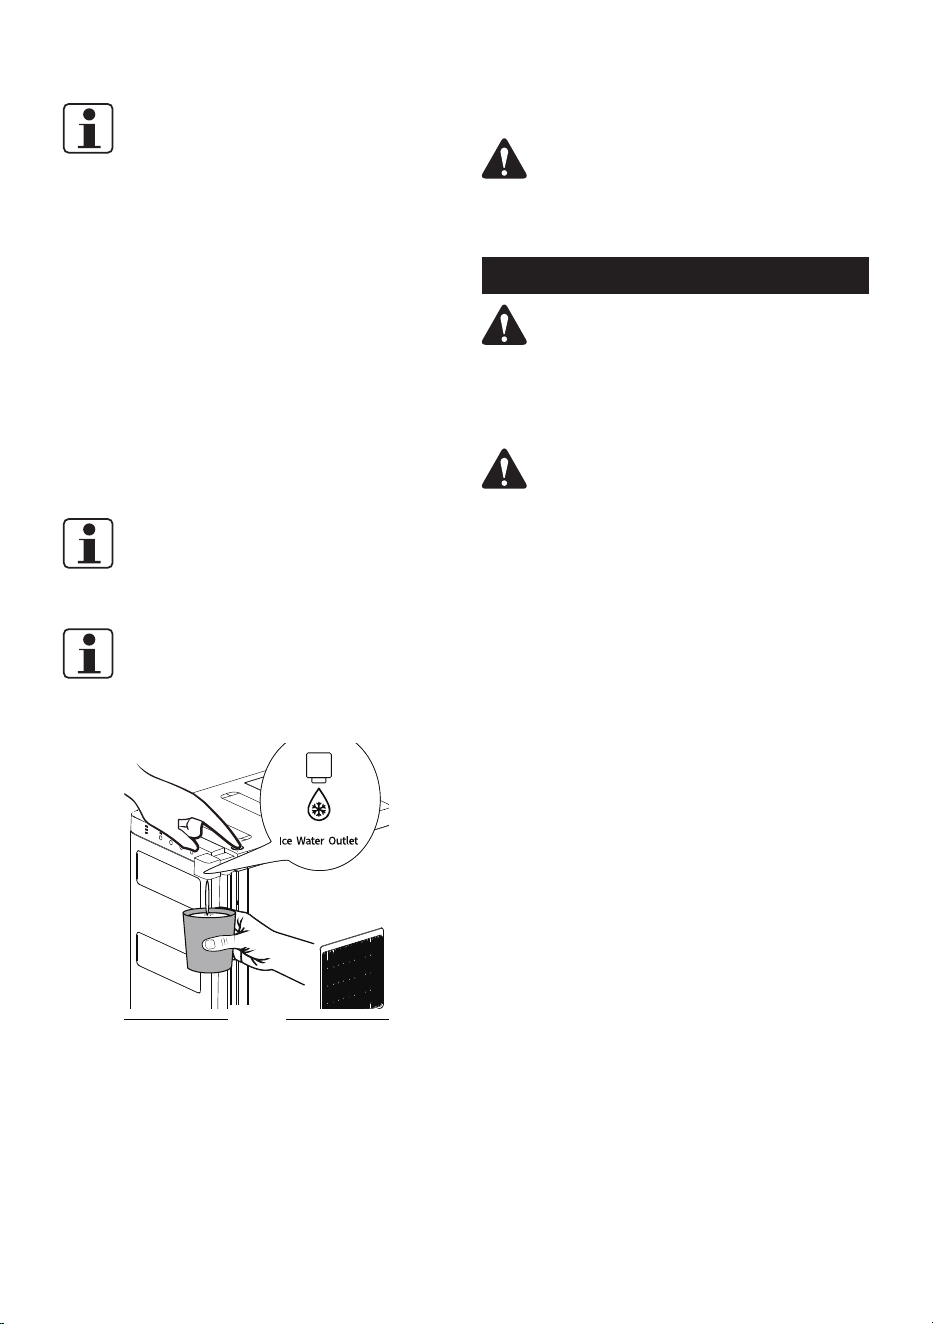
1. Open the side door and take out the water
tank.
2. Fill the tank with clean drinking water. Do
not exceed the MAX 67.6 oz (2.0 L) water
level mark.
3. Place the tank back into the unit, making
sure it is pushed all the way into position.
4. Plug in the power cord. The unit will beep
and the power indicator light will turn on.
Fig. 2
Fig. 3
ICE MAKING FUNCTION
1. Before starting, ensure the drain plug is in
place to prevent leakage.
2. Touch Ice Making to start, the button light
turns on. Touch again to stop; the light
turns o.
3. Check water level during operation. When
water reaches the min level, the unit stops
and the Add Water light turns on. Rell to
resume.
4. When Ice Full lights up, the basket is ready
to empty.
Fig. 4
NOTE:
When the Add Water lights up, add water to
the tank. After relling, the indicator will turn
o after about 2 minutes.
NOTE:
Ice making cycle: approx. 15 minutes
(varies with water and room temperature).
Recommended room temperature: 50°F–90°F
(10°C–32°C).
TIPS
• Before rst use or after long storage, clean
the machine and discard the rst batch of
ice.
• When the ice basket is full (approx. 2
hours), use the scoop to move ice to a
storage bag — this prevents cubes from
freezing together.
• When the Power light ashes, the unit is in
auto defrost mode. Operation will resume
automatically after defrost completes.
WARNING!
If a power outage occurs, the system cannot
detect the water level in the ice water tank. To
prevent overow from melted ice, remove all
ice from the basket immediately.
EN - 8
SENIXTOOLS.COM
ICE WATER FUNCTION
NOTE:
The ice water function is available only when
the water temperature reaches 45°F–54°F
(7–12°C). The Ice Water button light stays
on steadily within this temperature range; it
turns o when the temperature exceeds 54°F
(12°C).
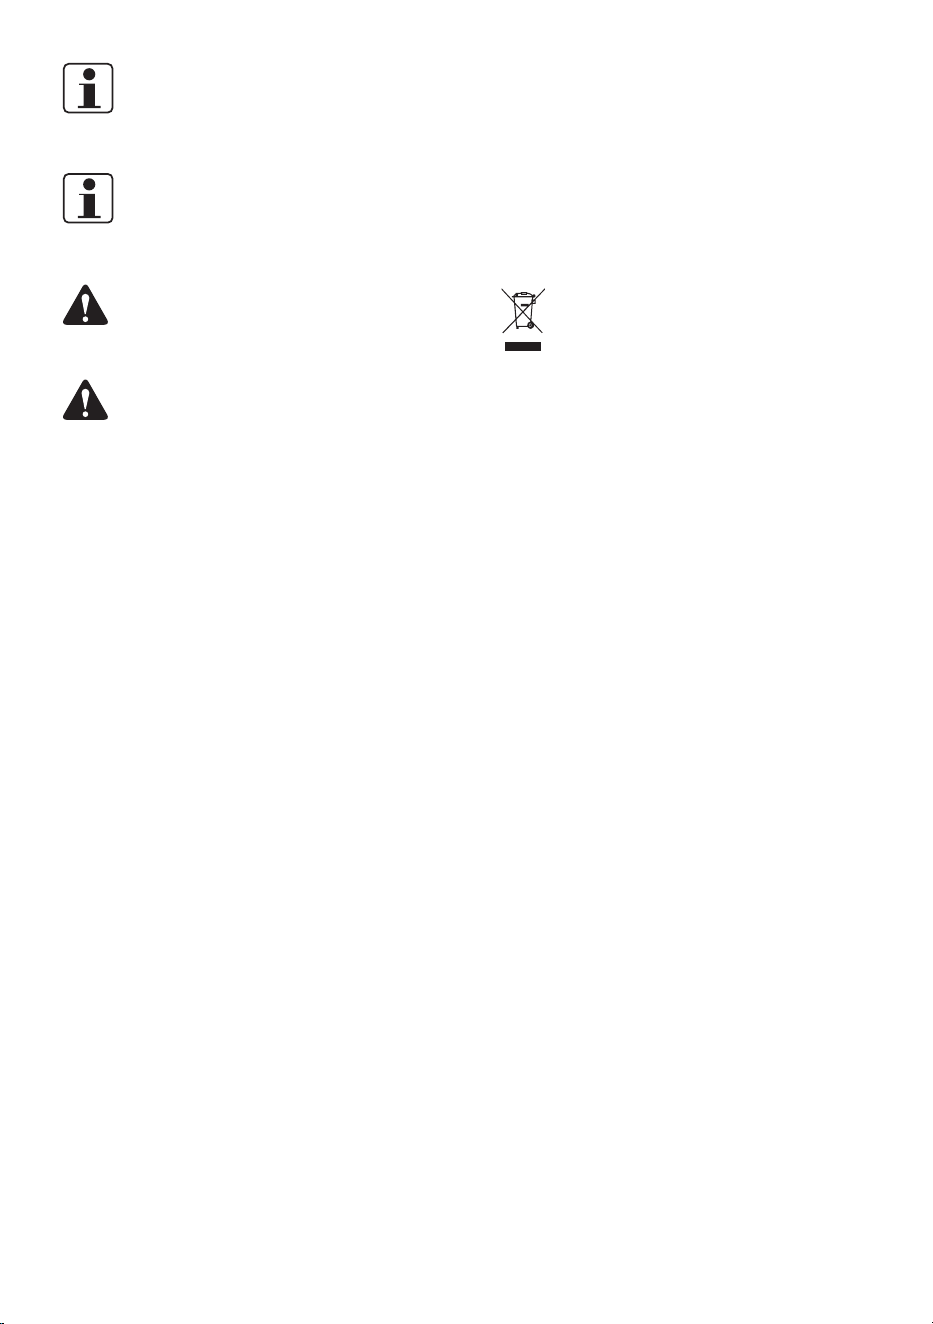
1. Start ice making (see “ICE MAKING
FUNCTION”). Wait until the Ice Water lights
up solid.
2. Press Release button — the ice water
outlet extends.
3. Touch the Ice Water button. A beep sounds
and water dispenses. Touch again to stop
once you have enough.
4. Push the outlet back into place.
NOTE:
The Ice Water button only works when the
outlet is extended.
NOTE:
Maximum dispensing per cycle is 8.5 oz
(250 mL). Touch Ice Water again for more.
Fig. 5
TIPS
• After relling and reinstalling the water
tank: If the unit shows a “Add Water” alert
when starting ice making or cleaning, the
tank may not be fully seated. Push it rmly
all the way in, then press the function
button again.
• When the ice basket is full, gently level the
ice before pulling it out.
• To remove the ice basket: Pull out and lift
up.
WARNING!
Disconnect the unit from the power supply
when not in use.
MAINTENANCE
WARNING!
Only perform cleaning and maintenance
according to these instructions! Any additional
work must be performed by an authorized
service center.
WARNING!
ALWAYS unplug the power cord before
performing any inspection, maintenance, or
cleaning work!
CLEANING
If not using for a while, drain all water from
tank and basket. Wipe dry and air dry 1–2
hours before storing to prevent mold.
1. Unplug the unit.
2. Remove tank, empty, and wipe dry.
3. Move unit to drain area, place container
underneath, open drain plug to release
water.
4. Wipe basket compartment and tank dry.
5. Air dry all parts completely, then
reassemble and close.
Deep Cleaning
Over time, mineral deposits in the water tank
and evaporator may aect performance. Use
white vinegar or citric acid for deep cleaning.
1. Dilute white vinegar or citric acid and pour
into the water tank.
2. Plug in and touch Clean button. When the
cycle finishes (approx. 5 minutes, a beep
sounds), open the drain plug to drain all
water from the tank and ice water tank. For
deeper cleaning, run an extra cycle or use
warm water (approx. 122°F).
3. Rinse the tank, refill with clean water,
and run the cleaning cycle again. Drain
completely.
9 - EN
SENIXTOOLS.COM
NOTE:
Deep clean every 2 months to prevent friction
noise from mineral deposits.
NOTE:
Close the drain plug tightly after draining to
prevent leakage.
WARNING!
Do not use harsh chemicals, they may damage
internal components.
WARNING!
Do not use chemical, alkaline, abrasive, or
other aggressive detergents or disinfectants
to clean this product as they might be harmful
to its surfaces.
TRANSPORTATION
1. Protect from any heavy impact or strong
vibrations which may occur during
transportation in vehicles.
2. Secure to prevent it from slipping or falling
over.
STORAGE
1. Clean thoroughly as described above.
2. Store in a dark, dry, frost-free, and well-
ventilated area that is inaccessible to
children. The recommended storage
temperature is 50°F - 78.8°F (10°C ~ 26°C).
3. Use the original package for storage or
cover it with a suitable cloth to protect it
against dust.
DISPOSAL
Waste products should not be disposed of
with household waste. Please recycle where
facilities exist. Check with your local authority
or retailer for recycling advice. Dust and debris
may be produced by the tool during operation.
Users should clean up this debris to aid in
protecting the environment.
Electrical products should not be
discarded with household products.
Used electrical products must be
collected separately and disposed
of at collection points provided for
this purpose. Talk with your local
authorities or dealer for advice on
recycling.
EN - 10
SENIXTOOLS.COM
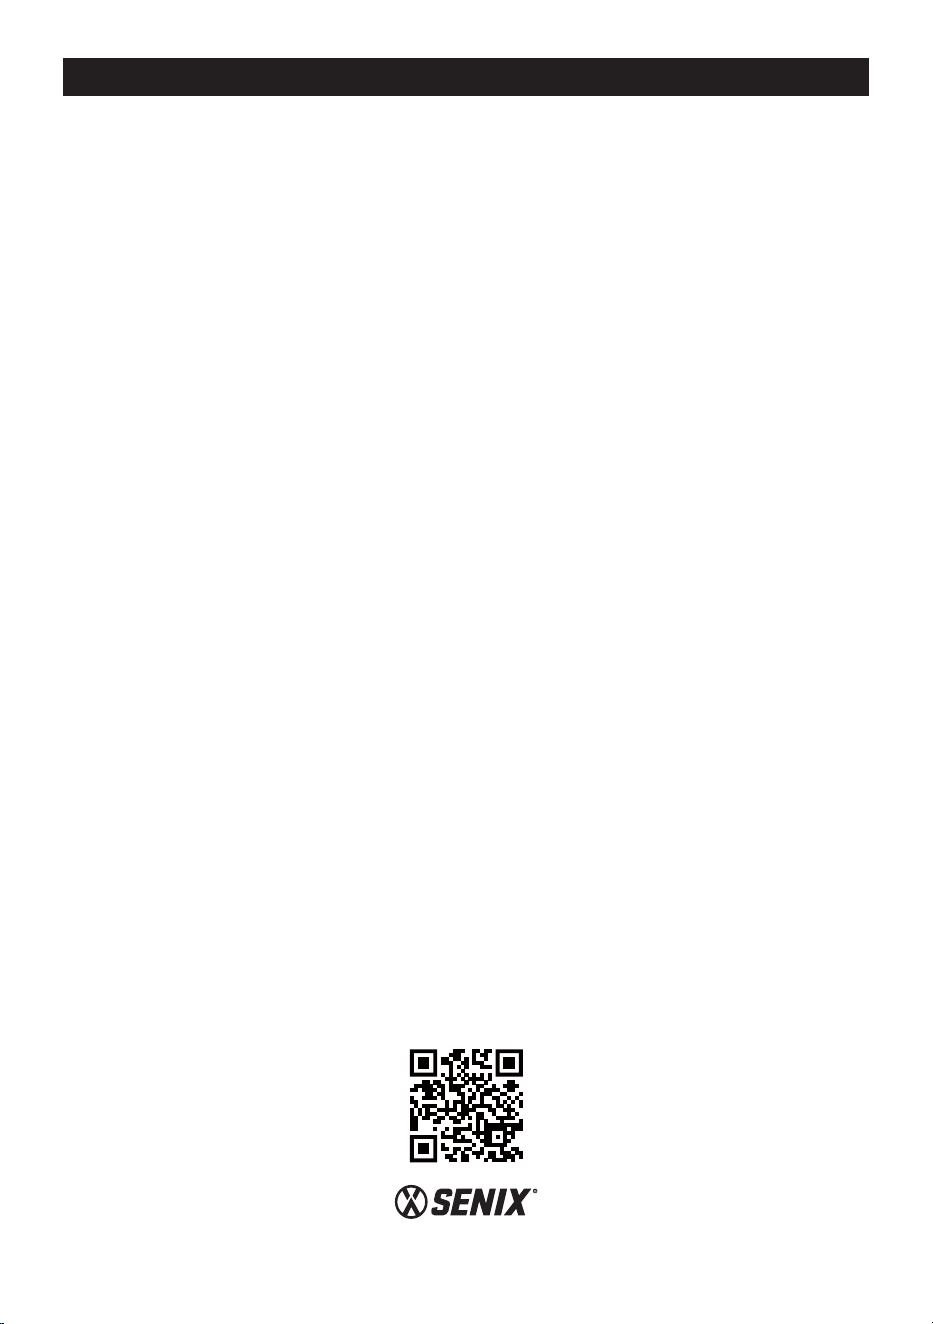
TROUBLESHOOTING
Suspected malfunctions are often due to causes that can be addressed by the user. Therefore,
troubleshoot the product using this section. In most cases the problem can be solved quickly.
PROBLEM POSSIBLE CAUSE SOLUTION
Unit does not start No power Check outlet and plug.
No ice production Water tank empty Refill water tank.
“Add Water” light stays
on after refilling
Water tank not fully seated Push tank firmly all the way in.
Ice basket difficult to
remove
Ice piled above basket rim
Gently tap basket to level ice, then
pull out.
Water leaks
Drain plug not fully closed Close drain plug tightly.
Water tank overfilled Do not exceed MAX fill line.
Ice water does not
dispense
Outlet not extended
Press Release button to extend
outlet.
Water tank empty Refill water tank.
Water temperature above
54°F (12°C)
see “ICE WATER FUNCTION”
WARRANTY
SENIX TOOLS LIMITED WARRANTY
FOR ONE YEAR from the date of original purchase this product is warranted against defects in material or
workmanship. WITH PROOF OF ORIGINAL PURCHASE a defective product will receive free repair. If the product
cannot be repaired it will be replaced free of charge.
For details to obtain warranty coverage, visit senixtools.com, email [email protected]
or call 1-800-261-3981.
• This warranty does not cover repairs necessary due to product accident or abuse, or failure to operate or
maintain the product according to all supplied instructions.
• This warranty does not cover expendable items that can wear out from normal use within the warranty
period, including but not limited to drill bits, cutting blades and trimmer spool or line.
• This warranty does not apply to damage resulting from repairs to the product made or attempted by other
than SENIX authorized agents.
• This warranty does not cover the cost of mailing or transporting the power tool to receive warranty
coverage.
• The warranty is void if the product has been used for commercial, professional, or rental service purposes.
• The warranty applies to the original retail purchaser and is not transferable.
• Proof of purchase is required to obtain warranty coverage.
THIS WARRANTY IS GIVEN IN LIEU OF ALL OTHERS, INCLUDING THE IMPLIED WARRANTY OF MERCHANTABILITY
AND FITNESS FOR A PARTICULAR PURPOSE, AND EXCLUDES ALL INCIDENTAL OR CONSEQUENTIAL DAMAGE.
Some states do not allow limitations on how long an implied warranty lasts or the exclusion or limitation of incidental
or consequential damages, so these limitations may not apply to you. This warranty gives you specific legal rights
and you may have other rights which vary in certain states or provinces.
Latin America: This warranty does not apply to products sold in Latin America. For products sold in Latin America,
see the country-specific warranty information contained in the packaging, call the retailer from which it was
purchased, or visit the website for warranty information.
Free warning label replacement: If your warning labels become illegible or are missing, call 1-800-261-3981 for
a free replacement.
REGISTER ONLINE - senixtools.com/pages/product-registration
Thank you for your purchase! Register your product now for:
Warranty Service: Registering your product will help you obtain more efficient warranty service in case of a problem
with your product.
Confirmation of Ownership: In case of an insurance loss, such as fire, flood, or theft, your ownership registration
will serve as proof of purchase.
For your safety: Registering your product will allow us to contact you in the unlikely event a safety notification is
required under the Federal Consumer Safety Act.
YAT USA INC. 10506 Bryton Corporate Center Dr, #500 Huntersville, NC 28078
For customer support, please call 1-800-261-3981 or email us at senix.support@yatusa.com