Crankcase Splitter &
Installer Tool
User Manual
Read Carefully Before Use
Keep for Future Reference
V20240614

1
Safety Information
• Instructions provided herein are only for general information. ALWAYS perform all repairs in
full compliance with your vehicle’s service manual. Particularly, ALWAYS use the transmission
uid type and amount listed in the service manual. After any repair, test your engine and vehicle
in your workshop and at low speed before returning to normal use. Failure to do so may result
in brake failure, serious property damage, and severe personal injury.
• Use this tool exclusively for installing crankshafts, separating and installing crankcase on
motorcycle or ATV engines. Using it for purposes other than stated herein could result in serious
property damage or personal injuries.
• ALWAYS tighten fasteners down to their stated torques in your vehicle’s manual. Failure to do
so may result in serious property damage and severe injuries.
• ALWAYS follow the original equipment manufacturer (OEM) procedures of your vehicle.
• DO NOT allow children or those unfamiliar with this product.
• DO NOT use while under the inuence of alcohol, drugs, or any medication that negatively
aects your judgment or reexes.
• Keep children and bystanders away during use.
• Keep your work site clean and well lit. Cluttered and dark work areas invite accidents.
• For best results, keep the kit clean and dry. Remove any uid, oil, or grease before and after
work, particularly from the handle and ttings.
• ALWAYS use personal protective equipment (PPE) suitable to your task. Always wear ANSI-
approved eye and hand protection while using this product. Nonslip footwear is also highly
recommended. Other equipment such as ear, head, and body protection may also be necessary
depending on your work and other equipment.
• Dress properly for motorcycle servicing. DO NOT wear loose clothing or jewelry and keep hair,
clothing, gloves, hoses, and tools away from any moving parts during use.
• ALWAYS know and understand the specic safety warnings and instructions for your vehicle
before using this kit.

2
• Use the correct uids, pressures, adapters, etc. for your vehicle..
• Use jack and jack stands able to fully support the necessary weight. Never touch any heated
surface with exposed skin.
• DO NOT overreach. Keep proper footing and balance at all times.
• DO NOT use excessive pressure with this product and do not force it or its attachments.
• Maintain this product. Check for misalignment, binding, wear, or other damage before use. If
any damage is detected, repair or replace the problematic components before further use. In
a large shop, mark such tools “DO NOT USE” until they have been repaired. ONLY replace
components with identical parts.
• Motorcycle repairing can be dangerous. and this manual cannot cover all possible situations
that you may encounter using this tool. ALWAYS exercise discretion and good judgement.
Safety Information

3
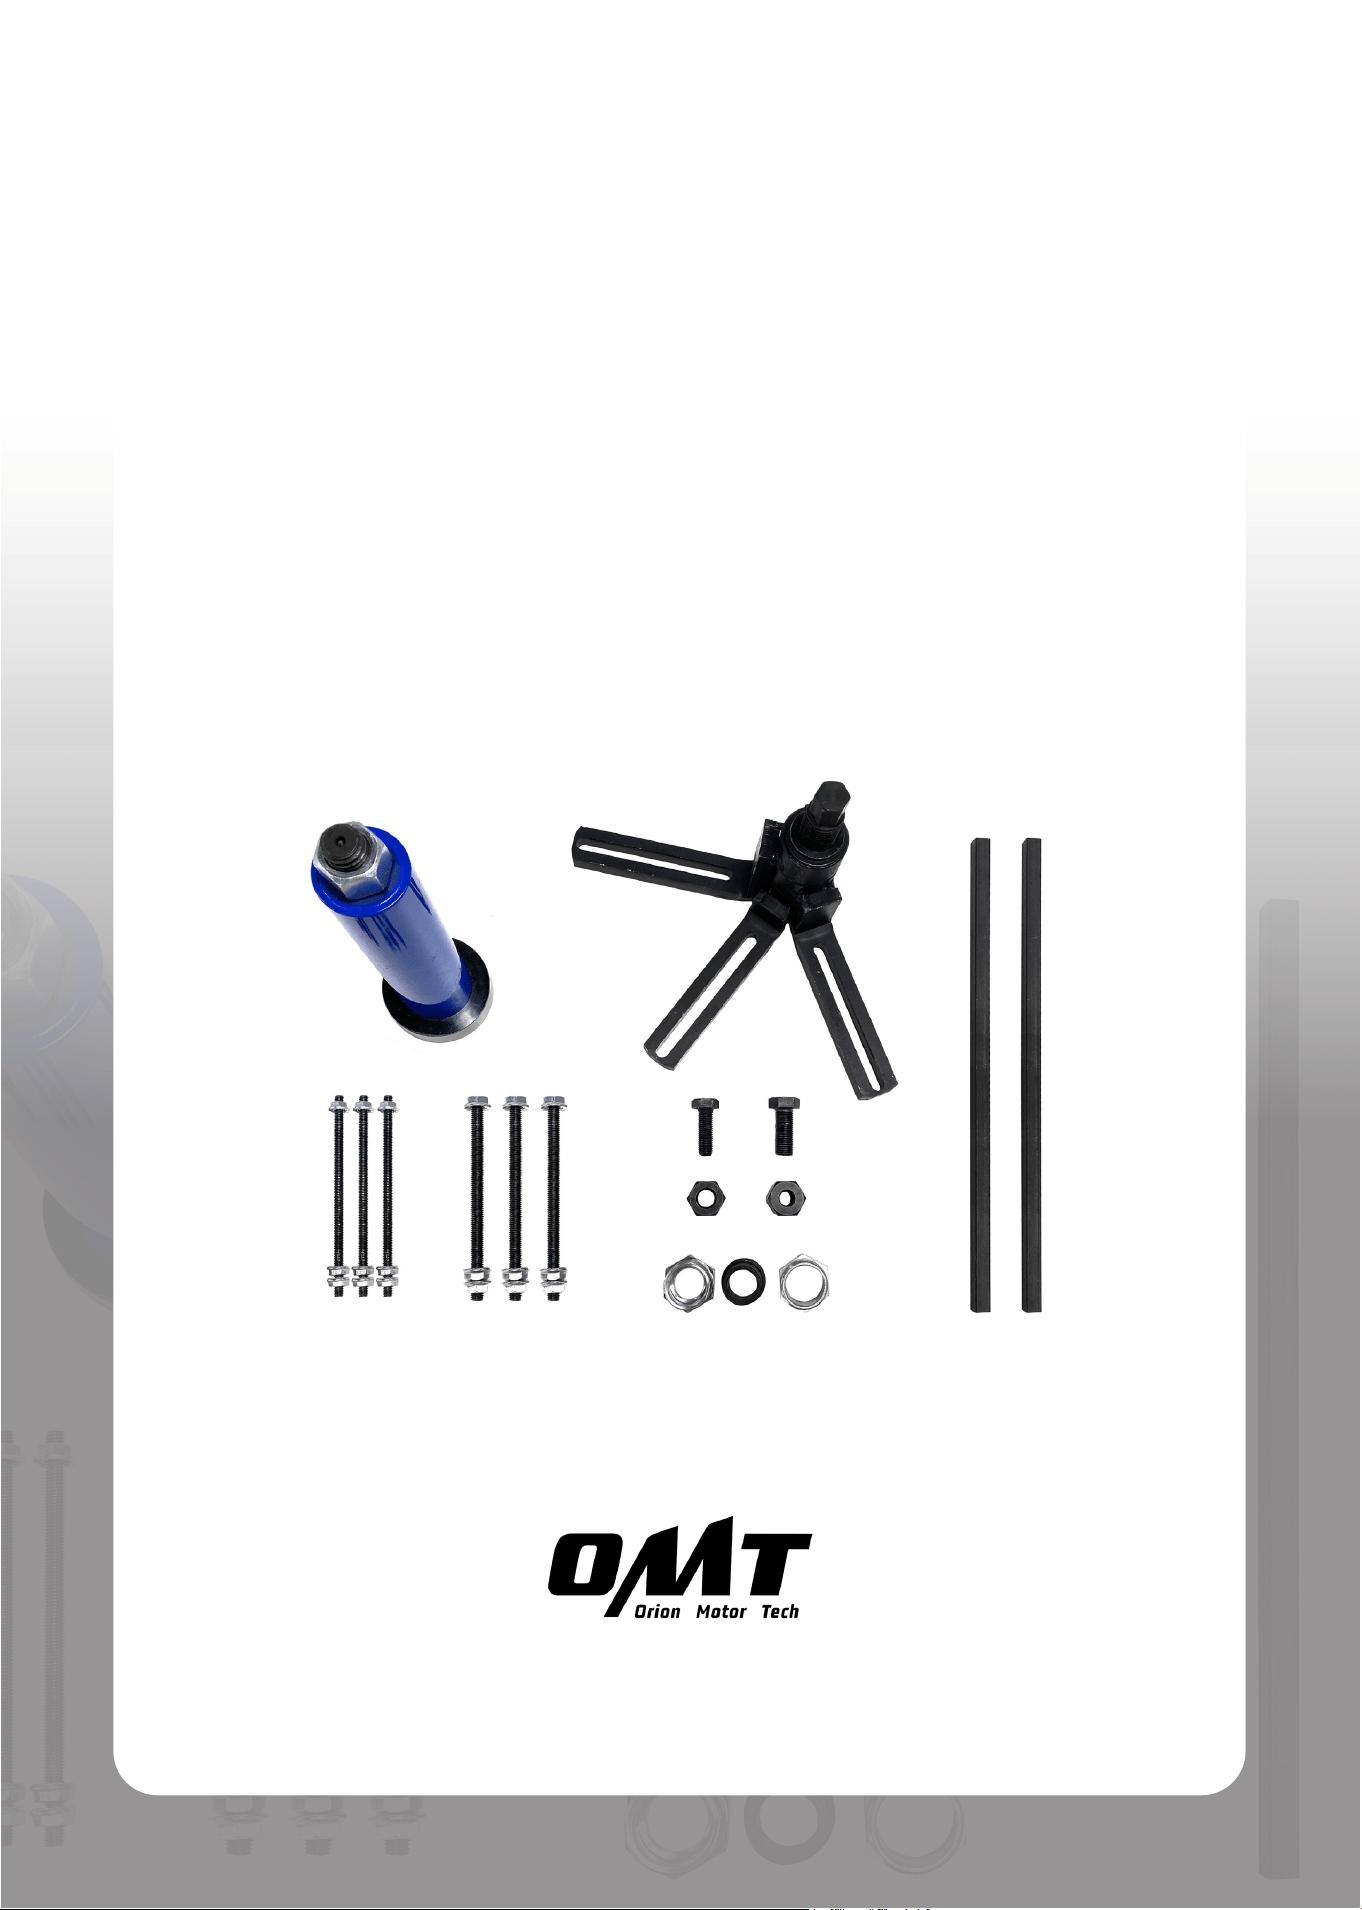
No. Item Qty.
A Crankshaft Installer 1
B Crankcase Splitter 1
C M6 Mounting Bolts 3
D M8 Mounting Bolts 3
No. Item Qty.
E M10 Screw & Nut 1
F M12 Screw & Nut 1
G Steel Rods 2
H Crankshaft Adapters 3
Package List
A B
C D
E F
G
H

4
Operation
• Shut the engine before servicing, make sure the vehicle is in a stationary state for easy
maintenance, and that the engine has cooled to room temperature before performing
maintenance or adjustments.
• Use correct tools and personal protective equipment (PPE) before performing any operation.
Be extremely careful with possible pinching points, moving parts, or parts that may suddenly
spring out.
• Make sure your surroundings are safe for using the tool. Avoid operating in crowded or
unstable areas.
• Makesuretheworkareaiscleanandclearofanyclutterordirtthatmayaectoperations.
•
ALWAYS
ensure that your vehicle has been jacked up and is adequately supported with axle
stands.
• Do not force the tool. Excessive force may cause serious personal injuries and severe
property damage.
• For an abundance of safety, we recommend you take training before using these tools.
Serious injury could happen due to a lack of training.
Disassembling the Crankcase
1. Align the splitter (B) with the exposed crank end, ensuring that the tool is pressing the dead
center of the crankshaft.
2. Adjust the three ears of the tool so that their holes align with the bolt hole on the crank case. .
3. Using the 6 or 8 mm bolts (C or D), attach the ears evenly spaced around to the crankcase.
Note: You could arrange the tool in either way as shown. But mind that in either way, make sure
the tool is parallel to the crankcase and presses against the dead center of the crankshaft.
Note: If you only need two arms, separate evenly.

5
Operation
4. Using a 17 mm socket or wrench, carefully tighten bolt on the tool until the crankcase is separated
from the transmission.
If the crankcase is bound up too tight to the transmission, tap the crankcase and the crankshaft
with a rubber mallet.
5. Disassemble the tool from the crankcase when can be manually separated from the transmission.
Installing the Crankshaft
1. Grease your crankshaft and the main bearing.
2. Insert the crankshaft all the way into the hole on the crankcase.
3. Grab the correct adapter (H) and set it up on the crank.
4. Use a nut (E or F) to x the chosen adapter to the crankshaft.
5. Remove the center threaded shaft of the installer (A) from its shell by removing the 26mm nut
and pulling the shaft away.
6. Attach the threaded center shaft to the adapter.
7. Arrange the two steel rods (G) on the crankcase so that they will be as wide as the shell of the
installer.
8. Feeding the threaded center shaft through the shell, tighten the shell to the adapter until the
base of the shell presses tight against the steel rods.
9. Reattach the 26mm nut and tighten it using an adjustable wrench.
10. Continue tightening the 26mm nut until the crankshaft is completely seated into its collet.
11. Remove the 26mm nut, shell, the nut fastening the adapter, and the adapter. Stow everything
away.

6
• Clean the tool with a soft damp cloth using a mild detergent or solution after use. DO NOT rinse
it or use abrasive cleaners or caustic chemicals.
• For best results, lubricate the tool with high-quality anti-corrosive oil (not included) between
uses.
• Check the parts of the tool periodically for any wear or damage. Repair or replace any problematic
parts before further use.
• If the tool will not be used for an extended period of time, clean and lubricate it and store in a
cool dry place away from direct sunlight and inaccessible to children.
Maintenance

PUL-QS01-00 Rev. 14 Jun. 2024
Thank you for choosing our products! If you have any questions
or comments, contact us at
support@orionmotortech.com
and we'll resolve your issue ASAP!
For a .pdf copy of the latest version of these instructions, use the
appropriate app on your smartphone to scan the QR code to the
right.
Contact Us