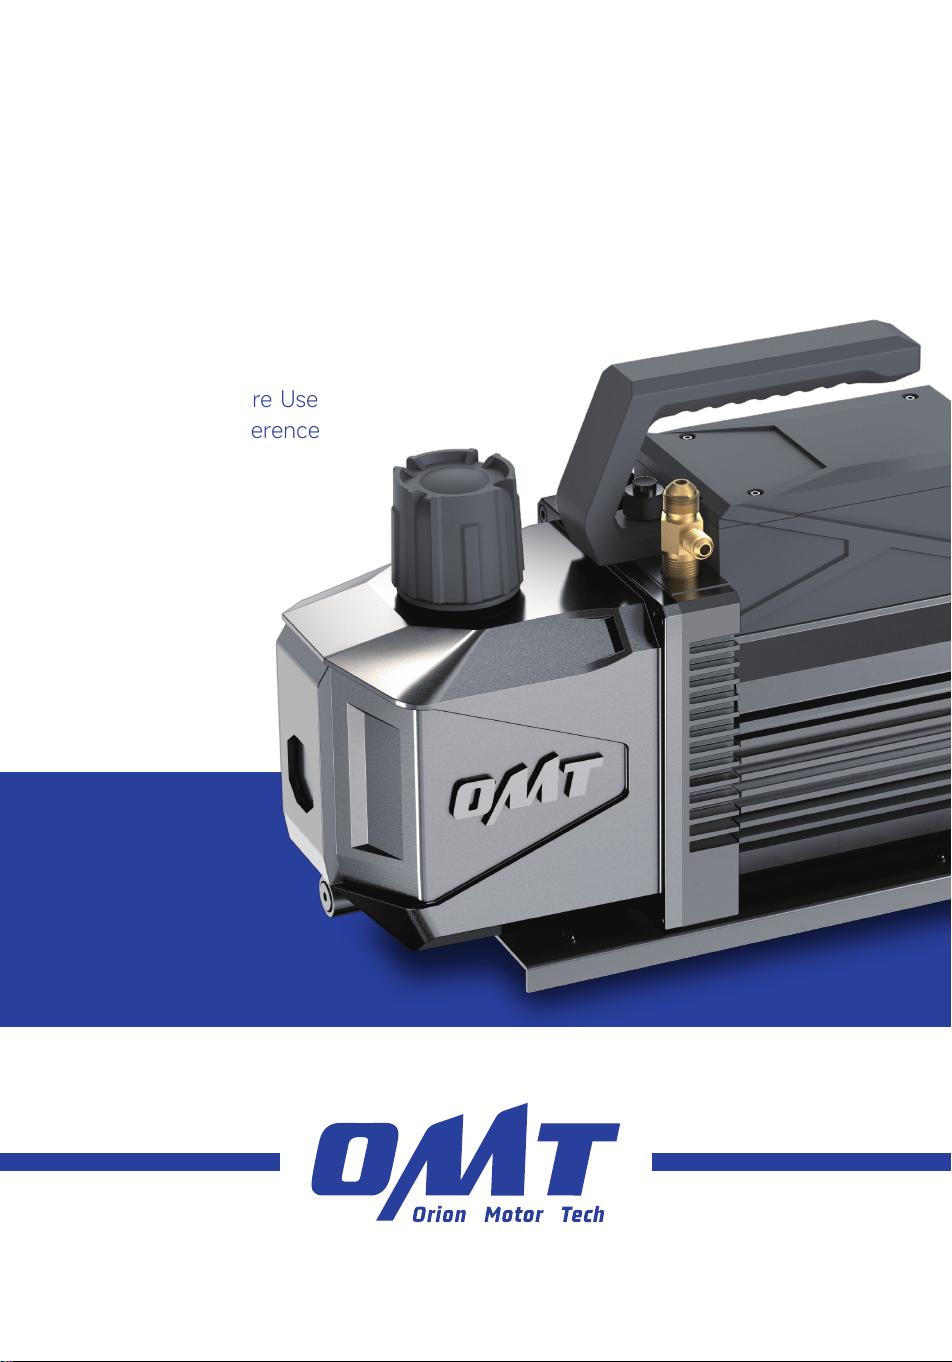
Read Carefully Before Use
Keep for Future Reference
UM-VPH-0040-V2
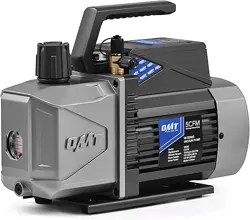
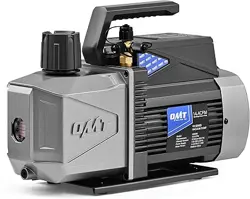
A/C Vacuum Pump
User Manual

How did we get our start?
Orion Motor Tech began with a passion for cars. We started out by maintaining family cars in
our home garage but quickly found that affordable quality tools are hard to come by. That’s why
we made it our mission to put durable tools in the hands of do-it-yourself repairmen—so you
can get the job done right.
What makes our products unique?
We have a wide inventory of quality automotive tools and parts, covering almost all makes and
models. As a professional manufacturer, we are driven to make top-quality products affordable
for both professional and amateur mechanics.
Why do we love what we do?
We’re still in love with cars—just like we were back in that old family garage. We hope to pass
that passion on to all our customers, and we still believe in our old motto: You don’t need more
cars in your life. You need more life in your car.
Contact Us
Thank you for choosing our products! If you have any questions or comments,
contact us and we'll address your issues ASAP!
support@orionmotortech.com
https://orionmotortech.com/
@OrionMotorTech
More Life in Every Mile

Contents
1 Safety Information ........................................................................................................... 1
1.1 Disclaimer ................................................................................................................................................ 1
1.2 Symbol Guide ......................................................................................................................................... 1
1.3 General Safety Instructions ................................................................................................................. 2
1.4 PPE Safety Instructions ........................................................................................................................ 2
1.5 Work Area Safety Instructions ............................................................................................................ 2
1.6 Operational Safety Instructions ......................................................................................................... 3
1.7 Disposal Instructions ............................................................................................................................. 3
2 Introduction ...................................................................................................................... 4
2.1 Designated Use ...................................................................................................................................... 4
2.2 Package List ............................................................................................................................................ 4
2.3 Specifications ......................................................................................................................................... 5
2.4 Product Diagram .................................................................................................................................... 5
3 Installation ......................................................................................................................... 6
4 Operation .......................................................................................................................... 8
4.1 Gauge Connection................................................................................................................................. 9
4.2 Evacuation ............................................................................................................................................... 10
5 Maintenance ...................................................................................................................... 13
5.1 General Maintenance ............................................................................................................................ 13
5.2 Replacing Vacuum Pump Oil .............................................................................................................. 14
6 Troubleshooting ................................................................................................................ 15

1
1 Safety Information
1.1 Disclaimer
1.2 Symbol Guide
The following symbols appear on this machine’s labels or in this manual:
These items indicate an imminent hazard that WILL
result in death or severe injury if not avoided.
Always wear protective eyewear around this product
during operation.
These items indicate a potential risk that COULD
result in death or serious injury, as well as
significant equipment damage.
Always wear protective gloves around this product
during operation.
These items address similarly serious concerns
about electrical components.
Always wear a hearing protector around this product
during operation.
These items address similarly serious concerns
about fire hazards.
This product is sold in conformity with applicable EU
regulations.
Note These items address tips that help.
This product contains electrical components that
should not be disposed of with regular garbage.
Always wear a respirator around this product during
operation.
Read this disclaimer completely and carefully before
proceeding with the rest of the manual content.
1. Product Modifications
Any modifications or alterations to OrionMotorTech (OMT)
products void any warranties and may result in damage or
injury. OMT shall not be liable for any damages resulting
from such modifications or alterations.
2. Compliance with Laws
Customers shall be liable for ensuring that the use of
OMT products complies with all applicable laws and
regulations in their respective jurisdictions. OMT assumes
no responsibility for any violations of laws or regulations
resulting from the use of OMT products.
3. Correct Use
Always use OMT products only as directed in the
accompanying manuals. Failure to follow instructions may
result in injury or damage.
Always ensure the assembly, installation, operation,
maintenance, or repair of OMT products is carried out by
a competent person.
Always make maintenance regularly throughout OMT
products’ lifecycles; you have the liability to keep the
products operating as intended.
Always wear appropriate protective gear.
4. Third-Party Products
OMT shall not be liable for any damages or losses
resulting from the use of third-party products in
conjunction with OMT products. Customers shall refer to
the third-party’s guidelines or/and warranties (if any) for
any third-party products used.
5. Limitation of Liability
OMT shall not be liable for any direct, indirect, punitive,
incidental, special, or consequential damages to property
or life, whatsoever arising out of or connected with the
use or misuse of OMT products. In no event shall OMT’s
liability exceed the value of the products sold.
6. Warranty
Refer to the sales page for the warranty information.
This disclaimer states the entire obligation of OMT with
respect to OMT products. If any part of this disclaimer is
determined to be void, invalid, unenforceable, or illegal,
including but not limited to the warranty disclaimers, liability
disclaimers, and liability limitations set forth above, the invalid
or unenforceable provision will be deemed superseded by
a valid and enforceable provision that most closely matches
the intent of the original provision and the remainder of the
agreement shall remain in full force and effect.
2
1.3 General Safety Instructions
• Read this manual carefully BEFORE installation, use, and maintenance, and store it for future reference.
• Follow ALL these instructions strictly DURING installation, use, and maintenance. Failure to do so can bring
about severe property damage and personal injury.
Provide this manual to anyone who will use this product. Include this manual alongside this product if it is ever
given or sold to a third party. Failure to do so may lead to property damage and personal injury.
• ONLY use this product for its intended purpose, removing gas molecules from a sealed volume to create a partial
or complete vacuum.
It is NOT a toy and should NOT be used playfully or carelessly.
Any other use NOT specified in this manual could pose risks and void ALL warranties stated or implied.
• DO NOT use this product while you are tired or under the influence of drugs, alcohol, or strong medication.
• DO NOT allow children under the age of 18, anyone WITHOUT specialized training, persons unfamiliar with this
product, or people whose physical or mental impairment precludes safe use to use this product.
• ALWAYS keep children, bystanders, and pets away during use. Restrict access to your work area as needed.
• This manual ONLY provides instructions about THIS product. For instructions on specific tasks, refer to the
service manual by your A/C system’s manufacturer.
1.4 PPE Safety Instructions
• Wear appropriate personal protective equipment (PPE) as needed:
Breathing, eye, and hand protection for systems that contain refrigerants or other substances capable of
generating harmful gases or causing burns, scalds, frostbite, etc. Protective equipment must meet ANSI (American
National Standards Institute) or OSHA (Occupational Safety and Health Administration) standards.
Hearing protection for noise generated by this product during operation.
• ALWAYS avoid ALL direct contact with the vacuum pump oil.
If contact accidentally occurs with the skin, remove contaminated clothing and rinse the skin with plenty of water.
If contact accidentally occurs with the eyes, IMMEDIATELY flush them with plenty of water for at least 15
minutes while seeking medical attention.
• NEVER swallow the oil, which may cause FATAL problems.
1.5 Work Area Safety Instructions
Make sure your work area meets the following requirements:
• No bystanders, children, or pets
• Helpers wearing necessary PPE
• Well-lit and ventilated but adequately protected from the elements
• Clean and clear of clutter
• Free from flammables, explosives, and heat sources such as firecrackers and open flames, especially when
working on systems that contain refrigerants or other substances that pose the risks of fire, explosion, carbon
monoxide poisoning, etc.
3
1.6 Operational Safety Instructions
• DO NOT operate this product if any component is damaged or shows any sign of malfunction. Repair or replace
affected components before further use.
• NEVER replace any components with nonidentical or unauthorized parts.
• For HVAC systems, ALWAYS turn it off BEFORE performing evacuation with this product.
• ALWAYS check that this product’s power cord is undamaged BEFORE use. NEVER attempt to remove ANY
permanently preconnected power cords.
• ONLY use this product with stable, compatible, and well-grounded power sources.
• DO NOT use 3-to-2 prong adapters, ungrounded extension cords, or extension cords of insufficient gauge for
this product’s expected electrical load.
• Stay alert, watch what you are doing, and use common sense when using this product.
• Refrigerant can irritate your eyes, nose, throat, and skin or cause frostbite, heart arrhythmia, unconsciousness,
and EVEN death. Insufficient preparations may cause accidents, leading to serious consequences.
• DO NOT move this product by pulling on its power cord or modify its power plug.
• In case of power loss during operation, IMMEDIATELY unplug this product until power is restored.
• DO NOT wet or operate this product with wet hands or in highly humid environments.
• If ANY electrical component accidentally becomes wet, IMMEDIATELY disconnect this product from power and
wait for it to completely dry BEFORE resuming use.
• DO NOT run this product WITHOUT the provided vacuum pump oil or with its oil inlet left open.
• ALWAYS maintain the oil level between the MIN and MAX height marks on the reservoir window during use.
• DO NOT leave this product unattended during use.
• When working on A/C systems, use EXTREME caution when disconnecting hoses after use. They may still
contain some refrigerant under pressure.
• DO NOT rinse the entire product with tap water, immerse it completely in water, or expose it to rain.
• If you begin to develop symptoms such as headaches, dizziness, or nausea during use, IMMEDIATELY stop work
and get fresh air.
DO NOT continue work until better ventilation is provided for your work area. This is especially important when
you work on HVAC systems.
• DO NOT maintain this product with harsh abrasives or caustic chemicals.
• NEVER disassemble this product.
• NEVER modify its internal components WITHOUT professional guidance.
1.7 Disposal Instructions
Electrical products should not be disposed of with household products. In the EU and UK, according to the European
Directive 2012/19/EU for the disposal of electrical and electronic equipment and its implementation in national laws,
used electrical products must be collected separately and disposed of at the collection points provided for this purpose.
Locations in Australia, Canada, and the United States may have similar regulations.
4
2 Introduction
2.1 Designated Use
This product is used to remove air and any residual gases from the A/C system. During this
process, the pump usually needs to be connected with a manifold gauge set.
This manual is presented using Model VB130 as an example. The other models feature similar
functions.
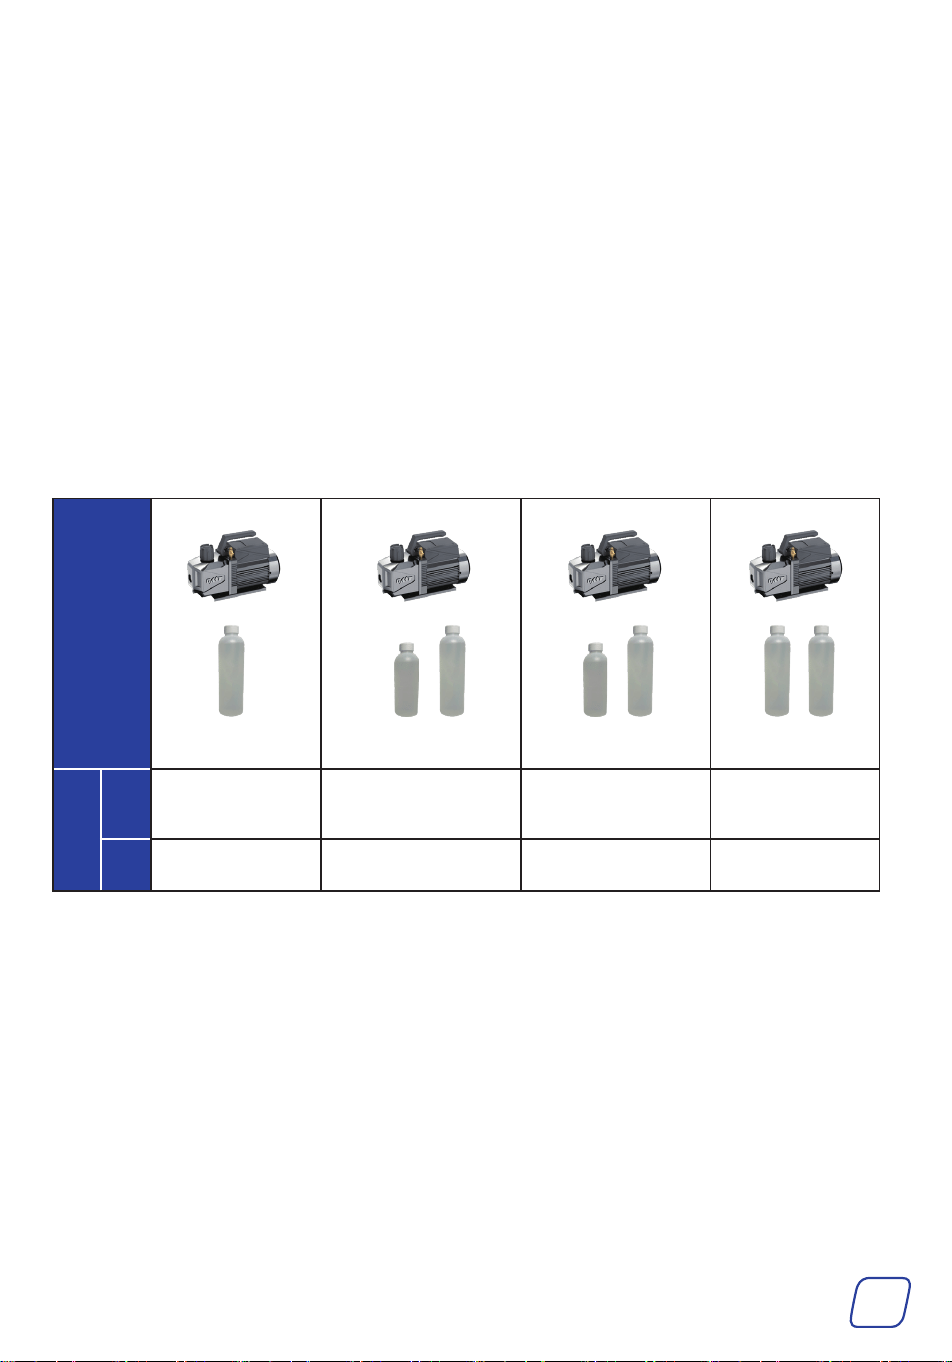
2.2 Package List
Check that all parts of this product are present and intact after unpacking. If any of them is
damaged, ask your local dealer or contractor for a new identical replacement.
Product
Model
VB130 VB240 (US) VB240 (UK) VB2200
No.
A Vacuum Pump ×1 Vacuum Pump ×1 Vacuum Pump ×1 Vacuum Pump ×1
B
Vacuum Pump Oil
46 330 ml ×1
Vacuum Pump Oil 46
230 ml, 330 ml ×2
Vacuum Pump Oil 46
230 ml, 330 ml ×2
Vacuum Pump Oil
46 330 ml ×2
5
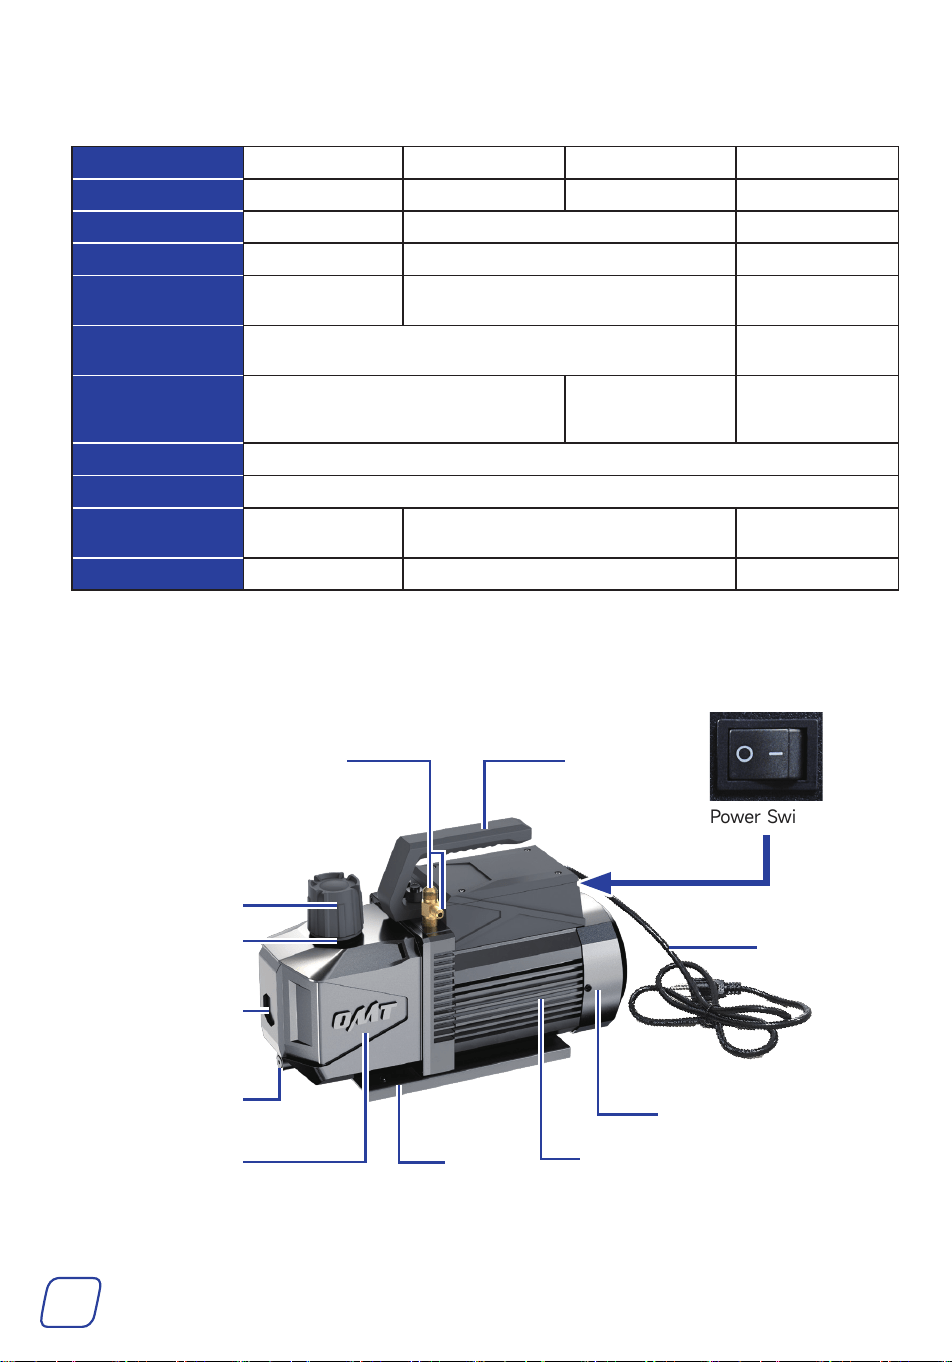
2.4 Product Diagram
2.3 Specifications
Product Model VB130 VB240 (US) VB240 (UK) VB2200
Power Supply AC 110–120 (V), 60 Hz AC 110–120 (V), 60 Hz AC 220–240 (V), 50 Hz AC 110–120 (V), 60 Hz
Rated Power 180 W ±15% 375 W ±15% 1100 W ±15%
Evacuation Speed 3.5 cfm | 0.1 m³/min 5 cfm | 0.14 m³/min 14.4 cfm | 0.4 m³/min
Working Oil Volume
Range
10.1–13.5 (fl oz)
300–400 (mL)
10.8–14.9 (fl oz)
320–440 (mL)
18.3–22 (fl oz)
540–650 (mL)
Compatible
Refrigerants
A1 and A2L, for example R32, R1234yf, R134a, R22, and R410a A1
Air Inlet Size
1/4" SAE Male;
1/2"ACME Male
1/4" SAE Male;
3/8"ACME Male
1/4" SAE Male;
1/2" ACME Male;
3/8" SAE Male
Power Cable Length 55.1 in. | 1.4 m
Noise Level ≤ 70 dBA
Dimensions
(W×D×H)
10.6×4.7×8.4 (in.)
270×120×215 (mm)
12.6×5.3×9.1 (in.)
320×135×232 (mm)
15.1×5.4×10 (in.)
383×138×255 (mm)
Net Weight 11.4 lb. | 5.2 kg 18.7 lb. | 8.5 kg 36.16 lb. | 16.4 kg
Oil Inlet
(Exhaust Port)
Filter
Motor
Base
Fan Cover
Power Switch
Handle
Power Cable
Gas Inlets
Reservoir
Window
Oil Drain Cap
Oil Tank
6
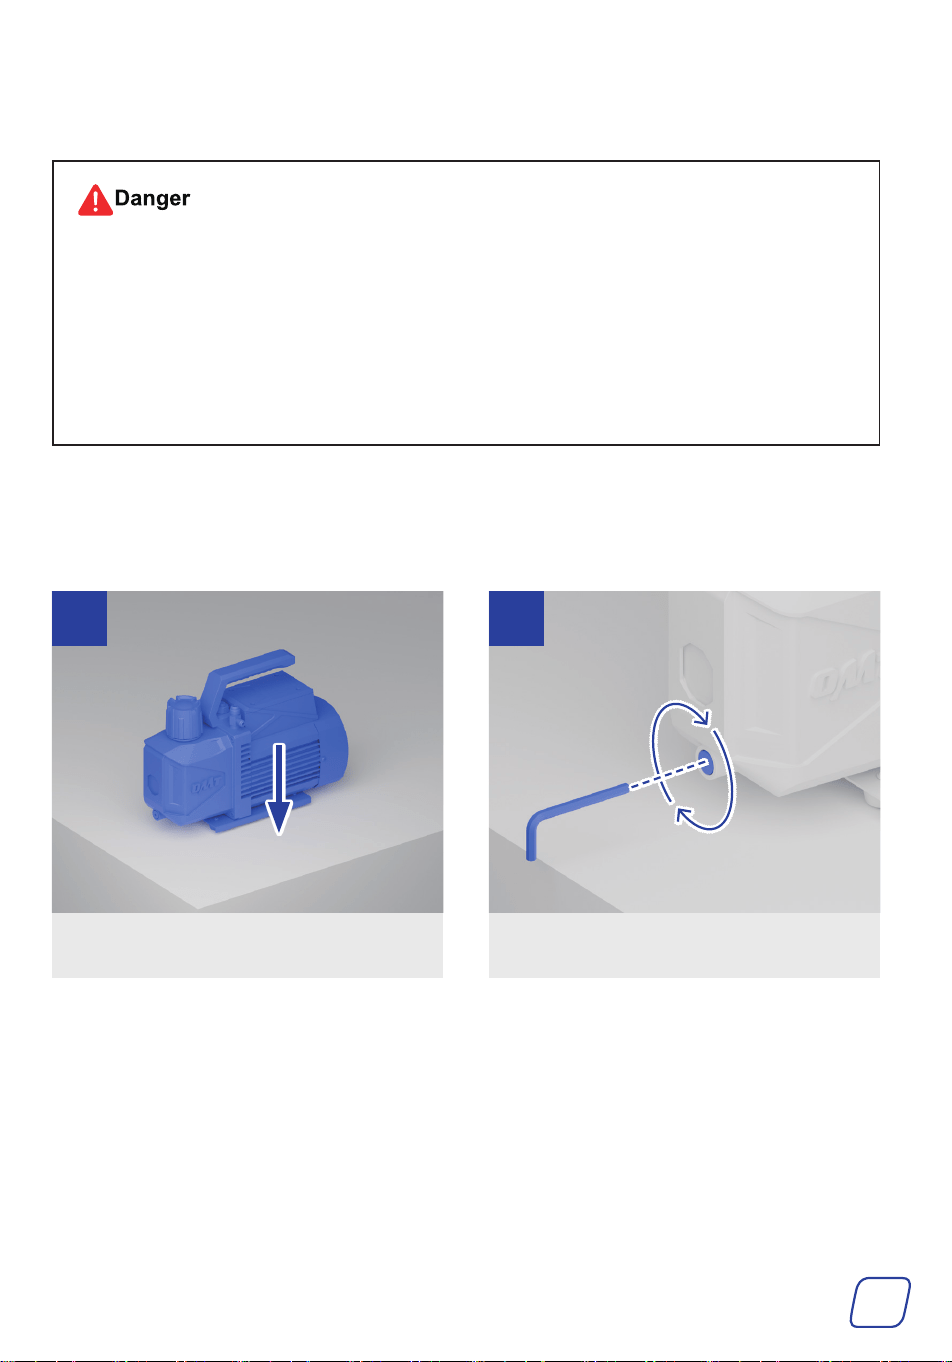
Place the vacuum pump on a firm, level
surface.
Retighten the oil drain cap using an M4 hex
wrench.
3 Installation
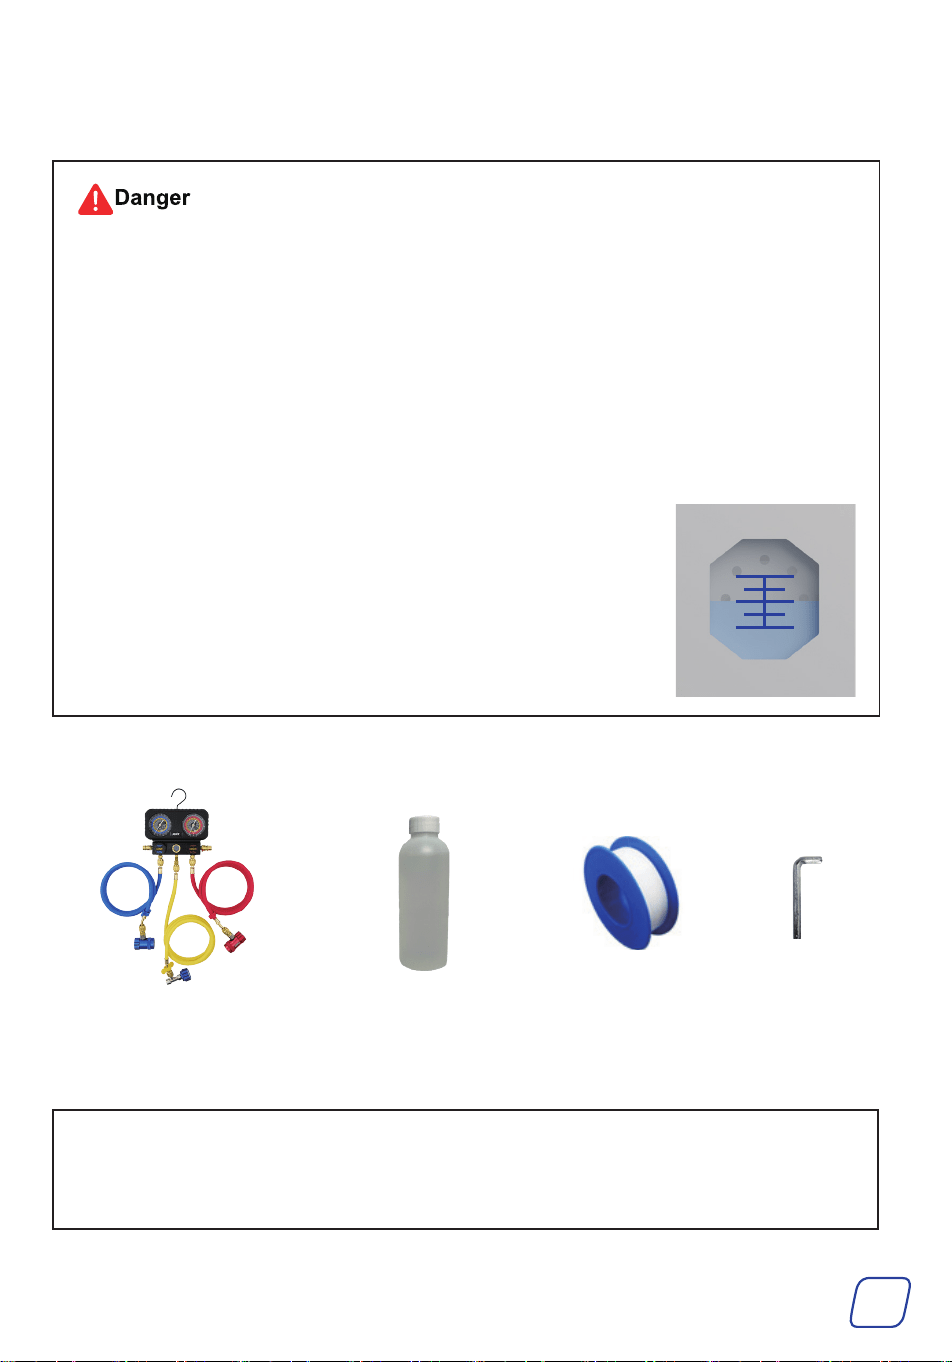
• Vacuum pump oil is flammable and explosive and MUST be kept away from open flames
and sparks.
• NEVER swallow the oil or touch it with bare skin.
• Put on your dust mask, goggles, work gloves, ear muffs, and any other PPE necessary for
your work area.
• Be sure to use the provided oil or oil meant for vacuum pumps. Using other mechanical
oils could impact the quality and performance of your vacuum.
Tools Needed
• Vacuum Pump Oil 46
• M4 Hex Wrench (Not Included)
1 2
7
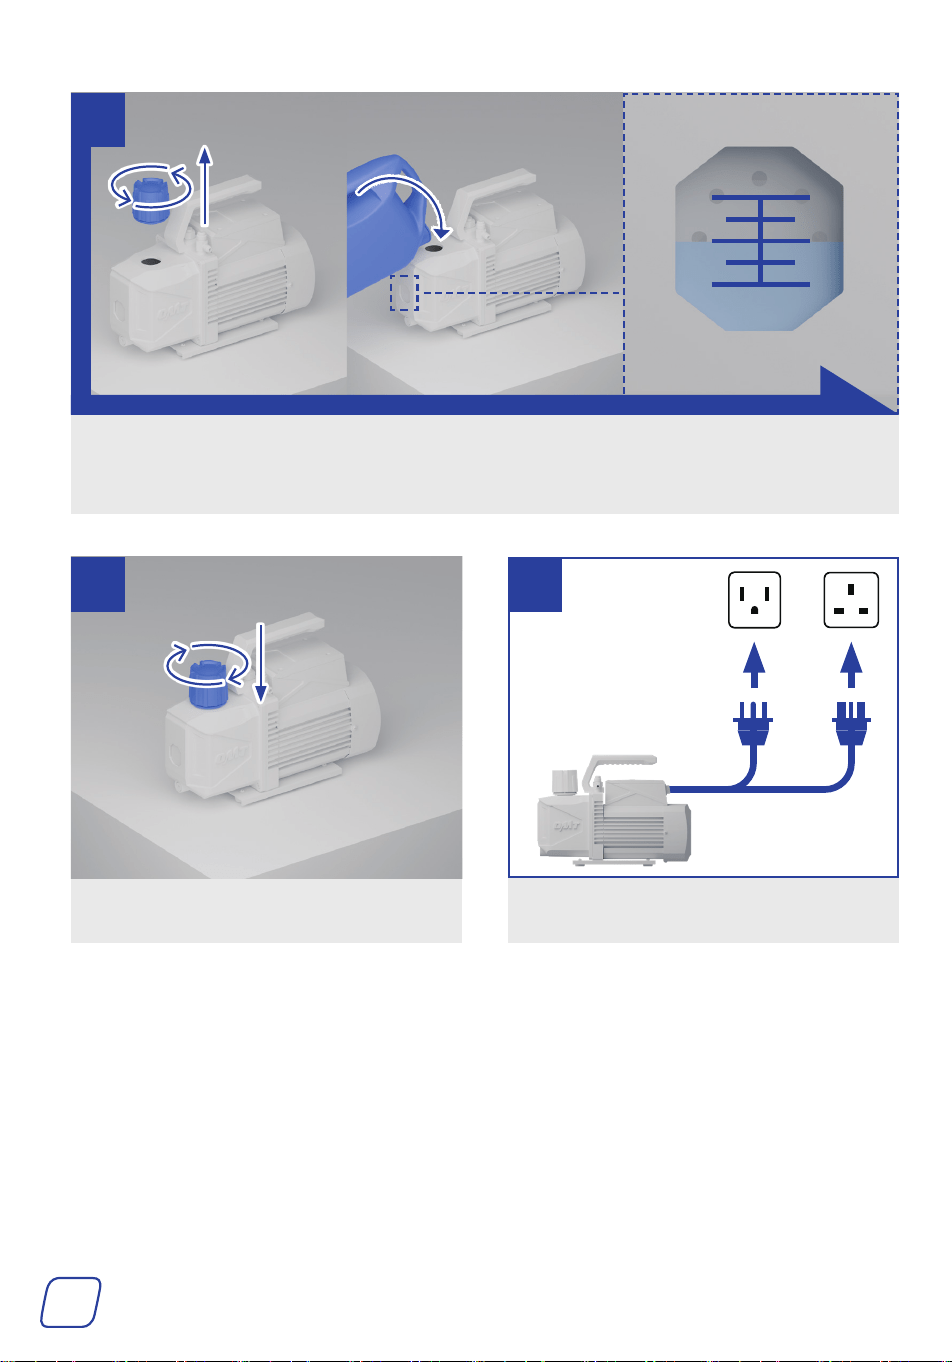
Remove the cap of the oil inlet by turning it by hand and add the provided oil until the level is
between the MIN and MAX height marks BEFORE use.
To prevent spills, use a funnel (not included) that fits the oil inlet.
MAX
MIN
3
Add the cap, turning it into place.
Connect the pump to a stable, compatible,
and grounded power source.
4 5
or
US UK
8
4 Operation
• Put on your dust mask, goggles, work gloves, ear muffs, and any other PPE necessary for
your work area.
• For optimal safety, be sure to know your A/C system and take sufficient training BEFORE
using this product. Failures and accidents could happen due to a lack of training.
• Avoid operating this machine in crowded, poorly lit, or cluttered areas.
• Ensure NO explosives or ignition sources nearby.
• Be sure that ALL connections ARE tightly secured.
• If working on an HVAC system, check that it has been turned off BEFORE starting work.
• Check the pump oil volume if you used the pump before. If the
oil amount is under the MIN mark, refill it until the level is between
the MIN and MAX height marks BEFORE use.
Check if the pump oil is emulsified and unclean. If it is, replace
the oil. For instructions, see 5.2 Replacing Vacuum Pump Oil
on Page 14.
Tools and Parts Needed
MAX
MIN
Manifold Gauge Set
(Hanging on the Hood, Not
Included)
The Provided Vacuum
Pump Oil 46 or Any
Other Equivalent
(ISO 100 Or SAE 30)
Thread Seal Tape
(Not Included)
M4 Hex Wrench
(Optional)
Note:
The following instructions use a OMT 3-Valve Manifold Gauge Set as an example.
To purchase, contact customer service.
9
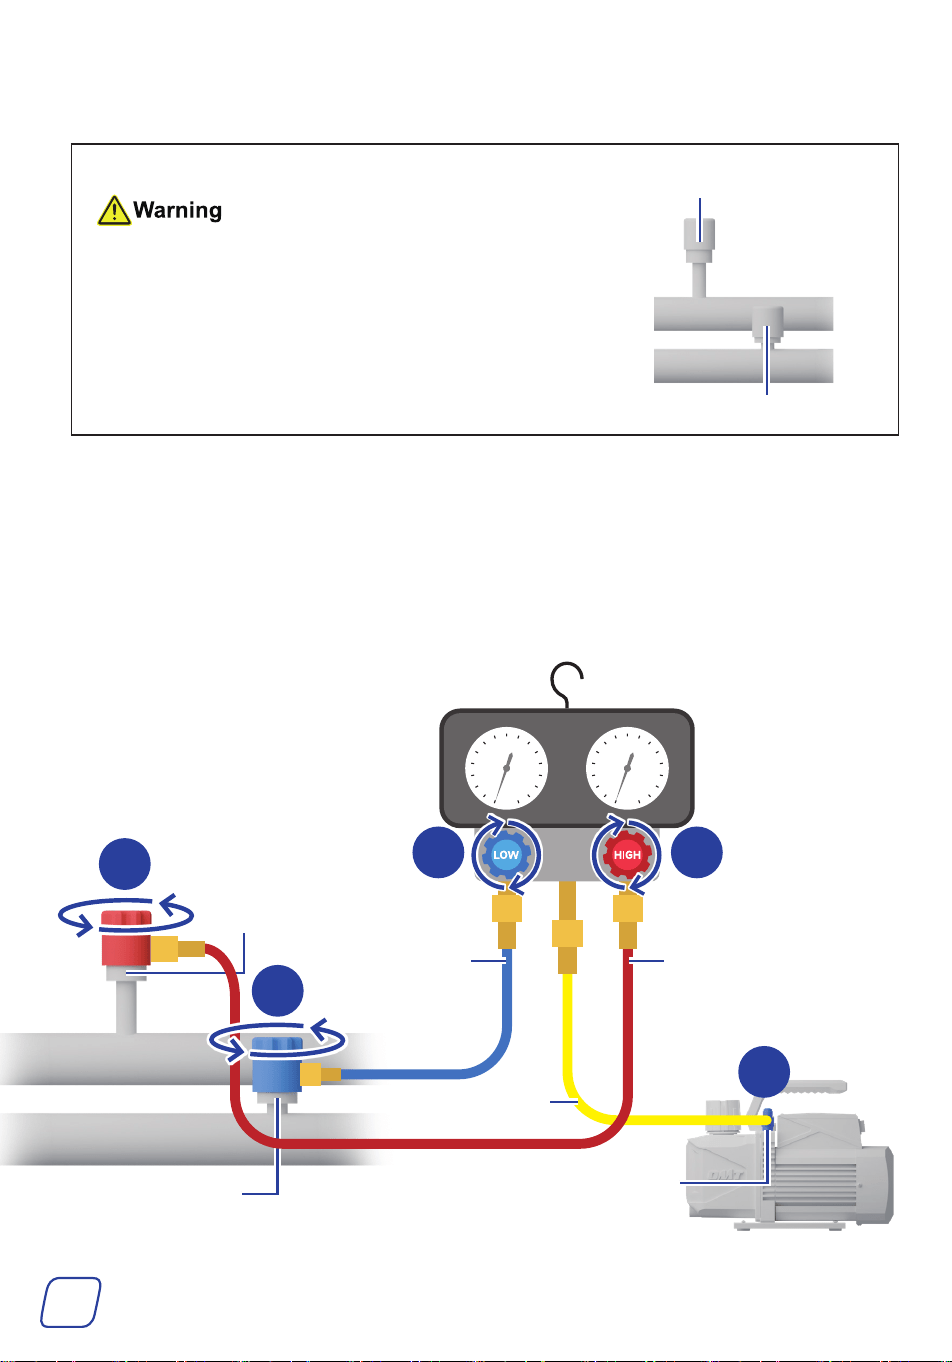
• Identifying the high and the low-pressure ports on your
A/C system is important. Generally, high-pressure ports are
physically bigger and higher than the low-pressure ports.
• Attach thread seal tape to all joints to make sure they
are connected well. Loose seals can affect your vacuum
performance.
4.1 Gauge Connection
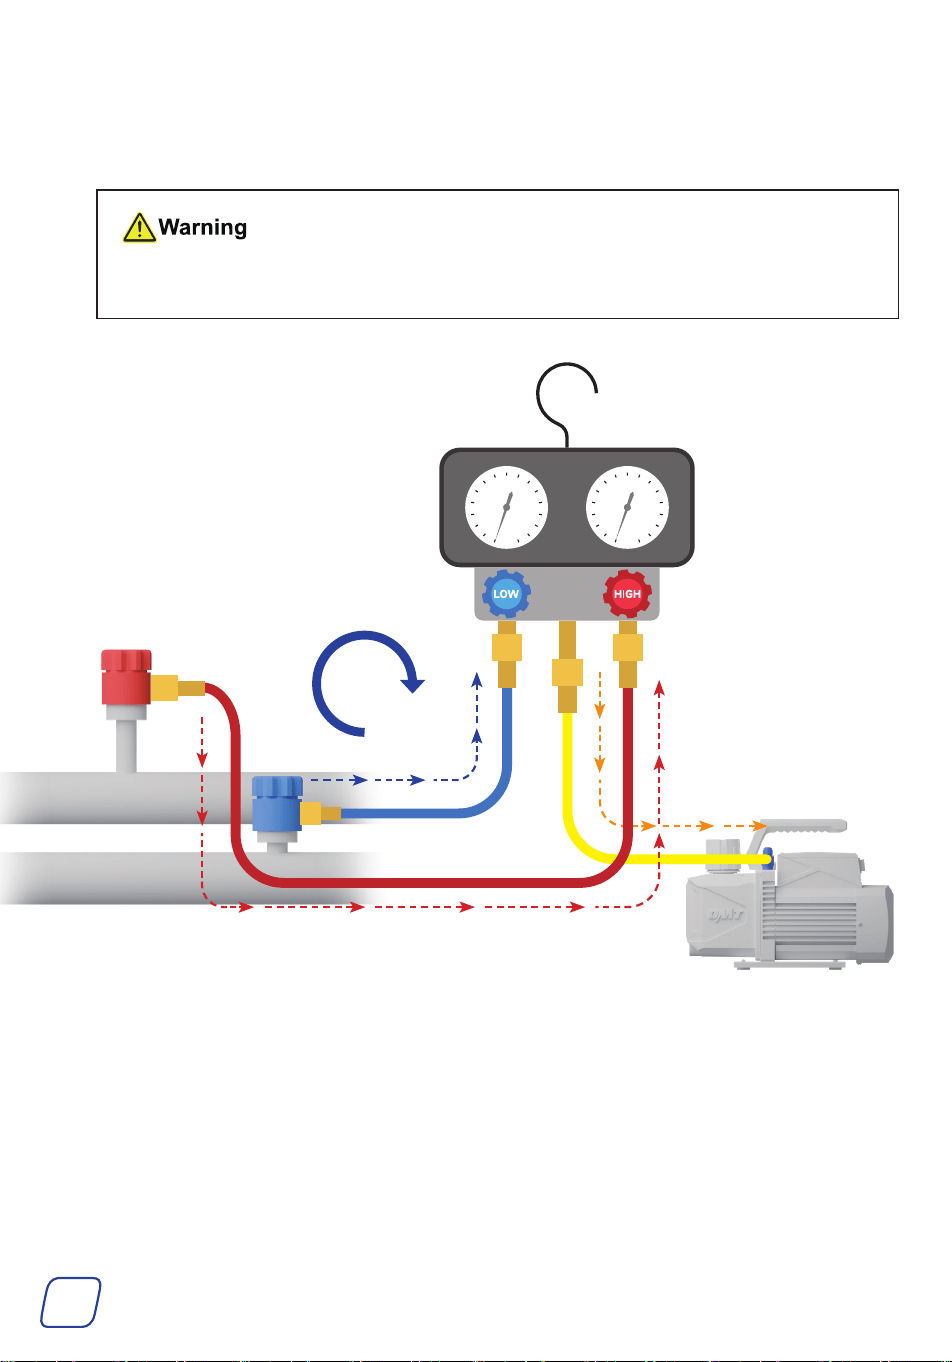
High-Pressure Port
Low-Pressure Port
1. Connect the low-pressure hose to the low-pressure port on your A/C system. Make sure
the hose is closed by turning the port of the hose counterclockwise and turning the gauge
clockwise.
2. Connect the high-pressure hose to the high-pressure port on your A/C system. Again, make
sure the hose is closed by turning the port of the hose counterclockwise and turning the gauge
clockwise.
3. Connect the evacuation/charging (E/C) hose to one compatible gas inlet port on the vacuum
pump.
Low-Pressure Port
Low-Pressure
Hose
High-Pressure
Hose
E/C Hose
Compatible
Gas Inlet Port
High-Pressure Port
1
2
1 2
3

10
4.2 Evacuation
1. Open both service ports of the high-pressure
and low-pressure hoses by turning their
valves clockwise.
2. Turn on the pump by flipping its power
switch to I. You should hear the vacuum
running once it is switched on.
• DO NOT leave the pump
unattended while it is in operation.
• If you are trying to start the pump
in cold weather, open the air inlet
ports until the pump reaches normal
running speed. Then, close them.
3. Open your gauges by turning their knobs
COMPLETELY counterclockwise, and
evacuation should begin. The gauges will
soon begin to dip below 0.
11
4. Wait for the vacuum pump to run for 30–45 minutes to evacuate the A/C system.
It’s NORMAL for a little steam to come out of the exhaust port, because it’s just the
condensation built up from the A/C system or the vacuum pump.
ALWAYS keep an eye on the reservoir window during evacuation. Stop the pump and
properly refill the reservoir if the oil level falls to MIN.
30-45
mins
12
7. Now continue the rest of your work. Your A/C system is ready to be recharged or repaired.
8. When you finish:
Disconnect the hoses from both ports on your A/C system and add their caps.
Disconnect the E/C hose from the pump.
For optimal use, disconnect the pump from power.
30
mins
5. Shut off the gauges and the vacuum pump by turning the knobs COMPLETELY clockwise and
flipping the pump’s power switch to O.
6. Wait another 30 minutes to confirm that there
is no leak in the system.
• If the needles stay the same, there is no
leakage and the vacuum is done.
• If the needles point at 0, there is a
leakage. Locate and fix the leakage.
This rarely happens if you have attached
the thread seal tape to all joints in
§4.1 Gauge Connection (Page 9).
13
5 Maintenance
5.1 General Maintenance
• ALWAYS disconnect this product from power and A/C systems BEFORE performing ANY
maintenance tasks.
Failure to do so can cause accidents, leading to equipment damage and personal injury.
• For tests or other purposes that require power or system connections to be restored,
wear INSULATED hand protection as well as ANSI or OSHA-compliant breathing and eye
protection.
• Be careful NOT to scrape or abrade the hoses and NOT to drop the pump or gauge set
on hard or rough surfaces.
• Disconnect the pump from power between uses and before undertaking any cleaning,
maintenance, or repairs.
• Clean the exterior of the pump with a soft damp cloth. DO NOT use harsh abrasives or caustic
chemicals.
• NEVER drop the pump on hard or rough surfaces.
• Clear any debris, dust, and oil off the external surfaces of the vacuum pump and other items as
needed after each use. DO NOT allow any electrical component to become wet or damp.
Recommended tools: Soft dry brush, soft damp cloth, ANSI or OSHA-compliant compressed air.
ALWAYS avoid direct pressurized spray. DO NOT flush or soak this product. NEVER use
abrasive or caustic cleaners.
• Check the vacuum pump and other items for any wear, damage, and malfunction after each
use.
If any part of the pump is damaged, worn, or shows signs of malfunction, repair or replace it
with a new identical part before further use, especially the filter.
• DO NOT dismantle the pump or gauge set WITHOUT professional training. ONLY trained
technicians should do repairs to the internal components.
• ANY consequences of arbitrary modification WILL void ALL warranties stated or implied.
• If the pump will not be used for an extended period, clean all items, seal all ports with their
protective caps, and store it and its accessories in a cool, dry, and clean place away from
flammables, explosives, caustics, and heat sources, and inaccessible to children.
14
5.2 Replacing Vacuum Pump Oil
Be mindful of the oil behind the reservoir window. If it turns turbid, replace it as follows.
Tools and Parts Needed
• The provided vacuum pump oil 46 or any other equivalent (ISO 100 or SAE 30)
• M4 hex wrench
1. Make sure the oil remains warm.
Note: If unsure, run the pump for about 10 minutes to heat the oil sufficiently. Remember
to deactivate and unplug the pump BEFORE continuing.
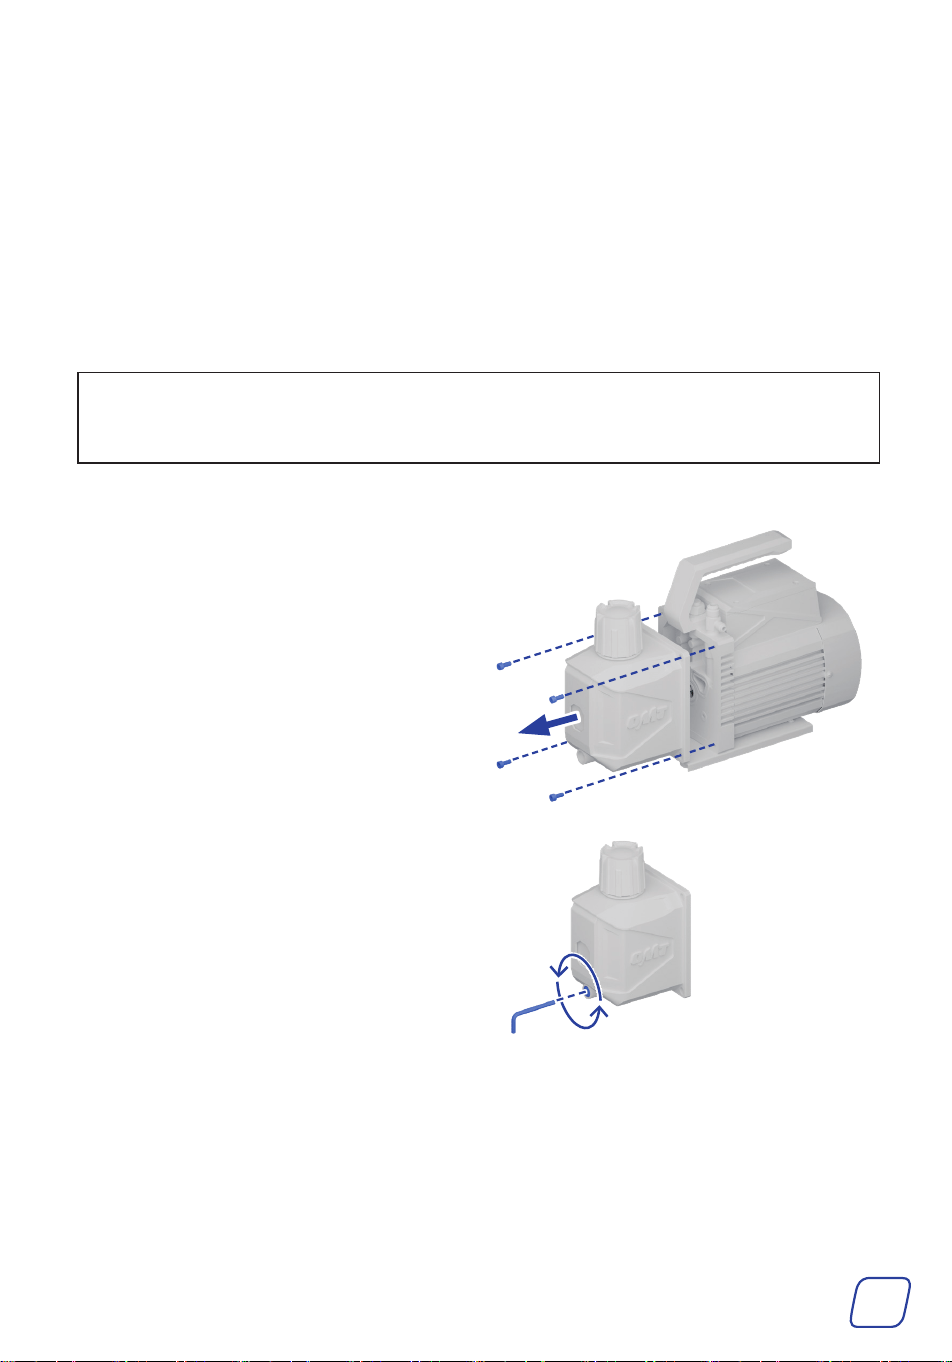
2. Remove the oil tank by removing the four bolts using a hex wrench.
3. Remove the oil drain cap using your M4 hex
wrench.
4. Drain the remaining oil into a suitable
container.
5. Refill the tank with new oil until the level is between the MIN and MAX height marks BEFORE
use.
6. Add the cap and the oil tank back into place.
15
6 Troubleshooting
Problems Solutions
Low Vacuum or
leakage
Check if the vacuum itself has leakage.
Remove the connected hose, turn on the pump, and close the gas
inlet ports.
• If oil mist continues to escape without any gas entering the pump,
it indicates a leak inside the vacuum pump. Do the following to
repair it:
a. Check if the gas inlet port is loose and tighten if so.
b. Check if the rubber ring in the gas inlet port is damaged and
replace if so.
c. Check if the oil inlet port is clean.
• If there is no continuous oil mist, check all connections, such as
the connecting hoses, the container, and if the O-rings on the
hoses are missing or damaged. There could also be a possibility of
leaks in the A/C system itself.
Check if the oil inlet of the pump is blocked or the oil supply is
insufficient.
Open the oil tank, clean the pump chamber inlet, and clean the oil
inlet and the filter.
Check if the pump oil is emulsified and unclean. If it is, replace the
oil.
Check the size of the vacuumed container, recalculate, and select the
appropriate type of pump.
Check if the gap caused by parts wear is increased. If it is, repair or
replace the pump.
Oil leakage
Check if the connections of the oil tank are loose or damaged. If they
are, retighten all bolts around the oil reservoir and adjust the O-rings.
Check if the pump’s support surface is flat and level.
Oil Ejection
Check if the oil is over the MAX mark. If it is, discharge the oil until
the level is between the MIN and MAX marks.
The inlet pressure is too high for a long time.
Choose the right pump to increase the pumping speed.
16
Problems Solutions
The vacuum pump
cannot turn on or it
automatically turns off.
The motor temperature is too high.
The thermal protector will deactivate your pump if its motor reaches
160 ° F (70 ° C). Wait about 15 minutes to let it cool down and
restart your pump.
The oil temperature is too low.
Move the pump to a warmer location and wait a while before
reactivating it.
Or, remove the gas inlet cap and the oil filter, and turn the fan blades
counterclockwise with a flat-head screwdriver. After the pump turns
on normally, add the gas inlet cap and the oil filter.
Check if the motor, power supply, or circuit board have problems. If
they do, have them repaired by technicians.
Check if some foreign matter dropped into the pump and remove if
any.
Check if your power supply is correct and functions well.
Check for damage to the power cable. If necessary, ask your local
dealer or contractor for a new identical replacement.
If both are fine, firmly reconnect the power cord to the power source
and inlet.
The overload protection occurs. If this is the case, keep the switch
on, remove the power cable, wait for about 30 seconds, check and
solve why the overload occurs, then replug in the power cable.
Oil Backflow
This pump is equipped with a simple anti-backflow device and
such device may experience backflow in actual applications with
a 5% probability due to factors such as pressure, impurities, and
obstruction.
After operation, disconnect the connection between the vacuum
pump and the gauge set or close the middle valve BEFORE turning
off the vacuum pump to prevent backflow.
Incompatible Gauges Replace with the compatible SAE parts.

Scan for the latest user manual
Rev. 11 Feb. 2025