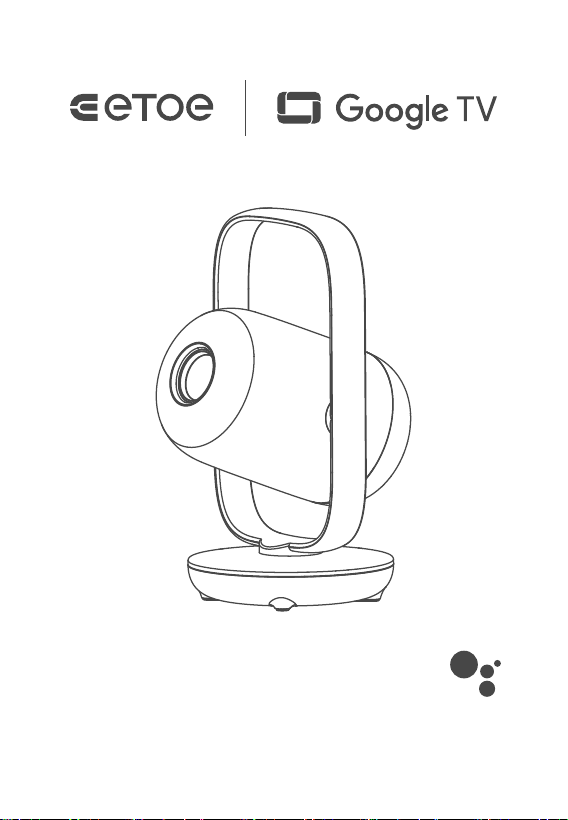
Starfish 2
User Manual
Hey
Google

Safety Instructions
Read all instructions before you use this device. Do not make any changes
that are not described in this manual. If physical injury, loss of data, or damage
is caused by failure to follow instructions, the warranty does not apply.
Setup
• To reduce the risk of fire and/or electric shock, do not expose the device to
rain or moisture, and objects filled with liquids, such as vases, should not
be placed on the device.
• Do not place the device in areas susceptible to excessive dust and dirt or
near any appliance generating a strong magnetic field.
• To prevent overheating, do not block or clog the ventilation openings.
Never place the device in a confined space. Always leave enough
space around the device for ventilation.
• Protect the device against direct sunlight, heat, large temperature
fluctuations and moisture.
• When the device runs for a long period of time and the surface
becomes hot, shut it down and unplug the power cord.
Resume operation only after the device has cooled.
• Always handle the device with care. Avoid touching the lens.
• Never place heavy or sharp objects on the device or the power cord.
To avoid electric shock, do not disassemble.
• Only use attachments or accessories specified by the manufacturer.
Avoid extreme vibration. It may damage the internal components.
Do not allow children to handle the device without supervision.
• Under the following conditions, a layer of moisture can appear inside
the device which can lead to malfunctions:
To avoid any moisture, seal the device in a plastic bag before moving it
to another room, and wait for one to two hours before you take it out of
the bag.
• Do not place the device on soft surfaces such as tablecloths or carpets
as doing so could be a fire-hazard.
a) if the device is moved from a cold to a warm area;
b) after a cold room is heated;
c) when the device is placed in a damp room.
EN
01
EN
01

Power Supply
• Use only the provided power adapter.
• Power off the device before removing the power supply from the socket.
• Protect the power cord from being walked on or pinched, particularly
at plugs, convenience receptacles, and the point where they exit from
this device.
• Unplug this device if there are lightning storms or when unused for a
long period of time.
• Where the power plug or an appliance coupler is used as the
disconnect device, the disconnect device shall remain readily
operable.
• Before you make or change any connections, ensure that all devices
are disconnected from the power outlet.
• Do not touch the power cable or the power connector with wet hands.
Hearing Safety
• To avoid hearing damage, do not listen for extended periods at high volume.
Set the volume at a safe level.
Cleaning
• Power off the device and remove it from the power supply before cleaning
the surface.
• Use a soft, lint-free cloth. Never use liquid, gaseous, or easily flammable
cleansers (like sprays, abrasives, polishes, and alcohol). Wipe over the
surfaces gently. Be careful that you do not scratch the surfaces.
• Do not use any liquid cleaning agents to clean the lens as they may
damage the protective coating on the lens. Use lens cleaning paper
to clean the lens of the projector.
Repairs
• Do not make any repairs to the device by yourself. Only have your device
repaired by an authorized service center.
• Improper maintenance can result in injuries or damage to the device.
• Refer all servicing to qualified service personnel.
Caution
• Do not stare at operating beam, the bright light may hurt your eyes.
EN
02
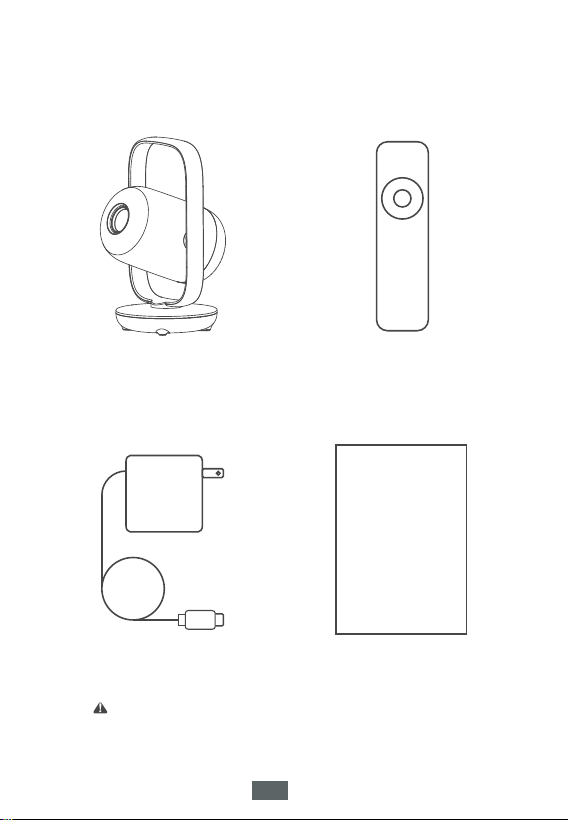
What’s Included
Projector Remote control
Power Adapter
User manual
ENENEN
03
EN
User manual
Note: The TV stick is already installed inside the product.
EN
04
EN
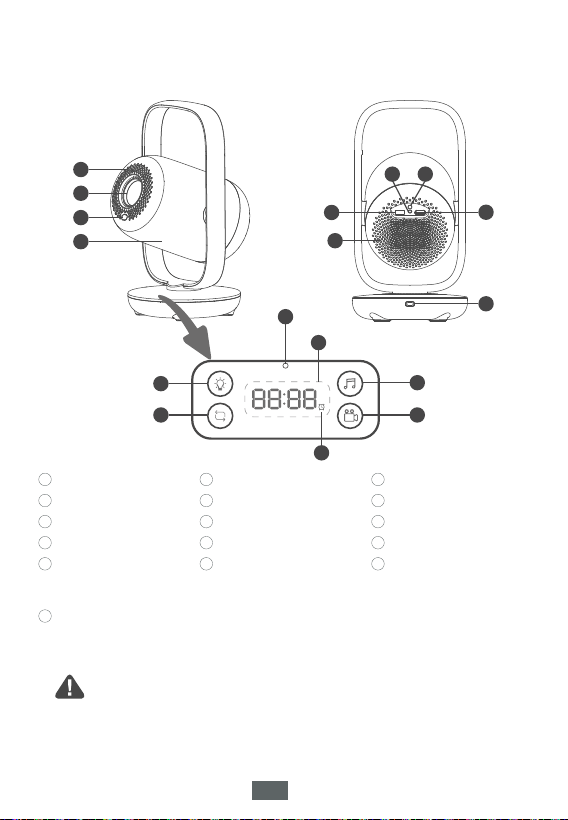
Autofocus Sensor
Aux Port
Lens
USB Port
HDMI Port
Air ventilation(Outlet)
Clock Bluetooth speaker
Alarm Clock Indicator:
On: Alarm is set
Off: Alarm is not set
Ambient Light Button:
Short press: Changes light
color/style
Long press: Switches between
solid color and
dynamic modes
Projector Button
Ambient Lighting
Type C-inIR receiver
• Do not look into the lens directly to avoid harm for your eyes.
• Do not block the air ventilation(Outlet).
• The alarm clock function only works when the power is on.
• Keep the power on to ensure accurate time display.
Attention:
Overview
1
4
7
10
13
Status indicator light:
Red: Standby
Green: Projector is operating
Blue: Bluetooth speaker is operating
16
2
5
8
11
14
Ambient light brightness:
Press to switch brightness:
Brightest -> Medium ->
Darkest -> OFF
15
3
6
9
12
3
5
4
9
8
11
10
16
13
12
6 7
2
1
1
15
14
EN
05
Remote Control
Note:
• Install batteries before use.(Batteries not included).
• Please pair the remote control for a better experience.
• The distance between the remote and the projector should not exceed 10 m / 33 ft.
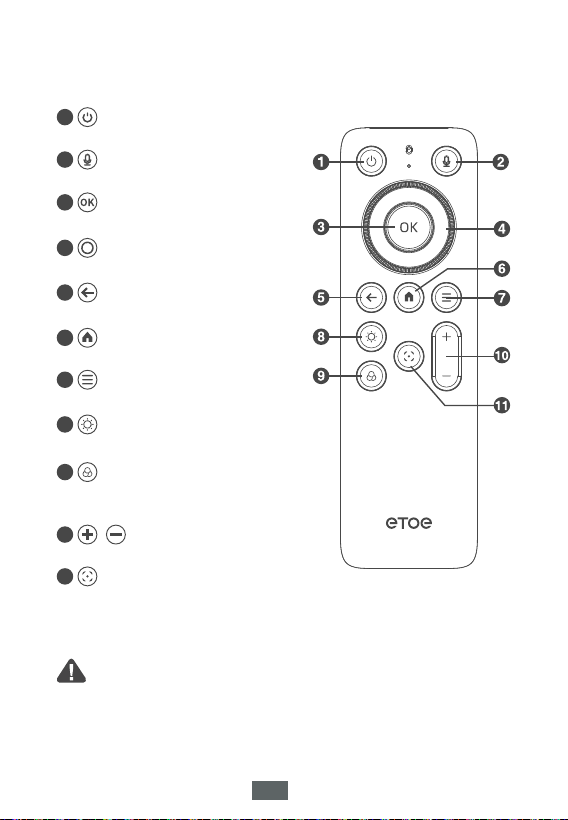
• Press the button once: Power on
• Press the button twice: Power off
Activate Google Assistant
Projector settings
Press to confirm a selection or entry
Navigate through menus or adjust
selected content
Return to the previous page
Go to TV homepage
Volume up/down
Adjust the focus
1
2
3
4
5
6
7
8
9
10
11
Press to switch Ambient light brightness:
Brightest -> Medium -> Darkest -> OFF
Ambient Light Button:
Short press: Changes light color/style
Long press: Switches between solid
color and dynamic modes
Getting Started
Placement
Position the projector so that it is facing toward the projection surface to
get a rectangular picture.
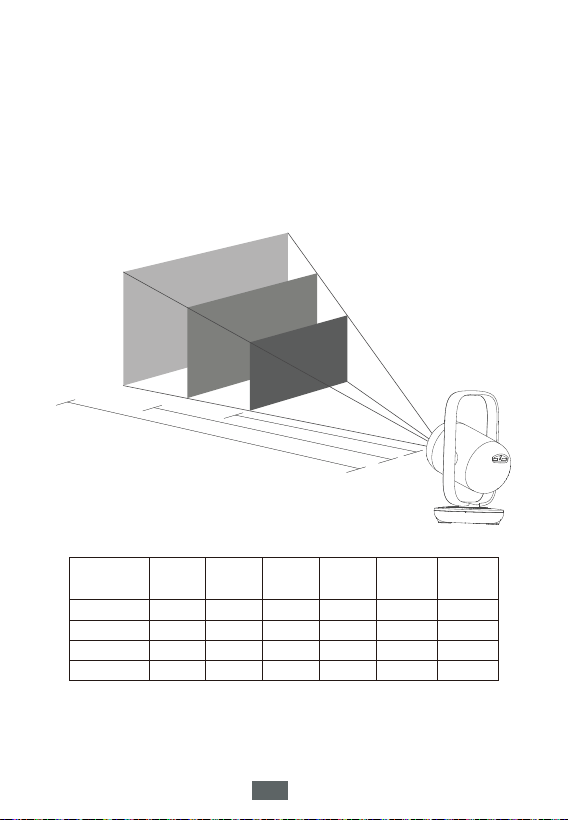
The distance between the projector and the projection surface will
determine the size of the picture.
Check the projection distance and screen size in the Specifications section.
Make sure there are no obstacles within 30 cm/11.8" blocking the vents.
•
The Projection distance should be between 1.5 m and 4.5 m.
EN
06
100“
80“
60“
1.62m
2.16m
2.70m
5 16275291335260
80
100
120
70
87
105
177
221
266
39
49
59
100
125
149
7
9
11
216
270
324
Screen size
(inch)
Width
(inch)
Width
(cm)
Height
(cm)
Distance
(cm)
Distance
(ft)
Height
(inch)
①
②
③
④
Ambient Lighting
EN
07
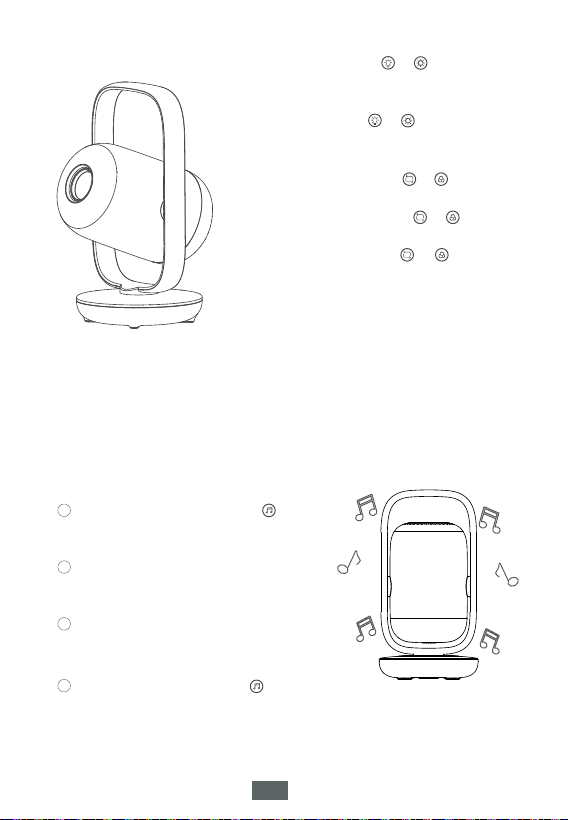
Note: You can use ambient
light without turning
on the projector.
Pro Tip: You can use the Bluetooth
speaker mode independently
without turning on the projector.
Brightness Adjustment
In Solid Color Mode: Press or to cycle
through brightness levels: Brightest -> Medium
-> Darkest -> OFF.
In Dynamic Mode: Press or to toggle the
light ON or OFF.
Ambient Light Modes
Switching Modes: Press and hold or to toggle
between Solid Color Mode and Dynamic Mode.
In Solid Color Mode: Short press or to
change the light color.
In Dynamic Mode: Short press or to switch
between lighting styles.
Available Styles:
•Aurora: A vibrant, flowing light effect.
•Sunrise: Simulates a sunrise effect (approx. 10 minutes).
•Dynamic: Syncs with audio playback for a rhythmic light show.
•Sleep: Simulates a sunset effect to help you wind down
(approx. 10 minutes).
•Candle: Simulates the warm, flickering glow of a candle.
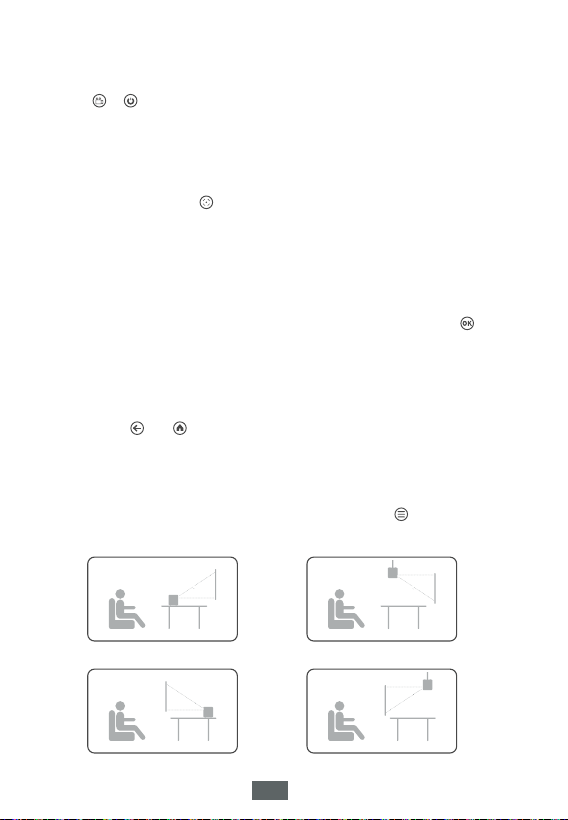
Bluetooth speaker
This product can also be used as a high-quality
Bluetooth speaker. To enable this feature:
Enter Bluetooth Mode: Press the button.
The power indicator light will turn blue,
signaling it is ready to pair.
1
Exit Bluetooth Mode: Press the button
again. The Bluetooth speaker mode will
turn off, and the power indicator light will
switch back to green.
4
Connect Your Device: On your phone or
tablet, go to Bluetooth settings and select
“Starfish 2” from the list of available devices.
2
Play Music: Once connected, you can play
music and adjust the volume directly from
your phone.
3
EN
08
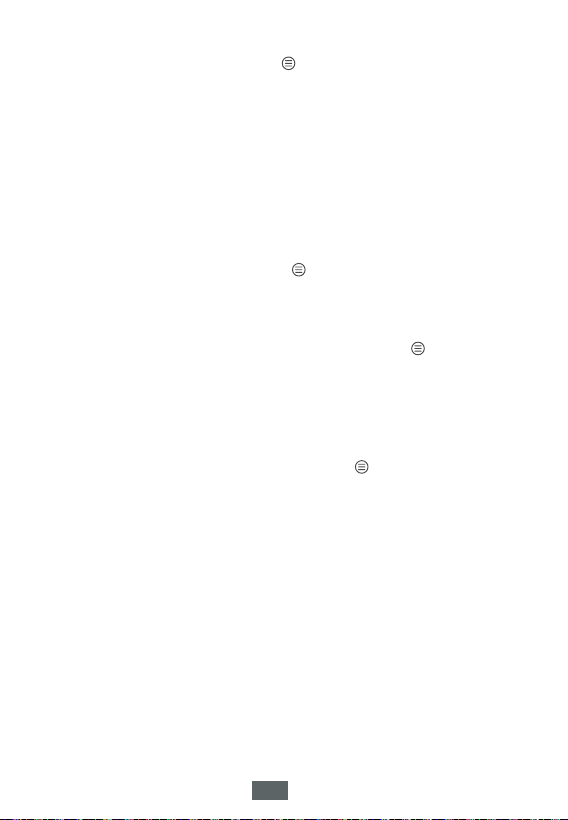
Front Projection Front Ceiling
Rear CeilingRear Projection
Projector Functions
Power ON/OFF
Press or to turn the projector power on or off.
Note: You can use Ambient Light Mode and Bluetooth Speaker Mode even
when the projector is turned off.
Focus Adjustment
• Auto Focus: The projector will automatically adjust the focus when moved.
• Manual Focus: Use the buttons to fine-tune the image clarity.
• Surface Quality: Image sharpness depends on the projection surface.
A smoother surface will result in a clearer image.
• Projection Distance: For best results, keep the projector within a range
of 1.5m – 4.5m.
Language Selection
Use the Arrow Keys to highlight your preferred language and press the button
to confirm.
Remote Control Pairing
Pairing the remote control will improve the operating experience:
① Hold the remote control near the projector.
Press the and buttons at the same time for about ten seconds.
"Successful" will appear on the screen when your remote control has paired
with the projector.
②
③
Projection Modes
This product supports multiple projection modes. Press the button and select
[Projection Mode] to set.
ENEN
09
EN
Digital Zoom
Without moving the projector, press the button on the remote. Navigate to
[Picture] -> [Zoom Screen] to adjust the screen size.
Auto Keystone Correction
The projector automatically corrects image distortion when moved. The quality of
the correction depends on the surface texture and projection angle. A smoother
surface and a smaller projection angle will yield the best results.
Optimal Range: For the best viewing experience, maintain a projection distance
of 1.5m – 4.5m and an angle within ±30°.
Manual Keystone Correction
If further adjustment is needed, press the button and navigate to [Picture]
-> [Manual Keystone] to manually align the image.
Image Reset
To restore all image settings to their factory defaults, press the button and
select [Picture] -> [Screen Reset].
Language Settings
System Language: Go to the TV settings menu, then navigate to [System]
-> [Language] to select your display language.
Projector settings menu language settings: Press the button, select [General]
-> [Language Settings], and then select the language in projector settings.
HDMI Plug and Play
When this feature is enabled, the system will automatically switch to the HDMI
input channel as soon as an HDMI signal is detected.
EN
10
EN
Special Features
Starry Night
To transform your room with the stars:
Press the button and Navigate to [Dream Space] -> [Starry Night] to activate.
Ambient Lighting Settings
To customize your atmosphere, press the button and navigate to [Dream Space]
-> [Lighting Settings] to access the ambient light control interface.
Clock Configuration
Press the button and navigate to [Dream Space] -> [Clock Settings] to access
the Clock & Alarm control interface.
• Display Clock: Use the [Turn on display] option to toggle the clock on the base
of the machine.
• Accuracy Tip: To maintain the correct time, please keep the device connected
to power.
• Resetting: If the device has been unplugged for an extended period, please
reset the clock before use.
Alarm Setup
Navigate to [Dream Space] -> [Clock Settings] to enter the Clock & Alarm control
interface.
• Enable Alarm: Toggle the [Alarm Clock] option to turn your alarms on or off.
• Wake-up Experience: When the alarm goes off, the projector will automatically
turn on and project a Sunrise scene.
• Power Requirement: The device must be connected to a power source for the
alarm clock to function properly.
Starry Night Settings
While in Starry Night Mode, press the button to open the settings menu.
Here, you can:
• Select your preferred display style.
• Adjust the brightness in Starry Night mode.
• Set a sleep timer (auto-shutdown).
Note: The shutdown timer set here applies only to Starry Night Mode.
EN
11
EN
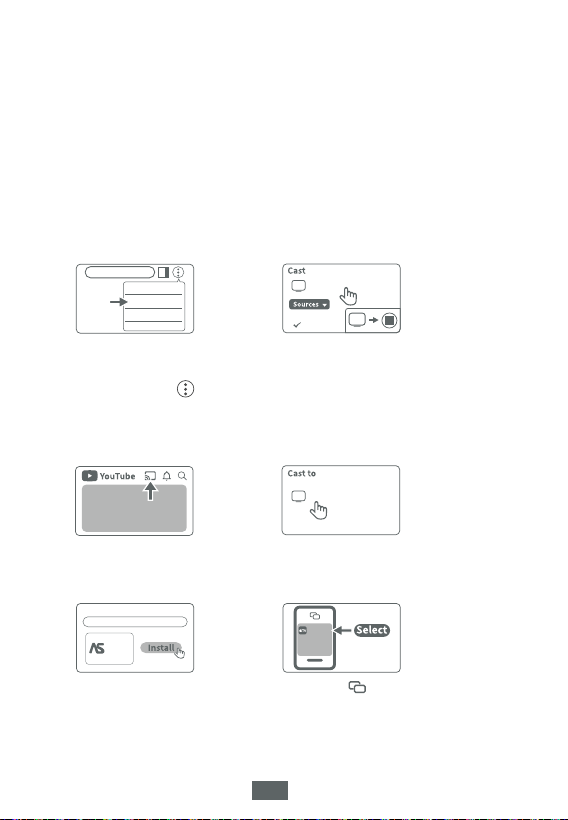
Google Cast ™
To ensure a smooth wireless connection between your device and the projector:
• Wi-Fi Network: Make sure both your device (phone, tablet, or laptop) and the
projector are connected to the same Wi-Fi network.
• Custom Names: You may have renamed the projector during the initial TV setup.
When starting a wireless projection, simply select the name you assigned to the
device. By default, the projector’s name is “D2861”.
Google Cast-enabled TV devices
Make sure devices are connected to the same Wi-Fi network.
①
Click the Cast button and select D2861.
②
Google Cast-enabled iOS Device
AirScreen - AirPlay & Cast
AirScreen
Install AirScreen in the
projector from the Apps page
.
①
Open the AirScreen app on the
projector and follow the on-screen
instructions.
②
③
Click the button on your iOS
device and select D2861.
Google Cast-enabled Sites/Apps
Click on the Cast button
on the website/app.
①
Select D2861.
②
Google Cast-enabled computer
www.xxxx.com
Cast...
Print...
Find...
Available
Cast tab
Cast screen
Install Google Chrome on
your computer and open it.
①
Select D2861.
③
Click "Cast" in the , menu on the top right,
then go to the Sources menu and choose whether
you want to cast a tab or the whole screen.
②
D����
D����
D����
EN
12
EN
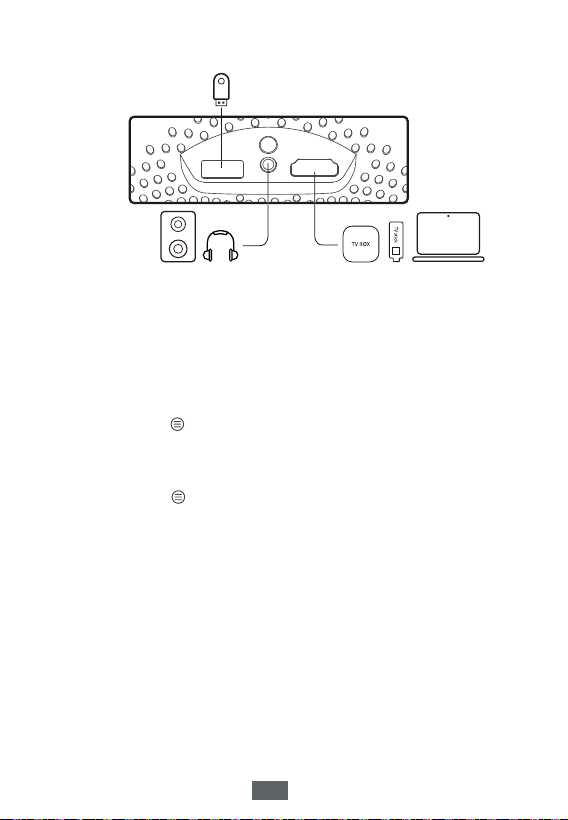
Wired Connections
1. Connect to an HDMI Playback Device
2. Connect to a Flash Drive
① Plug in the USB storage device.
②
③ Select the file you plan to play from the file and folder menu.
3. Connect to a Headphone via AUX Cable
You can connect a headphone or speaker to Projector via AUX cable as well.
① Plug in the 3.5mm AUX cable connector to projector AUX port.
② Plug the other connector of the 3.5mm AUX cable to your headphone or
speaker.
③ Play your media on projector.
This projector supports connections with various HDMI playback devices such
as PC, TV stick, TV box, DVD player, set-top box (STB), game console or other
devices.
①
Connect this projector to an HDMI playback device with an HDMI cable
(not provided).
② Press the button on remote control, and select [Signal Source]->[HDMI].
Press the button on remote control, and select [Signal Source]->[USB].

FCC Statement
This equipment has been tested and found to comply with the limits for a Class B
digital device, pursuant to part 15 of the FCC rules. These limits are designed to
provide reasonable protection against harmful interference in a residential installation.
This equipment generates, uses and can radiate radio frequency energy and, if not
installed and used in accordance with the instructions, may cause harmful
interference to radio communications. However, there is no guarantee that
interference will not occur in a particular installation. If this equipment does cause
harmful interference to radio or television reception, which can be determined by
turning the equipment off and on, the user is encouraged to try to correct the
interference by one or more of the following measures:
-Reorient or relocate the receiving antenna.
-Increase the separation between the equipment and receiver.
-Connect the equipment into an outlet on a circuit different from that to which the
receiver is connected.
-Consult the dealer or an experienced radio/TV technician for help.
To assure continued compliance, any changes or modifications not expressly
approved by the party.
Responsible for compliance could void the user’s authority to operate this
equipment. (Example- use only shielded interface cables when connecting to
computer or peripheral devices).
This equipment complies with Part 15 of the FCC Rules. Operation is subject to
the following two conditions:
(1) This device may not cause harmful interference, and
(2) This device must accept any interference received, including interference that
may cause undesired operation.
FCC Radiation Exposure Statement:
The equipment complies with FCC Radiation exposure limits set forth for
uncontrolled environment. This equipment should be installed and operated
with minimum distance 20cm between the radiator and your body.
• Google TV is the name of this device's software experience and a
trademark of Google LLC. Google, Google Home, Google Chrome,
Google Cast and other marks are trademarks of Google LLC.
• Netflix is a trademark of Netflix, Inc.
• Manufactured under license from Dolby Laboratories. Dolby,
Dolby Audio and the double-D symbol are trademarks of Dolby
Laboratories Licensing Corporation.
• The terms HDMI, HDMI High-Definition Multimedia
Interface, HDMI Trade dress and the HDMI Logos are trademarks
or registered trademarks of HDMI Licensing Administrator, Inc.
Copyright Notice
• All brands contained herein are trademarks of their respective owners.
Product name: ETOE Starfish 2 Projector
Model: R2T
Manufacturer: Shenzhen Etoe Technology Co.,Ltd
Address: 201,No.36,Hezhou Road, Hangcheng Street, Baoan District, Shenzhen,
Guangdong, China.
E-mail: [email protected]
All rights reserved. ETOE and the ETOE logo are trademarks of HUNAN ETOE Technology
Co., Ltd, which is registered in the United States and other countries. All other
trademarks are the property of the irrespective owners.
5400123