VN:241207
Camera Setup
Instruction
If you may need any technical support,
please contact us at [email protected]
Model:S103

- 01 -
1. Warm tips before installing ................. 02
2. Product View ..................................... 03
3.LED Indicator Light ..............................04
4.More Operation Video on YouTube ......05
5.Download and install the App ...............05
6.Camera setup ...................................... 06
7.Add your camera to a WiFi network . 07-30
8.Add your camera without a WiFi network
........................................................ 31-43
9.Delete your camera .............................43
10.Intelligent Detection settings ..............43
11.Detection Message Push ................... 43
12.Recording Settings ............................44
13.SD Card Status ................................. 44
14.Screen settings ..................................45
15.Timing settings ..................................45
16.Share your camera ............................45
17.How to reset your camera? ................46
18.How do I save the videos from cloud
storage and SD cards to my phone’s
gallery? .............................................. 46
19.Troubleshooting ............................. 47-48
20.Warranty & Technical Support ....... 49-50
CONTENT

- 02 -
1. Warm tips before installing
1. Please carefully read the manual before
setting up your camera. This manual will
quickly help you to add your camera.
2. The camera can only be set up with a
2.4g Wi-Fi network. (You can use a 4G/5G
mobile network to view live video after the
camera is set up with a
2.4g Wi-Fi network first.)
3. Recommend using San-Disk brad Micro
SD card and install the Micro SD card, then
turn on your
camera. (Micro SD card is not included
in the package)
4. Make sure the distance between your
phone, router, and camera is no more
than 1.5 feet when you're ready to pair the
camera. Ensure that the Wi-Fi signal
strength on your phone is good.

- 02 -
1. Warm tips before installing
5. Camera overheating? Yes, it's normal for
your camera to get hot. Your phone's
temperature will also increase when you
use it for prolonged
periods.
6. The camera has no night vision function,
so it can't work in low or dark light.
- 03 -
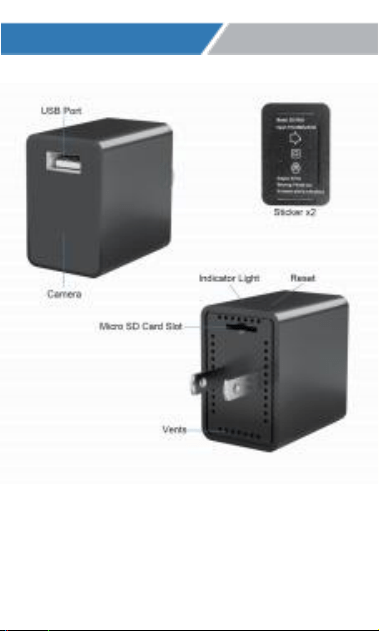
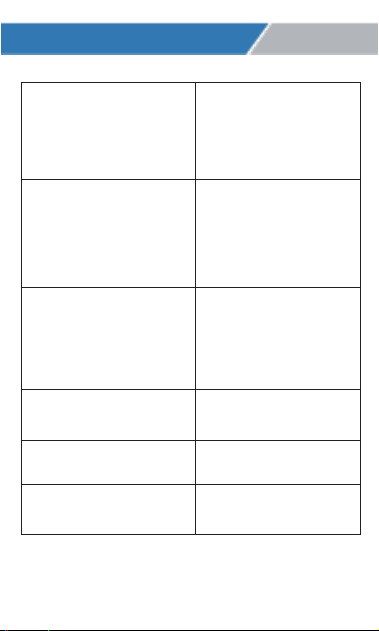
2.Product View
- 04 -
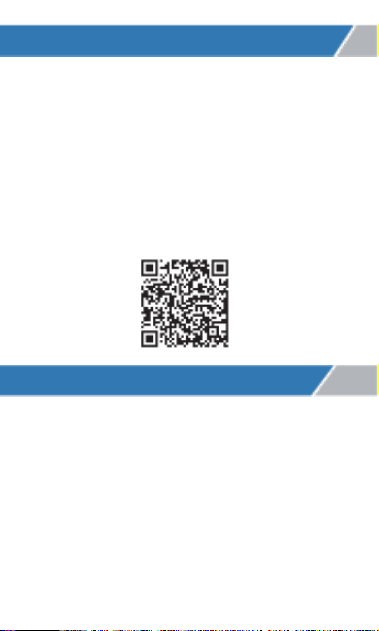
3.LED Indicator Light
Blue light blinks
quickly Red light
turns off
Network is being
configured
Solid Blue light
Red light turns off
Network
configuration
success
Blue light blinks
quickly Solid Red
light
Network
connection
abnormal
Blue light turns off
Red light blinks slowly
Reset successful
Solid green light
Charging
Green light turns off
Charging finished
- 05 -
4.More Operation Video on YouTube
Please watch the YouTube video below to
help you to install the camera.
Enter the website:
https://www.youtube.com/@HomeEeyCamera
Or scan the QR Code through your cell
phone browser,such as Google:
5.Download and install the App
Please locate the“HomeEye”in your Google
Play store or iPhone App Store to
download the
HomeEye App.

- 05 -
NOTE: Please allow all tips when you
launch the app for the first time.
Otherwise, the app may not work correctly.

- 06 -
6.Camera setup
A. Insert a Micro SD card into the SD Card
slot. Recommend using San Disk brand.
Your camera may not record video to an
SD card while you
using a poor-quality SD card.
B. Please plug your camera into a power
outlet, then wait for the red indicator light
to blink slowly. If the red light doesn't blink
slowly, please press and hold the reset
button for 10s.

- 07 -
Methon-1:Add your camera through AP
Connection This connection method is
applicable to all devices.
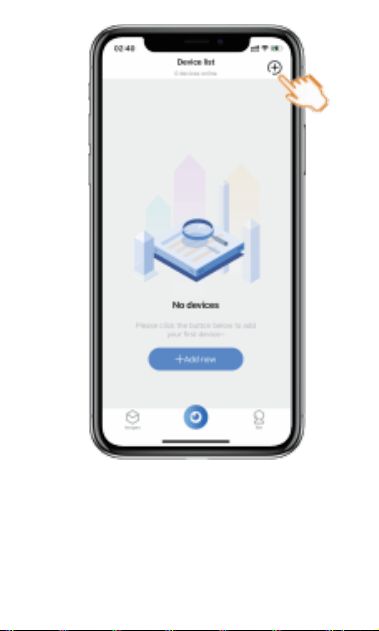
A: Launch the App, then tap the “+” button
7.Add your camera to a WiFi
network (Remote Mode)
- 07 -
- 08 -
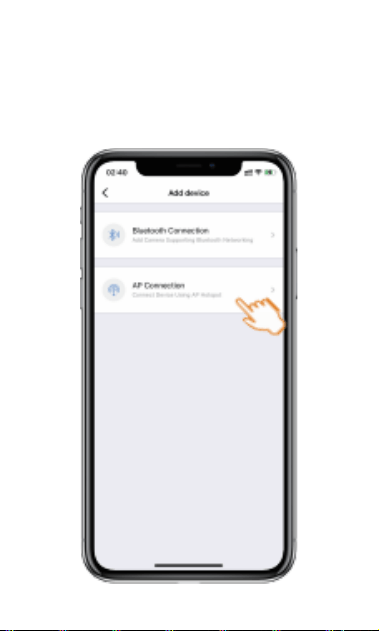
B: Tap the “AP Connection” button.

- 09 -
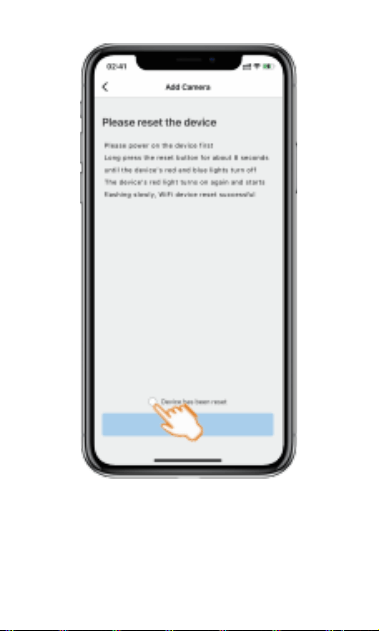
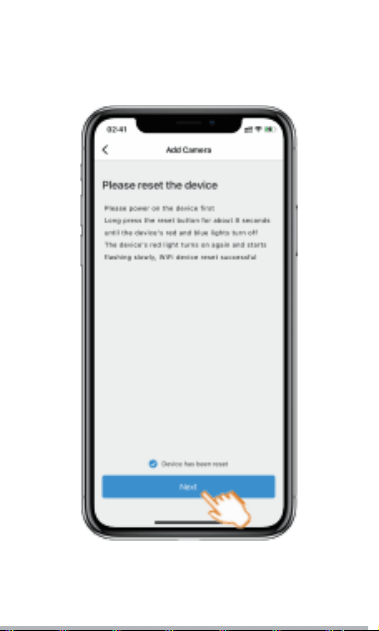
C: Tap the “ Device has been reset”
button and “ Next” button.
- 09 -
- 10 -

- 11 -
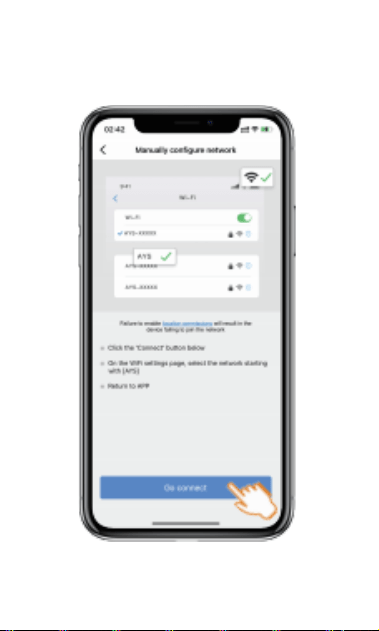
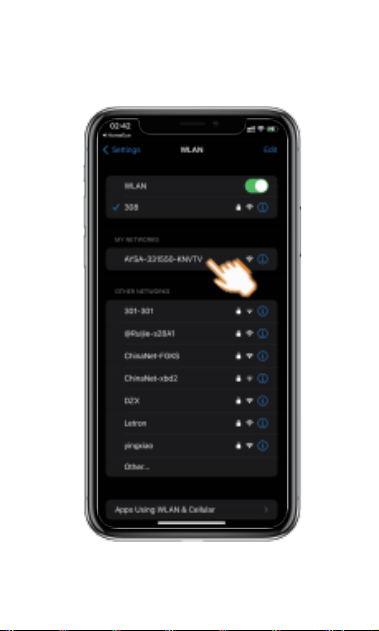
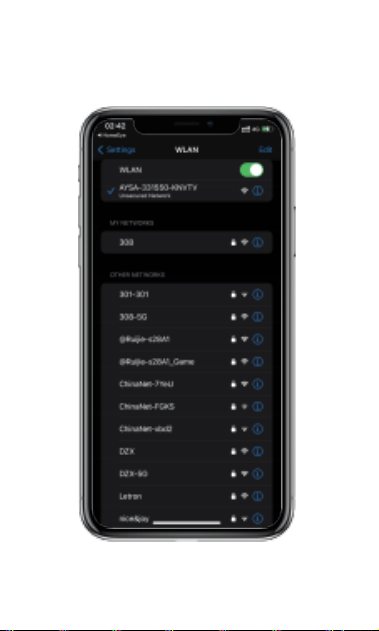
D: Tap the “Go connect” button and enter
your
phone WiFi/WLAN settings page. Then
connect to Wi-Fi name starting with "AYS-
xxx" . This is your
camera’s hotspot.
Note:
1.Your phone's location services need
to be enabled.
2.If you use an Android phone, a warning
window may pop up saying that "Internet
unavailable".
Ignore the message and keep on the
current network connection. Then go to
the next steps.
3.If you use an iPhone, a warning window
may pop up saying "Unsecured Internet".
Ignore the

- 11 -
message and keep on the current
network connection. Then go to the
next steps.
- 12 -
- 13 -
- 14 -
- 15 -
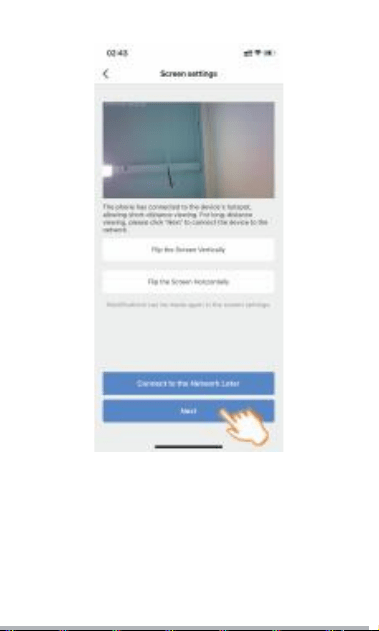
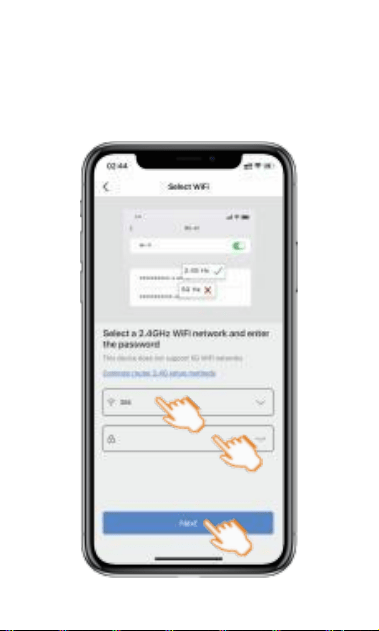
E: Return back the Application page. Then
tap the “ Next” button, and select a 2.4G
WiFi network and enter related
password.Then tap the “ Next”
button.
- 15 -
- 16 -
3
2
1

- 17 -
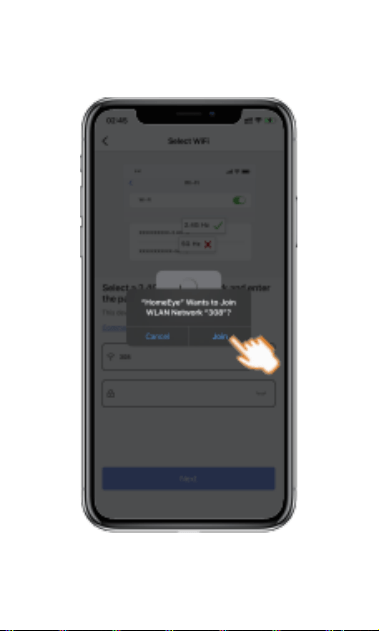
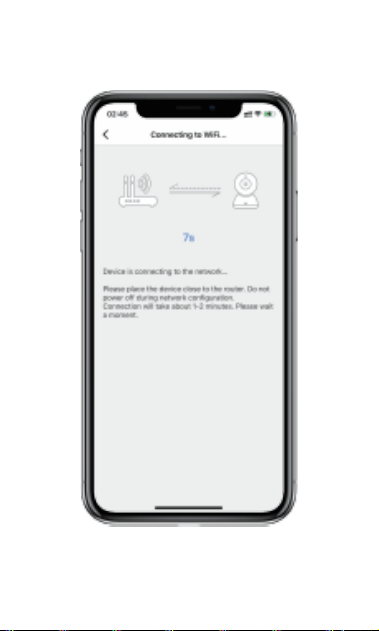
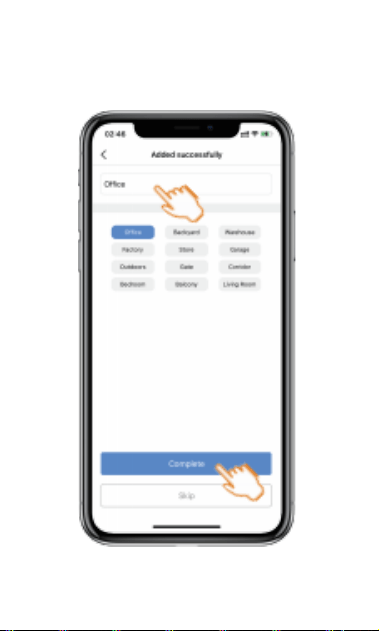
F: Your phone will get a tip “ HomeEye”
Wants to join WLAN network, then tap the
“Join” button. Then wait for a while, the
camera will be added successfully. Then
give your camera a name and tap the
“Complete” button.
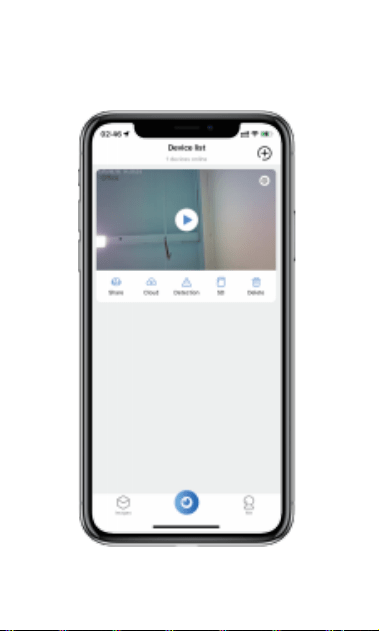
Now you have successfully configured the
wireless settings for your cameras on the
"HomeEye" app. You can monitor your home
from anywhere,
anytime.
- 18 -
- 19 -
- 20 -
1
2
- 21 -
- 22 -
Methon-2:Add your camera through Bluetooth
Connection
This option is only supported by devices with
Bluetooth functionality.
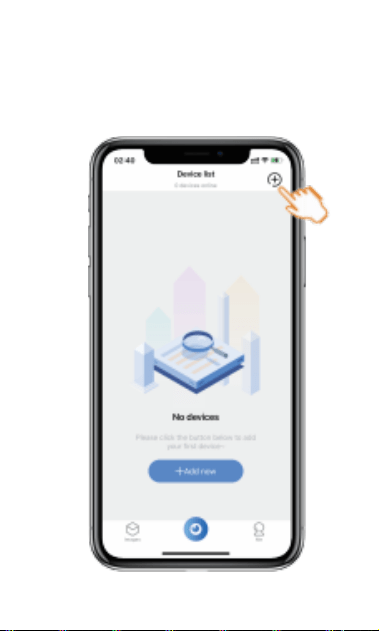
A: Launch the App, then tap the “+ ” button
- 23 -
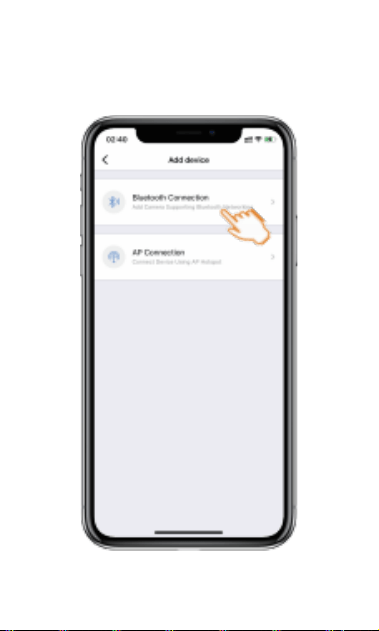
B: Tap the “ Bluetooth Connection” button.
Note: You should turn on your phone’s
Bluetooth.

- 24 -
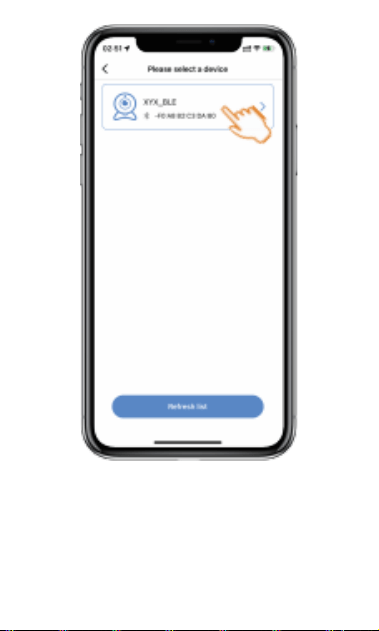
C: Select your camera ID and go to next
steps. If you can’t find the Bluetooth
device, please go back to the previous
device addition page, then tap the “AP
Connection” to add the camera.
- 24 -

- 25 -
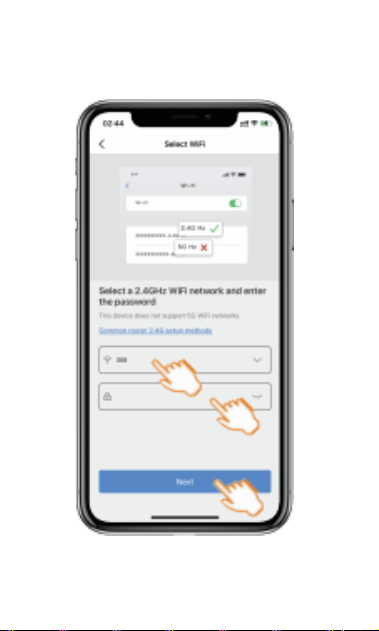
D: Select a 2.4G WiFi network and enter
related password.Then tap the “ Next”
button.
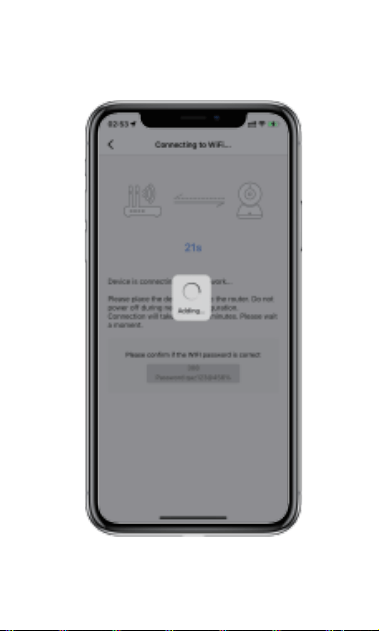
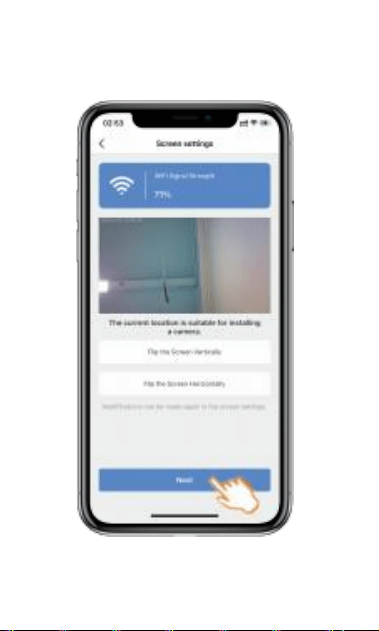
Then wait for a while, your camera will be
added successfully. Then tap the “ Next”
button.
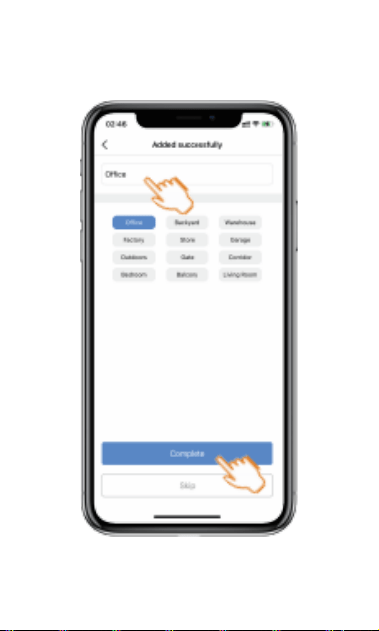
Please give your camera a name and
tap the “Complete” button.
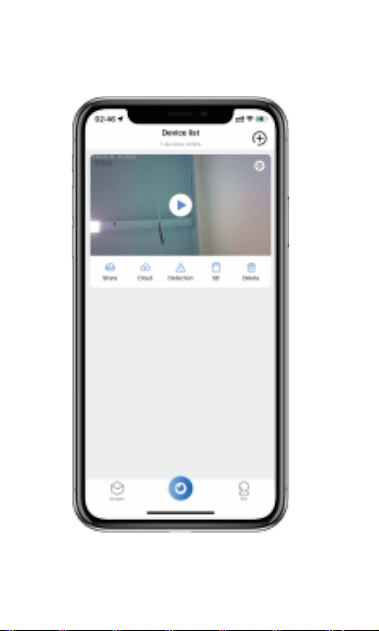
Now you have successfully configured the
wireless settings for your cameras on the
"HomeEye" app. You can monitor your
home from anywhere, anytime.
- 26 -
1
2
3
- 27 -
- 28 -
- 29 -
2
1
- 30 -

- 31 -
8.Add your camera without a
WiFi network (AP mode)
AP Mode: Your phone connects to the
camera's hotspot, and then you are able
to access the
camera at a short distance. But you can't
remote access your camera on the app.
It's very convenient when there's no WiFi or a
terrible network in someplace. If you want
to view or set the camera, you can connect
to the
camera's hotspot; if not needed, your
phone can disconnect from the camera's
hotspot.
- 32 -
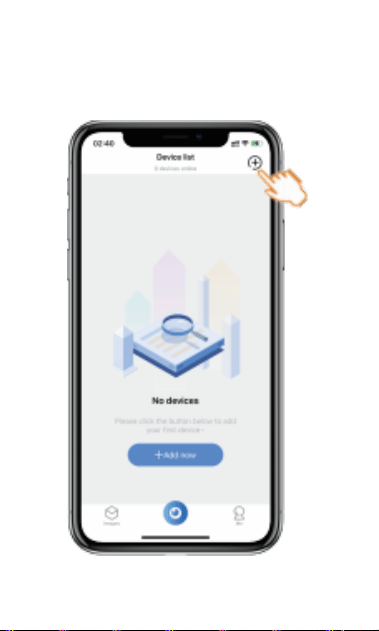
A: Launch the App, then tap the “+ ”
button
- 33 -
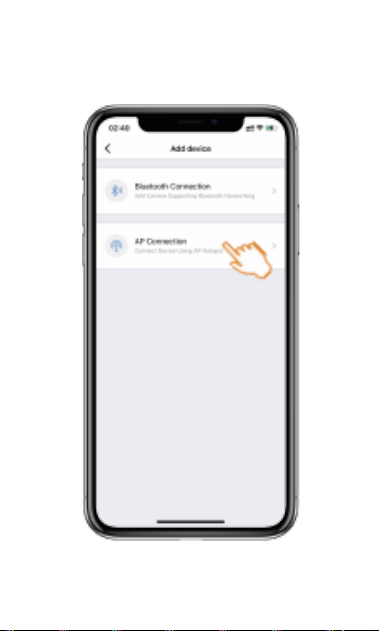
B: Tap the “AP Connection” button
- 34 -
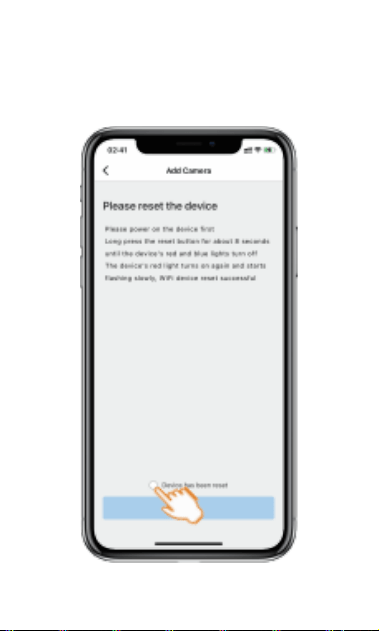
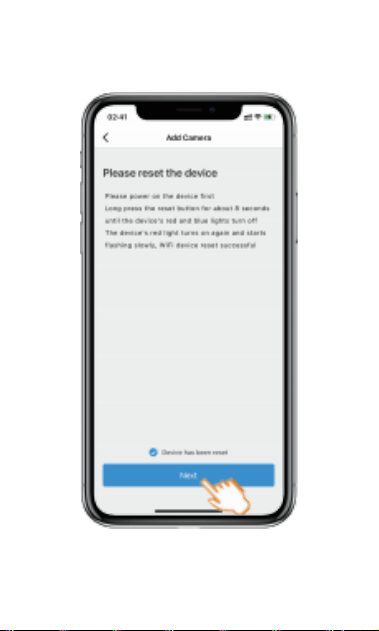
C: Tap the “ Device has been reset”
button and “ Next” button.
- 35 -

- 36 -
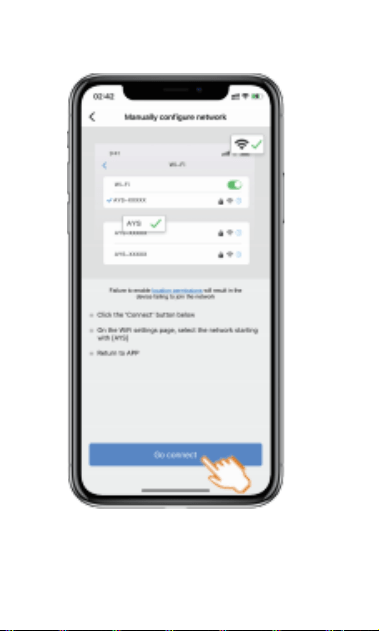
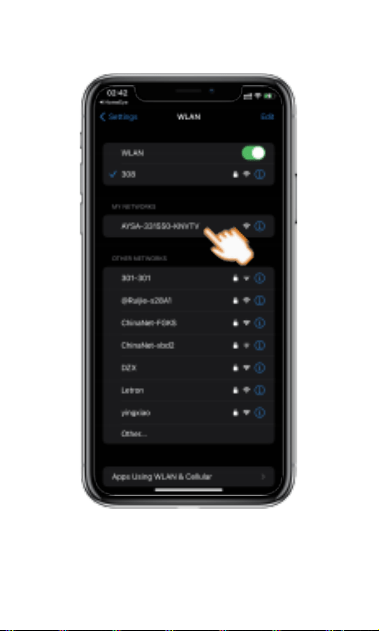
D: Tap the “Go connect” button and enter
your
phone WiFi/WLAN settings page. Then
connect to Wi-Fi name starting with "AYS-
xxx" . This is your
camera’s hotspot.
Note:
1.Your phone's location services need
to be enabled.
2.If you use an Android phone, a warning
window may pop up saying that "Internet
unavailable".
Ignore the message and keep on the
current network connection. Then go to
the next steps.
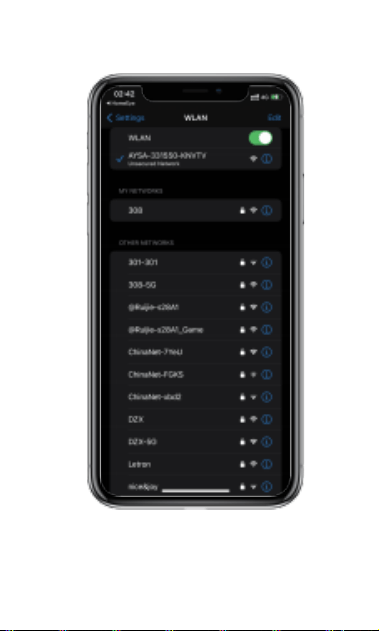
3.If you use an iPhone, a warning window
may pop up saying "Unsecured Internet".
Ignore the

- 36 -
message and keep on the current
network connection. Then go to the
next steps.
- 37 -
- 38 -
- 39 -

- 40 -
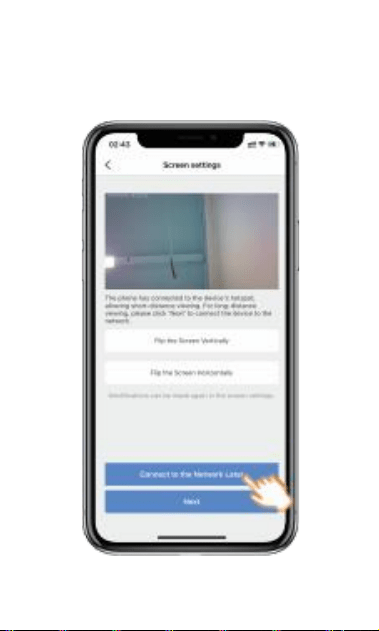
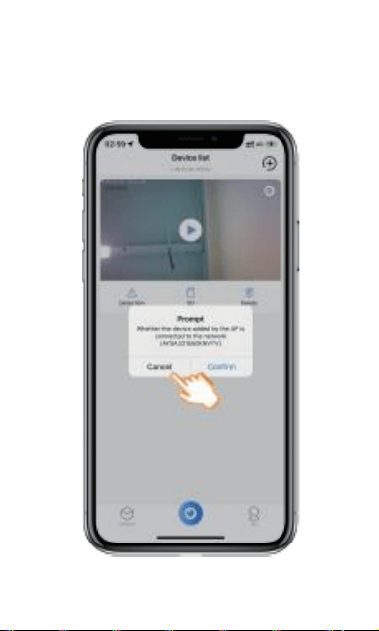
E: Return back the Application page. Then
tap the “Connect to the Network Later”
button. Then you will get a tip “Whether the
device added by the AP is connected to the
network”.
1.If you want to remotely view the live video,
please tap the "confirm" button to go to
the next steps.
2.If you don't want to remotely view the live
video, please tap the"Cancel " button. Now,
you can also view the live video or set up your
camera at a short distance without a Wi-Fi
network.
- 41 -
- 42 -

- 43 -
Waring
Tips:
If you exit the app from the background, you will
need to re-add the device the next time you open
the app.
If you no longer wish to view the device,
disconnect your phone's Wi-Fi from the camera's
hotspot. When you want to access the device
again through the app, simply follow the steps
above to re-add the device.
9.Delete your camera
For security purposes, when you no longer need
the camera, you can tap the "Delete" button to
unbind the device.
10.Intelligent Detection settings
You can select "Human Detection," "Motion
Detection," or "Disable Detection" based on your
preference.
11.Detection Message Push
If you don’t want your phone to receive push
notifications, you can disable this function.

- 44 -
12.Recording Settings
Full day recording: Records continuously
throughout the day, ensuring you
capture all activity at any time.
Timed recording: Records video only during
specific, pre-set times, helping to save storage
and focus on important hours.
Alarm recording: Automatically records when
motion is detected, providing footage of
specific events triggered by motion
detection.
SD Card Recording Duration (Minutes):
You can choose between 5 to 15 minutes.
Loop Recording: Once the storage capacity
is full, the camera automatically overwrites
the oldest footage, ensuring continuous
recording without interruption.
13.SD Card Status:

- 44 -
When it displays "normal", your camera
detects the SD card;
When it displays "abnormal", your camera
doesn't detect the SD card. You need to tap
the "Format SD Card" button or you need
to replug the SD card or you need to change
to another top-quality SD card with class
10 and above. Recommend using SanDisk
Micro SD card.
- 45 -
14.Screen settings
Enter the camera’s live page, then tap the “
” button. You can control the camera's
up, down, left, and right tilt through the
app.
15.Timing settings
When the time is not correct, please select
the correct time zone or enable/disable the
daylight saving time.
16.Share your camera
Step 1: Make sure your friend has
downloaded the app and registered an
account using their email address.
Step 2: Launch the app, then tap the
share button.

- 45 -
14.Screen settings
Step 3: Tap the “Add Friend” button and
enter your friend's registered email address.
- 46 -
17.How to reset your camera?
Please press and hold the "Reset " button for
10s. When your camera is reset successfully,
the red indicator light will blink slowly.
18.How do I save the videos
from cloud storage and SD
cards to
my phone’s gallery?
Tap the cloud or SD card icon, then tap the
“ ” button to download the current
video to the App’s Image. After that tap the
“ ” button to save
the current video to your phone’s gallery.
Tap the “ ” button to share the current
photo or video.

- 47 -
19.Troubleshooting
1.How to record video and snapshots to
the app without an SD card?
Tap your camera button to enter the live
view page. Tap the"Video" button to record
videos. Recorded video files are saved to the
App. Please tap the
"Images" button on the main page, and next tap
the "Take photos and videos" button to
preview the recorded video. Then tap the “
” button to save the photo or video to
your phone’s gallery.
NOTE: When you exit the view interface, the
record will be stopped. But the camera still
records videos to the SD card.
You can also tap the "Photo" button to take a
photo. Snapshots are also saved to the App.
Please tap the "Images" button on the main
page, and next tap the "Take photos and
videos" button to preview the recorded

- 47 -
19.Troubleshooting
video. Then tap the “ ” button to save
the photo or video to your phone’s gallery.
2.How to record videos to a Micro SD
card and playback videos from a Micro
SD card?
Please insert a Micro SD card into the device,
then turn on your camera. If the camera
detects the
Micro SD card under "SD Card Setting". If the
camera doesn't detect the SD card or displays
"abnormal", you may unplug the SD card from
the

- 48 -
device and plug the SD card into the device
again or format the SD card or change a
new SD card into the device. Tap the "SD"
button on the main page to preview the
recorded videos from the
Micro SD card.
3.I can't view the live video when away from
home.
(1). Please connect your camera to your
home Wi-Fi network.
(2). Please make sure that your phone
network allows the app to access.
4.I can't get a push notification when
enabling motion detection.
(1). Please make sure to enable the
"Detection Message Push" function.
(2). Please make sure that your phone
allows the app to access phone’s
notifications.

- 48 -
5.My phone can't play the recorded video or
there is no sound when playing the video?
Please download"VLC Media Player" or
"KM Player"to play the videos.
6.The camera is offline when I change the
new router or password?
When your router changes the new
password or you change a new router, you
need to delete your camera on the app,
then reset your camera and add the
camera to the app again.

- 49 -
20.Warranty & Technical Support
Warranty:
We warrants this product against defects in
workmanship and material for a
period of 18 months from its original
purchase date. You
must present your receipt as proof of
purchase for warranty validation. Any unit
which proves defective during the stated
period will be repaired without charge for
parts or labor or replaced at the sole
discretion. The end user is responsible for
all freight charges incurred to send the
product to our repair center. The end
user is responsible for all shipping costs
incurred when shipping from and to
any country other than the
country of origin.
The warranty does not cover any
incidental, accidental or consequential

- 49 -
20.Warranty & Technical Support
damages arising from the use of or the
inability to use this
product. Any costs associated with the
fitting or removal of this product by a
tradesman or other person or any
other costs associated with its use are
the responsibility of the end user.

- 50 -
This warranty applies to the original
purchaser of the product only and is not
transferable to any third party.
Unauthorized end user or
third party modifications to any
component or evidence of misuse or
abuse of the device will render all
warranties void.
By law some countries do not allow
limitations on certain exclusions in this
warranty. Where applicable by local laws,
regulations and legal rights will take
precedence.
Technical Support:
If you may need any technical support,
please contact us at
service@facamword.com

- 50 -
FCC Warning
This device complies with Part 15 of the
FCC Rules. Operation is subject to the
following two conditions:
(1) This device may not cause harmful
interference, and (2) this device must
accept any interference received,
including interference that may cause
undesired operation.
NOTE 1: This equipment has been tested
and found to comply with the limits for
a Class B digital device, pursuant to part
15 of the FCC Rules. These limits are
designed to provide reasonable protection
against harmful interference in a

- 50 -
residential installation. This equipment
generates, uses and can radiate radio
frequency energy and, if not installed
and used in accordance with the
instructions, may cause harmful
interference to radio communications.
However, there is no guarantee that
interference will not occur in a particular
installation. If this equipment does cause
harmful interference to radio or television
reception, which can be determined by
turning the equipment off and on, the
user is encouraged to try to correct the
interference by one or more of the
following measures:
- Reorient or relocate the receiving
antenna.

- 50 -
- Increase the separation between the
equipment and receiver.
-Connect the equipment into an outlet
on a circuit different from that to which
the receiver is connected.
-Consult the dealer or an experienced
radio/TV technician for help.
NOTE 2: Any changes or modifications to
this unit not expressly approved by the
party responsible for compliance could
void the user's authority to operate the
equipment.
RF Exposure Statement
To maintain compliance with FCC'S RF
Exposure guidelines, This equipment

- 50 -
should be installed and operated with
minimum 20cm between the radiator
and your body. This device and its
antenna(s) must not be co-located or
operation in conjunction with any other
antenna or transmitter.