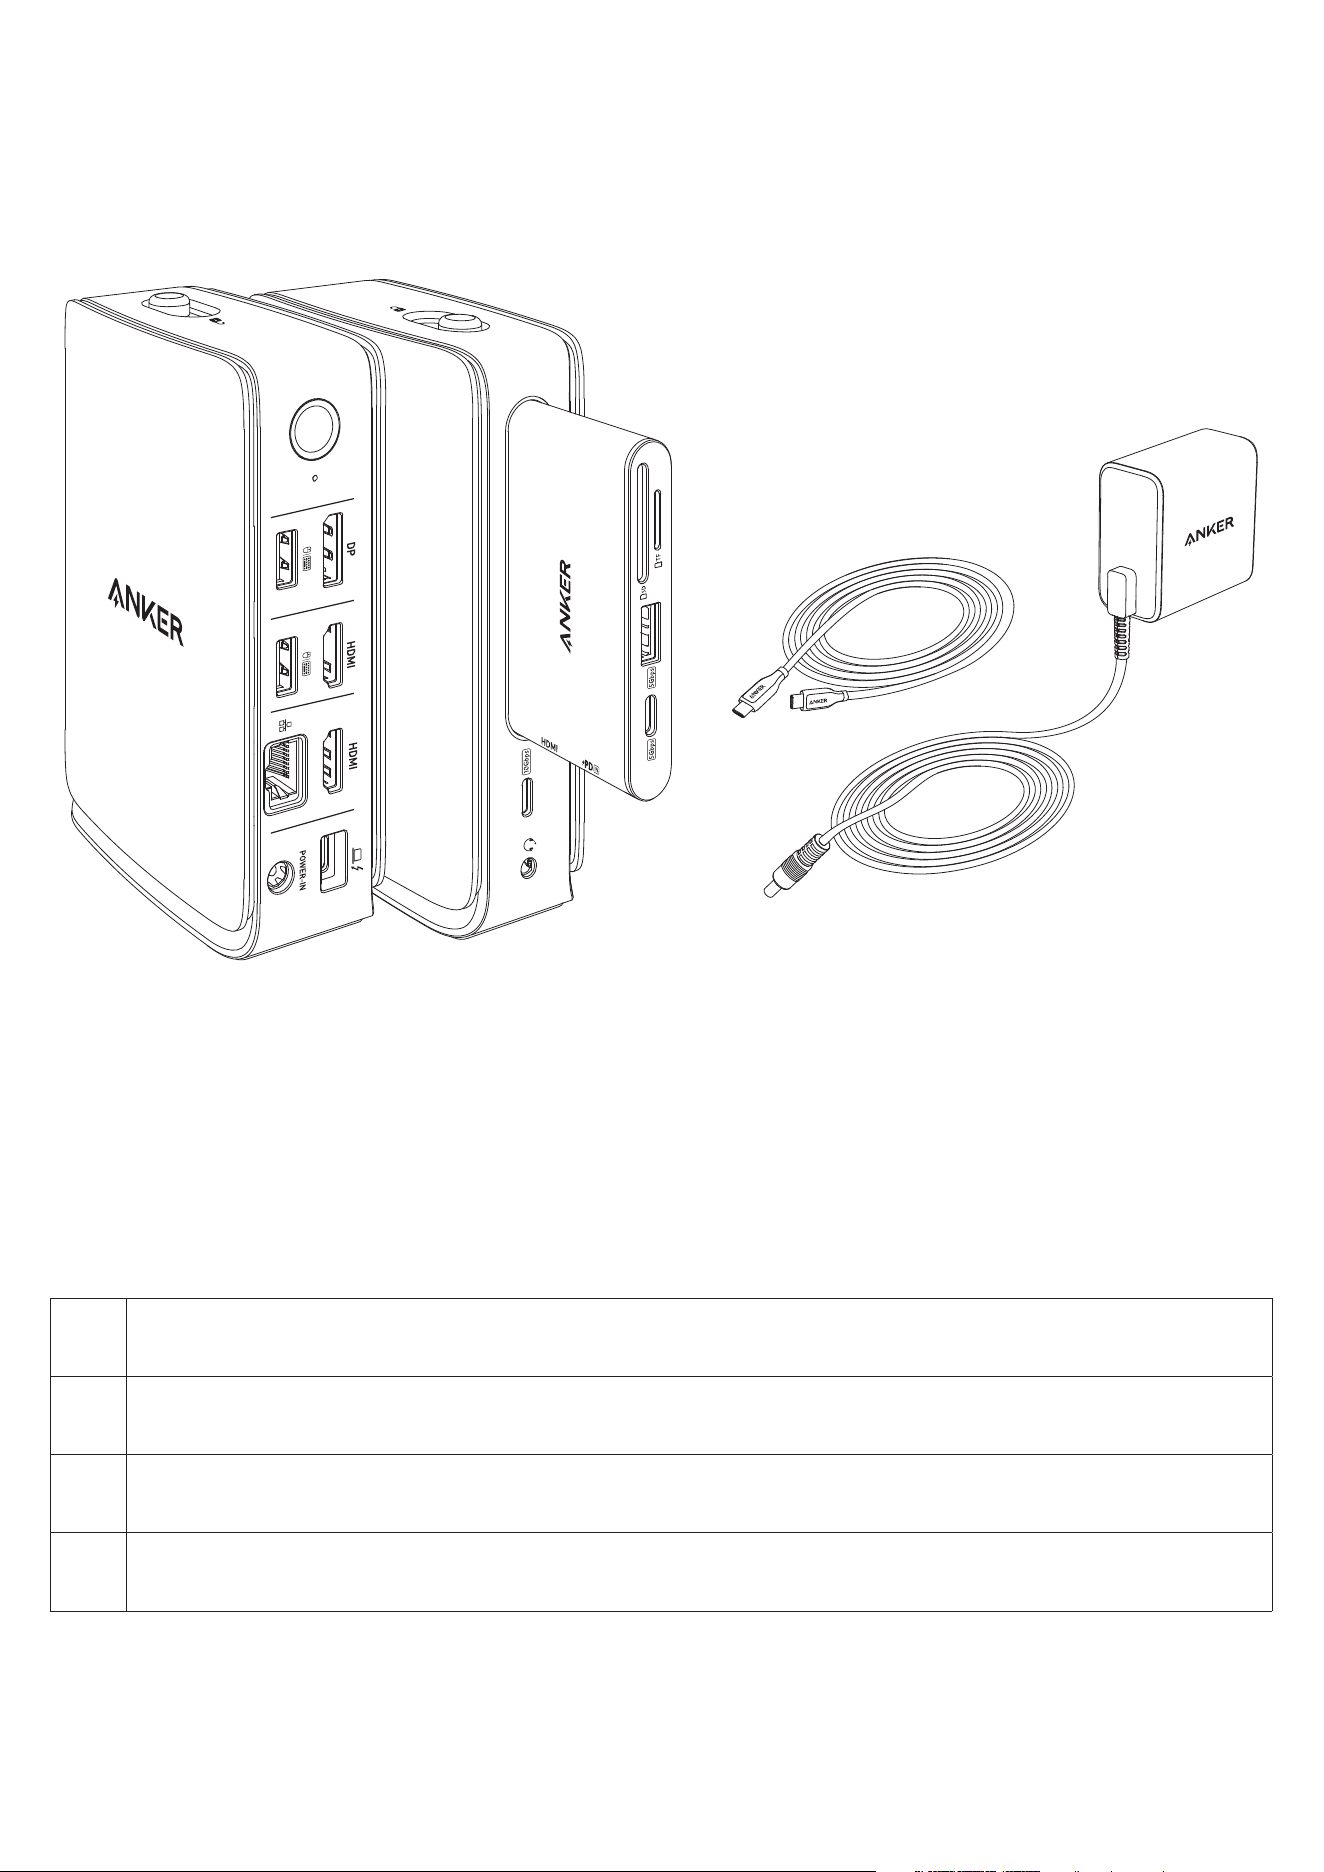
At a Glance
A
B
C
D
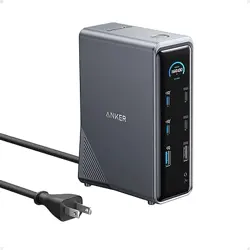
A: Docking Station (Dock)
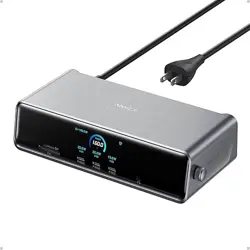
B: Removable Hub
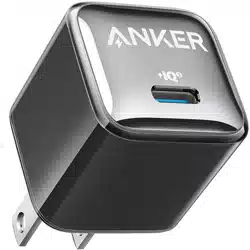
C: 140W Wall Power Adapter
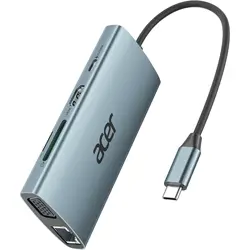
D: 3.3 (1 m) USB-C to USB-C 3.1 Gen 2 Cable
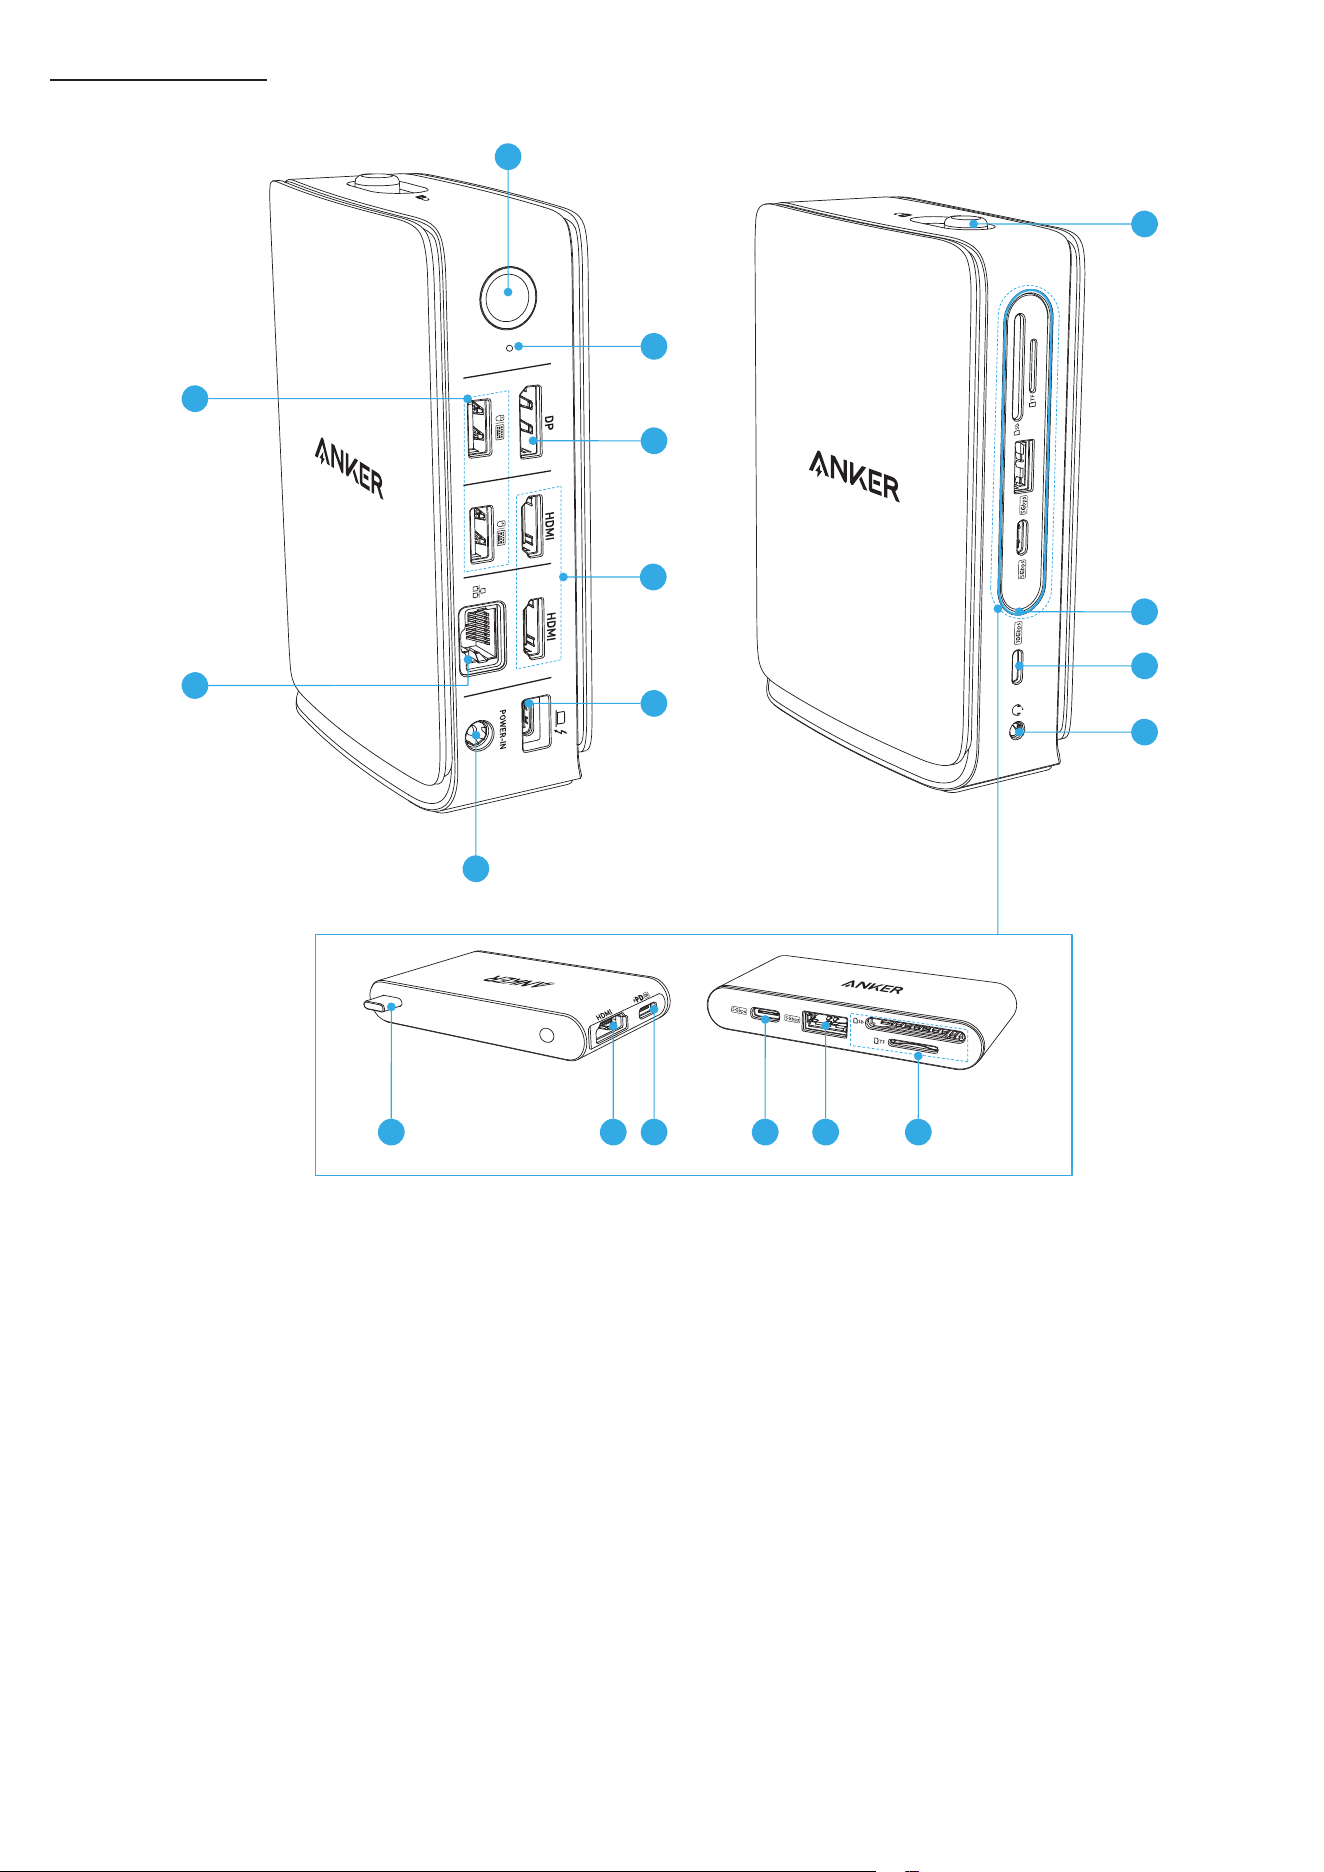
Port Specifications
1
8
2
9
10
11
12
4
7
5
6
3
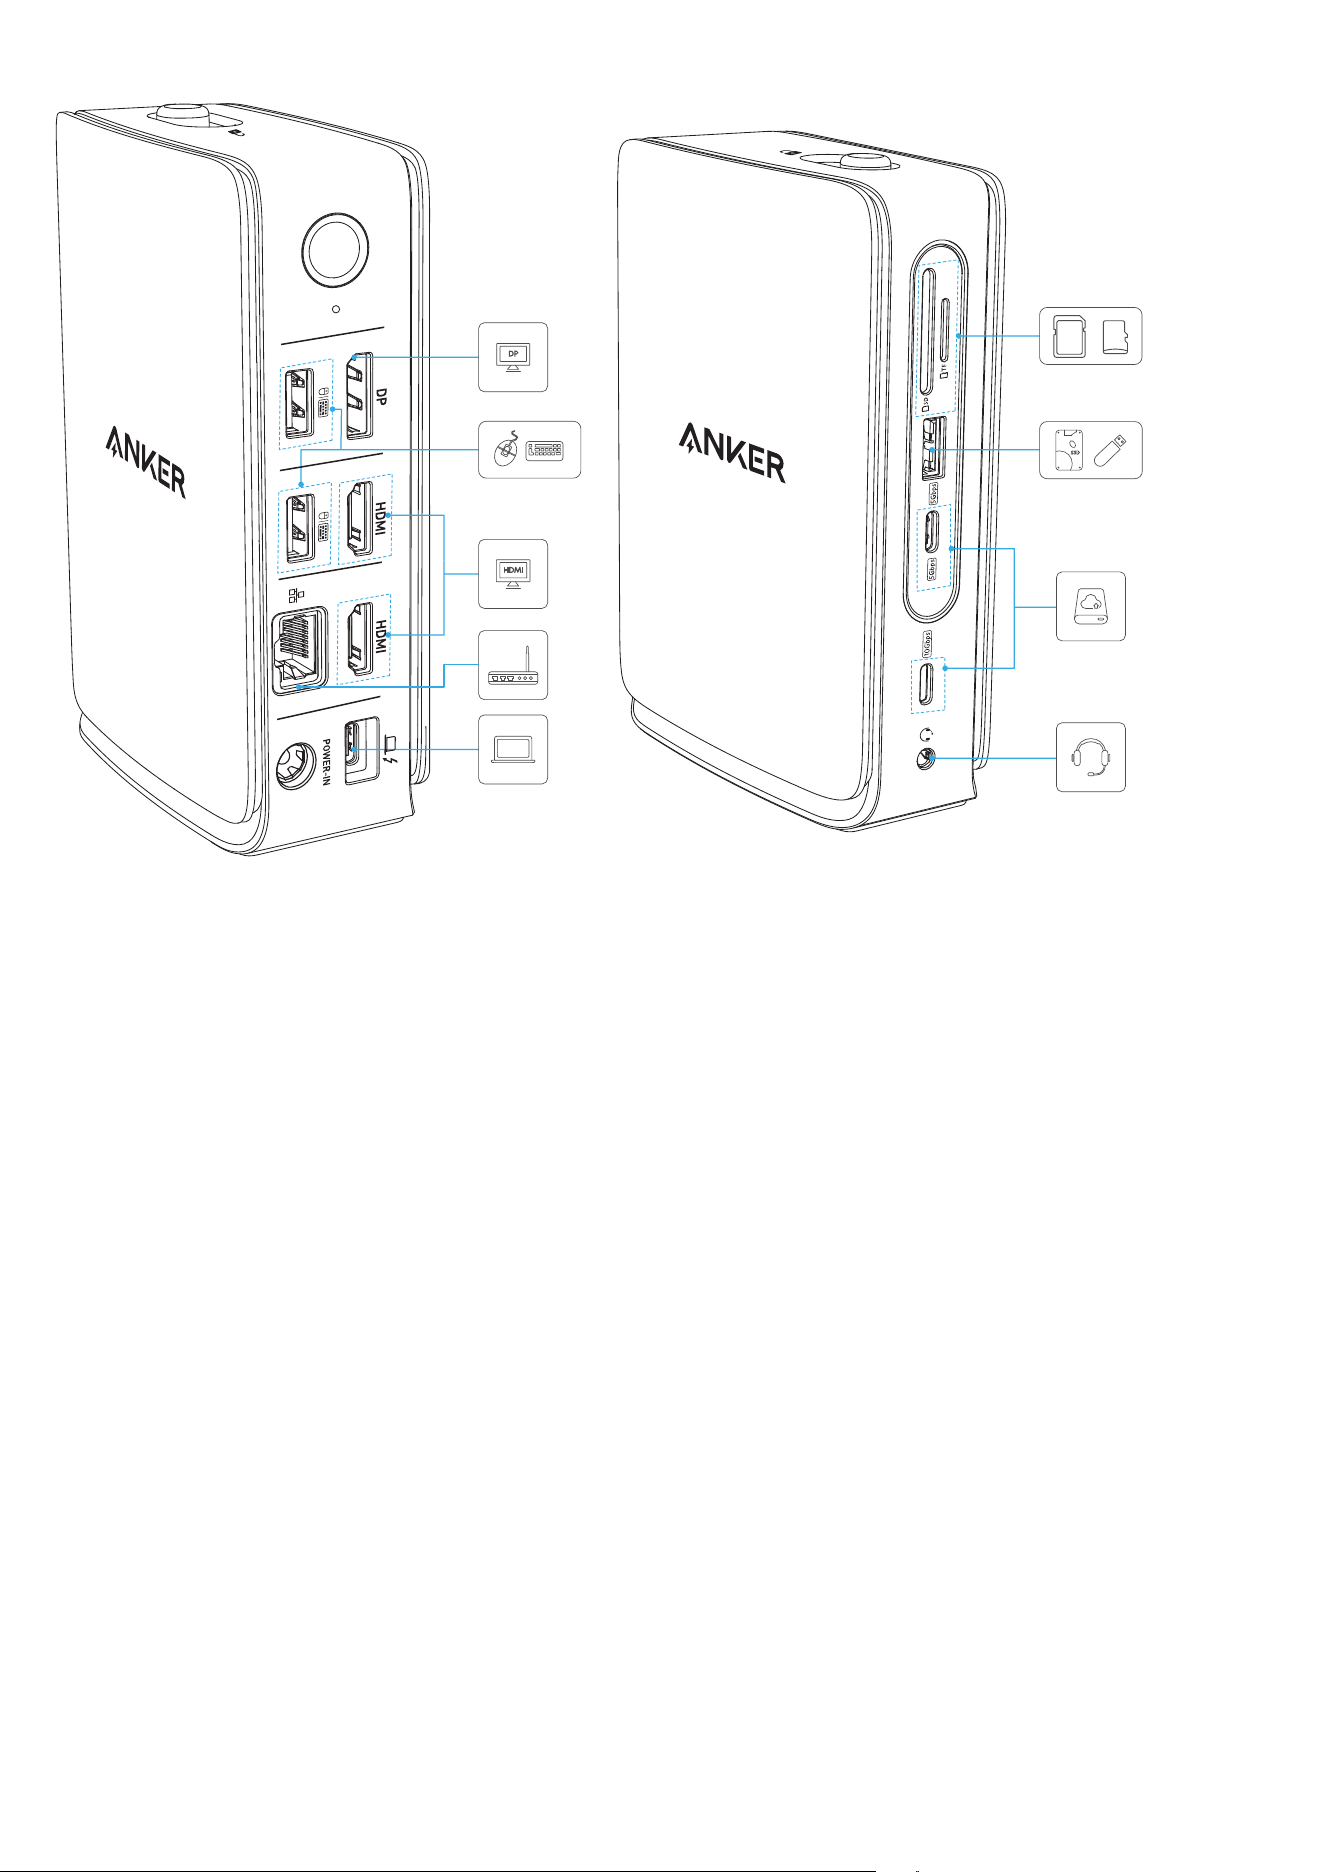
13 14 15 16 17 18

Docking Station (Dock)
1
POWER-IN
Connect to a power outlet using the included wall adapter.
Supports up to 140W input power.
2
USB-C Upstream
Port
Connect to a laptop using the provided USB-C to USB-C cable.
Supports up to 100W output power.
Supports data transfer speeds up to 10 Gbps.
Note: Your laptop's USB-C port must support DP Alt Mode (for display output)
and Power Delivery (for charging).
3
HDMI 2.0 Ports (×2)
Connect to HDMI-enabled monitors with support for up to 4K resolution.
Note: Display peormance depends on the host device and monitor. Refer to
the Video Resolution and Refresh Rate table for details.
4
DisplayPort (DP) 1.4
Connect a DP-enabled monitor with resolutions up to 4K.
Note: Display peormance depends on the host device and monitor. Refer to the
Video Resolution and Refresh Rate table for details.
5
Indicator Light Turns white when the dock is powered on.
6
Button
When the hub is connected and the dock is powered on, short-press once to
turn o the light strip, and short-press again to turn it back on.
7
USB-A Ports (×2)
Each port supports data transfer speeds up to 480 Mbps.
Each port supports up to 2.5W output power.
8
Ethernet Port
Connect to a wired network with speeds up to 1 Gbps.
Note: Actual speeds depend on your internet service provider (ISP).
9
Audio Jack Connect headphones or other 3.5 mm AUX-compatible devices.
10
USB-C Port
Supports data transfer speeds up to 10 Gbps.
Supports up to 7.5W output power.
Note: This port is for data transfer only and does not support charging or video
output.
11
Light Strip
Turns blue when the hub is connected to the dock and the dock is connected
to a laptop.
Turns o when the hub is detached.
Note: When the hub is connected and the dock is powered on, short-press
the button once to turn o the light strip, and short-press again to turn it
back on.
12
Hub Unlock Switch Slide backward to detach the hub from the dock.

Removable Hub
13
USB-C Upstream
Connector
Connect to your laptop's USB-C port.
Note: Your laptop's USB-C port must support DP Alt Mode (for display
output) and Power Delivery (for charging).
14 HDMI Port Connect to an HDMI-enabled monitor with support for up to 4K resolution.
15 USB-C PD-IN Port
Connect a PD wall charger and USB-C cable (not included).
Notes:
1. This port supports charging only. It does not support data transfer or
video output for devices such as external drives, headphones, speakers, or
monitors.
2. The port delivers up to 85W to your laptop and 15W to the hub. For full
85W charging, use a 100W PD charger and cable (not included).
16 USB-C Port
Supports data transfer speeds up to 5 Gbps.
Supports up to 7.5W output power.
Note: This port is for data transfer only and does not support charging or
video output.
17 USB-A Port
Supports data transfer speeds up to 5 Gbps.
Supports up to 4.5W output power.
18 Card Reader
Supports SD and TF memory cards.
Transfer speeds up to 104 MB/s. Compatible with SD 3.0, UHS-I, SDXC, SDHC,
SD, MMC, RS-MMC, Micro SDXC, Micro SD, and Micro SDHC.
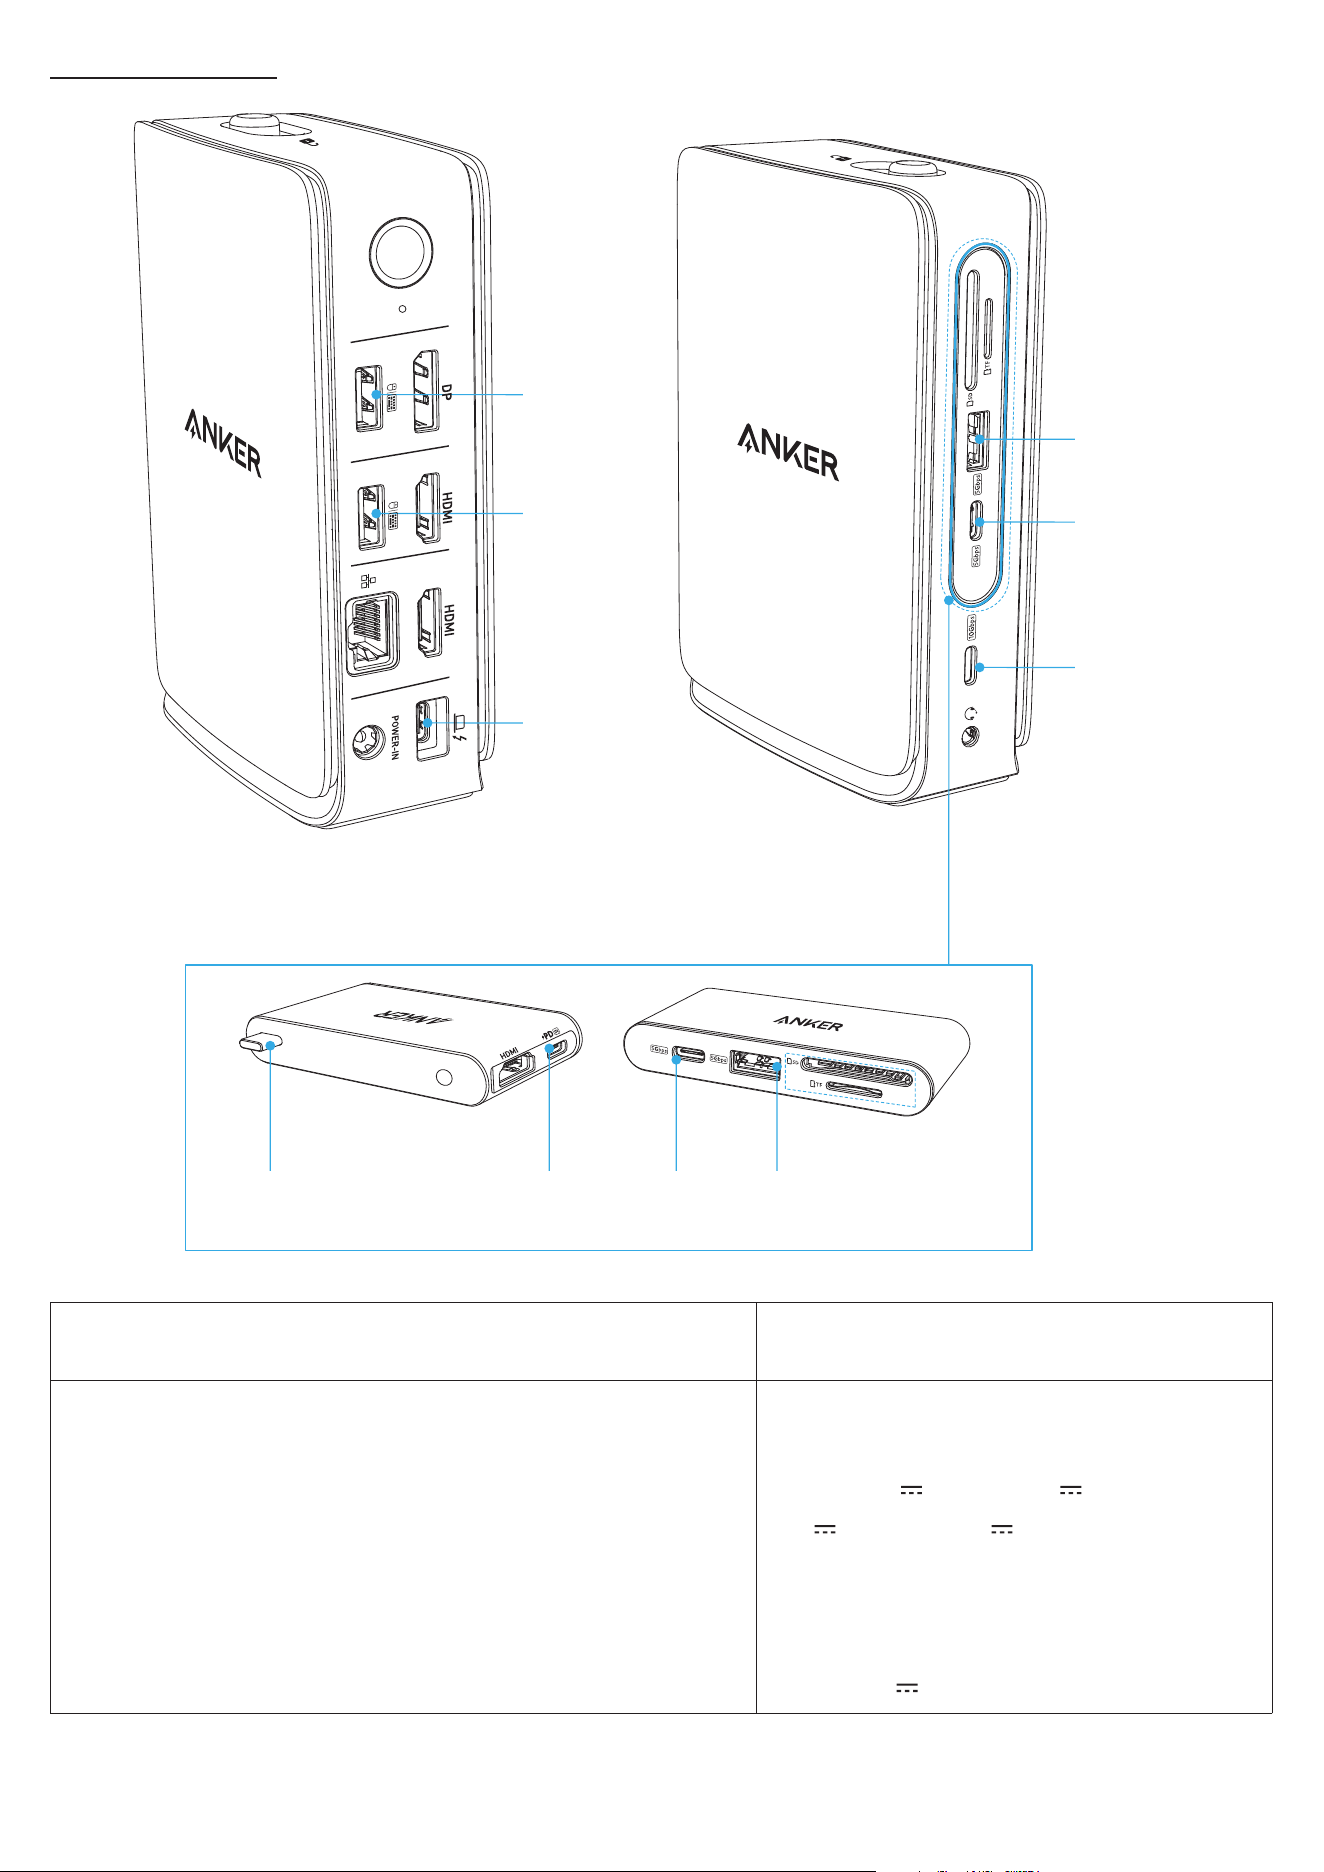
Dock Specifications
7
USB-A2
7
USB-A3
7
USB-C1
USB-C1 USB-C2
USB-C3 USB-A1
7
USB-A1
7
USB-C3
7
USB-C2
Docking Station Hub
Input
DC-IN: 140W Max
Input
When Connected to Power Supply
USB-C2: 5V
3A, 15W / 9V
3A, 27W /
15V
3A, 45W / 20V
5A, 100W (100.0W
Max)
When Not Connected to Power Supply
(Connected Devices Will Be Powered by
the Laptop)
USB-C1: 5V
3A, 15W (15.0W Max)
Output
USB-C1: 5.0VDC, 3.0A (15.0W) / 9.0VDC, 3.0A (27.0W) / 15.0VDC,
3.0A (45.0W) / 20.0VDC, 5.0A (100.0W Max)
USB-A1: 5.0VDC, 0.9A (4.5W)
USB-A2: 5.0VDC, 0.5A (2.5W)
USB-A3: 5.0VDC, 0.5A (2.5W)
USB-C2: 5.0VDC, 1.5A (7.5W)
USB-C3: 5.0VDC. 1.5A (7.5W)
USB-C4: 5.0VDC. 3.0A (15W)
USB-A2+USB-A3: 5.0VDC, 1.0A (5.0W)
USB-A1+USB-C3: 5.0VDC, 0.5A (2.5W) + 5.0VDC, 1.5A (7.5W)
USB-A1+USB-A2+USB-A3+USB-C2+USB-C3: 5.0VDC, 4.5A
(22.5W)
USB-A2+USB-A3+USB-C2+USB-C4: 5.0VDC, 0.5A (2.5W) +
5.0VDC, 0.5A (2.5W) 5.0VDC, 1.5A (7.5W) + 5.0VDC, 2.5A (12.5W)
Total power: 125.0W Max
Note: USB-C4 refers to the charging port inside the dock. It
is used to supply power to the hub when connected to the
dock.
Output
When the hub is connected to a power
supply (Voltage varies according to USB-
PD input):
USB-C1: 5.0VDC, 0.5A (2.5W) / 9.0VDC, 1.5A
(13.5W) / 15.0VDC, 2.0A (30.0W) / 20.0VDC,
4.25A (85.0W) Max (Voltage varies
according to USB-PD input)
USB-A1: 5.0VDC, 0.9A (4.5W)
USB-C3: 5.0VDC, 1.5A (7.5W)
USB-A1+USB-C3: 5.0VDC, 0.5A (2.5W) +
5.0VDC, 1.5A (7.5W)
Total power: 95.0W Max
When the hub is not connected to a
power supply (connected devices will be
powered by the laptop):
USB-A1: 5.0VDC, 0.9A (4.5W)
USB-C3: 5.0VDC, 1.5A (7.5W)
USB-A1+USB-C3: 5.0VDC, 0.5A (2.5W) +
5.0VDC, 1.5A (7.5W)
Total power: 10.0W Max
Operating
Temperature
32°F - 95°F (0℃ - 35℃)
Storage
Temperature
-40°F - 176°F (-40℃ - 80℃)
Data Transfer
Speed
Up to 10 Gbps
Compatible
Operating
Systems
Windows 10 / 11, macOS 13.5 or later, ChromeOS
Compatible
Host devices
Windows and MacBook computers that support USB-C with DP Alt Mode and Power
Delivery.
Also compatible with USB4, Thunderbolt 3, Thunderbolt 4, and Thunderbolt 5 ports.
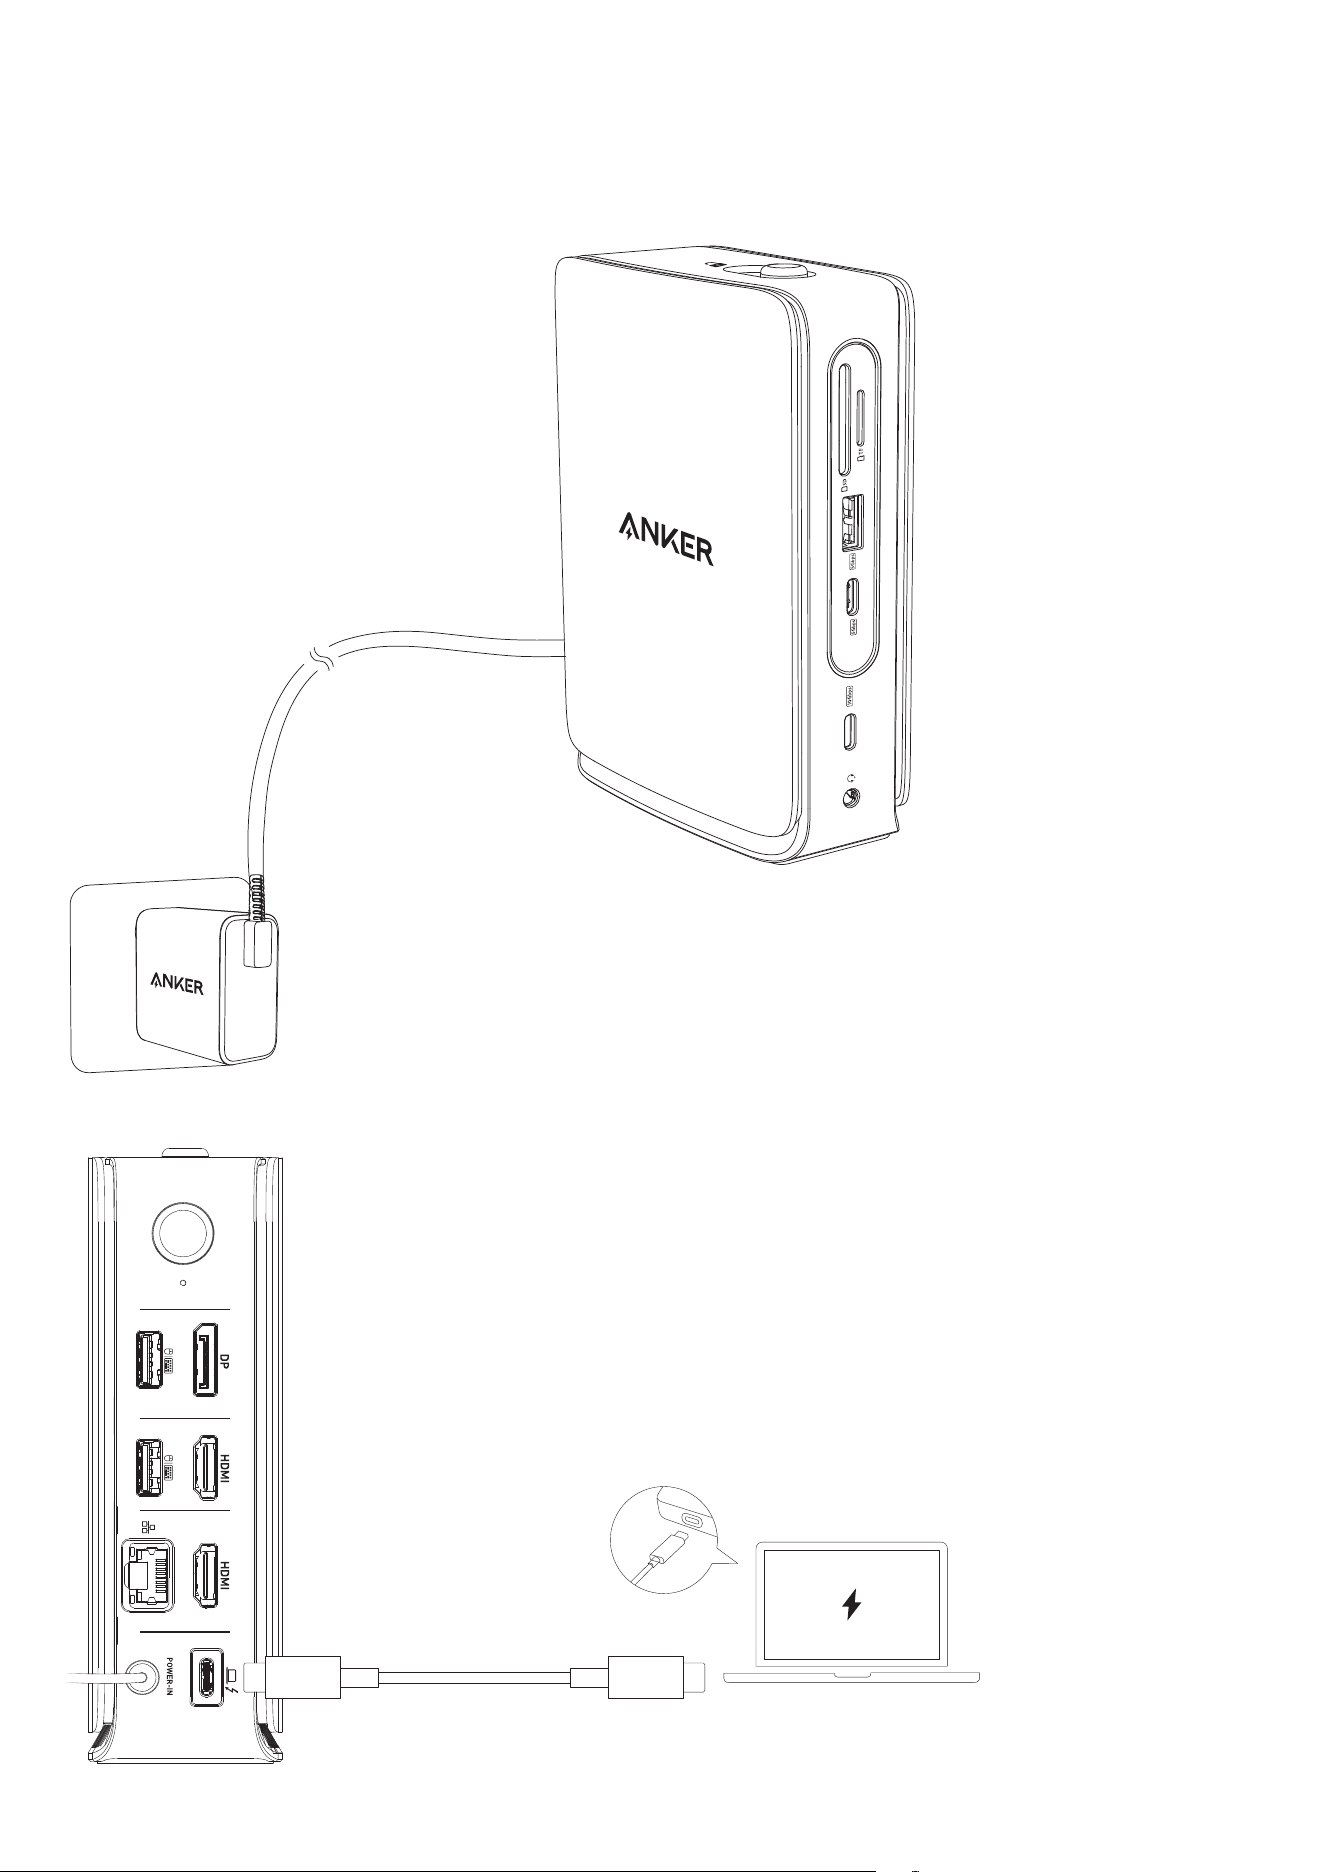
Getting Started With the Dock
1. Connect the included power adapter to a wall outlet. The light indicator on the dock will turn on.
Note: Make sure the Anker logo on the charger is upright. Using it upside down may cause the charger to
become unstable.
2. Use the included USB-C to USB-C cable to connect your laptop to the USB-C upstream port on the dock.
USB-C USB-C
3. Connect other devices to the appropriate ports as needed.
SD
micro
SD
DP
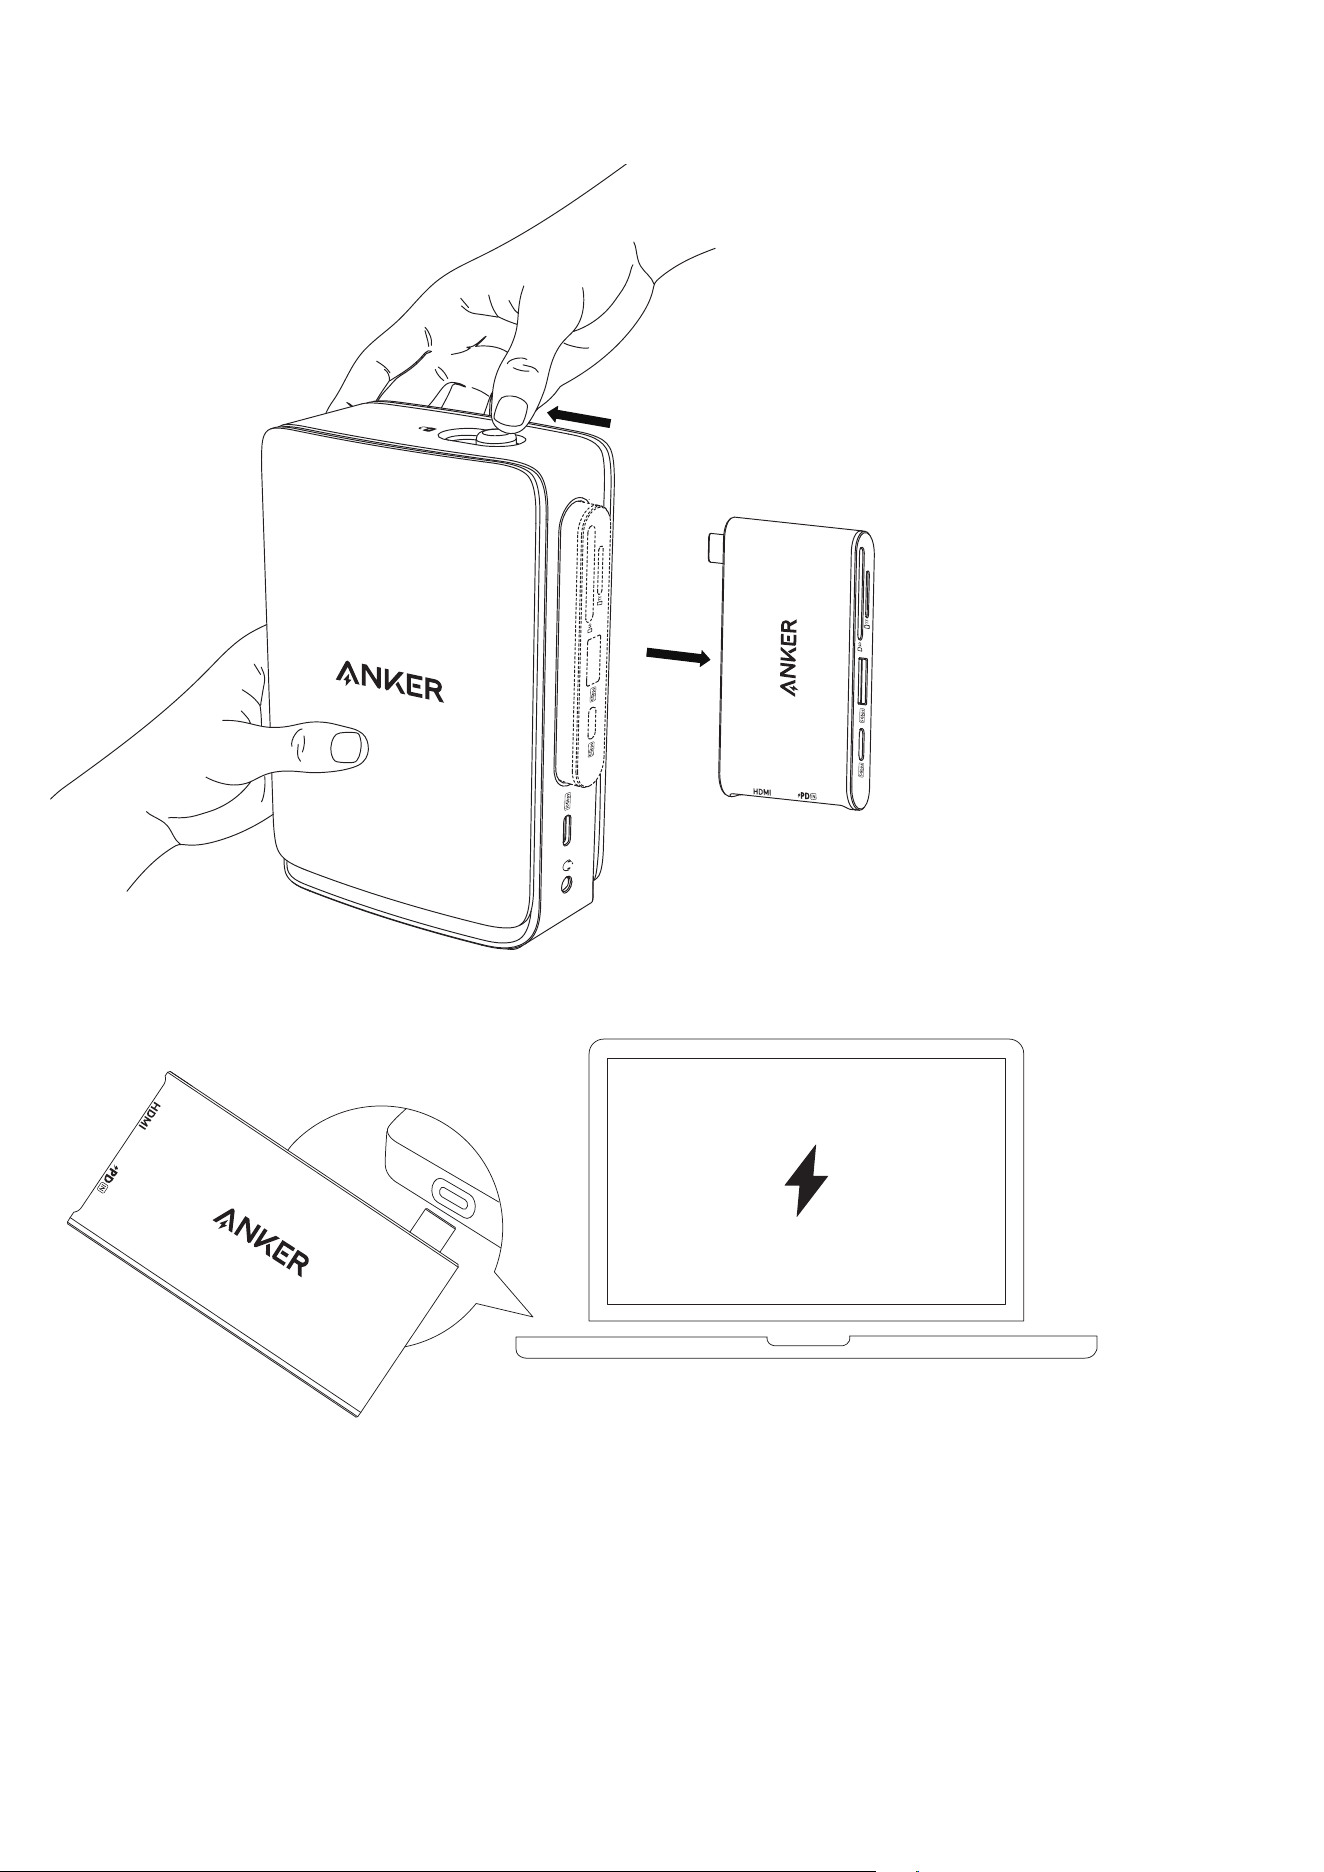
Using the Removable Hub
1. Slide the unlock switch backward to detach the hub from the dock.
2. Connect the USB-C upstream connector on the hub to the USB-C port on your laptop.
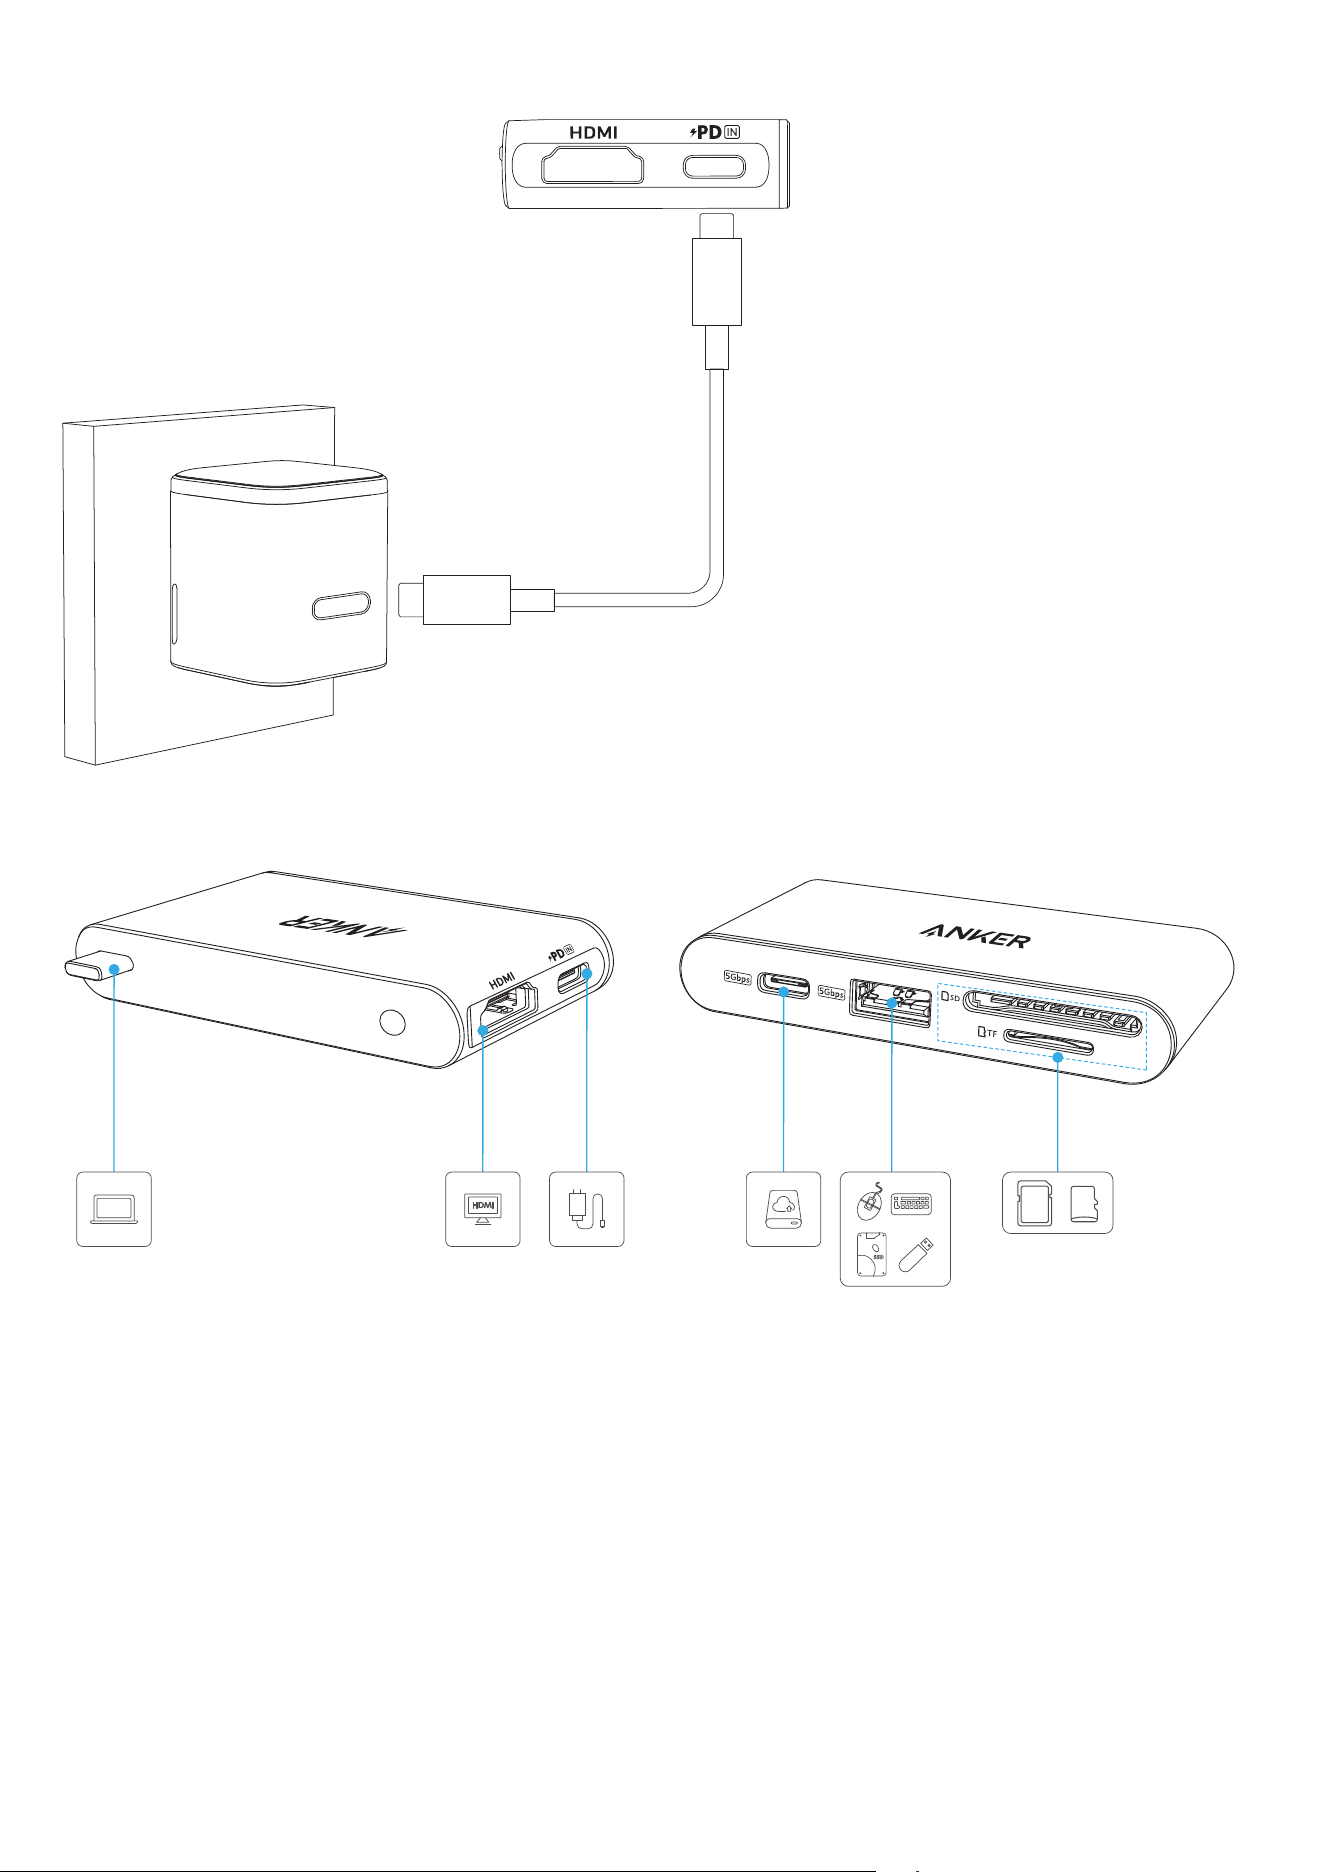
3. To charge your laptop while using the hub, connect a compatible PD wall charger (not included) to the
hub's PD input port.
4. Connect other devices as needed.
SD
micro
SD
PD
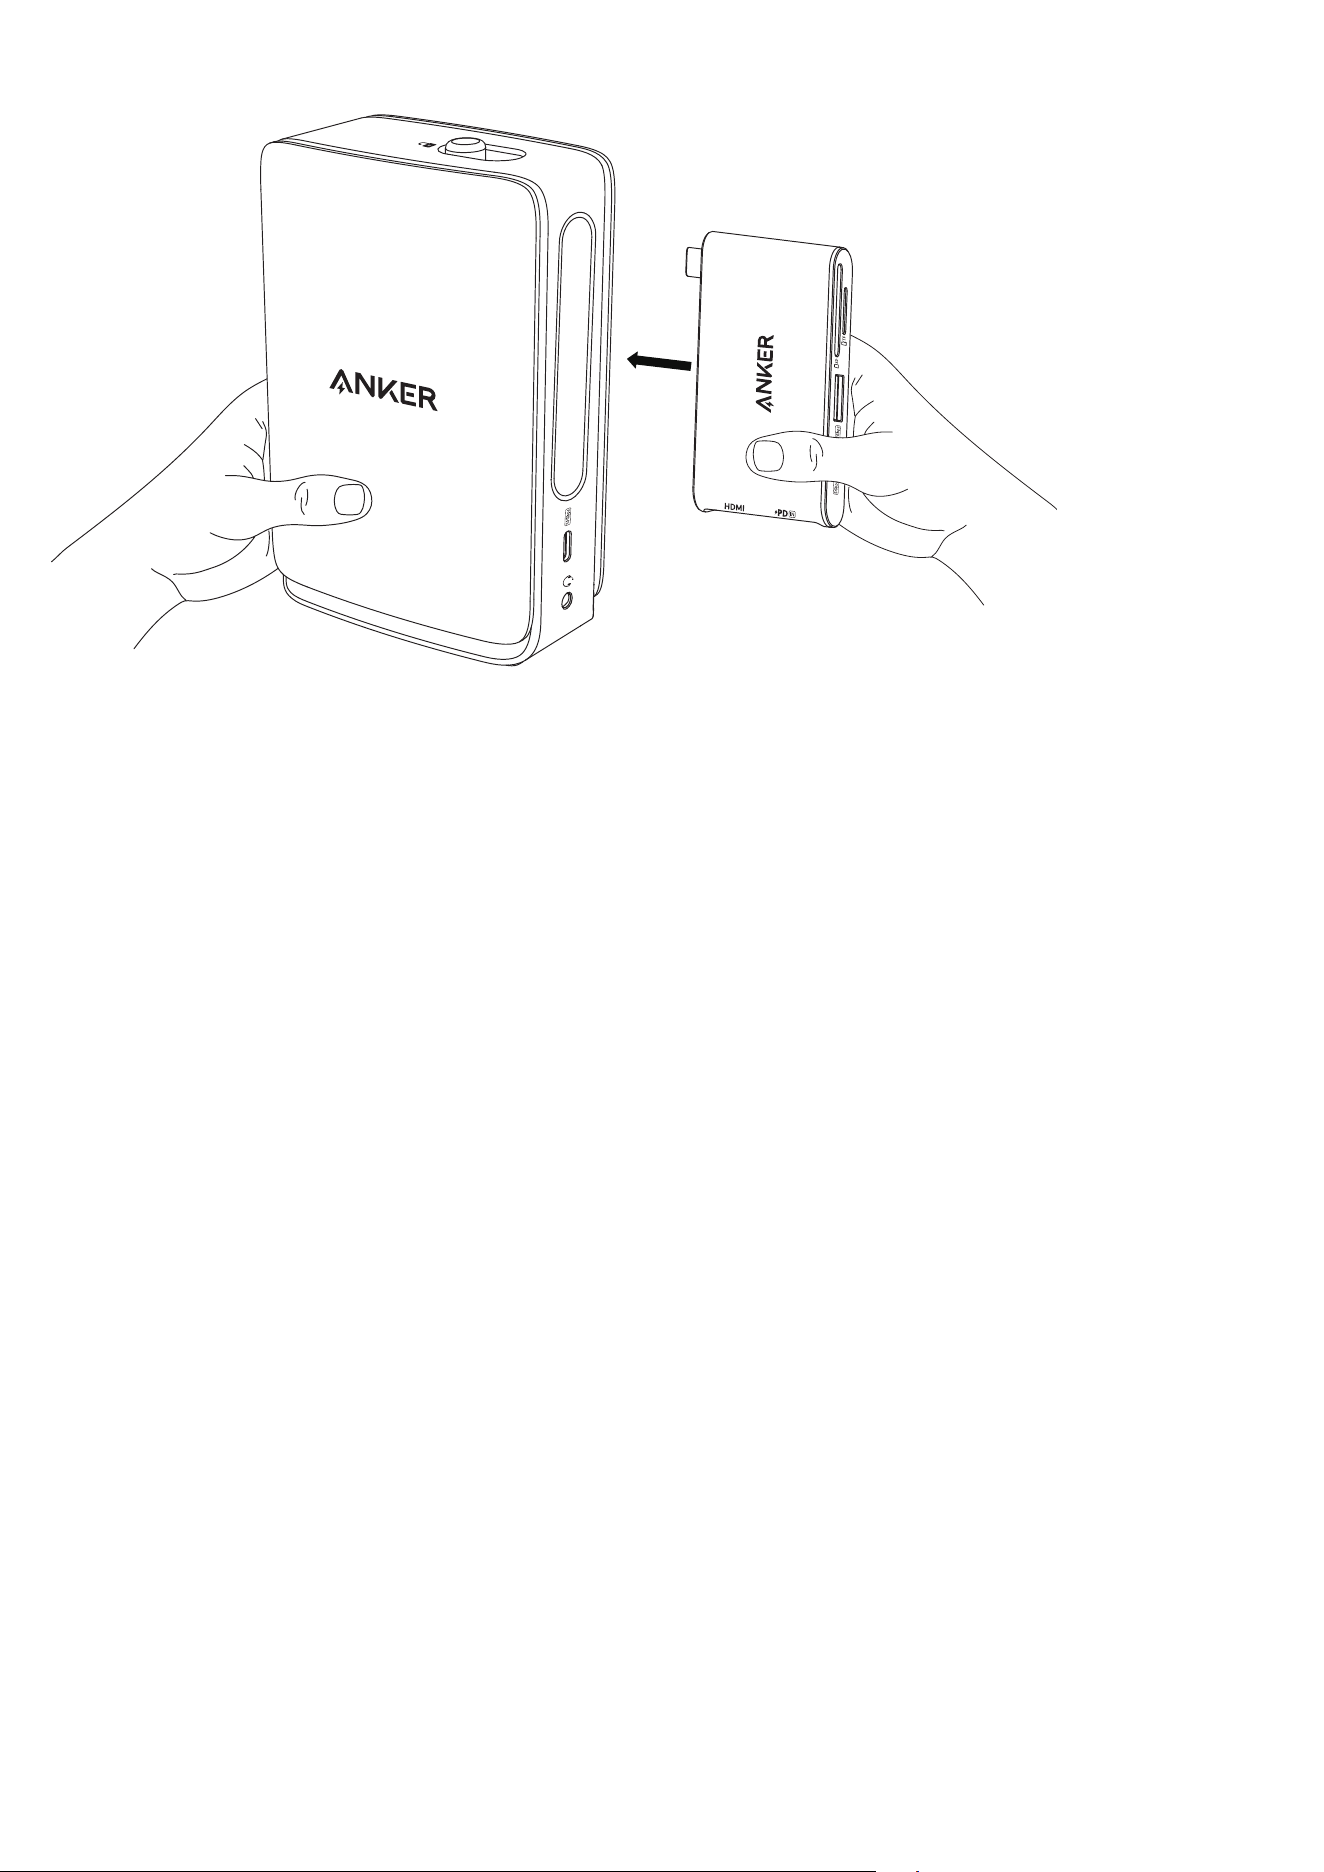
5. Insert the hub back into the dock until you hear a click and the light strip turns blue. Both the dock and the
hub are now ready for use.
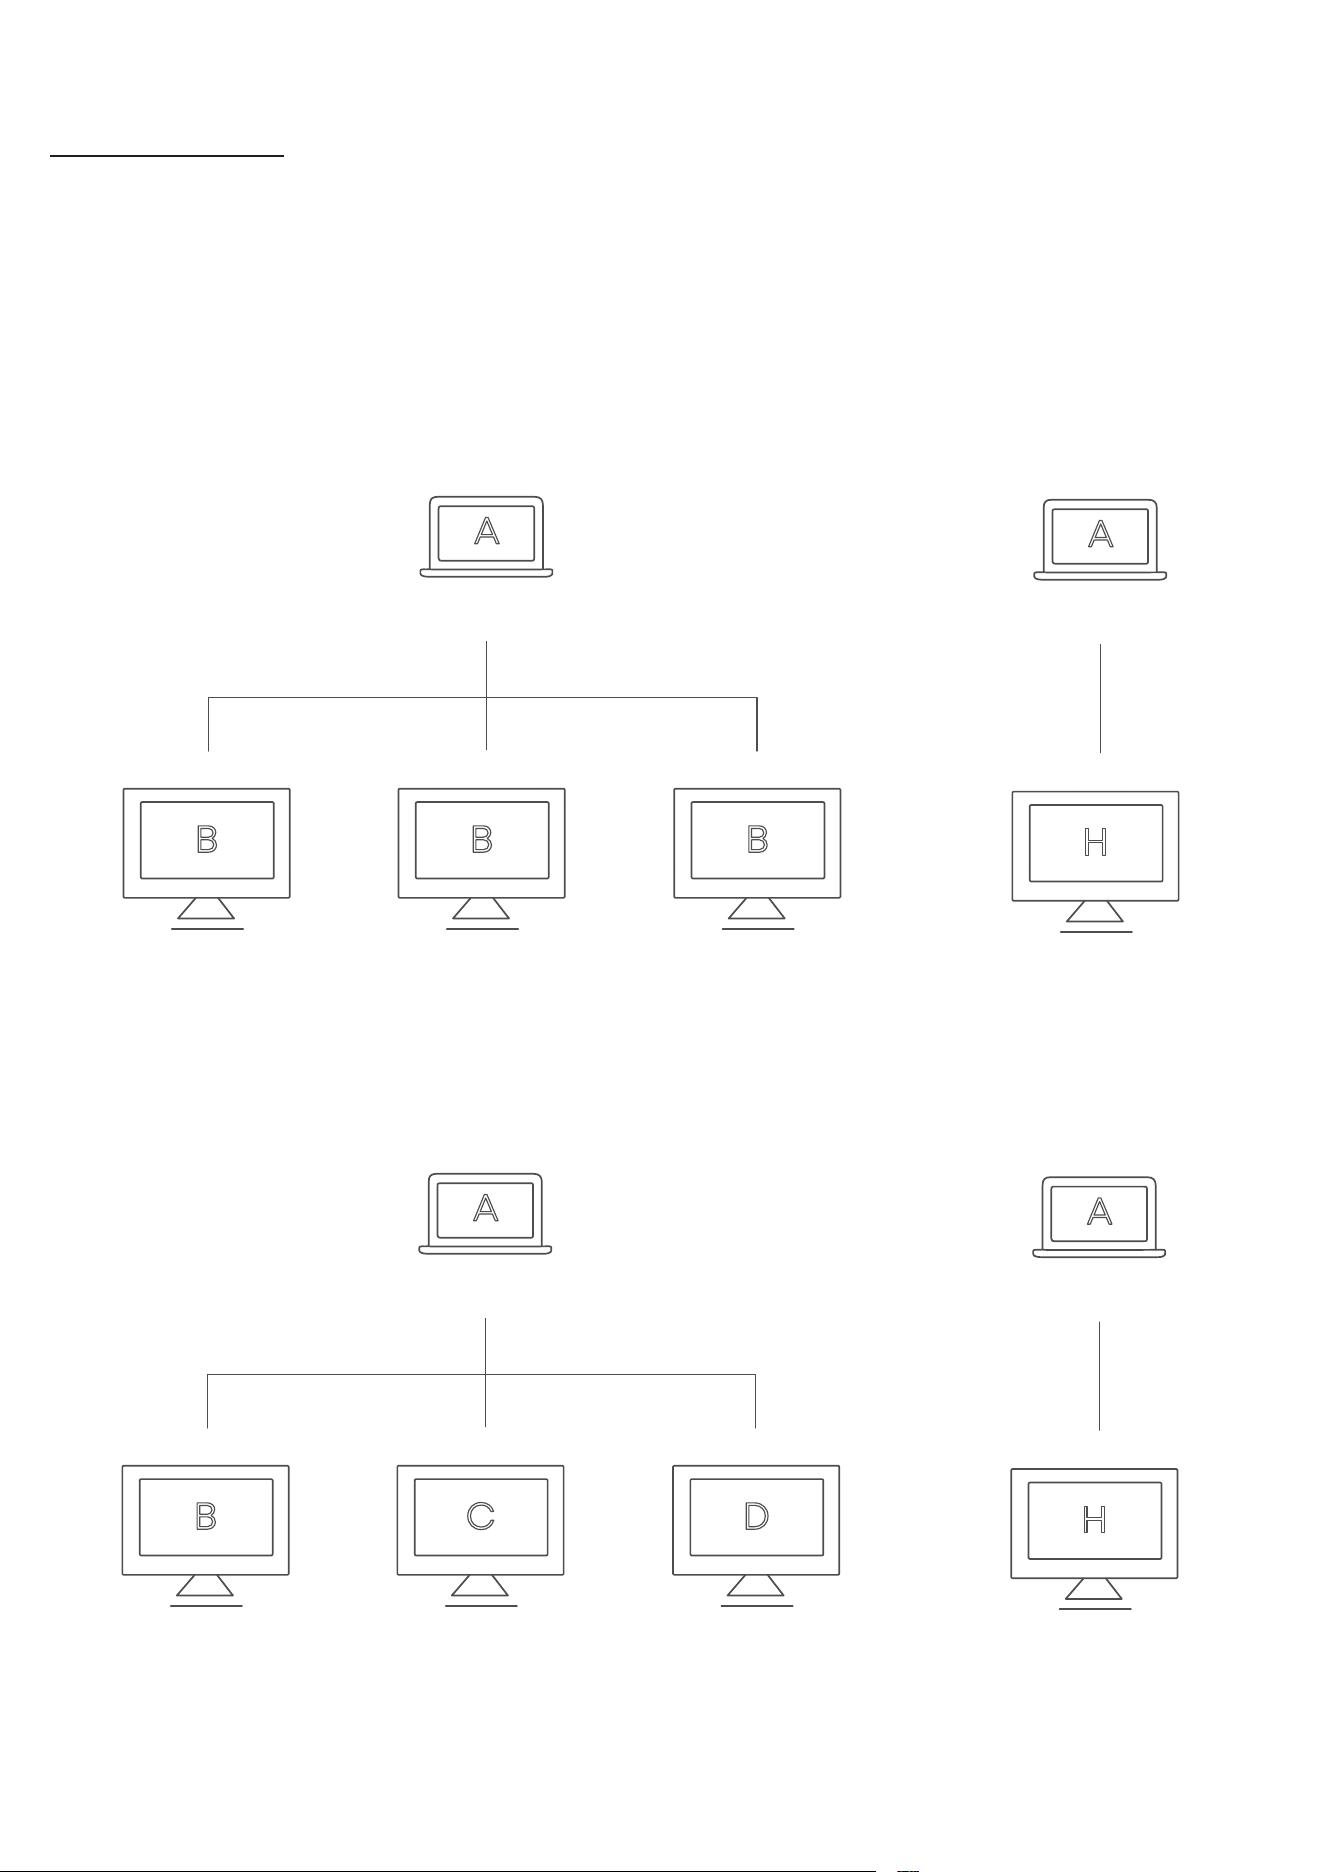
Video Output
Video Output Modes
• The figures shown below are for reference only. You can configure display settings from your laptop
system preferences.
• In the images, A, B, C and H represent separate screens showing dierent content.
• macOS: External displays will show the same content (mirrored). This behavior is due to limitations in
macOS and the hardware design of the docking station.
• Windows: External displays can show dierent content (Extended Mode is supported).
macOS Example: All external monitors mirror the same screen.
Dock Hub
Laptop
HDMI 2.0
HDMI 2.0 DP 1.4
Laptop
Display
Windows Example: Each external monitor can display dierent content.
Dock Hub
Laptop
HDMI 2.0
HDMI 2.0 DP 1.4
Laptop
Display
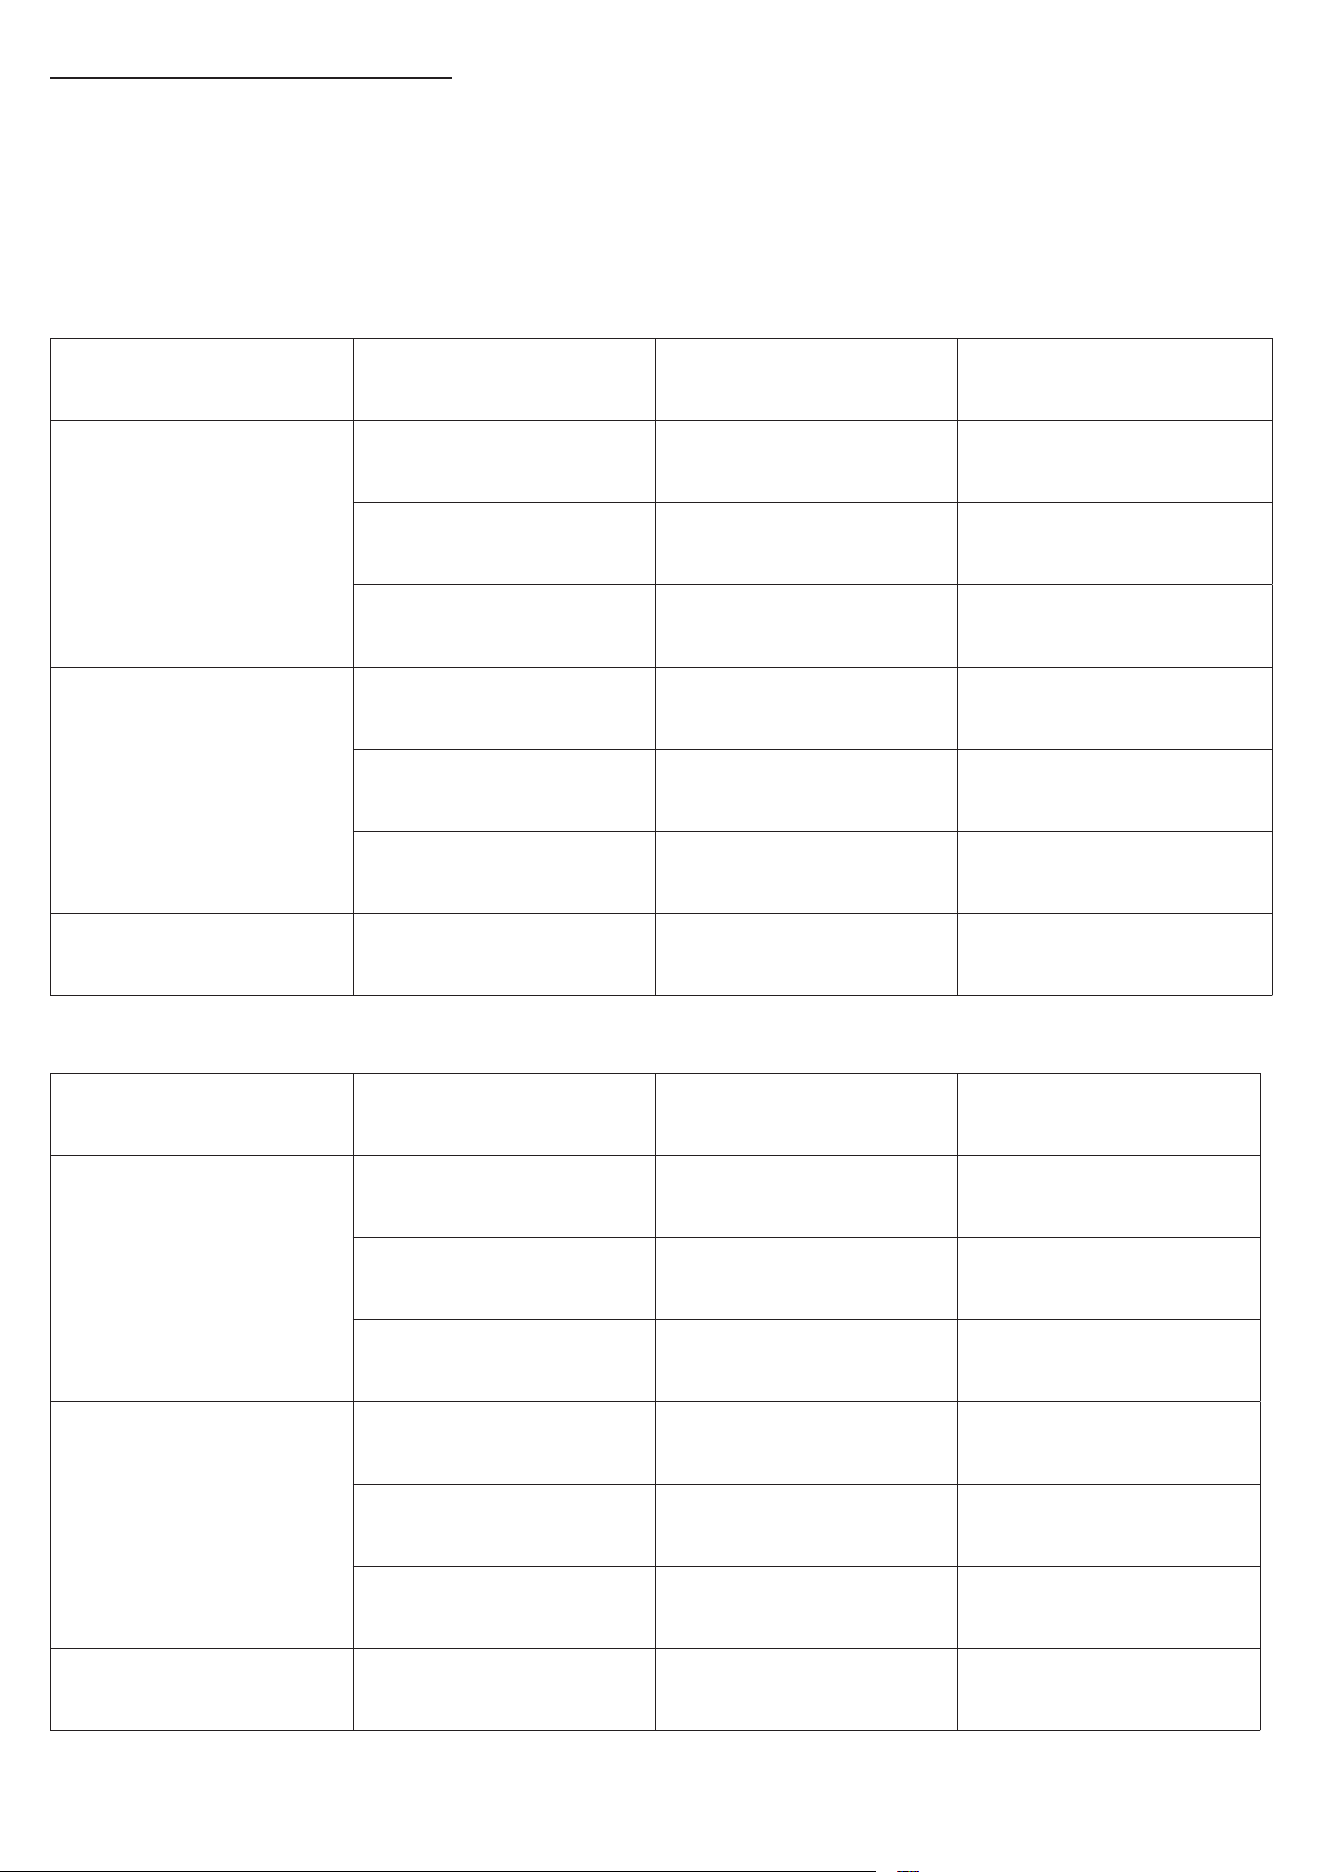
Video Resolution and Refresh Rates
• The tables below show the maximum supported resolutions for this docking station. Actual results may
vary based on your laptop's hardware specifications.
• "DP" stands for DisplayPort. The terms DP 1.2 and DP 1.4 refer to the version of the video signal your laptop's
USB-C port supports, not the physical DisplayPort connector.
• Main dierence: DP 1.4 supports higher bandwidth than DP 1.2, which allows for higher resolution and
refresh rates when using multiple monitors.
For Laptops with a DP 1.4 USB-C Port
HDMI 2.0 HDMI 2.0 DisplayPort 1.4
Single Monitor
3840x2160@60Hz / /
/ 3840x2160@60Hz /
/ / 3840x2160@60Hz
Dual Monitors
2560x1440@60Hz 2560x1440@60Hz /
2560x1440@60Hz / 2560x1440@60Hz
/ 2560x1440@60Hz 2560x1440@60Hz
Triple Monitors 1920x1080@60Hz 1920x1080@60Hz 1920x1080@60Hz
For Laptops with a DP 1.2 USB-C Port
HDMI 2.0 HDMI 2.0 DisplayPort 1.4
Single Monitor
3840x2160@30Hz / /
/ 3840x2160@30Hz /
/ / 3840x2160@30Hz
Dual Monitors
1920x1080@60Hz 1920x1080@60Hz /
1920x1080@60Hz / 1920x1080@60Hz
/ 1920x1080@60Hz 1920x1080@60Hz
Triple Monitors 1600x900@60Hz 1600x900@60Hz 1600x900@60Hz

Troubleshooting
Display Issues
When using this dock to connect a MacBook to multiple monitors, it's expected behavior for macOS to only
support screen mirroring. This is due to system-level limitations—macOS does not support Multi-Stream
Transport (MST), so multiple external monitors will display the same content.
In contrast, Windows supports both Single-Stream Transport (SST) and Multi-Stream Transport (MST), allowing
for dierent content on each external display.
If you're experiencing additional display issues, please try the steps below:
1. Confirm whether your laptop's USB-C port supports DP Alt Mode (DisplayPort output). Refer to your user
manual, contact your device manufacturer, or check the oicial website for confirmation.
2. Make sure your laptop's graphics driver is up to date. Updating the driver may resolve compatibility issues.
3. Try connecting the dock to another laptop that supports DP Alt Mode to isolate whether the issue is
laptop-specific.
4. Try using a dierent HDMI or DP cable, or test with another monitor. Lowering the resolution or refresh rate
may also help resolve the issue.
5. Disconnect the dock from your laptop and unplug all connected devices. Wait at least 5 minutes, then
restart your laptop and reconnect everything.
General Operation Issues
If the dock is not working as expected, try the following troubleshooting steps:
1. Disconnect the dock and all connected devices from your laptop. Wait at least 5 minutes, then restart your
laptop and reconnect the dock.
2. Use a dierent laptop to check if the issue persists. This can help determine if the issue is related to your
original laptop.
3. Test your peripheral devices directly with your laptop to confirm they are working properly on their own.
4. Try dierent USB-A or USB-C devices in the same ports to check whether the issue is device- or port-
specific.
USB-A or USB-C Port Issues
If your USB-A or USB-C ports are not functioning correctly, follow these steps:
1. Disconnect the dock and all connected devices from your laptop. Wait at least 5 minutes, then restart your
laptop and reconnect the dock.
2. Verify that your USB devices operate correctly when plugged directly into your laptop.
3. Use dierent USB-A or USB-C devices to see if the issue is limited to a specific device.
4. Check whether the same issue occurs when the dock is connected to a dierent laptop.
Ethernet Port Issues
If you're having trouble with the Ethernet connection, follow these steps:
1. For MacBooks with Intel chips or Windows laptops, you may need to install drivers from Realtek. Visit:
https://www.realtek.com/Download/List?cate_id=585.
2. Connect the dock to another laptop to see if the issue persists.
3. Try plugging the Ethernet cable directly into your laptop (if it has an Ethernet port) to check whether your
internet connection is stable.
4. Use a dierent Ethernet cable to rule out cable-related issues.
5. Test the connection using a dierent router or network to eliminate external network issues.
6. Unplug the dock from your laptop, disconnect all devices, and wait at least 5 minutes. Reboot your laptop
and reconnect the dock.
SD or microSD Card Reader Issues
If the SD or microSD port is not working properly, follow these steps:
1. Disconnect the dock and all connected devices from your laptop. Wait at least 5 minutes, then restart your
laptop and reconnect the dock.

2. Check the dock's SD or microSD functionality on a dierent laptop.
3. Use another SD or microSD card to see if the issue lies with the card itself.
4. Make sure the card is fully inserted—press down until it clicks into place.
Audio Port Issues
If your headphones or speakers aren't working through the 3.5 mm audio port, follow these steps:
1. Disconnect the dock and all connected devices from your laptop. Wait at least 5 minutes, then restart your
laptop and reconnect the dock.
2. If you're using a MacBook, go to System Settings > click Sound > select the Output tab > select Anker 3.5 mm
Audio as the output device.
3. Connect the dock to a dierent laptop to check if the issue persists.
4. Try another pair of headphones or speakers to determine whether the problem is device-related.
FAQ
Compability FAQs
Will this dock and the removable hub work with any laptop? How do I make sure my laptop is compatible
with this dock?
This dock and the removable hub are compatible with laptops that have a USB-C port supporting
Thunderbolt 3 / 4 / 5, USB4, DisplayPort Alt Mode, and Power Delivery. To confirm your laptop's compatibility,
check the user manual or contact the manufacturer. If your USB-C port does not support DisplayPort Alt
Mode, video output will not be available. If it does not support Power Delivery, the dock will still transmit
video and data, but will not charge your laptop.
Can I use a dierent USB-C to USB-C cable instead of the included one?
We recommend using the included USB 3.1 Gen 2 cable for best results when connecting the dock to your
laptop. If you choose a dierent cable, make sure it supports 10 Gbps data transfer, 100W PD charging, and
video output (DisplayPort Alt Mode).
Why does my Dell laptop show a slow charging warning even though its power requirement is less than
100W?
Dell laptops use a proprietary charging protocol, which may trigger a "slow charging" warning when
connected to non-Dell chargers. However, if your Dell laptop's power requirement is under 100W, our docking
station will still charge it at the same speed as the original adapter.
Display FAQs
Why are the displays identical when I connect my MacBook to multiple monitors through this dock?
This behavior is expected due to a system limitation in macOS and iPadOS, which only support Single-Stream
Transport (SST) mode. This means that even if you connect multiple monitors to the dock, the same image will
appear on all external displays. In contrast, Windows supports both Single-Stream Transport (SST) and Multi-
Stream Transport (MST), which allows each monitor to show dierent content.
Why can't my laptop connect to three external monitors using this dock?
Some laptops have GPU limitations that restrict the number of displays they can support—this includes both
built-in and external monitors. For example: Dell XPS 13 9350 and HP Spectre 16 x360. To check your laptop's
display support, open Intel Graphics Command Center. Go to Display Settings > Advanced Settings. Under
Processor Graphics, locate "Maximum Number of Displays." (Note: This number includes both built-in and
external screens.)
Why is only one display visible when I connect multiple monitors to the dock on Windows or macOS?
This issue can happen for dierent reasons depending on your operating system:
1. Windows
Check Settings > Display.
If one monitor is not recognized, check if both EDIDs are detected.
Manually enable the missing display if it appears disabled.
2. macOS
Apple devices only support Single Stream Transport (SST), so only a single video signal is output, even if
multiple displays are connected.
The system uses the primary monitor's EDID to determine output. If monitors have dierent specs, this can
cause one to go black. For example: A 2K@120Hz monitor and a 4K@60Hz monitor connected simultaneously
may cause the 4K monitor to fail if the system prioritizes the 2K EDID at 120Hz.
To resolve this, adjust the high-refresh-rate monitor to a more compatible setting, such as 60Hz, so that both
diplays can function properly.
Serial Number (SN) Location
The serial number (SN) is printed on the back of the dock, and follows the format shown below:
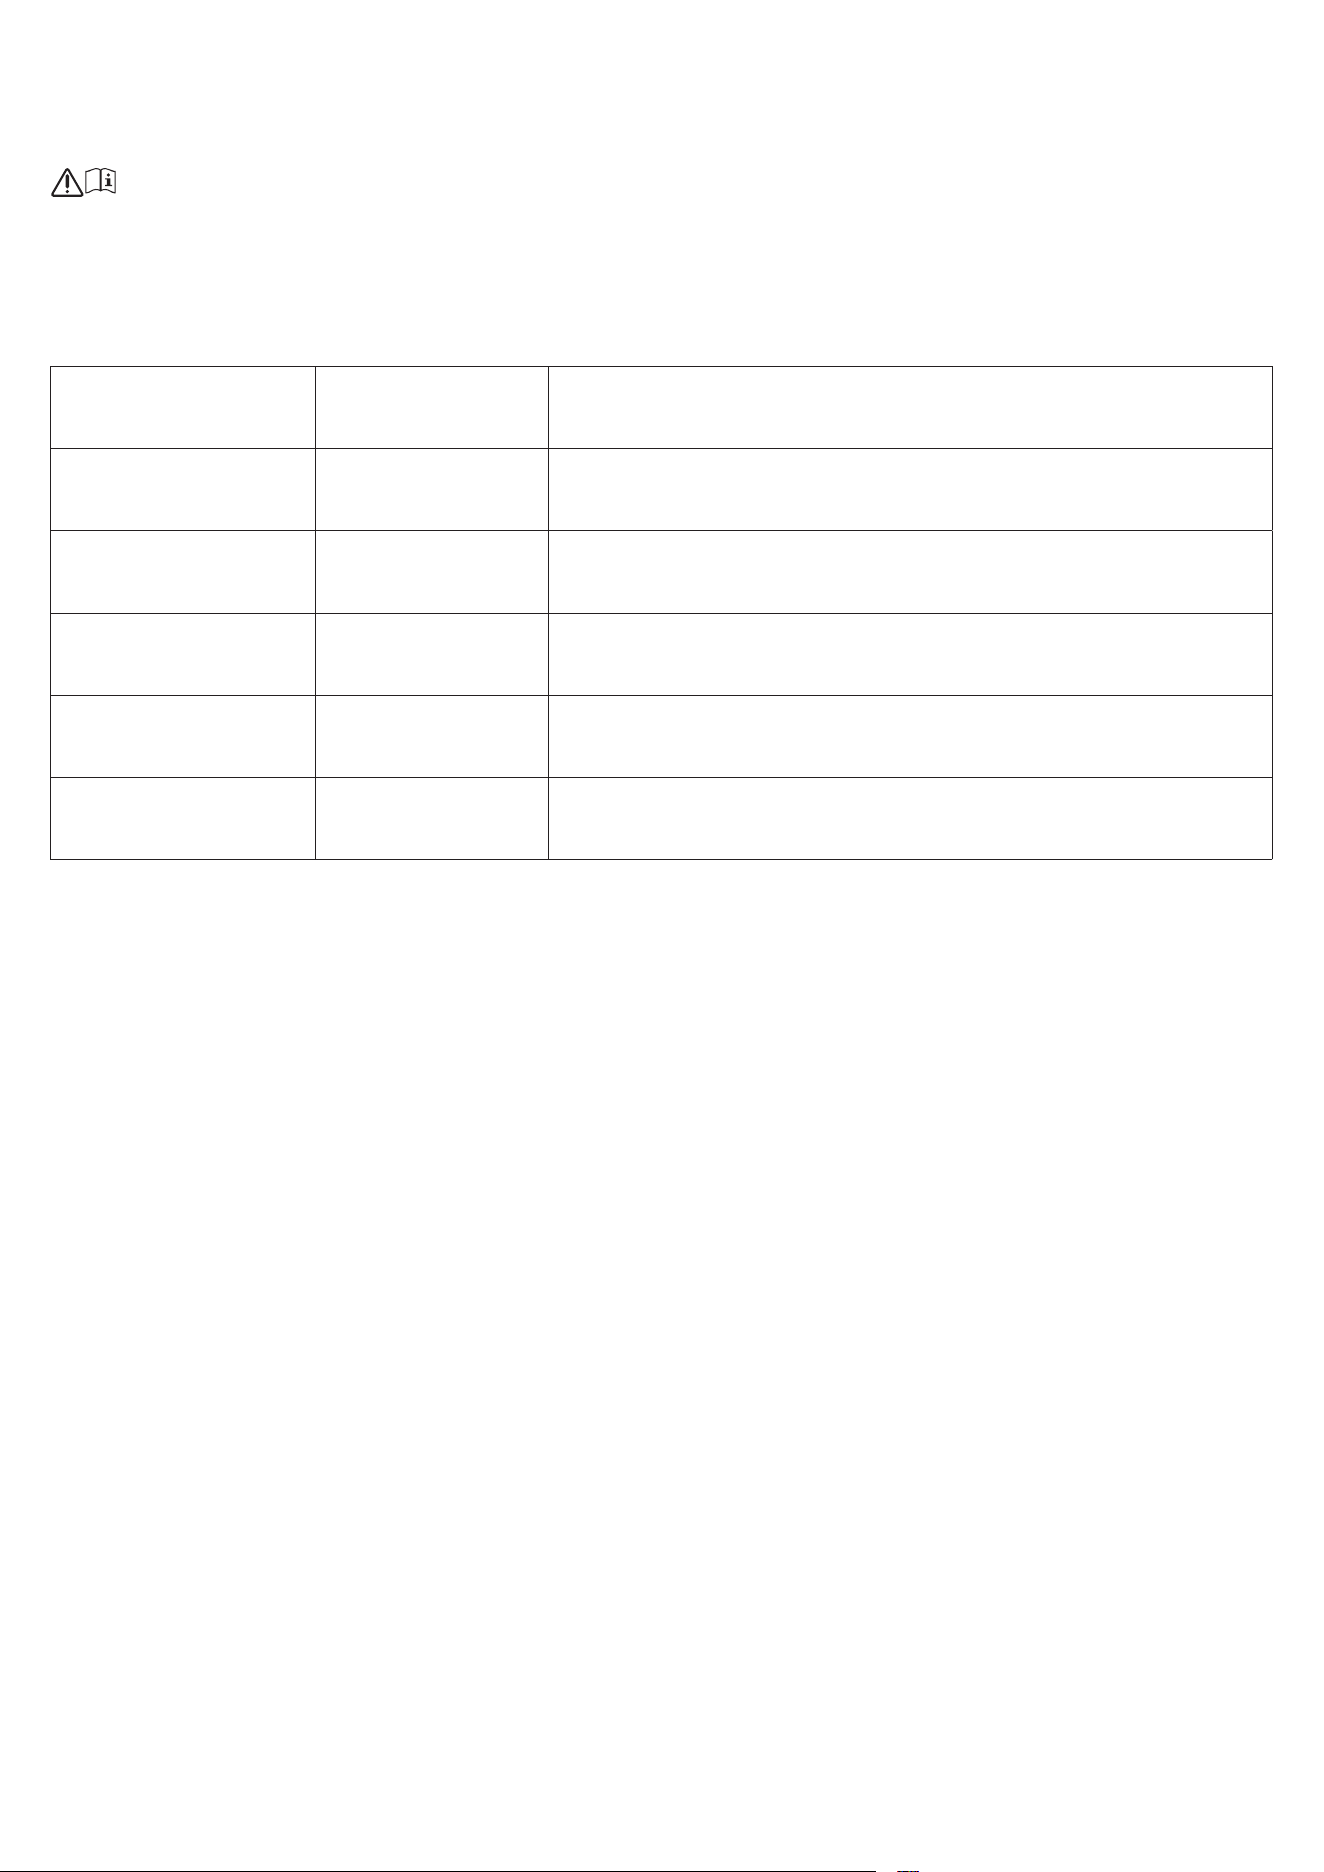
Note: Please refer the information on exterior bottom enclosure.
Pay attention to the instructions.
Example Format: SN Code: xxxxxxxxxxxxxxxx
Note: Each "x" represents a variable. See the table below for details.
Variable Range Description
Eighth Character 0-9 or A-F
Indicates the hardware version. This does not aect safety
compliance.
Ninth Character 8, 9, A, B, C...
Indicates the production year: 8 = 2018, 9 = 2019, A = 2020, B =
2021, C = 2022, etc.
Tenth and Eleventh
Character
01, 02, 03...
Indicates the production week: 01 = 1st week of the year, 02 =
2nd week, etc.
Twelh Character 1-7
Indicates the day of the week: 1 = Monday, 2 = Tuesday..., 7 =
Sunday.
Last Five Digits 00001-99999 Indicates the unit's unique serial number.
Compliance Information
1. The power of low power consumption condition: 0.376W
2. The time of automatically into low power consumption condition or networked standby mode: 5mins
3. Information of applicable adapter:
Input: 100-240VAC, 2.5A, 50-60Hz
Output: 21.0 VDC, 6.67A, 140.0 W