Main screen
1
H-RADIO 4.2
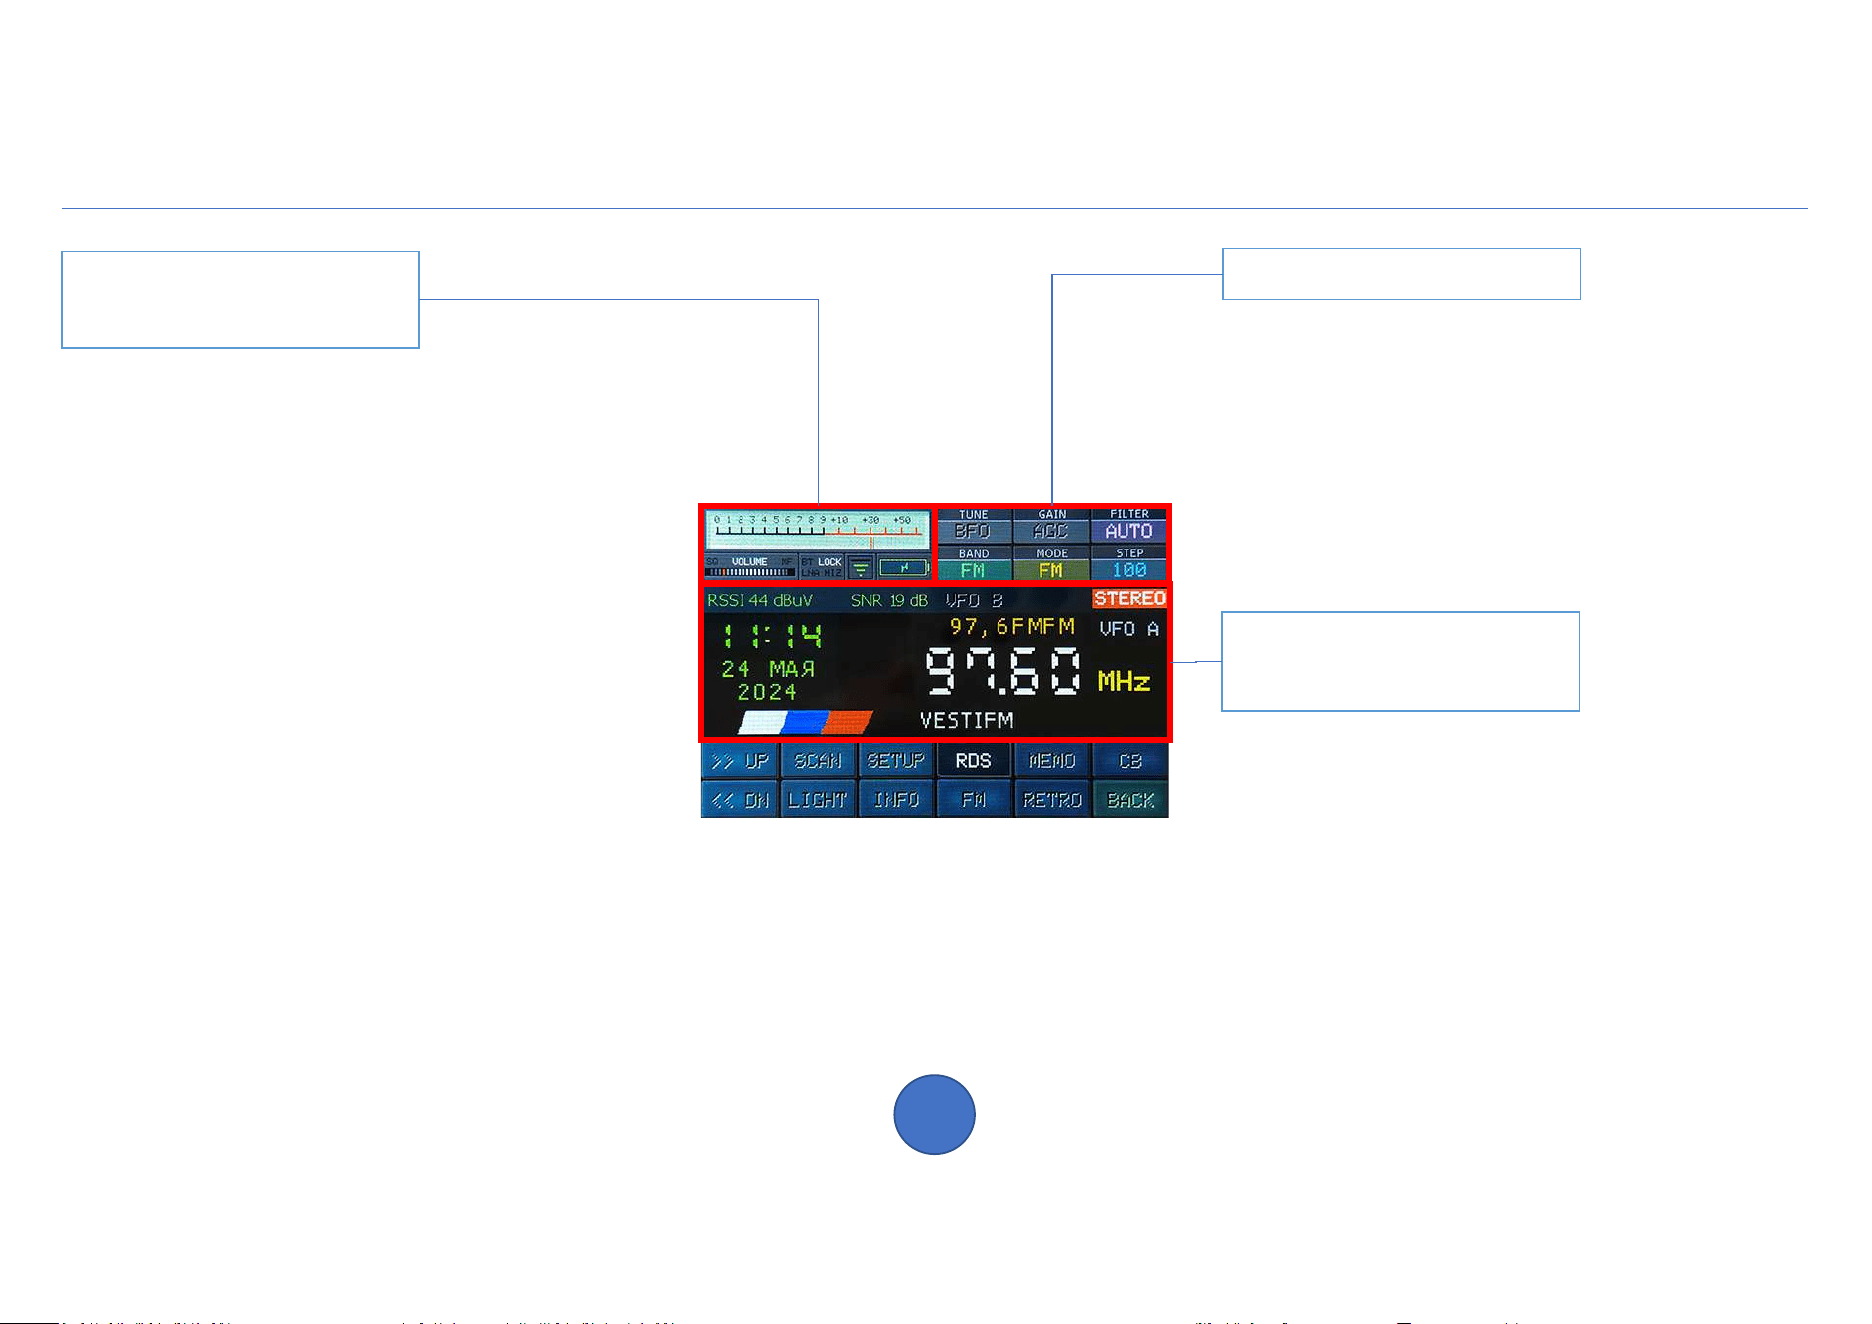
Status panel
Indicators and panel
quick start
Main screen
(FM band)
- use of BFO generator for
fine tuning to frequency
- automatic gain or attenuator
- LF bandwidth
- range
- modulation
- setup step
- S-meter (press to change view and switch
to the histogram or “waterfall” mode for the low-frequency signal,
press and hold to turn metering on/off
RSSI/SNR signal quality, use for
reduce digital noise)
- volume (press to turn sound on/off)
SQ – indicator of a working squelch
MF – simultaneous function indicator
listening to multiple frequencies (page 5)
- indicator panel for switching on circuit elements
(click to display control buttons)
(page 3)
- Wi-Fi connection (tap to turn on/off)
indicator color:
green - connection active
orange - no Internet connection
red - connection error
gray - no available networks
- battery charge level (tap to display in percentage or volts)
"lightning" is displayed while the battery is charging
as the charge level decreases, the color changes to yellow and red
- tuning frequency in MHz (press and hold
to switch between VFO A/B)
- signal quality:
RSSI – level
SNR – signal to noise ratio
- stereo broadcast reception indicator in range
FM (press to turn on/off stereo reception)
- current date and time
- RDS information (station name, text and
program type)
Home screen buttons
2
H-RADIO 4.2
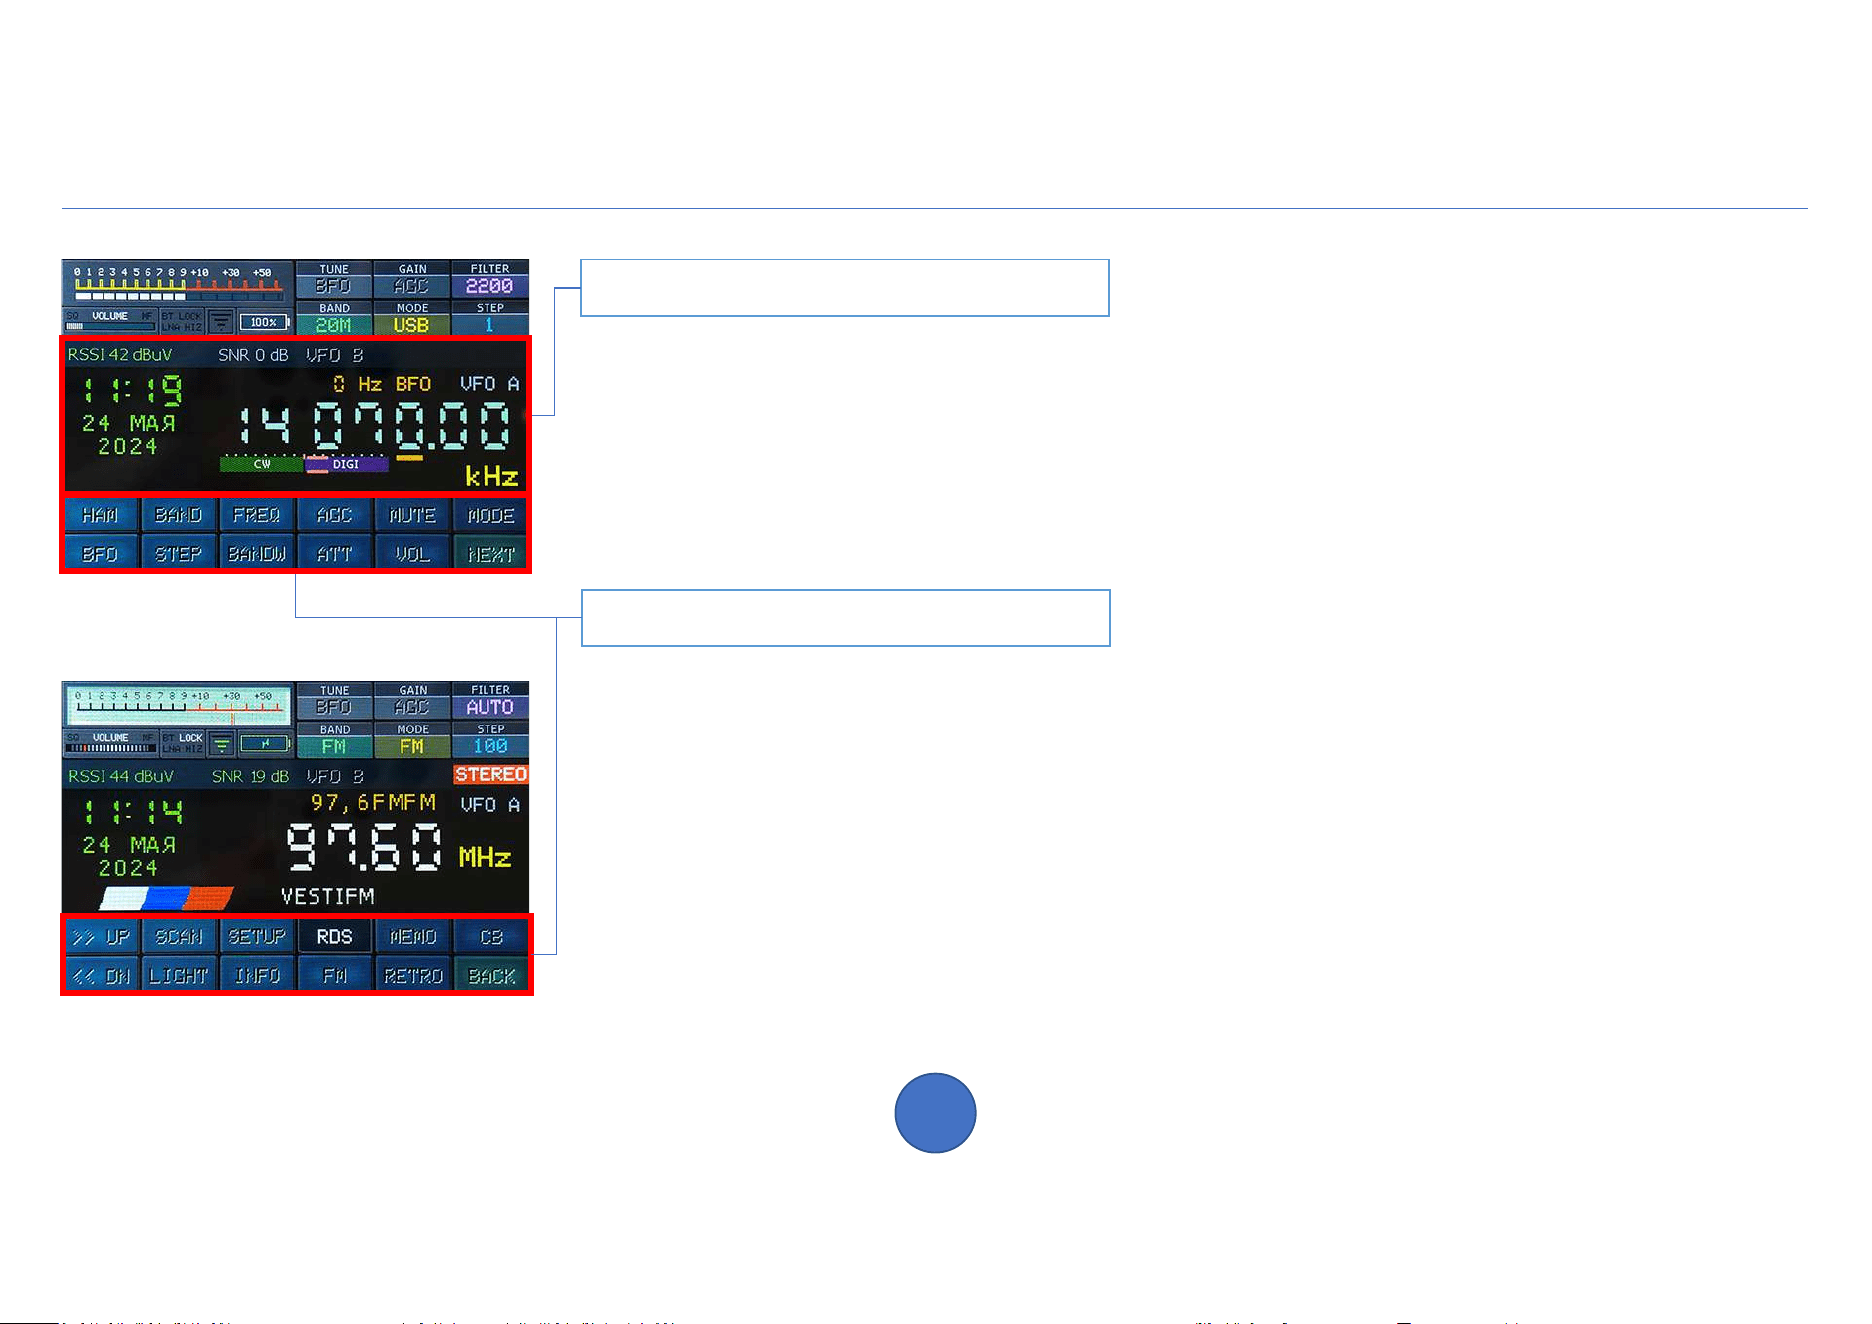
Main screen (SSB modulation)
- tuning frequency in kHz (click to directly set frequency without using BFO offset, color
the numbers will change to white)
- indicator of a variable digit in the frequency when tuning (click on the corresponding digit to
installations)
- indicator of the passage of waves on the selected range (information obtained from the Internet), color
indicator shows the quality of passage (red - bad, yellow - average, green - good)
- information about the type of amateur radio communication used in the current range section
Buttons
- HAM selection of amateur radio band (page 6)
- BAND selection of broadcast band (page 6)
- FREQ frequency setting / simultaneous mode
listening to multiple frequencies (page 5)
- STEP selection of tuning step (page 6)
- BANDW selection of bass bandwidth (page 6)
- MODE modulation selection / decoder modes (page 6)
- VOL / MUTE volume control (page 4)
- AGC on/off automatic gain (page 4)
- ATT attenuator control (page 4)
- BFO control of BFO oscillator/frequency
generator SI5351 (page 3)
- UP search for broadcast station up in frequency
- DN search for broadcast station downward in frequency
- SCAN range scanner (page 8)
- LIGHT display brightness control (page 19)
- MEMO memory of stations and cities (page 9)
- RETRO retro receiver scale (page 12)
- CB civil band CB channels (page 11)
- FM fast switching of saved stations
FM band of current location (page 11)
- RDS on/off RDS functions
- SETUP device settings (page 13)
- INFO information about the device, settings and
passing waves (page 17)
- NEXT / BACK switching between pages
Quick start panel / BFO generator
3
H-RADIO 4.2
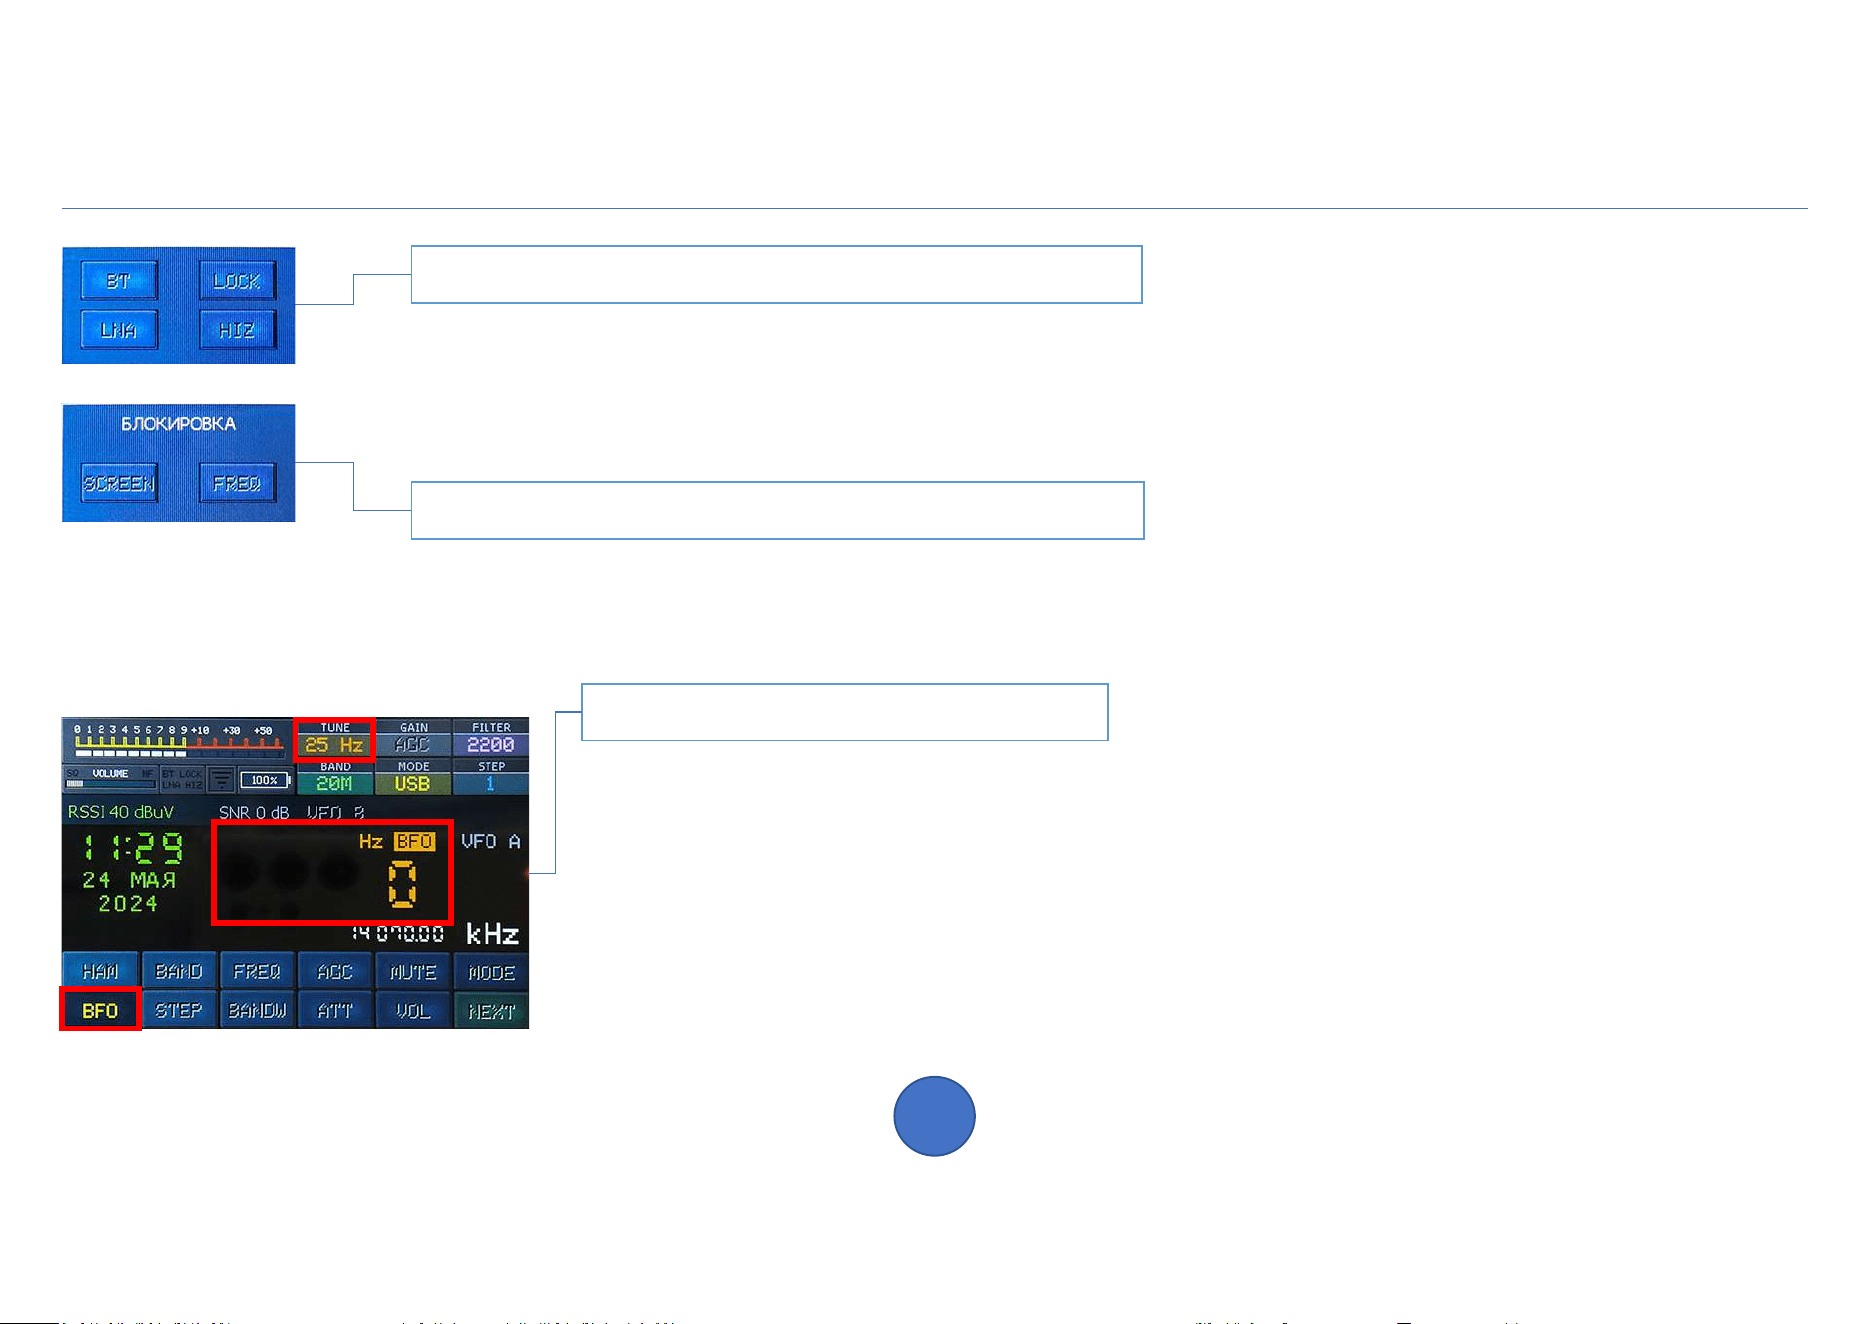
Panel for quick inclusion of circuit elements
Called up by clicking on the panel indicating the inclusion of circuit elements.
- BT on/off the Bluetooth module to connect a wireless audio device
- LNA on/off HF preamplifier
- HIZ antenna input impedance switching 50 Ohm/Hi-Z
- LOCK locks the touch screen and encoder (press to open the lock panel)
Lock panel
- SCREEN enable touch screen lock, use to block accidental taps on the screen
(can also be used to reduce your own digital noise)
- FREQ on/off encoder rotation lock
The locks are disabled by pressing the encoder button.
BFO generator
To fine tune to the transmitter frequency in SSB mode, use a BFO generator.
Entering the oscillator trim mode is available for each amateur radio band using
BFO button or long press the encoder button.
In this case, each range retains its own BFO frequency value.
The adjustment frequency value varies from -1999 to +1999 Hz. The adjustment step is displayed
on the status panel and can be changed by pressing the STEP button.
If the device uses an SI5351 generator, then to fine-tune it is necessary to use the
BFO Press the BFO frequency once and the SI5351 frequency will be displayed.
Reseng the BFO or SI5351 frequency to default values is done by long pressing the frequency.
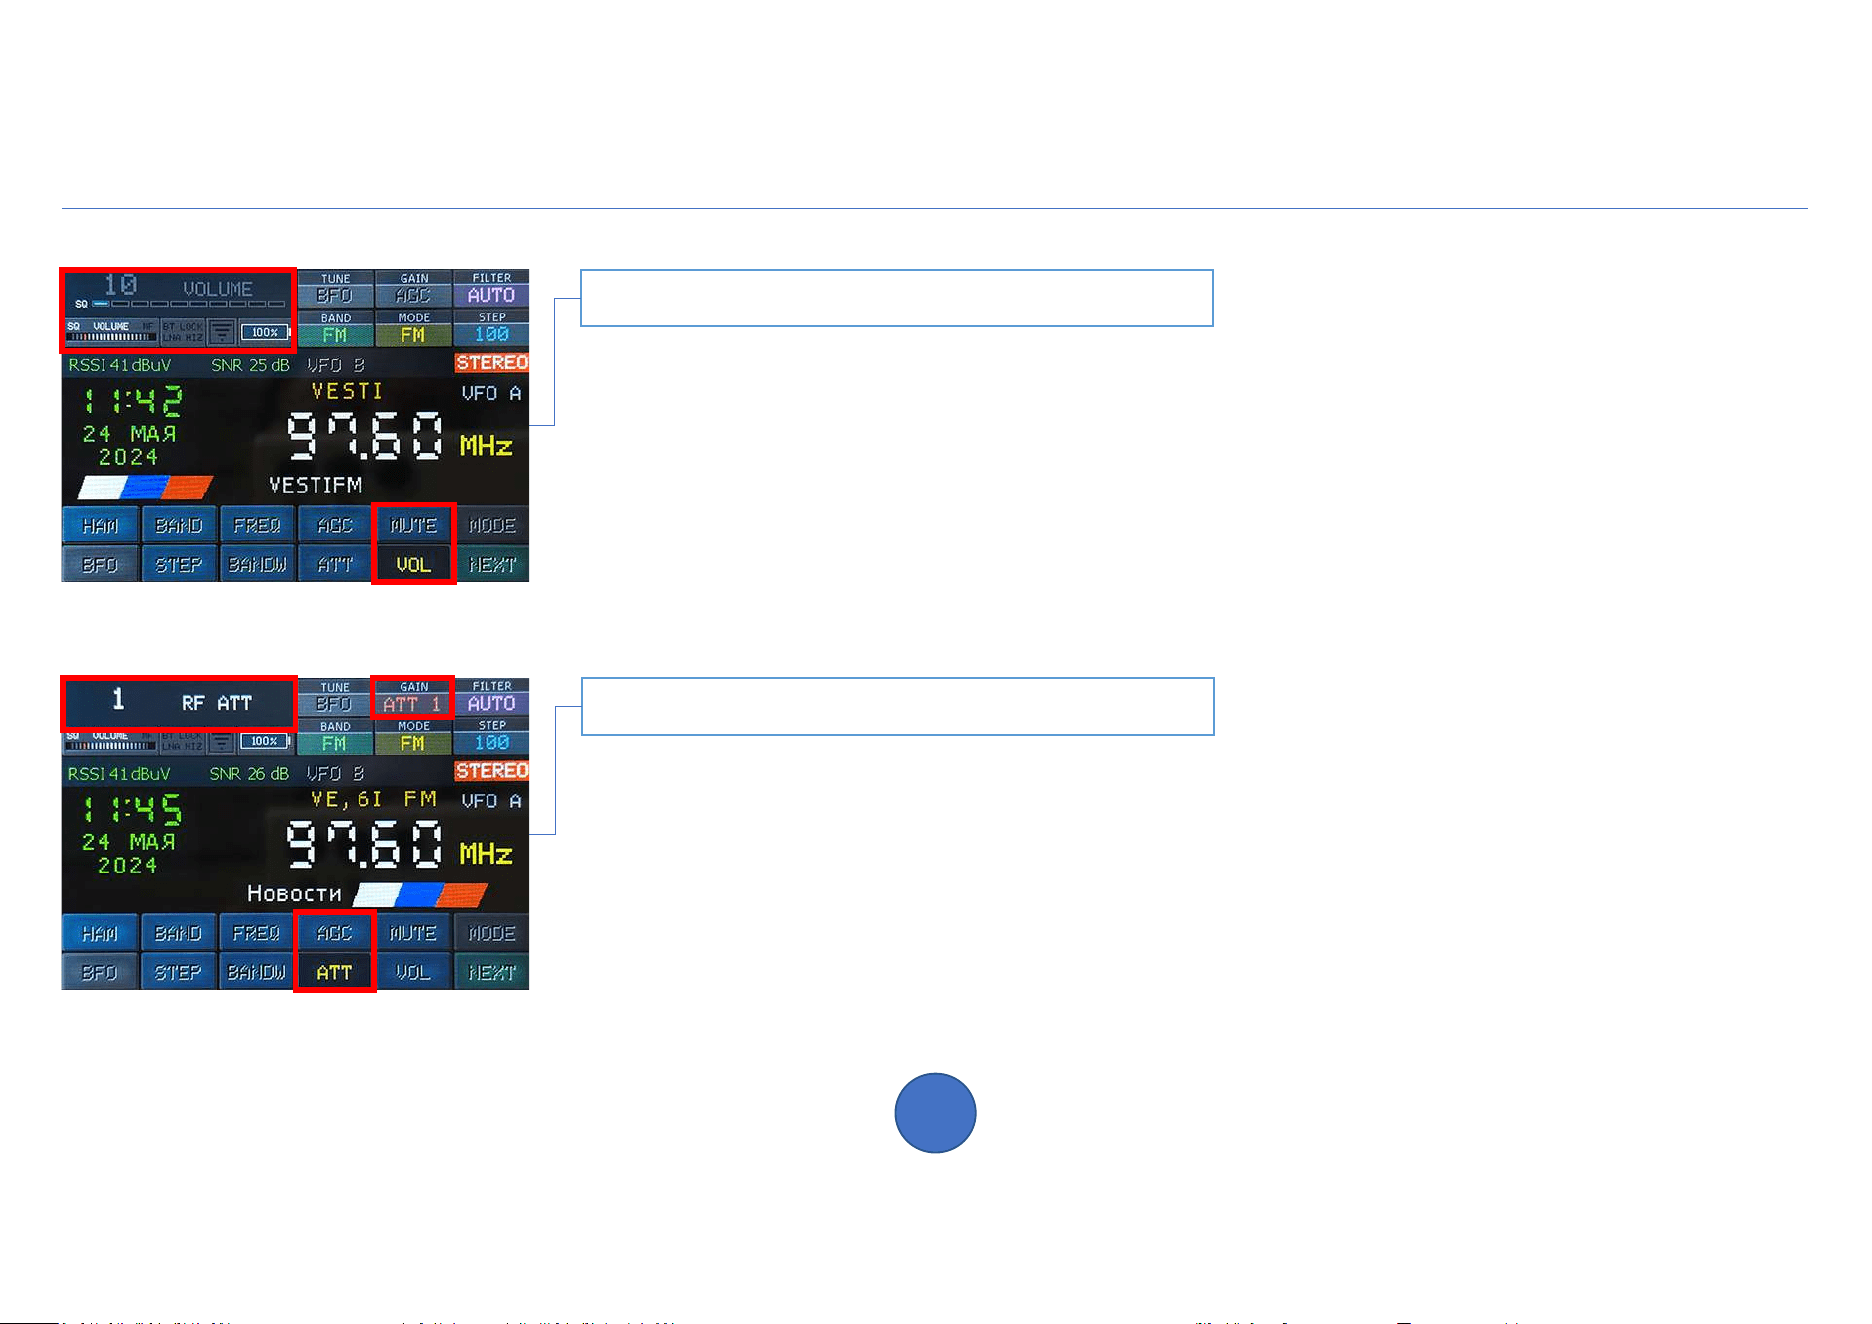
Adjusting the volume and signal gain
4
H-RADIO 4.2
Volume control
Auto gain and attenuator
To control the volume, press the VOL button or the encoder button once.
To mute the sound, press the MUTE button or the volume indicator.
To automatically mute the sound when there is no station signal, use the squelch.
To adjust the squelch level, press in volume control mode to the value
volume or once on the encoder button. The squelch level bar will be highlighted.
brighter and can be adjusted using an encoder.
Squelch is not available for SSB mode.
Use the built-in attenuator to control signal gain. Entering control mode
the attenuator is performed by pressing the ATT button. Set the required value using the encoder
attenuator level to eliminate overload at the RF input. The higher the value, the weaker
signal amplification.
Press the ATT button again to exit the attenuator adjustment mode.
The set level will be displayed in the status bar.
Press the AGC button to enable automatic signal gain. The status bar will display
corresponding indicator. Press the AGC button again to set the maximum level
gain. The corresponding indicator in the status line will be extinguished.
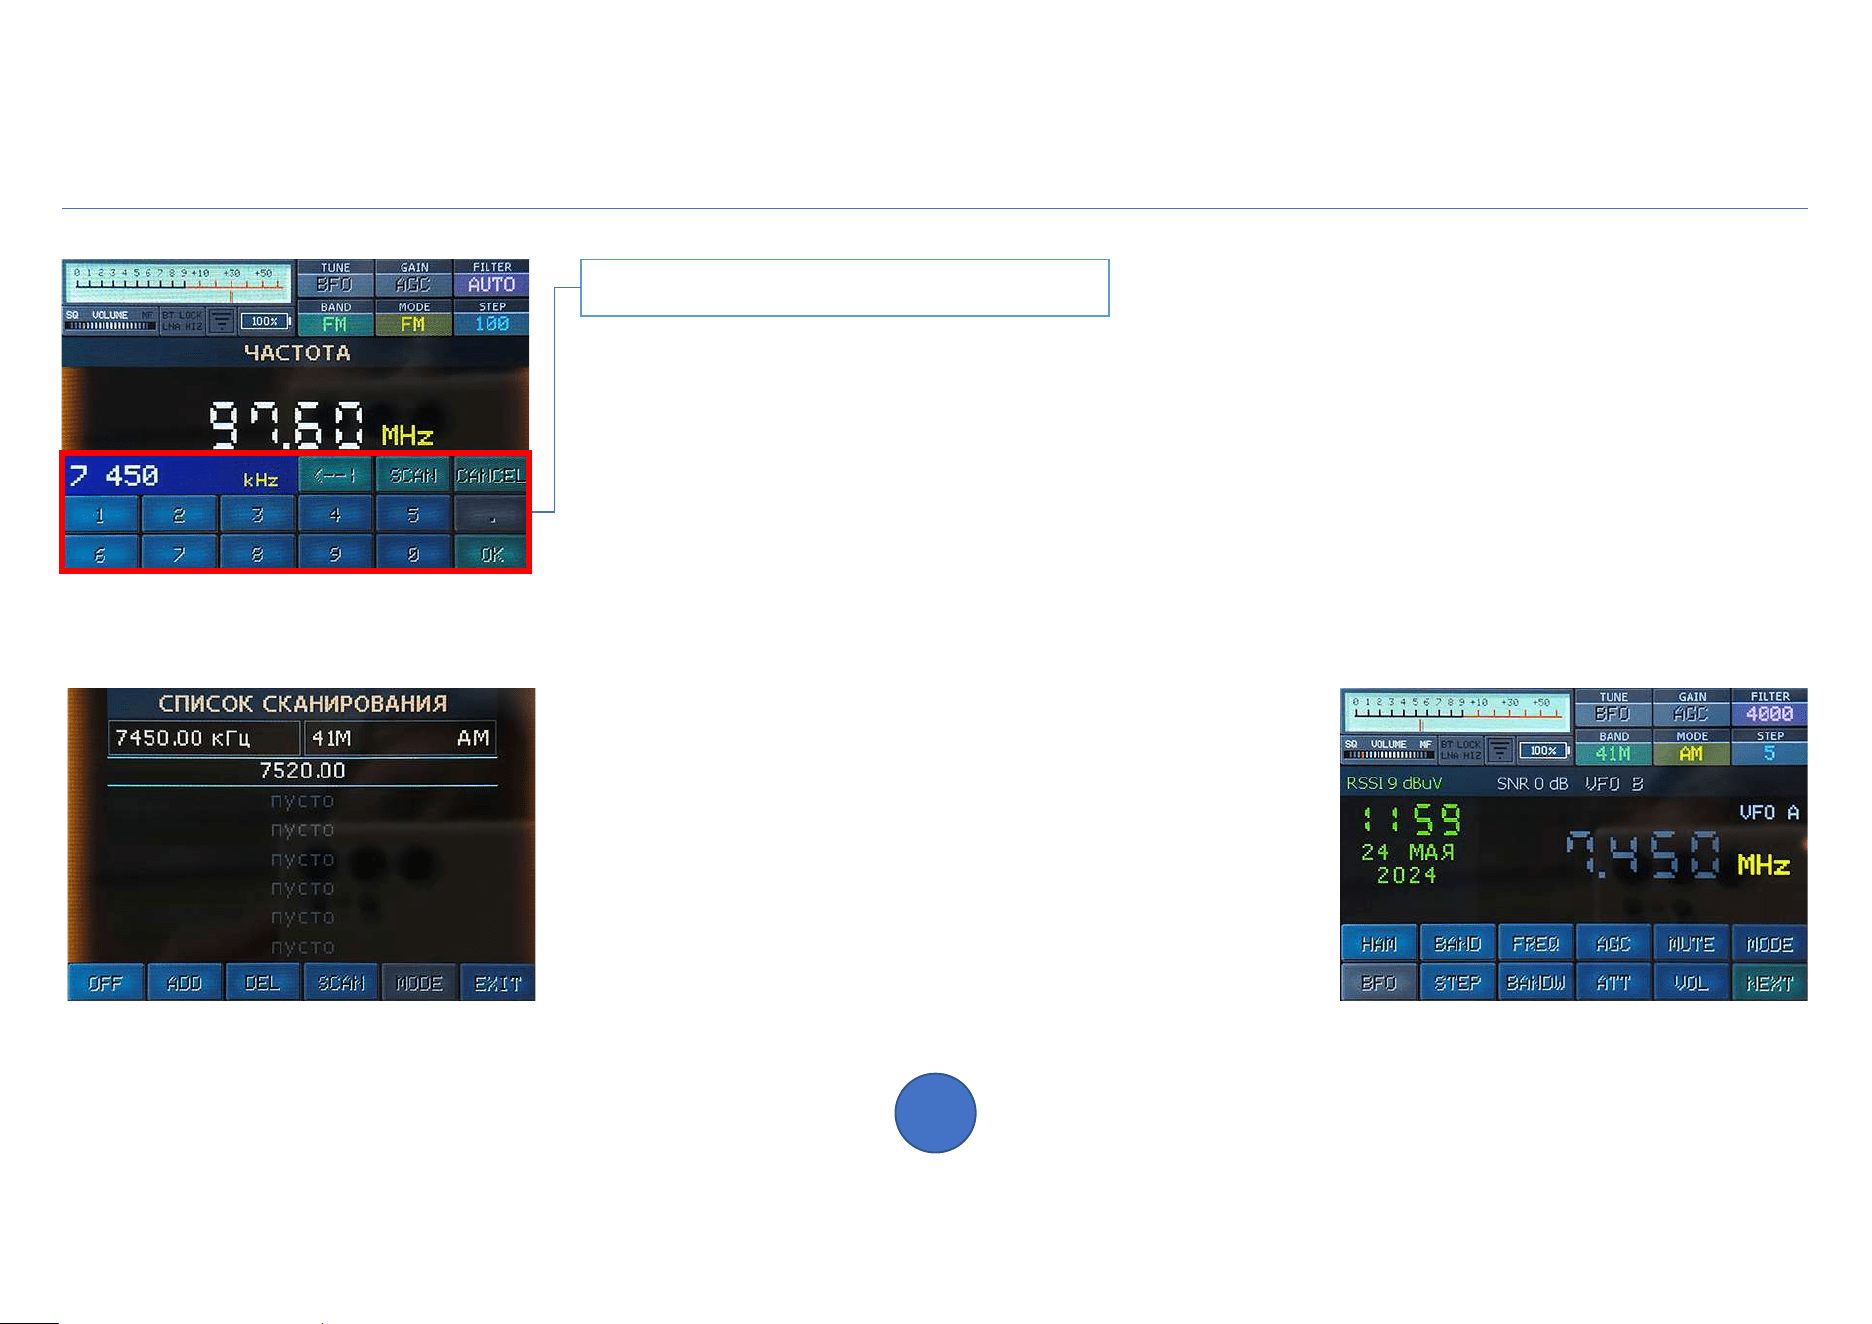
Entering frequency
5
H-RADIO 4.2
Direct frequency entry buttons
Press the FREQ button on the main screen to enter the frequency or set the listening mode
several frequencies.
Use the number buttons to enter the frequency. The units of measurement will be selected automatically.
Use the dot to enter the FM broadcast frequency.
To delete incorrectly entered numbers, use the | button.
A frequency that cannot be set is displayed in red.
Click OK to set the frequency. The range and type of modulation will be selected automatically.
To exit without changing the frequency, press CANCEL.
Press SCAN to enter multi-frequency simultaneous listening mode.
This mode is not available for SSB.
For each range and type of modulation AM or FM can
be created your own list of 7 frequencies to scan. Range
will be selected automatically according to the entered frequency.
- MODE select the type of modulation, if possible
- OFF disables the frequency of the selected slot from scanning
- ADD adding the current frequency to a free slot
- DEL release the selected slot
- SCAN start listening.
The sound will be muted and scanning of frequencies from the list
will begin. When a signal appears on one of the frequencies,
scanning will paused and the frequency will appear in white.
Tap the screen to exit the mode.
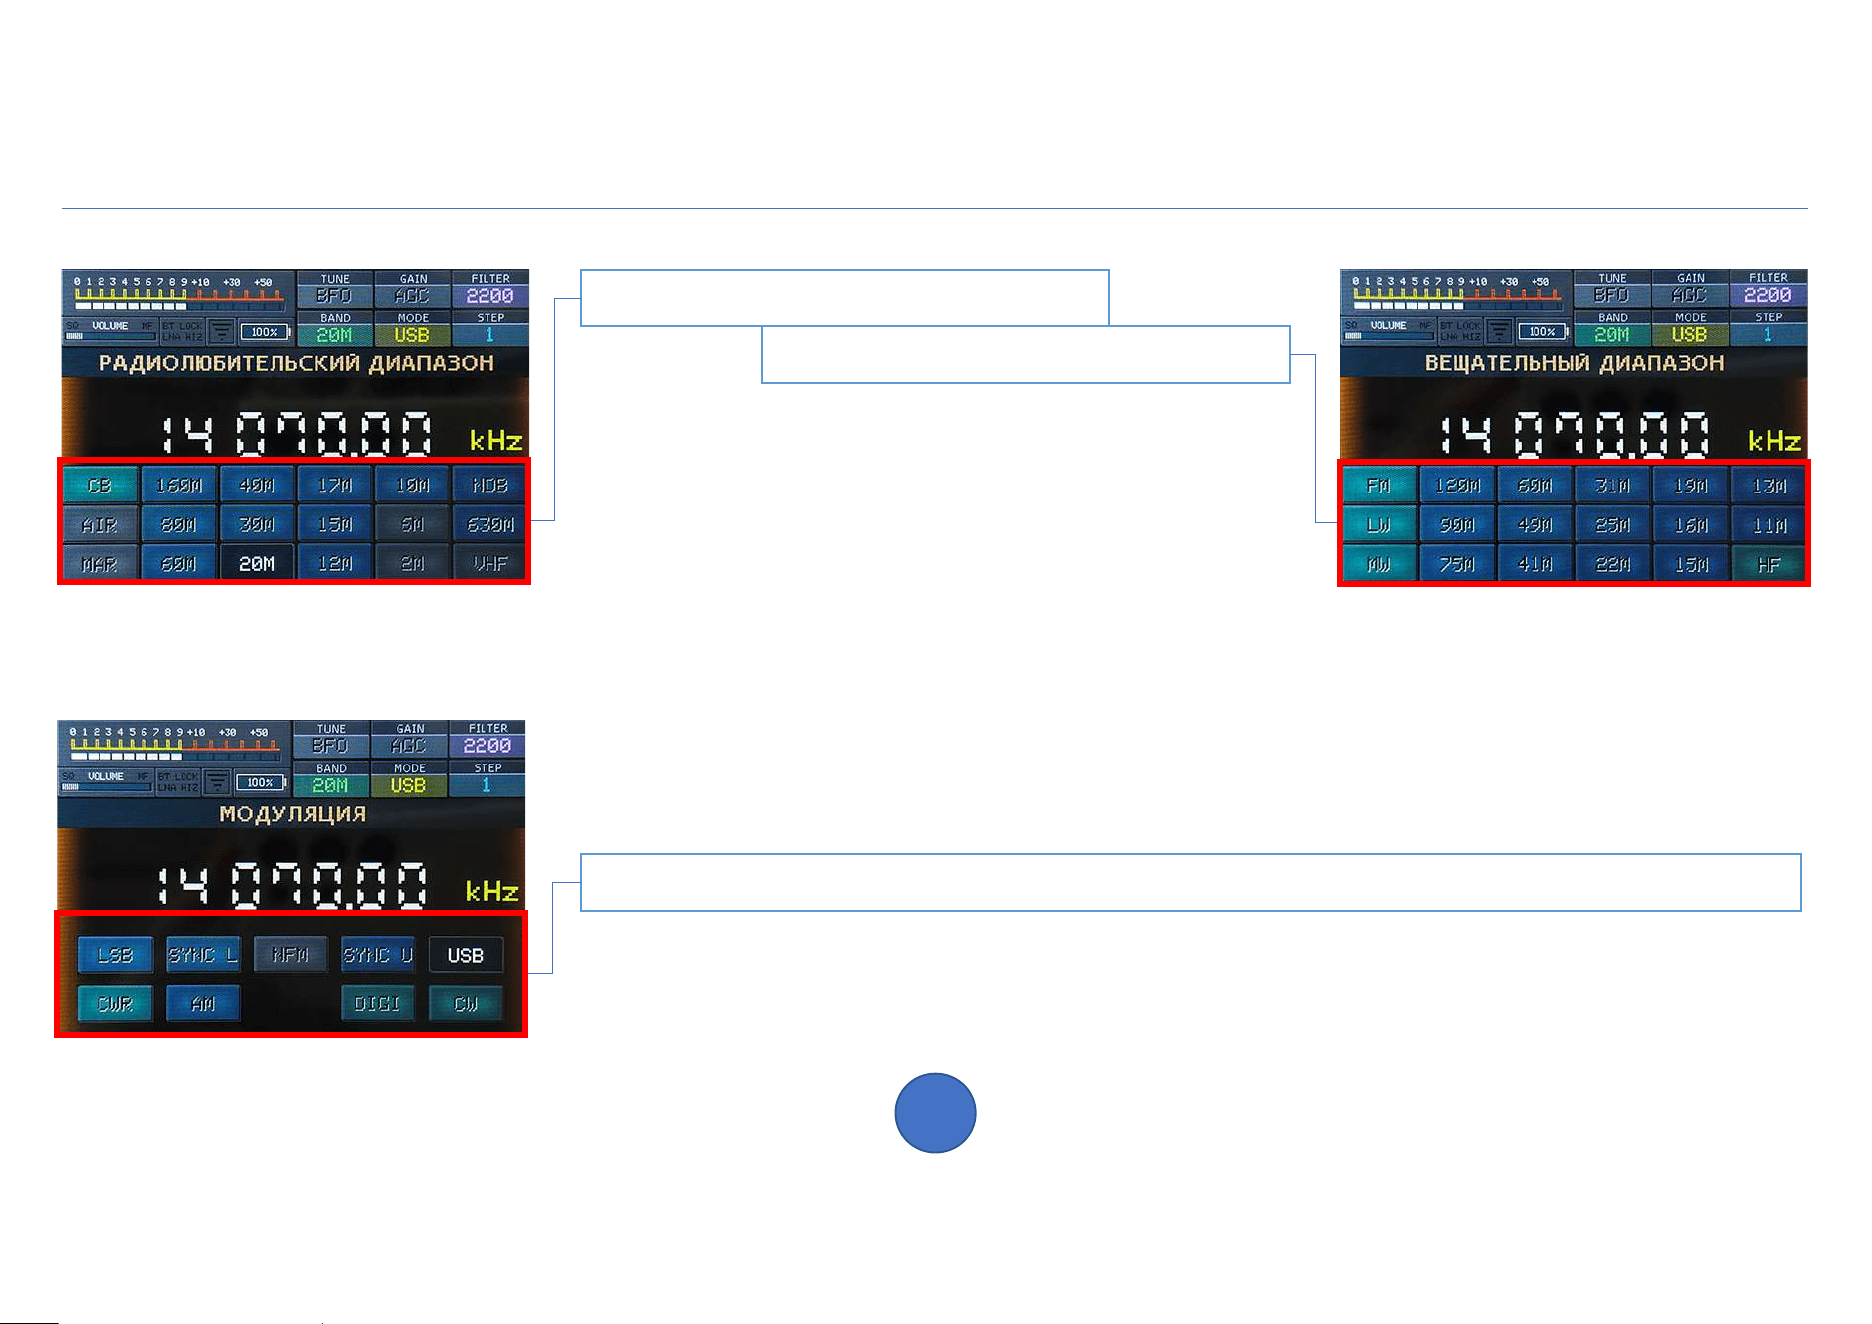
Bands / Modulation / Bandwidth / Tuning Step
6
H-RADIO 4.2
Amateur radio bands
Broadcast bands
Lists are available using the HAM and BAND buttons.
The lists contain frequency ranges allocated for
radio amateurs and radio broadcasting.
Range boundaries can be overridden in the file
seng.ini. Frequency values are available for viewing in
INFO section.
To select modulation, bandwidth or tuning step, click the appropriate
MODE, BANDW or STEP button on the main screen.
The current range, modulation type, bandwidth and tuning step are indicated in the lists
pressed button.
Ranges and types of modulation not available in the receiver configuration are indicated by gray buttons
and cannot be selected (see the description of your device).
To exit without changes, click on the frequency.
Types of modulation / decoder of Morse code and digital modes of communication
All possible types of modulation are available for the amateur radio and HF bands.
The CWR and CW buttons enable the Morse code decoder. Select the alphabet in the settings (page 14).
The DIGI button opens a list of digital communications to launch the corresponding decoder (page 7).
When you select a band, the priority modulation type will be turned on automatically.
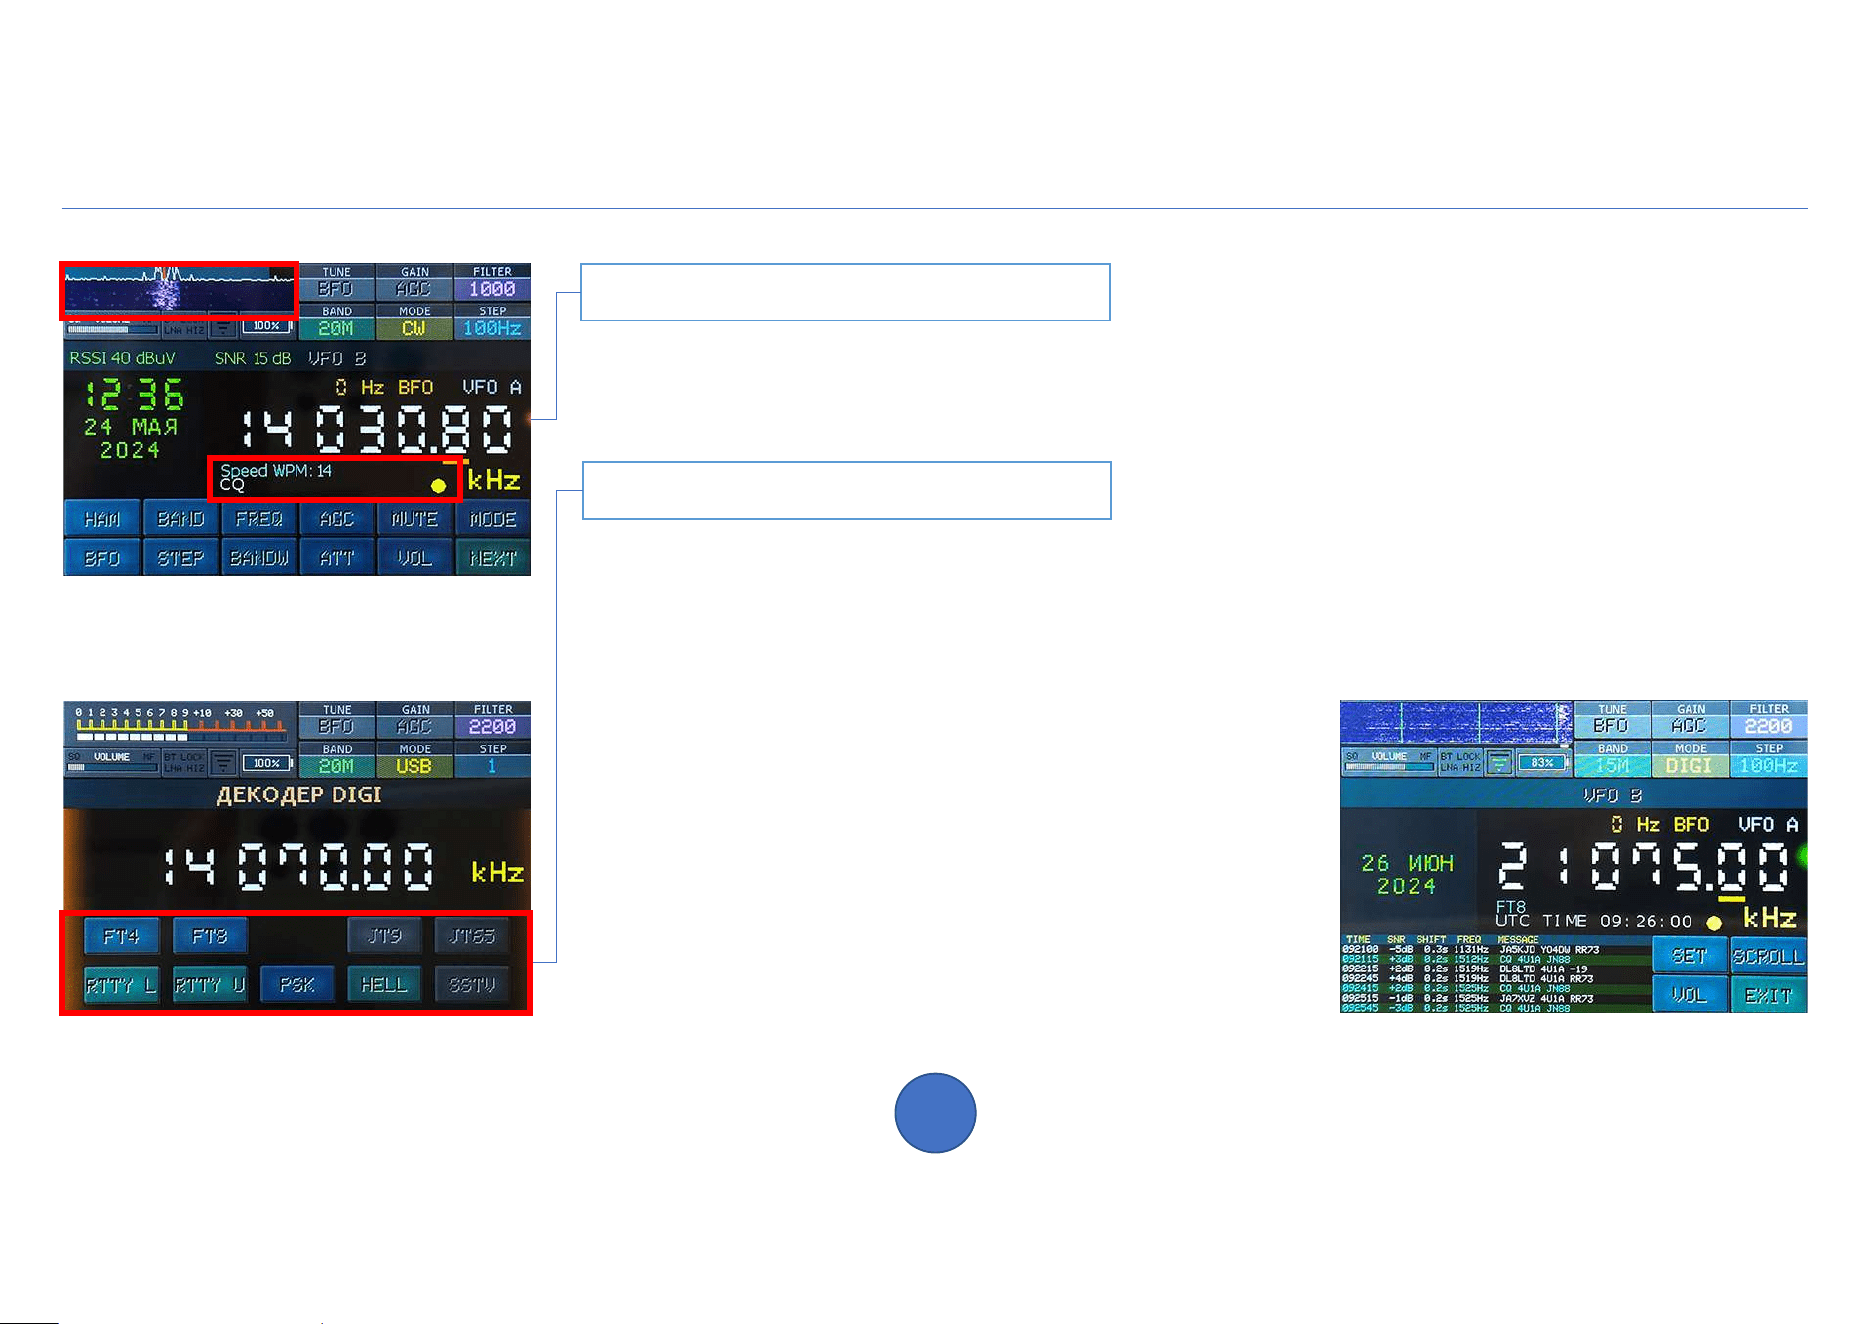
Decoder
7
H-RADIO 4.2
Digital mode decoders
Morse code decoder
For successful decoding, align the red mark on the “waterfall” with the signal while adjusting the frequency.
Select the volume level so that the signal is clearly visible at the “waterfall” (usually volume 45).
The yellow indicator will flash in time with the signal. The decode line displays the decoded
characters and words per minute.
To decode RTTY, PSK and Feld-Hell transmissions, align the red mark on the "waterfall" with the signal and
adjust the volume. For RTTY L, use the left signal stream, and for RTTY U, use the right signal stream.
To manually scroll the RTTY, PSK and FT4/FT8 decoding screen, press SCROLL and rotate the encoder.
The SET button for RTTY sets the baud rate to 45.45/50/75 baud. For Feld-Hell, turn on/off anti-aliasing
Pictures. For PSK, switches between BPSK31 and BPSK63 modes. In FT4/FT8 decoder it is used to set
time manually (page 13).
To move the Feld-Hell picture up or down for
For ease of reading, use the SCROLL button.
Decoding FT4/FT8 broadcasts requires accurate
setting the time. Connect the receiver using Wi-Fi
to the Internet or set the time manually.
When the time is set, it is displayed in the UTC TIME line.
For each FT4/FT8 gear, time, power are displayed
signal, offset in seconds from the start of the session, offset
frequency from the set one and the transmission data packet.
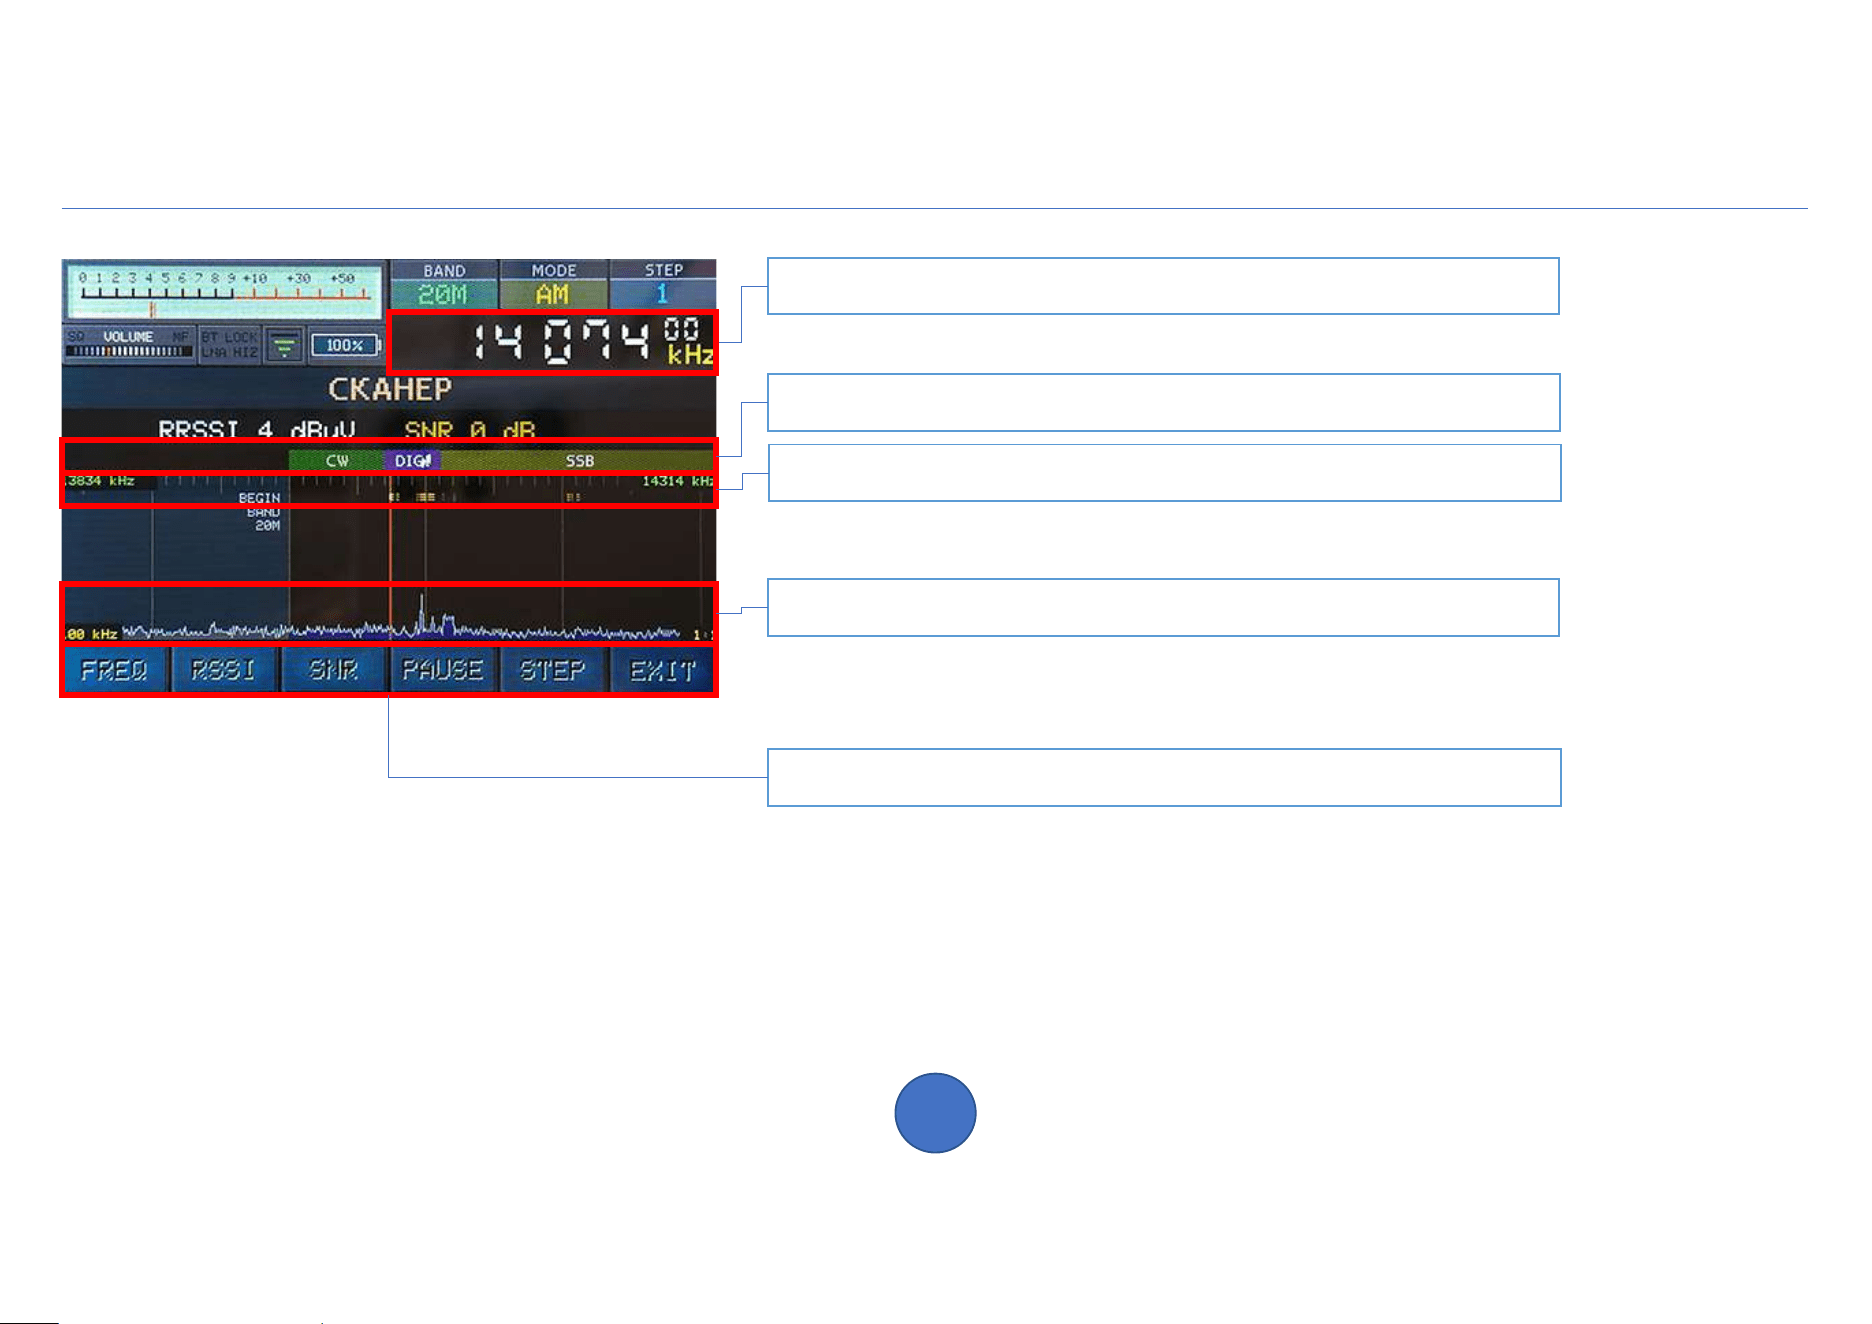
Range Scanner
8
H-RADIO 4.2
Frequency at cursor position
Indication of types of amateur radio communications
Scale
- initial and final scanning frequency
- marks of found signals
Signal graph
- scale step
- chart scale
- graph based on RSSI and SNR of the signal
Buttons
- FREQ horizontal scale control
- RSSI vertical scale control
- SNR graphics contrast control
to control, rotate the encoder or press and hold in the center of the graph to set the default value
- PAUSE press to stop scanning and listen to the broadcast
turns on automatically when you move the cursor
- STEP press to select the encoder setting step
Rotate the encoder to move the cursor or select a location on the display
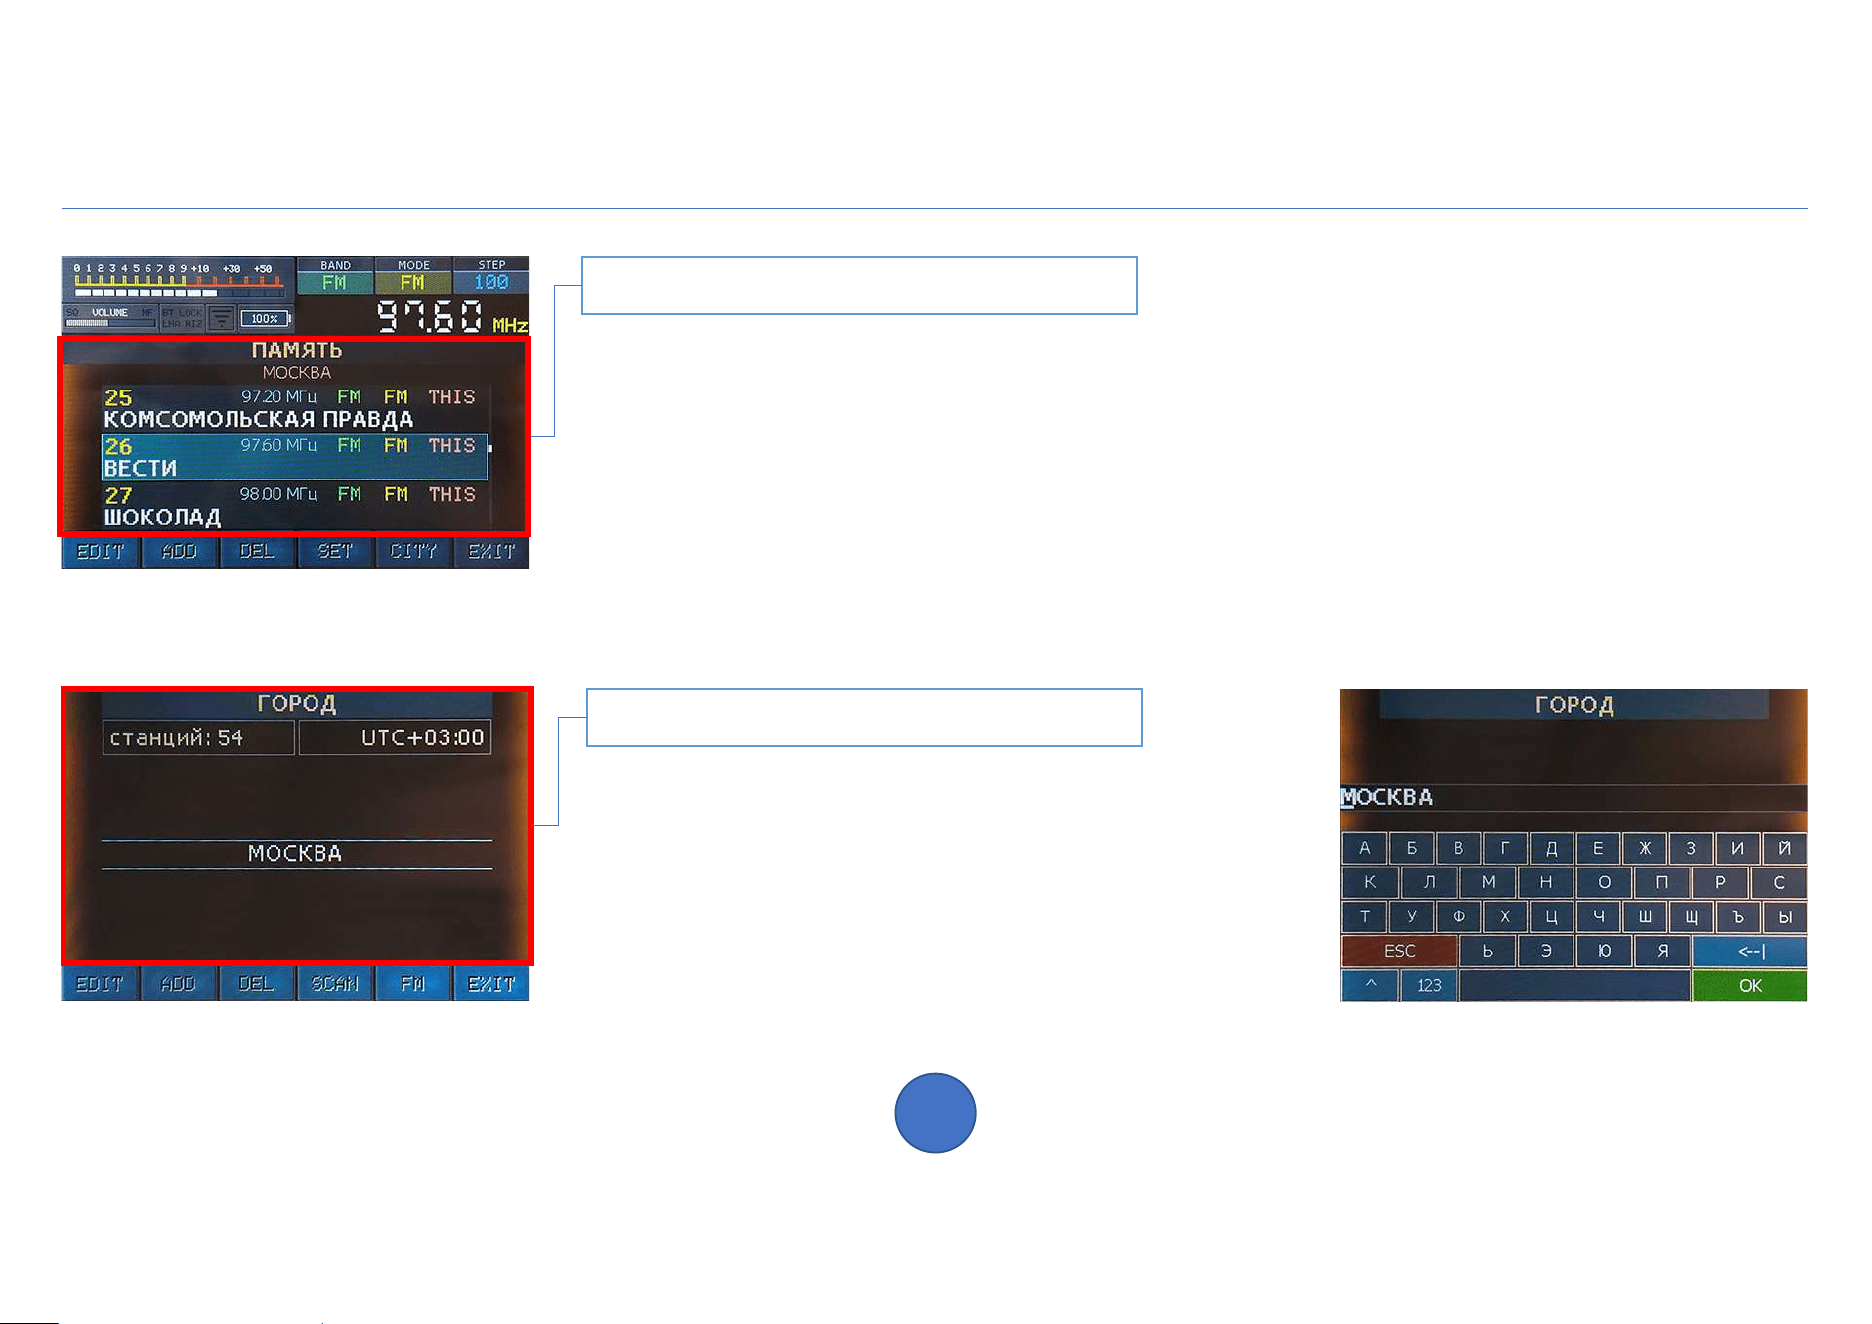
Memory of stations and cities
9
H-RADIO 4.2
Station memory list
List of locations (cities)
The current frequency, modulation type and range can be saved into the receiver's memory.
To set settings from a saved memory cell, rotate the encoder to search for the desired cell,
then press the encoder button or SET button or the desired cell.
The list display filter is set in the SETUP -> MEMORY LIST section (page 14).
To save the current settings, press the ADD button. To edit a saved cell
press the EDIT button. To delete a cell, press DEL.
When saving or editing a memory location, you must enter the station name using the on-screen
keyboards. Then, rotate the encoder to select a location where the station can be received.
THIS – the station will be saved for the current city. ALL – the station is available in any city. NONE -
There is no connection to the city.
The current city is shown at the top of the list. Press CITY to go to the list of cities.
For correct display of time and distribution
stations in the cities you are located in
add your location to cities memory.
Just like city stations, you can add, change and
delete. After editing the city name, you must
Rotate the encoder to select the time zone.
Press SCAN to search and save FM stations
range (page 10). Use the FM button to go to
list of saved FM stations for the city.
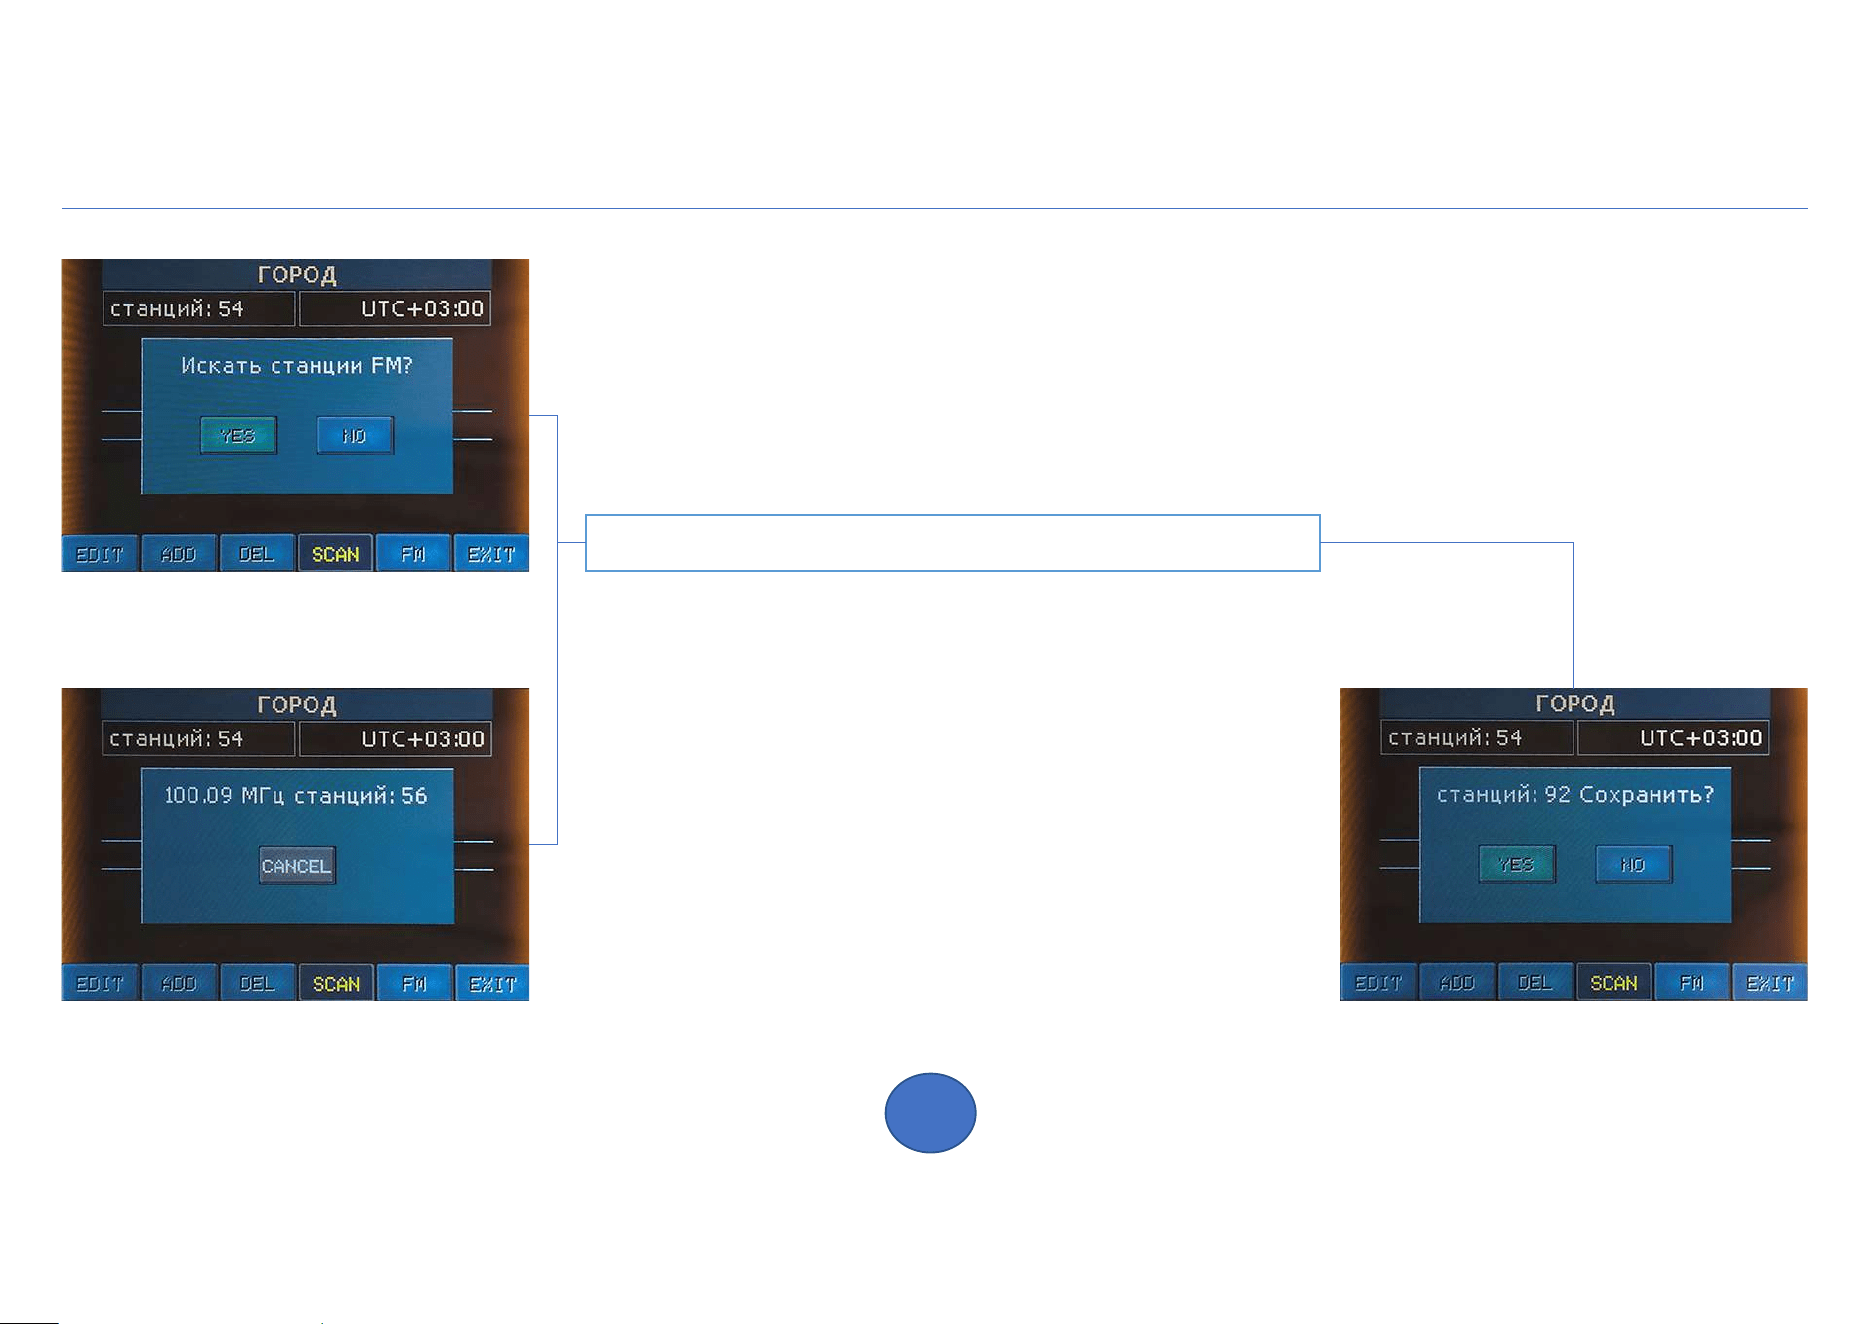
Search and save FM stations
10
H-RADIO 4.2
For each new location, unique lists of FM stations can be saved.
You can manually add stations to the receiver's memory or edit memory files (page 19).
You can automatically search for FM stations and save them to the receiver’s memory for
current location. First add your location to the list of cities (page 9).
Press SCAN to start automatically searching for stations.
During the search process, the current frequency will be
displayed and number of stations found.
You can abort the search at any time without saving
list of found stations by pressing the CANCEL button.
When the search is complete, save the stations found.
Then press the FM button and change the station names
created automatically. You can edit
list on your computer (page 19).
Saved station names will be used
in FM mode (page 11), as well as in retro scale (page 12).
Automatic search for FM stations
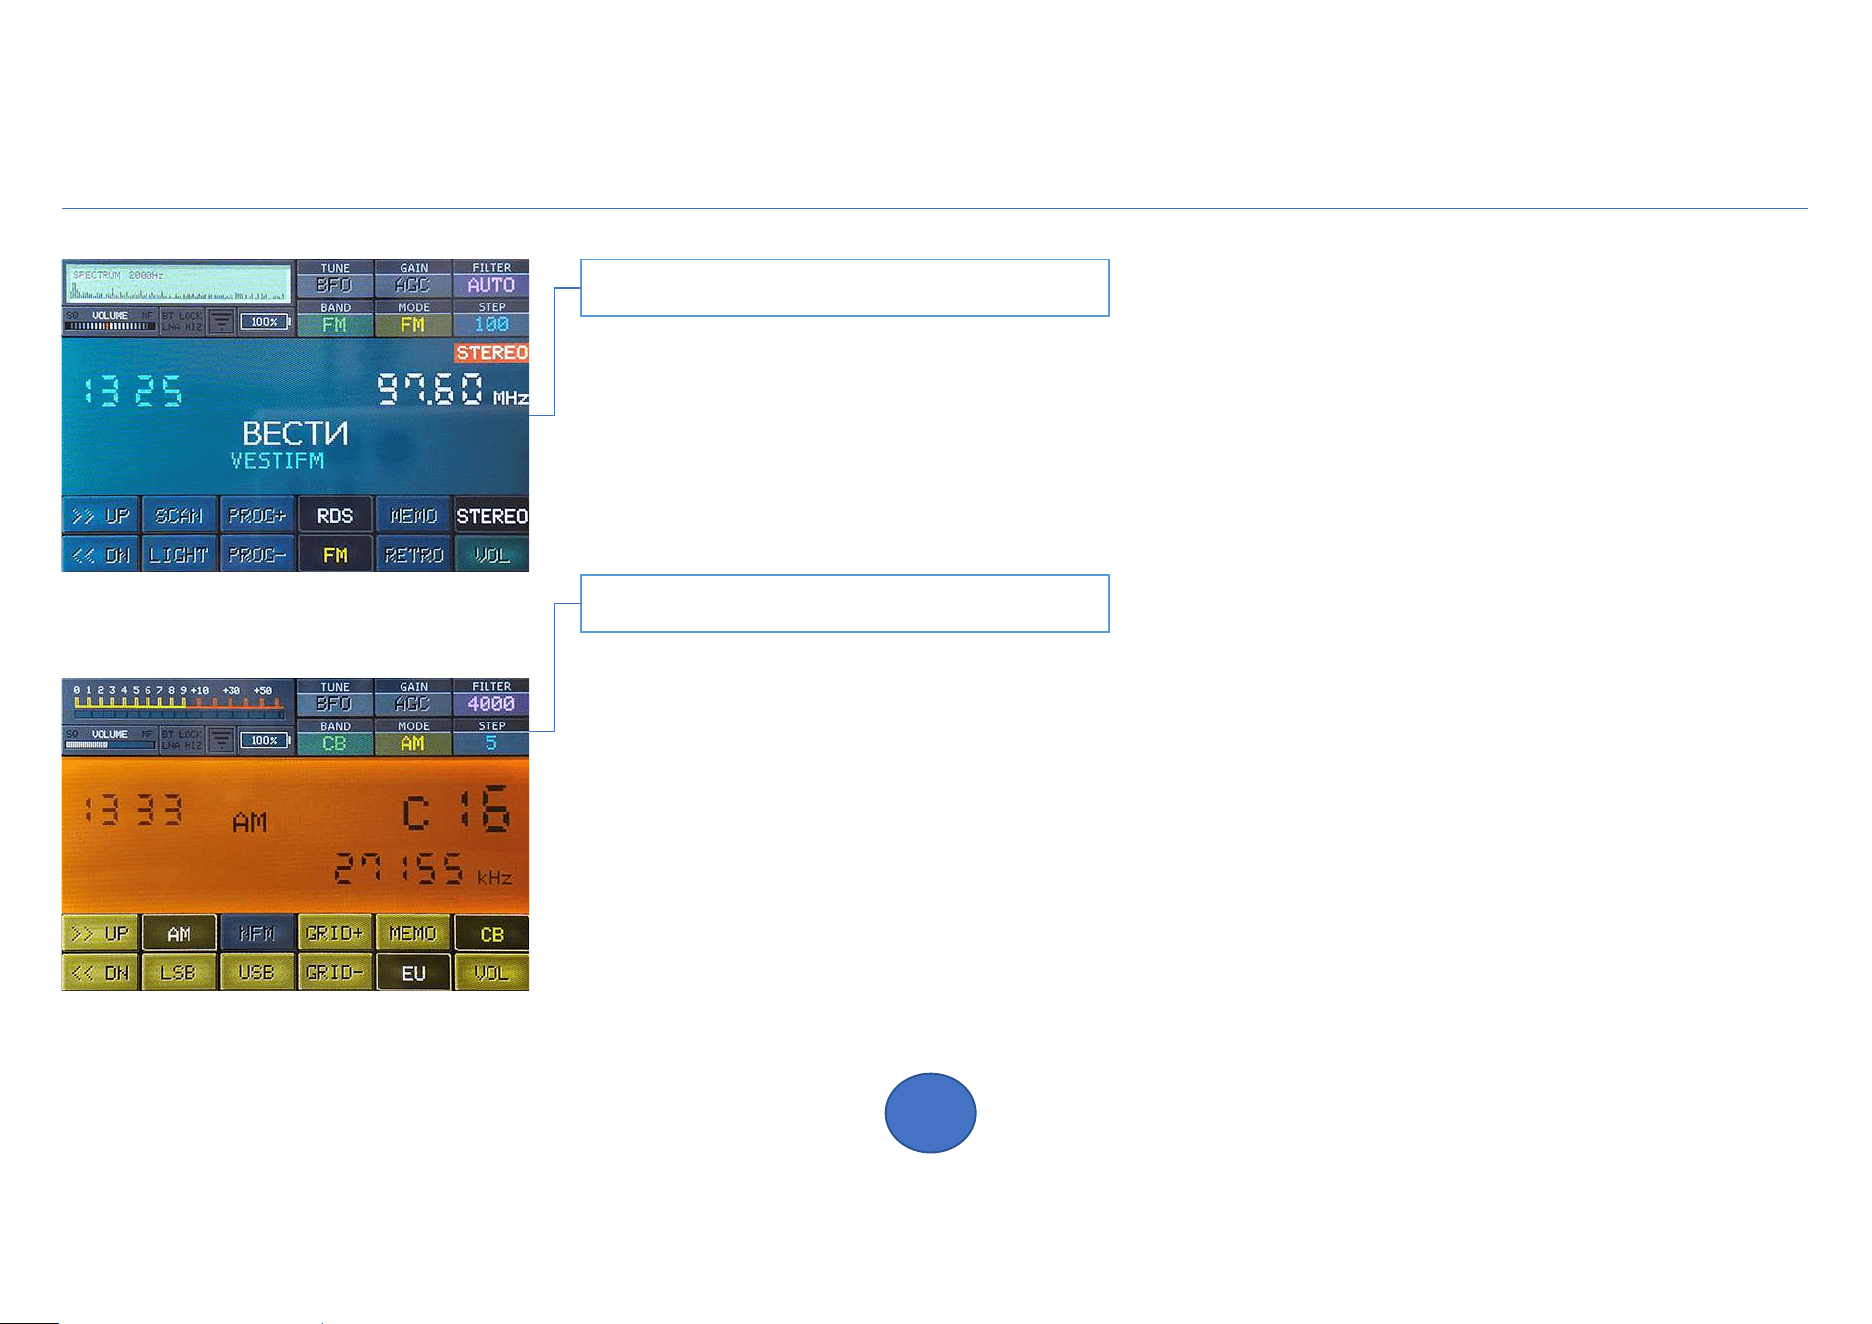
FM and CB channels
11
H-RADIO 4.2
FM channel mode
CB channel mode
Stored FM stations can be switched as a channel list. To enter FM mode
channels, press the FM button on the main screen. This mode displays station name, frequency,
RDS information, stereo reception indicator and time. Switching channels is done by rotating
encoder or by pressing the PROG+ and PROG- buttons.
STEREO button turns on/off reception of a station in stereo format.
RDS button turns on/off receiving RDS information.
To exit FM channel mode, press the FM button.
It is possible to listen to CB civil band channels. To enter the mode
CB channels press the CB button on the main screen. In this mode, the channel number, letter
grid designation, frequency, modulation type and time.
Channels are switched by rotating the encoder.
Switching grids is done using the GRID+ and GRID- buttons.
EU button on/off using the European frequency grid.
The AM, NFM, LSB and USB buttons enable the corresponding type of modulation.
To exit CB channel mode, press the CB button.
In channel modes, the search for stations up and down in frequency also works using the UP and DN buttons.
To change the theme, tap on the screen in the center. Four themes are available.
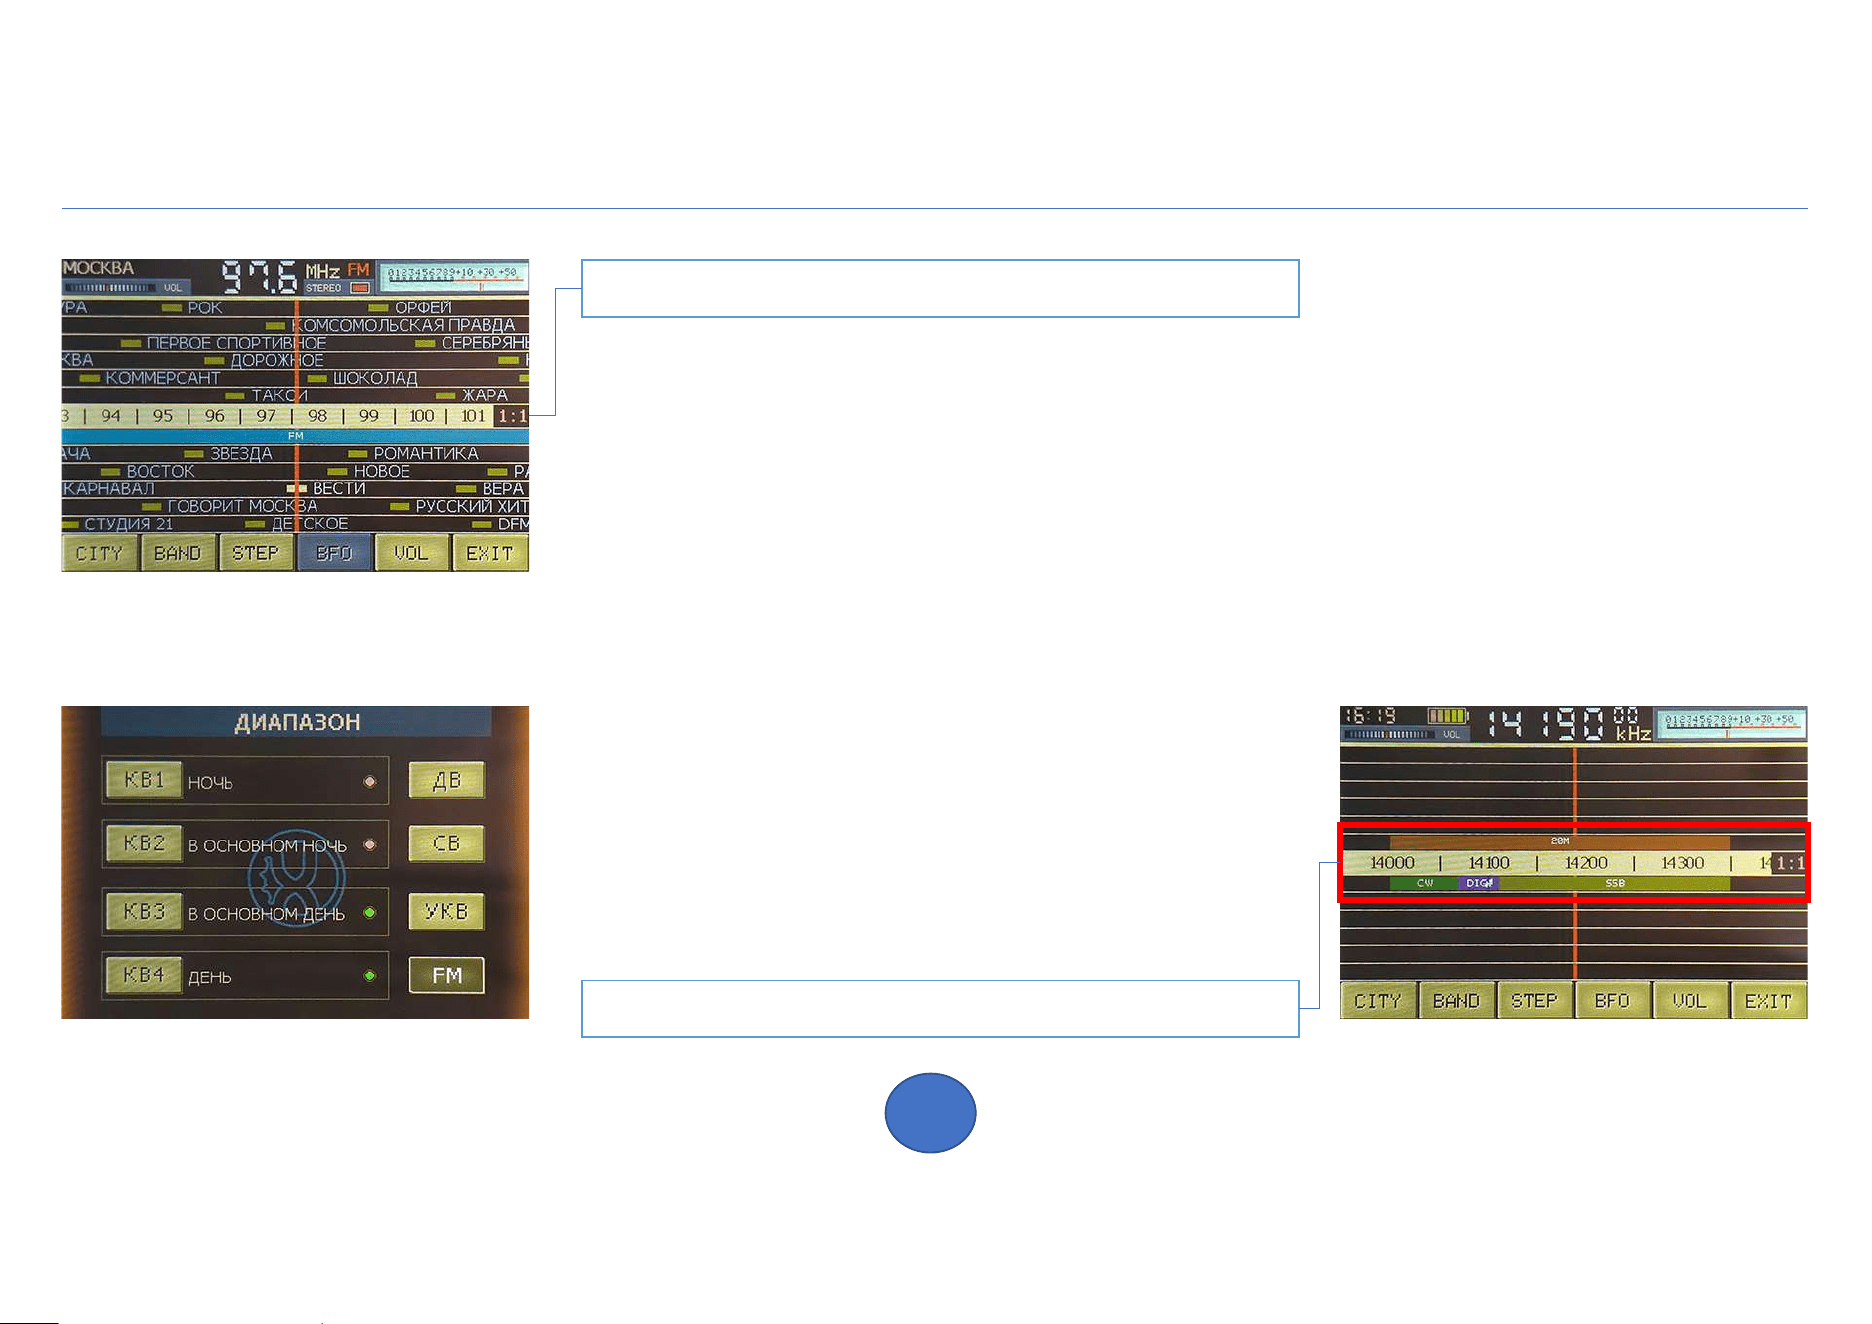
Retro scale
12
H-RADIO 4.2
Retro receiver scale
Indication of range and types of communication
To display the retro scale, press the RETRO button on the main screen.
The scale will display stations of the selected band and cities stored in memory cells.
Navigation along the scale is carried out by rotating the encoder or sliding on the touch screen.
To automatically advance the scale to the next station, quickly swipe the screen
in the opposite direction and release. Rewinding will stop at the first available station.
The rewind direction is changed by rotating the encoder. To stop, press the screen or encoder.
To change the scale scale, click on the red 1:1 indicator on the right and, while pressing,
Move the scale indicator to the desired position.
At the top there is a volume indicator (press to mute the sound on/off).
The screen displays the current frequency, the name of the band and city, as well as the time and battery charge.
There is a retro S-meter located separately (press to switch to the spectrum indicator and back).
- CITY list of cities
- BAND band selection. The ranges are divided as in retro
receivers by the passage of waves depending on time
days. Color indication shows passing conditions.
- STEP selection of tuning step
- VOL volume adjustment (rotate the encoder to change)
- BFO BFO oscillator setting (available for SSB modulation)
Modulation switches automatically depending on
range at the cursor position.
Settings
13
H-RADIO 4.2
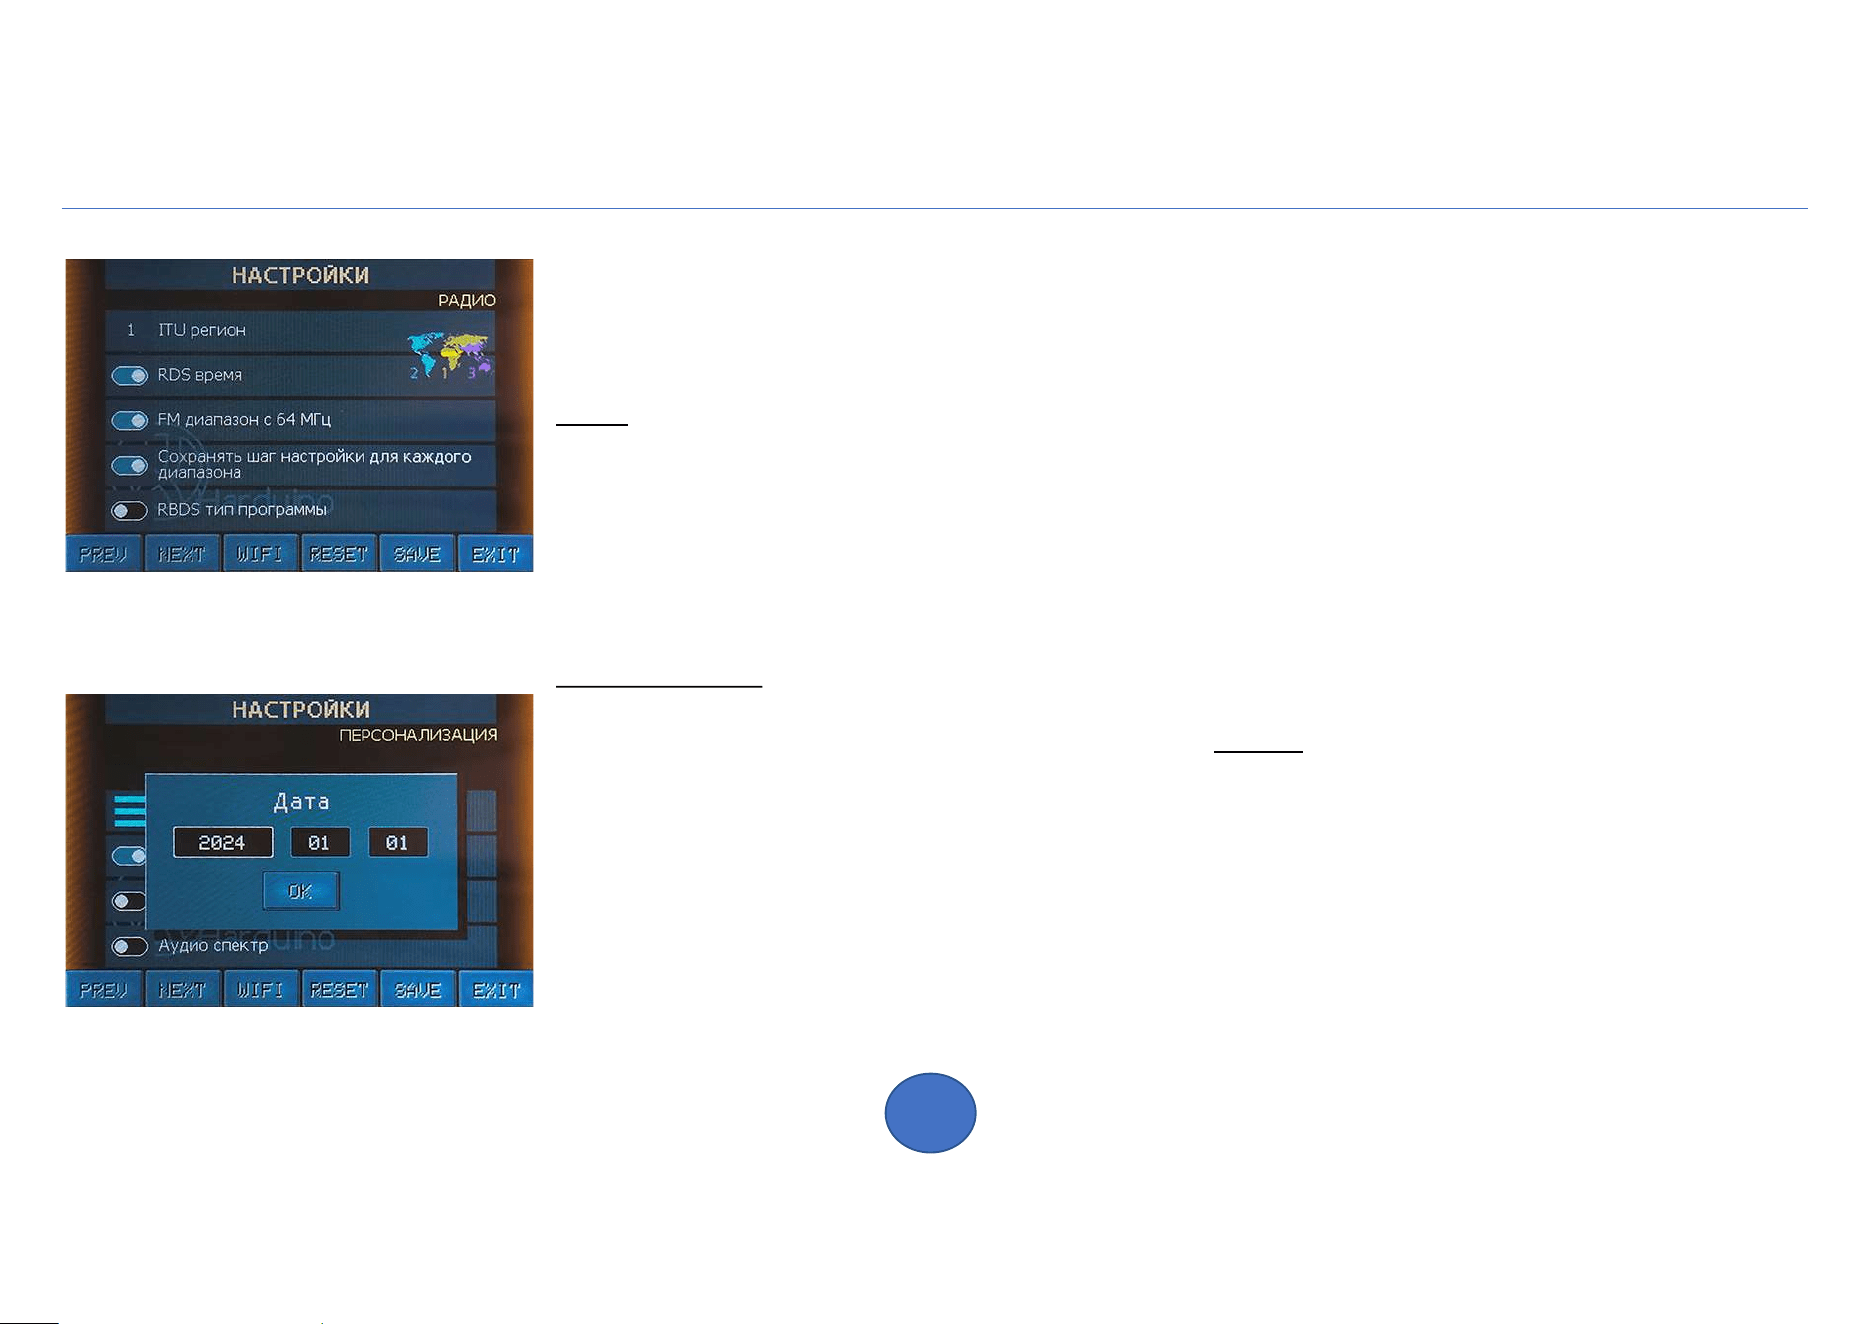
To enter setup mode, press the SETUP button on the main screen. Settings are divided into pages.
Switching pages is done by rotating the encoder or using the PREV and NEXT buttons. Click WIFI for
connection settings (page 15). Press RESET to load default settings. To save
settings, press SAVE or EXIT and confirm saving.
RADIO
- ITU region select the region on the map
- RDS time get time from RDS
- FM band start in 64 MHz beginning of the FM band
- Save step individual for band
step can be saved for modulation type
or for each range. Only until restart
- RBDS program type American standard RDS TP
PERSONALIZATION
- Frequency digit backlight imitation
seven-segment indicators
- Highlight the frequency in SSB in color if the BFO is not
zero for tuning in SSB mode is used
Oscillator BFO bias. When the offset is not
equal to zero, the frequency digits are displayed darker.
- Buttons click to change the appearance of the buttons
- Language select the interface language
- Show country flag in RDS in information bar
RDS for FM band flag will be displayed
countries for the selected interface language
- Setting clock manually setting the date and time.
Set the date first, then the time. Choose
edit field on the screen and rotate
encoder for installation. When the seconds field is
selected. The countdown stops. Click OK to precise
installation. After which the countdown will resume.
- 24-hour time format, choice of 12/24 hour
format
- Retro S-meter indicator display in retro style
- Audio spectrum switching view S-meter / spectrum
DISPLAY
- Screen saver enable screensaver (page 19)
- Display light off in screen saver turn off the backlight by
after the period of inactivity has expired
- Wait time to saver in minutes select after how many
minutes will the screensaver turn on or go off screen
backlight after last action
- Screen orientation select the rotation angle of the
display. Quickly rotate the screen at any time: press
and hold the encoder and tap on the screen.
Settings
14
H-RADIO 4.2
SCANNER
- Scanning SSB in AM modulation graph will be
displayed for AM modulation when SSB is enabled
MEMORY LIST
- View not city linked in the list
stations with city label NONE are displayed
- View all city linked in the list
stations are displayed not only for the current
cities. Stations linked to other cities
are marked OTHER in the memory list.
- View only from current band in the list
stations of the selected band are displayed
BATTERY
- Battery indicator display battery indicator
- Battery value in volts display
charge in volts or percent
- Warning about an unacceptable battery level
A message will be displayed if the battery is charged
batteries will exceed acceptable levels
HARDWARE
- Encoder reverse, rotation direction selection
- Encoder step select encoder type
- Beeper selection of beeper sound
ANTENNA
- LNA on/off RF preamplifier
- Hi-Z antenna input impedance on/off matching
Antenna Impedance Hi-Z/50 Ohm
SI473x
- Mute the sound when turned on, the sound will be
turned off when the receiver is turned on
- Inversion GPO1 invert control
signal on pin GPO1
- Inversion GPO2 invert manager
signal on pin GPO2
DECODER
- Decoded data send to COM port
decoded data can be received
using the Putty program on a personal computer
computer (connect your receiver using
USB cable and install the device driver)
- Feld-Hell picture smoothing image,
received when decoding a Feld-Hell transmission
will be smoothed for easier reading
- Cyrillic alphabet in CW for alphabet decoder
Morse will use the Cyrillic alphabet
Wireless Settings
15
H-RADIO 4.2
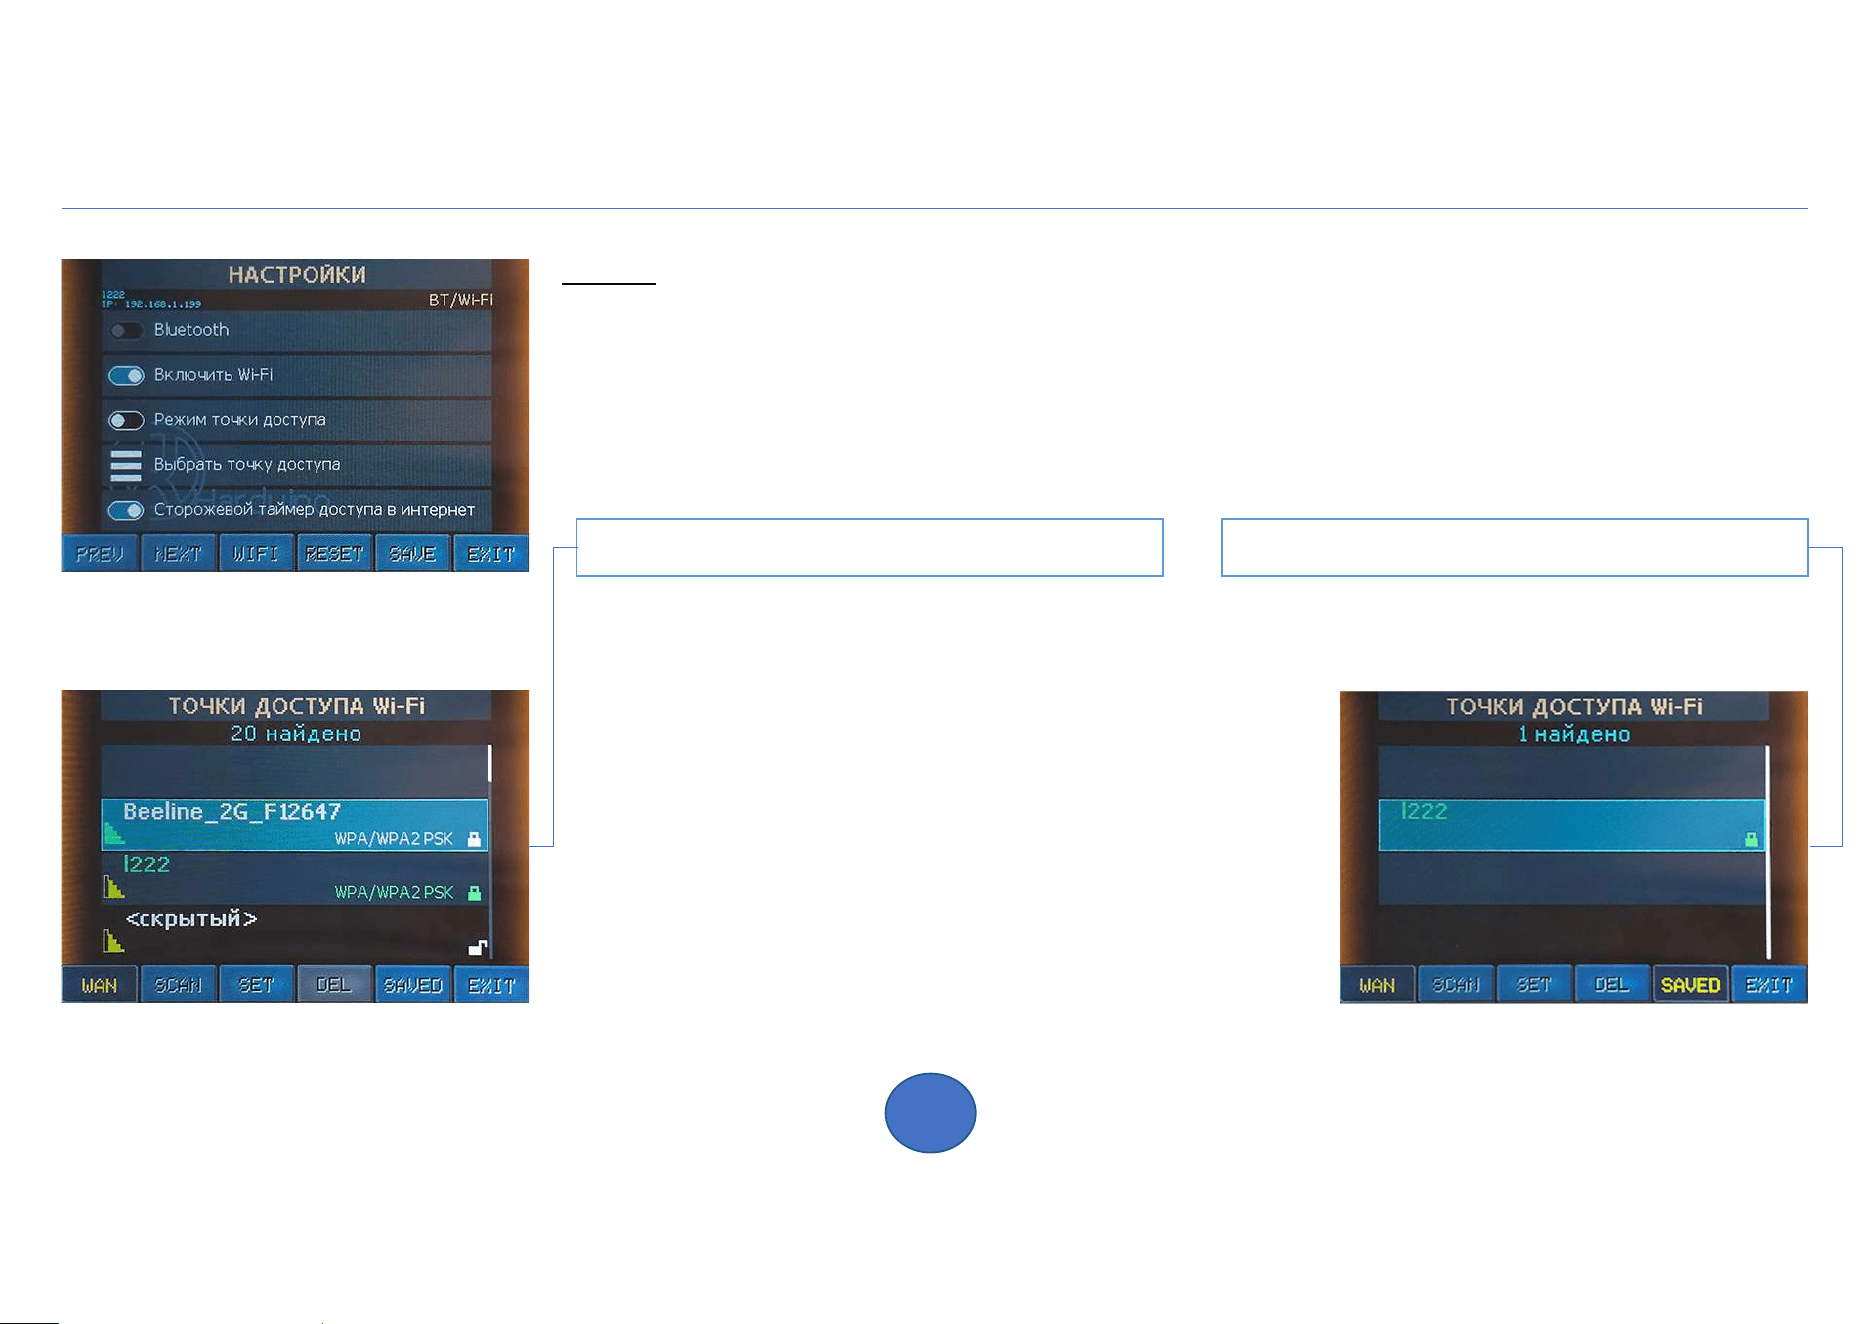
BT/Wi-Fi
- Bluetooth on/off for connecting wireless headphones or speakers
- Wireless on on/off the Wi-Fi module
- Access point mode enables built-in hotspot. The connection can be used in
there are no other access points to connect to the receiver (not currently used).
- Select AP displays a list of available access points (also available by pressing the WIFI button)
- Internet access watchdog timer is used to restart the connection if there is no connection
Internet access
Available access points
Scanning access points takes a few seconds. Then the list and quantity will be output
found access points. Rotate the encoder to search. If no access points are found or signal
too weak, check the Wi-Fi antenna connection (do not use the Wi-Fi module without an antenna).
- WAN on/off Wi-Fi module
- SCAN search for access points
- SET establish a connection to the selected access point or
click on the desired access point (when connecting for the first
time you will need to enter a password)
- DEL remove access point from saved ones
- SAVED list of saved access points
Access Point Name Color:
blue – access point in the list of saved ones
yellow – a connection attempt is in progress
green – connection active
Saved access points
Setting up device components
16
H-RADIO 4.2
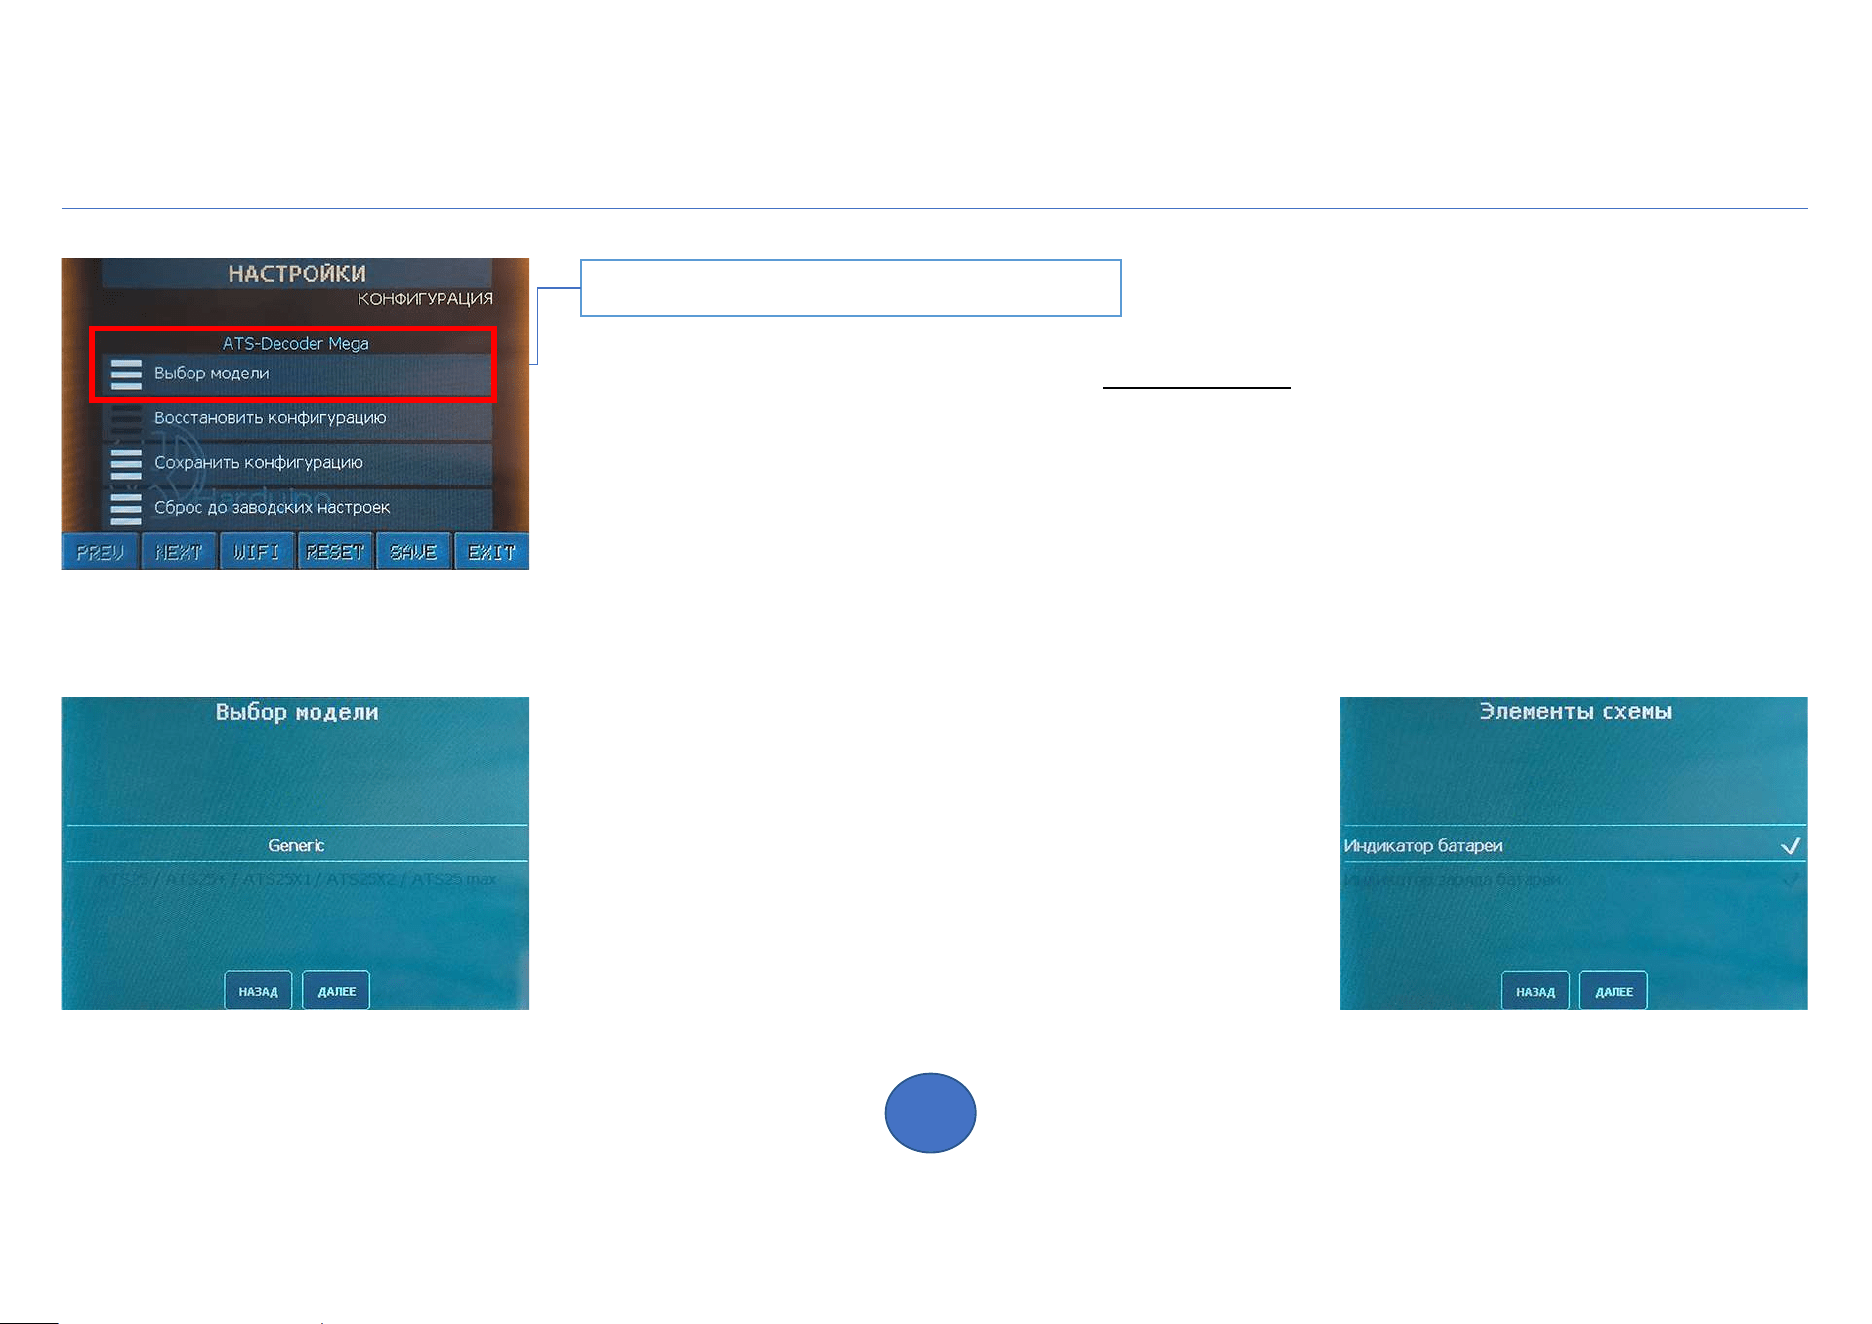
Selecting your device model
For the correct functioning of all components of the receiver, it is necessary to select the correct model.
The currently selected model is displayed on the CONFIGURATION page. Here you can save or
restore the settings configuration, as well as load the factory settings.
Click Select Model. If your device has not been modified and only contains components
installed at the manufacturer's factory, you should rotate the encoder to select your model from the list.
If changes have been made to your receiver or you assembled it yourself, then choose a model
"Generic" Click "next". And then, by rotating the encoder and pressing the screen, check the boxes opposite
those components that are installed in your receiver.
The following components are available for configuration:
- battery charge level indication
- indication of the battery charging process
- additional Lock button (present in receivers
ATS120 and ATS200 series)
- Bluetooth module
- Morse code and digital communications decoder
- HF preamplifier
- 50 Ohm / Hi-Z antenna impedance switching circuit
- HF range filters present in various models
- special mixer of ATS200 series receivers for
aviation band
- non-standard connection of the mixer for the converter
ranges to pin CLK 0 of the SI5351 generator
Update/Device Information
17
H-RADIO 4.2
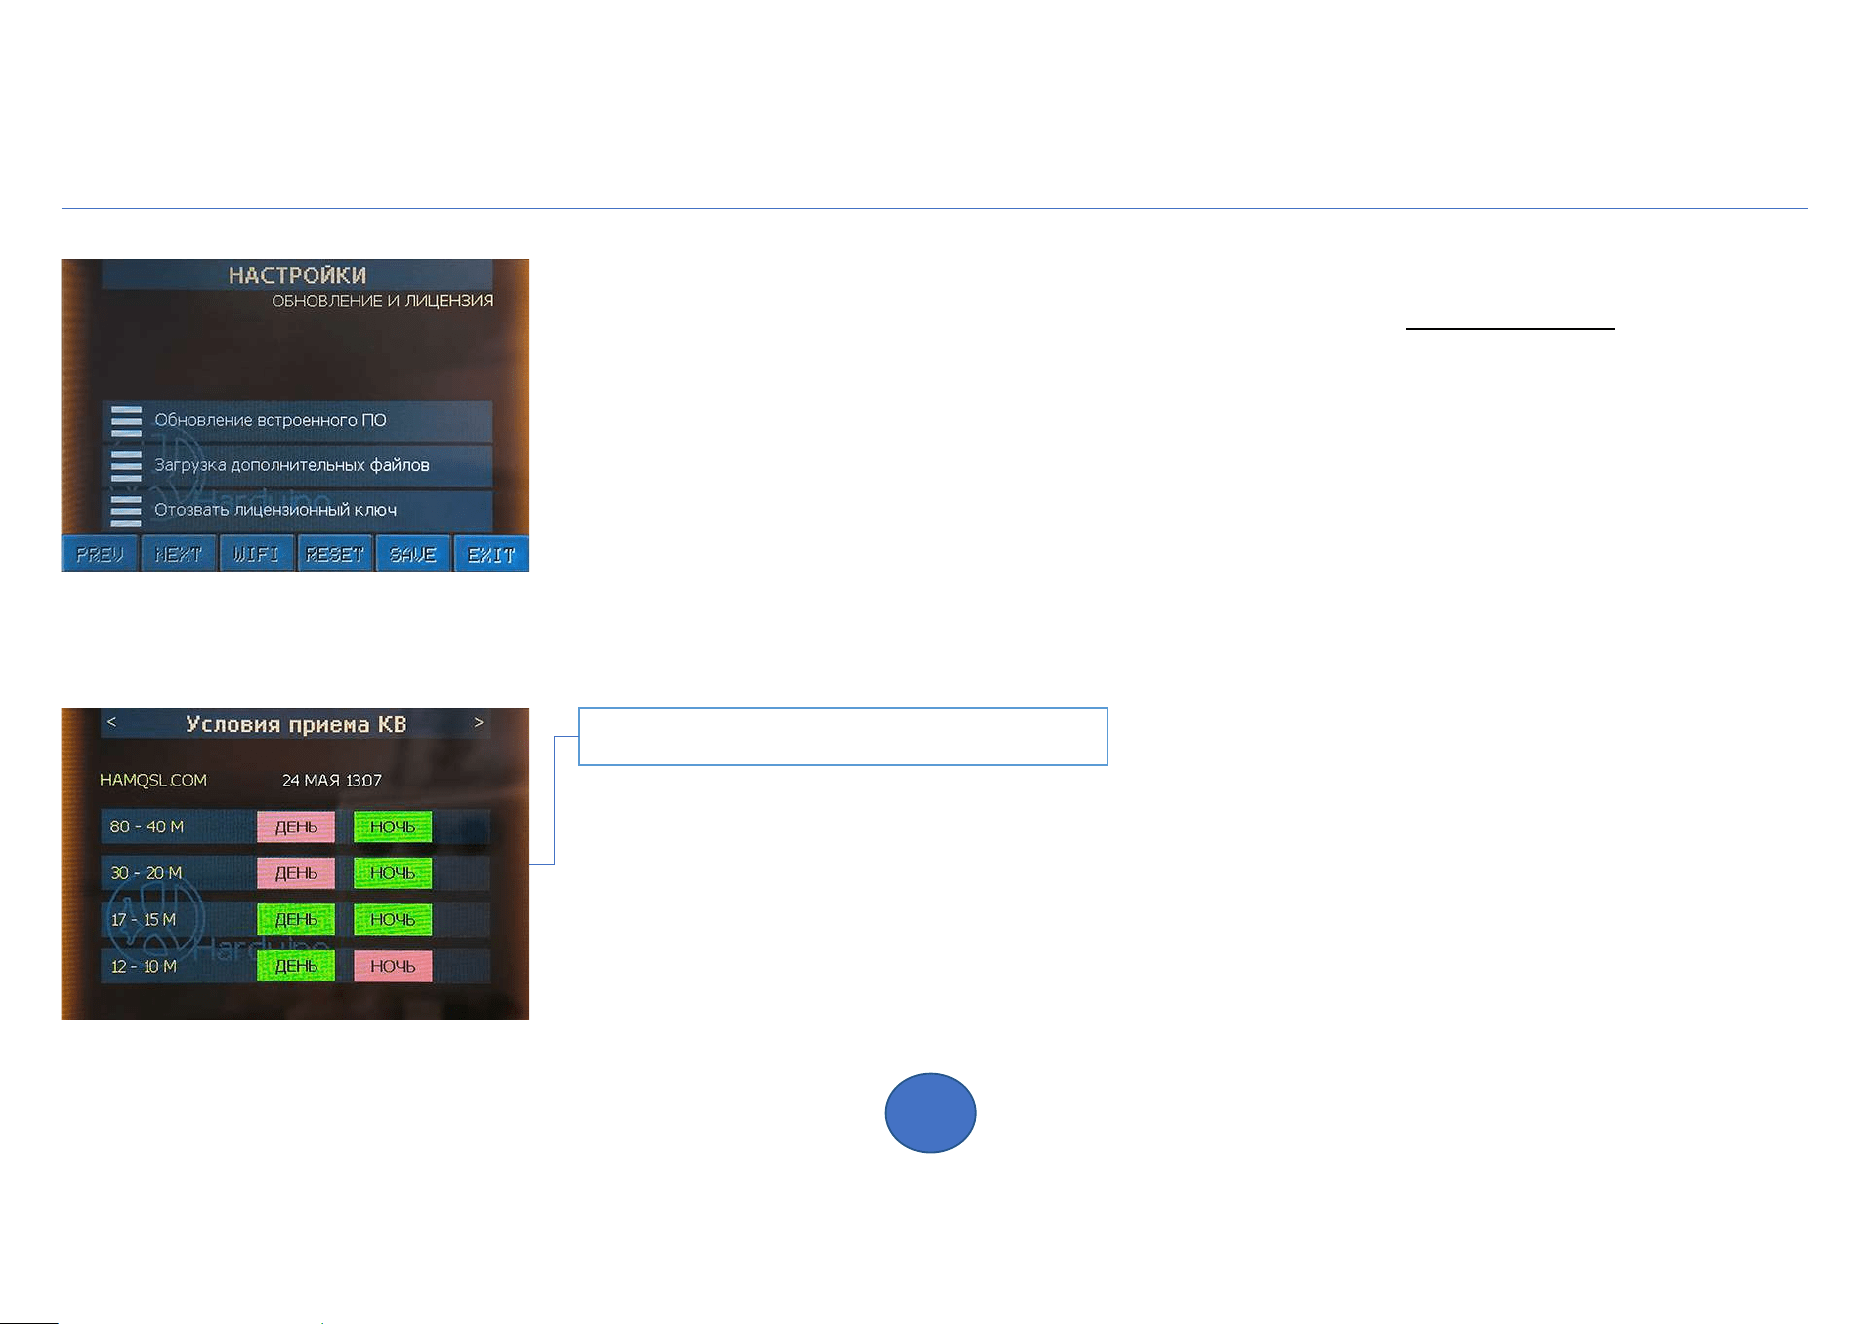
Information section
The firmware update can be installed using a PC or obtained automatically from a server
updates. Information about the availability of an update is available on the UPDATE & LICENSE page.
To update online, you must connect the receiver to the Internet. Then click "Update"
embedded software." The update files will be searched for and downloaded. Read the information and run
update process.
After updating the software, download additional files (localization file, etc.).
If you need to revoke your activation key for use on another device, first obtain the code from
website. Log in to your account using your Email and activation key. Then revoke the key on this
settings page.
The section is entered using the INFO button on the main screen.
This section contains several pages of information. To turn pages, rotate the encoder.
Press the screen or encoder to exit the section.
Here you can find information about the firmware version, settings and status of the equipment, connection
Wi-Fi, device components, range limits, receiver manufacturer and model, serial
device number, software developers and copyrights.
Information on the passage of waves on the HF bands, obtained from the website HAMQSL.COM, is also available.
The date and time of the last download of information are indicated.
Virtual encoder / Power-on settings
18
H-RADIO 4.2
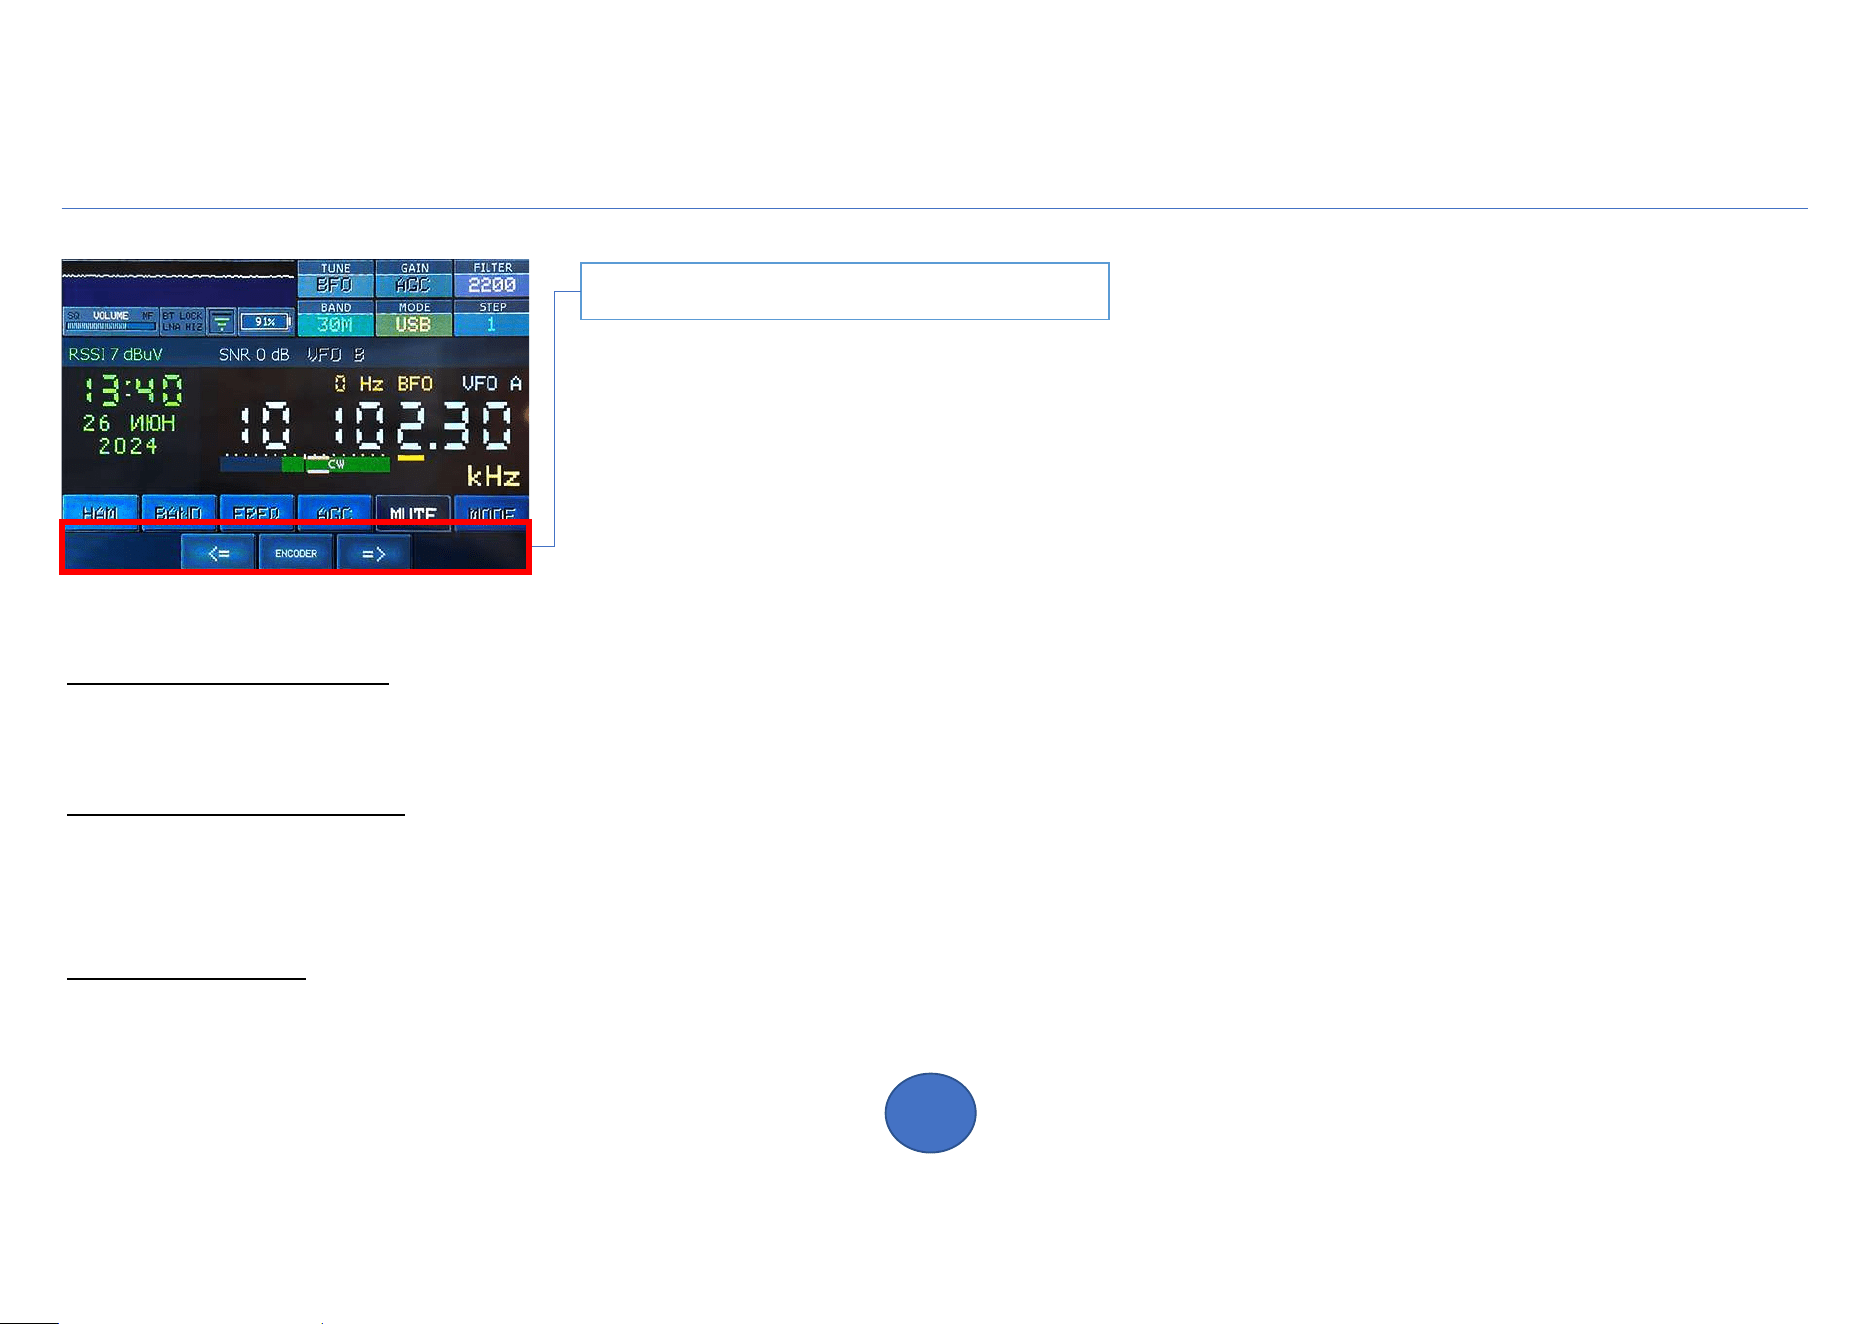
Virtual encoder
In all modes, you can use on-screen buttons that duplicate the actions of the encoder.
The virtual encoder is called by sliding upward from the bottom edge of the screen.
To close the virtual encoder, use the slide in the opposite direction.
After a period of inactivity, the screen encoder will close automatically.
Press and hold the arrow buttons to simulate encoder rotation.
Actions to take when turning on the receiver
RESET TO FACTORY SETTINGS
With the device turned off, press and hold the encoder button and turn on the power. When the LOADED DEFAULTS message appears, release
encoder All receiver settings will be restored to their original values. After the reset, you need to perform the initial setup
main parameters.
FILE SHARING MODE FROM PC
If you need to access files in the device's memory before starting, then with the device turned off, press and hold the screen and turn on the power.
When a message appears indicating that you are ready to exchange files using the A-explorer program, release the screen and connect your receiver to the PC
with using a USB cable. The device driver and A-explorer file sharing application must be installed on the PC. Applications to install
and user manual are available on the website HARDUINO.RU in the “Download” section. Tap the screen to exit the mode.
SCREEN CALIBRATION
In file sharing mode with a PC, press and hold the screen until a message appears indicating that screen calibration has started. Continue holding for
reset calibration settings or release the screen and then click on the positions indicated by the green arrow one by one. Calibration is complete.
File handling / Energy saving
19
H-RADIO 4.2
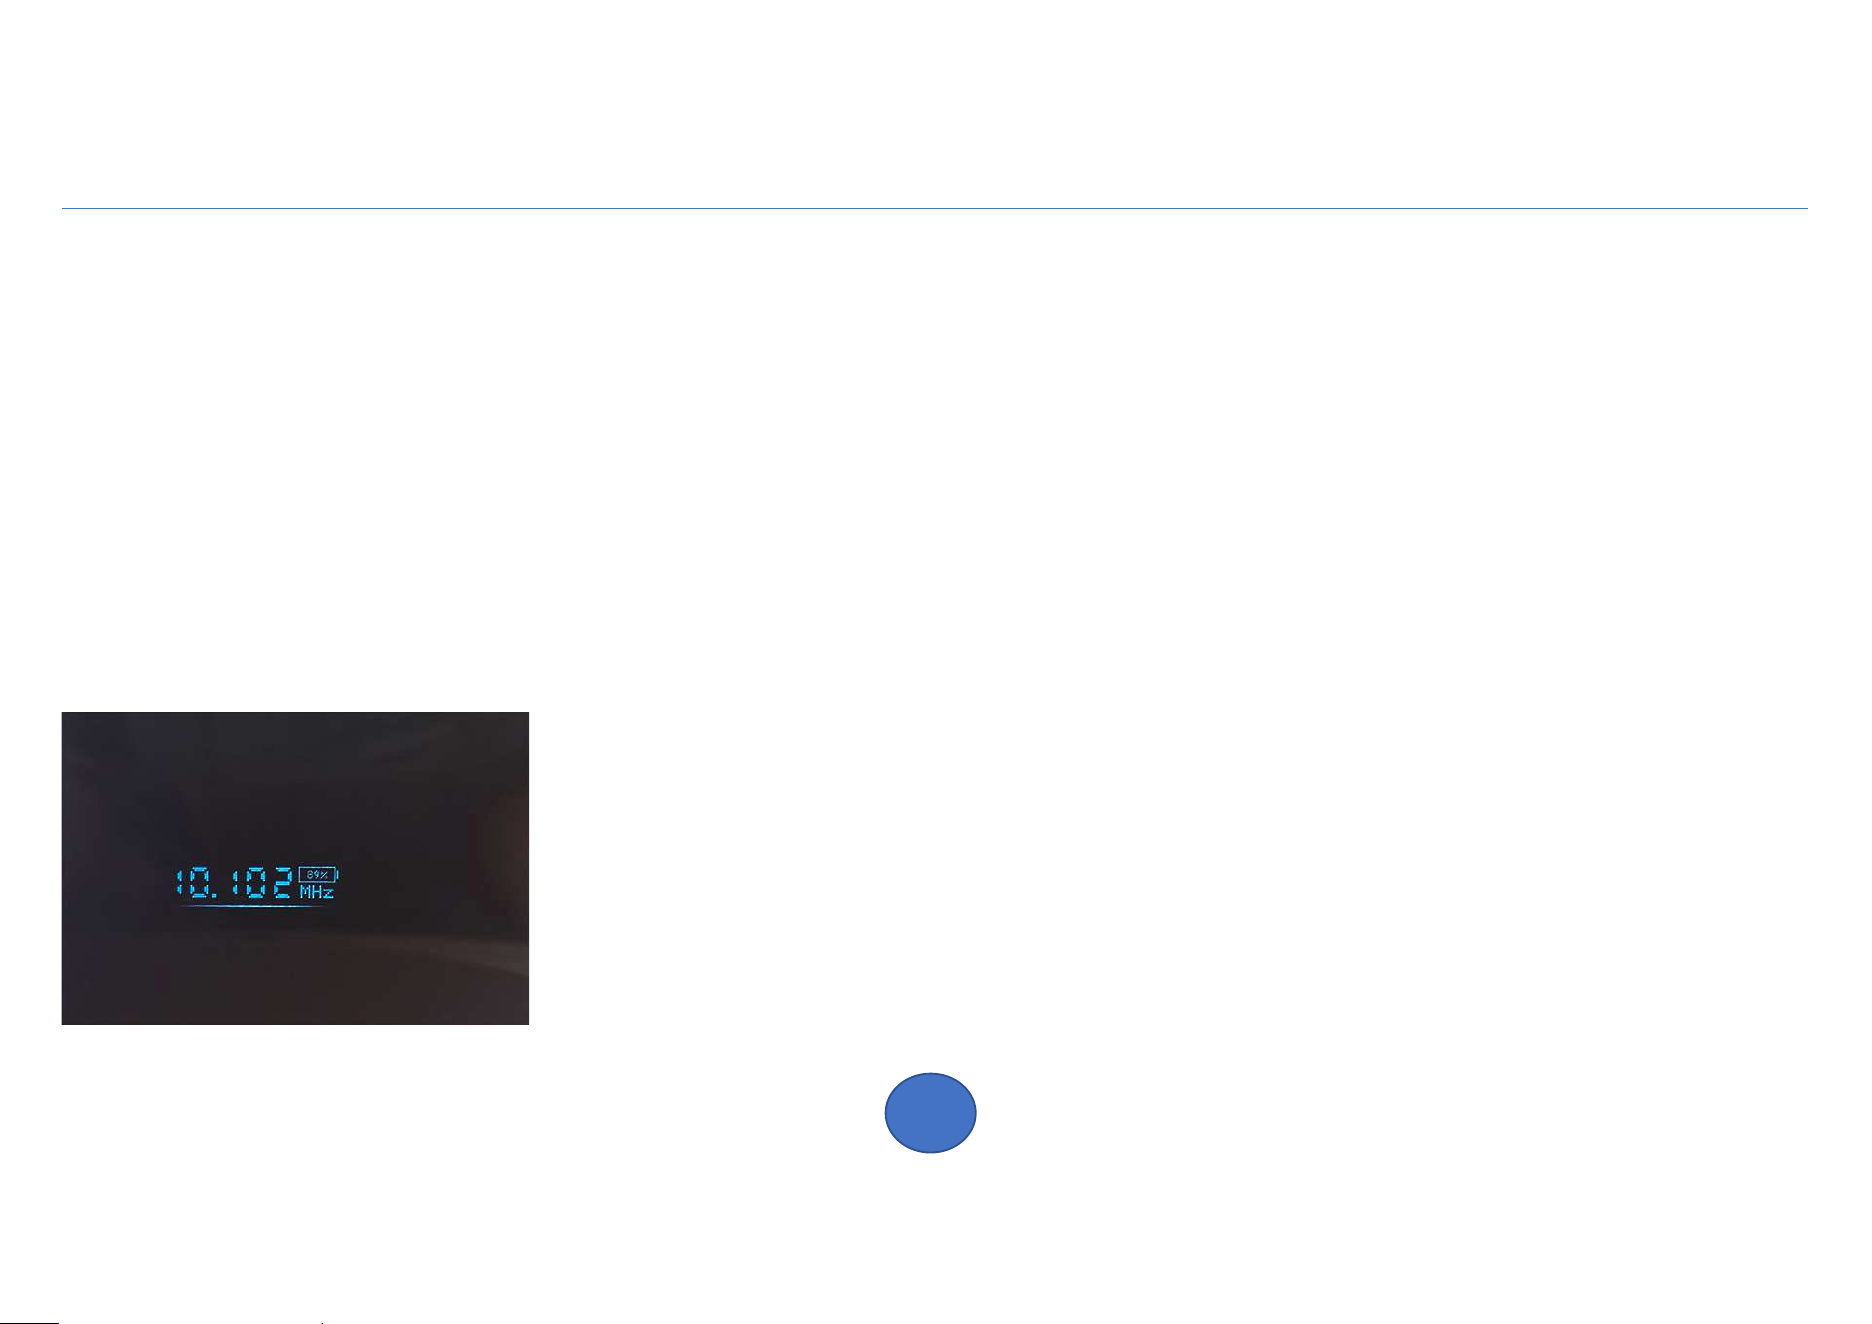
To increase the battery life of your device without recharging, use simple functions.
- enable a short period of inactivity in the settings until the screen saver appears. During the transition
When the receiver enters standby mode, some functions are suspended. At the same time, listening to the
broadcast doesn't stop.
- enable in the settings to turn off the display backlight after a period of inactivity. Disable
You can also turn on the backlight by pressing the LIGHT backlight control button on the main screen and then
pressing backlight brightness level indicator. You can turn on the backlight by tapping on the screen.
- reduce the brightness of the screen backlight. Press the LIGHT button on the main screen and rotate the encoder.
- turn off Wi-Fi after receiving the necessary data from the Internet. Turn off the Bluetooth module,
when not using a wireless audio device.
- Use wired headphones to reduce energy consumption.
Files in the receiver's memory
To download files from the receiver to your PC, upload or delete, use the A-explorer application. Use notepad for editing.
city.csv list of locations (id, name, time zone)
preset.csv list of stations (frequency, name, city id, modulation)
label.csv list of frequency boundaries of various types of communication
decoder.log decoder log file (erased when the decoder starts)
scan.csv frequency lists for simultaneous listening mode
ap.csv list of saved Wi-Fi access points
setting.ini override settings
*.lng interface localization files
value.hex dump of saved settings
flag.ini data for forming the country flag in the RDS information band
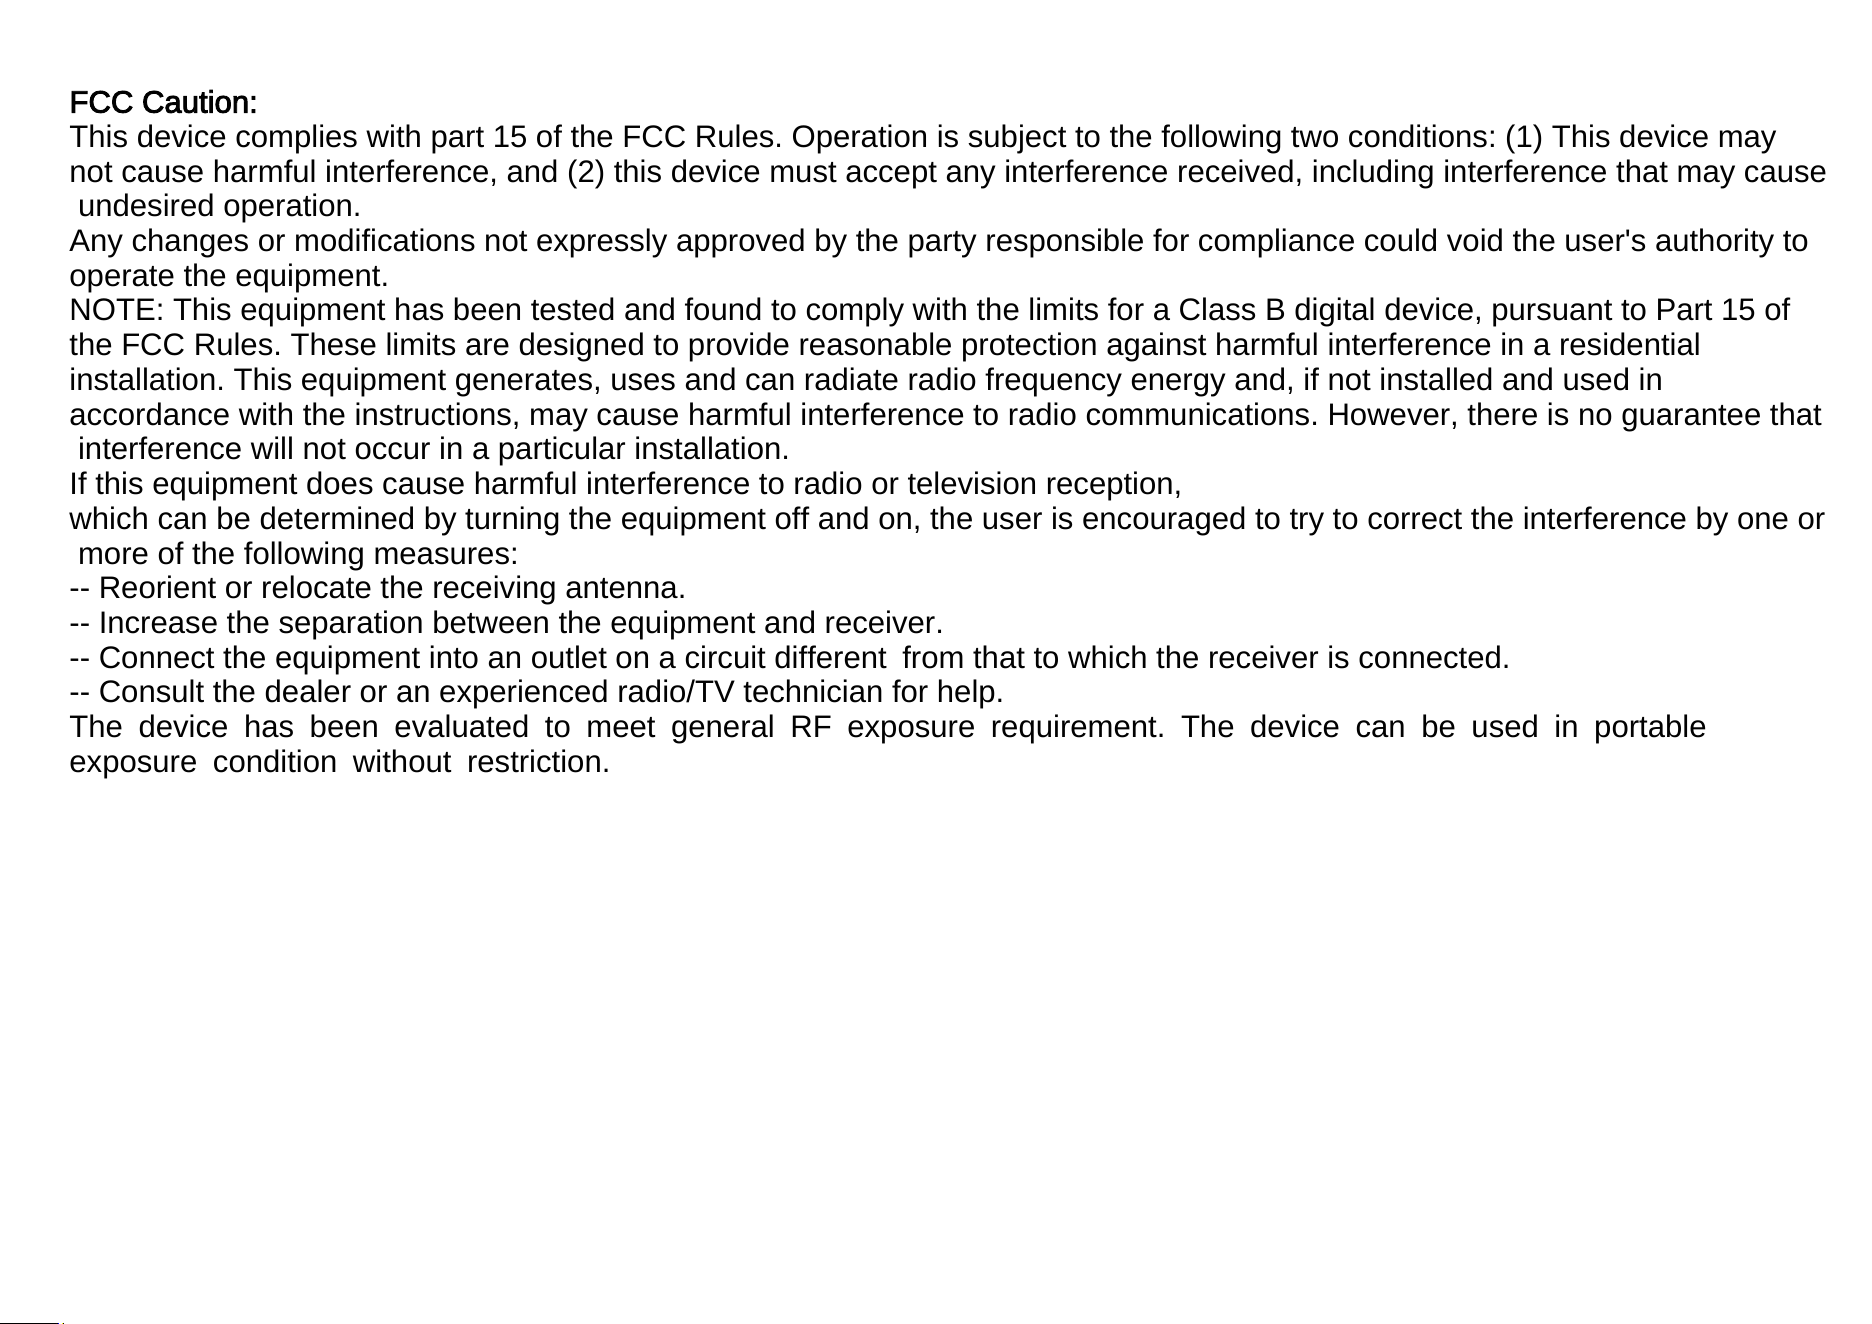
FCC Caution:
This device complies with part 15 of the FCC Rules. Operation is subject to the following two conditions: (1) This device may
not cause harmful interference, and (2) this device must accept any interference received, including interference that may cause
undesired operation.
Any changes or modifications not expressly approved by the party responsible for compliance could void the user's authority to
operate the equipment.
NOTE: This equipment has been tested and found to comply with the limits for a Class B digital device, pursuant to Part 15 of
the FCC Rules. These limits are designed to provide reasonable protection against harmful interference in a residential
installation. This equipment generates, uses and can radiate radio frequency energy and, if not installed and used in
accordance with the instructions, may cause harmful interference to radio communications. However, there is no guarantee that
interference will not occur in a particular installation.
If this equipment does cause harmful interference to radio or television reception,
which can be determined by turning the equipment off and on, the user is encouraged to try to correct the interference by one or
more of the following measures:
-- Reorient or relocate the receiving antenna.
-- Increase the separation between the equipment and receiver.
-- Connect the equipment into an outlet on a circuit different from that to which the receiver is connected.
-- Consult the dealer or an experienced radio/TV technician for help.
The device has been evaluated to meet general RF exposure requirement. The device can be used in portable
exposure condition without restriction.

