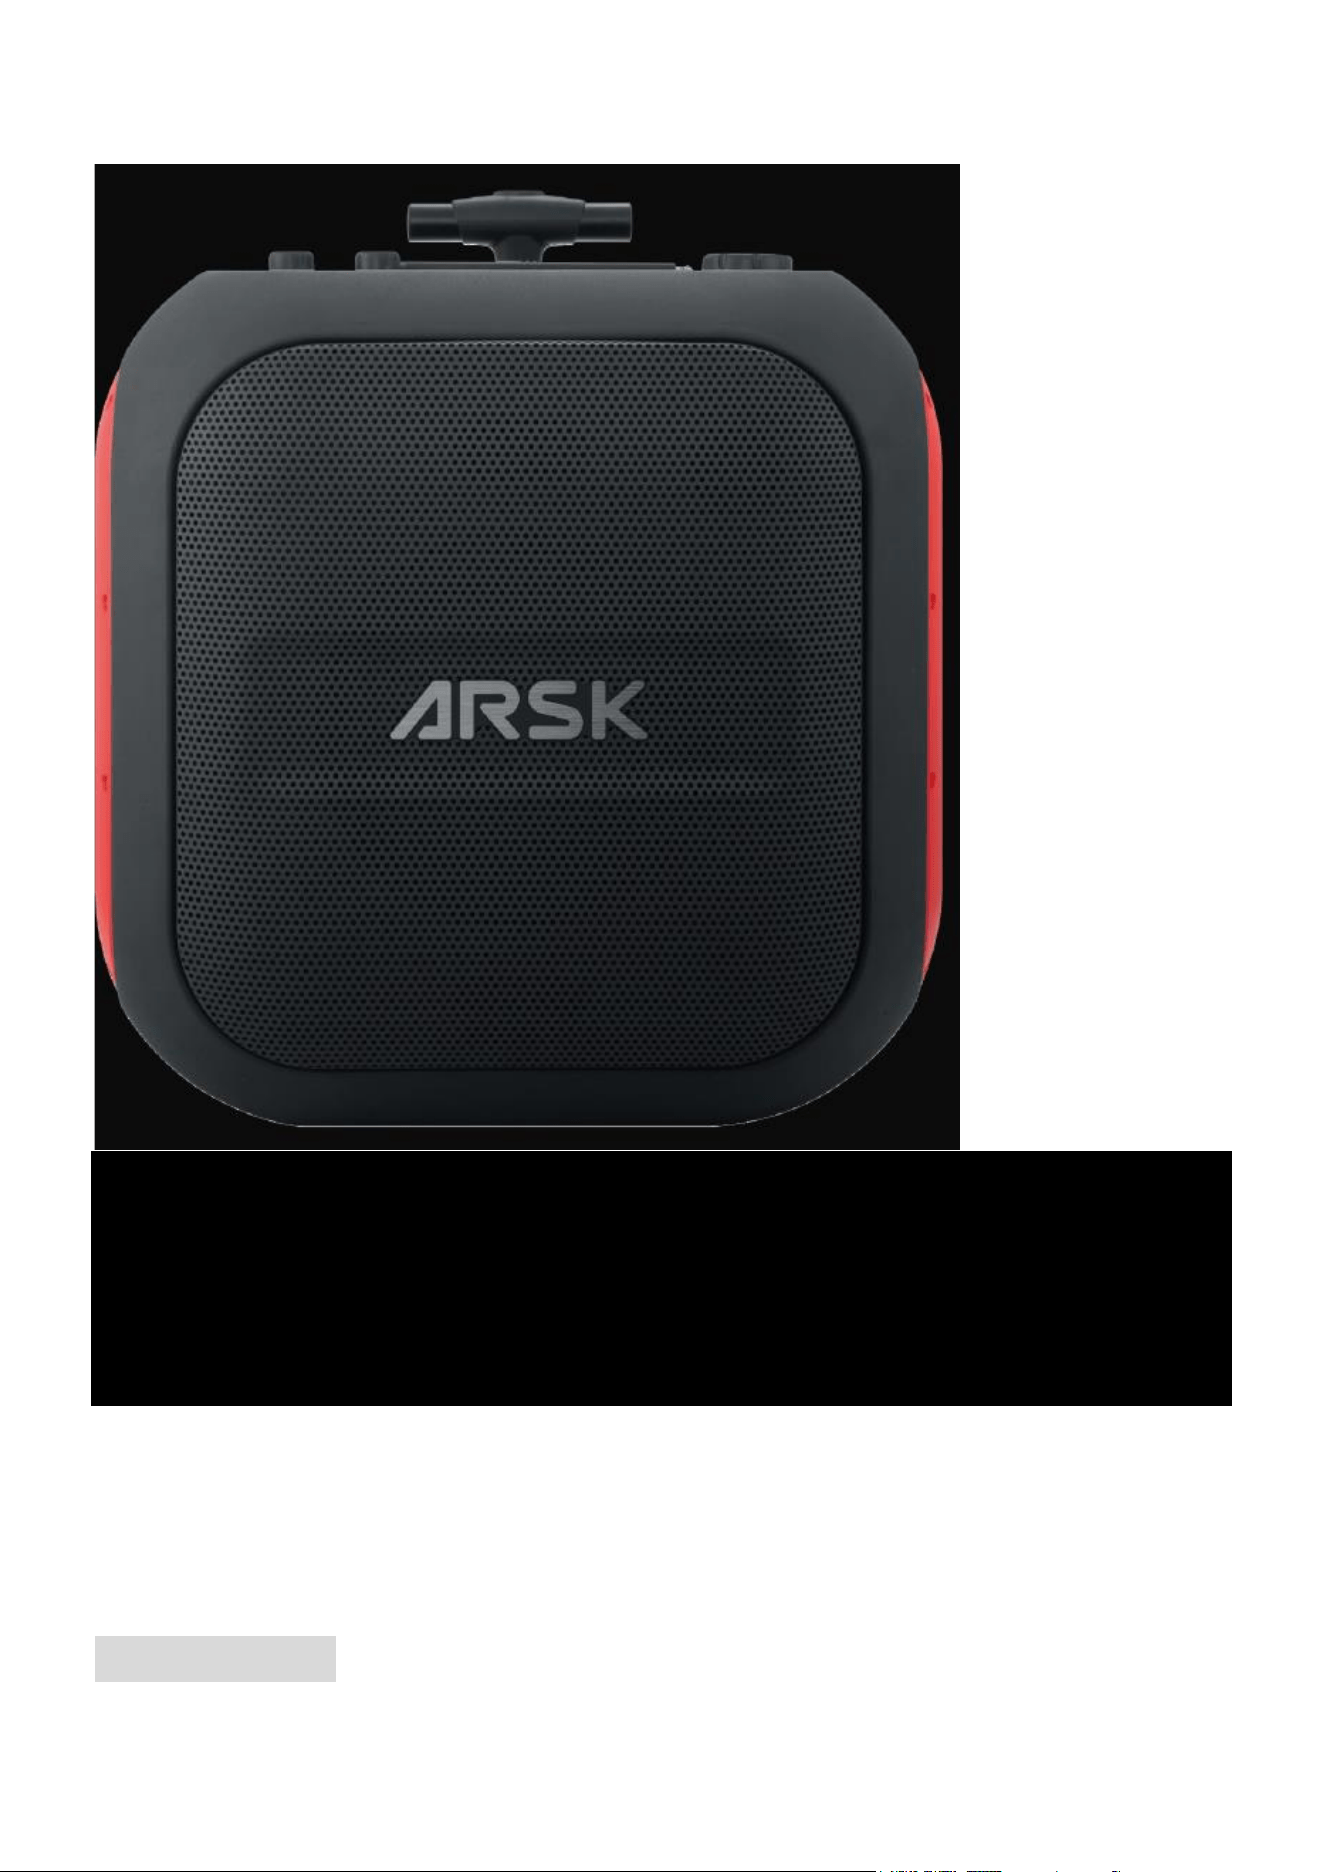
ARSK POWER
Owner’s Manual
Thank you for purchasing the ARSK POWER. Now that you’re an official owner, we suggest
reading this owner’s Manual cover to cover to learn everything you need to know—from setting up
to tuning in.
WARNINGS
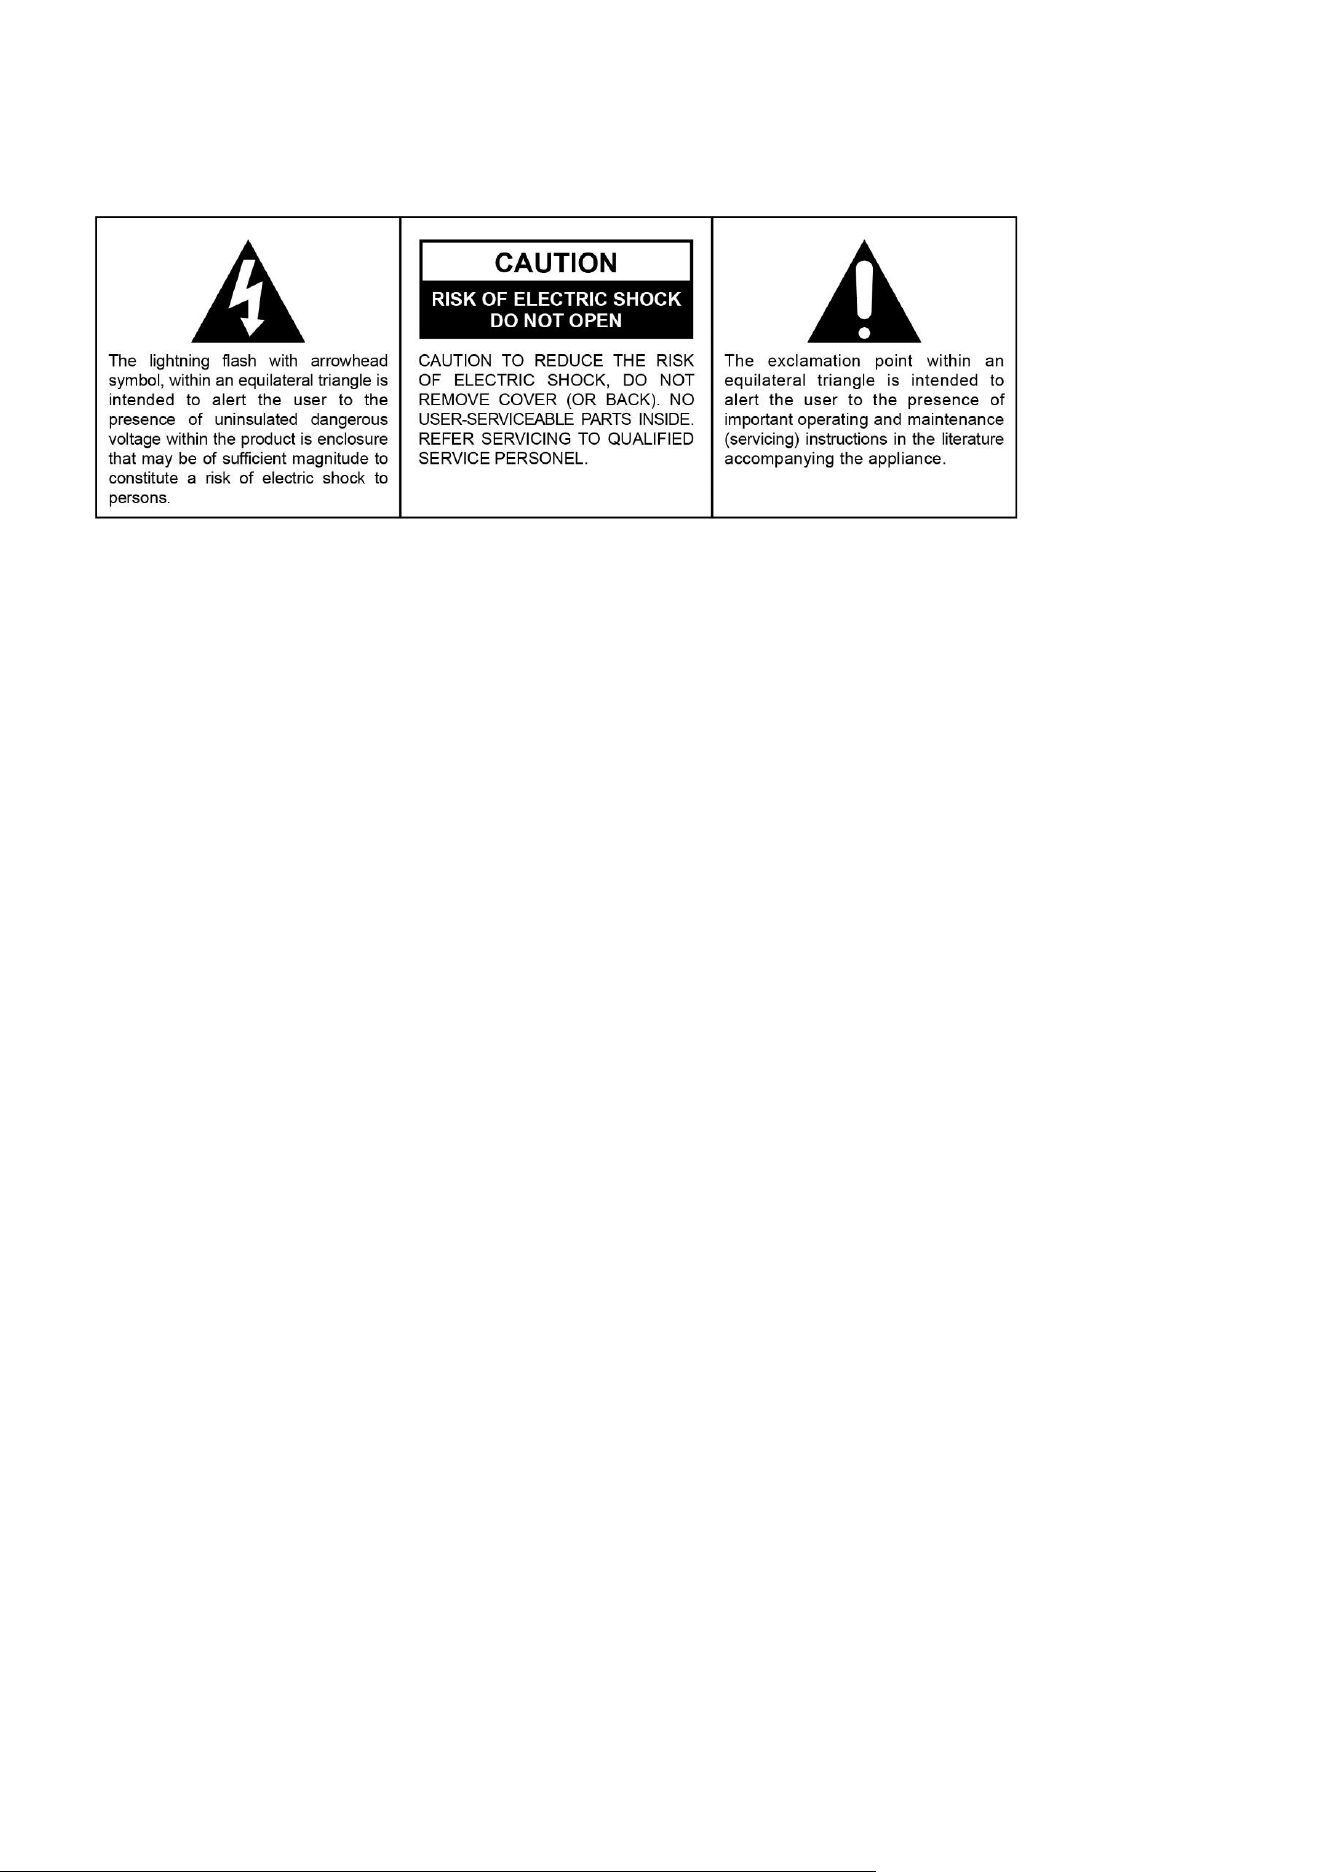
TO PREVENT ELECTRIC SHOCK, MATCH WIDE BLADE OF PLUG TO WIDE SLOT. FULLY INSERT THE
PLUG TO MAIN POWER SOCKET.
TO PREVENT FIRE OR SHOCK
HAZARD, DO NOT EXPOSE THIS
APPLIANCE TO RAIN OR MOISTURE.
The Caution Marking is located at the back enclosure of the apparatus.
The Rating plate is located at the back enclosure of the apparatus.
CAUTION-Risk of Electric Shock. Do not remove cover. No user serviceable parts inside. Refer servicing to
qualified service personnel.
WARNING-
a) Do not overcharge the internal battery. See Instruction Manual.
b) Do not smoke, strike a match, or cause a spark in the vicinity of the power pack.
c) Only charge the internal battery in a well ventilated area.
CAUTION-Risk of Electric Shock. Connect only to properly grounded outlets.
CAUTION-Risk of Injury To Persons. Do not use this product if the power cord or the battery cables are damaged
in any way.
CAUTION-This device is not intended for use in a commercial repair facility.
FCC ID: 2ACM4R5307
ID:34442-R5307
This device complies with Part 15 of the FCC Rules. Operation is subject to the following two conditions:
(1) this device may not cause harmful interference, and
(2) this device must accept any interference received, including interference that may cause undesired
operation.
NOTE: This equipment has been tested and found to comply with the limits for a Class B digital device, pursuant
to Part 15 of the FCC Rules. These limits are designed to provide reasonable protection against harmful
interference in a residential installation. This equipment generates, uses and can radiate radio frequency energy
and, if not installed and used in accordance with the instructions, may cause harmful interference to radio
communications. However, there is no guarantee that interference will not occur in a particular installation. If
this equipment does cause harmful interference to radio or television reception, which can be determined by
turning the equipment off and on, the user is encouraged to try to correct the interference by one or more of the
following measures:
- Reorient or relocate the receiving antenna.
- Increase the separation between the equipment and receiver.
- Connect the equipment into an outlet on a circuit different from that to which the receiver is connected.
- Consult the dealer or an experienced radio/TV technician for help.
CAUTION: Changes or modifications not expressly approved by the party responsible for compliance could
void the user’s authority to operate the equipment.
This Class B digital apparatus complies with the Canadian ICES-003.
This device contains licence-exempt transmitter(s)/receiver(s) that comply with Innovation, Science and
Economic Development Canada’s licence-exempt RSS(s). Operation is subject to the following two
conditions:
(1) This device may not cause interference.
(2) This device must accept any interference, including interference that may cause undesired operation
of the device.

RF exposure
This equipment complies with FCC & ISED radiation exposure limits set forth for an uncontrolled environment.
It should be installed and operated with minimum distance 20cm between the radiator & your body.
IMPORTANT SAFETY INSTRUCTIONS
SAVE THESE INSTRUCTIONS
INSTRUCTIONS PERTAINING TO RISK OF
FIRE, ELECTRIC SHOCK, OR INJURY TO
PERSONS
WARNING – When using this product, basic precautions should always be followed, including the
following:
a) Read all the instructions before using the product.
b) To reduce the risk of injury, close supervision is necessary when the product is used near
children.
c) Do not put fingers or hands into the product.
d) Use of an attachment not recommended or sold by power pack manufacturer may result
in a risk of fire, electric shock, or injury to persons.
e) To reduce risk of damage to the electric plug and cord, pull the plug rather than the cord
when disconnecting the power pack.
f) Do not use a battery pack or appliance that is damaged or modified. Damaged or modified
batteries may exhibit unpredictable behavior resulting in fire, explosion or risk of injury.
g) Do not operate the power pack with a damaged cord or plug, or a damaged output cable.
h) Do not disassemble the power pack, take it to a qualified service person when service or
repair is required. Incorrect reassembly may result in a risk of fire or electric shock.
i) To reduce the risk of electric shock, unplug the power pack form the outlet before
attempting any instructed servicing.
j) WARNING – RISK OF EXPLOSIVE GASES.
1) WORKING IN VICINITY OF A LEAD ACID BATTERY IS DANGEROUS.
BATTERIES GENERATE EXPLOSIVE GASES DURING NORMAL BATTERY
OPERATION. FOR THIS REASON, IT IS OF THE UTMOST IMPORTANCE THAT
YOU FOLLOW THE INSTRUCTIONS EACH TIME YOU USE THE POWER PACK.
2) To reduce risk of battery explosion, follow these instructions and those published
by battery manufacturer and manufacturer of any equipment you intend to use in
vicinity of the battery. Review cautionary marking on these products and on engine.
k) PERSONAL PRECAUTIONS
3) Wear complete eye protection and clothing protection. Avoid touching eyes while
working near battery.
5) NEVER smoke or allow a spark or flame in vicinity of battery or engine.
6) Be extra cautious to reduce risk of dropping a metal tool onto battery. It might
spark or short-circuit battery or other electrical part that may cause explosion.
l) When charging the internal battery, work in a well ventilated area and do not restrict
ventilation in any way.
m) Under abusive conditions, liquid may be ejected from the battery; avoid contact. If
contact accidentally occurs, flush with water. If liquid contacts eyes, additionally seek
medical help. Liquid ejected from the battery may cause irritation or burns.
n) Do not expose a power pack to fire or excessive temperature. Exposure to fire or
temperature above 130°C may cause explosion. The temperature of 130°C can be replaced
by the temperature of 265°F.
o) Have servicing performed by a qualified repair person using only identical replacement
parts. This will ensure that the safety of the product is maintained.

SAVE THESE INSTRUCTIONS
GROUNDING INSTRUCTIONS
This product must be grounded. If it should malfunction or breakdown, grounding provides a path of
least resistance for electric current to reduce the risk of electric shock. This product is equipped
with a cord having an equipment grounding conductor and a grounding plug. The plug must be
plugged into an outlet that is properly installed and grounded in accordance with all local codes
ordinances.
WARNING – Improper connection of the equipment grounding conductor is able to result in a risk
of electric shock. Check with a qualified electrician if you are in doubt as to whether the product is
properly grounded. Do not modify the plug provided with the product – if it will not fit the outlet, have
a proper outlet installed by a qualified electrician.
IMPORTANT SAFETY INSTRUCTIONS
1. Read these instructions.
2. Keep these instructions.
3. Heed all warnings.
4. Follow all instructions.
5. Do not use this apparatus near water.
6. Clean only with dry cloth.
7. Do not block any ventilation openings. Install in accordance with the manufacturer’s instructions.
8. Do not install near any heat sources such as radiators, heat registers, stoves, or other apparatus (including
amplifiers) that product heat.
9. Do not defeat the safety purpose of the polarized or grounding-type plug. A polarized plug has two blades
with one wider than the other. A grounding type plug has two blades and a third grounding prong. The wide
blade or the third prong is provided for your safety. If the provided plug does not fit into your outlet, consult an
electrician for replacement of the obsolete outlet.
10. Protect the power cord from being walked on or pinched particularly at plugs, convenience receptacles, and
the point where they exit from the apparatus.
11. Only use attachments/accessories specified by the manufacturer.
12. Use only with a cart, stand, tripod, bracket, or table recommended by the manufacturer, or sold with
the product. When a cart is used, use caution when moving the cart/apparatus combination to avoid
injury from tip-over.
13. Unplug this apparatus during lightning storms or when unused for a long period of time.
14. Refer all servicing to qualified service personnel. Servicing is required when the apparatus has been
damaged in any way, such as power-supply cord or plug is damaged, liquid has been spilled or objects have
fallen into the apparatus, the apparatus has been exposed to rain or moisture, does not operate normally, or
has been dropped.
15. To reduce the risk of fire or electric shock, do not expose this appliance to rain or moisture. Do not place
objects filled with water, such as a vase on the apparatus.
16. Mains plug is used as disconnect device and it should remain readily operable during intended use. In order
to disconnect the apparatus from the mains completely, the mains plug should be disconnected from the mains
socket outlet completely.
17. The use of apparatus in moderate climates.
18. Make sure to have a minimum distance of 5 cm around the unit for sufficient ventilation.
19. Ensure that the ventilation openings are not covered with items such as newspapers, tablecloths, curtains,
etc.
20. Do not place naked flame sources, such as lighted candles on the apparatus.
21.Do not expose this appliance to dripping or splashing water.
22. Do not throw batteries into fire!
23. Batteries should not be exposed to excessive heat such as sunshine, fire or other similar heat source.
24.Under the influence of fast transient and / or electrostatic electric phenomenon, the product may
malfunction and the user must perform a power reset of the device.

25.The normal function of the product may be disturbed by strong Electro-Magnetic Interference. If so, simply
reset the product to resume normal operation by following the instruction manual. In case the function could
not resume, please use the product in other location.
This symbol indicates that this product incorporates
double
insulation between hazardous mains voltage
and
user
accessible
parts.
OPERATING INSTRUCTIONS
WARNING: Risk of Electric Shock and Risk of Fire.This device is not to be stored in a
vehicle.
Charging ambient temperature:-20
°
C~55
°
C.
Ratings of battery:
22.4VDC, 52Ah,
Maximum Charge Current: 52A@20
°
C~45
°
C
Maximum Discharge Current: 78A continuous,156A for 60s
Upper Limited Charging Voltage
:
25.55V
Final Discharge Voltage
:
17V
Charging temp. Range
:
0~55
°
C for pack,-20~55
°
C for cell
Discharging temp. Range
:
-30
°
C~60
°
C for pack,-30~60
°
C for cell
TOP SIDE
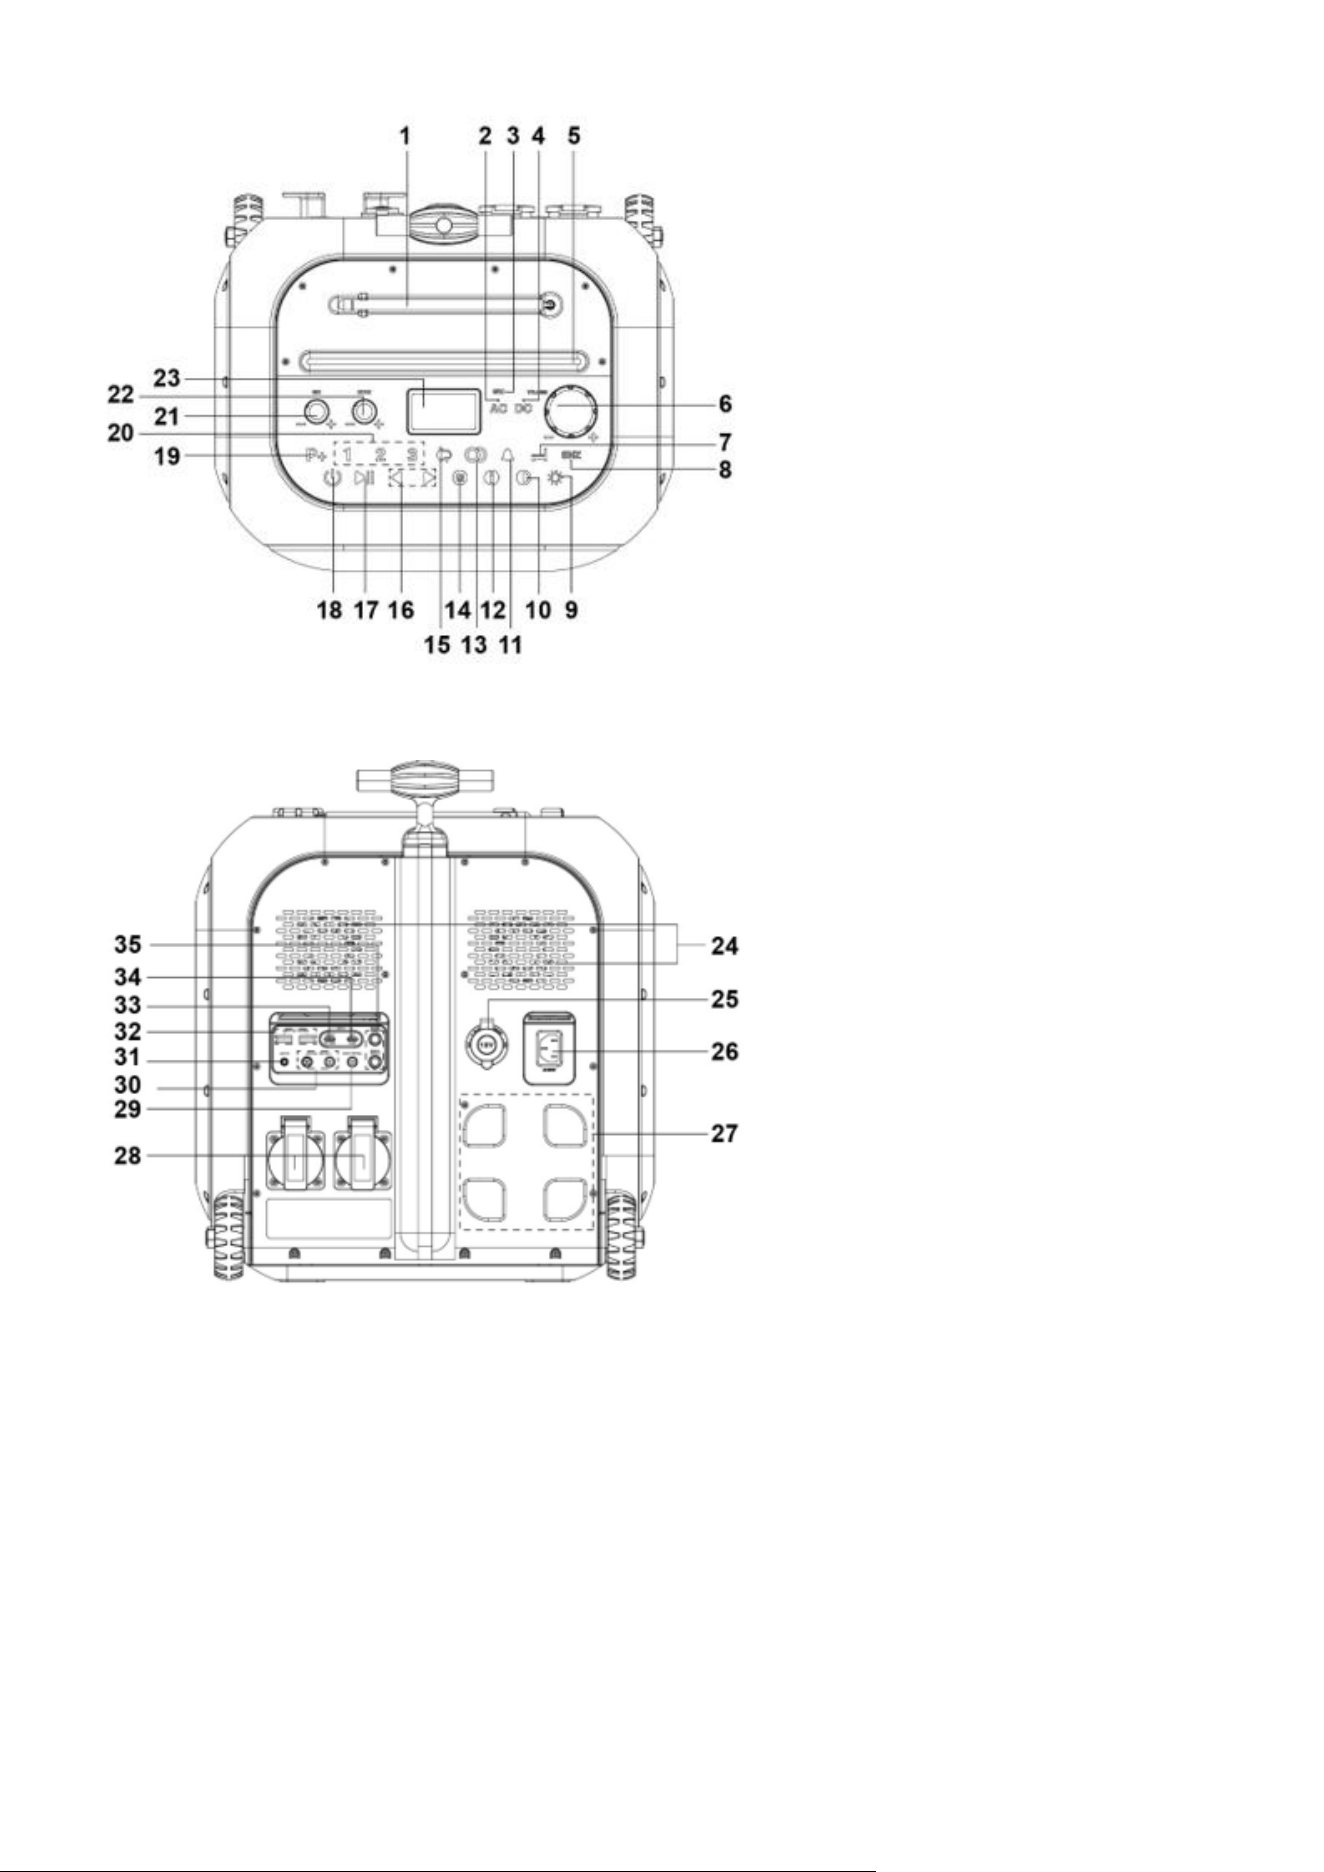
BACK SIDE
LEFT/RIGHT SIDE
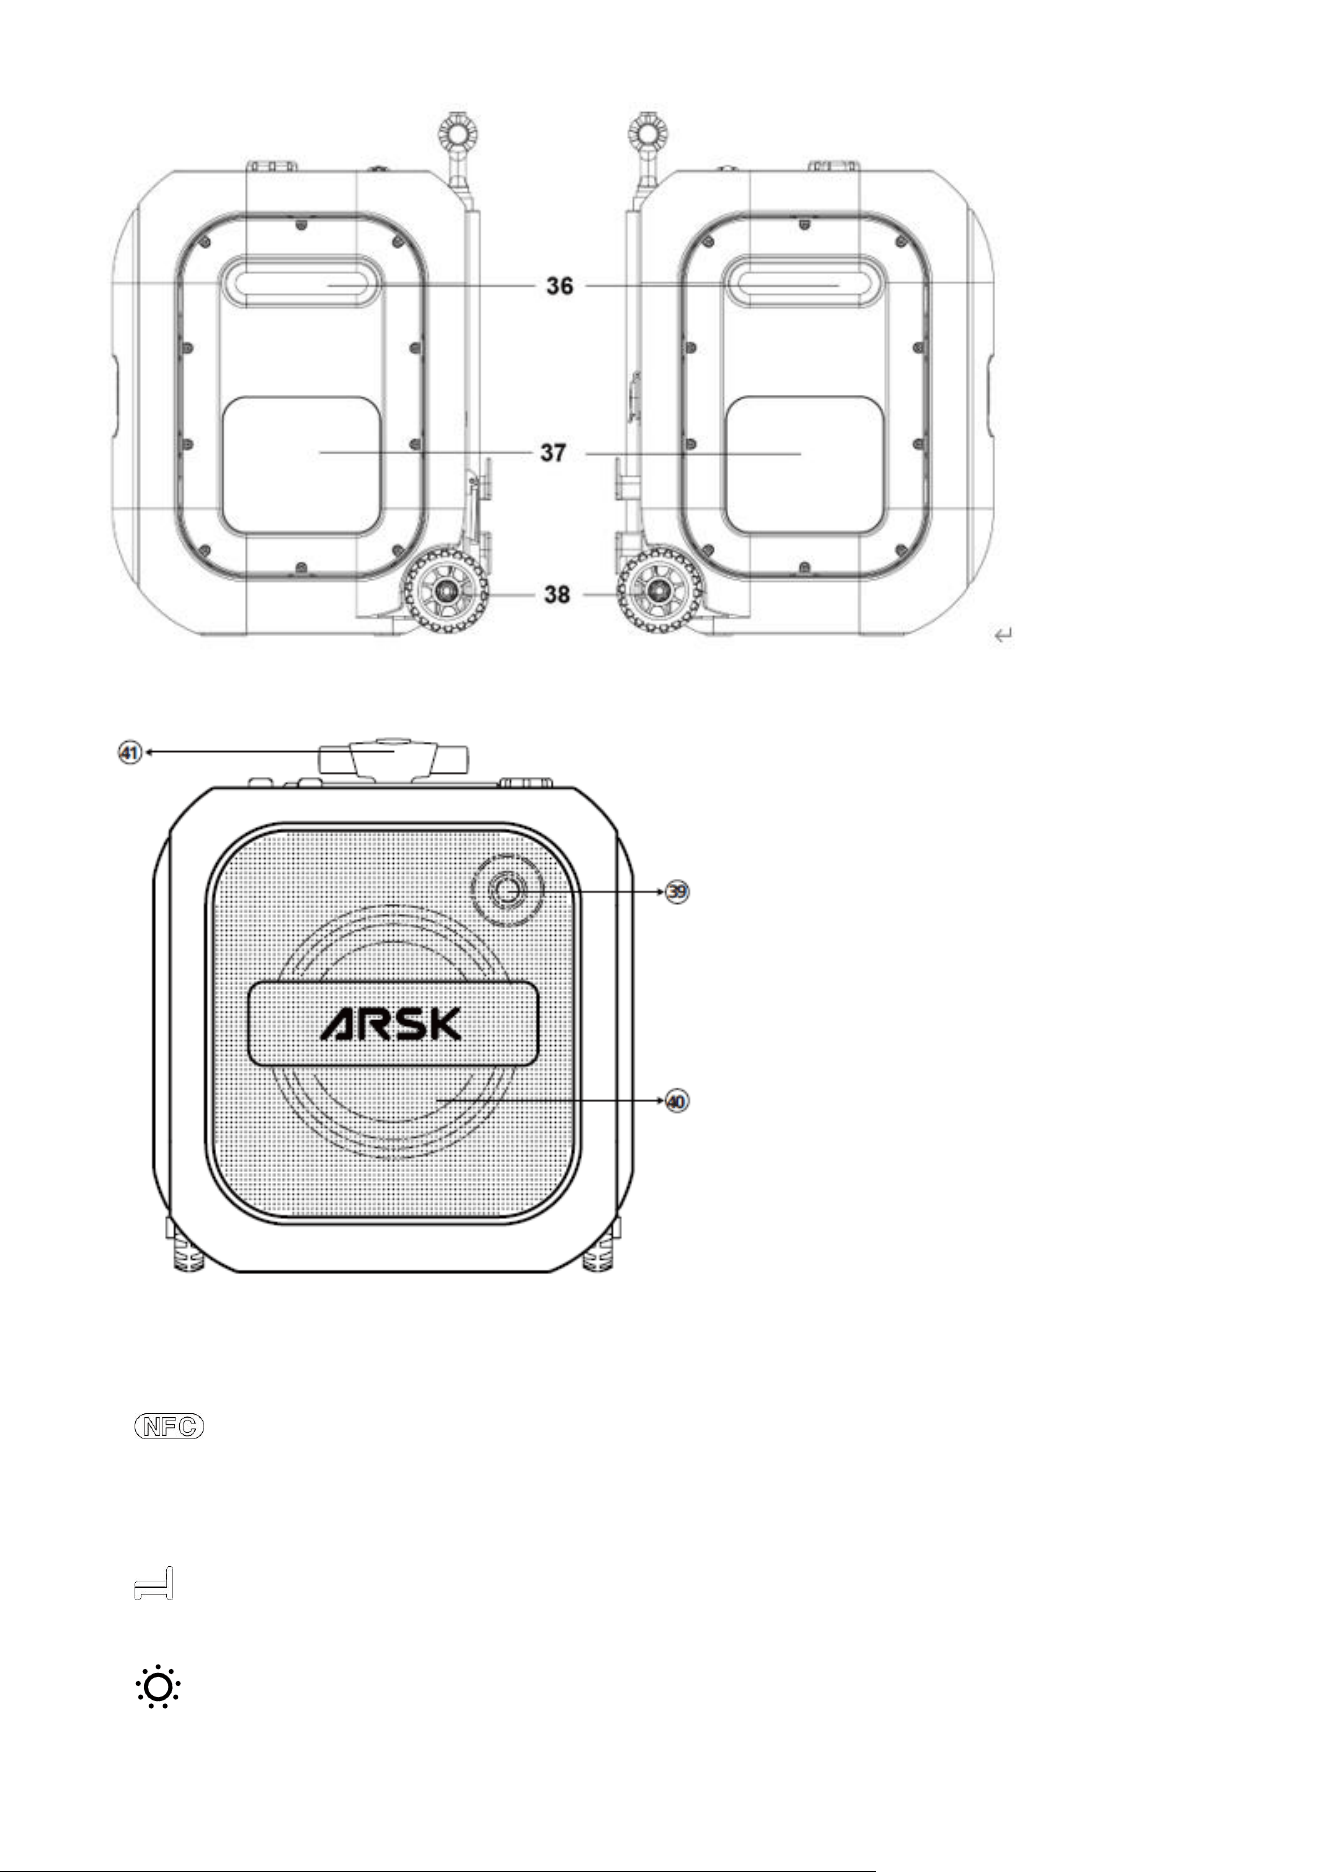
FRONT SIDE
1. Swivel telescopic antenna
2. AC: AC output on/off with LED indicator
3. NFC Tag
4. DC: DC output on/off with LED indicator
5. Groove for Tablet or Smart phone
6. VOLUME+/- control
7. : To fall asleep to Radio, Bluetooth or Aux
8. SNZ (snooze): Interval alarm repetition
9. : LED Light button: Warm white light/Red light/Off switch

10. : Dimmer: Dimmer light intensity of the LED light
11. : To set the alarm
12. : Short press to show clock time; Long press to select Radio band (FM/WB/SW/AM)
13. : Bluetooth stereo pairing
14. (Memory): Long press to set time; Short press to preset radio stations
15. : Alert button
16. / : Tuning; setting up / down; Searching; To select desired track (Bluetooth mode)
17. : Short press to Play/Pause; Long press Bluetooth pairing / Disconnect the paired Bluetooth device
18. : To turn unit on/off; To select between Bluetooth, Radio and AUX
19. P+: Recall preset stations
20. 1,2,3: To recall preset station 1,2,3
21. MIC +/-: MIC volume adjustment
22. ECHO +/-: Echo adjustment
23. LCD display
24. Cooling Fan X 2
25. Car Output jack (12V 10A)
26. AC INPUT Socket for built-in charging(120V~60Hz 500W)
27. Power cord bracket for rolling up the power cord
28. AC OUTPUT jack x 2 (110V~ 60Hz 1200W)
29. DC IN jack (12V 10A)
30. DC OUT jack x 2 (12V 10A)
31. :AUX IN jack (3.5MM)
32. USB-A port x 2 to charge external device (QC 30W MAX)
33. USB-C port to charge IN/OUT (PD 100W MAX)
34. : USB-C port to charge external device(5V/1A)
35. SIGNAL INPUT Jack x2: Mic jacks
36. Side Handle
37. Dual color LED light (Warm white/Red)
38. Wheels
39. Tweeter
40. Main speaker
41. Telescopic Handle
DISPLAY
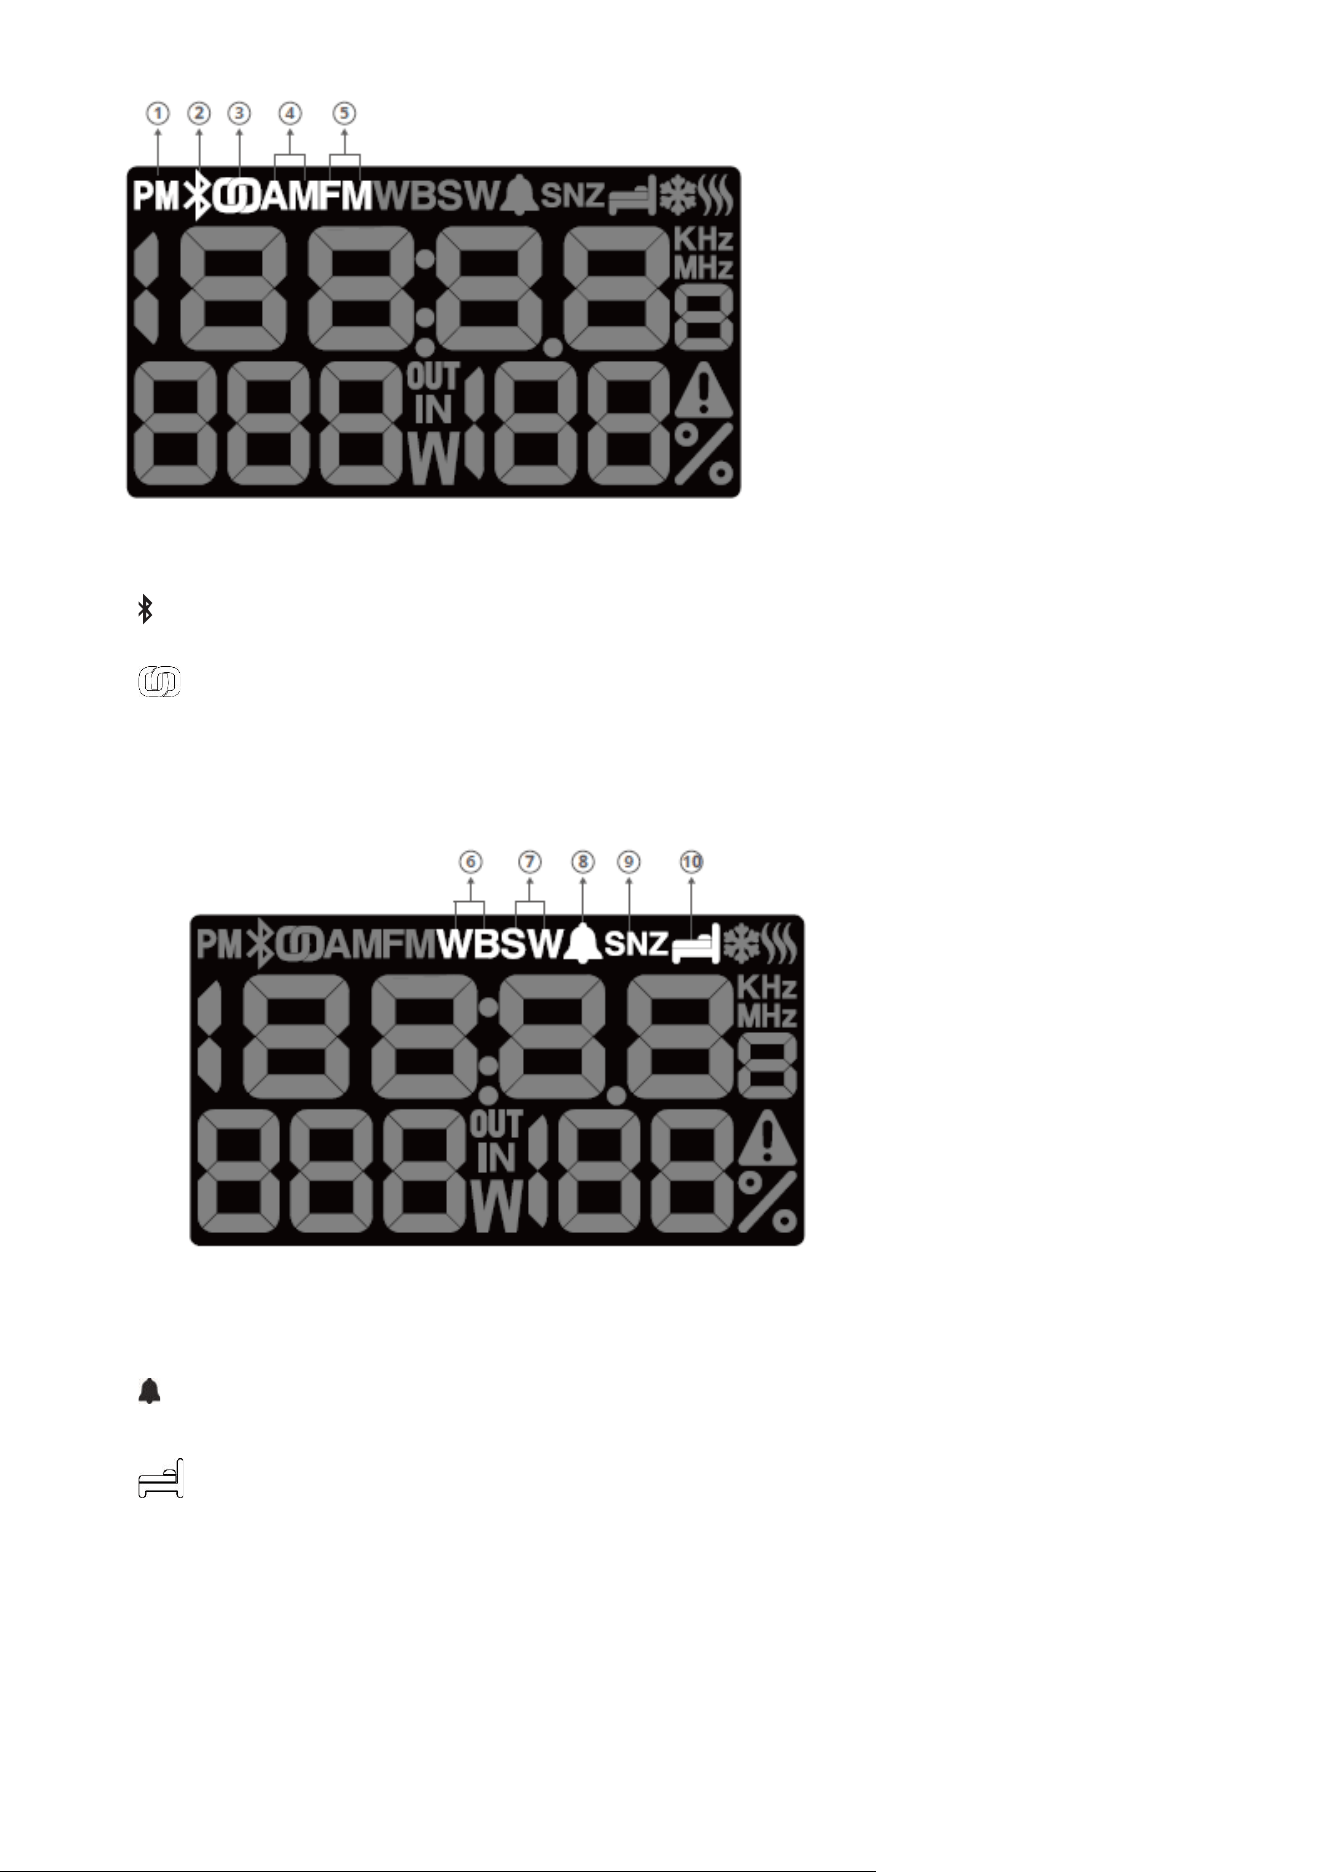
1. PM: PM icon for 12H time format
2. : Bluetooth
3. : Bluetooth stereo pairing
4. AM: AM radio
5. FM: FM radio
6. WB: Weather Band radio
7. SW: SW radio
8. : Alarm
9. SNZ: Snooze
10. : Sleep
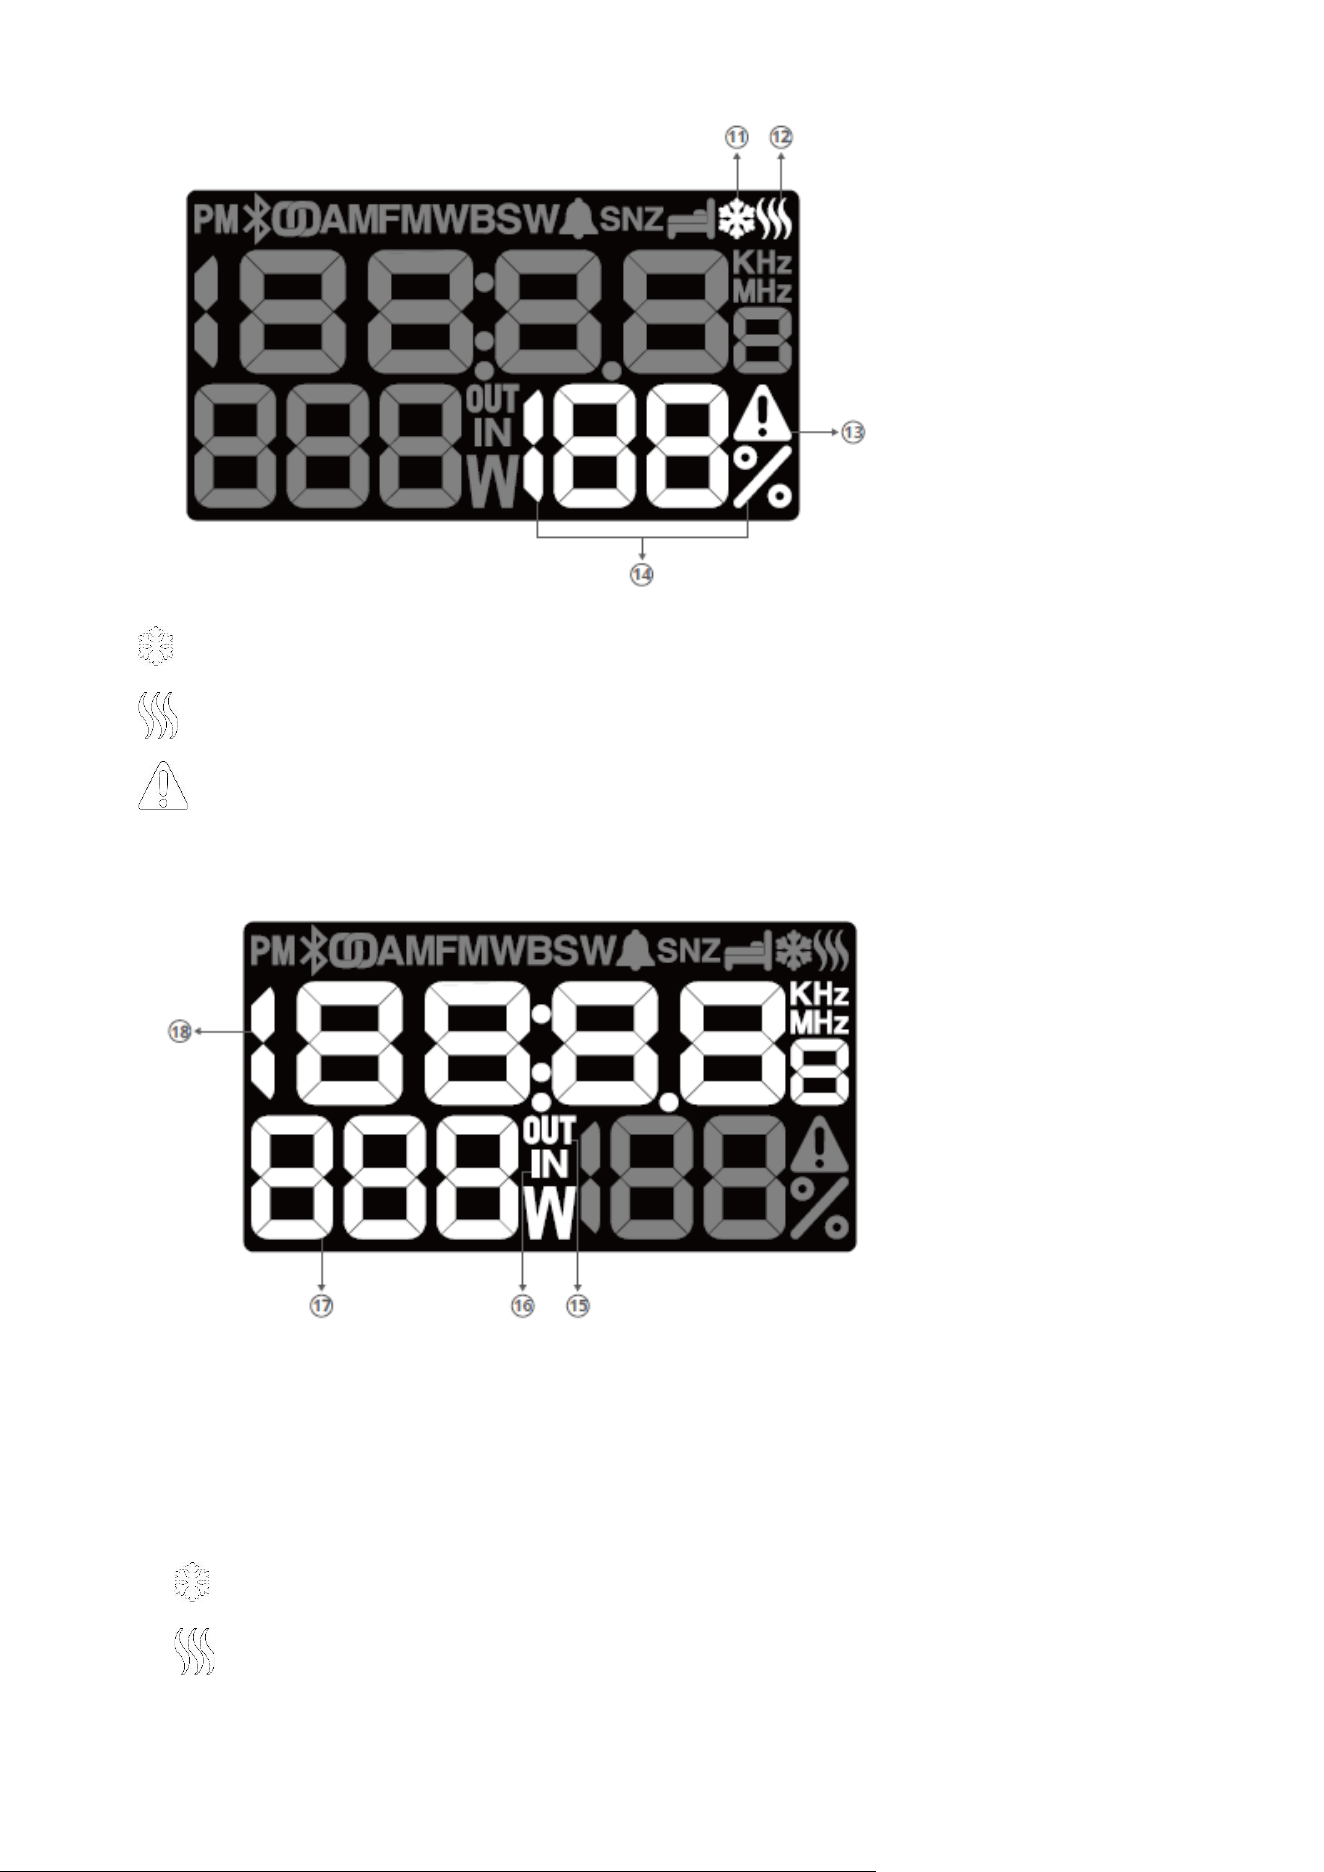
11. : Low temperature alert
12. : Over temperature alert
13. : AC inverter function failure alert
14. 100%: Battery level value
15.OUT: DC out function
16.IN: Unit charging in (AC charging / USB-C charging / DC charging)
17. Power value of inverter AC output (AC output on) / Power value of AC charging in (AC charging in)
18. Radio frequency and Clock time display
Notes:
-When icon appears on display, move the unit to indoors.
-When icon appears on display, turn off the unit, await the unit to cool down.

- When icon appears on display, turn off the unit, leave it for a period of time before use it again, or
consult qualified service personal.
POWER SUPPLY
The unit has a built-in rechargeable battery (lithium-ion/ LiFePo4). Charge the built-in battery before using it
for the first time. The display will show the battery level “100%” when it becomes fully charged.
To charge the internal battery, choose one of the following methods:
Using AC INPUT socket:
Connect the detachable AC cord (included) to the AC INPUT socket on the back of the unit.
Plug the power cord into 120V~ 60Hz AC outlet, “IN” icon will show on display and charging starts.
Cautions
- Insert the plug of AC cord into a standard wall outlet
- The included AC cord is for use with this unit only. Do not use it with other equipment.
- When the unit is not going to be used for long time, disconnect the power cord from the AC outlet.
- Be sure to use it near the wall outlet. If a malfunction occurs, disconnect the plug from the wall outlet at
once.
- If the AC cord is plugged in, the apparatus is not completely disconnected from the main power source,
even when the unit is turned off.
- AC cord is used as the disconnect device. It shall remain readily operable and should not be obstructed
during intended use. To be completely disconnected the apparatus from supply mains, the AC power cord
of the apparatus shall be disconnected from the mains socket outlet completely.
Using USB-C IN port (PD 100W)
Connect one end of the USB-C cable (not included) to the USB-C port on unit and the other end to a powered
USB-C jack on a charger (not included). “IN” icon will show on display and charging starts.
The power delivered by the charger must be between min 20 Watts required by the radio equipment, and max
100 Watts in order to achieve the maximum charging speed.
Using DC IN jack
The unit can also be charged with an AC adaptor (not included) with the output DC12V, 10A, 120W.
Insert the DC plug of the AC adaptor into the DC IN jack on unit, “IN” icon will show on display and charging
starts.
Warnings:
• The battery level value will be shown on display.
• Recharge the built-in battery when you are ready to use it again.
• While using the built-in battery, the environmental temperature should be 0°C to 40°C.
• To get the longest service life of the built-in battery, charge at indoor temperature.
• The built-in battery in this device may present a risk of fire or chemical burn if mistreated. Do not
disassemble, heat above 100°C, or incinerate.
• The unit should not be exposed to excessive heat such fire or the like.
• When discarding the unit, environmental problems must be considered and local rules or laws governing the
disposal of such products must be strictly followed.
• Recharge the built-in battery when the battery level is lower than 20%.
• To maintain the battery performance, fully charge it at least every 3 months when the unit is not used for a
long time.
CAUTION: Do not attempt to remove or replace the built-in battery. Service must be performed by
qualified personnel.
Note:
- The unit is supplied from limited power sources.
- The unit is designed with a thermal protection system. When the unit’s operation temperature exceeds
45°C, it will stop charging the built-in battery automatically for protection. In this case, await the unit to cool
down to resume normal.
- In a concern of saving energy, when playback has reached to the end or listening volume is set at a very
low level and no control is operated on the device for a period of 15 minutes, the unit will be turned off
automatically. However, when the unit is in IN charging and/or OUT charging mode, the unit will not turn off
automatically in this case.
TURNING UNIT ON/OFF
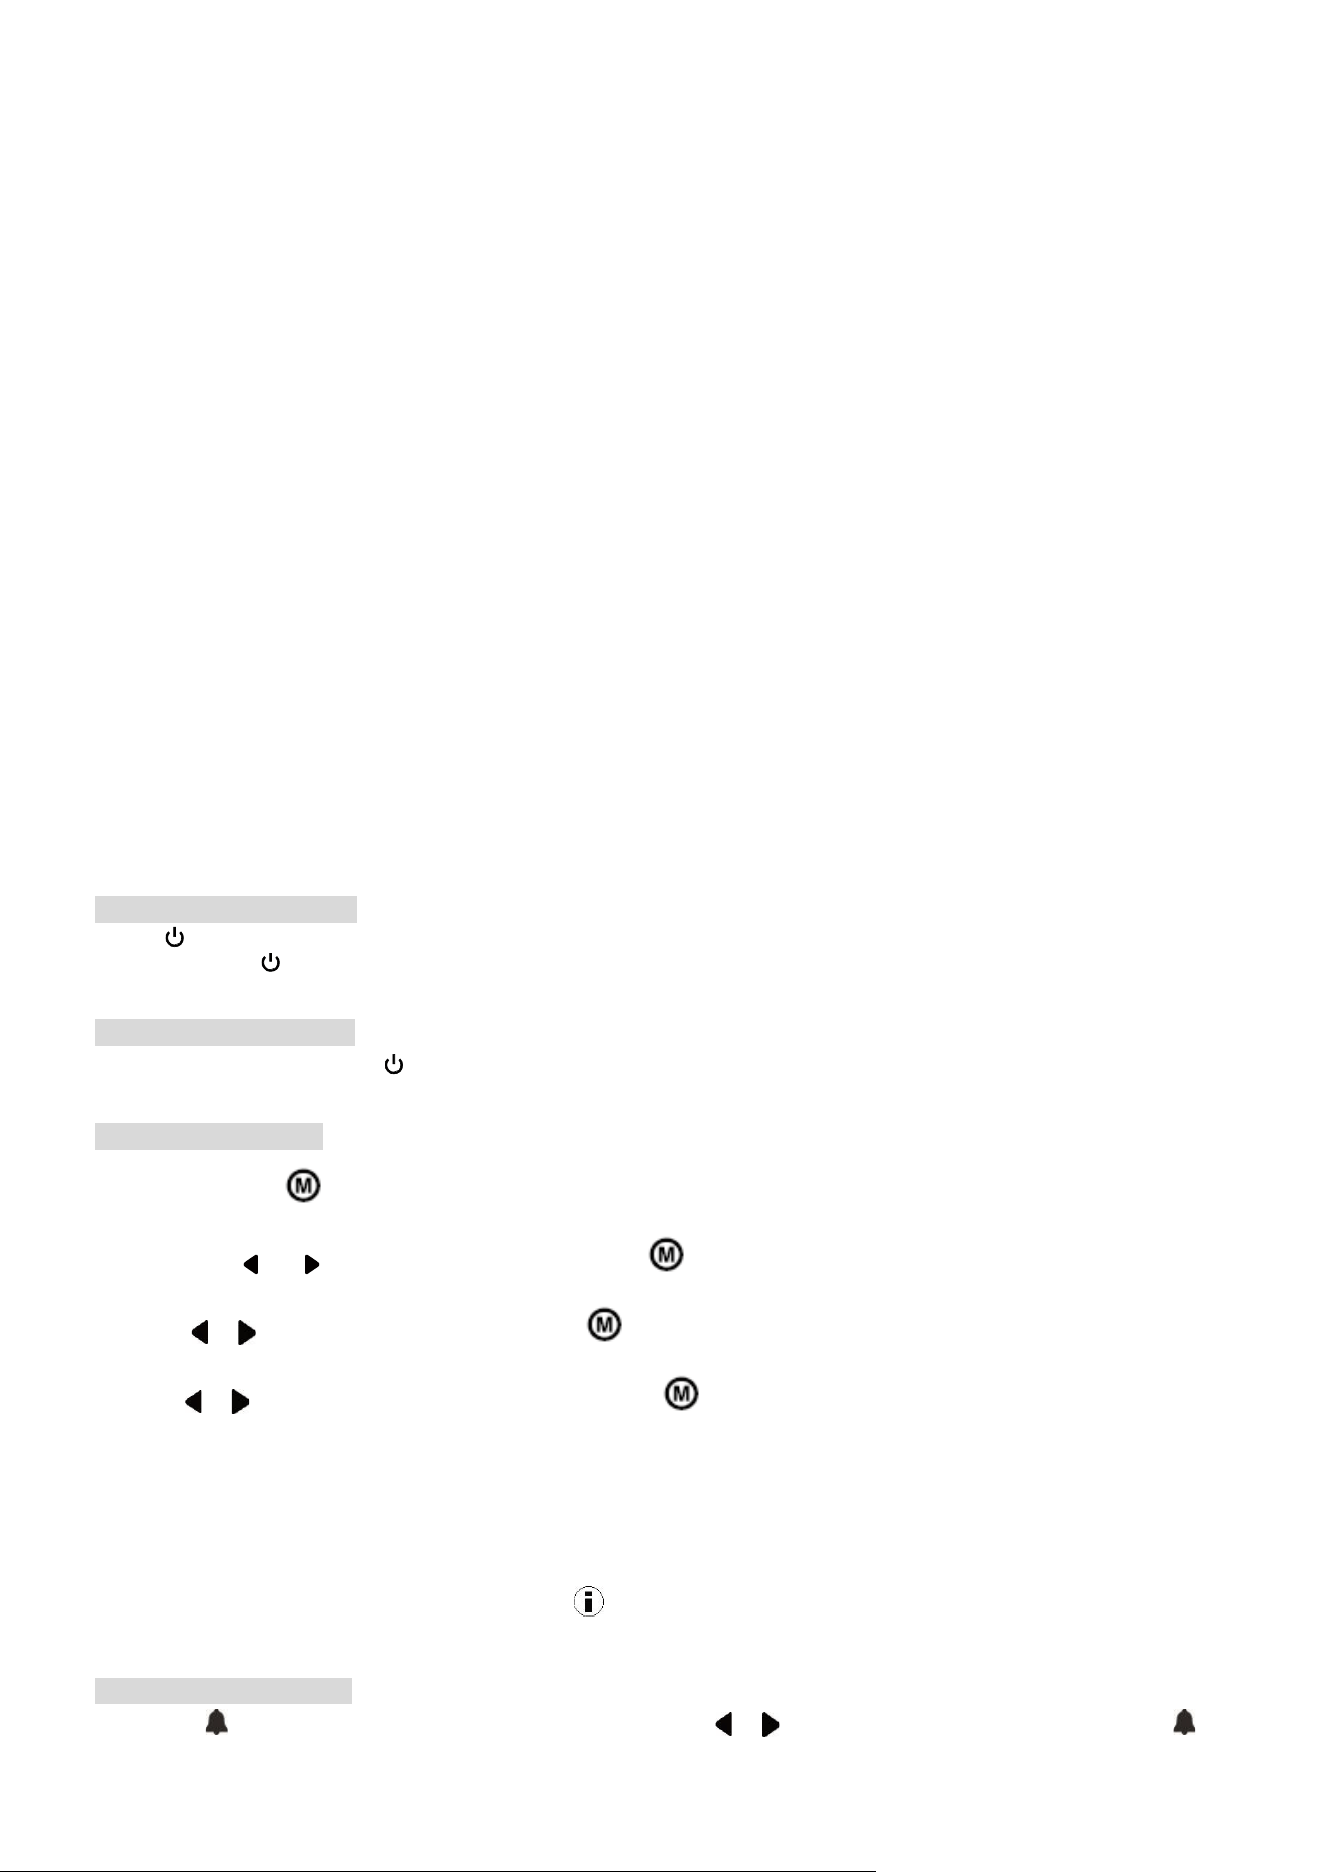
Press button once to turn on the unit.
Press and hold button again to turn off the unit.
SELECTING FUNCTION
When the unit is ON, press button repeatedly to select Radio, Bluetooth or AUX mode.
SETTING THE TIME
1.Press and hold button to enter time setting mode and the hour digits flash.
2.Then press or to choose 12H or 24H. Press button again to confirm, the hour digits flash.
3. Press / to adjust the hour value. Press button to confirm and minute digits flash.
4.Press / to adjust the minute value and press button again to confirm.
NOTE:
- If during the adjustment time no key is activated in 10 seconds, the current display will be automatically
stored.
- If you need to check the clock time, press button on unit.
SETTING THE ALARM
1. Press button to enter time setting mode, then press / to choose ALON(Alarm ON), press
button to confirm and hour digits flash.

2. Press / to adjust the hour value. Press button to confirm and minute digits flash.
3. Press / to adjust the minute value and press button again to confirm. The alarm icon will
remain on.
Note: In 12h clock format, be sure to observe the PM icon to set the alarm time correctly.
STOPPING THE ALARM
1-Alarm repetition
Press SNZ button. The alarm stops and will sound again 9 minutes later. The alarm icon lights on during
the snooze time.
2-Alarm stop
Press button. The alarm will sound again the next day at the same time.
3-Alarm Cancellation
Press button, then press / to choose ALOF(Alarm OFF), press button to confirm. The alarm
icon lights off.
LISTENING TO THE RADIO
When the unit is ON, press button repeatedly to select Radio mode.
Long press button to select the desired broadcast band((FM/WB/SW/AM).
MANUAL SEARCH
1. Choose your radio station with / .
2. Adjust the volume to desired level.
AUTOMATIC SEARCH
Press and hold / . The automatic search locates strong stations. A station with a weak signal can be set
manually by repeatedly pressing / .
Note: During the search operation, the sound level is automatically muted.
To enhance radio reception ability
FM/WB/SW: Adjust the position of the antenna.

AM: Rotate the unit horizontally for optimum reception.
PRESET STATIONS
This unit can store 30 FM stations.
Manual storage:
1. Select a radio station manually or in automatic search.
2. Press button until “Pxx” shows on the display.
3. Press repeatedly P+ button to select a channel.
4. Press button to save it.
5. Repeat steps 1-4 to store other stations.
Auto preset
Press and hold to start automatic preset programming. Radio frequencies will be browsed and radio
stations stored automatically. When all the available radio stations are stored or all memory locations are full,
the auto preset programming function will stop.
Listen to station presets
Press P+ and repeat the operation as many times as necessary to select your station.
Note: To recall the stations in preset channel 1/2/3, simply press 1/2/3 respectively.
WEATHER ALERT
After select the weather band radio, your radio can receive NOAA weather broadcasts and alert sound
automatically when dangerous weather (like tornadoes or floods) is approaching.
Note: This function only works in the USA.
BLUETOOTH FUNCTION
The Bluetooth® word mark and logos are registered trademarks owned by Bluetooth SIG, Inc. and any use of
such marks by ARSK LTD is under license. Other trademarks and trade names are those of their respective
owners.
Pairing a Bluetooth Device
1. When the unit is ON, press button repeatedly to select Bluetooth mode. The display will blink “ ”
for a few seconds, indicating it is in pairing mode.

2. On the Bluetooth device, enable Bluetooth and select “ARSK power” from the Device List.(Refer to the
user manual of the device to be connected for detailed operations.) If the Bluetooth device prompts for a
pass code, use “0000”. Some Bluetooth devices will ask you to accept the connection. If the units are
paired properly, you will hear the indication sound. The Bluetooth will remain on.
Tip: If you want to connect your Bluetooth speaker to another Bluetooth audio device, press and hold
button to disconnect the current device, and then follow the steps above to make a new connection.
·On some devices such as computers, once paired you must select the unit from the Bluetooth menu and
choose “Use as Audio Device (stereo)” or similar.
·Pairing remains intact when the unit and/or your Bluetooth device is taken out of communication range. An
active connection will be re-established when your Bluetooth device returns within range.
·When the unit is turned on again, it will automatically try to reconnect with the most recently paired Bluetooth
device.
Using a Bluetooth Device
With a unit paired (see previous section), operate your Bluetooth device and its sound will be heard through
the ARSK power’s speaker.
1. Press button to pause playback. Press again to resume playback.
2. Select desired track with / .
3. Adjust the volume level by the VOLUME knob. You can also adjust the volume on the device to which you
are paired.
Using a NFC Device
NFC (Near Field Communication) is a technology that enables short-range wireless communication between
NFC-enabled devices, such as mobile phones.
1. When the unit is ON, press button repeatedly to select Bluetooth mode. The display will blinks “ ” for
a few seconds, indicating it is in pairing mode.
2. Enable NFC and Bluetooth on your Bluetooth device(see the user manual of your device for details), tap
the NFC device on the NFC tag of this unit. If the units are paired properly, you will hear the indication sound.
The Bluetooth will remain on. The NFC device is connected to this unit via Bluetooth.
3. Select and play audio files or music on your NFC device.
4. To break the connection, tap the NFC device with the NFC tag on this unit again.
Note:
- The operational range between the main unit and a NFC device is approximately 10 meters.
- There are many NFC enabled devices in the market. We cannot guarantee to support all different models.
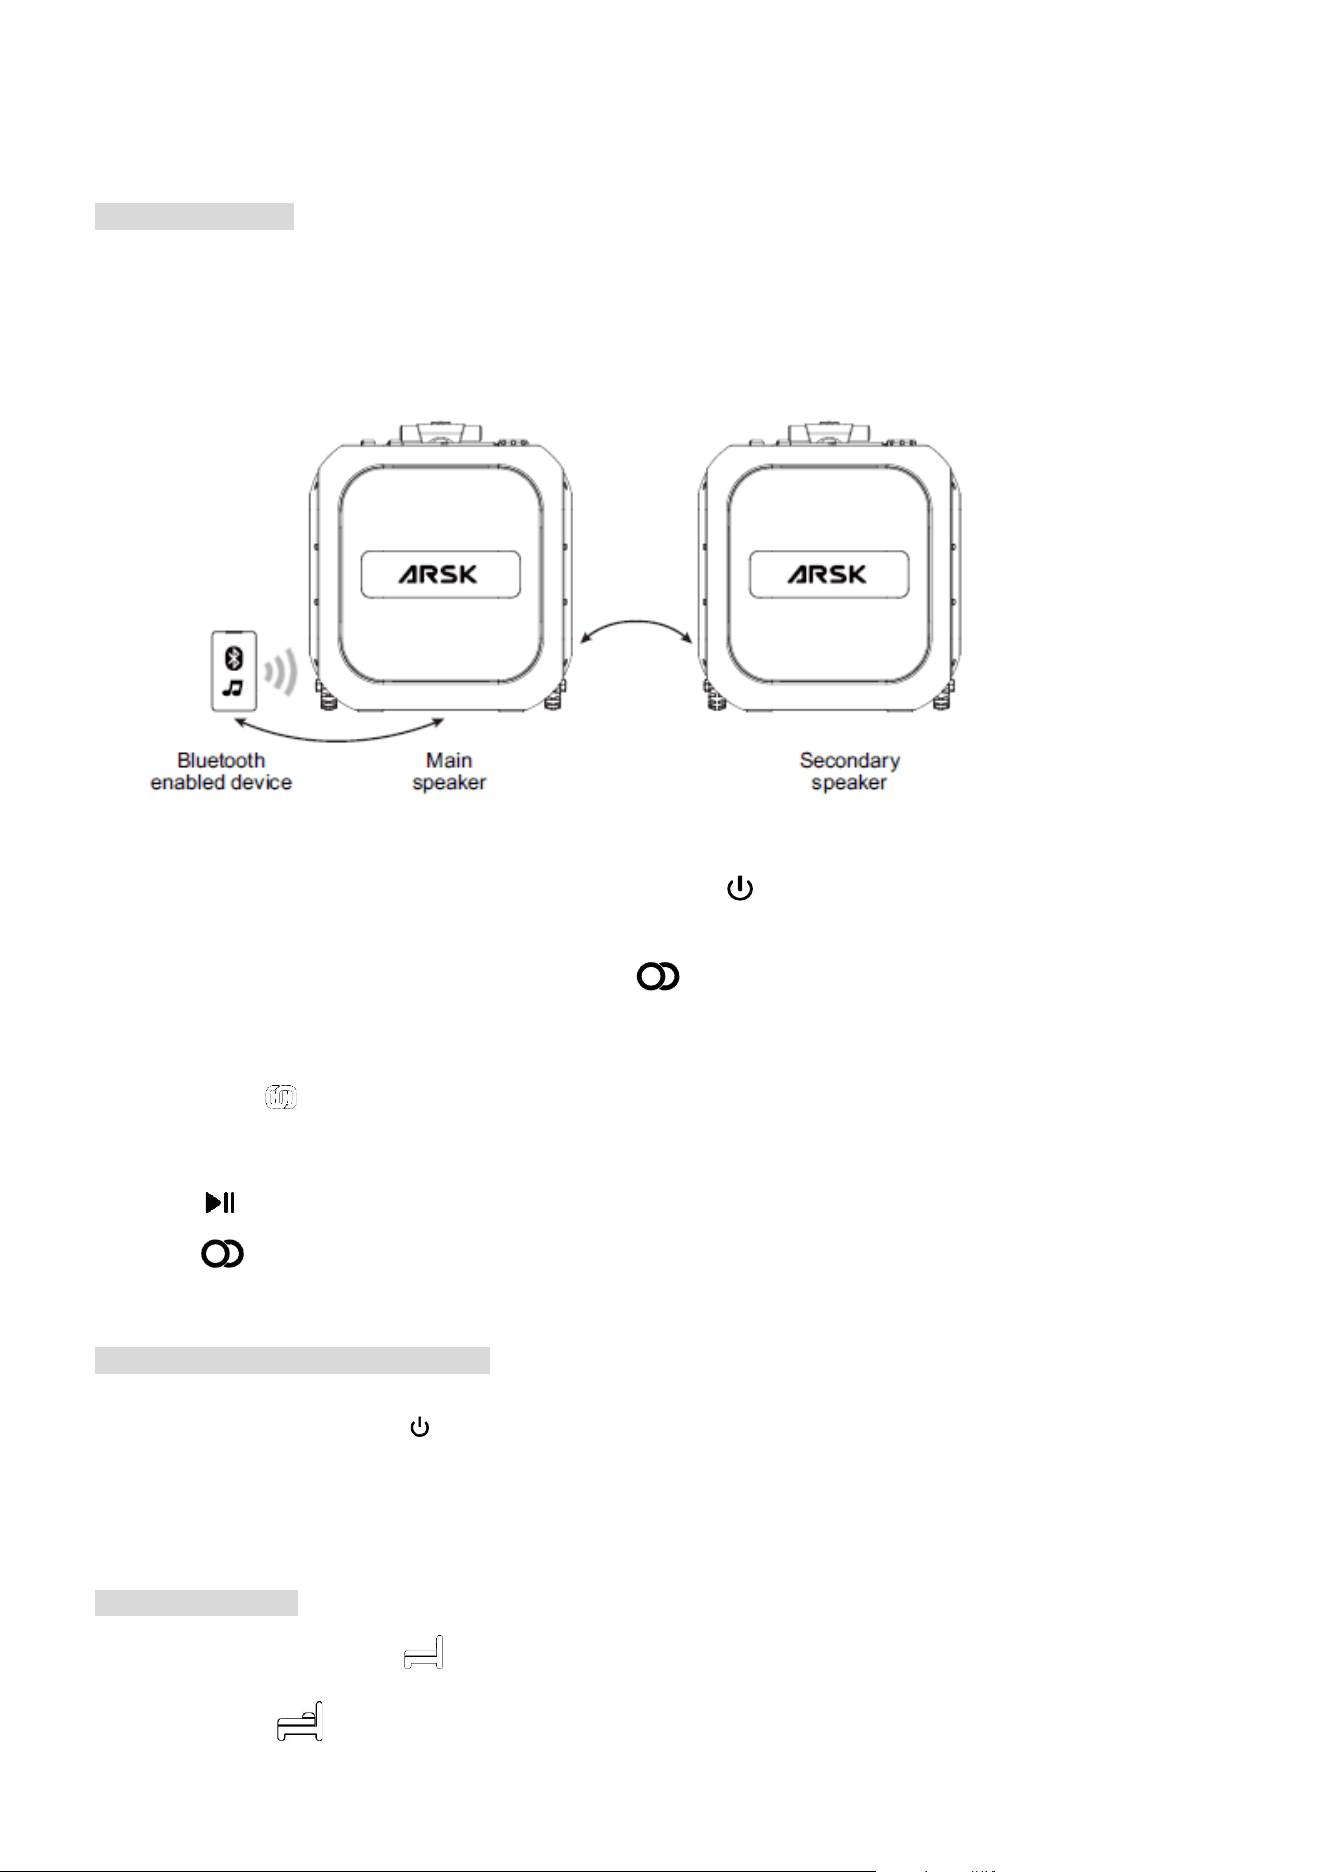
STEREO PAIRING
This function makes it possible for you to get stereo surround sound quality. It requires two Bluetooth
speakers ARSK power to realize the real Bluetooth radio channel wireless separation, therefore, you’ve got to
purchase two ARSK power.
Tips: it is suggested that the distance between the main speaker and secondary speaker is within 4 meters.
1. Turn on the two Bluetooth speakers ARSK power. Press button repeatedly to select Bluetooth mode
for both speakers.
2. When both speakers are in pairing mode, press button on one Bluetooth speaker which will become
the main speaker (left channel), then it will search and connect to the secondary speaker (right channel).
They will recognize the left and right channel automatically. You will hear the indication sound. The stereo
pairing icon will remain on.
3. Connect your main speaker to Bluetooth enabled device (e.g. smart phone).
4. Play your song and listen to the sound in stereo.
5. Press button on either speaker to pause playback. Press again to resume playback.
Press button on either speaker to disconnect the stereo pairing.
CONNECTING AUXILIARY SOURCE
1. Connect your auxiliary source (e .g. mp3 player) to the AUX IN jack on the unit (cable not included).
2. When the unit is ON, press button repeatedly to select AUX mode. “AUX” will show on display.
3. Start playback from your auxiliary source.
4. Adjust the volume to desired level.
5. To stop playback, disconnect your auxiliary source from the AUX IN jack.
SLEEP FUNCTION
1.When the unit is ON, press button repeatedly to select 90-60-45-30-15-10 or 5 minutes of listening.
2.The sleep icon will light on. The unit will automatically turn off after the specified time.
3.To cancel the sleep function, press button repeatedly until “0” appears. The sleep icon lights off.
USING THE LED LIGHT
Press button repeatedly to select the dual LED light color: Warm white, Red or Off.
DIMMER
Press button to select the brightness of the dual LED light: high, medium or low.
USING THE ALERT LIGHT AND SIREN
Press button once, the alert light will be on in red with siren. Press button again to turn off the alert
light and siren.
Note: Adjust the Alert volume level by the VOLUME knob.
AC Output jack
AC Output jack for power supply
This unit is equipped with two AC output jacks for power supply to your small household appliances.(e.g.
Kettle, hairdryer, etc.)
Press AC button on the unit, the AC output LED indicator will light on. Then plug your appliance (110V~
60Hz) to the AC output jack, the appliance starts running and the output power and “OUT” icon will show on
display.
Note: Two AC output Jacks can work at the same time, but the total power consumption of two appliances
cannot exceed 1200W.
DC Output jack
DC Output Jack for power supply
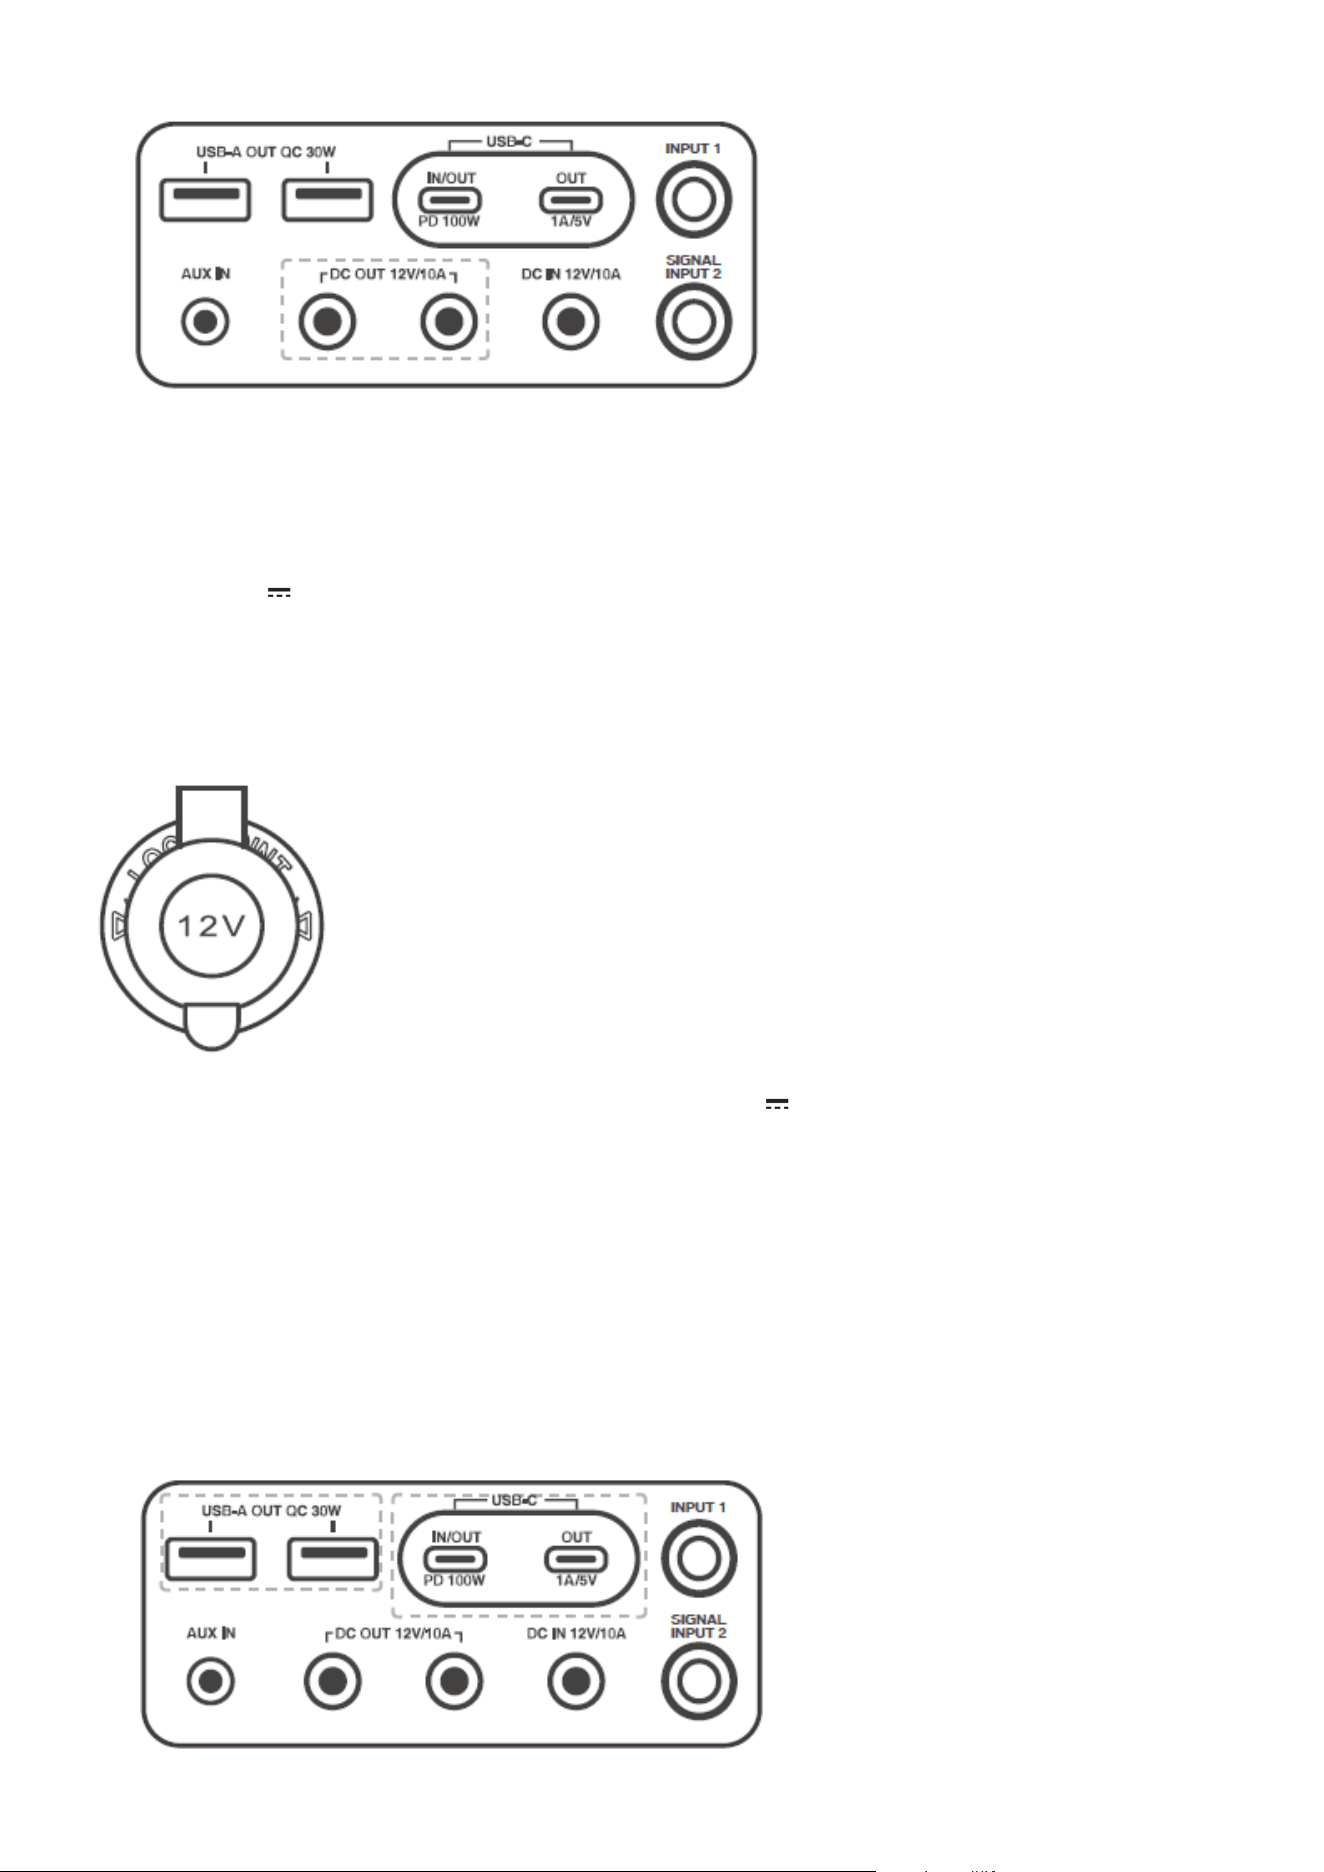
This unit is equipped with two DC OUT jacks for supply power to your electronic
devices.
Press DC button on the unit, the DC output indicator will light on. Then plug your appliances (12V DC) to the
DC output (12V 10A) jack, the appliance starts running and the output power and “OUT” icon will show on
display.
Car Output Jack for power supply (Cigarette lighter outlet)
This unit is equipped with a built-in Car output jack (Output: 12V 10A) for power supply to your car
electrical appliances. (e.g. Driving recorders, Car fan etc.)
Press DC button on the unit, the DC output LED indicator will light on. Then plug the car electrical appliances
to the output jack, the appliance starts running and “OUT” icon will show on display.
Note: DC output jacks X 2 and Car Output Jack X1 can work at the same time, but the total power
consumption of three appliances cannot exceed 120W.
USB-A/USB-C Charging

This unit is equipped with two built-in USB-C charging ports and two USB-A charging ports for recharging
your mobile device. (e.g. Smartphone, tablet, etc.) Connect your mobile device to the corresponding USB port
on power station with the correct USB charging cable (not included).
USB-C IN/OUT jack 1: PD 100W 5V 3A, 9V 3A, 12V 3A, 15V 3A, 20V 5A
USB-C OUT jack 2: 5V 1A
USB-A OUT jacks: QC 30W 5V 3A, 9V 3A, 12V 2.5A, 20V 1.5A
SINGING THROUGH THE MICROPHONE
Sing along with the music by plugging in the Microphone (not included) into either of the SIGNAL INPUT (1/2)
jacks on the unit.
* Rotate VOLUME +/- knob to adjust the unit’s volume. Rotate MIC+/- knob to adjust the mic volume as
desired.
* If the microphone is placed near the loudspeaker, a howling effect (acoustic feedback) may occur. If this
happens, place the microphone away from the loudspeaker.
* Disconnect the microphone from the unit to avoid unnecessary interference when not in use.
Warning: Tapping or dropping the microphone can permanently damage your microphone. Resist the urge to
swing the microphone around by the cord.
ECHO: Rotate the ECHO control knob to adjust the ECHO control to enhance the singer’s voice for a concert
hall effect.
TECHNICAL SPECIFICATION
POWER SUPPLY:
AC IN: 120V ~ 60Hz, 500W
RECHARGEABLE BATTERY
Battery Type: 22.4V 1164.8Wh LiFePo4 Battery
AC Charging time: Approx. 3 hours
USB-C PD 100W Charging time: Approx. 12 hours
DC IN jack Charging time: Approx. 20 hours
RADIO FREQUENCY
FM :87.5-108 MHz
AM :520-1710 kHz
SW :9.0-22.0 MHz

WB:162.400/162.425/162.450/162.475/162.500/162.525/162.550 MHz
BLUETOOTH
Bluetooth Version: V5.0
Bluetooth: 2.402-2.48GHz
RF output power: 0.481dBm
Working Distance: Up to 10 meters measured in open space (wall and structures may affect range of device)
Specifications are subject to change without notice.
NEED HELP?
CONTACT US
Room 402A , TCL Tower, no. 8 Tai Chung road, Tsuen Wan, N.T., Hong Kong
Check our website for FAQ’S: support@arsk.fr
ENVIRONMENT
Disposal
Please act according to your local rules and do not dispose of your old products with your normal household
waste.
Please dispose of all types of batteries per your Government, State or Local rules and/or regulations. If you
are unsure, please call the appropriate local authority to find out how to dispose of them safely and help
protect the environment.
SERVICE FOR YOUR PRODUCT
To obtain service for your product, we recommend first contacting an ARSK service
representative support@arsk.fr for problem determination and trouble- shooting