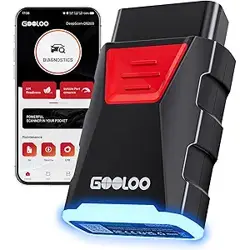
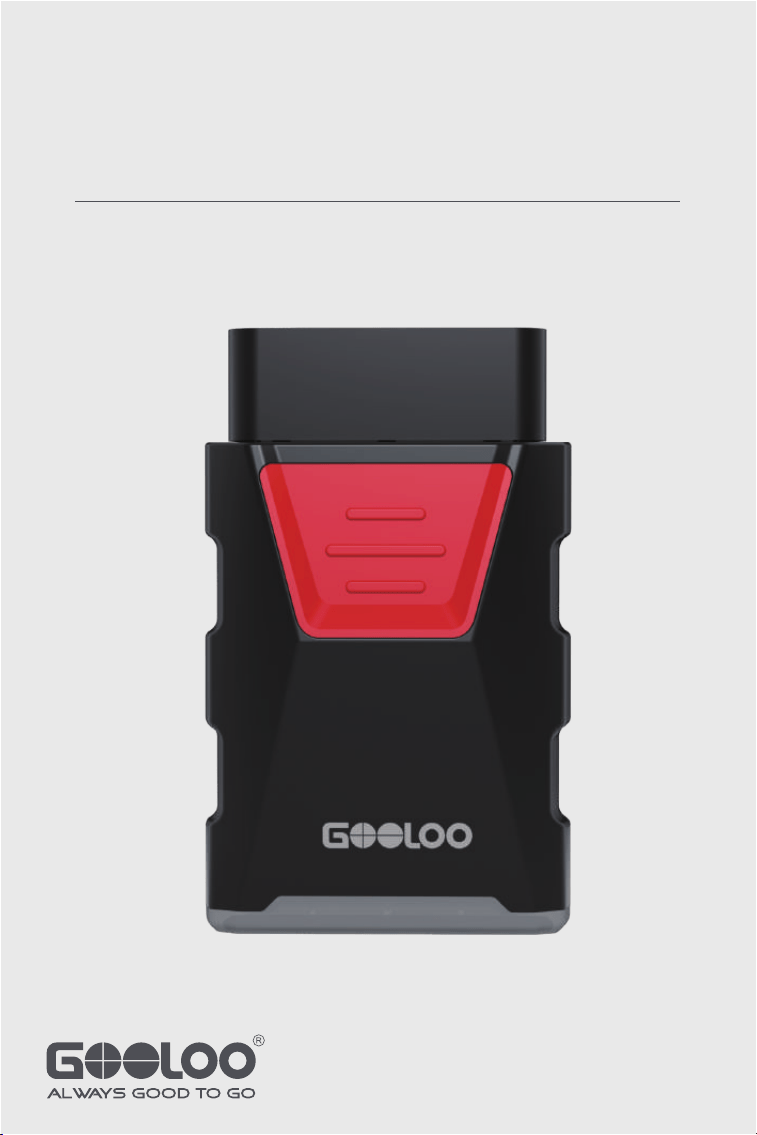
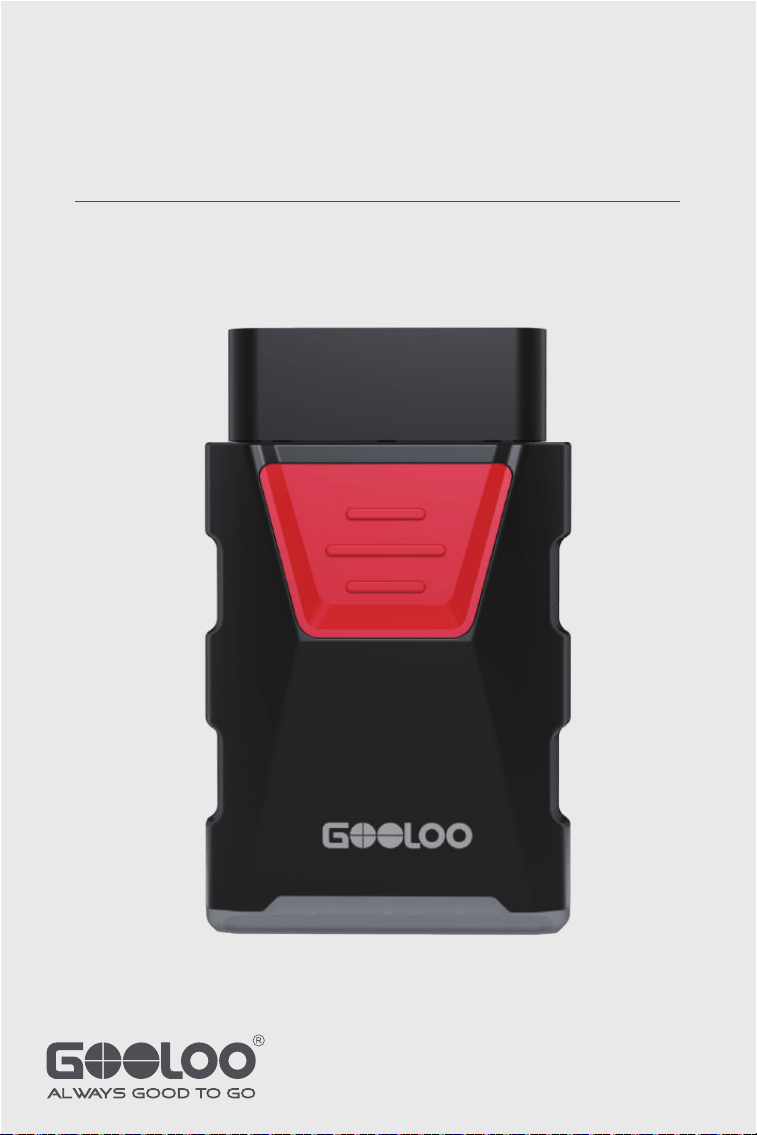
Bluetooth Vehicle Diagnostic Dongle I User Manual
DS200

Safety Is Always the First Priority!
Section 1 What's in the Box?
Section 2 Product Overview
Section 3 Getting Started
Section 4 Using the DS200 via the App
Section 6 FAQ
Section 7 Warranty
.......................................
.......................................
.......................................
.......................................
.......................................
.......................................
.......................................
.......................................
Contents
4
5
6
8
20
53
54
55
4
For your safety, the safety of others, and to avoid any damage to
the product and your vehicle, CAREFULLY READ AND MAKE SURE
YOU FULLY UNDERSTAND ALL THE SAFETY INSTRUCTIONS AND
MESSAGES ON THIS MANUAL BEFORE OPERATING. You must also
read the vehicle's service manual, and observe the stated precautions or
instructions before and during any test or service procedure.
Keep yourself, your clothing and other objects away from moving or hot
engine parts and avoid contact with electrical connections.
ONLY OPERATE THE VEHICLE IN A WELL-VENTILATED AREA, as the
vehicle produces carbon monoxide, a toxic and poisonous gas, and
particulate matter when the engine is running.
ALWAYS WEAR APPROVED SAFETY GOGGLES to prevent damage
from sharp objects and caustic liquids.
DO NOT SMOKE OR HAVE ANY FLAMES NEAR THE VEHICLE when
testing. The fuel and battery vapors are highly fammable.
DO NOT ATTEMPT TO INTERACT WITH THE PRODUCT WHILE
DRIVING. Any distraction may cause an accident.
TURN THE IGNITION OFF BEFORE CONNECTING OR
DISCONNECTING THE PRODUCT FROM THE DATA LINK
CONNECTOR (DLC) to prevent causing damage to the product or
vehicle's electronic components.
Safety Is Always the First Priority!
Safety Is Always the First Priority!
5
DS200 Quick Reference Guide
Section 1
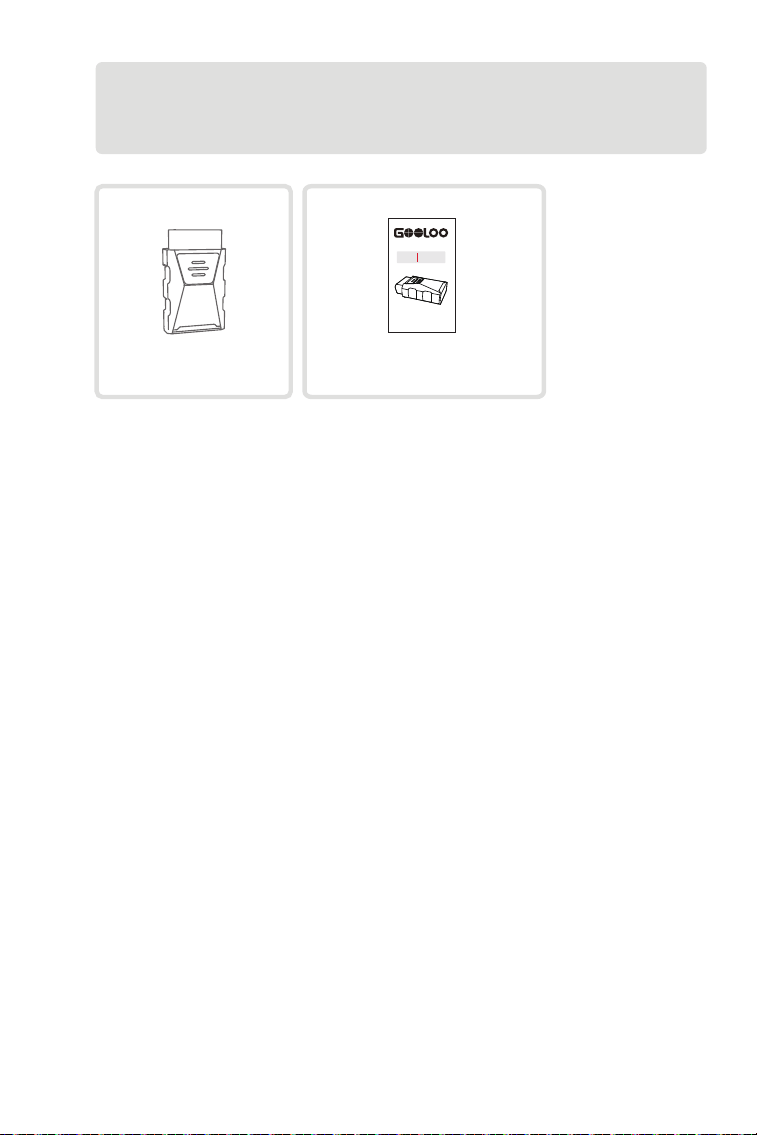
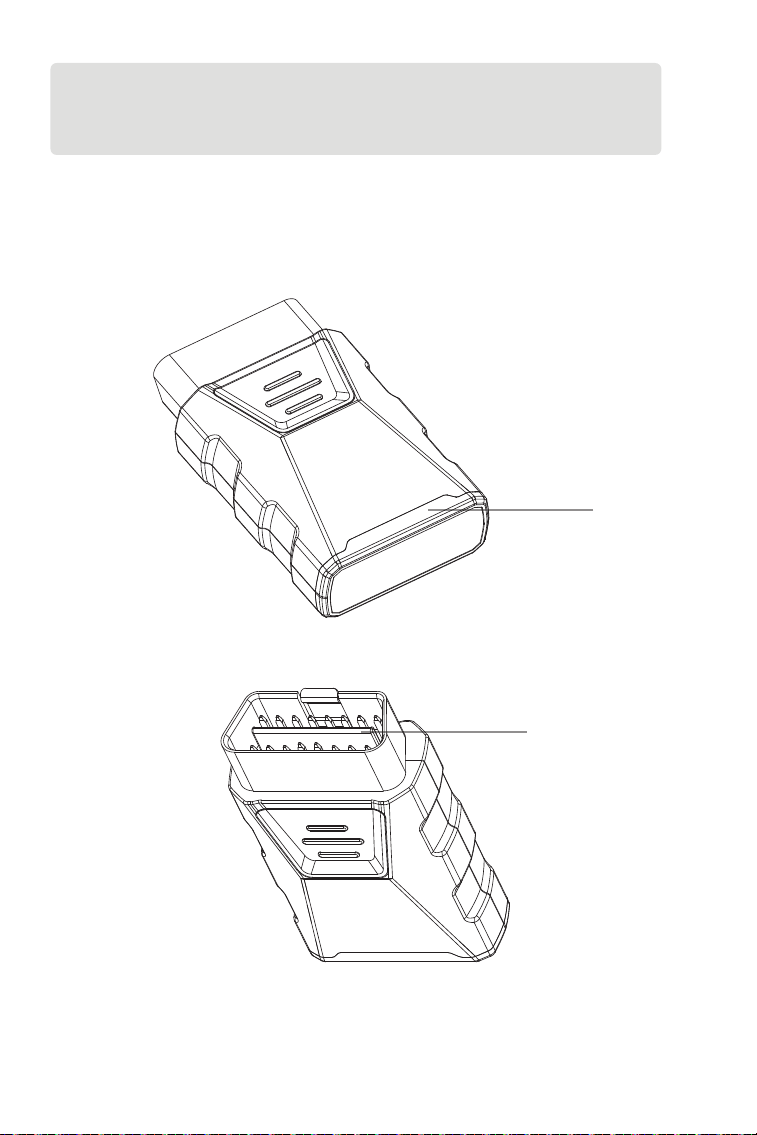
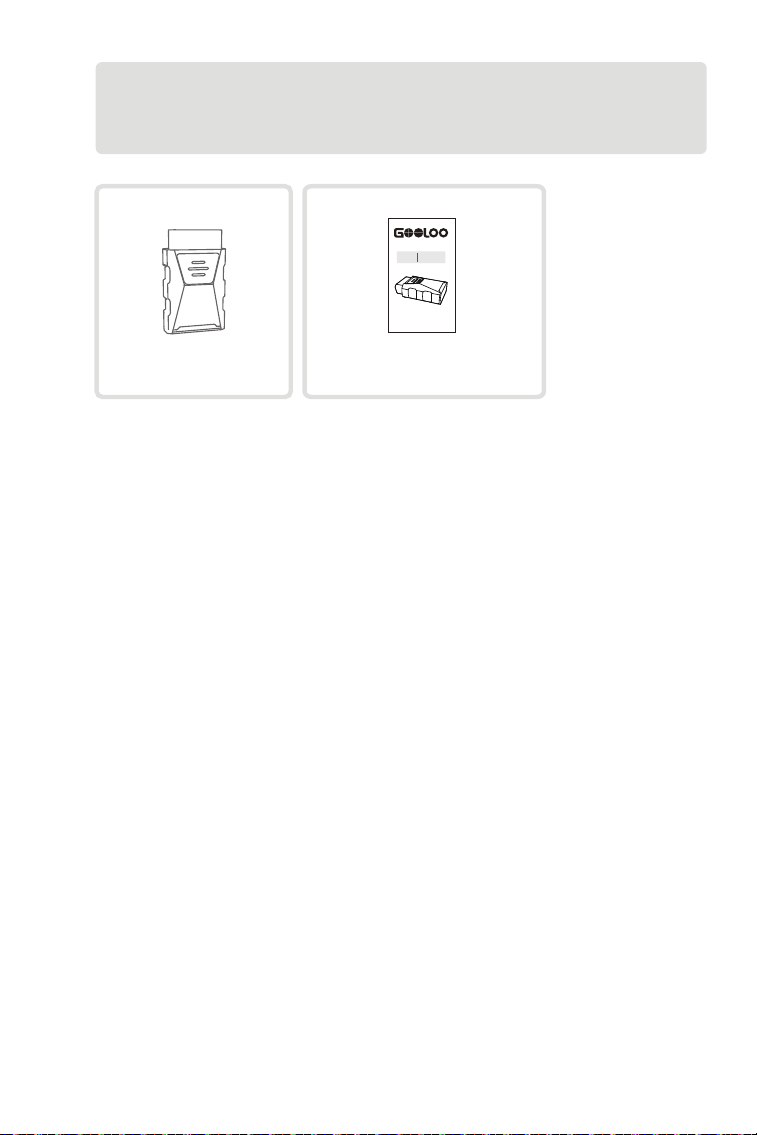
What's in the Box?
Quick Reference Guide
Always Good To Go
OBD II
DS200
SCANNER
6
Section 2
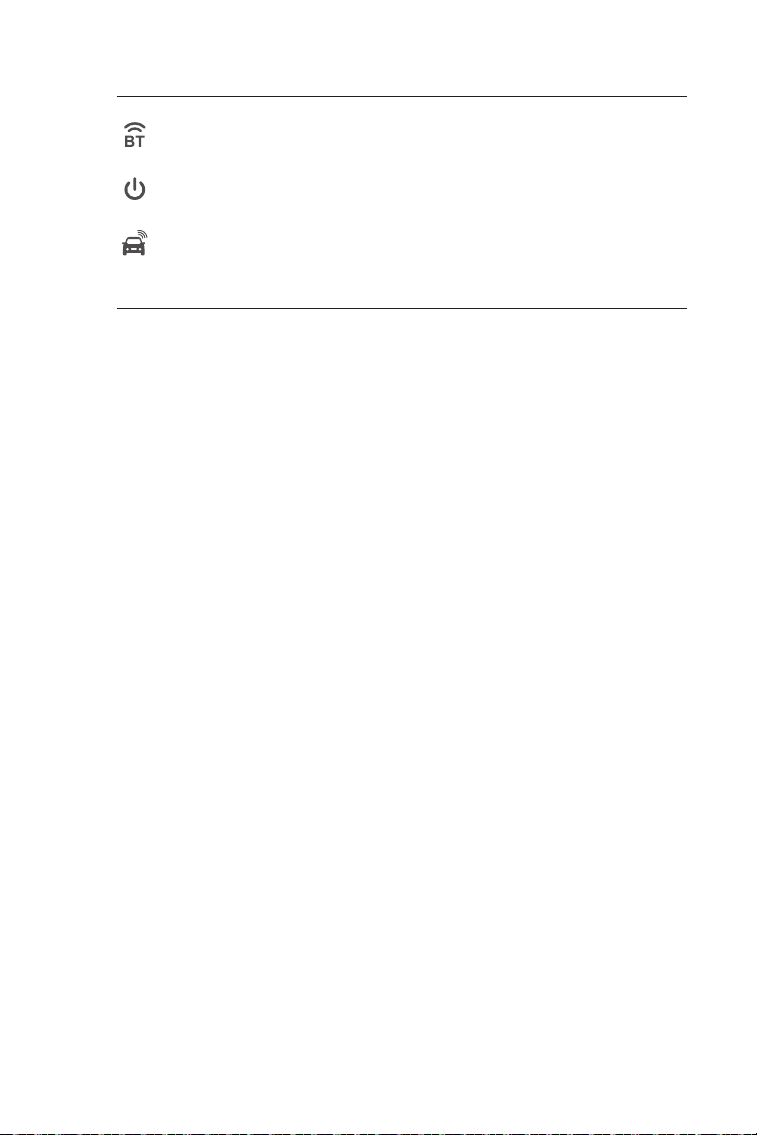
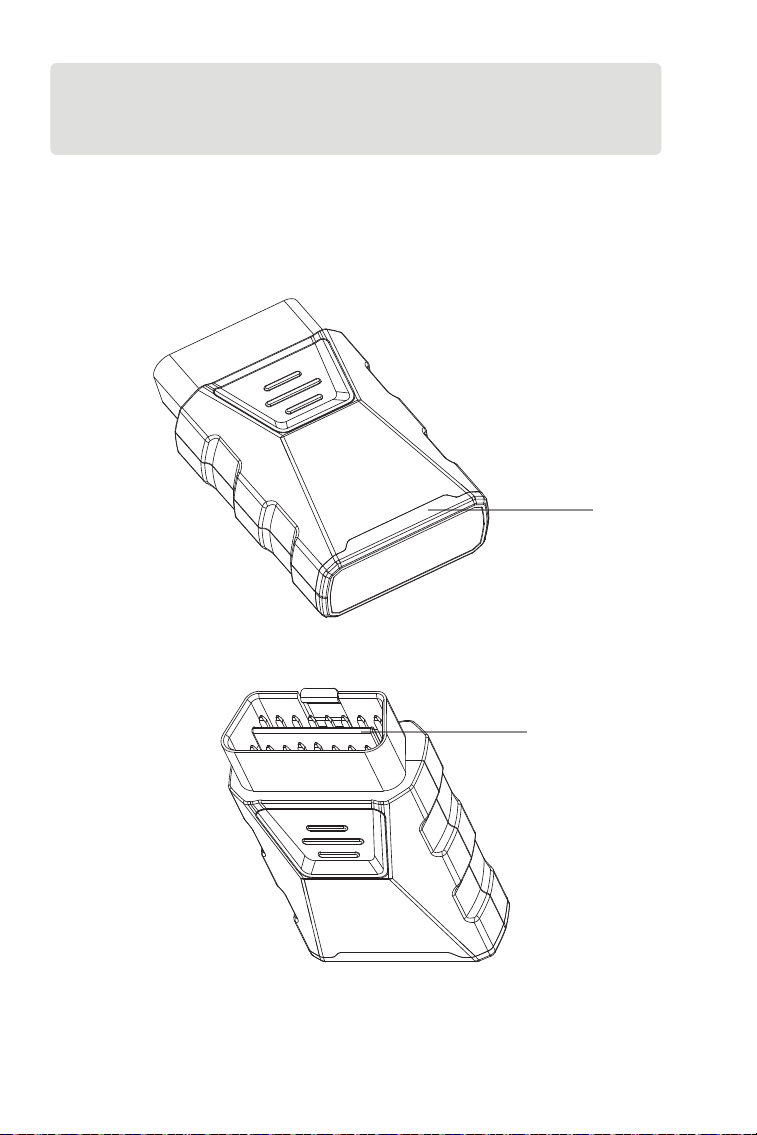
Product Overview
2
1
7
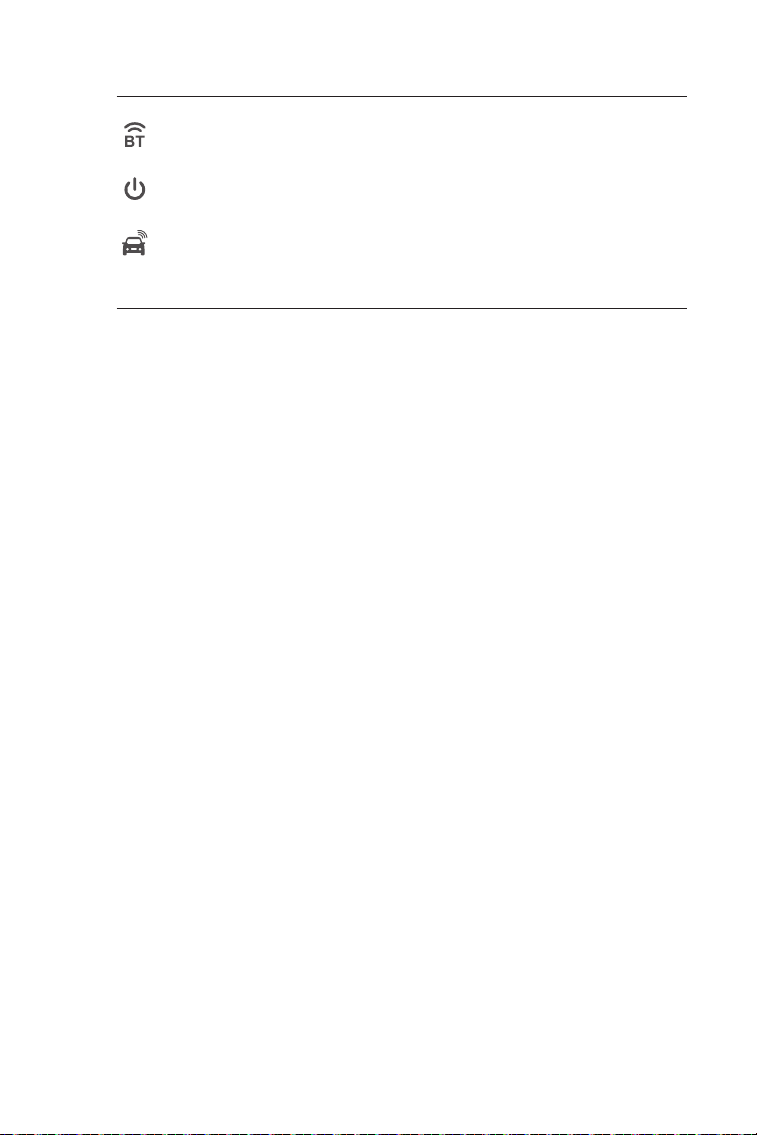
1. Indicators
2. OBD-II 16 Pin Connector
Connects the DS200 to vehicle's DLC.
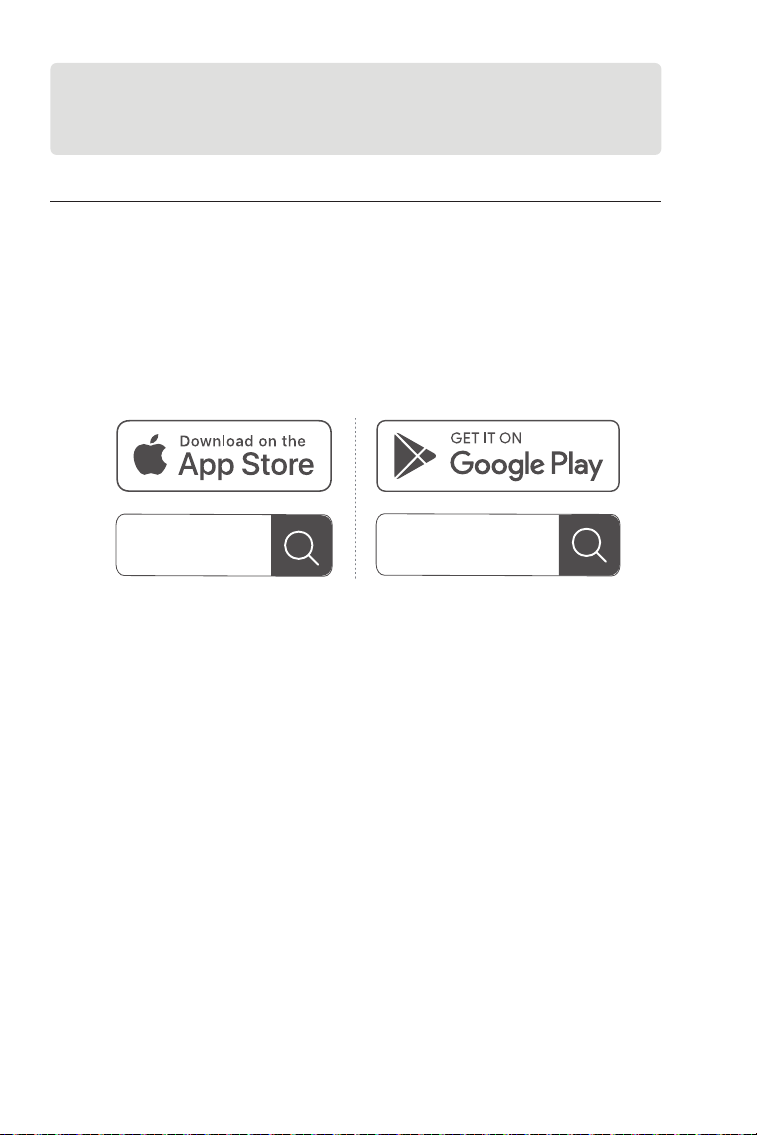
Solid Blue: Bluetooth
connected
Solid Green: power on
Flashing Blue:
communicating with the
vehicle
Bluetooth Connection
Indicator
Power Indicator
Communication
Indicator
8
Section 3
Getting Started
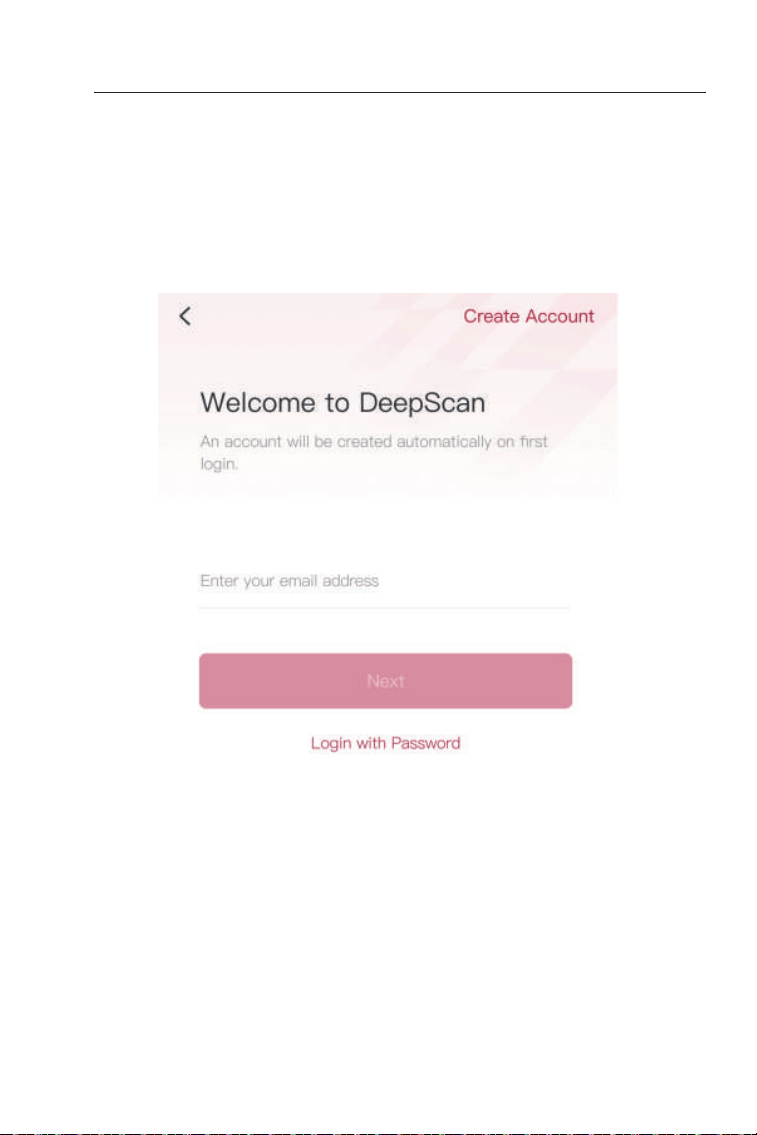
3.1 Download the App
Search for “DeepScan OBD2 Scanner” in the App Store or Google Play to
download and install.
Note:
This app is compatible with iOS 11.0 or later / Android 7.0 or later.
Figure 3-1
DeepScan OBD2
Scanner
DeepScan OBD2
Scanner
9
3.2 Register & Log In
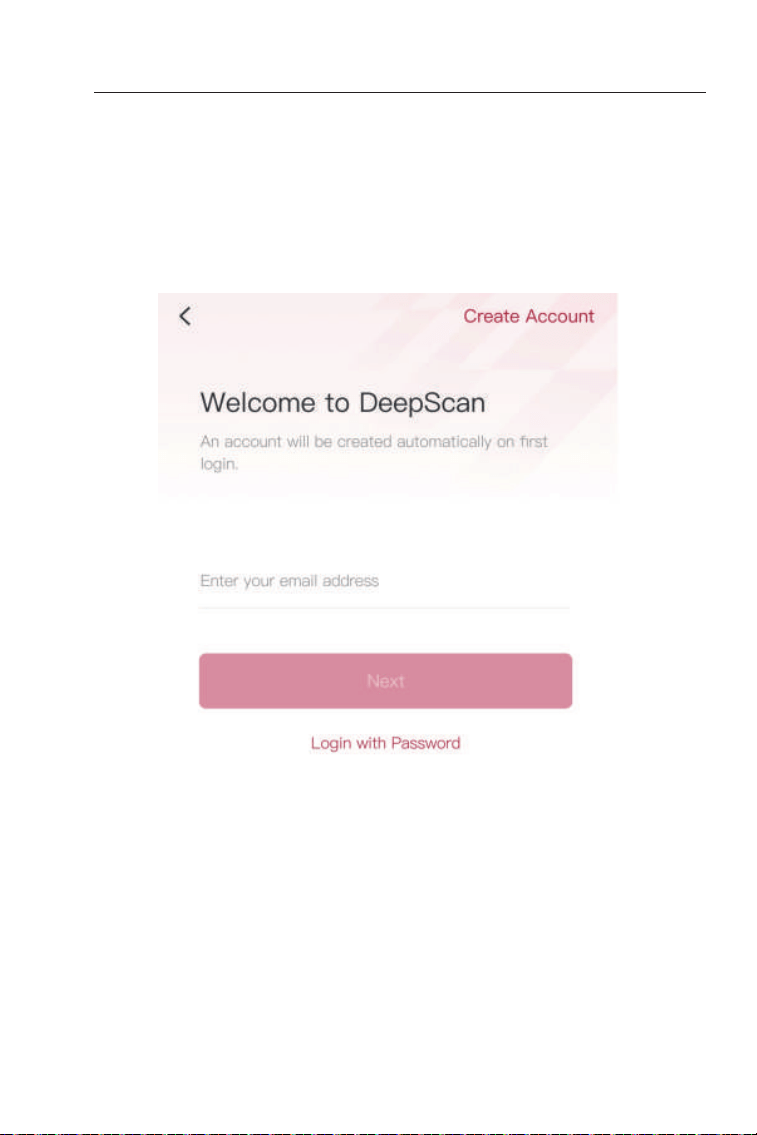
Open the app and log in to your account. (If you do not have an
account, please register with your email.)
Enable Wi-Fi, Bluetooth, camera, and location service for the app
access on your phone.
Figure 3-2
10
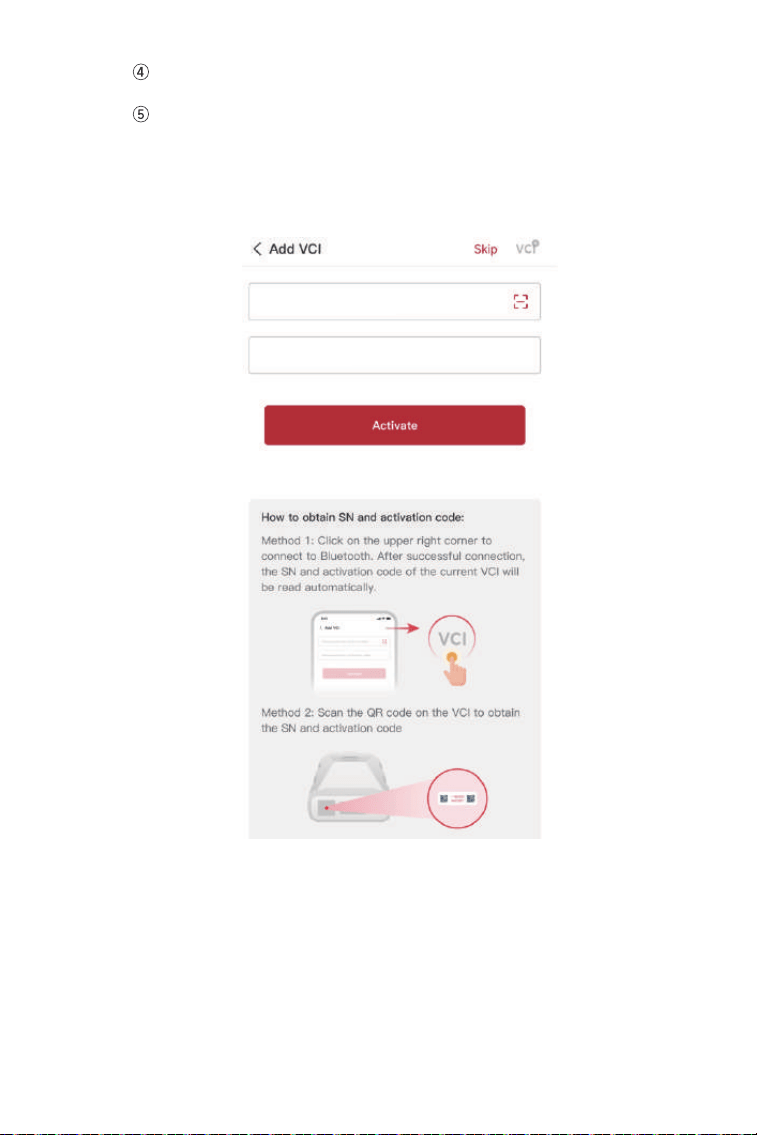
3.3 Bind the VCI
You will enter the guided interfaces of the App.
Then bind the VCI in one of the two following ways.
Figure 3-3
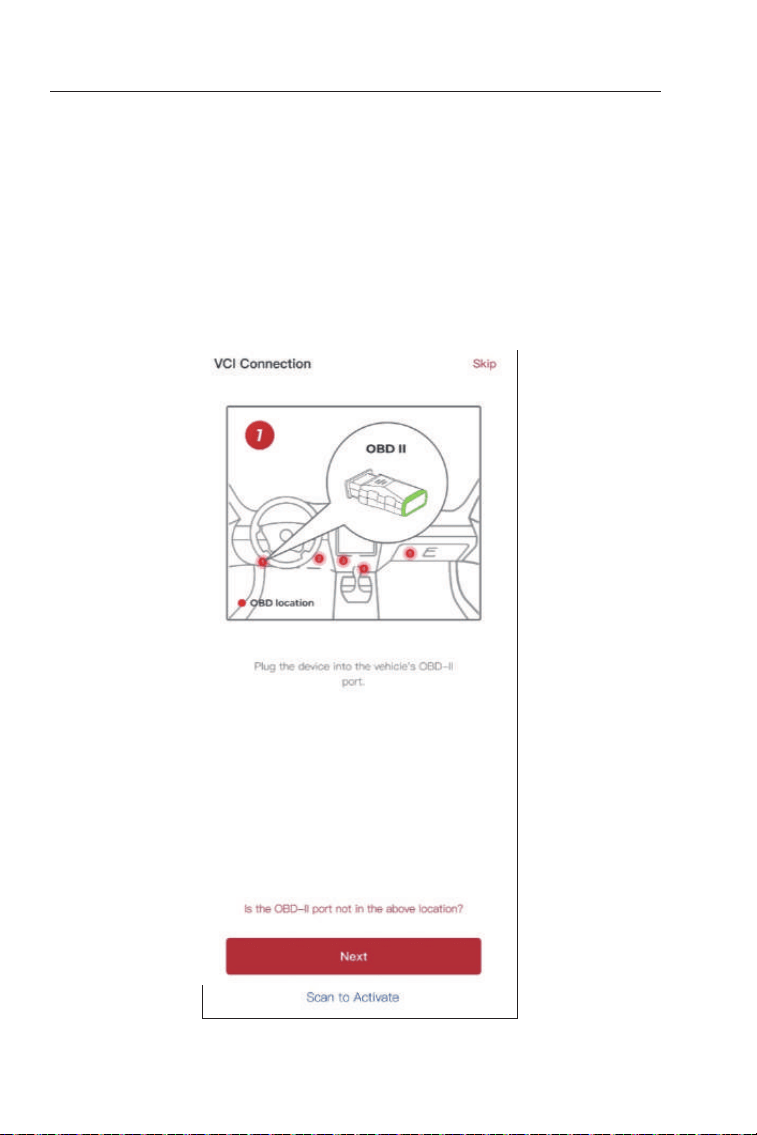
Tap Scan to Activate to activate the VCI (See Figure 3-3). The
serial number and activation code will be automatically obtained.
Then the app will jump to the home page. Proceed to step 3.6 to
continue.
3.3.1 Bind the VCI via Code Scanning
11
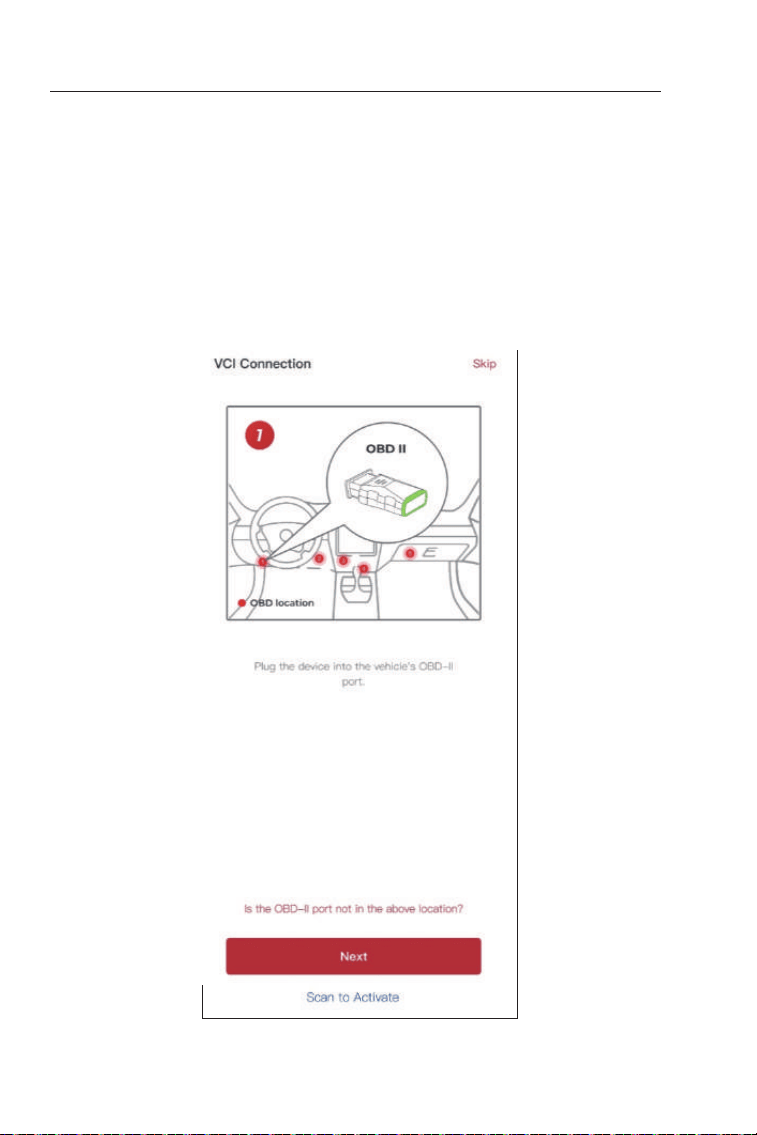
Figure 3-4
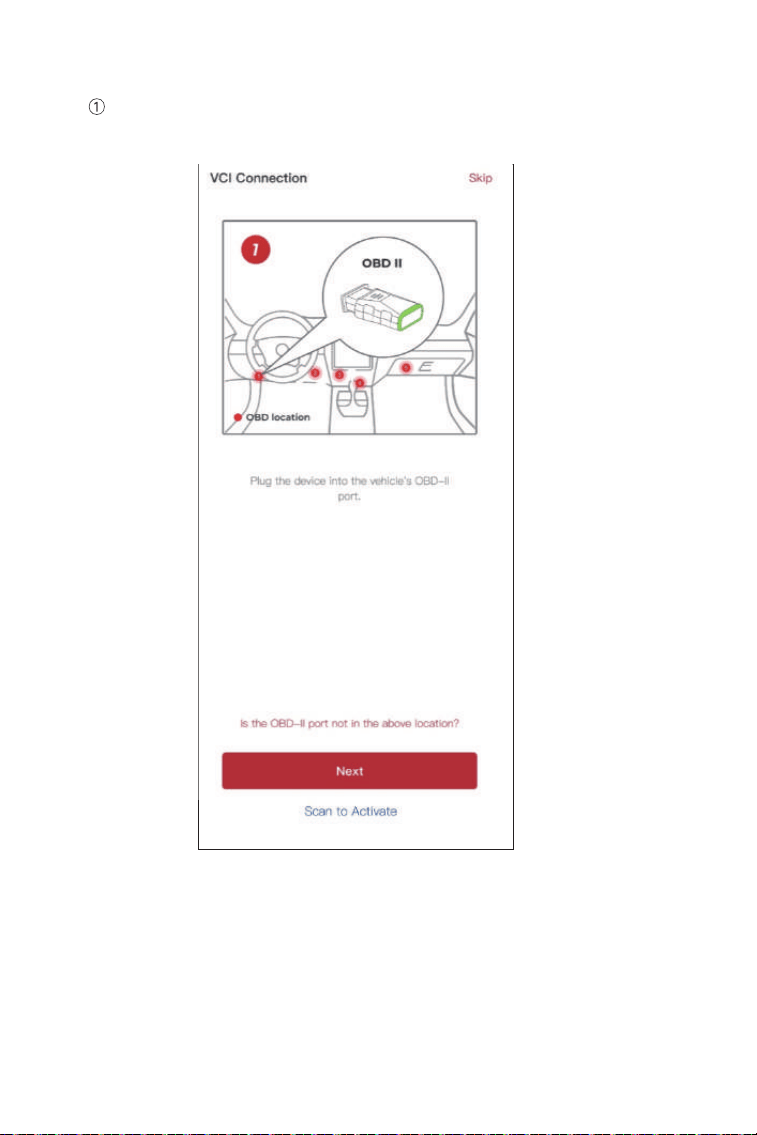
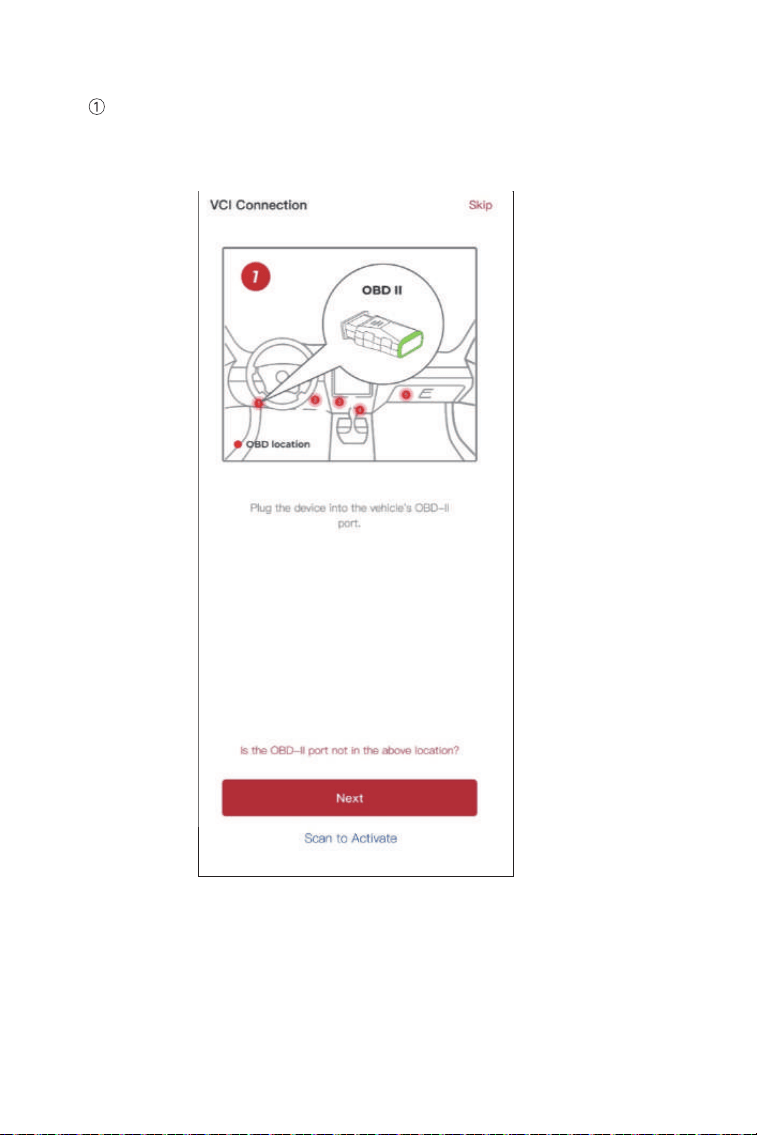
Follow the on-screen instructions to plug the DS200 into the
vehicle's DLC. Then tap Next (See Figure 3-4).
3.3.2 Bind the VCI via Bluetooth Connection
12
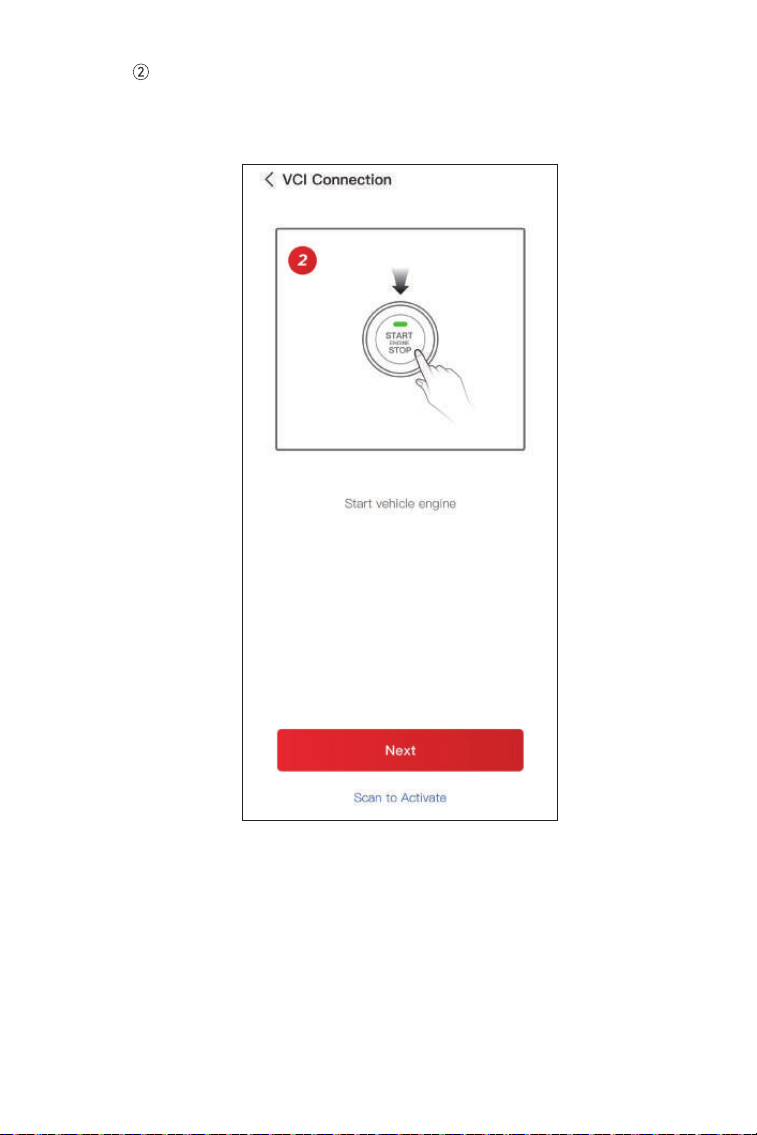
Figure 3-5
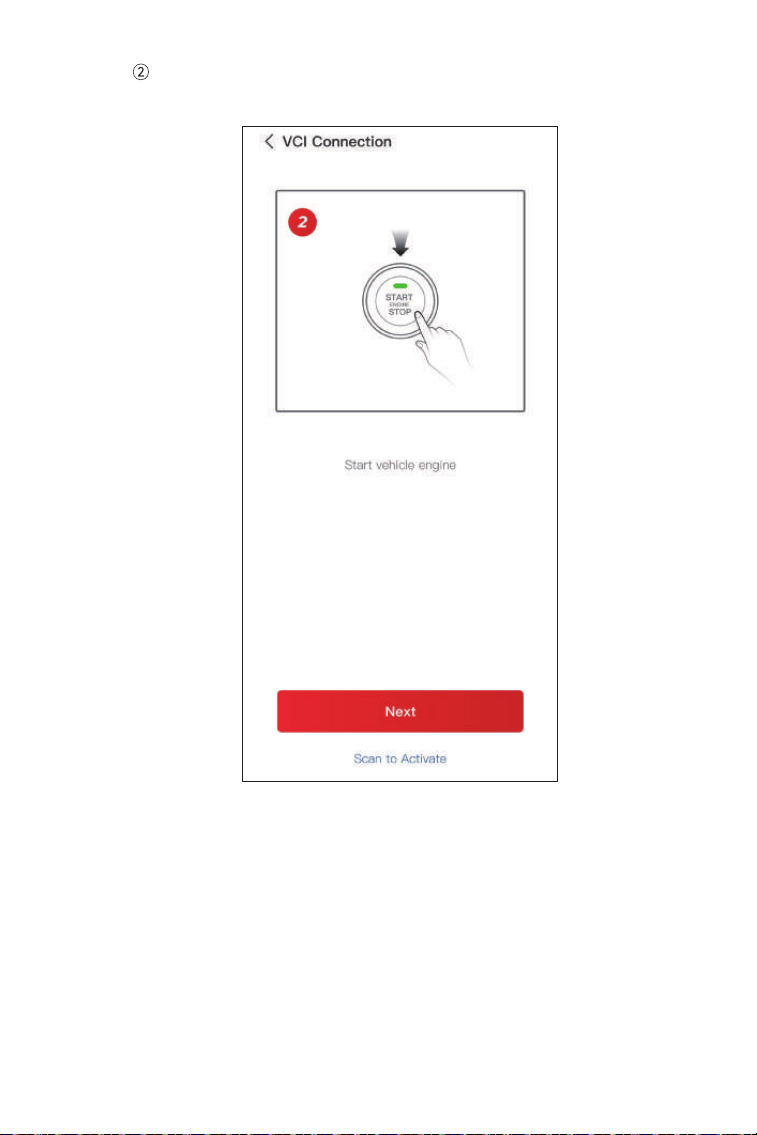
Start the engine of the vehicle as prompted on the guided
interface. Then tap Next (See Figure 3-5).
13
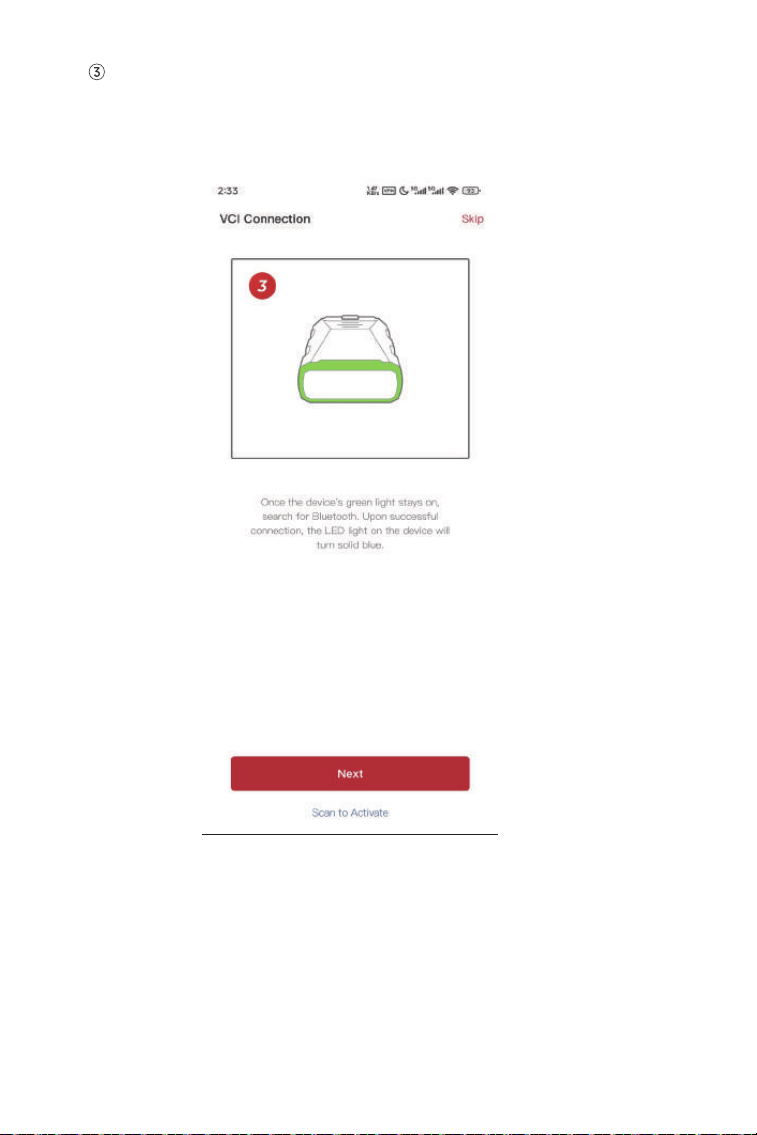
Figure 3-6
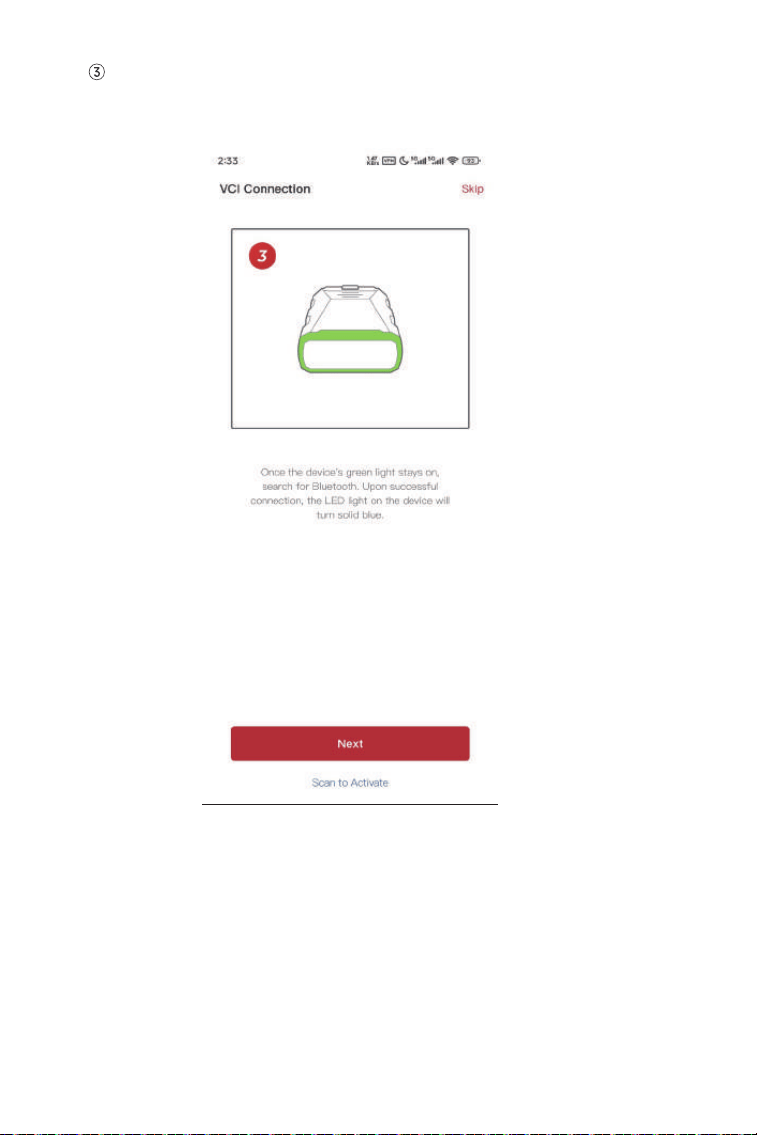
Make sure the LED light on the device is solid green and search for
Bluetooth. Once connected, the LED light on the device will turn
solid blue (See Figure 3-6).
14
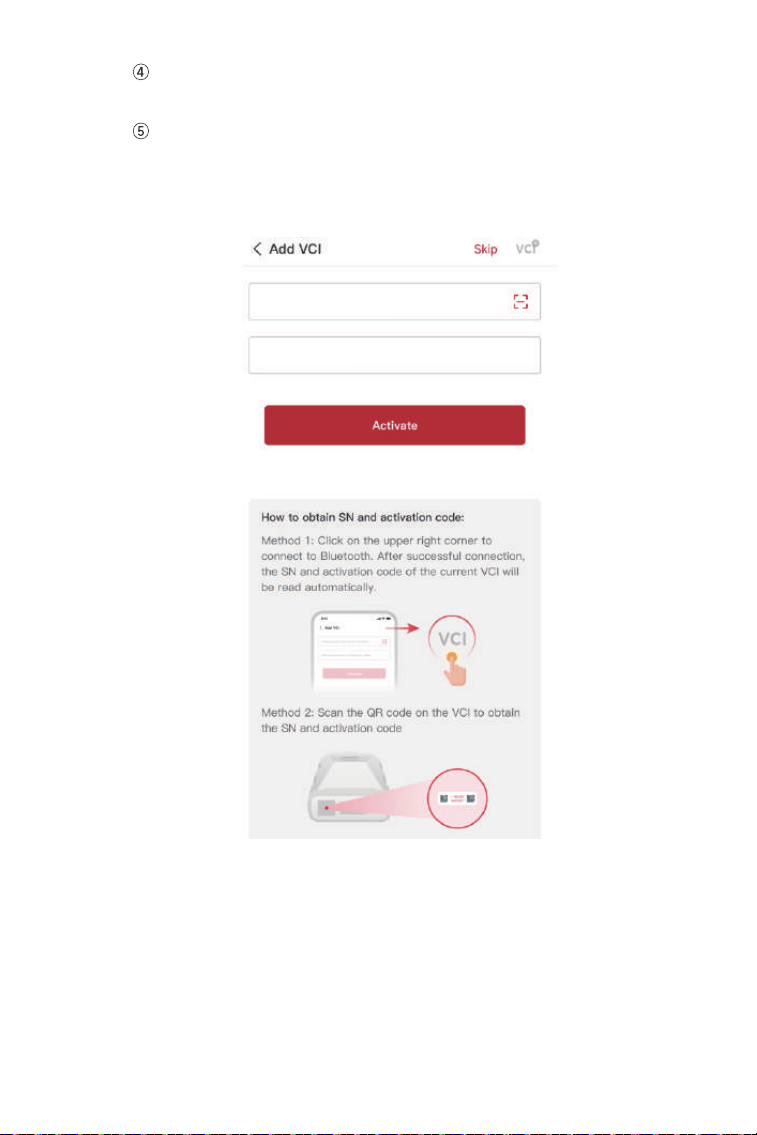
Figure 3-7
Select your device from the list of searched Bluetooth devices.
After successful Bluetooth connection, the SN and the activation
code of the VCI will be read automatically. Then tap Activate
(See Figure 3-7).
If you have not completed the VCI binding on the guided interface,
you can also follow the steps below to bind the VCI.
***********************
*******
15
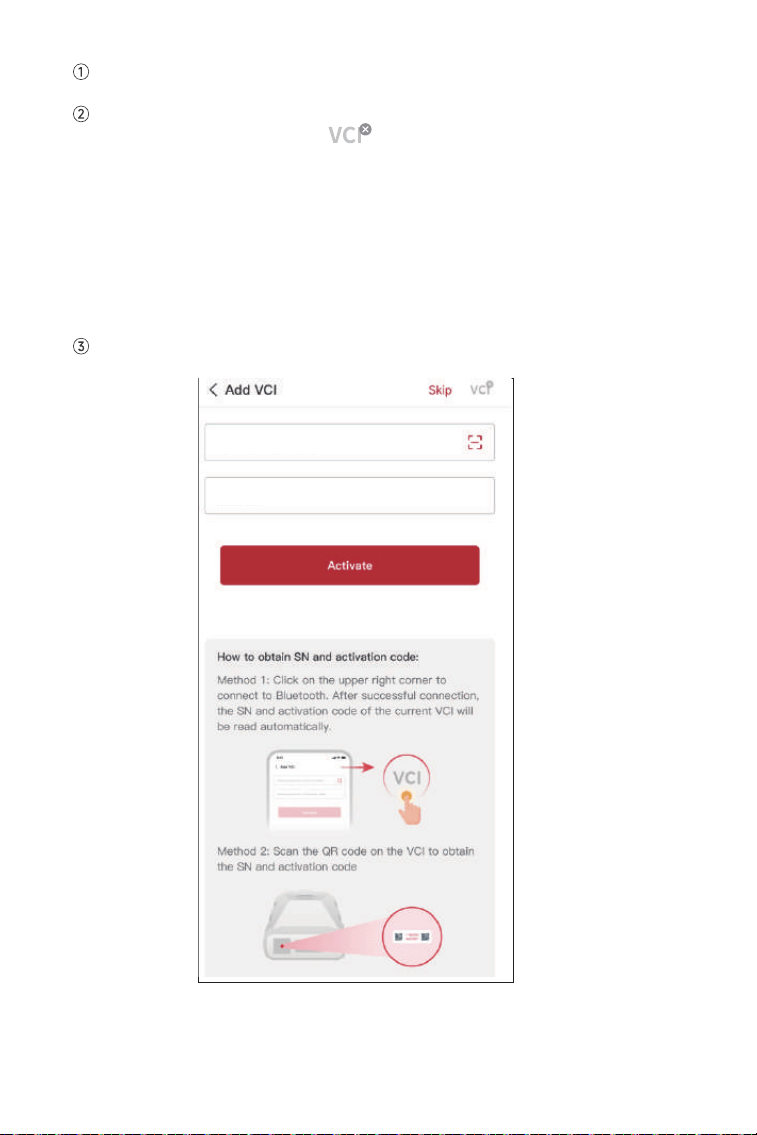
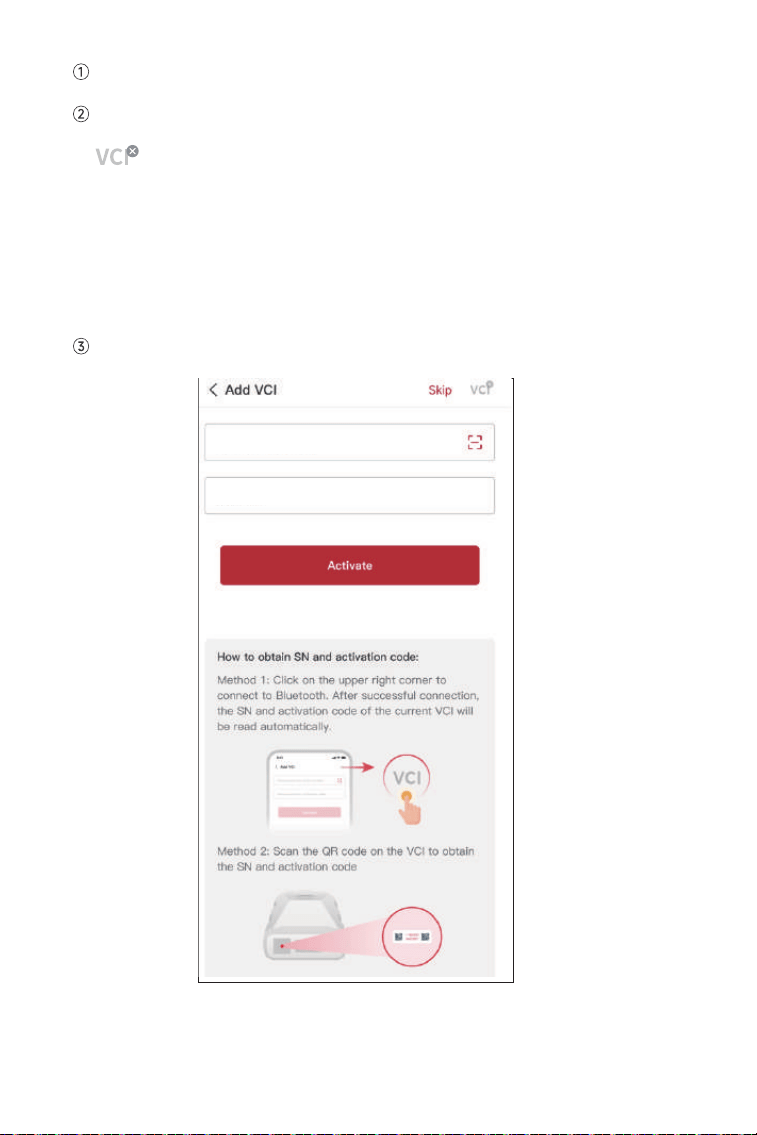
Tap Me > VCI Management > + .
To get the serial number and activation code, please scan the QR code on the
product. Alternatively, tap the icon at the top right of the activation
screen to establish a Bluetooth connection (see Figure 3-8). Once the Bluetooth
connection between the DS200 and your phone is established, the serial
number and activation code will be automatically obtained.)
Note:
The DS200 should be properly plugged into the vehicle's DLC before Bluetooth
can be connected.
Then, tap Activate.
Figure 3-8
***********************
*******
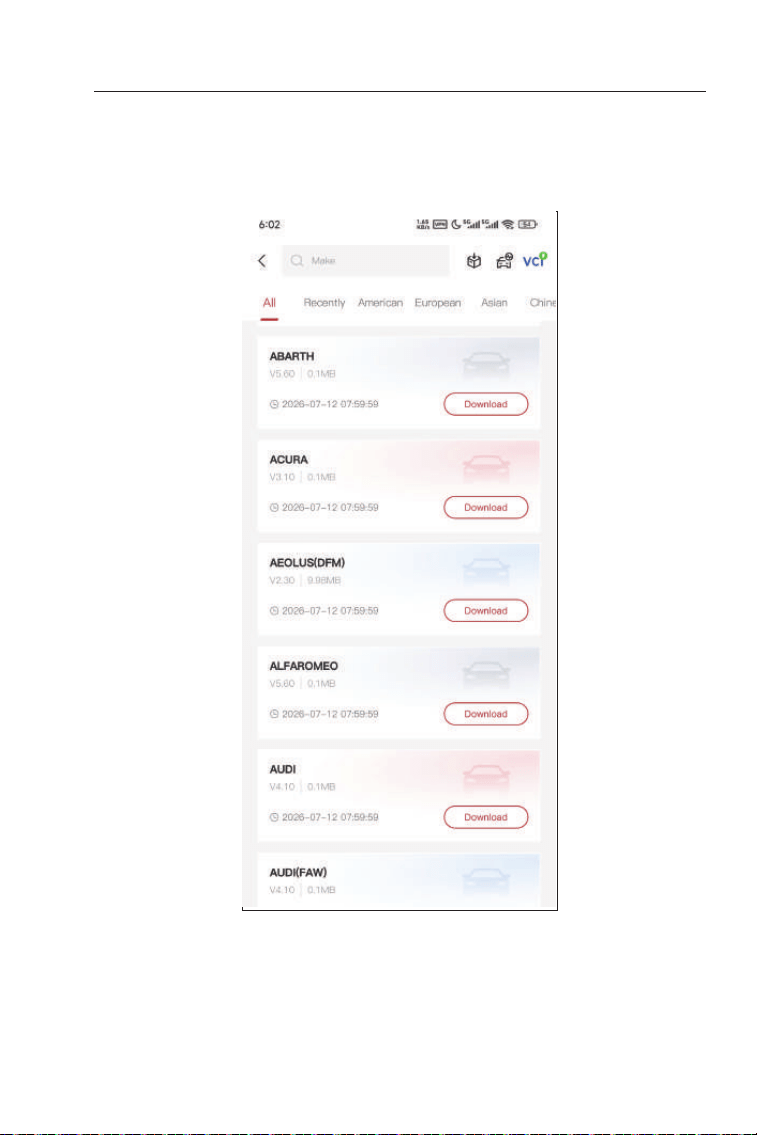
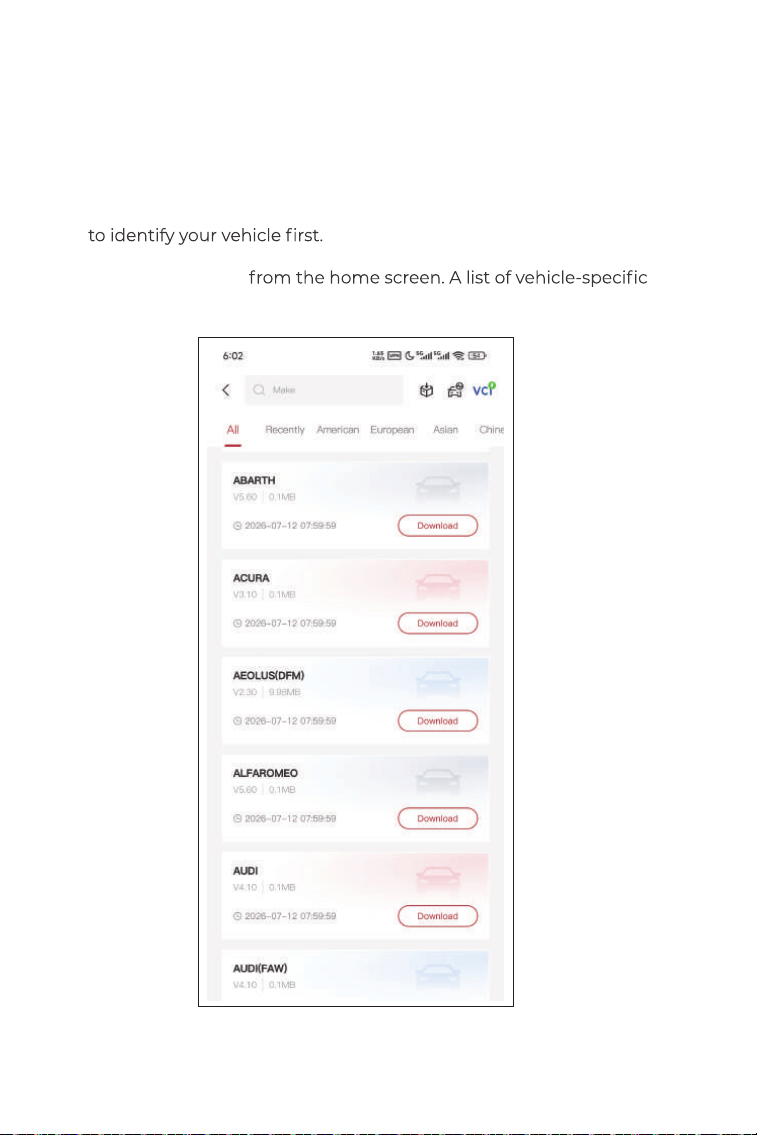
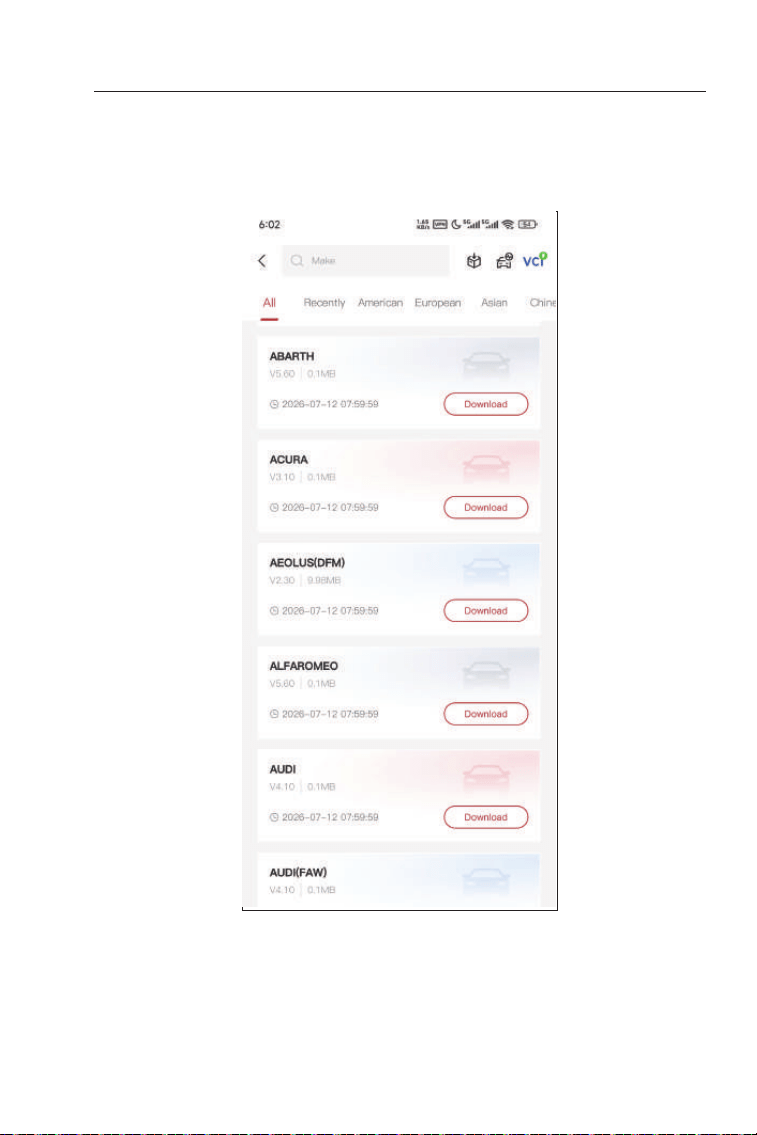
You will need to download the vehicle-specifc software the frst time you use
the diagnostic function. Tap Diagnostics from the home screen and
download the software you need.
16
3.4 Download the Diagnostic Software
Figure 3-9
17
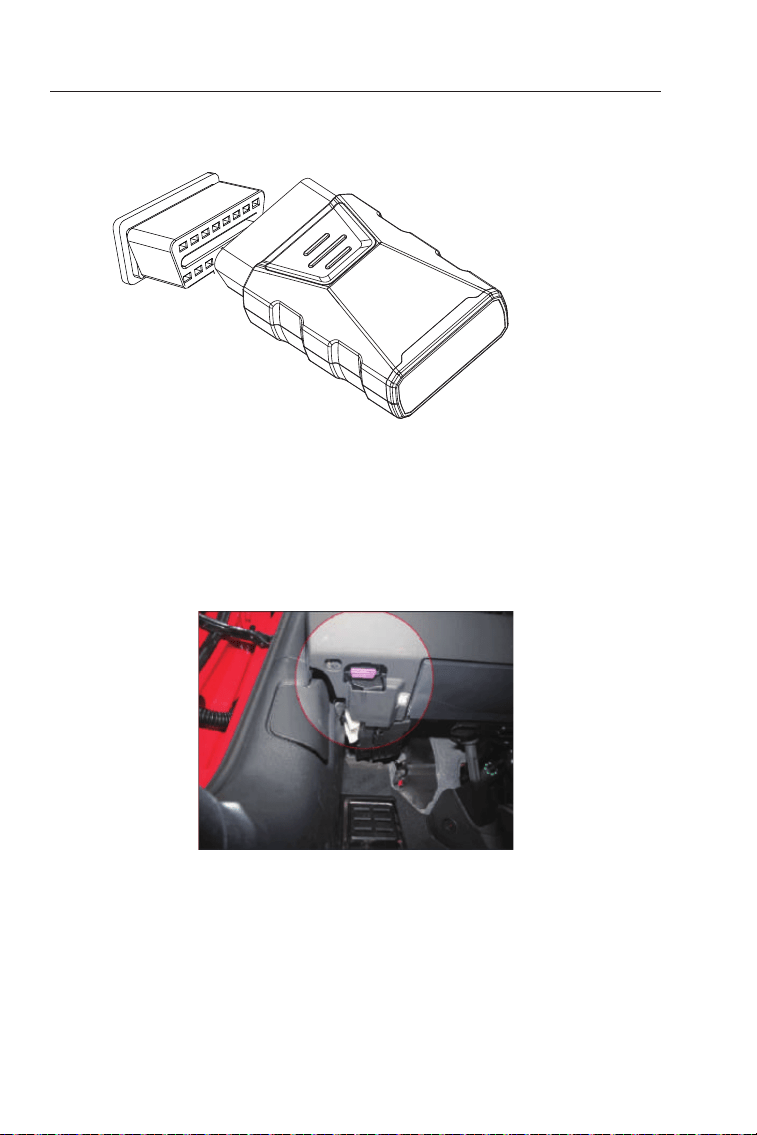
3.5 Plug the DS200 into the Vehicle's DLC
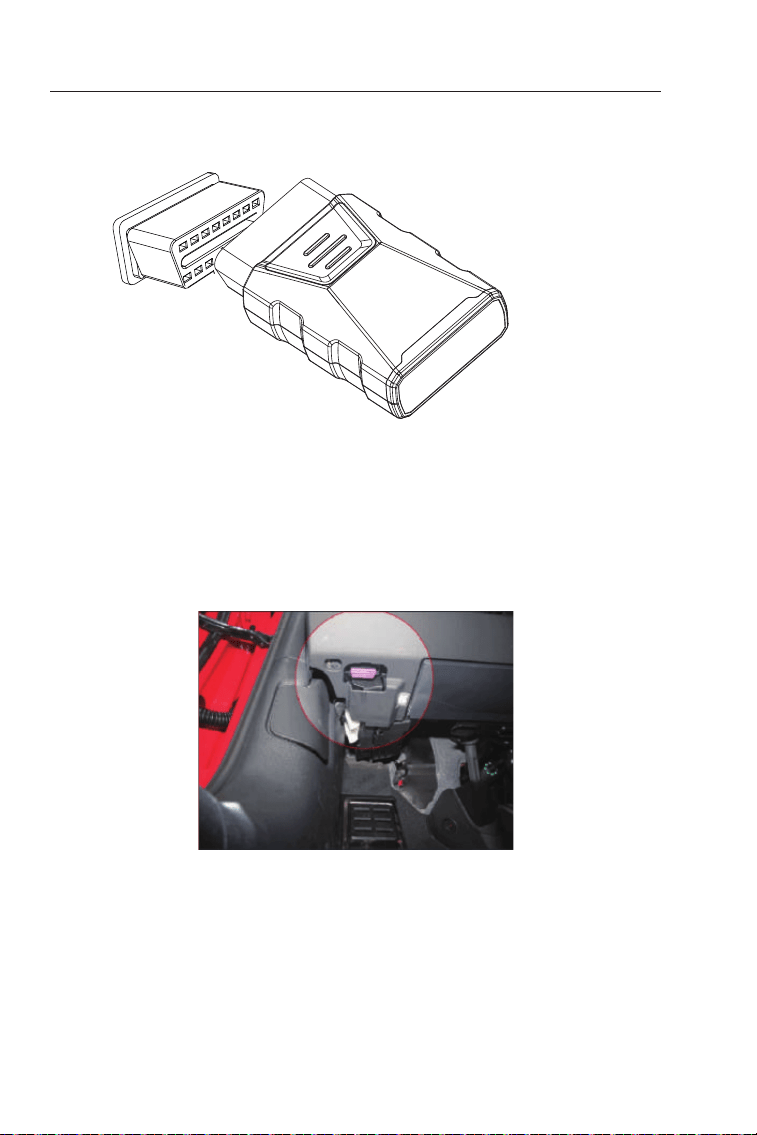
To locate the vehicle's DLC, tap Repair Information > DLC Location, select vehicle
make, model and year, and tap Next. A picture of DLC location for the selected
vehicle will display.
,
Note:
Make sure the ignition is OFF before plugging in the unit.
Figure 3-10
Figure 3-11
18
Note:
Update to continue.
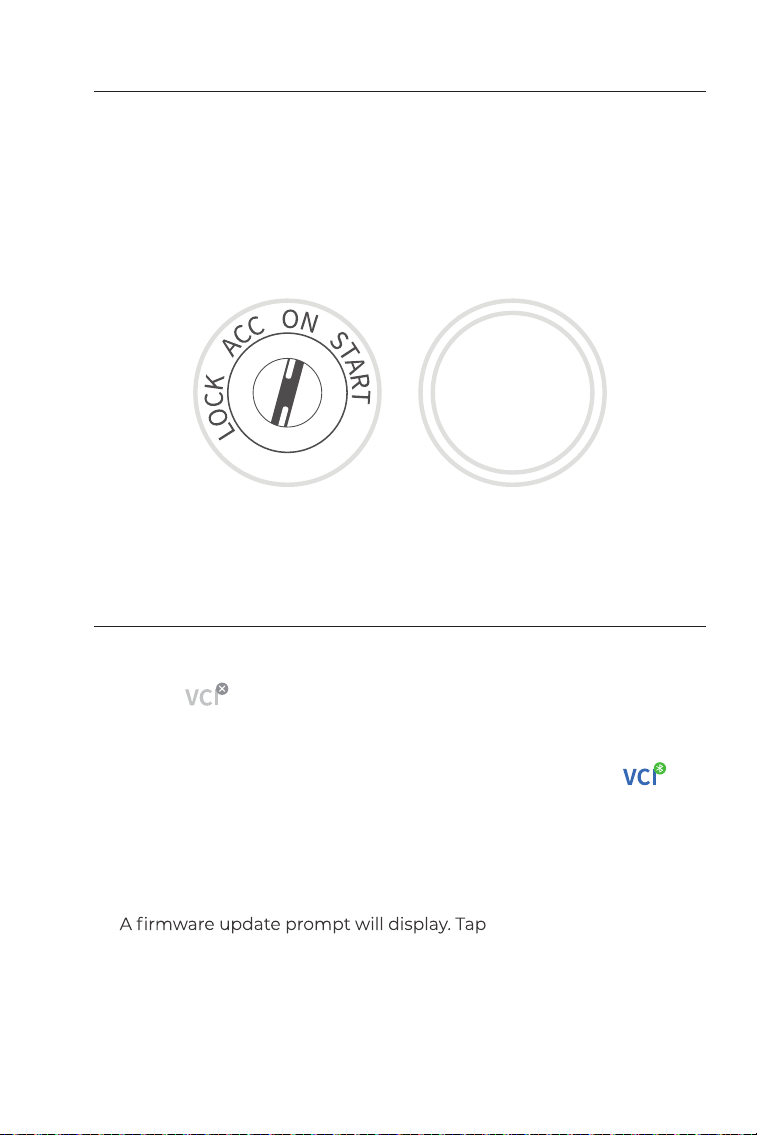
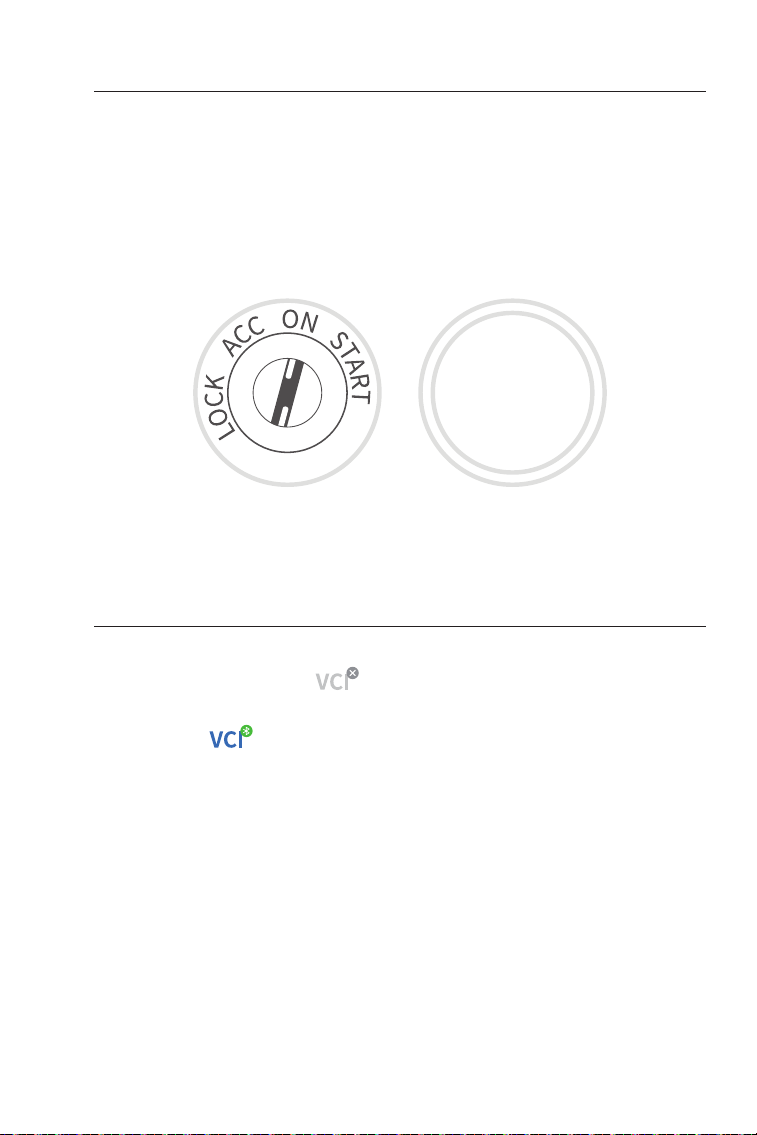
3.6 Turn the Ignition to the "ON" Position (see Figure 3-12)
3.7 Bluetooth Connection
If your vehicle is equipped with a keyless start system and the
ignition switch is an "Engine Start Stop" button (see Figure 3-13),
press the "Engine Start Stop" button until the car is in "ON" mode. Do
not apply the brake while pressing the "Engine Start Stop" button or
you will start the car instead of putting it in the "ON" position.
The method of ignition varies by vehicle model. Refer to the vehicle's
service manual for details.
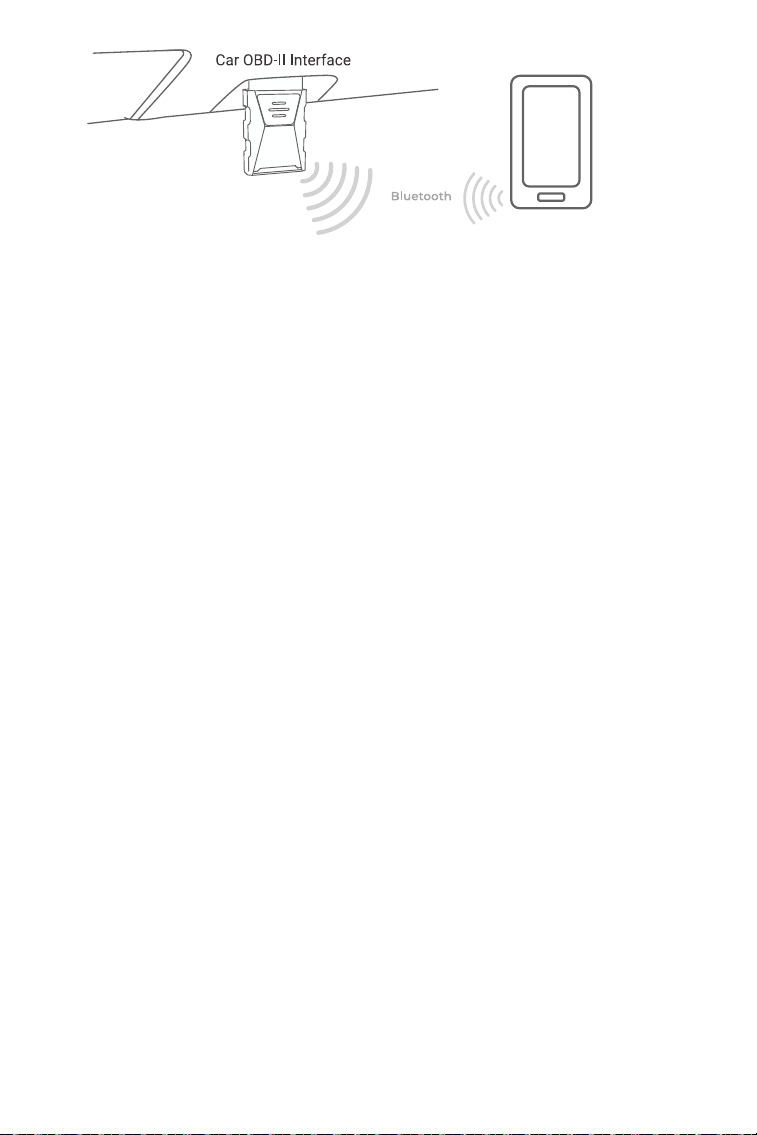
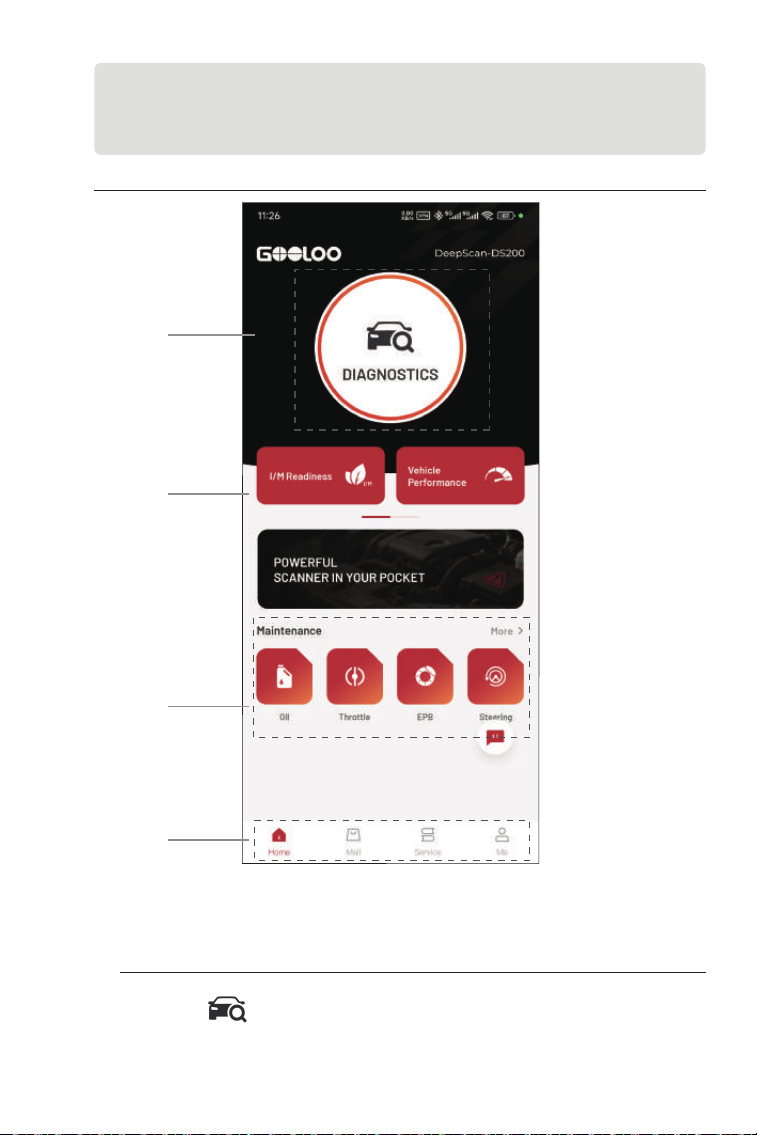
Select your device from the list of searched Bluetooth devices.
Tap the icon at the top right of any screen with this icon to
establish Bluetooth connection with the DS200
unit. After the
connection is successfully established, the icon changes to .
Once Bluetooth is successfully paired, the connection will be
automatically established when you open the app. If not connected,
manually tap the icon to reconnect.
ENGINE
START
STOP
Figure 3-12 Figure 3-13
19
Figure 3-14
20
Figure 4-1
Section 4
Using the DS200 via the App
4.1 Home Screen
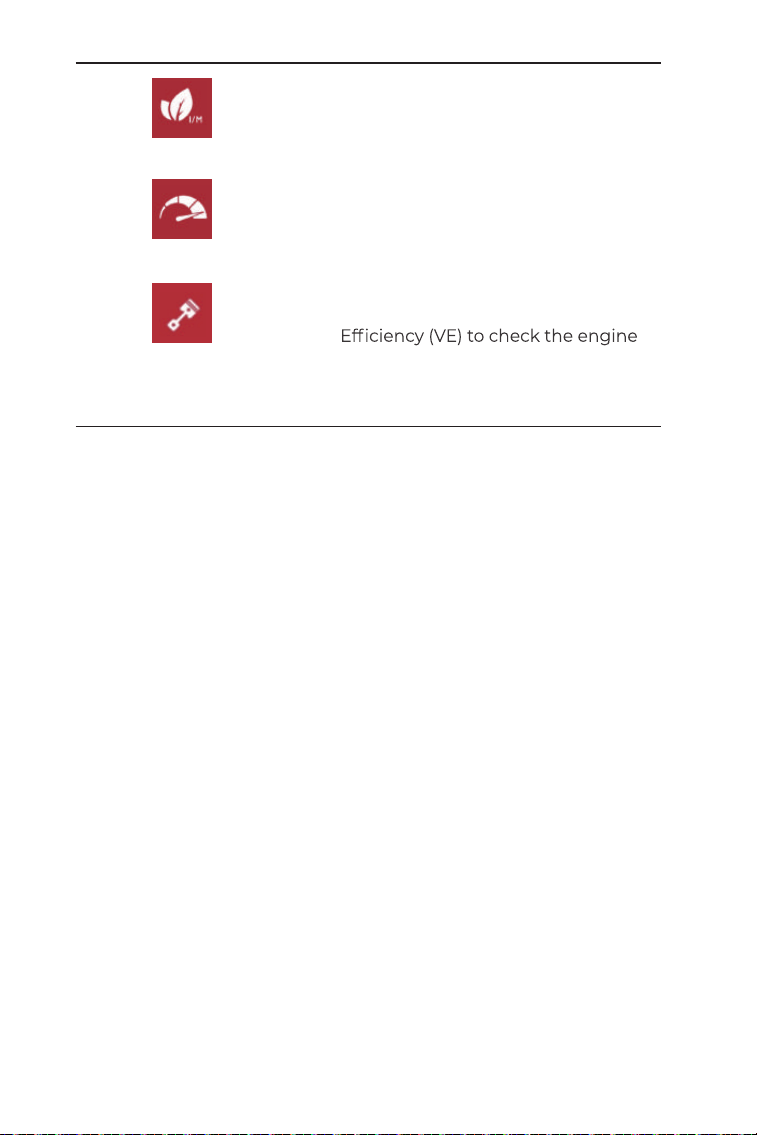
1
2
4
3
1. Main Functions
Swipe right or left to move through the functions.
Configures the DS200 to
operate as a scan tool.
Diagnostics
21
2. Maintenance Service Functions
Provides 8 maintenance service functions.
Provides quick access to check
the status of the emission-related
systems.
Allows you to perform acceleration
tests on your vehicle.
Allows you to calculate Volumetric
performance.
I/M Readiness
Vehicle Performance
VE Calculator
Selecting this icon returns you to the
home screen.
Allows you to purchase or renew diagnostic
software license. For DS200, single purchase
for a year and subscriptions (monthly,
quarterly, annual) are available.
Includes DTC Repair Guide, Technical Service
Bulletins, DLC Location and Warning Light
Library, which provides reference information
on vehicle inspection, diagnostics, and repair.
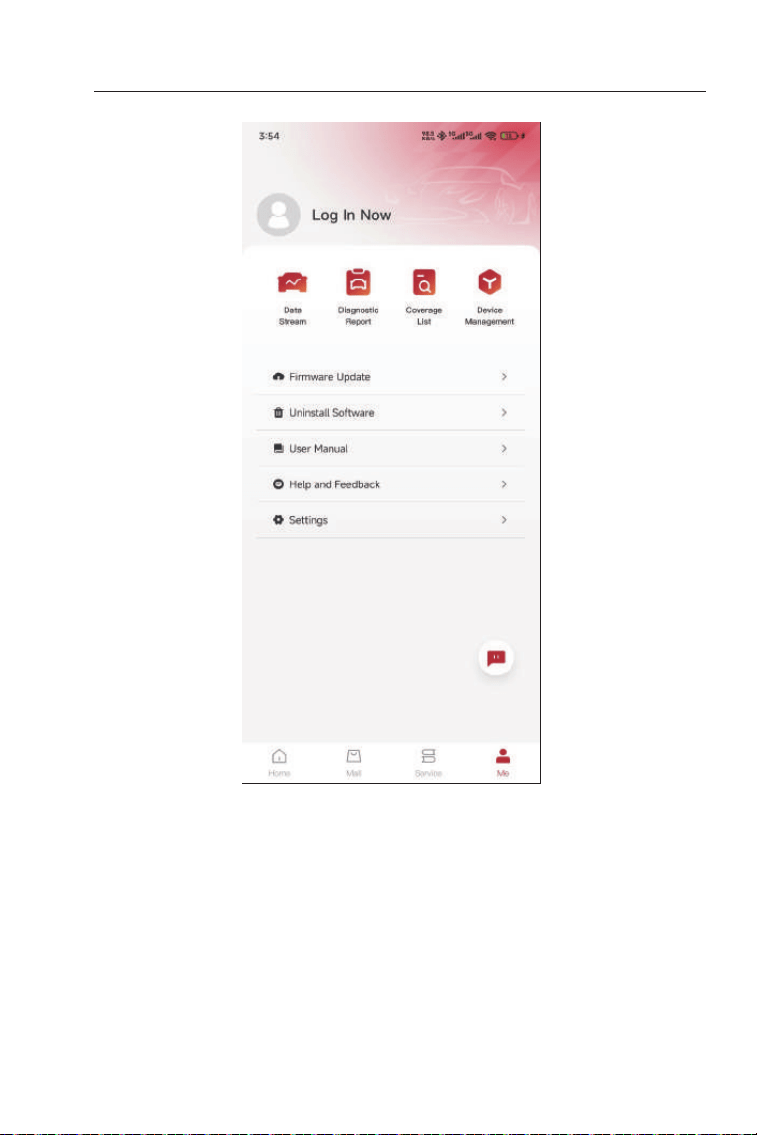
Allows you to view your account profile,
access saved data streams and diagnostic
reports, check vehicle coverage, manage
VCIs, update firmware, uninstall diagnostic
software, open the user manual, submit
feedback, and adjust system settings.
22
3. Toolbar
Home
Mall
Me
Service
Note:
app to open the on-line chat tool. Then tap START CHAT to
to move it anywhere.
4. Diagnostics
The Diagnostics module allows you to scan all supported vehicle
systems at one time (Auto Scan) for Diagnostic Trouble Codes (DTCs)
or select an individual system to perform Read Trouble Code, Clear
Trouble Code, Read Data Stream, Read Version Information and
23
Figure 4-2
To perform Auto Scan or Individual System Diagnostics, you need
1. Tap Diagnostics
diagnostic software will display.
4.1 Auto Scan and Individual System Diagnostics
Identifying the Vehicle
Active Test. You can also access EOBD and Diagnostic Feedback
through this module.
24
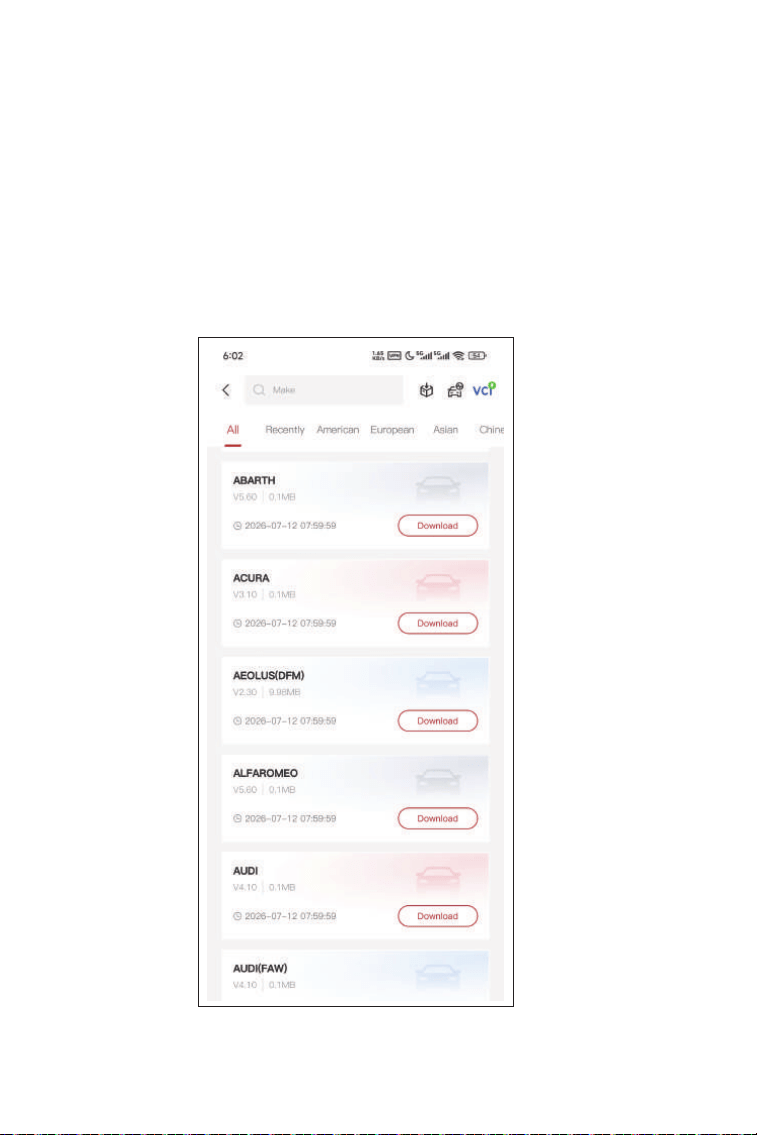
2. Select the software by your vehicle make (If you have not
downloaded the software, please download and install the software
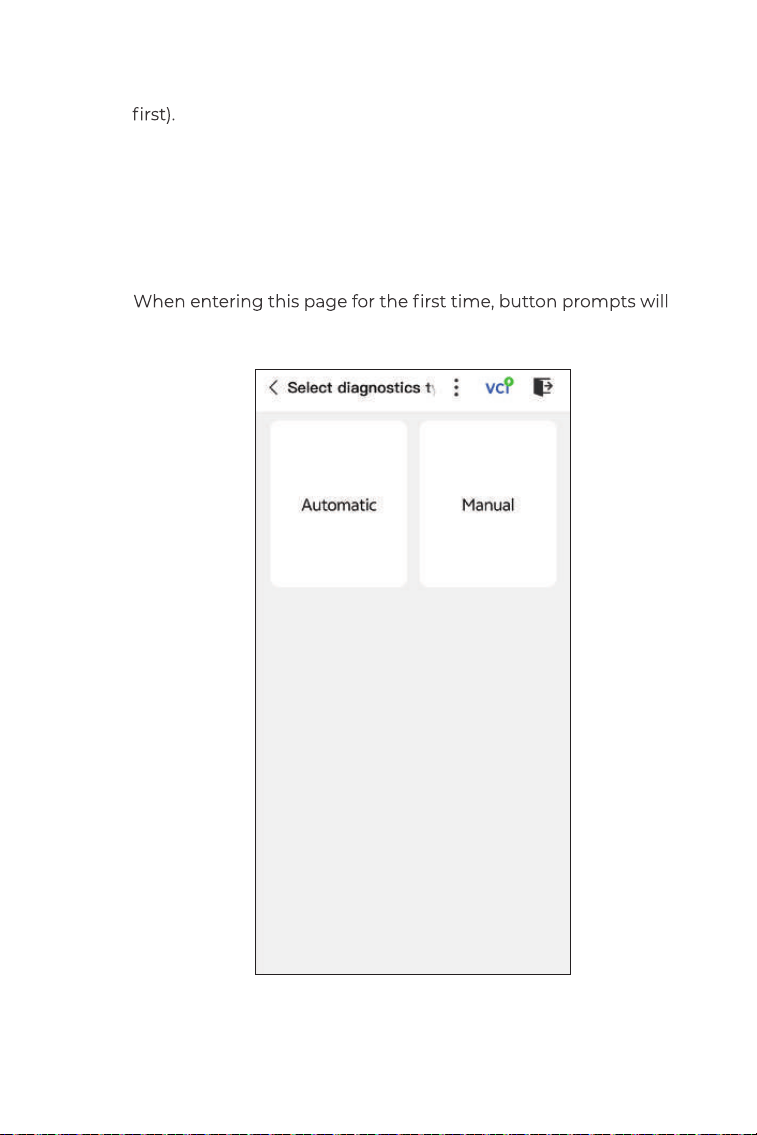
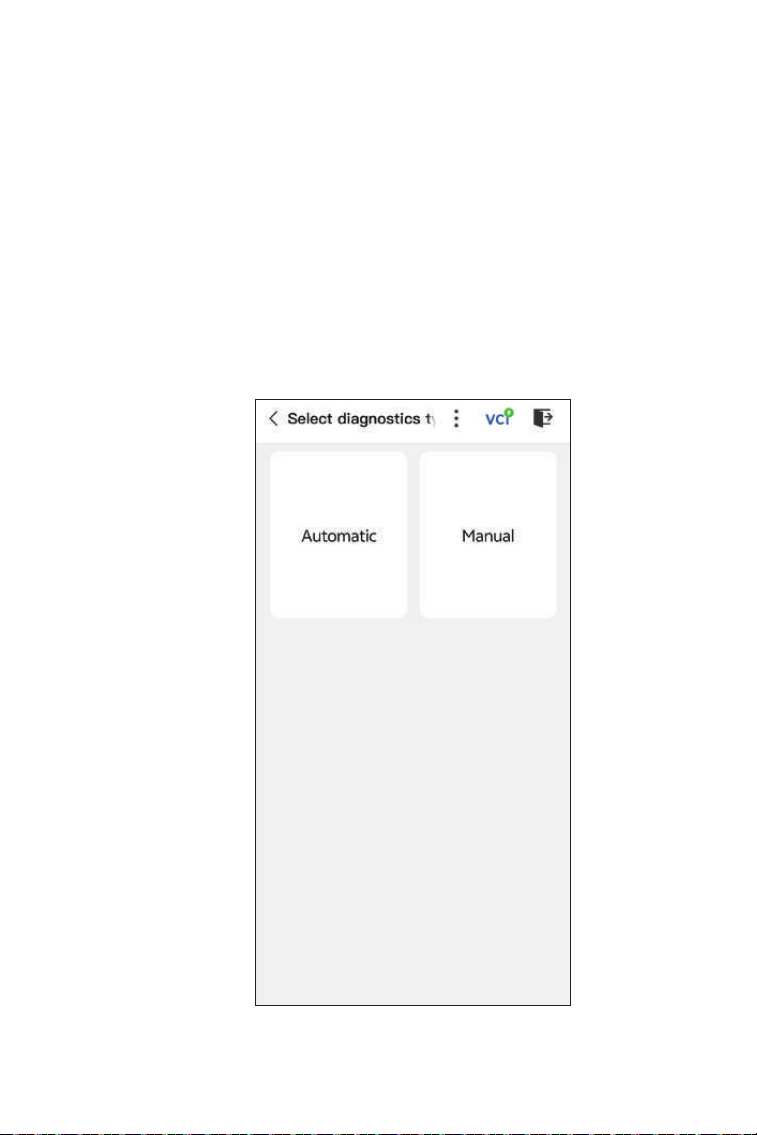
3. Select Automatic / Manual to identify the vehicle.
Note:
A demonstration mode (DEMO option) is provided to help you
become familiar with Diagnostics functions.
Note:
appear in the upper right corner of the page. Tap Next to continue.
Figure 4-3
25
Automatic
Read to
acquire VIN, then tap
. DS200 will automatically decode
the VIN to identify the vehicle.
Manual
Manually select the vehicle information to identify the vehicle.
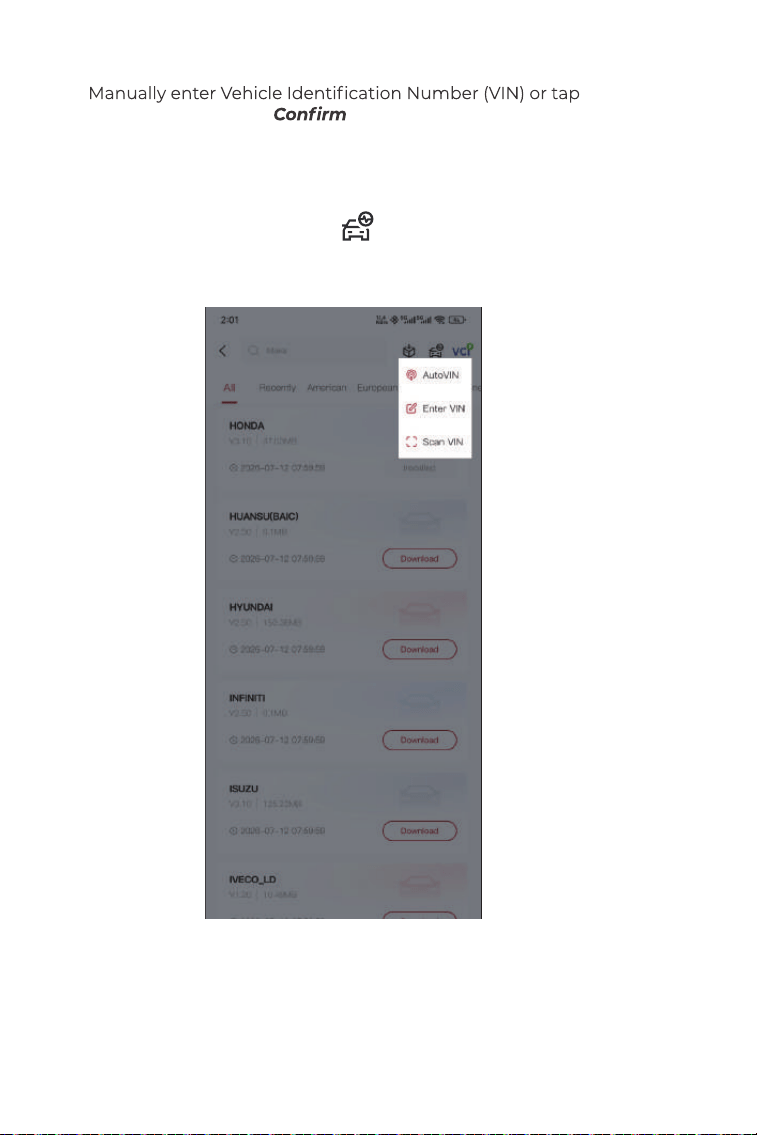
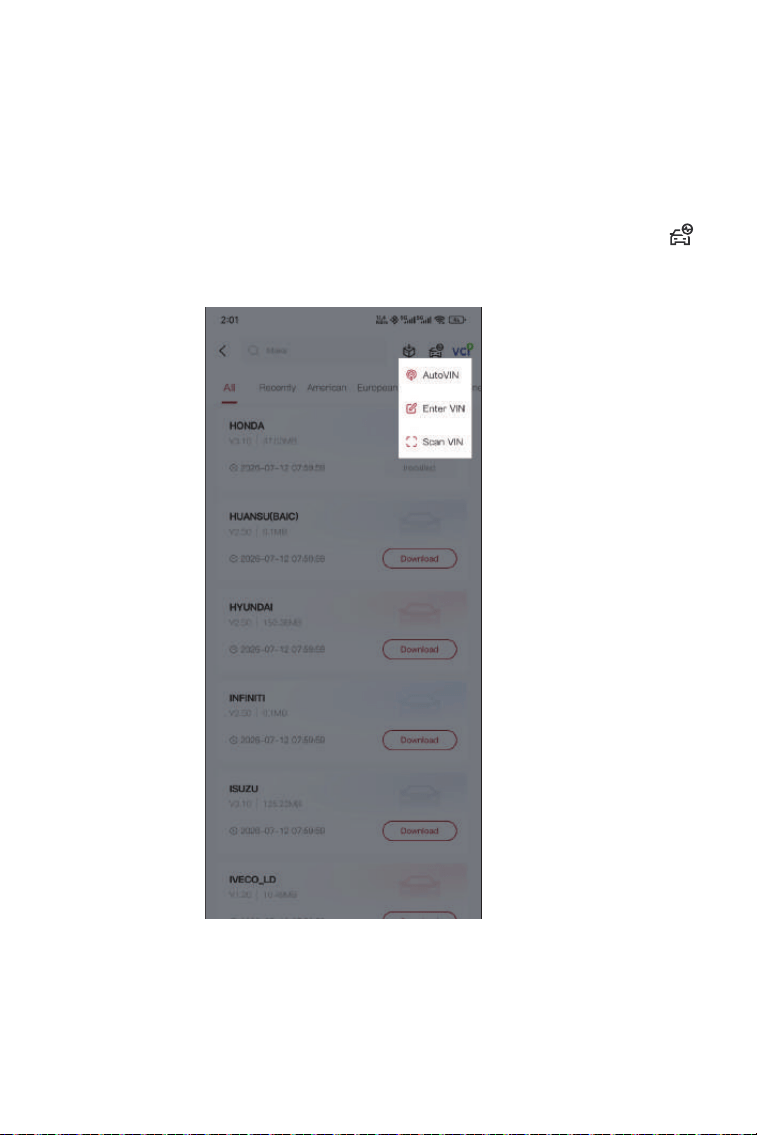
Alternatively, you can tap the icon at the top right of the
screen and select AutoVIN, Enter VIN or Scan VIN to identify the
vehicle.
Figure 4-4
26
AutoVIN - The DS200 automatically reads and decodes the VIN.
Enter VIN - manually enter the VIN.
Scan VIN - tap to scan the VIN characters.
Figure 4-5
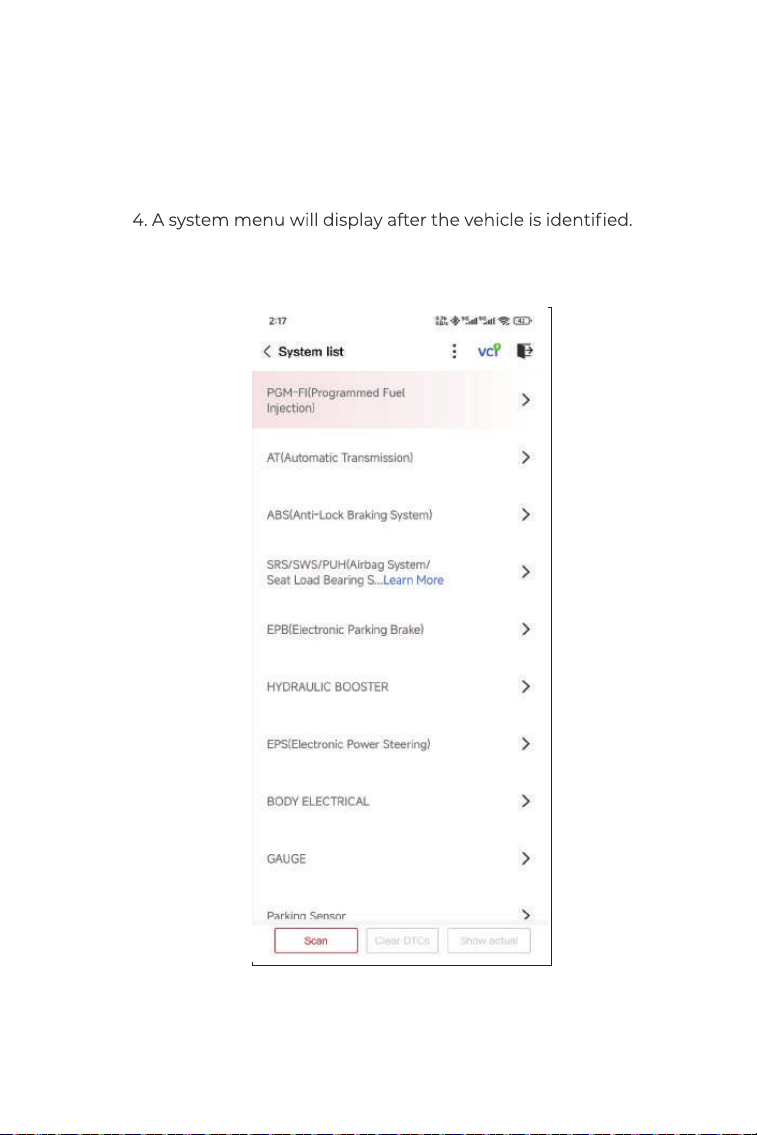
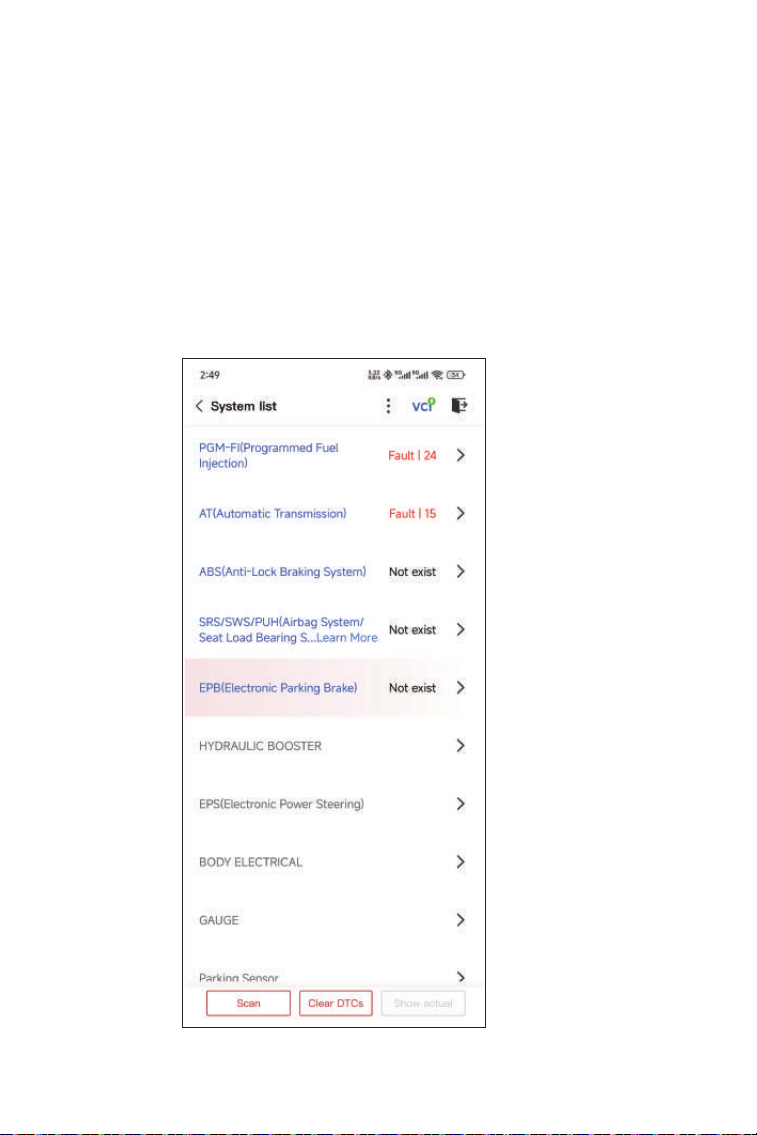
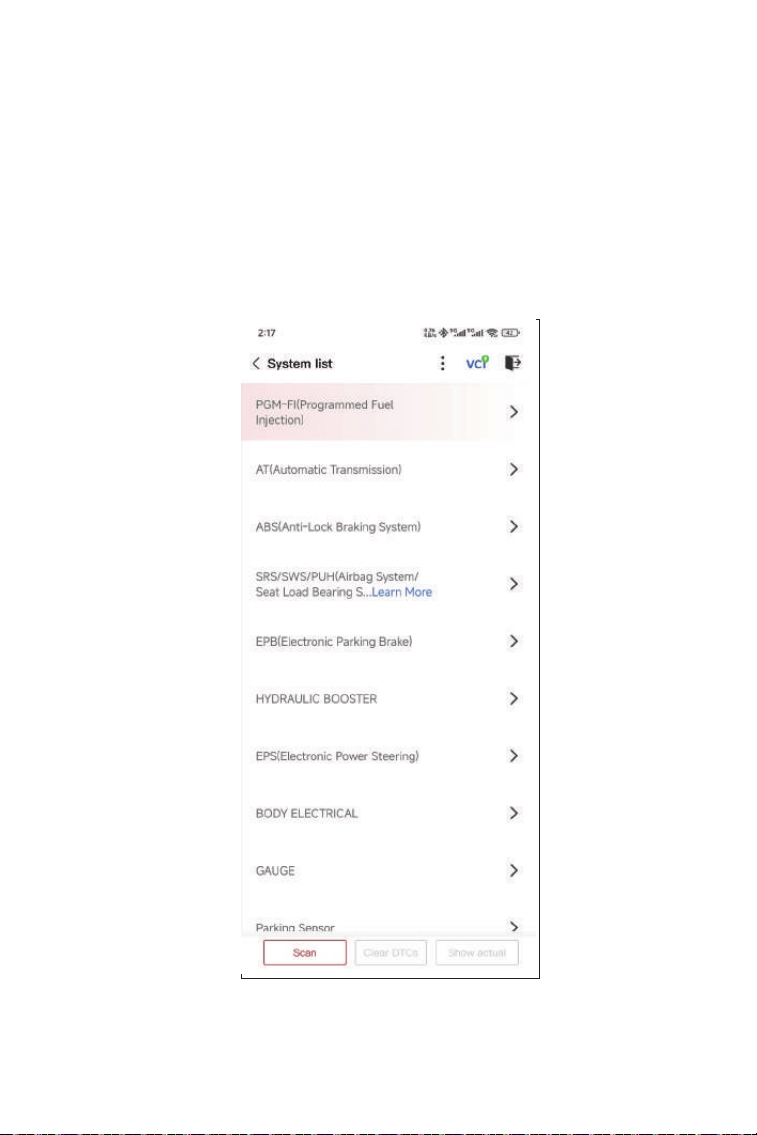
You can either select Scan or tap a vehicle system to open the
function menu for that system.
Note:
Systems may vary by vehicle make, model and year.
27
Figure 4-6
Auto Scan
Auto Scan detects the systems supported by the vehicle and
retrieves DTCs for all of these systems, providing a complete health
check of your vehicle. Performing Auto Scan before and after repair
could help in troubleshooting and validating repairs. Pre and post
scan reports can allow you to record the condition of the vehicle
before and after repair for comparison.
To perform an Auto Scan, tap the Scan button. The
DS200 will start scanning all the systems supported by the
vehicle, and DTC retrieval will be automatically proceeded.
Results are dis
played progressively as the systems are scanned.
28
Button Description
Clear DTCs - tap to clear all the DTCs retrieved.
Show All / Show Actual - tap to toggle between showing all
vehicle systems and showing only the supported systems.
Performing Individual System Diagnostics
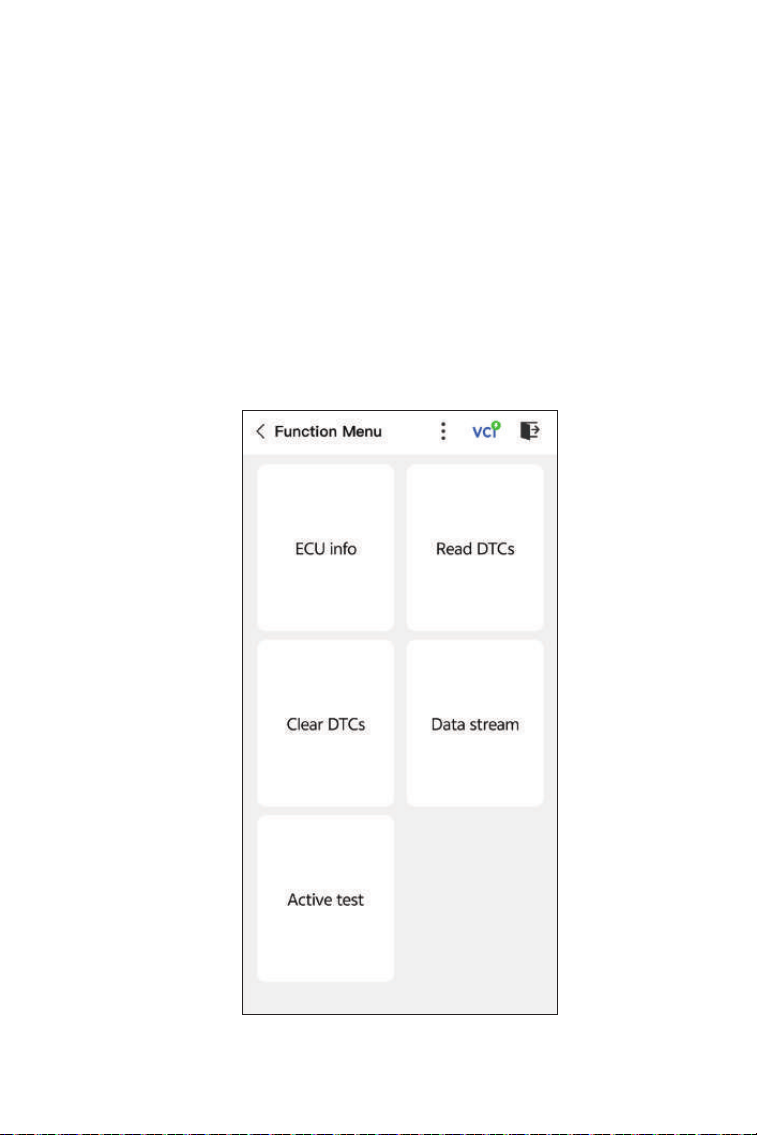
To access the function menu of a certain system:
From the systems menu, select the desired vehicle system.
Available function options for the system will be displayed. Select a
function to continue.
Figure 4-7
29
Read ECU Information
Tap ECU info in the function menu. Then you can view the version
information of the Electronic Control Unit (ECU) for the currently
selected system.
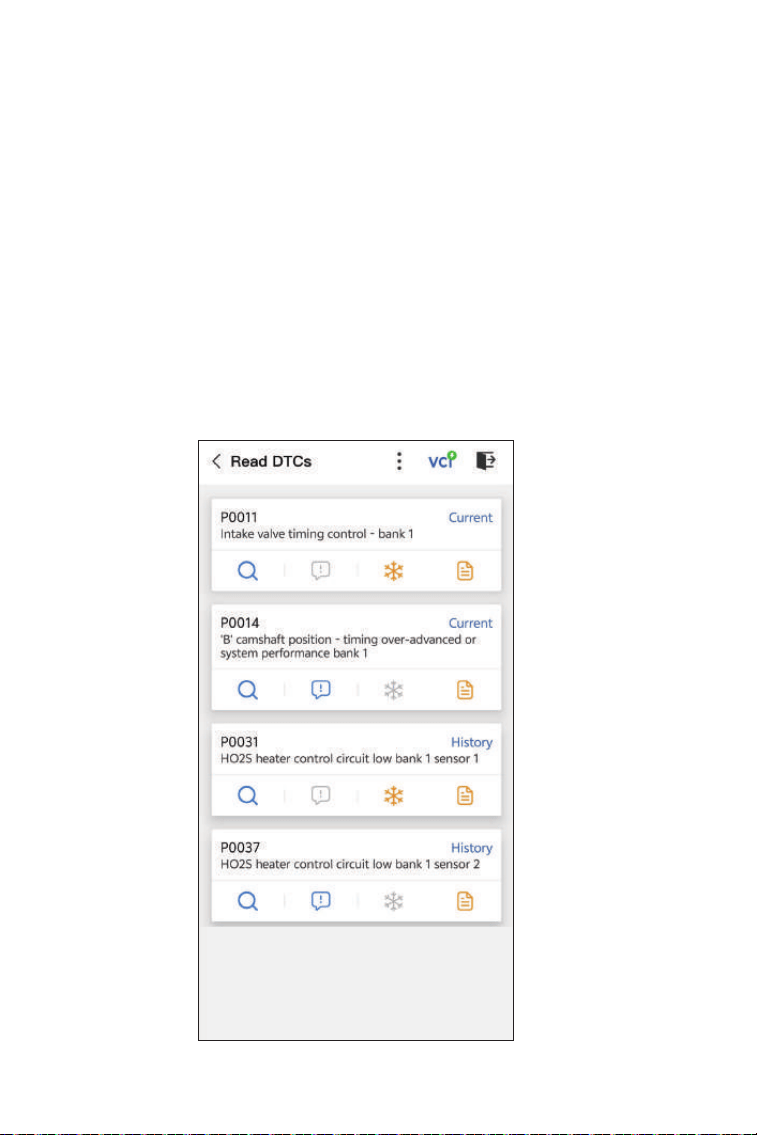
Read Trouble Code
To retrieve DTC for the currently selected system:
Tap Read DTCs in the function menu. DS200 will communicate
with the ECU and retrieve and display DTCs for the currently
selected system.
Figure 4-8
Note:
Depending on the vehicle make, some functions may not be
available.
30
Icon Description
Button Description
Report - tap to save the results in report format. (To view the saved
reports, go to Me > Diagnostic Report.)
Clear DTCs - tap to clear all the DTCs retrieved.
Clear Trouble Code
To clear DTCs for the currently selected system:
1. Tap Clear DTCs in the function menu.
2. Tap OK when the DTCs are cleared.
Tap to open a window that allows you to search on Google
for more information about the DTC.
When the icon lights up, tap to view the detailed
description of the DTC.
When the icon lights up, tap to view the freeze frame
captured at the tim
e when the DTC occurs.
When the icon lights up, tap to view the instructional
repair measures.
Note:
1. Procedure of clearing DTCs should be performed after the
freeze data stored in the ECU will be cleared.
2. DO NOT START UP THE ENGINE WHILE CLEARING DTCS.
31
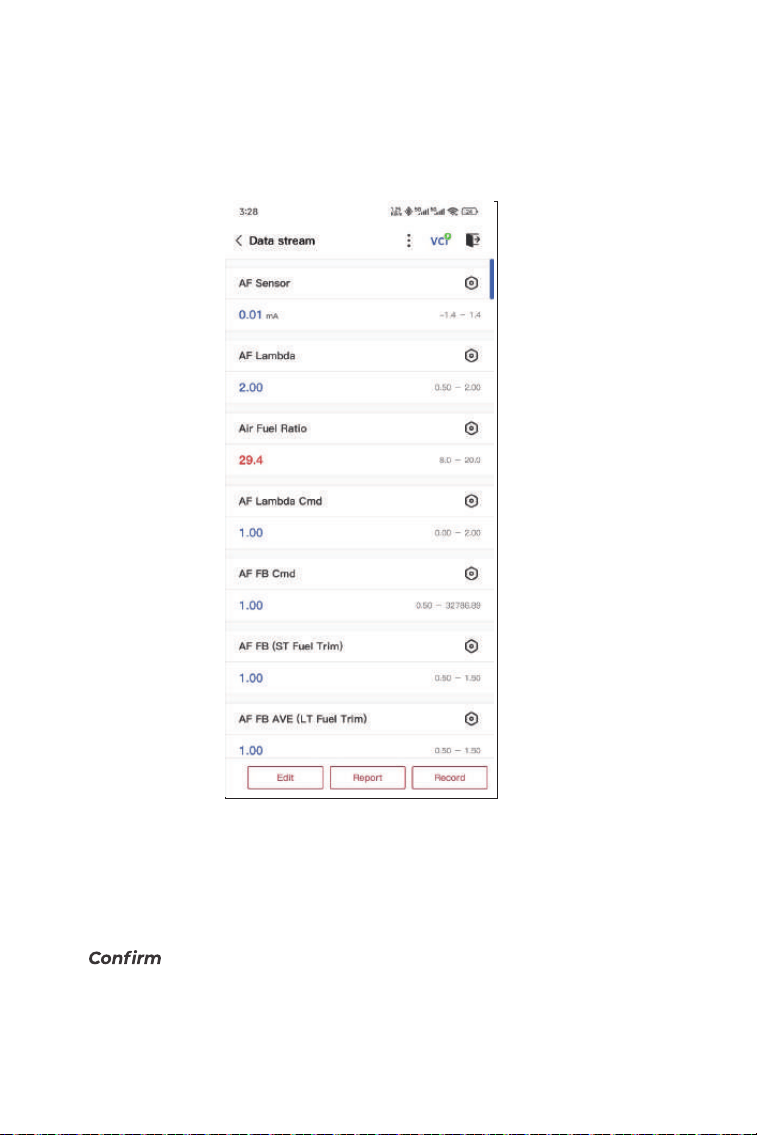
Read Data Stream
To view data stream for the currently selected system:
1. Tap Data stream in the function menu.
A data stream list displays.
Button Description
Edit - allows you to customize your data stream list. Select the
check box of the data stream you are interested in viewing and tap
.
Record - allows you to record and save data stream information
for comparison and analysis. To view the saved data stream
information, go to Me > Data Stream.
Figure 4-9
32
Report - tap to save the current data stream values in report
format. To view the saved reports, go to Me > Diagnostic Report.
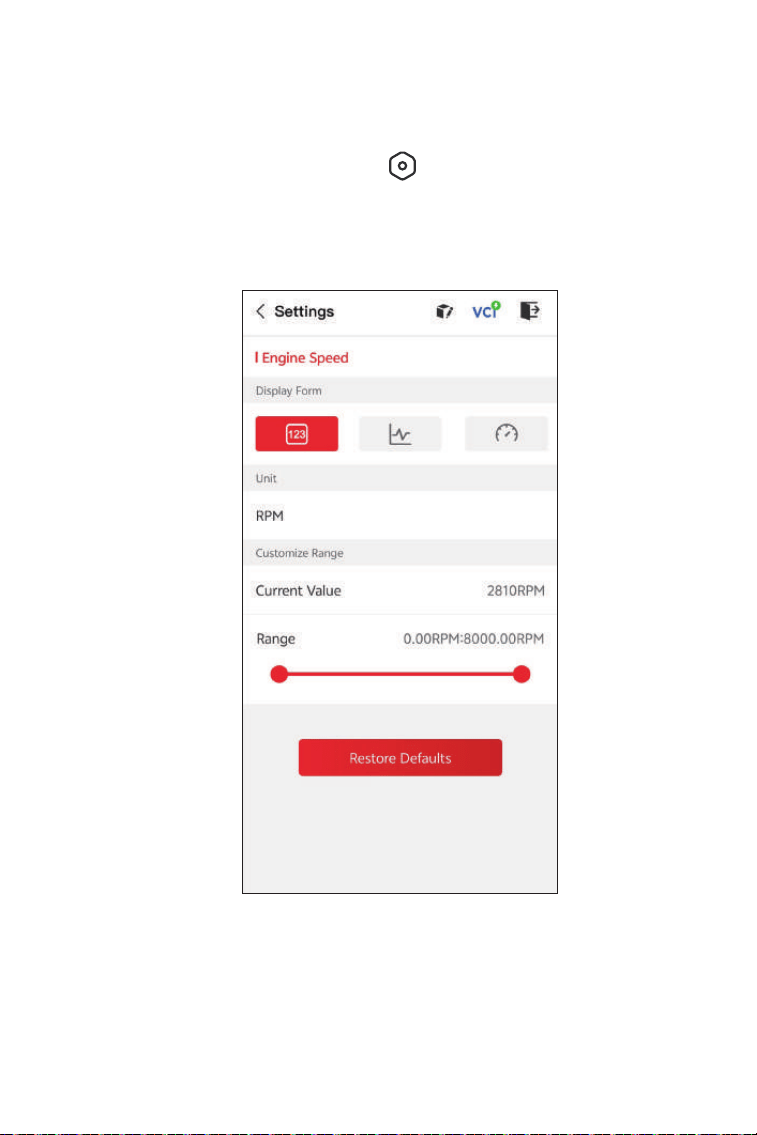
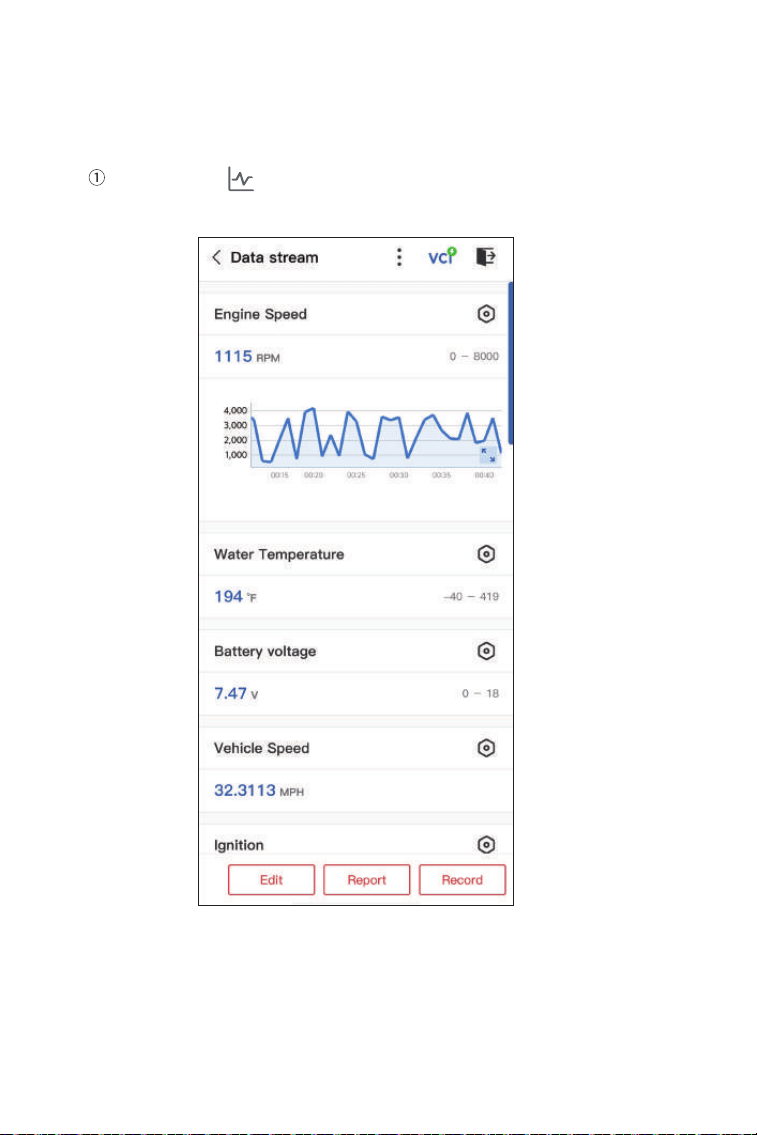
Each entry of the list shows the name and the current value of the
data stream. You can tap the icon at the side of each entry to
enter the setting screen. The data stream can be viewed in value,
graph, or gauge format (see Figure 4-10).
Figure 4-10
33
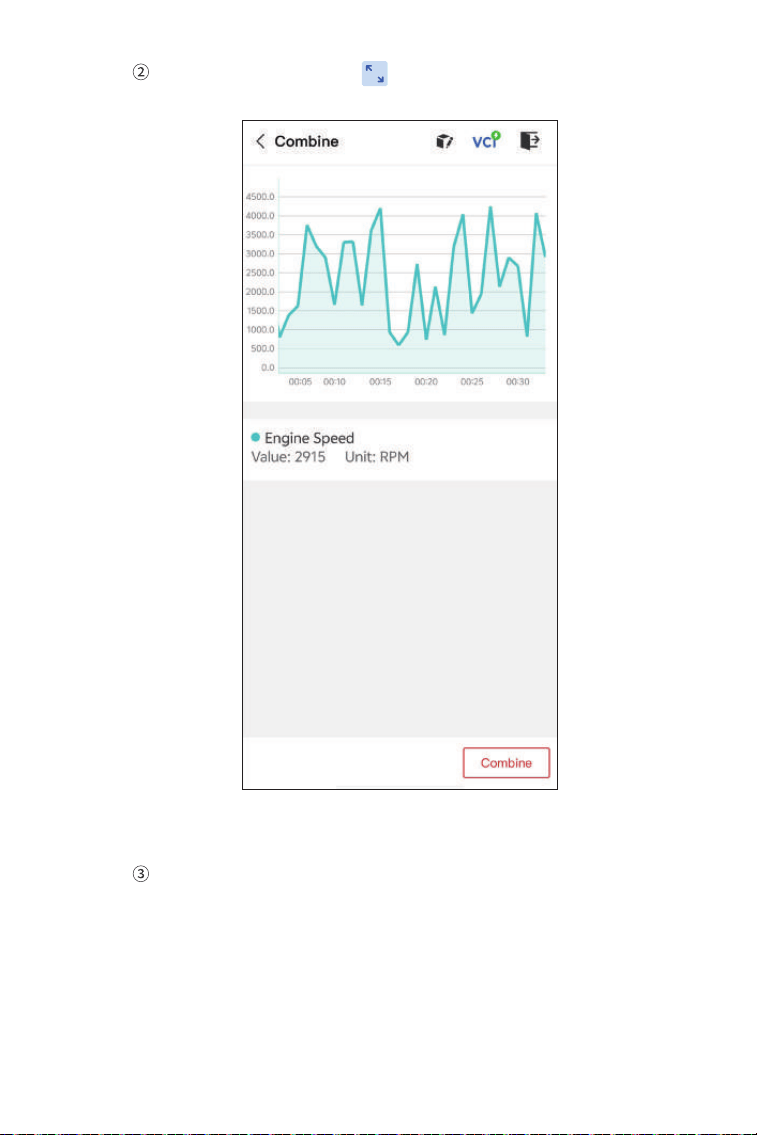
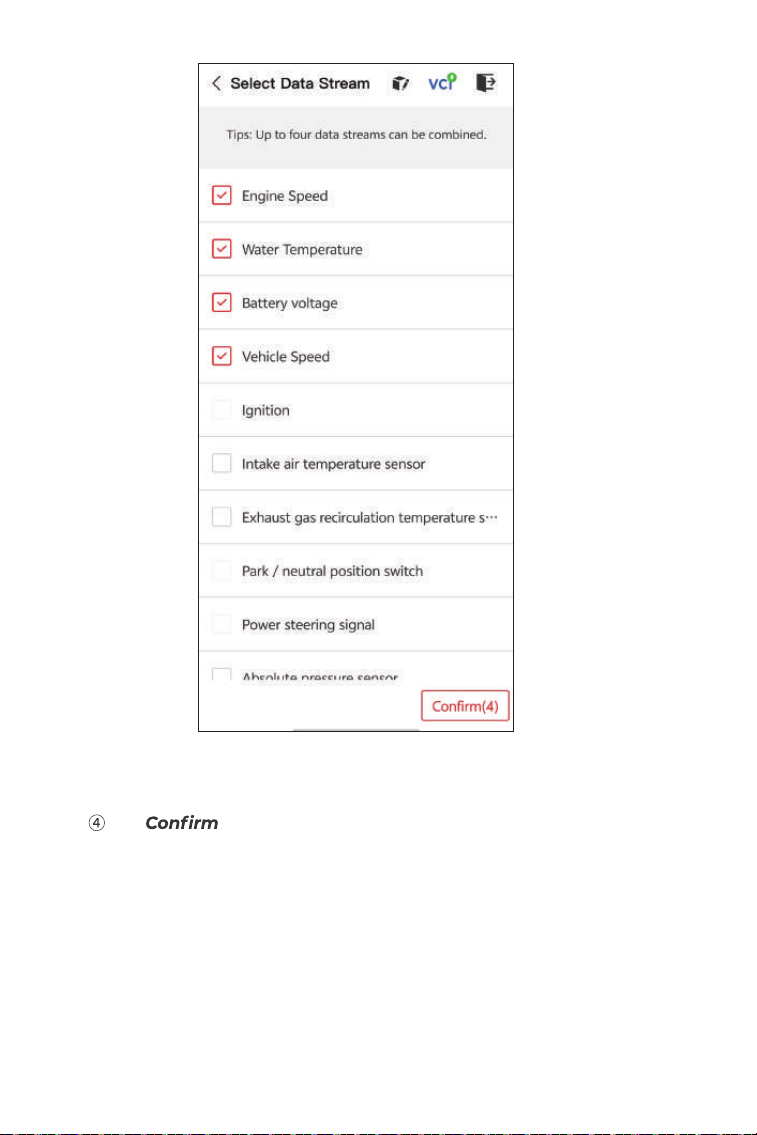
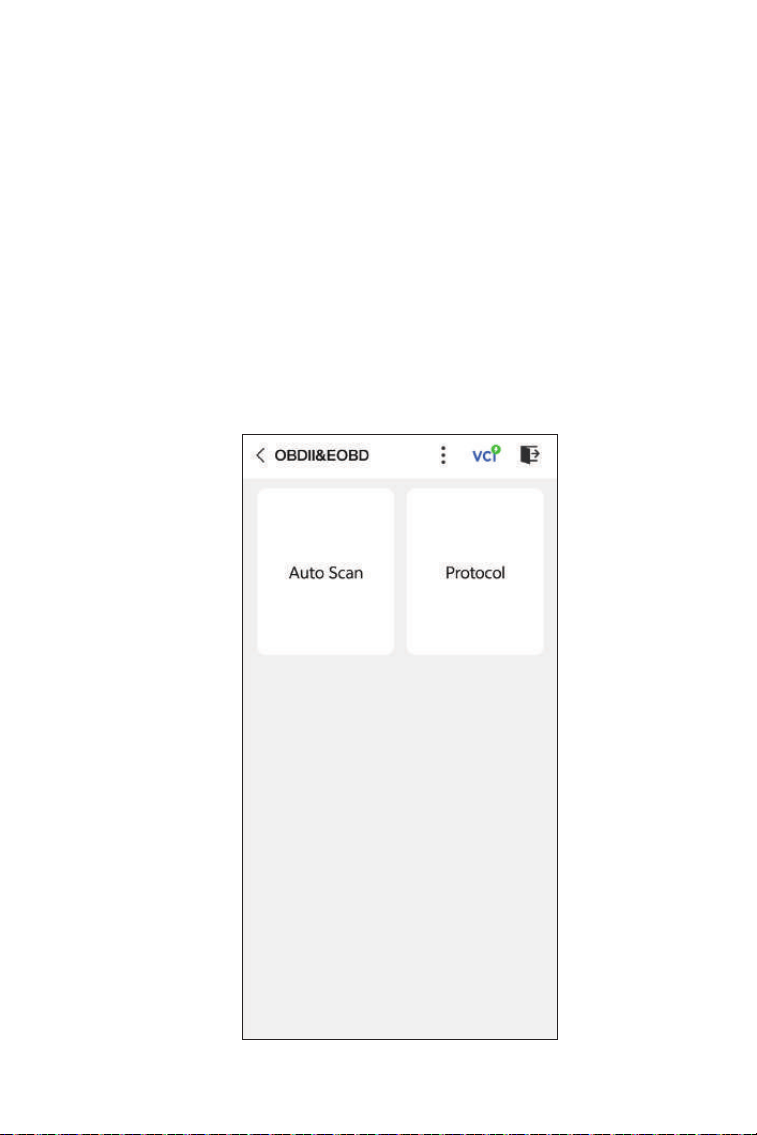
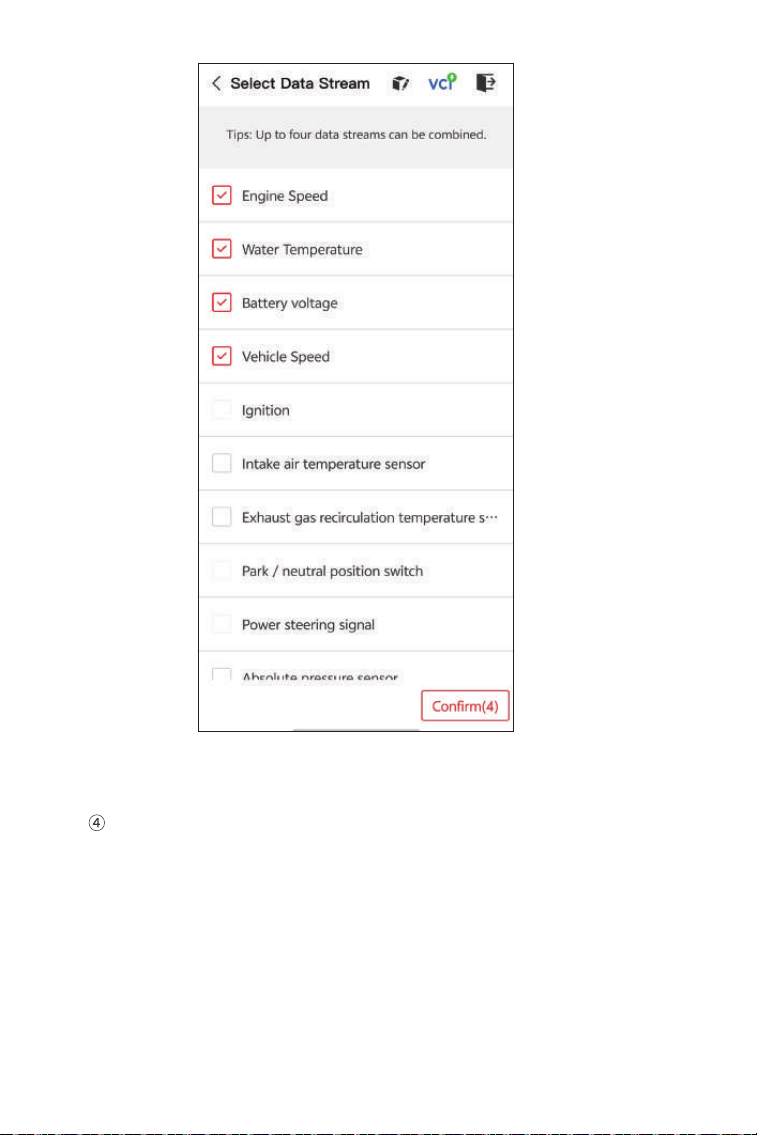
2. For ease of comparison and observation, the Combine function
is provided which allows up to 4 data streams to be viewed in one
graph.
To access the Combine function:
Tap the icon to change the display form, and go back to
the data stream screen.
Figure 4-11
34
Tap the full screen icon at the right side. The following
screen will appear.
Tap Combine, and select up to four data streams.
Figure 4-12
35
Tap . A combined graph will display.
Note:
IF THE VEHICLE MUST BE DRIVEN TO VIEW THE LIVE DATA
STREAM, ALWAYS HAVE A SECOND PERSON HELPING YOU. DO
NOT WATCH THE DATA STREAM WHILE DRIVING.
Figure 4-13
36
Active Test
- allows you to manually control certain component operations
directly from the app to verify the operations of components.
Note:
Available tests vary by vehicle make, year and model.
4.2 EOBD
The EOBD function allows you to perform emission-related
diagnostics for your vehicle.
To perform EOBD Diagnostics:
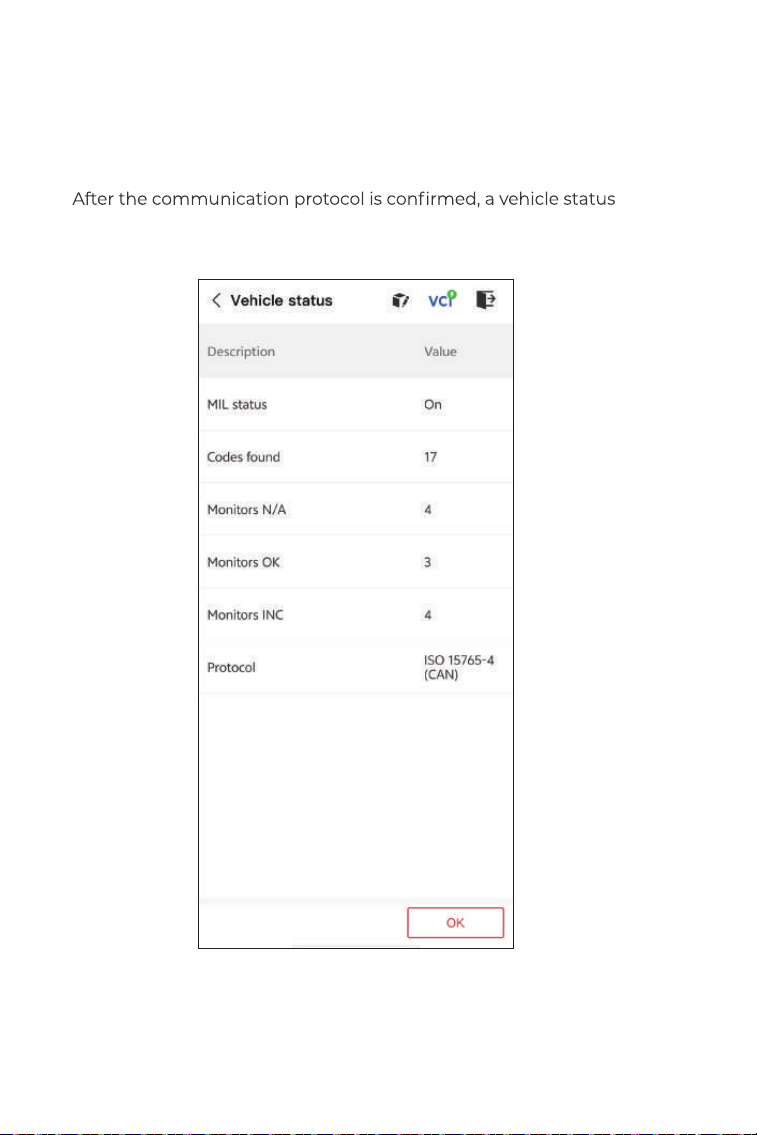
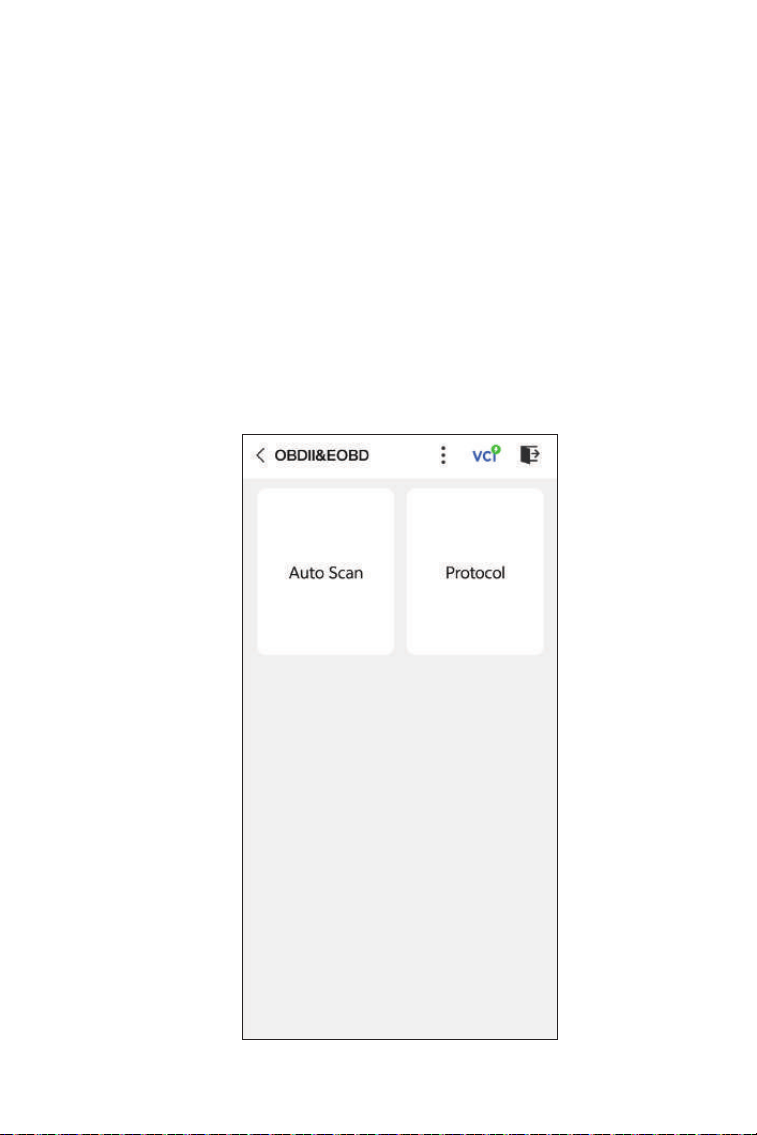
1. Tap Diagnostics from the home screen. Select EOBD in the
displayed vehicle make list.
2. Select your communication method: Auto Scan or Protocol.
Figure 4-14
37
Auto Scan - The DS200 will automatically communicate with the
vehicle and identify which protocol the vehicle is using.
Protocol - allows you to manually select the communication
protocol.
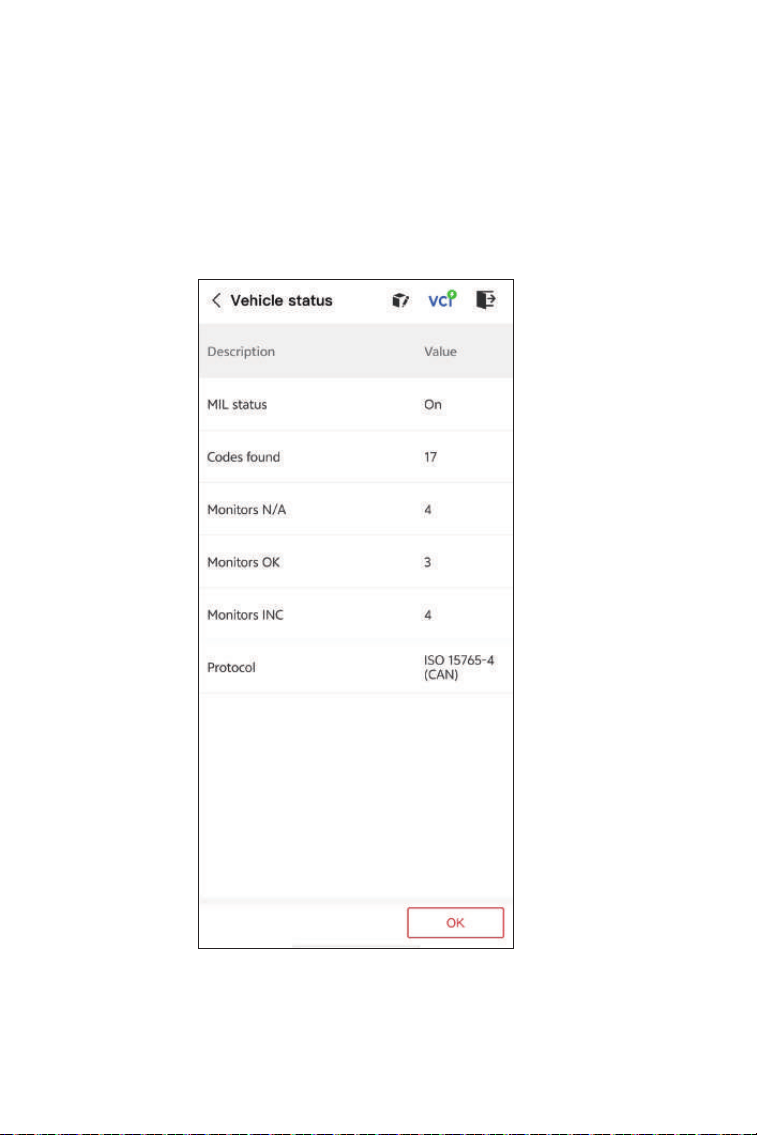
screen displays showing the protocol and other status info of your
vehicle.
Figure 4-15
38
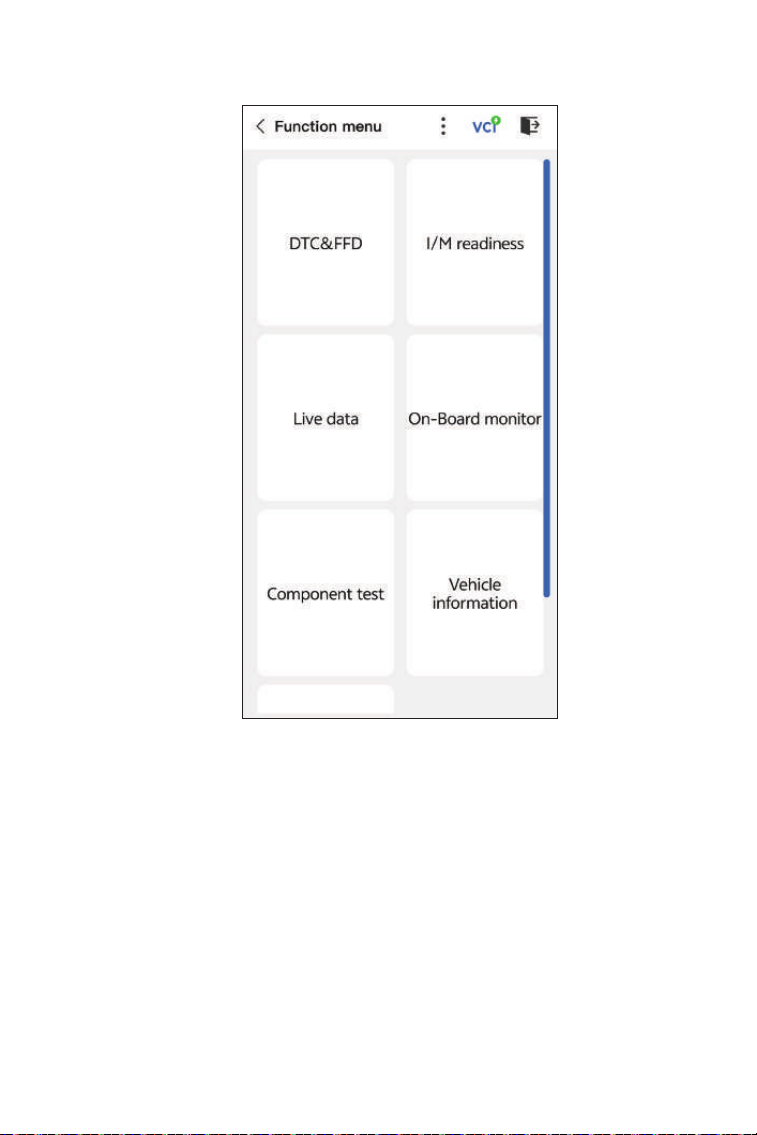
3. Tap OK to enter the function menu.
4. Select a function to continue.
Note:
Depending on the vehicle make, some functions may not be
available.
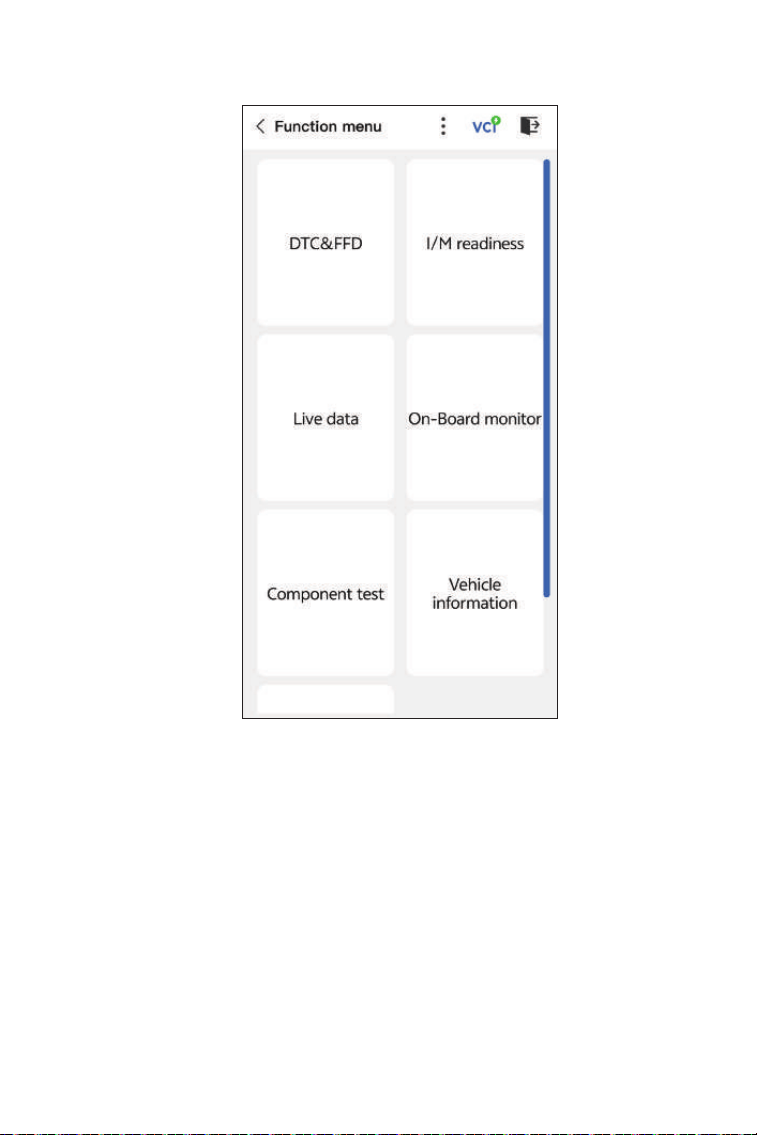
Typical function options may include:
• DTC & Freeze Frame Data
• I/M Readiness
• Live Data
• O2 Sensor Monitoring
• On-Board Monitoring
• Component Testing
• Vehicle Information
Figure 4-16
39
DTC & FFD (Freeze Frame Data)
I/M (Inspection and Maintenance) Readiness
This function helps retrieve and clear DTCs stored in the vehicle's
ECU and displays FFD of the emission-related systems.
1. Read DTCs
This function displays the DTCs retrieved from the emission-related
systems.
2. Clear DTCs
This function allows you to clear the DTCs retrieved from the
emission-related systems.
3. FFD
This function takes a snapshot of the data and operating conditions
when an emission-related fault occurs.
Note:
1. The procedure of clearing DTCs should be performed after the
FFD stored in the ECU will be cleared.
2. DO NOT START UP THE ENGINE WHILE CLEARING DTCS.
This function checks whether or not the various emission-related
systems on the vehicle are operating properly, and are ready for I/M
testing.
It can also be used to check the monitor running status and to
Live Data
This function displays the real-time live data and parameters from
the vehicle’s ECU.
O2 Sensor Monitor
This function displays O2 sensor monitor test results of the most
recently completed tests from the vehicle’s ECU.
On-Board Monitor
This function displays the test results for emission-related
powertrain components and systems that are not continuously
monitored.
40
The DS200 allows you to instantly send diagnostic feedback
(with logs of diagnostic data automatically attached) while you are
encountering a software problem with the diagnostics operations.
To send diagnostic feedback:
1. Tap the icon and tap the icon located at the top right
corner of any screen in the Diagnostics module.
2. Select the type of problem.
3. Write a description of the problem.
4. Tap Submit to send the feedback.
Component Test
This function helps send control commands to the vehicle's ECU as
a way to test and operat
e the system parts and components.
Vehicle Information
This function displays a list of information (provided by the vehicle
manufacturer) from the vehicle’s ECU.
The information may include:
• VIN
• Calibration ID (CID)
4.3 Diagnostic Feedback
41
5. I/M Readiness
6. Vehicle Performance Test
This function checks whether or not the various emission-related
systems on the vehicle are operating properly, and are ready for I/M
testing.
It can also be used to check the monitor running status and to
Note:
The vehicle should only be considered ready for inspection and
allowed to pass emissions if all required tests have been passed.
Vehicle Performance Test allows you to make accurate
measurements of vehicle acceleration, providing results at intervals
42
6.1 Performing a Vehicle Performance Test
1. Tap Vehicle Performance from the home screen.
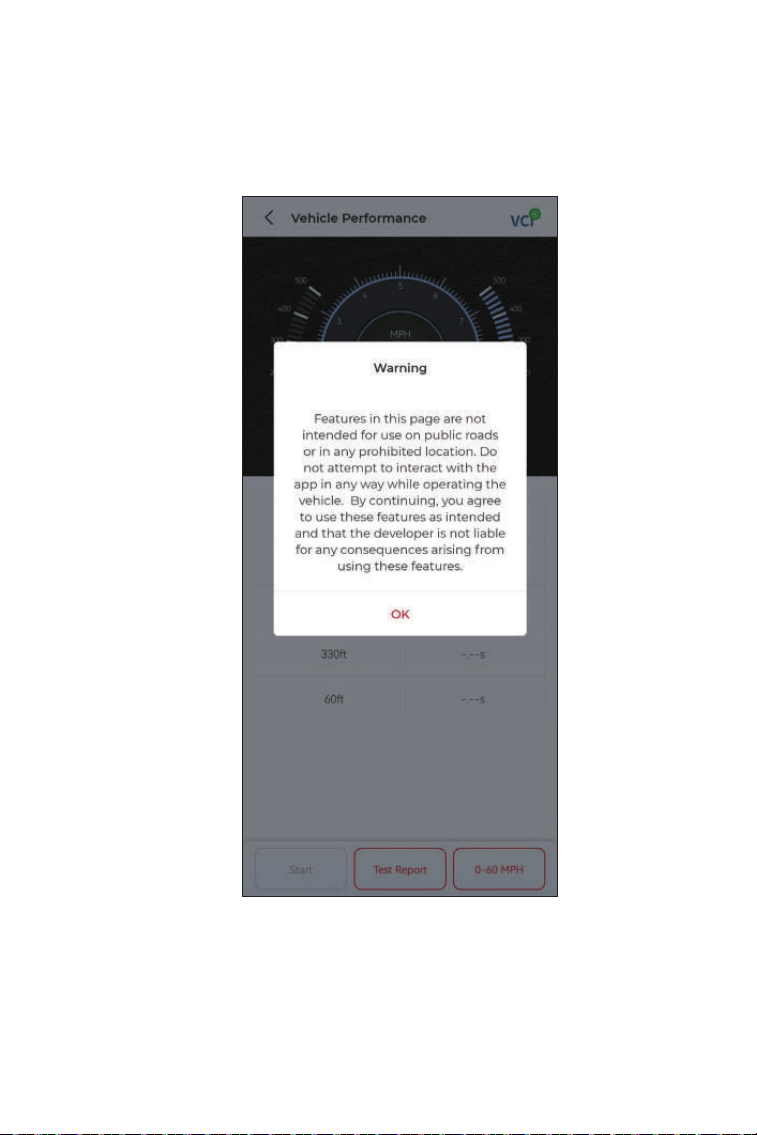
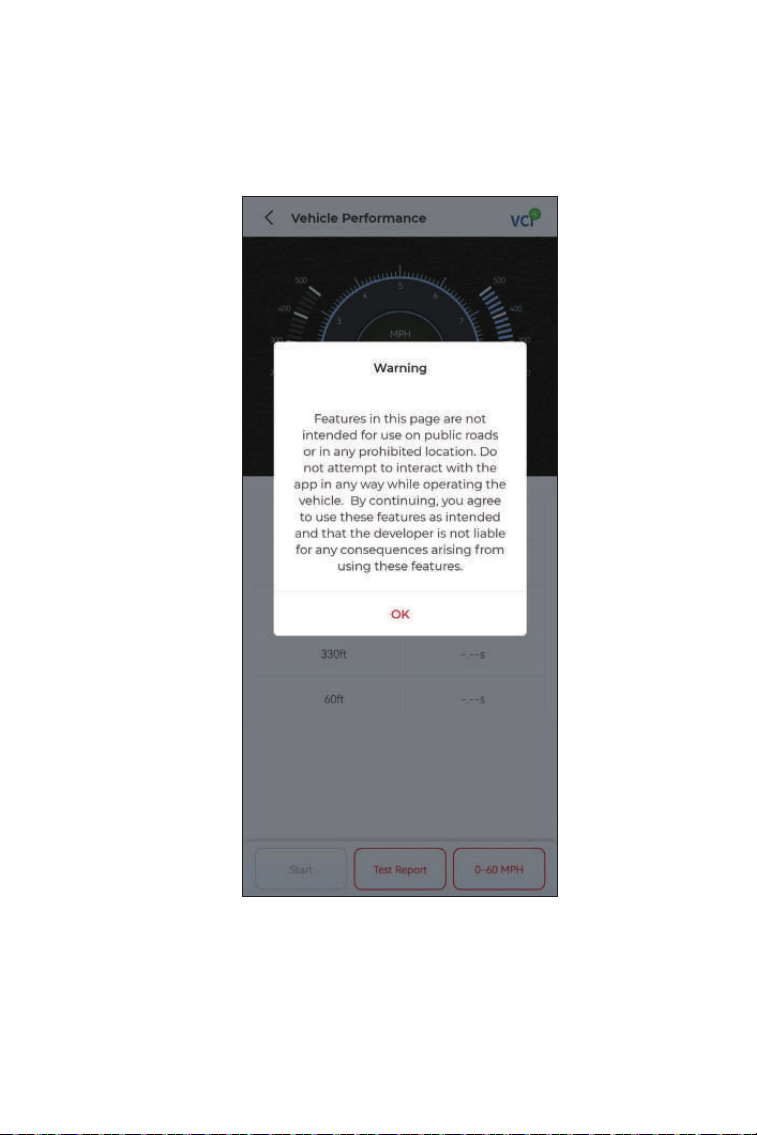
2. A warning message appears. Carefully read the message and tap
OK to continue.
Figure 4-17
43
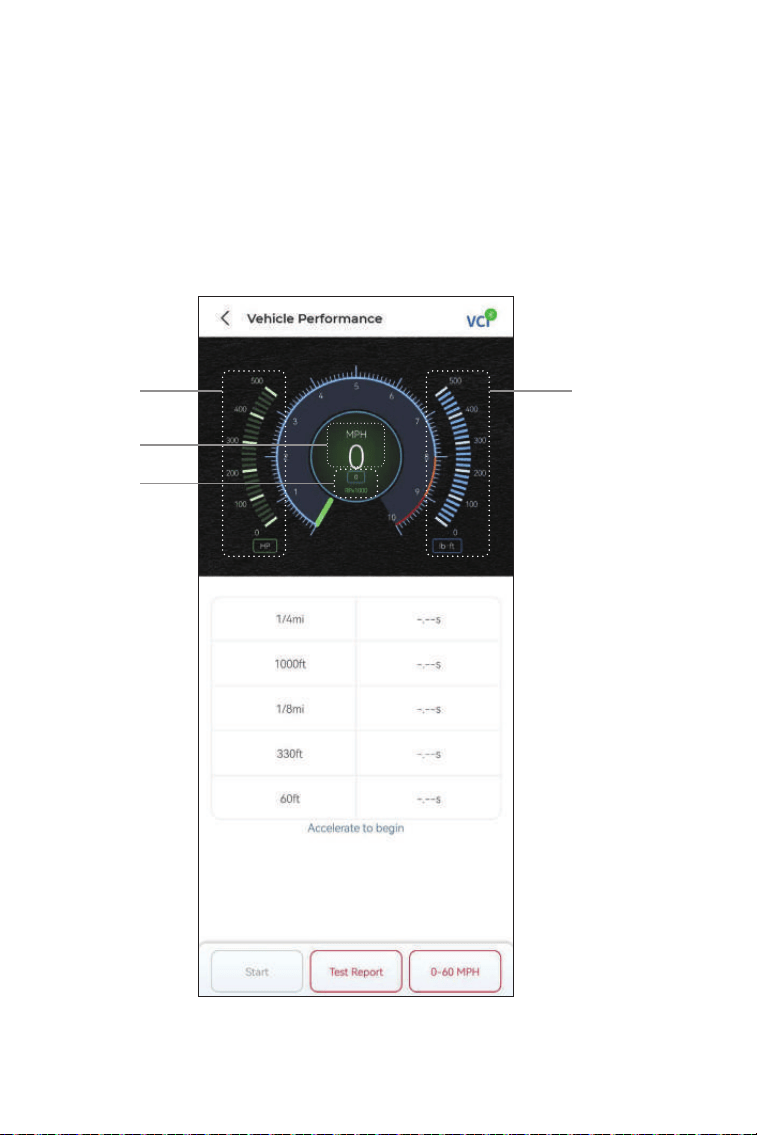
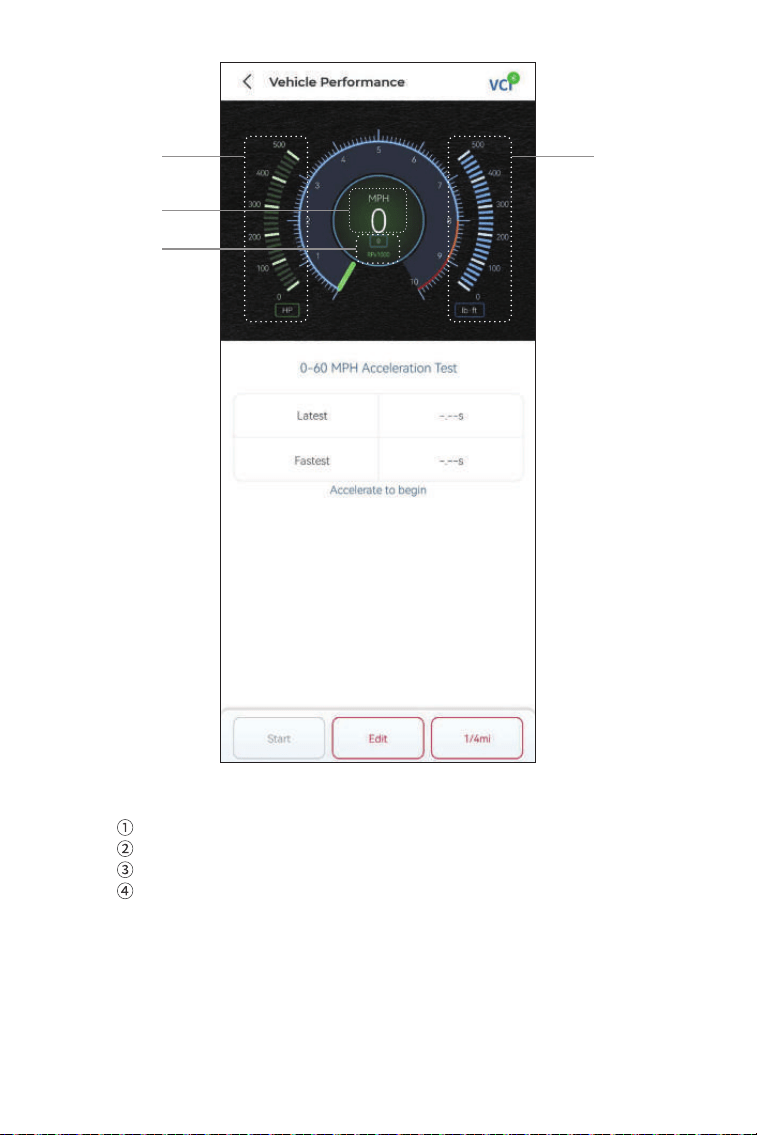
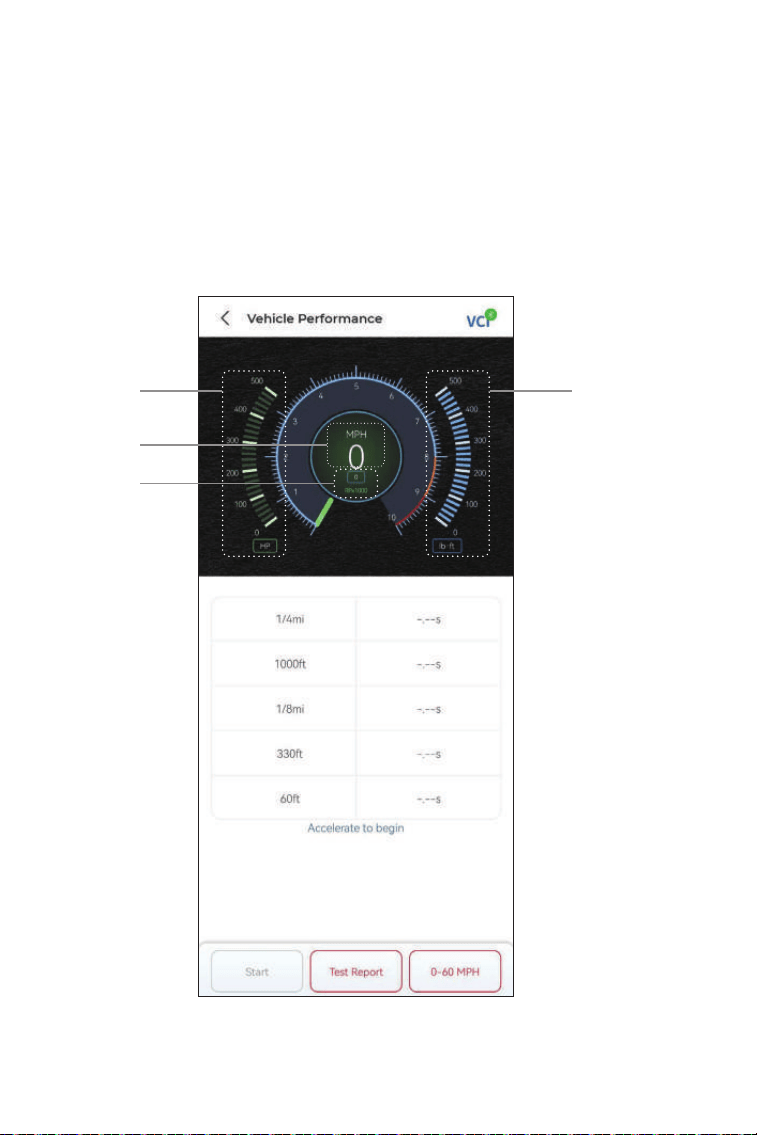
3. The default values for the start and end speeds are 0 MPH and
60 MPH respectively. If you want to change the values, tap the 0-60
MPH button, and tap Edit to set the start and end speeds.
4. Accelerate your vehicle to start the test.
Note:
If you do not reach the end-of-measurement speed, the results will
be automatically reset as soon as the speed of the car is equal to
the start speed.
Figure 4-18
3 4
1
2
44
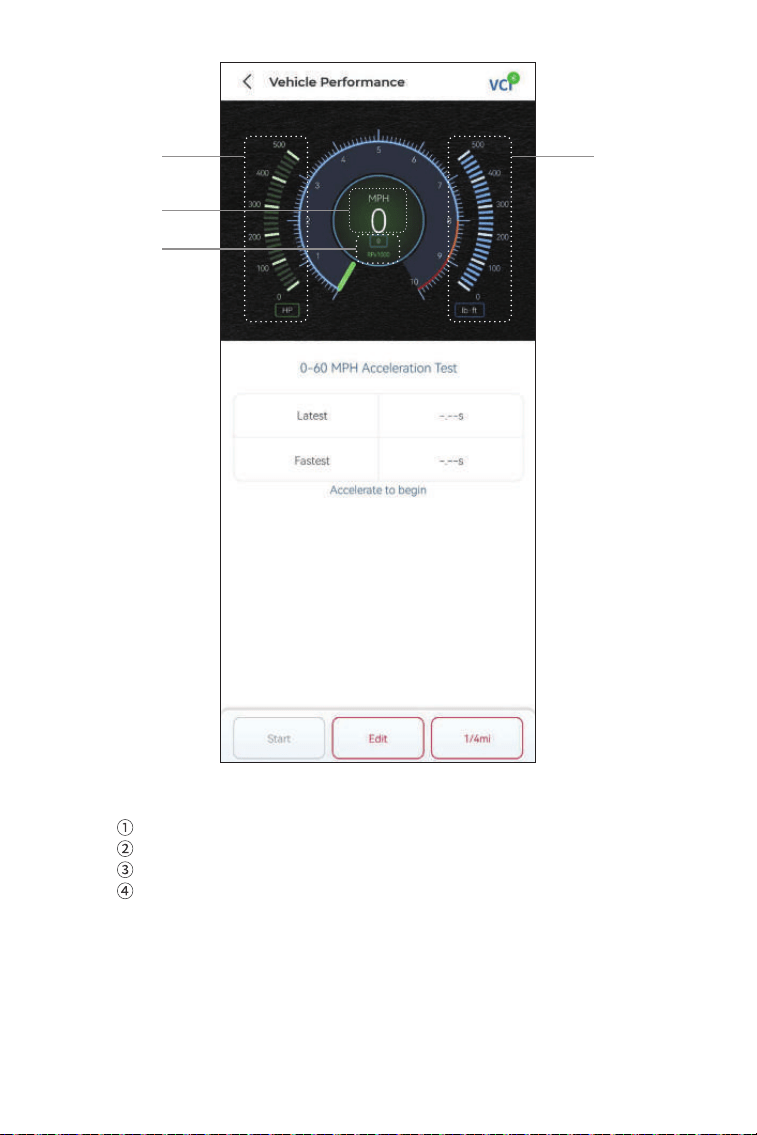
Vehicle Speed
Engine Speed
Horsepower
Torque
Button Description
Start - tap to reset for the next run
Test Report - tap to view the test results
0-60 MPH / (1/4 mi) - tap to toggle between 0-60 MPH result screen
Figure 4-19
3 4
1
2
45
and 1/4 mi result screen.
Edit - tap to set the start and end speeds.
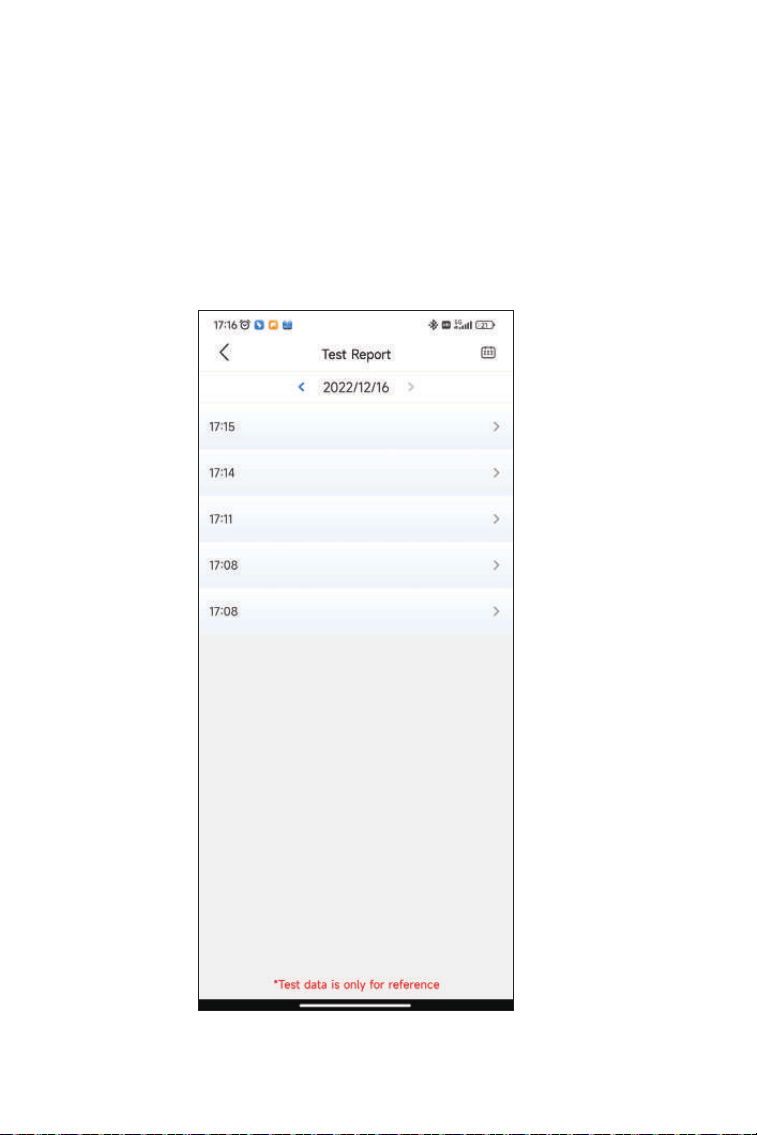
6.2 Viewing Test Results
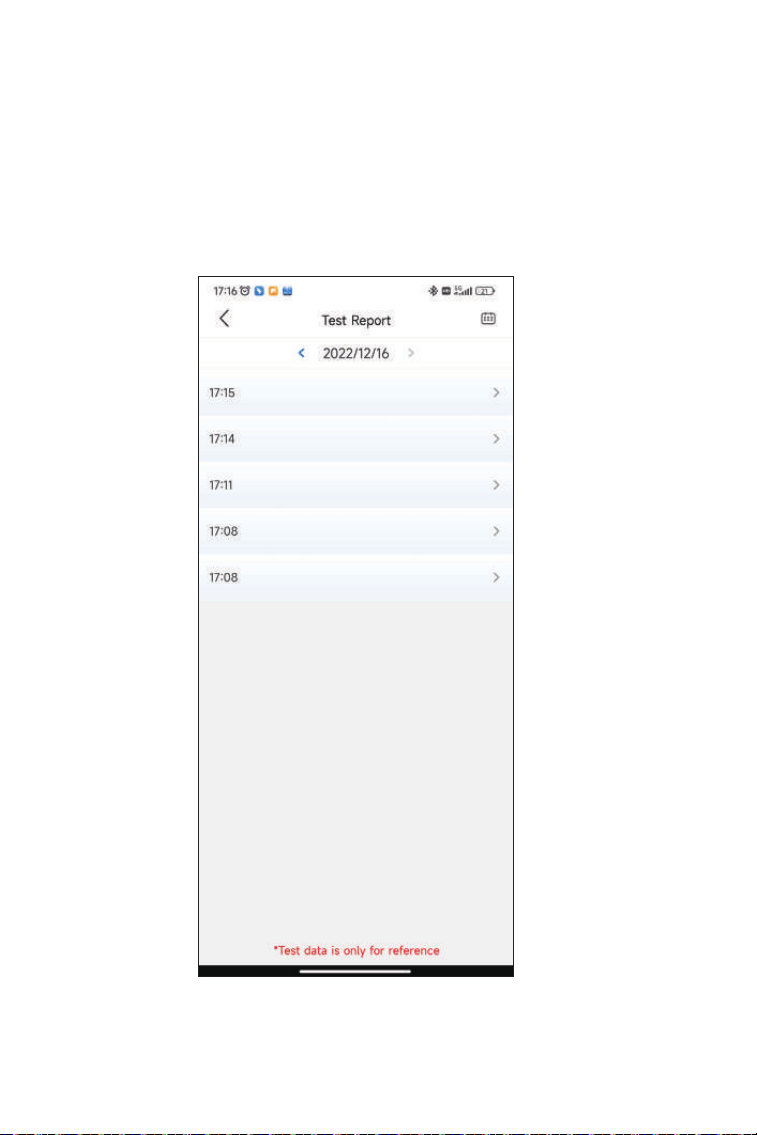
1. From the test screen, tap Test Report. The result screen will appear.
Figure 4-20
46
2. Tap the desired record to view its full content.
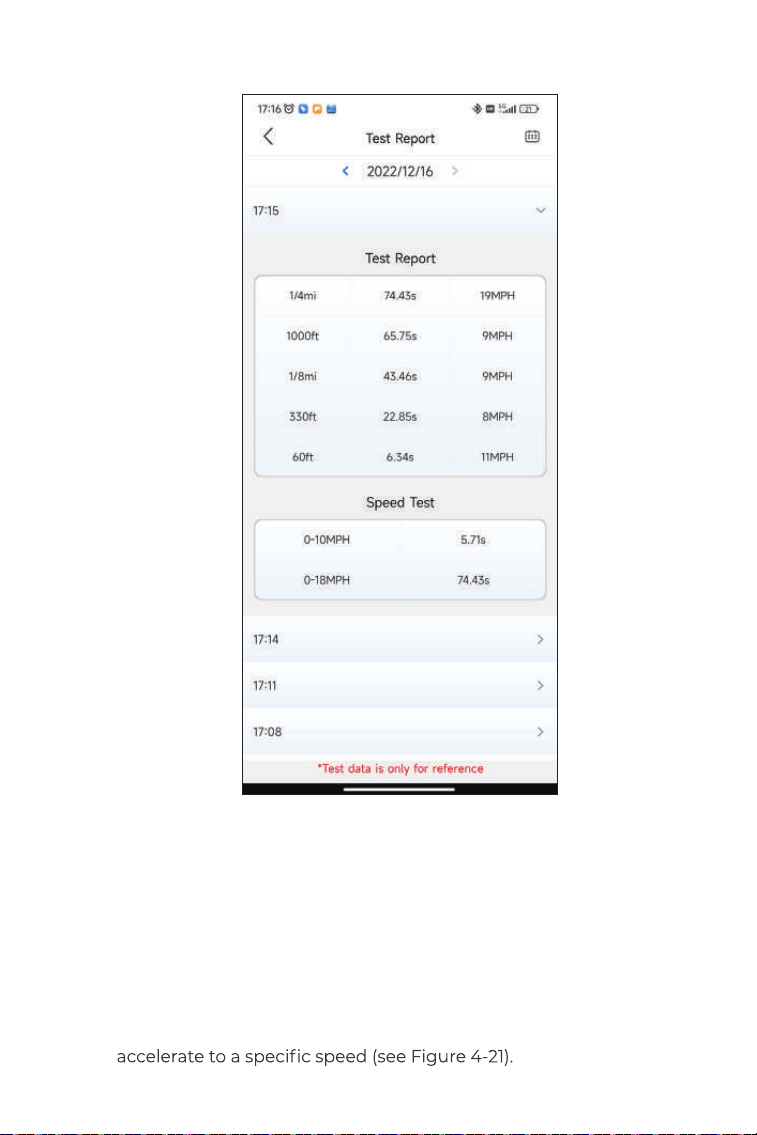
Figure 4-21
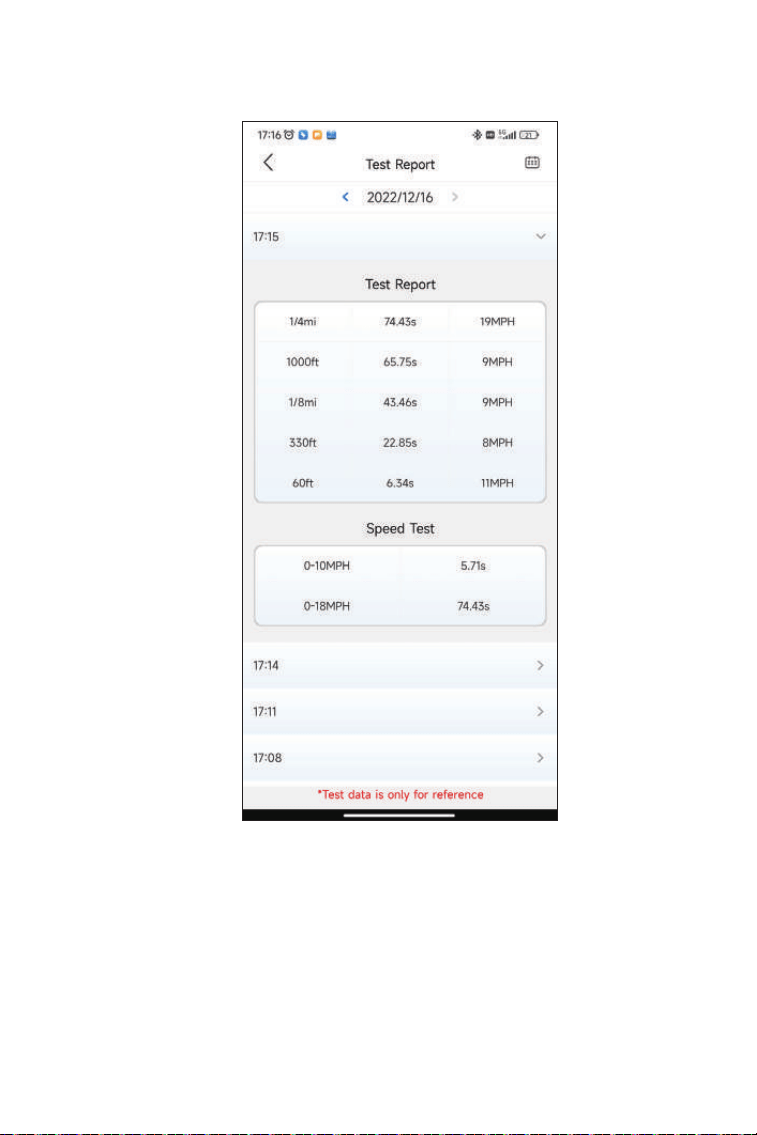
1/4 mi Test Results - record the elapsed time for a vehicle to travel
a certain distance (60 ft, 330 ft, 1/8 mi, 1000 ft, 1/4 mi), and the
instantaneous speed at each point (see Figure 4-18 and Figure 4-21).
0-60 MPH Test Results - record the elapsed time for a vehicle to
accelerate from 0 to 60 miles per hour (see Figure 4-19). The values
for the start and end speeds can be changed if desired.
Speed Test Results - record the elapsed time for a vehicle to
47
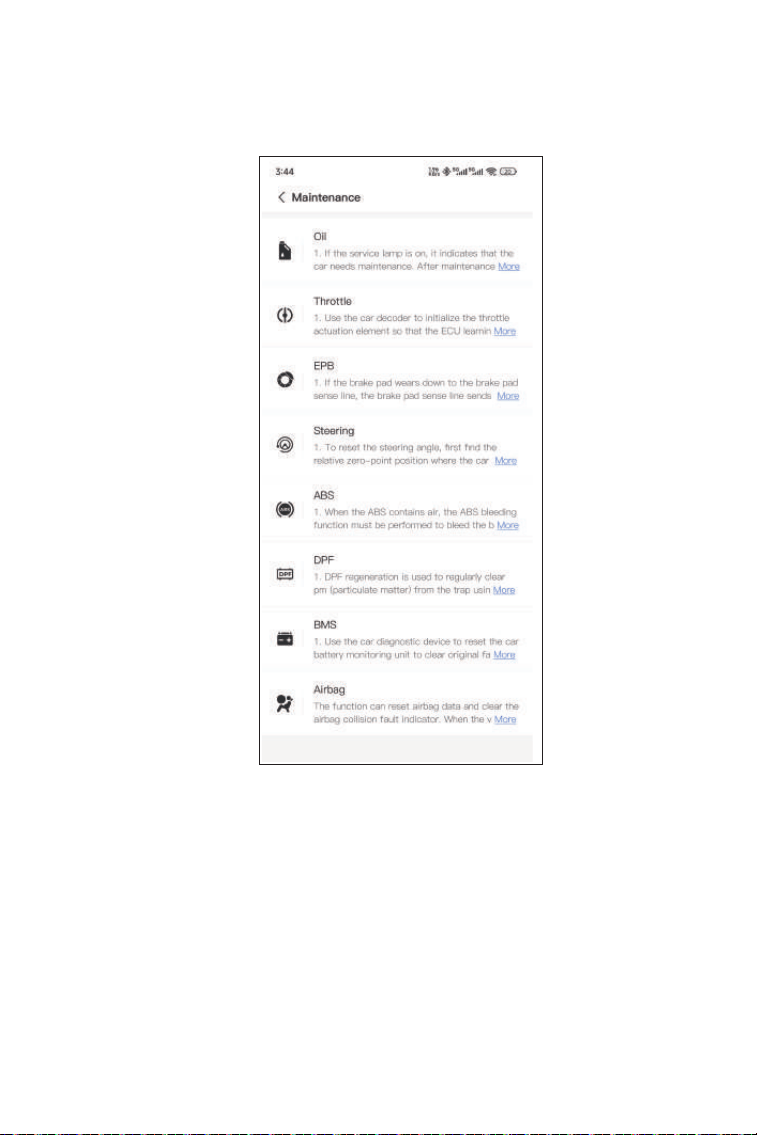
8. Maintenance
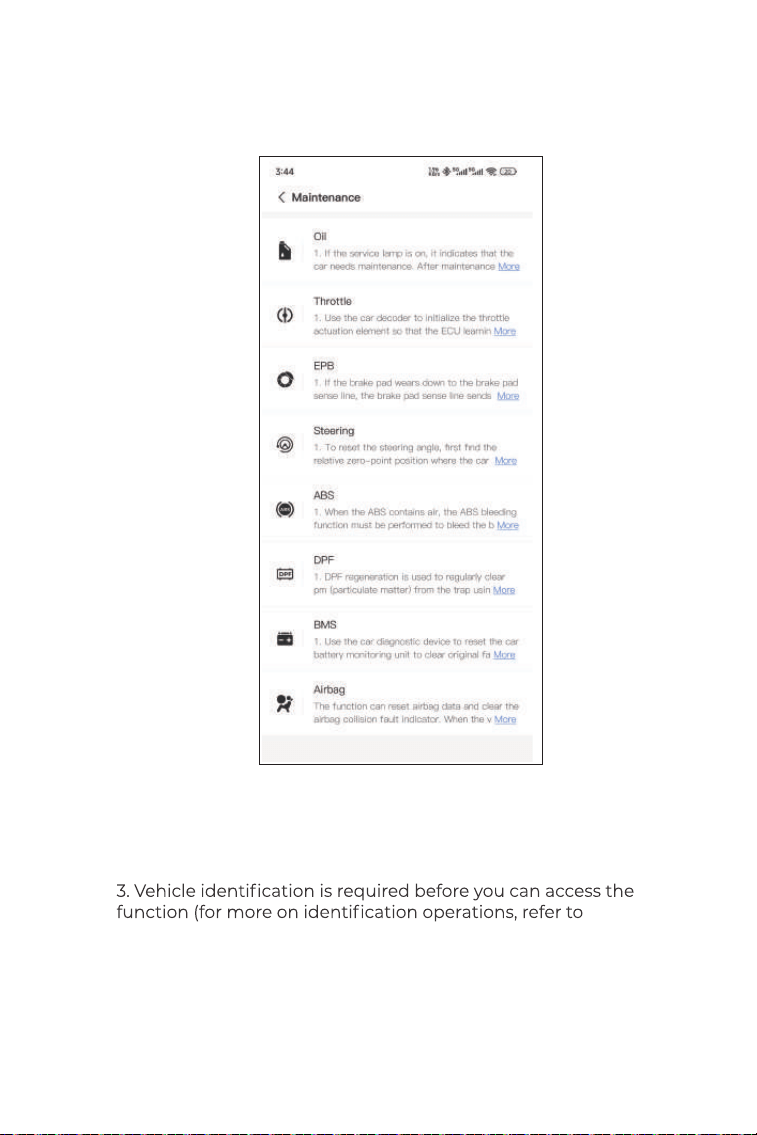
7. VE Calculator
The DS200 supports 8 special functions, including Oil Reset,
Throttle Adaptation, Electronic Parking Brake (EPB) Reset, Steering
Angle Reset, Diesel Particulate Filter (DPF) Regeneration, Anti-lock
Braking System (ABS) Bleeding, Battery Management System (BMS)
Resets, and Airbag Reset.
of your vehicle engine, which is one of an important engine
performance parameters.
To calculator the VE:
Tap VE Calculator from the home screen, enter the required values
including Engine Size, Engine Speed, MAF, Intake Air Temp, Number
of Cylinders, and Air Intake Pressure. Then, tap Calculate.
8.1 Services Overview
Oil Reset
This function allows you to reset the oil service lamp for the engine
oil life system, which calculates an optimal oil life change interval
depending on the vehicle driving conditions and weather events. Oil
reset is required every time the engine oil is changed.
EPB Reset
This function he
lps you replace and reset the brake pads.
It needs to be performed in the following cases:
• After the brake pads and brake pad wear sensor are replaced;
• When the brake pad warning light is on;
• After the servo motor is replaced.
48
Steering Angle Reset
If the steering angle sensor is replaced, or the steering angle is
inaccurate or not centered, the steering angle reset function needs
as a reference, the ECU can then calculate the exact angle for left
and right steering.
BMS Reset
After the car battery is replaced, the car battery control unit needs to
be reset. This will clear fault information (such as low battery level) so
that the control unit can match the relevant information of the newly
replaced battery.
ABS Bleeding
When the brake system is opened to replace components such
inside, which can lead to a soft brake pedal. ABS Bleeding is required
Throttle Adaptation
If the ECU is disconnected accidentally, or if the throttle is replaced
or cleaned, then the throttle actuators need to be initialized via the
Throttle Adaptation function. This resets the ECU's data to its initial
state so that the throttle can accurately regulate the air intake.
DPF Regeneration
This function is mainly used for the regeneration of diesel particulate
means of combustion and oxidation.
Airbag Reset
This function allows you to reset the airbag data to turn off the airbag
light, so that the airbag control module can run normally.
It needs to be performed in the following cases:
• When the airbag deploys;
• When the diagnostic tool reads "Crash data stored";
• When the airbag light is on;
• When relevant DTCs cannot be cleared.
49
2. Select a function that you want to perform.
Identifying
the Vehicle on 4.2.1). When it completes, the function menu displays.
4. Follow the on-screen instructions to perform the service reset.
8.2 Performing a Service Reset
1. Tap Maintenance from the home screen. A function menu will
display.
Figure 4-22
50
9.1 DTC Repair Guide
9.2 Technical Service Bulletins
9.3 DLC Location
9.4 Warning Light Library
The DTC Repair Guide is an experience-based database of generic
To use the DTC Repair Guide:
Tap Service > DTC Repair Guide . Enter a DTC in the
search bar to search.
To view technical service bulletins:
Tap Service > Technical Service Bulletins . Select
vehicle make, model, year, system and subsystem, and tap Next. A
list of OEM technical service bulletins issued for the selected vehicle
will display. Tap the desired option to view the full content.
To view DLC location:
Tap Service > DLC Location . Select vehicle make, model
and year, and tap Next. A picture of the DLC location for the selected
vehicle will display.
The Warning Light Library provides inf
ormation on dashboard
warning lights, including light descriptions, impacts on driving,
typical causes, responsive measures and relevant FAQs.
To use the Warning Light Library:
Tap Service > Warning Light Library . A list of warning
lights will display. Tap the desired option to view the details.
9. Service
51
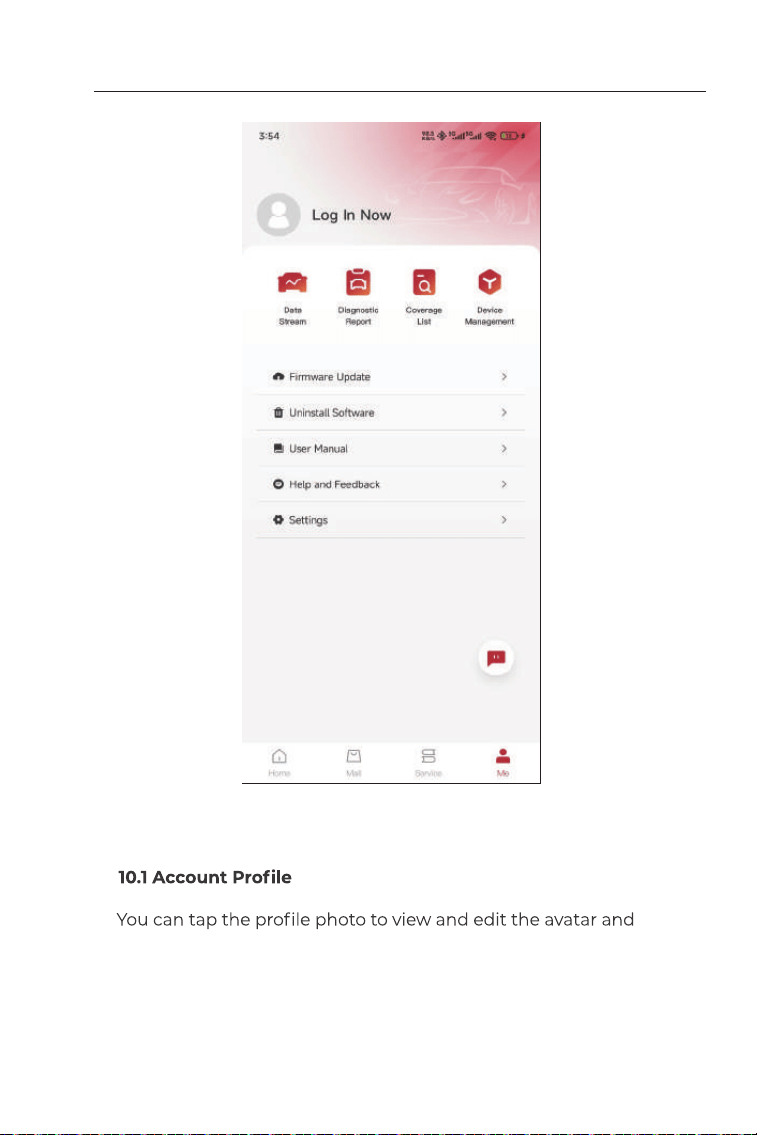
nickname. You can also view your Email account and ID,
change login password, delete account, and log out to your account
in this page.
10.2 Data Stream
10. Me
Figure 4-23
52
Allows you to view the saved data stream information.
10.3 Diagnostic Report
Allows you to view the saved diagnostic reports.
10.4 Coverage List
Allows you to check whether the DS200 is applicable to your
vehicle.
10.5 Device Management
Allows you to bind the VCI to your account.
10.6 Firmware Update
10.7 Uninstall Software
Allows you to uninstall the vehicle-specific diagnostic software.
10.8 User Manual
Allows you to view the user manual of the DS200.
10.9 Help and Feedback
Allows you to view the frequently asked questions, customer service
replies, and submit feedback.
10.10 Settings
The Settings function provides general setting options including
language setting, unit setting and cache clearing, and allows you to
view the SN, privacy and terms of service, privacy policy, third-party
components, and the contact information of technical support. You
can also check for updates in this function.
53
Section 5
Bluetooth
Operating System Supported
Storage Temperature
Working Temperature
Dimensions
Net Weight
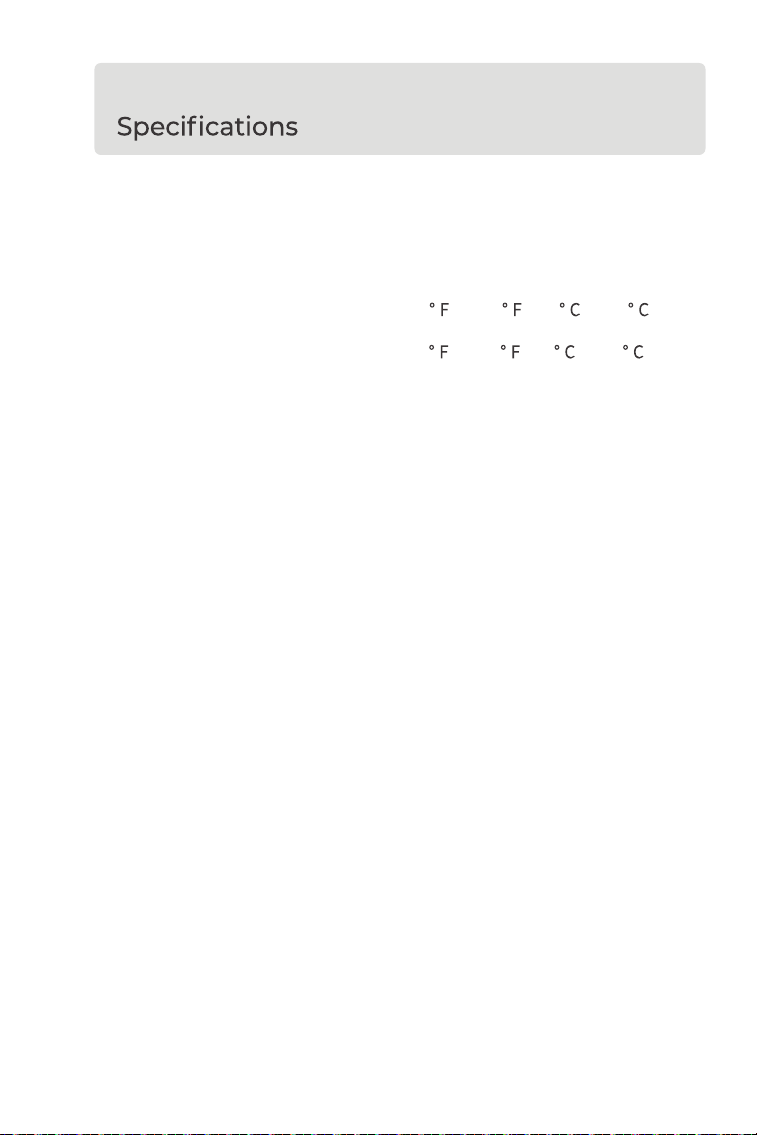
Version: Bluetooth 5.0
Range: 33 feet (10 m)
iOS 11.0 or later
Android 7.0 or later
-4
to 158 (-20 to 70 )
14 to 122 (-10 to 50 )
76 × 47 × 28 mm (2.99 × 1.85 × 1.10")
60 g (2.12 oz)
54
Section 6
FAQ
What should I do if a communication error occurs?
Follow the steps below to identify the problem:
1) Check if the ignition is ON.
2) Check if the DS200 is securely plugged into the vehicle’s OBD-
II port.
3) Turn the ignition off. Then, turn it on after 10 seconds and
continue the operation.
4) Check if the vehicle’s control module is defective.
Why do I need to download the diagnostic software after
installing the DS200 app?
Since there are various vehicle manufacturers, different diagnostic
software is required for different brands.
What special functions does the DS200 support?
The DS200 supports 8 special functions, including Oil Reset,
Throttle Adaptation, EPB Reset, ABS Bleeding, Steering Angle
Reset, DPF Regeneration, Airbag Reset, and BMS Reset.
time?
Yes. Firmware will automatically update to the latest version once
the DS200 is connected with your phone via Bluetooth. You can
Can multiple devices be bound to one DS200 app account?
Yes.
Q
Q
Q
Q
Q
A
A
A
A
A
55
Section 7
Warranty
GOOLOO's One Year Limited Warranty
GOOLOO warrants to its original purchaser that the company's
products will be free from defects in material and workmanship for
12 months from the date of purchase (Warranty Period).
For the defects reported during the Warranty Period, GOOLOO will
either repair or replace the defective part or product according to its
GOOLOO shall not be liable for any incidental or consequential
damages arising from the device's use, misuse, or mounting.
local laws, the local laws shall prevail.
GOOLOO
This limited warranty is void under the following conditions:
• Misused, disassembled, altered or repaired by unauthorized stores
or technicians.
• Careless handling and/or improper operation.
Notice:
All information in this manual is based on the latest information
available at the time of publication and no warranty can be
made for its accuracy or completeness. GOOLOO reserves the
right to make changes at any time without notice.
56
Section 8
Warranty
Regulatory Compliance
FCC ID: 2BNZ7-DSCAN
IC: 33598-DSCAN
HVIN: DeepScan-DS200
FCC & ISED Statement:
This device complies with Part 15 of the FCC Rules [and contains
license exempt transmitter(s)/receiver(s) that comply with Innovation,
Science and Economic Development Canada’s licence-exempt RSS
standard(s)].
Operation is subject to the following two conditions:
(1) This device may not cause harmful interference, and
(2) This device must accept any interference received, including
interference that may cause undesired operation of the device.
L'émetteur/récepteur exempt de licence contenu dans le
p
résent appareil est conforme aux CNR d’Innovation, Sciences et
Développement économique Canada applicables aux appareils radio
exempts de licence.
L'exploitation est autorisée aux deux conditions suivantes:
(1) l'appareil ne doit pas produire de brouillage, et
(2) l'appareil doit accepter tout brouillage radioélectrique subi,
même si le brouillage est susceptible d'en compromettre le
fonctionnement.
responsible for compliance could void your authority to operate the
equipment.
FCC VOC
This equipment has been tested and found to comply with the limits
for a Class B digital device, pursuant to Part 15 of the FCC Rules.
These limits are designed to provide reasonable protection against
harmful interference in a residential installation. This equipment
generates, uses and can radiate radio frequency energy and, if not
installed and used in accordance with the instructions, may cause

57
harmful interference to radio communications. However, there is no
guarantee that interference will not occur in a particular installation.
If this equipment does cause harmful interference to radio or
television reception, which can be determined by turning the
equipment off and on, the user is encouraged to try to correct the
interference by one or more of the following measures:
-- Reorient or relocate the receiving antenna.
-- Increase the separation between the equipment and receiver.
-- Connect the equipment into an outlet on a circuit different from
that to whi
ch the receiver is connected.
-- Consult the dealer or an experienced radio/TV technician for help.
In case this equipment has to subject to FCC/IC SAR (Specific Absorption
Rate) exposure test, this equipment is designed to meet the requirements
for exposure to radio waves established by the FCC and ISED. These
requirements set a SAR limit of 1.6 W/kg averaged over one gram of tissue.
The highest SAR value reported under this standard during product
certification for use when properly worn on the body is within
regulatory limits.
FCC Caution
The device for operation in the band 5150-5250 MHz is only for indoor use
to reduce the potential for harmful interference to co-channel mobile
satellite systems.
IC Caution
1. The device for operation in the band 5150-5250 MHz is only for indoor
use to reduce the potential for harmful interference to co-channel mobile
satellite systems;
2. For devices with detachable antenna(s), the maximum antenna gain
permitted for devices in the band 5725-5850 MHz shall be such that the
equipment still complies with the e.i.r.p. limits specified for point-to-point
and non-point-to-point operation as appropriate.
1. les dispositifs fonctionnant dans la bande 5150-5250 MHz sont réservés
uniquement pour une utilisation à l’intérieur afin de réduire les risques de
brouillage préjudiciable aux systèmes de satellites mobiles utilisant les
mêmes canaux;
2. le gain maximal d’antenne permis (pour les dispositifs utilisant la bande
5725-5850 MHz) doit se conformer à la limite de p.i.r.e. spécifiée pour
l’exploitation point à point et non point à point, selon le cas.
Customer Service
12 Months Limited Warranty Service
Lifetime Technical Service
Feel Free to Contact Us
For FAQ and More Information
www.gooloo.com
1-888-886-1805
Mon.-Fri. PST 9:00a.m.-5:00p.m.

Bluetooth-Fahrzeugdiagnose-Dongle I Benutzerhandbuch
DS200


Sicherheit hat oberste Priorität!
Abschnitt 1 Lieferumfang
Abschnitt 2 Produktübersicht
Abschnitt 3 Erste Schritte
Abschnitt 4 DS200 über die App verwenden
Abschnitt 5 Technische Daten
Abschnitt 6 FAQ
Abschnitt 7 Garantie
.......................................
.......................................
.......................................
.......................................
.......................................
.......................................
.......................................
.......................................
Contents
4
5
6
8
20
53
54
55
4
Zu Ihrer Sicherheit, der Sicherheit anderer und zur Vermeidung von Schäden
an Produkt und Fahrzeug lesen Sie bitte alle Sicherheitshinweise und
Hinweise in diesem Handbuch vor der Inbetriebnahme sorgfältig durch und
stellen Sie sicher, dass Sie sie vollständig verstanden haben. Lesen Sie
außerdem das Servicehandbuch des Fahrzeugs und beachten Sie die
angegebenen Vorsichtsmaßnahmen und Anweisungen vor und während
aller Prüf- und Wartungsvorgänge.
Halten Sie sich, Ihre Kleidung und andere Gegenstände von beweglichen
oder heißen Motorteilen fern und vermeiden Sie den Kontakt mit
elektrischen Anschlüssen.
BETRIEBEN SIE DAS FAHRZEUG NUR IN GUT BELÜFTETEN RÄUMEN, da
das Fahrzeug bei laufendem Motor Kohlenmonoxid, ein giftiges Gas, und
Feinstaub produziert.
TRAGEN SIE IMMER EINE ZUGELASSENE SCHUTZBRILLE, um Schäden
durch scharfe Gegenstände und ätzende Flüssigkeiten zu vermeiden.
RAUCHEN SIE NICHT UND VERWENDEN SIE KEINE FEUER IN DER NÄHE
DES FAHRZEUGS während der Prüfung. Kraftstoff und Batteriedämpfe sind
hochentzündlich.
VERSUCHEN SIE NICHT, WÄHREND DER FAHRT MIT DEM PRODUKT ZU
INTERAGIEREN. Jede Ablenkung kann zu Unfällen führen.
SCHALTEN SIE DIE ZÜNDUNG AUS, BEVOR SIE DAS PRODUKT AN DEN
DATA LINK-ANSCHLUSS (DLC) ANSCHLIESSEN ODER TRENNEN, um
Schäden am Produkt oder an den elektronischen Fahrzeugkomponenten
zu vermeiden.
Sicherheit steht immer an erster Stelle!
5
DS200 Kurzanleitung
Abschnitt 1
Lieferumfang
Quick Reference Guide
Always Good To Go
OBD II
DS200
SCANNER
6
Abschnitt 2
Produktübersicht
2
1
7
1. Anzeigen
2. OBD-II 16-Pin-Anschluss
Verbindet den DS200 mit dem Fahrzeug-DLC.
Blau leuchtend: Bluetooth
verbunden
Grün leuchtend: eingeschaltet
Blau blinkend:
Kommunikation mit dem
Fahrzeug
Bluetooth-
Verbindungsanzeige
Betriebsanzeige
Kommunikationsanzeige
8
Abschnitt 3
Erste Schritte
3.1 App herunterladen
Suchen Sie im App Store oder bei Google Play nach “DeepScan OBD2
Scanner”, um die App herunterzuladen und zu installieren.
Hinweis:
Diese App ist kompatibel mit iOS 11.0 oder höher/Android 7.0 oder höher.
Figure 3-1
DeepScan OBD2
Scanner
DeepScan OBD2
Scanner
herunterladen
HERUNTERLADEN BEI
Im
9
3.2 Registrieren und Anmelden
Öffnen Sie die App und melden Sie sich an (falls Sie noch kein Konto
haben, registrieren Sie sich bitte mit Ihrer E-Mail-Adresse).
Aktivieren Sie WLAN, Bluetooth, Kamera und Ortungsdienste für
den App-Zugriff auf Ihrem Smartphone.
Figure 3-2
10
3.3 VCI binden
Sie gelangen in die geführten Benutzeroberflächen der App.
Binden Sie die VCI anschließend auf eine der beiden folgenden Arten ein.
Figure 3-3
Tippen Sie auf “Zum Aktivieren scannen”, um die VCI zu aktivieren
(siehe Abbildung 3-3). Seriennummer und Aktivierungscode werden
automatisch abgerufen. Anschließend springt die App zur Startseite.
Fahren Sie mit Schritt 3.6 fort.
3.3.1 VCI per Code-Scan binden
11
Figure 3-4
Folgen Sie den Anweisungen auf dem Bildschirm, um den DS200 mit
dem DLC des Fahrzeugs zu verbinden. Tippen Sie anschließend auf
“Weiter” (siehe Abbildung 3-4).
3.3.2 VCI per Bluetooth verbinden
12
Figure 3-5
Starten Sie den Motor des Fahrzeugs gemäß den
Anweisungen auf der Benutzeroberfläche. Tippen Sie
anschließend auf “Weiter” (siehe Abbildung 3-5).
13
Figure 3-6
Stellen Sie sicher, dass die LED am Gerät durchgehend grün
leuchtet, und suchen Sie nach Bluetooth. Sobald die Verbindung
hergestellt ist, leuchtet die LED am Gerät durchgehend blau
(siehe Abbildung 3-6).
14
Figure 3-7
Wählen Sie Ihr Gerät aus der Liste der gesuchten
Bluetooth-Geräte aus.
Nach erfolgreicher Bluetooth-Verbindung werden die
Seriennummer und der Aktivierungscode des VCI automatisch
gelesen. Tippen Sie anschließend auf “Aktivieren”
(siehe Abbildung 3-7).
Falls Sie die VCI-Anbindung über die geführte Benutzeroberfläche
noch nicht abgeschlossen haben, können Sie die VCI auch
wie folgt anbinden.
***********************
*******
15
Tippen Sie auf “Ich” > “VCI-Verwaltung” > “+”.
Um die Seriennummer und den Aktivierungscode zu erhalten, scannen
Sie bitte den QR-Code auf dem Produkt. Alternativ können Sie auf das
Symbol oben rechts im Aktivierungsbildschirm tippen, um eine Bluetooth-
Verbindung herzustellen (siehe Abbildung 3-8). Sobald die Bluetooth-
Verbindung zwischen dem DS200 und Ihrem Smartphone hergestellt ist,
werden die Seriennummer und der Aktivierungscode automatisch abgerufen.
Hinweis:
Der DS200 muss ordnungsgemäß mit dem DLC des Fahrzeugs verbunden
sein, bevor eine Bluetooth-Verbindung hergestellt werden kann.
Tippen Sie anschließend auf “Aktivieren”.
Figure 3-8
***********************
*******
Beim ersten Gebrauch der Diagnosefunktion müssen Sie die
fahrzeugspezifische Software herunterladen. Tippen Sie auf dem
Startbildschirm auf “Diagnose” und laden Sie die benötigte Software herunter.
16
3.4 Diagnosesoftware herunterladen
Figure 3-9
17
3.5 Schließen Sie das Ds200 an den Fahrzeug-DLC an.
Um den Fahrzeug-DLC zu finden, tippen Sie auf “Reparaturinformationen” > “DLC-
Standort”, wählen Sie Fahrzeugmarke, Modell und Baujahr aus und tippen Sie auf
“Weiter”. Ein Bild des DLC-Standorts für das ausgewählte Fahrzeug wird angezeigt.
Hinweis:
Stellen Sie sicher, dass die Zündung ausgeschaltet ist, bevor Sie das
Gerät anschließen.
Figure 3-10
Figure 3-11
18
Hinweis:
Es wird eine Aufforderung zur Aktualisierung der Firmware
angezeigt. Tippen Sie auf “Aktualisieren”, um fortzufahren.
3.4 Schalten Sie die Zündung ein (siehe Abbildung 3-12).
3.7 Bluetooth-Verbindung
Wenn Ihr Fahrzeug mit einem schlüssellosen Startsystem
ausgestattet ist und der Zündschalter über eine “Engine Start Stop”-
Taste verfügt (siehe Abbildung 3-13), drücken Sie die “Engine Start
Stop”-Taste, bis das Fahrzeug eingeschaltet ist. Betätigen Sie die
Bremse nicht, während Sie die “Engine Start Stop”-Taste drücken,
da Sie sonst das Fahrzeug starten, anstatt es einzuschalten.
Die Zündmethode variiert je nach Fahrzeugmodell. Weitere
Informationen finden Sie im Servicehandbuch des Fahrzeugs.
Wählen Sie Ihr Gerät aus der Liste der gesuchten Bluetooth-Geräte
aus. Tippen Sie auf das Symbol oben rechts auf einem beliebigen
Bildschirm, um eine Bluetooth-Verbindung mit dem DS200
herzustellen. Nach erfolgreicher Verbindung ändert sich das
Symbol zu .
Sobald Bluetooth erfolgreich gekoppelt ist, wird die Verbindung
beim Öffnen der App automatisch hergestellt. Falls keine
Verbindung besteht, tippen Sie manuell auf das Symbol, um
die Verbindung wiederherzustellen.
ENGINE
START
STOP
Figure 3-12 Figure 3-13
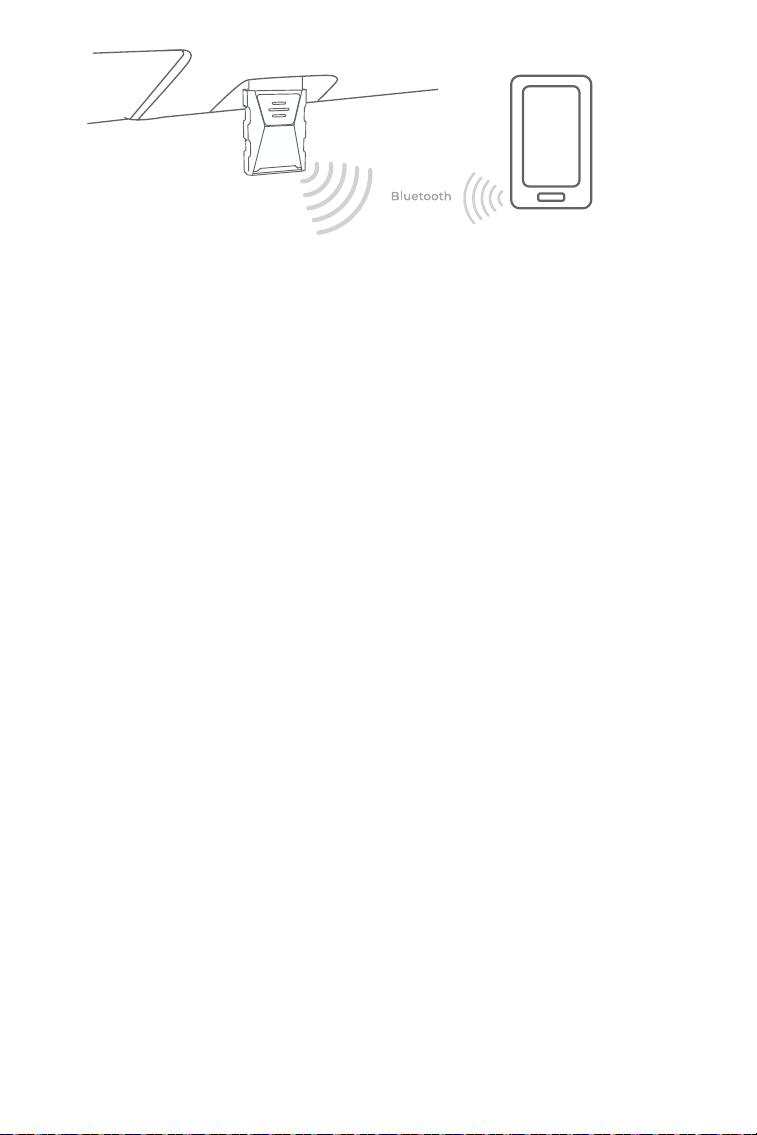
Auto 0BD-ll Schnittstelle
19
Figure 3-14
20
Figure 4-1
Abschnitt 4
Nutzung des DS200 über die App
4.1 Startbildschirm
1
2
4
3
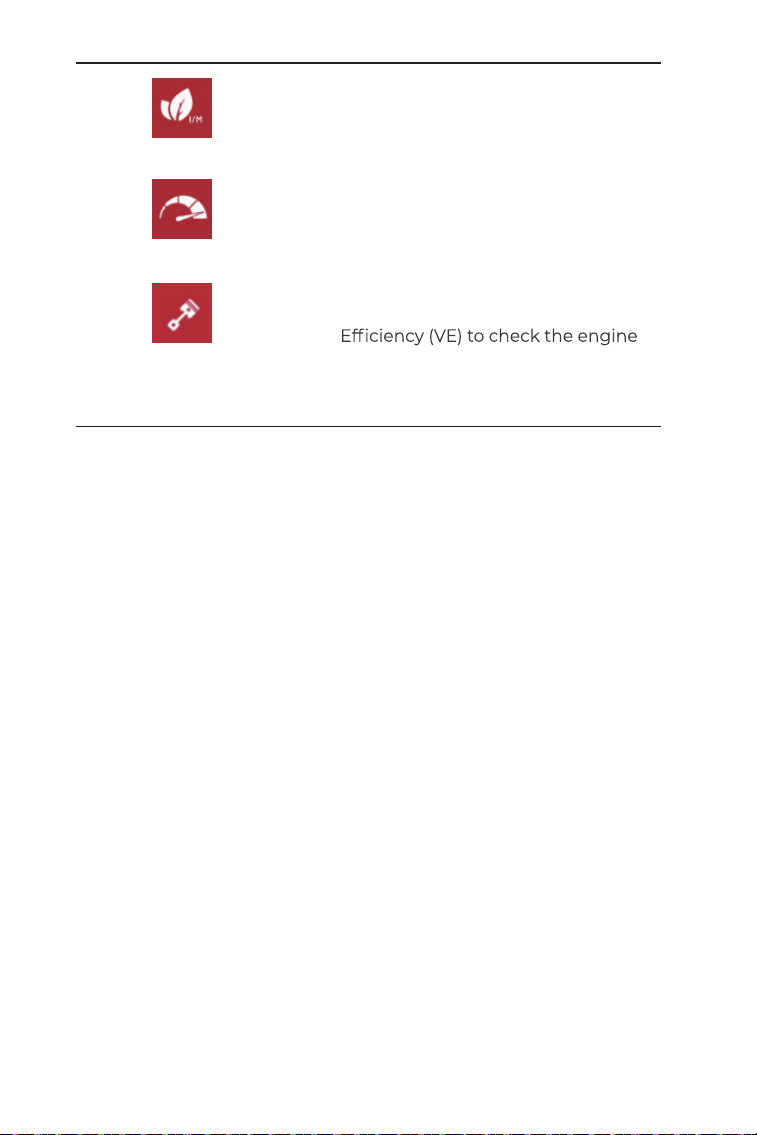
1. Hauptfunktionen
Wischen Sie nach rechts oder links, um durch die Funktionen zu
navigieren.
Configures the DS200 to
operate as a scan tool.
Diagnostics
21
2. Wartungsfunktionen
Bietet 8 Wartungsfunktionen.
Provides quick access to check
the status of the emission-related
systems.
Allows you to perform acceleration
tests on your vehicle.
Allows you to calculate Volumetric
performance.
I/M Readiness
Vehicle Performance
VE Calculator
Selecting this icon returns you to the
home screen.
Allows you to purchase or renew diagnostic
software license. For DS200, single purchase
for a year and subscriptions (monthly,
quarterly, annual) are available.
Includes DTC Repair Guide, Technical Service
Bulletins, DLC Location and Warning Light
Library, which provides reference information
on vehicle inspection, diagnostics, and repair.
Allows you to view your account profile,
access saved data streams and diagnostic
reports, check vehicle coverage, manage
VCIs, update firmware, uninstall diagnostic
software, open the user manual, submit
feedback, and adjust system settings.
22
3. Symbolleiste
Home
Mall
Me
Service
Note:
app to open the on-line chat tool. Then tap START CHAT to
to move it anywhere.
4. Diagnose
Mit dem Diagnosemodul können Sie alle unterstützten
Fahrzeugsysteme gleichzeitig (automatischer Scan) auf Diagnose
-Fehlercodes (DTCs) prüfen oder ein einzelnes System auswählen,
um Fehlercodes zu lesen, zu löschen, Datenstrom zu lesen,
Versionsinformationen zu lesen und einen aktiven Test
durchzuführen. Sie können über dieses Modul auch auf EOBD
und Diagnose-Feedback zugreifen.
23
Figure 4-2
Um einen automatischen Scan oder eine individuelle Systemdiagnose
durchzuführen, müssen Sie zunächst Ihr Fahrzeug identifizieren.
1. Tippen Sie auf dem Startbildschirm auf “Diagnose”. Eine Liste
fahrzeugspezifischer Diagnosesoftware wird angezeigt.
4.1 Automatischer Scan und individuelle Systemdiagnose zur
Fahrzeugidentifizierung
24
2. Wählen Sie die Software entsprechend Ihrer Fahrzeugmarke
aus (falls Sie die Software noch nicht heruntergeladen haben,
laden Sie sie bitte zuerst herunter und installieren Sie sie).
3. Wählen Sie “Automatisch” / “Manuell”, um das Fahrzeug zu
identifizieren.
Wenn Sie diese Seite zum ersten Mal aufrufen, werden oben
rechts Schaltflächen angezeigt. Tippen Sie auf “Weiter”, um
fortzufahren.
Hinweis:
Ein Demomodus (Option DEMO) hilft Ihnen, sich mit den
Diagnosefunktionen vertraut zu machen.
Hinweis:
Figure 4-3
25
Automatisch
Geben Sie die Fahrzeugidentifikationsnummer (VIN) manuell ein oder
tippen Sie auf “Lesen”, um die VIN zu ermitteln. Tippen Sie anschließend
auf “Bestätigen”. DS200 dekodiert die VIN automatisch, um das
Fahrzeug zu identifizieren.
Manuell
Wählen Sie die Fahrzeuginformationen manuell aus, um das Fahrzeug
zu identifizieren. Alternativ können Sie auf das Symbol oben rechts
tippen und “AutoFIN”, “VIN eingeben” oder “VIN scannen” auswählen,
um das Fahrzeug zu identifizieren.
Figure 4-4
26
AutoVIN – Der DS200 liest und dekodiert die Fahrgestellnummer
(VIN) automatisch.
VIN eingeben – Geben Sie die Fahrgestellnummer (VIN) manuell ein.
VIN scannen – Tippen Sie, um die VIN-Zeichen zu scannen.
Figure 4-5
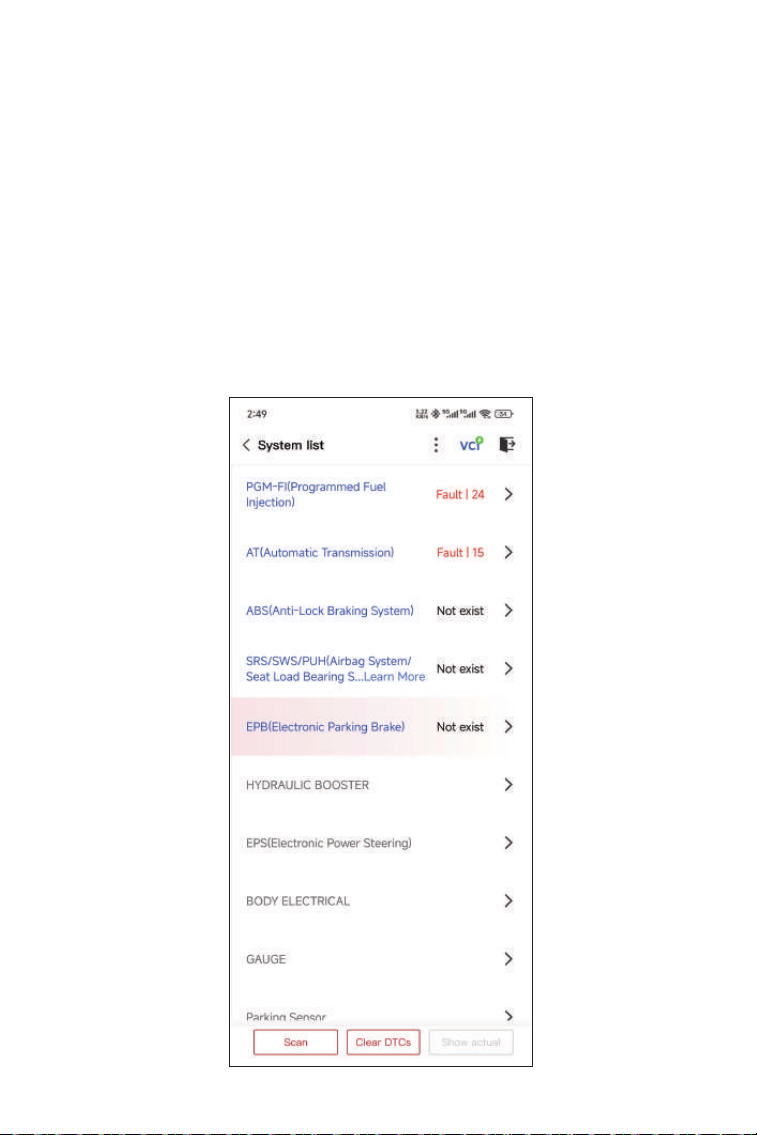
Sie können entweder “Scannen” auswählen oder auf ein Fahrzeugsystem
tippen, um das Funktionsmenü für dieses System zu öffnen.
Hinweis:
Die Systeme können je nach Marke, Modell und Baujahr variieren.
4. Nach der Fahrzeugidentifizierung wird ein Systemmenü angezeigt.
27
Figure 4-6
Auto-Scan
Der Auto-Scan erkennt die vom Fahrzeug unterstützten Systeme und
ruft die DTCs für alle diese Systeme ab. So erhalten Sie eine vollständige
Zustandsprüfung Ihres Fahrzeugs. Ein Auto-Scan vor und nach der
Reparatur kann bei der Fehlersuche und der Validierung von
Reparaturen hilfreich sein. Berichte vor und nach dem Scan
ermöglichen Ihnen, den Zustand des Fahrzeugs vor und nach der
Reparatur zum Vergleich aufzuzeichnen.
Um einen Auto-Scan durchzuführen, tippen Sie auf die Schaltfläche
“Scannen”. Der DS200 beginnt mit dem Scannen aller vom Fahrzeug
unterstützten Systeme, und der DTC-Abruf wird automatisch durchgeführt.
Die Ergebnisse werden während des Scannens der Systeme
fortlaufend angezeigt.
28
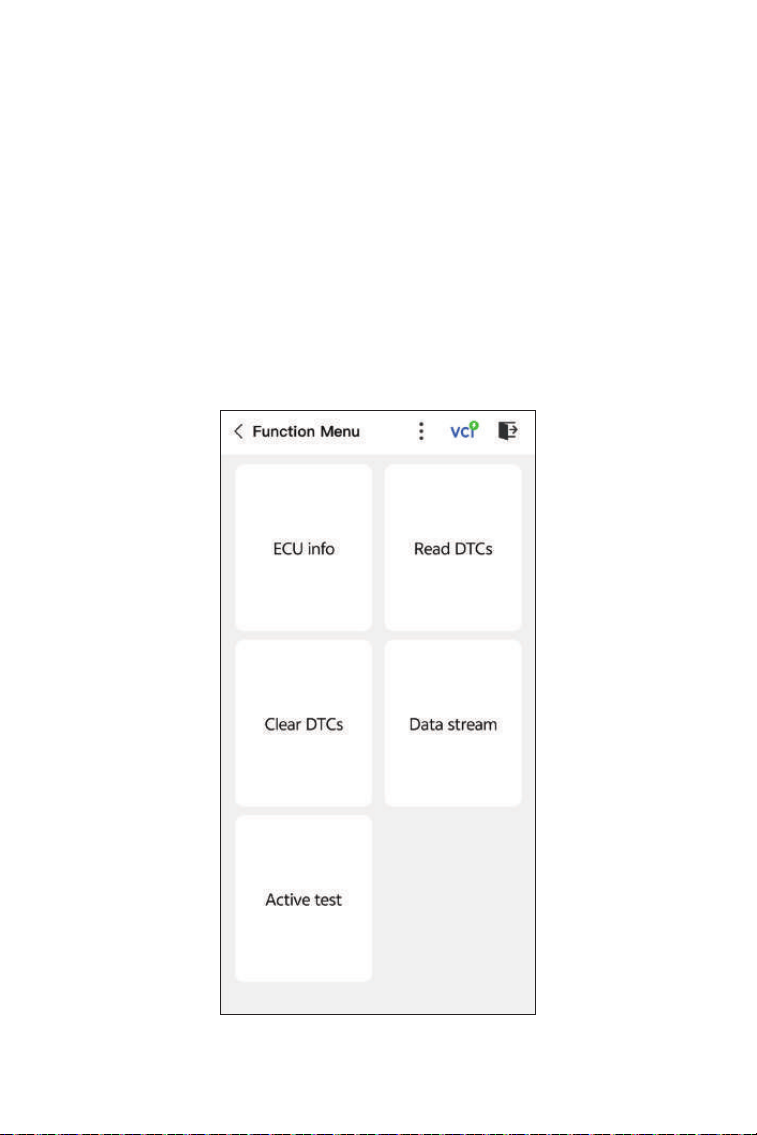
Schaltfläche Beschreibung
DTCs löschen – Tippen Sie hier, um alle abgerufenen DTCs
zu löschen.
Alle anzeigen/Aktuell anzeigen – Tippen Sie hier, um zwischen
der Anzeige aller Fahrzeugsysteme und der Anzeige nur der
unterstützten Systeme umzuschalten.
Einzelne Systemdiagnose durchführen
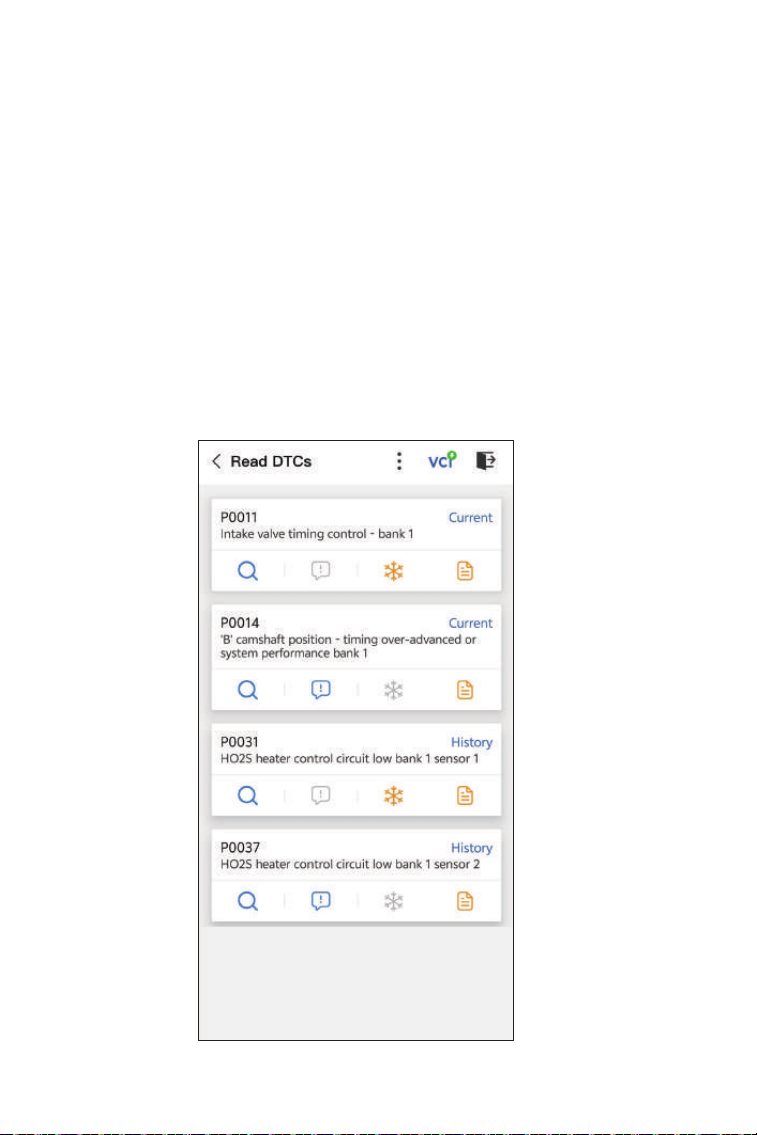
So greifen Sie auf das Funktionsmenü eines bestimmten Systems zu:
Wählen Sie im Systemmenü das gewünschte Fahrzeugsystem aus.
Die verfügbaren Funktionsoptionen für das System werden
angezeigt. Wählen Sie eine Funktion aus, um fortzufahren.
Figure 4-7
29
ECU-Informationen lesen
Tippen Sie im Funktionsmenü auf ECU-Info. Anschließend können
Sie die Versionsinformationen der elektronischen
Steuereinheit (ECU) für das aktuell ausgewählte System anzeigen.
Fehlercode lesen
So rufen Sie den DTC für das aktuell ausgewählte System ab:
Tippen Sie im Funktionsmenü auf DTCs lesen. DS200 kommuniziert
mit der ECU und ruft DTCs für das aktuell ausgewählte System ab
und zeigt sie an
Figure 4-8
Hinweis:
Je nach Fahrzeugmarke sind einige Funktionen möglicherweise
nicht verfügbar.
30
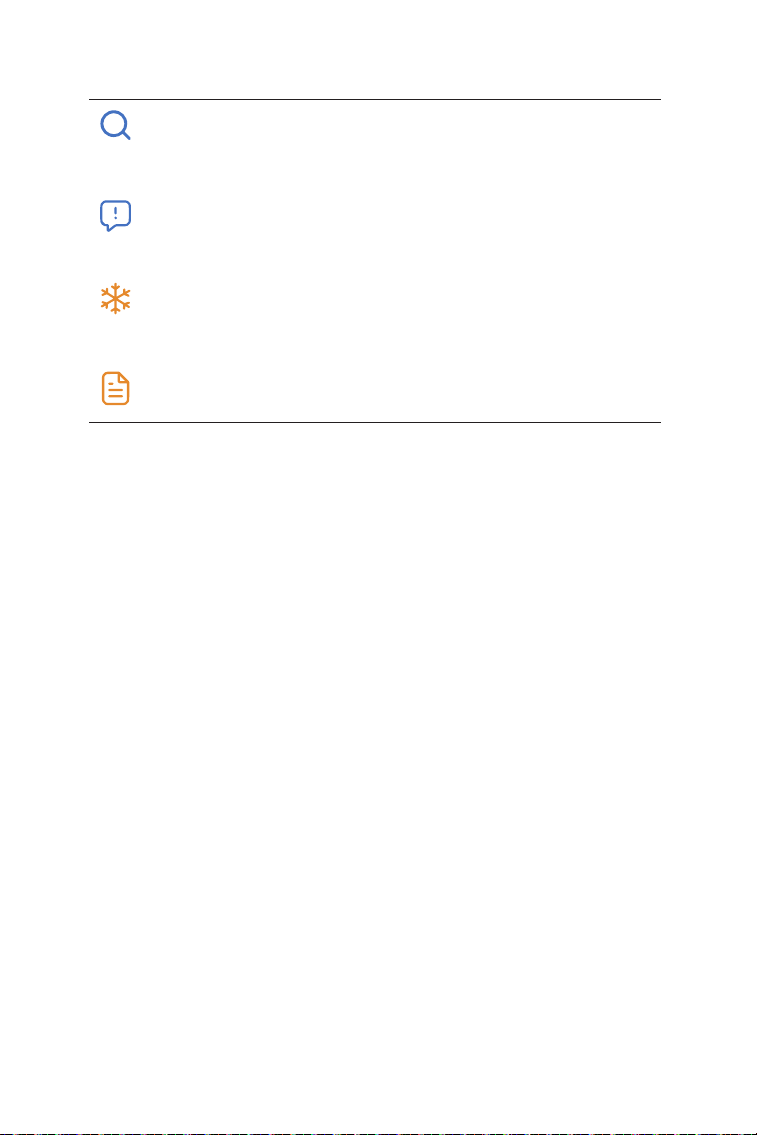
Icon Description
Schaltfläche Beschreibung
Bericht - Tippen Sie hier, um die Ergebnisse im Berichtsformat
zu speichern. (Um die gespeicherten
Berichte anzuzeigen, gehen Sie zu Ich > Diagnosebericht.)
DTCs löschen - Tippen Sie hier, um alle abgerufenen DTCs zu löschen.
Fehlercode löschen
So löschen Sie DTCs für das aktuell ausgewählte System:
1. Tippen Sie im Funktionsmenü auf DTCs löschen.
2. Tippen Sie auf OK, wenn die DTCs gelöscht sind.
Hinweis:
1. Das Löschen von DTCs sollte nach der erforderlichen Reparatur
durchgeführt werden. Nach der Bestätigung werden die im
Steuergerät gespeicherten DTCs und Freeze-Daten gelöscht.
2. STARTEN SIE DEN MOTOR NICHT, WÄHREND DIE DTCS LÖSCHEN
Tap to open a window that allows you to search on Google
for more information about the DTC.
When the icon lights up, tap to view the detailed
description of the DTC.
When the icon lights up, tap to view the freeze frame
captured at the time when the DTC occurs.
When the icon lights up, tap to view the instructional
repair measures.
31
Datenstrom lesen
So zeigen Sie den Datenstrom für das aktuell ausgewählte System an:
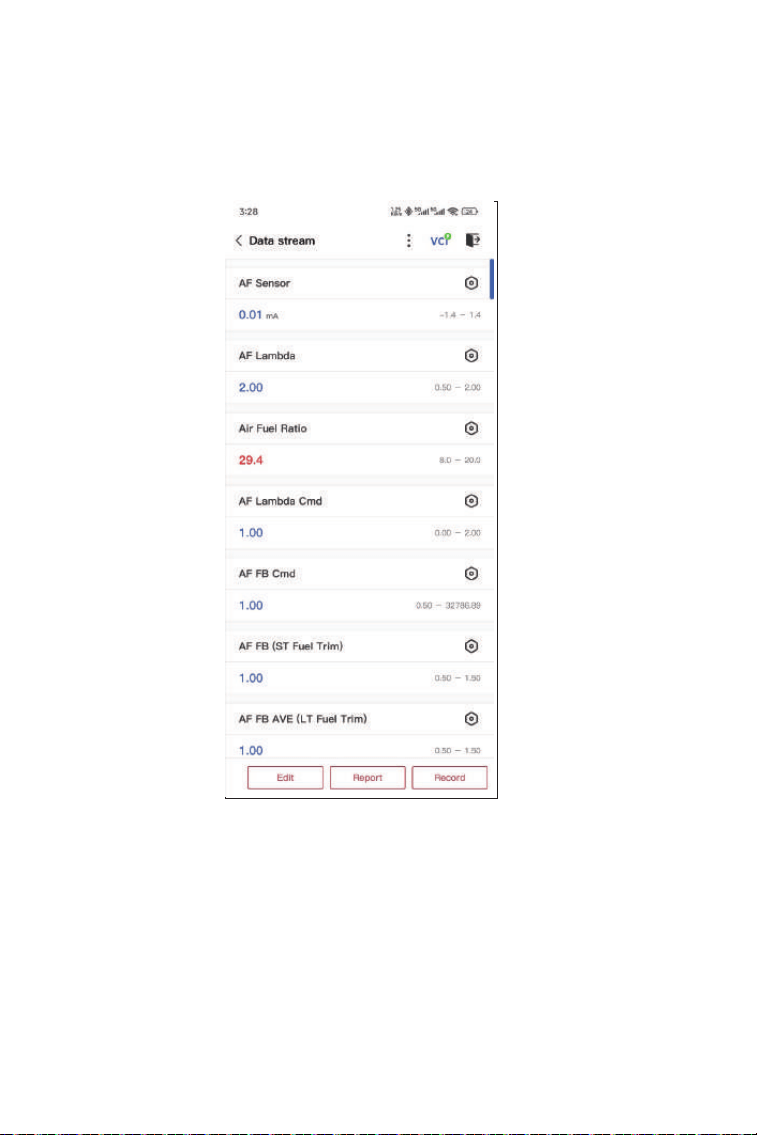
1. Tippen Sie im Funktionsmenü auf Datenstrom.
Eine Datenstromliste wird angezeigt
Schaltfläche Beschreibung
Bearbeiten - Ermöglicht Ihnen, Ihre Datenstromliste anzupassen.
Aktivieren Sie das Kontrollkästchen des Datenstroms, den Sie anzeigen
möchten, und tippen Sie auf Bestätigen.
Aufzeichnen - Ermöglicht Ihnen, Datenstrominformationen zum
Vergleich und zur Analyse aufzuzeichnen und zu speichern. Um die
gespeicherten Datenstrominformationen anzuzeigen, gehen Sie zu
Ich > Datenstrom
.
Figure 4-9
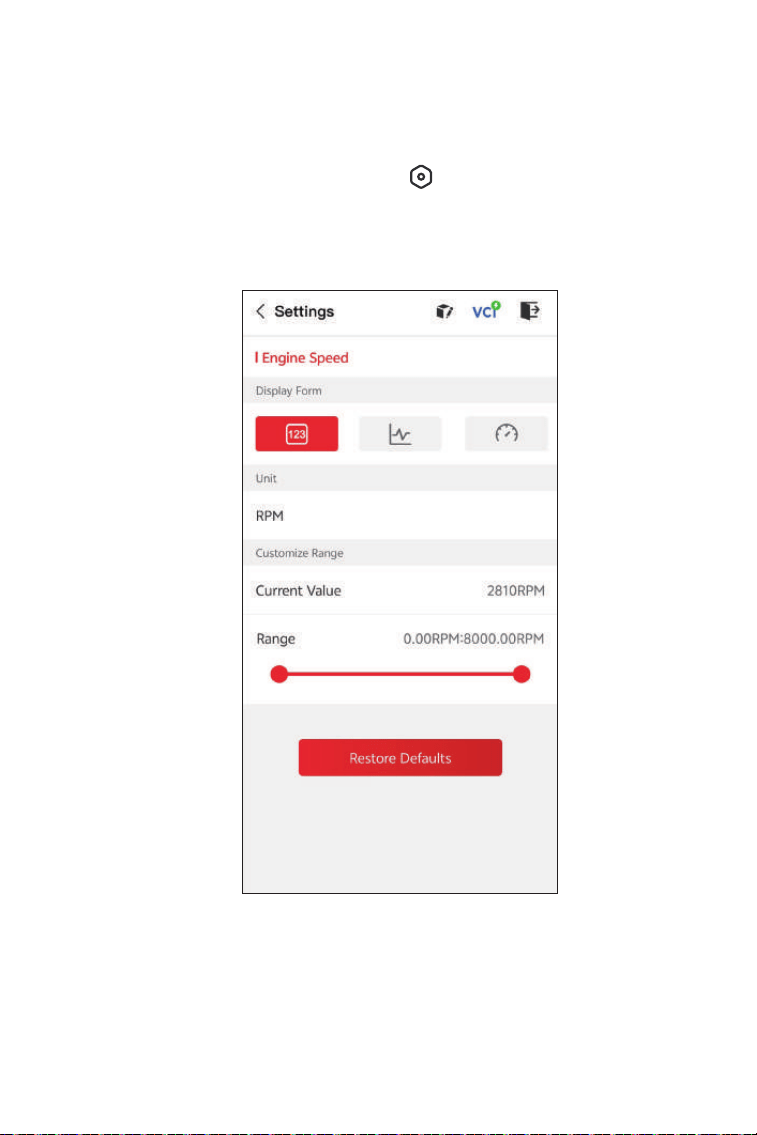
Jeder Eintrag in der Liste zeigt den Namen und den aktuellen Wert
des Datenstroms. Tippen Sie auf das Symbol neben jedem Eintrag,
um zum Einstellungsbildschirm zu gelangen. Der Datenstrom kann
als Wert, Diagramm oder Messanzeige angezeigt werden (siehe
Abbildung 4-10).
32
Bericht - Tippen Sie hier, um die aktuellen Datenstromwerte im
Berichtsformat zu speichern. Um die gespeicherten Berichte
anzuzeigen, gehen Sie zu Ich > Diagnosebericht.
Figure 4-10
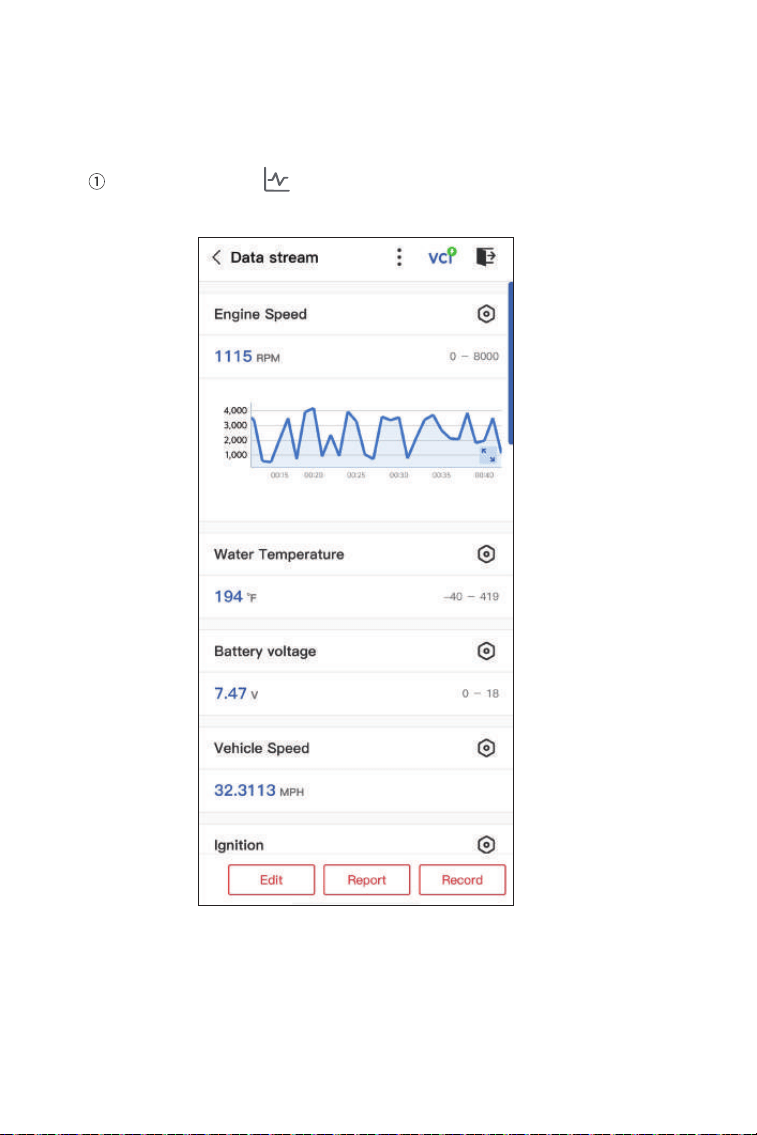
Tippen Sie auf das Symbol, um die Anzeigeform zu ändern und zum
Datenstrombildschirm zurückzukehren
33
2. Zur Vereinfachung des Vergleichs und der Beobachtung steht die
Funktion „Kombinieren“ zur Verfügung, mit der bis zu 4 Datenströme
in einem Diagramm angezeigt werden können.
So greifen Sie auf die Funktion “Kombinieren” zu:
Figure 4-11
34
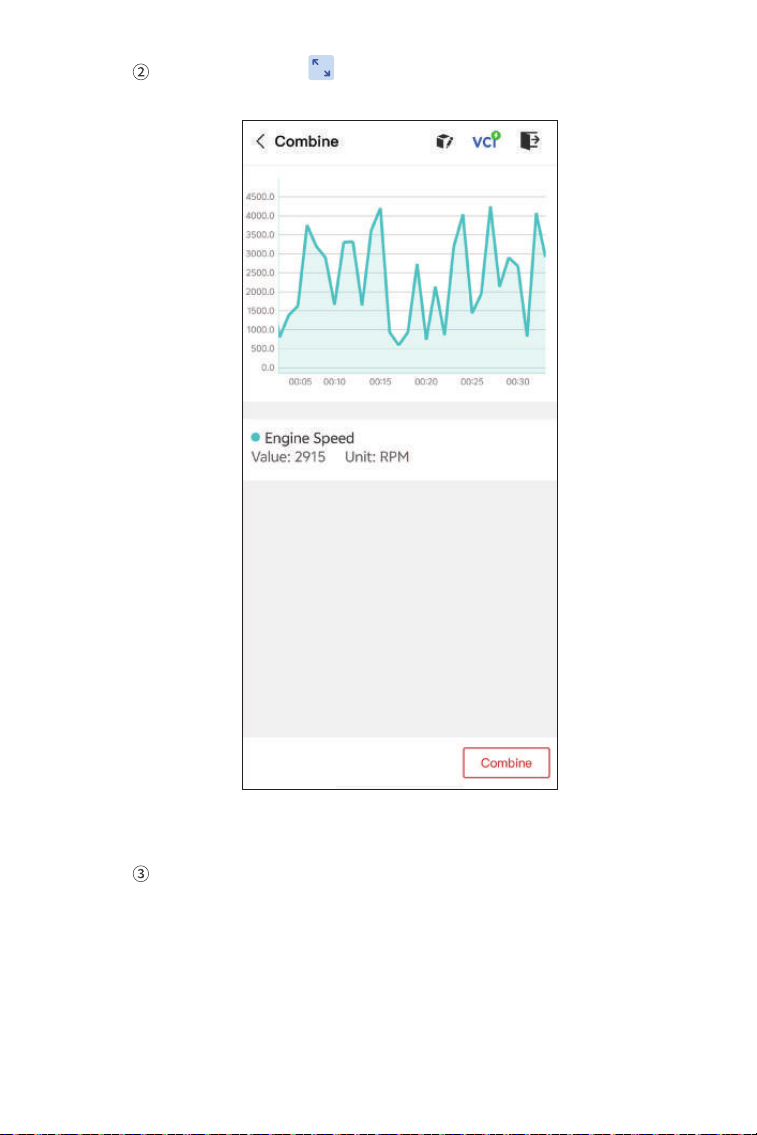
Tippen Sie auf das Vollbildsymbol auf der rechten Seite.
Der folgende Bildschirm wird angezeigt.
Tippen Sie auf “Kombinieren” und wählen Sie bis zu vier
Datenströme aus.
Figure 4-12
35
Tippen Sie auf Bestätigen. Ein kombiniertes Diagramm wird angezeigt.
Hinweis:
WENN DAS FAHRZEUG FAHREN MUSS, UM DEN LIVE-DATENSTREAM
ANZUSEHEN, LASSEN SIE SICH IMMER VON EINER ZWEITEN
PERSON HELFEN. SEHEN SIE DEN DATENSTREAM NICHT
WÄHREND DER FAHRT AN
Figure 4-13
36
Aktiver Test
- Ermöglicht Ihnen die manuelle Steuerung bestimmter
Komponentenvorgänge direkt über die App, um deren Funktion
zu überprüfen.
Hinweis:
Die verfügbaren Tests variieren je nach Fahrzeugmarke, Baujahr
und Modell.
4.2 EOBD
Mit der EOBD-Funktion können Sie emissionsbezogene
Diagnosen für Ihr Fahrzeug durchführen.
So führen Sie die EOBD-Diagnose durch:
1. Tippen Sie auf dem Startbildschirm auf Diagnose. Wählen Sie
EOBD in der angezeigten Fahrzeugmarkenliste aus.
2. Wählen Sie Ihre Kommunikationsmethode: Auto-Scan oder
Protokoll
Figure 4-14
37
Automatischer Scan - Der DS200 kommuniziert automatisch mit
dem Fahrzeug und erkennt, welches Protokoll das Fahrzeug verwendet.
Protokoll - Ermöglicht die manuelle Auswahl des
Kommunikationsprotokolls.
Nachdem das Kommunikationsprotokoll bestätigt wurde, wird ein
Fahrzeugstatusbildschirm mit dem Protokoll und weiteren
Statusinformationen Ihres Fahrzeugs angezeigt
Figure 4-15
38
3. Tippen Sie auf “OK”, um das Funktionsmenü aufzurufen.
4. Wählen Sie eine Funktion, um fortzufahren.
Hinweis:
Je nach Fahrzeugmarke sind einige Funktionen möglicherweise
nicht verfügbar.
Typische Funktionsoptionen können sein:
· DTC- und Freeze-Frame-Daten
· I/M-Bereitschaft
· Live-Daten
· O2-Sensorüberwachung
· Bordüberwachung
· Komponentenprüfung
· Fahrzeuginformationen
Figure 4-16

39
DTC & FFD (Freeze Frame Data)
I/M-Bereitschaft (Inspektion und Wartung)
Diese Funktion prüft, ob die verschiedenen emissionsrelevanten
Systeme des Fahrzeugs ordnungsgemäß funktionieren und für die
I/M-Prüfung bereit sind.
Sie kann auch verwendet werden, um den Betriebsstatus des Monitors
zu überprüfen und zu bestätigen, ob die Reparatur eines
Fahrzeugfehlers korrekt durchgeführt wurde.
Live-Daten
Diese Funktion zeigt die Echtzeitdaten und -parameter der
Fahrzeug-ECU an.
O2-Sensor-Monitor
Diese Funktion zeigt die Testergebnisse des O2-Sensor-Monitors der
zuletzt durchgeführten Tests der Fahrzeug-ECU an.
Bordmonitor
Diese Funktion zeigt die Testergebnisse für emissionsrelevante
Antriebsstrangkomponenten und -systeme an, die nicht
kontinuierlich überwacht werden
Diese Funktion hilft beim Abrufen und Löschen von DTCs, die im
Steuergerät des Fahrzeugs gespeichert sind, und zeigt die FFD der
emissionsrelevanten Systeme an.
1. DTCS lesen
Diese Funktion zeigt die von den emissionsrelevanten Systemen
abgerufenen DTCs an.
2. DTCS löschen
Mit dieser Funktion können Sie die von den emissionsrelevanten
Systemen abgerufenen DTCs löschen.
3. FFD
Diese Funktion erstellt eine Momentaufnahme der Daten und
Betriebsbedingungen, wenn ein emissionsrelevanter Fehler auftritt.
Hinweis:
1. Das Löschen von DTCs sollte nach der erforderlichen Reparatur
durchgeführt werden. Nach der Bestätigung werden die im Steuergerät
gespeicherten DTCs und FFD gelöscht.
2. STARTEN SIE DEN MOTOR NICHT, WÄHREND DIE DTCS GELÖSCHT
WERDEN

40
Der DS200 ermöglicht Ihnen das sofortige Senden von Diagnose-
Feedback (mit automatisch angehängten Protokollen der
Diagnosedaten), wenn bei den Diagnosevorgängen ein
Softwareproblem auftritt.
So senden Sie Diagnose-Feedback:
1. Tippen Sie auf das Symbol und dann auf das Symbol in der
oberen rechten Ecke eines beliebigen Bildschirms im Diagnosemodul.
2. Wählen Sie die Art des Problems aus.
3. Schreiben Sie eine Beschreibung des Problems.
4. Tippen Sie auf “Senden”, um das Feedback zu senden
Komponententest
Diese Funktion hilft dabei, Steuerbefehle an das Steuergerät
des Fahrzeugs zu senden, um die Systemteile und -komponenten
zu testen und zu betreiben.
Fahrzeuginformationen
Diese Funktion zeigt eine Liste von Informationen (vom
Fahrzeughersteller bereitgestellt) vom Steuergerät des Fahrzeugs an.
Die Informationen können Folgendes umfassen:
· VIN
· Kalibrierungs-ID (CID)
· Kalibrierungsverifizierungsnummer (CVN)
4.3 Diagnose-Feedback

41
5. I/M-Bereitschaft
6. Fahrzeugleistungsprüfung
Diese Funktion prüft, ob die verschiedenen emissionsrelevanten
Systeme des Fahrzeugs ordnungsgemäß funktionieren und für die
I/M-Prüfung bereit sind.
Sie kann auch verwendet werden, um den Betriebsstatus des Monitors
zu überprüfen und zu bestätigen, ob die Reparatur eines Fahrzeugfehlers
korrekt durchgeführt wurde.
Hinweis:
Das Fahrzeug sollte erst dann als prüfbereit betrachtet und die
Abgasuntersuchung bestanden werden, wenn alle erforderlichen
Tests bestanden wurden.
Die Fahrzeugleistungsprüfung ermöglicht Ihnen genaue Messungen der
Fahrzeugbeschleunigung und liefert Ergebnisse in Intervallen, die durch
festgelegte Geschwindigkeits- und Entfernungsmessungen definiert sind
42
6.1 Durchführen eines Fahrzeugleistungstests
1. Tippen Sie auf dem Startbildschirm auf Fahrzeugleistung.
2. Eine Warnmeldung wird angezeigt. Lesen Sie die Meldung
sorgfältig durch und tippen Sie auf OK, um fortzufahren
Figure 4-17
43
3. Die Standardwerte für die Start- und Endgeschwindigkeit sind 0
MPH bzw. 60 MPH. Wenn Sie die Werte ändern möchten, tippen Sie
auf die Schaltfläche 0-60 MPH und dann auf Bearbeiten, um die Start
- und Endgeschwindigkeit festzulegen.
4. Beschleunigen Sie Ihr Fahrzeug, um den Test zu starten.
Hinweis:
Wenn Sie die Endgeschwindigkeit der Messung nicht erreichen, werden
die Ergebnisse automatisch zurückgesetzt, sobald die Geschwindigkeit
des Fahrzeugs der Startgeschwindigkeit entspricht
Figure 4-18
3 4
1
2
44
Fahrzeuggeschwindigkeit
Motordrehzahl
Leistung
Drehmoment
Tastenbeschreibung
Start - Tippen Sie hier, um für den nächsten Lauf zurückzusetzen
Testbericht - Tippen Sie hier, um die Testergebnisse anzuzeigen
0-60 MPH/(1/4 Meile) - Tippen Sie hier, um zwischen dem
0-60 MPH-Ergebnisbildschirm umzuschalten
Figure 4-19
3 4
1
2
45
und 1/4-Meilen-Ergebnisbildschirm.
Tippen Sie auf “Bearbeiten”, um die Start- und
Endgeschwindigkeit festzulegen.
6.2 Testergebnisse anzeigen
1. Tippen Sie im Testbildschirm auf “Testbericht”. Der
Ergebnisbildschirm wird angezeigt
Figure 4-20
46
2. Tippen Sie auf den gewünschten Datensatz, um seinen
vollständigen Inhalt anzuzeigen.
Figure 4-21
1/4-Meilen-Testergebnisse - Zeichnen Sie die verstrichene Zeit auf, die
ein Fahrzeug benötigt, um eine bestimmte Distanz (60 Fuß, 330 Fuß, 1/8
Meile, 1000 Fuß, 1/4 Meile) zurückzulegen, und die momentane
Geschwindigkeit an jedem Punkt (siehe Abbildung 4-18 und Abbildung 4-21).
0-60 MPH-Testergebnisse - Zeichnen Sie die verstrichene Zeit auf, die
ein Fahrzeug benötigt, um von 0 auf 60 Meilen pro Stunde zu
beschleunigen (siehe Abbildung 4-19). Die Werte für die Start- und
Endgeschwindigkeit können bei Bedarf geändert werden.

Geschwindigkeitstestergebnisse - Zeichnen Sie die verstrichene Zeit
auf, die ein Fahrzeug benötigt, um auf eine bestimmte Geschwindigkeit
zu beschleunigen (siehe Abbildung 4-21).
47
8. Wartung
7. VE-Rechner
Der DS200 unterstützt 8 Sonderfunktionen, darunter Ölrückstellung,
Drosselklappenanpassung, Rückstellung der elektronischen
Parkbremse (EPB), Rückstellung des Lenkwinkels, Regeneration
des Dieselpartikelfilters (DPF), Entlüftung des Antiblockiersystems
(ABS), Rückstellung des Batteriemanagementsystems (BMS)
und Rückstellung des Airbags
Mit dem VE-Rechner können Sie den volumetrischen Wirkungsgrad
Ihres Fahrzeugmotors berechnen, der einer der wichtigsten
Leistungsparameter des Motors ist.
So berechnen Sie den VE:
Tippen Sie auf dem Startbildschirm auf VE-Rechner und geben Sie die
erforderlichen Werte ein, darunter Hubraum, Motordrehzahl, MAF,
Ansauglufttemperatur, Zylinderzahl und Ansaugluftdruck. Tippen
Sie anschließend auf Berechnen
.
8.1 Serviceübersicht
Öl zurücksetzen
Mit dieser Funktion können Sie die Ölserviceleuchte für das
Motoröllebensdauersystem zurücksetzen. Dieses berechnet ein
optimales Ölwechselintervall in Abhängigkeit von den
Fahrbedingungen und Wetterbedingungen. Ein Öl-Reset ist bei jedem
Motorölwechsel erforderlich.
EPB zurücksetzen
Diese Funktion hilft Ihnen beim Austausch und Zurücksetzen der
Bremsbeläge.
Sie muss in folgenden Fällen durchgeführt werden:
• Nachdem die Bremsbeläge und der Bremsbelagverschleißsensor
ausgetauscht wurden;
• Wenn die Bremsbelagwarnleuchte leuchtet;
• Nachdem ein Kurzschluss im Bremsbelagsensor behoben wurde;
• Nachdem der Servomotor ausgetauscht wurde

48
Lenkwinkel zurücksetzen
Wenn der Lenkwinkelsensor ausgetauscht wird oder der Lenkwinkel
ungenau oder nicht zentriert ist, muss die Lenkwinkel-Reset-Funktion
durchgeführt werden, um die relative Nullposition zu finden. Mit dieser
Position als Referenz kann die ECU dann den genauen Winkel für die Links-
und Rechtslenkung berechnen.
BMS-Reset
Nach dem Austausch der Autobatterie muss das Batteriesteuergerät
zurückgesetzt werden. Dadurch werden Fehlerinformationen (z. B. niedriger
Batteriestand) gelöscht, sodass das Steuergerät die relevanten Informa-
tionen der neu ausgetauschten Batterie abgleichen kann.
ABS-Entlüftung
Wenn das Bremssystem geöffnet wird, um Komponenten wie Bremspumpe,
Hauptbremszylinder, Bremsleitungen oder Bremsflüssigkeit auszutauschen,
gelangt Luft ins Innere, was zu einem weichen Bremspedal führen kann.
Eine ABS-Entlüftung ist erforderlich, um die Festigkeit des Bremspedals
wiederherzustellen.
Drosselklappenanpassung
Wenn die ECU versehentlich getrennt wird oder die Drosselklappe
ausgetauscht oder gereinigt wird, müssen die Drosselklappenstellglieder
über die Drosselklappenanpassungsfunktion initialisiert werden. Dadurch
werden die Daten der ECU auf ihren Ausgangszustand zurückgesetzt, sodass
die Drosselklappe die Luftzufuhr genau regulieren kann
DPF-Regeneration
Diese Funktion wird hauptsächlich zur Regeneration von Dieselpartikelfiltern
verwendet. Um die Leistung der Filter aufrechtzuerhalten, werden Partikel
durch Verbrennung und Oxidation entfernt.
Airbag-Reset
Mit dieser Funktion können Sie die Airbag-Daten zurücksetzen, um die
Airbag-Leuchte auszuschalten, damit das Airbag-Steuergerät normal
funktionieren kann.
Sie muss in den folgenden Fällen durchgeführt werden:
• Wenn der Airbag ausgelöst wird;
• Wenn das Diagnosetool "Crashdaten gespeichert" anzeigt;
• Wenn die Airbag-Leuchte leuchtet;
• Wenn relevante DTCs nicht gelöscht werden können
49
2. Wählen Sie eine Funktion aus, die Sie ausführen möchten.
3. Bevor Sie auf die Funktion zugreifen können, ist eine
Fahrzeugidentifikation erforderlich (weitere Informationen zu
Identifikationsvorgängen finden Sie unter Identifizieren des
Fahrzeugs unter 4.2.1). Nach Abschluss wird das Funktionsmenü
angezeigt.
4. Folgen Sie den Anweisungen auf dem Bildschirm, um den
Service-Reset durchzuführen
8.2 Durchführen eines Service-Resets
1. Tippen Sie auf dem Startbildschirm auf Wartung. Ein
Funktionsmenü wird angezeigt
Figure 4-22

50
9. Reparaturinformationen
9.1 DTC-Reparaturhandbuch
Das DTC-Reparaturhandbuch ist eine erfahrungsbasierte Datenbank mit
allgemeinen OBD-II-DTCs, die codespezifische Informationen, einschließlich
gängiger Korrekturen und Reparaturschritte zur Fehleridentifizierung,
bereitstellt.
So verwenden Sie das DTC-Reparaturhandbuch:
Tippen Sie auf Service > DTC-Reparaturhandbuch. Geben Sie einen DTC in
die
Suchleiste ein, um zu suchen.
9.2 Technische Service-Bulletins
So zeigen Sie technische Service-Bulletins an:
Tippen Sie auf Service > Technische Service-Bulletins. Wählen Sie Fahrzeu-
gmarke, Modell, Baujahr, System und Subsystem aus und tippen Sie auf
Weiter. Eine Liste der für das ausgewählte Fahrzeug herausgegebenen
technischen Service-Bulletins des OEM wird angezeigt. Tippen Sie auf die
gewünschte Option, um den vollständigen Inhalt anzuzeigen.
9.3 DLC-Standort
So zeigen Sie den DLC-Standort an:
Tippen Sie auf Service > DLC-Standort. Wählen Sie Fahrzeugmarke, Modell
und Baujahr aus und tippen Sie auf Weiter. Ein Bild des DLC-Standorts für
das ausgewählte Fahrzeug wird angezeigt.
9.4 Warnleuchtenbibliothek
Die Warnleuchtenbibliothek bietet Informationen zu Warnleuchten im
Armaturenbrett, einschließlich Leuchtbeschreibungen, Auswirkungen auf
das Fahren, typische Ursachen, Reaktionsmaßnahmen und relevante FAQs
So verwenden Sie die Warnleuchtenbibliothek:
Tippen Sie auf Service > Warnleuchtenbibliothek. Eine Liste der Warn-
leuchten wird angezeigt. Tippen Sie auf die gewünschte Option, um die
Details anzuzeigen
51
10.2 Datenstrom
10.1 Kontoprofil
10. Me
Figure 4-23
Sie können auf das Profilbild tippen, um den Avatar und den
Spitznamen anzuzeigen und zu bearbeiten. Auf dieser Seite können
Sie auch Ihr E-Mail-Konto und Ihre ID anzeigen, das
Anmeldekennwort ändern, das Konto löschen und sich von
Ihrem Konto abmelden.

52
Ermöglicht Ihnen, die gespeicherten Datenstrominformationen anzuzeigen.
10.3 Diagnosebericht
Ermöglicht Ihnen, die gespeicherten Diagnoseberichte anzuzeigen.
10.4 Abdeckungsliste
Ermöglicht Ihnen zu überprüfen, ob das DS200 für Ihr Fahrzeug geeignet ist.
10.5 Geräteverwaltung
Ermöglicht Ihnen, das VCI an Ihr Konto zu binden.
10.6 Firmware-Update
Ermöglicht Ihnen, die VCI-Firmware zu aktualisieren, wenn eine neue
Version verfügbar ist.
10.7 Software deinstallieren
Ermöglicht Ihnen, die fahrzeugspezifische Diagnosesoftware zu deinstallie-
ren.
10.8 Benutzerhandbuch
Ermöglicht Ihnen, das Benutzerhandbuch des DS200 anzuzeigen.
10.9 Hilfe und Feedback
Ermöglicht Ihnen, die häufig gestellten Fragen und Antworten des Kunden-
dienstes anzuzeigen und Feedback zu senden.
10.10 Einstellungen
Die Funktion „Einstellungen“ bietet allgemeine Einstellungsmöglichkeiten,
darunter Spracheinstellung, Einheiteneinstellung und Cache-Löschung.
Außerdem können Sie die Seriennummer, Datenschutz- und Nutzungsbedi-
ngungen, Datenschutzrichtlinie, Komponenten von Drittanbietern und die
Kontaktinformationen des technischen Supports einsehen. Sie können in
dieser Funktion auch nach Updates suchen

53
Abschnitt 5
Bluetooth
Unterstützte Betriebssysteme
Lagertemperatur
Betriebstemperatur
Abmessungen
Nettogewicht
Version: Bluetooth 5.0
Reichweite: 10 m
iOS 11.0 oder höher
Android 7.0 oder höher
-20 °C bis 70 °C (-4 °F bis 158 °F)
-10 °C bis 50 °C (14 °F bis 122 °F)
76 x 47 x 28 mm
(2,99 x 1,85 × 1,10 Zoll)
60 g (2,12 oz)
Spezifikationen

54
Abschnitt 6
FAQ
Was soll ich tun, wenn ein Kommunikationsfehler auftritt?
A:Befolgen Sie die folgenden Schritte, um das Problem zu identifizieren:
1) Prüfen Sie, ob die Zündung eingeschaltet ist.
2) Überprüfen Sie, ob der DS200 sicher in den OBD-II-Anschluss des
Fahrzeugs eingesteckt ist.
3) Schalten Sie die Zündung aus. Schalten Sie sie nach 10 Sekunden
wieder ein und setzen Sie den Vorgang fort.
4) Prüfen Sie, ob das Steuermodul des Fahrzeugs defekt ist.
Warum muss ich die Diagnosesoftware nach der Installation der
DS200-App herunterladen?
Da es verschiedene Fahrzeughersteller gibt, wird für verschiedene
Marken unterschiedliche Diagnosesoftware benötigt.
Welche Sonderfunktionen unterstützt das DS200?
Das DS200 unterstützt 8 Sonderfunktionen, darunter Öl-Reset,
Drosselklappenanpassung, EPB-Reset, ABS-Entlüftung, Lenkwinkel-
Reset, DPF-Regeneration, Airbag-Reset und BMS-Reset.
Muss ich die Firmware vor der ersten Verwendung aktualisieren?
Ja. Die Firmware wird automatisch auf die neueste Version aktualisiert, sobald
der DS200 über Bluetooth mit Ihrem Telefon verbunden ist. Sie können auch
auf „Ich“ > „Firmware-Update“ tippen, um die Firmware manuell zu aktualisieren.
Können mehrere Geräte an ein DS200-App-Konto gebunden werden?
Ja
Q
Q
Q
Q
Q
A
A
A
A
A

55
Abschnitt 7
Garantie
Einjährige eingeschränkte Garantie von GOOLOO
GOOLOO garantiert dem Erstkäufer, dass die Produkte des
Unternehmens für 12 Monate ab Kaufdatum (Garantiezeitraum) frei
von Material- und Verarbeitungsfehlern sind. Für während des
Garantiezeitraums gemeldete Mängel repariert oder ersetzt GOOLOO
das defekte Teil oder Produkt gemäß Analyse und Bestätigung durch
den technischen Support.
GOOLOO haftet nicht für Neben- oder Folgeschäden, die durch die
Verwendung, den Missbrauch oder die Montage des Geräts
entstehen. Im Falle eines Konflikts zwischen den
Garantiebestimmungen von GOOLOO und den örtlichen Gesetzen
gelten die örtlichen Gesetze.
Diese eingeschränkte Garantie erlischt unter den folgenden
Bedingungen:
· Missbrauch, Demontage, Veränderung oder Reparatur durch nicht
autorisierte Geschäfte oder Techniker.
· Unachtsame Handhabung und/oder unsachgemäße Bedienung.
Hinweis:
Alle Informationen in diesem Handbuch basieren auf den
zum Zeitpunkt der Veröffentlichung verfügbaren neuesten
Informationen und es kann keine Garantie für deren Richtigkeit
oder Vollständigkeit übernommen werden. GOOLOO behält
sich das Recht vor, jederzeit und ohne vorherige
Ankündigung Änderungen vorzunehmen

56
Abschnitt 8
Garantie
Einhaltung gesetzlicher Vorschriften
FCC-ID: 2BNZ7-DSCAN
IC: 33598-DSCAN
JAMMERN: DeepScan-DS200
FCC- und ISED-Erklärung:
Dieses Gerät entspricht Teil 15 der FCC-Regeln [und enthält lizenzfreie
Sender/Empfänger, die den lizenzfreien RSS-Standards von Innovation,
Science and Economic Development Canada entsprechen].
Der Betrieb unterliegt den folgenden zwei Bedingungen:
(1) Dieses Gerät darf keine schädlichen Störungen verursachen und
(2) Dieses Gerät muss alle empfangenen Störungen tolerieren, einschließlich
Störungen, die einen unerwünschten Betrieb des Geräts verursachen
können.
Der in diesem Gerät enthaltene lizenzfreie Sender/Empfänger entspricht den
lizenzfreien RSS-Standards von Innovation, Science and Economic Develop-
ment Canada.
Der Betrieb ist unter den folgenden zwei Bedingungen zulässig:
(1) das Gerät darf keine Störungen verursachen und
(2) Das Gerät muss alle empfangenen Funkstörungen tolerieren, auch wenn
die Störung seinen Betrieb beeinträchtigen könnte.
Änderungen oder Modifikationen, die nicht ausdrücklich von der für die
Einhaltung verantwortlichen Partei genehmigt wurden, können zum
Erlöschen Ihrer Betriebserlaubnis für das Gerät führen
FCC VOC
Dieses Gerät wurde geprüft und entspricht den Grenzwerten für digitale
Geräte der Klasse B gemäß Teil 15 der FCC-Bestimmungen. Diese Grenzw-
erte sollen einen angemessenen Schutz vor Störungen in Wohngebäuden
bieten. Dieses Gerät erzeugt, nutzt und strahlt möglicherweise Hochfrequen-
zenergie aus. Bei unsachgemäßer Installation und Verwendung kann es zu
Störungen des Funkverkehrs kommen. Es gibt jedoch keine Garantie dafür,
dass bei einer bestimmten Installation keine Störungen auftreten. Sollte
dieses Gerät Störungen des Radio- oder Fernsehempfangs verursachen (dies
lässt sich durch Ein- und Ausschalten des Geräts feststellen), wird dem
Benutzer empfohlen, die Störungen durch eine oder mehrere der folgenden
Maßnahmen zu beheben:

57
-- Richten Sie die Empfangsantenne neu aus oder stellen Sie sie an
einem anderen Ort auf.
-- Vergrößern Sie den Abstand zwischen Gerät und Empfänger.
-- Schließen Sie das Gerät an eine Steckdose an, die sich in einem
anderen Stromkreis befindet als der Empfänger.
-- Wenden Sie sich an den Händler oder einen erfahrenen
Radio-/Fernsehtechniker.
Für den Fall, dass dieses Gerät einem FCC/IC-SAR-Test (Spezifische
Absorptionsrate) unterzogen werden muss, erfüllt es die von FCC und
ISED festgelegten Anforderungen für die Belastung durch Funkwellen.
Diese Anforderungen legen einen SAR-Grenzwert von 1,6 W/kg, gemittelt
über ein Gramm Gewebe, fest. Der höchste nach dieser Norm bei der
Produktzertifizierung gemeldete SAR-Wert für den ordnungsgemäßen
Gebrauch am Körper liegt innerhalb der gesetzlichen Grenzwerte.
FCC-Warnhinweis
Das Gerät für den Betrieb im Band 5150-5250 MHz ist nur für den
Innenbereich bestimmt, um das Potenzial schädlicher Störungen von
Gleichkanal-Satellitenmobilfunksystemen zu reduzieren.
IC-Warnhinweis
1. Das Gerät für den Betrieb im Band 5150-5250 MHz ist nur für den
Innenbereich bestimmt, um das Potenzial schädlicher Störungen von
Gleichkanal-Satellitenmobilfunksystemen zu reduzieren;
2. Bei Geräten mit abnehmbarer Antenne(n) muss der maximal zulässige
Antennengewinn für Geräte im Band 5725-5850 MHz so bemessen sein,
dass das Gerät weiterhin die für den Punkt-zu-Punkt- und
Nicht-Punkt-zu-Punkt-Betrieb angegebenen EIRP-Grenzwerte einhält
1. Geräte, die im 5150–5250 MHz-Band betrieben werden, sind
ausschließlich für den Einsatz in Innenräumen vorgesehen, um das
Potenzial schädlicher Störungen bei mobilen Satellitensystemen auf
demselben Kanal zu verringern.
2. Der maximal zulässige Antennengewinn (für Geräte, die das 5725–5850
MHz-Band verwenden) muss dem für den Punkt-zu-Punkt- und
Nicht-Punkt-zu-Punkt-Betrieb angegebenen EIRP-Grenzwert entsprech-
en, je nachdem, was zutrifft.
Kundenservice
12 Monate eingeschränkte Garantie
Lebenslanger technischer Service
Kontaktieren Sie uns gerne
Für FAQ und weitere Informationen
www.gooloo.com
1-888-886-1805
Mo.-Fr. PST 9:00-17:00 Uhr