1
Smart Electronic Lock Instruction
Manual
2
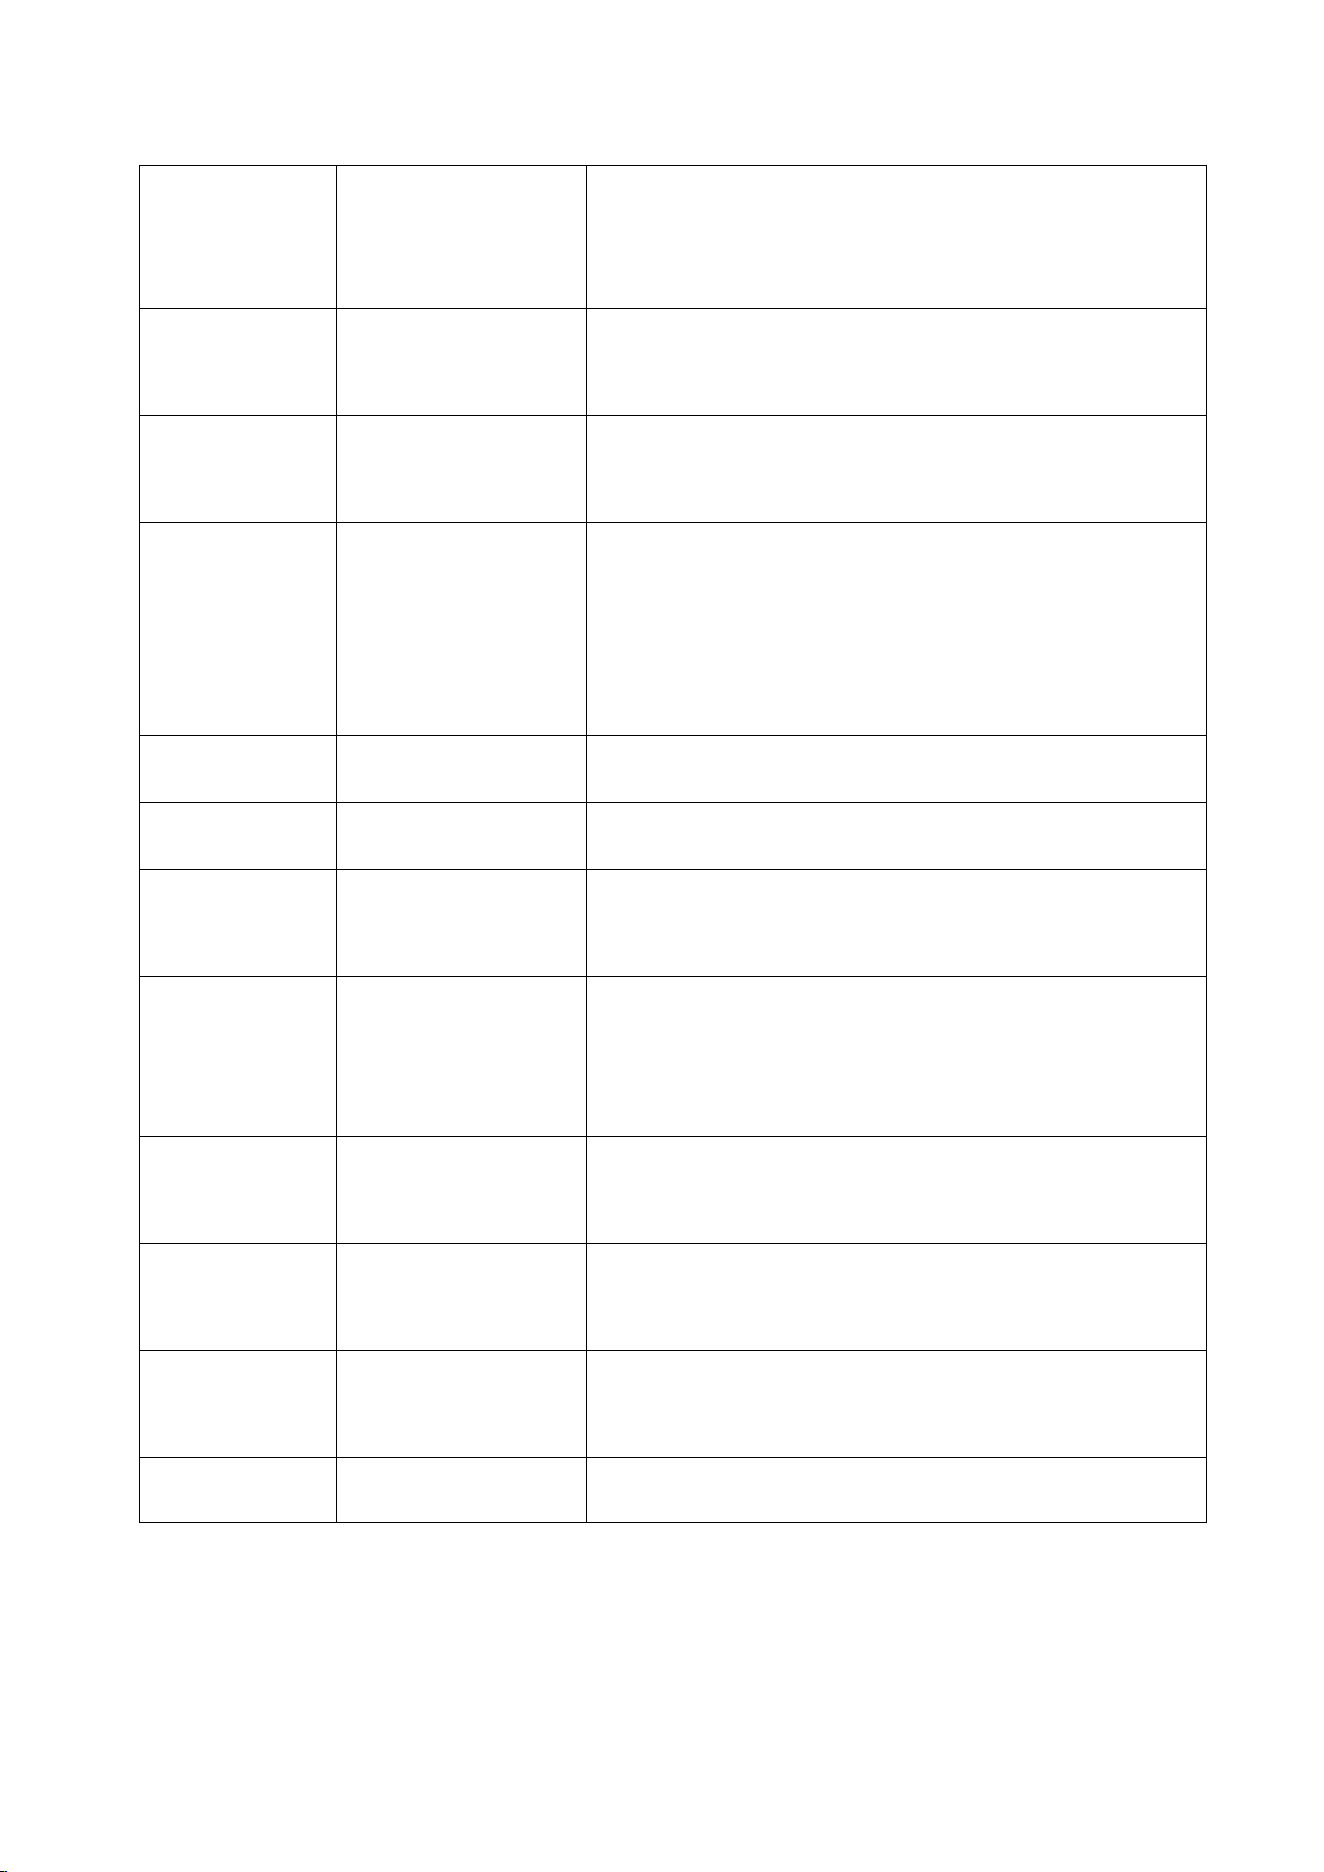
一、Specification Parameters
Serial
Number
Parameter Name
Specification Parameters
1
False Reject
Rate(FRR)
≤0.1%
2
False
recognition rate
<0.001%
3
User Capacity
Total Capacity:250 sets
Up to 100 fingerprints
Up to 100 sets of passwords
Up to 50 sets of facial and palmar veins
4
Working Voltage
7.0V~8.4V, Low voltage alarm voltage 6.8 ± 0.2V
5
Dynamic Power
≤ 1A (no motor action, no playback sound)
6
Static Power
Consumption
≤ 200uA (average power consumption)
7
Verification
Time
≤ 3S (including the entire process of fingerprint
collection, comparison, and unlocking signal
output)
8
Antistatic
Ability
≥ 8KV (contact type) ≥ 15KV (non-contact type)
9
Storage
Temperature
-25℃~80℃
10
Operation
Temperature
-25℃~70℃
11
Ambient Humidity
15%RH~93%RH
3
二、Operating Manual

4
2.1 Create Administrator Password
To use it for the first time, you need to create an administrator password. The steps are as follows:
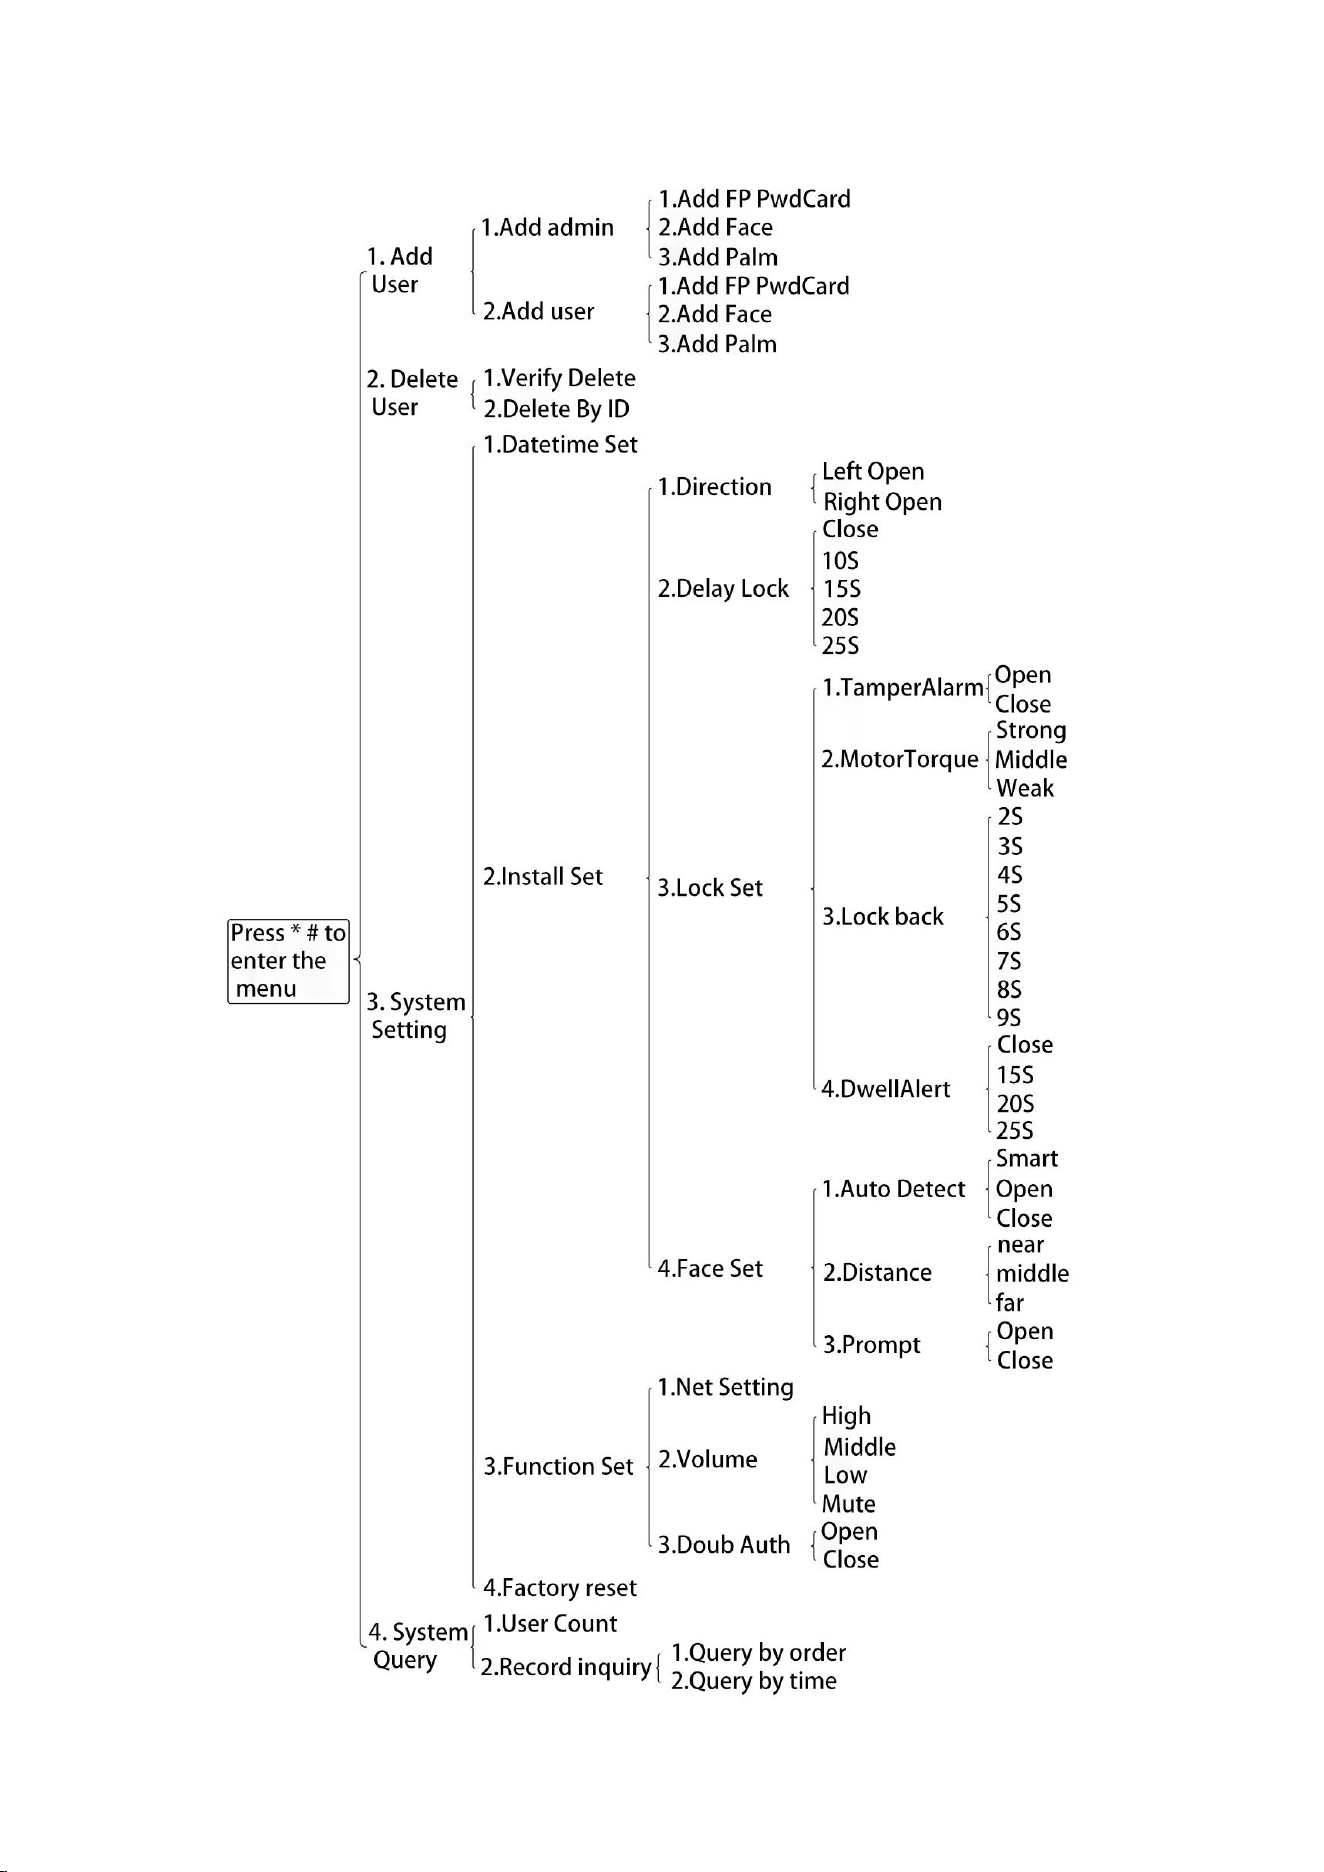
1. Wake up the screen and press {*} → {#} in sequence to enter the add interface.
2. Enter a 6-8 digit password according to the voice prompt, press the {#} key to confirm, then re-enter
the same password and press the {#} key again to confirm.
3. After the system voice broadcasts "User: 000, Add Success", the settings are completed and you can
enter the main menu.
Prompt:The administrator password user 000 has the highest authority and can be used to
generate temporary and one-time passwords. Please keep them safe.
2.2 Add User
1. Wake up the screen, press the {*} key and then the {#} key to enter the management user information
and enter the menu.
2. Press {1}Add User - {1} Add admin or {2} Add user to select the user type.
3. Press {1} Add FP PwdCard, {2} Add Face, or {3} Add Palm to select the user type.
4. Complete the corresponding input according to the voice prompt:
⚫ Fingerprint:Place the fingerprint sensor with your finger, and upon hearing 'Press again', repeat
placing the same finger until complete.
⚫ Password:Enter a 6-8 digit password and press the {#} key to confirm.
⚫ Face:After hearing 'Enroll face', place the face parallel to the camera for 40-80CM and follow the
prompts to enter continuously.
⚫ Palm:After hearing "Please place your palm in front of the camera", place your hand parallel to the
camera 10~25CM and enter as prompted.
5. Voice broadcast "User:* * *, Add Success" indicates successful addition.
Prompt:
⚫ Manage user number ranges:000-009(10 people in total)。
⚫ Ordinary user number ranges:010-249(240 people in total)。
2.3 Delete User
2.3.1 Verify the deletion of users
1. Enter the menu, press {2} Delete User - {1} Verify Delete.
2. Select the corresponding verification method based on the user type:
⚫ Fingerprint:Place the finger to delete the fingerprint on the fingerprint sensor.
⚫ Password:Enter the password of the user to be deleted.
⚫ Face:The user to be deleted is facing the camera directly (at a distance of 40-80CM).
⚫ Palm:Place the palm to be removed in front of the camera(at a distance of 10-25CM)。
3. After the system verification is passed, the corresponding user will be automatically deleted.
Prompt:Managing user * * *, entering the menu, the corresponding user cannot be deleted.
2.3.2Delete users by number
1. Enter the menu, press {2} Delete User - {2} Delete By ID
2. Enter the user ID to be deleted, for example: 010.
3. If the user exists, the system voice broadcasts: "User ***, Delete Success"; If it does not exist, announces:
"Delete Failure".

5
2.4 System Setting
2.4.1 Time Setting
1. Enter the menu,press {3} System Setting - {1} Datetime Set.
2. Enter the time in the format of 20xx year xx month xx day xx hour xx minute (e.g. January 1, 2025 0:00,
enter 2501010000).
3. The system reports' Success 'to complete the setup.
2.4.2 Opening Direction
1. Enter the menu,press {3} System Setting - {2} Install Set - {1} Direction.
2. Press {1} to switch the Direction to "left open" or "right open".
Prompt:The direction of opening the door is subject to the opening and closing direction of the door leaf
when standing outside the door to unlock.
2.4.3 Delayed Locking
1. Enter the menu and press {3} System Setting - {2} Install Set - {2} Delay Lock.
2. Press {2} "Delay Lock" to switch the delay lock time: off, 10S, 15S, 20S, 25S.
Prompt:After turning on the delay lock, it will be automatically locked when the set time is reached after
unlocking. Please close the door before the end of the delay to avoid damage to the lock body due to not
closing the door.
2.4.4 Anti-prying Alarm
1. Enter the menu,press {3} System Setting - {2} Install Set - {3} Lock Set - {1} TamperAlarm.
2. Press {1} to switch the anti pry alarm to "off" or "on"。
Prompt:After opening, if the door lock is pried, the system will play an alarm sound; If the device is connected
to the internet, synchronously push alarm information to the mobile phone.
2.4.5 Motor Torque
1. Enter the menu, press {3} System Setting - {2} Install Set - {3} Lock Set - {2} Motor Torque.
2. Press {2} to switch the motor torque gear: weak, medium, strong.
Prompt:If the switch lock is difficult, it may be that the torque of the motor is insufficient, so it is
recommended to adjust the torque to "strong" gear.
2.4.6 Lock Back Time
1. Enter the menu, press {3} System Setting - {2} } Install Set - {3} Lock Set - {3} Lock back.
2. Press {3} to switch back to Lock back (2-9 seconds).
Prompt:The lock-back time is the delay time of automatic rebound reset of the lock tongue (oblique tongue)
after closing the door.
2.4.7 Dwell Alert
1. Enter the menu,press {3} System Setting - {2} Install Set - {3} Lock Set - {4} Dwell Alert.
2. Press {4} to switch the Dwell Alert time: 15S, 20S, 25S, and turn off.
Prompt:If it is detected that the alarm time of human staying reaches the set value (such as 20 seconds)
within 1 minute, the system will trigger an alarm and push a message to the equipment with network
distribution.

6
2.4.8 Human Body Induction
1. Enter the menu, press {3} System Setting - {2} Install Set - {4} Face Set - {1} Auto Detect.
2. Press {1} to switch the human body sensing mode: on, off, and smart.
Mode Description:
⚫ Off:The door lock does not activate human body sensing.
⚫ On:No matter what state the door lock is in, it continues to perform human body sensing.
⚫ Smart:Intelligent mode can only trigger human body sensing when the lock is closed (with the square
tongue extended).
2.4.9 Sense Distance
1. Enter the menu, press {3} System Setting - {2} Install Set - {4} Face Set -{2} Distance.
2. Press {2} to switch the sensing distance gears: near, medium, and far.
Sensing Range:
⚫ Near:50±10cm
⚫ Medium:90±20cm
⚫ Far:120±10cm。
Prompt:
⚫ The above is the theoretical distance in the laboratory, and the actual sensing range may vary slightly
due to installation environment.
⚫ When the space is narrow, it is recommended to choose the "near" mode, and in open areas, the "far"
mode can be selected to adapt to different usage scenarios.
2.4.10 Recognition Prompt
1. Enter the menu, press {3} System Setting - {2} Install Set - {4} Face Set -{3} Prompt.
2. Press {3} to switch the recognition prompt to "on" or "off".
Prompt:After opening, when the human body induction wakes up the door lock, the system will give a voice
prompt "Please verify face".
2.4.11 Network Setting
1. Enter the menu, press {3} System Setting - {3} Function Set - {1} Net Setting;
2. Open the mobile app and follow the prompts on the app page to complete the distribution network
operation until the lock control reports "Connected Success".
Prompt:
⚫ The distribution network function only supports one mobile phone operation. Entering the distribution
network mode again will clear the last connection data. Please operate with caution.
⚫ If the system prompts' not supported ', it indicates a network module failure. Please ensure that the cat
eye module is properly plugged in.
2.4.12 Door Lock Volume
1. Enter the menu, press {3} System Setting - {3} Function Set - {2} Volume.
2. Press {2} to switch volume levels: High, Medium, Low, Quiet.
Prompt:
⚫ The volume can be adjusted according to the usage scenario (such as selecting "quiet" or "low" mode
for quiet environments and "high" mode for noisy environments).

7
⚫ In silent mode, there is no prompt sound for the switch lock, but the doorbell, alarm sound, and menu
broadcast functions are normal and do not affect safety prompts.
2.4.13 Double Authentication
1. Enter the menu, press {3} System Setting - {3} Function Set - {3} Doub Auth.
2. Press {3} to switch dual authentication to 'on' or 'off'.
Prompt:
⚫ After opening, two different users need to be continuously verified before unlocking. The system will
prompt "Enter another user" after the first authentication, and the second user authentication must be
completed within the specified time before unlocking.
⚫ Suitable for scenarios with high security requirements such as finance and confidentiality, to avoid risks
caused by the leakage of single user credentials.
2.4.14. Factory Reset
1. Enter the menu, press {3} System Setting - {4} Factory reset.
2. The system voice prompts "Factory reset NO (*) YES (#) ". Press the # key to confirm the operation, and
the system will restart and return to the initialization state.
Prompt:After resetting all user data (including fingerprints, passwords, etc.) to factory settings, please
proceed with caution.
2.5 Information Query
2.5.1 Number of Users
1. Enter the menu, press {4} System Query - {1} User Count.
2. System voice broadcast: "Admin: * * *, Uers: * * *".
2.5.2 Record Query
⚫ Query by order
1. Enter the menu, press {4} System Query - {2} Record inquiry - {1} Query by order.
2. Press the {8} key to search for the next record, and press the {2} key to search for the previous record.
Prompt:Sequential query is displayed in reverse order starting from the current latest record
⚫ Query by time
1. Enter the menu, press {4} System Query - {2} Record inquiry - {2} Query by time.
2. Please enter the target date in the format of "20xx year xx month xx sun", and the system will display all
operation records of that date.
3. Press the {8} key to search for the next record, and press the {2} key to search for the previous record.
三、Function Description
⚫ Factory Reset
Long press the reset button, or press the switch lock button for 5 seconds at the same time, or enter the
factory reset menu to perform the factory reset function. At this point, the system voice will prompt: "Factory

8
reset NO (*) YES (#) ". After pressing the # key to confirm, the system will restart and return to its initial
state.
⚫ Low Battery Alarm
When the system's battery level is below 25%, a voice message saying 'low battery' will be displayed during
the unlocking process. At this time, the battery can still support about 50 unlocking operations, but please
charge or replace the battery for the device in a timely manner.
⚫ Anti Pry Alarm
When the door lock is pried, the anti pry switch triggers the alarm function. The anti pry alarm function can
be turned on or off in the system menu.
⚫ Illegal User Alarm
If the wrong unlock information is entered 3 to 5 times in a row, the system will trigger an alarm sound. After
the 5th error, the system will lock for 90 seconds without any response, and will automatically unlock after
the timer ends.
⚫ USB Emergency Power Unlock
When the battery level is too low to unlock, you can connect the power bank to the front lock USB interface
to supply power to the door lock, and wait for about 30 seconds before unlocking. Only for temporary
unlocking, please remove the battery and charge it promptly after use.
⚫ Virtual Password Function
When unlocking with a password, any number can be added before and after the correct password (the
system only recognizes the first 16 digits) to enhance password security and prevent peeping. For example,
if the correct password is "123456", you can enter "426123456745" to complete the verification.
⚫ Shortcuts
Enter installation menu:111# View device activation code:666# Enter settings menu:*#
Enter factory menu:888# Query system version number:999#
四、Factory Directive
Press 888 # on the main interface to enter the factory menu (if a registered user, they need to enter the
management user password first).
Motor rotation time after locking:Input command 7000#~7009# can be set, the range is 0ms~900ms
(the last digit of the command corresponds to the time, such as 7005 # corresponding to 500ms).
Motor rotation time after unlocking: Input commands 7100 #~7109 # to set the motor running time after
unlocking, ranging from 0ms to 900ms.
Prompt:
⚫ Non professionals are not allowed to make arbitrary adjustments, as incorrect settings may affect the
normal operation of the lock body;
⚫ This function is mainly used by installation technicians, and ordinary users do not need to operate it.
五、Door lock activation
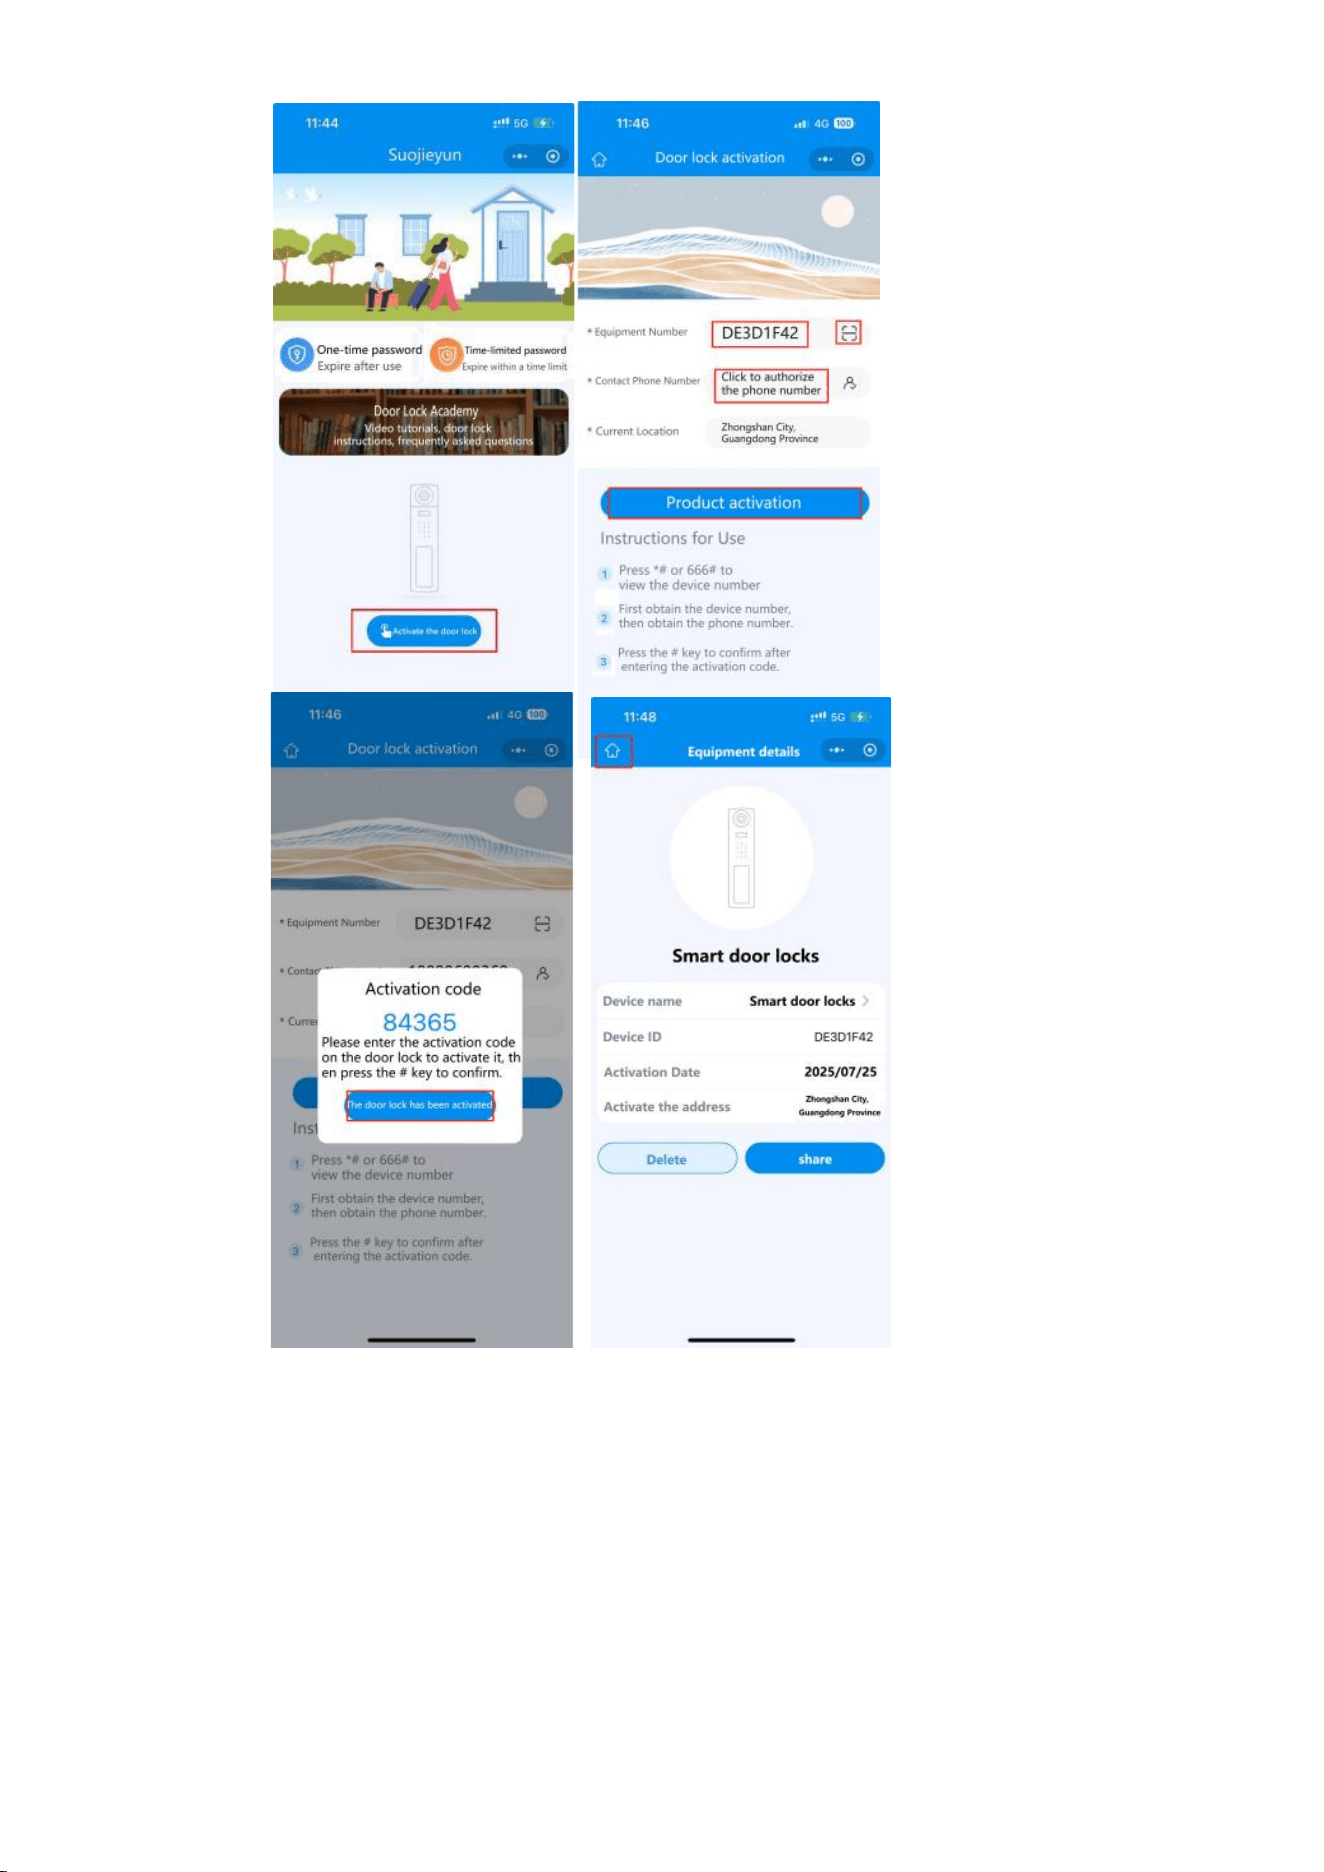
1. Wake up the door lock, enter 666 #, and the screen will display the activation QR code.
2. Open WeChat and scan the code directly, or enter the "Lock Boundary Cloud" mini program and click
on "Activate Door Lock" ->"Scan" to scan the QR code to obtain the device number.
3. Click
on "Contact Phone" in the mini program to bind your phone number, and click on "Product Activation"
to generate an activation code.
4. Wake up the door lock again and enter the activation code. After the lock board prompts "Success",
return to the mini program and click [Confirm] to complete the activation.
9
六、 Temporary
Password
6.1 One Time Password
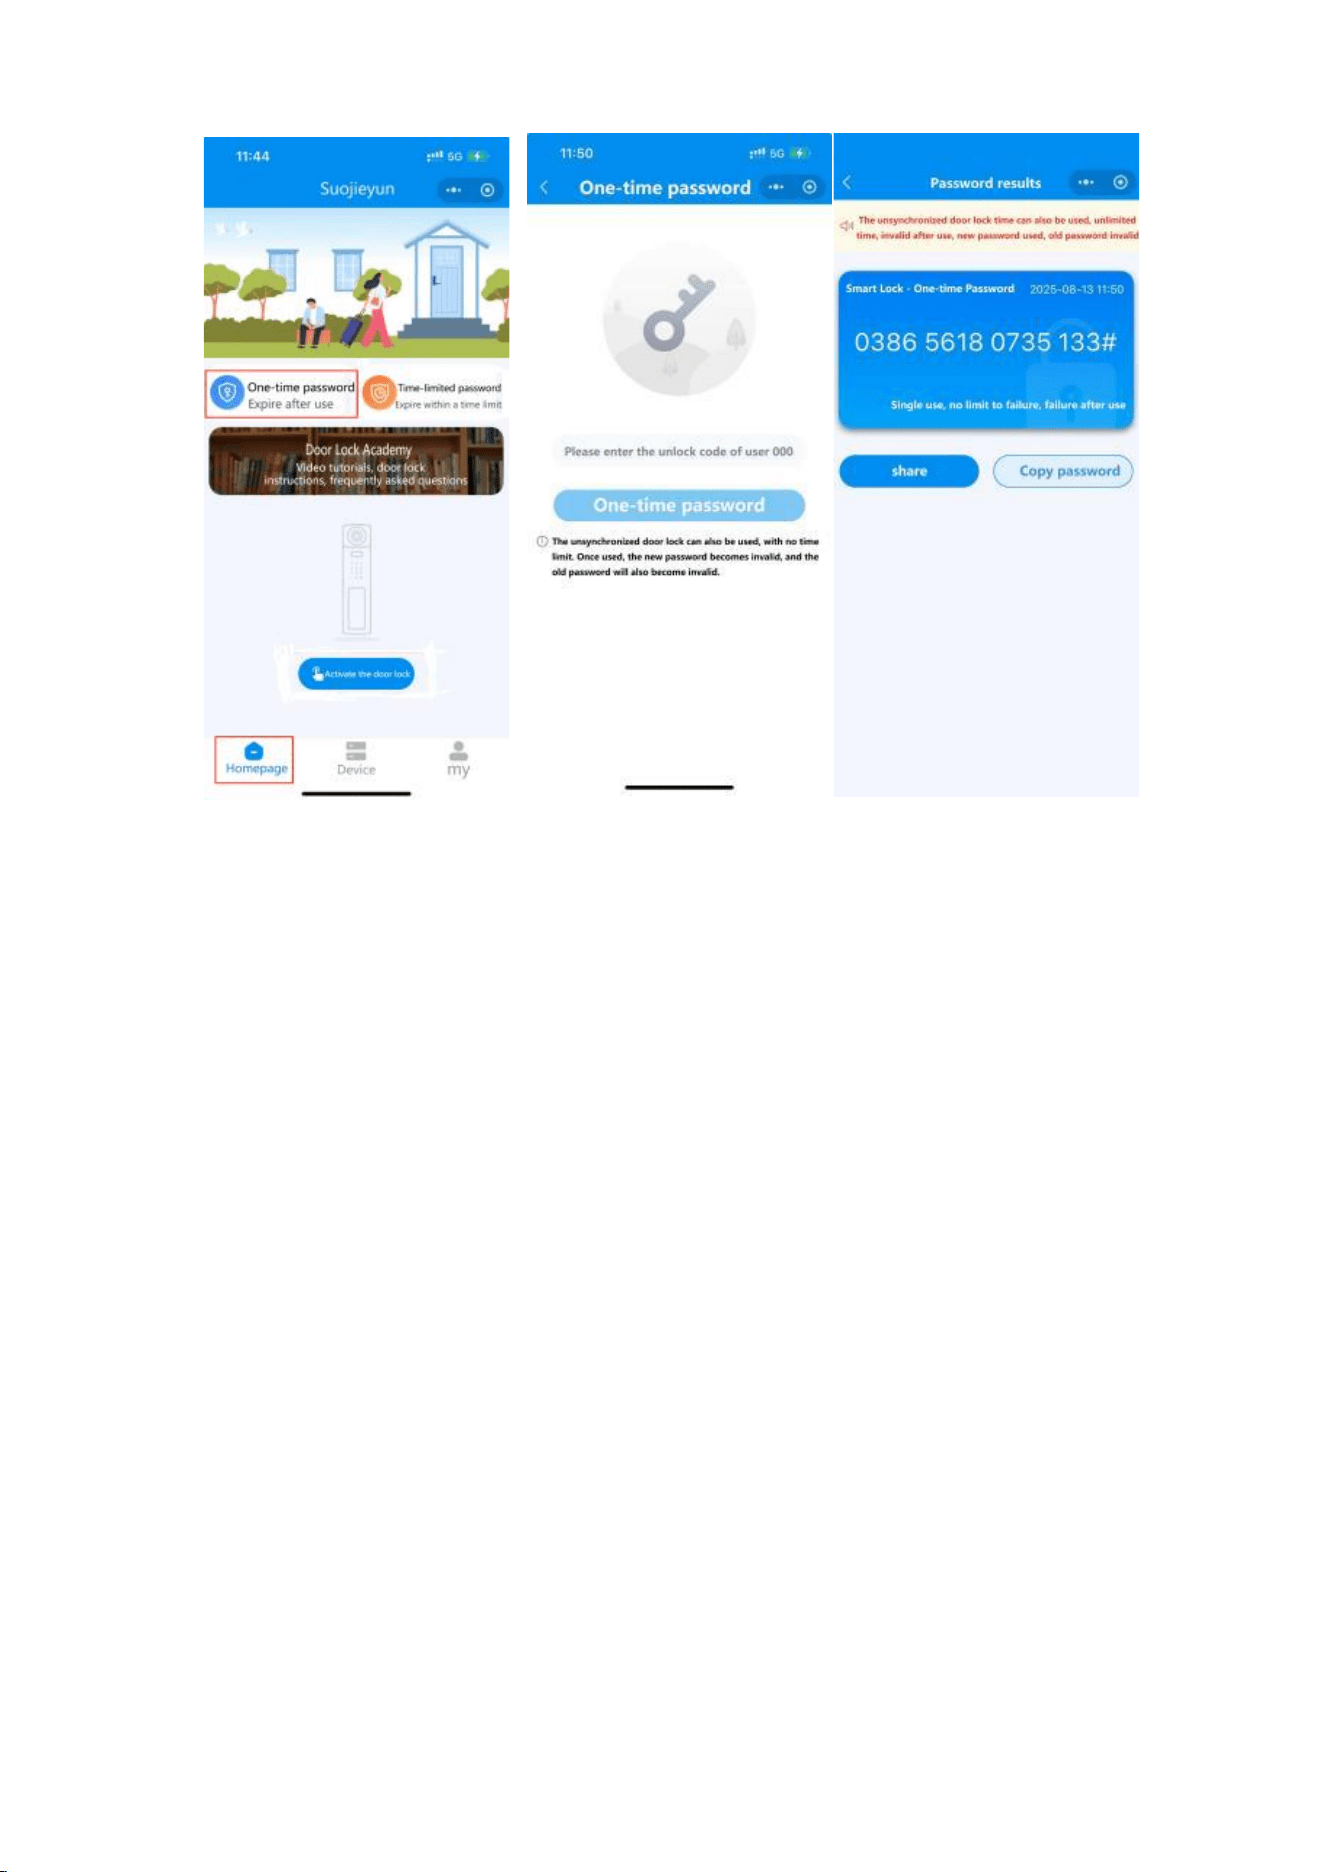
1. Open the "Lock Boundary Cloud" mini program and click the "One time Password" button.
2. Enter the administrator password for user number 000, generate a one-time password, and enter it
on the lock end to unlock.
Prompt:
⚫ No need to calibrate the door lock time, the password will immediately expire after use
⚫ After the new password is generated or used, the old password is automatically invalidated to ensure
10
the security of single authorization.
6.2 Limited Time Password
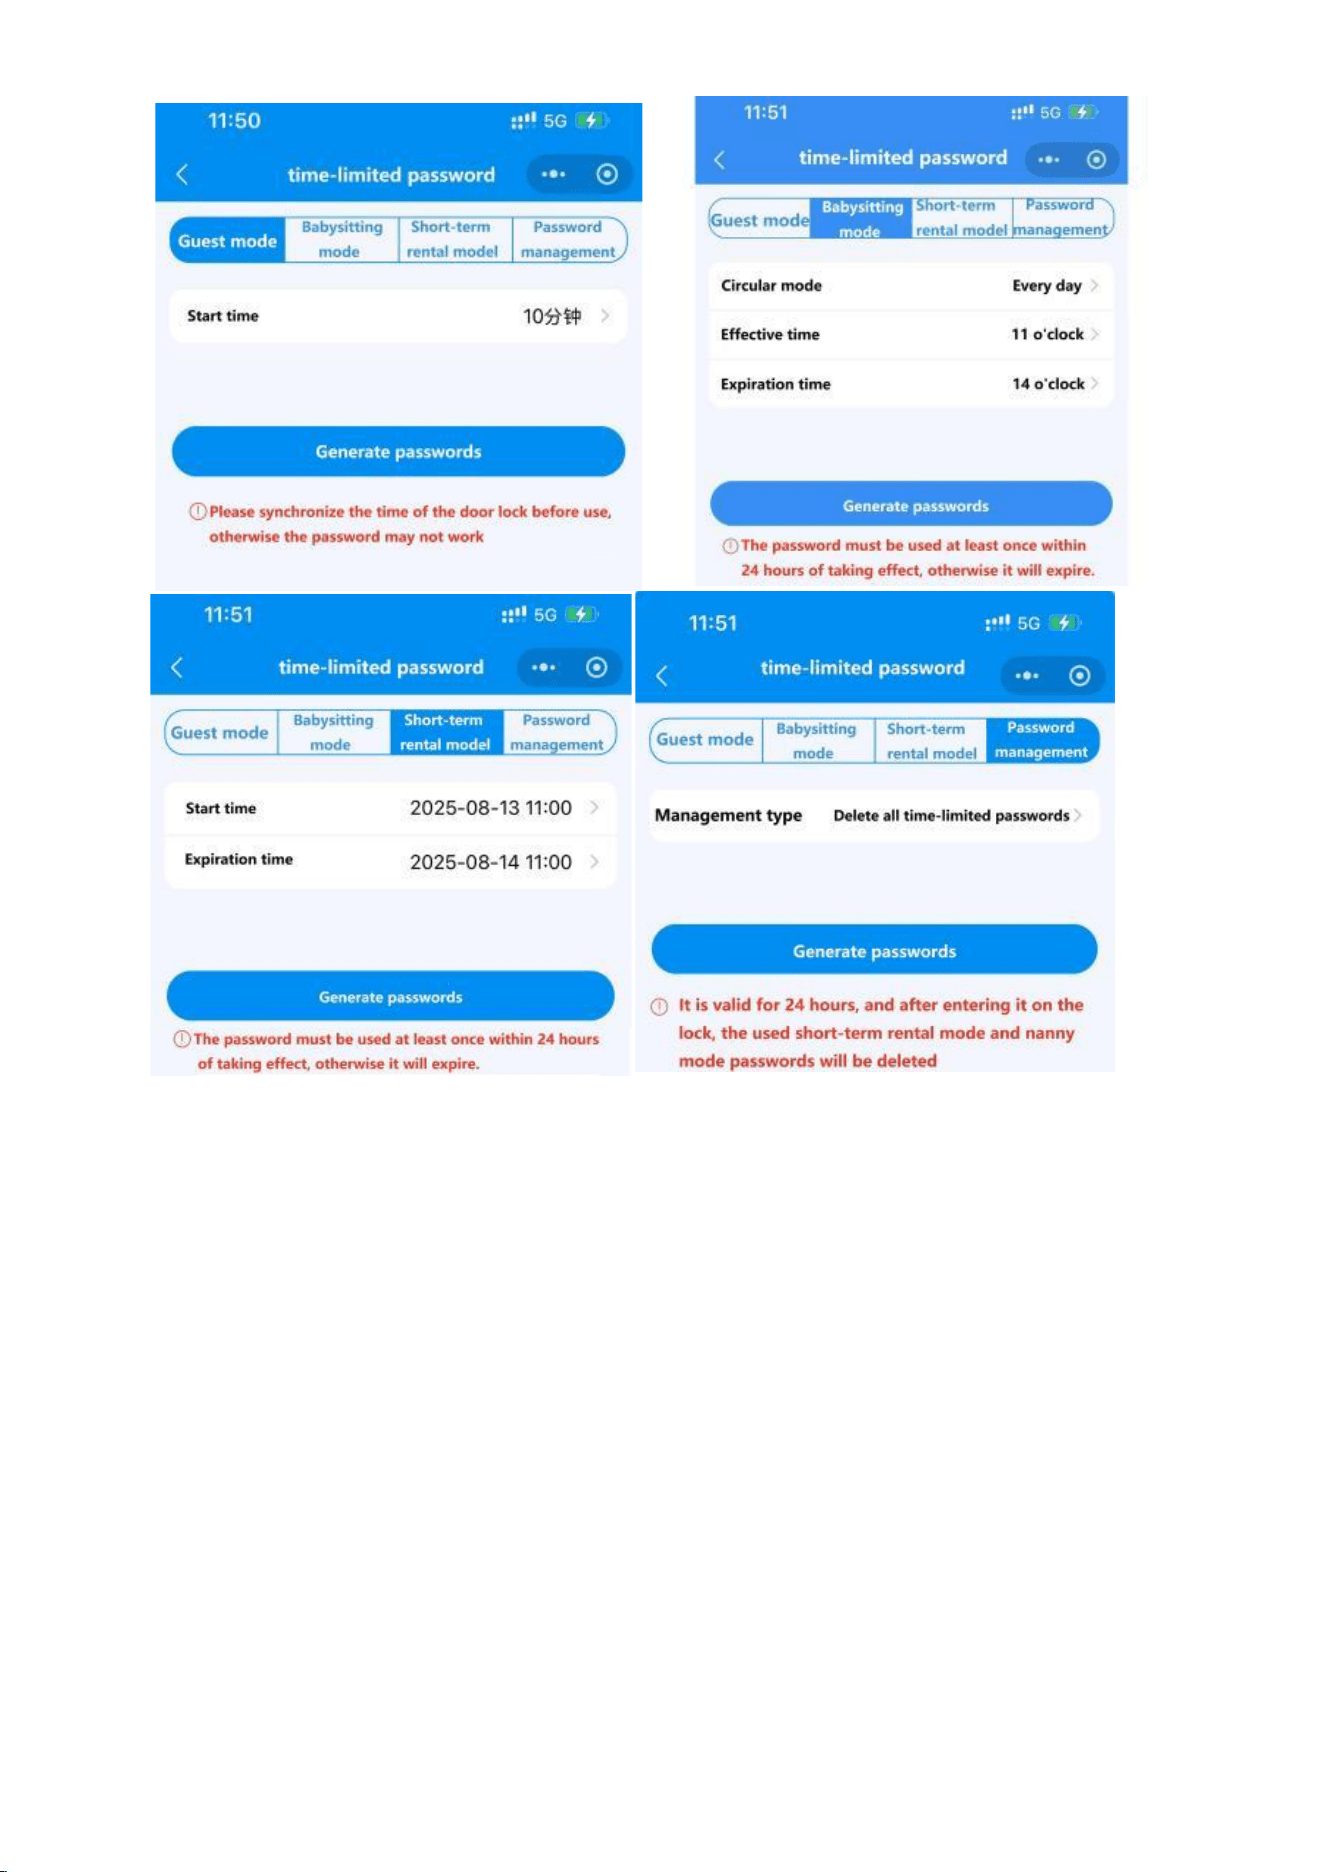
1. Open Lock Boundary Cloud and click the 【 Limited Time Password 】 button.
2. Enter the administrator password (user 000) and select the mode:
⚫ Visitor Mode:Set a time limited password with a validity period of 1-60 minutes (calculated from
the first unlocking time, expired)
⚫ Nanny Mode:Set the allowed unlocking time period every day (the expiration time must be
greater than the effective time), and the password must be entered within 24 hours, otherwise it
will become invalid.
⚫ Short Term Rental Mode:Set a valid password for any time period (expiration time>effective
time and>current time, up to 60 days). The password must be entered within 24 hours after it
takes effect, otherwise it will become invalid.
⚫ Password Management:It is possible to delete time limited passwords that have already taken
effect within the lock (supporting the deletion of all or specified user passwords). After entering
the generated deletion password on the lock end, a prompt of "Success" will be displayed to
complete the operation. Note: Unused generated passwords cannot be deleted; If you need to
batch invalidate all time limited passwords, you can delete the "User 000" administrator password
and add a new administrator.
Prompt:Before using a time limited password, please calibrate the door lock time first, otherwise it
will cause the generated password to be unusable.
11
七、Language Switching Instruction
On the main interface, press 888 # to enter the factory menu, enter the command, and press the # key to
set language switching;
3000 Chinese 3001 English 3002 Traditional 3003 Russian 3004 Vietnamese
3005 Korean 3006 Arabic 3007 Portuguese 3008 French 3009 Spanish
3011 Indonesian 3012 Thai 3013 Hebrew 3014 Turkish 3015 Italian
3016 Mongolian 3017 Uzbek 3018 Kazakh 3019 Serbian 3020 Korean
3022 Japanese 3023 Persian
12
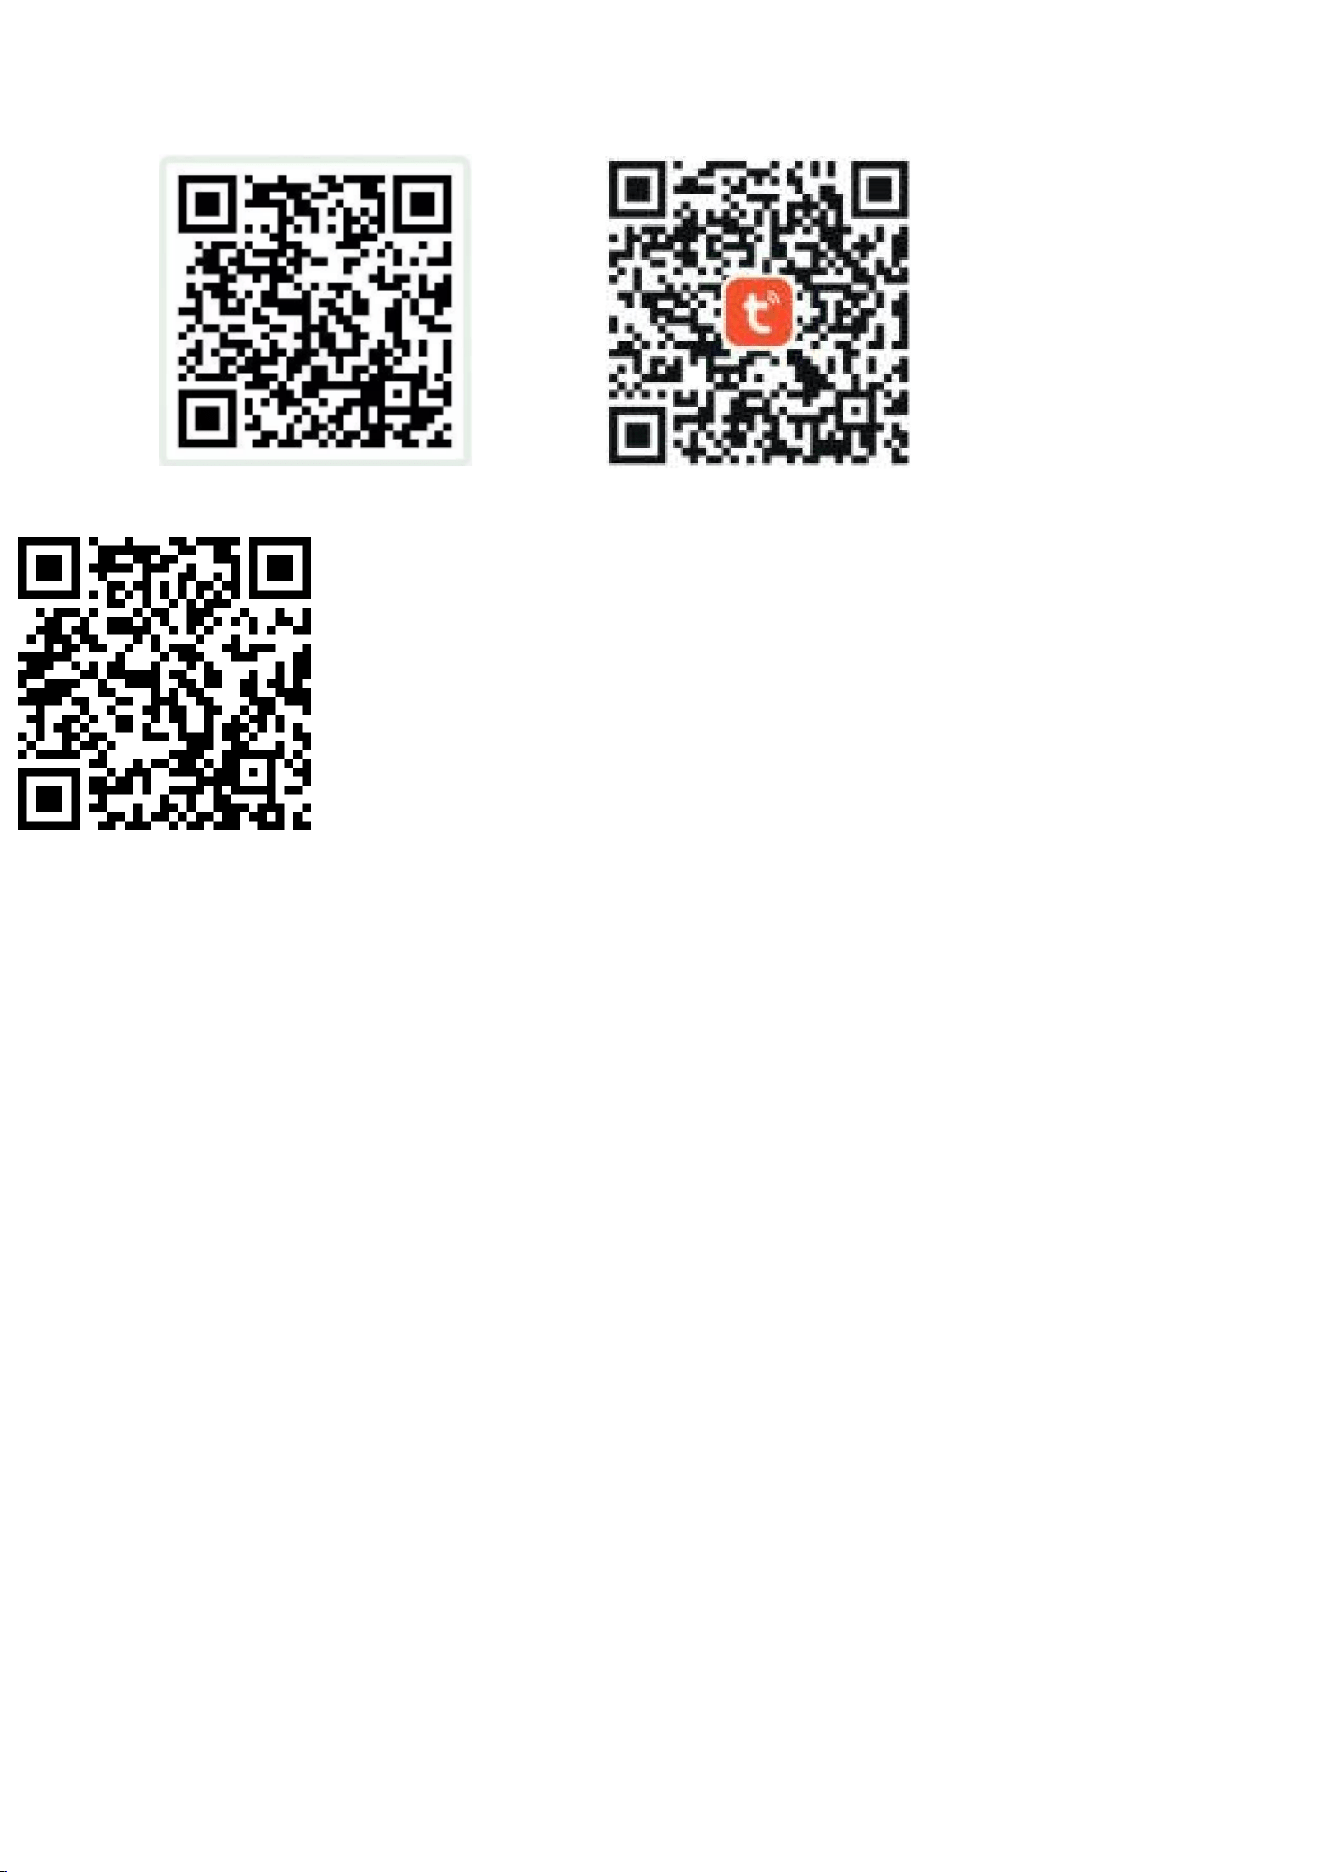
八、QR codes related to installation and operation
Installation Tutorial
APP Download
Internet Tutorial

FCC Warnning:
This equipment has been tested and found to comply with the limits for a Class B digital device,
pursuant to part 15 of the FCC Rules. These limits are designed to provide
reasonable
protection againstharmful interference in a residential installation. This equipment generates,
uses and can radiateradio
frequency
energy
and,
if
not
installed
and
used
in
accordance
with
the
instructions,
maycause
harmful
interference
to
radio
communications.
However,
there
is
no
guarantee
thatinterference
will
not
occur
in
a
particular
installation.
If
this
equipment
does
cause
harmfulinterference to radio or television reception, which can be
determined by turning the equipmentoff
and
on,
the
user
is
encouraged
to
try
to
correct
the
interference
by
one
or
more
of
thefollowing measures:
•
Reorient or relocate the receiving antenna.
•
Increase the separation between the equipment and receiver.
•
Connect the equipment into an outlet on a circuit different from that to which the receiver is
connected.
• Consult the dealer or an experienced radio/TV technician for help.
Caution:
Any
changes
or
modifications
to
this
device
not
explicitly
approved
by
manufacturer
could void your authority to operate this equipment.
This
device
complies
with
part
15
of
the
FCC
Rules.
Operation
is
subject
to
the
following
two
conditions:
(1)This
device
may
not
cause
harmful
interference,
and
(2)
this
device
must
accept
any
interference received, including interference that may cause undesired operation.
This
equipment
complies
with
FCC
radiation
exposure
limits
set
forth
for
an
uncontrolled
environment.
This
equipment
should
be
installed
and
operated
with
minimum
distance
20cm
between the radiator and your body.