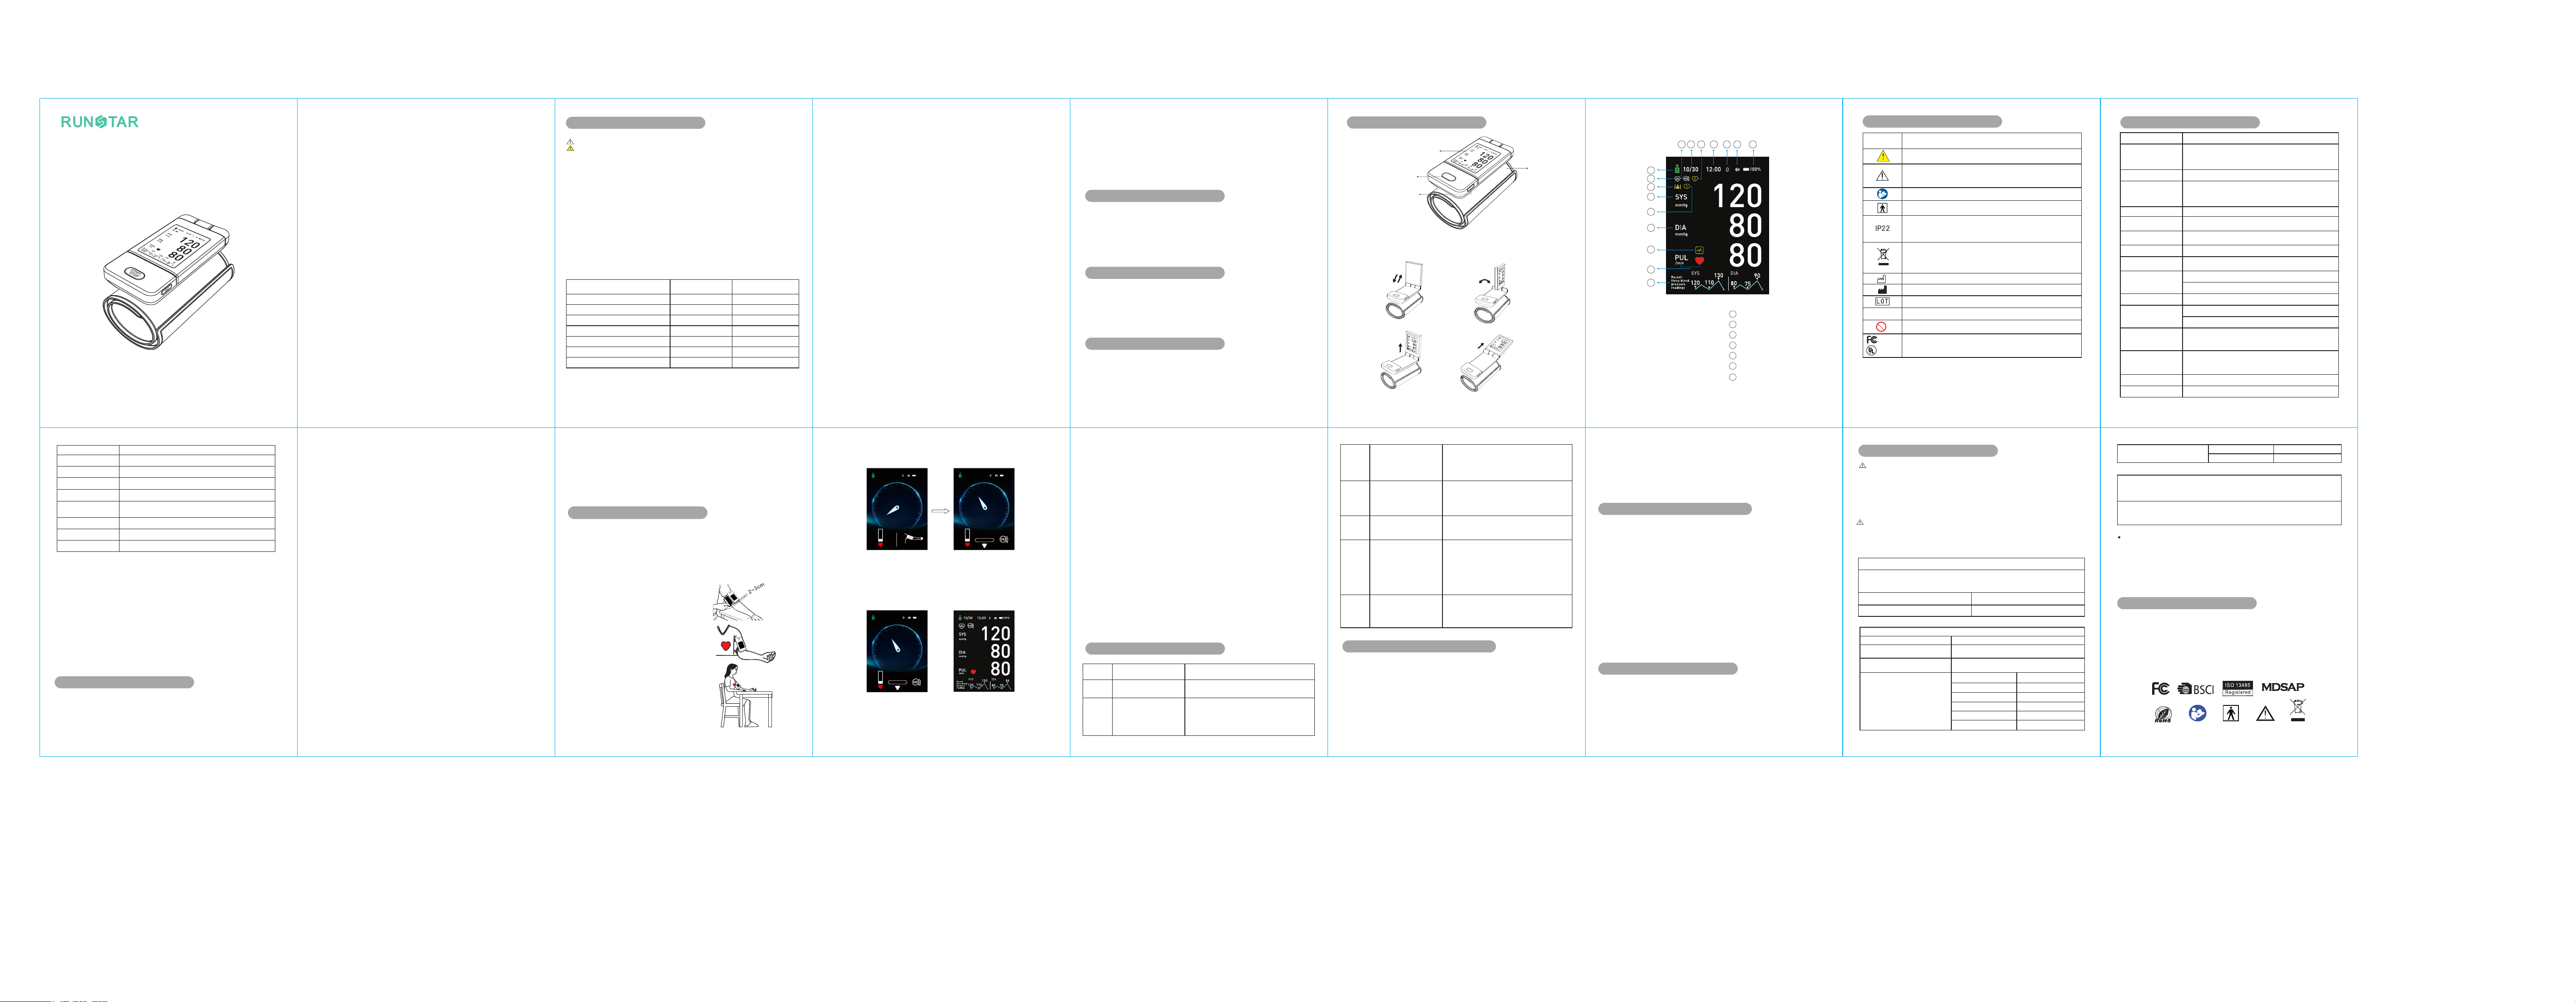
TFT Display Explanation
12
10
11
12
13
14
15
16
34567
8
9
① ② ③ ④ ⑤
⑥ ⑨⑦ ⑧
Battery Indicator
Sound Icon
Wireless Connection Icon
Time Icon
Blood Pressure Out of Range
Date Icon
Cuff Wrap Guide: Correct
User Icon
Normal Blood Pressure
10
12
13
14
15
11
16
Movement Error
Systolic Blood Pressure
Test Again
Diastolic Blood Pressure
Irregular Pulse
Pulse Rate Icon
Recent 3 Blood
Pressure Readings
Screen rotation diagram
1. Safety Instructions
Thank you for purchasing Runstar Arm-type Electronic Blood Pressure Monitor.
Please read this instruction manual carefully before use.
This device is not a direct diagnostic device. It is only suitable for monitoring the
blood pressure and pulse rate of adults. The measurement results should not be used
for self-diagnosis or treatment. Please follow your doctor's advice.
Blood pressure is an important indicator of the human circulatory system. The home
blood pressure monitor is easy to use regularly. It is crucial for preventing
cardiovascular disease, encouraging hypertension patients to seek treatment, and
managing high blood pressure.
Blood pressure fluctuates continuously throughout the day and night. The highest
values typically occur during the day and the lowest at midnight. It is recommended
that you measure your blood pressure at roughly the same time each day.
Various activities such as physical exercise, excitement, stress, eating, drinking,
smoking, body posture, and other factors (including taking a blood pressure
measurement) can influence blood pressure readings. Due to these factors, it is
uncommon to obtain identical blood pressure readings in multiple measurements.
Definition and Classification of Blood Pressure Levels from WHO-ISH
Classification
Ideal Blood Pressure
Normal Blood Pressure
High Normal
Hypertension GradeⅠ(Slight)
Hypertension GradeⅡ(Medium)
Hypertension GradeⅢ(Serious)
Isolated Systolic Hypertension
<120
<130
130~139
140~159
160~179
≥180
≥140
Systolic Pressure
(mmHg)
<80
<85
85~89
90~99
100~109
≥110
<90
Diastolic Pressure
(mmHg)
2
The information above is for reference only.
1.1 Warning:
This product is intended for daily blood pressure monitoring only and should not
be used for diagnosing hypertension.
CONTENTS
1
● Use this product only for blood pressure measurements. Using it for other
purposes may lead to accidents.
● This device is suitable for use by adults only. Do not use it on infants, toddlers,
children or individuals who cannot express themselves.
● Self-diagnosis and treatment based on blood pressure readings are not
recommended. Consult healthcare professionals for proper evaluation and
guidance.
● Patients with severe blood pressure or circulation disorders, as well as blood
diseases, should use this device under medical supervision.
● The displayed pulse reading used as medical heart rate should not be
monitoring.
● Patients with arrhythmia or arteriosclerosis should have their blood pressure
readings confirmed by medical professionals.
● Do not apply the cuff on limbs with intravascular access, therapy, or arterio-
venous shunts to prevent blood flow interference and patient injury.
● Do not use the cuff on an injured or operated arm to prevent further harm.
● In the presence of common arrhythmias, such as premature beats or atrial
fibrillation, the accuracy of the readings may be affected.
● Keep the device away from any great power appliances (e.g. high-voltage
equipment, X-ray machine, and ultrasound equipment, etc.) to prevent
interference during use.
● Keep the device away from active HF surgical equipment, MRI system and RF
shielded rooms which generate strong electromagnetic interference.
● Keep the device away from strong electromagnetic fields (e.g. near the mobile
power supply, microwave oven, etc.), as it may affect accuracy.
● Do not submerge the device in water or any liquids.
● Do not use the device near flammable anesthetic mixtures.
● Do not stack this device with other equipment to prevent operational issues.
● Keep batteries away from fire and out of reach of children and pets.
1.2 Caution
- For best results, practice multiple times to become familiar with the
measurement technique.
- Inspect the device for any damage before use, especially the cuff. Do not use if
damaged to avoid skin injury.
- Verify the device is in proper working condition before use.
- Do not inflate the cuff when not properly wrapped around the arm.
- If cuff pressure causes discomfort, stop the measurement immediately by
pressing the "START/STOP" button to release pressure, and remove the cuff.
- Inaccurate measurement values may occur due to unconscious mis-operation.
Instruction Manual
Electronic Blood Pressure Monitor
Model: BP-202
1. Safety Instructions................................................................................2
2. Working Principle..................................................................................4
3. Intended Purpose .................................................................................4
4. Product Introduction .............................................................................4
5. Product Structures................................................................................5
6. Symbol Explanation..............................................................................7
7. Product Specification............................................................................8
8. Settings ................................................................................................9
9. Blood Pressure Measurement Method.................................................11
10. Error and Fault Troubleshooting .........................................................13
11. Maintenance and Cleaning .................................................................14
12. Product Charging ...............................................................................15
13. After-sale Service ...............................................................................15
14. EMC Information and Statement ........................................................16
15. Manufacturer Information ...................................................................17
Made in China
Storage and
Transportation
Environment
Temperature: -20℃~50℃
Humidity: 15%~85% RH
Atmospheric pressure range: 70kPa~106kPa
Pressure Sensor
Resistance type pressure sensor
Measuring Range
Measuring
Accuracy
Blood Pressure/Indication Range: 0-299mmHg (0-39.9kPa)
Pulse Rate: 40-199 beats/minute
Blood Pressure: ±3mmHg (±0.4kPa)
Pulse Rate: ±5 %
Reproducibility of
Blood Pressure
Determination
Resolution
Power Supply
1mmHg (0.1kPa)
Rechargeable Lithium-ion (1000mAh/3.7V/3.7Wh)
Stability of Blood
Pressure
Determination
Display TFT display
Maximum allowed
pressure
299mmHg
Cuff deflation
pressure
<10s deflate 260mmHg to less than 15mmHg
Static leakage
≤±6mmHg for 6min
Manometer
test mode
Dynamic pressure mode, Static pressure mode
±3mmHg (Root mean square between 10
measurements and their average)
≤±3mmHg (Maximum deviation between the
maximum value of 10 measurements and its average)
Version: 1.0
Revise date: 2023-02
Measuring Method
7. Product Specification
Item
Operating
Environment
Specification
Temperature: 5℃~40℃
Humidity: 15%~85% RH
Atmospheric pressure range: 70kPa~106kPa
Oscillometric method
The WEEE mark for electronic product recovery indicates that
when the end user intends to discard the product, it must be taken
to the appropriate facility for recovery and recycling.
Manufacture date
Manufacturer
Production batch number
6. Symbol Explanation
Graphic
Symbol
Content
WARNING Indicates a potentially hazardous situation, which if not
avoided, could result in death or serious injury.
CAUTION Indicates a potentially hazardous situation, which if not
avoided, may result in minor or moderate injury to the user or
patient or damage to the equipment or other property.
Please read the instructions before use.
Cover Protection Class IP22:2 Protected against solid foreign
objects of 12,5 mm ∅ and greater; 2 Protected against vertically
falling water drops when enclosure tilted up to 15°.
It belongs to the electric shock protection BF application
part.
UN38.3
Lithium battery certification
UDI
Unique device identifier
MR unsafe
MR
2. Working Principle
The Electronic Blood Pressure Monitor adopts the principle of oscillometric method,
receives the blood pressure signal in the armband (cuff) through the pressure sensor,
and measures the systolic blood pressure and diastolic blood pressure of the human
body after processing by the chip. During the process of measuring blood pressure,
the blood pressure sensor detects the number of pulsations of arterial blood vessels,
and then converts them into the number of pulsations within a minute to achieve pulse
rate measurement.
3. Intended Purpose
4. Product Introduction
Product Name: Electronic Blood Pressure Monitor
Model: BP-202
This equipment is composed of a main body and a cuff. The main body is composed
of a central processing unit, a pressure sensor, an air pump, a solenoid valve, a
uniform speed vent valve, a PCB board, and an TFT display.
5. Product Structures
This device is a digital monitor intended for use in measuring blood pressure and
pulse rate in adult patient population who can understand this instruction manual with
the arm circumference range printed on the arm cuff.
Population: Adult, not including pregnant patients.
Contraindications: No known contradictions.
Side effects: Not applicable.
START/STOP Button
SET Button
Cuff
TFT Display
3
4
13
1411
6
7
8
12
15
9 10
11.1 Maintenance
1) Do not disassemble, repair, replace parts, or modify the device. Contact the seller
or manufacturer for any necessary assistance.
2) Avoid exposing the equipment to high temperatures, moisture, excessive humidity,
or direct sunlight. Follow the instructions in this manual for proper usage and storage
under specified environmental conditions.
3) Store the device in a secure location out of children's reach.
11.2 Cleaning:
1) Clean the device with a soft, dry cloth or a slightly damp cloth. It is advised to clean
11. Maintenance and Cleaning
Radiated RF
IEC 61000-4-3
80MHz- 2.7GHz 10 V/m
380MHz- 390MHz
430MHz- 470MHz
704MHz- 787MHz
800MHz- 960MHz
1.7GHz- 1.99GHz
27 V/m
28 V/m
9 V/m
28 V/m
28 V/m
Table 2: Electromagnetic Immunity
Guidance and Declaration - Electromagnetic Emissions
Electrostatic Discharge (ESD)
IEC 61000-4-2
Power Frequency (50/60 Hz)
Magnetic Field IEC 61000-4-8
30 A/m
Immunity Test
Compliance
±8 kV contact
±15 kV air
Table 1: Electromagnetic Emissions
Guidance and Declaration - Electromagnetic Emissions
The product is intended for use in the electromagnetic environment specified
below. The customer or the user of the product should assure that it is used in
such an environment.
Emission Test
RF emissions CISPR 11
Compliance
Group 1, Group B
Warnings:
- This product should not be used close to or stacked with other devices. If it must be
used close to or stacked with other devices, it should be observed to verify that it can
operate normally under the configuration used.
14. EMC Information and Statement
Precautions:
- This product conforms to the electromagnetic compatibility requirements of IEC
60601-1-2:2014 standard.
- The user shall use the device according to EMC information provided in this manual.
- Portable and mobile RF communication equipment may affect the performance of
the product. Avoid strong electromagnetic interference, such as close to mobile
phones and microwave ovens.
- The guidance and manufacturer's statement are detailed in the table below.
5
8. Settings
Statement
The electronic blood pressure monitor has been performed clinical investigation
according to ISO 81060-2: 2018 Non-invasive sphygmomanometers - Part 2:
Clinical investigation of intermittent automated measurement type. The mean
error and the maximum permissible standard deviation met the requirements of
ISO 81060-2: 2018.
- This monitor is clinically investigated in accordance with the requirements of IEC
80601-2-30:2018.
- This monitor’s biocompatibility has been verified by test according to ISO 10993
series standards.
- This monitor has been designed and tested in accordance with EN 60601-
1:2006+A1:2013 to ensure safety and essential performance.
- Any serious incidents should be reported to the EU representative,
manufacturer, and competent authority.
Long press the setting button to enter the settings function:
8.1 Unit Switching
1) Long press the "SET" button. If the current unit is mmHg, press the
"START/STOP" button to switch to kPa.
9. Blood Pressure Measurement Method
9.1 Check and Prepare Before Measurement
1) Avoid exercising, bathing, drinking stimulating drinks (such as coffee or alcohol),
and smoking within 30 minutes before the measurement.
2) Rest in a comfortable and stable environment for at least 5 minutes before the
measurement.
3) Remove tight-fitting or thick clothing from your arm, bare the upper arm or wear thin
shirts for the measurement.
4) Sit in a chair with your feet flat on the floor and arms on the table.
9.2 Apply the Cuff
2) The screen will display 0.0kPa, indicating successful switching.
3) Press the "SET" button to save and proceed to the next setting.
8.2 User Switching
1) After completing the previous setting, enter the user setting.
2) Press the "START/STOP" button to switch between "1" and "2" users. 3) Press the
"SET" button to save and proceed to the next setting.
8.3 Date/Time Setting
1) After completing the previous setting, enter the date setting
(year, month, day).
2) Press the "START/STOP" button to adjust the year, then press the "SET" button to
enter the month setting.
3) Press the "START/STOP" button to adjust the month, then press the "SET" button
to enter the day setting.
4) Press the "START/STOP" button to adjust the day, then press the "SET" button to
save and proceed to the 12/24-hour format setting.
5) Press the "START/STOP" button to switch between 12-hour and 24-hour format.
6) Press the "SET" button to save and proceed to the hour setting.
7) Press the "START/STOP" button to adjust the hour, then press the
"SET" button to enter the minute setting.
8) Press the "START/STOP" button to adjust the minute.
9) Press the "SET" button to save and proceed to the next setting.
8.4 Voice Settings
1) After completing the previous setting, enter the voice settings.
2) Press the "START/STOP" button to switch between ON and OFF.
3) Press the "SET" button to save and proceed to the next step.
8.5 Clearing Memory Data
1) After completing the previous setting, enter the memory deletion setting.
2) Press and hold the "START/STOP" and "SET" buttons simultaneously for 2
seconds. When the screen displays "--", all memory data has been successfully
deleted.
3) Press the "SET" button to save and turn off the device.
Note: Memory deletion will permanently erase all stored measurement data for all
users on this device.
Note: When the device is in settings mode, the "START/STOP" button cannot be used
to turn the power on or off. You must cycle through all settings to the end, then press
the "SET" button to shut down the device. Once shut down, the "START/STOP" button
will resume its normal power function.
9.3 Start Blood Pressure Measurement
1) Press the "START/STOP" button while the device is in shutdown or standby mode
to initiate the measurement process. The cuff will automatically inflate.
Note: During inflation, please keep your arm still to ensure accurate readings. Any
movement may affect the measurement. Feeling the cuff pressure is normal during
inflation. Refer to the "Error and Fault Troubleshooting" section for error indications.
2) The device will stop automatically after full inflation and proceed to detect your
pulse rate. Once the measurement is complete, your blood pressure and pulse values
will be displayed.
Notice:
ER4
The cuff is too loose or
leaks air.
ER5
The cuff is too tight or
the cuff is blocked.
ER3
Abnormal
measurement results
Please check if the cuff is normal and properly
worn, and ensure the blood pressure monitor
is aligned with the level of the heart. Adopt the
correct sitting posture, maintain a relaxed and
quiet state, and take the measurement again.
Check whether the cuff is secured with
adequate tightness (one or two fingers should
fit between the cuff and the arm); check for
any noticeable air leakage from the cuff, then
re-measure.
Check whether the cuff is tight enough
to fit one or two fingers into your arm;
re-measure.
ER6
Severe pressure
interference during
measurement.
ER7
Pressure exceeds
upper limit
Do not speak during measurement
and keep relaxed. Do not use force or
move the arm suddenly during
measurement, re-measure.
Check whether there are strong interference
devices in the measurement environment,
such as mobile phones, motors, and
microwave ovens. Do not speak during
measurement and keep relaxed. Do not use
force or move the arm suddenly during
measurement, re-measure.
10. Error and Fault Troubleshooting
ER1
ER2
Abnormal sensor signal
Check whether the cuff is normal and
whether it is worn correctly, re-measure.
No measurement results
Check whether the cuff is normal, whether it
is worn correctly, whether the blood pressure
monitor communicates with heart. Using
correct sitting posture, keep relaxed and
quiet, re-measure.
Symbol
Cause Solution
Note: Maintain a correct posture and a quiet environment during measurement. To end
the measurement, press the "START/STOP" button to stop the pressure and deflate
the cuff.
- Various factors such as measurement site, patient position (standing, sitting, lying
down), cuff placement, exercise, and physiological condition can affect blood pressure
readings.
- Extreme temperature, humidity, and altitude can impact the blood pressure monitor's
performance. Use the device in the environment in accordance with the Instruction
Manual.
- Proper cuff tightness is crucial for accurate readings.
- Maintain consistency in measurement timing, body position, posture, and device
usage.
- Please measure both arms for first-time use.
- During measurement, please avoid squeezing the cuff, as squeezing may cause
persistent over-inflation of the cuff. Excessive pressure can block blood flow and
cause discomfort to the user. If you feel strong discomfort, promptly press the
"START/STOP" button to release pressure, and remove the cuff.
- Wait at least 2-3 minutes between measurements to allow the artery to return to its
normal state.
- Avoid frequent measurements to prevent blood flow interference and potential injury.
- Cuff pressurization may temporarily affect the function of other monitoring devices on
the same arm.
- Make sure that the blood pressure monitor operation does not excessively impede
blood circulation.
- Please follow the provided cleaning instructions in section 11 of this manual to
minimize Cross-infection risks for the intended reuse of the product.
- Do not clean the device with volatile solvents.
- Avoid dropping the device or subjecting it to strong impacts.
- Use only specified accessories provided by the manufacturer to maintain
proper functionality.
- Follow local laws when disposing of parts or the device at the end of its life
cycle.
Memory Capacity
Measure Time
Auto off
Dimension
Weight
Package List
Lifetime
2 users with 99 memories each
Approx. 60s
Auto power off after 60 seconds of inactivity
Approx. 132mm (l) × 71mm (w) × 93mm (h)
(5.2" × 2.8" × 3.7")
Approx. 248g (Included cuff )
USB-C cable, Instruction manual
5 years
Cuff Specification
Approx. 22 to 42cm (8.6" to 16.5")
DC 5.0VCharging Voltage
8.6 Viewing Stored Memory
1) Short press the "SET" button to enter the memory viewing mode to check the
measurement data stored on the device.
1) Unfold the cuff into a loop and ensure it is open
wide enough for your arm to fit in.
2) Wrap the cuff around the upper arm. Make
sure the bottom edge of the cuff is 2 cm to 3 cm
(approx. 1 inch) above the inner elbow.
3) Secure the cuff with the fabric fastener. Leave
enough space to fit one finger between the cuff
and your arm.
Correct measurement posture:
A. Rest your elbows on the table.
B. Align the cuff with your heart height.
C. Relax your body with palms facing up.
16
12. Product Charging
12.1 How to Charge
This monitor is powered by a built-in lithium-ion battery. Please ensure the device is
sufficiently charged before use. When the battery is low, please charge the device
using the steps below:
1) Insert the charging cable into the power port on the monitor.
2) Plug the USB end of the cable into a DC 5V/1A USB power adapter, then plug the
adapter into a standard 110V-240V AC outlet. The battery indicator will flash
sequentially during charging.
3) Once fully charged, the battery indicator will display 100%. Unplug the adapter and
disconnect the cable.
Important Safety Notes:
When used with a power adapter, this device is classified as a Medical Electrical
System. Please ensure the adapter complies with the requirements of GB9706.1-
2020.
12.2 Battery Life
A full charge provides approximately 200 measurements under normal usage
conditions.
13. After-sale Service
Visit official website or scan QR code
to activate lifetime warranty:
www.runstar.com
0
40
80
120
160
200
240
280
320
120
Abort the measurement
10/30 12:00
100%
Taking Measurements
mmHg
0
40
80
120
160
200
240
280
320
Please put on the cuff properly
Ready to measure
10/30 12:00
100%
Start Measuring Inflating
0
40
80
120
160
200
240
280
320
120
Abort the measurement
10/30 12:00
100%
Taking Measurements
mmHg
3) After the measurement, remove the cuff, press the "START/STOP" button to
manually turn off the device. If no action is taken, the device will turn off automatically
after 60 seconds.
the device before each use.
2) Disinfect the device with a soft cloth dampened with 75% medical alcohol after
cleaning. Daily disinfection is recommended. Allow the device to air dry in a cool place
after disinfection.
3) Avoid using strong volatile or corrosive solvents or abrasive cleaners.
2.4GHz- 2.57GHz
5.1GHz- 5.8GHz
28 V/m
9 V/m
Radiated RF
IEC 61000-4-3
WARNINGS!
This device should not be used in the vicinity or on the top of other electronic
equipment such as cell phone, transceiver or radio control products. If you have to
do so, the device should be observed to verify normal operation.
● The use of accessories and power cord other than those specified, with the
exception of cables sold by the manufacturer of the equipment or system as
replacement parts for internal components, may result in increased emissions or
decreased immunity of the equipment or system.
Table 3: Not Applicable
Harmonic Emissions (IEC 61000-3-2), Voltage Flicker Emissions (IEC 61000-3-
3), Electrical Fast Transients (IEC 61000-4-4), Surge (IEC 61000-4-5), Voltage
dips (IEC 61000-4-11), Conducted Immunity (IEC 61000-4-6)
Note: These guidelines may not apply in all situations. Electromagnetic
propagation is affected by absorption and reflection from structures, objects,
and people.
MEDICAL DEVICE SINGLE AUDIT PROGRAM
Manufacturer: Shenzhen HBcare Technology Co.,Ltd
Manufacturer Address: 4-5/F, Building 11, Tongfuyu Industrial Park,
Lezhujiao, Huangmabu Community, Hangcheng Street, Bao’an
District, Shenzhen, China
17
15. Manufacturer Information