Eagle Foodservice Equipment, Eagle MHC, and SpecFAB
®
are divisions of Eagle Group. ©2023 by the Eagle Group
• 100 Industrial Boulevard, Clayton, Delaware 19938-8903 U.S.A.
• Phone: 302/653-3000 • 800/441-8440 • Fax: 302/653-2065
• www.eaglegrp.com • www.eaglegrpnews.com • www.eaglemhc.com
#1
#2
#3
#4
#5
#8
#7
#6
#9
#10
#11
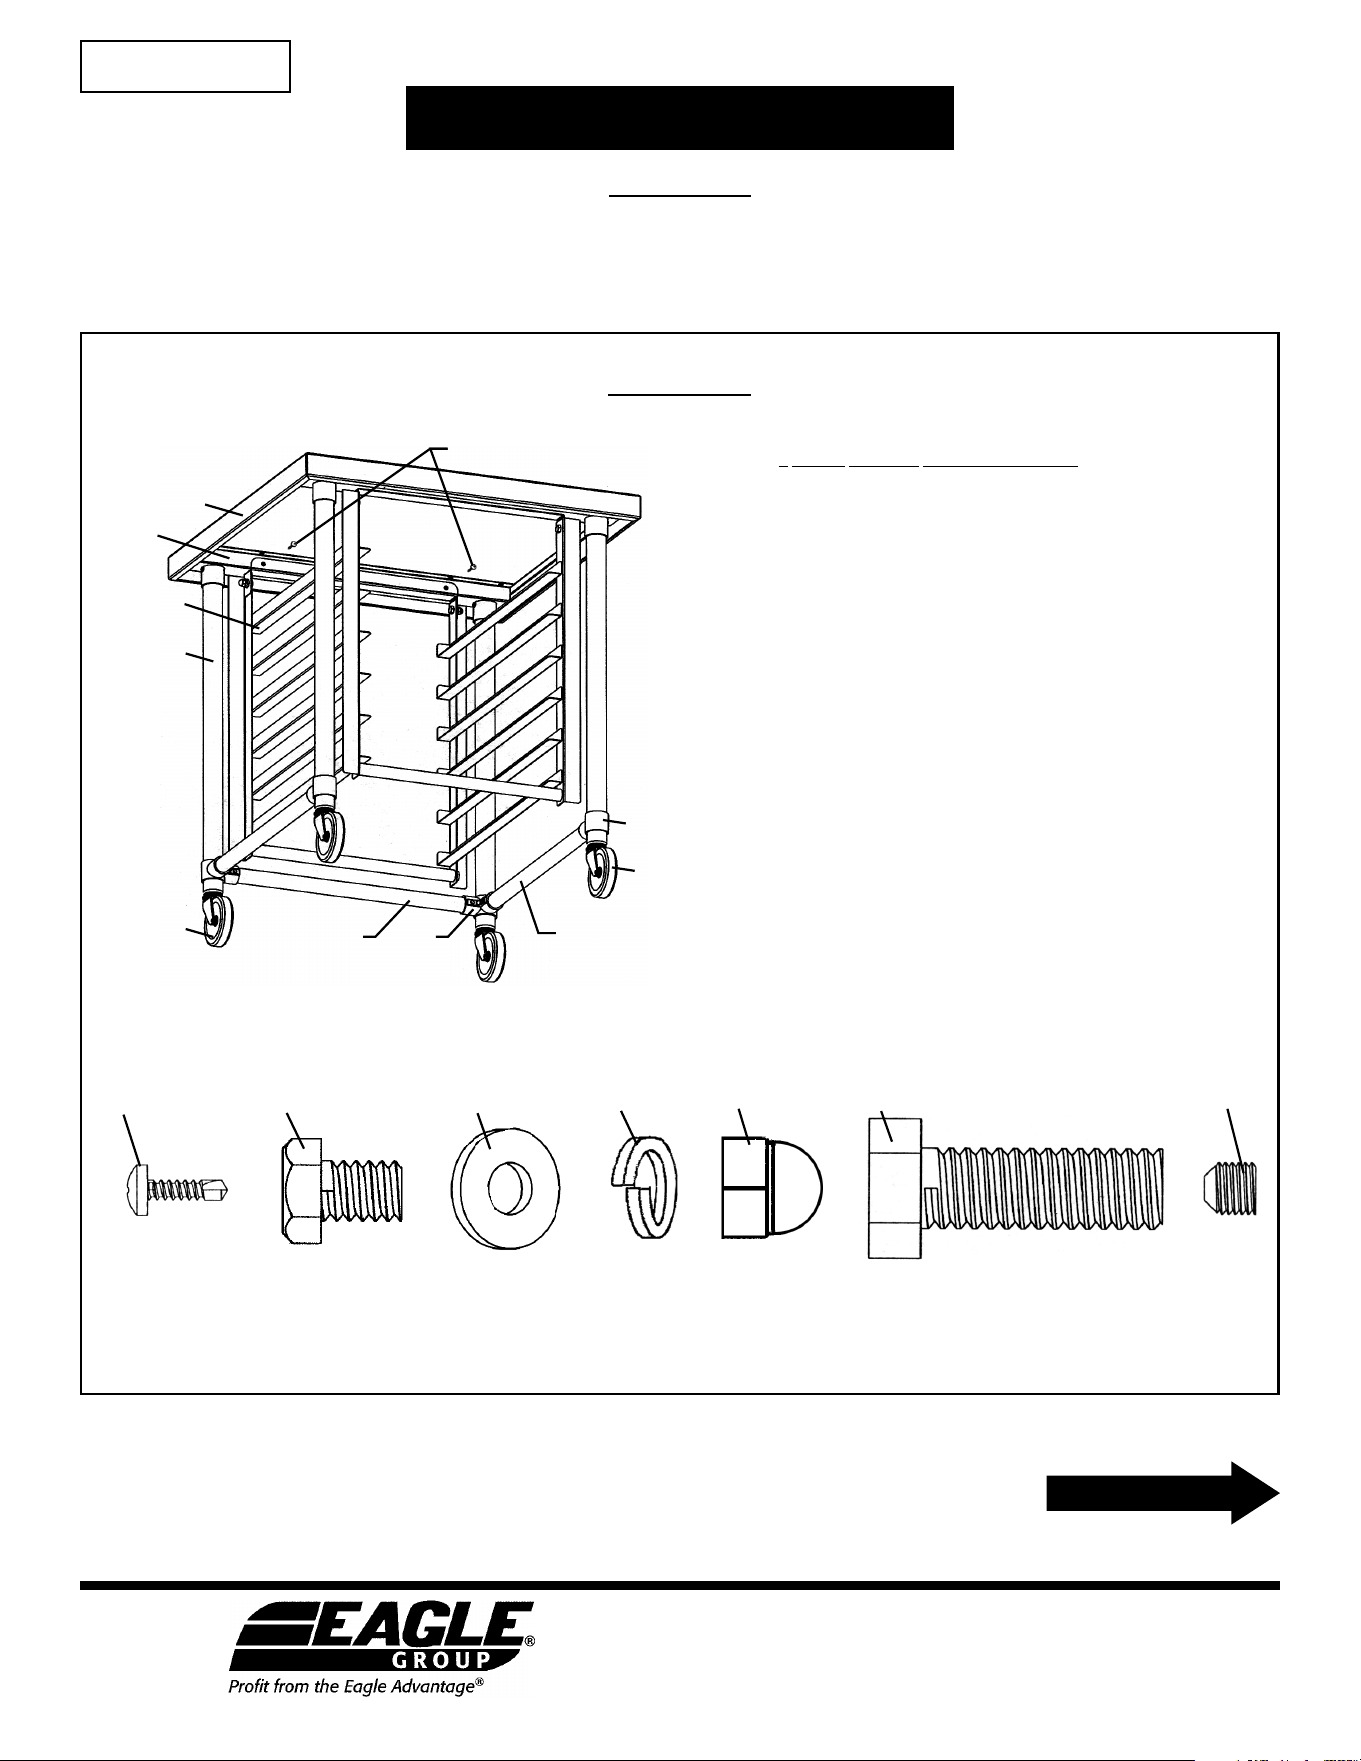
ASSEMBLY INSTRUCTIONS
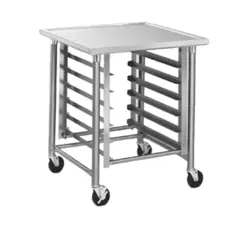
Mobile Mixer Stand
EG10021 Revised 02/23
CAUTION
INSPECT CONTENTS IMMEDIATELY AND FILE CLAIM WITH DELIVERING CARRIER FOR ANY DAMAGE.
SAVE YOUR BOX AND ALL PACKING MATERIALS.
YOU ARE RESPONSIBLE FOR DAMAGE TO YOUR UNIT IF RETURNED IMPROPERLY PACKED.
(actual size of hardware)
#11
#1 . . 1 . . . 330126. . . . Table Top
#2 . . 2 . . . 348345. . . . Leg Channel
#3 . . 1 . . . 315463. . . . Tray Slide Rack
#4 . . 4 . . . 315461. . . . Leg
#5 . . 2 . . . 300699. . . . Caster
#6 . . 2 . . . 300698. . . . Caster with Brake
#7 . . 2 . . . 317646. . . . Front Fitting
#8 . . 2 . . . 317647. . . . Corner Fitting
#9 . . 1 . . . 317663. . . . Side-to-side Crossbrace
#10 . . 2 . . . 317643. . . . Front-to-back Crossbrace
#11 . . 6 . . . 300794. . . . #8 x
1
⁄2˝ Screw
#12 . . 4 . . . 377798. . . .
3
⁄8 - 16 x
1
⁄2˝ Hex Cap Screw
#13 . . 4 . . . 305010. . . . Flat Washer
#14 . . 4 . . . 306122. . . . Lock Washer
#15 . . 4 . . . 306137. . . . Cap Nut
#16 . . 4 . . . 300962. . . .
1
⁄2 - 13 x 1
1
⁄2˝ Bolt
#17 . . 4 . . . 311243 . . . .
5
⁄16 - 24 Set Screw
# qty part description
#16#15 #17#14
#12
Parts List
#13
INSTRUCTION SHEET
#357006
(continued on page 2)
Item #16
#300962
bolt
Item #14
#306122
lock washer
Item #13
#305010
flat washer
Item #15
#306137
cap nut
Item #12
#377798 bolt
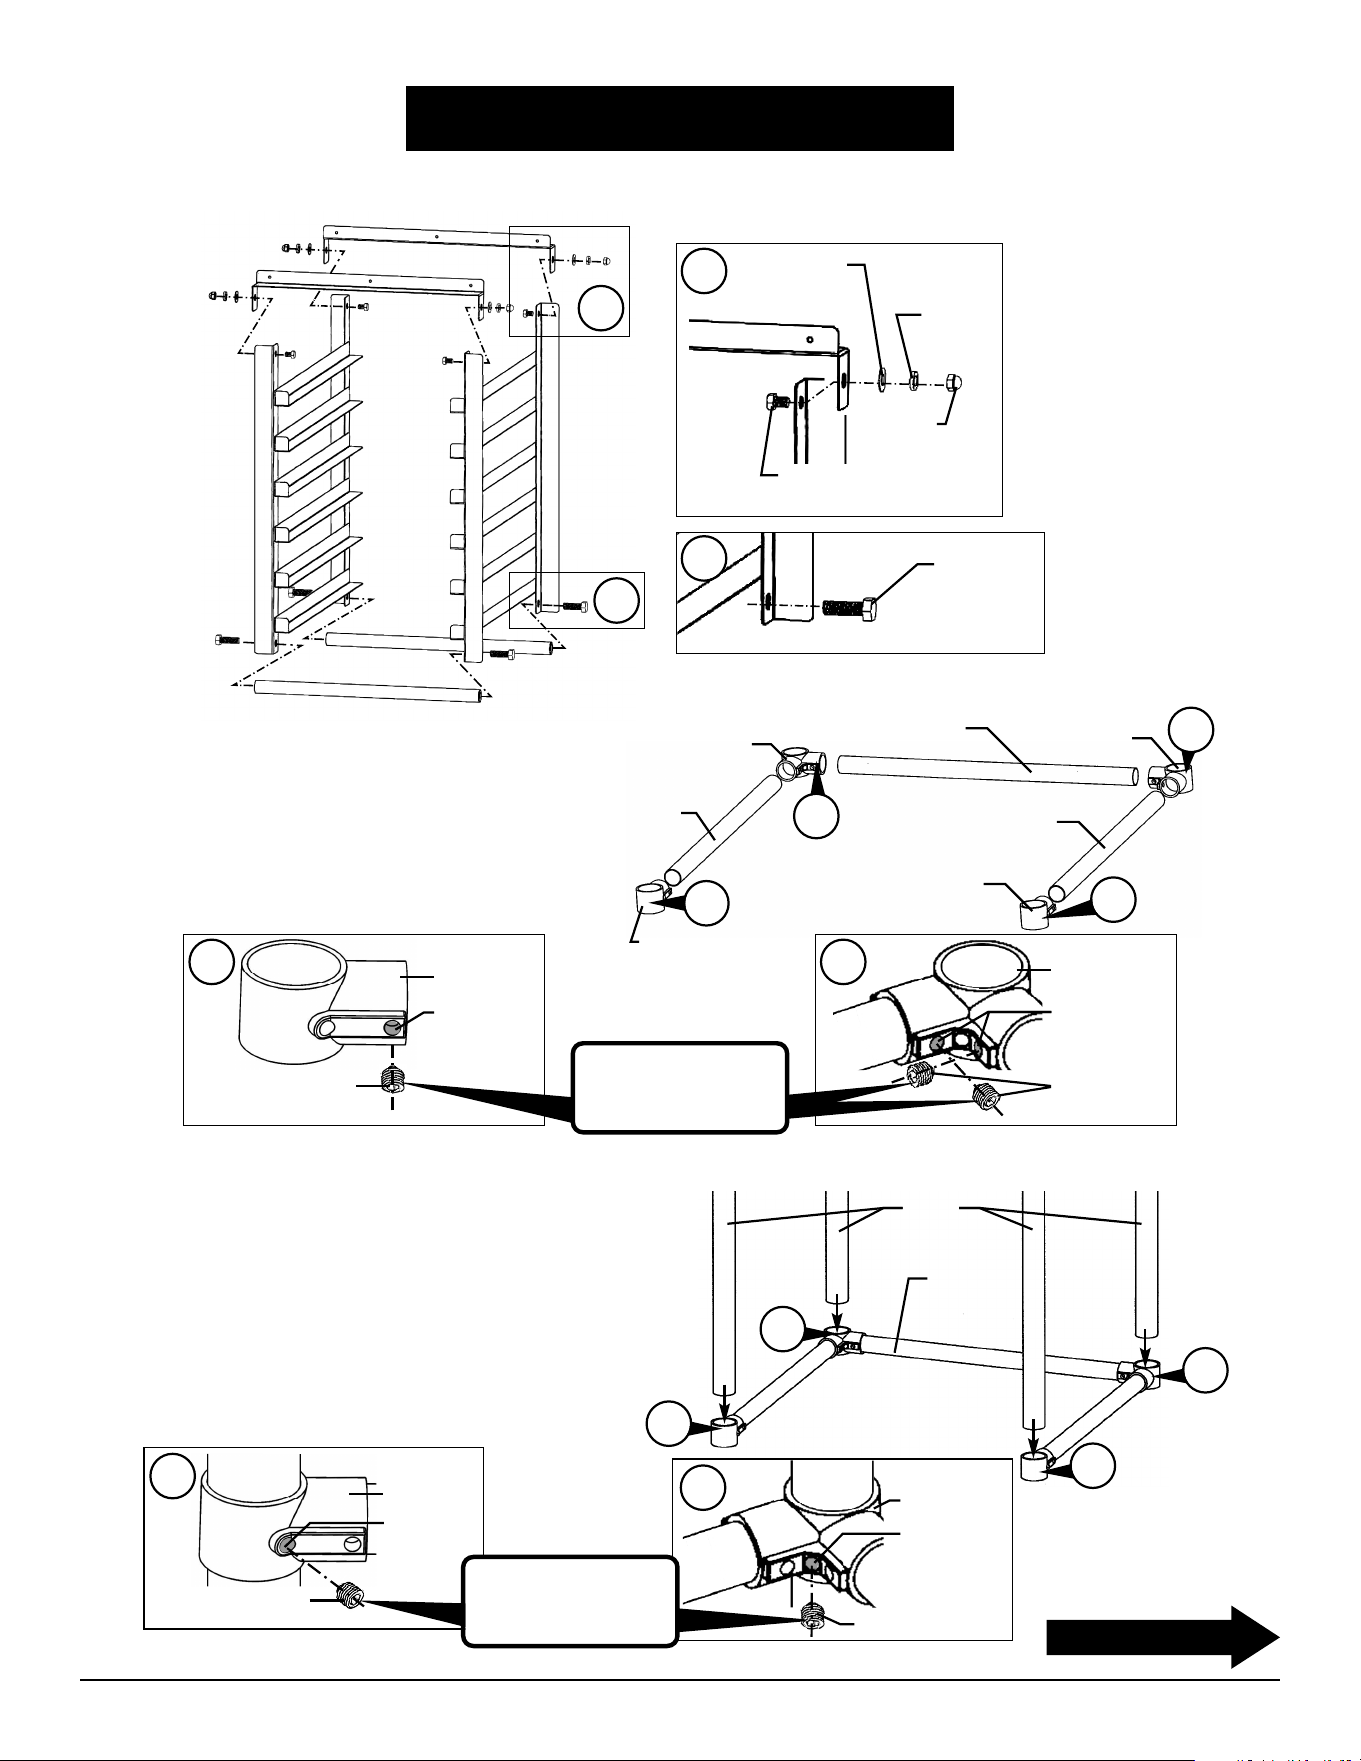
Step 2 - Assemble crossbrace subassembly.
• Loosen Item #17 set screws* in Items #7 and #8 castings.
• Assemble castings to Items #9 and #10
crossbracing, as shown.
• With 5/32˝ allen wrench, tighten set screws* in the
appropriate threaded hole in castings (see below).
Item #10
crossbrace
Item #10
crossbrace
Item #8
corner fitting
Item #8
corner fitting
Item #9
crossbrace
Item #7
front fitting
Item #7
front fitting
2b
2b
2a
2a
ASSEMBLY INSTRUCTIONS
Mobile Mixer Stand
Page 2
Step 3 - Slide legs through crossbrace subassembly
and snug set screws*.
• Loosen Item #17 set screws* in Items #7 and #8 castings
of crossbrace subassembly.
• Insert legs through castings. Position legs so that
approximately 1˝ of each leg protrudes through each casting.
• With 5/32˝ allen wrench, tighten set screws* in the
appropriate threaded hole in castings (see below).
(continued on page 3)
Step 1 - Assemble rack (Item #3) and set aside.
Item #17*
set screw
casting
threaded hole
in casting for
crossbracing
Item #17*
set screws
corner casting
threaded holes
in casting for
crossbracing
2a
1a
1a
1b
1b
2b
* To meet NSF standards:
Set screws must be filled
with NSF-approved sealant.
Item #4
legs
crossbrace
subassembly
threaded hole
in casting for
legs
set screw*
3b
corner casting
Item #17 set screw*
casting
threaded hole
in casting for
legs
3a
* To meet NSF standards:
Set screws must be filled
with NSF-approved sealant.
3a
3b
3a
3b
Page 3
ASSEMBLY INSTRUCTIONS
Mobile Mixer Stand
Step 4 - Attach tabletop.
• Turn tabletop upside-down, taking care not to scratch the surface.
• Insert legs into gussets.
• With 5/32˝ allen wrench, tighten all Item #17 set screws* to secure legs into gussets.
Note: Open end of crossbrace faces the front of the table.
Step 5 - Turn rack assembly (from Step 1) upside-down and
attach to tabletop channel frame.
tabletop
(upside-down)
rack
assembly
(upside-
down)
tabletop
channel
frame
Item #11
#300794
screw
(continued on back page)
4a
4a
4a
4a
4a
Item #17*
set screw
* To meet NSF standards:
Set screws must be filled
with NSF-approved sealant.

Eagle Foodservice Equipment, Eagle MHC, and SpecFAB
®
are divisions of Eagle Group. ©2023 by the Eagle Group
• 100 Industrial Boulevard, Clayton, Delaware 19938-8903 U.S.A.
• Phone: 302/653-3000 • 800/441-8440 • Fax: 302/653-2065
• www.eaglegrp.com • www.eaglegrpnews.com • www.eaglemhc.com
ASSEMBLY INSTRUCTIONS
Mobile Mixer Stand
(End)
Step 6 - Attach casters to assembly.
Note: It is recommended that casters with brake are to be at the front of the table.
When caster
is snug in leg,
use a 2˝ wrench
to tighten
bottom nut.
Fully assembled unit.
bottom
nut
6b
6a
6a
6b
6b
6a
6b
6a
6b
knurled
nut
Tighten knurled nut
until applicator starts
to expand. Insert caster
into leg. If caster is not
snug, tighten knurled
nut more.
6a