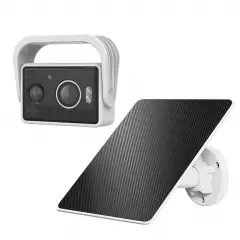
BF37 /
2026.05.27
1.单⻚尺⼨ : 125*125mm
2.105g双铜+4C印刷+表⾯连线光油
说明书
智能摄像头
2024.10.21
第1⻚ 第2⻚空⽩⻚
最后⼀⻚ 封⾯
第5⻚
第6⻚
第9⻚ 第10⻚第7⻚ 第8⻚
第3⻚
第4⻚
第11⻚ 第12⻚
第15⻚
第16⻚
第13⻚
第14⻚
第19⻚ 第20⻚第17⻚ 第18⻚
⽬录
第21⻚ 第23⻚第22⻚ 第24⻚
修改型号名、末尾⻚增加警示语
2026.05.27
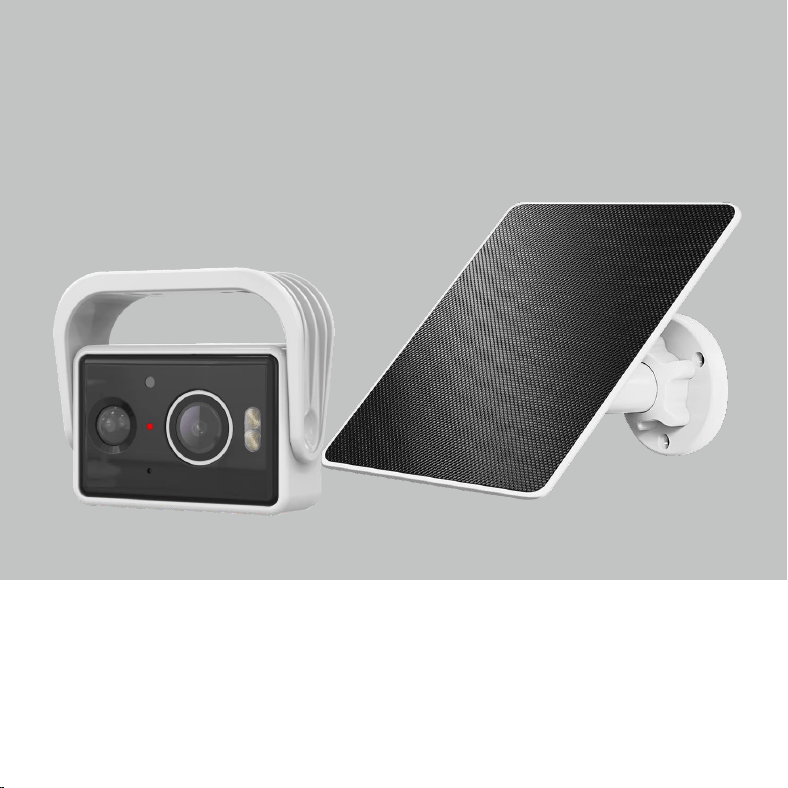
Product manual
Smart AI Bird Camera


Warm tips. ..........................................................................................................................1
What’s in the box. ..............................................................................................................2
Specifications for bird feeder . ........................................................................................3
Introduction for camera. .................................................................................................4
Indicator light. ....................................................................................................................5
How to connect to the APP . ......................................................................................6-10
APP interface introduction. ..........................................................................................11
How to install . ...........................................................................................................12-18
How to Charge Batteries...............................................................................................19
FAQ .............................................................................................................................20-23
CONTENT

1
WARM TIPS
1.Keep the camera and all accessories out of reach of children and pets.
2.Please do not expose the camera lens to sunlight directly .
3.Please do not soak the camera in water.
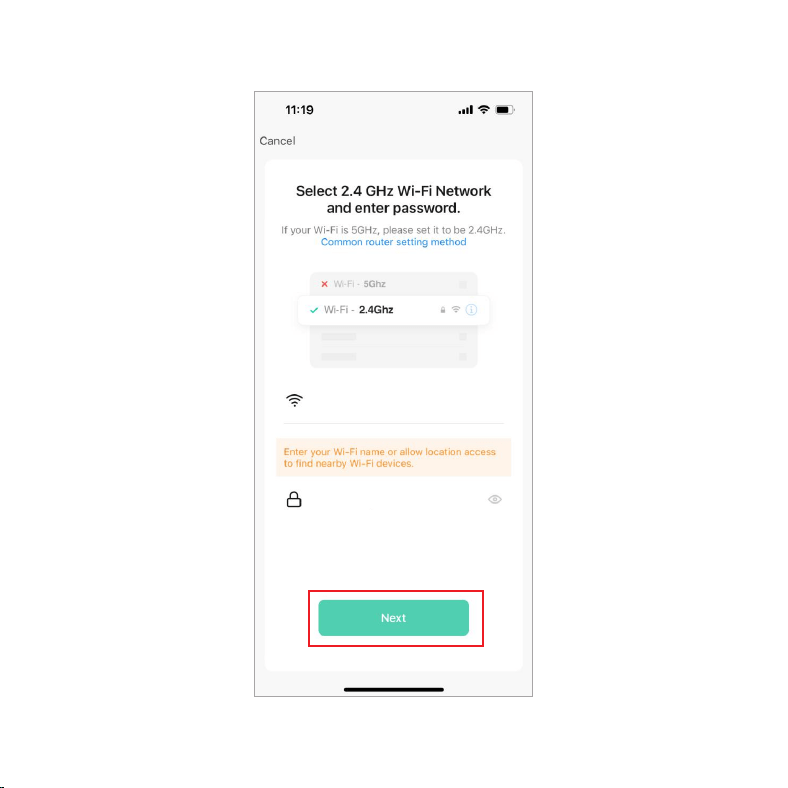
4.Please use 2.4 GHz WI-FI to connect the application.
5.Please stay away from the strong light when pairing.
6.Please keep the camera within the range of WI-FI signal.
7.Please install Solar Panel in an area with consistent sunlight throughout
the year. It only needs a few hours of direct sunlight each day to keep your
camera powered.
8.The energy produced by solar panels is affected by weather conditions,
seasonal variations, geographic location, and other factors.
9.The locking grounding plug ring is sharp, so please use caution when
installing to prevent cuts.
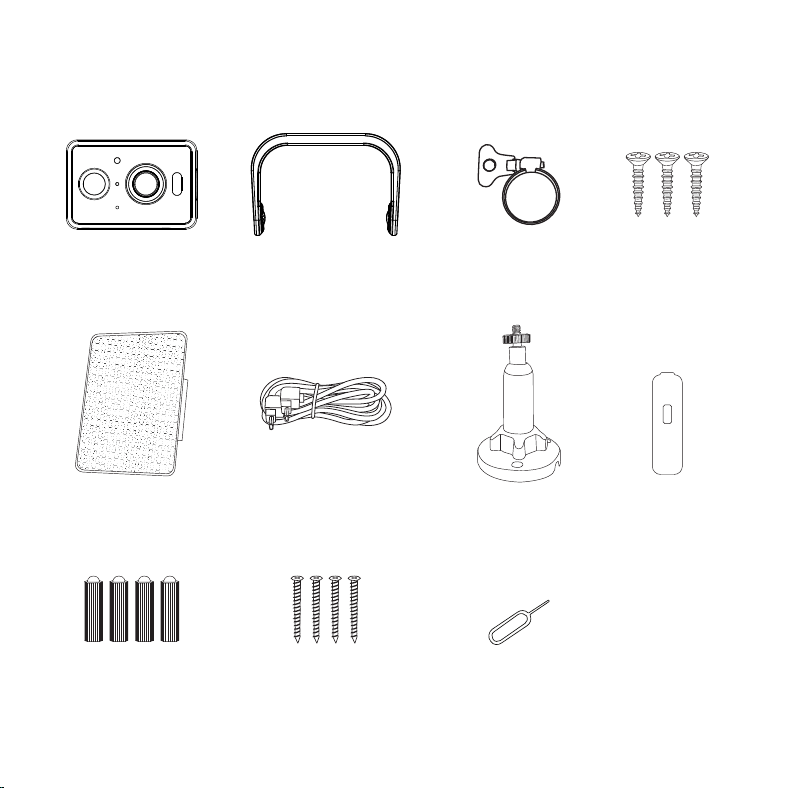
WHAT’S IN THE BOX
Charging cable
2
Camera Bracket
Smart Camera
External Solar Panel
Bracket Screws * 4
External Solar Panel
Screw Washer * 4
External
Solar Panel
Locking Ground
Plug Rings
External Solar
panel bracket
Reset Pin
Bracket
Screws*3
Waterproof
rubber

Product Model
Camera Resolution
Field of View
Night Visual Range
Network Connection
Motion Detection
wo-way Audio
Battery
Battery Life
Charging
Power Supply
Power Consumption
Main Materia
Waterproof Rating
Micro SD Card Replay
Working Temperature
Working Relative Humidity
Camera Net Weight
Camera Dimensions
Certifications
3Megapixels, 2K HD Video
160°
8M(Max)
2.4 GHz WiFi
Passive lnfrared Radiation
Microphone and Speaker
5000mAh Rechargeable and Removable Lithium lon Battery
4-6 Years
3W Solar Power and TYPE-C Cable
DC5V 2A
2W(Max)
PC
IP65
Support Micro SD Cards of 8-128GB
-20°C to 45°C
0-95%
60g
68.0*46.5*24.7mm
FCC, CE, ROHS, REACH, IP65
SPECIFICATIONS FOR BIRD FEEDE
BF37
R
3
4
①
②
③
④
⑤
⑥
⑧
⑨
⑦
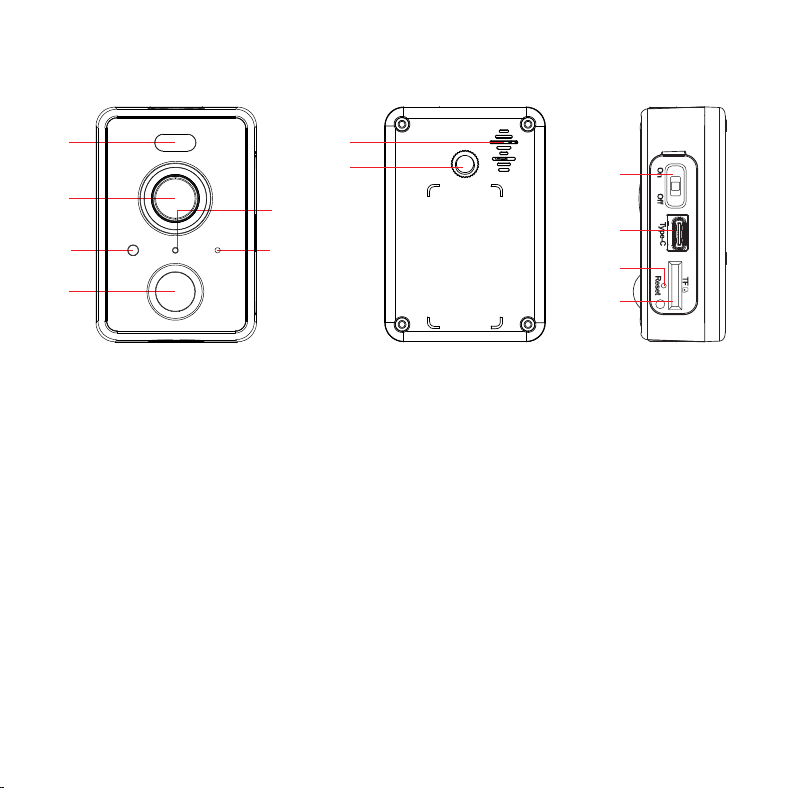
INTRODUCTION FOR CAMERA
⑩
⑪
⑫
Lights
Camera
Light Sensor
PIR
Indicator Light
Microphone
Speaker
Coupling Nut
Power On/Off
Power Port
Reset
①
②
③
④
⑤
⑥
⑦
⑧
⑨
⑩
⑪
⑫
TF Card Slot (Capacity
max to 128G)
INDICATOR LIGHT
5
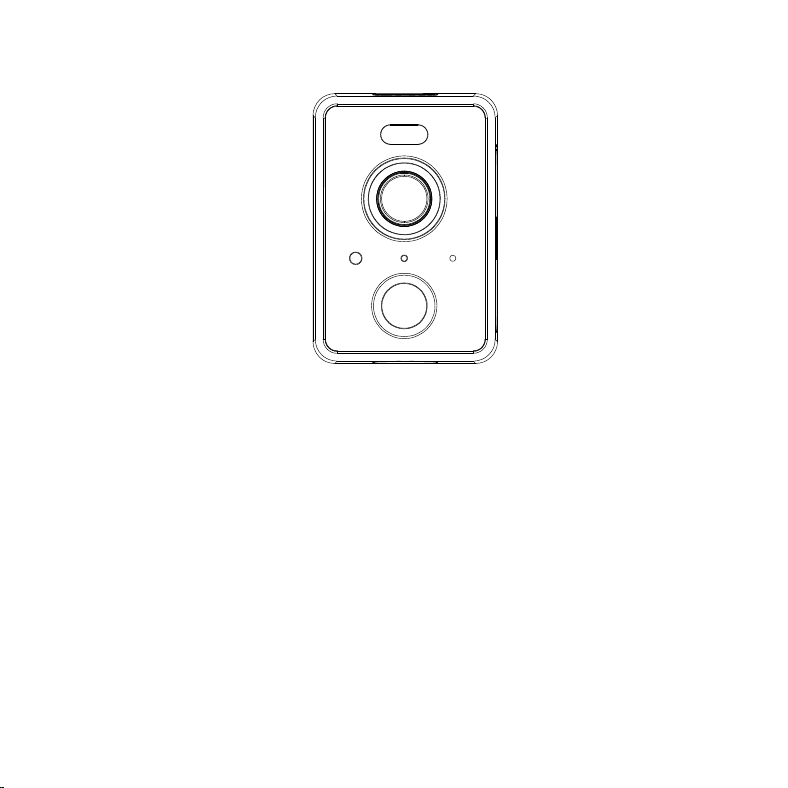
1.Camera turn on: Red light always ON.
2.Pairing mode: Red light fast blinking.
3.Network connecting: Green light fast blinking.
4.Network connected: Green light always ON.
5.Abnormal status : Red light slow blinking.(Need to reset)
6.During firmware update: Yellow light always ON.
7.Charging status: White light always ON during charging and OFF after
fully charged.
HOW TO CONNECT TO THE APP
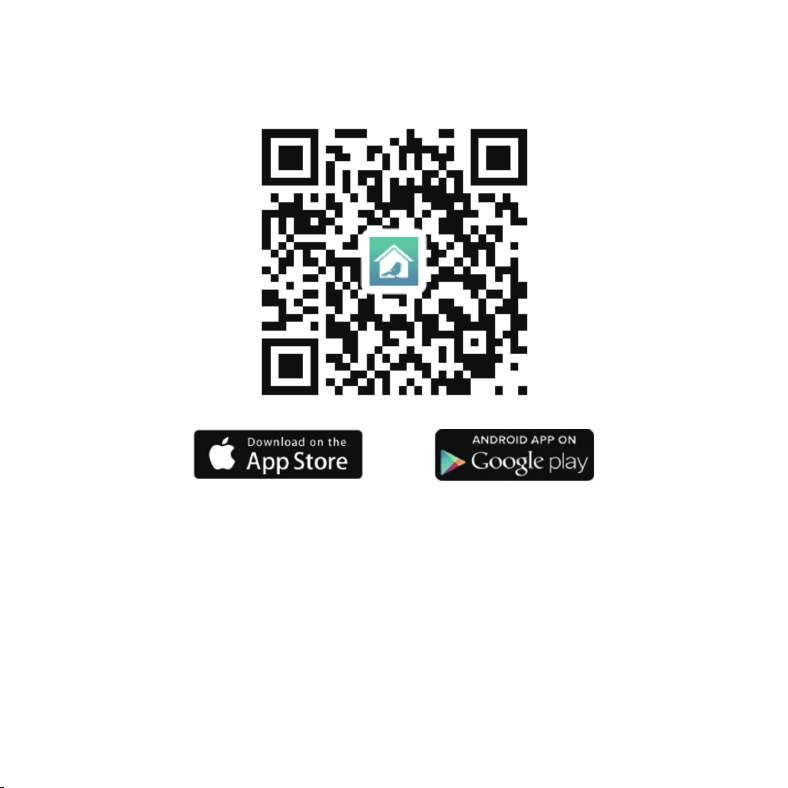
Download or scan the QR code and install the Bird Lover App for either IOS
or Android. Once downloaded, the APP will prompt you to register your
device. Enter your phone number or email address which one makes you
feel comfortable and select the country you live in. You will receive the
registration code. Input the registration code, then create a password.
6
7
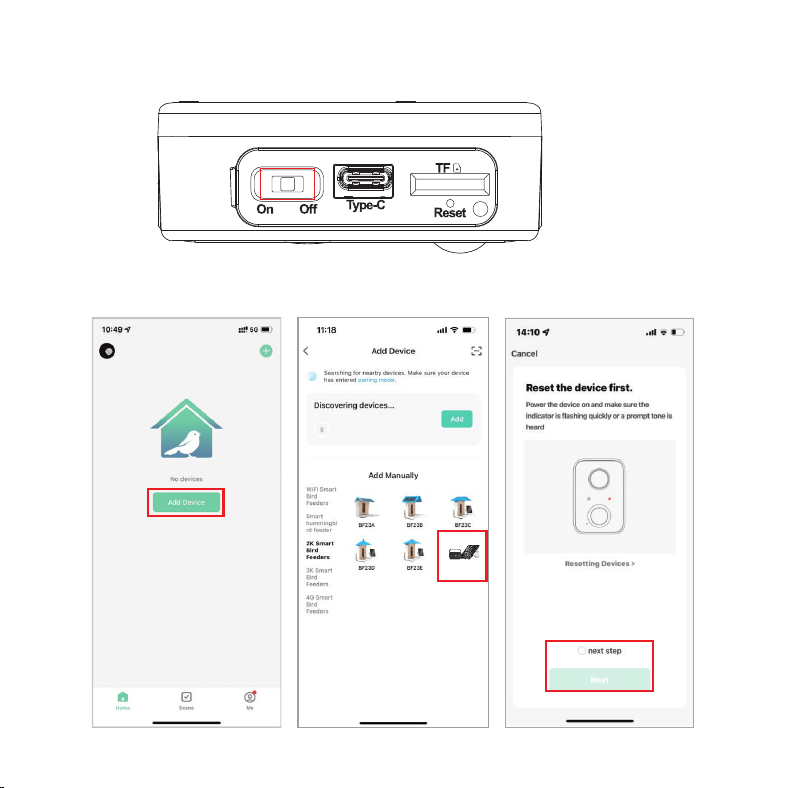
1.Turn on the switch. ( )Note: The camera should be power on.
2.Entering the APP and connect the device with the following steps.
BF 37
8
*** * * **
*** * * **
3.Enter the WIFI password.
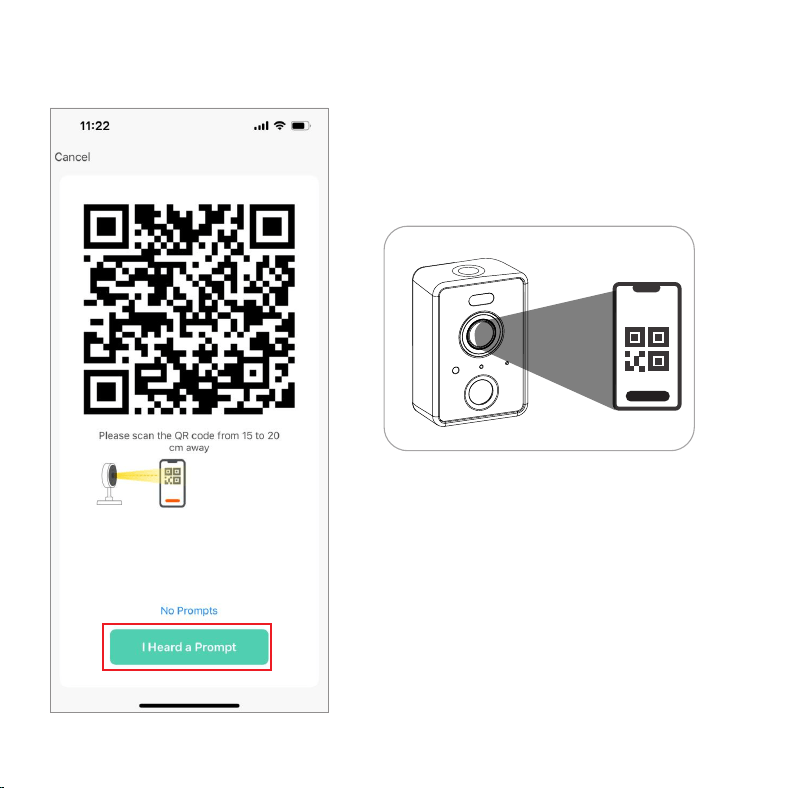
4.Scan the QR code with the camera, and enter the connection after
hearing the sound of the camera prompt.
NOTE: The QR code needs to be
aimed at the camera below
9
10
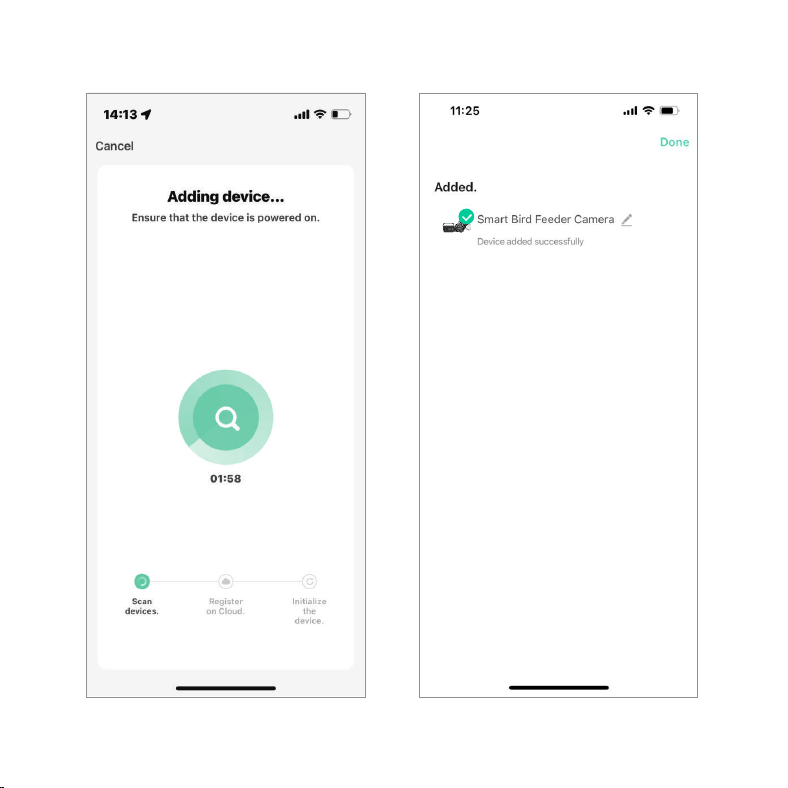
5.Wait for the connection to complete, and click "Done" .
11
APP INTERFACE INTRODUCTION
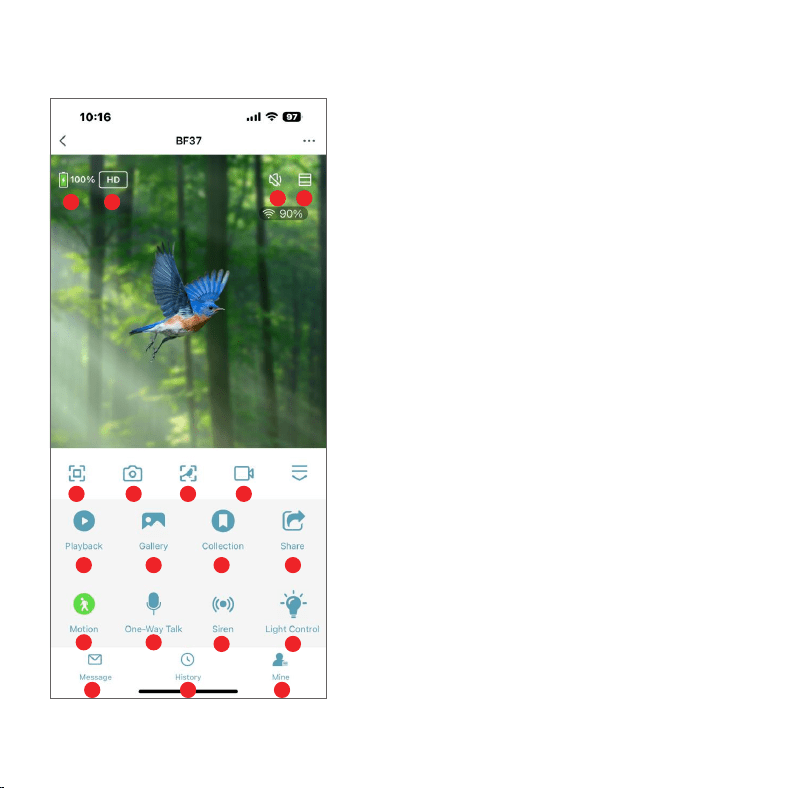
1.Quality adjustment: you can choose HD or SD
2.Battery Remaining Capacity
3.Voice switch
4.Zoom in the screen for camera
5.Screen horizontal and vertical adjustment
6.Take photo
7.Bird recognition
8.Shot videos
9.Playback for previous
10.View photos or videos took
11.Check out the bird collection
12.Share the device
13.Motion detection(Click to turn on/off)
14.One-Way Talk
15. Siren(Manual Siren or Squirrel Automatic Siren )
16.Lighting control
17.Notification for motion detection
18.History for bird recognition
19.Back to all function interface
9
5 6 7
8
10 11 12
13 14
15
17
18 19
1 2
3
4
16
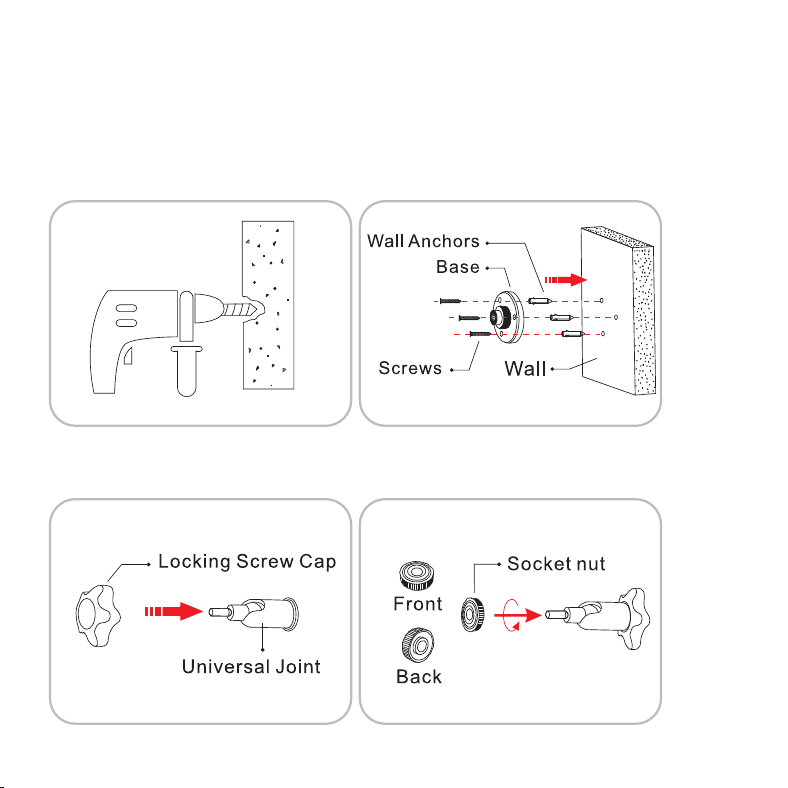
HOW TO INSTALL
External Solar Panel Installation
1.Fix the base to your mounting location using the included screws. If the
installation surface is soft or unstable, first use a drill bit to drill a hole in the
wall, then insert the anchor nail into the hole, and fix the base with screws.
2.First, install the locking screw cap into the universal joint and then screw
the circular socket nut into the universal joint.
12
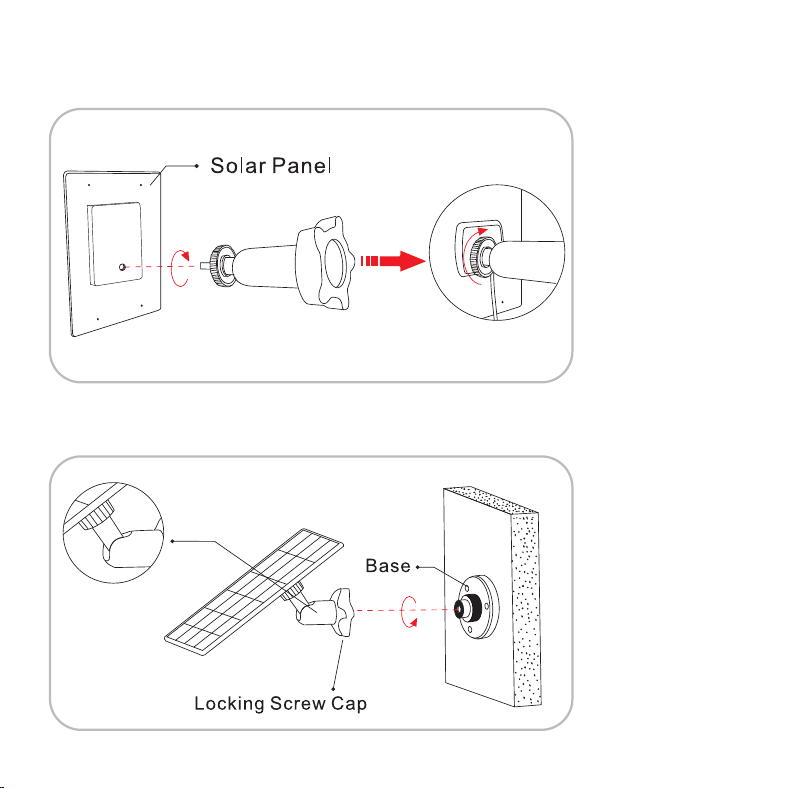
3.Screw the universal joint into the back of the solar panel. Tighten it firmly
with the attached nut.
4.Screw the locking screw cap into the base. Make sure that the universal
joint is angled upward.
13
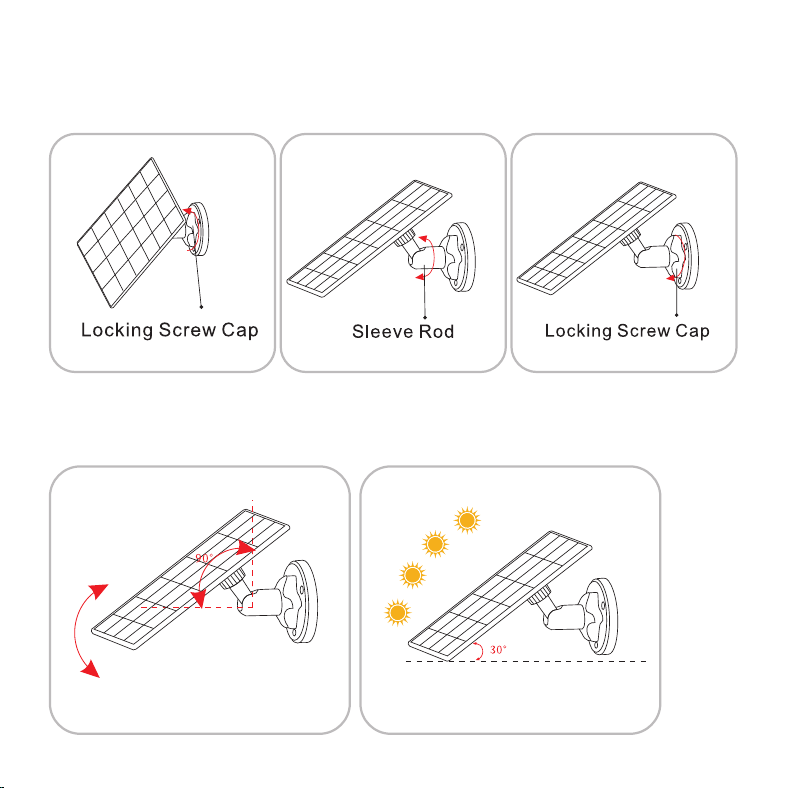
①
5.When adjusting the solar panel left or right, loosen the locking screw cap,
turn the sleeve rod, and tighten the locking screw cap when the panel is in
position.
6.Solar panel's angle can be adjusted up and down up to 90°.(Tip: After the
installation is complete, please check that all locking mechanisms are
tightly secured)
②
③
14
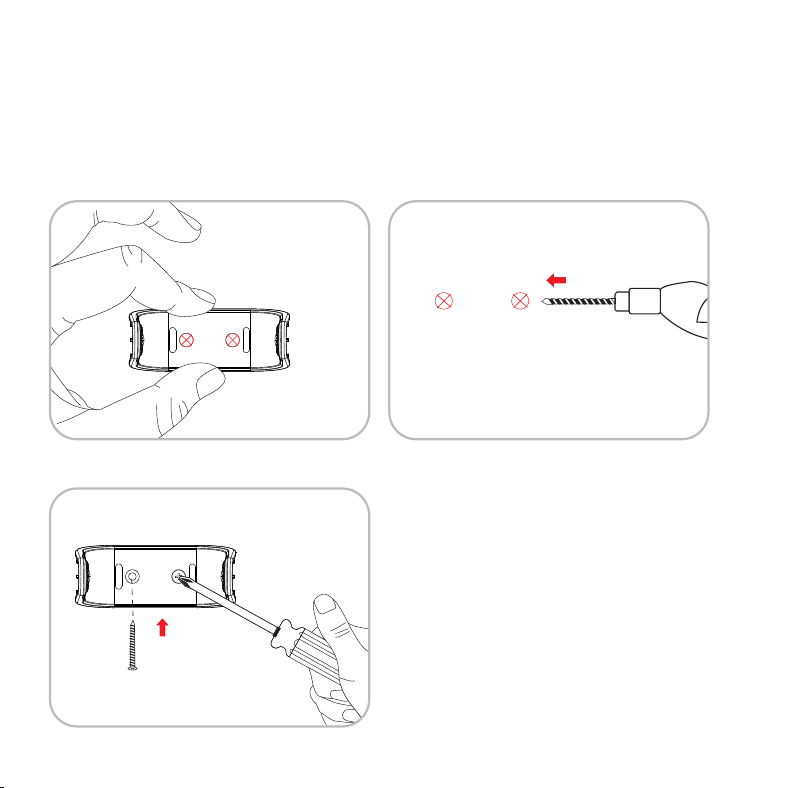
15
3. Use screws to fix the bracket to the location where you want to install it.
Installation method 1:
1. Fit the bracket to the location where you want to install it, and mark the two
circular holes on the bracket.
2. Drill holes at the marked locations.
Camera Installation
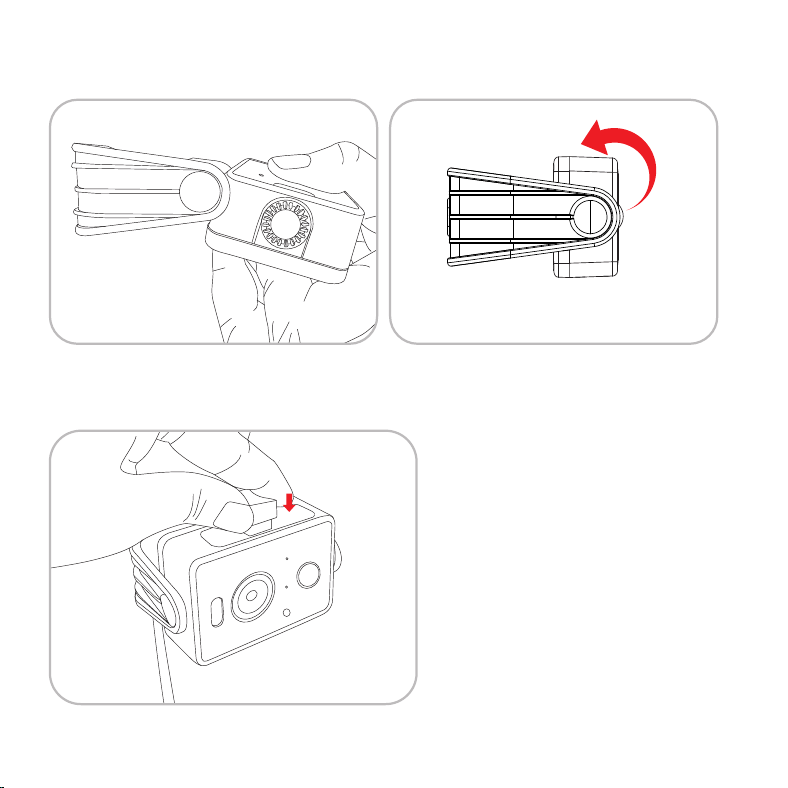
16
4. Align the camera with the buckle of the bracket until the camera is fixed
on the bracket.
5. Connect the Type-C cable of the solar panel to the camera's type-C
interface.
360°
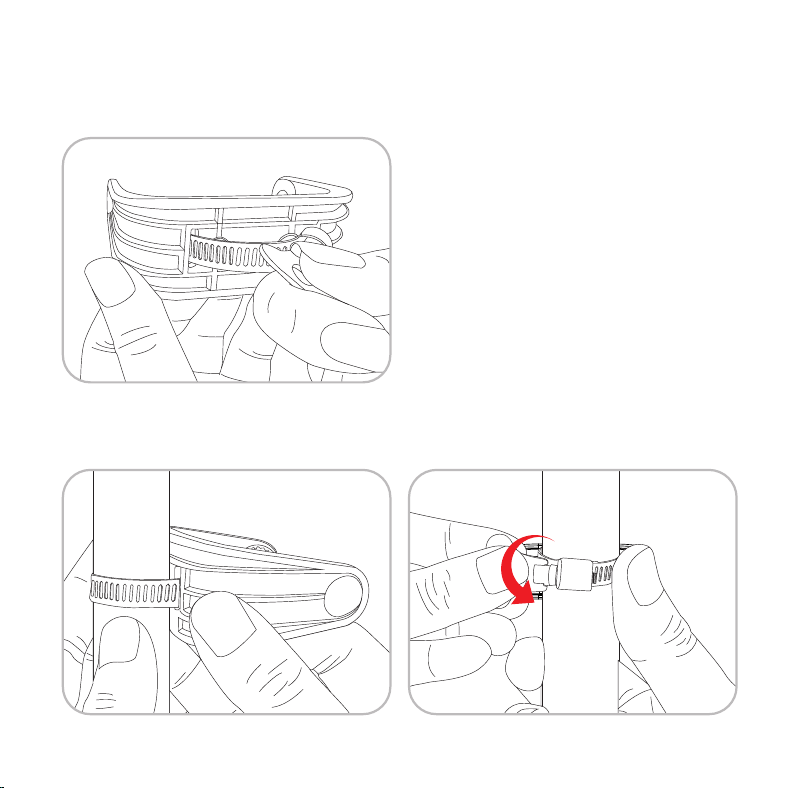
17
2. Pass the Locking Ground Plug Rings through the ground plug, lock the screws,
and fix the bracket to the ground plug.
Installation method 2:
1. Pass the Locking Ground Plug Rings through the rectangular hole on the back
of the bracket.
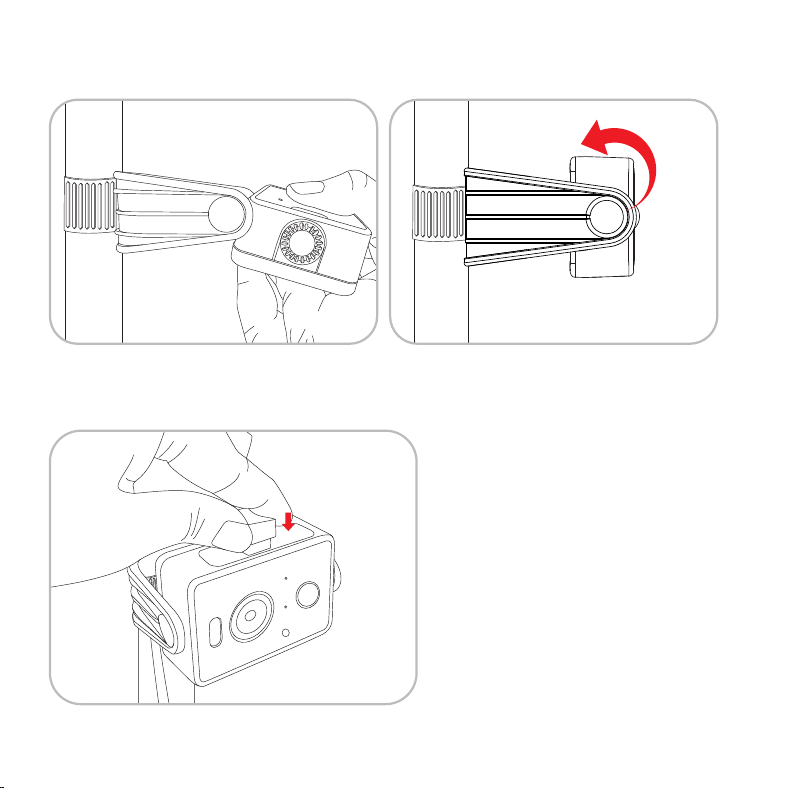
18
3. Align the camera with the buckle of the bracket until the camera is fixed
on the bracket.
4. Connect the Type-C cable of the solar panel to the camera's type-C
interface.
360°
19
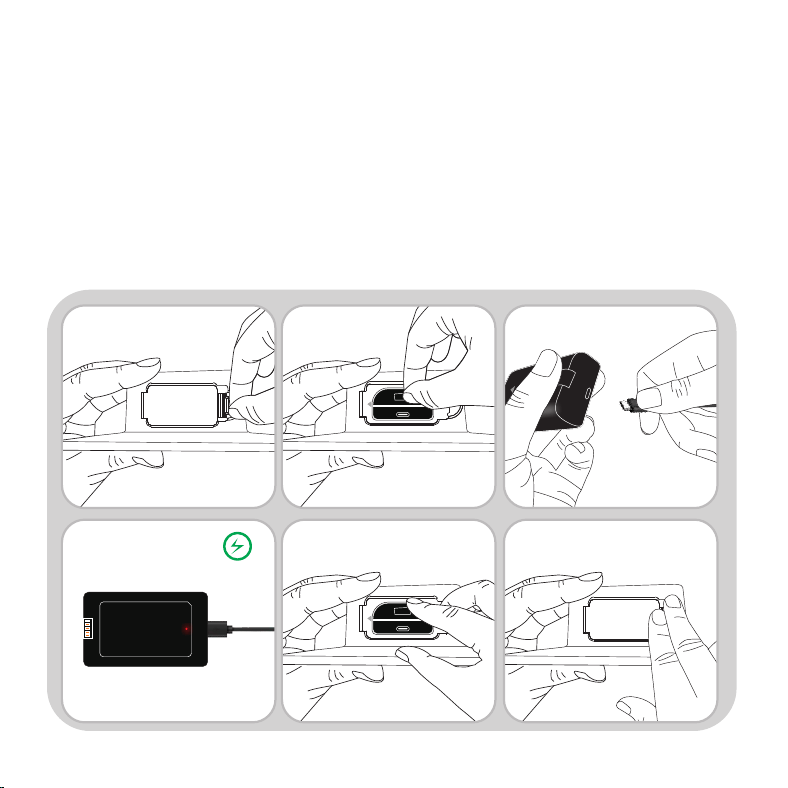
HOW TO CHARGE BATTERIES
Remove the battery from the battery slot on the side.
Insert the Type-C charging port to charge, the red light is always on
during charging, and the green light is always on when fully charged.
After fully charged, put the battery back into the battery slot in the
direction of the arrow and cover it.
①
②
③

20
A: The Smart Bird Feeder can only be linked to one account at a time. If it is
linked by other accounts, please Long press the reset button for 10s to release.
Q: How many accounts can be linked with one Smart Bird Feeder?
FAQ
Q: Do I need to create an account to use the App?
A: Yes, you need to use email address or phone number to get a
verification code for registering an account .
Q: What operating systems are the App compatible with?
A: The App is compatible with Apple iOS and Android system.
IOS 10.0 and above.
Android V5.0 and above.
A: 2.4Ghz WiFi only.
Q:What Wifi band does the AI Camera support?
A: The App’s language will match your device's system language. But the
Language of AI recognition result only supports English or Chinese now.
Q: What’s the language of the App?

21
A: Check the following:
1. Please confirm that the TF card is installed correctly or the payment action
of cloud storage has been completed. If the TF card cannot be read, please
format it to FAT32 with computer. Our product support 4G-128G TF card.
2. Please make sure you have enabled recording in the “Recording Settings”
And turn on the detection mode.
Q: Why the “Playback” is not available?
A: Yes. You are able to share the Smart Bird Feeder with other users however
they will need to install the “Bird Lover” app.
When the App is ready, any of the following methods is optional to share the
device:
When they have individual account:
1.Sharing the device by adding the their account names.
2.Adding new accounts to your family group.
When they have no individual account:
Using your main account and password to log in the same way as you do.
Q: Can I share the Smart Bird Feeder with other users?
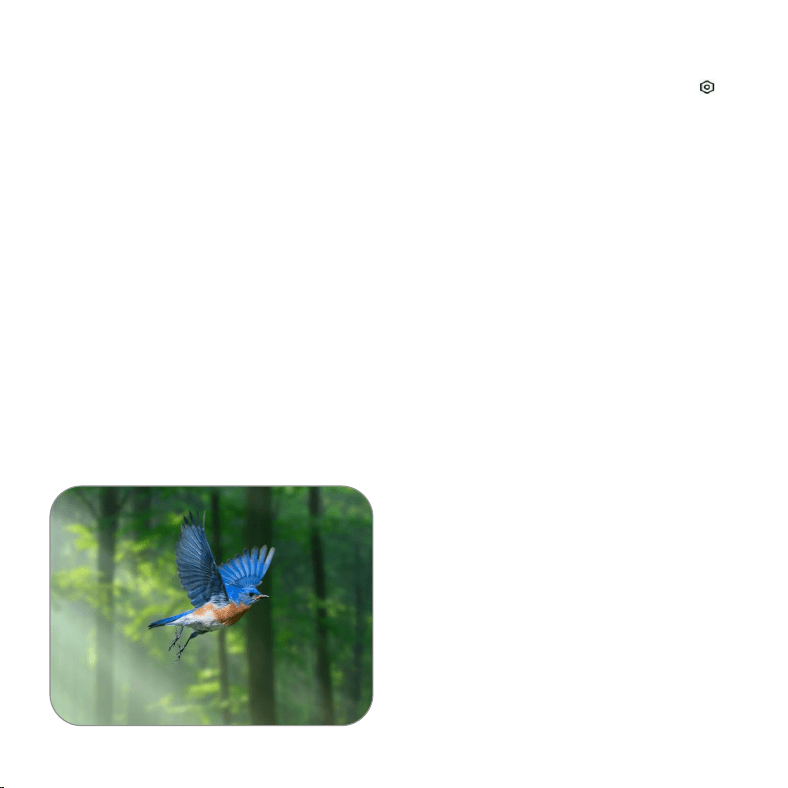
A: The accuracy rate depends on the angle and clarity of the bird image. To get
more accurate result, please ensure the picture is clear enough. The identify
features (bird’s head, tail wings and pattern of feathers) should not be
obscured. The bird image should be shown in the main position of the picture.
Retry to capture more clear bird photos in the movement to recognize the bird
if the result is not satisfied.
If there are two or more bird species in one picture, the recognized result will
focus on the main position.
Q: Why the recognition result is wrong?
22
Demonstration: The best
angle for recognition
A: 1. Enter the main page and find “Me” on the left bottom, click icon “ ”
And set the app notification to turn on or off “Enable Notifications”. You
can also set up a schedule for “Do-Not Disturb Schedule” at the same
interface.
2.Turn on or off the “Motion Detection” at the UI interface.
3.Turn on or off the “Detection Alarm Settings” on the Setting interface.
Q: How to turn on or turn off the message notify?

1.Please check whether the power cable is correct plugged in and make sure
the power switch is turned on.
2.Please check whether the WI-FI is available and the smart bird feeder is work
at the range of WI-FI.
3.Please remove the device and reconnect it.
Q: What should I do if the device is not working properly?
23

FCC STATEMENT:
This device complies with part 15 of the FCC Rules. Operation is subject to the
following two conditions:
(1) This device may not cause harmful interference, and (2) this device must accept
any interference
received, including interference that may cause undesired operation.
Any Changes or modifications not expressly approved by the party responsible for
compliance could
void the user's authority to operate the equipment.
Note: This equipment has been tested and found to comply with the limits for a Class
B digital device,
pursuant to part 15 of the FCC Rules. These limits are designed to provide reasonable
protection
against harmful interference in a residential installation. This equipment generates
uses and can radiate
radio frequency energy and, if not installed and used in accordance with the
instructions, may cause
harmful interference to radio communications. However, there is no guarantee that
interference will not
occur in a particular installation. If this equipment does cause harmful interference to
radio or television reception, which can be determined by turning the equipment off
and on, the user is encouraged to try to
correct the interference by one or more of the following measures:
-Reorient or relocate the receiving antenna.
-Increase the separation between the equipment and receiver.
-Connect the equipment into an outlet on a circuit different from that to which the
receiver is connected.
-Consult the dealer or an experienced radio/TV technician for help.
This equipment complies with FCC radiation exposure limits set forth for an
uncontrolled environment.
This equipment should be installed and operated with minimum distance 27cm
between the radiator & your body
24