EN
Cordless Bar Light INSTRUCTION MANUAL 4
ESMX
Linterna de Barra Inalámbrica MANUAL DE INSTRUCCIONES 9
ML012G
• IMPORTANT: Read Before Using.
• IMPORTANTE: Lea antes de usar.
3
12
8
9
6
7
1
2
5
4
5
11
10
180°
90°
13
Fig. 1
Fig. 4
Fig. 6 Fig. 7
Fig. 5
Fig. 2
Fig. 3
3
12
8
9
6
7
1
2
5
4
5
11
10
180°
90°
13
Fig. 1
Fig. 4
Fig. 6 Fig. 7
Fig. 5
Fig. 2
Fig. 3
15
14
16
16
17
21
22
21
22
19
20
18
23
23
Fig. 10
Fig. 12
Fig. 13
Fig. 11
Fig. 8
Fig. 9

4 English
ENGLISH
(Original instructions)
1
Telescopic
hook
2 LED light bar 3 Button 4
Battery
cartridge
5 Red indicator 6 Indicator lamp 7 Check button 8
Fixed light part
(LED-24 pcs)
9
Foldable light part
(LED-18 pcs )
10 Switch 11 Mode selector 12
Low battery
indicator
13 Movable part 14 Metal hook 15 Strap 16 Ring
17 Strap hole 18
Carrier clip
positioning hole
19 Main bar 20 Inner bar 21 Carrier clip 22 Holder hook 23 Clipped position
SPECIFICATIONS
Model:
ML012G
Light
Luminous flux (H/M/L) 1,700 lm / 800 lm / 400 lm
Dimensions (L × W × H)
(without battery cartridge)
972 mm × 85 mm × 100 mm (38-1/4” × 3-3/8” × 3-15/16”)
Rated voltage D.C. 36 V - 40 V max
Net weight
(without battery cartridge)
1.1 kg (2.4 lbs)
Telescopic
hook
Dimensions (L × W × H)
(with clips)
1,181 mm × 99 mm × 259 mm (46-1/2” × 3-7/8” × 10-1/4”)
Net weight
(with clips)
1.5 kg (3.3 lbs)
Available width *
1,130 mm - 1,900 mm (44-1/2” - 74-3/4”)
• Specifications may differ from country to country.
• Due to our continuing program of research and development, the specifications herein are subject to change
without notice.
* Actual available width may differ depending on the location and shape.
Applicable battery cartridge and charger
Battery cartridge BL4020 / BL4025 / BL4040 / BL4040F / BL4050F / BL4080F
Charger DC40RA / DC40RB / DC40RC / DC40WA
• Some of the battery cartridges listed above may not be available depending on your region of residence.
WARNING: Only use the battery cartridges listed above. Use of any other battery cartridges may cause
injury and/or fire.
Operating time
Applicable battery
cartridge
Operating time (Approximately)
Whole light
( LED-42 pcs )
High Medium Low
BL4020 3.5 hours 7.5 hours 16 hours
BL4025 4.5 hours 9.5 hours 20 hours
BL4040/BL4040F 7.0 hours 15 hours 32 hours
BL4050F 8.5 hours 19 hours 40 hours
BL4080F 14 hours 31 hours 65 hours
• The operating times in the above table are a rough guideline. They may differ from actual operating times.
• Battery cartridge may differ from country to country.
• Operating times may differ depending on battery type, charging status, and usage condition.
5 English
FCC caution (For United States)
This device complies with Part 15 of the FCC Rules.
Operation is subject to the following two conditions:
(1) this device may not cause harmful interference, and
(2) this device must accept any interference received,
including interference that may cause undesired
operation. Changes or modifications not expressly
approved by the party responsible for compliance could
void the user’s authority to operate the equipment.
NOTE:
This equipment has been tested and found to comply
with the limits for a Class B digital device, pursuant
to part 15 of the FCC Rules. These limits are
designed to provide reasonable protection against
harmful interference in a residential installation. This
equipment generates, uses and can radiate radio
frequency energy and, if not installed and used in
accordance with the instructions, may cause harmful
interference to radio communications. However, there
is no guarantee that interference will not occur in a
particular installation. If this equipment does cause
harmful interference to radio or television reception,
which can be determined by turning the equipment
off and on, the user is encouraged to try to correct the
interference by one or more of the following measures:
– Reorient or relocate the receiving antenna.
– Increase the separation between the equipment and
receiver.
– Connect the equipment into an outlet on a circuit
different from that to which the receiver is connected.
– Consult the dealer or an experienced radio/TV
technician for help.
IMPORTANT SAFETY
INSTRUCTIONS
WARNING:
To reduce the risk of injury, do not stare at operating
appliances. Serious eye injury could occur.
CAUTION:
When using appliances, basic safety precautions
should always be followed to reduce the risk of fire,
electric shock, and personal injury, including the
following:
READ ALL INSTRUCTIONS.
1. To reduce the risk of injury, close supervision is
necessary when the appliance is used near children.
2. To reduce the risk of electrical shock, do not put the
appliance in water or other liquid. Do not place or
store the appliance where it can fall or be pulled into
a tub or sink.
3. Do not cover the appliance with cloth or carton, etc.
Otherwise it may cause a flame.
4. Do not touch the inside of the appliance with
tweezers, metal tools, etc.
5. Do not expose the appliance to rain or snow. Do not
wash it in water.
6. Do not touch the inside of the appliance with
tweezers, metal tools, etc.
7. Do not contact hot parts.
8. When the appliance is not in use, always switch off
and remove the battery cartridge from the appliance.
9. Do not give the appliance a shock by dropping,
striking, etc.
10. Only use attachments recommended or sold by the
manufacturer.
11. Store product indoors when not in use. Keep out of
reach of children.
12. Safety information for portable luminaires with
batteries.
• Battery disposal should be in compliance with
your local regulations that address the disposal of
hazardous materials.
• Do not incinerate the battery.
13. Additional information for luminaires.
• The light source of this luminaire is not replaceable;
when the light source reaches its end of life the whole
luminaire shall be replaced.
14. Battery tool use and care.
• WARNING: Read all safety warnings and instructions.
Failure to follow the warnings and instructions may
result in electric shock, fire and/or serious injury.
• Prevent unintentional starting. Ensure the switch is
in the off-position before connecting to battery pack,
picking up or carrying the appliance. Carrying the
appliance with your finger on the switch or energizing
appliance that have the switch on invites accidents.
• Disconnect the battery pack from the appliance before
making any adjustments, changing accessories, or
storing appliance. Such preventive safety measures
reduce the risk of starting the appliance accidentally.
• Recharge only with the charger specified by the
manufacturer. A charger that is suitable for one type of
battery pack may create a risk of fire when used with
another battery pack.
• Use appliances only with specifically designated
battery packs. Use of any other battery packs may
create a risk of injury and fire.
• When battery pack is not in use, keep it away from
other metal objects, like paper clips, coins, keys, nails,
screws or other small metal objects, that can make a
connection from one terminal to another. Shorting the
battery terminals together may cause burns or a fire.
• Under abusive conditions, liquid may be ejected from
the battery; avoid contact. If contact accidentally
occurs, flush with water. If liquid contacts eyes,
additionally seek medical help. Liquid ejected from the
battery may cause irritation or burns.
• Do not use a battery pack or appliance that is
damaged or modified. Damaged or modified batteries
may exhibit unpredictable behavior resulting in fire,
explosion or risk of injury.
• Do not expose a battery pack or appliance to fire
or excessive temperature. Exposure to fire or
temperature above 130 °C (265 °F) may cause
explosion.
• Follow all charging instructions and do not charge the
battery pack or appliance outside of the temperature
range specified in the instructions. Charging
improperly or at temperatures outside of the specified
range may damage the battery and increase the risk
of fire.
• Have servicing performed by a qualified repair person
using only identical replacement parts. This will ensure
that the safety of the product is maintained.
6 English
• Do not modify or attempt to repair the appliance or the
battery pack except as indicated in the instructions for
use and care.
15. Important safety instructions for battery cartridge.
• Before using battery cartridge, read all instructions
and cautionary markings on (1) battery charger,
(2) battery, and (3) product using battery.
• Do not disassemble or tamper with the battery
cartridge. It may result in a fire, excessive heat, or
explosion.
• If operating time has become excessively shorter,
stop operating immediately. It may result in a risk of
overheating, possible burns and even an explosion.
• If electrolyte gets into your eyes, rinse them out with
clear water and seek medical attention right away. It
may result in loss of your eyesight.
• Do not short the battery cartridge.
• Do not store and use the tool and battery cartridge in
locations where the temperature may reach or exceed
50 °C (122 °F).
• Do not incinerate the battery cartridge even if it is
severely damaged or is completely worn out. The
battery cartridge can explode in a fire.
• Do not nail, cut, crush, throw, drop the battery
cartridge, or hit against a hard object to the battery
cartridge. Such conduct may result in a fire, excessive
heat, or explosion.
• Do not use a damaged battery.
• The contained lithium-ion batteries are subject to
the Dangerous Goods Legislation requirements. For
commercial transports e.g. by third parties, forwarding
agents, special requirement on packaging and labeling
must be observed. For preparation of the item being
shipped, consulting an expert for hazardous material
is required. Please also observe possibly more
detailed national regulations. Tape or mask off open
contacts and pack up the battery in such a manner
that it cannot move around in the packaging.
• Use the batteries only with the products specified
by Makita. Installing the batteries to non-compliant
products may result in a fire, excessive heat,
explosion, or leak of electrolyte.
• If the tool is not used for a long period of time, the
battery must be removed from the tool.
• During and after use, the battery cartridge may take on
heat which can cause burns or low temperature burns.
Pay attention to the handling of hot battery cartridges.
• Do not touch the terminal of the tool immediately after
use as it may get hot enough to cause burns.
• Do not allow chips, dust, or soil stuck into the
terminals, holes, and grooves of the battery cartridge.
It may result in poor performance or breakdown of the
tool or battery cartridge.
• Unless the tool supports the use near high-voltage
electrical power lines, do not use the battery cartridge
near high-voltage electrical power lines. It may result
in a malfunction or breakdown of the tool or battery
cartridge.
• Keep the battery away from children.
SAVE THESE INSTRUCTIONS.
CAUTION:
Only use genuine Makita batteries. Use
of non-genuine Makita batteries, or batteries that have
been altered, may result in the battery bursting causing
fires personal injury and damage. It will also void the
Makita warranty for the Makita tool and charger.
16. Tips for maintaining maximum battery life.
• Charge the battery cartridge before completely
discharged.
Always stop tool operation and charge the battery
cartridge when you notice less tool power.
• Never recharge a fully charged battery cartridge.
Overcharging shortens the battery service life.
• Charge the battery cartridge with room temperature
at 10 °C - 40 °C (50 °F - 104 °F). Let a hot battery
cartridge cool down before charging it.
• When not using the battery cartridge, remove it from
the tool or the charger.
• Charge the battery cartridge if you do not use it for a
long period (more than six months).
FUNCTIONAL DESCRIPTION
CAUTION:
Always be sure that the appliance is switched off, and
the battery cartridge is removed before adjusting or
checking function on the appliance.
Installing or removing battery cartridge
(Fig. 2)
CAUTION:
Always switch off the appliance before installing or
removing the battery cartridge.
CAUTION:
Hold the appliance and the battery cartridge firmly
when installing or removing battery cartridge.
Failure to hold the appliance and the battery cartridge
firmly may cause them to slip off your hands and result
in damage to the appliance and battery cartridge and a
personal injury.
To install the battery cartridge, align the tongue on the
battery cartridge with the groove in the housing and slip
it into place. Insert it all the way until it locks in place
with a little click. If you can see the red indicator as
shown in the figure, it is not locked completely.
To remove the battery cartridge, slide it from the
appliance while sliding the button on the front of the
cartridge.
CAUTION:
Always install the battery cartridge fully until the red
indicator cannot be seen. If not, it may accidentally fall
out of the appliance, causing injury to you or someone
around you.
CAUTION:
Do not install the battery cartridge forcibly. If the
cartridge does not slide in easily, it is not being
inserted correctly.
7 English
Indicating the remaining battery
capacity (Fig. 3)
Press the check button on the battery cartridge to
indicate the remaining battery capacity. The indicator
lamps light up for a few seconds.
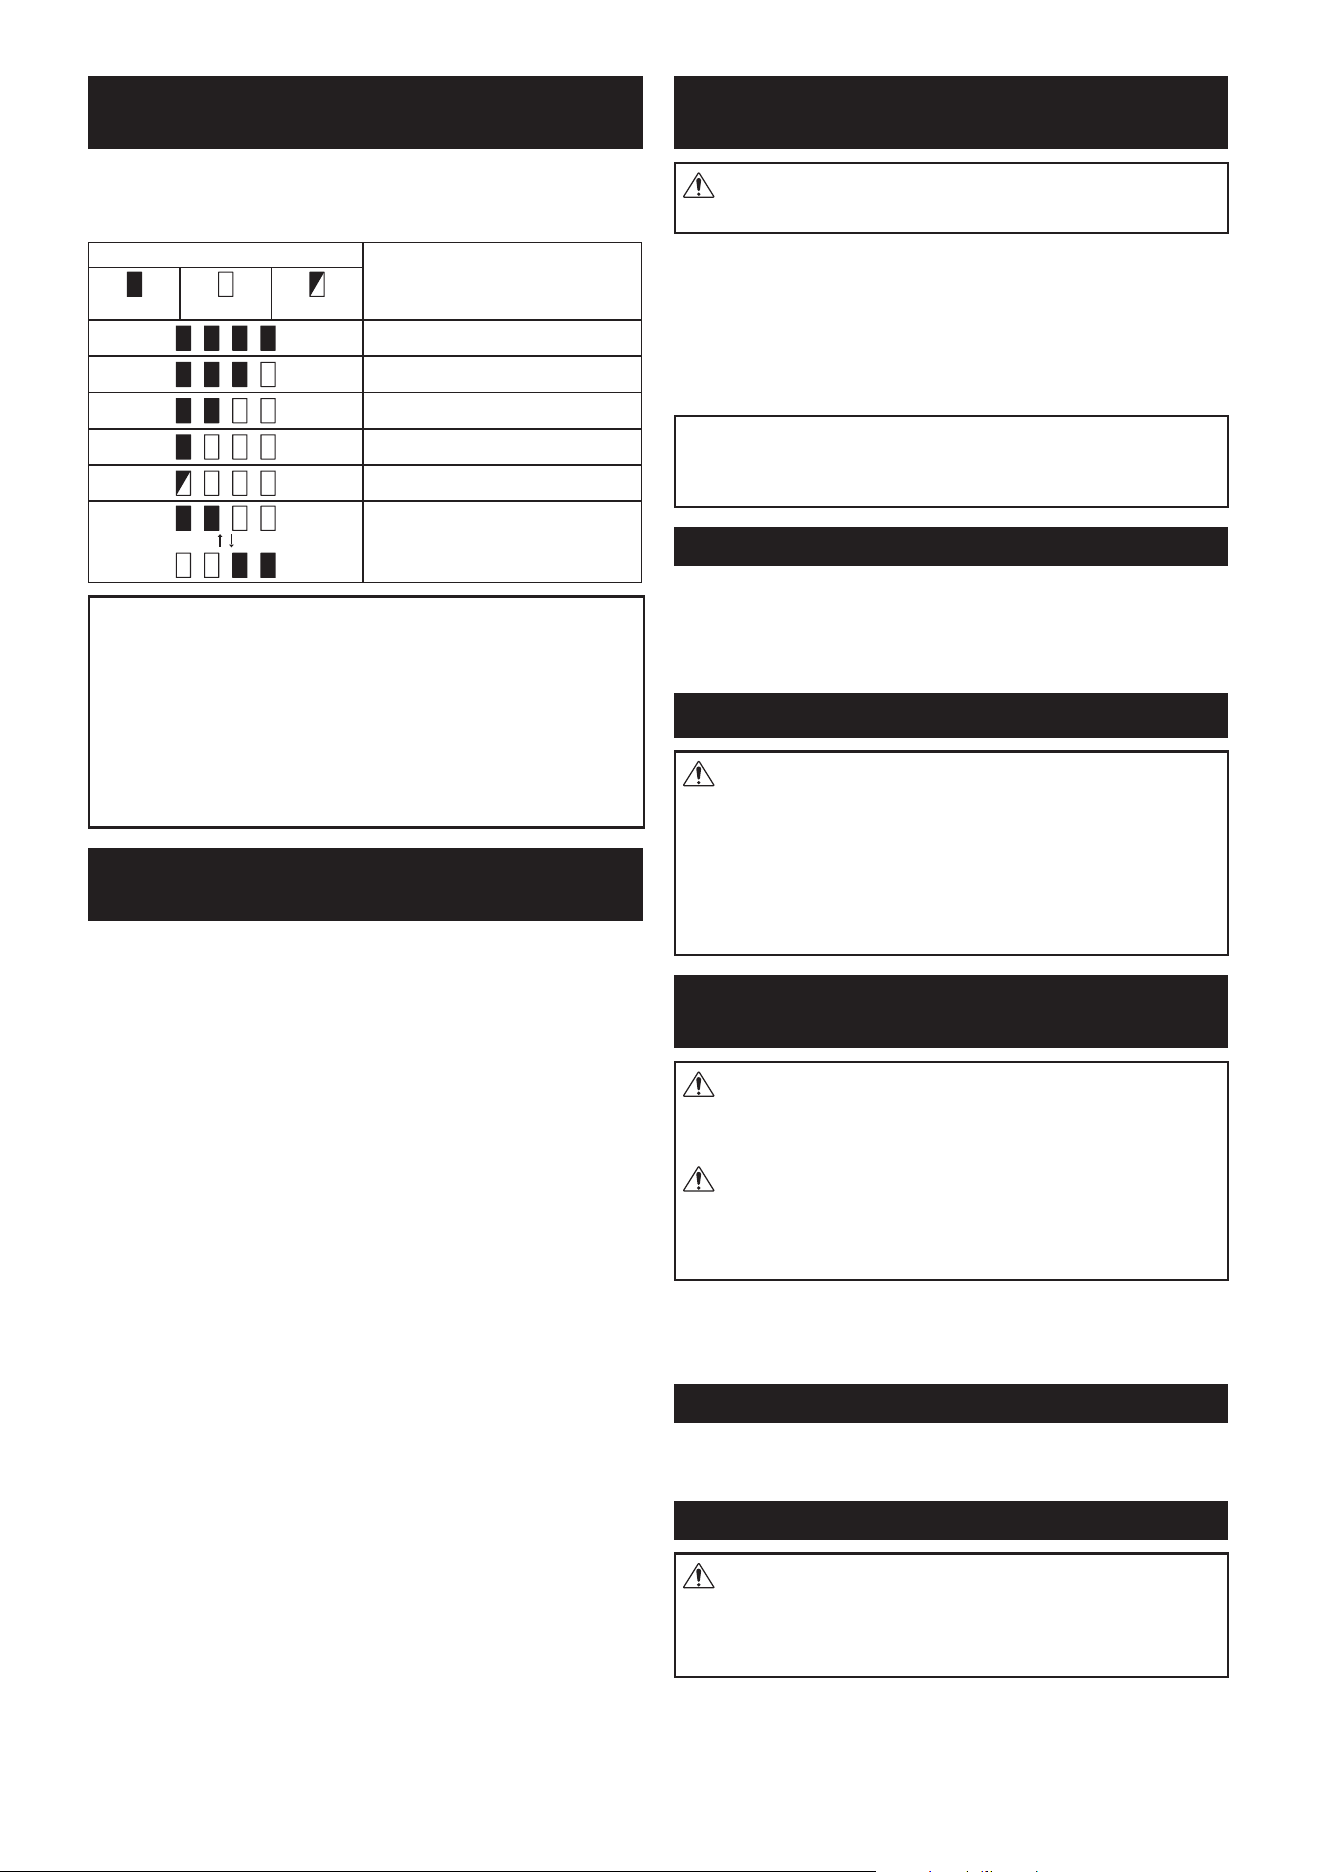
Indicator lamps
Remaining capacity
Lighted
Off Blinking
75% to 100%
50% to 75%
25% to 50%
0% to 25%
Charge the battery.
The battery may have malfunctioned.
NOTE:
Depending on the conditions of use and the ambient
temperature, the indication may differ slightly from the
actual capacity.
NOTE:
The first (far left) indicator lamp will blink when the
battery protection system works.
Appliance / battery protection system
The appliance is equipped with the protection system,
which automatically cuts off the output power for long
service life.
Overdischarge protection
When the battery capacity is not enough, the appliance
stops automatically. In this case, remove the battery
from the appliance and charge the battery.
Protections against other causes
Protection system is also designed for other causes that
could damage the appliance and allows the appliance to
stop automatically. Take all the following steps to clear
the causes, when the appliance has been brought to a
temporary halt or stop in operation.
1. Turn the appliance off, and then turn it on again to
restart.
2. Charge the battery(ies) or replace it/them with
recharged battery(ies).
3. Let the appliance and battery(ies) cool down.
If no improvement can be found by restoring protection
system, then contact your local Makita Service Center.
Turning on the light and brightness
mode selection (Fig. 4)
CAUTION:
Do not look in the light or see the source of light
directly.
1. Switch: Brightness sequence is: High mode(On) /
Medium mode / Low mode / Off for each press.
2. Mode selector: Light up sequence is: Whole Light/
Fixed light part / Foldable light part for each press
when the switch is on.
NOTE:
When you switch on the appliance, it will be turned on
the same light mode as the last time you use.
Low battery indicator (Fig. 5)
When the battery becomes low, the LED lights go out
except one LED light as illustrated. Then approximately
five to ten minutes later, the appliance automatically
turns off.
OPERATION
CAUTION:
Rotate the LED light bar and fold down the foldable
light part to stabilise the balance of the appliance when
you put the appliance in upright position as shown
in fig.4. Otherwise, the appliance may fall over and
personal injury occur.
LED light bar angle (Fig. 6, Fig. 7)
CAUTION:
Take care not to trap finger(s) when adjusting the
angle of the light.
CAUTION:
Make sure the fixed and foldable light part to be locked
together firmly in folding and unfolding positions
respectively.
The LED light bar can be rotated in seven stages for
every 45˚. (90˚ to the right and 180˚ to the left)
The foldable light part can be bent to 0˚ or 180˚.
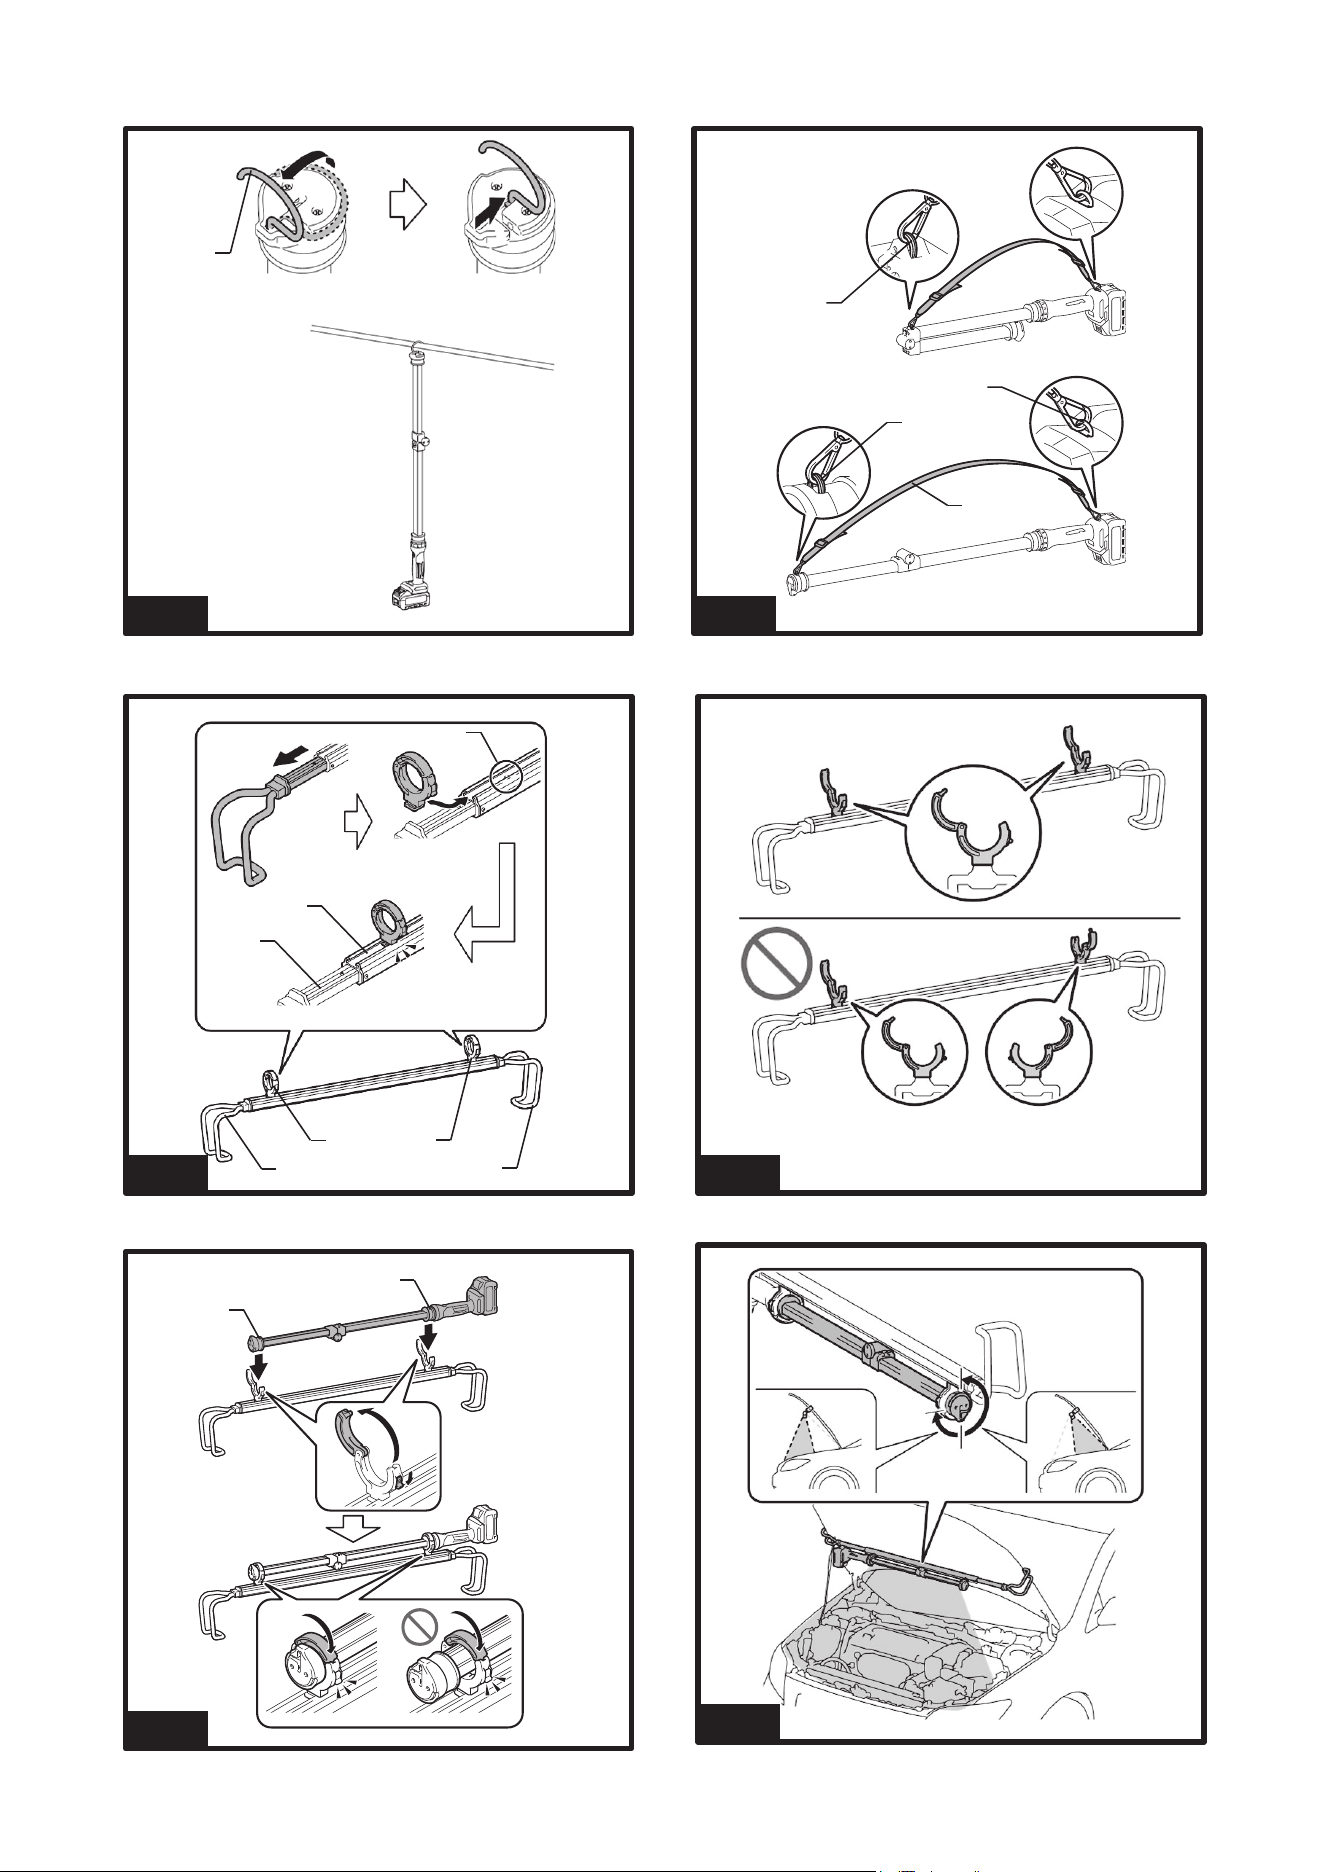
Metal hook (Fig. 8)
Raise and slide the metal hook to center position when
using the metal hook.
Strap (Fig. 9)
CAUTION:
Do not use the ring and strap hole for any purpose
other than installing the strap. Otherwise personal
injury may occur.
Install the strap on the appliance as illustrated.
8 English
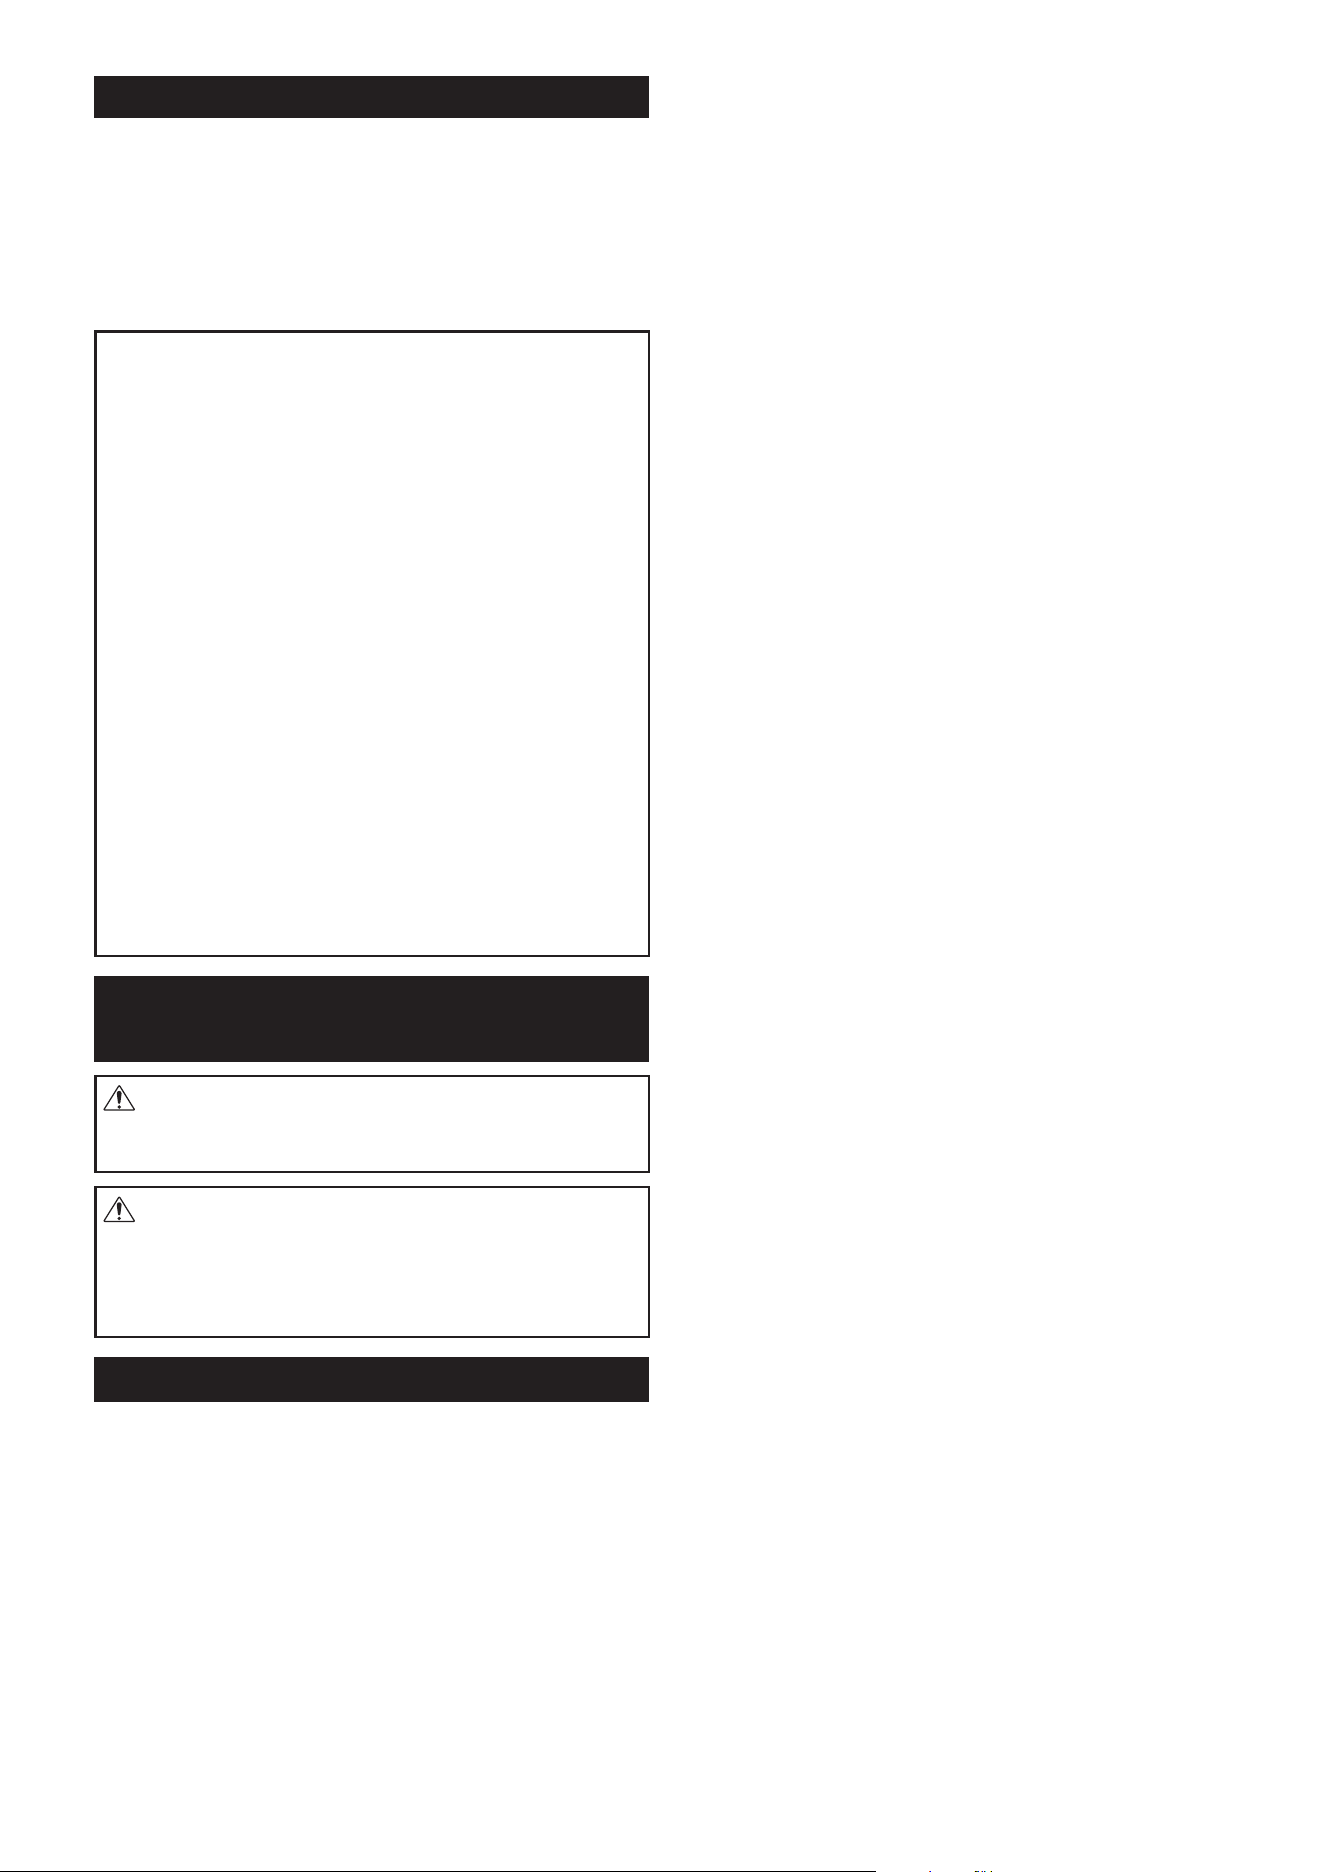
Installing carrier clips into telescopic
hook (Fig. 10, Fig. 11)
CAUTION:
Take care not to pinch finger(s) when installing the
carrier clips into telescopic hook.
Install the carrier clips into telescopic hook as illustrated.
NOTE:
Make sure each carrier clip is slid to the carrier clip
positioning hole on the main bar.
NOTE:
Make sure the two carrier clips in the same direction
installation.
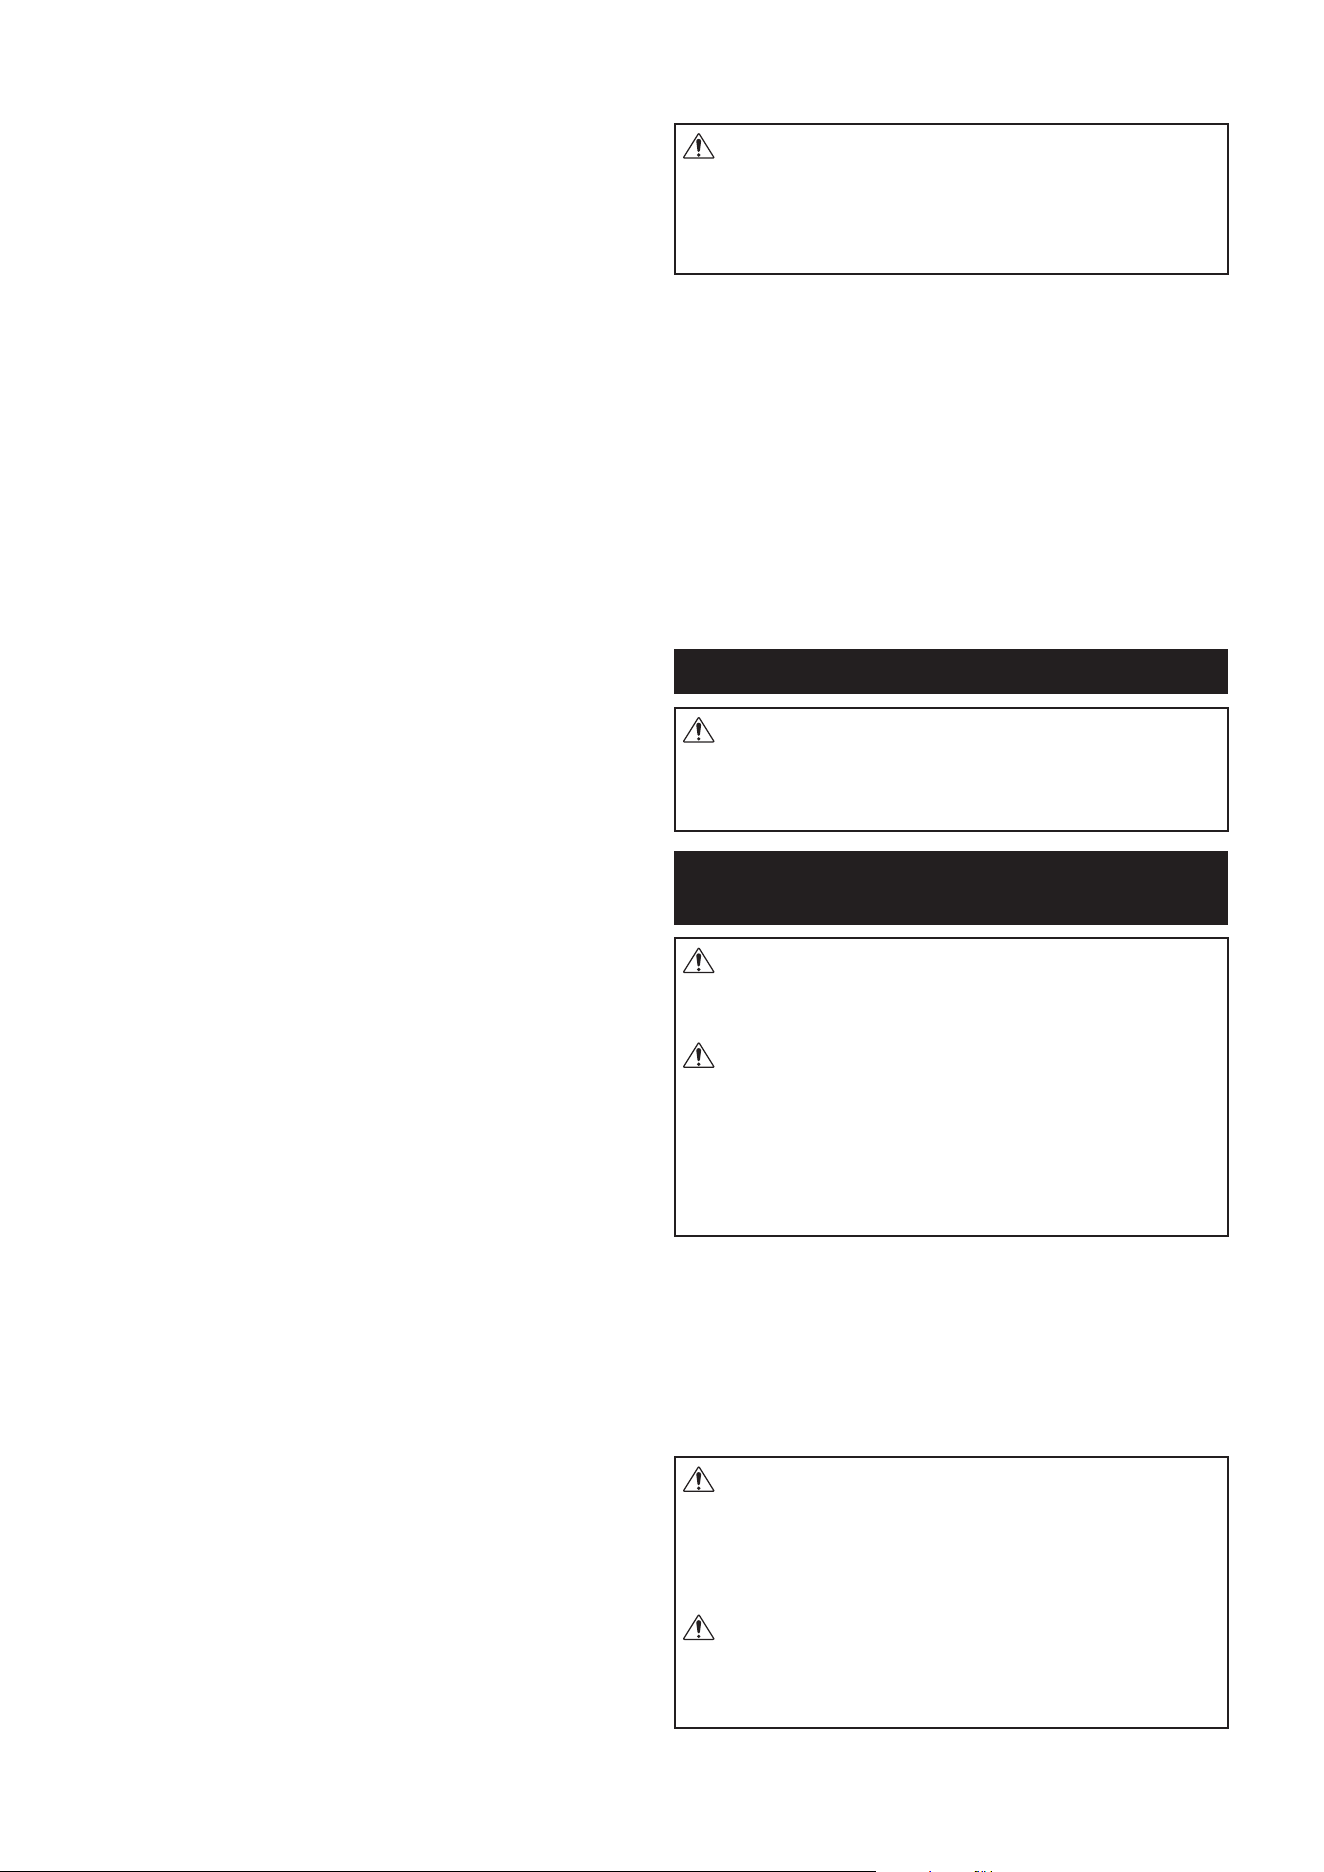
Installing appliance on telescopic hook
(Fig. 12)
Install the appliance on the telescopic hook by the
carrier clips as illustrated.
NOTE:
Make sure each carrier clip holds the clipped position
of the appliance.
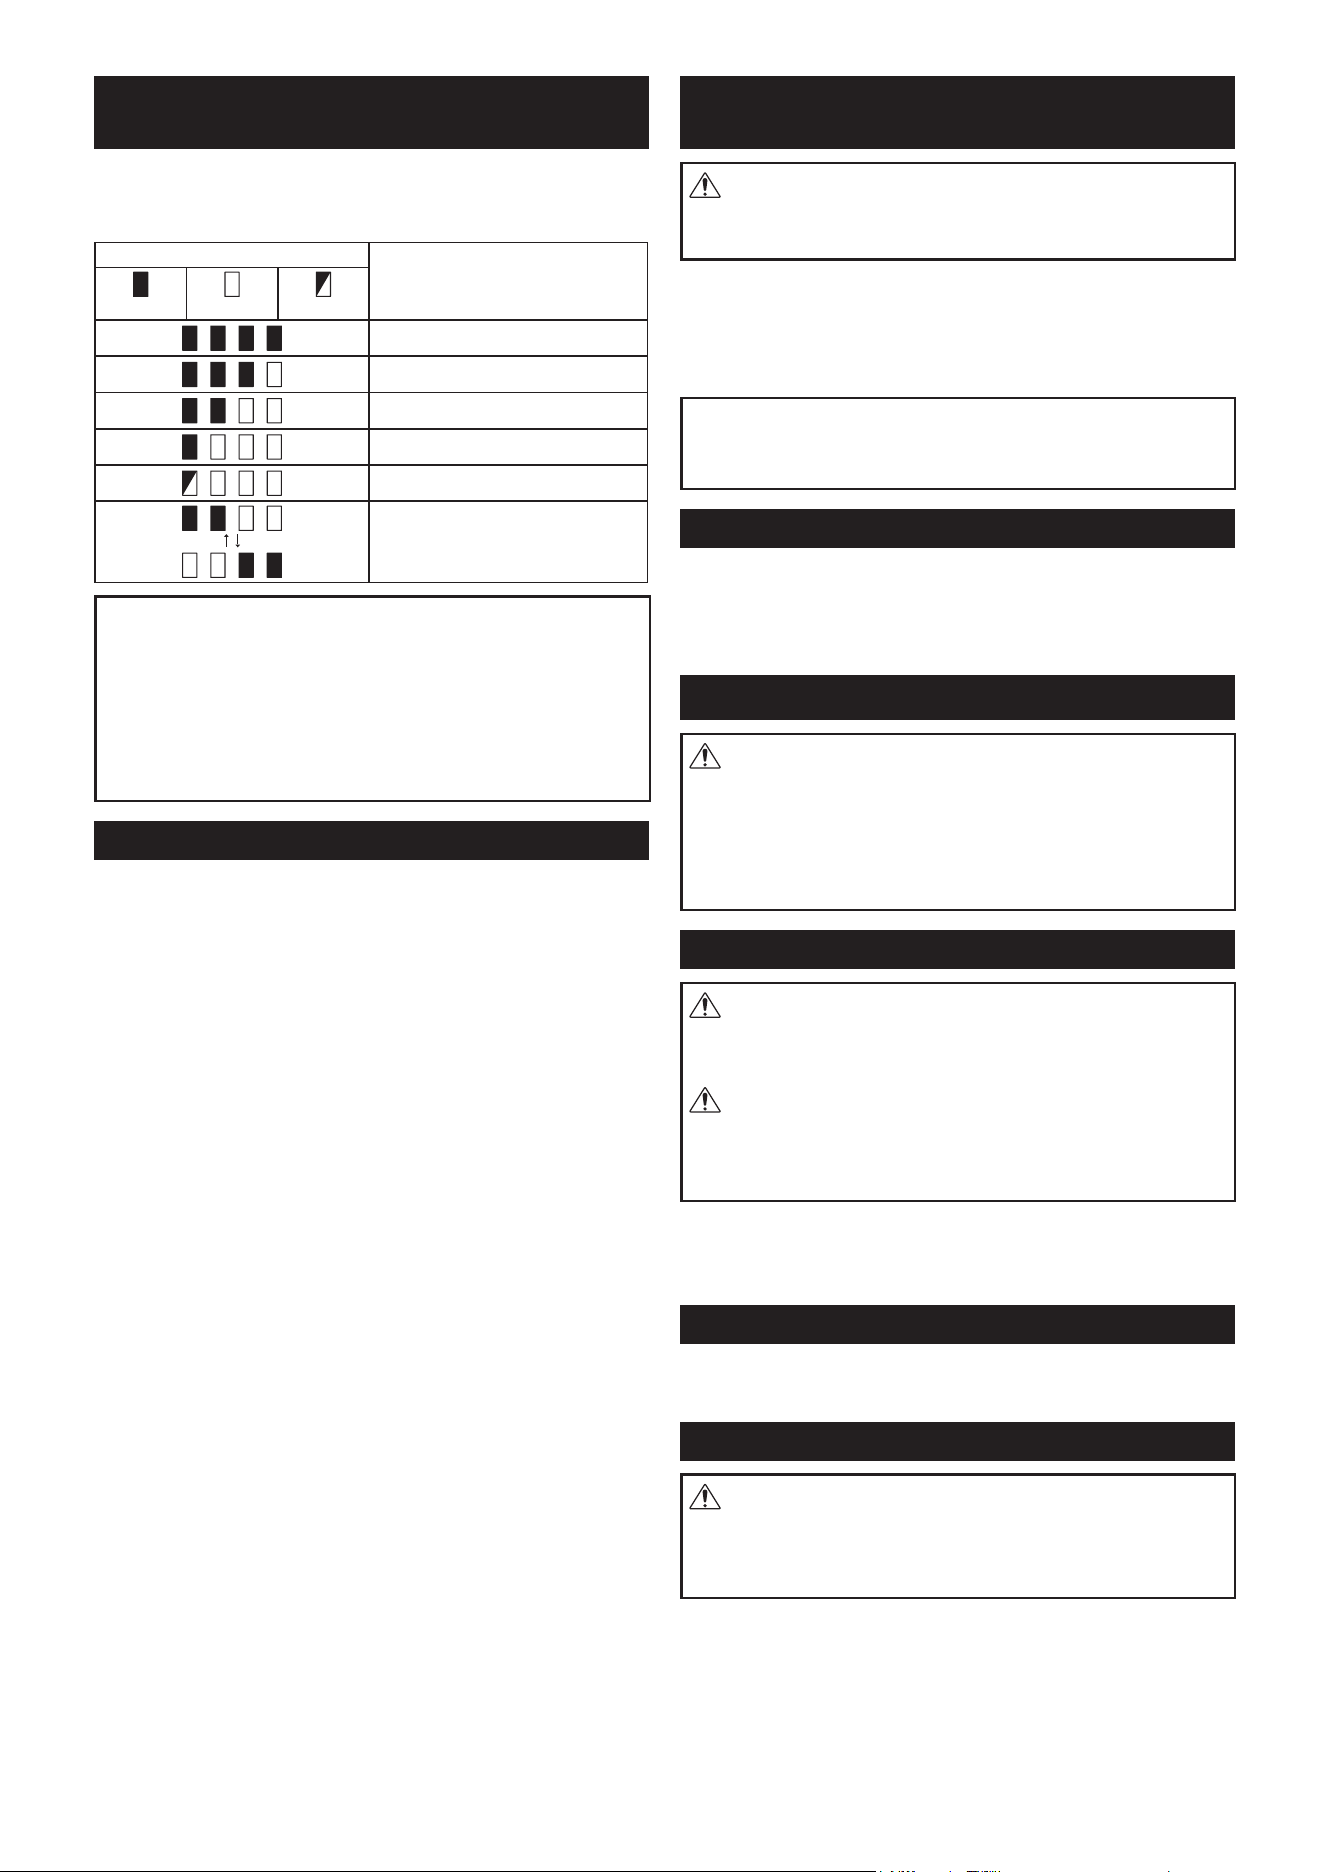
Mounting telescopic hook (Fig. 13)
CAUTION:
Do not hang anything other than the appliance on the
telescopic hook. Otherwise the holder hooks would be
damaged and personal injury may occur.
CAUTION:
Make sure every part is fixed securely before use.
CAUTION:
Operate by holding the main bar and the holder hooks
when mounting the telescopic hook. Take care not to
pinch your hands and fingers because the inner bar
is returned to its original position by the force of the
springs.
Hold one holder hook to mount it onto where you want.
Hold another one of holder hook while extending
the telescopic hook to mount it onto the desired
location(another side).
Switch on the appliance and adjust the illumination
angle of the appliance to illuminate the desired location
as illustrated.
NOTICE:
If you use the heavy battery, rotate only the LED light
bar for adjustment of illumination angle.
MAINTENANCE
CAUTION:
Always be sure that the appliance is switched off, and
the battery cartridge is removed before attempting to
perform inspection or maintenance.
NOTICE:
Never use gasoline, benzine, thinner, alcohol or the
like. Discoloration, deformation or cracks may result.
To maintain product SAFETY and RELIABILITY,
repairs, any other maintenance or adjustment should
be performed by Makita Authorized or Factory Service
Centers, always using Makita replacement parts.
Cleaning
CAUTION:
Never wash the appliance in water.
From time to time wipe off the outside of the
appliance (appliance body) using a cloth dampened in
soapywater.
OPTIONAL ACCESSORIES
CAUTION:
These accessories or attachments are recommended
for use with your Makita appliance specified in
this manual. The use of any other accessories or
attachments might present a risk of injury to persons.
Only use accessory or attachment for its stated
purpose.
If you need any assistance for more details regarding
these accessories, ask your local Makita service center.
• Makita genuine battery and charger
NOTE:
Some items in the list may be included in the
appliance package as standard accessories. They may
differ from country to country.
MAKITA LIMITED WARRANTY
Please refer to the annexed warranty sheet for the
most current warranty terms applicable to this product.
If annexed warranty sheet is not available, refer to the
warranty details set forth at below website for your
respective country.
United States of America: www.makitatools.com
Canada: www.makita.ca
Other countries: www.makita.com
9 Español
ESPAÑOL (Instrucciones originales)
1
Gancho
telescópico
2
Barra de luz
LED
3 Botón 4
Cartucho de
batería
5 Indicador rojo 6
Lámparas
indicadoras
7
Botón de
verificación
8
Parte de luz fija
(LED-24 piezas)
9
Parte de luz plegable
(LED-18 piezas)
10 Interruptor 11
Selector de
modo
12
Indicador de
batería baja
13 Parte móvil 14
Gancho
metálico
15 Correa 16 Aro
17
Orificio para
correa
18
Orificio de posicionamiento
del clip de soporte
19 Barra principal 20 Barra interior 21 Clip de soporte 22
Gancho de
sujeción
23 Posición de recorte
ESPECIFICACIONES
Modelo:
ML012G
Luz
Flujo luminoso (H/M/L) 1,700 lm / 800 lm / 400 lm
Medidas (largo × ancho × altura)
(sin cartucho de batería)
972 mm × 85 mm × 100 mm (38-1/4” × 3-3/8” × 3-15/16”)
Tensión nominal CC 36 V - 40 V máx.
Peso neto
(sin cartucho de batería)
1,1 kg (2,4 lbs)
Gancho
telescópico
Medidas (largo × ancho × altura)
(sin clips)
1,181 mm × 99 mm × 259 mm (46-1/2” × 3-7/8” × 10-1/4”)
Peso neto
(sin clips)
1,5 kg (3,3 lbs)
Ancho disponible *
1,130 mm - 1,900 mm (44-1/2” - 74-3/4”)
• Las especificaciones pueden diferir de un país a otro.
• Debido a nuestro programa continuo de investigación y desarrollo, las especificaciones en este documento están
sujetas a cambios sin previo aviso.
* El ancho disponible podría variar dependiendo de la localización y de la forma.
Cargador y cartucho de batería correspondientes
Cartucho de batería BL4020 / BL4025 / BL4040 / BL4040F / BL4050F / BL4080F
Cargador DC40RA / DC40RB / DC40RC / DC40WA
• Es posible que algunos de los cartuchos de batería mencionados anteriormente no estén disponibles según su
área de residencia.
ADVERTENCIA: utilice únicamente los cartuchos de batería mencionados anteriormente. El uso de
cualquier otro cartucho de batería puede causar lesiones y/o incendio.
Tiempo de funcionamiento
Cartucho de batería
correspondiente
Tiempo de funcionamiento (aproximadamente)
Luz completa
(LED-42 piezas)
Alto Mediano. Bajo
BL4020 3,5 horas 7,5 horas 16 horas
BL4025 4,5 horas 9,5 horas 20 horas
BL4040/BL4040F 7,0 horas 15 horas 32 horas
BL4050F 8,5 horas 19 horas 40 horas
BL4080F 14 horas 31 horas 65 horas
• Los tiempos de funcionamiento en la tabla anterior son una guía aproximada. Pueden diferir de los tiempos de
funcionamiento reales.
• El cartucho de la batería puede diferir de un país a otro.
•
Los tiempos de funcionamiento pueden variar según el tipo de batería, el estado de la carga y las condiciones de uso.
10 Español
Advertencia de la FCC (para los
Estados Unidos)
Este dispositivo cumple con la Parte 15 de las Reglas
de la FCC. La manipulación está sujeta a las dos
condiciones siguientes:
(1) que este dispositivo no cause interferencias dañinas,
y (2) que este dispositivo acepte cualquier interferencia
recibida, incluida la interferencia que pueda causar
un funcionamiento no deseado. Los cambios o las
modificaciones no aprobados expresamente por la
parte responsable del cumplimiento podrían anular la
autoridad del usuario para operar el equipo.
NOTA:
Este equipo ha sido probado y se encontró que cumple con
los límites de dispositivos digitales Clase B, acorde a la
parte 15 de las Reglas FCC. Estos límites están diseñados
para proporcionar una protección razonable contra
interferencias dañinas en una instalación residencial.
Este equipo genera, utiliza y puede irradiar energía de
radiofrecuencia y, si no se instala y utiliza de acuerdo con
las instrucciones, puede causar interferencias dañinas en
las comunicaciones radioeléctricas. Sin embargo, no hay
garantía de que no se produzcan interferencias en una
instalación en particular. Si este equipo causa interferencias
perjudiciales en la recepción de radio o televisión, que se
pueden determinar apagando y encendiendo el equipo, se
recomienda al usuario que intente corregir la interferencia
mediante una o más de las siguientes medidas:
- Reoriente o reubique la antena receptora.
- Aumente la distancia entre el equipo y el receptor.
- Conecte el equipo a un tomacorriente en un circuito
diferente al que está conectado el receptor.
- Consulte al distribuidor o a un técnico de radio/TV
con experiencia para obtener ayuda.
INSTRUCCIONES DE
SEGURIDAD IMPORTANTES
ADVERTENCIA:
Para reducir el riego de una lesión, no se quede
mirando mientras el equipo esté en uso. Podría ocurrir
una lesión grave en sus ojos.
PRECAUCIÓN:
cuando utilice aparatos electrodomésticos, siempre se
deben seguir las precauciones básicas de seguridad
para reducir el riesgo de incendio, descarga eléctrica y
lesiones personales, incluyendo lo siguiente:
LEA TODAS LAS INSTRUCCIONES.
1. Para reducir el riesgo de una lesión, es necesaria
la supervisión próxima cuando el equipo se use en
presencia de niños.
2.
Para reducir el riesgo de una descarga eléctrica, no
coloque el equipo en agua o en algún otro líquido. No
coloque o almacene el equipo en un lugar en el que
podría caer o ser jalado dentro de una bañera o lavabo.
3. No cubra el equipo con telas o cartones, etc. De otro
modo, podría provocarse un incendio.
4. No toque el interior del aparato con pinzas,
herramientas metálicas, etc.
5. No exponga el aparato a la lluvia o la nieve. No la
lave con agua.
6. No toque el interior del aparato con pinzas,
herramientas metálicas, etc.
7. No entre en contacto con partes calientes.
8. Cuando el aparato no esté en uso, apáguelo siempre
y desconecte/retire el cartucho de batería del
aparato.
9. No permita que el aparato se caiga, se golpee,
etcétera.
10. Use únicamente partes recomendadas o vendidas
por el fabricante.
11. Almacene el equipo en interiores cuando no esté en
uso. Manténgase fuera del alcance de los niños.
12. Información de seguridad para luminarias portátiles
con baterías.
• Deseche las baterías en conformidad con las reglas
locales de eliminación de materiales peligrosos.
• No queme la batería.
13. Información adicional para luminarias.
• La fuente de luz de esta luminaria no es reemplazable;
cuando la fuente de luz llegue al final de su vida útil,
se deberá sustituir toda la luminaria.
14. Usos y cuidados de la herramienta a batería.
•
ADVERTENCIA: Lea todas las precauciones y las
instrucciones de seguridad. No seguir las precauciones
y las instrucciones podría dar como resultado una
descarga eléctrica, un incendio y/o una lesión grave.
• Evite el encendido involuntario. Asegúrese de que
el interruptor esté en posición de apagado antes de
conectar el paquete de baterías, recoger o transportar
el aparato. Transportar el aparato con el dedo en el
interruptor, o alimentar el aparato con el interruptor
encendido puede causar accidentes.
• Desconecte la batería del aparato antes de realizar
cualquier ajuste, cambiar accesorios o almacenarlo.
Estas medidas de seguridad preventivas reducen el
riesgo de encender el aparato accidentalmente.
• Recárguelo solo con el cargador especificado por
el fabricante. Un cargador que es adecuado para
determinado tipo de batería puede crear un riesgo de
incendio cuando se utiliza con otra batería.
•
Utilice aparatos solo con baterías indicadas
específicamente. El uso de cualquier otro paquete de
baterías puede conllevar riesgo de lesiones e incendio.
• Cuando la batería no esté en uso, manténgala alejada
de otros objetos metálicos, como clips de papel,
monedas, llaves, clavos, tornillos u otros objetos
metálicos pequeños, que puedan crear una conexión
de un terminal a otro. El cortocircuito de los terminales
de la batería puede causar quemaduras o un incendio.
• En condiciones de mal uso, de la batería puede salir
líquido; evite el contacto. Si se produce un contacto
accidental, enjuáguese con agua. Si el líquido entra
en contacto con los ojos, busque además ayuda
médica. El líquido que sale de la batería puede causar
irritación o quemaduras.
• No utilice una batería o un aparato que esté dañado
o modificado. Las baterías dañadas o modificadas
pueden tener un comportamiento impredecible que
resulte en incendio, explosión o riesgo de lesiones.
• No exponga una batería o un aparato al fuego o a una
temperatura excesiva. La exposición al fuego o a una
temperatura por encima de 130 ºC (265 ºF) puede
causar una explosión.
•
Siga todas las instrucciones de carga y no cargue la
batería o el aparato cuando se exceda el rango de
temperatura especificado en las instrucciones. La carga
incorrecta o a temperaturas fuera del rango especificado
puede dañar la batería y aumentar el riesgo de incendio.
11 Español
•
El mantenimiento debe ser realizado por un técnico
calificado utilizando solo piezas de repuesto idénticas.
Esto garantizará que se respete la seguridad del producto.
• No modifique ni intente reparar el aparato o la batería,
excepto como se indica en las instrucciones de uso y
de cuidados.
15. Instrucciones de seguridad importantes para el
cartucho de batería.
• Antes de usar el cartucho de batería, lea todas
las instrucciones y marcas de precaución en (1) el
cargador de la batería, (2) la batería y (3) el producto
que usa la batería.
• No desensamble o manipule el cartucho de la batería.
Podría dar como resultado un incendio, calor excesivo
o una explosión.
•
Si el tiempo de funcionamiento se ha vuelto excesivamente
más corto, deje de operar el aparato de inmediato.
Puede haber un riesgo de sobrecalentamiento, posibles
quemaduras e incluso una explosión.
• Si el electrolito le entra en los ojos, enjuágueselos con
agua limpia y busque atención médica de inmediato.
Podría producirse pérdida de la visión.
•
No provoque cortocircuitos en el cartucho de la batería.
• No almacene la herramienta ni el cartucho de la
batería en lugares donde la temperatura pueda
alcanzar o superar los 50 °C (122 °F).
• No incinere el cartucho de la batería aunque
esté gravemente dañado o esté completamente
desgastado. El cartucho de la batería puede explotar
en caso de incendio.
•
No clave, corte, apriete, arroje, deje caer el cartucho de la
batería o golpee contra un objeto duro. Podría dar como
resultado un incendio, calor excesivo o una explosión.
• No utilice una batería dañada.
•
Las baterías de iones de litio contenidas están sujetas
a los requisitos de la legislación sobre mercancías
peligrosas. En los transportes comerciales, por ejemplo,
por terceros, deben observarse requisitos especiales
en el embalaje y el etiquetado. Para la preparación del
artículo que se transporta, se requiere consultar a un
experto en materiales peligrosos. Por favor, observe
también las regulaciones nacionales que, posiblemente,
sean más detalladas. Tape o enmascare los contactos
abiertos y empaque la batería de tal manera que no
pueda moverse en el embalaje.
• Utilice las baterías únicamente con los productos
especificados por Makita. La instalación de las
baterías en productos que incumplen las normas
puede provocar incendios, calor excesivo, una
explosión o una fuga de electrolitos.
• Si el aparato no se utiliza durante un largo período, la
batería debe retirarse del aparato.
• Durante y después del uso, el cartucho de la
batería podría calentarse y causar quemaduras o
quemaduras de bajas temperaturas. Preste atención a
la manipulación de cartuchos de baterías calientes.
• No toque el terminal de la herramienta
inmediatamente después de usarla, porque podría
estar suficientemente caliente como para quemar lo.
• No permita astillas, polvo o tierra atascada en los
terminales, los orificios y las ranuras del cartucho de
la batería. Podría dar como resultado bajo rendimiento
o avería de la herramienta o el cartucho de la batería.
•
A menos que la herramienta sea compatible con el uso
cercano de líneas eléctricas de alto voltaje, no use el
cartucho de la batería cerca de las líneas eléctricas de
alto voltaje. Podría dar como resultado una falla o una
avería de la herramienta o el cartucho de la batería.
• Mantenga la batería fuera del alcance de los niños.
GUARDE ESTAS INSTRUCCIONES.
PRECAUCIÓN:
Use únicamente las baterías originales
Makita. El uso de baterías Makita no originales, o de baterías
que se hayan alterado, puede causar la explosión de la batería,
incendios, lesiones personales y daños. También anulará la
garantía de Makita para la herramienta y el cargador.
16.
Consejos para conservar la máxima duración de la batería.
• Cargue el cartucho de la batería antes de que se
descargue por completo.
Detenga siempre el funcionamiento de la herramienta
y cargue el cartucho de la batería cuando observe
menos potencia en la herramienta.
• Nunca recargue un cartucho de batería
completamente cargado.
La sobrecarga acorta la vida útil de la batería.
•
Cargue el cartucho de la batería a temperatura ambiente
a 10 ºC - 40 ºC (50 ºF - 104 ºF). Si el cartucho de batería
está caliente permita que se enfríe antes de cargarlo.
• Cuando no use el cartucho de la batería, retírelo de la
herramienta o el cargador.
• Cargue el cartucho de batería si no lo utiliza durante
un período prolongado (más de seis meses).
DESCRIPCIÓN FUNCIONAL
PRECAUCIÓN:
Asegúrese siempre de que el aparato esté apagado
y de que el cartucho de la batería se haya extraído
antes de ajustar o comprobar la función del aparato.
Instalación o extracción del cartucho
de la batería (Fig. 2)
PRECAUCIÓN:
Siempre apague el equipo antes de colocar o remover
el cartucho de la batería.
PRECAUCIÓN:
Sujete firmemente el aparato y el cartucho de
batería al instalar o extraer el cartucho de batería.
Si no se sujeta el aparato y el cartucho de la batería
firmemente, es posible que se les escape de las
manos y se dañen el aparato y el cartucho de la
batería y se produzca una lesión personal.
Para instalar el cartucho de batería, alinee la lengüeta del
cartucho de batería con la ranura de la carcasa y deslícela
hasta que quede en su lugar. Insértela hasta que quede
fija en su lugar y escuche un breve clic. En caso de que
pueda ver el indicador rojo tal como se muestra en la
figura, quiere decir que no está cerrado por completo.
Para extraer el cartucho de batería, deslícelo del aparato
mientras desliza el botón en la parte frontal del cartucho.
PRECAUCIÓN:
instale siempre el cartucho de batería completamente
hasta que no se pueda ver el indicador rojo. Si no es
así, puede caerse accidentalmente del aparato, lo que
le causará lesiones a usted o a alguien cercano.
PRECAUCIÓN:
No instale el cartucho de batería por la fuerza. Si
el cartucho no se desliza fácilmente, no se está
insertando correctamente.
12 Español
Indicación de la capacidad restante de
la batería (Fig. 3)
Pulse el botón de verificación del cartucho de batería
para indicar la capacidad restante de la batería. Las
luces indicadoras se encienden durante unos segundos.
Lámparas indicadoras
Capacidad restante
Iluminado
Apagado
Parpadeando
75 % a 100 %
50 % a 75 %
25 % a 50 %
0 % a 25 %
Cargue la batería.
Es posible que la batería no haya
funcionado correctamente.
NOTA:
Dependiendo de las condiciones de uso y la
temperatura ambiente, la indicación puede diferir
levemente de la capacidad real.
NOTA:
La primera lámpara indicadora (en el extremo
izquierdo) parpadeará cuando funcione el sistema de
protección de la batería.
Equipo / Sistema de protección del
aparato.
El equipo cuenta con un sistema de protección que
corta de manera automática la fuente de poder a fin de
alargar el tiempo de vida del equipo.
Protección contra descargas excesivas
Cuando la capacidad de la batería no es suficiente, el
aparato se detiene automáticamente. En este caso,
extraiga la batería del aparato y cargue la batería.
Protecciones contra otras causas.
El sistema de protección está también diseñado contra
otras causas que podrían dañar el dispositivo y que
permite que el dispositivo se apague en automático.
Siga los siguientes pasos para quitar las causas cuando
el dispositivo se haya detenido temporalmente durante
la operación.
1. Apague el dispositivo y enseguida enciéndalo de
nuevo para que se reinicie.
2. Cargue la batería o baterías y reemplácelas con
baterías cargadas.
3. Permita que las baterías del dispositivo se enfríen.
En caso de que no haya mejoría al reestablecer el
sistema de protección, contacte a su Centro de Servicio
Makita local.
Encendido de la luz y selección del
modo de brillo (Fig. 4)
PRECAUCIÓN:
No mire a la luz ni a la fuente de luz directamente.
1. Interruptor: La secuencia de brillo es: Modo alto
(encendido) / Modo medio / Modo Bajo / Apagado
por cada vez que oprima.
2. Selector de modo: La secuencia de encendido
es: Luz complete / Pare de luz fija / Parte de luz
plegable oprimiendo una vez por cada uno cuando el
interruptor esté encendido.
NOTA:
Cuando encienda el equipo, éste se encenderá en el
mismo modo de luz que se utilizó la última vez.
Indicador de batería baja (Fig. 5)
Cuando la batería esté baja, las luces LED se apagarán
a excepción de la luz LED que aparece en la ilustración
Transcurridos aproximadamente de 5 a 10 minutos, el
equipo de apagará de manera automática.
OPERACIÓN
PRECAUCIÓN:
Gire la barra de luz LED y doble hacia abajo la parte
de la luz plegable para estabilizar el equilibrio del
equipo cuando coloque el equipo en una posición
vertical tal como se muestra en la fig. 4. De otro
modo el equipo podría caer y causar una lesión a su
persona.
Ángulo de la barra de luz LED (Fig. 6,
Fig. 7)
PRECAUCIÓN:
tenga cuidado de no quedar con los dedos atrapados
al ajustar el ángulo de la luz.
PRECAUCIÓN:
Asegúrese de que las partes de luz fija y plegable
estén aseguradas juntas de manera firma y posiciones
de doblar y desdoblar respectivamente.
La barra de luz LED puede girar en 7 etapas cada 45°.
(90° hacia la derecho y 180° hacia la izquierda)
La parte de luz plegable puede doblarse a 0° o a 180°.
Gancho metálico (Fig. 8)
Levante y deslice el gancho metálico para centrar la
posición cuando utilice el gancho metálico.
Correa (Fig. 9)
PRECAUCIÓN:
No utilice el anillo ni el orificio de la correa para otro
propósito que no sea el de instalar la correa. De lo
contrario, podría ocurrir una lesión personal.
Instale la correa sobre la aplicación tal como está
ilustrado.
13 Español
Instalación de los clips de soporte dentro
del gancho telescópico (Fig. 10, Fig. 11)
PRECAUCIÓN:
Tenga cuidado de no machucarse los dedos cuando
instale los clips de soporte dentro del gancho
telescópico.
Instale los clips de soporte dentro del gancho
telescópico tal como está ilustrado.
NOTA:
Asegúrese de que cada clip de soporte se deslice hasta
el orificio de posicionamiento de la barra principal.
NOTA:
Asegúrese de que los clips de soporte estén instalados
hacia la misma dirección.
Instalación del gancho telescópico del
equipo (Fig. 12)
Instale el equipo sobre el gancho telescópico junto a los
clips de soportes tal como se ilustra.
NOTA:
Asegúrese de que cada clip de soporte mantenga la
posición de recorte de la aplicación.
Colocación del gancho telescópico
(Fig. 13)
PRECAUCIÓN:
No cuelgue ninguna otra cosa aparte del equipo sobre
el gancho telescópico. De otro modo los ganchos de
sujeción podrían dañarse y causar una lesión a su
persona.
PRECAUCIÓN:
Asegúrese de que cada parte esté bien fijada antes de
usarse.
PRECAUCIÓN:
Opere sujetando la abarra principal y los ganchos de
sujeción cuando coloque el gancho telescópico. Tenga
cuidado de no machucarse las manos ni los dedos
porque la barra interior esté nuevamente colocada en
su posición original por la fuerza de los muelles.
Sostenga uno de los ganchos de sujeción para colocarlo
donde desee.
Sostenga otro de los ganchos de sujeción mientras
extiende el gancho telescópico para colocarlo en la
ubicación deseada (del otro lado).
Encienda el equipo y ajuste el ángulo de iluminación del
equipo para iluminar la ubicación deseada tal como está
ilustrado.
AVISO:
Si utiliza una batería pesada, rote únicamente la barra
de luz LED para ajustar el ángulo de iluminación.
MANTENIMIENTO
PRECAUCIÓN:
Asegúrese siempre de que el aparato esté apagado
y de que el cartucho de batería se retire antes de
intentar realizar una inspección o mantenimiento.
AVISO:
Nunca use gasolina, benceno, diluyente, alcohol o
productos similares. Pueden producirse decoloración,
deformación o grietas.
Para mantener la SEGURIDAD y la CONFIABILIDAD
del producto, las reparaciones y cualquier otro
mantenimiento o ajuste deben ser realizados por los
Centros autorizados o de Servicio de fábrica de Makita,
siempre usando piezas de reemplazo de Makita.
Limpieza
PRECAUCIÓN:
nunca lave el aparato con agua.
De tiempo en tiempo limpie la parte exterior del equipo
(el cuerpo del equipo) usando tela humedecida en
agua con jabón.
ACCESORIOS OPCIONALES
PRECAUCIÓN:
estos accesorios se recomiendan para su uso con su
aparato Makita especificado en este manual. El uso
de cualquier otro accesorio o elemento anexo podría
presentar un riesgo de lesiones para las personas.
Utilice únicamente los accesorios para el propósito
indicado.
Si necesita ayuda para obtener más detalles con
respecto a estos accesorios, pregunte a su centro de
servicio local de Makita.
• Batería y cargador genuinos de Makita
NOTA:
Algunos de los ítems de la lista podrían estar incluidos
en el paquete del equipo como accesorios estándar.
Pueden diferir de un país a otro.
GARANTÍA LIMITADA DE MAKITA
Consulte la hoja de garantía adjunta para conocer
los términos de garantía más actuales que aplican
a este producto. Si la hoja de garantía anexa no
está disponible, consulte los detalles de la garantía
detallados en el siguiente sitio web para su país
respectivo.
Estados Unidos: www.makitatools.com
Canadá: www.makita.ca
Otros países: www.makita.com

ML012G-NA2-240
2
GER/CRE
Makita Corporation
3-11-8, Sumiyoshi-cho,
Anjo, Aichi 446-8502 Japan
www.makita.com