P a g e 1 | 14
User Manual
Please register your device to activate it.
See page 4.

P a g e 2 | 14
Page 2 Contents Guide / Important Information
Page 3 Controls & Indicators / Installation
Page 4-5 Setup
Page 6 Home Page / Impact / Perimeter
Page 7 Perimeter / Temperature
Page 8 Speed / Locate
Page 9 Make a claim User Guide
Page 10 Alarms
Page 11 Products
Page 12 Navigating the Settings
Page 13 Frequently Asked Questions
Page 14 Warranty
Important Information
Understanding your smart alarm:
The most common question is, why, when an alarm is triggered, can it take a
short while for the App to notify me?
On average, this can take anywhere from 30 seconds to 2 minutes, based on
several variables. Satellite signal, data upload, network latency, server
processing, and your mobile's background activity.
However, when the alert/notification comes through, it will
display the correct time the alarm occurred.
P a g e 3 | 14
Functions:
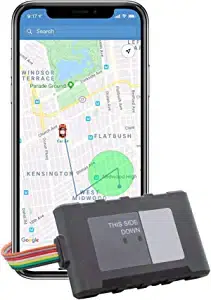
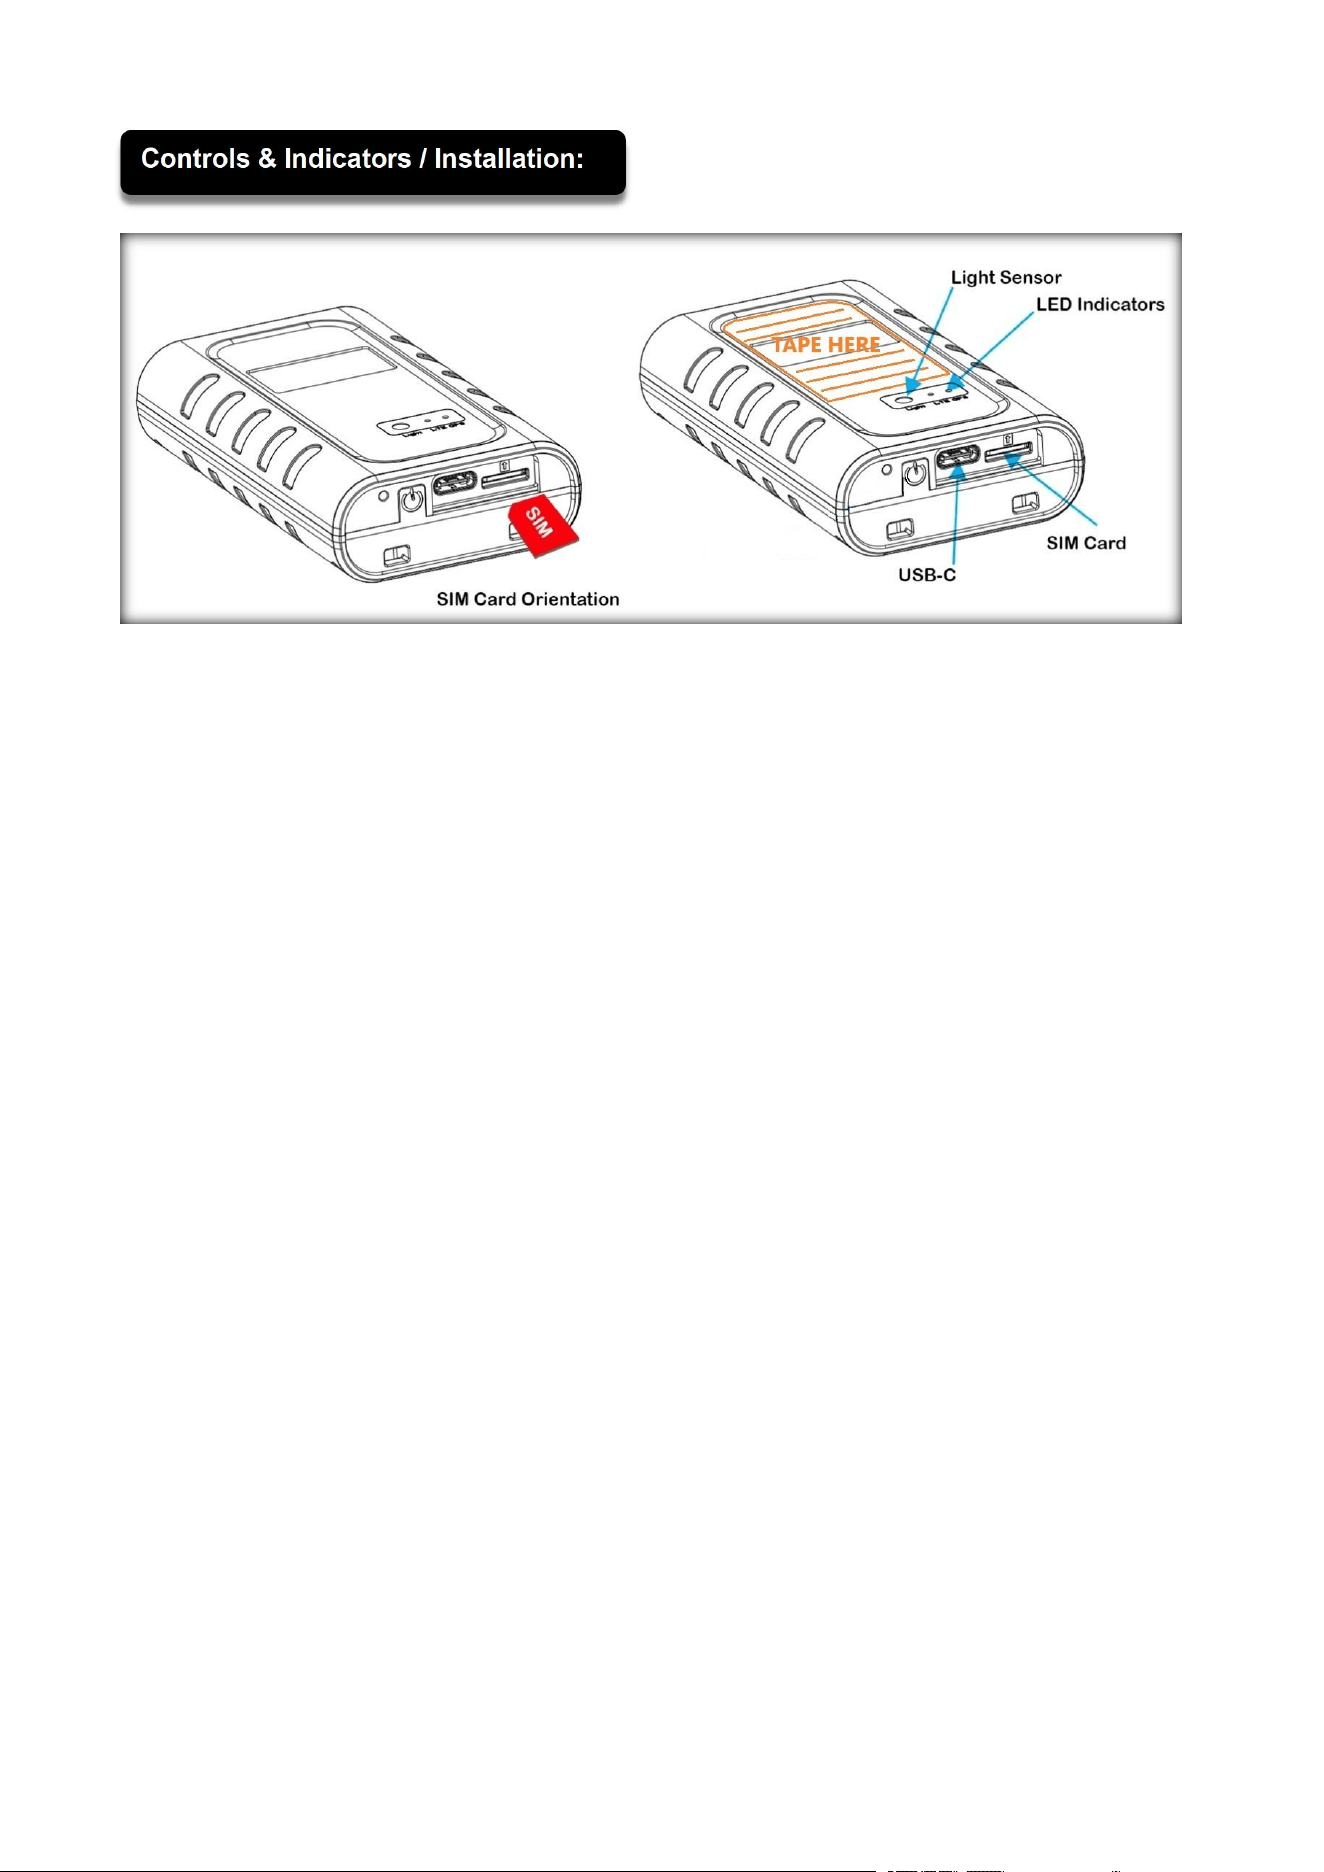
Please see the side of the box for fitment instructions.
Once powered on, the device automatically turns on.
Blue light: GPS status indicator.
Red light: GSM/LTE.
USB-C to the power cord.
SIM Card – Mini
Face the SIM card (chip down) as illustrated above.
(Clips in – click sound)
Installation:
Locate your vehicle’s OBD port – usually within arm’s reach of the driver.
Insert the provided harness’s USB-C into the smart alarm's USB-C Port.
Plug the harness’s OBD plug into your car's OBD port.
Place the double-sided tape over the logo (not over the light sensor).
Find a flat area and place the device, logo, and light sensor face down.
The device will power on straight away.
o
Red light on, then flashing with blue for approximately 30-40 seconds.
o
Solid red light, with flashing blue 30-40 seconds.
o After approximately 70 seconds - no lights.
Once you’ve installed and activated your device, it may take up to 30
minutes for it to become fully operational in the App.
P a g e 4 | 14
If you do not register your device, any claim made will be assessed
based on the original invoice date.
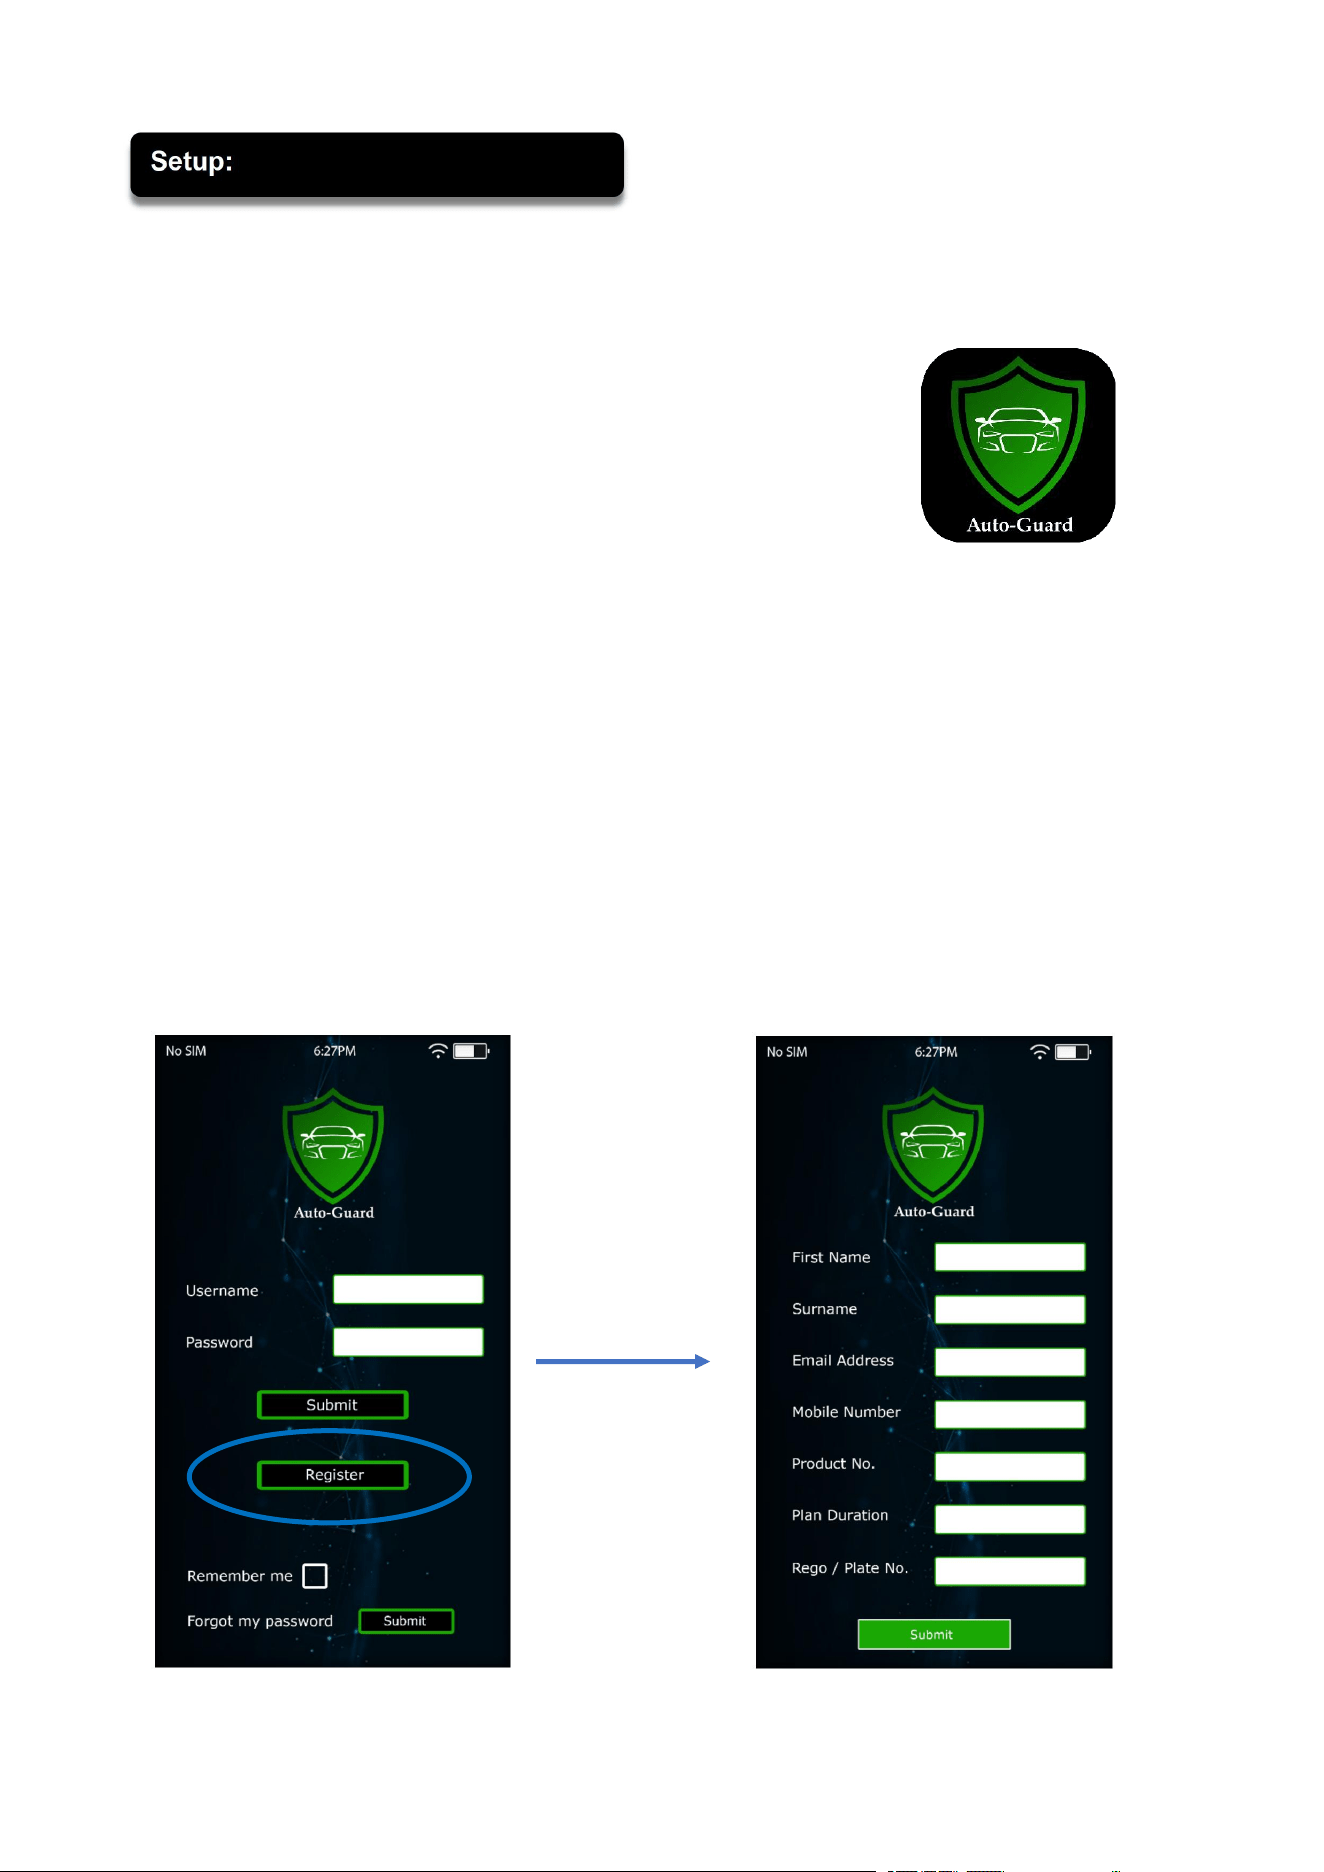
Step 1:
Download the app from your app store.
(Google Play for Android and Apple Store for IOS).
Search “Auto Guard” and select download.
Step 2:
Go into the Auto-Guard app.
Click on “Register”.
Complete the form. (Please ensure this information is accurate.)
You will find your unique Product No. located on the box and the device.
Press “Submit”.
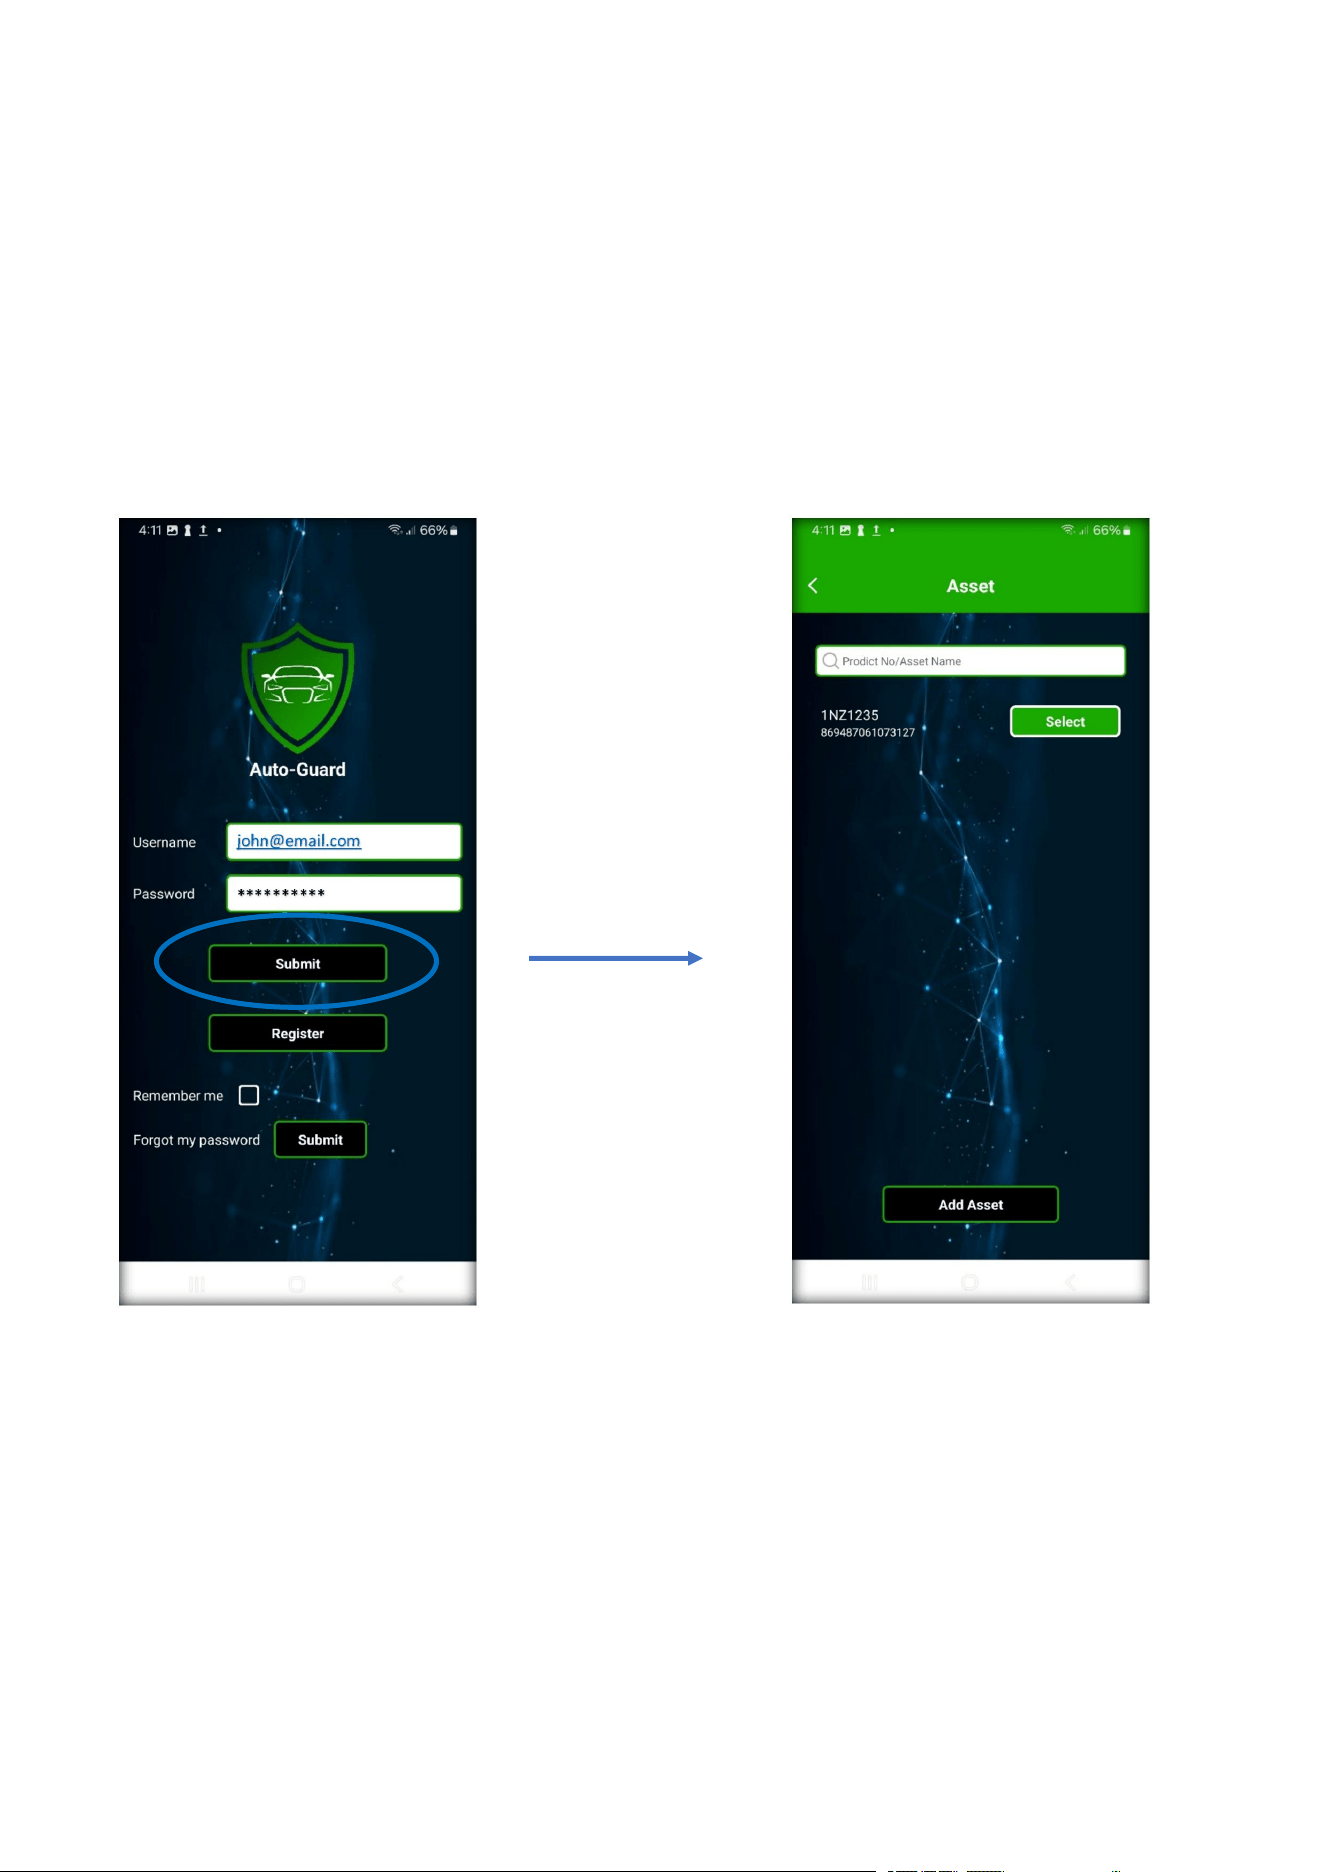
You will receive your welcome letter via email, with your app login details.
(Username & Password) Please check your spam and junk folders.
If the images and words are blocked, view them on your mobile device.
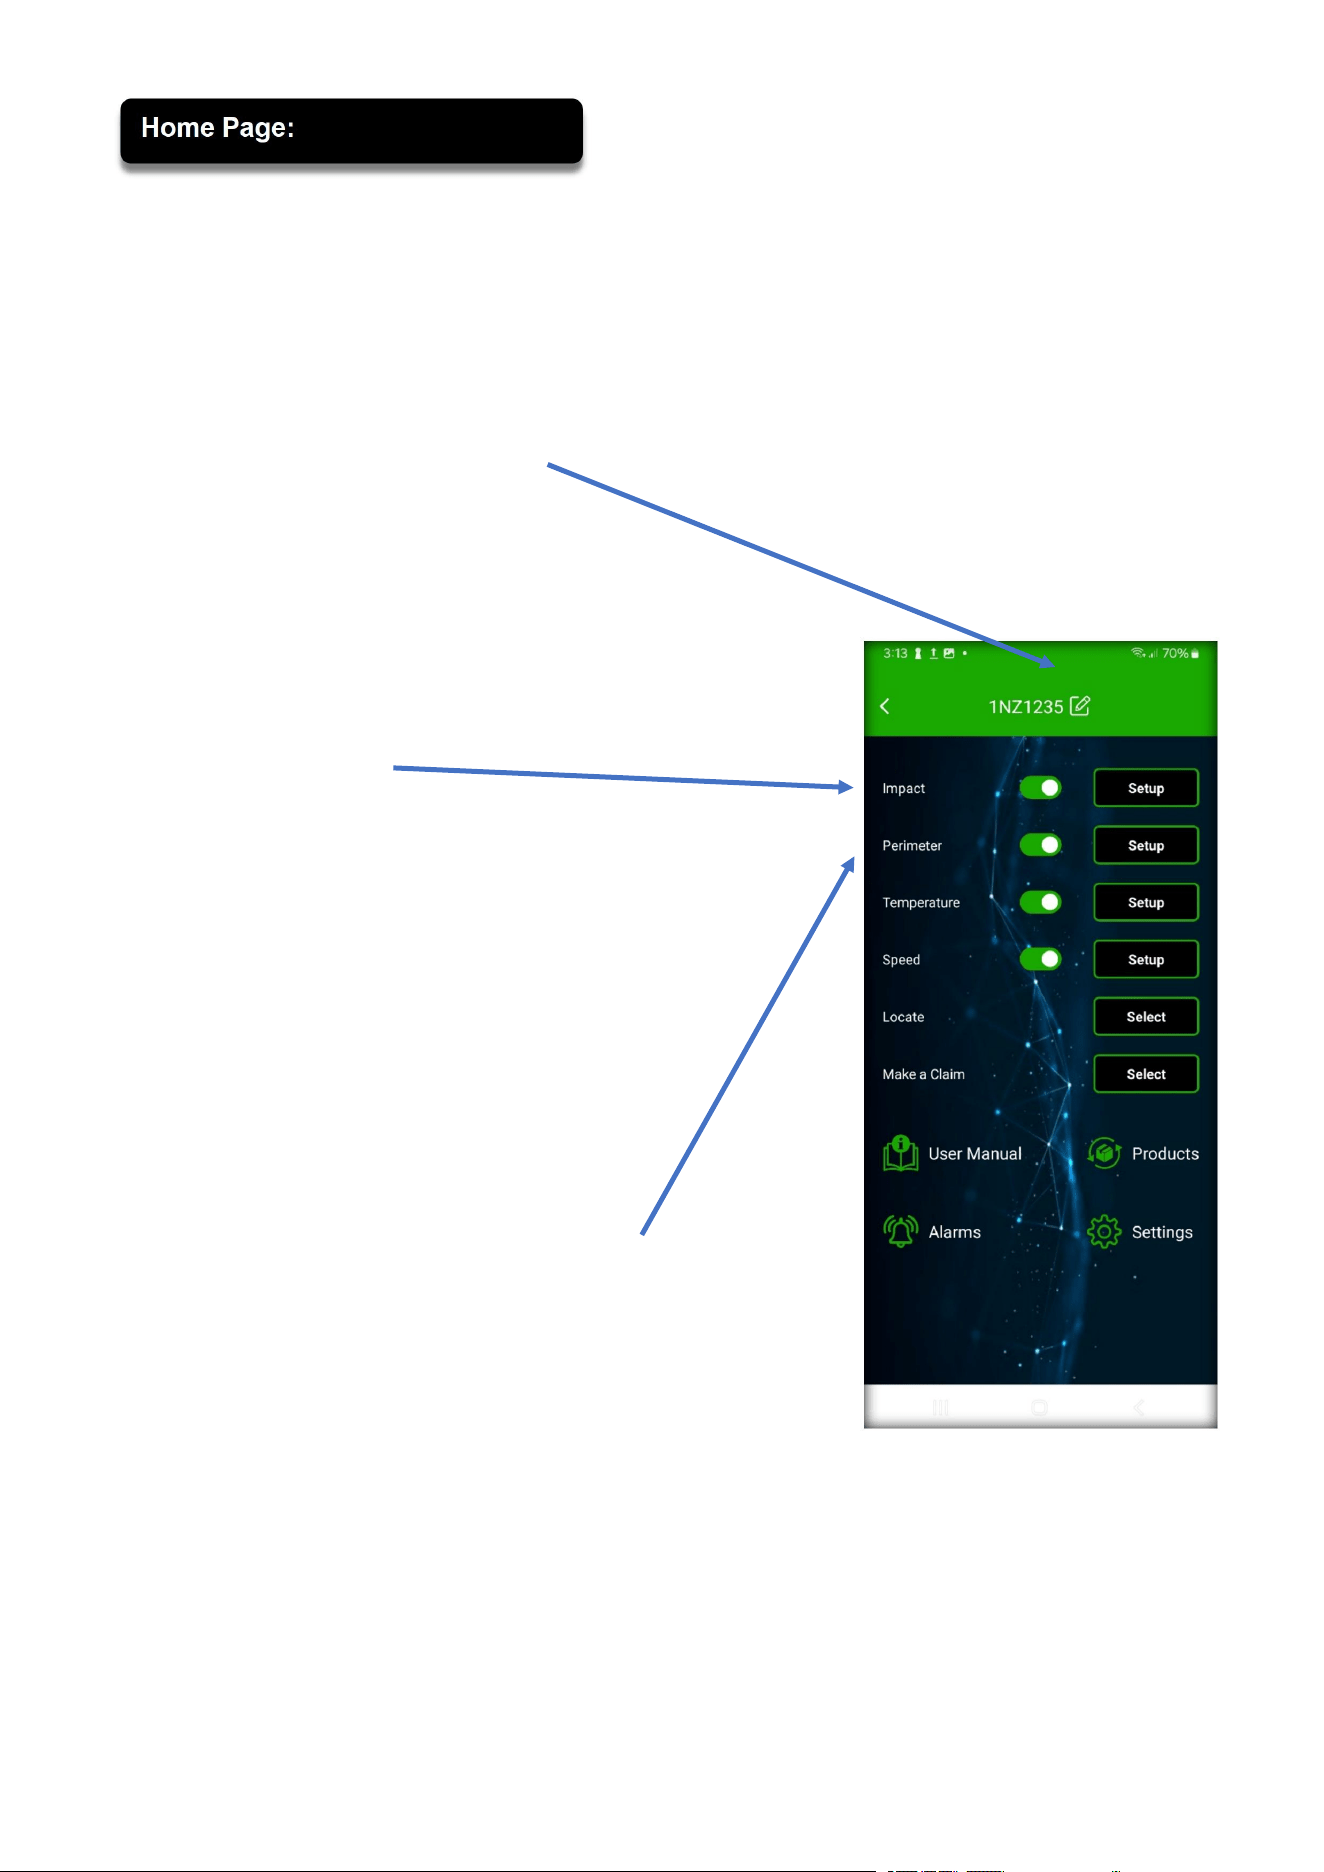
P a g e 6 | 14
Here you can manage your smart alarm according to your preferences.
You can also adjust the settings and purchase additional value-added
products.
Option to rename your asset.
The Impact alarm can be turned on
and off with the toggle switch. You
can press “Setup” and adjust the
sensitivity. This feature will send a
push notification to your mobile
phone in the event an impact/accident
has taken place.
Here you can create an invisible
barrier around a location of your
choosing. Receive an alarm if your
vehicle enters or leaves these
locations.
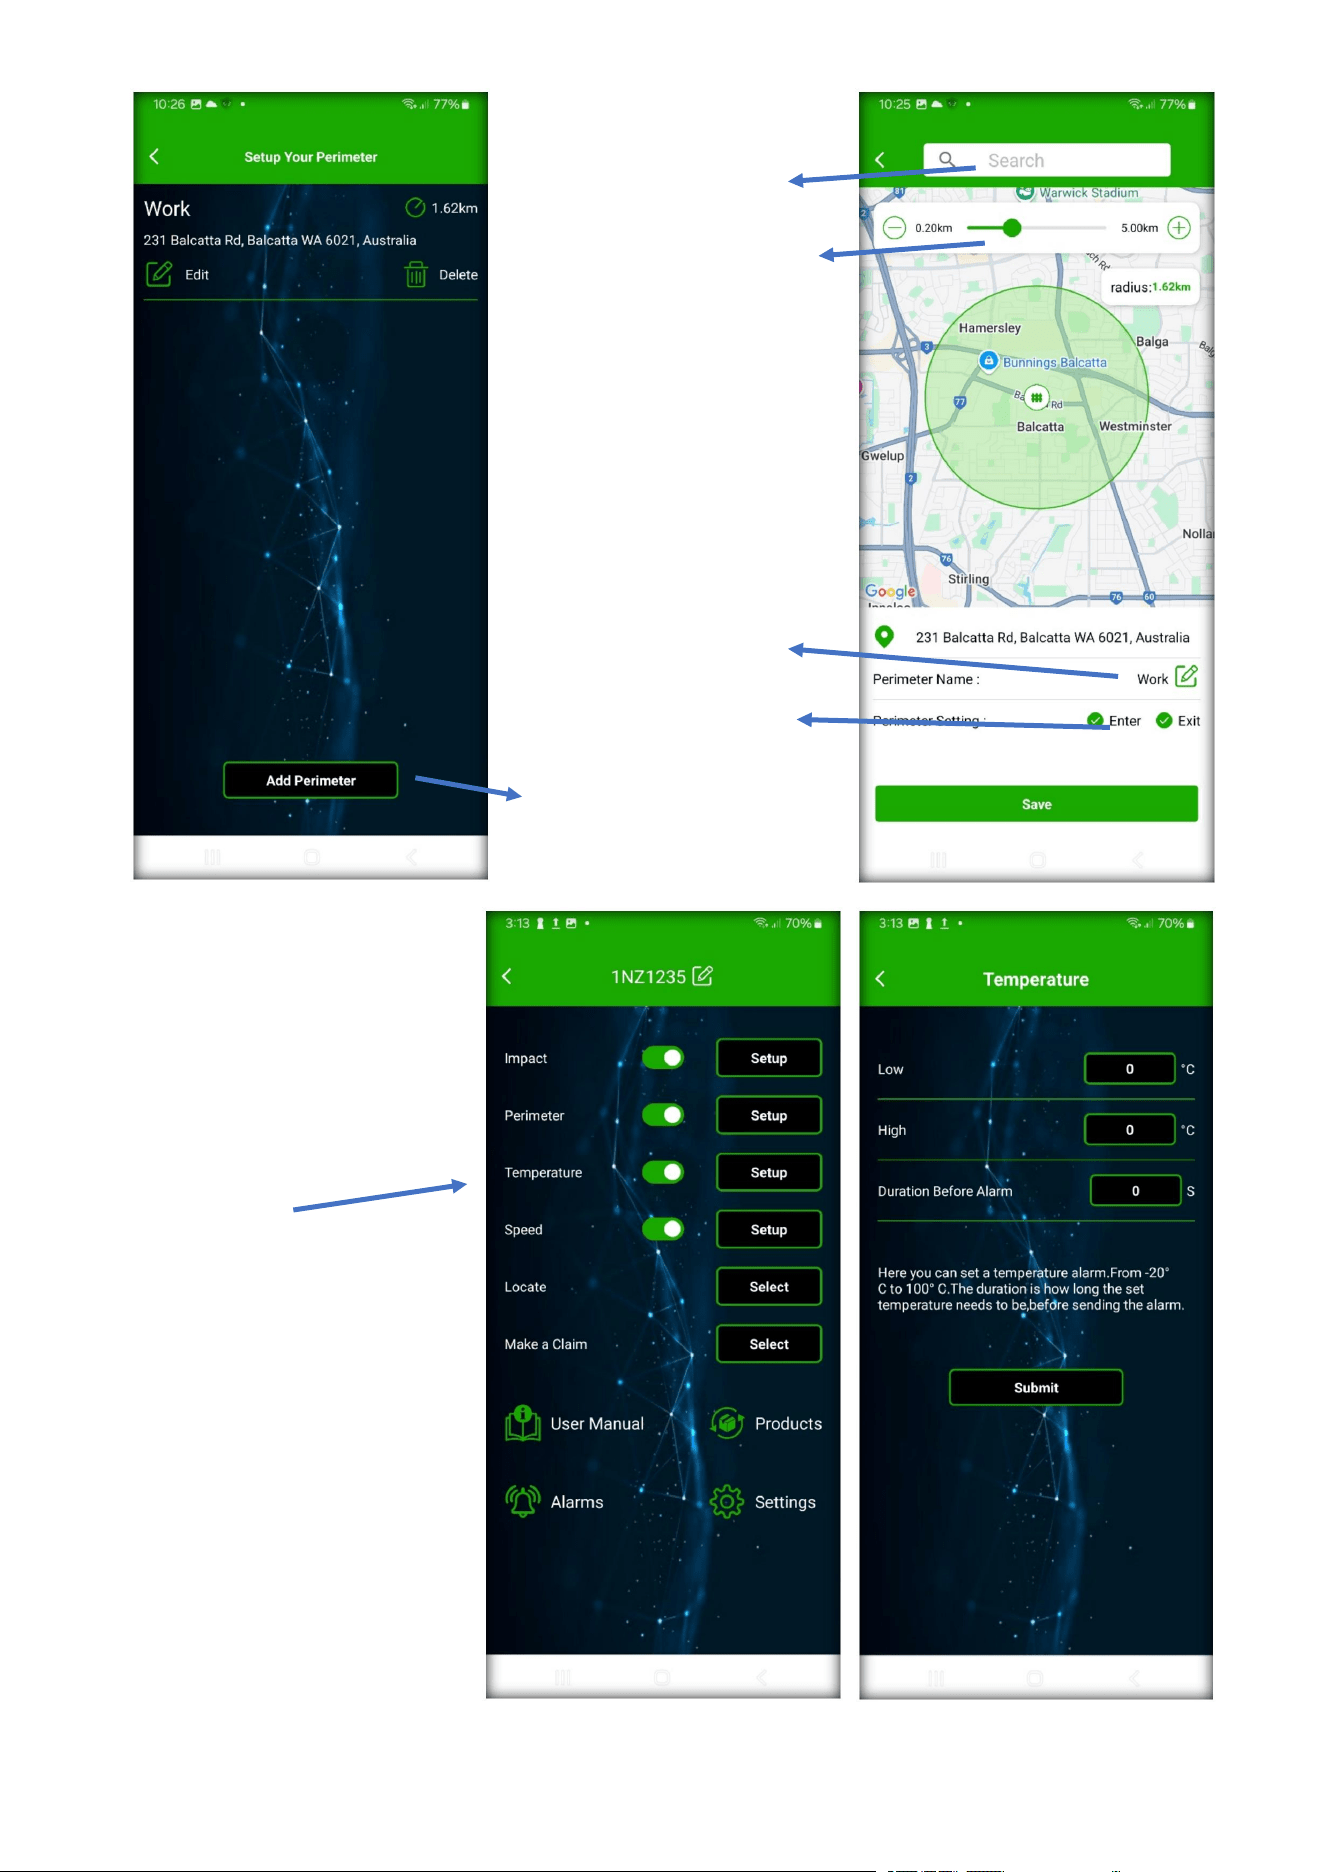
P a g e 7 | 14
Enter an address
Increase / Decrease size
Name this location
Alarm to enter / exit
Create a new Perimeter
Set up a temperature
alarm. Receive an alarm
once the preset
temperature is reached.
Based on the temperature
around the device.
The device can be up to
10 degrees warmer, as it
a little PC.
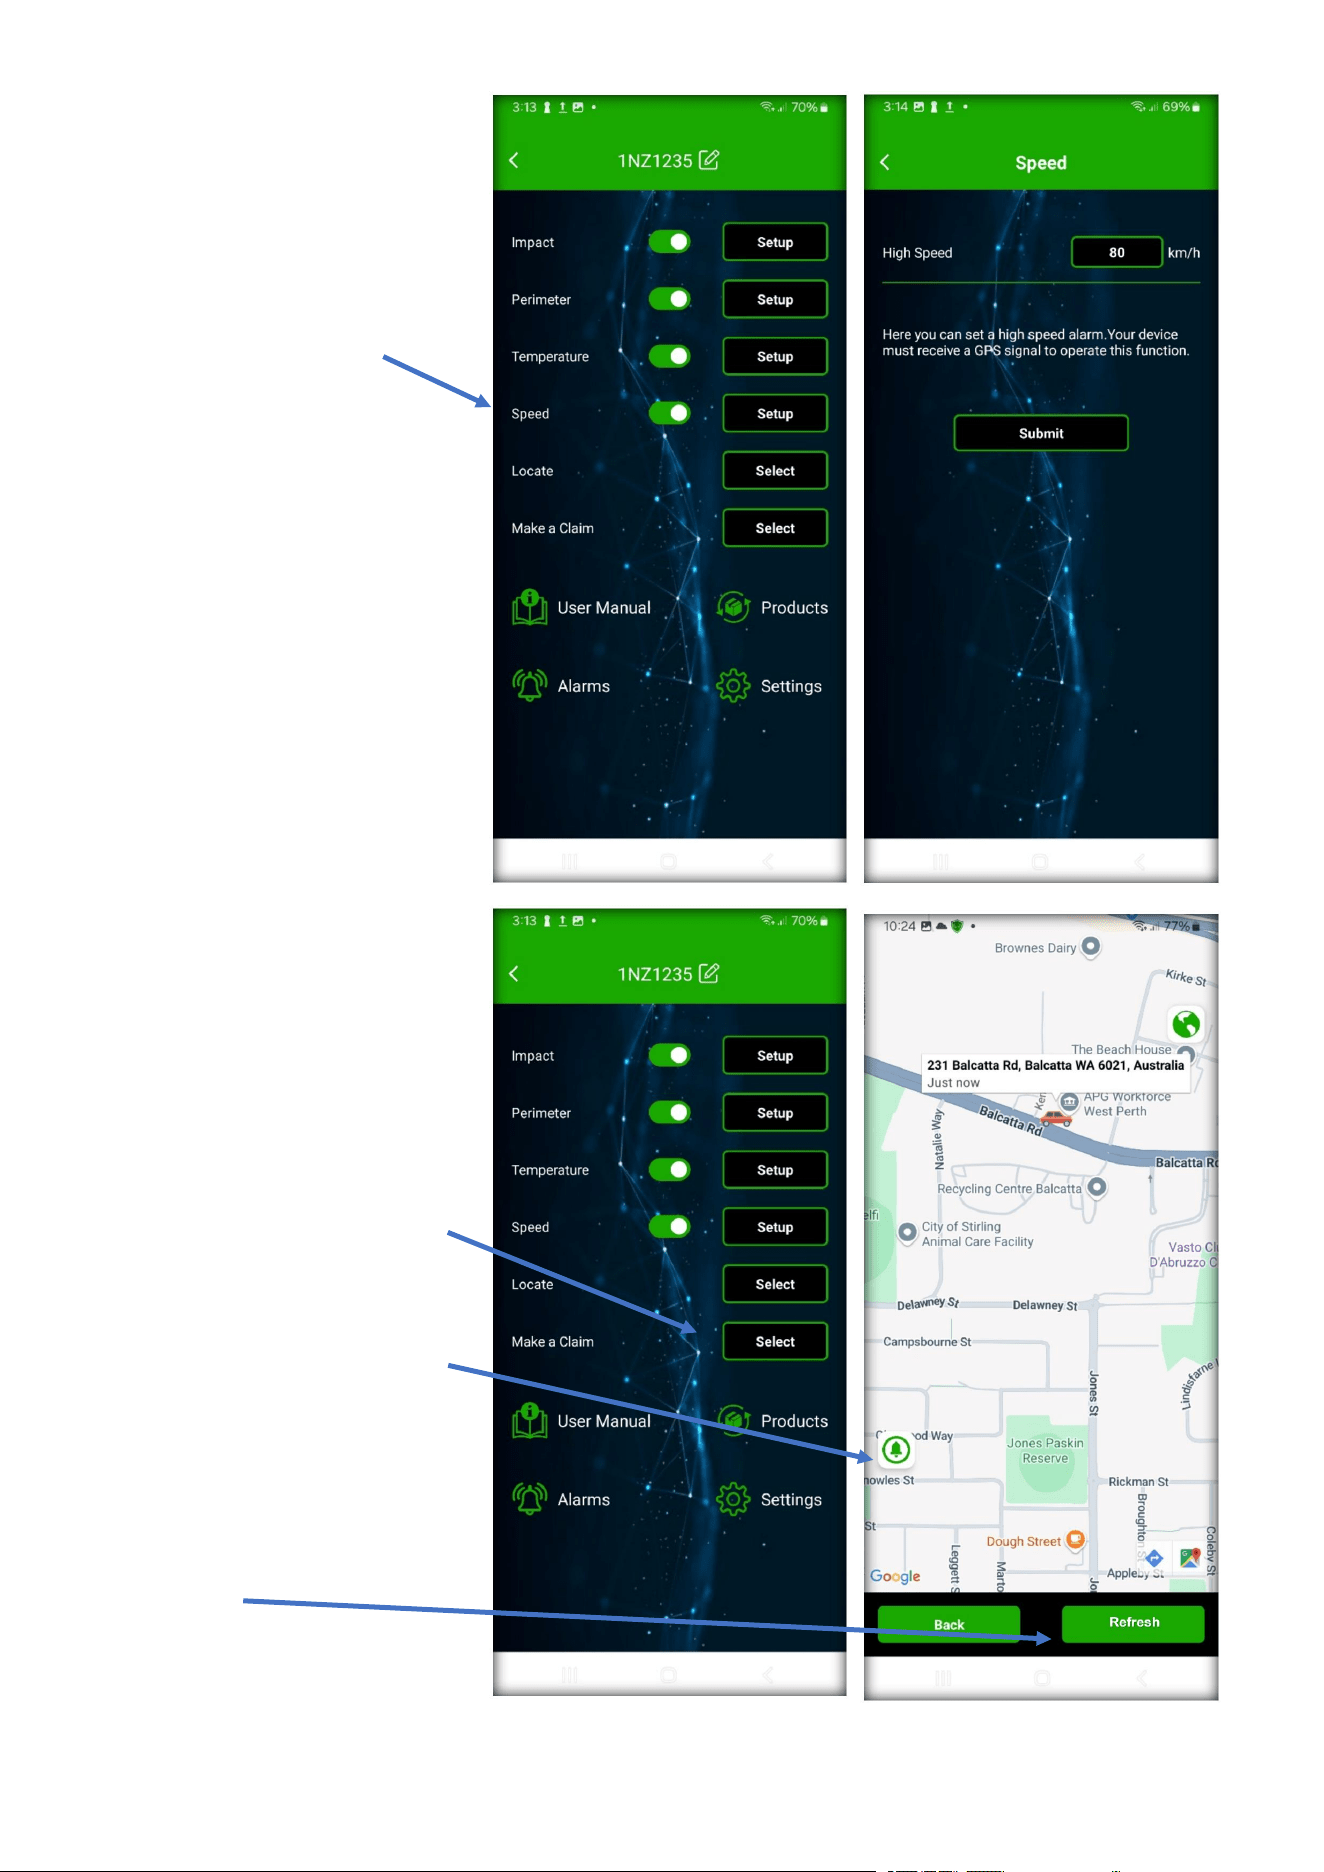
P a g e 8 | 14
Here you can preset a
high-speed alarm. In the
event the vehicle goes
over this speed, you will
receive the alarm.
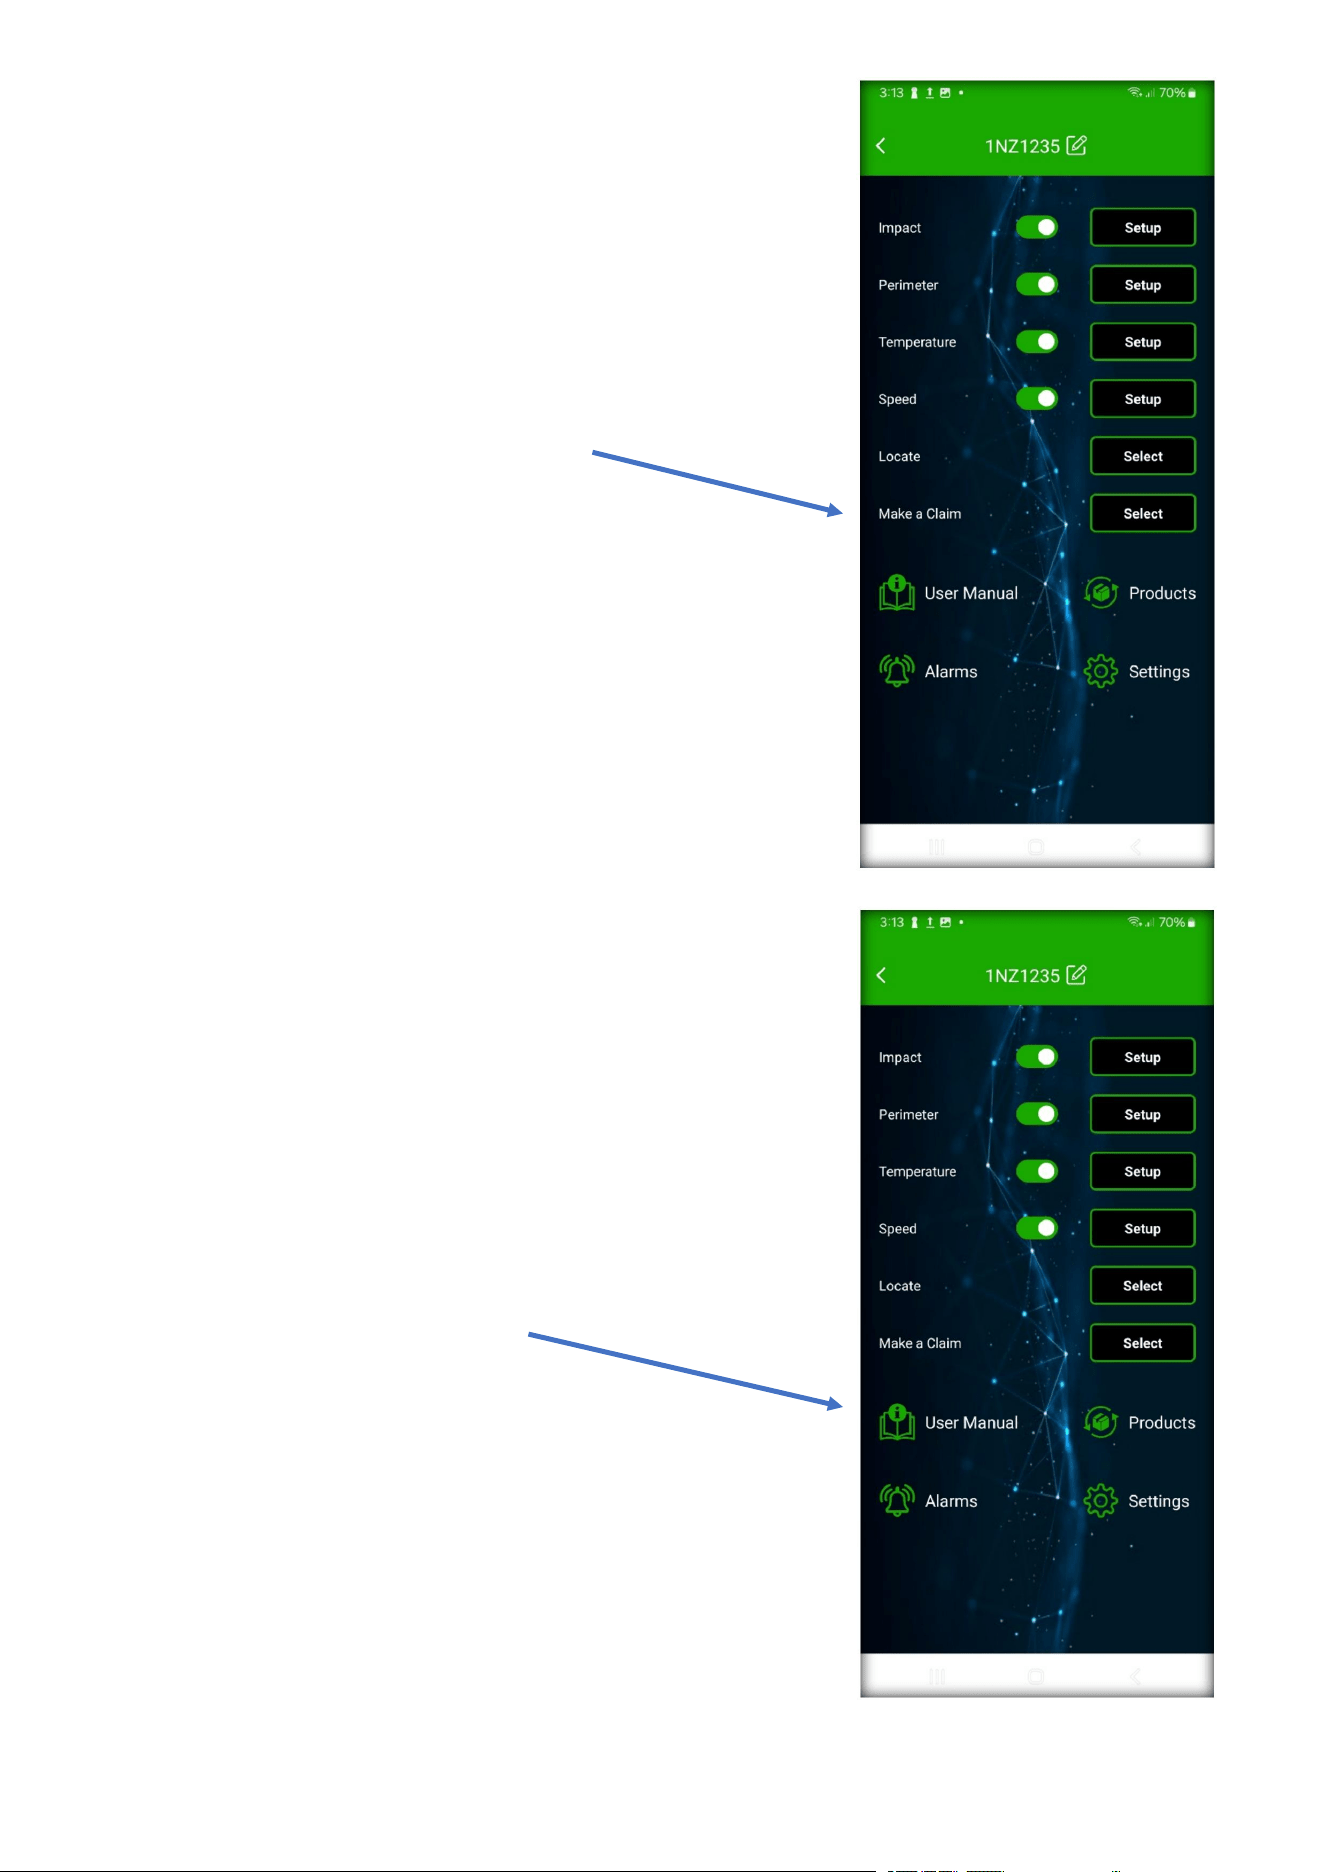
Need to find your vehicle?
Simply press “Locate” -
using the built-in GPS,
your vehicle’s current
location will be displayed.
Press the Bell Icon to get
a new location update.
If you have good signal,
this may take anywhere
from 30 seconds to
2 minutes.
Refresh
Refreshes the map page.
P a g e 9 | 14
Make a Claim (Subject to your region/country)
If you have had an at-fault collision and made
a claim with your car insurer.
Click “select” and download the form to
receive a refund for your excess.
The email address is located on the form.
User Manual
A digital version of this manual.
Easy to read and can be updated in the app
when new features are added.
P a g e 10 | 14
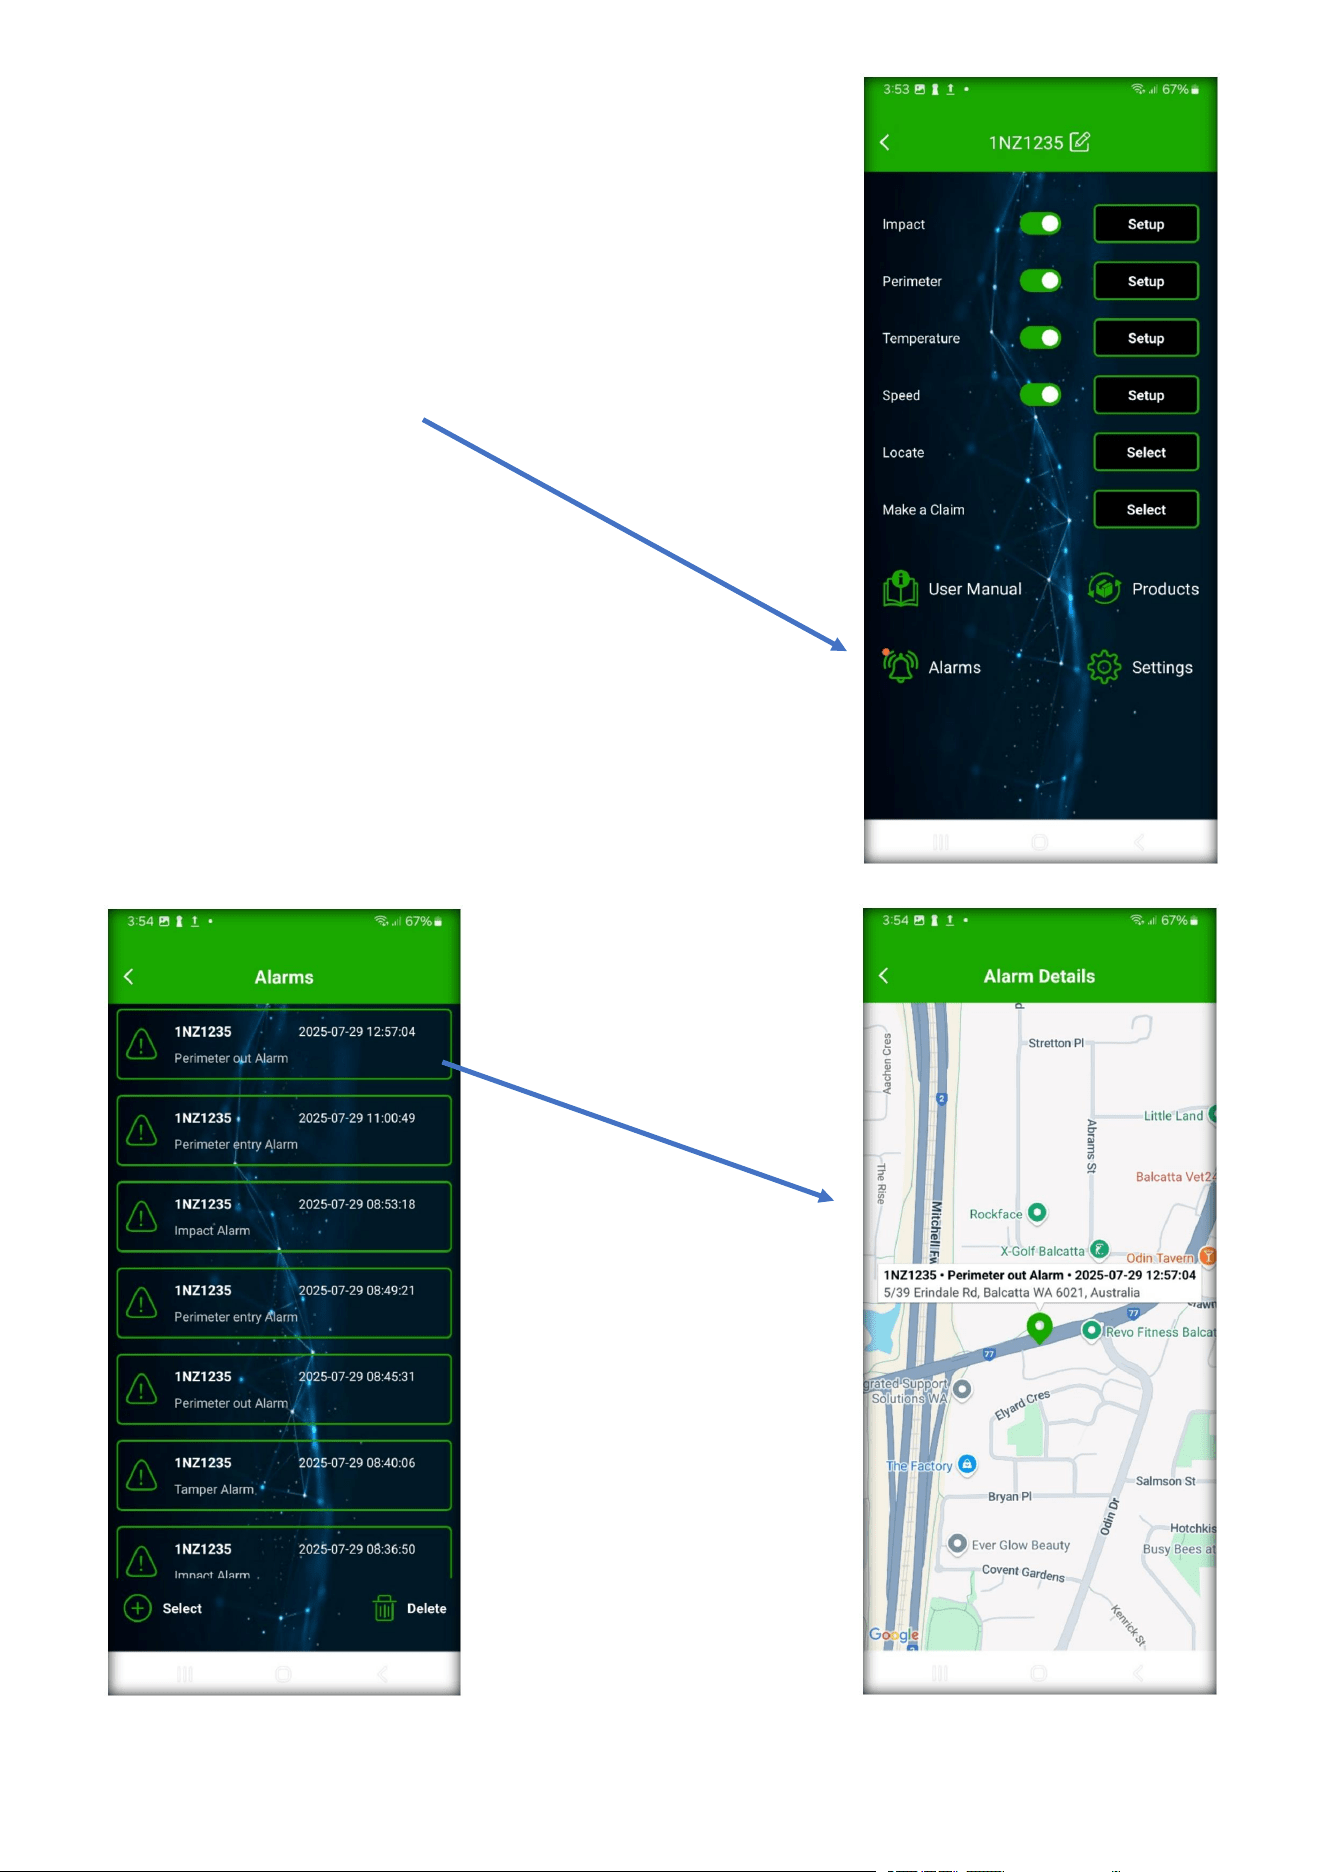
Alarms
Here you can view all the alarms that you have
received. All historical alarms are saved here
and can be deleted.
A red dot indicates that you have unread alarms.
Click on the alarm.
P a g e 11 | 14
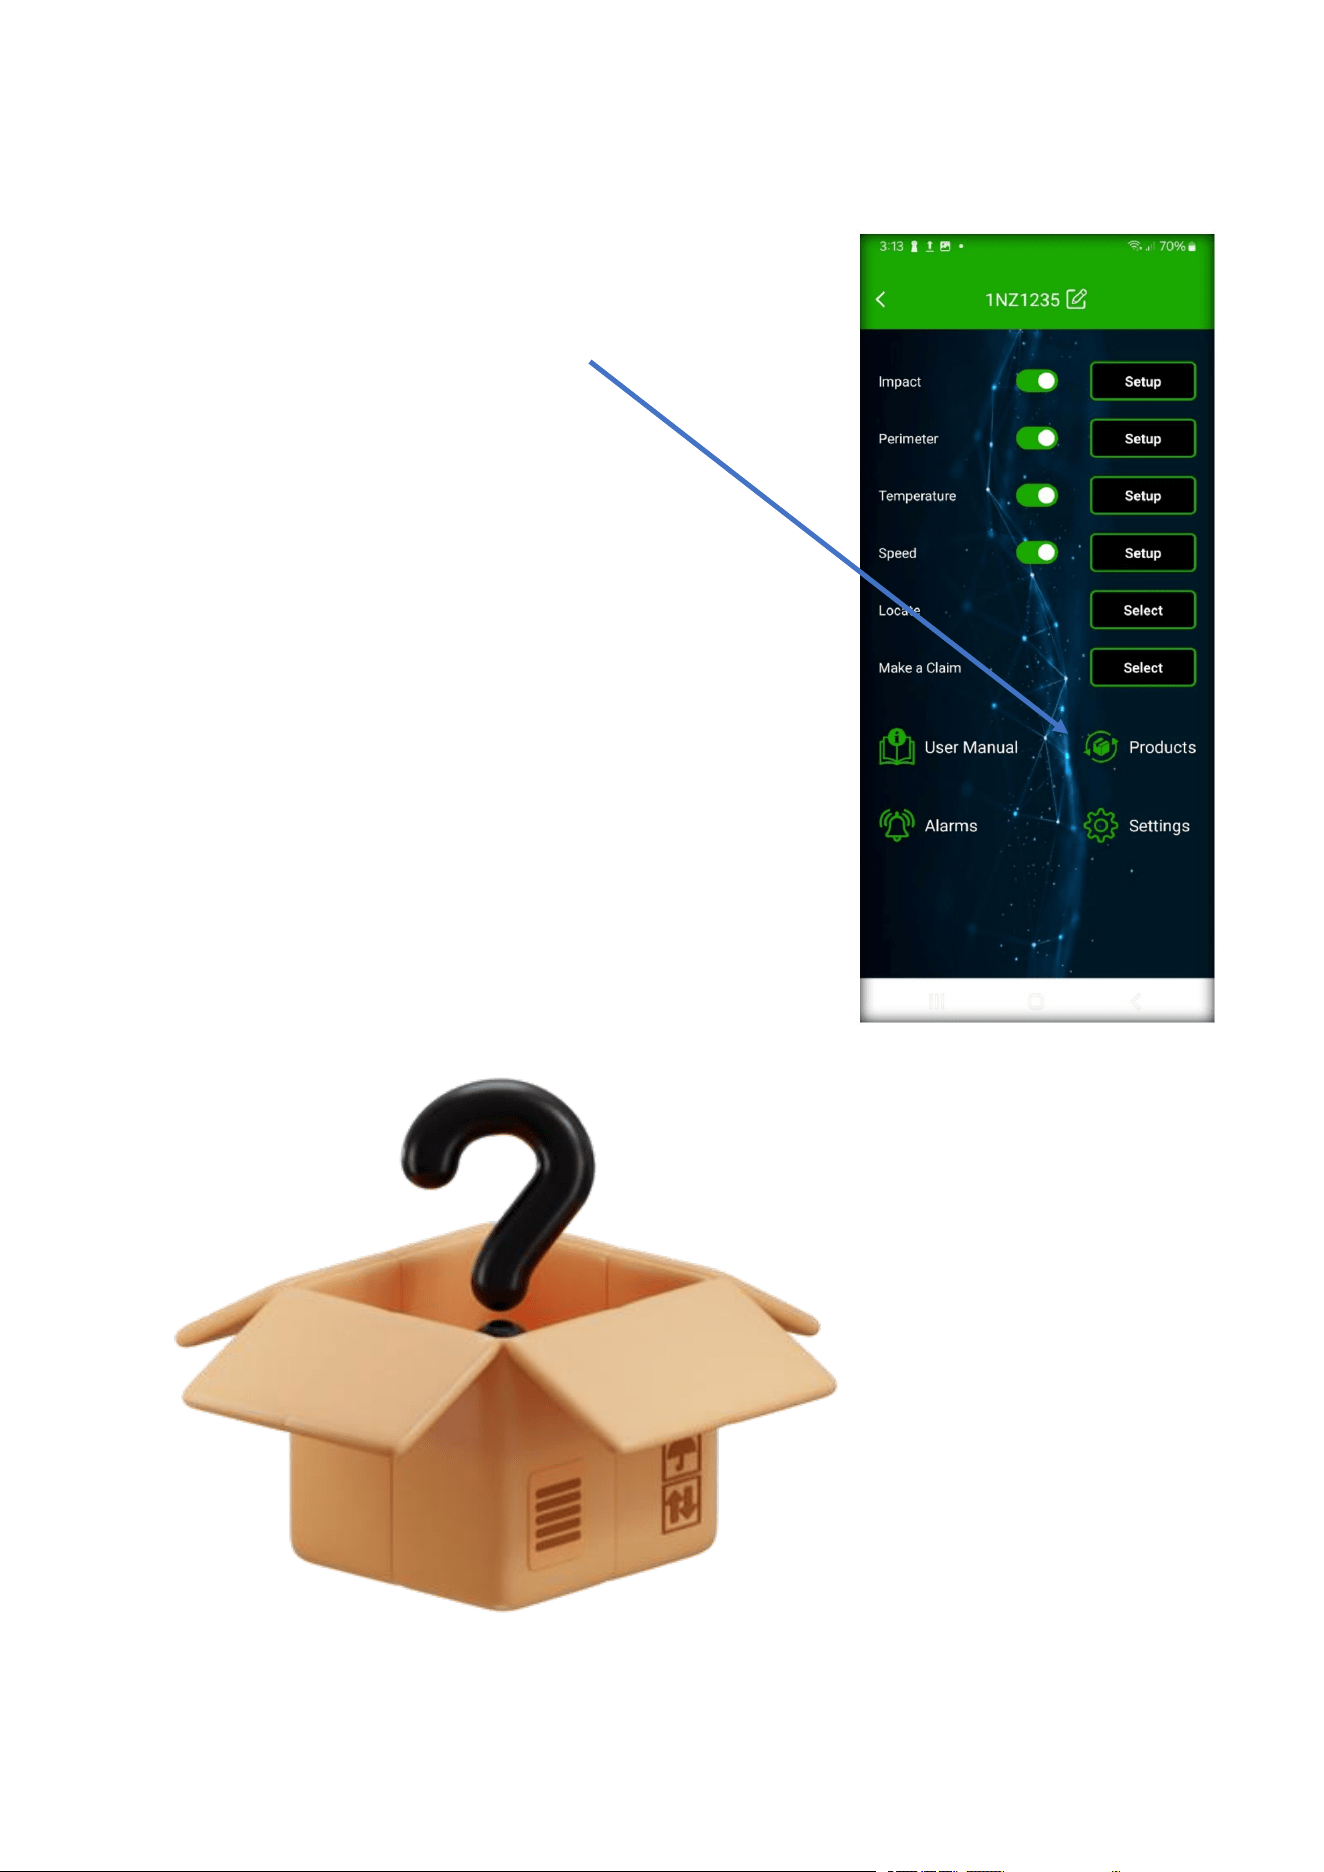
Products (Post Purchase)
Be sure to view this tab from time to time as
there will be exclusive specials on all
vehicle-related products after you take delivery.
Loyalty discounts will be applied.
P a g e 12 | 14
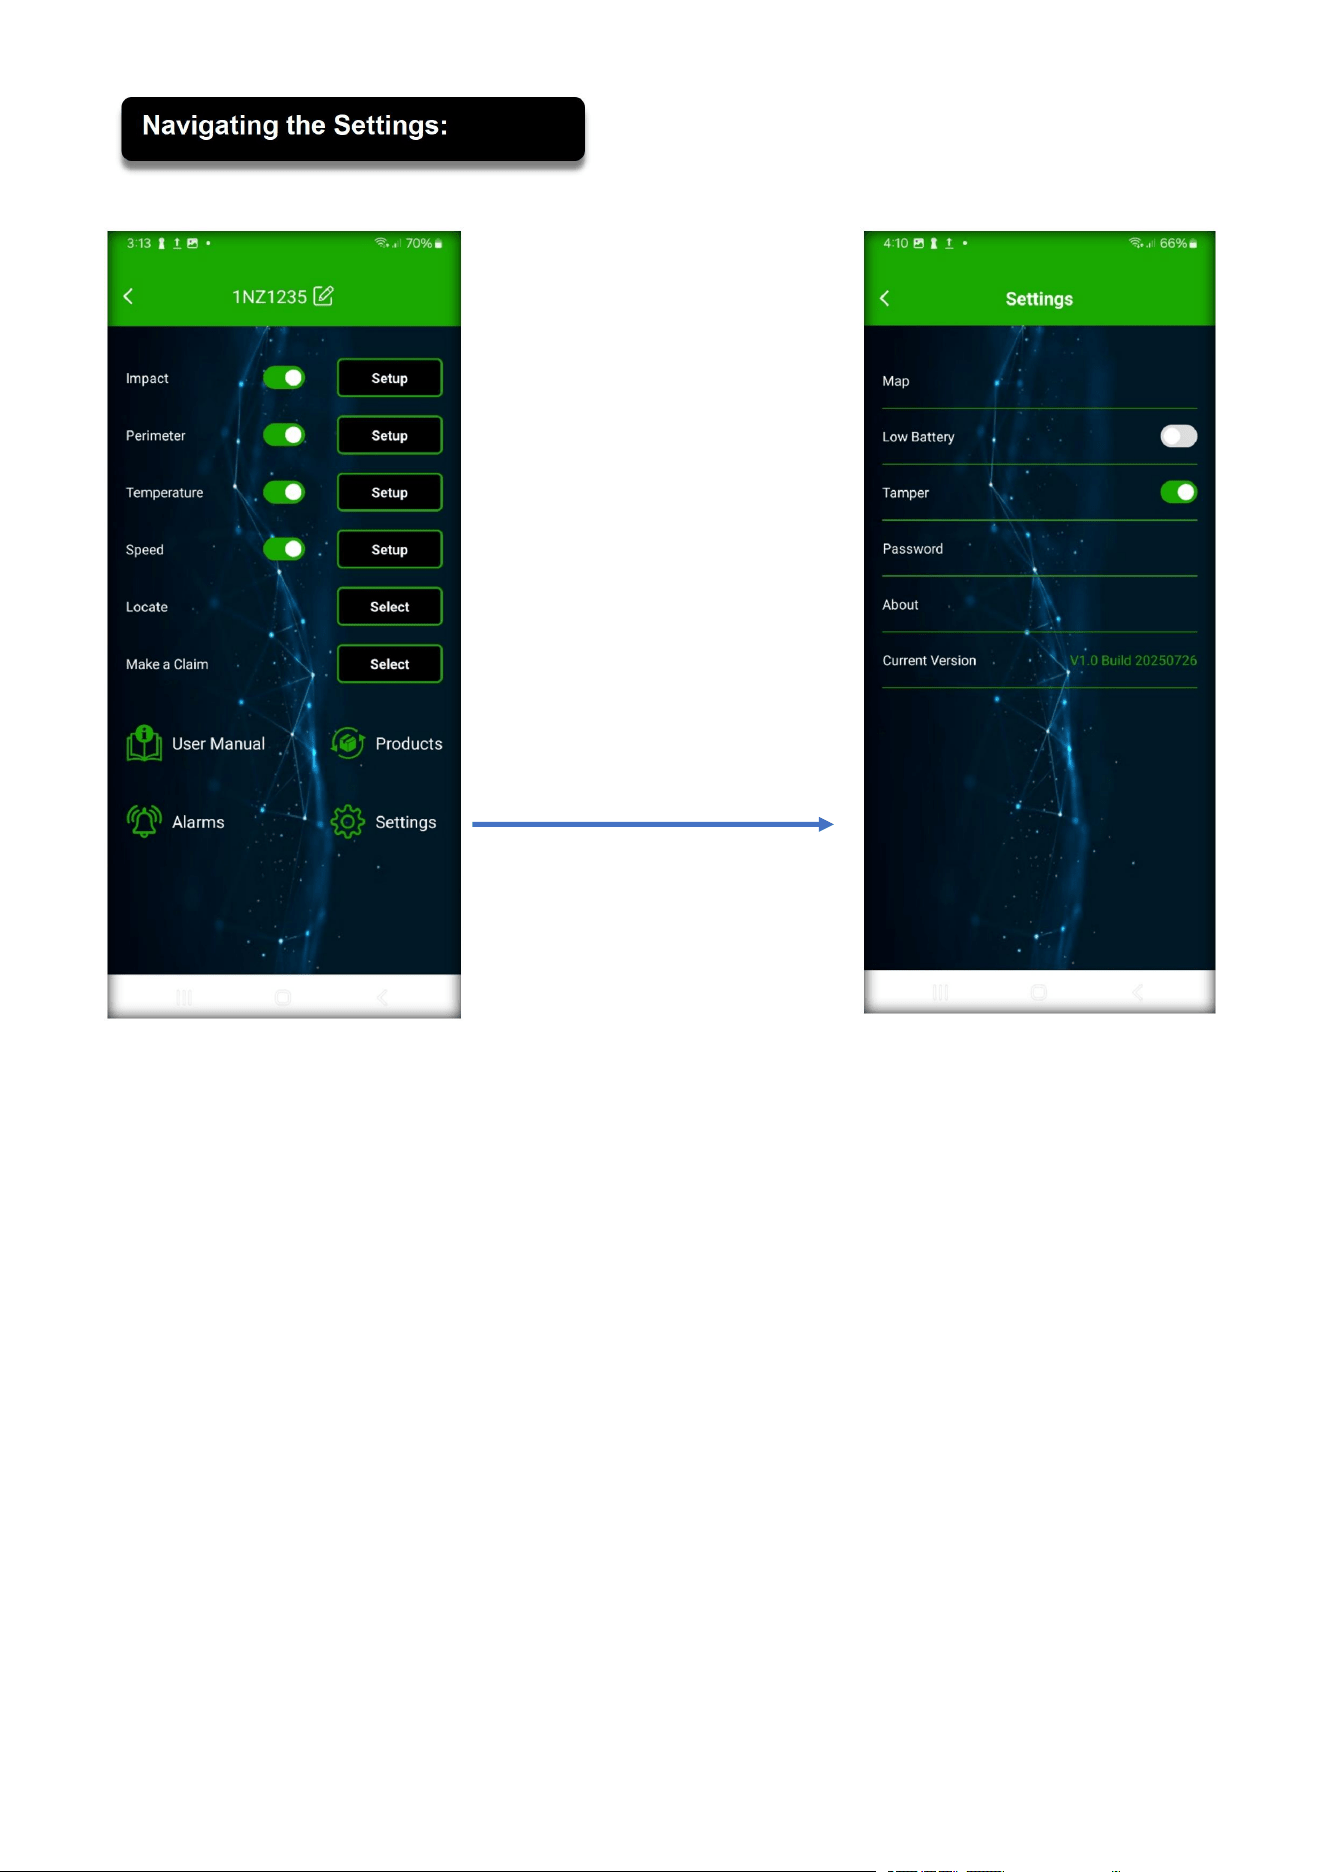
Map – The mapping platform used.
Low Battery - Only applicable for the battery-powered units.
Tamper - Notification sent if the device is removed.
Password – Change your login password.
About – Details about the product.
Current Version – Your current app version.

P a g e 13 | 14
Why am I not receiving the alarms?
Head to your phone’s settings, find the App, and ensure “Push
Notifications” are turned on.
Ensure that you have turned the alarm/s “on” within the app.
If your device is in an area that is out of GPS signal, it may delay the
alarm from being sent. An example, in the basement of a building.
Your mobile phone must be within a mobile coverage area to receive the
alarm notifications from the device.
On rare occasions, when your smart alarm has been fitted within your
vehicle, it may be causing interference. To test this, unplug the device
and plug it into a power bank outside the vehicle. Test by using the
“Locate” function.
The temperature doesn’t seem accurate:
The temperature of your device will be higher than your car’s cabin
temperature. Much like any computer, it will generate its own heat.
My smart alarm doesn’t seem to be working:
First, locate where the device has been installed, usually within arm’s reach of
the driver. Unplug the USB-C power cord and plug it back in. You should see a
“red” light come on.
I activated/registered my device in the app, but I did not receive
the activation letter:
The letter will be sent to the same email address you entered on the
registration form. Please check your spam and junk folders. If you still have
not received the letter, please head to www.auto-guard.com.au/contact with
your name, surname, plan length, product number, and vehicle’s
registration/plate number. Some email programs may block the content; try
viewing it on another device.
P a g e 14 | 14
Important:
You must register your smart alarm and activate the excess benefit within 7 days
of purchase. If registration is not completed within this period, your coverage will
be deemed to commence from the retailer’s date of sale, not the date of
activation.
This product (The Smart Alarm unit) is covered by a 24-month limited warranty
(Unless otherwise specified by your retailer) against defects in materials and
workmanship under normal use from the date of purchase.
The warranty does not cover:
Damage due to misuse, accident, modification, or improper installation.
Consumable components such as batteries (unless damaged due to
defects).
Loss or damage resulting from external causes, including, but not limited to,
power failures, weather conditions, or network outages.
The warranty is non-transferable.
Retailers Name:
Client’s Full Name:
Date Of Purchase:
Warranty End Date:

FCC Statement
This device complies with part 15 of the FCC rules. Operation is subject to the
following two conditions: (1) this device may not cause harmful interference,
and (2) this device must accept any interference received, including
interference that may cause undesired operation.
Changes or modifications not expressly approved by the party responsible for
compliance could void the user’s authority to operate the equipment.
NOTE: This equipment has been tested and found to comply with the limits for
a Class B digital device, pursuant to part 15 of the FCC Rules. These limits
are designed to provide reasonable protection against harmful interference in
a residential installation. This equipment generates uses and can radiate radio
frequency energy and, if not installed and used in accordance with the
instructions, may cause harmful interference to radio communications.
However, there is no guarantee that interference will not occur in a particular
installation. If this equipment does cause harmful interference to radio or
television reception, which can be determined by turning the equipment off
and on, the user is encouraged to try to correct the interference by one or
more of the following measures:
• Reorient or relocate the receiving antenna.
• Increase the separation between the equipment and receiver.
• Connect the equipment into an outlet on a circuit different from that to which
the receiver is connected.
• Consult the dealer or an experienced radio/TV technician for help.
Important Note:
Radiation Exposure Statement
This equipment complies with FCC radiation exposure limits set forth for an
uncontrolled environment. This equipment should be installed and operated
with minimum distance 20cm between the radiator and your body.
This transmitter must not be co-located or operating in conjunction with any
other antenna or transmitter.