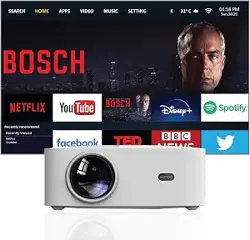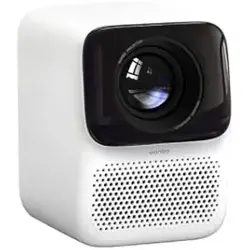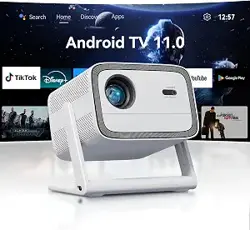
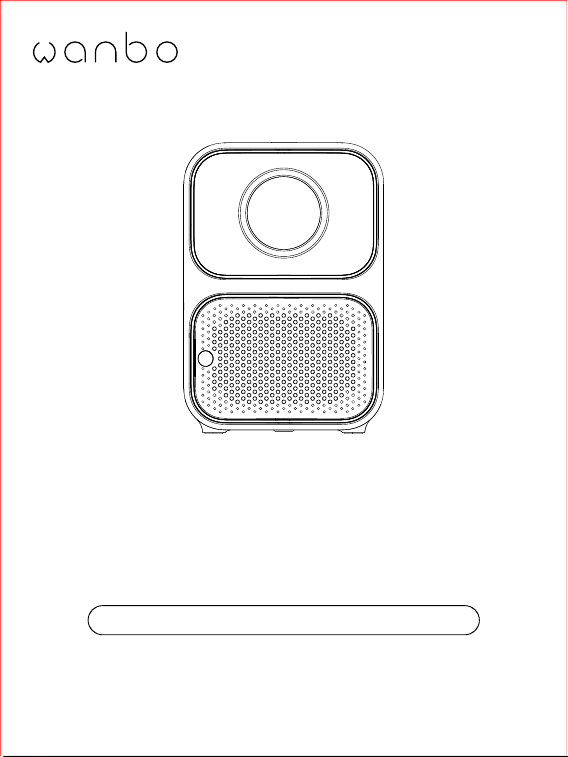
Portable Projector
TT
User Manual/Manual de usuario
英语

English……………………………………………………………01
Español…………………………………………………………25

Contents
Safety Instructions…………………………………………………………02
Packing List…………………………………………………………………05
Over View……………………………………………………………………06
Ready to Start………………………………………………………………10
Setting………………………………………………………………………14
Using Method………………………………………………………………16
Product Specification………………………………………………………19
Fault Diagnosis……………………………………………………………20
Warranty……………………………………………………………………24
1

Safety Instructions
Read all instructions before you use this device. Do not make any changes or create
settings that are not described in this manual. If physical injury, loss of data or damage is
caused by failure to follow instructions, the warranty does not apply.
Setup
• To reduce the risk of fire and / or electric shock, do not expose the device to rain
or moisture. Objects filled with liquids, such as vases, should not be placed on
this device.
• Do not place this device on soft surfaces such as tablecloths or carpets, otherwise
the device could be a fire hazard.
• Do not place this device in areas susceptible to excessive dust and dirt or near
any appliance generating a strong magnetic field.
• Protect this device from overexposure to direct sunlight, heat, large temperature
fluctuations and moisture. Avoid extreme temperatures. The suitable operations
and storage temperature for this device and its accessories is 41°F to 95°F/ 5°C
to 35°C.
• When this device is running for a long period of time, the surface may become
hot. Shut it down immediately and unplug the charger. Resume operation after
this device has cooled down.
• Always handle this device with care. Avoid touching the lens. Do not allow children
to handle the device without supervision.
• Never place heavy or sharp objects on this device.
• To avoid electric shock, do not disassemble.
• Use attachments or accessories specified by the manufacturer only.
• Avoid extreme vibrations as they may damage the internal components.
• To prevent overheating, do not block or clog the ventilation openings.
• Do not stare directly at the operating beam. The bright light may damage your eyes.
2

Power Supply
• Use only the provided power adapter.
• Power off the device before removing the power supply from the socket.
• Protect the power cord from being walked on or pinched, particularly at plugs,
convenience receptacles, and the point where they exit from this device.
• Unplug this device if there are lightning storms or when unused for a long period
of time.
• Where the power plug or an appliance coupler is used as the disconnect device,
the disconnect device shall remain readily operable.
• Before you make or change any connections, ensure that all devices are disconnected
from the power outlet.
• Never touch the power cable or the power connector with wet hands.
Repairs
• Do not make any repairs to this device yourself. Only have your device repaired
by an authorized service center.
• Improper maintenance can result in injuries to persons or damage to this device.
• Install away from the wall so as to maintain proper performance and feasibility,
please leave at least 30cm between the projector and the wall.
3
4
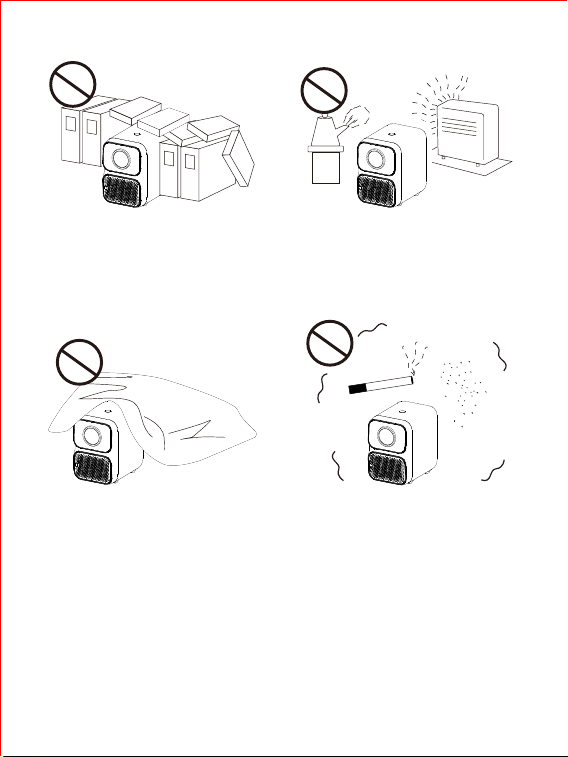
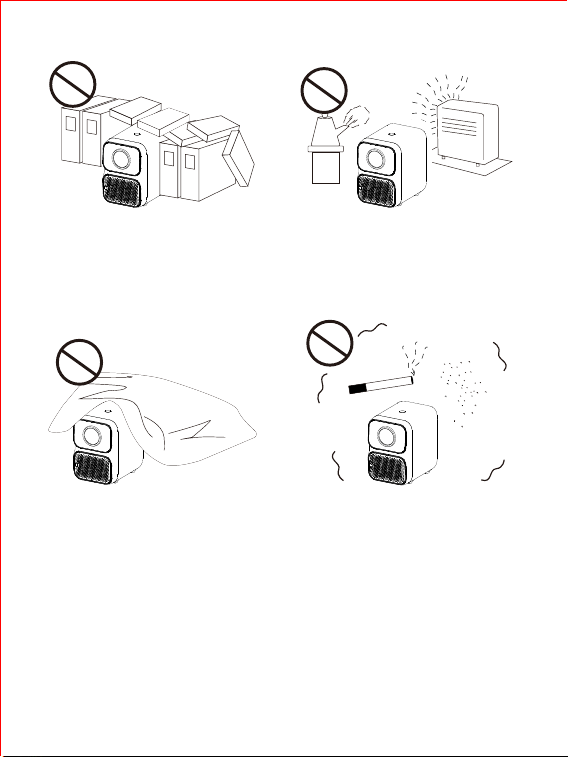
Don’t install in places with poor ventilation Don’t install in places that hot and humid
Don’t block the vent (Inlet or Outlet) Don’t install in dusty and smoky areas
Portable Projector
TT
User Manual/Manual de usuario/取扱説明書
5
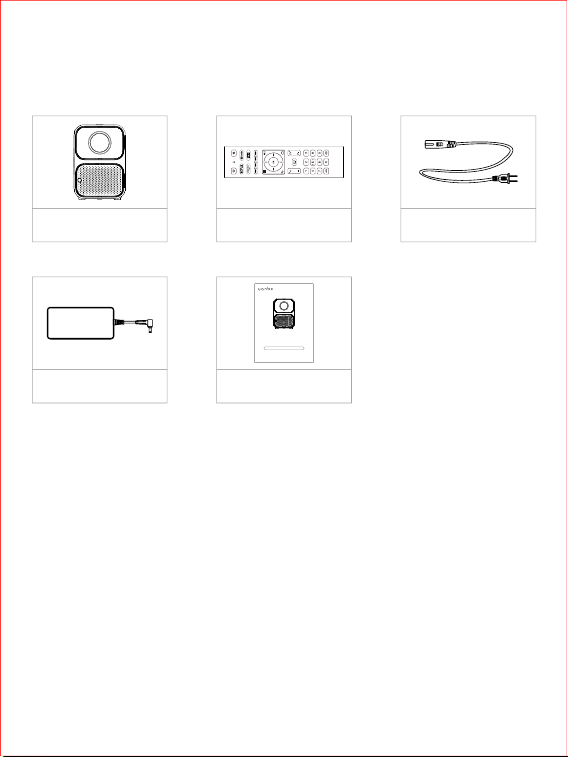
Packing List
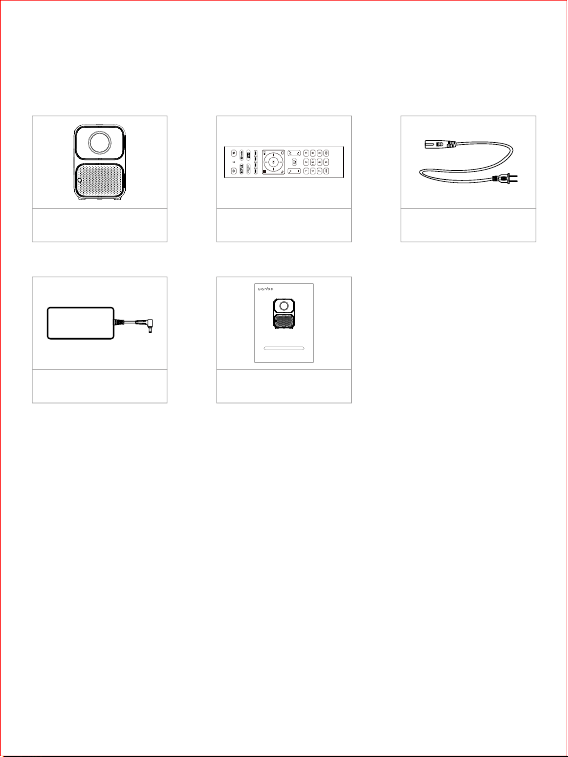
Projector TT Remote control
User manual Power adapter
Power line
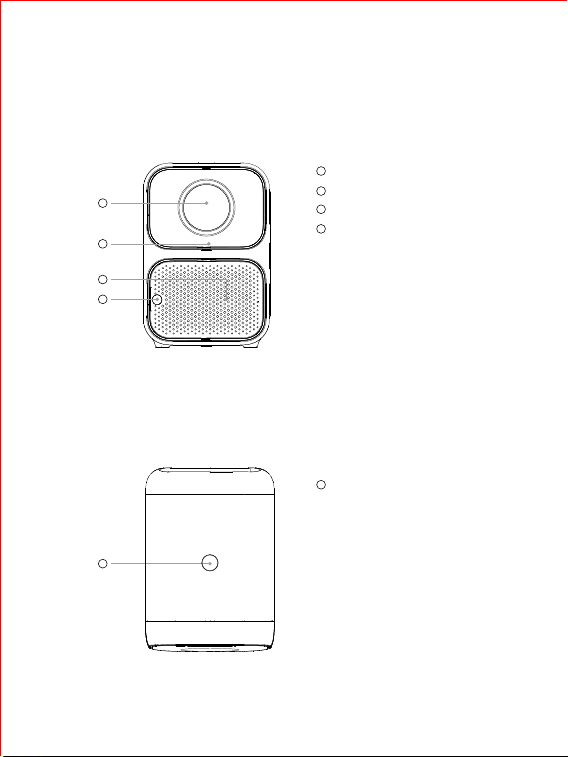
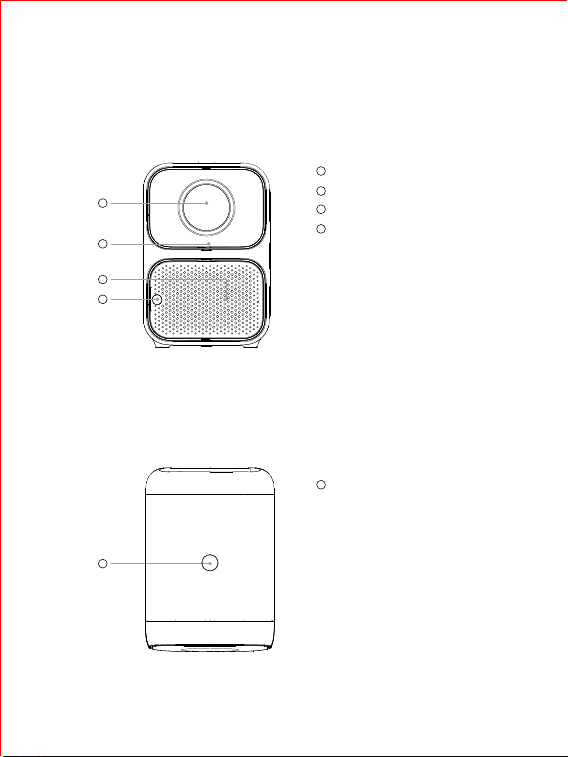
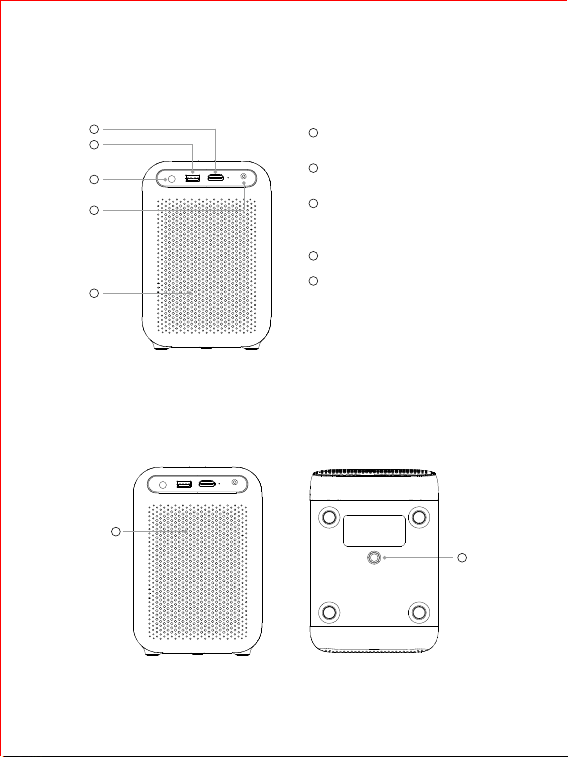
1.Front view
2.Top view
6
Over View
1
1
2
3
4
Lens
1
Power key
Press the power key to turn on and off
1
Infrared receiving window
2
Heat radiation outlet
3
Auto-focus camera
4
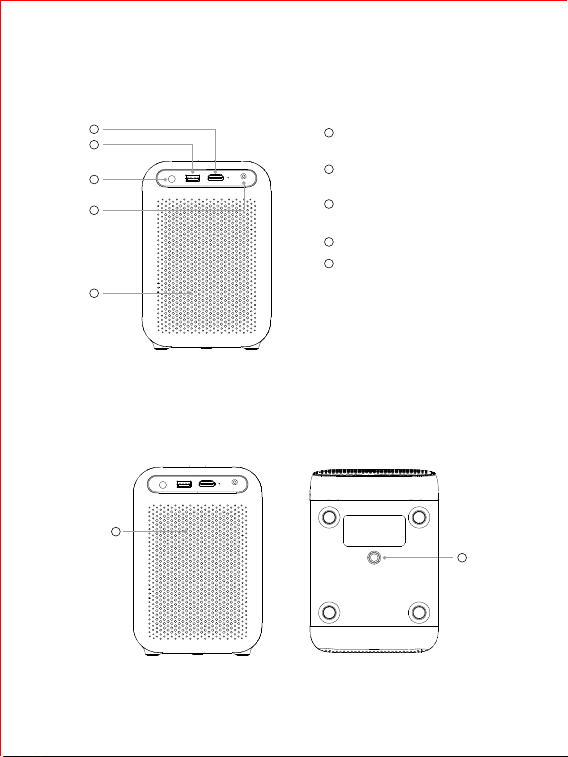
Screw hole
for bracket
Horn
1
2
3
4
HDMI input
Connect with HDMI devicet
1
USB Port
Plug with USB device
2
Power Supply Input
Connect with power line
3
Headphone Jack
4
Heat radiation outlet
5
5
1
4.Side view 5.Bottom view
7
3.Back view
1
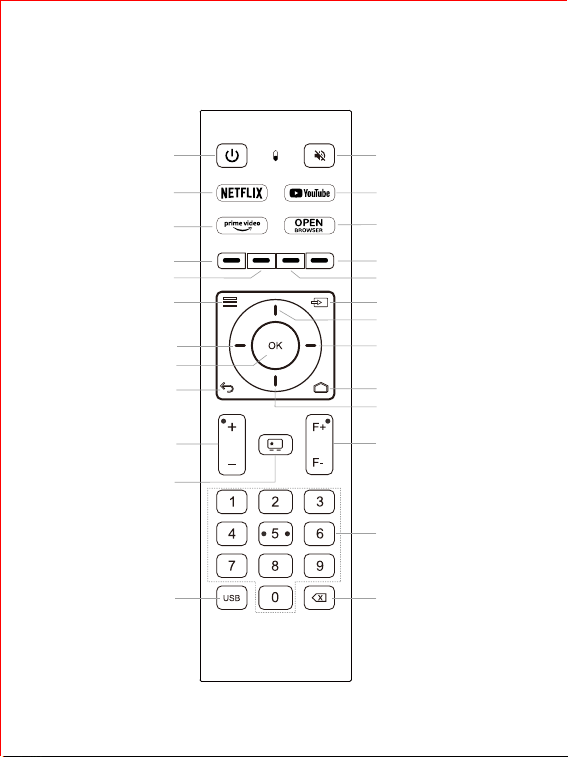
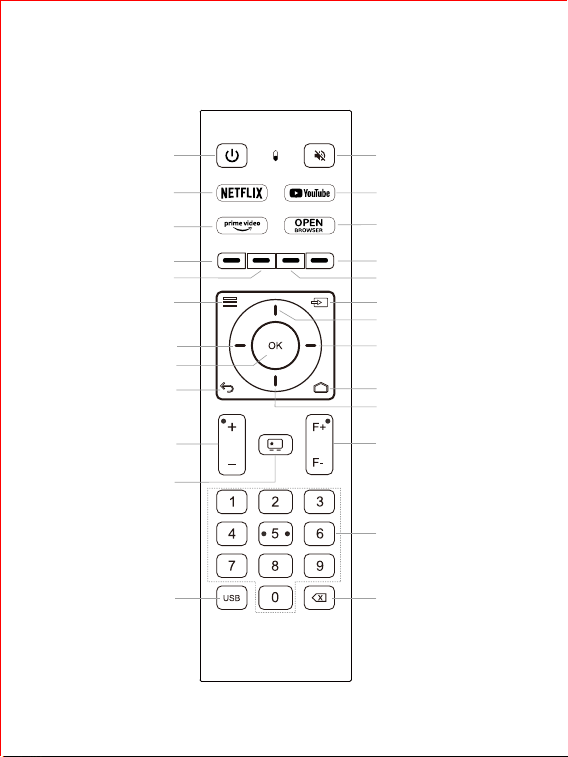
6.Remote control
8
OFF/ON
Mute switch
Netflix hotkey
YouTube hotkey
Prime Video hotkey
OPEN Browser hotkey
Red key
Green key Yellow key
Blue key
Set Signal Source
Left Right
Up
Down
OK
Sound Volume +/-
Projection mode
switching
Focus +/-
Number key
USB Source
Backspace
Return Home
9
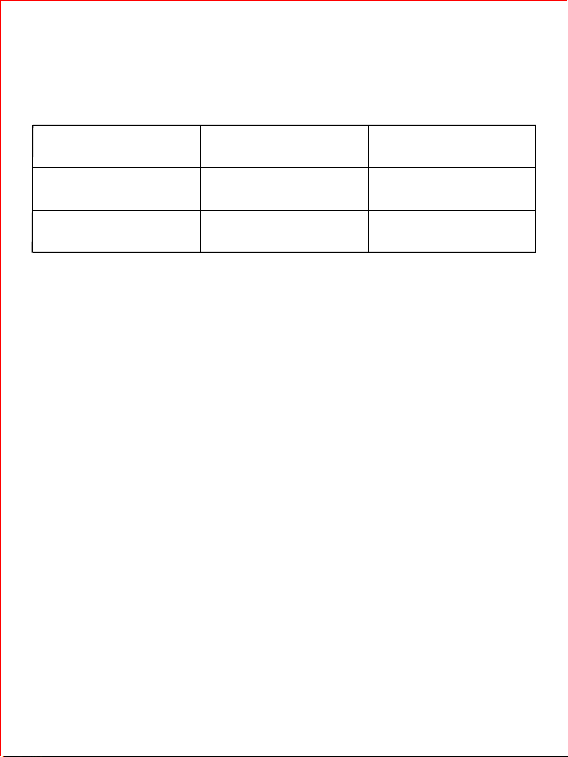
7.LED indicate light
Indicate site
Machine
Machine
LED light status
Red light
Green light
Instruction
Turn off
Turn on
Ready to Start
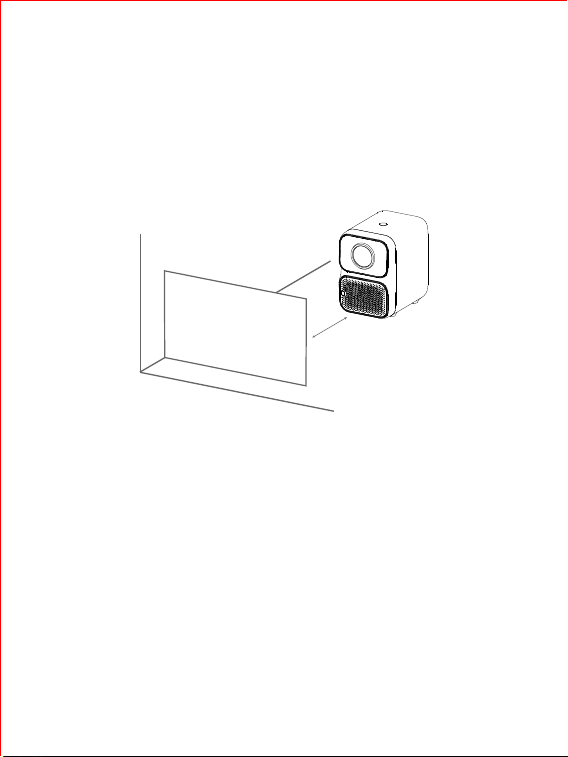
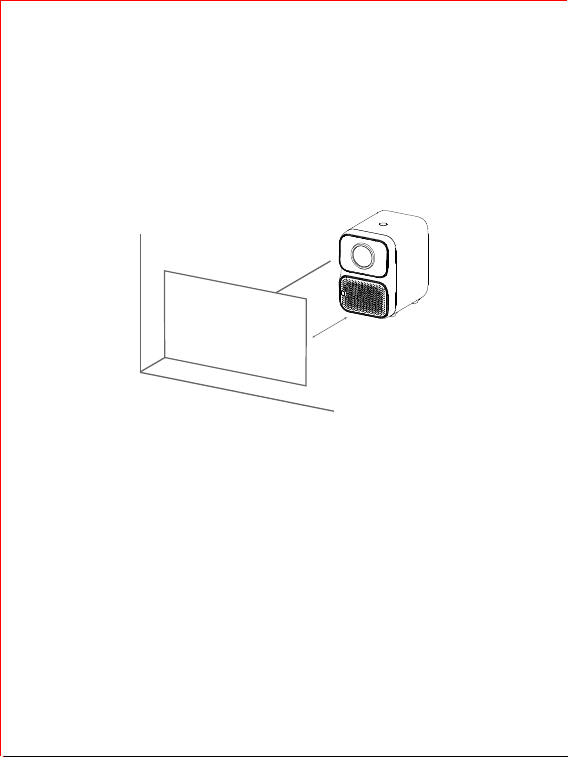
Put the product on a stable surface in front of the projector, projection surface should be
white and smooth to achieve the best effect. Projection size is 40-120 inches with a distance
of 1.1m to 3.3m.
1.Placing
• Side projection is supported, we can adjust image through 4 points keystone correction.
• Image size depends on distance between the projector and projection screen.
Attention:
① 2 pcs of # 5 batteries are required to put into the remote control before using.
② Please slide the back panel of the remote control and open to change new battery if
necessary, [kindly match the indicated palarity [+/-], then close the battery compartment.
2.Prepare remote control
10
1.1m—3.3m
40"-120"
11
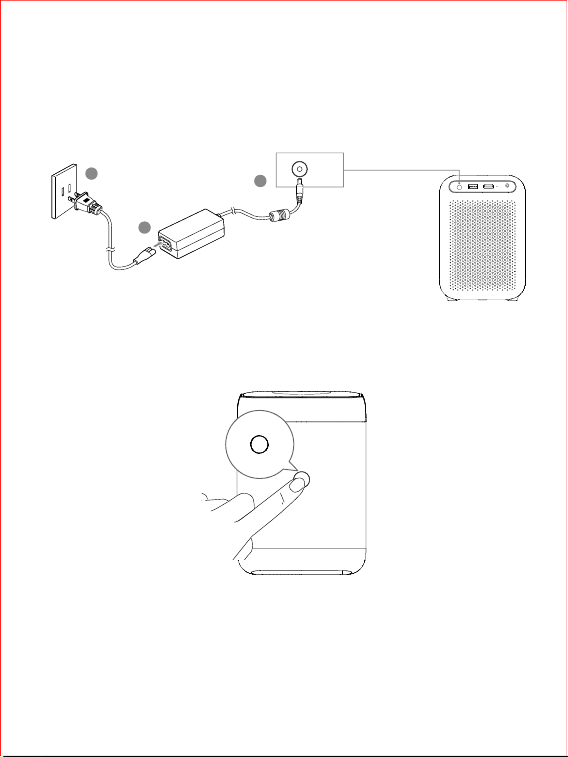
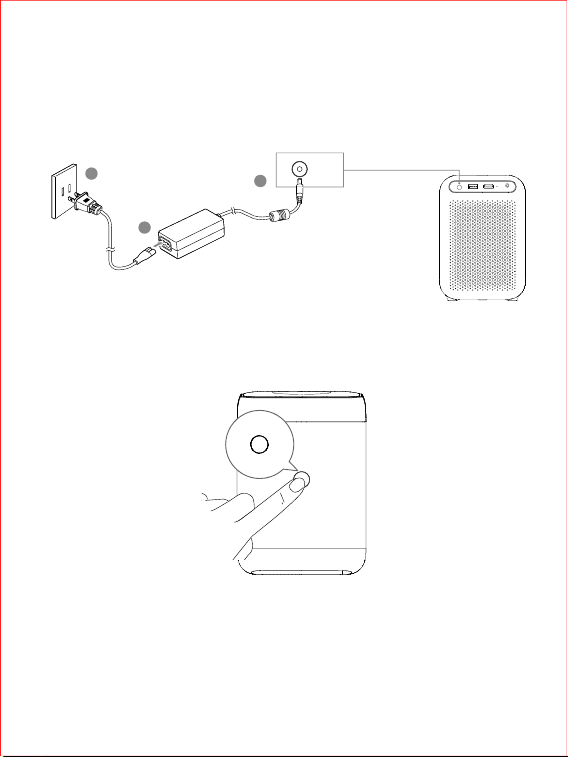
① Please connect the projector to the power jack with the supplied adapter and power line.
② Press product power key to open.
3.Ready to start
DC IN
2
1
3
4.Projection
12
③ Put the product towards appropriate projection screen.
④ The product will focus automatically to achieve clear image, or you can focus with remote
control.
⑤ Please finish basic setting according to the screen instructions.
Notice: Please use the supplied adapter and power line for safely and rapidness.
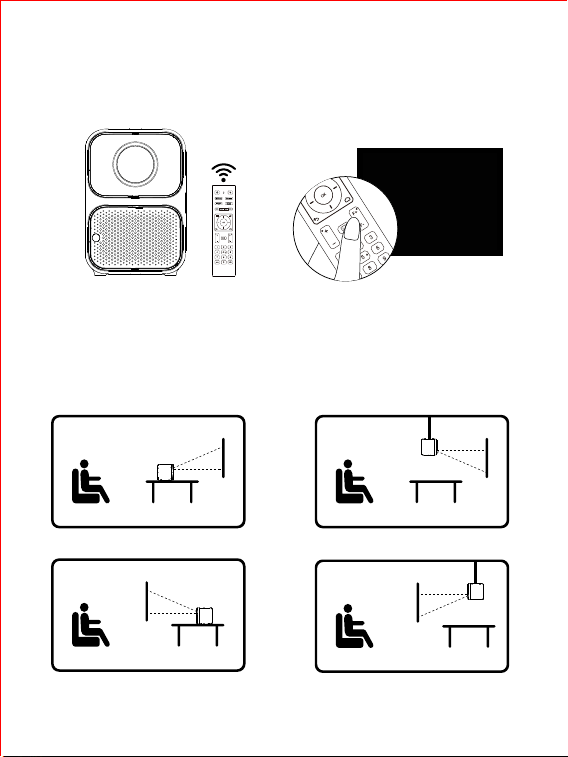
Schematic diagram of blurred image
Table Mount
Table Mount: Mirror
Ceiling Mount: Mirror
Ceiling Mount
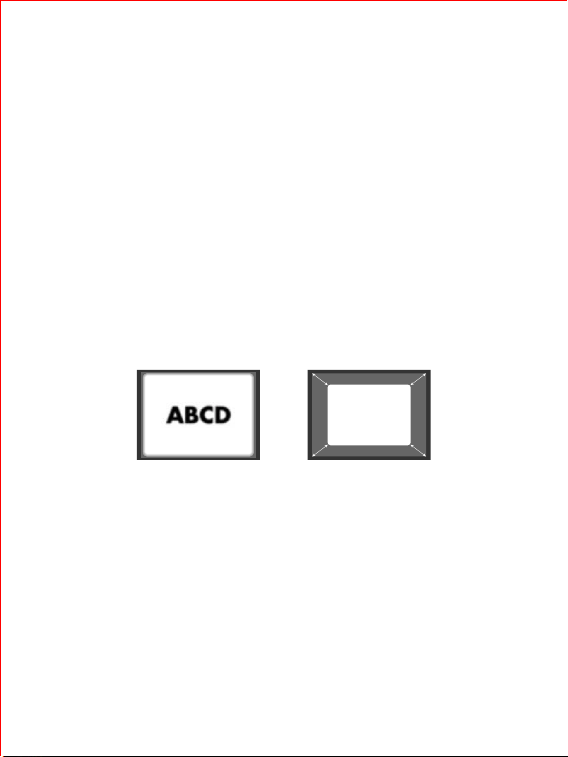
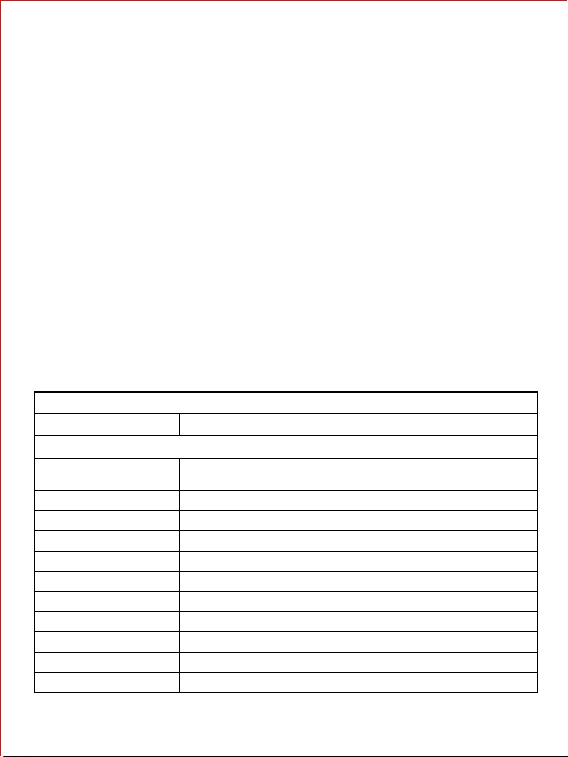
Keystone correction includes keystone,zoom and focus. Please select appropriate option to
adjust in the setting menu with remote control.
1. Keystone Correction: Open [ Settings] on the homepage >[Keystone]>[Four points
keystone], Adjust horizontal and vertical direction value of the four angles. Open [Settings]
on the homepage > [Keystone] > [Auto], Adjust keystone correction automatically.
2. Zoom: Open [Settings] on the homepage >[Zoom], zoom the image to required screen
pictures with remote control.
3. Focus: Open [Settings] on the homepage >[Manual Focus], adjust image with the remote
control to get images as you like. Open [Settings] on the homepage >[Auto Focus], adjust
image focus automatically.
5.Keystone correction
13
Four points keystone Zoom
14
Setting
The projector can be connected to internet with Wi-Fi.
① On the homepage, choose[Settings]>[Network]>[Internet Connection], choose the Wi-Fi
needed and press OK key.
② Please finish wifi connection according to screen prompts.
1.Network
① Open on the homepage [Settings]>[Bluetooth]>[Bluetooth Connection], choose the Bluetooth
needed and press OK key.
② Follow the on-screen instructions to complete the Bluetooth connection.
Choose [Settings] on the homepage
2. Bluetooth connection
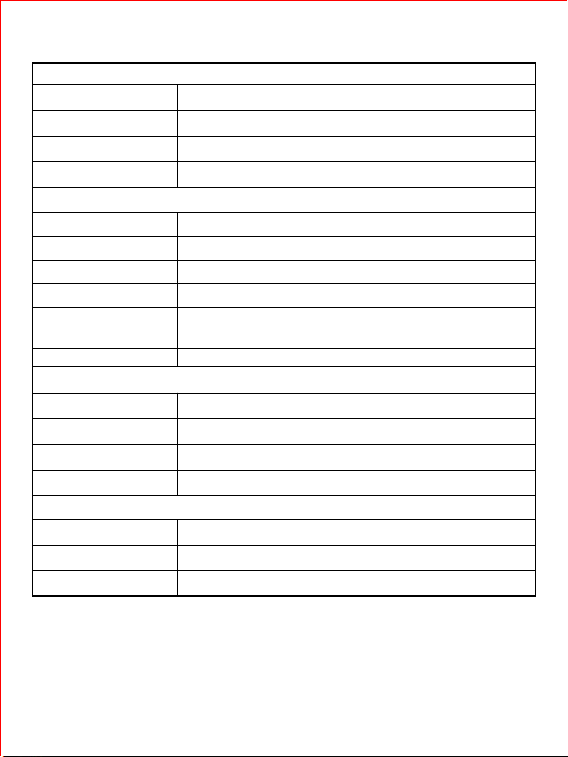
3.Projector
OSD language Select an on-screen display language
Set up
Set the time
automatically
Enable / disable automatic date and time
Manually set date
Manually set time
Select time zone
Select 24-hour format or 12-hour format
Select the Image/Timer of Screensaver
Select the time of Sleep timer
Select the time of Auto sleep
Upgrade system via USB drive APK
Online upgrade system
Reset the projector to factory settings
Time setup
Date
Time
Region
Use 24 -hour format
Screensaver
Sleep timer
Auto sleep
USB auto upgraded
Internet update check
Reset default
15
The projector can be connected to internet with Wi-Fi.
① On the homepage, choose[Settings]>[Network]>[Internet Connection], choose the Wi-Fi
needed and press OK key.
② Please finish wifi connection according to screen prompts.
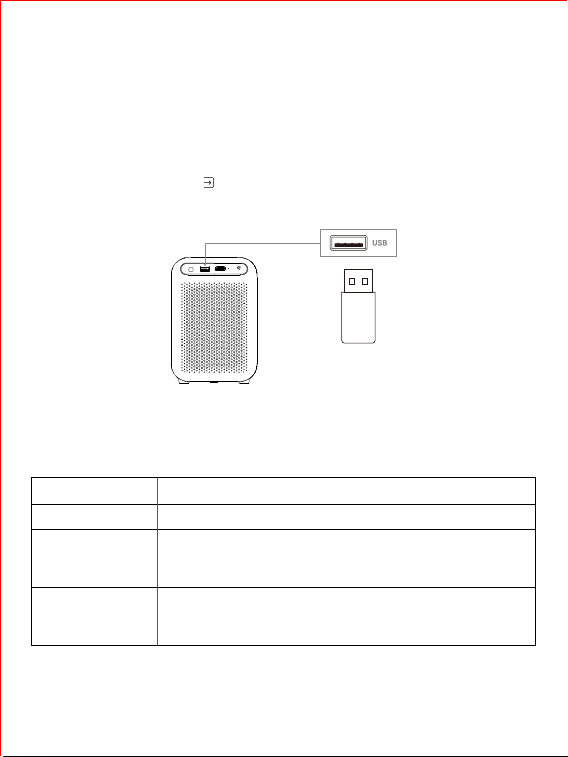
Picture mode
Sharpness
Gamma
Color temperature
[Custom]/ [Cinema]/ [Sport]/ [Vivid]/ [Hi-Bright]/ [Standard]
Adjust the value of Projector sharpness
[Dark] /[Middle] /[Bright]
[Cool] /[Standard] /[Warm] /[User]
Picture Mode
Adjust the value of the sound bass
Adjust the value of the sound Treble
Enable / disable Sound surround
[User] /[Standard] /[Vivid]/[Sport] /[Movie] /[Music]/[News]
[Auto] /[PCM] /[Bypass] /[Dolby Audio-Dolby Digital]
/[Dolby Audio-Dolby Digital plus]
[Off] /[Low] /[Medium] /[High]
Audio
Bass
Treble
Sound surround
Sound style
Digital output mode
Dialogue enhancement
Adjust keystone correction automatically
Get square images through adjusting values of the 4 points
Choose appropriate projection method from the four
Zoom the image to required 50%-100% screen pictures
Keystone
Auto
Four points correction
Projection
Zoom
Enable / disable auto focus
Adjust focus manually
The information of projector
Focus
Auto focus
Manual focus
About
Using Method
You can connect USB storage device to this projector to enjoy local music, videos and pictures.
① On the homepage, choose[ Inputs]>[USB], then press the OK key
② Choose the file required, then press OK key.
1.Connect to USB storage device
Formats supported by U Disk
16
File style
Picture
Video
Audio
File formats supported
JPG/PNG/BMP
HEVC/H.265, MPEG1/2, MPEG4, DivX3.11, DivX 4.12,
DivX 5.x,DivX 6, XviD, Sorenson H.263, H.263, H.264,
AVS, AVS+, AVS2, WMV3, VC1, Motion JPEG, RV30/RV40
MPEG1/2 Layer1, MPEG1/2 Layer2, MPEG1/2/2.5 Layer3,
AAC-LC,HEAAC, VORBIS, DTS, DTS Master Audio, LPCM,
IMA-ADPCM, MS-ADPCM, G711A/mu-law, FLAC, OPUS
Note: Operation are subject to actual condition due to aperiodical update of the product
system.
17
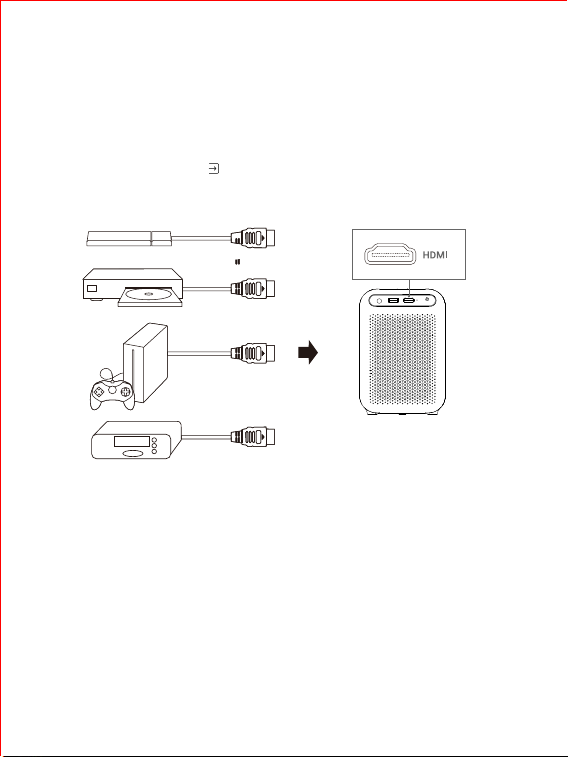
The projector supports a variety of HDMI playback devices, such as TV box, TV sticker, DVD,
STB, games console and so on.
① Connect the projector to HDMI playback device with HDMI cable [not provided].
② On the homepage, choose[ Inputs]>[HDMI], then press OK key.
2.Connect to HDMI device
How to push content to the projector.
① Ensure the phone and projector under the same Wi-Fi.
② Open video play software of the phone, find the TV push icon, which is on either of the four
corners of the video UI.
3. Phone projection
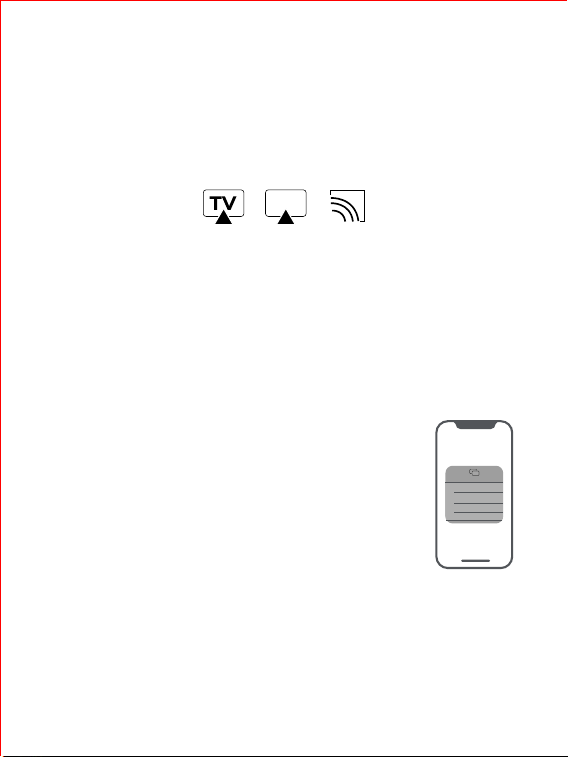
③ Click the icon and chose [Smart Projector] to push videos to the projector. It doesn’t need
to stay on the video interface during projection, we can have other operations on the phone.
Note: Push icons are different for each Apps.Not all videos have push functions due to copyright
issue for some contents.
How to push content to the projector.
① Ensure the phone and projector under the same Wi-Fi.
② Open video play software of the phone, find the TV push icon, which is on either of the four
corners of the video UI.
18
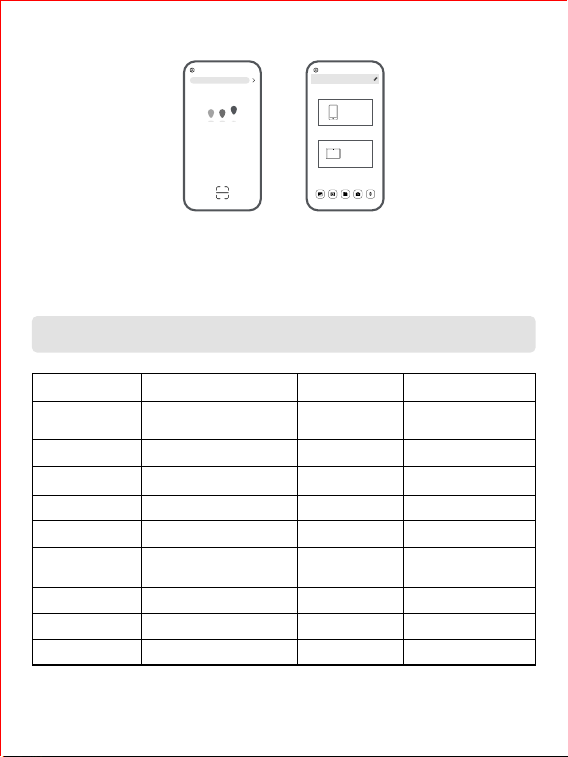
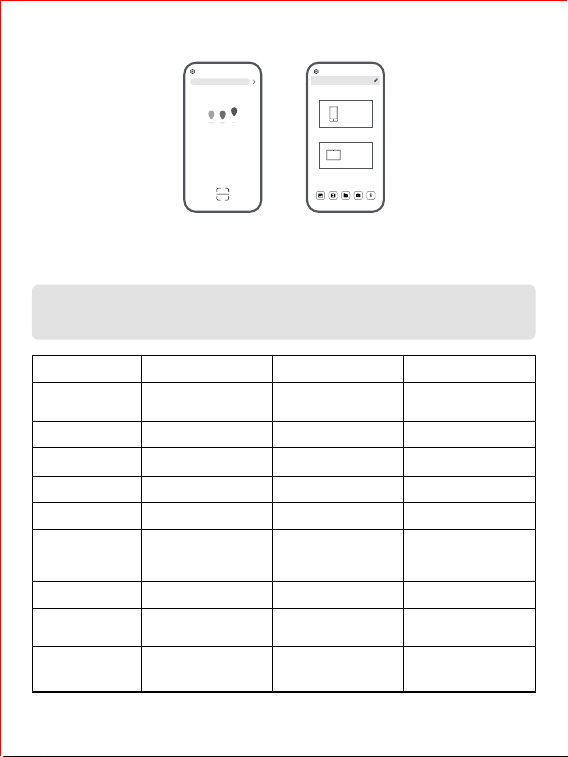
According to the following steps, contents of the phone can be displayed on the projection
screen synchronously through wifi.Enjoy videos or other contents with larger images.There
are many similar software in the market, this instruction takes “Eshare” as an example.
Device requirement: devices over iOS6 or over Android 5.4.
4.Phone same screen
① Ensure iPhone and projector are under the same Wi-Fi.
② Open console, AirPlay function [It’s called“screen mirror”] for
new system version,then find [EShare-XXXX] and click connection
iPhone devices tutorial:
Schematic diagram of some push icons
Screen Mirroring
EShare-xxxx
Android devices tutorial:
① Ensure the phone and projector are under the same Wi-Fi.
② On the homepage, choose [EShareServer], Open EShare.
③ For Android phone, download “EShare”APP, install and open it correctly.
④ Open EShare, choose [EShare-XXXX] and Click connection.
③ Click the icon and chose [Smart Projector] to push videos to the projector. It doesn’t need
to stay on the video interface during projection, we can have other operations on the phone.
Note: Push icons are different for each Apps.Not all videos have push functions due to copyright
issue for some contents.
19
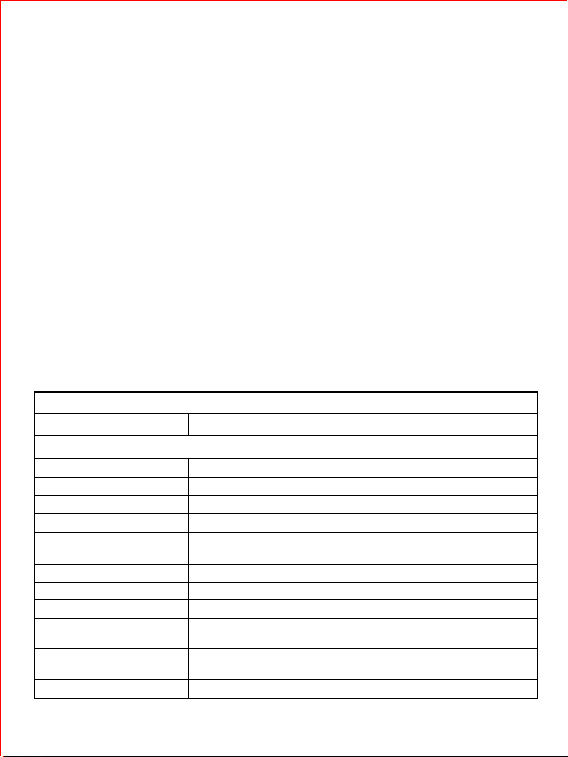
Product Specification
Input voltage
Overall power
consumption
Horn
Physical resolution
Brightness
Contrast
Recommend
projection distance
Wi-Fi
Projection scale
USB format
We reserve the right to change specification and design without prior notice
110V-240V , 50-60Hz
120 W
5W*2
1920 x 1080p
650 ANSI
3000:1
1.1 -3.3m
2.4G/ 5G
4:3 / 16:9
FAT32
4*A53
40-120 inches
1G
8G
Bluetooth 5.1
LED
5℃-35℃
>20000h
1.67 kg
170×120×180mm
CPU
Recommend
projection size
RAM
ROM
Bluetooth
Light source
Recommend
temperature
Light source life
Net Weight
Machine Size
Device List
Scan
Enter IP or PIN code to connect
EShare
Connected to:EShare-xxxx
192.168.0.998
Share Screen
Photo Audio/
Video
Doc Camera Remote
TV Mirror
Please ensure your devices are
connected to the smart phone
20
① Unable to turn on the projector with remote control ?
• Ensure the projector has been connected with power.
• Press the power key on machine to turn on.
② Remote control can not work
• Ensure batteries are put in
• Change batteries for the Remote control
③ Remote control doesn’t work? Images are not clear ?
• Adjust focus through focus key of the remote control.
④ Flip image?
• On the main menu, choose [Settings]>[Projection ], change to the correct projection
state.
Fault Diagnosis
Manufactured under license from Dolby Laboratories. Dolby, Dolby Audio, and the
double-D symbol are trademarks of Dolby Laboratories Licensing Corporation.
NOTICE:The terms HDMI and HDMI High-Definition Multimedia Interface, and the
HDMI Logo are trademarks or registered trademarks of HDMI Licensing LLC in the
United States and other countries.

21
This product contains technology subject to certain intellectual property rights of
Microsoft. Use or distribution of this technology outside of this product is prohibited
without the appropriate license(s) from Microsoft.
Content owners use Microsoft PlayReadyTM content access technology to protect
their intellectual property, including copyrighted content. This device uses PlayReady
technology to access PlayReadyprotected content and/or WMDRM-protected content.
If the device fails to properly enforce restrictions on content usage, content owners
may require Microsoft to revoke the device’s ability to consume PlayReady-protected
content. Revocation should not affect unprotected content or content protected by
other content access technologies. Content owners may require you to upgrade
PlayReady to access their content. If you decline an upgrade, you will not be able
to access content that requires the upgrade.
The camera on the device will collect projection screen information when performing
autofocus and auto keystone function, and the information will be released afterwards.
Such information shall not be saved or uploaded.
FCC STATEMENT
This device complies with Part 15 of the FCC Rules. Operation is subject to the
following two conditions: This device may not cause harmful interference, and
This device must accept any interference received, including interference that
may cause undesired operation.
This device must accept any interference received, including interference that may
cause undesired operation.
Warning: Changes or modifications not expressly approved by the party responsible
for compliance could void the user's authority to operate the equipment.

22
NOTE: This equipment has been tested and found to comply with the limits for a
Class B digital device, pursuant to Part 15 of the FCC Rules. These limits are
designed to provide reasonable protection against harmful interference in a residential
installation. This equipment generates uses and can radiate radio frequency energy
and, if not installed and used in accordance with the instructions, may cause harmful
interference to radio communications. However, there is no guarantee that interference
will not occur in a particular installation. If this equipment does cause harmful
interference to radio or television reception, which can be determined by turning the
equipment off and on, the user is encouraged to try to correct the interference by
one or more of the following measures:
Reorient or relocate the receiving antenna.
Increase the separation between the equipment and receiver.
Connect the equipment into an outlet on a circuit different from that to which the
receiver is connected.
Consult the dealer or an experienced radio/TV technician for help.
RF warning statement:
The device has been evaluated to meet general RF exposure requirement. The
device can be used in portable exposure condition without restriction.

23
IC STATEMENT
English: "
This device complies with Industry Canada licence-exempt RSS standard(s).
Operation is subject to the following two conditions:
(1) this device may not cause interference, and
(2) this device must accept any interference, including interference that may cause
undesired operation of the device."
French:"
Le présent appareil est conforme aux CNR d'Industrie Canada applicables aux
appareils radio exempts de licence. L'exploitation est autorisée aux deux conditions
suivantes :
(1) l'appareil nedoit pas produire de brouillage, et
(2) l'utilisateur de l'appareil doit accepter tout brouillage radioélectriquesubi, même
si le brouillage est susceptible d'en compromettre le fonctionnement."
L'appareil a été évalué pour répondre aux exigences générales d'exposition aux
RF. L'appareil peut être utilisé sans restriction dans des conditions d'exposition
portables.
RF warning statement:
The device has been evaluated to meet general RF exposure requirement. The
device can be used in portable exposure condition without restriction.
24
Warranty
Warranty for one year
12 months’ warranty service are provided upon purchase, decomposition and
transformation are excluded.
Support Email:[email protected]
http://en.szwanbo.cn/
Facebook Twitter Instagram

25
Contenido
Instrucciones de seguridad ………………………………………………26
Lista de embalaje …………………………………………………………29
Resumen ……………………………………………………………………30
Listo para empezar …………………………………………………………34
Ajustes ………………………………………………………………………38
Método de utilización ………………………………………………………40
Especificaciones del producto………………………………………………43
Diagnóstico de averías ………………………………………………………44
Garantía ……………………………………………………………………45
西班牙语

Instrucciones de seguridad
Lea todas las instrucciones antes de utilizar este dispositivo. No realice ningún cambio ni
cree ajustes que no estén descritos en este manual. Si se producen lesiones físicas,
pérdida de datos o daños por no seguir las instrucciones, la garantía no se aplica.
Ajustes
• Para reducir el riesgo de incendio y/o descarga eléctrica, no exponga el dispositivo
a la lluvia o la humedad. Los objetos que contienen líquidos, como jarrones, no
deben colocarse en este dispositivo.
• No coloque este aparato sobre una superficie blanda, como un mantel o una alfombra,
o este aparato puede ser un peligro de incendio.
• No coloque este dispositivo en un lugar donde sea probable que se genere polvo
y suciedad excesivos, o cerca de cualquier equipo que genere un campo magnético
fuerte.
• Proteja este dispositivo de la exposición excesiva a la luz solar directa, altas
temperaturas, grandes fluctuaciones de temperatura y humedad. Evite las
temperaturas extremas. La temperatura de funcionamiento y almacenamiento
adecuada para este aparato y sus accesorios es de 41 °F a 95 °F/5 °C a 35 °C.
• Cuando este dispositivo se opera durante mucho tiempo, su superficie puede
calentarse. Apague el dispositivo inmediatamente y desenchufe el cargador.
Reanude el funcionamiento después de que la unidad se haya enfriado.
• Siempre maneje este dispositivo con cuidado. Evite tocar la lente. No permita que
los niños operen este dispositivo sin un tutor.
• No coloque objetos pesados o afilados sobre el dispositivo.
• Para evitar descargas eléctricas, no desmonte el dispositivo.
• Utilice únicamente los accesorios o racores especificados por el fabricante.
• Evite las vibraciones violentas, ya que pueden dañar los componentes internos.
• Para evitar el sobrecalentamiento, no bloquee ni obstruya las aberturas de
ventilación.
• No mire directamente al haz de luz. La luz brillante puede dañar sus ojos.
26

Fuente de alimentación
• Sólo se puede utilizar el adaptador de corriente suministrado.
• Apague el dispositivo antes de retirar la fuente de alimentación de la toma de corriente.
• Proteja el cable de alimentación para que no lo pisen o aprieten, especialmente
en enchufes, enchufes de conveniencia y a la salida del cable de este aparato.
• Si hay una tormenta eléctrica o si no se usa durante mucho tiempo, desenchufe
este dispositivo.
• Cuando se utiliza un enchufe de alimentación o un acoplador eléctrico como
dispositivo de desconexión, el dispositivo de desconexión debe permanecer
operativo en todo momento.
• Antes de realizar o cambiar cualquier conexión, asegúrese de que todos los dispositivos
estén desconectados de la toma de corriente.
• Nunca toque el cable de alimentación o el conector de alimentación con las manos
mojadas.
Reparaciones
• Por favor, no realice ninguna reparación a este dispositivo usted mismo. Su dispositivo
solo debe ser reparado por un centro de servicio autorizado.
• La reparación inadecuada puede provocar lesiones al personal o daños a este
equipo.
• Instale lejos de las paredes para mantener un buen rendimiento y viabilidad, deje
al menos 30 cm entre el proyector y la pared.
27
28
No instale en lugares con
poca ventilación.
No lo instale en lugares
cálidos y húmedos.
No bloquees la ventilación
(entrada o salida ).
No instale en áreas polvorientas
y humeantes.
Portable Projector
TT
User Manual/Manual de usuario/取扱説明書
29
Lista de embalaje
Proyector TT Control remoto
Manual del usuarioAdaptador de corriente
Cable de alimentación
1.Vista frontal
2. Vista superior
30
Resumen
1
1
2
3
4
Lente
1
Tecla de encendido
Presione la tecla de encendido para
encender y apagar
1
Ventana de recepción de infrarrojos
2
Salida de la radiación térmica
3
Cámara de enfoque automático
4
orificios de
tornillo del
soporte
Claxon
1
2
3
4
Entrada HDMI
Conéctese con el dispositivo HDMI
1
Interfaz USB
Conecte el dispositivo USB
2
Entrada de alimentación
Conectar con el cable de
alimentación
3
Toma de auriculares
4
Salida de radiación térmica
5
5
1
4.Vista lateral 5.Vista inferior
31
3. Vista trasera
1
6.Control remoto
32
OFF/ON
Interruptor Muite
Tecla de acceso
directo a Netflix
Tecla de acceso directo
a YouTube
Tecla de acceso directo
a Prime Video
Tecla de acceso directo
a OPEN Broswer
Tecla roja
Tecla verde Tecla amarilla
Tecla azul
Set Fuente de la señal
Izquierda Derecha
Arriba
Abajo
OK
Volumen del sonido +/-
Cambio de modo
de proyección
Enfoque +/-
Tecla de número
Fuente USB
Retroceso
Retorno Inicio
33
7.Luz indicadora LED
Indicar el sitio
Máquina
Máquina
Estado de la luz LED
Luz roja
Luz verde
Instrucción
Apagar
Encender
Listo para empezar
Coloque el producto en una superficie estable frente al proyector, la superficie de proyección
debe ser blanca y lisa para lograr el mejor efecto. El tamaño de proyección es de 40-120
pulgadas con una distancia de 1.1m a 3.3m.
1.Colocación
• Se admite la proyección lateral, podemos ajustar la imagen mediante la corrección trapezoidal
de 4 puntos.
• El tamaño de la imagen depende de la distancia entre el proyector y la pantalla de
Atención:
① Es necesario colocar 2 pilas del nº 5 en el mando a distancia antes de usarlo.
② Si necesita reemplazar la batería, deslice el panel posterior del control remoto, abra el
compartimento de la batería y reemplácelo con una batería nueva [ coopere con la polaridad
indicada [+/- ] y luego cierre el compartimiento de la batería.
2. Preparar el control remoto
34
1.1m—3.3m
40"-120"
35
① Conecte el proyector a la toma de corriente con el adaptador y el cable de alimentación
suministrados.
② Presione la tecla de encendido del producto para encenderlo.
3. Listo para empezar
DC IN
2
1
3
③ Coloque el producto hacia la pantalla de proyección adecuada.
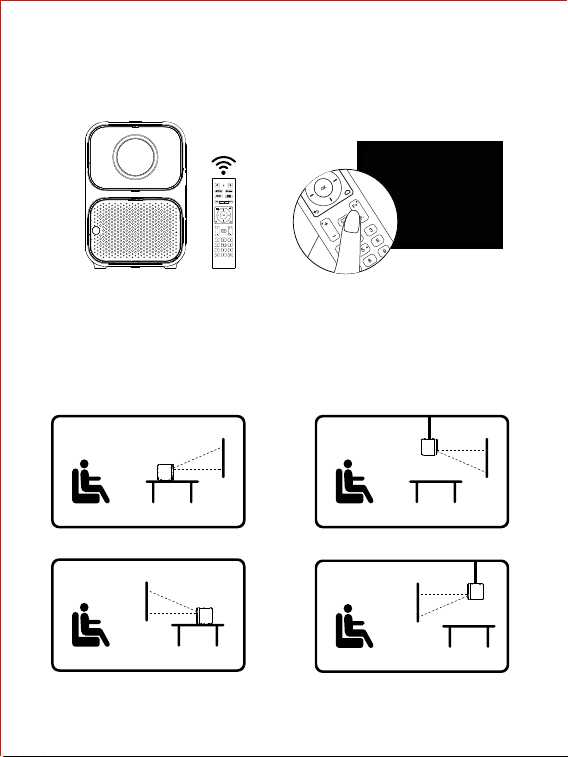
4.Proyección
36
④ El producto ajusta automáticamente el enfoque para obtener una imagen clara, o puede
enfocar con el control remoto.
⑤ Siga las instrucciones en pantalla para completar la configuración básica.
Atención: Utilice el adaptador y el cable de alimentación suministrados para mayor seguridad
y velocidad.
Diagrama esquemático de la imagen borrosa
Proyección frontal
Proyección Trasero
Proyección Techo trasero
Proyección Techo frontal
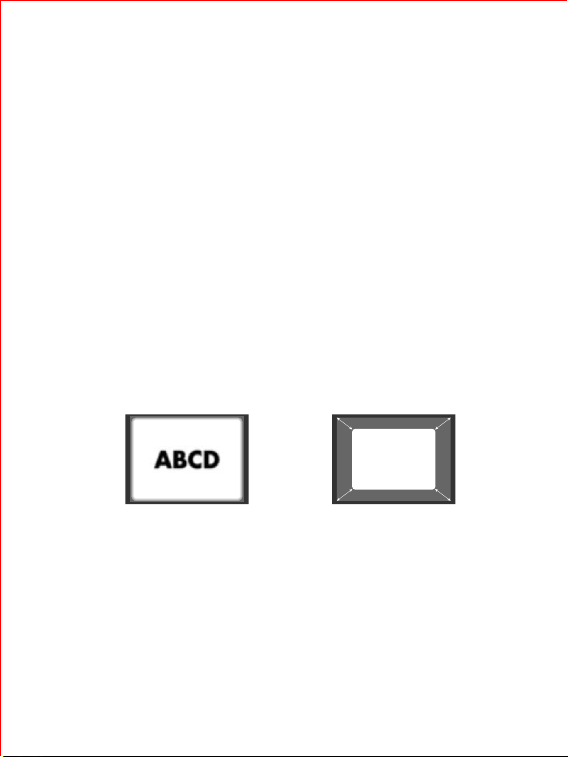
La corrección trapezoidal incluye corrección trapezoidal, zoom y enfoque. Por favor, seleccione
la opción apropiada para ajustar en el menú de configuración con el mando a distancia.
1. Corrección trapezoidal: Abra [Ajustes] en la página de inicio [Piedra ciave]>[Corrección de
cuatro puntos], ajuste el valor de la dirección horizontal y vertical de los cuatro ángulos.
Abra [Ajustes] en la página de inicio [Piedra ciave] > [Auto], Ajuste la corrección trapezoidal
automáticamente.
2. Zoom: Abra [Ajustes] en la página de inicio > [Zoom], amplíe la imagen a las imágenes de
pantalla requeridas con el control remoto.
3. Enfoque: Abra [Ajustes] en la página de inicio [Enfoque] >[Enfoque manual], ajuste la imagen
con el mando a distancia para obtener las imágenes que desee. Abra [Ajustes ] en la página
de inicio [Enfoque] >[Enfoque automático], ajustar el enfoque automáticamente.
5.Corrección trapezoidal
37
Corrección de cuatro puntos Zoom
La corrección trapezoidal incluye corrección trapezoidal, zoom y enfoque. Por favor, seleccione
la opción apropiada para ajustar en el menú de configuración con el mando a distancia.
1. Corrección trapezoidal: Abra [Ajustes] en la página de inicio [Piedra ciave]>[Corrección de
cuatro puntos], ajuste el valor de la dirección horizontal y vertical de los cuatro ángulos.
Abra [Ajustes] en la página de inicio [Piedra ciave] > [Auto], Ajuste la corrección trapezoidal
automáticamente.
2. Zoom: Abra [Ajustes] en la página de inicio > [Zoom], amplíe la imagen a las imágenes de
pantalla requeridas con el control remoto.
3. Enfoque: Abra [Ajustes] en la página de inicio [Enfoque] >[Enfoque manual], ajuste la imagen
con el mando a distancia para obtener las imágenes que desee. Abra [Ajustes ] en la página
de inicio [Enfoque] >[Enfoque automático], ajustar el enfoque automáticamente.
38
Ajustes
El proyector puede conectarse a Internet con Wi-Fi.
① En la página de inicio, elija [ Ajustes ] >[ La red ]>[ Conexión a internet ] , elija el Wi-Fi necesario
y pulse la tecla OK.
② Por favor, finalice la conexión Wi-Fi de acuerdo con las indicaciones de la pantalla.
1.Red
① En la página de inicio, elija [ Ajustes ]>[ Bluetooth ]> [ Conexión Bluetooth ] , elija el Bluetooth
necesario y pulse la tecla OK.
② Siga las instrucciones en pantalla para completar la conexión Bluetooth.
Seleccione [Ajustes] en la página de inicio
2.Conexión Bluetooth
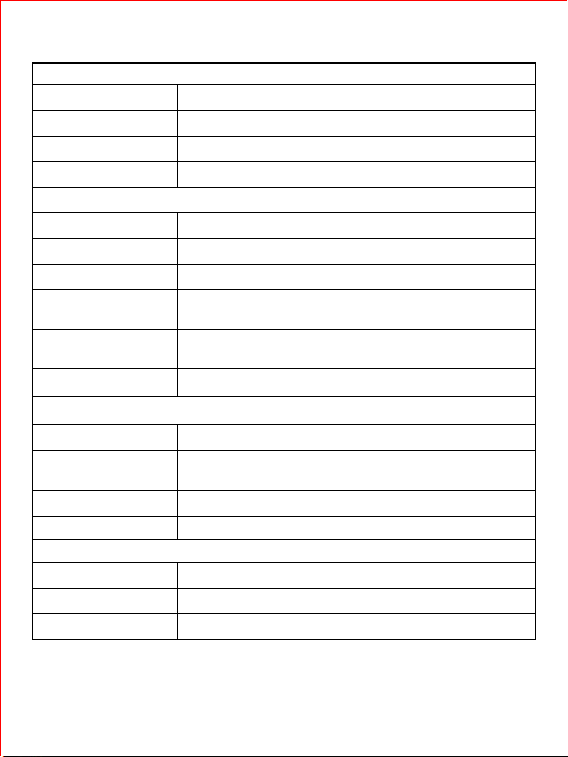
3. Proyector
Idioma OSD Seleccione el idioma de visualización en pantalla
Congiguración
Active o desactive la fecha y hora automática
Configure manualmente la fecha
Configure manualmente la hora
Seleccione la zona horaria
Seleccione entre el formato de 24 horas o el formato de 12 horas
Seleccione la Imágenes/Temporizador del Salvapantallas
Seleccione la hora de Tiempo de dormir
Seleccione el tiempo de Suspensión automática
Actualizar el sistema a través de una unidad USB APK
Actualizar el sistema en línea
Restablecer la configuración de fábrica del proyector
Congiguración de tiempo
Establecer la hora
Fecha
Tiempo
Región
Usar el formato de
24 horas
Protector de pantalla
Tiempo de dormir
Suspensión automática
Actualización automática
de USB
Comprobación de
autualización de internet
Restablecer predeterminado
39
El proyector puede conectarse a Internet con Wi-Fi.
① En la página de inicio, elija [ Ajustes ] >[ La red ]>[ Conexión a internet ] , elija el Wi-Fi necesario
y pulse la tecla OK.
② Por favor, finalice la conexión Wi-Fi de acuerdo con las indicaciones de la pantalla.
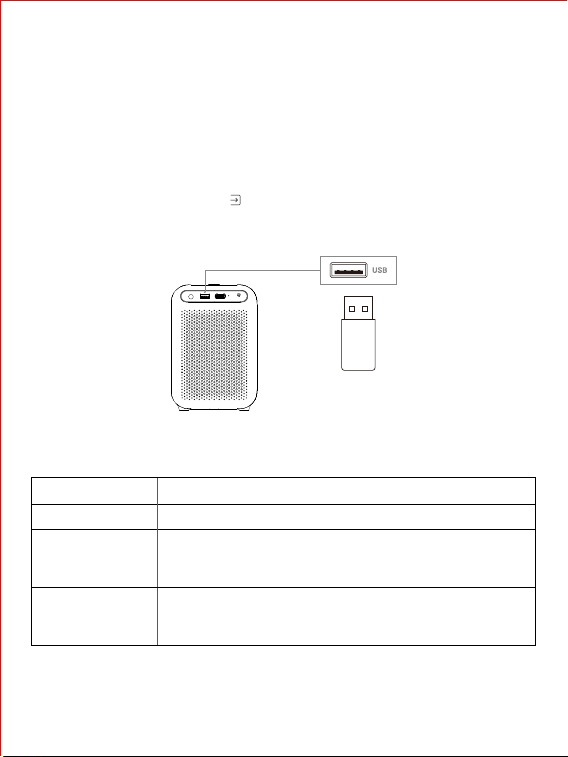
Modo de imagen
Nitidez
Gama
Temperatura del color
[Disfraz ] /[Cine] / [Deporte] /[Vivido] / [Hola-brillante] / [Estándar]
Ajuste del valor de la nitidez del proyector
[Medio ] / [Brillante] / [Oscuro]
[Estándar] / [Cálido] /[Usuario] /[Enfriar]
Modo de imagen
Ajuste del valor de los graves del sonido
Ajuste del valor de los agudos del sonido
Activación/desactivación del sonido envolvente
[Usuario] /[Estándar] /[Vivido] /[Deporte] /[ Pelicula]
/[ Música] /[Noticias]
[Auto] /[PCM] /[Derivación] /[Dolby Audio-Dolby Digital]
/[Dolby Audio-Dolby Digital plus]
[Apagado] /[Bajo] /[Medio ] /[Alto]
Audio
Bajo
Triplicar
Sonido envolvente
Estilo de sonido
Modo de salida digital
Mejora del diálogo
Activar/Desactivar la corrección trapezoidal automática
Ajustar el valor de la dirección horizontal y vertical de los
cuatro ángulos
Elija el método de proyección adecuado entre los cuatro
Ampliar la imagen a las imágenes de la pantalla requeridas
Piedra ciave
Auto
Four points correction
Projection
Zoom
Activar / desactivar el enfoque automático
Ajustar el enfoque manualmente
La información del proyector
Enfoque
Enfoque automático
Enfoque Manual
Sobre
Ajuste del valor de los graves del sonido
Ajuste del valor de los agudos del sonido
Activación/desactivación del sonido envolvente
[Usuario] /[Estándar] /[Vivido] /[Deporte] /[ Pelicula]
/[ Música] /[Noticias]
[Auto] /[PCM] /[Derivación] /[Dolby Audio-Dolby Digital]
/[Dolby Audio-Dolby Digital plus]
[Apagado] /[Bajo] /[Medio ] /[Alto]
Método de utilización
Puede conectar un dispositivo de almacenamiento USB a este proyector para disfrutar de
música, vídeos e imágenes locales.
① En la página de inicio, seleccione[ Entrades]>[USB] y, a continuación, pulse la tecla OK.
② Elija el archivo deseado y pulse la tecla OK.
1. Conectarse a un dispositivo de almacenamiento USB
Formatos compatibles con U Disk
40
Estilo de archivo
Imagen
Vídeo
Audio
Formatos de archivo compatibles
JPG/PNG/BMP
HEVC/H.265, MPEG1/2, MPEG4, DivX3.11, DivX 4.12,
DivX 5.x,DivX 6, XviD, Sorenson H.263, H.263, H.264,
AVS, AVS+, AVS2, WMV3, VC1, Motion JPEG, RV30/RV40
MPEG1/2 Layer1, MPEG1/2 Layer2, MPEG1/2/2.5 Layer3,
AAC-LC,HEAAC, VORBIS, DTS, DTS Master Audio, LPCM,
IMA-ADPCM, MS-ADPCM, G711A/mu-law, FLAC, OPUS
Note: Debido a la actualización periódica del sistema del producto, la operación está
sujeta a la situación real.
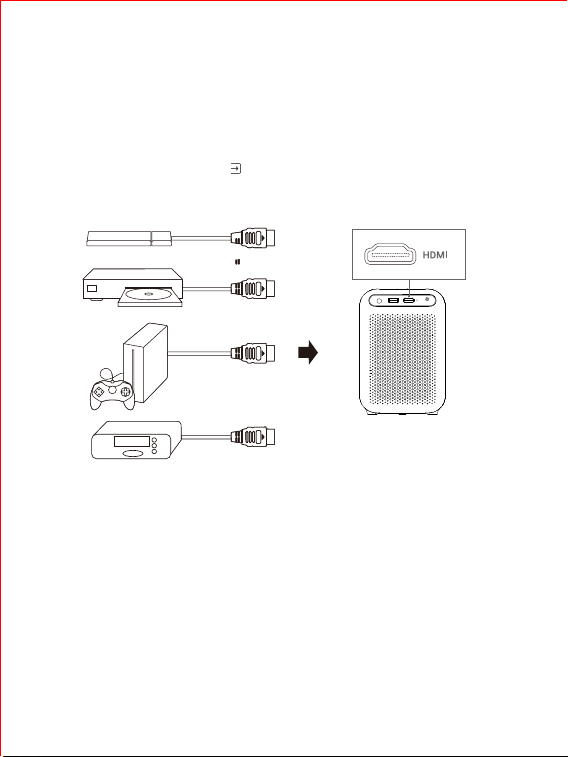
El proyector es compatible con varios dispositivos de reproducción HDMI, como cajas de TV,
pegatinas de TV, DVD, decodificadores, consolas de juegos, etc.
① Conecte el proyector al dispositivo de reproducción HDMI con el cable HDMI (no suministrado).
② En la página de inicio, seleccione[ Entrades]>[HDMI]y, a continuación, pulse la tecla OK.
2. Conectarse a un dispositivo HDMI
41
Cómo enviar contenidos al proyector.
① Asegúrese de que el teléfono y el proyector están bajo la misma Wi-Fi.
② Abre el software de reproducción de vídeo del teléfono y busca el icono de transmisión de
TV, que se encuentra en cualquiera de las cuatro esquinas de la interfaz de usuario de vídeo.
3.Proyección telefónica
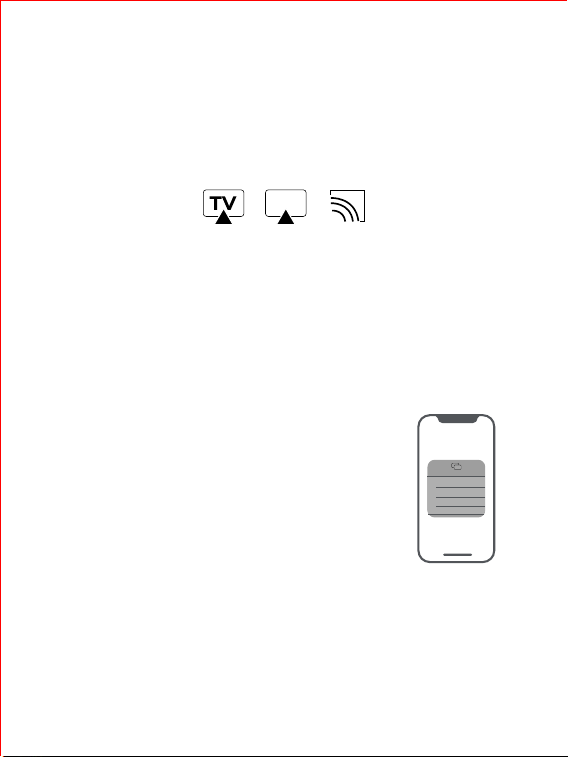
③ Haga clic en el icono y elija [Smart Projector]para enviar vlos vídeos al proyector. No es
necesario permanecer en la interfaz de vídeo durante la proyección, podemos tener otras
operaciones en el teléfono.
Nota: Los iconos de empuje son diferentes para cada aplicación, no todos los vídeos tienen
funciones de empuje debido a los derechos de autor de algunos contenidos.
42
De acuerdo con los siguientes pasos, los contenidos del teléfono se pueden mostrar en la
pantalla de proyección de forma sincronizada a través de wifi.Disfrute de los vídeos u otros
contenidos con imágenes más grandes.Hay muchos software similares en el mercado, esta
instrucción toma "Eshare" como un ejemplo. Requisito del dispositivo: dispositivos sobre ios6
o sobre Android 5.4.
4.El teléfono está en la misma pantalla
① Asegúrese de que su iPhone y proyector estén en el mismo Wi-Fi.
② Abra la consola, la función AirPlay [la nueva versión del sistema
se llama "Screen Mirroring"], luego busque [EShare-XXXX] y
haga clic en Conectar.
Tutorial para dispositivos iPhone:
Diagrama esquemático de algunos iconos push
Duplicar pantalla
EShare-xxxx
Tutorial para dispositivos Android:
① Asegúrate de que el teléfono y el proyector están bajo la misma Wi-Fi.
② En la página de inicio, seleccione [EShareServer], Abrir EShare.
③ Para el teléfono Android, descargue la APP "EShare", instálela y ábrala correctamente.
④ Abra EShare, elija [EShare-XXXX] y haga clic en la conexión.
43
Especificaciones del producto
Tensión de entrada
Consumo total de
energía
Bocina
Resolución física
Brillo
Contraste
Distancia de
proyección
recomendada
Wi-Fi
Escala de
proyección
Formato USB
Nos reservamos el derecho de cambiar las especificaciones y el diseño sin
previo aviso.
110V-240V , 50-60Hz
120 W
5W*2
1920 x 1080p
650 ANSI
3000:1
1.1 -3.3m
2.4G/ 5G
4:3 / 16:9
FAT32
4*A53
5℃-35℃
1G
8G
Bluetooth 5.1
LED
40-120 pulgadas
1.67 kg
>20000h
170×120×180mm
CPU
Temperatura
recomendada
RAM
ROM
Bluetooth
Fuente de luz
Tamaño de
proyección
recomendado
Peso de la máquina
Duración de la fuente
de luz
Tamaño de la
máquina [W*H*D]
Device List
Scan
Enter IP or PIN code to connect
EShare
Connected to:EShare-xxxx
192.168.0.998
Share Screen
Photo Audio/
Video
Doc Camera Remote
TV Mirror
Please ensure your devices are
connected to the smart phone

① No puede encender el proyector con el mando a distancia?
• Asegúrese de que el proyector está conectado a la corriente.
• Pulse la tecla de encendido del equipo para encenderlo.
② El mando a distancia no funciona
• Asegúrese de que las pilas están puestas.
• Cambie las pilas del mando a distancia.
③ El mando a distancia no funciona? Las imágenes no son claras ?
• Ajuste el enfoque mediante la tecla de enfoque del mando a distancia.
④ Voltea una imagen?
• En el menú principal, seleccione [ Ajustes ]>[ Proyeccíon ] , cambie al estado de
proyección correcto.
Diagnóstico de averías
44
45
Garantía
Garantía de un año
12 meses de servicio de garantía se proporcionan a la compra, la descomposición y
la transformación están excluidos.
Correo electrónico de apoyo:[email protected]
http://en.szwanbo.cn/
Facebook Twitter Instagram