2. Quic k guide
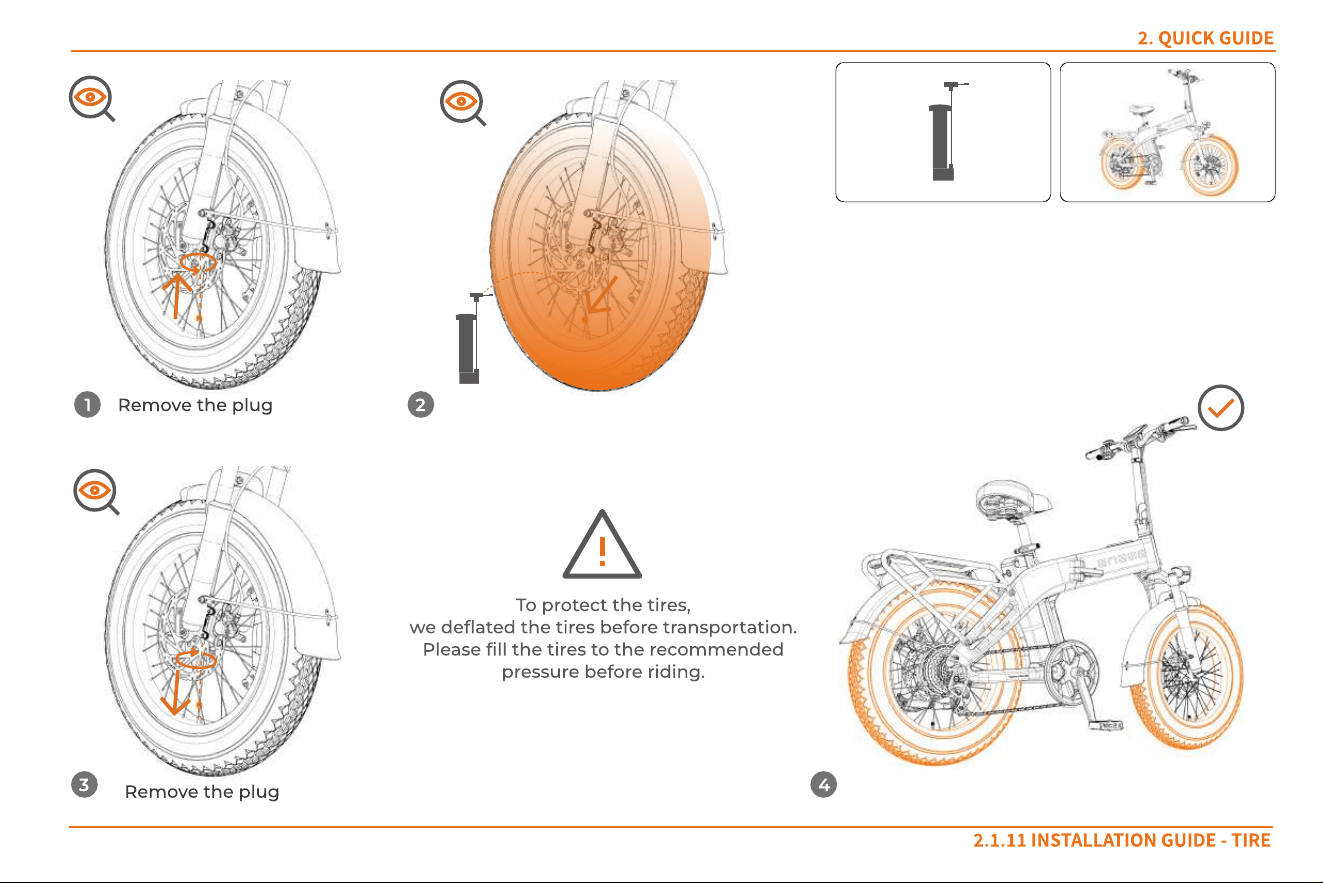
2.1.11 In st al l at io n guide - Tir e
4
To protect the tires,
we deflated the tires before transportation.
Please fill the tires to the recommended
pressure before riding.
1 Remove the plug 2
3
Remove the plug

Congratulations!
Your bike has been assembled
successfully!
2. Quic k guide
2.1.12 In st a l l a t io n g u id e - a s c o mpl et ed
2
5
①
②
1
4
①
②
6
3
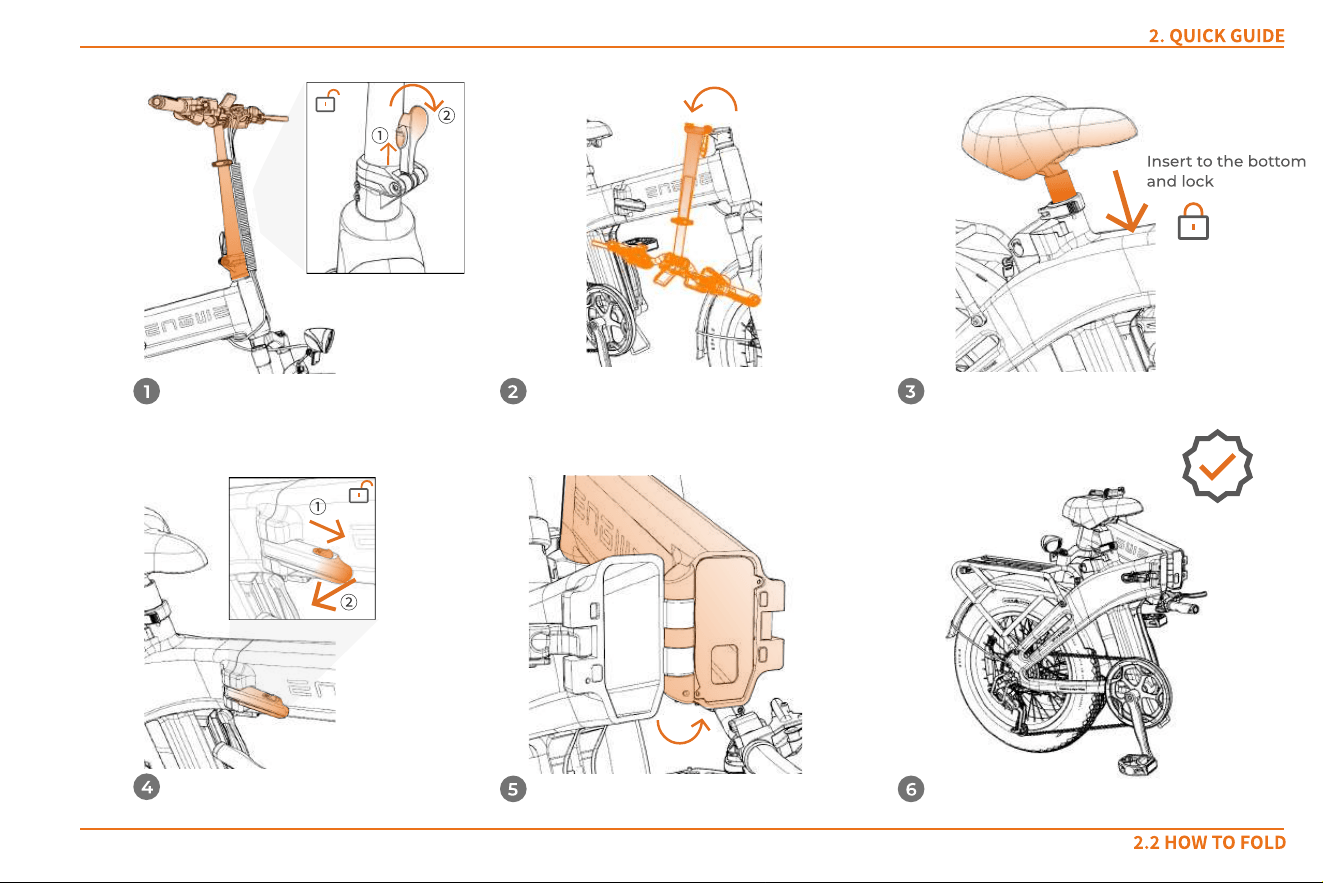
Insert to the bottom
and lock
2.2 Ho w t o Fo l d
2. Quic k guide
2. Quic k guide
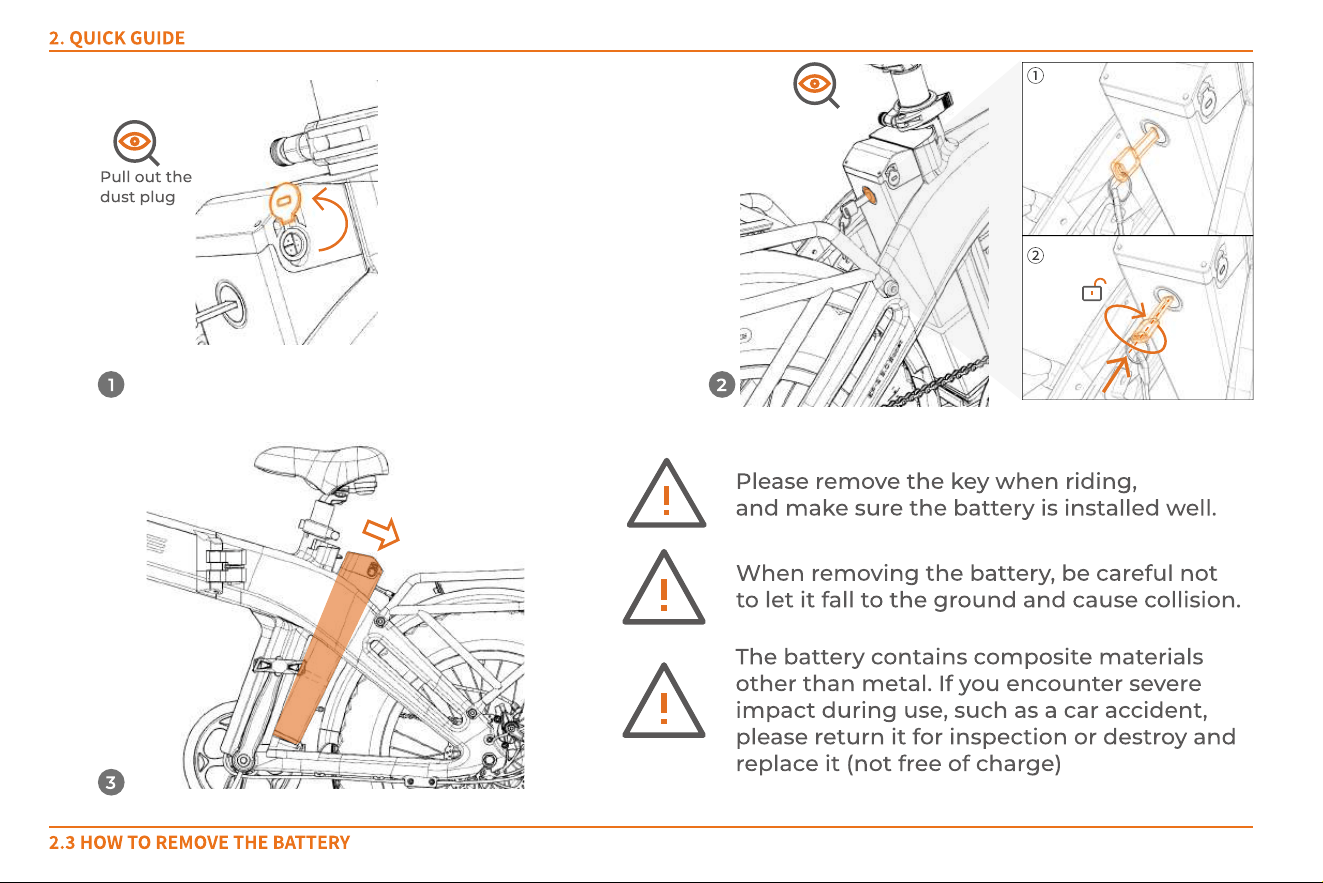
2.3 Ho w t o r emove t he bat t er y
①
②
2
3
1
Pull out the
dust plug
Please remove the key when riding,
and make sure the battery is installed well.
W hen removing the battery, be careful not
to let it fall to the ground and cause collision.
The battery contains composite materials
other than metal. If you encounter severe
impact during use, such as a car accident,
please return it for inspection or destroy and
replace it (not free of charge)
Steps
Before charging: Please ensure that the charging environment has normal air circulation and is dry; check that the charger plug and socket are dry
and free of foreign objects; avoid charging in direct sunlight; avoid charging in an environment with a temperature below 5 degrees Celsius and
above 30 degrees Celsius; ensure that there is no accumulation of flammable materials at the charging area
Start of charging: Fully insert the charger connector into the battery's charging port, and then fully insert the charger's power plug into the power
socket.
Status indication: W hen the charging indicator lam p on the charger is red, it indicates that the charging is normal; W hen the indicator lamp is green,
it indicates that the battery is fully charged. Flashing Green light means ready to charge and no output; Flashing Red light m eans fault.
Charging time: about 3.5 hours
End of charging: Unplug the power plug first, and then remove the charger connector from the battery. To charge by the method indicated in
①
, just
close the battery's dust plug. To charge by the method indicated in
②
, you must insert the battery into the frame and secure it, and then close the
battery's dust plug.
Note: The charger contains a high-voltage device. Unauthorized repairs are strictly prohibited due to the risk of danger. The battery and the charger
must be placed in a safe, well-ventilated, and dry area, beyond the reach of children, and away from any flammable, explosive, or hazardous items
(such as saddles, sofas, etc.). Additionally, charging may not be conducted outdoors to prevent accidents like electrical short circuits and fires due
to rain or similar elements.
W arning: If you detect an unusual odor or if the battery or charger becomes excessively hot during charging, stop charging im m ediately and
contact the after-sales team.
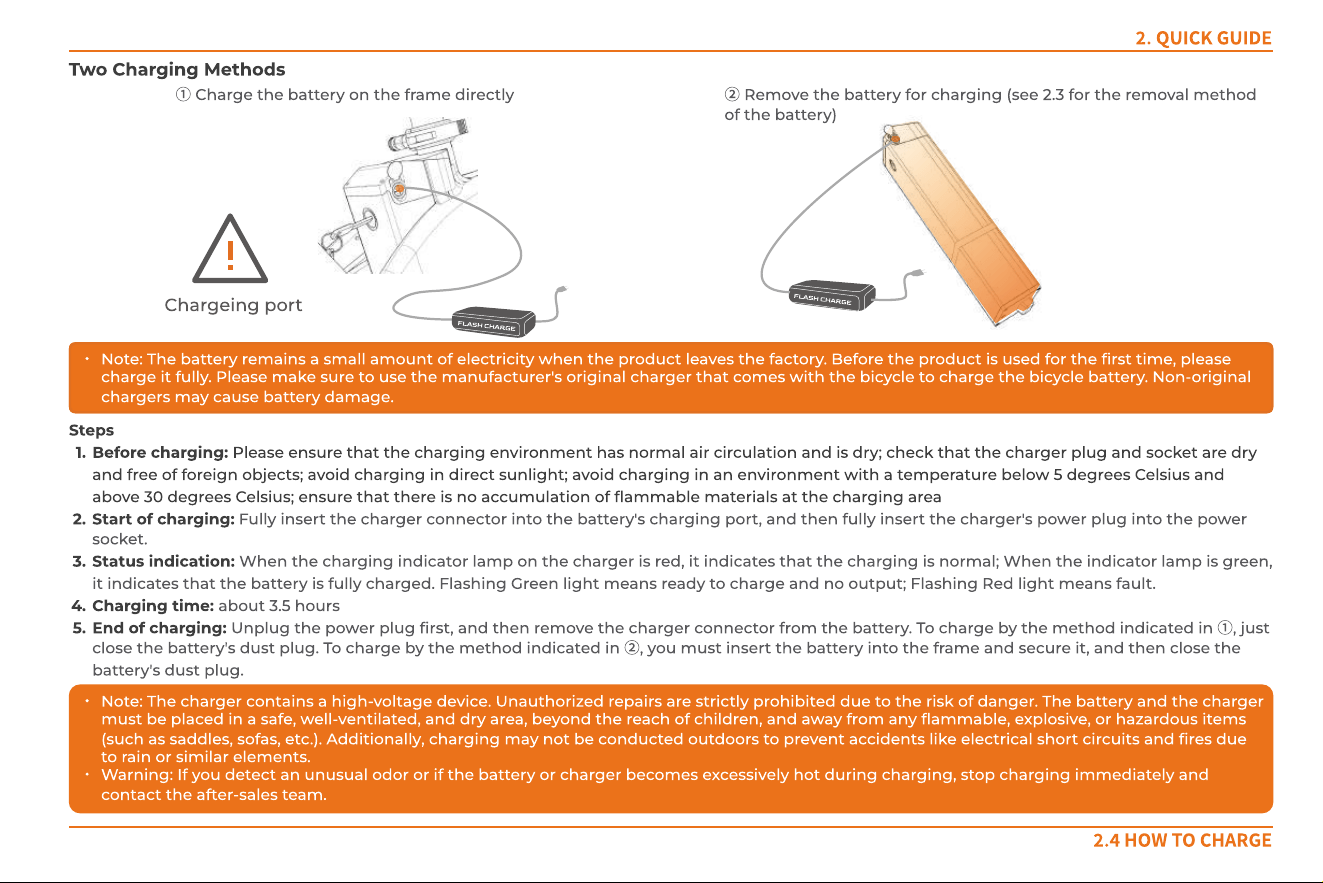
Two c harg ing methods
①
Charge the battery on the frame directly
2. Quic k guide
2.4 Ho w t o char g e
Note: The battery remains a small amount of electricity when the product leaves the factory. Before the product is used for the first tim e, please
charge it fully. Please make sure to use the manufacturer's original charger that comes with the bicycle to charge the bicycle battery. Non-original
chargers m ay cause battery damage.
②
Remove the battery for charging (see 2.3 for the removal m ethod
of the battery)
f
l
a
s
h
c
h
a
r
g
e
Chargeing port
F
l
a
s
h
c
h
a
r
g
e
2. Quic k guide
2.5 Bat t er y act ivat io n
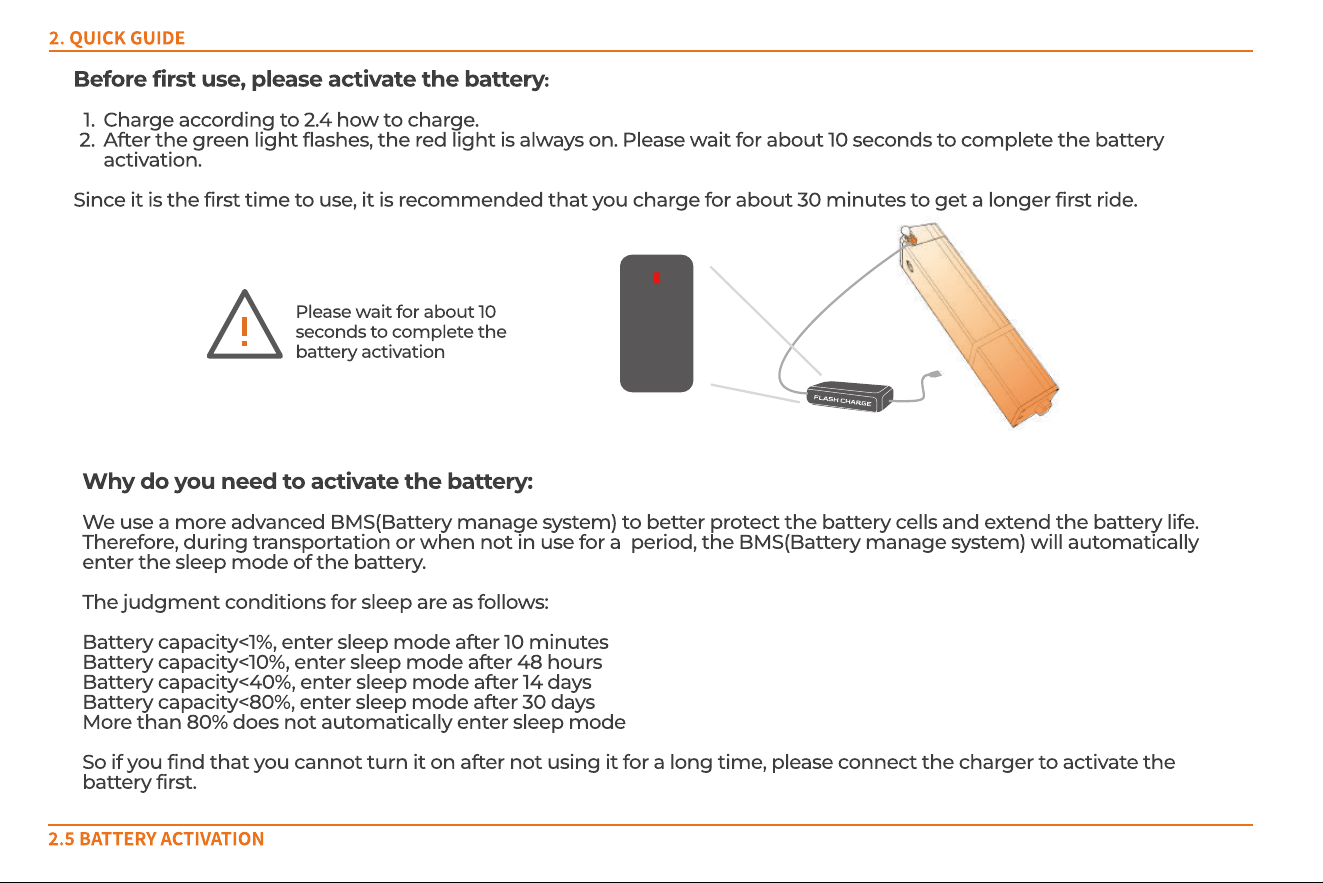
Before first use, please activate the battery:
Charge according to 2.4 how to charge.
After the green light flashes, the red light is always on. Please wait for about 10 seconds to complete the battery
activation.
Since it is the first time to use, it is recommended that you charge for about 30 minutes to get a longer first ride.
W hy do you need to activate the battery:
W e use a more advanced BMS(Battery manage system) to better protect the battery cells and extend the battery life.
Therefore, during transportation or when not in use for a period, the BMS(Battery manage system) will automatically
enter the sleep mode of the battery.
The judgment conditions for sleep are as follows:
Battery capacity<1%, enter sleep mode after 10 minutes
Battery capacity<10%, enter sleep mode after 48 hours
Battery capacity<40%, enter sleep mode after 14 days
Battery capacity<80%, enter sleep mode after 30 days
More than 80% does not automatically enter sleep mode
So if you find that you cannot turn it on after not using it for a long time, please connect the charger to activate the
battery first.
f
l
a
s
h
c
h
a
r
g
e
Please wait for about 10
seconds to complete the
battery activation
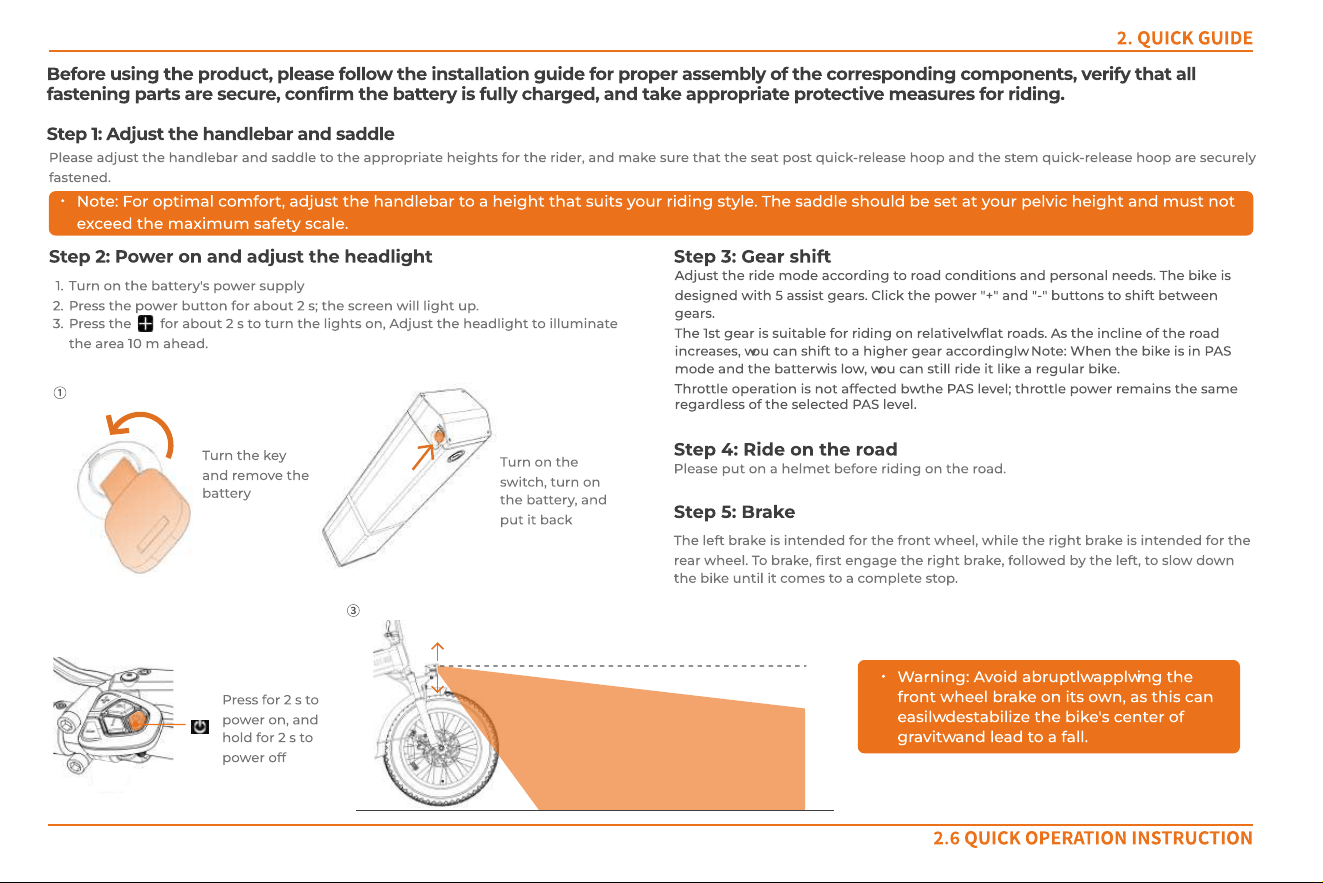
Before using the product, please follow the installation guide for proper assembly of the corresponding components, verify that all
fastening parts are secure, confirm the battery is fully charged, and take appropriate protective measures for riding.
Step 1: Adjust the handlebar and saddle
Step 2: Power on and adjust the headlight Step 3: Gear shift
Please adjust the handlebar and saddle to the appropriate heights for the rider, and make sure that the seat post quick-release hoop and the stem quick-release hoop are securely
fastened.
Note: For optimal comfort, adjust the handlebar to a height that suits your riding style. The saddle should be set at your pelvic height and must not
exceed the maximum safety scale.
Press for 2 s to
power on, and
hold for 2 s to
power off
Adjust the ride mode according to road conditions and personal needs. The bike is
designed with 5 assist g ears. Click the power "+" and "-" buttons to shift between
gears.
The 1st gear is suitable for riding on relatively flat roads. As the incline of the road
increases, you can shift to a higher gear accordingly. Note: W hen the bike is in PAS
mode and the battery is low, you can still ride it like a regular bike.
Throttle operation is not affected by the PAS level; throttle power rem ains the same
regardless of the selected PAS level.
Step 4 : Ride on the road
Please put on a helmet before riding on the road.
Step 5: Brake
The left brake is intended for the front wheel, while the right brake is intended for the
rear wheel. To brake, first engage the right brake, followed by the left, to slow down
the bike until it com es to a com plete stop.
2. Quic k guide
2.6 Quic k o per at ion inst r uct io n
Turn on the battery's power supply
Press the power button for about 2 s; the screen will light up.
Press the for about 2 s to turn the lights on, Adjust the headlight to illuminate
the area 10 m ahead.
③
①
Turn the key
and remove the
battery
Turn on the
switch, turn on
the battery, and
put it back
W arning: Avoid abruptly applying the
front wheel brake on its own, as this can
easily destabilize the bike's center of
gravity and lead to a fall.
2. Quic k guide
2.7 Inst r u ct io n s et t in g
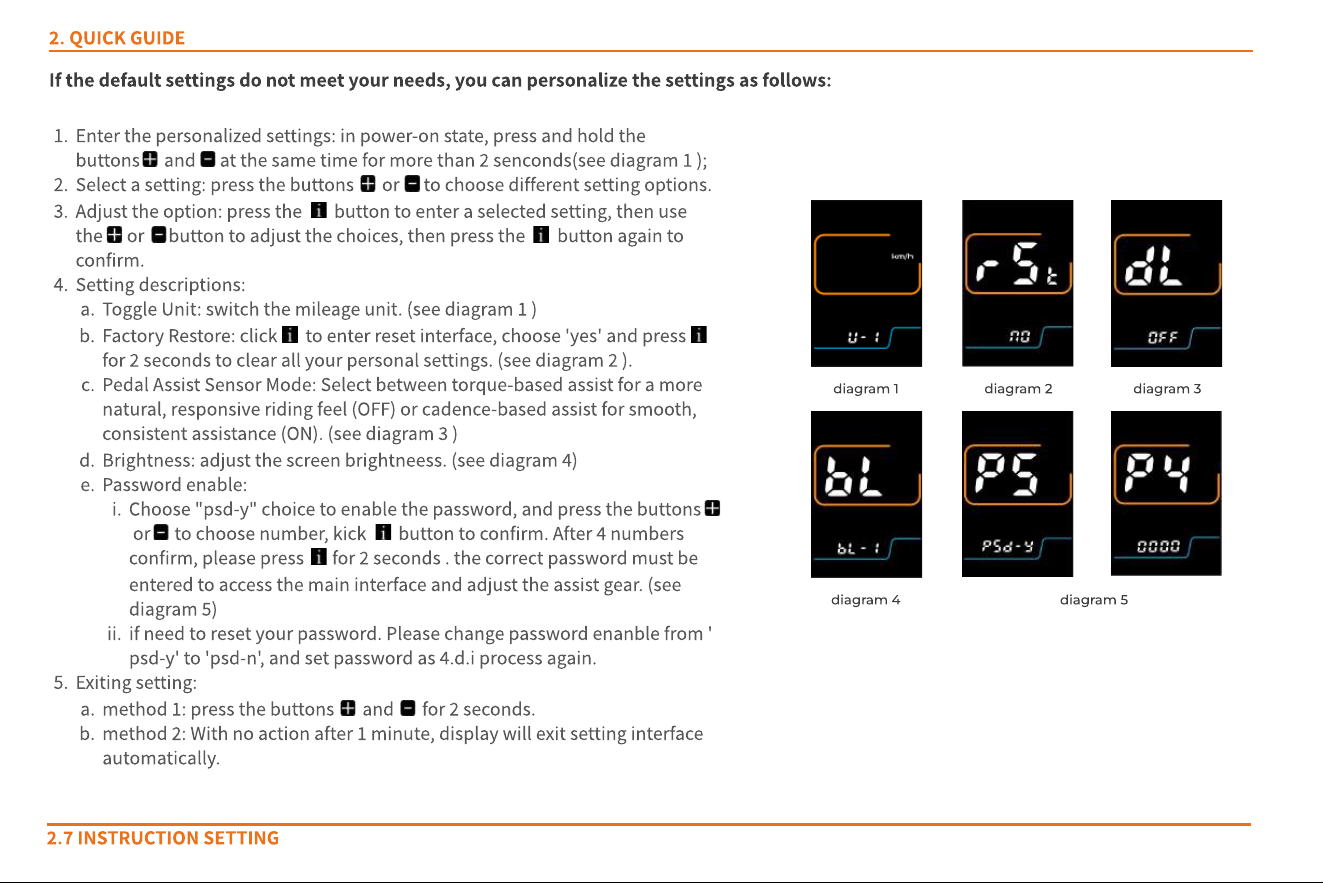
If the default settings do not meet your needs, you can personalize the settings as follows:
Enter the personalized settings: in power-on state, press and hold the
buttons and at the same time for more than 2 senconds(see diagram 1 );
Select a setting: press the buttons or to choose different setting options.
Adjust the option: press the button to enter a selected setting, then use
the or button to adjust the choices, then press the button again to
confirm.
Setting descriptions:
Toggle Unit: switch the mileage unit. (see diagram 1 )
Factory Restore: click to enter reset interface, choose 'yes' and press
for 2 seconds to clear all your personal settings. (see diagram 2 ).
Pedal Assist Sensor Mode: Select between torque-based assist for a more
natural, responsive riding feel (OFF) or cadence-based assist for smooth,
consistent assistance (ON). (see diagram 3 )
Brightness: adjust the screen brightneess. (see diagram 4)
Password enable:
Choose "psd-y" choice to enable the password, and press the buttons
or to choose number, kick button to confirm. After 4 numbers
confirm, please press for 2 seconds . the correct password must be
entered to access the main interface and adjust the assist gear. (see
diagram 5)
if need to reset your password. Please change password enanble from '
psd-y' to 'psd-n', and set password as 4.d.i process again.
Exiting setting:
method 1: press the buttons and for 2 seconds.
method 2: With no action after 1 minute, display will exit setting interface
automatically.
diagram 1 diagram 2
diagram 4
diagram 3
diagram 5
Electrical and Safety Guidelines
Do not park or charge the eBike in building entrances, hallways,
stairwells, or evacuation routes.
Do not charge inside residential buildings. Keep away from
flammable materials and avoid charging for more than 12 hours.
Do not modify the battery, wiring, lighting, or install unauthorized
electrical accessories.
Do not touch electrical components with wet hands or metal
objects.
Do not open electrical parts to avoid liquid or debris entering.
Avoid spraying water directly on electrical connectors; do not use a
pressure washer.
Avoid prolonged exposure to sun or rain to prevent component
aging.
Riding Safety
Riders must be 14 years or older. Do not lend the bike to
inexperienced users.
Ride in designated bike lanes and follow local speed regulations.
Carry passengers or cargo only as allowed by local laws.
Always wear a properly fastened helmet.
Slow down in rain or snow; avoid riding in severe weather.
Follow traffic laws; do not ride under the influence or with
improper control.
Wear bright, comfortable clothing and suitable footwear.
3.USER MAINTENANCE INSTRUCTIONS
3.1 Not es f o r oper at io n
Pre-Ride Checklist
Power on, display works, and battery level is sufficient.
Front/rear lights and turn signals function correctly; headlight angle
is appropriate.
Horn works properly.
Handlebar position and screws are secure.
Brakes are responsive and activate the tail light.
Tire pressure and condition are normal, with no sharp objects.
Wheel nuts are tight; pedal reflectors are intact.
Riding Precautions
Accelerate gradually when starting to avoid sudden loss of control.
Increase braking distance and ride cautiously on wet or snowy roads
to prevent slipping.
Shift to a lower gear before stopping to make the next start easier.
Pushing and Parking
Turn off the power before pushing the bike to avoid accidental
throttle activation.
Use the walk-assist mode when pushing uphill or when carrying
heavy loads.
Park the bike on a flat surface, deploy the kickstand, and turn off the
power.
Clean and maintain the bike regularly to keep it in optimal condition.
Storage Instructions
Store the eBike in a cool, dry, and well-ventilated area, away from
direct sunlight, moisture, and extreme temperatures.
Turn off the battery switch before storage.
For long-term storage, keep the battery between 50%
‒
80% charge
and recharge every 1
‒
2 months.
Keep the bike and battery away from flammable or explosive
materials.
Store the bike and battery out of reach of children.
Do not place heavy objects on the bike or battery.
War ning:Repairs must not be performed by untrained
personnel. If a malfunction occurs, please contact
customer service or visit an authorized service center
for assistance.
3.2 Maint enanc e and s el f -in s pect io n
Vehicle Maintenance & Self-Check
The eBike is fully adjusted before leaving the factory. If you have any doubts, contact the manufacturer or dealer.
Check tire pressure regularly and keep it within the recommended range.
Routinely inspect major components
—
handlebar, stem, saddle, axles, bottom bracket, freewheel, chain, and wheels
—
to ensure
smooth operation. Tighten any loose nuts or bolts immediately.
Replace worn parts such as brake pads, chain, or tires at a local repair shop. Always use parts of the same model and specifications.
Motor Maintenance
Keep the motor clean and free from foreign objects or corrosive liquids/gases. Do not strike or heat the motor housing.
The motor is rated IPX5. Do not spray it with a high-pressure water jet or submerge it in water. If water reaches the hub center, electrical
components may short-circuit and become damaged.
Battery Maintenance
Lithium battery lifespan depends heavily on usage habits. Avoid running the battery to very low levels. Charge regularly and do not
leave the battery unused for long periods.
For initial use, a normal full charge is sufficient. Disconnect the charger once charging is complete.
If the bike will not be used for an extended time, charge the battery for about 2 hours every month. Do not store the battery in a fully
discharged state, as deep discharge can cause irreversible damage.
3.USER MAINTENANCE INSTRUCTIONS
Danger : Do not disassemble old batteries yourself. Dispose of them only at government-designated facilities or at our
authorized service centers.
War ning: Keep the battery away from open flames and high-temperature heat sources. Do not throw the battery into fire. Do
not expose it to direct sunlight during hot weather.

Troubleshooting
The bike fails to work
Insufficient range
The battery fails to be
charged
Unusual acceleration or
excessively low speed
The motor fails to work
after power-on
Charge the battery
Clean and re-tighten the connector
Start the bike in the correct sequence (see 2.5)
Check whether the tire leaks and inflate the tire adequately
Utilize the pedal for assistance while riding or modify your route accordingly
Contact the ENGWE after-sales team for assistance
Reconnect the charg er
Replace the charger
Contact the ENGWE after-sales team for assistance
Reconnect or replace the cable
Tighten or replace the throttle grip
Contact the ENGWE after-sales team for assistance
Low battery
Poor connection of electrical parts
Incorrect start sequence
Insufficient tire pressure
Excessive uphill travel, high wind speeds, frequent braking,
and overloading
The battery is faulty, damaged or aging
Poor connection of charger
The charger is damaged
The battery is stored for a long time and not charg ed
regularly
The motor cable is loose or damag ed
The throttle grip is loose or damag ed.
The motor is damaged
The throttle grip is loose or damag ed, or the battery
charge is too low
Tighten or replace the throttle grip and fully charg e the
battery
Possible causeSymptom Common solution
Fault code
The ENGWE electric bike comes with a fault detection system. If the electrical system fails, the instrument will display a fault code. Here are the m ost common fault codes to
assist you with troubleshooting. If a fault code is displayed, please stop operation im mediately and contact the after-sales team of ENGWE.
3.3 Tr o ubl es h oot ing
3.USER MAINTENANCE INSTRUCTIONS
Control unit current fault
E01/E02/E42
Control unit Hall fault
E03
Torque sensor fault
E36
Speed sensor fault
E37
Tem perature sensor fault
E38
Motor fail fault
E43
Control unit fail
E31
Communication fault
E30
Control unit temperature fault
E05
Motor temperature protection
E06
Volt fault
E09
SymptomFault code
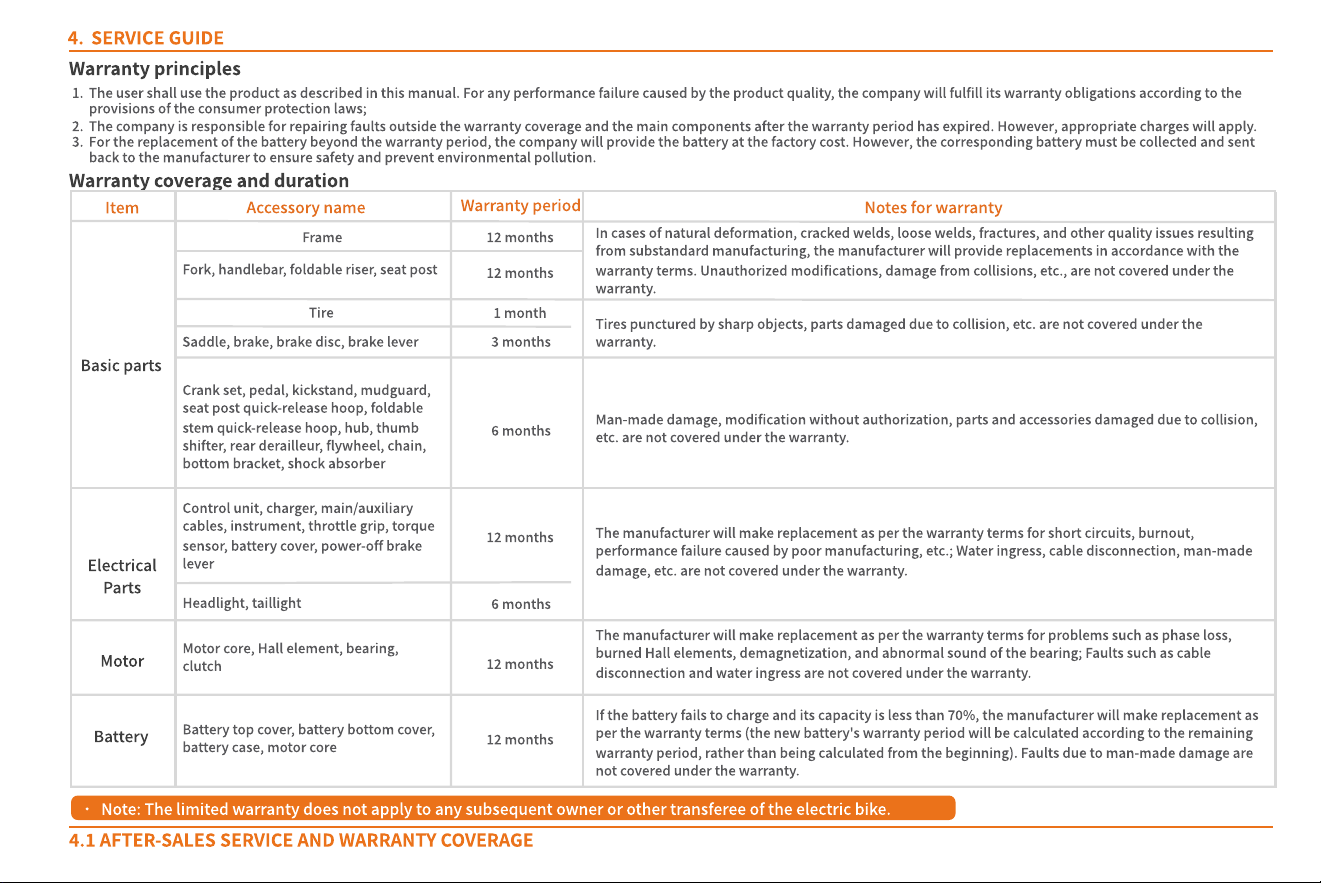
The user shall use the product as described in this manual. For any performance failure caused by the product quality, the Company will fulfill its warranty obligations according to the
provisions of the consumer protection laws;
The Company is responsible for repairing faults outside the warranty coverage and the main components after the warranty period has expired. However, appropriate charges will apply.
For the replacement of the battery beyond the warranty period, the company will provide the battery at the factory cost. However, the corresponding battery must be collected and sent
back to the manufacturer to ensure safety and prevent environmental pollution.
Warranty principles
Warranty coverage and duration
Ser vice g uide
4.1 Af t er -s al es s er vice and war r ant y cover ag e
Basic parts
Frame
Tire
12 months
Electrical
parts
Motor
Battery
Accessory name
Warranty period
Item
12 months
12 months
Fork, handlebar, foldable riser, seat post
12 months
3 months
1 month
6 months
6 months
12 months
Notes for warranty
In cases of natural deformation, cracked welds, loose welds, fractures, and other quality issues resulting
from substandard manufacturing, the manufacturer will provide replacements in accordance with the
warranty terms. Unauthorized modifications, damage from collisions, etc., are not covered under the
warranty.
Saddle, brake, brake disc, brake lever
Tires punctured by sharp objects, parts damaged due to collision, etc. are not covered under the
warranty.
Crank set, pedal, kickstand, mudguard,
seat post quick-release hoop, foldable
stem quick-release hoop, hub, thumb
shifter, rear derailleur, flywheel, chain,
bottom bracket, shock absorber
Man-made damage, modification without authorization, parts and accessories damaged due to collision,
etc. are not covered under the warranty.
Control unit, charger, main/auxiliary
cables, instrument, throttle grip, torque
sensor, battery cover, power-off brake
lever
Headlight, taillight
Motor core, Hall element, bearing,
clutch
The manufacturer will make replacement as per the warranty terms for short circuits, burnout,
performance failure caused by poor manufacturing, etc.; Water ingress, cable disconnection, man-made
damage, etc. are not covered under the warranty.
Battery top cover, battery bottom cover,
battery case, motor core
The manufacturer will make replacement as per the warranty terms for problems such as phase loss,
burned Hall elements, demagnetization, and abnormal sound of the bearing; Faults such as cable
disconnection and water ingress are not covered under the warranty.
If the battery fails to charge and its capacity is less than 70%, the manufacturer will make replacement as
per the warranty terms (the new battery's warranty period will be calculated according to the remaining
warranty period, rather than being calculated from the beginning). Faults due to man-made damage are
not covered under the warranty.
Note: The limited warranty does not apply to any subsequent owner or other transferee of the electric bike.
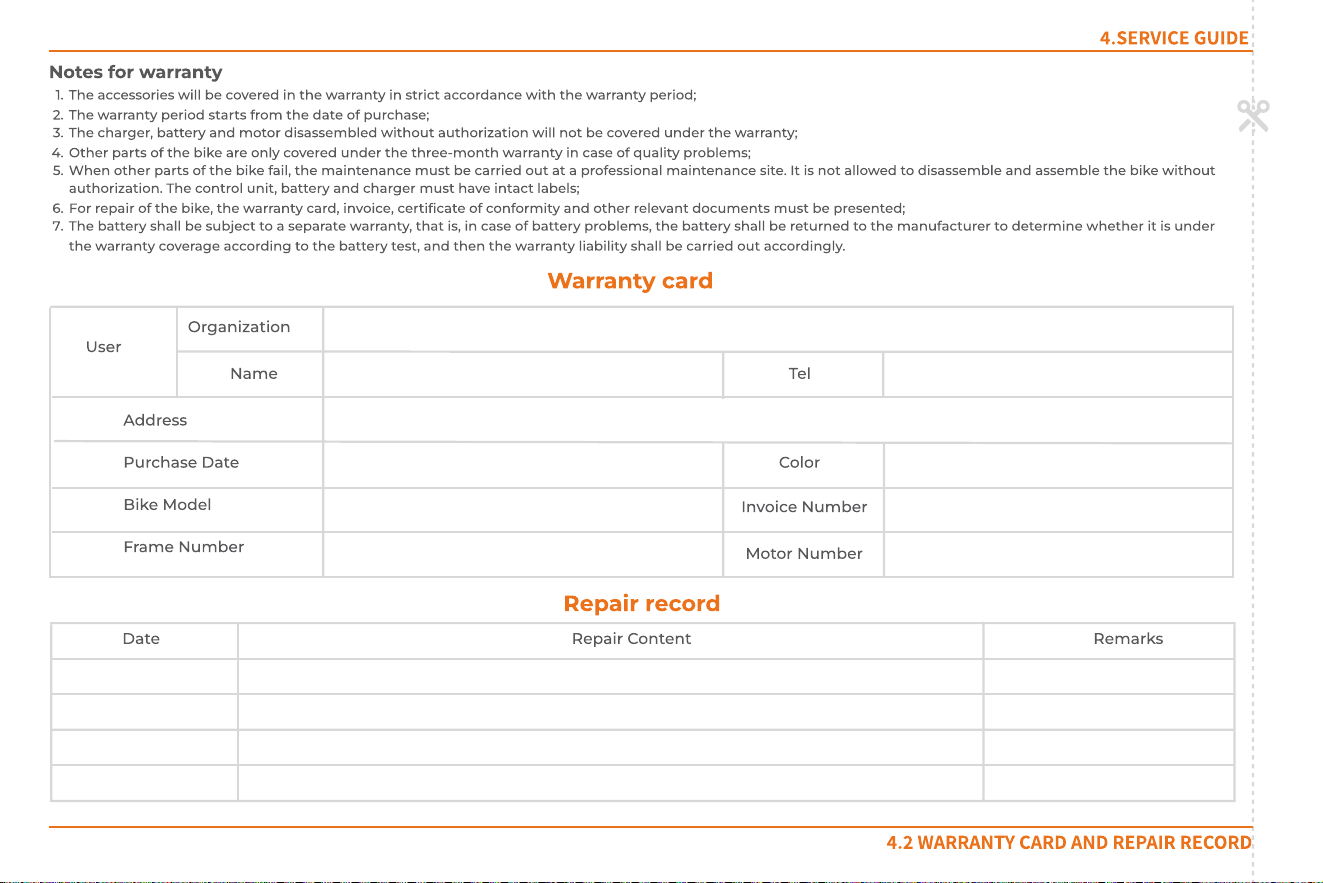
W arranty card
User
Organization
Nam e Tel
Address
Purchase d ate
Bike model
Frame n umber
Color
Invoice n umber
Motor n um ber
Repair record
Date Repair c ontent Remarks
4.Ser vic e guide
The accessories will be covered in the warranty in strict accordance with the warranty period;
The warranty period starts from the date of purchase;
The charger, battery and m otor disassembled without authorization will not be covered under the warranty;
Other parts of the bike are only covered under the three-month warranty in case of quality problems;
W hen other parts of the bike fail, the m aintenance m ust be carried out at a professional maintenance site. It is not allowed to disassemble and assemble the bike without
authorization. The control unit, battery and charger m ust have intact labels;
For repair of the bike, the warranty card, invoice, certificate of conformity and other relevant documents must be presented;
The battery shall be subject to a separate warranty, that is, in case of battery problems, the battery shall be returned to the manufacturer to determine whether it is under
the warranty coverage according to the battery test, and then the warranty liability shall be carried out accordingly.
Notes for warranty
4.2 War r ant y car d and r epair r eco r d
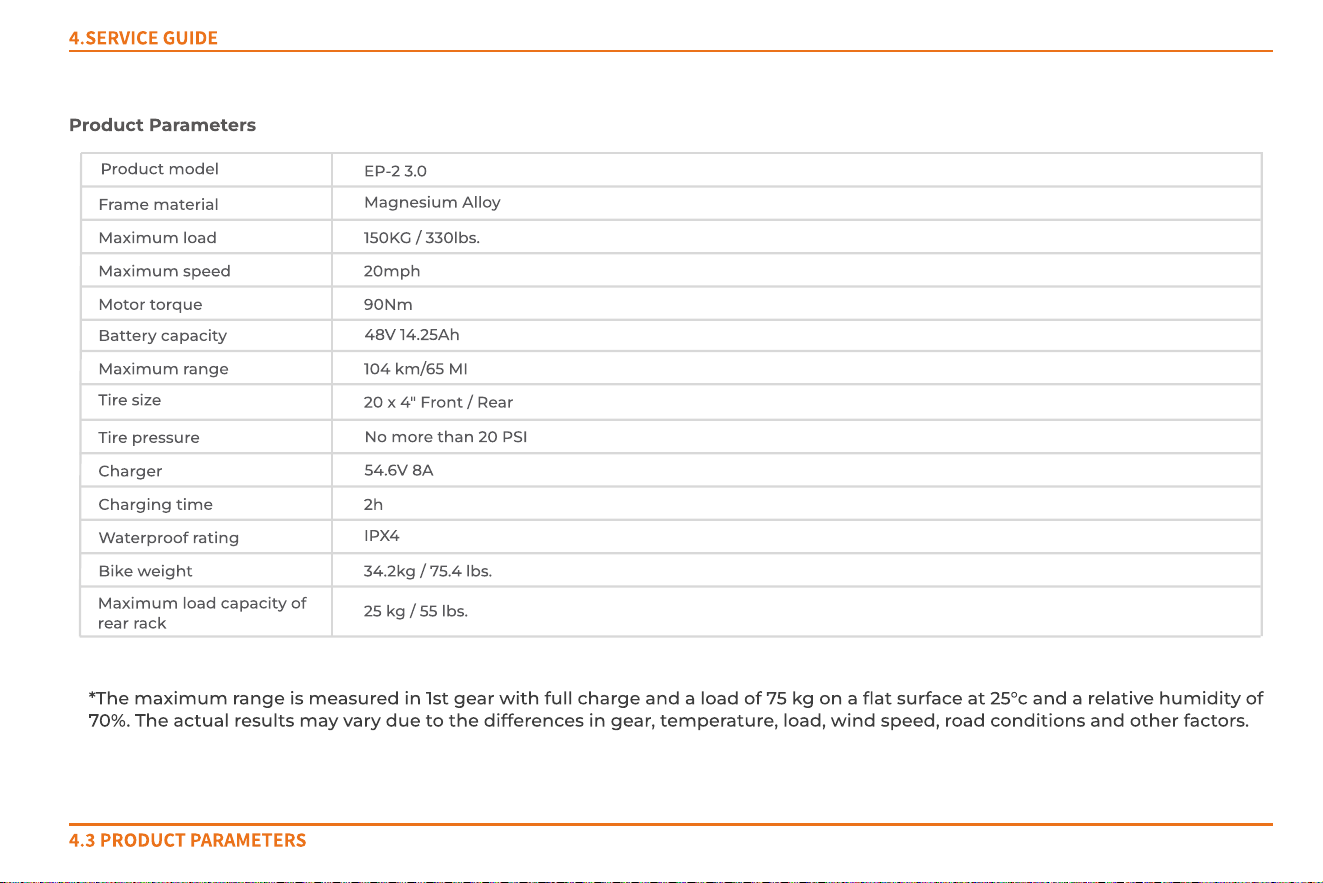
*The maximum range is measured in 1st gear with full charge and a load of 75 kg on a flat surface at 25°C and a relative humidity of
70%. The actual results may vary due to the differences in gear, temperature, load, wind speed, road conditions and other factors.
Maximum load 150KG / 330lbs.
Maximum speed 20mph
Motor torque
Battery capacity
48V 14.25Ah
Maximum range 104 km/65 MI
Tire size
20 x 4" Front / Rear
Tire pressure
No m ore than 20 PSI
54.6V 8A
EP-2 3.0
Product model
Charger
2h
34.2kg / 75.4 lbs.
25 kg / 55 lbs.
IPX4
Bike weight
Charging time
W aterproof rating
Maximum load capacity of
rear rack
Frame material
Magnesium Alloy
90Nm
Product parameters
4.Ser vic e guide
4.3 Pr o duct par amet er s
FCC STATEMENT
FCC STATEMENT
1. This device complies with Part 15 of the FCC Rules. Operation is subject to the following two conditions:
(1) This device may not cause harmful interference, and
(2) This device must accept any interference received, including interference that may cause undesired operation.
2. Changes or modifications not expressly approved by the party responsible for compliance could void the user's authority to operate the
equipment.
NOTE: This equipment has been tested and found to comply with the limits for a Class B digital device, pursuant to Part 15 of the FCC
Rules. These limits are designed to provide reasonable protection against harmful interference in a residential installation.
This equipment generates, uses and can radiate radio frequency energy and, if not installed and used in accordance with the instructions,
may cause harmful interference to radio communications. However, there is no guarantee that interference will not occur in a particular
installation. If this equipment does cause harmful interference to radio or television reception, which can be determined by turning the
equipment off and on, the user is encouraged to try to correct the interference by one or more of the following measures:
Reorient or relocate the receiving antenna.
Increase the separation between the equipment and receiver.
Connect the equipment into an outlet on a circuit different from that to which the receiver is connected.
Consult the dealer or an experienced radio/TV technician for help.
FCC Radiation Exposure Statement
This equipment complies with FCC radiation exposure limits set forth for an uncontrolled environment. This equipment should be installed
and operated with a minimum distance of 20 cm between the radiator and your body.
FCC STATEMENT
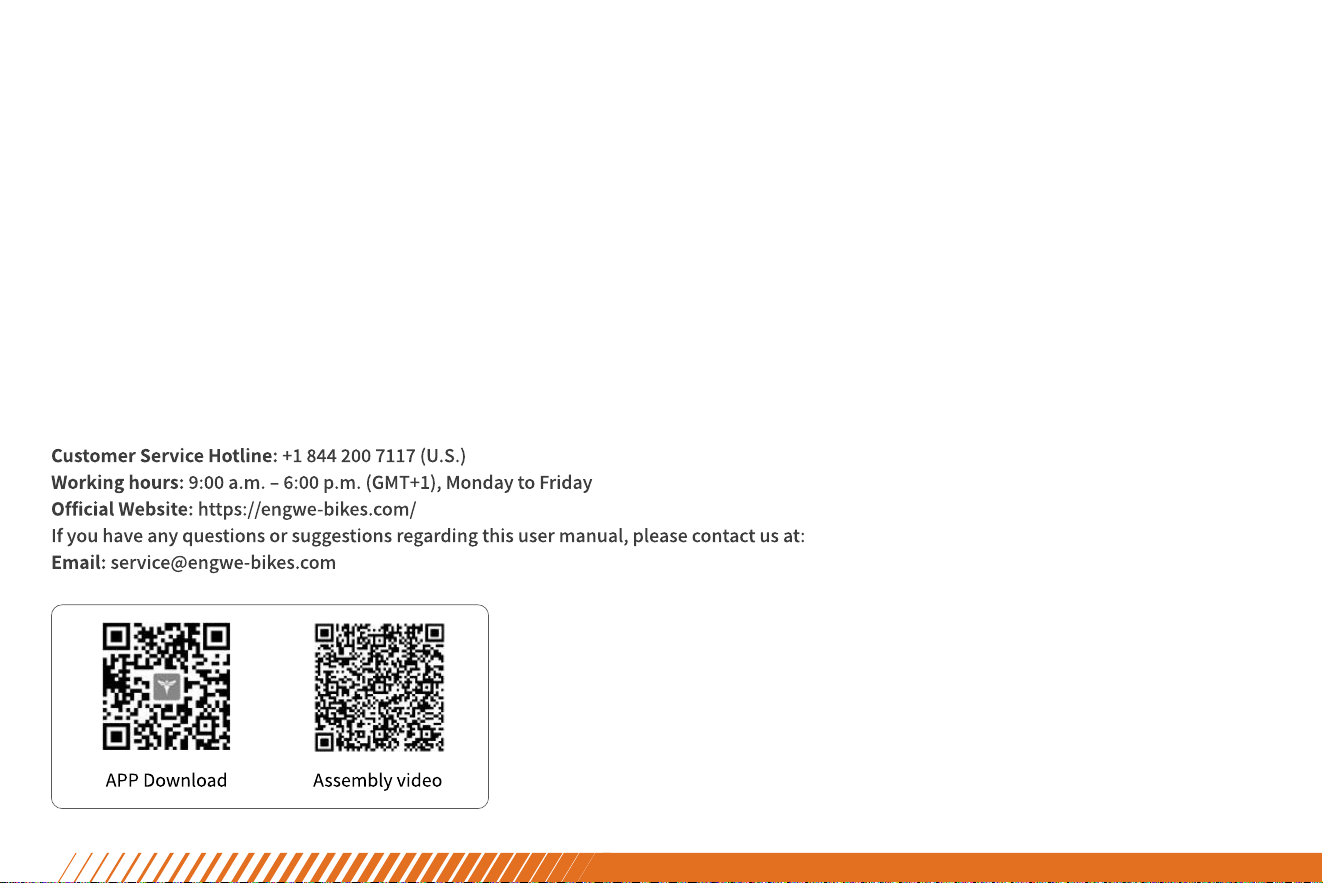
Customer Service Hotline: +1 844 200 7117 (U.S.)
Working hours: 9:00 a.m.
‒
6:00 p.m. (GMT+1), Monday to Friday
Official Website: https://engwe-bikes.com/
If you have any questions or suggestions regarding this user manual, please contact us at:
Email: service@engwe-bikes.com
Assembly videoAPP Download