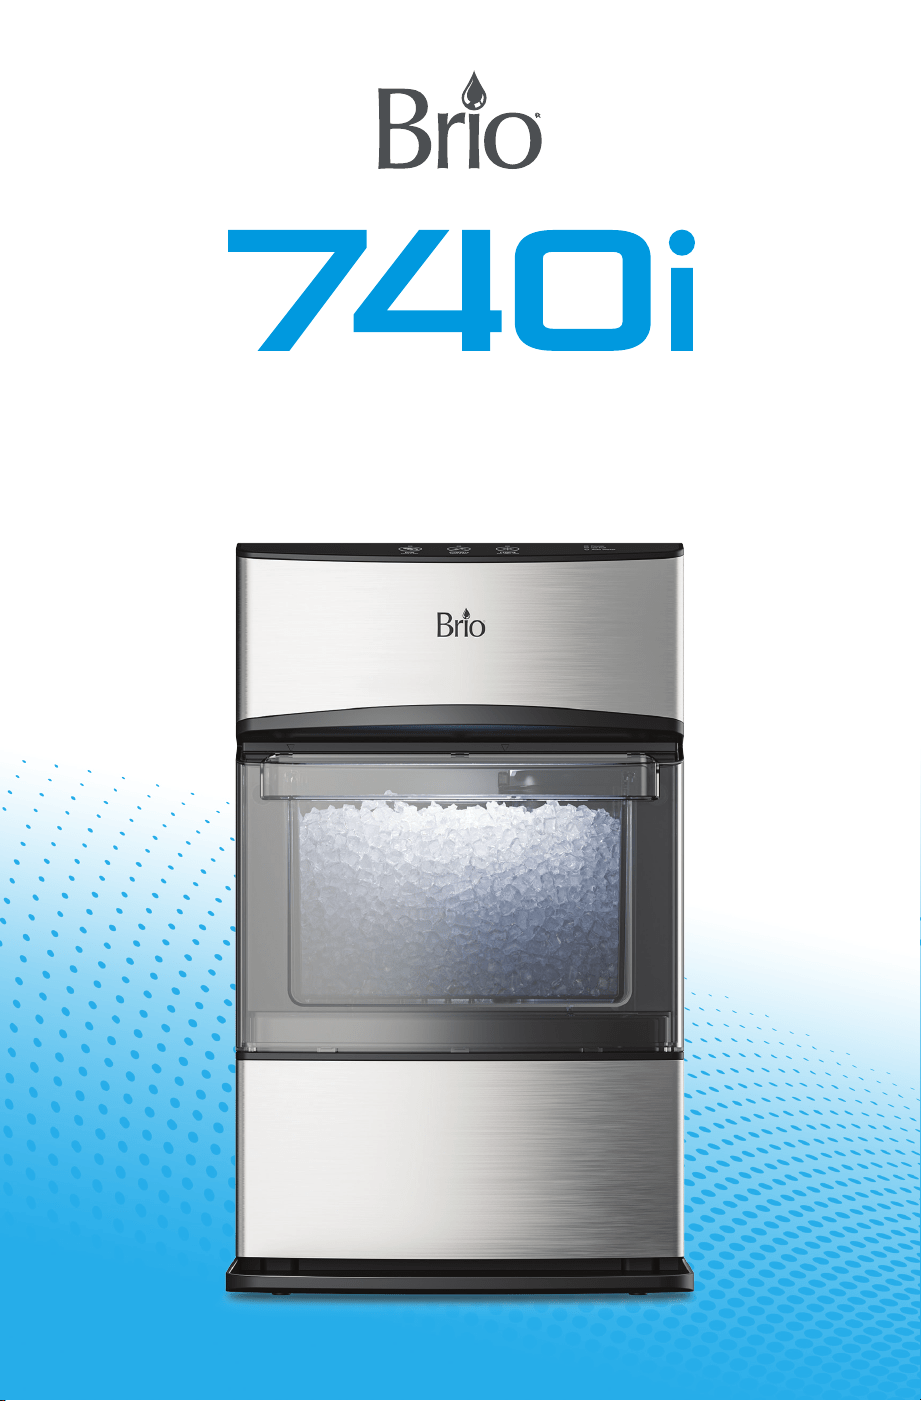
Setup Manual
Model No.: IMCT740ISC
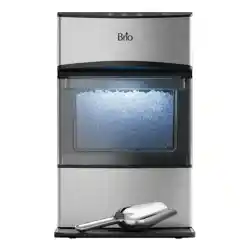
Countertop Nugget Ice Maker

2
Table of Contents
Safety Information .........................................................3
Intended Use .............................................................4
Product Features ..........................................................4
Control Panel Description ...................................................5
Operational and Technical Specifications ......................................5
Installation ...............................................................6
Determine Installation Location ..............................................6
Install Ice Scoop and Drip Tray ...............................................6
Operation ................................................................7
Connecting the Ice Maker ...................................................7
Fill Side Water Tank and Run Clean Cycle .....................................7
Make Ice ..................................................................8
Adjust Ice Storage Bin Light .................................................8
Open Ice Storage Bin Drawer ................................................8
Refill Side Water Tank .......................................................9
Troubleshooting ...........................................................9
Normal Operating Sounds ..................................................10
Cleaning and Maintenance ................................................10
External Cleaning .........................................................10
Descale the Ice Maker ......................................................11
Warranty ................................................................12

3
Safety Information
WARNING: To reduce risk of injury and property damage, you must read this entire
guide before assembling, installing and operating the ice maker.
• For indoor use only. Keep the ice maker in a dry place away from direct sunlight.
Do NOT use outdoors.
• Install and use only on a hard, flat and level surface.
• Do NOT place the ice maker in an enclosed space or cabinet.
• Do NOT operate ice maker in the presence of explosive fumes.
• Use only properly grounded outlets.
• Do not use an extension cord.
• Always grasp the plug and pull straight out from the outlet. Never unplug by
pulling on the power cord.
• Do NOT use the ice maker if the cord becomes frayed or otherwise damaged. If
the supply cord is damaged, it must be replaced by the manufacturer, its service
agent or similarly qualified persons in order to avoid a hazard.
• To protect against electric shock, do NOT immerse cord, plug, or any other part of
the ice maker in water or other liquids.
• Do NOT use ice maker with water that is microbiologically unsafe or of unknown
quality.
• Ensure the ice maker is unplugged prior to cleaning.
• Unplug the unit to prevent unsupervised use by children.
• Service should be performed only by a certified technician.
• The appliance must not be cleaned by a water jet and is not suitable for
installation in an area where a water jet could be used.
• Never turn the ice maker upside down or lean it more than 45°.
WARNING: Designed for use with 120V AC power only. DO NOT use with 220V outlet.
4
Intended Use
This ice maker is intended to be used in household and similar applications such as:
• Sta kitchen areas, oces, and other working environments
• Houses, apartments, and other residential-type environments
• Hotels, motels, bed-and-breakfasts, short-term rentals, and other hospitality-type
environments
• Catering and similar non-retail applications
This ice maker is not intended for use by persons (including children) with reduced
physical, sensory or mental capabilities, or lack of experience and knowledge, unless they
have been given supervision or instruction concerning use of the appliance by a person
responsible for their safety.
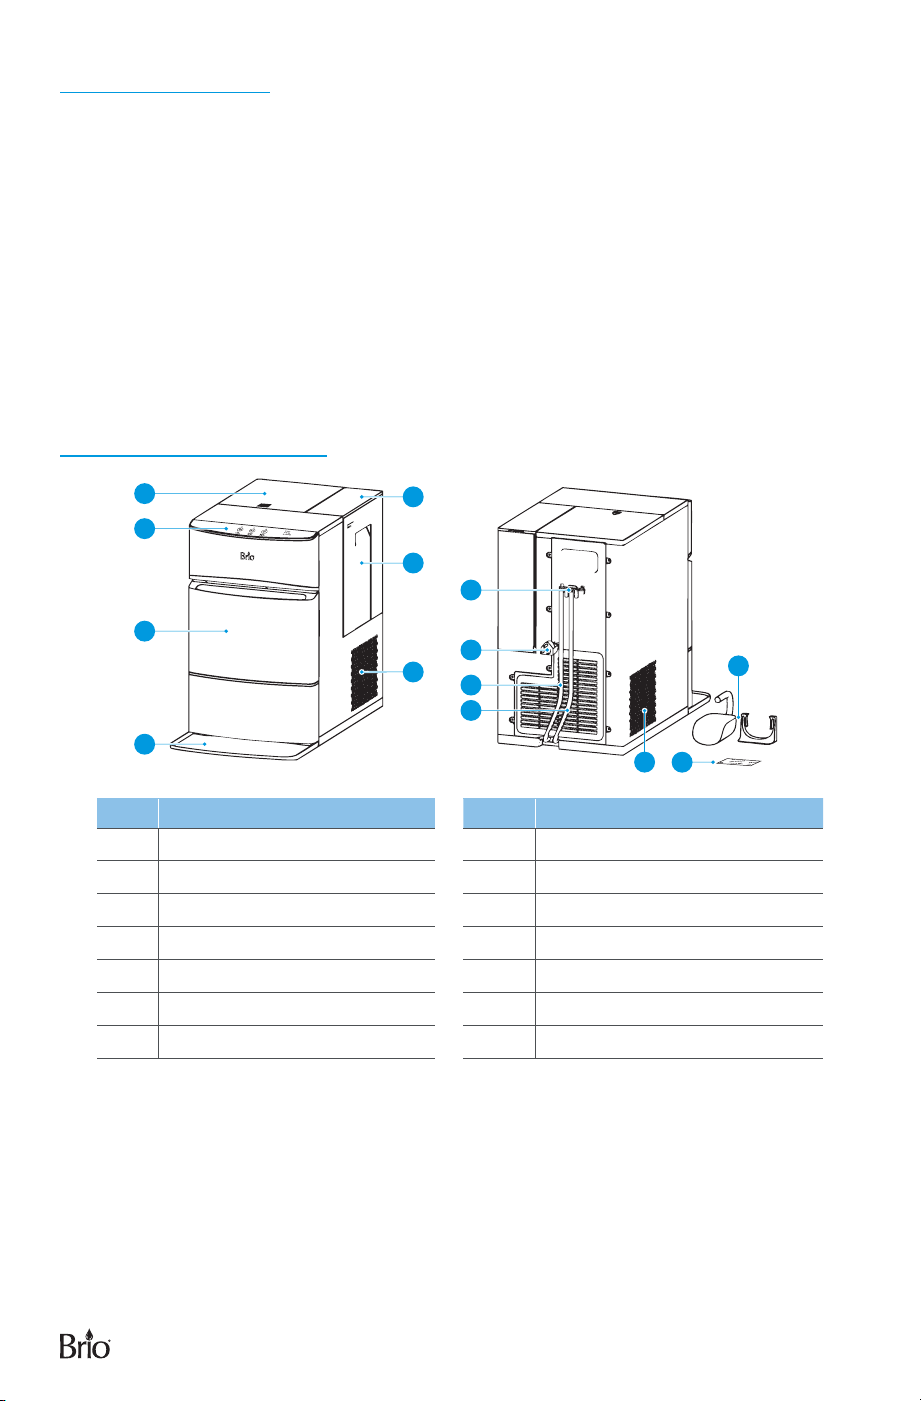
Product Features
2
3
1
5
6
7
13
12
8
9
10
11
4
14
Part Description Part Description
1 Top lid 8 Drain-tube plug bracket
2 Control Panel 9 Power cord
3 Ice storage bin drawer 10 Top water tank drain tube
4 Drip tray 11 Bottom water tank drain tube
5 Side water tank lid 12 Cold air inlet
6 Side water tank 13 Ice scoop & holder
7 Hot air outlet 14 Extra adhesive tape
5
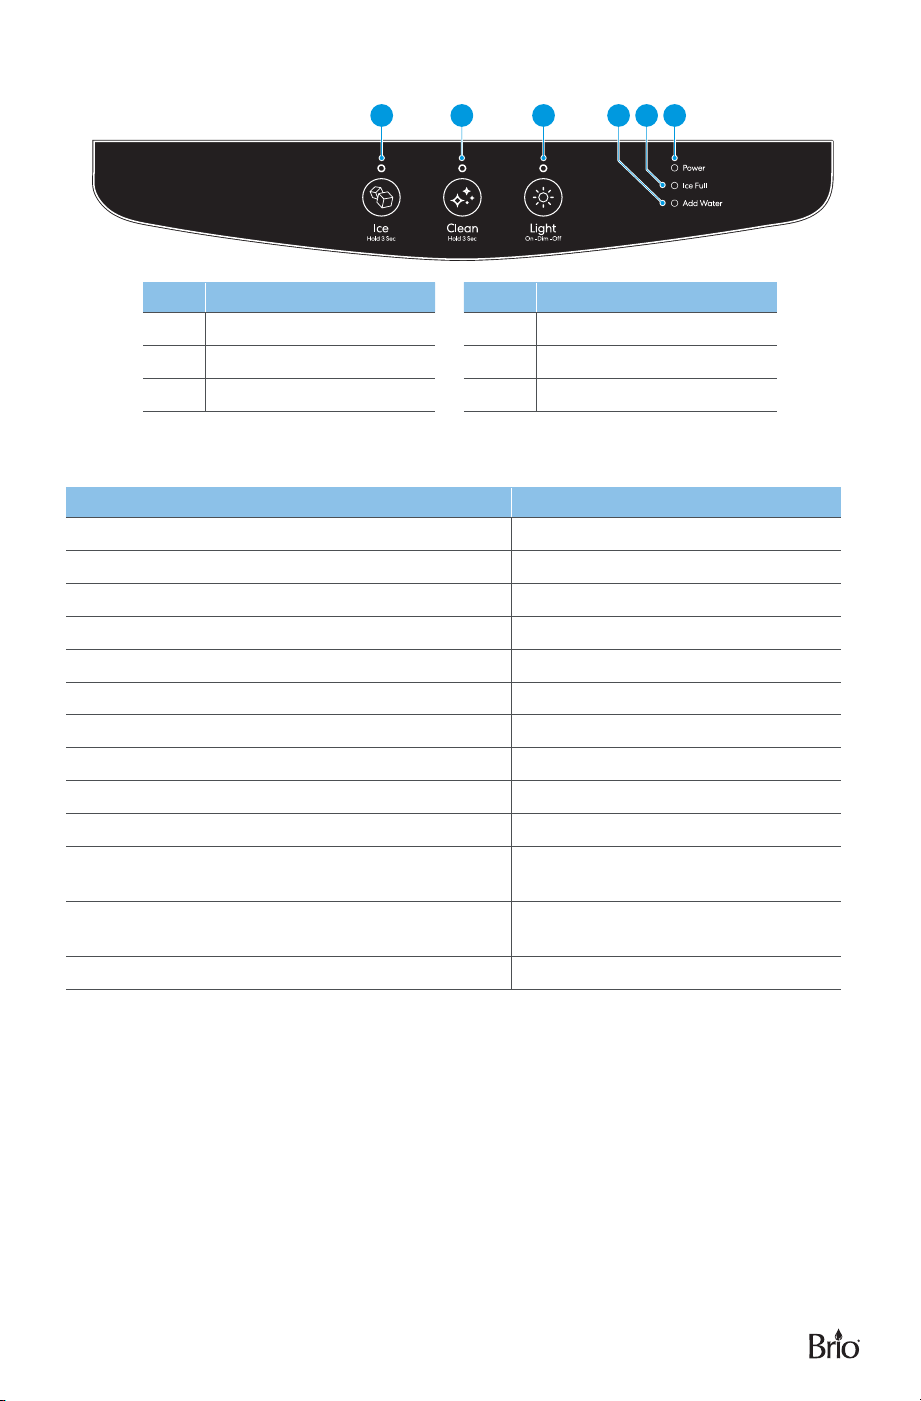
Control Panel Description
1 2 3 654
Part Description Part Description
1 Ice button & indicator 4 Add Water indicator
2 Clean button & indicator 5 Ice Full indicator
3 Light button & indicator 6 Power indicator
Operational and Technical Specifications
Model No. IMCT740ISC
Current 2.2 A
Rated Voltage / Frequency 115 V / 60 Hz
Watts 250 W
Ice Storage Capacity 4.0 lb (1.81 kg)
Ice-Making Rate 44 lb / 24 h
Initial Ice Production Time 10-15 mins.
Side Water Tank Capacity 0.68 gal / 2.57 L / 87 fl oz
Source Water Type Potable Water
Operating Water Temperature 50°F – 70°F (10°C – 21°C)
Net Weight 28.7 lb (13 kg)
Product Dimensions with Drip Tray (WxHxD)
10.04 x 16.53 x 18.9 in. (25.5 x 42 x
48 cm)
Noise (dBA)
40 – 50 dB at approximately
1 meter distance
Power Cord Length 72 in. (180 cm)
6
Installation
Determine Installation Location
1. After unboxing, thoroughly wipe down the ice maker interior, ice storage bin drawer,
and side water storage tank with lukewarm water and a soft cloth.
2. Locate ice maker on a hard, level surface away from direct sunlight and other heat
sources, such as stoves, furnaces, and radiators.
3. Position the back of the ice maker at least 6 in. (15 cm) from the wall, and the cold air
intake side at least 8 in. (20 cm) from the wall. Insucient airflow/ventilation space
may negatively impact ice-making capability and product lifespan.
IMPORTANT: Ensure ice maker stands upright for at least one hour BEFORE plugging
in to allow oil to settle back into the compressor. Failure to do so may
damage compressor and void warranty.
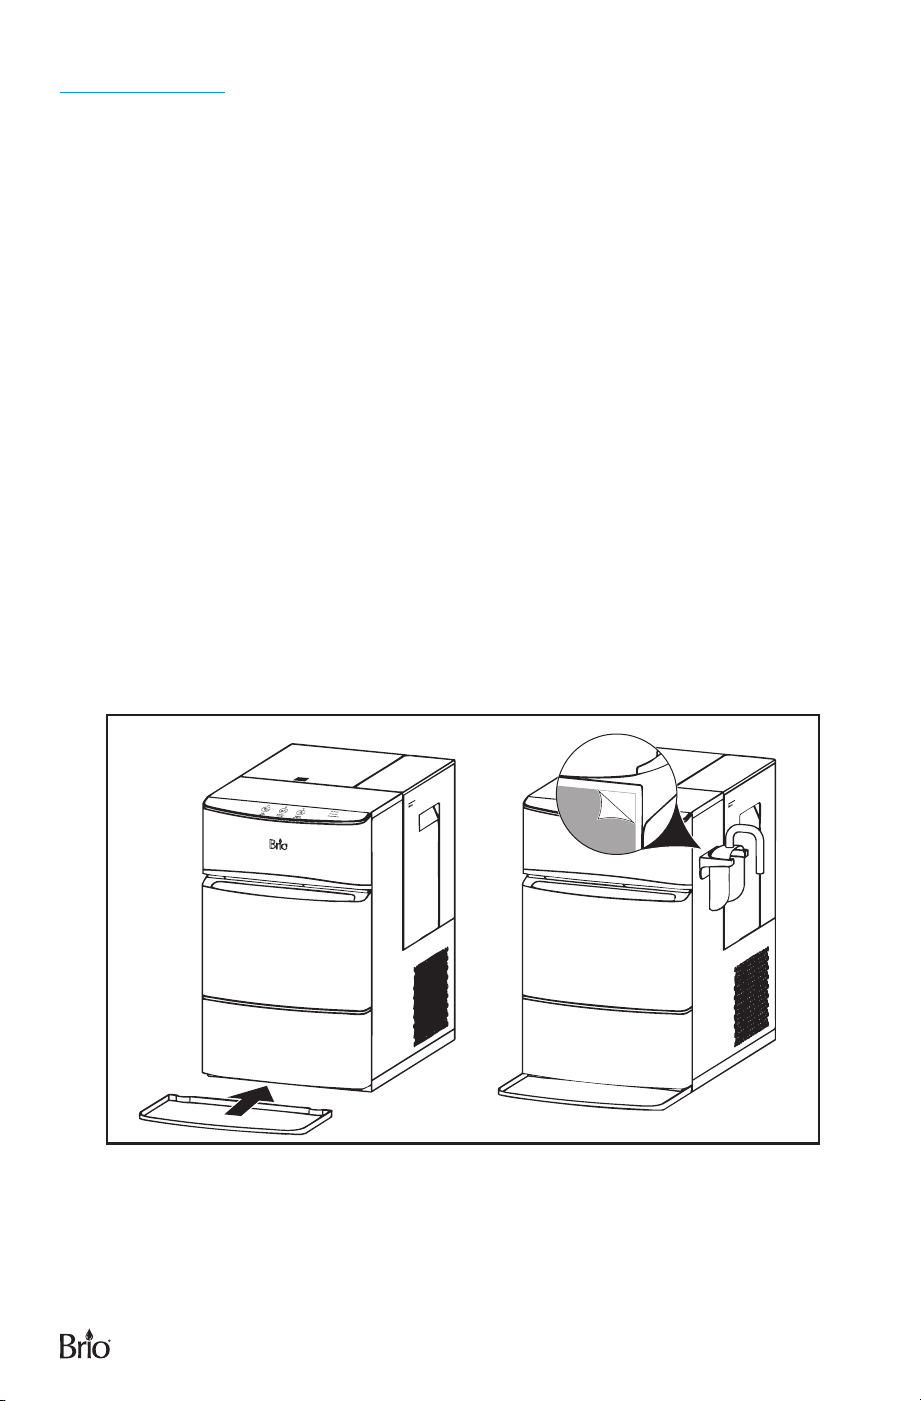
Install Ice Scoop Holder and Drip Tray
1. To attach the ice scoop holder, select your preferred side of the ice maker. Ensure it’s
clean and dry.
2. Peel o the backing from the adhesive pad on the ice scoop holder. Firmly press the
ice scoop holder against the side of the ice maker for 30 seconds.
3. Wait at least one hour before placing ice scoop in holder. This will allow the adhesive
bond to reach its full strength.
4. Attach drip tray to small tabs at base of ice maker.
7
Operation
STEP 1: Connecting the Ice Maker
WARNING: Improper use of the grounding plug can lead to risk of electrical shock.
Do not use if power cord is damaged.
1. For your safety this ice maker should be properly grounded. The power cord of this
ice maker is equipped with a grounding plug that matches a standard grounded wall
socket to minimize risk of electric shock.
2. Ice maker should be connected into a dedicated, properly installed grounded
wall socket. Under no circumstances should the grounding device of the plug
be tampered with. If you have any questions about power supply, contact a
licensed electrician.
3. This ice maker requires a standard 115V / 60Hz power outlet with proper
grounding device.
STEP 2: Fill Side Water Tank and Run Clean Cycle
IMPORTANT: We strongly recommend
running the clean cycle
before first use and if the
ice maker has not been
used for an extended
period of time.
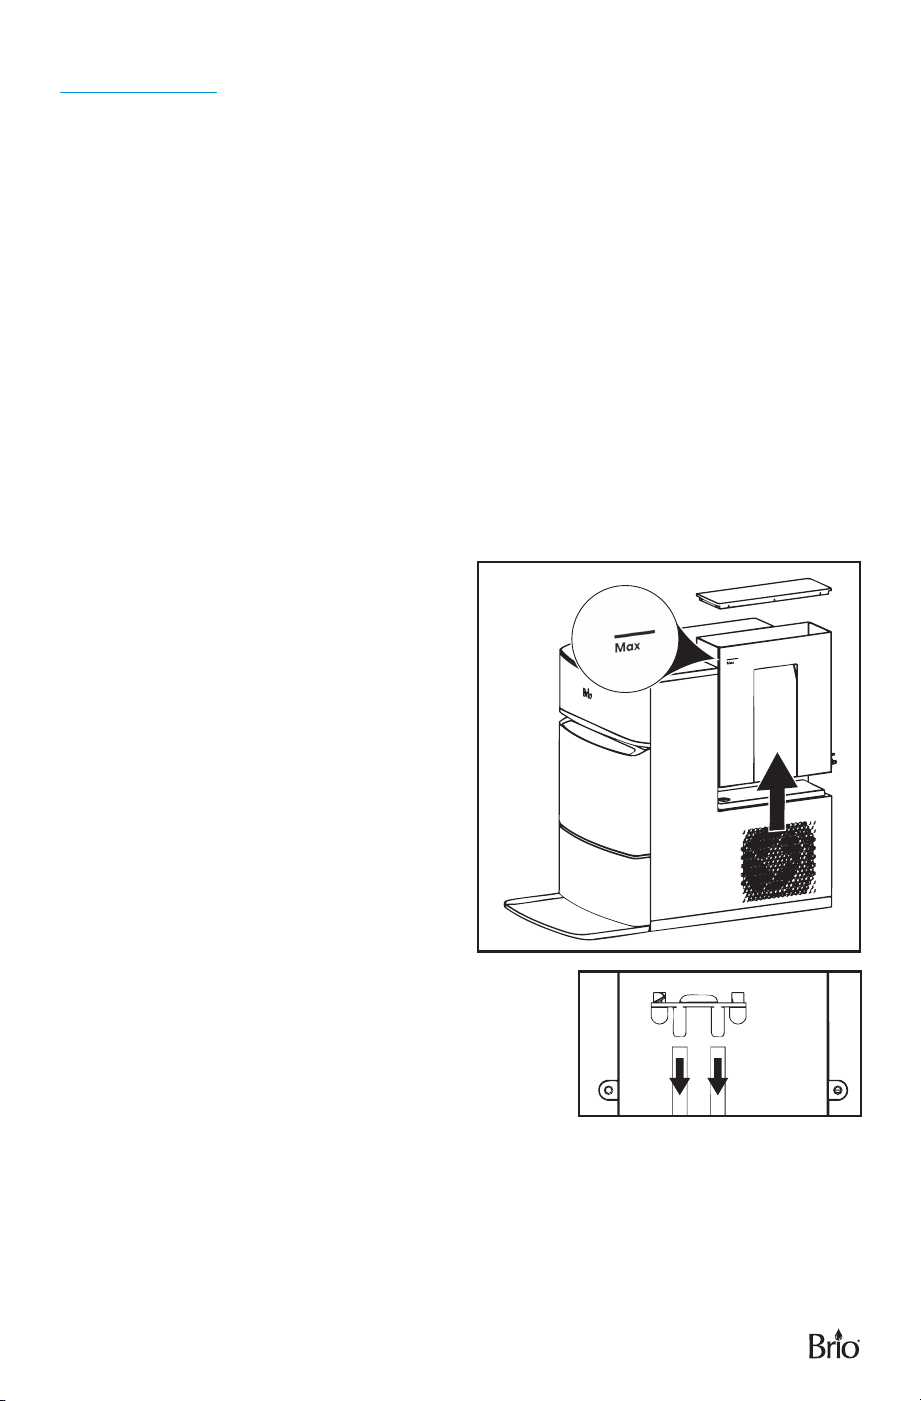
1. Remove side water tank by grasping
handle and pulling straight up until tank
disengages from latches.
2. Remove the side water tank lid and fill
side water tank with potable water to
the MAX line.
3. Reinstall lid. Align tank with side of
ice maker, then slide down to engage
latches. Move tank down until it sits
securely on base.
4. Plug in the ice maker. All indicator lights
will turn on and then o. The power indicator
light will remain on.
5. Touch and hold the Clean button for 3 seconds.
The indicator will illuminate, and the ice maker will
run the clean cycle for approximately 20 minutes,
after which the indicator will turn o. To stop the
cleaning process at any time, touch and hold the
Clean button for 3 seconds.
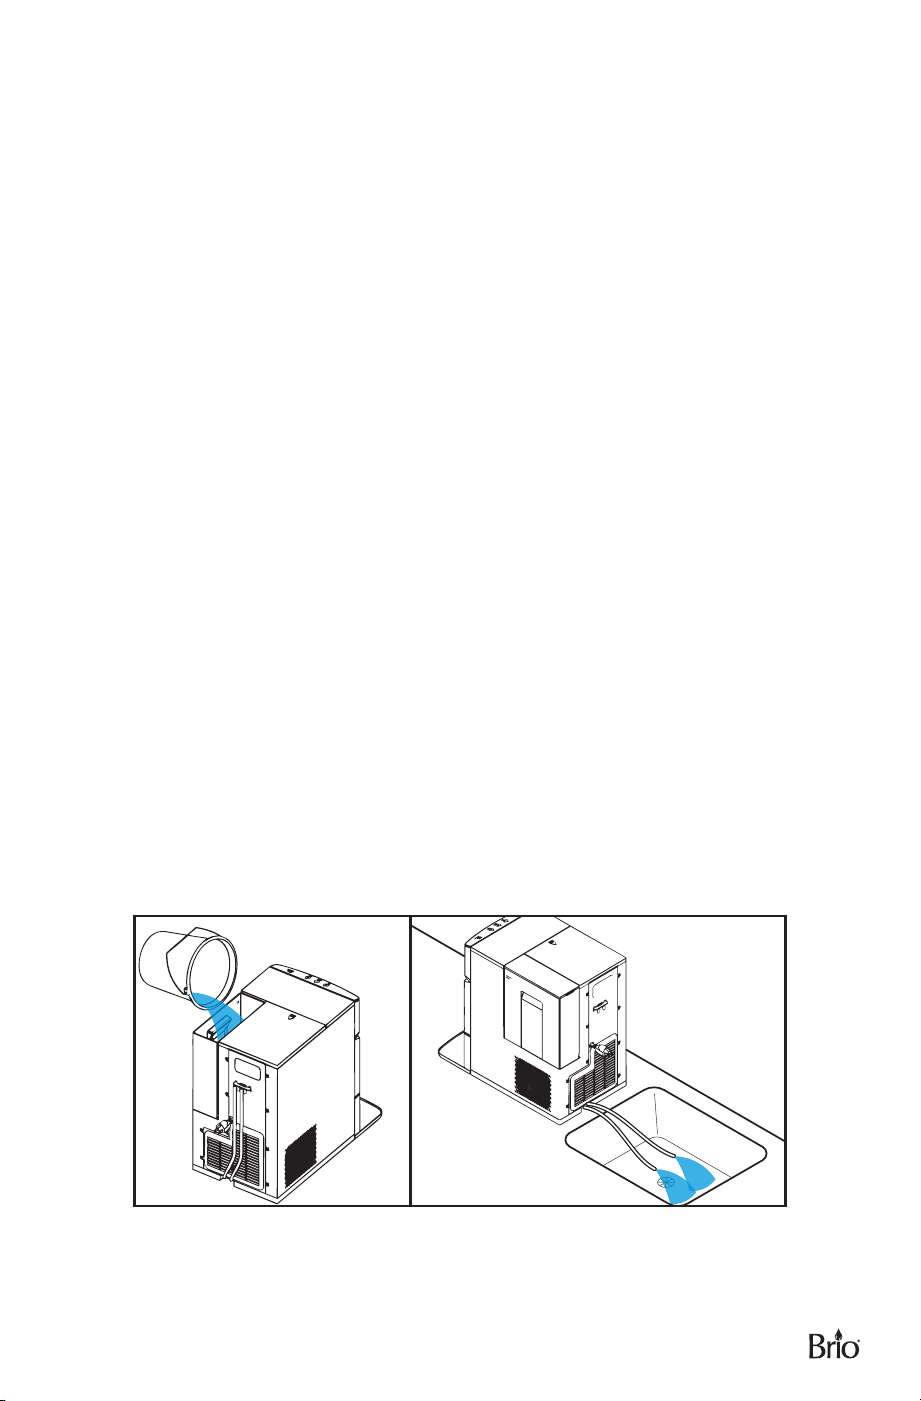
6. After the clean cycle ends, move the ice maker to the edge of a sink or other
receptacle.
7. Lift up the drain-tube plug bracket to remove it from the back of the ice maker. Unplug
the top and bottom tank drain tubes from bracket.
8
8. Position the open end of each tube into the sink or receptacle and allow all water to
drain out.
9. After ice maker tanks have drained, reattach tubes to plug bracket, then
reinstall bracket.
STEP 3: Make Ice
1. Fill the side water tank with potable water to the MAX line.
NOTE: Use of warmer water will slow down initial ice production. Optimal source
water temperature is 50°F to 70°F (10°C to 21°C).
2. Touch and hold the Ice button for 3 seconds. The indicator will illuminate, indicating
ice production has commenced. Touch and hold the button for 3 seconds at any time
to stop the process.
3. Regularly check the water level in the side tank. If the water level falls too low, the
ice maker will stop ice production and the Add Water indicator will illuminate. If this
happens, refill the side tank, then touch and hold the Ice button for 3 seconds to
restart the ice-making process.
4. When the Ice Full indicator illuminates, the ice storage bin drawer is full, and the ice
maker will automatically stop making ice.
NOTE: The actual volume of ice produced can vary due to changes in environmental
conditions, such as temperature, humidity, water quality, and pressure.
STEP 4: Adjust Ice Storage Bin Light
The ice storage bin drawer has an internal light that allows you to see ice status. To access:
1. Repeatedly touch the Light button to cycle through light options: bright, dim, and o.
STEP 5: Open Bin, Scoop Ice, and Enjoy
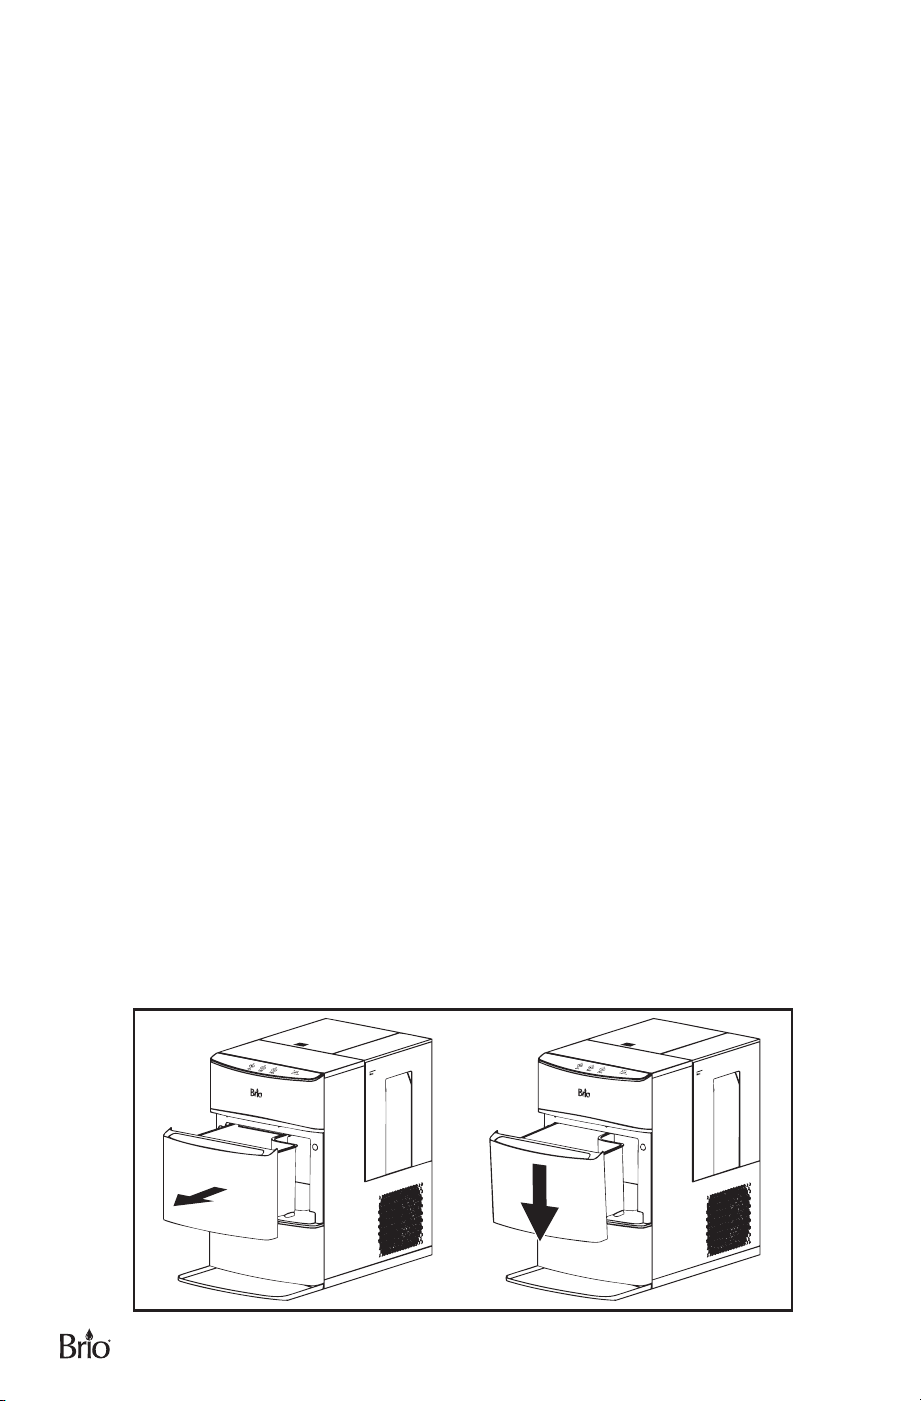
1. Grasp the handle and pull storage bin drawer straight out until it meets resistance.
Allow drawer to rest at an angle on the front opening edge.
2. Use ice scoop to retrieve ice.
3. To close the storage bin drawer, grasp the handle, lift up drawer, and push back into
ice maker.
NOTE: The storage bin drawer can be completely removed from the ice maker by
pulling it out, then angling it upward to detach it from unit.
9
Refill Side Water Tank
When the Add Water indicator illuminates, the side water tank needs to be refilled:
1. Grasp side water tank handle and lift tank straight up until it tank disengages
from latches.
2. Remove the tank lid and fill side water tank with potable water to the MAX line.
3. Reinstall the side tank lid. Align tank with side of ice maker, then slide down to
engage latches. Move tank down until it sits securely on base. Touch and hold the Ice
button for 3 seconds to restart ice-making process.
NOTE: Alternatively, side water tank can be refilled without removing. To do so,
remove lid and fill tank with potable water to MAX line. Do NOT overfill so that
water spills from tank into base.
Troubleshooting
Problem Probable Cause Solution
“Add Water”
indicator light is on.
Side tank water
level is too low.
Refill the side water tank, then touch and
hold Ice button for 3 seconds to restart the
process.
“Ice Full” indicator
light is on but there
is no ice in the
storage bin.
There is a possible
obstruction in ice
storage bin.
Clear any potential obstructions or clean the
inner walls of the ice storage bin by wiping
down interior. If you continue to experience a
problem, simultaneously touch and hold the
Ice and Clean buttons for 5 seconds. The unit
will continue making ice for 60 minutes. The
Ice icon will slowly blink during this process.
Power and Ice
indicators are
flashing.
Ambient
temperature or
water temperature
is too warm.
Use ice maker in a room where the air
temperature and water temperature are
below 70°F (21°C).
Ice making is slow.
Hot air outlet is
blocked.
Ensure there is at least 6 in. (15 cm) of
clearance between the outlet and wall for
proper ventilation.
Water temperature
in the top internal
tank is too high.
Fill the side water tank with water that is
between 50°F (10°C) and 70°F (21°C).
There is a water
leak.
Back drain tubes
are not installed
properly.
Unplug drain tubes from drain-tube plug
bracket, then plug in again, ensuring a
secure fit.
Ice bin light is not on
or is dim.
Ice bin light has not
been turned on or
is in “dim” mode.
To turn on or brighten ice bin light,
repeatedly touch Light button to cycle
through 3 modes: bright, dim, and o.
Control panel
buttons are
unresponsive.
There is moisture
or residue on the
control panel.
Unplug the unit, then wipe the control
panel clean.

10
Normal Operating Sounds
The ice maker may make sounds that are unfamiliar to you. Most are normal. Hard
surfaces, like countertops, can amplify these sounds. Here are some of the normal sounds
you may hear:
Buzzing: When the water pump first turns on, the ice maker will make a buzzing sound.
After the ice maker is filled with water, the buzzing will diminish significantly.
Squeaking: When the ice maker needs to be defrosted, you may hear a light squeaking
as ice builds up. If the squeaking becomes more frequent, run a clean cycle using citric
acid crystals to dissolve mineral deposits. Mineral deposits can cause the ice maker to get
stuck in the freeze cycle which causes frost to buildup.
Humming: The compressor is the motor of the ice maker, and you’ll hear a low, steady
humming while it’s running.
Cleaning and Maintenance
External Cleaning
WARNING: Electric Shock Hazard. Always disconnect ice maker from power before
performing any maintenance.
• Gently wipe external surfaces with a soft, clean cloth dipped in soapy water. Dry with
a clean cloth.
• Remove ice storage bin drawer and set aside. Use a clean, damp cloth to wipe
bottom water tank clean. DO NOT use soap or soapy water. Use fresh water only.
IMPORTANT: Ice storage bin drawer is NOT dishwasher safe. Manually clean
with a gentle detergent and clean water. Rinse and dry thoroughly
before reinstalling.
• From time to time, melted ice water will need to be drained from the bottom tank. To
drain, detach bottom tank drain tube on back of ice maker and route open end into
sink or receptacle. Allow water to drain out. Reinstall drain tube.
• If ice maker is not going to be used for an extended period of time, dispose of ice,
drain all water tanks, and unplug unit. Run clean cycle before using again.
11
Descale the Ice Maker
Depending on hardness of source water, the ice maker should be descaled every 2 to 3
weeks to remove mineral buildup and optimize ice maker performance.
Gather the following supplies:
• 150g Citric acid crystals
• 2.5 Liters water
1. Unplug ice maker, then empty all ice from ice storage bin drawer. Reinstall bin drawer
if it’s been removed.
2. Move the ice maker to the edge of sink or other receptacle.
3. Lift up the drain-tube plug bracket to remove it from the back of the ice maker. Unplug
the top and bottom tank drain tubes from bracket.
4. Position the open end of each tube into the sink or receptacle and allow all remaining
water to drain out.
5. After ice maker tanks have drained, reinstall bracket and tubes.
6. Prepare descaling solution by combining citric acid crystals and water. Stir solution
until crystals have completely dissolved.
7. Remove side tank lid and pour descaling solution into side water tank. Reinstall lid.
Plug in ice maker.
8. Touch and hold the Clean button for 3 seconds and allow cleaning process to take
place for approximately 5 minutes. This will distribute descaling solution throughout
ice maker. Unplug ice maker again. Allow descaling solution to sit in ice maker for 12
to 18 hours.
9. Plug in the ice maker. Touch and hold the Clean button for 3 seconds. Allow entire
cleaning process to take place, approximately 20 minutes.
10. When the Clean indicator turns o, the cleaning process is done. Drain all cleaning
solution from tanks by following steps 3 through 5.
11. Thoroughly rinse interior by repeating steps 7 to 10 twice more with fresh, clean
water, and omitting 12 to 18 hour wait period.

12
Warranty
Brio (“Vendor”) warrants to the original purchaser of the Brio Ice Maker (the “Product”),
and to no other person, that if the Product is assembled and operated in accordance with
the printed instructions accompanying it, then for a period of one (1) year from the date of
purchase, all parts in the Product shall be free from defects in material and workmanship.
This Limited Warranty shall be limited to repair or replacement of parts, which prove
defective under normal use and service and which Vendor shall determine in its
reasonable discretion upon examination to be defective. To take advantage of this Limited
Warranty, please follow these steps:
1. Please retain your sales slip or invoice, as Vendor may require reasonable proof of your
date of purchase.
2. Contact Vendor’s Customer Service Department using the contact information listed
below.
3. Return parts to Vendor, per Vendor’s instructions, at your cost and expense.
4. Upon receipt by Vendor, Vendor shall advise you in writing whether a defect covered
by this Limited Warranty exists in any returned part and whether your claim has been
approved or denied.
5. Upon Vendor’s approval of your claim, Vendor will replace such defective part without
charge to you.
WHAT THIS LIMITED WARRANTY DOES NOT COVER: This Limited Warranty does not
cover any failures or operating diculties of the Product due to accident, abuse, misuse,
alteration, misapplication, improper installation or improper maintenance or service by you
or any third party, or failure to perform normal and routine maintenance on the Product, as
set out in the User’s Manual. In addition, this Limited Warranty does not cover damages to
the finish, such as scratches, dents, discoloration or rust after purchase.
This Limited Warranty is the only express warranty given on the Product and is in lieu
of all other express warranties. Vendor disclaims all warranties for products that are
purchased from seller other than authorized retailers or distributors. THIS LIMITED
WARRANTY RESTRICTS THE DURATION OF ANY AND ALL IMPLIED WARRANTIES,
INCLUDING WITHOUT LIMITATION, THE IMPIED WARRANTY OF MERCHANTABILITY AND
FITNESS FOR A PARTICULAR PURPOSE TO THE ONE (1) YEAR TERM OF THIS LIMITED
WARRANTY. UPON THE EXPIRATION OF THE ONE (1) YEAR TERM OF THIS LIMITED
WARRANTY, VENDOR DISCLAIMS ANY AND ALL IMPLIED WARRANTIES, INCLUDING
WITHOUT LIMITATION THE IMPLIED WARRANTIES OF MERCHANTABILITY AND FITNESS
FOR A PARTICULAR PURPOSE, THE PRODUCT BEING THUS SOLD AS-IS, WITH ALL
FAULTS. FURTHER, VENDOR SHALL HAVE NO LIABILITY WHATSOEVER TO PURCHASER
OR ANY THIRD PARTY FOR ANY SPECIAL, INDIRECT, PUNITIVE, INCIDENTAL, OR
CONSEQUENTIAL DAMAGES. OTHER THAN THIS LIMITED WARRANTY, THERE ARE NO
WARRANTIES WHICH EXTEND BEYOND THE DESCRIPTION ON THE FACE HEREOF.
Vendor assumes no responsibility for any defects caused by third parties. This Limited
Warranty gives you specific legal rights, and you may have other rights which vary from
state to state. State law may also override statements in this Limited Warranty regarding
the restriction on the duration of implied warranties. Some jurisdictions do not allow
exclusion or limitation of special, incidental or consequential damages, or limitations on
how long awarranty lasts, so the above exclusion and limitations may not apply to you.

13
Intentionally Left Blank

14
Intentionally Left Blank

15
Intentionally Left Blank

WWW.BRIOWATER.COM
©2026 Brio Water Technology, Inc.