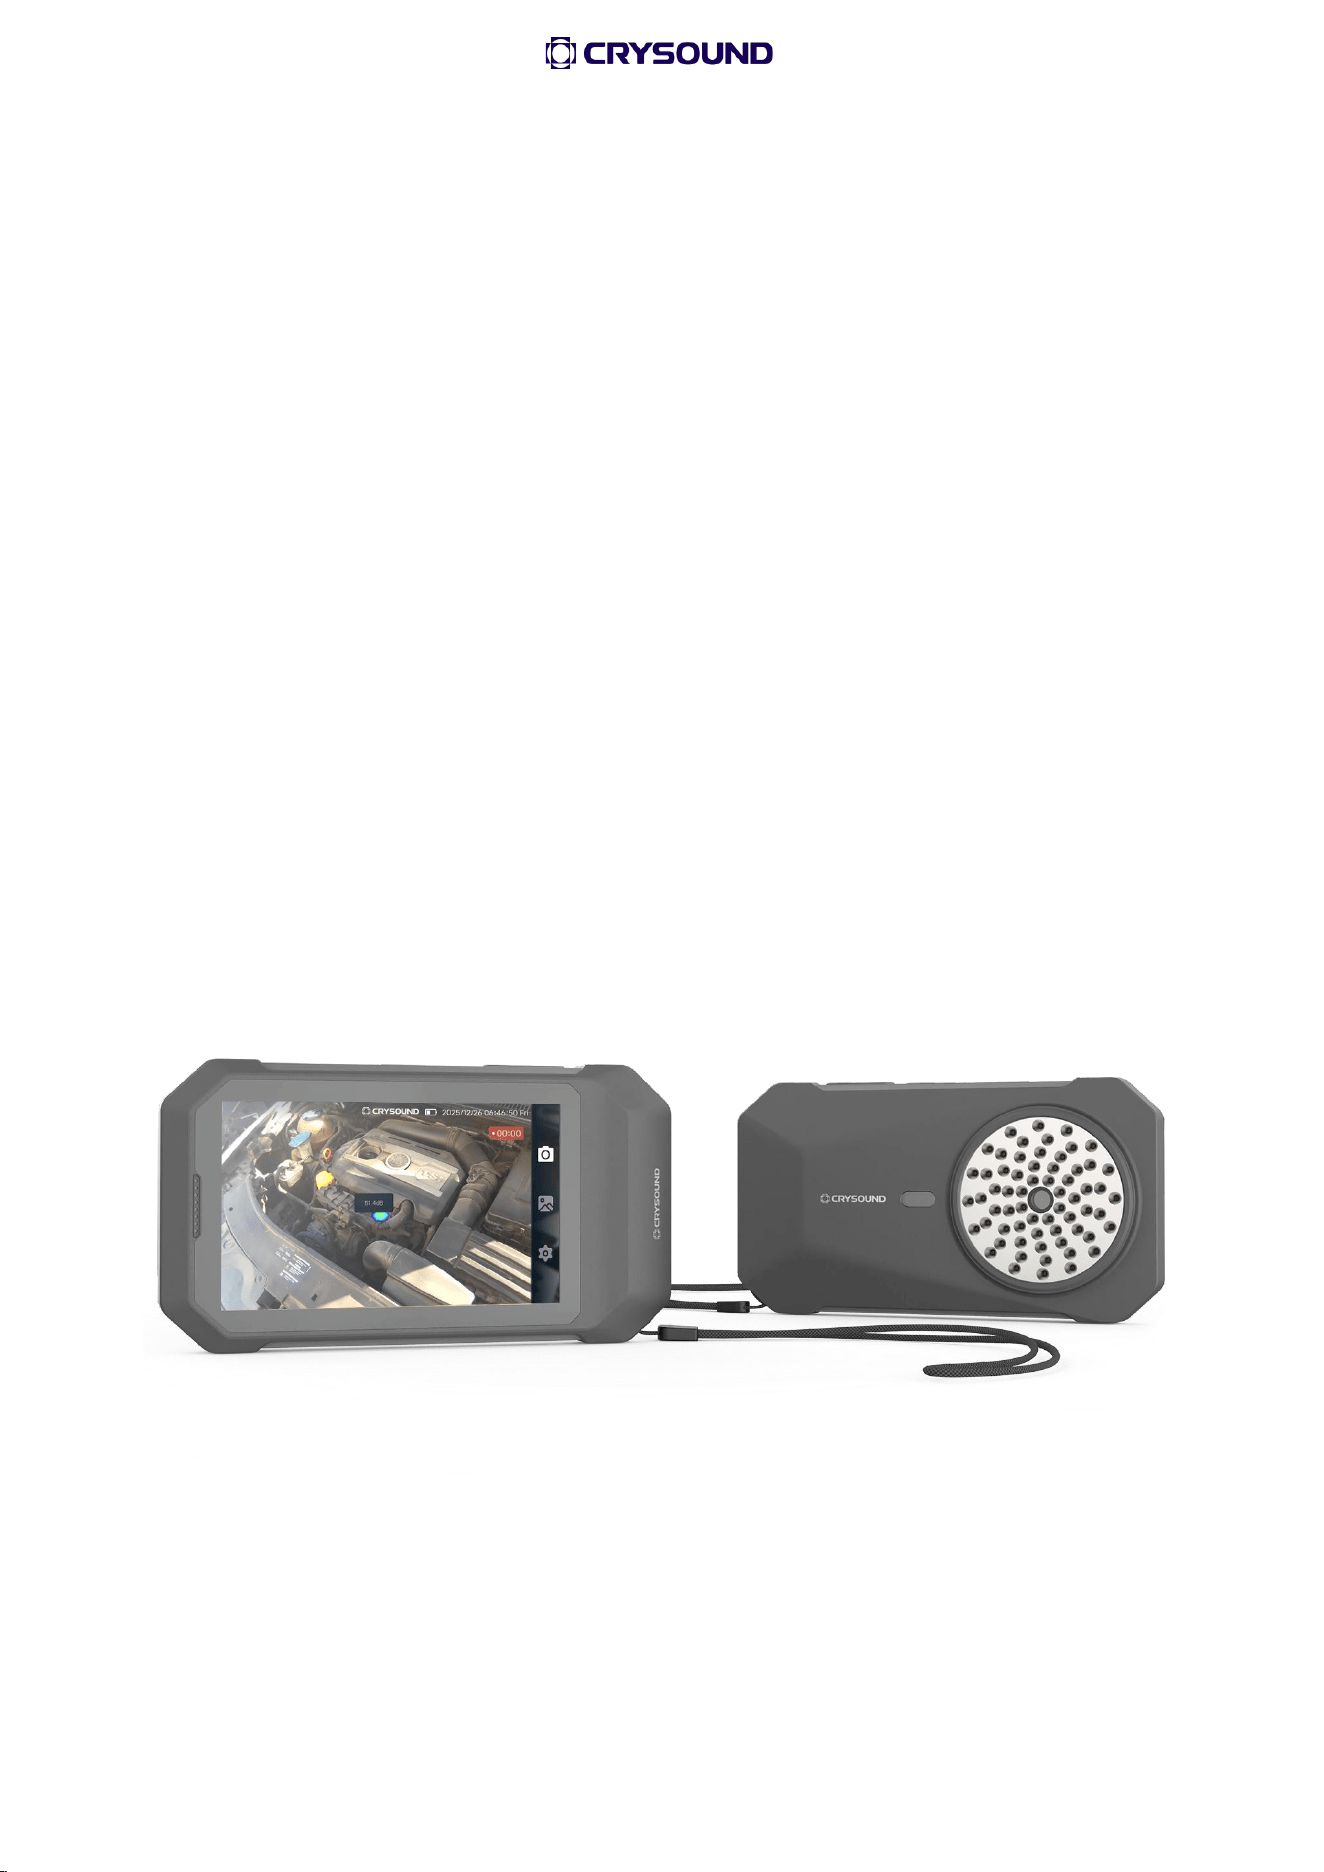
CRY8024
SonoCam Pocket Acoustic Camera
User Manual
02
Table of Contents
01 User Notice 05
02 Introduction 09
03 Glossary 10
04 Product and Accessories 12
4.1 Product Accessory List 12
4.2 Battery and Charging 12
05 Product Instruction 14
5.1 Appearance 14
5.2 Port 15
5.3 Power On 15
5.4 Power Off 16
5.5 Sleep 16
06 Software Functions 17
6.1 Main Interface 17
6.2 Interface Operation 18
6.3 Photos 18
6.4 Dropdown Menu 20
6.5 System Settings 20
03
07 Usage Tips 24
7.1 Capturing Sound Source 24
7.2 Eliminating Reflection Interference 24
7.3 Eliminating Interference Noise 24
7.4 Equipment Maintenance 24
08 Contact Us 26
8.1 Hangzhou Headquarters 26
8.2 Dongguan Branch 26
8.3 U.S. Office 26
04
Revision History
Revision
Number
Description
Revision Date
1.0
⚫ Initial version
2026/02/02
1.1
⚫ Add FCC warning statements.
2026/06/15

05
01 User Notice
Legal Disclaimer
Copyright © 2026 Hangzhou CRYSOUND Electronic Co., Ltd. All rights reserved.
This manual, including its text, images, graphics, and other content, is the
property of Hangzhou CRYSOUND Electronic Co., Ltd. or other authorized
companies. Without written permission, no entity or individual may excerpt,
reproduce, translate, or modify this manual in any way. Hangzhou CRYSOUND
Electronic Co., Ltd. makes no express or implied warranties.
Compliance
This device has been tested and complies with regulations regarding electronic
products. It may cause interference to RF receivers in residential areas, and users
are responsible for resolving such interference. The device is equipped with the CE
mark, indicating compliance with relevant EMC requirements.
This device complies with the limits for Class B electronic devices specified in Part
15 of the FCC Rules. The device generates, uses, and radiates radio frequency
energy. If not installed and used in accordance with the instructions, it may cause
interference to radio communications. This manual serves solely as a guide for the
specific model of the product and may differ from the actual product. Please refer
to the physical product itself for accurate information and specifications.
In the event of product version upgrades or other requirements, CRYSOUND may
update this manual. The latest version of the manual can be viewed on the device
itself or accessed on the official website of CRYSOUND.
Warranty and Calibration
This product is covered by free warranty repair for abnormalities or malfunctions
within two years from the date of purchase. The free warranty repair service does
not cover issues caused by improper use or accidental damage such as drops.
Unauthorized disassembly of the product will void warranty.
In case of malfunctions caused by improper use or accidental damage, we offer
repair services at cost price. The device is calibrated during the manufacturing
process. We recommend sending the device back to the manufacturer for

06
calibration, testing, and maintenance every two years to ensure optimal
performance during prolonged use.
Safety Usage Reminder
To prevent potential fire or personal injury, please note:
1. Please carefully read the content of this safety notice before using the product.
2. Only use the product for its designated purpose.
3. Do not disassemble the device without authorization.
4. If the device experiences any malfunctions or abnormal heating, please stop
using it.
5. Please contact the manufacturer for device repair services.
6. Do not place the device near heat sources, flames, or in high-temperature
environments.
7. Prohibit the use of all cable connectors and sensors in hazardous areas.
8. Prohibit charging in hazardous areas.
Limitations of the GHz Frequency Range
According to Article 10(10) of Directive 2014/53/EU, as indicated in the packaging
instructions, when selling this wireless radio equipment in Belgium (BE), Bulgaria
(BG), Czech Republic (CZ), Denmark (DK), Germany (DE), Estonia (EE), Ireland (IE),
Greece (EL), Spain (ES), France (FR), Croatia (HR), Italy (IT), Cyprus (CY), Latvia (LV),
Lithuania (LT), Luxembourg (LU), Hungary (HU), Malta (MT), Netherlands (NL),
Austria (AT), Poland (PL), Portugal (PT), Romania (RO), Slovenia (SI), Slovakia (SK),
Finland (FI), Sweden (SE), Northern Ireland (UK), Turkey (TR), Norway (NO),
Switzerland (CH), Iceland (IS), and Liechtenstein (LI), the wireless local area
network (WLAN) function is restricted and limited to indoor use within the
frequency range of 5150 to 5250 MHz.
FCC Warning
This device complies with part 15 of the FCC Rules. Operation is subject to the
following two conditions:
(1) this device may not cause harmful interference, and (2) this device must
accept any interference received, including interference that may cause undesired
operation.

07
This equipment has been tested and found to comply with the limits for a Class B
digital device, pursuant to part 15 of the FCC Rules. These limits are designed to
provide reasonable protection against harmful interference in a residential
installation. This equipment generates, uses and can radiate radio frequency
energy and, if not installed and used in accordance with the instructions, may
cause harmful interference to radio communications. However, there is no
guarantee that interference will not occur in a particular installation. If this
equipment does cause harmful interference to radio or television reception, which
can be determined by turning the equipment off and on, the user is encouraged
to try to correct the interference by one or more of the following measures:
—Reorient or relocate the receiving antenna.
—Increase the separation between the equipment and receiver.
—Connect the equipment into an outlet on a circuit different from that to which
the receiver is connected.
—Consult the dealer or an experienced radio/TV technician for help.
Any changes or modifications not expressly approved by the party responsible for
compliance could void the user's authority to operate the equipment.
FCC WARNING
This equipment complies with FCC radiation exposure limits set forth for an
uncontrolled environment.
End user must follow the specific operating instructions for satisfying RF exposure
compliance. This transmitter must not be co-located or operating in conjunction
with any other antenna or transmitter.
The mobile device is designed to meet the requirements for exposure to radio
waves established by the Federal Communications Commission (USA). These
requirements set a SAR limit of 1.6 W/kg averaged over one gram of tissue. The
highest SAR value reported under this standard during product certification for
use when properly worn on the body is 0.821W/kg.
For body operation, this device has been tested and meets FCC RF exposure
guidelines when used with any accessory that contains no metal and that
positions a minimum of 0mm from the body. Use of other accessories may not
ensure compliance with FCC RF exposure guidelines.

08
This product includes Wi-Fi, Bluetooth functionality. The wireless operating
frequency bands include:
Bluetooth: 2402 MHz ~ 2480 MHz.
Wi-Fi: 2.400 GHz ~ 2.4835 GHz, 5.150 GHz ~ 5.350 GHz, 5.470 GHz ~ 5.725 GHz,
5.725 GHz ~ 5.850 GHz.
The 5180MHz to 5240MHz/5260MHz to 5320MHz is for indoor use only.

09
02 Introduction
The CRYSOUND CRY8024 SonoCam Pocket Acoustic Camera makes the invisible
audible—turning sound into vision through advanced acoustic imaging
technology. It helps industries detect problems earlier, reduce energy loss, and
ensure safer operations.
As the smallest and lightest acoustic camera in its class, the CRY8024 integrates
high-sensitivity array sensing, real-time imaging, and intelligent analysis into a
compact handheld device.
Users can quickly identify compressed-air leaks, partial discharges, and other
anomalies, and generate standardized inspection reports effortlessly via mobile
app.
As a key member of the CRYSOUND acoustic inspection family, the CRY8024
embodies the concept of a “pocket-sized acoustic imaging
camera”—redefining efficiency and mobility in industrial inspection.

10
03 Glossary
USB Power Delivery (USB PD)
The device utilizes a power delivery protocol based on the USB 3.0 standard,
allowing for higher power transfer through the USB port.
Sound Pressure Level (SPL)
The device measures the amplitude of the sound source using sound pressure
level (SPL), which is a physical quantity that represents the magnitude of a sound
wave. SPL is expressed in decibels (dB) and is referenced to a standard sound
pressure level in air. It is commonly denoted as dBSPL when used for
representation.
Audible Domain
The frequency range of sound that can be perceived by human ears generally
refers to the sound in the frequency band of 20Hz-20KHz.
Ultrasonic
Generally, refers to a frequency of more than 20kHz, which the human ear cannot
perceive.
Sound Image
It refers to the two-dimensional data table representing the intensity distribution
of sound sources in space, after the signal collected by microphone array is
calculated by the algorithm.
Palette
The color data used in the color mapping of a sound image.
Sound Cloud Image
The sound pressure level data of each resolution point on the sound image is
mapped to a certain color number on the palette, according to a certain
conversion formula to form a color image. Then it is fused with the visible image
to form a sound cloud image.

11
Test Frequency Range
When a frequency range is selected within the full frequency range supported by
the device, the device will only measure and display a sound cloud image that is
within this frequency range. Sound outside this frequency range will not be
displayed.
Frequency Peak
A peak in the spectrum denotes a strong sound energy distribution at this
frequency.
Field of View
An angle formed by the camera and the two diagonal points of the rectangular
picture captured by it.
For sound cloud image, it is an angle formed by the microphone array and the
two diagonal points of the rectangular sound image.
12
04 Product and Accessories
4.1 Product Accessory List
Item Numbers
Name
Description
1
SonoCam Pocket
Acoustic Camera
CRY8024
2
USB-C Charging Cable
Cable used to charge the device or export
data.
4.2 Battery and Charging
Battery Information
The device is powered by a lithium-ion battery with a nominal capacity of
3900mAh at 3.85V. To charge the device, use the USB-C port labeled "USB-C" on
the device. It is recommended to use a power adapter or portable charger that
supports the PD (Power Delivery) protocol with a 9V voltage output and a
minimum output power of 15W.
Battery Charging
Connect one end of the USB-C cable to the USB port of the device and the other
end to the USB-C adapter.
Attention
1.
Do not place the battery near heat sources, flames, or use it in
high-temperature environments.
2.
Do not expose the battery to direct sunlight for extended periods or use the
product under prolonged exposure to sunlight.
3.
Do not disassemble the battery without authorization.
4.
Please do not charge the battery in high-temperature environments (exceeding
45°C).
5.
If the product malfunctions or shows any abnormalities, please stop using it
and contact the manufacturer to schedule a repair.
6.
Please do not exceed 24 hours of charging time for the battery.
7.
It is recommended to store the product within a temperature range of -20 °C
to +40 °C.

13
8.
If you plan not to use this product for extended periods, it is recommended to
turn it off and store it in a cool, dry place. Additionally, recharge the device to
approximately 70%-90% every three months or so to prevent battery damage
from over-discharge.
14
05 Product Instructions
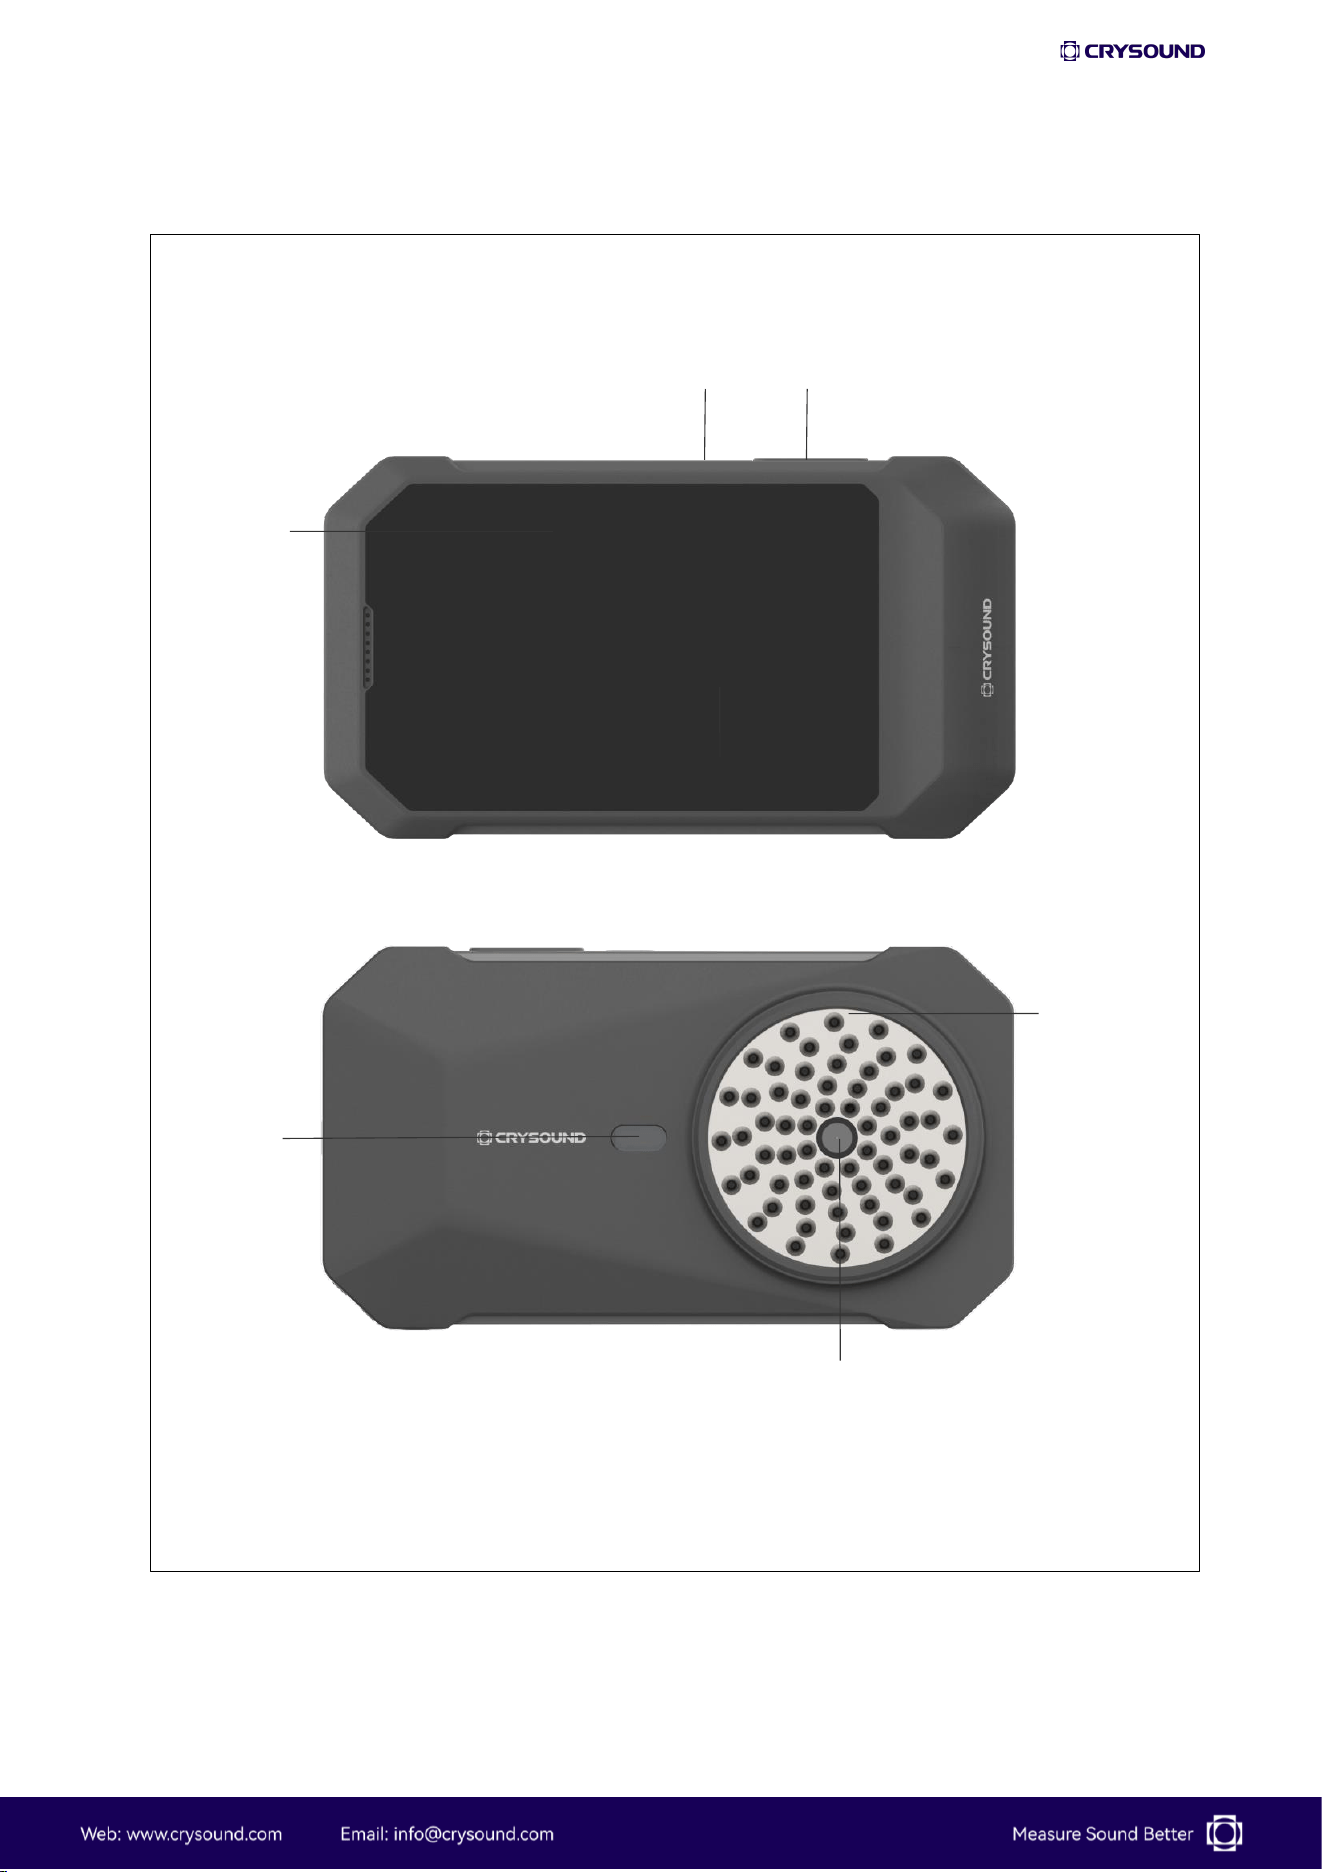
5.1 Appearance
Power Button
Display
Screen
LED
Light
Microphone
Array
Optical Camera
Function Button
15
5.2 Ports
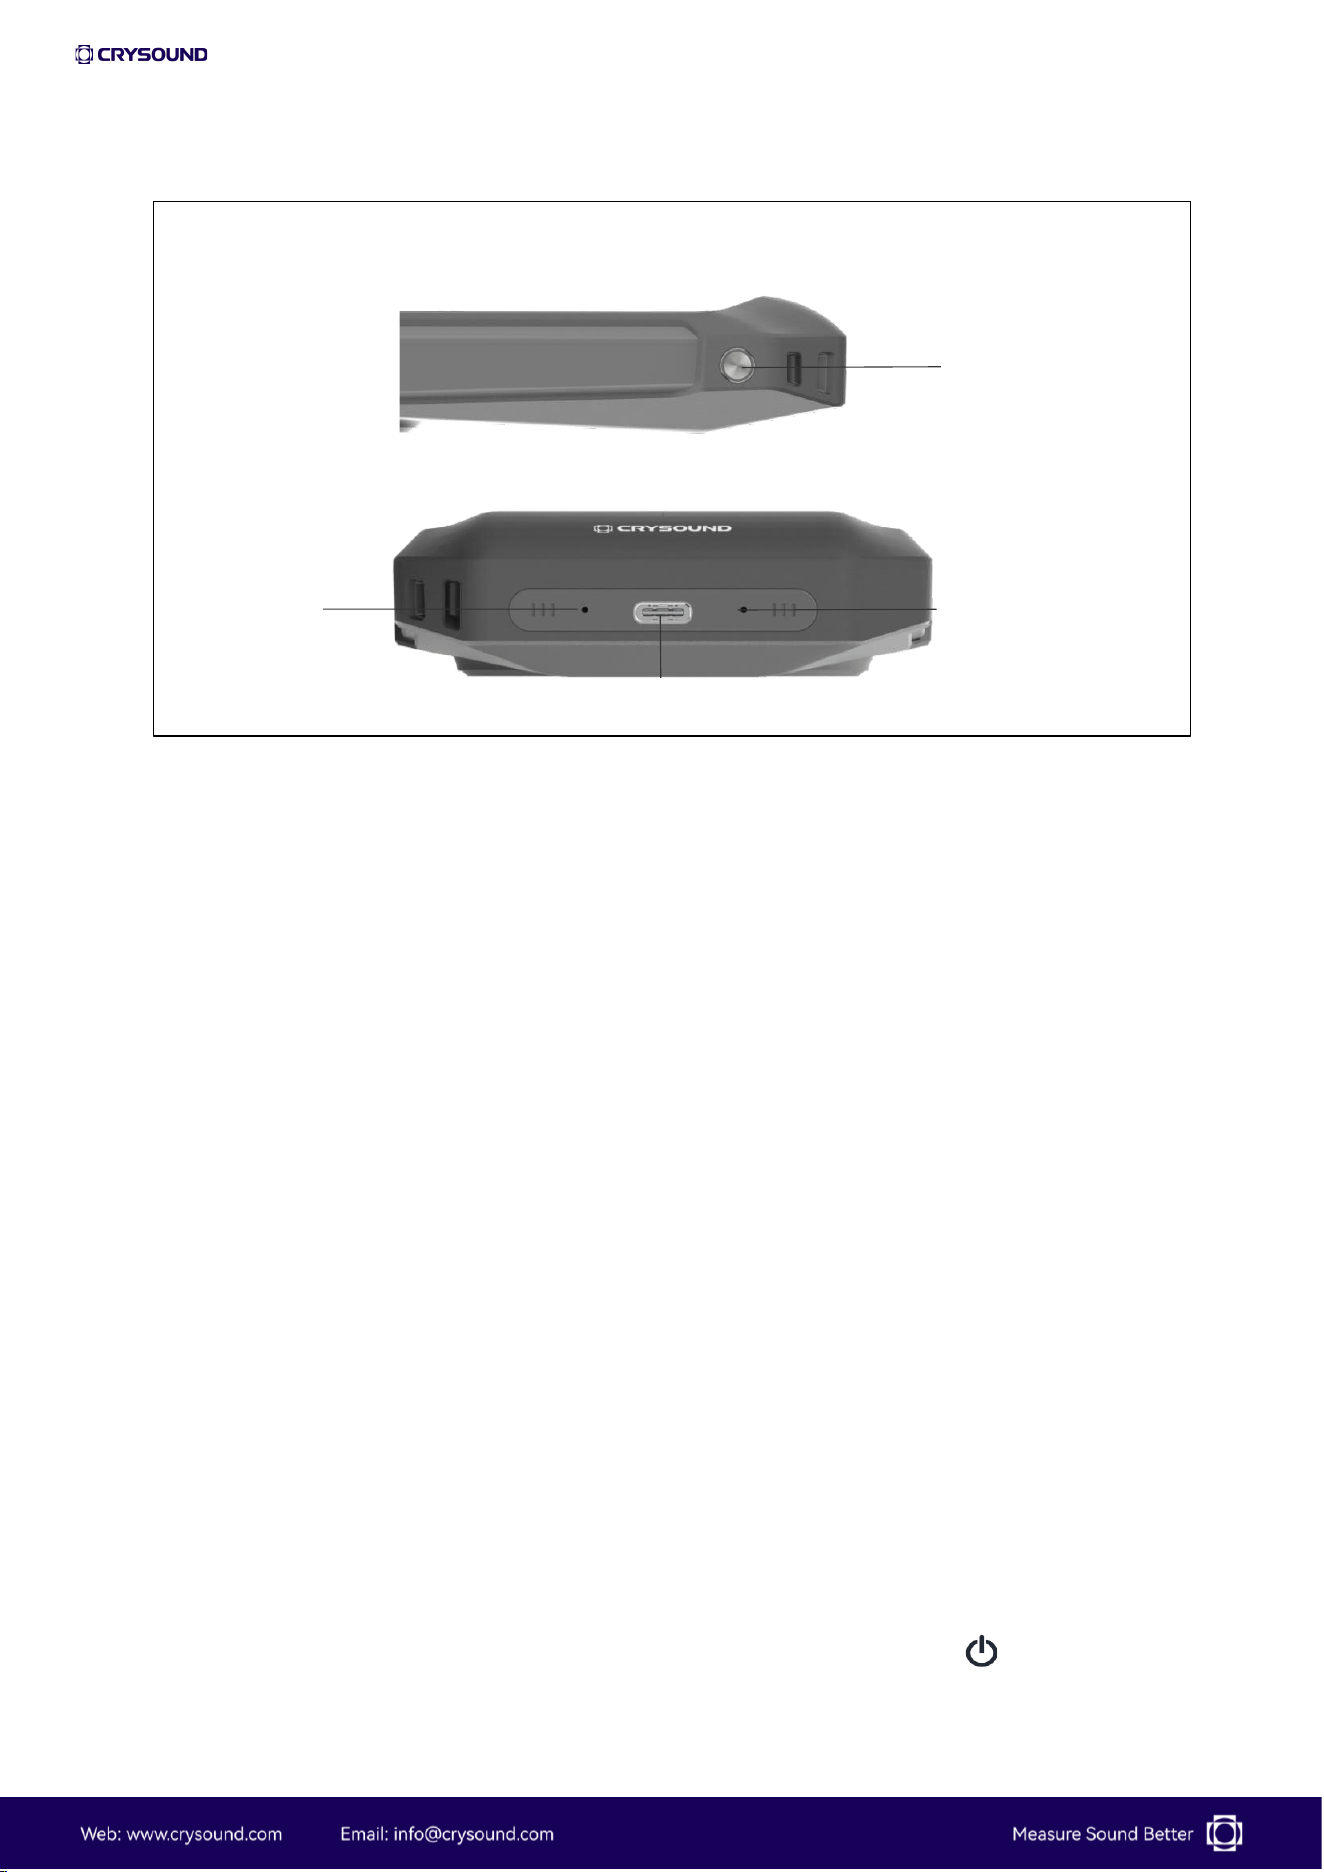
1 - Fixed threaded hole
Standard 1/4-inch imperial threaded hole for fixing the device to a tripod or
mount.
2 - USB-C interface
Use a USB-C cable with a charger to charge the device; connect it to a computer
to export files or perform software upgrades. When connected to a display via a
USB-C to HDMI adapter, the device screen can be mirrored to the external display.
3 - Recording microphone
Built-in recording microphone for voice capture.
4 - Charging indicator
The indicator light stays solid while charging, turns off when fully charged, and
flashes when a charging abnormality occurs.
5.3 Power On the Camera
When the battery is sufficiently charged, press and hold the " " button for 3
seconds to turn on the Camera. After powering on, the camera will display a boot
logo animation.
3
4
1
2
16
Note: Before powering on, please ensure that the battery has sufficient charge. If
the battery is low, please charge it promptly.
5.4 Power Off the Camera
Press and hold the " " button for 15 seconds to force shutdown the camera.
Short press the " " button to bring up the shutdown options, then click on
"Shutdown" to turn off the camera.
5.5 Sleep
Manual Sleep
Short press the " " button to bring up the options "Shutdown/Sleep/Cancel".
Click on "Sleep" to put the camera into sleep mode.
Short press the " " button again to wake up the camera.
Auto Sleep
You can set the auto sleep time in the "System Settings" menu. Users can set the
auto sleep time using the following steps:
1.
tap " " to access "System Settings" - "Low Power settings".
2.
Enable auto sleep and set the desired time for auto sleep.
3.
Tap " " to save and exit.
Note: Short press the " " button to wake up the camera from sleep.
17
06 Software Functions
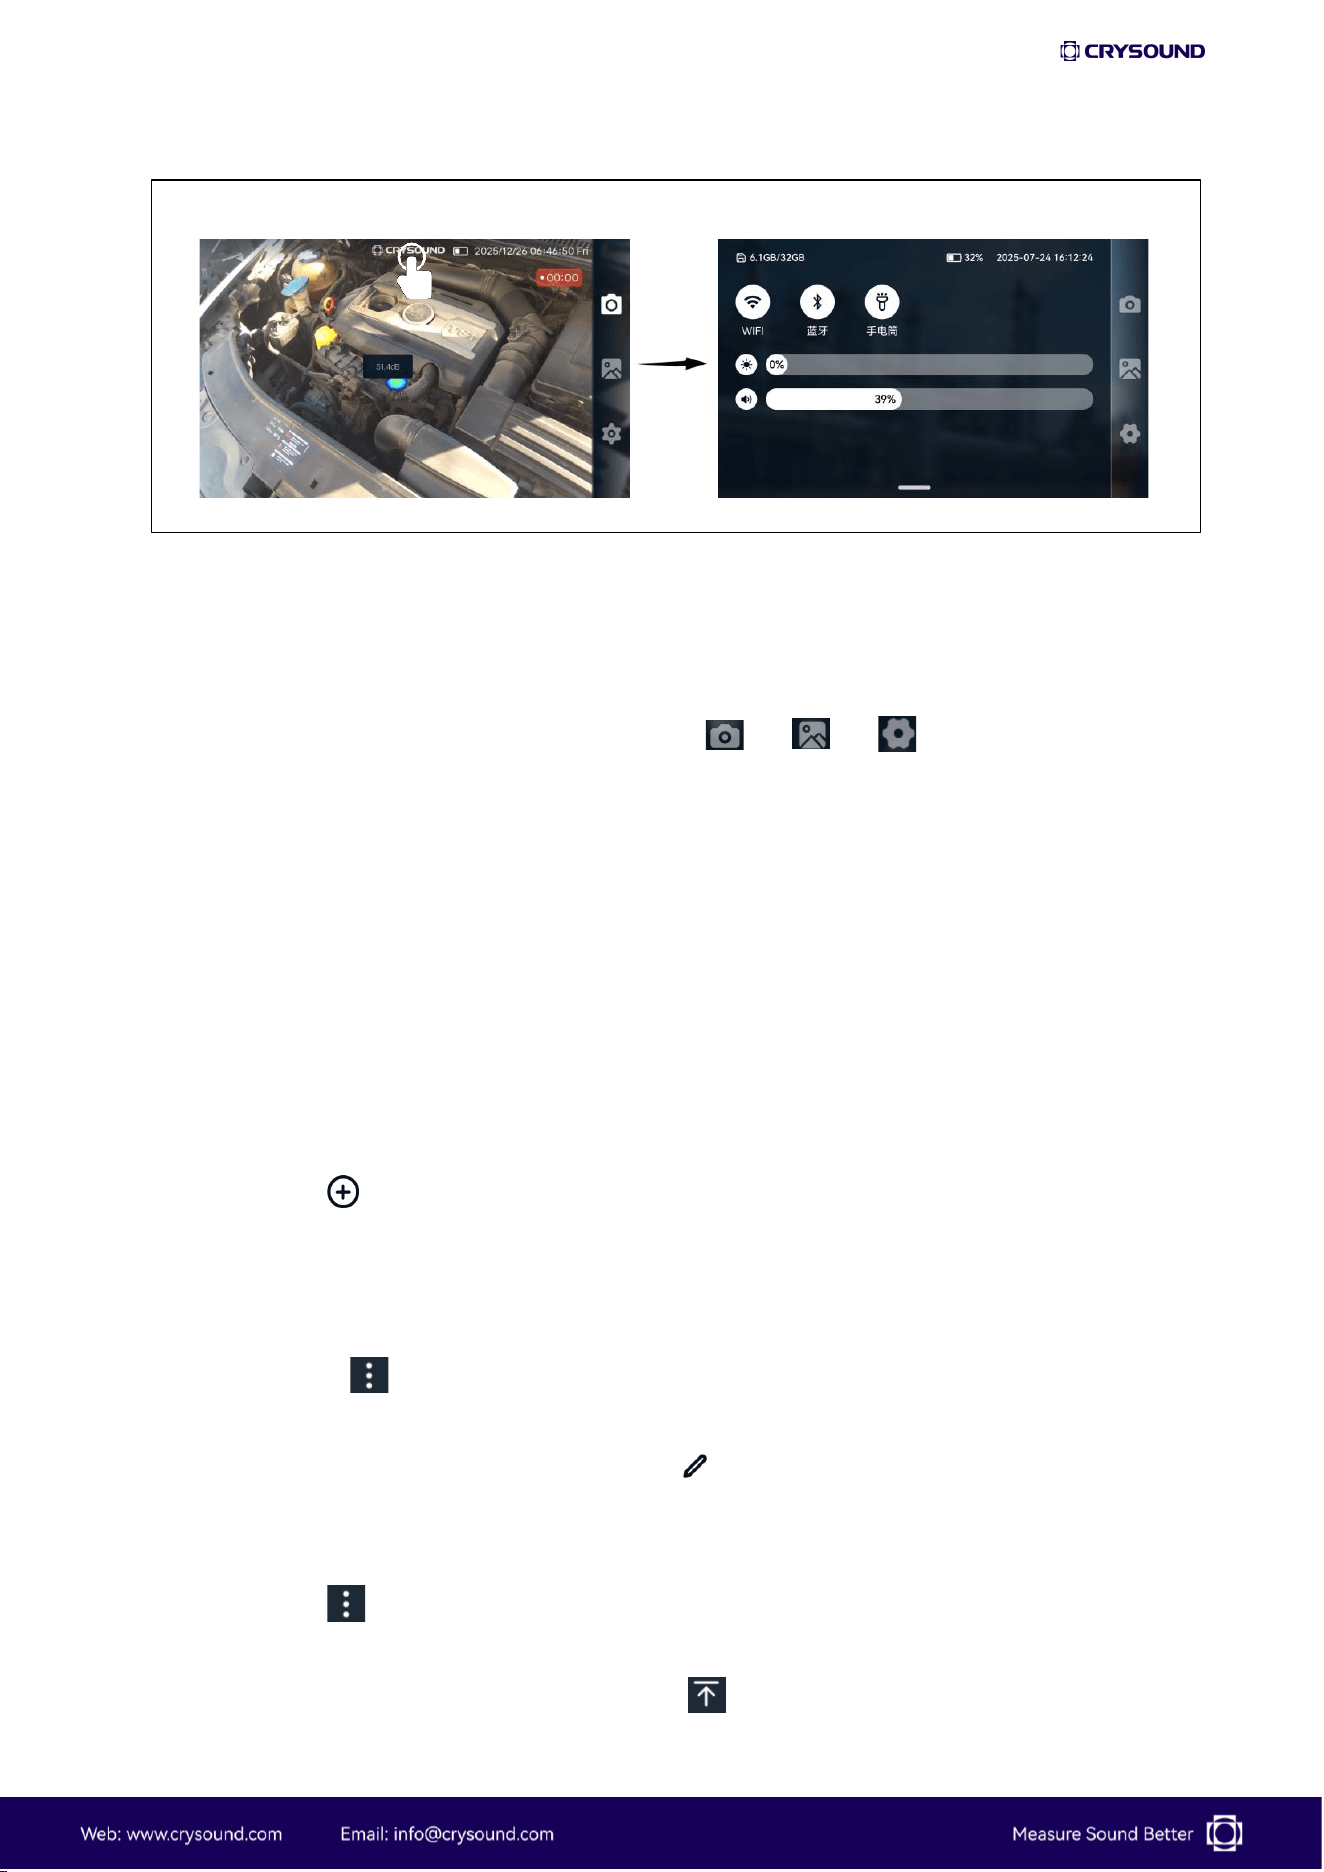
6.1 Main Interface
1 - Frequency Selection Box and FFT Spectrogram
You can set the test sound frequency range and view the FFT spectrogram.
2 - Dropdown Menu
By pulling down the dropdown menu, you can access and customize various
functions and open the system settings.
3 - Acoustic Imaging Test Main Interface
Users can tap to enter the acoustic imaging main interface.
4 - Gallery Interface
Users can tap to enter the gallery.
5 - Settings Interface
Users can tap to enter the settings interface.
1
5
2
3
4
18
6.2 Interface Operation
Clicking the ">" button brings up the FFT spectrum. Pulling down from the top of
the screen can open the quick-access dropdown window.
Clicking the three buttons on the right
“ ”“ ”“ ”
will switch to the main
test interface, gallery interface, and settings interface in sequence.
6.3 Gallery
After clicking the "Gallery" button, the user enters the Gallery interface, where
captured images and videos are saved to the currently active album.
Album Creation
Users can create a new album following these steps:
1.
Click " " to create a new album.
2.
Enter a name to create a new album.
Album Renaming
1.
Tap the " " icon in the upper-right corner of the Gallery interface to enter
edit mode.
2.
Select a single album and tap the " " button to edit its name.
Active Album Setting
1.
Click " " in the upper-right corner of the Gallery interface to enter edit
mode.
2.
Select a single album and tap the " " button to mark it as the active album.
19
Album Deletion
1.
Tap the " " button in the upper-right corner of the Gallery interface to enter
edit mode.
2.
Select one or multiple albums and tap the " " button to remove the album(s)
and their contents.
3.
Tap the " " button to exit album edit mode.
Image/Video Viewing
Tap an image to enter the Image Viewing interface. Tap the screen to switch to
full-screen display for the image/video. Tap the " " button in the upper-right
corner to enter edit mode.
Text Tagging
Users can add a text tag by following these steps:
1.
Click " " to open the text tagging interface.
2.
Tap the input box and use the keyboard to enter text content. Edit the text
information using the keyboard.
3.
Click " " to save the text tag.
Tags
Click " " to bring up the tag information input interface. Users can input
information about the tested equipment.
Voice Tagging
Uses can add avoice tag by following these steps:
1.
Click " " to open the voice tagging interface.
2.
Click " " to start recording, then click " " to end the recording. After
recording, click " " to listen (headphones required), or click " " to remove
the recording.
3.
Click " " to save the voice tag.
Image Deletion
Click " " to remove the photo.
20
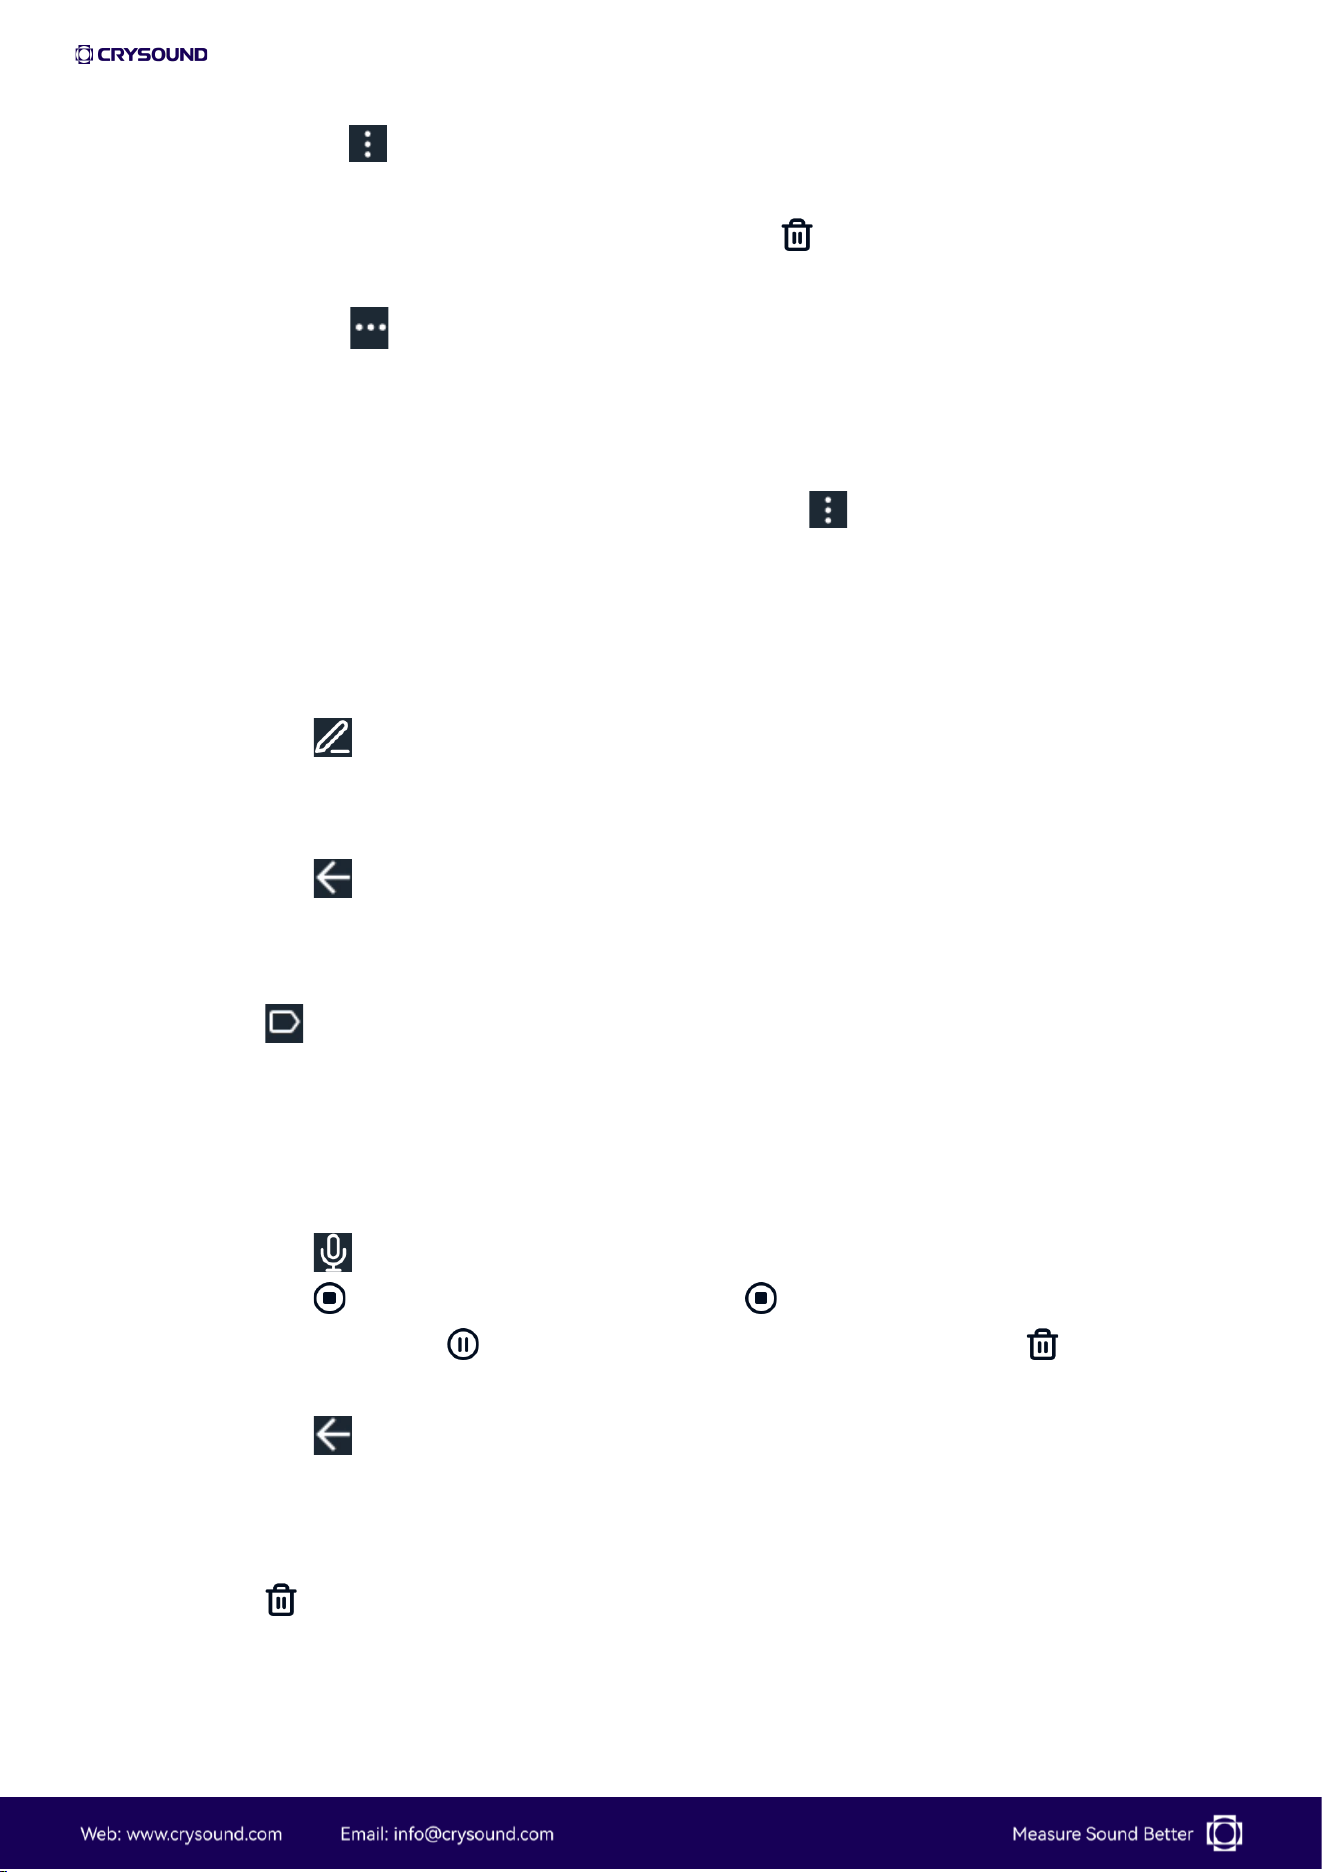
6.4 Dropdown Menu
Pull down from the top edge of the display area to open the dropdown menu
interface.The dropdown interface displays the actual memory size, device battery
level, and device time.
Wi-Fi
Click " " to toggle Wi-Fi on or off. Long-press to enter Wi-Fi settings.
Bluetooth
Click " " to toggle Bluetooth on or off. Long-press to enter Bluetooth settings.
Light
Click " " to toggle the LED light on or off.
Brightness
Slide the bar to the right of " " to adjust the backlight brightness of the display
and disable auto brightness.
Volume
Slide the bar to the right of " " to adjust the volume of the headphone jack.
6.5 System Settings
Measurement Parameter Settings
Cloud Map Color
Sets the color of the acoustic cloud map in the detection interface. Options
include Rainbow, Iron-red, and Grayscale.
Focus Function
Enables or disables the focus function on the main detection interface. When
enabled, minor leaks can be detected. You may also double-tap the screen on the
main test interface to turn the focus function on or off.
Frequency Range
Sets the mode for frequency selection. Options include Automatic Frequency
Selection and Manual Frequency Selection.
21
Language, Time & Region
Language Settings
Tap the " " icon next to "Preferred Language" to select a language.
Time & Region Settings
1.
When the device is not connected to the internet, the automatic time
synchronization function is inactive
2.
Click " " to enable automatic time synchronization. When connected to
the internet, the device will automatically adjust its time to internet time.
3.
In the time zone section, click " " to choose your time zone.
4.
In the date settings, you can modify the date.
5.
In the time settings, you can modify the time.
6.
In the date format, you can set the display format to year-month-day,
month-day-year, or day-month-year.
7.
Click " " to save and exit.
Screen Brightness
Clicking "Screen Brightness" will take you to the display and brightness settings
interface.
1.
In brightness, you can adjust the brightness of the current display (0% to
100%).
2.
Click " " to save and exit.
Low Energy Settings
Click "Low energy Settings" to enter the low power settings interface. Users can
setup low energy settings using the following steps:
1.
Click " "on the right side of "Auto Sleep Time" to select how long the device
should wait before going to sleep when not in use.
2.
Click " " to save and exit.
Bluetooth Settings
After entering the system settings interface, navigate to the Bluetooth® settings.
The camera's Bluetooth name is CRY8024. Users can connect devices with
Bluetooth using the following steps:
1.
Click the " " button to turn Bluetooth on or off.
22
2.
Click " " to update the list of available Bluetooth devices.
3.
Click on a Bluetooth device in the list to pair it. A pairing confirmation popup
will appear; click "Pair" to complete the pairing process and connect the
Bluetooth device.
4.
Click " " to view the details of a connected Bluetooth device. Click " " to
remove a connected Bluetooth device. Click " " to save and exit.
Wi-Fi Settings
Clicking "Wi-Fi Settings" will take you to the Wi-Fi settings interface. Users can
connect devices with Wi-Fi using the following steps:
1.
Click the " " button to turn Wi-Fi on or off.
2.
Click " " to update the list of available Wi-Fi devices.
3.
Click on a Wi-Fi device in the list to connect to it. A password input interface
will appear; enter the password and click "OK" to connect to the Wi-Fi.
4.
Click " " to view the details of a connected Wi-Fi device. Click " " to remove
a Wi-Fi device. Click the " " switch to automatically connect to this Wi-Fi
device on device startup. Click on the password to view the current password
of the Wi-Fi device.
5.
Click " " to save and exit.
About Device
Clicking "About Device " will take you to the device information interface. In this
interface, you can view information about the device.
Software Upgrade
Clicking "Software update" will take you to the software update interface, where
you can view the current software version of the device.Both online updates and
offline updates are supported.
Software & System offline Update
Follow these steps for an offline update:
1.
Download the firmware to your PC.
2.
Place connect the device to your PC via USB-C cable, open the "CRY8024" disk,
and place the firmware in the "Update" folder.

23
3.
Navigate to "Settings" > "Software Update" interface. Click on "Check for
offline Updates," prompting a window to select the firmware package.
4.
Choose the firmware, then click "Confirm" to start the software update
process.
5.
Wait for the device to restart. Once restarted, return to "System Settings" >
"Software Update" to confirm the software version.
6.
Click " " when finished.
Software & System online Update
Follow these steps for an online update:
1.
Connect the device to Wi
‑
Fi or a hotspot.
2.
Navigate to “Settings” > "Software Update" interface, tap “Check for
Updates” button next to “Firmware Online Update”. A firmware package
selection window will pop up. Select the firmware, tap “Confirm”, and the
device will start downloading the latest version.
3.
If a network interruption occurs during download, the process will pause
automatically and can be resumed from the point of interruption.
4.
Wait 3
‑
5 minutes for the firmware download to complete, then tap Confirm to
begin the update. Once restarted, return to "System Settings" > "Software
Update" to confirm the software version.
5.
Click " " when finished.
Microphone Test
Clicking "Microphone Test" will take you to the microphone self-test interface.
Users can start the microphone test using the following steps:
1. Click on "Start test" to initiate the microphone test.
2. After the test is completed, review the microphone test results. If any damaged
microphones are detected, please contact the manufacturer for repair.
Help
Clicking "Help" will take you to the help interface.
Operation Guide
Tap the "Enter" button to enter the Operation Guide interface.
Tap the " " button to exit.

24
07 Usage Tips
7.1 Capturing Sound Source
Observe the frequency spectrum graph for any prominent signals or peaks. If such
signals exist, adjust the frequency band to encompass the frequency range where
the prominent signal or peak is located. Then, observe if any sound sources
appear in the display.
Try adjusting the dynamic range to relatively larger values. This allows for
capturing multiple sound sources with similar sound pressure levels
simultaneously. In scenarios where there are significant differences in sound
pressure levels among multiple sound sources in the display, smaller dynamic
range parameters may result in larger sound sources overshadowing smaller
ones.
7.2 Eliminating Reflection Interference
If you are not unsure whether the sound cloud image in the display is the actual
source or a reflected virtual image, you can try capturing the sound source from
different angles. If the sound source is captured from multiple angles, it is likely
the actual source location. Reflected sound sources may exhibit position shifts or
even disappear at different angles.
7.3 Eliminating Interference Noise
Low-frequency ranges are susceptible to environmental noise interference.
Depending on the characteristics of the sound source, it's advisable to use the
mid to high-frequency ranges to pinpoint the location of the sound source
effectively.
Select a relatively narrow frequency band range for locating the sound source.
This helps to eliminate interference noise from other frequency bands.
7.4 Equipment Maintenance
Keep the acoustic sensor ports clean to prevent dust buildup, when there is dust
in the acoustic sensor ports, gently blow air to clean them, and do not use a wet
cloth for cleaning.

25
When the device is not in use for a long time, fully charge the device, then place it
in its original packaging, and store it in a dry environment at room temperature.
Regularly checking and replenishing the device's battery can effectively prolong
its lifespan.

26
08 Contact Us
8.1 Hangzhou Headquarters
Tel: +86-571-88225128
E-mail: [email protected]
Add: No. 10 Xianqiao Rd, Yuhang Dist, Hangzhou, China
Web: www.crysound.com
8.2 Dongguan Branch
Tel: +86-769-21688120
E-mail: [email protected]
Add: 7F, B1 Bldg, Songshan Lake Intelligent Valley, Minfu Rd, Liaobu Town,
Dongguan, China
Web: www.crysound.com
8.3 U.S. Office
Tel: +1-877-215-7752
E-mail: [email protected]
Add: 515 S Fry Rd, Suite A-221, Katy, TX 77450, USA
Web: www.crysound.com
27