1
User Manual
For Firmware V1.0.2
※
In the interest of product improvement, the specifications and/or the content of products (including but not limited to appearances, packaging design, manual
content, accessories, size, parameters and display screen), are subject to change without prior notice. Please check with local supplier for exact offers. Specifications
and features (including but not limited to appearances, colors and size) may vary by model owing to environmental factors, and all images are illustrative.
Contents
Welcome ···································································································1
Safety Instructions ···················································································2
Panel ·········································································································8
Quickstart ······························································································ 10
Connecting Instruments ····················································································· 10
Music Listening via BT ··························································································11
Using USB Audio ··································································································· 12
Tuner ························································································································· 13
Battery ···················································································································· 13
Using Pulze Editor ··················································································14
Connection ··············································································································· 14
Advanced Tone Shaping (In Play Mode) ························································· 15
Effects Chain ······································································································ 16
Change Effects ·································································································· 17
Adjust Parameters And Effect Descriptions ················································ 17
Tone Volume and Tempo ··············································································· 20
Create A New Tone ·························································································· 20
Import ·················································································································· 21
Import IR ············································································································· 21
Save ······················································································································ 22
Advanced Songlist Functions (Songlist Mode) ··········································· 23
My Tones ············································································································· 24
All Tones ·············································································································· 24
My Songlist ········································································································· 27
Using Hotone Community ····································································· 29
Find ····························································································································· 29
My ·······························································································································30
Downloaded ·······································································································30
Uploaded ············································································································· 31
Using Drum on Pulze Editor ·································································· 32
Settings ·································································································· 33
Audio ·························································································································· 33
Tuner Settings ········································································································34
USB Audio ················································································································34
How To Reamp ··································································································34
Global EQ ·················································································································· 36
Display ······················································································································· 37
My ·········································································································· 37
Feedback ··················································································································38
Factory Reset ········································································································38
Backup ······················································································································· 39
Firmware Update ··················································································· 40
Troubleshooting ·····················································································41
Technical Specifications ········································································ 43
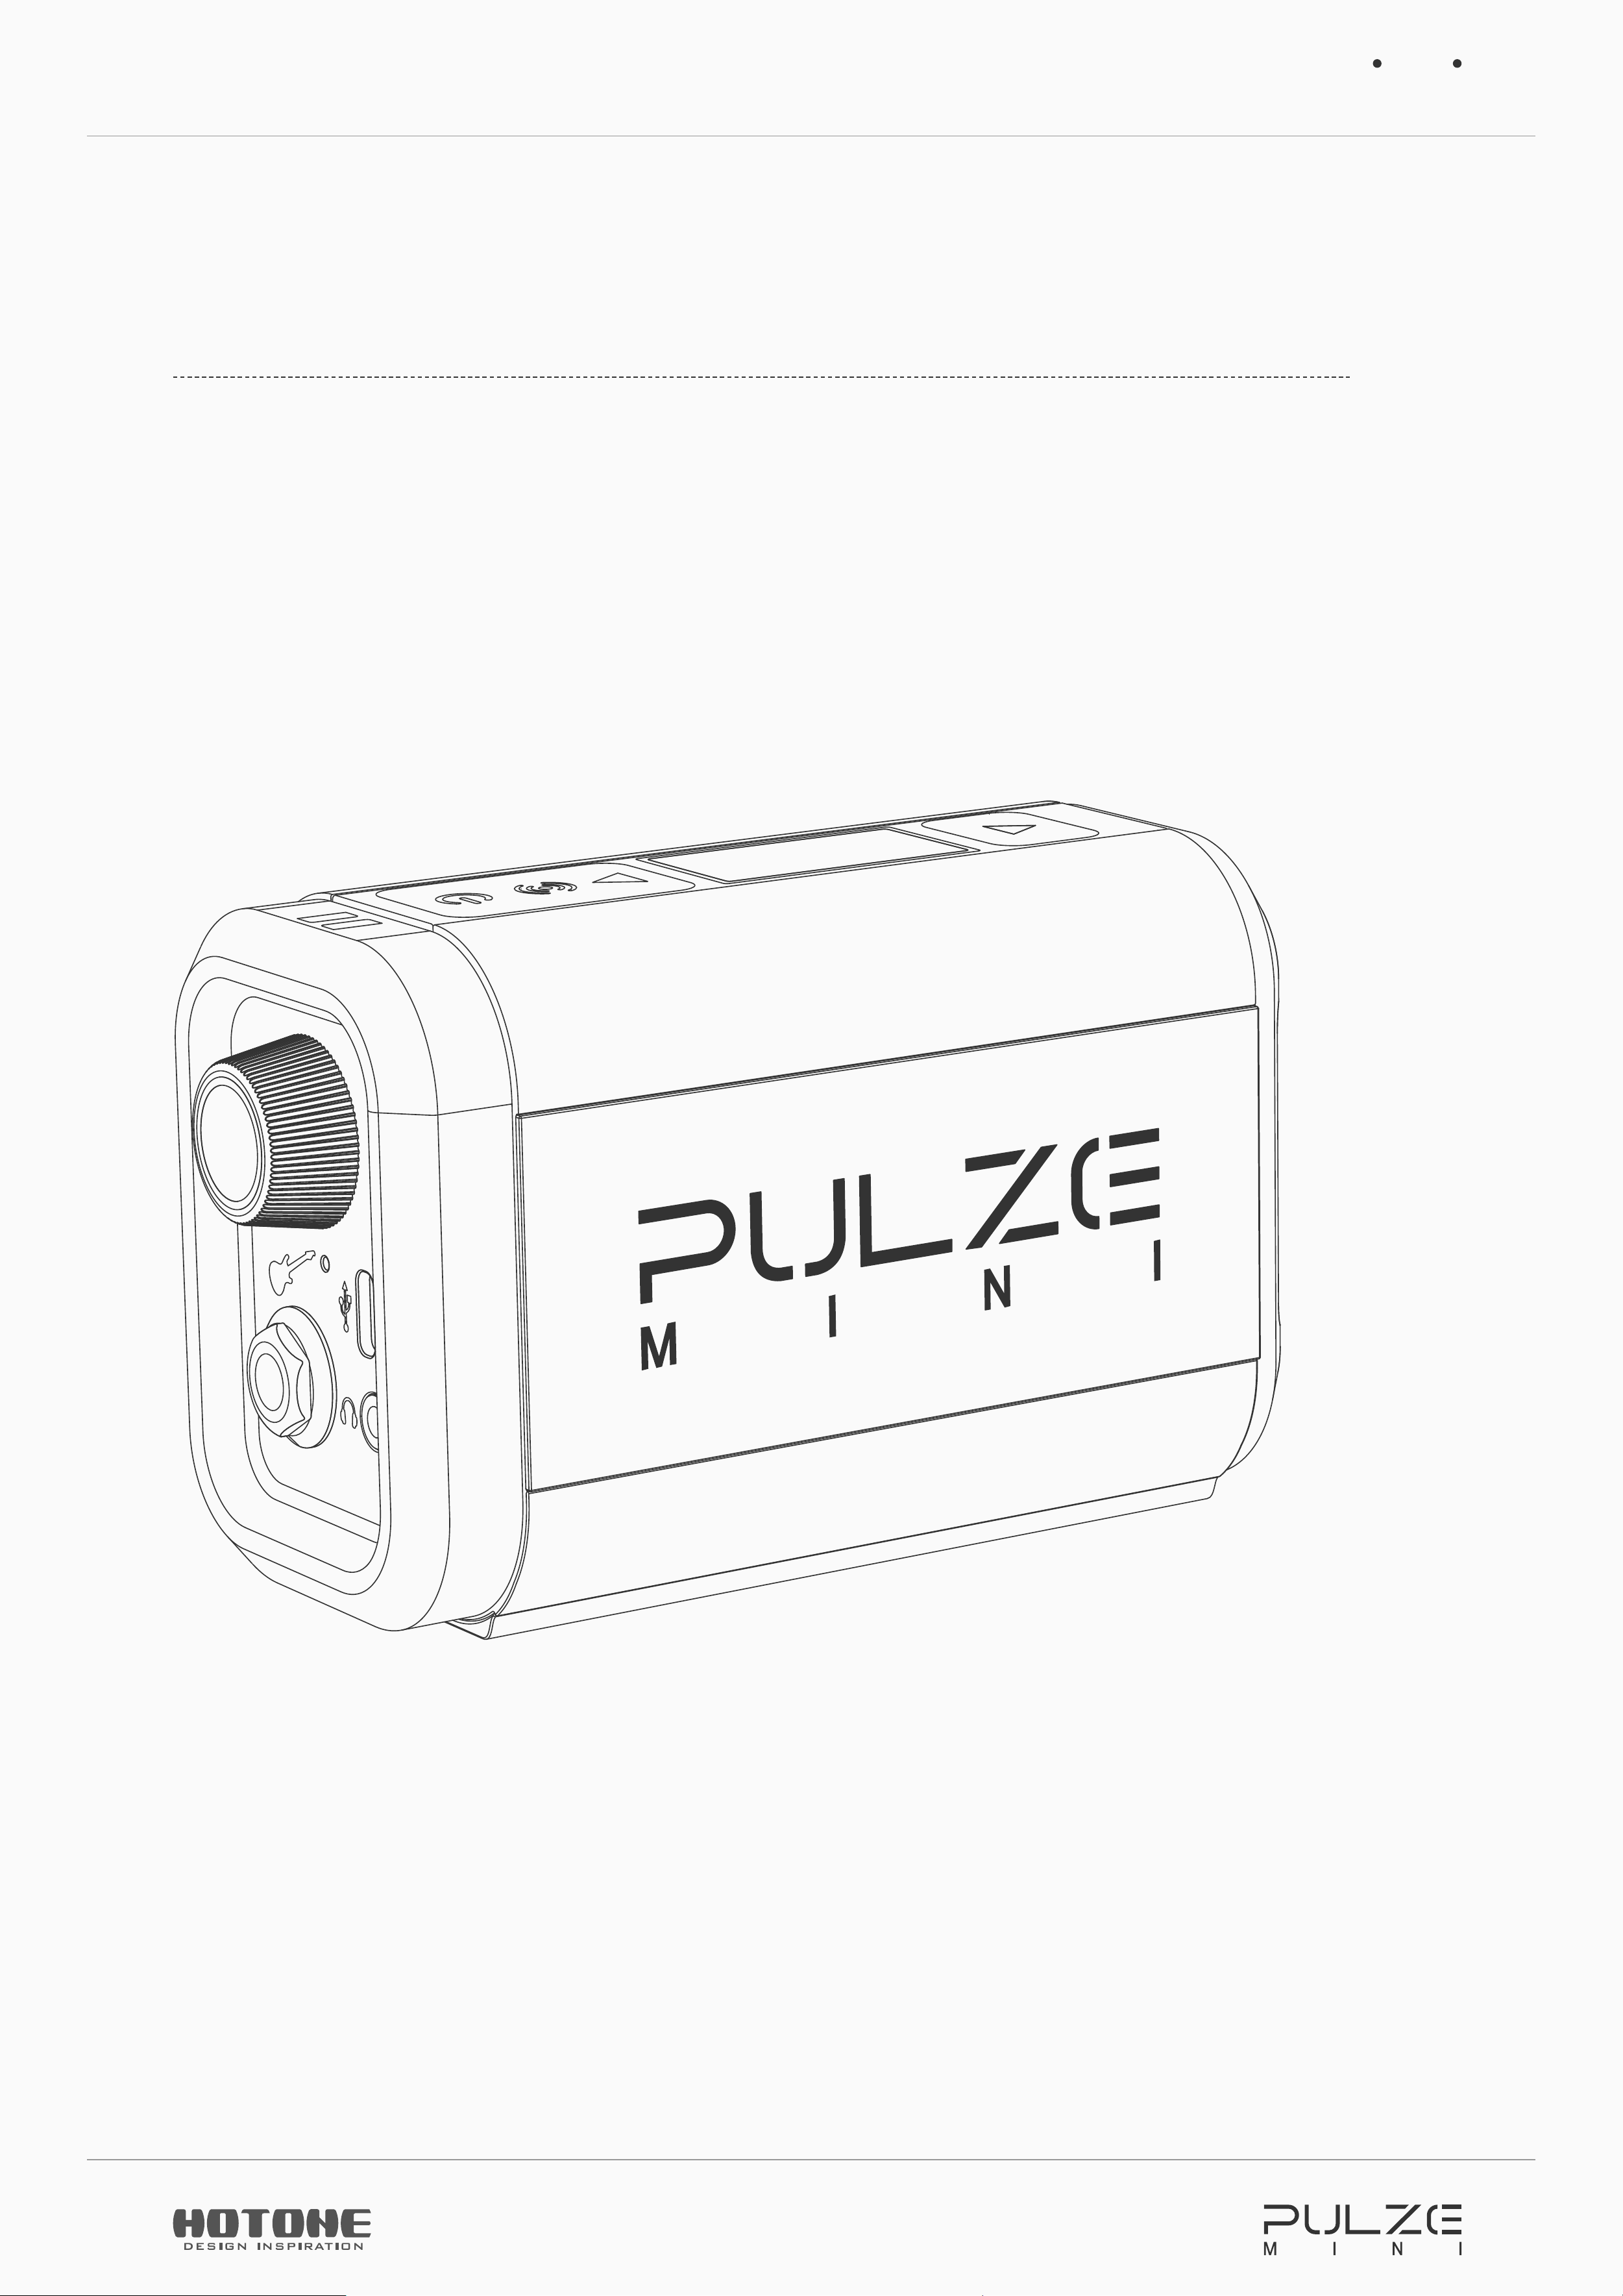
Welcome
1
Welcome
Thank you for purchasing a Hotone product.
Please read this manual carefully to get the most out of your Pulze Mini.
Please keep this manual in a safe place for further reference.
Safety Instructions
2
Safety Instructions
Precautions
PLEASE READ CAREFULLY BEFORE OPERATING THE DEVICE.
Please keep this manual in a safe place for future reference.
Please always follow the basic precautions listed below.
These precautions include, but are not limited to, the following:
Definition of intended use
Power supply & power cord
Please check the voltage specification on the device or device power adaptor
match your power supply network.
Please be sure to use the device just with an adequate power supply, such as
original supplied power adaptor.
When using a 3rd party power adapter, please make sure the power adapter fits
the device’s power requirement. Use of an adapter other than that specified could
damage the unit or cause malfunction and pose a safety hazard, such as incorrect
polarity would cause the fire hazard.
Hotone will not be responsible for physical injury to you or others, or damage to
the device or other property.
When disconnecting the adapter from an outlet, please always pull the connector
itself. Pulling the cord will cause damage to the unit.
Make sure to separate the power adapter and store in a safe place.
Please remove the electric plug from the outlet when the device is not to be used
for extended periods of time, or during electrical storms.
Please be sure to connect to an appropriate outlet with a protective grounding
connection.
Safety Instructions
3
Do not open
This device contains no user-serviceable parts. Do not open the device or attempt
to disassemble the internal parts or modify them in any way.
Opening the case may expose you to dangerous voltages, or other hazards.
Opening the casing or performing self-repairs on this device will result in the loss
of the warranty eligibility for this device.
If it should appear to be malfunctioning, please discontinue use immediately and
contact our service team.
Water warning
Do not expose the device to rain, use it near water or in damp or wet conditions,
or place on it any containers (such as vases, bottles or glasses) containing liquids
which might spill into any openings. If any liquid such as water seeps into the
device, turn off the power immediately and unplug the power cord from the AC
outlet.
Please never insert or remove an electric plug with wet hands.
Fire warning
Please do not place any burning items or open flames near the device, since they
may cause a fire hazard.
Electromagnetic fields warning
Please avoid operating the device within significant electromagnetic fields. Failing
to do so may result in noise, device malfunction, or even loss of data etc.
Hearing loss
Please avoid setting all volume levels to their maximum, specially with using
headphones. Depending on the condition of the connected devices, doing so
may result in feedback that can cause hearing loss and damage the speakers or
headphones.
Safety Instructions
4
Before connecting the device to other devices, please turn off the power for all
devices. Also, before turning the power of all devices on or off, please make sure
that all volume levels are set to the minimum. Failing to do so may result in hearing
loss, electric shock, or device damage.
Location
Please keep away form children, or be accompanied by an adult. The following may
cause choking hazard.
- Swallowing of small parts.
- Plastic covers and other packaging material.
While using, please do not cover the device with any cloth, or block any jack of the
device.
The device and power supply will become warm with extended use.
Please avoid using the device in any of the following conditions that could cause
malfunction:
- Extremely hot or cold places
- Sandy or dusty places
- Contact with corrosive gases or salt air
- Places with extreme vibrations
Before moving the device, please be sure to remove all connected cables, and
power adaptor.
Depending on the material and temperature of the surface on which you place the
device, its rubber feet may discolor or mar the surface.
Maintenance
Please remove the power plug from the AC outlet while cleaning the device.
Please use a soft cloth to clean the panels if they become dirty. If necessary,
slightly moisten the cloth.
Never use cleansers, wax, or solvents such as paint thinner, benzene or alcohol.
Safety Instructions
5
Operation
Please do not apply excessive force to the knobs, switches, jacks, and other
controls.
Please do not apply excessive force to the screen (if applicable) or casing, which
may cause malfunction.
Please do not expose the unit to strong impact or drop it.
Please do not place foreign objects (liquid or solid) into the device.
Malfunction
If any of the following problems occur, immediately turn off the device and
disconnect the electric plug from the outlet.
- The device is dropped or damaged.
- The power cord or plug becomes frayed or damaged.
- The power adaptor malfunction.
- Unusual smells or smoke are emitted.
- Some object has been dropped into the device.
- There is a sudden loss of sound during use of the device.
- Cracks or other visible damage appear on the device.
- The device has other obvious signs of malfunction (e.g. can not turn on, knobs
can not work, volume is too low, etc.)
Then please contact our service team.
About disposal
While disposing of this product, please take them to applicable collection points,
for proper treatment, in accordance with your national legislation.
Disposal of the packaging material
For the transport and protective packaging, environmentally friendly
materials have been chosen that can be supplied to normal recycling.
Ensure that plastic bags, packaging, etc. are properly disposed of.
Safety Instructions
6
Please do not just dispose of these materials with your normal household waste,
but make sure that they are collected for recycling.
Disposal of your old device
This symbol on the products, packaging, and/or accompanying documents
means that used electrical and electronic products should not be mixed
with general household waste.
By disposing of these products correctly, you will help to save valuable resources
and prevent any potential negative effects on human health and the environment
which could otherwise arise from inappropriate waste handling.
For more information about collection and recycling of old products, please contact
your local municipality, your waste disposal service or the point of sale where you
purchased the items.
This product is subject to the European Waste Electrical and Electronic Equipment
Directive (WEEE Directive - Waste Electrical and Electronic Equipment) as
amended from time to time version.
Observe the disposal note for documentation in France.
Disposal of batteries
Batteries must not be discarded or incinerated, but disposed of in
accordance with local hazardous waste disposal regulations.
Service Contact
Please prepare information including the model name, serial number, specific
symptoms related to the malfunction, your name, address and telephone number,
etc.
You can contact the store where you bought the device, or contact Hotone support
(service@hotone.com)
Please use this device according to the manual provided. Any other use, as well as
Safety Instructions
7
use under other operating conditions, is considered improper use.
Hotone cannot be held responsible for damage caused by improper use or
modifications to the device.
Panel
8
Panel
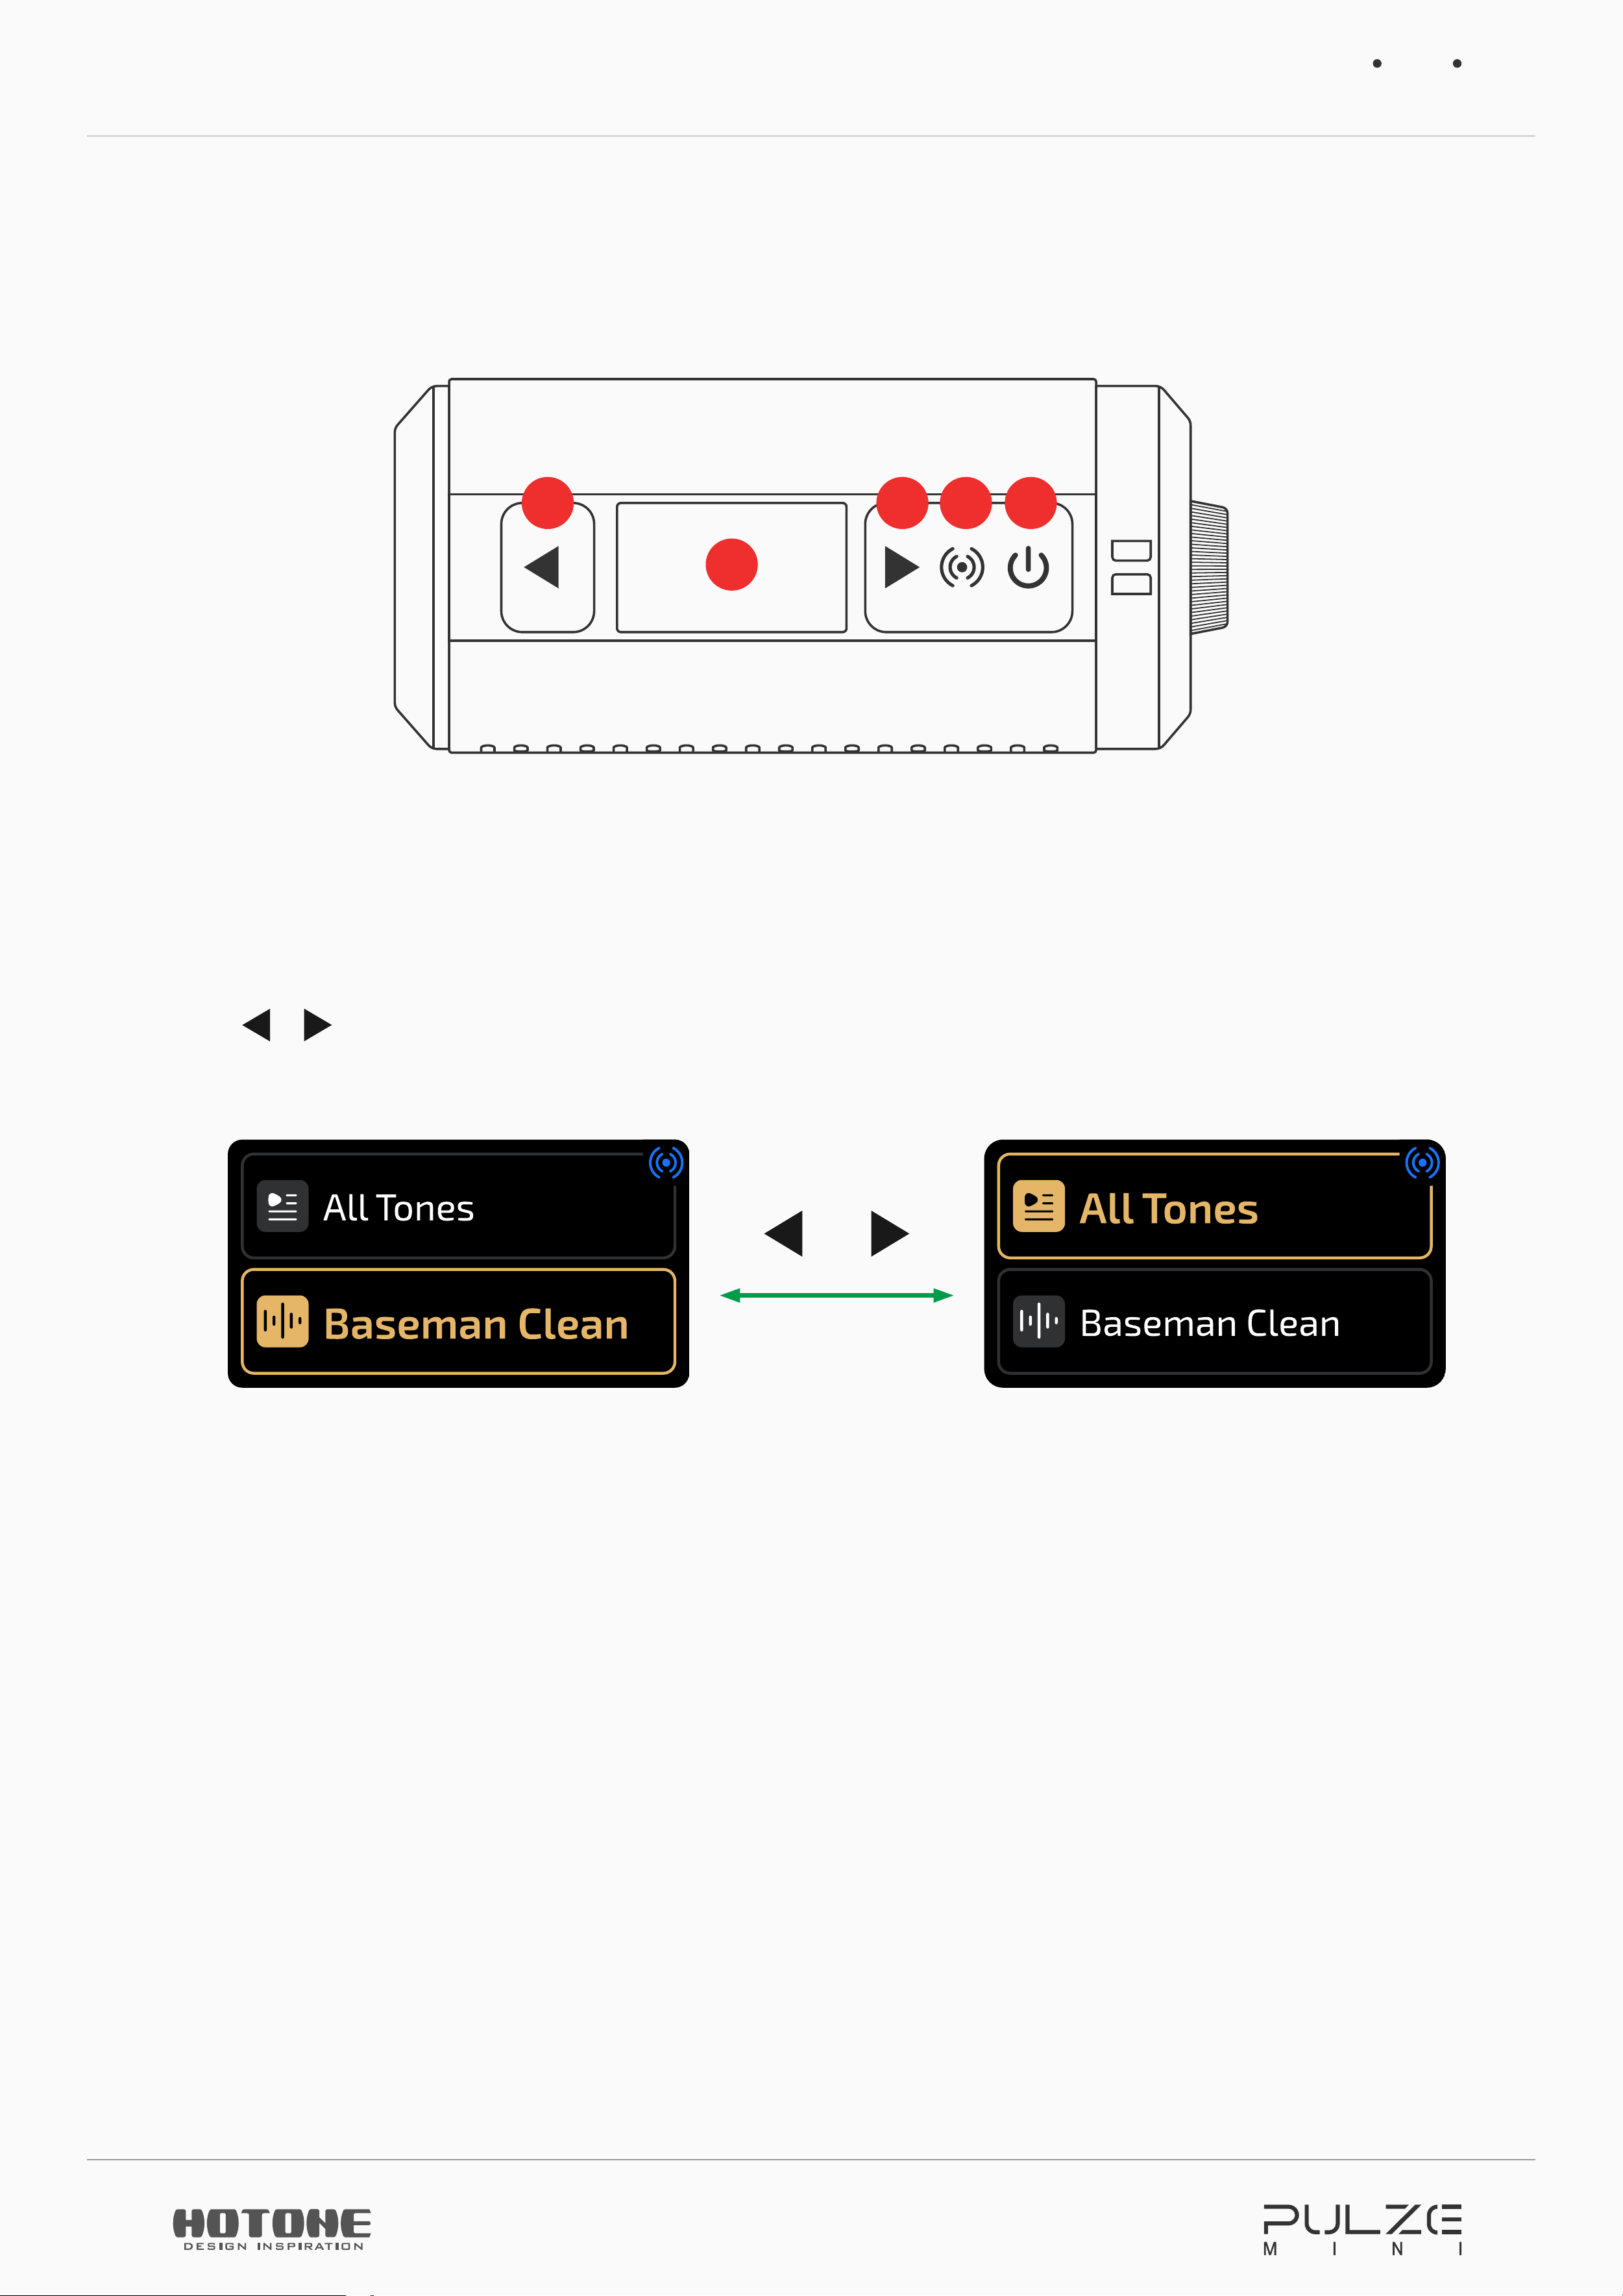
124
3
4
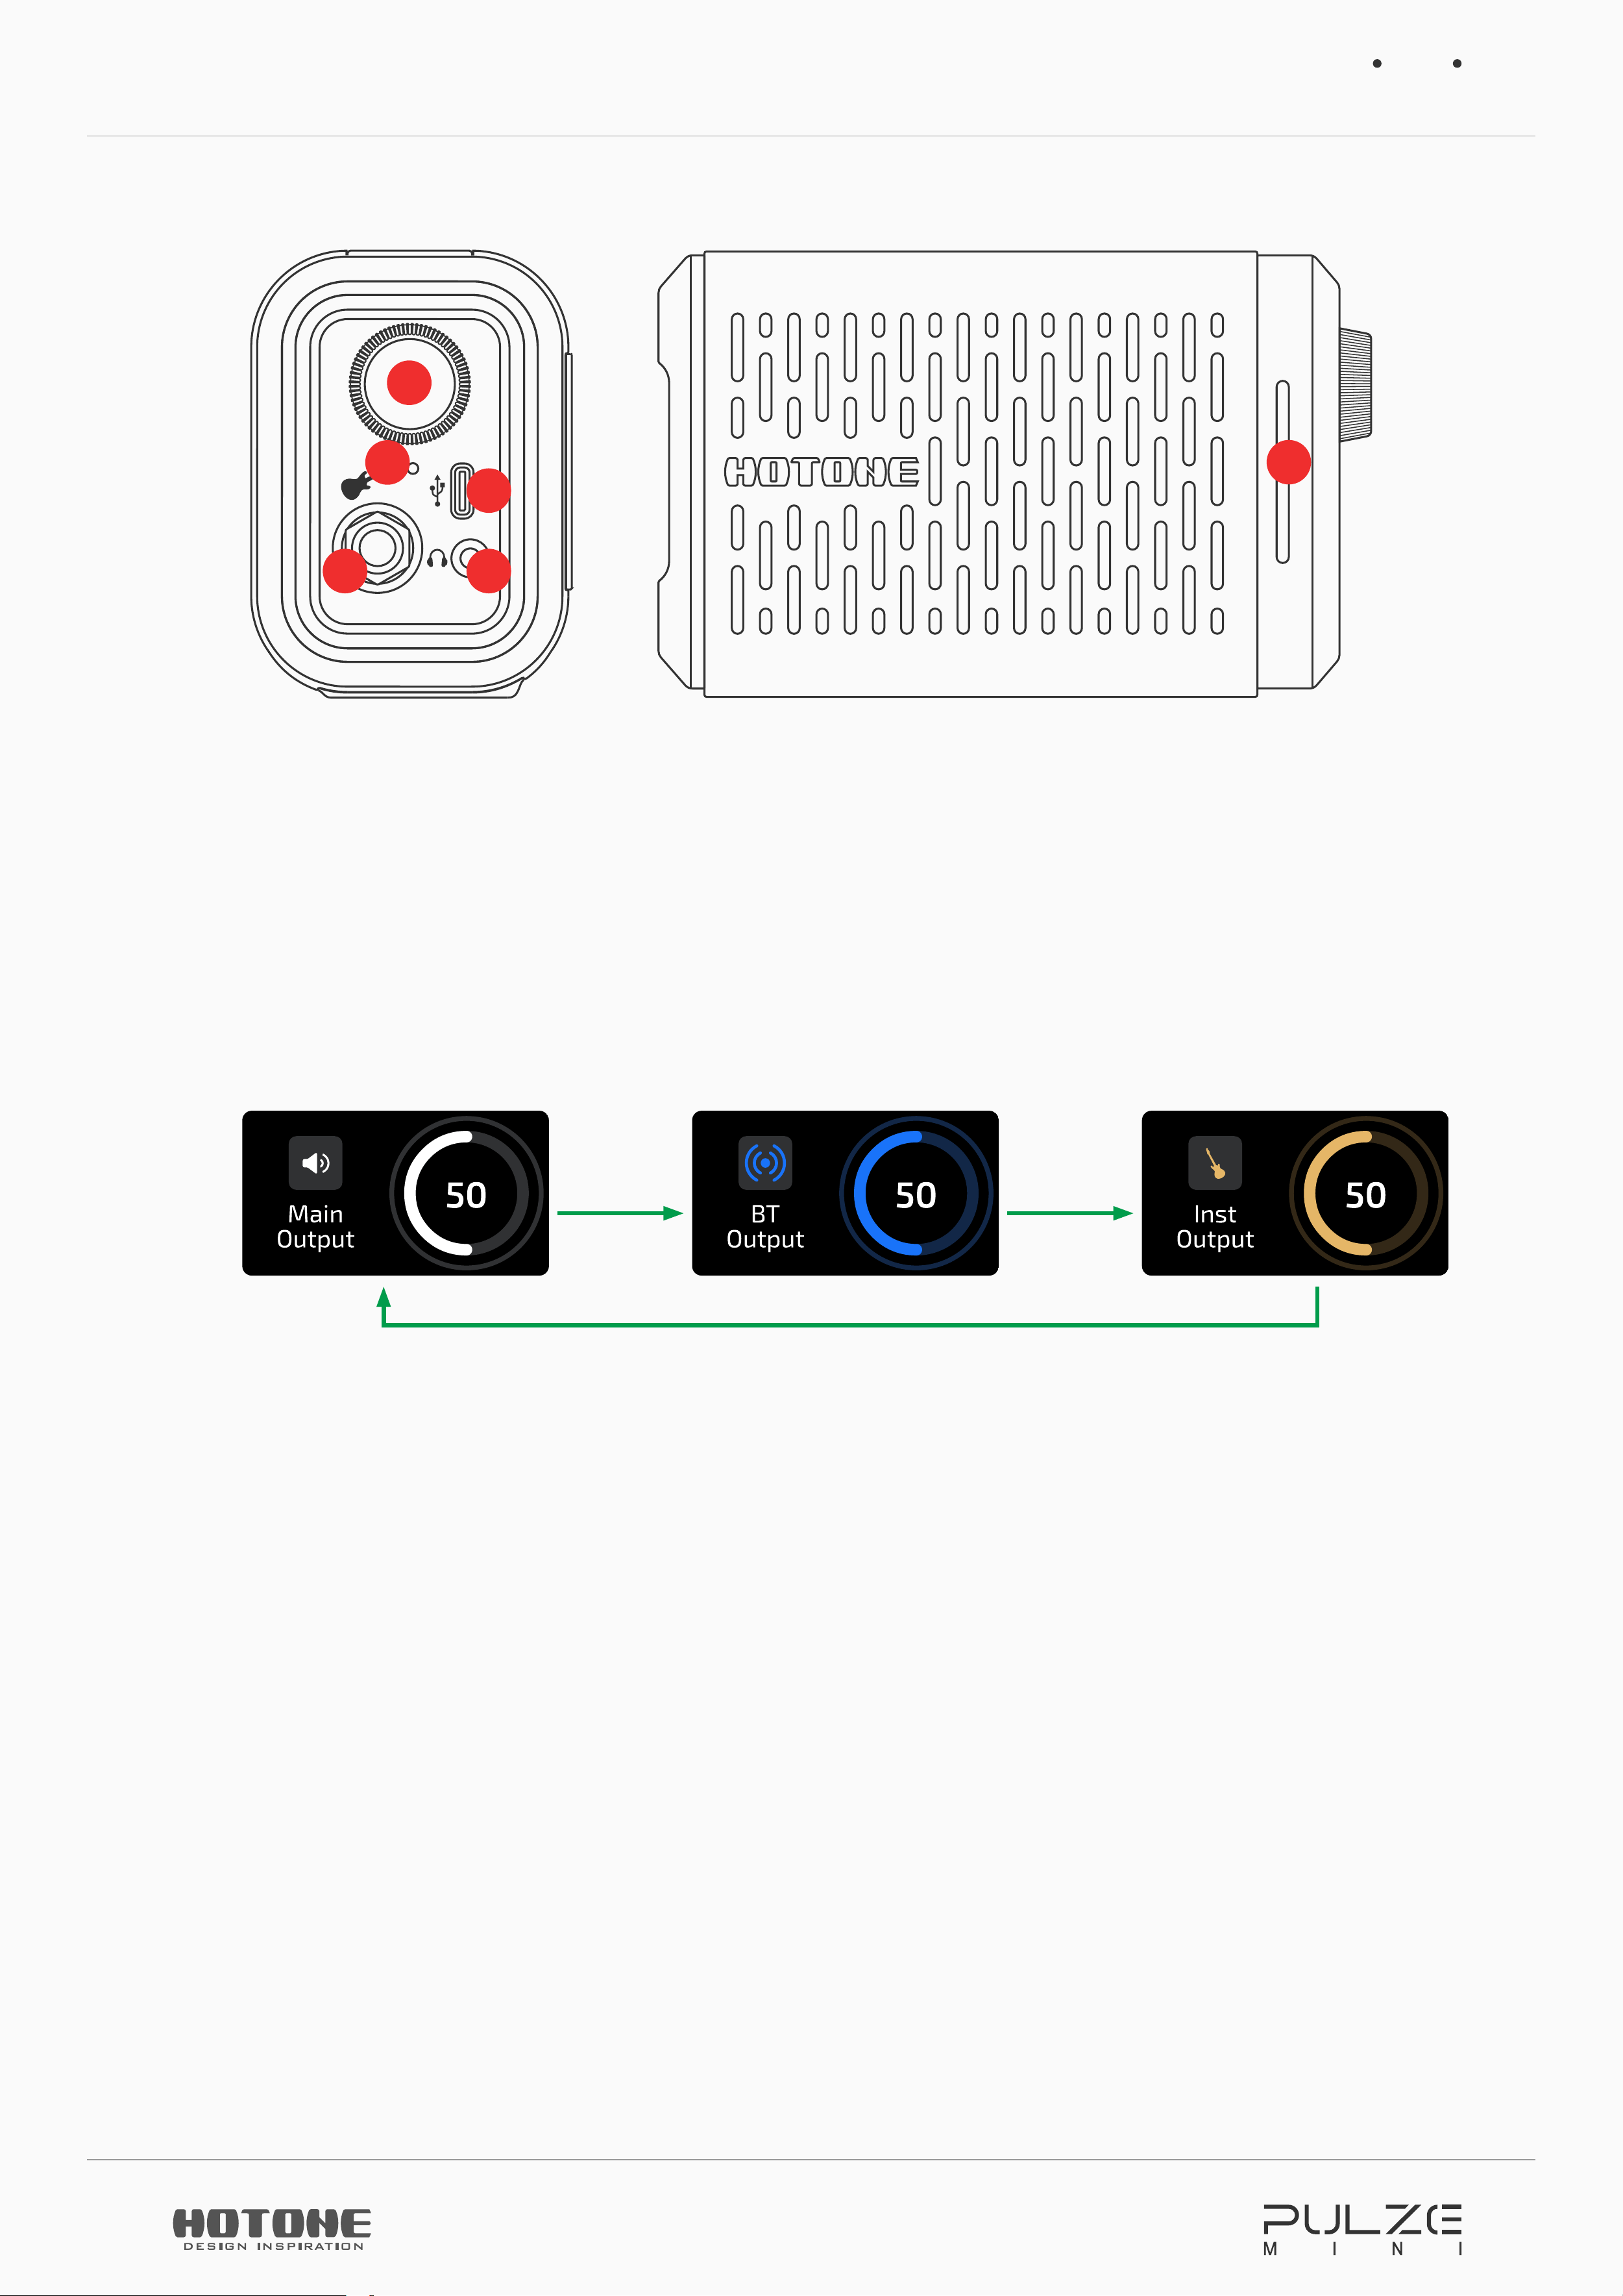
1. Power Button:
Hold to turn the unit on/off.
2. BT Switch:
Hold to turn BT function on/off.
3. Screen:
Displays unit current status.
4.
/ Button:
Press either button to switch tones/songlists; press both to
choose whether to switch tones or songlists:
+
Press Both
Switch tones Switch songlists
Panel
9
10
7
8
9
56
5. Phones Jack:
1/8” stereo output for connecting headphones. When plugged
in, the speaker output will be MUTED.
6. Input Jack:
1/4” mono input connection for guitar or other instruments.
7. Volume Knob:
Turn to adjust master/BT/instrument volume, hold to enter
tuner, press to cycle through knob functions:
Press Press
Press
8. Reset Button:
Force power off switch triggered by a sim card needle or similar
tools.
9. USB Jack:
USB 2.0 Type-C jack for connecting to computers/phones. We
recommend to use with an OTG cable when connecting phones/pads.
10. Atmosphere Light Strip:
RGB LED strip lights for indicating I/O meter, acting
as a parameter status bar, etc.
Quickstart
10
Quickstart
Connecting Instruments
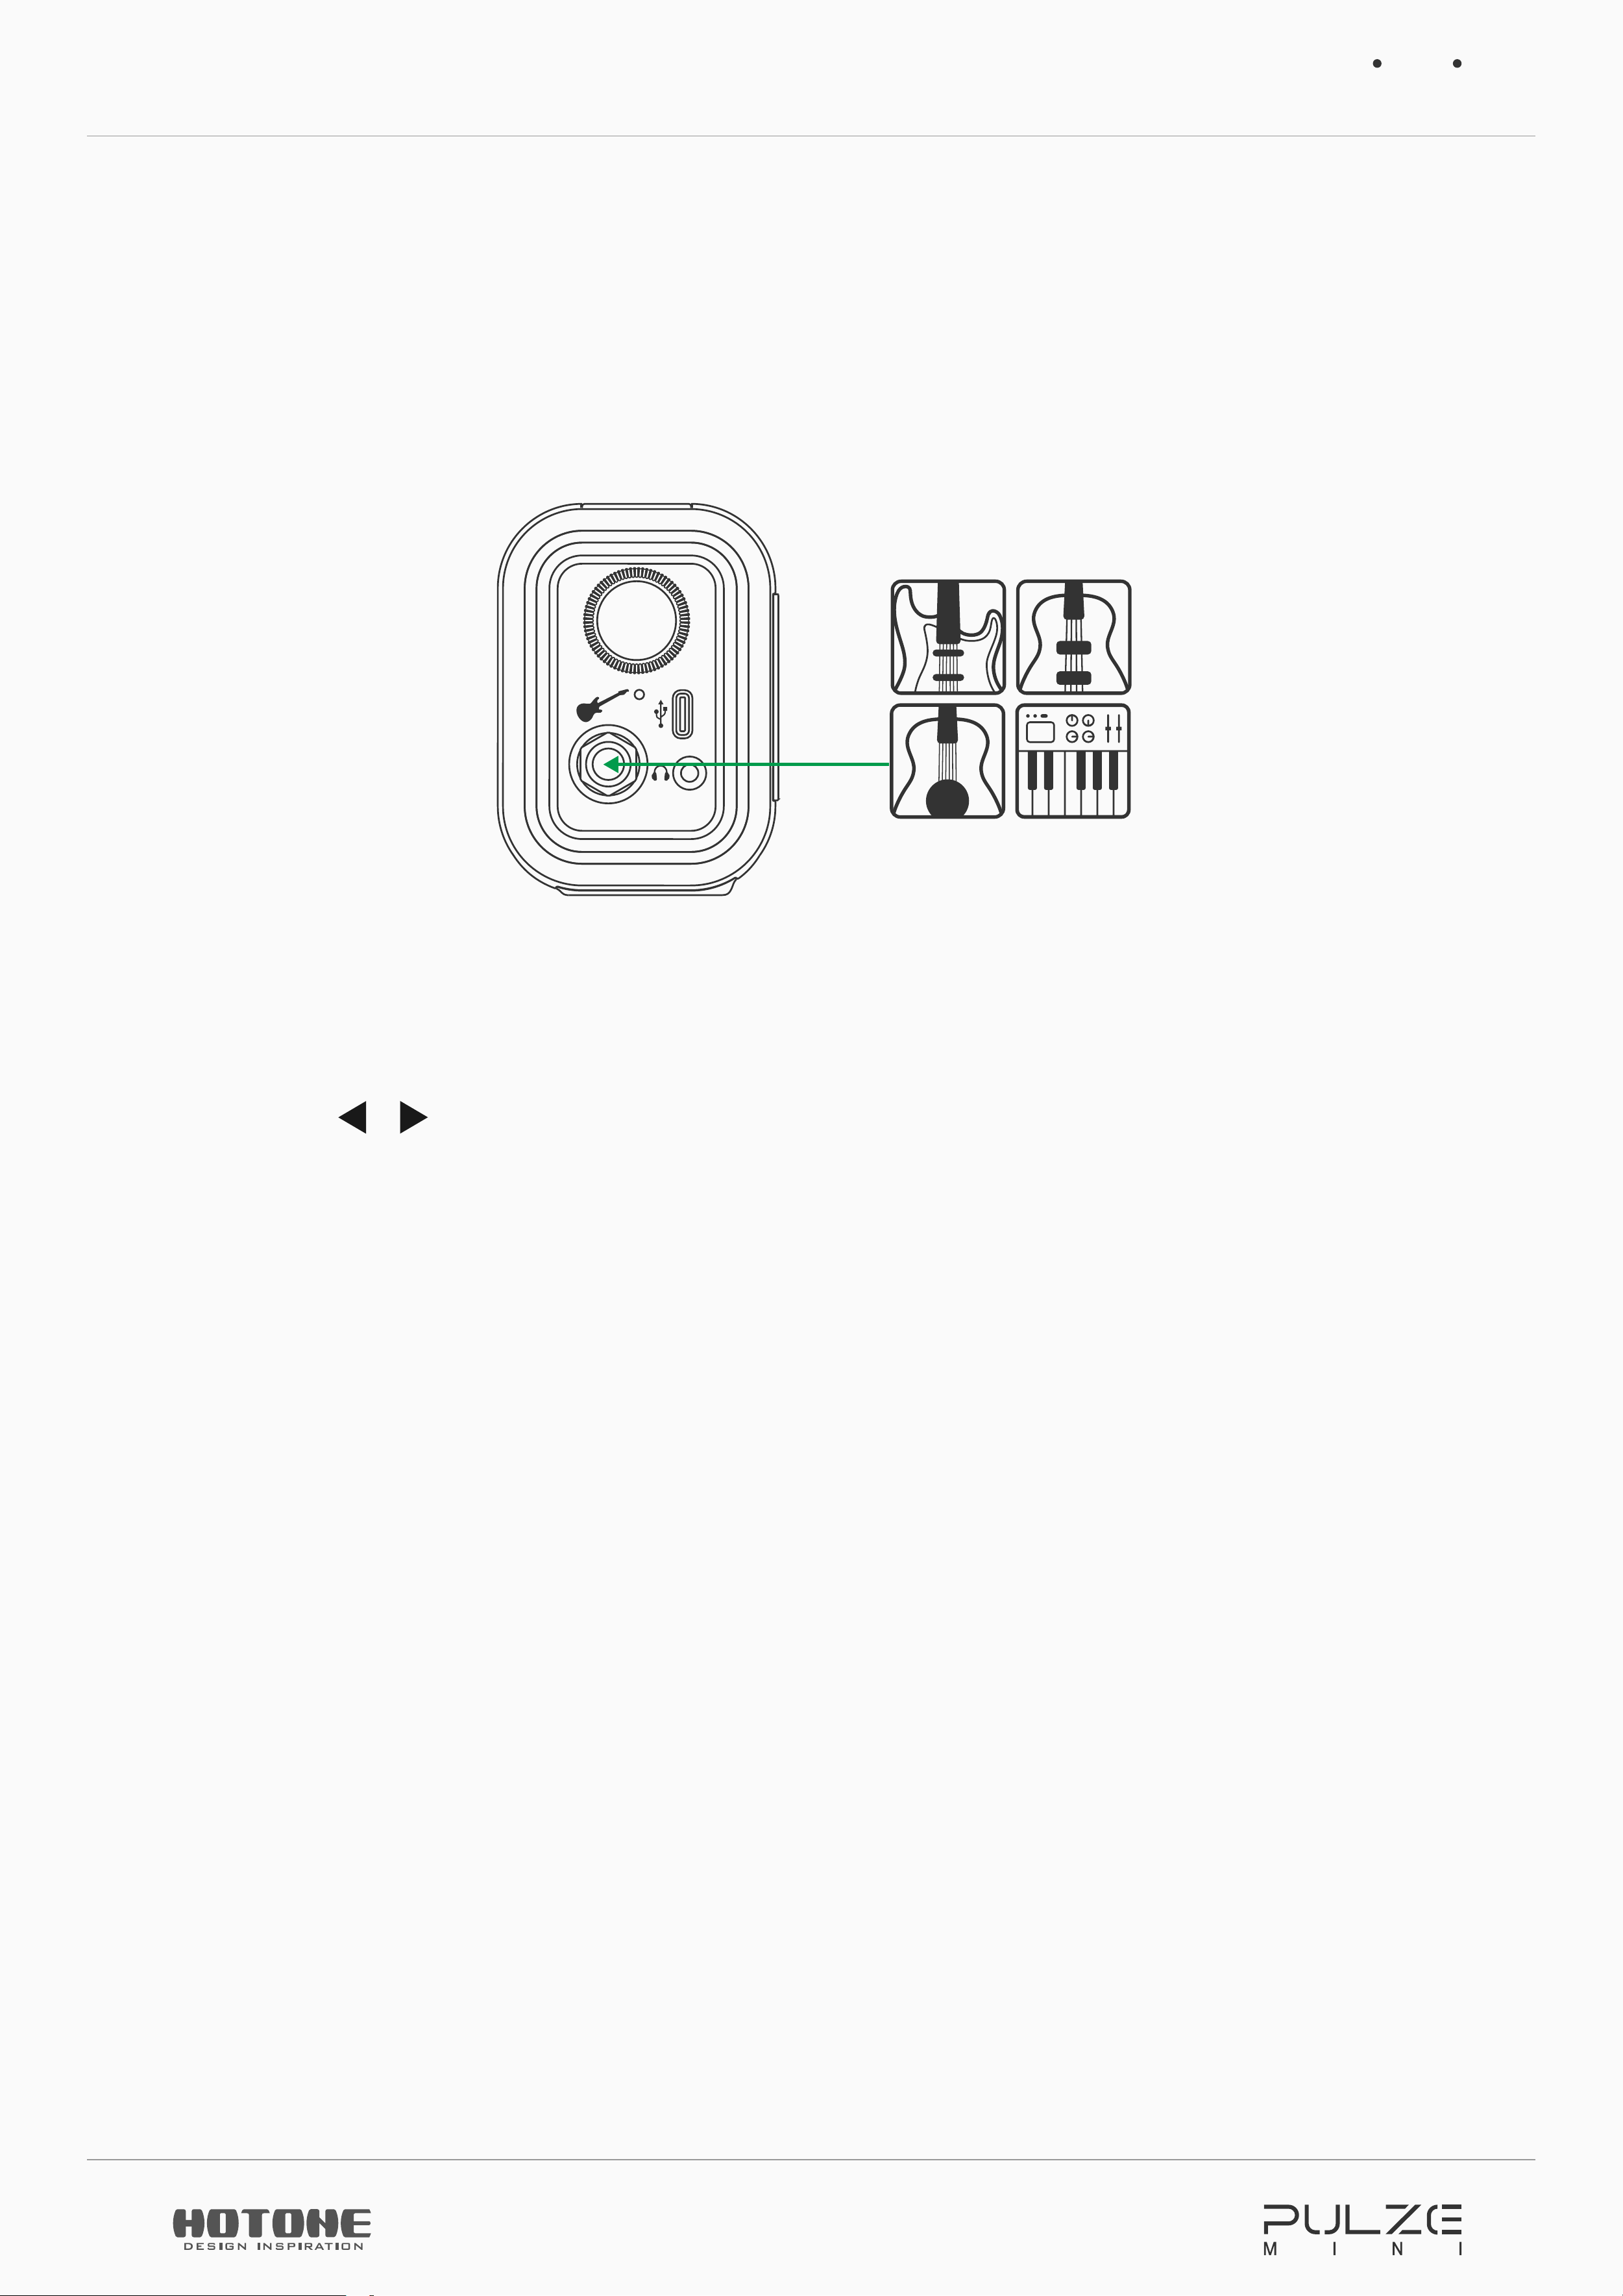
1. Connect your instrument (guitars, basses, etc.) to Pulze Mini’s input jack:
2. Hold the power button to turn the unit ON.
3. Adjust output volume depending on your needs.
4. Press
/
button to choose a tone you like.
5. For further tone shaping, please download Pulze Editor via App Store (iOS/
iPadOS) or directly download apk file on our official website (Android).
Quickstart
11
Music Listening via BT
1. Hold the power button to turn the unit ON.
2. Hold
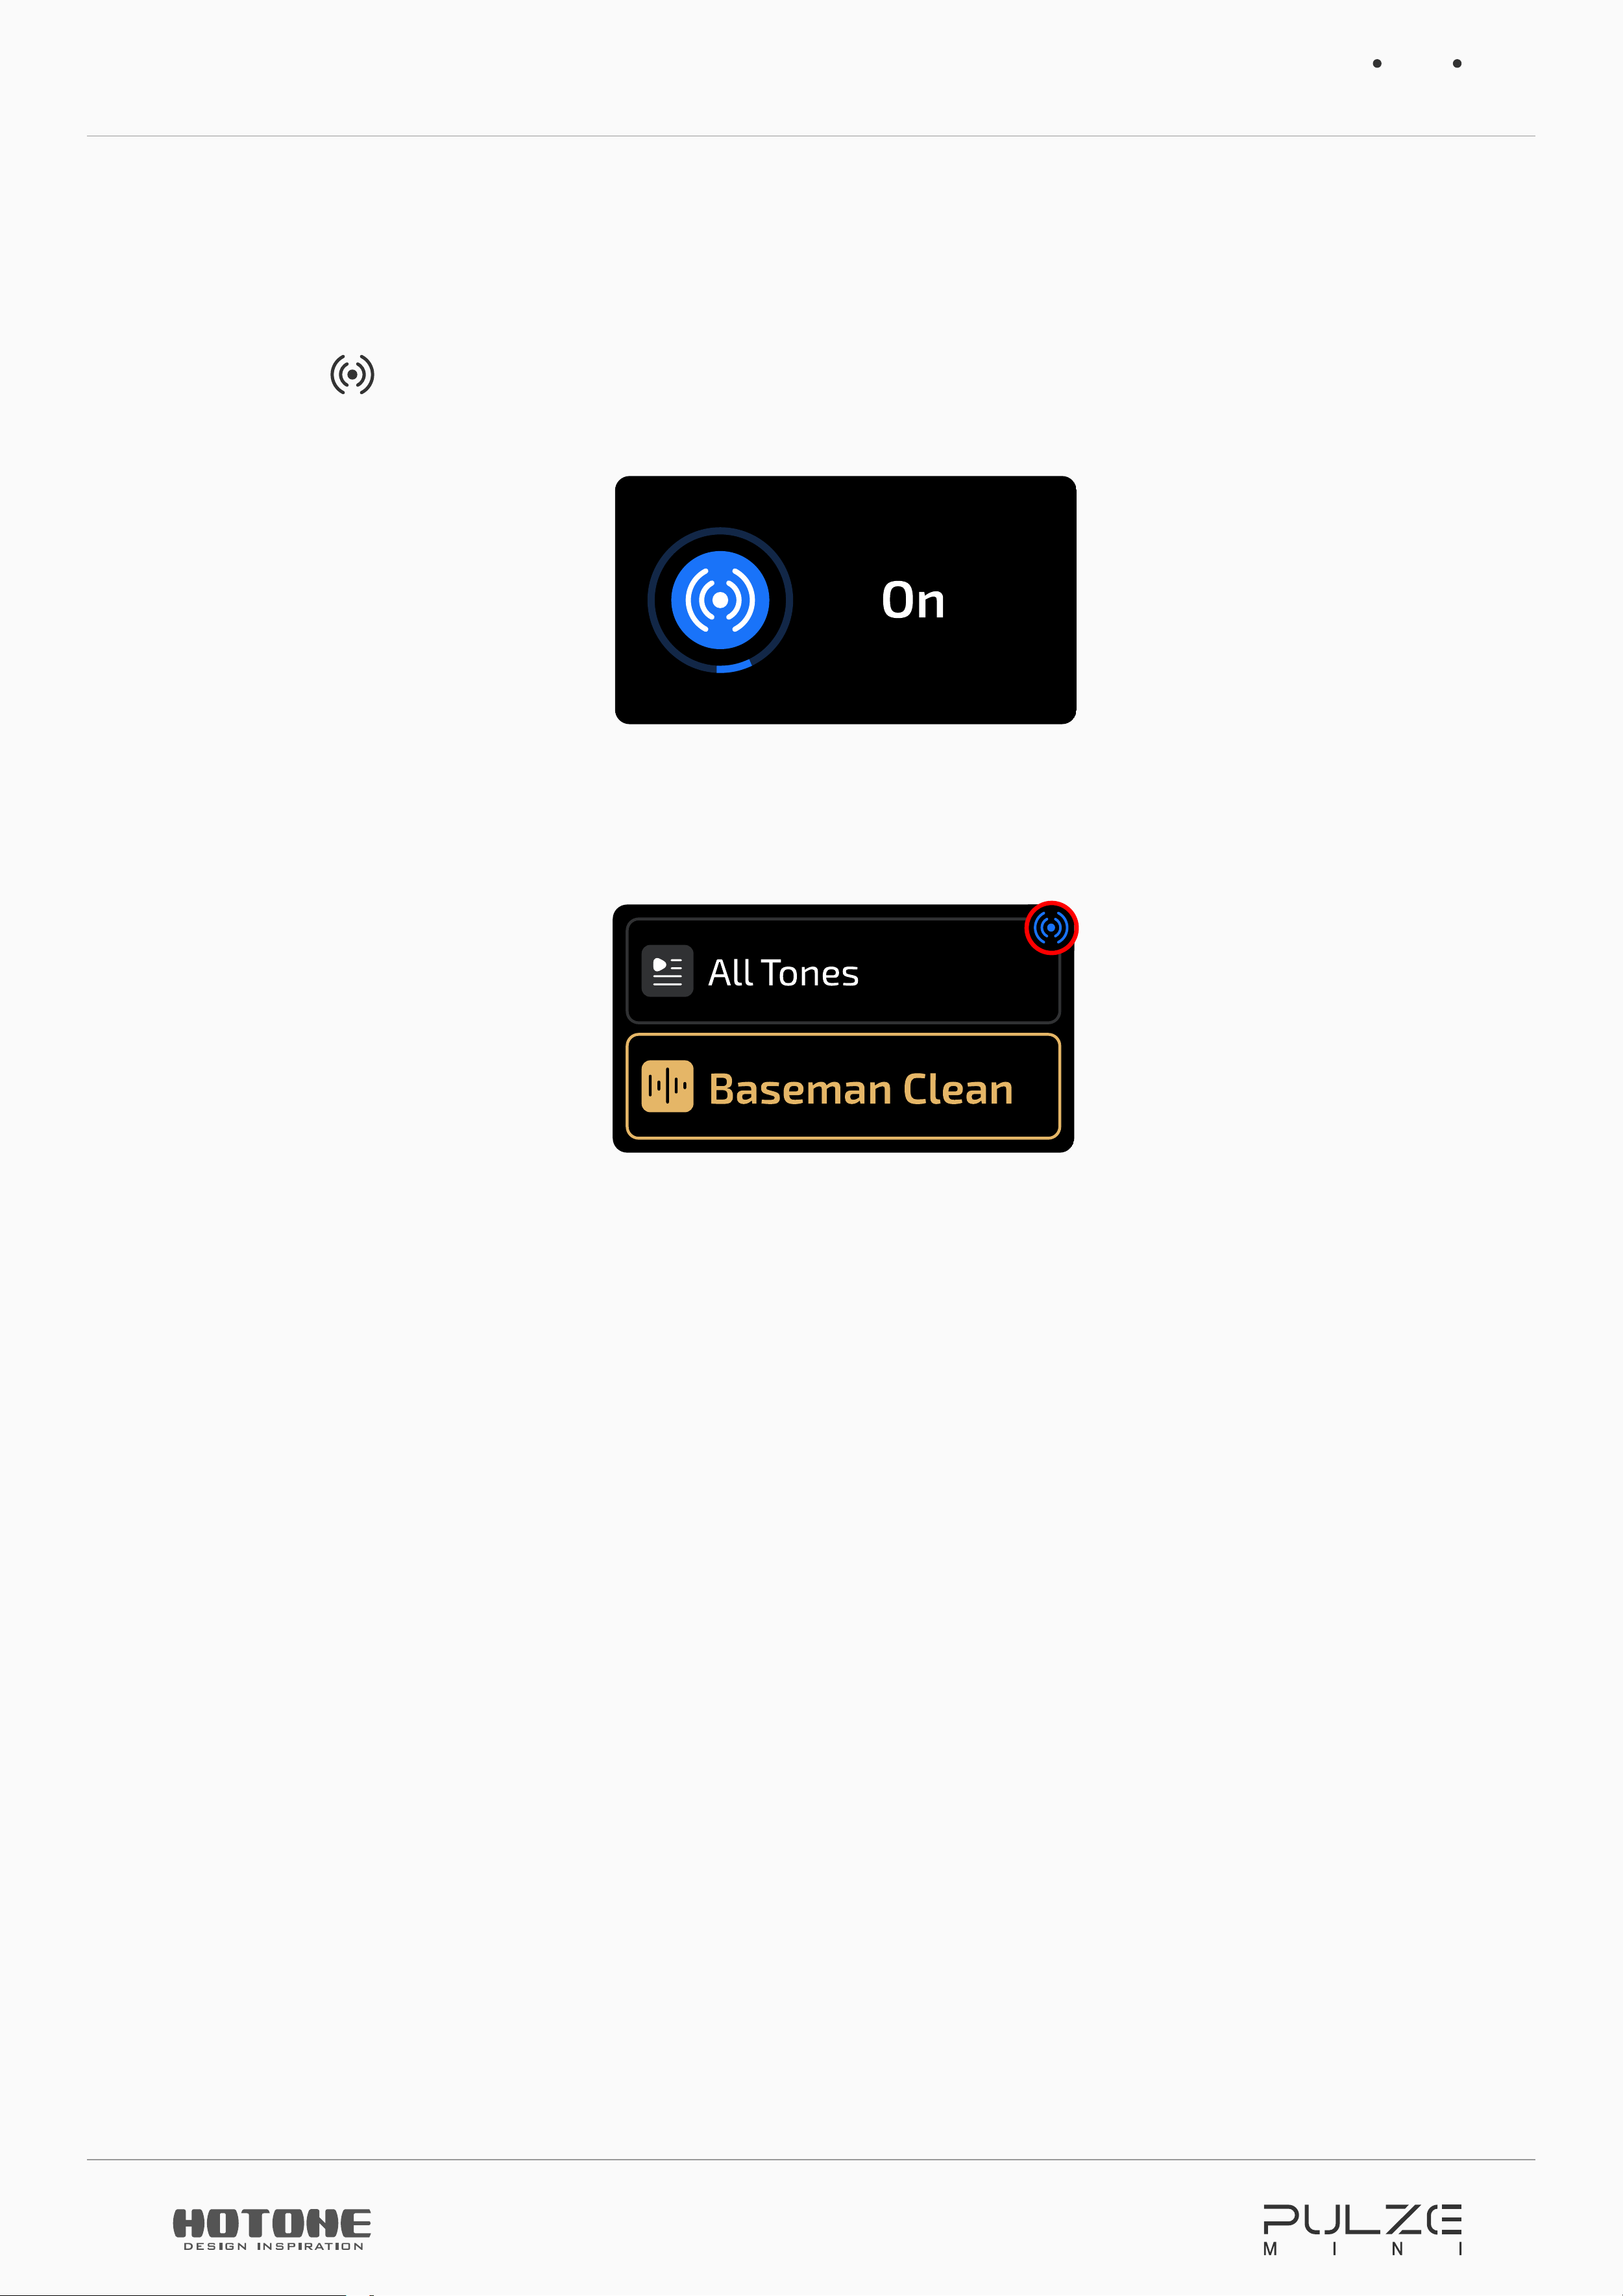
button to turn on BT function. The atmosphere light will breathe
once and the display below will show up:
Then BT indicator on the screen will flash to indicate that the unit is waiting
for connection:
The indicator in the top right corner will flash
3. Turn on the BT switch on your phones/pads, find the device name containing
“Pulze Mini Audio” in the device list, then connect.
4. When connected, the unit will play a notification sound, the atmosphere lights
will display a steady blue to indicate a successful connection. The BT icon in
the upper right corner of the screen will remain lit.
5. Play your favorite music!
Quickstart
12
Using USB Audio
1. Hold the power button to turn the unit ON.
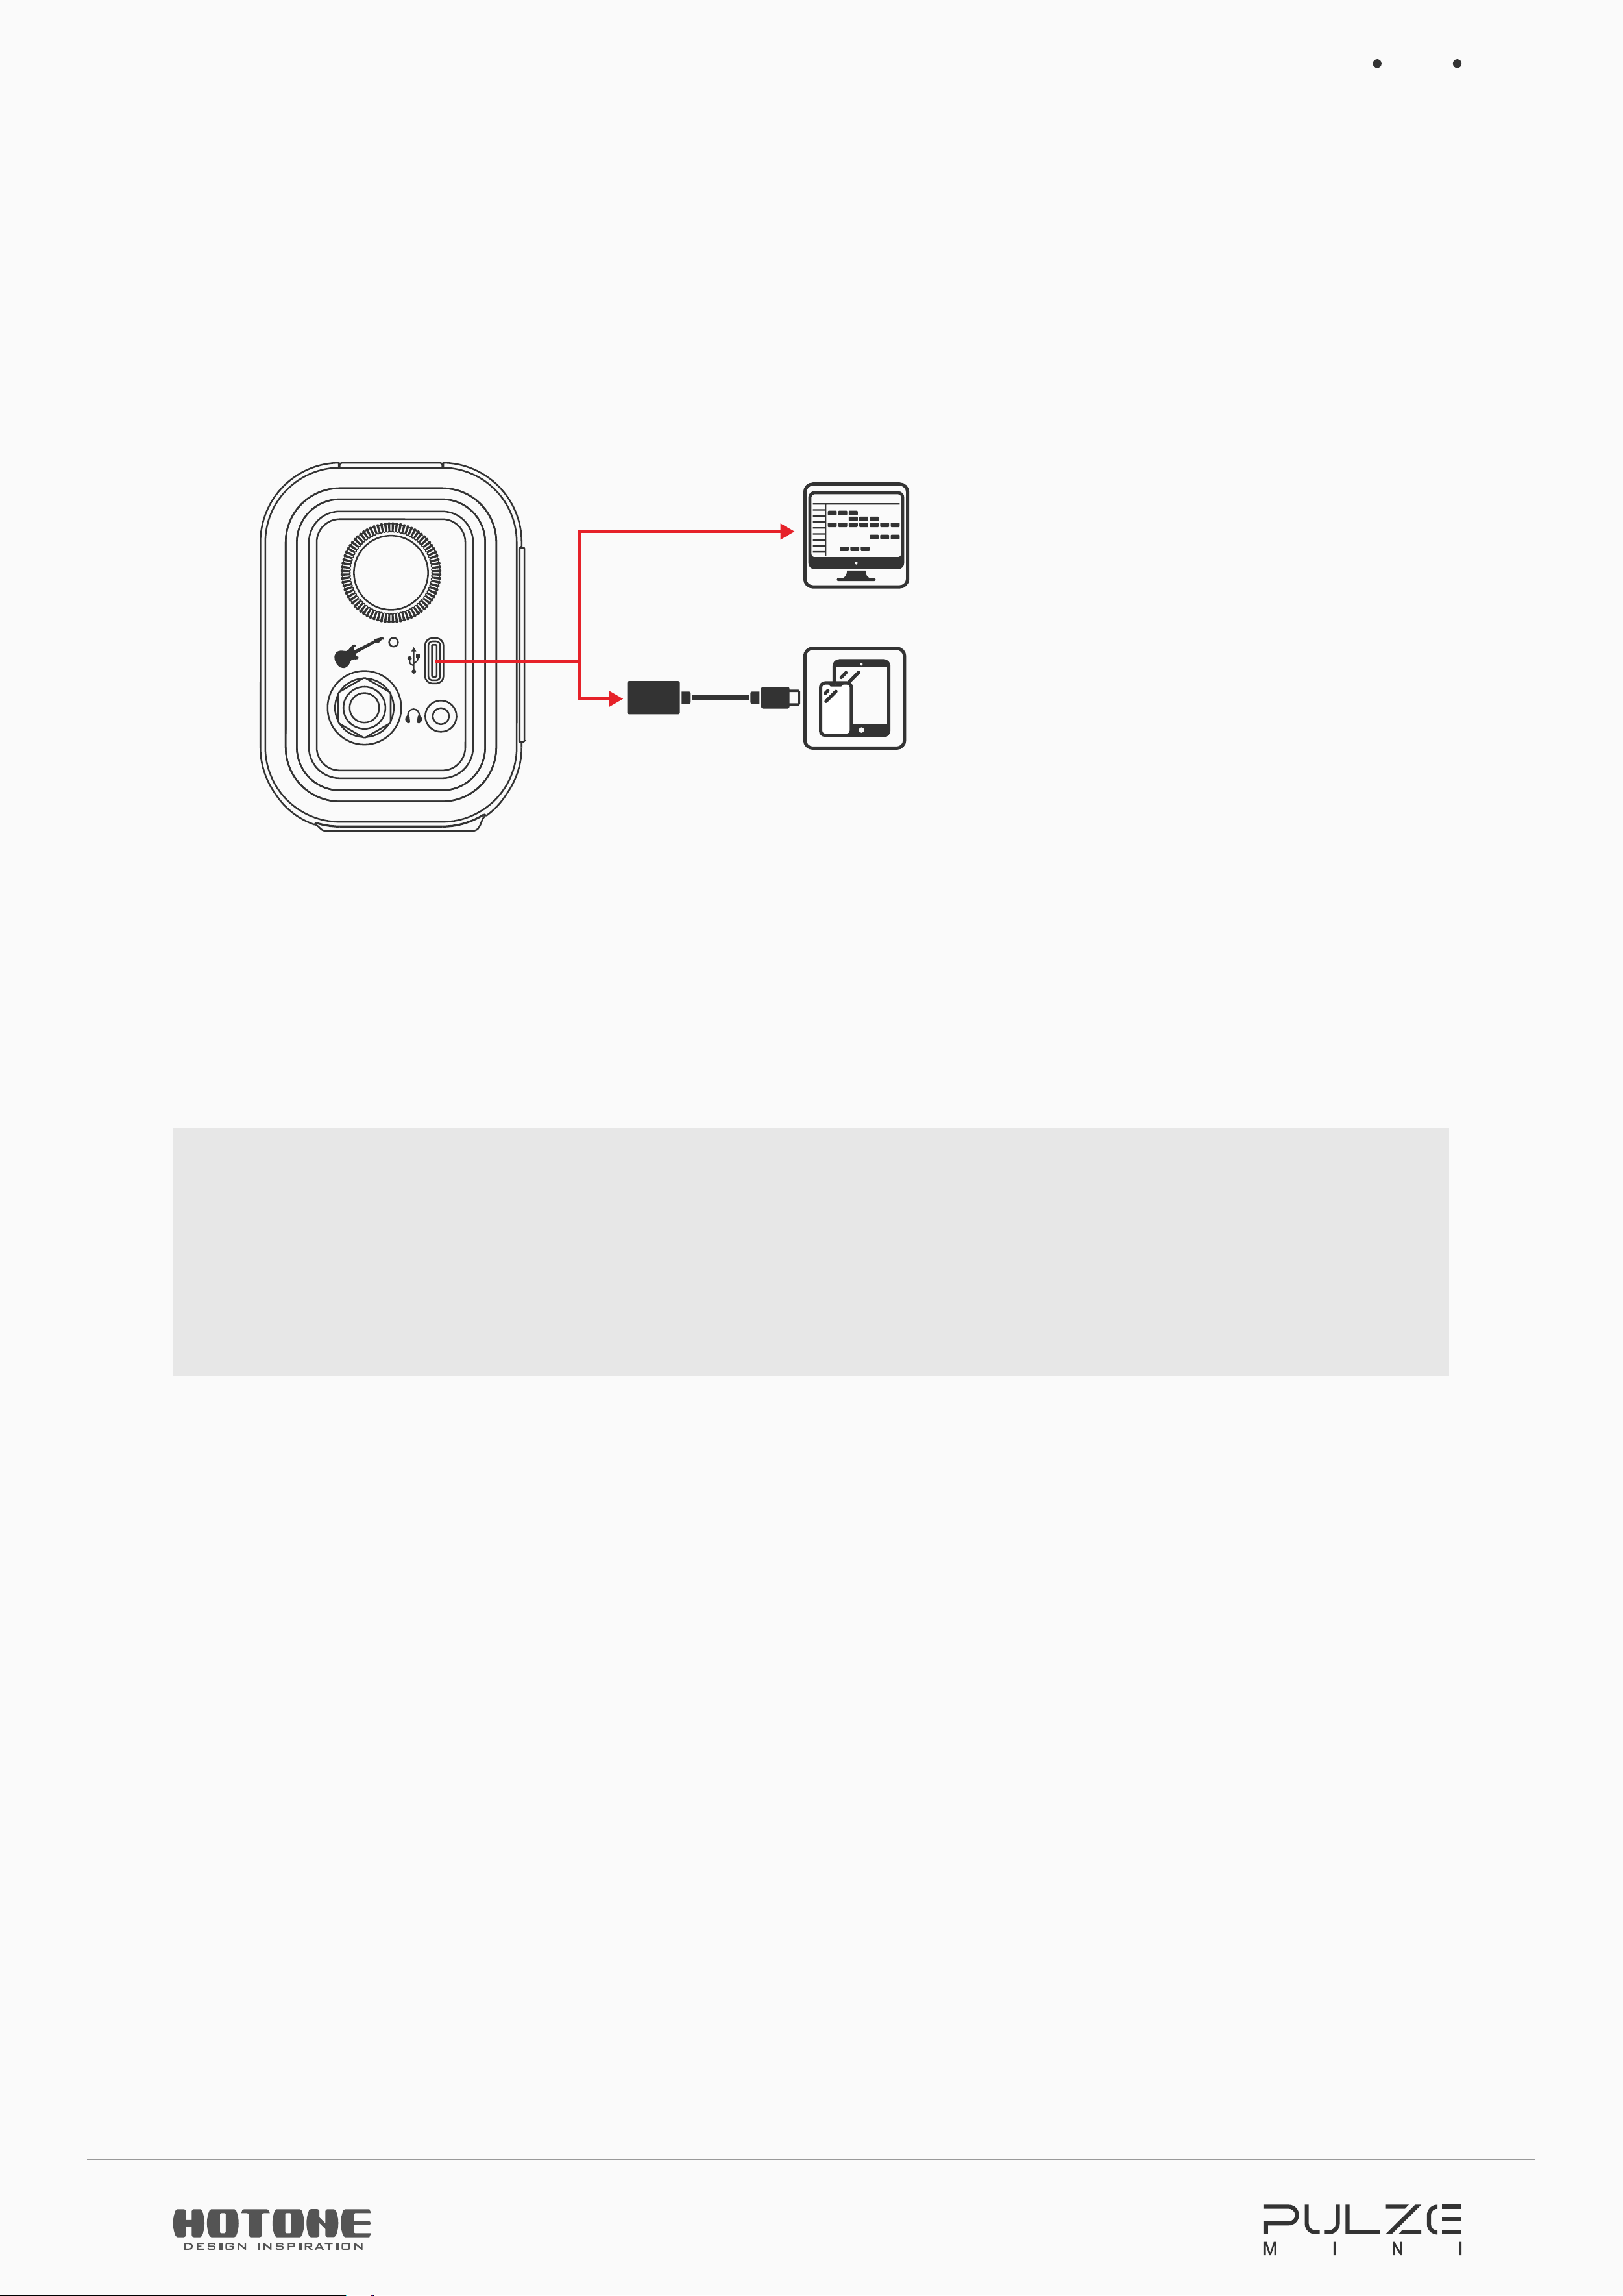
2. Connect to your PC/Mac/Phones/Pads with the attached USB cable:
OTG
Before connecting to PC, please
install Hotone USB
ASIO driver first;
We recommend to use OTG cable
when connecting to phones/
pads
3. When connected to your PC/Mac, your Pulze Mini will be recognized as an
audio device named Pulze Mini Audio. Please set it as your main audio device.
4. Play your favorite music!
Please note:
For protecting your hearing, please adjust the output volume knob very carefully.
In default settings, the atmosphere light strip will show output meter. So, you
can pay attention to the atmosphere light strip prevent signal clipping.
Quickstart
13
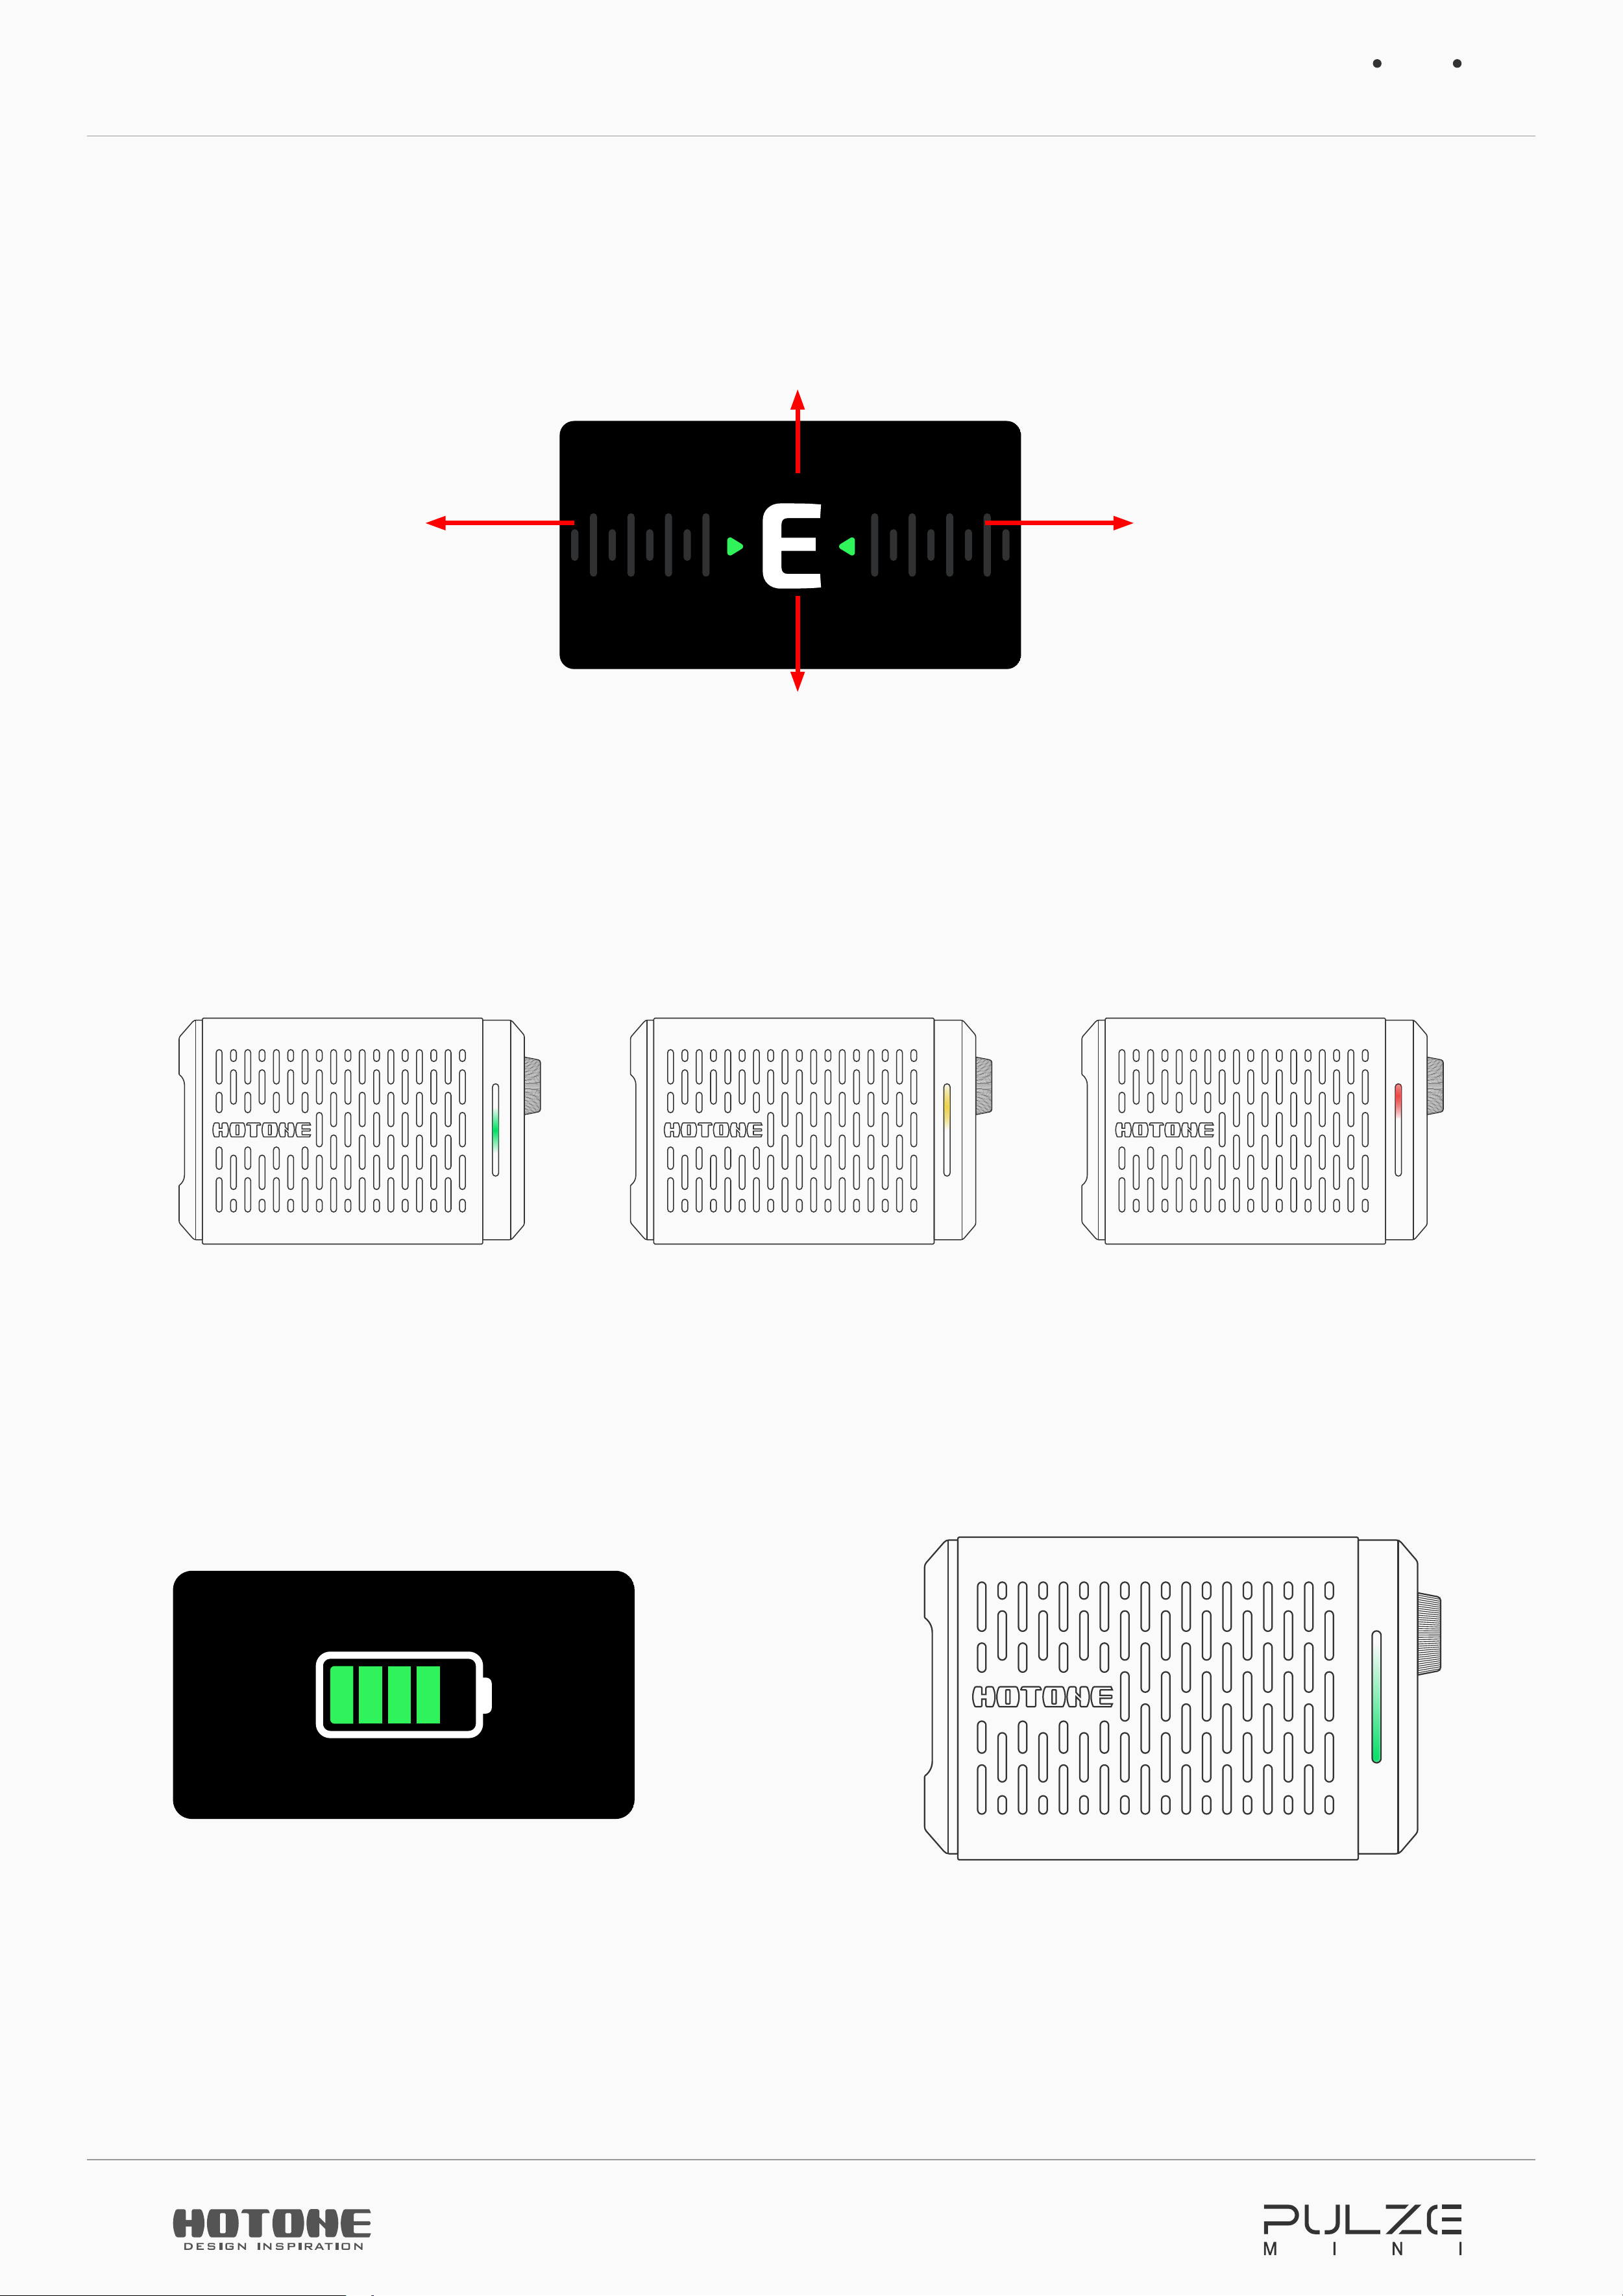
Tuner
Hold volume knob to enter Tuner menu:
Pitch flat
In tune
Current note name
Pitch sharp
The reference pitch (standard A frequency) is defaulted to 440Hz. You can set the
reference pitch via Pulze Editor.
Press volume knob to exit tuner.
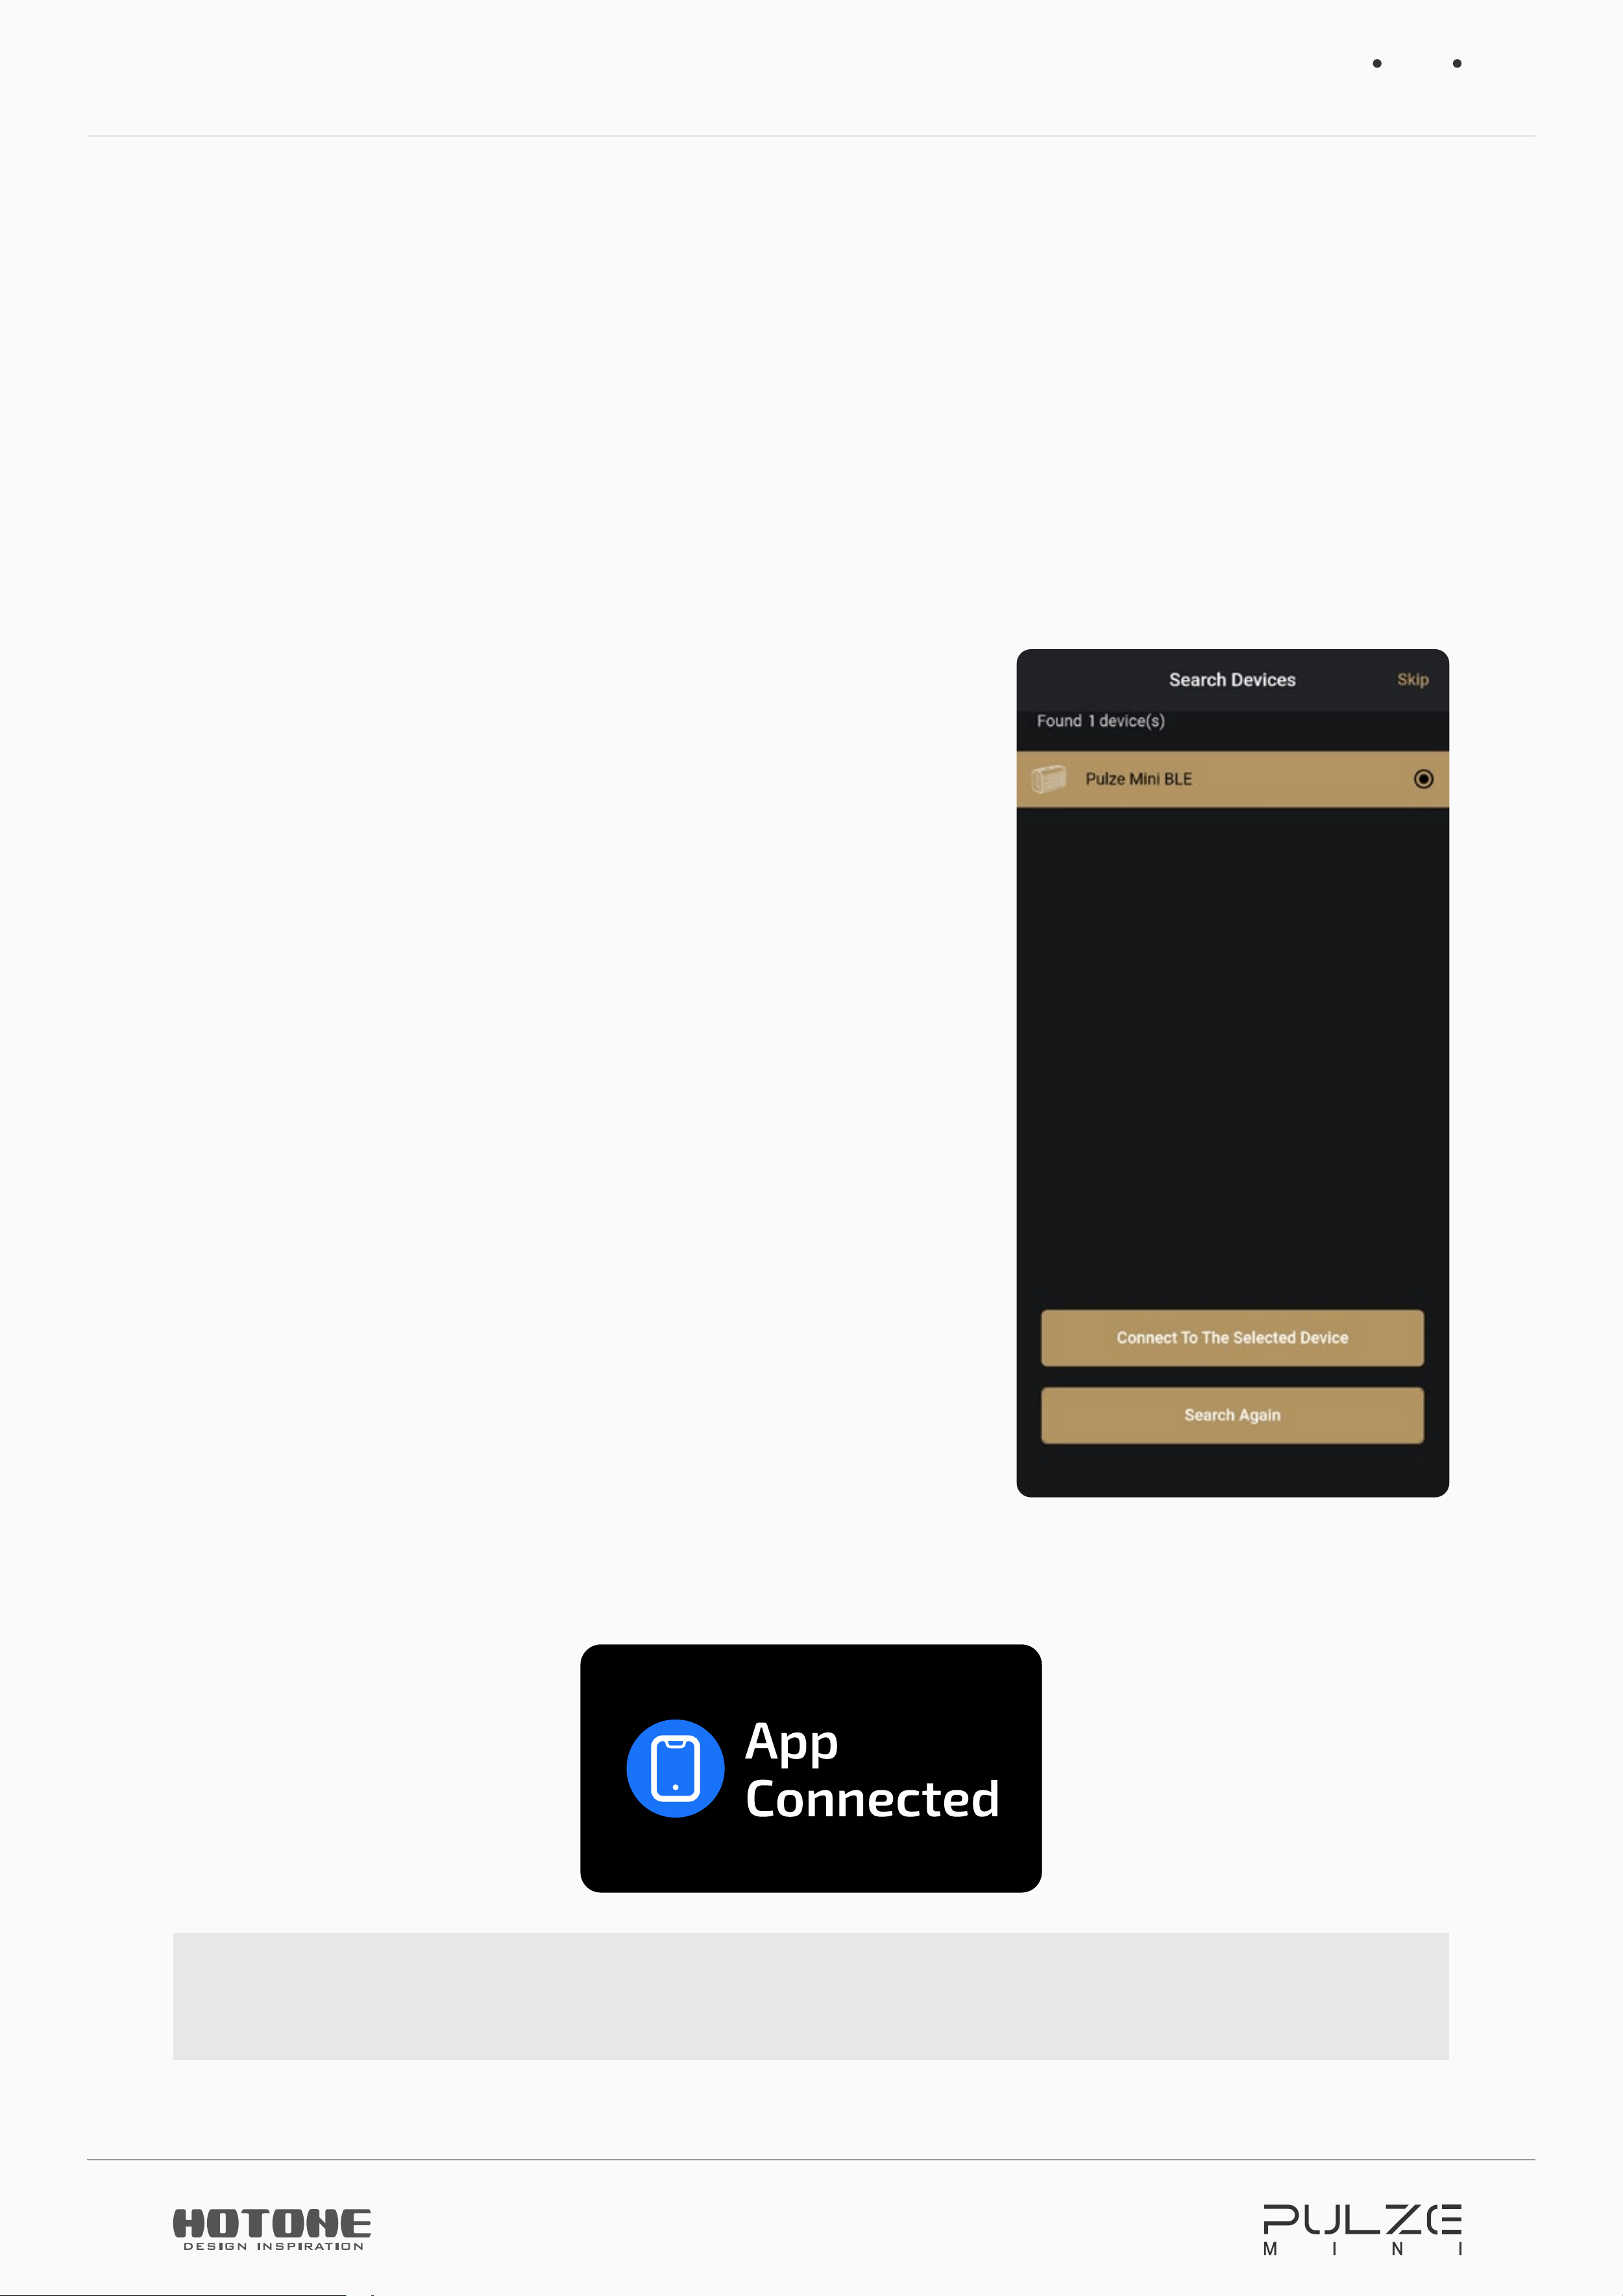
Battery
Press power button to check current battery status:
Screen display
Atmosphere light strip display
Using Pulze Editor
14
Using Pulze Editor
For full access to your Pulze, please download Pulze Editor via hotone.com/support
(Android) or App Store (iOS):
Connection
1. Turn on the BT switch on your phones/pads, then
turn on your Pulze Mini’s BT function and launch
the Pulze Editor app.
2. Login your account (optional).
3. On first use, Pulze editor will ask BT access
permission (for some Android device, location
permission will also be asked). When such
permission requests popped up, please tap
“Allow”.
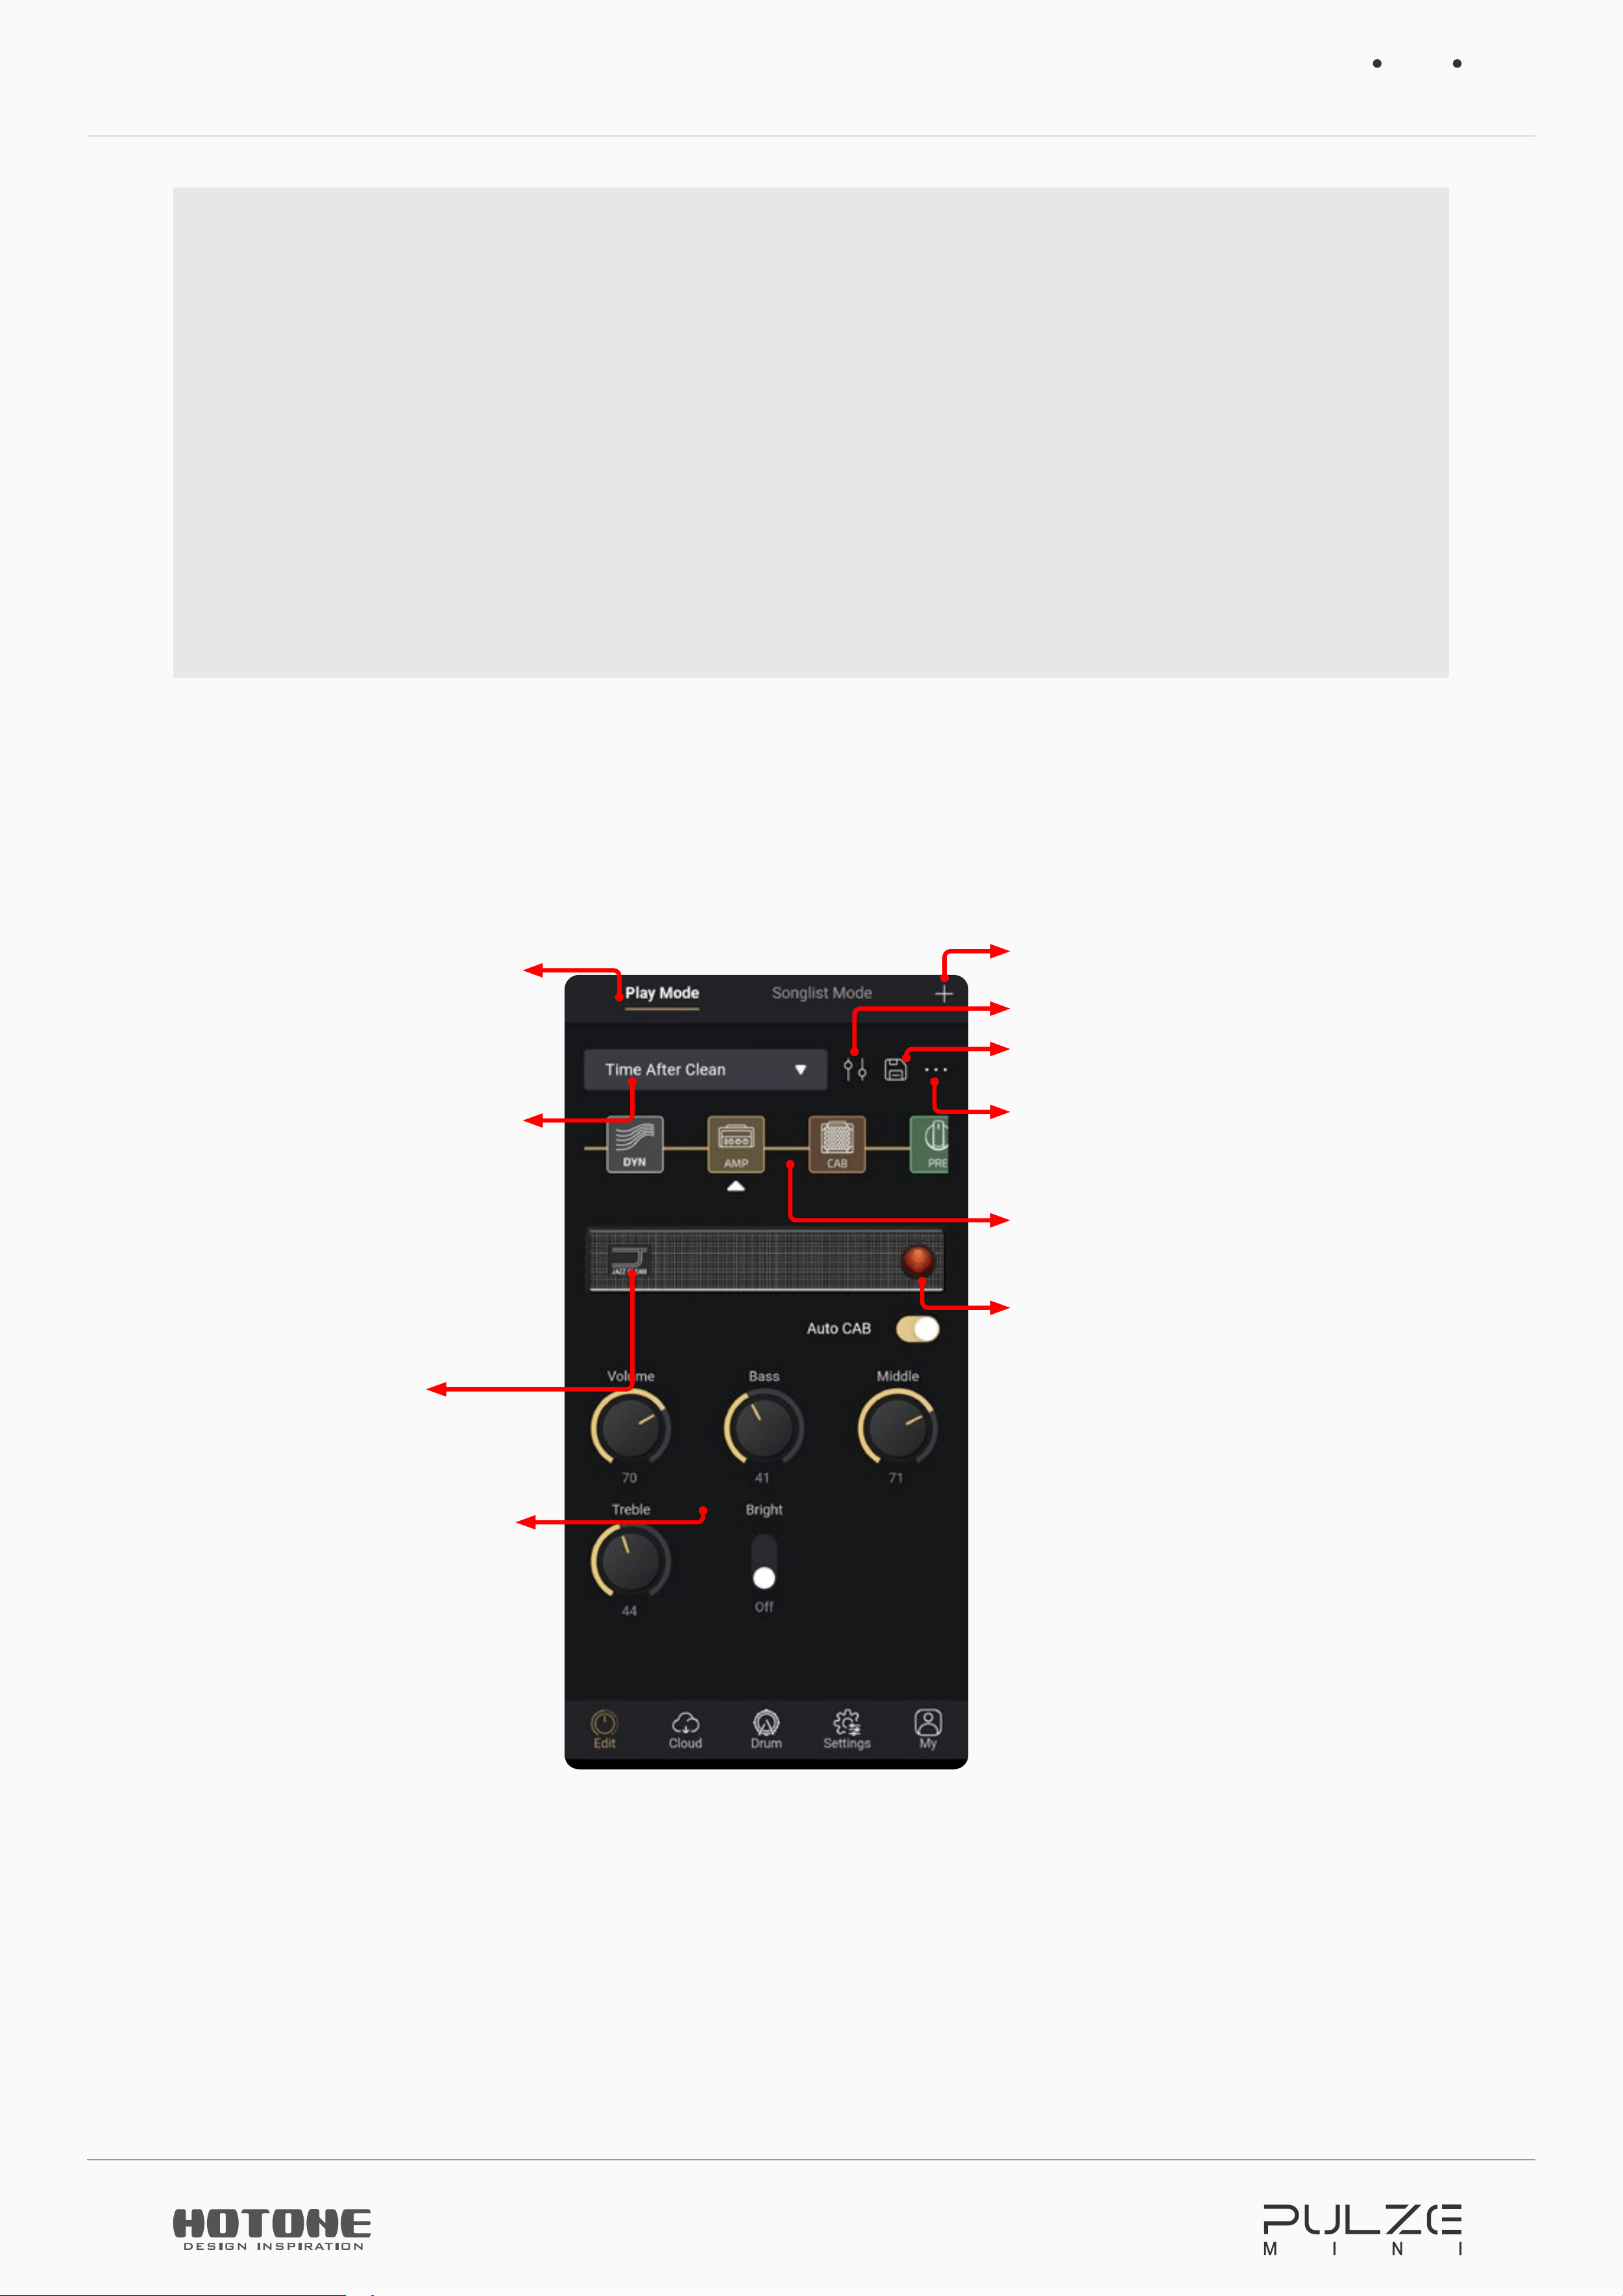
4. When your Pulze Mini appears listed on the
startup page (the app will automatically scan all
nearby devices), select and tap the “Connect to
The Selected Device” button on the screen.
Then the screen will display as shown below:
Please note:
You can enter offline mode if no device is found.
Using Pulze Editor
15
You can only connect to one device at a time. To connect to other devices, please
disconnect current connection.
The default device name is Pulze Mini BLE. You can customize your device name
if needed.
If search failed (no device found or timeout), you can retry searching by manually
tap “Search Again” button, or restart BT on your mobile device.
Please keep your Pulze Mini close to your phones/pads for best possible
experience.
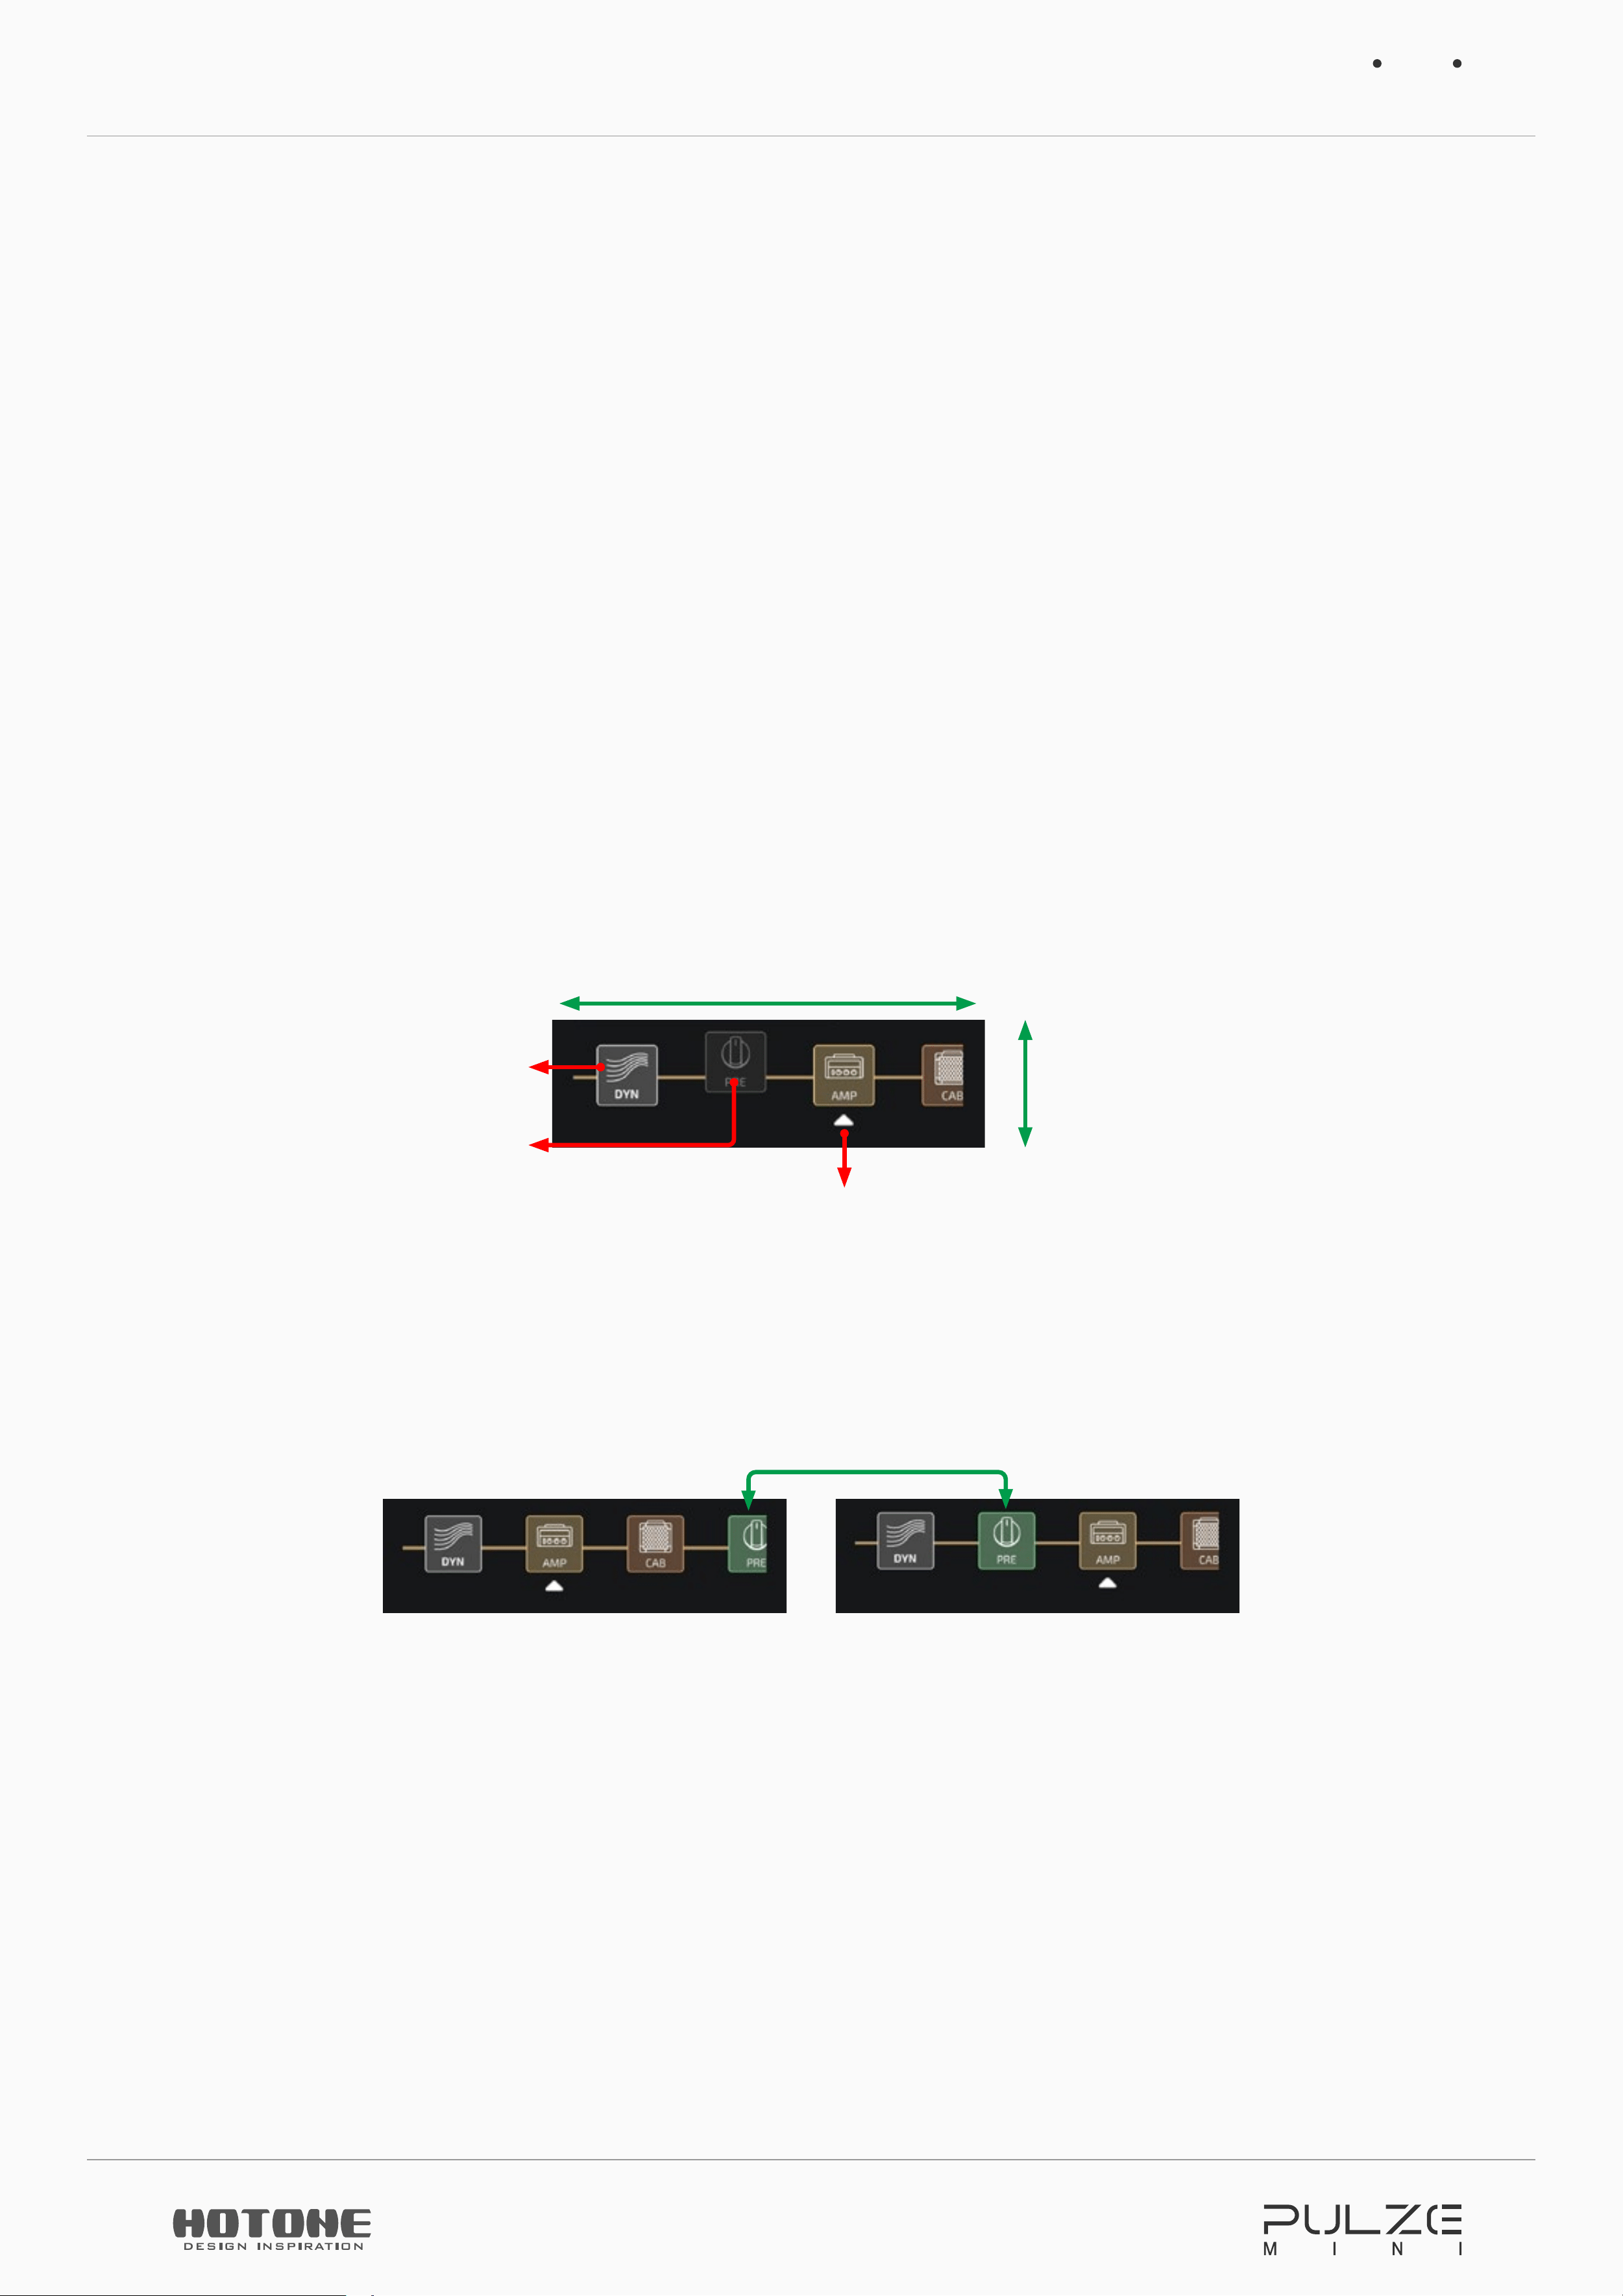
Advanced Tone Shaping (In Play Mode)
Pulze Editor app will enter Play Mode when connected:
Indicates current mode
(Play Mode)
Current tone name
Tap to enter the songlist
which current tone
belongs to
Create or import a tone
Adjusts tone BPM and volume
Save current tone
For renaming, uploading tones,
etc.
Effect chain
Turn on/off selected module
Available parameters of
current effect
Tap to enter effects list of
current module
Using Pulze Editor
16
Effects Chain
The effects chain of Pulze Mini represents the inter signal flow, effect combination,
etc.
The 7 effect units on the effects chain is called modules. You can pick the effects
you need in the modules as listed below:
• DYN: Dynamic effects (e.g. noise gates, boosts)
• PRE: Pre-amplifier effects (e.g. compressors, boosts, mods, filters, octaves)
• AMP: Amp modeling effects
• CAB: Cabinet simulations and IRs
• EQ/MOD: Equalizers and modulation effects
• FX1/FX2: Custom effect modules including mods, delays, reverbs and more
Effects chain operations are shown as below:
Slide to view the whole chain
Module turned on
Current selected module
Select one module to view
details or adjust parameters
Module turned off
Slide up/down to turn
modules on/off
To swap module order, hold on one module and slide to desired position:
Hold target module and slide to the desired position
Using Pulze Editor
17
Change Effects
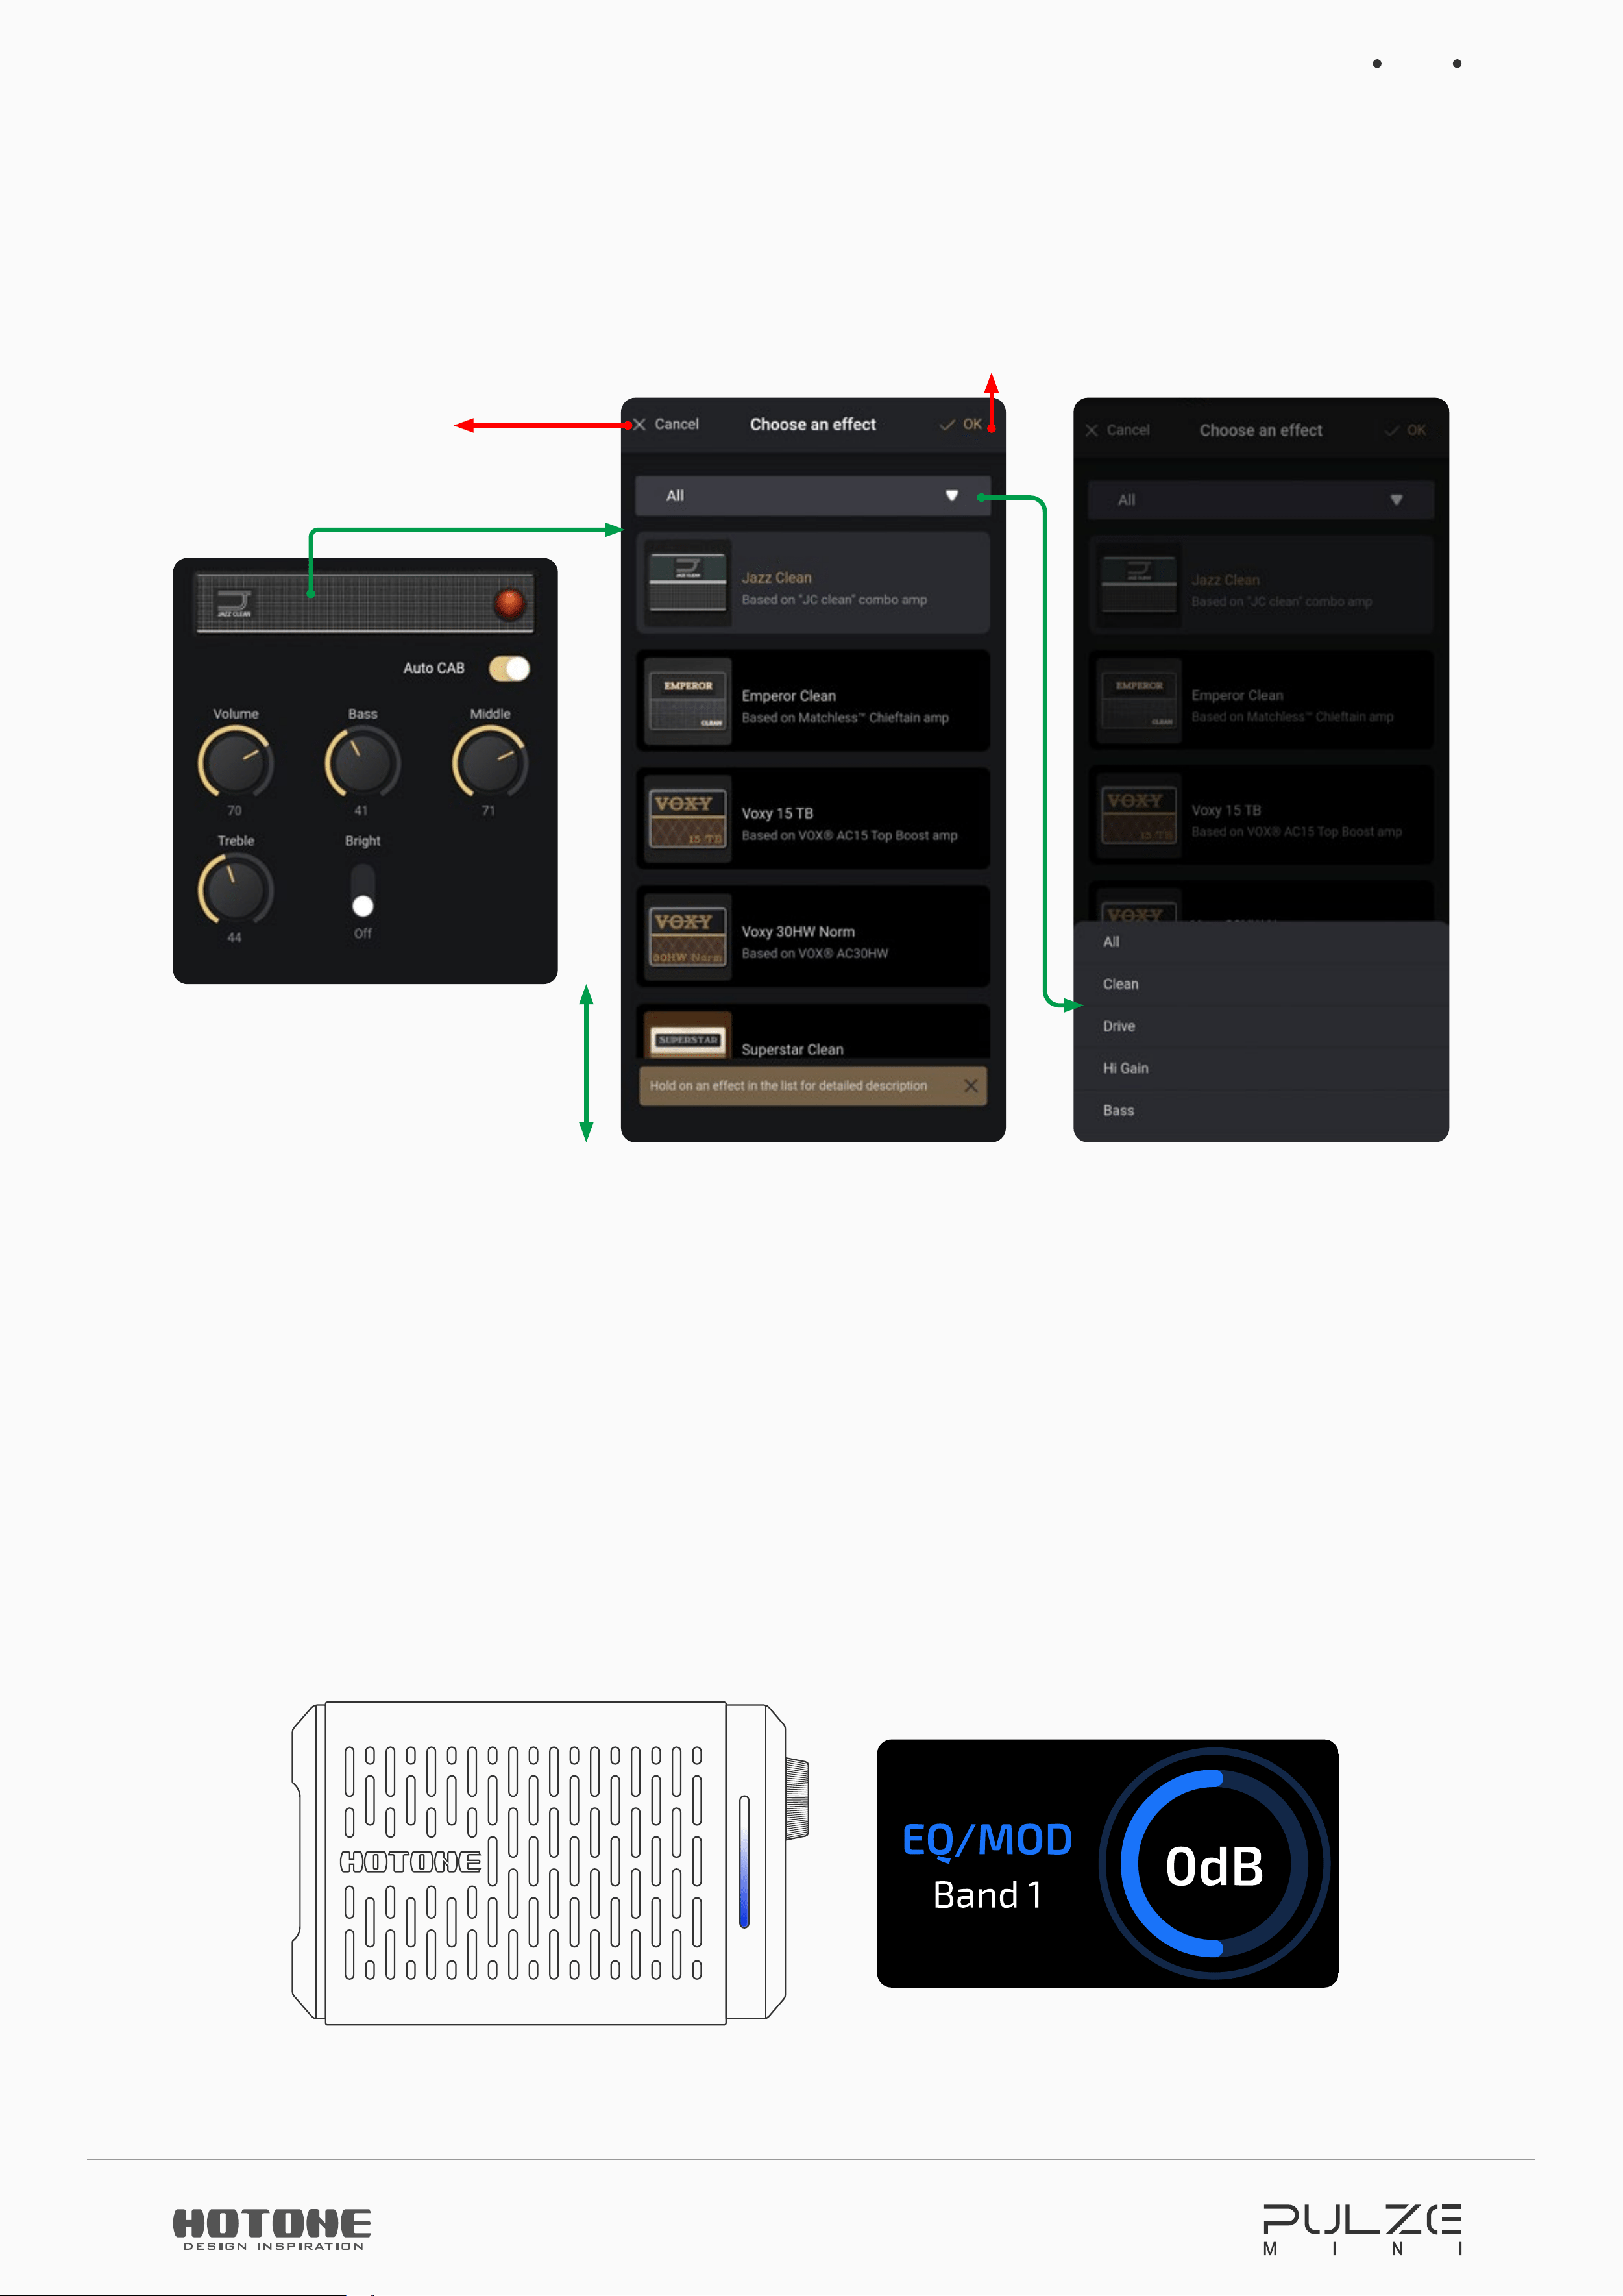
To change effects, please follow the operations below:
Tap here
Slide up/down to check
available offects
Cancel and go back to
previous effect
Confirm selection
Tap here to check
effacts by categories
Adjust Parameters And Effect Descriptions
You can slide on one effect parameter to adjust, hold to enter a parameter value.
If one effect features more than 6 parameters, you can slide on the blank area of
listed parameters to check them.
When adjusting parameters, the atmosphere light strip and screen will display
depending on your operations:
e.g. Adjusting the Band 1 parameter of EQ/MOD
Using Pulze Editor
18
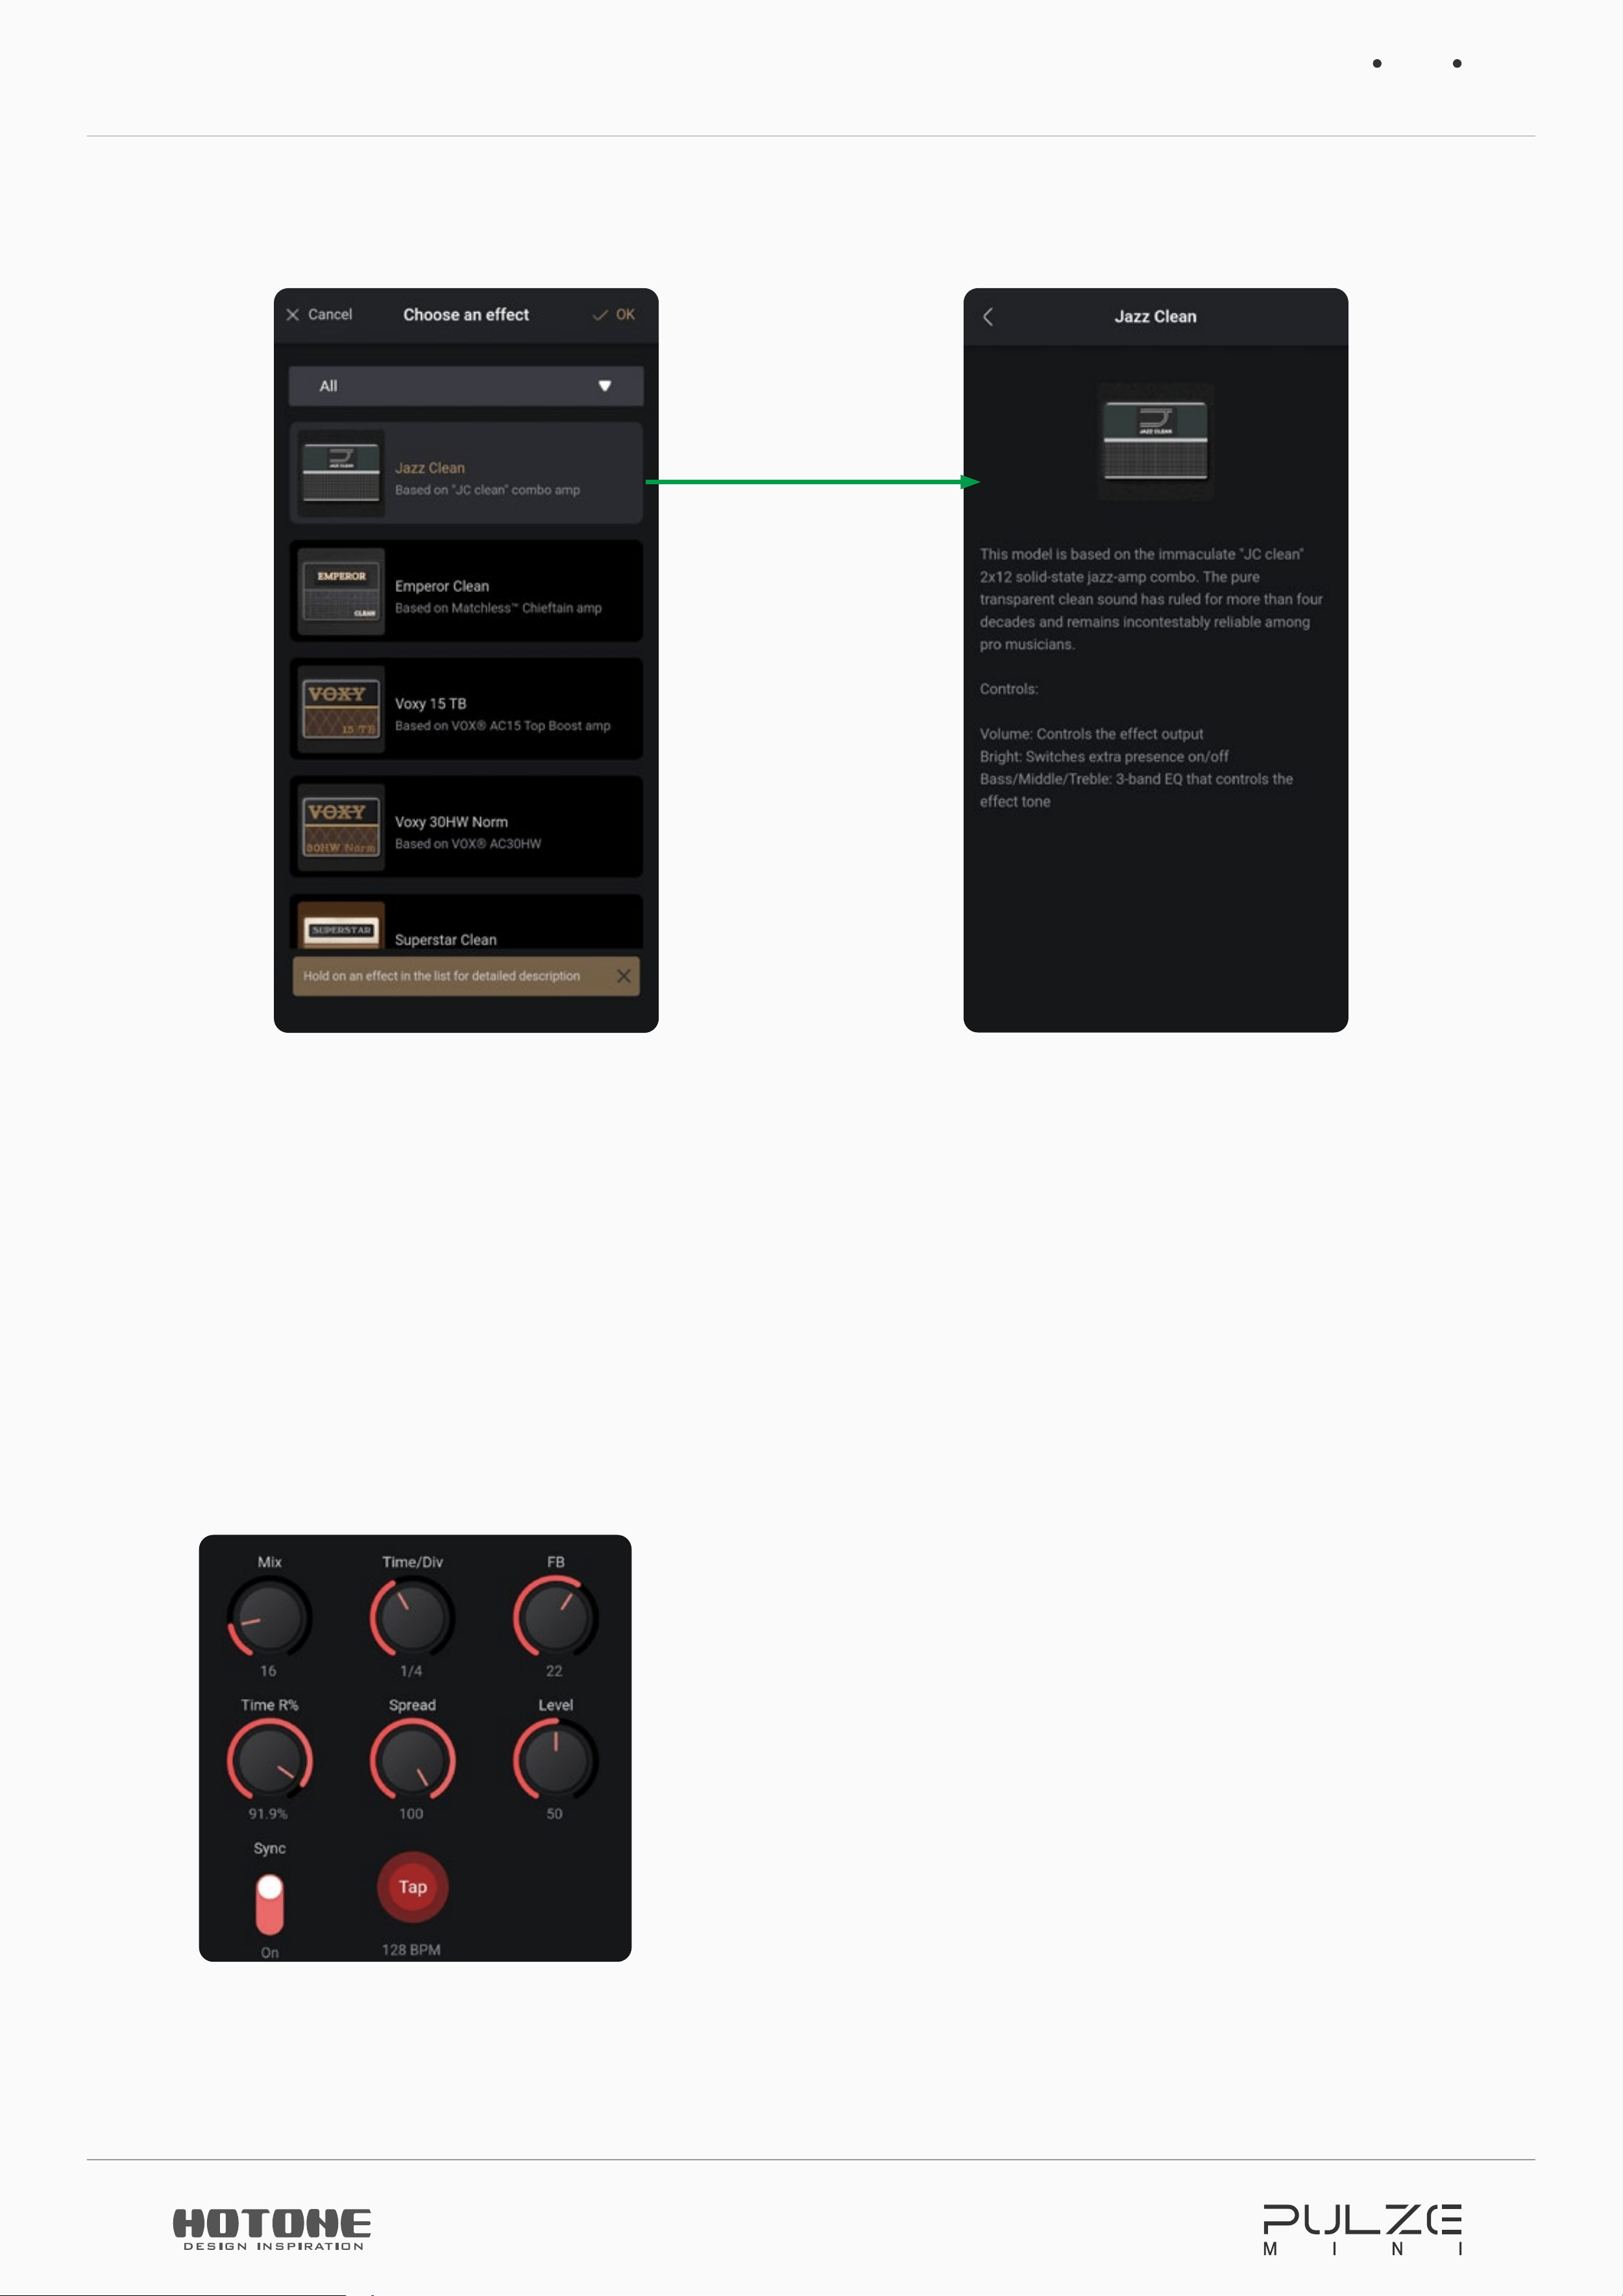
Hold on one effect in the effect list to view detailed descriptions:
Hold on one effect
to view detailed
effect descriptions
Here are some descriptions of some special switches/functions:
• Auto CAB (AMP module only)
The Auto CAB function will automatically help you match a cab when switching
amps. Default is set to on. If you want to try different amp/cab combinations or
using user IRs, please turn the switch off.
• Sync and Tap button
The function of Time/Div parameter varies
depending on Sync switch:
Sync On: Controls tap tempo division value
Sync Off: Controls actual delay time (ms)
Turning on Sync switch means, the time-based parameters (like delay time,
Using Pulze Editor
19
mod speed) will sync to the tap tempo value by some certain rates (tap tempo
divisions). Sync function is defaulted to on.
The parameter names affected by Sync function (comes with a /Div suffix)
means:
• Sync on: the parameter controls tap division value
• Sync off: controls actual parameter values in ms (delay time), Hz (mod rate), etc.
In most cases, default tap divide is set to quarter note (1/4, no divide).
Tap divide values in relation to their musical beats are shown below:
Time Value Beats Display
Whole note 4 1/1
Half note 2 1/2
Dotted half note 3 1/2D
Half note triplet 4/3 1/2T
Quarter note (no divide) 1/1 1/4
Dotted quarter note 3/2 1/4D
Quarter note triplet 2/3 1/4T
Eighth note 1/2 1/8
Dotted eighth note 3/4 1/8D
Eighth note triplet 1/3 1/8T
Sixteenth note 1/4 1/16
If you don’t want specified division value, just keep it as 1/4.
Using Pulze Editor
20
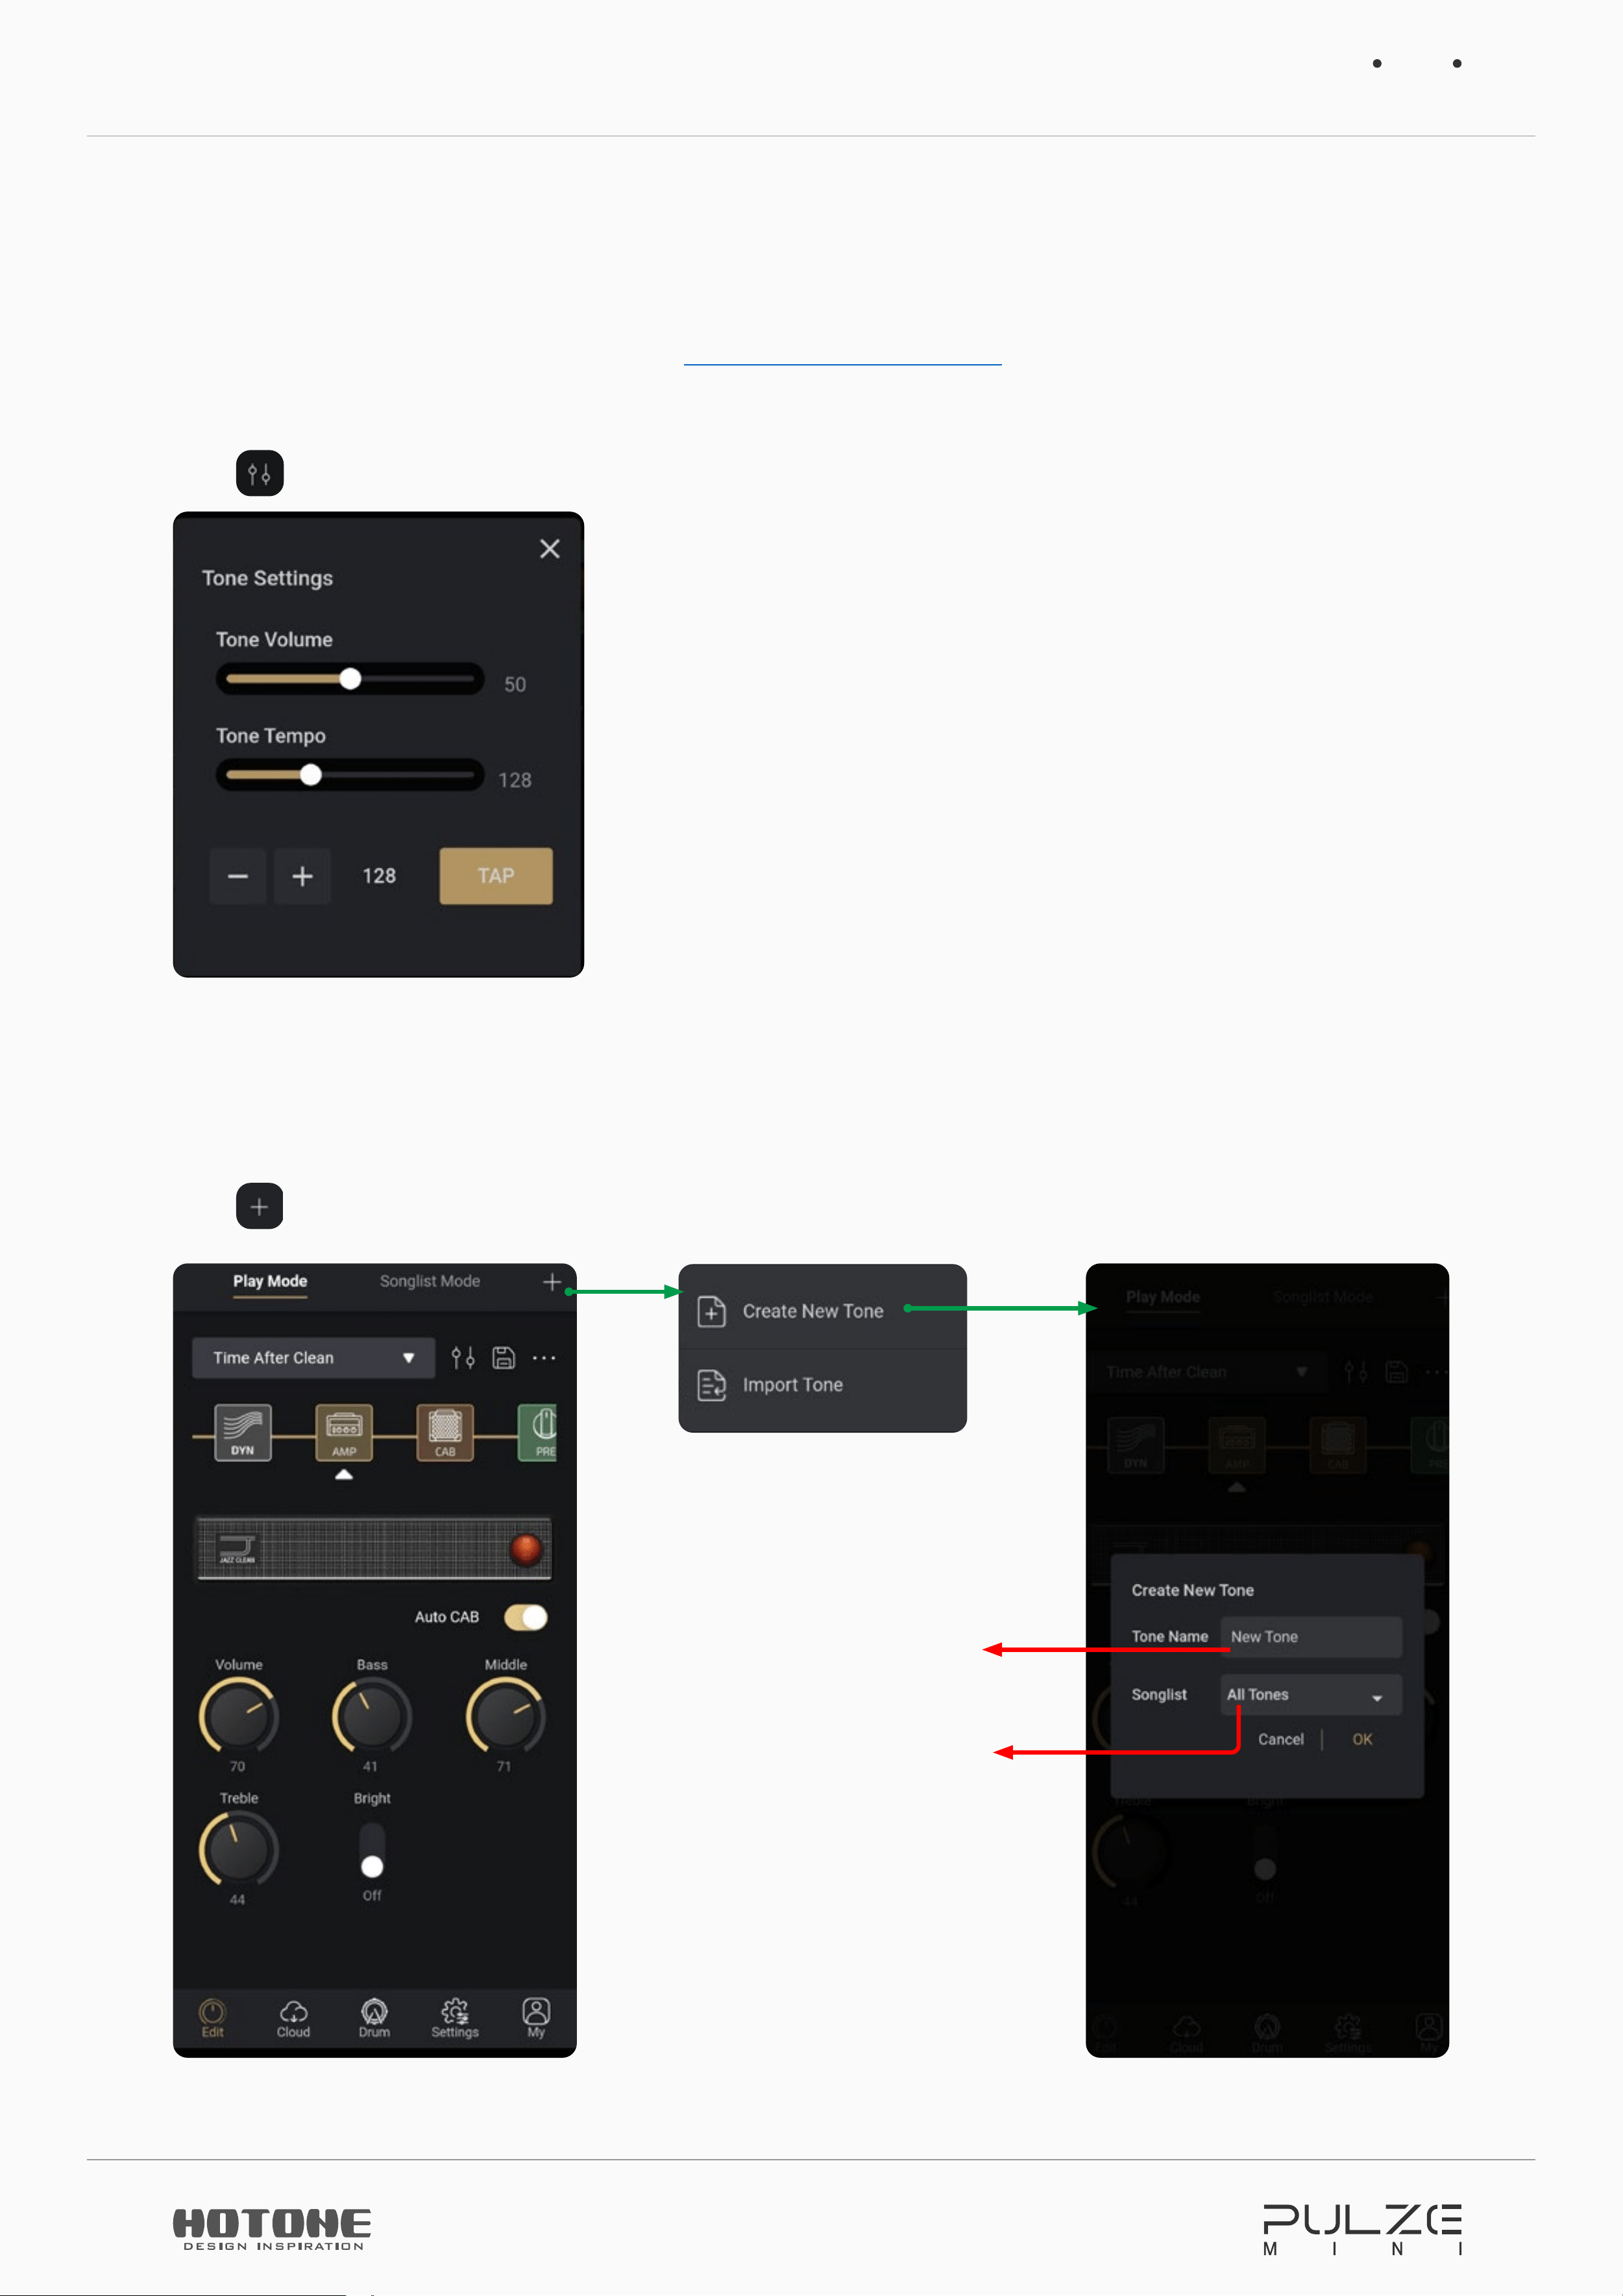
Tone Volume and Tempo
You can set tone volume to increase/decrease current tone output.
If you’re using Sync function (see
Sync and Tap button
section), you can adjust tone
tempo to control time-based parameter value.
Tap
icon and operate in the pop-up menu:
Slide to adjust – hold to enter a value
Volume range=0-100, Tempo range=40-300BPM
Use +/- and TAP buttons to fine tune tone tempo
Create A New Tone
You can start with an empty tone by creating a new tone.
Tap
icon and choose “Create New Tone”:
Enter a tone name
Default name is New Tone
Choose a songlist you want
to store the tone to
Default songlist is All Tones
Using Pulze Editor
21
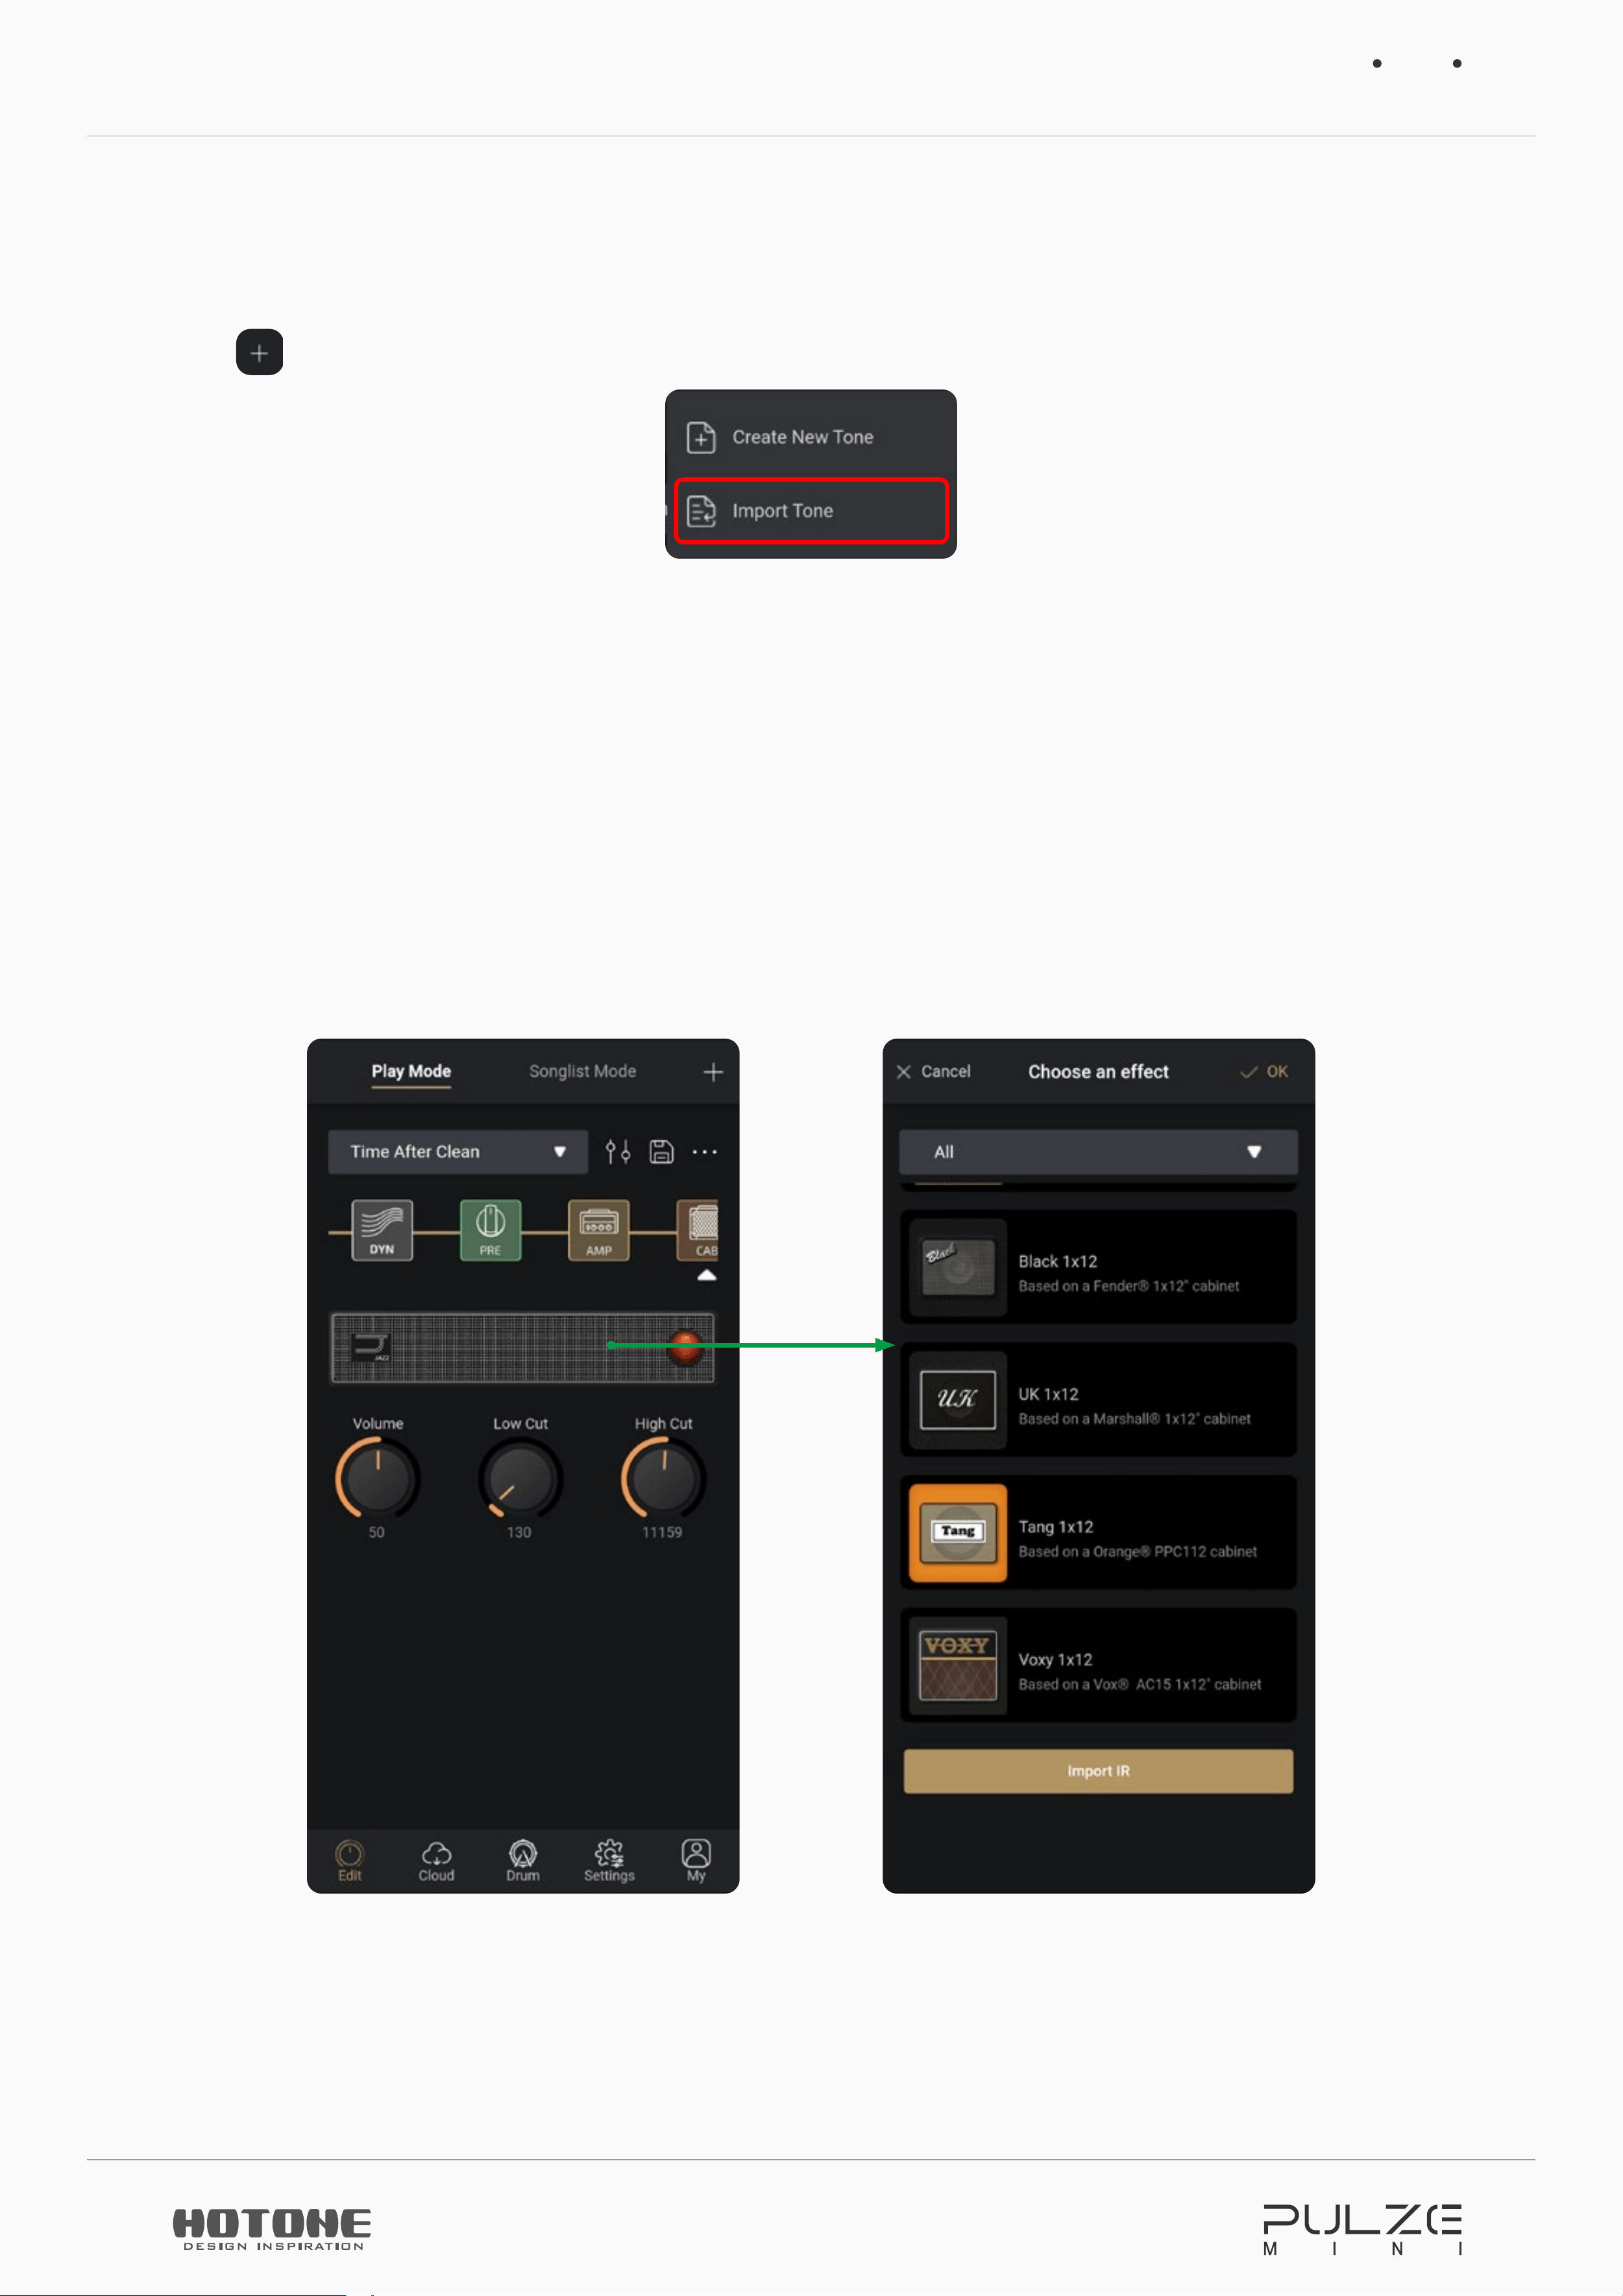
Import
Use Import function to import the tone files stored on your phones/pads.
Tap
icon and choose “Import”:
Then Pulze Editor will launch your file manager on your phones/pads, just choose
the files you need (with .prst suffix) and import. The app will notice you if the files
are not compatible with Pulze Mini.
Newly imported tones will be added to the end of All Tones songlist in alphabetical
order.
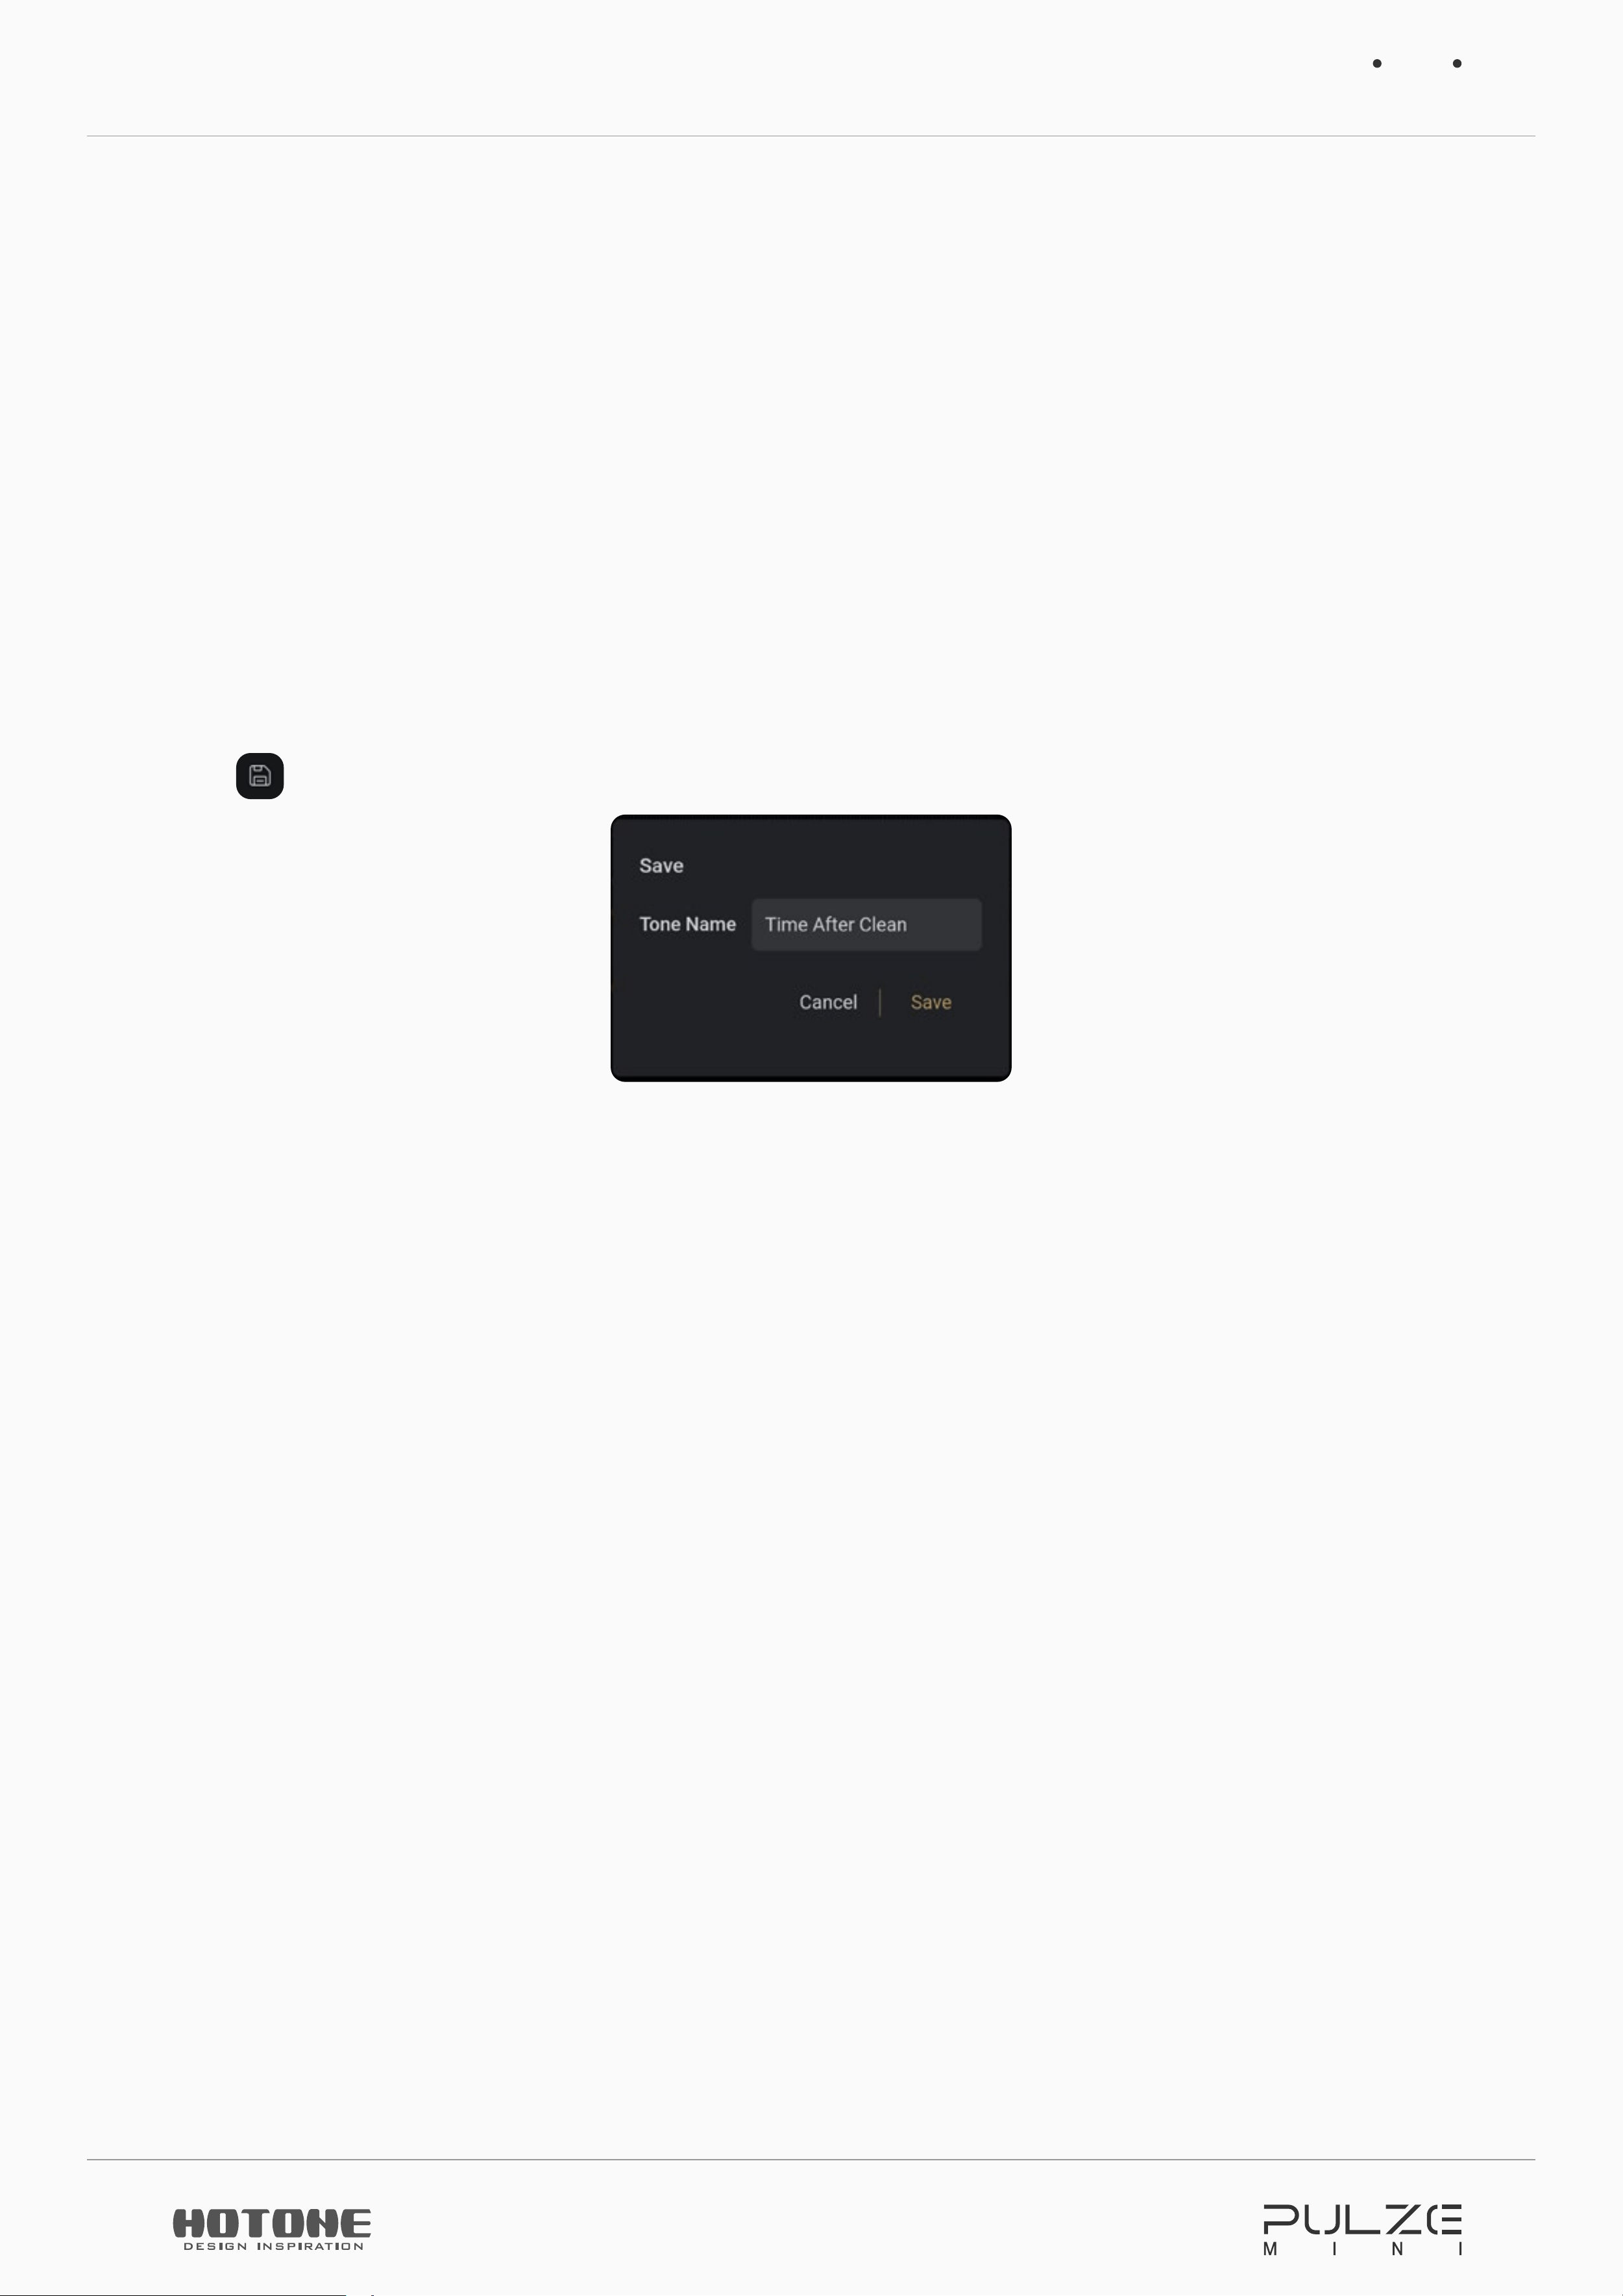
Import IR
You can import custom IR files to achieve a more refined tone if needed.
Choose CAB module, enter effects list, then press "Import IR" button.
Using Pulze Editor
22
Then Pulze Editor will launch your file manager on your phones/pads, just choose
the IR files you need (should be a .wav file) and import. The app will automatically
convert the file format.
If the files are not compatible with Pulze Mini, the app will notice you.
Newly imported IRs will be added to the end of the CAB list (User IR 1-20 slots).
The unit supports importing 20 IR files.
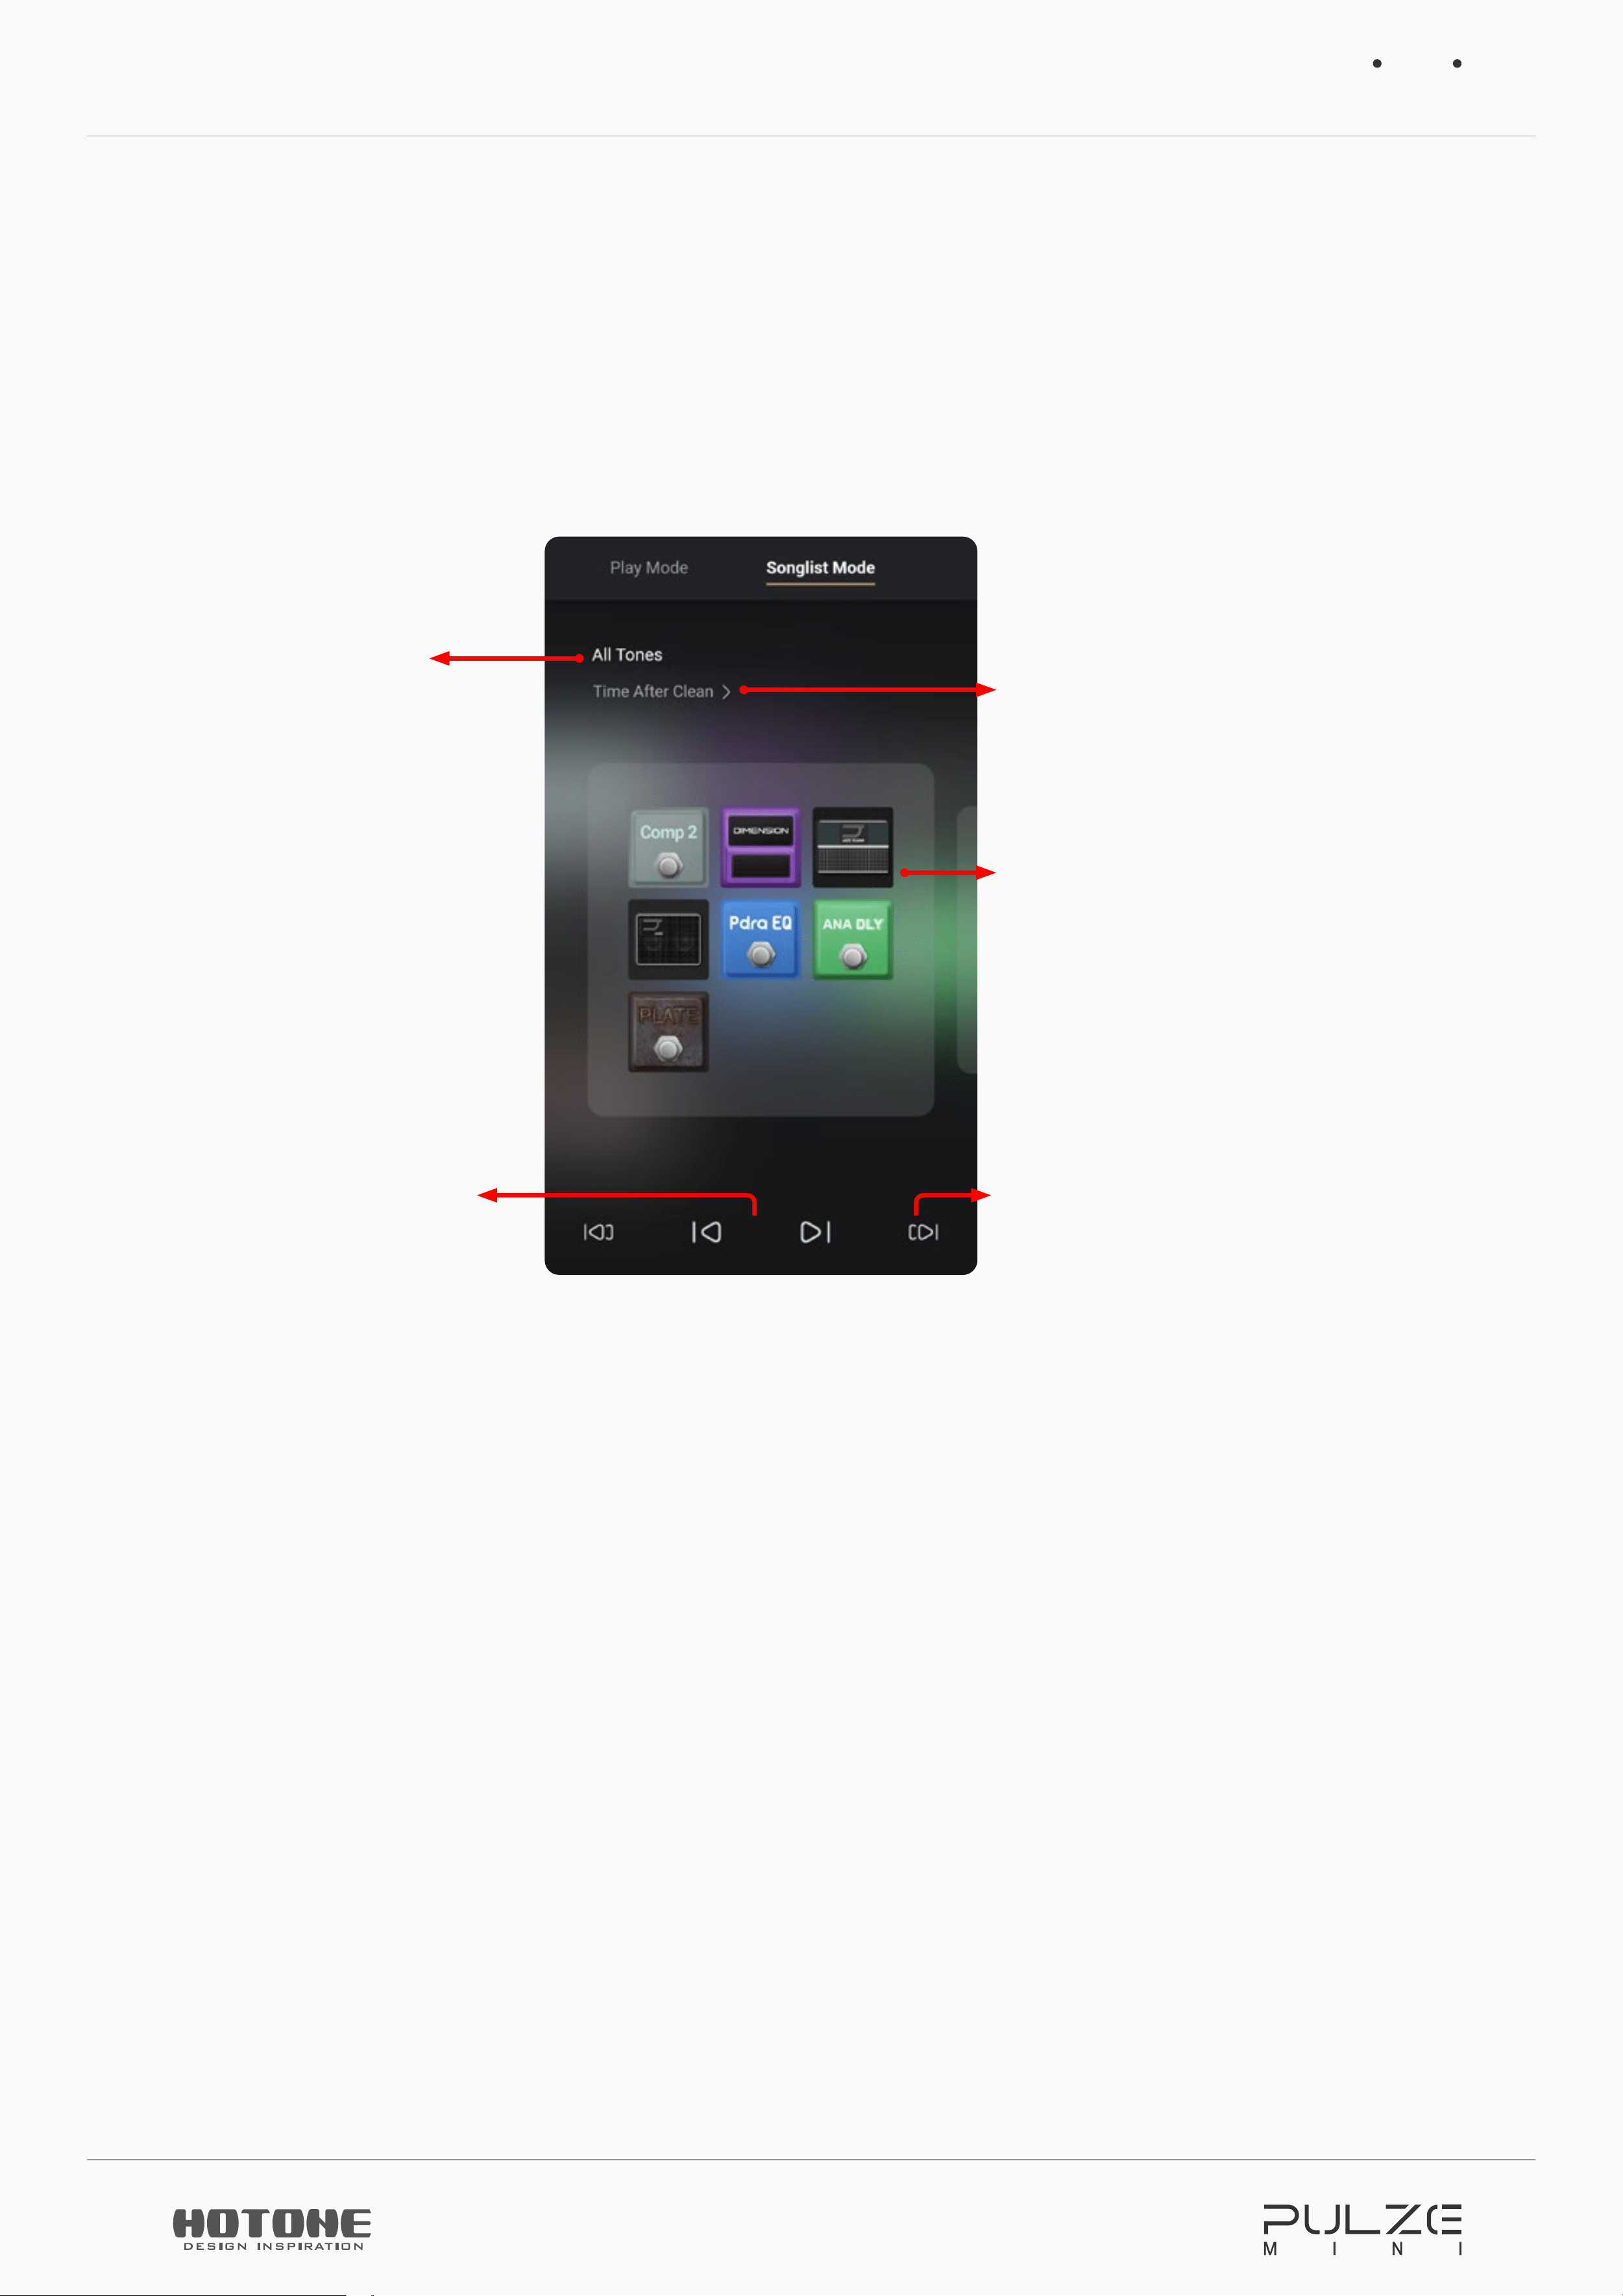
Save
It is very important to save the changes you made to your tone!
Tap
icon and the save menu will appear:
Supports upper/lower case letters, spaces, numbers, ASCII symbols
Using Pulze Editor
23
Advanced Songlist Functions (Songlist Mode)
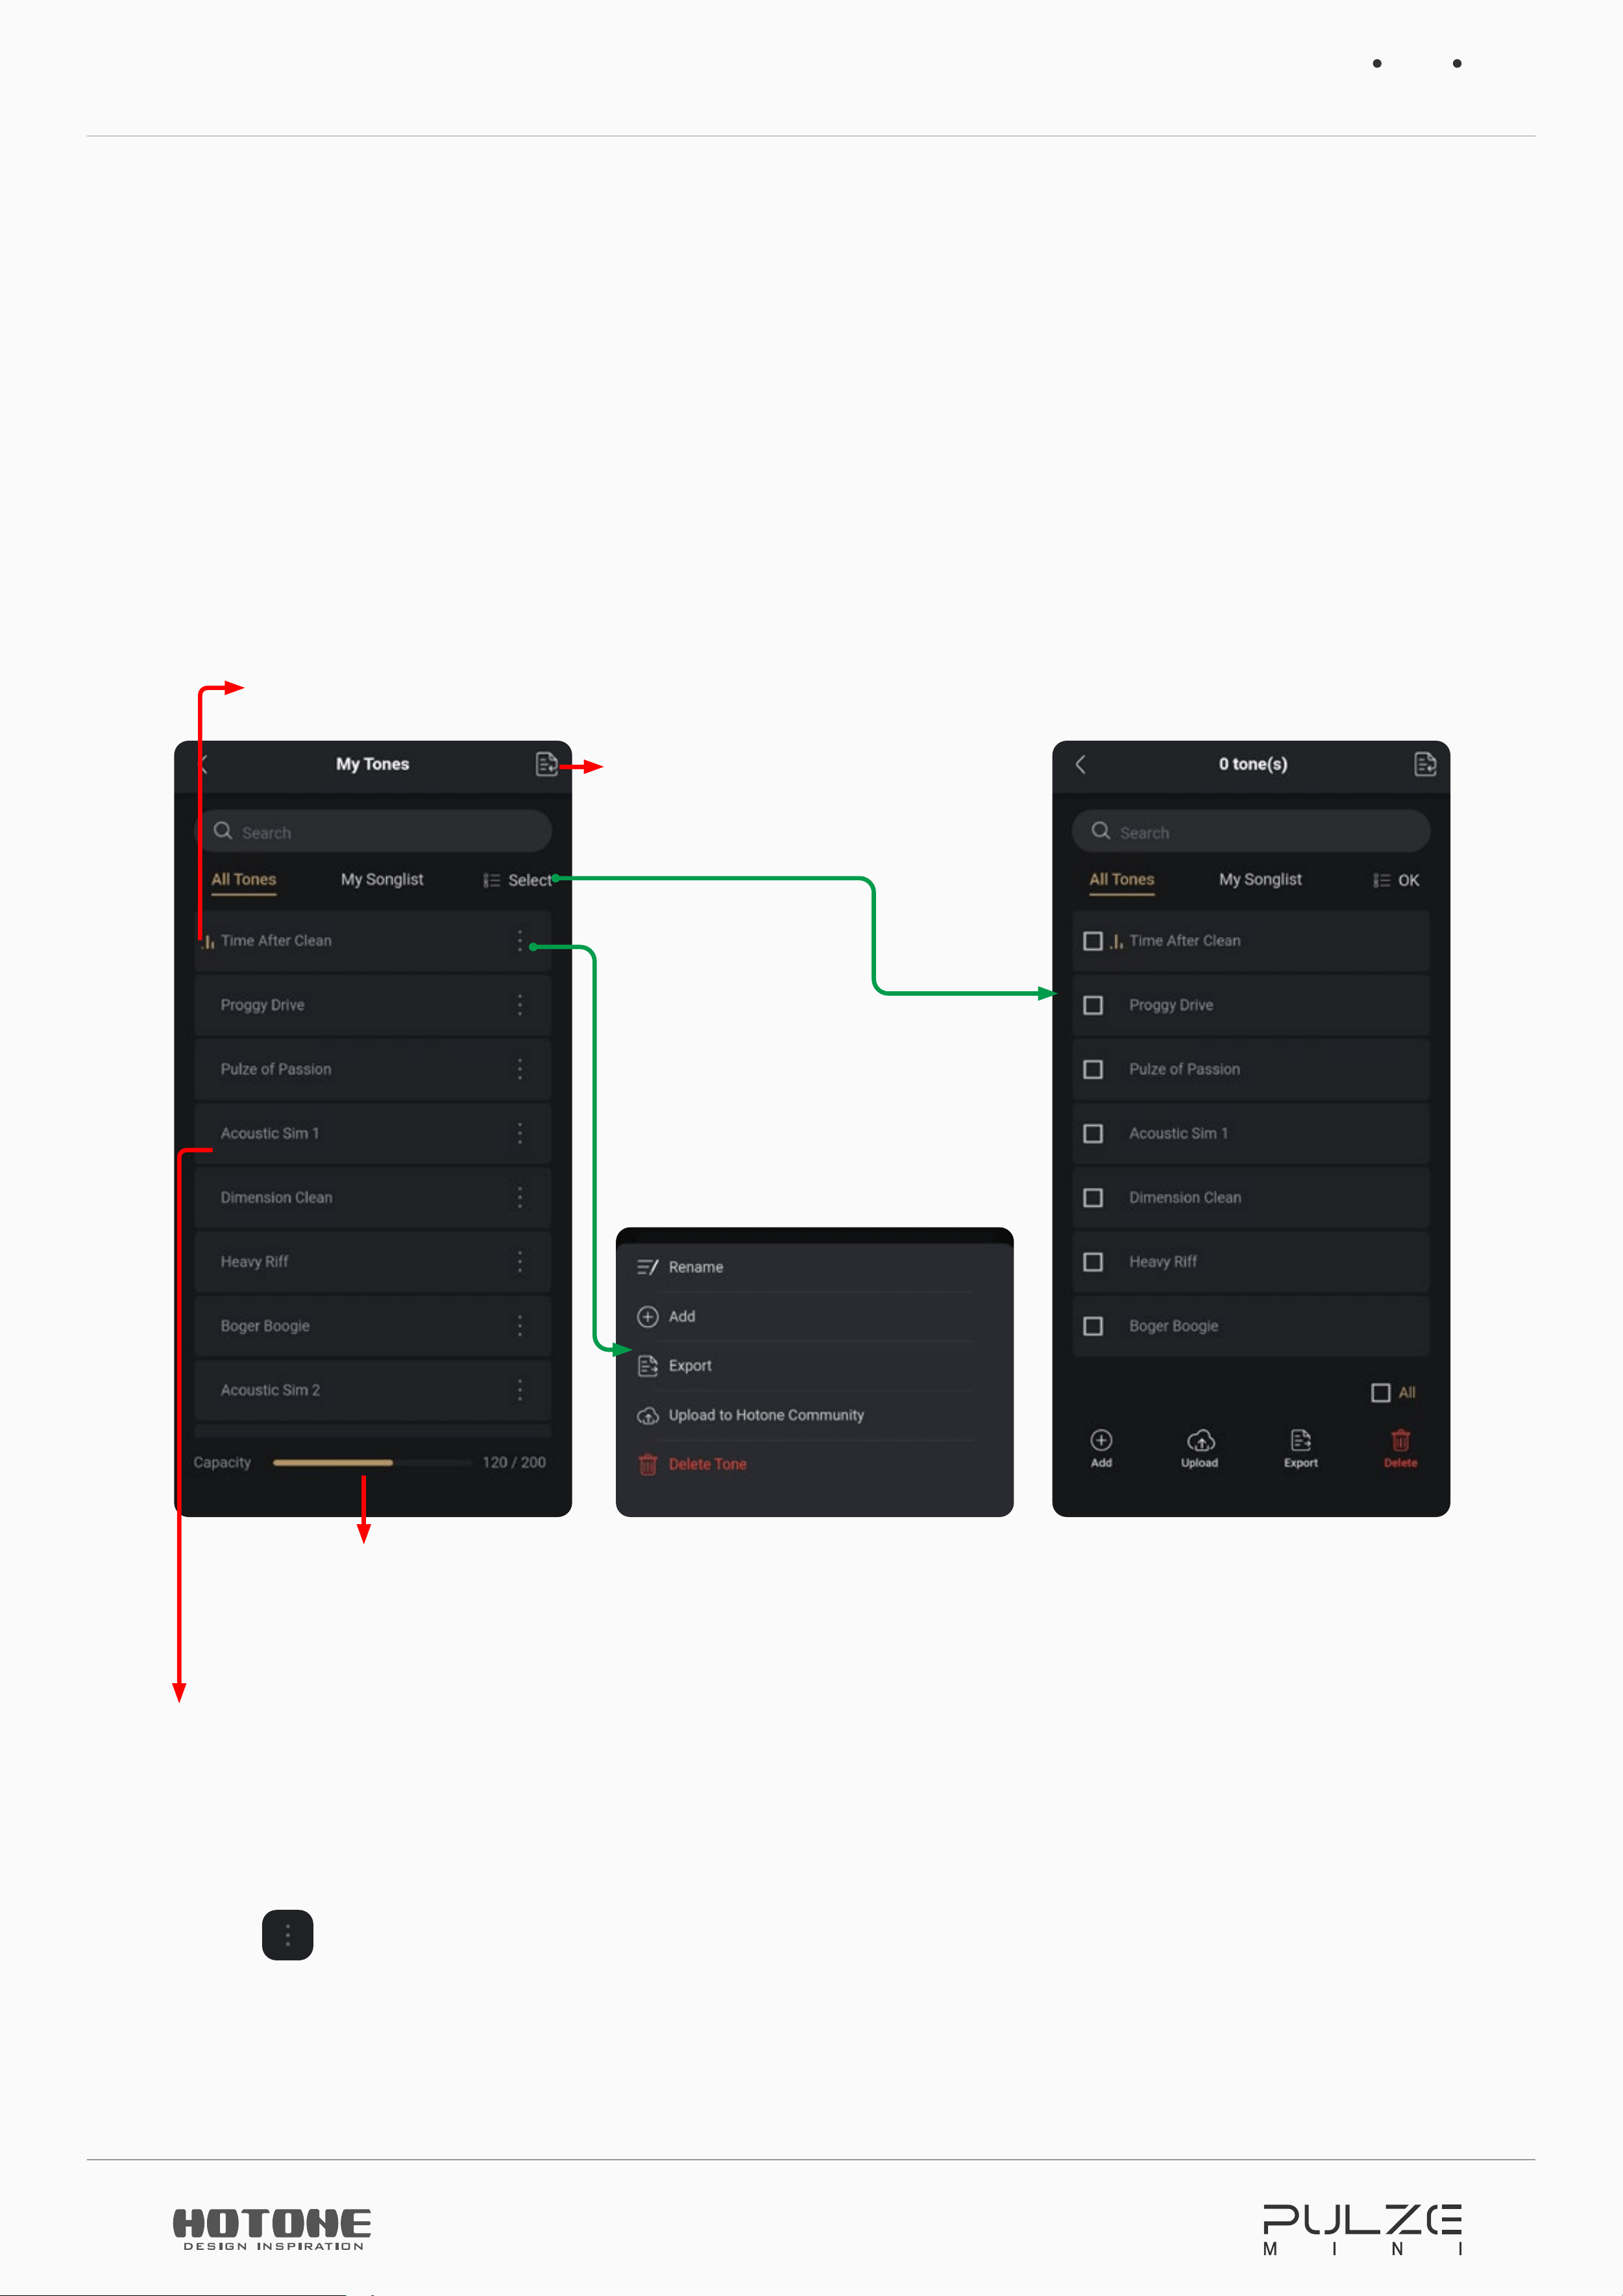
You can gather any tone you like to make a songlist. Pulze Mini supports up to 40
songlists, each songlist can hold up to 50 tones. A tone can be stored to different
songlists.
Tap “Songlist Mode” to enter songlist menu:
Current songlist
Previous/next tone
To “My Tones” menu
Modules used in current tone
Previous/next songlist
Using Pulze Editor
24
My Tones
In My Tones menu you can manage all your tones and songlists stored in your
Pulze Mini.
All Tones
Same as All Tones songlist which can be selected on your Pulze Mini, this menu
allows you to access and manage all tones in your Pulze Mini:
Indicates current tone capacity
on your Pulze (max. 200 Tones
total)
This indicates current
tone selection
Import
Slide and drag to change order
• Rename
Tap
icon on one tone and choose “Rename”, then enter a new name in
popped out menu.
Using Pulze Editor
25
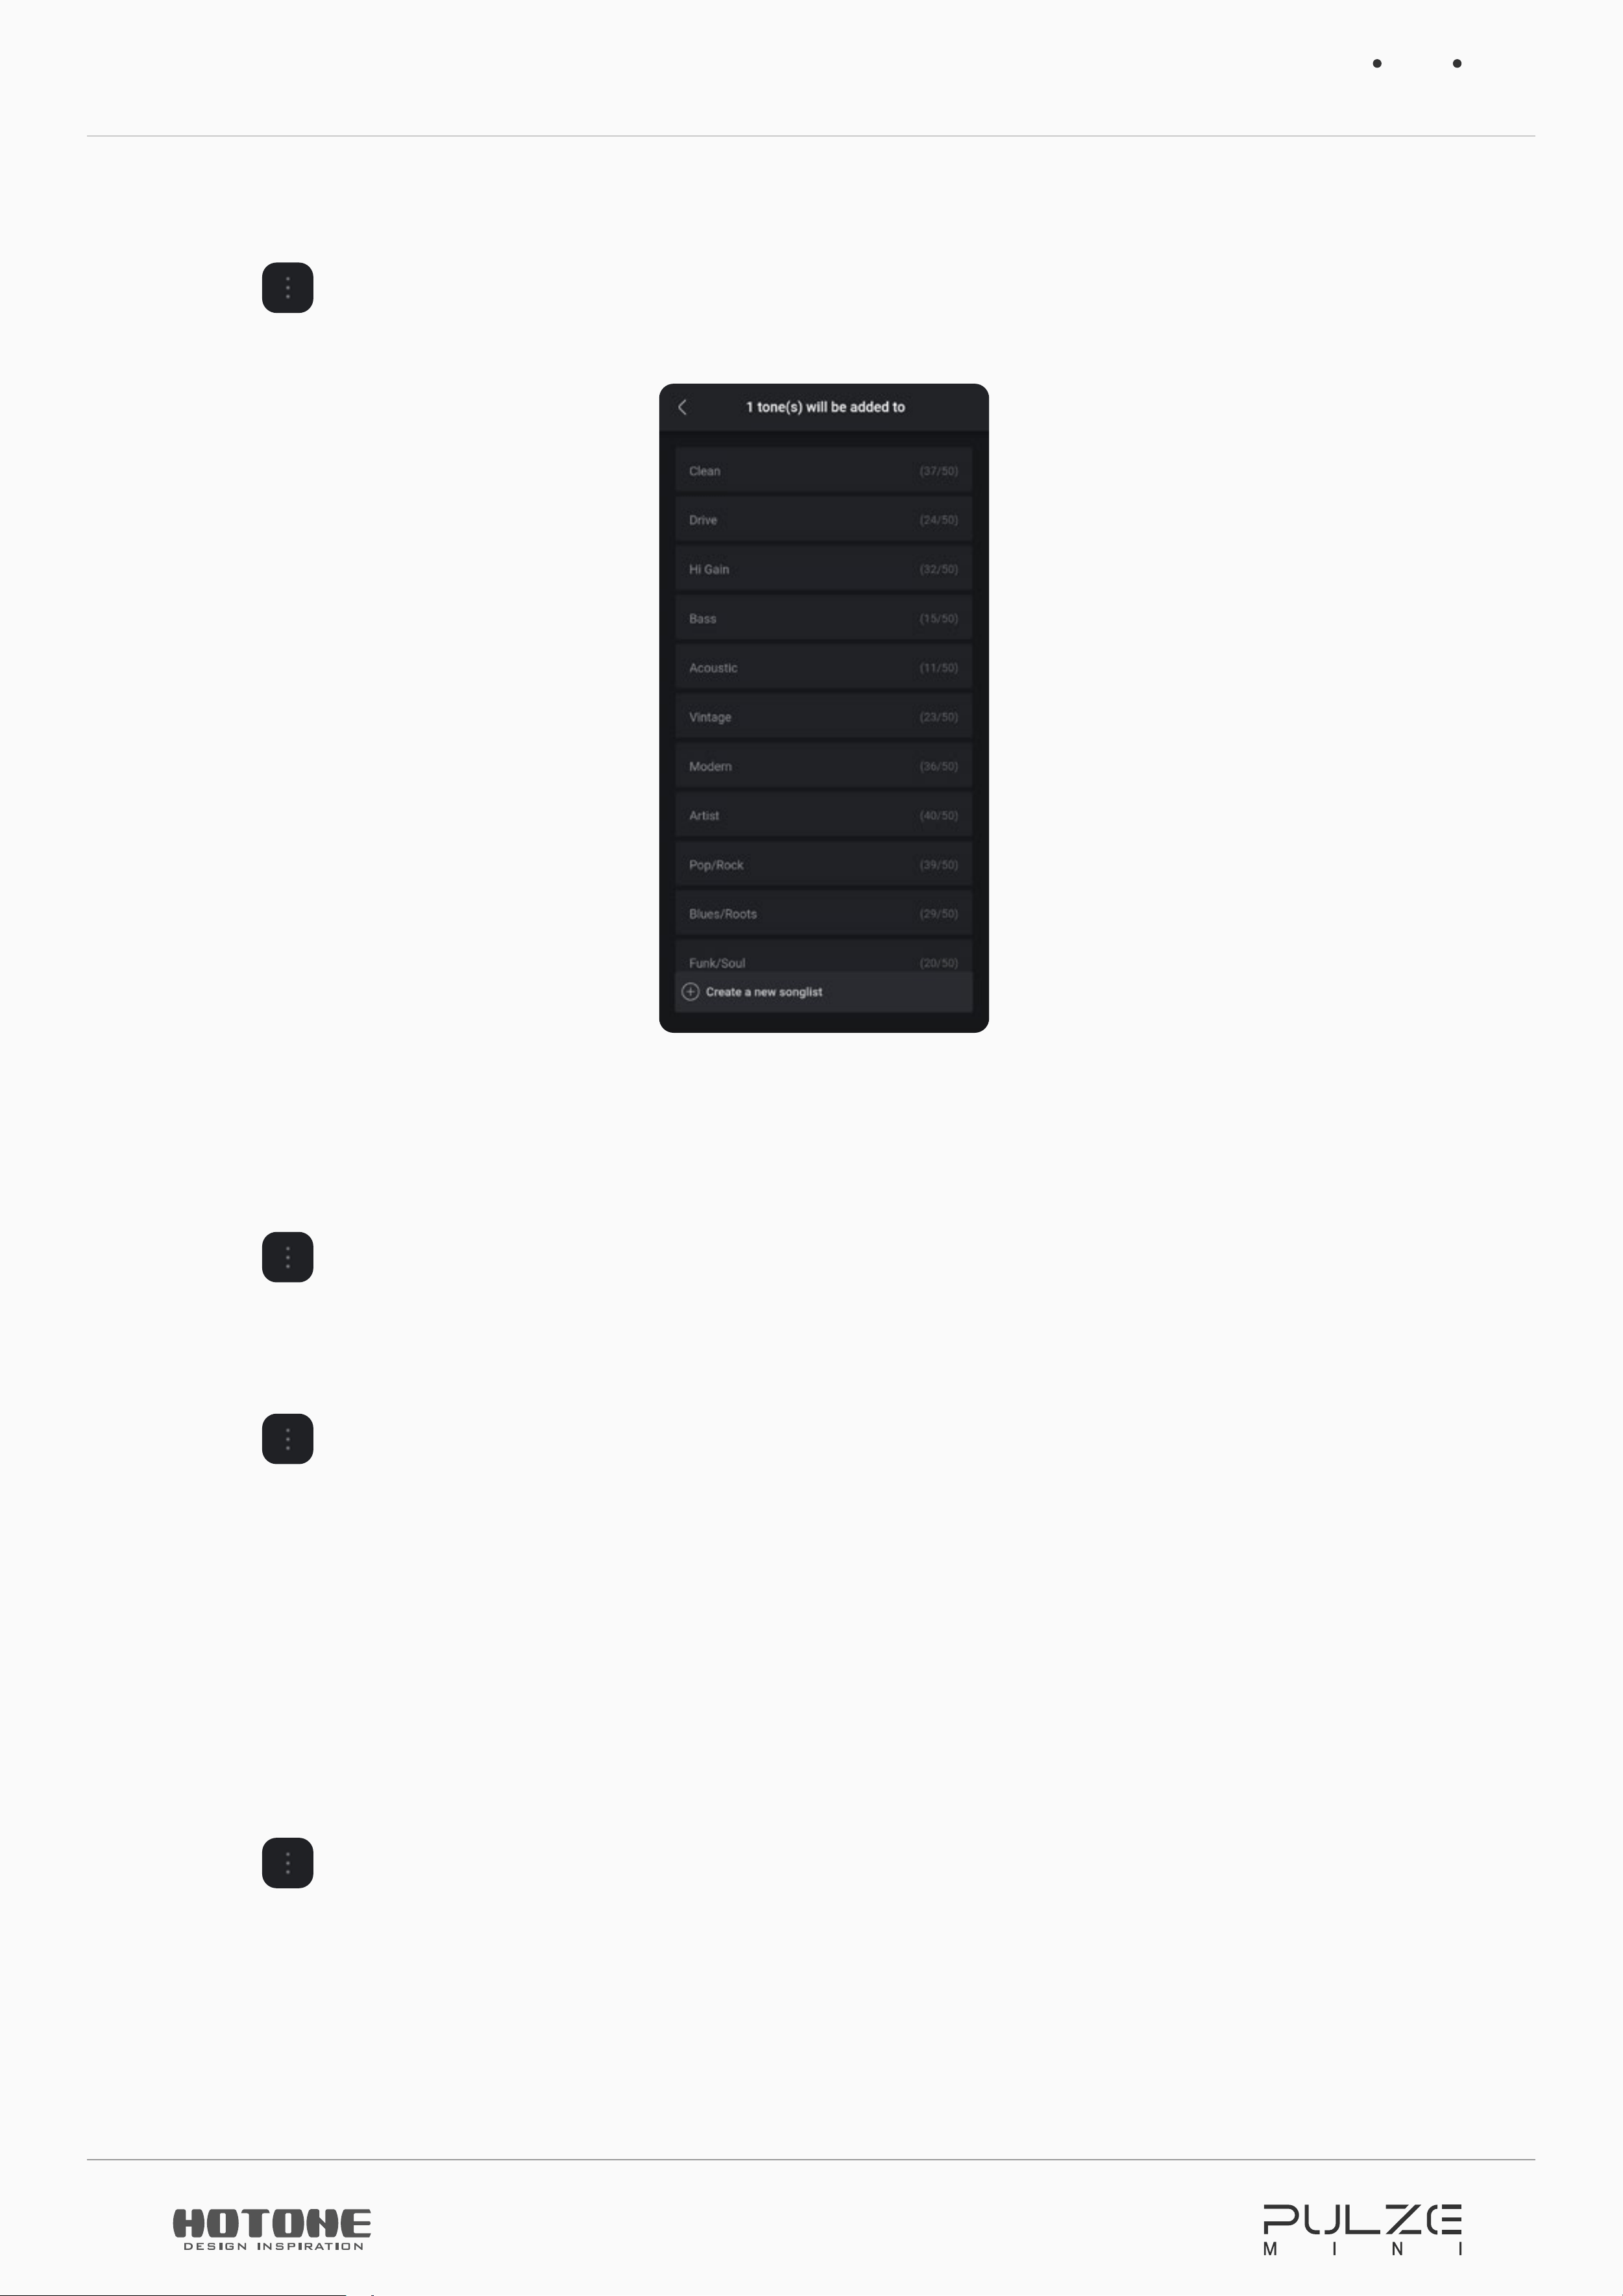
• Add
Tap
icon on one tone and choose “Add”, then choose a songlist in the
following menu:
You can also create a new songlist and add the tone to it if needed.
• Import
Tap
icon on top right corner to import.
• Export
Tap
icon on one tone and choose “Export”. Pulze Editor will launch your file
manager on your phones/pads. Choose a file location you need, and the tone will
be exported as a file with .prst suffix.
For iOS users, when exporting, the file should be exported to Files/My iPhone/
Pulze Editor/.
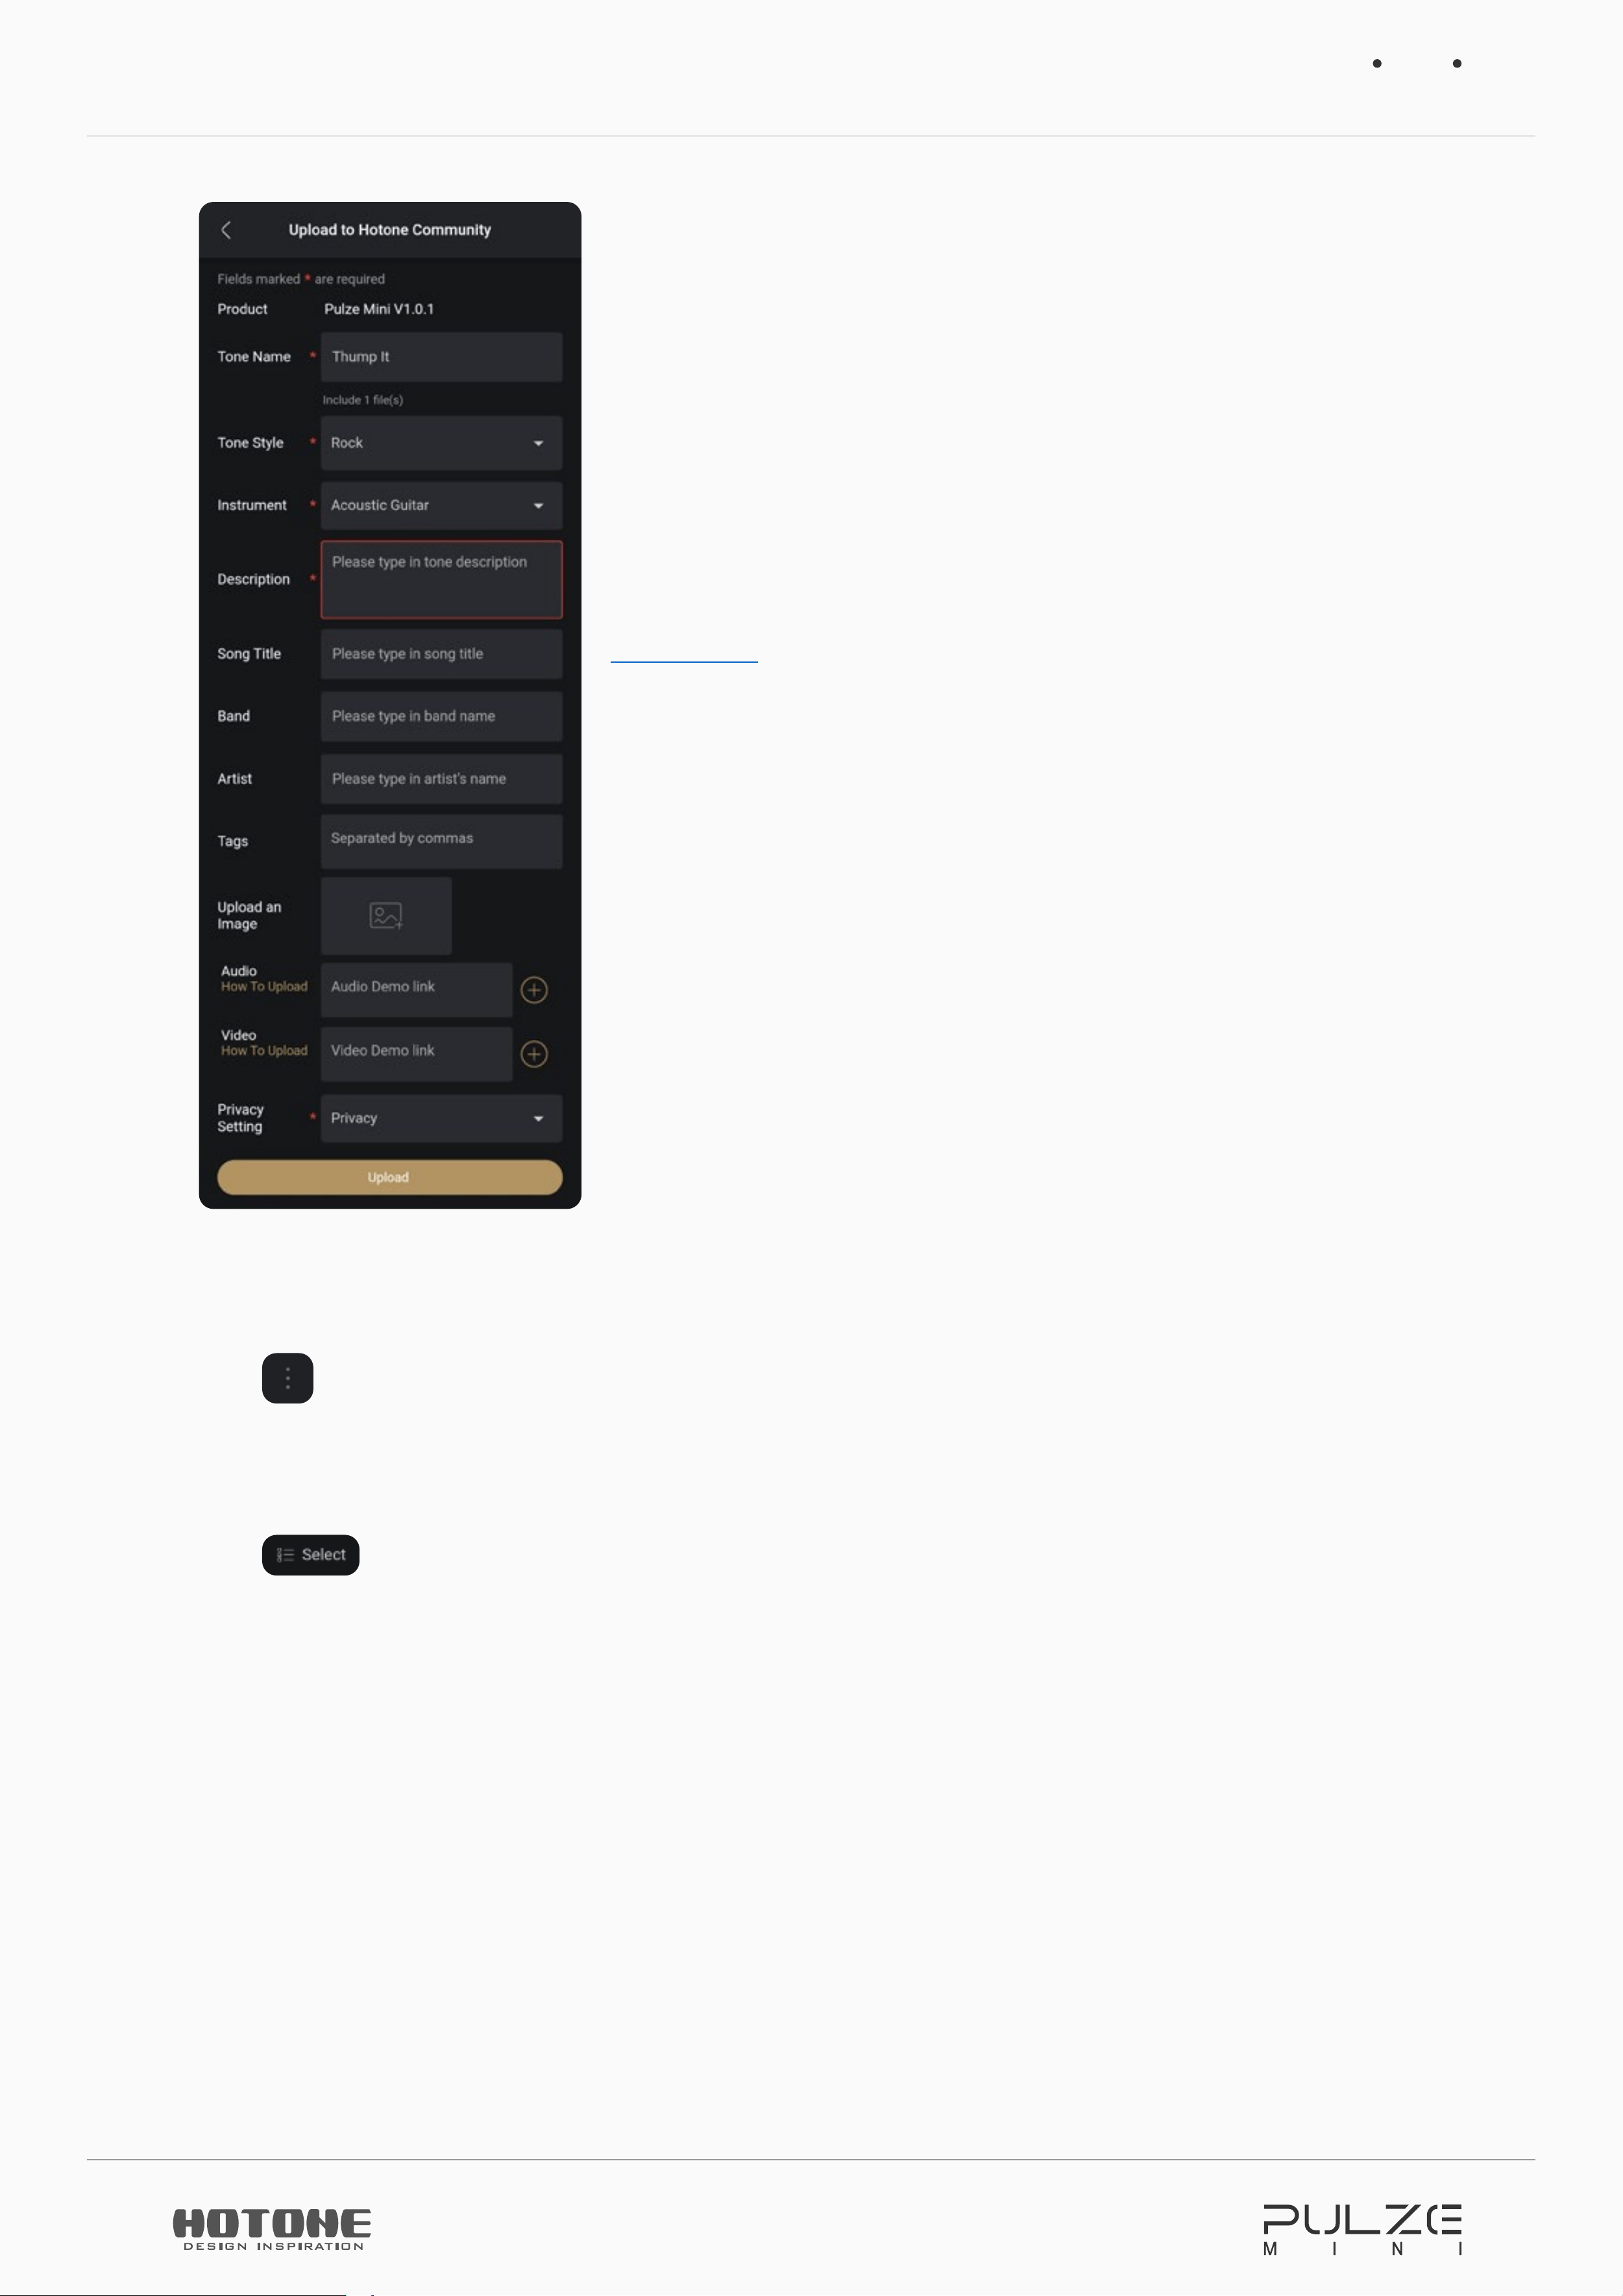
• Upload
Tap
icon on one tone and choose “Upload to Hotone Community”. You need
to register and log in to use upload function.
Using Pulze Editor
26
Enter the messages depending on your needs
following the instructions above; The items with * are
required
For private data backup, you can set “Privacy Setting”
to “Privacy”; In this case the tone you uploaded will be
only visible by yourself
You can download uploaded tones in Cloud menu (see
Uploaded
section)
• Delete
Tap
icon on one tone and choose “Delete”.
• Batch
Tap
button to select multiple tones for batch export, upload, delete, etc.
with same operations above.
Using Pulze Editor
27
My Songlist
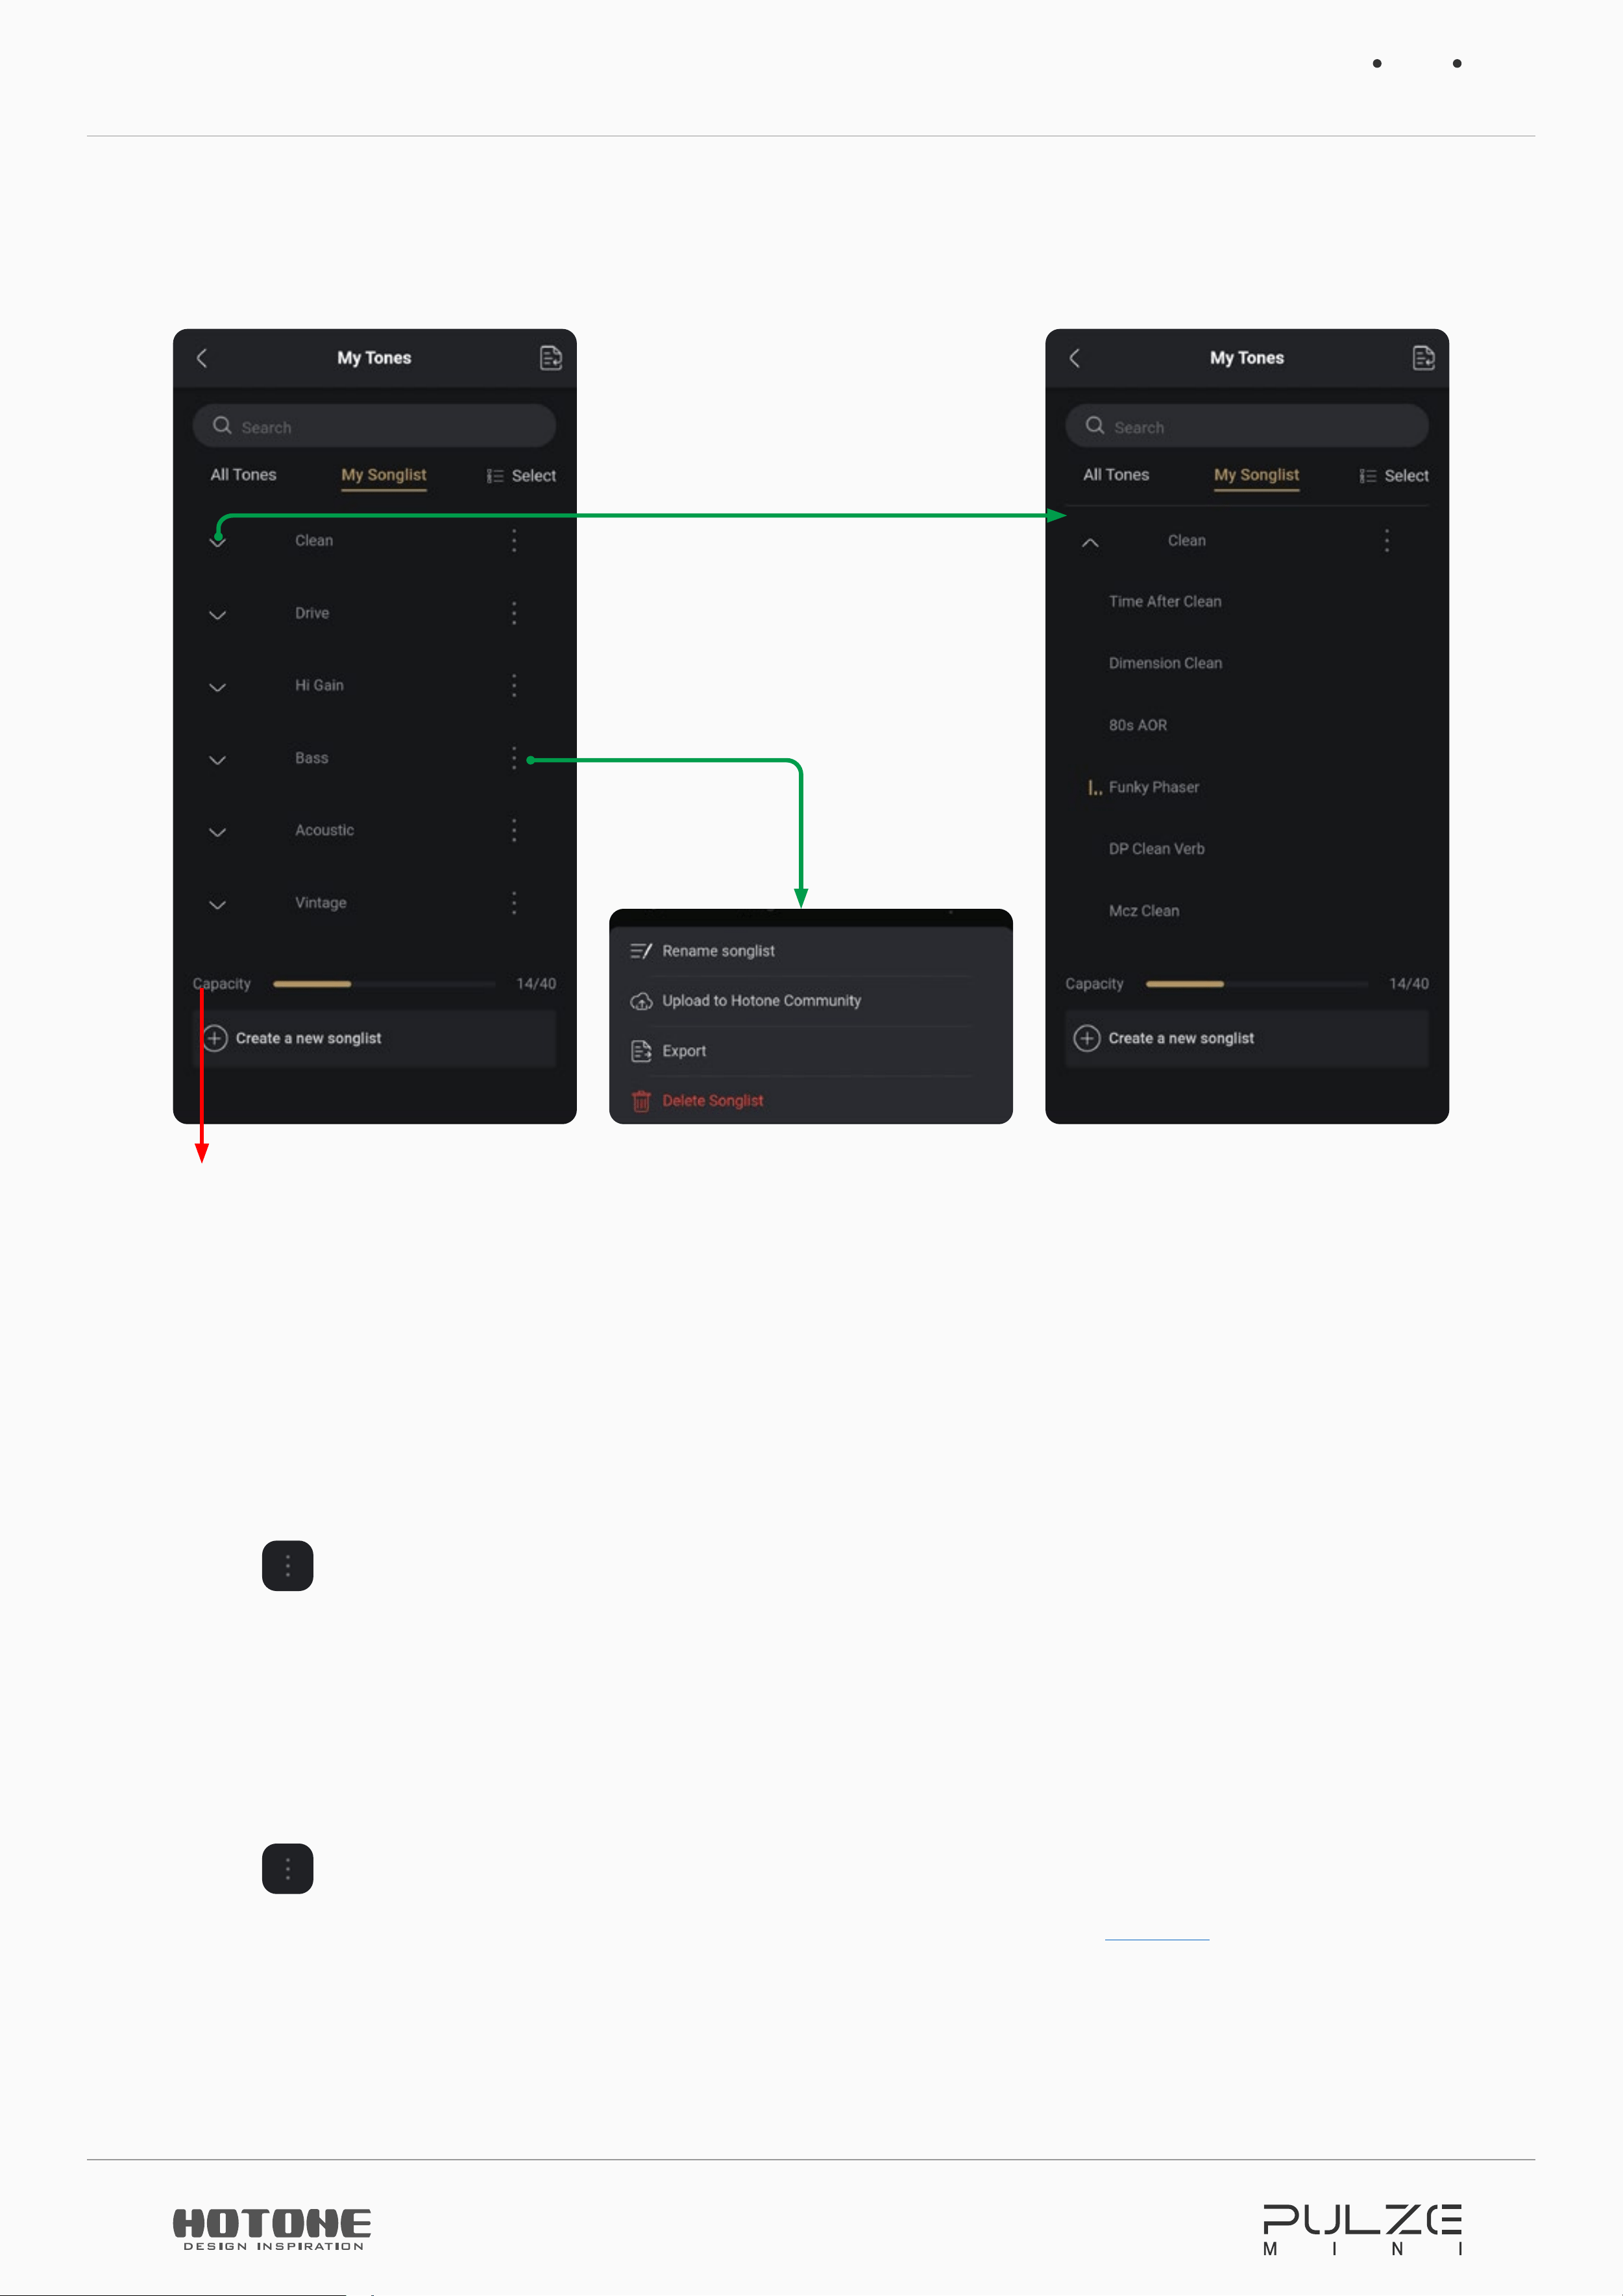
In “My Songlist” menu you can view and manage all songlists on your Pulze Mini:
Indicates current songlist capacity on your
Pulze Mini (max. 40 songlists total)
Expand tones contained in
the songlist
• Sort
Drag and drop one songlist to change its order.
• Upload
Tap
icon on one songlist and choose “Upload to Hotone Community”. In this
case, all tones in the selected songlist will be uploaded to Hotone community.
Same as uploading tones, this requires a Hotone account.
• Export
Tap
icon on one songlist and choose “Export”. In this case, all tones in the
songlist will be exported. Same as exporting one tone (see
Export
section), the
file should be exported to Files/My iPhone/Pulze Editor/.
Using Pulze Editor
28
• Delete
Tap
icon on one songlist and choose “Delete”. This deletes the songlist only;
tones contained in the songlist are not affected.
• Batch
Tap
button to select multiple songlists for batch export, upload, delete,
etc. with same operations above.
Using Hotone Community
29
Using Hotone Community
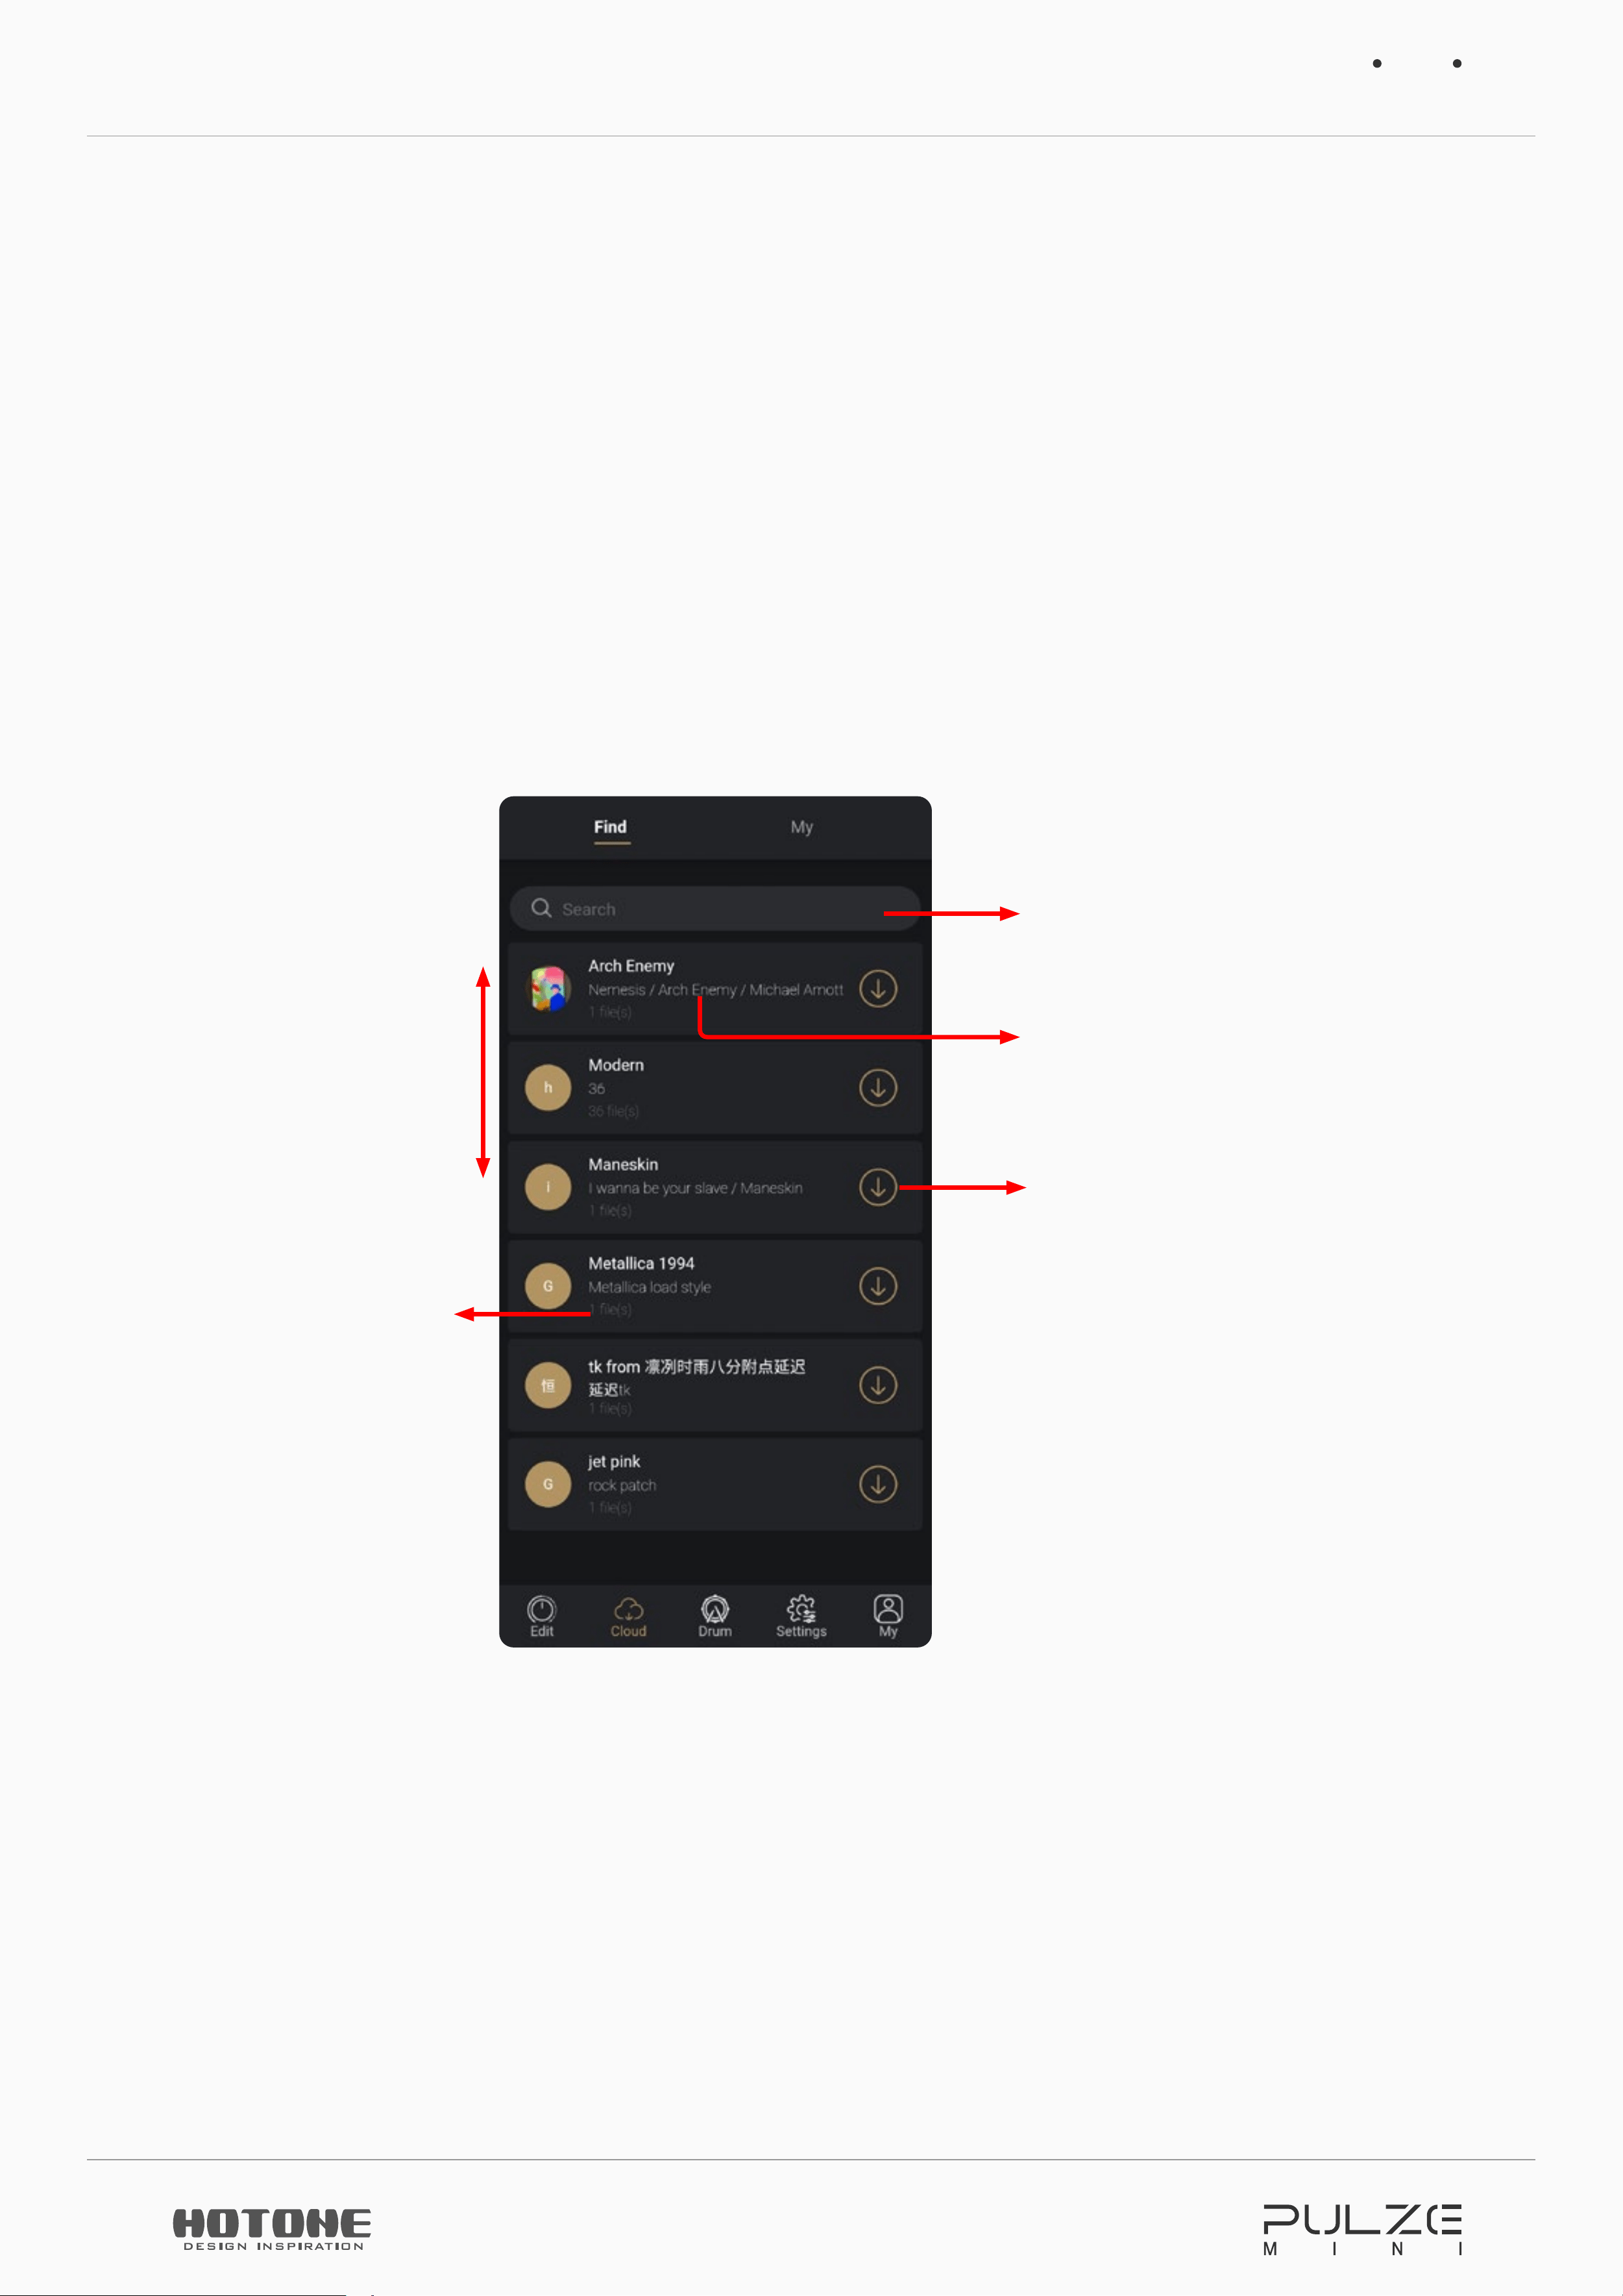
Tap “Cloud” tab to enter Cloud menu. In this menu you can view and download
tones compatible for Pulze Mini in Hotone Community. You can also manage the
tones you uploaded.
Find
Here lists all available Pulze Mini tones in Hotone community for you to check
detailed descriptions or download:
Slide to view
Drag and release on
the end of the list to
refresh
Shows tone
numbers contained
in the group
Search Bar
See tone group details
Tap here to download all files
contained in the group
Using Hotone Community
30
My
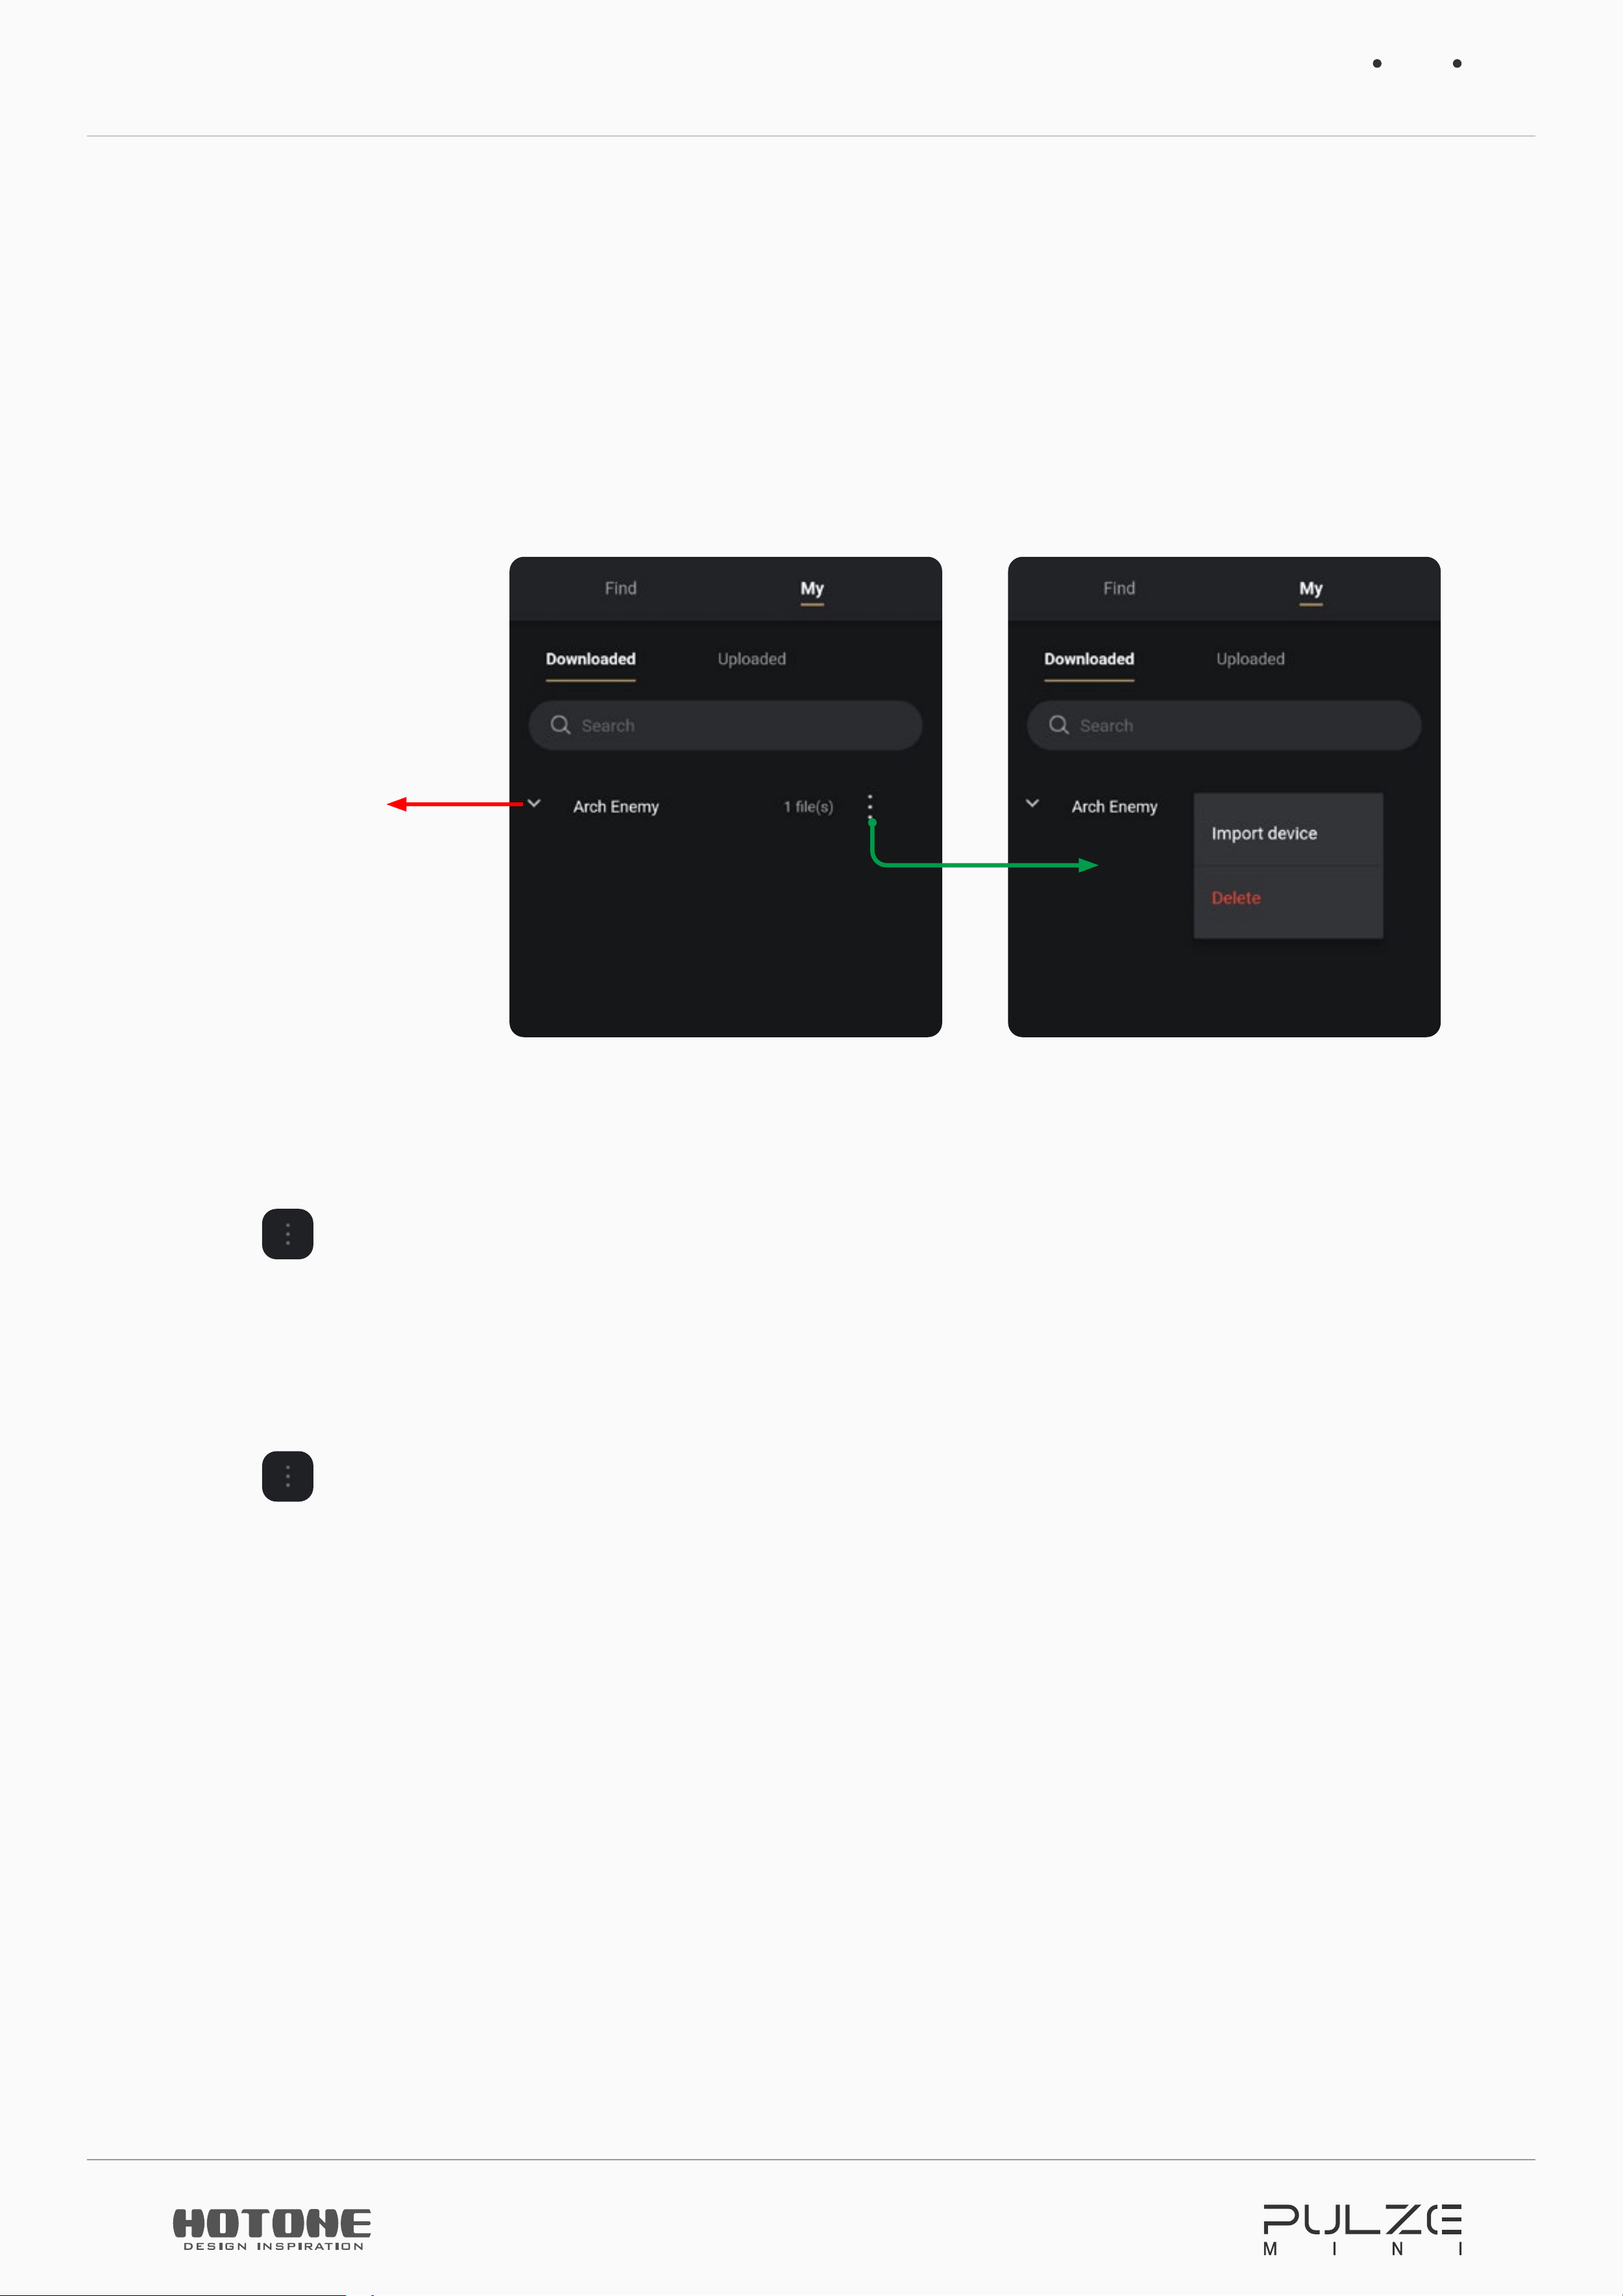
This menu lists the tones you downloaded/uploaded.
Downloaded
You can manage the tones you downloaded from Hotone community:
Tap to expand
• Import device
Tap
button on a tone group or a tone (in an expanded group), and choose
“Import device” to import selected tones to your Pulze Mini.
• Delete
Tap
button on a tone group or a tone (in an expanded group), and choose
“Delete” to delete selected tones to your Pulze Mini.
Using Hotone Community
31
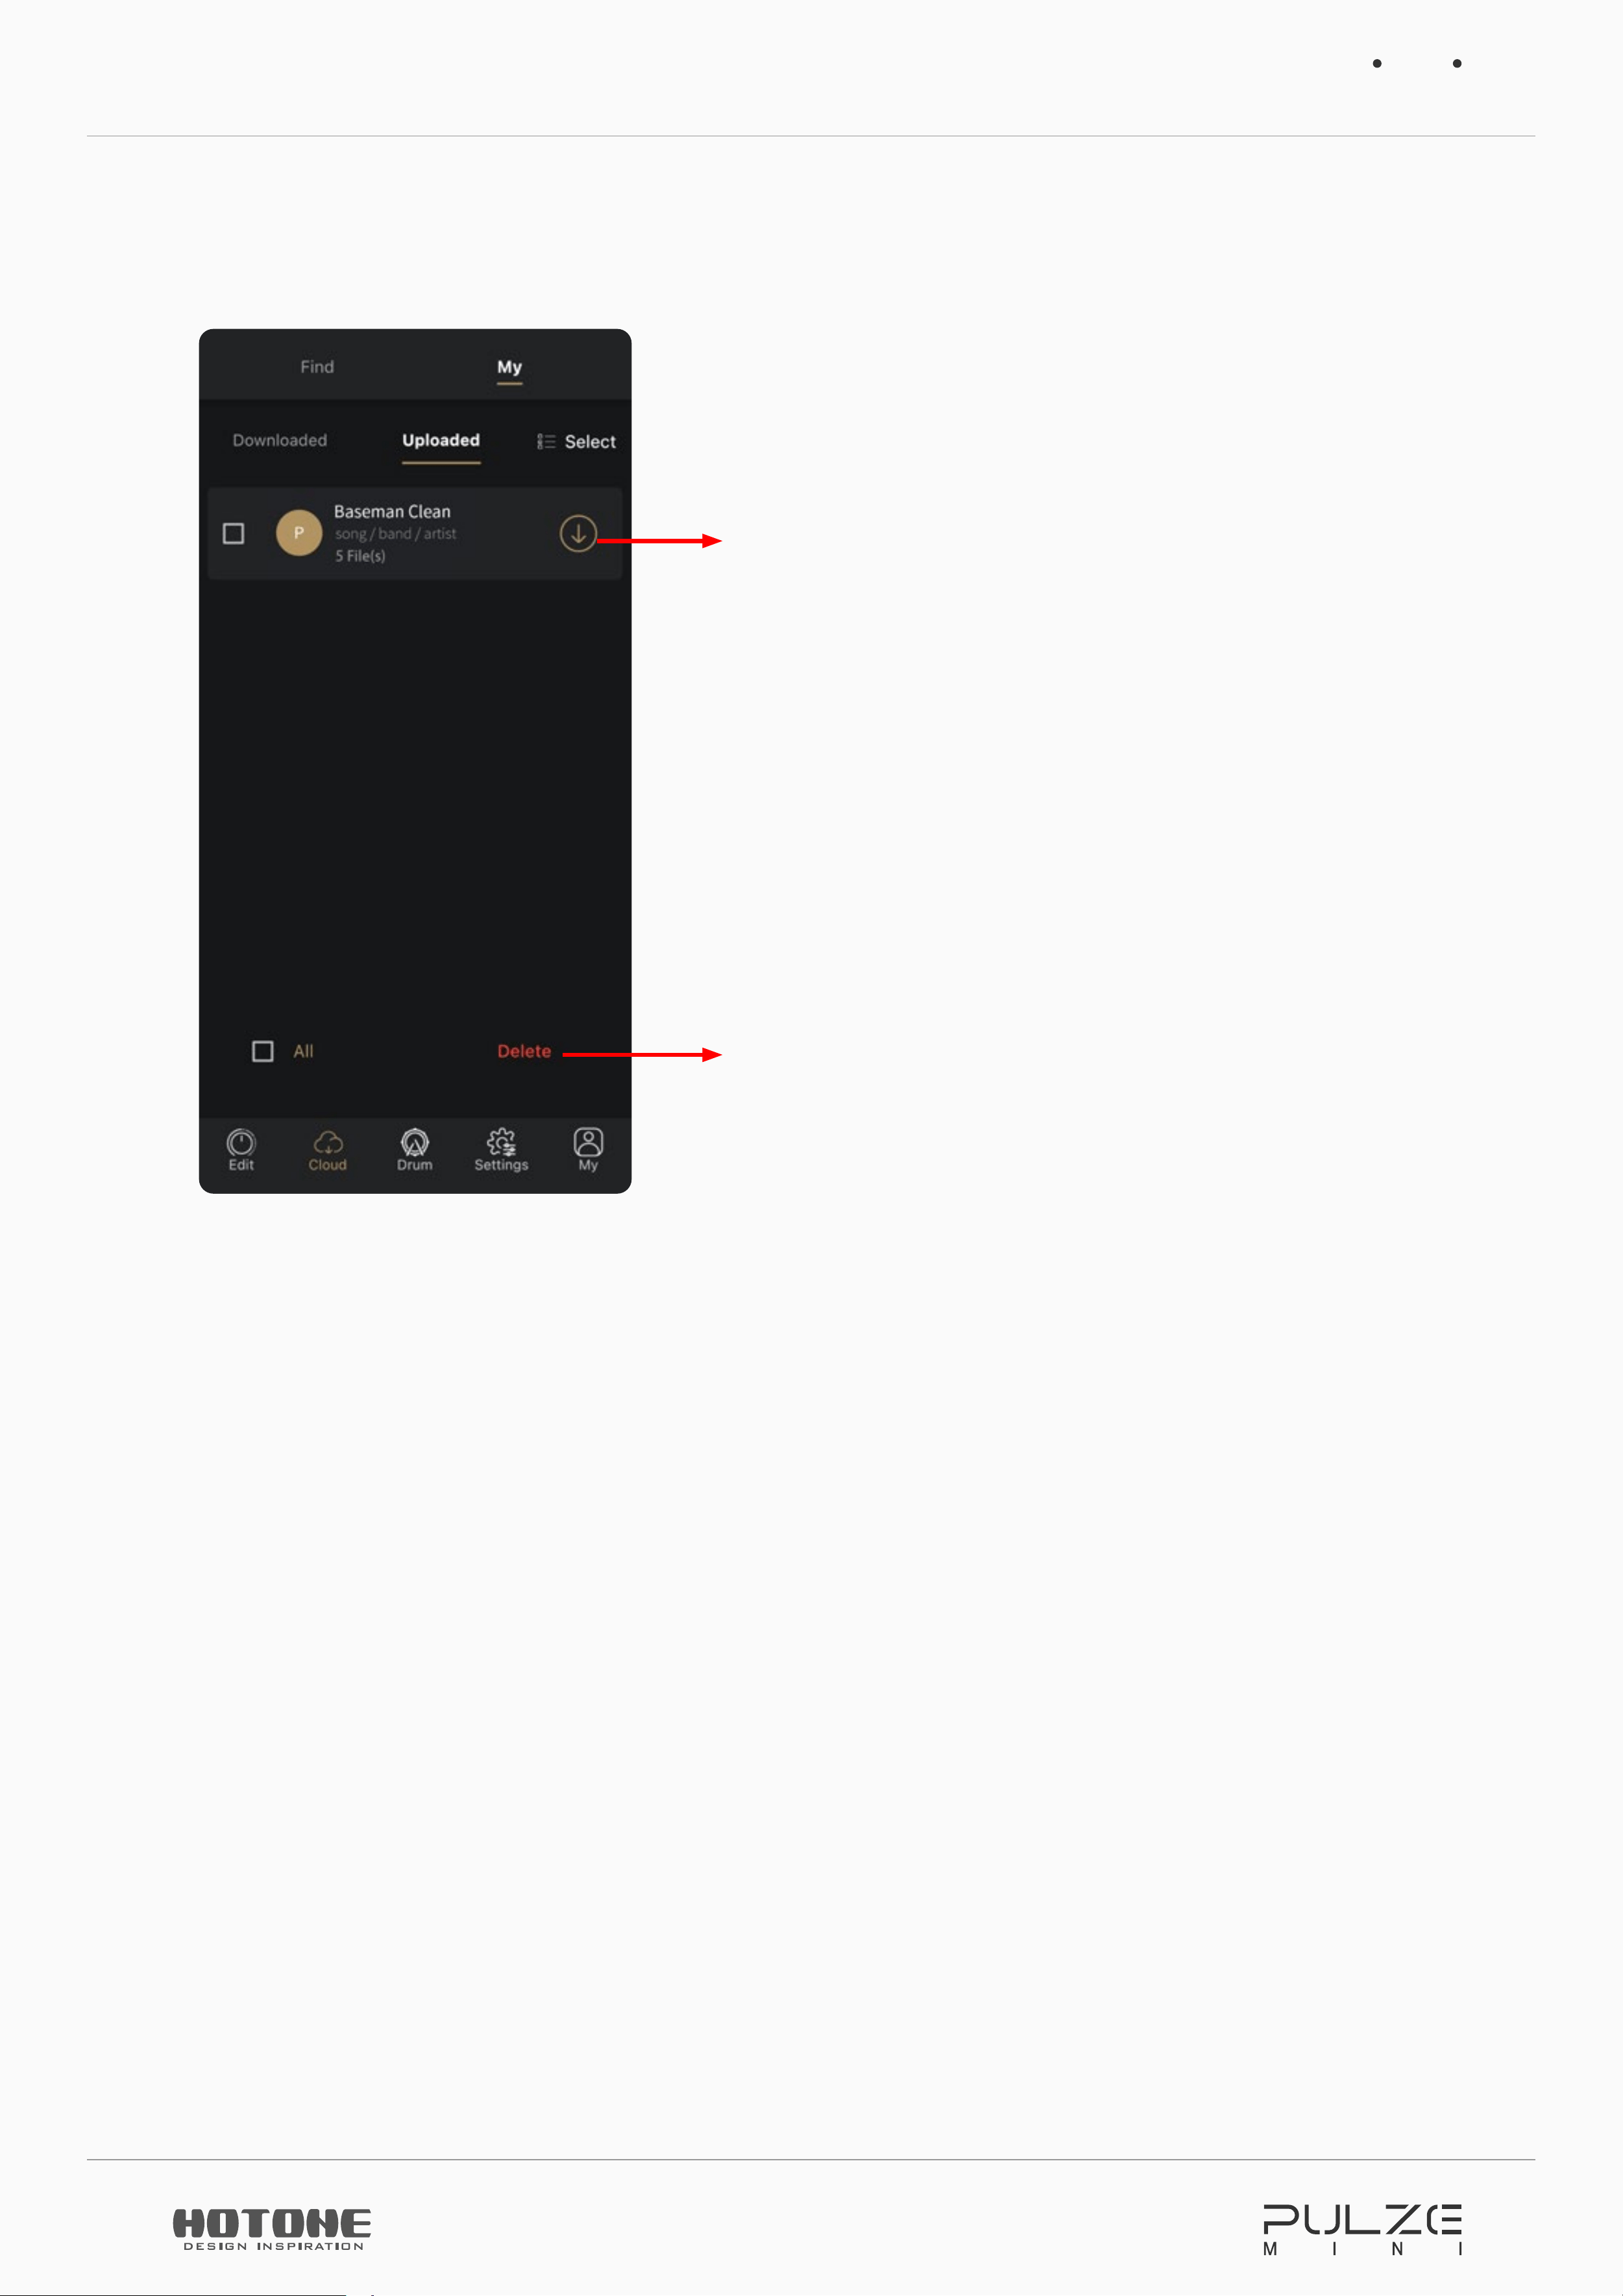
Uploaded
You can manage the tones you uploaded to Hotone community:
Tap to download the selected tone (group)
to your app; Tap “Downloaded” tab to check
Tap to delete selected tone group in Hotone
Community
Using Drum on Pulze Editor
32
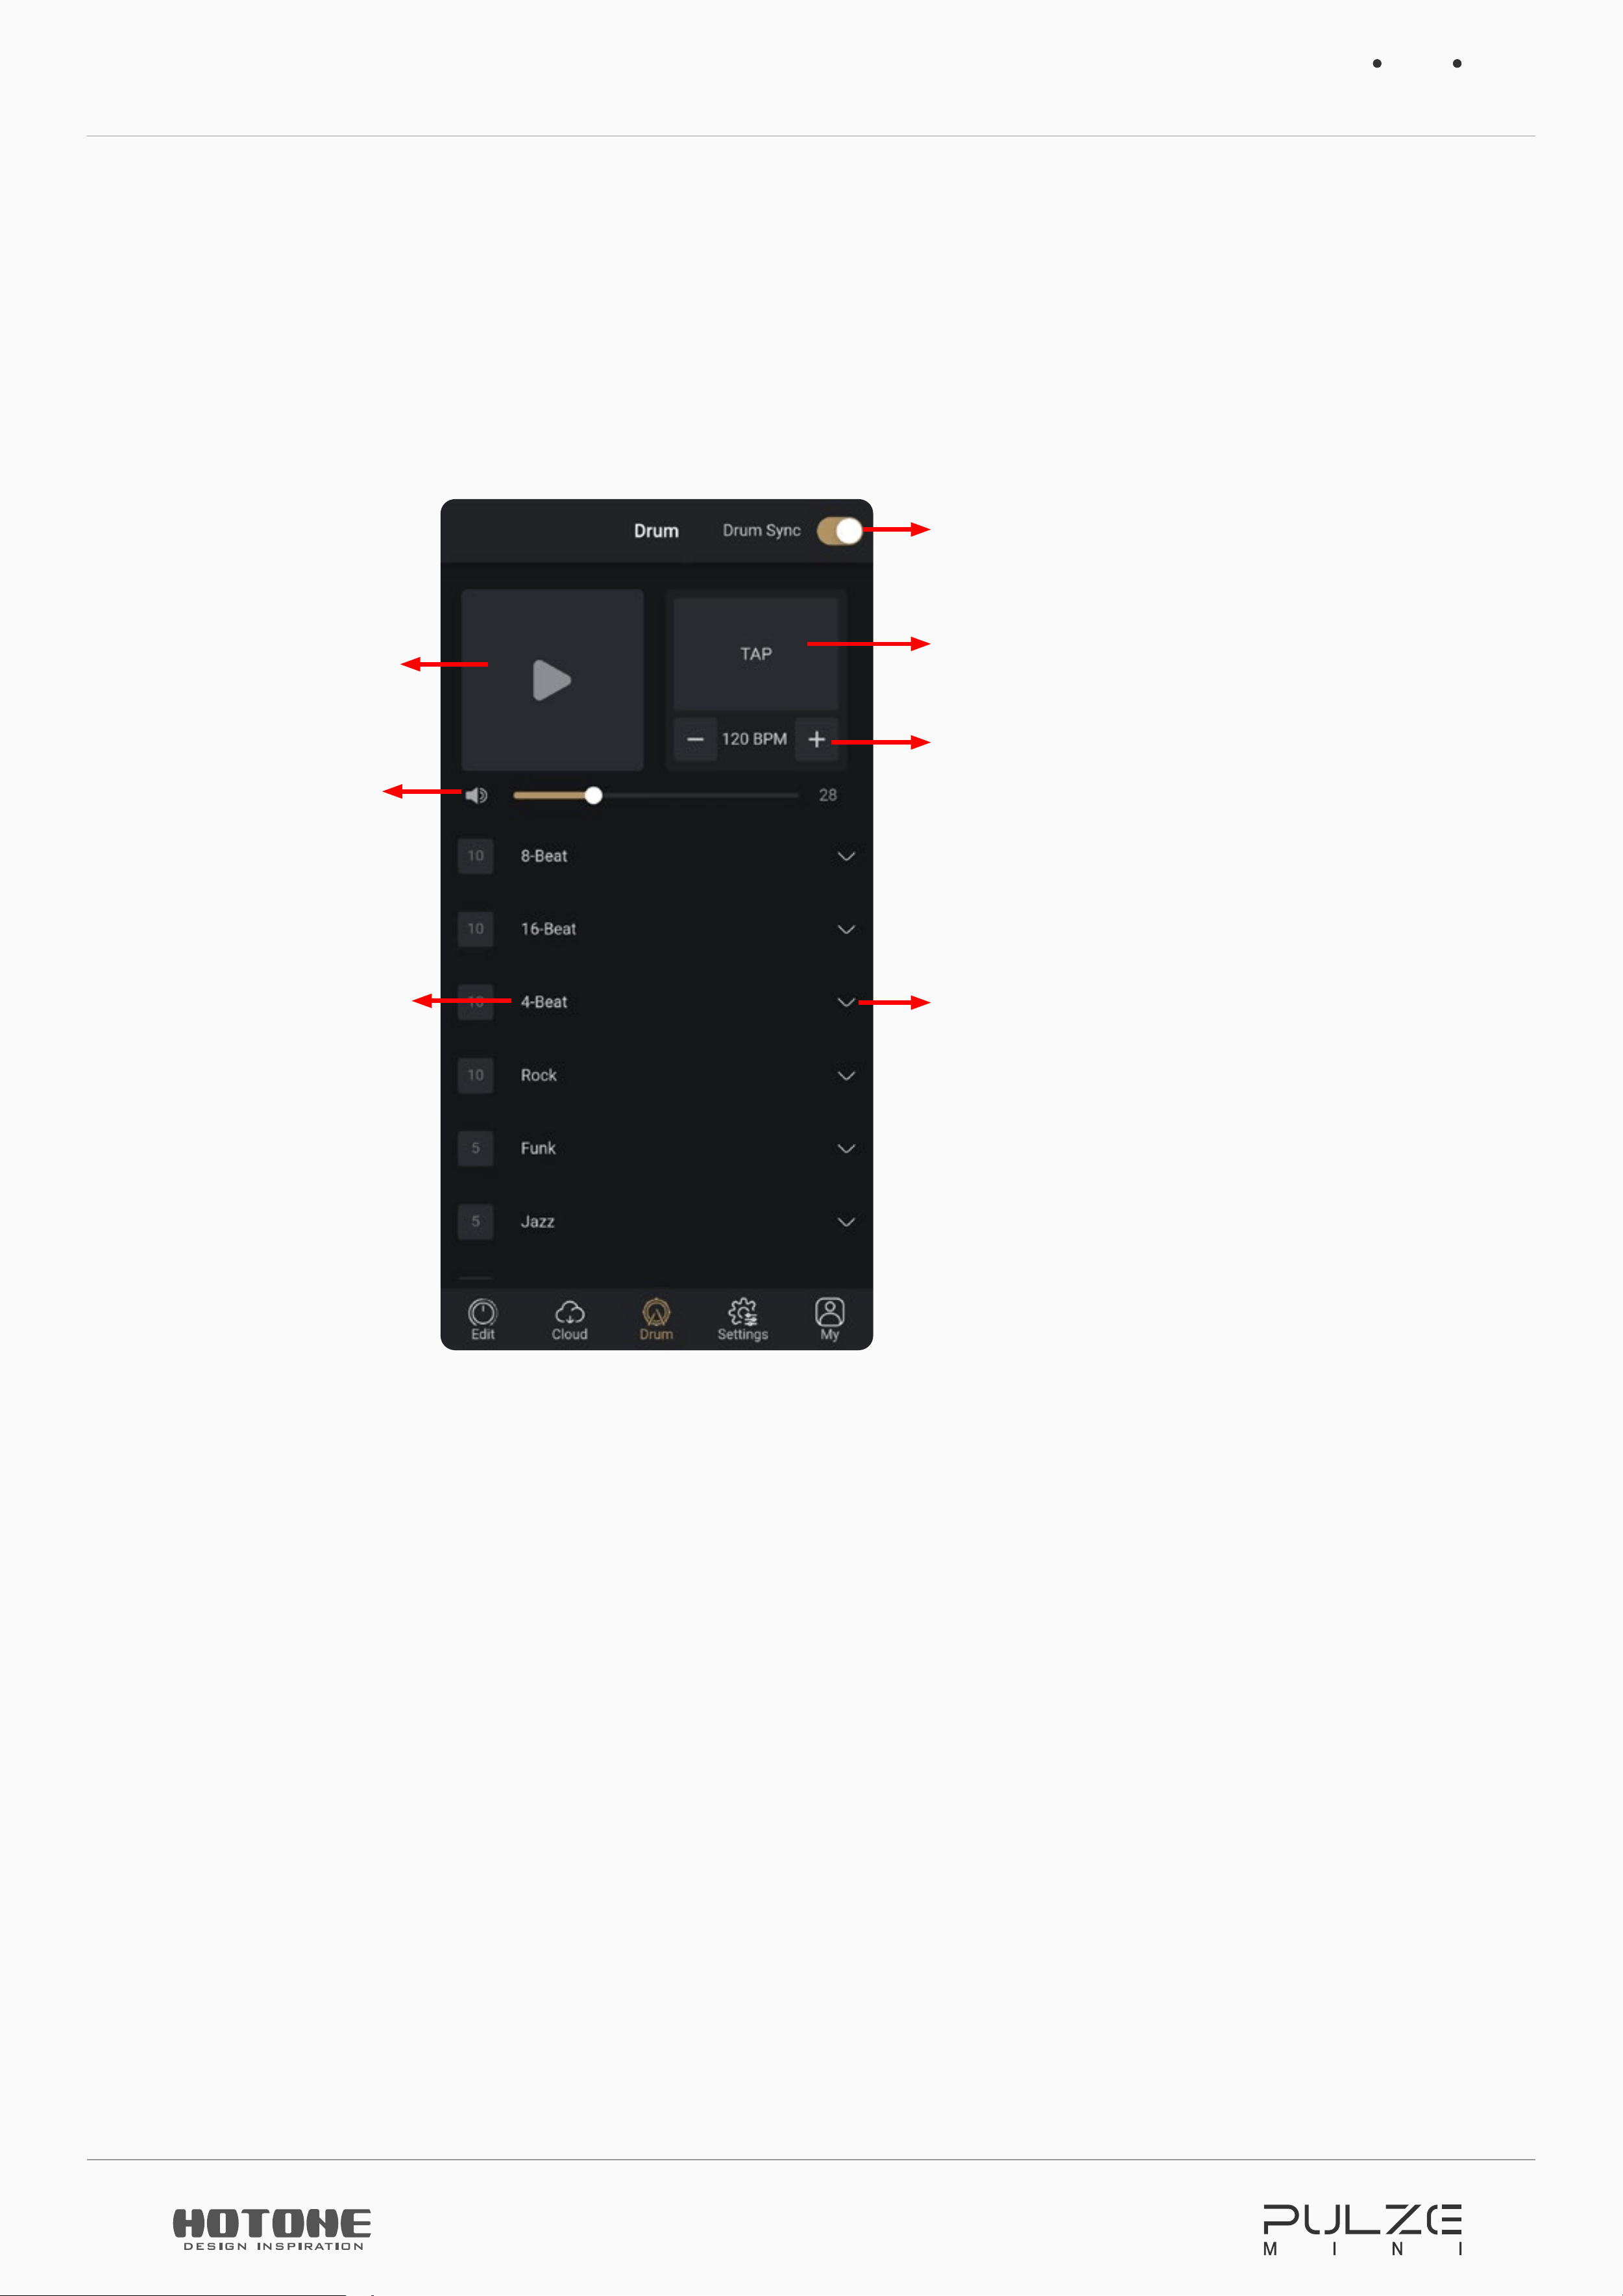
Using Drum on Pulze Editor
Tap “Drum” tab to enter Drum menu, then follow the instructions below:
Drum play/stop
Drum volume
Drum categories
Drum sync switch (default on)
Turn on to sync with tone tempo
Drum tap tempo
Use +/- button to fine tune; tap
number to enter
a tempo value ranging from 40 to
300BPM
Tap to expand all drum rhythms
under this category
Settings
33
Settings
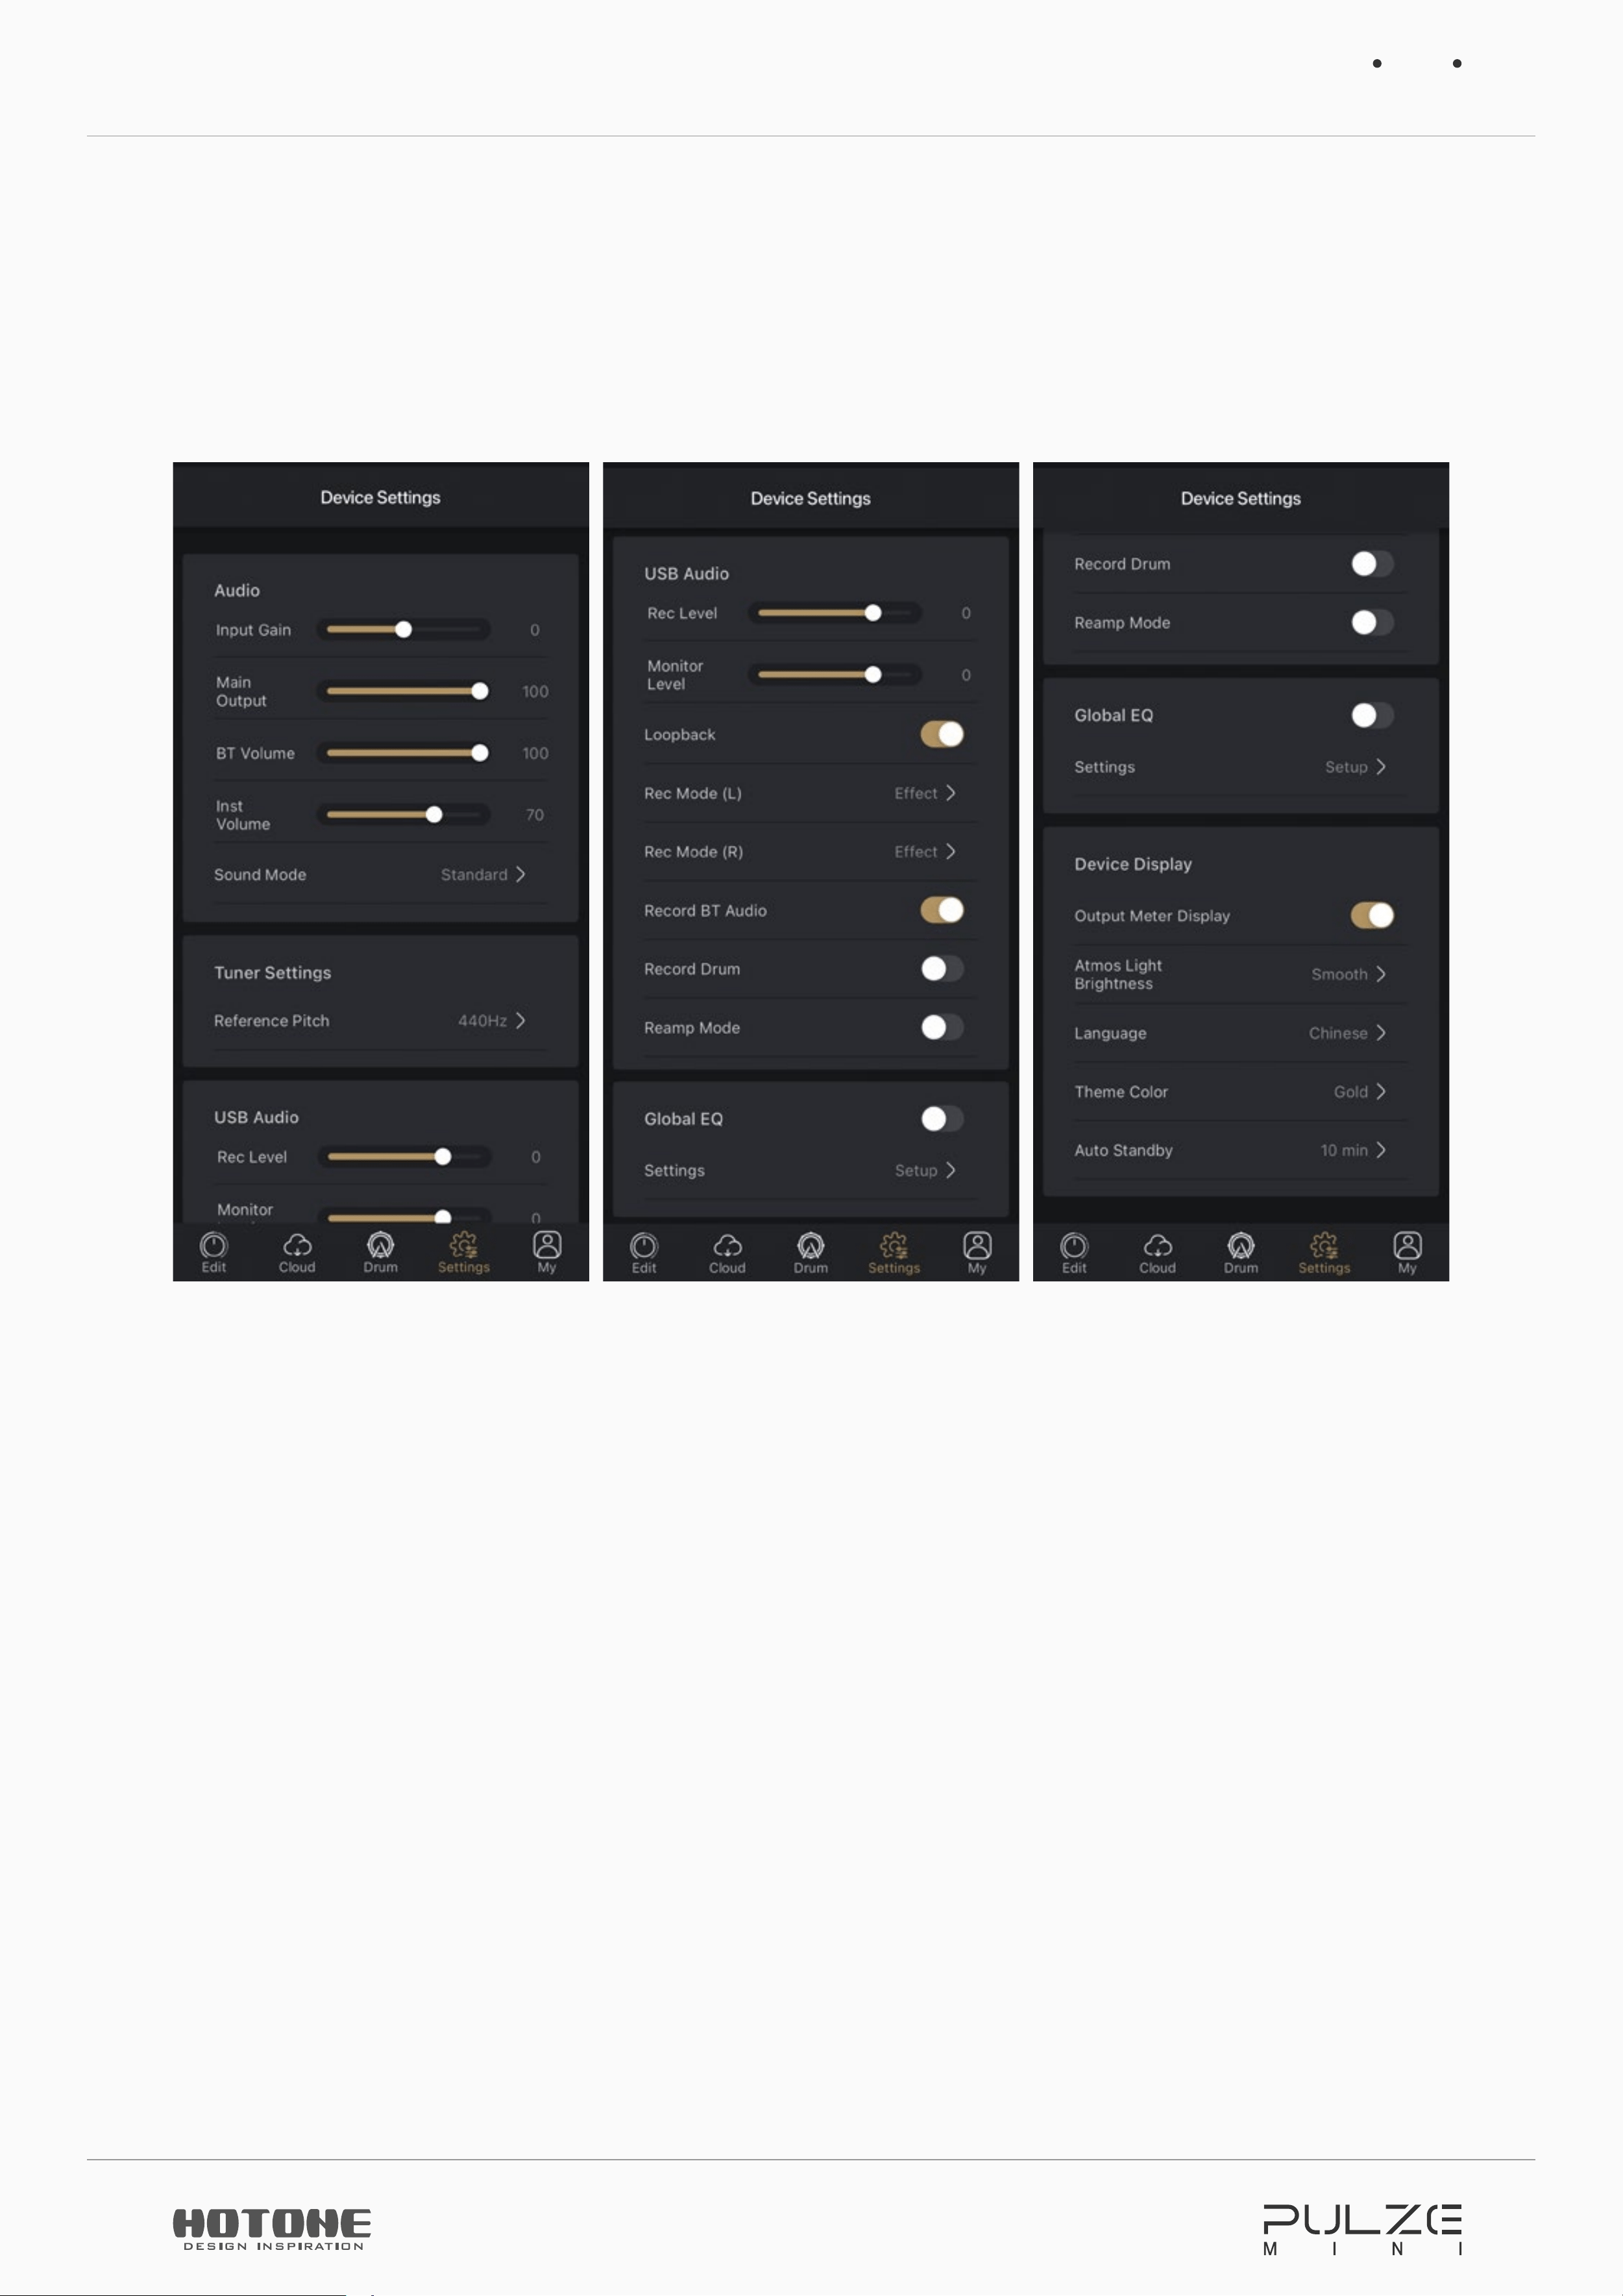
Tap “Settings” tab to enter Settings menu:
Audio
•
Input Gain:
Sets input gain from -20dB to 20dB depending on your instrument.
Default is set to 0dB (unity gain).
•
Master Volume:
Sets overall output volume from 0-100. Default is set to 100.
•
Inst Volume:
Sets instrument output volume from 0-100. Default is set to 70.
•
BT Audio Volume:
Sets Bluetooth audio output volume from 0-100. Default is
set to 100.
•
Sound Mode:
Selects from different EQ modes for music playback only. Default
is set to Standard.
Settings
34
Tuner Settings
•
Reference Pitch:
Sets standard A (A4) pitch calibration from 415Hz-475Hz.
Default is 440Hz.
USB Audio
•
Record Level:
Adjusts USB audio record level from Mute~-60dB~+20dB. Default
is 0dB.
•
Monitor Level:
Adjusts USB audio monitor level from Mute~-60dB~+20dB.
Default is 0dB.
•
Loopback:
Turn on to reroute your USB audio output to USB audio input for
podcasting/streaming. Default is off.
•
Rec Mode:
Selects USB recording input sources form dry signal (Dry) and wet
signal (Effect) on USB input L/R channels. Default are all set to Effect.
•
Record BT Audio/Drum:
Selects whether to record audio signal from BT/built-
in drum machine. Default are all set to on.
•
Reamp:
Turn on to send USB audio output 1/2 to effects chain for reamping.
This will bypass the input jack of your unit. Default is off.
How To Reamp
1. Get dry instruments tracks: You can find and download tracks on your own, or
set Rec Mode switch on your Pulze Mini to Dry to record some tracks.
2. Turn on Reamp switch.
3. Launch a DAW and create two audio tracks. Set track 1’s input to None, output
to USB Audio Output 1/2; set track 2’s input to USB Audio Input 1/2, output
to USB Audio Output 1/2. Then keep monitor switches off on both tracks. If
you only need to record AMP+CAB modules, keep track 2’s input to USB Audio
Input 1.
4. Still in DAW, set only track 2 can be recorded, and import a dry track (Audio
Clip A) to track 1.
5. In DAW, start playback and loop the dry track in track 1, you’ll hear the Audio
Settings
35
Clip A with effects (depending on effects chain settings).
6. Adjust effects parameters depending on your needs.
7. Turn off looping switch in DAW. Record on track 2 with track 1 playing
simultaneously. Then you get a wet track (Audio Clip B) as you’ve heard in step
5 and 6.
8. Turn off Reamp switch and check whether Audio Clip B is OK.
9. Repeat the steps above to get different reamped tracks.
Please note:
For tone creation, you only need to execute steps 1 to 6.
If needed, connect a pair of headphones to phones jack in step 4.
To avoid possible abnormal computer audio monitoring/playback issues, PLEASE
REMEMBER TO TURN REAMP SWITCH OFF WHEN REAMP FINISHED.
PLEASE DO NOT TURN ON MONITOR SWITCH OF YOUR TRACKS IN YOUR DAW
DURING REAMP PROGRESS to avoid abnormal feedback/noises which may
harm your devices.
Turning on Loopback switch is not recommended during reamp progress.
Settings
36
Global EQ
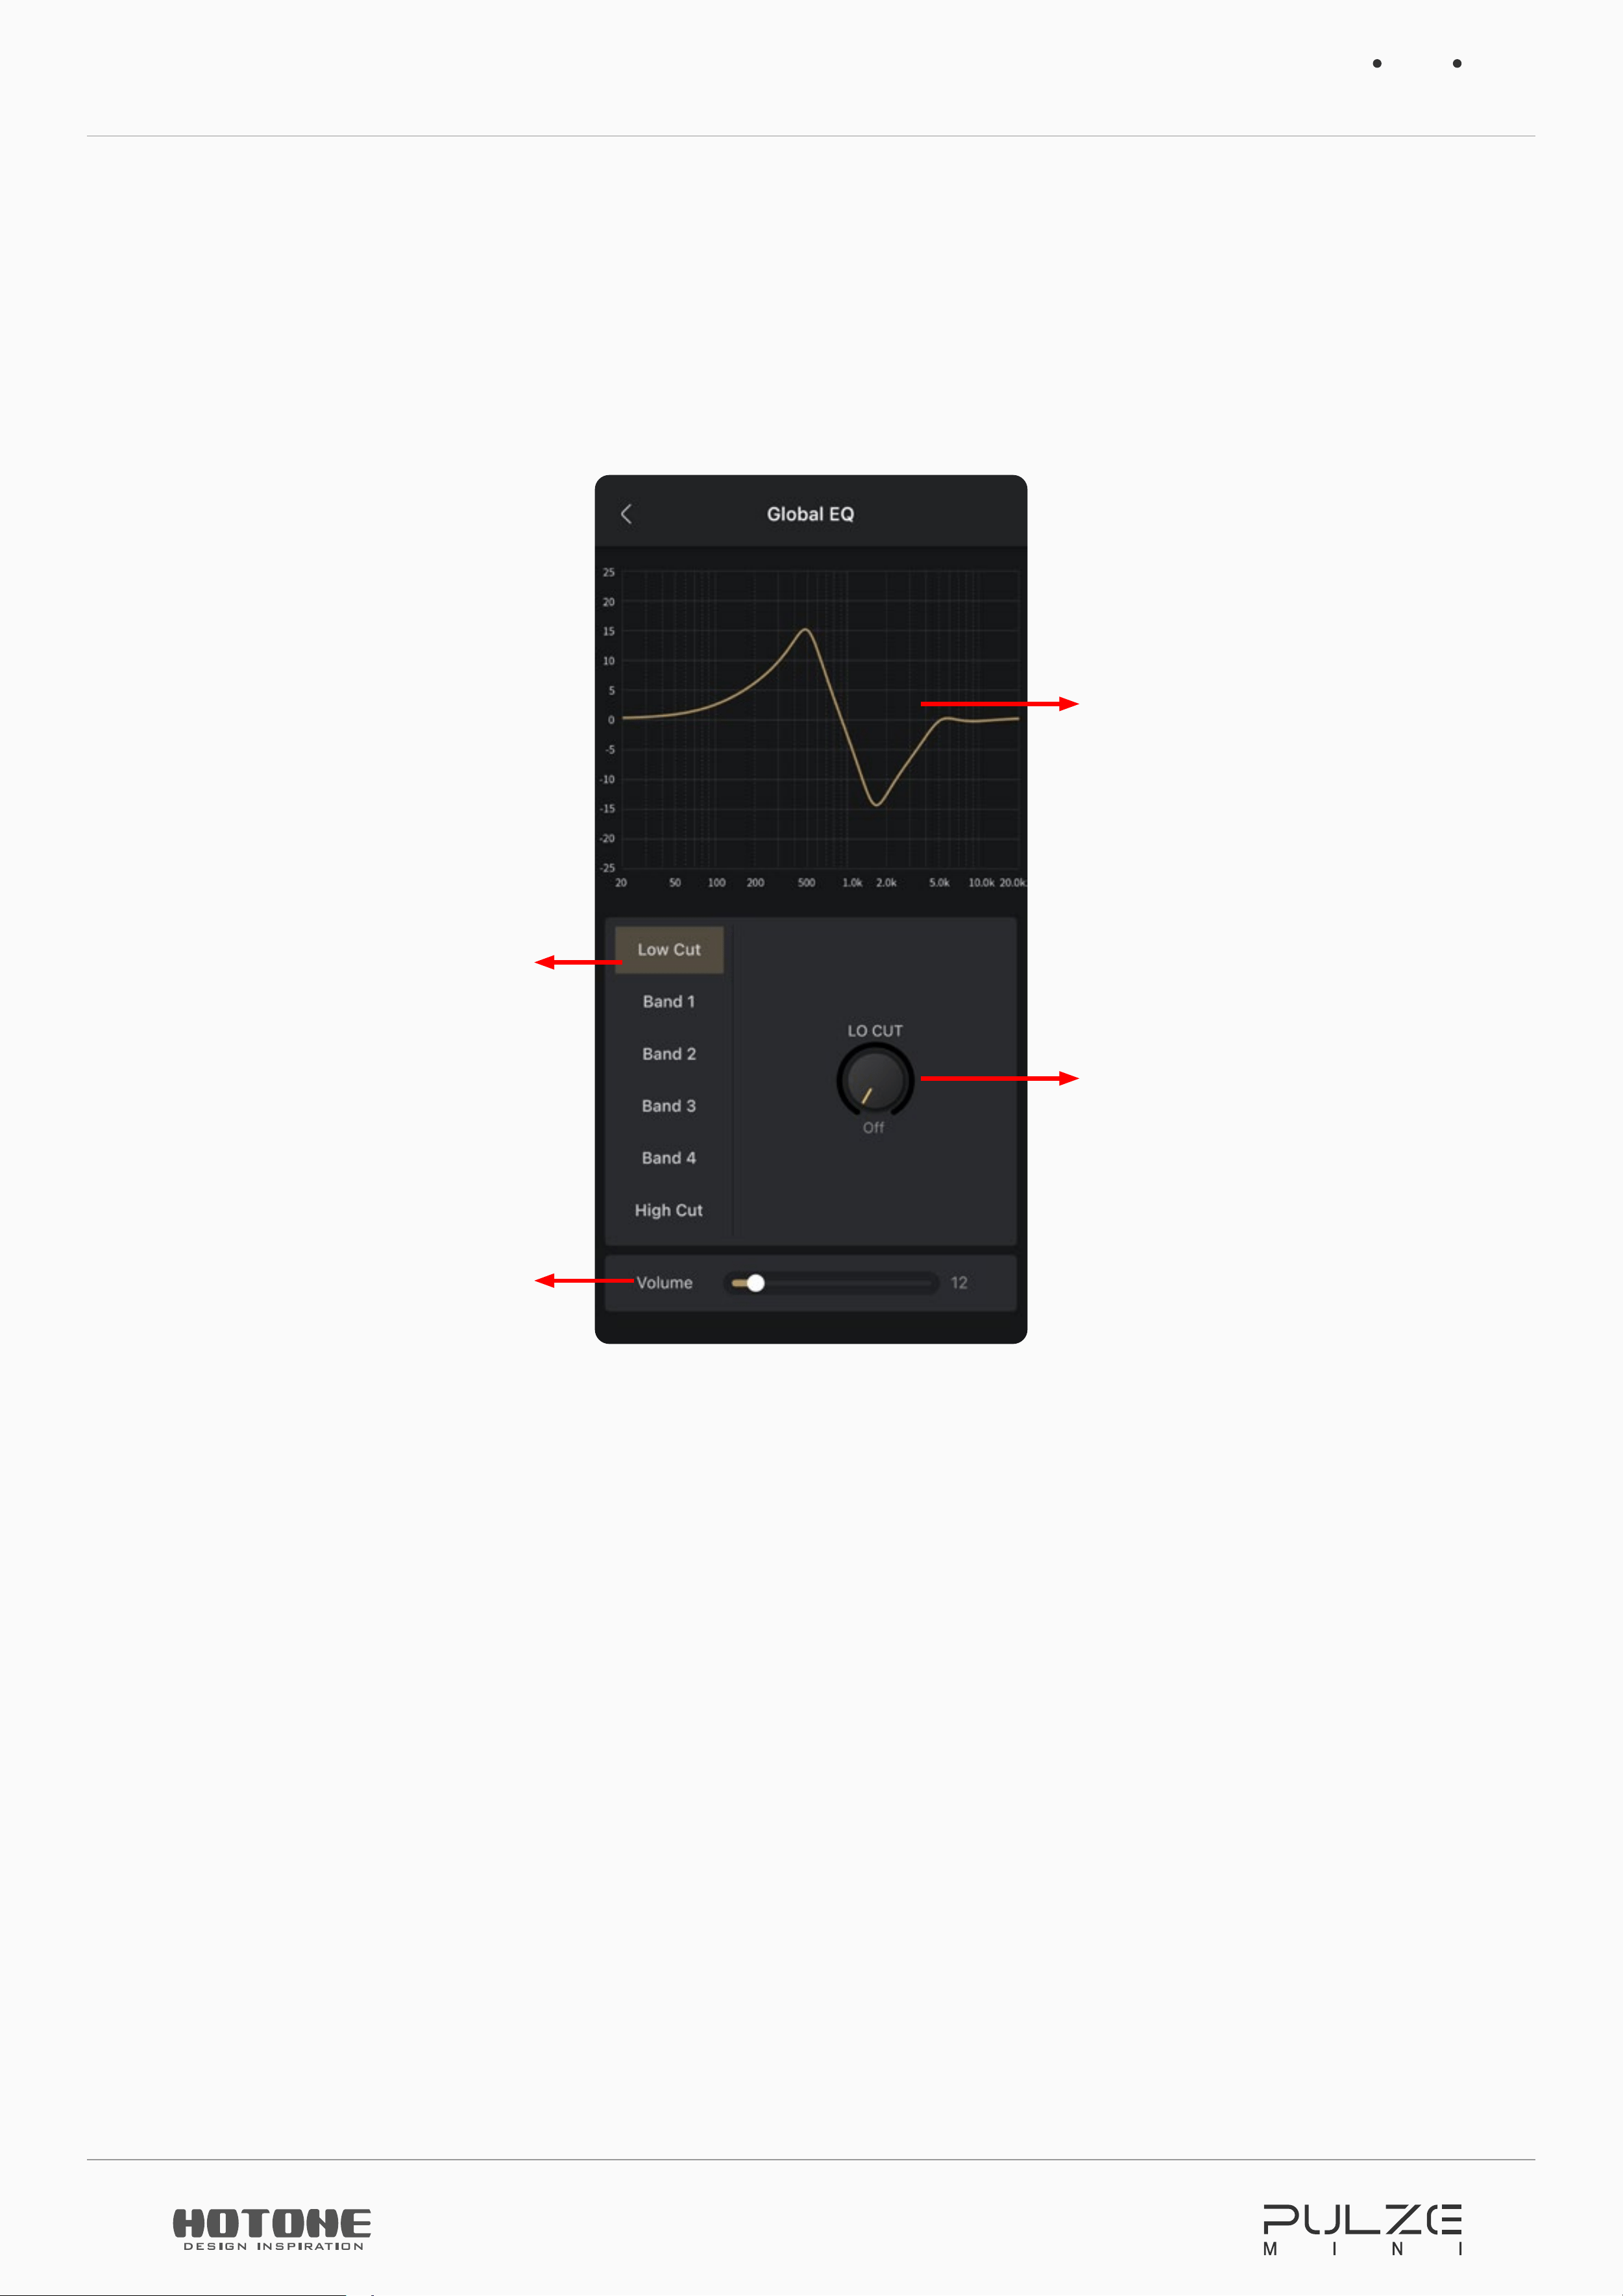
You can turn on Global EQ for overall tone sculpting if needed. Global EQ is
defaulted to off and won’t affect audio playback.
Tap “Setup” in Global EQ section:
Current global EQ curve
Available parameter for
this band
Global EQ output volume
Selects a frequency band
Low Cut/High Cut set low cut/high cut filter frequency from Off-20Hz-20000Hz,
defaults are all off.
Band 1-4 are 4 switchable peak filters with center frequency, bandwidth (Q) and
gain controls. 4 band controls are the same:
FREQ 1-4: Controls band 1-4 center frequency from 20Hz-20000Hz. Default
values are:
BAND 1: 100Hz
BAND 2: 500Hz
BAND 3: 1600Hz
BAND 4: 5000Hz
Q: Controls filter width from 0.10-10.00, default is 0.71
Gain: Controls filter gain from -20dB to +20dB, default is 0dB
My
37
Display
Display Output Meter: Sets whether atmosphere light strip shows output meter.
Default is on.
Atmos Light Brightness: Adjusts atmosphere light strip brightness from Off,
Smooth, Standard and Bright. Default is set to Standard.
Theme Color: Selects a system UI color; this will affect both screen display and
atmosphere lights.
Language: Select unit system UI language.
Auto Standby: Adjusts after how long the unit enters standby mode. Selections are
Never, 10 min, 20min, 30min, 40min, 50min, 60min. Default is set to 10min.
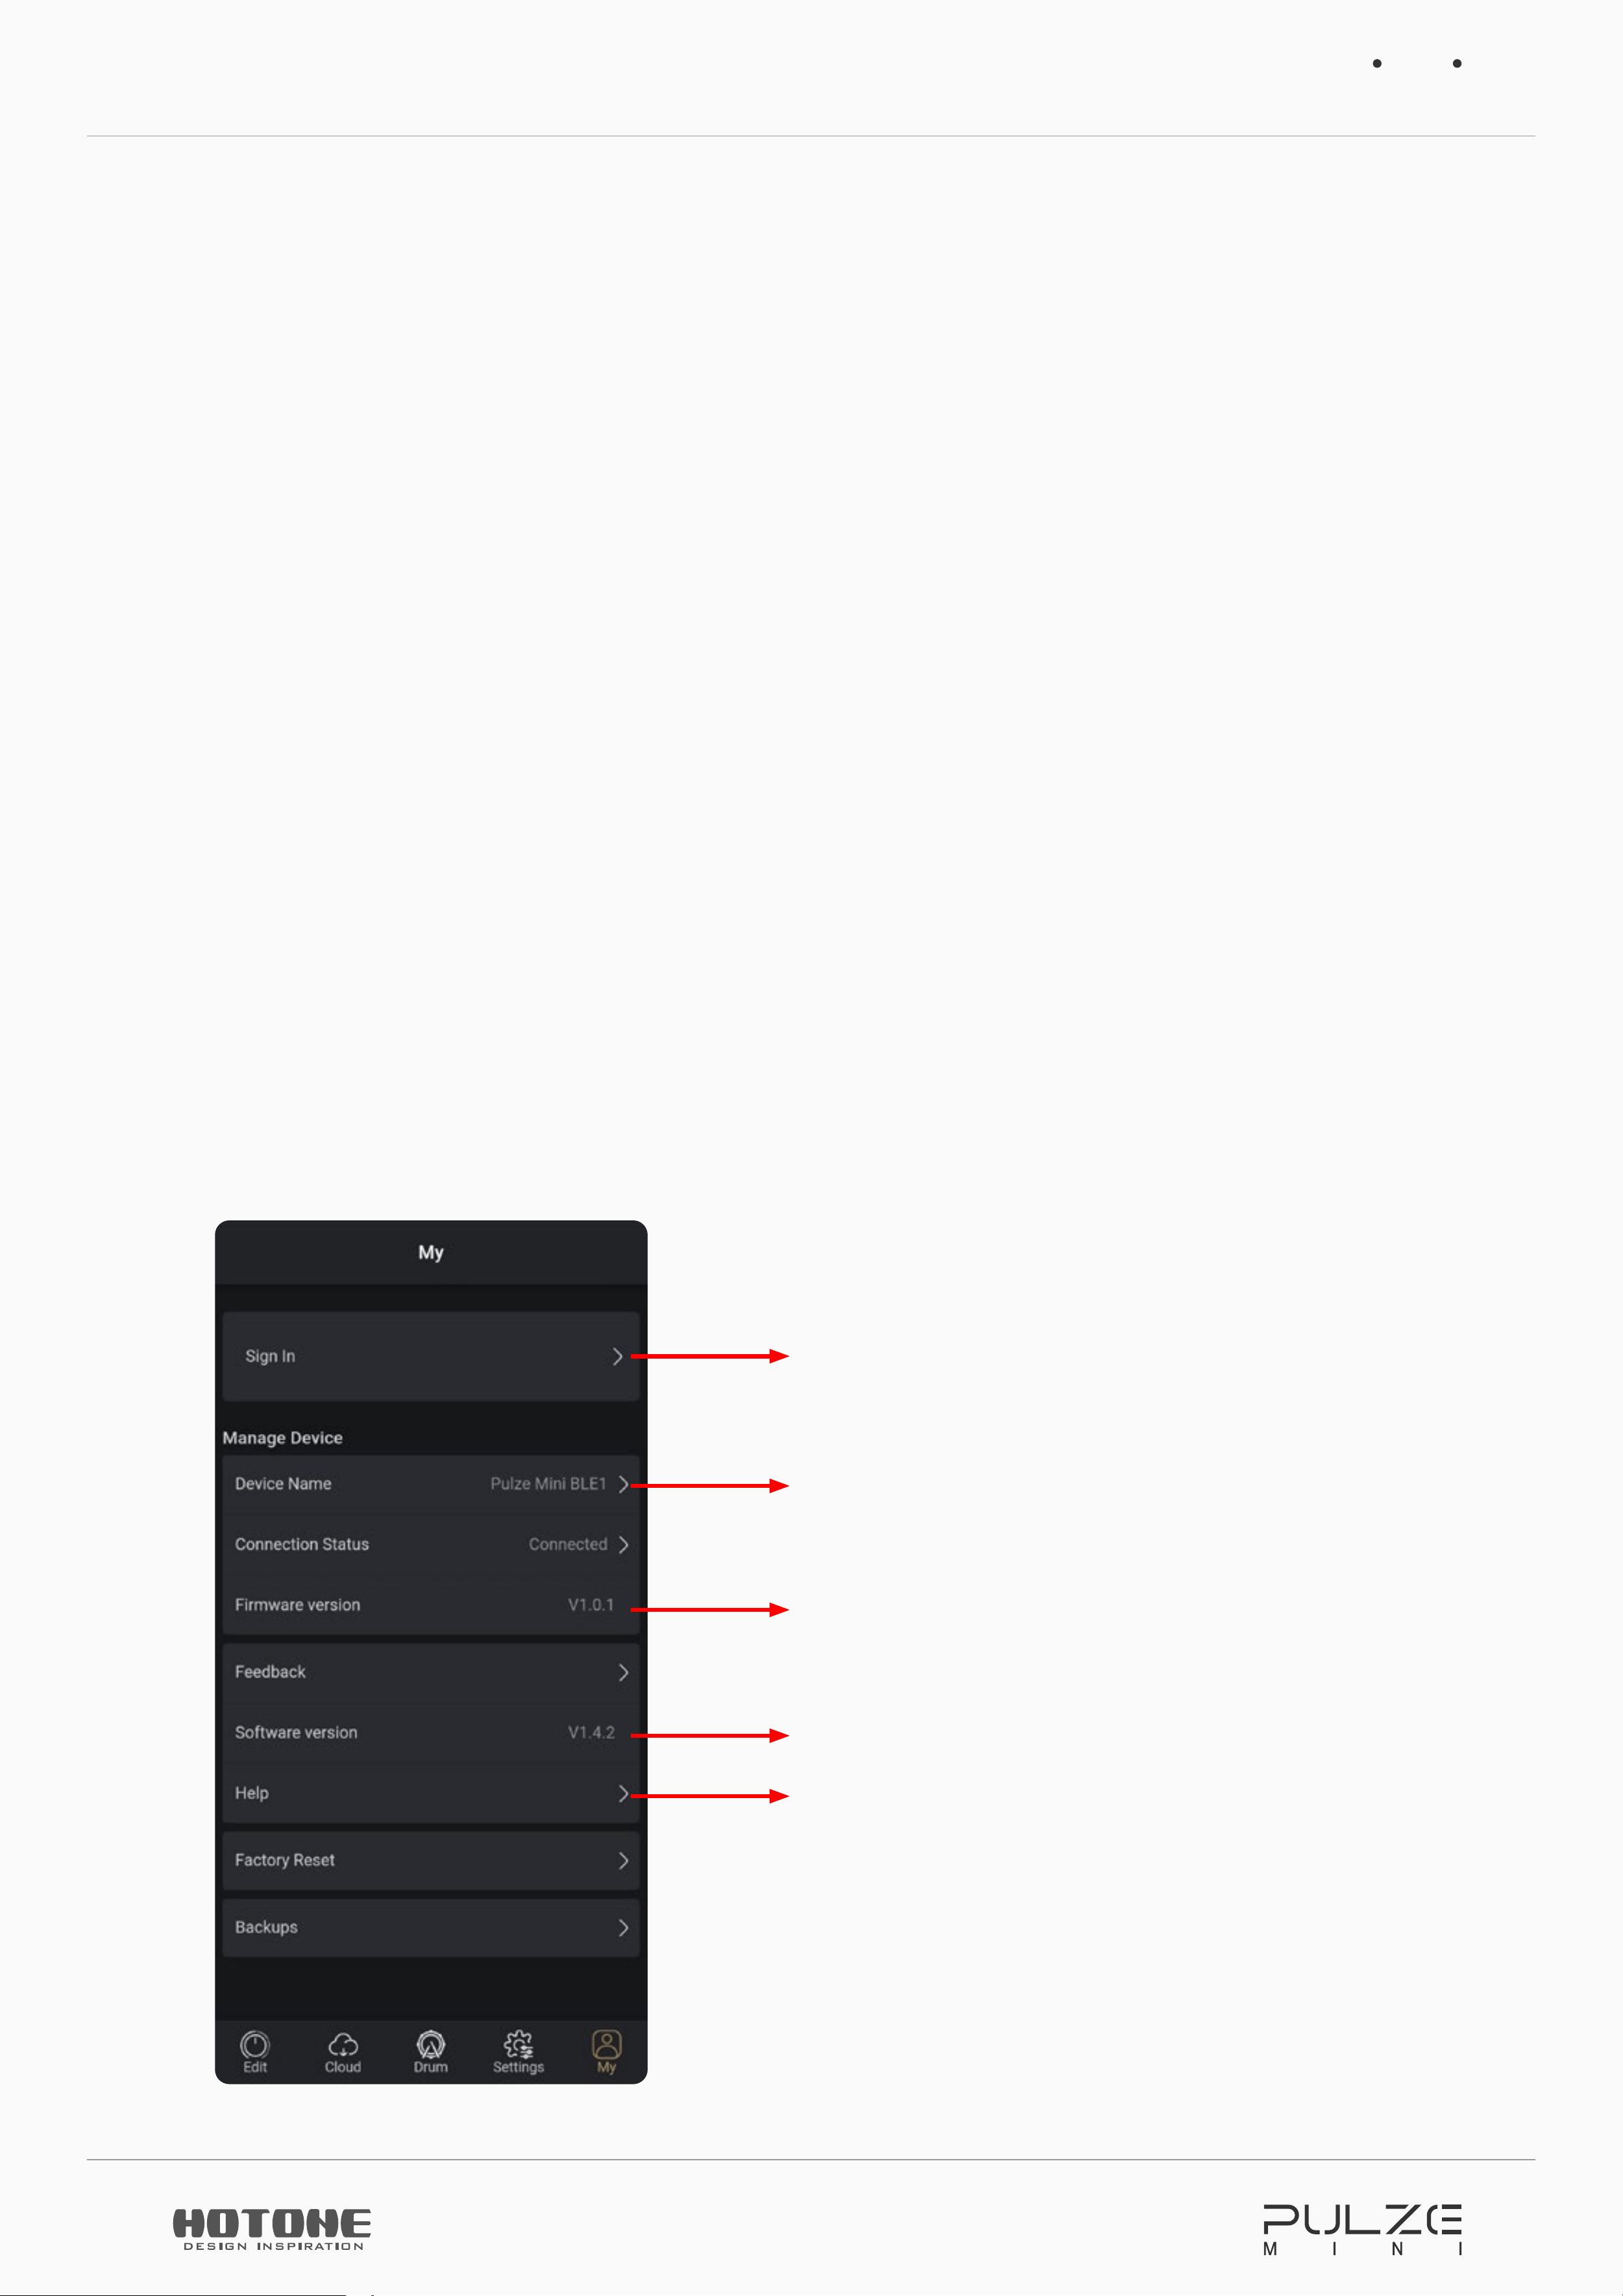
My
In this menu you can manage your account, manage your unit, check manuals,
backup your data and reset your unit.
Tap “My” tab to enter:
Tap to sign in if not signed in
Tap to change nickname/password or sign
out if signed in
Tap to change unit name
Supports upper/lower cases and numbers
Current firmware version
Current app version
Tap to get manuals
My
38
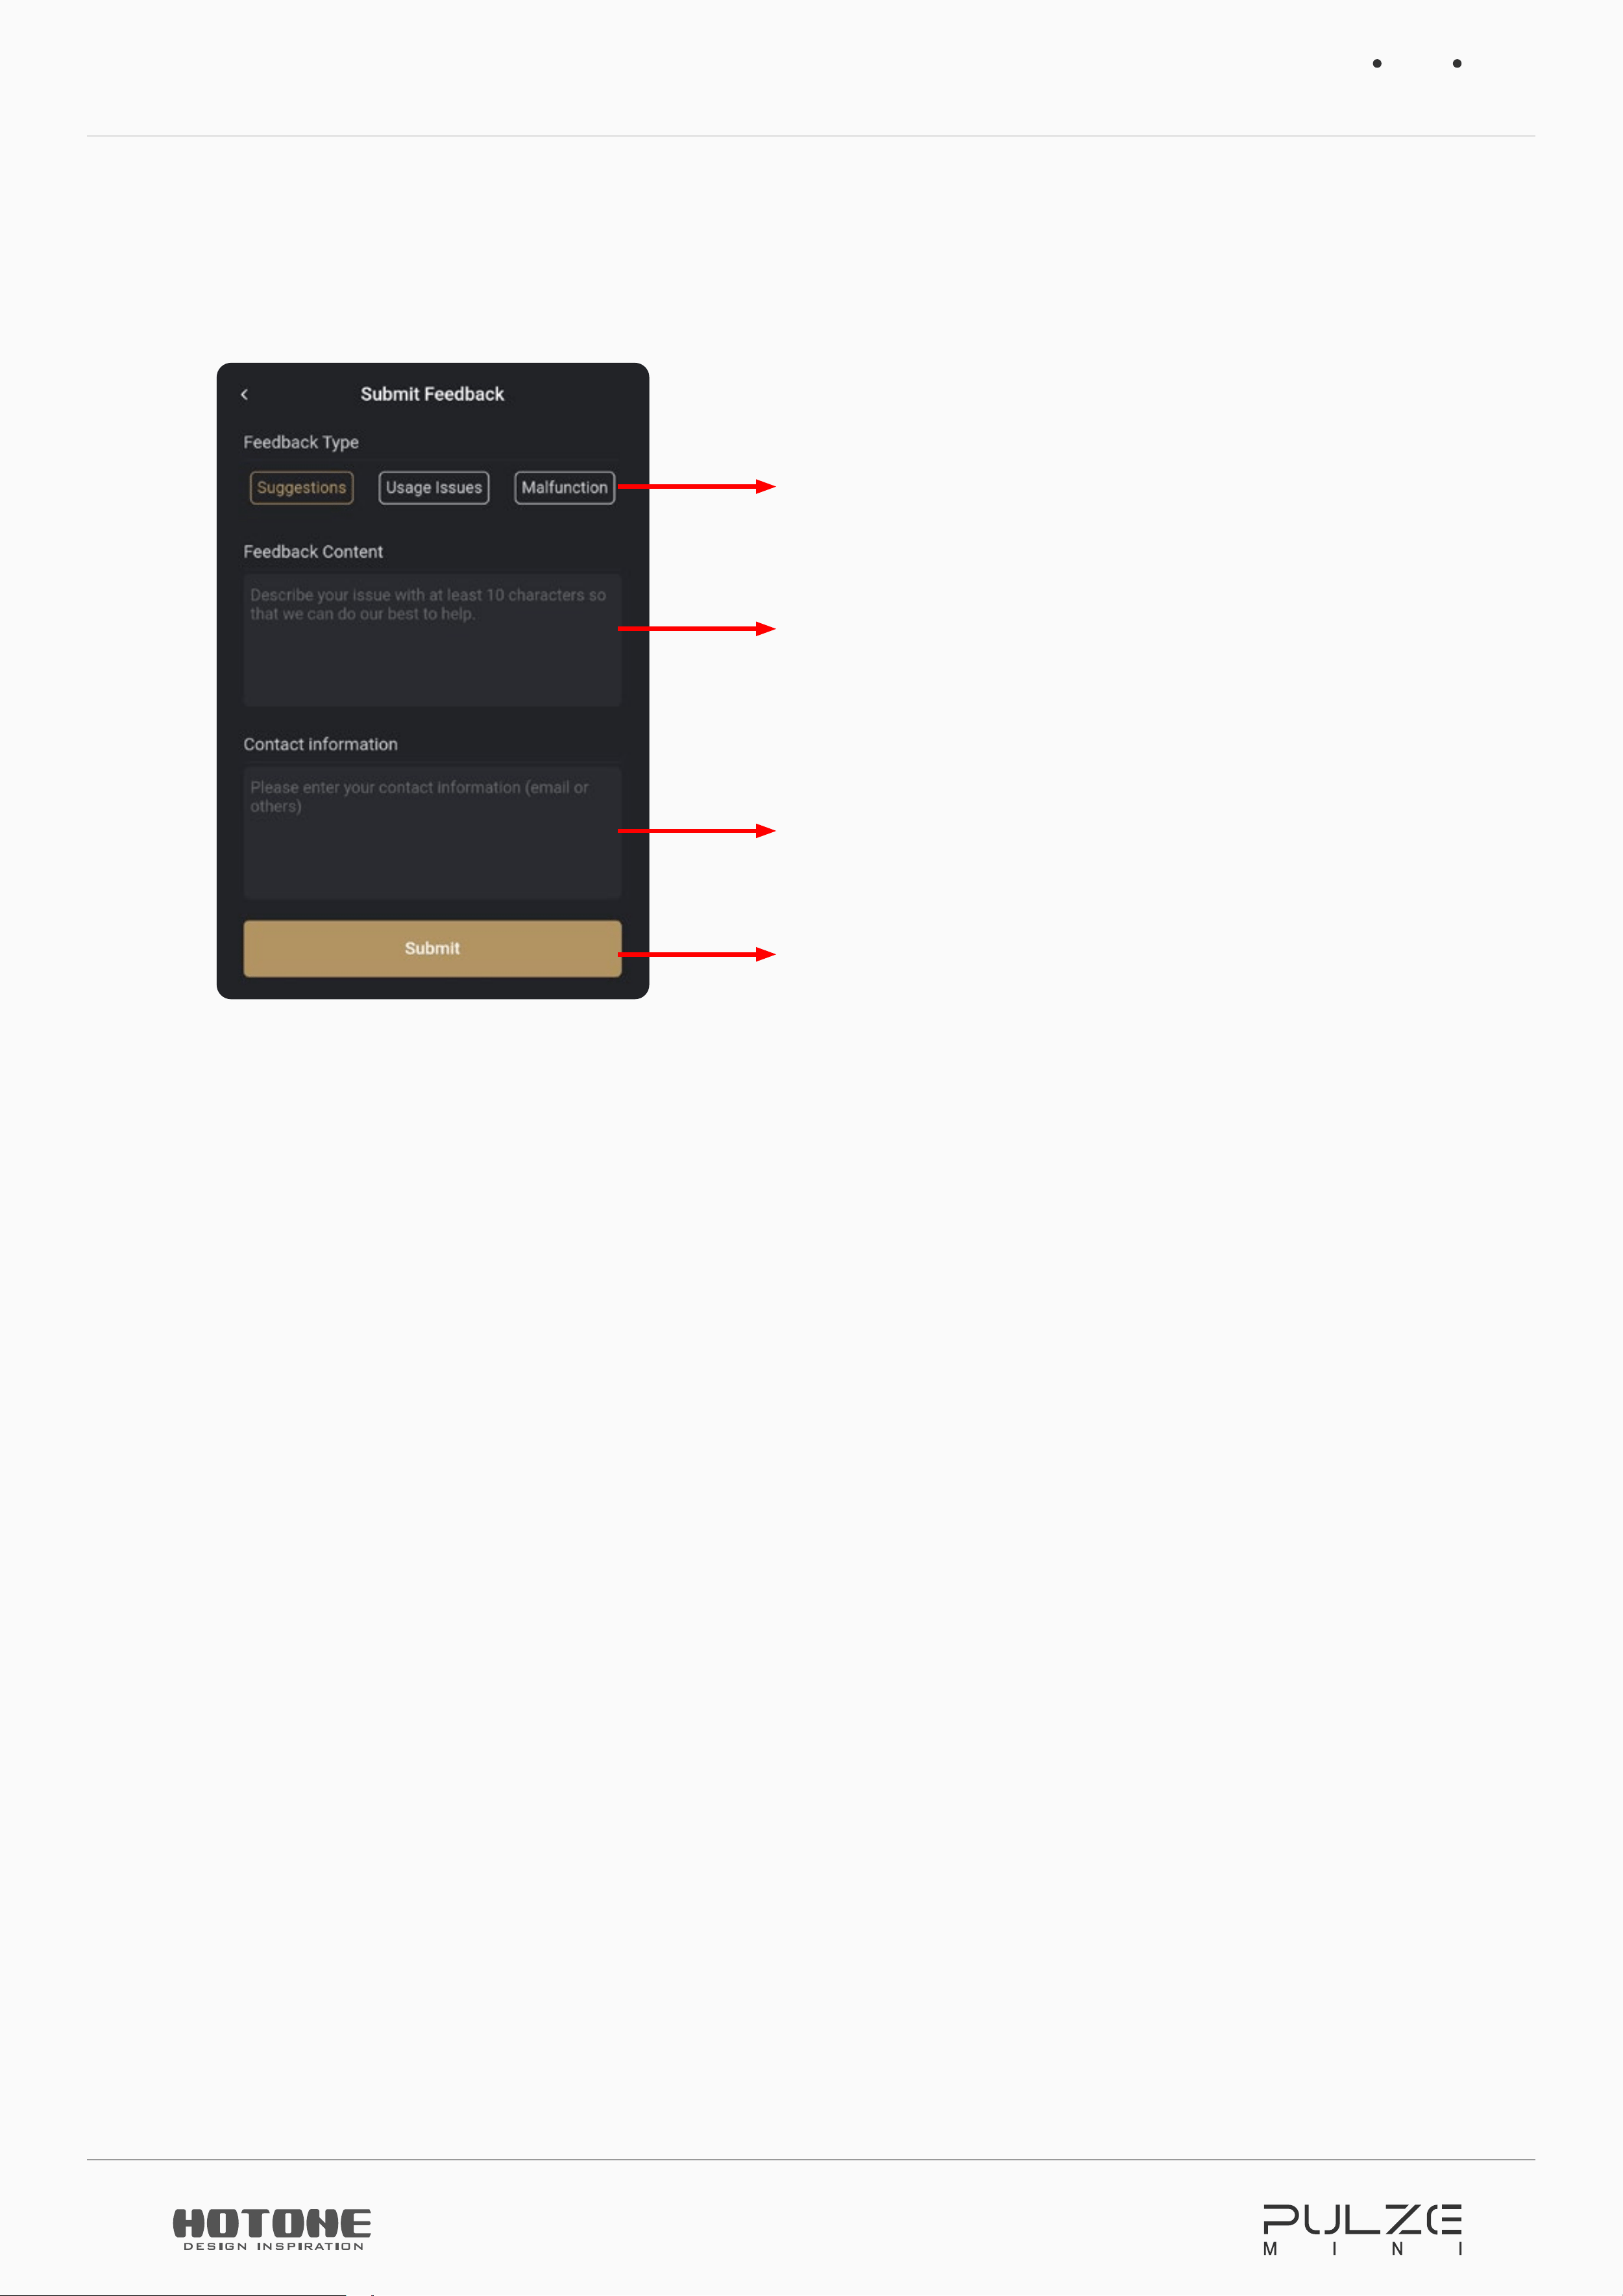
Feedback
If you have some suggestions and issues, you can tell us via Feedback page:
Choose a feedback type
Fill in feedback content (min. 10 characters)
Fill in your contact info
Confirm and submit
Factory Reset
You can restore part of/all data to factory default here.
• Reset Songlist/Tone: Delete all user tones and restore to factory tones. User
settings are not affected.
• Reset Settings: Reset all settings to factory default. Tones and songlists are not
affected.
• Factory Reset: Performs a factory reset which deletes all user data and resets all
settings.
Choose a selection depending on your needs.
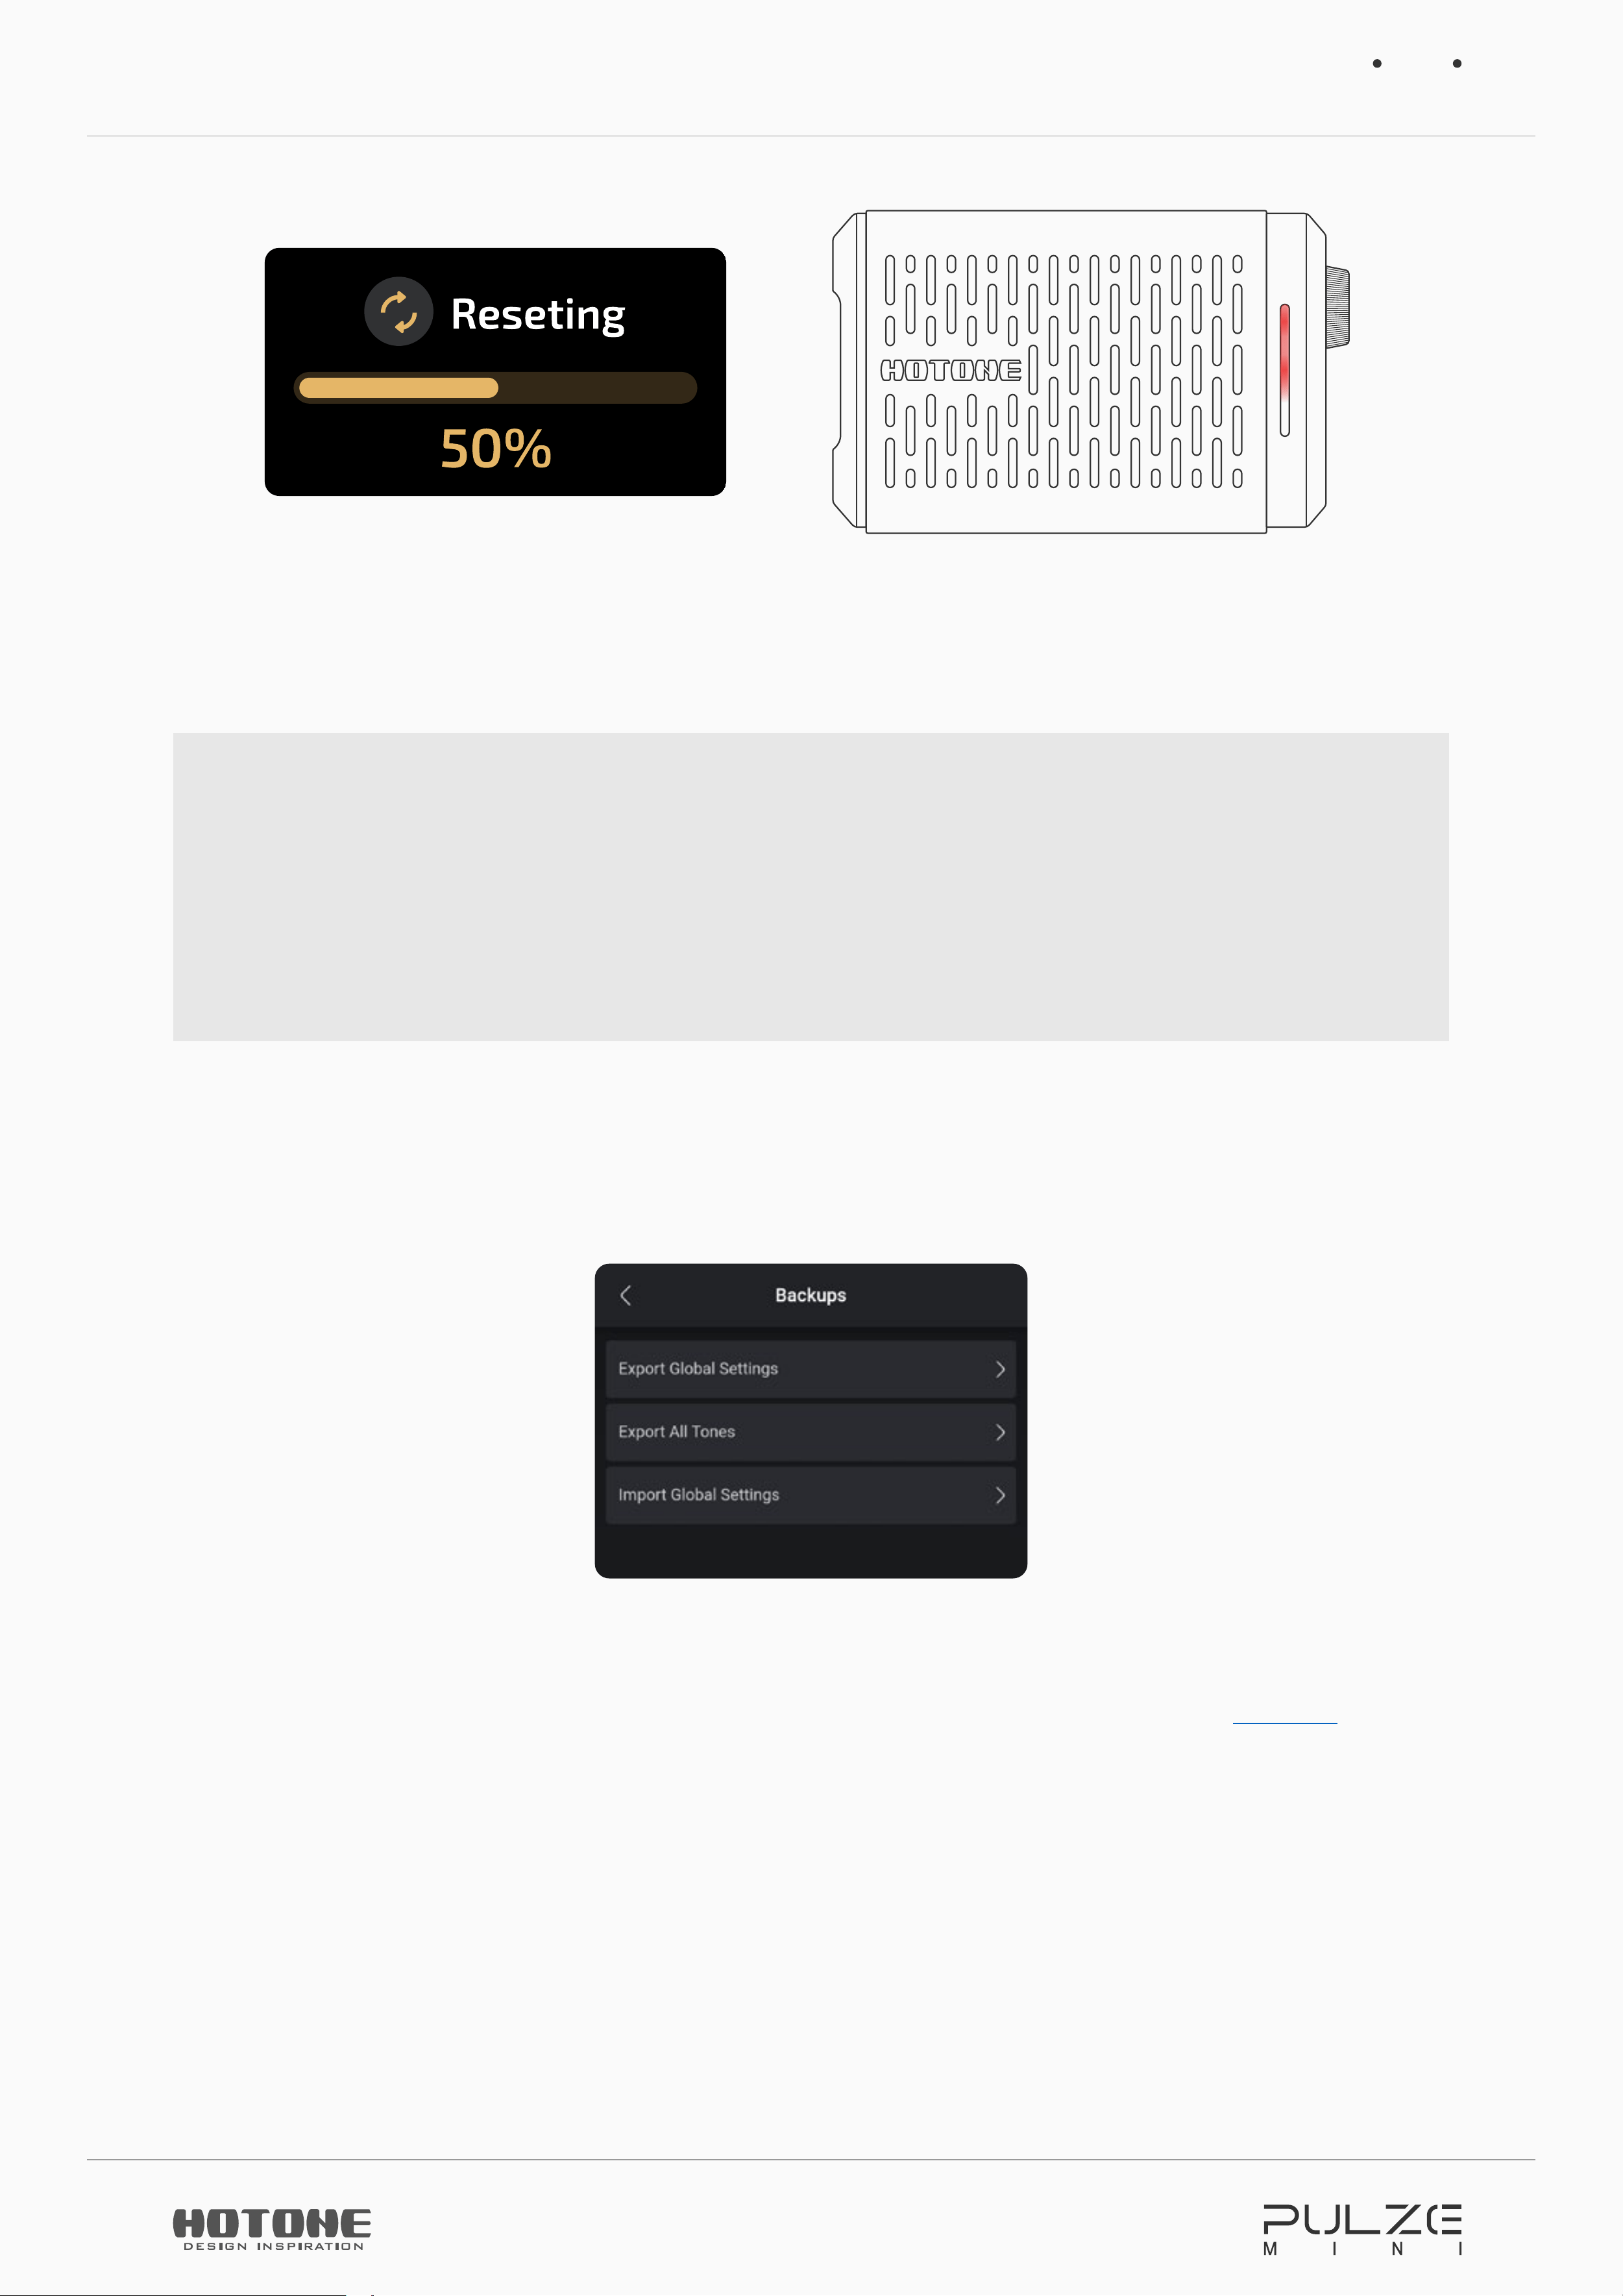
After pressing Factory Reset button, this display will come up with a warning.
Pressing YES will perform the factory reset. Pressing NO will return to the previous
menu.
After continuing with the factory preset, both the screen and atmosphere light
strip will show reseting progress.
My
39
When the factory reset is complete, the unit will go to normal witl BT function off.
Please reconnect the unit and app manually.
Please note:
Once it is executed, it cannot be undone, so please back up your settings with
Pulze Editor on your phones/pads before performing a factory reset.
Do not power off while the reset is in progress. This may cause your Pulze Mini
to malfunction.
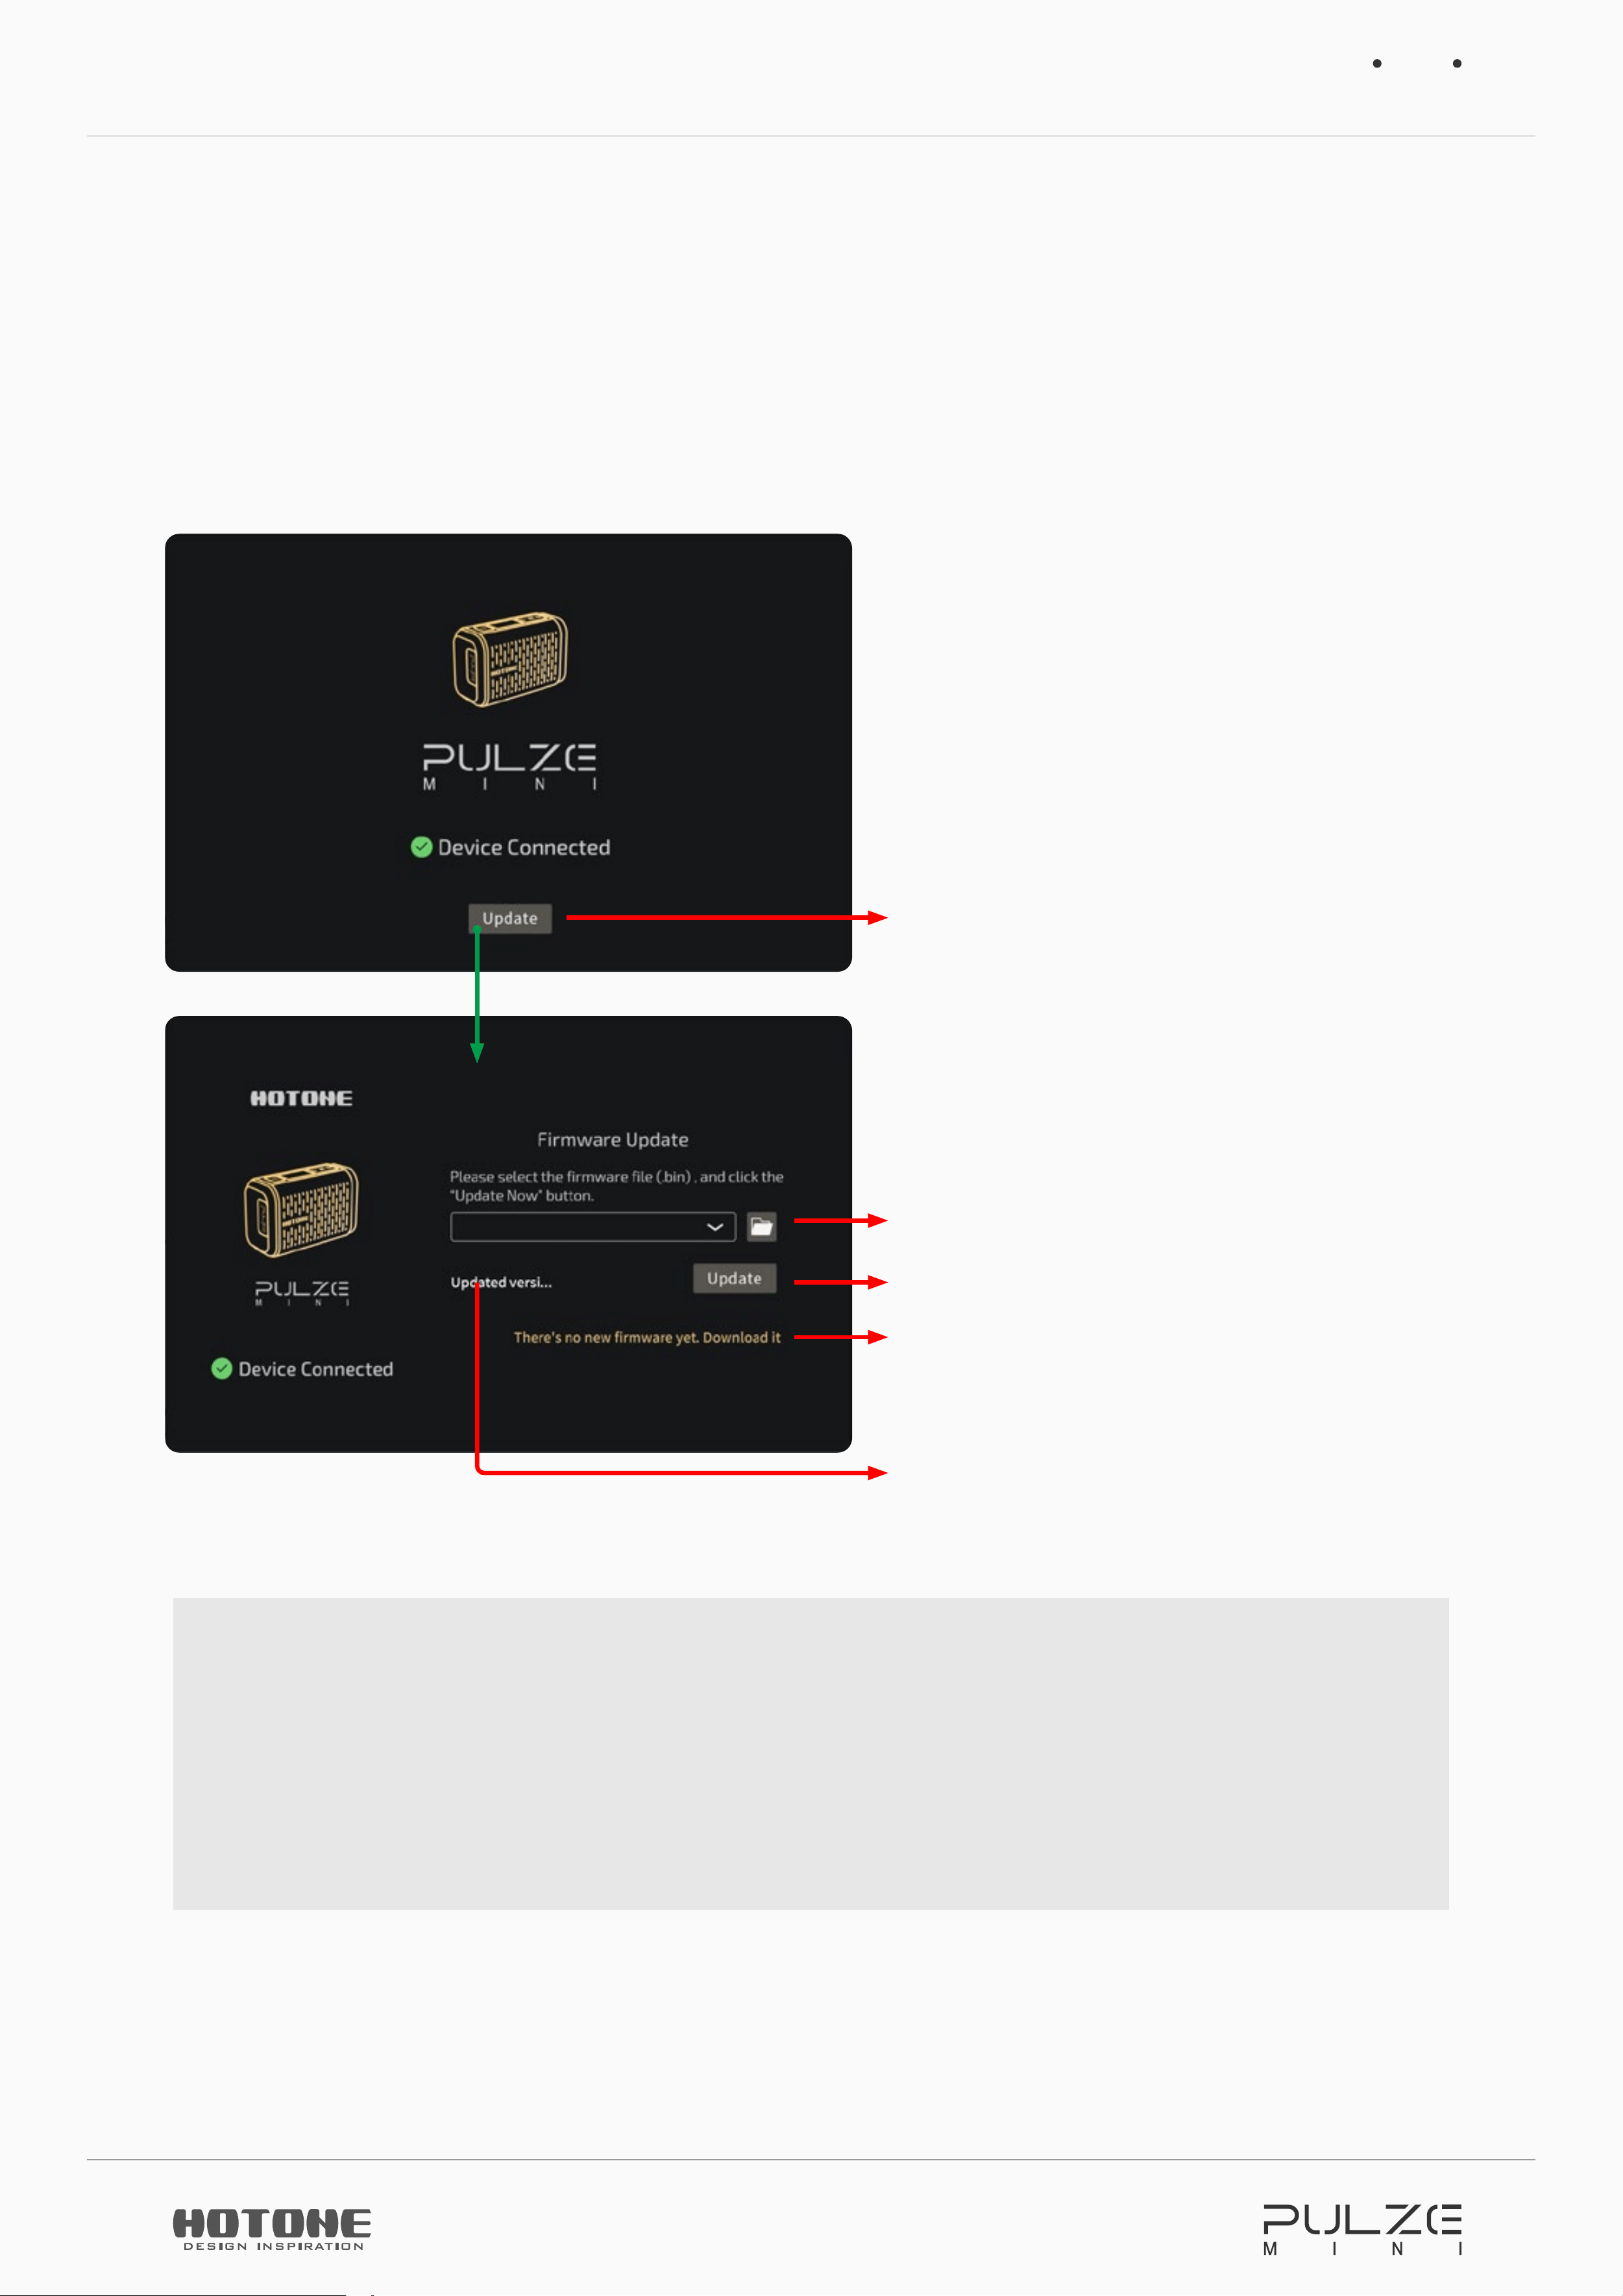
Backup
You can use Backup function for backing up your tones and settings.
Export All Tones function lets you export all tones stored in your Pulze as individual
tone files. The operation is the same as normal export progress (see
Export
section).
Export Global Settings function lets you export your current settings as a .glb file.
If you need to recover your global settings, you can use Import Global Settings
function.
For iOS users, when exporting, the file should be exported to Files/My iPhone/
Pulze Editor/.
Firmware Update
40
Firmware Update
You can update your unit by using Pulze USB Updater on your PC/Mac.
Download and launch Pulze USB Updater, power up your unit and connect to your
computer, then follow the instructions on the updater UI:
Tap to go to the following page
Pulze Mini will automatically enter
firmware update mode
Firmware version of chosen file
Click to download firmware from
Hotone website
Execute firmware update
Choose firmware file (.bin file) directory
Please note:
Do not disconnect the power supply while update is in progress to avoid possible
malfunction.
If update accidentally failed, please turn off your unit, power up while holding
the volume knob to enter firmware update mode, then re-update.
Troubleshooting
41
Troubleshooting
Please note: If issues still occur after troubleshooting, please disconnect the AC
adapter and turn the power OFF immediately and disconnect all other connected
cables, then contact our service team/authorized dealers/the store where
you bought the unit. Please inform us the model name, serial number, specific
symptoms related to the malfunction, your contact info and other info if you think
which will be helpful.
Device won’t turn on
• Please confirm if the battery is sufficiently charged. If the battery level is low,
please charge it in time.
No sound or slight sound
• Make sure your cables are connected properly.
• Make sure the volume knob is adjusted properly.
• Check effect output volume settings.
• Check tone volume of your current tone.
• Check the noise gate threshold setting of your current tone.
• Make sure Reamp switch is off by using Pulze Editor (Settings > Reamp). the
noise
• Make sure your Pulze is not blocked by other objects.
Noise
• Make sure your cables are connected properly.
• Check your instrument output jack.
• Check if you’re using the correct power adapter.
• If the noise is coming from your instrument, try using the noise gate effects or
adjust threshold parameter.
Troubleshooting
42
Sound problems
• Make sure your cables are connected properly.
• Check your instrument output jack.
• Check I/O meters to see if your input/output levels are properly set. Extreme I/O
levels may cause abnormal sounds.
• Check effect parameters to see if they are properly set. Extreme parameters
may cause abnormal sounds.
• Make sure Reamp switch is off when finish reamping and start monitoring reamp
results.
Technical Specifications
43
Technical Specifications
Frequency Range: 20Hz-20kHz
Speakers: One 2” custom full range speaker
Power Amp: Class D power amp with 5W rated output
Digital Audio Signal Processing: 24-bit depth, 48kHz sample rate
No. of Effect Modules: 7
No. of Effects: 191 (incl. Global EQ)
Tones (Presets): Max. 200 tones
Drum Machine: 100 rhythm patterns incl. metronome
Inputs: One 1/4” Tip Sleeve (TS) instrument jack
Outputs: One 1/8” stereo headphones output jack
Screen: 1.45” TFT LCD Color Screen
USB Port: USB 2.0 Type-C port, supports USB Audio 2.0
USB Audio: 2-in/2-out USB audio interface with loopback and reamp support
IR processing: Supports 24-bit/48kHz Mono WAV files, 1024 points; Supports up
to 20 user IRs
Battery: Built-in 3.8V 3900mAh Lithium battery
Battery Life:
Continuous Playback: Approx. 5.5 hours of under medium volume
Maximum: Approx. 11.5 hours with headphones
Dimensions: 125mm (W) × 57mm (D) ×79mm (H)
Weight: 368g