www.gorenje.com
Thank you very much for choosing our company's products.
Please correctly install and use this product, and do not use this product to wash
clothes that are not suitable for machine washing.
The images in the manual are for illustration purposes only. The appearance,
printing, etc. shall be subject to the actual product.
Our company emphasizes technology updates. In order to enhance the overall
performance of this appliance, we will make technical changes to it without further
notice. Your understanding is appreciated.
This product is for household use only.
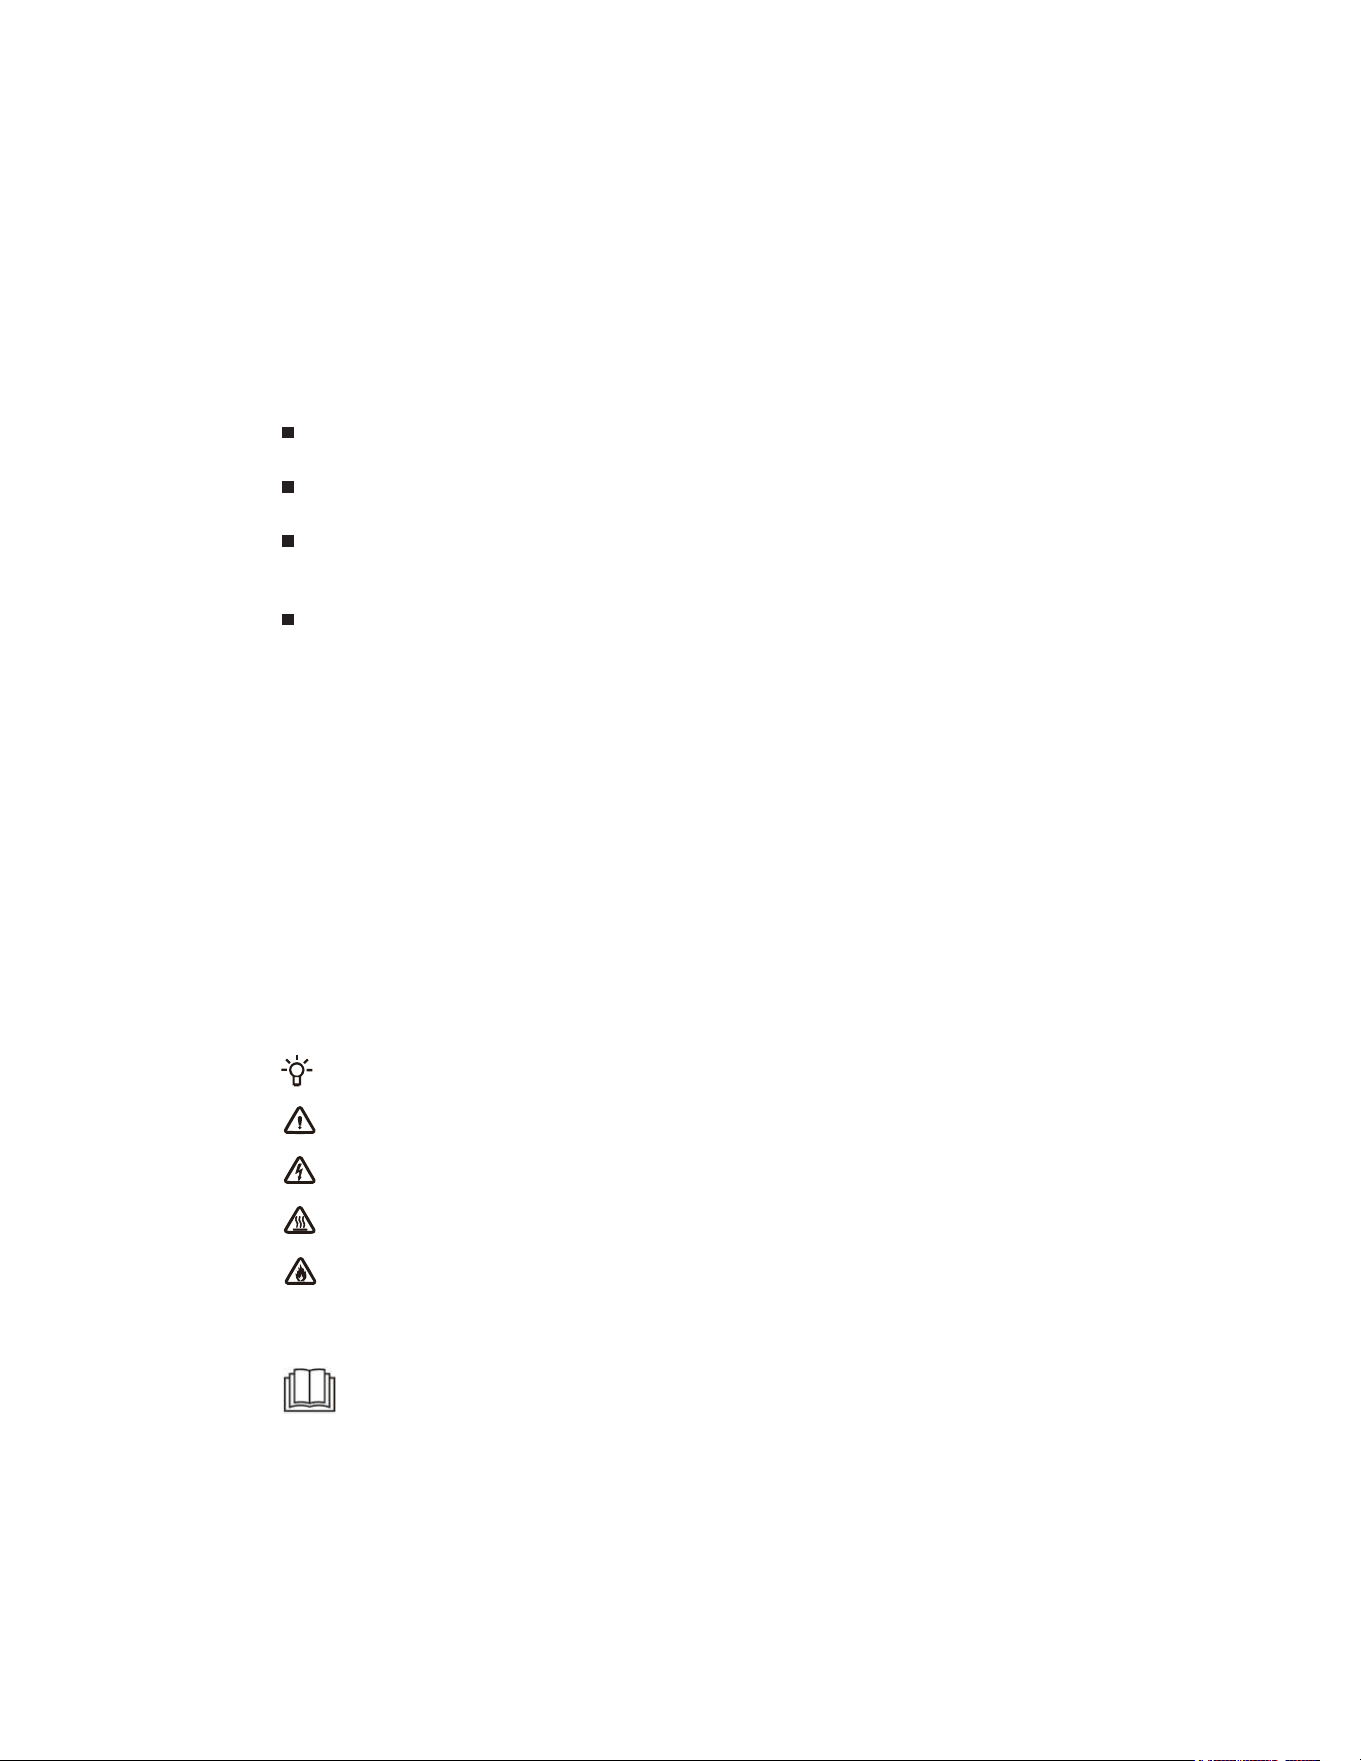
The following symbols in this manual are indicated as follows:
Information, suggestions, prompts, or advice
WARNING - GENERAL HAZARD
WARNING - ELECTRIC SHOCK HAZARD
WARNING - BURN HAZARD
WARNING - FIRE HAZARD
Please read the user manual carefully.

3
CONTENTS
INTRODUCTION
PREPARATION
BEFORE FIRST
USE
WASHING
STEPS
CLEANING AND
MAINTENANCE
TROUBLE-
SHOOTING
MISCELLANE-
OUS
4 SAFETY PRECAUTIONS
22 BEFORE THE FIRST USE
10 PRODUCT DESCRIPTION
11 Specifications
12 INSTALLATION AND CONNECTION
12 Packing/Packaging
14 Removing the transport screws
15 Installation location
15 Adjustable feet
15 Installation clearance
16 Connecting to water supply
19 Connecting and securing the drain hose
20 Connecting to the power mains
21 Transportation after installation
26 PROGRAMS AND FUNCTIONS
27 Program table
29 Additional settings and functions
33 Start the program
33 End of the program
35 MAINTENANCE AND CLEANING
35 Cleaning the detergent drawer
36 Cleaning the water inlet hose, detergent drawer outer compartment,
and rubber door gasket
37 Cleaning the pump filter
38 Cleaning the inlet filter
38 Cleaning the outside of your washer
39 TROUBLESHOOTING
42 FAULT CODES AND TROUBLESHOOTING
43 SERVICING
43 USAGE RECOMMENDATIONS
44 RECOMMENDATIONS FOR SPECIFIC STAIN REMOVAL
46 DISPOSAL
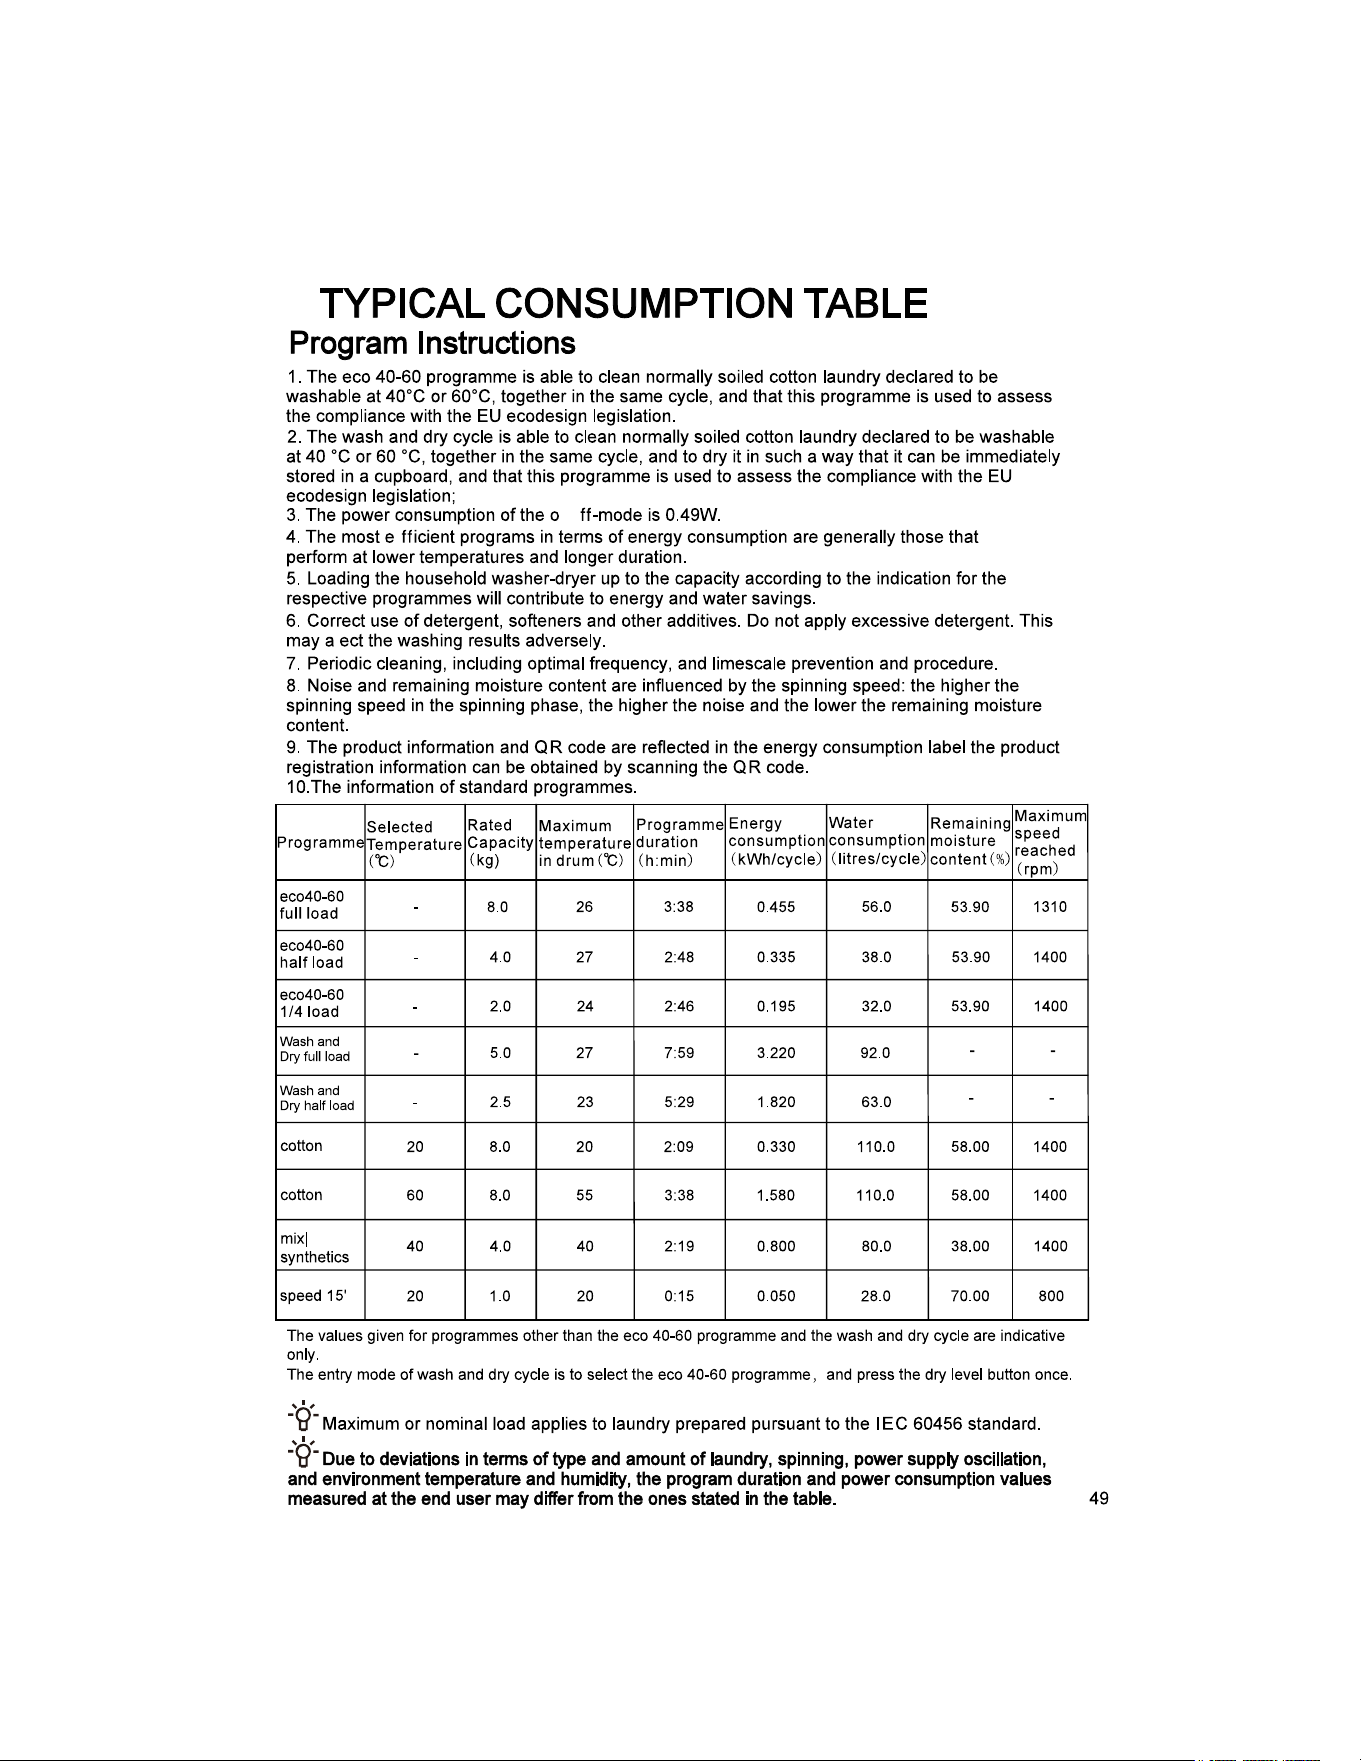
47 TYPICAL CONSUMPTION TABLE
34 PROGRAM INTERRUPTIONS AND CHANGES

4
SAFETY PRECAUTIONS
Please read the manual carefully before using this appliance.
Do not use this appliance if you have not read or understood this
manual.
This manual is applicable to multiple models. Therefore, this manual
may contain functions not covered by this model.
Failure to follow the instructions or improper operation may damage
clothing or the appliance, or cause injury to you. Please place the
manual near the appliance for easy access.
This appliance is intended to be used in household and similar applications
such as:
• staff kitchen areas in shops, offices and other working environments
• farm houses;
• by clients in hotels, motels and other residential type environments;
• bed and breakfast type environments;
• areas for communal use in blocks of flats or in launderettes.
If the appliance is used for professional, for-profit purpose or purpose
exceeding normal use in a household and similar applications, or if the
appliance is used by a person who is not a consumer, the warranty period
shall be equal to the shortest warranty period required by relevant legislation.
This appliance is not intended for use by persons (including children) with
reduced physical, sensory or mental capabilities, or lack of experience
and knowledge, unless they have been given supervision or instruction
concerning use of the appliance by a person responsible for their safety.
Children should be supervised to ensure that they do not play with the
appliance.
Children of less than 3 years should be kept away unless
continuously supervised.
This appliance can be used by children aged from 8 years and above
and persons with reduced physical, sensory or mental capabilities or
lack of experience and knowledge if they have been given supervision or
instruction concerning use of the appliance in a safe way and understand
the hazards involved.
Children shall not play with the appliance. Cleaning and user maintenance
shall not be made by children without supervision.
5
The maximum capacity in some cycles for dry clothes to be used is:
Wash 8kg /Dry 5kg .
The recommended maximum capacity may vary among different
programs. For best results, see "PROGRAM TABLE".
To connect the appliance to water supply, make sure to use the
supplied water supply hose and gaskets. Water pressure has to be
between 0.1-1 MPa (1-10 bar; 1-10 kp/cm²;10-100 N/cm²).
Always use a new water supply hose to connect the appliance to water
supply, do not reuse an old water supply hose.
For appliances with ventilation openings in the base, the ventilation
openings must not be obstructed by a carpet.
If the supply cord is damaged, it must be replaced by the manufacturer, its
ELECTRICAL SAFETY
This appliance complies with relevant safety standards.
Before connecting the appliance to the power supply, please wait at
least 2 hours to ensure it reaches room temperature.
This appliance must be repaired by an authorized service center, and only
spare parts recognized by the authorized manufacturer shall be used.
Any repairs and maintenance related to safety or performance should
be conducted by trained professionals.
Do not attempt to repair this appliance yourself. Repairs by
unprofessional personnel may cause personal injury or more serious
malfunctions. Please consult your local service center and always
use original spare parts.
Do not attempt to operate the appliance if it is damaged, malfunctioning,
partially disassembled, or has missing or damaged parts, including
damaged wires or plugs.
Do not bend the power cord excessively or place heavy objects on it.
Do not spray water to clean inside or outside the device.
In case of flooding, please disconnect the power plug and contact the
after-sales service center.

6
Models with drying functions have automatic heating device shutdown
protection to prevent overheating. If the temperature exceeds the
protection temperature, the system will automatically shut down the
heating device, and when the temperature drops below the protection
temperature, the heating device will resume operation.
Do not use multiple outlets, extended power cords, or dual adapters on the
appliance. Do not use an extended cord to connect the appliance to the
power supply.
Do not connect the appliance to the electrical socket of an electric shaver
or hair dryer.
Do not connect the appliance to an electrical outlet specifically designed
for low-load appliances.
Before connecting the appliance to the power supply , ensure that the electric
The power socket must be safely grounded, and the water supply must
remain unobstructed.
Do not connect the appliance to the power supply with an external
switching appliance (such as a program timer) or connect it to a power
supply that is turned on and off regularly by the power supplier.
The exhaust gas must not be discharged into the flue used to discharge
combustion gases or other fuel exhaust gases.
INSTALLATION
Before using the appliance, be sure to remove the packaging (sponge,
polystyrene foam, etc.) attached to the bottom of the appliance.
Please install the appliance correctly according to the instructions
and connect the water and electricity (see "INSTALLATION AND
CONNECTION"). The connection of water and electricity should be carried
out by fully trained technicians or professionals.
Do not install this appliance in places where door opening is restricted.
Do not install the appliance in an area where the temperature may drop
to 5°C
below, otherwise, the parts may be damaged when water freezes.
Place the appliance on a sturdy flat surface. If the appliance is installed on
a high platform, it must be secured to prevent it from tipping over.
The end of the drain hose should be placed in the drainage system.

7
This appliance must not be stored or used in any outdoor locations.
Avoid lint accumulation near the appliance.
Do not install the appliance near heaters or any flammable items.
Do not install the appliance in locations where gas leakage may occur.
Please ensure good ventilation conditions to avoid the gas generated by
this appliance from flowing back into the room, thereby causing a fire.
USAGE
Before the first use, remove the transport screws; Otherwise, serious
damage may occur when the machine is turned on (see "INSTALLATION
is not covered under warranty.
Inspect the appliance to see if it has been damaged during
transportation. Never operate the appliance in a damaged condition.
Use detergents suitable for the appliance cleaning and clothes washing.
We are not responsible for damage or discoloration of seals and plastic
parts caused by the use of bleach or dyes.
Do not attempt to separate any panels or disassemble the appliance.
Do not use sharp objects like pins, knives, or fingernails to press the
button.
Do not use wet hands to touch the power plug or operate the appliance.
This appliance is only suitable for ordinary washing or drying of clothes
(models with drying function), not for dry cleaning.
Because the appliance is heavy, you may injure yourself trying to lift it. Do
not lift the appliance yourself; your hands may be cut by its sharp edges.
Do not grasp the appliance by its protruding parts. The protruding parts on
the appliance may break when lifting or pushing the appliance.
8
Do not wash clothes with large buttons or other heavy metal items. Make
sure all the pockets in the laundry are empty. To prevent odors and mildew,
open the door after the wash cycle ends and let the drum air dry.
Do not leave metal objects in the drum for a long time.
The door glass may break due to strong impact, so be careful when using
the appliance.
Place the laundry completely inside the drum so that the clothes will not be
caught by the door.
When the appliance is not in use, turn off the water supply and unplug the
power cord from the power socket.
Do not put animals (such as pets) into the appliance.
TRANSPORTATION/TRANSPORT AFTER INSTALLATION
If you plan to move the installed appliance, install the transport
screws
TRANSPORTING AFTER INSTALLATION"). Before installing the transport
screws, unplug the power plug!
After the washing program ends, turn off the tap and unplug the
power plug. Never unplug an appliance by pulling on the power cord.
Always firmly grasp the power plug and pull it directly out from the socket.
MAY RELEASE TOXIC GASES, DAMAGE THE APPLIANCE, AND
CAUSE FIRE OR EXPLOSION HAZARDS.
Do not force the door open while the appliance is in operation (high
temperature washing/dehydrating).
Do not use the appliance after cleaning with industrial chemicals.
The wastewater discharged during high-temperature washing is hot, so
do not touch it to prevent burns.
Clothes stained with substances such as cooking oil, acetone, alcohol, gasoline,
kerosene, stain removers, turpentine, wax and wax removers should be washed
first with hot water and plenty of detergent, then washed in the drum.
Use softeners or similar products according to the instructions for use with
the softener.
Please remove all items from the garment pocket, such as lighters and matches.

9
BURN HAZARD
The door may become hot during washing and drying. Be careful to avoid
burns. Do not let children play near the door. Do not touch the door glass
during the operation of the appliance.
WATER LEAKAGE PROTECTION (while the appliance is on)
If the water level in the appliance exceeds the normal level, the water
level protection function will be activated. This function will stop the water
supply and start draining. The current program is interrupted and an error
message is reported.
Do not wash or dry items such as foam rubber (latex foam), shower caps,
waterproof fabrics, rubber products, clothes with foam rubber pads, or
pillows in the drum.
WARNING
If your appliance has a drying function, do not stop the program before
the drying cycle ends. If you need to interrupt the program for any reason,
carefully remove the clothes to avoid burns. Quickly remove the clothes
and spread them out to cool down quickly.
CHILD SAFETY
Before you close the appliance door and run the program, please ensure
that there is only clothing in the drum. Make sure that no children climb
into the appliance and close the door from the inside.
Do not let the appliance door stay open. Children may hang on the door or
climb inside the appliance, causing damage or injury.
Keep all packaging materials in a place out of the reach of children, as
these may be dangerous.
Keep detergent and softener out of the reach of children.
SERVICING
The user shall be responsible for the maintenance cost of damage caused
by improper connection, improper installation and use, or repair by
unauthorized personnel, as such damage is not included in the warranty.
The warranty does not include consumables, slight color deviations,
increased noise due to device aging (which does not affect the functionality
of the device), and cosmetic defects of parts (which do not affect the
functionality and safety of the device).

10
PRODUCT DESCRIPTION
FRONT
1 Control panel
2 Knob
3 Detergent drawer
4 Door
5 Drain pump filter door cover
BACK
1 Water inlet hose
2 Power cord
3 Drain hose
4 Adjustable feet
5 Transport screw
The illustrations in this manual are for demonstration purposes only. Due to product improvements
and series expansion, the product appearance, color, and functional components you receive may
differ from the illustrations in this manual. Please refer to the actual product.
11
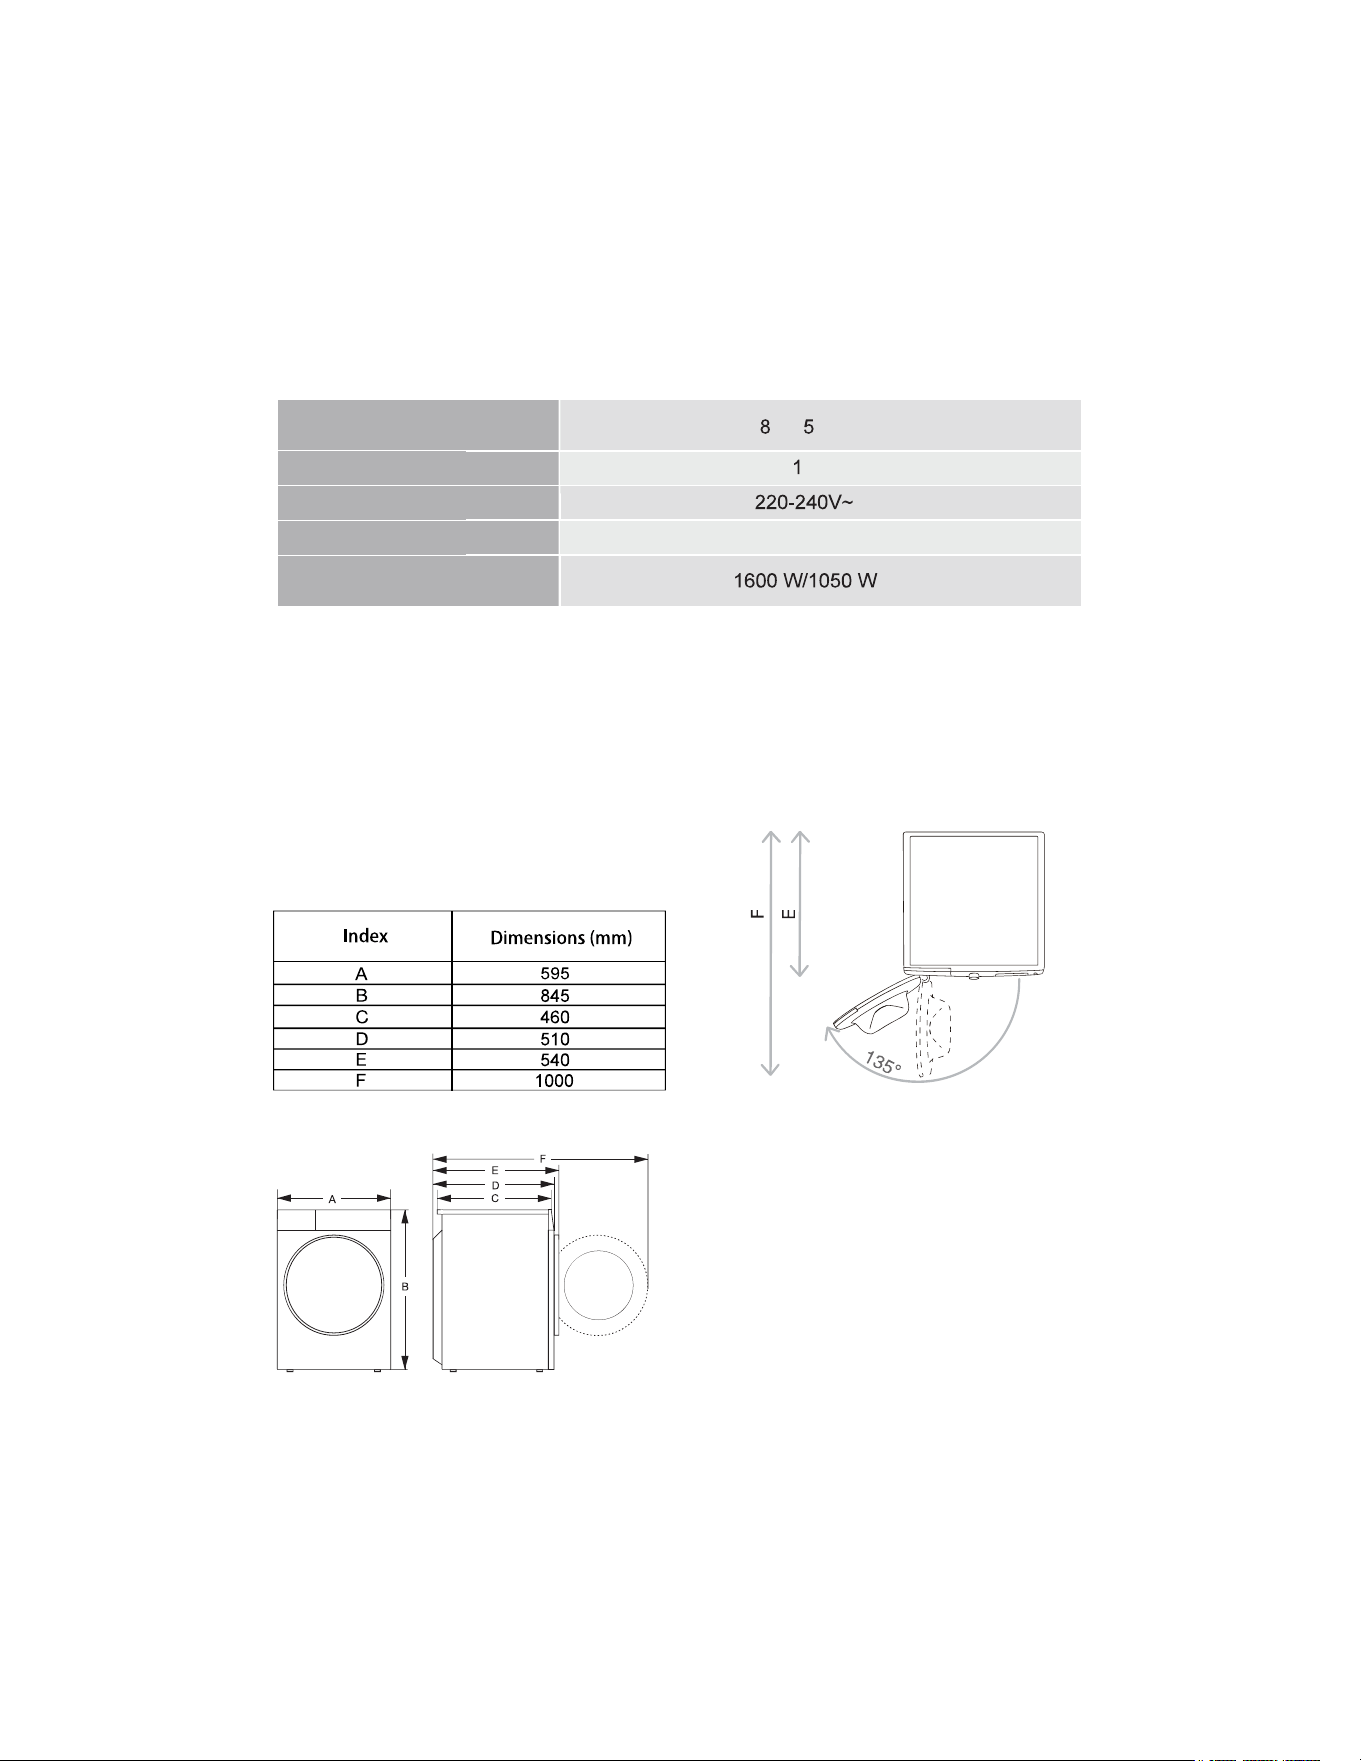
SPECIFICATIONS
(depending on the model)
Maximum washing load/
drying load
kg/ kg
Net weight
6 kg
Rated voltage
Frequency
50 Hz
Rated power/drying power
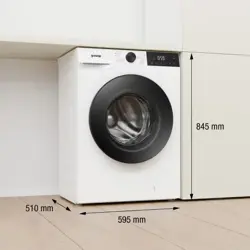
DIMENSIONS (MM)
E = Appliance depth
F = Depth with door open
12
INSTALLATION AND CONNECTION
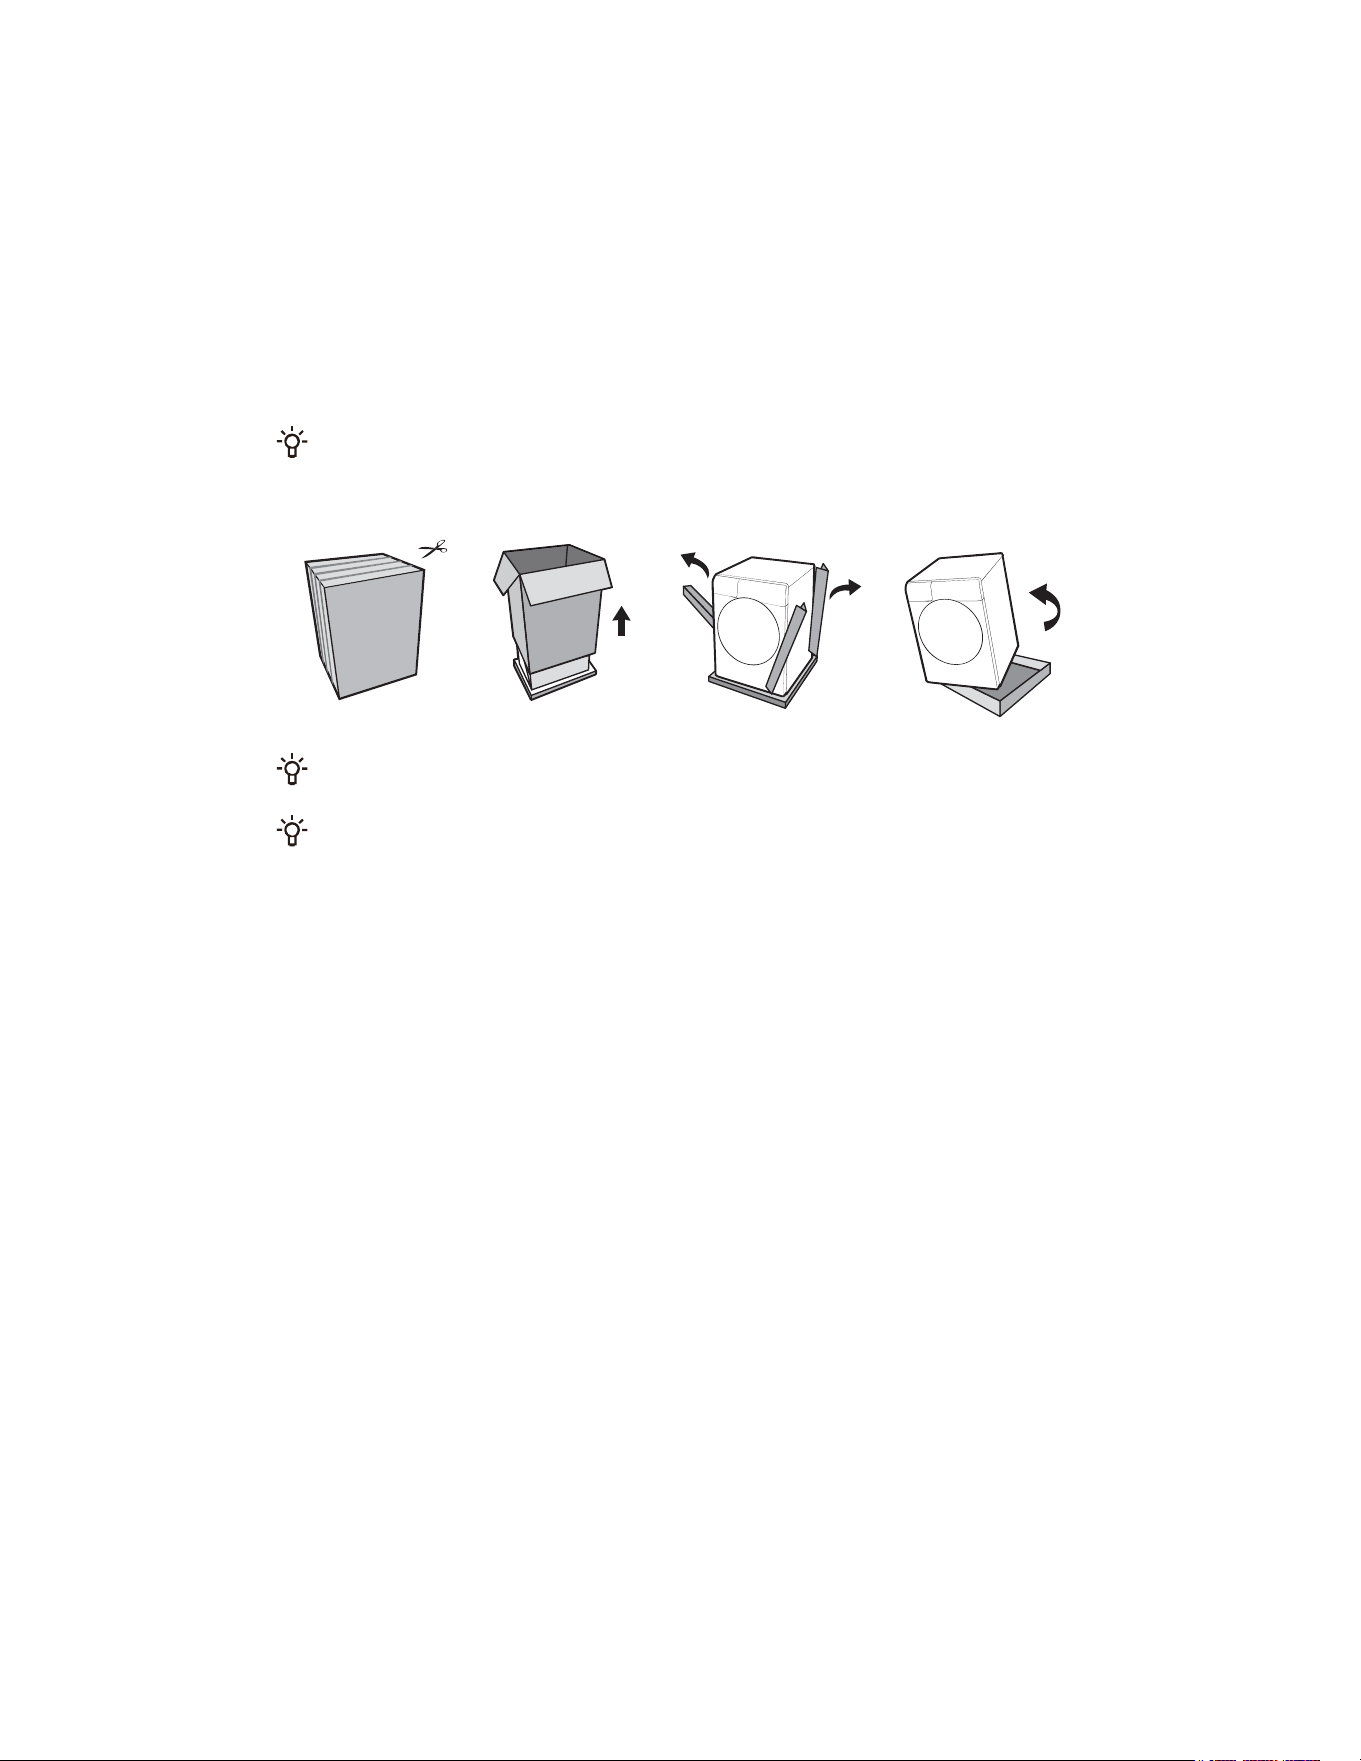
PACKING/PACKAGING
Please first remove all the packaging and foam, especially the foam base. When unpacking the
device, please do not use sharp objects to damage it. Keep packaging materials (plastic bags, other
plastic parts, etc.) out of reach of children.
The process of packing the machine is just the opposite of unpacking above.
Please check the device for any damage. If damaged, do not use it, and immediately contact
after-sales service.
The accessories included with this appliance include one or more of the following:
• User Manual;
• 4 transport screw covers;
• Water inlet hose;
• Water drain hose bracket;
• Wrench;
• Noise reduction board/sponge strip/none (subject to the actual model).
Different models have different configurations, and the accessories included with this device are
subject to the actual configuration of the model.
13
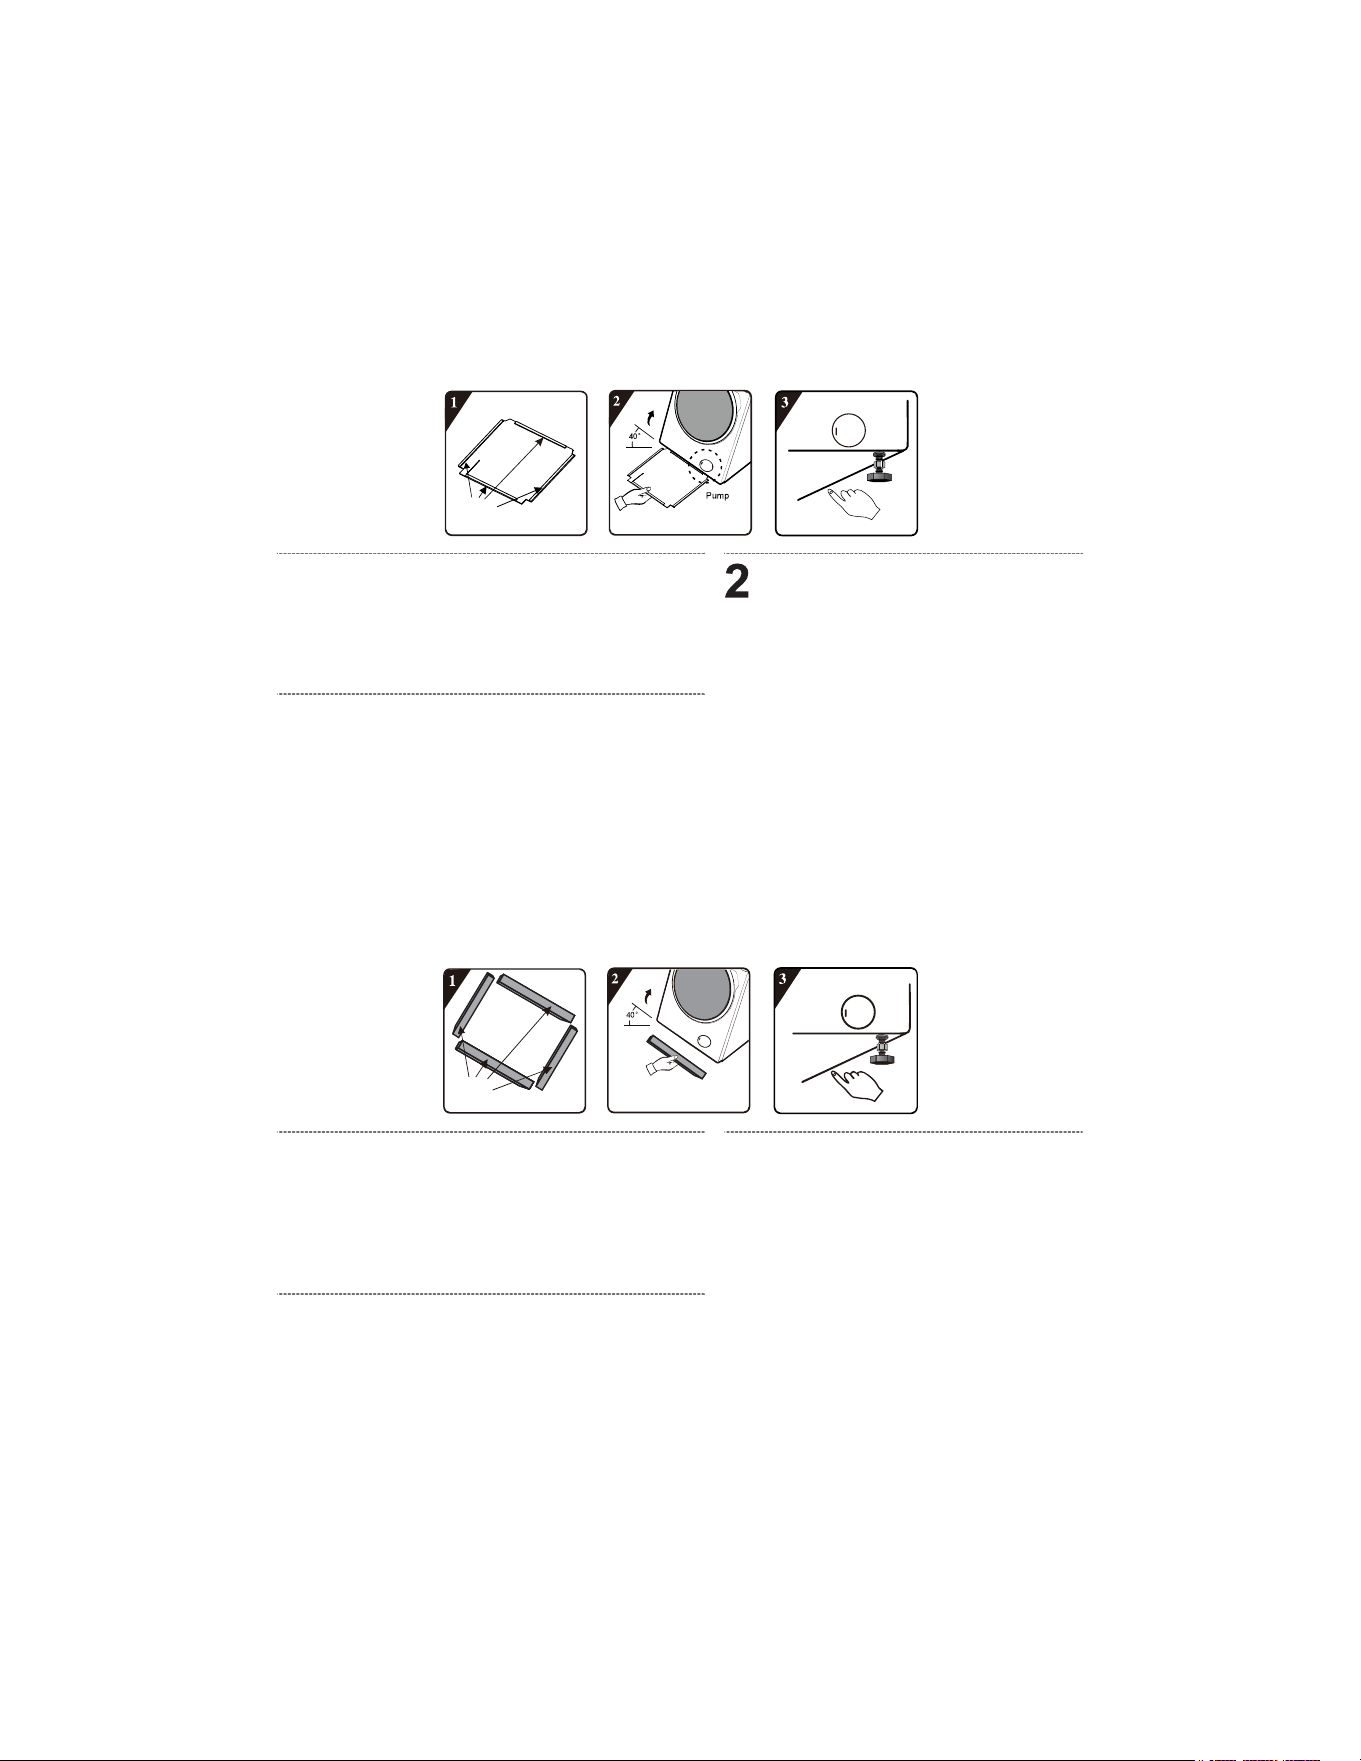
INSTALLATION METHOD OF THE NOISE
REDUCTION BOARD:
1
Peel off the release paper from the
double-sided tape around the bottom
cover.
3
Tilt the appliance at a 40° angle, with the right-
angle notch facing the front of the appliance
as shown in the illustration. Insert the oblique-angle
notch between the two foot screws at the rear of
the appliance until fully inserted. Close the bottom
panel so that it fits tightly against the bottom of the
appliance.
Use your hand to press the double-
sided tape around the edges firmly,
ensuring the noise reduction board is
securely attached to the appliance body.
INSTALLATION METHOD OF THE SPONGE STRIPS:
Remove the release paper from
the double-sided tape
1
Peel off the release paper from the double-sided
tape on the sponge strips.
2
Tilt the appliance at a 40° angle, stick
2 long sponge strips on the front and
rear support positions at the bottom of
the appliance body, and stick 2 short
sponge strips on the left and right
support positions.
3
Use your hand to press and firmly attach the
sponge strips.
Remove the release paper from the
double-sided tape around the edges
14
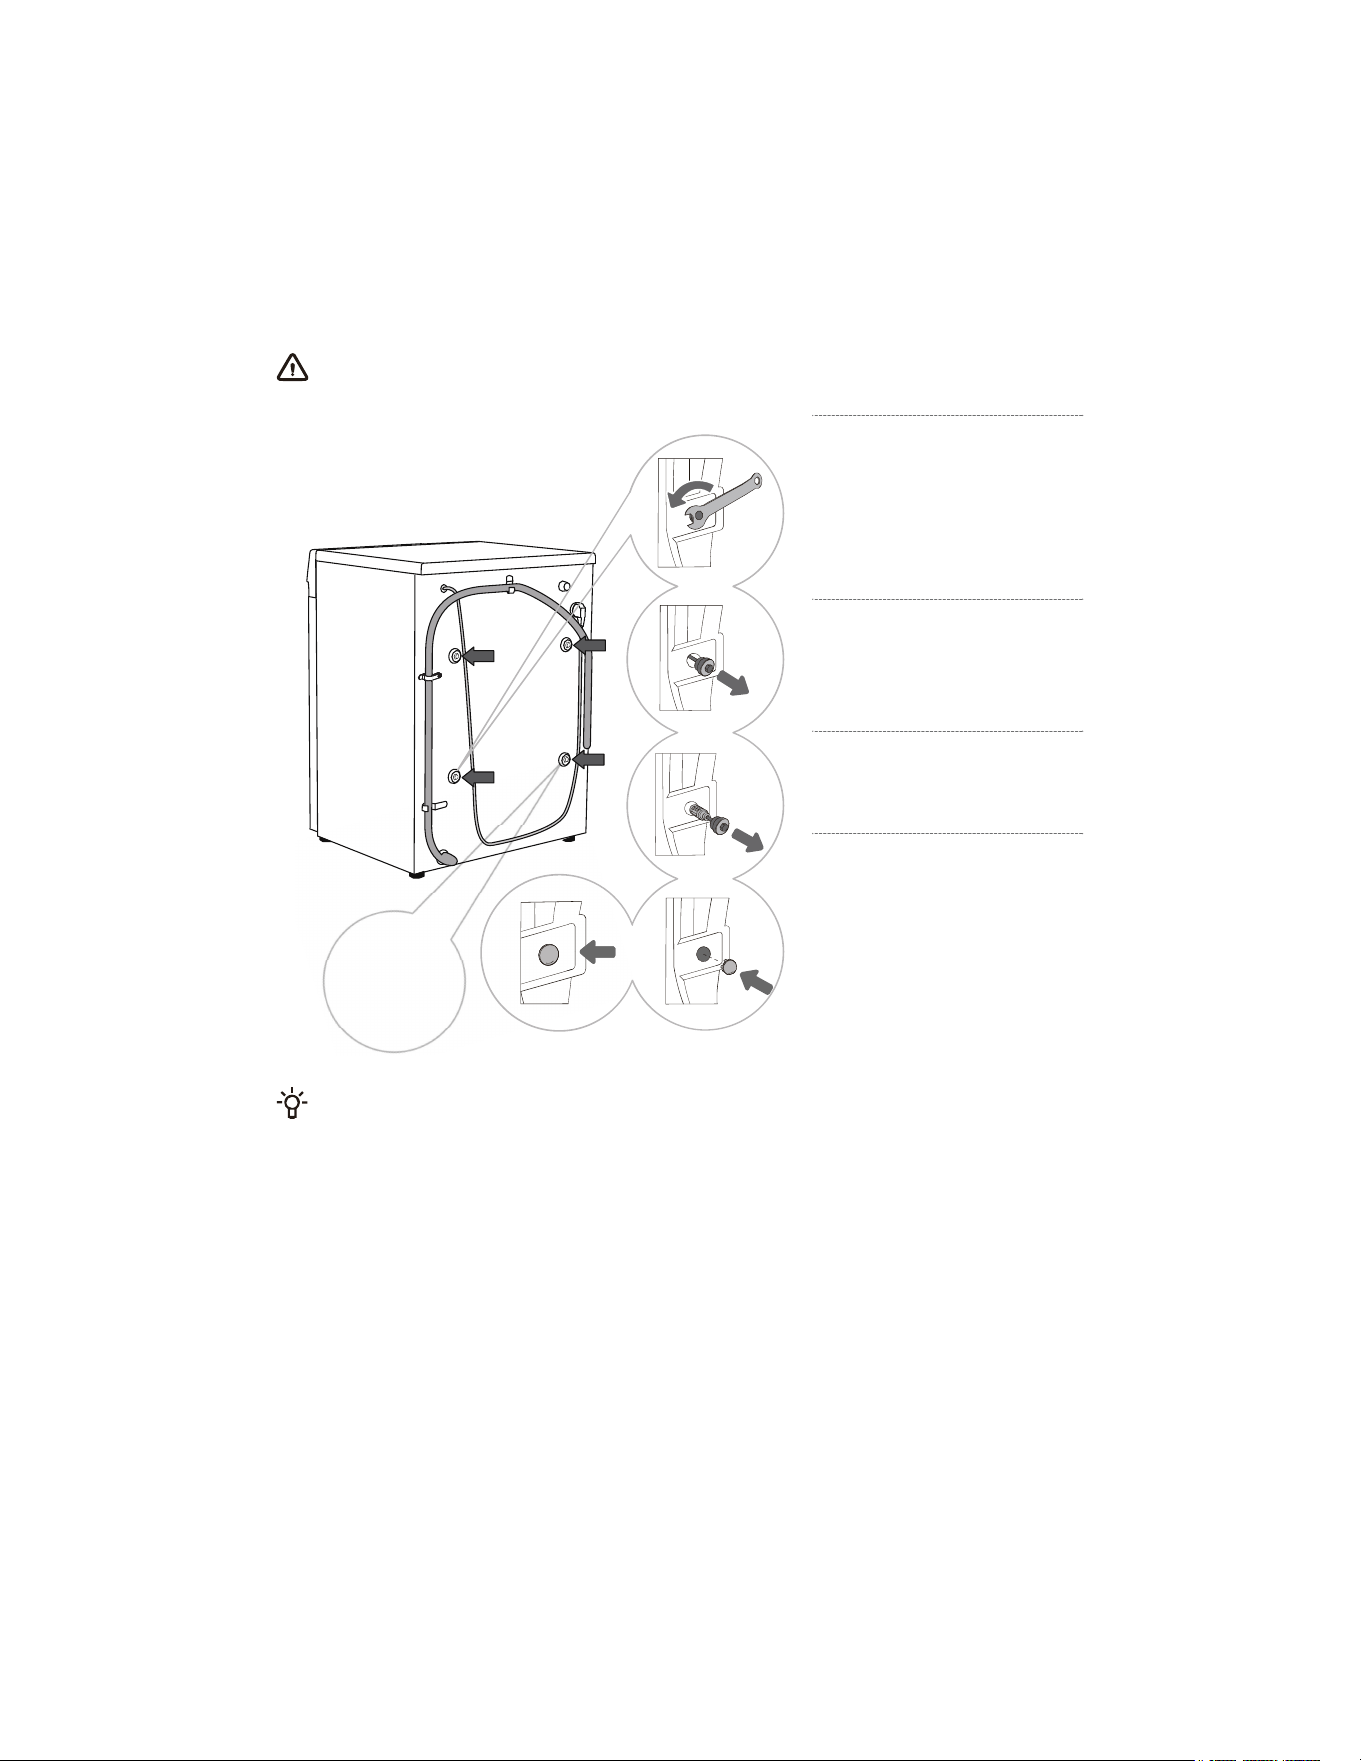
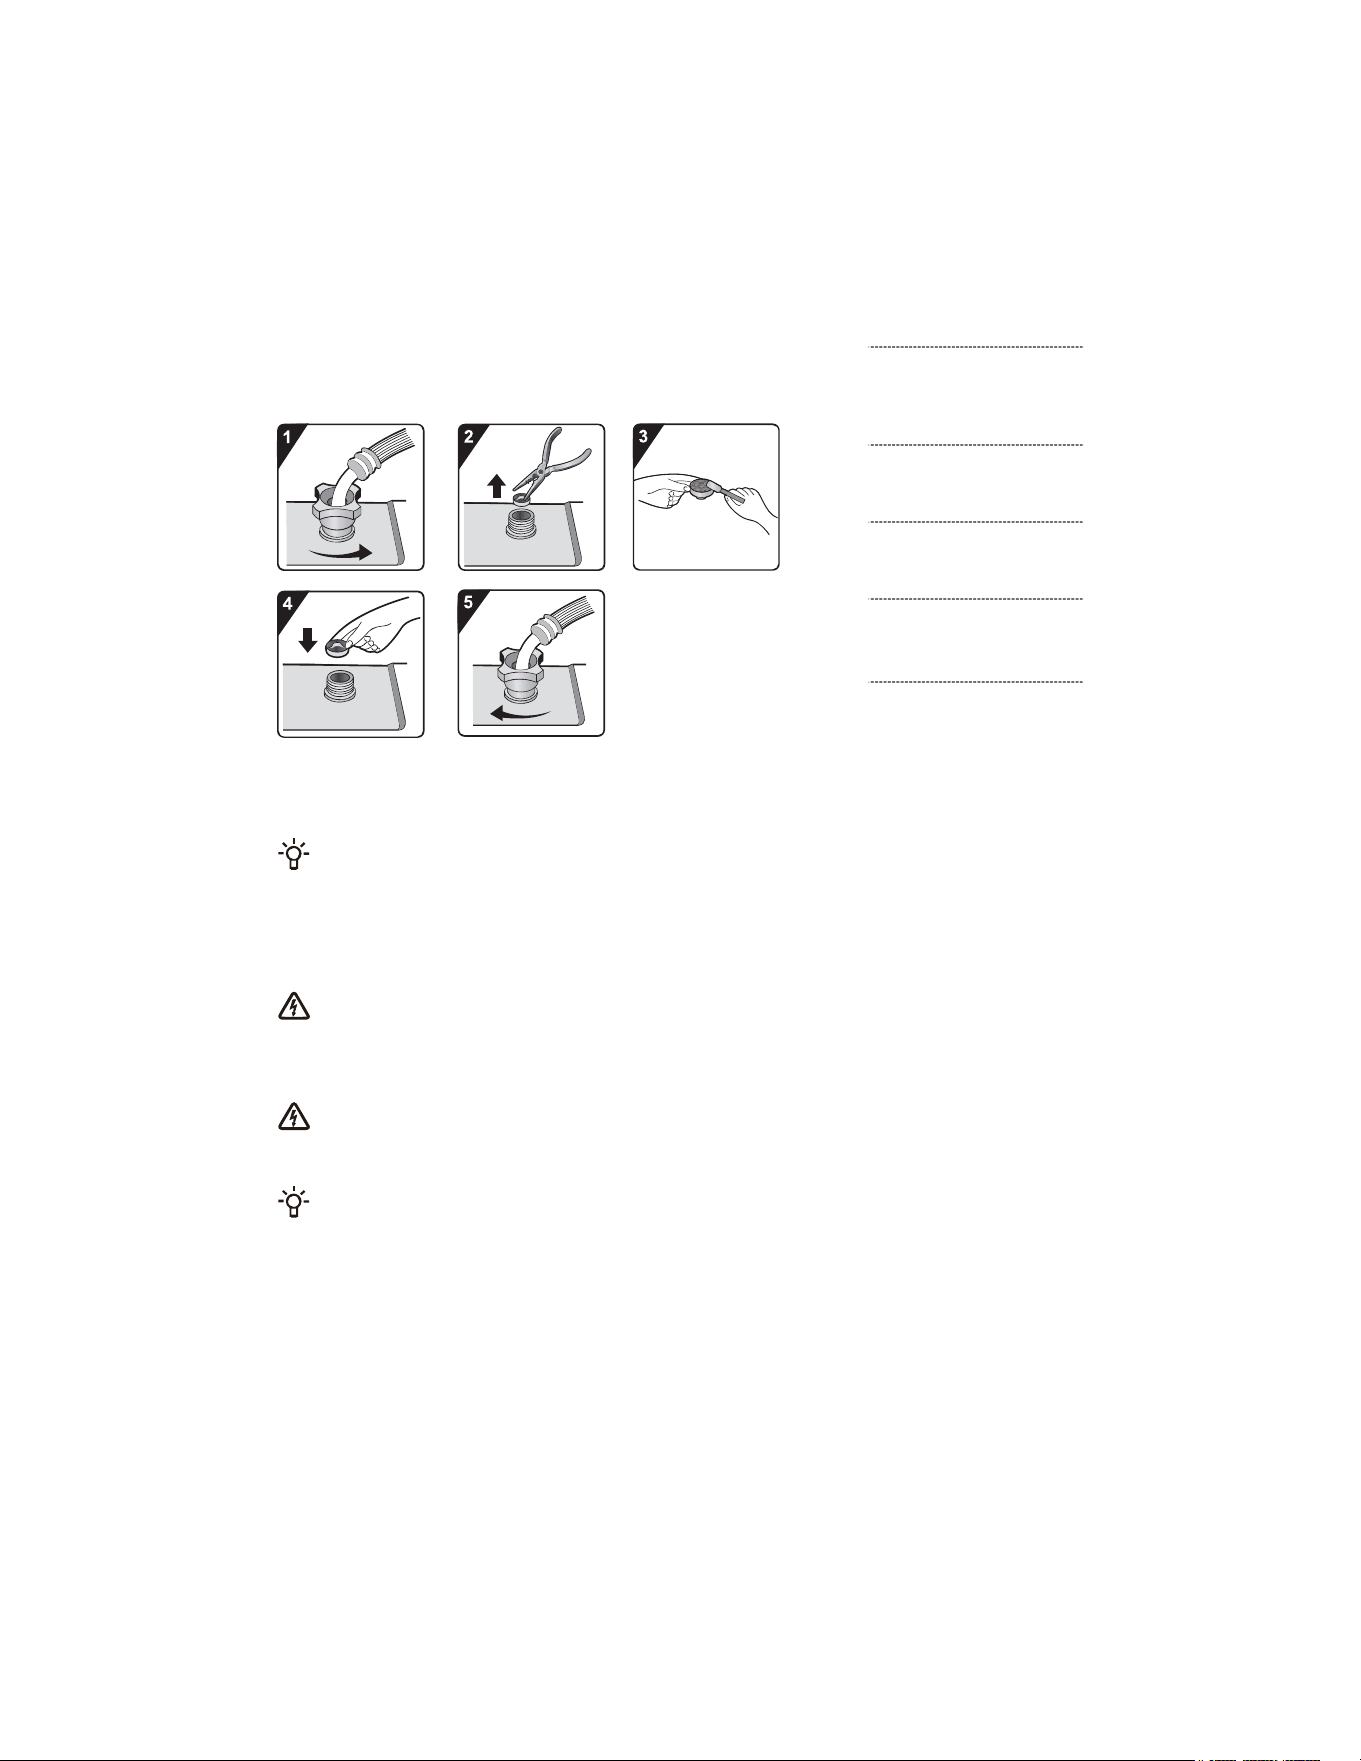
REMOVING THE TRANSPORT SCREWS
After removing all packaging, remove the transport screws. Otherwise, this equipment may be
damaged during use. Such damage is not covered under warranty.
The power cord
clamp is configured
here and needs to
be removed. (Not
available for some
models)
1
Place the drain hose aside.
Using a suitable wrench to
loosen the 4 screws on the back
by turning counterclockwise in
the direction indicated by the
arrows. Loosen each screw by
approximately 30 mm.
2
Pull out the 4 transport
screws horizontally.
3
Horizontally pull out the
transport screws together
with the rubber and plastic parts.
4
Use transport screw covers
to cover the screw holes.
(Transport screw covers and
instruction manual are included
in the supplied accessories.)
Please keep the transport screws for future transportation. If reinstallation of the transport screws
is required, follow the above steps in reverse order.
15
INSTALLATION LOCATION
Please place the appliance on a solid surface and keep it steady. The flat surface should be kept
clean and dry; otherwise, the appliance may slip. Also, clean the bottom of the adjustable feet.
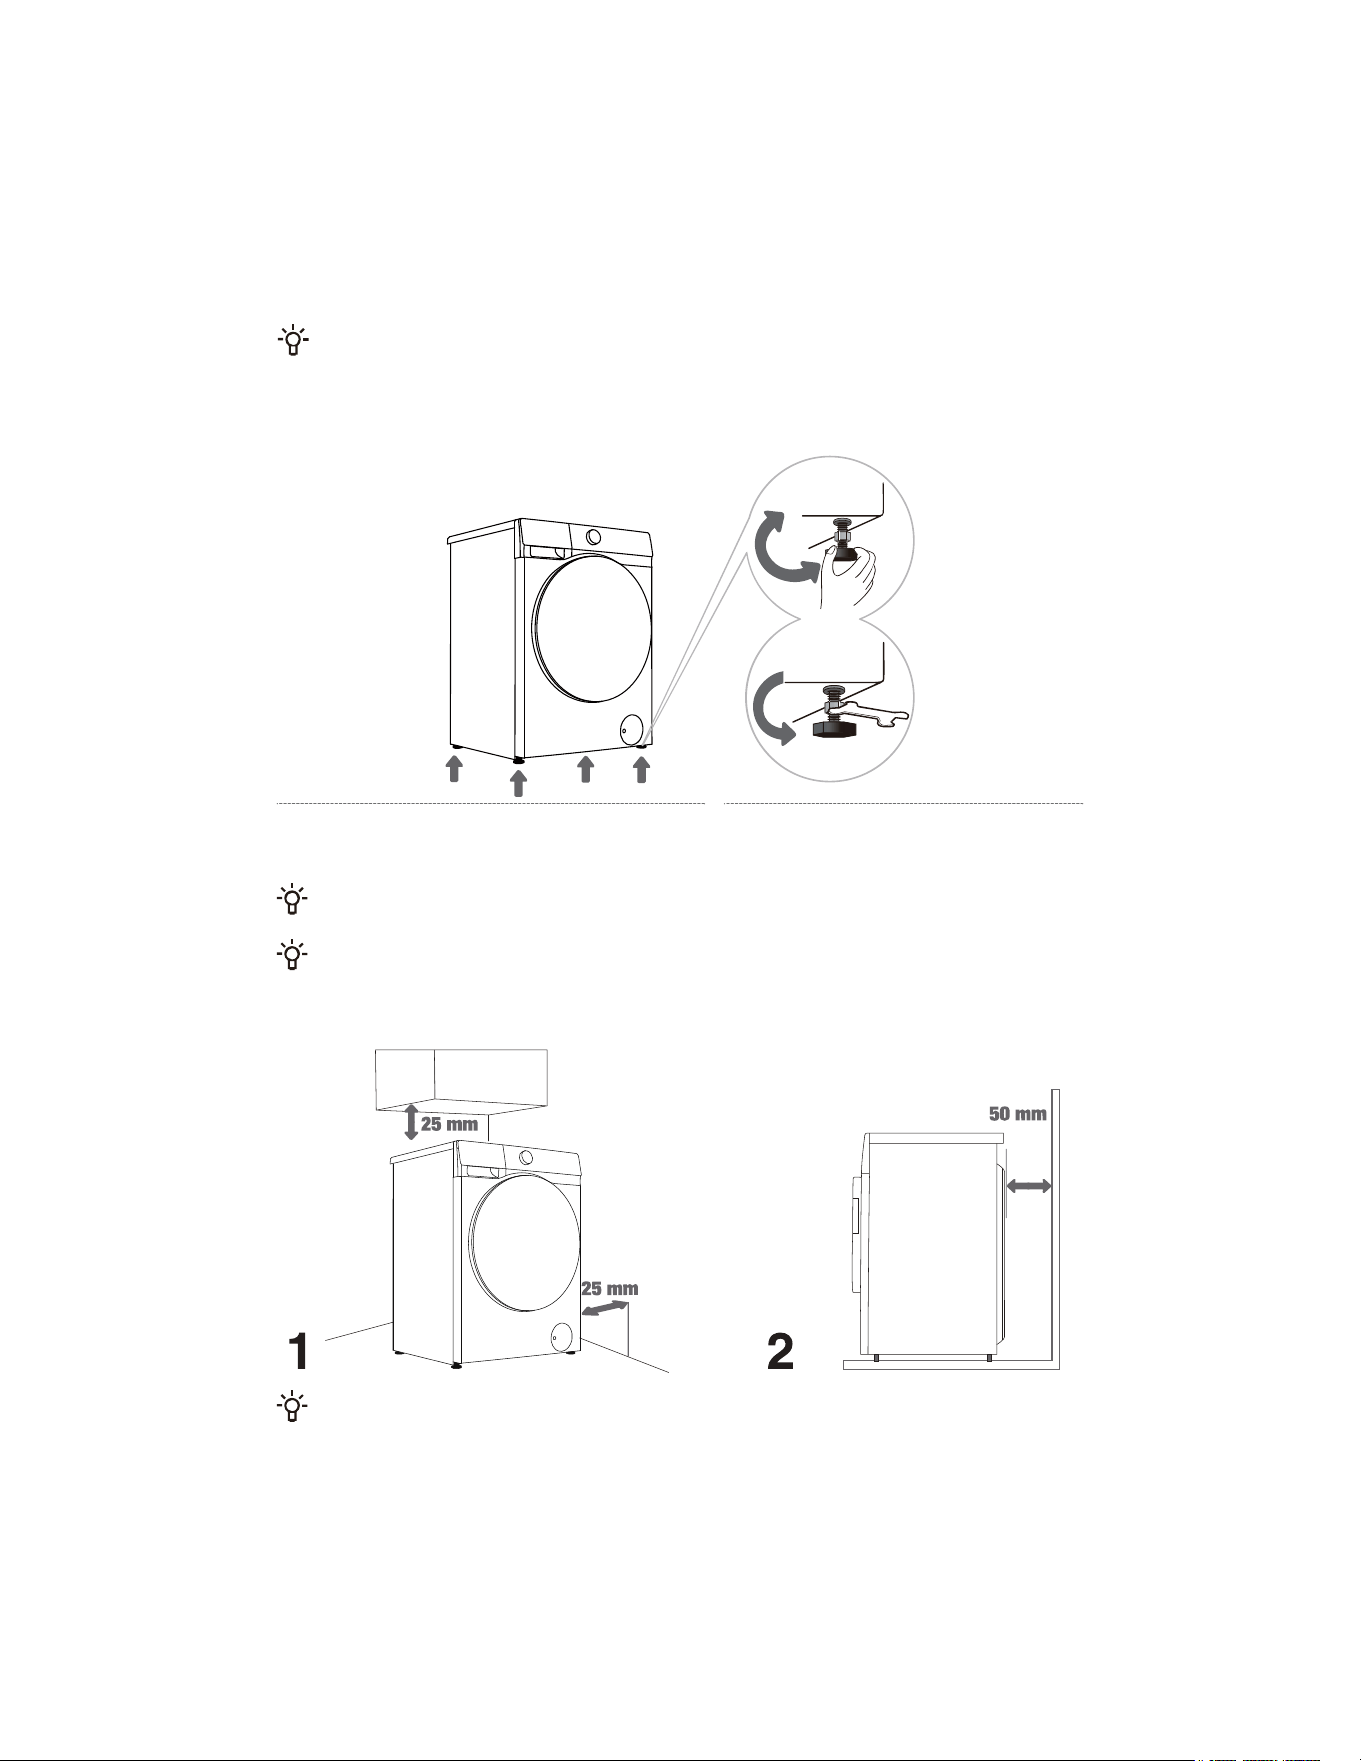
ADJUSTABLE FEET
Use a spirit level and a suitable wrench.
1
Adjust the level by rotating the adjustable feet.
The adjustable feet allows for 2 cm of level
adjustment.
2
After adjusting the height, tighten the
lock nut anticlockwise using a suitable
wrench (see the figure).
If the equipment is not placed steadily, it may cause vibration, sliding, and noise. The damage
caused by improper level adjustment is not covered by the warranty.
During appliance operation, abnormal or noisy sounds may occur, which are mainly caused by
improper installation.
INSTALLATION CLEARANCE
Space should be left between the appliance and the walls or furniture. To ensure optimal operation
of the appliance, leave some clearance on all sides as shown in the figure.
Failure to maintain the minimum required clearance may result in safety hazards, abnormal operation.
Overheating may also occur (Figures 1 and 2).
16
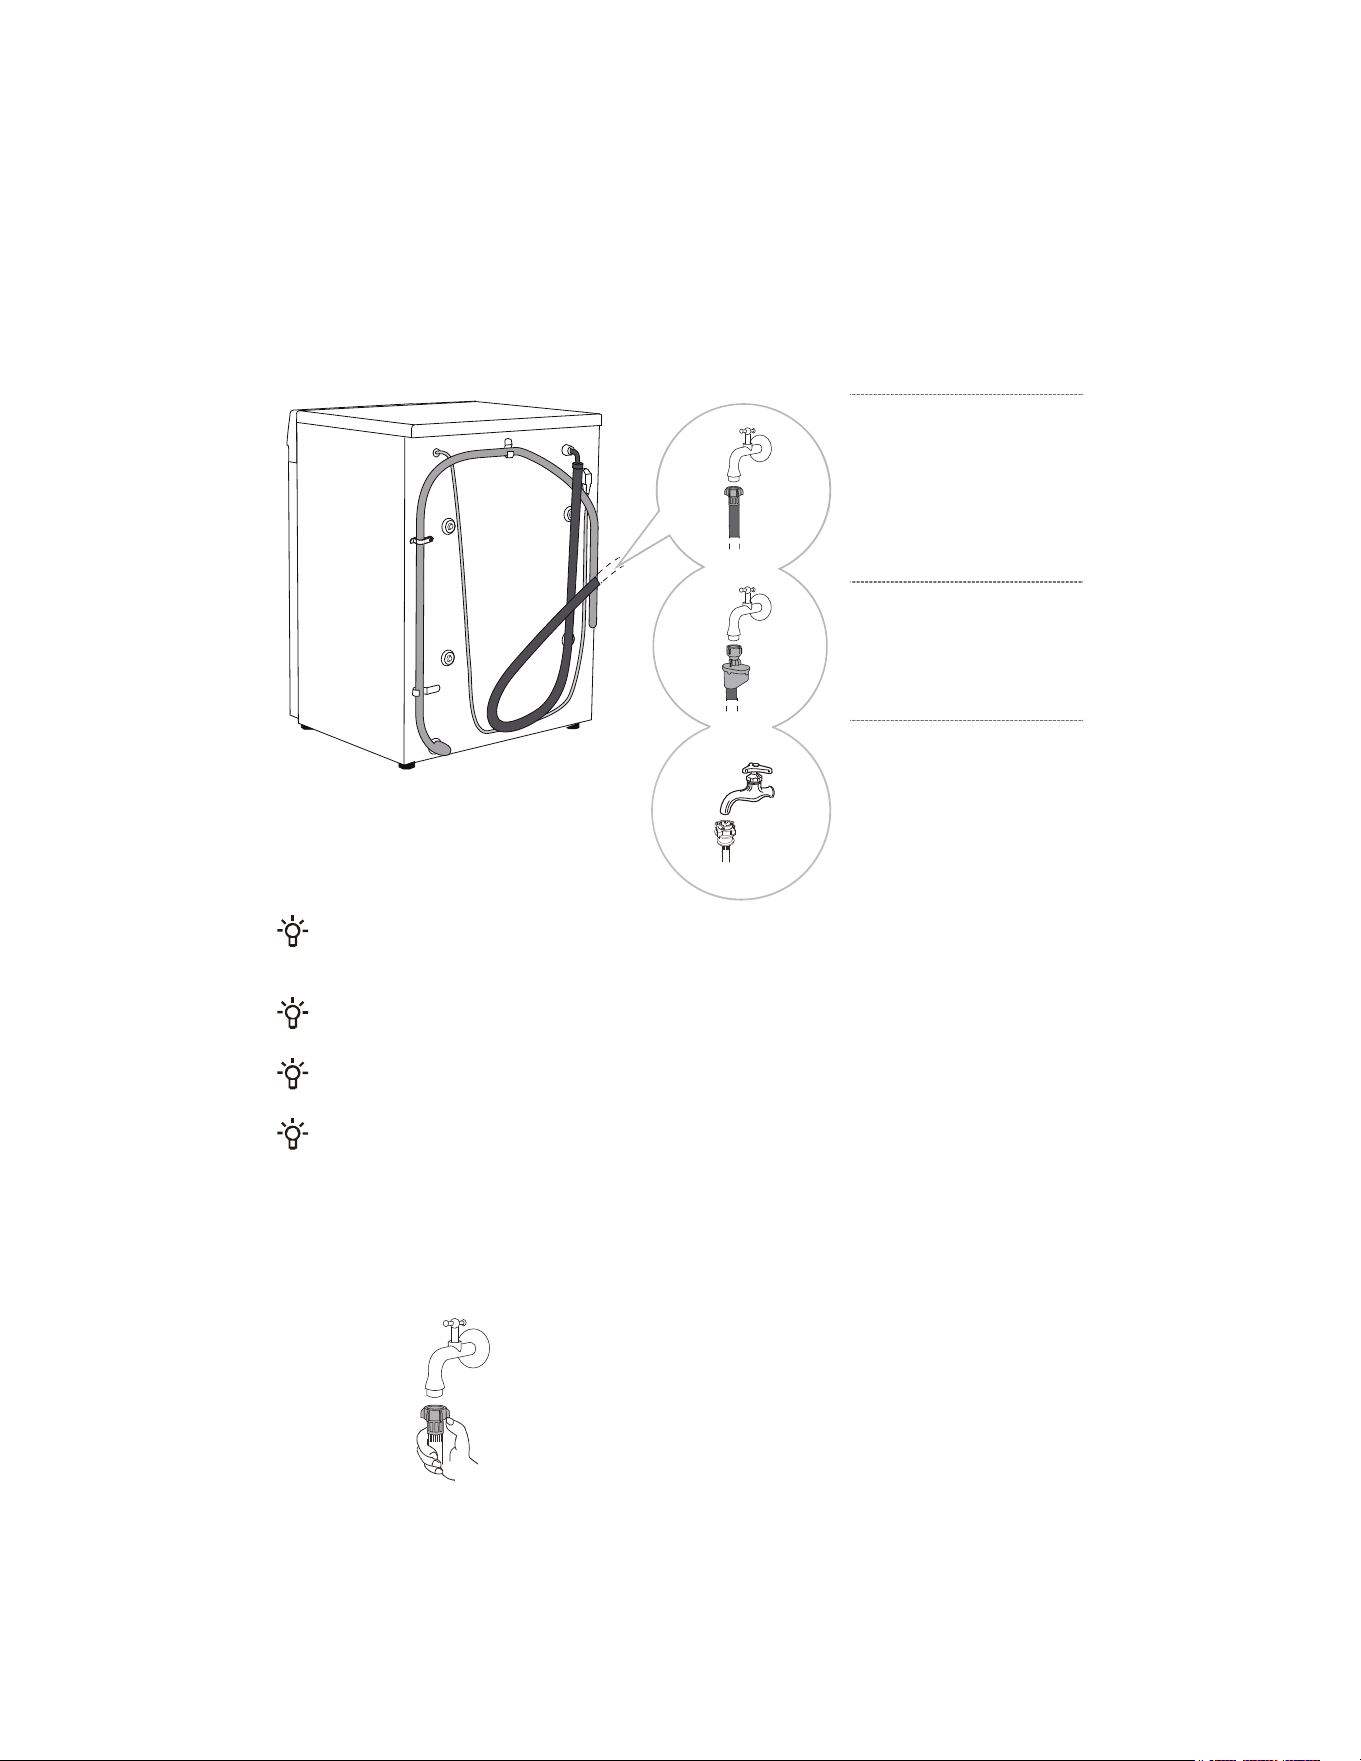
CONNECTING TO WATER SUPPLY
Different models have different water inlet hoses. Connect the inlet hose to the tap properly according
to the actual hose.
A
European water inlet
hose connection
B
AquaStop connection
C
Chinese water inlet
hose connection
To ensure normal operation, the inlet water pressure must be between 0.1-1 MPa (1-10 bar,
1-10 kp/cm
2
, 10-100 N/cm
2
). The minimum dynamic water pressure can be determined by measuring
the water flow. Open the tap fully and 3 liters of water should flow out within 15 seconds.
Use the new water hose that comes with the appliance. Do not use old water hoses or other water
hoses.
Ensure the water hoses are not damaged. If the water hose is aged, brittle or cracked, it must be
replaced.
The appliance can only be connected to a cold water inlet and cannot be connected to a hot water
inlet.
EUROPEAN WATER INLET HOSE CONNECTION
Gently tighten the water hose by hand to ensure a good seal (maximum torque: 2 Nm). Check whether
there is any water leakage at the seal.
Do not use pliers or similar tools to avoid damaging the threads of the nut.
17
AQUASTOP CONNECTION
If the internal pipes or water hoses are damaged, the shutdown system will be automatically activated to cut off the
water supply to the appliance. In this case, the control window (a) will turn red. Please replace the water pipes.
The AquaStop system contains an electric valve; therefore, do not immerse the water hose equipped with the
AquaStop system in water.
The water hose can also be connected without using a check valve.
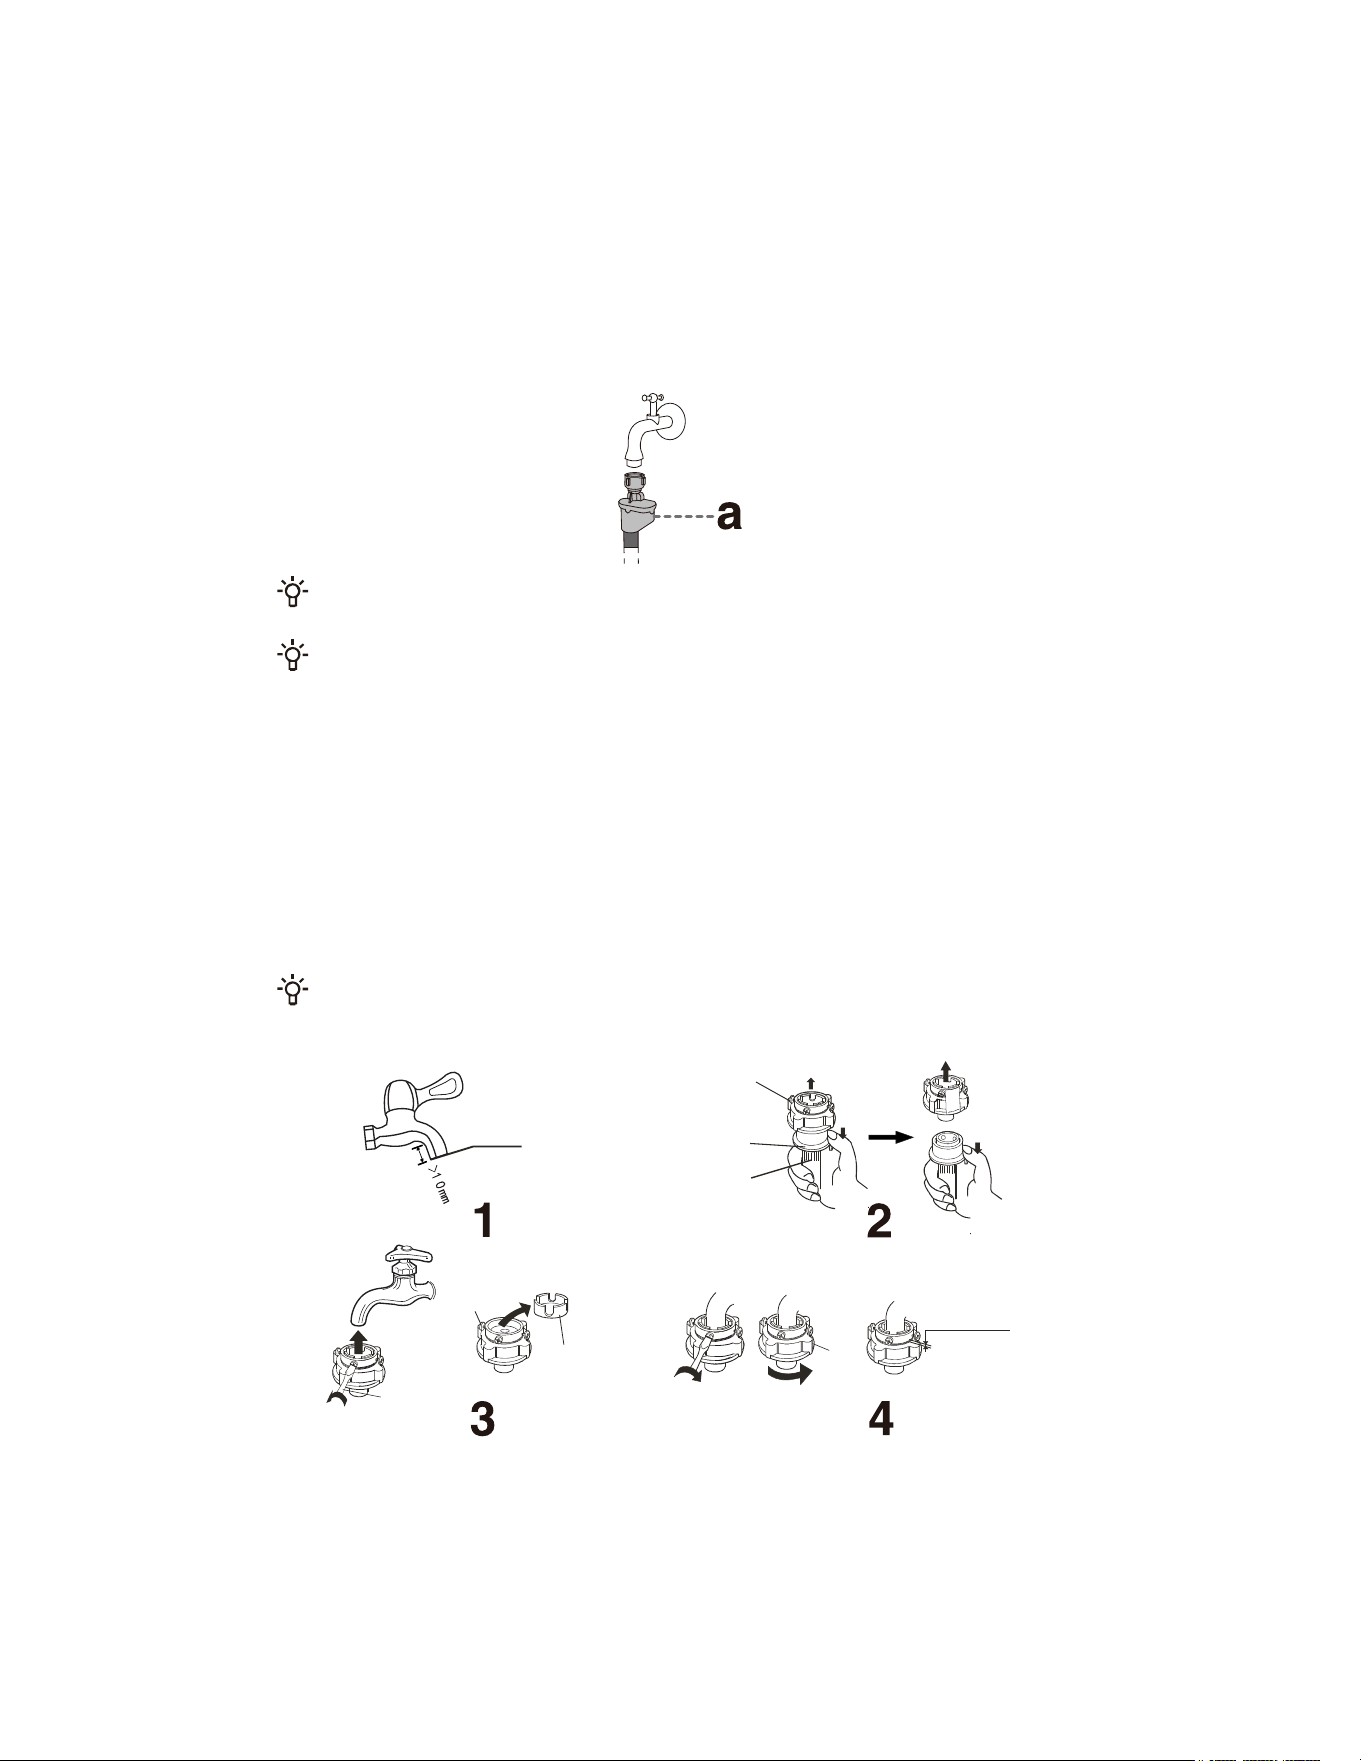
CHINESE WATER INLET HOSE CONNECTION
1. Select a suitable water tap; the front end length of the water tap must be greater than 10 mm. The outlet end face
must be kept flat. If it is uneven, file it flat with a file to prevent water leakage after installation, as shown in Figure 1.
2. Push the slider downward to detach the water inlet hose connector from the water inlet assembly, as shown in
Figure 2.
3. Loosen the 4 screws on the water inlet hose connector, then connect the water inlet hose connector to the water
tap (if the water tap diameter is too large and cannot connect to the water inlet hose connector, loosen the 4
screws and remove the bushing), as shown in Figure 3.
4. Evenly tighten the 4 screws on the water inlet hose connector, then tighten the nuts, as shown in Figure 4.
5. If the appliance is to be used once or multiple times within a week, push down the slider and do not disassemble
the water inlet hose connector to prevent damage to the fixing screws.
Note: The exposed thread length before tightening the fastening nut is approximately 4 mm; after tightening, the
exposed thread length is less than 2 mm, as shown in Figure 4.
Suitable
Outlet end face
Water inlet hose
connector
Water inlet hose
Water inlet hose
Screw
Bushing
Screwdriver
Nut
Before tightening, the
length is about
4 mm; after tightening,
it is less than 2 mm
18
CHECK THE CONNECTION BETWEEN THE WATER
INLET HOSE AND THE WATER TAP
1. Gently pull the water inlet hose to check if the connection is secure.
2. Open the water tap to check for any leaks.
3. The water inlet hose should be free of twists and bends.
4. Before each use, check the water inlet hose connection to prevent improper connection.
CONNECTION BETWEEN THE WATER INLET
HOSE AND THE APPLIANCE
Connect the water inlet hose nut to the appliance water inlet valve connector, tighten the nut, and
gently shake it to check if it is tightened, as shown in the right figure.
Water inlet hose nut
Water inlet
valve connector
Rubber gasket
Note:
1. Tighten evenly and do not screw into the water inlet hose, otherwise the water inlet hose joint will
be damaged.
2. Do not remove the rubber gasket. Check whether the rubber gasket is detached or damaged every
time you use the appliance. If there is any damage, contact after-sales immediately.
19
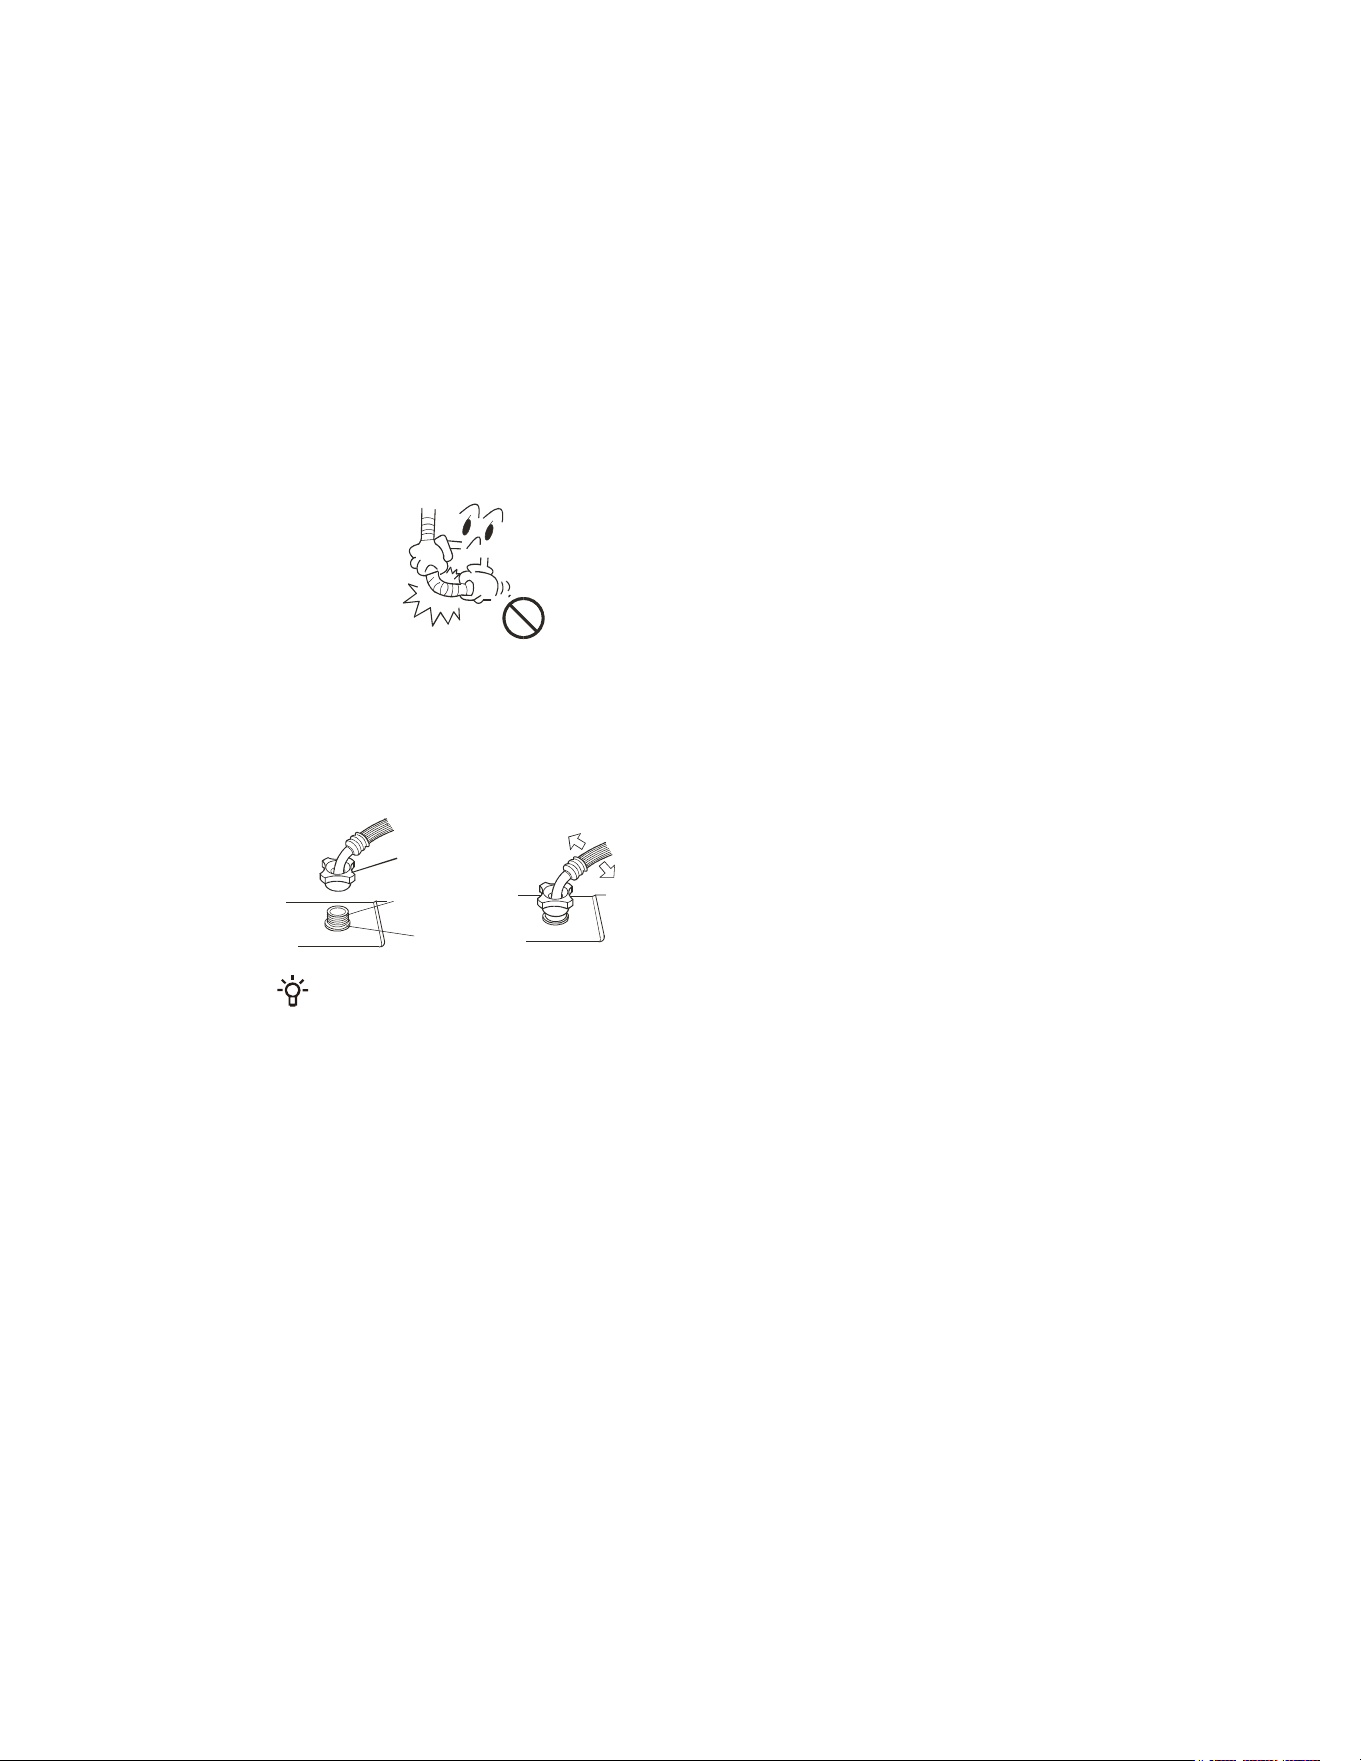
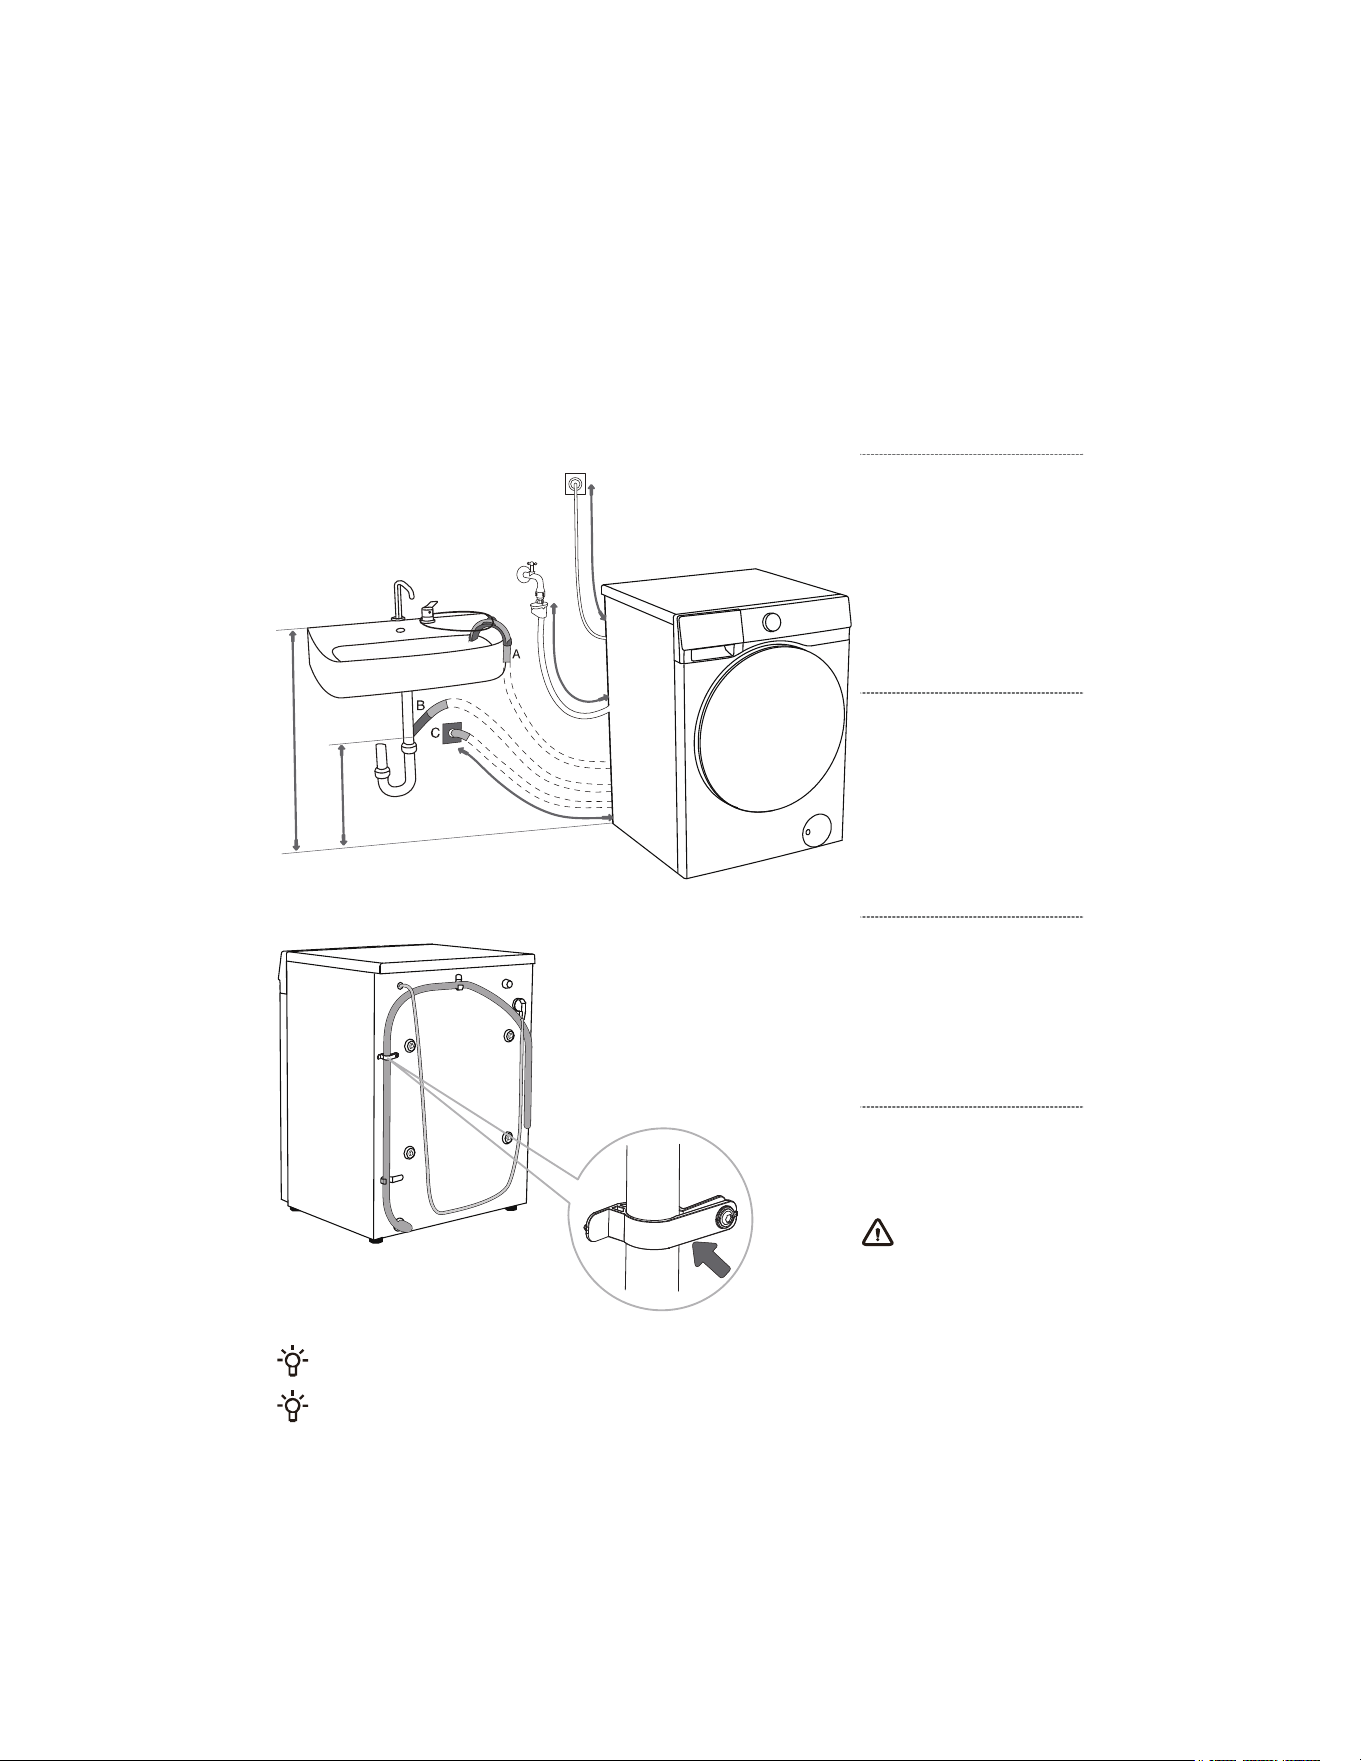
CONNECTING AND SECURING THE DRAIN HOSE
Put the drain hose into the washbasin or bathtub, or connect it directly to the drain outlet (the minimum
diameter of the drain hose is 4 cm). The vertical distance of the drain hose from the ground is
70-100 cm. There are three ways to connect the drain hose (A, B, C).
Maximum 100 cm
Minimum 70 cm
M
a
x
i
m
u
m
9
0
c
m
A
Put the end of the
drain hose into the
sink or bathtub. Use cable
ties to secure the drain
hose through the elbow
bracket to prevent it from
slipping.
B
Place the drain hose
directly into the sink
drain outlet. Do not use a
small sink. Note that the
drained water may be hot.
C
Connect the drain
hose to the drain
outlet on the wall with
the water storage bend,
and install it correctly for
cleaning.
D
The drain hose must
be fixed to the hose
clamp on the back of the
appliance as shown.
The hose clamp is not
allowed to be removed,
otherwise, it will cause
improper washing.
Make sure the drain hose is not damaged.
Failure to properly install the drain hose may result in safety hazards or abnormal operation.
20
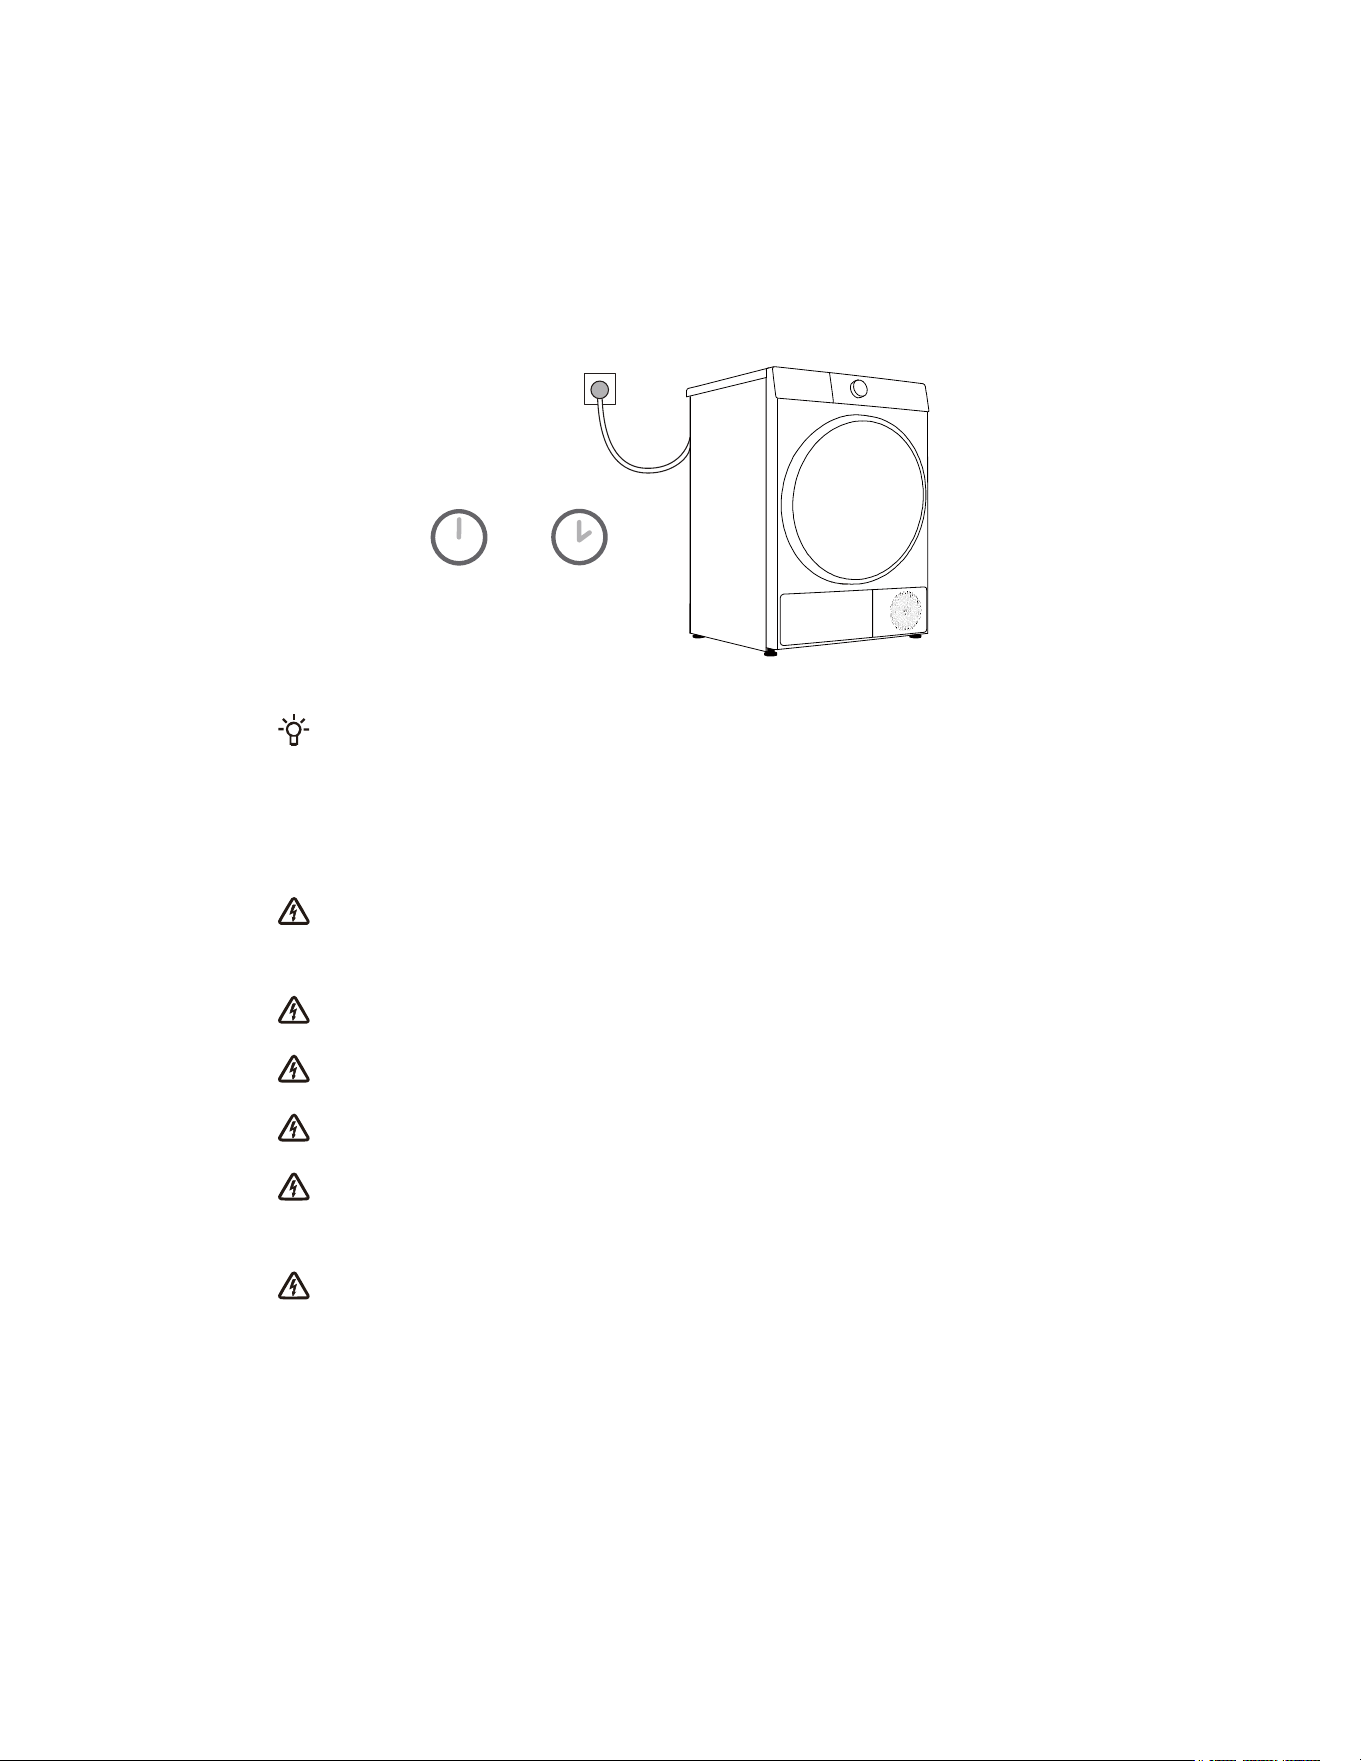
CONNECTING TO POWER MAINS
2 hours
Before connecting the appliance to the power supply, please wait at least 2 hours to
ensure it reaches room temperature.
This appliance is connected to a grounded power socket, and there should be no obstructions between
the appliance and the socket. The power socket should have compliant grounding protection. For basic
information about the appliance, please refer to the nameplate.
It is recommended to use overvoltage protection devices to protect this appliance from
lightning strikes.
Do not use an extension cord to connect the appliance to the power supply.
Do not connect the appliance to a power outlet designated for light-load appliances.
Please do not plug or unplug the appliance with wet hands.
The repair and maintenance of this appliance should be handled by professionally trained
personnel.
Only personnel authorized by the manufacturer can replace a damaged power cord.
21
TRANSPORTATION AFTER INSTALLATION
If you need to transport an installed device, first unplug the power plug, turn off the tap, remove
the water inlet and drain hoses, and make sure the detergent box and door are closed properly.
Be sure to reinstall the transport screws to prevent vibrations during transport from damaging the
If you accidentally lose the transport screws, you can order them from the manufacturer.
Pack all packaging materials (plastic bags, other plastic parts, etc.).
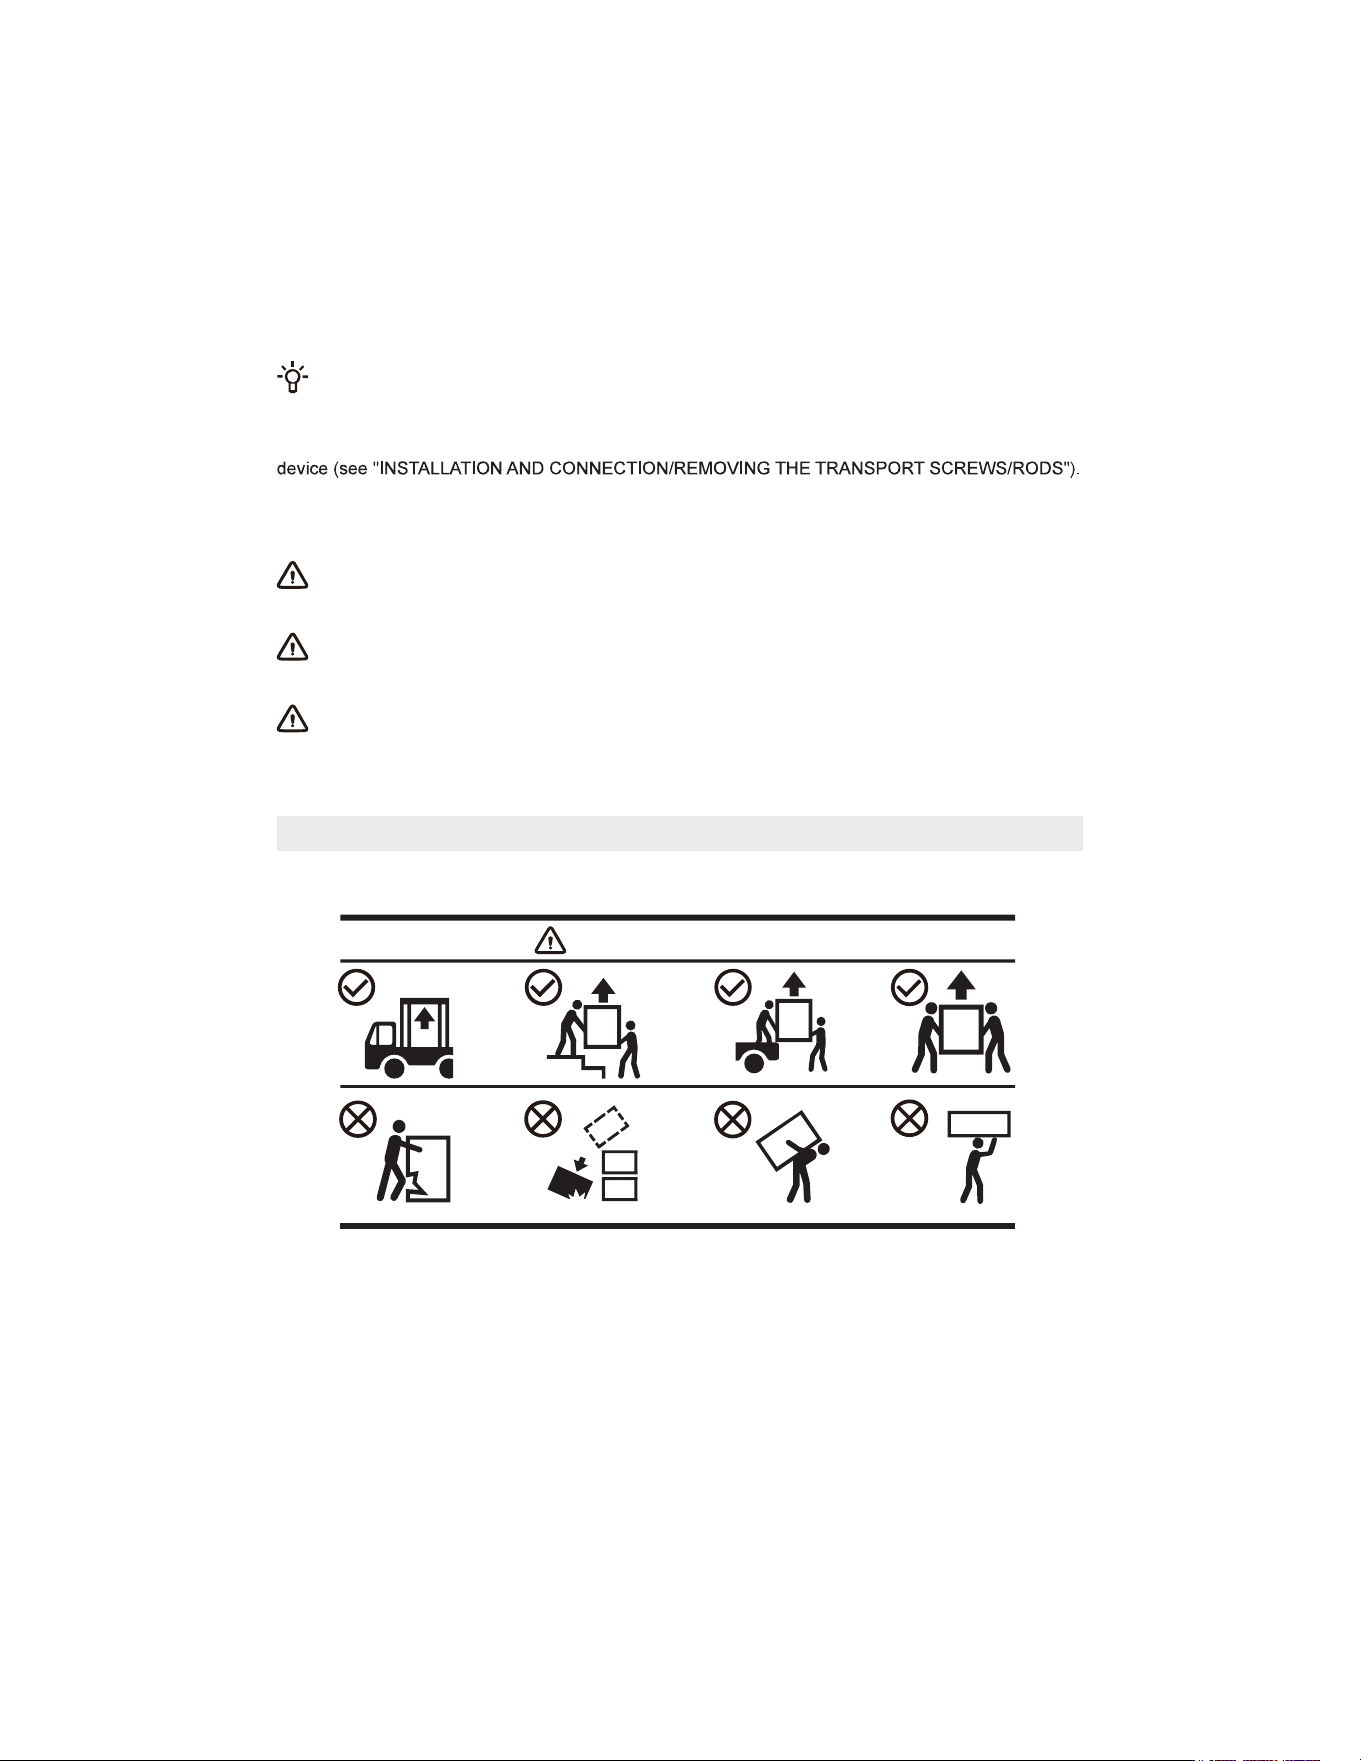
The device is heavy. Please use at least two people to move it. When transporting, do not hold
protruding parts such as the door, top cover, etc., to prevent them from falling off or being damaged.
After transport, let the device sit for at least 2 hours before connecting it to the power supply.
The device should be installed and connected by trained technicians.
Please read the instructions carefully before reconnecting the device. Damage caused by
improper connection or use is not covered by the warranty.
Transport and Handling Method
Handling Method
22
BEFORE THE FIRST USE
THE FIRST USE
The appliance has been tested before leaving the factory, and there may be a small amount of water residue. It is
recommended to run the "Drum Clean" (or other high-temperature) program before use to clean the residual water in the drum.
• Connect the power and turn on the tap. Do not put clothes in the drum. Select and start the program.
Do not use solvents or cleaning agents that may damage the appliance (please follow the recommendations
and warnings provided by the cleaning agent manufacturer).
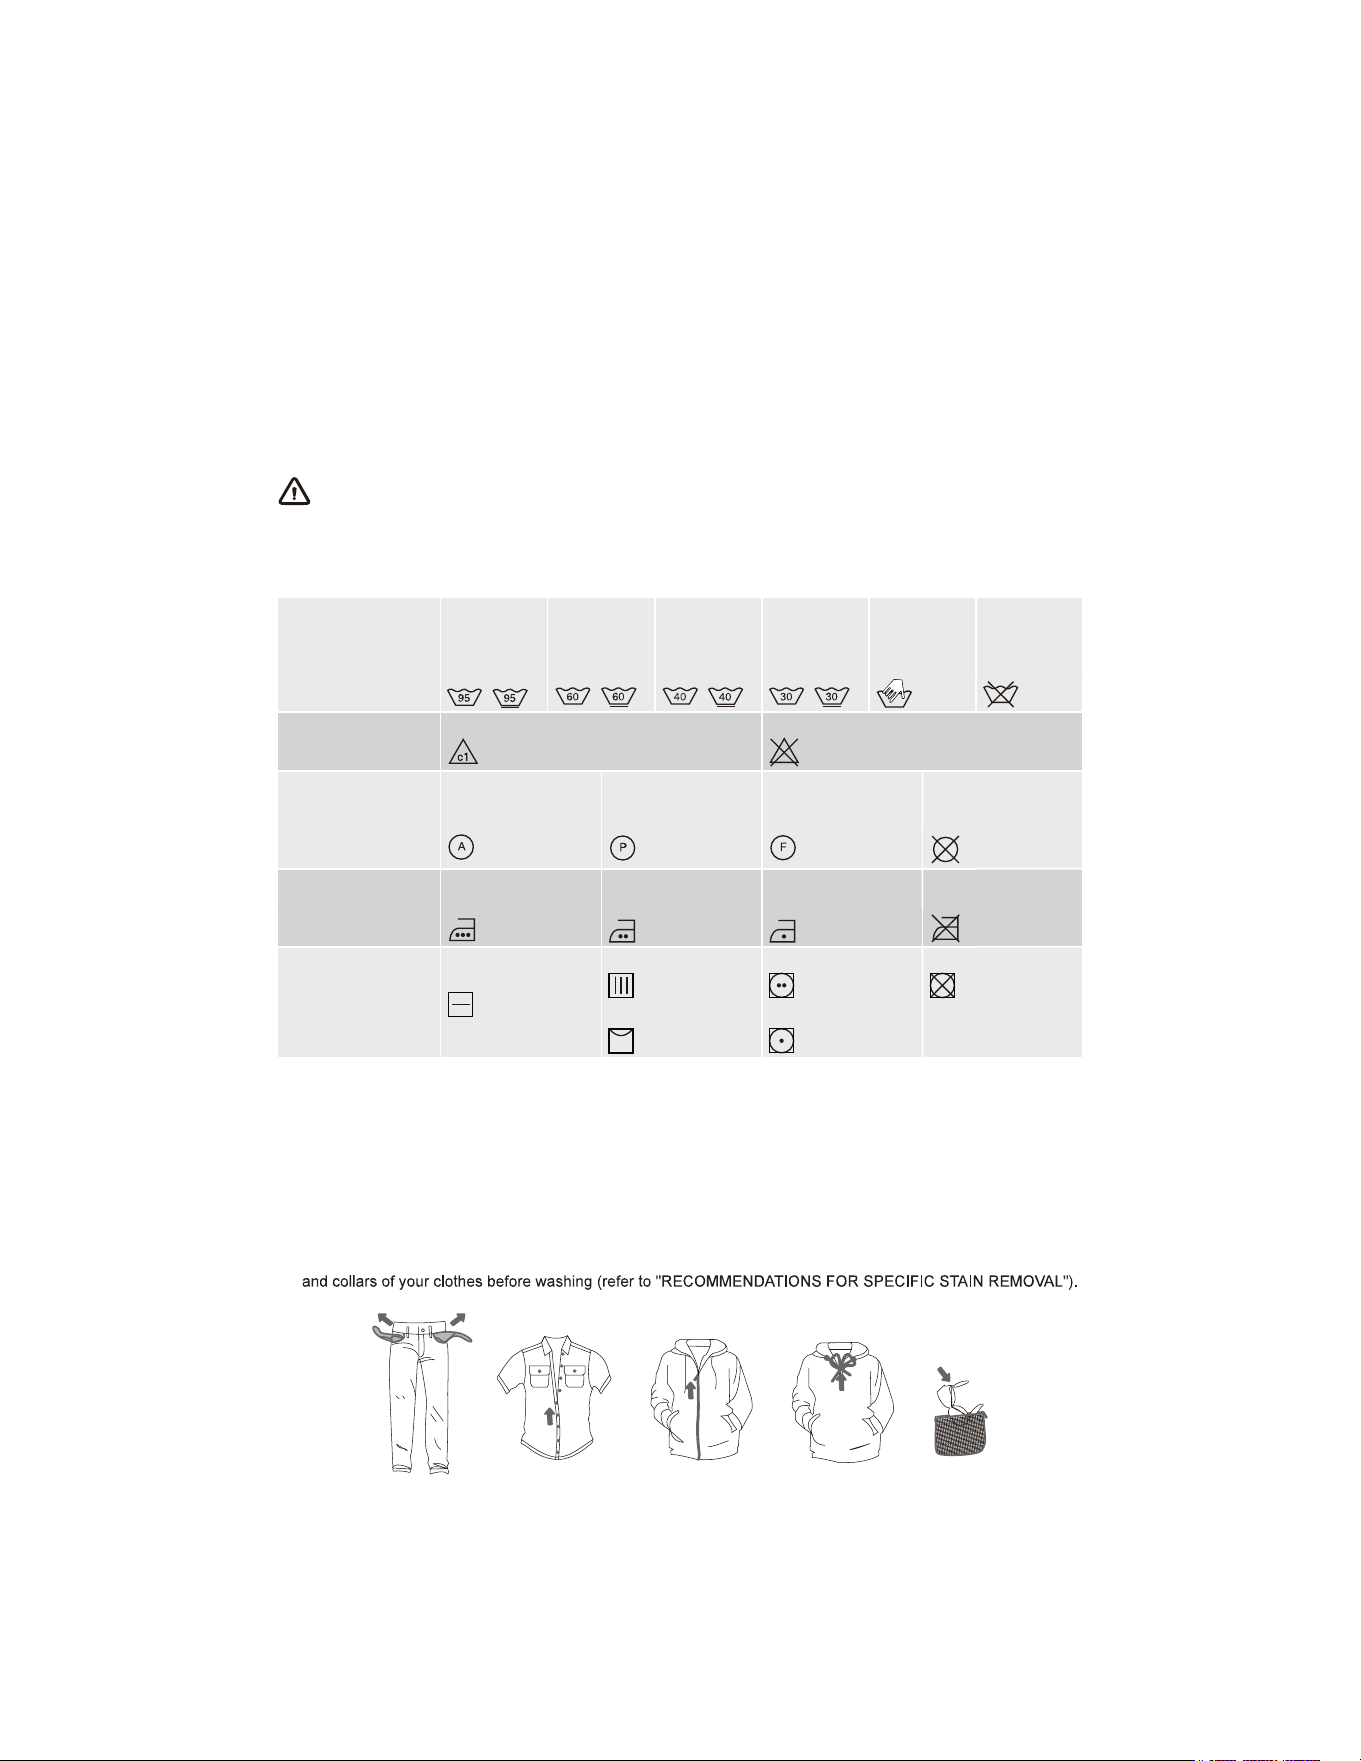
PAY ATTENTION TO CLOTHING LABELS
Washing Maximum
water
temperature
95°C
Maximum
water
temperature
60°C
Maximum
water
temperature
40°C
Maximum
water
temperature
30°C
Hand wash
only
Do not wash
Rinsing Rinse in cold water Do not rinse
Dry cleaning It can be dry cleaned.
No restrictions on
detergent
Dry clean with
petroleum solvent
R11 and R113
Dry clean with
kerosene, pure
alcohol, and R113
Do not dry clean
Ironing Maximum ironing
temperature 200°C
Maximum ironing
temperature 150°C
Maximum ironing
temperature 110°C
Do not iron
Drying Dry flat (placed on a
flat surface)
Drip dry
Line dry
High heat
Low temperature
Do not dry
PREPARATION FOR WASHING
1. Classify clothing according to its type (cotton, blended fiber, silk, wool, etc.), label requirements, color (white,
colored, etc.), degree of soiling, etc.
2. Empty all pockets. Remove metal items that could damage clothing or the appliance. Fasten buttons and turn
garments with buttons or embroidery inside out. Zip up and tie any drawstrings.
3. Place sensitive clothing and small, lightweight clothing into a mesh laundry bag and wash them together with
other clothing.
4. For clothes with pilling surfaces or long pile fabrics, please turn them over before washing.
5. Stains will be difficult to clean after being left for a long time. Please pre-treat the soiled areas such as the cuffs
6. Do not wash heavy quilts, plush toys, or clothes in laundry bags separately to avoid unbalance error.
23
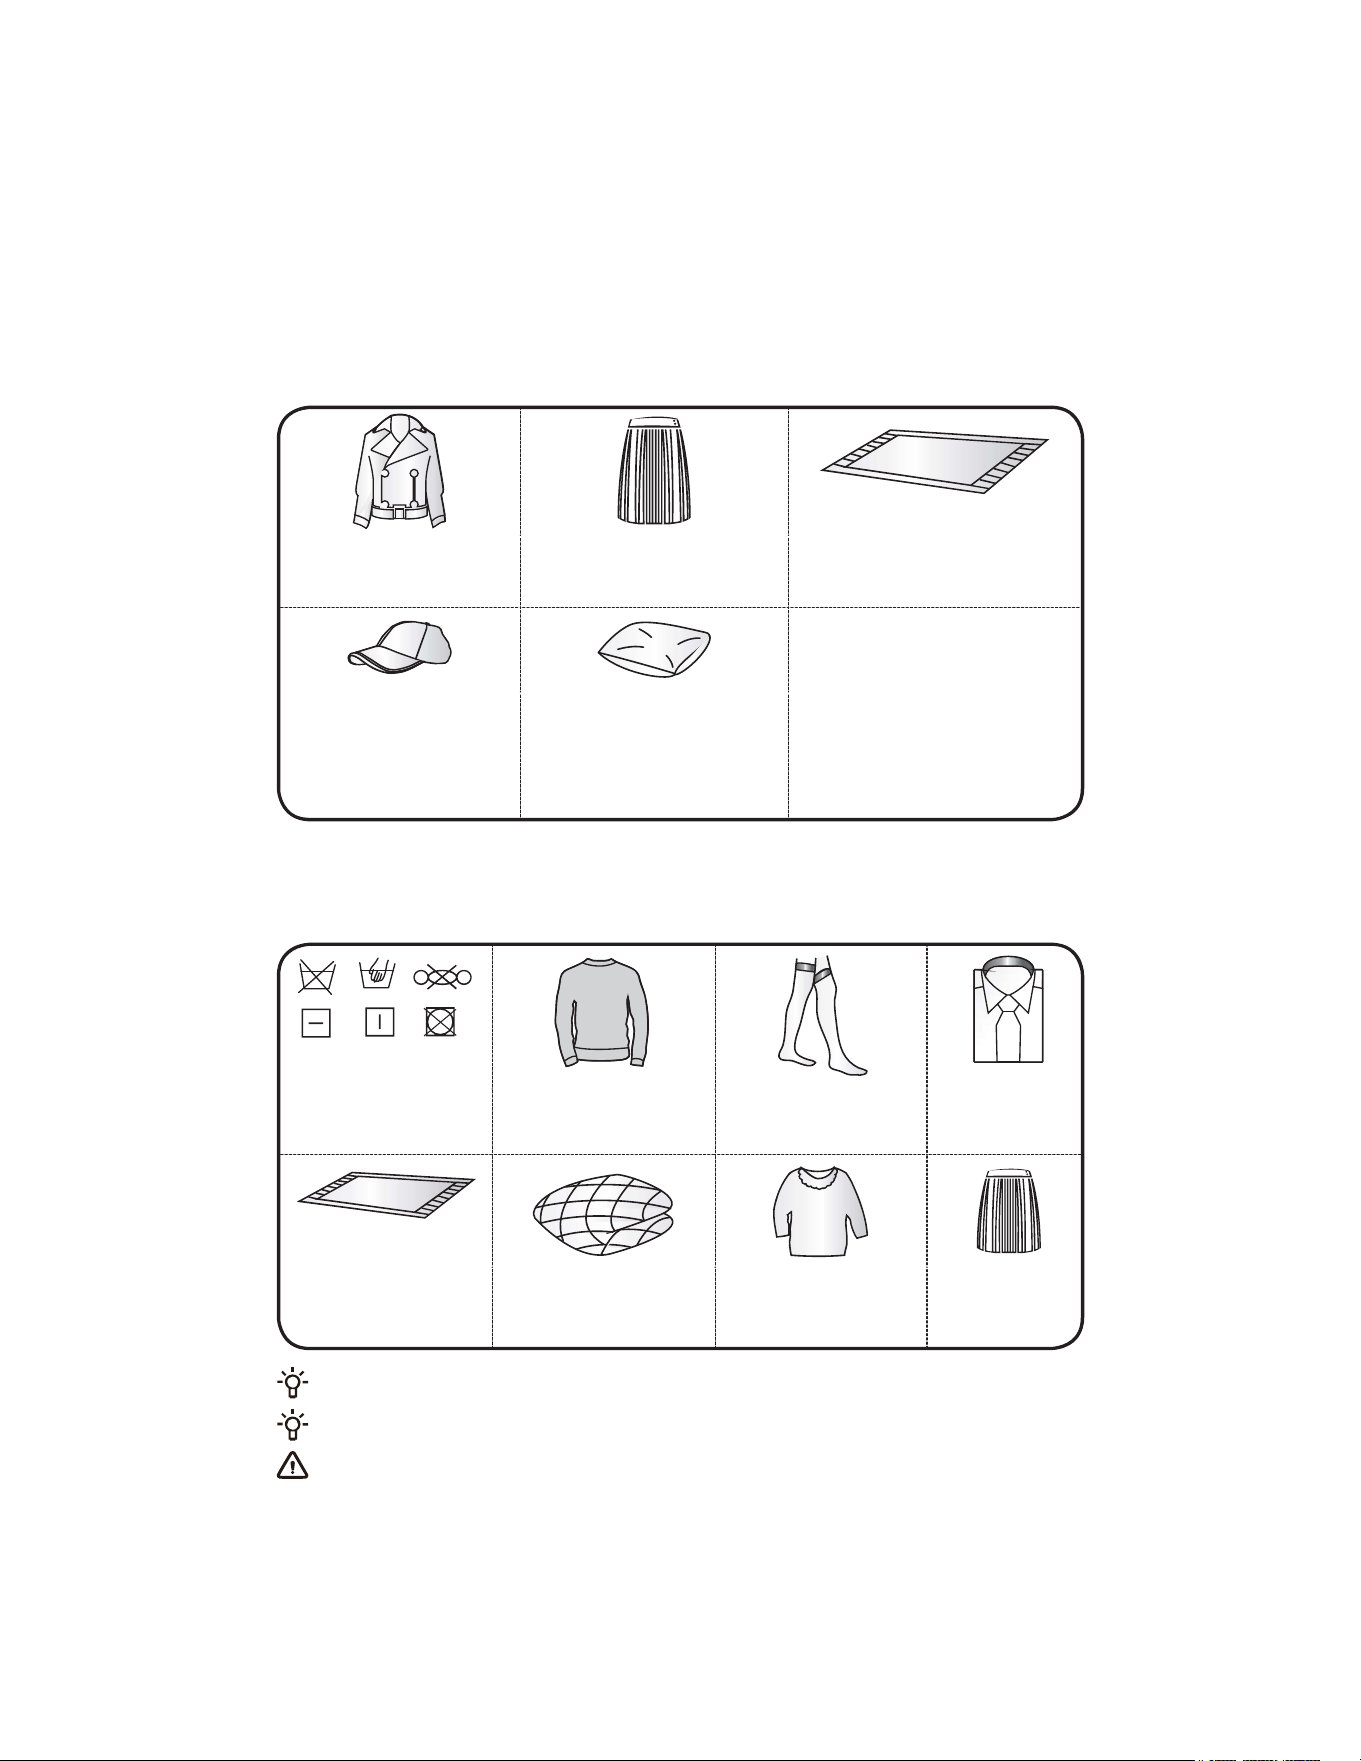
CLOTHES THAT ARE UNSUITABLE FOR BOTH
WASHING AND DRYING
Leather or fur products
(may cause deformation)
Rayon and its blended fabrics
(may cause discoloration or
deformation)
Rubber-made or large-sized
thick mats
(may cause damage or malfunction)
Others:
Wrinkled or embossed processed
clothing; coated down clothing; crepe
fabrics;
Clothing prone to deformation (suits,
jackets, ties, dresses, etc.);
Clothes prone to pilling (silk velvet or
cotton velvet).
Hats containing hard
materials (may damage the
washing machine and cause
malfunctions)
Seat cushions, pillows, items
containing cotton wool, foam,
and other sponge materials, and
carpet covers
(may cause damage or
malfunction)
CLOTHES THAT ARE UNSUITABLE FOR DRYING
(APPLICABLE TO MODELS WITH A DRYING FUNCTION)
Any clothing marked with
any of the above symbols
(may damage the clothing)
Woolen clothing
(may cause shrinkage and
pilling)
Tights and stockings
(may cause damage or
deformation)
Starched clothing
Mats and fur clothing
(may cause damage or
malfunction)
Quilt
(may cause damage or
malfunction)
Clothes with lace and
embroidery and new synthetic
fibers (ultra-fine fibers)
(may cause deformation)
Silk
Non-washable. Dryable/Non-dryable clothes include, but are not limited to, the above-mentioned clothes.
Check the clothing label to confirm that the garment has a machine-washable/dryable symbol.
Wet clothes that are still dripping are not suitable for drying and may cause the appliance to alarm.
24
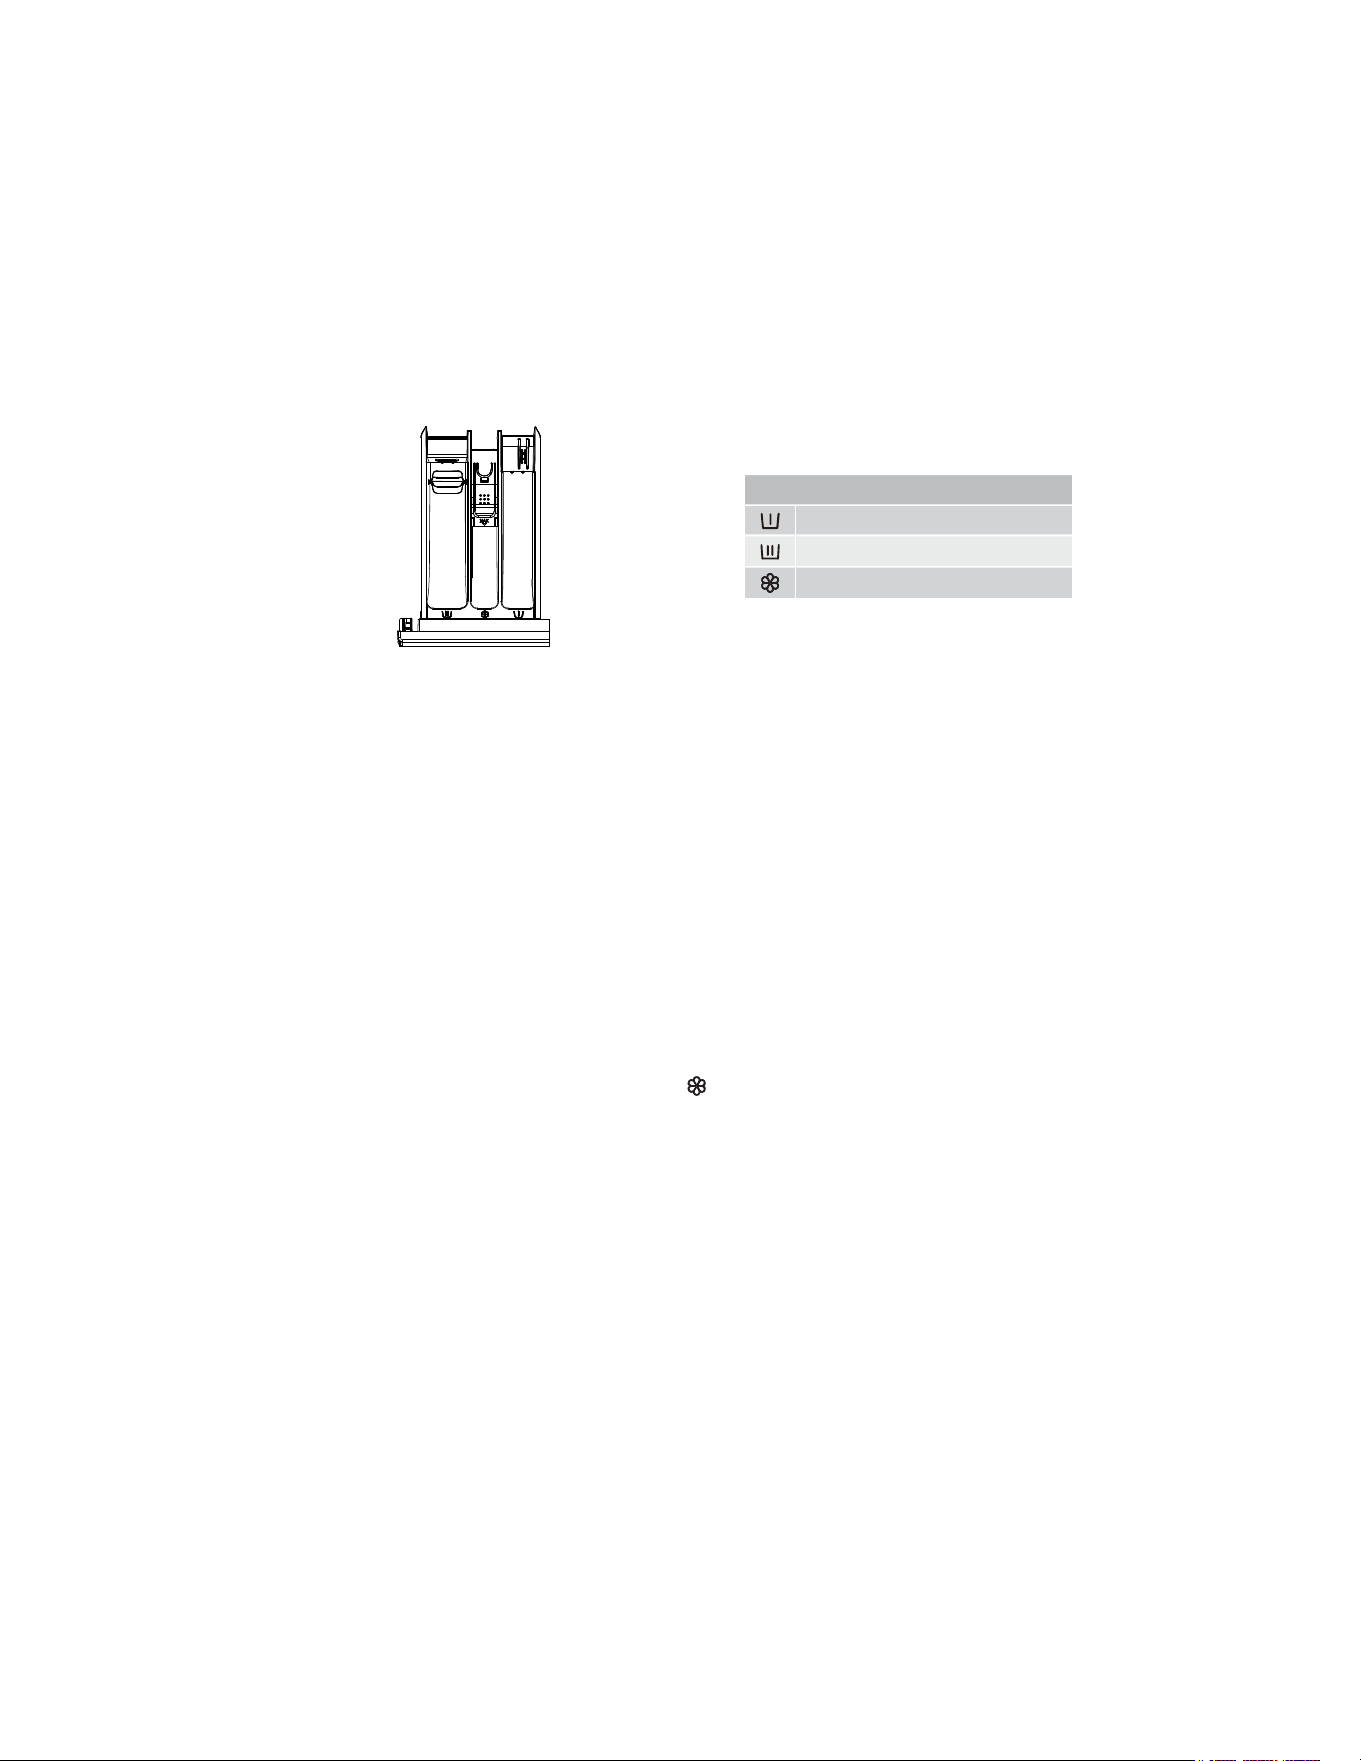
ADD DETERGENT/SOFTENER
DETERGENT DRAWER
DETERGENT DRAWER
Prewash compartment
Main wash compartment
Softener compartment
PRECAUTIONS FOR USE
1. Always use a high-efficiency neutral low-foaming detergent suitable for this appliance. The amount of detergent to
be used depends on the type of clothing, degree of soiling, color of clothing, and washing temperature. Please add
an appropriate amount according to the detergent manufacturer's instructions.
2. Excessive detergent may cause foaming, which will affect the washing effect. If the appliance detects too much
foam, it may pause the program for defoaming.
3. If insufficient detergent is used, it may result in poor washing performance and could also lead to the formation of
limescale in the drum and water hoses.
4. When adding powder detergent, we recommend adding it immediately before the wash program starts. If you add
detergent in advance, make sure that the detergent drawer is completely dry; otherwise, the powdered detergent may
harden and clump before the washing program begins.
5. If you are using the "Reservation" function (if available) or have selected the "Pre-Wash" function (if available), do
not use liquid detergent, as liquid detergent will be dispensed immediately and may become sticky in the dispenser
drawer or drum.
6. Do not allow detergent to harden, as this may cause clogging, poor rinsing, or odor.
7. Pour the softener into the compartment marked with the "
" symbol in the detergent box and follow the
instructions on the softener packaging. Do not add more softener than the MAX mark on the softener compartment,
otherwise the softener will be added to the clothes too early, resulting in poor washing results.
8. Keep detergent and softener out of the reach of children.
9. Corrosive descaling agents may damage the appliance. Do not use solvents. Do not wash clothing that has been
cleaned with solvents or flammables.
10. If you use modern phosphate-free detergent, white residue (streaks, etc.) may appear on black clothing. In this
case, you can scrub off the white stripes and then use a liquid detergent.
11. Before starting a program, gently close the detergent drawer. Closing the detergent drawer forcefully may cause
the detergent to spill into other compartments or be placed in the drum earlier than the time set in the program. When
closing the detergent drawer, be careful not to get your hands caught.
12. At the end of the program, a small amount of water may remain in the dispenser drawer.
13. The detergent dispenser drawer is not designed for adding disinfectants. It is not recommended to use
disinfectant. If disinfectants are necessary, make sure to choose products designed for fabrics. Avoid using
disinfectants containing strong corrosive or bleaching agents. Use only after proper dilution, and strictly control the
concentration and frequency of use (it is recommended to use no more than once a month) to prevent damage to
equipment or fabrics.
25
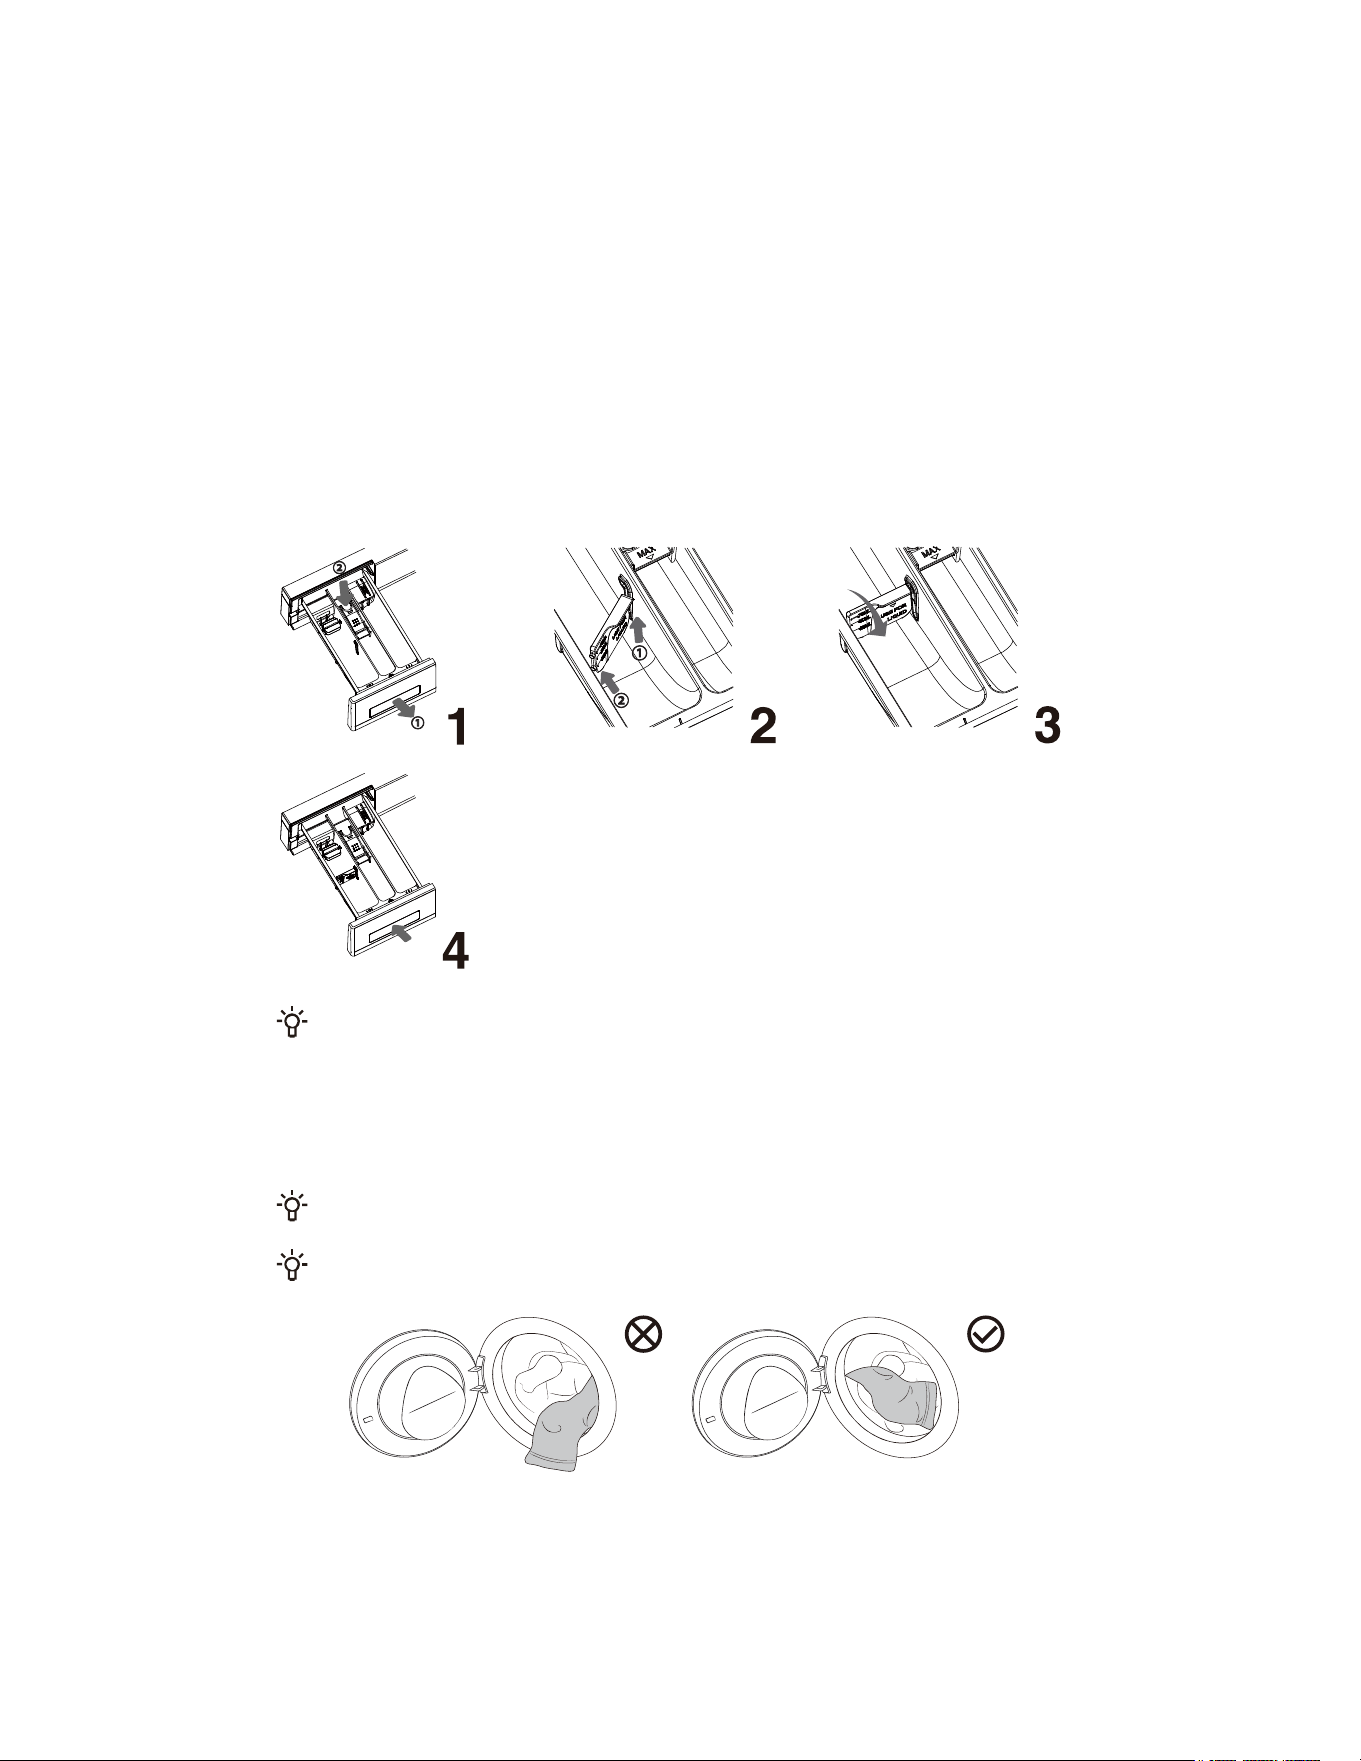
INSTALLING/USING THE BAFFLE
If your accessories are equipped with baffles, follow the steps below to install the baffles in place for a better
detergent dissolution effect when using detergent.
1. Pull out the detergent drawer. Press the small tab in the detergent drawer to pull out the detergent drawer.
2. With the scale line of the baffle facing the operating side, first, insert the two guide posts on one side of the baffle
into the slots, then gently pull the detergent drawer, and finally, insert the two guide posts on the other side into
the slots on that side.
3. Slide the baffle forward and downward to lower the baffle.
4. Put the detergent drawer back into place.
When using powdered detergent or gel detergent, always remove the baffle to prevent detergent residue.
PUT IN THE LAUNDRY
Open the machine door, make sure there is no foreign matter in the drum, and put the clothes loosely into the drum.
Close the door until you hear a "click" indicating it is securely closed.
Do not overload the drum! Refer to the "PROGRAM TABLE" for the maximum load. If the drum is too full, the
clothes may not be cleaned effectively.
Please put the laundry into the drum completely to prevent the clothes from getting caught in the door.
26
PROGRAMS AND FUNCTIONS
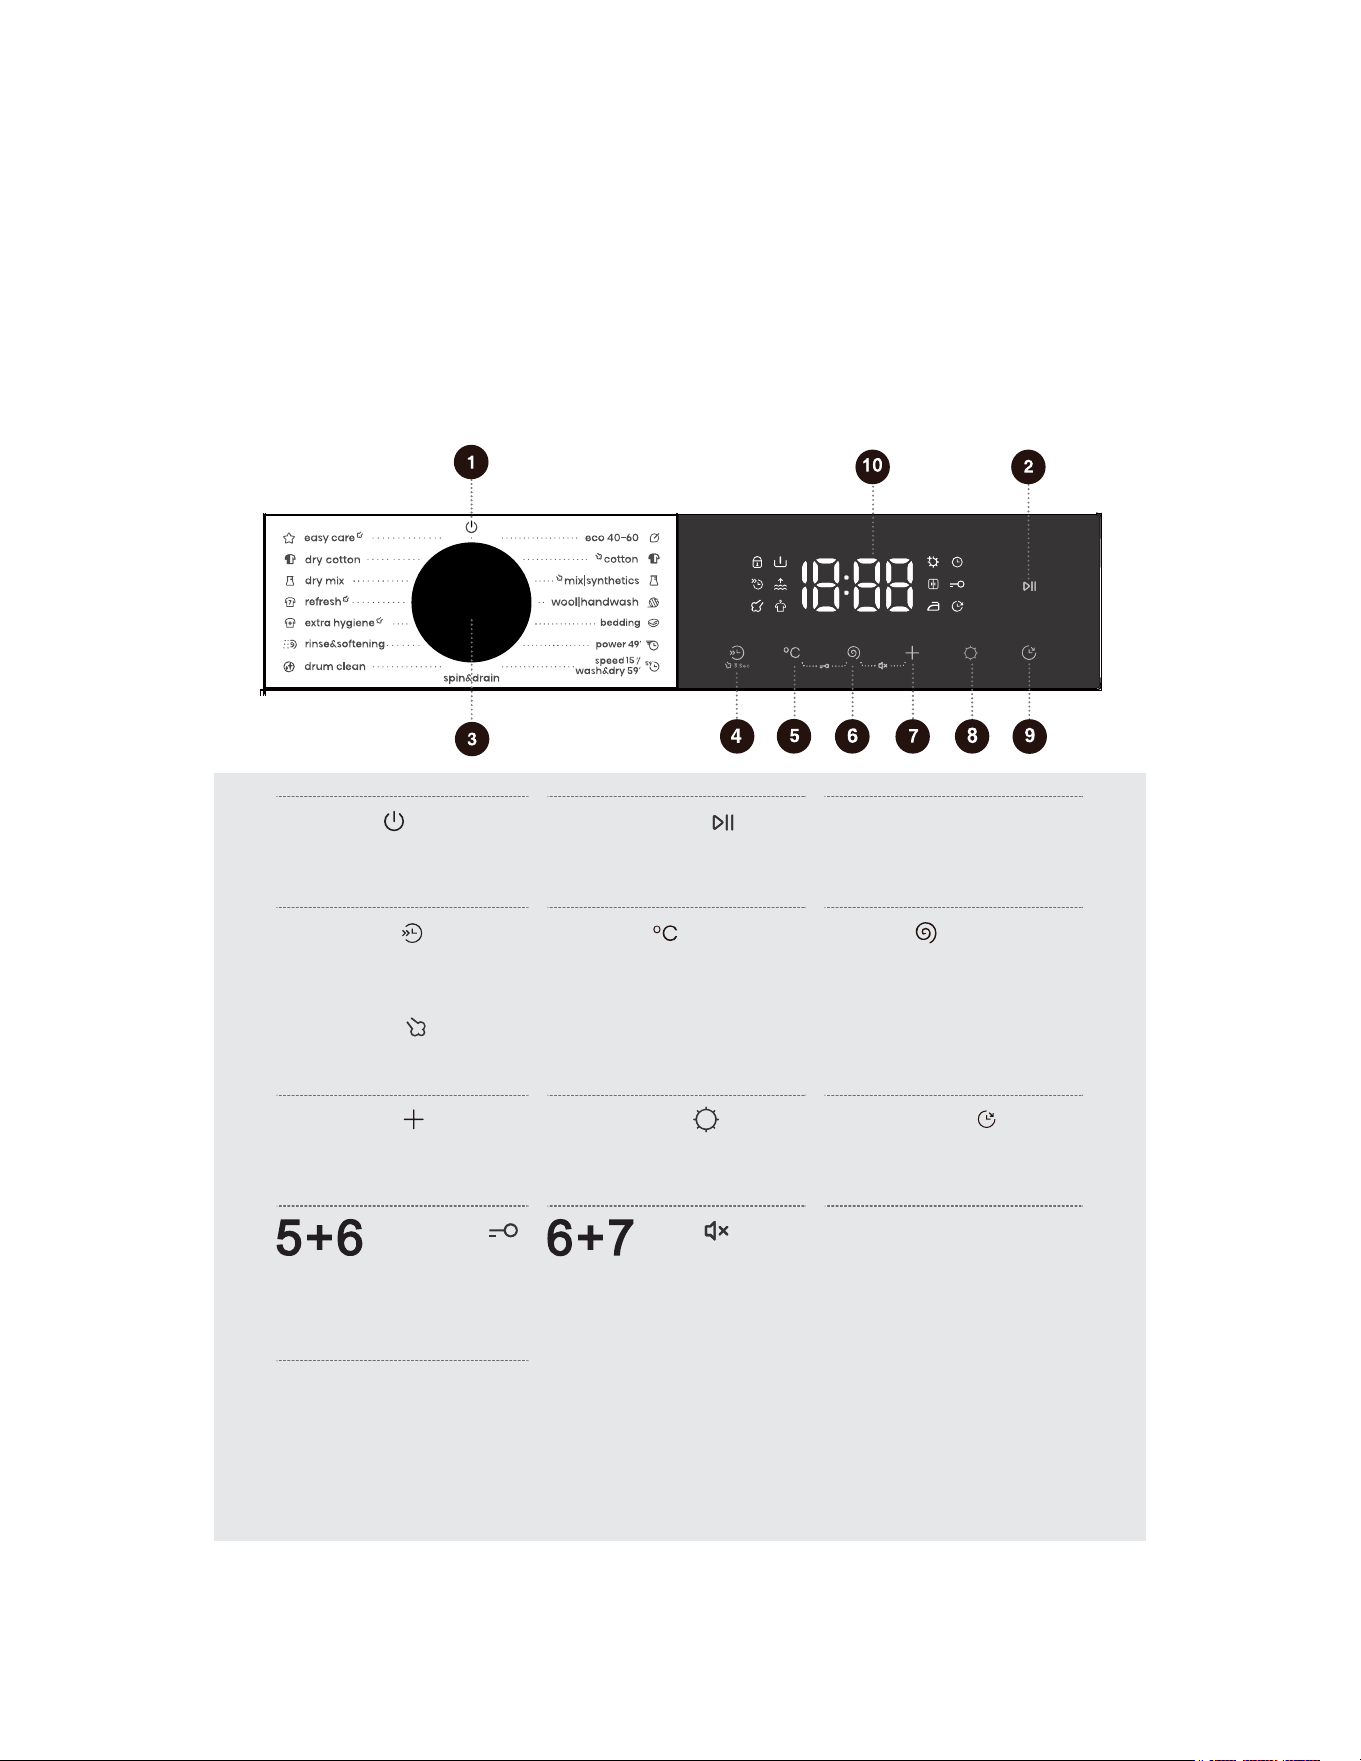
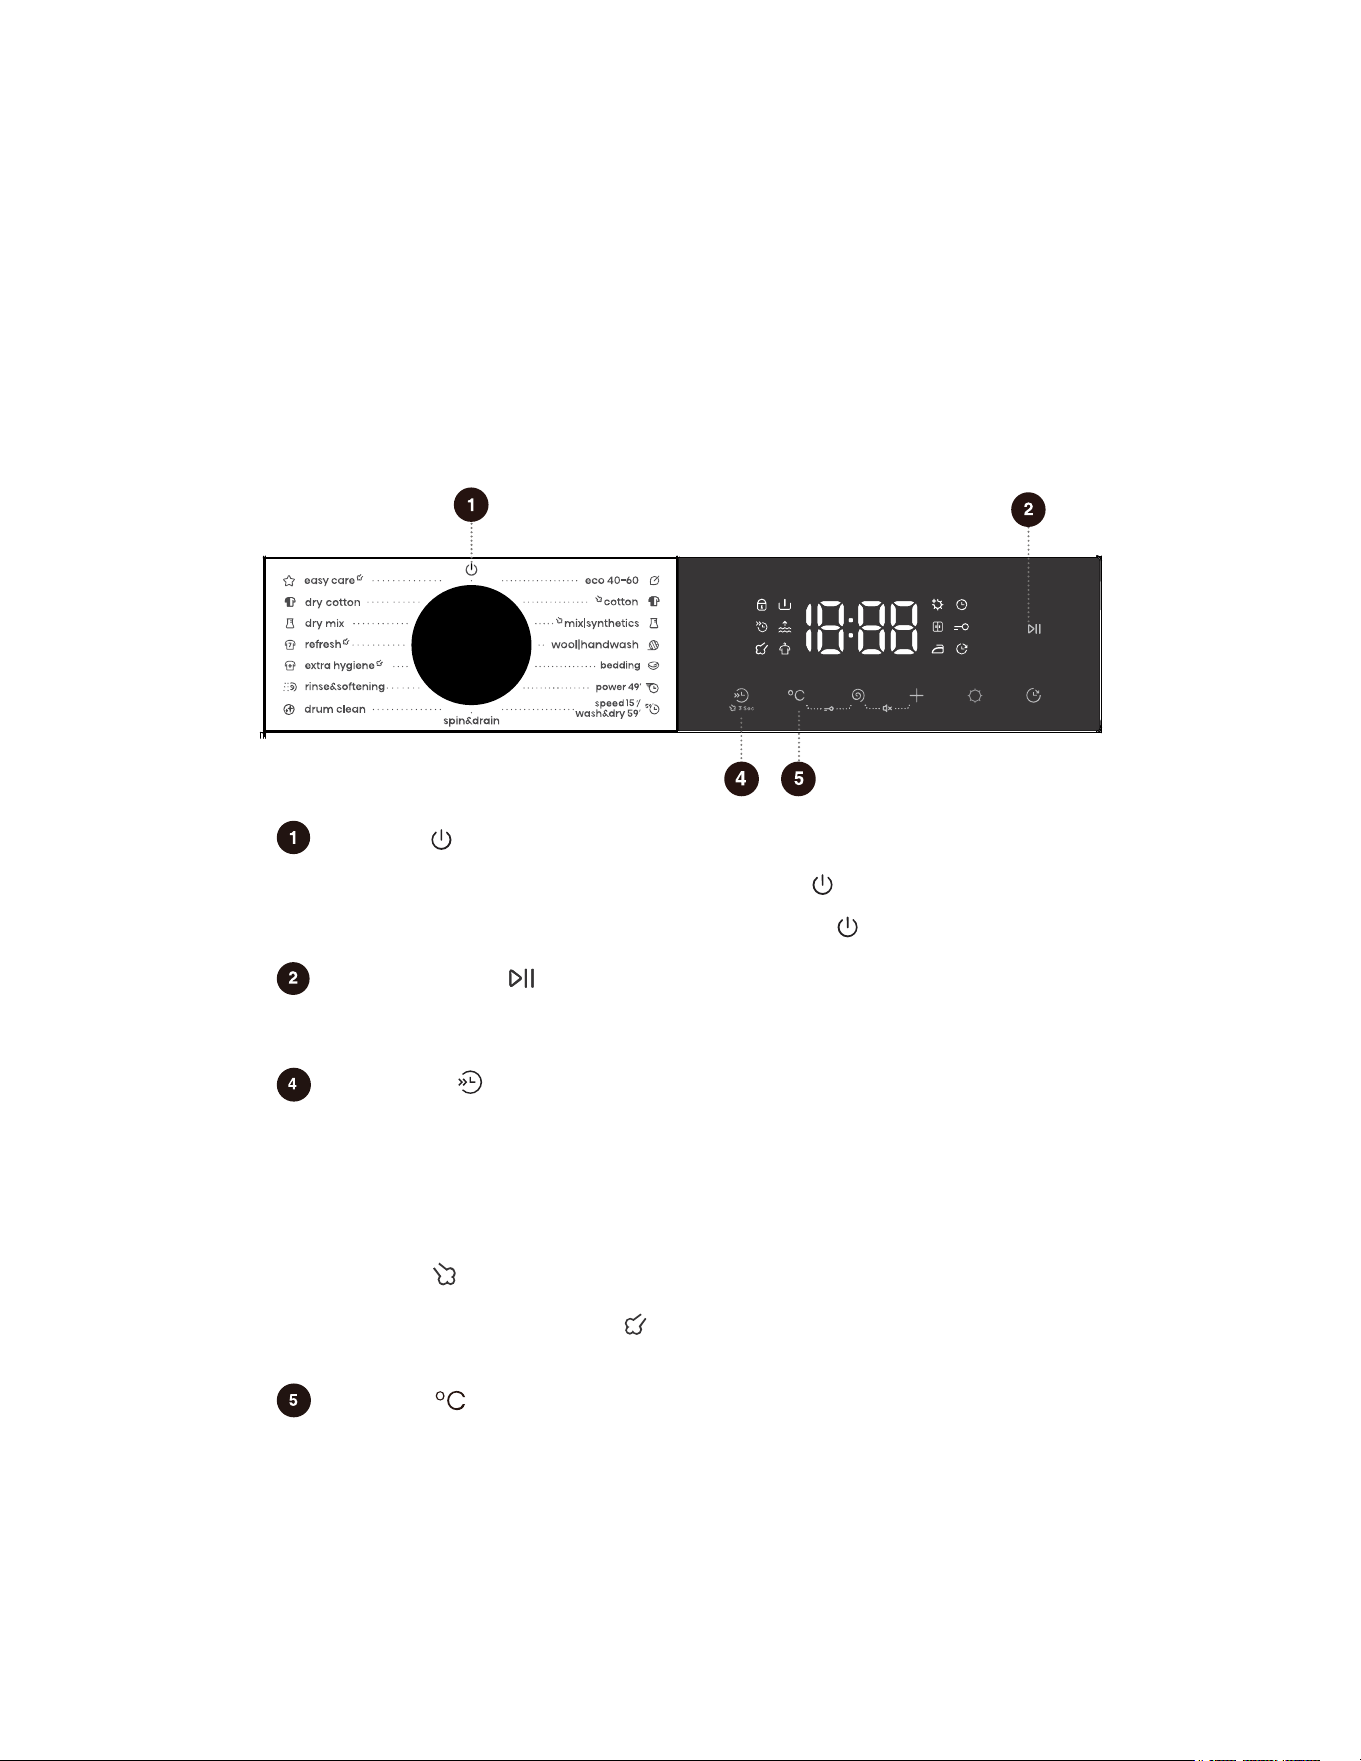
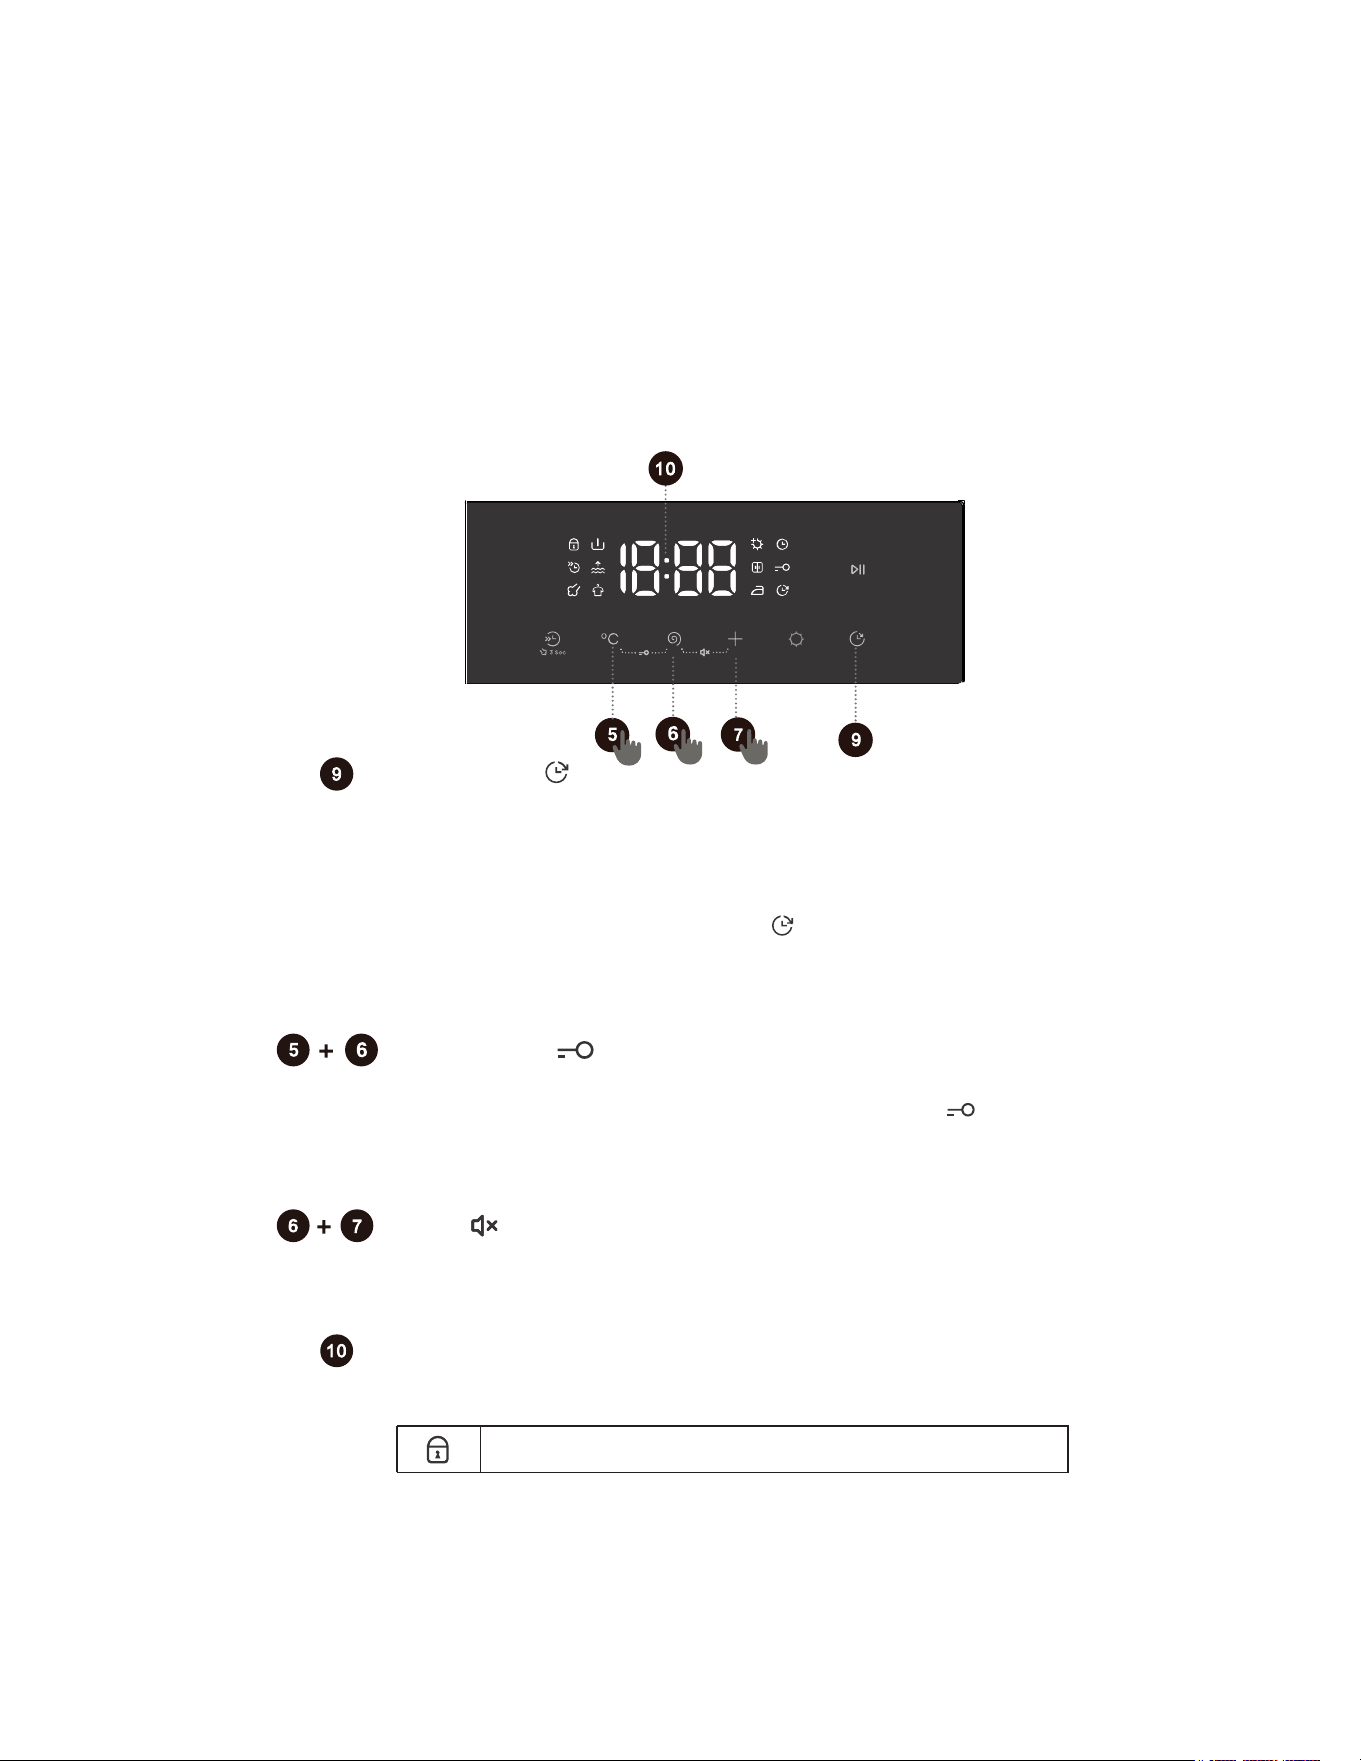
CONTROL PANEL
Please refer to the actual product for the final print
1
Power
Used to turn off the device's
power.
2
Start/Pause
Used to start/pause a program.
3
Cycle Selector
Turn the main knob to power
on the device and select a
program.
4
Quicker
Short press the button to
reduce the washing time of
the program.
* Steam
Press and hold to activate/
deactivate the steam function.
5
Temp.
Set washing temperature.
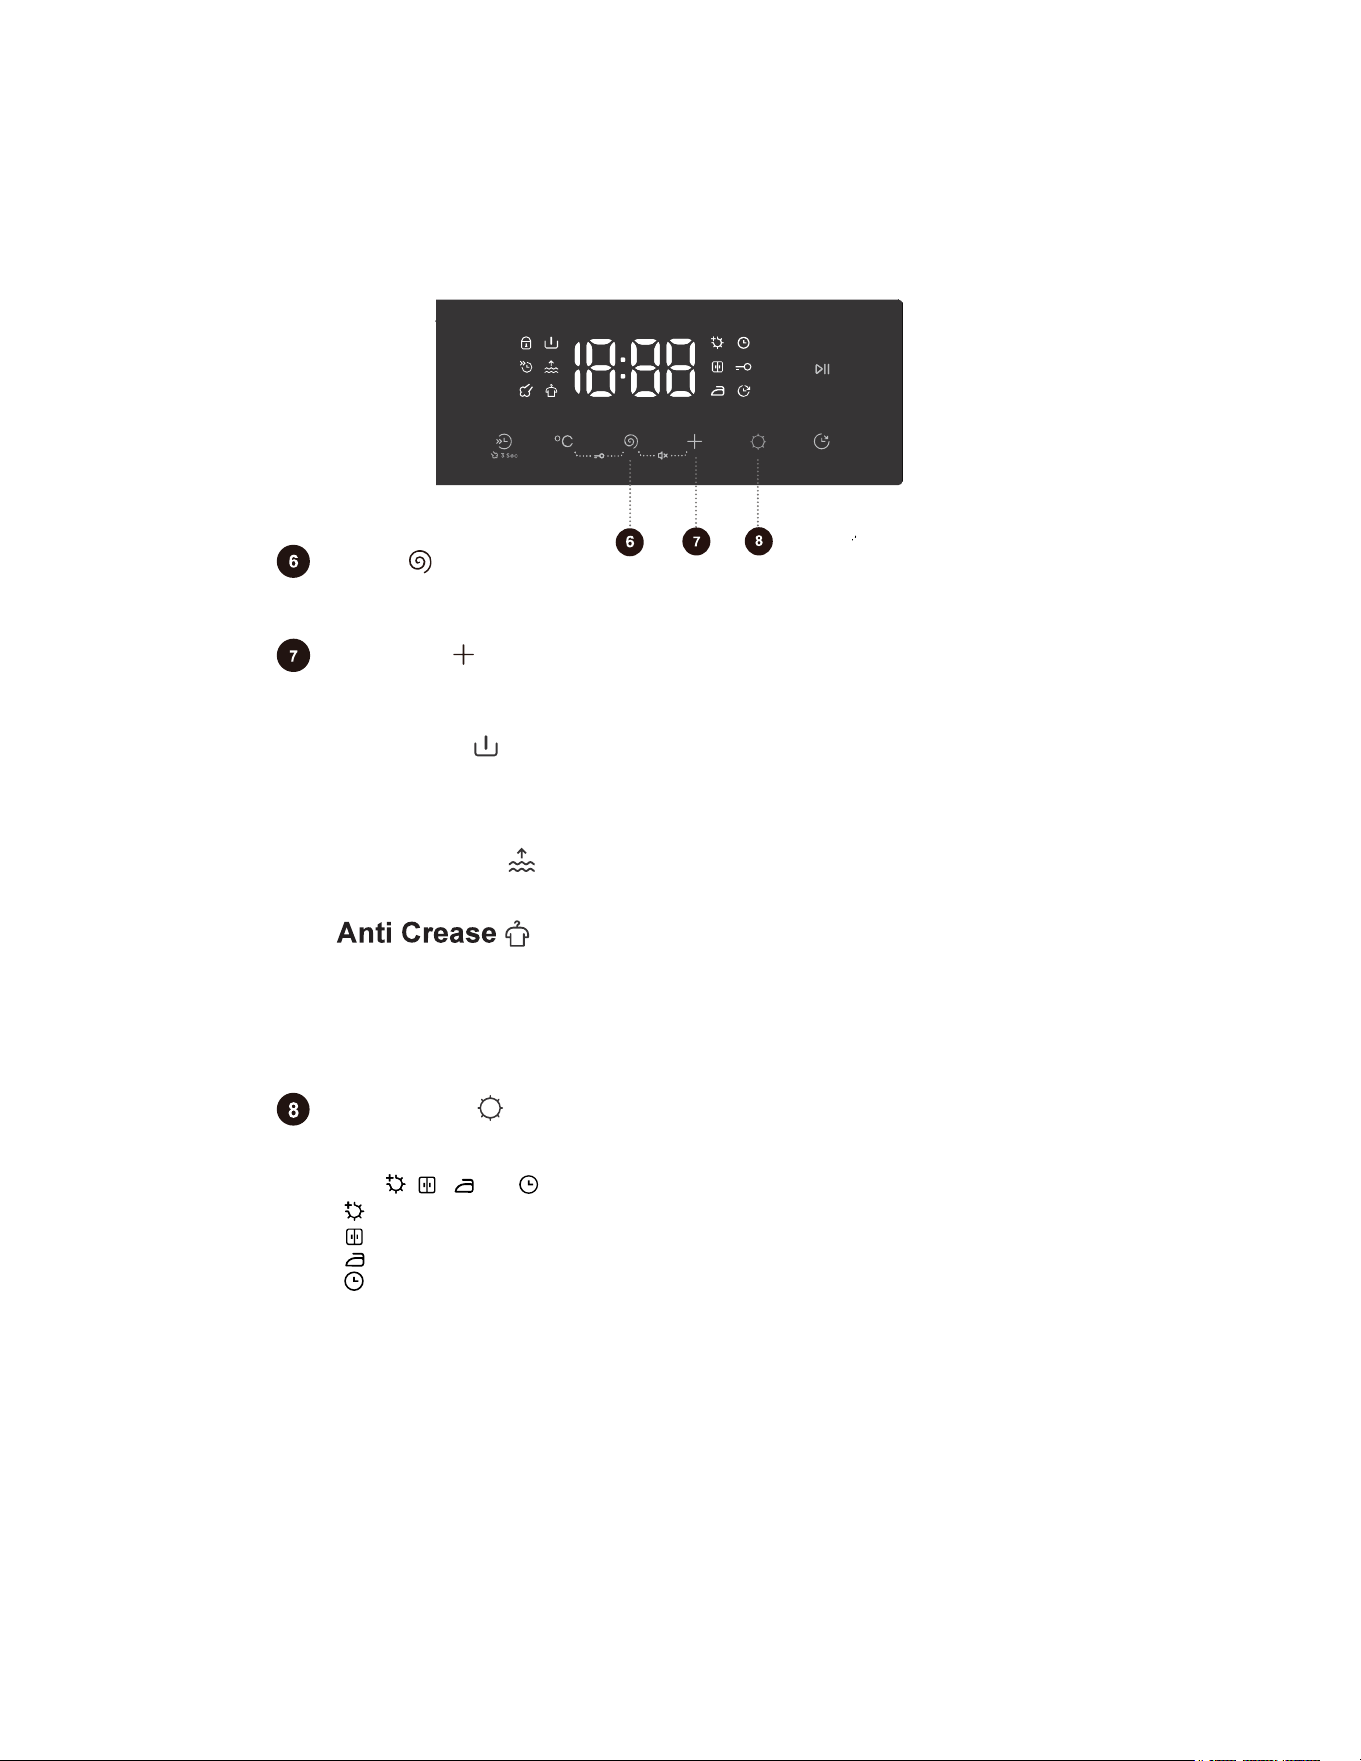
6
Spin
Set dehydration spin speed.
7
Options
Press this button to select
additional functions.
8
Dry Level
Press this button to select
the drying mode and add the
drying function.
9
Delay End
This function allows you to
schedule laundry at your
convenience.
Child Lock
Press and hold these two
buttons at the same time
to turn on/off the child lock
function.
Mute
Press and hold these two
buttons simultaneously to
enable/disable the mute
function.
10
Display
Used to display the remaining
time of the program,
reservation time, fault code,
and other related information.
*Extra Function: Hold 3 sec.
For extra function:
Press and hold for 3 seconds.
26
27
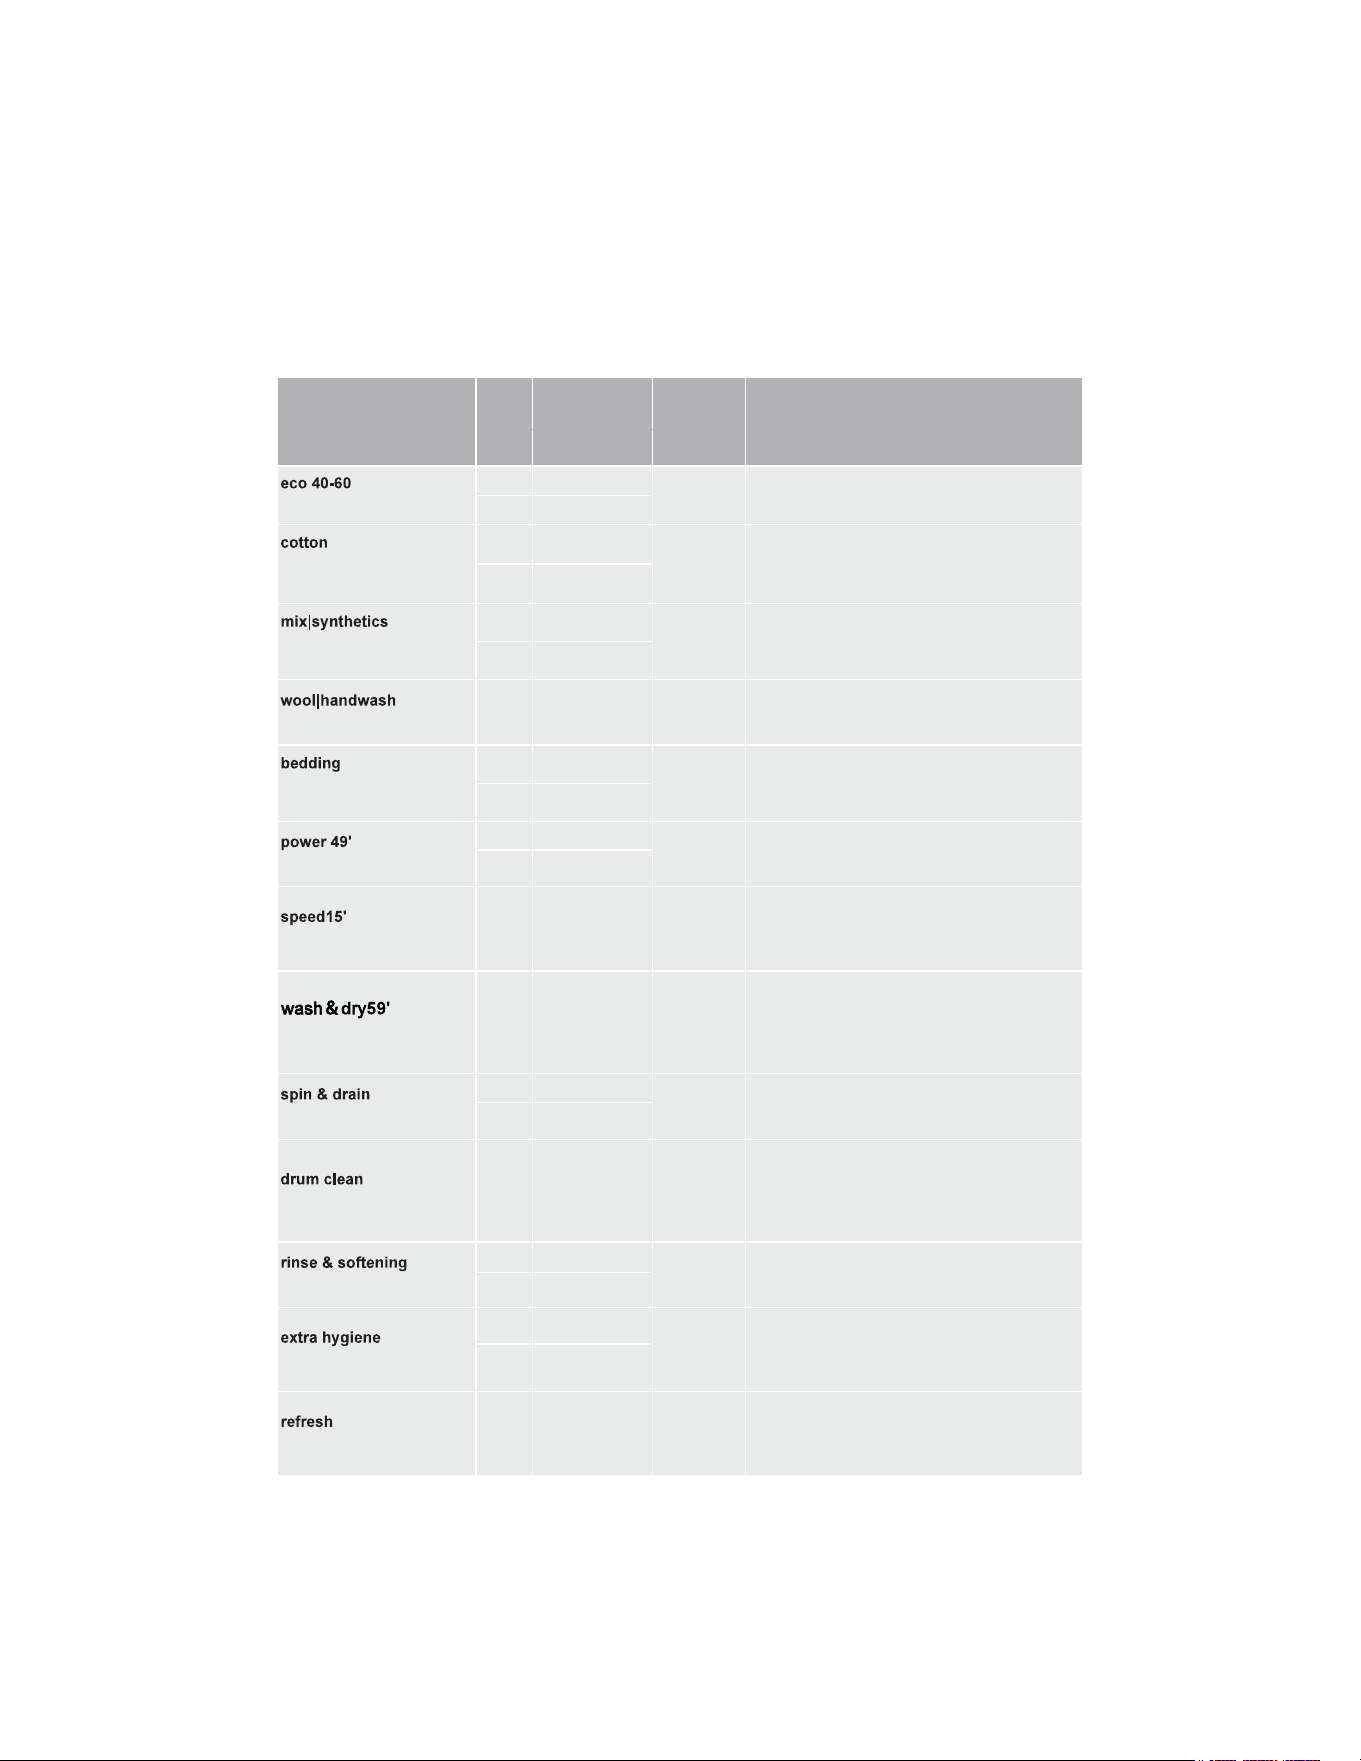
PROGRAM TABLE
Turn the main knob to select the appropriate program (depending on the type of clothing and the degree of soiling).
During operation, the main knob will not turn automatically.
Program
Func-
tion
Maximum
load (kg)
Maximum
speed
(rpm)
Program description
_
W 8
1400
This program is suitable for cotton cloth with a
general degree of soiling.
WD 5
(--, 20°C, 30°C, 40°C,
60°C, 90°C)
W 8
1400
This program is suitable for cotton or linen
fabrics with a medium to heavy degree of
soiling.
WD 5
(--, 20°C, 30°C, 40°C,
60°C)
W 4
1400
This program is suitable for soiled synthetic
fabrics with a medium degree of soiling.
WD 4
(--, 20°C, 30°C, 40°C)
W 2 600
This program is suitable for washing machine
washable woolen clothes (refer to the laundry
label requirements).
(--, 20°C, 30°C, 40°C,
60°C)
W 2
1400
This program is suitable for large-sized items
such as curtains, bed sheets, and duvet covers.
WD 2
(--, 20°C, 30°C, 40°C)
W 4
1400
This program is suitable for a small amount of
heavily soiled laundry, with an intensive wash
cycle in a short period of time.
WD 4
(--, 20°C, 30°C, 40°C)
W 1 800
This program is suitable for washing a small
amount of laundry or lightly soiled laundry. If
you change the default setting, the washing
time will be longer.
_
WD 1 1400
This 59-minute wash and dry program is
suitable for lightly soiled clothes, such as
T-shirts, shirts, skirts, etc., which need to be
changed every day. It is recommended not to
wash more than 3 pieces of clothes at a time.
_
S 8
1400
This program is used for separate spinning of
laundry. Do not add detergent/softener for this
program.
SD 5
(90°C)
WD / 800
This program is used to clean the drum
and remove detergent residues, as well as
bacteria that accumulate and grow when
washing at low temperatures. Do not add
detergent/softener for this program.
_
W 8
1400
This program is for separate rinsing and
spinning of laundry. Do not add detergent for
this program.
WD 5
(60°C)
W 2
1400
This program is suitable for high-temperature-
resistant and colorfast garments, removing
allergens such as pollen, mites, and parasites
through high temperatures.
WD 2
_
N 2 /
This program is used for sanitizing, dewrinkling,
and deodorizing a small load of dry clothes.
The faucet must be turned on, and neither
detergent nor softener should be added.
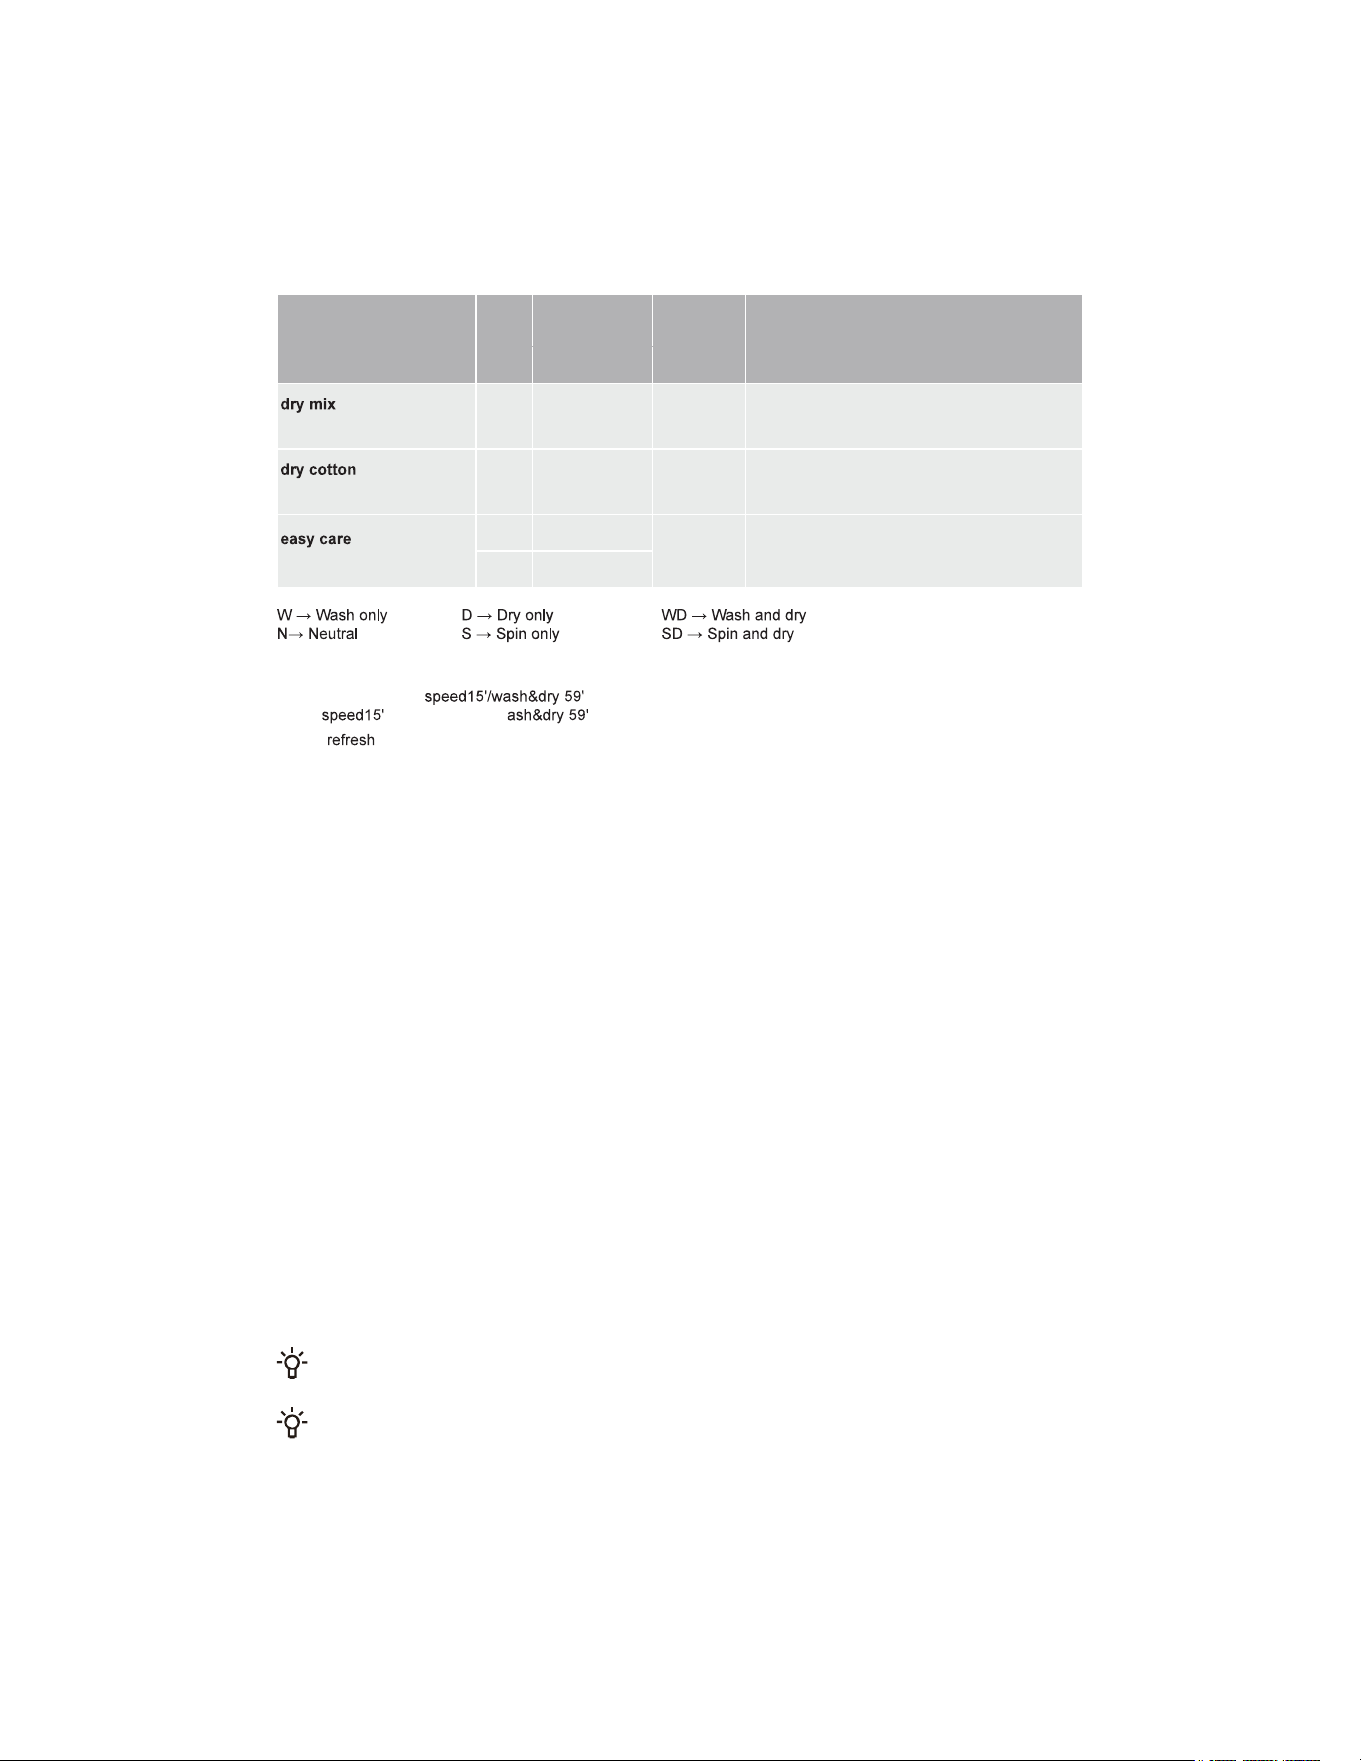
28
Program Func-
tion
Maximum
load (kg)
Maximum
speed
(rpm)
Program description
_
D 4 /
This program is suitable for drying soiled
synthetic fabrics after spinning. Do not add
detergent/softener for this program.
_
D 5 /
This program is suitable for drying wet cotton
fabrics after spinning. Do not add detergent/
softener for this program.
(--, 20°C, 30°C, 40°C)
W 5
1400
This program is suitable for lightly soiled
laundry.
WD 5
Tips:
• After selecting the program, press the Dry Level button to complete the switch between
the program and the program.
• The program is a dry clothing care program that allows you to set the care time with the Dry Level
function, which is available in a range of 30/40/50 minutes.
Note
(1) Water temperature: Select the appropriate water temperature according to the selected washing program. When
washing, follow the clothing manufacturer's washing label or instructions to avoid damaging the clothing.
(2) The actual water temperature may differ from the stated program temperature.
(3) Test results depend on water pressure, water hardness, inlet water temperature, room temperature, type and
amount of laundry, degree of soiling, detergent used, power supply fluctuations and other options selected.
(4) If you add too much laundry during the wash cycle, the laundry may be washed less efficiently because the
machine initially detects a lower weight and adds less water. Insufficient water can also cause damage to the laundry
and the wash time will be longer.
(5) Drum Clean (if available): The drum must be emptied before using the Drum Clean program. It is recommended
to run it at least once a month.
(6) For descaling, use a descaling agent with corrosion protection (only use non-corrosive descaling agents and
follow the instructions for use of the descaling agent). Run the "Drum Clean" (or other high temperature) program
several times to remove any descaling agent residues and complete descaling. It is recommended to descale at least
once every six months.
The maximum or nominal load applies to laundry prepared in accordance with the relevant provisions of
standard IEC60456.
For better washing performance, we recommend that you fill no more than 2/3 of the drum volume when using
the Cotton program.
29
ADDITIONAL SETTINGS AND FUNCTIONS
The program comes with default settings, and some functions can be changed by user. You can adjust the settings
by pressing the corresponding function button (before pressing the Start/Pause button).
Some settings cannot be selected or changed in some programs. These settings will not light up, and the buttons are
inactive (see "FUNCTION SELECTION TABLE").
Most functions can only be set in standby mode, i.e., before a program starts. After starting the program, most
functions cannot be adjusted anymore.
Power
Used to turn off the device's power.
During the program, if you need to shut down, turn the main knob to " " to shut down.
In standby mode, when the program ends, if no operation is performed for a certain period, the device will
automatically shut down. At this time, you need to turn the main knob to " " to return to the position.
Start/Pause
Used to start/pause a program.
The device cannot be started if the door is not closed or the door lock is not locked.
Quicker
This function can shorten the washing time and speed up the washing process.
Short press this key. When the icon lights up, the quick wash mode is activated. For each reduction in the
time gear setting, the maximum load capacity of the clothes decreases to half of that of the previous gear
setting. Short press this button repeatedly until the icon turns off to disable this function. The washing time
and the maximum load capacity will then return to their initial settings. The selectable acceleration gears
may vary depending on the model and program.
For programs with automatic weighing, enabling this function will pause automatic weighing; once disabled,
the automatic weighing function will resume.
Steam
This function can add a steam wash program to the washing process.
Press and hold this button to light up the " " icon and activate the "Steam" function. The same operation
can be used to turn off this function.
Temp.
This function changes the temperature of the selected program.
Each program has a preset temperature. Before starting the program, press this button to display the current
setting temperature for the first time. Press again to cycle through the set temperature gear (-- for cold wash).
The heating temperature that can be set for each program is different.
30
Spin
This function can adjust the program's spin speed before the program starts. Press this button to display the
current spin speed for the first time. Continue pressing to make a selection in the cycle of the set modes.
Options
This function selects additional functions for the current program before the program starts. Each press can
only set one function. After the additional function is selected, the corresponding icon lights up or flashes.
Pre-wash
This additional function adds a prewash phase before the main wash to enhance washing performance.
When you select the prewash function, please add detergent to the prewash compartment of the detergent
box.
Extra Rinse
This additional function can add an extra rinse cycle to the program.
The additional function is used to turn on the anti-crease mode. After the program ends, the inner drum
rotates intermittently to prevent creases from being generated when clothes are not taken out for a long time.
When the additional function is turned on, the program automatically enters the anti-crease mode at the
end. During the anti-crease function, pressing any button or turning the knob will end this function. If no
operation is performed, the program will automatically end after a maximum of 12 hours by default. When
the dehydration speed is set to "0", the anti-crease function cannot be set.
Dry Level
This function adds the option of drying after spinning.
Before starting the program, press this button to cycle through the selectable drying gears. Available drying
gears: , , , and . The drying gear options vary depending on the selected program.
" ": After drying, the clothes are ready for storage.
" ": After drying, the clothes can be worn immediately.
" ": After drying, the clothes contain a small amount of moisture and are suitable for ironing.
" ": Timed dry, you can choose the appropriate drying time according to the type and quantity of clothes.
The optional range of Timed Dry is 30/60/90/120/180/240. Please select an appropriate drying time. If the
drying time is too short, the clothes cannot be completely dried.
Before drying, please confirm the material of the clothes to see if they can be dried. Drying clothes of
different materials together will affect the drying effect. It is recommended to dry them separately. Before
drying, you need to confirm that the faucet is turned on and it must be cold water.
At the beginning of drying, water automatically enters the drum to rinse the lint in the air duct, which is
normal.
At the end of the drying process, the device will run at a certain rhythm for a period of time to shake out the
laundry and reduce wrinkles.
31
If hand-washed clothes need to be dried, please spin them before drying. Please try to choose a
suitable spin speed according to the type of clothes. Excessive cotton clothes that stick to the drum
wall after spinning may affect the drying effect. It is recommended to take them out of the drum
first, shake them out, and then put them back into the drum; please dry them in batches, and do not
exceed the maximum amount of such clothes each time.
The device can sense the weight of the clothes being dried and automatically adjust the drying time
and drying intensity. The drying time may be longer or shorter than the set time (except for Timed Dry).
Some programs have a built-in drying function, while some programs do not have the drying
function.
Delay End
This function allows you to schedule laundry at your convenience.
After selecting the program and function, make a reservation. Press this button to start the
reservation, and press it again to cycle through the available options. Each press adjusts the time
by 1-hour increments. The maximum selectable time is 24 hours.
The reservation time is the end time of the program, including the entire program running time, so
the reservation time must be greater than the program running time.
After selecting the delay end time, press the Start/Pause button to start the delay end process.
When the reservation process is in progress, the icon " " on the display lights up or flashes. When
the reservation process finishes, the icon goes off.
If the Delay End function has been selected before the program starts, it can be canceled by
selecting another program or function button.
After the program is started, if you need to cancel the Delay End function, you need to shut down
and restart.
Child Lock
To prevent children from operating the device accidentally and protect their safety, this device is
equipped with a Child Lock function.
Press and hold the "Temp. + Spin" button simultaneously. The child lock icon " " will light up,
and the child lock function will be turned on. The same operation can be used to disable the Child
Lock. After the Child Lock function is enabled, all button and knob operations are locked, except for
turning the knob to power off and using the combination key to disable the Child Lock. After the
program ends, the child lock function is automatically cancelled.
Mute
This function can mute all prompt sounds except the alarm sound.
When the device is in standby, paused, or running, press and hold the "Spin+Options" buttons
simultaneously to enable the Mute function. Except for the alarm sound, all other device sounds are muted.
The same operation can disable the Mute function, and all prompt sounds will be reactivated.
Display
Used to display the remaining time of the program, reservation time, fault code, and other related information.
Icon description
Door lock indicator icon. When this icon lights up, the device door is locked. Do not
force the door open at this time to avoid causing injury.

32
FUNCTION SELECTION TABLE
Program
Quicker
Steam
Temp.
Spin
Pre-wash
Extra Rinse
Anti Crease
Dry Level
Delay End
Child Lock
Mute
- - - - - -
- - - - -
- -
-
- - - -
wash dry 59' - - - - - -
- - - - -
- - - - - - -
- - - -
- -
- - - - - -
- - - - - -
- - - - - -
-
• The function is optional
- The function is not optional
Function default and cannot be canceled

33
START THE PROGRAM
Select the program and additional functions, and make sure that the detergent has been added to the
detergent drawer. Press the "Start/Pause" button to start the program.
After pressing the "Start/Pause" button, other settings cannot be changed except turning Child Lock
on/off, turning Mute on/off (if available), and adjusting Water Level (if available).
When the program starts, if the display shows " ", indicating that the clothes are being weighed.
Some programs automatically detect the weight of clothes before washing, and the program
duration will be automatically adjusted.
END OF THE PROGRAM
When the program finishes, the device emits an acoustic signal and "End" appears in the display.
If you do not perform any operation for a period of time, the device will automatically shut down.
1. Turn off the device power.
2. Turn off the water tap.
3. Unplug the power cord from the outlet.
4. Open the machine door.
5. Remove the clothes from the drum.

34
PROGRAM INTERRUPTIONS AND CHANGES
Cancel program
To cancel a program while it is running, you need to turn off the device power.
Change program
If you want to change the program while it is running, you need to turn off the power of the device first;
After powering on, reselect the program and additional functions, and press the "Start/Pause" button
to start.
Pause the program
You can press the "Start/Pause" button to pause the program at any time during the program
operation. When the remaining program time on the display flashes, the program is paused. If the
following conditions are met, the door lock is unlocked and the machine door can be opened.
1. The temperature in the drum must be suitable;
2. The water level in the drum must be below a specific value.
To resume the program, please close the door first, and then press the "Start/Pause" button. The wash
program is paused and started again, and the program continues from where it was interrupted. The
spin program is paused and restarted, and the program starts from the beginning of the spin cycle.
Add Clothes
If you need to add clothes during the program, after confirming that the water level and temperature in
the machine are safe, press the "Start/Pause" button to pause the program. The remaining program
time on the display will flash, and the door lock icon will go out (the "Add Clothes" icon " " will light
up for some models), and then you can open the door to add clothes. If the door lock icon does not go
out, the door opening conditions are not met and you cannot add clothes.
If too much extra clothing is added during the washing process and the amount of water is
insufficient, the cleaning effect will be poor, because the device calculates the amount of water intake
based on the weight of the initial clothing. Insufficient water may also cause damage to the clothing (due
to friction), and the washing time will be prolonged.
Fault
If the device fails, the program will be interrupted.
If this happens (see "FAULT CODES AND TROUBLESHOOTING"), the device will sound an alarm
with a flashing light and a beep, and the fault code (FXX) will appear on the display.
Power failure
In the event of a power failure (blackout), the washing program will be interrupted. When the power
supply is restored, the program will continue running from the stage where it was interrupted.
If there is still water in the appliance after a power outage, do not open the door before
manually draining the water using the drain pump filter.
35
MAINTENANCE AND CLEANING
Regular maintenance can extend the appliance's service life. Before maintenance, please be sure
to cut off the power supply and turn off the faucet.
Children are not allowed to clean or perform any maintenance work on this device without
supervision.
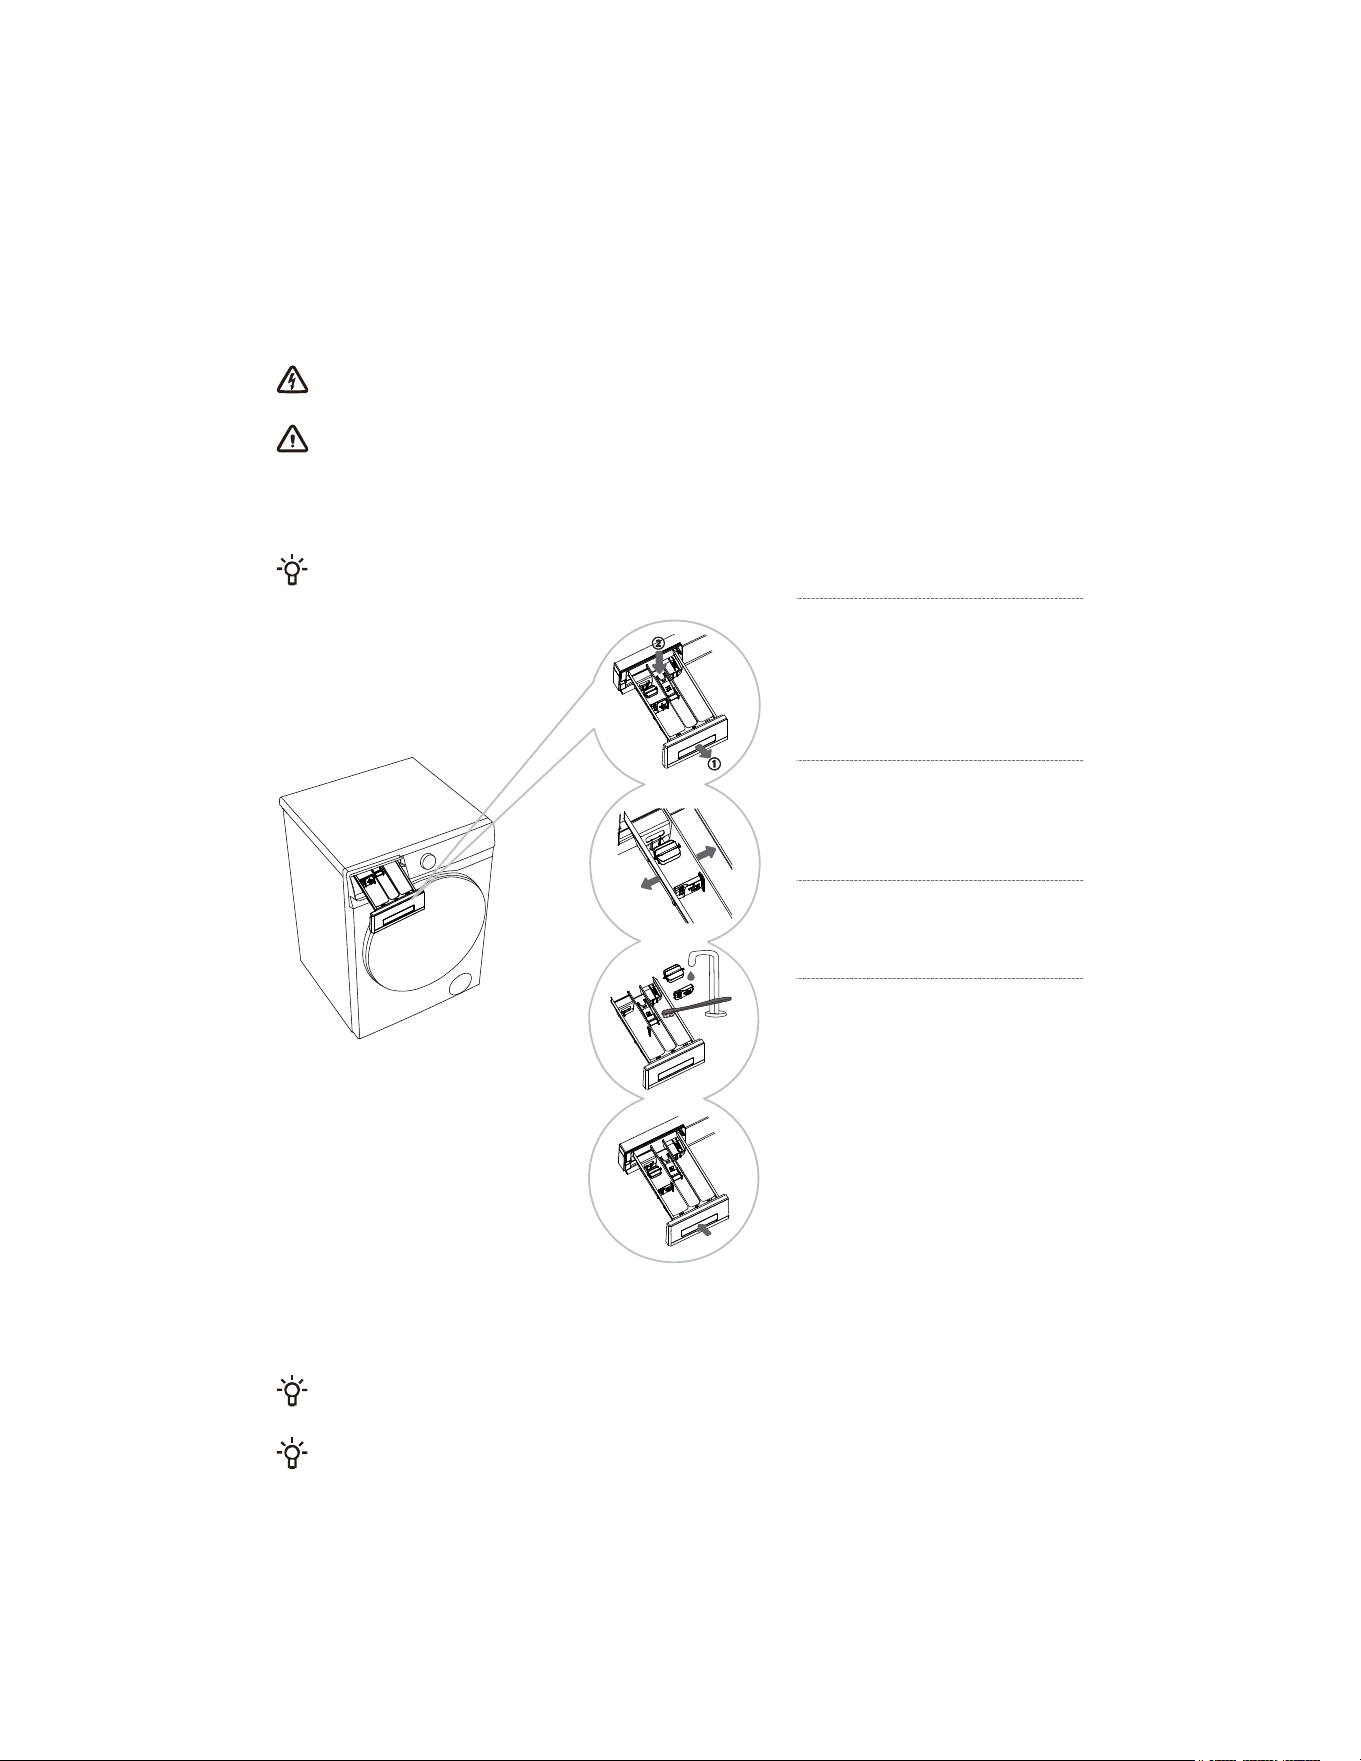
CLEANING THE DETERGENT DRAWER
Clean the detergent drawer regularly.
1
Pull out the detergent drawer.
Press the small tab in the
detergent drawer to pull out the
detergent drawer. (See the position
indicated by the arrow in the left
figure.)
2
Gently bend the main wash
compartment of the detergent
drawer by hand to slightly deform
it, and remove the baffle and roller.
3
Use a brush to clean the
baffle, roller, and detergent
drawer separately.
4
Clean any remaining
detergent from the bottom
of the detergent drawer and wipe
it dry.After wiping the baffle and
roller dry, reinstall them in their
original positions and reinstall the
detergent drawer into place.
When installing the roller, make sure that the positioning posts at both ends of the roller match the
positioning holes of the detergent drawer.
Do not place the detergent box in the dishwasher for cleaning.
36
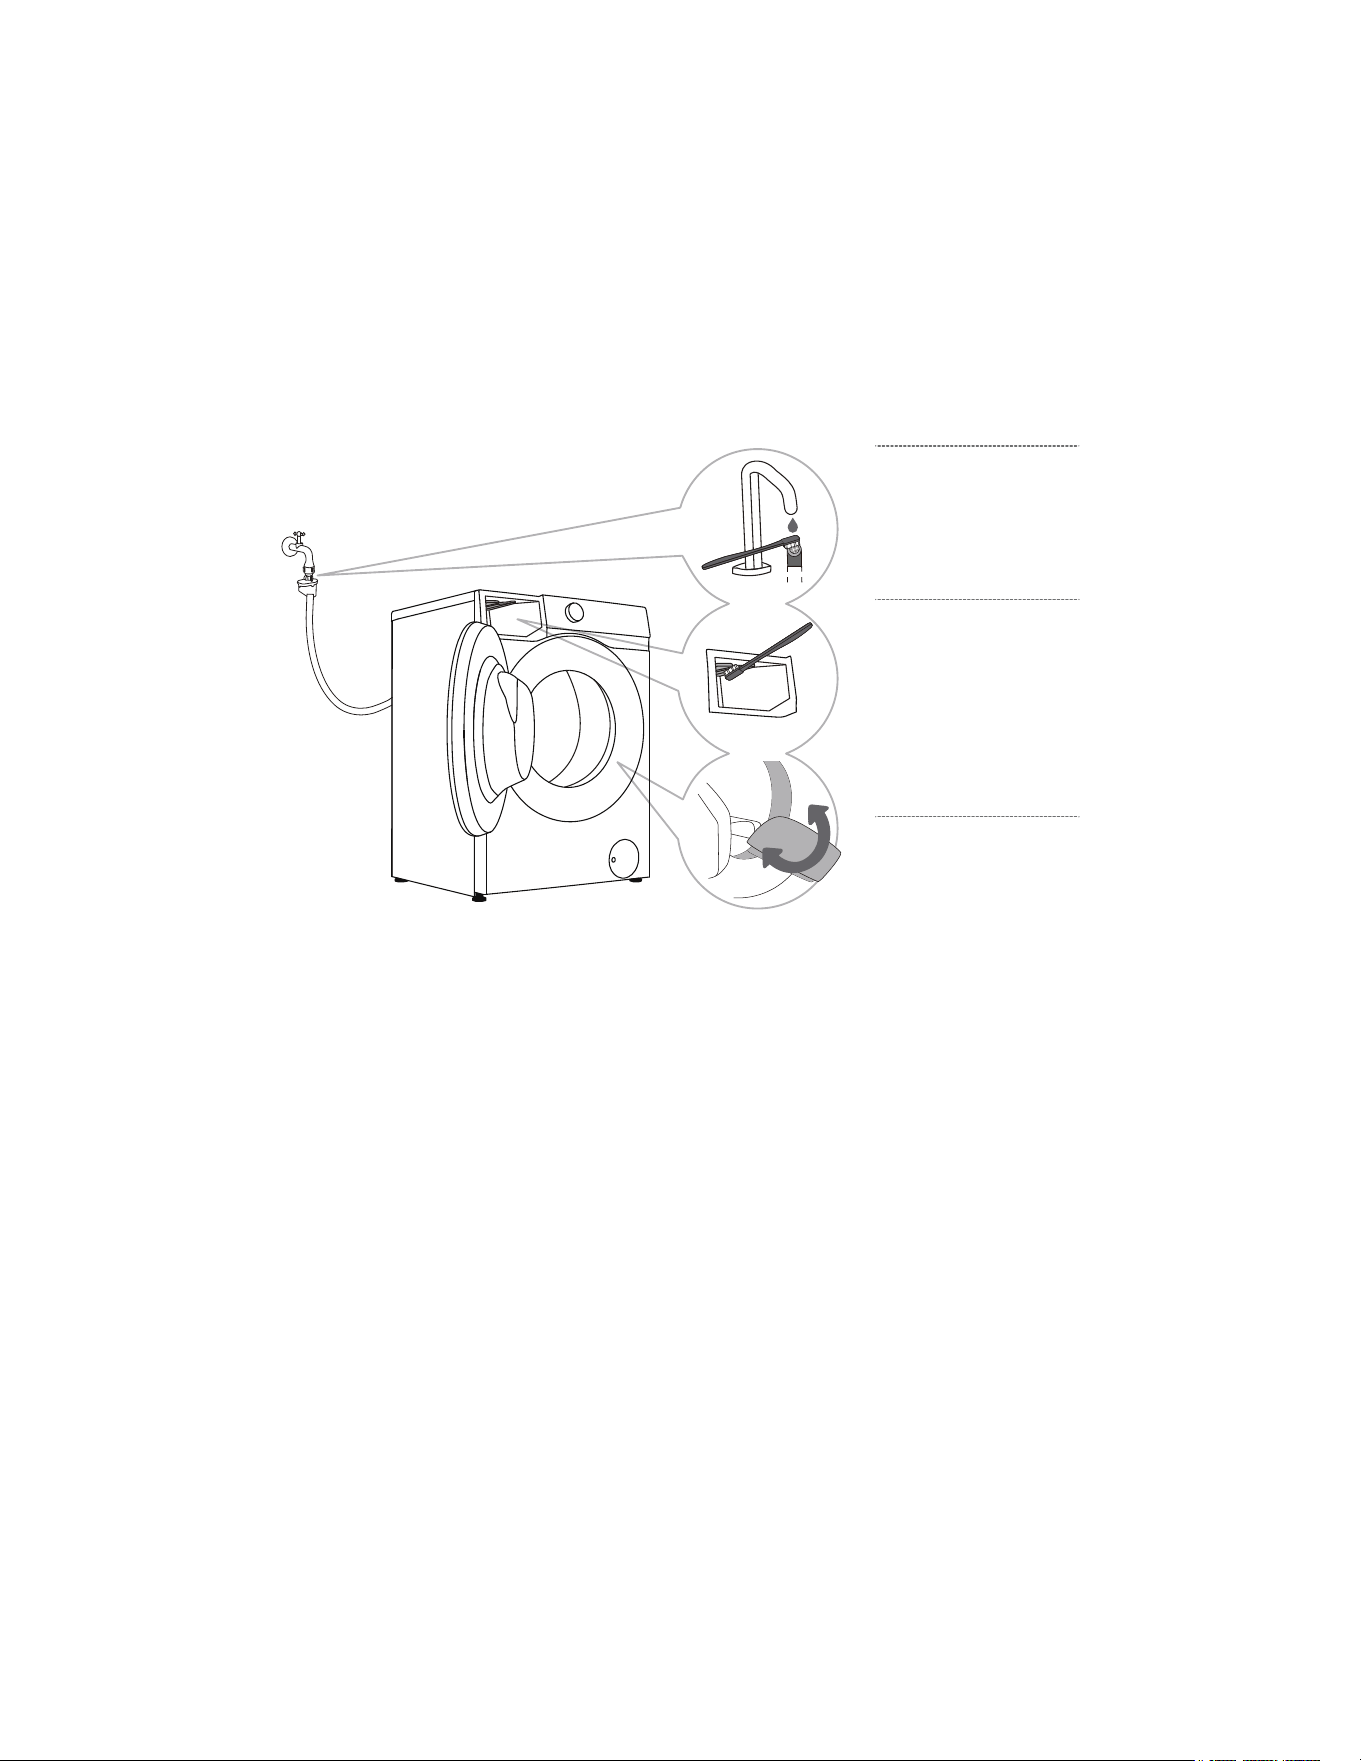
CLEAN THE WATER HOSE, DETERGENT DRAWER
OUTER COMPARTMENT, AND RUBBER DOOR
GASKET
1
Clean the water
inlet hose filter
regularly.
2
Use a brush
to clean the
detergent drawer outer
compartment, especially
the nozzle on the upper
side of the compartment.
3
After each wash,
wipe the rubber
door gasket to extend
its life. After washing,
keep the appliance door
slightly open to release
moisture before closing
it, to prevent the door
seal from getting moldy.
37
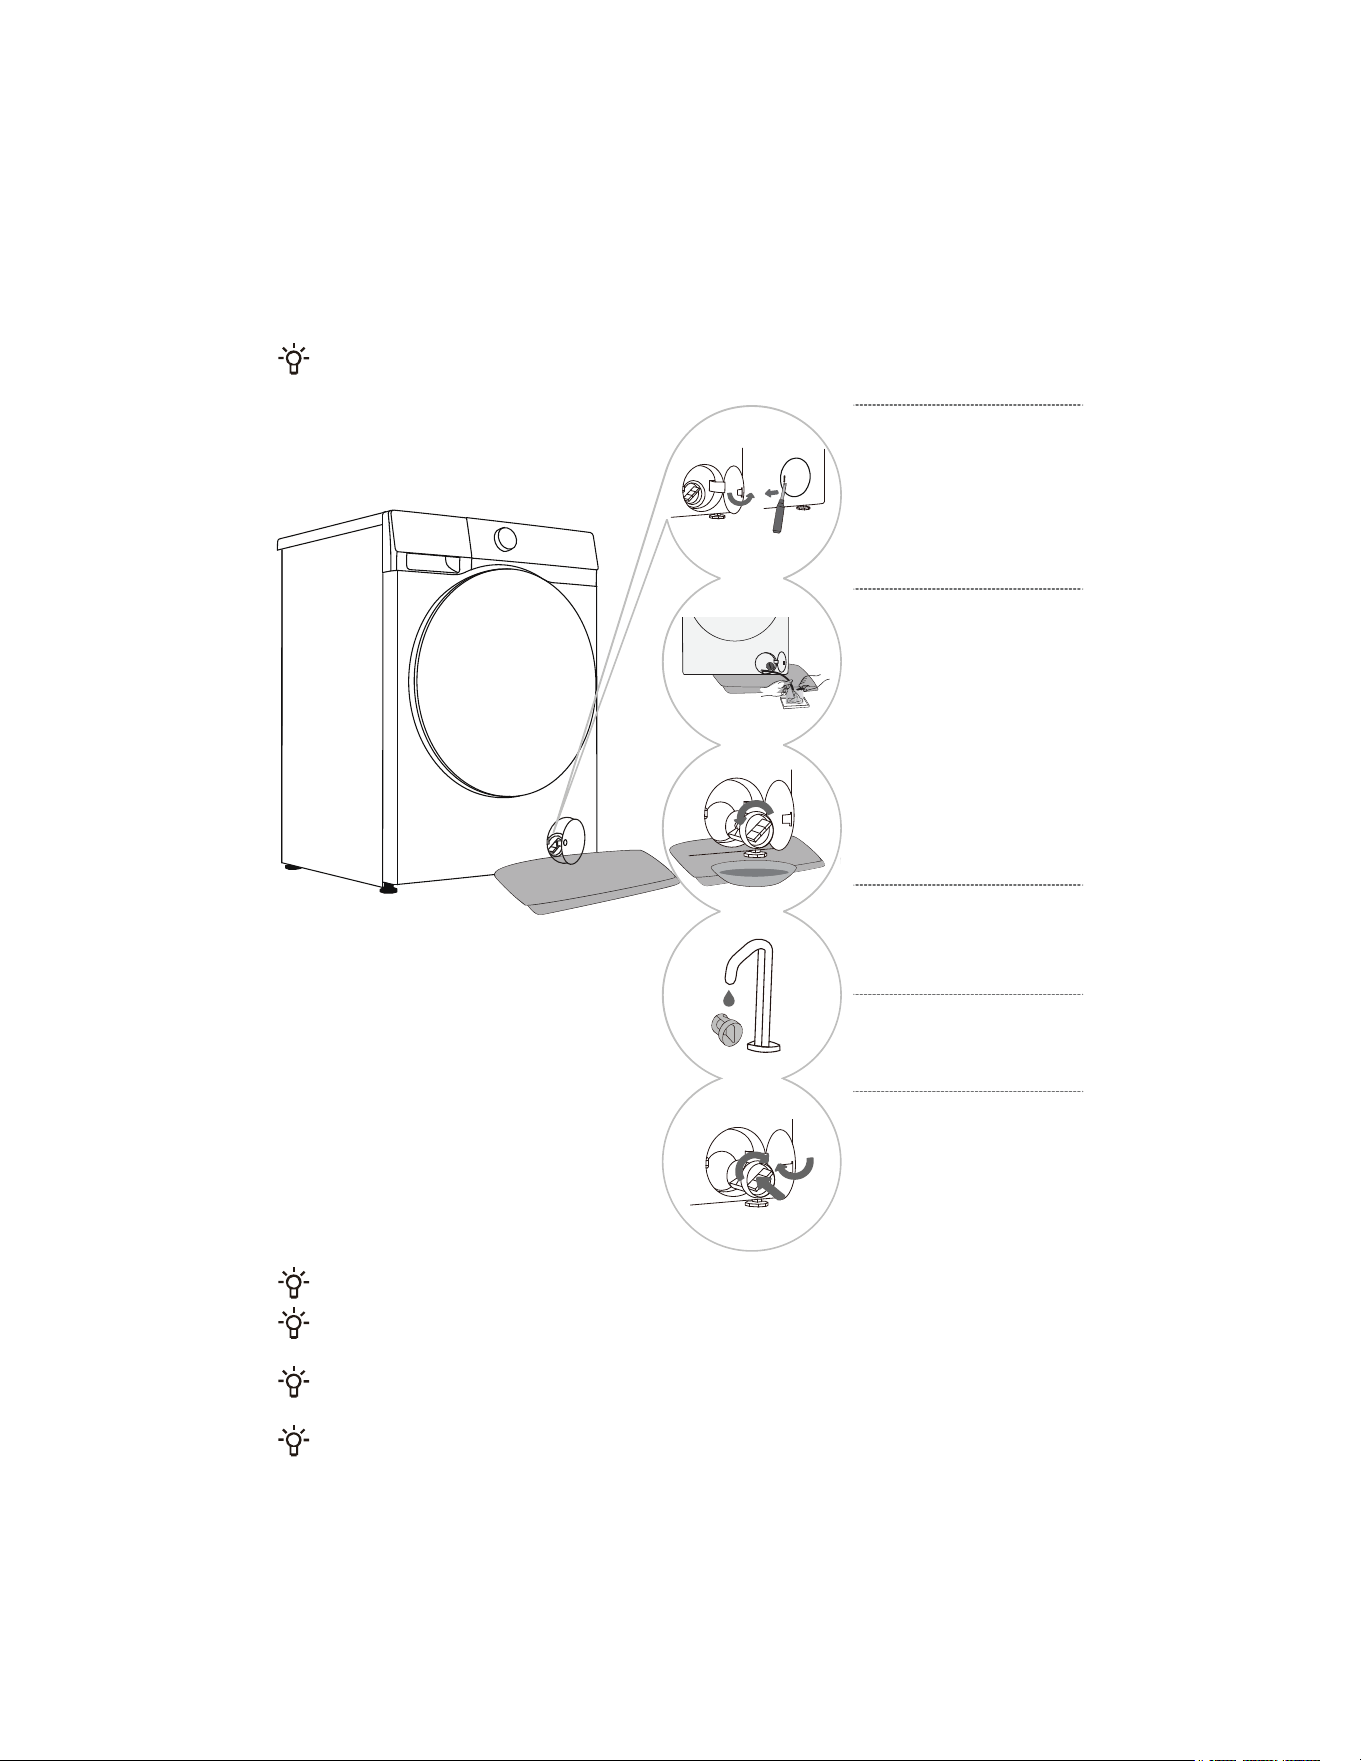
CLEANING THE PUMP FILTER
When cleaning the pump filter, water may spill out. Therefore, it is recommended to place an absorbent cloth on the floor.
Before draining the water, make sure the water has cooled down.
Style 1
Style 2
1
Open the drain pump filter
cover. Style 1: Press the door
cover; the filter cover pops out;
Style 2: Use the appropriate
tool (flat head screwdriver or a
similar tool) to open the drain
pump filter cover. (The style
depends on different models.)
2
Place a towel under the
filter door. If the device
has a discharge pipe, place
the discharge pipe end into a
container, rotate the discharge
pipe plug, remove it after it
loosens, wait until the water
drains out naturally, and
reinstall the discharge pipe
plug. If the device does not
have a discharge pipe, place a
container under the pump filter.
(The style depends on different
models.)
3
Slowly turn the pump filter
counterclockwise. Pull out
the pump filter to allow water to
drain slowly.
4
Clean the pump filter with
tap water.
5
Reinstall the pump filter as
shown in the illustration,
and tighten it clockwise. To
ensure a good seal, the filter
sealing ring surface should be
kept clean.
It is recommended to clean the drain pump filter every two months.
It is recommended to clean the drain pump filter every time you wash items such as quilts and bath towels that
are prone to shedding.
If the spin program cannot start or there is debris (buttons, coins, hairpins, etc.) in the drain pump, clean the
pump filter.
Do not open the pump filter while the device is in operation. Do not operate the device before the pump filter is
installed in place to avoid water leakage or malfunction.
38
CLEANING THE INLET FILTER
Check and clean the inlet filter regularly.
If the water inlet speed is slow, please clean the filter at the water inlet in
time. The specific steps are as follows:
1
Turn off the water
tap and loosen the
water inlet hose.
2
Remove the inlet
filter.
3
Clean the inlet filter.
4
Install the inlet filter.
5
Connect the water
inlet hose. Turn on
the water tap and make
sure there are no leaks at
the connections.
The inlet filter collects impurities and sediment in the water supply of the equipment. It is
recommended to clean the inlet filter at least once every six months. If the water is hard or there are
limescale deposits, the filter should be cleaned more frequently.
CLEANING THE OUTSIDE OF YOUR WASHER
Before cleaning the outside of your washer, please be sure to disconnect the machine
from the power supply.
Clean the appliance housing and control panel with a soft, damp cloth. Then wipe them dry with a soft
dry cloth.
Do not use solvents, abrasive cleaners, or cleaning agents that may damage the device (please
follow the recommendations and warnings provided by the cleaning agent manufacturer). Wipe the
drum door with a damp cloth, and then wipe it dry with a soft dry cloth.
If cleaning with a wet towel, make sure to ring out the water from the towel before wiping down
the washer.
39
TROUBLESHOOTING
The device is equipped with various automatic safety functions, ensuring that faults can be detected
promptly and effective safety countermeasures can be initiated.
These faults are usually minor and can be eliminated in a very short time.
When the device cannot operate normally, the display will show abnormal information. Please refer to
the warning content and take appropriate actions.
If the fault persists after you have handled it yourself according to the recommended
processing method, please contact after-sales service.
If the user performs maintenance by themselves or hires non-manufacturer after-sales personnel, all
consequences will be assumed by the user.
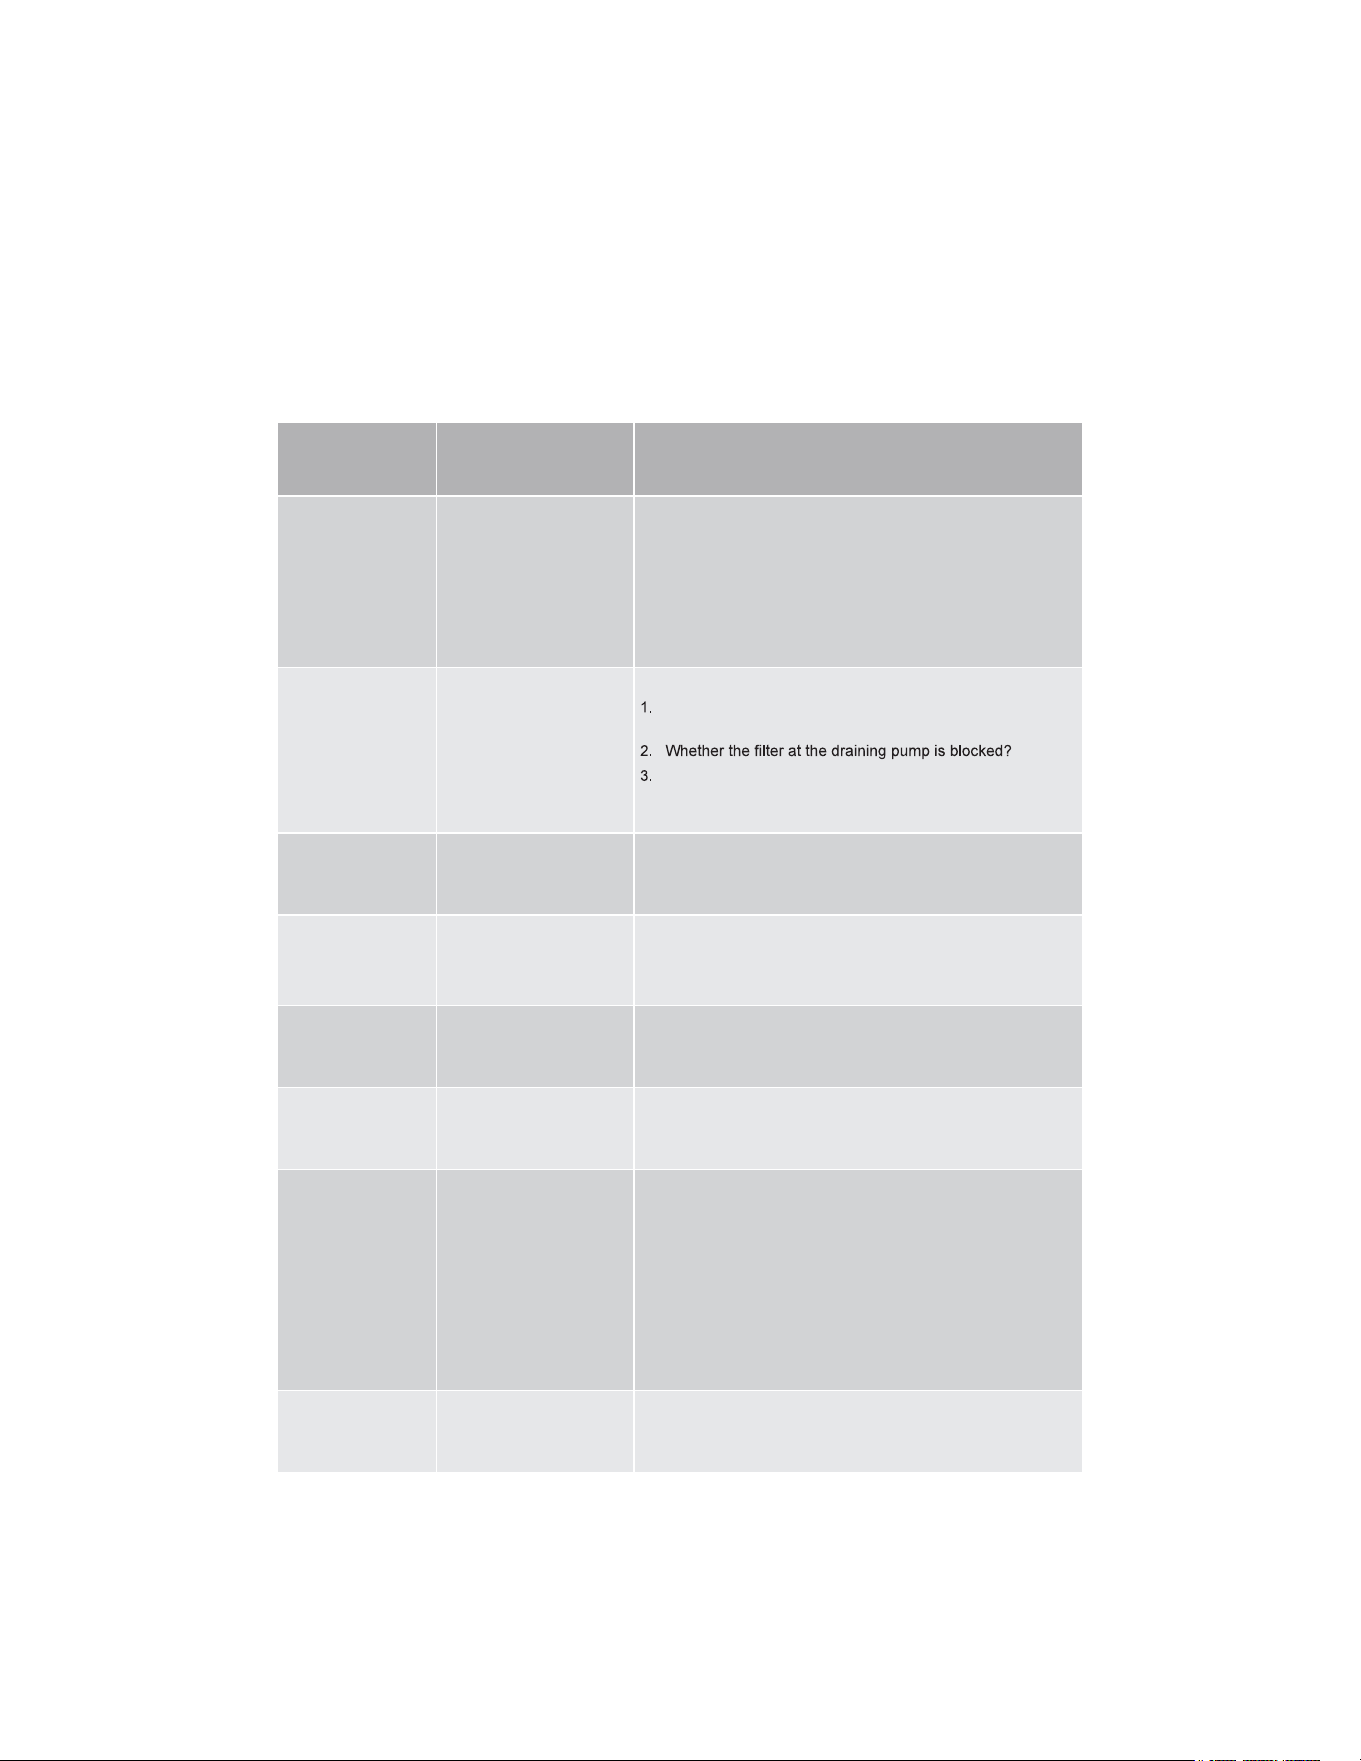
Fault Description Recommended handling methods
The device cannot start
normally
Check whether the device power supply is plugged into the power
socket, and whether the power socket is working properly (you can test
the power socket with other electrical devices).
Check if the machine door is closed properly.
Check if the "Start/Pause" button is pressed.
The device stops
operating under normal
working conditions
Check if the machine door is closed properly. If not, close the door and
press the "Start/Pause" button.
Check for excessive foam. When the device detects excessive foam,
it will enter a draining or standby state, or water will be taken to
eliminate foam for defoaming treatment. The program is paused during
this process, and the time displayed on the screen remains unchanged.
After defoaming is completed, the device will automatically resume
operation. If foam overflows and leaks, wipe away the foam to prevent
corrosion of the device.
Check if the device has activated the alarm protection.
The time at which the
program starts displaying
may be extended or
shortened by a certain
duration
This is an adaptive adjustment made by the device in response to factors
affecting the washing time.
Excessive foam.
Bulky clothing causes imbalance.
The low inlet water temperature causes the heating time to be prolonged.
Due to the above reasons, the remaining time displayed by the program
will be recalculated and updated in a timely manner (when the device is
making imbalance adjustments, the displayed time remains unchanged).
In addition, during the water intake phase, the device detects the load and
adjusts the program time accordingly (fuzzy control).
After washing, there is
residual detergent or
other additives in the
detergent drawer
Check whether the detergent drawer is installed correctly and kept clean.
Check whether the water pressure is normal and whether the filter
of the water inlet hose is blocked (refer to "MAINTENANCE AND
CLEANING").
The equipment has an
odor
The odor may be caused by the rubber material inside the device. This
is the smell of the rubber itself and will automatically disappear after a
few uses.
Faults or problems caused by external factors (such as lightning strikes, power grid failures,
natural disasters, etc.) are not covered by the warranty.
40
Fault Description Recommended handling methods
Abnormal sound/noise
occurs during the washing
process
A foreign object, such as a key, coin, or pin, may have
fallen into the drum.
Shut down the equipment and check whether there is any
foreign matter in the drum. If there is still abnormal noise
after restarting, please contact after-sales service.
The laundry may be unevenly distributed in the drum.
Pause the program and redistribute the laundry after
unlocking the door.
The equipment vibrates
intensely during spinning
Check whether the device is placed level, with the four
feet stably supported on a flat surface.
Check that the transport screws have been removed.
Before using the equipment, the transport screws must be
removed.
Check that all bottom support foam has been removed.
Poor Spin Effect
The device has a balance detection and correction
system. If clothes are very heavy (such as bathrobes),
the system detects imbalance and, after trying to spin dry
multiple times, will automatically reduce the spin speed or
even stop spinning to protect the device.
If clothes are still very wet after the spin cycle, take them
out, shake them out, and select the spin cycle again.
Excessive foam will affect the spin effect. Please use an
appropriate amount of low-foaming detergent.
Check whether the speed selection is set to "0" or "No Spin".
Water leakage problem
occurs
The water inlet hose is leaking.
Check whether the tap and the water inlet hose connector
are leaking. If there is leakage, wrap sealing tape around
the end of the tap or replace it with a suitable tap. It is
recommended to check whether the water inlet hose
connector and the water inlet valve port are tightened.
After tightening, the leakage will be eliminated.
The drain hose is leaking.
For top-drain models, the drain hose fixing clip should not
be removed; otherwise, the drainage will not stop.
The detergent drawer is leaking.
The detergent drawer is not closed tightly. Please push
the handle of the detergent drawer tightly to close it.
The door gasket is leaking.
Check the door gasket for any foreign matter and clean it.
Excessive wrinkling
Clothes were not taken out of the machine in time.
After the washing program is completed, please take out
the clothes from the machine in time.
The device is overloaded.
The drum should not be tightly packed with clothing, and
the door should close easily.
The spin speed may be too high.
Set the appropriate speed for the clothing type.
41
DRYING MALFUNCTION
(applicable to models with
drying function)
Fault Description Recommended handling methods
Appliance not drying
Check if a drying program has been set.
Check whether the water tap is turned off.
Check if the machine door is closed properly.
Check if the load of laundry is excessive (refer to the
"PROGRAM TABLE" for the recommended capacity for the
selected program). Remove some items and restart the drying
cycle.
Insufficient drying
Check if the load of laundry is excessive. Overloading can result
in poor drying performance and may cause wrinkles. Dry the
load in separate batches.
Check whether clothes that are difficult to dry (such as thick
cotton) are mixed with clothes that are easy to dry (such as
synthetic fibers).
Dry different types of clothes separately.
Drying time is too
long
Check if the load of laundry is excessive (refer to the
"PROGRAM TABLE" for the recommended capacity for the
selected program). Remove some items and restart the drying
cycle.
Insufficient spin of laundry (refer to the "POOR SPIN EFFECT"
section for handling).
The load contains many thick items (such as denim).
Odor during drying
The use of detergents or softeners with strong chemical
fragrances may cause odors during clothes drying.
If the appliance is not thoroughly cleaned inside, residual
dirt may cause odors during clothes drying. Please clean the
appliance regularly (refer to "MAINTENANCE AND CLEANING")
and promptly remove clothes after the drying cycle ends.
42
FAULT CODES AND TROUBLESHOOTING
When the device does not operate normally and the display shows the following code, it may not be a
fault. Please refer to the content in the fault code and take the corresponding measures.
Problem/
Fault
Description Solution
F01 Water inlet fault Check the following items:
1. Is the water tap open? Is the water pressure too low?
2. Is the water inlet hose pinched?
3. Is the water inlet hose filter clogged?
4. Is the water inlet hose frozen?
After excluding these problems, press the "Start/Pause" button
to continue running.
F03 Water outlet fault Check the following items:
Is the drain hose pinched? Is there water flowing in
the hose?
Is the drain hose frozen?
After excluding these problems, press the "Start/Pause" button
to continue running.
F24 Overflow
Pause the program first, then restart the program.
If the device continues to overflow, please turn off the tap and
contact a service technician.
F13 Door locking fault The appliance door is closed but cannot be locked.
Turn off the appliance, turn it back on, and restart the wash
program. If the fault still exists, please contact a service
technician.
F14 Door unlocking fault
The appliance door is closed but cannot be locked.
Turn off the machine first, then turn it on. If the fault still exists,
please contact a service technician.
Other Electronic module fault
Turn off the appliance and then turn it on again. Restart the
washing program.
If the fault still exists, please contact a service technician.
Unb Unbalance alarm To clear the unbalance alarm, follow these steps:
1. Entangled laundry
If the laundry is tangled together, first turn off the machine,
open the door, and loosen clothes. Then, place them back
into the drum, close the door, and select the separate "Spin"
program to try again.
2. Insufficient laundry weight
Turn off the machine, open the door, and add more clothes (or
add one or two towels). Close the door, and select the separate
"Spin" program to try again.
F15-F18 Drying abnormality
(applicable to models
with drying function)
Turn the appliance off and then turn it on.
If the fault still exists, please contact a service technician.
43
SERVICING
BEFORE CALLING MAINTENANCE PERSONNEL
When you contact the service center, please first state your device model.
Information such as model number, code/ID, model type, and serial number are displayed on the
nameplate of the device.
In case of defects, only use spare parts approved by the authorized manufacturer.
Repairs or any warranty claims resulting from incorrect connection or use of the device are not
covered by the warranty. In this case, the maintenance costs shall be borne by the user.
USAGE RECOMMENDATIONS
When washing colored clothes for the first time, separate them by color.
When washing heavily soiled clothes, load fewer clothes each time and use more powder detergent
or select the prewash function (if available). Before starting the wash, apply a special stain remover to
If you frequently wash clothes with cold water and liquid detergent, the appliance may develop
bacteria, resulting in unpleasant odors. We recommend running the "Drum Clean" (or other high-
temperature) program periodically to clean the drum.
Avoid washing very small loads to prevent energy waste and poor cleaning results. Shake out clothes
that are folded or tangled together before putting them into the drum.
Use detergents specifically designed for machine washing.
If the water hardness exceeds 14°dH, use a water softener. Damage to the heater caused by improper
use of water softeners is not covered by the warranty. Consult your local water supplier for water
hardness information.
The use of chlorine-containing bleach is not recommended, as it may damage the heater.
If using descaling agents, bleaches, or colorants, ensure they are suitable for this washing machine.
Do not use solvents or similar chemicals (such as paint thinner, turpentine, gasoline, etc.).
Do not put hardened powder detergent into the detergent dispenser, as this may clog the internal
hoses of the appliance.
Powder or liquid detergents should be added according to the manufacturer’s instructions, the wash
temperature, and the selected washing program.
When using thick liquid fabric care products, it is recommended to dilute them with water to prevent
clogging the detergent drawer drainage outlet.
Liquid detergents are suitable for washing programs without a prewash cycle.
Be careful not to confuse detergent and softener.
The higher the spin speed, the less moisture remains in the clothes. Therefore, using an appliance
with a drying function is more economical and efficient for drying clothes.

44
RECOMMENDATIONS FOR SPECIFIC STAIN
REMOVAL
Before using specialty stain removers, try natural, environmentally friendly methods to remove lighter,
stubborn stains. It is easier to remove stains if you treat them promptly!
Please wash with cold water (warm water) according to the following stain removal methods. Do not
use hot water!
Stain type Stain removal method
Mud If the stain is dried mud, first scrape it off the garment, then put it into the
machine for washing. For stubborn stains, soak the garment first in an enzyme-
based stain remover before washing.
For less stubborn stains, pre-treat the garment with liquid or powder detergent
manually before washing.
Antiperspirant Before placing the garment in the machine for washing, apply liquid detergent
directly to the stains.
For stubborn stains, use a stain remover for treatment. or wash with an oxygen
bleach.
Tea Soak or wash the garment in cold water. Add the stain remover if necessary.
Chocolate Soak or wash the garment in warm soapy water, then apply lemon juice and
rinse.
Ink Before starting the wash, apply a stain remover to stains. You may also use
the denatured alcohol, turn the garment inside out and place a tissue paper
under the stain, apply alcohol from the back side of the garment, then wash the
garment thoroughly after treatment.
Marker pen writing Dilute some starch with water, then apply it to the stain. After it dries, brush it off
with a brush; then, put the garment into the machine for washing.
Baby stains (urine,
mud, or food)
Soak the stained area in warm water for at least half an hour before putting the
garment into the machine for washing. To make it easier to remove stains, an
enzyme-based detergent can be added.
Grass Before putting the garment into the washing machine, soak them in an enzyme-
based detergent first. You can also soak it in diluted lemon juice or white vinegar
(for about 1 hour) to remove grass stains.
Egg Soak the garment in an enzyme-based detergent. Soak it in cold water for at
least 30 minutes. If the stain is stubborn, you can soak it for several hours. Then,
put the garment into the machine for washing.
Coffee Soak the garment in salt water. For older stains, you can soak it with a mixture
of castor oil, ammonia, and alcohol.
Shoe polish Apply edible oil to the stain, then wash the garment.

45
Stain type Stain removal method
Blood For fresh blood stains, first rinse the garment with cold water, then put it into the
machine for washing.
For dried blood stains, soak the garment in an enzyme-based detergent. Then,
put the garment into the machine for washing. If the stain remains, consider
using a bleach product suitable for the fabric type.
Glue or chewing
gum
Put the garment in a bag, then place it in the refrigerator until the stains harden.
Scrape it off with a dull knife. Dilute the stain with a prewash stain remover and
wash thoroughly. Finally, put the garment into the machine for washing.
Makeup Use a stain remover to pre-wash, then put the garment into the machine for
washing.
Butter Before putting the garment in the washing machine, apply a stain remover to the
stains. Then wash with hot water (temperature permitted by the garment).
Milk Soak the garment in an enzyme-based detergent. Soak the garment for at least
30 minutes. If the stain is stubborn, you can soak it for several hours. Then, put
the garment into the machine for washing.
Juice Apply salt water to the stains. Leave it for a short while, then wash. Alternatively,
before putting the garment in the washing machine, apply baking soda, white
vinegar, or lemon juice to the stains. For old stains, apply castor oil to the stains,
and rinse with cold water after 20 minutes. Finally, put the garment into the
machine for washing.
Wine Soak the garment in cold water for at least 30 minutes. Use the detergent at the
same time. Then, put the garment into the machine for washing.
Wax Put the garment in the refrigerator until the wax stains harden. Then scrape it off.
Place a piece of paper towel over the stain, then iron on top until the paper towel
absorbs the remaining wax.
Sweat Before placing the garment in the machine for washing, apply liquid detergent
directly to the stain.
Chewing gum Put the garment in the refrigerator until the chewing gum harden, then scrape it
off. Then, put the garment into the machine for washing.

46
DISPOSAL
The packaging is made of environmentally friendly materials and can be recycled,
reused, processed, or destroyed without causing harm to the environment. For this
purpose, the packaging materials are marked with appropriate labels.
This icon on the product or its packaging indicates that this product cannot be
disposed of as household waste. Please dispose of this product at a collection point
for the recycling of electrical and electronic equipment.
When the device reaches the end of its life and needs to be scrapped, please remove
all power cords, destroy door locks and switches to prevent the doors from locking.
This is to avoid the risk of children or small animals becoming trapped inside.
The labeling of the appliance complies with the provisions of the European WEEE
Directive.
Ensure this product is handled correctly and avoid inappropriate waste disposal
measures for this product, as this helps prevent potential negative impacts on the
environment and human health. For more information on product recycling, please
contact your local municipal department, your household waste disposal service
center, or the store where you purchased the product.