
DK2 CHPW102 man. v.200601
Model:
DETAIL K2 INC.
STOP!
Questions, problems, missing parts? Do not return to your retailer.
Please call our customer service department at: 1(888) 277-6960. Our customer service sta are ready to provide
assistance. If a part is damaged or missing, replacement parts can be shipped from our facility. For immediate help
with assembly, or for additional product information, call our North American toll-free number: 1(888) 277-6960.C
Save this manual
You will need this manual for safety instructions, operating procedures, and warranty.
Put it and the original sales invoice in a safe, dry place for future reference.
CHPW102
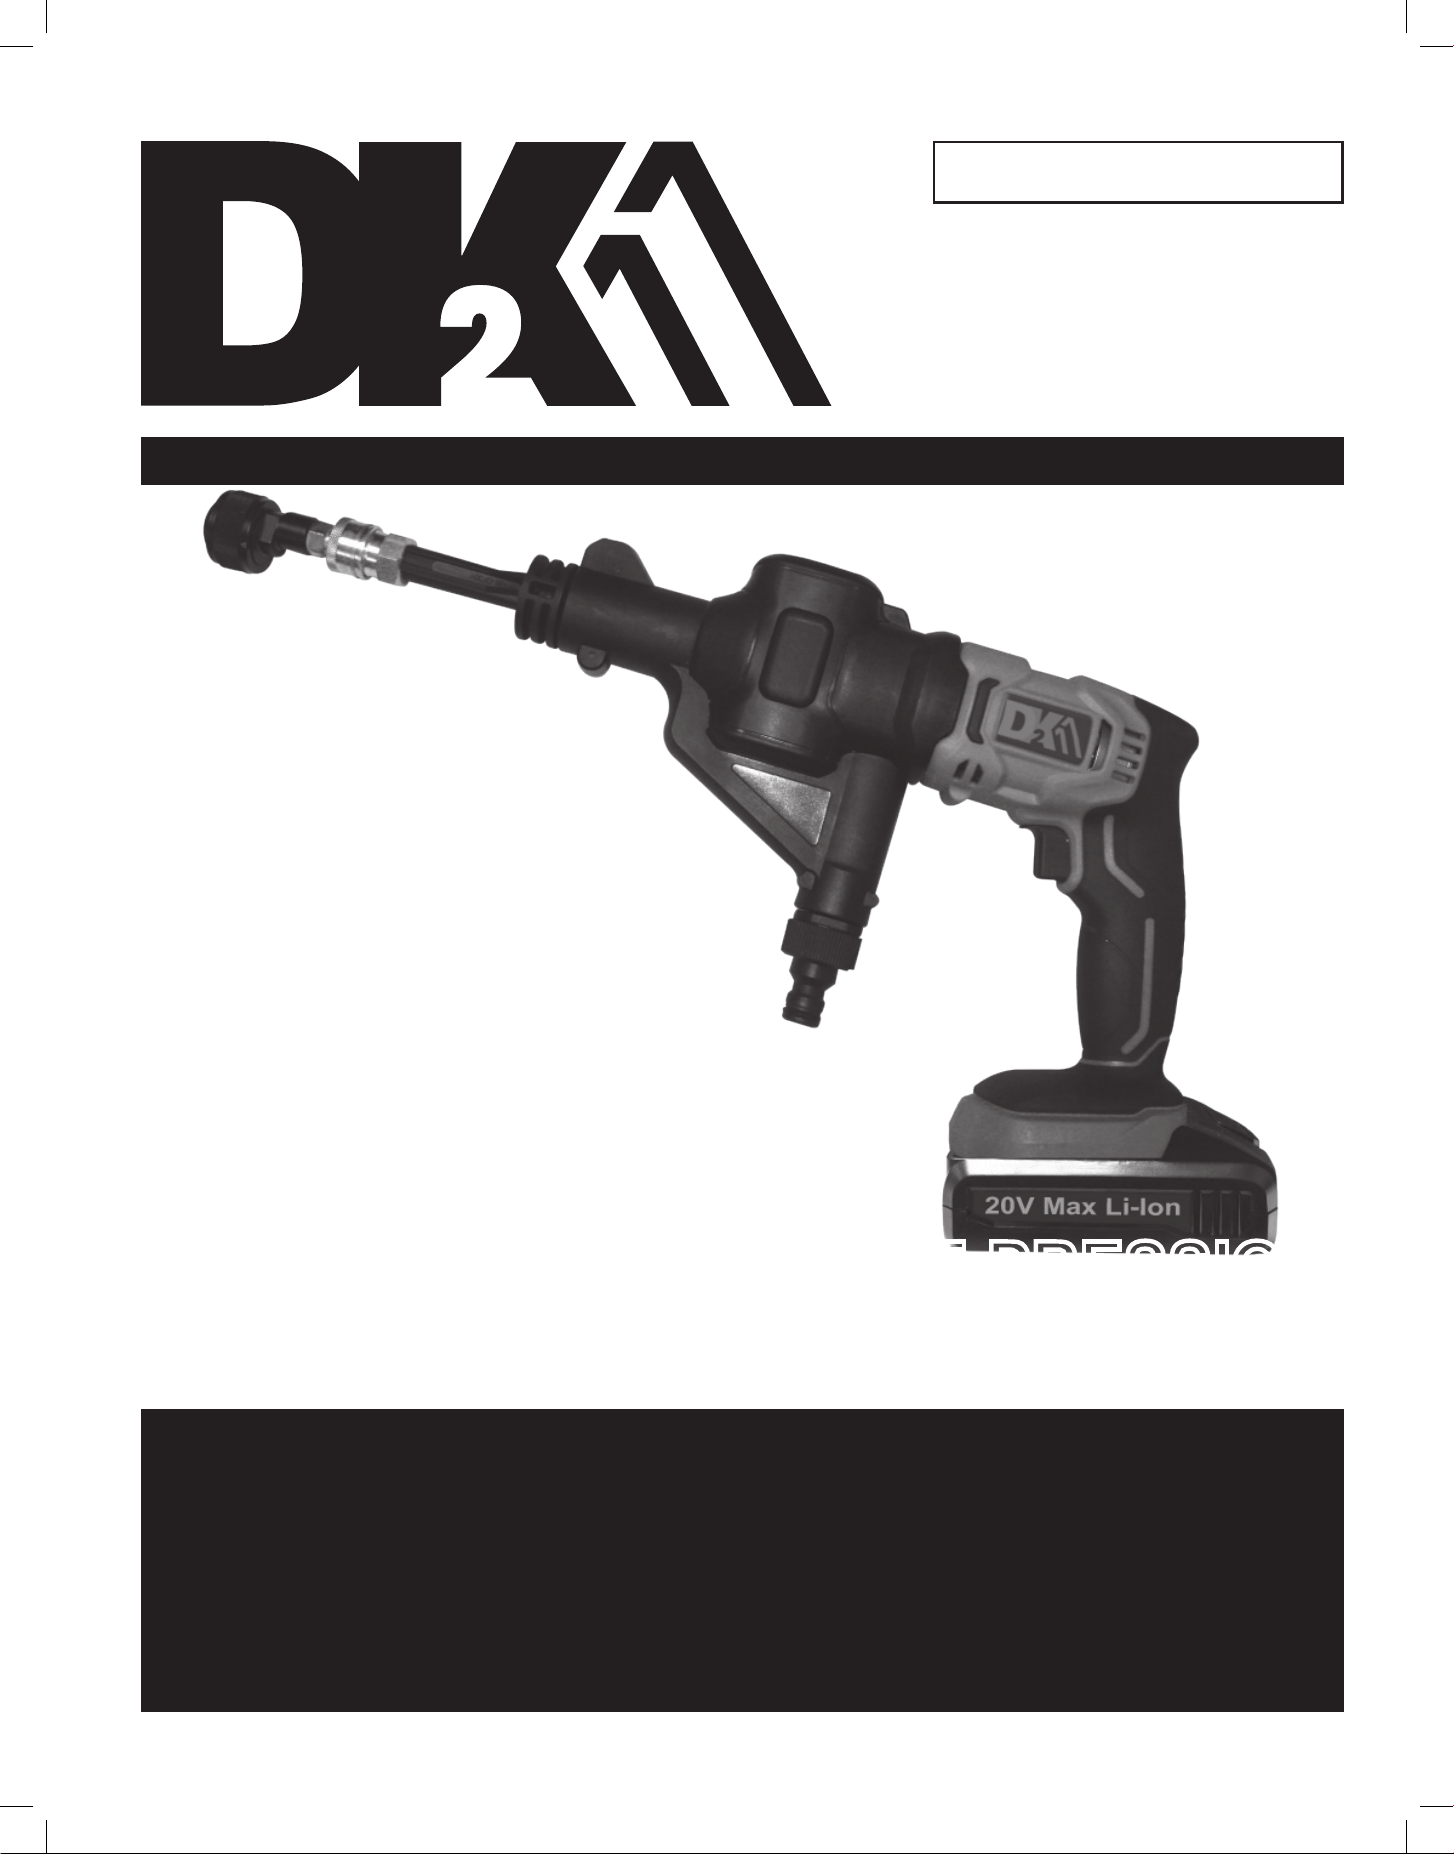
20V CORDLESS 4 IN 1
HIGH PRESSURE WASHER
Instruction manual
Manuel Français à l’interieur

En.2 DK2 CHPW102 man.
ENGLISH
THANK YOU FOR PURCHASING A DK2 TOOL!
TABLE OF CONTENTS
IMPORTANT SAFE OPERATING PRACTICES .................. EN.3
CALIFORNIA PROPOSITION 65 ......................................... EN.3
GENERAL ............................................................................... EN.3
WORK AREA SAFETY .......................................................... EN.3
ELECTRICAL SAFETY.......................................................... EN.3
PERSONAL SAFETY ............................................................ EN.4
POWER TOOL SAFETY ........................................................ EN.4
IMPORTANT SAFE OPERATING PRACTICES .................. EN.4
BATTERY PACK SAFETY WARNINGS ............................... EN.5
BATTERY TOOL USE AND CARE ....................................... EN.6
SPECIFIC SAFETY RULES FOR THIS TOOL .................... EN.6
SPECIFIC SAFETY RULES FOR INFLATOR ..................... EN.7
COMPONENTS AND FUNCTIONAL DESCRIPTION ......... EN.8
BATTERY PACK .................................................................... EN.9
SPECIFICATIONS ................................................................. EN.9
OPERATING INSTRUCTIONS ............................................. EN.9
20V CORDLESS PRESSURE WASHER ............................. EN.10
OPERATING INSTRUCTIONS ............................................. EN.10
20V CORDLESS INFLATOR ................................................. EN.13
20V CORDLESS VACUUM CLEANER ................................ EN.14
20V CORDLESS BLOWER ................................................... EN.14
MAINTENANCE ..................................................................... EN.14
CLEANING ............................................................................. EN.14

v.200601 En.3
ENGLISH
IMPORTANT SAFE OPERATING PRACTICES
CAUTION: SAFETY FIRST
—
Read this manual carefully before
operating your tool. We recommend that you read this manual
completely so that you are fully aware of all important safety
recommendations. Record your serial number.
To use this tool properly, you must observe the safety regulations, the assembly
instructions and the operating instructions to be found in this manual. All persons
who use and service the tool must be informed about its potential hazards and
must be acquainted with this manual. Children should be supervised at all times
if they are in the area in which the tool is being used. It is also imperative that
you observe the accident prevention regulations in force in your area. The same
applies for general rules of occupational health and safety.
CALIFORNIA PROPOSITION 65
WARNING: This product can expose you to chemicals including DEHP,
which is known to the State of California to cause cancer and birth defects
or other reproductive harm. For more information go to www.P65Warnings.
ca.gov.
GENERAL
WARNING! Read all safety warnings instructions, illustrations and
specications provided with this battery powered tool. Failure to follow the
warnings and instructions may result in electric shock, re and/or serious
injury. The term “power tool” in the warnings refers to your mains-operated
(corded) power tool or your battery-operated (cordless) power tool. Read your
owner’s manual carefully. Get to know your tool and familiarize yourself with
its applications and limitations.
1. Use the tool according to the guidelines in this manual. Do not abuse it or
force it to do a job for which it was not designed.
2. Use only original equipment parts and accessories. Consult the owner’s
manual. The use of incorrect accessories may produce unforeseen hazards.
WARNING: Make no attempt to assemble and operate the tool until you
have thoroughly read this manual and completely understood its contents.
Operating your DK2 tool improperly can result in serious personal injury and/
or damage to both tool and vehicle. Since Detail K2 Inc. does not complete
its assembly or installation, we cannot be held responsible for any personal
injury or damages that product misuse may produce.
WORK AREA SAFETY
1. Keep work area clean and well lit. Cluttered and dark areas invite accidents.
2. Do not operate battery powered tools in explosive atmospheres, such as in
the presence of ammable liquids, gases or dust. Power tools create sparks
which may ignite the dust or fumes.
3. Keep children and bystanders away while operating a power tool.
Distractions can cause you to lose control.
ELECTRICAL SAFETY
1. Battery charger plugs must match the outlet. Never modify the plug in any
way. Unmodied plugs and matching outlets will reduce risk of electric shock.
2. Avoid body contact with earthed or grounded surfaces such as pipes,
radiators, ranges and refrigerators. There is an increased risk of electric
shock if your body is earthed or grounded.
3. Do not expose battery powered tools to rain or wet conditions. Water entering
a power tool will increase the risk of electric shock.
4. Do not abuse the cord. Never use the cord for carrying, pulling or unplugging
the charger. Keep cord away from heat, oil, sharp edges or moving parts.
Damaged or entangled cords increase the risk of electric shock.

En.4 DK2 CHPW102 man.
ENGLISH
IMPORTANT SAFE OPERATING PRACTICES
PERSONAL SAFETY
1. Stay alert, watch what you are doing and use common sense when operating
a battery powered tool. Do not use any power tool while you are tired or
under the inuence of drugs, alcohol or medication. A moment of inattention
while operating power tools may result in serious personal injury.
2. Use safety equipment. Always wear eye protection. Everyday eyeglasses
have only impact resistance lenses. They are not safety glasses. Safety
equipment such as dust mask, non-skid safety shoes, hard hat, or hearing
protection used for appropriate conditions will reduce personal injuries.
3. Prevent unintentional starting. Ensure the switch is in the o-position before
connecting to power source and/or battery pack, picking up or carrying
the tool. Carrying battery powered tools with your nger on the switch or
energizing power tools that have the switch on invites accidents.
4. Remove any adjusting key or wrench before turning the tool on. A wrench or
a key left attached to a rotating part of the power tool may result in personal
injury.
5. Do not overreach. Keep proper footing and balance at all times. This enables
better control of the tool in unexpected situations.
6. Dress properly. Do not wear loose clothing or jewellery. Keep your hair,
clothing and gloves away from moving parts. Loose clothes, jewellery or long
hair can be caught in moving parts.
7. Do not let familiarity gained from frequent use of tools allow you to become
complacent and ignore tool safety principles. A careless action can cause
severe injury within a fraction of a second.
8. For safety, keep children and pets at a distance from the tool and the
operating area.
POWER TOOL SAFETY
1. Do not force the power tool. Use the correct tool for your application. The
correct power tool will do the job better and safer at the rate for which it was
designed.
2. Do not use a power tool if the switch does not turn it on and o. Any power
tool that cannot be controlled with the switch is dangerous and must be
repaired.
3. Disconnect the battery from the tool before making any adjustments,
changing accessories, or storing your tool. Such preventive safety measures
reduce the risk of starting the power tool accidentally.
4. Store idle power tools out of the reach of children and do not allow persons
unfamiliar with the power tool or these instructions to operate the power tool.
Battery powered tools are dangerous in the hands of untrained users.
5. Maintain power tools. Check for misalignment or binding of moving parts,
breakage of parts and any other condition that may aect the tools operation.
If damaged, have the power tool repaired before use. Many accidents are
caused by poorly maintained power tools.
6. Use the power tool, accessories and tool bits etc., in accordance with these
instructions and in the manner intended for the particular type of power tool,
taking into account the working conditions and the work to be performed.
Use of the power tool for operations dierent from intended could result in a
hazardous situation.
7. Keep handles and grasping surfaces dry, clean and free from oil and grease.
Slippery handles and grasping surfaces do not allow for safe handling and
control of the tool in unexpected situations.
8. Carefully inspect your tool before every use. Particularly check the alignment
of moving parts and tighten any loose screws and bolts.
9. This unit is not intended for commercial use.
WARNING! Only use attachments or accessories recommended by the
manufacturer.
v.200601 En.5
ENGLISH
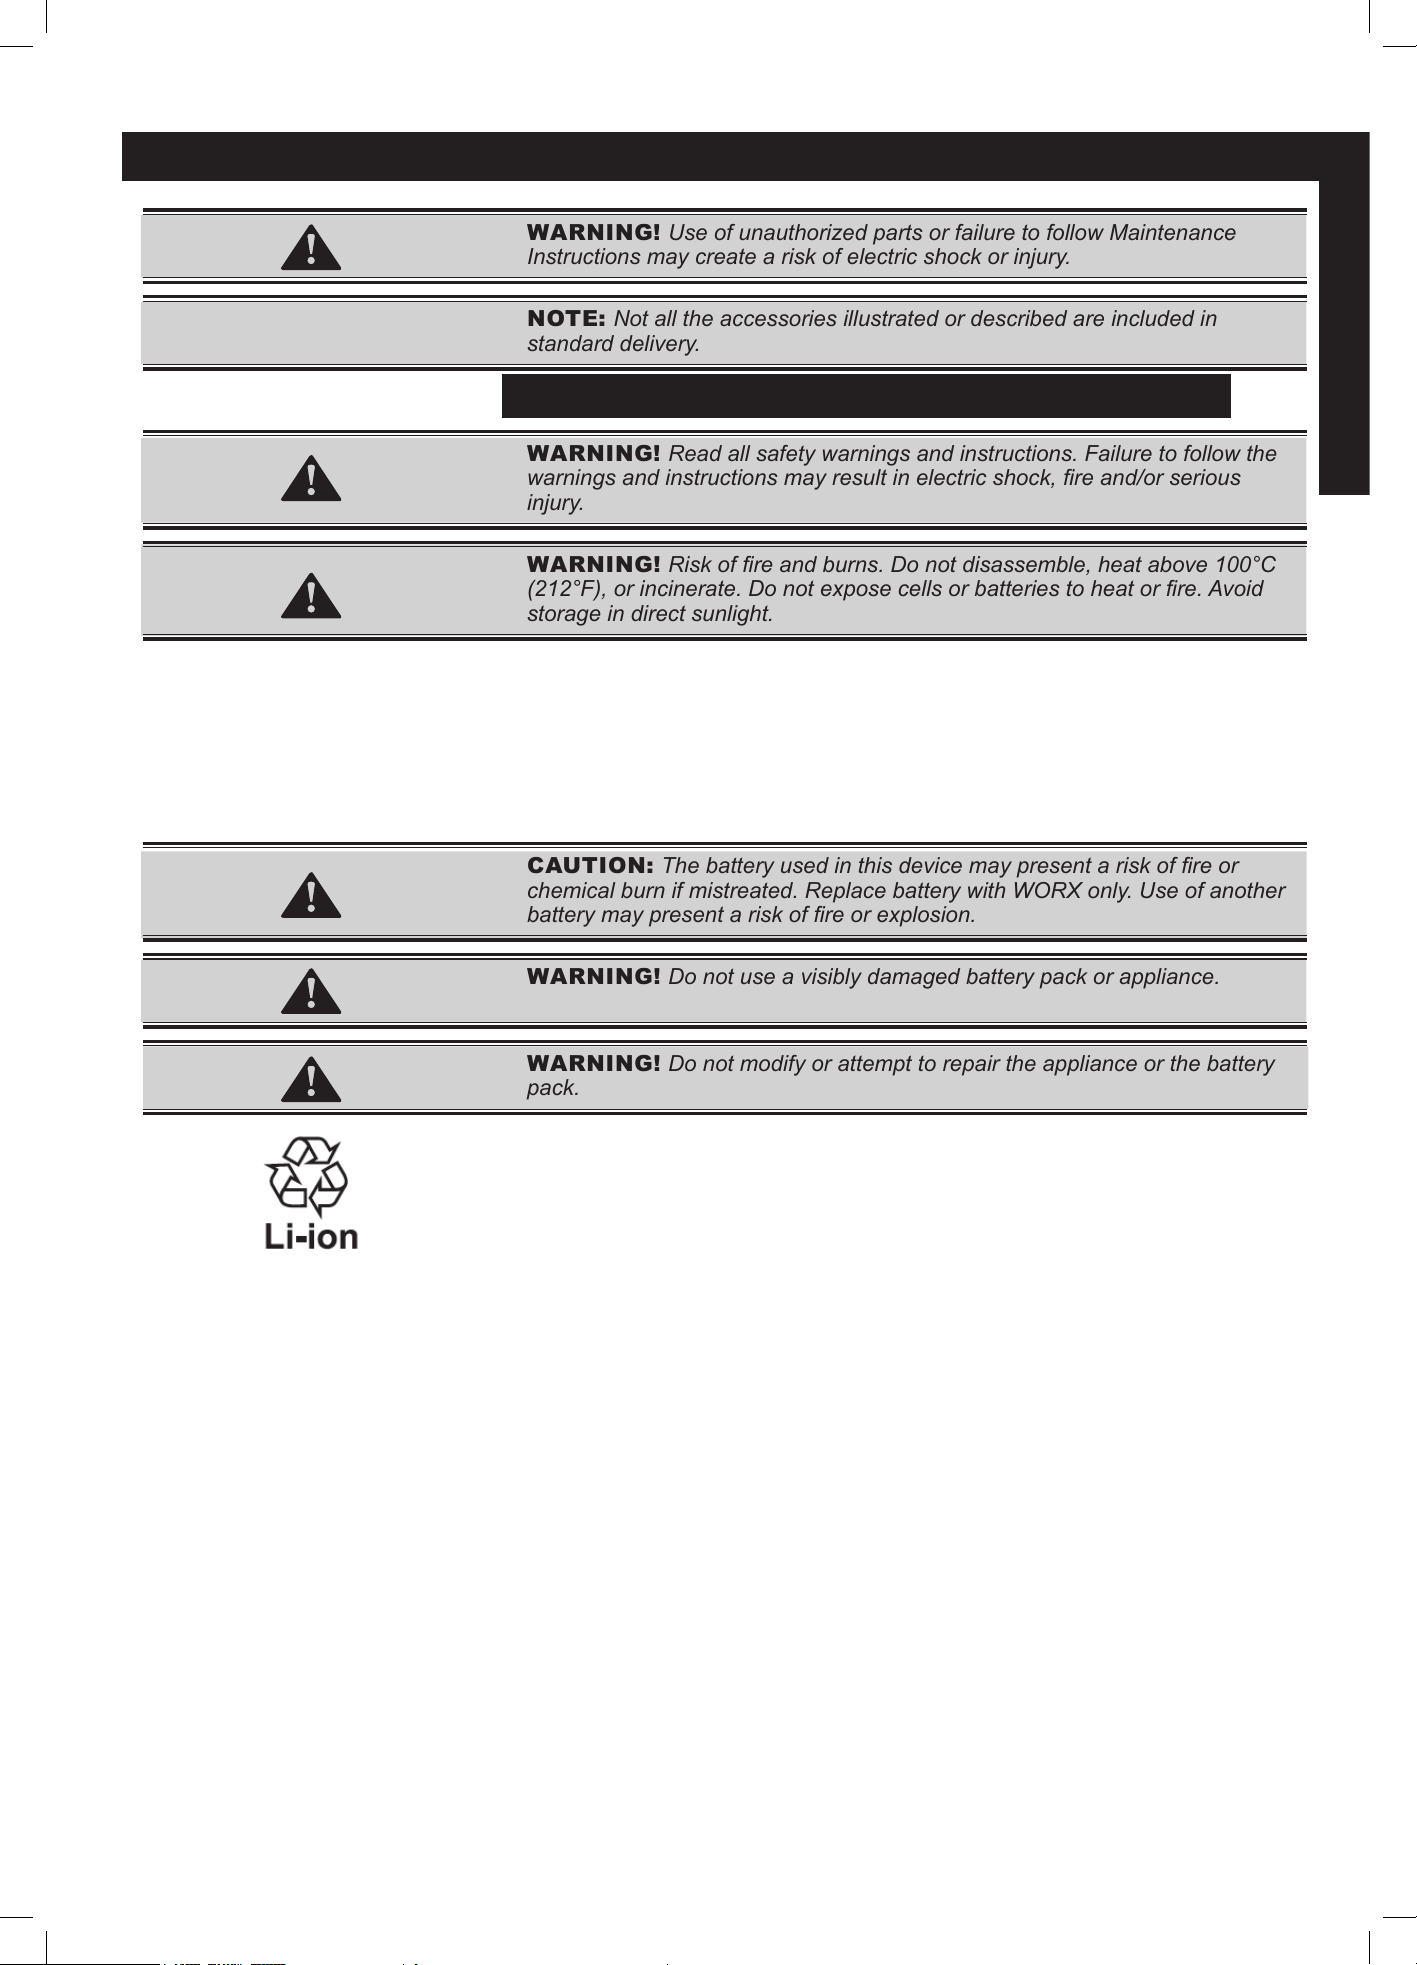
WARNING! Use of unauthorized parts or failure to follow Maintenance
Instructions may create a risk of electric shock or injury.
NOTE: Not all the accessories illustrated or described are included in
standard delivery.
BATTERY PACK SAFETY WARNINGS
WARNING! Read all safety warnings and instructions. Failure to follow the
warnings and instructions may result in electric shock, re and/or serious
injury.
WARNING! Risk of re and burns. Do not disassemble, heat above 100°C
(212°F), or incinerate. Do not expose cells or batteries to heat or re. Avoid
storage in direct sunlight.
1. DISPOSE OF USED BATTERY PROMPTLY. When disposing of secondary
cells or batteries, keep cells or batteries of dierent electrochemical systems
separate from each other.
2. KEEP BATTERY OUT OF REACH OF CHILDREN and in original package
until ready to use.
3. NEVER PUT BATTERIES IN MOUTH. If swallowed, contact your physician
or local poison control center.
CAUTION: The battery used in this device may present a risk of re or
chemical burn if mistreated. Replace battery with WORX only. Use of another
battery may present a risk of re or explosion.
WARNING! Do not use a visibly damaged battery pack or appliance.
WARNING! Do not modify or attempt to repair the appliance or the battery
pack.
4. BATTERY MUST BE RECYCLED.
5. DO NOT SHORT-CIRCUIT A CELL OR BATTERY. Do not store cells or
batteries haphazardly in a box or drawer where they may short-circuit each
other or be short-circuited by conductive materials.
6. DO NOT subject cells or batteries to mechanical shock.
7. KEEP CELLS AND BATTERIES CLEAN AND DRY. Wipe the cell or
battery terminals with a clean dry cloth if they become dirty.
8. DO NOT maintain spare cells and batteries on charge when not in use.
9. RETAIN THE ORIGINAL CELL AND BATTERY LITERATURE for future
reference.
10. DO NOT USE ANY CHARGER OTHER THAN THAT SPECIFICALLY
PROVIDED for use with the equipment. Secondary cells and batteries
need to be charged before use. Always use the correct charger and refer
to the manufacturer’s instructions or equipment manual for proper charging
instructions.
11. WHEN POSSIBLE, REMOVE THE BATTERY from the equipment when
not in use.
12. PREVENT UNINTENTIONAL STARTING. Ensure the switch is in the
o-position before connecting to battery pack, picking up or carrying the
appliance. Carrying the appliance with your nger on the switch or energizing
appliance that have the switch on invites accidents.
13. DISCONNECT THE BATTERY PACK FROM THE APPLIANCE
BEFORE MAKING ANY ADJUSTMENTS, changing accessories, or
storing appliance. Such preventive safety measures reduce the risk of
starting the appliance accidentally.
IMPORTANT SAFE OPERATING PRACTICES
En.6 DK2 CHPW102 man.
ENGLISH
IMPORTANT SAFE OPERATING PRACTICES
BATTERY TOOL USE AND CARE
1. Recharge only with the charger specied by the manufacturer. A charger that
is suitable for one type of battery pack may create a risk of re when use with
another battery pack.
2. Use battery powered tools only with specically designated battery packs.
Use of any other battery packs may create a risk if injury and re.
3. When battery pack is not in use, keep it away from metal objects, like paper
clips, coins, keys, nails, screws or other small metal objects, that can make a
connection from one terminal to another. Shorting the battery terminals may
cause burns or a re.
4. Do not burn the battery or dispose of it by incineration.
WARNING! Under abusive conditions, liquid may be ejected from the
battery; avoid contact. If contact accidentally occurs, ush with water. If liquid
contacts eyes, additionally seek medical help. Liquid ejected from the battery
may cause irritation or burns.
SPECIFIC SAFETY RULES FOR THIS TOOL
WARNING! When using this product, basic precautions should always be
followed, including the following:
z To reduce the risk of injury, close supervision is necessary when a product is
used near children.
z Know how to stop the product and bleed pressures quickly. Be thoroughly
familiar with the controls.
z Stay alert – watch what you are doing.
z Do not operate the product when fatigued or under the inuence of alcohol or
drugs.
z Keep operating area clear of all persons
z Do not overreach or stand on unstable support. Keep good footing and
balance at all times.
z Follow the maintenance instructions specied in the manual.
WARNING! Risk of injection or injury- Do not direct discharge stream at
persons.
z Do not spray electrical apparatus and wiring.

v.200601 En.7
ENGLISH
IMPORTANT SAFE OPERATING PRACTICES
SPECIFIC SAFETY RULES FOR INFLATOR
GENERAL INFORMATION AND SAFETY WARNINGS
1. INSPECT THE TIRE INFLATOR before each use and do not use if any of
the components are bent, broken, burnt, melted, wet or damaged.
2. CHECK THE TIRE PRESSURES BEFORE INFLATING so as not to
exceed the rated pressure as the tires may burst if over inated.
3. DO NOT USE THE TIRE INFLATOR ON HIGH PRESSURE TIRES such
as those used on commercial vehicles, agricultural or specialist vehicles.
4. DO NOT KINK OR BLOCK THE AIR HOSE while the Tire inator is
working.
5. THE INFLATOR IS NOT DESIGNED FOR CONTINUOUS USE.
Operation over an extended period of time will overheat and damage the tire
inator. It should not be used continuously for more than 30 minutes. After 10
minutes, turn it o and let it cool for 15 minutes before resuming operation.
6. TURN THE POWER OFF IMMEDIATELY If the inator is making an
abnormal sound, or the temperature of the unit is too high, and let it cool for
at least 30 minutes before resuming operation.
7. DO NOT LEAVE THE INFLATOR UNATTENDED when operating and
keep out of the reach of children.
8. STORE THE INFLATOR in a cool, dry and dust free environment in the box
When not in use.
9. DO NOT PLACE THE INFLATOR ON OR NEAR SOURCES OF DIRECT
HEAT or in locations where it will be exposed to direct sunlight for prolonged
periods of time.
10. DO NOT OPERATE THE TIRE INFLATOR IN OR AROUND
FLAMMABLE ENVIRONMENTS.
11. USE ONLY THE ADAPTERS SUPPLIED with the tire inator.
12. THE TIRE INFLATOR IS NOT WATERPROOF.
13. NEVER PUT THE CONNECTOR AND ADAPTORS INTO YOUR
MOUTH, EAR OR EYE. They are not toys.
14. THE INFLATOR CONTAINS NO USER SERVICEABLE PARTS – Do not
open.
15. FOR YOUR OWN SAFETY BE SURE TO FOLLOW THE
INSTRUCTIONS carefully when using the inator. Other ways of use not
mentioned in this manual could lead to injury.
16. NO ALTERATIONS SHOULD BE MADE to the Tire inator, a attachments
or adaptors supplied by the manufacturer.
Improper use of the inator can cause damage to property and possibly harm
the user. When using the tire inator ensure the vehicle is parked in a safe
location, o the road with the vehicle handbrake on and where your personal
safety is not at risk.
En.8 DK2 CHPW102 man.
ENGLISH
COMPONENTS AND FUNCTIONAL DESCRIPTION
12
fig.1
1
2
3
4
5
6789
10
11
13
13
14
15
15
16
17
18
19
20
21
22
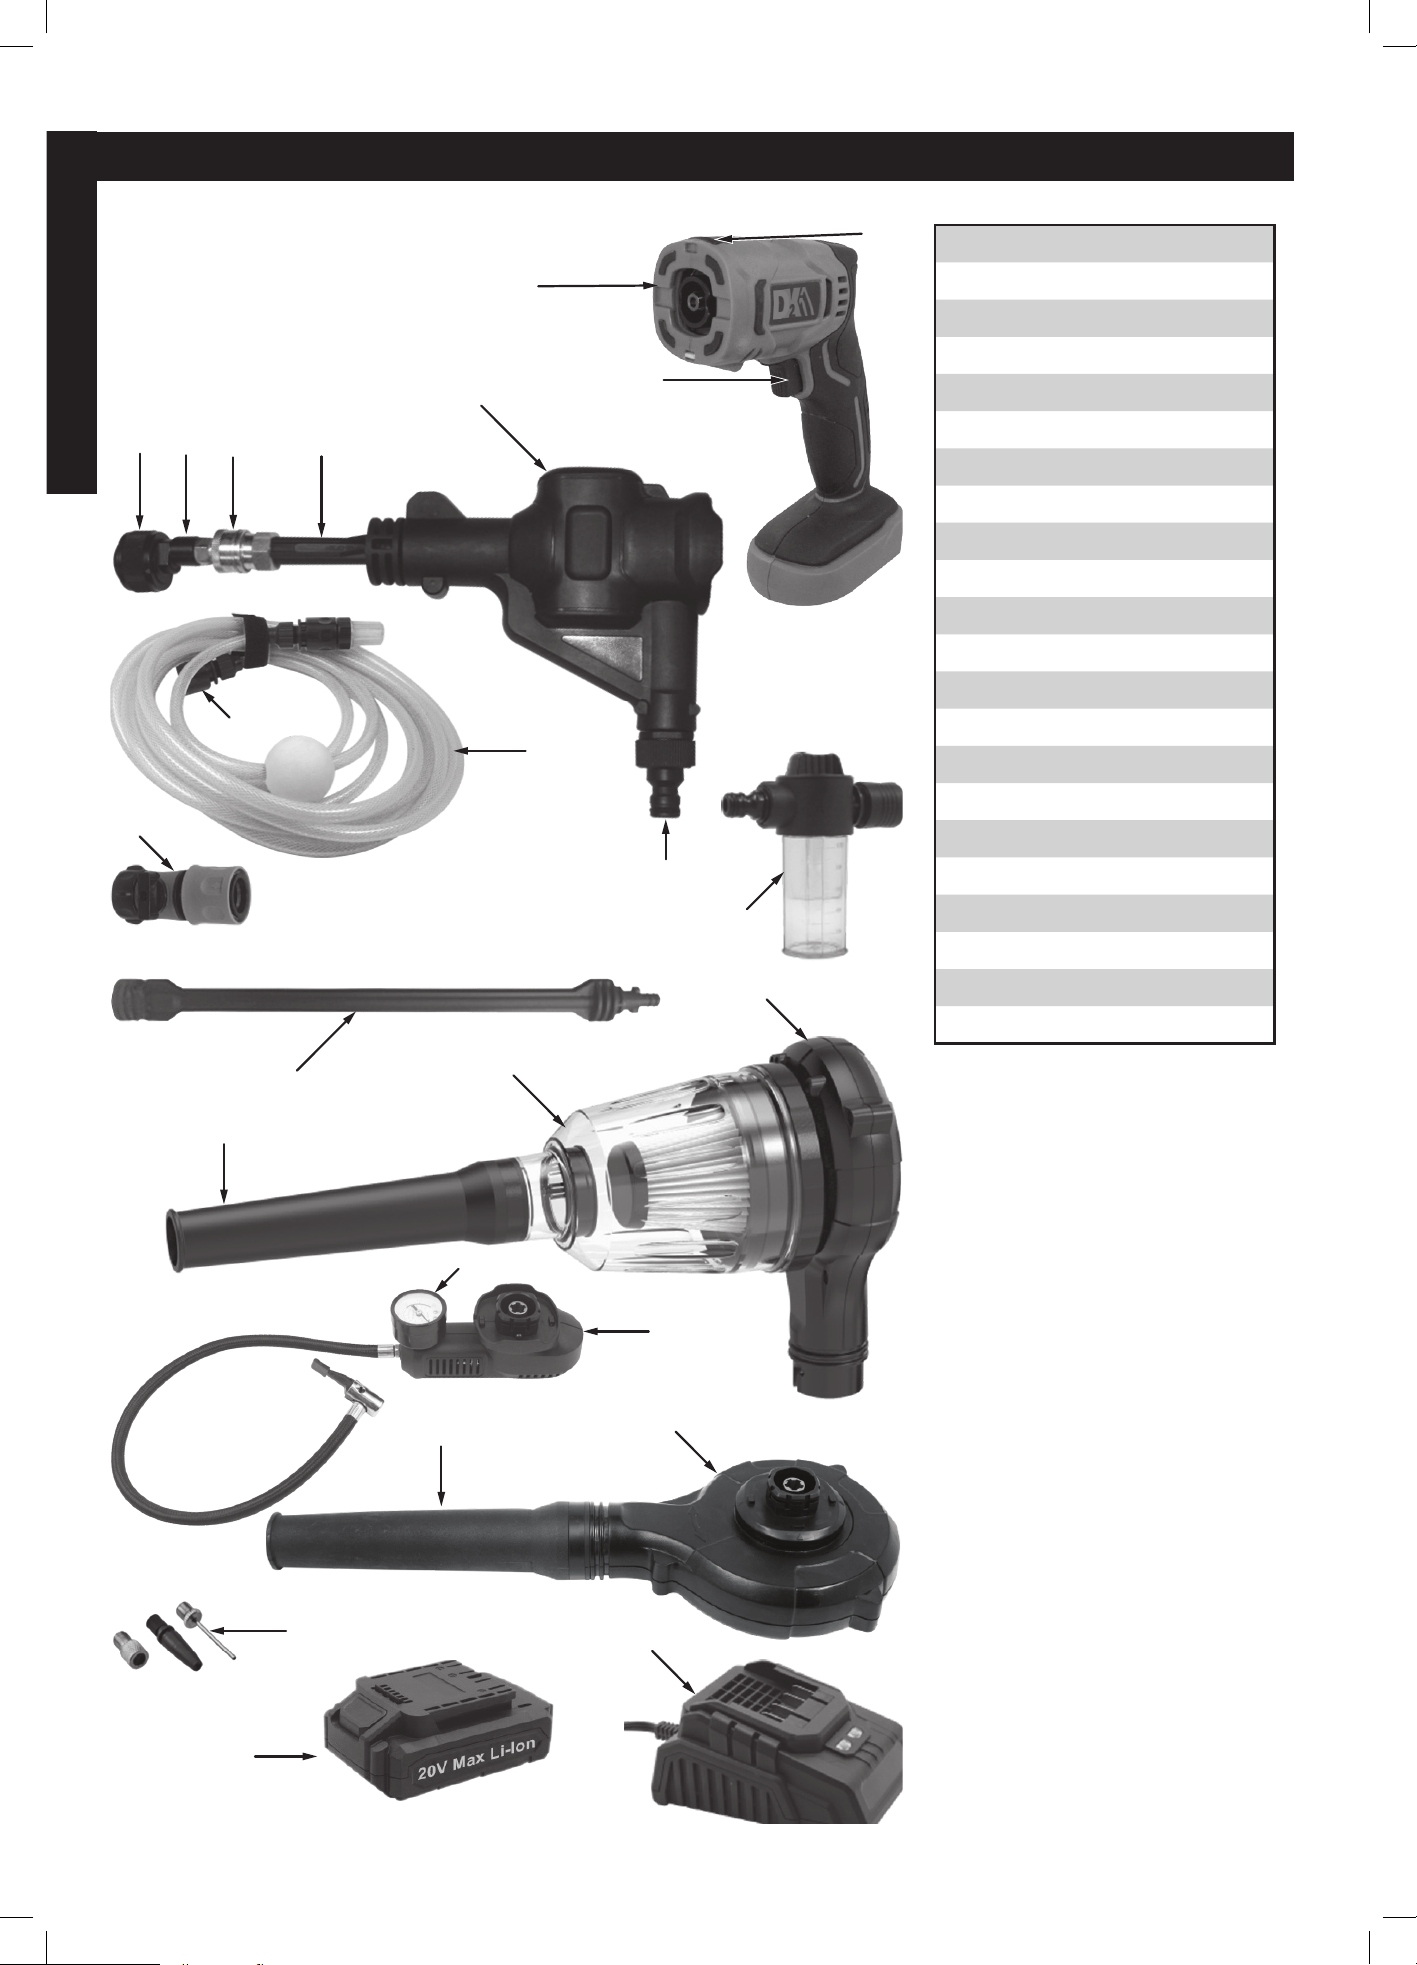
1 Main power unit
2 Release push button
3 Power switch
4 Water inlet
5 Pressure wash unit
6 Short wand
7 Brass chuck
8 Nozzle adapter
9 Multi-spray nozzle
10 Exension wande
11 Inator
12 Air pressure gauge
13 Blower/vacuum body
14 Dust cup
15 Blower/vacuum tube
16 6 m intake hose
17 Hose connector
18 Water pipe adapter
19 Soap bottle
20 Air nozzles
21 Battery
22 Charger
v.200601 En.9
ENGLISH
SPECIFICATIONS
OPERATING INSTRUCTIONS
20 V Cordless Pressure Washer
Max. Pressure 25 Bar (est.)
2500 kPa (est.)
363 psi (est.)
Flow 2.5 L/min. (est.)
0.66 U.S gal. (est.)
Takeup Hose (1 included) 6 m
19.7 ft.
Short wand (1 included)
Spray nozzle (1 included)
20 V Cordless Inator
Max. Pressure 7 Bar
700 kPa
100 psi
Ination Hose 50 cm
19.6 in.
20 V Cordless Vacuum Cleaner
No-load speed 0 - 15000 rpm
Air ow 2.5 m³/min
88.3 cu. ft.
Vacuum 8.0 kPa
1.16 psi
Container capacity 0.6 L
0.63 qt.
20 V Cordless Blower
No-load speed 0 - 15000 rpm
Air ow 2.5 m³/min
88.3 cu. ft.
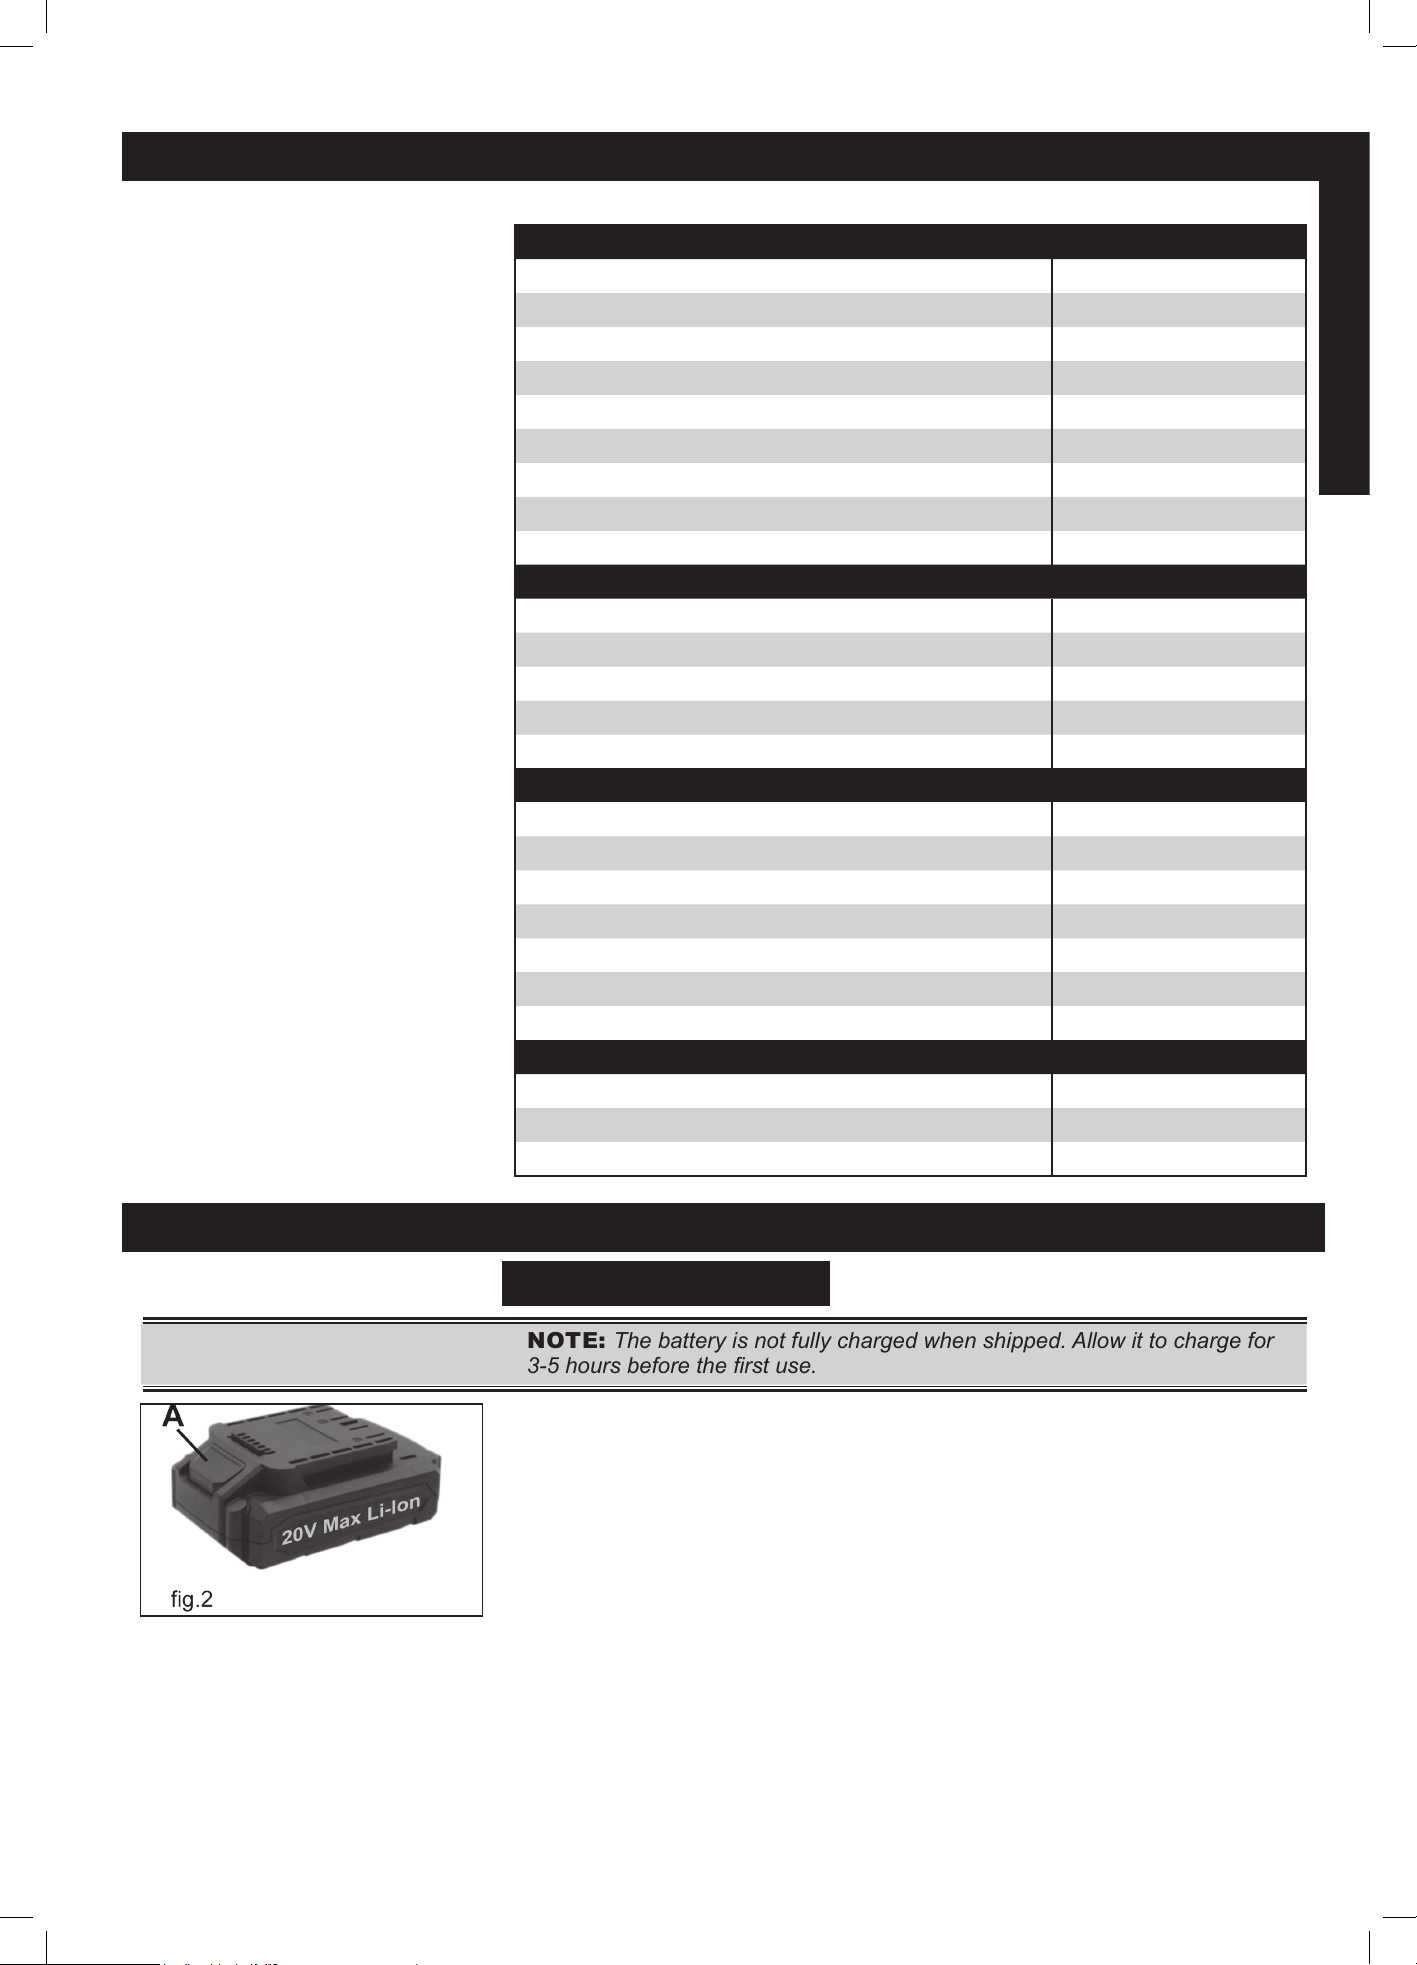
BATTERY PACK
NOTE: The battery is not fully charged when shipped. Allow it to charge for
3-5 hours before the rst use.
1. Normal charging time is 1-2 hours when the battery is completely dead.
2. Replace the battery (g.2) with a freshly charged one when tool performance
begins to diminish.
○ Severe heat is most destructive to a battery; the more heat it generates,
the faster the battery loses power.
○ Allowing a battery to get too hot can shorten its life.
3. Never over-discharge a battery when using the tool even after tool
performance has decreased. When tool performance begins to diminish, stop
using the tool and recharge the battery for optimal performance.
En.10 DK2 CHPW102 man.
ENGLISH
OPERATING INSTRUCTIONS
HOW TO CHARGE THE BATTERY PACK
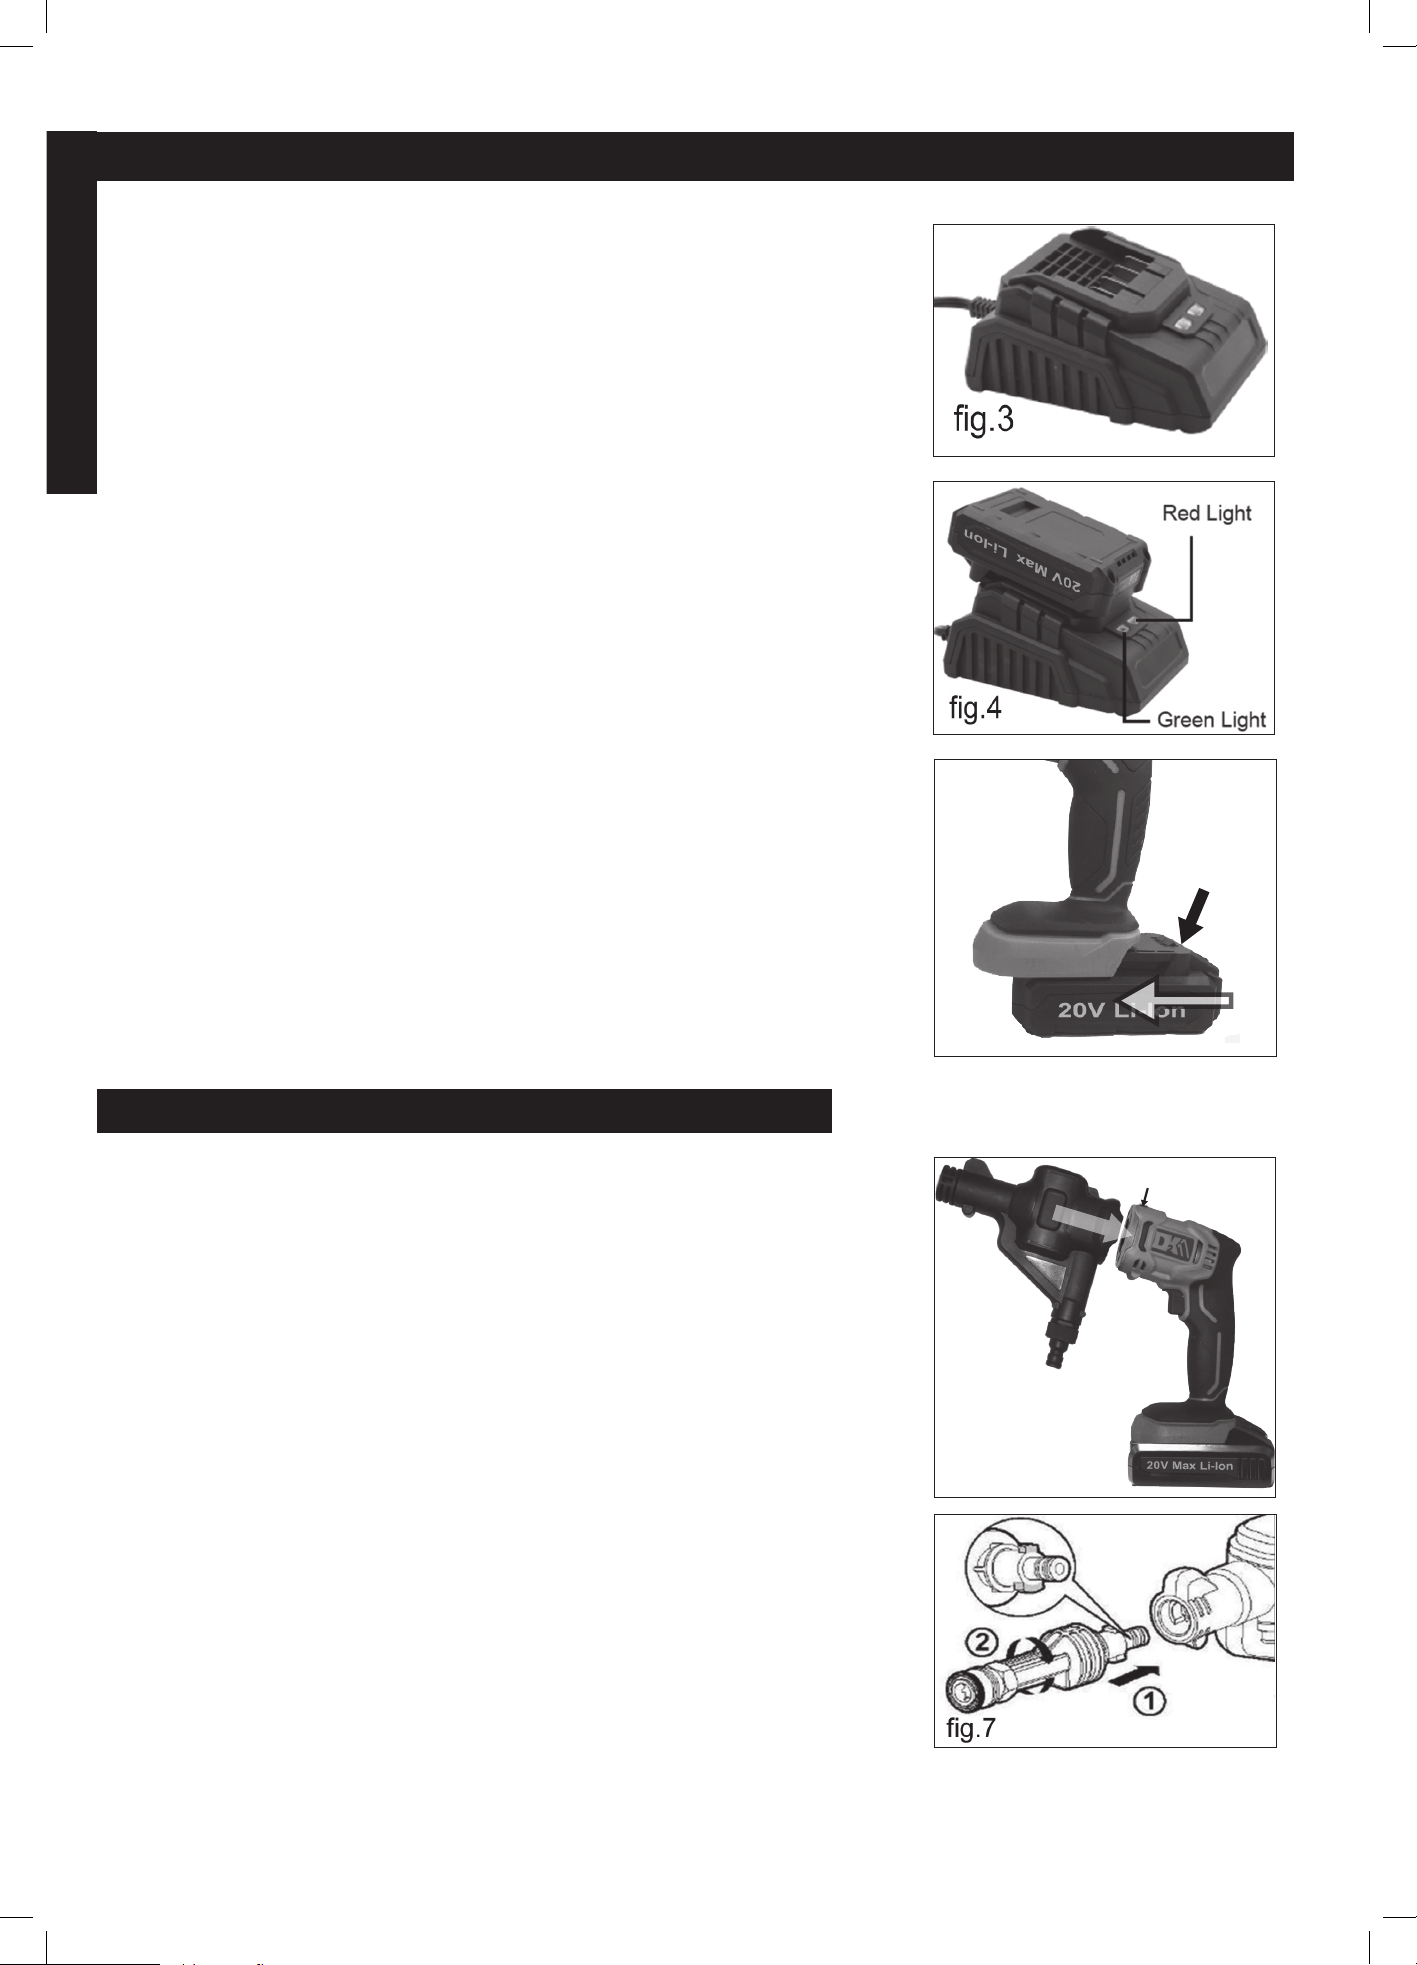
z Plug the charger into a 120 volt receptacle. When the charger is connected to
AC household current, the green light is on.
z When the battery is properly inserted into the charger and charging (g.4),
the red light will ash.
z The red light will turn o and the green light remains lit once the battery is
fully charged.
z After the charging is completed, remove the battery pack from the charging
stand immediately. When charging more than one battery pack, allow the
charger 15 minutes rest between charges.
z After many charge/discharge cycles, your battery may lose its ability to hold a
charge. If so, please replace it. Dispose of batteries at an appropriate waste
disposal facility. Do not throw batteries away in common trash receptacles.
BATTERY INSTALLATION AND REMOVAL
z To install: slide battery pack into the bottom of the tool(g.5) until you hear a
click. Make sure that the battery release latch (g.5, A) is in place and battery
is secure before operation.
z To remove: Press the battery release latch and pull the battery pack out at
the same time.
20V CORDLESS PRESSURE WASHER
1. Attach the pressure wash unit to the main power unit as shown in g.6. The
lock and release button (g.6, L) on top of the power unit should engage the
pressure wash unit.
2. Press the short wand (the brass chuck should be at the other end) into the
pressure wash unit (g.7, 1) and turn clockwise until it is xed in place (g 7,
2).
A
fig.5
fig.6
v.200601 En.11
ENGLISH
OPERATING INSTRUCTIONS
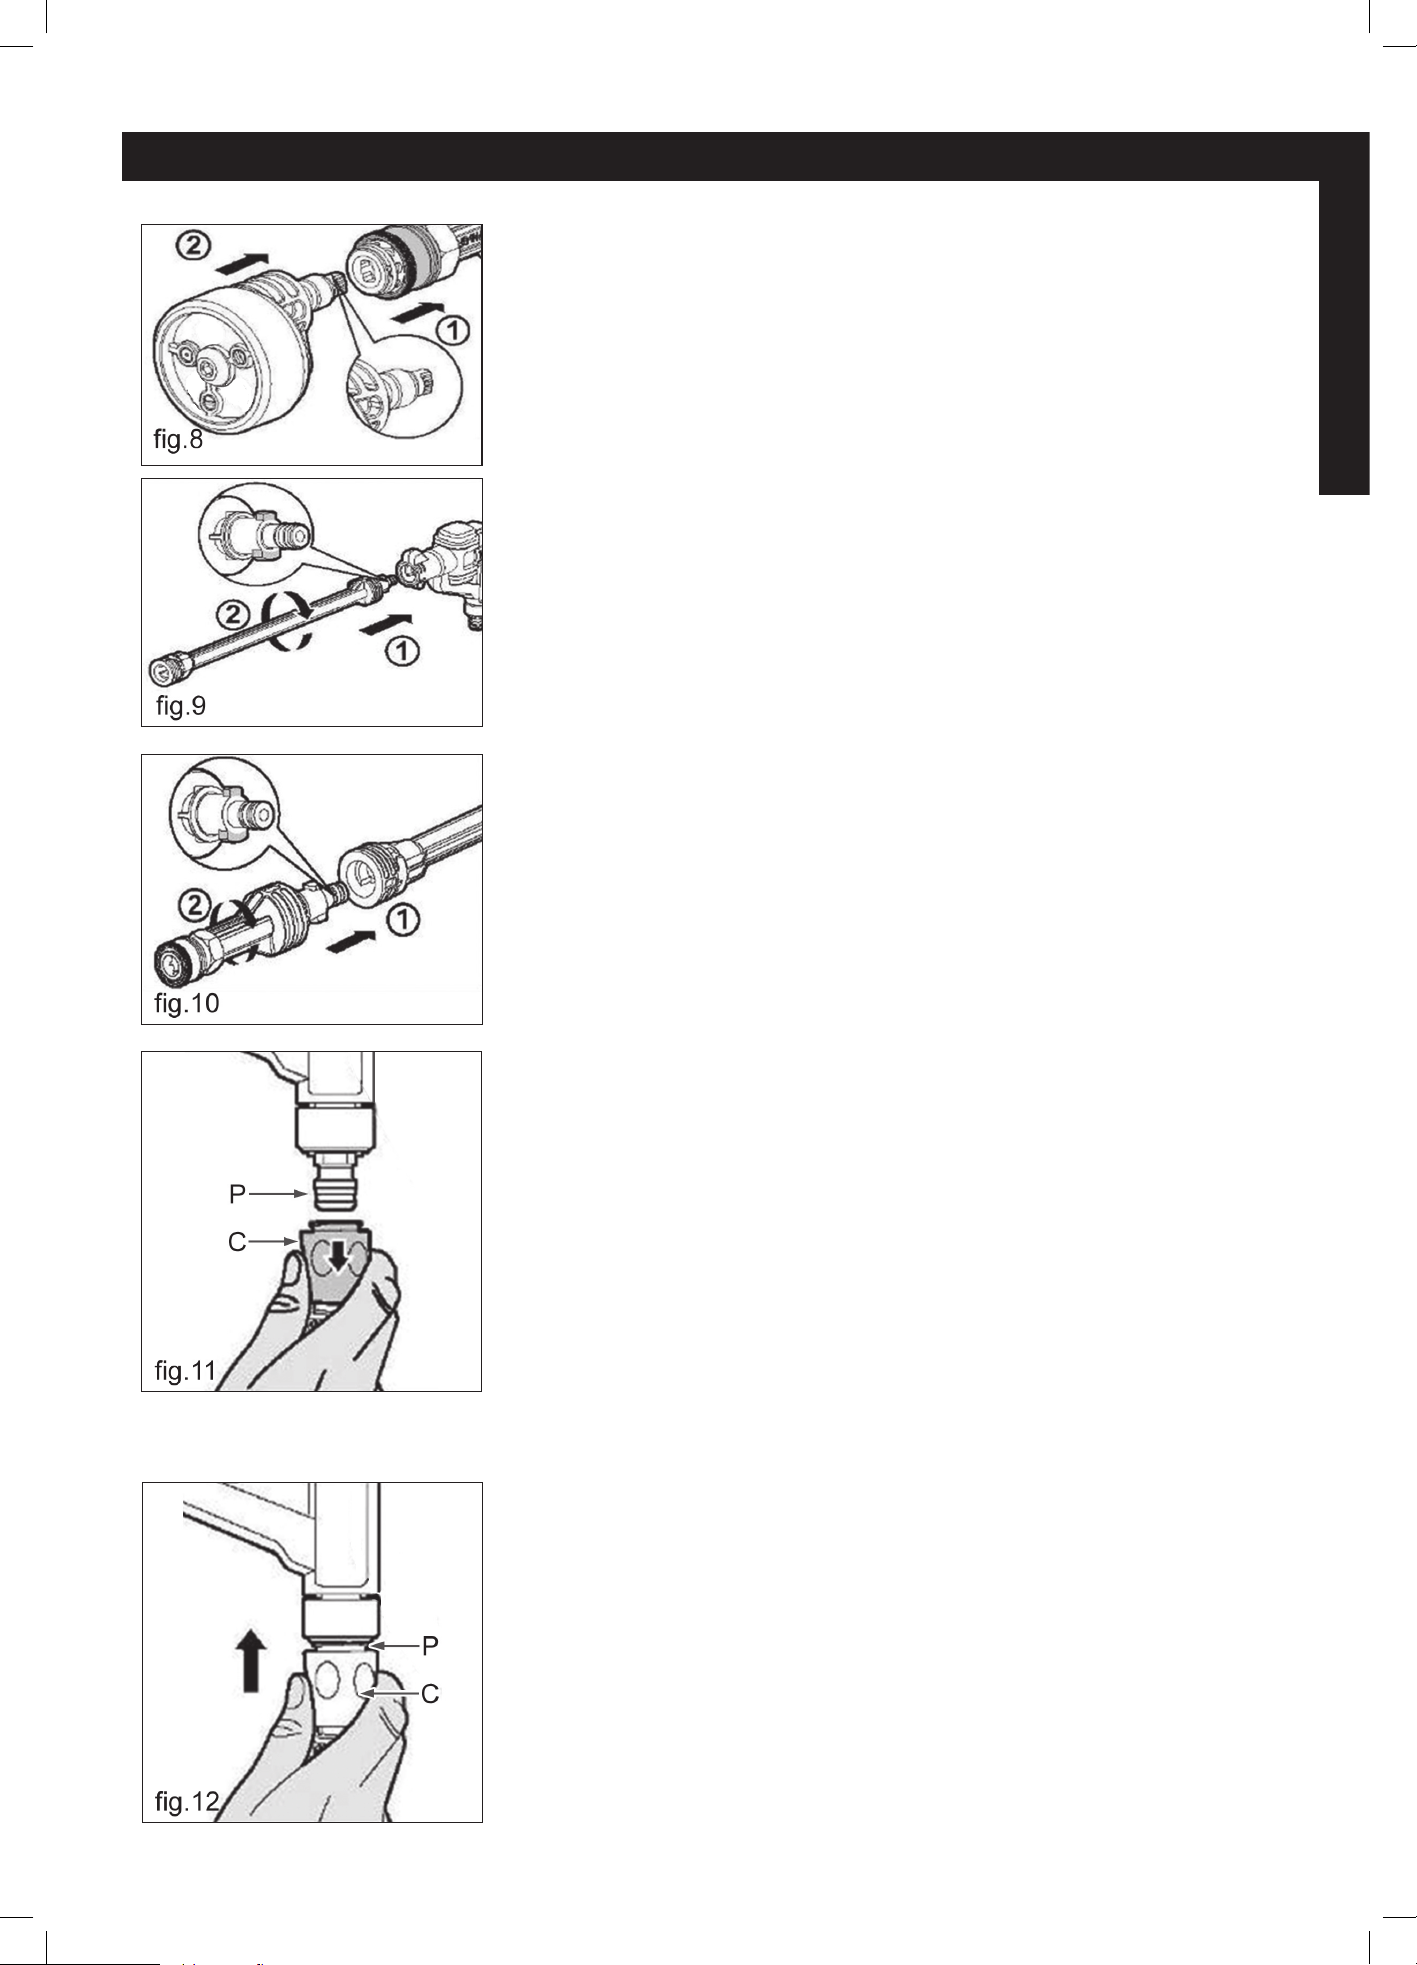
3. Pull backward on the brass chuck ring (g.8, 1), insert the nozzle adapter
with multi-spray nozzle into the short wand (g.8, 2) and release the chuck
ring.
4. If it is more convenient to position yourself further from the spray nozzle or
you require a longer reach, insert the longer extension wand (g.9, 1) into the
pressure wash unit and turn it clockwise until it is xed in place (g.9, 2).
5. Following that, add the short wand (g.10) before nally inserting the nozzle
adapter with multi-spray nozzle into the short wand as in g 8 above.
ADD THE INTAKE HOSE
1. Pulling back on the connector’s outer sleeve (g.11, C),
push the hose connector onto the inlet of the pressure wash unit (g.12, P) .
Release the outer sleeve.
En.12 DK2 CHPW102 man.
ENGLISH
2. Immerse the other end of the intake hose in a water source, ideally a bucket
of water.
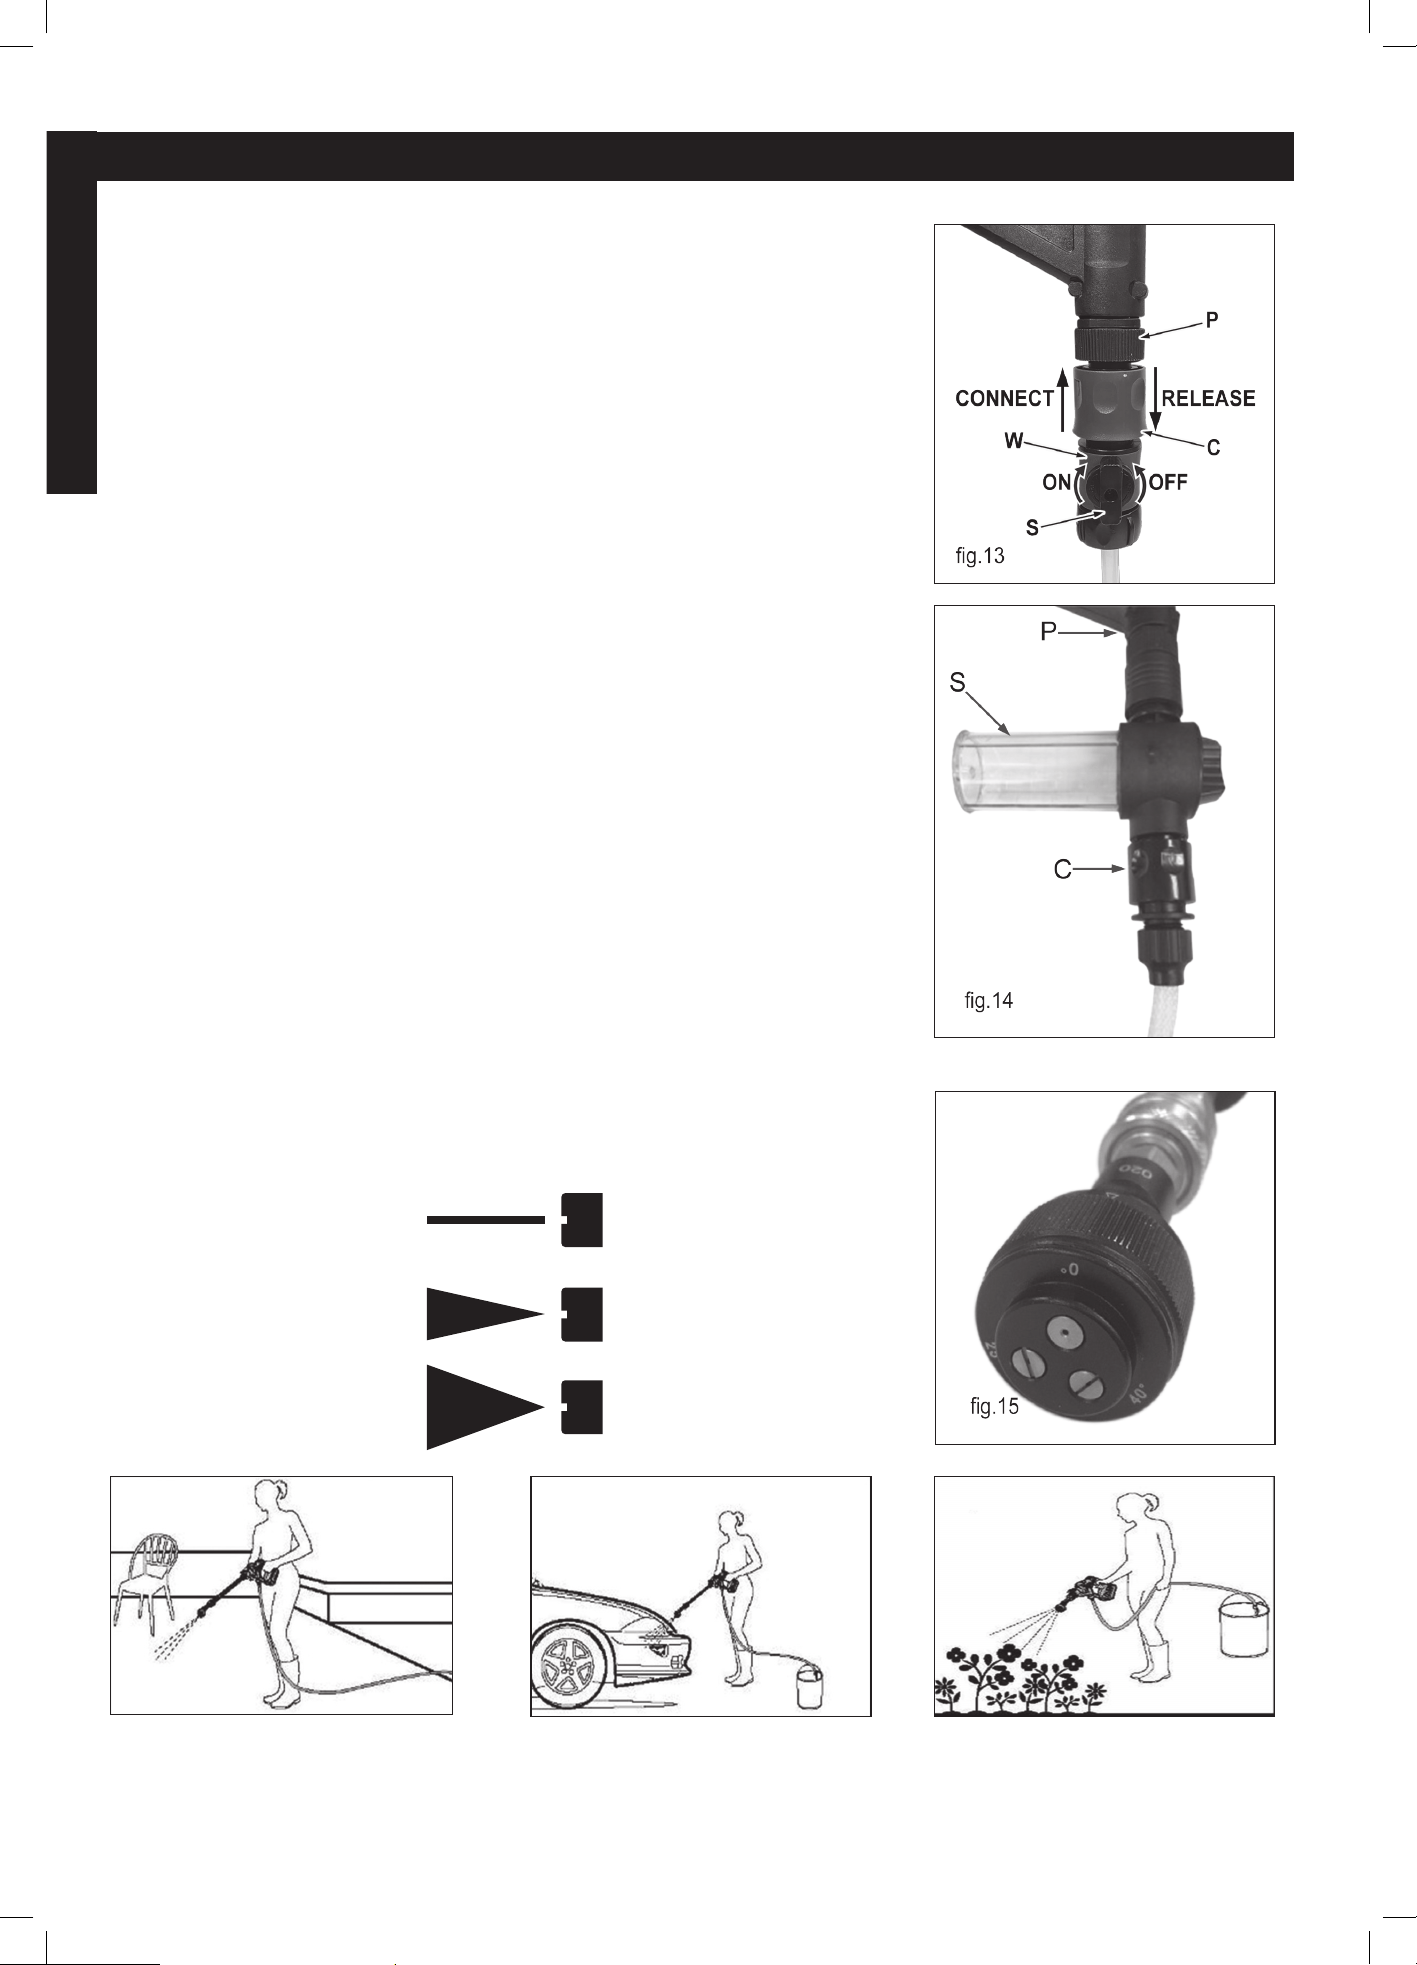
3. When the product is connected with tap water, the water pipe joint (g.13, W)
can be used to prevent the gun head from leaking. The water pipe joint
(g.13, W) includes a switch function to start and stop the ow of water
(g.13, S). Push the water pipe joint (g.13, W) onto the inlet of the pressure
wash unit (g.13, P). Pulling back on the connector’s (g.13, C) outer sleeve
to release the water pipe joint (g.13, W).
4. You can also connect the soap bottle (g.14, S) between the pressure wash
water inlet (g.14, P) and the hose connector (g.14, C). This will inject soap
from the bottle into the pressurized water stream.
CHOOSE THE SPRAY PATTERN
5. Hold the nozzle adapter with one hand and turn the multi-spray nozzle with
another hand to choose the spray pattern you want. There are three nozzles
with 0°, 25°, 40° patterns.
0°
25°
40°
OPERATING INSTRUCTIONS
v.200601 En.13
ENGLISH
OPERATING INSTRUCTIONS
20V CORDLESS INFLATOR
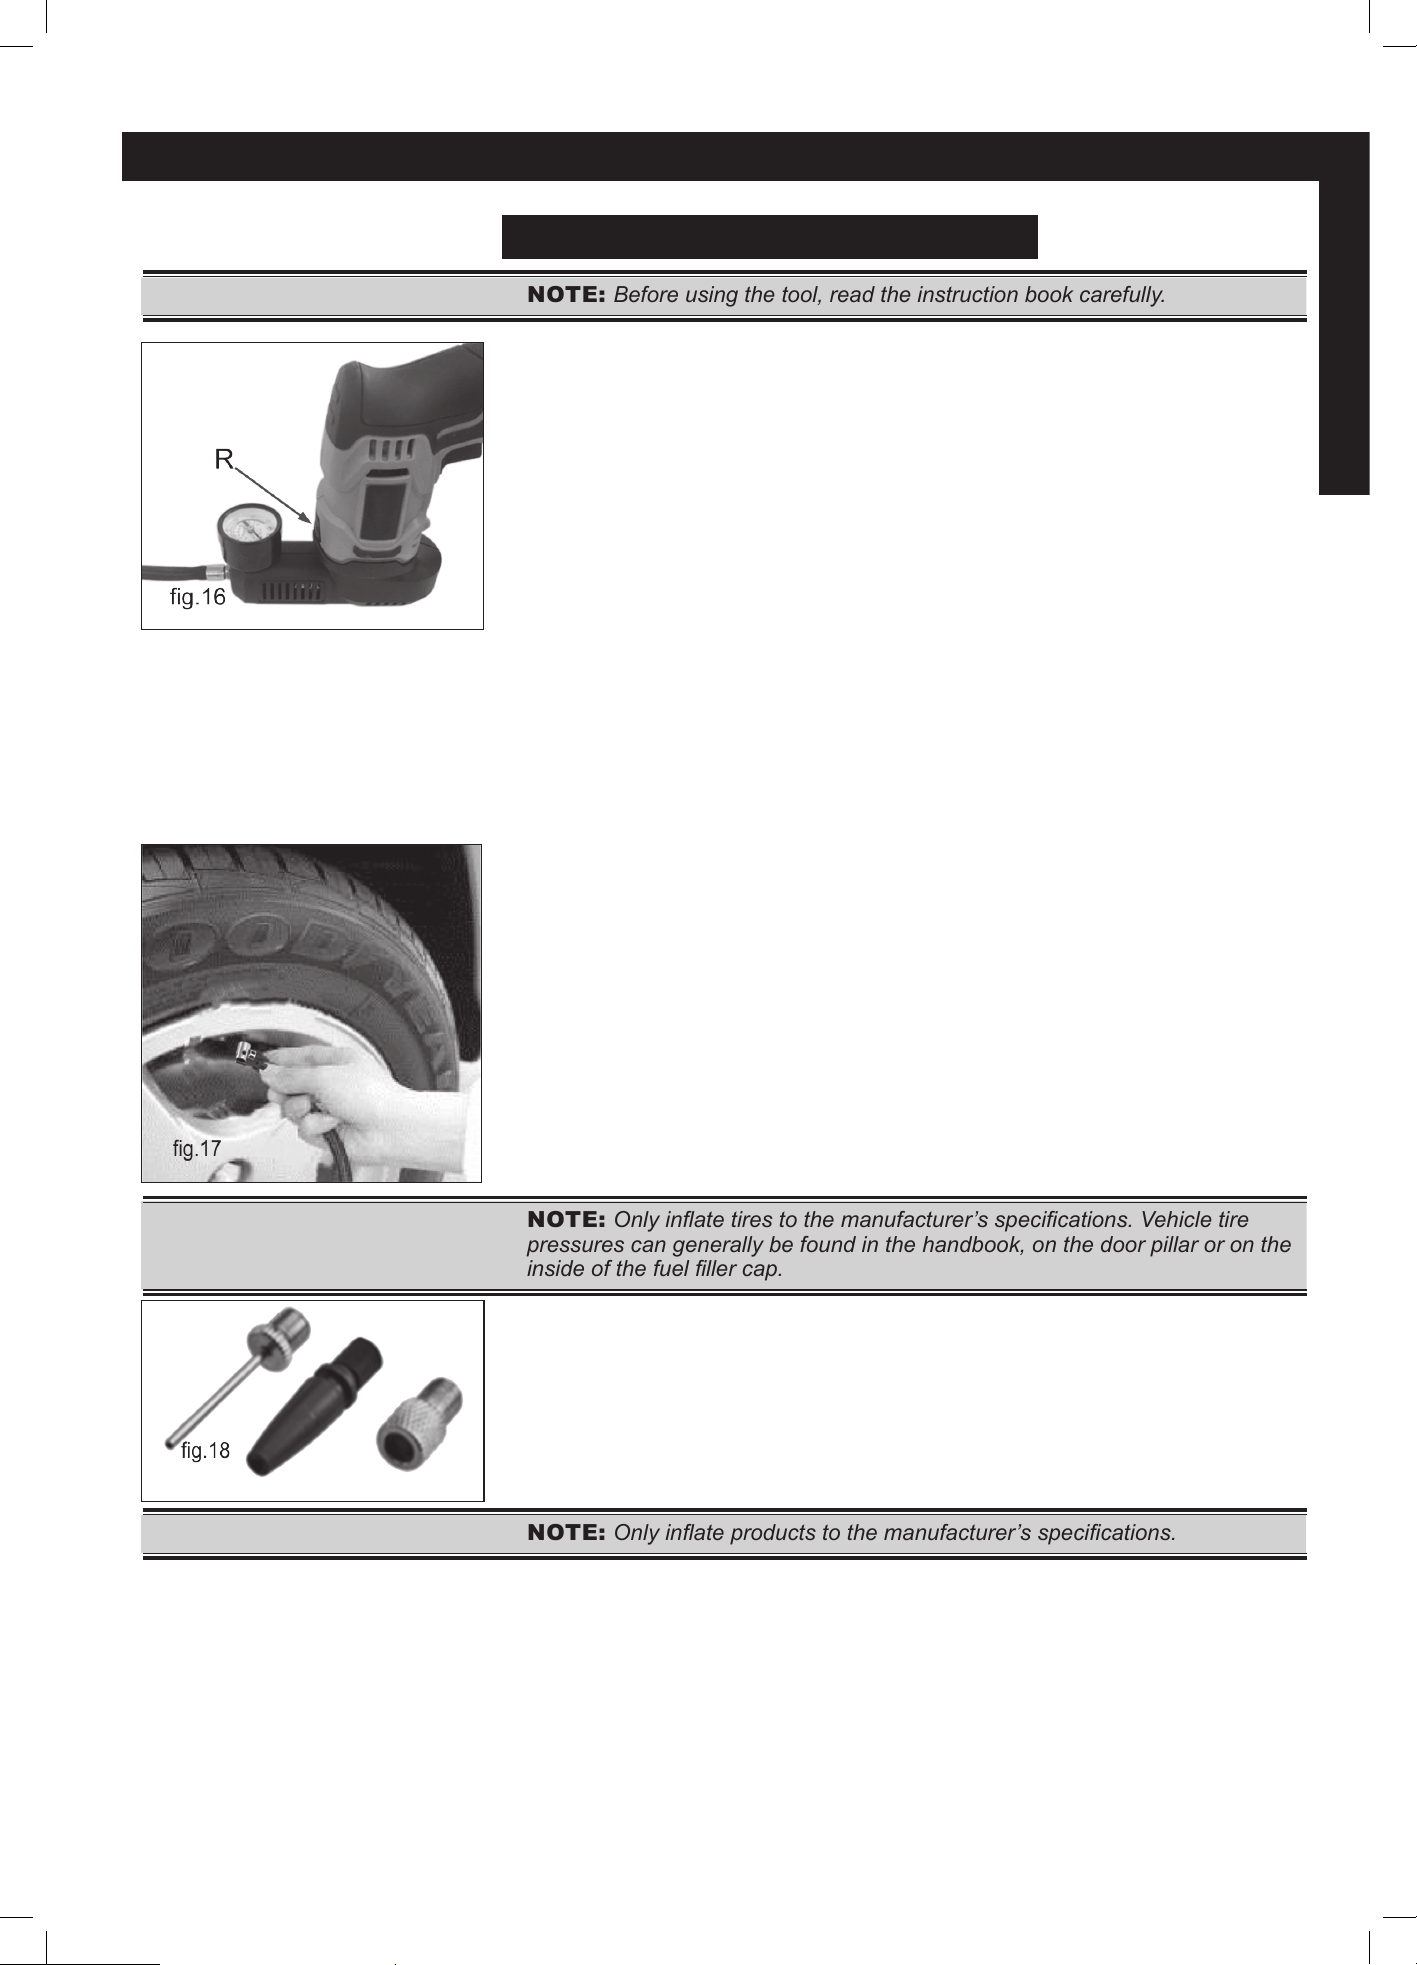
NOTE: Before using the tool, read the instruction book carefully.
TO INSTALL COMPRESSOR UNIT TO THE POWER HEAD
1. Depress release button (g.16 R) and slight downward pressure on the
power unit will be sucient install.
2. Depress release button to separate the compressor unit.
USING THE PRESSURE GAUGE
z The blue scale pressure units are in Bar.
z The black scale pressure units are in PSI.
TIRE CHECKS
z Check tires on a monthly basis.
z Incorrect ination shortens the life and performance of your tires, increasing
fuel consumption and jeopardising safety.
VEHICLE TIRE INFLATION
1. Remove the dust cap from the tire valve and store in a safe place.
2. Plug the air hose’s valve tip directly onto the tire’s air valve,then press the
lever down to lock it tightly
3. Check pressure gauge measurement in Bar or PSI.
4. If needed, add more air by pressing the trigger switch until the recommended
pressure is reached.
5. Flip up the lever and remove the air hose from the tire valve.
6. Replace the tire valve dust cap.
NOTE: Only inate tires to the manufacturer’s specications. Vehicle tire
pressures can generally be found in the handbook, on the door pillar or on the
inside of the fuel ller cap.
INFLATABLE & LEISURE INFLATION
z Select the appropriate adapter and screw into the valve connector.
z The adapter for sports balls and the adaptor for air mattresses and rafts are
clipped onto the rear of the Tire inator.
z Insert the connector adapter into the appropriate inlet of the inatable.
NOTE: Only inate products to the manufacturer’s specications.
CLEANING
z Only clean the inator using a clean dry cloth.
z Do not use cleaning products.
z Ensure the inator is clear of any dust or other debris before connection.
En.14 DK2 CHPW102 man.
ENGLISH
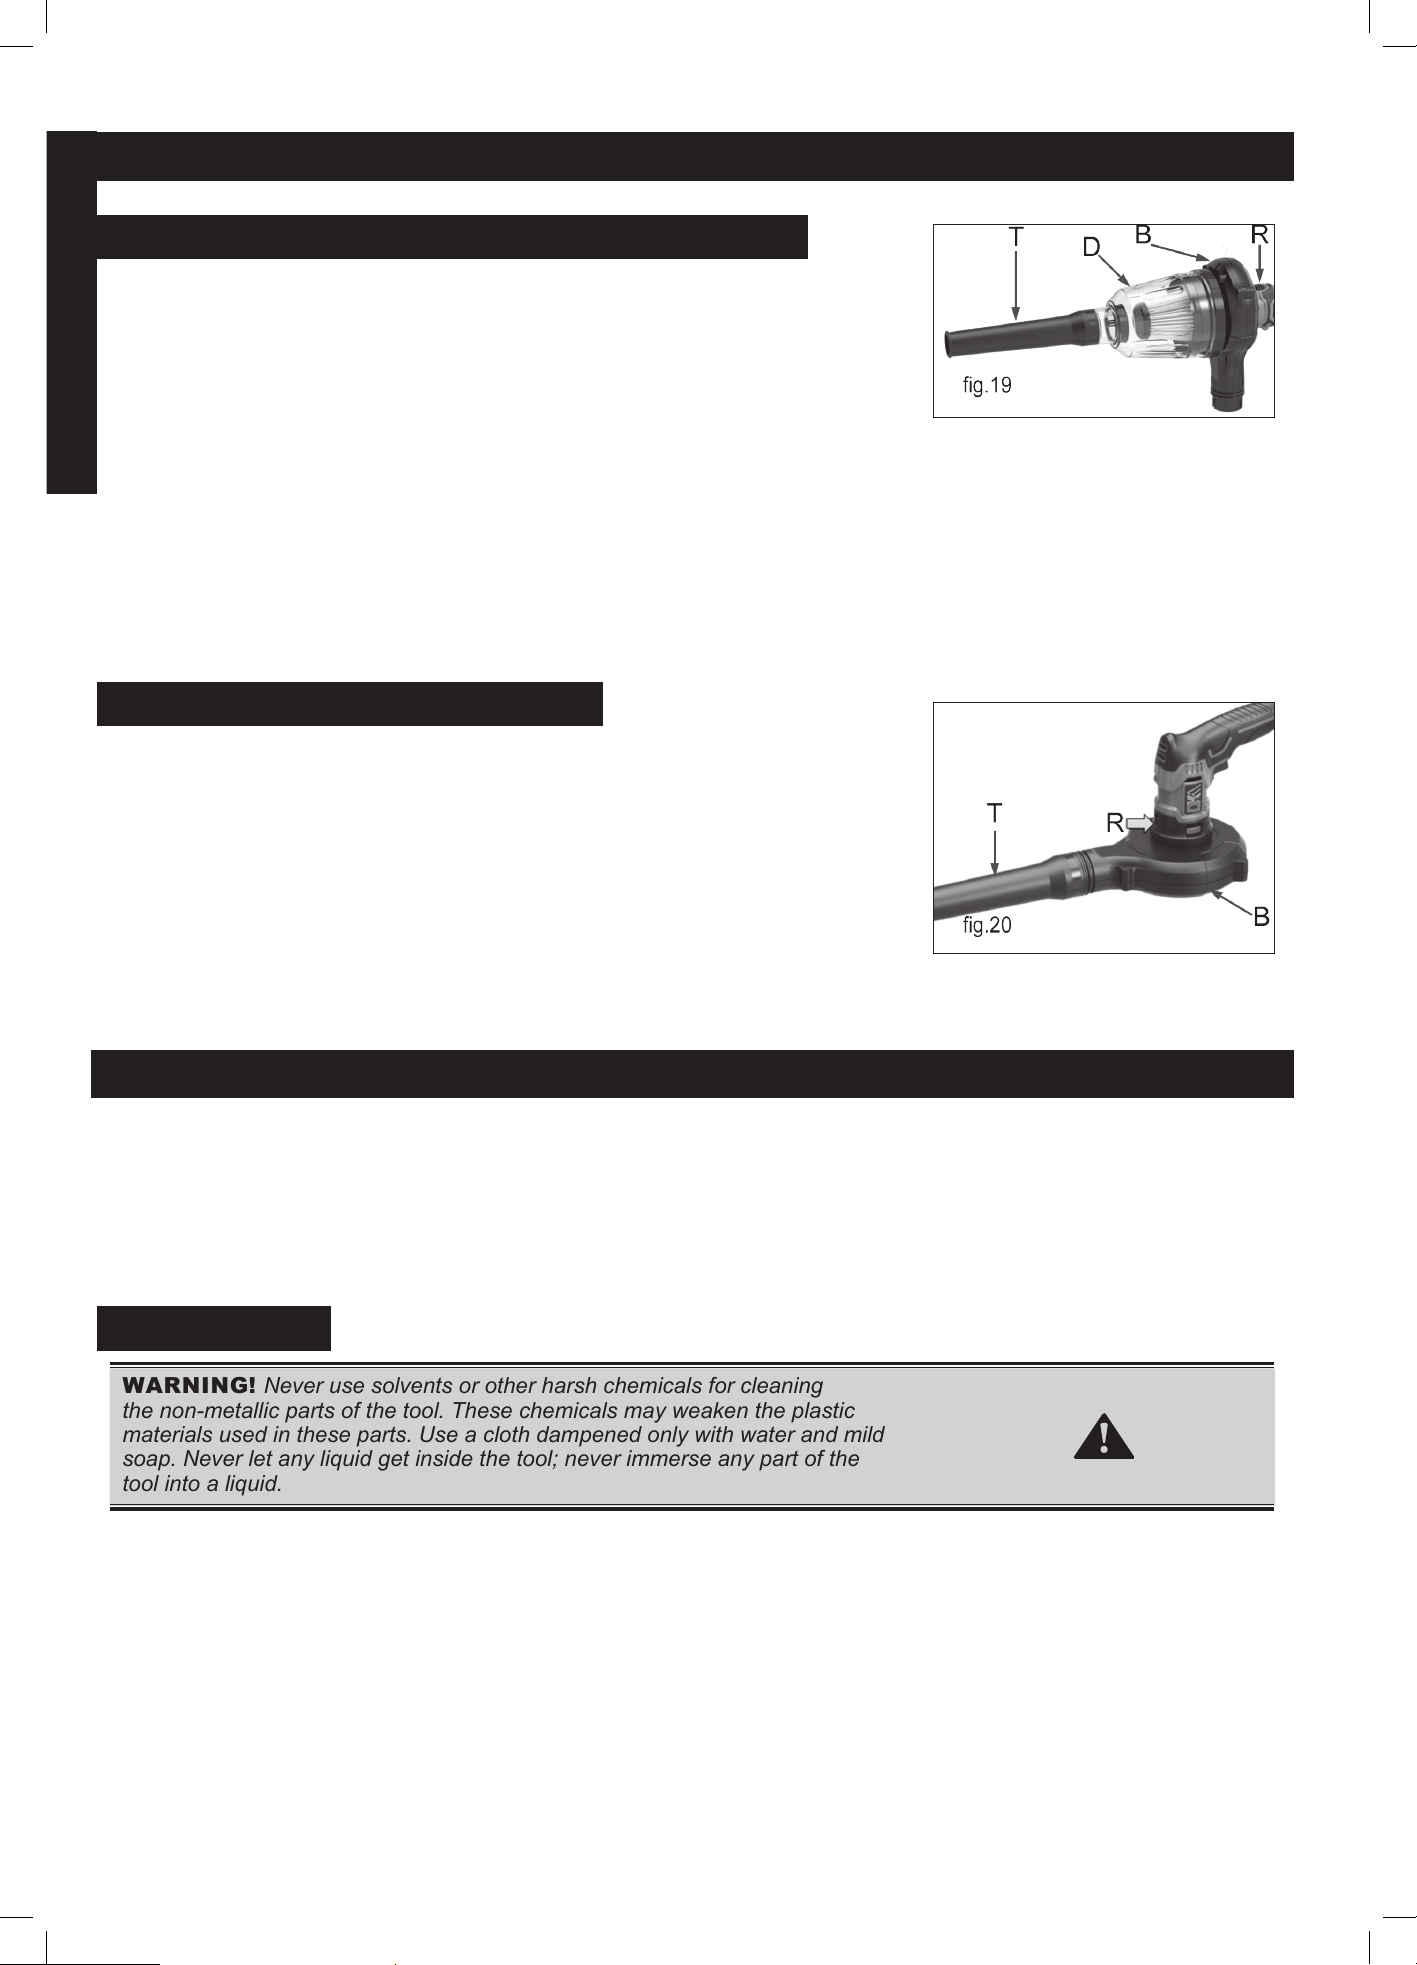
20V CORDLESS VACUUM CLEANER
1. Depressing the release button (g.19, R) on the power unit and slight
pressure will be sucient to install.
2. Push the dust cup (g.19, D) onto the blower body (g.19 B) and turn it
clockwise to lock in place.
3. Push blower tube (g.19, T) onto the dust box and turn it clockwise to lock in
place.
4. Turn the blower tube anti-clockwise and pull it out to separate it.
5. Turn the dust cup anti-clockwise and pull it out to separate it.
6. Depress the release push button to separate the vacuum/blower body from
the main power unit.
20V CORDLESS BLOWER
1. Depressing the release button (g.20, R) on the power unit and slight
pressure will be sucient to install.
2. To install, push blower tube onto the blower/vacuum body and turn it
clockwise to lock in place.
3. Depress the release button to separate the blower body from the power unit.
4. Turn the blower tube anti-clockwise and pull out to separate it from the
blower/vacuum body.
OPERATING INSTRUCTIONS
MAINTENANCE
z Remove the battery pack from the tool before carrying out and adjustment,
servicing or maintenance.
z Your battery powered tool requires no additional lubrication or maintenance.
There are no user serviceable parts in your tool. Never use water or
chemical cleaners to clean your power tool. Wipe clean with a dry cloth.
z Always store your tool in a dry place. Keep the motor ventilation slots clean.
Keep all working controls free of dust.
CLEANING
WARNING! Never use solvents or other harsh chemicals for cleaning
the non-metallic parts of the tool. These chemicals may weaken the plastic
materials used in these parts. Use a cloth dampened only with water and mild
soap. Never let any liquid get inside the tool; never immerse any part of the
tool into a liquid.
DK2 CHPW102 man. v.200601
DETAIL K2 INC.
ARRÊTEZ!
Des questions, des problèmes, des pièces manquantes?
Ne retournez pas chez votre détaillant.
Veuillez appeler notre service à la clientèle au: 1 (888) 277-6960. Notre service client est prêt à fournir assistance. Si une
pièce est endommagée ou manquante, des pièces de remplacement peuvent être expédiées de notre département de service
à la clientèle. Pour une aide immédiate avec l’assemblage, ou pour plus d’informations sur le produit, appelez notre numéro
sans frais en Amérique du Nord: 1 (888) 277-6960.
CONSERVEZ CE MANUEL
Vous aurez besoin de ce manuel pour les instructions de sécurité, les procédures d’utilisation et la garantie.
Mettez-le et la facture de vente originale dans un endroit sûr et sec pour référence future.
CHPW102
Modèle :
LAVEUSE HAUTE PRESSION
SANS FIL 20V 4 EN 1
Manuel d’instructions

Fr.2 DK2 CHPW102 man.
FRANÇAIS
MERCI D’AVOIR ACHETÉ UN OUTIL DK2!
TABLE DES MATIÈRES
PRATIQUES DE FONCTIONNEMENT SÉCURISÉES
IMPORTANTES ..................................................................... FR.3
CALIFORNIA PROPOSITION 65 ......................................... FR.3
GÉNÉRAL ............................................................................... FR.3
SÉCURITÉ DE LA ZONE DE TRAVAIL ................................ FR.3
SÉCURITÉ ÉLECTRIQUES.................................................. FR.4
SÉCURITÉ PERSONNELLE ................................................ FR.4
PRATIQUES DE FONCTIONNEMENT
SÉCURISÉES IMPORTANTES ............................................ FR.4
SÉCURITÉ DES OUTILS ÉLECTRIQUES .......................... FR.5
AVERTISSEMENTS DE SÉCURITÉ DU BLOC-PILES ...... FR.5
UTILISATION ET ENTRETIEN
DES OUTILS DE LA BATTERIE ........................................... FR.6
RÈGLES DE SÉCURITÉ SPÉCIFIQUES ............................ FR.6
RÈGLES DE SÉCURITÉ SPÉCIFIQUES
POUR LE COMPRESSEUR D’AIR ...................................... FR.7
COMPOSANTS ET DESCRIPTION FONCTIONNELLE .... FR.8
CARACTÉRISTIQUES .......................................................... FR.9
LE BLOC BATTERIE ............................................................. FR.10
MODE D’EMPLOI .................................................................. FR.10
LAVEUSE À PRESSION SANS FIL 20V .............................. FR.11
COMPRESSEUR D’AIR SANS FIL 20V ............................... FR.13
ASPIRATEUR SANS FIL 20V ............................................... FR.14
VENTILATEUR SANS FIL 20V ............................................. FR.15
ENTRETIEN ........................................................................... FR.15
NETTOYAGE.......................................................................... FR.15
v.200601 Fr.3
FRANÇAIS
PRATIQUES DE FONCTIONNEMENT
SÉCURISÉES IMPORTANTES
ATTENTION : LA SÉCURITÉ D’ABORD
—
Lisez attentivement ce
manuel avant utiliser votre outil. Nous vous recommandons de lire ce
manuel complètement an que vous soyez pleinement conscient de toute
sécurité importante recommandations. Enregistrez votre numéro de série.
Pour utiliser correctement cet outil, vous devez respecter les règles de sécurité,
les instructions de montage et les instructions de service gurant dans ce Manuel.
Toutes les personnes qui utilisent et entretiennent l’outil doivent être informées de
son danger potentiel et doit être familiarisé avec ce manuel. Les enfants doivent
être surveillés en tout temps s’ils se trouvent dans la zone où l’outil est utilisé. Il est
il est également impératif que vous respectiez les réglementations de prévention
des accidents en vigueur votre région. Il en va de même pour les règles générales
de santé et de sécurité au travail.
CALIFORNIA PROPOSITION 65
AVERTISSEMENT : Ce produit peut vous exposer à des produits chimiques,
notamment le DEHP, qui est connu de l’État de Californie pour causer le cancer
et des malformations congénitales ou tout autre problème de reproduction. Pour
plus d’informations, visitez www.P65Warnings.ca.gov.
GÉNÉRAL
AVERTISSEMENT! Lisez toutes les instructions, illustrations et
spécications fournies avec cet outil. Non-respect des avertissements et les
instructions peuvent entraîner un choc électrique, un incendie et / ou des
blessures graves. Le terme «Outil électrique» dans les avertissements fait
référence à votre alimentation secteur (laire) outil ou votre outil électrique
fonctionnant sur batterie (sans l). Lisez votre manuel du propriétaire
soigneusement. Apprenez à connaître votre outil et familiarisez-vous avec ses
applications et ses limites.
1. Utilisez l’outil conformément aux directives de ce manuel. Ne pas en abuser ou
l’obliger à faire un travail pour lequel il n’a pas été conçu.
2. Utilisez uniquement des pièces et accessoires d’origine. Consultez le manuel
du propriétaire. L’utilisation d’accessoires incorrects peut entraîner des dangers
imprévus.
AVERTISSEMENT : N’essayez pas d’assembler et d’utiliser l’outil avant
d’avoir avoir lu attentivement ce manuel et parfaitement compris son contenu.
L’utilisation incorrecte de votre outil DK2 peut entraîner des blessures graves et
/ ou des dommages à l’outil et au véhicule. Étant donné que Detail K2 Inc. ne
termine pas son assemblage ou son installation, nous ne pouvons être tenus
pour responsables blessures ou dommages que la mauvaise utilisation du
produit peut produire.
SÉCURITÉ DE LA ZONE DE TRAVAIL
1. Gardez la zone de travail propre et bien éclairée. Les zones encombrées et
sombres peuvent crée des accidents.
2. Ne pas utiliser d’outils électriques dans des atmosphères explosives, telles que
présence de liquides, gaz ou poussières inammables. Les outils électriques
créent des étincelles ce qui peut enammer la poussière ou les fumées.
3. Éloignez les enfants et les personnes présentes lorsque vous utilisez un outil.
Les distractions peuvent vous faire perdre le contrôle.

Fr.4 DK2 CHPW102 man.
FRANÇAIS
PRATIQUES DE FONCTIONNEMENT
SÉCURISÉES IMPORTANTES
SÉCURITÉ ÉLECTRIQUES
1. Les ches des outils électriques doivent correspondre à la prise. Ne modiez
jamais la che d’aucune façon. Ne pas utiliser de ches d’adaptateur
avec des outils électriques mis à la terre . Fiche Non modié et les prises
correspondantes réduiront le risque de choc électrique.
2. Évitez tout contact corporel avec des surfaces mises à la terre ou mises à la
terre telle que des tuyaux, radiateurs, cuisinières et réfrigérateurs. Il y a un
risque accru de choc électricité si votre corps est mis à la terre.
3. N’exposez pas les outils électriques à la pluie ou à des conditions humides.
L’eau entrant dans une puissance l’outil augmentera le risque de choc
électrique.
4. N’abusez pas du cordon. N’utilisez jamais le cordon pour transporter, tirer ou
débrancher l’outil électrique. Gardez le cordon loin de la chaleur, de l’huile, des
arêtes vives ou des pièces mobiles. Des cordons endommagés ou emmêlés
augmentent le risque de choc électrique.
5. Lorsque vous utilisez un outil électrique à l’extérieur, utilisez une rallonge pour
une utilisation en extérieur. L’utilisation d’un cordon adapté à une utilisation en
extérieur réduit le risque.
SÉCURITÉ PERSONNELLE
1. Restez vigilant, regardez ce que vous faites et faites preuve de bon sens
lors de l’utilisation un outil. N’utilisez pas d’outil lorsque vous êtes fatigué ou
sous le inuence des drogues, de l’alcool ou des médicaments. Un moment
d’inattention tout en l’utilisation d’outils peut entraîner des blessures graves.
2. Utilisez un équipement de sécurité. Portez toujours des lunettes de protection.
Lunettes de vue de tous les jours n’ont que des verres résistants aux chocs. Ce
ne sont pas des lunettes de sécurité. Équipement de sécurité tel qu’un masque
anti-poussière, des chaussures de sécurité antidérapantes, un casque ou
une protection pour l’ouïe utilisée dans des conditions appropriées réduira les
blessures corporelles.
3. Empêchez tout démarrage involontaire. Assurez-vous que l’interrupteur est
en position d’arrêt avant connexion à une source d’alimentation et/ou à une
batterie, ramasser ou transporter le outil. Transporter des outils électriques avec
le doigt sur l’interrupteur ou alimenter les outils dont l’interrupteur est allumé
provoque des accidents.
4. Retirez toute clé ou clé de réglage avant d’allumer l’outil. Une clé ou une clé
attachée à une partie rotative de l’outil électrique peut entraîner blessure
personnelle.
5. Ne vous étendez pas trop. Gardez une bonne assise et un bon équilibre à
tout moment. Cela permet un meilleur contrôle de l’outil dans des situations
inattendues.
6. Habillez-vous correctement. Ne portez pas de vêtements amples ni de bijoux.
Gardez vos cheveux, vêtements et gants loin des pièces mobiles. Vêtements
amples, bijoux ou longs les cheveux peuvent se coincer dans les pièces
mobiles.
7. Si des dispositifs sont fournis pour le raccordement de l’aspiration et de la
collecte des poussières installations, assurez-vous qu’ils sont connectés et
correctement utilisés. Utilisation de ces les appareils peuvent réduire les risques
liés à la poussière.
8. Ne laissez pas la familiarité acquise grâce à l’utilisation fréquente d’outils vous
complaire et ignorer les principes de sécurité des outils. Une action imprudente
peut provoquer blessure grave en une fraction de seconde.
9. Pour des raisons de sécurité, gardez les enfants et les animaux à distance de
l’outil et du zone d’exploitation.
v.200601 Fr.5
FRANÇAIS
SÉCURITÉ DES OUTILS ÉLECTRIQUES
1. Ne forcez pas l’outil électrique. Utilisez l’outil électrique approprié à votre
application. L’outil électrique correct fera le travail mieux et plus sûr à la vitesse
pour laquelle il a été conçu.
2. N’utilisez pas l’outil électrique si l’interrupteur ne le met pas sous et hors
tension. Tout pouvoir un outil qui ne peut pas être commandé avec l’interrupteur
est dangereux et doit être réparé.
3. Débranchez la che de la source d’alimentation avant de procéder à tout
réglage, changer les accessoires ou ranger les outils électriques. Une telle
sécurité préventive les mesures réduisent le risque de démarrage accidentel de
l’outil électrique.
AVERTISSEMENT! N’utilisez que des xations ou accessoires
recommandés par le fabricant.
AVERTISSEMENT! Utilisation de pièces non autorisées ou non-respect des
instructions de la maintenance. Les peuvent créer un risque de choc électrique
ou de blessure.
REMARQUE : Tous les accessoires illustrés ou décrits ne sont pas inclus
dans livraison standard.
AVERTISSEMENTS DE SÉCURITÉ DU
BLOC
-
PILES
AVERTISSEMENT! Lisez tous les avertissements et instructions de sécurité.
Non-respect des avertissements et les instructions peuvent entraîner un choc
électrique, un incendie et / ou de graves blessure.
AVERTISSEMENT! Risque d’incendie et de brûlures. Ne pas démonter,
chauer au-dessus de 100 °C (212 °F), ou incinérer. N’exposez pas les cellules
ou les batteries à la chaleur ou au feu. Éviter L’entreposage en plein soleil.
1. RECYCLER RAPIDEMENT LES PILES USAGÉES. Lors de l’élimination des
cellules ou batteries, conserver les cellules ou batteries de diérents systèmes
électrochimiques séparés les uns des autres.
2. GARDER LA BATTERIE HORS DE LA PORTÉE DES ENFANTS et dans
son emballage d’origine jusqu’à utilisation.
3. NE JAMAIS METTRE LES PILES DANS LA BOUCHE. En cas d’ingestion,
contactez votre médecin ou un eco-centre local.
ATTENTION : La batterie utilisée dans cet appareil peut présenter un risque
d’incendie ou brûlure chimique en cas de mauvais traitement. Remplacez la
batterie par DK2 uniquement. Utilisation d’un autre la batterie peut présenter un
risque d’incendie ou d’explosion.
AVERTISSEMENT! N’utilisez pas une batterie ou un appareil visiblement
endommagé.
AVERTISSEMENT! Ne modiez pas et n’essayez pas de réparer l’appareil
ou la batterie pack.
PRATIQUES DE FONCTIONNEMENT
SÉCURISÉES IMPORTANTES
Fr.6 DK2 CHPW102 man.
FRANÇAIS
4. LA BATTERIE DOIT ÊTRE RECYCLÉE.
5. NE PAS COURT-CIRCUITER UNE PILE OU UNE BATTERIE. N’entreposer
les piles au hasard dans une boîte ou un tiroir où elles être court-circuité par
des matériaux conducteurs.
6. NE SOUMETTEZ PAS les batteries à des chocs mécaniques.
7. GARDEZ LES PILES PROPRES ET SÈCHES. Essuyez les bornes de la
batterie avec un chion propre et sec si elles sont sales.
8. NE PAS MAINTENIR LES BATTERIES DE RECHANGE EN CHARGE
lorsqu’elles ne sont pas utilisées.
9. CONSERVEZ LA LITTÉRATURE ORIGINALE DE LA BATTERIE pour les
références à l’avenir.
10. N’UTILISEZ AUCUN CHARGEUR AUTRE QUE CELUI FOURNI
SPÉCIFIQUEMENT pour une utilisation avec l’équipement. Les batteries
doivent être chargées avant utilisation. Utilisez toujours le chargeur approprié
et reportez-vous conformément aux instructions du fabricant ou au manuel de
l’équipement pour une charge appropriée instructions.
11. LORSQUE C’EST POSSIBLE, ENLEVEZ LA BATTERIE DE
L’ÉQUIPEMENT, lorsqu’hors service.
12. ÉVITEZ LES DÉMARRAGES INUTILISÉS. Assurez-vous que le
commutateur est hors tension avant de se connecter à la batterie, de
ramasser ou de transporter le appareil. Transporter l’appareil avec le doigt
sur l’interrupteur ou le mettre sous tension l’appareil dont l’interrupteur est
enclenché invite aux accidents.
13. DÉBRANCHEZ LE BLOC BATTERIE DE L’APPAREIL AVANT DE FAIRE
DES AJUSTEMENTS, de changer d’accessoire ou entreposage de l’appareil.
Ces mesures de sécurité préventives réduisent le risque de démarrage
accidentel de l’appareil.
UTILISATION ET ENTRETIEN DES OUTILS
DE LA BATTERIE
1. Rechargez uniquement avec le chargeur spécié par le fabricant. Un chargeur
qui pourrait convenir autre que le chargeur original à un type de batterie peut
créer un risque d’incendie lors de l’utilisation avec une autre batterie.
2. Utilisez les outils électriques uniquement avec des blocs-piles spéciquement
désignés. Utilisation de tout d’autres batteries peuvent créer un risque en cas
de blessure et d’incendie.
3. Lorsque la batterie n’est pas utilisée, éloignez-la des objets métalliques, comme
les papiers clips, pièces de monnaie, clés, clous, vis ou autres petits objets
métalliques, qui peuvent faire une connexion d’un terminal à un autre. Court-
circuiter les bornes de la batterie peut provoquer des brûlures ou un incendie.
4. Ne brûlez pas la batterie et ne la jetez pas par incinération..
AVERTISSEMENT! Dans des conditions abusives, du liquide peut être
éjecté du batterie; éviter tout contact. En cas de contact accidentel, rincer à
l’eau. Si liquide contact avec les yeux, consulter en outre un médecin. Liquide
éjecté de la batterie peut provoquer une irritation ou des brûlures.
RÈGLES DE SÉCURITÉ SPÉCIFIQUES POUR
CET OUTIL
AVERTISSEMENT! Lors de l’utilisation de ce produit, des précautions de
base doivent toujours être suivies, notamment :
z Pour réduire le risque de blessure, une surveillance étroite est nécessaire
lorsqu’un produit est utilisé à proximité des enfants.
PRATIQUES DE FONCTIONNEMENT
SÉCURISÉES IMPORTANTES
v.200601 Fr.7
FRANÇAIS
z Savoir arrêter le produit et purger rapidement les pressions. Soyez très
familiarisé avec les commandes.
z Restez vigilant - regardez ce que vous faites.
z N’utilisez pas le produit en cas de fatigue ou sous l’inuence de l’alcool ou
drogue.
z Gardez la zone d’opération à l’écart de toute personne.
z Ne vous étendez pas trop et ne vous tenez pas sur un support instable. Gardez
un bon pied et équilibre en tout temps.
z Suivez les instructions d’entretien spéciées dans le manuel.
AVERTISSEMENT! Risque d’injection ou de blessure - ne dirigez pas le ux
de décharge personnes.
z Ne pas vaporiser l’appareil électrique ni de câblage.
RÈGLES DE SÉCURITÉ SPÉCIFIQUES POUR
LE COMPRESSEUR D’AIR
INFORMATIONS GÉNÉRALES ET
AVERTISSEMENTS DE SÉCURITÉ
1. INSPECTER LE COMPRESSEUR D’AIR DE PNEUS avant chaque
utilisation et ne pas utiliser si les composants sont tordus, cassés, brûlés,
fondus, humides ou endommagés.
2. VÉRIFIEZ LES PRESSIONS DES PNEUS AVANT DE GONFLER an de ne
pas dépasser la pression nominale, car les pneus peuvent éclater s’ils sont trop
gonés.
3. NE PAS UTILISER LE COMPRESSEUR D’AIR DE PNEU SUR DES
PNEUS HAUTE PRESSION comme celles utilisées sur les véhicules
utilitaires, agricoles ou véhicules spécialisés.
4. NE PAS PLIER OU BLOQUER LE TUYAU D’AIR lorsque le compresseur
d’air de pneus est en travail.
5. LE COMPRESSEUR N’EST PAS CONÇU POUR UNE UTILISATION
CONTINUE. Un fonctionnement sur une longue période de temps surchauera
et endommagera le compresseur d’air. Il ne doit pas être utilisé en continu
pendant plus de 30 minutes. Après 10 minutes, éteignez-le et laissez-le refroidir
pendant 15 minutes avant de reprendre le fonctionnement.
6. COUPEZ L’ALIMENTATION IMMÉDIATEMENT si le compresseur fait un
son anormal ou la température de l’unité est trop élevée et laissez-la refroidir au
moins 30 minutes avant de reprendre l’opération.
7. NE LAISSEZ PAS LE COMPRESSEUR SANS SURVEILLANCE, garder
hors de la portée des enfants.
8. CONSERVEZ LE COMPRESSEUR D’AIR dans un environnement frais, sec
et sans poussière dans la boîte lorsqu’il n’est pas utilisé.
9. NE PLACEZ PAS LE COMPRESSEUR SUR OU À PROXIMITÉ DES
SOURCES DE DIRECT CHAUFFER ou dans des endroits où il sera exposé à
la lumière directe du soleil pendant une période prolongée.
10. N’UTILISEZ PAS LE COMPRESSEUR À AIR DE PNEUS DANS OU
AUTOUR ENVIRONNEMENTS INFLAMMABLES.
11. UTILISEZ UNIQUEMENT LES ADAPTATEURS FOURNIS avec le
compresseur d’air.
12. LE COMPRESSEUR D’AIR POUR PNEU N’EST PAS ÉTANCHE.
13. NE METTEZ JAMAIS LE CONNECTEUR ET LES ADAPTATEURS DANS
VOTRE BOUCHE, OREILLE OU OEIL. Ce ne sont pas des jouets.
14. LE COMPRESSEUR NE CONTIENT AUCUNE PIÈCE RÉPARABLE PAR
L’UTILISATEUR – Ne pas L’ouvrir.
PRATIQUES DE FONCTIONNEMENT
SÉCURISÉES IMPORTANTES
Fr.8 DK2 CHPW102 man.
FRANÇAIS
COMPOSANTS ET
DESCRIPTION FONCTIONNELLE
12
fig.1
1
2
3
4
5
6789
10
11
13
13
14
15
15
16
17
18
19
20
21
22
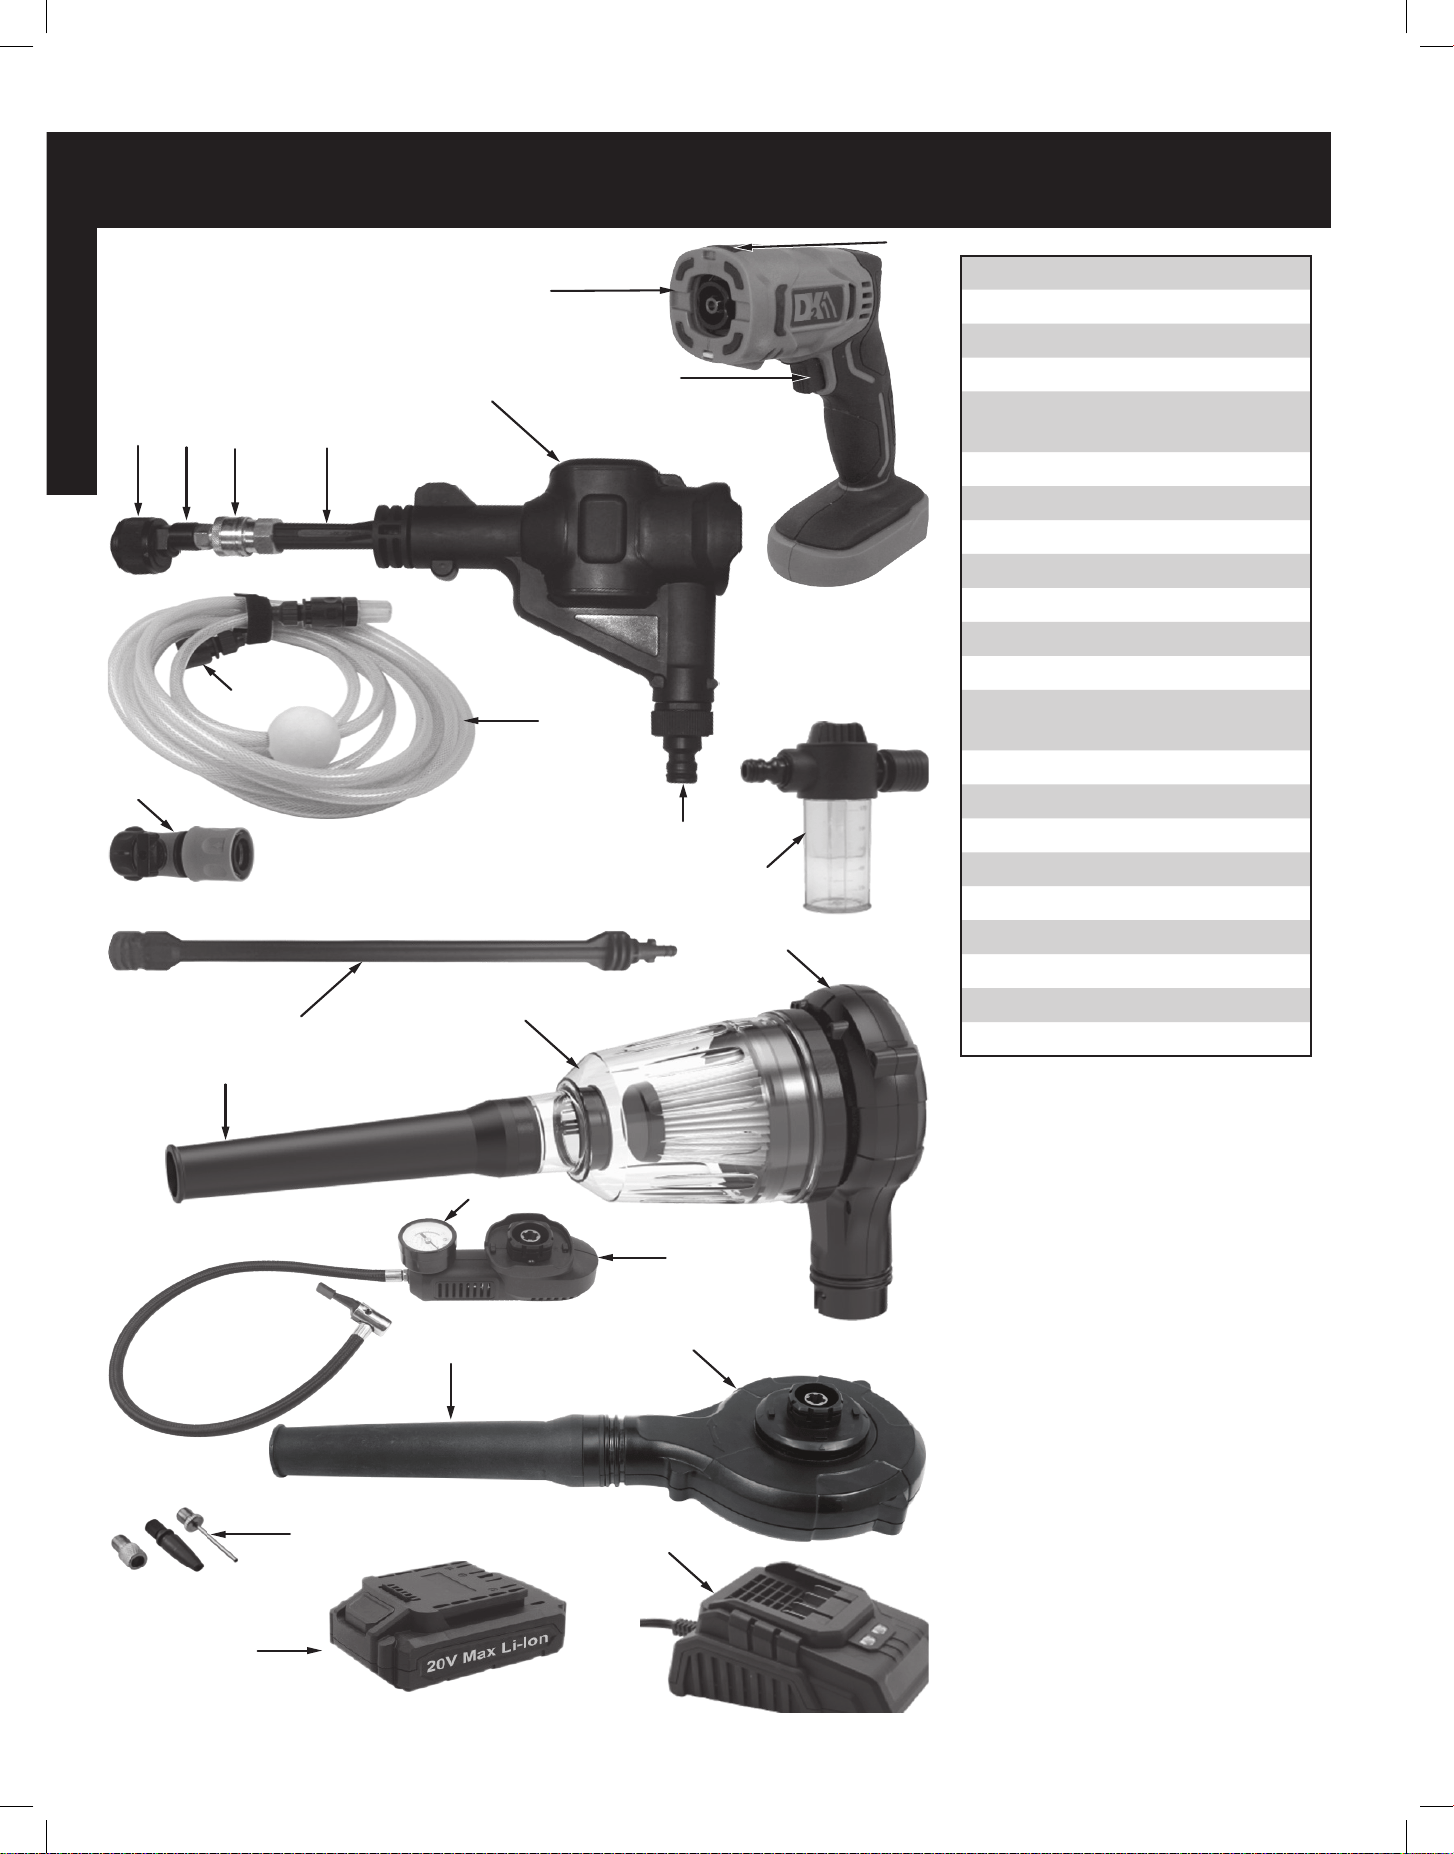
1 Bloc d’alimentation principal
2 Bouton-poussoir de relâche
3 Interrupteur d’alimentation
4 Entrée d’eau
5 Unité de lavage sous
pression
6 Tube court
7 Mandrin en laiton
8 Adaptateur de buse
9 Buse multipulvérisation
10 Tube extension
11 Goneur
12 Manomètre de pression d’air
13 Ventilateur / corps
d’aspirateur
14 Bac à poussière
15 Soueur / tube à vide
16 Tuyau d’admission de 6 m
17 Connecteur de tuyau
18 Adaptateur de tuyau d’eau
19 Bouteille de savon
20 Buses d’air
21 Batterie
22 Chargeur

v.200601 Fr.9
FRANÇAIS
CARACTÉRISTIQUES
15. POUR VOTRE PROPRE SÉCURITÉ, ASSUREZ-VOUS DE SUIVRE
LES INSTRUCTIONS soigneusement lors de l’utilisation du compresseur.
Autres modes d’utilisation non mentionnée dans ce manuel peu entraîner des
blessures.
16. AUCUNE MODIFICATION NE DOIT ÊTRE EFFECTUÉE sur le compresseur
d’air pour pneus, ou adaptateurs fournis par le fabricant.
17. UNE UTILISATION INCORRECTE DU COMPRESSEUR PEUT CAUSER
DES DOMMAGES À PROPRIÉTÉ ET NUISIBLE POSSIBLE POUR
L’UTILISATEUR. Lors de l’utilisation du pneu le goneur garantit que le
véhicule est stationné dans un endroit sûr, hors de la route frein à main du
véhicule et où votre sécurité personnelle n’est pas en danger.
Nettoyeur haute pression sans l 20 V
Max. Pression 25 Bar (est.)
2500 kPa (est.)
363 psi (est.)
Débit 2,5 L/min. (est.)
0,66 U.S gal. (est.)
Tuyau d’aspiration (1 inclus) 6 m
19,7 pi.
Tige courte (1 incluse)
Buse de pulvérisation (1 incluse)
Compresseur d’air sans l 20 V
Max. Pression 7 Bar
700 kPa
100 psi
Tuyau de gonage 50 cm
19,6 pouces
Aspirateur sans l 20 V
Vitesse à vide 0 - 15000 tr/min
Débit d’air 2,5 m³/min
88,3 pi/cu.
Vide 8,0 kPa
1,16 psi
Capacité du conteneur 0,6 L
0,63 qt.
Soueur sans l 20 V
Vitesse à vide 0 - 15000 rpm
Débit d’air 2,5 m³/min
88,3 pi/cu.
Fr.10 DK2 CHPW102 man.
FRANÇAIS
MODE D’EMPLOI
LE BLOC BATTERIE
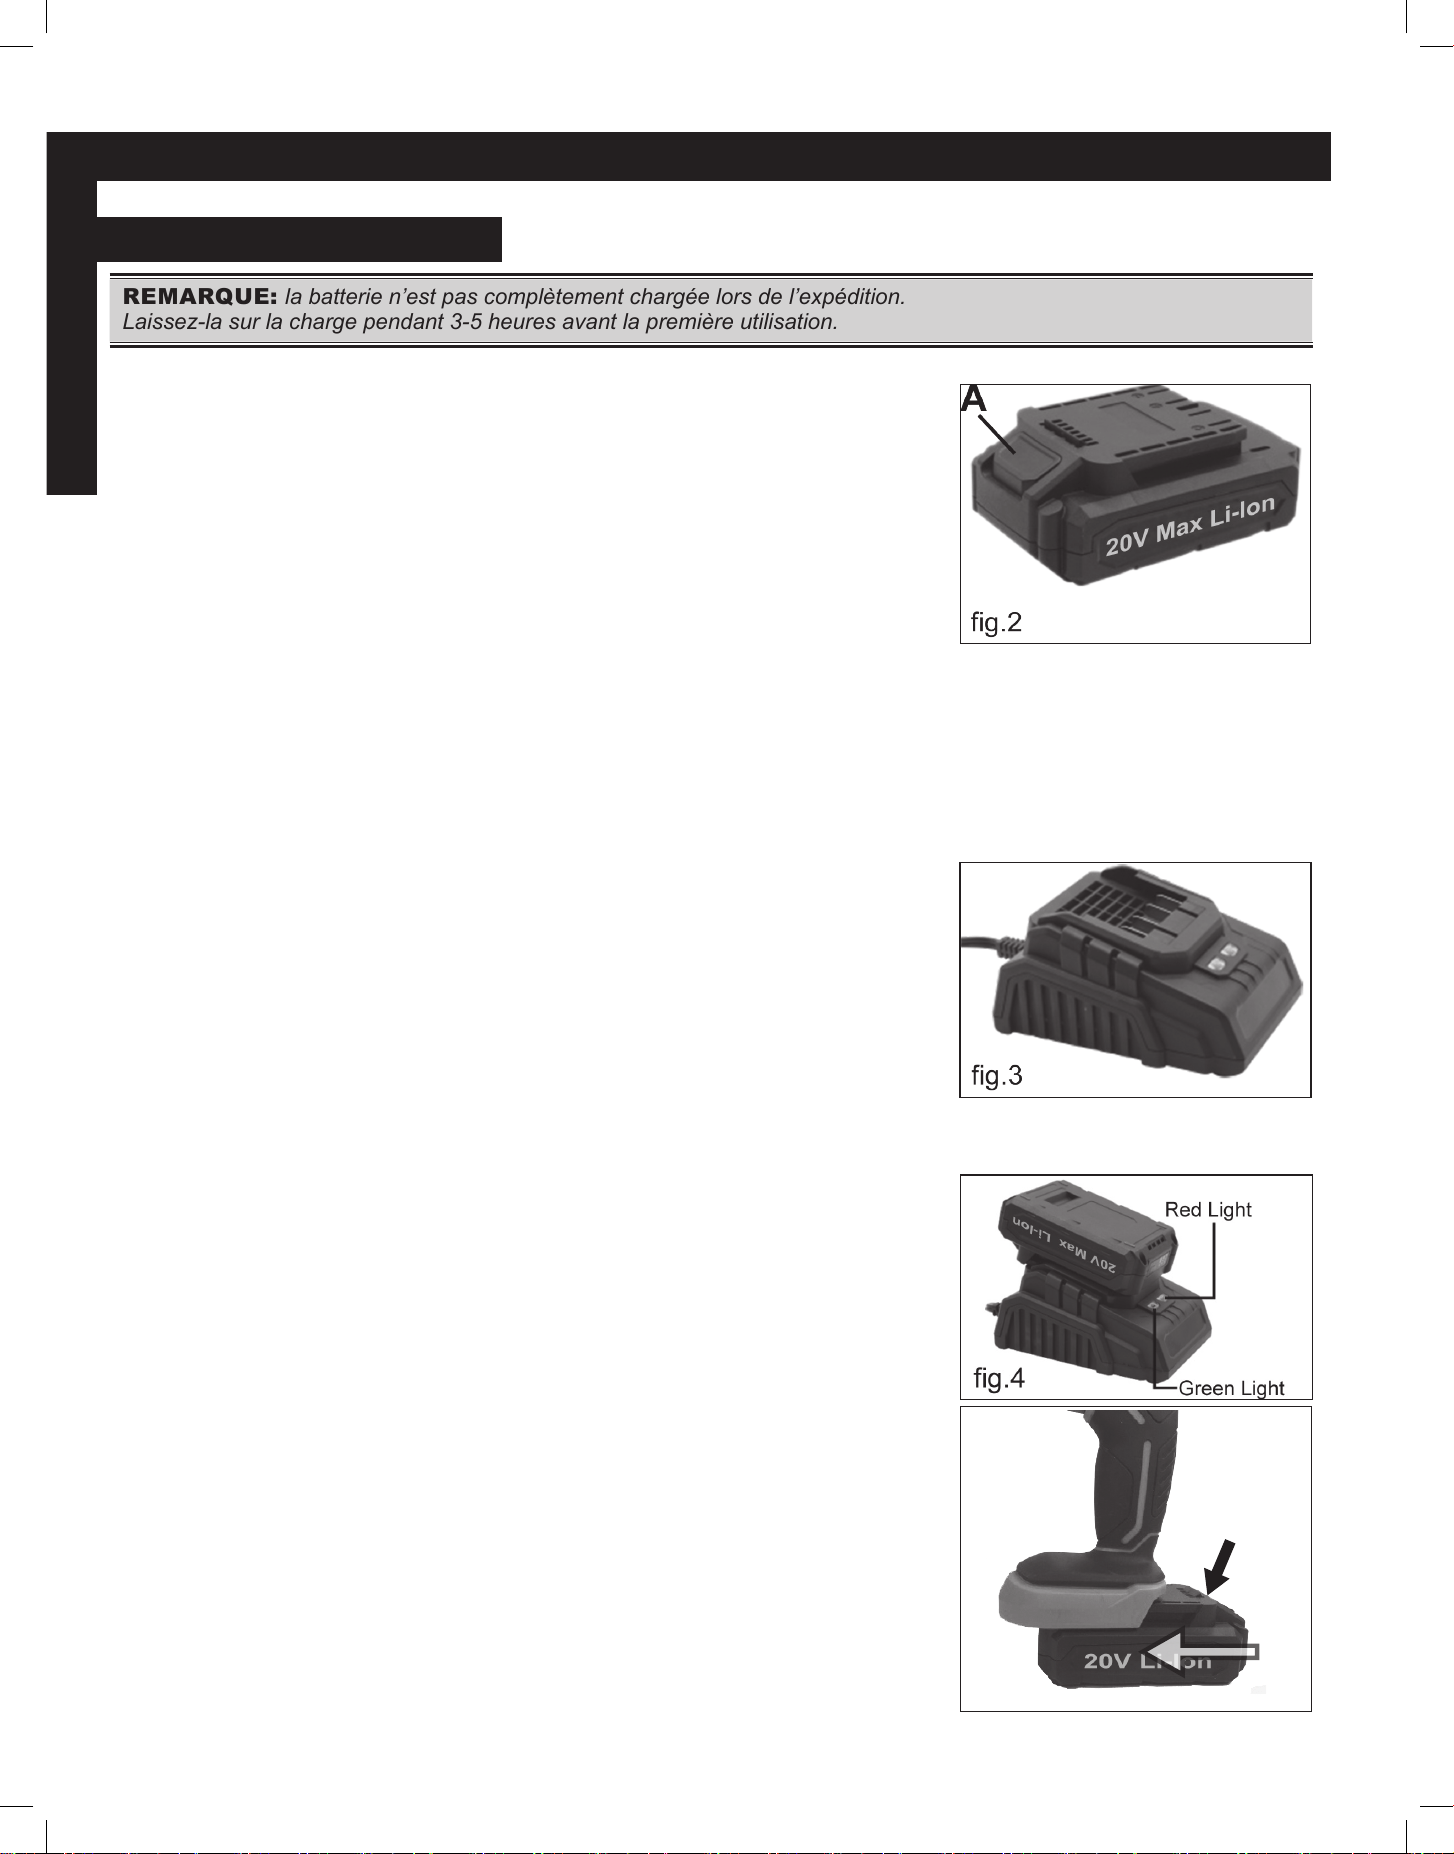
REMARQUE: la batterie n’est pas complètement chargée lors de l’expédition.
Laissez-la sur la charge pendant 3-5 heures avant la première utilisation.
1. Le temps de charge normal est de 1 à 2 heures lorsque la batterie est
complètement déchargée.
2. Remplacer la batterie (g.2) avec une fraîchement chargée lorsque la
performance de l’outil commence à diminuer.
○ La chaleur intense est la plus destructrice pour une batterie; plus il génère
de chaleur, plus plus vite la batterie perd de la puissance.
○ Laisser une batterie devenir trop chaude peut raccourcir sa durée de vie.
3. Ne jamais surdécharger la batterie en utilisant l’outil, même après que la
performance de l’outil est diminué. Lorsque les performances de l’outil
commencent à diminuer, arrêtez d’utiliser l’outil et rechargez la batterie pour
des performances optimales.
COMMENT CHARGER LE BLOC BATTERIE
z Branchez le chargeur (g.3) dans une prise de 120 volts. Lorsque le chargeur
est connecté au courant AC domestique, le voyant vert est allumé.
z Lorsque la batterie est correctement insérée dans le chargeur et en charge
(g.4), le voyant rouge clignote.
z Le voyant rouge s’éteint et le voyant vert reste allumé une fois que la batterie
est complètement chargée.
z Une fois le chargement terminé, retirez la batterie du chargeur immédiatement.
Lorsque vous chargez plusieurs batteries, laissez chargeur 15 minutes de repos
entre les charges.
z Après de nombreux cycles de charge / décharge, votre batterie peut perdre
sa capacité de charge. Si oui, veuillez le remplacer. Disposer de la Batterie
en la recyclant de façon appropriée. Ne jetez pas les piles dans les poubelles
courantes.
INSTALLATION ET RETRAIT DE LA BATTERIE
z Pour installer: faites glisser la batterie dans le bas de l’outil (g.5) jusqu’à ce
que cliquez sur.. Assurez-vous que le loquet de libération de la batterie (g.5, A)
est en place et que la batterie est sécurisée avant l’opération.
z Pour retirer: appuyez sur le loquet de dégagement de la batterie et retirez le
même temps.
A
fig.5

v.200601 Fr.11
FRANÇAIS
MODE D’EMPLOI
LAVEUSE À PRESSION SANS FIL 20V
1. Fixez l’unité de lavage sous pression à l’unité d’alimentation principale, comme
illustrée à la g.6. le bouton de verrouillage et de déverrouillage (g.6, L) sur le
dessus du bloc d’alimentation doit unité de lavage sous pression.
2. Appuyez sur la petite baguette (le mandrin en laiton doit être à l’autre extrémité)
l’unité de lavage sous pression (g.7, 1) et tourner dans le sens des aiguilles
d’une montre jusqu’à ce qu’elle soit bien en place (g 7, 2).
3. Tirez vers l’arrière l’anneau de serrage en laiton (g.8, 1), insérez l’adaptateur
de buse avec buse multipulvérisation dans la lance courte (g.8, 2) et libérer le
mandrin bague.
4. S’il est plus pratique de vous placer plus loin de la buse de pulvérisation ou
vous avez besoin d’une portée plus longue, insérez la rallonge plus longue
(g.9, 1) dans le l’unité de lavage sous pression et tournez-la dans le sens des
aiguilles d’une montre jusqu’à ce qu’elle soit bien en place (g.9, 2).
5. Ensuite, ajoutez la petite baguette (g.10) avant d’insérer enn la buse
adaptateur avec buse multipulvérisation dans la buse courte comme dans la
gure 8 ci-dessus.
fig.6
Fr.12 DK2 CHPW102 man.
FRANÇAIS
AJOUTER LE TUYAU D’ADMISSION
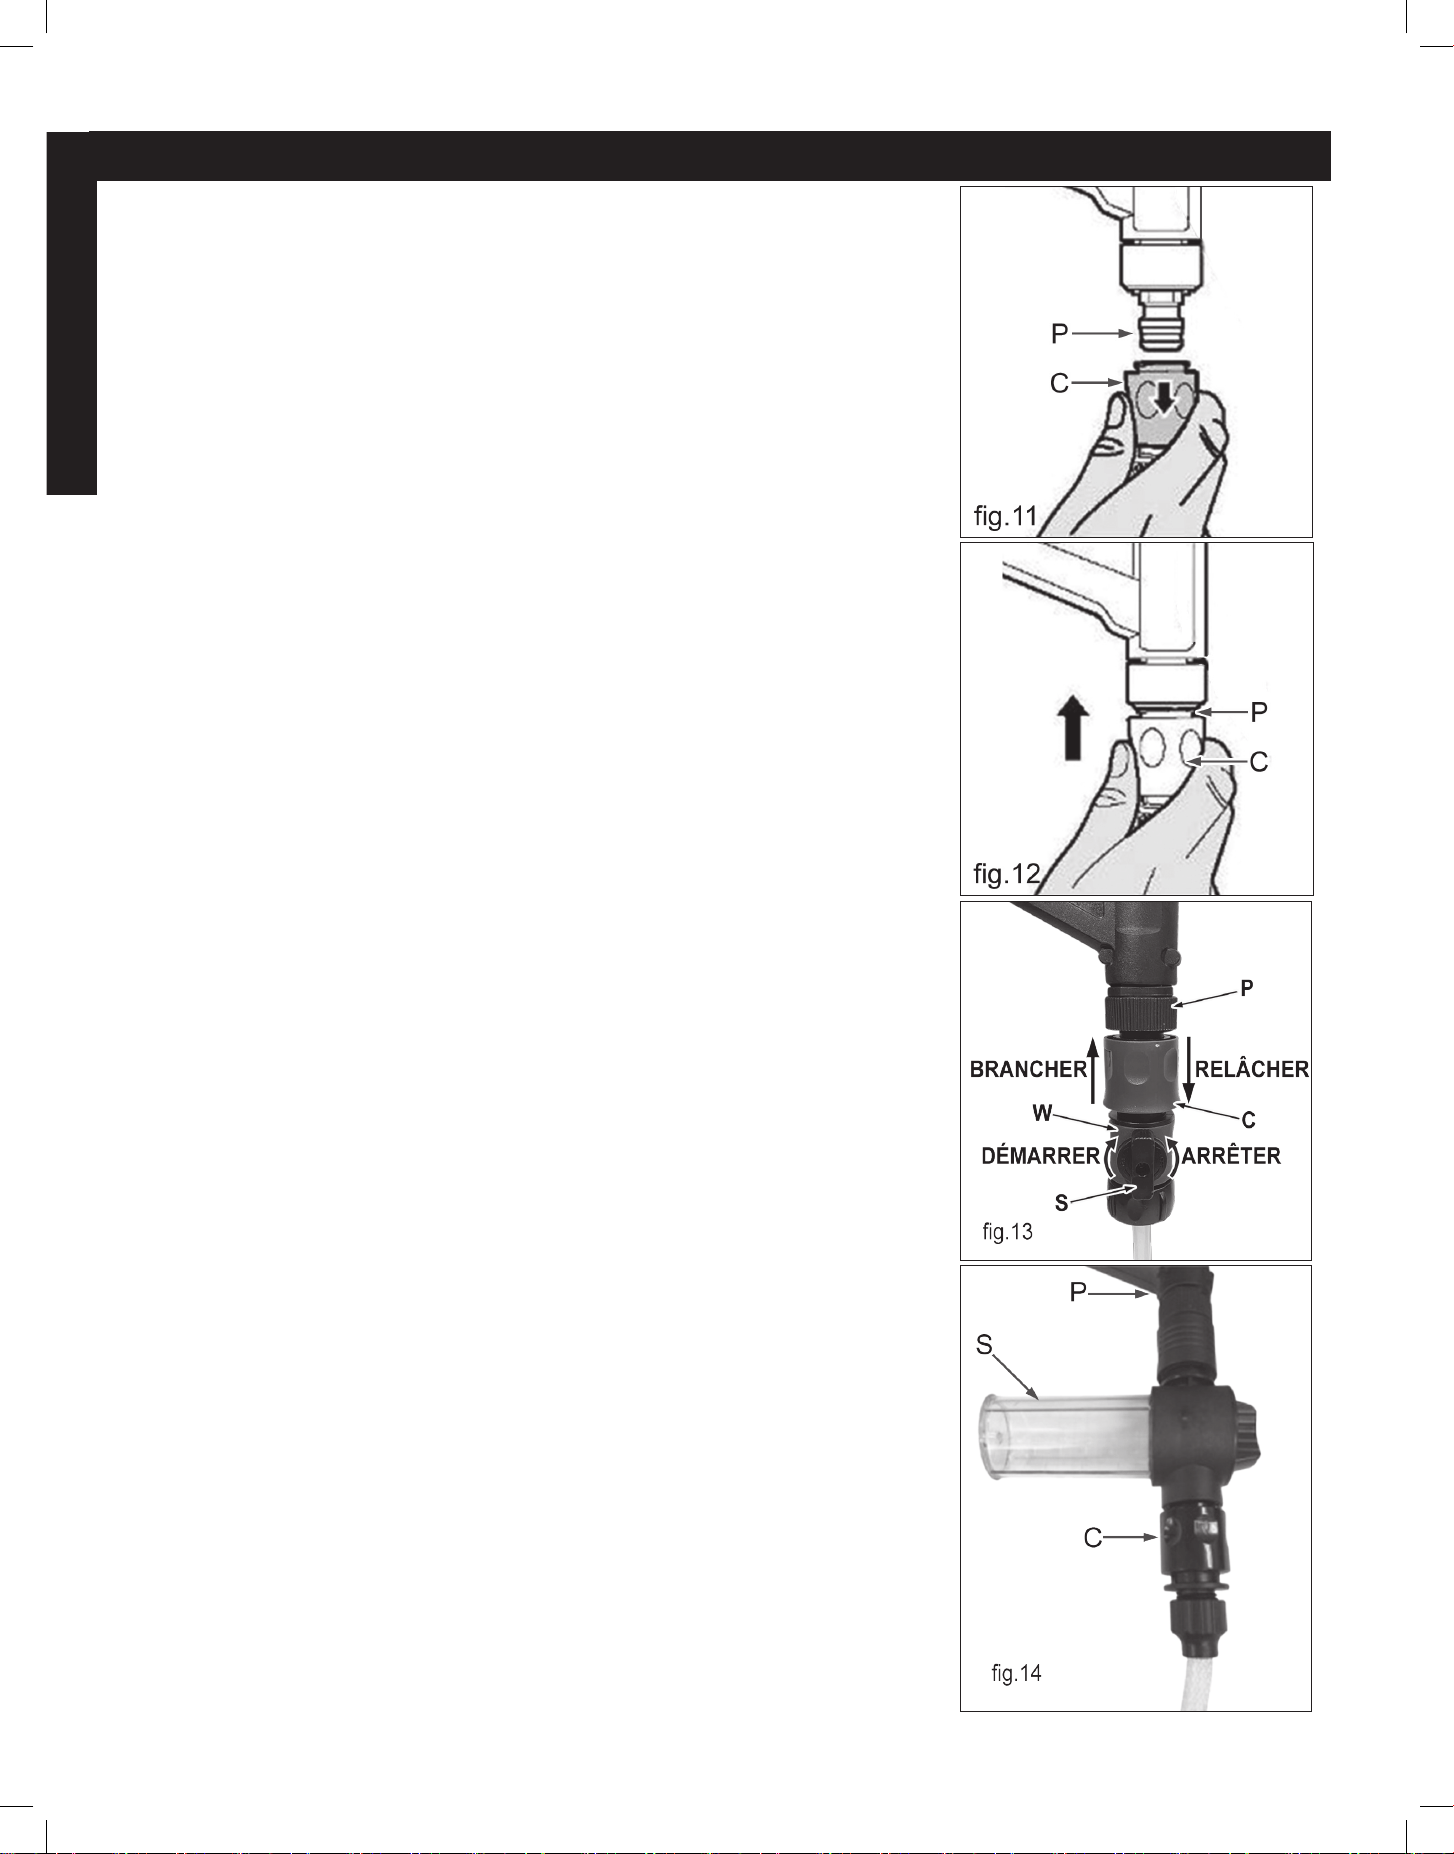
1. Tirez sur le manchon extérieur du connecteur (g.11, C), poussez le raccord du
tuyau sur l’entrée de l’unité de lavage sous pression (g.12, P). Relâchez le
manchon extérieur.
2. Plongez l’autre extrémité du tuyau d’admission dans une source d’eau,
idéalement un seau de l’eau.
3. Lorsque l’unité est raccordée à l’eau du robinet, le raccord de la conduite d’eau
(g.13, W) peut être utilisé pour empêcher la tête du pistolet de fuir. Le joint de
la conduite d’eau (g.13, W) comprend une fonction de commutation pour
démarrer et arrêter le débit d’eau (g.13, S). Poussez le raccord du tuyau d’eau
(g.13, W) sur l’entrée de l’unité de lavage (g.13, P).Pour le retrait, pousser le
manchon du connecteur (g.13, C) vers le haut pour libérer le joint de la
conduite d’eau (g.13, W).
4. Vous pouvez également connecter la bouteille de savon (g.14, S) entre le
lavage sous pression entrée d’eau (g.14, P) et le raccord de tuyau (g.14, C).
Cela injectera du savon de la bouteille dans le jet d’eau sous pression.
MODE D’EMPLOI
v.200601 Fr.13
FRANÇAIS
MODE D’EMPLOI
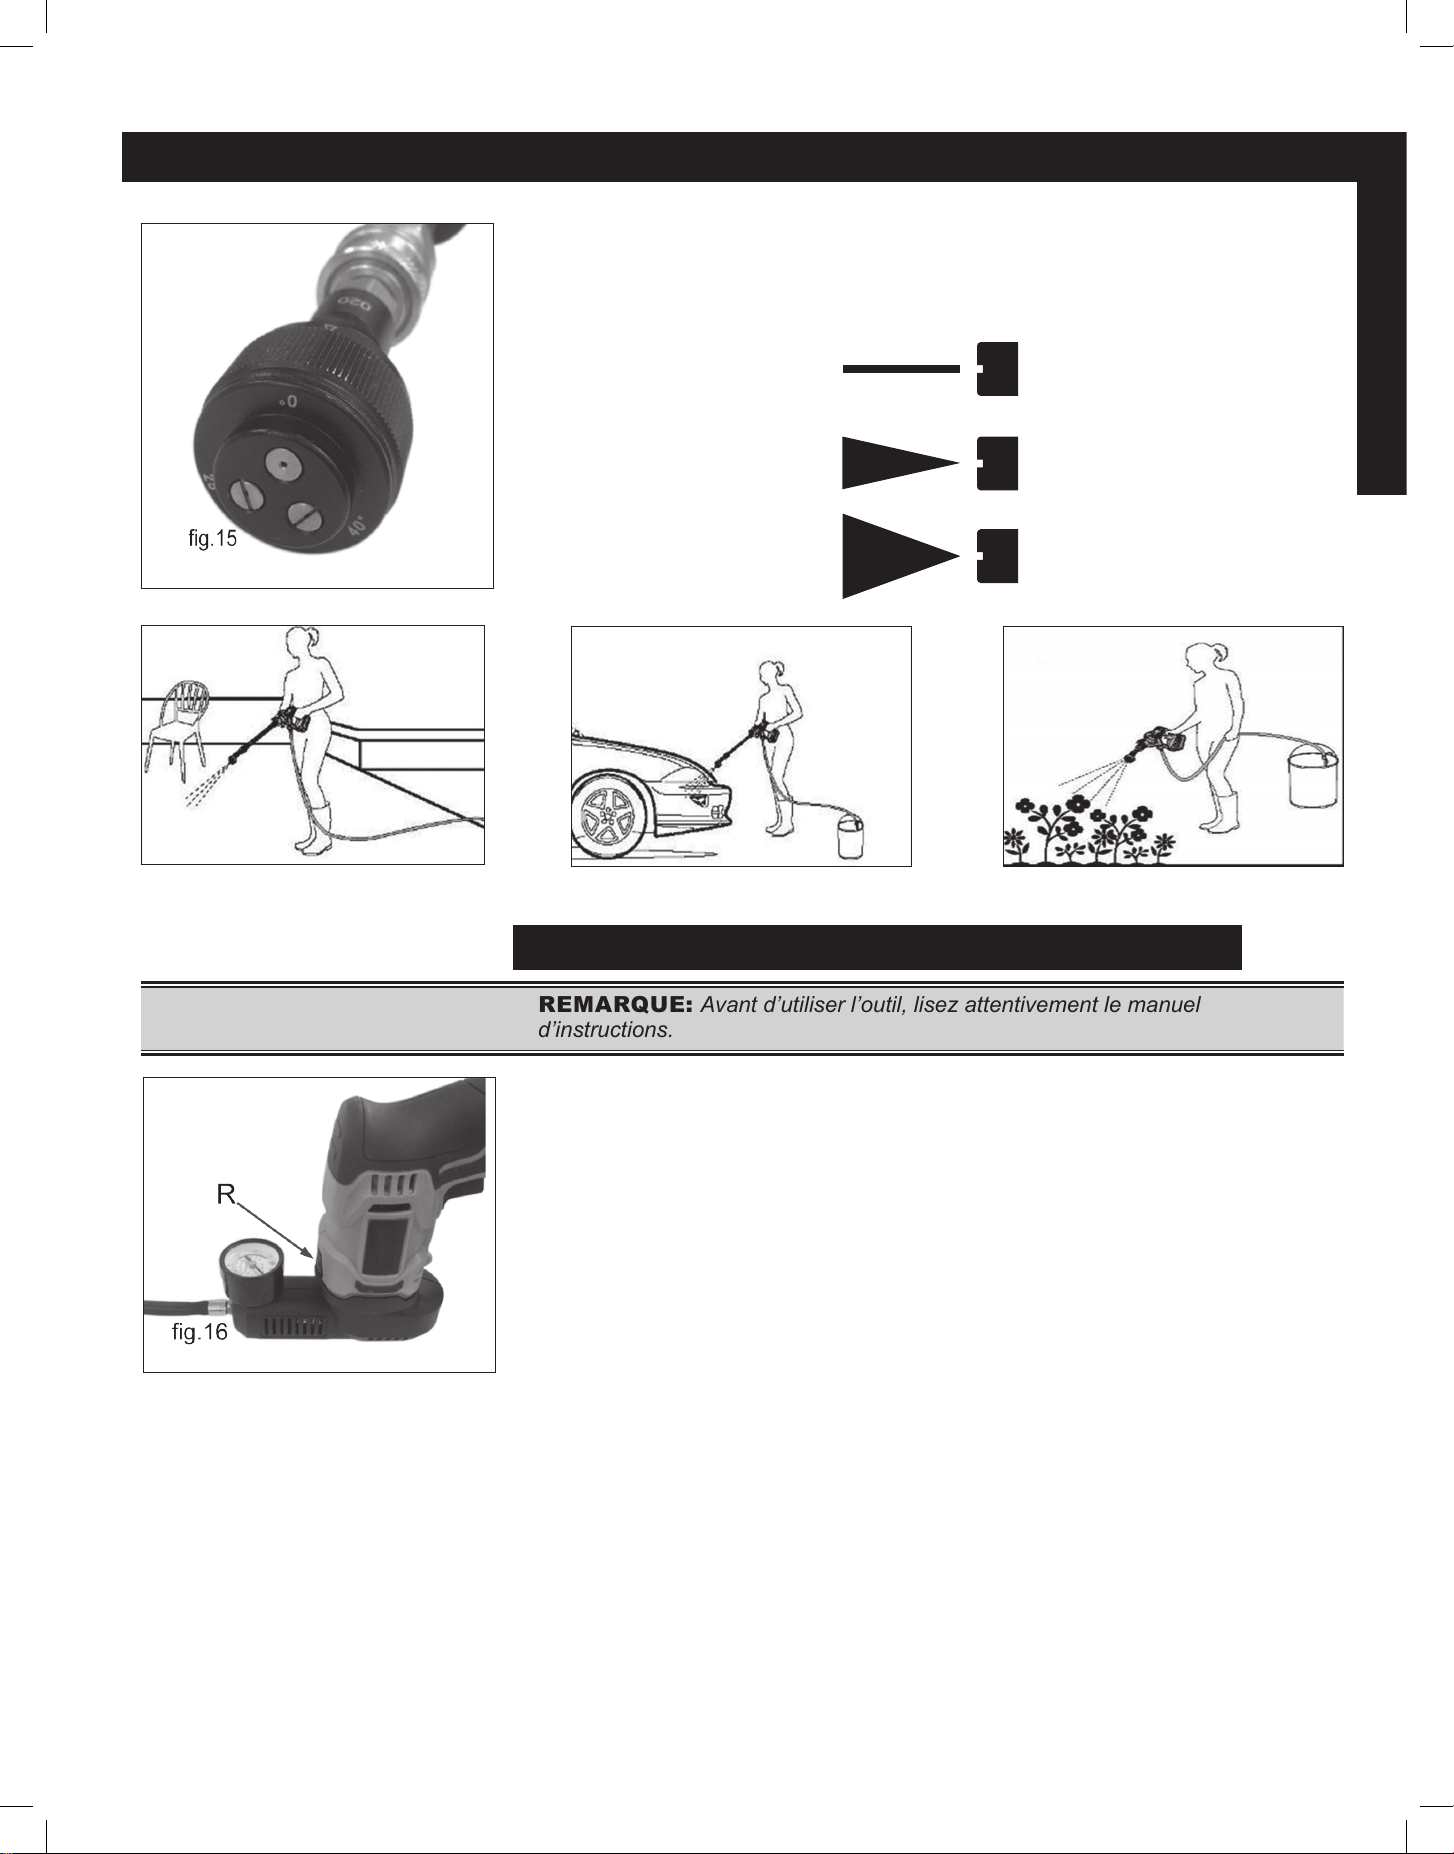
CHOISISSEZ LE MOTIF DE PULVÉRISATION
5. Tenez l’adaptateur de buse d’une main et tournez la buse multipulvérisation
avec une autre main pour choisir le modèle de pulvérisation que vous
souhaitez. Il y a trois buses avec motifs 0 °, 25 °, 40 °..
COMPRESSEUR D’AIR SANS FIL 20V
REMARQUE: Avant d’utiliser l’outil, lisez attentivement le manuel
d’instructions.
POUR INSTALLER L’UNITÉ DE COMPRESSEUR SUR LA
TÊTE D’ALIMENTATION
1. Appuyez sur le bouton de déverrouillage (g.16, R) et appuyer légèrement vers
le bas l’unité d’alimentation sera susante pour l’installation.
2. Appuyez sur le bouton de déverrouillage pour séparer le compresseur
UTILISATION DE LA JAUGE DE PRESSION
z Les unités de pression de l’échelle bleue sont en bar.
z Les unités de pression à échelle noire sont en PSI.
CONTRÔLE DE PRESSION DES PNEUS
z Vérifiez les pneus sur une base mensuelle.
z Un gonage incorrect raccourcit la durée de vie et les performances de vos
pneus, la consommation de carburant et la sécurité.
0°
25°
40°
Fr.14 DK2 CHPW102 man.
FRANÇAIS
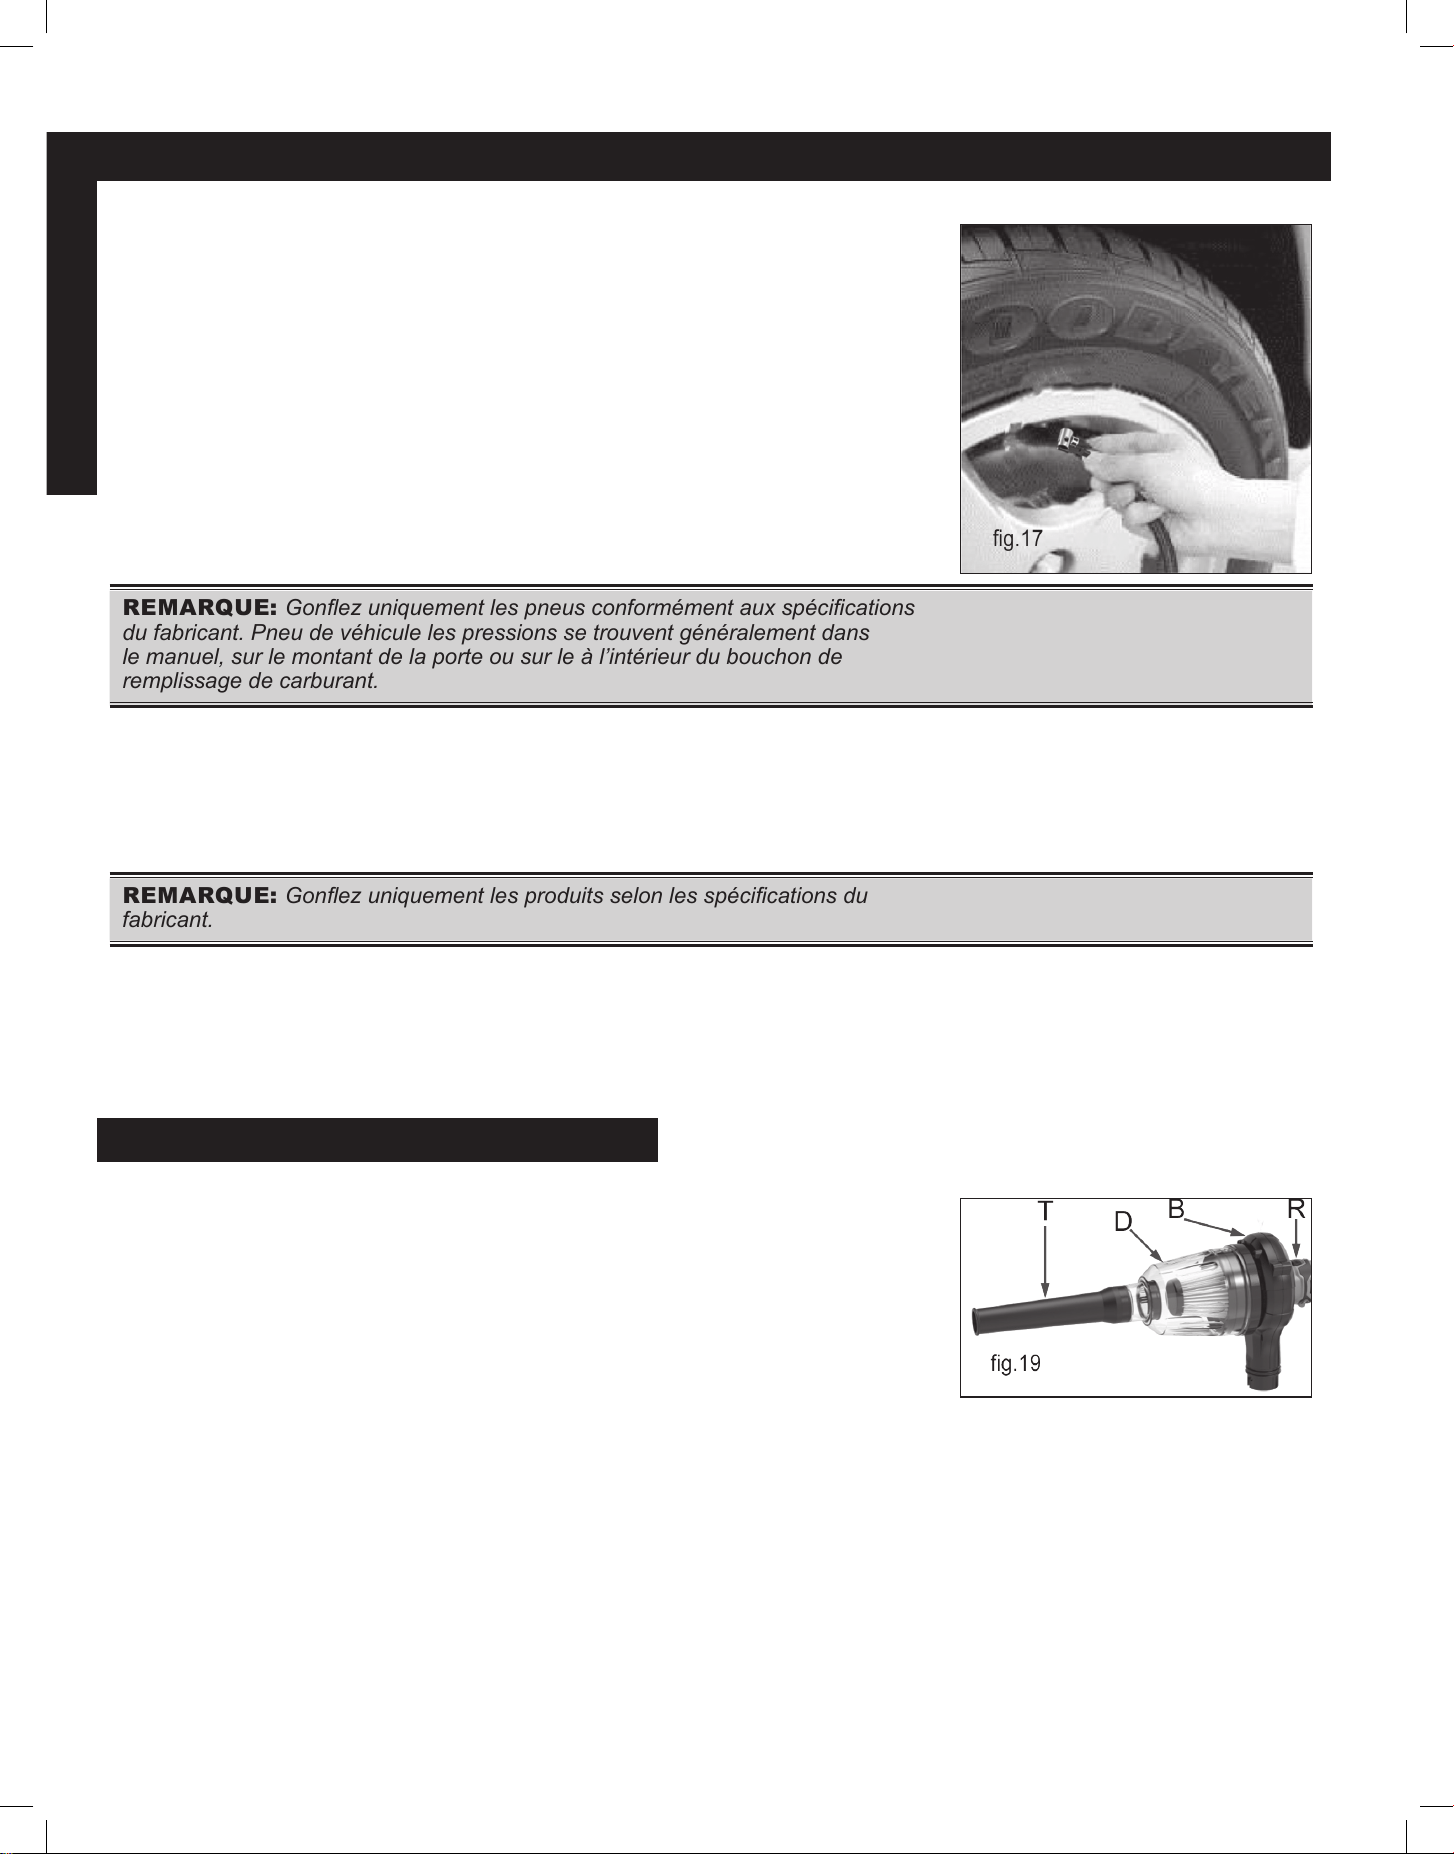
GONFLAGE DES PNEUS DU VÉHICULE
1. Retirez le capuchon anti-poussière de la valve du pneu et rangez-le dans un
endroit sûr.
2. Branchez la pointe de la valve du tuyau à air directement sur la valve à air du
pneu, puis appuyez levier vers le bas pour le verrouiller fermement
3. Vériez la mesure du manomètre en Bar ou PSI.
4. Si nécessaire, ajoutez plus d’air en appuyant sur la gâchette jusqu’à ce que le
la pression est atteinte.
5. Relevez le levier et retirez le tuyau d’air de la valve du pneu.
6. Remettez le capuchon anti-poussière de la valve du pneu.
REMARQUE: Gonez uniquement les pneus conformément aux spécications
du fabricant. Pneu de véhicule les pressions se trouvent généralement dans
le manuel, sur le montant de la porte ou sur le à l’intérieur du bouchon de
remplissage de carburant.
GONFLAGE & GONFLAGE DE LOISIRS
z Sélectionnez l’adaptateur approprié et vissez-le dans le connecteur de valve.
z L’adaptateur pour ballons de sport et l’adaptateur pour matelas pneumatiques
et radeaux sont attachés à l’arrière du goneur de pneus.
z Insérez l’adaptateur de connecteur dans l’entrée appropriée du gonable.
REMARQUE: Gonez uniquement les produits selon les spécications du
fabricant.
NETTOYAGE
z Nettoyez le goneur uniquement à l’aide d’un chion propre et sec.
z N’utilisez pas de produits de nettoyage.
z Assurez-vous que le goneur est exempt de poussière ou d’autres débris avant
la connexion.
ASPIRATEUR SANS FIL 20V
1. Appuyez sur le bouton de déverrouillage (g.19, R) sur le bloc d’alimentation et
la pression sera susante pour installer.
2. Poussez le bac à poussière (g.19, D) sur le corps du ventilateur (g.19, B) et
tournez-le dans le sens horaire pour verrouiller en place.
3. Poussez le tube du ventilateur (g.19, T) sur le bac à poussière et tournez-le
dans le sens des aiguilles d’une montre pour le verrouiller endroit.
4. Tournez le tube du ventilateur dans le sens inverse des aiguilles d’une montre
et tirez-le pour le séparer.
5. Tournez le bac à poussière dans le sens inverse des aiguilles d’une montre et
retirez-le pour le séparer.
6. Appuyez sur le bouton de déverrouillage pour séparer le corps de l’aspirateur /
l’unité d’alimentation principale.
MODE D’EMPLOI
v.200601 Fr.15
FRANÇAIS
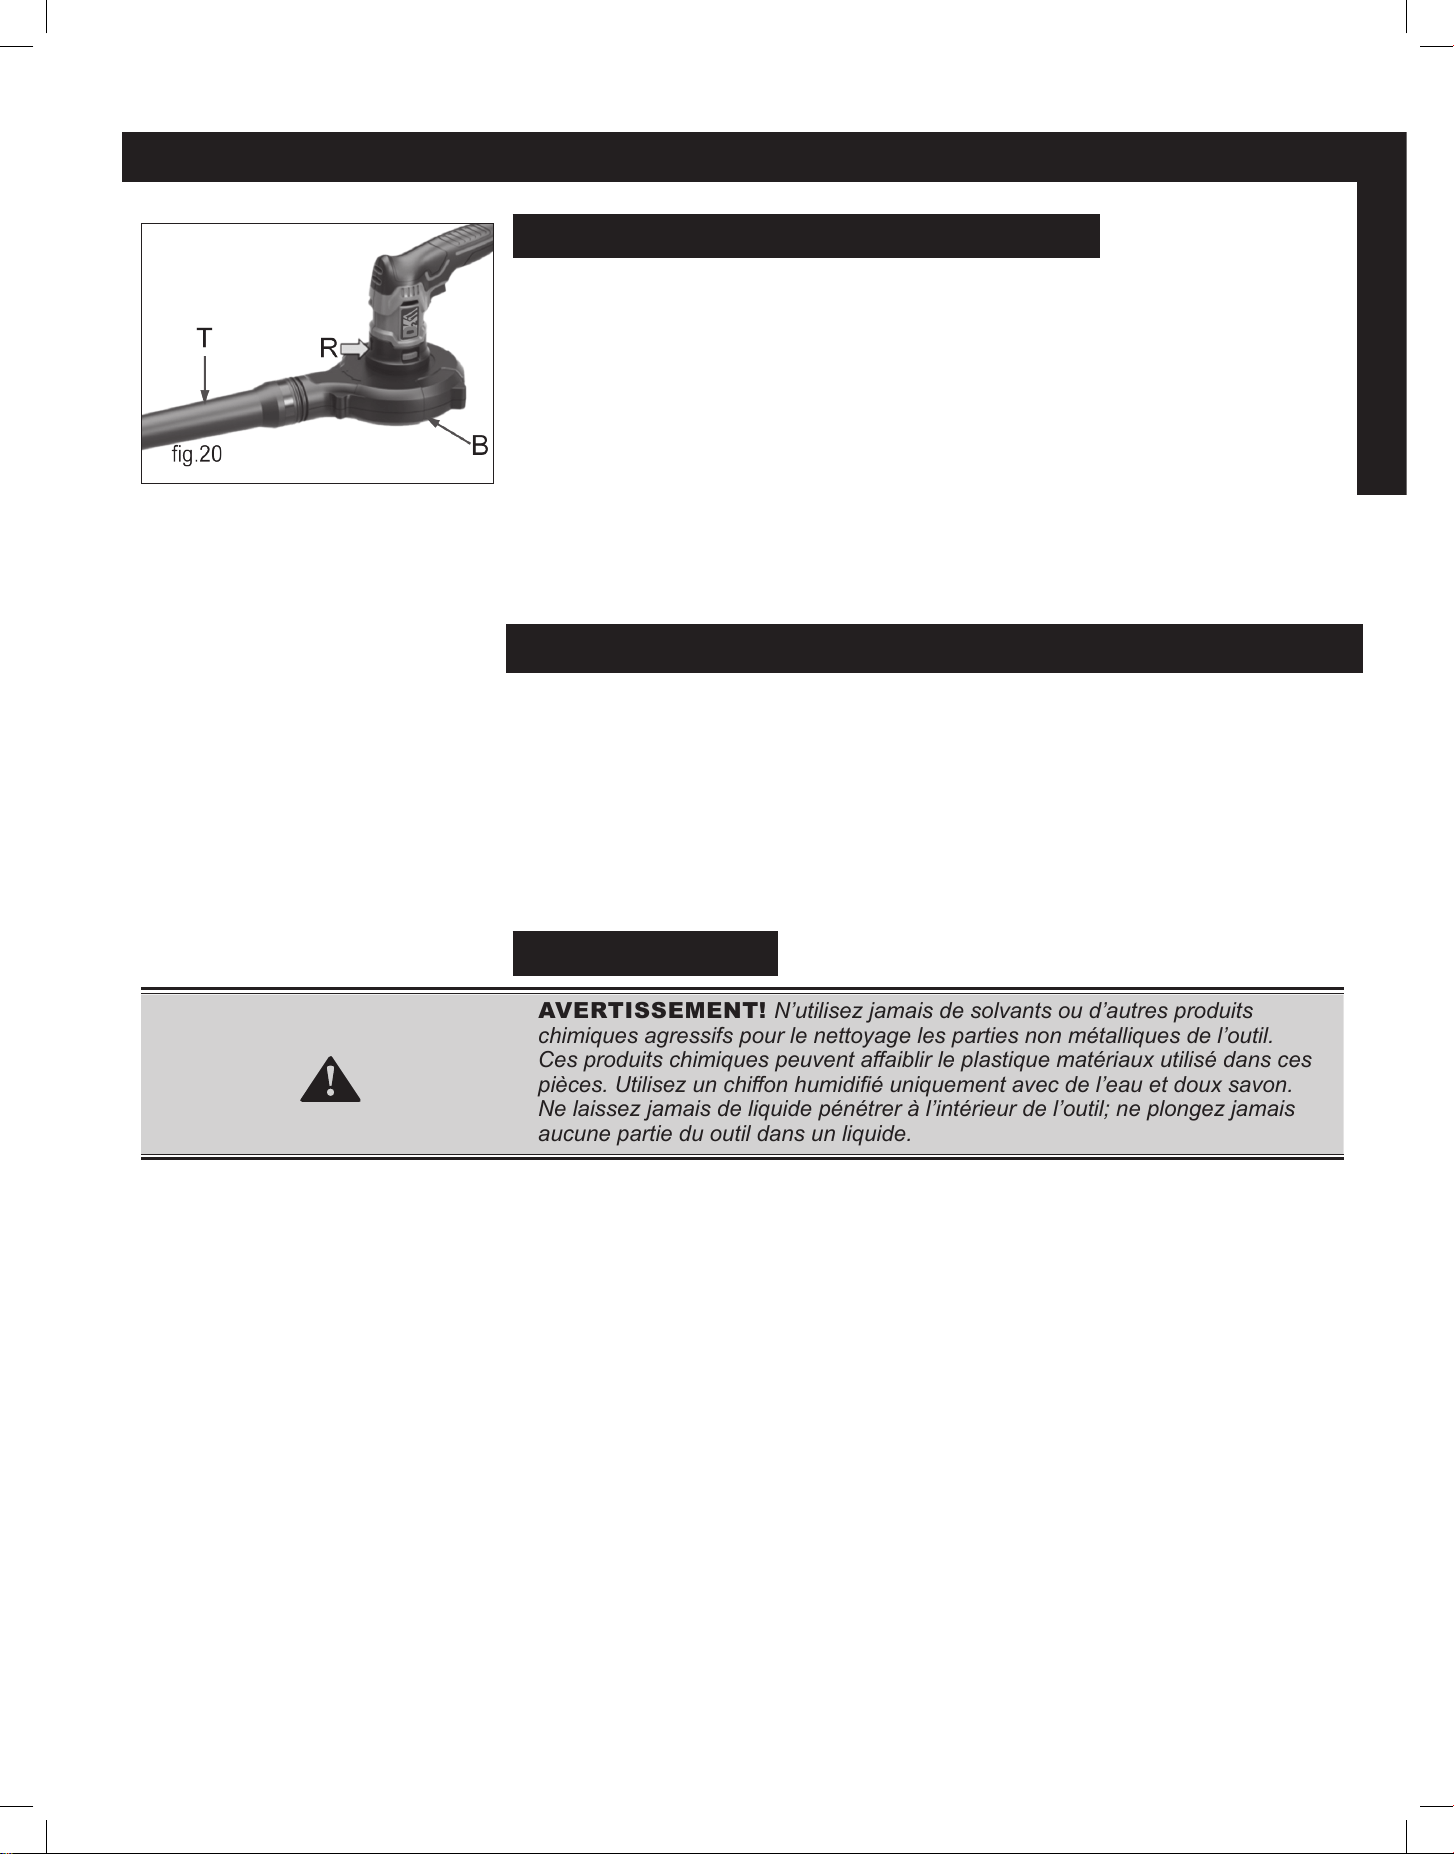
VENTILATEUR SANS FIL 20V
1. Appuyez sur le bouton de déverrouillage (g.20, R) sur le bloc d’alimentation et
la pression sera susante pour installer.
2. Pour installer, poussez le tube du ventilateur sur le corps du ventilateur /
aspirateur et tournez-le dans le sens horaire pour verrouiller en place.
3. Appuyez sur le bouton de déverrouillage pour séparer le corps du ventilateur de
l’unité d’alimentation.
4. Tournez le tube du ventilateur dans le sens inverse des aiguilles d’une montre
et tirez-le pour le séparer du boitier.
ENTRETIEN
z Retirez la batterie de l’outil avant d’effectuer et de régler, entretien ou
maintenance.
z Votre outil électrique ne nécessite aucune lubrification ou maintenance
supplémentaire. Aucune pièce réparable par l’utilisateur dans votre outil
électrique. N’utilisez jamais d’eau ou de produits chimiques nettoyants pour
nettoyer votre outil électrique. Essuyer avec un chiffon sec.
z Rangez toujours votre outil électrique dans un endroit sec. Gardez les fentes
de ventilation du moteur nettoyer. Gardez toutes les commandes de travail
exemptes de poussière.
NETTOYAGE
AVERTISSEMENT! N’utilisez jamais de solvants ou d’autres produits
chimiques agressifs pour le nettoyage les parties non métalliques de l’outil.
Ces produits chimiques peuvent aaiblir le plastique matériaux utilisé dans ces
pièces. Utilisez un chion humidié uniquement avec de l’eau et doux savon.
Ne laissez jamais de liquide pénétrer à l’intérieur de l’outil; ne plongez jamais
aucune partie du outil dans un liquide.
MODE D’EMPLOI