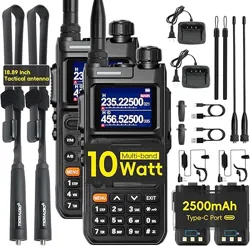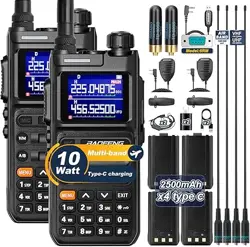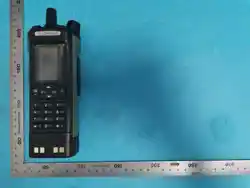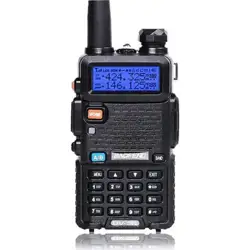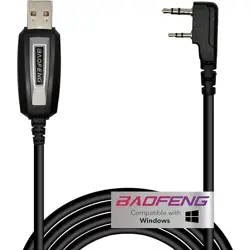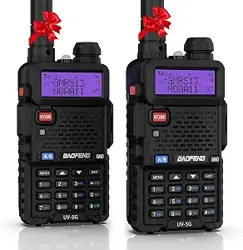

UV-5G PRO
GMRS
Radio
OWNER’S MANUAL

PREFACE
Thank you for purchasing UV-5G PRO Two Way Radio, It is a multitask GMRS transceiver. Combining the latest technology in
radio communication along with a sturdy mechanical frame, UV-5G PRO is the ideal and effective solution for the
professionals who need to stay in touch with the working team (in construction sites, buildings, shows, trade fairs or hotels)
or for leisure users that just want to keep up with friends and family.
IMPORTANT NOTICE
To help you ward off bodily injury or property loss that may arise from improper operation, please read all the
information carefully before using our products. This contains instructions for safe usage and RF energy
awareness and control for compliance with applicable standards and regulation.
Safety Information for GMRS Radios
Your wireless handheld portable transceiver contains a low power transmitter. When the talk button is pushed, it sends out
radio frequency (RF) signals. The device is authorized to operate at a duty factor not to exceed 50%. In August 1996, the
Federal Communications Commissions (FCC) adopted RF exposure guidelines with safety levels for handheld wireless
devices.
FCC Part 15.21 Warning Statement
THE GRANTEE IS NOT RESPONSIBLE FOR ANY CHANGES OR MODIFICATIONS NOT EXPRESSLY APPROVED BY THE PARTY
RESPONSIBLE FOR COMPLIANCE. SUCH MODIFICATIONS COULD VOID THE USER’S AUTHORITY TO OPERATE THE
EQ UIPMENT.
I

Table of Contents
Chapter1. Getting Started 5.3 Making a call
1.1 Regulations and Safety Warnings 5.4 Channel selection
1.2 Content of the packaging 5.5 Frequency (VFO) mode
1.3 Main features 5.6 Channel (MR) mode
Chapter2. Charging the Battery Chapter6. Advanced Features
2.1 Charging the Battery Pack 6.1 Frequency scanning
2.2 Charger Supplied 6.2 Channel scanning
2.3 Use Caution with the Li-ion Battery 6.3 Tone scanning
2.4 How to Charge 6.4 Dual Watch
2.5 LED Indicator 6.5 Cursor▼▲Conversion (A/B)
6.6 High/low power fast selection
Chapter3. Installation of Accessories 6.7 Keypad lock
3.1 Installing / Removing the Antenna 6.11 1000Hz, 1450Hz, 1750Hz Tone-burst
3.2 Installing the belt clip 6.12 One touch frequency Search
3.3 Installing the battery pack Chapter7. Working the MENU System
3.4 Additional Speaker/Microphone (Optional) 7.1 Basic use
Chapter4. Radio Overview 7.2 Using short-cuts
4.1 Buttons and controls of the radio 7.3 Functions and operations
4.2 Display of the radio Appendix A. - Technical Specifications
4.3 Status Indications Appendix B. - Trouble shooting guide
4.4 Main keypad controls Appendix C. - Shortcut Menu operations
Chapter5. Basic Operations Appendix D. - GMRS Frequency Chart
5.1 Power on the radio Appendix E. - DCS Table
5.2 Adjusting the volume Appendix F. - CTCSS Table
Appendix G.- NOAA Weather Radio Frequency List
II

Chapter1. Getting Started
Chapter1. Getting Started
1.1 Regulations and Safety Warnings
This device complies with Part 15 of the FCC Rules. Operation is subject to the following two conditions:
(1) This device may not cause harmful interference.
(2) This device must accept any interference received, including interference that may cause undesired operation.
Important: Any changes or modifications not expressly approved by the party responsible for compliance could void the
user's authority to operate this device. Your radio is set up to transmit a regulated signal on an assigned frequency. It is
against the law to alter or adjust the settings inside the radio to exceed those limitations. Any adjustments to your radio
must be made by qualified technicians.
To be safe and sure:
• Never open your radio’s case.
• Never change or replace anything in your radio except the battery.
Your radio might cause TV or radio interference even when it is operating properly. To determine whether your radio is
causing the interference, turn it off. If the interference goes away, your radio is causing it. Try to eliminate the interference by
moving your radio away from the receiver. If you cannot eliminate the interference, the FCC requires that you stop using the
radio.
Hazardous Environments: Do not operate the radio in hazardous environments. Explosion or fire may result.
Do not operate the radio near unshielded electrical blasting caps.
Under certain conditions, radios can interfere with blasting operations and may cause an explosion. Turn your radio OFF to
prevent accidental transmission when in a blasting area or in areas posted: "Turn off two-way radio." Construction crews
often use remote control RF devices to set off explosives.
Care and Safety: To clean the radio, use a soft cloth dampened with water. Do not use cleaners or solvents because they can
harm the body of the unit and leak inside, causing permanent damage. Use a dry, lint-free cloth to clean the battery
contacts.
-1-

RF Exposure Information
WARNING! Read this information before using the radio. In August 1996 the Federal Communications Commission (FCC) of
the United States with its action in Report and Order FCC 96-326 adopted an updated safety standard for human exposure to
radio frequency electromagnetic energy emitted by FCC regulated transmitters.
Those guidelines are consistent with the safety standard previously set by both U.S. and international standards bodies. The
design of the radio complies with the FCC guidelines and these international standards.
Never allow children to operate the radio without adult supervision and the knowledge of the following guidelines.
WARNING! It is up to the user to properly operate this radio transmitter to insure safe operation. Please adhere to the
following:
Use only the supplied or an approved antenna. Unauthorized antennas, modifications, or attachments could impair call
quality, damage the radio, or result in violation of FCC regulations.
Do not use the radio with a damaged antenna.
If a damaged antenna comes into contact with the skin, a minor burn may result. Please contact your local dealer for a
replacement antenna.
Hand-held Operation (Held-to-Face)
This device was evaluated for typical hand-held (held-to- face) operations with a 1 inch spacing from the front of the radio.
For hand-held operation, the radio should be held 1 inch from the user's face in order to comply with FCC RF exposure
requirements.
For more information about RF exposure, please visit the FCC web site at www.fcc.gov.
Body-worn Operation
This device was evaluated for body-worn operations with the supplied belt-clip accessory. (All necessary accessories are
included in the package; any additional or optional accessories are not required for compliance with the guidelines.) Third
party accessories (unless approved by the manufacturer) should be avoided as these might not comply with FCC RF exposure
guidelines.
For more information about RF exposure, please visit the FCC web site at www.fcc.gov.
-2-

GMRS Communication
This GMRS (General Mobile Radio Service) feature is a land-mobile service available for short-distance, two-way
communications in the USA. You must have a valid FCC license to communicate on these channels. The GMRS/FRS
frequencies that radio this radio uses are set aside for communicating with others while hiking, biking, and working; keeping
track of family and friends at a crowded public event; checking with travel companions in another car; talking with neighbors;
arranging meeting spots with others while shopping at the mall. Licensed users will be issued a call sign by the FCC, which
should be used for station identification when operating this radio. GMRS users should also cooperate by
engaging in
permissible transmissions only, avoiding channel interference with other GMRS users, and being prudent with the length of
their transmission time.
FCC License Required
This two-way radio operates on GMRS (General Mobile Radio Service) frequencies which require an FCC (Federal
Communications Commission) license. A user must be licensed prior to transmitting on the GMRS band with this radio.
Serious penalties could result for unlicensed use of GMRS channels, in violation of FCC rules. Operation of this radio is
subject to additional rules specified in 47 C.F.R. Part 95. For licensing information and application forms, please call the FCC
Hotline at 800418-FORM. Request form #159 and form #605. Questions regarding the license application should be directed
to the FCC at 888-CALL-FCC. Additional information is available on the FCC’s website at www.fcc.gov.
NOTE: Even if you operate this radio on FRS (Family Radio Service) channels at low power (0.5 watt), you are required to have
an FCC license. Because this radio operates in the 0.5 to 5 watt GMRS power range all GMRS rules apply and will
require you have a GMRS license even for FRS (Family Radio Service) communication. Normal FRS only radios operate
at a maximum power of 0.5 watt (500 mill watt) power and have an integral (non-detachable) antenna.
FCC Warnings
Replacement or substitution of transistors, regular diodes or other parts of a unique nature, with parts other than those
recommended by Pofung may cause a violation of the technical regulations of part 95 of the FCC rules, or violation of type
acceptance requirements of part 2 of the rules.
-3-

■ Precautions for Portable Terminals
Operating Prohibitions
To protect you against any property loss, bodily injury or even death, be sure to observe the following safety instructions:
1. Do not operate the product in a location containing fuels, chemicals, explosive atmospheres and other flammable or
explosive materials. In such location, only an approved Ex-protection model is allowed for use, but any attempt to
assemble or disassemble it is strictly prohibited.
2. Do not operate the product near or in any blasting area.
3. Do not operate the product near any medical or electronic equipment that is vulnerable to RF signals.
4. Do not hold the product while driving.
5. Do not operate the product in any area where use of wireless communication equipment is completely prohibited.
Important Tips
To help you make better use of the product, be sure to observe the following instructions:
1. Do not use any unauthorized or damaged accessory.
2. Keep the product at least 2.5 centimeters away from your body during transmission.
3. Do not keep the product receiving at high volume for a long time.
4. For vehicles with an air bag, do not place the product in the area over the air bag or in the air bag deployment area.
5. Keep the product and its accessories out of reach of children and pets.
6. Please operate the product within the specified temperature range.
7. Continuous transmission for a long time may lead to heat accumulation within the product. In this case, please keep it at
a proper location for cooling.
8. Handle the product with care.
9. Do not disassemble, modify or repair the product and its accessories without authorization.
■ Precautions for Batteries
Charging Prohibitions
To protect you against any property loss, bodily injury or even death, be sure to observe the following safety instructions:
1. Do not charge or replace your battery in a location containing fuels, chemicals, explosive atmospheres and other
-4-

flammable or explosive materials.
2. Do not charge your battery that is wet. Please dry it with a soft and clean cloth prior to charge.
3. Do not charge your battery suffering deformation, leakage and overheat.
4. Do not charge your battery with an unauthorized charger.
5. Do not charge your battery in a location where strong radiation is present.
6. Overcharge shall always be prohibited for it may shorten the life of your battery.
Maintenance Instructions
To help your battery work normally or prolong its life, be sure to observe the following instructions:
1. Accumulated dust on charging connector may affect normal charging. Please use a clean and dry cloth to wipe it on a
regular basis.
2. It is recommended to charge the battery under 5℃~40℃. Violation of the said limit may cause battery life reduction or
even battery leakage.
3. To charge a battery attached to the product, turn it off to ensure a full charge.
4. Do not remove the battery or unplug the power cord during charging to ensure a smooth charging process.
5. Do not dispose of the battery in fire.
6. Do not expose the battery to direct sunlight for a long time nor place it close to other heating sources.
7. Do not squeeze and penetrate the battery, nor remove its housing.
Transportation Instructions
1. Damaged batteries must not be transported.
2. To avoid short circuit, separate the battery from metal pars or from each other if two or more batteries are transported in
one packaging.
3. The radio must be switched off and secured against switch-on, if the battery is attached.
The content of the shipment must be declared in the shipping documents and by a Battery Shipping Label on the packaging.
Contact your hauler for the local regulations and further information.
-5-

1.2 Content of the packaging
• 1 Radio • 1 Li-Ion battery pack
• 1 Fast desktop charger • 1 Wall adaptor
• 1 Antenna • 1 Belt clip
If any item is missing, please verify with your dealer.
1.3 Main features
• 22 Modifiable GMRS Channels (RX &TX) • 8 Modifiable GMRS Repeater Channels (RX & TX)
• Scanning receiver frequency range: FM 76-108 MHz; AM108-136MHz; VHF 136-260MHz, UHF 400-520MHz
• One touch search frequency, easy pairing and grouping (copying channel configuration parameters)
• Frequency step, selectable between 2.5K | 5.0K | 6.25K | 10.0K | 12.5K | 20.0K | 25.0K | 50.0K
• Frequency hopping and scramble functions to keep your call privacy confidential
• Channel scan, frequency scan, and three scan and recovery methods: TO, CO, and SE
• Up to 128 memory channels. • Broadcast FM radio receiver 76-108 MHz
• DTMF encoder and DTMF manual dial • High Capacity Lithium-Ion battery.
• VOX (voice activated transmit).
• Alarm function. • Display illumination programmable via keypad.
• Programmable repeater offset. • Battery save function.
• Transmission time-out timer. • Busy channel lock out.
• LED flashlight. • Ten (10) levels of Squelch adjustment.
• End of transmission tone, aka “Roger Beep” • Two (2) pins for Kenwood accessory port
• Support NOAA weather reception function in the United States and Canada
-6-

Chapter2. Battery Information
2.1 Charging the Battery Pack
The Li-ion battery pack is not charged at the factory; please charge it before use. Charging the battery pack for the first time after
purchase or extended storage (more than 2 months) may not bring the battery pack to its normal maximum operating capacity. Best
operation will require fully charging/ discharging the battery two or three times before the operating capacity will reach its best
performance. The battery pack life may be depleted when it’s operating time decreases even though it has been fully and correctly
charged. If this is the case, replace the battery pack.
2.2 Charger Supplied
Please use the specified charger provided by BAOFENG. Other models may cause explosion and personal injury. After installing the
battery pack, and if the radio displays low battery with a voice prompt, please charge the battery.
2.3 Use Caution with the Li-ion Battery
a. Do not short the battery terminals or throw the battery into a fire. Never attempt to remove the casing from the battery pack, as
BAOFENG cannot be held responsible for any accident caused by modifying the battery.
b. The ambient temperature should be between 5℃-40℃ (40˚F - 105˚F) while charging the battery. Charging outside this range may
not fully charge the battery.
c. Please turn off the radio before inserting it into the charger. It may otherwise interfere with correct charging.
d. To avoid interfering with the charging cycle, please do not cut off the power or remove the battery during charging until the green
light is on.
e. Do not recharge the battery pack if it is fully charged. This may shorten the life of the battery pack or damage the battery pack.
f. Do not charge the battery or the radio if it is damp. Dry it before charging to avoid damage.
WARNING
!
When keys, ornamental chain or other electric metals contact the battery terminal, the battery may become damage or
injure a human. If the battery terminals are short circuited it will generate a lot of heat. Take care when carrying and using
the battery. Remember to put the battery or radio into an insulated container. Do not put it into a metal container.
-7-
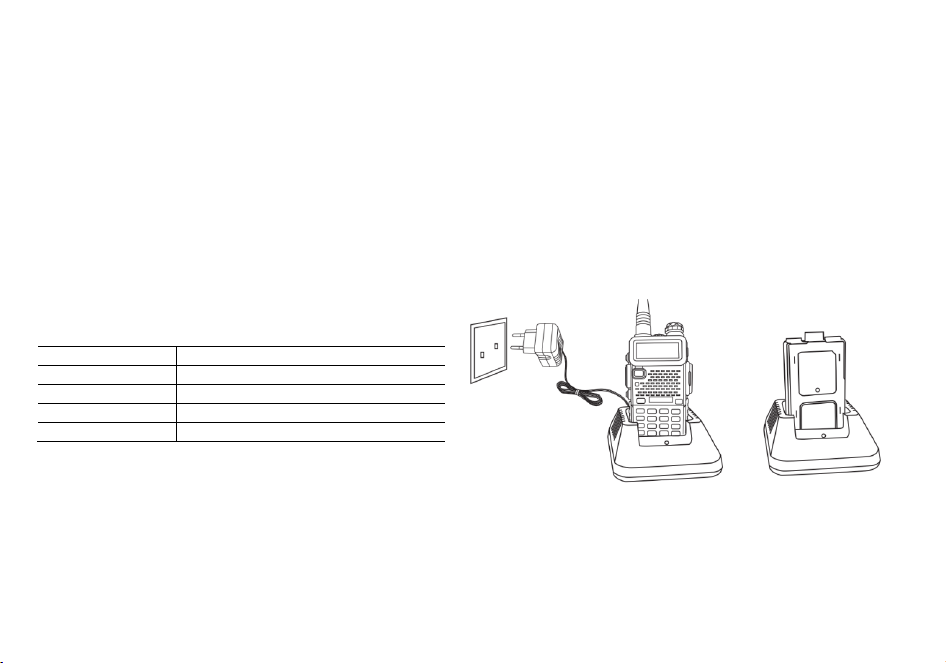
2.4 How to Charge
a. Plug the AC adaptor into the AC outlet, and then plug the cable of the AC adaptor into the DC jack located on the back of the
charger. The indicator light blinks orange and is then ready to charge a battery.
b. Plug the battery or the radio into the charger. Make sure the battery terminals are good in contact with charging terminals. The
indicator light turns to red--- charging begins.
c. It takes approximately 2-5 hours to fully charge the battery. When the lamp lights green, the charging is completed. Remove the
battery or the radio unit with its battery from socket.
When charging a radio (with battery) the indicating lamp will not turn into green to show the fully charged status if the radio
is powered on. Only when the radio is switched off will the lamp indicate normal operation. The radio consumes energy
when it is power-on, and the charger cannot detect the correct battery voltage when the battery has been fully charged. So
the charger will charge the battery in constant voltage mode and fail to indicate correctly when the battery has been fully
charged.
2.5 LED Indicator
NOTE:Trouble means battery too warm, battery short-circuited or charger short-circuited.
STATUS LED
No Battery Green and red alternately flashing
Charge Normally Red
Fully Charged Green
Trouble Red blinks fast for a long time
-8-
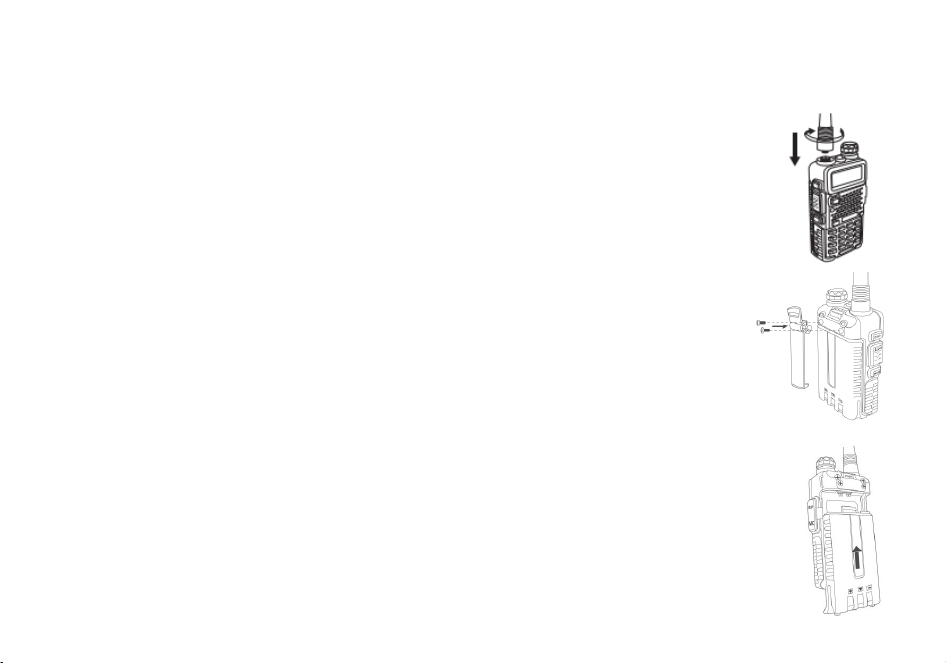
Chapter3. Installation of Accessories
Before the radio is ready for use we need to attach the antenna and battery pack, as well as charge
the battery.
3.1 Installing/ Removing the Antenna
a. Installing the Antenna: Screw the antenna into the connector on the top of the transceiver by
holding the antenna at its base and turning it clockwise until secure.
b. Removing the Antenna: Turn the antenna counter-clockwise to remove it.
3.2 Installing the belt clip
a. At the back of the radio there are two parallel screws mounted above the battery, remove these
and thread them through the holes on the belt clip as you screw them back into the radio body.
b. Removing the Belt Clip: Unscrew counter-clockwise to remove the belt clip.
3.3 Installing the battery pack
Before attaching or removing the battery make sure your radio is turned off by turning the power/volume
knob all the way counter-clockwise.
a. Make sure the battery is aligned in parallel with the radio body with the lower edge of the battery
about 1-2cm below the edge of the radio.
b. Once aligned with the guide-rails, slide the battery upward until you hear a click as the battery locks in
place.
-9-
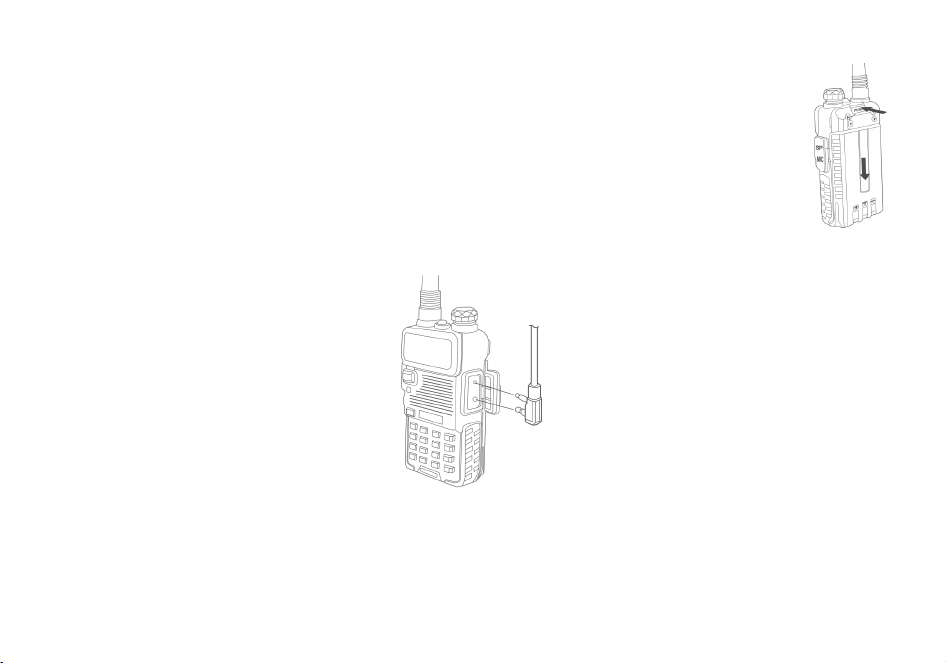
Remove the battery pack
To remove the battery, press the battery release above the battery pack, as you slide the battery downward.
3.4 Installing the Additional Speaker/Microphone (Optional)
Pry open the rubber MIC-Headset jack cover and then insert the Speaker / Microphone plug into the double jack.
-10-
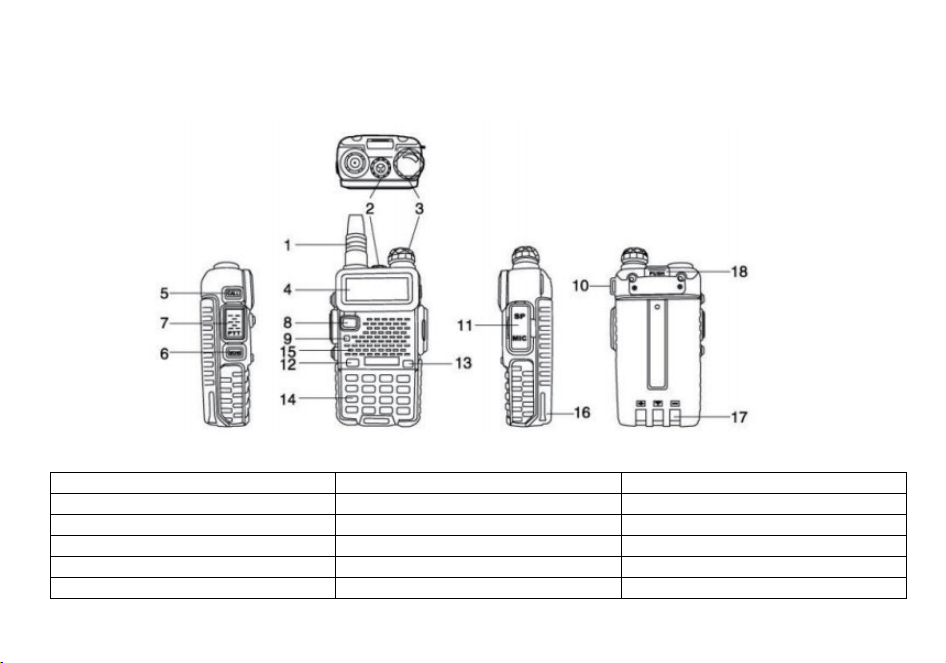
Chapter4. Radio Overview
4.1 Buttons and controls of the radio
1. Antenna 7. PTT - Push to talk 13. BAND key
2. LED flashlight 8. VFO/MR mode key 14. Keypad
3. Power / Volume knob 9. Status LED 15. Speaker and microphone
4. Two-line LCD 10. Lanyard loop 16. Battery pack
5. Call key 11. Accessory jack 17. Battery contacts
6. Monitor key 12. A / B select key 18. Battery release latch
-11-
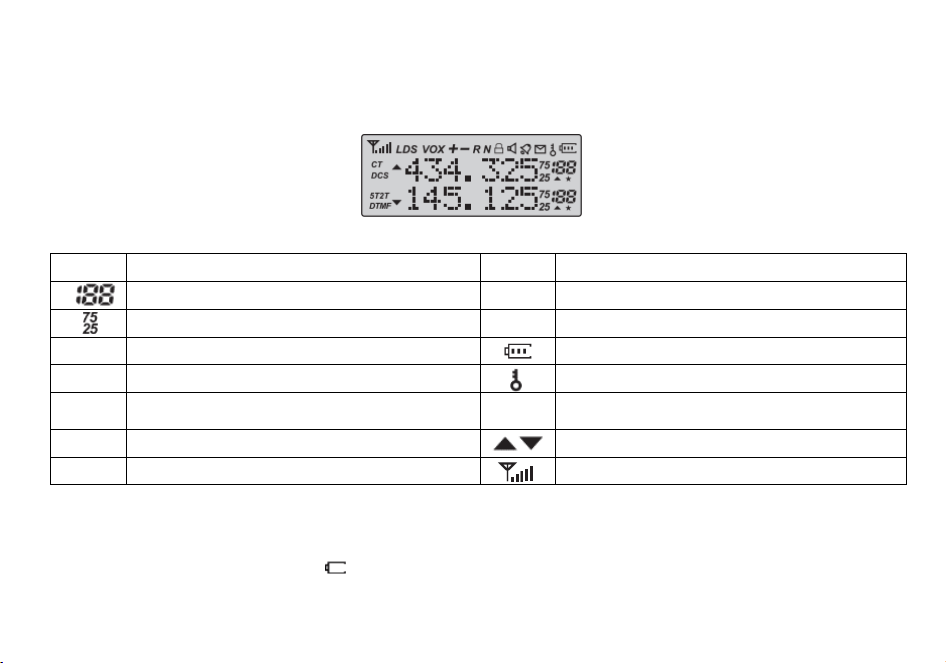
4.2 Main controls and parts of the radio
LCD Display
Icon Description Icon Description
Memory channel R Reverse function enabled
Least significant modifiers. N Narrowband enabled
CT CTCSS enabled Battery level indicator
DCS DCS enabled Keypad lock enabled
+-
Frequency shift direction if enabled in VFO
H,L
Transmit power level indicator
According to Power (High, Low)
S Dual watch enabled Indicates active band or channel
VOX VOX enabled Squelch Open/ Close Indicator
Note: Even though it is a seven character by two-line display, channel memories are only configurable to
six character names.
Battery Level Indicator
When the battery level indicator reads
the battery is depleted. At this point the radio will start beeping periodically as
well as flash the backlight of the display and when voice prompts are enabled, a "Low Voltage" announcement will be heard,
-12-
indicating that you need to change your battery or put your radio in the charger.
4.3 Status Indications
The status LED has a very simple and traditional design. When you receive a signal it turns green, when you transmit it turns
red, and it's off in standby.
LED Indicator Radio Status
Constant Red Transmitting.
Constant Green Receiving.
4.4 Main keypad controls
• [CALL] key: Press it for a short time to turn on the FM radio. Press it again to turn it off.
If you press it for a long time you will activate the alarm function. Press it again to turn off this feature.
• [MON] key: Press it for a short time to light up the flashlight. If you push this button again, the flashlight will light up to
strobe mode. Press MONI a third time to turn off the flashlight.
To activate the Monitor function presses the button for a long time.
• [VFO/MR] key: Press it for switches between Frequency (VFO) Mode and Memory (MR) mode. Memory mode is
sometimes also referred to as Channel mode.
To save frequencies to channel memory you must be in Frequency (VFO) mode.
• [A/B] key: Press it for switches between A (upper) and B (lower) displays. The frequency or channel on the selected display
becomes the active listening and transmit frequency or channel.
To save frequencies to channel memory you must be on the A display.
• [MENU] key: it is used for activating the MENU, choose each MENU selection and confirm the parameter.
• [▲] key: Press it for more than 2 seconds, the channel and frequency will move upwards rapidly; in SCAN mode, press this
control to move the scanning upwards.
• [▼] key: Keep it pressed it for more than 2 seconds, the channel and frequency will move downwards rapidly; in SCAN
mode, press this control to move the scanning downwards.
• [EXIT] key: push this button to exit the functions and settings.
• [BAND] key: Press it for switch between VHF or UHF bands. Press and hold the [BAND] key to activate the one-touch
search function. When listening to broadcast FM, the [BAND]
key switches between 65-75 MHz and 76-108 MHz bands.
-13-
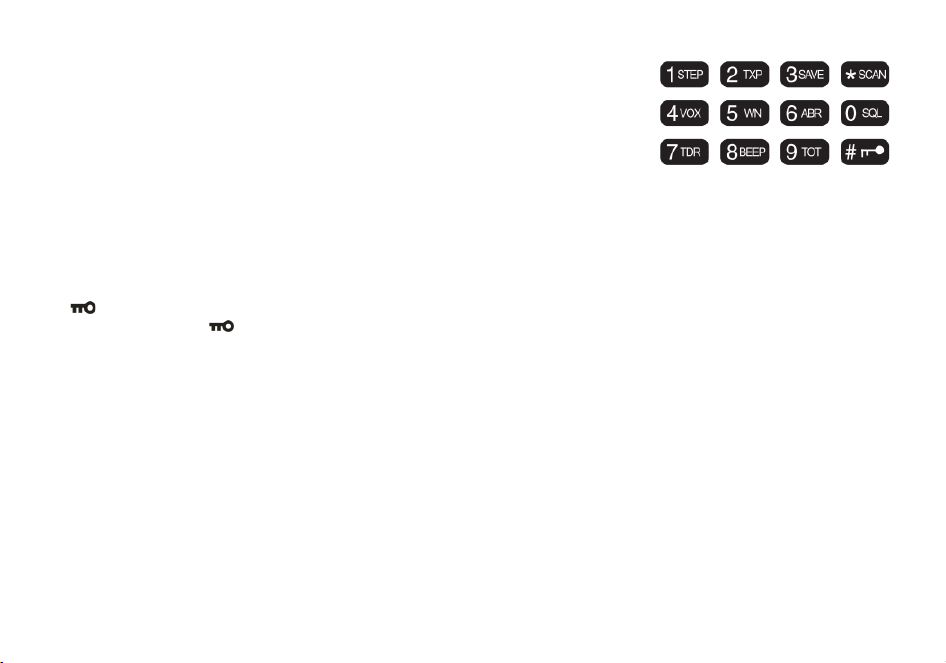
• Numeric keypad
With these keys you can input the information or your selections on the radio. In tx
mode, push the number keys to send a corresponding DTMF code.
• *SCAN Key
A short momentary press of the key enables the reverse function.
When listening to broadcast FM a momentary press will start the scanning. Scanning in broadcast FM will stop as soon as
an active station is found, regardless of scanner resume method.
To enable the scanner, press and hold the [*SCAN] key for about two seconds.
• Zero 0 Key
The BAOFENG UV-5G PRO features a battery voltage meter that the current voltage of the battery on the display.
To see the voltage displayed, press and hold the [0SQL] key for about two seconds.
• #
key
If you press shortly [#
] you will switch to High or Low output power.
If you press this button for more than 2 seconds you will lock/unlock the keypad.
Chapter5. Basic Operations
5.1 Power on the radio
To turn the unit on, simply rotate the Volume/Power knob clockwise until you hear a "click". If your radio powers on
correctly there should be an audible double beep after about one second and the display will show a message or flash the
LCD depending on settings for about one second. Then it will display a frequency or channel. If the Voice prompt is enabled,
the voice will announce "frequency mode" or "channel mode".
Turn the Volume/Power knob counter-clock wise all the way until you hear a "click". The unit is now off.
5.2 Adjusting the volume
To turn up the volume, turn the Volume/Power knob clock-wise. To turn the volume down, turn the Volume/Power knob
counter-clock-wise. Be careful not to turn it too far, as you may inadvertently turn your radio off.
-14-

5.3 Making a call
NOTE: Press the [A/B] key to switch the main channel to the other channel if there is 2 channels shown on the display.
Press the [VFO/MR] key to switch between VFO and channel display.
• Channel mode call: After selecting a channel, hold down the [PTT] key to initiate a call to the current channel. Speak into
the microphone with normal tone. Initiate a call, the red LED is on.
• Frequency mode call: Press the [VFO/MR] key to switch to the frequency mode, the frequency range allowed entering,
press the [PTT] key, a call to the current channel. Speak into the microphone with normal tone. Initiate a call, the red LED is
on.
• Receive a call: When you release the [PTT] key, you can answer it without any action.
When receiving a call, the green LED is on.
NOTE: To ensure the best reception volume, keep the distance between the microphone and the mouth at the time of
transmission from 2.5 cm to 5 cm.
5.4 Channel selection
There are two modes of operation: Frequency (VFO) mode, and Channel or Memory (MR) mode.
For everyday use, Channel (MR) mode is going to be a whole lot more practical than Frequency (VFO) mode. However,
Frequency (VFO) mode is very handy for experimentation out in the field. Frequency (VFO) mode is also used for
programming channels into memory.
In Channel (MR) mode you can navigate up and down the channel by using the ▲ and ▼ keys.
Ultimately which mode you end up using will depend entirely on your use case.
5.5 Frequency (VFO) mode
In Frequency (VFO) mode you can navigate up and down the band by using the ▲ and ▼ keys. Each press will increment or
decrement your frequency according to the frequency step you've set your transceiver to.
You can also input frequencies directly on your numeric keypad with kilohertz accuracy.
The following example assumes the use of a 12.5 kHz frequency step.
Example. Entering the frequency 462.6125 MHz on display A
a. Use the [VFO/MR] key to switch to Frequency (VFO) mode.
b. Press [A/B] until the
icon appears next to the upper display.
-15-

c. Enter [4][6][2][6][1][2][5] on the numeric keypad.
WARNING!
Just because you can program in a channel does not mean you're automatically authorized to use that
frequency. You may be tempted to use PMR446, FRS, GMRS and MURS (in USA) frequencies. Do note however
that there are restrictions on these bands that make this transceiver illegal for use. Contact your local
regulatory body for further information on what laws, rules and regulations apply to your area.
5.6 Channel (MR) mode
The use of Channel (MR) mode is dependent on actually having programmed in some channels to use.
Once you have channels programmed and ready, you can use the ▲ and ▼ keys to navigate between channels.
Note: If you have channels programmed with Transmit power set to Low, you can use the [#
] key to
momentarily switch over to mid or high power if you're having trouble getting through.
Chapter6. Advanced Features
6.1 Frequency scanning
This function can scan the frequency.
a. In frequency mode, press [*/scan] key for more than 2 seconds. The radio will start scanning the frequency according to
the set frequency step.
b. You can change the scanning direction with the ▲ and ▼ keys.
c. Press any key to stop the scanning.
Note: for Scan mode, see Menu No.18.
6.2 Channel scanning
This function can scan the channels.
a. In channels mode, press [*scan] key for more than 2 seconds. The radio will start scanning according to the channel you
set.
b. You can change the scanning direction with the ▲and ▼ keys.
-16-

c. Press any key to stop scanning.
Note: for Scan mode, see Menu No.18.
6.3 Tone Scanning
Scanning for CTCSS and DCS Tones/Codes
Scanning for a CTCSS tone or DCS code can be done while Frequency Mode (VFO) or Channel Mode (MR) is selected. Only
when VFO mode is selected, can the detected tone/code be saved to menu 11/10.
CTCSS tone and DCS code scanning mode can be accessed with or without a signal being present. The scanning process itself
only occurs while a signal is being received.
Not all repeaters requiring a CTCSS tone or DCS code for access will transmit one back. In that case, the transmitter of a
station that can access the repeater would need to be scanned. In other words: this would be done by listening to stations on
the repeater's input frequency.
• Scanning for CTCSS Tone
1. Press the [MENU] [1] [1] to come to Menu 11: R-CTCS
2. Press the [MENU] key to select. Insure you have a tone activated (and it is not off)
3. Press the [*SCAN] to begin CTCSS scanning
A flashing "CT" will be in the left status display to indicate the radio is in CTCSS scanning mode. In this mode, whenever the
radio is receiving an RF signal on the selected MR channel or VFO frequency, the lower display will cycle through the CTCSS
tones as they are being tested. Once the frequency of the received CTCSS tone is determined, the "CT" indicator will stop
flashing.
Press the [MENU] key to save the scanned tone into memory (VFO Mode Only) then press the [EXIT] key to exit the menu.
Don't forget to set VFO menu 11 back to OFF when the CTCSS tone is no longer required.
• Scanning for a DCS tone
1. Press the [MENU] [1] [0] to come to Menu 10: R-DCS
2. Press the [MENU] key to select. Insure you have a tone activated (and it is not off)
3. Press the [*SCAN] to begin DCS scanning
-17-

A flashing "DCS" will be in the left status display to indicate the radio is in DCS scanning mode. In this mode, whenever the
radio is receiving an RF signal on the selected MR channel or VFO frequency, the lower display will cycle through the DCS
codes as they are being tested. Once the bits of the received DCS code are determined, the "DCS" indicator will stop
flashing.
Press the [MENU] key to save the scanned tone into memory (VFO Mode Only) then press the [EXIT] key to exit the menu.
Don't forget to set VFO menu 10 back to OFF when the DCS tone is no longer required.
6.4 Dual Watch
The BAOFENG UV-5G PRO features Dual Watch functionality (single receiver) with the ability to lock the transmit frequency
to one of the two channels it monitors.
• Enabling or disabling Dual Watch mode
1. Press the [MENU] [7] to get to MENU 7: TDR.
2. Press [MENU] key to select.
3. Use the ▲and ▼ keys to enable or disable.
4. Press the [MENU] key to confirm.
5. Press the [EXIT] key to exit the menu.
Due to the way the BAOFENG UV-5G PRO is constructed, whenever one of the A or B Frequencies (VFO/MR) goes active, it
will default to transmit on that channel. This behavior can be inconvenient, especially if when monitoring a frequency, you
should not transmit on. There is a menu option available to lock the transmitter to one of the A or B channels.
• Locking the Dual Watch transmit channel
1. Press the [MENU] [3][4] to get to MENU 34: TDR-AB.
2. Press [MENU] key to select.
3. Use the ▲and ▼ keys to select A (upper) or B (lower) display.
4. Press the [MENU] key to confirm.
5. Press the [EXIT] key to exit the menu.
-18-

If you want to momentarily override the lock without having to setting the menu option to OFF, you can do so by pressing
the [A/B] key an instant before pressing the PTT.
Another option is to disable menu [7] (TDR) to override the lock. Then re-enable TDR when you want the lock resumed
6.5 Cursor■ ■ Conversion (A/B)
Directly press [A/B] key to move the cursor up and down. Then, you can modify or confirm the parameters indicated by the
cursor.
Important1: UV-5G PRO has a dual-frequency display function. In frequency mode, you will see on the display two different
receiving and transmitting frequencies; while in channel mode the two different channels will be displayed.
Important2: In frequency or channel mode, press the [A/B] key to shift between the main channel A and the sub-channel B
▲ on the display indicates on which channel (main channel A or sub channel B) you are operating.
▼ is displayed next to the channel.
6.6 High/low power fast selection
In channel mode, press [#
] key to shift between high and low power.
6.7 Keypad lock
This function locks the keypad to prevent accidental pressure of the controls.
To unlock the keypad, press [#
] for more than 2 seconds.
6.8 FM Radio (FM)
The frequency range to listen to the radio is 65-108MHz. When listening to broadcast FM, press [A / B] key switches between
65-75 MHz and 76-108 MHz band.
a. In frequency or channel mode, Press [CALL] to turn on the radio.
b. Select the desired radio frequency with the ▲ or ▼ keys or input the frequency. or
• Press [* SCAN] to automatically search a radio station.
c. Press [CALL] to exit FM radio.
Note: while you are listening to the radio, the frequency or channel of A / B receiving signal will
automatically switch to the frequency or channel mode for normal transmitting and receiving.
-19-
When the signal disappears the radio will automatically switch again to FM radio mode.
6.9 Flashlight
This function is very useful for night illumination.
To turn it on press MON; push it again, the flash light will be strobe; push it again: it will turn off.
6.10 1000Hz, 1450Hz, 1750Hz Tone-burst
To send out a tone-burst; you simultaneously will press a key while holding down the PTT. No further configuration required
using this feature.
The following configurations will transmit accordingly:
• [PTT] + [CALL] = Transmits 1000Hz Tone Burst
• [PTT] + [VFO/MR] = Transmits 1450Hz Tone Burst
• [PTT] + [A/B] = Transmits 1750Hz Tone Burst
If you have the keypad lock enabled on your radio, you can still send a 1750Hz tone the regular way without having to unlock
your radio.
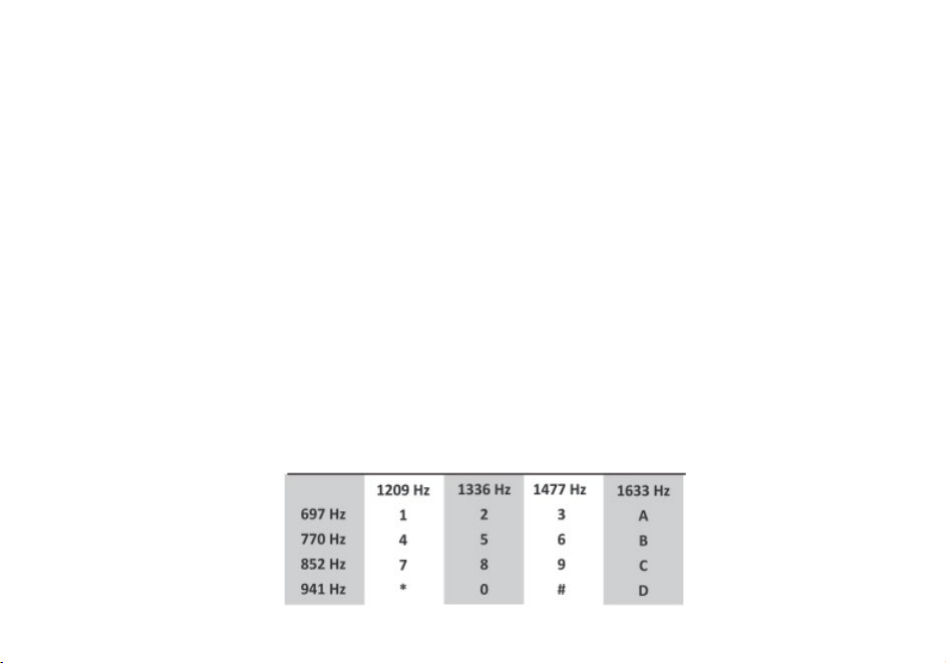
6.11 DTMF
DTMF is an in-band signaling method using dual sinusoidal signals for any given code. Originally developed for telephony
systems, it has proved a very versatile tool in many other areas.
In two-way radio systems, DTMF is most commonly used for automation systems and remote control. A common example
would be in amateur radio repeaters where some repeaters are activated by sending out a DTMF sequence (usually a simple
single-digit sequence).
-20-
The BAOFENG UV-5G PRO EU has a full implementation of DTMF, including the A, B, C and D codes. The numerical keys, as
well as the [*SCAN], and [#
] , keys correspond to the matching DTMF codes as you would expect. The A, B, C and D codes
are located in the [MENU], [▲],[▼]and [EXIT] keys respectively (†).
To send DTMF codes, press the key(s) corresponding to the message you want to send while holding down the PTT key.
If you have the keypad lock enabled on your radio, you can still send DTMF tones the regular way without having to
unlock your radio.
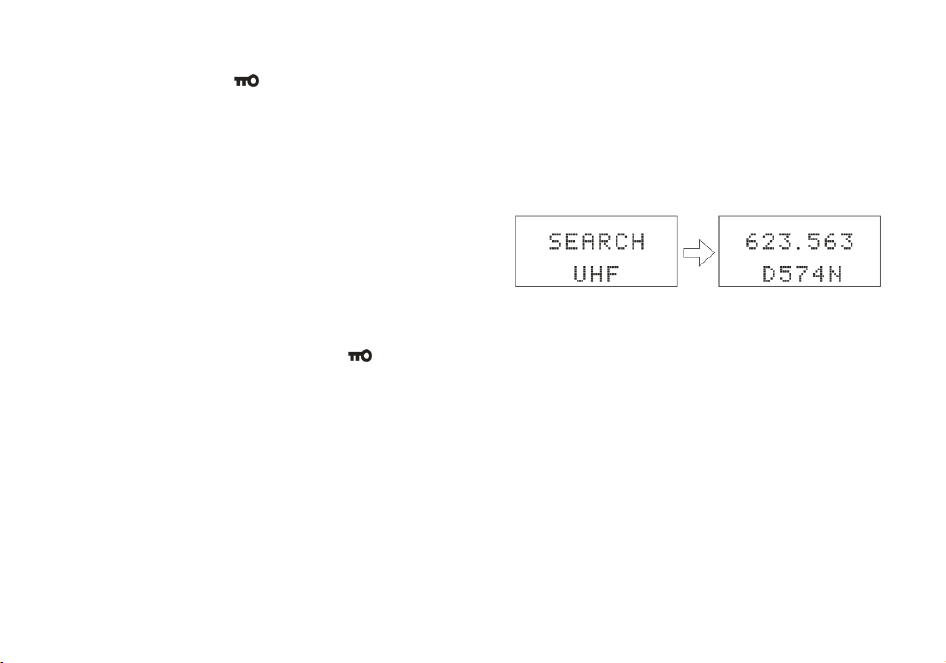
6.12 One touch frequency Search
(1) The radio will act as a receiver. Press and hold the [BAND] key,
and the screen will display “SEARCH UHF".
(2) If the transmitter continues to transmit and the unit receives
an effective frequency (the strongest and stable signal), the
received frequency will be displayed. If there is a CTCSS or DCS,
the CTCSS or DCS value is displayed, and if there is no CTCSS or DCS, NONE is displayed
(3) You can press the [MENU] key to save the Search frequency and CTCSS or DCS to the channel.
Note: During frequency Search, press the [#
] key on the radio to switch between UHF or VHF bands.
Chapter7. Working the MENU System
For a complete reference on available menu items and parameters, see Appendix C, Shortcut Menu operations.
Note: in channel mode, the setting of these features is not possible: CTCSS/ DCS tones, wide/narrow bandwidth, PTT-ID,
Busy channel lock out, channel name edit.
7.1 Basic use
Using the menu with arrow keys
a. Press the [MENU] key to enter the menu.
b. Use the [▲] and [▼] keys to navigate between menu items.
c. Once you find the desired menu item, press [MENU] again to select that menu item.
d. Use the [▲] and [▼] keys to select the desired parameter.
-21-
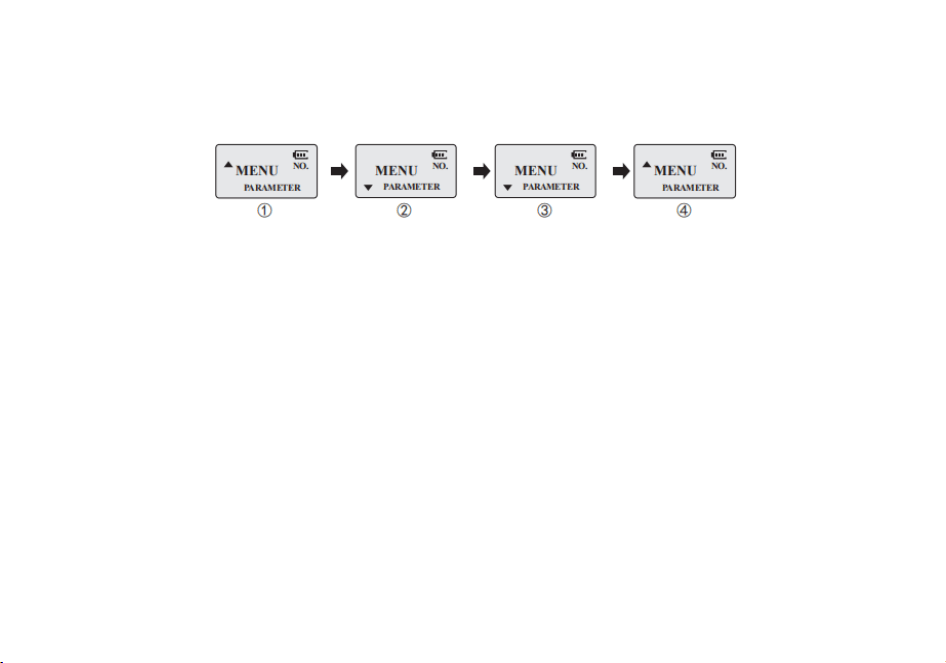
e. When you've selected the parameter you want to set for a given menu item;
a). To confirm your selection, press [MENU] and it will save your setting and bring you back to the main menu.
b). To cancel your changes, press [EXIT] and it will reset that menu item and bring you out of the menu entirely.
f. To exit out of the menu at any time, press the [EXIT] key.
7.2 Using short-cuts
As you may have noticed if you looked at Appendix C, Shortcut Menu operations, every menu item has a numerical value
associated with it. These numbers can be used for direct access of any given menu item.
The parameters also have a number associated with them, see Appendix C, Shortcut Menu operations for details.
Using the menu with short-cuts
a. Press the [MENU] key to enter the menu.
b. Use the numerical keypad to enter the number of the menu item.
c. To enter the menu item, press the [MENU] key.
d. For entering the desired parameter you have two options:
a). Use the arrow keys as we did in the previous section; or
b). Use the numerical keypad to enter the numerical short-cut code.
e. And just as in the previous section;
a). To confirm your selection, press [MENU] and it will save your setting and bring you back to the main menu.
b). To cancel your changes, press [EXIT] and it will reset that menu item and bring you out of the menu entirely.
f. To exit out of the menu at any time, press the [EXIT] key.
g. All further examples and procedures in this manual will use the numerical menu short- cuts.
-22-
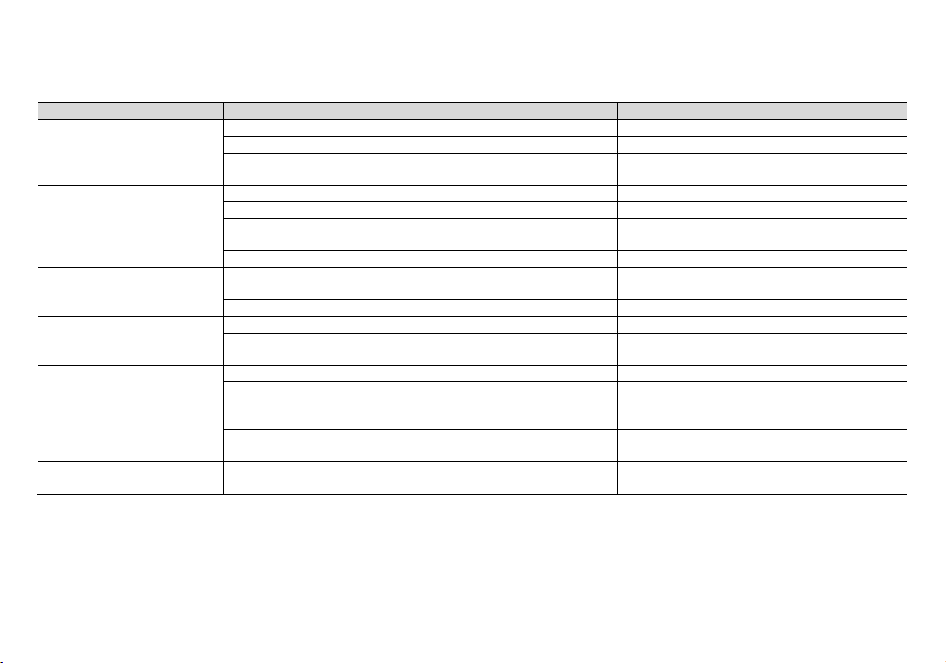
Appendix A. – Trouble shooting guide
Phenomena Analysis Solution
You cannot turn on the radio.
The battery may be installed improperly. Remove and reattach the battery.
The battery power may run out. Recharge or replace the battery.
The battery may suffer from poor contact caused by dirty or damaged
battery contacts.
Clean the battery contacts or replace the battery.
During receiving, the voice is
weak or intermittent.
The battery voltage maybe low. Recharge or replace the battery.
The volume level may be low. Increase the volume.
The antenna maybe loose or maybe installed incorrectly. Turnoff the radio, and then remove and reattach
the antenna.
The speaker maybe blocked. Clean the surface of the speaker.
You cannot communicate with
other group members.
The frequency or signaling type maybe inconsistent with that of other
members.
Verify that your TX/RX frequency and signaling
type are correct.
You may be too far away from other members. Move towards other members.
You hear unknown voices or
noise.
You may be interrupted by radios using the same frequency. Change the frequency, or adjust the squelch level.
The radio in analog mode maybe set with no signaling. Request your dealer to set signaling for the
current channel to avoid interference
You are unable to hear anyone
because of too much noise
and hiss.
You may be too far away from other members. Move towards other members.
You may be in an unfavorable position. For example, your
communication may be blocked by high buildings or blocked in an
underground area.
Move to an open and flat area, restart the radio,
and try again.
It may be the result of external disturbance (such as electromagnetic
interference).
Stay away from equipment that may cause
interference.
The radio keeps transmitting.
VOX may be turned on or the headset is not installed in place Turn off the VOX function. Check that the
headphones are in place.
NOTE: If the above solutions cannot fix your problems, or you may have some other queries, please contact your dealer
for more technical support.
-23-
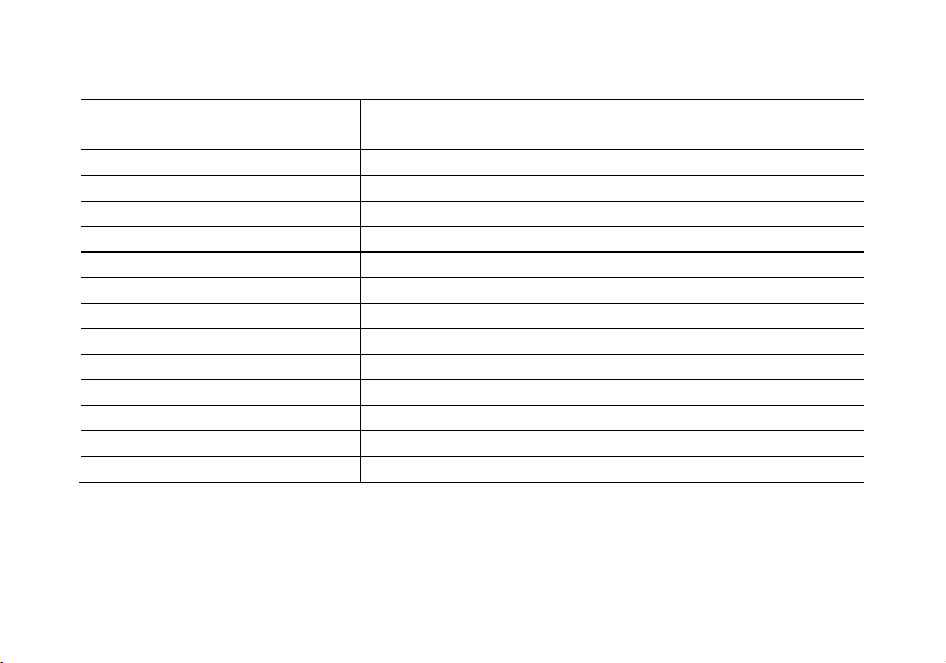
Appendix B. - Technical Specifications
Scanning Receive Frequency
FM65-108MHz; AM108-136MHz(Rx); 136-174MHz (Rx); 220-260MHz
(Rx); 350-390MHz(Rx); 400-520MHz(Rx)
Transmission Frequency GMRS
Memory channels 128
Power supply batteria Li-Ion da 7.4V/1800 mAh (BL-5)
Operating temperature -10°C to + 45°C
Working mode monoband/dualband
Modulation F3E(FM)
Max. frequency deviation ≤ ±5KHz
Spurious radiation < -60dB
Frequency stability ±2.5 ppm
Rx sensitivity < 0.2uV
Audio output power ≥ 500mW
Dimensions 58x109x33mm (LxAxP)
Weight 208g
Specifications are subject to change without notice.
WARNING. Direct plug-in ac/dc power supply must be used for disconnecting the transceiver from the mains; the
desktop charger must be positioned close to the unit and easily accessible.
-24-
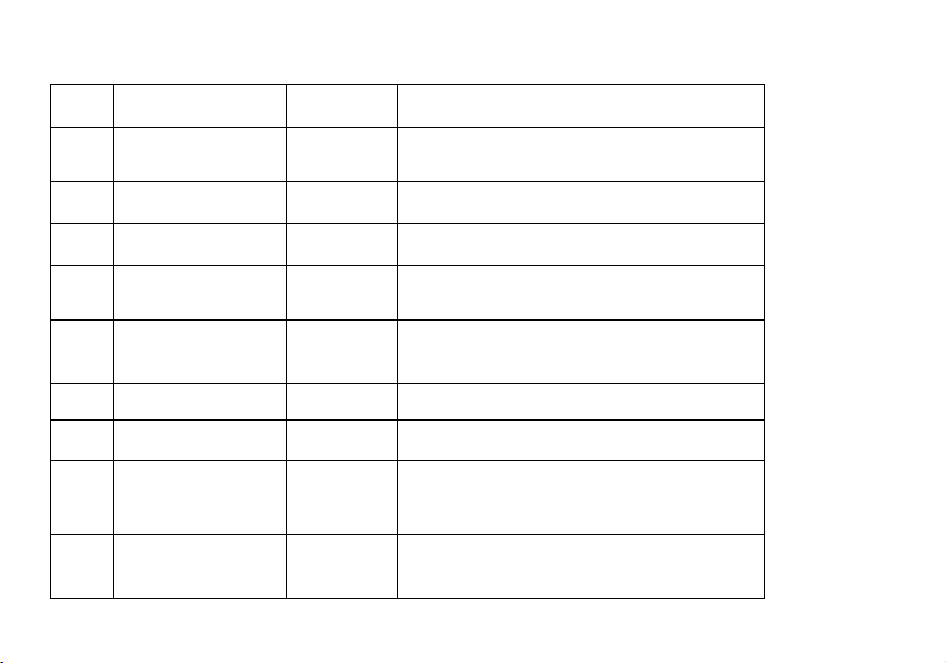
Appendix C. - Shortcut Menu operations
MEN
U No.
Name
(Full Name)
Enter item Select able
0 SQL - Squelch Level MENU+0
0-9 Levels
0:Lowest
9:Highest
1
STEP –Step
Frequency
MENU+1
2.5K/5.0K/6.25K/10.0K
12.5K/20.0K/25.0K/50.0K
2 TXP – Transmit Power MENU+2
HIGH:5W(VHF) 4W(UHF)*
Low:2W
3
SAVE - Battery
Saving
MENU+3
OFF: 1:1
2:2 3:3
4:4
4 VOX - VOX MENU+4
OFF, 1-9 OFF: off
1: Highest Sensitivity
9: Highest Sensitivity
5 WN-Wide/Narrow MENU+5
WIDE:25.0K
NARR:12.5K
6 ABR –Auto Backlight MENU+6
OFF/1,2,3…8,9,10
*Time-out for the LCD backlight. (seconds)
7
TDR – Dual Watch
Operation
MENU+7
OFF ON
*Monitor [A] and [B] at the same time. The display
with the most recent activity ([A] or [B]) becomes
the selected display.
8 BEEP - Keypad Beep MENU+8
OFF ON
*Allows audible confirmation of a key press.
-25-

9 TOT- Time-Out-Timer MENU+9
15,30…600S
*This feature provides a safety switch that limits
transmission time to a programmed value. This
will promote battery conservation by not allowing
you to make excessively long transmissions, and
in the event of a stuck PTT switch it can prevent
interference to other users as well as battery
depletion
10
R-DCS - Receiver
DCS
MENU+10
OFF
D023N…D754N
D023I …D754I
*Mutes the speaker of the transceiver in the
absence of a specific low-level digital signal. If
the station you are listening to does not transmit
this specific signal, you will not hear anything.
11
R-CTCS - Receiver
CTCSS
MENU+11
OFF
67.0HZ…254.1HZ
*Mutes the speaker of the transceiver in the
absence of a specific and continuous
sub-audible signal. If the station you are
Listening to does not transmit this specific and
continuous signal, you will not hear anything.
12
T-DCS -Transmitter
DCS
MENU+12
OFF
D023N…D754N
D023I …D754I
*Transmits a specific low-level digital signal to
unlock the squelch of a distant receiver (usually
a repeater).
-26-
13
T-CTCS - Transmitter
CTCSS
MENU+13
OFF
67.0HZ…254.1HZ
*Transmits a specific and continuous sub audible
signal to unlock the squelch of a distant receiver
(usually a repeater).
14
VOICE - Voice
Reminding
MENU+14
OFF CHI
ENG
*Allows audible voice confirmation of a key
press.
15 ANI-ID -ANI-ID MENU+15 It can be programmed by software
16 DTMFST - DTMFST MENU+16
OFF: No DTMF Side Tones are heard
DT-ST : Side Tones are heard only from manually
keyed DTMF
codes
ANI-ST: Side Tones are heard only from
automatically keyed
DTMF codes
DT+ANI : All DTMF Side Tones are heard
17 S-CODE - Signal Code MENU+17 1,…,15
18
SC-REV - Scanner
Resume Method
MENU+18
TO : Time Operation - scanning will resume after a
fixed time has
passed
CO : Carrier Operation -scanning will resume after
the signal disappears
SE : Search Operation -scanning will not resume
19 PTT-ID - PTT-ID MENU+19
OFF: No ID is sent
BOT: The selected S-CODE is sent at the beginning
EOT: The selected S-CODE is sent at the ending
BOTH : The selected S-CODE is sent at the
beginning and ending
-27-
20 PTT-LT – PTT ID delay MENU+20
0,1,2…,50ms
*PTT-ID Delay (milliseconds)
21
MDF-A - Channel A
Display Mode
MENU+21
FREQ: Displays programmed Frequency
CH: Displays the channel number
NAME: Displays the channel name
*Note: Names must be entered using software.
22
MDF-B - Channel B
Display Mode
MENU+22
FREQ: Displays programmed Frequency
CH: Displays the channel number
NAME: Displays the channel name
*Note: Names must be entered using software.
23
BCL – Busy Channel
Lock-out
MENU+23
OFF
ON
*Disables the [PTT] button on a channel that is
already in use. The transceiver will sound a beep
tone and will not transmit if the [PTT] button is
pressed when a channel is already in use.
24
AUTOLK –Automatic
Keypad Lock
MENU+24
OFF
ON
*When ON, the keypad will be locked if not used
in 8 seconds. Pressing the [# ] key for 2
seconds will unlock the keypad.
25
SFT-D – Frequency
Offset Direction
MENU+25
OFF: TX = RX (simplex)
+: TX will be shifted higher in frequency than RX
- : TX will be shifted lower in frequency than RX
26
OFFSET -Frequency
shift
amount
MENU+26
00.000…69.990
*Specifies the difference between the TX and RX
frequencies
-28-
27
MEM-CH - Store a
Memory Channel
MENU+27
000…127
*This menu is used to either create new or modify
existing channels (0 through 127) so that they
can be accessed from
MR/Channel Mode
28
DEL-CH - Delete a
memory channel
MENU+28
000…127
*This menu is used to delete the programmed
information from the specified channel (0
through 127) so that it can either be programmed
again or be left empty.
29
WT-LED- Standby
Backlight
MENU+29 OFF/ BLUE/ ORANGE/ PURPLE
30
RX-LED- Receive
Backlight
MENU+30 OFF/ BLUE/ ORANGE/ PURPLE
31
TX-LED- Transmit
Backlight
MENU+31 OFF/ BLUE/ ORANGE/ PURPLE
32 AL-MOD - Alarm Mode MENU+32
SITE: Sounds alarm through your radio speaker only
TONE: Sending alarm tone
CODE: Sending alarm code
34
TDR-AB - Transmit
selection while in Dual
Watch mode
MENU+34
OFF
A band transmit (Upper row frequency)
B band transmit (Bottom row frequency)
*When enabled, priority is returned to selected
display once the signal in the other display
disappears.
35
STE - Squelch Tail
Elimination
MENU+35
ON
OFF
*This function is used eliminate squelch tail noise
between BAOFENG handhelds that are
communicating directly (no repeater). Reception
-29-
of a 55 Hz or 134.4 Hz tone burst mutes the audio
long enough to prevent hearing any squelch tail
noise.
36
RP-STE-Squelch Tail
Elimination
MENU+36
OFF/ 1,2,3…10
*This function is used eliminate squelch tail noise
when communicating through a repeater.
37
RPT-RL - Delay the
squelch tail of repeater
MENU+37
OFF/ 1,2,3…10
*Delay the Tail Tone of Repeater (X100
milliseconds)
38
PONMSG-Power On
Message
MENU+38
FULL: Performs an LCD screen test at power-on
MSG: Displays a 2-line power on message
*Controls the behavior of the display when the
transceiver is turned on.
39 ROGER - Roger Beep MENU+39
OFF
ON
*Sends an end-of-transmission tone to indicate to
other stations that the transmission has ended.
40
RESET – Restore
defaults
MENU+40
VFO: Menu initialization
ALL: Menu and channel initialization
*Resets the radio to factory defaults, with some
exceptions.
-30-
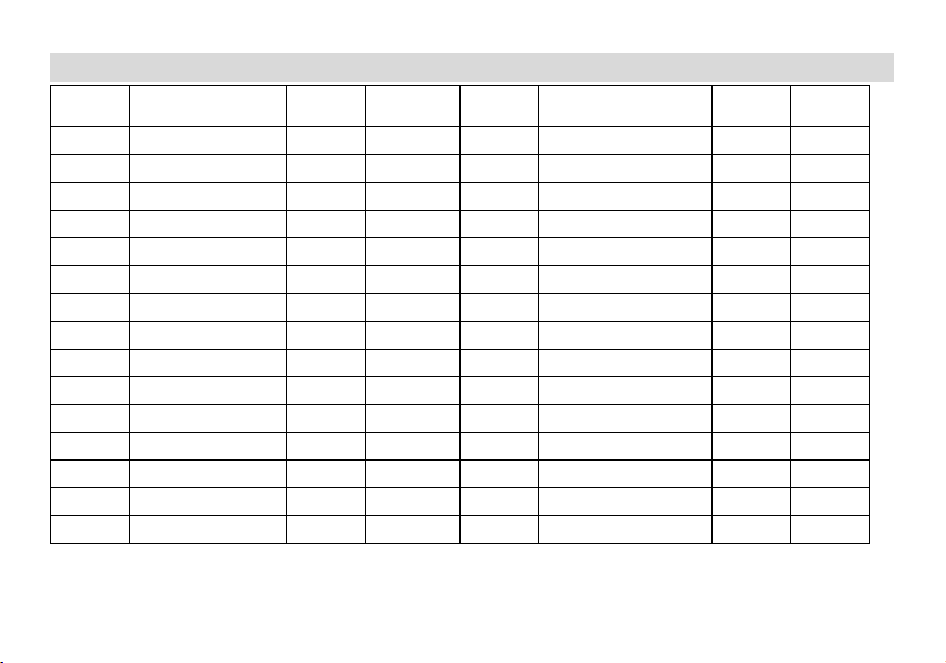
Appendix D. - GMRS Frequency Chart (MHz)
CH.No CH.Freq.
Type of
Radio
Power
Output
CH.No CH.Freq.
Type of
Radio
Power
Output
1 462.5625 GMRS High 16 462.5750 GMRS High
2 462.5875 GMRS High 17 462.6000 GMRS High
3 462.6125 GMRS High 18 462.6250 GMRS High
4 462.6375 GMRS High 19 462.6500 GMRS High
5 462.6625 GMRS High 20 462.6750 GMRS High
6 462.6875 GMRS High 21 462.7000 GMRS High
7 462.7125 GMRS High 22 462.7250 GMRS High
8 467.5625 FRS Low 23 467.5500/462.5500 RPT High
9 467.5875 FRS Low 24 467.5750/462.5750 RPT High
10 467.6125 FRS Low 25 467.6000/462.6000 RPT High
11 467.6375 FRS Low 26 467.6250/462.6250 RPT High
12 467.6625 FRS Low 27 467.6500/462.6500 RPT High
13 467.6875 FRS Low 28 467.6750/462.6750 RPT High
14 467.7125 FRS Low 29 467.7000/462.7000 RPT High
15 462.5500 GMRS High 30 467.7250/462.7250 RPT High
* Channels 8~14 are low-power FRS license free channels.
-31-
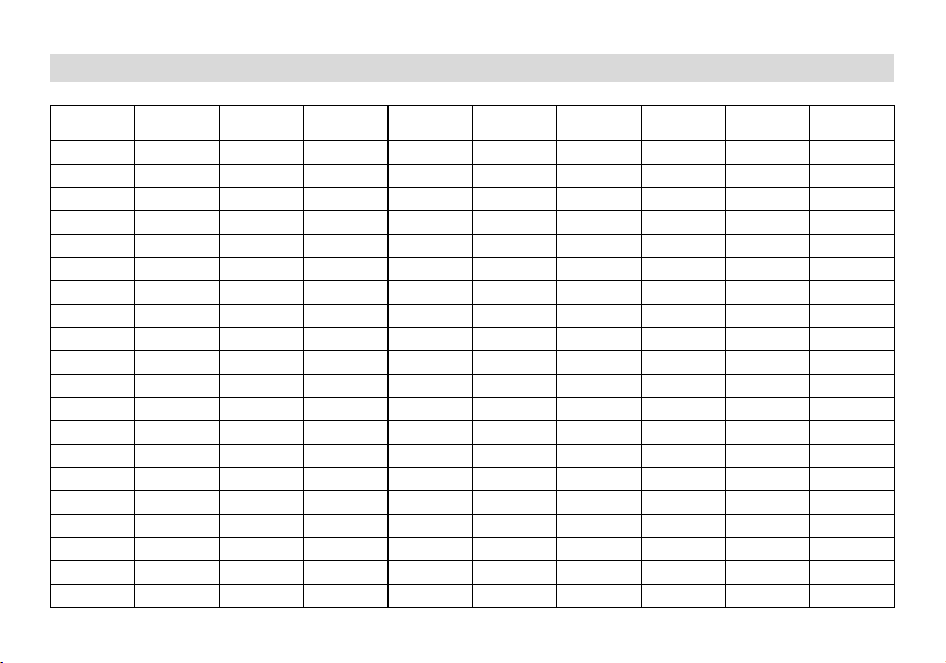
Appendix E. - DCS Table
DCS CODE LIST
Number Code Number Code Number Code Number Code Number Code
1 D023N 2 D025N 3 D026N 4 D031N 5 D032N
6 D036N 7 D043N 8 D047N 9 D051N 10 D053N
11 D054N 12 D065N 13 D071N 14 D072N 15 D073N
16 D074N 17 D114N 18 D115N 19 D116N 20 D122N
21 D125N 22 D131N 23 D132N 24 D134N 25 D143N
26 D145N 27 D152N 28 D155N 29 D156N 30 D162N
31 D165N 32 D172N 33 D174N 34 D205N 35 D212N
36 D223N 37 D225N 38 D226N 39 D243N 40 D244N
41 D245N 42 D246N 43 D251N 44 D252N 45 D255N
46 D261N 47 D263N 48 D265N 49 D266N 50 D271N
51 D274N 52 D306N 53 D311N 54 D315N 55 D325N
56 D331N 57 D332N 58 D343N 59 D346N 60 D351N
61 D356N 62 D364N 63 D365N 64 D371N 65 D411N
66 D412N 67 D413N 68 D423N 69 D431N 70 D432N
71 D445N 72 D446N 73 D452N 74 D454N 75 D455N
76 D462N 77 D464N 78 D465N 79 D466N 80 D503N
81 D506N 82 D516N 83 D523N 84 D526N 85 D532N
86 D546N 87 D565N 88 D606N 89 D612N 90 D624N
91 D627N 92 D631N 93 D632N 94 D645N 95 D654N
96 D662N 97 D664N 98 D703N 99 D712N 100 D723N
-32-
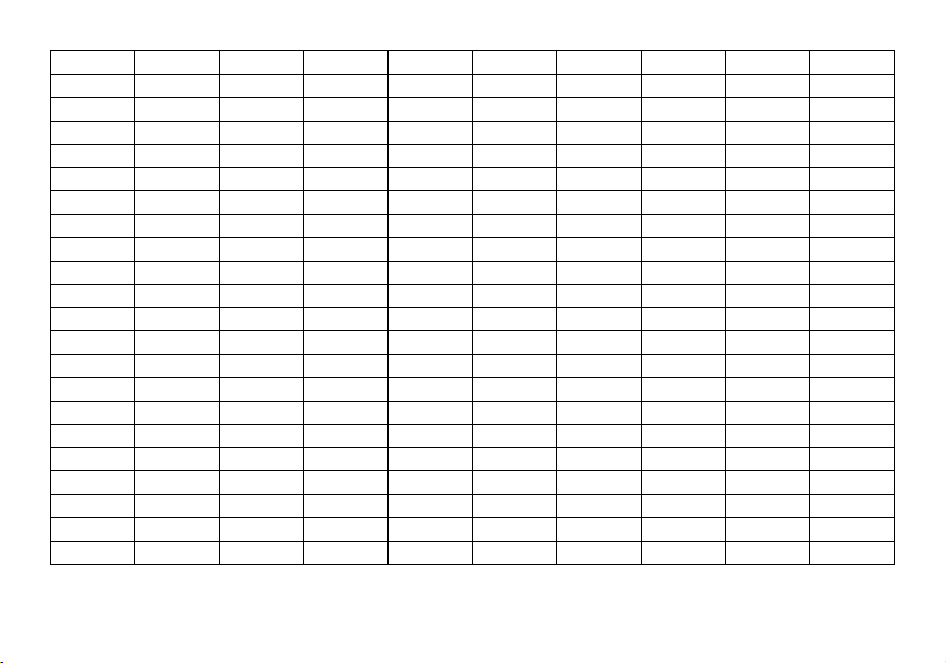
101 D731N 102 D732N 103 D734N 104 D743N 105 D754N
106 D023I 107 D025I 108 D026I 109 D031I 110 D032I
111 D036I 112 D043I 113 D047I 114 D051I 115 D053I
116 D054I 117 D065I 118 D071I 119 D072I 120 D073I
121 D074I 122 D114I 123 D115I 124 D116I 125 D122I
126 D125I 127 D131I 128 D132I 129 D134I 130 D143I
131 D145I 132 D152I 133 D155I 134 D156I 135 D162I
136 D165I 137 D172I 138 D174I 139 D205I 140 D212I
141 D223I 142 D225I 143 D226I 144 D243I 145 D244I
146 D245I 147 D246I 148 D251I 149 D252I 150 D255I
151 D261I 152 D263I 153 D265I 154 D266I 155 D271I
156 D274I 157 D306I 158 D311I 159 D315I 160 D325I
161 D331I 162 D332I 163 D343I 164 D346I 165 D351I
166 D356I 167 D364I 168 D365I 169 D371I 170 D411I
171 D412I 172 D413I 173 D423I 174 D431I 175 D432I
176 D445I 177 D446I 178 D452I 179 D454I 180 D455I
181 D462I 182 D464I 183 D465I 184 D466I 185 D503I
186 D506I 187 D516I 188 D523I 189 D526I 190 D532I
191 D546I 192 D565I 193 D606I 194 D612I 195 D624I
196 D627I 197 D631I 198 D632I 199 D645I 200 D654I
201 D662I 202 D664I 203 D703I 204 D712I 205 D723I
206 D731I 207 D732I 208 D734I 209 D743I 210 D754I
-33-
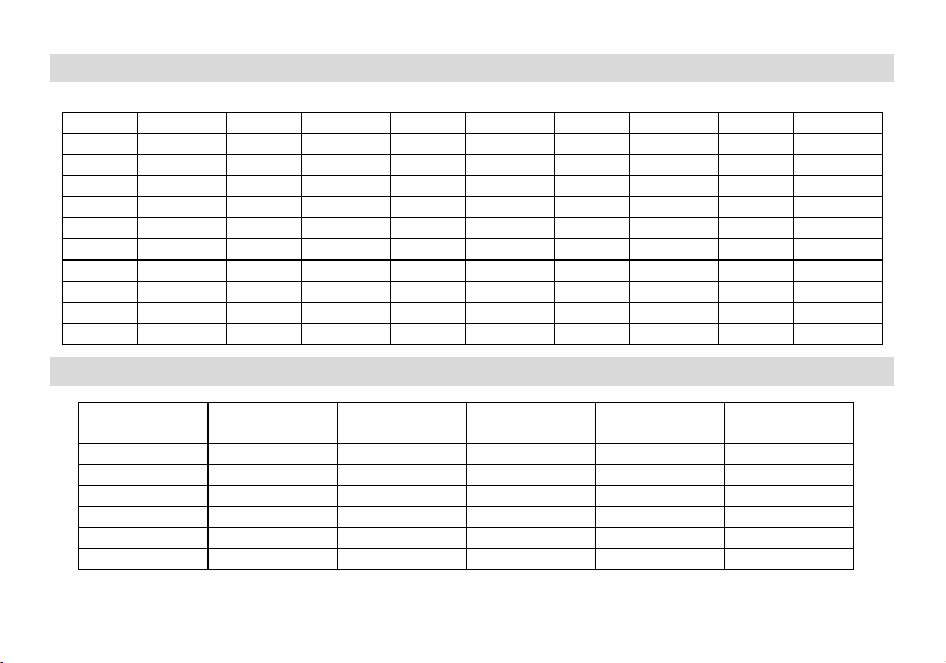
Appendix F. - CTCSS Table
CTCSS CHART (Hz)
Number Frequency Number Frequency Number Frequency Number Frequency Number Frequency
1 67.0 2 69.3 3 71.9 4 74.4 5 77.0
6 79.7 7 82.5 8 85.4 9 88.5 10 91.5
11 94.8 12 97.4 13 100 14 103.5 15 107.2
16 110.9 17 114.8 18 118.8 19 123.0 20 127.3
21 131.8 22 136.5 23 141.3 24 146.2 25 151.4
26 156.7 27 159.8 28 162.2 29 165.5 30 167.9
31 171.3 32 173.8 33 177.3 34 179.9 35 183.5
36 186.2 37 189.9 38 192.8 39 196.6 40 199.5
41 203.5 42 206.5 43 210.7 44 218.1 45 225.7
46 229.1 47 233.6 48 241.8 49 250.3 50 254.1
Appendix G.- NOAA Weather Radio Frequency List (US, CAN)
Channel Number RX Frequency
MHz
Weather Channel Channel Number RX Frequency
MHz
Weather Channel
117 162.550 WX1 123 162.525 WX 7
118 162.400 WX 2 124 161.650 WX 8
119 162.475 WX 3 125 161.775 WX 9
120 162.425 WX 4 126 161.750 WX 10
121 162.450 WX 5 127 162.000 WX 11
122 162.500 WX 6 --- --- ---
-34-
Disclaimer
The accuracy and completeness of the contents are sought in the process of compilation, but we do not bear any
responsibility for the possible errors or omissions. With the continuous development of technology, we reserve the right to
change the design and specification of the product without notice. No copy, modification, translation and dissemination of
this handbook may be made in any form without the prior written authorization of our department.
PO FUNG ELECTRONIC (HK) INTERNATONAL GROUP COMPANY LIMITED
ADD: Room 1508, 15/F, Office Tower II, Grand Plaza, 625 Nathan Road, Kowloon, Hong Kong
Http://www.baofengradio.com
www.pofungshop.com
Print version: UV-5G PRO_V1.0
Disclaimer
The Company endeavors to achieve the accuracy and completeness of this manual, but no warranty of accuracy or
reliability is given. All the specifications and designs are subject to change without notice due to continuous
technological development. No part of this manual may be copied, modified, translated, or distributed in any manner
without the prior written consent of the Company.
We do not guarantee, for any particular purpose, the accuracy, validity, timeliness, legitimacy or completeness of the
third-party products and contents involved in this manual.