
SVC 9486BK
SVC 9476BK
SVC 9466BK
EN
STICK VACUUM CLEANER WITH
COLLECTION STATION
Translation of the original manual
SVC 9486BK
SVC 9476BK
SVC 9466BK
A
1
2
3
4
5
9
16
17
8
67
10
18
19
14
20
11
12
13
14
15
B
B2
B2
B2.1
B2.2
B2.3
B2.4
B2.5
B2.6
B2.8
B2.9
B2.10
B2.7
B1
B1.1
B1.2
B3
PUSH
B3
B3.1
B3.2
B3.3
B3.4
B3.5
B3.6
B3.7
B3.8
B4
B4
B4.1
B4.2
B4.3
B4.4
B4.7
B4.5
B4.6
C
1
2
3
4
6
7
5
B5
B5
B5.1
B5.2
B5.4
B5.5
B5.6
B6
B7 B8
D
PUSH
PUSH
E3
E4 E5
E1
E2
E6
PUSH
E7
E8
E9
E10
E11
F1
F2
G1
G2
G3
G4
G5
H
I1
I2
I3
I4
J1
J2
J3
J4


- 1 -
04/2026
2026, .
EN
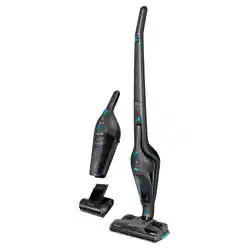
Stick Vacuum Cleaner with Collection Station
User Manual
IMPORTANT SAFETY INSTRUCTIONS
READ CAREFULLY AND STORE FOR FUTURE USE.
• This appliance may be only used by children aged
8years and older and by persons with physical, sensory
or mental impairments or lack of experience and
knowledge, if they are supervised or have been instructed
on the safe use of the appliance and understand the
potential hazards.
• Children must not play with the appliance. Cleaning and
maintenance must not be performed by unsupervised
children.
• If the mains cable is damaged, have it replaced in
aprofessional service centre in order to prevent
adangerous situation. It is forbidden to use the appliance
with the cable damaged.
• The vacuum cleaner must be switched off and must not
be charging, and the battery must be removed during
cleaning or maintenance.
• The vacuum cleaner accessories contain rotating brushes
and there is arisk of being caught by these parts in the
event of incorrect handling.
• Use the vacuum cleaner only with accessories that are
supplied with it or that the manufacturer recommends. Do
not use other accessories. This could lead to adangerous
situation, property damage or electric shock.
STICK VACUUM CLEANER WITH COLLECTION STATION

- 2 -
04/2026
2026, .
• Do not immerse any part of the vacuum cleaner or its
accessories in water or other liquid during cleaning. There
is arisk of injury by electrical shock.
• Regularly inspect the condition of the vacuum cleaner and
its accessories to ensure they are not damaged. Damaged
cleaner or damaged accessories must not be used. There
is arisk of electrical shock or damage to property.
Warning:
Danger of scalding. Do not reach into the area where
the steam is coming out, as it is very hot and may
cause injury.
. . . . . . . . . . . . . . . . . . . . . . . . . . . . . . . . . . . . . . . . . . . . . . . . . . . . . . . . . . . . . . . . . . . . . . . . . . . . . . . . . . . . . . . . . . . . . . . . . . . . . . . . . . . . . . . . . . . . . . . . . . . . . . . . . . . . . . . . . . . .
Additional Important Safety Instructions forUse of the Appliance
• This vacuum cleaner is designed for use in households, offices and similar types of areas. Do not use in industrial settings. Do not use it outdoors.
• Do not expose the vacuum cleaner to direct sunlight and do not place it near an open fire or appliances that are asource of heat. Avoid using or
storing the cleaner in an environment where flammable, volatile, or explosive substances are used or stored.
• Before connecting the adapter to amains socket check that the technical details on its rating label match the electrical voltage in the socket.
• Connect the adapter only to aproperly earthed mains socket.
• Do not short-circuit the connectors of the vacuum cleaner or battery.
• Do not touch the connectors with wet or dirty hands.
• The recommended operating temperature is 0 to 40 °C. Do not use the vacuum cleaner at lower or higher temperatures.
• Ensure that the adapter and its cable do not come into contact with hot surfaces or sharp objects.
• Do not immerse the vacuum cleaner in water or other liquid, nor rinse it under running water, unless the manufacturer states otherwise.
• Before switching on the vacuum cleaner, ensure that it is correctly assembled.
• Ensure that during operation of the vacuum cleaner, the air outlet openings or the suction opening are not blocked.
• Do not use accessories for vacuuming water or other liquids.
• Do not use the vacuum cleaner to vacuum:
– smouldering cigarettes, burning objects, matches or hot ashes;
– flammable or volatile substances;
– sharp objects such as shards, needles, pins, etc;
– flour, plaster, cement and other building materials;
– larger pieces of paper or plastic bags, which can easily block the suction opening.
• Vacuuming certain types of floor coverings may create electrostatic charge, which poses no danger to the user.
• Exercise increased caution when using the vacuum cleaner on stairs.
• Do not apply the suction ports to any parts of the face or body.
• Always switch off the vacuum cleaner and remove it from the charging base if you will be assembling, disassembling or changing accessories.
• Disconnect the mains cable from the socket by pulling the plug, not the cable. Otherwise, you may damage the mains cable or the socket.
• Keep the appliance clean. Wipe the outer surface with aclean, dry sponge. Follow the cleaning instructions provided in this manual.
• Clean the appliance after each use according to the instructions in the CLEANING AND MAINTENANCE section.
• Do not use the cleaner if it does not operate properly, has been damaged, or has been submerged in water.
• Do not attempt to repair or modify the cleaner yourself. All repairs should be carried out by an authorised service centre. Tampering with the
appliance may result in the loss of your legal rights regarding faulty performance or warranty for quality.
Special Safety Instructions for the Collection Station
• Read the user manual before charging.
• The collection station is intended for indoor use only. Do not expose the collection station to rain, dripping or splashing water.
• This collection station is intended, among other things, for charging only Sencor brand batteries for vacuum cleaner models SVC 9486xx,
SVC 9476xx or SVC 9466xx.
- 3 -
04/2026
2026, .
Warning
Do not use the collection station to charge other batteries that are not intended for this purpose.
• During charging, the collection station must be located in awell-ventilated area.
• Before connecting the mains cable to amains socket, ensure that the input voltage stated on its type plate corresponds to the electrical voltage of
your socket.
• Place the collection station on aflat, dry and solid surface. Ensure there is free space around it for air circulation and handling.
• Before use, check that the dust bag is installed. Do not use the collection station without adust bag.
• Do not place the collection station near open fire or other heat sources. Do not expose it to direct sunlight.
• Check that the mains cable does not come into contact with hot surfaces or sharp objects. Position the mains cable so that it cannot be tripped over
or stepped on.
• Do not cover or block the air outlet and inlet openings.
• Disconnect the mains cable from the mains socket before replacing the dust bag, cleaning, moving or storing the collection station.
• Do not touch the mains cable or plug with wet or damp hands.
• Disconnect the mains cable plug from the mains socket by pulling the plug, not the cable. Otherwise, the plug or socket could be damaged.
• Do not use the collection station if it is not functioning properly, has been damaged or immersed in water.
Warning When Charging the Battery
• Use only the supplied charging and storage base to charge the battery. Ensure that the base is connected to apower source.
• We recommend fully charging the battery before use.
• Before placing the cleaner in the charging base, make sure that the contacts on the cleaner and on the charging base are clean and dry.
• Do not leave the cleaner unattended while it is charging.
• Do not charge the cleaner near flammable materials or objects or at high ambient temperatures. We recommend charging the cleaner at
temperatures between 5 and 40 °C.
• Do not expose the cleaner to direct sunlight during charging.
• Ensure sufficient clearance around the cleaner. Do not cover the cleaner while charging.
• Regularly check the charging base or the cleaner for damage. Do not charge the cleaner if the battery is visibly damaged, inflated, or has fallen into
water.
• During charging, the battery and the part of the base in which the cleaner is located may heat up. This is normal. If these parts become very hot,
disconnect the mains cable plug from the mains socket and allow the cleaner to cool down. Then start charging again. If the problem persists,
disconnect the mains cable plug from the mains socket and contact an authorised service centre.
Safety Instructions for the Li-ion Battery
• Use only the battery supplied with the cleaner. Do not use the battery withanother appliance or withthis cleaner.
• Do not allow children to play with the battery.
• Always remove the battery from the motor unit before cleaning or maintenance.
• To remove the battery, first press the button on the battery andthen remove it from the motor unit.
• Do not remove or apply force to the battery.
• Before switching on the cleaner, make sure that the battery is correctly inserted.
• The battery is intended for indoor use only. Do not use or store the battery in excessively dusty environments.
• Do not expose the battery to the outdoor environment, extreme temperatures, rapid temperature changes, heat, fire or direct sunlight.
• Keep the battery dry out of reach of children and pets. Do not expose it to moisture or immerse it in water or any other liquid.
• Do not make any adjustments to the battery.
• Do not use abattery whose power contacts show signs of damage or corrosion.
• Do not expose the battery to mechanical shocks. Do not disassemble, modify, throw into fire or expose the battery to high pressure.
• Do not short-circuit the battery power contacts. Do not store the battery in places where metal objects such as paper clips, coins, nails, screws, etc.
could short circuit the power contacts. There is arisk of fire if ashort circuit occurs.
• Do not use the battery if it is damaged, bloated or has fallen into water.
• Charge anduse the battery inadry environment at an ambient temperature of 5 to 40°C.
• Incorrect use may cause fluid to leak out of the battery.
• In the event of aleak from the battery:
– use gloves, goggles or other protective equipment (e.g. abreathing mask); do not handle the battery with unprotected hands;
– place the battery on anon-flammable surface, ideally outdoors or in awell-ventilated place;
– if there is astrong chemical smell, leave the room and ventilate it well, or leave the window or door open;
– transfer the battery to asuitable container (ametal container with alid or aplastic box that is resistant to chemicals and is lined with non-
conductive loose material) and hand it in at acollection point or contact aspecialist company for hazardous waste disposal;
– never throw adamaged battery into ordinary waste.
• In case of skin or eye splashes, rinse with plenty of water and seek medical attention.
• Inthe event of ingestion, contact immediate medical help
Safety Instructions for Mains Adapters
• The supplied charging adapter is intended for Sencor brand models SVC 9486xx, SVC 9476xx or SVC 9466xx. Do not use the adapter for other
models.
- 4 -
04/2026
2026, .
• This product is not atoy. Keep it out of reach of children and pets. Children must not play with the product. There is arisk of strangulation or
suffocation.
• If the adapter is damaged, have it replaced in aprofessional service centre in order to prevent adangerous situation. Do not use adamaged adapter.
• Only plug the adapter into asocket with aprotective contact.
• Before connecting the adapter to amains socket, ensure that the input voltage stated on the type plate corresponds to the electrical voltage of the
socket.
• Connect the adapter only to aproperly earthed socket. Do not use an extension cord.
• Do not disconnect the adapter from the socket by pulling the mains cable. This could damage the adapter or the socket. Disconnect the adapter from
the socket by pulling the plug.
• Do not lay the adapter of the collection station over sharp objects. Ensure that the mains cable does not hang over the edge of atable or come into
contact with aheated or hot surface. Route the mains cable so that it cannot be stepped on or tripped over. The mains cable must not be routed
under carpets or furniture.
• Keep the adapter and its mains cable dry.
• Do not connect or disconnect the adapter mains cable to or from the mains socket with wet hands.
• To prevent electric shock, do not spray the adapter with water or immerse it in water or other liquids.
• When the adapter is in use, it heats up slightly. This is normal. If the adapter feels hot to the touch, disconnect it from the battery and allow it to cool
down. If the problem persists, stop using the adapter and have it repaired at an authorised service centre.
• Ensure adequate ventilation for heat dissipation when using the adapter. Do not cover it during use. There is arisk of overheating and damage to the
adapter or battery.
• Do not disassemble the adapter, expose it to extreme temperatures, dust, or moisture. Avoid mechanical damage.
• Do not modify or repair the adapter yourself. It does not contain parts that the user can repair themselves.
• Use only adry cloth for cleaning.
. . . . . . . . . . . . . . . . . . . . . . . . . . . . . . . . . . . . . . . . . . . . . . . . . . . . . . . . . . . . . . . . . . . . . . . . . . . . . . . . . . . . . . . . . . . . . . . . . . . . . . . . . . . . . . . . . . . . . . . . . . . . . . . . . . . . . . . . . . . .
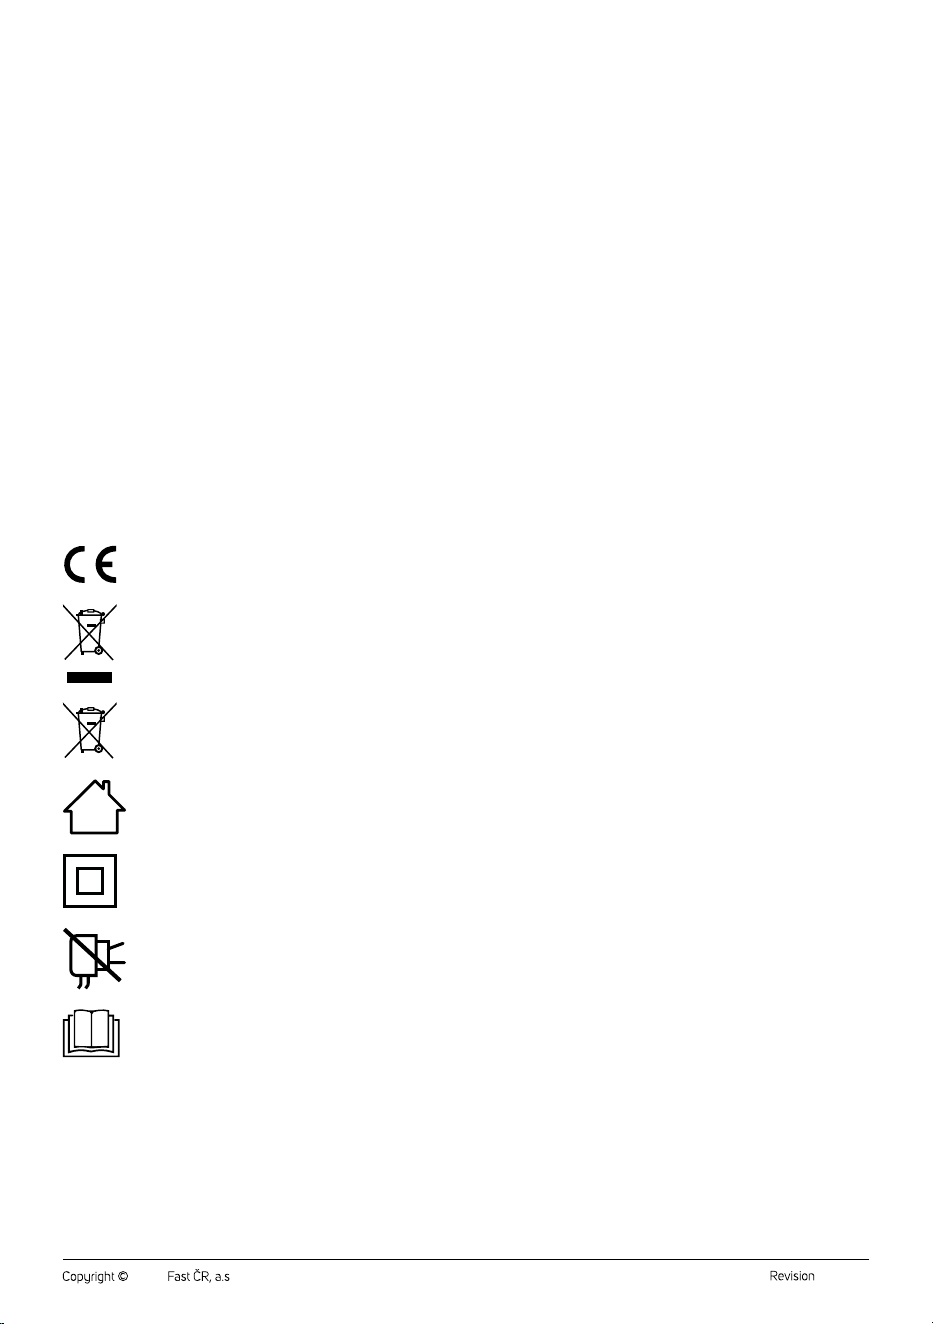
EXPLANATION OF SYMBOLS PLACED ON THE PRODUCT OR INTHE ACCOMPANYING
DOCUMENTATION
The product meets all the basic requirements of the applicable EU directives.
Used electrical andelectronic products must not be disposed of in ordinary municipal waste.
Used accumulators and batteries do not belong in normal municipal waste.
The product is intended for household use only. The product is not intended for outdoor use.
Class II protection device
Protection against electric shock is ensured by double or reinforced insulation.
This symbol indicates that the appliance must not be used if the power plug is damaged.
Caution: Read the manual.
. . . . . . . . . . . . . . . . . . . . . . . . . . . . . . . . . . . . . . . . . . . . . . . . . . . . . . . . . . . . . . . . . . . . . . . . . . . . . . . . . . . . . . . . . . . . . . . . . . . . . . . . . . . . . . . . . . . . . . . . . . . . . . . . . . . . . . . . . . . .
- 5 -
04/2026
2026, .
• Thank you for purchasing our SENCOR product; we hope it will serve
to your satisfaction.
• Prior to using this appliance, please read the user manual thoroughly,
even in cases when you are already familiar with the use of similar
types of appliances. Use the appliance only as described in this
user manual. Keep the manual for future reference. If you pass the
appliance on to another person, ensure that this user manual is
included.
• Carefully unpack the appliance and make sure not to discard any part
of the packaging material until you have removed all its components.
It is recommended that you keep the original packaging, packing
material, receipt and confirmation of the extent of the seller'sliability
or warranty certificate at least for the duration of the legal right to
file adefect claim or the quality warranty. When transporting the
appliance, we recommend repackaging it in the original box provided
by the manufacturer.
. . . . . . . . . . . . . . . . . . . . . . . . . . . . . . . . . . . . . . . . . . . . . . . . . . . . . . . . . . . . . . . . . . . .
DESCRIPTION OF VACUUM CLEANER
A1 Battery
A2 Button to release the battery
A3 Battery charging connectors
A4 Socket for connecting the
charging adapter connector
A5 Handle
A6 Button
for selecting the
vacuum cleaner mode
A7 Button
to switch the
vacuum cleaner on/off
A8 Display
A9 Motor unit withventilation
openings
A10 HEPA filter
A11 Microfibre inlet filter
A12 Sliding lever to release dirt
from the tube filter
A13 Dust container
A14 Hinged bottom of the dust
container
A15 Tube filter
A16 Buttons to release the dust
container (located on the
sides)
A17 Button to release the bottom
of the dust container
A18 Connectors for attaching
accessories
A19 Opening for attaching
accessories
A20 Dust container bottom lock
. . . . . . . . . . . . . . . . . . . . . . . . . . . . . . . . . . . . . . . . . . . . . . . . . . . . . . . . . . . . . . . . . . . .
DESCRIPTION OF ACCESSORIES
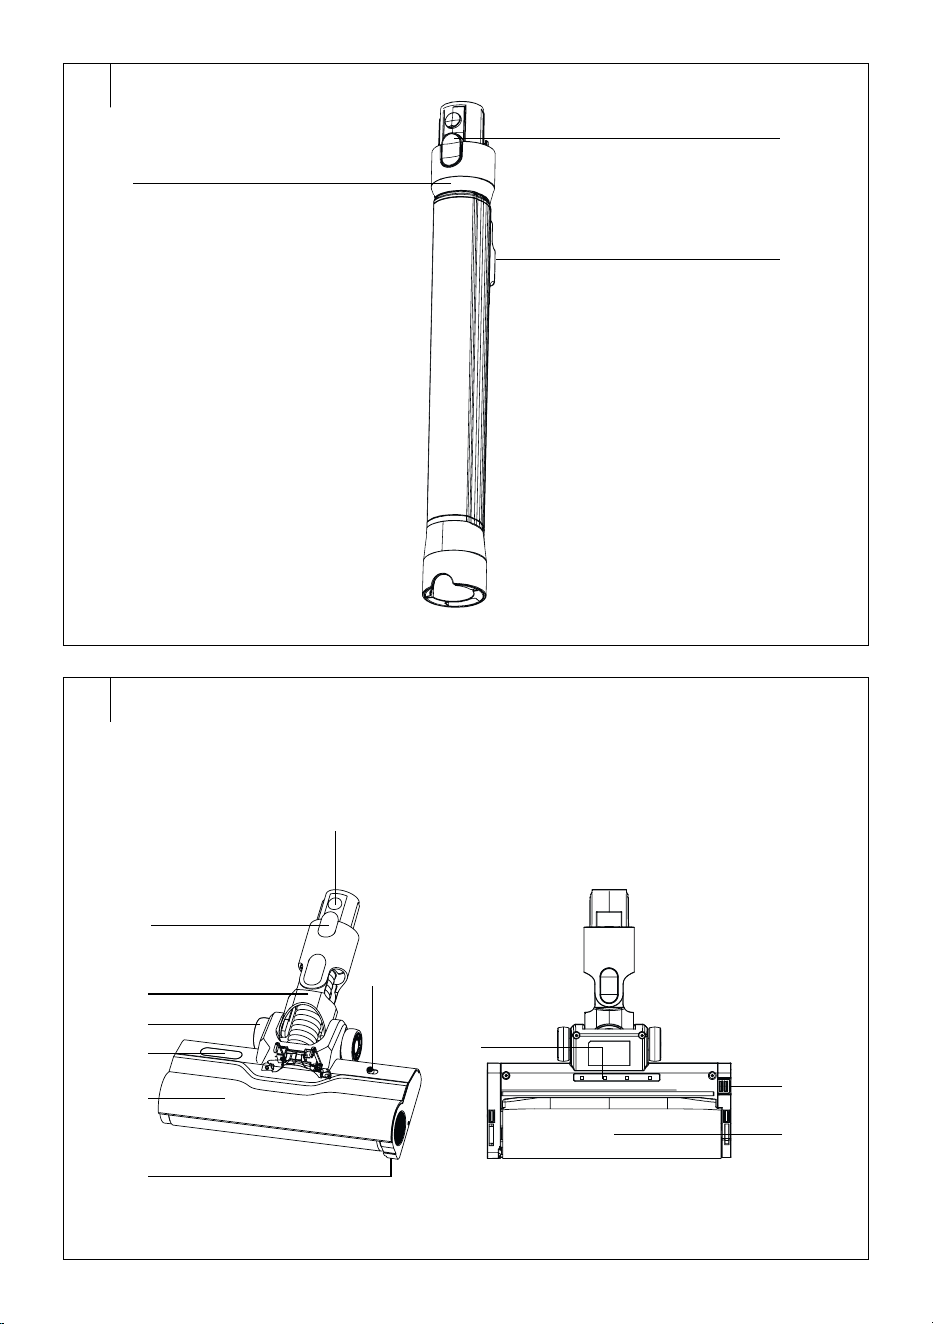
B1 Telescopic tube
B1.1 Button to release the
telescopic tube
B1.2 Button to adjust the length of
the telescopic tube
. . . . . . . . . . . . . . . . . . . . . . . . . . . . . . . . . . . . . . . . . . . . . . . . . . . . . . . . . . . . . . . . . . . .
B2 Motorised brush nozzle for
dry vacuuming
B2.1 Button to release the dry
vacuuming nozzle
B2.2 Flexible joint
B2.3 Drive castors
B2.4 Dust level indicator
B2.5 Rotating brush front cover
B2.6 LED light
B2.7 Switch to turn the LED light
on/off
B2.8 UV light
B2.9 Soft rotating brush
B2.10 Button to remove the rotating
brush
. . . . . . . . . . . . . . . . . . . . . . . . . . . . . . . . . . . . . . . . . . . . . . . . . . . . . . . . . . . . . . . . . . . .
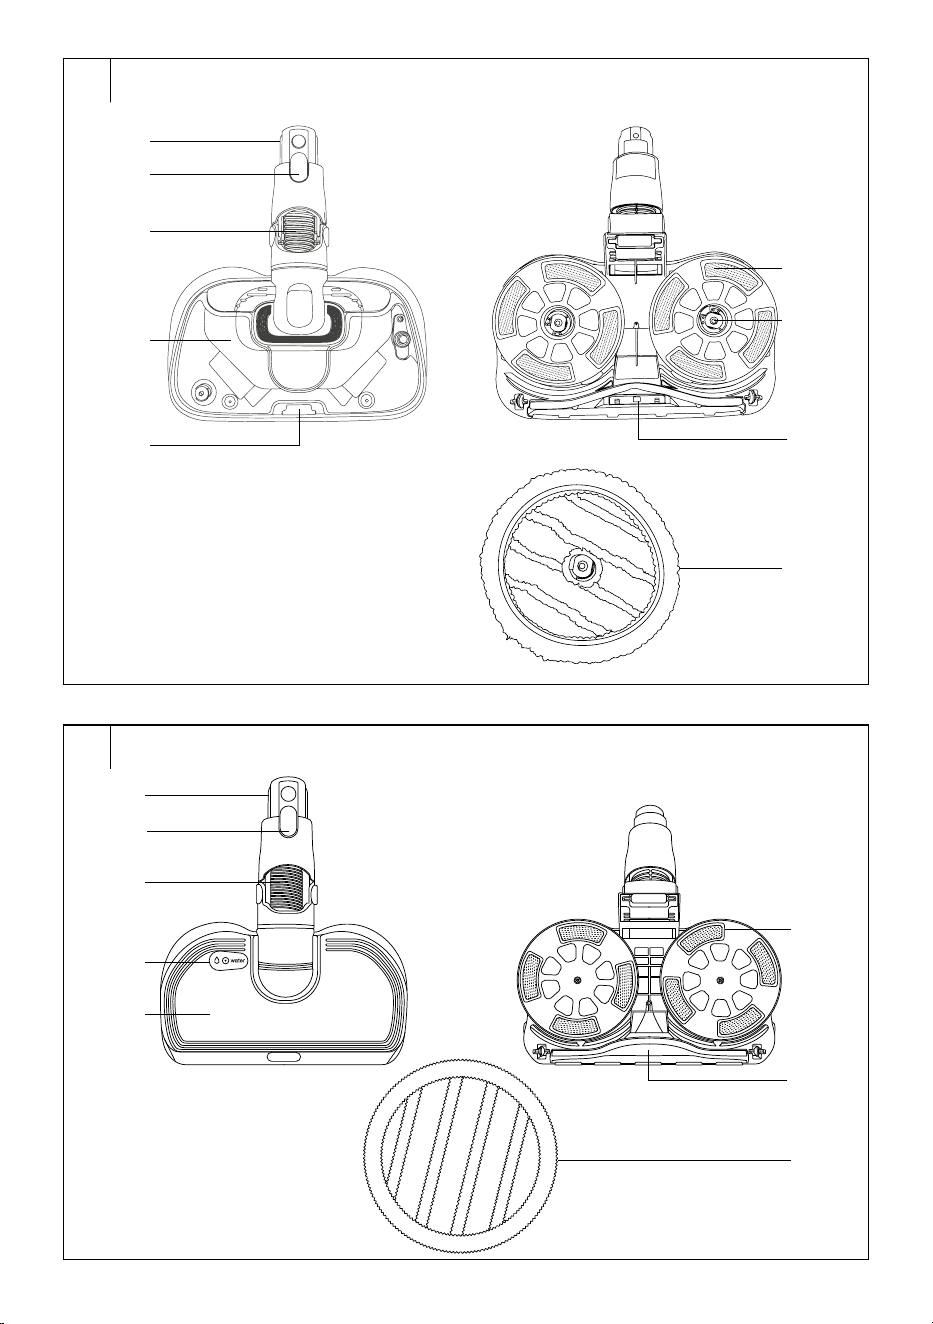
B3 Steam mopping nozzle
(SVC 9486BK model only)
B3.1 Button to release the steam
mopping nozzle
B3.2 Flexible joint
B3.3 Water tank
B3.4 Button to release the water
tank
B3.5 Mopping pad holders
B3.6 Water/steam discharge
nozzles
B3.7 LED light
B3.8 Mopping pads
. . . . . . . . . . . . . . . . . . . . . . . . . . . . . . . . . . . . . . . . . . . . . . . . . . . . . . . . . . . . . . . . . . . .
B4
Mopping
nozzle (SVC 9476BK
model only)
B4.1 Button to release the
mopping nozzle
B4.2 Flexible joint
B4.3 Water tank cap
B4.4 Water tank
B4.5 Mopping pad holders
B4.6 Suction opening
B4.7 Mopping pads
. . . . . . . . . . . . . . . . . . . . . . . . . . . . . . . . . . . . . . . . . . . . . . . . . . . . . . . . . . . . . . . . . . . .
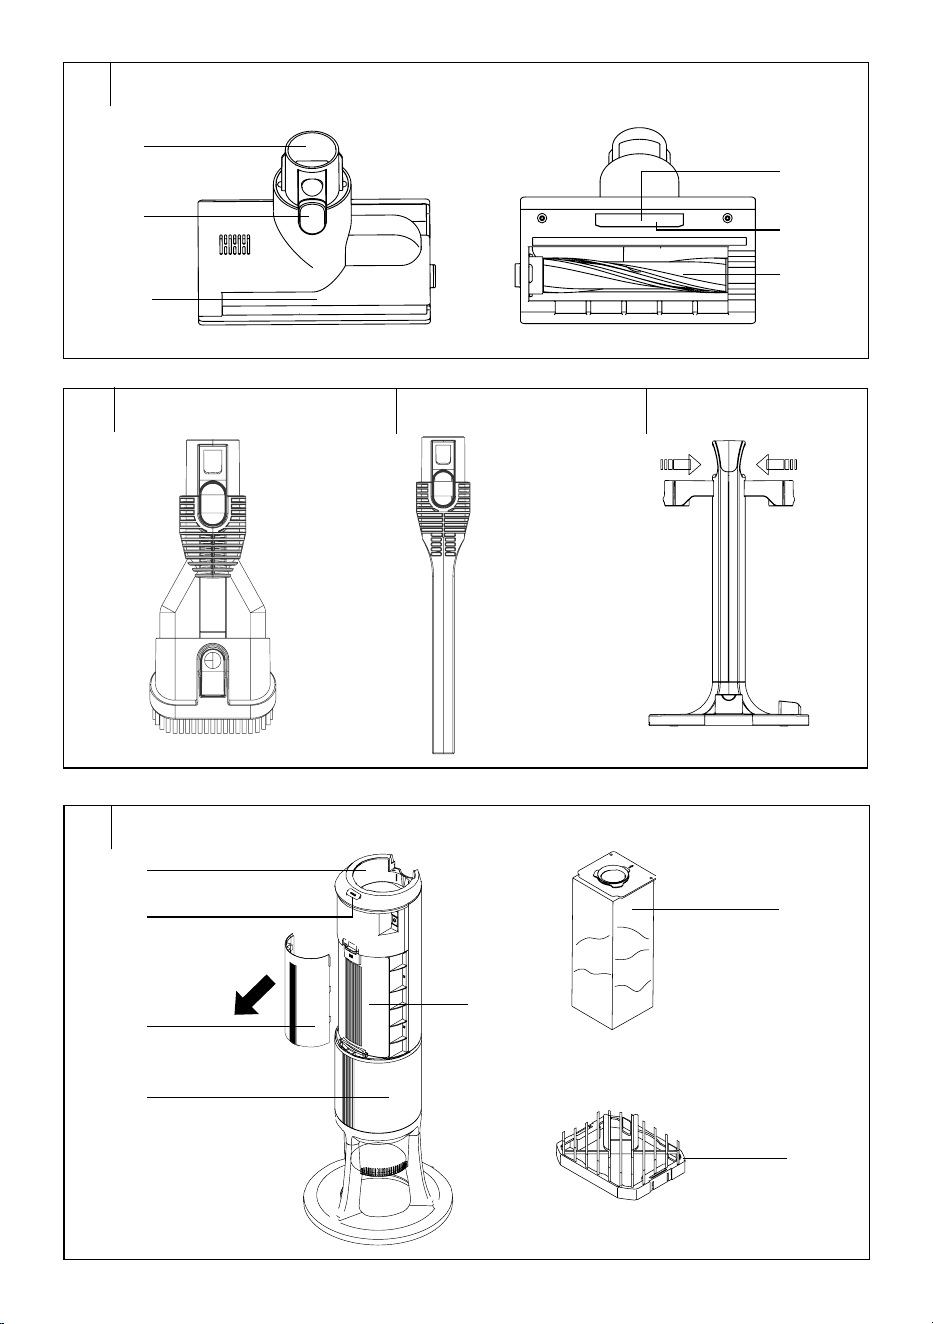
B5 Mattress and upholstery
nozzle
B5.1 Button to release the nozzle
B5.2 Rotating brush protective
cover
B5.3 Rotating lock to release the
rotating brush
B5.4 Sensor
B5.5 UV light
B5.6 Rotating brush
. . . . . . . . . . . . . . . . . . . . . . . . . . . . . . . . . . . . . . . . . . . . . . . . . . . . . . . . . . . . . . . . . . . .
B6 Nozzle withretractable soft
brush
B7 Long crevice nozzle
B8 Accessory holder
. . . . . . . . . . . . . . . . . . . . . . . . . . . . . . . . . . . . . . . . . . . . . . . . . . . . . . . . . . . . . . . . . . . .
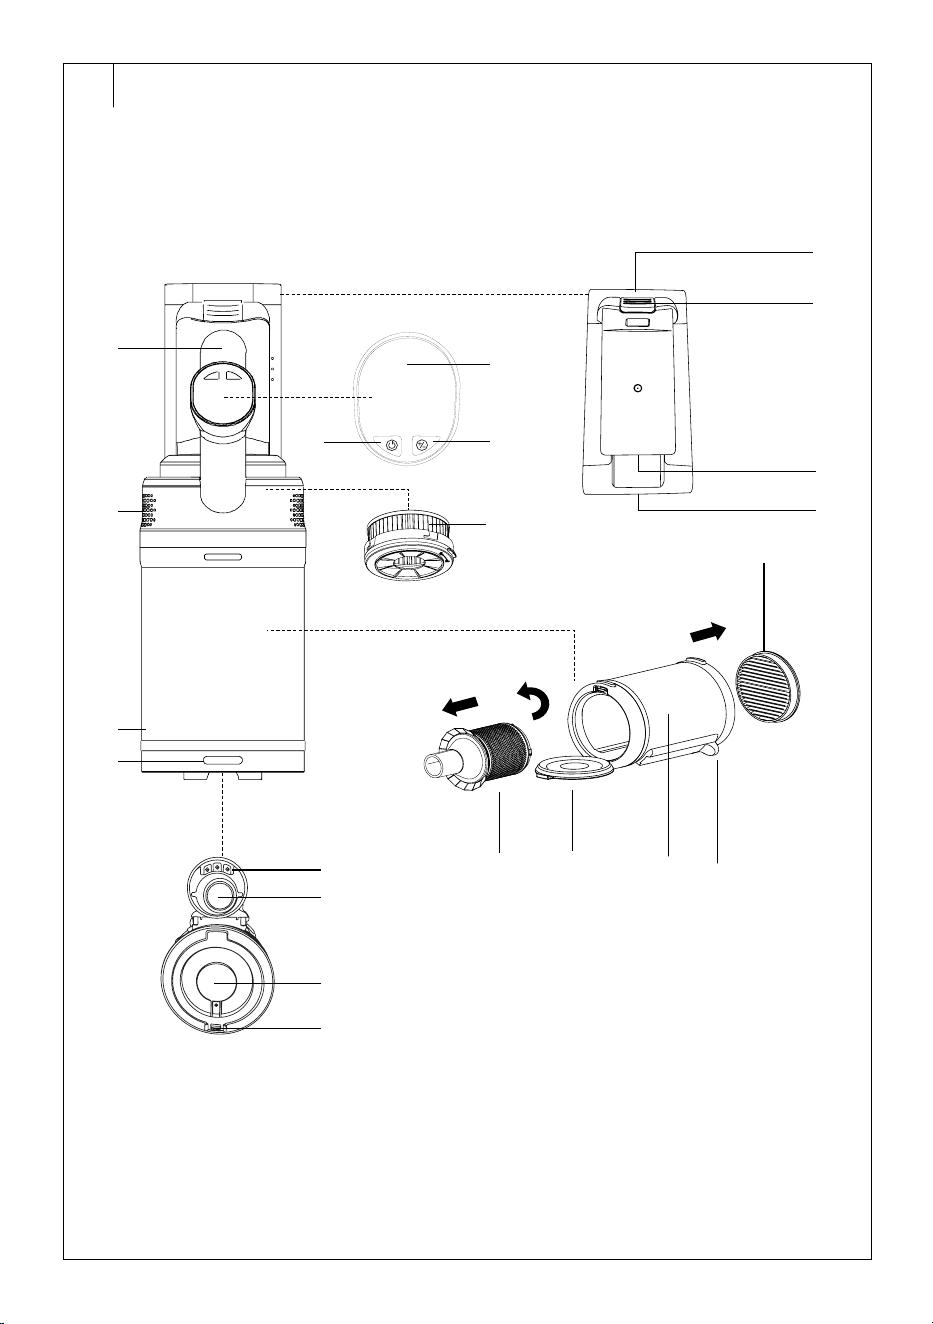
DESCRIPTION OF THE COLLECTION STATION
C1 Space for inserting the
vacuum cleaner
C2 ON/OFF button
C3 Outer cover
C4 Dust bag cover
C5 Base
C6 Dust bag
C7 Filter cover
Not shown: foam filter
. . . . . . . . . . . . . . . . . . . . . . . . . . . . . . . . . . . . . . . . . . . . . . . . . . . . . . . . . . . . . . . . . . . .
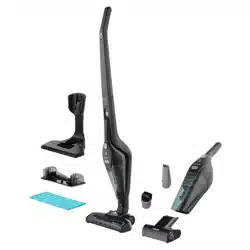
PACKAGE CONTENTS
SVC 9486BK
• Vacuum cleaner (motor unit with 2 batteries and dust container)
• Telescopic tube
• Motorised brush nozzle for dry vacuuming
• Steam mopping nozzle
• Mopping pads (6 pcs)
• Mattress and upholstery nozzle
• Nozzle with retractable soft brush
• Long crevice nozzle
• Accessory holder
• Collection station
• Dust bag (3+1, 1 bag is installed in the collection station)
SVC 9476BK
• Vacuum cleaner (motor unit with battery and dust container)
• Telescopic tube
• Motorised brush nozzle for dry vacuuming
• Mopping nozzle
• Mopping pads (6 pcs)
• Mattress and upholstery nozzle
• Nozzle with retractable soft brush
• Long crevice nozzle
• Accessory holder
• Collection station
• Dust bag (3+1, 1 bag is installed in the collection station)
SVC 9466BK
• Vacuum cleaner (motor unit with battery and dust container)
• Telescopic tube
• Motorised brush nozzle for dry vacuuming
• Mattress and upholstery nozzle
• Nozzle with retractable soft brush
• Long crevice nozzle
• Accessory holder
• Collection station
• Dust bag (3+1, 1 bag is installed in the collection station)
. . . . . . . . . . . . . . . . . . . . . . . . . . . . . . . . . . . . . . . . . . . . . . . . . . . . . . . . . . . . . . . . . . . .
EN
Stick Vacuum Cleaner with Collection Station
User Manual

- 6 -
04/2026
2026, .
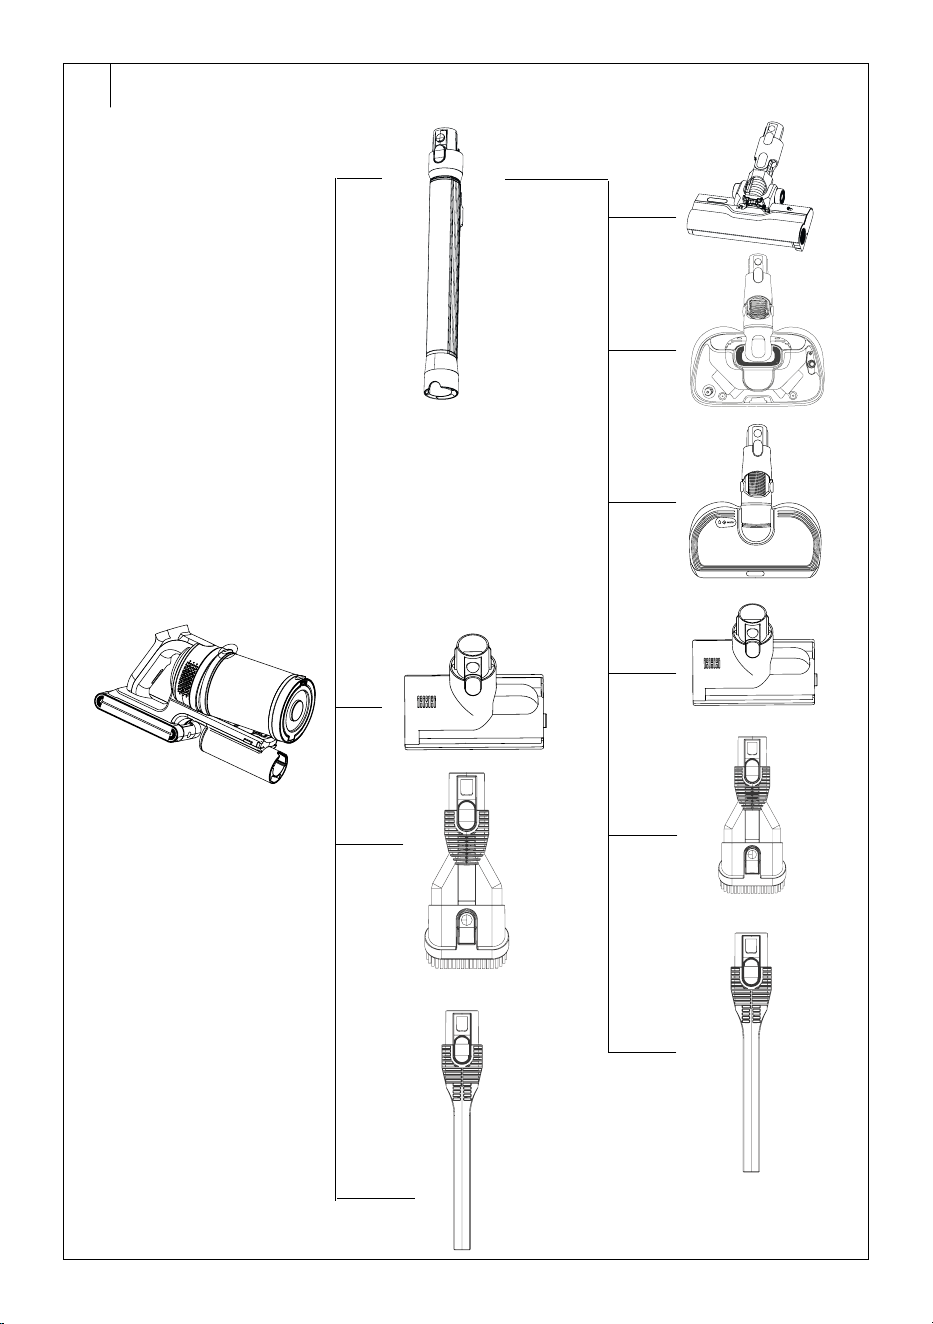
INTENDED USE
• The vacuum cleaner is intended, thanks to its rich accessories, for
cleaning various surfaces and places in your household. For options
on how to combine the accessories with each other, see figure D.
• The motorised brush nozzle for dry vacuuming is intended for
vacuuming dust and dirt from both smooth surfaces (e.g. wooden or
laminate floating floors), hard floors (e.g. tiles, vinyl), as well as carpets,
mats, runners, etc.
• The steam mopping nozzle (SVC 9486BK model only) is intended
for cleaning hard floors such as wooden or laminate floating floors,
tiles, vinyl, etc. We recommend checking with the floor manufacturer
whether the steam mopping nozzle can be used on the given
type of flooring. Thanks to the generation of hot steam, it ensures
ahygienically clean mopped floor. This nozzle is not intended for
cleaning carpets or runners.
• The mopping nozzle (SVC 9476BK model only) is intended for
cleaning hard floors such as wooden or laminate floating floors, tiles,
vinyl, etc. We recommend checking with the floor manufacturer
whether the mopping nozzle can be used on the given type of flooring.
This nozzle is not intended for cleaning carpets or runners.
• The mattress andupholstery nozzle is intended for removing dust,
dirt, hair or animal fur from mattresses, upholstered furniture, cushions
and other textile surfaces. You can use it not only at home, but
alsoinyour car. It quickly and effectively removes hair, animal fur and
other dirt, e.g. from car seats.
• The nozzle with retractable soft brush is suitable for vacuuming dirt
and dust from fragile objects, bookshelves, walls, blinds, furniture, etc.
• The long slot nozzle withillumination is suitable for vacuuming in
hard-to-reach places (e.g. windows, corners, bookcases, spaces
between mattresses, upholstery, etc.).
• The collection station serves to extract dirt and dust from the dust
container. These are collected in the dust bag. When the bag is full,
the collection station alerts you to replace it.
. . . . . . . . . . . . . . . . . . . . . . . . . . . . . . . . . . . . . . . . . . . . . . . . . . . . . . . . . . . . . . . . . . . .
VACUUMING MODES
The vacuum cleaner is equipped with three operating modes:
1. Eco mode: mode with reduced suction power and maximum
consideration for battery life.
2. Auto mode: the vacuum cleaner automatically adjusts the suction
power according to the type of surface being vacuumed and the
degree of soiling. This conserves battery capacity, and thus its
overall lifespan. This mode is available only for dry vacuuming.
3. Max mode: mode withthe highest suction power.
. . . . . . . . . . . . . . . . . . . . . . . . . . . . . . . . . . . . . . . . . . . . . . . . . . . . . . . . . . . . . . . . . . . .
SETUP BEFORE USE
• Remove the vacuum cleaner, collection station and all accessories
from the packaging. Check that you have removed all parts. Check
that the vacuum cleaner and its accessories are not damaged.
• Remove protective films and promotional labels from the vacuum
cleaner, collection station and all accessories.
Charging the vacuum cleaner
• The vacuum cleaner can be charged using the supplied mains adapter
or in the collection station.
Charging using the mains adapter
• To charge the vacuum cleaner, use only the supplied mains adapter.
• Before use, we recommend fully charging the vacuum cleaner.
• Insert the adapter plug into aproperly earthed mains socket. Insert the
connector into the socket in the battery.
• Charging will start automatically. The charge status will be displayed
on the display. When the display shows 100% charge status, the
vacuum cleaner is charged.
• Disconnect the connector from the socket in the battery and remove
the adapter plug from the mains socket.
• The time to full charge is typically 4 hours.
Charging at the collection station
• Place the vacuum cleaner in the collection station.
• Charging will start automatically. The charge status will be displayed
on the display. When the display shows 100% charge status, the
vacuum cleaner is charged. Charging will stop automatically.
Collection station
• Place the collection station on asolid and flat surface. Ensure
sufficient free space around it for handling.
• Ensure that the collection station is located at asufficient distance
from the mains socket.
• Insert the mains cable plug into aproperly earthed mains socket.
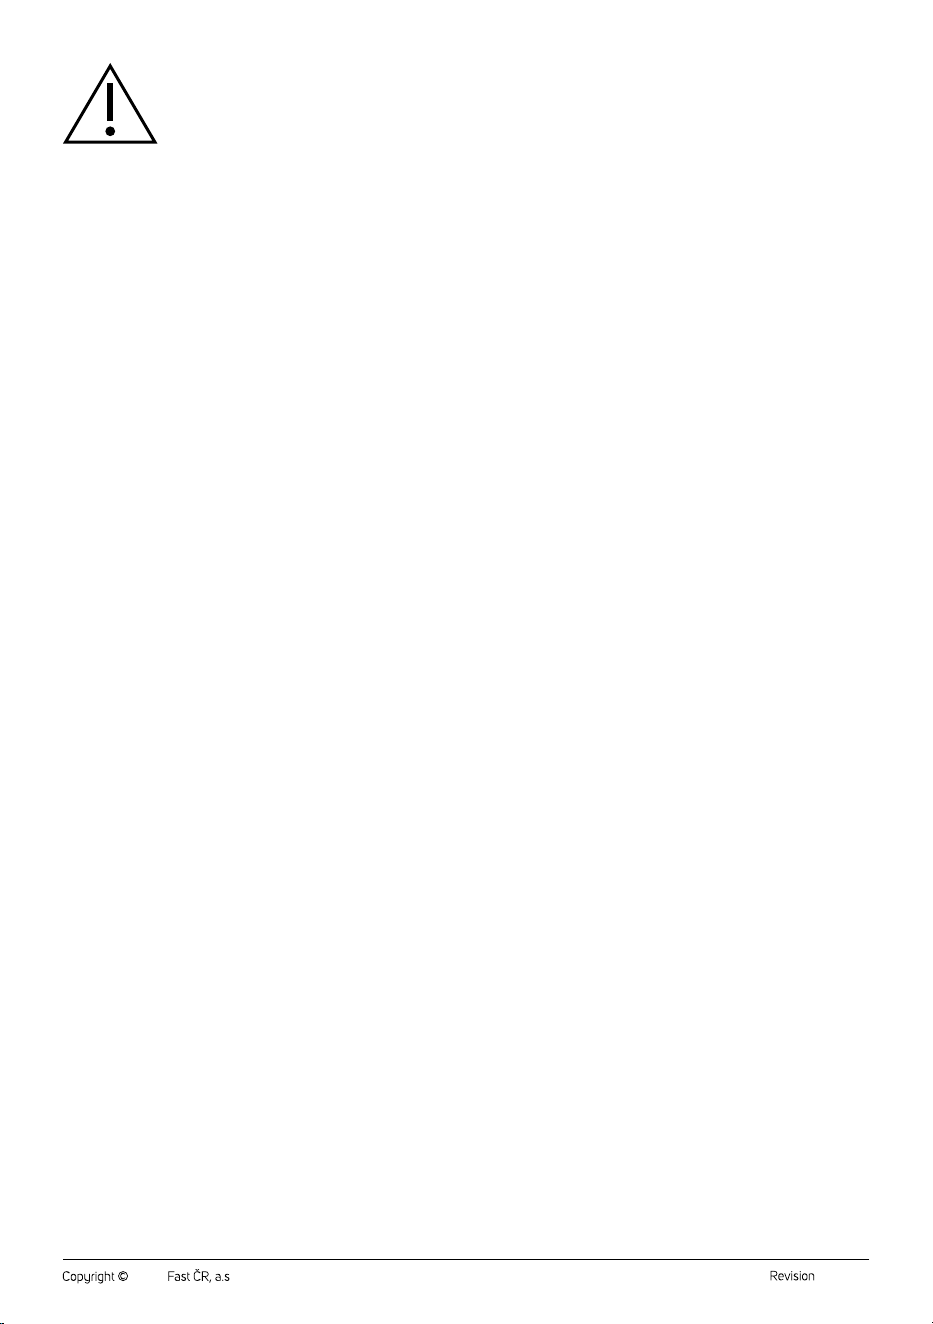
An Alternative battery charging method
• The spare battery can be charged directly in the accessory holder.
1. Insert the charging adapter connector into the battery compartment
opening from below - see Figure J1.
2. Guide the charging adapter cable through the groove at the bottom of
the holder - see Figure J2.
3. Place the accessory holder in asuitable place within reach of the
mains socket and insert the adapter into it.
4. Insert the spare battery into the designated space in the holder so
that the charging adapter connector is inserted into the opening in the
battery - see Figure J3 and J4.
Note:
Only the SVC 9486BK comes with two batteries. For other
models, asecond battery must be purchased separately.
. . . . . . . . . . . . . . . . . . . . . . . . . . . . . . . . . . . . . . . . . . . . . . . . . . . . . . . . . . . . . . . . . . . .
ASSEMBLY/DISASSEMBLY OF THE VACUUM
CLEANER
Inserting/Removing the Battery
• Hold the battery with one hand and the motor unit with the other.
• Align the battery with the guide grooves in the space in the motor unit –
see figure E1; and move it downwards to install the battery. Press gently
until you hear aclick. This indicates that the battery is correctly fitted.
• If you need to remove the battery, press the button to remove the
battery and at the same time pull it upwards out of the motor unit –
see figure E2.
Note:
With the exception of replacing the battery andcleaning
the motor unit, it is not necessary to insert andremove it
frequently.
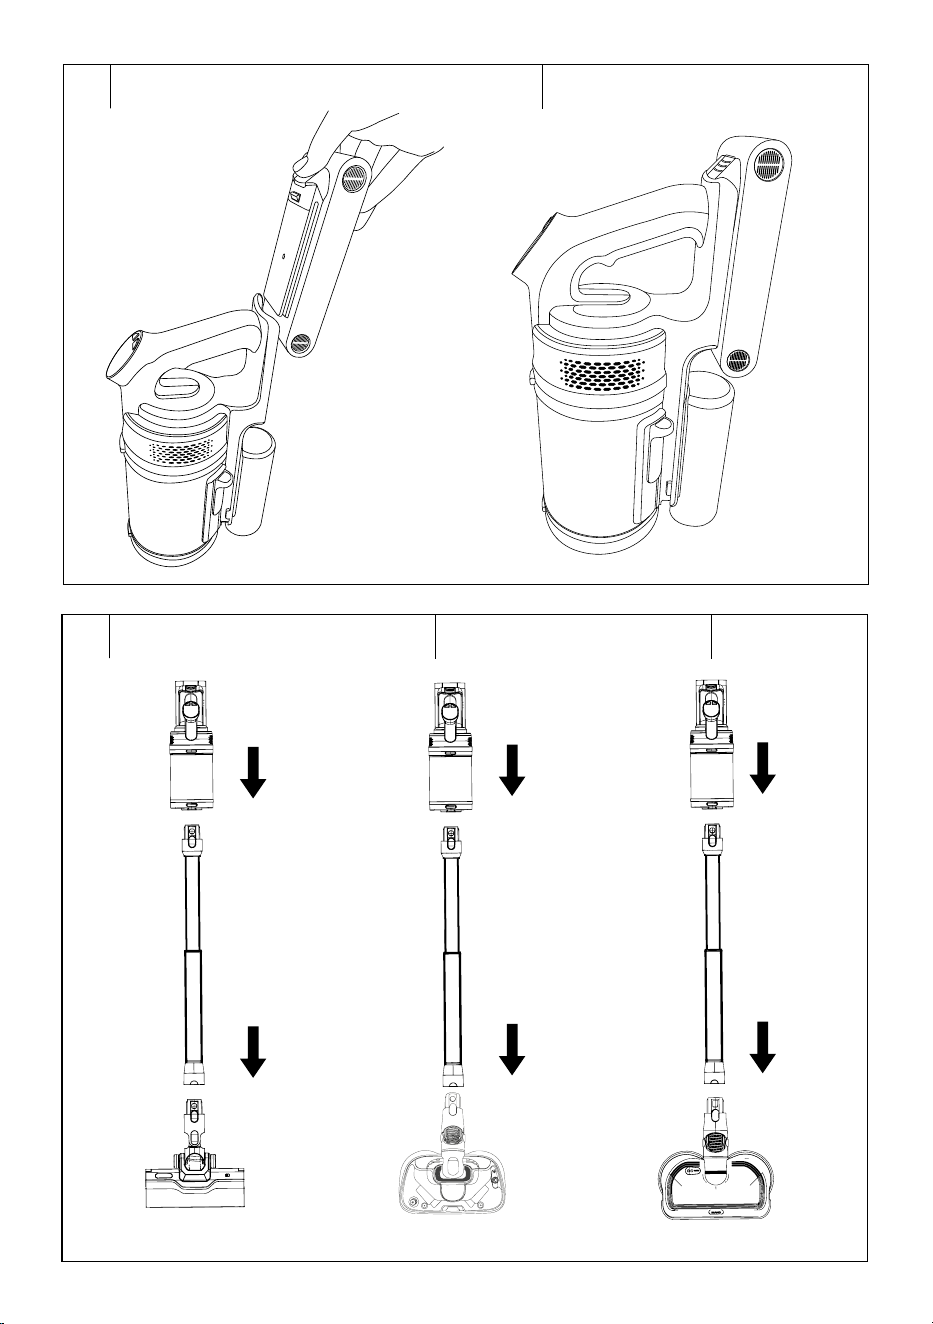
Assembling/disassembling the vacuum cleaner with the dry
vacuuming nozzle (Fig. E3)
• The vacuum cleaner is supplied disassembled. Follow these steps
for assembly:
• Insert the end of the dry vacuuming nozzle into the wider opening
of the telescopic tube. Ensure that the connectors at the rear of the
telescopic tube are aligned with the connectors on the nozzle. Press
gently until you hear aclick. This indicates correct connection.
• Insert the narrower end of the telescopic tube into the accessory
connection opening in the lower part of the motor unit. Ensure that
the connectors at the rear of the telescopic tube are aligned with the
connectors in the opening. Press gently until you hear aclick. This
indicates correct connection.
• If you need to disassemble the vacuum cleaner, hold the motor
unit from below with one hand and press the button to release the
telescopic tube with the other hand. Pull the telescopic tube away
from the motor unit.
• Then hold the telescopic tube with one hand and press the button to
release the dry vacuuming nozzle with the other hand. Pull the dry
vacuuming nozzle away from the telescopic tube.
Assembling/disassembling the vacuum cleaner with the steam
mopping nozzle (Fig. E4; SVC 9486BK model only)
• Insert the end of the steam mopping nozzle into the wider opening
of the telescopic tube. Ensure that the connectors at the rear of the
- 7 -
04/2026
2026, .
telescopic tube are aligned with the connectors on the nozzle. Press
gently until you hear aclick. This indicates correct connection.
• Insert the narrower end of the telescopic tube into the accessory
connection opening in the lower part of the motor unit. Ensure that
the connectors at the rear of the telescopic tube are aligned with the
connectors in the opening. Press gently until you hear aclick. This
indicates correct connection.
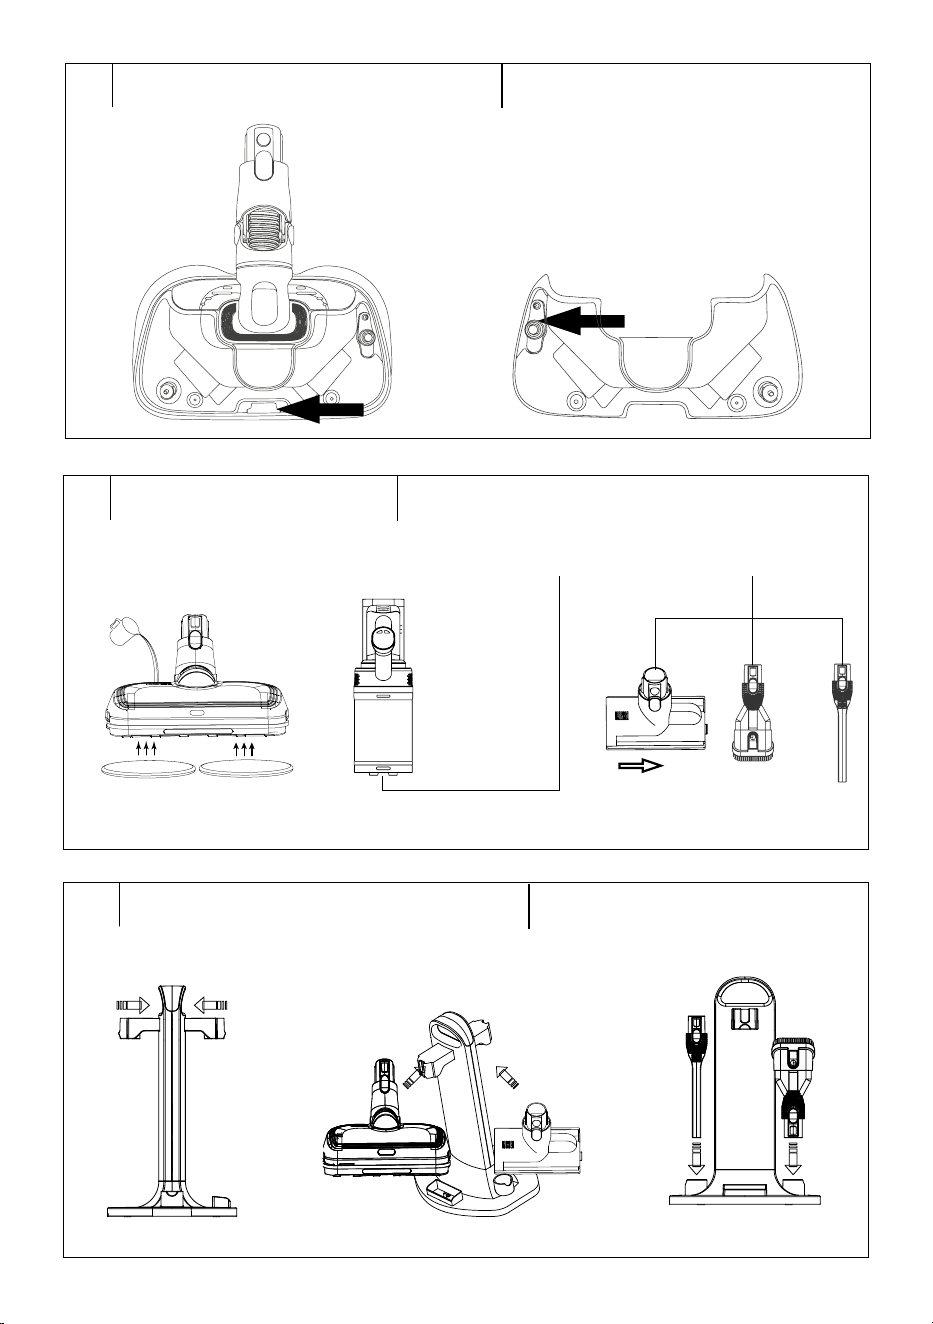
• Attach two mopping pads to the holders in the lower part of the nozzle.
We recommend moistening the pads in clean water and wringing
them out lightly before attaching. This will speed up mopping.
• If you need to disassemble the vacuum cleaner, hold the motor
unit from below with one hand and press the button to release the
telescopic tube with the other hand. Pull the telescopic tube away
from the motor unit.
• Then hold the telescopic tube with one hand and press the button to
release the steam mopping nozzle with the other hand. Pull the steam
mopping nozzle away from the telescopic tube.
Assembling/disassembling the vacuum cleaner with the
mopping nozzle (Fig. E5; SVC 9476BK model only)
• Insert the end of the mopping nozzle into the wider opening of
the telescopic tube. Ensure that the connectors at the rear of the
telescopic tube are aligned with the connectors on the nozzle. Press
gently until you hear aclick. This indicates correct connection.
• Insert the narrower end of the telescopic tube into the accessory
connection opening in the lower part of the motor unit. Ensure that
the connectors at the rear of the telescopic tube are aligned with the
connectors in the opening. Press gently until you hear aclick. This
indicates correct connection.
• Attach two mopping pads to the holders in the lower part of the nozzle.
We recommend moistening the pads in clean water and wringing
them out lightly before attaching. This will speed up mopping.
• If you need to disassemble the vacuum cleaner, hold the motor
unit from below with one hand and press the button to release the
telescopic tube with the other hand. Pull the telescopic tube away
from the motor unit.
• Then hold the telescopic tube with one hand and press the button to
release the mopping nozzle with the other hand. Pull the mopping
nozzle away from the telescopic tube.
Filling the water tank (steam mopping nozzle, SVC 9486BK
model only)
1. Press the button to release the water tank (B3.4) and carefully
remove the water tank from the nozzle – see figure E6.
2. Turn the tank upside down and release the cap – see figure E7. Pour
water into the tank.
3. Close the cap, turn the tank upside down again and check that water
does not leak. If it does not leak, insert the tank back into the nozzle
by first inserting the upper part under the catches, and then press
the lower part of the tank against the nozzle until you hear aclick.
Filling the water tank (mopping nozzle)
1. Remove the water tank cap and pour clean water into the tank – see
figure E8. Do not use any cleaning agents or chemicals.
2. Replace the cap and close it properly.
Assembling/disassembling the vacuum cleaner with other
accessories (Fig. E9)
• Insert the narrower end of the mattress and upholstery nozzle, nozzle
with retractable soft brush or long crevice nozzle into the accessory
connection opening in the lower part of the motor unit. Ensure that
the connectors at the rear of the telescopic tube are aligned with the
connectors in the opening. Press gently until you hear aclick. This
indicates correct connection.
• If you need to remove the connected accessory, press the release
button on the given accessory. Pull the given accessory away from
the motor unit.
Accessory holder
• The accessory holder consists of 4 parts: bottom base, handle and
2 holders.
• Place the base on asolid and flat surface.
• Install the handle on the base and then attach the two accessory
holders – see figure E10.
• Hang the mopping nozzle and mattress and upholstery nozzle each
on one holder, and place the nozzle with retractable soft brush and
long crevice nozzle on the projections at the bottom – see figure E11.
. . . . . . . . . . . . . . . . . . . . . . . . . . . . . . . . . . . . . . . . . . . . . . . . . . . . . . . . . . . . . . . . . . . .
USING THE VACUUM CLEANER
Check that the vacuum cleaner is correctly assembled and fully charged.
1. Grasp the vacuum cleaner by the handle.
2. Press the button
once briefly and the vacuum cleaner will start
in Eco mode.
3. By repeteadly pressing the button
, select the vacuum cleaner
mode: Eco – Auto – Power. The display will show agraphic
representation of the selected mode and the remaining battery
charge capacity.
4. Move the vacuum cleaner forwards and backwards.
5. After use, press the button
to switch off the vacuum cleaner.
6. Clean the vacuum cleaner according to the instructions in the
CLEANING AND MAINTENANCE section.
Warning:
Do not drive the vacuum cleaner over thresholds,
threshold strips or other obstacles or foreign objects.
Using the vacuum cleaner with the dry vacuuming nozzle
• The dry vacuuming nozzle is equipped with arotating brush, UV light,
LED light, dust sensor and indication of optimal brush operation. This
nozzle is intended for vacuuming dust and dirt from both smooth
surfaces (e.g. wooden or laminate floating floors), hard floors (e.g. tiles,
vinyl), as well as carpets, mats, runners, etc.
UV light
• After switching on the vacuum cleaner, the UV light will automatically
come on and will remain on for the entire time the vacuum cleaner is
switched on.
LED light
• Move the switch to the on position and the LED light will come on.
Move the switch to the off position and the LED light will go off.
Dust sensor and dust indication
• This function is available only in Auto mode and when using the dry
vacuuming nozzle on the floor.
• The dry vacuuming nozzle is equipped with adust sensor that sends
asignal to the vacuum cleaner according to the amount of dirt or dust
on the floor, and the vacuum cleaner automatically adjusts the suction
power. At the same time, the indication on the nozzle (number B2.4)
changes depending on whether the dust sensor detects dirt or dust.
• If the indication lights up green, low dust level is detected and the
rotating brush is in optimal operation.
• If the indication lights up red, high dust level is detected. At this
moment, the power will increase until the indication is green again.
• If the indication flashes red, the rotating brush has become blocked.
Using the vacuum cleaner with the steam mopping nozzle/
mopping nozzle
• Fill the water tank according to the instructions in the FILLING THE
WATER TANK section – see the previous part of the manual for the
given nozzle.
• Attach two mopping pads to the holders in the lower part of the nozzle.
We recommend moistening them in clean water and wringing them
out lightly before attaching. This will speed up mopping.
• The vacuum cleaner will vacuum dirt and at the same time wipe the
floor.
• The steam mopping nozzle (model SVC 9486BK) and mopping
nozzle (model SVC 9476BK) are equipped with LED light. The LED
light will automatically come on and will remain on for the entire time
the vacuum cleaner is switched on.
- 8 -
04/2026
2026, .
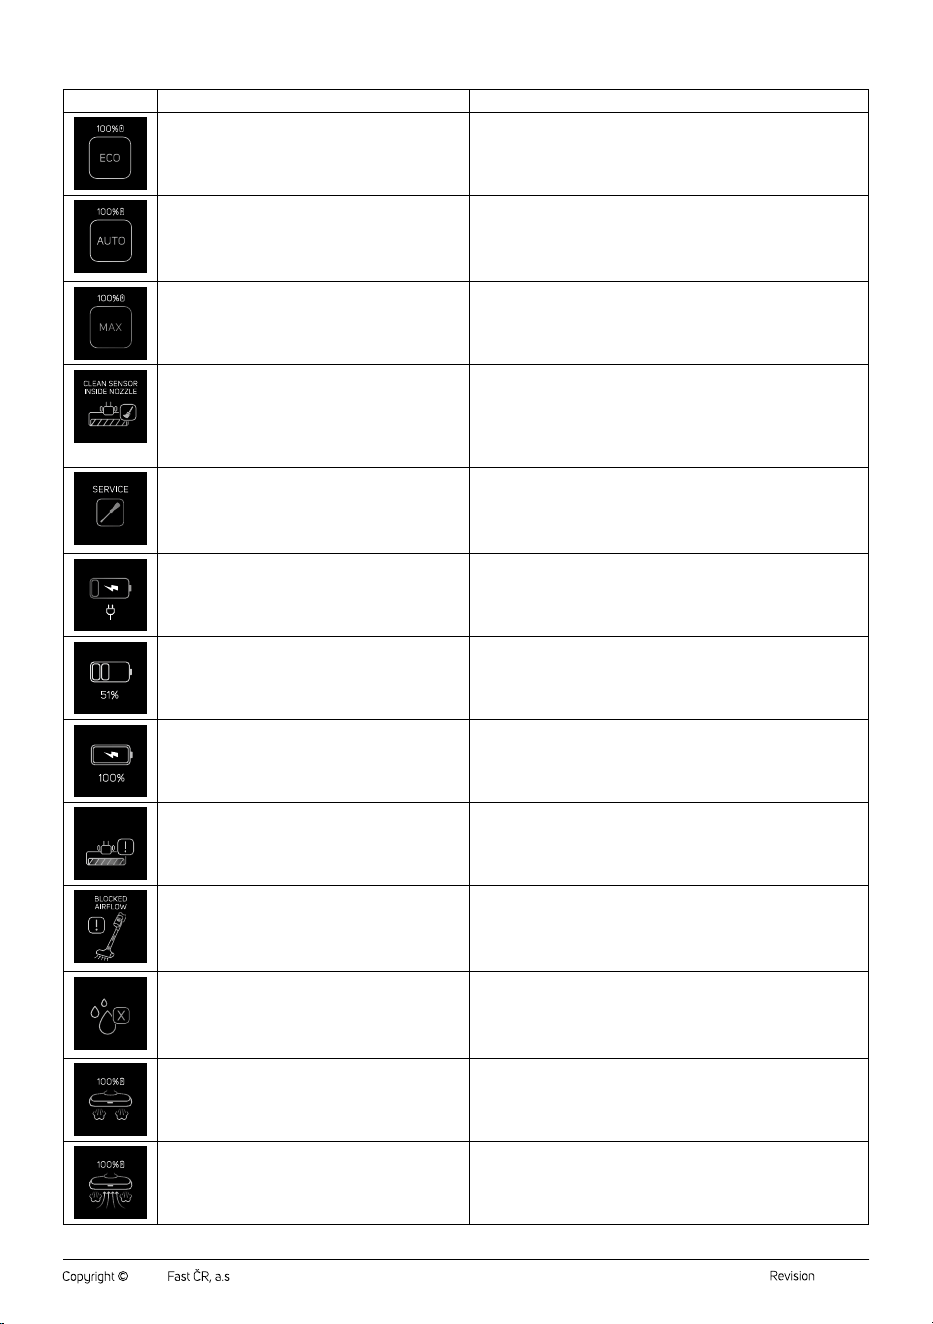
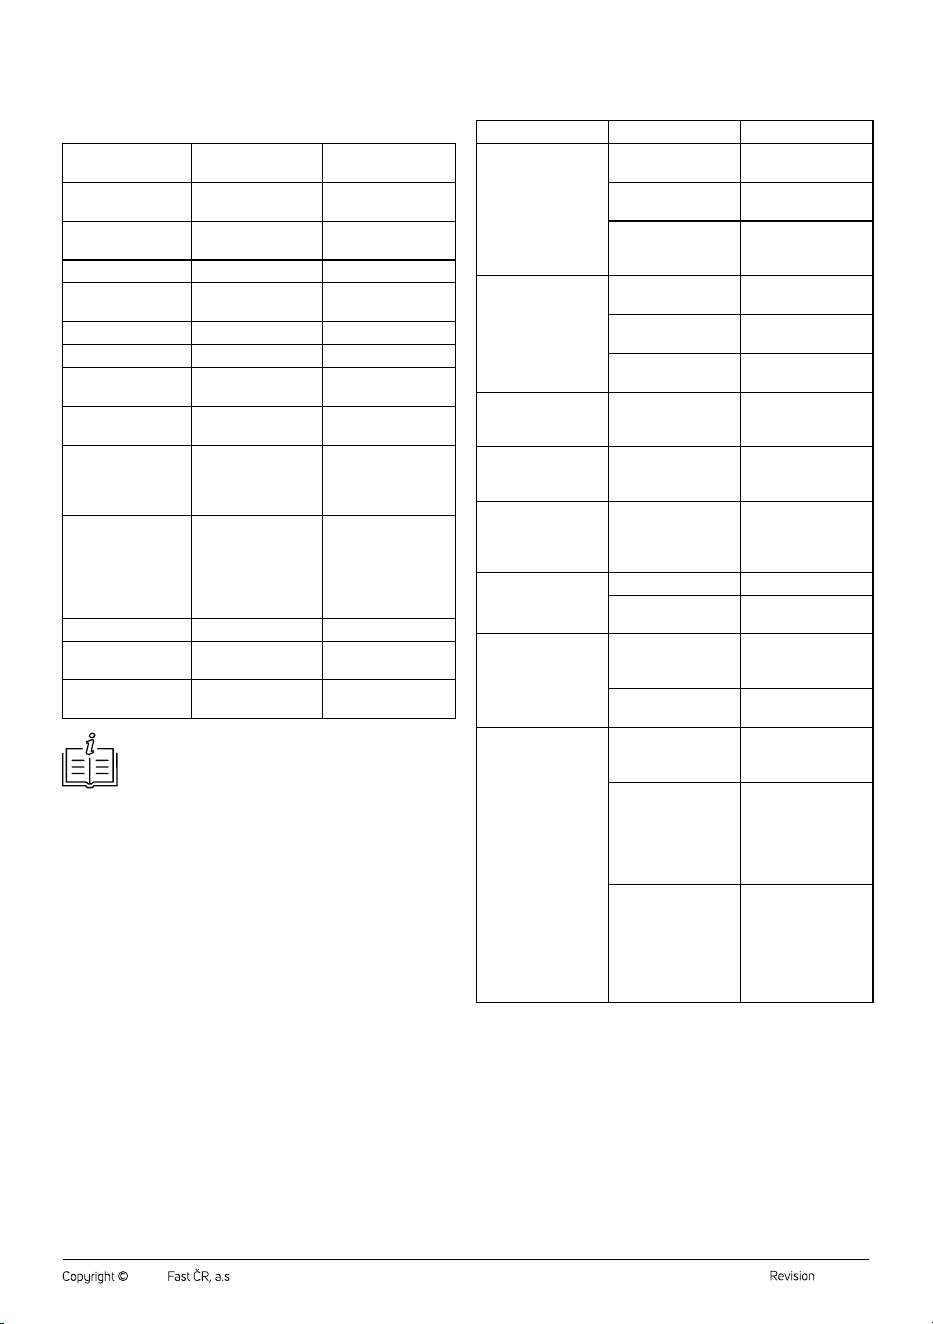
Overview of icons and their meaning on the display
ICON MEANING WHAT TO DO
Eco mode: mode for daily cleaning with maximum
consideration for battery life.
—
Auto mode: the vacuum cleaner always optimally
adjusts the suction power according to the type of
surface being vacuumed and the degree of soiling. This
conserves battery capacity, andthus its overall lifespan.
This mode is available only for dry vacuuming of floors.
—
Max mode: mode with the highest suction power for
heavy soiling.
—
Dirty sensor inside the suction opening in the joint of the
floor nozzle.
Disconnect the floor nozzle from the tube. The sensor is located inside
the nozzle joint. Carefully clean it with asoft, dry cloth or cotton swab.
Ensure that no dirt or moisture remains in the sensor area. Reconnect
the nozzle and switch on the vacuum cleaner.
If the icon does not go off, repeat the process or contact an authorised
service centre.
Damage or incorrect function of the sensor located in
the floor nozzle of the vacuum cleaner.
Switch off the vacuum cleaner and disconnect the floor nozzle from
the tube. Check that the sensor and the nozzle surroundings are not
dirty. If the sensor is clean and the icon remains displayed, contact an
authorised service centre.
Do not attempt to disassemble or repair the sensor yourself.
The vacuum cleaner battery is almost flat. The vacuum cleaner needs to be charged.
Charging in progress. —
The vacuum cleaner is fully charged. —
BLOCKED
BRUSH
The rotating brush of the dry vacuuming nozzle is
blocked.
Clean the rotating brush and remove the cause of blockage.
The airflow in the vacuum cleaner is blocked. The cause
may be ablocked nozzle, tube, dust container, filter or
other part of the suction system.
Switch off the vacuum cleaner. Check that the following parts are not
blocked: floor nozzle and suction opening, tube and connecting parts,
dust container, filters (inlet and outlet). Remove all dirt and check that
all parts are correctly seated. Switch on the vacuum cleaner. If the icon
disappears, airflow has been restored.
NO WATER
The water tank in the steam mopping nozzle is empty
or not correctly installed.
The appliance cannot generate steam until water is
added.
Switch off the vacuum cleaner and disconnect it from power. Remove
the water tank. Fill it with clean water. Ensure that the tank is correctly
and firmly installed. Switch on the vacuum cleaner.
If the icon does not go off, repeat the process or contact an authorised
service centre.
Steam discharge mode of the steam mopping nozzle. —
Steam discharge mode of the steam mopping nozzle in
combination with eco vacuuming mode.
—
- 9 -
04/2026
2026, .
Using the collection station
• The default emptying mode for the dust container is automatic mode.
In automatic mode, the ON/OFF button is lit.
• Before placing the vacuum cleaner in the collection station and
emptying the dust container, we recommend pressing the sliding lever
(A12) several times to release dirt, tangled hair and fur, etc. from the
coarse filter.
• Place the vacuum cleaner in the opening in the collection station.
• The dust container emptying process will start automatically. The
bottom of the dust container will open, dust and dirt will be extracted
from the container, and the bottom of the dust container will close.
The entire process consists of three cycles and takes approximately
30seconds. Wait until the process is complete. The process is
complete when the bottom of the dust container closes. You will hear
the bottom closing and agentle click.
Note:
If you remove the vacuum cleaner from the collection
station whilst the collection station is operating, the bottom
of the dust container may remain open.
Warning:
Do not remove the vacuum cleaner from the
collection station whilst the dust container is being
emptied.
• Manual mode (night mode): Press and hold the ON/OFF button
for 3seconds and the collection station will switch to manual dust
container emptying mode. The ON/OFF button will go off. After
placing the vacuum cleaner in the station, the dust container emptying
process will not start. Only when you press the ON/OFF button briefly
will the dust container emptying process start. The bottom of the dust
container will open, dust and dirt will be extracted from the container,
and the bottom of the dust container will close. The entire process
consists of three cycles and takes approximately 30 seconds. Wait
until the process is complete. The process is complete when the
bottom of the dust container closes. You will hear the bottom closing
and agentle click. The ON/OFF button will go off.
• To switch back to automatic mode, press and hold the ON/OFF
button.
• Full dust bag warning: If the ON/OFF button flashes red, the dust
bag is full. The collection station can be used normally, however
we recommend replacing the dust bag. When replacing, follow the
instructions in the REPLACING THE DUST BAG section.
• Missing dust bag warning: If the ON/OFF button lights up red for
5 seconds and then goes off, the dust bag is not installed and the
collection station cannot be used. Install the dust bag.
Storing the vacuum cleaner
• If you will not be using the vacuum cleaner, clean it according to the
instructions in the CLEANING AND MAINTENANCE section and
store it in the collection station. It also serves as astand for storing the
vacuum cleaner.
• Store accessories (mopping nozzle, mattress and upholstery nozzle,
nozzle with retractable soft brush and long crevice nozzle) in the
holder.
Warning:
Avoid storing the vacuum cleaner and its accessories
in direct sunlight, near heat sources (e.g. stoves,
heating) or in adamp or dusty environment.
. . . . . . . . . . . . . . . . . . . . . . . . . . . . . . . . . . . . . . . . . . . . . . . . . . . . . . . . . . . . . . . . . . . .
CLEANING AND MAINTENANCE
• The vacuum cleaner must be switched off before cleaning. When
cleaning the motor unit, the battery must be removed.
• Never use abrasive cleaning agents, solvents, etc. for cleaning.
• Neglecting cleaning and maintenance may negatively affect
the working order of the vacuum cleaner and lead to its reduced
performance.
• For everyday cleaning and maintenance, wipe the body of the
vacuum cleaner and collection station with adry cloth.
Warning:
Do not immerse the motor unit, battery, collection
station or mains cable in water or other liquid. There is
arisk of injury by electrical shock.
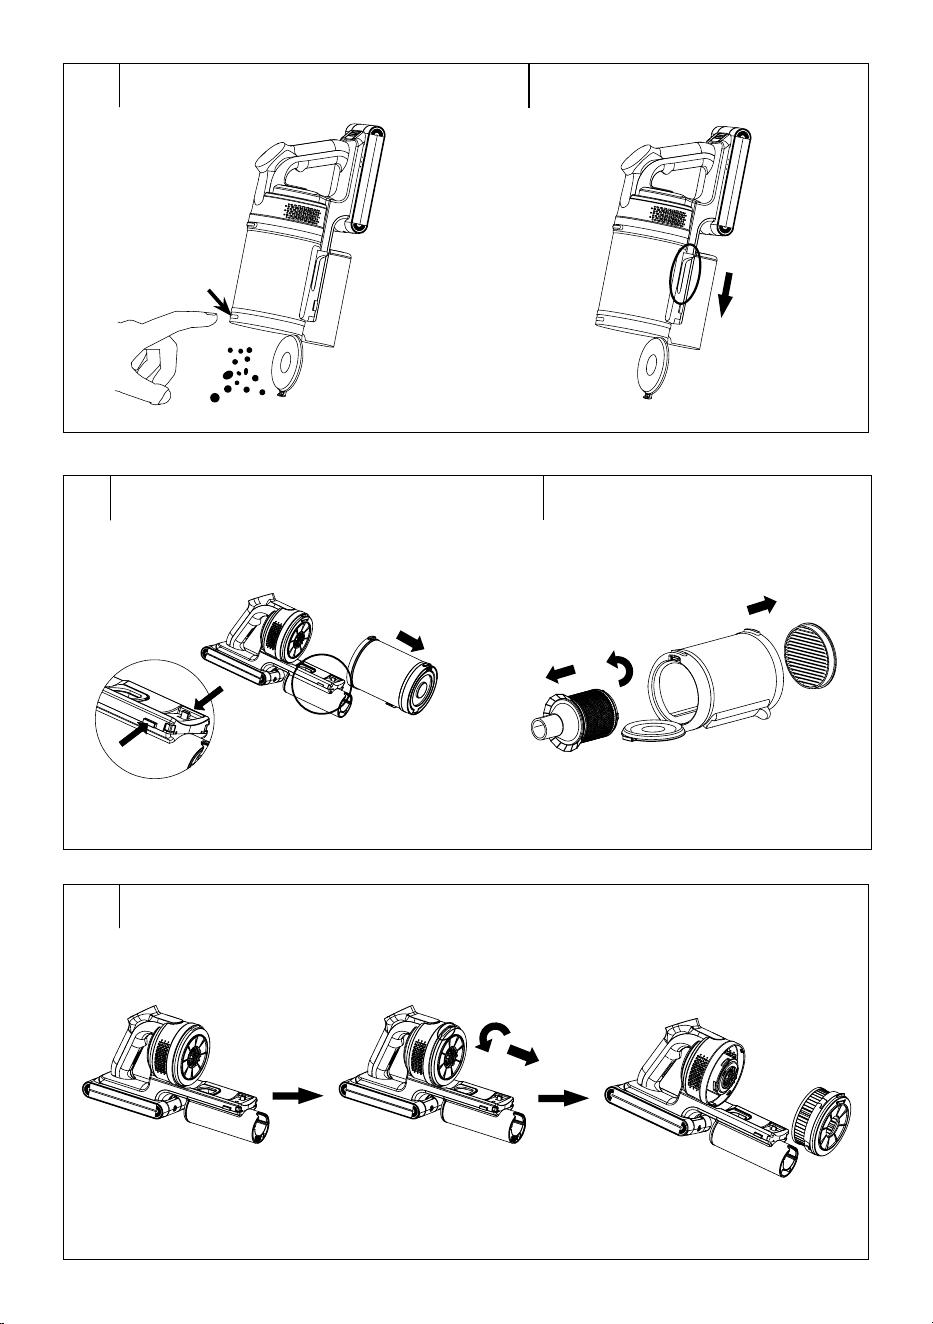
Emptying the dust container
• The dust container can be emptied in two ways: into the dust bag in
the collection station or manually. The procedure for emptying into the
dust bag in the collection station is described in the previous part of the
manual USING THE COLLECTION STATION. For manual emptying,
proceed as follows.
• Disconnect the motor unit andremove the battery.
• Move the motor unit over the trash can so that the bottom of the dust
container is pointing down.
• Press the button to release the bottom of the dust container – see
figure F1. The bottom will release and the contents of the container will
fall into the bin.
• We recommend pressing the sliding lever (A12) several times to
release dirt, tangled hair and fur, etc. from the coarse filter – see figure
F2.
• Use your free hand to attach the bottom back to thecontainer. Press
gently until you hear aclick. This indicates that the bottom has been
properly secured.
Cleaning the Dust Container
• Empty the dust container according to the instructions above.
• Press the buttons to release the dust container and remove it from the
motor unit – see figure G1.
• Remove the microfibre inlet filter from the upper part. Open the
bottom of the dust container, grasp the tube filter by hand and turn it
clockwise to release it. Remove the tube filter from the dust container
– see figure G2.
• Grasp the HEPA filter with one hand and turn it anticlockwise (in the
direction of the open lock arrow marked on the HEPA filter) to release it
and remove it from the motor unit – see figure G3.
• Remove dirt from the tube filter. Ifnecessary, you can rinse it under
running water. And then wipe dry with aclean cloth.
• Shake out the HEPA filter and microfibre inlet filter and remove dirt
from them using asoft brush or dry cloth. In the event of heavy soiling,
you can vacuum them out using adifferent vacuum cleaner with an
attached brush nozzle. Do not wash them in water. This may lead
to their damage. If the HEPA filter or microfibre inlet filter are already
heavily soiled, damaged or deformed, replace them with new ones.
We recommend changing the HEPA filter and microfibre inlet filter
depending on the frequency of use, at least once every six months.
• Wipe the inner walls of the dust container with aslightly moistened
soft sponge. Wipe dry with aclean cloth.
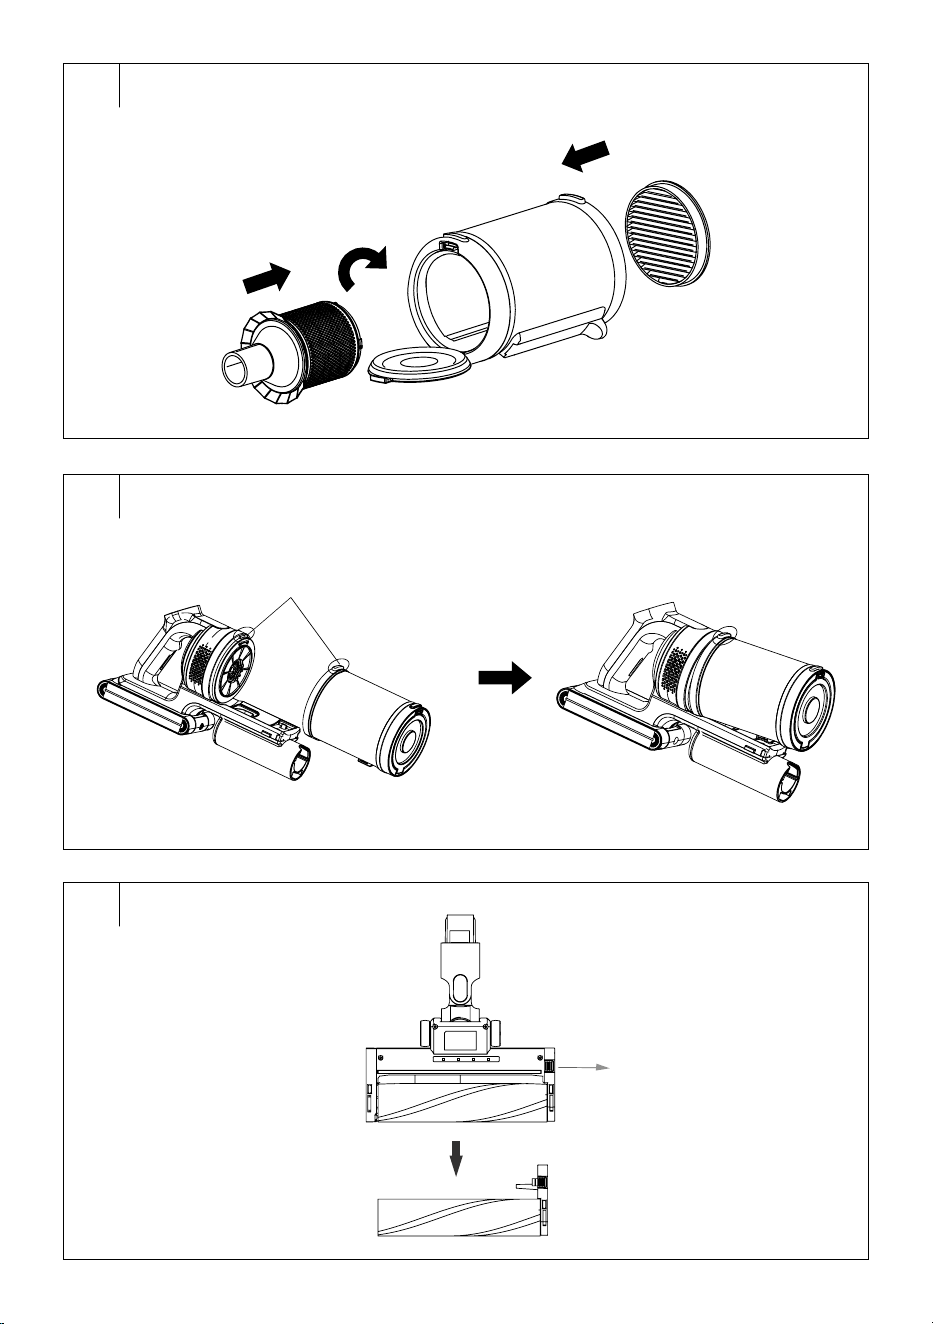
Warning:
Never install the filters if they are wet or damp. Before
installing them, make sure that they are thoroughly
dry.
• Insert the tube filter into the dust container and turn it anticlockwise to
secure it. Close the bottom of the dust container. Insert the microfibre
inlet filter in the upper part – see figure G4.
- 10 -
04/2026
2026, .
• Place the HEPA filter against the motor unit andturn the filter
clockwise (in the direction of the open-lock arrow marked on the
HEPA filter) until you feel resistance.
• Place the dust container against the motor unit at aright angle so that
the projection at the front of the motor unit fits into the opening in the
upper part of the dust container – see figure G5.
• Then press the lower part of the dust container against the motor
unit. Press gently until you hear aclick. This indicates the correct
attachment of the dust container.
Cleaning the dry vacuuming nozzle
• Remove the telescopic tube from the nozzle.
• Press the button to release the rotating brush and pull it out of the
nozzle – see figure H.
• Remove hair and fur entangled in the brush. You can use scissors, for
example, to release or remove them.
• Wipe the nozzle, especially the suction opening, with asoft sponge
slightly dampened in warm water. Wipe with adry cloth.
• Insert the rotating brush back into the nozzle. Press gently until you
hear aclick. This indicates that the brush is properly secured.
Warning:
Do not submerge the nozzle in water or wash it under
water. There is arisk of damage andinjury by electric
shock.
Cleaning the steam mopping nozzle (SVC 9486BK model
only)
• Remove the telescopic tube from the steam mopping nozzle.
• Remove the mopping pads from the holders in the lower part of the
nozzle.
• Remove the water tank from the nozzle.
• Release the cap and pour out the remaining water from the tank.
Leave the cap open so that the tank can dry.
• Wipe the steam mopping nozzle, especially the suction opening, with
asoft sponge slightly moistened in warm water. Wipe with adry cloth.
Cleaning the mopping nozzle (SVC 9476BK model only)
• Remove the telescopic tube from the mopping nozzle.
• Remove the mopping pads from the holders in the lower part of the
nozzle.
• Release the cap and pour out the remaining water from the tank.
Leave the cap open so that the tank can dry.
• Wipe the mopping nozzle, especially the suction opening, with asoft
sponge slightly moistened in warm water. Wipe with adry cloth.
Cleaning the mopping pads
• Wash the mopping pads by hand in warm water (max. 40 °C) with
alittle detergent for delicate laundry. Wring out and rinse in clean
water. Allow to dry.
Warning:
Do not wash the mopping pads in awashing machine
or dishwasher, nor dry them in atumble dryer.
Note:
The mopping pads need to be replaced from time to time.
Check their condition regularly andreplace them after
6–12months or as needed.
Cleaning the mattress and upholstery nozzle
• Turn the lock on the side of the nozzle towards the open lock symbol
to release the rotating brush.
• Pull the rotating brush out of the brush nozzle.
• Remove hair and fur entangled in the brush. You can use scissors, for
example, to release or remove them.
• Wipe the mattress and upholstery nozzle, especially the suction
opening, with asoft sponge slightly moistened in warm water. Wipe
with adry cloth.
• Insert the rotating brush back into the nozzle. Press lightly until you
feel resistance, and turn the lock towards the closed lock symbol.
Cleaning the motor unit, accessories and holder
• Remove the battery from the motor unit.
• Wipe the motor unit and other accessory parts including the holder
with adry cloth.
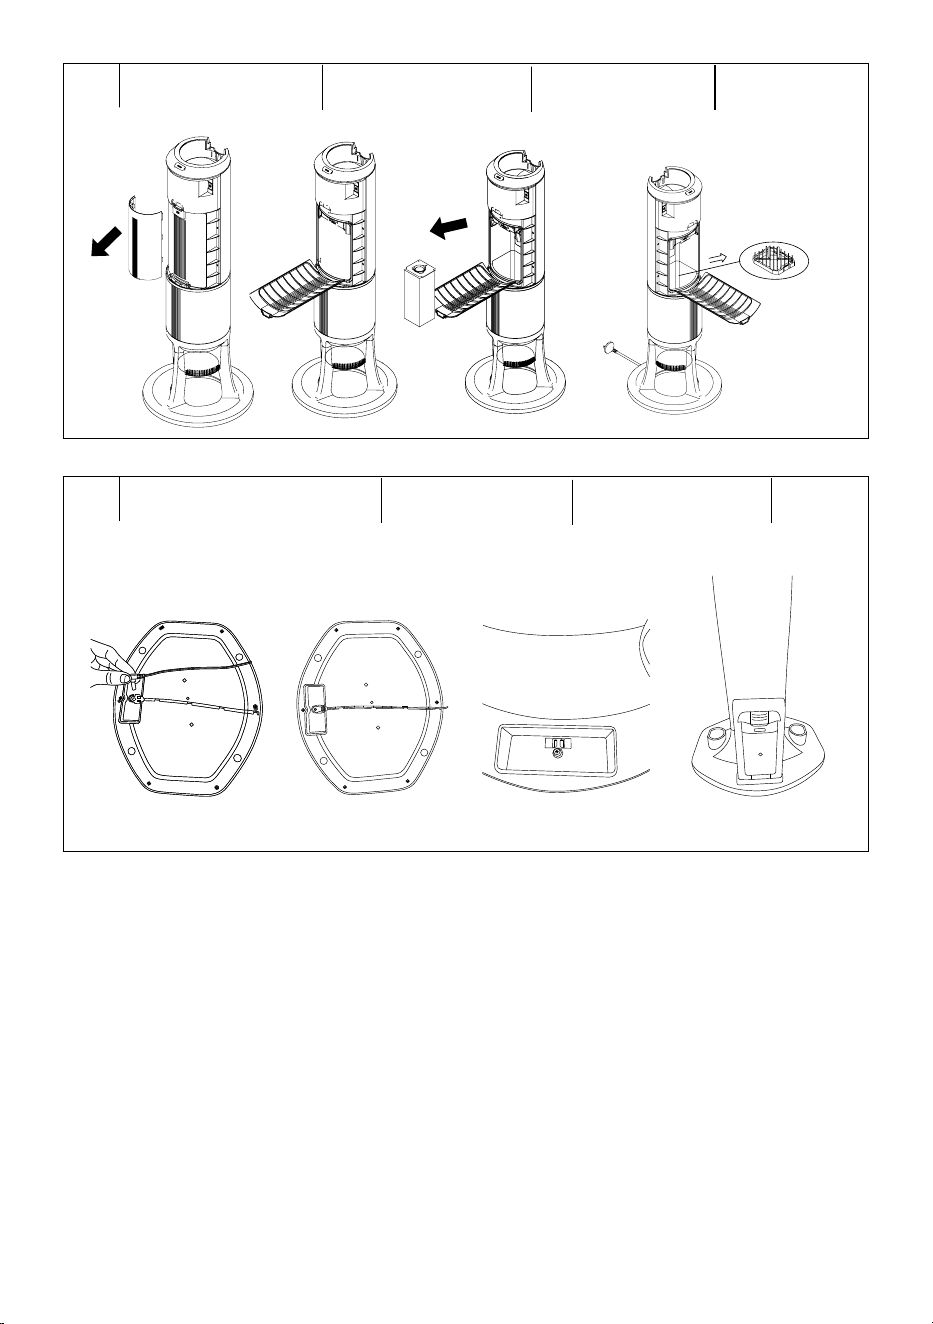
Replacing the dust bag
• If ashort beep sounds after pressing the ON/OFF button and the ON/
OFF button flashes red, the dust bag is full and needs to be replaced.
• Disconnect the mains cable from the mains socket and remove the
vacuum cleaner from the collection station.
• Grasp the outer cover with both hands and carefully remove it – see
figure I1. Place to the side.
• Press the lock at the top of the dust bag cover to release the cover and
be able to remove it – see figure I2.
• Remove the dust bag – see figure I3, and install anew dust bag in the
space. Dispose of the full dust bag in mixed waste.
• Install the dust bag cover by first inserting the lower part into the body
of the collection station, and then carefully close the upper part until
you hear aclick.
• Install the outer cover so that the projections on both sides of the outer
cover fit into the space in the housing of the collection station.
Cleaning the collection station filter
• Regularly clean the collection station filter, which is located under the
dust bag.
• Disconnect the mains cable from the mains socket and remove the
vacuum cleaner from the collection station.
• Grasp the outer cover with both hands and carefully remove it – see
figure I1. Place to the side.
• Press the lock at the top of the dust bag cover to release the cover and
be able to remove it – see figure I2.
• Remove the dust bag – see figure I3, and remove the collection
station filter – see figure I4.
• Remove dirt from the filter. Ifnecessary, you can rinse it under running
water. And then wipe dry with aclean cloth.
• Insert the clean and dry filter back into the collection station. Insert the
dust bag, dust bag cover and outer cover.
Warning:
Never install the filter if it is wet or damp. Before
installing it, ensure that it is properly dry.
Note:
If the collection station'spower decreases when emptying
the dust container, the filter is clogged and needs to be
cleaned.
- 11 -
04/2026
2026, .
. . . . . . . . . . . . . . . . . . . . . . . . . . . . . . . . . . . . . . . . . . . . . . . . . . . . . . . . . . . . . . . . . . . .
RECOMMENDED MAINTENANCE
ANDREPLACEMENT OF ACCESSORIES
Vacuum Cleaner Part
Recommended
Maintenance
Recommended
Replacement
Dry vacuuming
nozzle
After each use —
Rotating brush of dry
vacuuming nozzle
After each use
Replacement incase
of wear or damage
Dust container After each use —
HEPA filter and outlet
HEPA filter
After each use
Replacement every
3–6 months
Mopping nozzle After each use —
Water tank After each use —
Mopping pads After each use
Replacement incase
of wear or damage
Mattress and
upholstery nozzle
After each use —
Rotating brush,
mattress
andupholstery
nozzle
After each use
Replacement incase
of wear or damage
Other accessories
(telescopic tube,
nozzle with
retractable soft brush,
long crevice nozzle,
accessory holder)
After each use
Replacement incase
of wear or damage
Collection station Once amonth —
Dust bag —
Replace when full bag
warning appears
Dust bag filter Once amonth
Replacement incase
of wear or damage
Note:
The above values are indicative only and may vary
depending on the frequency of vacuum cleaner use.
. . . . . . . . . . . . . . . . . . . . . . . . . . . . . . . . . . . . . . . . . . . . . . . . . . . . . . . . . . . . . . . . . . . .
LONG-TERM STORAGE
• If you will not be using the vacuum cleaner for along time, clean it
according to the instructions above and ensure that it is completely
dry. Disconnect the collection station from the mains socket. Store the
vacuum cleaner with all its accessories in adry, clean and cool place.
• We recommend charging the battery every 3 months to extend its
lifespan.
. . . . . . . . . . . . . . . . . . . . . . . . . . . . . . . . . . . . . . . . . . . . . . . . . . . . . . . . . . . . . . . . . . . .
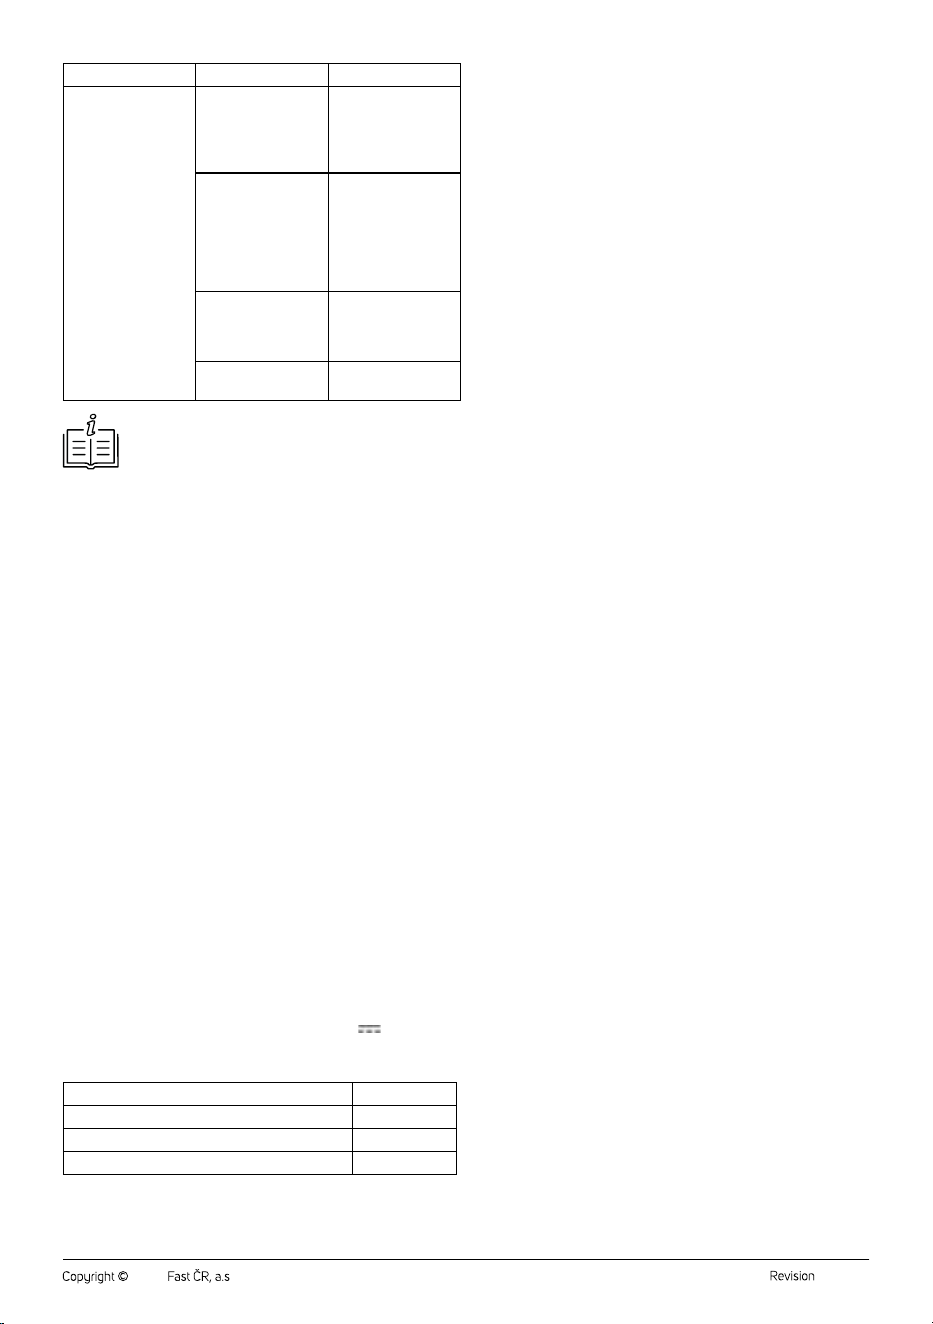
TROUBLESHOOTING
PROBLEM CAUSE SOLUTION
The vacuum cleaner
cannot be switched
on and controlled.
The battery is
depleted.
Allow the battery to
fully charge.
The dust container
is full.
Empty the dust
container.
You are using the
vacuum cleaner for
too long.
Let it cool down.
The suction output
is weak.
The outlet HEPA filter
is dirty.
Clean the outlet HEPA
filter.
The rotating brush is
blocked.
Clean the rotating
brush.
The suction opening
or tube is blocked.
Remove the cause of
the blockage.
The rotating brush of
the dry vacuuming
nozzle does not work.
The rotating brush is
blocked by tangled
hair and fur.
Clean the rotating
brush.
The castors of the dry
vacuuming nozzle do
not rotate.
The castors are
blocked by tangled
hair and fur.
Remove the tangled
hair and fur.
The mopping nozzle
does not discharge
water, mopping pads
are dry.
There is no water in
the tank.
Fill the tank with clean
water.
The collection
station'ssuction
power is low.
The dust bag is full. Replace the dust bag.
The dust bag filter is
clogged.
Clean the dust bag
filter.
The collection station
does not work.
The mains cable is
not plugged into the
mains socket.
Insert the mains cable
plug into the mains
socket.
The dust bag is not
installed.
Insert the dust bag.
The collection station
does not charge the
vacuum cleaner.
The mains cable is
not plugged into the
mains socket.
Insert the mains cable
plug into the mains
socket.
The vacuum cleaner
is not correctly
inserted.
Insert the vacuum
cleaner into the
opening in the
collection station
so that the contacts
connect.
The dust container
emptying process is in
progress.
During the emptying
process, charging is
interrupted. When the
process is complete,
charging of the
vacuum cleaner will
resume.
- 12 -
04/2026
2026, .
PROBLEM CAUSE SOLUTION
Charging indicators
flash red.
Internal temperature
is too high. The
vacuum cleaner will
start but will switch off
immediately.
Allow the vacuum
cleaner to cool down.
Liquid has been
sucked up.
Switch off the vacuum
cleaner, remove the
battery, disassemble
the vacuum cleaner
and dry the liquid with
adry cloth. Allow all
parts to dry properly.
The motor unit/
rotating brush has
become blocked by
aforeign object.
Remove the cause of
the blockage.
The battery is almost
flat.
Allow it to charge.
Note:
If the problem persists, switch off the vacuum cleaner and
contact an authorised service centre.
. . . . . . . . . . . . . . . . . . . . . . . . . . . . . . . . . . . . . . . . . . . . . . . . . . . . . . . . . . . . . . . . . . . .
TECHNICAL SPECIFICATIONS
Vacuum cleaner
Operating voltage ................................................................................................ 25.9 V
Rated power input (vacuum cleaner with dry vacuuming nozzle) .....500 W
Rated power input (steam mopping nozzle) . 200 W (160 W after 1 minute)
Rated power input (mopping nozzle) ..............................................................20 W
Rated power input (mattress and upholstery nozzle) .................................15 W
Battery .......................................................................... Li-ion / 25.9 V/ 3000 mAh
Weight (motor unit only) .......................................................................................1.1 kg
Charging time approximately ............................................................... 3.5–4 hours
Water tank capacity (steam mopping nozzle) ........................................... 170 ml
Water tank capacity (mopping nozzle) ........................................................135 ml
Noise level ......................................................................................................≤85 dB(A)
Suction power .................................................................................................. ≥25 kPa
Operating time (dry vacuuming nozzle) ............55–60 minutes (Eco mode)
16–20 minutes (Power mode)
Operating time (steam mopping nozzle) ..... 22–26 minutes (steam mode only)
15–17 minutes (steam mode + Eco mode)
Operating time (mopping nozzle)..........................25–29 minutes (Eco mode)
Collection station
Rated voltage...........................................................................................220–240 V~
Rated frequency ............................................................................................50/60Hz
Rated power input ..............................................................................................650 W
Noise level ......................................................................................................≤80 dB(A)
Suction power ................................................................................................≥16.5 kPa
Dimensions ............................................................................280 × 280 × 750mm
Weight .....................................................................................................................3.5 kg
Dust bag capacity ....................................................................................................2.5 l
Power Adapter
Input voltage ..................................................................100–240 V~ 50/60 0.6 A
Output voltage .................................................................... 30 V 0.8 A24.0 W
Original Consumable Accessories Available for Purchase
Replacement battery SVX 085
Filter set SVX 086HF
Bag set (5 pcs) for station with filter (1 pc) SVCX 5051
Mopping pad set (3 pairs) SVX 087
. . . . . . . . . . . . . . . . . . . . . . . . . . . . . . . . . . . . . . . . . . . . . . . . . . . . . . . . . . . . . . . . . . . .
INSTRUCTIONS AND INFORMATION ON
DISPOSAL OF USED PACKAGING MATERIAL
Dispose of used packaging material at the designated municipal waste
disposal site.
. . . . . . . . . . . . . . . . . . . . . . . . . . . . . . . . . . . . . . . . . . . . . . . . . . . . . . . . . . . . . . . . . . . .
DISPOSAL OF USED ELECTRICAL AND
ELECTRONIC EQUIPMENT
Used electrical andelectronic products must not be disposed of in
ordinary municipal waste. To enable the proper disposal, renewal and
recycling of these products, deliver them to the designated collection
points. Alternatively, in some European Union states or other European
countries the products can be returned to the local retailer when buying
an equivalent new product. By disposing of this product correctly, you
help to conserve valuable natural resources and prevent any potential
adverse impact on the environment and human health that could result
from improper waste disposal. For more details, contact your local
authority or nearest collection point. Fines may be imposed for the
improper disposal of this type of waste as per national regulations.
For business entities in European Union States
If you wish to dispose of electrical and electronic equipment, please
request the necessary information from your retailer or supplier.
Disposal in other countries outside the European Union
To dispose of this product elsewhere, request the necessary information
on the correct disposal method from local authorities or your retailer.
. . . . . . . . . . . . . . . . . . . . . . . . . . . . . . . . . . . . . . . . . . . . . . . . . . . . . . . . . . . . . . . . . . . .
Changes to text and technical parameters are reserved.