
EN
CORDLESS VACUUM CLEANER 4 IN 1
Translation of the original manual
SVC 0675BK
SVC 0675BK
A
1
2
4
24
25
5
6
7
8
9
3
10
11
12
13
14
15
17
18
19
20
21
22
23
16
B
F
2
1
G
2
1
4
3
H
- 1 -
08/2023
2023, .
EN Cordless vacuum cleaner 4 in 1
Important safety instructions
READ CAREFULLY AND STORE FOR FUTURE USE.
• This vacuum cleaner may be used by children 8 years of
age and older and by persons with physical, sensory or
mental impairments or by inexperienced persons, if they
are properly supervised or have been informed about
how to use this vacuum cleaner in asafe manner and
understand the potential dangers.
• Children must not play with the appliance. Cleaning
and maintenance performed by the user must not be
performed by unsupervised children.
• In the event that the power adapter is damaged, it must be
replaced with an original type. For areplacement power
adapter, please contact an authorised service centre. It is
forbidden to use the appliance if it has adamaged power
adapter.
WARNING:
Avoid coming into contact with the rotating parts of
the vacuum cleaner'shand accessories. There is
arisk of getting caught on these parts and possible
injury.
Only use the vacuum cleaner with the original
power adapter, charging base and accessories that
were supplied with it.

- 2 -
08/2023
2023, .
• This vacuum cleaner is designed for use in households, offices and similar types of areas. Do not use in industrial surroundings.
• Do not expose the vacuum cleaner to direct sunlight and do not place it near an open fire or appliances that are asource of heat.
• Before connecting the adapter to apower socket, check that the technical details on its rating label match the electrical voltage in the power socket.
• Make sure the adapter power cord is not touching ahot surface or sharp objects. Position the adapter power cord so that it will not be tripped over.
• Never submerge the vacuum cleaner, the charging base or the power adapter in water or any other liquid and do not wash it under running water.
• Before turning on the vacuum cleaner, make sure that it is correctly assembled and that all inflow and outflow filters are installed in their place.
• When the vacuum cleaner is running, ensure that the air outlets and the suction opening are not blocked.
• Do not use the vacuum cleaner to vacuum the following items:
- smouldering cigarettes, burning items, matches or embers;
- water and other liquids;
- flammable or volatile materials;
- sharp items, e.g. broken glass, needles, pins, etc.;
- flour, wall plaster, cement and other building materials;
- larger pieces of paper or plastic bags, which can easily block the suction hole.
• Vacuuming of some types of floors or floor surfaces can create an electrostatic discharge, which presents no danger to the user.
• Always turn off the vacuum cleaner when leaving it without supervision, after finishing using it and before cleaning it.
• Disconnect the power adapter from the power socket before cleaning it and after it has finished charging.
• Disconnect the power adapter from the power socket by pulling on the plug, never pulling on the power cord. Otherwise, this could damage the
power adapter or the socket.
• If the power adapter is damaged, it must be replaced with an original type. For areplacement power adapter, please contact an authorised service
centre.
• Do not use the vacuum cleaner if it is not working correctly, if it has been damaged or has been submerged in water.
• Do not repair the vacuum cleaner yourself or make any adjustments to it. Have all repairs or adjustments performed at an authorised service centre.
By tampering with the appliance, you risk voiding your legal rights arising from unsatisfactory performance or quality warranty.

- 3 -
08/2023
2023, .
• Prior to using this appliance, please read the user’smanual
thoroughly, even in cases, when one has already familiarised
themselves with previous use of similar types of appliances. Only use
the appliance in the manner described in this user’smanual. Keep
this user’smanual in asafe place where it can be easily retrieved for
future use.
• We recommend saving the original cardboard box, packaging
material, purchase receipt and responsibility statement of the vendor
or warranty card for at least the duration of the legal liability for
unsatisfactory performance or quality. In the event of transportation,
we recommend that you pack the appliance in the original box from
the manufacturer.
. . . . . . . . . . . . . . . . . . . . . . . . . . . . . . . . . . . . . . . . . . . . . . . . . . . . . . . . . . . . . . . . . . . .
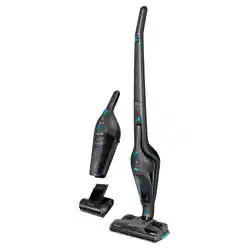
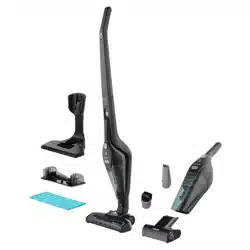
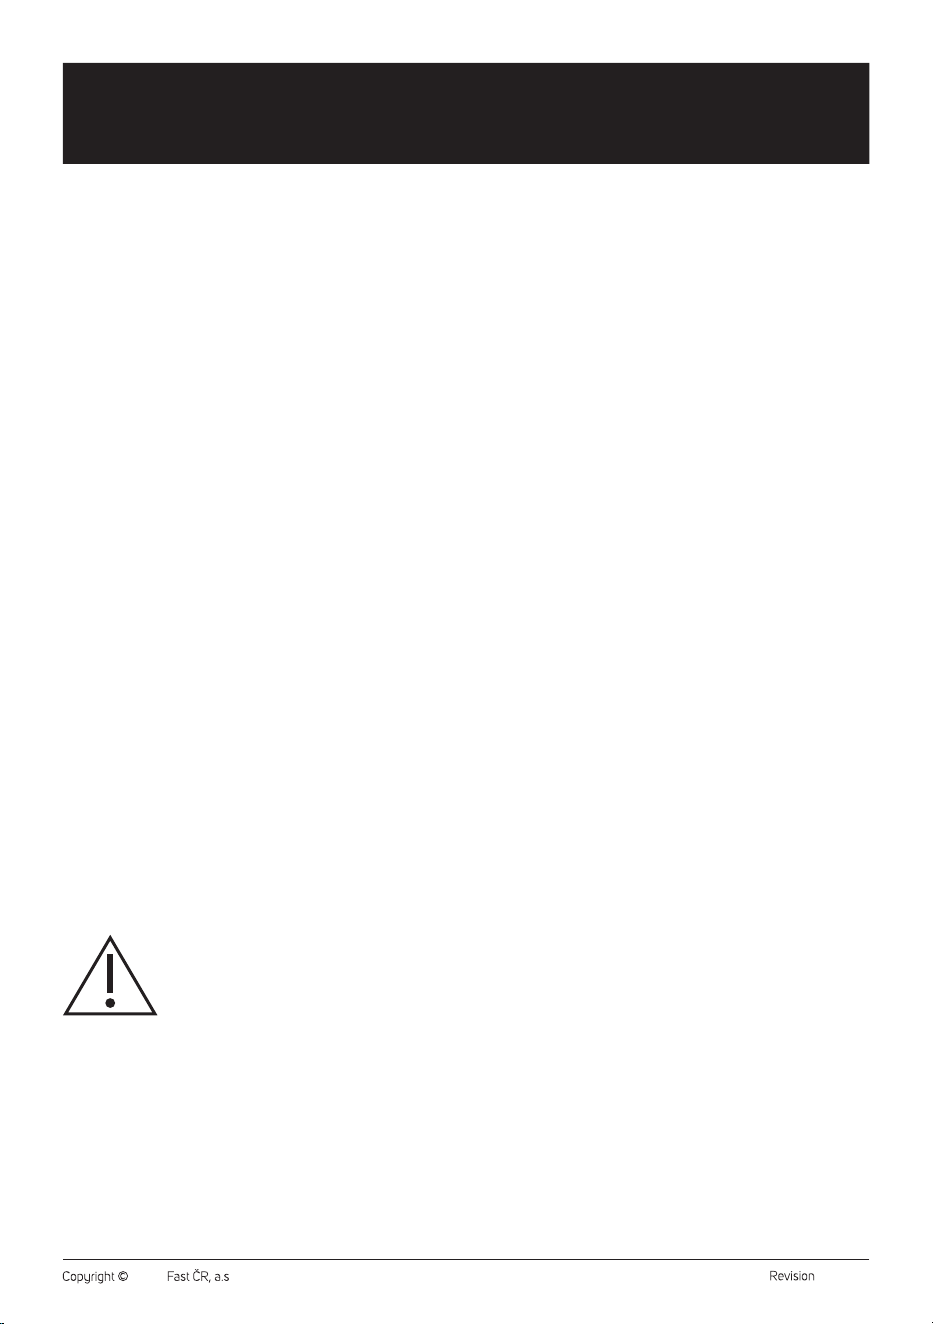
DESCRIPTION OF THE VACUUM CLEANER AND ITS ACCESSORIES
A1 Handle of the upright vacuum
cleaner
A2 On/Off button of the upright
vacuum cleaner
A3 Button for setting 2 suction
power levels and 2 rotary
brush speeds
A4 Connecting cable
located in the joint between
the handle and body of the
upright vacuum cleaner.
A5 Button for releasing the hand
vacuum cleaner from the
body of the vacuum cleaner
A6 Body of the vacuum cleaner
A7 Bagless hand vacuum
cleaner with the Cyclone
system for perfect separation
of dust from air
A8 Floor nozzle release button
A9 Floor nozzle with an electric
rotary brush
A10 Air exhaust openings
A11 Dust container
A12 Washable internal HEPAtype
filter
A13 Washable external filter
A14 Hand vacuum cleaner holder
A15 On/Off button of the hand
vacuum cleaner
A16 LED charging level and
battery power indicators
A17 Dust container release button
A18 Motor unit of the hand
vacuum cleaner
A19 Air exhaust openings
A20 Hand vacuum cleaner suction
opening
A21 Slot nozzle
A22 Brush nozzle
A23 Charging base with storage
space for the slot nozzle and
brush nozzle
A24 Power adapter
A25 Cat&Dog Mini motorised
brush
. . . . . . . . . . . . . . . . . . . . . . . . . . . . . . . . . . . . . . . . . . . . . . . . . . . . . . . . . . . . . . . . . . . .
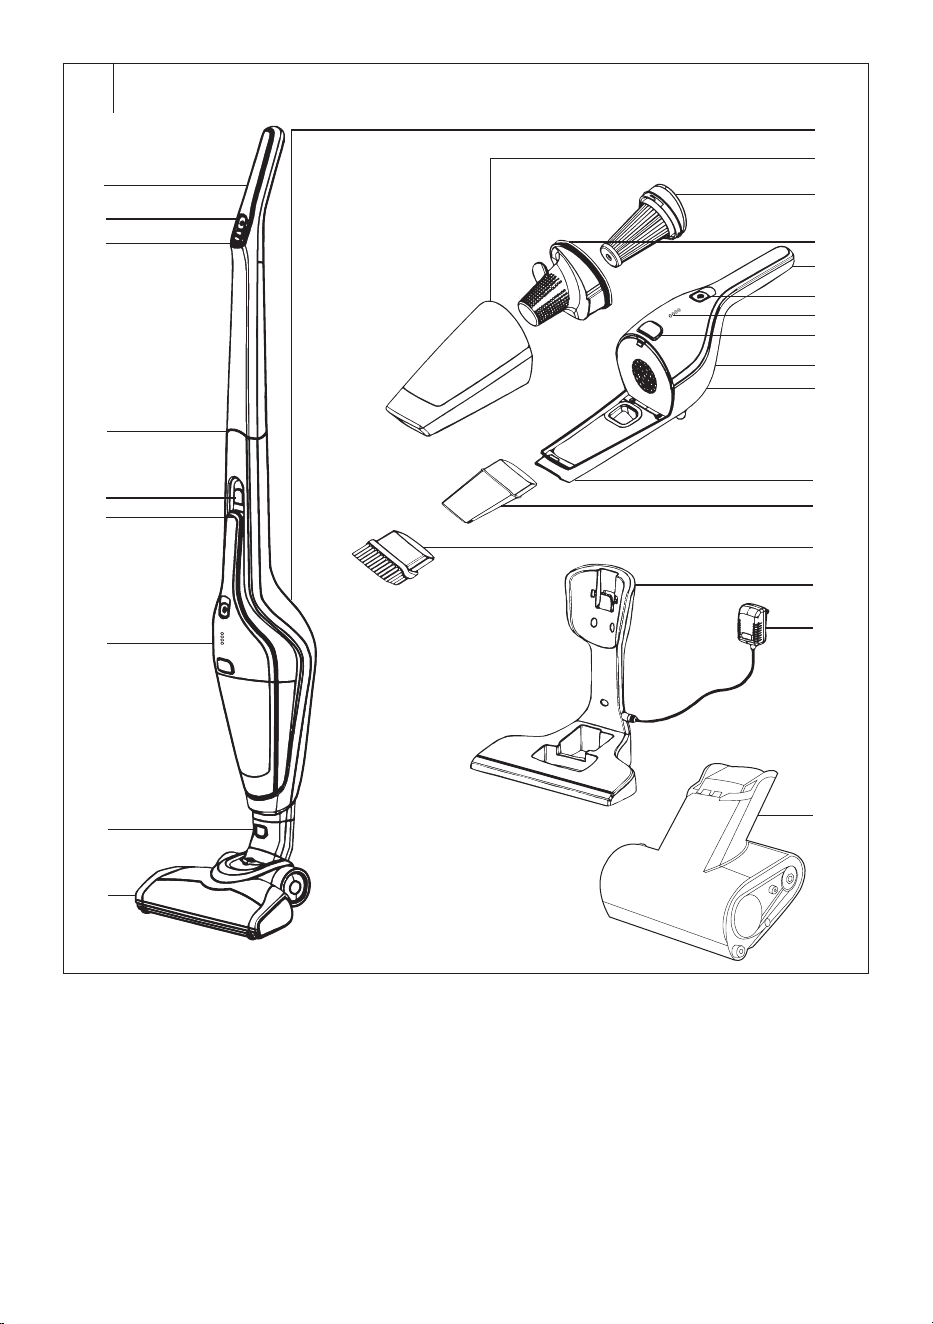
DESCRIPTION OF THE MOP ATTACHMENT
G1 Mop attachment
G2 Tank for water / solution with
cleaning detergent
G3 Filling outlets
G4 Removable Velcro mop cover
G5 Surface to attach the mop
cover (at the bottom of the
attachment, not shown)
G6 Removable panel with
nozzles (at the bottom of the
attachment, not shown)
. . . . . . . . . . . . . . . . . . . . . . . . . . . . . . . . . . . . . . . . . . . . . . . . . . . . . . . . . . . . . . . . . . . .
ASSEMBLY AND DISASSEMBLY
1. Hand vacuum cleaner
• Insert the internal filter into the external filter and turn the handle of the
internal filter clockwise (see fig. B1), until both filters are joined (see fig.
B2). Insert the assembled filter into the dust container, and attach the
dust container to the motor unit of the hand vacuum cleaner.
• It is possible to connect the brush nozzle or slot nozzle, which are
apart of the accessories, to the suction opening.
• To disassemble, proceed in the reverse sequence. To remove the
dust container, press button A17 and at the same time remove the
dust container.
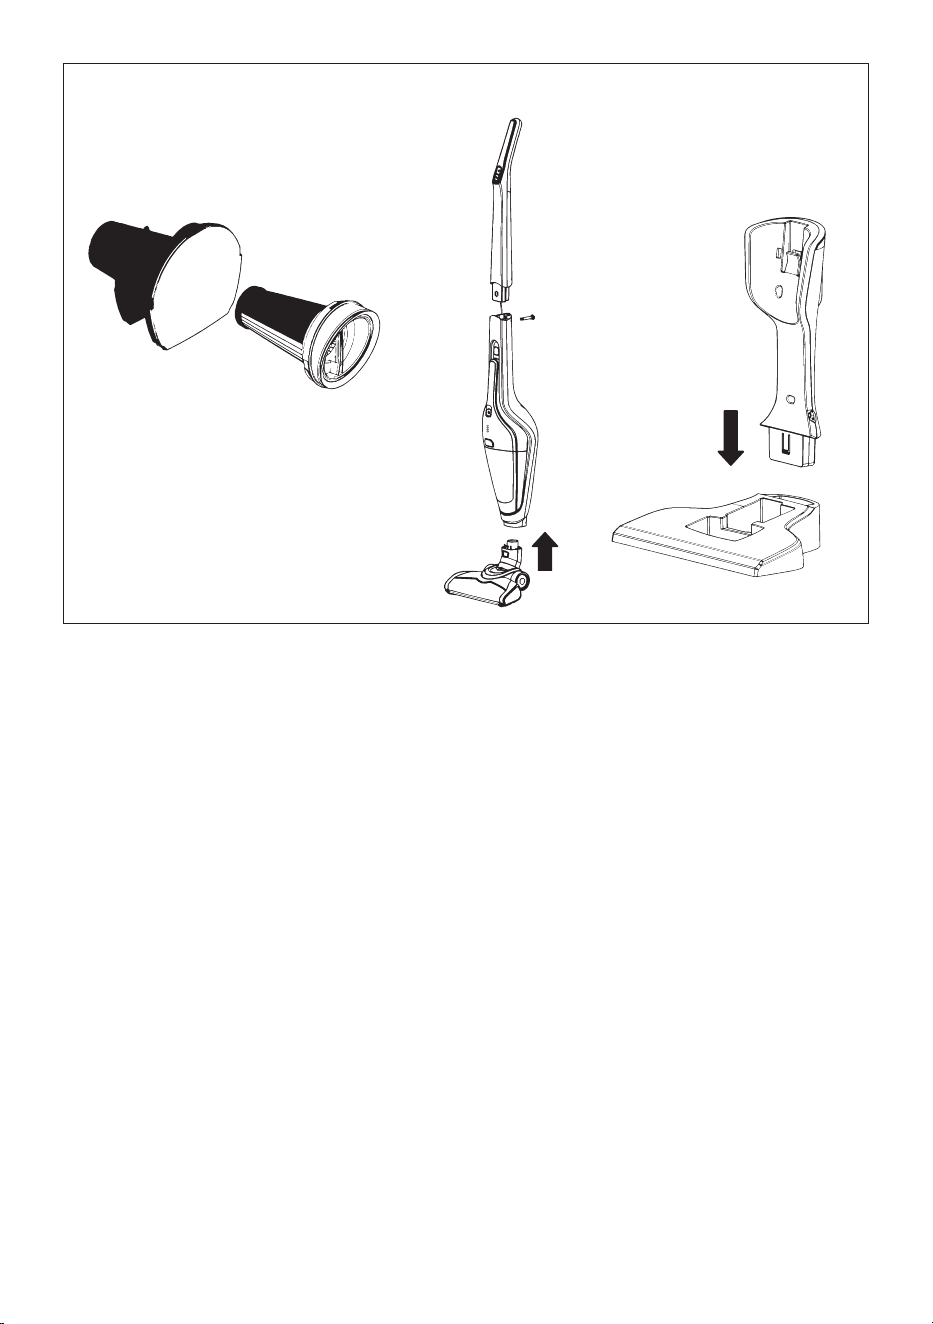
2. Upright vacuum cleaner
• To the body of the upright vacuum cleaner, connect the handle so that
the connecting cable is inside the connection. Secure the connection
with the supplied screw, see fig. C. Into the body of the upright
vacuum cleaner, insert the assembled hand vacuum cleaner (without
attachment). Connect the floor nozzle to the bottom part of the body
of the vacuum cleaner, see fig. C. The connection of the nozzle is
indicated by the button A8 sliding out.
• To disassemble, proceed in reverse sequence. To remove the floor
nozzle, press the button A8 and at the same time remove the nozzle.
To take the hand vacuum cleaner out of the body of the upright
vacuum cleaner, press the button A5 and at the same time take out
the hand vacuum cleaner.
3. Charging base
• Assemble the charging base by inserting the top part into the bottom
part (see fig. D). To ensure better stability, the charging base can be
attached to awall using the attached screws, whilst it is necessary
to ensure that the charging base is located within reach of apower
socket.
• To disassemble, proceed in reverse sequence.
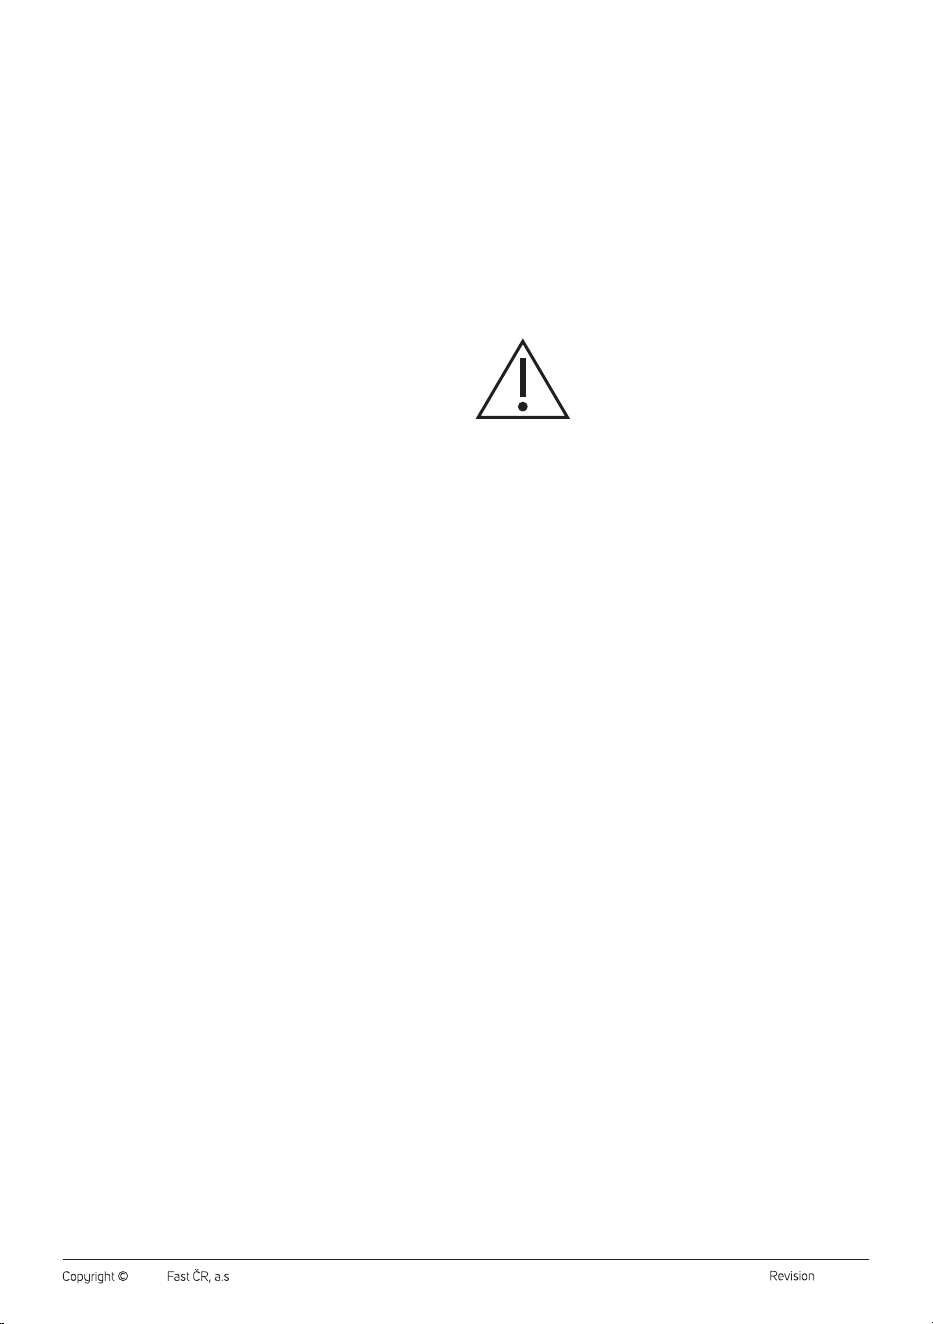
4. Assembling and disassembling the wiping adapter
• Assemble the cordless vacuum cleaner – see the original
user‘smanual of the vacuum cleaner.
• Put the sleeve on to the bottom part of the attachment and stand the
attachment on the floor.
• Place the vacuum cleaner on to the wiping attachment so that the
tab on the attachment is aligned with the hole on the underside of the
floor nozzle. Place the vacuum cleaner on to the attachment. This is
attached to the underside of the floor nozzle by means of the built-in
magnets.
• If you need to take the attachment off the vacuum cleaner, hold down
the attachment carefully with one hand and pull the vacuum cleaner
upwards until the floor nozzle is released from the attachment.
. . . . . . . . . . . . . . . . . . . . . . . . . . . . . . . . . . . . . . . . . . . . . . . . . . . . . . . . . . . . . . . . . . . .
PARKING POSITION OF THE VACUUM CLEANER
• Put the upright vacuum cleaner into the parking position by placing
the tip of your foot on top of the floor nozzle and with asimple forward
movement of the handle secure the vacuum cleaner in the vertical
position. The latch located at the front on the elbow of the floor nozzle
will slide into the groove on the top cover of the floor nozzle.
• To release the upright vacuum cleaner from the parking position,
place the tip of your foot on top of the floor nozzle and tilt the handle
backwards. The latch located at the front on the elbow of the floor
nozzle will slide out of the groove on the top cover of the floor nozzle.
. . . . . . . . . . . . . . . . . . . . . . . . . . . . . . . . . . . . . . . . . . . . . . . . . . . . . . . . . . . . . . . . . . . .
CHARGING THE VACUUM CLEANER
• Locate the assembled charging base on an even, dry and stable
surface within reach of apower socket.
• Connect the connector of the power adapter to the socket located on
the side of the charging base, and insert the plug of the power adapter
into apower socket.
• Place the upright vacuum cleaner, that you have previously turned
off and put in the parking position, into the base, see fig. E. After being
inserted into the charging base, the vacuum cleaner will switch to
charging mode and the LED indicators will signal the power level of
the built-in battery. Afull charge requires approximately 6 hours. The
actual charging time depends on the power level of the battery.
• Once the charging process is complete, all the LED indicators will
be lit.
• When you finish cleaning and have cleaned out the appliance, place it
back into the stand so that the battery can recharge.
EN
Cordless vacuum cleaner 4 in 1
User'smanual
- 4 -
08/2023
2023, .
• Keep the charging adapter plugged in permanently. The electronics
in the appliance control the battery charging process and ensure that
it is always optimally charged. When the battery is fully charged,
the electronics interrupt the charging process and resume it when it
is necessary to charge the battery again. There is no need to worry
about wasting electricity.
• Disconnect the charging adapter from the power socket only in the
event of a long term absence. When you return, plug it back into the
socket so that the vacuum cleaner is again ready for use.
. . . . . . . . . . . . . . . . . . . . . . . . . . . . . . . . . . . . . . . . . . . . . . . . . . . . . . . . . . . . . . . . . . . .
USING THE VACUUM CLEANER
1. Upright vacuum cleaner
• You may use the vacuum cleaner for vacuuming various types of floor
coverings such as for example hard floor coverings, carpets, etc.
• Hold the vacuum cleaner by the handle and pulling it upwards,
remove it from the charging base. After removing from the charging
base, the vacuum cleaner should be secured in the vertical parking
position. After releasing it from the parking position, the handle may
be moved in the vertical direction.
• Start the vacuum cleaner by pressing button A2. Use button A3 to
regulate the suction power of the vacuum cleaner and the speed of
the rotary brush at two levels.
• The LED indicators signal the battery power level. The individual
LED indicators will turn off as the battery gradually discharges. If it
is discharged fully, all the LED indicators will be off and the vacuum
cleaner will stop running.
• When you have finished using it, turn off the vacuum cleaner
by pressing the button A2. Clean it according to the instructions
contained in chapter Maintenance and cleaning, and allow it to
charge according to the instructions contained in chapter Charging the
vacuum cleaner.
2. Hand vacuum cleaner
• Turn on the hand vacuum cleaner by pressing button A15. You may
use it for vacuuming locally soiled floor coverings, furniture, etc.
Vacuuming hard to reach places is made easier by the slot nozzle and
upholstered furniture by the brush nozzle.
• When you have finished using it, turn off the vacuum cleaner by
pressing button A15 again. Clean it according to the instructions
contained in chapter Maintenance and cleaning, and allow it to
charge according to the instructions contained in chapter Charging the
vacuum cleaner.
3. Cat & Dog Mini motorised brush
• Cat & Dog Mini motorised brush is provided with its own electric
motor. Attach the motorised brush to the hand vacuum cleaner. Turn
on the hand vacuum cleaner by pressing button A15. You may use
it for vacuuming upholstery furniture or car interior. It easily removes
hair or animal fur from the furniture, carpet, floor or car interior.
• When you have finished using it, turn off the vacuum cleaner by
pressing button A15 again. Clean it according to the instructions
contained in chapter.
4. Using the vacuum cleaner with the wiping attachment
• remove the lid and pour water or acleaning agent solution into the
tank. Put the lid back on. Place the wiping attachment with the
attached sleeve on the floor.
• We recommend that you wet the wiping sleeve before attaching it to
the attachment. This will speed up the wiping process, which will be
more effective from the very beginning.
• Put the vacuum cleaner on to the attachment. Water will start to
slowly flow into the sleeve. Turn on the vacuum cleaner, and while
vacuuming you will also wipe the floor at the same time.
• Always use aneutral cleaning agent with alow foaming effect. Do not
use cleaning agents with ableaching effect, chlorine-based cleaning
agents, disinfection cleaning agents, etc. Before using the cleaning
agent, check that it is suitable for your type of floor covering.
• Regularly check the water/solution level in the water tank, and fill it
up as necessary.
• When no longer using the wiping attachment, turn off the vacuum
cleaner and remove the wiping attachment from the vacuum cleaner.
. . . . . . . . . . . . . . . . . . . . . . . . . . . . . . . . . . . . . . . . . . . . . . . . . . . . . . . . . . . . . . . . . . . .
MAINTENANCE AND CLEANING
• Before cleaning, always make sure that the vacuum cleaner is turned
off and the power adapter is disconnected from the power socket.
Dust container and filters
• Disassemble the hand vacuum cleaner according to the instructions in
chapter Assembly and disassembly. Remove the contents of the dust
container, rinse it out with water and thoroughly wipe dry.
• Remove dust and dirt from the external filter. Wash it under running
water and then dry thoroughly, or allow it to dry naturally.
• In the event that the internal HEPAtype filter is soiled, wash it under
agentle current of running water and allow it to dry naturally.
Attention:
Before assembling the vacuum cleaner, make sure
that all its parts are completely dry. Prior to starting it,
make sure that all the filters are properly installed in
their place. Otherwise, this could damage the vacuum
cleaner.
When filters are soiled, their effectiveness is reduced,
so do not neglect their cleaning.
• After 6 months of use, we recommend replacing the internal
HEPAtype filter for anew one. Spare filters are available at brick and
mortar, and online stores.
Floor nozzle and attachments
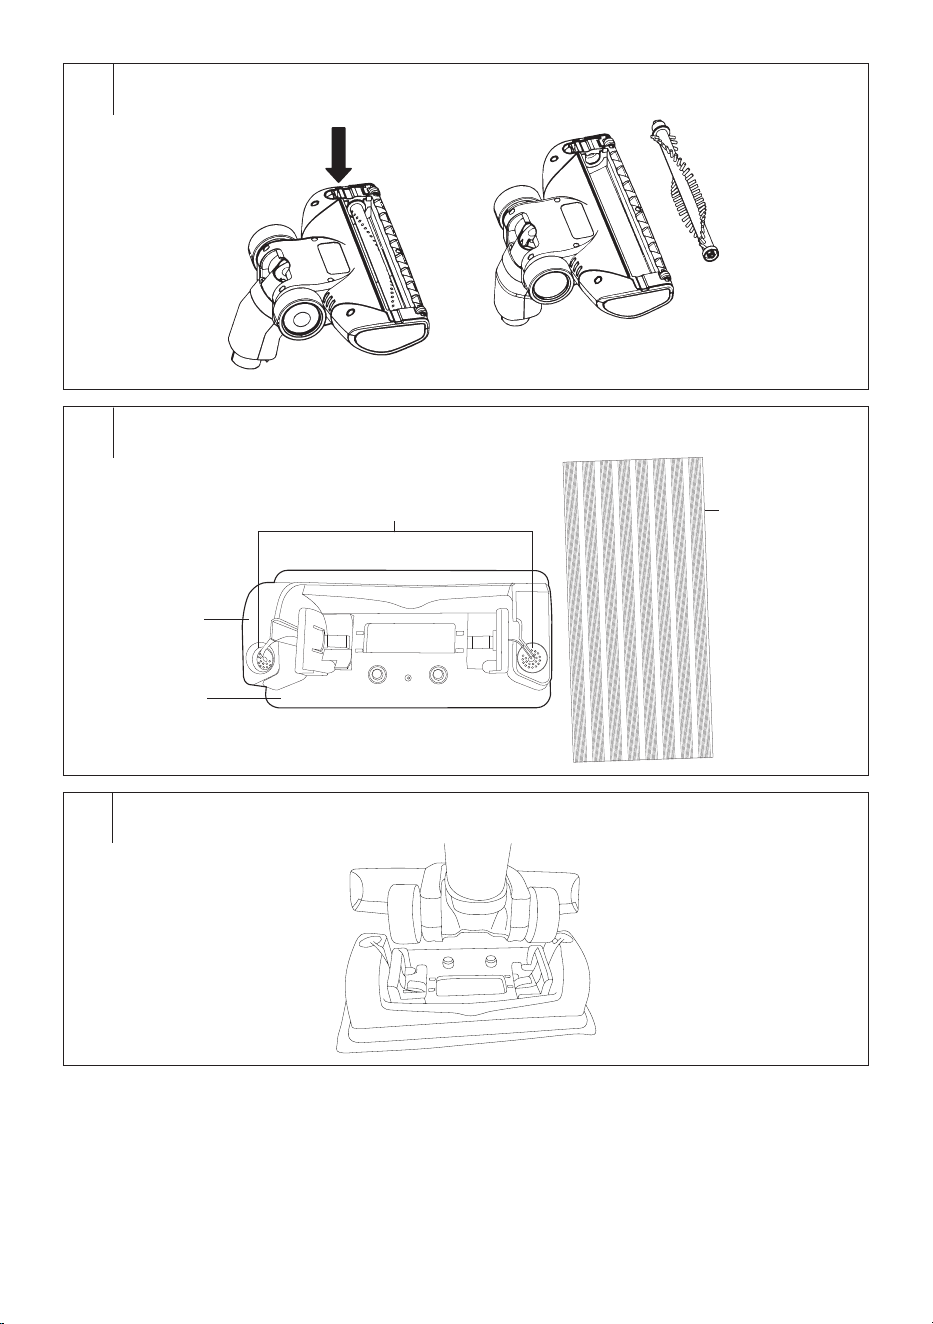
• If the rotary brush is soiled by hair or animal fur, remove the floor
nozzle from the body of the vacuum cleaner. Turn it so that the rotary
brush is pointing upwards. On the left side of the nozzle there is alatch
that secures the brush cover in place, see fig. F1. Release the latch, tilt
open the cover and take out the brush (see fig. F2).
• Remove all dirt and dust from the rotary brush and the internal space
of the floor nozzle. After cleaning, return the rotary brush back in its
place. Tilt the cover back and secure in place.
• For cleaning the surface of the floor nozzle and the attachments use
adry or alightly dampened cloth. Then wipe everything so that it is
thoroughly dry.
Outer surface of the vacuum cleaner
• Clean the outer surface of the vacuum cleaner using adry or alightly
dampened cloth. Then wipe everything so that it is thoroughly dry.
Pay special attention when cleaning the body of the upright vacuum
cleaner. In the part where the suction opening is located, dust may
accumulate, which needs to be removed regularly.
• Clean the charging base using adry or slightly dampened cloth, whilst
ensuring that the socket for connecting the power adapter plug does
not come into contact with moisture. Then wipe everything so that it
is thoroughly dry.
• Do not use steel wool, abrasive cleaning products, solvents, etc. to
clean the vacuum cleaner.
Cleaning the wiping attachment
• Aways empty out the tank after every use of the attachment. Wipe the
attachment with asoft sponge lightly dampened in warm water. Wipe
dry using aclean wiping cloth.
• Remove the sleeve and hand wash it in clean water with asmall
amount of washing powder for delicate laundry at atemperature of
30° to 40°. Do not use washing agents containing bleach, with an
extra bleaching effect or highly alkaline washing agents. Allow the
sleeve to dry naturally. Do not use adryer, fan or other electrical
appliances for drying.
• We recommend regularly inspecting the sleeve and replacing it
with anew one based on the frequency of use. Despite regular and
rigorous maintenance, it is possible that over time remains of dirt and
dust accumulate in the sleeve, which may clog it and thus negatively
- 5 -
08/2023
2023, .
affect ability of water to flow through the sleeve and the effectiveness
of wiping.
. . . . . . . . . . . . . . . . . . . . . . . . . . . . . . . . . . . . . . . . . . . . . . . . . . . . . . . . . . . . . . . . . . . .
TECHNICAL SPECIFICATIONS
SVC 0675BK
Power adapter
Input ....................................................................... 100−240 V~, 50/60 Hz, 0.5 A
Output .................................................................................................36.0V , 0.4 A
Electrical shock protection class ............................................................................... II
Vacuum Cleaner
Power input .......................................................................................................... 120 W
Electric rotary brush .............................................................................................. 10 W
Battery .................................................................. Li-ion / 25.2 V / 2 200 mAh
Time required for charging to full capacity .................. approximately 4 - 6 h
Operating time when fully charged
(high/low power) ..................................................................... up to 22/50 minutes
Noise level .........................................................................................................79 dB(A)
Dust container capacity ........................................................................................ 0.5 l
The declared noise emission level of the SVC 0675BK vacuum cleaner
is 79 dB(A), which represents level Aof acoustic power with respect to
areference acoustic power of 1 pW.
Explanation of technical terminology
Safety class for electrical shock protection:
Safety class for electrical shock protection:
Class II – Electrical shock protection is provided by double
or heavy-duty insulation.
House symbol (domestic use)
The product is intended for household use only. The
product is not intended for outdoor use.
Tento symbol označuje, že spotřebič se nesmí používat,
pokud je vidlice zástrčky poškozená.
We reserve the right to change text and technical specifications.
INSTRUCTIONS AND INFORMATION REGARDING THE DISPOSAL OF
USED PACKAGING MATERIALS
Dispose of used packaging material at asite designated for waste in your
municipality.
DISPOSAL OF USED ELECTRICAL AND ELECTRONIC EQUIPMENT
This symbol on products or original documents means
that used electric or electronic products must not be added
to ordinary municipal waste. For proper disposal, renewal
and recycling hand over these appliances to determined
collection points. Alternatively, in some European Union
states or other European countries you may return your
appliances to the local retailer when buying an equivalent
new appliance.
Correct disposal of this product helps save valuable natural resources
and prevents potential negative effects on the environment and human
health, which could result from improper waste disposal. Ask your local
authorities or collection facility for more details.
In accordance with national regulations penalties may be imposed for the
incorrect disposal of this type of waste.
For business entities in European Union states
If you want to dispose of electric or electronic appliances, ask your retailer
or supplier for the necessary information.
Disposal in other countries outside the European Union.
This symbol is valid in the European Union. If you wish to dispose of this
product, request the necessary information about the correct disposal
method from the local council or from your retailer.
This product meets all the basic requirements of EU
directives related to it.
DISPOSAL OF BATTERIES
Prior to disposing of the product or handing it over at
aspecialised collection facility, it is necessary to ensure
that the built-in battery is removed. Before removing the
battery, it is necessary to start the vacuum cleaner and
wait until it is completely flat. Battery removal will be
performed at the authorised service centre.
The battery contains environmentally damaging substances and
therefore does not belong in standard household waste. Their correct
disposal will be performed by the respective collection facility.

FAST ČR, a.s.
U Sanitasu 1621
CZ-251 01 Říčany
www.sencor.eu