Version: 2.0
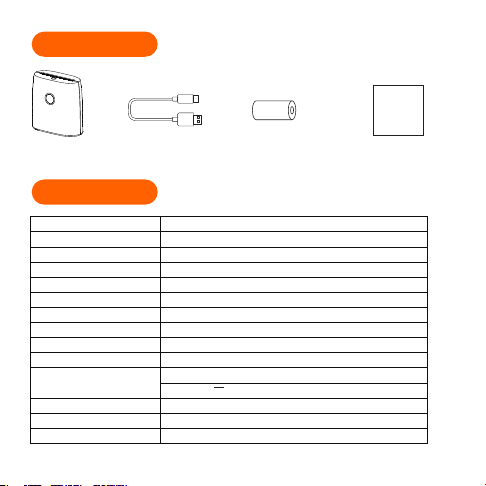
Printer*1 Type-C Cable*1 Instruction Manual*1
Instruction
Manual
01.Item Checklist
Paper*1
(In printer)
02.Specifications
Name
Model
Technology
Consumable Max Width
Paper Bin Dimensions
Supported Consumable
Darkness
Resolution
Printhead Lifespan
Communication Port
Standby Time
Product Dimensions
OS Supported(Bluetooth)
Power Supply
Porotable wireless thermal printer
Q2/Q2 Pro
Thermal printing
57mm (2.24inch)
59*31*31mm(2.39*1.22*1.22inch)
Recording paper,Recording sticker,Label paper
Light, Medium, High
Q2:203dpi/Q2 Pro:300dpi
50KM
Bluetooth
1000mAh Lithium Battery
Type-C 5V --- 2A
96h
85*84*41mm(3.3*3.3*1.6inch)
Smartphones with Android 7.0 and iOS 11.0 and above
1
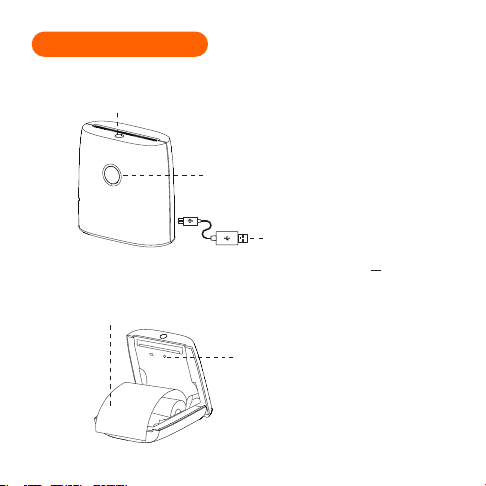
❷ Power button and indicator light
Press and hold 2 seconds to turn on/off.
❹ Paper bin
Dimensions:59*31*31mm.
(2.39*1.22*1.22inch)
❶ Paper change button
Press it, open the cover and exchange
the paper.
03.Product Introduction
❸ Type-C Port
• Charged with mobile phone
charger or power bank.
(Input Power:5V --- 2A)
❺ Reset key
• When the printer is not responding, try
inserting the needle/toothpick into the
reset hole for 3 seconds until the power
indicator light goes off and the device
shuts down. If needed, press and hold
for 2 seconds to turn on the device.
2
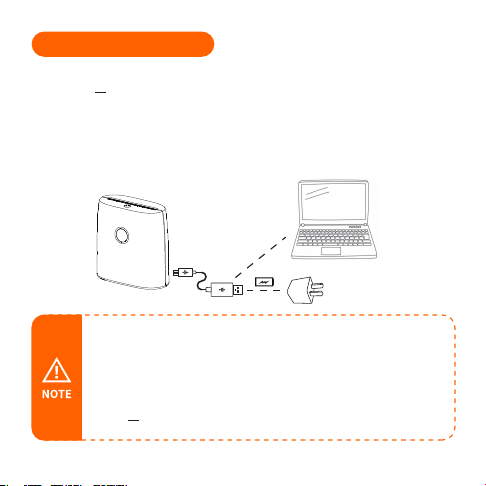
04.Charging Introduction
• Please connect one end of the included USB cable to the device and the other
end to a 5V --- 2A adapter or computer USB port for charging;
• Charge time: about 3 hours;
• We recommend you to use Mobile phone chargers for charging;
• If not used for a long time, please charge once every 3 months to avoid long-term
natural loss of lithium battery can not be charged.
• Working environment: Use at the ambient temperature of 5℃~40℃;
• Caution!This product doesn’t contain power adapter. If consumers
use a power adapter for power supply, please buy a power adapter
that has obtained CE and FCC certification and meets the standard
requirements.The output specifications of the adapter shall comply
with 5V --- 2A.
3
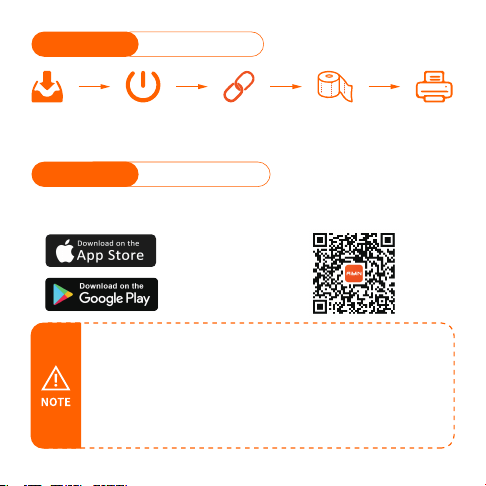
• This product needs to be connected to the printer in the App;
• Due to the requirements of mobile phone system,the Android
mobile phone will use the user's geographic location when
connecting,so that the user needs to turn on the GPS and
confirm the authorization;
• This app only supports phones with Android 7.0 or iOS 11.0 or above
systems.
Usage Overview
05.How to Use
❶ APP
Download
❷ Printer
Startup
❸ Connected
Printer
❹ Installation
Consumables
❺ Edit
Print
❶ Search for [AiYin] on Google
Play or App Store.
❷ Scan the following QR
code to download App.
① APP Download
05.How to Use
4
② Printer Startup
05.How to Use
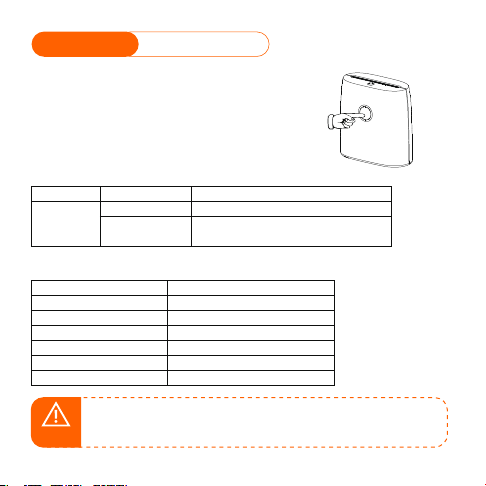
Press and hold the power button of the printer
for 2 seconds to turn on the printer.
Power Button Description
Button
Operation
Hold for 2 seconds
Functions
Power on/off
Print diagnostic page and the QR code to
connect the printer with smart phone App
Power button
Press twice
Indictor Light
Light
Light steady on
Light flashing slowly
Blue light on
Red light on
Purple light on
Purple light flashing quickly
Functions
Bluetooth connected
Bluetooth disconnected
Normal use status /Full charged
Cover opened/Nopaper/Over-heat
Low battery,please charge in time.
Charging
NOTE
Auto power off: The printer will automatically power off after 20
minutes without operation.You can set the timer in the App.
5
③ Connected Printer
05.How to Use
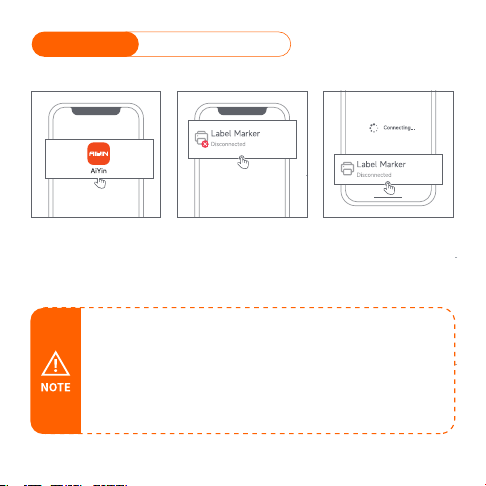
❶ Open AiYin App. ❷ Click to search for printer Bluetooth and connect.
or scan the device connection QR code by printing
from printer after double clicking the power button.
• When connecting device in the App,please make sure that your
printelis turned on and Bluetooth of your mobile phone is turned on;
• Due to the requirements of mobile phone system,the Android mobile
phone will use the user's geographic location when connecting,so
that the user needs to turn on the GPS and confirm the authorization;
• Please pair Bluetooth in the app, do not pair Bluetooth in the phone
settings;
• If you need a PIN code, please enter 0000.
6
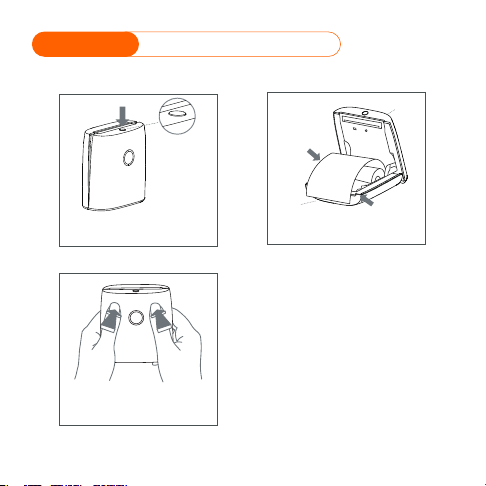
❶ Open cover.
Press the open button to open
the cover
Press the machine to close the
cover.
The
back
The end of the paper outlet
needs to exceed the paper
outlet of the machine.
(The side with the button is the
front)
The
front
The print side
is facing up
❷ Put paper in.
❸ Close the cover.
④ Installation Consumables
05.How to Use
Paper Installation Guide
7
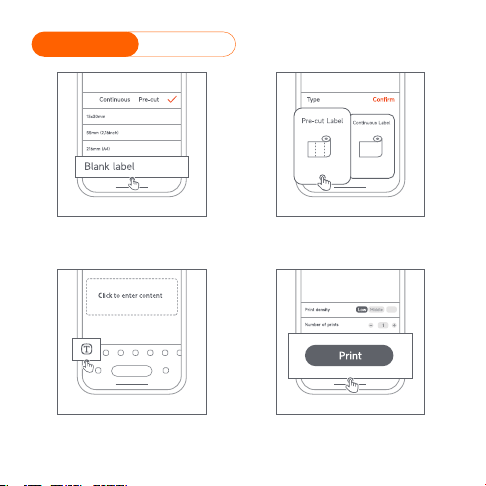
⑤ Edit Print
05.How to Use
❶ Open the App and select
the correct paper size.
❷ Select printing method
for editing.
❹ Click the print after editing.
High
❸ Edit printing content.
8
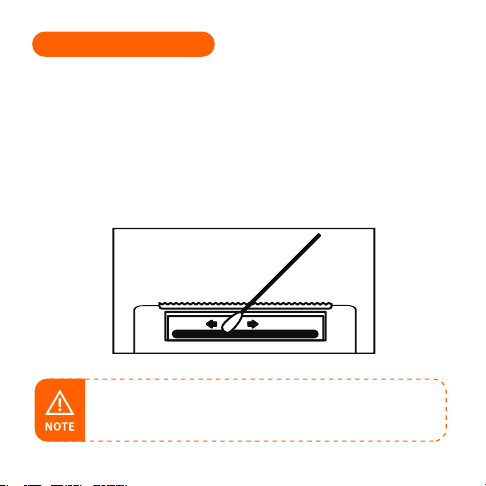
❶ Please turn off the printer and open the printer cover and take out
the paper.
❷ Dip a cotton cloth or cotton swab with medical alcohol, and wipe
gently along the center to the periphery of the printer head.
❸ After cleaning the printer head, do not use the printer imlmediately.
Please wait for 1 to 2 minutes, and then use the printer after the
alcohol has completely evaporated.
• Please do not directly touch the printing head to avoid damage.
Especially,do not directly touch the printing head immediately
after printing to avoid overheating and scalding.
9
06.Clean the Printer Head
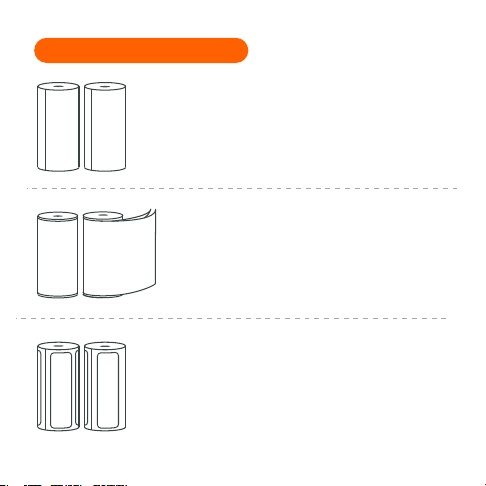
Recording paper
Diameter 30mm
Three-proofing (moisture proofing, salt
spray proofing and fungus proofing), free
of Bisphenol A
Recording sticker
Diameter 30mm
Three-proofing, free of Bisphenol A
Label paper
Diameter 30mm
Three-proofing, free of Bisphenol A
10
07.Thermal Paper Introduction

11
This device complies with part 15 of the FCC Rules.Operation is subject to the following
two conditions:
(1)This device may not cause harmful interference,and
(2)this device must accept any interference received,including interferencethat may
cause undesired operation.Any Changes or modifications not expressly approved by
the party responsible for compliance could void the user's authority to operate the
equipment.This equipment has been tested and found to comply with the limits for a
Class B digital device,pursuant to part 15 of the FCC Rules.These limits are designed to
provide reasonable protection against harmful interference in aresidential installation.
This equipment generates uses and can radiate radio frequency energy and,if not installed
and used in accordance with the instructions,may cause harmful interference to radio
communications. However,there is no guarantee that interference will not occur in a
particular installation.If this equipment does cause harmful interference to radio or
television reception,which can be determined by turning the equipment off and on,the
user is encouraged to try to correct the interference by one or more of the following
measures:
-Reorient or relocate the receiving antenna.
-Increase the separation between the equipment and receiver.
-Connect the equipment into an outlet on a circuit different from that to which the
receiver is connected.
-Consult the dealer or an experienced radio/TV technician for help.
The device has been evaluated to meet general RF exposure requirement.The device
can be used in portable exposure condition without restriction.
08.FCC Warning

12
IC Caution:
Radio Standards Specification RSS-Gen,issue 5-English:
This device contains licence-exempt transmitter(s)/receiver(s)that comply with
Innovation,Science and Economic Development Canada's licence-exempt RSS(s).
Operation issubject to the following two conditions:
This device may not cause interference.
This device must accept any interference,including interference that may cause
undesired operation of the device.
RF exposure statement:
The device has been evaluated to meet general RF exposure requirement.The device
can be used in portable exposure condition without restriction.
-French:
Cet appareil contientdes émetteurs /récepteurs exemptés de licence conformes
aux RSS (RSS)d'Innovation,Sciences et Développement économique Canada.Le
fonctionnement est soumisaux deux conditions suivantes:
Cet appareil ne doit pas causer d'interférences.
Cet appareil doit accepter toutes les interférences,ycompris celles susceptibles
deprovoquer un fonctionnement indésirable del'appareil.Déclaration d'exposition
RF:
Lappareil a été évalué pour répondre aux exigencesgénéralesd'exposition aux RF.
Lappareil peut être utilisé dans des conditions d'exposition portable sans restriction.
09.IC Warning
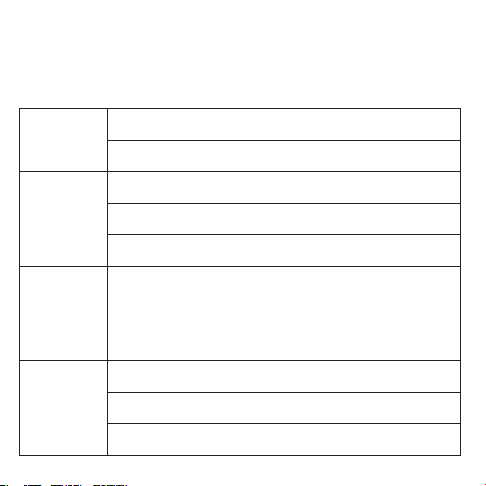
Warranty Card
□ Return
Name:
Address:
Purchase date:
Product order number:
Product Serial Number:
Reason description:
Failure condition:
Handling situation:
Maintenance ticket number:
Maintenance person:
Delivery date:
Delivery date:
Phone:Gender:
□ Exchange □ Repair
User Info
Product Info
Requirements
of return
/replacement
/repair
Maintenance
records
www.aiyin.com
Please kindly contact us if you have any touble or question when
installing and using.
Manufacturer: Xiamen AiYin Technology Co., Ltd.
at 10am to 10pm EST
Scan or upload this QR code using
the WhatsApp camera to add us
Scan the following QR code to talk with us
help.aiyin.com

